

Page 1
User’s Manual
Protector®Storage Cabinets –
Standard, Acid, Solvent
and Vacuum Pump
Models
9900000 9901000 9902000 9903000 9904000
9900100 9901100 9902100 9903100 9904100
9900200 9901200 9902200 9903200 9904200
9900300 9901300 9902300 9903300 9904300
9900400 9901400 9902400 9903400 9904400
9900500 9901500 9904500
9900600 9901600
9900700
9900800
9905000 9906000 9907000
9905100 9906100 9907100
9905200 9906200
9905300 9906300
To receive important product updates,
complete your product registration card
online at register.labconco.com
Labconco Corporation
8811 Prospect Avenue
Kansas City, MO 64132-2696
800-821-5525, 816-333-8811
FAX 816-363-0130
E-MAIL labconco@labconco.com
HOME PAGE www.labconco.com
Please read the User’s Manual before operating the equipment.
Page 2

Copyright © 1999, 2007 Labconco Corporation. All rights reserved.
The information contained in this manual and the accompanying products are copyrighted and all rights
reserved by Labconco Corporation. Labconco Corporation reserves the right to make periodic design
changes without obligation to notify any person or entity of such change.
Warranty
Labconco provides a warranty on all parts and factory workmanship. The warranty includes areas of
defective material and workmanship, provided such defect results from normal and proper use of the
equipment.
The warranty for all Labconco products will expire one year from date of installation or two years
from date of shipment from Labconco, whichever is sooner, except the following;
• Purifier® Delta® Series Biological Safety Cabinets and PuriCare® Lab Animal Research
Stations carry a three-year warranty from date of installation or four years from date of
shipment from Labconco, whichever is sooner.
• SteamScrubber® & FlaskScrubber® Glassware Washers carry a two-year warranty from date
of installation or three years from date of shipment from Labconco, whichever is sooner.
• Blood Drawing Chairs carry a ten year warranty.
• Carts carry a lifetime warranty.
• Glassware is not warranted from breakage when dropped or mishandled.
This limited warranty covers parts and labor, but not transportation and insurance charges. In the
event of a warranty claim, contact Labconco Corporation or the dealer who sold you the product. If
the cause is determined to be a manufacturing fault, the dealer or Labconco Corporation will repair or
replace all defective parts to restore the unit to operation. Under no circumstances shall Labconco
Corporation be liable for indirect, consequential, or special damages of any kind. This statement may
be altered by a specific published amendment. No individual has authorization to alter the provisions
of this warranty policy or its amendments. Lamps and filters are not covered by this warranty.
Damage due to corrosion or accidental breakage is not covered.
Returned or Damaged Goods
Do not return goods without the prior authorization from Labconco. Unauthorized returns will not be
accepted. If your shipment was damaged in transit, you must file a claim directly with the freight carrier.
Labconco Corporation and its dealers are not responsible for shipping damages.
The United States Interstate Commerce Commission rules require that claims be filed with the delivery
carrier within fifteen (15) days of delivery.
Limitation of Liability
The disposal and/or emission of substances used in connection with this equipment may be governed by
various federal, state, or local regulations. All users of this equipment are required to become familiar with
any regulations that apply in the user’s area concerning the dumping of waste materials in or upon water,
land, or air and to comply with such regulations. Labconco Corporation is held harmless with respect to
user’s compliance with such regulations.
Contacting Labconco Corporation
If you have questions that are not addressed in this manual, or if you need technical assistance, contact
Labconco’s Customer Service Department or Labconco’s Product Service Department at 1-800-821-5525
or 1-816-333-8811, between the hours of 7:00 a.m. and 6:00 p.m., Central Standard Time.
Part #9918500, Rev. E
ECO E394
Page 3

T
AABBLLEE
T
CHAPTER 1: INTRODUCTION 1
About This Manual 3
Typographical Conventions 4
CHAPTER 2: PREREQUISITES 5
CHAPTER 3: GETTING STARTED 6
Unpacking Your Cabinet 7
Storage Cabinet Components 7
Setting Up Your Cabinet 9
Component Identification 10
Standard Base Storage Cabinets 10
Acid Storage Cabinets 12
Solvent Storage Cabinets 14
Vacuum Pump Storage Cabinets 16
Installation 18
Cabinet Leveling – All Cabinets 18
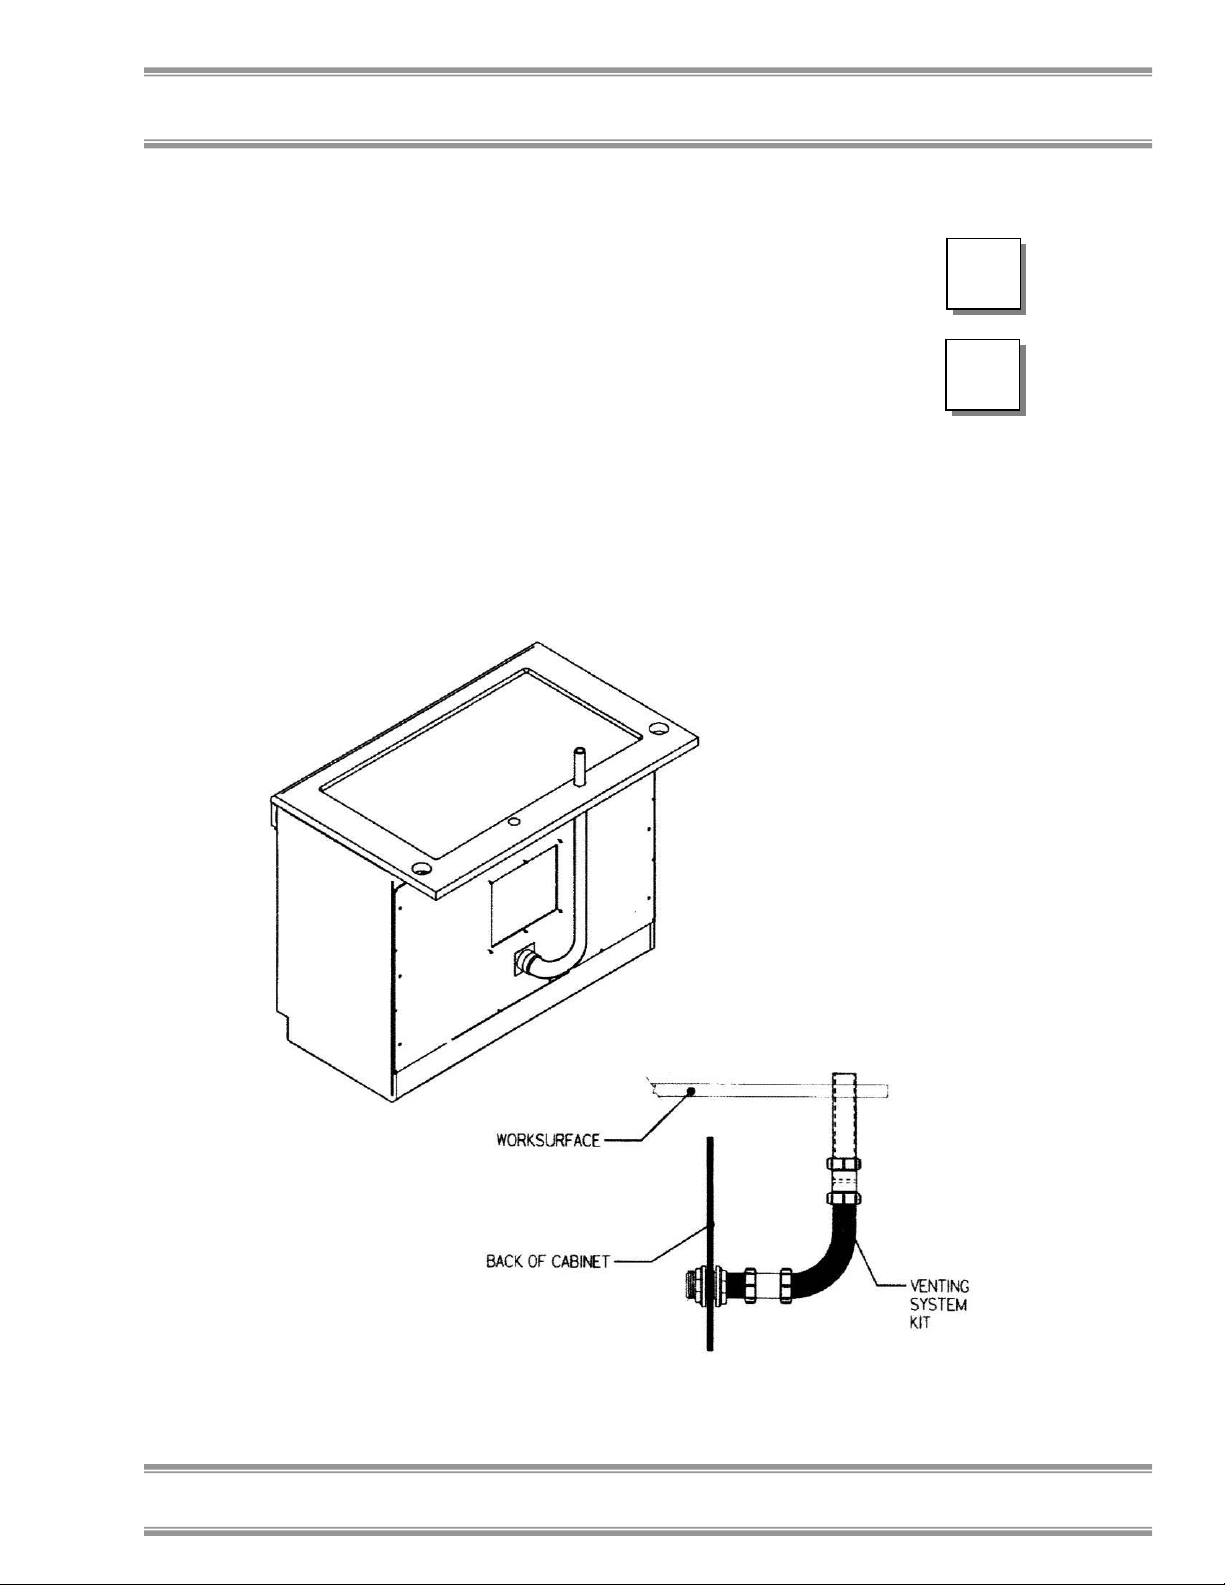
Vent Installation 19
Acid Storage Cabinet 19
Solvent Storage Cabinet 20
Filler Panel – All Cabinets 21
SpillStopper Work Surface 22
Electrical Ground Connection – Solvent Storage Cabinet 24
Acid Storage Cabinet Shelf Liner 25
Adjustable Shelf – Solvent Storage Cabinet 25
Junction Box Connection – Vacuum Pump Cabinet 25
Environmental Conditions 26
CHAPTER 4: USING YOUR STORAGE CABINETS 27
Normal Operation 27
CHAPTER 5: MAINTAINING YOUR STORAGE CABINETS 29
APPENDIX A: CABINET DIMENSIONS 30
O
O
FF
C
OONNTTEENNTTSS
C
Page 4

APPENDIX B: CABINET REPLACEMENT PARTS 35
APPENDIX C: CABINET ACCESSORIES 36
APPENDIX D: QUICK REFERENCE STORAGE CABINETS 39
DECLARATION OF CONFORMITY 40
Page 5

C
HHAAPPTTEERR
C
I
NNTTRROODDUUCCTTIIOONN
I
Congratulations on your purchase of a Protector®
Storage Cabinet. Labconco manufacturers four types of
Storage Cabinets – Acid, Solvent, Standard Base, and
Vacuum Pump.
Protector® Acid Storage Cabinets have been
engineered to efficiently store and ventilate corrosive
materials and include an interior plastic liner to protect
the metal from corrosion.
Protector® Solvent Storage Cabinets are designed to
efficiently store flammable materials and includes a 11/2" double wall construction for fire protection.
Protector® Standard Base Storage Cabinets are utilized
for general storage and are not recommended for
corrosive or flammable materials.
Protector® Vacuum Pump Storage Cabinets are utilized
for vacuum pump storage.
All cabinets’ feature 18 gauge steel construction with
epoxy coated paint, to give you both a durable and
chemically resistant finish that ensures many years of
quality service.
The Labconco Protector® Storage Cabinets has been
engineered in accordance with NFPA 30, OSHA 191062, and all pertinent SEFA regulations. The cabinets
1
1
Product Service 1-800-522-7658, International 816-333-8811
1
1
Page 6
Chapter 1: Introduction
are available in several configurations to meet your
various requirements.
All Protector® Storage Cabinets are designed with
provisions for venting to the exterior of your laboratory.
Vent connections are located on the back wall of the
cabinet and can be used at the discretion of the
customer.
The vent connection on the Solvent Storage Cabinet is
supplied with a closure plug on both sides, and is
diametrically opposed on the back wall of the cabinet
for optimum airflow throughout its interior.
The vent connection on the Acid Cabinet and Standard
Base Cabinet is located on the back wall of the cabinet
and does not include a closure plug.
2
Product Service 1-800-522-7658, International 816-333-8811
Page 7

About This Manual
This manual will help you learn how to install, use, and
maintain your Storage Cabinet. Instructions for
performing routine maintenance and for minor
modifications to your Storage Cabinet are included.
Chapter 1: Introduction provides a brief overview of
the Storage Cabinets, explains the organization of the
manual, and defines the typographical conventions used
in the manual.
Chapter 2: Prerequisites explains what you need to do
to prepare your site before you install the Storage
Cabinet.
Chapter 3: Getting Started contains the information
you need to properly unpack, inspect, and install the
Storage Cabinet.
Chapter 4: Using Your Storage Cabinet discusses the
normal operation of the Storage Cabinet.
Chapter 5: Maintaining Your Storage Cabinet explains
how to perform routine maintenance on the Storage
Cabinet.
Appendix A: Storage Cabinet Dimensions contains
comprehensive diagrams showing the dimensions for
the Storage Cabinets.
Appendix B: Storage Cabinet Replacement Parts
contains a list of service parts for the Storage Cabinets.
Appendix C: Storage Cabinet Accessories lists the part
numbers and descriptions of the accessories available
for the Storage Cabinet.
Appendix D: Storage Cabinet Quick Reference lists
sizes and part numbers for Solvent, Acid, Standard
Base, and Vacuum Pump Cabinets.
Chapter 1: Introduction
Product Service 1-800-522-7658, International 816-333-8811
3
Page 8
Chapter 1: Introduction
!
)
A
B
S
V
Typographical Conventions
Recognizing the following typographical conventions
will help you understand and use this manual:
• Book, chapter, and section titles are shown in italic
type (e.g., Chapter 3: Getting Started).
• Steps required to perform a task are presented in a
numbered format.
• Comments located in the margins provide
suggestions, reminders, and references.
• Critical information is presented in boldface type in
paragraphs that are preceded by the exclamation
icon. Failure to comply with the information
following an exclamation icon may result in injury
to the user or permanent damage to the Storage
Cabinet.
• Important information is presented in capitalized
type in paragraphs that are preceded by the pointer
icon. It is imperative that the information contained
in these paragraphs be thoroughly read and
understood by the user.
• Information that is specific to a particular model of
Storage Cabinet. The A icon indicates text specific
to the Acid Storage Cabinet, the S icon indicates
text specific to the Solvent Storage Cabinet, the B
icon indicates text specific to the Standard Base
Storage Cabinet, and the V icon indicates text
specific to the Vacuum Pump Storage Cabinet.
4
Product Service 1-800-522-7658, International 816-333-8811
Page 9

C
HHAAPPTTEERR
C
P
RREERREEQQUUIISSIITTEESS
P
Before you install your Storage Cabinet, you need to
prepare your site for installation. Carefully examine the
location where you intend to install the Storage
Cabinet. You must be certain that the area is level and
of solid construction. In addition, your Storage Cabinet
should be adjacent to a vent connection to allow for
venting to the exterior of the building, if so desired.
Otherwise, it is typical to vent the Storage Cabinet
through the work surface and fume hood, which is
supported by the Storage Cabinet.
2
2
Space Requirements
Refer to Appendix A: Storage Cabinet Dimensions for
complete Storage Cabinet dimensional specifications.
Product Service 1-800-522-7658, International 816-333-8811
5
5
Page 10

C
HHAAPPTTEERR
C
G
EETTTTIINNGG
G
Now that the site for your Storage Cabinet is properly
prepared, you are ready to unpack, inspect, and install,
the Storage Cabinet. Read this chapter to learn how to:
• Unpack and move the Storage Cabinet.
• Set up the Storage Cabinet – Acid, Solvent,
Standard Base, and Vacuum Pump.
• Properly level the Storage Cabinet.
• Properly install the accessory work surface.
• Attach the filler panel for additional
aesthetics.
• Properly vent the Storage Cabinet.
• Properly ground the Solvent Cabinet.
• Connect the electrical supply source to the
Vacuum Pump Cabinet.
Depending upon which model of Storage Cabinet you
are installing, you will need common hand tools,
including a Phillips head screwdriver, a flat blade
screwdriver, a ¾" open end wrench, and pliers to
complete the instructions in this chapter.
S
S
3
3
TTAARRTTEEDD
6
Product Service 1-800-522-7658, International 816-333-8811
Page 11
Unpacking Your Storage
Cabinets
Carefully unpack the Storage Cabinet and inspect it for
damage that may have occurred in transit. If your
Storage Cabinet is damaged, notify the delivery carrier
immediately and retain the entire shipment intact for
inspection by the carrier.
DO NOT RETURN ANY STORAGE
CABINET WITHOUT THE PRIOR
)
)
Do not discard the carton or packing material for your
Storage Cabinet until you have checked all of the
components, installed, and tested the Storage Cabinet.
AUTHORIZATION OF
LABCONCO. UNAUTHORIZED
RETURNS WILL NOT BE
ACCEPTED.
IF YOUR STORAGE CABINET
WAS DAMAGED IN TRANSIT,
YOU MUST FILE A CLAIM
DIRECTLY WITH THE FREIGHT
CARRIER. LABCONCO
CORPORATION AND ITS
DEALERS ARE NOT
RESPONSIBLE FOR SHIPPING
DAMAGE.
Chapter 3: Getting Started
Storage Cabinet
Components
As previously mentioned Labconco manufactures four
types of Storage Cabinets, Acid, Solvent, Standard
Base, and Vacuum Pump.
The different Storage Cabinet models require different
assembly components. Locate the model of Storage
Cabinet you received in the following tables. Verify
that the components listed are present and undamaged.
Product Service 1-800-522-7658, International 816-333-8811
7
Page 12

Chapter 3: Getting Started
Model Number Description
9900000 48" Standard Base Cabinet
9900100 36" Standard Base Cabinet
9900200 30" Standard Base Cabinet
9900300 24" Standard Base Cabinet – Right Hinged
9900400 18" Standard Base Cabinet – Right Hinged
9900500 12" Standard Base Cabinet – Right Hinged
9900600 24" Standard Base Cabinet – Left Hinged
9900700 18" Standard Base Cabinet – Left Hinged
9900800 12" Standard Base Cabinet – Left Hinged
9904000 24" ADA Standard Base Cabinet – Right Hinged
9904100 18" ADA Standard Base Cabinet – Right Hinged
9904200 12" ADA Standard Base Cabinet – Right Hinged
9904300 24" ADA Standard Base Cabinet – Left Hinged
9904400 18" ADA Standard Base Cabinet – Left Hinged
9904500 12" ADA Standard Base Cabinet – Left Hinged
9901000 48" Acid Cabinet
9901100 36" Acid Cabinet
9901200 30" Acid Cabinet
9901300 24" Acid Cabinet – Right Hinged
9901400 18" Acid Cabinet – Right Hinged
9901500 24" Acid Cabinet – Left Hinged
9901600 18" Acid Cabinet – Left Hinged
9905000 24" ADA Acid Cabinet – Right Hinged
9905100 18" ADA Acid Cabinet – Right Hinged
9905200 24" ADA Acid Cabinet – Left Hinged
9905300 18” ADA Acid Cabinet – Left Hinged
9902000 48" Manual Closing/Self Latching Solvent Cabinet
9902100 36" Manual Closing/Self Latching Solvent Cabinet
9902200 30" Manual Closing/Self Latching Solvent Cabinet
9902300 24" Manual Closing/Self Latching Solvent Cabinet – Right Hinged
9902400 24" Manual Closing/Self Latching Solvent Cabinet – Left Hinged
9903000 48" Self Closing/Automatic Latching Solvent Cabinet
9903100 36" Self Closing/Automatic Latching Solvent Cabinet
9903200 30" Self Closing/Automatic Latching Solvent Cabinet
9903300 24" Self Closing/Automatic Latching Solvent Cabinet – Right Hinged
9903400 24" Self Closing/Automatic Latching Solvent Cabinet – Left Hinged
9906000 24" Manual Closing/Self Latching ADA Solvent Cabinet – Right
Hinged
9906100 24" Manual Closing/Self Latching ADA Solvent Cabinet – Left Hinged
9906200 24" ADA Self Closing Automatic Latching Solvent Cabinet – Right
Hinged
9906300 24" ADA Self Closing/Automatic Latching Solvent Cabinet – Left
Hinged
9907000 18" Vacuum Pump Cabinet – Right Hinged
9907100 18" Vacuum Pump Cabinet – Left Hinged
8
Product Service 1-800-522-7658, International 816-333-8811
Page 13

Plus the Following:
Part # Component Description
9920301 Panel, Filler Standard (for 30” Interior Depth
Protector® XL Fume Hood)
or
9920304
9920400 Angle, Filler Panel (for 30” Interior Depth
Protector® XL Fume Hood)
or
9920401
1928300 Leveling Feet (4)
Different filler panel depths are available; refer to
Appendix C: Storage Cabinet Accessories for filler
panel selection.
If you do not receive one or more of the components
listed for your Storage Cabinet, or if any of the
components are damaged, contact Labconco
Corporation immediately for further instructions.
Panel, Filler ADA (for 30” Interior Depth
Protector® XL Fume Hood)
Angle, Filler Panel ADA (for 30” Interior
Depth Protector® XL Fume Hood)
Chapter 3: Getting Started
Setting Up Your Storage
Cabinet
After you verify the Storage Cabinet components listed
on the following pages, move your Storage Cabinet to
the location where you want to install it. Then, follow
the steps for installation.
Product Service 1-800-522-7658, International 816-333-8811
9
Page 14

Chapter 3: Getting Started
B
Component Identification
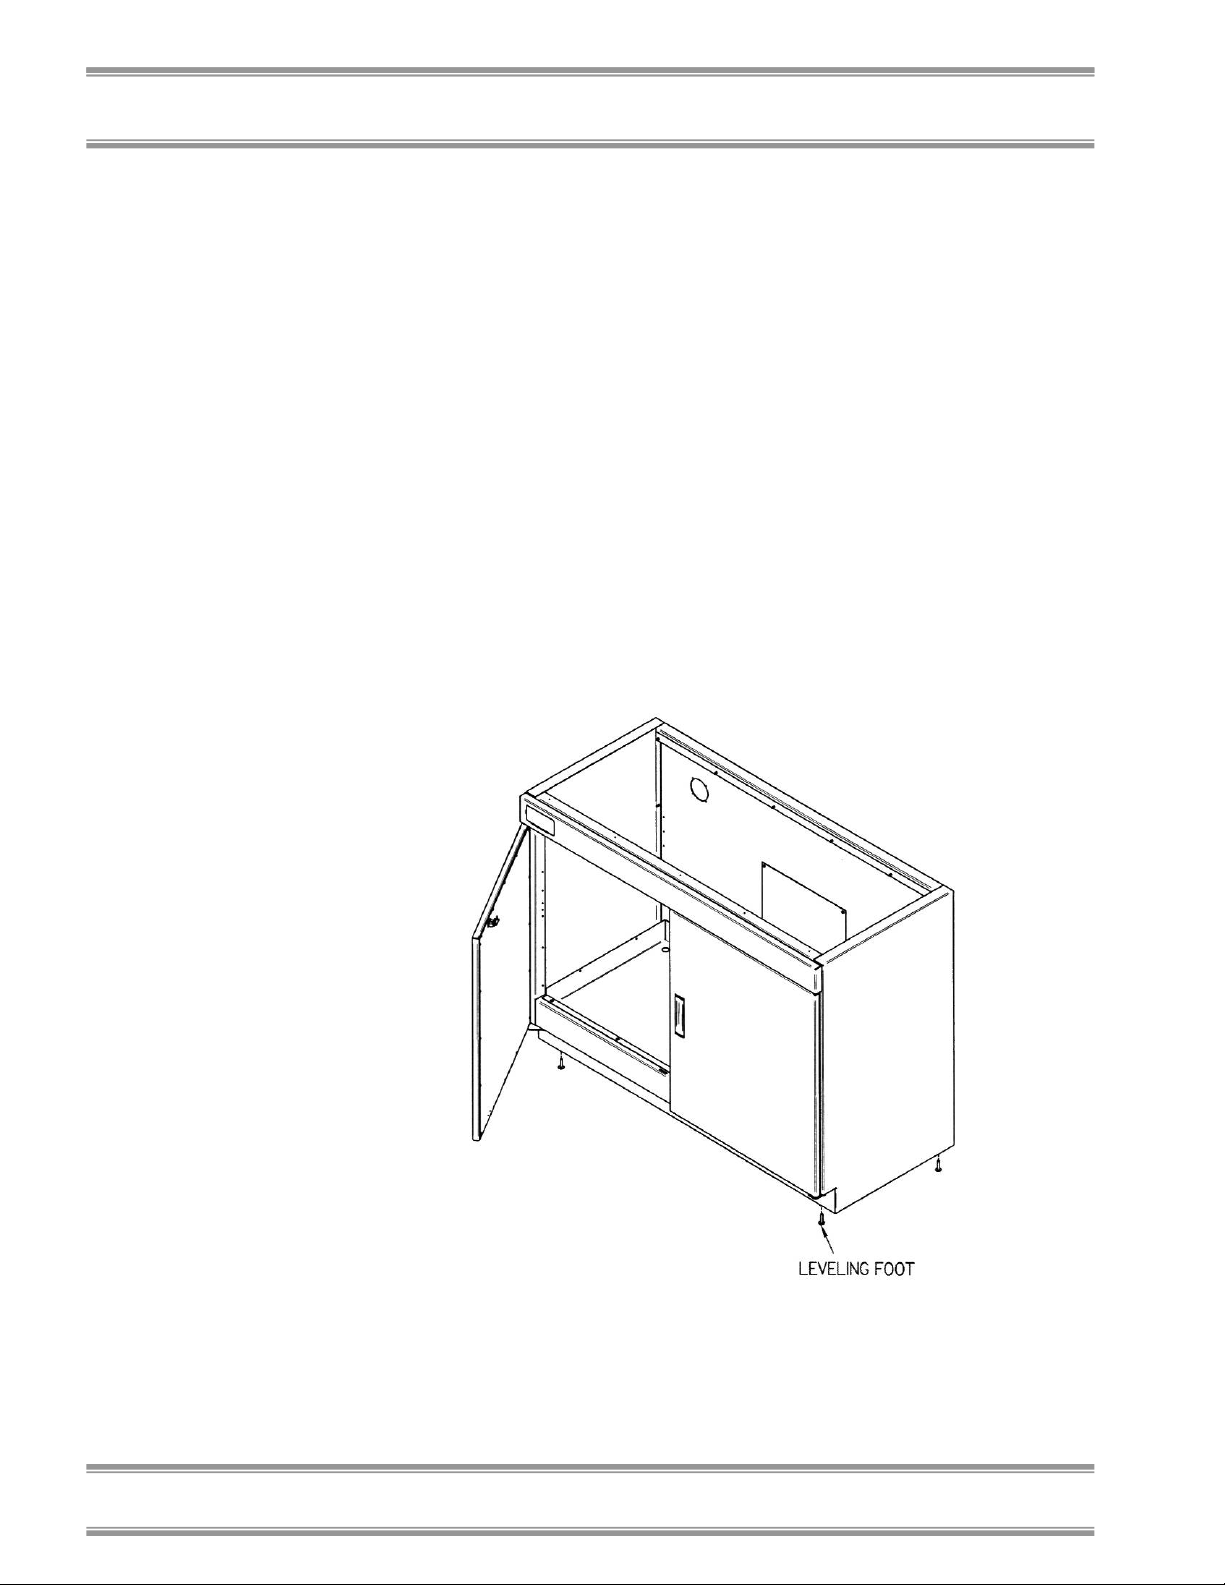
Protector Standard Base Storage Cabinets
Models 9900000, 9900100, 9900200, 9900300,
9900400, 9900500, 9900600, 9900700, 9900800,
9904000, 9904100, 9904200, 9904300, 9904400,
9904500
1. Cabinet. - Features 18 gauge steel exterior
sidewalls. The cabinet shell is epoxy coated to
provide a durable chemical resistant surface.
2. Door Assembly - Cabinet features one or two
manual closing, non-locking doors. The doors are
18 gauge epoxy coated steel and feature a strike and
latch assembly to hold them in position once closed.
3. Vent Connection - Cabinet features two vent
connections on the back wall of the cabinet. The
vent openings have been left open, and venting is at
the discretion of the customer. Instructions for
venting can be found on page 22. For Base Vent
Kit accessory see page 43.
4. Optional – Accessory Shelf – Features 16-gauge
steel shelf to provide additional storage. Shelf
support kit allows height adjustment.
5. Leveling Feet - Four individual leveling feet
provide adjustability to level the cabinet per the
requirements of your laboratory floor.
10
Product Service 1-800-522-7658, International 816-333-8811
Page 15

Protector Standard Base Storage Cabinet
Chapter 3: Getting Started
Product Service 1-800-522-7658, International 816-333-8811
11
Page 16

Chapter 3: Getting Started
A
Protector Acid Storage Cabinets
Models 9901000, 9901100, 9901200, 9901300,
9901400, 9901500, 9901600, 9905000, 9905100,
9905200, 9905300
1. Cabinet. Features 18 gauge steel exterior sidewalls.
The cabinet shell is epoxy coated to provide a
durable chemical resistant surface.
2. Door Assembly. Depending on the width, the
cabinet features one or two manual closing, nonlocking doors. The doors are 18 gauge epoxy
coated steel and feature a strike and latch assembly
to hold them in position once closed. The backs of
the doors are lined with polyethylene to provide
additional corrosion protection.
3. Vent Connection. Cabinet features two vent
connections located on the back wall of the cabinet.
These vents are open. Using a Vent Kit, the cabinet
may be vented to the fume hood or directly outside.
Instructions for venting can be found on page 22.
For Acid Vent Kit accessory see page 43.
4. Optional – Accessory Shelf. Features 16 gauge
steel shelf with polyethylene molded tray to hold
spills and provides a chemical resistant surface. The
shelf support kit allows height adjustment.
5. Leveling Feet. Four individual leveling feet provide
adjustability to level the cabinet per the
requirements of your laboratory floor.
6. Acid Shelf Liners. Vacuum formed polyethylene
liner trays fit down into both the adjustable shelf
and the bottom floor of the cabinet. These liner
trays give additional chemical resistance to the
cabinet interior and are removable for easy
cleaning. The liners are watertight in construction
and will contain any minor spills and/or drips from
containers stored in the cabinet.
7. Interior Liner. Interior sides and back are fully
lined with polyethylene plastic to provide excellent
corrosion resistance.
12
Product Service 1-800-522-7658, International 816-333-8811
Page 17

Protector Acid Storage Cabinet
Chapter 3: Getting Started
Product Service 1-800-522-7658, International 816-333-8811
13
Page 18

Chapter 3: Getting Started
S
Protector Solvent Storage Cabinets
Models 9902000, 9902100, 9902200, 9902300,
9902400, 9903000, 9903100, 9903200, 9903300,
9903400, 9906000, 9906100, 9906200, 9906300
1. Factory Mutual Approval on Models; 9902000,
9902100, 9902300, 9903000, 9903100, 9903200
2. Double Wall Construction. Cabinet features 18
gauge epoxy coated steel exterior and interior liner
walls with a 1-1/2" air space located between them.
3. Locking Door Assembly. Cabinet features one or
two manual closing/self latching doors. NOTE:
Some models feature one or two selfclosing/automatic latching doors.
4. Shelf. 16 gauge steel shelf features fully welded
corners to hold spills and epoxy coated to provide a
chemical resistant surface. The shelf supports
inside the cabinet allows for height adjustment.
5. Vent Connection. Two vent connections are
located on the back wall of the cabinet and are
diametrically opposed. Each vent connection
includes a threaded coupling, two flame arrestors,
and closure plugs. Instructions for venting can be
found on page 23.
6. Leveling Feet Four individual leveling feet provide
adjustability to level the cabinet per the
requirements of your laboratory floor.
7. Optional Self-Closing Doors. Some models
include a self-closing door mechanism to close
doors automatically in case of fire.
8. Sequential Kit. Allows doors with self-
closing/automatic latching to be sequenced so the
left door closes before the right.
9927400 - 30" models
9927401 - 48" models only
14
Product Service 1-800-522-7658, International 816-333-8811
Page 19

Protector Solvent Storage Cabinet
Chapter 3: Getting Started
Product Service 1-800-522-7658, International 816-333-8811
15
Page 20

Chapter 3: Getting Started
V
Protector Vacuum Pump Storage Cabinets
Models 9907000, 9907100
1. Cabinet – Features 18 gauge steel exterior
sidewalls. The cabinet shell has been epoxy coated
to provide a durable chemical resistant surface.
2. Door Assembly – Cabinet features one manual
closing, non-locking door. The door is of 18 gauge
epoxy coated steel and features a strike and latch
assembly to hold it in position once closed.
3. Vent Connection. Cabinet features two vent
connections on the back wall of the cabinet. These
vent openings have been left open and venting is
left to the discretion of the customer.
4. Electrical Connection – Cabinet features 115V, 60
Hz electrical outlet to provide power for the vacuum
pump.
5. Leveling Feet – Four individual leveling feet
provide adjustability to level the cabinet per the
requirements of your laboratory floor.
16
Product Service 1-800-522-7658, International 816-333-8811
Page 21

Protector Vacuum Pump Storage Cabinet
Chapter 3: Getting Started
Product Service 1-800-522-7658, International 816-333-8811
17
Page 22

Chapter 3: Getting Started
Installation
A
B
Cabinet Leveling – All Models
Each cabinet is supplied with four independent leveling
feet. These leveling feet have been packaged separately
and must be installed on the bottom of the cabinet
before installation. Each leveling foot is independently
adjustable by turning it by means of a crescent wrench
underneath the cabinet. All of the leveling feet, with
exception to the Solvent Storage Cabinet, can be
adjusted with a flat blade screw driver from inside the
cabinet through the access holes in the lower metal pan.
18
Product Service 1-800-522-7658, International 816-333-8811
Page 23
Vent Installation – Acid and Standard
Base Cabinet
Chapter 3: Getting Started
To ventilate the Acid Storage Cabinet and the Standard
Base Storage Cabinet properly, first decide which of the
two vent connections in the back of the cabinet that you
intend to use. The lower vent connection should be
used for heavier than air vapors and the upper vent
connection should be used for lighter than air vapors to
obtain the best results within the cabinet structure.
Vent Kit, P/N 35911, allows the Acid Storage Cabinet
or Standard Base Cabinet to be vented directly into a
Protector® Laboratory Hood. Run the vent line
through the work surface into the fume hood or connect
through separate duct system to the outside. The vent is
sized for 2" diameter nominal plastic pipe.
A
B
Product Service 1-800-522-7658, International 816-333-8811
19
Page 24

Chapter 3: Getting Started
S
Vent Installation – Solvent Storage
Cabinet
To ventilate the cabinet properly remove both the
exterior and interior barrel plugs from the vent
connection that you are venting.
The lower vent connection should be used for heavier
than air vapors and the higher vent connection on the
back wall should be used for lighter than air vapors to
obtain the best fume removal within the cabinet.
The cabinet vent connections are designed to accept 2"
diameter threaded metal pipe material, which can be
purchased locally. Once the connection on the back of
the cabinet has been completed, remove both the
internal and external plugs from the remaining vent
connection to allow for proper airflow from the cabinet.
CAUTION
!
used with your vent connections
should it become necessary to isolate
the cabinet from the vent connection
as ducted.
: Retain the barrel plugs
20
Product Service 1-800-522-7658, International 816-333-8811
Page 25

Filler Panel – All Cabinets
One 8.0" filler panel and filler panel angle has been
supplied with your cabinet to close off the plumbing
access. Attach the filler panel angle directly to the back
wall of the cabinet structure using the four #8 sheet
metal screws that hold the back panel in position. Next,
attach the filler panel to this angle by the three #8 sheet
metal screws provided.
Different filler panel depths are available; refer to
Appendix C: Storage Cabinet Accessories for filler
panel selection.
Chapter 3: Getting Started
S
V
Product Service 1-800-522-7658, International 816-333-8811
21
Page 26

Chapter 3: Getting Started
SpillStopper™ Work Surface
A S
B
V
Once your cabinet has been properly leveled, vented
(optional), and filler panel installed, place the epoxy
work surface directly on top of the cabinet. It is not
necessary to attach the work surface to the cabinet. It is
held in place both by its own weight and the weight of
the fume hood and other equipment on top of it. Align
the work surface on top of the cabinet before making
plumbing or electrical connections through the work
surface itself. Normally, the work surface is aligned
flush with the top front of the cabinet and overhangs the
back of the cabinet.
WARNING: Never use screws and/or
!
bolts to fasten the epoxy molded work
surface directly to the cabinet as this
can damage the work surface.
22
Product Service 1-800-522-7658, International 816-333-8811
Page 27

SpillStopper™ Work Surface Installation Detail
Chapter 3: Getting Started
Dimensions Shown in Inches
Hood Depth
“B”
33.19" 24" 8" 30"
39.19" 30" 14" 36"
45.19" 36" 20" 42"
Hood Internal
Depth
“D”
Filler Panel
Depth
“E”
Work Surface
Depth
Product Service 1-800-522-7658, International 816-333-8811
23
Page 28

Chapter 3: Getting Started
S
Electrical Ground Connection – Solvent
Storage Cabinet
Use the grounding screw located in the lower right hand
corner on the back panel of your solvent storage cabinet
to properly ground the cabinet structure. Remove the
grounding screw and attach a grounding wire directly to
the back of the cabinet at this point. Make sure you
have a tight bond when you retighten the grounding
screw.
24
Product Service 1-800-522-7658, International 816-333-8811
Page 29

Shelf Liner – Acid Storage Cabinet
Polyethylene liner trays have been included in your
Acid Storage Cabinet for added chemical resistance.
Place a shelf liner in the cabinet floor. The watertight
tray collects spills and drips from bottles and containers
stored within the cabinet.
Chapter 3: Getting Started
A
Adjustable Shelf – Solvent Storage
Cabinet
Remove the four shelf brackets included with the
cabinet’s leveling feet and place one bracket in each of
the shelf positions located on the interior walls of the
cabinet. Make sure that the shelf brackets are located at
the same height to assure that the shelf will be level
when placed in its working position. To install, simply
squeeze the shelf bracket with pliers and place in the
shelf positions of your cabinet.
Junction Box Connection – Vacuum
Pump Storage Cabinet
Connect power to the electrical junction box, provided
for the vacuum pump, through the back panel to the
receptacle.
S
V
Product Service 1-800-522-7658, International 816-333-8811
25
Page 30

Chapter 3: Getting Started
Environmental Conditions
This equipment is designed to be safe under the
following conditions:
• Indoor use
• Altitude up to 6562 Ft. (2000m)
• Temperature 41° to 104° F (5° to 40°C)
• Maximum relative humidity 80% for
temperatures up to 88°F (31°C) decreasing
linearly to 50% relative humidity at 104°F
(40°C)
• Main supply voltage fluctuations not to
exceed ± 10% of the nominal voltage
• Transient overvoltages according to
Installation Categories II (Overvoltage
Categories per IEC 1010)
• Pollution degrees 2, in accordance with IEC
664, normally only non-conductive foreign
matter, solid, liquid, or gaseous (ionized
gases), that may produce a reduction of
dielectric strength or surface resistivity
occurs. Occasionally, however, a temporary
conductivity caused by condensation must
be expected
26
Product Service 1-800-522-7658, International 816-333-8811
Page 31

C
HHAAPPTTEERR
C
U
SSIINNG
U
S
TTOORRAAGGEE
S
After the Storage Cabinet has been installed as detailed
in Chapter 3: Getting Started, you are ready to begin
using it. Read this chapter to learn how to:
• Properly store and vent chemicals.
• Operate it in a safe manner.
Normal Operation
Although the Storage Cabinet is engineered to maintain
the optimum in operator safety, caution should always
be used while working with it. Good general
housekeeping procedures with the following specific
recommendations should allow you to operate your
cabinet safely for years to come.
• Properly vent your storage cabinet to the
outside atmosphere.
G
Y
Y
4
4
OOUURR
C
AABBIINNEETT
C
• It is not recommended to store solvents and
acids in the same storage cabinet. For best
results, use two separate storage cabinets to
safeguard or protect these materials.
Product Service 1-800-522-7658, International 816-333-8811
27
Page 32

Chapter 4: Using Your Storage Cabinet
• Do not block open the door assembly on the
S
• Do not store flammable material in excess of
• Do not block either vent connection as it
• Always clean up spills immediately to
solvent storage cabinet. This is an unsafe
practice should a fire occur.
the individual Solvent Storage Cabinet
rating. Ratings are located on the nameplate
of each Solvent Storage Cabinet.
will alter the airflow pattern in the cabinet
and could interfere with ventilation of the
cabinet.
prolong the life of your Storage Cabinet.
28
Product Service 1-800-522-7658, International 816-333-8811
Page 33

C
HHAAPPTTEERR
C
M
S
Under normal conditions, the Storage Cabinet requires
little maintenance. The following maintenance
schedule is recommended:
As Needed:
Remove liquid containers from cabinet and clean up
spills.
AAIINNTTAAIINNIINNG
M
TTOORRAAGGEE
S
5
5
C
Y
G
Y
AABBIINNEETTSS
C
OOUURR
Product Service 1-800-522-7658, International 816-333-8811
29
Page 34

A
PPPPEENNDDIIX
A
S
TTOORRAAGGEE
S
D
IIMMEENNSSIIOONNSS
D
The following drawings provide dimensions for the
Standard Base Cabinet, Acid Storage Cabinet, Solvent
Storage Cabinet, and the Vacuum Pump Cabinet.
X
A
A
C
C
AABBIINNEET
T
30
Product Service 1-800-522-7658, International 816-333-8811
Page 35

Protector Standard Base Cabinet
Appendix A: Dimensions
Product Service 1-800-522-7658, International 816-333-8811
31
Page 36

Appendix A: Dimensions
Protector Acid Storage Cabinet
32
Product Service 1-800-522-7658, International 816-333-8811
Page 37

Protector Solvent Storage Cabinet
Appendix A: Dimensions
Product Service 1-800-522-7658, International 816-333-8811
33
Page 38

Appendix A: Dimensions
Protector Vacuum Pump Cabinet
34
Product Service 1-800-522-7658, International 816-333-8811
Page 39

A
PPPPEENNDDIIX
A
S
TTOORRAAGGE
S
R
EEPPLLAACCEEMMEENNT
R
P
AARRTTS
P
The following pages list components that are typical
replacement parts. If other parts are required, contact
Product Service.
Part # Description Cabinet Type
1928300 Leveling Feet All
1663600 Door Bumpers All
1928400 Handle, Acid All but Solvent
3598300 Lock Handle, Solvent Solvent Only
1934500 Rotary Catch, Door Latch All but Solvent
1930600 Shelf Support Clip, Solvent Solvent Only
9921200 48" Adjusting Solvent Shelf Solvent Only
9921201 36" Adjusting Solvent Shelf Solvent Only
9921202 30" Adjusting Solvent Shelf Solvent Only
9921203 24" Adjusting Solvent Shelf Solvent Only
1934100 Bushing, Brass – Door Hinge Support All
9917100 Lower Hinge Assembly, Right All
9717101 Lower Hinge Assembly, Left All
9920700 Upper Hinge Pin All
9922100 48" Lower Acid Polyethylene Tray Acid Only
9922101 36" Lower Acid Polyethylene Tray Acid Only
9922102 30" Lower Acid Polyethylene Tray Acid Only
9922103 24" Lower Acid Polyethylene Tray Acid Only
9922104 18" Lower Acid Polyethylene Tray Acid Only
S
E
X
C
B
B
C
AABBIINNEET
T
T
Product Service 1-800-522-7658, International 816-333-8811
35
Page 40
A
A
B
A
PPPPEENNDDIIXX
A
S
TTOORRAAGGEE
S
A
CCCCEESSSSOORRIIEESS
A
The following accessories are available for the Storage
Cabinets.
Vent Kit - Part No. 3591100
Includes one plastic vent tube assembly complete with
2" diameter threaded connector locknut, flexible tubing
and vent extension. Vent kit is used for venting Acid
Storage Cabinets through Spillstopper worksurface and
into the fume hood. Shipping weight 5 lbs. (2.3 kg).
Shelf Kits for Acid Storage Cabinets -
These kits provide additional shelf, polyethylene
tray, and mounting hardware.
48" 9919000
36" 9919001
30" 9919002
24" 9919003
18" 9919004
C
C
C
C
AABBIINNEETT
36
B
Product Service 1-800-522-7658, International 816-333-8811
Shelf Kits for Standard Base Cabinets –
These kits provide additional shelf, and mounting
hardware.
48" 9919100
36" 9919101
30" 9919102
24" 9919103
18" 9919104
12" 9919105
Page 41

Appendix C: Accessories
Work Surfaces
9727500 4' Work Surface Only, 30" Depth
9727501 5' Work Surface Only, 30" Depth
9727502 6' Work Surface Only, 30" Depth
9727503 8' Work Surface Only, 30" Depth
9727504 10' Work Surface Only, 30" Depth – Two Piece
9727505 12' Work Surface Only, 30" Depth – Two Piece
9727506 16' Work Surface Only, 30" Depth – Three Piece
9727507 4' Work Surface Only, 36" Depth
9727508 5' Work Surface Only, 36" Depth
9727509 6' Work Surface Only, 36" Depth
9727510 8' Work Surface Only, 36" Depth
9727511 10' Work Surface Only, 36" Depth – Two Piece
9727512 12' Work Surface Only, 36" Depth – Two Piece
9727513 16' Work Surface Only, 36" Depth – Three Piece
9727514 4' Work Surface Only, 42" Depth
9727515 5' Work Surface Only, 42" Depth
9727516 6' Work Surface Only, 42" Depth
9727517 8' Work Surface Only, 42” Depth
9727518 10' Work Surface Only, 42" Depth – Two Piece
9727519 12' Work Surface Only, 42" Depth – Three Piece
9727520 16' Work Surface Only, 42" Depth – Three Piece
9732000 4' HOPEC Work Surface
9732001 5' HOPEC Work Surface
9732002 6' HOPEC Work Surface
9732003 8' HOPEC Work Surface
9732004 4' HOPEC Work Surface with (1) cupsink cutout
9732005 5' HOPEC Work Surface with (1) cupsink cutout
9732006 6' HOPEC Work Surface with (1) cupsink cutout
9732007 8' HOPEC Work Surface with (1) cupsink cutout
Other Work Surfaces with cutout options are available. Contact Labconco
Corporation for ordering.
Self-Closing Kit for Solvent Storage Cabinets
9914700 Self-Closing/Automatic Latching Solvent Left Hinged Door
Kit
9914701 Self-Closing/Automatic Latching Solvent Right Hinged
Door Kit
9914702 Self-Closing/Automatic Latching Solvent Double Door Kit
- 30" and 36" units
9914703 Self-Closing/Automatic Latching Solvent Double Door Kit
- 48" unit
Product Service 1-800-522-7658, International 816-333-8811
37
Page 42

Appendix C: Accessories
Filler Panel Kits
9920300 Panel, Filler 24" for Interior depth Protector XL Fume Hood
9920301 Panel, Filler 30" for Interior depth Protector XL Fume Hood
9920302 Panel, Filler 36" for Interior depth Protector XL Fume Hood
9920303 Panel, Filler ADA 24" for Interior depth Protector XL Fume
Hood
9920304 Panel, Filler ADA 30" for Interior depth Protector XL Fume
Hood
9920305 Panel, Filler ADA 36" for Interior depth Protector XL Fume
Hood
9920306 Panel, Filler Protector Fume Hood
9920307 Panel, Filler ADA Protector Fume Hood
*Individual kits contain one filler panel, filler panel angle, and
mounting screws.
38
Product Service 1-800-522-7658, International 816-333-8811
Page 43

APPENDIX D
QUICK REFERENCE
STORAGE CABINETS
Size/Description Dual Doors Right Hinge Left Hinge Dual Doors Right Hinge Left Hinge
48" 9902000* - - 9901000 - 36" 9902100* - - 9901100 - 30" 9902200* - - 9901200 - 24" - 9902300 9902400 - 9901300 9901500
18" - - - - 9901400 9901600
12" - - - - - 48" w/Self Closing /Automatic
Latching Doors
36" w/Self Closing /Automatic
Latching Doors
30" w/Self Closing /Automatic
Latching Doors
24" w/Self Closing /Automatic
Latching Doors
24" ADA - 9906000 9906100 - 9905000 9905200
24" ADA w/Self Closing Doors - 9906200 9906300 - - 18" ADA - - - - 9905100 9905300
12" ADA - - - - - -
Size/Description Dual Doors Right Hinge Left Hinge Dual Doors Right Hinge Left Hinge
48" 9900000 - - - - 36" 9900100 - - - - 30" 9900200 - - - - 24" - 9900300 9900600 - - 18" - 9900400 9900700 - 9907000 9907100
12" - 9900500 9900800 - - 48" w/Self Closing Doors - - - - - 36" w/Self Closing Doors - - - - - 30" w/Self Closing Doors - - - - - 24" w/Self Closing Doors - - - - - 24" ADA - 9904000 9904300 - - 24" ADA w/Self Closing Doors - - - - - 18" ADA - 9904100 9904400 - - 12" ADA - 9904200 9904500 - - -
9903000* - - - - -
9903100* - - - - -
9903200* - - - - -
- 9903300 9903400 - - -
*Factory Mutual Listed
SOLVENT ACID
STANDARD BASE VACUUM PUMP
Product Service 1-800-522-7658, International 816-333-8811
39
39
Page 44
Declaration of Conformity
DECLARATION OF CONFORMITY
Application Council Directive(s): 73/23/EEC, 89/336/EEC, 2002/95/EC (ROHS),
2002/96/EC (WEEE)
Standard(s) to which conformity is declared: EN61010-1, EN61326-1
Manufacturer’s Name: Labconco Corporation
Manufacturer’s Address: 8811 Prospect Avenue
Kansas City, MO 64132 USA
Importer’s Name: See Shipping/Customs Documents
Importer’s Address: See Shipping/Customs Documents for your equipment
Type of Equipment: Laboratory Equipment - Storage Cabinets
Model No.:
9904000 thru 9904500 ADA Standard Base Cabinet
9901000 thru 9901600 Acid Storage Cabinet
9905000 thru 9905300 ADA Acid Storage Cabinet
9902000 thru 9902400 Solvent Storage Cabinet
9903000 thru 9903400 Self Closing Solvent Storage Cabinet
9906000 thru 9906100 ADA Solvent Storage Cabinet
9906200 thru 9906300 ADA Self Closing Solvent Storage Cabinet
9907000 thru 9907100 Vacuum Pump Cabinet
Serial No.: Various – See Individual Declaration
Year of Manufacture: 1999 and Subsequent
I, the undersigned, hereby declare that the equipment specified above conforms to the
above Directive(s) and Standard(s).
See individual Declaration of Conformity which
will be signed by the importer for your country.
Place: _______________________________________
(Signature)
Date: _______________________________________
(Full Name)
_______________________________________
(Position)
Labconco P/N 36960-19, Rev. B, ECO E394
9900000 thru 9900800 Standard Base Cabinet
40
Product Service 1-800-522-7658, International 816-333-8811
 Loading...