

Page 1

LABCONCO CORPORATION 8811 Prospect Ave, Kansas City, MO 64132
(816) 333-8811, Fax (816) 363-0130, (800) 821-5525
Oxygen and Moisture Removal Column No. 5244200
Operation
The Precise Controlled Atmosphere Glove Box protects valuable laboratory materials from the
effects of oxygen and moisture exposure. With the aid of the Oxygen and Moisture Removal
Column, the Precise Controlled Atmosphere Glove Box can maintain low moisture (<50 ppm)
and oxygen (<5 ppm) levels. Experimentations at Labconco have yielded moisture levels below
10 ppm as well as oxygen levels under 1 ppm. Under sealed gloveport conditions, the life span
for continuous recirculation operation of the oxygen removal column is approximately 70 days at
+1" water column pressure. The life span for moisture control is estimated greater than 9 years
for continuous use. See the attached charts and graphs for life span calculations based on
glove box leak rate tests. In order to obtain the maximum life of the removal column, shut off
the manual Auxiliary Valves connected to the oxygen and moisture recirculation loop. We also
recommend installing glove port covers when the glove box is not in use. Good operation
technique can extend the life of the column for many months. Follow the installation procedure
below to properly install the removal column.
Installation Procedure
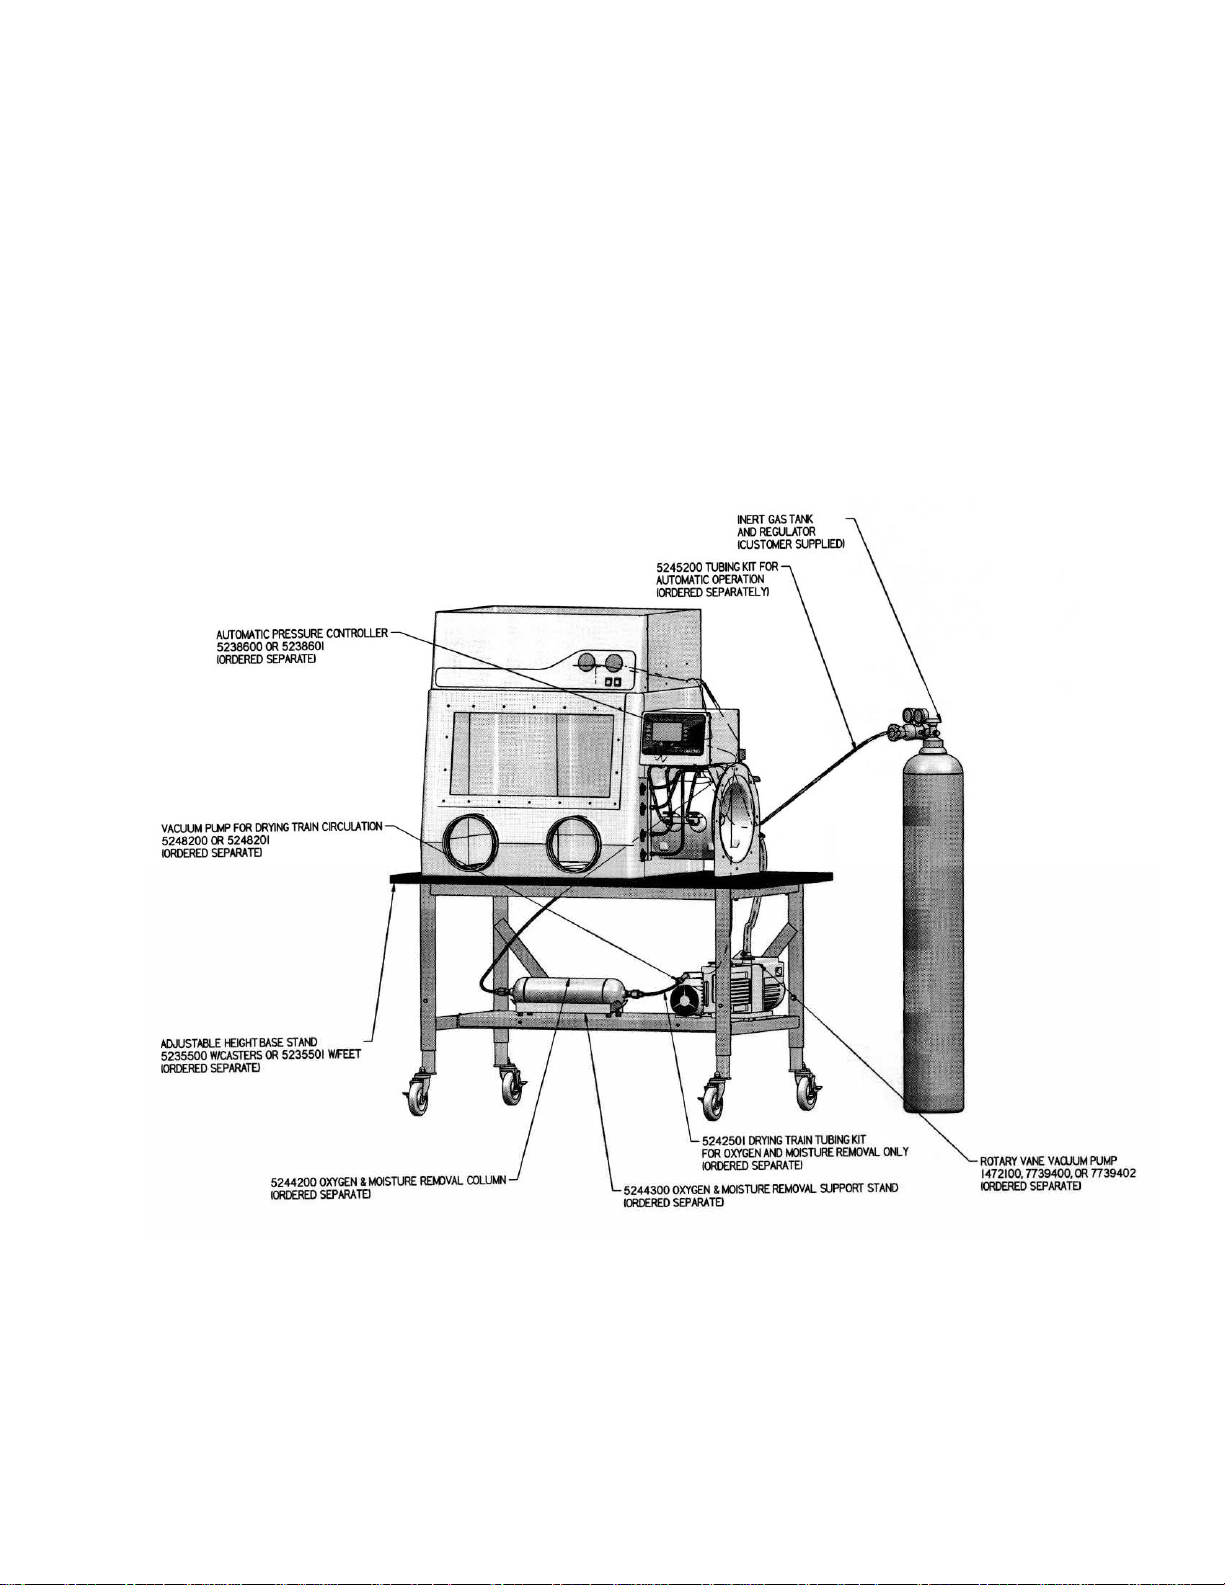
1. To easily install the 5244200 Oxygen and Moisture Removal Column, the 5242501
Tubing Connection Kit is available from Labconco. Recirculation Pumps 5248200 or
5248201 will also be required to pump the glove box inert air through the Oxygen and
Moisture Removal Column. Refer to the installation pictorial and plumbing diagrams
attached for proper installation.
2. Close the two Auxiliary Valves located on the glove box main chamber. These valves
will be used to connect the Removal Column, and control the recirculation loop.
3. Place the Removal Column on the Support Stand (5244300 ordered separately).
4. Following the instructions provided with Tubing Connection Kit 5242501, properly
connect the tubing to the Auxiliary Valves.
5. Remove both shipping End Caps on the Removal Column and install the two female
tubing connectors from the 5242501 Tubing Kit using Teflon tape thread sealant. (Save
the shipping End Caps.)
6. Route and connect the tubing between the Auxiliary Valves, the two female tube
connectors attached to the removal column, and the recirculation pump. (See the
instructions included with the Tubing Kit 5242501).
7. Before starting the recirculation pump keep the two auxiliary valves closed, and purge and
fill the glove box main chamber with inert gas. 100-150 purge and fill cycles will reduce
oxygen and moisture levels to below 3,000 ppm or 0.3%.
8. The two auxiliary valves may then be opened and the recirculation pump turned on to
further reduce the oxygen and moisture levels below 100 ppm.
Labconco Instruction Sheet 5244201, Rev. -, ECO E275 1 of 6
Page 2
Removal Column Refill Policy
The Oxygen and Moisture Removal Column can be refilled more economically than to purchase
a new one. It is recommended that a second removal column be available and stocked by the lab
user should the initial column be expended. For refill, the Oxygen and Moisture Removal
Column must be packaged well with End Caps and sent to:
LABCLEAR
508 29th Ave.
Oakland, CA 94601
Phone: (800) 227-1084, (510) 534-7050
Fax: (510) 534-0454
e-mail: info@labclear.com
technical questions: techsupport@labclear.com
Typical Tubing Connections for Oxygen & Moisture
Removal Shown with the Automatic Pressure Controller
(Tubing Connection Kit 5242501 provides full details)
Labconco Instruction Sheet 5244201, Rev. -, ECO E275 2 of 6
Page 3

Life Span for Oxygen Removal Column & Moisture Trap Removal
V
Note: Precise Glove Box Volume is 13 cu. ft. or 368 liters; 3000ppm or 0.3% of 368 liters = 1.1 liters of oxygen initially used
Glove Box Initial Oxygen Catalog# 5244200 Total Oxygen Total Oxygen Number
Main Chamber Pressure Oxygen Leak Rate Capacity Used Oxygen Column Life Life Capacity
(inches of water)
-1 0.52 3000 21 19022 7 1
0 0.22 3000 51 19022 7 1
1 0.15 3000 74 19022 7 1
Glove Box Catalog# 5244200 Total Moisture Total Moisture Number
Main Chamber Pressure Moisture Leak Rate Initial Moisture Moisture Column Life Life Capacity Weight Capacity of Columns
(inches of water)
-1 2.9 10000 3318 13864241 100 1
0 1.7 10000 5659 13864241 100 1
1 1.6 10000 6013 13864241 100 1
Note: 1ppm of moisture = 7.21ug of moisture inside the 368 liter glove box volume Note: All data with glove port covers installed
(ppm/min) (ppm) (24 hour days) (ppm) (liters)
Note: All data with glove port covers installed
(ppm/min) (ppm) (24 hour days) (ppm) (grams of moisture)
olume Capacity of Columns
Moisture/Oxygen Leak Rate @ -1, 0, +1 Box Pressure
400
350
Moisture -1
2.9 ppm/min
300
250
Moisture 0
1.7 ppm/min
200
150
ppm Moisture/Oxygen
100
50
0
0 1020304050607080
Time (Minutes)
Moisture +1
1.6 ppm/min
Oxygen -1
0.52ppm/min
Oxygen 0
0.22 ppm/min
Oxygen +1
0.15 ppm/min
Labconco Instruction Sheet 5244201, Rev. -, ECO E275 3 of 6
Page 4

Plumbing Diagrams
Labconco Instruction Sheet 5244201, Rev. -, ECO E275 4 of 6
Page 5

Labconco Instruction Sheet 5244201, Rev. -, ECO E275 5 of 6
Page 6

Warranty
Labconco provides a warranty on all parts and factory workmanship. The warranty includes areas of
defective material and workmanship, provided such defect results from normal and proper use of the
equipment.
The warranty for all Labconco products will expire one year from date of installation or two years from
date of shipment from Labconco, whichever is sooner, except the following;
• Purifier® Delta® Series Biological Safety Cabinets and PuriCare® Lab Animal Research
Stations carry a three-year warranty from date of installation or four years from date of shipment
from Labconco, whichever is sooner.
• SteamScrubber® & FlaskScrubber® Glassware Washers carry a two-year warranty from date of
installation or three years from date of shipment from Labconco, whichever is sooner.
• Blood Drawing Chairs carry a ten year warranty.
• Carts carry a lifetime warranty.
• Glassware is not warranted from breakage when dropped or mi shan dl ed.
This limited warranty covers parts and labor, but not transportation and insurance charges. In the event
of a warranty claim, contact Labconco Corporation or the dealer who sold you the product. If the cause
is determined to be a manufacturing fault, the dealer or Labconco Corporation will repair or replace all
defective parts to restore the unit to operation. Under no circumstances shall Labconco Corporation be
liable for indirect, consequential, or special damages of any kind. This statement may be altered by a
specific published amendment. No individual has authorization to alter the provisions of this warranty
policy or its amendments. Lamps and filters are not covered by this warranty. Damage due to corrosion
or accidental breakage is not covered.
Returned or Damaged Goods
Do not return goods without the prior authorization from Labconco. Unauthorized returns will not be accepted. If
your shipment was damaged in transit, you must file a claim directly with the freight carrier. Labconco Corporation
and its dealers are not responsible for shipping dam ages.
The United States Interstate Commerce Commission rules require that claims be filed with the delivery carrier
within fifteen (15) days of delivery.
Limitation of Liability
The disposal and/or emission of substances used in connection with this equipment may be governed by various
federal, state, or local regulations. All users of this equipment are required to become familiar with any regulations
that apply in the user’s area concerning the dumping of waste materials in or upon water, land, or air and to comply
with such regulations. Labconco Corporation is held harmless with respect to user’s compliance with such
regulations.
Contacting Labconco Corporation
If you have questions that are not addressed in this manual, or if you need technical assistance, contact Labconco’s
Customer Service Department or Labconco’s Product Service Department at 1-800-821-5525 or 1-816-333-8811,
between the hours of 7:00 a.m. and 6:00 p.m., Central Standard Time.
Labconco Instruction Sheet 5244201, Rev. -, ECO E275 6 of 6
 Loading...