

Page 1
BEDIENUNGSANWEISUNG
mit Montageanweisungen
Instructions for use and installation instructions
Instrucciones de uso y de montaje
EEB 6250.0
072375 H41
Page 2

For your information...
Contents
You should carefully read the information in this manual before you use your
oven. Here you will find important notes concerning safety and how to use,
look after and service your appliance so that it enjoys a long service life.
Should a fault arise, please first consult chapter “What to do if trouble occurs”.
You can often remedy minor faults yourself and thus save unnecessary service
costs.
Please keep this manual in a safety place and pass it on to new owners for
their information and safety.
The following symbols are used in this operating manual:
The warning triangle draws your attention to risks to your health or
[
damage that might be caused to your appliance.
Here you will find useful hints and information.
F
Conditions of guarantee
The conditions of guarantee applicable for this product are subject to those
published by the representative in the relevant country. Details regarding same
may be obtained from the dealer from whom the appliance was purchased.
For claims under guarantee the sales receipt must be produced.
Your appliance at a glance . . . . . . . . . . . . . . . . . . . . . . . 18
Safety instructions . . . . . . . . . . . . . . . . . . . . . . . . . . . . . 19
Connection and operation
Oven
Before using the appliance for the first time . . . . . . . . . . . 19
Disposing of the packaging and the old appliance
Setting the clock
Initial cleaning
Using your oven. . . . . . . . . . . . . . . . . . . . . . . . . . . . . . . 20
General
Symbols and operating modes
Turning the oven on and off
Heating-up indicator and pilot light
Oven trays
Rack levels:
backmobil
Telescopic glide-out shelves (acc.-no. 601)
Fast preheating
Baking
Baking pizza
Tips on the table “Recommended temperatures for baking”
Recommended temperatures for baking
Grilling
Recommended temperatures for grilling
Roasting
Recommended temperatures for roasting
Defrosting
Preserving
®
(acc.-no. 600)
The electronic timer with switch-off function. . . . . . . . . . . 24
Setting the clock
Setting the alarm time
Cleaning and care . . . . . . . . . . . . . . . . . . . . . . . . . . . . . 25
For all surfaces
Remove caking
Please note the information for the cleaning scraper
The use of oven sprays - information
Enamel
Stainless steel
Glass
Door sealing
Buttons
Removing and installing the oven door
Removing and installing the side racks
Folding heating element down/up
Regenerating the ökotherm
®
catalyst
What to do if trouble occurs... . . . . . . . . . . . . . . . . . . . . . 26
Replacing the oven lamp
Replacing the door sealing
Rating label. . . . . . . . . . . . . . . . . . . . . . . . . . . . . . . . . . 27
Installation instructions for fitter. . . . . . . . . . . . . . . . . . . . 27
Electrics
Installation dimensions
Installation in a fitted kitchen
EEB 6250.0 17
Page 3
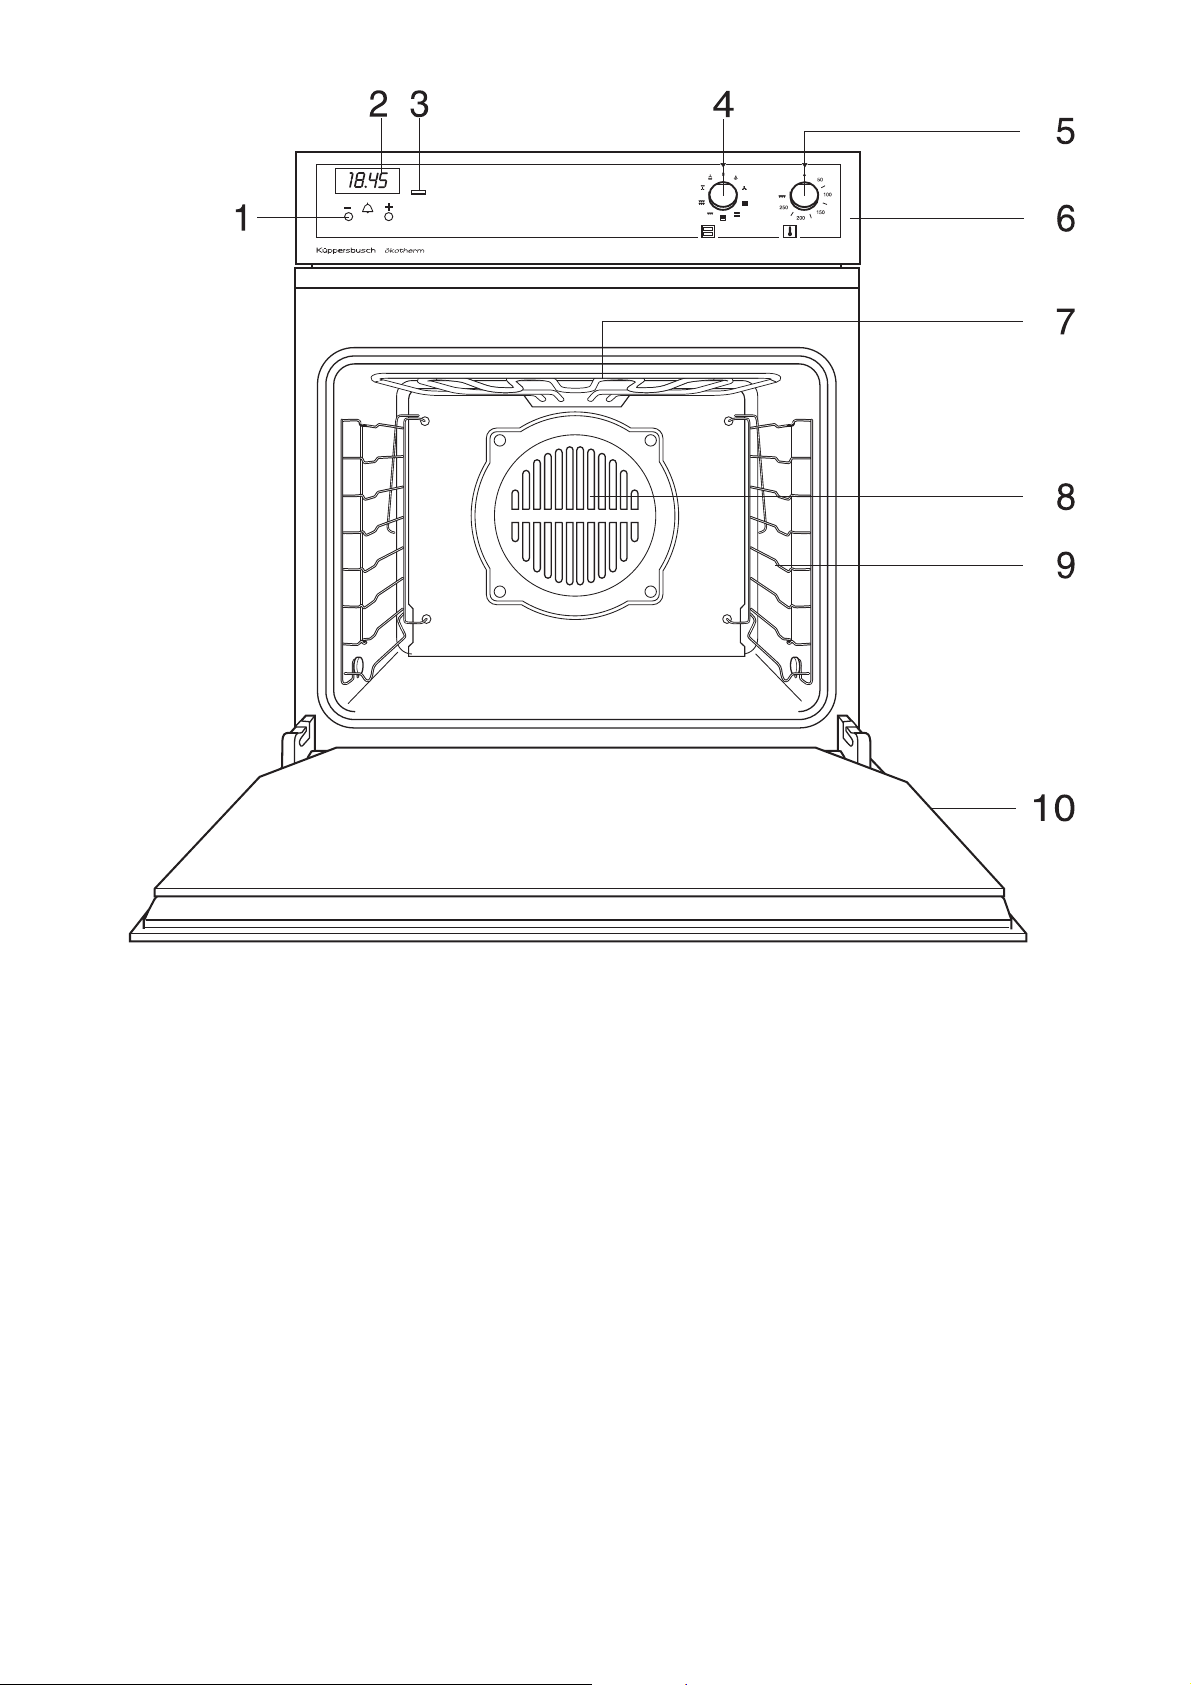
Your appliance at a glance
1 Control buttons for the timer
2 Display of the timer
3 Heating-up indicator
4 Mode selector
5 Temperature control
6 Control panel
7 Fold-down grill (top heat and grill)
8 Hot air fan
9 Rack levels
10 Oven door
Accessories supplied:
Gridiron
Baking tray (enamel)
Drip pan
Grilling rack with lifter
Accessories available:
Grilling rack with lifter (acc.-no. 125)
Pizza stone (acc.-no. 145)
Gridiron (acc.-no. 124)
Roasting tray (acc.-no. 441)
Baking tray (enamel) (acc.-no. 541)
Drip pan (aluminium) (acc.-no. 542)
Drip pan (acc.-no. 543)
®
backmobil
Telescopic glide-out shelves (acc.-no. 601)
Accessories available
for the telescopic glide-out shelves (acc.-no. 601):
Gridiron, depressed, e.g. for large poultry (acc.-no. 750)
Glass drip pan, suitable only for accessory 750 (acc.-no. 751)
(acc.-no. 600)
18 EEB 6250.0
Page 4
Safety instructions
Connection and operation
Before using the appliance for
the first time
■ Only KÜPPERSBUSCH built-in hobs were designed and tested for use above
a Küpperbusch fitted oven. No other hobs may be used.
■ The appliances may only be connected to the mains, maintained and
repaired by a qualified electrician according to valid safety regulations. Work
carried out incorrectly places your safety at risk.
■ Do not put the appliance into operation unless it has been built in!
■ The surface of the oven is very hot when in operation. Always keep children
away!
■ Make sure connection cables for electrical devices are not jammed in the
oven door.
■ Steam and/or pressure cleaning machines must not be used to clean the
oven! This can damage the unit resulting in risk of personal injury.
■ The appliance is to be used only for the preparation of food in the home.
Oven
■ When carrying out repairs and replacing oven light bulbs, the cooker must
be disconnected from the mains (switch off the fuse or unplug from the
mains).
■ Never store any objects in your oven which could cause a hazard if the oven
is unintentionally switched on.
■ Take special care when working in the hot oven. Use a dish cloth, oven
gloves or similar.
■ Be careful opening the door when the oven is hot: don’t lean over the open
door straight away. As soon as you open the door, hot air and even steam
will spill out through the door opening.
■ The oven door must close well. In the event of damage to the hinges or to
the glass pane, do not use the appliance until it has been repaired and
checked by a qualified person.
■ A damaged door sealing must be replaced. The oven must not be used with
damaged door sealing.
■ Always close the oven door completely when preparing food in the oven.
■ Keep it at a distance of at least 5 cm from the grill and top heat.
Disposing of the packaging and the old appliance
Dispose of the transport packaging in such a way that it does not impact on
the environment.
If the appliance is purchased in Germany, the dealer who sold you the
appliance will dispose of the transport packaging for you. Recycling the
packaging saves raw materials and reduces the amount of waste. Disposed
appliances still contain useful materials. Dispose of your old appliance at a
collection point for recycling useful materials. Before disposing of your old
appliance ensure that it cannot be used any longer. This will prevent misuse.
Setting the clock
The clock must be set before first using the oven or after a loss of power
F
(mains). The oven will not function until the clock is set.
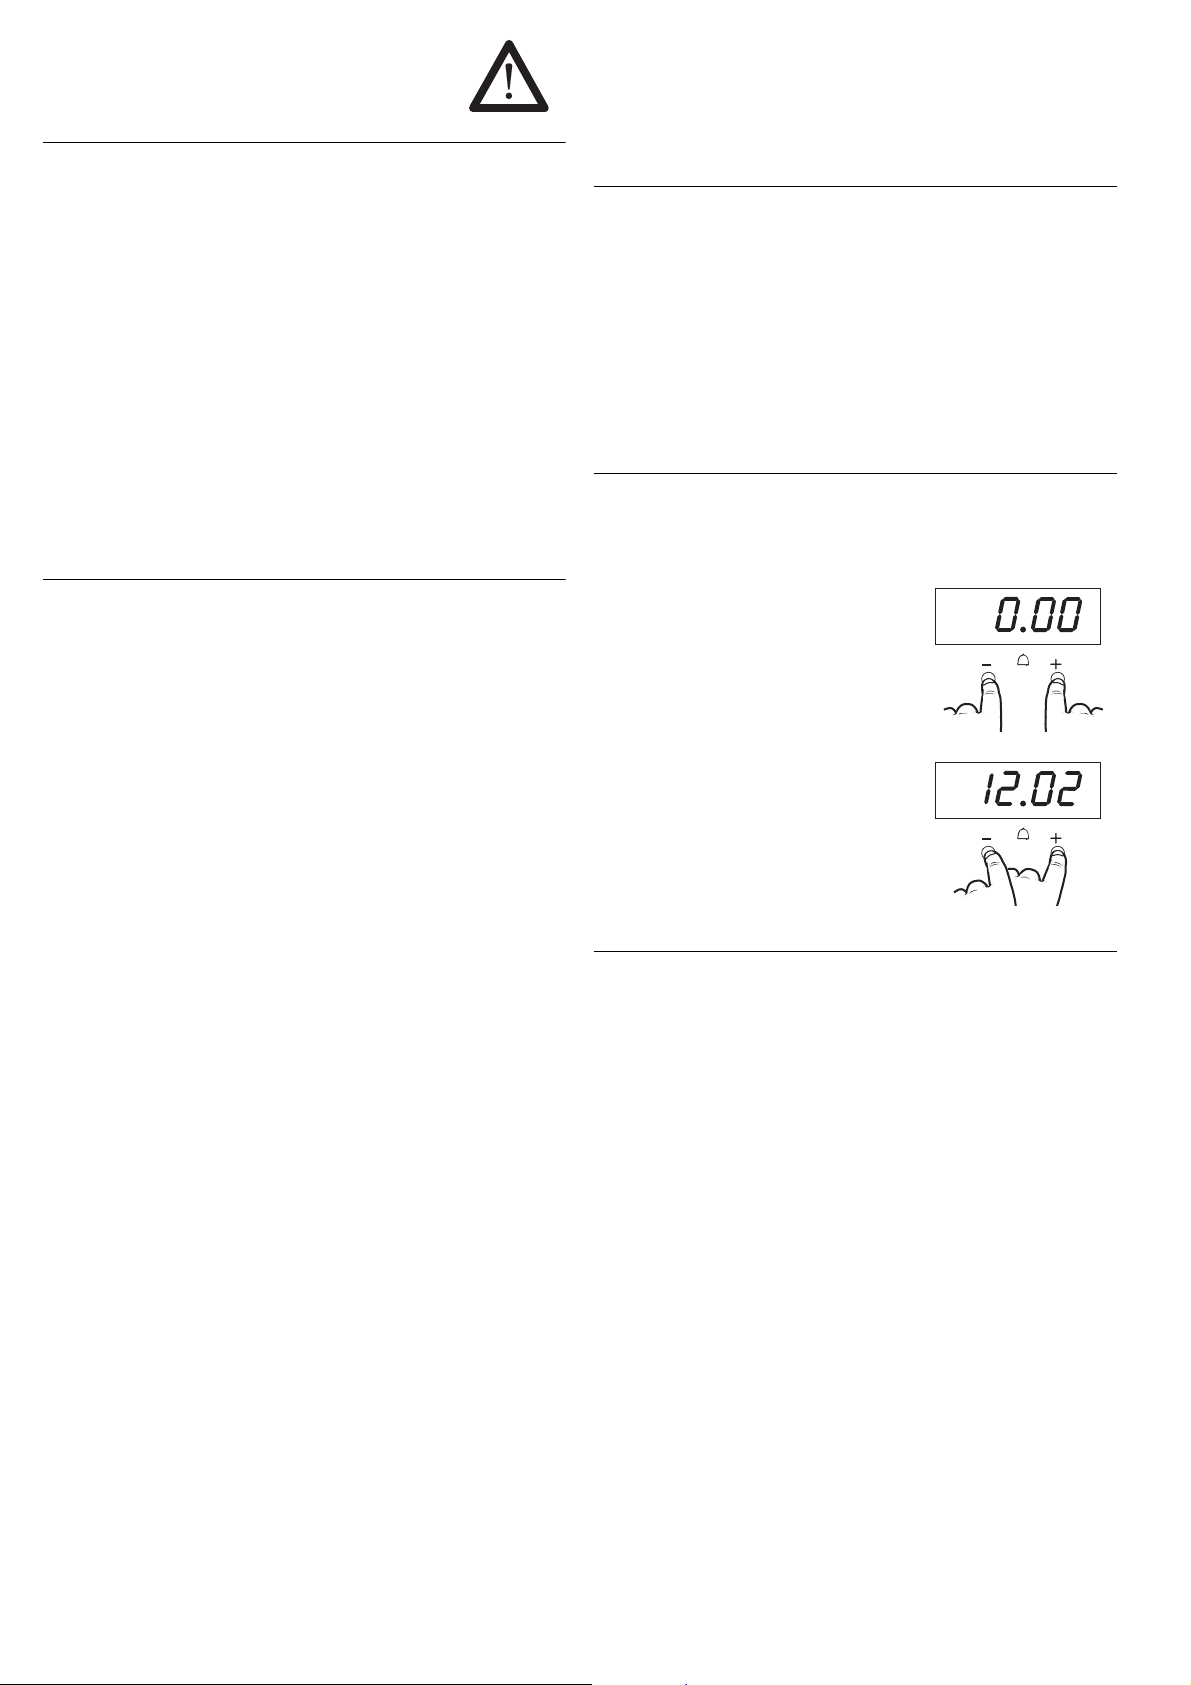
If the clock needs to be set, you will see “0.00” flashing in the display.
F
Set the clock as follows:
– Press the “+” and “-” keys simultaneously
for a short moment.
– Immediately set the desired time with the
“+” and “-” keys. The clock starts
immediately.
Initial cleaning
– Remove foreign matter and packaging.
– Before preparing food for the first time, the appliance must be cleaned.
Clean the baking trays, drip pan, gridiron etc. with a damp cloth and a little
detergent.
– Heating the oven.
Close the oven door.
Heat up the oven with top heat/bottom heat at 250 °C for 60 minutes.
Air the kitchen well at the same time.
.
EEB 6250.0 19
Page 5

Using your oven
General
Please note the safety instructions on page 19!
[
Attention. Risk of overheating! Do not cover the bottom of the oven
[
with aluminium foil and do not place pots or pans directly on it! This
would cause a build-up of heat that would damage the enamel.
When the oven is in use, it becomes hot. In order to cool the housing, the
F
cooling fan is switched on as soon as the housing heats up. The cooling
fan continues to run until the housing has cooled down - even after the
appliance has been switched off. The fan noises are normal running noises
and not a fault.
If you are cooking a dish in the oven that contains alcohol or yeast, the
F
Hot air convection, Intensive hot air convection and Pizza Mode will result
in a vinegar smell. If you find the smell disturbing, use one of the other
modes, such as Top/Bottom Heat.
Heating-up indicator and pilot light
The heating-up indicator on the control panel will light up while the appliance
is heating up and will go out as soon as the set temperature has been
reached. It also comes on during operation when the oven is heated to
maintain the temperature you want.
The illuminated rings on the cooking zone controls are the pilot lights. As long
as the oven is switched on the illuminated rings of the control knobs show
that the oven is operating.
Oven trays
Baking trays:
■ Lift slightly when removing.
After baking trays are placed back into the oven, the sloping edge of the
tray must point towards the oven door.
■ Push the drip pan and baking tray with the two slots right at the back into
the oven.
Symbols and operating modes
Switch
Operating
symbol
mode
Off
0
Lighting
!
Cold air
#
convection
Hot air
#
convection
Top heat/
$
Bottom heat
Bottom heat Prebaking very moist cake
-
Top heat Browning toppings
.
Grilling Grilling small portions. Position the pieces of meat in the
*
Large area
+
grill
Intensive hot
0
air convection
Pizza mode Baking bread, pizzas and moist cakes, making preserves.
Intended for
Without temperature setting, for gently defrosting and
Cooling food.
with temperature setting, for roasting, baking and cooking
on several levels.
Preheating,
baking and roasting on one level
centre of the gridiron.
Grilling larger portions such as steaks, fish and sausages,
but also for browning toast dishes and gratins.
Baking large flat cakes with a dry topping (such as a
crumble topping), intensive roasting of large joints and large
poultry such as goose or turkey.
Turning the oven on and off
Gridiron:
■ Please ensure that the catches of
the racks always point towards
the back (away from you).
Grilling rack with lifter to insert
in the dripping pan (accessory)
■ The grilling rack is inserted in the drip
pan. With the lifter you can remove
the grilling rack together with the drip
pan from the oven. Nothing drips and
you can easily serve.
Roasting tray as splash guard for
roasting and grilling (accessory)
■ The roasting tray is inserted in the drip pan and prevents the fat from
splashing out of the drip pan.
Rack levels:
You have 8 levels in the side racks. The rack levels are numbered from 0 to
7 from the bottom up. For example, the drip pan can be inserted into rack
level 0.
Side racks:
Rack level 0 is the lowest
possible level.
Selecting the operating mode:
– Turn the mode selector (the switch
on the left) to the right.
Selecting the temperature:
– Turn the temperature control (the
2nd switch from the left) to the
right.
Turning the oven off:
– Drehen Sie beide Schalter auf “0” zurück.
backmobil® (acc.-no. 600)
The backmobil® replaces the shelf
racks in your oven and can be
completely pulled out like a trolley.
It can be removed from the oven
and dismantled for cleaning
purposes.
If your oven is equipped with a
backmobil
instructions enclosed with it.
®
, please read the
20 EEB 6250.0
Page 6

Telescopic glide-out shelves (acc.-no. 601)
are oven rails available as
accessories which replace the
side racks and make working in a
hot oven more easy. Trays or
gridirons are placed on the glideout shelves. They can be pulled
out singly and independently of
each other.
If your oven is fitted with glide-out
shelves, please read the
instructions enclosed with them.
■ for pizzas: preheat the oven with a baking tray or a pizza stone (accessory)
■ for bread: preheat the oven
Baking pizza
Select the Pizza mode at 250 °C.
F
– If you use a pizza stone (special accessory), the pizza gets a particularly
crispy base. Preheating time: at least 30 min.!
Read the instructions enclosed with the pizza stone.
Basic recipe for pizza
250 g of flour, 20 g of yeast, 1/8 l of lukewarm water, 3 tablespoons of (olive)
oil, salt.
Fast preheating
Do not insert food for roasting or baking into the oven until fast preheating
F
is over and the oven has been set to the normal mode of operation.
With the Pizza mode the empty oven can be preheated in a relatively
F
short time.
– Close the oven door.
– Set the mode selector to Pizza mode .
– Set the temperature you want. The heating-up indicator comes on.
– As soon as the heating-up indicator goes off, set the mode you want.
– Put the food into the oven.
Baking
Hot air convection #
No need to preheat the oven - baking is possible on several levels
F
simultaneously.
Rack levels:
1 tray: 2nd rack level from the bottom
2 trays: 2nd and 5th rack levels from the bottom
3 trays: 2nd, 4th and 6th rack levels from the bottom
4 trays: 0., 2nd, 4th and 6th rack levels from the bottom
■ If you are baking several cakes in baking tins, about 5 to 10 minutes
additional baking time will be needed for each baking tray.
■ Remove the baking trays individually, depending on how well browned the
cakes are.
■ Bake using hot air convection
no instructions for baking by hot air convection in your recipe.
■ Important: When cakes with a moist fruit topping are being baked, the
development of humidity is particularly high. You should bake no more than
two cakes at the same time.
Top heat/bottom heat $
Preheating - baking on one level
F
■ Preheat the oven by pizza mode , and when the temperature has been
reached,
set the oven back to Top heat/bottom heat $
■ Baking tins made of black metal and aluminium are particularly suitable.
Intensive hot air convection 0
No need to preheat the oven - baking on one level
F
■ Only for large flat cakes with a dry topping, such as a crumble topping.
Pizza mode
Baking on one level
F
■ for moist cakes
at a temperature of 160 °C if there are
#
Baking pizza on a baking tray
– Make a yeast dough out of the specified ingredients.
– Allow the dough to rise for approx. 30 minutes until it has doubled in size.
– Then knead the dough for a few minutes and allow it to prove for another
15 minutes.
– Preheat the oven (Pizza mode at a temperature of 250 °C).
– Grease the baking tray.
If you are making small round pizzas, insert the baking tray into the oven
now and preheat it as well.
– Roll out the dough, place on a baking tray and form an edge.
– Add any topping you want quickly so that the dough does not become moist.
– Small pizzas: Put topped dough onto the preheated baking tray.
– Place the baking tray in rack level 0.
– Bake for approx. 8 - 12 minutes in Pizza mode , at a temperature of
250 °C.
Baking pizzas on the pizza stone
– Prepare the pizza dough as described above.
– Place the pizza stone on the gridiron and insert at rack level 0.
– Preheat the oven in Pizza mode and at a temperature of 250 °C.
– Place the dough onto the floured lifter and add toppings quickly so that the
dough does not become moist. The topped pizza must not lie too long on
the lifter as otherwise the dough no longer slides off.
– When preheating is over, push the pizza off the lifter onto the hot pizza
stone.
– Bake for approx. 8 - 12 minutes in Pizza mode , at a temperature of 250 °C.
Tips on the table “Recommended temperatures
for baking”
The table on page 22 contains a selection of cakes etc., the necessary
temperatures, cooking times and rack levels.
■ Temperatures are generally given in ranges as they depend on the
composition of the dough, the quantity and the shape.
■ We recommend you to set the lower temperature value the first time and
only select a higher temperature if necessary, e.g. if you want more
browning or the baking time is too long.
■ If you do not find any specific temperatures for your own recipes, use a
similar cake in the table given as a reference.
■ Height differences of the food can result in different degrees of browning at
the start of the baking process. In this case please do not change the
temperature setting. Differences in browning are offset during the course of
baking.
EEB 6250.0 21
Page 7

Recommended temperatures for baking
The recommended temperatures for the preferred operating modes have been highlighted. Please note the tips on p. 21!
Type of cake or biscuit
Cake mixture
Ring cake 2 150-160 1 170-180 50-65
Tin cake 2 150-160 1 170-190 50-70
Madeira cake 2 150-160 1 160-180 60-70
Gateaux and flans 2 150-160 1 170-180 40-60
Flan bases 2 170-180 2 180-200 20-30
Fine fruit flans 2 150-160 1 170-180 2 150-160 45-60
Small biscuits 2 150 2 170-180 15-30
Large flat cakes: 2
with a dry topping 2 150-160 2 180-190 2 0 150-160 25-35
with a moist topping 2 160-170 2 170-180 2 160-170 35-50
Kneaded dough
Flan bases 2 170-180 2 180-200 25-35
Cheese cake 2 140-150 1 160-170 2 140-150 70-90
Small bisquits 2 140-150 2 180-190 15-35
Large flat cakes: 2
with a dry topping 2 150-160 2 180-190 2 0 150-160 25-35
with a moist topping 2 160-170 2 170-180 2 160-170 30-50
Leavened dough
Ring cake 2 150-160 1 175-180 40-65
Yeast cake 2 150-160 2 175-180 40-50
Rich sweet bread (preheated) 2 150-160 2 175-180 50-70
Small biscuits 2 140-150 2 180-200 15-30
Large flat cakes: 2
with a dry topping 2 150-160 2 175-180 2 0 150-160 30-40
with a moist topping 2 160-170 2 170-180 2 160-170 30-50
Sponge cake
Gateaux and flans 2 150-160 2 175-180 30-40
Rolls 2 170-180 2 180-200 12-25
Biscuits made with white of egg
Meringue 2 80-90 2 100-120 80-120
Cinnamon stars 2 100-120 2 120-140 20-40
Macaroons 2 100-120 2 120-140 20-50
Other doughs
Puff pastry 2 170-180 2 190-210 15-30
Puff pastry made with leavened
dough
Puff pastry made with curd
cheese
Choux pastry 2 170-180 2 190-210 30-40
Dough made with curd cheese
and oil
Honey cake 2 140-150 2 170-180 20-35
Bread and pizza
Leaven and bread made with
yeast (preheat: 230 °C,
prebake: 10 min., 230 °C)
Bread made with yeast/white
bread.
Pretzels (preheat: 230 °C) 2 200 2220 15-20
Pizza (preheat: 250 °C) 0 250 8-12
Hot air convention # Top heat/bottom heat $
rack level Temperature in °C rack level Temperature in °C rack level Temperature in °C in minutes
2 170-180 2 190-210 30-40
2 160-180 2 180-200 30-40
2 150-160 2 170-180 30-40
2 180 1/2 160 50-65
2 180 22002 180 30-50
Intensive hot air convention 0
Pizza mode
Baking time
22 EEB 6250.0
Page 8

Grilling
Always close the oven door when grilling!
[
Set the operating mode Grill * for small portions or Large area grill +
F
for large portions.
Set the temperature control to *. Exception: With larger roasts it is
better to select a temperature between 200 and 250 °C so that the roast
does not burn.
Switch setting for Grill *: Switch setting for Large area grill + :
– Preheat the oven for 5 to 10 min.
– Place the food on the gridiron.
– Push the drip pan into the 2nd or 3rd rack level and the gridiron into the
rack level as per the table.
– Select Grill * or Large area grill + .
– Set temperature control to *.
– Close the oven door.
Recommended temperatures for grilling
Dish Rack
level
Pork chops/Escalope 6 6-8 4-6 8-9 5-7
Fillet of pork 5 10-12 8-10 12-13 8-10
Sausages 6 6-8 4-6 8-10 5-7
Shashlik 4 7-8 5-6 8-10 7-10
Rissoles 4 8-10 6-8 10-15 10-12
Beef steak 6 4-6 3-5 6-7 4-6
Slices of liver 6 3-4 2-3 4-5 3-4
Escalope of veal 5 5-7 4-5 7-8 5-6
Veal steak 5 6-8 4-6 8-9 5-6
Mutton chops 5 8-10 6-8 10-11 7-8
Lamb chops 5 8-10 6-8 10-11 7-8
Half a chicken 3 10-12 8-10 14-15 10-11
Fillet of fish 6 6-7 4-5 7-8 5-6
Trout 4 4-7 3-6 8-11 5-6
Toast 5 2-3 2-3 2-3 2-3
Toasted sandwiches 4 6-8 6-8
Grill Large area grill
st
side 2d side 1st side 2d Side
1
in minutes
Roasting
Use the drip pan and the gridiron.
F
■ You should only cook meat or fish in the oven if they weigh more than 1 kg.
■ The roasting time depends on the type of meat you are roasting, the quality
and on the thickness of the joint.
To measure the joint, lift it slightly as it collapses under its own weight.
■ The roasting time for meat with a layer of fat can be as much as twice as long
as usual.
■ If you are cooking several small pieces of meat or small poultry in the oven,
the cooking time increases by about 10 min. per piece. The roasting time
for a chicken is, for example, about 60 min., for 2 chickens 65 to
75 minutes.
Be absolutely certain to observe the notes on the rack levels!
F
Rack levels (count from bottom!):
Intensive hot air convection 0
Hot air convection
#
Top heat/bottom heat
Drip pan: rack level 0, Gridiron: rack level 1
Drip pan: rack level 1, Gridiron: rack level 2
Drip pan: rack level 1, Gridiron: rack level 2
$
Roasting on the gridiron
■ You can cook large roasts directly in the drip pan or on the gridiron with
the drip pan inserted underneath (e.g. turkey, goose, 3-4 chickens or
knuckles).
■ Turn the roast after 2/3 of the cooking time unless you are using the hot
air convection mode
#
.
Roasting in a pan (oven)
Select Intensive hot air convection 0 at 180-200 °C.
F
■ You should roast lean types of meat in the roasting pan with the lid closed
(e.g. roast of veal or marinated beef, braised beef or deep-frozen meat).
The meat remains juicier that way.
■ You can use any type of pan (stainless steel, enamelled, cast iron or glass)
which does not have plastic or wooden handles.
■ If you use an earthenware cooking pot, study the manufacturer's
instructions.
We recommend the following procedure:
– Rinse out the pan with water or grease it lightly.
– After preparing the meat (adding spices), place it into the pan. Put the lid
on the pan and place the pan onto the rack in the cold oven.
– Select Intensive hot air convection 0 and set the temperature to between
180 and 200 °C.
Prepare the sauces in the usual way.
Recommended temperatures for roasting
Type of meat Hot air
convection
#
Joint of beef 160 170-190 18
Roast beef 180 200-220 180-200 8-10
Fillet 180 200-220 180-200 8
Veal 160 170-190 160-180 12
Roast pork 160 170-190 160-180 12-15
Smoked loin of pork 160 170-190 160-180 8
Shoulder of pork 160 170-190 160-180 12-15
Roast pork with
crackling
Game 160 170-190 15
Wild boar 160 170-190 15
Fillet of game 180 200-220 180-200 8-10
Mutton 150-160 170-190 15
Duck 160 170-190 160-180 12
Goose 160 170-190 160-180 12
Chicken 160 180-200 160-180 8*
Turkey 160 200-220 160-180 12
Fish 160 200-220 8
*whole chicken 45 - 60 min.
Top heat/
bottom heat
$
Temperature in °C per cm of the
160 170-190 160-180 12-15
Intensive hot
air convection
0
Roasting time
thickness of the
joint in mins.
EEB 6250.0 23
Page 9

Defrosting
The electronic timer with
Set the operating mode to Cold air convection# (Hot air convection
F
without temperature setting). The oven slightly heats up via the lighting perfect for a mild defrosting.
When defrosting ready to serve meals please follow the instructions of
F
the producer.
– Remove the frozen food from the packaging, place it in a dish and insert
into the oven with the rack on the third rack level from the bottom.
– Set the mode selector to # and the temperature control to “0” (resp. the
instructions of the producer).
Preserving
Attention! Do not use jars with twist-off® lids if the latter have been
[
already in use. The jars could otherwise smash under certain
circumstances!
Conventional preservative jars with a rubber ring and glass lid or standard
F
jars with a twist-off
Metal cans are unsuitable.
Do not pour water into the drip pan! A lot of steam would emerge from
F
the vapour opening and you could burn yourself on it! Place a container
of water in the drip pan, not on the bottom of the oven!
Select Pizza mode .
F
■ Only use fresh food and prepare according to the usual recipes.
■ Prepare no more than 6 preserving jars with a capacity of 1 litres at one
time.
■ Only use jars of the same height and fill 3/4 full with the same contents.
■ The jars should not touch each other.
– Place the drip pan on the 1st rack level from the bottom.
– Set 1 cup with water in the drip pan.
– Select Pizza mode at 160 °C and observe preserving process.
After 10 to 20 minutes (jars with a capacity of 1 l) the liquid in the jars will
start to bubble, usually in the jar on the front right first.
Fruits
– Then switch off the oven and keep the jars in the closed oven for another
30 min. (approx. 15 min if preserving very sensitive fruit such as
strawberries.)
Vegetables and meat
– When the liquid starts to bubble, turn the oven down to 100 °C and
continue to heat for a further 60 to 90 minutes.
– Then switch off the oven and keep the jars in the closed oven for another
30 min.
®
lid (only with new lid) are suitable.
switch-off function
Setting the clock
The clock must be set before first using the oven or after a loss of power
F
(mains). The oven will not function until the clock is set.
If the clock needs to be set, you will see “0.00” flashing in the display.
Would you like to change the preset time?
F
Proceed exactly as follows.
– Press the “+” and “-” keys
simultaneously for a short moment.
– Immediately set the desired time with
the “+” and “-” keys. The clock starts
immediately.
Setting the alarm time
If the oven is switched on the timer has a switch-off function: If the timer
F
runs down the oven switches off. If the oven is not operating the timer
can be used as “reminder”.
– Press the “+” key until the desired time
appears in the display. With the “-” key
you can also correct the setting.
The symbol flashes and the set time
begins to run down.
After the time has run down a signal rings
and the oven switches automatically off.
The display shows the time and the
symbol flashes.
– Press one of the keys to turn off the
signal. The oven is switched on again.
If the signal is not turned off it stops
F
after approx. 2 min. by itself. The
symbol flashes and the oven
stays off until you convert the oven
into the normal mode by pressing
one of the two keys.
24 EEB 6250.0
Page 10

Cleaning and care
You should carefully read this chapter before you use your appliance the first
time. If cleaned correctly and looked after regularly the appliance will remain
beautiful and clean for many years. Here you will find tips concerning the
careful cleaning and of the individual surfaces and how to look after them.
A cleaning scraper for glass ceramic surfaces is suitable for removing
F
heavy dirt.
To thoroughly clean your appliance we recommend the use of VSR O-
F
FIX-C. Oven spray may be used.
Stainless steel
For all surfaces
Steam and/or pressure cleaning machines must not be used to clean the
[
appliance! This can damage the unit resulting in risk of personal injury.
Risk of burning! Make sure the appliance has cooled down before cleaning.
[
Please note the instructions of the cleaning agents.
[
Clean the appliance each time you use it. Not removed dirt will burn into the
surface the next time you switch it on and these incrustations can often not
be removed anymore.
Use a damp cloth or a soft sponge with warm water containing a small amount
of detergent to clean light amounts of dirt from the surface. Always wipe off
the surface completely with cold water to remove cleaning agents residues
which could cause discolouring and stains. Wipe dry afterwards.
You can find information in the following paragraphs concerning the
F
individual surfaces and parts and how to remove heavy dirt.
VSR O-FIX-C is perfect for the cleaning of glass ceramic, enamel and the
F
coated inside of the door. You can obtain this cleaning agent from
KÜPPERSBUSCH customer service.
Do not use any
- aggressive or bleaching cleaning agents containing for example active
oxygen, chlorine or corrosive components.
- abrasive or aggressive cleaning or scouring agents such as steel wool,
soap-impregnated steel wool, metal or plastic sponges or similar agents
with an abrasive surface.
Remove caking
Heavy dirt sh ould f irst be soaked – bes t with a wet cloth. Afterwards i t is ea sier
to remove the dirt.
Stainless steel door front, control panel, telescopic glide-out shelves
(acc. No. 601), backmobil (acc. No. 600)
Stainless steel is very sensitive to scratches!
[
Do not use a cleaning scraper!
Remove any deposits of calcium or any spots of grease, and starch as
[
soon as possible, or stains will appear!
For the cleaning a cleaning agent for stainless steel can be used.
We recommend to clean once a week stainless steel surfaces with an usual
cleaning agent for stainless steel. This will create a protective film protecting
the stainless steel surface from discolouring.
Glass
Inside of the door – coated glass
If possible, oven spray should not be used as it can cause the destruction
[
of the coated glass surface when used frequently.
A cleaning scraper for glass ceramic surfaces is suitable for removing heavy dirt.
To thoroughly clean your appliance we recommend the use of VSR O-
F
FIX-C or glass detergent.
Door front, control panel
Clean the oven front with warm water containing a small amount of deter-
F
gent, with a damp cloth o a soft sponge. Do not use glass cleaning agents.
Door sealing
The door sealing should be removed when cleaning the oven to avoid
F
that dirt can collect under the sealing. See page 27.
If necessary the sealing can be cleaned with detergent or washing-up liquid.
Buttons
Please note the information for the cleaning scraper
Caution! Risk of cutting! The blade of the cleaning scraper is very sharp!
[
Always keep the cleaning scraper flat on the
surface and push the caking away.
Do not scratch the surface with the edge of
[
the scraper and take care not to damage the
sealings with the edge.
The use of oven sprays - information
Pease follow the instructions of the manufacturer. Oven sprays damage
[
aluminium, lacquered surfaces and plastic!
Do not spray into the opening of the ventilator at the backplate! The
[
ökotherm
For environmental reasons you should not use oven spray at all. If you nevertheless want to use it, only spray it in the oven interior and on enamel baking trays.
®
catalyst will be destroyed if oven spray is used.
Enamel
Oven interior, front, baking trays, drip pan, enamel hobs
Some plastic sponges with abrasive side can be used. Some products do
however contain grains in the abrasive side of the sponge which can cause
scratches. Carefully try out the sponge on a small surface!
Clean the buttons with warm water containing a small amount of detergent,
with a damp cloth o a soft sponge.
Removing and installing the oven door
Removing the oven door
– Open the oven door as wide as it will
go.
– Fold forward the clamps on the door
hinges.
Take hold of the oven door on the both
sides and close it almost completely.
EEB 6250.0 25
Page 11

– Gently lift the door and pull the
hinges forward away from the door
opening.
Reassembling the oven door
– Take hold of the oven door on both
sides and push the hinges into the
relevant holes on the oven. The hinge
will click into place.
– Slowly open the oven door full.
– Fold back the clamps on the door
hinges.
– Close the oven door.
Removing and installing the side racks
Removing the side racks.
– Loosen the screws.
– Remove the slot-in racks.
Installing side racks
– Insert side racks and tighten down in
front.
Folding heating element down/up
Folding heating element (top
heat/grill) down
– Open lock and fold heating element
down.
What to do if trouble occurs...
Repairs may only be carried out by a qualified technician!
[
You can deal with some problems that occur yourself. First check whether
there has been any operating error. Repairs during the guarantee period are
not free of charge, when they are caused by operating errors or nonobservance of the following instructions:
Fault Cause Remedy
Not possible to switch
off the oven.
Oven does not heat
up.
Oven light no longer
works.
Glass of oven door
broken.
Door sealing damaged. Change the door sealing.
Strong smells from
oven in spite of
®
ökotherm
Strong vinegar smell
when preparing.
Fruit juice or protein
stains on enamelled
parts.
catalyst.
Replacing the oven lamp
Caution: Danger of electric shock! Before you open the cover of the
[
oven lamp the appliance has to be disconnected from the electricity
supply: Switch off the fuse or pull out the mains plug!
The lamps become very hot after being in use for some time. Therefore,
[
the lamps should be changed when they have cooled down!
Type: 25 W, 230/240 V, socket: E14
Important: temperature resistant up to 300 °C!
You can obtain these lamps from KÜPPERSBUSCH customer service or from
your dealer.
Changing the light bulb:
– Unscrew the shelf rack.
Electronic component defective. Disconnect fuse, call
Fuse defective. Check and replace fuse, if
Temperature control or mode selector has not been switched on.
Electronic timer flashing – the
clock has not yet been set.
Lighting defective. Change the light bulb.
ökotherm® catalyst must be
regenerated.
Baking with sour dough or with
yeast, food containing alcohol
and using a fan-assisted mode.
Moist cake or meat juices. Harmless changes in the
customer service.
necessary.
Set temperature control or
mode selector as required.
Set the clock. See page
19.
When changing the
[
bulb, the relevant
house fuse must be
switched off!
Switch off the appliance,
call customer service.
See left column: “Regenerating the ökotherm
catalyst”.
Use a mode without fanassistance, e.g., top heat/
bottom heat.
enamel, cannot be
remedied.
®
Folding heating element up
– Fold heating element up and close
again with the lock.
– Carefully lever out the glass
cover with a screwdriver.
Regenerating the ökotherm® catalyst
– Set the mode selector to Hot air convection $ .
– Set the temperature control to ”*” and
– Heat the empty oven for 60 minutes.
26 EEB 6250.0
– Remove the damaged light
bulb and put the new one in.
– Reinstall the glass cover.
Page 12

Replacing the door sealing
Electrics
Do not use the oven with damaged or missing door sealing!
[
If the sealing is damaged or cannot be cleaned anymore it has to be replaced.
You can obtain a new sealing from KÜPPERSBUSCH customer service.
Removing the sealing
– To remove the sealing gently pull
each corner out.
Fitting the new sealing
– Clasp one corner after the other into
the oven front.
Take care not to deform the hooks!
Rating label
Always indicate the data provided on the rating label when calling in customer
service or ordering spare parts.
The rating label for the oven is located on the
right-hand side strip and is visible when the
oven door is open.
– Make a note of this information in case you
have to consult our customer service.
Production-no. oven
WARNING! This appliance must be earthed!
[
Electrical requirements (for UK and Republic of Ireland only)
Check that the voltage stamped on the rating plate corresponds with your
house electricity supply, which must be AC (alternating current).
Electrical connection of the apppliance must be performed by a trained
electrician. The legally recognized regulations and the connection requirements
of the electricity board seving your area must be fully complied with.
WARNING! Should the oven be supplied with a continental two-pin plug,
[
then this plug must be cut off from the connection cable. Dispose of the
plug safely; do not insert it in a 13 A socket elsewhere in the house as
this could cause a shock hazard.
Connection for UK and Republic of Ireland only: Permanent connection
to an oven power point (fuse: 20 A!).
Other countries:
Connection is via the mains plug into a wall socket.
Total rating at 230 V: 3.5 kW,
at 235 V: 3.6 kW
Electrical connection 230 - 240 V, 50 Hz
Fuse current 16 A
Installation dimensions
Model designation oven:
Installation instructions for fitter
■ Only KÜPPERSBUSCH built-in hobs were designed and tested for use above
a Küpperbusch fitted oven. No other hobs may be used.
■ Statutory regulations and the connection specifications issued by the local
power supply company must be strictly observed.
■ Switch off the appliance by means of these safety devices before connecting
up the oven, carrying out repair work or replacing the oven light bulb.
Disconnect the appliance from the mains, disconnect fuse.
■ It must not be possible to touch components which are insulated under
operating conditions.
■ The earth wire must be so long that if the mains lead cleat fails, the live
wires of the connecting cable are subjected to tension before the earth wire.
■ The unit is ready to plug in and may be connected only to a properly
installed protected socket. Installing and wiring a socket or replacing the
connection cable should only be performed by an electrician and in
observance of the relevant regulations.
■ f the socket is too far away to reach from the installation location, safety
regulations require that an all-polo isolator with a contact opening of at least
3 mm be used on the installation side.
■ The socket for plugging in the unit must be outside the installation space.
■ Built-in kitchen fixtures must be temperature resistant to 100 °C. This
applies especially to veneers, plastic coatings, adhesives and varnishes.
Adjacent cabinetry front must be temperature resistant to at least 70 °C.
■ The unit must be installed absolutely horizontal on a level, solid base. The
base must not be allowed to sag.
■ If the cupboard element is not attached to the way, screw on using an
ordinary bracket.
Installation in a fitted kitchen
Installing the appliance
(not correct for UK and
Republic of Ireland!)
– Plug into the wall socket.
(UK and Republic of Ireland:
Connect to an oven power
point!)
– Push the oven right into the
cupboard alcove. Do not jam
the cooker connection!
Fastening the appliance
– Open the oven door and fix the screws
supplied at an angle through the
cupboard.
EEB 6250.0 27
 Loading...