

Page 1
BEDIENUNGSANWEISUNG
mit Montageanweisungen
Instructions for use and installation instructions
Instructions d’utilisation et avis de montage
Gebruiksaanwijzing en montagehandleiding
EEB 60.1
3172046 ABB00
Page 2

Conditions of guarantee
Contents
The conditions of guarantee applicable for this product are subject to those
published by the representative in the relevant country. Details regarding same
may be obtained from the dealer from whom the appliance was purchased.
For claims under guarantee the sales receipt must be produced.
For your information...
Please read this manual carefully before using your cooker. It contains
important safety advice; it explains how to use and look after your appliance
so that it will provide you with many years of reliable service.
If a fault develops with your appliance, please consult chapter “What to do if
trouble occurs”. You can often fix minor problems yourself, without having to
call in an engineer.
Please keep this manual in a safe place and pass it on to new owners for their
information and safety.
The following symbols are used in this operating manual:
The warning triangle warns of possible health hazards. It also warns of a
[
risk of damage to the appliance.
Stands for useful hints and tips.
F
Your appliance at a glance . . . . . . . . . . . . . . . . . . . . . . . 16
Safety instructions . . . . . . . . . . . . . . . . . . . . . . . . . . . . . 17
Connection and operation
Oven
Before using the appliance for the first time . . . . . . . . . . . 17
Disposing of the packaging and your old appliance
Initial cleaning
Using your oven. . . . . . . . . . . . . . . . . . . . . . . . . . . . . . . 18
General Information
Controls and displays for the oven
Symbols and operating modes
Turning the oven on and off
Heating-up indicator and pilot light
Oven trays
Rack levels
Pre-heating
Roasting
Guidelines for roasting
Baking
Notes on the table: “Guidelines for baking”
Guidelines for baking
Defrosting without cooking
Preserving
Grilling
Guidelines for grilling
Cleaning and maintenance. . . . . . . . . . . . . . . . . . . . . . . . 23
For all surfaces
Removing fat and grease deposits
Information about the cleaning scraper
Suggestions on the use of oven sprays
Enamel
Stainless steel
Glass
Door sealing
Knobs
Removing and refitting the oven door
Removing and refitting the side racks
What to do if trouble occurs... . . . . . . . . . . . . . . . . . . . . . 25
Replacing the oven lamp
Replacing the door seal
Model identification plate . . . . . . . . . . . . . . . . . . . . . . . . 25
Installation instructions for fitter. . . . . . . . . . . . . . . . . . . . 26
Electrics
Installation dimensions
Installing in a fitted kitchen unit
EEB 60.1 15
Page 3
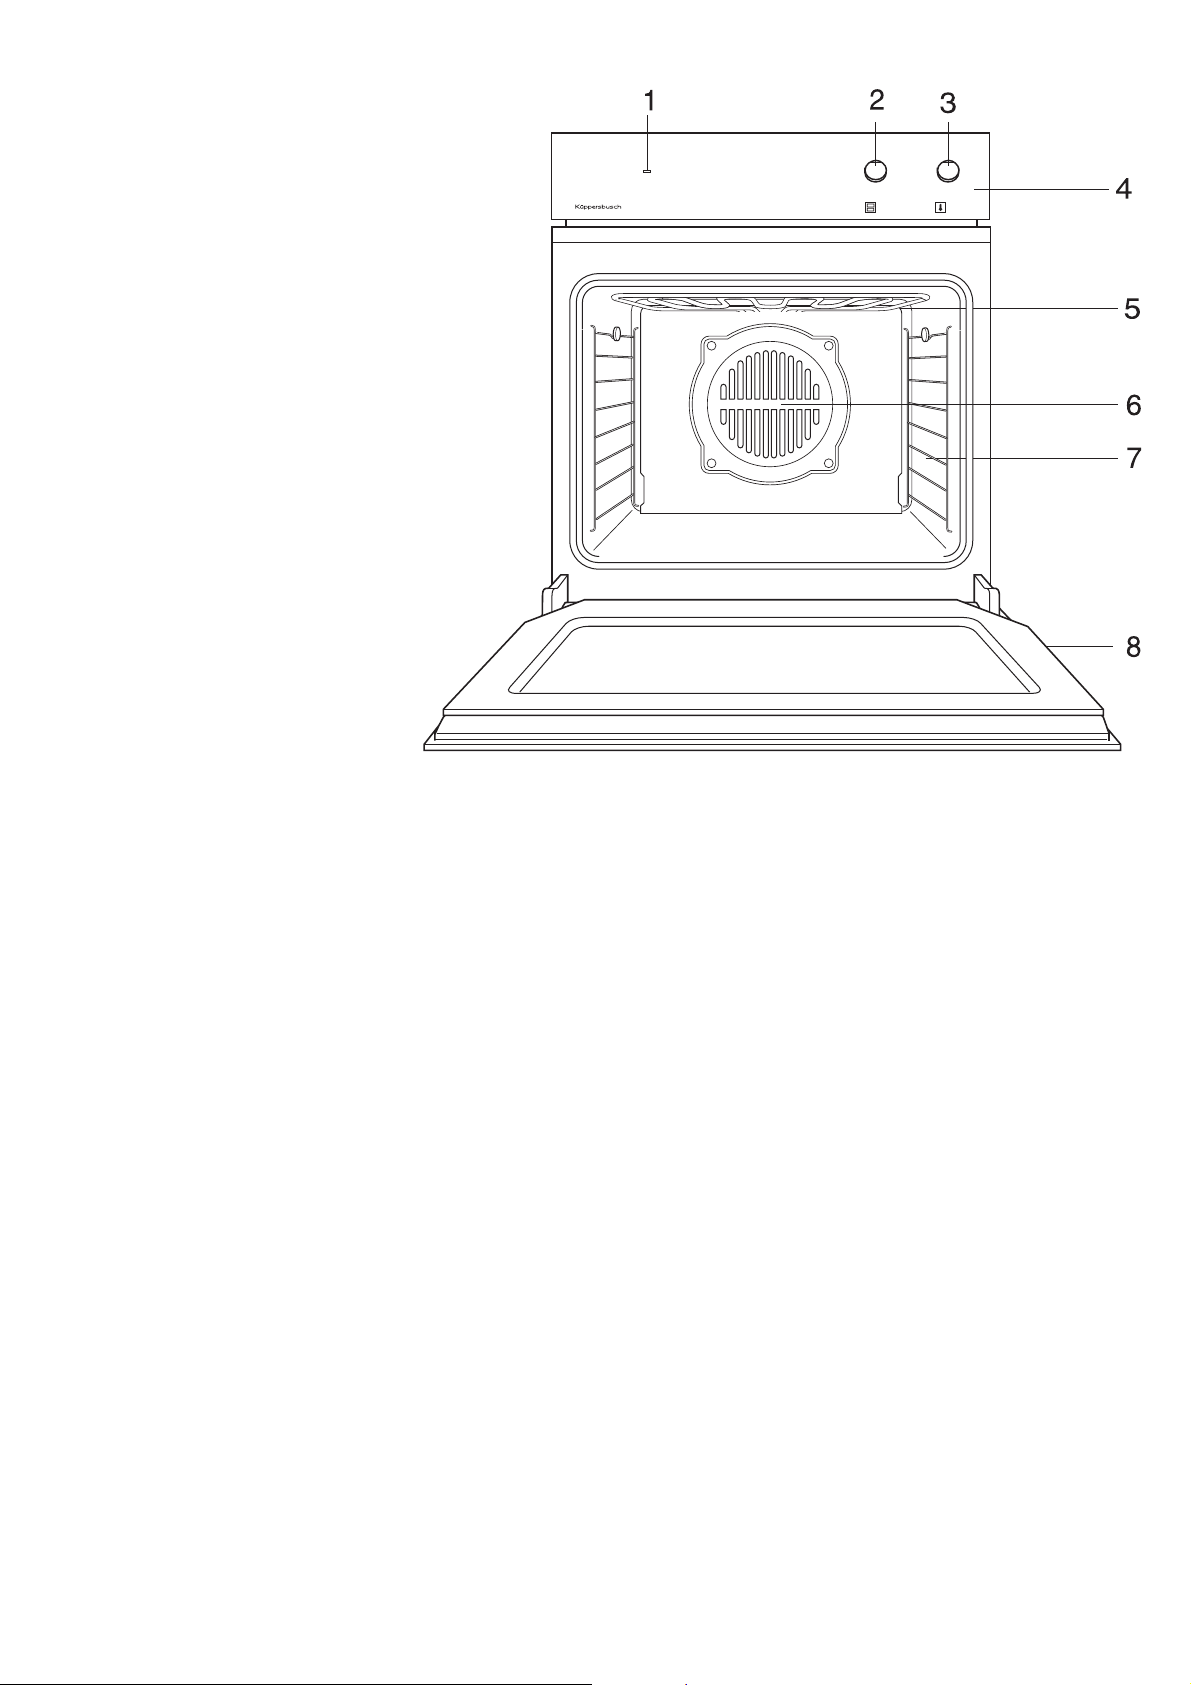
Your appliance at a glance
1 Heating-up indicator (red)
2 Mode selector
3 Oven temperature control
4 Control panel
5 Top heat and grill
6 Hot air fan
7 Rack levels
8 Oven door
Accessories supplied:
Roasting grid
Baking tray (enamel)
Optional accessories:
Grilling rack with lifter (acc. No. 125)
Gridiron (acc. No. 124)
Splash guard roasting tray (acc. No. 441)
Enamel baking tray (acc. No. 541)
Aluminium baking tray (acc. No. 542)
Drip pan (acc. No. 543)
16 EEB 60.1
Page 4

Safety instructions
Connection and operation
Before using the appliance for
the first time
■ Only KÜPPERSBUSCH built-in hobs were designed and tested for use above
a Küpperbusch fitted oven. No other hobs may be used.
■ Fitting a mains socket, repairing and servicing the appliance are jobs that
should be left to a qualified electrician according to valid safety regulations.
For your own safety, do not allow anyone other than a qualified service
technician to install, service or repair this appliance.
■ Do not switch the appliance on until it has been installed!
■ The surface of the oven becomes hot in use. Always make sure that children
are kept well away!
■ Make sure that trailing leads for kitchen appliances cannot become trapped
in the oven door.
■ Never use steam and/or pressure cleaners to clean the oven! Damage
caused to your appliance by cleaning it this way can make it lethally
dangerous.
■ The appliance is designed solely for the preparation of food in the home.
Oven
■ When carrying out repairs and replacing oven light bulbs, the cooker must
be disconnected from the mains (switch off the fuse!).
■ Never keep items in your oven that could be hazardous if the oven is
accidentally switched on.
■ Take special care when working in the hot oven and always use an oven
cloth, oven gloves or similar protection.
■ Be careful opening the door when the oven is hot; don’t lean over the open
door straight away. Hot air and steam are released when you open the door.
■ If the oven door is to get less hot (e.g. when you have little children in your
household), the KÜPPERSBUSCH Customer service can offer you a solution.
■ The oven door must form a good seal when closed. If the hinges or the
door glass are damaged, do not use the oven until it has been repaired and
checked by a service engineer.
■ A damaged door seal must be replaced. Do not use the oven if the door
seal is damaged.
■ Always close the oven door tightly when cooking food in the oven.
■ Keep food at a distance of at least 5 cm from the grill and top heat.
Disposing of the packaging and your old
appliance
Please dispose of the packaging that came with your appliance in an
environmentally friendly way.
If you bought your appliance in Germany, the dealer who sold it to you will
take the packaging back for recycling. Recycling in this way saves on
resources and cuts down on waste. Your old appliance still contains useful
raw materials. Take your old appliance to a recycling collection point. Please
make your old appliances unserviceable before disposing of it, to prevent it
from misuse.
Initial cleaning
– Remove packaging and non-essential components.
– We recommend that you clean your oven before using it for the first time.
Clean the drip pan, gridiron etc. using a damp cloth and a little detergent.
– Heat the oven.
Close the oven door.
Heat up the oven with Top/Bottom heat at 250 °C for 60 minutes.
Make sure that the kitchen is well ventilated during this time.
EEB 60.1 17
Page 5

Using your oven
General Information
Please note the safety instructions on page 17!
[
Attention. Risk of overheating! Do not cover the bottom of the oven
[
with aluminium foil and do not place pots or pans directly on the bottom
of the oven! This will trap heat and damage the enamel surface.
Controls and displays for the oven
A Heating-up indicator
b Mode selector
C Temperature control
Symbols and operating modes
Symbol Operating
mode
Off
0
Top/Bottom
$
heat
Cold air
#
convection
Hot air
#
convection
Grill grilling small portions. Position the pieces of meat in the
*
Large area
+
grill
Large area
grill and
recirculating
air
Bottom heat prebaking very moist cake
-
Grill and
bottom heat
Intended for
preheating,
baking and roasting on one level
without temperature setting, for gently defrosting and
cooling food.
with temperature setting, for roasting, baking and cooking
on several levels, making preserves, pizza.
centre of the gridiron.
grilling larger portions such as steaks, fish and sausages,
but also for browning toast dishes and gratins.
baking and roasting on one level and gratins
roasting in a pan
Heating-up indicator and pilot light
The heating-up indicator on the control panel will light up while the appliance
is heating up and will go out as soon as the set temperature has been
reached. It also comes on during operation when the oven is heated to
maintain the temperature you want.
The pilot light lights up when you have selected an operating mode – the oven
is operating.
Oven trays
Baking trays:
■ Lift them slightly before taking them out of the oven.
When you put them back in the oven, make sure that the sloping edge of
the tray is pointing towards the oven door.
■ Push the drip pan (acc No. 543) and baking tray with the two slots right at
the back into the oven.
Gridiron:
■ The crossbars on the racks
should point towards the back of
the oven (away from you).
Drip pan (accessory)
■ For baking moist cakes and as receiver for roasting and grilling we
recommend the use of the drip pan.
Grilling rack with lifter to insert in
the drip pan (accessory)
■ The grilling rack is inserted in the drip
pan. Its lifter allows you to remove
both the tray and the drip pan together
from the oven. The drip pan remains
in place to catch any drips.
Splash guard roasting tray
(accessory) for roasting and grilling
■ The roasting tray is inserted in the drip pan and prevents the fat from
splashing out of the drip pan.
Turning the oven on and off
Selecting the operating mode:
– Turn the mode selector (the switch
on the left) to the right.
Selecting the temperature:
– Turn the temperature selector (the
switch on the right) to the right.
Rack levels
There are 7 rack levels in the side racks. These are numbered from 1 to 7,
from bottom to top.
.
Side racks
Rack level 1 is the lowest
possible level.
Turning the oven off:
– Turn both switches to the “0” position.
18 EEB 60.1
Page 6

Pre-heating
Top and bottom heat require the oven to be preheated.
F
Do not insert food for roasting or baking into the oven until fast preheating
F
is over.
– Close the oven door.
– Then set the mode selector to the required operation mode.
– Set the desired temperature. The heating-up indicator comes on.
– Put the food into the oven as soon as the heating-up indicator goes off.
Roasting
■ Only cook meat or fish in the oven if the item weighs over 1 kg.
■ Cooking time depends on the type of meat, its quality and its thickness.
To measure the joint, lift it slightly, as a joint tends to compress under its
own weight.
■ A layer of fat around the joint can double the cooking time.
■ If you are cooking a number of small pieces of meat or poultry in the oven,
increase the cooking time by about 10 minutes for each additional piece.
For example, the time needed to roast a chicken is normally about 60
minutes. To cook 2 chickens, cook for 65 to 75 minutes.
Be sure to follow the guidelines for shelf positions.
F
Rack levels (count from bottom!):
Hot air convection
Top/Bottom heat
Large area grill with
recirculating air
#
$
thin slices of
meat
thick slices of
meat
Grill with
bottom heat
Roasting on the gridiron
Use the baking tray and the gridiron as drip protection.
F
When roasting take care that the baking tray does not overflow. If in
F
doubt roast very greasy or juicy meat in a casserole.
■ You can cook large roasts directly in a flat dish or on the gridiron with the
baking tray inserted underneath (e.g. turkey, goose, chickens or knuckles).
■ Turn the meat over after 2/3 of the cooking time.
Drip pan: rack level 2
Gridiron: rack level 3
Drip pan: rack level 2
Gridiron: rack level 3
Drip pan: rack level 2
Gridiron: rack level 3
Drip pan: rack level 2
Gridiron: rack level 3
Gridiron: rack level 1 or 2
Roasting in a pan (oven)
Select the grill/bottom heat mode at 160 °C to 200 °C
F
■ We recommend that you roast leaner types of meat in a covered roasting
pan (e.g. roast veal, braised beef or frozen meat) to retain the meat's juices.
■ You can use any type of heat-resistant pan (stainless steel, enamel, cast
iron or glass) as long as it does not have a plastic or wooden handle.
■ If you use a cooking brick, follow the manufacturer's instructions.
We recommend the following procedure:
– Rinse the pan with water or grease it lightly.
– Season the meat as required and place in the pan. Put the lid on the pan
and place the pan onto the gridironin the cold oven.
– Select Grill/Bottom heat and set the temperature to between 160 and
200 °C.
Make your gravy in the usual way.
Guidelines for roasting
The recommended temperatures for the preferred operating modes are
highlighted.
Type of meat Hot air
convection
Joint of beef 160 170-180 180-200 18
Roastbeef 180 190-210 180-200 8-10
Fillet steak 180 190-210 190-210 8-10
Veal 150-160 170-180 160-180 10-12
Roast pork 160 170-190 170-180 180-200 12-15
Roast pork with
crackling
Gammon 160 170-180 160-180 8-10
Game 160 170-180 180-200 12-15
Wild boar 160 170-190 180-200 12-15
Filet of game 180 190-210 180-200 8-10
Lamb 160 170-180 160-180 12-15
Duck 160 170-180 160-180 180-200 12-12
Goose 160 170-190 170-180 12-14
Turkey 160 170-180 160-170 10-12
Chicken 160 180-200 180-190 8-10*
Whole fish 180 180-190 180-200 8-10
* whole chicken 45-60 minutes
Top heat/
Bottom heat
Large area
grill with
recirculating
air
Grill with
Bottom
heat
Roasting
time
#$
Temperature in °C
160 170-180 160-180 180-200 12-15
per cm
thickness
of meat in
min.
EEB 60.1 19
Page 7

Baking
Guidelines for baking
Hot air convection #
Baking is possible on two levels simultaneously.
F
Rack levels:
1 tray: 4th rack level from the bottom
2 trays: 3rd and 6th rack levels from the bottom
■ If you are baking several cakes in baking tins at the same time, add about
5 to 10 minutes for each additional tray used.
■ You can take out one baking tray at a time if you wish, and leave the others
to continue baking.
■ Bake with Hot air convection
, at a temperature of 160 °C. If there are
#
no instructions for baking with Hot air convection in your recipe.
■ Important: Baking cakes with a moist fruit topping generates a lot of excess
moisture. You should bake only one cake at the same time.
Top/Bottom heat $
Baking on one level
F
■ Baking tins made of black metal and aluminium are particularly suitable.
Grill with bottom heat
Baking on one level
F
■ Suitable for flat biscuits, pastries or cakes which are to turn out quite brown
on top (e.g. crumble cake, 2nd rack level from the bottom, baking time
approx. 30 minutes).
Notes on the table: “Guidelines for baking”
The table on page 20 contains a selection of cakes etc., the necessary
temperatures, cooking times and rack levels.
■ A temperature range is given, since the optimum temperature depends on
the recipe you are using for the dough and the size and shape of the item
you are baking.
■ We recommend that you use the lower temperature to start with, increasing
it only if you want a deeper brown or if baking is taking too long.
■ If you are not sure how to bake your own recipes, select a similar one from
the table and use the temperatures and baking times as a guide.
■ Food that is dissimilar in height will brown differently at the beginning.
Please do not change the temperature setting, because this will even itself
out as baking continues.
The recommended temperatures for the preferred operating modes are
highlighted. Please refer to the notes on the table on p. 20!
Preheat the oven!
F
Cakes
Cake mixture
Gugelhupf 2 150-160 2 170-180 50-65
Tin cake 2 150-160 2 170-190 50-70
Madeira cake 2 150-160 2 160-180 60-70
Gateaux and flans 2 150-160 2 170-180 40-60
Flan bases 3 170-180 3 180-200 20-30
Fine fruit flans 3 150-160 2 170-180 45-60
Small biscuits 4 150-160 5 170-180 15-30
Large flat cakes:
with a dry topping 4 150-160 3 180-190 25-35
with a moist topping 4 160-170 3 170-180 35-50
Kneaded dough
Flan bases 3 170-180 3 180-200 25-35
Cheese cake 2 140-150 1 160-170 70-100
Small biscuits 4 140-150 5 180-190 15-35
Large flat cakes:
with a dry topping 4 150-160 3 180-190 25-35
with a moist topping 4 160-170 2 170-180 30-50
Yeast dough
Gugelhupf 2 150-160 2 175-180 40-65
Yeast cake 3 150-160 2 175-180 40-50
Rich sweet bread
(preheated)
Small biscuits 4 140-150 5 180-200 15-30
Large flat cakes:
with a dry topping 4 150-160 4 175-180 30-40
with a moist topping 4 160-170 4 170-180 30-50
Sponge cake
Gateaux and flans 4 150-160 3 175-180 20-35
Rolls 4 170-180 3 180-200 12-15
Egg white baking
Meringue 4 80-90 5 100-120 80-120
Cinnamon stars 4 100-120 5 120-140 20-40
Macaroons 4 100-120 5 120-140 20-50
Other doughs
Puff pastry 3 170-180 4 190-210 15-30
Puff pastry made with
leavened dough
Puff pastry made with curd
cheese
Choux pastry 3 170-180 4 190-210 30-40
Dough made with curd
cheese and oil
Honey cake 4 140-150 3 170-180 20-35
Pizza (preheat: 230 °C) 1 250 2 220 10-15
Bread
White bread and sour dough
(preheat: 230 in °C
prebake: 10 min. 230 °C)
Bread made with yeast/
white bread
(preheat: 180 °C)
Hot air convection # Top/Bottom heat $ Time
Level Temp. in °C Level Temp. in °C in min.
3 150-160 2 175-180 50-70
3 170-180 4 190-210 30-40
3 160-180 4 180-200 30-40
4 150-160 3 170-180 30-40
2 180 50-80
2 180 2 200 30-50
20 EEB 60.1
Page 8

Defrosting without cooking
Set the operating mode to Cold air convection # (Hot air convection
F
without temperature setting). The heat of the oven light will warm up the
oven - perfect for gentle defrosting.
When defrosting ready-to-serve meals, follow the instructions on the
F
pack.
– Remove the frozen food from the packaging, place it in a dish and insert
into the oven with the rack on the third rack level from the bottom.
– Set the mode selector to # and the temperature control to “0” (resp. the
instructions of the producer).
Preserving
Attention! Do not use jars with twist-off® lids that have been used
[
before. Under certain conditions, the jars could explode!
The standard type of preserving jar with a rubber seal and glass lid, or
F
standard jars with a twist-off
Metal cans are unsuitable.
Do not pour water into the baking tray! This will create large amounts of
F
steam that will escape with some force as soon you open the door. Place
a container of water on the baking tray, not on the bottom of the oven!
Put preserving jars and the cup with water on a baking tray or even
F
better: in the drip pan (accessory).
Set the operating mode to Hot air convection #.
F
■ Use only fresh ingredients and stick to standard recipes.
■ Preserve a maximum of 6 one-litre jars at a time.
■ Use only jars of the same height. Fill them 3/4 full, using the same
ingredients in each.
■ The jars should not touch each other.
– Place the baking tray or drip pan on the 1st rack level from the bottom.
– Set 1 cup with water on the baking tray.
– Select Hot Air Convection # at 160 °C, preheat and observe preserving
process. After 30 to 50 minutes (jars with a capacity of 1 l) the liquid in
the jars will start to bubble, usually in the jar on the front right first.
Fruit
– Now switch off the oven. Allow the jars to stand in the closed oven for
another 30 minutes. If you are preserving more delicate fruit like
strawberries, reduce the standing time to around 15 minutes.
Vegetables and meat
– When the liquid starts to bubble, turn the oven down to 100 °C and allow
to simmer for a further 30 to 60 minutes.
– Then switch off the oven and let the jars stand in the closed oven for
another 30 minutes.
®
lid, (but only with new lid) are suitable.
EEB 60.1 21
Page 9

Grilling
Always close the oven door when grilling!
[
We recommend to insert a drip pan or the baking tray under the gridiron
F
to collect dripping fat.
Set the operating mode Grill * for small portions or Large area grill +
F
for large portions.
Set the temperature control to *. Exception: With larger roasts it is
better to select a temperature between 200 and 250 °C so that the roast
does not burn.
Switch setting for Grill *: Switch setting for Large area grill +
– Preheat the oven for 5 to 10 min.
– Place the food on the gridiron.
– Push the drip pan or the baking tray into the rack level 0 or 1 and the
gridiron into the rack level as per the table.
– Select Grill * or Large area grill + .
– Set temperature control to 250 °C.
– Close the oven door.
Guidelines for grilling
Type of meat Rack level Grill * Large area grill + Large area grill with
recirculating air
1st side 2nd side 1st side 2nd side 1st side 2nd side
in minutes
Pork chop/cutlet
Pork fillet 6 10-12 8-10 180
Frying sausages 6 6-10 4-6 8-10 6-8
Kebab 4 5-6 14-16 10-12 10-15 8-10 180
Rissoles 5 10-12 6-8 12-15 8-10 10-15 5-7 230
Beef fillet 7 5-7 3-5 7-8 5-6
Roast beef fillet 7 6-8 8-9 6-7
Veal cutlet 6 7-10 2-3 9-11 7-9
veal steak 7 6-9 4-5 8-10 6-8
Slices of liver 7 3-5 4-6 5-6 3-5
Lamb chop 6 10-12 6-8 12-14 8-10
Chicken halfs 4 8-10 20-25 20-25 18-20 13-15 190
Chicken drumstick 5 16-18 18-20 15-18 12-15 8-10 190
Fish fillet 6 6-7 8-10 10-12 8-10
Trouts 4 4-7 14-16 8-10
Toast 6 2-3 3-4 3-4 3-4
Topped slices of toast 5 6-8 6-10 8-12
7 12-15 7-9 15-17 7-8
Temperature in °C
22 EEB 60.1
Page 10

Cleaning and maintenance
Enamel
You should carefully read this chapter before you use your appliance the first
time. If cleaned correctly and looked after regularly the appliance will remain
beautiful and clean for many years. The following tips will help you to clean
and care for your oven’s various surfaces gently but thoroughly.
For all surfaces
Do not, under any circumstances, use steam or pressure cleaning
[
machines to clean the appliance! Damage caused to your appliance by
cleaning it this way can make it lethally dangerous.
Risk of burning! Make sure the appliance has cooled down before
[
cleaning.
Please follow the instructions provided with the cleaning agents you plan
[
to use.
Clean the oven each time you use it. Dirt left will burn into the surface next
time you use it. These burned on residues can sometimes be impossible to
remove completely.
To clean an oven that is not very dirty, use a damp cloth, a soft brush or a
soft sponge and a weak solution of detergent and warm water. Always rinse
the surfaces with cold water to remove all traces of detergent. Detergent
residues can cause discoloration and blotches. Wipe dry afterwards.
The following pointers will help you to carry out a more thorough cleaning
F
of the various parts of your oven.
VSR O-FIX-C is perfect for the cleaning of glass ceramic, enamel and the
F
coated inside of the door. This cleaning powder is available from
KÜPPERSBUSCH Customer service.
Do not use any
- aggressive or bleach-based cleaning agents that contain active oxygen,
chlorine or other caustic substances.
- abrasive cleaning or scouring agents, such as steel wool, soap-impregnated
steel wool, stiff brushes, metal or plastic sponges or any similar cleaners
with an abrasive surface.
Oven interior, front, baking trays, drip pan, enamel hobs
Some plastic sponges with abrasive side can be used. Some products do
however contain grains in the abrasive side of the sponge which can cause
scratches. Test carefully on a section which is not clearly visible!
The type of scraper normally used for glass-ceramic surfaces is suitable
F
for removing heavy dirt.
To thoroughly clean your appliance we recommend the use of VSR
F
O-FIX-C. Oven spray may be used - however not on an enamel hob.
Stainless steel
Door front, control panel, stainless steel hob
Stainless steel is very easy to scratch!
[
Do not use a scraper!
Remove any calcium, grease or starch deposits right away. They will stain
[
the surface! We recommend that you use a proprietary stainless steel
cleaner.
We recommend cleaning the stainless steel surfaces weekly with a proprietary
stainless steel cleaner. This will create a protective film that protects the
surfaces from discoloration.
Glass
Door interior – coated glass
Avoid using oven spray if you can. If used regularly, an oven spray will
[
attack the coated surface of the glass.
The type of scraper normally used for glass-ceramic surfaces is suitable for
removing heavy dirt.
We recommend VSR O-FIX C or glass cleaner for thorough cleaning.
F
Door front, control panel
Clean the oven front with a weak solution of detergent and warm water,
F
using a damp cloth or a soft sponge. Glass cleaner may be used.
Removing fat and grease deposits
First, soak any heavy deposits to loosen them. A wet cloth is ideal. This will
make them easier to remove later.
Information about the cleaning scraper
Caution! Risk of cutting! The blade of the cleaning scraper is very sharp!
[
Always hold the cleaning scraper flat to the surface
and push the grease away from you.
Do not scratch the surface with the edge of
[
the scraper and take care not to damage the
sealing with the edge.
Suggestions on the use of oven sprays
Please follow the manufacturer's instructions carefully.
[
Oven sprays attack aluminium, paint and plastic!
For environmental reasons you should not use oven spray at all. If you
nevertheless want to use it, only spray it in the oven interior and on enamel
baking trays.
Door sealing
Remove the door seal when you clean the oven, to prevent dirt from
F
collecting under the seal. See “Replacing the door seal” on page 25.
If the seal is dirty, use some washing-up liquid or wash it in the dishwasher.
Knobs
Clean the knobs with a weak solution of detergent and warm water, using a
damp cloth or a soft sponge.
EEB 60.1 23
Page 11

Removing and refitting the oven door
Removing and refitting the side racks
Removing the oven door
– Open the oven door as far as it will
go.
– Insert the locking pins enclosed into
the drilled holes of the door hinges.
– Grasp the oven door at both sides
and lift it up until it is nearly closed.
– Gently lift the door and pull the
hinges forward away from the door
opening.
Important! Risk of injury!
[
Do not pull the locking pins out of
the drilled holes. The hinge is
under tension. It must also be
under tension on installation. Once
the pins have been removed it is
no longer possible to tension and
secure the hinge.
Removing the side racks.
– Press down the rod of the top rack
level and tilt the rack inwards.
– Firstly unhook the side rack at the
front on the bottom and then at the
back.
– Remove the side racks.
Refitting the side racks
– Firstly hook the side rack in at the
back and then at the front on the bottom.
– Press down the rod of the top rack level and tilt the rack towards the wall
of the oven until the top rod locks into place.
Refitting the oven door
– Grasp the oven door at both sides
and slide the hinges into the
openings on the oven. The hinge will
click into place.
– Slowly open the oven door until it is
fully open.
– Remove the locking pins from the
drilled holes of the door hinges again.
– Close the oven door.
24 EEB 60.1
Page 12

What to do if trouble occurs...
Replacing the door seal
Repairs must be carried out by a qualified service engineer!
[
But there are some problems that you can fix yourself. First check whether
there has been any operating error. Repairs during the guarantee period are
chargeable, if they are caused by user error or non-observance of the following
instructions.
Fault Cause Remedy
Not possible to switch
off the oven.
Oven does not heat up. Blown fuse. Check and replace fuse.
Oven light no longer
works.
Oven door glass
cracked.
Door seal damaged. Fit a new seal.
Fruit juice or egg white
stains on enamel parts.
Faulty electronic component. Switch off at the mains; call
Customer service.
Mode selector and/or oven
temperature control has not
been switched on.
Blown lamp. Replace the oven lamp.
Moist cake or meat juices. Harmless changes in the
Set mode selector and
temperature control as
required.
Switch off the appliance; call
Customer service.
enamel, cannot be remedied.
Replacing the oven lamp
Caution: danger of electric shock! Disconnect the oven from the mains
[
before you open the oven lamp cover. Switch off or pull out the fuse!
Allow the appliance and the lamp to cool before changing the lamp. If
[
the oven has been used recently, the lamp will be hot!
Type: 25 W, 230/240 V, fitting: E14
Important: bulbs must be heat-resistant up to 300 °C!
These lamps are available from KÜPPERSBUSCH Customer service or from
your dealer.
Do not use the oven if the door seal is damaged or missing!
[
If the seal is damaged, or if it can no longer be cleaned, it must be replaced.
New seals are available from KÜPPERSBUSCH Customer service.
Unhooking the seal
– To remove the seal, start by carefully
unhooking it at each corner.
Fitting a new seal
– Insert the new seal one corner at a time into the oven front.
Take care not to bend the hooks out of shape!
Model identification plate
Should you need to contact Customer
service or order spare parts, always quote
the information printed on the model
identification plate.
The oven's identification plate is located
just in the bottom inside the oven and is
visible when the door is open.
– Make a note of this information before
you consult Customer service.
Oven production number
Changing the light bulb:
– Unhook the rack as described.
– Carefully lever out the glass
cover with a screwdriver.
– Remove the faulty light bulb
and screw in the new one.
– Replace the glass cover.
Oven model type
You will find the rating label for the hob on the front page of the cooking
surface assembly instructions.
EEB 60.1 25
Page 13

Installation instructions for fitter
Installing in a fitted kitchen unit
■ Only KÜPPERSBUSCH built-in hobs were designed and tested for use above
a Küpperbusch fitted oven. No other hobs may be used.
■ Statutory regulations and the connection specifications issued by the local
power supply company must be strictly observed.
■ When installing the appliance, carrying out repair work, or replacing the
oven light bulb, always disconnect the appliance from the mains. Unplug
the appliance or disconnect fuse.
■ Ensure that all live connections are safely insulated when installing the oven.
■ The appliance is supplied ready to plug in. It should be connected only to
a properly protected wall socket. Installing and wiring a socket or replacing
the connection cable should only be performed by an electrician and in
observance of the relevant regulations.
■ If the socket is inaccessible after the installation, safety regulations require
that an all-pole isolator with a contact opening of at least 3 mm be used
on the installation side.
■ The socket for plugging in the unit must be outside the installation space.
■ The kitchen unit for the oven must be capable of withstanding temperatures
of up to 100 °C. This applies particularly to veneers, plastic coatings,
adhesives, paint and varnishes. Adjacent cabinetry front must be temperature
resistant to at least 70 °C.
■ Make sure that the appliance is installed perfectly horizontally on a firm,
level base. The base must be perfectly rigid.
■ The kitchen unit must be fixed to the wall, using an angle bracket if
required.
Installing the appliance:
– Insert the plug into the wall socket.
– Slide the oven fully into the housing unit. Do not jam the cooker connection!
Fixing the appliance:
– Open the oven door. Fix the oven to
the housing by inserting the screws
(supplied) at an angle, and screwing
through into the housing unit.
Electrics
Connection standard mains plug into a wall socket.
Power consumption at 230 V: 2.7 kW,
at 235 V: 2.8 kW
Power supply 230 - 240 V, 50 Hz
Fuse rating 16 A
Installation dimensions
26 EEB 60.1
 Loading...