

Page 1
Register
your product
www.kaercher.com/welcome
WD 3 Battery
WD 3 Battery Set
WD 3 Battery Premium
WD 3 Battery Premium Set
59676660 (04/19)
001
ΔϳΒήόϠ
272
Deutsch 5
English 14
Français 23
Italiano 32
Nederlands 41
Español 50
Português 59
Dansk 68
Norsk 77
Svenska 86
Suomi 95
Ελληνικά 104
Türkçe 114
Русский 122
Magyar 133
Čeština 143
Slovenščina 152
Polski 161
Româneşte 170
Slovenčina 179
Hrvatski 188
Srpski 197
Български 206
Eesti 216
Latviešu 225
Lietuviškai 234
Українська 243
Қазақша 253
Page 2
2
5
3
6
7
8
9
10
11
4
WD 3 Battery
WD 3 Battery
Premium
Set
WD 3 Battery
Premium Set
WD 3 Battery
14
15
12
13
16
18
19
20
17
Akku Battery
Power 36/25
1
BC 36 V
B
A
T
T
E
R
Y
P
O
W
E
R
2
Page 3
1.
2.
1.
1.
2.
1.
1.
2.
D
E
F
H
I
J
4x
1.
2.
2.
1.
2.
3.
3.
G
1.
2.
BATTERY
POWER
5,5 h
100%
3
Page 4
1.
2.
1.
2.
3.3.
4.
5.
6.
B
AT
T
ERY
POWE
R
B
AT
T
ERY
PO
WE
R
4
Page 5
– 5
Sehr geehrter Kunde,
Lesen Sie vor der ersten Benutzung
Ihres Gerätes diese Originalbetriebsanleitung, handeln Sie danach und bewahren Sie diese für späteren Ge-
brauch oder für Nachbesitzer auf.
Das Gerät ist gemäß der in dieser Betriebsanleitung
aufgeführten Beschreibungen und Sicherheitshinweisen zur Verwendung als Mehrzwecksauger bestimmt.
Dieses Gerät wurde für den privaten Gebrauch entwickelt und ist nicht für die Beanspruchungen des gewerblichen Einsatzes vorgesehen.
– Das Gerät vor Regen schützen. Nicht im Aussen-
bereich lagern.
– Asche und Ruß dürfen mit diesem Gerät nicht ge-
saugt werden.
Der Hersteller haftet nicht für eventuelle Schäden, die
durch nicht bestimmungsgemäßen Gebrauch oder falsche Bedienung verursacht werden.
Hinweise zu Inhaltsstoffen (REACH)
Aktuelle Informationen zu Inhaltsstoffen finden Sie unter:
www.kaercher.de/REACH
Hinweise zu Inhaltsstoffen (REACH)
Aktuelle Informationen zu Inhaltsstoffen finden Sie unter:
www.kaercher.de/REACH
In jedem Land gelten die von unserer zuständigen Vertriebsgesellschaft herausgegebenen Garantiebedingungen. Etwaige Störungen an Ihrem Gerät beseitigen
wir innerhalb der Garantiefrist kostenlos, sofern ein Material- oder Herstellungsfehler die Ursache sein sollte.
Im Garantiefall wenden Sie sich bitte mit Kaufbeleg an
Ihren Händler oder die nächste autorisierte Kundendienststelle.
Bei Fragen oder Störungen hilft Ihnen unsere KÄRCHER-Niederlassung gerne weiter.
Nur Original-Zubehör und Original-Ersatzteile verwenden, sie bieten die Gewähr für einen sicheren und störungsfreien Betrieb des Gerätes.
Informationen über Zubehör und Ersatzteile finden Sie
unter www.kaercher.com.
Bei fehlendem Zubehör oder bei Transportschäden benachrichtigen Sie bitte ihren Händler.
GEFAHR
Hinweis auf eine unmittelbar
drohende Gefahr, die zu schweren Körperverletzungen oder
zum Tod führt.
몇 WARNUNG
Hinweis auf eine möglicherweise gefährliche Situation, die zu
schweren Körperverletzungen
oder zum Tod führen kann.
Inhaltsverzeichnis
Allgemeine Hinweise DE 5
Sicherheitshinweise DE 5
Hinweise zu Akkupack und Ladegerät DE 8
Sicherheitseinrichtungen DE 9
Bedienelemente DE 9
Ladevorgang DE 9
Bedienung Akkupack DE 9
Lagerung DE 10
Transport und Lagerung DE 10
Pflege und Wartung DE 10
Hilfe bei Störungen DE 10
Gerätebeschreibung DE 11
Montage DE 11
Akkupack aufladen DE 11
Inbetriebnahme DE 11
Allgemeine Hinweise zur Bedienung DE 12
Bedienung DE 12
Transport DE 12
Pflege und Wartung DE 12
Hilfe bei Störungen DE 13
Technische Daten DE 13
Allgemeine Hinweise
Bestimmungsgemäße Verwendung
Umweltschutz
Die Verpackungsmaterialien sind recyclebar. Bitte
Verpackungen umweltgerecht entsorgen.
Altgeräte enthalten wertvolle recyclebare Materialien, die einer Verwertung zugeführt werden sollten. Batterien und Akkus enthalten Stoffe, die
nicht in die Umwelt gelangen dürfen. Bitte Altgeräte sowie Batterien oder Akkus umweltgerecht entsorgen.
Elektrische und elektronische Geräte enthalten
oft Bestandteile, die bei falschem Umgang oder
falscher Entsorgung eine potentielle Gefahr für
die menschliche Gesundheit und die Umwelt darstellen können. Für den ordnungsgemäßen Betrieb des Gerätes sind diese Bestandteile jedoch
notwendig. Mit diesem Symbol gekennzeichnete
Geräte dürfen nicht mit dem Hausmüll entsorgt
werden.
Garantie
Kundendienst
Zubehör und Ersatzteile
Lieferumfang
Sicherheitshinweise
Gefahrenstufen
5DE
Page 6

– 6
몇 VORSICHT
Hinweis auf eine möglicherweise
gefährliche Situation, die zu leichten Verletzungen führen kann.
ACHTUNG
Hinweis auf eine möglicherweise gefährliche Situation, die zu
Sachschäden führen kann.
GEFAHR
Der Benutzer hat das Gerät
bestimmungsgemäß zu ver-
wenden. Er hat die örtlichen
Gegebenheiten zu berück-
sichtigen und beim Arbeiten
mit dem Gerät auf Personen
im Umfeld zu achten.
Der Betrieb in explosionsge-
fährdeten Bereichen ist unter-
sagt.
Beim Einsatz des Gerätes in
Gefahrbereichen sind die ent-
sprechenden Sicherheitsvor-
schriften zu beachten.
Das Gerät nicht verwenden,
wenn es zuvor heruntergefal-
len, sichtbar beschädigt oder
undicht ist.
Verpackungsfolien von Kin-
dern fernhalten, es besteht
Erstickungsgefahr!
몇 WARNUNG
Dieses Gerät ist nicht dafür
bestimmt, durch Personen
mit eingeschränkten physi-
schen, sensorischen oder
geistigen Fähigkeiten oder
mangels Erfahrungen und/
oder mangels Wissen benutzt
zu werden, es sei denn, sie
werden durch eine für ihre Sicherheit zuständige Person
beaufsichtigt oder erhielten
von ihr Anweisungen, wie das
Gerät zu benutzen ist und haben die daraus resultierenden Gefahren verstanden.
Kinder dürfen das Gerät nur
dann verwenden, wenn sie
über 8 Jahre alt sind und
wenn sie durch eine für ihre
Sicherheit zuständige Person
beaufsichtigt werden oder
von ihr Anweisungen erhielten, wie das Gerät zu benutzen ist und die daraus resultierenden Gefahren verstanden haben.
Kinder dürfen mit dem Gerät
nicht spielen.
Kinder beaufsichtigen, um si-
cherzustellen, dass sie nicht
mit dem Gerät spielen.
Das Gerät nur entsprechend
der Beschreibung bzw. Abbildung betreiben oder lagern!
Das Gerät enthält elektrische
Bauteile - nicht unter fließendem Wasser reinigen.
몇 VORSICHT
Das Gerät niemals unbeauf-
sichtigt lassen, solange es in
Betrieb ist.
ACHTUNG
Das Gerät nicht bei Tempera-
turen unter 0 °C betreiben.
Nie ohne Filter saugen, das
Gerät kann sonst beschädigt
werden.
Sicherheitshinweise für
Nass-/Trockensauger
Sicherer Umgang
6 DE
Page 7

– 7
Das Gerät vor extremer Wit-
terung, Feuchtigkeit und Hit-
ze schützen.
GEFAHR
Explosionsgefahr!
Der Betrieb in explosionsge-
fährdeten Bereichen ist unter-
sagt.
Keine explosiven oder brenn-
baren Gase, Flüssigkeiten
und Stäube aufsaugen!
Keine reaktiven Metallstäube
(z. B. Aluminium, Magnesium
oder Zink) aufsaugen!
Keine unverdünnten Säuren
oder Laugen aufsaugen!
Keine brennenden oder glim-
menden Gegenstände auf-
saugen!
몇 WARNUNG
Verletzungsgefahr!
Mit Düse und Saugrohr nicht
in Kopfnähe saugen.
몇 VORSICHT
Um Unfälle oder Verletzun-
gen zu vermeiden, beim
Transport das Gewicht des
Gerätes beachten (siehe
technische Daten).
몇 VORSICHT
Vor allen Tätigkeiten mit oder
am Gerät Standsicherheit
herstellen, um Unfälle oder
Beschädigungen durch Um-
fallen des Geräts zu vermei-
den.
GEFAHR
Vor jeder Benutzung Stecker-
netzteil, Verbindungskabel,
Akkuadapter und Akkupack
auf Beschädigung kontrollieren. Beschädigte Geräte
nicht mehr verwenden und
ersetzen.
Ladegerät nicht öffnen. Bei
Beschädigung oder Defekt
muss das Ladegerät ersetzt
werden.
Ladegerät nicht in explosi-
onsgefährdeter Umgebung
betreiben.
Netzstecker und Steckdose
niemals mit feuchten Händen
anfassen.
Ladegerät nicht in ver-
schmutztem oder nassem
Zustand benutzen.
Keine Batterien (Primärzel-
len) aufladen, Explosionsgefahr.
몇 VORSICHT
Die Netzspannung muss mit
der auf dem Typenschild des
Ladegeräts angegebenen
Spannung übereinstimmen.
Ladegerät nur zum Laden zu-
gelassener Akkupacks verwenden.
Das Laden des Akkupacks ist
nur mit dem beiliegendem
Originalladegerät oder einem
von KÄRCHER zugelassenem Ladegerät erlaubt.
Sonstige Gefahren
Standsicherheit
Sicherheitshinweise
Ladegerät
7DE
Page 8
– 8
ACHTUNG
Ladegerät nicht am Verbin-
dungskabel tragen.
Verbindungskabel von Hitze,
scharfen Kanten, Öl und sich
bewegenden Geräteteilen
fernhalten.
Steckernetzteil nicht abdecken.
Vermeiden Sie Verlänge-
rungskabel mit Mehrfachsteckdosen und gleichzeitigem Betrieb von mehreren
Geräten.
Wickeln Sie das Verbin-
dungskabel nicht um das Steckernetzteil oder den Akkuadapter um Beschädigungen
zu vermeiden.
Lesen Sie unbedingt die dem
Akkupack beiliegenden Sicherheitshinweise und beachten Sie diese bei der Verwendung!
몇 VORSICHT
– Verletzungsgefahr, Beschädigungsgefahr durch
explodierenden Akku! Akkupacks nur mit dem dafür vorgesehenen Ladegerät laden.
– Bitte prüfen Sie vor der Verwendung die Überein-
stimmung von Akkupack und Ladegerät!
– Nur unbeschädigte Akkupacks laden.
– Umbauten und nicht vom Hersteller autorisierte
Veränderungen sind aus Sicherheitsgründen untersagt.
– Jede andere Verwendung ist unzulässig. Für Ge-
fährdungen, die durch unzulässige Verwendung
entsteht, haftet der Anwender.
Für die Inbetriebnahme ist ein Akkupack sowie La-
degerät mit 36 V Nennspannung erforderlich. Bei
den „Set-Varianten“ ist im Lieferumfang bereits ein
Li-ION Akkupack mit 36V, 2,5 Ah (Battery Power
36/25) sowie ein Standardladegerät 36 V (Battery
Power BC 36 V) enthalten.
Die Akkupacks Battery Power (+) 36/25, 36/50 und
36/75 dürfen nur mit dafür vorgesehenen Geräten
des Kärcher 36 V Battery Power Systems verwendet werden.
Akkupacks / Ladegeräte, die nicht im Lieferumfang
enthalten sind oder zusätzlich benötigt werden,
sind als Sonderzubehör erhältlich und können entsprechend nachgekauft werden.
Bitte beachten Sie vor der Verwendung das Akku-
packs in einem Gerät der KÄRCHER Battery Power Akku-Plattform die Betriebsanleitung des verwendeten Gerätes und die eventuell beiliegenden
Sicherheitshinweise.
Weitere Informationen über die Betriebssanleitung
für Akkupacks sowie Zubehör und Ersatzteile finden Sie unter www.kaercher.com.
Der Lithium-Ionen-Akku unterliegt den Anforderun-
gen des Gefahrgutrechts und kann durch den Benutzer ohne weitere Auflagen im öffentlichen Verkehrsraum transportiert werden.
Beim Versand durch Dritte (Transportunterneh-
men) sind besondere Anforderungen an Verpackung und Kennzeichnung zu beachten.
Versenden Sie den Akku nur, wenn das Gehäuse un-
beschädigt ist. Kleben Sie offenliegende Kontakte ab
und verpacken Sie den Akku fest und sicher. Er darf
sich in der Verpackung nicht bewegen können.
Bitte beachten Sie auch die nationalen Vorschriften.
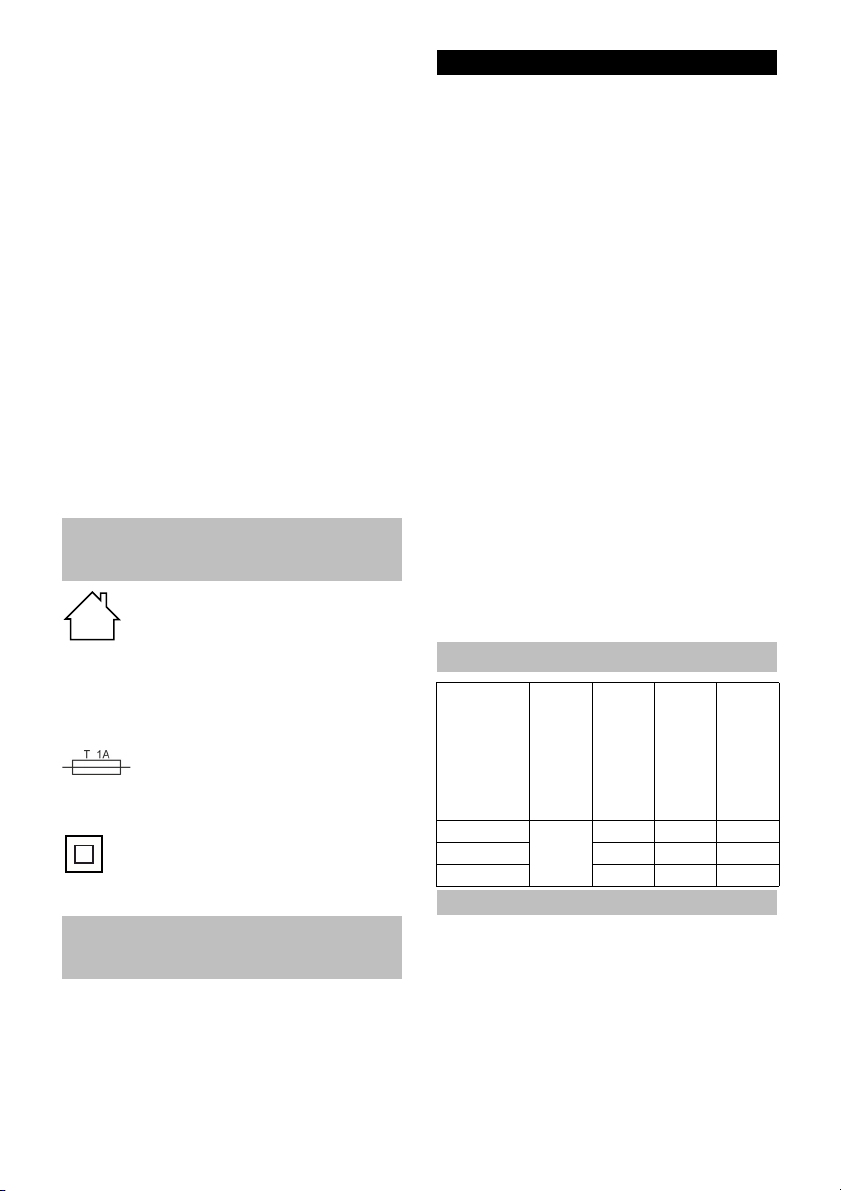
Symbole auf dem
Ladegerät
Ladegerät vor Nässe
schützen und trocken lagern. Gerät ist nur zur
Verwendung in Räumen
geeignet, Gerät nicht
dem Regen aussetzen.
Das Ladegerät besitzt
eine eingebaute Sicherung von 1 Ampere.
Das Ladegerät erfüllt die
Anforderungen der
Schutzklasse II.
Sicherheitshinweise
Akkupack
Hinweise zu Akkupack und Ladegerät
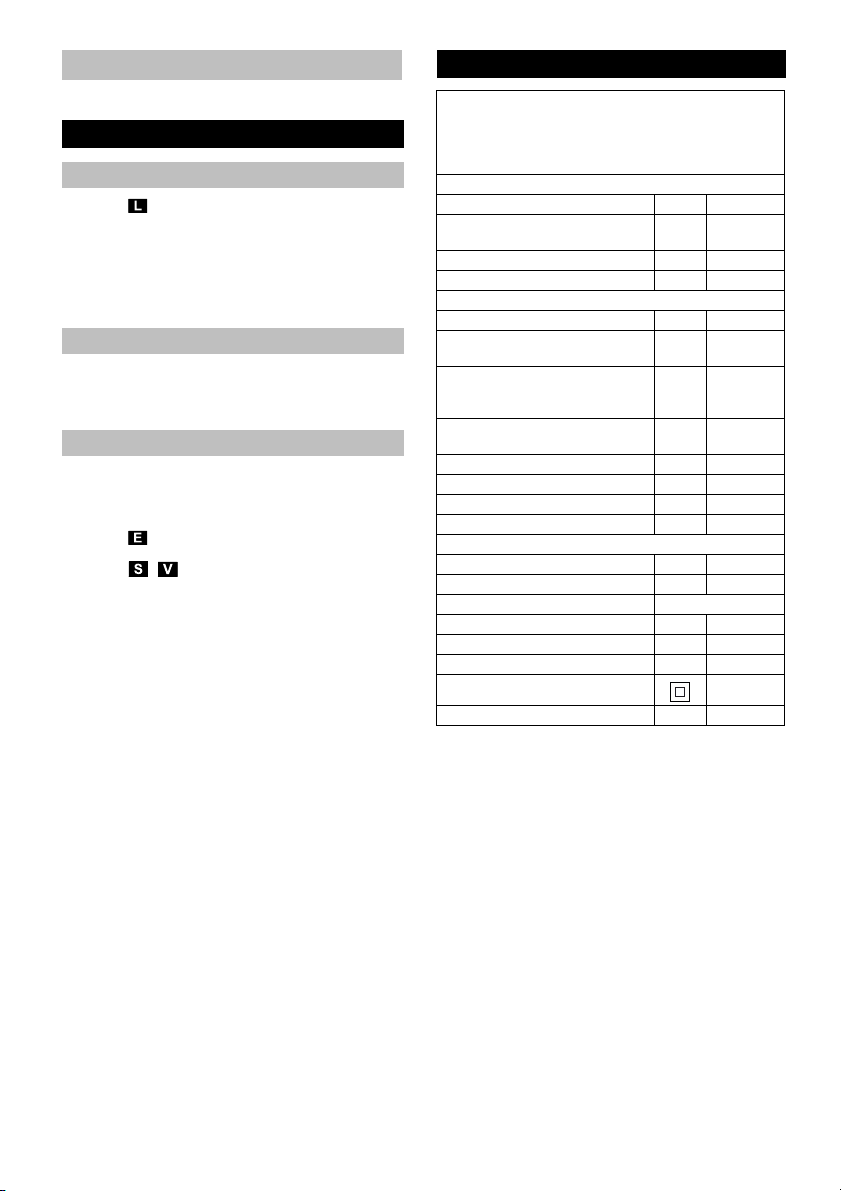
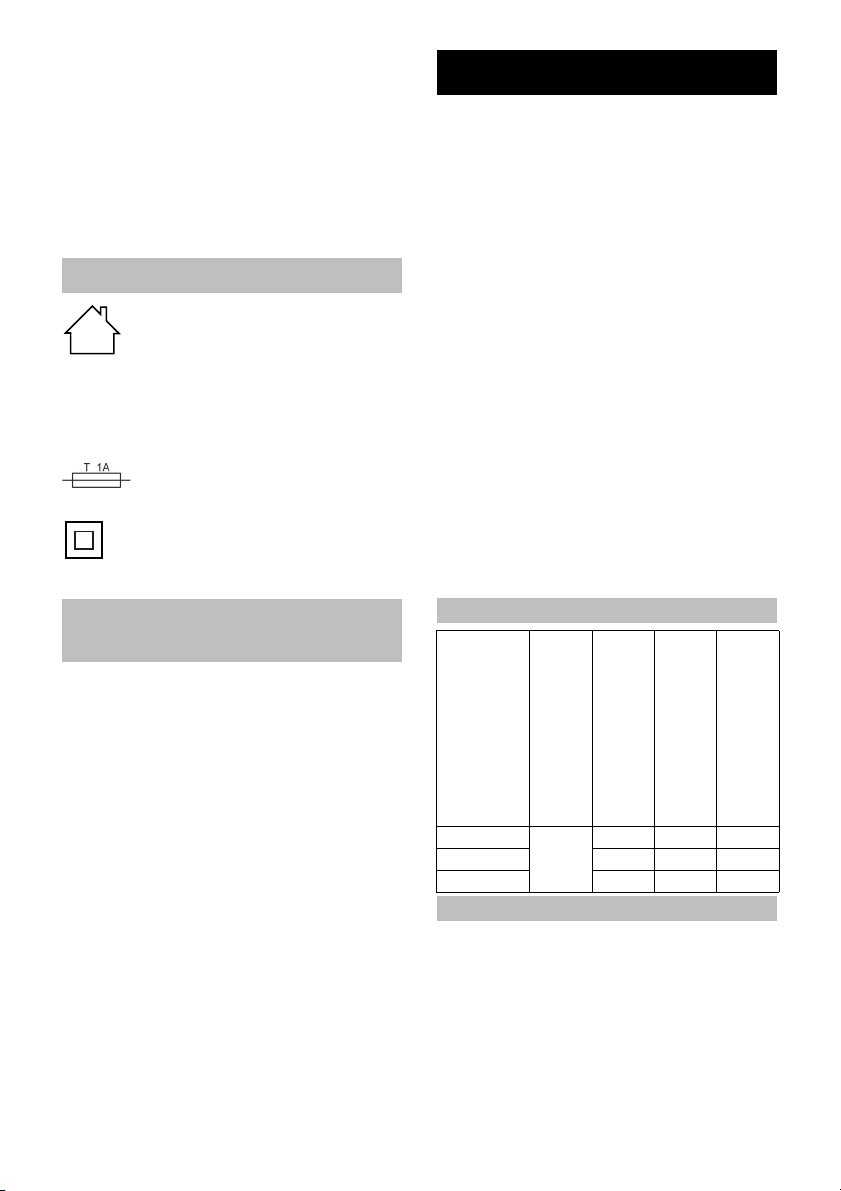
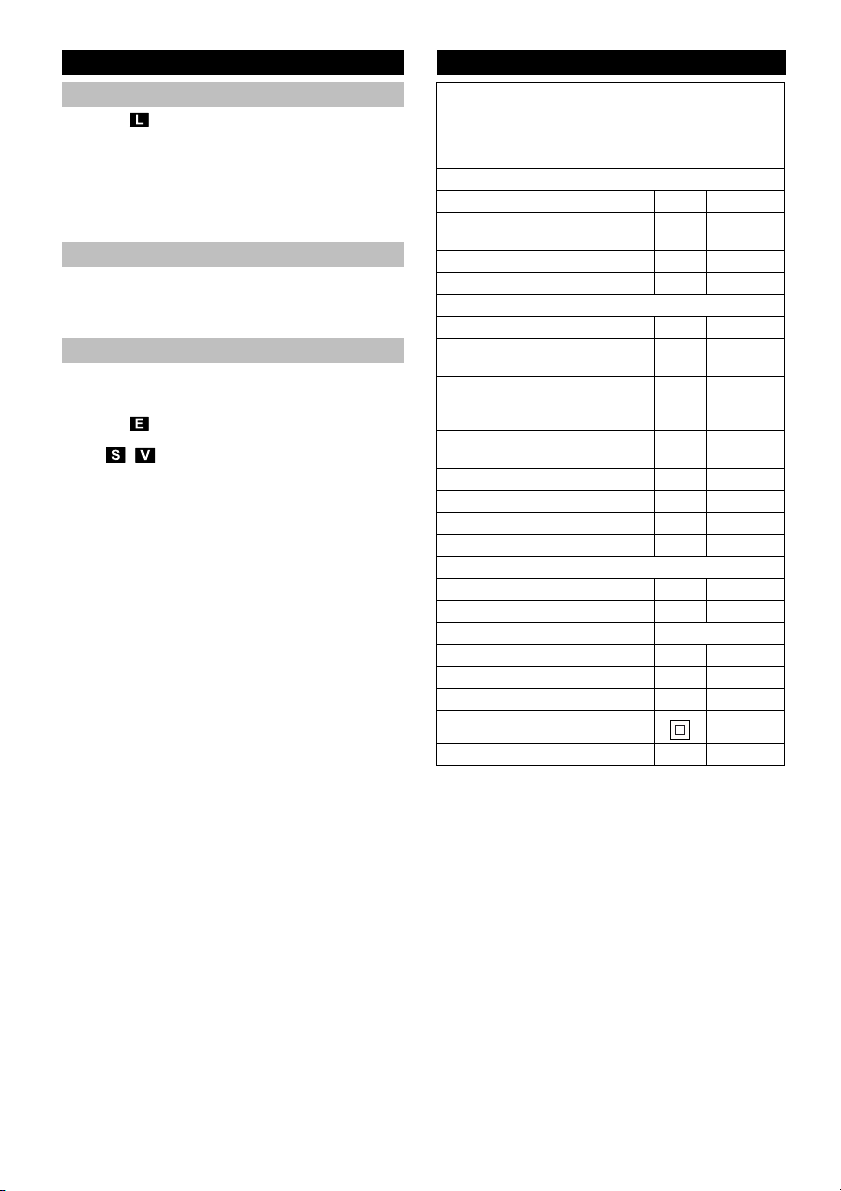
Akkupacks 36 V Battery Power
Bezeichnung
Akkutyp
Nennspannung
Nen
nkapazität
(nach IEC/EN 61690)
Nennkapazität
(nach Angabe des
Zellenherstellers)
Li-Ion
VAhAh
36/25 36 2,4 2,5
36/50 36 4,8 5,0
Transport
8 DE
Page 9

– 9
몇 VORSICHT
Sicherheitseinrichtungen dienen dem Schutz des
Benutzers und dürfen nicht verändert oder umgangen werden.
Die eingebaute Schutzschaltung schützt den Akkupack
vor
Überhitzung
Tiefentladung
Überladung
Kurzschluss
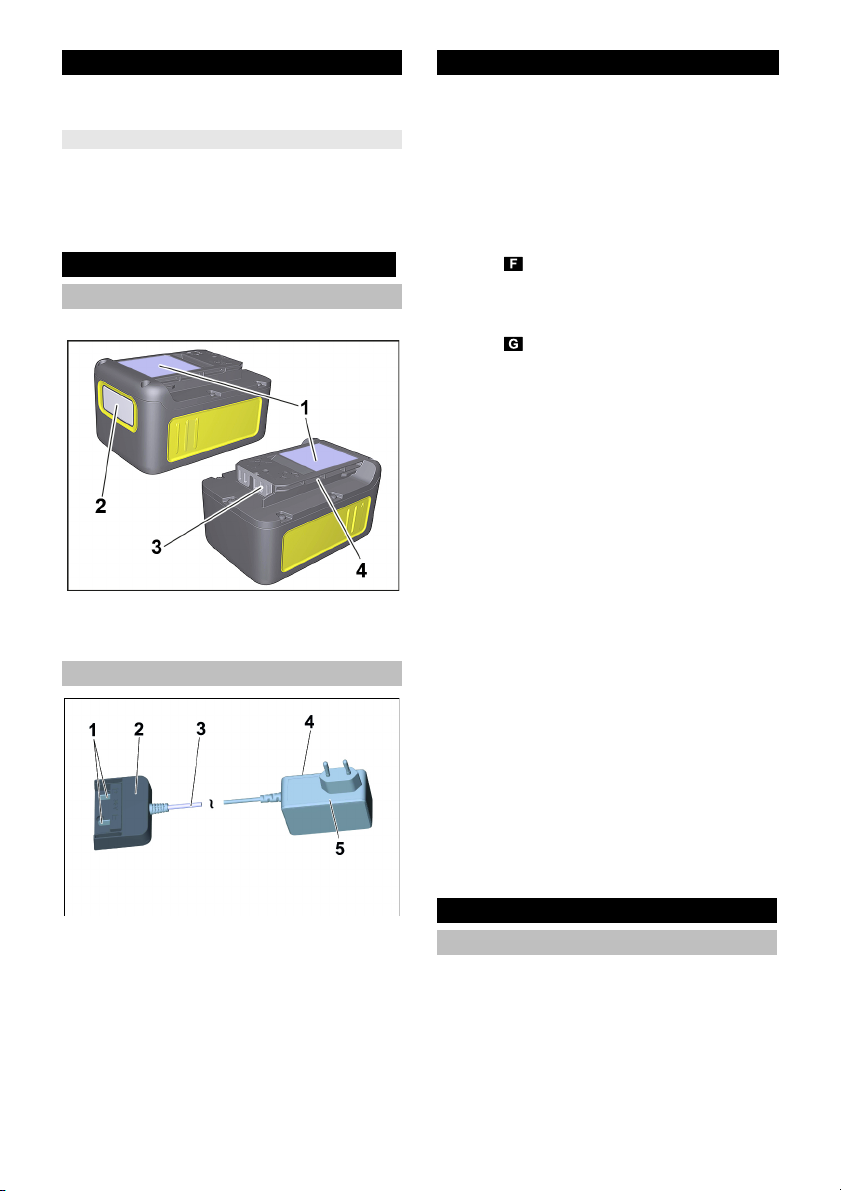
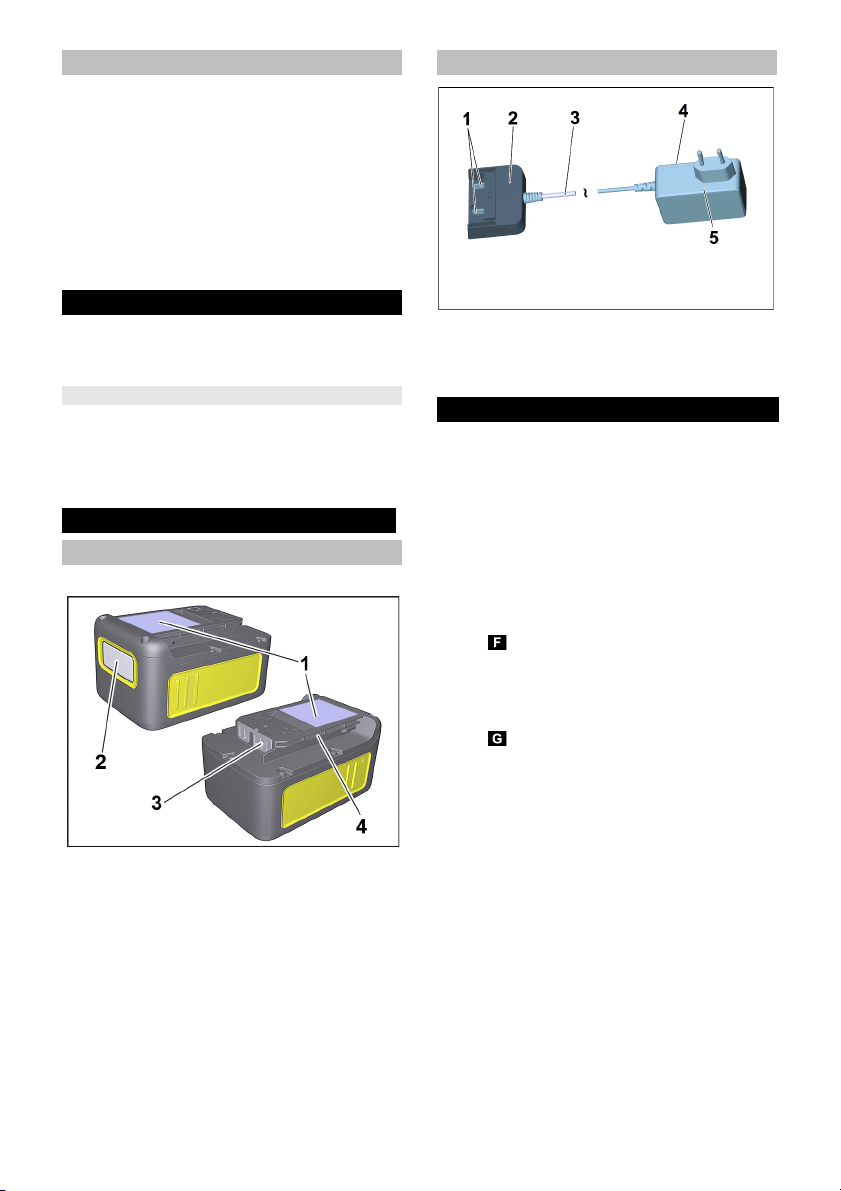
Abbildung Typenabhängig
1 Typenschild
2 Display
3 Kontakte
4 Aufnahme
1 Ladekontakte
2 Akkuadapter
3 Verbindungskabel
4 Typenschild
5 Steckernetzteil
몇 VORSICHT
Verletzungsgefahr, Beschädigungsgefahr! Betriebsanleitung und Sicherheitshinweise des Ladegeräts beachten.
Hinweis
Neue Akkupacks sind nur vorgeladen und müssen vor
der ersten Benutzung vollständig aufgeladen werden.
Das Display wird beim ersten Ladevorgang aktiviert.
Damit die Ladezustandsanzeige richtig funktioniert,
muss der Akkupack bei der ersten Verwendung bis zum
Abschalten des Geräts entladen werden.
Abbildung
Steckernetzteil in die Steckdose stecken.
Akkupack in den Akkuadapter des Ladegerätes
schieben.
Der Ladevorgang beginnt automatisch.
Abbildung
Im Display des Akkupacks wird die Restladedauer
angezeigt.
Die Ladezeit mit einem Standardladegerät (Battery
Power BC 36 V) für einen leeren Akkupack (Battery
Power 36/25) beträgt ca. 5,5 Stunden.
Ist der Akkupack vollständig aufgeladen, zeigt das
Display 100% an.
Nach dem Laden, Akkuadapter vom Akkupack ab-
ziehen.
Steckernetzteil aus der Steckdose ziehen.
Hinweis
Zeigt das Display nichts an, wenn sich der Akkupack im
Ladegerät befindet, ist die Akkukapazität erschöpft oder
sehr niedrig. Sobald der Akkupack ausreichend geladen wurde, zeigt das Display die Restladezeit an.
Erfolgt auch nach längerer Zeit keine Anzeige, ist
der Akkupack defekt und muss ersetzt werden.
Hinweis
Neue Akkupacks erreichen ihre volle Kapazität nach ca.
5 Lade- und Entladezyklen.
Längere Zeit nicht verwendete Akkupacks vor der Benutzung nachladen.
Bei Temperaturen unter 0 °C sinkt die Leistungsfähigkeit eines Akkupacks.
Lange Lagerung bei Temperaturen über 20 °C kann die
Kapazität eines Akkupacks verringern.
Hinweis
Der aufgeladene Akkupack kann bis zur Verwend
ung
a
uf dem Ladegerät bleiben. Es besteht keine Gefahr
der Überladung.
Um unnötigen Energieverbauch zu vermeiden, sollte
das Ladegerät jedoch ausgesteckt werden, sobald der
Akkupack vollständig geladen ist.
Der Akkupack ist mit einem Display ausgestattet,
das dauerhaft Auskunft über den Ladezustand
,
de
n Fortschritt der Aufladung und die Restlaufzeit
gibt. Zudem werden eventuelle Fehlermeldungen
angezeigt.
Die Laufzeitanpassung wird durch Leistungsum-
schaltung erzeugt.
Je nach verwendetem Gerät dreht sich die Anzeige
beim Einsetzen des Akkupacks.
Sicherheitseinrichtungen
Schutzschaltung
Bedienelemente
Akkupack
Standard-Ladegerät
Ladevorgang
Bedienung Akkupack
Display
9DE
Page 10

– 10
몇 VORSICHT
Verletzungs- und Beschädigungsgefahr! Zum Betrieb,
Betriebsanleitung und Sicherheitshinweise des verwendeten Gerätes beachten.
Akkupack in die Aufnahme des Gerätes schieben.
몇 VORSICHT
Verletzungs- und Beschädigungsgefahr! Darauf achten, dass der Akkupack richtig einrastet.
Hinweis
Während der Verwendung zeigt das Display die verbleibende Restlaufzeit an.
Nach der Arbeit Akkupack aus dem Gerät nehmen.
Akkupack nach der Arbeit aufladen.
Hinweis
Auch teilentladene Akkupacks nach der Benutzung aufladen.
몇 VORSICHT
Verletzungs- und Beschädigungsgefahr! Gewicht des
Gerätes beim Transport beachten.
ACHTUNG
Beschädigungsgefahr! Akkupacks nur in Räumen mit
niedriger Luftfeuchtigkeit und unter 20 °C lagern.
Dieses Gerät darf nur in Innenräumen gelagert werden.
Der Akkupack zeigt seinen aktuellen Ladezustand im
Display an, auch ohne an ein Ladegerät angeschlossen
zu sein.
Erlischt das Display des Akkupacks während der Lagerung, ist die Akkukapazität erschöpft und das Display
wurde abgeschaltet. Bitte laden Sie den Akkupack so
schnell wie möglich wieder auf.
몇 VORSICHT
Verletzungs- und Beschädigungsgefahr! Gewicht des
Gerätes beim Transport beachten.
Ladekontakte regelmäßig auf Verschmutzung prü-
fen und gegebenenfalls reinigen.
Über einen längeren Zeitraum gelagerte Akku-
packs zwischenladen.
Das Gerät ist wartungsfrei.
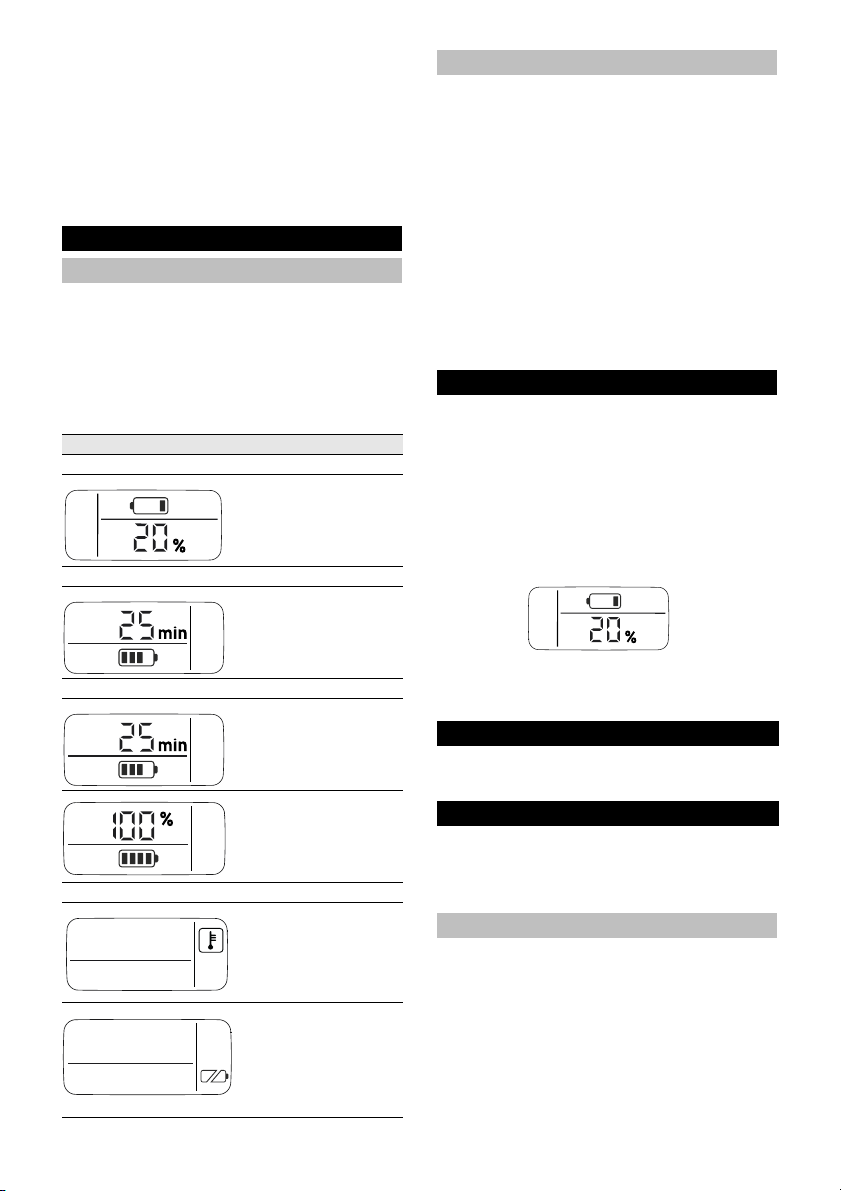
Anzeige Bedeutung
Akku lagern
Ladestand des Akkupacks bei Nichtverwendung.
Akku verwenden
Restlaufzeit des Akkupacks bei Verwendung.
Akku laden
Restladezeit des Akkupacks beim Aufladen.
Akkupack voll geladen.
Fehleranzeige
Akkupacktemperatur außerhalb der zugelassenen Werte oder wegen
Kurschluss gesperrt
(siehe Hilfe bei Störungen).
Akkupack defekt und zur
Sicherheit gesperrt. Akkupack nicht mehr verwenden und vorschriftsmäßig entsorgen.
Betrieb
Lagerung
Transport und Lagerung
Pflege und Wartung
Wartung
Hilfe bei Störungen
Fehler beim Laden
Display ist aus, Akkupack lädt nicht
Ladegerät defekt. Ersetzen Sie das Ladegerät.
Der Akkupack ist eventuell komplett entladen. Warten
Sie ab, ob das Display nach einiger Zeit die Restladedauer anzeigt. Wenn nicht, ist der Akkupack defekt. Ersetzen Sie den Akkupack.
Display ist an, Akkupack lädt aber nicht
Ladegerät defekt. Ersetzen Sie das Ladegerät.
Beachten Sie die Displayanzeige. Ggf. ist die Akkutem-
peratur nicht im Normalbereich.
Display zeigt Temperatursymbol, Akkupack lädt
nicht
Akkupacktemperatur zu niedrig / hoch. Bringen Sie den
Akkupack in eine Umgebung mit gemäßigten Temperaturen. Warten Sie ab, bis sich die Akkupacktemperatur normalisiert hat.
Der Ladevorgang beginnt dann automatisch.
Fehler im Betrieb
Im Display wird das Temperatursymbol angezeigt
Akkupacktemperatur zu niedrig / hoch. Bringen Sie den
Akkupack in eine Umgebung mit gemäßigten Temperaturen. Warten Sie ab, bis sich die Akkupacktemperatur normalisiert hat.
10 DE
Page 11
Fehler im Betrieb
Bei einem Kurzschluss wird der Akkupack für die weitere Verwendung für 30 Sekunden gesperrt. Tritt der
Kurzschluss häufiger auf, wird der Akkupack dauerhaft
gesperrt. Schließen Sie den Akkupack zum entsperren
an das Ladegerät an.
Display zeigt Restlaufzeit 0 an, Gerät schaltet sich aus.
Der Akkupack ist entladen. Bitte laden Sie den Akkupack wieder auf.
Fehler bei der Lagerung
Display zeigt keine Restkapazität mehr an
Der Akkupack ist entladen. Bitte laden Sie den Akkupack wieder auf.
Display zeigt Restkapazität 70% an, obwohl der Akkupack frisch geladen wurde.
Der Akkupack befindet sich im automatischen Lagermodus. Dieser wird aktiviert, wenn der Akku mehr als
21 Tage nicht verwendet wurde. Diese Funktion
schützt die Akkuzellen vor schneller Alterung und erhöht die Lebensdauer. Laden Sie den Akkupack vor
der nächsten Verwendung wieder vollständig auf.
Allgemeiner Fehler
Display zeigt durchbrochenes Batteriesymbol an.
Akkupack defekt und zur Sicherheit gesperrt. Akkupack nicht mehr verwenden und vorschriftsmäßig entsorgen.
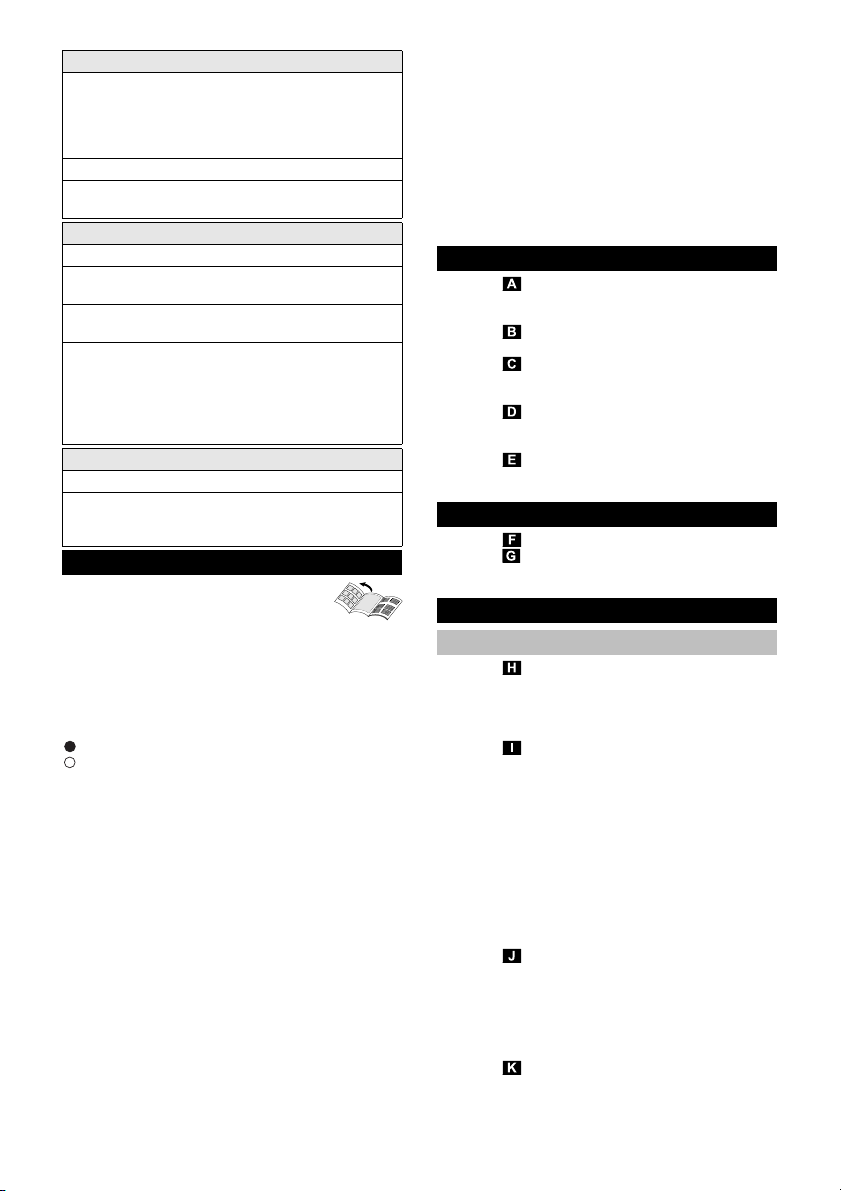
Gerätebeschreibung
Abbildungen siehe Ausklappseite!
Diese Betriebsanleitung beschreibt
die auf dem vorderen Umschlag aufgeführten Mehrzwecksauger.
Die Abbildungen zeigen die maximale Ausstattung,
je nach Modell gibt es Unterschiede in Ausstattung
und mitgeliefertem Zubehör.
Prüfen Sie beim Auspacken den Packungsinhalt auf
fehlendes Zubehör oder Beschädigungen. Benachrichtigen Sie bei Transportschäden bitte Ihren Händler.
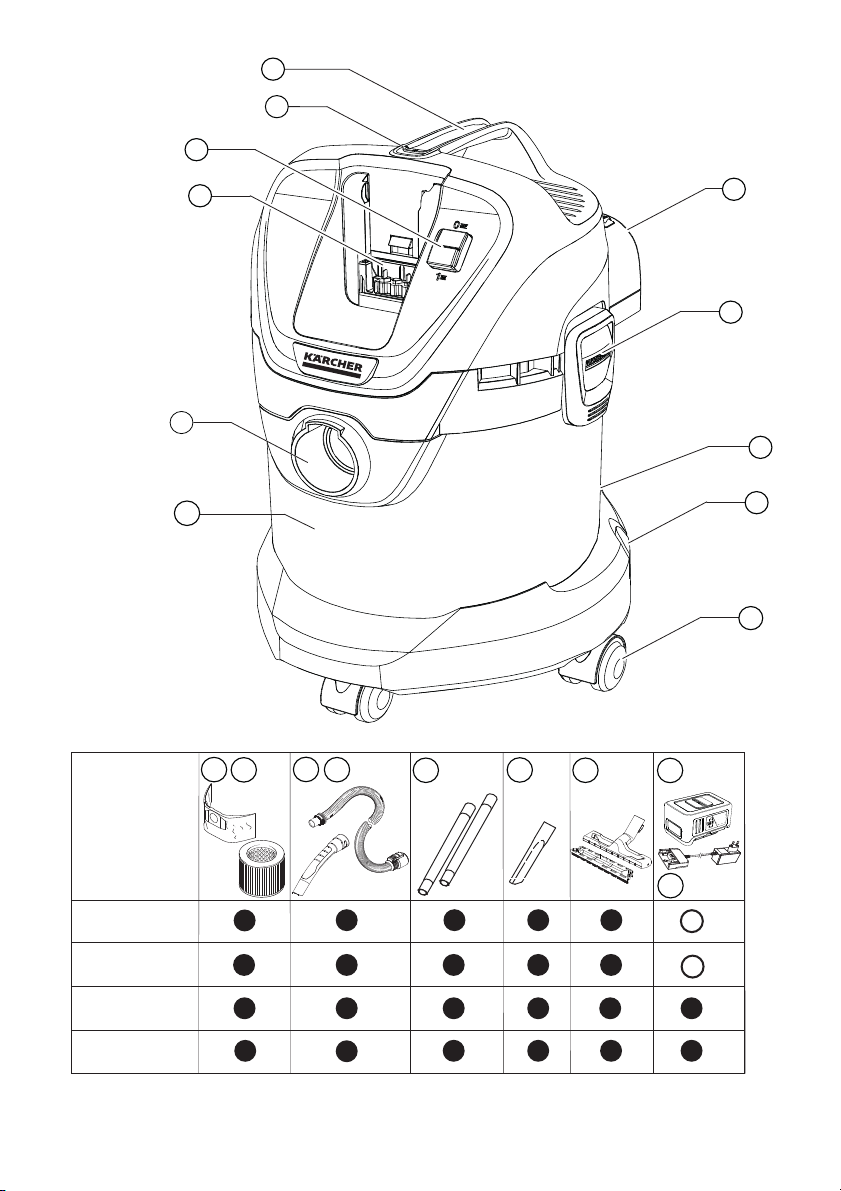
im Lieferumfang enthalten
mögliches Zubehör
1 Saugschlauchanschluss
2 Akkufach
3 Geräteschalter (EIN/AUS)
4 Akkuentriegelungstaste
5Griff
6 Blasanschluss
7 Behälterverschluss
8 Parkposition
9 Zubehöraufnahme
10 Lenkrolle
11 Behälter
12 Filterbeutel
13 Patronenfilter
14 Saugschlauch mit Verbindungsstück
15 Abnehmbarer Handgriff
16 Saugrohre 2 x 0,5 m
17 Fugendüse
18 Bodendüse
(mit Einsatz)
19 Akkupack
Battery Power 36/25
20 Standardladegerät
Battery Power BC 36 V
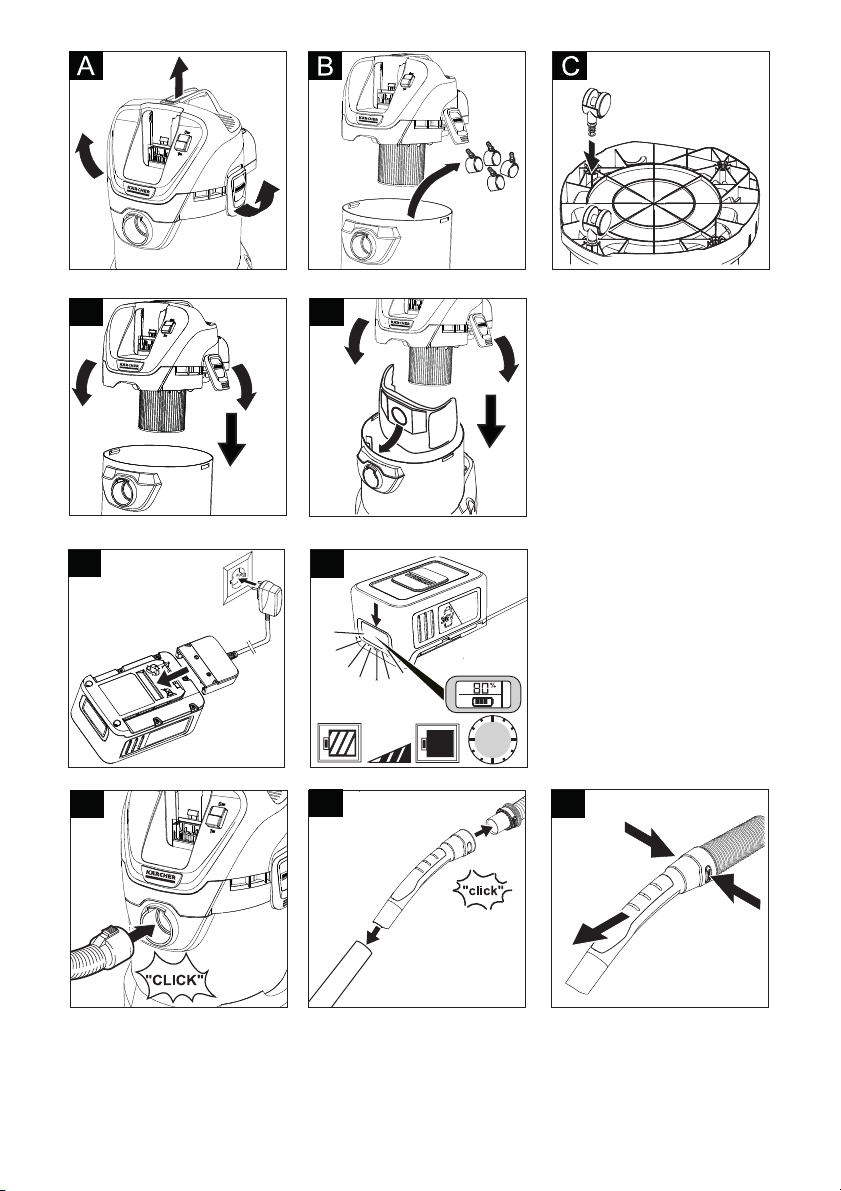
Montage
Abbildung
Zum Öffnen Behälterverschlüsse nach außen zie-
hen und Gerätekopf am Tragegriff abnehmen.
Abbildung
Inhalt aus dem Behälter nehmen.
Abbildung
Behälter umdrehen, Lenkrollen in die Öffnungen
am Behälterboden bis zum Anschlag eindrücken.
Abbildung
Gerätekopf auf Behälter aufsetzen und Behälter-
verschlüsse schließen.
Abbildung
Zum Saugen von trockenem Schmutz kann bei Be-
darf zusätzlich ein Filterbeutel eingesetzt werden.
Akkupack aufladen
Abbildung
Abbildung
Siehe Kapitel „ Ladevorgang“ und „Bedienung Ak-
kupack“.
Inbetriebnahme
Zubehör anschließen
Abbildung
Saugschlauch in Anschluss am Gerät eindrücken,
er rastet ein.
Zum Entnehmen Raste mit Daumen drücken und
Saugschlauch herausziehen.
Abbildung
Handgriff mit Saugschlauch verbinden, bis er ein-
rastet.
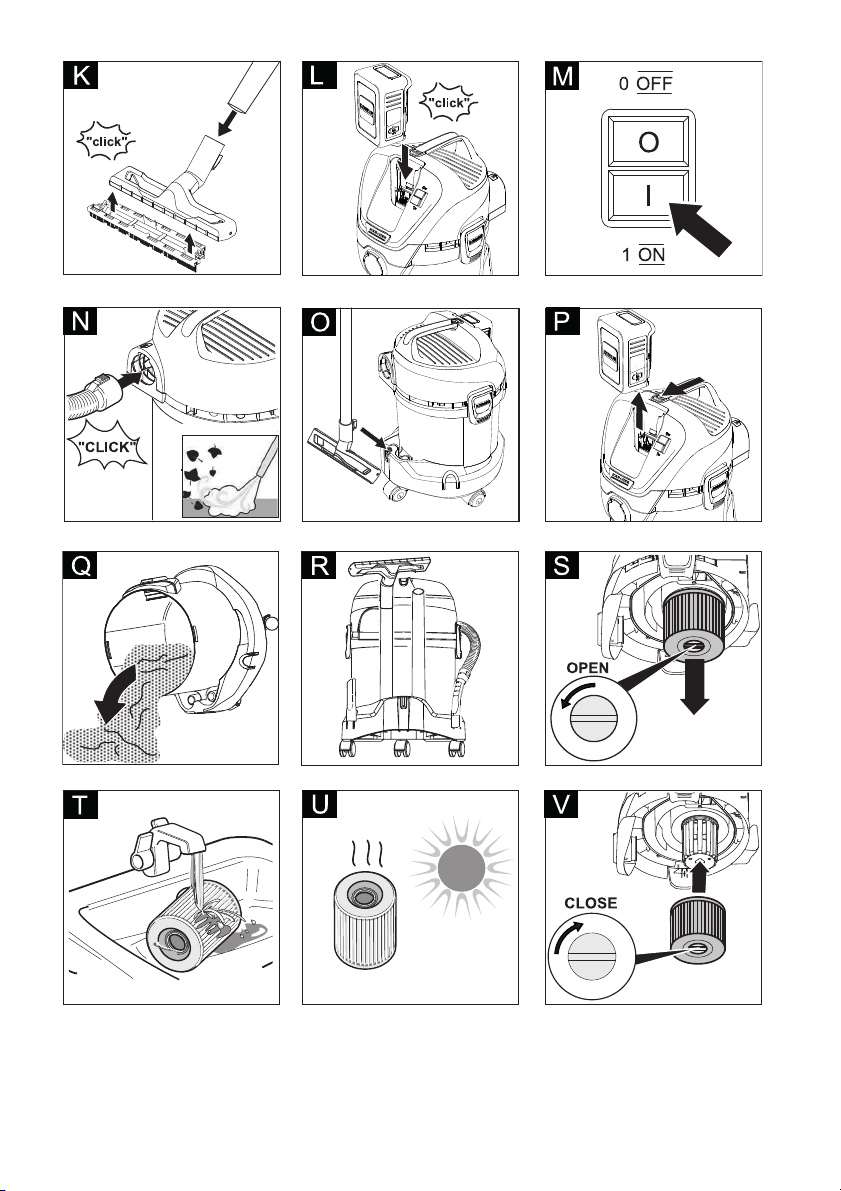
Beide Saugrohre zusammenstecken und mit
Handgriff verbinden.
Hinweis: Zubehöre, wie z. B. Saugbürsten (optional),
können direkt auf das Verbindungsstück aufgesteckt
und somit mit dem Saugschlauch verbunden werden.
Für bequemes Arbeiten auch auf engen Räumen.
Der abnehmbare Handgriff kann bei Bedarf zwischen
Zubehör und Saugschlauch angebracht werden.
Empfehlung: Zum Bodensaugen Handgriff auf Saugschlauch stecken.
Abbildung
Zur Abnahme des Handgriffes von Saugschlauch,
Raste mit Daumen und Zeigefinger drücken und
Handgriff abziehen
Hinweis: Durch die Abnahme des Handgriffes können
Zubehöre auch direkt auf den Saugschlauch gesteckt
werden.
Abbildung
Bodendüse mit Saugrohr verbinden.
– 11
11DE
Page 12
– 12
Hinweis: Zum Bodensaugen von trockenem Schmutz
oder Wasser - immer mit Einsatz (Bürstenstreifen und
Gummilippe) in der Bodendüse arbeiten.
Abbildung
Akkupack von oben in Akkuhalter einschieben und
einrasten.
Abbildung
Stellung I: Saug- oder Blasfunktion.
Stellung 0: Gerät ist ausgeschaltet.
ACHTUNG
Der Metallbehälter kann sich beim einsaugen großer
Feinstaubmengen statisch aufladen und dann bei einer
Berührung entladen.
ACHTUNG
Der Bereich des Akkuhalters muss sauber gehalten
werden.
Falls in diesen Bereich zu viel Schmutz kommt,
kann es sein, dass der Akkupack nicht mehr richtig
eingesetzt/eingerastet werden kann.
Ebenso besteht die Möglichkeit, dass der Akku-
pack nicht mehr aus dem Gerät genommen werden
kann, weil der Auswurfhebel sich nicht mehr bewegen lässt.
ACHTUNG
Immer mit eingesetztem Patronenfilter arbeiten, sowohl
beim Nass- als auch beim Trockensaugen!
ACHTUNG
Vor dem Einsatz den Filter auf Beschädigungen prüfen
und bei Bedarf austauschen.
Nur mit trockenem Patronenfilter arbeiten!
Abbildung
Empfehlung: Zum Saugen von Feinstaub den Fil-
terbeutel einsetzen.
– Der Füllgrad des Filterbeutels ist abhängig vom
aufgesaugten Schmutz.
– Bei Feinstaub, Sand usw... sollte der Filterbeutel
häufiger ausgetauscht werden.
– Zugesetzte Filterbeutel können platzen, deshalb
den Filterbeutel rechtzeitig wechseln!
ACHTUNG
Saugen von kalter Asche nur mit Vorabscheider.
Informationen über Zubehör und Ersatzteile finden Sie
unter www.kaercher.com.
ACHTUNG
Keinen Filterbeutel verwenden!
Abbildung
Zum Aufsaugen von Feuchtigkeit bzw. Nässe auf
richtigen Bodendüseneinsatz achten und entsprechendes Zubehör anschließen.
Hinweis: Ist der Behälter voll, schließt ein Schwimmer
die Saugöffnung und das Gerät läuft mit erhöhter Drehzahl. Gerät sofort ausschalten und Behälter entleeren.
Reinigung von schwer erreichbaren Stellen oder wo das
Saugen nicht möglich ist, z.B Laub aus dem Kiesbeet.
Abbildung
Saugschlauch in Blasanschluss einstecken, die
Blasfunktion ist damit aktiviert.
Gerät ausschalten.
Abbildung
Bodendüse in die Parkposition einhängen.
Hinweis: Falls während der Arbeitsunterbrechung eine
Abnahme des Saugkopfs notwendig ist, kann der Akkupack stecken bleiben. Der Akkupack ist fest eingerastet
und kann nicht abfallen.
Gerät ausschalten.
Abbildung
Akkuentriegelungstaste nach vorne schieben und
Akkupack aus dem Gerät nehmen.
Je nach Bedarf, Akkupack neu aufladen (siehe Ka-
pitel „Akkupack aufladen“).
Empfehlung: Akkupack nach Beendigung der Arbeit
aus dem Gerät nehmen.
Abbildung
Gerätekopf abnehmen und Behälter entleeren.
Abbildung
Zubehör am Gerät verstauen und Gerät in trocke-
nen Räumen aufbewahren.
Hinweis: Unabhängig vom Saugbetrieb zieht das LCDisplay etwas Akkukapazität, egal ob Akkupack im Gerät oder außerhalb.
Siehe Kapitel „ Ladevorgang“ und „Bedienung Ak-
kupack“.
몇 VORSICHT
Verletzungs- und Beschädigungsgefahr!
Gewicht des Gerätes beim Transport beachten.
Gerät am Tragegriff hochheben und tragen.
Ge
rät gegen Verrutschen und Kippen sichern.
Gerät und Zubehörteile aus Kunststoff mit einem
handelsüblichen Kunststoffreiniger pflegen.
Behälter und Zubehör bei Bedarf mit Wasser aus-
spülen und vor der Weiterverwendung trocknen.
Abbildung Patronenfilter bei Bedarf nur unter fließendem
Wasser reinigen, nicht abreiben oder abbürsten.
Vor dem Einbau vollständig trocknen lassen.
Ladekontakte regelmäßig auf Verschmutzung prü-
fen und gegebenenfalls reinigen.
Lüftungsschlitze auf Verschmutzung prüfen und
gegebenenfalls reinigen.
Akkupack einsetzen
Gerät einschalten
Allgemeine Hinweise zur Bedienung
Bedienung
Trockensaugen
Hinweise Filterbeutel
Nasssaugen
Blasfunktion
Betrieb unterbrechen
Betrieb beenden
Behälter entleeren
Gerät aufbewahren
Akkupack aufbewahren
Transport
Transport von Hand
Transport in Fahrzeugen
Pflege und Wartung
12 DE
Page 13
– 13
Das Gerät ist wartungsfrei.
Abbildung
Akkupack sitzt nicht richtig im Akkuhalter, Akku-
pack im Akkuhalter einschieben und einrasten lassen.
Ladezustand des Akkupack (siehe Display) zu
schwach, bei Bedarf Akkupack aufladen.
Akkupack oder Ladegerät defekt, Akkupack oder
Ladegerät durch neues Zubehör ersetzten.
Überhitzung von Gerät/Akkupack, kurz warten da-
mit Gerät/Akkupack abkühlen können.
Behälter ist voll Wasser und dadurch wird der
Schwimmer aktiviert, Behälter entleeren.
Zubehör, Saugschlauch oder Saugrohre sind ver-
stopft.
Verstopfung mit einem geeigneten Hilfsmittel ent-
fernen.
Abbildung
Filterbeutel ist voll, neuen Filterbeutel einsetzen.
Abbildung Patronenfilter ist verschmutzt, Patronenfilter ab-
klopfen und bei Bedarf unter fließendem Wasser
reinigen.
Beschädigten Patronenfilter wechseln.
Empfehlung: Patronenfilter 1x pro Jahr wechseln.
Technische Änderungen vorbehalten!
Wartung
Hilfe bei Störungen
Gerät läuft nicht
Gerät schaltet selbsttätig ab
Nachlassende Saugleistung
Technische Daten
Akkupack und Standardladegerät im Lieferumgang von:
WD 3 Battery Set
WD 3 Battery Premium Set
(Akkupack Battery Power 36/25 / Standardladegerät
Battery Power BC 36 V)
Gerät
Nennleistung W 300
Betriebszeit bei voller Akkuladung
(max.)
min 15
Schutzklasse III
Schutzart IPX4
Akkupack Battery Power 36/25
Nennspannung V 36
Nennkapazität
(nach IEC/EN 61690)
Ah 2,4
Nennkapazität
(nach Angabe des Zellenherstellers)
Ah 2,5
Nennenergie
(nach UN 3480)
Wh 86,4
Ladestrom max. A 4
Akkutyp Li-Ion
Gewicht kg 0,9
Abmessungen (l x b x h) mm 133x88x72
Standardladegerät Battery Power BC 36 V
Nennspannung Akkupack V 36
Ladestrom max. A 0,5
Akkutyp Li-Ion
Netzspannung V 100-240
Frequenz Hz 50-60
Stromaufnahme (max.) A 0,3
Schutzklasse II
Gewicht (ohne Akkupack) g 205
13DE
Page 14
– 5
Dear Customer,
Before using your appliance for the
first time, read these original operating
instructions, act in compliance with
them, and keep them for later use or
for subsequent owners.
In accordance with the descriptions and the safety information in these operating instructions the appliance is
intended for use as a multi-purpose vacuum cleaner.
This appliance has been designed for use in private
households and is not intended for commercial use.
– Protect the unit from rain. Do not store outside.
– This device may not be used to suck in ash and
soot.
The manufacturer is not responsible for any damages
that may occur on account of improper use or wrong operations.
Notes about the ingredients (REACH)
You will find current information about the ingredients
at:
www.kaercher.com/REACH
Notes about the ingredients (REACH)
You will find current information about the ingredients
at:
www.kaercher.com/REACH
The warranty terms published by the relevant sales
company are applicable in each country. We will repair
potential failures of your appliance within the warranty
period free of charge, provided that such failure is
caused by faulty material or defects in manufacturing. In
the event of a warranty claim please contact your dealer
or the nearest authorized Customer Service centre.
Please submit the proof of purchase.
Our KÄRCHER branch will be pleased to help you further in the case of questions or faults.
Only use original accessories and spare parts, they ensure the safe and trouble-free operation of the device.
For information about accessories and spare parts,
please visit www.kaercher.com.
In the event of missing accessories or any transport
damage, please contact your dealer.
DANGER
Pointer to immediate danger,
which leads to severe injuries or
death.
몇 WARNING
Pointer to a possibly dangerous
situation, which can lead to severe injuries or death.
Contents
General notes EN 5
Safety instructions EN 5
Information on battery pack and charger EN 8
Safety Devices EN 9
Operating elements EN 9
Charging process EN 9
Battery pack operation EN 9
Storage EN 10
Transport and storage EN 10
Care and maintenance EN 10
Troubleshooting EN 10
Description of the Appliance EN 11
Assembly EN 11
Charging the battery pack EN 11
Commissioning EN 11
General information on the operation EN 12
Operation EN 12
Transport EN 12
Care and maintenance EN 12
Troubleshooting EN 13
Technical specifications EN 13
General notes
Proper use
Environmental protection
The packaging material can be recycled. Please
arrange for the environmentally appropriate disposal of the packaging.
Old appliances contain valuable recyclable materials that should be recycled properly. Batteries
and accumulators contain substances that must
not enter the environment. Please dispose of old
devices and batteries or accumulators in an environmentally friendly way.
Electrical and electronic devices often contain
components which could potentially pose a danger to human health and the environment if handled or disposed of incorrectly. However, these
components are necessary for the proper operation of the device. Devices marked with this symbol must not be disposed of with regular household rubbish.
Warranty
Customer Service
Accessories and Spare Parts
Scope of delivery
Safety instructions
Danger or hazard levels
14 EN
Page 15

몇 CAUTION
Pointer to a possibly dangerous
situation, which can lead to minor injuries.
ATTENTION
Pointer to a possibly dangerous
situation, which can lead to
property damage.
Safety Instructions for wet/
dry vacuum cleaners
Safe handling
DANGER
The user must use the appli-
ance as intended. The person
must consider the local conditions and must pay attention
to other persons in the vicinity
when working with the appliance.
The appliance may not be op-
erated in explosive atmospheres.
If the appliance is used in
hazardous areas the corresponding safety provisions
must be observed.
Do not use the appliance if it
fell down, is visibly damaged
or leaking.
Keep packaging films away
from children, there is a risk of
suffocation!
몇 WARNING
This appliance is not intended
for use by persons with limited physical, sensory or mental capacities or lacking experience and/or skills, unless
such persons are accompanied and supervised by a per-
son in charge of their safety
or they have received precise
instructions on the use of this
appliance and have understood the resulting risks.
Children may only use this
appliance if they are over the
age of 8 and supervised by a
person in charge of their safety, or if they have received instructions on the use of this
appliance and have understood the resulting risks.
Children must not play with
this appliance.
Supervise children to prevent
them from playing with the
appliance.
Operate or store the appli-
ance only in accordance with
the description or illustration!
The appliance contains elec-
trical components - do not
clean under running water.
몇 CAUTION
Never leave the appliance
unattended as long as it is in
operation.
ATTENTION
Do not operate the appliance
at temperatures below 0 °C.
Never vacuum without a filter,
otherwise the appliance can
get damaged.
Protect the appliance from
extreme weather conditions,
moisture and heat.
– 6
15EN
Page 16

– 7
DANGER
Risk of explosion!
The appliance may not be op-
erated in explosive atmos-
pheres.
Do not vacuum up explosive
or combustible gases, fluids
and dusts!
Do not vacuum up reactive
metal dusts (e.g. aluminium,
magnesium or zinc!
Do not vacuum up undiluted
acids or brines!
Do not vacuum up burning or
smouldering objects!
몇 WARNING
Risk of injury!
Do not vacuum in the vicinity
of the head when using the
nozzle and suction pipe.
몇 CAUTION
In order to prevent accidents
or injuries, mind the weight of
the appliance during trans-
port (see technical data).
몇 CAUTION
Create stability for the appli-
ance prior to any work on or
with the appliance to prevent
accidents or damage.
DANGER
Check the plug-in power sup-
ply, connection cable, battery
adapter and battery pack for
damage before every use.
Damaged devices may no
longer be used and must be
replaced.
Do not open the charger. The
charger must be replaced if
damaged or defect.
Do not operate the charger in
explosive environment.
Never touch the mains plug
and the socket with wet
hands.
Do not use the charger if dirty
or wet.
Do not charge battery (prima-
ry cells); risk of explosion.
몇 CAUTION
The mains voltage must
match the voltage mentioned
on the type plate of the charger.
Use the charger only to
charge approved battery
packs.
Only charge the battery pack
using the original charger enclosed or with a charger approved by KÄRCHER.
ATTENTION
Do no carry charger by the
connection cable.
Keep connection cable away
from heat, sharp edges, oil
and moving parts.
Do not cover the plug-in pow-
er supply.
Other risks
Stability
Charger safety instructions
16 EN
Page 17
– 8
Avoid extension cables with
multiple sockets and simultaneous operation of several
devices.
Do not wind the connection
cable around the or the battery adapter to avoid damages.
Be sure to read the safety instructions enclosed with the
battery pack and observe
these during use!
몇 CAUTION
– Risk of injury, risk of damage due to exploding bat-
tery! Only charge the battery packs with the appropriate charger.
– Please check that the battery pack and charger
match before use!
– Only charge undamaged battery packs.
– Modifications and changes that are not authorised by
the manufacturer are prohibited for safety reasons.
– Any other use is prohibited. The user is liable for
any hazards arising from improper
use.
A battery pack and charger with 36 V nominal volt-
age is required for the initial startup. The “Set variants” already include a Li-ION battery pack with 36
V, 2.5 Ah (Battery Power 36/25) and a 36 V (Battery Power BC 36 V) standard charger in the scope
of delivery.
The Battery Power battery packs (+) 36/25, 36/50
and 36/75 may only be used for the designated
Kärcher 36 V Battery Power system devices.
Batteries / chargers that are not supplied in the
scope of delivery or are additionally required are
available as special accessories or can be purchased later.
Before using the battery packs in a KÄRCHER Bat-
tery Power battery platform, please observe the operating instructions of the device used and any
safety instructions enclosed.
More information on the operating instructions for
battery packs or on accessories and spare parts
can be found at www.kaercher.com.
The lithium-ion battery is subject to the require-
ments of dangerous goods regulations and can be
transported by the user in public traffic areas without any further restrictions.
When shipping by third parties (transport compa-
nies), special requirements for packaging and labelling must be observed.
Only send the battery if the casing is undamaged.
Tape off open contacts and pack the battery tightly
and securely. It must not be able to move in the
packaging.
Please also observe the national regulations.
Symbols on the charger
Protect the charger
against moisture and
store it dry. The device is
only suitable for use in
rooms; do not expose
the device to rain.
The charger has a builtin fuse of 1 ampere.
The charger meets the
requirements of protective class II.
Battery pack safety
instructions
Information on battery pack and
charger
Battery packs 36 V Battery Power
Description
Rechargeable battery type
Nominal voltage
R
ated capacity
(according to IEC/EN 61690)
Rated capacity
(according to specifications of
cell manufacturer)
Li-Ion
VAhAh
36/25 36 2,4 2,5
36/50 36 4,8 5,0
Transport
17EN
Page 18
– 9
몇 CAUTION
Safety installations serve the protection of the user
and may not be modified or bypassed.
The installed protective circuit protects the battery pack
against
Overheating
Full discharge
Overcharging
Short-circuit
Figure dependent on types
1Nameplate
2 Display
3Contacts
4 Intake
1 Battery contacts
2 Battery adapter
3 Connection cable
4Nameplate
5 Plug-in power supply
몇 CAUTION
Risk of injury, risk of damage! Observe the operating instructions and safety instructions of the charger.
Note
New battery packs are only pre-charged and must be
fully charged before first use.
The display is activated during the first charging process.
To ensure that the charge level indicator works correctly, the battery pack must be discharged during initial use
until the device is switched off.
Illustration
Plug the plug-in power supply into the socket.
Push the battery pack into the battery adapter of
the charger.
The charging process begins automatically.
Illustration
The remaining charging time is displayed on the
battery pack display.
The charging time with a standard charger (Battery
Power BC 36 V) for an empty battery pack (Battery
Power 36/25) is approx. 5,5 hours.
When the battery pack is fully charged, the display
shows 100%.
Remove the battery adapter from the battery pack
after charging.
Pull the plug-in power supply from the socket.
Note
If the display does not show anything when the battery
pack is in the charger, the battery capacity is fully depleted or very low. As soon as the battery pack has
been sufficiently charged, the display shows the remaining charging time.
If the display does not show anything even after a
long period of time, the battery pack is defective
and must be replaced.
Note
New battery packs reach their full capacity after approx.
5 charging and discharging cycles.
Charge batteries that have not been used for a long time
before use.
The performance of the battery pack is reduced at temperatures below 0°C.
The capacity of the battery pack may be reduced if
stored at temperatures over 20°C.
Note
The charged battery pack can remain on the charger till
it is to be used. There is no risk of over-charging.
In order to avoid unnecessary energy consumption, the
charger should, however, be unplugged as soon as the
battery pack has been fully charged.
The battery pack is equipped with a display that
provides continuous information on the charging
state, the progress of charging and the remaining
battery life. In addition, any error messages occur-
ring will also be shown.
The runtime adjustment is generated via capacity
switching.
Depending on the device used, the display rotates
when the battery pack is inserted.
Safety Devices
Protective circuit
Operating elements
Battery pack
Standard charger
Charging process
Battery pack operation
Display
18 EN
Page 19

– 10
몇 CAUTION
Risk of personal injury or damage! For operation, observe the operating instructions and safety instructions
of the device used.
Insert the battery pack into the intake of the device.
몇 CAUTION
Risk of personal injury or damage! Ensure that the battery pack properly snaps into place.
Note
During use, the display shows the remaining operating
time.
Remove the battery pack from the device after
completion of the work.
Recharge battery pack after work.
Note
Also recharge partially discharged battery packs after
use.
몇 CAUTION
Risk of personal injury or damage! Mind the weight of
the appliance during transport.
ATTENTION
Risk of damage! Store the battery packs in rooms with
low humidity and below 20 °C only.
This appliance must only be stored in interior rooms.
The battery pack indicates its current charging state on
the display, even without being connected to a charger.
If the battery pack display goes out during storage, the
battery capacity is fully depleted and the display has
been switched off. Please recharge the battery as soon
as possible.
몇 CAUTION
Risk of personal injury or damage! Mind the weight of
the appliance during transport.
Check charging contacts for soiling at regular inter-
vals and clean them as necessary.
Recharge battery packs that are stored over a long-
er period of time.
The appliance is maintenance free.
Display Meaning
Battery in storage
Charging state of the
battery pack while not in
use.
Battery in use
Remaining battery life of
the battery pack while in
use.
Battery charging
Remaining charging
time of the battery pack
during charging.
Battery pack fully
charged.
Error display
Battery pack temperature outside the permitted values or disabled
due to short-circuit (see
Help in case of malfunctions).
Battery pack defective
and disabled for safety.
Do not use the battery
pack anymore and dispose of it properly.
Operation
Storage
Transport and storage
Care and maintenance
Maintenance
Troubleshooting
Error during charging
Display is off, battery pack not charging
Charger defective. Replace the charger.
The battery pack may be completely discharged. Wait
and see if the display shows the remaining charging
time after some time. If not, the battery pack is defective. Replace the battery pack.
Display is on but the battery pack is not charging
Charger defective. Replace the charger.
Observe the display. The battery temperature may not
be within the normal range.
Display shows temperature symbol, battery pack
not charging
Battery pack temperature too low / too high. Put the
battery pack in a moderate temperature environment.
Wait until the battery pack temperature has normalized.
The charging process then starts automatically.
Error during operation
The display shows the temperature symbol
Battery pack temperature too low / too high. Put the
battery pack in a moderate temperature environment.
Wait until the battery pack temperature has normalized.
19EN
Page 20
– 11
Illustrations on fold-out page!
These operating instructions de-
scribe the multi-purpose vacuum
cleaners listed on the front cover.
The illustrations show the maximum equipment;
depending on the model, there are differences in
equipment and supplied accessories.
When unpacking the product, make sure that no accessories are missing and that none of the package contents have been damaged. If you detect any transport
damages please contact your dealer.
included in the scope of delivery
possible accessories
Illustration
To open, pull the container closures upwards and
remove the device head on the carrying handle.
Illustration
Remove the contents from the container.
Illustration
Turn the container, press in the steering roller in the
openings at the base of the container till the end-
point.
Illustration
Put the appliance head onto the container and lock
the container locks.
Illustration
For vacuuming dry dirt an additional filter bag can
be inserted if necessary.
Illustration
Illustration
See chapters "Charging process" and "Battery
pack operation".
Illustration
Push the suction hose into the connection on the
appliance, it snaps in place.
In order to disconnect it, push down with your
thumb and pull the suction hose out.
Illustration
Connect the handle with the suction hose until it
snaps in place.
Put both suction tubes together and connect them
with the handle.
Note: Accessories, such as suction brushes (optional)
can be directly attached to the connecting piece and
thus connected to the suction hose.
For convenient working even in tight spaces.
The removable handle can be attached between the accessories and the suction hose if necessary.
Recommendation: In order to vacuum the floor, attach
the handle to the suction hose.
Illustration
To remove the handle from the suction hose, press
the button with your thumb and index and remove
handle
Note: Due to removing the handle, accessories can be
directly attached to the suction hose.
Illustration
Connect the floor nozzle with the suction pipe.
Note: For vacuuming dry dirt or water off the floor - always work with the insert (brush strip and rubber lip) in
the floor nozzle.
Illustration
Push the battery pack from the top into the battery
holder and lock it.
In case of a short circuit, the battery pack is disabled
for 30 seconds for further use. If the short-circuit occurs more frequently, the battery pack is permanently
disabled. Connect the battery pack to the charger to
unlock it.
Display shows remaining run time 0, device
switches off.
The battery pack is discharged. Please recharge the
battery pack.
Storage error
Display shows no remaining capacity
The battery pack is discharged. Please recharge the
battery pack.
Display shows remaining capacity 70% even
though the battery pack has been freshly charged.
The battery pack is in automatic storage mode. This is
activated if the battery has not been used for more
than 21 days. This function protects the battery cells
against rapid aging and increases their service life.
Fully recharge the battery pack before next use.
General fault
Display screen shows broken battery symbol.
Battery pack defective and disabled for safety. Do not
use the battery pack anymore and dispose of it properly.
Description of the Appliance
1 Suction hose connection
2 Battery compartment
3 ON/OFF switch for appliance
4 Battery unlocking button
5 Handle
6 Blowing connection
7 Container closure
8 Parking position
9 Accessory mount
10 Steering roller
11 Container
12 Filter bag
13 Cartridge filter
14 Suction hose with connecting piece
15 Removable handle
16 Suction tubes 2 x 0.5 m
17 Crevice nozzle
Error during operation
18 Floor nozzle
(with insert)
19 Battery pack
Battery Power 36/25
20 Standard charger
Battery Power BC 36 V
Assembly
Charging the battery pack
Commissioning
Connect accessories
Inserting the battery pack
20 EN
Page 21
– 12
Illustration
Position I: Vacuum and blowing function.
Position 0: Appliance is switched off
ATTENTION
The metal container can become statically charged
when vacuuming large amounts of fine dust particles
and then discharge upon contact.
ATTENTION
The batter holder area must be kept clean.
If there is too much dirt in this area, it is possible
that the battery pack is not inserted/locked into
place.
Similarly, it may be the case that battery pack can
no longer be taken out of the device because the
eject lever can no longer be moved.
ATTENTION
Always work with an inserted cartridge filter during wet
as well as dry vacuum cleaning!
ATTENTION
Check the filter for damage prior to installation and replace as necessary.
Work with a dry cartridge filter only!
Illustration
Recommendation: To vacuum fine dust, use the
filter bag.
– The filling level of the filter bag depends on the dirt
that is sucked in.
– The filter bag needs to be replaced more frequently
while sucking in fine dust, sand, etc.
– Clogged filter bags can burst - therefore make sure
to replace the filter bag in a timely manner!
ATTENTION
Vacuum cold ashes only when using a pre-filter.
For information about accessories and spare parts,
please visit www.kaercher.com.
ATTENTION
Do not use a filter bag!
Illustration
For vacuuming up moisture or liquids pay attention
to the correct floor nozzle insert and connect the
corresponding accessories.
Note: If the container is full, a float closes the suction
opening, and the appliance works at a higher speed.
Switch off the appliance immediately, and empty the
container.
Cleaning hard to reach locations or, where vacuuming
is not possible, like leaves from a gravel bed.
Illustration
Connect the suction hose to the blower connection,
this will activate the blower function.
Turn off the appliance.
Illustration
Hook the floor nozzle into the parking position.
Note: If it is necessary to remove the suction head when
work is interrupted, the battery pack may become stuck.
The battery pack is locked in tightly and cannot fall out.
Turn off the appliance.
Illustration
Push the battery release button forwards and re-
move the battery pack from the device.
If necessary, recharge battery pack (see chapter
“Charging battery pack”).
Recommendation: Remove the battery pack from the
device after completing the work.
Illustration
Remove the appliance head and empty the reser-
voir.
Illustration
Store the accessories on the appliance and store
the appliance in dry rooms.
Note: Regardless of the vacuuming operations, the LC
display uses little battery capacity, regardless of whether the battery pack is inside or outside the device.
See chapters "Charging process" and "Battery
pack operation".
몇 CAUTION
Risk of personal injury or damage!
Mind the weight of the appliance during transport.
Lift appliance by the carrying handle and carry it.
Secure the appliance against shifting and tipping
over.
Clean the device and accessory parts made of
plastic with a customary plastic cleaner.
If required, rinse the container and accessories
wit
h water properly and dry them before reuse.
Figure Only clean the cartridge filter under running water;
do not wipe or brush. Let it dry completely prior to
installation.
Check charging contacts for soiling at regular inter-
vals and clean them as necessary.
Check ventilation slits for soiling and clean them if
necessary.
The appliance is maintenance free.
Turning on the Appliance
General information on the operation
Operation
Dry vacuum cleaning
Information filter bag
Wet vacuum cleaning
Blowing function
Interrupting operation
Finish operation
Empty the container
Storing the appliance
Storing the battery pack
Transport
When transporting by hand
When transporting in vehicles
Care and maintenance
Maintenance
21EN
Page 22
– 13
Illustration
The battery pack is not seated correctly in the bat-
tery holder, insert the battery pack into the battery
holder and let it click into place.
Charging state of the battery pack (see display) too
low, charge the battery if necessary.
Defect battery pack or charger, replace battery
pack or charger with new accessory.
Device/battery pack is overheated, wait briefly to
allow device/battery pack to cool down.
Container is full of water, which activated the float
tank and empties the container.
Accessories, suction hose or suction pipes are
clogged.
Remove the clog with a suitable aid.
Illustration
Filter bag is full, install new filter bag.
Figure Cartridge filter is dirty, knock off dirt from cartridge
filter and clean under running water if necessary.
Replace damaged cartridge filter.
Recommendation: Replace cartridge filter 1x per year.
Subject to technical modifications!
Troubleshooting
Appliance is not running
The device switches off automatically
Decreasing cleaning power
Technical specifications
Battery pack and quick charger in scope of delivery of:
WD 3 Battery Set
WD 3 Battery Premium Set
(Battery pack Battery Power 36/25 / standard charger
Battery Power BC 36 V)
Device
Rated power W 300
Operating time when battery fully
charged (max.)
min 15
Protective class III
Type of protection IPX4
Battery pack Battery Power 36/25
Nominal voltage V 36
Rated capacity
(according to IEC/EN 61690)
Ah 2,4
Rated capacity
(according to specifications of cell
manufacturer)
Ah 2,5
Nominal width
(in accordance with UN 3480)
Wh 86,4
Max. charging current A 4
Battery type Li-Ion
Weight kg 0,9
Dimensions (l x b x h) mm 133x88x72
Standard charger Battery Power BC 36 V
Battery pack nominal voltage V 36
Max. charging current A 0,5
Battery type Li-Ion
Mains voltage V 100-240
Frequency Hz 50-60
Power input (max.) A 0,3
Protective class II
Weight (without battery pack) g 205
22 EN
Page 23
– 5
Cher client,
Veuillez lire ce manuel d'instructions
original avant la première utilisation de
votre appareil ; agissez selon ces instructions et conservez ce manuel pour
une utilisation ultérieure ou pour le futur propriétaire.
L'appareil est conçu pour une aspiration multi-usages,
conformément aux descriptions et consignes de sécurité stipulées dans ce manuel d'utilisation.
Cet appareil ne doit être utilisé que pour un usage domestique.
– Protéger l'appareil de la pluie. Ne pas l'entreposer
à extérieur.
– Il est interdit d'aspirer des cendres et de la suie
avec cet appareil.
Le fabricant décline toute responsabilité en cas de dommages dus à une utilisation non conforme ou incorrecte
de l'appareil.
Instructions relatives aux ingrédients (REACH)
Les informations actuelles relatives aux ingrédients se
trouvent sous :
www.kaercher.com/REACH
Instructions relatives aux ingrédients (REACH)
Les informations actuelles relatives aux ingrédients se
trouvent sous :
www.kaercher.com/REACH
Dans chaque pays, les conditions de garantie en vigueur sont celles publiées par notre société de distribution responsable. Les éventuelles pannes sur l’appareil
sont réparées gratuitement dans le délai de validité de
la garantie, dans la mesure où celles-ci relèvent d'un
défaut matériel ou d'un vice de fabrication. En cas de recours en garantie, adressez-vous à votre revendeur ou
au service après-vente agréé le plus proche munis de
votre preuve d'achat.
Notre succursale Kärcher
®
se tient à votre entière dis-
position pour d'éventuelles questions ou problèmes.
N'utiliser que des accessoires et pièces de rechange
d'origine, ils garantissent le bon fonctionnement de l'appareil.
Vous trouverez des informations relatives aux accessoires et pièces de rechange sur www.kaercher.com.
S'il manque des accessoires ou en cas de dommages
imputables au transport, informer immédiatement le revendeur.
DANGER
Signale la présence d'un danger
imminent entraînant de graves
blessures corporelles et pouvant avoir une issue mortelle.
Table des matières
Consignes générales FR 5
Consignes de sécurité FR 5
Remarques sur la batterie et le chargeur FR 8
Dispositifs de sécurité FR 9
Eléments de commande FR 9
Processus de charge FR 9
Commande du bloc-batterie FR 10
Entreposage FR 10
Transport et stockage FR 10
Entretien et maintenance FR 10
Assistance en cas de panne FR 11
Description de l’appareil FR 11
Montage FR 11
Charger le bloc-batterie FR 11
Mise en service FR 12
Remarques générales relatives à la com-
mande FR 12
Utilisation FR 12
Transport FR 13
Entretien et maintenance FR 13
Assistance en cas de panne FR 13
Caractéristiques techniques FR 13
Consignes générales
Utilisation conforme
Protection de l’environnement
Les matériels d'emballage sont recyclables. Éliminez l'emballage d'une manière respectueuse
de l'environnement.
Les anciens modèles contiennent des matériaux
précieux recyclables qui doivent être amenés à
un lieu de recyclage. Les batteries et les accumulateurs contiennent des substances ne devant
pas être tout simplement jetées. Veuillez éliminer
les anciens appareils ainsi que les batteries ou
les accumulateurs d'une manière respectueuse
de l'environnement.
Les appareils électriques et électroniques renferment souvent des composants qui peuvent représenter un danger potentiel pour l'intégrité physique et l'environnement s'ils sont mal utilisés ou
éliminés. Ces composants sont pourtant nécessaires au bon fonctionnement de l'appareil. Les
appareils qui présentent ce symbole ne doivent
pas être jetés avec les déchets ménagers.
Garantie
Service après-vente
Accessoires et pièces de rechange
Contenu de livraison
Consignes de sécurité
Niveaux de danger
23FR
Page 24

– 6
몇 AVERTISSEMENT
Signale la présence d'une situation éventuellement dangereuse
pouvant entraîner de graves
blessures corporelles et même
avoir une issue mortelle.
몇 PRÉCAUTION
Remarque relative à une situation potentiellement dangereuse
pouvant entraîner des blessures
légères.
ATTENTION
Remarque relative à une situation éventuellement dangereuse
pouvant entraîner des dommages matériels.
DANGER
L’utilisateur doit utiliser l’ap-
pareil de façon conforme. Il
doit prendre en considération
les données locales et lors du
maniement de l’appareil, il
doit prendre garde aux
tierces personnes, et en parti-
culier aux enfants.
Il est interdit d’utiliser l’appa-
reil dans des domaines pré-
sentant des risques d’explo-
sion.
Si l’appareil est utilisé dans
des zones dangereuses, tenir
compte des consignes de sé-
curité correspondantes.
Ne pas utiliser l'appareil s'il
est tombé, s'il présente des
dommages visibles ou s'il fuit.
Tenir les feuilles d'emballage
hors de la portée d'enfants Risque d'asphyxie !
몇 AVERTISSEMENT
Cet appareil n'est pas destiné
à être utilisé par des personnes ayant des capacités
physiques, sensorielles ou
mentales réduites ou manquant d'expérience et/ou de
connaissances, sauf si ces
mêmes personnes sont sous
la supervision d'une personne responsable de leur
sécurité ou ont été formées à
l'utilisation de l'appareil.
Des enfants ne peuvent utili-
ser l'appareil que s'ils ont plus
de 8 ans et s'ils sont sous la
surveillance d'une personne
compétence ou s'ils ont reçu
de sa part des instructions
d'utilisation de l'appareil et
s'ils ont compris les dangers
qui peuvent en résulter.
Les enfants ne doivent pas
jouer avec l'appareil.
Surveiller les enfants pour
s'assurer qu'ils ne jouent pas
avec l'appareil.
N'utiliser ou ne stocker l'ap-
pareil que conformément à la
description ou à la figure !
L'appareil contient des com-
posants électriques - ne pas
nettoyer sous l'eau courante.
몇 PRÉCAUTION
Ne jamais laisser l’appareil
sans surveillance lorsqu’il est
en marche.
Consignes de sécurité pour
l'aspirateur à sec/humide
Manipulation fiable
24 FR
Page 25

– 7
ATTENTION
Ne pas exploiter l'appareil à
des températures inférieures
à 0 °C.
Ne jamais aspirer sans filtre :
l'appareil pourrait être en-
dommagé.
Conserver l'appareil à l'abri
des intempéries, de l'humidité
et des sources de chaleur.
DANGER
Risque d'explosion !
Il est interdit d’utiliser l’appa-
reil dans des domaines pré-
sentant des risques d’explo-
sion.
Ne pas aspirer de gaz, li-
quides et poussières explo-
sifs ou inflammables !
Ne pas aspirer de poussières
de métal réactives (par ex.
aluminium, magnésium ou
zinc) !
Ne pas aspirer d'acides ou de
lessives non dilués !
Ne pas aspirer d'objets en-
flammés ou incandescents !
몇 AVERTISSEMENT
Risque de blessure !
Ne pas aspirer avec le suceur
et le tuyau d'aspiration à
proximité du visage.
몇 PRÉCAUTION
Afin d'éviter tout accident ou
toute blessure lors du trans-
port, tenir compte du poids de
l'appareil (voir les caractéris-
tiques techniques).
몇 PRÉCAUTION
Avant d'effectuer toute opéra-
tion avec ou sur l'appareil, en
assurer la stabilité afin d'éviter tout accident ou tout endommagement dû à une
chute de l'appareil.
DANGER
Avant toute utilisation, contrô-
ler l’absence de dommage
sur le bloc secteur, le câble
de liaison, l'adaptateur d’batterie et le bloc de la batterie.
Ne plus utiliser et remplacer
les appareils endommagés.
Ne pas ouvrir le chargeur. En
cas de dommage ou de défaut, remplacer impérativement le chargeur.
Ne pas utiliser l'appareil de
charge dans un environnement où il y a un risque de explosion.
Ne jamais saisir la fiche sec-
teur ni la prise de courant
avec des mains humides.
Ne pas utiliser l'appareil de
charge en état sale ou mouillé.
Ne pas charger des piles (cel-
lule primaire), risque d'explosion.
몇 PRÉCAUTION
La tension de réseau doit cor-
respondre à la tension indiqué sur la plaque signalétique de l'appareil de charge.
Autres dangers
Stabilité
Consignes de sécurité
ch
argeur
25FR
Page 26
– 8
Ne utiliser l'appareil de
charge que pour le chargement des groupes d'accumulateurs autorisés.
Chargez la batterie unique-
ment avec le chargeur d'origine fourni ou avec un chargeur autorisé par KÄRCHER.
ATTENTION
Ne pas porter le chargeur par
le câble de liaison.
Tenir le câble de liaison éloi-
gné de la chaleur, de bords
vifs, d’huile et des pièces de
l’appareil mobiles.
Ne pas couvrir le bloc sec-
teur.
Éviter les câbles de rallonge
équipés de prises multiples et
l’utilisation simultané de plusieurs appareils.
Ne pas enrouler le câble de
liaison autour du bloc secteur
ou de l’adaptateur de batterie
pour éviter tout dommage.
Lire impérativement les
consignes de sécurité accompagnant la batterie et les respecter lors de l’utilisation !
몇 PRÉCAUTION
– Risque de se blesser et risque d'endommagement
par explosion de la batterie ! Charger les blocs-batterie uniquement avec le chargeur prévu.
– Avant l’utilisation, veuillez vérifier la compatib
ilité
du bloc-batterie avec le chargeur !
– Ne charger que les blocs-batteries non endomma-
gés.
– Les modifications et les transformations non auto-
risées par le fabricant sont interdites pour des raisons de sécurité.
– Toute autre utilisation n'est pas autorisée. L'utilisa-
teur est responsable des risques dus à une utilisation non autorisée.
Pour la mise en service, un bloc-batterie ainsi
qu'un chargeur d'une tension nominale de 36 V
sont requis. Pour les « variantes Set », un blocbatterie Li-ION de 36 V, 2,5 Ah (Battery Power 36/
25) et un chargeur standard 36 V (Battery
Power BC 36 V) sont déjà inclus dans l'étendue de
livraison.
Les blocs de batterie Battery Power (+) 36/25, 36/
50 et 36/75 ne doivent être utilisés qu’avec les appareils du système Battery Power 36 V de Kärcher
prévus.
Les accumulateurs/chargeurs non inclus dans
l’étendue de livraison ou dont vous avez besoin en
supplément sont disponibles en tant qu’accessoires spéciaux et peuvent être achetés ultérieurement.
Avant d'utiliser le bloc-batterie dans un appareil de
la plate-forme d'accumulateurs KÄRCHER Battery
Power, veuillez consulter le manuel d'utilisation de
l'appareil utilisé et les consignes de sécurité éventuellement jointes.
Des informations sur le manuel d’utilisation pour
les packs d’accumulateurs ainsi que les accessoires et pièces de rechange sont disponibles sur
le site Internet www.kaercher.com.
Symboles sur le chargeur
Protéger l'appareil de
charge de l'humidité et
déposer dans un endroit
sec. L'utilisation de l'appareil est appropriée uniquement pour l'intérieur,
ne pas exposer l'appareil
à la pluie.
Le chargeur dispose
d’un fusible de 1 ampère
intégré.
Le chargeur répond aux
exigences de la classe
de protection II.
Consignes de sécurité pour
la batterie
Remarques sur la batterie et le chargeur
Blocs-batteries 36 V Battery Power
dés.
Type d'accumulateur
Tension nominale
C
apacité nominale
(selon CEI/EN 61690)
Capacité nominale
(selon l’indication du
fabricant des piles)
Li-Ion
VAhAh
36/25 36 2,4 2,5
36/50 36 4,8 5,0
26 FR
Page 27
– 9
La batterie Lithium-Ion est soumise aux exigences
de la loi sur les marchandises dangereuses et peut
être transportée par l’utilisateur sans autres restrictions dans la zone de circulation publique.
En cas d’expédition par des tiers (entreprises de
transport), observer les exigences particulières sur
l’emballage ainsi que la désignation.
Utilisez la batterie uniquement si son boîtier est in-
tact. Collez les contacts apparents et emballez la
batterie de manière solide et sécurisée. Elle ne doit
pas pouvoir bouger d’ans l’emballage.
Veuillez respecter également les directives natio-
nales.
몇 PRÉCAUTION
Le but des dispositifs de sécurité est de protéger
l'utilisateur. Ils ne doivent en aucun cas être transformés ou désactivés.
Le circuit de protection monté protège le pack de batteries.
Surchauffe
Déchargement bas
Surcharge
Court-circuit
Figure en fonction du type
1 Plaque signalétique
2Ecran
3Contacts
4 Logement
1 Contacts de charge
2 Adaptateur de batteries
3 Câbles de connexion
4 Plaque signalétique
5 Bloc secteur
몇 PRÉCAUTION
Risque de blessure, de dommage ! Respecter le manuel d'utilisation et les consignes de sécurité du chargeur.
Remarque
Les blocs-batterie neufs ne sont que préchargés et
doivent être entièrement chargés avant leur première
utilisation.
L'écran est activé lors du premier cycle de charge.
Pour que l'affichage de l'état de charge fonctionne correctement, le bloc-batterie doit être déchargé lors de la
première utilisation jusqu'à la mise hors tension de l'appareil.
Figure :
Brancher le bloc secteur dans une prise de cou-
rant.
Pousser le bloc de batteries dans l’adaptateur de
batteries du chargeur.
Le cycle de charge débute automatiquement.
Figure :
La durée de charge restante est affichée sur l'écran
du bloc-batterie.
La durée de la charge d'un bloc-batterie vide (Bat-
tery Power 36/25) avec un chargeur standard (Bat-
tery Power BC 36 V) est d'environ 5,5 heures.
Lorsque le bloc-batterie est entièrement rechargé,
l'écran affiche 100%.
Après la charge, débrancher l’adaptateur de batte-
ries du bloc de batteries.
Débrancher le bloc secteur de la prise de courant.
Remarque
Si rien n'est indiqué sur l'écran lorsque le bloc-batterie
se trouve dans le chargeur, la capacité de service de la
batterie est épuisée ou très basse. Dès que le bloc-batterie est suffisamment rechargé, l'écran affiche le temps
de recharge restant.
Si aucun affichage n'apparaît après un certain
temps, cela signifie que le bloc-batterie est défectueux et qu'il doit être remplacé.
Remarque
Les blocs-batterie neufs atteignent leur pleine capacité
après env. 5 cycles de charge et décharge.
Recharger les blocs-batterie qui n'ont pas été utilisés
sur une période prolongée avant de les utiliser.
Transport
Dispositifs de sécurité
Circuit de protection
Eléments de commande
Batterie
Chargeur standard
Processus de charge
27FR
Page 28
– 10
La puissance d'un bloc-batterie baisse à une température en dessous de 0° C.
Un stockage prolongé à une température au-dessus de
20° C peut diminuer la capacité du bloc-batterie.
Remarque
Le pack de batteries chargé peut rester jusqu'à l'utilisation sur le chargeur. Il n'existe pas de risque de surcharge.
Pour éviter une consommation d'énergie inutile, le chargeur doit toutefois être débranché dès que le pack de
batteries est totalement chargé.
Le bloc-batterie est équipé d'un écran qui donne en
permanence des informations sur l'état de charge,
le progrès de la charge et la durée de service restante. Les messages d'erreur éventuels sont également affichés.
L'adaptation de la durée de marche est générée
par la commutation de puissance.
Selon l'appareil utilisé, l'affichage tourne lorsque le
bloc-batterie est inséré.
몇 PRÉCAUTION
Risque de blessure et d'endommagement ! Pour le
fonctionnement, respecter le manuel d'utilisation et les
consignes de sécurité de l'appareil utilisé.
Pousser le pack de batteries dans le logement de
l'appareil.
몇 PRÉCAUTION
Risque de blessure et d'endommagement ! Veiller à ce
que le pack de batteries s’enclenche correctement.
Remarque
Pendant l'utilisation, l'écran indique la durée de service
restante.
Après le travail, retirer le pack de batteries de l'ap-
pareil.
Charger le pack de batteries après le travail.
Remarque
Charger également des packs de batteries partiellement déchargés après l'utilisation.
몇 PRÉCAUTION
Risque de blessure et d'endommagement ! Respecter
le poids de l'appareil lors du transport.
ATTENTION
Risque d'endommagement ! Stocker des packs de batteries uniquement dans des pièces avec une humidité
de l'air basse et inférieures à 20 °C.
Cet appareil doit uniquement être entreposé en intérieur.
Le bloc-batterie indique sont état de charge actuel sur
l'écran, même sans être raccordé à un chargeur.
Si l'écran du bloc-batterie s'éteint pendant le stockage,
cela indique que la capacité de service de la batterie est
épuisée et l'écran a été désactivé. Veuillez recharger le
bloc-batterie le plus rapidement possible.
몇 PRÉCAUTION
Risque de blessure et d'endommagement ! Respecter
le poids de l'appareil lors du transport.
Contrôler régulièrement l'encrassement des
contacts de charge et et les nettoyer le cas
échéant.
Procéder à un chargement intermédiaire des packs
de batteries stockés pendant une longue période.
L'appareil ne nécessite aucune maintenance.
Commande du bloc-batterie
Résolution
Affichage Signification
Stocker la batterie
État de charge du blocbatterie lorsque qu'il
n'est pas utilisé.
Utiliser la batterie
Durée de service restante du bloc-batterie.
Charger la batterie
Temps de recharge restant du bloc-batterie lors
de la recharge.
Bloc-batterie pleinement rechargé.
Indicateur de défauts
Température du blocbatterie en dehors des limites autorisées ou désactivé en raison d'un
court-circuit (voir Aide en
cas de dérangements).
Bloc-batterie défectueux et désactivé par
sécurité. Ne plus utiliser
le bloc-batterie et l'éliminer conformément à la
réglementation en vigueur.
Fonctionnement
Entreposage
Transport et stockage
Entretien et maintenance
Maintenance
28 FR
Page 29
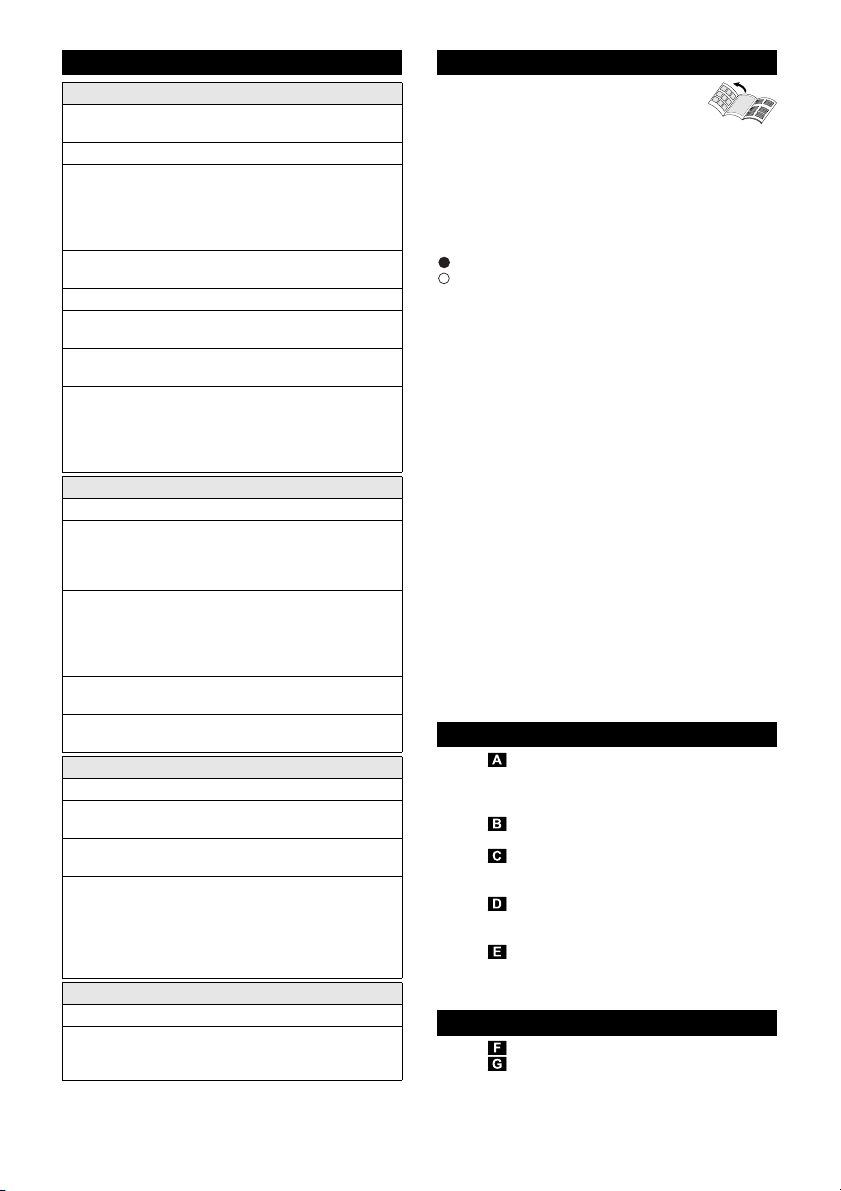
– 11
Illustrations, cf. côté escamotable !
Ces instructions de service décrivent
l'aspirateur multi-usage décrit sur la
page de garde.
Les illustrations montrant l'équipement complet, il
peut y avoir des différences au niveau de l'équipe-
ment et des accessoires livrés, suivant le modèle.
Contrôler le matériel lors du déballage pour constater
des accessoires manquants ou des dommages. Si des
dégâts dus au transport sont constatés, il faut en informer le revendeur.
inclus dans la fourniture
accessoires possibles
Figure :
Pour ouvrir les fermetures du réservoir, tirer vers
l’extérieur et retirer la tête de l’appareil par la poi-
gnée de transport.
Figure :
Sortir le contenu du réservoir.
Figure :
Vider la cuve, presser les roulettes pivotants dans
l'ouverture au fond de la cuve jusqu'à la butée.
Figure :
Placer la tête de l'appareil sur le collecteur et fer-
mer les fermetures.
Figure :
Pour aspirer de salissures sèches, un sac filtrant
peut être mis en place en complément, en cas de
besoin.
Figure :
Figure :
Voir les chapitres « Cycle de charge» et
« Commande du bloc-batterie ».
Assistance en cas de panne
Défaut lors du chargement
L'écran est éteint, le bloc-batterie ne se recharge
pas.
Chargeur défectueux. Remplacez le chargeur.
Le bloc-batterie est éventuellement entièrement dé-
chargé. Attendre et vérifier si l'écran affiche la durée
de charge restante après quelques instants. Si ce
n'est pas le cas, le bloc-batterie est défectueux. Remplacez le bloc-batterie.
L'écran est allumé mais le bloc-batterie ne se recharge pas
Chargeur défectueux. Remplacez le chargeur.
Observer cet affichage à l'écran. La température de
l'accu n'est peut-être pas dans la plage normale.
L'écran affiche le symbole de température, le blocbatterie ne se recharge pas.
Température du bloc-batterie trop basse/trop élevée.
Amener le bloc-batterie dans un environnement à température moyenne. Attendre que la température du
bloc-batterie soit de nouveau normale.
Le cycle de charge débute alors automatiquement.
Défaut en cours de fonctionnement
Le symbole de température apparaît sur l'écran
Température du bloc-batterie trop basse/trop élevée.
Amener le bloc-batterie dans un environnement à température moyenne. Attendre que la température du
bloc-batterie soit de nouveau normale.
En cas de court-circuit, le bloc-batterie est désactivé
pendant 30 secondes avant d'être utilisé à nouveau.
Si le court-circuit se répète, le bloc-batterie est désactivé de façon permanente. Raccordez le bloc-batterie
au chargeur pour le déverrouiller.
L'écran indique une durée de service restante 0,
l'appareil s'éteint.
Le bloc-batterie est déchargé. Veuillez recharger le
bloc-batterie.
Défaut en cours de stockage
L'écran n'indique plus de capacité résiduelle
Le bloc-batterie est déchargé. Veuillez recharger le
bloc-batterie.
L'écran indique une capacité résiduelle de 70%,
bien que le bloc-batterie vient d'être rechargé.
Le bloc-batterie se trouve en mode entrepôt automatique. Celui-ci est activé si la batterie n'a pas été utilisée pendant plus de 21 jours. Cette fonction protège
les cellules de batterie d'un vieillissement rapide et
augmente la durée de vie. Rechargez le bloc-batterie
entièrement avant la prochaine utilisation.
Erreur générale
L'écran affiche le symbole de batterie ajouré.
Bloc-batterie défectueux et désactivé par sécurité. Ne
plus utiliser le bloc-batterie et l'éliminer conformément
à la réglementation en vigueur.
Description de l’appareil
1 Raccord du tuyau d'aspiration
2 Compartiment à accumulateur
3 Interrupteur MARCHE/ARRET
4 Touche de déverrouillage de l'accumulateur
5 Poignée
6 Raccord de soufflerie
7 Dispositif de verrouillage de la cuve
8 Position de stationnement
9 Range-accessoires
10 Roues directionnelles
11 Réservoir
12 Sac filtrant
13 Filtre-cartouche
14 tuyau d'aspiration avec raccord
15 Poignée amovible
16 Tubes d'aspiration 2 x 0,5 m
17 Suceur fente
18 Buse de sol
(avec insert)
19 Batterie
Battery Power 36/25
20 Chargeur standard
Battery Power BC 36 V
Montage
Charger le bloc-batterie
29FR
Page 30
– 12
Figure :
Enfoncer le flexible d'aspiration dans le raccord sur
l'appareil, jusqu'à ce qu'il s'enclenche.
Pour le retirer, presser le cran d'arrêt du pouce et
retirer le flexible d'aspiration.
Figure :
Raccorder la poignée au tuyau d'aspiration jusqu'à
ce qu'il s'enclenche.
Assembler les deux tubes d'aspiration et les relier
à la poignée.
Remarque : Les accessoires, comme par ex. les
brosses d'aspiration (en o) peuvent être branchées sur
le raccord et être ainsi raccordées au tuyau d'aspiration.
Pour un confort de travail dans des espaces réduits.
En cas de besoin, la poignée amovible peut être posée
entre l'accessoire et le tuyau d'aspiration.
Recommandation: Pour une aspiration au sol, enficher
la poignée sur le tuyau d'aspiration.
Figure :
Pour retirer la poignée du tuyau d'aspiration, ap-
puyer avec le pouce et l’index sur le cliquet et reti-
rer la poignée
Remarque : Grâce au retrait de la poignée, des accessoires peuvent également être enfichés directement sur
le tuyau d'aspiration.
Figure :
Relier la buse pour sol au tube d'aspiration.
Remarque : Pour l'aspiration au sol de salissures
sèches ou d'eau - toujours travailler avec un insert
(bande de brosse et lèvre en caoutchouc) dans la buse
pour sol.
Figure :
Insérer le bloc-batterie par le haut dans le support
d'accumulateur et l'enclencher.
Figure :
Position I : Fonction aspiration ou soufflage.
Position 0: appareil hors circuit.
ATTENTION
Le réservoir métallique peut se charger statiquement
lors de l’aspiration de grandes quantités de poussière
fine et se décharger en cas de contact.
ATTENTION
La zone du support de l’accumulateur doit toujours être
propre.
En cas de pénétration, dans cette zone, de trop de
salissures, il est possible que le bloc-batterie ne
puisse plus être inséré/enclenché correctement.
Il est également possible que le bloc-batterie ne
puisse plus être retiré de l'appareil car le levier
d'éjection ne peut plus bouger.
ATTENTION
Toujours travailler avec la cartouche filtrante mise en
place, aussi bien pendant l'aspiration humide que pendant l'aspiration à sec !
ATTENTION
Avant l'utilisation, vérifier l'état du filtre et le remplacer
en cas de besoin.
Travailler uniquement avec un filtre cartouche sec!
Figure :
Recommandation : mettre le sac filtrant en place
pour aspirer les poussières fines.
– Le niveau de remplissage du sac à poussière dé-
pend de la saleté aspirée.
– En cas de poussière fine, sable etc... le sac à pous-
sière doit être changé plusieurs fois.
– Les sac filtrants colmatés pouvant éclater, rempla-
cer le sac filtrant à temps !
ATTENTION
Aspiration de cendres froides uniquement avec préséparateur.
Vous trouverez des informations relatives aux accessoires et pièces de rechange sur www.kaercher.com.
ATTENTION
Ne pas utiliser de papier filtre!
Figure :
Pour l'aspiration d'humidité ou de particules hu-
mides, veiller à la présence d'un insert correct
d'une buse pour sol et raccorder un accessoire correspondant.
Remarque : Dès que la cuve est pleine, un flotteur obture l'ouverture d'aspiration et la vitesse de rotation augmente. Arrêter immédiatement l’appareil et vider la
cuve.
Nettoyage d'endroits difficilement accessibles ou là ou
l'aspiration s'avère impossible, par exemple feuilles sur
lit de cailloux.
Figure :
In
sérer le flexible d'aspiration dans le raccord de
soufflage pour activer la fonction de soufflage.
Mettre l’appareil hors tension.
Figure :
Accrocher la buse de sol en position de repos.
Remarque : S'il s'avère nécessaire, pendant une interruption de travail, de retirer la tête d'aspiration, le blocbatterie peut rester branché. Le bloc-batterie est bien
enclenché et ne peut pas tomber.
Mettre l’appareil hors tension.
Figure :
Pousser la touche de déverrouillage du bloc-batte-
rie vers l'avant et sortir le bloc-batterie de l'appareil.
Recharger le bloc-batterie en cas de besoin (voir le
chapitre « Charger le bloc-batterie »).
Recommandation : Sortir le bloc-batterie de l'appareil
à la fin du travail.
Figure :
Enlever la tête de l'appareil et vider le réservoir.
Mise en service
Raccorder les accessoires
Insérer la batterie
Mettre l'appareil en marche
Remarques générales relatives à la
commande
Utilisation
Aspiration de poussières
Remarques relatives au sac filtrant
Aspiration humide
Soufflage
Interrompre le fonctionnement
Fin de l'utilisation
Vider le réservoir
30 FR
Page 31

– 13
Figure :
Ranger les accessoires sur l'appareil et conserver
ce dernier dans des pièces sèches.
Remarque : Indépendamment du mode Aspiration,
l'écran LCD utilise un peu de la capacité de service de
l'accumulateur, que le bloc-batterie soit dans l'appareil
ou à l'extérieur.
Voir les chapitres « Cycle de charge» et
« Commande du bloc-batterie ».
몇 PRÉCAUTION
Risque de blessure et d'endommagement !
Respecter le poids de l'appareil lors du transport.
Soulever l'appareil avec la poignée et le porter.
Freiner l'appareil pour l'empêcher de glisser et de
basculer.
Entretenir l’appareil et les accessoires en plastique
à l’aide d’un détergent pour synthétique du com-
merce.
Rincer cuve et accessoires à l'eau si nécessaire et
les sécher avant toute réutilisation.
Figure Si nécessaire, ne nettoyer la cartouche filtrante
qu'à l'eau claire, sans la frotter, ni la brosser. La
faire complètement sécher avant le montage.
Contrôler régulièrement l'encrassement des
contacts de charge et et les nettoyer le cas
échéant.
Contrôler l'encrassement des fentes d'aération, le
nettoyer le cas échéant.
L'appareil ne nécessite aucune maintenance.
Figure :
La batterie n'est pas bien placée dans le support
d'accumulateur, pousser la batterie dans le support
d'accumulateur et l'enclencher.
Etat de charge de la batterie trop faible (voir
l'écran), recharger la batterie, si besoin.
Batterie ou chargeur défectueux, remplacer la bat-
terie ou le chargeur par de nouveaux accessoires.
Surchauffe de l'appareil/batterie, attendre un peu
jusqu'à ce que l'appareil/batterie ait pu refroidir.
Le réservoir est plein d’eau ce qui active le flotteur,
vider le réservoir.
Les accessoires, le tuyau d'aspiration ou les tubes
d'aspiration sont bouchés.
Retirer les dépôts avec un moyen auxiliaire adapté.
Figure :
Le sac filtrant est plein ; mettre un nouveau sac fil-
trant en place.
Figure La cartouche filtrante est encrassée ; la tapper et la
nettoyer à l'eau claire si nécessaire.
Remplacer la cartouche filtrante endommagée.
Recommandation : Remplacer le filtre à cartouche filtrante 1 fois par an.
Sous réserve de modifications techniques !
Ranger l’appareil
Rangement du bloc-batterie
Transport
Transport manuel
Transport dans des véhicules
Entretien et maintenance
Maintenance
Assistance en cas de panne
L'appareil ne fonctionne pas
L'appareil se met hors service de manière
autonome.
Faible puissance d'aspiration
Caractéristiques techniques
Bloc-batterie et chargeur standard dans l'étendue de livraison de :
WD 3 Battery Set
WD 3 Battery Premium Set
(Bloc-batterie Battery Power 36/25/Chargeur
standard Battery Power BC 36 V)
Appareil
Puissance nominale W 300
Heures de service avec charge-
ment complet de la batterie (max.)
min 15
Classe de protection III
Type de protection IPX4
Bloc-batterie Battery Power 36/25
Tension nominale V 36
Capacité nominale
(selon CEI/EN 61690)
Ah 2,4
Capacité nominale
(selon l’indication du fabricant des
piles)
Ah 2,5
Puissance nominale
(selon EN 3480)
Wh 86,4
Courant de chargement max. A 4
Type d'accumulateur Li-Ion
Poids kg 0,9
Dimensions (l x l x h) mm 133x88x72
Chargeur standard Battery Power BC 36 V
Tension nominale de la batterie V 36
Courant de chargement max. A 0,5
Type d'accumulateur Li-Ion
Tension du secteur V 100-240
Fréquence Hz 50-60
Puissance absorbée (max.) A 0,3
Classe de protection II
Poids (sans batterie) g 205
31FR
Page 32

– 5
Gentile cliente,
Prima di utilizzare l'apparecchio per la
prima volta, leggere le presenti istruzioni per l'uso originali, seguirle e conservarle per un uso futuro o in caso di
rivendita dell'apparecchio.
L'apparecchio, in conformità alle descrizioni e alle avvertenze di sicurezza date in queste istruzioni per l'uso,
è destinato per essere utilizzato come aspiratore multiuso.
Questo apparecchio è concepito per il solo uso domestico e non deve essere adibito ad uso commerciale o
industriale.
– Proteggere l'apparecchio contro la pioggia. Depo-
sitare l'apparecchio soltanto in ambienti chiusi.
– È vietato aspirare con questo apparecchio cenere
e fuliggine.
Il produttore non è responsabile per eventuali danni
causati dall'uso improprio e/o uso che non corrisponde
a quello conforme a destinazione.
Avvertenze sui contenuti (REACH)
Informazioni aggiornate sui contenuti sono disponibili
all'indirizzo:
www.kaercher.com/REACH
Avvertenze sui contenuti (REACH)
Informazioni aggiornate sui contenuti sono disponibili
all'indirizzo:
www.kaercher.com/REACH
Le condizioni di garanzia valgono nel rispettivo paese di
pubblicazione da parte della nostra società di vendita
competente. Entro il termine di garanzia eliminiamo gratuitamente eventuali guasti all’apparecchio, se causati
da difetto di materiale o di produzione. Nei casi previsti
dalla garanzia si prega di rivolgersi al proprio rivenditore, oppure al più vicino centro di assistenza autorizzato,
esibendo lo scontrino di acquisto.
In caso di domande o anomalie la filiale KÄRCHER è felice di poterla aiutare.
Utilizzando solamente accessori e ricambi originali, si
garantisce un funzionamento sicuro e privo di disturbi
dell'apparecchio.
Si possono trovare informazioni riguardo ad accessori e
ricambi su www.kaercher.com.
In caso di accessori assenti o danni dovuti al trasporto
si prega di contattare il rivenditore.
PERICOLO
Indica un pericolo imminente
che determina lesioni gravi o la
morte.
몇 AVVERTIMENTO
Indica una probabile situazione
pericolosa che potrebbe determinare lesioni gravi o la morte.
Indice
Avvertenze generali IT 5
Norme di sicurezza IT 5
Indicazioni sull'unità accumulatore e sul
caricabatterie IT 8
Dispositivi di sicurezza IT 9
Dispositivi di comando IT 9
Processo di carica IT 9
Funzionamento unità accumulatore IT 10
Immagazzinaggio IT 10
Trasporto e stoccaggio IT 10
Cura e manutenzione IT 10
Guida alla risoluzione dei guasti IT 10
Descrizione dell’apparecchio IT 11
Montaggio IT 11
Caricamento dell’unità accumulatore IT 11
Messa in funzione IT 11
Indicazioni generali riguardo all'uso IT 12
Uso IT 12
Trasporto IT 13
Cura e manutenzione IT 13
Guida alla risoluzione dei guasti IT 13
Dati tecnici IT 13
Avvertenze generali
Uso conforme a destinazione
Protezione dell’ambiente
I materiali d'imballaggio sono riciclabili. Smaltire a
regola d'arte gli imballaggi.
Gli apparecchi dismessi contengono preziosi materiali riciclabili che devono essere consegnati al
riciclaggio. Sia le batterie che gli accumulatori
contengono sostanze che non devono essere disperse nell’ambiente. Smaltire gli apparecchi dismessi nonché le batterie e gli accumulatori nel
rispetto delle norme ambientali.
Gli apparecchi elettrici ed elettronici contengono
spesso componenti che, con un utilizzo o smaltimento non corretti, possono costituire un potenziale pericolo per la salute umana e per l'ambiente. Questi componenti sono tuttavia necessari per
un corretto funzionamento dell'apparecchio. Gli
apparecchi contrassegnati con questo simbolo
non devono essere smaltiti con i rifiuti domestici.
Garanzia
Servizio assistenza
Accessori e ricambi
Fornitura
Norme di sicurezza
Livelli di pericolo
32 IT
Page 33

– 6
몇 PRUDENZA
Indica una probabile situazione
pericolosa che potrebbe causare lesioni leggere.
ATTENZIONE
Indica una probabile situazione
pericolosa che potrebbe determinare danni alle cose.
PERICOLO
L'utente deve utilizzare l'ap-
parecchio in modo conforme
alla sua destinazione. Esso
deve rispettare le condizioni
del luogo e durante il lavoro
con l'apparecchio, fare atten-
zione alle persone presenti
sul luogo circostante.
È interdetto fare funzionare
l'apparecchio in aree poten-
zialmente a rischio di esplo-
sione.
Rispettare assolutamente le
relative norme di sicurezza in
caso di utilizzo dell'apparec-
chio in aree a rischio.
Non utilizzare l'apparecchio
se dapprima è caduto a terra,
è visibilmente danneggiato o
non è ermetico.
Tenere le pellicole di imbal-
laggio fuori dalla portata dei
bambini. Pericolo di asfissia!
몇 AVVERTIMENTO
Questo apparecchio non è in-
dicato per essere usato da
persone con delle limitate ca-
pacità fisiche, sensoriali o
mentali e da persone che abbiano poca esperienza e/o
conoscenza dell'apparecchio
a meno che non vengano supervisionati per la loro sicurezza da una persona incaricata o che abbiano da questa
ricevuto istruzioni su come
usare l'apparecchio e dei pericoli da esso derivante.
I bambini possono utilizzare
l'apparecchio solo se maggiori dell'età di 8 anni e a meno
che non vengano supervisionati per la loro sicurezza da
una persona incaricata o che
abbiano da questa ricevuto
istruzioni su come usare l'apparecchio e dei pericoli da
esso derivante.
I bambini non devono giocare
con l'apparecchio.
Sorvegliare i bambini per as-
sicurarsi che non giochino
con l'apparecchio.
Utilizzare e conservare l'ap-
parecchio solo secondo la
descrizione o la figura!
L'apparecchio contiene com-
ponenti elettrici, non pulirlo
sotto acqua corrente.
몇 PRUDENZA
Non lasciare mai l’apparec-
chio incustodito quando è in
funzione.
ATTENZIONE
Non utilizzare l'apparecchio
in caso di temperature inferiori a 0 °C.
Avvertenze di sicurezza per
aspiratore liquidi/solidi
Uso sicuro
33IT
Page 34

– 7
Mai aspirare senza filtro, l'ap-
parecchio potrebbe altrimenti
venirne danneggiato.
Proteggere l'apparecchio da
intemperie estreme, umidità e
calore.
PERICOLO
Rischio di esplosioni!
È interdetto fare funzionare
l'apparecchio in aree poten-
zialmente a rischio di esplo-
sione.
Non aspirare gas, liquidi e
polveri esplosivi o infiamma-
bili!
Non aspirare polveri di metal-
lo reattive (ad es. alluminio,
magnesio, zinco)!
Non aspirare acidi non diluiti
o soluzioni alcaline!
Non aspirare materiali o og-
getti brucianti o incandescen-
ti!
몇 AVVERTIMENTO
Pericolo di lesioni!
Non tenere la bocchetta e il
tubo dell'aspiratore in prossi-
mità della testa.
몇 PRUDENZA
Per prevenire incidenti o le-
sioni durante il trasporto è ne-
cessario osservare il peso
dell'apparecchio (vedi Dati
tecnici).
몇 PRUDENZA
Prima di qualsiasi attività con
o sull'apparecchio è necessa-
rio renderlo stabile per evitare
incidenti o danneggiamenti
dovuto dalla caduta dell'apparecchio.
PERICOLO
Prima di ogni utilizzo verifica-
re che la spina alimentatore, il
cavo di collegamento, l'adattatore per l'accumulatore e
l'unità accumulatore non siano danneggiati. Gli apparecchi danneggiati non devono
essere utilizzati e devono essere sostituiti.
Non aprire il caricabatterie. In
caso di danni o guasti, sostituire il caricabatterie.
Non utilizzare il caricabatterie
in ambienti a rischio d'esplosione.
Mai toccare e afferrare la spi-
na e la presa elettrica con
mani bagnate.
Non utilizzare il caricabatterie
sporco o bagnato.
Non caricare batterie (celle pri-
marie). Pericolo di esplosioni.
몇 PRUDENZA
La tensione indicata sulla tar-
ghetta del caricabatterie deve
corrispondere alla tensione di
rete.
Utilizzare il caricabatterie
solo per caricare unità accumulatore autorizzate.
È consentito caricare l'unità
accumulatore solo con il caricabatterie originale o con caricabatterie approvati da
KÄRCHER.
Altri pericoli
Stabilità dell'apparecchio
Avvertenze di sicurezza per
il caricabatterie
34 IT
Page 35

– 8
ATTENZIONE
Non trasportare il caricabatte-
rie tramite il cavo di collegamento.
Tenere lontano il cavo di col-
legamento da fonti di calore,
spigoli vivi, olio e parti in movimento.
Non coprire la spina alimen-
tatore.
Evitare il funzionamento di di-
versi apparecchi contemporaneamente utilizzando prolunghe con prese multiple.
Per evitare che si danneggi,
non avvolgere il cavo di collegamento intorno alla spina
alimentatore né all'adattatore
per l'accumulatore.
Leggere le avvertenze di sicurezza di corredo all'unità accumulatore e attenersi sempre ad esse durante l'utilizzo!
몇 PRUDENZA
– L'esplosione dell'accumulatore può causare lesioni
alle persone e danni alle cose! Caricare l'unità accumulatore solo con l'apposito caricabatterie.
– Prima dell'utilizzo verificare che il caricabatterie sia
compatibile con l'unità accumulatore!
– Caricare solo unità accumulatore non danneggiate.
– Per motivi di sicurezza sono interdette trasforma-
zioni e cambiamenti non autorizzati dal costruttore.
– Qualsiasi altro utilizzo è vietato. Per pericoli che si
creano dall'impiego non consentito ne è responsabile l'utente.
Per la messa in esercizio sono necessari un’unità
accumulatore nonché un caricabatterie con una
tensione nominale di 36 V. Nel "set-varianti", sono
già inclusi nella consegna un’unità accumulatore
Li-ION da 36V, 2,5 Ah (Battery Power 36/25) nonché un caricabatterie standard da 36 V (Battery Power BC 36 V).
Le unità accumulatore Battery Power (+) 36/25, 36/
50 e 36/75 possono essere impiegate solo con apparecchi appositi del sistema Kärcher Battery Power 36 V.
Gli accumulatori / i caricatori non compresi nella
fornitura o che sono ulteriormente necessari, possono essere acquistati come accessori opzionali e
possono di conseguenza essere comprati separatamente.
Prima di utilizzare l'unità accumulatore in un appa-
recchio delle piattaforme accumulatore KÄRCHER
Battery Power leggere le istruzioni per l'uso dell'apparecchio utilizzato ed eventualmente le allegate
avvertenze di sicurezza.
Ulteriori informazioni riguardo alle istruzioni d'uso
per l'unità accumulatore e accessori e ricambi,
sono disponibili su www.kaercher.com.
Simboli sul caricabatterie
Proteggere l'accumulatore da umidità e tenerlo
in un luogo asciutto.
L'apparecchio si adatta
alla pulizia di ambienti interni. Non va esposto
alla pioggia.
Il caricabatterie è dotato
di un fusibile integrato da
1 ampere.
Il caricabatterie è conforme ai requisiti del grado
di protezione II.
Avvertenze di sicurezza per
l'unità accumulatore
Indicazioni sull'unità accumulatore e
sul caricabatterie
Sede per l'unità accumulatore Battery Power
36 V
Denominazione
Tipo accumulatore
Tensione nominale
Cap
acità nominale
(secondo IEC/EN 61690)
Capacità nominale
(secondo i dati forniti dal
produttore delle celle)
ioni di litio
VAhAh
36/25 36 2,4 2,5
36/50 36 4,8 5,0
35IT
Page 36

– 9
La batteria agli ioni di litio è soggetta ai requisiti del
diritto relativo alle merci pericolose e può essere
trasportata dall’utente in ambiente pubblico, senza
l’applicazione di ulteriori requisiti.
In caso di spedizione ad opera di terzi (impresa di
trasporti), occorre attenersi a particolari requisiti in
materia di imballo e contrassegno.
Spedire l’unità accumulatore, solo se l’alloggia-
mento non risulta danneggiato. Fissare i contatti
che rimangono aperti e imballare l’unità accumulatore in modo stabile e sicuro. Il prodotto non deve
potersi muovere all’interno della confezione.
Osservare anche le disposizioni nazionali.
몇 PRUDENZA
I dispositivi di sicurezza servono alla protezione
dell'utente e non devono essere modificati o essere
raggirati.
Il circuito di protezione installato protegge il pacchetto
batteria da
surriscaldamento
scarica completa
Sovraccarico
Pericolo di cortocircuito
Figura a seconda della tipologia
1 Targhetta
2 Display
3Contatti
4 Alloggiamento
1 Contatti ricarica
2 Adattatore per l'accumulatore
3 Cavo di collegamento
4 Targhetta
5 Spina alimentatore
몇 PRUDENZA
Pericolo di lesioni e danneggiamento! Osservare le
istruzioni per l’uso e le avvertenze di sicurezza del caricabatterie.
Nota
Le unità accumulatore nuove sono semplicemente precaricate e devono essere caricate completamente prima del primo utilizzo.
Il display si attiva alla prima procedura di ricarica.
Affinché l'indicatore dello stato di ricarica possa funzionare correttamente, al primo utilizzo l'unità accumulatore deve essere completamente scaricata fino allo spegnimento dell'apparecchio.
Figura
Inserire la spina alimentatore nella presa elettrica.
Inserire l'unità accumulatore nell'adattatore accu-
mulatore del caricabatterie.
Il ciclo di ricarica si attiva automaticamente.
Figura
Sul display dell'unità accumulatore viene indicata
la durata restante di ricarica.
Il tempo di ricarica con un caricabatterie standard
(Battery Power BC 36 V) per un’unità accumulatore
scarica (Battery Power 36/25) è di circa 5,5 ore.
Se l'unità accumulatore è completamente carica, il
display mostra 100%.
Al termine della carica, staccare l'adattatore
dall'unità accumulatore.
Staccare la spina alimentatore dalla presa.
Nota
Se il display non mostra niente quando l'unità accumulatore si trova nel caricabatterie, la capacità dell'accumulatore è esaurita o molto bassa. Se l'unità accumulatore è stata ricaricata a sufficienza, il display mostra il
tempo di ricarica residuo
.
Se
dopo diverso tempo non viene mostrato nulla,
l'unità accumulatore è guasta e deve essere sostituita.
Nota
Le unità accumulatore raggiungono la loro massima capacità dopo circa 5 cicli di carica/scarica.
Ricaricare le unità accumulatore non utilizzate per un
lungo periodo prima dell'uso.
Se le temperature scendono sotto i 0 °C l'efficacia
dell'unità accumulatore inizia a diminuire.
Depositi di lunga durata a temperature superiori a 20 °C
possono ridurre la capacità dell'unità accumulatore.
Nota
Il pacchetto batteria ricaricato può rimanere sul caricabatterie fino al momento dell'utilizzo. Non vi è pericol
o
di sovrac
carico.
Per evitare un consumo di energia inutile, il caricabatterie però deve essere staccato dalla corrente, non appena il pacchetto batterie è completamente ricaricato.
Trasporto
Dispositivi di sicurezza
Circuito di protezione
Dispositivi di comando
Unità accumulatore
Caricabatterie standard
Processo di carica
36 IT
Page 37

– 10
L'unità accumulatore è dotata di un display che dà
costantemente informazioni sullo stato di carica,
sul progresso della ricarica e sulla durata residua.
Inoltre visualizza gli eventuali messaggi di errore.
L'adattamento della durata viene generato tramite
commutazione della potenza.
A seconda dell'apparecchio utilizzato, il display
ruota nel momento in cui è inserita l'unità accumulatore.
몇 PRUDENZA
Pericolo di lesioni e di danneggiamento! Per il funzionamento, osservare le istruzioni per l’uso e le avvertenze
di sicurezza dell’apparecchio utilizzato.
Infilare il pacchetto batteria nell’alloggiamento
dell’apparecchio.
몇 PRUDENZA
Pericolo di lesioni e di danneggiamento! Fare attenzione che il pacchetto batteria s'agganci correttamente.
Nota
Durante l'utilizzo, il display mostra il tempo residuo.
Terminato il lavoro, rimuovere il pacchetto batteria
dall’apparecchio.
Dopo il lavoro ricaricare il pacchetto batteria.
Nota
Ricaricare dopo l’uso anche i pacchetti batteria semiscarichi.
몇 PRUDENZA
Pericolo di lesioni e di danneggiamento! Per il trasporto
osservare il peso dell'apparecchio.
ATTENZIONE
Pericolo di danneggiamento! Conservare i pacchetti
batteria solo in locali con bassa umidità dell’aria e sotto
20 °C.
Questo apparecchio può essere conservato solo in ambienti interni.
Sul display l'unità accumulatore mostra lo stato attuale
di carica anche se non è collegato a un caricabatterie.
Se il display dell'unità accumulatore si spegne durante
il deposito, la capacità dell'accumulatore è esaurita e il
display è stato spento. Ricaricare quanto prima l'unità
accumulatore.
몇 PRUDENZA
Pericolo di lesioni e di danneggiamento! Per il trasporto
osservare il peso dell'apparecchio.
Verificare regolarmente se i contatti di carica sono
sporchi e pulirli all’occorrenza.
Pacchetti batteria conservati a lungo tempo vanno
sempre di tanto in tanto ricaricati.
L'apparecchio è senza manutenzione.
Funzionamento unità accumulatore
Display
Display Significato
Conservazione dell'unità accumulatore
Stato della carica
dell'unità accumulatore
mente non è utilizzata.
Utilizzo dell'unità accumulatore
Durata residua dell'unità
accumulatore durante
l'utilizzo.
Carica dell'accumulatore
Durata residua di ricarica dell'unità accumulatore durante la ricarica.
Unità accumulatore
completamente carica.
Visualizzazione errori
Temperatura dell'unità
accumulatore fuori dai
valori ammessi oppure
unità bloccata a causa di
un corto circuito (vedi
Guida in caso di guasti).
Unità accumulatore guasta o bloccata per sicurezza. Non utilizzare più
l'unità accumulatore e
smaltirla conformemente alle norme.
Funzionamento
Immagazzinaggio
Trasporto e stoccaggio
Cura e manutenzione
Manutenzione
Guida alla risoluzione dei guasti
Errore durante la ricarica
Il display è spento, l'unità accumulatore non si ca-
rica
Il caricabatterie è guasto. Sostituire il caricabatterie.
L'unità accumulatore è totalmente scarica. Attendere
e verificare se dopo un certo tempo il display mostra il
tempo residuo di ricarica. Se non lo mostra, l'unità accumulatore è guasta. Sostituire l'unità accumulatore.
Il display è acceso ma l’accumulatore non si carica
Il caricabatterie è guasto. Sostituire il caricabatterie.
Osservare le indicazioni sul display. La temperatura
dell’unità accumulatore potrebbe non essere normale.
Il display mostra il simbolo della temperatura,
l'unità accumulatore non si carica
37IT
Page 38

– 11
Figure riportate sulla pagina pieghevole!
Le presenti istruzioni per l'uso descri-
vono gli aspiratori multiuso riportati in copertina.
Le figure illustrano la dotazione massima. In base
al modello sussistono delle differenze nella dota-
zione e gli accessori forniti.
Durante il disimballaggio controllare l'eventuale mancanza di accessori o la presenza di danni del contenuto.
Nel caso in cui si riscontrino danni dovuti al trasporto, informare immediatamente il proprio rivenditore.
compreso nella fornitura
possibile accessorio
Figura
All'apertura tirare verso l'esterno il tappo del serba-
toio e rimuovere la testa dell"apparecchio sull'im-
pugnatura.
Figura
Estrarre il contenuto dal serbatoio.
Figura
Girare il serbatoio e spingere le ruote pivottanti ne-
gli orifizi sul fondo del serbatoio, fino alla battuta.
Figura
Montare la testa dell'apparecchio sul contenitore e
chiudere le chiusure del contenitore.
Figura
Per l'aspirazione di sporco secco, all'occorrenza
può essere utilizzato aggiuntivamente un sacchet-
to filtro.
Figura
Figura
Vedere il capitolo "Processo di carica " e "Funzio-
namento unità accumulatore".
Figura
Inserire il tubo flessibile di aspirazione nell'attacco
dell'apparecchio e si aggancia.
Per la rimozione premere con il pollice ed estrarre
il tubo flessibile di aspirazione.
Figura
Collegare il manico con il tubo flessibile, finché si
aggancia.
Infilare uno dentro l'altro i due tubi di aspirazione e
collegarli con il manico.
Avviso: Accessori, come p. es. spazzole aspiranti (in
opzione) possono essere infilati direttamente sul raccordo e quindi collegarsi con il tubo flessibile di aspirazione.
Per lavorare comodi anche in locali angusti.
Temperatura dell’unità accumulatore troppo bassa /
alta. Trasferire l’unità accumulatore in un ambiente
con temperature adeguate. Attendere fino a quando la
temperatura dell’unità accumulatore non si sia normalizzata.
La procedura di ricarica si attiva automaticamente.
Errore nel funzionamento
Sul display è visualizzato il simbolo della tempera-
tura
Temperatura dell’unità accumulatore troppo bassa /
alta. Trasferire l’unità accumulatore in un ambiente
con temperature adeguate. Attendere fino a quando la
temperatura dell’unità accumulatore non si sia normalizzata.
In caso di cortocircuito l'unità accumulatore viene bloccata e non è utilizzabile per ulteriori 30 secondi. Se il
corto circuito si verifica spesso, l'unità accumulatore
viene bloccata definitivamente. Per sbloccare l'unità
accumulatore, collegarla al caricabatterie.
Se il display mostra come durata residua 0, l'apparecchio si spegne.
L'unità accumulatore è scarica. Ricaricare l'unità accumulatore.
Errore durante il deposito
Il display non mostra la capacità residua
L'unità accumulatore è scarica. Ricaricare l'unità accumulatore.
Il display mostra come capacità residua 70% anche se l'unità accumulatore è stata appena ricaricata.
L'unità accumulatore si trova in modalità automatica di
deposito. Questa modalità viene attivata quando l'accumulatore non viene utilizzato per oltre 21 giorni.
Questa funzione protegge le celle dell'accumulatore
da un invecchiamento precoce e ne allunga la durata.
Ricaricare completamente l'unità accumulatore prima
del successivo utilizzo.
Errore generico
Il display visualizza il simbolo di batteria rotta.
Unità accumulatore guasta o bloccata per sicurezza.
Non utilizzare più l'unità accumulatore e smaltirla conformemente alle norme.
Descrizione dell’apparecchio
1 Raccordo tubo flessibile di aspirazione
2 Scomparto accumulatore
Errore durante la ricarica
3 Interruttore dell'apparecchio (ON/OFF)
4 Tasto di sblocco batteria
5 Maniglia
6 Raccordo di soffiatura
7 Chiusura serbatoio
8 Posizione parcheggio
9 Alloggiamento accessori
10 Ruota pivottante
11 Contenitore
12 Sacchetto filtro
13 Filtro a cartuccia
14 Tubo flessibile di aspirazione con raccordo
15 Manico estraibile
16 Tubi rigidi di aspirazione 2 x 0,5 m
17 Bocchetta fessure
18 Bocchetta pavimenti
(con inserto)
19 Unità accumulatore
Battery Power 36/25
20 Caricabatterie standard
Battery Power BC 36 V
Montaggio
Caricamento dell’unità accumulatore
Messa in funzione
Collegare gli accessori
38 IT
Page 39

– 12
Il manico estraibile può essere conservato all'occorrenza tra gli accessori e il tubo flessibile di aspirazione.
Raccomandazione: Per aspirare il pavimento, infilare il
manico sul tubo flessibile di aspirazione.
Figura
Per la rimozione del manico dal tubo flessibile di
aspirazione, premere il nottolino con il pollice e l'indice ed estrarre il manico
Avviso: Togliendo il manico, è possibile infilare direttamente anche gli accessori sul tubo flessibile di aspirazione.
Figura
Collegare la bocchetta per pavimenti al tubo d'aspi-
razione.
Avviso: Per l'aspirazione di pavimenti con sporco secco o acqua - aspirare sempre con l'inserto (striscia di
setole e labbro di gomma) nella bocchetta per pavimenti.
Figura
Dall'alto, innestare e far scattare in posizione l'unità
accumulatore nel supporto dell'accumulatore.
Figura
Posizione I: Funzione di aspirazione o di soffiatu-
ra.
Posizione 0: l'apparecchio è spento.
ATTENZIONE
Nell'aspirazione, il serbatoio di metallo può caricarsi
staticamente di quantità più grandi di polveri sottili e poi
scaricarsi in caso di contatto.
ATTENZIONE
L'area del supporto dell'accumulatore deve essere tenuta pulita.
Nel caso in cui in quest'area giunga troppo sporco,
può accadere che non sia più possibile inserire/far
scattare in posizione l'unità accumulatore in modo
corretto.
Vi è altresì la possibilità di non riuscire più ad
estrarre l'unità accumulatore dall'apparecchio, poiché non è più possibile muovere la leva di espulsione.
ATTENZIONE
Lavorare sempre con il filtro a cartuccia inserito sia durante l'aspirazione di liquidi che l'aspirazione di solidi!
ATTENZIONE
Prima di utilizzarlo, verificare se il filtro presenta danneggiamenti e sostituirlo se necessario.
Lavorare solo con il filtro a cartuccia asciutto!
Figura
Suggerimento: Per l'aspirazione di polvere fine in-
serire il sacchetto filtro.
– Il livello di riempimento del sacchetto filtrante di-
pende dallo sporco che viene aspirato.
– Nel caso di polveri fini, sabbia, ecc. sostituire spes-
so il sacchetto filtrante.
– Il sacchetto filtrante usurato può scoppiare, pertan-
to va sostituito in tempo!
ATTENZIONE
Aspirare ceneri raffreddate solo un pre-separatore.
Si possono trovare informazioni riguardo ad accessori e
ricambi su www.kaercher.com.
ATTENZIONE
Non utilizzare il sacchetto filtrante!
Figura
Per l'aspirazione di umidità o bagnato, scegliere il
corretto inserto nella bocchetta per pavimenti e col-
legare accessori corrispondenti.
Indicazione: Se il serbatoio è pieno, un galleggiante
chiude l'apertura di aspirazione e l'apparecchio gira con
maggiore velocità. Spegnere subito l'apparecchio e
svuotare il serbatoio.
Pulizia di punti difficilmente accessibili o in cui l'aspirazione non è possibile, ad es. foglie dal letto di ghiaia.
Figura
Inserire il tubo flessibile di aspirazione nell'apposito
attacco. In questo modo la funzione di soffiaggio è
attivata.
Spegnere l’apparecchio.
Figura
Agganciare la bocchetta per pavimenti nella posi-
zione di parcheggio.
Nota: nel caso in cui durante l'interruzione del lavoro sia
necessario rimuovere la testa di aspirazione, l'unità accumulatore può bloccarsi. L'unità accumulatore è incassata saldamente e non può cadere.
Spegnere l’apparecchio.
Figura
Spingere in avanti il tasto di sbloccaggio dell'unità
accumulatore e rimuovere l'accumulatore dell'ap-
parecchio.
A seconda delle necessità, ricaricare l'unità accu-
mulatore (vedi il capitolo "Ricaricare l'unità accu-
mulatore").
Consigl
io: al termine del lavoro, estrarre l'unità accu-
mulatore dall'apparecchio.
Figura
Rimuovere la testa dell'apparecchio e svuotare il
serbatoio.
Figura
Conservare gli accessori nell’apparecchio e con-
servare l'apparecchio in luoghi asciutti.
Nota: indipendentemente dal funzionamento in aspirazione, il display LC traccia la capacità dell'accumulatore, sia che l'unità accumulatore si trovi all'interno
dell'apparecchio sia all'esterno.
Vedere il capitolo "Processo di carica " e "Funzio-
namento unità accumulatore".
Inserimento dell'unità accumulatore
Accendere l’apparecchio
Indicazioni generali riguardo all'uso
Uso
Aspirazione a secco
Indicazioni riguardo al sacchetto filtro
Aspirazione ad umido
Funzione di soffiatura
Interrompere il funzionamento
Dopo l’uso
Svuotare il contenitore
Deposito dell’apparecchio
Conservazione dell’unità accumulatore
39IT
Page 40

– 13
몇 PRUDENZA
Pericolo di lesioni e di danneggiamento!
Per il trasporto osservare il peso dell'apparecchio.
Sollevare l'apparecchio con l'apposito manico e
trasportarlo.
Bloccare l'apparecchio in modo tale che non possa
scivolare o ribaltarsi.
Trattare l'apparecchio e gli accessori in plastica
con un detergente per plastica disponibile in commercio.
Sciacquare all'occorrenza il contenitore e gli acces-
sori con dell'acqua ed asciugarli prima del loro riu-
tilizzo.
Figura All'occorrenza pulire il filtro a cartuccia solo sotto
acqua corrente; non strofinare o spazzolare. Asciu-
garlo completamente prima di inserirlo.
Verificare regolarmente se i contatti di carica sono
sporchi e pulirli all’occorrenza.
Controllare le feritoie di ventilazione se sporche ed
eventualmente pulirle.
L'apparecchio è senza manutenzione.
Figura
Se l'unità accumulatore non è posizionata corretta-
mente nel supporto dell'accumulatore, inserire e far
scattare in posizione l'unità accumulatore nel suo
supporto.
Stato di ricarica dell’unità accumulatore troppo de-
bole (vedere il display), se necessario caricare
l'unità accumulatore.
In caso di unità accumulatore o caricabatterie difet-
tosi, sostituirli con nuovi accessori.
In caso di surriscaldamento dell'apparecchio / unità
accumulatore, attendere brevemente affinché l'ap-
parecchio / unità accumulatore possano raffreddar-
si.
Se il serbatoio è pieno d'acqua e per questo si atti-
va il galleggiante, svuotare il serbatoio.
Accessori, tubo aspirante o pipette ostruiti.
Rimuovere l’ostruzione con un ausilio idoneo.
Figura
Il sacchetto filtrante è pieno. Inserire un nuovo sac-
chetto.
Figura Il filtro a cartuccia è sporco, battere il filtro a cartuc-
cia ed all'occorrenza pulirlo sotto acqua corrente.
Sostituire il filtro a cartuccia danneggiato.
Consiglio: cambiare il filtro a cartuccia 1 volta all'anno.
Con riserva di modifiche tecniche!
Trasporto
Posizione manuale
Posizione in veicoli
Cura e manutenzione
Manutenzione
Guida alla risoluzione dei guasti
L'apparecchio non funziona
L'apparecchio si spegne autonomamente
Diminuzione della potenza di aspirazione
Dati tecnici
Unità accumulatore e caricabatterie standard nella consegna di:
WD 3 Battery Set
WD 3 Battery Premium Set
(Unità accumulatore Battery Power 36/25 / caricabatterie standard Battery Power BC 36 V)
Apparecchio
Potenza nominale W 300
Tempo di funzionamento con bat-
teria totalmente carica (max.)
min 15
Classe di protezione III
Protezione IPX4
Unità accumulatore Battery Power 36/25
Tensione nominale V 36
Capacità nominale
(secondo IEC/EN 61690)
Ah 2,4
Capacità nominale
(secondo i dati forniti dal produttore delle celle)
Ah 2,5
Energia nominale
(secondo UN 3480)
Wh 86,4
Corrente di carica max. A 4
Tipo accumulatore ioni di litio
Peso kg 0,9
Dimensioni (lunghezza x larghez-
za x altezza)
mm 133x88x72
Caricabatterie standard Battery Power BC 36 V
Tensione nominale unità accumulatore
V36
Corrente di carica max. A 0,5
Tipo accumulatore ioni di litio
Tensione di rete V 100-240
Frequenza Hz 50-60
Assorbimento di corrente (max) A 0,3
Classe di protezione II
Peso (senza unità accumulatore) g 205
40 IT
Page 41

– 5
Beste klant,
Lees vóór het eerste gebruik van uw
apparaat deze originele gebruiksaanwijzing, ga navenant te werk en bewaar deze voor later gebruik of voor
een andere eigenaar.
Het apparaat is volgens de in deze gebruiksaanwijzing
gegeven beschrijvingen en de veiligheidsinstructies bestemd voor gebruik als multifunctionele zuiger.
Dit apparaat is voor privé-gebruik ontwikkeld en is niet
bedoeld voor industrieel gebruik.
– Het apparaat tegen regen beschermen. Niet buiten
opslaan.
– As en roet mogen met dit apparaat niet opgezogen
worden.
De fabrikant is niet aansprakelijk voor eventuele schade
die ontstaat wanneer het apparaat niet volgens de voorschriften of op een verkeerde manier wordt gebruikt.
Aanwijzingen betreffende de inhoudsstoffen
(REACH)
Huidige informatie over de inhoudsstoffen vindt u onder:
www.kaercher.com/REACH
Aanwijzingen betreffende de inhoudsstoffen
(REACH)
Huidige informatie over de inhoudsstoffen vindt u onder:
www.kaercher.com/REACH
In ieder land zijn de door ons bevoegde verkoopkantoor
uitgegeven garantiebepalingen van toepassing. Eventuele storingen aan het apparaat verhelpen wij zonder
kosten binnen de garantietermijn, mits een materiaal of
fabrieksfout de oorzaak van deze storing is. Neem bij
klachten binnen de garantietermijn contact op met uw
leverancier of de dichtstbijzijnde klantenservicewerkplaats en neem uw aankoopbewijs mee.
Bij vragen of storingen helpt onze KÄRCHER-filiaal u
graag verder.
Gebruik alleen origineel toebehoren en originele reserveonderdelen. Deze garanderen dat het apparaat veilig
en zonder storingen functioneert.
Informatie over het toebehoren en de reserveonderdelen vindt u op www.kaercher.com.
Mochten er eventueel accessoires ontbreken of mocht
u transportschade constateren, neem dan contact op
met uw leverancier.
GEVAAR
Verwijzing naar een onmiddellijk
dreigend gevaar dat tot ernstige
en zelfs dodelijke lichaamsverwondingen leidt.
몇 WAARSCHUWING
Verwijzing naar een mogelijke
gevaarlijke situatie die tot ernstige en zelfs dodelijke lichaamsverwondingen kan leiden.
Inhoud
Algemene instructies NL 5
Veiligheidsaanwijzingen NL 5
Instructies over accupack en oplaadappa-
raat NL 8
Veiligheidsinrichtingen NL 9
Bedieningselementen NL 9
Laadproces NL 9
Bediening accupack NL 9
Opslag NL 10
Transport en opslag NL 10
Onderhoud NL 10
Hulp bij storingen NL 10
Beschrijving apparaat NL 11
Montage NL 11
Accupack opladen NL 11
Inbedrijfstelling NL 11
Algemene instructies voor de bediening NL 12
Bediening NL 12
Verv oer NL 1 2
Onderhoud NL 12
Hulp bij storingen NL 13
Technische gegevens NL 13
Algemene instructies
Doelmatig gebruik
Zorg voor het milieu
Het verpakkingsmateriaal is recyclebaar. Gelieve
verpakkingen op milieuvriendelijke manier te verwijderen.
Oude apparaten bevatten waardevolle recyclebare materialen die moeten worden hergebruikt.
Batterijen en accu's bevatten stoffen die niet in
het milieu mogen terechtkomen. Gelieve oude
apparaten en batterijen en accu's op milieuvriendelijke manier te verwijderen.
Elektrische en elektronische apparaten bevatten
vaak onderdelen die een potentieel gevaar kunnen vormen voor de menselijke gezondheid en
het milieu als ze foutief worden gebruikt of niet
correct worden afgevoerd. Deze onderdelen zorgen er desalniettemin voor dat het apparaat naar
behoren functioneert. Apparaten die dit symbool
dragen, mogen niet met het huisvuil worden afgevoerd.
Garantie
Klantenservice
Toebehoren en reserveonderdelen
Leveringsomvang
Veiligheidsaanwijzingen
Gevarenniveaus
41NL
Page 42

– 6
몇 VOORZICHTIG
Verwijzing naar een mogelijk gevaarlijke situatie die tot lichte
verwondingen kan leiden.
LET OP
Verwijzing naar een mogelijke
gevaarlijke situatie die tot materiele schade kan leiden.
GEVAAR
De gebruiker moet het appa-
raat op reglementaire wijze
gebruiken. Hij moet rekening
houden met de plaatselijke
omstandigheden en tijdens
de werkzaamheden met het
apparaat letten op personen
in de omgeving.
Het is verboden om het appa-
raat in explosiegevaarlijke
bereiken te gebruiken.
Bij het gebruik van het appa-
raat in gevaarlijke bereiken
moeten de overeenkomstige
veiligheidsvoorschriften in
acht genomen worden.
Gebruik het apparaat niet als
het vooraf gevallen, zichtbaar
beschadigd of ondicht is.
Houd verpakkingsfolie uit de
buurt van kinderen, er be-
staat verstikkingsgevaar!
몇 WAARSCHUWING
Dit apparaat mag niet gebruikt
worden door personen met be-
perkte fysieke, zintuiglijke of
mentale capaciteiten of met te
weinig ervaring en/of kennis,
tenzij ze onder toezicht staan
van een bevoegde persoon die
instaat voor hun veiligheid of
van die persoon instructies
hebben gekregen over het gebruik van het apparaat en de
daaruit resulterende gevaren
begrijpen.
Kinderen mogen het appa-
raat enkel gebruiken wanneer
ze ouder zijn dan 8 jaar en
onder toezicht staan van een
persoon die verantwoordelijk
is voor hun veiligheid of van
die persoon instructies hebben gekregen over het gebruik van het apparaat en de
daaruit resulterende gevaren
begrijpen.
Kinderen mogen niet met het
apparaat spelen.
Kinderen moeten gecontro-
leerd worden om te garanderen dat ze niet met het apparaat spelen.
Bedien of bewaar het appa-
raat overeenkomstig de beschrijving c.q. afbeelding!
Het apparaat bevat elektri-
sche onderdelen - reinig het
niet onder stromend water.
몇 VOORZICHTIG
Laat het apparaat nooit zon-
der toezicht staan terwijl het
in bedrijf is.
LET OP
Gebruik het apparaat niet bij
temperaturen onder 0 °C.
Zuig nooit zonder filter, an-
ders kan het apparaat beschadigd worden.
Veiligheidsinstructies voor
nat-/droogzuiger
Veilige omgang
42 NL
Page 43

– 7
Bescherm het apparaat tegen
extreme weersomstandighe-
den, vochtigheid en hitte.
GEVAAR
Explosiegevaar!
Het is verboden om het appa-
raat in explosiegevaarlijke
bereiken te gebruiken.
Zuig geen explosieve of
brandbare gassen, vloeistof-
fen en stof op!
Zuig geen reactief metaalstof
(bv. aluminium, magnesium
of zink) op.
Zuig geen onverdunde zuren
of logen op!
Zuig geen brandende of
gloeiende voorwerpen op!
몇 WAARSCHUWING
Verwondingsgevaar!
Zuig met de sproeier en de
zuigbuis niet in de buurt van
het hoofd.
몇 VOORZICHTIG
Neem bij het transport het ge-
wicht van het apparaat in acht
om ongevallen of verwondin-
gen te vermijden (zie techni-
sche gegevens).
몇 VOORZICHTIG
Zorg er vóór alle handelingen
met of aan het apparaat voor
dat het apparaat stabiel staat
om ongevallen of beschadi-
gingen door omvallen van het
apparaat te vermijden.
GEVAAR
Voor elk gebruik stekkervoe-
ding, verbindingskabel, accuadapter en accupack controleren op schade. Beschadigde apparaten niet meer gebruiken en vervangen.
Oplaadapparaat niet openen.
Bij schade of defect moet het
oplaadapparaat worden vervangen.
Laadapparaat niet in een ex-
plosiegevaarlijke omgeving
gebruiken.
Neem de netstekker en de
contactdoos nooit met vochtige handen vast.
Laadapparaat niet in vervuil-
de of natte toestand gebruiken.
Geen batterijen (primaire cel-
len) opladen, explosiegevaar.
몇 VOORZICHTIG
De netspanning moet over-
eenkomen met de spanning
die is vermeld op het typeplaatje van het laadapparaat.
Laadapparaat uitsluitend
voor het opladen van goedgekeurde accupacks gebruiken.
Het accupack mag alleen
worden geladen met het
meegeleverde originele oplaadapparaat of met een door
KÄRCHER toegestaan oplaadapparaat.
Andere gevaren
Stabiliteit
Veiligheidsinstructies
oplaadapparaat
43NL
Page 44

– 8
LET OP
Oplaadapparaat niet aan de
verbindingskabel dragen.
Verbindingskabel uit de buurt
houden van hittebronnen,
scherpe kanten, olie en bewegende apparaatonderdelen.
Stekkervoeding niet afdekken.
Vermijd verlengkabels met
verdeeldozen en het gelijktijdig gebruik van meerdere apparaten.
Wikkel de verbindingskabel
niet om de stekkervoeding of
de accu-adapter om schade
te vermijden.
De veiligheidsinstructies die
bij de accupack worden geleverd, moeten absoluut worden gelezen en in acht worden
genomen tijdens het gebruik!
몇 VOORZICHTIG
– Gevaar voor letsel, beschadigingsgevaar door ex-
ploderende accu! Accupacks alleen met het daarvoor bestemde oplaadapparaat opladen.
– Controleer voor het gebruik of de accupack en het
oplaadapparaat compatibel zijn!
– Laad alleen accupacks die onbeschadigd zijn.
– Ombouwen en niet door de fabrikant geautoriseer-
de veranderingen zijn uit veiligheidsoverwegingen
verboden.
– Elk ander gebruik is niet toegestaan. De gebruiker
zelf is aansprakelijk voor gevaren die ontstaan door
niet-geautoriseerd gebruik.
Voor de inbedrijfstelling is een accupack en op-
laadapparaat met 36 V nominale spanning vereist.
Bij de "set-varianten" is bij de levering al een Li-ionaccupack met 36 V, 2,5 Ah (Battery Power 36/25)
en een standaardoplaadapparaat 36 V (Battery
Power BC 36 V) inbegrepen.
De accupacks Battery Power (+) 36/25, 36/50 en
36/75 mogen alleen met daarvoor geschikte apparaten van het Kärcher 36 V Battery Power System
worden gebruikt.
Accu's / oplaadapparaten die niet bij de levering
zijn inbegrepen of extra nodig zijn, zijn als bijzonder
toebehoren verkrijgbaar en kunnen worden besteld.
Lees voor het gebruik van de accupack in een ap-
paraat van de KÄRCHER Battery Power-accuplatform de gebruiksaanwijzing van het gebruikte apparaat en de eventueel meegeleverde veiligheidsinstructies.
Meer informatie over de gebruiksaanwijzing voor
accupacks en toebehoren en reserveonderdelen
vindt u onder www.kaercher.nl.
De lithium-ion-accu is onderworpen aan de eisen
van de Wet vervoer gevaarlijke stoffen en mag
door de gebruiker zonder verdere speciale vereisten in het openbare verkeer worden vervoerd.
Bij verzending door derden (transportbedrijf) moe-
ten de speciale vereisten aan verpakking en labels
in acht worden genomen.
Symbolen op het
oplaadapparaat
Laadapparaat beschermen tegen vocht en
droog bewaren. Het apparaat is uitsluitend geschikt voor gebruik in
ruimten, het apparaat
mag niet aan regen
blootgesteld worden.
Het oplaadapparaat
heeft een ingebouwde
zekering van 1 ampère.
Het oplaadapparaat voldoet aan de eisen van de
beschermingsklasse II.
Veiligheidsinstructies
accupack
Instructies over accupack en
oplaadapparaat
Accupacks 36 V Battery Power
Benaming
Accutype
Nominale spanning
Nomina
le capaciteit
(conform IEC/EN 61690)
Nominale capaciteit
(volgens informatie celfabrikant)
Li-ion
VAhAh
36/25 36 2,4 2,5
36/50 36 4,8 5,0
Vervoer
44 NL
Page 45

– 9
Verzend de accu alleen als de behuizing niet be-
schadigd is. Plak openliggende contacten af en
zorg voor een stevige en veilige verpakking van de
accu. De accu moet zich niet kunnen verplaatsen in
de verpakking.
Houd ook rekening met de nationale voorschriften.
몇 VOORZICHTIG
Veiligheidsinrichtingen dienen ter bescherming van
de gebruiker en mogen niet veranderd of omzeild
worden.
De ingebouwde veiligheidsschakeling beschermt de
batterij tegen
oververhitting
volledige ontlading
Overbelasting
Kortsluiting
Afbeelding afhankelijk van type
1 Typeplaatje
2 Display
3 Contacten
4 Opname
1 Oplaadcontacten
2 Accu-adapter
3 Verbindingskabel
4 Typeplaatje
5 Stekkervoeding
몇 VOORZICHTIG
Verwondingsgevaar, beschadigingsgevaar! Neem de
gebruiksaanwijzing en de veiligheidsinstructies van het
oplaadapparaat.
Opmerking
Nieuwe accupacks zijn slechts vooraf opgeladen en moeten voor het eerste gebruik volledig worden opgeladen.
Het display wordt bij het eerste laadproces geactiveerd.
Om ervoor te zorgen dat de weergave van de ladingstoestand correct werkt, moet de accupack bij het eerste
gebruik tot uitschakeling van het apparaat worden ontladen.
Afbeelding
Stekkervoeding in het stopcontact steken.
Accupack in de accu-adapter van het oplaadappa-
raat schuiven.
Het laadproces begint automatisch.
Afbeelding
Op het display van de accupack wordt de resteren-
de oplaadtijd weergegeven.
De oplaadtijd met een standaardoplaadapparaat
(Battery Power BC 36 V) voor een leeg Accupack
(Battery Power 36/25) bedraagt ongeveer 5,5 uur.
Als de accupack volledig is opgeladen, geeft het
display 100% weer.
Na het laden de accu-adapter van het accupack
trekken.
Stekkervoeding uit het stopcontact trekken.
Opmerking
Als het display niets weergeeft wanneer de accupack
zich in het oplaadapparaat bevindt, is de accucapaciteit
uitgeput of zeer laag. Zodra de accupack voldoende is
opgeladen, geeft het display de resterende laadtijd
weer.
Als ook na langere tijd niets wordt weergegeven, is
de accupack defect en moet deze worden vervangen.
Opmerking
Nieuwe accupacks bereiken hun volledige capaciteit na
ca. 5 laad- en ontlaadcycli.
Accupacks die langere tijd niet zijn gebruikt, moeten
voor gebruik worden opgeladen.
Bij temperaturen onder 0 °C daalt het vermogen van
een accupack.
Lange opslag bij temperaturen boven 20 °C kan de capaciteit van een accupack verlagen.
Instructie
Het opgeladen batterijpak kan tot het gebruik op het oplaadapparaat blijven staan. Er bestaat geen gevaar van
overlading.
Om onnodig energieverbruik te vermijden, moet het oplaadapparaat echter uitgetrokken worden zodra het batterijpak volledig opgeladen is.
De accupack heeft een display dat continu informa-
tie over de ladingstoestand, de voortgang van het
opladen en de resterende looptijd weergeeft. Ook
worden eventuele foutmeldingen weergegeven.
De looptijd wordt aangepast door het vermogen om
te schakelen.
Afhankelijk van het gebruikte apparaat draait de
weergave bij het plaatsen van de accupack.
Veiligheidsinrichtingen
Veiligheidsschakeling
Bedieningselementen
Accupack
Standaard oplaadapparaat
Laadproces
Bediening accupack
Display
45NL
Page 46

– 10
몇 VOORZICHTIG
Verwondings- en beschadigingsgevaar! Neem bij het
gebruik de gebruiksaanwijzing en de veiligheidsinstructies van het gebruikte apparaat in acht.
Schuif het batterijpak op de opname van het appa-
raat.
몇 VOORZICHTIG
Verwondings- en beschadigingsgevaar! Let erop dat
het batterijpak correct vastklikt.
Opmerking
Tijdens het gebruik geeft het display de resterende
looptijd weer.
Neem het batterijpak na het werk uit het apparaat.
Laad het batterijpak na het werk op.
Instructie
Laad ook gedeeltelijk ontladen batterijpakken na gebruik op.
몇 VOORZICHTIG
Verwondings- en beschadigingsgevaar! Neem bij het
transport het gewicht van het apparaat in acht.
LET OP
Beschadigingsgevaar! Berg batterijpakken enkel in ruimten met een lage luchtvochtigheid en onder 20 °C op.
Het apparaat mag alleen binnen worden opgeborgen.
De accupack geeft zijn actuele ladingstoestand op het
display weer, ook zonder op een oplaadapparaat te zijn
aangesloten.
Als het display van de accupack tijdens de opslag uitgaat,
is de accucapaciteit uitgeput en is het display uitgeschakeld. Laad de accupack zo snel mogelijk weer op.
몇 VOORZICHTIG
Verwondings- en beschadigingsgevaar! Neem bij het
transport het gewicht van het apparaat in acht.
Controleer laadcontacten regelmatig op verontrei-
niging en reinig eventueel.
Laad langdurig opgeborgen batterijpakken tussen-
tijds op.
Het apparaat is onderhoudsvrij.
Weergave Betekenis
Accu opbergen
Oplaadstatus van de accupack wanneer deze
niet wordt gebruikt.
Accu gebruiken
Resterende looptijd van
de accupack wanneer
deze wordt gebruikt.
Accu opladen
Resterende laadtijd van
de accupack bij het opladen.
Accupack volledig opgeladen.
Foutweergave
Accupacktemperatuur
buiten de toegestane
waarden of vanwege
kortsluiting geblokkeerd
(zie Hulp bij storingen).
Accupack defect en voor
de veiligheid geblokkeerd. Accupack niet
meer gebruiken en volgens de voorschriften afvoeren.
Gebruik
Opslag
Transport en opslag
Onderhoud
Onderhoud
Hulp bij storingen
Fouten bij het opladen
Display is uit, accupack wordt niet opgeladen
Oplaadapparaat defect. Vervang het oplaadapparaat.
De accupack is eventueel volledig ontladen. Wacht af
of het display na een poos de resterende oplaadtijd
weergeeft. Zo niet, dan is de accupack defect. Vervang de accupack.
Display is aan maar accupack wordt niet geladen
Oplaadapparaat defect. Vervang het oplaadapparaat.
Neem de displayweergave in acht. Mogelijk ligt de ac-
cutemperatuur niet binnen het normale bereik.
Display geeft temperatuursymbool weer, accupack wordt niet opgeladen
Accupacktemperatuur te laag/hoog. Breng het accupack in een omgeving met gematigde temperatuur.
Wacht tot de temperatuur van de accupack binnen de
normale waarden ligt.
Het laadproces begint vervolgens automatisch.
Fouten tijdens het gebruik
Het temperatuursymbool wordt op het display
weergegeven
Accupacktemperatuur te laag/hoog. Breng het accupack in een omgeving met gematigde temperatuur.
Wacht tot de temperatuur van de accupack binnen de
normale waarden ligt.
46 NL
Page 47

– 11
Afbeeldingen zie uitklapbaar blad!
Deze gebruiksaanwijzing beschrijft
de op de voorpagina vermelde multifunctionele zuiger.
De afbeeldingen tonen de maximale uitvoering, al
naar model zijn er verschillen in uitvoering en mee-
geleverd toebehoren.
Controleer bij het uitpakken de inhoud van de verpakking op ontbrekende toebehoren, of beschadigingen.
Neem bij transportschades contact op met uw leverancier.
Behoort tot het leveringspakket
Mogelijke accessoires
Afbeelding
Voor het openen reservoirsluitingen naar buiten
trekken en apparaatkop met de handgreep verwij-
deren.
Afbeelding
Inhoud uit het reservoir halen.
Afbeelding
Reservoir omdraaien, zwenkwielen tot de aanslag
in de openingen op de bodem van het reservoir du-
wen.
Afbeelding
Apparaatkop op het reservoir zetten en reservoir-
sluitingen sluiten.
Afbeelding
Voor het opzuigen van droog vuil kan indien nodig
tevens een filterzak gebruikt worden.
Afbeelding
Afbeelding
Zie hoofdstuk "Laadproces" en "Bediening accu-
pack".
Afbeelding
Duw de zuigslang in de aansluiting op het apparaat
tot ze gastklikt.
Om eruit te nemen met duim op pal drukken en
zuigslang eruit trekken.
Afbeelding
Handgreep met zuigslang verbinden tot hij vast-
klikt.
Beide zuigbuizen samensteken en met de hand-
greep verbinden.
Instructie: Accessoires zoals zuigborstels (optioneel)
kunnen direct op het verbindingsstuk gestoken en op
die manier met de zuigslang verbonden worden.
Voor comfortabel werken, ook op enge plaatsen.
De afneembare handgreep kan indien nodig tussen het
accessoire en de zuigslang aangebracht worden.
Advies: Om de vloer te zuigen steekt u de handgreep
op de zuigslang.
Afbeelding
Om de handgreep van de zuigslang te halen, ver-
grendeling met duim en wijsvinger indrukken en de
handgreep eraf trekken.
Instructie: Door het verwijderen van de handgreep
kunnen accessoires ook direct op de zuigslang gestoken worden.
Afbeelding
Vloersproeier met zuigbuis verbinden.
Instructie: Om droog vuil of water van de grond te zuigen - altijd met inzetstuk (borstelstrook en rubberstrip)
in de vloersproeier werken.
Bij kortsluiting wordt de accupack voor verder gebruik
30 seconden lang geblokkeerd. Als er vaker kortsluiting optreedt, wordt de accupack permanent geblokkeerd. Sluit de accupack op het oplaadapparaat aan
om te ontgrendelen.
Op het display wordt resterende looptijd 0 weergegeven, apparaat wordt uitgeschakeld.
De accupack is ontladen. Laad de accupack weer op.
Fouten bij de opslag
Display geeft geen restcapaciteit meer aan
De accupack is ontladen. Laad de accupack weer op.
Display geeft restcapaciteit 70% aan, hoewel de
accupack net is opgeladen.
De accupack bevindt zich in de automatische opslagmodus. Deze wordt geactiveerd wanneer de accu
meer dan 21 dagen niet is gebruikt. Deze functie beschermt de accucellen tegen snelle veroudering en
verhoogt de levensduur. Laad de accupack voor het
volgende gebruik weer volledig op.
Algemene fout
Display geeft een onderbroken accusymbool
weer.
Accupack defect en voor de veiligheid geblokkeerd.
Accupack niet meer gebruiken en volgens de voorschriften afvoeren.
Beschrijving apparaat
1 Zuigslangaansluiting
2 Batterijhouder
3 Schakelaar van het apparaat (AAN / UIT)
4 Ontgrendelingsknop batterij
5Greep
6 Blaasaansluiting
7 Sluiting reservoir
8 Opbergpositie
9 Bergruimte toebehoren
10 Zwenkwiel
11 Reservoir
12 Filterzak
13 Patronenfilter
14 Zuigslang met verbindingsstuk
15 Afneembare handgreep
16 Zuigbuis 2 x 0,5 m
17 Spleetmondstuk
Fouten tijdens het gebruik
18 Vloerkop
(met inzetstuk)
19 Accupack
Battery Power 36/25
20 Standaardoplaadapparaat
Battery Power BC 36 V
Montage
Accupack opladen
Inbedrijfstelling
Accessoires aansluiten
47NL
Page 48

– 12
Afbeelding
Accupack van boven in accuhouder schuiven en
vergrendelen.
Afbeelding
Stand I: Zuig- of blaasfunctie.
Stand 0: Apparaat is uitgeschakeld.
LET OP
Het metalen reservoir kan bij het opzuigen van grote
hoeveelheden fijn stof statisch opladen en dan bij aanraking ontladen.
LET OP
Het bereik van de accuhouder moet proper worden gehouden.
Indien in dit bereik veel vuil terechtkomt, kan het
zijn dat het accupack niet meer correct geplaatst/
vergrendeld kan worden.
Zo bestaat de kans dat het accupack niet meer uit
het apparaat kan worden genomen omdat de afwerphendel niet meer kan worden bewogen.
LET OP
Werk altijd met een aangebrachte patronenfilter, zowel
bij nat- als bij droogzuigen!
LET OP
Controleer de filter voor gebruik op beschadigingen en
vervang hem indien nodig.
Werk enkel met een droge patronenfilter!
Afbeelding
Aanbeveling: Voor het zuigen van fijn stof de filter-
zak aanbrengen.
– Het vulpeil van de filterzak is afhankelijk van het
opgezogen vuil.
– Bij fijn stof, zand, enz. moet de filterzak vaker ver-
vangen worden.
– Volle filterzakken kunnen openbarsten, daarom de
filterzak op tijd vervangen!
LET OP
Opzuigen van koude as enkel met voorafscheider.
Informatie over het toebehoren en de reserveonderdelen vindt u op www.kaercher.com.
LET OP
Geen filterzak gebruiken!
Afbeelding
Om vocht c.q. nattigheid op te zuigen, moet gelet
worden op een correct inzetstuk in de vloersproeier
en moet het overeenkomstige accessoire aangesloten worden.
Instructie: Wanneer het reservoir vol is, sluit een vlotter
de zuigopening en draait het apparaat met een verhoogd toerental. Schakel het apparaat onmiddellijk uit
en maak het reservoir leeg.
Reinigen van moeilijk bereikbare plaatsen of waar zuigen niet mogelijk is, bijv. bladeren uit het grindbed.
Afbeelding
Zuigslang in blaasaansluiting steken, de blaasfunc-
tie is zo geactiveerd.
Apparaat uitschakelen.
Afbeelding
Vloerkop in de opbergpositie hangen.
Instructie: Indien tijdens de werkonderbreking de zuigkop moet worden verwijderd, kan de accupack blijven
steken. Het accupack is vast vergrendeld en kan niet
vallen.
Apparaat uitschakelen.
Afbeelding
De toets voor de ontgrendeling van het accupack
naar voren schuiven en het accupack uit het appa-
raat halen.
Indien nodig accupack opnieuw opladen (zie
hoofdstuk "Accupack opladen").
Aanbeveling: Accupack na beëindiging van het werk
uit het apparaat halen.
Afbeelding
Apparaatkop afnemen en reservoir ledigen.
Afbeelding
Accessoires aan het apparaat opbergen en appa-
raat in een droge ruimte bewaren.
Instructie: Onafhankelijk van de zuigwerking gebruikt
het LC-display een beetje batterijcapaciteit, of het accupack in het apparaat zit of niet.
Zie hoofdstuk "Laadproces" en "Bediening accu-
pack".
몇 VOORZICHTIG
Verwondings- en beschadigingsgevaar!
Neem bij het transport het gewicht van het apparaat in
acht.
Ap
paraat aan de draaggreep optillen en dragen.
Apparaat beveiligen tegen verschuiven en kantelen.
Apparaat en toebehoren uit kunststof met een ge-
wone kunststofreiniger onderhouden.
Reservoir en accessoires indien nodig met water
uitspoelen en laten drogen voor verder gebruik.
Afbeelding Patroonfilter indien nodig alleen onder stromend
water reinigen; niet afwrijven of afborstelen. Voor
de montage helemaal laten drogen.
Controleer laadcontacten regelmatig op verontrei-
niging en reinig eventueel.
Controleer ventilatieopeningen op verontreiniging
en reinig eventueel.
Accupack plaatsen
Apparaat inschakelen
Algemene instructies voor de bediening
Bediening
Droogzuigen
Instructies filterzak
Natzuigen
Blaasfunctie
Werking onderbreken
De werkzaamheden beëindigen
Reservoir ledigen
Apparaat opbergen
Accupack opbergen
Vervoer
Transport met de hand
Transport in voertuigen
Onderhoud
48 NL
Page 49

– 13
Het apparaat is onderhoudsvrij.
Afbeelding
Accupack zit niet goed in de accuhouder. Accu-
pack in de accuhouder schuiven en laten vergrendelen.
Ladingstoestand van het accupack (zie display) te
zwak; indien nodig, accupack opladen.
Accupack of oplaadapparaat defect, accupack of
oplaadapparaat door nieuw toebehoren vervangen.
Oververhitting van apparaat/accupack. Kort wach-
ten zodat apparaat/accupack kan afkoelen.
Reservoir is vol water, waardoor wordt de vlotter
wordt geactiveerd. Reservoir legen.
Toebehoren, zuigslang of zuigbuis zijn verstopt.
Verstopping met een geschikt hulpmiddel verwijde-
ren.
Afbeelding
Filterzak is vol, nieuwe filterzak aanbrengen.
Afbeelding Patroonfilter is vuil, patroonfilter afkloppen en in-
dien nodig onder stromend water reinigen.
Beschadigd patroonfilter vervangen.
Aanbeveling: Patronenfilter 1x per jaar vervangen.
Technische veranderingen voorbehouden!
Onderhoud
Hulp bij storingen
Apparaat draait niet
Het apparaat schakelt zelf uit.
Te weinig zuigcapaciteit
Technische gegevens
Accupack en snellader in de levering inbegrepen van:
WD 3 Battery Set
WD 3 Battery Premium Set
(Accupack Battery Power 36/25 / Standaardoplaadapparaat Battery Power BC 36 V)
Apparaat
Nominaal vermogen W 300
Bedrijfstijd bij volledig opgeladen
accu (max.)
min 15
Veiligheidsklasse III
Beveiligingsklasse IPX4
Accupack Battery Power 36/25
Nominale spanning V 36
Nominale capaciteit
(conform IEC/EN 61690)
Ah 2,4
Nominale capaciteit
(volgens informatie celfabrikant)
Ah 2,5
Nominale stroom
(conform UN 3480)
Wh 86,4
Laadstroom max. A 4
Accutype Li-ion
Gewicht kg 0,9
Afmetingen (L x B x H) mm 133x88x72
Standaardoplaadapparaat Battery Power BC 36 V
Nominale spanning accupack V 36
Laadstroom max. A 0,5
Accutype Li-ion
Netspanning V 100-240
Frequentie Hz 50-60
Stroomverbruik (max.) A 0,3
Veiligheidsklasse II
Gewicht (zonder accupack) g 205
49NL
Page 50

– 5
Estimado cliente:
Antes de utilizar por primera vez el
equipo, lea este manual, siga sus instrucciones y consérvelo para posteriores usos o futuros propietarios.
El aparato está previsto para el uso como aspirador en
seco conforme a las descripciones e instrucciones de
seguridad de este manual de instrucciones.
Este aparato ha sido diseñado para el uso particular y
no para los esfuerzos del uso industrial.
– Proteger el aparato de la lluvia. No depositarlo a la
intemperie.
– No se deben aspirar cenizas ni hollín con este apa-
rato.
El fabricante no asume responsabilidad alguna por los
daños que pudieran derivarse de un uso inadecuado o
incorrecto.
Indicaciones sobre ingredientes (REACH)
Encontrará información actual sobre los ingredientes
en:
www.kaercher.com/REACH
Indicaciones sobre ingredientes (REACH)
Encontrará información actual sobre los ingredientes
en:
www.kaercher.com/REACH
En todos los países rigen las condiciones de garantía
establecidas por nuestra empresa distribuidora. Las
averías del aparato serán subsanadas gratuitamente
dentro del periodo de garantía, siempre que se deban a
defectos de material o de fabricación. En un caso de garantía, le rogamos que se dirija con el comprobante de
compra al distribuidor donde adquirió el aparato o al
servicio al cliente autorizado más próximo a su domicilio.
En caso de dudas o alteraciones, la sucursal de KÄRCHER estará encantada de ayudarle.
Utilice solamente accesorios y recambios originales, ya
que garantizan un funcionamiento correcto y seguro del
equipo.
Puede encontrar información acerca de los accesorios
y recambios en www.kaercher.com.
En caso de detectar que faltan accesorios o o que han
surgido daños durante el transporte, informe a su distribuidor.
PELIGRO
Aviso sobre un riesgo de peligro
inmediato que puede provocar
lesiones corporales graves o la
muerte.
Índice de contenidos
Indicaciones generales ES 5
Instrucciones de seguridad ES 5
Avisos sobre la batería y el cargador ES 8
Dispositivos de seguridad ES 9
Elementos de mando ES 9
Proceso de carga ES 9
Manejo de la batería ES 10
Almacenamiento ES 10
Transporte y almacenamiento ES 10
Cuidados y mantenimiento ES 10
Ayuda en caso de avería ES 10
Descripción del aparato ES 11
Montaje ES 11
Cargar la batería ES 11
Puesta en marcha ES 11
Indicaciones generales sobre manejo ES 12
Manejo ES 12
Transporte ES 12
Cuidados y mantenimiento ES 13
Ayuda en caso de avería ES 13
Datos técnicos ES 13
Indicaciones generales
Uso previsto
Protección del medio ambiente
Los materiales empleados para el embalaje son
reciclables y recuperables. Rogamos elimine los
envases de forma que no se dañe el medio ambiente.
Los aparatos viejos contienen materiales valiosos reciclables que deberán ser entregados para
su aprovechamiento posterior. Las baterías y los
acumuladores contienen sustancias que no deben entrar en contacto con el medio ambiente.
Eliminar los aparatos usados, batería o acumuladores ecológicamente.
Los equipos eléctricos y electrónicos contienen a
menudo componentes que pueden representar
un peligro potencial para la salud de las personas
y para el medio ambiente en caso de que se manipulen o se eliminen de forma errónea. Estos
componentes son necesarios para el correcto
funcionamiento del equipo. Los equipos marcados con este símbolo no pueden eliminarse con
la basura doméstica.
Garantía
Servicio de atención al cliente
Accesorios y piezas de repuesto
Volumen del suministro
Instrucciones de
seguridad
Niveles de peligro
50 ES
Page 51

– 6
몇 ADVERTENCIA
Aviso sobre una situación propablemente peligrosa que puede provocar lesiones corporales
graves o la muerte.
몇 PRECAUCIÓN
Indicación sobre una situación
que puede ser peligrosa, que
puede acarrear lesiones leves.
CUIDADO
Aviso sobre una situación probablemente peligrosa que puede provocar daños materiales.
PELIGRO
El usuario debe utilizar el
equipo de forma correcta.
Debe tener en cuenta las si-
tuaciones locales y respetar
las personas del entorno a la
hora de trabajar con el apara-
to.
Está prohibido el funciona-
miento en zonas donde haya
riesgo de explosión.
Para usar el aparato en zo-
nas de peligro deben cumplir-
se las normas de seguridad
correspondientes.
No utilizar el aparato si se ha
caido antes, o está dañado o
no es estanco.
¡Mantener los plásticos del
embalaje fuera del alcance
de los niños, se corre el ries-
go de asfixia!
몇 ADVERTENCIA
Este aparato no es apto para
ser manejado por personas
con incapacidades físicas,
sensoriales o intelectuales o
falta de experiencia y/o conocimientos, a no ser que sean
supervisados por una persona encargada o hayan recibido instrucciones de esta sobre como usar el aparato y
qué peligros conlleva.
Los niños solo podrán utilizar
el aparato si tienen más de 8
años y siempre que haya una
persona supervisando su seguridad o les hayan instruido
sobre como manejar el aparato y los peligros que conlleva.
Los niños no pueden jugar
con el aparato.
Supervisar a los niños para
asegurarse de que no jueguen con el aparato.
Operar y almacenar el apara-
to solo de acuerdo con la descripción o la ilustración.
El equipo contiene compo-
nentes eléctricos. No limpiar
estos con agua corriente.
몇 PRECAUCIÓN
No dejar el equipo nunca sin
vigilancia mientras esté en
funcionamiento.
CUIDADO
No operar el equipo a tempe-
raturas inferiores a 0 ºC.
No aspirar nunca sin filtro, se
podría dañar el aparato.
Proteger el aparato de extre-
ma climatología, humedad y
calor.
Indicaciones de seguridad
para aspirador para
líquidos/sólidos
Manipulación segura
51ES
Page 52

– 7
PELIGRO
Peligro de explosiones
Está prohibido el funciona-
miento en zonas donde haya
riesgo de explosión.
¡No aspirar gases, líquidos y
polvo explosivos o combusti-
bles!
¡No aspirar polvos metálivos
reactivos (p.ej. aluminio,
magnesio o cinc)!
¡No aspirar ácidos o lejías sin
disolver!
No aspire objetos incandes-
centes, con o sin llama.
몇 ADVERTENCIA
¡Peligro de lesiones!
No aspirar con boquilla y tu-
bería de aspiración cerca de
la cabeza.
몇 PRECAUCIÓN
Para evitar accidentes o le-
siones durante el transporte,
se debe tener en cuenta el
peso del equipo (véase los
datos técnicos).
몇 PRECAUCIÓN
Antes de realizar cualquier
tarea con o en el equipo, es-
tabilizarlo para evitar acci-
dentes o daños si se cae el
equipo.
PELIGRO
Antes de cada uso, compro-
bar si la fuente de alimentación de red, el cable de conexión, al adaptador de la batería y la batería en busca de
daños. Dejar de usar equipos
dañados y sustituirlos.
No abrir el cargador. En caso
de daños o defectos hay que
sustituir el cargador.
No utilizar el cargador en un
ambiente con peligro de explosión.
No tocar nunca la clavija ni el en-
chufe con manos húmedas.
No utilizar el cargador si está
sucio o húmedo.
No cargar baterías (células pri-
marias), riesgo de explosión.
몇 PRECAUCIÓN
La tensión de red tiene que
coincidir con la indicada en la
placa de características del
cargador.
Utilice el cargador sólo para
cargar la batería permitida.
Solo se permite la carga de la
batería con el cargador original suministrado o con un
cargador autorizado por
KÄRCHER.
CUIDADO
No llevar el cargador por el
cable de conexión.
Alejar el cable de conexión
del calor, bordes afilados,
aceite y componentes del
equipo en movimiento.
Otros peligros
Estabilidad
Instrucciones de seguridad
del cargador
52 ES
Page 53

– 8
No cubrir la fuente de alimen-
tación de red.
Evite cables de prolongación
con múltiples enchufes y el
funcionamiento simultáneo
de varios equipos.
Para evitar daños, no envuel-
va el cable de conexión alrededor de la fuente de alimentación de red o el adaptador
de batería.
Leer las instrucciones de seguridad adjuntas a la batería y
tenerlas en cuenta en su uso.
몇 PRECAUCIÓN
– Peligro de lesiones, peligro de daños por la explo-
sión de la batería. Cargar las baterías únicamente
con los cargadores previstos para ello.
– Antes del uso, compruebe la compatibilidad de la
batería y el cargador.
– Cargar únicamente baterías sin daños.
– Las alteraciones y modificaciones no autorizada
s
por el fabricante están prohibidas por motivos de
seguridad.
– No está permitido otro uso. El usuario se responsa-
bilizará de los riesgos causados por un uso no admisible.
Para la puesta en funcionamiento se necesita una
batería y un cargador con 36 V de tensión nominal.
En el alcance del suministro, entre las «variantes
del set», se incluye una batería de iones de litio con
36 V, 2,5 Ah (Battery Power 36/25), así como un
cargador estándar de 36 V (Battery Power BC
36 V).
Las baterías Battery Power (+) 36/25, 36/50 y 36/
75 solo pueden utilizarse con los equipos predeterminados del sistema de 36 V Battery Power de
Kärcher.
Las baterías/los cargadores que no estén incluidos
en el alcance de suministro o que sean necesarios
de forma adicional, están disponibles como accesorios especiales y se pueden comprar posteriormente según corresponda.
Antes de utilizar la batería en un equipo de la pla-
taforma de baterías Battery Power de KÄRCHER,
consulte el manual de instrucciones del equipo utilizado y las posibles instrucciones de seguridad incluidas.
Encontrará más información sobre el manual de
instrucciones para las baterías, así como sobre los
accesorios y recambios en www.kaercher.com.
Símbolos sobre el cargador
Proteger el cargador de
la humedad y guardar en
un sitio seco El aparato
sólo es apto para el uso
en interiores, no exponerlo a la lluvia.
El cargador cuenta con
un fusible integrado de 1
amperio.
El cargador cumple con
los requisitos de la clase
de protección II.
Instrucciones de seguridad
de la batería
Avisos sobre la batería y el cargador
Baterías de 36 V Battery Power
Denominación
Tipo de batería
Tensión nominal
Cap
acidad nominal
(según IEC/EN 61690)
Capacidad nominal
(según indicación del fabricante de la célula)
Iones de litio
VAhAh
36/25 36 2,4 2,5
36/50 36 4,8 5,0
53ES
Page 54

– 9
Las baterías de iones de litio están sujetas a los re-
querimientos relativos al transporte de mercancías
peligrosas y el usuario puede transportarlas en el
área de circulación público sin otras restricciones.
En caso de envío por terceros (empresa de trans-
porte), deben respetarse los requerimientos relativos al embalaje y el marcado.
Solo envíe la batería si la carcasa está dañada. Se-
lle los contactos abiertos y embale la batería de forma segura. No debe moverse dentro del embalaje.
Asimismo, debe respetar la normativa nacional.
몇 PRECAUCIÓN
Los dispositivos de seguridad sirven para proteger
al usuario y no se pueden modificar o sortear.
El circuito de protección integrado protege la batería
Sobrecalentamiento
Descarga profunda
Sobrecarga
Cortocircuito
Figura en función de las características
1 Placa de características
2 anuncio
3 Contactos
4 Alojamiento
1 Contactos para la recarga
2 Adaptador de batería
3 Cable de conexión
4 Placa de características
5 Fuente de alimentación de red
몇 PRECAUCIÓN
Peligro de lesiones, peligro de daños. Respetar el manual de instrucciones y las indicaciones de seguridad
del cargador.
Aviso
Las baterías nuevas solo están cargadas previamente
y deben cargarse por completo antes del primer uso.
La pantalla se activa durante el primer proceso de carga.
Para que el indicador del estado de carga funcione correctamente, la batería debe descargarse durante el primer uso hasta que el equipo se desconecte.
Imagen
Conectar la fuente de alimentación de red en un
enchufe.
Insertar la batería en el adaptador de batería del
cargador.
El proceso de carga comienza automáticamente.
Imagen
En la pantalla de la batería se muestra la duración
restante de la carga.
El tiempo de carga con un cargador estándar (Battery
Power BC 36 V) para una batería descargada (Battery
Power 36/25) es de alrededor de 5,5 horas.
Si la batería se ha cargado por completo, la panta-
lla muestra un 100 %.
Tras la carga, retirar el adaptador de la batería.
Desconectar la fuente de alimentación de red del
enchufe.
Aviso
Si la pantalla no muestra nada y la batería se encuentra
en el cargador, la capacidad de los acumuladores se ha
agotado o es muy baja. Cuando la batería se haya cargado lo suficiente, la pantalla mostrará el tiempo restante de carga.
Si tras un tiempo prolongado no se muestra ninguna indicación, la batería está defectuosa y debe
sustituirse.
Aviso
Las baterías nuevas alcanzan su capacidad total tras
aproximadamente 5 ciclos de carga y descarga.
Antes de utilizarlas, volver a cargar las baterías que no
se hayan utilizado durante un tiempo prolongado.
Con temperaturas inferiores a 0 °C se reduce el rendimiento de la batería.
Un almacenamiento prolongado a temperaturas superiores a 20 °C puede reducir la capacidad de una batería.
Observación
La batería ya cargada puede estar en el cargador hasta
que se vaya a utilizar. No se corre peligro de sobrecargarla.
Para evitar un consumo de energía innecesario, se
debe desenchufar el cargador tan pronto como la batería esté totalmente cargada.
Transporte
Dispositivos de seguridad
Circuito de protección
Elementos de mando
Batería
Cargador estándar
Proceso de carga
54 ES
Page 55

– 10
La batería está equipada con una pantalla que
ofrece información sobre el estado de carga, el
progreso de carga y el tiempo restante. Además,
se muestran los posibles mensajes de error.
La adaptación del tiempo restante se produce por
conmutación de rendimiento.
En función del equipo utilizado, el indicador gira
para colocar la batería.
몇 PRECAUCIÓN
¡Peligro de lesiones y daños! Para el funcionamiento se
debe respetar el manual de instrucciones y las indicaciones de seguridad del aparato utilizado.
Desplazar la batería en el alojamiento del aparato.
몇 PRECAUCIÓN
¡Peligro de lesiones y daños! Al hacerlo, procurar que la
batería esté encajada correctamente.
Aviso
Durante el uso, la pantalla muestra el tiempo restante.
Tras el trabajo, sacar la batería del aparato.
Cargar la batería después del trabajo.
Observación
Cargar también las baterías parcialmente descargadas
tras el uso.
몇 PRECAUCIÓN
¡Peligro de lesiones y daños! Respetar el peso del aparato para el transporte.
CUIDADO
¡Peligro de daños! Almacenar las baterías solo en lugares con una humedad del aire baja y a una temperatura
inferior a 20ºC.
Este aparato sólo se puede almacenar en interiores.
La batería muestra su estado de carga actual en la pantalla, incluso sin estar conectada a ningún cargador.
Si la pantalla de la batería se borra durante el almacenamiento, se ha agotado la capacidad de los acumuladores y la pantalla se ha desconectado. Volver a cargar
la batería tan rápido como sea posible.
몇 PRECAUCIÓN
¡Peligro de lesiones y daños! Respetar el peso del aparato para el transporte.
Comprobar regularmente la suciedad de los con-
tactos de carga, limpiar si es necesario.
Carga intermedia de las baterías almacenadas du-
rante un período prolongado.
El aparato no precisa mantenimiento.
Manejo de la batería
Pantalla
Ver Significado
Almacenamiento de la batería
Estado de carga de la
batería durante el no
uso.
Uso de la batería
Tiempo restante de la
batería durante el uso.
Carga de la batería
Tiempo restante de carga de la batería durante
la carga.
Batería totalmente cargada.
Indicación de fallos
Temperatura de la batería fuera de los valores
admisibles o bloqueada
debido a un cortocircuito
(véase Ayuda en caso
de avería).
Batería defectuosa o
bloqueada por seguridad. Dejar de utilizar la
batería y desecharla de
forma adecuada.
Funcionamiento
Almacenamiento
Transporte y almacenamiento
Cuidados y mantenimiento
Mantenimiento
Ayuda en caso de avería
Error al cargar
La pantalla está apagada, la batería no se carga
Cargador defectuoso. Sustituya el cargador.
La batería puede estar totalmente descargada. Espe-
re hasta que, al cabo de un tiempo, la pantalla muestre
la duración restante de la carga. En caso de no ser
así, la batería está defectuosa. Sustituya la batería.
La pantalla está encendida pero la batería no se
carga
Cargador defectuoso. Sustituya el cargador.
Observe la pantalla de visualización. Puede ser que la
temperatura de la batería no esté dentro del rango
normal.
La pantalla muestra el símbolo de la temperatura,
la batería no se carga
Temperatura de la batería demasiado baja/elevada.
Lleve la batería a un entorno con temperaturas moderadas. Espere hasta que la temperatura de la batería
haya vuelto a un valor normal.
Entonces el proceso de carga comenzará automáticamente.
55ES
Page 56

– 11
Ilustraciones, véase la contraportada.
Este manual de instrucciones descri-
be la aspiradora de usos múltiples indicada en la portada.
Las ilustraciones muestran el equipamiento máxi-
mo, según el modelo hay diferencias en el equipa-
miento y los accesorios suministrados.
Cuando desempaque el contenido del paquete, compruebe si faltan accesorios o si el aparato presenta daños. Informe a su distribuidor en caso de detectar daños
ocasionados durante el transporte.
incluido en el volumen de suministro
accesorios posibles
Imagen
Tirar de los cierres del recipiente hacia el exterior
para abrirlo y extraer el cabezal del equipo en el
asa de transporte.
Imagen
Extraer el contenido del recipiente.
Imagen
Girar el recipiente, introducir hasta el tope las rue-
das giratorias en los orificios de la parte de abajo
del recipiente.
Imagen
Colocar el cabezal de los aparatos sobre el reci-
piente y cerrar los cierres del depósito.
Imagen
Para aspirar suciedad seca, se puede utilizar tam-
bién una bolsa filtrante si es necesario.
Imagen
Imagen
Véanse los capítulos «Proceso de carga» y «Ma-
nejo de la batería».
Imagen
Presionar la manguera de aspiración en la toma
del aparato, se encaja.
Para extraer, presionar la lengüeta con el pulgar y
extraer la manguera de aspiración.
Imagen
Conectar la empuñadura con la manguera de aspi-
ración hasta que encaje.
Insertar ambos tubos de aspiración y conectar con
la empuñadura.
Indicación: Los accesorios, como los cepillos aspiradores (opcional), se pueden insertar directamente a la
pieza de conexión para unir con la manguera de aspiración.
Para trabajar cómodamente también en espacios estrechos.
El mango extraíble se puede colocar entre los accesorios y la manguera de aspiración si es necesario.
Recomendación: Insertar la empuñadura de aspiración de suelos en la manguera de aspiración.
Imagen
Para extraer el asa de la manguera de aspiración,
presionar el enganche con el dedo pulgar y el índi-
ce, y retirar el asa.
Indicación: Si se extrae la empuñadura se pueden insertar directamente los accesorios en la manguera de
aspiración.
Error durante el funcionamiento
En la pantalla aparece el símbolo de la temperatu-
ra
Temperatura de la batería demasiado baja/elevada.
Lleve la batería a un entorno con temperaturas moderadas. Espere hasta que la temperatura de la batería
haya vuelto a un valor normal.
En caso de cortocircuito, la batería se bloquea durante
30 segundos para otro uso. Si el cortocircuito se presenta con frecuencia, la batería se bloquea de forma
continua. Conecte la batería al cargador para desbloquearla.
La pantalla muestra un tiempo restante de 0, el
equipo se desconecta.
La batería está descargada. Vuelva a cargar la batería.
Error durante el almacenamiento
La pantalla ya no muestra la capacidad residual
La batería está descargada. Vuelva a cargar la batería.
La pantalla muestra una capacidad restante del
70 % aunque la batería se haya vuelto a cargar.
La batería se encuentra en el modo automático de almacenamiento, que se activa si la batería no se ha utilizado durante más de 21 días. Esta función protege
las celdas de la batería frente a un envejecimiento rápido y aumenta la vida útil. Vuelva a cargar por completo la batería antes del siguiente uso.
Error general
La pantalla muestra el símbolo de la batería.
Batería defectuosa o bloqueada por seguridad. Dejar
de utilizar la batería y desecharla de forma adecuada.
Descripción del aparato
1 Racor de empalme de la manguera de aspiración
2 Compartimento de la batería
3 Interruptor del aparato (ON / OFF)
4 tecla de desbloqueo de la batería
5 asidero
6 Conexión para soplado
7 Cierre del recipiente
8 Posición de estacionamiento
9 Alojamiento del accesorio
10 Rodillo de dirección
11 Contenedor
12 Bolsa del filtro
13 Filtro de cartuchos
14 Manguera de aspiración con pieza de conexión
15 Empuñadura extraíble
16 Tubos de aspiración 2 x 0,5 m
17 Boquilla para juntas
18 Boquilla barredora de suelos
(con inserto)
19 Batería
Battery Power 36/25
20 Cargador estándar
Battery Power BC 36 V
Montaje
Cargar la batería
Puesta en marcha
Conecte los accesorios
56 ES
Page 57

– 12
Imagen
Conectar la boquilla para suelos con el tubo de as-
piración.
Indicación: Para aspirar suelos con suciedad seca o
agua - trabajar siempre con elemento (tiras de cepillo y
racor de goma) en la boquilla para suelos.
Imagen
Insertar la batería en su soporte desde arriba y en-
cajar.
Imagen
Posición I: Función de aspiración y de soplado.
Posición 0: El aparato está apagado.
CUIDADO
El recipiente de metal puede cargarse estáticamente al
aspirar grandes cantidades de polvo fino y, a continuación, descargarse al tocarlo.
CUIDADO
La zona del soporte de la batería debe mantenerse limpia.
Si se trata de una zona en la que entra mucha su-
ciedad, es posible que la batería no pueda volver a
utilizarse/encajarse correctamente.
Asimismo, es posible que la batería no pueda vol-
ver a extraerse del equipo debido a que la palanca
de expulsión no pueda volver a moverse.
CUIDADO
¡Trabajar siempre con cartucho filtrante, tanto para la
aspiración en húmedo como en seco!
CUIDADO
Antes de usar el filtro, comprobar si está dañado y cambiar si es necesario.
¡Trabajar solo con cartucho filtrante seco!
Imagen
Recomendación: Colocar la bolsa filtrante para
aspirar polvo fino.
– Cuanto más suciedad de aspira más se llena la
bolsa filtrante.
– En caso de aspirar polvo fino, arena etc... se debe
cambiar la bolsa filtrante con más frecuencia.
– Las bolsas filtrantes pueden explotar, por eso es
necesario cambiarla a tiempo.
CUIDADO
Aspirar cenizas frías solo con el separador previo.
Puede encontrar información acerca de los accesorios
y recambios en www.kaercher.com.
CUIDADO
¡No utilizar una bolsa filtrante!
Imagen
Para aspirar suciedad húmeda o líquida, es impor-
tante colocar el elemento de boquilla para suelos
correcto y conectar el accesorio correspondiente.
Nota: Si el recipiente está lleno, un flotador cierra el orificio de aspiración y el aparato gira a un mayor número
de revoluciones. Desconecte el aparato de inmediato y
vacíe el recipiente.
Limpieza de zonas de difícil acceso o donde la aspiración no sea posible, p.ej. hojas del lecho de gravilla.
Imagen
Insertar la manguera de aspiración en la toma de
aire para que se active la función de soplado.
Desconexión del aparato
Imagen
Colgar la boquilla para suelos en la posición de
aparcamiento.
Aviso: Si fuera necesario extraer el cabezal de aspiración durante una interrupción del trabajo, la batería
puede seguir conectada. La batería está perfectamente
encajada y no se puede caer.
Desconexión del aparato
Imagen
Empujar la tecla de desbloqueo de la batería hacia
delante y extraer la batería del equipo.
Si fuera necesario, volver a cargar la batería (véa-
se el capítulo «Carga de la batería»).
Recomendación: Tras finalizar los trabajos, extraer la
batería del equipo.
Imagen
Quite el cabezal de aparato y vacíe el depósito.
Imagen
Guardar el accesorio en el aparato y éste en un lu-
gar seco.
Aviso: Independientemente del servicio de aspiración,
la pantalla LC muestra la capacidad aproximada de la
batería, tanto si esta se encuentra en el equipo o fuera
de este.
Véanse los capítulos «Proceso de carga» y «Ma-
nejo de la batería».
몇
PRECAUCIÓN
¡
Peligro de lesiones y daños!
Respetar el peso del aparato para el transporte.
Levante el aparato por el asa y de sopórtelo.
Asegurar el aparato para evitar que se deslice o
vuelque.
Colocar la batería
Conexión del aparato
Indicaciones generales sobre manejo
Manejo
Aspiración en seco
Indicaciones sobre la bolsa filtrante
Aspiración de líquidos
Función de soplado
Interrupción del funcionamiento
Finalización del funcionamiento
Vacíe el depósito
Almacenamiento del aparato
Almacenamiento de la batería
Transporte
Transporte manual
Transporte en vehículos
57ES
Page 58

– 13
P ar a c ons er va r el eq ui po y lo s a cce so ri os de p lá st ico ,
utilizar un limpiador para plástico convencional.
En caso necesario, aclarar el depósito y los acce-
sorios con agua y secar antes de volverlos a utili-
zar.
Figura Si es necesario, limpiar el filtro de cartucho bajo
agua corriente, no frotar ni cepillar. Antes del mon-
taje dejar secar totalmente.
Comprobar regularmente la suciedad de los con-
tactos de carga, limpiar si es necesario.
Comprobar regularmente la suciedad de la ranura
de ventilación, limpiar si es necesario.
El aparato no precisa mantenimiento.
Imagen
Si la batería no está asentada correctamente en su
soporte, insertar la batería en el soporte hasta que
quede encajada.
Si el estado de carga de la batería es demasiado
bajo (véase el display), cargar la batería según sea
necesario.
Si la batería o el cargador están defectuosos, sus-
tituirlos por un accesorio nuevo.
Si el equipo/la batería se sobrecalienta, esperar un
momento para que el equipo/la batería pueda en-
friarse.
Si el recipiente está lleno de agua y se activa el de-
pósito de flotador, vaciar el recipiente.
Los accesorios, la manguera de aspiración y los tu-
bos de aspiración están atascados.
Eliminar la obstrucción con un elemento adecuado.
Imagen
La bolsa filtrante está llena, sustituirla por otra.
Figura El filtro del cartucho está sucio, golpearlo para que
caiga la suciedad y limpiarlo con agua corriente si
es necesario.
Cambiar el filtro de cartucho dañado.
Recomendación: Cambiar el filtro de cartucho una vez
al año.
Reservado el derecho a realizar modificaciones técnicas.
Cuidados y mantenimiento
Mantenimiento
Ayuda en caso de avería
El aparato no funciona
El aparato se deconecta automáticamente
Potencia de aspiración reducida
Datos técnicos
Batería y cargador estándar en el alcance del suministro
de:
WD 3 Battery Set
WD 3 Battery Premium Set
(Batería Battery Power 36/25 / cargador estándar Battery Power BC 36 V)
Aparato
Potencial nominal W 300
Tiempo de servicio con cargador
de baterías cargado (máx.)
min 15
Clase de protección III
Categoria de protección IPX4
Batería Battery Power 36/25
Tensión nominal V 36
Capacidad nominal
(según IEC/EN 61690)
Ah 2,4
Capacidad nominal
(según indicación del fabricante
de la célula)
Ah 2,5
Energía nominal
(según UN 3480)
Wh 86,4
Máx. corriente de carga A 4
Tipo de batería Iones de li-
tio
Peso kg 0,9
Dimensiones (l x an x al) mm 133x88x72
Cargador estándar Battery Power BC 36 V
Tensión nominal de la batería V 36
Máx. corriente de carga A 0,5
Tipo de batería Iones de litio
Tensión de red V 100-240
Frecuencia Hz 50-60
Corriente de entrada (máx.) A 0,3
Clase de protección II
Peso (sin batería) g 205
58 ES
Page 59

– 5
Estimado cliente,
Leia o manual de instruções original
antes de utilizar o seu aparelho. Proceda conforme as indicações no manual e guarde o manual para uma consulta posterior ou para terceiros a
quem possa vir a vender o aparelho.
O aparelho foi concebido, de acordo com as descrições
constantes nestas Instruções de Serviço e com as indicações sobre segurança, como aspirador polivalente.
Este aparelho foi desenvolvido para o uso privado e não
foi concebido para suster as necessidades de uma utilização industrial.
– Proteger o aparelho contra a chuva. Não armaze-
nar fora de casa.
– Cinza e fuligem não podem ser aspiradas com este
aparelho.
O fabricante não se responsabiliza por eventuais danos
causados por uma utilização indevida ou erros de manuseamento.
Avisos sobre os ingredientes (REACH)
Informações actuais sobre os ingredientes podem ser
encontradas em:
www.kaercher.com/REACH
Avisos sobre os ingredientes (REACH)
Informações actuais sobre os ingredientes podem ser
encontradas em:
www.kaercher.com/REACH
Em cada país vigem as respectivas condições de garantia estabelecidas pelas nossas Empresas de Comercialização. Eventuais avarias no aparelho durante o
período de garantia serão reparadas, sem encargos
para o cliente, desde que se trate dum defeito de material ou de fabricação. Em caso de garantia, dirija-se,
munido do documento de compra, ao seu revendedor
ou ao Serviço Técnico mais próximo.
Em caso de dúvidas ou avarias, a nossa filial KÄRCHER local está à sua disposição.
Utilizar apenas acessórios e peças sobressalentes originais. Só assim poderá garantir uma operação do aparelho segura e sem avarias.
Para mais informações sobre acessórios e peças sobressalentes, consulte www.kaercher.com.
Contacte imediatamente o vendedor, em caso de falta
de acessórios ou no caso de danos de transporte.
PERIGO
Aviso referente a um perigo eminente que pode conduzir a graves ferimentos ou à morte.
몇 ATENÇÃO
Aviso referente a uma possível
situação perigosa que pode
conduzir a graves ferimentos ou
à morte.
Índice
Instruções gerais PT 5
Avisos de segurança PT 5
Avisos sobre o conjunto da bateria e o
carregador PT 8
Equipamento de segurança PT 9
Elementos de manuseamento PT 9
Processo de carga PT 9
Operação do conjunto da bateria PT 10
Armazenamento PT 10
Transporte e armazenamento PT 10
Conservação e manutenção PT 10
Ajuda em caso de avarias PT 11
Descrição da máquina PT 11
Montagem PT 11
Carregar conjunto da bateria PT 12
Colocação em funcionamento PT 12
Avisos gerais para o comando PT 12
Manuseamento PT 12
Transporte PT 13
Conservação e manutenção PT 13
Ajuda em caso de avarias PT 13
Dados técnicos PT 13
Instruções gerais
Utilização conforme as disposições
Proteção do meio-ambiente
Os materiais da embalagem são recicláveis. Eliminar as embalagens de forma a preservar o
meio ambiente.
Os aparelhos velhos contêm materiais preciosos
e recicláveis e deverão ser reutilizados. Pilhas e
baterias recarregáveis contêm materiais que não
devem entrar em contacto com o meio ambiente.
Eliminar os aparelhos velhos, assim como as pilhas ou baterias recarregáveis, de acordo com as
normas de preservação do meio ambiente.
Muitas vezes, os aparelhos eléctricos e electrónicos contém componentes que, em caso de manuseamento incorrecto ou recolha errada, podem
representar um perigo para a saúde e para o ambiente. Contudo, estes componentes são necessários para a operação adequada do aparelho.
Os aparelhos assinalados com este símbolo não
podem ser eliminados com o lixo doméstico.
Garantia
Serviço de assistência técnica
Acessórios e peças sobressalentes
Volume do fornecimento
Avisos de segurança
Níveis de perigo
59PT
Page 60

– 6
몇 CUIDADO
Aviso referente a uma situação
potencialmente perigosa que
pode causar ferimentos leves.
ADVERTÊNCIA
Aviso referente a uma situação
potencialmente perigosa que
pode causar danos materiais.
PERIGO
Utilize o aparelho somente
para os fins a que se destina.
Deve ter em consideração as
condições locais e, ao utilizar
o aparelho, ter em conta o
comportamento de pessoas
nas proximidades.
É proibido pôr o aparelho em
funcionamento em áreas com
perigo de explosão.
Ao utilizar o aparelho em zo-
nas de perigo devem ser ob-
servadas as respectivas ins-
truções de segurança.
Não utilizar o aparelho se
este tiver caído ao chão,
apresentar danos visíveis ou
fugas.
Manter as películas da emba-
lagem fora do alcance das
crianças! Perigo de sufoca-
mento!
몇 ATENÇÃO
Este aparelho não é adequado
para a utilização por pessoas
com capacidades físicas, sen-
soriais e psíquicas reduzidas e
por pessoas com falta de ex-
periência e/ou conhecimentos,
excepto se forem supervisionadas por uma pessoa responsável pela segurança ou
receberam instruções sobre o
manuseamento do aparelho e
que tenham percebido os perigos inerentes.
As crianças só estão autori-
zadas a utilizar o aparelho se
tiverem uma idade superior a
8 anos e se forem supervisionadas por uma pessoa responsável pela segurança ou
se receberem, por essa pessoa, instruções de utilização
do aparelho e que tenham
percebido os perigos inerentes.
Crianças não podem brincar
com o aparelho.
Supervisionar as crianças, de
modo a assegurar que não
brincam com o aparelho.
Operar e armazenar o apare-
lho apenas em conformidade
com a descrição ou figura!
O aparelho contém compo-
nentes eléctricos. Este não
pode ser limpo sob água corrente.
몇 CUIDADO
Nunca deixar o aparelho sem
vigilância enquanto estiver a
funcionar.
ADVERTÊNCIA
Não operar o aparelho a tem-
peraturas inferiores a 0 °C.
Nunca aspirar sem filtro, de
modo a evitar danos no aparelho.
Avisos de segurança para
aspirador húmido/seco
Manuseamento seguro
60 PT
Page 61

– 7
Proteger o aparelho contra
influências climatéricas, hu-
midade e calor extremos.
PERIGO
Perigo de explosão!
É proibido pôr o aparelho em
funcionamento em áreas com
perigo de explosão.
Não aspirar gases, líquidos e
pós explosivos ou inflamá-
veis!
Não aspirar pós metálicos re-
activos (p. ex. alumínio, mag-
nésio ou zinco)!
Não aspirar ácidos ou solu-
ções alcalinas não diluídos!
Não aspirar materiais em
combustão nem em brasa!
몇 ATENÇÃO
Perigo de lesões!
Não aspirar com o bico e o
tubo de aspiração nas ime-
diações da cabeça.
몇 CUIDADO
De modo a evitar acidentes
ou ferimentos durante o
transporte, deve ter-se aten-
ção ao peso do aparelho (ver
dados técnicos).
몇 CUIDADO
Antes de iniciar quaisquer
trabalhos com ou no apare-
lho, deve-se assegurar o po-
sicionamento estável do apa-
relho, de modo a evitar aci-
dentes ou danos causados
pelo tombamento do apare-
lho.
PERIGO
Antes de cada utilização, ve-
rificar a fonte de alimentação
de ficha, o cabo de ligação, o
adaptador da bateria e o conjunto da bateria quanto a danos. Não continuar a utilizar,
mas substituir aparelhos danificados.
Não abrir o carregador. O
carregador deve ser substituído em caso de dano ou defeito.
Não utilizar o carregador em
ambientes potencialmente
explosivos.
Nunca tocar na ficha de rede
e na tomada com as mãos
molhadas.
Não utilizar o carregador em
estado húmido ou sujo.
Não carregar pilhas (células
primárias) - Perigo de explosão.
몇 CUIDADO
A tensão de rede deve estar
em conformidade com a tensão indicada na placa de características do carregador.
Utilizar o carregador somente
para carregar as baterias
acumuladoras autorizadas.
Apenas é permitido carregar
o conjunto da bateria com o
carregador original fornecido
ou com um carregador autorizado pela KÄRCHER.
Outros perigos
Segurança de estabilidade
Avisos de segurança
relativos ao carregador
61PT
Page 62

– 8
ADVERTÊNCIA
Não pegar no carregador
pelo cabo de ligação.
Manter o cabo de ligação
afastado de calor, arestas
afiadas, óleo e peças móveis
do aparelho.
Não cobrir a fonte de alimen-
tação de ficha.
Evite o cabo de extensão
com tomadas múltiplas e a
operação simultânea de vários aparelhos.
Para evitar danos, não enrole
o cabo de ligação em torno
da fonte de alimentação de ficha ou do adaptador da bateria.
Leia sempre os avisos de segurança incluídos no conjunto da bateria e tenha-os em
conta durante a utilização.
몇 CUIDADO
– Perigo de ferimentos, perigo de dano devido a ex-
plosão da bateria! Carregar os conjuntos de baterias apenas com os carregadores previstos para
esse efeito.
– Antes da utilização, verifique a correspondência do
conjunto de bateria e do carregador!
– Carregar apenas conjuntos de bateria não danifi-
cados.
– Por razões de segurança não são permitidas alte-
rações construtivas e adaptações não autorizadas
pelo fabricantes.
– Qualquer outra utilização não é admissível. Os pe-
rigos que sejam resultado de uma utilização inadmissível são da responsabilidade do utilizador.
Para o arranque, é necessário um conjunto da ba-
teria e um carregador com 36 V de tensão nominal.
O volume do fornecimento das “variantes de conjuntos” já inclui um conjunto de bateria de iões de
lítio com 36 V, 2,5 Ah (Battery Power 36/25), bem
como um aparelho de carga rápida de 36 V (Battery Power BC 36 V).
Os conjuntos de bateria Battery Power (+) 36/25,
36/50 e 36/75 só podem ser utilizados com os aparelhos previstos para o efeito do sistema Kärcher
Battery Power de 36 V.
As baterias/carregadores não que não estiverem
incluídos no volume do fornecimento ou que forem
necessários adicionalmente, estão disponíveis
como acessórios especiais e podem ser adquiridos
posteriormente como tal.
Antes da utilização do conjunto de bateria num
aparelho dos sistemas KÄRCHER Battery Power
com plataforma para bateria, consulte o manual de
instruções do aparelho utilizado e os avisos de segurança eventualmente em anexo.
Poderá encontrar informações adicionais sobre o
manual de instruções para conjuntos de baterias,
bem como acessórios e peças sobressalentes, em
www.kaercher.com.
Símbolos no carregador
Proteger o carregador
contra humidade e guardar num local seco. O
aparelho destina-se somente à utilização em
espaços fechados. Não
expor o aparelho à chuva.
O carregador possui um
fusível montado de 1
ampere.
O carregador cumpre os
requisitos da classe de
protecção II.
Avisos de segurança
relativos ao conjunto da
bateria
Avisos sobre o conjunto da bateria e o
carregador
62 PT
Page 63

– 9
A bateria de iões de lítio está sujeita aos requisitos
da lei sobre materiais perigosos e pode ser trans-
portada pelo utilizador, sem quaisquer restrições,
em locais públicos.
Em caso de envio por terceiros (empresas de
transporte) devem ser tidos em atenção os requisi-
tos relativos à embalagem e à identificação.
Enviar a bateria apenas se a carcaça estiver intac-
ta. Colar os contactos expostos e embalar a bateria
de um modo seguro e correto. A bateria não deve
poder mover-se dentro da embalagem.
Ter também em atenção as prescrições nacionais.
몇 CUIDADO
As unidades de segurança protegem o utilizador e não
podem ser alteradas ou colocadas fora de serviço.
O circuito de protecção montado protege as baterias recarregáveis contra
Sobreaquecimento
Descarregamento profundo
Sobrecarga
Curto-circuito
Figura dependente do tipo
1 Placa de tipo
2 Display
3 Contactos
4 Alojamento
1 Contactos de carregamento
2 Adaptador da bateria
3 Cabo de ligação
4 Placa de tipo
5 Fonte de alimentação de ficha
몇 CUIDADO
Perigo de ferimentos, perigo de danos! Observar o manual de instruções e os avisos de segurança do carregador.
Aviso
Os novos carregadores de baterias estão apenas précarregados e devem ser completamente carregados
antes da primeira utilização.
O display é activado no primeiro processo de carga.
Na primeira utilização, o conjunto de bateria deve ser
descarregado até o aparelho ser desligado para que a
indicação do estado de carga funcione correctamente.
Figura
Ligar a fonte de alimentação de ficha à tomada.
Colocar o conjunto de bateria no adaptador de ba-
teria do carregador.
O processo de carga começa automaticamente.
Figura
O display do conjunto de bateria apresentar a du-
ração de carga restante.
O tempo de carga com um carregador standard
(Battery Power BC 36 V) para um conjunto de ba-
teria (Battery Power 36/25) totaliza cerca de 5,5
horas.
Se o conjunto de bateria estiver totalmente carre-
gado, o display indica 100%.
Após o carregamento, retirar o adaptador da bate-
ria do conjunto de bateria.
Retirar a fonte de alimentação de ficha da tomada.
Aviso
Se o display não indicar nada e o conjunto de bateria
estiver no carregador, a capacidade da bateria está esgotada ou é muito reduzida. Quando o conjunto de bateria estiver suficientemente carregado, o display indica
o tempo de carga restante
.
Caso não seja apresentada qualquer indicação
após um período prolongado, o conjunto de bateria
tem defeito e deve ser substituído.
Aviso
Os novos conjuntos de baterias atingem a sua capacidade máxima após aprox. 5 ciclos de carga e descarga.
Recarregar os conjuntos de baterias não utilizados durante um período prolongado antes da utilização.
Conjuntos da bateria de 36 V Battery Power
Denominação
Tipo de acumulador
Tensão nominal
Cap
acidade nominal
(em conformidade com
a IEC/EN 61690)
Capacidade nominal
(conforme indicação do
fabricante
Iões de lítio
VAhAh
36/25 36 2,4
2,5
36
/50 36 4,8
5,0
Transporte
Equipamento de segurança
Circuito de protecção
Elementos de manuseamento
Conjunto da bateria
Carregador standard
Processo de carga
63PT
Page 64

– 10
Com temperaturas inferiores a 0 °C, a capacidade de
desempenho do conjunto de bateria é reduzida.
Um armazenamento prolongado a temperaturas superiores a 20 °C poderá reduzir a capacidade do conjunto
de bateria.
Aviso
As baterias recarregáveis carregadas podem ficar no
carregador até à sua utilização. Não existe qualquer risco de sobrecarga.
Para evitar um consumo de energia desnecessário, o
carregador deverá ser desconectado assim que as baterias recarregáveis estiverem completamente carregadas.
O conjunto de bateria está equipado com um dis-
play que emite permanentemente informações sobre o estado de carga, o progresso do carga e o
tempo de funcionamento restante. São também
apresentada eventuais mensagens de erros.
A adaptação do tempo de funcionamento ocorre
através da comutação de desempenho.
Conforme o aparelho utilizado, a indicação roda ao
inserir o conjunto de bateria.
몇 CUIDADO
Perigo de lesões e de danos! Para a operação, observar o manual de instruções e os avisos de segurança do
aparelho utilizado.
Inserir as baterias recarregáveis no encaixe do
aparelho.
몇 CUIDADO
Perigo de lesões e de danos! Prestar atenção para que
as baterias recarregáveis estejam correctamente encaixadas.
Aviso
Durante a utilização, o display apresenta o tempo de
funcionamento restante.
Após os trabalhos, retirar as baterias recarregáveis
do aparelho.
Após os trabalhos, carregar as baterias recarregá-
veis.
Aviso
Após a utilização, carregar também as baterias recarregáveis que estejam apenas parcialmente descarregadas.
몇 CUIDADO
Perigo de lesões e de danos! Ter atenção ao peso do
aparelho durante o transporte.
ADVERTÊNCIA
Perigo de danos! Armazenar as baterias recarregáveis
apenas em espaços com uma humidade do ar reduzida
e uma temperatura inferior a 20 °C.
Este aparelho só pode ser armazenado em espaços fechados e cobertos.
O conjunto de bateria indica o seu estado de carga actual no display, mesmo que não esteja ligado nenhum
carregador.
Se o display do conjunto de bateria acender durante o
armazenamento, a capacidade da bateria esgotou e o
display foi desligado. Recarregue o conjunto de bateria
assim que possível.
몇 CUIDADO
Perigo de lesões e de danos! Ter atenção ao peso do
aparelho durante o transporte.
Controlar os contactos de carregamento regular-
mente quanto a sujidade e eventualmente limpar.
As baterias recarregáveis que fiquem armazena-
das durante um período de tempo prolongado de-
vem ser ocasionalmente carregadas.
Operação do conjunto da bateria
Display
Indicação Significado
Armazenar bateria
Estação de carga do
conjunto de bateria
quando não está a ser
utilizado.
Utilizar bateria
Tempo de funcionamento restante do conjunto
de bateria quando está a
ser utilizado.
Carregar bateria
Tempo de carga restante do conjunto de bateria
ao carregar.
Conjunto de bateria totalmente carregado.
Indicação de erros
Temperatura do conjunto de bateria fora dos valores permitidos ou bloqueada devido a curtocircuito (ver Ajuda em
caso de avaria).
Conjunto de bateria com
defeito e bloqueado para
fins de segurança. Não
utilizar conjunto de bateria e eliminar de acordo
com as prescrições.
Funcionamento
Armazenamento
Transporte e armazenamento
Conservação e manutenção
Indicação Significado
64 PT
Page 65

– 11
O aparelho está isento de manutenção.
Ver figuras na página desdobrável!
Este manual de instruções descreve
os aspiradores polivalentes apresen-
tados na capa.
As figuras mostram o equipamento máximo. O
equipamento e os acessórios variam consoante o
modelo.
Verifique o conteúdo da embalagem a respeito de acessórios não incluídos ou danos. No caso de danos provocados durante o transporte, informe o seu revendedor.
incluído no volume de fornecimento
possíveis acessórios
Figura
Para abrir, puxar os fechos do depósito para fora e
retirar a parte superior do aparelho utilizando a
pega de transporte.
Figura
Retirar o conteúdo do depósito.
Figura
Virar o recipiente e pressionar os rolos de guia con-
tra as aberturas no fundo do recipiente até encai-
xarem.
Figura
Colocar a cabeça do aparelho no recipiente e fe-
char os fechos do recipiente.
Manutenção
Ajuda em caso de avarias
Erro ao carregar
O display está desligado e o conjunto de bateria
não carrega
Carregador com defeito. Substitua o carregador.
É possível que o conjunto de bateria esteja completa-
mente descarregado. Aguarde para verificar se o display indica a duração de carga restante após algum
tempo. Se não apresentar, o conjunto de bateria tem
defeito. Substitua o conjunto de bateria.
O display está ligado mas o conjunto de bateria
não carrega
Carregador com defeito. Substitua o carregador.
Observe a indicação no display. É possível que a tem-
peratura da bateria não esteja no intervalo normal.
O display apresenta o símbolo de temperatura e o
conjunto de bateria não carrega
Temperatura do conjunto de bateria demasiado baixa/
alta. Coloque o conjunto de bateria num ambiente
com temperaturas moderadas. Aguarde até que a
temperatura do conjunto de bateria tenha normalizado.
O processo de carga começa automaticamente.
Erro na operação
O símbolo de temperatura é apresentado no dis-
play
Temperatura do conjunto de bateria demasiado baixa/
alta. Coloque o conjunto de bateria num ambiente
com temperaturas moderadas. Aguarde até que a
temperatura do conjunto de bateria tenha normalizado.
Em caso de curto-circuito, o conjunto de bateria é bloqueado e não pode continuar a ser utilizado durante
30 segundos. Se o curto-circuito ocorrer com maior
frequência, o conjunto de bateria é bloqueado permanentemente. Feche o conjunto de bateria para desbloquear o carregador.
Se o display apresentar 0 como tempo de funcionamento restante, o aparelho desliga-se.
O conjunto de bateria está descarregado. Recarregue
o conjunto de bateria.
Erro no armazenamento
O display não apresenta qualquer capacidade res-
tante
O conjunto de bateria está descarregado. Recarregue
o conjunto de bateria.
O display apresenta a capacidade restante a 70%,
apesar de o conjunto de bateria ter sido carregado
há pouco tempo.
O conjunto de bateria encontra-se no modo Standby
automático. Este pode ser activado, se a bateria não
for utilizada durante mais de 21 dias. Esta função evita
o desgaste rápido das células da bateria e aumenta a
respectiva vida útil. Recarregue totalmente o conjunto
de bateria antes da próxima utilização.
Erro geral
O display apresenta o símbolo de bateria interrom-
pido.
Conjunto de bateria com defeito e bloqueado para fins
de segurança. Não utilizar conjunto de bateria e eliminar de acordo com as prescrições.
Descrição da máquina
1 Ligação do tubo flexível de aspiração
2 Compartimento da bateria acumuladora
3 Interruptor do aparelho (LIG/DESL)
4 Tecla de desbloqueio da bateria recarregável
5 Punho
6 Ligação do sopro
7 Fecho do recipiente
8 Posição de estacionamento
9 Depósito dos acessórios
10 Rolo de guia
11 Recipiente
12 Saco-filtro
13 Filtro de cartucho
14 Mangueira de aspiração com peça de ligação
15 Punho removível
16 Tubos de aspiração 2 x 0,5 m
17 Bocal para juntas
18 Bocal para pavimentos
(com encaixe)
19 Conjunto da bateria
Battery Power 36/25
20 Carregador standard
Battery Power BC 36 V
Montagem
65PT
Page 66

– 12
Figura
Para a aspiração de sujidade seca pode, em caso
de necessidade, ser utilizado adicionalmente um
saco de filtro.
Figura
Figura
Ver capítulo “Processo de carga” e “Operação do
conjunto da bateria”.
Figura
Pressionar o tubo de aspiração contra a ligação no
aparelho, até encaixar.
Para retirar basta premir a patilha (com o polegar)
e retirar o tubo de aspiração.
Figura
Conectar o punho com a mangueira de aspiração,
até encaixar.
Encaixar os dois tubos de aspiração e conectar
com o punho.
Aviso: acessórios como, p. ex., escovas de aspiração
(opcional) podem ser encaixados directamente na peça
de ligação e, deste modo, ser conectados com a mangueira de aspiração.
Para trabalhar confortavelmente, mesmo em espaços
apertados.
O punho removível pode, se necessário, ser montado
entre o acessório e a mangueira de aspiração.
Recomendação: para a aspiração do chão, encaixar o
punho na mangueira de aspiração.
Figura
Para retirar o punho da mangueira de aspiração,
pressionar o entalhe com o polegar e o dedo indi-
cador e retirar o punho
Aviso: com o retirar do punho, os acessórios podem
também ser encaixados directamente na mangueira de
aspiração.
Figura
Ligar o bocal para pavimentos ao tubo de aspira-
ção.
Aviso: durante a aspiração do chão de sujidade seca
ou de água - trabalhar sempre com o encaixe (tiras de
escova ou lábio de borracha) no bocal de chão.
Figura
Introduzir conjunto da bateria no suporte da bateria
a partir de cima e engatar.
Figura
Posição I: Função de sopro ou de aspiração.
Posição 0: aparelho desligado.
ADVERTÊNCIA
O recipiente em metal pode ser carregado estaticamente durante a aspiração de grandes quantidades de pó
fino e descarregado mediante contacto.
ADVERTÊNCIA
A zona do suporte da bateria deve manter-se limpa.
Se a zona apresentar demasiada sujidade, o con-
junto da bateria pode deixar de poder ser utilizado/
engatado correctamente.
Existe também a possibilidade de não ser possível
retirar o conjunto da bateria do aparelho, porque a
alavanca de ejecção já não se desloca.
ADVERTÊNCIA
Trabalhar sempre com o filtro de cartucho, tanto durante os trabalhos de aspiração a húmido como a seco!
ADVERTÊNCIA
Antes do encaixe, verificar se o filtro apresenta danos
e, se necessário, trocá-lo.
Trabalhar apenas com um filtro de cartucho seco!
Figura
Recomendação: montar o saco de filtro para aspi-
rar pó fino.
– O nível de enchimento do saco de filtro depende do
tipo de sujidade aspirada.
– Para pó fino, areia, etc. é necessário substituir o
saco de filtro com maior frequência.
– Sacos de filtro cheios podem rebentar, pelo que é
necessário que estes sejam substituídos atempadamente.
ADVERTÊNCIA
Aspiração de cinza fria apenas com separador prévio.
Para mais informações sobre acessórios e peças sobressalentes, consulte www.kaercher.com.
ADVERTÊNCIA
Não utilizar um saco de filtro!
Figura
Para a aspiração de lixo húmido ou líquido, ter
atenção ao encaixe do bocal de chão correcto e
conectar o acessório correspondente.
Aviso: quando o recipiente estiver cheio, o flutuador fecha a abertura de aspiração e o aparelho funciona com
uma rotação mais elevada. Neste caso deve desligar
imediatamente o aparelho e esvaziar o recipiente.
Limpeza de locais de difícil acesso ou onde não é possível aspirar (p. ex. folhagem sobre brita).
Figura
Conectar a mangueira de aspiração na ligação de
sopr
o, a função de sopro é activada.
Desligar o aparelho.
Figura
Engatar o bocal de pavimento na posição de esta-
cionamento.
Aviso: Se for necessário retirar a cabeça de aspiração
durante uma interrupção nos trabalhos, o conjunto da
bateria pode manter-se inserida. O conjunto da bateria
está firmemente engatado e não pode cair.
Desligar o aparelho.
Figura
Empurrar o bloqueio da bateria para a frente e re-
tirar o conjunto da bateria do aparelho.
Se necessário, recarregar novamente o conjunto
da bateria (ver capítulo “Carregar conjunto da bateria”).
Carregar conjunto da bateria
Colocação em funcionamento
Conectar os acessórios
Inserir conjunto da bateria
Ligar a máquina
Avisos gerais para o comando
Manuseamento
Aspirar a seco
Avisos relativos ao saco de filtro
Aspirar a húmido
Função de sopro
Interromper o funcionamento
Desligar o aparelho
66 PT
Page 67

– 13
Recomendação: Retirar o conjunto da bateria do apa-
relho após a conclusão do trabalho.
Figura
Remover a cabeça do aparelho e esvaziar o reci-
piente.
Figura
Guardar os acessórios no aparelho e guardar o
aparelho num local seco.
Aviso: Independentemente da operação de aspiração,
o display LC apresenta a capacidade aproximada do
conjunto da bateria, quer este se encontre fora ou dentro do aparelho.
Ver capítulo “Processo de carga” e “Operação do
conjunto da bateria”.
몇 CUIDADO
Perigo de ferimentos e de danos!
Ter atenção ao peso do aparelho durante o transporte.
Levantar o aparelho no manípulo e transportar.
Proteger o aparelho contra deslizamentos e tom-
bamentos.
Assegurar a conservação do aparelho e das peças
de acessórios com um produto de limpeza para
plástico comum.
Lavar o recipiente e os acessórios com água e se-
car antes de utilizar novamente.
Figura Limpar o filtro de cartucho, se necessário, apenas
sob água corrente, não esfregar nem escovar. Dei-
xar secar totalmente antes de montar.
Controlar os contactos de carregamento regular-
mente quanto a sujidade e eventualmente limpar.
Controlar a fenda de ventilação quanto a sujidade
e, eventualmente, limpar.
O aparelho está isento de manutenção.
Figura
O conjunto da bateria não encaixa correctamente
no suporte da bateria. Empurrar o conjunto da ba-
teria no suporte da bateria e engatar.
Estado de carga do conjunto da bateria (ver dis-
play) demasiado fraco. Se necessário, carregar o
conjunto da bateria.
Conjunto da bateria ou carregador com defeito.
Substituir o conjunto da bateria ou o carregador por
um novo acessório.
Sobreaquecimento do aparelho/conjunto da bate-
ria. Aguardar uns instantes até que o aparelho/conjunto da bateria arrefeçam.
O depósito está cheio de água, o que activa o flu-
tuador. Esvaziar o depósito.
Os acessórios, a mangueira de aspiração ou os tu-
bos de aspiração estão obstruídos.
Desobstruir com um meio auxiliar adequado.
Figura
Saco do filtro está cheio; inserir novo saco.
Figura Filtro de cartucho está sujo; sacudir o filtro de car-
tucho e lavar com água corrente, se necessário.
Trocar um filtro de cartucho danificado.
Recomendação: Trocar o filtro de cartucho 1x por ano.
Reservados os direitos a alterações técnicas!
Esvaziar o recipiente
Guardar a máquina
Armazenar o conjunto da bateria
Transporte
Transporte manual
Transporte em veículos
Conservação e manutenção
Manutenção
Ajuda em caso de avarias
A máquina não funciona
O aparelho desliga automaticamente
Perda da potência de aspiração
Dados técnicos
O conjunto da bateria e o carregador standard no volume do fornecimento de:
WD 3 Battery Set
WD 3 Battery Premium Set
(Conjunto de bateria Battery Power 36/25 / carregador
standard Battery Power BC 36 V)
Aparelho
Potência nominal W 300
Tempo de serviço com carrega-
mento da bateria completo (máx.)
min 15
Classe de protecção III
Tipo de protecção IPX4
Conjunto de bateria Battery Power 36/25
Tensão nominal V 36
Capacidade nominal (em confor-
midade com a IEC/EN 61690)
Ah 2,4
Capacidade nominal
(conforme indicação do fabricante
das células)
Ah 2,5
Energia nominal
(em conformidade com a UN
3480)
Wh 86,4
Corrente máx. de carga A 4
Tipo de acumulador Iões de lítio
Peso kg 0,9
Dimensões (a x l x p) mm 133x88x72
Carregador standard Battery Power BC 36 V
Tensão nominal do conjunto da
bateria
V36
Corrente de carga máx. A 0,5
Tipo de acumulador Iões de lítio
Tensão da rede V 100-240
Frequência Hz 50-60
Consumo de potência (máx.) A 0,3
Classe de protecção II
Peso (sem conjunto da bateria) g 205
67PT
Page 68

– 5
Kære kunde
Læs den originale driftsvejledning inden første brug, følg anvisningerne og
opbevar vejledningen til senere brug
eller til den næste ejer.
Maskinen er i henhold til beskrivelserne i denne brugsvejledning og sikkerhedsanvisningerne beregnet til anvendelse som universalsuger.
Denne maskine blev udviklet til privat brug og er ikke
beregnet til erhvervsmæssig brug.
– Beskyt damprenseren mod regn. Må ikke opbeva-
res udendørs.
– Aske og sod må ikke opsuges med denne maskine.
Producenten garanterer ikke for eventuelle skader som
blev forårsaget af ikke bestemmelsesmæssigt brug eller
ukorrekt betjening af apparatet.
Henvisninger til indholdsstoffer (REACH)
Aktuelle oplysninger til indholdsstoffer finder du på:
www.kaercher.com/REACH
Henvisninger til indholdsstoffer (REACH)
Aktuelle oplysninger til indholdsstoffer finder du på:
www.kaercher.com/REACH
I de enkelte lande gælder de af vore forhandlere fastlagte garantibetingelser. Eventuelle fejl på apparatet afhjælpes gratis inden for garantien, såfremt fejlen kan tilskrives en materiale- eller produktionsfejl. Hvis De ønsker at gøre garantien gældende, bedes De henvende
Dem til Deres forhandler eller nærmeste kundeservice
medbringende kvittering for købet.
Vores KÄRCHER-afdeling hjælper gerne, hvis De har
spørgsmål, eller der er fejl på støvsugeren.
Anvend kun originaltilbehør og -reservedele. De er en
garanti for en sikker og fejlfri drift af maskinen.
Informationer om tilbehør og reservedele findes
www.kaercher.com
Kontakt venligst forhandleren, hvis der mangler tilbehør
eller ved transportskader.
FARE
Henviser til en umiddelbar fare,
der fører til alvorlige kvæstelser
eller til døden
몇 ADVARSEL
Henviser til en mulig farlig situation, der kan føre til alvorlige
kvæstelser eller til døden.
몇 FORSIGTIG
Henviser til en mulig farlig situation, der kan føre til lette personskader.
Indholdsfortegnelse
Generelle henvisninger DA 5
Sikkerhedsanvisninger DA 5
Oplysninger om batteripakke og oplader DA 8
Sikkerhedsanordninger DA 8
Betjeningselementer DA 9
Opladning DA 9
Betjening af batteripakke DA 9
Opbevaring DA 10
Transport og opbevaring DA 10
Pleje og vedligeholdelse DA 10
Hjælp ved fejl DA 10
Beskrivelse af apparatet DA 11
Montering DA 11
Opladning af batteripakke DA 11
Ibrugtagning DA 11
Generelle henvisninger til betjening DA 11
Betjening DA 11
Transport DA 12
Pleje og vedligeholdelse DA 12
Hjælp ved fejl DA 12
Tekniske data DA 13
Generelle henvisninger
Bestemmelsesmæssig anvendelse
Miljøbeskyttelse
Emballagen kan genbruges. Sørg for at bortskaffe emballagen på en miljømæssigt forsvarlig måde.
Udtjente maskiner indeholder værdifulde materialer, der kan og bør afleveres til genbrug. Akku'er
og batterier indeholder stoffer, der ikke må komme ud i naturen. Gamle apparatet og batterier
skal bortskaffes miljøvenligt.
Elektriske og elektroniske maskiner indeholder
ofte bestanddele, der ved forkert omgang eller
forkert bortskaffelse kan udgøre en mulig fare for
menneskers sundhed og for miljøet. For en korrekt drift af maskinen er disse bestanddele imidlertid nødvendige. Maskiner kendetegnet med
dette symbol må ikke bortskaffes sammen med
husholdningsaffaldet.
Garanti
Kundeservice
Tilbehør og reservedele
Leveringsomfang
Sikkerhedsanvisninger
Faregrader
68 DA
Page 69

– 6
BEMÆRK
Henviser til en mulig farlig situation, der kan føre til materiel skade.
FARE
Brugeren skal anvende høj-
tryksrenseren iht. dens an-
vendelsesformål. Han skal
tage hensyn til lokale forhold
og holde øje med, om der er
personer i nærheden, når han
arbejder med aggregatet.
Det er forbudt at bruge høj-
tryksrenseren i områder, hvor
der er eksplosionsfare.
Ved anvendelse af dampren-
seren i fareområder skal de
relevante sikkerhedsforskrif-
ter overholdes.
Renseren må ikke bruges,
hvis den før enten er faldet
ned, er tydeligt beskadiget el-
ler utæt.
Emballagefolie skal holdes
fjern fra børn, kvælningsfare!
몇 ADVARSEL
Apparatet er ikke beregnet til
at blive brugt af personer (in-
klusive børn), hvis fysiske,
sensoriske eller åndelige ev-
ner er indskrænket eller af
personer med manglende er-
faring og/eller kendskab med
mindre disse personer over-
våges af en person, som er
ansvarlig for deres sikkerhed,
eller blev trænet i apparatets
håndtering og de evt. resulterende farer.
Børn må kun bruge appara-
tet, hvis de er over 8 år under
opsyn af en person, som er
ansvarlig for deres sikkerhed,
eller hvis de blev indlært/trænet i brugen af apparatet og
de evt. resulterende farer.
Børn må ikke lege med appa-
ratet.
Børn skal være under opsyn
for at sørge for, at de ikke leger med maskinen.
Maskinen bør kun bruges og
opbevares iht. beskrivelsen,
hhv. figuren!
Apparatet indeholder elektri-
ske komponenter, disse må
ikke renses under rindende
vand!
몇 FORSIGTIG
Lad aldrig damprenseren
være uden opsyn, mens den
er i drift.
BEMÆRK
Apparatet må ikke bruges
ved temperaturer under 0 °C.
Sug aldrig uden filter, appara-
tet kan ellers gå i stykker.
Beskyt apparatet imod eks-
tremt vejr, fugtighed og varme.
FARE
Eksplosionsrisiko!
Det er forbudt at bruge høj-
tryksrenseren i områder, hvor
der er eksplosionsfare.
Sikkerhedsanvisninger til
våd-/tørsugeren
Sikker brug
Andre farer
69DA
Page 70

– 7
Opsug ikke eksplosive eller
brandbare gasser, væsker og
støv!
Opsug ikke reaktivt metalstøv
(f.eks. aluminium, magnesi-
um eller zink)!
Opsug ikke ufortyndede syrer
eller baser!
Opsug ikke brændende eller
glødende genstande!
몇 ADVARSEL
Fysisk Risiko!
Sug ikke med dyse og suge-
rør i nærheden af hovedet.
몇 FORSIGTIG
Tag hensyn til maskinens
vægt til transporten (se tekni-
ske data) for at undgå ulykker
og personskader.
몇 FORSIGTIG
Inden der arbejdes med eller
ved maskinen, skal det sik-
res, at maskinen står stabilt
for at forhindre ulykker eller
beskadigelser/kvæstelser
ved at maskinen vælter.
FARE
Kontrollér før enhver anven-
delse af netdelen med stik,
forbindelseskablet, batteria-
dapteren og batteripakken,
om de er beskadigede. Be-
skadigede maskiner må ikke
anvendes mere, og skal ud-
skiftes.
Opladeren må ikke åbnes. I
tilfælde af beskadigelse eller
defekter skal opladeren udskiftes.
Opladeren må ikke bruges i
områder med eksplosionsfare.
Rør aldrig ved netstik og stik-
kontakt med fugtige hænder.
Brug ladeapparatet aldrig til-
smudset eller vådt.
Oplad ingen batterier (pri-
mærceller), eksplosionsfare.
몇 FORSIGTIG
Strømspændingen skal svare
til spændingen på apparatets
typeskilt.
Brug opladeapparatet kun til op-
ladning af godkendte akkuer.
Opladningen af batteripakken
er kun tilladt med vedlagte
originale oplader eller en oplader, der er godkendt af
KÄRCHER.
BEMÆRK
Opladeren må ikke bæres i
forbindelseskablet.
Hold forbindelseskablet væk
fra varme, skarpe kanter, olie
og bevægende maskindele.
Netdelen med stik må ikke til-
dækkes.
Undgå at anvende forlænger-
kabler med flere stikkontakter
og drift af flere maskiner samtidigt.
For at undgå beskadigelser
må forbindelseskablet ikke
vikles om netdelen med stik
eller batteriadapteren.
Stabilitet
Sikkerhedshenvisninger
ladeaggregat
70 DA
Page 71

– 8
Læs altid de medfølgende sikkerhedsforskrifter til batteripakken, og overhold disse i
forbindelse med anvendelsen!
몇 FORSIGTIG
– Fare for kvæstelse, fare for beskadigelse på grund
af eksploderende batteri! Batteripakker må kun oplades med den dertil beregnede oplader.
– Kontrollér før anvendelse, at batteripakken og op-
laderen passer sammen!
– Oplad kun ubeskadigede batteripakker.
– Modifikationer og ændringer som ikke er godkendt
fra producenten er af sikkerhedsgrunde forbudt.
– Enhver anden anvendelse er ikke tilladt. Brugeren
hæfter for farer som opstår pga. af misbrug.
Til ibrugtagningen kræves en batteripakke samt et
ladeaggregat med 36 V nominel spænding. Leveringsomfanget for "sætvarianterne" indeholder allerede en Li-ION batteripakke med 36 V, 2,5 Ah (Battery Power 36/25) og et standardladeaggregat på
36 V (Battery Power BC 36 V).
Batteripakkerne Battery Power (+) 36/25, 36/50
und 36/75 må kun anvendes sammen med de dertil
beregnede apparater fra Kärcher 36 V Battery Power Systems.
Batterier/opladere, som ikke indgår i leveringsom-
fanget eller er derudover nødvendige, kan fås som
specialtilbehør og efterkøbes.
Før anvendelsen af batteripakken i et apparat fra
KÄRCHER Battery Power-batteriplatformen bedes
du være opmærksom på det anvendte apparats
driftsvejledning og de eventuelt vedlagte sikkerhedsforskrifter.
Yderligere informationer betjeningsvedledningen til
batteripakker samt tilbehør og reservedele findes
på www.kaercher.com.
Lithium-ion-batteriet er omfattet af kravene i be-
stemmelserne om transport af farligt gods og kan
transporteres af brugeren på offentlig vej uden
yderligere pålæg.
Ved forsendelse gennem tredjepart (transportvirk-
somheder) skal særlige krav til emballage og
mærkning overholdes.
Fremsend kun batteriet, hvis huset er fri for beska-
digelser. Afdæk åbne kontakter, og emballer batteriet på fast og sikker vis. Det må ikke kunne bevæge sig i emballagen.
Overhold de nationale forskrifter.
몇 FORSIGTIG
Sikkerhedsanordninger skal beskytte mod kvæ-
stelser og må hverken ændres eller omgås.
Den monterede beskyttelseskreds beskytter batterierne mod
overophedning
total afladning
Overopladning
Kortslutning
Symboler på
ladeaggregatet
Beskyt ladeapparatet
imod fugtighed og opbevar det tørt. Apparatet er
kun egnet til rug indenfor
rum, må ikke udsættes
for regn.
Opladeren har en indbygget sikring på 1 ampere.
Opladeren opfylder kravene for beskyttelsesklasse II.
Sikkerhedshenvisninger
batteripakke
Oplysninger om batteripakke og
oplader
Batteripakker 36 V Battery Power
Navn
Akkutype
Mærkespænding
Nomine
l ydelse
(iht. IEC/EN 61690)
Nominel ydelse
(iht. celleproducentens angivelser)
Li-Ion
VAhAh
36/25 36 2,4 2,5
36/50 36 4,8 5,0
Transport
Sikkerhedsanordninger
Beskyttelseskreds
71DA
Page 72

– 9
Figur Typeafhængig
1 Typeskilt
2 Display
3 Kontakter
4 Holder
1 Ladekontakter
2 Batteriadapter
3 Forbindelseskabel
4 Typeskilt
5 Netdel med stik
몇 FORSIGTIG
Fare for tilskadekomst, fare for beskadigelse! Læs opladerens driftsvejledning og sikkerhedsanvisninger.
Bemærk
Nye batteripakker er kun foropladet og skal oplades helt
inden første anvendelse.
Displayet aktiveres ved første opladning.
For at opladningstilstandsvisningen fungerer rigtigt, skal
batteripakken ved første anvendelse aflades, indtil apparatet slukker.
Figur
Sæt netdelen med stik i stikkontakten.
Sæt batteripakken ind i batteriadapteren til oplade-
ren.
Opladningen begynder automatisk.
Figur
I batteripakkens display vises den resterende lade-
tid.
Opladningstiden af en tom batteripakke (Battery
Power 36/25) er ca. 5,5 timer med et standardladeaggregat (Battery Power BC 36 V).
Hvis batteripakken er helt opladet, viser displayet
100%.
Tag efter opladningen batteriadapteren ud af batte-
ripakken.
Træk netdelen med stik ud af stikkontakten.
Bemærk
Hvis displayet ikke viser noget, når batteripakken befinder sig i opladeren, er batterikapaciteten opbrugt e
ller
meget lav. Når batteripakken er opladet tilstrækkeligt,
viser displayet den resterende ladetid.
Hvis der også efter længere tid ikke vises noget, er
batteripakken defekt og skal udskiftes.
Bemærk
Nye batteripakker opnår deres fulde kapacitet efter ca.
5 lade- og afladningscykler.
Genoplad batteripakker, der ikke har været anvendt i
længere tid, inden anvendelsen.
Ved temperaturer under 0 °C falder batteripakkens ydeevne.
Lang opbevaring ved temperaturer over 20 °C kan reducere kapaciteten for en batteripakke.
OBS
De opladede batterier kan stå på opladeren indtil de
bruges. Der er ingen fare for overladning.
For at undgå unødvendigt energiforbrug, skal opladeren
trækkes ud af stikdåsen, så snart batterierne er helt opladet.
Batteripakken er udstyret med et display, der lø-
bende giver oplysninger om opladningstilstanden,
hvor langt opladningen er kommet og restløbetiden. Derudover vises eventuelle fejlmeddelelser.
Løbetidstilpasning dannes ved strømafbrydelse.
Afhængigt af det anvendte apparat drejer visnin-
gen sig ved isætning af batteripakken.
Betjeningselementer
Batteripakke
Standard ladeaggregat
Opladning
Betjening af batteripakke
Display
Display Forklaring
Opbevaring af batteri
Batteripakkens opladningstilstand når den
ikke anvendes.
Anvendelse af batteri
Batteripakkens restløbetid ved anvendelse.
Opladning af batteri
Batteripakkens resterende ladetid ved opladningen.
72 DA
Page 73

– 10
몇 FORSIGTIG
Fare for person- og materialeskader! Læs apparatets
driftsvejledning og sikkerhedsanvisninger.
Skub batterierne ind i apparatets holder.
몇 FORSIGTIG
Fare for person- og materialeskader! Hold øje med at
batterierne går i hak.
Bemærk
Under anvendelsen viser displayet den resterende løbetid.
Efter arbejdet tages batterierne ud af apparatet.
Oplad batterierne efter arbejdet.
OBS
Også delvist afladede batterier skal oplades efter brug.
몇 FORSIGTIG
Fare for person- og materialeskader! Hold øje med maskinens vægt ved transporten.
BEMÆRK
Risiko for beskadigelse! Opbevar kun batterierne i rum
med lav luftfugtighed og under 20 °C.
Denne maskine må kun opbevares indendørs.
Batteripakken viser sin aktuelle opladningstilstand på
displayet, også uden at være tilsluttet til en oplader.
Hvis batteripakkens display slukker under opbevaringen, er batterikapaciteten opbrugt og displayet er blevet
slukket. Oplad batteripakken så hurtigt som muligt igen.
몇 FORSIGTIG
Fare for person- og materialeskader! Hold øje med maskinens vægt ved transporten.
Kontroller regelmæssigt ladekontakterne for til-
smudsning, rens evt.
Oplad ind imellem batterierne, som opbevares i
længere tid.
Højtryksrenseren er vedligeholdelsesfri.
Batteripakke helt opladet.
Fejlvisning
Batteripakketemperatur
uden for de tilladte værdier eller spærret på
grund af kortslutning (se
Hjælp i tilfælde af fejl).
Batteripakke defekt og
spærret for en sikkerheds skyld. Batteripakken må ikke længere anvendes og skal bortskaffes iht. forskrifterne.
Drift
Opbevaring
Transport og opbevaring
Display Forklaring
Pleje og vedligeholdelse
Vedligeholdelse
Hjælp ved fejl
Fejl ved opladningen
Displayet er slukket, batteripakken oplader ikke
Opladeren er defekt. Udskift opladeren.
Batteripakken er muligvis afladet helt. Afvent, om dis-
playet efter et stykke tid viser den resterende ladetid.
Hvis ikke, er batteripakken defekt. Udskift batteripakken.
Displayet er tændt men batteripakken oplader ikke
Opladeren er defekt. Udskift opladeren.
Vær opmærksom på displayvisningen. Batteriets tem-
peratur er eventuelt ikke i normalområdet.
Displayet viser temperatursymbol, batteripakken
oplader ikke
Batteripakketemperatur for lav / høj. Anbring batteripakken i omgivelser med moderat temperatur. Vent,
indtil batteripakkens temperatur er normal igen.
Opladningen begynder derefter automatisk.
Fejl under driften
På displayet vises temperatursymbolet
Batteripakketemperatur for lav / høj. Anbring batteripakken i omgivelser med moderat temperatur. Vent,
indtil batteripakkens temperatur er normal igen.
Ved en kortslutning spærres batteripakken for yderligere anvendelse i 30 sekunder. Hvis kortslutningen
optræder hyppigere, spærres batteripakken konstant.
Slut batteripakken til opladeren for at opspærre den.
Displayet viser den resterende løbetid 0, apparatet
slukker.
Batteripakken er afladet. Oplad batteripakken igen.
Fejl ved opbevaring
Displayet viser ingen restkapacitet længere
Batteripakken er afladet. Oplad batteripakken igen.
Displayet viser restkapacitet 70%, selv om batteripakken er nyopladet.
Batteripakken befinder sig i automatisk opbevaringsmodus. Denne aktiveres, hvis batteriet ikke er blevet
anvendt i de sidste 21 dage. Denne funktion beskytter
battericellerne mod hurtig ældning og øger levetiden.
Oplad batteripakken helt igen, inden næste anvendelse.
Generel fejl
Displayet viser et brudt batterisymbol.
Batteripakke defekt og spærret for en sikkerheds
skyld. Batteripakken må ikke længere anvendes og
skal bortskaffes iht. forskrifterne.
73DA
Page 74

– 11
Se figurerne på side 4!
Denne driftsvejledning beskriver uni-
versalmodellerne som er vist på omslaget.
Figurerne viser det maksimale udstyr, afhængigt af
modellen er der forskelle mellem udstyr og medle-
veret tilbehør.
Kontroller pakningens indhold for manglende tilbehør
eller beskadigelser, når den pakkes ud. Kontakt Deres
forhandler i tilfælde af transportskader.
kommer med leveringen
muligt tilbehør
Figur
Træk beholderlågene udad, og tag maskinhovedet
af ved hjælp af bæregrebet for at åbne
.
F
igur
Tag indholdet ud af beholderen.
Figur
Vend beholderen, tryk styrehjulene i åbningerne på
beholderens bund indtil stoppositionen.
Figur
Sæt maskinhovedet på beholderen og luk behol-
derlågene.
Figur
Ved opsugning af tørt smuds kan der ved behov
isættes en filterpose.
Figur
Figur
Se kapitlet "Opladning" og "Betjening Batteripak-
ke".
Figur
Tryk sugeslangen ind i tilslutningen, den går i hak.
For at fjerne sugeslangen skal låsetappen trykkes
ind med tommelfingeren og sugeslangen trækkes
ud.
Figur
Forbind håndtaget med sugeslangen indtil det går i
hak.
Sæt begge sugerør sammen og forbind dem med
håndtaget.
Bemærk: Tilbehør som f.eks. sugebørster (option) kan
direkte sættes på forbindelsesstykket og således forbindes med sugeslangen.
Til bekvemt arbejde selv i små rum.
Efter behov kan det aftagelige håndtag anbringes mellem tilbehør og sugeslangen.
Anbefaling: Til sugning af gulve sættes håndtaget på
sugeslangen.
Figur
For at tage håndgrebet af sugeslangen, skal lå-
setappen trykkes ind med tommelfingeren og pe-
gefingeren, hvorefter håndgrebet tages af.
Bemærk: Hvis håndtaget tages af kan tilbehør sættes
direkte på sugeslangen.
Figur
Forbind gulv-mundstykket med sugerøret.
Bemærk: Til sugning af gulve af tør smuds eller vand skal der altid arbejdes med indsats (børstetsribe og
gummilæbe) i gulvdysen.
Figur
Sæt batteripakken i batteriholderen fra oven, og
klik det på plads.
Figur
Position I: Suge- eller blæsefunktion.
Position 0: Maskinen er slukket.
BEMÆRK
Metalbeholderen kan i forbindelse med opsugning af
store finstøvsmængder blive statisk ladet og derefter afladet ved berøringer.
BEMÆRK
Området om batteriholderen skal holdes rent.
Hvis der kommer for meget snavs ind i dette områ-
de, er det muligt, at batteripakken ikke længere kan
klikkes rigtigt på plads.
Ligeledes er der risiko for, at batteripakken ikke
længere kan tages ud af apparatet, fordi udkast-
ningshåndtaget ikke længere kan bevæges.
BEMÆRK
Såvel ved våd- og tørsugning skal der altid arbejdes
med et isat patronfilter!
BEMÆRK
Kontroller filteret for skader før det sættes i og udskift
det efter behov.
Arbejd kun med tør patronfilter!
Beskrivelse af apparatet
1 Sugeslangetilslutning
2Akkurum
3 Startknap (TÆND/SLUK)
4 Batteriåbneknap
5 Håndtag
6 Blæsetilslutning
7 Beholderlås
8 Parkeringsposition
9 Tilbehørsholder
10 Styringsrulle
11 Beholder
12 Filterpose
13 Patronfilter
14 Sugeslange med forbindelsesstykke
15 Aftageligt håndtag
16 Sugerør 2 x 0,5 m
17 Fugemundstykke
18 Gulvdyse
(med indsats)
19 Batteripakke
Battery Power 36/25
20 Standardladeaggregat
Battery Power BC 36 V
Montering
Opladning af batteripakke
Ibrugtagning
Tilslut tilbehøret
Isætning af batteripakke
Tænd for maskinen
Generelle henvisninger til betjening
Betjening
Tørsugning
74 DA
Page 75

– 12
Figur
Anbefaling: Isæt filterposen til opsugning af fint
støv.
– Filterposens påfyldningsgrad er afhængigt af den
opsugede snavs.
– Ved fintstøv, sand osv. skal filterposen udskiftes of-
tere.
– Tilstoppede filterposer kan eksplodere, derfor skal
filterposen udskiftes i tide!
BEMÆRK
Sugning af kold aske kun med separator.
Informationer om tilbehør og reservedele findes
www.kaercher.com
BEMÆRK
Brug ingen filterpose!
Figur
Til opsugning af fugtighed hhv. våde gulve skal der
holdes øje med den korrekte gulvdyseindsats og
det tilsvarende tilbehør tilsluttes.
Bemærk: Hvis beholderen er fuld, lukker en svømmerventil sugeåbningen, og støvsugeren kører med forhøjet omdrejningstal. Sluk straks for sugeren, og tøm beholderen.
Rengøring af svær tilgængelige steder eller hvor opsugning ikke er muligt, f.eks. løv ud af gruslag.
Figur
Sæt sugeslangen ind i blæsetilslutningen, blæse-
funktionen er så aktiveret.
Sluk for renseren
Figur
Hæng gulvdysen ind i parkeringsholderen.
Bemærk: Hvis det er nødvendigt at tage sugehovedet
af, mens arbejdet er afbrudt, kan batteripakken blive
siddende. Batteripakken er klikket fast og kan ikke falde
ned.
Sluk for renseren
Figur
Skub oplåsningstasten til batteriet fremad, og tag
batteripakken ud af apparatet.
Lad batteripakken op efter behov (se kapitlet "Op-
ladning af batteripakke").
Anbefaling: Tag batteripakken ud af apparatet, når arbejdet er afsluttet.
Figur
Tag maskinens hoved af og tøm beholderen.
Figur
Anbring tilbehøret på maskinen og opbevar maski-
nen i et tørt rum.
Bemærk: Uafhængig af sugedriften trækker LC-displayet en smule batterikapacitet, uanset om batteripakken befinder sig i eller uden for apparatet.
Se kapitlet "Opladning" og "Betjening Batteripak-
ke".
몇 FORSIGTIG
Fare for person- og materialeskader!
Hold øje med maskinens vægt ved transporten.
Løft maskinen ved hjælp af grebet og bær den.
Maskinen sikres/fastgøres, så den ikke kan vælte
eller flytte sig.
Maskinen og tilbehørsdelene af plast skal plejes
med en sædvanlig plastrenser.
Beholder og tilbehør spoles med vand og tørres in-
den de bruges igen.
Figur Efter behov må patronfilteret renses under flyden-
de vand; den må ikke gnides eller børstes. Ind
en
de
t monteres skal det tørres.
Kontroller regelmæssigt ladekontakterne for til-
smudsning, rens evt.
Kontroller ventilationsåbningerne for snavs, rens
dem om nødvendigt.
Højtryksrenseren er vedligeholdelsesfri.
Figur
Batteripakken sidder ikke rigtigt i batteriholderen:
Skub batteripakken i batteriholderen, og klik den på
plads.
Batteripakkens opladningsstatus (se display) for
lavt: Lad batteripakken op ved behov.
Ba
tteripakken eller oplader defekt: Udskift batteri-
pakken eller opladeren med nyt tilbehør.
Overophedning af apparat/batteripakke: Vent et
øjeblik, så apparatet/batteripakken kan køle af.
Beholder er fyldt med vand, og derved aktiveres
svømmeren: Tøm beholderen.
Tilbehør, sugeslange eller sugerør er tilstoppet.
Fjern tilstopning med et egnet hjælpemiddel.
Figur
Filterposen er fuld, isæt en ny filterpose.
Figur Patronefilteret er tilsmudset, bank patronfilteret og
rens det efter behov under flydende vand.
Udskift beskadiget patronfilter.
Anbefaling: Udskift patronfiltret 1x om året.
Henvisninger filterpose
Vådsugning
Blæsefunktion
Afbrydelse af driften
Efter brug
Tøm beholderen
Opbevaring af maskinen
Opbevaring af batteripakke
Transport
Manuel transport
Transport i køretøjer
Pleje og vedligeholdelse
Vedligeholdelse
Hjælp ved fejl
Maskinen kører ikke
Apparatet frakobles automatisk
Aftagende sugeeffekt
75DA
Page 76

– 13
Forbehold for tekniske ændringer!
Tekniske data
Batteripakke og standardladeaggregat i leveringsomfanget til:
WD 3 Battery Set
WD 3 Battery Premium Set
(Batteripakke Battery Power 36/25 / standardladeaggregat Battery Power BC 36 V)
Maskine
Nominel ydelse W 300
Driftstid ved fuldt opladet batteri
(maks.)
min 15
Beskyttelsesklasse III
Kapslingsklasse IPX4
Batteripakke Battery Power 36/25
Mærkespænding V 36
Nominel ydelse
(iht. IEC/EN 61690)
Ah 2,4
Nominel ydelse
(iht. celleproducentens angivelser)
Ah 2,5
Nominel energi
(iht. UN 3480)
Wh 86,4
Ladestrøm maks. A 4
Akkutype Li-Ion
Vægt kg 0,9
Dimensioner (lxbxh) mm 133x88x72
Standardladeaggregat Battery Power BC 36 V
Nominel spænding batteripakke V 36
Ladestrøm maks. A 0,5
Akkutype Li-Ion
Netspænding V 100-240
Frekvens Hz 50-60
Strømforbrug (maks.) A 0,3
Beskyttelsesklasse II
Vægt (uden batteripakke) g 205
76 DA
Page 77

– 5
Kjære kunde,
Les og følg denne originale bruksanvisningen før første gangs bruk av enheten og oppbevar den til senere bruk
eller overlevering til neste eier.
Maskinen skal brukes iht. de beskrivelser og sikkerhetsanvisninger som er gitt i denne bruksanvisning for bruk
som multisuger.
Dette apparatet er utviklet for privat bruk og er ikke forberedt for kravene som stilles i kommersiell bruk.
– Beskytt apparatet mot regn. Det må ikke oppbeva-
res utendørs.
– Aske og sot skal ikke suges opp med dette appara-
tet.
Produsenten er ikke ansvarlig for eventuelle skader forårsaket av ikke-tiltenkt eller feil bruk.
Anvisninger om innhold (REACH)
Aktuell informasjon om stoffene i innholdet finner du under:
www.kaercher.com/REACH
Anvisninger om innhold (REACH)
Aktuell informasjon om stoffene i innholdet finner du under:
www.kaercher.com/REACH
Vår ansvarlige salgsorganisasjon for det enkelte land
har utgitt garantibetingelsene som gjelder i det aktuelle
landet. Eventuelle feil på maskinen blir reparert gratis i
garantitiden dersom disse kan føres tilbake til materialeller produksjonsfeil. Ved behov for garantireparasjoner, vennligst henvend deg med kjøpskvitteringen til din
forhandler eller nærmeste autoriserte kundeservice.
Våre KÄRCHER-avdelinger hjelper deg gjerne ved feil
eller om du har spørsmål.
Bruk bare originalt tilbehør og originale reservedeler; de
garanterer for en sikker og problemfri drift av maskinen.
Informasjon om tilbehør og reservedeler finner du på
www.kaercher.com.
Ved manglende tilbehør eller ved transportskader,
vennligst informer forhandleren.
FARE
Anvisning om en umiddelbar truende fare som kan føre til store
personskader eller til død.
몇 ADVARSEL
Anvisning om en mulig farlig situasjon som kan føre til store
personskader eller til død.
몇 FORSIKTIG
Anvisning om en mulig farlig situasjon som kan føre til mindre
personskader.
Innholdsfortegnelse
Generelle merknader NO 5
Sikkerhetsanvisninger NO 5
Henvisninger angående batteri og lade-
apparat NO 8
Sikkerhetsinnretninger NO 8
Betjeningselementer NO 8
Lading NO 9
Betjening av batteripakken NO 9
Lagring NO 10
Transport og lagring NO 10
Pleie og vedlikehold NO 10
Feilretting NO 10
Beskrivelse av apparatet NO 10
Montering NO 11
Lade opp batteripakken NO 11
Ta i b ru k NO 11
Generelle anvisninger for betjening NO 11
Betjening NO 11
Transport NO 12
Pleie og vedlikehold NO 12
Feilretting NO 12
Tekniske data NO 13
Generelle merknader
Forskriftsmessig bruk
Miljøvern
Materialet i emballasjen kan resirkuleres. Kvitt
deg med emballasjen på miljøvennlig måte.
Gamle apparater inneholder verdifulle materialer
som kan gjenbrukes og som bør sendest til gjenbruk. Akkumulatorene inneholder stoffer som ikke
må komme ut i miljøet. Vennligst deponer gamle
apparater samt batterier eller oppladbare batterier på en miljøvennlig måte.
Elektriske og elektroniske apparater inneholder
ofte deler som kan utgjøre en potensiell fare for
helse og miljø ved feil bruk eller feil avfallsbehandling. Disse delene er imidlertid nødvendige
for korrekt drift av apparatet. Apparater merket
med dette symbolet skal ikke kastes i husholdningsavfallet.
Garanti
Kundetjeneste
Tilbehør og reservedeler
Leveringsomfang
Sikkerhetsanvisninger
Risikotrinn
77NO
Page 78

– 6
OBS
Anvisning om en mulig farlig situasjon som kan føre til materielle skader.
FARE
Maskinen må brukes på kor-
rekt måte. Brukeren må ta
hensyn til forholdene på det
aktuelle bruksstedet, og være
oppmerksom på andre perso-
ner som måtte befinne seg i
nærheten.
Bruk i eksplosjonsfarlige om-
råder er forbudt.
Ved bruk av apparatet i risiko-
områder skal angjeldende
sikkerhetsforskrifter følges.
Ikke bruk apparatet dersom
det har falt ned, har synlige
skader eller er utett.
Emballasjefolien holdes unna
barn, fare for kvelning!
몇 ADVARSEL
Dette apparatet er ikke ment
for bruk av personer med re-
duserte fysiske, sensoriske
eller sjelelige evner, eller som
pga. mangel på erfaring og/
eller kunnskap ikke kan be-
nytte apparatet trygt. De skal
da kun bruke apparatet under
oppsyn av en sikkerhetsan-
svarlig person, eller få in-
struksjoner av vedkommende
om bruk av appratet.
Barn skal bare bruke appara-
tet når barnet er over 8 år og
er under oppsyn av en sikkerhetsansvarlig person, eller får
anvisninger av en person om
hvordan apparatet fungerer
og forstår hva slags farer det
kan medføre.
Barn skal ikke leke med ap-
paratet.
Barn skal holdes under tilsyn
for å sikre at de ikke leker
med apparatet.
Apparatet skal kun brukes og
lagres som angitt i beskrivelse eller illustrasjoner!
Apparatet inneholder elektris-
ke komponenter - skal ikke
rengjøres under rennende
vann.
몇 FORSIKTIG
La aldri maskinen være ube-
voktet når det er i gang.
OBS
Maskinen skal ikke brukes
ved temperaturer under 0 °C.
Sug aldri uten filter, ellers kan
apparatet ta skade.
Apparatet skal beskyttes mot
ekstreme værforhold, fuktighet og varme.
FARE
Eksplosjonsfare!
Bruk i eksplosjonsfarlige om-
råder er forbudt.
Ikke sug opp eksplosive eller
brennbare gasser, væsker eller støv!
Ikke sug opp reaktivt metall-
støv (f.eks. aluminium, magnesium eller sink)!
Sikkerhetsanvisninger for
tørr-/våtsuger
Sikker håndtering
Andre farer
78 NO
Page 79

– 7
Ikke sug opp ufortynnede sy-
rer eller laker!
Brennene eller glødende
gjenstander må ikke suges
opp!
몇 ADVARSEL
Fare for personskade!
Unngå å suge med dyse og
sugeslange i nærheten av ho-
det.
몇 FORSIKTIG
For å unngå uhell eller per-
sonskader ved transport, vær
oppmerksom på vekten av
maskinen (se tekniske data).
몇 FORSIKTIG
Før alle arbeider på maski-
nen, sørg for at den står støtt
for å forhindre personskader
eller materielle skader der-
som den velter.
FARE
Kontroller strømadapteren,
tilkoblingskabelen, batteria-
dapteren og batteripakken for
skader før hver bruk. Ikke
bruk deler som er skadet, og
skift dem i så fall ut.
Du må ikke åpne ladeappara-
tet. Dersom ladeapparatet er
skadet eller defekt, må det
skiftes ut.
Ladeapparatet skal ikke bru-
kes i eksplosjonsfarlige omgi-
velser.
Ta aldri i støpselet eller stik-
kontakten med våte hender.
Bruk ikke ladeapparat i skit-
ten eller våt tilstand.
Ikke lad opp vanlige batterier
(primærceller), fare for eksplosjon.
몇 FORSIKTIG
Nettspenningen må stemme
overens med angitt spenning
på typeskiltet på ladeapparatet.
Ladeapparatet skal bare bru-
kes til lading av godkjente
batteripakker.
Batteripakken skal kun lades
med vedlagte originallader eller en annen lader godkjent
av KÄRCHER.
OBS
Ikke bær ladeapparatet kun
ved hjelp av tilkoblingskabelen.
Hold tilkoblingskablen unna
varmekilder, skarpe kanter,
olje og apparatdeler som beveger seg.
Strømadapteren må ikke til-
dekkes.
Unngå å bruke en forlengel-
seskabel med flerveisstikkontakt og samtidig drift av flere
apparater på en gang.
For å unngå skader, må du
ikke vikle tilkoblingskabelen
rundt strømadapteren eller
batteradapteren.
Stabilitet
Sikkerhetshenvisninger for
ladeapparatet
79NO
Page 80

– 8
Les alltid sikkerhetshenvisningene som følger med batteripakken, og følg disse ved
bruk!
몇 FORSIKTIG
– Fare for personskade og materiell skade pga. at
batteriet kan eksplodere! Denne batteripakken må
kun brukes i godkjente ladere.
– Før bruk må du kontrollere at batteripakken passer
til ladeapparatet!
– Lad kun uskadde batteripakker.
– Ombygging eller forandringer som ikke er godkjen-
te av produsenten er forbudt av sikkerhetsgrunner.
– All annen bruk er forbudt. Brukeren er ansvarlig for
farer som oppstår grunnet feil bruk.
For å ta apparatet i drift trengs det en batteripakke
og en lader med 36 V nominell spenning. For “settvariantene” er det allerede inkludert en Li-ION-batteripakke på 36 V og 2,5 Ah (Battery Power 36/25)
samt en standardlader på 36 V (Battery Power BC
36 V) i leveringsomfanget.
Batteripakkene Battery Power (+) 36/25, 36/50 og
36/75 må kun brukes i egnede apparater i Kärcher
36 V Battery Power-systemet.
Batterier/ ladeapparater som ikke følger med leve-
ringen eller som trengs i tillegg, kan fås som tilleggsutstyr og kan kjøpes i etterkant.
Før du bruker batteripakken i et apparat i KÄR-
CHER Battery Power-batterisystemet må du lese
bruksansvisningen til apparatet som skal brukes og
ev. vedlagte sikkerhetsanvisninger.
Ytterligere informasjon om bruksanvisningen for
batteripakker samt tilbehør og reservedeler finner
du på www.kaercher.com.
Litium-ionebatteriet må behandles i henhold til kra-
vene i loven om farlige materialer og brukeren kan
transportere dem i offentlig trafikk uten ytterligere
pålegg.
Ved transport som utføres av tredjeperson (trans-
portfirma) må man ta hensyn til spesielle krav til
emballasje og merking.
Batteriene må kun forsendes hvis huset er uskadd.
Kleb til åpne kontakter og pakk batteriet fast og sikkert. Det skal ikke kunne beveges.
Følg nasjonale forskrifter.
몇 FORSIKTIG
Sikkerhetsinnretningen fungerer som beskyttelse
for brukeren, og må ikke endres eller omgås.
Den innebygde beskyttelseskretsen beskytter batteripakken for
Overoppheting
Total utladning
Overlast
Kortslutning
Bilde avhengig av maskintypen
1 Typeskilt
2 Display
3Kontakter
4Holder
Symboler på ladeapparatet
Beskytt ladeapparatet
mot fuktighet og lagre
det tørt. Apparatet er
bare egnet for bruk
innendørs, må ikke utsettes for regn.
Ladeapparatet har en
innebygd sikring på
1 ampere.
Ladeapparatet oppfyller
kravene i
beskyttelsesklasse II.
Sikkerhetshenvisninger for
batteripakken
Henvisninger angående batteri og
ladeapparat
Batteripakker 36 V Battery Power
Betegnelse
Batteritype
Nettspenning
Nomine
ll kapasitet
(iht. IEC/EN 61690)
Nominell kapasitet
(iht. elementprodusentens
opplysninger)
Li-ion
VAhAh
36/25 36 2,4 2,5
36/50 36 4,8 5,0
Transport
Sikkerhetsinnretninger
Beskyttelseskrets
Betjeningselementer
Batteripakke
80 NO
Page 81

– 9
1 Ladekontakter
2 Batteriadapter
3 Tilkoblingskabel
4 Typeskilt
5 Strømadapter
몇 FORSIKTIG
Fare for personskade, fare for materiell skade! Vær
oppmerksom på bruksanvisning og sikkerhetsanvisningene til lad apparatet
Merknad
Nye batteripakker er kun forhåndsladet og må lades helt
opp før førstegangs bruk.
Displayet aktiveres ved førstegangs lading.
For at ladenivåvdisplayet skal fungere riktig må batteripakken lades helt opp til apparatet slås av ved første
gangs bruk.
Figur
Sett strømadapteren i en stikkontakt.
Skyv batteripakken inn i batteriadapteren på lade-
apparatet.
Oppladingen starter automatisk.
Figur
Gjenværende Ladetid vises på batteripakkens dis-
play.
Det tar ca. 5,5 timer å lade opp en tom batteripakke
(Battery Power 36/25) med en standardlader (Bat-
tery Power BC 36 V).
Dersom batteripakken er helt oppladet viser dis-
playet 100%.
Trekk batteriadapteren ut av batteriadapteren etter
ladingen.
Trekk strømadapteren ut av stikkontakten.
Merknad
Dersom displayet ikke viser noe når batteripakken er i
laderen, er batteriet tomt eller svært lavt. Så snart batteripakken er tilstrekkelig oppladet viser displayet gjenværende ladetid.
Dersom det ikke skjer noen visning på lengre tid, er
batteripakken defekt og må skiftes ut.
Merknad
Nye batteripakker når full kapasitet etter ca. 5 lade eller
utladningssykler.
Batteripakker som ikke er blitt brukt på lag tid må etterlades før bruk.
Ved temperaturer under 0 °C, synker batteripakkens
ytelse.
Langtids lagring ved temperaturer over 20 °C kan forringe batteripakkens kapasitet.
Merknad
Oppladet batteripakke kan være i ladeapparatet helt til
den skal brukes. Det er ingen fare for overlading.
For å unngå unødig energiforbruk bør laderen kobles
fra så snart batteripakken er fulladet.
Batteripakken har en display som gir vedvarende
opplysninger om batterinivå, hvor langt ladingen er
kommet og gjenværende tid. Dessuten viser det
eventuelle feilmeldinger.
Levetiden tilpasses ved effektomkobling.
Alt etter apparat dreier displayet seg når du setter
inn batteripakken.
Standard-ladeapparat
Lading
Betjening av batteripakken
Display
Indikator Betydning
Lade batteri
Batteripakkens ladetilstand når det ikke er i
bruk.
Bruke batteri
Batteripakkens gjenværende kapasitet ved
bruk.
Lade batteri
Batteripakkens gjenværende ladetid ved opplading.
Batteripakken er helt
oppladet.
Feilmelding
Batteripakketemperatur
utenfor tillatt verdi eller
sperret pga. kortslutning
(se hjelp ved feil).
Batteripakken defekt og
sperret av sikkerhetsårsaker. Batteripakken kan
ikke brukes mer og må
kastet iht. forskriftene.
81NO
Page 82

– 10
몇 FORSIKTIG
Fare for personskader og materielle skader! Ved drift
må det tas hensyn til bruksanvisning og sikkerhetsanvisninger.
Skyv skyvebøyle inn i holderen på rengjøringsho-
det.
몇 FORSIKTIG
Fare for personskader og materielle skader! Pass da på
at batteripakken går ordentlig i lås.
Merknad
Ved bruk viser displayet gjenværende kapasitet.
Etter arbeidet tas batteripakken ut av apparatet.
Lad opp batteripakken etter arbeidet.
Merknad
Lad også opp batteripakken etter delvis utladning.
몇 FORSIKTIG
Fare for personskade og materiell skade! Pass på vekten av apparatet ved transport.
OBS
Fare for skader! Batteripakken må bare oppbevares i
rom med lav luftfuktighet og under 20 °C.
Dette apparatet skal kun lagres innendørs.
Batteripakken viser aktuell ladetilstand på displayet
også uten å være koblet til lader.
Dersom displayet på batteripakken slukker under lagring, er batteriet tomt og displayet slått av. Du må lade
opp batteripakken snarest mulig.
몇 FORSIKTIG
Fare for personskade og materiell skade! Pass på vekten av apparatet ved transport.
Ladekontaktene kontrolleres for smuss og skal
eventuelt rengjøres.
Hvis batteripakken lagres over lengre tid skal de
mellomlades.
Høytrykksvaskeren er vedlikeholdsfri.
Illustrasjoner se utfoldingssidene!
Denne bruksanvisningen beskriver
multisugeren som beskrevet på omslaget.
Figurene viser makimal utrustning, alt etter modell
vil det være forskjeller i utrustning og medfølgende
tilbehør.
Kontroller ved utpakkingen at innholdet i pakken er
komplett og uskadd. Kontakt din forhandler ved eventuelle transportskader.
del av leveransen
mulig tilbehør
Drift
Lagring
Transport og lagring
Pleie og vedlikehold
Vedlikehold
Feilretting
Feil ved lading
Display er av, batteripakken lader ikke
Lader defekt. Skift lader.
Batteripakken er eventuelt helt tom. Vent og se om dis-
playet viser gjenværende kapasitet etter en liten
stund. Hvis ikke er batteripakken defekt. Skift batteripakken.
Display er på men batteripakken lader ikke
Lader defekt. Skift lader.
Følg visningen på displayet. Batteritemperaturen er
ev. ikke i normalt område.
Displayet viser temperatursymbol, batteripakken
lader ikke
Batteripakkens temperatur er for lav/høy. Plasser batteripakken i omgivelser med moderat temperatur. Vent
til temperaturen i batteripakken har normalisert seg.
Oppladingen starter da automatisk.
Feil ved bruk
I displayet vises temperatursymbolet
Batteripakkens temperatur er for lav/høy. Plasser batteripakken i omgivelser med moderat temperatur. Vent
til temperaturen i batteripakken har normalisert seg.
Ved kortslutning sperres batteripakken for bruk i 30
sekunder. Dersom det oppstår oftere kortslutning,
sperres batteripakken vedvarende. Lukk batteripakken for å låse opp laderen.
Displayet viser gjenværende kapasitet 0, apparatet
slås av.
Batteripakken er tom. Du må lade opp batteripakken
snarest mulig.
Feil ved lagring
Displayet viser ingen gjenværende kapasitet
Batteripakken er tom. Du må lade opp batteripakken
snarest mulig.
Displayet viser gjenværende kapasitet på 70 %
selv om batteripakken akkurat er ladet helt opp.
Batteripakken er i automatisk standby. Denne aktiveres dersom batteriet ikke er blitt brukt på over 21 dager. Denne funksjonen beskytter battericellene mot
hurtig aldring og øker levetiden. Lad batteripakken opp
før den brukes neste gang.
Generelle feil
Displayet viser temperatursymbol med strek over.
Batteripakken defekt og sperret av sikkerhetsårsaker.
Batteripakken kan ikke brukes mer og må kastet iht.
forskriftene.
Beskrivelse av apparatet
1 Sugeslangetilkobling
2 Batterirom
3 Hovedbryter (AV/PÅ)
4 Batterilåseknapp
5 Håndtak
6 Blåsetilkobling
7 Beholderlåsing
8 Parkeringsposisjon
Feil ved lading
82 NO
Page 83

– 11
Figur
Trekk beholderlåsene utover for å åpne og ta av
apparathodet ved bæretaket.
Figur
Ta innholdet ut av beholderen.
Figur
Snu beholderen, sett inn styrehjulene i åpningene
på bunnen av beholderen, trykk inn til de går i lås.
Figur
Sett apparathuset på beholderen, og lukk igjen be-
holderlåsene.
Figur
For å suge tørt smuss, kan det i tillegg brukes en
filterpose ved behov.
Figur
Figur
Se kapitlet “Ladeprosess” og “Betjening av batteri-
pakken”.
Figur
Sett sugeslangen i tilkoblingen på maskinen, den
går i lås.
For å ta av, trykk låsen med tommelen og trekk ut
sugeslangen.
Figur
Koble håndtaket på sugeslangen til det går i lås.
Sett sammen begge sugerørene og koble til hånd-
taket.
Merk: Tilbehør som f.eks. sugebørster (ekstrautstyr)
kan settes direkte på tilkoblingsstykket og kan kobles til
sugeslangen.
For komfortabelt arbeid i trange rom.
Det avtagbare håndtaket kan ved behov settes på mellom tilbehør og sugeslangen.
Anbefaling: For suging av gulv, sett håndtaket på sugeslangen.
Figur
For å ta av sugeslangens håndtak, trykk på spaken
med tommel og pekefingeren, og trekk av håndta-
ket
Merk: Ved å ta av håndtaket kan tilbehør også settes direkte på sugeslangen.
Figur
Koble gulvdysen til sugerøret.
Merk: For suging av gulv ved tørt smuss eller vann brukes alltid med innsats (børstestriper og gummileppe)
i gulvdysen.
Figur
Skyv batteripakken inn i batteriholderen ovenfra til
den går i lås.
Figur
Stilling I: Suge- eller blåsefunksjon.
Stilling 0: Apparatet er slått av.
OBS
Metallbeholderen kan lades opp statisk ved innsuging
av store finstøvmengder, også utlades ved berøring.
OBS
Området rundt batteriholderen må holdes rent.
Hvis det oppstår for mange forurensninger i dette
området, kan det hende at batteripakken ikke kan
settes inn/ gå i lås skikkelig lenger.
Det er også mulig at batteripakken ikke lenger kan
tas ut av apparatet fordi utkastspaken ikke lenger
kan beveges.
OBS
Arbeid alltid med påsatt patronfilter, både ved tørr og våt
suging!
OBS
Før bruk, kontroller filteret for skader og skift ut ved behov.
Arbeide kun med tørt patronfilter!
Figur
Anbefaling: For suging av fint støv skal det sette
s
inn
filterpose.
– Fyllingsgraden av filterposen er avhengig av hva
slags smuss som suges opp.
– Ved fint støv, sand osv... må filterposen skiftes of-
tere.
– Fulle filterposer kan sprekke, pass derfor på å skif-
te filterpose til rett tid!
OBS
Suging av kald aske kun med foravskiller.
Informasjon om tilbehør og reservedeler finner du på
www.k
aercher.com.
OBS
Ikke bruk filterpose!
Figur
For suging ved fuktighet eller vann, pass på korrekt
innsats i gulvdysen og koble til aktuelt tilbehør.
Merk: Når beholderen er full, blir sugeåpningen stengt
av en flottør og apparatet går med økt turtall. Slå av
maskinen umiddelbart, og tøm beholderen.
9 Tilbehørsholder
10 Styrerulle
11 Beholder
12 Filterpose
13 Patronfilter
14 Sugeslange med tilkoblingsstykke
15 Avtagbart håndtak
16 Sugerør 2 x 0,5 m
17 Fugemunnstykke
18 Gulvmunnstykke
(med innsats)
19 Batteripakke
Battery Power 36/25
20 Standardlader
Battery Power BC 36 V
Montering
Lade opp batteripakken
Ta i bruk
Montering av tilbehør
Sette inn batteripakken
Slå apparatet på
Generelle anvisninger for betjening
Betjening
Støvsuging
Anvisning filterpose
Våtsuging
83NO
Page 84

– 12
Rengjøring av vanskelig tilgjengelige steder eller der
det ikke er mulig med suging, f. eks. løv fra takrenner.
Figur
Sett sugeslangen i blåsetilkoblingen, derved akti-
veres blåsefunksjonen.
Slå av maskinen.
Figur
Sett gulvdysen i parkeringsholderen.
Merknad: Hvis det blir nødvendig å ta av sugehodet under arbeidspauser, kan det hende at batteripakken blir
sittende fast. Batteripakken har gått helt i lås og kan ikke
falle av.
Slå av maskinen.
Figur
Skyv batteripakkens låseknapp forover og ta batte-
ripakken ut av apparatet.
Ved behov kan du lade opp batteripakken på nytt
(se kapitlet “Lade opp batteripakken”).
Anbefaling: Ta batteripakken ut av apparatet når du er
ferdig med arbeidet.
Figur
Ta av apparathodet og tøm beholderen.
Figur
Lagre tilbehør på apparatet og oppbevar det i et
tørt rom.
Merknad: Avhengig av sugemodusen tar LC-displayet
litt av batteripakkens kapasitet, både når batteripakken
befinner seg i apparatet og når det er utenfor apparatet.
Se kapitlet “Ladeprosess” og “Betjening av batteri-
pakken”.
몇 FORSIKTIG
Fare for personskade og materiell skade!
Pass på vekten av apparatet ved transport.
Løft apparatet i bærehåndtaket og bær det.
Sikre maskinen mot å skli eller vippe.
Bruk et vanlig rengjøringsmiddel til kunststoff på
apparatet og tilbehørsdeler av kunststoff.
Beholder og tilbehør skylles med vann ved behov,
og skal tørke før bruk.
Bilde Patronfilter rengjøres ved behov under rennende
vann, ikke skrubb eller børste. La tørke fullstendig
før montering.
Ladekontaktene kontrolleres for smuss og skal
eventuelt rengjøres.
Kontroller dryppskålen for tilsmussing, eventuelt
rengjør.
Høytrykksvaskeren er vedlikeholdsfri.
Figur
Batteriet sitter ikke skikkelig i batteribeholderen, skyv
batteriet inn i batteribeholderen og la det gå i lås.
Ladenivået for det oppladbare batteriet (se display)
er for lavt, lad det opp om nødvendig.
Batteri eller ladeapparat er i ustand, erstatt batteriet
eller ladeapparatet med nytt tilbehør.
Apparatet/batteriet har blitt for varmt, vent litt slik at
apparatet/batteriet kan kjøle ned.
Beholderen er full av vann, derfor aktiveres flottø-
ren, tøm beholderen.
Tilbehør, sugeslange eller sugerør er tilstoppet.
Fjern tilstopping forsiktig med et egnet hjelpemid-
del.
Figur
Filterposen er full, sett inn ny filterpose.
Bilde Patronfilter er tilsmusset, ta av patronfilter og ren-
gjør det ved behov under rennende vann.
Bytt skadet patronfilter.
Anbefaling: Skift patronfilteret 1x per år.
Blåsefunksjon
Opphold i arbeidet
Etter bruk
Tøm beholderen
Oppbevaring av apparatet
Oppbevaring av batteripakken
Transport
Transport for hånd
Transport i kjøretøy
Pleie og vedlikehold
Vedlikehold
Feilretting
Apparatet går ikke
Apparatet slår seg av automatisk
Avtagende sugeeffekt
84 NO
Page 85

– 13
Det tas forbehold om tekniske endringer!
Tekniske data
Batteripakke og standardladere i leveringsomfanget
med:
WD 3 Battery Set
WD 3 Battery Premium Set
(Batterpakke Battery Power 36/25 / standardlader Battery Power BC 36 V)
Apparat
Nominell effekt W 300
Driftstid ved fullt ladet batteri
(maks)
min 15
Beskyttelsesklasse III
Beskyttelsestype IPX4
Batteripakke Battery Power 36/25
Nettspenning V 36
Nominell kapasitet
(iht. IEC/EN 61690)
Ah 2,4
Nominell kapasitet
(iht. elementprodusentens opplysninger)
Ah 2,5
Nominell energi
(iht. UN 3480)
Wh 86,4
Tilførselsstrøm maks. A 4
Batteritype Li-ion
Vekt kg 0,9
Mål (l x b x h) mm 133x88x72
Standardlader Battery Power BC 36 V
Nominell spenning batteri V 36
Ladestrøm maks. A 0,5
Batteritype Li-ion
Nettspenning V 100-240
Frekvens Hz 50-60
Strømopptak (maks.) A 0,3
Beskyttelsesklasse II
Vekt (uten batteripakke) g 205
85NO
Page 86

– 5
Bäste kund,
Läs bruksanvisningen innan maskinen
används första gången, följ anvisningarna och spara den för framtida behov,
eller för nästa ägare.
Apparaten är avsedd att användas som multifunktionssug enligt beskrivningarna och säkerhetsanvisningarna
i denna bruksanvisning.
Denna produkt har konstruerats för privat användning
och är ej avsedd för påfrestande, industriell användning.
– Skydda maskinen från regn. Får inte förvaras ut-
omhus.
– Aska och sot får inte sugas upp med detta aggre-
gat.
Tillverkaren påtar sig inget ansvar för eventuella skador
som uppkommer på grund av felaktig användning eller
felaktig hantering.
Upplysningar om ingredienser (REACH)
Aktuell information om ingredienser finns på:
www.kaercher.com/REACH
Upplysningar om ingredienser (REACH)
Aktuell information om ingredienser finns på:
www.kaercher.com/REACH
I respektive land gäller de garantivillkor som publicerats
av våra auktoriserade distributörer. Eventuella fel på
aggregatet repareras utan kostnad under förutsättning
att det orsakats av ett material- eller tillverkningsfel. I
frågor som gäller garantin ska du vända dig med kvitto
till inköpsstället eller närmaste auktoriserade serviceverkstad.
Vid frågor eller problem hjälper närmaste KÄRCHER-filial gärna till.
Använd endast originaltillbehör och originalreservdelar,
så att en säker och störningsfri drift av maskinen är garanterad.
Information om tillbehör och reservdelar finns på
www.kaercher.com.
Kontakta din försäljare om något tillbehör saknas eller
om det finns transportskador.
FARA
Varnar om en omedelbart överhängande fara som kan leda till
svåra personskador eller dödsfall.
몇 VARNING
Varnar om en möjligen farlig situation som kan leda till svåra
personskador eller döden.
Innehållsförteckning
Allmänna hänvisningar SV 5
Säkerhetsanvisningar SV 5
Information om uppladdningsbart batteri-
paket och laddare SV 8
Säkerhetsanordningar SV 9
Reglage SV 9
Laddningsförlopp SV 9
Använda batteripaketet SV 9
Förvaring SV 10
Transport och förvaring SV 10
Skötsel och underhåll SV 10
Åtgärder vid störningar SV 10
Beskrivning av aggregatet SV 11
Montering SV 11
Ladda batteripaketet SV 11
Börja använda SV 11
Allmän information om användning SV 12
Handhavande SV 12
Transport SV 12
Skötsel och underhåll SV 12
Åtgärder vid störningar SV 13
Tekniska data SV 13
Allmänna hänvisningar
Ändamålsenlig användning
Miljöskydd
Emballagematerialen kan återvinnas. Avfallshantera emballag på ett miljövänligt sätt.
Uttjänta maskiner innehåller värdefulla material
som kan återvinnas och de ska därför lämnas till
ett insamlingsställe. Batterier, engångs och uppladdningsbara, innehåller ämnen som inte får
komma ut i miljön. Avfallshantera uttjänta maskiner och batterier på ett miljövänligt sätt.
Elektriska och elektroniska maskiner innehåller
ofta komponenter som vid felaktig användning eller felaktig avfallshantering kan utgöra en potentiell risk för människors hälsa och för miljön. Dessa
komponenter är dock nödvändiga för att maskinen ska kunna arbeta korrekt. Maskiner som
märkts med denna symbol får inte kastas i hushållssoporna.
Garanti
Kundservice
Tillbehör och reservdelar
Leveransens innehåll
Säkerhetsanvisningar
Risknivåer
86 SV
Page 87

– 6
몇 FÖRSIKTIGHET
Varnar om en möjligen farlig situation som kan leda till lättare
personskador.
OBSERVERA
Varnar om en möjligen farlig situation som kan leda till materiella skador.
FARA
Användaren måste använda
apparaten enligt föreskrifter-
na. Användaren ska ta hän-
syn till förutsättningarna på
platsen och kontrollera att
ingen uppehåller sig i närhe-
ten vid arbete med maskinen.
Användning av maskinen i ut-
rymmen med explosionsrisk
är förbjuden.
När maskinen används i risk-
områden ska motsvarande
säkerhetsföreskrifter beak-
tas.
Använd inte maskinen när
den har fallit ner tidigare, när
den har synliga skador eller
när den är otät.
Håll förpackningsfolien borta
från barn, risk för kvävning!
몇 VARNING
Denna apparat är ej avsedd
att användas av personer
med begränsade psykiska,
sensoriska eller mentala
egenskaper eller som saknar
erfarenhet och/eller kunskap
att hantera den, såvida de
inte befinner sig under uppsikt av en person ansvarig för
deras säkerhet eller har fått
anvisningar från en sådan
person om hur apparaten ska
användas och har förstått vilka faror som kan uppstå vid
användningen av apparaten.
Barn får endast använda ap-
paraten om de är över 8 år
gamla och om de befinner sig
under uppsikt av en person
ansvarig för deras säkerhet
eller har fått anvisningar från
en sådan person om hur apparaten ska användas och
har förstått vilka faror som
kan uppstå vid användningen
av apparaten.
Barn får inte leka med appa-
raten.
Barn ska hållas under uppsikt
för att garantera att de inte leker med maskinen.
Använd eller förvara bara ma-
skinen enligt beskrivningen
resp. bilden!
Maskinen innehåller elektris-
ka komponenter - rengör inte
under rinnande vatten.
몇 FÖRSIKTIGHET
Lämna aldrig maskinen utan
uppsikt så länge som den är i
drift.
OBSERVERA
Använd inte maskinen vid
temperaturer under 0 °C.
Sug aldrig utan filter - då kan
maskinen skadas.
Skydda maskinen mot extrem
väderlek, fukt och värme.
Säkerhetsanvisningar för
våt-/torrsug
Säker hantering
87SV
Page 88

– 7
FARA
Explosionsrisk!
Användning av maskinen i ut-
rymmen med explosionsrisk
är förbjuden.
Sug inte upp explosiva eller
brännbara gaser eller vätskor
och explosivt eller brännbart
damm!
Sug inte upp reaktivt metall-
damm (t.ex. aluminium, mag-
nesium eller zink)!
Sug inte upp outspädda syror
eller lutar!
Sug inte upp brinnande eller
glödande föremål!
몇 VARNING
Risk för skada!
Sug inte i närheten av huvu-
det med munstycke och sug-
rör.
몇 FÖRSIKTIGHET
Observera för att undvika
olyckor eller skador vid trans-
port maskinens vikt (se tek-
nisk data).
몇 FÖRSIKTIGHET
Säkerställ innan all typ av ar-
bete med eller på maskinen
dess stabilitet för att undvika
olyckor eller sakskador på
grund av att maskinen faller
omkull.
FARA
Kontrollera om strömkontak-
ten, anslutningskabeln, batteriadaptern och batteripaketet
är skadade varje gång maskinen ska användas. Använd
inte skadade delar, byt ut
dem.
Öppna inte laddaren. Byt lad-
daren om den är defekt eller
skadad.
Använd inte laddaren på plat-
ser där det finns risk för explosion.
Ta aldrig tag i nätkontakten
eller eluttaget med fuktiga
händer.
Använd inte laddaren när den
är smutsig eller fuktig.
Ladda inte engångsbatterier
(primärbatterier), risk för explosion.
몇 FÖRSIKTIGHET
Nätspänningen måste över-
ensstämma med den spännings som anges på laddarens typskylt.
Laddaren får endast använ-
das för laddning av godkända, uppladdningsbara batterier.
Batteripaketet får endast lad-
das med medföljande originalladdare eller en laddare
som godkänts av KÄRCHER.
OBSERVERA
Bär inte laddaren i anslut-
ningskabeln.
Övriga faror
Stabilitet
Säkerhetsinformation för
laddare
88 SV
Page 89

– 8
Skydda anslutningskabeln
mot värme, vassa kanter, olja
och rörliga komponenter.
Täck inte över strömkontak-
ten.
Anslut inte förläningskablar
med grenuttag och använd
inte flera maskiner samtidigt.
Linda inte anslutningskabeln
runt strömkontakten eller batteriadaptern för att undvika
skador.
Läs säkerhetsföreskrifterna
till batteripaketet och följ
dem!
몇 FÖRSIKTIGHET
– Risk för personskador och materialskador på grund
av exploderande batteri! Batteripaketen får endast
laddas med avsedd laddare.
– Kontrollera att batteripaketet motsvarar laddaren
innan den används!
– Ladda endast oskadda batteripaket.
– Ombyggnationer och förändringar som inte har
auktoriserats av tillverkaren är förbjudna av säkerhetsskäl.
– All annan användning är otillåten. Användaren an-
svarar för risker som uppstår genom otillåten användning.
För idrifttagningen krävs ett uppladdningsbart bat-
teripaket och en laddare med en märkspänning på
36 V. På ”Set-varianterna” innehåller paketet redan
ett uppladdningsbart litiumjonbatteri med 36 V,
2,5 Ah (Battery Power 36/25) och en standardladdare på 36 V (Battery Power BC 36 V).
Batteripaketen Battery Power (+) 36/25, 36/50 och
36/75 får endast användas med därför avsedda enheter i Kärchers 36 V Battery Power-system.
Uppladdningsbara batterier/laddare som inte ingår
i paketet eller som behövs finns som specialtillbehör och kan köpas till i efterhand.
Observera bruksanvisningen för den enhet som
används samt eventuellt medföljande säkerhetsanvisningar innan du använder batteripaketet i en enhet från KÄRCHER Battery Power batteriplattformen.
Mer information om bruksanvisningen för batteripa-
ket samt tillbehör och reservdelar finns på
www.kaercher.com.
Litium-/jonbatteriet uppfyller kraven i lagen om far-
ligt gods och kan transporteras i normal trafik av
användaren utan ytterligare åtgärder.
Vid frakt genom tredje part (transportföretag) gäller
särskilda krav på förpackning och märkning.
Använd bara batteriet om höljet är oskadat. Tej
pa
för öppna kontakter och förpacka batteriet väl och
säkert. Det får inte kunna röra sig i förpackningen.
Följ även nationella direktiv.
Symboler på laddaren
Skydda laddaren mot
väta och förvara den
torrt. Apparaten är endast avsedd för användning inomhus. Utsätt den
inte för regn.
Laddaren har en inbyggd
säkring på 1 ampere.
Laddaren uppfyller kraven för skyddsklass II.
Säkerhetsinformation för
batteripaket
Information om uppladdningsbart
batteripaket och laddare
Batteripaket 36 V Battery Power
Beteckning
Typ av uppladdningsbart batteri
Märkspänning
Nomine
ll kapacitet
(enligt IEC/EN 61690)
Märkkapacitet
(enligt batteritillverkaren)
Litiumjon
VAhAh
36/25 36 2,4 2,5
36/50 36 4,8 5,0
Transport
89SV
Page 90

– 9
몇 FÖRSIKTIGHET
Säkerhetsanordningar är till för att skydda använ-
daren och får inte ändras eller sättas ur spel.
Den inbyggda skyddskopplingen skyddar batteripaketet
mot
Överhettning
Djupurladdning
Överladdning
Kortslutning
Bild beroende på typ
1 Typskylt
2 Display
3 Kontakter
4Hållare
1 Laddningskontakter
2 Batteriadapter
3 Anslutningskabel
4 Typskylt
5 Strömkontakt
몇 FÖRSIKTIGHET
Risk för personskador, risk för materialskador! Beakta
laddarens och apparatens driftsanvisning och säkerhetsanvisningar.
Information
Nya batteripaket är bara förladdade och måste laddas
upp fullständigt innan de används för första gången.
Displayen aktiveras vid den första laddningen.
För att laddningsindikatorn ska fungera korrekt måste
batteripaketet laddas ur helt och hållet första gången
enheten används, ända tills enheten stängs av.
Bild
Anslut strömkontakten till vägguttaget.
Sätt in batteripaketet i laddarens batteriadapter.
Laddningen börjar automatiskt.
Bild
På batteripaketets display visas den återstående
laddningstiden.
Laddtiden med en standardladdare (Battery Power
BC 36 V) för ett tomt batteripaket (Battery
Power 36/25) är ca 5,5 timmar.
Om batteripaketet är fulladdat visar displayen 100 %.
Dra av batteriadaptern från batteripaketet efter
laddningen.
Dra ut strömkontakten ur vägguttaget.
Information
Om ingenting visas på displayen medan batteripaketet
laddas är batterikapaciteten förbrukad eller mycket låg.
När batteripaketet har laddats tillräckligt mycket visar
displayen återstående laddningstid.
Om det fortfarande inte visas något på displayen efter en längre stund är batteripaketet defekt och
måste bytas ut.
Information
Nya batteripaket når sin fulla kapacitet efter ca 5 uppladdnings- och urladdningscykler.
Batteripaket som inte använts på en längre tid måste
laddas upp innan de används.
Vid temperaturer under 0 °C minskar batteripaketets kapacitet.
Längre förvaring vid temperaturer över 20 °C kan minska batteripaketets kapacitet.
Information
Det uppladdade batteriet kan ligga kvar på laddaren tills
det ska användas. Det finns ingen risk för överladdning.
För att undvika en onödig energiförbrukning bör laddningskontakten dock dras ut så snart batteripaket är helt
laddat.
Batteripaketet har en display som ger konstant in-
formation om batterinivån, aktuell uppladdning och
återstående drifttid. Dessutom visas eventuella felmeddelanden.
Livslängdsanpassningen uppnås genom effektom-
koppling.
Beroende på vilken enhet som används vrids dis-
playen när batteripaketet sätts i.
Säkerhetsanordningar
Skyddskoppling
Reglage
Batteripaket
Standardladdare
Laddningsförlopp
Använda batteripaketet
Display
90 SV
Page 91

– 10
몇 FÖRSIKTIGHET
Risk för personskada och materiell skada! I samband
med driften skall driftsanvisningen och säkerhetsanvisningen till den använda apparaten beaktas.
Skjut in batteripaketet i apparatens upptagning.
몇 FÖRSIKTIGHET
Risk för personskada och materiell skada! Kontrollera
att batteripaketet hakar fast ordentligt.
Information
Under användning visas den återstående drifttiden på
displayen.
Efter arbetet skall batteripaketet tas ut ur appara-
ten.
Ladda upp batteripaketet efter arbetet.
Information
Även djupurladdade batteripaket skall laddas upp efter
användningen.
몇 FÖRSIKTIGHET
Risk för personskada och materiell skada! Tänk på maskinens vikt vid transporten.
OBSERVERA
Risk för materiella skador. Batteripaket får bara lagras i
lokaler med låg luftfuktighet och under 20 °C.
Denna maskin får endast lagras inomhus.
Batteripaketet indikerar sin aktuella laddning på displayen, även om det inte är anslutet till en laddare.
Om batteripaketets display slocknar under förvaringen
är batterikapaciteten förbrukad eller displayen har
stängts av. Ladda batteripaketet så snabbt som möjligt.
몇 FÖRSIKTIGHET
Risk för personskada och materiell skada! Tänk på maskinens vikt vid transporten.
Kontrollera regelbunder om laddningskontakterna
är smutsiga och rengör dem vid behov.
Underhållsladda batteripaket, som lagrats under
en längre tid.
Aggregatet är underhållsfritt.
Indikering Betydelse
Förvara batteri
Batteripaketets laddningsnivå när det inte
används.
Använda batteri
Batteripaketets återstående drifttid när det inte
används.
Ladda batteri
Batteripaketets återstående laddningstid när
det laddas.
Batteripaketet är fulladdat.
Felmeddelande
Batteripaketets temperatur utanför de tillåtna
värdena eller spärrat på
grund av kortslutning (se
hjälp vid störningar).
Batteripaketet är defekt
och har spärrats av säkerhetsskäl. Använd inte
batteripaketet mer och
kassera det enligt gällande föreskrifter.
Drift
Förvaring
Transport och förvaring
Skötsel och underhåll
Skötsel
Åtgärder vid störningar
Fel vid laddning
Displayen är släckt och batteripaketet laddar inte
Laddaren är defekt. Byt laddare.
Batteripaketet är eventuellt helt urladdat. Vänta och se
om displayen visar återstående laddningstid efter en
stund. Om den inte gör det är batteripaketet defekt.
Batteripaketet är defekt.
Displayen är tänd men batteriet laddar inte
Laddaren är defekt. Byt laddare.
Beakta indikeringen på displayen. Ev. är batteritempe-
raturen inte i normalområdet.
Displayen visar temperatursymbolen och batteripaketet laddar inte
Batteripaketets temperatur är för låg/hög. Flytta batteripaketet till en omgivning med moderata temperaturer. Vänta tills batteripaketets temperatur är normal.
Laddningen börjar sedan automatiskt.
Fel vid drift
På displayen visas temperatursymbolen
Batteripaketets temperatur är för låg/hög. Flytta batteripaketet till en omgivning med moderata temperaturer. Vänta tills batteripaketets temperatur är normal.
Vid kortslutning spärras batteripaketet mot all användning i 30 sekunder. Om kortslutningen förekommer oftare spärras batteripaketet permanent. Anslut batteripaketet till laddaren för att låsa upp det.
91SV
Page 92

– 11
Figurer och bilder finns på kartongens
utfällbara sidor!
Denna bruksanvisning beskriver den
multifunktionssug som finns avbildad på det främre
omslaget.
Bilderna visar den maximala utrustning. Beroende
av modell förekommer skillnader i utrustning och
levererade tillbehör.
Kontrollera vid uppackningen att inga tillbehör saknas
eller är skadade. Kontakta återförsäljaren om skador
uppkommit vid transporten.
ingår i leveransen
möjliga tillbehör
Bild
För att öppna drar du behållarens spärrar utåt och
tar av maskinens huvud i handtaget.
Bild
Ta ut innehållet från behållaren.
Bild
Vänd behållaren, tryck in styrrullar i öppningarna
på botten av behållaren, till anslag.
Bild
Placera apparathuvudet på behållaren och spärra
förreglingarna på behållaren.
Bild
När torr smuts sugs upp kan dessutom en filterpå-
se användas om detta behövs.
Bild
Bild
Se kapitlet ”Laddning” och ”Använda batteripake-
tet”.
Bild
Tryck in sugslangen i anslutningen på apparaten
så att den hakar fast.
Ta loss den genom att trycka på spärren med tum-
men och dra ut slangen.
Bild
Anslut handtaget till sugslangen tills den hakar fast.
Sätt ihop båda sugrören och anslut till handtaget.
Observera: Tillbehör som t.ex. sugbortar (tillval) kan
träs på direkt på skarvstycket och därmed anslutas till
sugslangen.
För bekvämt arbete även i trånga utrymmen.
Det avtagbara handtaget kan vid behov placeras mellan
tillbehör och sugslang.
Rekommendation: För att suga upp smuts från golv,
sätt handtaget på sugslangen.
Bild
För att ta av handtaget från sugslangen trycker du
ner spärren med tummen och pekfingret och dra av
handtaget
Observera: Genom att man tar av handtaget kan man
sätta på tillbehör direkt på slangen.
Bild
Sätt in golvmunstycket i sugröret.
Observera: För att suga upp torr smuts eller vatten från
golv - arbeta alltid med insats (borstavstrykare och
gummiläpp) i golvmunstycket.
Bild
Skjut in batteripaketet uppifrån i hållaren och haka
fast det.
Bild
Läge I: Sug- eller blåsfunktion.
Position 0: Aggregatet är avstängt.
Displayen visar återstående drifttid 0 och enheten
stängs av.
Batteripaketet är urladdat. Ladda batteripaketet.
Fel vid förvaring
Displayen visar ingen återstående kapacitet
Batteripaketet är urladdat. Ladda batteripaketet.
Displayen visar en återstående kapacitet på 70 %,
trots att batteripaketet nyss laddades.
Batteripaketet befinner sig i automatiskt förvaringsläge. Detta läge aktiveras om batteriet inte har använts
på 21 dagar. Funktionen skyddar battericellerna mot
snabbt åldrande och ökar livslängden. Ladda batteripaketet fullständigt innan du använder det igen.
Allmänt fel
Displayen visar en bruten batterisymbol.
Batteripaketet är defekt och har spärrats av säkerhetsskäl. Använd inte batteripaketet mer och kassera det
enligt gällande föreskrifter.
Beskrivning av aggregatet
1 Sugslangsanslutning
2 Batterifack
3 Strömbrytare (PÅ/AV)
4 Batteriupplåsning
5 Handtag
6 Blåsanslutning
7 Förslutning behållare
8 Parkeringsposition
9 Tillbehörshållare
10 Styrrulle
11 Behållare
12 Filterbehållare
13 Patronfilter
14 Sugslang med skarvstycke
15 Avtagbart handtag
16 Sugrör 2 x 0,5 m
17 Fogmunstycke
18 Golvmunstycke
(med insats)
19 Batteripaket
Battery Power 36/25
20 Standardladdare
Battery Power BC 36 V
Fel vid drift
Montering
Ladda batteripaketet
Börja använda
Anslut tillbehör
Sätta in batteripaket
Koppla till aggregatet
92 SV
Page 93

– 12
OBSERVERA
När stora mängder findamm sugs in i metallbehållaren
kan den laddas elektrostatiskt och sedan urladdas när
man rör vid den.
OBSERVERA
Håll rent runt batterihållaren.
Om detta område utsätts för smuts kan det hända
att batteripaketet inte längre kan sättas in eller användas.
Det finns även en risk att batteripaketet då inte
längre kan tas ut ur maskinen eftersom utkastarspaken kan fastna.
OBSERVERA
Arbeta alltid med isatt patronfilter, både vid våt- och
torruppsugning!
OBSERVERA
Innan användning, kontrollera om filtret är skadat och
byt ut det vid behov.
Arbeta endast med torrt patronfilter!
Bild
Rekommendation: Sätt i filterpåsen om maskinen
ska användas för uppsugning av fint damm.
– Filterpåsens uppsamlingsförmåga styrs av den
smuts som sugs upp.
– Vid fint damm, sand och liknande ... måste filterpå-
sen bytas oftare.
– Tilltäppta filterpåsar kan spricka, byt därför filterpå-
sen i god tid!
OBSERVERA
Uppsugning av kall aska endast med avskiljare.
Information om tillbehör och reservdelar finns på
www.kaercher.com.
OBSERVERA
Använd ingen filterpåse!
Bild
För att suga upp fukt eller väta, se till att använda
rätt insats i golvmunstycket och anslut lämplig tillbehör.
Observera: Om behållaren är full stängs sugöppningen
av en flottör och sugturbinen går med högre varvtal.
Koppla omedelbart från apparaten och töm behållaren.
Rengöring av svåråtkomliga ställen eller på platser där
uppsugning inte kan utföras, t.ex. löv i en grusbädd.
Bild
Stick in sugslangen i blåsanslutningen, därmed är
utblåsningsfunktionen aktiverad.
Stäng av aggregatet.
Bild
Häng i golvmunstycket i förvaringshållaren.
Information: Om sughuvudet behöver tas av under en
arbetspaus kan batteripaketet sitta kvar. Batteripaketet
är fast ihakat och kan inte falla ut.
Stäng av aggregatet.
Bild
Skjut batteriupplåsningsknappen framåt och ta ut
batteripaketet ur maskinen.
Ladda batteripaketet efter behov (se kapitlet ”Lad-
da uppladdningsbart batteripaket”).
Rekommendation: Ta ut batteripaketet ur maskinen
när arbetet är klart.
Bild
Ta av maskinhuvudet och töm behållaren.
Bild
Placera tillbehören på maskinen och förvara denna
i ett torrt utrymme.
Information: Oberoende av sugdrift förbrukar LCDskärmen en smula energi, oavsett om batteripaketet är
i eller utanför enheten.
Se kapitlet ”Laddning” och ”Använda batteripake-
tet”.
몇 FÖRSIKTIGHET
Risk för person och egendomsskada!
Tänk på maskinens vikt vid transporten.
Lyft upp maskinen i bärhandtaget och bär den.
Säkra maskinen så att den inte kan glida eller tippa.
Maskinen och tillbehören av plast kan rengöras
med vanligt plastrengöringsmedel.
Spola vid behov ur behållare och tillbehör med vat-
ten och torka före nästa användningstillfälle.
Bild -
Rengör patronfiltret vid behov endast under rinnan-
de
vat
ten, skrubba eller borsta inte av det. Låt det
torka helt innan det sätts tillbaka.
Kontrollera regelbunder om laddningskontakterna
är smutsiga och rengör dem vid behov.
Kontrollera om ventilationsöppningarna är smutsi-
ga, rengör vid behov.
Aggregatet är underhållsfritt.
Allmän information om användning
Handhavande
Torrsugning
Hänvisningar filterpåse
Våtsugning
Blåsfunktion
Avbryta drift
Avsluta driften
Töm behållaren
Förvaring av apparaten
Förvara batteripaketet
Transport
Transport för hand
Transport i fordon
Skötsel och underhåll
Skötsel
93SV
Page 94

– 13
Bild
Batteripaketet sitter inte korrekt i batterihållaren.
Skjut in batteripaketet i batterihållaren så att det hakar fast.
Batteripaketets laddning (se displayen) är för svag.
Ladda batteripaketet.
Batteripaketet eller laddaren är defekt. Byt ut batte-
ripaketet eller laddaren mot nya tillbehör.
Maskinen eller batteripaketet har överhettats. Vän-
ta en stund och låt maskinen/batteripaketet svalna.
Behållaren är full av vatten och utlöser därmed flot-
tören. Töm behållaren.
Tillbehöret, sugslangen eller sugrören är tilltäppta.
Avlägsna igensättningen med ett lämpligt hjälpme-
del.
Bild
Filterpåsen är full, sätt i en ny filterpåse.
Bild Patronfiltret är smutsigt, slå ur smutsen och rengör
vid behov under rinnande vatten.
Byte skadat patronfilter.
Rekommendation: Byt patronfilter 1 gång per år.
Med reservation för tekniska ändringar!
Åtgärder vid störningar
Apparaten arbetar inte
Maskinen stänger av sig automatiskt
Avtagande sugeffekt
Tekniska data
Uppladdningsbart batteripaket och standardladdare ingår i:
WD 3 Battery Set
WD 3 Battery Premium Set
(batteripaket Battery Power 36/25 / standardladdare
Battery Power BC 36 V)
Aggregat
Normeffekt W 300
Drifttid med full batteriladdning
(max.)
min 15
Skyddsklass III
Skydd IPX4
Batteripaket Battery Power 36/25
Märkspänning V 36
Nominell kapacitet
(enligt IEC/EN 61690)
Ah 2,4
Märkkapacitet
(enligt batteritillverkaren)
Ah 2,5
Nominell energi
(enligt UN 3480)
Wh 86,4
Laddström max. A 4
Typ av uppladdningsbart batteri Litiumjon
Vikt kg 0,9
Mått (l x b x h) mm 133x88x72
Standardladdare Battery Power BC 36 V
Märkspänning batteripaket V 36
Laddström max. A 0,5
Typ av uppladdningsbart batteri Litiumjon
Nätspänning V 100-240
Frekvens Hz 50-60
Strömförbrukning (max.) A 0,3
Skyddsklass II
Vikt (utan batteripaket) g 205
94 SV
Page 95

– 5
Arvoisa asiakas,
Lue tämä alkuperäiskäyttöohje ennen
laitteesi ensimmäistä käyttöä, toimi
sen mukaisesti ja säilytä käyttöohje
myöhempää käyttöä tai mahdollista
toista omistajaa varten.
Laite on tarkoitettu käytettäväksi monitoimi-imurina tämän käyttöohjeen kuvausten ja turvaohjeiden mukaisesti.
Tämä laite on suunniteltu yksityiskäyttöön eikä vastaa
ammattikäyttöön tarkoituksia vaatimuksia.
– Suojaa laite sateelta. Älä säilytä laitetta ulkona.
– Tällä laitteella ei saa imuroida tuhkaa eikä nokea.
Valmistaja ei vastaa mahdollisista vahingoista, jotka
johtuvat ohjeidenvastaisesta käytöstä.
Huomautuksia materiaaleista (REACH)
Ajantasaisia tietoja ainesosista löytyy osoitteesta:
www.kaercher.com/REACH
Huomautuksia materiaaleista (REACH)
Ajantasaisia tietoja ainesosista löytyy osoitteesta:
www.kaercher.com/REACH
Kussakin maassa ovat voimassa valtuuttamamme
myyntiorganisaation julkaisemat takuuehdot. Materiaali- ja valmistusvirheistä aiheutuvat virheet laitteessa korjaamme takuuaikana maksutta. Takuutapauksessa ota
yhteys ostotositteen kanssa jälleenmyyjään tai lähimpään valtuutettuun huoltoon.
KÄRCHER -edustustomme vastaa mielellään kysymyksiisi ja auttaa mahdollisissa häiriötilanteissa.
Käytä vain alkuperäisiä tarvikkeita ja varaosia. Ne takaavat laitteen turvallisen ja häiriöttömän toiminnan.
Tietoja tarvikkeista ja varaosista on sivustolla www.kaercher.com.
Ota yhteys jälleenmyyjään, jos varusteita puuttuu tai havaitset kuljetusvahinkoja.
VAARA
Huomautus välittömästi uhkaavasta vaarasta, joka voi aiheuttaa vakavan ruumiinvamman tai
johtaa kuolemaan.
몇 VAROITUS
Huomautus mahdollisesta vaarallisesta tilanteesta, joka voi aiheuttaa vakavan ruumiinvamman tai voi johtaa kuolemaan.
Sisällysluettelo
Yleisiä ohjeita FI 5
Turvaohjeet FI 5
Akkupakettia ja laturia koskevia ohjeita FI 8
Turvalaitteet FI 9
Hallintaelementit FI 9
Lataustapahtuma FI 9
Akun käyttäminen FI 9
Säilytys FI 10
Kuljetus ja varastointi FI 10
Hoito ja huolto FI 10
Häiriöapu FI 10
Laitekuvaus FI 11
Asennus FI 11
Akun lataaminen FI 11
Käyttöönotto FI 11
Yleiset käyttöohjeet FI 12
Käyttö FI 12
Kuljetus FI 12
Hoito ja huolto FI 12
Häiriöapu FI 12
Tekniset tiedot FI 13
Yleisiä ohjeita
Tarkoituksenmukainen käyttö
Ympäristönsuojelu
Pakkausmateriaalit ovat kierrätettäviä. Huolehdi
pakkausten ympäristöystävällisestä hävittämisestä.
Käytetyt laitteet sisältävät arvokkaita kierrätettäviä materiaaleja, jotka tulee toimittaa kierrätykseen. Paristot ja akut sisältävät aineita, joita ei
saa päästää ympäristöön. Huolehdi vanhojen laitteiden sekä paristojen ja akkujen ympäristöystävällisestä hävittämisestä.
Sähkö- ja elektroniikkalaitteet sisältävät usein rakenneosia, jotka voivat aiheuttaa mahdollisen
vaaran ihmisten terveydelle ja ympäristölle, jos
niitä käsitellään väärin tai ne hävitetään väärin.
Nämä rakenneosat ovat kuitenkin tarpeellisia, jotta laite toimisi asianmukaisesti. Tällä symbolilla
merkittyjä laitteita ei saa hävittää tavallisena talousjätteenä.
Takuu
Asiakaspalvelu
Varusteet ja varaosat
Toimitus
Turvaohjeet
Vaarallisuusasteet
95FI
Page 96

– 6
몇 VARO
Huomautus mahdollisesta vaarallisesta tilanteesta, joka voi aiheuttaa vähäisiä vammoja.
HUOMIO
Huomautus mahdollisesta vaarallisesta tilanteesta, joka voi aiheuttaa aineellisia vahinkoja.
VAARA
Käyttäjän on käytettävä laitet-
ta tarkoituksenmukaisesti.
Käyttäjä on huomioitava pai-
kalliset olosuhteet ja työsken-
nellessään laitteen kanssa
huomioitava ympäristössä
oleskelevat henkilöt.
Käyttö räjähdysalttiilla alueilla
on kielletty.
Käytettäessä laitetta vaara-
alueilla on noudatettava vas-
taavia turvallisuusmääräyk-
siä.
Laitetta ei saa käyttää, jos se
on aikaisemmin pudonnut,
näkyvästi vaurioitunut tai
epätiivis.
Pidä pakkausfoliot lasten
ulottumattomissa, tukehtu-
misvaara!
몇 VAROITUS
Laitetta eivät saa käyttää sel-
laiset henkilöt, joilla on rajoit-
tuneet fyysiset, aistimukselli-
set tai henkiset kyvyt tai, joilta
puuttuu laitteen käyttämiseen
tarvittavaa kokemusta ja/tai
tietoa, paitsi jos heidän turval-
lisuudestaan vastaava henkilö valvoo heitä tai on antanut
heille laitteen käyttämiseen
tarvittavat ohjeet.
Lapset saavat käyttää laitetta
vain, kun he ovat yli 8 vuotiaita ja ovat turvallisuudesta
vastaavan henkilön valvonnassa tai ovat saaneet häneltä opastuksen laitteen käyttämiseen.
Lapset eivät saa leikkiä lait-
teen kanssa.
Lapsia on valvottava sen var-
mistamiseksi, että he eivät
leiki laitteella.
Käytä ja säilytä laitetta vain
kuvausten tai kuvien mukaisesti!
Laitteessa on sähköisiä ra-
kenneosia - älä puhdista sitä
juoksevassa vedessä.
몇 VARO
Älä koskaan jätä laitetta val-
vomatta niin kauan, kun se on
käytössä.
HUOMIO
Laitetta ei saa käyttää alle
0 °C lämpötiloissa.
Älä koskaan imuroi ilman
suodatinta, laite saattaa muuten vaurioitua.
Suojaa laite äärimmäisiltä
sääolosuhteilta, kosteudelta
ja kuumuudelta.
VAARA
Räjähdysvaara!
Käyttö räjähdysalttiilla alueilla
on kielletty.
Turvaohjeet märkä-/
kuivaimureille
Turvallinen käyttö
Muita vaaroja
96 FI
Page 97

– 7
Älä imuroi räjähdysherkkiä tai
palamaan syttyviä kaasuja,
nesteitä ja pölyjä!
Älä imuroi reaktiivisia metalli-
pölyjä (esim. alumiini, mag-
nesium tai sinkki)!
Älä imuroi ohentamattomia
happoja tai emäksiä!
Älä imuroi palavia tai hehku-
via kohteita!
몇 VAROITUS
Loukkaantumisvaara!
Vältä imurointia suuttimella ja
putkella pään lähellä.
몇 VARO
Onnettomuuksien tai vammo-
jen välttämiseksi, huomioi lai-
tetta kuljetettaessa sen paino
(katso Tekniset tiedot).
몇 VARO
Varmista ennen laitteen jo-
kaista käyttämistä tai siihen
kohdistuvaa toimenpidettä,
että laite seisoo kantavalla
alustalla tukevasi paikallaan,
jotta vältytään laitteen kaatu-
misen aiheuttamilta onnetto-
muuksilta tai vaurioilta.
VAARA
Tarkasta ennen käyttöä, että
verkkopistoke, yhdysjohto,
akkuadapteri ja akku ovat
kunnossa. Vaurioituneita laitteita ei saa käyttää eikä vaihtaa.
Latauslaitetta ei saa avata.
Latauslaite on vaihdettava,
jos se vaurioituu tai siihen tukee vika.
Älä käytä latauslaitetta räjäh-
dysalttiissa tiloissa.
Älä koskaan tartu märillä kä-
sillä virtapistokkeeseen ja
pistorasiaan.
Älä käytä latauslaitetta, jos se
on likainen tai märkä.
Älä lataa paristoja (ensiöpa-
reja) räjähdysvaaran vuoksi.
몇 VARO
Tyyppikilvessä ilmoitetun jän-
nitteen on oltava sama kuin
pistorasian jännite.
Käytä latauslaitetta vain hy-
väksyttyjen akkupakkausten
lataamiseen.
Lataa akkupaketti vain muka-
na toimitetulla alkuperäisellä
latauslaitteella tai jollakin
KÄRCHERin hyväksymällä
latauslaitteella.
HUOMIO
Älä kanna latauslaitetta yh-
dysjohdosta kiinni pitäen.
Pidä yhdysjohto kaukana
kuumuudesta, terävistä reunoista, öljystä ja liikkuvista
laitteen osista.
Seisontavakavuus
Latauslaitteen turvaohjeet
97FI
Page 98

– 8
Verkkopistoketta ei saa peit-
tää.
Älä käytä jatkojohtoja, joissa
on useita pistokepaikkoja ja
joiden avulla käytetään useita
laitteita yhtä aikaa.
Älä kierrä yhdysjohtoa pistok-
keen tai akkuadapterin ympärille, jotta osat eivät vaurioidu.
Lue akkupaketin mukana toimitettavat turvallisuusohjeet.
Niitä on noudatettava ehdottomasti käytön aikana!
몇 VARO
– Räjähtävän akun aiheuttama loukkaantumisvaara,
vaurioitumisvaara! Lataa akkupaketteja vain tähän
tarkoitetulla latauslaitteella.
– Tarkasta ennen käyttöä akkupaketin ja latauslait-
teen yhteensopivuus!
– Lataa vain ehjiä akkupaketteja.
– Rakennemuutokset ja valmistajan hyväksymättö-
mät muutokset ovat turvallisuussyistä kiellettyjä.
– Jokainen muu käyttö on luvatonta. Käyttäjä on vas-
tuussa vaaratilanteista, jotka aiheutuvat epäsopivasta käytöstä.
Käyttöönottoa varten tarvitaan akkupaketti ja laturi
36 V -nimellisjännitteellä. Sarjaversioissa toimitukseen sisältyy jo Li-ION-akkupaketti 36 V, 2,5 A
h
(Battery Power 36/ 25) sekä vakiolaturi 36 V (Battery Power BC 36 V).
Akkupaketteja Battery Power (+) 36/25, 36/50 ja
36/75 saa käyttää vain yhdessä Kärcher 36 V Battery Power -järjestelmän tarkoitukseen soveltuvien
laitteiden kanssa.
Toimitukseen sisältymättömiä tai lisäksi tarvittavia
akkuja/latureita on saatavana erikoisvarusteina ja
ne voidaan vastaavasti hankkia jälkikäteen.
Huomioi käytettävän laitteen käyttöohje ja mahdol-
liset turvallisuusohjeet ennen akkupaketin käyttämistä KÄRCHER Battery Power -akkualustaan
kuuluvassa laitteessa.
Lisätietoja akkupakkauksen käyttöohjeesta sekä
varusteista ja varaosista löytyy internetistä osoitteesta www.kaercher.com.
Litiumioniakku kuuluu vaarallisia esineitä koskevan
lainsäädännön vaatimusten piiriin, ja käyttäjä voi kuljettaa sitä yleisillä liikennealueilla ilman lisäasiakirjoja.
Lähetettäessä kolmannen osapuolen (kuljetusyri-
tyksen) välityksellä on otettava huomioon pakkaamista ja tunnistemerkintöjä koskevat erityisvaatimukset.
Akun saa lähettää vain, jos sen kotelo ei ole vauri-
oitunut. Teippaa avoimet koskettimet kiinni ja pakkaa akku tukevasti ja turvallisesti. Se ei saa liikkua
pakkauksessa.
Noudata myös kansallisia määräyksiä.
Latauslaitteessa olevat
symbolit
Suojaa latauslaite kosteudelta ja varastoi se kuivassa tilassa. Laite on
tarkoitettu ainoastaan
käytettäväksi sisätiloissa, suojaa laite sateelta.
Latauslaitteessa on integroitu 1 ampeerin sulake.
Latauslaite täyttää suojausluokan II vaatimukset.
Akkupaketin turvaohjeet
Akkupakettia ja laturia koskevia ohjeita
36 V Battery Power -akkupaketit
Nimike
Akkutyyppi
Nimellisjännite
Nimelliskapa
siteetti
(standardin IEC/EN 61690 mukaan)
Nimellisteho
(kennon valmistajan
tietojen mukaan)
Li-Ion
VAhAh
36/25 36 2,4 2,5
36/50 36 4,8 5,0
Kuljetus
98 FI
Page 99

– 9
몇 VARO
Turvalaitteet on tarkoitettu loukkaantumisilta suo-
jaamiseksi, niitä ei saa muuttaa eikä ohittaa.
Sisäänrakennettu suojakytkentä suojaa akkupakkausta
ylikuumenemiselta
syväpurkaukselta
Ylilataus
Oikosulku
Kuva tyyppikohtainen
1 Tyyppikilpi
2Näyttö
3 Liitännät
4 Aufnahme
1 Latauskoskettimet
2 Akkuadapteri
3 Yhdysjohto
4 Tyyppikilpi
5 Verkkopistoke
몇 VARO
Loukkaantumisvaara, vaurioitumisvaara! Noudata latauslaitteen käyttöohjetta ja turvaohjeita.
Ohje
Uudet akkupaketit on vain esiladattu, ja ne on ladattava
täyteen ennen ensimmäistä käyttöä.
Näyttö aktivoituu ensimmäisen latauksen yhteydessä.
Jotta varaustilan näyttö toimisi oikein, akkupakettia on
käytettävä ensimmäisen käytön yhteydessä laitteen
sammumiseen asti.
Kuva
Yhdistä verkkopistoke pistorasiaan.
Työnnä akku latauslaitteen akkuadapteriin.
Lataus alkaa automaattisesti.
Kuva
Akkupaketin näytöllä näkyy jäljellä oleva latausai-
ka.
Vakiolaitteen (Battery Power BC 36 V) tyhjän akku-
paketin (Battery Power 36/25) latausaika on no
in
5,
5 tuntia.
Jos akkupaketti on täyteen ladattu, näytöllä näkyy
100 %.
Vedä akku latauksen jälkeen irti akkuadapterista.
Irrota verkkopistoke pistorasiasta.
Ohje
Jos näytöllä ei näy mitään, kun akkupaketti on latauslaitteessa, akun kapasiteetti on käytetty tai hyvin alhainen. Kun akkupakettia on ladattu riittävästi, näytöllä näkyy jäljellä oleva latausaika.
Jos näytöllä ei näy mitään edes pidemmän ajan kuluttua, akkupaketti on viallinen ja se täytyy vaihtaa.
Ohje
Uudet akkupaketit saavuttavat täyden kapasiteettinsa
noin 5 lataus- ja käyttöjakson jälkeen.
Pidemmän aikaa käyttämättömänä olleet akkupaketit
on ladattava uudelleen ennen käyttöä.
Jos lämpötila on alle 0 °C, akkupaketin suorituskyky
laskee.
Pitkäaikainen varastointi yli 20 °C:n lämpötilassa voi
heikentää akkupaketin kapasiteettia.
Huomautus
Ladattua akkupakkausta voidaan pitää latauslaitteessa,
kunnes akku otetaan käyttöön. Ylilatautumisen vaaraa
ei ole.
Tarpeettoman energiankulutuksen välttämiseksi, latauslaitteen verkkopistoke tulisi vetää pois pistorasiasta,
heti kun akkupakkaus on täyteen ladattu.
Akkupaketissa on näyttö, jolla näkyvät jatkuvasti
tiedot varaustilasta, latauksen etenemisestä sekä
jäljellä olevasta käyttöajasta. Lisäksi näytöllä näkyvät mahdolliset virheilmoitukset.
Käyttöajan mukautus aikaansaadaan tehon vaihto-
kytkennän kautta.
Käytetystä laitteesta riippuen näyttö kääntyy, kun
akkupaketti asetetaan sisään.
Turvalaitteet
Suojakytkentä
Hallintaelementit
Akku
Vakiolatauslaite
Lataustapahtuma
Akun käyttäminen
Näyttö
99FI
Page 100

– 10
몇 VARO
Loukkaantumis- ja vaurioitumisvaara! Noudata käytettäessä käytetyn latauslaitteen käyttöohjetta ja turvaohjeita.
Työnnä akkupakkaus laitteen pidikkeeseen.
몇 VARO
Loukkaantumis- ja vaurioitumisvaara! Huomioi tällöin,
että akkupakkaus napsahtaa kunnolla lukitukseen.
Ohje
Käytön aikana näytöllä näkyy jäljellä oleva käyttöaika.
Töiden jälkeen, ota akkupakkaus pois laitteesta.
Lataa akkupakkaus töiden jälkeen.
Huomautus
Lataa myös osittain purkautuneet akkupakkaukset käytön jälkeen.
몇 VARO
Loukkaantumis- ja vaurioitumisvaara! Huomioi kuljetettaessa laitteen paino.
HUOMIO
Vaurioitumisvaara! Säilytä akkupakkauksia vain tiloissa, joissa on matala ilmankosteus ja lämpötila alle 20
°C.
Tätä laitetta saa säilyttää vain sisätiloissa.
Akkupaketin näytöllä näkyy senhetkinen varaustila,
vaikkei akkupakettia olisi kiinnitetty latauslaitteeseen.
Jos akkupaketin näyttö sammuu varastoinnin aikana,
akun kapasiteetti on käytetty ja näyttö on pois päältä.
Lataa akkupaketti mahdollisimman pian uudelleen.
몇 VARO
Loukkaantumis- ja vaurioitumisvaara! Huomioi kuljetettaessa laitteen paino.
Tarkasta latauskontaktien likaantuneisuus sään-
nöllisesti ja puhdista tarvittaessa.
Välilataa pidemmän aikaa varastoituna olleet akku-
pakkaukset.
Laitetta ei tarvitse huoltaa.
Näyttö Merkitys
Akun varastointi
Akkupaketin varaustila,
kun sitä ei käytetä.
Akun käyttäminen
Akkupaketin jäljellä oleva käyttöaika, kun sitä
käytetään.
Akun lataaminen
Akkupaketin jäljellä oleva latausaika, kun sitä
ladataan.
Akkupaketti täyteen ladattu.
Virheilmoitus
Akkupaketin lämpötila
sallittujen arvojen ulkopuolella tai sen käyttö
estetty oikosulun vuoksi
(katso Häiriöapu).
Akkupaketti viallinen ja
käyttö turvallisuussyistä
estetty. Älä enää käytä
akkupakettia ja hävitä se
määräysten mukaisesti.
Käyttö
Säilytys
Kuljetus ja varastointi
Hoito ja huolto
Huolto
Häiriöapu
Virhe ladattaessa
Näyttö on pois päältä, akkupaketti ei lataudu
Latauslaite on viallinen. Vaihda latauslaite.
Akkupaketin varaus voi olla kokonaan käytetty. Odota,
näkyykö näytöllä jonkin ajan kuluttua jäljellä oleva latausaika. Jos ei näy, akkupaketti on viallinen. Vaihda
akkupaketti.
Näyttö on päällä mutta akku ei lataudu
Latauslaite on viallinen. Vaihda latauslaite.
Kiinnitä huomiota näyttöön. Akun lämpötila ei ole vält-
tämättä normaalilla alueella.
Näytöllä näkyy lämpötilasymboli, akkupaketti ei lataudu
Akun lämpötila on liian matala/korkea. Vie akku ympäristöön, jossa on kohtuulliset lämpötilat. Odota, kunnes akun lämpötila on taas normaali.
Lataus alkaa tämän jälkeen automaattisesti.
Virhe käytössä
Näytöllä näkyy lämpötilasymboli
Akun lämpötila on liian matala/korkea. Vie akku ympäristöön, jossa on kohtuulliset lämpötilat. Odota, kunnes akun lämpötila on taas normaali.
Oikosulun yhteydessä akkupaketin käyttö estetään 30
sekunniksi. Jos oikosulkuja esiintyy usein, akkupaketin käyttö estetään pysyvästi. Liitä akkupaketti eston
poistamista varten latauslaitteeseen.
100 FI
 Loading...