

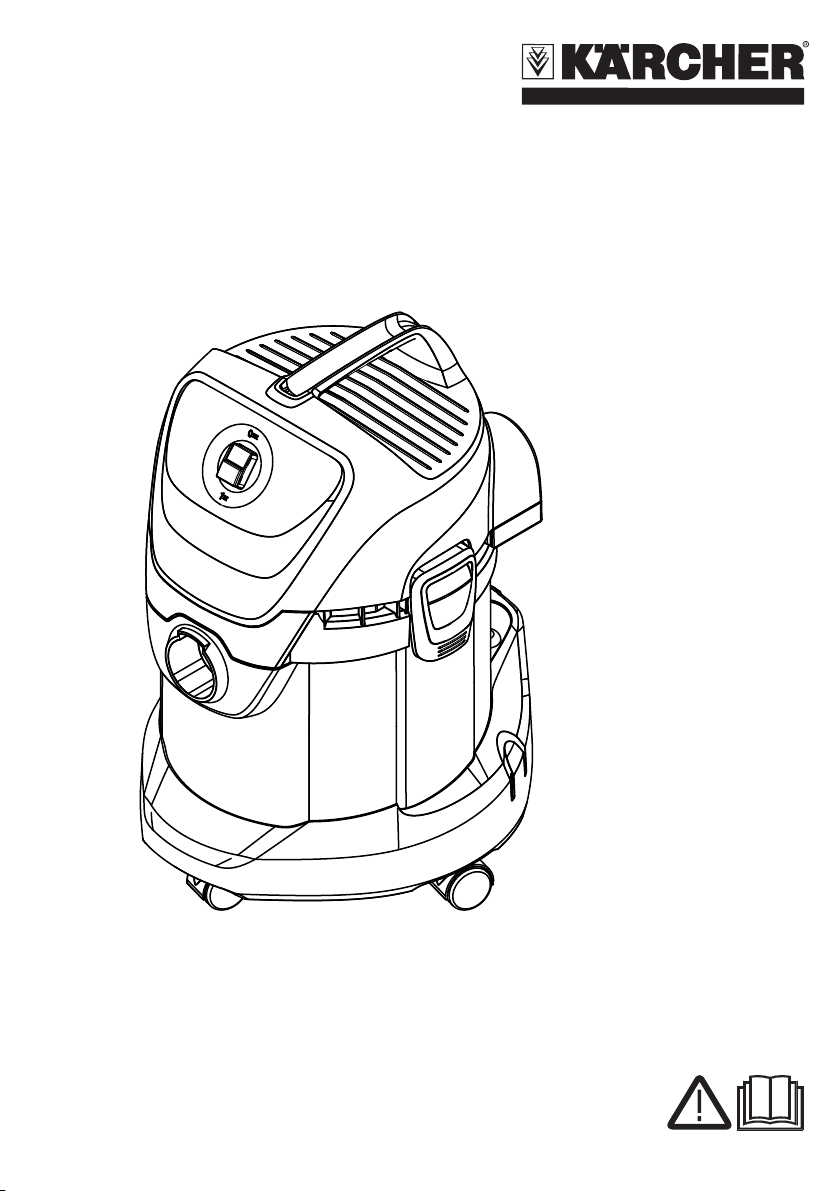
Page 1
WD 3.2xx
WD 3.3xx M
WD 3.5xx P
English 5
ΔϳΒήόϠ
16
59642570 (05/11)
Page 2
Page 3
Page 4

Page 5
Contents
Safety instructions . . . . . . . . . 5
Description of the Appliance . . 6
Operation . . . . . . . . . . . . . . . . 7
Maintenance and care . . . . . . 8
Troubleshooting . . . . . . . . . . . 8
Helpline . . . . . . . . . . . . . . . . . 9
General notes. . . . . . . . . . . . . 9
Technical specifications . . . . . 9
Dear Customer,
Please read and comply with
these original instructions prior to
the initial operation of your appliance and store
them for later use or subsequent owners.
Proper use
The appliance is intended for use as a Multi-Purpose Vac corresponding to the descriptions given in these operating
instructions and the safety notes.
This appliance has been designed for use
in private households and is not intended
for commercial use.
– Protect the unit from rain. Do not store
outside.
– This device may not be used to suck in
ash and soot.
Use the Multi-Purpose Vac only with:
– Original spare parts, accessories and
special accessories.
The manufacturer is not responsible for any
damages that may occur on account of improper use or wrong operations.
Environmental protection
The packaging material can be recy-
cled. Please do not place the packaging into the ordinary refuse for disposal, but
arrange for the proper recycling.
Old appliances contain valuable ma-
terials that can be recycled. Please
arrange for the proper recycling of old
appliances. Please dispose your old appliances using appropriate collection systems.
Disposing the cartridge filter
The cartridge filter is made from environment-friendly materials.
The cartridge filter can therefore be disposed off through the normal household
garbage provided you have not sucked in
substances that are not permitted to be
thrown into household garbage.
Notes about the ingredients (REACH)
You will find current information about the
ingredients at:
www.kaercher.com/REACH
Safety instructions
– This device is not intended for use by per-
sons (including children) with reduced
physical, sensory or mental abilities or
lacking experience and/or knowledge, unless they are supervised by a person responsible for their safety or are instructed
by these persons on the use of the device.
Children should be supervised, to ensure
that they do not play with the device.
– Keep packaging film away from children
- risk of suffocation!
– Switch the appliance off after every use
and prior to every cleaning/maintenance procedure.
– Risk of fire. Do not vacuum up any burn-
ing or glowing objects.
– The appliance may not be used in areas
where a risk of explosion is present.
몇 Electrical connection
The appliance may only be connected to alternating current. The voltage must correspond with the type plate on the appliance.
Risk of electric shock
Never touch the mains plug and the socket
with wet hands.
Do not pull the plug from the socket by pulling on the connecting cable.
Check the power cord with mains plug for
damage before every use. If the power cord
is damaged, please arrange immediately
for the exchange by an authorized customer service or a skilled electrician.
English 5
Page 6
To avoid accidents due to electrical faults
we recommend the use of sockets with a
line-side current-limiting circuit breaker
(max. 30 mA nominal tripping current).
Caution
Certain materials may produce explosive
vapours or mixtures when agitated by the
suction air!
Never vacuum up the following materials:
– Explosive or combustible gases, liquids
and dust particles (reactive dust particles)
– Reactive metal dust particles (such as
aluminium, magnesium, zinc) in combination with highly alkaline or acidic detergents
– Undiluted, strong acids and alkalies
– Organic solvents (such as petrol, paint
thinners, acetone, heating oil).
In addition, these substances may cause
the appliance materials to corrode.
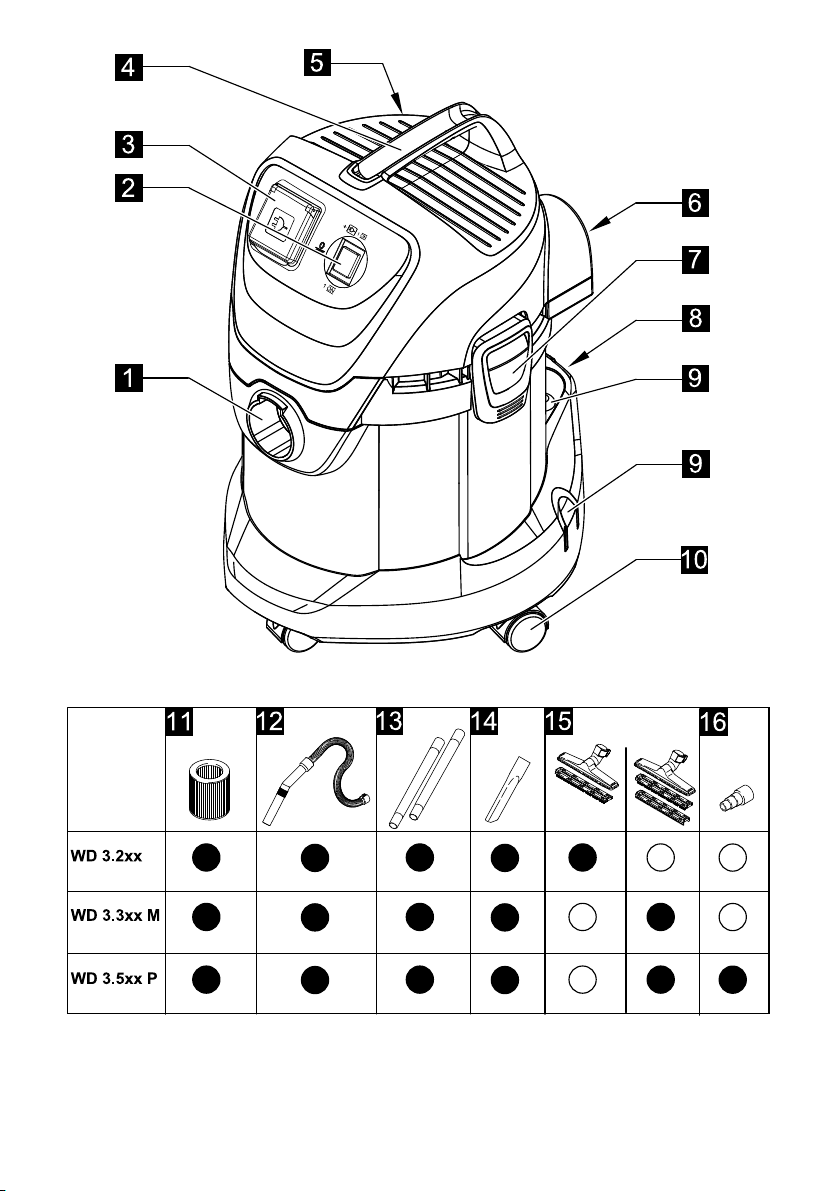
ON/OFF switch for appliance
(with built-in socket)
Position I: Suction or blowing
Position II: Automatic vacuuming with
connected electric tool
Position 0: Appliance and the connect-
ed electric tool are switched off
Machine socket
Note: Observe the maximum connected
power (see Chapter "Specifications").
To connect an electric tool.
(see description / illustration )
Carrying handle
Transport the appliance using the carry-
ing handle.
Cable hook
To store the mains cable.
(see description / illustration )
Description of the Appliance
Illustrations on fold-out page!
These operating instructions
describe the basic models of the MultiPurpose Vacs shown on the front cover.
The illustrations show the maximum
equipment; depending on the model,
there are differences in equipment and
supplied accessories.
When unpacking the product, make sure
that no accessories are missing and that
none of the package contents have been
damaged. If you detect any transport damages please contact your dealer.
included in the scope of delivery
possible accessories
Suction hose connection
To connect the suction hose during vac-
uuming.
(see description / illustration )
ON/OFF switch for appliance
(without built-in socket)
Position I: Suction or blowing
Position 0: Appliance is switched off
Blowing connection
Connect the suction hose to the blower
connection, this will activate the blower
function.
(see description / illustration )
Container closure
Pull out to open, push in to lock.
(see description / illustration )
Parking position
To rest the floor nozzle during work in-
terruptions.
(see description / illustration )
Accessory mount
The accessories compartment allows
the storage of suction pipes and suction
nozzles on the appliance.
(see description / illustration )
Steering roller
The steering rollers are located in the
compartment when the appliance is delivered. These must be attached prior to
starting up the appliance.
(see description / illustration )
6 English
Page 7

Cartridge filter
(already installed in the appliance)
The cartridge filter must always be in-
stalled - with wet and dry vacuuming.
Note: Let the wet cartridge filter dry pri-
or to using it for dry vacuuming.
(see description / illustration )
Suction hose with handle
Slide the suction hose into the connec-
tion, it will lock into place.
(see description / illustration )
In order to disconnect it, push down
with your thumb and pull the suction
hose out.
Suction tubes 2 x 0.5 m
Connect both suction pipes and con-
nect them to the suction hose.
(see description / illustration )
Crevice nozzle
For edges, joints, heaters and hard to
reach locations.
Floor nozzle
(with inserts)
Use the appropriate insert for vacuum-
ing on hard surfaces and carpets.
(see description / illustration )
Hard surfaces, wet vacuuming: Use
the insert with 2 rubber lips (or with a
rubber lip and bristle strips).
Hard surfaces, dry vacuuming: Use
the insert with 2 bristles (or with a rubber lip and bristle strips).
Carpets, wet and dry vacuuming:
Work without an insert.
Adapter
To connect the suction hose with an
electric tool.
(see description / illustration )
Adapt the adapter to the connection di-
ameter of the electric tool using a knife
if necessary.
Operation
몇 Always work with an inserted car-
tridge filter - during wet as well as
dry vacuum cleaning!
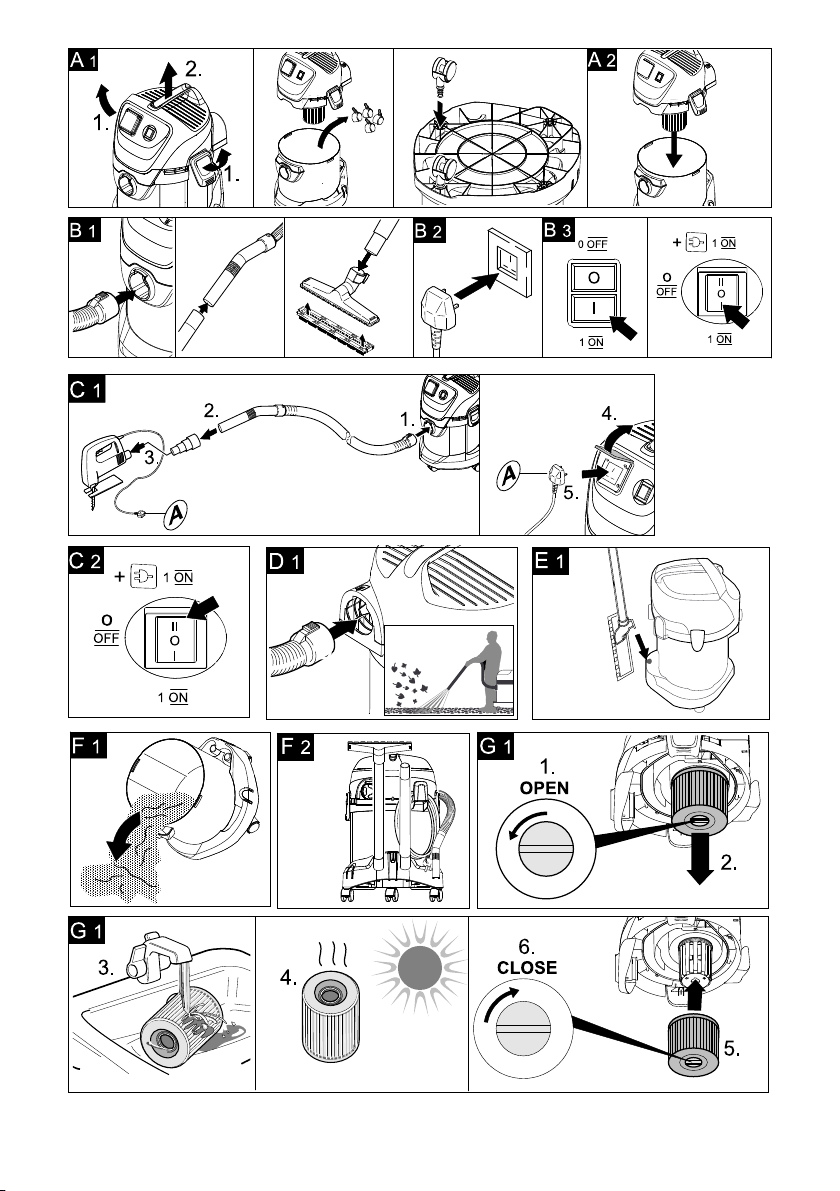
Before Startup
Illustration
Mount loose parts delivered with appliance prior to start-up.
Illustration
Insert and lock the appliance head.
Start up
Illustration
Connect accessories.
Illustration
Plug in the main plug.
Illustration
Turn on the machine.
Dry vacuum cleaning
몇 Work only with a dry cartridge filter!
Caution: Always use a pre-separator
while vacuuming ashes and soot (order
no. 2.863-139).
Wet vacuum cleaning
Attach the accessories to vacuum mois-
ture or wetness to the suction pipes or
directly to the handle.
몇 Caution
Immediately switch the appliance off or pull the
power plug if foam forms or liquids escape!
Note: If the container is full a float closes the
suction opening and the appliance works at a
higher speed. Switch off the appliance immediately and empty the container.
Working with electrical power tools
Adapt the adapter to the connection di-
ameter of the electric tool using a knife
if necessary.
Illustration
Connect the adapter to the handle of
the suction hose and connect it to the
electric tool connection.
English 7
Page 8

Connect the mains plug of the electric
power tool to the vacuum cleaner.
Illustration
Switch the vacuum cleaner to Position
II and start working.
Note: The suction turbine starts with a
delay of 0.5 seconds after the electric
tool has been switched on. After the
electric tool has been switched off, the
suction turbine will continue to run for
approx. 5 seconds to suck in the remaining dirt from the suction hose.
Blowing function
Cleaning hard to reach locations or, where
vacuuming is not possible, like leaves from
a gravel bed.
Illustration
Connect the suction hose to the blower
connection, this will activate the blower
function.
Interrupting operation
Turn off the appliance.
Illustration
Hook the floor nozzle into the parking
position.
Finish operation
Turn off the appliance and disconnect
the mains plug.
Empty the container
Illustration
Remove the appliance head and empty
the reservoir.
Storing the appliance
Illustration
Stow away the mains cable and accessory at the machine. Store the appliance in a dry room.
Maintenance and care
Danger
Turn off the appliance and remove the
mains plug prior to any care and maintenance work.
Repair works may only be performed by the
authorized customer service.
몇 Caution
Do not use abrasives, glass or universal
cleaners! Never immerse the appliance in
water.
Clean the appliance and accessory
parts made of plastic with a commercial
plastic cleaner.
If required, rinse the container and ac-
cessories with water properly and dry
them before reuse.
Illustration
Only clean the cartridge filter under running water; do not wipe or brush. Let it
dry completely prior to installation.
Troubleshooting
Decreasing cleaning power
If the cleaning power of the appliance deteriorates please check the following:
Accessories, suction hose or suction
tubes are clogged, please remove the
obstruction using a stick.
Cartridge filter is dirty, knock off dirt
from cartridge filter and clean under
running water if necessary.
(see description / illustration )
Replace damaged cartridge filter.
8 English
Page 9

Helpline
Karcher (UK) Limited operate a helpline allowing customers to discuss any problems
experienced with our products.
The helpline operates during normal business hours, if you have difficulty getting
through, please understand that there are
peak periods during the day when our consultants are unable to take all calls coming
in. In these circumstances we would ask
that you try to contact us again later in the
day.
The helpline number is 01295 752200,
open from 8.30am to 5.00pm Monday to
Friday.
It helps us if you have the model number
and data plate details to hand before making your call.
Alternatively you may write or E-mail to
the address below:
Karcher (UK) Limited
Karcher House
Beaumont Road
Banbury
Oxon, OX16 1TB
E-mail:
info@karcher.co.uk
General notes
Warranty
The terms of the guarantee applicable in
each country have been published by our
respective national distributors. We will repair possible faults on your unit free of
charge within the warranty period, insofar
as the faults are caused by material defects
or defective workmanship. Guarantee
claims should be addressed to your dealer
or the nearest authorized customer service
centre, and supported by documentary evidence of purchase.
(See address on the reverse)
Customer Service
Our KÄRCHER branch will be pleased to
help you further in the case of questions or
faults.
(See address on the reverse)
Ordering spare parts and special at-
tachments
At the end of the operating instructions you
will find a selected list of spare parts that
are often required.
You can procure the spare parts and the attachments from your dealer or your
KÄRCHER branch office.
(See address on the reverse)
Technical specifications
Voltage
1~50/60 Hz
Output P
Output P
Max. connection output
of appliance socket
Mains fuse (slow-blow) 13 A
Container capacity 17 l
Water intake with handle 10 l
Water intake with floor
nozzle
Sound pressure level
(EN 60704-2-1)
Power cord
WD 3.2xx, WD 3.3xx M
WD 3.5xx P
Weight (without accessories)
WD 3.2xx
WD 3.3xx M
WD 3.5xx P
Subject to technical modifications!
nom
max
220 - 240 V
1200 W
1400 W
1800 W
8 l
75 dB(A)
H05VV-F2x0.75
H05VV-F3G1.5
5.4 kg
5.8 kg
5.7 kg
English 9
Page 10

تﺎﻘﺤﻠﻤﻟاو رﺎﻴﻐﻟا ﻊﻄﻗ ﻰﻠﻋ لﻮﺼﺤﻟا ﻚﻨﻜﻤﻳ
ﺔﺴﺳﺆﻣ عﺮﻓ ﻦﻣ وأ عزﻮﻤﻟا ﻦﻣKÄRCHER.
)ﺔﻴﻔﻠﺨﻟا ﺔﺤﻔﺼﻟا ﻲﻓ دﻮﺟﻮﻣ ناﻮﻨﻌﻟا(
ﺔﻴﻨﻔﻟا تﺎﻧﺎﻴﺒﻟا
ﺔﻴﻓﺎﺿإ تﺎﻘﺤﻠﻣو رﺎﻴﻏ ﻊﻄﻗ ﺐﻠﻃ
ﻊﻄﻘﻟ جذﺎﻤﻧ ﻞﻴﻐﺸﺘﻟا ﻞﻴﻟد ﺔﻳﺎﻬﻧ ﻲﻓ ﺪﺠﺘﺳ
ﺎﻣاﺪﺨﺘﺳا ﺮﺜﻛﻷا رﺎﻴﻐﻟا.
220 - 240 V
ﺪﻬﺠﻟا
1~50/60 Hz
ﺔﻴﻤﺳﻻا ةرﺪﻘﻟا
1200 W
ﻟ ﻰﺼﻗﻷا ﺪﺤﻟاةرﺪﻘﻠ
1400 W
زﺎﻬﺠﻟا ﺲﺒﻘﻤﻟ ﻞﻴﺻﻮﺗ ةرﺪﻗ ﻰﺼﻗأ 1800 W
ﺔﻴﺴﻴﺋﺮﻟا ﺔﻴﺋﺎﺑﺮﻬﻜﻟا ﺔﻳﺬﻐﺘﻟا تاﺮﻬﺼﻨﻣ)ﻦﻛﺎﺴﻟا ﻊﺿﻮﻟا( 13 A
ناﺰﺨﻟا ﺔﻌﺳ 17 l
يوﺪﻴﻟا ﺾﺒﻘﻤﻟﺎﺑ هﺎﻴﻤﻟا ﺐﺤﺳ 10 l
ﺔﻴﺿرﻷا ﺔﻫﻮﻔﺑ هﺎﻴﻤﻟا ﺐﺤﺳ. 8 l
تﻮﺼﻟا ﻂﻐﺿ ىﻮﺘﺴﻣ)EN 60704-2-1( 75 dB)A(
H05VV-F2x0.75
H05VV-F3G1.5
5.4 kg
5.8 kg
5.7 kg
ﻲﺋﺎﺑﺮﻬﻛ ﻚﻠﺳ
WD 3.2xx ,WD 3.3xx M
WD 3.5xx P
نزﻮﻟا)تﺎﻘﺤﻠﻤﻟا نوﺪﺑ(
WD 3.2xx
WD 3.3xx M
WD 3.5xx P
ﺔﻇﻮﻔﺤﻣ ﺔﻴﻨﻓ تﻼﻳﺪﻌﺗ لﺎﺧدإ قﻮﻘﺣ ﻊﻴﻤﺟ !
Page 11

لﺎﻄﻋأ ثوﺪﺣ ﺪﻨﻋ ةﺪﻋﺎﺴﻤﻟا
ﻞﻴﻐﺸﺘﻟا ءﺎﻬﻧإ
ﺔﻴﻟﺪﺘﻤﻟا ﻂﻔﺸﻟا ﺔﺑﻮﺒﻧأ
ﺪﻛﺄﺗو ،زﺎﻬﺠﻟﺎﺑ ﺔﺻﺎﺨﻟا ﻂﻔﺸﻟا ﺔﺑﻮﺒﻧأ ﺾﻔﺨﺗ ﻻ
ﺔﻴﻟﺎﺘﻟا طﺎﻘﻨﻟا ﻦﻣ ﻚﻠﻀﻓ ﻦﻣ.
ﺴﻧﻻا ﺔﻟازﺈﺑ ﻢﻗ ،ةدوﺪﺴﻣ ﻂﻔﺸﻟا داﺪ
ﺔﻌﻴﻓر ﺎﺼﻋ ماﺪﺨﺘﺳﺎﺑ.
ﺖﺤﺗ ﻪﻌﺿﻮﺑ ﻪﻔﻴﻈﻨﺘﺑ ﻢﻗو ﺔﺷﻮﻃﺮﺨﻟا
ﺔﺟﺎﺤﻟا ﺪﻨﻋ بﺎﺴﻨﻤﻟا ءﺎﻤﻟا.
ﺔﻣﺎﻋ تادﺎﺷرإ
ﻀﻟانﺎﻤ
ﻲﺘﻟا نﺎﻤﻀﻟا طوﺮﺷ يﺮﺴﺗ ﺔﻟود ﻞﻛ ﻲﻓ
ﺎﻨﻟ ﺔﻌﺑﺎﺘﻟا ﺔﺼﺘﺨﻤﻟا ﻖﻳﻮﺴﺘﻟا ﺔﻛﺮﺷ ﺎﻬﻌﻀﺗ .
ﻰﻠﻋ أﺮﻄﺗ ﺪﻗ ﻲﺘﻟا لﺎﻄﻋﻷا جﻼﻋ ﻰﻟﻮﺘﻧ ﻦﺤﻧ
ﺎﻤﻟﺎﻃ نﺎﻤﻀﻟا ةﺮﺘﻓ لﻼﺧ ﻞﺑﺎﻘﻣ نوﺪﺑ كزﺎﻬﺟ
دﻮﺟو ﻦﻋ ﻢﺟﺎﻧ لﺎﻄﻋﻷا هﺬﻫ ﻲﻓ ﺐﺒﺴﻟا نأ
ﻊﻨﺼﻟا ﻲﻓ وأ داﻮﻤﻟا ﻲﻓ ﺐﻴﻋ . ﺔﻟﺎﺣ ﻲﻓ
ﻀﻓ ﻦﻣ ﻪﺟﻮﺗ ،نﺎﻤﻀﻟا قﺎﻘﺤﺘﺳا ﺔﻤﻴﺴﻘﺑ ﻚﻠ
ءﻼﻤﻋ ﺔﻣﺪﺧ ﺰﻛﺮﻣ وأ عزﻮﻣ بﺮﻗأ ﻰﻟإ ءاﺮﺸﻟا
ﺪﻤﺘﻌﻣ.
ءﻼﻤﻌﻟا ﺔﻣﺪﺧ
ﺔﺴﺳﺆﻣ عﺮﻓ ﺮﺴﻳKÄRCHER ﻚﻟ مﺪﻘﻳ نأ
دﻮﺟو ﺔﻟﺎﺣ ﻲﻓ ةﺪﻋﺎﺴﻤﻟا لﺎﻜﺷأ ﺔﻓﺎﻛ
لﺎﻄﻋأ وأ تارﺎﺴﻔﺘﺳا.
ناﺰﺨﻟا ﻎﻳﺮﻔﺘﺑ ﻢﻗو زﺎﻬﺠﻟا سأر عﺰﻧا.
ةرﻮﺳﺎﻣ وأ مﻮﻃﺮﺧ وأ ،تﺎﻘﺤﻠﻤﻟا نﻮﻜﺗ ﻻأ
تﺎﻘﺤﻠﻤﻟاو ءﺎﺑﺮﻬﻜﻟﺎﺑ داﺪﻣﻹا ﺔﻠﺻو ﻦﻳﺰﺨﺘﺑ ﻢﻗ
ﺮﺘﻠﻓ ﻰﻠﻋ ﺮﻘﻧا ،ﺦﺴﺘﻣ ﺔﺷﻮﻃﺮﺨﻟا ﺮﺘﻠﻓ
ﺔﻧﺎﻴﺼﻟاو ﺔﻳﺎﻨﻌﻟا
)ﻒﺻﻮﻟا ﺮﻈﻧا / ةرﻮﺼﻟا (
ﺔﻔﻟﺎﺘﻟا ﺔﺷﻮﻃﺮﺨﻟا ﺮﺗﻼﻓ ﺮﻴﻴﻐﺘﺑ ﻢﻗ.
ﻲﺋﺎﺑﺮﻬﻜﻟا ﺲﺑﺎﻘﻟا ﺐﺤﺳو زﺎﻬﺠﻟا ﻖﻠﻏ ﺐﺠﻳ
ﺔﻳﺎﻨﻌﻟا لﺎﻤﻋﺄﺑ مﺎﻴﻘﻟا ﻞﺒﻗ ةﺮﻣ ﻞﻛ ﻲﻓ
ماﺪﺨﺘﺳاو تﺎﺣﻼﺻﻹا ءاﺮﺟﺈﺑ حﻮﻤﺴﻣ ﺮﻴﻏ
ﺔﻣﺪﺧ ﺰﻛﺮﻤﻟ ﻻإ زﺎﻬﺠﻟﺎﺑ ﺔﻴﺋﺎﺑﺮﻬﻜﻟا تﺎﻧﻮﻜﻤﻟا
ﻒﻈﻨﻣ وأ جﺎﺟز وأ ﺔﻄﺷﺎﻛ ةادأ ﺔﻳأ مﺪﺨﺘﺴﺗ ﻻ
ماﺪﺨﺘﺳﻻا دﺪﻌﺘﻣ . ءﺎﻤﻟا ﻲﻓ زﺎﻬﺠﻟا ﺮﻤﻐﺗ ﻻ
ﺘﺳﺎﺑ ﺔﻴﻜﻴﺘﺳﻼﺒﻟا ﻚﻴﺘﺳﻼﺒﻟا ﻒﻈﻨﻣ ماﺪﺨ
)ﺔﻴﻔﻠﺨﻟا ﺔﺤﻔﺼﻟا ﻲﻓ دﻮﺟﻮﻣ ناﻮﻨﻌﻟا(
ﺎﻬﻔﻴﻔﺠﺗ ﻲﻐﺒﻨﻳ ﻪﻧأ ﻻإ ،ةروﺮﻀﻟا ﺪﻨﻋ ءﺎﻤﻟﺎﺑ
ماﺪﺨﺘﺳﻻا ةدﺎﻋإ ﻞﺒﻗ.
ﻻإ ﺔﺷﻮﻃﺮﺨﻟا ﺮﺘﻠﻓ ﻒﻴﻈﻨﺘﺑ ﻢﻘﺗ ﻻ ،ﺔﺟﺎﺤﻟا ﺪﻨﻋ
ﺴﻨﻤﻟا ءﺎﻤﻟا ﺖﺤﺗ وأ ﻪﻜﺤﺑ ﻢﻘﺗ ﻻ ؛بﺎ
ةﺎﺷﺮﻔﻟﺎﺑ ﻪﻔﻴﻈﻨﺘﺑ . ﻞﺒﻗ ﴼﻣﺎﻤﺗ ﻪﻔﻴﻔﺠﺘﺑ ﻢﻗو
)ﺔﻴﻔﻠﺨﻟا ﺔﺤﻔﺼﻟا ﻲﻓ دﻮﺟﻮﻣ ناﻮﻨﻌﻟا(
ﺔﻜﺒﺸﻟا ﺲﺑﺎﻗ ﺐﺤﺳاو زﺎﻬﺠﻟا ﻒﻗوأ.
ناﺰﺨﻟا ﻎﻳﺮﻔﺗ
زﺎﻬﺠﻟا ﻦﻳﺰﺨﺗ
زﺎﻬﺠﻟﺎﺑ .ﻣأ ﻲﻓ زﺎﻬﺠﻟا ﻆﻔﺤﻳﺔﻓﺎﺟ ﻦﻛﺎ.
ﺮﻄﺧ
ﻮﺻةر
ةرﻮﺻ
ﺔﻧﺎﻴﺼﻟاو .
ﺪﻤﺘﻌﻤﻟا ءﻼﻤﻌﻟا .
ﻪﻴﺒﻨﺗ :
ﴽﺪﺑأ.ﺎًﻘﻠﻄﻣ ءﺎﻤﻟا ﻲﻓ زﺎﻬﺠﻟا ﺮﻤﻐﺗ ﻻ .
تﺎﻘﺤﻠﻤﻟا ءاﺰﺟأو زﺎﻬﺠﻟا ﻒﻴﻈﻨﺘﺑ ﻢﻗ
لواﺪﺘﻤﻟا.
تﺎﻘﺤﻠﻤﻟاو تﺎﺧﺎﺴﺗﻻا ناﺰﺧ ﻞﺴﻏ ﻦﻜﻤﻳ
ﻪﺒﻴﻛﺮﺗ.
ةرﻮﺻ
Page 12

ﺔﻇﻮﺤﻠﻣ : ﺔﻣاﻮﻋ مﻮﻘﺗ ،ناﺰﺨﻟا ءﻼﺘﻣا ﺔﻟﺎﺣ ﻲﻓ
زﺎﻬﺠﻟا ﺔﻋﺮﺳ ﺪﻳﺰﺗو ﻂﻔﺸﻟا ﺔﺤﺘﻓ قﻼﻏﺈﺑ .
ناﺰﺨﻟا ﻎﻳﺮﻔﺗو زﺎﻬﺠﻟا ﻞﻴﻐﺸﺗ فﺎﻘﻳإ ﺐﺠﻳ
رﻮﻔﻟا ﻰﻠﻋ .
.
ﺔﻴﺋﺎﺑﺮﻬﻛ تاودأ ماﺪﺨﺘﺳﺎﺑ ﻞﻴﻐﺸﺘﻟا
ﺪﺨﺘﺳﺎﺑ ﺔﻴﺋﺎﺑﺮﻬﻜﻟا ةادﻷا ﺔﻠﺻوسﺎﻴﻘﻣ ما.
مﻮﻃﺮﺨﻟ يوﺪﻴﻟا ﺾﺒﻘﻤﻟا ﻲﻓ ﺊﻳﺎﻬﻤﻟا ﻞﺧدأ
ةادﻷا ﺔﻠﺻﻮﺑ ﻪﻠﻴﺻﻮﺘﺑ ﻢﻗو ﻂﻔﺸﻟا
ﺔﻴﺋﺎﺑﺮﻬﻜﻟا.
ﺔﺴﻨﻜﻤﻟﺎﺑ ﺔﻴﺋﺎﺑﺮﻬﻜﻟا ةادﻷا ﺲﺑﺎﻗ ﻞﺧدأ.
ﺔﺴﻨﻜﻤﻟا ﻞﻴﻐﺸﺗ ﻊﺿﻮﻟا2 أﺪﺑاو ﺎﻬﻠﻴﻐﺸﺘﺑ ﻢﻗ
ﺎﻬﻣاﺪﺨﺘﺳا ﻲﻓ.
ﺔﻈﺣﻼﻣ : ﻢﺘﻳ ،ﺔﻴﺋﺎﺑﺮﻬﻜﻟا ةادﻷا ﻞﻴﻐﺸﺗ دﺮﺠﻤﺑ
ﺔﺌﻃﺎﺒﺘﻣ ﺔﻋﺮﺴﺑ ﻂﻔﺸﻟا كﺮﺤﻣ ﻞﻴﻐﺸﺗ
ةﺪﻤﻟ0.5ٍناﻮﺛ . ةادﻷا ﻞﻴﻐﺸﺗ فﺎﻘﻳإ ﺪﻨﻋ
ةﺪﻤﻟ ﻞﻤﻌﻳ ﻂﻔﺸﻟا كﺮﺤﻣ ﻞﻈﻳ ،ﺔﻴﺋﺎﺑﺮﻬﻜﻟا
ﻲﻟاﻮﺣ5 ﻂﻔﺸﺑ مﻮﻘﻳ ﻰﺘﺣ ،ىﺮﺧأ ٍناﻮﺛ
روذﺎﻘﻟاﻂﻔﺸﻟا مﻮﻃﺮﺧ ﻲﻓ ﺔﻴﻘﺒﺘﻤﻟا تا .
سﺎﻴﻘﻣ ماﺪﺨﺘﺳﺎﺑ ﺔﻴﺋﺎﺑﺮﻬﻜﻟا ةادﻷا ﺔﻠﺻو.
)ﻒﺻﻮﻟا ﺮﻈﻧا/ ةرﻮﺼﻟا (
ﺮﻄﻘﻟ ﴼﻘﻓو ﺔﺟﺎﺤﻟا ﺪﻨﻋ ﺊﻳﺎﻬﻤﻟا ﺔﺌﻴﻬﺘﺑ ﻢﻗ
ماﺪﺨﺘﺳﻻا
ﺔﺷﻮﻃﺮﺧ ﺮﺘﻠﻔﺑ ﴼﻤﺋاد زﺎﻬﺠﻟا ﻞﻴﻐﺸﺗ ﺐﺠﻳ !
ﺮﻄﻘﻟ ﴼﻘﻓو ﺔﺟﺎﺤﻟا ﺪﻨﻋ ﺊﻳﺎﻬﻤﻟا ﺔﺌﻴﻬﺘﺑ ﻢﻗ
ةرﻮﺻ
ﺔﻛﻮﻜﻔﻤﻟا ءاﺰﺟﻷا ﺖﻴﺒﺜﺗ ﻢﺘﻳ ﻞﻴﻐﺸﺘﻟا ءﺪﺑ ﻞﺒﻗ
ةرﻮﺻ
ﻞﻴﻐﺸﺘﻟا ءﺪﺑ ﻞﺒﻗ
زﺎﻬﺠﻟا ﻊﻣ ﺔﻘﻓﺮﻤﻟا.
ﺎﻬﻠﻔﻗ ﻦﻴﻣﺄﺗو زﺎﻬﺠﻟا سأر ﺐﻴﻛﺮﺘﺑ ﻢﻗ.
ةرﻮﺻ
ةرﻮﺻ
ﻞﻴﻐﺸﺘﻟا
ةرﻮﺻ
تﺎﻘﺤﻠﻤﻟا ﻞﻴﺻﻮﺘﺑ ﻢﻗ.
ﺮﻬﻜﻟا ﺲﺑﺎﻗ ﻞﻴﺻﻮﺘﺑ ﻢﻗءﺎﺑ.
زﺎﻬﺠﻟا ﻞﻴﻐﺸﺘﺑ ﻢﻗ.
ةرﻮﺻ
ةرﻮﺻ
ﺦﻔﻨﻟا ﺔﻔﻴﻇو
وأ ﺎﻬﻴﻟإ لﻮﺻﻮﻟا ﺐﻌﺼﻳ ﻲﺘﻟا ﻦﻛﺎﻣﻷا ﻒﻴﻈﻨﺗ
ﻂﻔﺷ ﻞﺜﻣ ،ﺎﻬﺑ ﻂﻔﺸﻟا ﻦﻜﻤﻳ ﻻ ﻲﺘﻟا ﻦﻛﺎﻣﻷا
ﺔﻴﺿرأ ﻦﻣ ءاﺮﻀﺨﻟا تﺎﺗﺎﺒﻨﻟا وأ ﺮﺠﺸﻟا قاروأ
ﻰﺼﺤﻟا ﻦﻣ.
ا مﻮﻃﺮﺧ ﻞﺧدأ ﻲﺘﻟا ﺦﻔﻨﻟا ﺔﻠﺻو ﻲﻓ ﻂﻔﺸﻟ
ﺦﻔﻨﻟا ﺔﻔﻴﻇو ﻂﻴﺸﻨﺗ ﻰﻠﻋ ﻞﻤﻌﺗ.
ﻞﻴﻐﺸﺘﻟا فﺎﻘﻳإ
فﺎﻘﻳﻹا ﻊﺿو ﻲﻓ ﺔﻴﺿرﻷا ﺔﻫﻮﻓ ﻊﺿﻮﺑ ﻢﻗ.
فﺎﺠﻟا ﻒﻴﻈﻨﺘﻟا
ﺔﻓﺎﺠﻟا ﺮﺘﻠﻔﻟا ﺔﺷﻮﻃﺮﺧ ىﻮﺳ مﺪﺨﺘﺴﺗ ﻻ !
ﻲﻟوأ ﺮﺘﻠﻓ ماﺪﺨﺘﺳا ﻂﻘﻓ )ﺐﻠﻄﻟا ﻢﻗر :
ةرﻮﺻ
ءﺎﻤﻟﺎﺑ ﻒﻴﻈﻨﺘﻟا
وأ ﻂﻔﺸﻟا ﺔﺑﻮﺒﻧﺄﺑ ﺔﻣزﻼﻟا تﺎﻘﺤﻠﻤﻟا
ًةﺮﺷﺎﺒﻣ يوﺪﻴﻟا ﺾﺒﻘﻤﻟا.
زﺎﻬﺠﻟا فﺎﻘﻳﺈﺑ ﻢﻗ.
ةرﻮﺻ
ﺐﺠﻳ ﻞﺋاﻮﺳ جوﺮﺧ وأ يوﺎﻏر ﻦﻳﻮﻜﺗ ﺔﻟﺎﺣ ﻲﻓ
وأ ﴽرﻮﻓ زﺎﻬﺠﻟا ﻞﺼﻓﺲﺒﻘﻤﻟا ﻦﻣ ﺲﺑﺎﻘﻟا عﺰﻧ .
ﻪﺒﺘﻧا : ﺐﺠﻳ ،مﺎﺨﺴﻟاو دﺎﻣﺮﻟا ﻂﻔﺸﻟ
2.863139.(
ﺐﻴﻛﺮﺗ ﺐﺠﻳ ،ﻞﻠﺒﻟاو ﺔﺑﻮﻃﺮﻟا ﻂﻔﺸﻟ
ﻪﺒﺘﻧا
Page 13

ﺔﻈﺣﻼﻣ : ﺔﻠﺘﺒﻤﻟا ﺔﺷﻮﻃﺮﺨﻟا ﺮﺗﻼﻓ ﻒﻴﻔﺠﺘﺑ ﻢﻗ
ﻂﻔﺸﻟا ﺪﻨﻋ ﺎﻬﻣاﺪﺨﺘﺳا ﺔﻠﺻاﻮﻣ ﻞﺒﻗ
ﺐﻃﺮﻟا.
يوﺪﻳ ﺾﺒﻘﻤﺑ ﻂﻔﺷ مﻮﻃﺮﺧ
ﻞﻤﺤﻟا ﺾﺒﻘﻣ
)ﻒﺻﻮﻟا ﺮﻈﻧا / ةرﻮﺼﻟا (
كﻼﺳﻷا تﺎﻓﺎﻄﺧ
ﺾﺒﻘﻣ ﻦﻣ ﻪﻠﻤﺣ ﺐﺠﻳ ،زﺎﻬﺠﻟا ﻞﻘﻨﻟ
ﻞﻤﺤﻟا.
ﻪﻧﺎﻜﻣ ﻲﻓ ﺮﻘﺘﺴﻳ.
مﺎﻬﺑﻹا ﻊﺒﺻﺈﺑ ﺔﻃﺎﻘﺴﻟا ﻰﻠﻋ ﻂﻐﺿا ،ﻪﺒﺤﺴﻟ
ﻂﻔﺸﻟا مﻮﻃﺮﺧ ﺐﺤﺳاوجرﺎﺨﻟا ﻮﺤﻧ .
ﻂﻔﺸﻟا ةرﻮﺳﺎﻣ2 × 0.5م
ﻂﻔﺸﻟا مﻮﻃﺮﺨﺑ.
قﻮﻘﺸﻟا ﺔﻫﻮﻓ
ﺎﻬﻴﻟإ لﻮﺻﻮﻟا ﺐﻌﺼﻳ ﻲﺘﻟا ﻦﻛﺎﻣﻷاو.
ﺔﻴﺿرﻷا ﺔﻫﻮﻓ
)ﺔﻴﻠﺧاد تاﺪﺣﻮﺑ(
ﺔﺒﺳﺎﻨﻤﻟا ﺔﻴﺒﻴﻛﺮﺘﻟا ةﺪﺣﻮﻟا.
ﺐﻃﺮﻟا ﻂﻔﺸﻟا ،ﺔﺒﻠﺼﻟا ﺢﻄﺳﻷا : مﺪﺨﺘﺳا
ﻦﻴﺘﻴﻃﺎﻄﻣ ﻦﻴﺘﻓﺎﺤﺑ ﺔﻴﺒﻴﻛﺮﺗ ةﺪﺣو) ﺔﻓﺎﺤﺑ وأ
ﻦﺸﺧ ﺮﻌﺸﺑ دوﺰﻣ ﻂﻳﺮﺷو ﺔﻴﻃﺎﻄﻣ(
ﻄﺳﻷا فﺎﺠﻟا ﻂﻔﺸﻟا ،ﺔﺒﻠﺼﻟا ﺢ : مﺪﺨﺘﺳا
ﻦﺸﺨﻟا ﺮﻌﺸﻟا ﻦﻣ ﻦﻴﺘﺤﻳﺮﺸﺑ ﺔﻴﺒﻴﻛﺮﺗ ةﺪﺣو
ﻦﺸﺧ(
ﺐﻃﺮﻟا ﻂﻔﺸﻟا ،دﺎﺠﺴﻟﺎﺑ ةﺎﻄﻐﻤﻟا تﺎﻴﺿرﻷا
فﺎﺠﻟا ﻂﻔﺸﻟاو : تاﺪﺣو نوﺪﺑ ماﺪﺨﺘﺳﻻا
ﺔﻴﺒﻴﻛﺮﺗ.
ﻣﺊﻳﺎﻬ
ﻰﺘﺣ ﻞﺼﺘﻤﻟا ﻂﻔﺸﻟا مﻮﻃﺮﺧ ﻰﻠﻋ ﻂﻐﺿا
)ﻒﺻﻮﻟا ﺮﻈﻧا / ةرﻮﺼﻟا (
ﺦﻔﻨﻠﻟ ﺔﻠﺻو
ﺎﻬﻄﺑراو ﴼﻌﻣ ﻂﻔﺸﻟا ﺐﻴﺑﺎﻧأ ﻞﻴﺻﻮﺘﺑ ﻢﻗ
ﺦﻔﻨﻟا ﺔﻔﻴﻇو ﻂﻴﺸﻨﺗ ﻰﻠﻋ ﻞﻤﻌﺗ ﻲﺘﻟا.
ناﺰﺨﻟا ةداﺪﺳ
)ﻒﺻﻮﻟا ﺮﻈﻧا / ةرﻮﺼﻟا (
ﻦﻴﺨﺴﺘﻟا ةﺰﻬﺟأو قﻮﻘﺸﻟاو ﺪﻘﻌﻠﻟ
وأ ﺔﺒﻠﺼﻟا ﺢﻄﺳﻷا ﻦﻣ ﺔﺑﺮﺗﻷا ﻂﻔﺸﻟ
ا مﺪﺨﺘﺳا ،دﺎﺠﺴﻟﺎﺑ ةﺎﻄﻐﻤﻟا تﺎﻴﺿرﻷ
)ﻒﺻﻮﻟا ﺮﻈﻧا / ةرﻮﺼﻟا (
) ﺮﻌﺸﺑ دوﺰﻣ ﻂﻳﺮﺷو ﺔﻴﻃﺎﻄﻣ ﺔﻓﺎﺤﺑ وأ
زﺎﻬﺠﻟﺎﺑ ﻂﻔﺸﻟا تﺎﻫﻮﻓو ﻂﻔﺸﻟا.
فﺎﺠﻟا ﻂﻔﺸﻟا وأ ﺐﻃﺮﻟا ﻂﻔﺸﻟا.
تﺎﻘﺤﻠﻤﻟا تﺎﺤﺘﻓ
ﻞﺧاﺪﻠﻟ ﺎﻬﻴﻠﻋ.
فﺎﻘﻳﻹا ﻊﺿو
ﻞﻤﻌﻟا.
ﻪﻴﺟﻮﺗ ةﺮﻜﺑ
ناﺰﺨﻟا .ﻞﻴﻐﺸﺘﻟا ﻞﺒﻗ ﺎﻬﺒﻴﻛﺮﺘﺑ ﻢﻗ
ﺔﺷﻮﻃﺮﺨﻟا ﺮﺘﻠﻓ
)ﻞﻌﻔﻟﺎﺑ زﺎﻬﺠﻟﺎﺑ مﺪﺨﺘﺴﻣ(
ﺔﻗﺎﻄﻟﺎﺑ داﺪﻣﻹا ﺔﻠﺻو ﻦﻳﺰﺨﺘﻟ.
)ﻒﺻﻮﻟا ﺮﻈﻧا/ ةرﻮﺼﻟا (
ﺦﻔﻨﻟا ﺔﻠﺻو ﻲﻓ ﻂﻔﺸﻟا مﻮﻃﺮﺧ ﻞﺧدأ
)ﻒﺻﻮﻟا ﺮﻈﻧا / ةرﻮﺼﻟا (
ﻂﻐﺿا ﻖﻠﻐﻠﻟو ،جرﺎﺨﻟا ﻮﺤﻧ ﺎﻬﺒﺤﺳا ،ﺢﺘﻔﻠﻟ
)ﻒﺻﻮﻟا ﺮﻈﻧا / ةرﻮﺼﻟا (
ﻒﻗﻮﺗ ﺪﻨﻋ ﺔﻴﺿرﻷا ﺔﻫﻮﻓ ﻞﻴﻐﺸﺗ فﺎﻘﻳﻹ
)ﻒﺻﻮﻟا ﺮﻈﻧا / ةرﻮﺼﻟا (
ﺐﻴﺑﺎﻧأ ﻦﻳﺰﺨﺘﺑ ﺢﻤﺴﺗ تﺎﻘﺤﻠﻤﻟا ﺔﺤﺘﻓ
)ﻒﺻﻮﻟا ﺮﻈﻧا/ ةرﻮﺼﻟا (
ﻟا ﺪﻨﻋ ﻲﻓ ﻪﻴﺟﻮﺘﻟا تاﺮﻜﺑ ﻦﻳﺰﺨﺗ ﻢﺘﻳ ﻢﻴﻠﺴﺘ
)ﻒﺻﻮﻟا ﺮﻈﻧا / ةرﻮﺼﻟا (
ﺪﻨﻋ ءاﻮﺳ ﺔﺷﻮﻃﺮﺨﻟا ﺮﺘﻠﻓ ماﺪﺨﺘﺳا ﺐﺠﻳ
ﺔﻴﺋﺎﺑﺮﻬﻛ ةادأ ﺔﻳﺄﺑ ﻂﻔﺸﻟا مﻮﻃﺮﺧ ﻞﻴﺻﻮﺘﻟ
.
Page 14

فﻼﻐﻟا ﻰﻠﻋ ﺢﺿﻮﻤﻟا ﻲﺳﺎﺳﻷا ﻞﻳدﻮﻤﻟا
ﺔﺒﻃﺮﻟا تﺎﻴﺿرﻸﻟ ﺔﻴﺋﺎﺑﺮﻬﻛ ﺔﺴﻨﻜﻤﻟ ﻲﻣﺎﻣﻷا
ﺔﻓﺎﺠﻟاو.
ﺎﻬﻤﻴﻠﺴﺗ ﻢﺘﻳ ﻲﺘﻟا .ﺎﻓﻼﺘﺧﻻا ﺾﻌﺑ ﺔﻤﺛو ت
ﺔﻤﻠﺴﻤﻟا تﺎﻘﺤﻠﻤﻟاو تاﺰﻴﻬﺠﺘﻟﺎﺑ ﻖﻠﻌﺘﻳ ﺎﻤﻴﻓ
ﻞﻳدﻮﻤﻟا عﻮﻨﻟ ﴼﻘﻓو ﺞﺘﻨﻤﻟا ﻊﻣ.
مﺪﻋ ﻦﻣ ﺪﻛﺄﺘﻟﺎﺑ ﻢﻗ ةﻮﺒﻌﻟا تﺎﻳﻮﺘﺤﻣ ﺾﻓ ﺪﻨﻋ
راﺮﺿأ دﻮﺟو وأ تﺎﻘﺤﻠﻣ يأ ﺺﻘﻧ . ءﺎﺟﺮﺑ
راﺮﺿﻷ زﺎﻬﺠﻟا ضﺮﻌﺗ ﺪﻨﻋ عزﻮﻤﻟا رﺎﻄﺧإ
ﻞﻘﻨﻟا ﺐﺒﺴﺑ.
ﺎﻬﻤﻴﻠﺴﺗ ﻢﺘﻳ ﻲﺘﻟا تﺎﻳﻮﺘﺤﻤﻟا قﺎﻄﻧ ﻦﻤﺿ
ﺔﻠﻤﺘﺤﻤﻟا تﺎﻘﺤﻠﻤﻟا
ﻂﻔﺸﻟا مﻮﻃﺮﺧ ﺔﻠﻴﺻﻮﺗ
ﻂﻔﺸﻟا.
زﺎﻬﺠﻟا حﺎﺘﻔﻣ)ﻞﻴﻐﺸﺗ/فﺎﻘﻳإ(
)ﺐﻛﺮﻣ ﺲﺒﻘﻣ نوﺪﺑ(
ﺮﻔﺻ ﻊﺿﻮﻟا :ﻞﻤﻌﻟا ﻦﻋ ﻒﻗﻮﺘﻣ زﺎﻬﺠﻟا
زﺎﻬﺠﻟا حﺎﺘﻔﻣ)ﻞﻴﻐﺸﺗ/فﺎﻘﻳإ(
)ﺐﻛﺮﻣ ﺲﺒﻘﻤﺑ(
ﻊﺿﻮﻟا2 : ةادأ ماﺪﺨﺘﺳﺎﺑ ﻲﻟﻵا ﻂﻔﺸﻟا
ﺔﻠﺼﺘﻣ ﺔﻴﺋﺎﺑﺮﻬﻛ
ﺮﻔﺻ ﻊﺿﻮﻟا : ةادﻷاو زﺎﻬﺠﻟا ﻞﻴﻐﺸﺗ فﺎﻘﻳإ ﻢﺗ
ﺔﻠﺼﺘﻤﻟا ﺔﻴﺋﺎﺑﺮﻬﻜﻟا
زﺎﻬﺠﻟا ﺲﺒﻘﻣ
ﺔﻈﺣﻼﻣ : ةرﺪﻗ ﻰﺼﻗﺄﺑ ماﺰﺘﻟﻻا ﻰﺟﺮﻳ
ﻞﻴﺻﻮﺗ.
.
) ﻞﺼﻓ ﺮﻈﻧا"ﺔﻴﻨﻔﻟا تﺎﻧﺎﻴﺒﻟا ("
ﻣﺪﺻ ثوﺪﺣ ﺮﻄﺧ ﺔﻴﺋﺎﺑﺮﻬﻛ ﺔ
ﺖﻧﺎﻛ اذإ ﺲﺒﻘﻤﻟاو ﺲﺑﺎﻘﻟﺎﺑ كﺎﺴﻣﻹﺎﺑ ﻢﻘﺗ ﻻ
ﻦﻴﺘﻠﻠﺒﻣ كاﺪﻳ .
■ تاﺰﻴﻬﺠﺘﻟا ﻦﻣ ﺪﺣ ﻰﺼﻗأ رﻮﺼﻟا ﺢﺿﻮﺗ
ﻦﻣ ﺔﻠﺻﻮﻟا عﺰﻧ لﻼﺧ ﻦﻣ ﺲﺑﺎﻘﻟا ﺐﺤﺴﺗ ﻻ
ﺲﺒﻘﻤﻟا .
ﻞﺒﻗ ﻲﺋﺎﺑﺮﻬﻜﻟا ﺲﺑﺎﻘﻟا ﻊﻣ ﺔﻠﺻﻮﻟا ﺺﺤﻓ ﺐﺠﻳ
ﺔﻳأ دﻮﺟو مﺪﻋ ﻦﻣ ﺪﻛﺄﺘﻠﻟ زﺎﻬﺠﻠﻟ ﻞﻴﻐﺸﺗ ﻞﻛ
تﺎﻴﻔﻠﺗ . ﻰﻠﻋ ﺔﻔﻟﺎﺘﻟا تﻼﺻﻮﻟا لاﺪﺒﺘﺳا ﺐﺠﻳ
ﻲﺋﺎﺑﺮﻬﻛ ﻲﻨﻓ يأ ﻦﻣ رﻮﻔﻟا ﺰﻛﺮﻣ يأ وأ ﺪﻤﺘﻌﻣ
ﺔﻳأ عﻮﻗو ﻲﻓﻼﺗ ﻞﺟأ ﻦﻣ ﺪﻤﺘﻌﻣ ءﻼﻤﻋ ﺔﻣﺪﺧ
رﺎﻄﺧأ .
ماﺪﺨﺘﺳﺎﺑ ﺢﺼﻨﻧ ﺔﻴﺋﺎﺑﺮﻬﻛ ثداﻮﺣ عﻮﻗﻮﻟ ﺎﺒﻨﺠﺗ
ﺔﻴﺋﺎﺑﺮﻬﻜﻟا ةﺮﺋاﺪﻟا ﻊﻄﻗ ﺢﻴﺗﺎﻔﻣ تاذ ﺲﺑﺎﻘﻣ
رﺎﻴﺘﻠﻟ ةدﺎﻀﻣ ﻞﻠﺨﻟا رﺎﻴﺘﻟ) ﻰﺼﻗﻷا ﺪﺤﻟا30
ﺔﻴﻠﻤﻌﺑ مﺎﻴﻘﻟا ﺪﻨﻋ ﻂﻔﺸﻟا مﻮﻃﺮﺧ ﻞﻴﺻﻮﺘﻟ
ﻲﻤﺳﻻا ﺮﻳﺮﺤﺘﻟا رﺎﻴﺗ ةﺪﺸﻟ ﺮﻴﺒﻣأ ﻲﻠﻠﻣ .(
ﻪﺒﺘﻧا
ﻂﻴﻠﺧ وأ ةﺮﺨﺑأ نﻮﻜُﺗ نأ ﻦﻜﻤﻳ داﻮﻤﻟا ﺾﻌﺑ
)ﻧاﻒﺻﻮﻟا ﺮﻈ / ةرﻮﺼﻟا (
ﻊﺿﻮﻟا1 :ﺦﻔﻨﻟا وأ ﻂﻔﺸﻟا
ﻊﺿﻮﻟا1 :ﺦﻔﻨﻟا وأ ﻂﻔﺸﻟا
ءاﻮﻬﻟا ﻊﻣ ﺎﻫدﺎﺤﺗا ﺪﻨﻋ رﺎﺠﻔﻧﻼﻟ ﻞﺑﺎﻗ
ﺺﺘﻤﻤﻟا !
ﺎًﻘﻠﻄﻣ ﺔﻴﻟﺎﺘﻟا ءﺎﻴﺷﻷا ﻂﻔﺸﺑ ﻢﻘﺗ ﻻ :
،قاﺮﺘﺣﻻا وأ رﺎﺠﻔﻧﻼﻟ ﺔﻠﺑﺎﻘﻟا تازﺎﻐﻟا
ﺔﺑﺮﺗﻷاو ﻞﺋاﻮﺴﻟا)ﺔﻴﻠﻋﺎﻔﺘﻟا ﺔﺑﺮﺗﻷا (
ﺘﻠﻟ ﻞﺑﺎﻘﻟا ندﺎﻌﻤﻟا رﺎﺒﻏ ﻞﻋﺎﻔ) ﻞﺜﻣ
ﻚﻧﺰﻟاو ،مﻮﻴﺴﻨﻏﺎﻤﻟاو ،مﻮﻴﻧﻮﻣﻮﻟﻷا ( ﺪﻨﻋ
ﺔﻳﻮﻠﻘﻟا ﻒﻴﻈﻨﺘﻟا ﻞﺋﺎﺳو ﻊﻣ ﺎﻫدﺎﺤﺗا
ﺔﻳﻮﻘﻟا ﺔﻴﻀﻤﺤﻟاو .
ةﺰﻛﺮﻤﻟاو ﺔﻳﻮﻘﻟا ﺮﺻﺎﻨﻌﻟاو ضﺎﻤﺣﻷا
ﺔﺒﻳﺬﻤﻟا ﺔﻳﻮﻀﻌﻟا داﻮﻤﻟا) ،ﻦﻳﺰﻨﺒﻟا ﻞﺜﻣ
ﺖﻳﺰﻟاو ،نﻮﺘﻴﺳﻵاو ،ناﻮﻟﻷا ﻞﻳﺰﻣو
ﻦﺧﺎﺴﻟا .(
داﻮﻤﻟا هﺬﻫ يدﺆﺗ نأ ﻦﻜﻤﻳ ﻚﻟذ ﻰﻟإ ﺔﻓﺎﺿﻹﺎﺑ
ﻟإ ﻊﻨﺻ ﻲﻓ ﺔﻣﺪﺨﺘﺴﻤﻟا تﺎﻣﺎﺨﻟا ﻞﻛﺂﺗ ﻰ
زﺎﻬﺠﻟا .
زﺎﻬﺠﻟا ﻒﺻو
ﺔﻴﺋﺎﺑﺮﻬﻛ ةادأ ﺔﻳأ ﻞﻴﺻﻮﺘﻟ.
)ﻒﺻﻮﻟا ﺮﻈﻧا/ ةرﻮﺼﻟا (
ﺔﻳﻮﻄﻤﻟا ﺔﺤﻔﺼﻟا ﺮﻈﻧا ،رﻮﺼﻟا !
■ اﺬﻫ ﻞﻴﻐﺸﺘﻟا ﻞﻴﻟد ﻒﺼﻳ
Page 15

ﺔﻤﻴﻗ داﻮﻣ ﻰﻠﻋ ﺔﻤﻳﺪﻘﻟا ةﺰﻬﺟﻷا يﻮﺘﺤﺗ
ﻲﺘﻟاو ماﺪﺨﺘﺳﻻاو ﺮﻳوﺪﺘﻟا ةدﺎﻋﻹ ﺔﻠﺑﺎﻗ
ﺎﻬﻨﻣ ةدﺎﻔﺘﺳﻻا ﺐﺠﻳ . ﺺﻠﺨﺘﻟﺎﺑ ﻢﻗ ،اﺬﻟ
ﻢﻈﻧ ﻊﻣ ﻖﻓاﻮﺘﻳ ﺎﻤﺑ ﺔﻤﻳﺪﻘﻟا ةﺰﻬﺟﻷا ﻦﻣ
ﺔﺒﺳﺎﻨﻤﻟا ﻊﻴﻤﺠﺘﻟا.
ﺔﻘﻳﺪﺻ تﺎﻣﺎﺧ ﻦﻣ عﻮﻨﺼﻣ ﺶﻴﻃاﺮﺨﻟا ﺮﺘﻠﻓ
ﺎﻬﻌﺿو عﻮﻨﻤﻣ داﻮﻣ ﺔﻳأ ﺺﺘﻤﻳ ﻢﻟ ﻪﻧأ ﺎﻤﻟﺎﻃ
ﺺﻠﺨﺘﻟا ﻦﻜﻤﻤﻟا ﻦﻣ ﻪﻧﺈﻓ ﺔﻴﻟﺰﻨﻤﻟا ﺔﻣﺎﻤﻘﻟا ﻲﻓ
ﺔﻴﻟﺰﻨﻤﻟا ﺔﻣﺎﻤﻘﻟا ﻲﻓ ﻪﻨﻣ.
ﺔﻣﻼﺴﻟا تادﺎﺷرإ
يأ ﻞﺒﻗ ﻦﻣ زﺎﻬﺠﻟا اﺬﻫ ماﺪﺨﺘﺳا زﻮﺠﻳ ﻻ
صﺎﺨﺷأ)لﺎﻔﻃﻷا ﻚﻟذ ﻲﻓ ﺎﻤﺑ (ﺎﻌﻳ نﻮﻧ
وأ ﺔﻴﻨﻫذ وأ ﺔﻴﺴﺣ وأ ﺔﻴﻧﺪﺑ تﺎﻗﺎﻋإ ﺔﻳأ ﻦﻣ
ﻻإ ،ﺎﻤﻬﻴﻠﻛ وأ ﺔﻓﺮﻌﻤﻟا وأ ةﺮﺒﺨﻟا ﻢﻫزﻮﻌﺗ
ﺺﺨﺸﻟا ﻞﺒﻗ ﻦﻣ ﻢﻬﻴﻠﻋ فاﺮﺷﻹا ﻢﺗ اذإ
ﻰﻠﻋ اﻮﻠﺼﺣ اذإ ﻻإ وأ ﻢﻬﺘﻣﻼﺴﺑ ﺺﺘﺨﻤﻟا
ﺔﻴﻔﻴﻛ نﺄﺸﺑ ﺺﺨﺸﻟا اﺬﻫ ﻦﻣ تﺎﻤﻴﻠﻌﺗ
زﺎﻬﺠﻟا اﺬﻫ ماﺪﺨﺘﺳا . ،ﻚﻟذ ﻦﻋ ًﻼﻀﻓ
مﺪﻋ ﻦﻣ ﺪﻛﺄﺘﻠﻟ لﺎﻔﻃﻷا ﺔﺒﻗاﺮﻣ ﻦﻴﻌﺘﻳ
زﺎﻬﺠﻟﺎﺑ ﻢﻬﺜﺒﻋ .
ﺔﺻﺎﺨﻟا ﺮﻳﺪﺼﻘﻟا قرو ﺔﻓﺎﻔﻟ ﻆﻔﺤﺗ
ﺚﻴﺣ ،لﺎﻔﻃﻷا لوﺎﻨﺘﻣ ﻦﻋ ﴽﺪﻴﻌﺑ ﻒﻴﻠﻐﺘﻟﺎﺑ
قﺎﻨﺘﺧﻻا ﺮﻄﺧ ﻦﻤﻜﻳ !
ﻞﻛ ﺪﻌﺑ زﺎﻬﺠﻟا ﻞﻴﻐﺸﺗ فﺎﻘﻳإ ﻦﻴﻌﺘﻳ
وأ ﻒﻴﻈﻨﺗ ﺔﻴﻠﻤﻋ ﻞﻜﺑ مﺎﻴﻘﻟا ﻞﺒﻗو ماﺪﺨﺘﺳا
ﺔﻧﺎﻴﺻ .
ﻖﻳﺮﺤﻟا ﺮﻄﺧ ﺎﻨﻫ ﻦﻤﻜﻳ . ﺔﻳأ ﻂﻔﺷ ﺐﺠﻳ ﻻ
ﺔﺠﻫﻮﺘﻣ وأ ﺔﻠﻌﺘﺸﻣ ءﺎﻴﺷأ .
ﴼﻣﺎﻤﺗ ﺮﻈﺤﻳ ﻦﻛﺎﻣأ ﻲﻓ زﺎﻬﺠﻟا ﻞﻴﻐﺸﺗ
رﺎﺠﻔﻧﻻا ﺮﻄﺨﻟ ﺔﺿﺮﻌﻣ .
ﺔﻴﺋﺎﺑﺮﻬﻜﻟا ﺔﻠﺻﻮﻟا
ددﺮﺘﻣ ﻲﺋﺎﺑﺮﻬﻛ رﺎﻴﺘﺑ زﺎﻬﺠﻟا ﻞﻴﺻﻮﺘﺑ ﻢﻗ . ﺐﺠﻳ
رﻮﻛﺬﻤﻟا ﺪﻬﺠﻟا ﻊﻣ ﻲﺋﺎﺑﺮﻬﻜﻟا ﺪﻬﺠﻟا ﻖﻓاﻮﺘﻳ نأ
زﺎﻬﺠﻟا ﻰﻠﻋ دﻮﺟﻮﻤﻟا ﻖﺼﻠﻤﻟا ﻰﻠﻋ .
ﻞﻴﻤﻌﻟا يﺰﻳﺰﻋ
ﻲﻠﺻﻷا ﻞﻴﻐﺸﺘﻟا ﻞﻴﻟد ةءاﺮﻗ ءﺎﺟﺮﺑ
ﻞﻣﺎﻌﺘﻟا ﻢﺛ ،ﻢﻛزﺎﻬﺠﻟ ماﺪﺨﺘﺳا لوأ ﻞﺒﻗ اﺬﻫ
ﻞﻴﻟﺪﻟا اﺬﻬﺑ ةدراﻮﻟا تﺎﻤﻴﻠﻌﺘﻠﻟ ﴼﻘﻓو زﺎﻬﺠﻟا ﻊﻣ .
ﺘﻟا ﺶﻴﻃاﺮﺨﻟا ﺮﺘﻠﻓ ﻦﻣ ﺺﻠﺨ
ﺔﺌﻴﺒﻠﻟ.
يﻷ ﻞﻴﻐﺸﺘﻟا ﻞﻴﻟﺪﺑ ظﺎﻔﺘﺣﻻا ﻰﺟﺮﻳ ﺎﻤﻛ
ﻌﺑ ﺎﻤﻴﻓ ىﺮﺧأ تﺎﻣاﺪﺨﺘﺳا ﻢﻴﻠﺴﺗ ﺔﻟﺎﺣ ﻲﻓ وأ ﺪ
ﻦﻳﺮﺧآ ﻦﻴﻣﺪﺨﺘﺴﻤﻟ زﺎﻬﺠﻟا.
تﺎﻤﻴﻠﻌﺘﻠﻟ ﻖﺑﺎﻄﻤﻟا ماﺪﺨﺘﺳﻻا
ﻲﻓ ةدراﻮﻟا تﺎﻔﺻاﻮﻤﻠﻟ ﴼﻘﻓو زﺎﻬﺠﻟا ﻢﻴﻤﺼﺗ ﻢﺗ
ﺔﺻﺎﺨﻟا ﺔﻣﻼﺴﻟا تادﺎﺷرﻹو اﺬﻫ ﻞﻴﻐﺸﺘﻟا ﻞﻴﻟد
ﺔﺒﻃﺮﻟا تﺎﻴﺿرﻸﻟ ﺔﻴﺋﺎﺑﺮﻬﻛ ﺔﺴﻨﻜﻤﻛ ﻪﻣاﺪﺨﺘﺳﺎﺑ
ماﺪﺨﺘﺳﻻا ﻞﺟأ ﻦﻣ زﺎﻬﺠﻟا اﺬﻫ ﺮﻳﻮﻄﺗ ﻢﺗ
يرﺎﺠﺘﻟا ماﺪﺨﺘﺳﻻا.
ﺔﺣﻮﺘﻔﻤﻟا ﺔﻴﺟرﺎﺨﻟا ﻦﻛﺎﻣﻷا ﻲﻓ ﻪﻨﻳﺰﺨﺗ.
تﺎﻴﺿرﻸﻟ ﺔﻴﺋﺎﺑﺮﻬﻜﻟا ﺔﺴﻨﻜﻤﻟا ماﺪﺨﺘﺳا زﻮﺠﻳ ﻻ
ﺔﻴﻟﺎﺘﻟا تﺎﻧﻮﻜﻤﻟا ﻊﻣ ﻻإ ﺔﺒﻃﺮﻟاو ﺔﻓﺎﺠﻟا:
ﺔﻴﻠﺻﻷا ﺔﻴﻓﺎﺿﻹا تﺎﻘﺤﻠﻤﻟا.
راﺮﺿأ ﺔﻳأ ﺔﻴﻟﻮﺌﺴﻣ ﺔﺠﺘﻨﻤﻟا ﺔﻛﺮﺸﻟا ﻞﻤﺤﺘﺗ ﻦﻟ
ﺮﻴﻏ ماﺪﺨﺘﺳﻼﻟ ﺔﺠﻴﺘﻧ ثﺪﺤﺗ ﺪﻗ ﺔﻠﻤﺘﺤﻣ
ﺊﻃﺎﺨﻟا ﻞﻴﻐﺸﺘﻟا وأ تﺎﻔﺻاﻮﻤﻠﻟ ﻖﺑﺎﻄﻤﻟا .
ﺔﻓﺎﺠﻟاو.
ﺎﻤﻛ ﻲﺼﺨﺸﻟا تﺎﺒﻠﻄﺘﻣ ﺔﻴﺒﻠﺘﻟ ﻢﻤﺼﻣ ﺮﻴﻏ ﻪﻧأ
رﺎﻄﻣﻷا ﻦﻣ زﺎﻬﺠﻟا ﺔﻳﺎﻤﺣ ﺐﺠﻳ . زﻮﺠﻳ ﻻ
اﺬﻬﺑ مﺎﺨﺴﻟاو دﺎﻣﺮﻟا ﻂﻔﺷ ﻦﻜﻤﻳ ﻻ
زﺎﻬﺠﻟا.
رﺎﻴﻐﻟا ﻊﻄﻗ وأ ﺔﻴﻠﺻﻷا تﺎﻘﺤﻠﻤﻟا وأ ﺔﻴﻠﺻﻷا
ﺔﺌﻴﺒﻟا ﺔﻳﺎﻤﺣ
ةدﺎﻋإو ﺮﻳوﺪﺘﻠﻟ ﺔﻠﺑﺎﻗ ﻒﻴﻠﻐﺘﻟا داﻮﻣ
ماﺪﺨﺘﺳﻻا . ﻦﻣ ﺺﻠﺨﺘﻟا مﺪﻋ ءﺎﺟﺮﺑ
ا ﻚﻴﻠﻋ ﻦﻜﻟو ﺔﻴﻟﺰﻨﻤﻟا ﺔﻣﺎﻤﻘﻟا ﺔﻠﺳ ﻲﻓ ةﻮﺒﻌﻟ
ﺮﻳوﺪﺗ ةدﺎﻋﺈﺑ ﺔﺼﺘﺨﻤﻟا تﺎﻬﺠﻠﻟ ﺎﻬﻤﻳﺪﻘﺘﺑ
ﺔﻣﺎﻤﻘﻟا.
Page 16

Page 17

Page 18

A
Alfred Kärcher Ges.m.b.H.
Lichtblaustraße 7
1220 Wien
(01) 250 600
☎
AUS
Kärcher Pty. Ltd.
40 Koornang Road
Scoresby VIC 3179
(03) 9765 - 2300
☎
B / LUX
Kärcher N.V.
Industrieweg 12
2320 Hoogstraten
B: 0900 10027
☎
LUX: 0032 900 10027
BR
Kärcher Indústria e Comércio Ltda.
Av. Prof. Benedicto Montenegro 419
CEP 13.140-000 - Paulínia - SP
0800 176 111
☎
CDN
Kärcher Canada Inc.
6975 Creditview Road Unit #2
Mississauga, Ontario L5N 8E9
1-800-465-4980
☎
CH
Kärcher AG
Industriestraße 16
8108 Dällikon
0844 850 863
☎
CZ
Kärcher spol s r.o.
Modletice č.p. 141
251 01 Říčany u Prahy
0323 606 014
☎
D
Alfred Kärcher GmbH & Co. KG
Service-Center Gissigheim
Im Gewerbegebiet 2
97953 Königheim-Gissigheim
(07195) 903 2065
☎
DK
Kärcher Rengøringssystemer A/S
Gejlhavegård 5
6000 Kolding
70 206 667
☎
E
Kärcher S.A.
Pol. Industrial Font del Radium
Calle Doctor Trueta 6-7
08400 Granollers (Barcelona)
902 170 068
☎
F
Kärcher S.A.S.
5 Avenue des Coquelicots
Z.A. des Petits Carreaux
94865 Bonneuil-sur-Marne
(01) 43 996 770
☎
FIN
Kärcher OY
Yrittäjäntie 17
01800 Klaukkala
0207 413 600
☎
GB
Kärcher(UK) Limited
Kärcher House
Beaumont Road
Banbury
Oxon, OX16 1TB
01295 752 200
☎
GR
Kärcher Cleaning Systems A.E.
31-33, Nikitara str. &
Konstantinoupoleos str.
13671 Acharnes
210 - 2316 153
☎
H
Kärcher Hungária Kft
Tormásrét ut 2.
2051 Biatorbágy
(023) 530 640
☎
HK
Kärcher Limited
Unit 10, 17/F.
APEC Plaza
49 Hoi Yuen Road
Kwun Tong, Kowloon
(02) 357-5863
☎
I
Kärcher S.p.A.
Via A.Vespucci 19
21013 Gallarate (VA)
848 - 99 88 77
☎
IRL
Karcher Limited
12 Willow Business Park
Nangor Road
Clondalkin Dublin 12
(01) 409 77 77
☎
KOR
Karcher Co. Ltd. (South Korea)
872-2 Sinjeong-Dong,
Yangcheon-Gu,
Seoul, Korea Zip code 158-856
02-322-6588, A/S.1544-6577
☎
MAL
Karcher Cleaning Systems Sdn. Bhd.
No. 8, Jalan Serindit 2
Bandar Puchong Jaya
47100 Puchong, Selangor
(03) 5882 1148
☎
MEX
Karcher México, SA de CV
Av. Gustavo Baz No. 29-C
Col. Naucalpan Centro
Naucalpan, Edo. de México
C.P. 53000 México
01 800 024 13 13
☎
N
Kärcher AS
Stanseveien 31
0976 Oslo
24 17 77 00
☎
NL
Kärcher BV
Postbus 474
4870 AL Etten-Leur
0900-33 444 33
☎
NZ
Karcher Limited
12 Ron Driver Place
East Tamaki, Auckland
(09) 274-4603
☎
P
NEOPARTS II - Equipamentos, S.A.
Av. Infante D. Henrique, Lote 35
1800-218 Lisboa
21 8558300
☎
PL
Kärcher Sp. z o.o.
Ul. Stawowa 140
31-346 Kraków
(012) 6397-222
☎
PRC
Kärcher Cleaning Systems Co., Ltd.
Part B, Building 30,
No. 390 Ai Du Road
Shanghai Waigaoquiao 200131
(021) 5046-3579
☎
RO
Karcher Romania s.r.l.
Sos. Odaii Nr. 439
013606 Bucureşti
0372 709 001
☎
RUS
OOO«epxep»
109147,Moca
y.Taaca,.34,cp.3
+7 495 228 39 45
☎
S
Kärcher AB
Tagenevägen 31
42502 Hisings-Kärra
(031) 577-300
☎
SGP
Karcher Asia Pacific Pte. Ltd.
5 Toh Guan Road East
#01-00 Freight Links
Express Distripark
Singapore 608831
6897-1811
☎
SK
Kärcher Slovakia, s.r.o.
Beniakova 2
94901 Nitra
037 6555 798
☎
TR
Kärcher Servis Ticaret A.S.
9 Eylül Mahallesi
307 Sokak No. 6
Gaziemir / Izmir
(0232) 252-0708
☎
TWN
Karcher Limited
5F/6. No.7
Wu-Chuan 1st Rd
Wu-Ku Industrial Zone
Taipei County
(02) 2299-9626
☎
UA
Kärcher Ukraine
Kilzeva doroga, 9
03191, Kyiv
(044) 594 75 75
☎
UAE
Karcher FZE
Jebel Ali Free Zone
RA 8, XB 1, Jebel Ali, Dubai
(04) 8836-776
☎
USA
Alfred Karcher, Inc
2170 Satellite Blvd
Suite 350
Duluth, GA 30097
678-935-4545; 877-527-2437
☎
ZA
Kärcher (Pty.) Limited
144 Kuschke Street
Meadowdale
Edenvale 1614
(011) 574-5360
☎
03/2011
 Loading...