

Page 1
FLEX
VCE 35 L AC
Deutsch 6
English 15
Français 24
Italiano 33
Nederlands 42
Español 51
Português 60
Dansk 69
Norsk 78
Svenska 86
Suomi 95
Ελληνικά 104
Türkçe 114
Русский 123
Magyar 134
Čeština 143
Slovenščina 152
Polski 161
Româneşte 170
Slovenčina 179
Hrvatski 188
Srpski 197
Български 206
Eesti 216
Latviešu 225
Lietuviškai 234
Українська 243
59646770 04/12
Page 2

2
Page 3
23
22
28
1
27
26
26
21
20
19
18
17
25
24
2
16
314 15
13
4
5
6
789101112
3
Page 4
1
2
1
“Click”
“Click”
2
1
1
4
1
5
2
3
4
Page 5
A
F
35
32
26
21,5
25
45
31
26,9
B
C
D
1.
2.1.
G
H
I
2.
E
J
1.
2.
5
Page 6
Lesen Sie vor der ersten Benut-
Deutsch
nalbetriebsanleitung, handeln Sie danach
und bewahren Sie diese für späteren Gebrauch oder für Nachbesitzer auf.
–
– Bei Nichtbeachtung der Betriebsanlei-
– Bei Transportschaden sofort Händler
zung Ihres Gerätes diese Origi-
Vor erster Inbetriebnahme Sicherheitshinweise Nr. 5.956-249 unbedingt lesen!
tung und der Sicherheitshinweise können Schäden am Gerät und Gefahren
für den Bediener und andere Personen
entstehen.
informieren.
Inhaltsverzeichnis
Umweltschutz. . . . . . . . . . . DE . . .1
Symbole in der Betriebsanlei-
tung . . . . . . . . . . . . . . . . . . DE . . .1
Bestimmungsgemäße Verwen-
dung . . . . . . . . . . . . . . . . . . DE . . .2
Geräteelemente . . . . . . . . . DE . . .2
Symbole auf dem Gerät . . . DE . . .2
Sicherheitshinweise . . . . . . DE . . .2
Inbetriebnahme . . . . . . . . . DE . . .3
Bedienung . . . . . . . . . . . . . DE . . .4
Transport . . . . . . . . . . . . . . DE . . .5
Lagerung . . . . . . . . . . . . . . DE . . .5
Pflege und Wartung . . . . . . DE . . .5
Hilfe bei Störungen. . . . . . . DE . . .6
Entsorgung. . . . . . . . . . . . . DE . . .7
Garantie . . . . . . . . . . . . . . . DE . . .7
Zubehör und Ersatzteile . . . DE . . .8
EG-Konformitätserklärung . DE . . .8
Technische Daten . . . . . . . DE . . .9
Umweltschutz
Die Verpackungsmaterialien
sind recyclebar. Bitte werfen Sie
die Verpackungen nicht in den
Hausmüll, sondern führen Sie
diese einer Wiederverwertung
zu.
Altgeräte enthalten wertvolle recyclingfähige Materialien, die einer Verwertung zugeführt
werden sollten. Batterien, Öl
und ähnliche Stoffe dürfen nicht
in die Umwelt gelangen. Bitte
entsorgen Sie Altgeräte deshalb
über geeignete Sammelsysteme.
Symbole in der Betriebsanlei-
tung
Gefahr
Für eine unmittelbar drohende Gefahr, die
zu schweren Körperverletzungen oder zum
Tod führt.
몇 Warnung
Für eine möglicherweise gefährliche Situation, die zu schweren Körperverletzungen
oder zum Tod führen könnte.
Vorsicht
Für eine möglicherweise gefährliche Situation, die zu leichten Verletzungen oder zu
Sachschäden führen kann.
6 DE
– 1
Page 7
Bestimmungsgemäße Ver-
wendung
몇 Warnung
Das Gerät ist zur Absaugung trockener,
nicht brennbarer, gesundheitsschädlicher
Stäube an Maschinen und Geräten; Staubklasse L nach EN 60 335–2–69 geeignet.
Einschränkung: Es dürfen keine krebserzeugende Stoffe aufgesaugt werden.
– Dieser Sauger ist zur Nass- und Tro-
ckenreinigung von Boden- und Wandflächen bestimmt.
– Dieses Gerät ist für den gewerblichen
Gebrauch geeignet, z.B. in Hotels, Schulen, Krankenhäusern, Fabriken, Läden,
Büros und Vermietergeschäften.
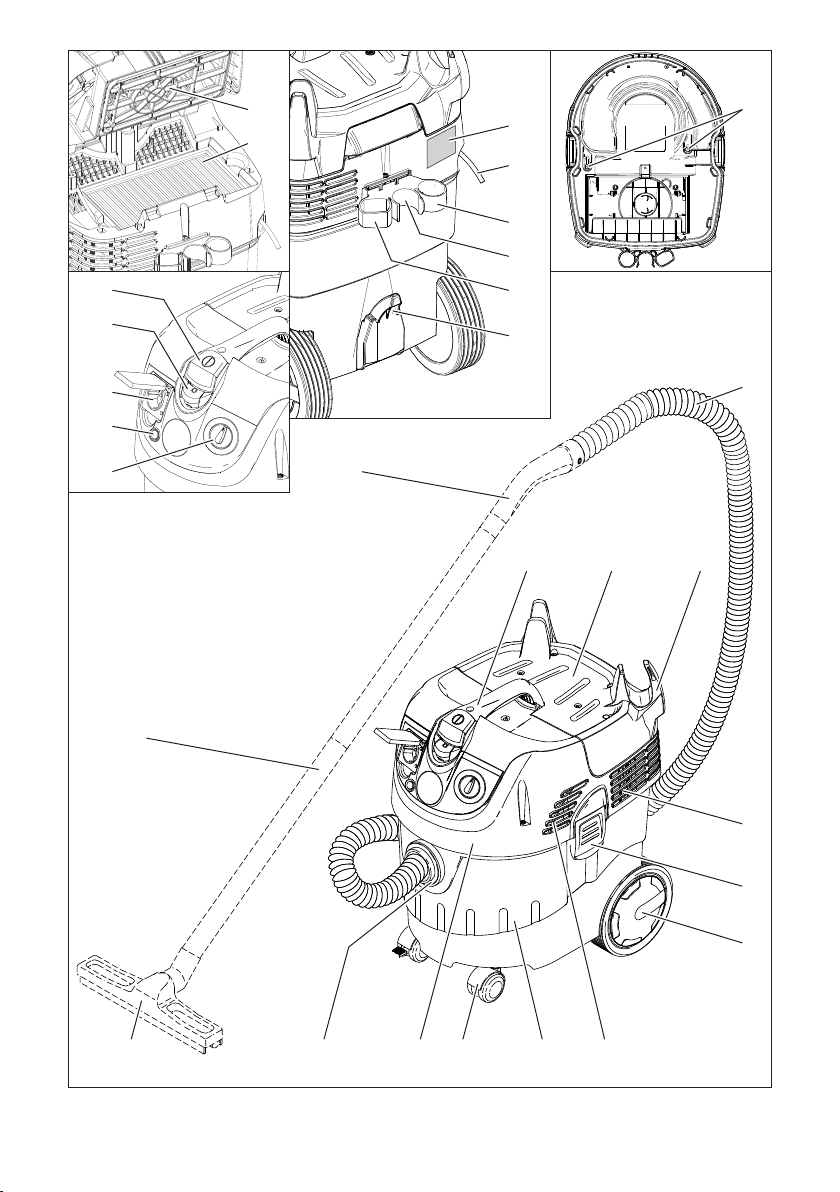
Geräteelemente
1 Elektroden
2 Saugschlauch
3 Kabelhaken
4 Luftaustritt, Arbeitsluft
5 Verriegelung des Saugkopfs
6 Rad
7 Lufteintritt, Motor-Kühlluft
8 Schmutzbehälter
9 Lenkrolle
10 Saugkopf
11 Saugstutzen
12 Bodendüse (nicht im Lieferumfang)
13 Saugrohr (nicht im Lieferumfang)
14 Tragegriff
15 Filterabdeckung
16 Krümmer (nicht im Lieferumfang)
17 Drehregler für Saugleistung (min-max)
18 Kontrolllampe
19 Steckdose
20 Automatische Filterabreinigung
21 Hauptschalter
22 Flachfaltenfilter
23 Filterabreinigung
24 Halter für Bodendüse
25 Halter für Fugendüse
26 Halter für Saugrohre
27 Netzkabel
28 Typenschild
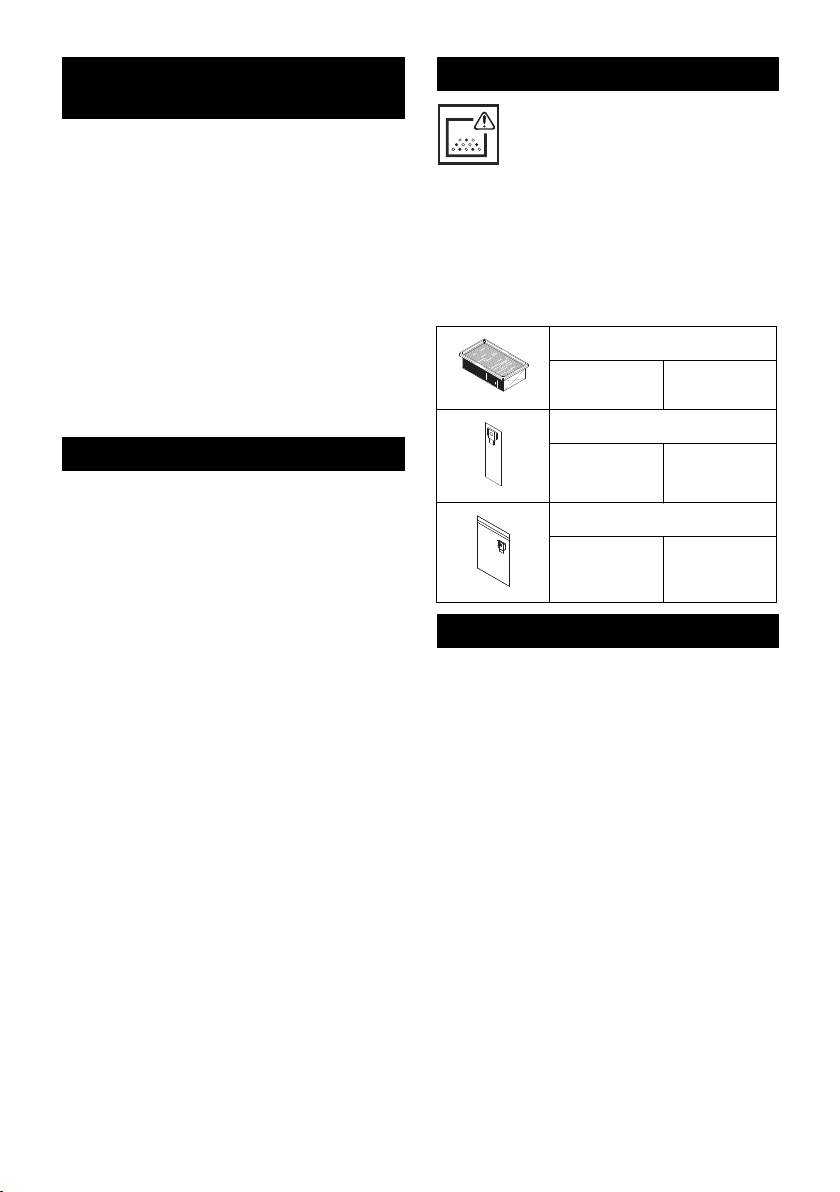
Symbole auf dem Gerät
WARNUNG: Dieses Gerät enthält gesundheitsgefährliche
Stäube. Entleerung und War-
tung, einschließlich der Entfernung des Staubbeutels, dürfen nur von
sachkundigen Personen vorgenommen
werden, die geeignete persönliche Schutzausrüstung tragen. Nicht einschalten, bevor das komplette Filtersystem installiert
ist.
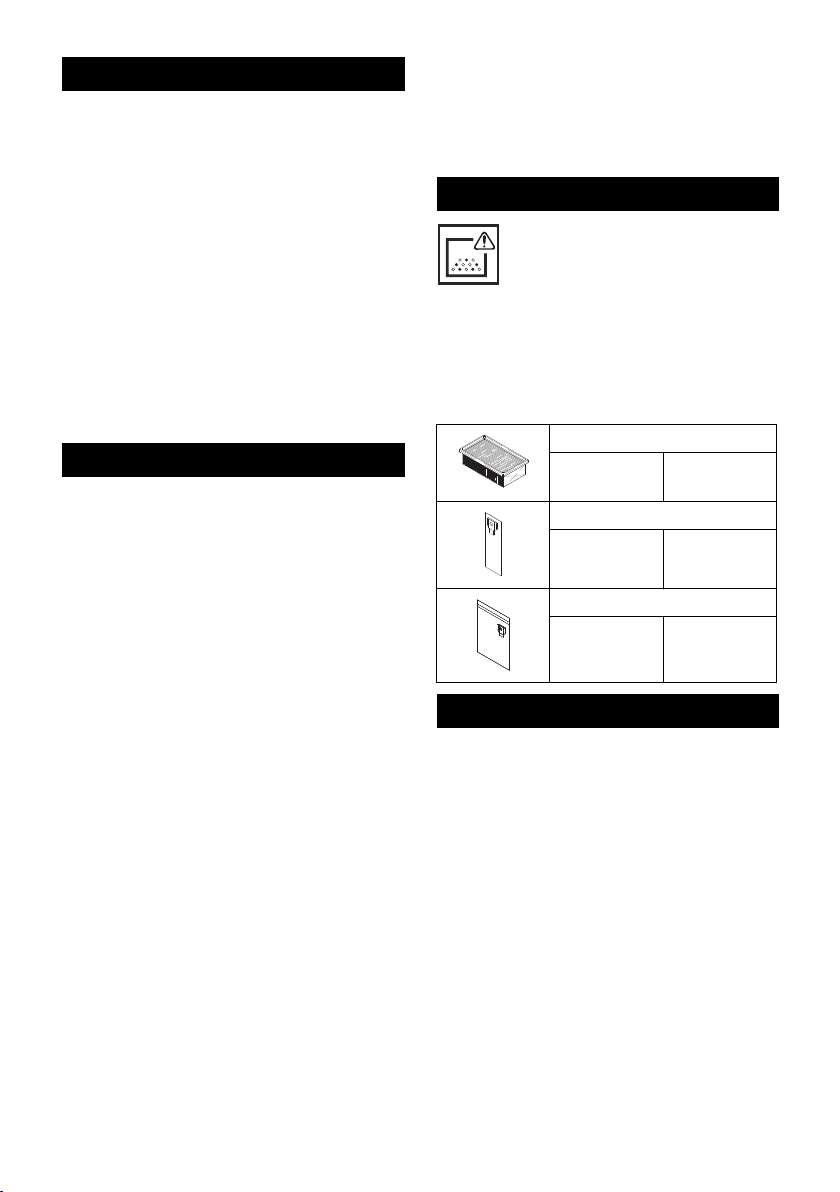
Flachfaltenfilter
Bestell-Nr. 337.692
Papierfiltertüte
Bestell-Nr. 296.961
Entsorgungsbeutel
Bestell-Nr. 340.766
Sicherheitshinweise
몇 Warnung
– Wenn die Abluft in den Raum zurückge-
führt wird, muss eine ausreichende
Luftwechselrate L im Raum vorhanden
sein. Um die geforderten Grenzwerte
einzuhalten, darf der zurückgeführte
Volumenstrom maximal 50% des
Frischluftvolumenstroms (Raumvolumen V
x Luftwechselrate LW) betragen.
R
Ohne besondere Lüftungsmaßnahme
gilt: L
=1h–1.
W
– Gebrauch des Gerätes und der Substan-
zen, für die es benutzt werden soll, einschließlich des sicheren Verfahrens der
Beseitigung des aufgenommenen Materials nur durch geschultes Personal.
– 2
7DE
Page 8

– Dieses Gerät enthält gesundheits-
schädlichen Staub. Leerungs- und Wartungsvorgänge, einschließlich der
Beseitigung der Staubsammelbehälter,
dürfen nur von Fachleuten durchgeführt
werden, die entsprechende Schutzausrüstung tragen.
– Gerät nicht ohne das vollständige Filtra-
tionssystem betreiben.
– Die anwendbaren Sicherheitsbestim-
mungen, die für die zu behandelnden
Materialien zutreffen, sind zu beachten.
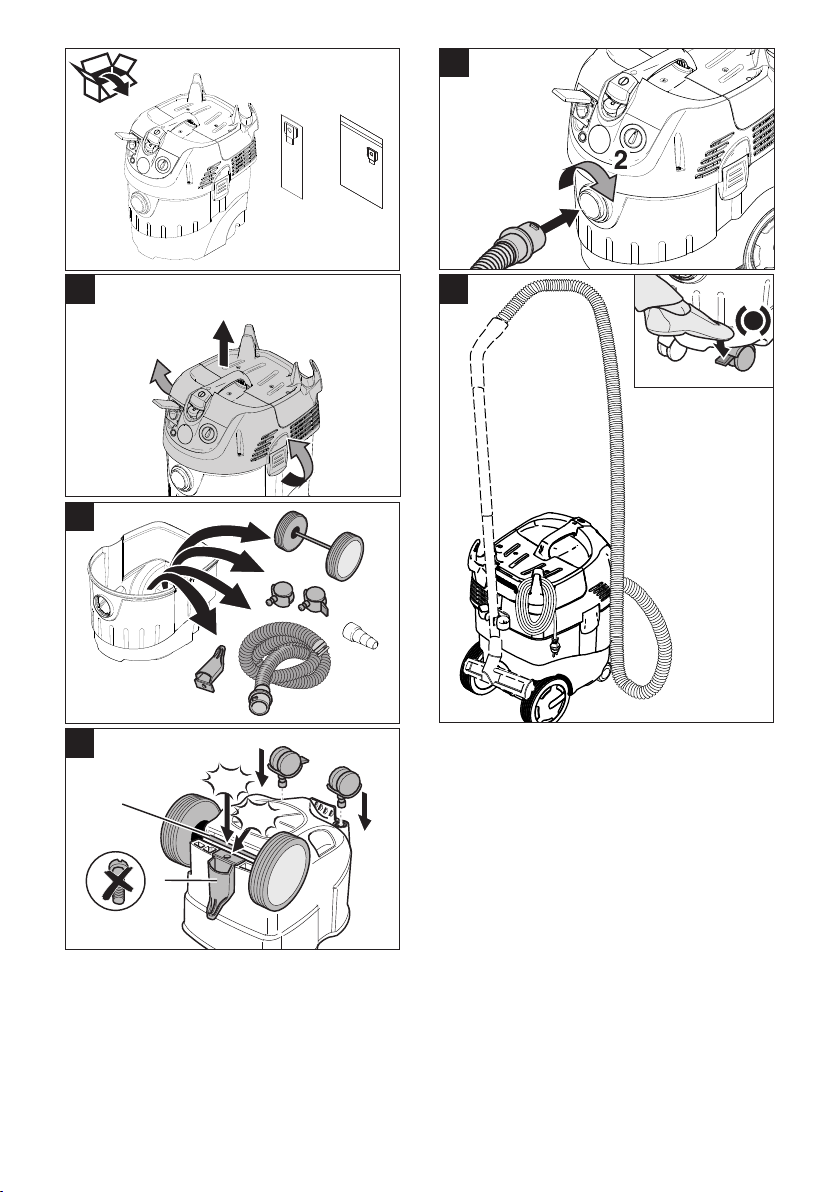
Inbetriebnahme
Das Gerät erlaubt 2 Betriebsarten:
1 Industriestaubsaugerbetrieb (Steckdo-
se nicht belegt)
2 Entstauberbetrieb (Steckdose belegt)
Saugschlauch anschließen und je nach
Betriebsart mit Aufsaugdüse versehen
oder an das stauberzeugende Gerät
anschließen.
몇 Warnung
Nicht ohne Filterelement saugen, da sonst
der Saugmotor beschädigt wird und eine
Gesundheitsgefährdung durch erhöhten
Feinstaubausstoß auftritt.
Anti-Statik-System
Durch den geerdeten Anschlussstutzen
werden statische Aufladungen abgeleitet.
Dadurch werden mit dem im Lieferumfang
enthaltenen, elektrostatisch geerdeten Zubehör, Funkenbildung und Stromstöße verhindert.
Trockensaugen
– Das Gerät ist mit einer Papierfiltertüte
mit Verschlussschieber ausgerüstet,
Bestell-Nr. 296.961 (5 Stück).
– Das Gerät ist mit einem Entsorgungs-
beutel mit Verschlussschieber und Ver-
schlussstreifen ausgerüstet, Bestell-Nr.
340.766 (10 Stück).
Hinweis: Mit diesem Gerät können alle Arten von Stäuben bis Staubklasse L aufgesaugt werden. Die Verwendung eines
Staubsammelbeutels (Bestell-Nr. siehe Filtersysteme) ist gesetzlich vorgeschrieben.
Hinweis: Das Gerät ist als Industriestaubsauger zum Aufsaugen und als Entstauber
für ortsveränderlichen Betrieb zum Absaugen von trockenen, nicht brennbaren Stäuben mit MAK-Werten größer gleich 1 mg/
3
m
geeignet.
Vorsicht
Beim Saugen darf niemals der Flachfaltenfilter entfernt werden.
– Beim Aufsaugen von Feinstaub muss
zusätzlich eine Papierfiltertüte oder ein
Entsorgungsbeutel verwendet werden.
Papierfiltertüte einbauen
Abbildung
Saugkopf entriegeln und abnehmen.
Papierfiltertüte aufstecken.
Saugkopf aufsetzen und verriegeln.
Entsorgungsbeutel einbauen
Abbildung
Saugkopf entriegeln und abnehmen.
Entsorgungsbeutel aufstecken.
Entsorgungsbeutel über Behälter stülpen.
Saugkopf aufsetzen und verriegeln.
Nasssaugen
몇 Warnung
Beim Nasssaugen dürfen keine gesundheitsgefährlichen Stäube aufgenommen
werden.
Papierfiltertüte entfernen
Abbildung
Saugkopf entriegeln und abnehmen.
Papierfiltertüte nach hinten herausziehen.
Verschlussschieber nach oben ziehen
und Papierfiltertüte bei der Herausnahme dicht verschließen.
Gebrauchte Papierfiltertüte gemäß den
gesetzlichen Bestimmungen entsorgen.
Saugkopf aufsetzen und verriegeln.
8 DE
– 3
Page 9
– Beim Aufsaugen von Nassschmutz
muss immer die Papierfiltertüte entfernt
werden.
Entsorgungsbeutel entfernen
Abbildung
Saugkopf entriegeln und abnehmen.
Entsorgungsbeutel hochstülpen.
Öffnung des Entsorgungsbeutels über
den Saugstutzen nach hinten heraus-
ziehen und dicht verschließen.
Entsorgungsbeutel mit Verschlussstrei-
fen unterhalb der Öffnung dicht ver-
schließen.
Entsorgungsbeutel herausnehmen.
Gebrauchten Entsorgungsbeutel ge-
mäß den gesetzlichen Bestimmungen
entsorgen.
Saugkopf aufsetzen und verriegeln.
– Beim Aufsaugen von Nassschmutz
muss immer der Entsorgungsbeutel
entfernt werden.
Allgemein
Vorsicht
Beim Saugen darf niemals der Flachfaltenfilter entfernt werden.
– Beim Aufsaugen von Nassschmutz mit
der Polster- oder Fugendüse (Option),
beziehungsweise wenn überwiegend
Wasser aus einem Behälter aufgesaugt
wird, empfiehlt es sich, die Funktion
„Automatische Filterabreinigung“ abzu-
schalten.
– Bei Erreichen des max. Flüssigkeitsstands
schaltet das Gerät automatisch ab.
– Bei nicht leitenden Flüssigkeiten
(zum Beispiel Bohremulsion, Öle
und Fette) wird das Gerät bei vollem
Behälter nicht abgeschaltet. Der
Füllstand muss ständig überprüft
und der Behälter rechtzeitig entleert
werden.
– Nach Beendigung des Nasssaugens:
Flachfaltenfilter mit der Filterabreini-
gung abreinigen. Elektroden mit einer
Bürste reinigen. Behälter mit einem
feuchten Tuch reinigen und trocknen.
Clipverbindung
Abbildung
Der Saugschlauch ist mit einem Clip-System ausgestattet. Alle C-35/C-DN-35 Zubehörteile können angeschlossen werden.
Bedienung
Gerät einschalten
Netzstecker einstecken.
Gerät am Hauptschalter einschalten.
Saugleistung einstellen
Saugleistung (min-max) am Drehregler
einstellen.
Arbeiten mit Elektrowerkzeugen
Gefahr
Verletzungs- und Beschädigungsgefahr!
Die Steckdose ist nur zum direkten Anschluss von Elektrowerkzeugen an den
Sauger bestimmt. Jeder andere Gebrauch
der Steckdose ist nicht zulässig.
Netzstecker des Elektrowerkzeugs am
Sauger einstecken.
Gerät am Hauptschalter einschalten.
Kontrolllampe leuchtet, Sauger befindet
sich im Standby-Modus.
Hinweis: Der Sauger wird automatisch mit
dem Elektrowerkzeug ein- und ausgeschaltet.
Hinweis: Der Sauger hat eine Anlaufverzögerung bis zu 0,5 Sekunden und eine
Nachlaufzeit von bis zu 15 Sekunden.
Hinweis: Leistungsanschlusswert der Elektrowerkzeuge, siehe Technische Daten.
Abbildung
Anschlussmuffe an den Anschluss des
Elektrowerkzeugs anpassen.
Abbildung
Anschlussmuffe an Saugschlauch
montieren.
Abbildung
Anschlussmuffe an Elektrowerkzeug
anschließen.
– 4
9DE
Page 10

Automatische Filterabreinigung
Das Gerät verfügt über eine neuartige Filterabreinigung, besonders wirksam bei feinem
Staub. Dabei wird der Flachfaltenfilter alle
15 Sekunden durch einen Luftstoß automatisch gereinigt (pulsierendes Geräusch).
Hinweis: Die automatische Filterabreinigung ist werkseitig eingeschaltet.
Hinweis: Das Aus-/Einschalten der automatischen Filterabreinigung ist nur bei eingeschaltetem Gerät möglich.
– Automatische Filterabreinigung aus-
schalten:
Schalter betätigen. Kontrolllampe im
Schalter erlischt.
– Automatische Filterabreinigung ein-
schalten:
Schalter wiederholt betätigen. Kontroll-
lampe im Schalter leuchtet grün.
Gerät ausschalten
Gerät am Hauptschalter ausschalten.
Netzstecker ziehen.
Nach jedem Betrieb
Behälter entleeren.
Gerät innen und außen durch Absau-
gen und Abwischen mit einem feuchten
Tuch reinigen.
Gerät aufbewahren
Abbildung
Saugschlauch und Netzkabel entspre-
chend Abbildung aufbewahren.
Gerät in einem trockenen Raum abstel-
len und vor unbefugter Benutzung sichern.
Transport
Vorsicht
Verletzungs- und Beschädigungsgefahr!
Gewicht des Gerätes beim Transport beachten.
Saugrohr mit Bodendüse aus der Halte-
rung nehmen. Gerät zum Tragen am
Tragegriff und am Saugrohr fassen.
Beim Transport in Fahrzeugen Gerät
nach den jeweils gültigen Richtlinien
gegen Rutschen und Kippen sichern.
Lagerung
Vorsicht
Verletzungs- und Beschädigungsgefahr! Gewicht des Gerätes bei Lagerung beachten.
Dieses Gerät darf nur in Innenräumen gelagert werden.
Pflege und Wartung
Gefahr
Vor allen Arbeiten am Gerät, Gerät ausschalten und Netzstecker ziehen.
Staubbeseitigende Maschinen sind Sicherheitseinrichtungen zur Verhütung oder Beseitigung von Gefahren im Sinne von
BGV A1.
– Zur Wartung durch den Benutzer muss
das Gerät auseinandergenommen, ge-
reinigt und gewartet werden, soweit es
durchführbar ist, ohne dabei eine Ge-
fahr für das Wartungspersonal und an-
dere Personen hervorzurufen.
Geeignete Vorsichtsmaßnahmen bein-
halten Entgiftung vor dem Auseinander-
nehmen. Vorsorge treffen für örtlich
gefilterte Zwangsentlüftung, wo das
Gerät auseinandergenommen wird,
Reinigung der Wartungsfläche und ge-
eigneter Schutz des Personals.
– Das Äußere des Gerätes sollte durch
Staubsaugverfahren entgiftet und sau-
ber abgewischt werden, oder mit Ab-
dichtmittel behandelt werden, bevor es
aus dem gefährlichen Gebiet genom-
men wird. Alle Geräteteile müssen als
verunreinigt angesehen werden, wenn
sie aus dem gefährlichen Gebiet ge-
nommen werden.
10 DE
– 5
Page 11

– Bei der Durchführung von Wartungs-
und Reparaturarbeiten müssen alle verunreinigten Gegenstände, die nicht zufriedenstellend gereinigt werden
können, weggeworfen werden. Solche
Gegenstände müssen in undurchlässigen Beuteln, in Übereinstimmung mit
den gültigen Bestimmungen für die Beseitigung solchen Abfalls, entsorgt werden.
몇 Warnung
Sicherheitseinrichtungen zur Verhütung von
Gefahren müssen regelmäßig gewartet werden. Das heißt, mindestens einmal jährlich
vom Hersteller oder einer unterwiesenen
Person auf ihre sicherheitstechnisch einwandfreie Funktion überprüft werden, z.B.
Dichtheit des Gerätes, Beschädigung des Filters, Funktion der Kontrolleinrichtungen.
Vorsicht
Beschädigungsgefahr! Keine silikonhaltigen Pflegemittel zum Reinigen verwenden.
– Einfache Wartungs- und Pflegearbeiten
können Sie selbst durchführen.
– Die Geräteoberfläche und die Behälte-
rinnenseite sollten regelmäßig mit einem feuchten Tuch gereinigt werden.
몇 Warnung
Gefahr durch gesundheitsschädlichen
Staub. Bei Wartungsarbeiten (z.B. Filterwechsel) Atemschutzmaske P2 oder höherwertig und Einwegkleidung tragen.
Flachfaltenfilter wechseln
Filterabdeckung öffnen.
Flachfaltenfilter herausnehmen.
Gebrauchten Flachfaltenfilter im staub-
dicht verschlossenen Beutel, gemäß
den gesetzlichen Bestimmungen entsorgen.
Angefallenen Schmutz auf der Reinluft-
seite entfernen.
Neuen Flachfaltenfilter einsetzen.
Filterabdeckung schließen, muss hör-
bar einrasten.
Papierfiltertüte wechseln
Abbildung
Saugkopf entriegeln und abnehmen.
Papierfiltertüte nach hinten herausziehen.
Verschlussschieber nach oben ziehen
und Papierfiltertüte bei der Herausnah-
me dicht verschließen.
Gebrauchte Papierfiltertüte gemäß den
gesetzlichen Bestimmungen entsorgen.
Neue Papierfiltertüte aufstecken.
Saugkopf aufsetzen und verriegeln.
Entsorgungsbeutel wechseln
Abbildung
Saugkopf entriegeln und abnehmen.
Entsorgungsbeutel hochstülpen.
Öffnung des Entsorgungsbeutels über
den Saugstutzen nach hinten heraus-
ziehen und dicht verschließen.
Entsorgungsbeutel mit Verschlussstrei-
fen unterhalb der Öffnung dicht ver-
schließen.
Entsorgungsbeutel herausnehmen.
Gebrauchten Entsorgungsbeutel ge-
mäß den gesetzlichen Bestimmungen
entsorgen.
Neuen Entsorgungsbeutel aufstecken.
Entsorgungsbeutel über Behälter stül-
pen.
Saugkopf aufsetzen und verriegeln.
Elektroden reinigen
Saugkopf entriegeln und abnehmen.
Elektroden mit einer Bürste reinigen.
Saugkopf aufsetzen und verriegeln.
Hilfe bei Störungen
Gefahr
Vor allen Arbeiten am Gerät, Gerät ausschalten und Netzstecker ziehen.
Hinweis: Tritt eine Störung (z.B. Filterbruch) auf, muss das Gerät sofort abgeschaltet werden. Vor erneuter
Inbetriebnahme muss die Störung beseitigt
werden.
– 6
11DE
Page 12

Saugturbine läuft nicht
Steckdose und Sicherung der Strom-
versorgung überprüfen.
Netzkabel, Netzstecker, Elektroden
und Steckdose des Gerätes überprüfen.
Gerät einschalten.
Saugturbine schaltet ab
Behälter entleeren.
Saugturbine läuft nach Behälterent-
leerung nicht wieder an
Gerät ausschalten und 5 Sekunden
warten, nach 5 Sekunden wieder einschalten.
Elektroden sowie den Zwischenraum
der Elektroden mit einer Bürste reinigen.
Saugkraft lässt nach
Verstopfungen aus Saugdüse, Saug-
rohr, Saugschlauch oder Flachfaltenfilter entfernen.
Gefüllte Papierfiltertüte wechseln.
Gefüllten Entsorgungsbeutel wechseln.
Filterabdeckung richtig einrasten.
Flachfaltenfilter wechseln.
Staubaustritt beim Saugen
Korrekte Einbaulage des Flachfaltenfil-
ters überprüfen.
Flachfaltenfilter wechseln.
Abschaltautomatik (Nasssaugen)
spricht nicht an
Elektroden sowie den Zwischenraum
der Elektroden mit einer Bürste reinigen.
Füllstand bei elektrisch nicht leitender
Flüssigkeit ständig kontrollieren.
Automatische Filterabreinigung ar-
beitet nicht
Saugschlauch nicht angeschlossen.
Automatische Filterabreinigung
lässt sich nicht abschalten
Kundendienst benachrichtigen.
Automatische Filterabreinigung
lässt sich nicht einschalten
Kundendienst benachrichtigen.
Entsorgung
Das Gerät ist gemäß den gesetzlichen Bestimmungen am Ende der Lebensdauer zu
entsorgen.
Garantie
In jedem Land gelten die von unserer zuständigen Vertriebsgesellschaft herausgegebenen Garantiebedingungen. Etwaige
Störungen an Ihrem Gerät beseitigen wir
innerhalb der Garantiefrist kostenlos, sofern ein Material- oder Herstellungsfehler
die Ursache sein sollte. Im Garantiefall
wenden Sie sich bitte mit Kaufbeleg an Ihren Händler oder die nächste autorisierte
Kundendienststelle.
12 DE
– 7
Page 13

Zubehör und Ersatzteile
– Es dürfen nur Zubehör und Ersatzteile
verwendet werden, die vom Hersteller
freigegeben sind. Original-Zubehör und
Original-Ersatzteile bieten die Gewähr
dafür, dass das Gerät sicher und störungsfrei betrieben werden kann.
– Eine Auswahl der am häufigsten benö-
tigten Ersatzteile finden Sie am Ende
der Betriebsanleitung.
Reinigungsset
Bestell-Nr. 369.845
Benennung Bestell-Nr. Stück
Krümmer
(Kunststoff)
Saugrohr (Metall) 300.691 2
Fugendüse 259.627 1
Bodendüse 300.659 1
Gummilippen der Bodendüse einbauen
(Nasssaugen)
Abbildung
Bürstenstreifen ausbauen.
Gummilippen einbauen.
Hinweis: Die strukturierte Seite der Gummilippen muss nach außen zeigen.
297.038 1
EG-Konformitätserklärung
Hiermit erklären wir, dass die nachfolgend
bezeichnete Maschine aufgrund ihrer Konzipierung und Bauart sowie in der von uns
in Verkehr gebrachten Ausführung den einschlägigen grundlegenden Sicherheitsund Gesundheitsanforderungen der EGRichtlinien entspricht. Bei einer nicht mit
uns abgestimmten Änderung der Maschine
verliert diese Erklärung ihre Gültigkeit.
Produkt: Nass- und Trockensauger
Typ: VCE 35 L AC
Einschlägige EG-Richtlinien
2006/42/EG (+2009/127/EG)
2004/108/EG
Angewandte harmonisierte Normen
EN 55014–1: 2006 + A1: 2009
EN 55014–2: 1997 + A2: 2008
EN 60335–1
EN 60335–2–69
EN 61000–3–2: 2006 + A2: 2009
EN 61000–3–3: 2008
EN 62233: 2008
Angewandte nationale Normen
-
Die Unterzeichnenden handeln im Auftrag
und mit Vollmacht der Geschäftsführung.
Dokumentationsbevollmächtigter:
E. Rühle
FLEX Elektrowerkzeuge GmbH
Bahnhofstr. 15
71711 Steinheim/Murr
Steinheim/Murr, 2010/10/01
– 8
13DE
Page 14

Technische Daten
VCE 35 L AC
Netzspannung V 220-240
Frequenz Hz 50/60
Max. Leistung W 1380
Nennleistung W 1200
Behälterinhalt l 34
Füllmenge Flüssigkeit l 19
Luftmenge (max.) m
Unterdruck (max.) kPa (mbar) 23,0 (230)
Leistungsanschlusswert der Elektrowerkzeuge W 100-2200
Schutzart -- IP X4
Schutzklasse -- I
Saugschlauchanschluss (C-DN/C-ID) mm 35
Länge x Breite x Höhe mm 520 x 380 x 580
Typisches Betriebsgewicht kg 12,5
Umgebungstemperatur (max.) °C +40
Ermittelte Werte gemäß EN 60335-2-69
Schalldruckpegel L
Unsicherheit K
pA
pA
Hand-Arm Vibrationswert m/s
Unsicherheit K m/s
Netzkabel H07RN-F 3x1,5 mm
2
Teile-Nr. Kabellänge
EU 297.534 7,5 m
3
/h 158
dB(A) 69
dB(A) 1
2
2
<2,5
0,2
14 DE
– 9
Page 15
Please read and comply with
English
to the initial operation of your appliance and
store them for later use or subsequent owners.
– Before first start-up it is definitely nec-
– The non-compliance of the operating
– In case of transport damage inform ven-
these original instructions prior
essary to read the safety indications Nr.
5.956-249!
and safety instructions may lead to
damages of the appliance and to dangers for the operator and other persons.
dor immediately
Contents
Environmental protection
The packaging material can be
recycled. Please do not throw
the packaging material into
household waste; please send it
for recycling.
Old appliances contain valuable
materials that can be recycled;
these should be sent for recycling. Batteries, oil, and similar
substances must not enter the
environment. Please dispose of
your old appliances using appropriate collection systems.
Environmental protection . . EN . . .1
Symbols in the operating in-
structions . . . . . . . . . . . . . . EN . . .1
Proper use . . . . . . . . . . . . . EN . . .2
Device elements. . . . . . . . . EN . . .2
Symbols on the machine . . EN . . .2
Safety instructions . . . . . . . EN . . .2
Start up. . . . . . . . . . . . . . . . EN . . .3
Operation . . . . . . . . . . . . . . EN . . .4
Transport . . . . . . . . . . . . . . EN . . .5
Storage. . . . . . . . . . . . . . . . EN . . .5
Maintenance and care . . . . EN . . .5
Troubleshooting . . . . . . . . . EN . . .6
Disposal . . . . . . . . . . . . . . . EN . . .7
Warranty. . . . . . . . . . . . . . . EN . . .7
Accessories and Spare Parts EN . . .7
EC Declaration of Conformity EN . . .8
Technical specifications . . . EN . . .9
Symbols in the operating
instructions
Danger
Immediate danger that can cause severe
injury or even death.
몇 Warning
Possible hazardous situation that could
lead to severe injury or even death.
Caution
Possible hazardous situation that could
lead to mild injury to persons or damage to
property.
– 1
15EN
Page 16

Proper use
몇 Warning
The appliance is suited for the extraction of
dry, non-combustible, harmful dusts on machines and appliances; dust class L according to EN 60 335–2–69. Restriction:
No carcinogenic substances may be vacuumed up.
– The machine is meant for dry and wet
cleaning of floors and walls.
– This appliance is suited for the commer-
cial use, e.g. in hotels, schools, hospitals, factories, shops, offices, and rental
companies.
Device elements
1 Electrodes
2 Suction hose
3 Cable hook
4 Air outlet, working air
5 Suction head lock
6 Wheel
7 Air inlet, motor cooling air
8 Dirt receptacle
9 Steering roller
10 Suction head
11 Suction support
12 Floor nozzle (not included in the delivery)
13 Suction pipe (not included in the delivery)
14 Carrying handle
15 Filter cover
16 Elbow (not included in the delivery)
17 Rotary switch for suction output (min-
max)
18 Indicator lamp
19 Socket
20 Automatic filter dedusting
21 Main switch
22 Flat fold filter
23 Filter dedusting
24 Floor nozzle holder
25 Holder for crevice nozzle
26 Holder for suction pipes
27 Power cord
28 Nameplate
16 EN
Symbols on the machine
WARNING: This appliance contains harmful dust. The emptying
and maintenance, including the
removal of the dust bag, may
only be executed by trained personnel
wearing suitable protection equipment. Do
not switch on until the complete filter system has been installed.
Flat fold filter
Order No. 337.692
Paper filter bag
Order No. 296.961
Dust disposal bag
Order No. 340.766
Safety instructions
몇 Warning
– When the outgoing air is carried back
into the room, a sufficient ventilation
rate L in the room must be ensured. To
comply with the required limit values the
carried back volume flow must be 50%
of the fresh air volume flow (room volume V
mum. Without a specific ventilation
system the following applies: L
– Only persons trained in the use of the ma-
chine and the handling of substances for
which the machine is to be used including
training in the safe disposal of the sucked-in
material may use the machine.
– This appliance contains harmful dust.
Evacuation and maintenance work, including the disposal of the dust collection containers, may only be performed
by specialists who wear the appropriate
protective equipment.
– 2
x ventilation rate LW) at maxi-
R
=1h–1.
W
Page 17

– Do not use the appliance without the
complete filtering system.
– Please follow the safety regulations ap-
plicable to the materials that are to be
treated.
Start up
The appliance allows 2 operating modes:
1 Industry vacuum cleaner mode (socket
not used)
2 Dedusting mode (socket used)
Connect the suction hose and insert in-
sert the suction nozzle or connect to the
dust-generating device depending on
the operating mode.
몇 Warning
Do not vacuum without the filter elements;
otherwise, the suction motor can get damaged and this can be hazardous to health
on account of increased release of fine dust
particles.
Anti-static system
Static charge is deflected by providing
earthing to the connection nozzles. This
prevents the formation of sparks and current shocks with attachments with electrostatically grounded accessories included in
the delivery.
Dry vacuum cleaning
– The device is fitted with a paper filter
bag with locking slide, order no.
296.961 (5 pcs).
– The appliance is equipped with a dis-
posal bag with locking slide and locking
strip, order no. 340.766 (10 pc).
Note:You can use this appliance to vacu-
um all types of dust up to dust class L. It is
statutorily necessary to use a dust collection bag (see Filter systems for order
number).
Note:The appliance is suited as industrial
vacuum cleaner and as dedusting device
for the mobile operation to take up dry, noncombustible dusts with MAK values greater
than or equal to 1 mg/m
3
.
Caution
The flat pleated filter must must always be
in place while vacuuming.
– To suck fine dust, you can also use an ad-
ditional paper filter bag or disposal bag.
Inserting the paper filter bag
Illustration
Release and remove the suction head.
Insert the paper filter bag.
Insert and lock the suction head.
Installing the dust disposal bag
Illustration
Release and remove the suction head.
Attach disposal bag.
Pull disposal bag over the container.
Insert and lock the suction head.
Wet vacuum cleaning
몇 Warning
No dusts hazardous to health should be
sucked in during wet vacuuming.
Remove the paper filter bag
Illustration
Release and remove the suction head.
Pull the paper filter bag out towards the
rear.
Pull the locking slide up and seal the pa-
per filter bag tightly when removing it.
Dispose of the used paper filter bag ac-
cording to the local provisions.
Insert and lock the suction head.
– To suck wet dirt, first remove the paper
filter bag.
Removing the dust disposal bag
Illustration
Release and remove the suction head.
Put the disposal bag over.
Pull the opening of the disposal bag out
toward the back over the suction support and seal it tightly.
Tightly seal the disposal bag with clo-
sure strips underneath the opening.
Remove disposal bag.
Dispose of the used disposal bag ac-
cording to the local provisions.
– 3
17EN
Page 18
Insert and lock the suction head.
– To suck wet dirt, always remove the dis-
posal bag.
General
Caution
The flat pleated filter must must always be
in place while vacuuming.
– If wet dirt is vacuumed with the uphol-
stery or crevice nozzle (option) or if wa-
ter is sucked up from a container it is
recommended to deactivate the "auto-
matic filter dedusting" function.
– If the maximum liquid level is reached
the appliance will turn off automatically.
– In case of non-conductive liquids
(such as emulsion drilling fluids,
oils, and greases) the appliance is
not turned off when the container is
full. The filling level must be continu-
ously monitored and the container
must be emptied in time.
– After the wet vacuuming: Clean the flat
folded filter with the filter cleaning.
Clean the electrodes with a brush.
Clean the container with a damp rag
and dry it.
Clip connection
Illustration
The suction hose is equipped with a clip
system. All C-35/C-DN-35 accessories can
be connected.
Operation
Turning on the Appliance
Plug in the main plug.
Switch on the appliance at the main
switch.
Adjust the suction output
Set the suction output (min - max) at the
rotary switch.
Working with electrical power tools
Danger
Risk of injury and damage! The socket outlet is only for the connection of power tools
to the vacuum cleaner. Any other use of the
socket outlet is not permitted.
Connect the mains plug of the electric
power tool to the vacuum cleaner.
Switch on the appliance at the main
switch.
Indicator lamp is on; vacuum cleaner is in
the standby mode.
Note: The vacuum cleaner is turned on and
off automatically with the electric power tool.
Note: The vacuum cleaner starts automatically within 0.5 seconds and continues to
run for 15 seconds after the power tool has
being switched off.
Note: Please refer to "Technical specifications" for the power connection specifications of the power tools.
Illustration
Adjust the stepped power tool adaptor
to fit the connection of the electric power tool.
Illustration
Attach the stepped power tool adaptor
to the suction hose.
Illustration
Connect the adaptor to the electric pow-
er tool.
Automatic filter cleaning
The appliance has an innovative filter
cleaning system that is particularly effective
with fine dust. The flat pleated filter is automatically cleaned every 15 seconds
through an air jet (pulsating sound).
Note: Automatic filter dedusting is switched
on at the factory.
Note: The automatic filter dedusting function can only be switched on/ off when the
appliance is switched on.
– To switch off automatic filter cleaning:
Activate the switch. Indicator lamp in
the switch goes off.
– To switch on automatic filter cleaning:
18 EN
– 4
Page 19

Press the switch again. Indicator lamp
in the switch glows green.
Turn off the appliance
Switch off the appliance at the main
switch.
Pull out the mains plug.
After each operation
Empty the container.
Vacuum and wipe the appliance inside
and outside with a damp cloth.
Storing the Appliance
Illustration
Store the suction hose and the mains
cable as shown in the illustration.
Place the appliance in a dry room and
secure it from unauthorized use.
Transport
Caution
Risk of injury and damage! Observe the
weight of the appliance when you transport it.
Remove the suction pipe with the floor
nozzle from the holder. Hold the appli-
ance at the handle and at the suction
pipe to transport it.
When transporting in vehicles, secure
the appliance according to the guide-
lines from slipping and tipping over.
Storage
Caution
Risk of injury and damage! Note the weight
of the appliance in case of storage.
This appliance must only be stored in interior rooms.
Maintenance and care
Danger
First pull out the plug from the mains before
carrying out any tasks on the machine.
Dust extracting machines are safeguards
for the prevention or elimination of hazards
defined in the regulations of BGV A1.
– In order to carry out maintenance work,
the user must disassemble, clean and
service the unit, in so far as this is possible without endangering maintenance
personnel and other persons. Suitable
precautions include decontamination
before the unit is disassembled. Precautions must be taken for local filtered
forced air ventilation at the place where
the unit is dissassembled, the cleaning
of the maintenance surface and suitable protection of the personnel.
– The outside of the unit should be
cleaned thoroughly and any harmful
substances removed. Alternatively, a
sealed coating may be applied before
the unit is removed from the danger area. All unit parts are to be considered
contaminated when they are removed
from the danger area.
– In the framework of maintenance and
repair work all contaminated objects
that cannot be cleaned satisfactorily
must be disposed of. Such objects must
be disposed of in impermeable bags in
accordance with the valid provisions for
the disposal of such waste.
몇 Warning
Safety equipment for preventing hazards
must be serviced and maintained regularly.
This means that the manufacturer's staff or
persons trained by the manufacturer must
check the equipment for proper functioning
at least once a year, i.e. check for leaks, filter damage, functioning of the controlling
elements, etc.
– 5
19EN
Page 20
Caution
Risk of damage! Do not use detergents
containing silicone to clean.
– No outside help is required for carrying
out basic maintenance and cleaning.
– The appliance surface and the inside of
the container should be cleaned regu-
larly using a damp cloth.
몇 Warning
Risk due to dust hazardous to health. Always
use disposal clothing and P2 or higher
breath-safe masks while carrying out maintenance tasks (such as changing filters).
Exchanging the flat pleated filter
Open filter door.
Take out the flat folded filter.
Dispose off the used flat-folded filter in
a dust-tight bag according to the statu-
tory provisions.
Remove the dirt that has accumulated
on the pure air side.
Insert new flat-folded filter.
Close the filter door, it must lock into
place.
Exchanging the paper filter bag
Illustration
Release and remove the suction head.
Pull the paper filter bag out towards the
rear.
Pull the locking slide up and seal the pa-
per filter bag tightly when removing it.
Dispose of the used paper filter bag ac-
cording to the local provisions.
Insert the new paper filter bag.
Insert and lock the suction head.
Replace the disposal bag
Illustration
Release and remove the suction head.
Put the disposal bag over.
Pull the opening of the disposal bag out
toward the back over the suction support and seal it tightly.
Tightly seal the disposal bag with clo-
sure strips underneath the opening.
Remove disposal bag.
Dispose of the used disposal bag ac-
cording to the local provisions.
Attach the new disposal bag.
Pull disposal bag over the container.
Insert and lock the suction head.
Cleaning the electrodes
Release and remove the suction head.
Clean the electrodes with a brush.
Insert and lock the suction head.
Troubleshooting
Danger
First pull out the plug from the mains before
carrying out any tasks on the machine.
Note: In case of a failure (e.g. filter breakage) the appliance must be turned off immediately. The failure must be remedied
before the appliance is put into operation
again.
Suction turbine does not run
Check the receptacle and the fuse of
the power supply.
Check the power cable, the power plug,
the electrodes and the receptacle of the
device.
Turn on the appliance.
Suction turbine turns off
Empty the container.
20 EN
– 6
Page 21
Suction turbine does not start again
after the container has been
emptied
Turn off the appliance and wait for 5
seconds, turn it on again after 5 sec-
onds.
Clean the electrodes as well as the
space between the electrodes with a
brush.
Suction capacity decreases
Remove blockages in the suction noz-
zle, suction tube, suction hose, or flat
pleated filter.
Replace the full paper filter bag.
Replace the filled disposal bag
Ensure the filter cover properly locks
into place.
Replace the flat pleated filter.
Dust comes out while vacuuming
Check for proper installation of the flat
pleated filter.
Replace the flat pleated filter.
Automatic shut-off (wet vacuum
cleaning) does not react
Clean the electrodes as well as the
space between the electrodes with a
brush.
Continuously check the filling level in
case of non-conductive liquid.
Automatic filter cleaning is not
working
Suction hose is not connected.
Automatic filter cleaning cannot be
switched off
Inform Customer Service
Automatic filter cleaning cannot be
switched on
Inform Customer Service
Disposal
At the end of its lifetime the appliance is to
be disposed of according to the statutory
provisions.
Warranty
The warranty terms published by the relevant sales company are applicable in each
country. We will repair potential failures of
your appliance within the warranty period
free of charge, provided that such failure is
caused by faulty material or defects in manufacturing. In the event of a warranty claim
please contact your dealer or the nearest
authorized Customer Service centre.
Please submit the proof of purchase.
Accessories and Spare Parts
– Only use accessories and spare parts
which have been approved by the manufacturer. The exclusive use of original
accessories and original spare parts
ensures that the appliance can be operated safely and trouble free.
– At the end of the operating instructions
you will find a selected list of spare parts
that are often required.
Cleaning kit
Order No. 369.845
Name Order No. Piece
Elbow (plastic) 297.038 1
Suction pipe
(metal)
Crevice nozzle 259.627 1
Floor nozzle 300.659 1
Insert the rubber lips of the floor nozzle
(wet vacuuming).
Illustration
Remove the brush strips.
Install the rubber lips.
Note: The structured side of the rubber lips
must point outwards.
300.691 2
– 7
21EN
Page 22
EC Declaration of Conformity
We hereby declare that the machine described below complies with the relevant
basic safety and health requirements of the
EU Directives, both in its basic design and
construction as well as in the version put
into circulation by us. This declaration shall
cease to be valid if the machine is modified
without our prior approval.
Product: Wet and dry vacuum cleaner
Type: VCE 35 L AC
Relevant EU Directives
2006/42/EC (+2009/127/EC)
2004/108/EC
Applied harmonized standards
EN 55014–1: 2006 + A1: 2009
EN 55014–2: 1997 + A2: 2008
EN 60335–1
EN 60335–2–69
EN 61000–3–2: 2006 + A2: 2009
EN 61000–3–3: 2008
EN 62233: 2008
Applied national standards
-
The undersigned act on behalf and under
the power of attorney of the company management.
Authorised Documentation Representative:
E. Rühle
FLEX Elektrowerkzeuge GmbH
Bahnhofstr. 15
71711 Steinheim/Murr
Steinheim/Murr, 2010/10/01
22 EN
– 8
Page 23
Technical specifications
VCE 35 L AC
Mains voltage V 220-240
Frequency Hz 50/60
Max. performance W 1380
Rated power W 1200
Container capacity l 34
Filling quantity (liquid) l 19
Air volume (max.) m
Negative pressure (max.) kPa (mbar) 23,0 (230)
Power connection data of the power tools W 100-2200
Type of protection -- IP X4
Protective class -- I
Suction hose connection (C-DN/C-ID) mm 35
Length x width x height mm 520 x 380 x 580
Typical operating weight kg 12,5
Max. ambient temperature °C +40
Values determined to EN 60335-2-69
Sound pressure level L
Uncertainty K
pA
pA
Hand-arm vibration value m/s
Uncertainty K m/s
3
/h 158
dB(A) 69
dB(A) 1
2
2
<2,5
0,2
Power cord H07RN-F 3x1,5 mm
Part no.: Cable length
EU 297.534 7,5 m
2
– 9
23EN
Page 24
Lire ces notice originale avant la
Français
pareil, se comporter selon ce qu'elles requièrent et les conserver pour une
utilisation ultérieure ou pour le propriétaire
futur.
– Avant la première mise en service, vous
– En cas de non-respect des instructions
– Contactez immédiatement le revendeur
première utilisation de votre ap-
devez impérativement avoir lu les
consignes de sécurité N° 5.956-249 !
de service et des consignes de sécuri-
té, l'appareil risque de subir des dom-
mages matériel et l'utilisateur ainsi que
toute tierce personne sont exposés à
des dangers potentiels.
en cas d'avarie de transport.
Table des matières
Protection de l’environnement FR . . .1
Symboles utilisés dans le mode
d'emploi . . . . . . . . . . . . . . . FR . . .1
Utilisation conforme . . . . . . FR . . .2
Éléments de l'appareil . . . . FR . . .2
Symboles sur l'appareil . . . FR . . .2
Consignes de sécurité . . . . FR . . .2
Mise en service . . . . . . . . . FR . . .3
Utilisation . . . . . . . . . . . . . . FR . . .4
Transport . . . . . . . . . . . . . . FR . . .5
Entreposage. . . . . . . . . . . . FR . . .5
Entretien et maintenance . . FR . . .5
Assistance en cas de panne FR . . .7
Mise au rebut . . . . . . . . . . . FR . . .7
Garantie . . . . . . . . . . . . . . . FR . . .8
Accessoires et pièces de re-
change . . . . . . . . . . . . . . . . FR . . .8
Déclaration de conformité CE FR . . . 8
Caractéristiques techniques FR . . .9
Protection de
l’environnement
Les matériaux constitutifs de
l’emballage sont recyclables.
Ne pas jeter les emballages
dans les ordures ménagères,
mais les remettre à un système
de recyclage.
Les appareils usés contiennent
des matériaux précieux recyclables lesquels doivent être apportés à un système de
recyclage. Il est interdit de jeter
les batteries, l'huile et les substances similaires dans l'environnement. Pour cette raison,
utiliser des systèmes de collecte
adéquats afin d'éliminer les appareils hors d'usage.
Symboles utilisés dans le
mode d'emploi
Danger
Pour un danger immédiat qui peut avoir
pour conséquence la mort ou des blessures corporelles graves.
몇 Avertissement
Pour une situation potentiellement dangereuse qui peut avoir pour conséquence des
blessures corporelles graves ou la mort.
Attention
Pour une situation potentiellement dangereuse qui peut avoir pour conséquence des
blessures légères ou des dommages matériels.
24 FR
– 1
Page 25
Utilisation conforme
몇 Avertissement
L'appareil convient à l'aspiration de poussières sèches, ininflammables, nocives
pour la santé sur des machines et appareils
; classe de poussière L selon EN 60 335–
2–69 : Restriction : il est interdit d'aspirer
des substances cancérigènes.
– Cet aapirateur est destiné au nettoyage
à sec et au nettoyage par voie humide
des sol et murs.
– Cet appareil convient à un usage indus-
triel, par exemple dans le cadre d'hô-
tels, d'écoles, d'hôpitaux, d'usines, de
magasins, de bureaux et d'agences de
location.
Éléments de l'appareil
1 Electrodes
2 Flexible d’aspiration
3 Crochet de câble
4 Sortie d'air, air de travail
5 Verrouillage de la tête d'aspiration
6 Roue
7 Entrée d'air, air de refroidissement du
moteur
8 Récipient collecteur
9 Galet de direction
10 Tête d'aspiration
11 Consoles d'apiration
12 Buse de sol (ne faisant pas partie de la
fourniture)
13 Tube d'aspiration (ne faisant pas partie
de la fourniture)
14 Poignée de transport
15 Recouvrement du filtre
16 Coude (ne faisant pas partie de la livraison)
17 Régulateur rotatif pour la puissance
d'aspiration (mini-maxi)
18 Témoin de contrôle
19 Prise de courant
20 Nettoyage automatique du filtre
21 Interrupteur principal
22 Filtre plat de plis
23 Nettoyage du filtre
24 Support pour buse de sol
25 Support pour buse à joint
26 Support pour tubes d'aspiration
27 Câble d’alimentation
28 Plaque signalétique
Symboles sur l'appareil
AVERTISSEMENT : cet appareil
contient des poussières nocives
pour la santé. Le vidage et la
maintenance, y compris le retrait
du sac à poussière, ne doivent être faits
que par des personnes expertes, portant
l'équipement de protection personnel approprié. Ne pas enclencher avant que l'intégralité du système de filtre ne soit installée.
Filtre plat de plis
N° de réf. 337.692
Sac filtrant en papier
N° de réf. 296.961
Sac d'élimination
N° de réf. 340.766
Consignes de sécurité
몇 Avertissement
–
Si l'air évacué est renvoyé dans la
pièce, le taux de renouvellement d'air L
dans la pièce doit être suffisant. Pour
respecter les valeurs limites exigées, le
débit volumétrique réintroduit doit représenter au maximum 50% du débit volumétrique d’air frais (Volume espace V
x taux de renouvellement de l’air L
suivant est valable sans mesures particulières de ventilation : L
– Seul du personnel formé est habilité à
opérer l'appareil et les substances pour
lesquels il doit être utilisé, y compris le
comportement sûr d'élimination du matériau aspiré.
=1h–1.
W
). Le
W
R
– 2
25FR
Page 26

– Cet appareil contient des poussières
nocives pour la santé. Les opérations
de vidange et de maintenance, y compris l’élimination du collecteur de poussières, ne doivent être effectuées que
par des spécialistes portant un équipement de protection approprié.
– Ne jamais utiliser l'appareil sans le sys-
tème complet de filtration.
– Respecter les dispositions de sécurité
applicables qui concernent les matériaux à traiter.
Mise en service
2 modes de service sont possibles avec
l'appareil :
1 Fonctionnement comme aspirateur in-
dustriel (prise pas occupée)
2 Fonctionnement comme dépoussiéreur
(prise occupée)
Raccorder le tuyau d'aspiration et selon
le mode de service, l'équiper d'une
buse d'aspiration ou bien le raccorder à
l'appareil formant des poussières.
몇 Avertissement
Ne pas aspirer sans élément filtrant, sous
peine d'endommager le moteur d'aspiration
et de mettre la santé en danger par émission accrue de poussière fine
Système antistatique
Les charges statiques sont évacuées par
les embouts de raccordement reliés à la
terre. La formation d'étincelles et les chocs
électriques sont ainsi évités en cas d'utilisation des accessoires électrostatiques reliés à la terre, faisant partie de la fourniture.
Aspiration de poussières
– L'appareil est équipé d'un sac filtrant en
papier avec glissière de fermeture, référence 296.961 (5 pièces).
– L'appareil est équipé d'un sachet d'éli-
mination avec glissière et bande de fermeture, référence 340.766 (10 pièce).
Remarque :Cet appareil permet d'aspirer
tous les types de poussières jusqu'à la
classe de poussières L. L'utilisation d'un
sac collecteur de poussières (référence voir
systèmes de filtrage) est imposée par la loi.
Remarque :L'appareil convient à une utilisation en tant qu'aspirateur industriel pour
l'aspiration et le dépoussiérage à différents
endroits, de poussières sèches, ininflammables avec une concentration maximale
supérieure ou égale à 1 mg/m
3
.
Attention
Le filtre à plis plats ne doit jamais être retiré
durant l'aspiration.
– Pour l'aspiration de poussières fines, il
faut en outre utiliser un sac filtrant en
papier ou un sac d'élimination.
Monter le sac filtrant en papier
Illustration
Déverrouiller et retirer la tête d'aspiration.
Enficher le sachet filtre en papier.
Positionner la tête d'aspiration et la ver-
rouiller.
Monter le sac d'élimination
Illustration
Déverrouiller et retirer la tête d'aspiration.
Enficher le sachet d'élimination.
Retourner le sachet d'élimination sur le
réservoir.
Positionner la tête d'aspiration et la ver-
rouiller.
Aspiration humide
몇 Avertissement
Pour l'aspiration de liquide, il est interdit
d'aspirer des poussières nocives pour la
santé.
Retirer le sachet filtre en papier.
Illustration
Déverrouiller et retirer la tête d'aspiration.
Sortir le sac filtrant en papier par l'arrière.
Tirer la glissière de fermeture vers le
haut et bien fermer le sac filtrant en papier lors de son retrait.
Éliminer le sac filtrant en papier usé se-
lon les dispositions légales.
26 FR
– 3
Page 27
Positionner la tête d'aspiration et la ver-
rouiller.
– En cas d'aspiration de saletés humides,
il convient de toujours démonter le sachet filtre en papier.
Retirer le sac d'élimination
Illustration
Déverrouiller et retirer la tête d'aspiration.
Retourner le sac d'élimination.
Tirer l'ouverture du sac d'élimination
au-dessus de l'embout d'aspiration vers
l'arrière et bien le fermer.
Fermer le sac d'élimination de manière
étanche avec la bande fermeture en
dessous de l'ouverture.
Retirer le sac d'élimination.
Éliminer le sac d'élimination usé selon
les dispositions légales.
Positionner la tête d'aspiration et la ver-
rouiller.
– En cas d'aspiration de saletés humides, il
faut toujours enlever le filtre d'élimination.
Généralités
Attention
Le filtre à plis plats ne doit jamais être retiré
durant l'aspiration.
–
Pour l'aspiration de saletés humides
avec la buse plate ou la buse à joints
(option), ou bien si l'aspiration consiste
surtout à aspirer de l'eau d'un réservoir,
il est recommandé de désactiver la fonction "Nettoyage automatique du filtre".
– L'appareil se met automatiquement
hors marche lorsque le niveau de liquide maxi est atteint.
–
En cas de liquides non conducteurs
(par exemple émulsion de perçage,
huiles et graisses), l'appareil n'est pas
mis hors marche lorsque le réservoir
est plein. Le niveau de remplissage
doit être contrôlé en permanence et le
réservoir doit être vidé à temps.
– À la fin de l'aspiration humide : nettoyer
le filtre à plis plats en même temps que
le filtre. Nettoyer les électrodes avec
une brosse. Nettoyer le réservoir avec
un chiffon humide et le sécher.
Clip de fixation
Illustration
Le flexible d'aspiration est doté d'un système à clip. Il est possible de raccorder
tous les accessoires C-35/C-DN-35.
Utilisation
Mettre l'appareil en marche
Brancher la fiche secteur.
Mettre l'appareil en service au niveau
de l'interrupteur principal.
Régler la puissance d'aspiration
Régler la puissance d'aspiration (min-
max) sur le régulateur rotatif.
Travailler avec des outils
électriques
Danger
Risque de blessure et d'endommagement !
La prise n'est destinée qu'au raccord direct
d'outils électriques sur l'aspirateur. Toute
autre utilisation de la prise est interdite.
Brancher la fiche de secteur de l'outil
électrique sur l'aspirateur.
Mettre l'appareil en service au niveau
de l'interrupteur principal.
Le témoin de contrôle s'allume, l'aspirateur
se trouve en mode veille.
Remarque :l'aspirateur est automatiquement mis en marche et hors marche avec
l'outil électrique.
Remarque :l'aspirateur a une temporisation de démarrage d'au maximum 0,5 secondes et un temps de marche par inertie
d'au maximum 15 secondes.
Remarque : Pour les données de branchement des outils électriques, voir les caractéristiques techniques.
Illustration
Adapter le manchon de jonction au rac-
cordement de l'outil électrique.
Illustration
Monter le manchon de jonction sur le
tuyau d'aspiration.
– 4
27FR
Page 28

Illustration
Raccorder le manchon de jonction à
l'outil électrique.
Nettoyage automatique du filtre
L'appareil est équipé d'un nouveau type de
nettoyage de filtre particulièrement efficace
pour les poussières fines. Avec ce procédé, le filtre à plis plats est automatiquement
nettoyé par un souffle (bruit pulsant) toutes
les 15 secondes.
Remarque :le nettoyage automatique du
filtre est mis en service en usine.
Remarque : la mise en ou hors service du
nettoyage de filtre automatique n'est possible que si l'appareil est en service.
– Mettre le nettoyage automatique de
filtre hors service :
Actionner le commutateur. La lampe té-
moin s'éteint dans le commutateur.
– Mettre le nettoyage automatique de
filtre en service :
Actionner de nouveau le commutateur.
La lampe témoin dans le commutateur
s'allume en vert.
Mise hors service de l'appareil
Mettre l'appareil hors service au niveau
de l'interrupteur principal.
Retirer le connecteur de la prise.
Après chaque mise en service
Vider le réservoir.
Nettoyer la partie intérieure et exté-
rieure de l'appareil en l'aspirant et en
l'essuyant avec un chiffon humide.
Ranger l’appareil
Illustration
Conserver le flexible d'aspiration et le
câble d'alimentation de la manière représentée.
Entreposer l’appareil dans un endroit
sec et le sécuriser contre toute utilisation non autorisée.
Transport
Attention
Risque de blessure et d'endommagement !
Respecter le poids de l'appareil lors du
transport.
Retirer le tube d'aspiration avec la buse
de sol du support. Pour transporter l'appareil, le saisir au niveau de la poitnée
et du tube d'aspiration.
Sécuriser l'appareil contre les glisse-
ments ou les basculements selon les directives en vigueur lors du transport
dans des véhicules.
Entreposage
Attention
Risque de blessure et d'endommagement !
Prendre en compte le poids de l'appareil à
l'entreposage.
Cet appareil doit uniquement être entreposé en intérieur.
Entretien et maintenance
Danger
Avant d'effectuer tout type de travaux sur
l'appareil, le mettre hors service et débrancher la fiche électrique.
Des machines destinées à éliminer les
poussières sont des dispositifs de sécurité
permettant d'éviter ou d'éliminer d'éventuels risques au sens de BGV A1.
– Pour la maintenance par l'utilisateur,
l'appareil doit être désassemblé, nettoyé et entretenu, dans la mesure du
possible, sans que le personnel de
maintenance ni d'autres personnes ne
soient exposés à un danger quelconque. La décontamination avant le
désassemblage fait également partie
des mesures de précaution appropriées. Prendre des mesures adéquates pour assurer une ventilation
forcée à filtrage local aux endroits où
l'appareil est désassemblé, nettoyage
de la surface de maintenance et protection appropriée du personnel.
28 FR
– 5
Page 29

– La partie extérieure de l'appareil doit
être décontaminée par aspiration des
poussières et essuyée proprement, ou
traitée avec un produit d'étanchéité
avant d'être sortie de la zone dangereuse. Tous les éléments de l'appareil
doivent être considérés comme contaminés s'ils sont sortis de la zone dangereuse.
– Lors des travaux de maintenance et de
réparation, il faut obligatoirement jeter
tous les objets contaminés ne pouvant
pas être nettoyés de manière satisfaisante. De tels objets doivent être évacués dans des sacs imperméables, en
conformité avec les prescriptions en vigueur pour l'élimination de tels déchets.
몇 Avertissement
Les dispositifs de sécurité permettant d'empêcher ou d'éviter des dangers doivent être
entretenus régulièrement. Cela signifie
qu'ils doivent être contrôlés au moins un
fois par an par le fabricant ou une personne
habilitée du point de vue de la sécurité
technique de fonctionnement, p.
ex. étanchéité de l'appareil, détérioration
du filtre, fonctionnement des dispositifs de
contrôle.
Attention
Risque d'endommagement ! Ne pas utiliser
de produits d'entretien à base de silicone
pour le nettoyage.
– Certains travaux de maintenance et de
nettoyage simples peuvent être effectués par l'utilisateur.
– La surface de l'appareil et l'intérieur de
la cuve devraient être nettoyés régulièrement avec un chiffon humide.
몇 Avertissement
Danger du fait de poussière nocive. Pour
les travaux d'entretien (par ex. remplacement du filtre), porter un masque respiratoire P2 ou supérieur et une tenue à usage
unique.
Remplacement du filtre à plis plats
Ouvrir le recouvrement du filtre.
Extraire le filtre à plis plats.
Eliminer le filtre à plis plats usé dans un
sac fermé étanche à la poussière, conformément aux prescriptions légales.
Enlever la saleté accumulée du côté de
l'air filtré.
Insérer le nouveau filtre à plis plats.
Fermer le recouvrement du filtre, il faut
l'entendre s'enclencher.
Remplacement du sachet filtre en
papier
Illustration
Déverrouiller et retirer la tête d'aspiration.
Sortir le sac filtrant en papier par l'arrière.
Tirer la glissière de fermeture vers le
haut et bien fermer le sac filtrant en papier lors de son retrait.
Éliminer le sac filtrant en papier usé se-
lon les dispositions légales.
Mettre le sac filtrant en papier en place.
Positionner la tête d'aspiration et la ver-
rouiller.
Remplacement du sac d'élimination
Illustration
Déverrouiller et retirer la tête d'aspiration.
Retourner le sac d'élimination.
Tirer l'ouverture du sac d'élimination
au-dessus de l'embout d'aspiration vers
l'arrière et bien le fermer.
Fermer le sac d'élimination de manière
étanche avec la bande fermeture en
dessous de l'ouverture.
Retirer le sac d'élimination.
Éliminer le sac d'élimination usé selon
les dispositions légales.
Mettre le nouveau sac d'élimination en
place.
Retourner le sachet d'élimination sur le
réservoir.
Positionner la tête d'aspiration et la ver-
rouiller.
– 6
29FR
Page 30

Nettoyage des électrodes
Déverrouiller et retirer la tête d'aspiration.
Nettoyer les électrodes avec une
brosse.
Positionner la tête d'aspiration et la ver-
rouiller.
Assistance en cas de panne
Danger
Avant d'effectuer tout type de travaux sur
l'appareil, le mettre hors service et débrancher la fiche électrique.
Remarque : l'appareil doit immédiatement
être mis hors marche en cas de panne (par
exemple rupture de filtre). L'erreur doit être
éliminée avant de remettre l'appareil en
marche.
La turbine d'aspiration ne
fonctionne pas
Vérifier la prise et le fusible de l'alimen-
tation électrique.
Vérifier le câble d'alimentation, la fiche
secteur, les électrodes et la prise de
l'appareil.
Allumer l’appareil.
Turbine d'aspiration se met hors
marche
Vider le réservoir.
Turbine d'aspiration ne se remet
pas en marche après avoir vidé la
cuve
Mettre l'appareil hors marche et at-
tendre 5 secondes avant de le remettre
en marche.
Nettoyer les électrodes ainsi que l'es-
pace libre entre les électrodes à l'aide
d'une brosse.
La force d'aspiration diminue
Déboucher la buse d'aspiration, le
tuyau d'aspiration, le flexible d'aspiration ou le filtre plat à plis.
Remplacement du sac filtrant en papier.
Remplacer le sac d'élimination plein.
Enclencher correctement le recouvre-
ment de filtre.
Remplacer le filtre à plis plats.
De la poussière s'échappe lors de
l'aspiration
Vérifier la position de montage du filtre
à plis plats.
Remplacer le filtre à plis plats.
Dispositif automatique de coupure
(aspiration humide) ne se
déclenche pas
Nettoyer les électrodes ainsi que l'es-
pace libre entre les électrodes à l'aide
d'une brosse.
Contrôler en permanence le niveau de
remplissage en cas de liquides non
conducteurs.
Le nettoyage automatique de filtre
ne fonctionne pas
Le flexible d'aspiration n'est pas raccordé.
Le nettoyage automatique ne se
laisse pas mettre hors service
Informer le service après-vente.
Le nettoyage automatique ne se
laisse pas mettre en service
Informer le service après-vente.
Mise au rebut
Lorsqu'il n'est plus utilisé, l'appareil doit
être éliminé conformément aux prescriptions légales.
30 FR
– 7
Page 31

Garantie
Dans chaque pays, les conditions de garantie en vigueur sont celles publiées par
notre société de distribution responsable.
Les éventuelles pannes sur l’appareil sont
réparées gratuitement dans le délai de validité de la garantie, dans la mesure où
celles-ci relèvent d'un défaut matériel ou
d'un vice de fabrication. En cas de recours
en garantie, adressez-vous à votre revendeur ou au service après-vente agréé le
plus proche munis de votre preuve d'achat.
Accessoires et pièces de
rechange
– Utiliser uniquement des accessoires et
des pièces de rechange autorisés par le
fabricant. Des accessoires et des
pièces de rechange d’origine garantissent un fonctionnement sûr et parfait de
l’appareil.
– Une sélection des pièces de rechange
utilisées le plus se trouve à la fin du
mode d'emploi.
Kit de nettoyage
Référence 369.845
Désignation N° de réf. Pièce
Coude (plastique)
Tube d'aspiration (métal)
Suceur fente 259.627 1
Buse pour sol 300.659 1
Monter les lèvres étanches de la buse de
sol (aspiration humide)
Illustration
Démonter les bandes de brosse
Monter les lèvres en caoutchouc.
Remarque : la face structurée des lèvres
en caoutchouc doit être dirigée vers l'extérieur.
297.038 1
300.691 2
Déclaration de conformité CE
Nous certifions par la présente que la machine spécifiée ci-après répond de par sa
conception et son type de construction ainsi que de par la version que nous avons
mise sur le marché aux prescriptions fondamentales stipulées en matière de sécurité et d’hygiène par les directives
européennes en vigueur. Toute modification apportée à la machine sans notre accord rend cette déclaration invalide.
Produit: Aspirateur à sec et par voie
humide
Type: VCE 35 L AC
Directives européennes en vigueur :
2006/42/CE (+2009/127/CE)
2004/108/CE
Normes harmonisées appliquées :
EN 55014–1: 2006 + A1: 2009
EN 55014–2: 1997 + A2: 2008
EN 60335–1
EN 60335–2–69
EN 61000–3–2: 2006 + A2: 2009
EN 61000–3–3: 2008
EN 62233: 2008
Normes nationales appliquées :
-
Les soussignés agissent par ordre et avec
les pleins pouvoirs de la Direction commerciale.
Responsable de la documentation :
E. Rühle
FLEX Elektrowerkzeuge GmbH
Bahnhofstr. 15
71711 Steinheim/Murr
Steinheim/Murr, 2010/10/01
– 8
31FR
Page 32

Caractéristiques techniques
VCE 35 L AC
Tension du secteur V 220-240
Fréquence Hz 50/60
Puissance maxi W 1380
Puissance nominale W 1200
Capacité de la cuve l 34
Plein de liquide l 19
Débit d'air (maxi) m
Dépression (maxi) kPa (mbar) 23,0 (230)
Branchement des outils électriques W 100-2200
Type de protection -- IP X4
Classe de protection -- I
Raccord du flexible d'aspiration
(C-DN/C-ID)
Longueur x largeur x hauteur mm 520 x 380 x 580
Poids de fonctionnement typique kg 12,5
Température ambiante (maxi) °C +40
Valeurs définies selon EN 60335-2-69
Niveau de pression sonore L
Incertitude K
pA
pA
Valeur de vibrations bras-main m/s
Incertitude K m/s
3
/h 158
mm 35
dB(A) 69
dB(A) 1
2
2
<2,5
0,2
Câble d’alimentation
H07RN-F 3x1,5 mm
Référence Longueur de
2
câble
EU 297.534 7,5 m
32 FR
– 9
Page 33

Prima di utilizzare l'apparecchio
Italiano
presenti istruzioni originali, seguirle e conservarle per un uso futuro o in caso di rivendita dell'apparecchio.
– Prima di procedere alla prima messa in
– La mancata osservanza delle istruzioni
– Eventuali danni da trasporto vanno co-
per la prima volta, leggere le
funzione leggere tassativamente le norma di sicurezza n. 5.956-249!
d'uso e delle norme di sicurezza può
causare danni all'apparecchio e presentare pericoli per l'utilizzatore e le altre persone.
municati immediatamente al proprio rivenditore.
Indice
Protezione dell’ambiente . . IT . . .1
Simboli riportati nel manuale
d'uso. . . . . . . . . . . . . . . . . . IT . . .1
Uso conforme a destinazione IT . . .1
Parti dell'apparecchio. . . . . IT . . .2
Simboli riportati sull’apparec-
chio. . . . . . . . . . . . . . . . . . . IT . . .2
Norme di sicurezza . . . . . . IT . . .2
Messa in funzione . . . . . . . IT . . .3
Uso. . . . . . . . . . . . . . . . . . . IT . . .4
Trasporto . . . . . . . . . . . . . . IT . . .5
Supporto. . . . . . . . . . . . . . . IT . . .5
Cura e manutenzione. . . . . IT . . .5
Guida alla risoluzione dei guasti IT . . .7
Smaltimento . . . . . . . . . . . . IT . . .7
Garanzia. . . . . . . . . . . . . . . IT . . .7
Accessori e ricambi . . . . . . IT . . .8
Dichiarazione di conformità CE IT . . .8
Dati tecnici . . . . . . . . . . . . . IT . . .9
Protezione dell’ambiente
Tutti gli imballaggi sono riciclabili. Gli imballaggi non vanno
gettati nei rifiuti domestici, ma
consegnati ai relativi centri di
raccolta.
Gli apparecchi dismessi contengono materiali riciclabili preziosi
e vanno consegnati ai relativi
centri di raccolta. Batterie, olio e
sostanze simili non devono essere dispersi nell’ambiente. Si
prega quindi di smaltire gli apparecchi dismessi mediante i sistemi di raccolta differenziata.
Simboli riportati nel manuale
d'uso
Pericolo
Per un rischio imminente che determina lesioni gravi o la morte.
몇 Attenzione
Per una situazione di rischio possibile che potrebbe determinare lesioni gravi o la morte.
Attenzione
Per una situazione di rischio possibile che
potrebbe determinare danni leggeri a persone o cose.
Uso conforme a destinazione
몇 Attenzione
L’apparecchio è idoneo all’aspirazione di
polveri asciutte, non infiammabili e nocive
alla salute vicino a macchine ed apparecchiature, della categoria polveri L secondo
EN 60 335–2–69. Limitazione: è vietato
aspirare sostanze cancerogene.
– Questo aspiratore è destinato alla puli-
zia a secco/umido di pavimenti o pareti.
– Questo apparecchio si adatta all'uso
professionale, ad esempio in alberghi,
scuole, ospedali, fabbriche, negozi e uffici.
– 1
33IT
Page 34

Parti dell'apparecchio Simboli riportati
1 Elettrodi
2 Tubo flessibile di aspirazione
3 Gancio per cavo
4 Fuoriuscita d'aria, aria d’esercizio
5 Dispositivo di blocco della testa di aspi-
razione
6 Ruota
7 Afflusso aria, aria di raffreddamento
motore
8 Contenitore sporcizia
9 Ruota pivottante
10 Testa aspirante
11 Raccordo di aspirazione
12 Bocchetta per pavimenti (non in dota-
zione)
13 Tubo di aspirazione (non in dotazione)
14 Maniglia trasporto
15 Coperchio del filtro
16 Gomito (non in dotazione)
17 Regolazione girevole della potenza di
aspirazione (min-max)
18 Spia di controllo
19 Presa elettrica
20 Pulizia automatica del filtro
21 Interruttore principale
22 Filtro plissettato piatto
23 Pulizia del filtro
24 Sostegno per bocchetta per pavimenti
25 Sostegno per bocchetta per fughe
26 Sostegno per tubi di aspirazione
27 Cavo di alimentazione
28 Targhetta
sa la rimozione del sacchetto della polvere
possono essere eseguite solo da personale specializzato indossando un equipaggiamento adatto alla protezione personale.
Non attivare prima della completa installazione del sistema di filtraggio.
몇 Attenzione
– Se l’aria di scarico viene rinviata nel ri-
– Utilizzo dell'apparecchio e delle sostan-
sull’apparecchio
ATTENZIONE: Questo apparecchio contiene polveri nocive alla
salute. Le operazioni di svuotamento e di manutenzione, inclu-
Filtro plissettato piatto
Codice N° 337.692
Sacchetto filtro di carta
Codice N° 296.961
Sacchetto di smaltimento
Codice N° 340.766
Norme di sicurezza
spettivo ambiente chiuso, occorre assicurare un sufficiente tasso di ricambio
dell'aria L. Per rispettare i valori limite richiesti, il flusso volumetrico ricondotto
deve essere al massimo 50% del flusso
volumetrico di aria fresca (volume
dell'ambiente V
dell'aria L
per la ventilazione si applica: L
ze, per le quali deve essere utilizzato,
inclusa la procedura sicura per l'eliminazione del materiale raccolto solo da
parte di personale qualificato.
x tasso di ricambio
R
). Senza particolari misure
W
=1h–1.
W
34 IT
– 2
Page 35

–
Questo apparecchio contiene polveri no-
cive alla salute. Tutti gli interventi di
svuotamento e di manutenzione, inclusa
l’eliminazione dei serbatoi di raccolta del-
la polvere, devono essere eseguiti solo
da personale specializzato che indossa i
necessari mezzi individuali di protezione.
– Non utilizzare l’apparecchio senza il si-
stema di filtraggio completo.
– Rispettare le disposizioni di sicurezza
applicabili pertinenti per i materiali da
trattare.
Messa in funzione
L'apparecchio consente di ricorrere a due
modi operativi:
1 Funzionamento come aspiratore indu-
striale (presa non occupata)
2 Funzionamento come depolverizzatore
(presa occupata)
Collegare il tubo flessibile di aspirazio-
ne e, a seconda del modo operativo,
applicare la bocchetta di aspirazione
oppure collegare il tubo all'apparecchio
che genera polvere.
몇 Attenzione
Non aspirare mai senza gli elementi di filtraggio, poiché altrimenti viene danneggiato il
motore di aspirazione, con conseguente rischio di danni alla salute a causa della maggiore emissione di polvere fine.
Sistema antistatico
Con il nipplo di raccordo collegato a massa
è possibile deviare le cariche statiche. In
questo modo con gli accessori collegati a
massa elettrostaticamente disponibili nella
fornitura è possibile prevenire la formazione di scintille e scosse elettriche.
Aspirazione a secco
– L'apparecchio è dotato di un sacchetto
filtro di carta con chiusura scorrevole,
N. ordine 296.961 (5 pezzi).
–
L’apparecchio è equipaggiato con un
sacchetto di smaltimento con chiusura
scorrevole, N. ordine 340.766 (10 pezzi).
Avviso:Questo apparecchio consente di
aspirare tutti i tipi di polvere fino alla categoria di polvere L. L'impiego di un sacchetto di raccolta della polvere (codice
d’ordinazione vedi Sistemi di filtraggio) è
prescritto per legge.
Avviso:L'apparecchio impegato come
aspiratore industriale è indicato per aspirare ed utilizzato come depolverizzatore ad
uso mobile è adatto ad aspirare polveri
asciutte, non infiammabili con valori MAK
superiori oppure uguali a 1 mg/m
3
.
Attenzione
Non rimuovere mai il filtro plissettato piatto
durante l'aspirazione.
– Quando si aspirano polveri fini è neces-
sario impiegare un sacchetto di smaltimento o un sacchetto filtro di carta
supplementare.
Montare il sacchetto filtro di carta
Figura
Sbloccare e staccare la testa aspirante.
Inserire il sacchetto filtro di carta.
Rimettere la testa aspirante e bloccarla.
Montare il sacchetto di smaltimento
Figura
Sbloccare e staccare la testa aspirante.
Introdurre il sacchetto di smaltimento.
Ripiegare il sacchetto di smaltimento
sul serbatoio.
Rimettere la testa aspirante e bloccarla.
Aspirazione ad umido
몇 Attenzione
Durante l'aspirazione ad umido non devono
essere assorbiti polveri nocive per la salute.
Rimuovere il sacchetto filtro di carta
Figura
Sbloccare e staccare la testa aspirante.
Rimuovere il sacchetto filtro di carta
all'indietro.
Sollevare la chiusura scorrevole e chiu-
dere ermeticamente il sacchetto filtro di
carta al momento di estrarlo.
Smaltire il sacchetto filtro di carta in
conformità alle norme legali vigenti.
– 3
35IT
Page 36

Rimettere la testa aspirante e bloccarla.
– Per l'aspirazione di liquidi occorre ri-
muovere sempre il sacchetto filtro di
carta.
Rimuovere il sacchetto di smaltimento
Figura
Sbloccare e staccare la testa aspirante.
Sollevare il sacchetto di smaltimento.
Sollevare all'indietro l'apertura del sac-
chetto di smaltimento sopra il manicotto
di aspirazione e chiudere ermeticamente.
Chiudere a tenuta stagna il sacchetto di
smaltimento con la fscetta di chiusura
sotto l'apertura.
Estrarre il sacchetto di smaltimento.
Smaltire il sacchetto di smaltimento
usato in conformità alle norme legali vi-
genti.
Rimettere la testa aspirante e bloccarla.
– Per l'aspirazione di liquidi occorre ri-
muovere sempre il sacchetto di smalti-
mento.
Norme generali
Attenzione
Non rimuovere mai il filtro plissettato piatto
durante l'aspirazione.
– Per l'aspirazione di liquidi con la boc-
chetta per imbottiture o fughe (opzione)
oppure per aspirare soprattuto acqua
da un recipiente, si consiglia di disinse-
rire la funzione "Pulizia automatica del
filtro".
– Appena raggiunto il livello massimo di
liquido, l'apparecchio si disinserisce au-
tomaticamente.
– In caso di liquidi non conduttori (per
esempio emulsioni per lavori con
trapano, oli e grassi) l'apparecchio
non viene spento a serbatoio pieno.
Controllare costantemente il livello
del serbatoio e svuotarlo in tempo.
– l termine dell'aspirazione di liquidi: Pulire
il filtro plissettato piatto con il prodotto per
la pulizia del filtro. Pulire gli elettrodi con
una spazzola. Pulire il serbatoio con un
panno umido ed asciugare.
Collegamento a clip
Figura
Il canale di aspirazione è dotato di un sistema a clip. Tutti gli accessori C-35/C-DN-35
possono essere collegati.
Uso
Accendere l’apparecchio
Inserire la spina di alimentazione.
Attivare l'apparecchio dall'interruttore
principale.
Regolazione della potenza di
aspirazione
Regolazione della potenza di aspirazio-
ne (min-max) sul regolatore.
Lavori con utensili elettrici
Pericolo
Pericolo di lesioni e di danneggiamento! La
presa è indicata per il collegamento diretto
di utensili elettrici all'aspiratore. Qualsiasi
altro utilizzo non è consentito.
Inserire la spina dell'utensile elettrico
nella presa dell'aspiratore.
Attivare l'apparecchio dall'interruttore
principale.
La spia luminosa di controllo è accesa,
l'aspiratore è in stand-by.
Avviso: L'aspiratore viene inserito e disinserito automaticamente con l'utensile elettrico.
Avviso: L'aspiratore ha un ritardo di avviamento di 0,5 secondi ed un tempo di funzionamento inerziale di 15 secondi.
Avviso: Il valore di alimentazione degli
utensili elettrici sono indicati nel capitolo
"Dati tecnici".
Figura
Adattare il manicotto di collegamento
all'attacco dell'utensile elettrico.
Figura
Montare il manicotto di collegamento
sul tubo flessibile di aspirazione.
Figura
Collegare il manicotto all'utensile elettrico.
36 IT
– 4
Page 37

Pulizia automatica del filtro
L'apparecchio dispone di un innovativo dispositivo di pulizia del filtro, particolarmente efficace per la polvere fina. In questo
modo il filtro plissettato piatto viene pulito
ogni 15 secondi con un colpo d'aria (rumore di pulsazione).
Avviso: La pulizia automatica del filtro è attivata in fabbrica.
Avviso: L'attivazione/disattivazione della
pulizia automatica del filtro è possibile solo
con il dispositivo attivato.
– Disattivazione della pulizia automatica
del filtro:
premere l'interruttore. La spia luminosa
nell'interruttore si spegne.
– Attivazione della pulizia automatica del
filtro:
premere ripetutamente l'interruttore. La
spia luminosa nell'interruttore è verde.
Spegnere l’apparecchio
Disattivare l'apparecchio dall'interrutto-
re principale.
Staccare la spina.
A lavoro ultimato
Svuotare il serbatoio.
Pulire l’apparecchio all’interno e
all’esterno aspirando e passando la su-
perficie con un panno umido.
Deposito dell’apparecchio
Figura
Conservare il tubo flessibile di aspira-
zione ed il cavo di alimentazione secon-
do quanto illustrato nella figura.
Depositare l’apparecchio in un luogo
asciutto e proteggerlo contro l’uso non
autorizzato.
Trasporto
Attenzione
Pericolo di lesioni e di danneggiamento! Rispettare il peso dell'apparecchio durante il
trasporto.
Rimuovere dal supporto il tubo di aspira-
zione con la bocchetta per pavimenti. Per
trasportare l’apparecchio tenere l'apposito manico ed il tubo di aspirazione.
Per il trasporto in veicoli, assicurare
l'apparecchio secondo le direttive in vigore affinché non possa scivolare e ribaltarsi.
Supporto
Attenzione
Pericolo di lesioni e di danneggiamento! Rispettare il peso dell'apparecchio durante la
conservazione.
Questo apparecchio può essere conservato solo in ambienti interni.
Cura e manutenzione
Pericolo
Disattivare l'apparecchio ed estrarre la spina di alimentazione prima di effettuare interventi sull'apparecchio.
Macchine per la rimozione delle polveri fanno parte dell’equipaggiamento di sicurezza
atto all’eliminazione o alla prevenzione di
pericoli ai sensi del § 3 del BGV A1.
– Ai fini della manutenzione l’apparecchio
deve essere smontato, pulito e controllato per quanto è possibile, senza causare pericoli al personale addetto alla
manutenzione o ad altre persone. Le
misure preventive idonee in tal senso
devono comprendere la decontaminazione prima dello smontaggio. Provvedere ad una ventilazione forzata
mediante filtri nei locali dove viene
smontato l'apparecchio, alla pulizia della superficie di manutenzione e alla protezione appropriata del personale.
– 5
37IT
Page 38

– L’esterno dell’apparecchio deve essere
decontaminato mediante aspirazione e
pulito accuratamente con un panno
umido, oppure trattato con un sigillante
prima di essere portato fuori dalla zona
pericolosa. Tutti i componenti dell’appa-
recchio devono essere considerati con-
taminati quando vengono portati fuori
dalla zona pericolosa.
– Durante l’esecuzione di interventi di
manutenzione e riparazione tutti gli og-
getti che non possono essere puliti suf-
ficientemente, devono essere gettati
via. Tali oggetti devono essere chiusi in
sacchetti ermetici e smaltiti in conformi-
tà alle disposizioni vigenti per lo smalti-
mento di rifiuti di questo tipo.
몇 Attenzione
Gli equipaggiamenti di sicurezza per la prevenzione o l’eliminazione di pericoli devono
essere sottoposti regolarmente a manutenzione. Ciò significa che essi devono essere
controllati almeno una volta all’anno dal
produttore o da una persona adeguatamente addestrata riguardo al loro perfetto
funzionamento rispetto alla tecnica di sicurezza, per es. ermeticità dell‘apparecchio,
danneggiamenti del filtro, funzionamento
dei dispositivi di controllo.
Attenzione
Rischio di danneggiamento. Per la pulizia
non usare detergenti contenenti silicone.
– Gli interventi di manutenzione e di puli-
zia semplici possono essere effettuati
dall’utente stesso.
– La superficie dell’apparecchio e l’inter-
no del serbatoio devono essere puliti ad
intervalli regolari con un panno umido.
몇 Attenzione
Rischi dovuti alle polveri nocive alla salute.
Durante gli interventi di manutenzione (ad
es. sostituzione dei filtri) è necessario indossare una maschera protettiva per le vie
respiratorie P2 o superiore ed una tuta monouso.
Sostituzione del filtro plissettato
piatto
Aprire il coperchio del filtro.
Rimozione del filtro plissettato piatto.
Smaltire il filtro plissettato piatto usato
nel sacchetto a chiusura ermetica in
conformità con le disposizioni di legge.
Rimuovere eventuale sporco sul lato
dell'aria pura.
Inserire il nuovo filtro plissettato piatto.
Chiudere il coperchio del filtro; bisogna
sentire lo scatto.
Sostituzione del sacchetto filtro di
carta
Figura
Sbloccare e staccare la testa aspirante.
Rimuovere il sacchetto filtro di carta
all'indietro.
Sollevare la chiusura scorrevole e chiu-
dere ermeticamente il sacchetto filtro di
carta al momento di estrarlo.
Smaltire il sacchetto filtro di carta in
conformità alle norme legali vigenti.
Introdurre il nuovo sacchetto filtro di carta.
Rimettere la testa aspirante e bloccarla.
Sostituzione del sacchetto di
smaltimento
Figura
Sbloccare e staccare la testa aspirante.
Sollevare il sacchetto di smaltimento.
Sollevare all'indietro l'apertura del sac-
chetto di smaltimento sopra il manicotto
di aspirazione e chiudere ermeticamente.
Chiudere a tenuta stagna il sacchetto di
smaltimento con la fscetta di chiusura
sotto l'apertura.
Estrarre il sacchetto di smaltimento.
Smaltire il sacchetto di smaltimento
usato in conformità alle norme legali vigenti.
Introdurre il nuovo sacchetto di smalti-
mento.
Ripiegare il sacchetto di smaltimento
sul serbatoio.
Rimettere la testa aspirante e bloccarla.
38 IT
– 6
Page 39

Pulizia degli elettrodi
Sbloccare e staccare la testa aspirante.
Pulire gli elettrodi con una spazzola.
Rimettere la testa aspirante e bloccarla.
Guida alla risoluzione dei
guasti
Pericolo
Disattivare l'apparecchio ed estrarre la spina di alimentazione prima di effettuare interventi sull'apparecchio.
Avviso:In caso di guasti o anomalie (p.es.
rottura del filtro), disinserire immediatamente l'apparecchio. Eliminare il guasto
prima di rimettere il funzione l'apparecchio.
La turbina di aspirazione non
funziona
Controllare la presa e il fusibile dell'ali-
mentazione di corrente.
Verificare il cavo e la spina di rete, gli
elettrodi e la presa dell'apparecchio.
Accendere l’apparecchio.
La turbina di aspirazione si spegne
Svuotare il serbatoio.
La turbina di aspirazione non si
reinserisce dopo aver svuotato il
serbatoio
Spegnere l'apparecchio e attendere 5
secondi; riaccenderlo dopo 5 secondi.
Pulire gli elettrodi ed i relativi interstizi
con una spazzola.
La forza aspirante diminuisce
Rimuovere eventuali otturazioni dalla
bocchetta di aspirazione, dal tubo rigido
di aspirazione o dal filtro plissettato
piatto.
Sostituire il sacchetto filtro di carta pieno.
Sostituire il sacchetto di smaltimento
pieno.
Far innestare correttamente il coper-
chio del filtro.
Sostituire il filtro plissettato piatto.
Fuoriuscita di polvere durante
l'aspirazione
Controllare che il filtro plissettato piatto
sia montato nella posizione corretta.
Sostituire il filtro plissettato piatto.
Il dispositivo automatico di
disinserimento (aspirazione di
liquidi) è difettoso
Pulire gli elettrodi ed i relativi interstizi
con una spazzola.
Controllare costantemente il livello di ri-
empimento in caso di liquidi non conduttori.
Il dispositivo di pulizia automatico
del filtro non funziona
Tubo flessibile di aspirazione non colle-
gato.
Impossibile disattivare la pulizia
automatica del filtro
Informare il servizio assistenza clienti.
Impossibile attivare la pulizia
automatica del filtro
Informare il servizio assistenza clienti.
Smaltimento
Trascorsa la sua durata operativa, l’apparecchio è da smaltire secondo le disposizioni di legge.
Garanzia
Le condizioni di garanzia valgono nel rispettivo paese di pubblicazione da parte
della nostra società di vendita competente.
Entro il termine di garanzia eliminiamo gratuitamente eventuali guasti all’apparecchio,
se causati da difetto di materiale o di produzione. Nei casi previsti dalla garanzia si
prega di rivolgersi al proprio rivenditore, oppure al più vicino centro di assistenza autorizzato, esibendo lo scontrino di acquisto.
– 7
39IT
Page 40

Accessori e ricambi
– Impiegare esclusivamente accessori e ri-
cambi autorizzati dal produttore. Acces-
sori e ricambi originali garantiscono che
l’apparecchio possa essere impiegato in
modo sicuro e senza disfunzioni.
– La lista dei pezzi di ricambio più comuni
è riportata alla fine del presente manua-
le d'uso.
Set di pulizia
N. ordine 369.845
Denominazione Codice N° Quantità
Gomito (Plastica) 297.038 1
Tubo di aspirazione (Metallo)
Bocchetta fessure
Bocchetta pavimenti
Montare i labbri di gomma (2) della bocchetta per pavimenti (aspirazione di liquidi)
Figura
Smontare il nastro con setole.
Montare i labbri di gomma.
Avviso:Il lato dei labbri in gomma con la
trama deve essere rivolto verso l'esterno.
300.691 2
259.627 1
300.659 1
Dichiarazione di conformità
CE
Con la presente si dichiara che la macchina
qui di seguito indicata, in base alla sua concezione, al tipo di costruzione e nella versione da noi introdotta sul mercato, è
conforme ai requisiti fondamentali di sicurezza e di sanità delle direttive CE. In caso
di modifiche apportate alla macchina senza
il nostro consenso, la presente dichiarazione perde ogni validità.
Prodotto: Aspiratore solidi-liquidi
Modelo: VCE 35 L AC
Direttive CE pertinenti
2006/42/CE (+2009/127/CE)
2004/108/CE
Norme armonizzate applicate
EN 55014–1: 2006 + A1: 2009
EN 55014–2: 1997 + A2: 2008
EN 60335–1
EN 60335–2–69
EN 61000–3–2: 2006 + A2: 2009
EN 61000–3–3: 2008
EN 62233: 2008
Norme nazionali applicate
-
I firmatari agiscono su incarico e con la procura dell’amministrazione.
40 IT
Responsabile della documentazione:
E. Rühle
FLEX Elektrowerkzeuge GmbH
Bahnhofstr. 15
71711 Steinheim/Murr
Steinheim/Murr, 2010/10/01
– 8
Page 41

Dati tecnici
VCE 35 L AC
Tensione di rete V 220-240
Frequenza Hz 50/60
Potenza max. W 1380
Potenza nominale W 1200
Capacità serbatoio l 34
Quantità di riempimento di liquido l 19
Quantità d'aria (max.) m
Sottopressione (max.) kPa (mbar) 23,0 (230)
Valore di alimentazione degli utensili elettrici W 100-2200
Protezione -- IP X4
Grado di protezione -- I
Attacco per tubo di aspirazione
(C-DN/C-ID)
Lunghezza x larghezza x Altezza mm 520 x 380 x 580
Peso d'esercizio tipico kg 12,5
Temperatura ambiente (max.) °C +40
Valori rilevati secondo EN 60335-2-69
Pressione acustica L
Dubbio K
pA
pA
Valore di vibrazione mano-braccio m/s
Dubbio K m/s
3
/h 158
mm 35
dB(A) 69
dB(A) 1
2
2
<2,5
0,2
Cavo di alimentazione
H07RN-F 3x1,5 mm
Codice com-
ponente
Lunghezza
cavo
EU 297.534 7,5 m
2
– 9
41IT
Page 42

Lees vóór het eerste gebruik
Nederlands
gebruiksaanwijzing, ga navenant te werk
en bewaar hem voor later gebruik of voor
een latere eigenaar.
– Voor de eerste inbedrijfstelling veilig-
– Bij veronachtzaming van de gebruiks-
– Bij transportschade onmiddellijk de
van uw apparaat deze originele
heidsinstructies nr. 5.956-249 in elk ge-
val lezen!
aanwijzing en de veiligheidsaanwijzin-
gen kan schade aan het apparaat
ontstaan, en gevaar voor gebruikers en
andere personen.
handelaar op de hoogte brengen.
Inhoudsopgave
Zorg voor het milieu . . . . . . NL . . .1
Symbolen in de gebruiksaanwij-
zing. . . . . . . . . . . . . . . . . . . NL . . .1
Reglementair gebruik . . . . . NL . . .2
Apparaat-elementen. . . . . . NL . . .2
Symbolen op het toestel. . . NL . . .2
Veiligheidsinstructies . . . . . NL . . .2
Inbedrijfstelling . . . . . . . . . . NL . . .3
Bediening . . . . . . . . . . . . . . NL . . .4
Vervoer. . . . . . . . . . . . . . . . NL . . .5
Opslag . . . . . . . . . . . . . . . . NL . . .5
Onderhoud . . . . . . . . . . . . . NL . . .5
Hulp bij storingen . . . . . . . . NL . . .6
Afvalverwijdering . . . . . . . . NL . . .7
Garantie . . . . . . . . . . . . . . . NL . . .7
Toebehoren en reserveonder-
delen . . . . . . . . . . . . . . . . . NL . . .7
EG-conformiteitsverklaring. NL . . .8
Technische gegevens . . . . NL . . .9
Zorg voor het milieu
Het verpakkingsmateriaal is
herbruikbaar. Deponeer het verpakkingsmateriaal niet bij het
huishoudelijk afval, maar bied
het aan voor hergebruik.
Onbruikbaar geworden apparaten bevatten waardevolle materialen die geschikt zijn voor
hergebruik. Lever de apparaten
daarom in bij een inzamelpunt
voor herbruikbare materialen.
Batterijen, olie en dergelijke
stoffen mogen niet in het milieu
belanden. Verwijder overbodig
geworden apparatuur daarom
via geschikte inzamelpunten.
Symbolen in de
gebruiksaanwijzing
Gevaar
Voor een onmiddellijk dreigend gevaar dat
leidt tot ernstige en zelfs dodelijke lichamelijke letsels.
몇 Waarschuwing
Voor een mogelijks gevaarlijke situatie die
zou kunnen leiden tot ernstige en zelfs dodelijke lichamelijke letsels.
Voorzichtig
Voor een mogelijks gevaarlijke situatie die
kan leiden tot lichte lichamelijke letsels of
materiële schade.
42 NL
– 1
Page 43

Reglementair gebruik
몇 Waarschuwing
Het apparaat is geschikt voor de afzuiging
van droge, onbrandbare, voor de gezondheid onschadelijke stoffen op machines en
apparaten; stofklasse L conform
EN 60 335–2–69. Beperking: Er mogen
geen kankerverwekkende stoffen opgezogen worden.
– Deze zuiger is voor het natte en droge
reinigen van vloer- en muuroppervlak-
ken bestemd.
– Dit apparaat is geschikt voor industrieel
gebruik, zoals bijvoorbeeld in hotels,
scholen, ziekenhuizen, fabrieken, win-
kels, kantoorgebouwen en verhuurkan-
toren.
26 Houder voor zuigbuizen
27 Netkabel
28 Typeplaatje
Symbolen op het toestel
WAARSCHUWING: Dit apparaat
bevat stof dat schadelijk is voor
de gezondheid. Lediging en on-
derhoud, inclusief het verwijderen van de stofzak, mogen enkel
uitgevoerd worden door vakkundige personen die geschikte persoonlijke beschermingsmiddelen dragen. Niet inschakelen
vooraleer het volledige filtersysteem geïnstalleerd is.
Vlak harmonicafilter
Bestel-nr. 337.692
Apparaat-elementen
1 Elektroden
2 Zuigslang
3 Kabelhaak
4 Luchtuitstroming, werklucht
5 Vergrendeling van de zuigkop
6 Wiel
7 Luchttoevoer, motor-koellucht
8 Vuilreservoir
9 Zwenkwiel
10 Zuigkop
11 Luchtinlaatleidingen
12 Vloersproeier (niet meegeleverd)
13 Zuigbuis (niet meegeleverd)
14 Handgreep
15 Filterafdekking
16 Bocht (niet meegeleverd)
17 Draairegelaar voor zuigcapaciteit (min-
max)
18 Controlelampje
19 Contactdoos
20 Automatische filterreiniging
21 Hoofdschakelaar
22 Vlak harmonicafilter
23 Filterreiniging
24 Houder voor vloersproeier
25 Houder voor voegsproeier
Filterzak van papier
Bestel-nr. 296.961
Afvalzak
Bestel-nr. 340.766
Veiligheidsinstructies
몇 Waarschuwing
–
Indien de retourlucht in de ruimte teruggeblazen wordt, moet een voldoende
ventilatiegraad L in de ruimte voorhanden zijn. Om de vereiste grenswaarden
na te leven, mag de teruggevoerde volumestroom maximaal 50 % van de volumestroom verse lucht (ruimtevolume V
x luchtverversingspercentage L
gen. Zonder bijzondere ventilatiemaatregelen geldt het volgende: L
– Gebruik van het apparaat en de sub-
stanties waarvoor het moet worden gebruikt, incl. de veilige werkwijze bij de
afvoer van het opgezogen materiaal alleen door geschoold personeel.
=1h–1.
W
) bedra-
W
R
– 2
43NL
Page 44

– Dit apparaat bevat stof dat schadelijk is
voor de gezondheid. Legings- en on-
derhoudswerkzaamheden, inclusief het
verwijderen van de stofverzamelcontai-
ner, mogen alleen worden uitgevoerd
door vaklui die de nodige bescher-
mingskleding dragen.
– Apparaat niet zonder het volledige filter-
systeem gebruiken.
– De toe te passen veiligheidsbepalingen
betreffende de te behandelen materia-
len moeten in acht genomen worden.
Inbedrijfstelling
Het apparaat kan op 2 manieren gebruikt
worden:
1 Gebruik als industriële stofzuiger (stop-
contact niet gebruikt)
2 Gebruiker als ontstoffer (stopcontact
gebruikt)
Zuigslang aansluiten en afhankelijk van
de gebruikssoort van zuigkop voorzien
of op het stofopwekkende apparaat
aansluiten.
몇 Waarschuwing
Nooit zonder filterelement zuigen aangezien anders de zuigmotor beschadigd
wordt en door het verhoogde emissie van
fijn stof een gezondheidsrisico ontstaat!
Antistatisch systeem
Door de geaarde aansluitmof worden statische ladingen afgeleid. Daardoor worden
met het meegeleverde, elektrostatisch geaarde toebehoren vonkvorming en stroomschokken verhinderd.
Droogzuigen
– Het apparaat is uitgerust met een pa-
pieren filterzak met schuifsluiting, be-
stelnummer 296.961 (5 stuks).
– Het apparaat is uitgerust met een afval-
zak met schuifsluiting en sluitstrippen,
bestelnr. 340.766 (10 stuks).
Instructie: Met dit apparaat kunnen alle
soorten stof tot stofklasse L opgezogen
worden. Het gebruik van een stofverzamelzak (bestelnummer zie Filtersystemen) is
wettelijk voorgeschreven.
Instructie:Het apparaat is als industriële
stofzuiger voor het opzuigen en als ontstoffer voor gebruik op verschillende plaatsen
voor het opzuigen van droge, niet brandbare stoffen met MAK-waarden groter dan of
gelijk aan 1 mg/m
3
geschikt.
Voorzichtig
Bij het zuigen mag de vlakvouwfilter nooit
verwijderd worden.
– Bij het opzuigen van fijn stof moet ook
nog een filterzak van papier of afvalzak
gebruikt worden.
Filterzak aanbrengen
Afbeelding
Zuigkop ontgrendelen en wegnemen.
Papieren filterzak opzetten.
Zuigkop eropzetten en vergrendelen.
Afvalzak aanbrengen
Afbeelding
Zuigkop ontgrendelen en wegnemen.
Stofzak aanbrengen.
Stofzak over reservoir stulpen.
Zuigkop eropzetten en vergrendelen.
Natzuigen
몇 Waarschuwing
Bij net natzuigen mogen geen stoffen opgezogen worden die schadelijk zijn voor de
gezondheid.
Papieren filterzak wegnemen
Afbeelding
Zuigkop ontgrendelen en wegnemen.
Filterzak naar achteren (eruit trekken.
Schuifsluiting naar boven trekken en fil-
ter goed sluiten bij het uitnemen.
Gebruikte filterzak wegdoen conform
de wettelijke bepalingen.
Zuigkop eropzetten en vergrendelen.
– Bij het opzuigen van nat vuil moet de
papieren filterzak altijd verwijderd worden.
44 NL
– 3
Page 45

Afvalzak verwijderen
Afbeelding
Zuigkop ontgrendelen en wegnemen.
Stofverzamelzak naar boven stulpen.
Opening van de afvalzak over de
zuigaansluiting naar achteren eruit trek-
ken en goed sluiten.
Stofverzamelzak met sluitstrip onder de
opening goed afsluiten.
Afval eruit nemen.
Gebruikte afvalzak wegdoen conform
de wettelijke bepalingen.
Zuigkop eropzetten en vergrendelen.
– Bij het opzuigen van nat vuil moet altijd
de afvalzak verwijderd worden.
Algemeen
Voorzichtig
Bij het zuigen mag de vlakvouwfilter nooit
verwijderd worden.
– Bij het opzuigen van nat vuil met de
kussen- of voegensproeier, en/of indien
er overwegend water uit een container
opgezogen wordt, raden wij u aan om
de functie 'Automatische filterreiniging'
uit te zetten.
– Bij het bereiken van de max. vulstand
schakelt het apparaat automatisch uit.
– Bij niet geleidende vloeistoffen (b.v.
booremulsie, oliën en vetten) wordt
het toestel bij een volle container
niet uitschakeld. De vulstand moet
voortdurend gecontroleerd worden
en de container moet tijdig geleegd
worden.
– Na het stoppen met natzuigen: Vlak-
vouwfilter samen met de filterreiniging
schoonmaken. Elektrodes met een bor-
stel schoonmaken. Reservoir met een
vochtige doek schoonmaken en afdro-
gen.
Clipverbinding
Afbeelding
De zuigslang is van een clip-systeem voorzien. Alle C-35/C-DN-35 accessoires kunnen worden aangesloten.
Bediening
Apparaat inschakelen
Steek de netstekker in de contactdoos.
Schakel het apparaat aan de hoofd-
schakelaar in.
Zuigcapaciteit instellen
Zuigcapaciteit (min-max) instellen met
de draairegelaar.
Werken met elektrische werktuigen
Gevaar
Gevaar voor letsels en beschadigingen! Het
stopcontact ist alleen voor de rechtstreekse
aansluiting van elektrisch gereedschap aan de
zuiger bestemd. Ieder ander gebruik van het
stopcontact ist niet togetsaan.
Stroomstekker van het elektrische
werktuig aan de zuiger insteken.
Schakel het apparaat aan de hoofd-
schakelaar in.
Controlelampje brandt, stofzuiger staat in
standby-modus.
Aanwijzing: De zuiger wordt met het elektrische gereedschap automatisch in- en uitgeschakeld.
Aanwijzing: De zuiger heeft een aanloopvertraging van max. 0,5 seconden en een
nalooptijd van max. 15 seconden.
Aanwijzing: Voor vermogensaansluitwaarde van het elektrische gereedschap,
zie Technische gegevens.
Afbeelding
Aansluitmoffen aanpassen aan de aan-
sluiting van het elektrische werktuig.
Afbeelding
Aansluitmof aan zuigslang monteren.
Afbeelding
Aansluitmof aan elektrisch werktuig
aansluiten.
– 4
45NL
Page 46

Automatische filterreiniging
Het apparaat beschikt over een nieuwe filterreiniging, bijzonder effectief bij fijn stof.
Daarbij wordt de vlakvouwfilter alle 15 seconden automatisch gereinigd door een
luchtstoot (pulserend geluid).
Aanwijzing: De automatische filterreini-
ging is af fabriek ingeschakeld.
Aanwijzing: Het uit-/inschakelen van de
automatische filterreiniging is alleen mogelijk, wanneer het apparaat is ingeschakeld.
– Automatische filterreiniging uitschakelen:
schakelaar bedienen. Controlelampje
in de schakelaar gaat uit.
– Automatische filterreiniging inschakelen:
schakelaar opnieuw bedienen. Contro-
lelampje in de schakelaar brandt groen.
Apparaat uitschakelen
Schakel het apparaat aan de hoofd-
schakelaar uit.
Netstekker uittrekken.
Na elk bedrijf
Reservoir leegmaken.
Apparaat aan de binnen- en buitenkant
reinigen door afzuigen en afvegen met
een vochtige doek.
Apparaat opslaan
Afbeelding
Zuigslang en stroomkabel bewaren in
overeenstemming met de afbeelding.
Apparaat in een droge ruimte plaatsen en
beveiligen tegen onbevoegd gebruik.
Vervoer
Voorzichtig
Gevaar voor letsels en beschadigingen!
Houd bij het transport rekening met het gewicht van het apparaat.
Zuigbuis met vloerkop uit de houder ne-
men. Draag het apparaat aan de draag-
greep en aan de zuigbuis.
Bij het transport in voertuigen moet het
apparaat conform de geldige richtlijnen
beveiligd worden tegen verschuiven en
kantelen.
46 NL
Opslag
Voorzichtig
Gevaar voor letsel en beschadiging! Het
gewicht van het apparaat bij opbergen in
acht nemen.
Het apparaat mag alleen binnen worden
opgeborgen.
Onderhoud
Gevaar
Bij alle werkzaamheden aan het apparaat,
het apparaat uitschakelen en de netstekker
uittrekken.
Stofverwijderende machines zijn veiligheidsinrichtingen voor het voorkomen of elimineren van gevaren in de zin van BGV A1.
– Voor het onderhoud door de gebruiker
moet het apparaat uit elkaar genomen,
gereinigd en onderhouden worden,
voor zover dat uitgevoerd kan worden
zonder dat daarbij gevaren ontstaan
voor het onderhoudspersoneel en andere personen. Geschikte voorzorgsmaatregelen bevatten het ontgiften
vóór de demontage. Voorzorgen nemen voor lokaal gefilterde kunstmatige
verluchting op de plaats waar het apparaat uit elkaar genomen wordt, reiniging
van het onderhoudsoppervlak en geschikte bescherming van het personeel.
–
De buitenkant van het apparaat moet
ontgift en schoongeveegd worden of behandeld worden met afdichtingsmateriaal vooraleer het uit het gevaarlijke
gebied genomen wordt. Alle onderdelen
van het apparaat moeten beschouwd
worden als verontreinigd indien ze uit het
gevaarlijke gebied genomen worden.
– Bij de uitvoering van onderhouds- en
herstellingswerkzaamheden moeten
alle verontreinigde voorwerpen die niet
voldoende gereinigd kunnen worden,
weggegooid worden. Zulke voorwerpen
moeten in ondoorlaatbare zakken en
overeenkomstig de geldende bepalingen betreffende de verwijdering van dat
soort afval verwijderd worden.
– 5
Page 47

몇 Waarschuwing
Veiligheidsinrichtingen ter voorkoming van
gevaren moeten regelmatig onderhouden
worden. Dat betekent tenminste één keer
per jaar door de fabrikant of een opgeleide
persoon gecontroleerd worden op een veiligheidstechnisch perfecte toestand, bv.
dichtheid van het apparaat, beschadiging
van de filter, functie van de controle-inrichtingen.
Voorzichtig
Gevaar voor beschadiging! Geen onderhoudsmiddelen met siliconen gebruiken.
– Eenvoudige onderhouds- en controle-
werkzaamheden kunt u zelf uitvoeren.
– De oppervlakten van het apparaat en
de binnenkant van de container dienen
regelmatig met een vochtige doek ge-
reinigd te worden.
몇 Waarschuwing
Gevaar door stof dat schadelijk is voor de
gezondheid. Bij onderhoudswerkzaamheden (bv. filtervervanging) ademmasker P2
of meer en wegwerpkledij dragen.
Vlakvouwfilter vervangen
Filterafdekking openen.
Vlakvouwfilter eruitnemen.
Gebruikte vlakvouwfilter in een stof-
dichte, gesloten zak en conform de de
wettelijke voorschriften als afval ver-
werken.
Vuil dat aan de verseluchtkant is gaan
zitten, verwijderen.
Nieuwe vlakvouwfilter plaatsen.
Filterafdekking sluiten, moet hoorbaar
in elkaar sluiten.
Papieren filterzak vervangen
Afbeelding
Zuigkop ontgrendelen en wegnemen.
Filterzak naar achteren (eruit trekken.
Schuifsluiting naar boven trekken en fil-
ter goed sluiten bij het uitnemen.
Gebruikte filterzak wegdoen conform
de wettelijke bepalingen.
Nieuwe filterzak aanbrengen.
Zuigkop eropzetten en vergrendelen.
Afvalzak vervangen
Afbeelding
Zuigkop ontgrendelen en wegnemen.
Stofverzamelzak naar boven stulpen.
Opening van de afvalzak over de
zuigaansluiting naar achteren eruit trekken en goed sluiten.
Stofverzamelzak met sluitstrip onder de
opening goed afsluiten.
Afval eruit nemen.
Gebruikte afvalzak wegdoen conform
de wettelijke bepalingen.
Nieuwe afvalzak aanbrengen.
Stofzak over reservoir stulpen.
Zuigkop eropzetten en vergrendelen.
Elektrodes reinigen
Zuigkop ontgrendelen en wegnemen.
Elektrodes met een borstel schoonma-
ken.
Zuigkop eropzetten en vergrendelen.
Hulp bij storingen
Gevaar
Bij alle werkzaamheden aan het apparaat,
het apparaat uitschakelen en de netstekker
uittrekken.
Aanwijzing: Wanneer er een storing (bijv.
filterbreuk) optreedt, moet het apparaat onmiddellijk worden uitgeschakeld. De storing
worden verholpen voordat het apparaat opnieuw wordt ingeschakeld.
– 6
47NL
Page 48

Zuigturbine start niet
Stekker en zekering van de stroom-
voorziening controleren.
Stroomkabel, stekker, elektroden en
contactdoos van het apparaat controle-
ren.
Apparaat inschakelen.
Zuigturbine schakelt uit
Reservoir leegmaken.
Zuigturbine start na het legen van
de container niet opnieuw
Apparaat uitschakelen en 5 seconden
wachten, na 5 seconden weer aanzetten.
Elektrodes en de tussenruimte van de elek-
trodes met een borstel schoonmaken.
Zuigkracht wordt minder
Verstoppingen uit zuigmondstuk, zuigbuis,
zuigslang of vlakvouwfilter weghalen.
Volle filterzak vervangen.
Volle afvalzak vervangen.
Filterafdekking goed vastklikken.
Vlakvouwfilter vervangen.
Er ontsnapt stof bij het zuigen
Controleren of de vlakvouwfilter correct
geplaatst is.
Vlakvouwfilter vervangen.
Uitschakelmechanisme (natzuigen)
springt niet aan
Elektrodes en de tussenruimte van de
elektrodes met een borstel schoonma-
ken.
Vulstand bij elektrisch niet leidende
vloeistof voortdurend controleren.
Automatische filterreiniging werkt
niet
Zuigslang niet aangesloten.
Automatische filterreiniging kan
niet uitgeschakeld worden
Klantendienst contacteren.
Automatische filterreiniging kan
niet ingeschakeld worden
Klantendienst contacteren.
Afvalverwijdering
Het apparaat dient conform de wettelijke
voorschriften aan het einde van de levensduur als afval verwerkt te worden.
Garantie
In ieder land zijn de door ons bevoegde
verkoopkantoor uitgegeven garantiebepalingen van toepassing. Eventuele storingen
aan het apparaat verhelpen wij zonder kosten binnen de garantietermijn, mits een materiaal of fabrieksfout de oorzaak van deze
storing is. Neem bij klachten binnen de garantietermijn contact op met uw leverancier
of de dichtstbijzijnde klantenservicewerkplaats en neem uw aankoopbewijs mee.
Toebehoren en
reserveonderdelen
– Er mogen uitsluitend toebehoren en re-
serveonderdelen gebruikt worden die
door de fabrikant zijn vrijgegeven. Originele toebehoren en reserveonderdelen
bieden de garantie van een veilig en
storingsvrije werking van het apparaat.
– Een selectie van de meest frequent be-
nodigde reserveonderdelen vindt u achteraan in de gebruiksaanwijzing.
48 NL
– 7
Page 49

Reinigingsset
Bestel-nr. 369.845
Benaming Bestelnr. Stuks
Bocht (van
kunststof)
Zuigbuis (van
metaal)
Spleetmondstuk 259.627 1
Vloersproeier 300.659 1
Rubberen lippen van de vloersproeier
aanbrengen (natzuigen)
Afbeelding
Borstelstrook demonteren.
Rubber strippen inbouwen.
Aanwijzing: De gestructueerde kant van
de rubber strippen moet naar buiten wijzen.
297.038 1
300.691 2
EG-conformiteitsverklaring
Hierbij verklaren wij dat de hierna vermelde
machine door haar ontwerp en bouwwijze
en in de door ons in de handel gebrachte
uitvoering voldoet aan de betreffende fundamentele veiligheids- en gezondheidseisen, zoals vermeld in de desbetreffende
EG-richtlijnen. Deze verklaring verliest
haar geldigheid wanneer zonder overleg
met ons veranderingen aan de machine
worden aangebracht.
Product: Droog- / natzuiger
Type: VCE 35 L AC
Van toepassing zijnde EG-richtlijnen
2006/42/EG (+2009/127/EG)
2004/108//EG
Toegepaste geharmoniseerde normen
EN 55014–1: 2006 + A1: 2009
EN 55014–2: 1997 + A2: 2008
EN 60335–1
EN 60335–2–69
EN 61000–3–2: 2006 + A2: 2009
EN 61000–3–3: 2008
EN 62233: 2008
Toegepaste landelijke normen
-
De ondertekenaars handelen in opdracht
en met volmacht van de bedrijfsleiding.
Gevolmachtigde voor de documentatie:
E. Rühle
FLEX Elektrowerkzeuge GmbH
Bahnhofstr. 15
71711 Steinheim/Murr
Steinheim/Murr, 2010/10/01
– 8
49NL
Page 50

Technische gegevens
VCE 35 L AC
Netspanning V 220-240
Frequentie Hz 50/60
Max. vermogen W 1380
Nominaal vermogen W 1200
Inhoud reservoir l 34
Vulhoeveelheid vloeistof l 19
Luchthoeveelheid (max.) m
Onderdruk (max.) kPa (mbar) 23,0 (230)
Vermogensaansluitwaarde van het elektrische ge-
reedschap
Beveiligingsklasse -- IP X4
Beschermingsklasse -- I
Zuigslangaansluiting (C-DN/C-ID) mm 35
Lengte x breedte x hoogte mm 520 x 380 x 580
Typisch bedrijfsgewicht kg 12,5
Omgevingstemperatuur (max.) °C +40
Bepaalde waarden conform EN 60335-2-69
Geluidsdrukniveau L
Onzekerheid K
pA
pA
Hand-arm vibratiewaarde m/s
Onzekerheid K m/s
3
/h 158
W 100-2200
dB(A) 69
dB(A) 1
2
2
<2,5
0,2
Stroomkabel H07RN-F 3x1,5 mm
2
Onderdeelnr. Lengte snoer
EU 297.534 7,5 m
50 NL
– 9
Page 51

Antes del primer uso de su apa-
Español
actúe de acuerdo a sus indicaciones y
guárdelo para un uso posterior o para otro
propietario posterior.
– ¡Antes de la primera puesta en marcha
– El incumplimiento de las instrucciones
– En caso de daños de transporte infor-
rato, lea este manual original,
lea sin falta las instrucciones de uso y
las instrucciones de seguridad n.°
5.956-249!
de uso y de las indicaciones de seguri-
dad puede provocar daños en el apara-
to y poner en peligro al usuario y a otras
personas.
me inmediatamente al fabricante.
Índice de contenidos
Protección del medio ambiente ES . . .1
Símbolos del manual de instruc-
ciones. . . . . . . . . . . . . . . . . ES . . . 1
Uso previsto . . . . . . . . . . . . ES . . .2
Elementos del aparato . . . . ES . . .2
Símbolos en el aparato . . . ES . . .2
Indicaciones de seguridad . ES . . .2
Puesta en marcha . . . . . . . ES . . .3
Manejo . . . . . . . . . . . . . . . . ES . . .4
Transporte . . . . . . . . . . . . . ES . . . 5
Almacenamiento . . . . . . . . ES . . .5
Cuidados y mantenimiento. ES . . .5
Ayuda en caso de avería . . ES . . .7
Eliminación de desechos . . ES . . .7
Garantía . . . . . . . . . . . . . . . ES . . .8
Accesorios y piezas de repuesto ES . . .8
Declaración de conformidad CE ES . . .8
Datos técnicos . . . . . . . . . . ES . . .9
Protección del medio
ambiente
Los materiales empleados para
el embalaje son reciclables y recuperables. No tire el embalaje
a la basura doméstica y entréguelo en los puntos oficiales de
recogida para su reciclaje o recuperación.
Los aparatos viejos contienen
materiales valiosos reciclables
que deberían ser entregados
para su aprovechamiento posterior. Evite el contacto de baterías, aceites y materias
semejantes con el medioambiente. Por este motivo, entregue los aparatos usados en los
puntos de recogida previstos
para su reciclaje.
Símbolos del manual de
instrucciones
Peligro
Para un peligro inminente que acarrea lesiones de gravedad o la muerte.
몇 Advertencia
Para una situación que puede ser peligrosa, que puede acarrear lesiones de gravedad o la muerte.
Precaución
Para una situación que puede ser peligrosa, que puede acarrear lesiones leves o
daños materiales.
– 1
51ES
Page 52

Uso previsto
몇 Advertencia
El aparato es apto para aspirar polvos secos, no inflamables y nocivos para la salud
en máquinas y aparatos: clases de polvo M
establecidas por la norma EN 60 335–2–
69. Restricción: No está permitido aspirar
sustancias cancerígenas.
– Este aspirador está diseñado para la
limpieza de pisos y superficies murales.
– Este aparato es apto para el uso en
aplicaciones industriales, como en ho-
teles, escuelas, hospitales, fábricas,
tiendas, oficinas y negocios de alquiler.
Elementos del aparato
1 Electrodos
2 Manguera de aspiración
3 Gancho portacables
4 Salida de aire, aire de trabajo
5 Bloqueo del cabezal de absorción
6 Rueda
7 Entrada de aire, aire refrigerado del
motor
8 Recipiente acumulador de suciedad
9 Rodillo de dirección
10 Cabezal de aspiración
11 Tubuladura de aspiración
12 Boquilla para suelos (no incluida en el
suministro)
13 Tubería de aspiración (no incluida en el
suministro)
14 Asa de transporte
15 Cubierta del filtro
16 Codo (no incluida en el suministro)
17 Rosca de regulación de la potencia de
aspiración (mín-máx)
18 Piloto de control
19 toma de corriente
20 Limpieza automática de filtro
21 Interruptor principal
22 filtro plano de papel plegado
23 Limpieza de filtro
24 Soporte para boquilla para suelos
25 Soporte para la boquilla para juntas
26 Soporte para la tubería de absorción
27 Cable de conexión a la red
28 Placa de características
Símbolos en el aparato
ADVERTENCIA: Este aparato
contiene polvos nocivos para la
salud. Tanto el vaciado, manteni-
miento, y la eliminación de la bolsa de polvo, solo pueden realizarlo
personas especializadas que lleven un
equipo de seguridad personal apropiado.
No conectar antes de instalar totalmente el
sistema filtrante.
filtro plano de papel plegado
Nº referencia
bolsa filtrante de papel
Nº referencia
Bolsa de desechos
Nº referencia
337.692
296.961
340.766
Indicaciones de seguridad
몇 Advertencia
– Cuando se retorne el aire de escape al
cuarto, debe existir en el mismo una
tasa suficiente de renovación de aire L.
Para respetar el valor límite requerido,
el flujo volumétrico retornado debe ser
como máximo el 50% del flujo volumétrico de aire exterior limpio (volumen del
cuarto V
L
W
cial, es aplicable: L
– El aparato y las sustancias para las que
se debe utilizar, así como el proceso
seguro de eliminar el material tomado,
sólo lo puede realizar personal cualificado.
x tasa de renovación de aire
R
). Sin una medida de aireación espe-
=1h–1.
W
52 ES
– 2
Page 53

– Este aparato contiene polvo nocivo
para la salud. Las tareas de vaciado y
mantenimiento, así como el desechamiento del depósito acumulador de polvo sólo podrán ser realizados por
especialistas ataviados con el correspondiente equipo protector.
– No utilice el aparato sin el sistema de fil-
tración íntegro.
– Se deben respetar las normativas de
seguridad aplicables para los materiales correspondientes a tratar.
Puesta en marcha
El aparato permite 2 modos de funcionamiento:
1 Modo de aspiración industrial (clavija
de enchufe no ocupada)
2 Modo de eliminar polvo (clavija de en-
chufe ocupada)
Conectar la manguera de aspiración y
dotar con una boquilla de aspiración o
conectar al aparato aspirador según el
tipo de funcionamiento.
몇 Advertencia
Efectúe la aspiración únicamente con los
elementos filtrantes; de lo contrario, el motor de aspiración sufrirá daños y se pondrá
en riesgo la salud de las personas debido a
las emisiones de polvo fino.
Sistema antiestático
A través del manguito de empalme se derivan cargas estáticas. Con los accesorios
incluidos electroestáticos y con puesta a
tierra se evitará la formación de chispas y
descargas eléctricas.
Aspiración en seco
– El aparato está equipado con una bolsa
filtrante de papel con pasador de cierre,
ref. 296.961 (5 unidades).
– El aparato está equipado con una bolsa
de basura con pasador y tiras de cierre,
ref. 340.766 (10 unidades).
Nota:Con este aparato se puede aspirar
todo tipo de polvos hasta la clase L. El uso de
una bolsa colectora de polvo (ref. véase sistemas de filtros) está previsto legalmente.
Nota: El aparato es apto como aspirador
industrial para aspirar y para eliminar el
polvo para el funcionamiento móvil para aspirar polvos secos, no inflamables con valores MAK superiores a 1 mg/m
3
.
Precaución
Al aspirar no retirar nunca el filtro plano de
papel plegado.
– Para la aspiración de polvo fino debe
utilizarse una bolsa de papel filtrante o
una bolsa de basura.
Montar la bolsa filtrante de papel
Figura
Desbloquear y extraer el cabezal de as-
piración.
Insertar la bolsa filtrante de papel.
Colocar y bloquear el cabezal de aspi-
ración.
Montar la bolsa de desechos
Figura
Desbloquear y extraer el cabezal de as-
piración.
Insertar la bolsa de basura.
Doblar la bolsa de basura por encima
del depósito.
Colocar y bloquear el cabezal de aspi-
ración.
Aspiración de líquidos
몇 Advertencia
Al aspirar en húmedo no se pueden absorber polvos nocivos para la salud.
Retirar la bolsa filtrante de papel
Figura
Desbloquear y extraer el cabezal de as-
piración.
Extraer hacia atrás la bolsa de papel fil-
trante.
Tirar hacia arriba del pasador de cierre
y cerrar bien la bolsa de papel filtrante
al extraer.
– 3
53ES
Page 54

Eliminar la bolsa de papel filtrante usa-
da de acuerdo con las normativas vigentes.
Colocar y bloquear el cabezal de aspi-
ración.
– Para aspirar suciedad líquida se debe
retirar la bolsa filtrante de papel.
Eliminar la bolsa de desechos
Figura
Desbloquear y extraer el cabezal de as-
piración.
Doblar hacia arriba la bolsa de dese-
chos.
Extraer hacia arriba el orificio de la bol-
sa de desechos por encima del racor de
aspiración y cerrar herméticamente.
Cerrar herméticamente la bolsa de de-
sechos con la tira de cierre por debajo
del orificio.
Extraer la bolsa de basura.
Eliminar la bolsa de desechos usada de
acuerdo con las normativas vigentes.
Colocar y bloquear el cabezal de aspi-
ración.
– Para aspirar suciedad líquida se debe
retirar siempre la bolsa de basura.
General
Precaución
Al aspirar no retirar nunca el filtro plano de
papel plegado.
– Al aspirar suciedad húmeda con la bo-
quilla para tapicerías o juntas (opcional), o cuando se aspira principalmente
agua de un recipiente, se recomienda
desactivar la función „Limpieza automática del filtro“.
– Al alcanzar el máx. nivel de líquido se
apaga automáticamente el aparato.
– En el caso de líquidos no conducto-
res (como emulsión de taladro, aceites y grasas), no se apaga el aparato
cuando el recipiente esté lleno. Se
debe comprobar el nivel continuamente y vaciar a tiempo el recipiente.
– Tras finalizar la aspiración de líquidos:
limpiar el filtro plano de papel plegado
con la limpieza de filtros. Limpiar los
electrodos con un cepillo. Limpiar y secar el recipiente con un paño húmedo.
Enganche de clip
Figura
La manguera de aspiración está equipada
con un sistema de clip. Se pueden conectar
todos los accesorios C-35/C-DN-35.
Manejo
Conexión del aparato
Enchufe la clavija de red.
Conectar el aparato con el interruptor
principal.
Ajustar la potencia de aspiración
Ajustar la potencia de aspiración (min-
max) en la rosca de regulación.
Trabajar con herramientas
eléctricas
Peligro
¡Peligro de lesiones y daños! La clavija sólo
está diseñada para la conexión directa de
herramientas eléctricas al aspirador. No
está permitido utilizar la clavija de enchufe
para otros fines.
Introducir la clavija de red de la herra-
mienta eléctrica en el aspirador.
Conectar el aparato con el interruptor
principal.
Si el piloto se ilumina, la aspiradora está en
modo standby.
Nota: La aspiradora se enciende y apaga
automáticamente con la herramienta eléctrica.
Nota: La aspiradora tiene un retraso de
arranque de hasta 0,5 segundos y hasta 15
segundos de marcha en inercia.
Nota: Valor de potencia de conexión de las herramientas eléctricas, véase Datos técnicos.
Figura
Adaptar el manguito de conexión a la
conexión de la herramienta eléctrica.
54 ES
– 4
Page 55

Figura
Montar el manguito de conexión en la
manguera de succión.
Figura
Conectar el manguito de conexión con
la herramienta eléctrica.
Limpieza automática de filtro
El aparato dispone de una novedosa limpieza de filtro, especialmente efectiva con
el polvo fino. El filtro plano de papel plegado se limpia automáticamente cada 15 segundos con un soplo de aire (ruido
vibrante).
Nota: La limpieza automática de filtro viene
ajustada de fábrica.
Nota: Sólo se puede apagar/encender la
limpieza automática de filtro con el aparato
apagado.
– Apagar la limpieza automática de filtro:
Pulsar el interruptor. El piloto de control
del interruptor se apaga.
– Encender la limpieza automática de filtro:
Pulsar de nuevo el interruptor. El piloto
de control del interruptor se ilumina en
verde.
Desconexión del aparato
Desconectar el aparato con el interrup-
tor principal.
Extraer el enchufe de la red.
Después de cada puesta en marcha
Vacíe el recipiente.
Limpie el aparato por dentro y por fuera
aspirándolo y frotar con un paño húmedo.
Almacenamiento del aparato
Figura
Almacene la manguera de aspiración y
el cable de acuerdo con la ilustración.
Coloque el aparato en un cuarto seco y
protéjalo frente a un uso no autorizado.
Transporte
Precaución
¡Peligro de lesiones y daños! Respetar el
peso del aparato para el transporte.
Sacar el tubo de aspiración con la bo-
quilla para suelos del soporte. Coger el
aparato por el asa y la tubería de aspiración para el transporte.
Al transportar en vehículos, asegurar el
aparato para evitar que resbale y vuelque conforme a las directrices vigentes.
Almacenamiento
Precaución
¡Peligro de lesiones y daños! Respetar el
peso del aparato en el almacenamiento.
Este aparato sólo se puede almacenar en
interiores.
Cuidados y mantenimiento
Peligro
Antes de efectuar cualquier trabajo en el
aparato, hay que desconectarlo de la red
eléctrica.
Las máquinas de eliminación del polvo son
dispositivos de seguridad para la prevención
o la eliminación de riesgos tal y como se señala en la BGV A1 (norma profesional).
– Para la conservación del equipo, el
usuario debe desmontar, limpiar y someter a las tareas de mantenimiento
pertinentes el aparato, siempre que las
circunstancias permitan hacerlo sin poner en peligro al personal de mantenimiento ni a ninguna otra persona. Entre
las medidas preventivas apropiadas se
encuentra la descontaminación antes
del desmontaje. Es necesario adoptar
precauciones en caso de ventilación
forzada filtrada in situ; en ese caso, se
desmonta el aparato, se limpia la superficie de mantenimiento y el personal
debe estar debidamente protegido.
– 5
55ES
Page 56

– El exterior del aparato se debe descon-
taminar aspirando el polvo y se debe
limpiar con un paño; también se puede
tratar con un material impermeabilizante antes de sacarlo de la zona peligrosa. Una vez que se saque el aparato de
la zona peligrosa, se debe considerar
que todas sus partes están sucias.
– Durante los trabajos de mantenimiento
y reparación, se deben desechar todos
los objetos que estén sucios y no se
puedan limpiar suficientemente. Dichos
objetos deberán ser desechados en
bolsas no transparentes, en concordancia con las disposiciones vigentes relativas a la eliminación de ese tipo de
residuos.
몇 Advertencia
Se deben revisar regularmente los dispositivos de seguridad para evitar peligros.
Esto significa que, al menos una vez al
año, el fabricante o una persona cualificada, debe comprobar el funcionamiento de
las cualidades técnicas, p.ej. estanqueidad
del aparato, daño del filtro, funcionamiento
de los dispositivos de control.
Precaución
¡Peligro de daños en la instalación! No utilizar productos de limpieza que contengan
silicona.
– Aquellos trabajos de mantenimiento o
cuidados los puede realizar usted mismo.
– La superficie del aparato y el lateral in-
terno del depósito se deben limpiar regularmente con un paño húmedo.
몇 Advertencia
Peligro por polvo nocivo para la salud. Al
realizar trabajos de mantenimiento (p.ej.
cambio de filtro), utilice una mascarilla protectora P2 o superior y ropa de un solo uso.
Cambiar el filtro plano de papel
plegado
Abrir la cubierta del filtro.
Extraer el filtro plano de papel plegado.
Eliminar el filtro plano de papel plegado
usado en una bolsa cerrada que no
deje salir el polvo de acuerdo con las
normativas vigentes.
Eliminar la suciedad caída en el lateral
de aire limpio.
Coloque el nuevo filtro plano de papel
plegado.
Cerrar la cubierta del filtro, se debe oír
cómo encaja.
Cambiar la bolsa filtrante de papel
Figura
Desbloquear y extraer el cabezal de as-
piración.
Extraer hacia atrás la bolsa de papel fil-
trante.
Tirar hacia arriba del pasador de cierre
y cerrar bien la bolsa de papel filtrante
al extraer.
Eliminar la bolsa de papel filtrante usa-
da de acuerdo con las normativas vigentes.
Insertar una nueva bolsa filtrante de papel.
Colocar y bloquear el cabezal de aspi-
ración.
Cambiar la bolsa de basura
Figura
Desbloquear y extraer el cabezal de as-
piración.
Doblar hacia arriba la bolsa de desechos.
Extraer hacia arriba el orificio de la bol-
sa de desechos por encima del racor de
aspiración y cerrar herméticamente.
Cerrar herméticamente la bolsa de de-
sechos con la tira de cierre por debajo
del orificio.
Extraer la bolsa de basura.
Eliminar la bolsa de desechos usada de
acuerdo con las normativas vigentes.
Insertar una nueva bolsa de basura.
56 ES
– 6
Page 57

Doblar la bolsa de basura por encima
del depósito.
Colocar y bloquear el cabezal de aspi-
ración.
Limpiar los electrodos
Desbloquear y extraer el cabezal de as-
piración.
Limpiar los electrodos con un cepillo.
Colocar y bloquear el cabezal de aspi-
ración.
Ayuda en caso de avería
Peligro
Antes de efectuar cualquier trabajo en el
aparato, hay que desconectarlo de la red
eléctrica.
Nota:Si ocurre una avería (p.ej. rotura del
filtro), se debe apagar inmediatamente el
aparato. Antes de ponerlo de nuevo en
marcha, se debe solucionar la avería.
La turbina de aspiración no
funciona
Comprobar la clavija y el seguro del su-
ministro de corriente.
Comprobar el cable, enchufe, electro-
dos y la clavija del enchufe del aparato.
Conexión del aparato
La turbina de aspiración se
desconecta
Vacíe el recipiente.
La turbina de aspiración no
funciona tras vaciar el recipiente
Apagar el aparato, esperar 5 segundos
y volver a encender tras 5 segundos.
Limpiar los electodos y el espacio entre
los electrodos con un cepillo.
La capacidad de aspiración
disminuye
Eliminar las obstrucciones de la boqui-
lla, tubo o manguera de aspiración o el
filtro plano de papel plegado.
Cambiar la bolsa de papel filtrante llena.
Cambiar las bolsas de basura llenas.
Encajar correctamente la cubierta del
filtro.
Cambiar el filtro plano de papel plegado.
Pérdida de polvo durante la
aspiración
Comprobar si el filtro plano de papel
plegado está montado correctamente.
Cambiar el filtro plano de papel plegado.
El sistema automático de
desconexión (aspiración en
húmedo) no arranca
Limpiar los electodos y el espacio entre
los electrodos con un cepillo.
Controlar el nivel del líquido no conduc-
tor de electricidad permanentemente.
La limpieza automática de filtro no
funciona
La manguera de aspiración no está no
conectada
La limpieza automática de filtro no
se puede apagar
Avisar al servicio técnico.
La limpieza automática de filtro no
se puede encender
Avisar al servicio técnico.
Eliminación de desechos
Se debe eliminar el aparato de acuerdo con
las normativas vigentes cuando caduque.
– 7
57ES
Page 58

Garantía
En todos los países rigen las condiciones
de garantía establecidas por nuestra empresa distribuidora. Las averías del aparato
serán subsanadas gratuitamente dentro
del periodo de garantía, siempre que se deban a defectos de material o de fabricación.
En un caso de garantía, le rogamos que se
dirija con el comprobante de compra al distribuidor donde adquirió el aparato o al servicio al cliente autorizado más próximo a su
domicilio.
Accesorios y piezas de
repuesto
– Sólo deben emplearse accesorios y
piezas de repuesto originales o autorizados por el fabricante. Los accesorios
y piezas de repuesto originales garantizan el funcionamiento seguro y sin averías del aparato.
– Podrá encontrar una selección de las
piezas de repuesto usadas con más
frecuencia al final de las instrucciones
de uso.
Set de limpieza
Nº referencia 369.845
Denominación Nº de pedi-doUnidad
Codo (plástico) 297.038 1
Tubería de aspi-
ración (metal)
Boquilla para
juntas
Boquilla barre-
dora de suelos
Montar los labios de goma de la boquilla
de suelos (aspiración de líquidos)
Figura
Desmontar la tira de cerdas.
Montar los labios de goma.
Nota: El lateral estructurado del borde de
goma tiene que estar para afuera.
300.691 2
259.627 1
300.659 1
Declaración de conformidad
CE
Por la presente declaramos que la máquina designada a continuación cumple, tanto
en lo que respecta a su diseño y tipo constructivo como a la versión puesta a la venta
por nosotros, las normas básicas de seguridad y sobre la salud que figuran en las directivas comunitarias correspondientes. La
presente declaración perderá su validez en
caso de que se realicen modificaciones en
la máquina sin nuestro consentimiento explícito.
Producto: aspirador en húmedo/seco
Modelo: VCE 35 L AC
Directivas comunitarias aplicables
2006/42/CE (+2009/127/CE)
2004/108/CE
Normas armonizadas aplicadas
EN 55014–1: 2006 + A1: 2009
EN 55014–2: 1997 + A2: 2008
EN 60335–1
EN 60335–2–69
EN 61000–3–2: 2006 + A2: 2009
EN 61000–3–3: 2008
EN 62233: 2008
Normas nacionales aplicadas
-
Los abajo firmantes actúan con plenos poderes y con la debida autorización de la dirección de la empresa.
Persona autorizada para la documentación:
E. Rühle
FLEX Elektrowerkzeuge GmbH
Bahnhofstr. 15
71711 Steinheim/Murr
Steinheim/Murr, 2010/10/01
58 ES
– 8
Page 59

Datos técnicos
VCE 35 L AC
Tensión de red V 220-240
Frecuencia Hz 50/60
Potencia Máx. W 1380
Potencial nominal W 1200
Capacidad del depósito l 34
Cantidad de líquido l 19
Cantidad de aire (máx.) m
Depresión (máx.) kPa (mbar) 23,0 (230)
Valor de conexión de potencia de las herramientas
eléctricas
Categoria de protección -- IP X4
Clase de protección -- I
Toma de tubo flexible de aspiración
(C-DN/C-ID)
Longitud x anchura x altura mm 520 x 380 x 580
Peso de funcionamiento típico kg 12,5
Temperatura ambiente (máx.) °C +40
Valores calculados conforme a la norma EN 60335-2-69
Nivel de presión acústica L
Inseguridad K
pA
pA
Valor de vibración mano-brazo m/s
Inseguridad K m/s
3
/h 158
W 100-2200
mm 35
dB(A) 69
dB(A) 1
2
2
<2,5
0,2
Cable de conexión a la
red
H07RN-F 3x1,5 mm
No. de pieza Longitud del
cable
EU 297.534 7,5 m
2
– 9
59ES
Page 60

Leia o manual de manual origi-
Português
lho. Proceda conforme as indicações no
manual e guarde o manual para uma consulta posterior ou para terceiros a quem
possa vir a vender o aparelho.
– Antes de colocar em funcionamento
– A não-observância deste Manual de
– No caso de danos provocados pelo
nal antes de utilizar o seu apare-
pela primeira vez é imprescindível ler
atentamente as indicações de segurança n.º 5.956-249!
Instruções e dos avisos de segurança
poderá levar a danos no aparelho e perigos tanto para o utilizador como para
terceiros.
transporte, informe imediatamente o revendedor.
Índice
Protecção do meio-ambiente
Os materiais da embalagem
são recicláveis. Não coloque as
embalagens no lixo doméstico,
envie-as para uma unidade de
reciclagem.
Os aparelhos velhos contêm
materiais preciosos e recicláveis e deverão ser reutilizados.
Baterias, óleo e produtos similares não podem ser deitados fora
ao meio ambiente. Por isso, elimine os aparelhos velhos através de sistemas de recolha de
lixo adequados.
Símbolos no Manual de
Instruções
Protecção do meio-ambiente PT . . .1
Símbolos no Manual de Instru-
ções . . . . . . . . . . . . . . . . . . PT . . .1
Utilização conforme o fim a que
se destina a máquina . . . . . PT . . .2
Elementos do aparelho . . . PT . . .2
Símbolos no aparelho . . . . PT . . .2
Avisos de segurança . . . . . PT . . .2
Colocação em funcionamento PT . . .3
Manuseamento . . . . . . . . . PT . . .4
Transporte . . . . . . . . . . . . . PT . . .5
Armazenamento. . . . . . . . . PT . . .5
Conservação e manutenção PT . . .5
Ajuda em caso de avarias . PT . . .7
Eliminação . . . . . . . . . . . . . PT . . .7
Garantia . . . . . . . . . . . . . . . PT . . .8
Acessórios e peças sobressa-
lentes . . . . . . . . . . . . . . . . . PT . . .8
Declaração de conformidade
CE . . . . . . . . . . . . . . . . . . . PT . . .8
Dados técnicos. . . . . . . . . . PT . . .9
Perigo
Para um perigo eminente que pode conduzir a graves ferimentos ou à morte.
몇 Advertência
Para uma possível situação perigosa que
pode conduzir a graves ferimentos ou à
morte.
Atenção
Para uma possível situação perigosa que
pode conduzir a ferimentos leves ou danos
materiais.
60 PT
– 1
Page 61

Utilização conforme o fim a
que se destina a máquina
몇 Advertência
Este aparelho é adequado para a aspiração de poeira seca não inflamável e tóxica
em máquinas e aparelhos; classe de poeira L conforme EN 60 335–2–69: Restrição:
não podem ser aspirados produtos carcinogénicos.
– O aspirador serve para limpar pavimen-
tos ou paredes a seco e a húmido.
– Este aparelho destina-se ao uso indus-
trial, p.ex. em hotéis, escolas, hospitais,
fábricas, lojas, escritórios e lojas à exploração.
Elementos do aparelho
1 Eléctrodos
2 Tubo flexível de aspiração
3 Gancho de cabo
4 Saída do ar, ar de trabalho
5 Bloqueio da cabeça de aspiração
6 Roda
7 Entrada de ar, ar de refrigeração do
motor
8 Recipiente de sujidades
9 Rolo de guia
10 Cabeçote de aspiração
11 Bocal de aspiração
12 Bico para pavimentos (não incluído no
volume de fornecimento)
13 Tubo de aspiração (não incluído no vo-
lume de fornecimento)
14 Pega para portar
15 Tampa do filtro
16 Tubo curvo (não incluído no volume de
fornecimento)
17 Regulador de rotação para potência de
aspiração (mín-máx)
18 Lâmpada de controlo
19 Tomada
20 Limpeza automática do filtro
21 Interruptor principal
22 Filtro de pregas
23 Limpeza do filtro
24 Suporte do bocal de chão
25 Suporte para bico de juntas
26 Suporte para tubos de aspiração
27 Cabo de rede
28 Placa de tipo
Símbolos no aparelho
ADVERTÊNCIA: este aparelho
contém pós nocivos para a saúde. O esvaziamento e manuten-
ção, incluindo a eliminação do
saco do pó, só podem ser realizados por
pessoas qualificadas que utilizem equipamento de protecção pessoal adequado.
Não ligar enquanto o completo sistema de
filtração não estiver instalado.
Filtro de pregas
Nº de encomenda
Saco de filtro de papel
Nº de encomenda
Saco de eliminação
Nº de encomenda
337.692
296.961
340.766
Avisos de segurança
몇 Advertência
– Quando o ar de exaustão for enviado
novamente para o ambiente, e imprescindível existir uma gama suficiente de
troca de ar (L) no local. Para manter os
valores-limite exigidos, o débito máximo de ar viciado não poderá ser superior a 50% do débito de ar fresco
(volume da sala V
ar L
). Sem medidas especiais de ven-
W
tilação é válido: L
x gama de troca de
R
=1h–1.
W
– 2
61PT
Page 62

– O manuseamento do aparelho e das
respectivas substâncias, incluindo a eliminação segura do material recolhido,
só pode ser efectuado por funcionários
devidamente instruídos e especializados.
– Esse aparelho contém poeira tóxica.
Processos de esvaziamento e manutenção, incluindo a eliminação dos recipientes colectores de poeira, podem
ser apenas realizados por pessoal especializado que use o respectivo equipamento de protecção necessário.
– Não operar o aparelho sem o sistema
de filtração completo.
– As prescrições de segurança aplicáveis
aos materiais empregues devem ser
respeitas.
Colocação em funcionamento
O aparelho permite dois modos de operação:
1 Operação de aspiração de poeira in-
dustrial (tomada não ocupada)
2 Operação de separação de pó (tomada
ocupada)
Ligar o tubo flexível de aspiração e, de
acordo com o modo de operação escolhido, colocar o bocal de aspiração ou
ligá-lo ao aparelho gerador de poeira.
몇 Advertência
Não aspirar sem elementos de filtragem,
caso contrário o motor de aspiração será
danificado e podem surgir riscos para a
saúde através da emissão aumentada de
poeira fina.
Sistema antiestático
Através do bocal de ligação à terra as cargas estáticas são desviadas. Desta forma,
com o equipamento electrostático ligado à
terra (incluído no volume de fornecimento)
são evitadas formações de faíscas e choques eléctricos.
Aspirar a seco
– O aparelho está equipado com um filtro
de saco de papel com fecho de corrediça; n.º de encomenda: 296.961
(5 unidades).
– O aparelho está equipado com um saco
de eliminação com fecho de corrediça e
tiras de fecho; n.º de encomenda:
340.766 (10 unidades).
Aviso: com este aparelho podem ser aspiradas poeiras de todo o tipo até à classe L.
A utilização de um saco colector de pó (ver
n.º de encomenda em "Sistemas de filtro")
está prescrita legalmente.
Aviso: o aparelho pode ser usado como
aspirador de poeira industrial para aspiração e separação de poeira, em operação
móvel, na aspiração de poeiras não inflamáveis com valores MAK superiores ou
iguais a 1 mg/m
máxima no lugar de trabalho).
Atenção
Nunca retirar o filtro de pregas plano durante a aspiração.
– Para aspirar pó fino é necessário utili-
zar adicionalmente um saco de eliminação ou um saco de filtro de papel.
Montar saco de filtro de papel
Figura
Destravar e retirar o cabeçote de aspi-
ração.
Colocar o saco filtro de papel.
Montar e travar o cabeçote de aspiração.
Montar saco de eliminação
Figura
Destravar e retirar o cabeçote de aspi-
ração.
Posicionar o saco de eliminação.
Colocar o saco de eliminação sobre o
recipiente.
Montar e travar o cabeçote de aspira-
ção.
3
(valor de concentração
62 PT
– 3
Page 63

Aspirar a húmido
몇 Advertência
Durante a aspiração a húmido não podem
ser aspiradas poeiras nocivas para a saúde.
Retirar o saco de papel filtrante
Figura
Destravar e retirar o cabeçote de aspi-
ração.
Puxar o saco do filtro de papel para fora
pelo lado traseiro.
Puxar o fecho de corrediça (3) para
cima e fechar o saco de filtro de papel
ao retirar.
Eliminar o saco de filtro de papel em con-
formidade com a legislação em vigor.
Montar e travar o cabeçote de aspiração.
– Para aspirar sujidade húmida, retirar
sempre o saco de filtro de papel.
Retirar o saco de eliminação
Figura
Destravar e retirar o cabeçote de aspi-
ração.
Virar do avesso o saco de eliminação.
Puxar a abertura do saco de eliminação
para trás, sobre o bocal de aspiração, e
fechar de forma estanque.
Fechar de forma estanque o saco de
eliminação com tiras de fecho, por baixo da abertura.
Retirar o saco de eliminação.
Eliminar o saco de eliminação usado em
conformidade com a legislação em vigor.
Montar e travar o cabeçote de aspiração.
– Na aspiração de sujidade húmida reti-
rar sempre o filtro de eliminação.
Generalidades
Atenção
Nunca retirar o filtro de pregas plano durante a aspiração.
– Na aspiração de sujidade molhada,
com o bocal para almofadas ou para
juntas (opcional), e quando se aspira
na sua maioria água, a partir de um recipiente, recomenda-se desligar a função "Limpeza automática do filtro".
– Ao atingir o nível de líquido máximo, o
aparelho desliga automaticamente.
– Com líquidos não conductíveis (por
exemplo, emulsões de rectificação,
óleos e graxas) o aparelho não se
desliga quando o recipiente estiver
cheio. O nível de enchimento deve
ser permanentemente controlado e o
recipiente esvaziado a tempo.
– Após terminar a aspiração a húmido: lim-
par o filtro de pregas plano com o dispositivo de limpeza de filtros. Limpar os
eléctrodos com uma escova. Limpar o recipiente com um pano húmido e secar.
Conexão clipe
Figura
A mangueira de aspiração está equipada
com um sistema clipe. Todos os acessórios
C-35/C-DN-35 podem ser conectados.
Manuseamento
Ligar a máquina
Ligar a ficha de rede.
Ligar o aparelho no interruptor principal.
Ajustar a potência de aspiração
Ajustar a potência de aspiração (mín-
máx) no regulador rotativo.
Trabalhar com ferramentas
eléctricas
Perigo
Perigo de ferimentos e de danos! A tomada
só está destinada para a ligação directa de
ferramentas eléctricas no aspirador. Qualquer outro tipo de utilização da tomada é
inadmissível.
Inserir a ficha de rede da ferramenta
eléctrica no aspirador.
Ligar o aparelho no interruptor principal.
A lâmpada de controlo brilha, o aspirador
encontra-se no modo standby.
Aviso: o aspirador é ligado e desligado automaticamente com a ferramenta eléctrica.
– 4
63PT
Page 64

Aviso: o aspirador apresenta um retardamento inicial de 0,5 segundos e um período
de funcionamento por inércia de 15 segundos.
Aviso: os dados de ligação e de potência
das ferramentas eléctricas constam nos
dados técnicos.
Figura
Adaptar a luva redutora à conexão da
ferramenta eléctrica.
Figura
Ligar a luva redutora ao tubo flexível de
aspiração.
Figura
Conectar a luva redutora à ferramenta
eléctrica.
Limpeza automática do filtro
O aparelho dispõe de um dispositivo inovador de limpeza do filtro, particularmente eficaz para poeira fina. Neste processo o filtro
de pregas plano é automaticamente limpo
por um jacto de ar (ruído pulsante) em intervalos de 15 segundos.
Aviso: a limpeza automática do filtro é
ajustada de fábrica.
Aviso: a desactivação/activação da limpeza automática do filtro só é possível com o
aparelho ligado.
– Desligar a limpeza automática do filtro:
accionar o interruptor. A lâmpada de
controlo no interruptor apaga.
– Ligar a limpeza automática do filtro:
accionar novamente o interruptor. A
lâmpada de controlo no interruptor brilha verde.
Desligar o aparelho
Desligar o aparelho no interruptor prin-
cipal.
Desligue a ficha da tomada.
Sempre depois de utilizar a
máquina
Esvaziar o recipiente.
Aspirar e esfregar o aparelho por dentro
e por fora para limpá-lo (pano húmido).
Guardar a máquina
Figura
Guardar o tubo flexível do aspirador e o
cabo de rede de acordo com a ilustração.
Colocar o aparelho num local seco e to-
mar as medidas necessárias para evi-
tar uma utilização por parte de pessoas
não autorizadas.
Transporte
Atenção
Perigo de ferimentos e de danos! Ter atenção ao peso do aparelho durante o transporte.
Retirar o tubo de aspiração com o bico
de juntas do apoio. Para transportar o
aparelho deve-se agarrá-lo na pega e
no tubo de aspiração.
Durante o transporte em veículos, pro-
teger o aparelho contra deslizes e tom-
bamentos, de acordo com as directivas
em vigor.
Armazenamento
Atenção
Perigo de ferimentos e de danos! Ter atenção ao peso do aparelho durante o armazenamento.
Este aparelho só pode ser armazenado em
espaços fechados e cobertos.
Conservação e manutenção
Perigo
Desligar o aparelho e retirar a ficha de rede
antes de efectuar quaisquer trabalhos no
aparelho.
As máquinas para eliminar poeiras são instalações de segurança para protecção ou
eliminação de perigos no sentido de BGV
A1.
– Se o utilizador levar a cabo a manuten-
ção, o aparelho deve ser desmontado,
limpo e a manutenção deve ser execu-
tada sem gerar perigo para o pessoal
de manutenção e outras pessoas. As
medidas de precaução adequadas in-
64 PT
– 5
Page 65

cluem a desintoxicação antes da desmontagem. Tomar as medidas
necessárias para uma ventilação forçada e filtrada no lugar onde é desmontado o aparelho assim como para a
limpeza da superfície de manutenção e
a protecção do pessoal.
– O aparelho deve ser desintoxicado por
fora através do processo de aspiração
de poeira e limpo ou tratado com um
produto de vedação antes de ser retirado da área perigosa. Todas as peças
do aparelho devem ser consideradas
como contaminadas quando forem retiradas da área perigosa.
– Na execução de trabalhos de manuten-
ção e de reparação devem ser eliminados todos os objectos contaminados
que não podem ser limpos de forma satisfactoria. Os objectos deste tipo devem ser eliminados em sacos
estanques, em concordância com as
prescrições em vigor para eliminação
de lixo deste tipo.
몇 Advertência
Os dispositivos de segurança para a prevenção ou eliminação de perigos devem
ser submetidos regularmente a manutenção. Isso significa que, pelo menos, uma
vez por ano devem ser verificados pelo fabricante ou por uma pessoa instruída
quanto à função técnica de segurança como, por exemplo, estanqueidade do aparelho, danificação do filtro, função dos
dispositivos de controlo.
Atenção
Perigo de danos! Não utilizar produtos de
limpeza com silicone.
– Os trabalhos simples de manutenção e
conservação podem ser executados
por conta própria.
– A superfície do aparelho e o interior do
recipiente devem ser limpos regularmente com um pano húmido.
몇 Advertência
Perigo devido a pó nocivo para a saúde.
Durante os trabalhos de manutenção (p.
ex. substituição de filtros) utilizar uma máscara de protecção respiratória P2 ou superior e roupa descartável.
Mudar o filtro de pregas plano
Abrir a cobertura do filtro.
Retirar o filtro de pregas.
Eliminar o elemento de pregas usado
num saco fechado e estanque, confor-
me as prescrições legais.
Retirar a sujidade acumulada no lado
de ar puro.
Inserir um novo saco de pregas.
Fechar a cobertura do filtro; deve enga-
tar de forma audível.
Mudar o saco filtro de papel
Figura
Destravar e retirar o cabeçote de aspi-
ração.
Puxar o saco do filtro de papel para fora
pelo lado traseiro.
Puxar o fecho de corrediça (3) para
cima e fechar o saco de filtro de papel
ao retirar.
Eliminar o saco de filtro de papel em
conformidade com a legislação em vi-
gor.
Colocar o novo saco de filtro de papel.
Montar e travar o cabeçote de aspira-
ção.
Substituir o saco de eliminação
Figura
Destravar e retirar o cabeçote de aspi-
ração.
Virar do avesso o saco de eliminação.
Puxar a abertura do saco de eliminação
para trás, sobre o bocal de aspiração, e
fechar de forma estanque.
Fechar de forma estanque o saco de
eliminação com tiras de fecho, por bai-
xo da abertura.
Retirar o saco de eliminação.
– 6
65PT
Page 66

Eliminar o saco de eliminação usado
em conformidade com a legislação em
vigor.
Posicionar o novo saco de eliminação.
Colocar o saco de eliminação sobre o
recipiente.
Montar e travar o cabeçote de aspira-
ção.
Limpar os eléctrodos
Destravar e retirar o cabeçote de aspi-
ração.
Limpar os eléctrodos com uma escova.
Montar e travar o cabeçote de aspira-
ção.
Ajuda em caso de avarias
Perigo
Desligar o aparelho e retirar a ficha de rede
antes de efectuar quaisquer trabalhos no
aparelho.
Aviso: se aparecer uma avaria (por exemplo, quebra de filtro), o aparelho deve ser
desligado imediatamente. Antes de uma
nova colocação em operação deve ser eliminada a avaria.
A turbina de aspiração não funciona
Verificar a tomada e o fusível da ali-
mentação eléctrica.
Verificar o cabo de rede, ficha, eléctro-
dos e a tomada do aparelho.
Ligar o aparelho.
A turbina de aspiração desliga
Esvaziar o recipiente.
A turbina de aspiração não torna a
arrancar depois de esvaziar o
recipiente
Desligar o aparelho e esperar 5 segun-
dos; religar após 5 segundos.
Limpar os eléctrodos e o espaço entre
os mesmos com uma escova.
A força de aspiração diminui
Retirar entupimentos do bocal de aspi-
ração, tubo de aspiração, mangueira de
aspiração ou filtro de dobras planas.
Substituir o saco de filtro de papel
cheio.
Trocar o saco de eliminação cheio.
Encaixar bem a cobertura do filtro.
Mudar o filtro de pregas plano.
Durante a aspiração sai pó
Verificar a posição correcta do filtro de
pregas plano.
Mudar o filtro de pregas plano.
A desconexão automática
(aspiração a húmido) não actua
Limpar os eléctrodos e o espaço entre
os mesmos com uma escova.
Controlar permanentemente o nível de
enchimento de líquidos electricamente
não conductíveis.
A limpeza automática do filtro não
funciona
Tubo flexível de aspiração não está co-
nectado.
A limpeza automática do filtro não
desliga
Avisar o serviço de assistência técnica.
A limpeza automática do filtro não
liga
Avisar o serviço de assistência técnica.
Eliminação
O aparelho deve ser eliminado no final da
sua vida útil conforme as prescrições legais.
66 PT
– 7
Page 67

Garantia
Em cada país vigem as respectivas condições de garantia estabelecidas pelas nossas Empresas de Comercialização.
Eventuais avarias no aparelho durante o
período de garantia serão reparadas, sem
encargos para o cliente, desde que se trate
dum defeito de material ou de fabricação.
Em caso de garantia, dirija-se, munido do
documento de compra, ao seu revendedor
ou ao Serviço Técnico mais próximo.
Acessórios e peças
sobressalentes
– Só devem ser utilizados acessórios e
peças de reposição autorizados pelo
fabricante do aparelho. Acessórios e
Peças de Reposição Originais - fornecem a garantia para que o aparelho
possa ser operado em segurança e
isento de falhas.
– No final das Instruções de Serviço en-
contra uma lista das peças de substituição mais necessárias.
Conjunto de limpeza
N.º de encomenda 369.845
Denominação N.º de enco-
menda
Tubo curvo (sintético)
Tubo de aspiração (metal)
Bocal para juntas 259.627 1
Bico para o chão 300.659 1
Montar os lábios de borracha do bico
para pavimentos (aspiração a húmido)
Figura
Desmontar as tiras da escova.
Montar lábios de borracha.
Aviso: a parte estruturada dos lábios de
borracha deve ser virada para fora.
297.038 1
300.691 2
Unidades
Declaração de conformidade
CE
Declaramos que a máquina a seguir designada corresponde às exigências de segurança e de saúde básicas estabelecidas
nas Directivas CE por quanto concerne à
sua concepção e ao tipo de construção assim como na versão lançada no mercado.
Se houver qualquer modificação na máquina sem o nosso consentimento prévio, a
presente declaração perderá a validade.
Produto: Aspirador húmido e seco
Tipo: VCE 35 L AC
Respectivas Directrizes da CE
2006/42/CE (+2009/127/CE)
2004/108/CE
Normas harmonizadas aplicadas
EN 55014–1: 2006 + A1: 2009
EN 55014–2: 1997 + A2: 2008
EN 60335–1
EN 60335–2–69
EN 61000–3–2: 2006 + A2: 2009
EN 61000–3–3: 2008
EN 62233: 2008
Normas nacionais aplicadas
-
Os abaixo assinados têm procuração para
agir e representar a gerência.
Responsável pela documentação:
E. Rühle
FLEX Elektrowerkzeuge GmbH
Bahnhofstr. 15
71711 Steinheim/Murr
Steinheim/Murr, 2010/10/01
– 8
67PT
Page 68

Dados técnicos
VCE 35 L AC
Tensão da rede V 220-240
Frequência Hz 50/60
Potência máx. W 1380
Potência nominal W 1200
Conteúdo do recipiente l 34
Quantidade de enchimento do líquido l 19
Volume de ar (máx.) m
Subpressão (máx.) kPa (mbar) 23,0 (230)
Valor da potência instalada das ferramentas eléctri-
cas
Tipo de protecção -- IP X4
Classe de protecção -- I
Ligação do tubo flexível de aspiração
(C-DN/C-ID)
Comprimento x Largura x Altura mm 520 x 380 x 580
Peso de funcionamento típico kg 12,5
Temperatura ambiente (máx.) °C +40
Valores obtidos segundo EN 60335-2-69
Nível de pressão acústica L
Insegurança K
pA
pA
Valor de vibração mão/braço m/s
Insegurança K m/s
3
/h 158
W 100-2200
mm 35
dB(A) 69
dB(A) 1
2
2
<2,5
0,2
Cabo de
rede
H07RN-F 3x1,5 mm
Refª Comprimen-
2
to do cabo
EU 297.534 7,5 m
68 PT
– 9
Page 69

Læs original brugsanvisning in-
Dansk
gerne og opbevar vejledningen til senere
efterlæsning eller til den næste ejer.
– Inden første ibrugtagelse skal betje-
– Hvis driftsvejledningen og sikkerheds-
– Ved transportskader skal forhandleren
den første brug, følg anvisnin-
ningsvejledningen og sikkerhedshenvisningerne nr. 5.956-249 læses!
anvisningerne ikke overholdes, kan der
opstå skader på apparatet og risici for
brugeren og andre personer.
informeres omgående.
Indholdsfortegnelse
Miljøbeskyttelse . . . . . . . . . DA . . . 1
Symbolerne i driftsvejledningen DA . . . 1
Bestemmelsesmæssig anvendel-
se . . . . . . . . . . . . . . . . . . . . DA . . . 2
Maskinelementer . . . . . . . . DA . . . 2
Symboler på maskinen. . . . DA . . . 2
Sikkerhedsanvisninger . . . . DA . . . 2
Ibrugtagning . . . . . . . . . . . . DA . . . 3
Betjening . . . . . . . . . . . . . . DA . . . 4
Transport . . . . . . . . . . . . . . DA . . . 5
Opbevaring. . . . . . . . . . . . . DA . . . 5
Pleje og vedligeholdelse . . DA . . . 5
Hjælp ved fejl . . . . . . . . . . . DA . . . 6
Bortskaffelse . . . . . . . . . . . DA . . . 7
Garanti . . . . . . . . . . . . . . . . DA . . . 7
Tilbehør og reservedele . . . DA . . . 7
EU-overensstemmelseserklæring DA . . . 8
Tekniske data. . . . . . . . . . . DA . . . 9
Miljøbeskyttelse
Emballagen kan genbruges.
Smid ikke emballagen ud sammen med det almindelige husholdningsaffald, men aflever
den til genbrug.
Udtjente apparater indeholder
værdifulde materialer, der kan
og bør afleveres til genbrug.
Batterier, olie og lignende stoffer er ødelæggende for miljøet.
Aflever derfor udtjente apparater på en genbrugsstation eller
lignende.
Symbolerne i
driftsvejledningen
Risiko
En umiddelbar truende fare, som kan føre
til alvorlige personskader eller død.
몇 Advarsel
En muligvis farlig situation, som kan føre til
alvorlige personskader eller til død.
Forsigtig
En muligvis farlig situation, som kan føre til
personskader eller til materialeskader.
– 1
69DA
Page 70

Bestemmelsesmæssig
anvendelse
몇 Advarsel
Maskinen er beregnet til udsugning af tørt,
ikke brændbart, sundhedsskadelig støv fra
maskiner og apparater; støvklasse L iht.
EN 60 335–2-69. Begrænsning: Der må
ikke indsuges kræftfremkaldende stoffer.
– Maskinen er til våd- og tørrensning af
gulvflader og vægge.
– Denne maskine er egnet til erhvervs-
mæssig brug, f.eks. på hoteller, skoler,
sygehuse, fabrikker, butikker, kontorer
og udlejningsvirksomheder.
Symboler på maskinen
ADVARSEL: Denne maskine indeholder sundhedsfarligt støv.
Tømning og vedligeholdelse, in-
klusive fjernelse af støvposen,
må kun gennemføres af sagkyndige personer under anvendelse af egnet personværn. Må ikke tilkobles inden filtersystemet
er fuldstændig monteret.
Fladt foldefilter
Bestillingsnr.
Papirfilterpose
337.692
Maskinelementer
1 Elektroder
2 Sugeslange
3 Kabelkrog
4 Luftudtag, arbejdsluft
5 Sugehovedets låsemekanisme
6 Hjul
7 Luftindtag, motor-køleluft
8 Snavsbeholder
9 Styringsrulle
10 Sugehoved
11 Sugestuds
12 Gulvdyse (ikke inkluderet i leveringen)
13 Sugerør (ikke inkluderet i leveringen)
14 Bæregreb
15 Filterdæksel
16 Rørbøjning (ikke inkluderet i leveringen)
17 Drejeregulator til sugeeffekt (min-max)
18 Kontrollampe
19 Stikkontakt
20 Automatisk filterrensning
21 Hovedafbryder
22 Fladt foldefilter
23 Rengøring af filter
24 Holder til gulvdyse
25 Holder til fugedysen
26 Holder til sugerør
27 Netkabel
28 Typeskilt
Bestillingsnr.
Bortskaffelsespose
Bestillingsnr.
296.961
340.766
Sikkerhedsanvisninger
몇 Advarsel
– Hvis returluften føres tilbage i rummet,
skal der være en tilstrækkelig høj luftskifterate L i lokalet. For at overholde de
påkrævede grænseværdier, må den tilbageførte volumenstrøm max.. udgøre
50 % af friskluftvolumenstrømmen
(rumvolumen V
Uden særlige udluftningstiltag gælder
følgende: L
– Brug af apparatet og stofferne, for hvil-
ke apparatet skal anvendes, inklusive
den sikre metode til at bortskaffe de opsugede materialer, må kun gennemføres af trænet personale.
– Dette apparat indeholder sundhedsfar-
ligt støv. Tømning og vedligeholdelse,
inkl. fjernelse af støvopsamlingsbeholdere, skal altid udføres af fagfolk iført
korrekt sikkerhedsudstyr.
x luftskifterate LS).
R
=1h–1.
S
70 DA
– 2
Page 71

– Apparatet må ikke anvendes uden et
komplet filtersystem.
– De anvendelige sikkerhedsregler til ma-
terialerne, som skal behandles, skal
overholdes.
Ibrugtagning
Apparatet har 2 driftsarter:
1 Industristøvsugerfunktion (stikkontakt
ikke i brug)
2 Afsugerfunktion (stikkontakt i brug)
Slut sugeslangen til, og forsyn den en-
ten med afsugningsdyse eller slut den
til den støvproducerende maskine.
몇 Advarsel
Der må kun suges, når alle filterelementer
er monteret, da sugemotoren i modsat fald
beskadiges, og der opstår sundhedsfare
pga. øget afgivelse af fint støv!
Antistatisk system
Ved hjælp af det jordede tilslutningsstykke
bliver statiske ladninger bortledt. På den
måde forhindres gnistdannelse og strømstød ved brug af det konduktive tilbehør,
som kommer med leverancen.
Tørsugning
– Maskinen kommer med en bortskaffel-
sespose med lukning, bestillingsnr.
296.961 (5 styk).
– Maskinen kommer med en bortskaffel-
sespose med lukning og lukningsstribe,
bestillingsnr. 340.766 (10 styk).
Bemærk:Maskinen er beregnet til udsug-
ning af alle typer støv indtil støvklasse L.
Brugen af en sikkerhedsfiltersæk (bestillingsnummer se "Filtersystemer") er forskrevet af lovgiveren.
Bemærk: Maskinen er beregnet som industristøvsuger til opsugning og som opsuger
til mobil funktion til opsugning af tørt, ikke
brændbart støv med MAK-værdier større
end 1 mg/m
3
.
Forsigtig
Under sugningen må det flade foldefilter aldrig fjernes.
– Hvis der opsuges fintstøv skal der yder-
ligere bruges en en papirfilterpose eller
bortskaffelsespose.
Isæt papirfilterpose
Figur
Tag sugehovedet ud af indgreb og tag
det af.
Sæt papirfilterposen på.
Sæt sugehovedet på og lås det fast.
Isæt bortskaffelsesposen
Figur
Tag sugehovedet ud af indgreb og tag
det af.
Sæt snavsposen på.
Smøg snavsposen over beholderen.
Sæt sugehovedet på og lås det fast.
Vådsugning
몇 Advarsel
Ved vådsugning må der ikke indsuges
sundhedsfarligt støv.
Fjern papirfilterposen
Figur
Tag sugehovedet ud af indgreb og tag
det af.
Træk papirfilterposen tilbage og træk
den ud.
Træk låseskyderen opad og luk papirfil-
terposen tæt, når den tages ud.
Brugte papirfilterposer bortskaffes iht.
de gældende love.
Sæt sugehovedet på og lås det fast.
– Papirfilterposen skal altid fjernes når
der opsuges våd snavs.
Fjerne bortskaffelsesposen
Figur
Tag sugehovedet ud af indgreb og tag
det af.
Slå bortskaffelsesposen op.
Træk bortskaffelsesposens åbning over
sugestudsen tilbage og luk posen tæt.
Bortskaffelsesposen skal lukkes tæt ne-
denfor åbningen ved hjælp af låsestrimlen.
– 3
71DA
Page 72

Fjerne bortskaffelsesposen.
Brugte bortskaffelsesposer bortskaffes
iht. de gældende love.
Sæt sugehovedet på og lås det fast.
– Bortskaffelsesfiltret skal altid fjernes når
der opsuges våd snavs.
Generelt
Forsigtig
Under sugningen må det flade foldefilter aldrig fjernes.
– Ved opsugning af våd snavs med mø-
bel- eller fugedysen (option), eller hvis
der fortrinsvis suges vand op af en be-
holder, anbefales det at slå funktionen
"Automatisk filterrensning" fra.
– Når det maksimale væskeniveau er nå-
et, slukker apparatet automatisk.
– Ved ikke ledende væsker (f.eks. bo-
reemulsion, olie og fedt) slukker ap-
paratet ikke, når beholderen er fuld.
Påfyldningsniveauet skal konstant
kontrolleres, og beholderen tømmes
i god tid.
– Efter opsugning af våd snavs er afslut-
tet: Rens det flade folderfilter med filte-
rensningen. Rens elektroderne med en
børste. Rens beholderen med en fugtet
klud og tør beholderen.
Klipforbindelse
Figur
Sugeslangen er udstyret med et klipsystem. Alle C-35/C-DN-35 tilbehørsdele kan
tilsluttes.
Betjening
Tænd for maskinen
Sæt netstikket i.
Tænd maskinen med hovedafbryderen.
Indstil sugeeffekt
Sugeeffekten (min-maks) kan indstilles
på regulatoren.
Arbejde med el-værktøjer
Risiko
Fare for person- og materialeskader! Stikdåsen er kun beregnet til direkte tilslutning
af el-værktøjer til sugeren. Et hvert andet
brug af stikdåsen er forbudt.
Sæt el-værktøjets netstik i sugeren.
Tænd maskinen med hovedafbryderen.
Kontrollampen lyser, sugeren er i standbymodus.
Bemærk: Sugeren tændes og slukkes
automatisk sammen med el-værktøjet.
Bemærk: Sugeren har en startforsinkelse
på op til 0,5 sekunder og et efterløb på op
til 15 sekunder.
Bemærk:El-værktøjernes effekttilslutningsdata, se tekniske data.
Figur
Tilpas tilslutningsmuffen til el-værktø-
jets tilslutning.
Figur
Monter tilslutningsmuffen på sugeslangen.
Figur
Slut tilslutningsmuffen til el-værktøjet.
Automatisk filterrengøring
Sugeren er udstyret med et nyudviklet filterrengøringssystem, særdeles effektivt til fint
støv. Derved rengøres det flade foldefilter
hver 15. sekund automatisk med et luftstød
(pulserende lyd).
Bemærk: Den automatiske filterrengøring
er slået til fra fabrikkens side.
Bemærk: Den automatiske filterrengøing
kan slås til/fra, når maskinen er tændt.
– Sådan slås den automatiske filterren-
gøring fra:
Tryk på kontakten. Kontrollampen i kon-
takten slukkes.
– Sådan slås den automatiske filterren-
gøring til:
Tryk gentagne gange på kontakten.
Kontrollampen i kontakten lyser grøn.
Sluk for maskinen
Sluk maskinen med hovedafbryderen.
Træk netstikket ud.
72 DA
– 4
Page 73

Efter hver brug
Tøm beholderen
Maskinen rengøres indvendigt og ud-
vendigt ved at støvsuge den og tørre
den af med en fugtet klud.
Opbevaring af damprenseren
Figur
Sugeslange og netkablet opbevares
ifølge figuren.
Opbevar maskinen i et tørt rum og sørg
for at sikre den mod uvedkommendes
brug.
Transport
Forsigtig
Fare for person- og materialeskader! Hold
øje med maskinens vægt ved transporten.
Fjern sugerøret med gulvdysen fra hol-
deren. Hold maskinen fast på håndta-
get og sugerøret hvis den skal løftes.
Ved transport i biler skal renseren fast-
spændes i.h.t. gældende love.
Opbevaring
Forsigtig
Fare for person- og materialeskader! Hold
øje med maskinens vægt ved opbevaring.
Denne maskine må kun opbevares indendørs.
Pleje og vedligeholdelse
Risiko
Træk netstikket og afbryd maskinen inden
der arbejdes på maskinen.
Støvfjernende maskiner er sikkerhedsanordninger til forebyggelse eller afhjælpning
af farer iht. gældende sikkerhedskrav.
– Brugerens vedligeholdelse kræver, at
apparatet skilles ad, rengøres og vedli-
geholdes, såfremt dette er muligt uden,
at der opstår fare for servicepersonalet
og andre personer. Passende forsigtig-
hedstiltag omfatter afgiftning inden af-
monteringen. Sørg for, at etablere lokalt
filtreret tvangsudluftning på det sted,
hvor apparatet skilles ad. Sørg endvidere for at rengøre vedligeholdelsesfladen, og at personalet er udstyret med
passende beskyttelsesudstyr.
– Apparatets yderside skal afgiftes ved
støvsugning og tørres af eller behandles med tætningsmiddel, før det tages
ud af det farlige område. Alle dele af apparatet skal behandles som værende
forurenet, når de tages ud af det farlige
område.
– Når der udføres service- og reparati-
onsarbejder skal alle forurenede genstande, der ikke kan rengøres
tilfredsstillende, smides væk. Sådanne
genstande skal bortskaffes i støvtæt
lukkede poser iht. til de gældende bestemmelser for bortskaffelse af sådant
affald.
몇 Advarsel
Sikkerhedsindretninger til prævenstion af
farer, skal vedligeholdes i regelmæssige intervaller. Dvs., kontrolleres mindst en gang
om året af producenten eller en trænet person med hensyn til alle sikkerhedstekniske
funktioner, f.eks. apparatets tæthed, skader på filteret, funktion af kontrolindretninger.
Forsigtig
Risiko for beskadigelse! Brug ikke silikoneholdige rengøringsmidler til rengøringen.
– Enkle vedligeholdelsesarbejder kan De
selv udføre.
– Apparatets overflade og indersiden af
beholderen bør jævnligt rengøres med
en fugtig klud.
몇 Advarsel
Risiko på grund af sundhedsfarligt støv.
Ved vedligeholdelsesarbejder (f.eks. filterskift) skal de altid bruges en beskyttelsesmaske P2 eller højere og
engangsbeklædning.
– 5
73DA
Page 74

Udskiftning af det flade foldefilter
Åbn filterafdækningen.
Fjern det flade foldefilter.
Det udtjente filterelement skal bortskaf-
fes i en støvtæt lukket pose iht. de gæl-
dende bestemmelser.
Fjern evt. snavs på renluftsiden.
Sæt et nyt fladt foldefilter i.
Luk filterafdækningen. Den skal gå hør-
bart i indgreb.
Udskiftning af papirfilterpose
Figur
Tag sugehovedet ud af indgreb og tag
det af.
Træk papirfilterposen tilbage og træk
den ud.
Træk låseskyderen opad og luk papirfil-
terposen tæt, når den tages ud.
Brugte papirfilterposer bortskaffes iht.
de gældende love.
Sæt ny papirfilterposen på.
Sæt sugehovedet på og lås det fast.
Udskift bortskaffelsesposer
Figur
Tag sugehovedet ud af indgreb og tag
det af.
Slå bortskaffelsesposen op.
Træk bortskaffelsesposens åbning over
sugestudsen tilbage og luk posen tæt.
Bortskaffelsesposen skal lukkes tæt ne-
denfor åbningen ved hjælp af låsestrim-
len.
Fjerne bortskaffelsesposen.
Brugte bortskaffelsesposer bortskaffes
iht. de gældende love.
Sæt ny bortskaffelsespose på.
Smøg snavsposen over beholderen.
Sæt sugehovedet på og lås det fast.
Rengøring af elektroder
Tag sugehovedet ud af indgreb og tag
det af.
Rens elektroderne med en børste.
Sæt sugehovedet på og lås det fast.
74 DA
Hjælp ved fejl
Risiko
Træk netstikket og afbryd maskinen inden
der arbejdes på maskinen.
Bemærk:Hvis der opstår en fejl (f.eks. filterbrud), skal der omgående slukkes for
maskinen. Fejlen skal afhjælpes, inden maskinen tages i brug igen.
Sugeturbine virker ikke
Kontroller stikdåsen og strømforsynin-
gens sikring.
Kontroller strømledningen, netstikket
og maskinens elektroder og stikdåser.
Tænd for maskinen.
Sugeturbinen slukker
Tøm beholderen
Sugeturbinen starter ikke igen efter
tømning af beholderen
Sluk for apparatet, vent i 5 sekunder, og
tænd igen.
Rengør elektroderne samt mellemrum-
met mellem elektroderne med en børste.
Nedsat sugeevne
Fjern forstoppelser fra dysen, sugerør,
sugeslangen eller det flade foldefilter.
Udskift den fyldte papirfilterpose.
Udskift den fyldte bortskaffelsespose.
Sørg for, at filterafdækningen går rigtigt
i indgreb.
Skift det flade foldefilter ud.
Der strømmer støv ud under
sugning
Kontroller, at det flade foldefilter er
monteret korrekt.
Skift det flade foldefilter ud.
Frakoblingsautomatikken
(vådsugning) virker ikke
Rengør elektroderne samt mellemrum-
met mellem elektroderne med en børste.
Kontroller påfyldningsniveauet konstant
ved væsker, der ikke er strømledende.
– 6
Page 75

Automatisk filterrengøring fungerer
ikke
Sugeslange ikke tilsluttet.
Den automatiske filterrengøring kan
ikke slås fra
Kontakt kundeservice.
Den automatiske filterrengøring kan
ikke slås til
Kontakt kundeservice.
Bortskaffelse
Når apparatet er udtjent, skal det bortskaffes iht. de gældende bestemmelser.
Garanti
I de enkelte lande gælder de af vore forhandlere fastlagte garantibetingelser.
Eventuelle fejl på apparatet afhjælpes gratis inden for garantien, såfremt fejlen kan tilskrives en materiale- eller produktionsfejl.
Hvis De ønsker at gøre garantien gældende, bedes De henvende Dem til Deres forhandler eller nærmeste kundeservice
medbringende kvittering for købet.
Rengøringssæt
Bestillingsnr. 369,845
Betegnelse Bestil-
lingsnr.
Rørbøjning
(kunststof)
Sugerør (metal) 300.691 2
Fugemundstykke 259.627 1
Gulvmundstykke 300.659 1
Montere gulvdysens gummilæber (vådsugning)
Figur
Afmontere børstestrimlen.
Montere gummilæberne.
Bemærk: Struktursiden på gummilæberne
skal pege udad.
297.038 1
Styk.
Tilbehør og reservedele
– Der må kun anvendes tilbehør og reser-
vedele, der er godkendt af producen-
ten. Originaltilbehør og -reservedele er
en garanti for, at maskinen kan fungere
sikkert og uden fejl.
– Et udvalg over de reservedele som bru-
ges meget ofte finder De i slutningen af
betjeningsvejledningen
– 7
75DA
Page 76

EU-overensstemmelseser-
klæring
Hermed erklærer vi, at den nedenfor nævnte maskine i design og konstruktion og i den
af os i handlen bragte udgave overholder
de gældende grundlæggende sikkerhedsog sundhedskrav i EF-direktiverne. Ved
ændringer af maskinen, der foretages uden
forudgående aftale med os, mister denne
erklæring sin gyldighed.
Produkt: Våd- og tørsuger
Type: VCE 35 L AC
Gældende EF-direktiver
2006/42/EF (+2009/127/EF)
2004/108/EF
Anvendte harmoniserede standarder
EN 55014–1: 2006 + A1: 2009
EN 55014–2: 1997 + A2: 2008
EN 60335–1
EN 60335–2–69
EN 61000–3–2: 2006 + A2: 2009
EN 61000–3–3: 2008
EN 62233: 2008
Anvendte tyske standarder
-
Undertegnede handler på vegne af og med
fuldmagt fra ledelsen.
Dokumentationsbefuldmægtiget:
E. Rühle
FLEX Elektrowerkzeuge GmbH
Bahnhofstr. 15
71711 Steinheim/Murr
Steinheim/Murr, 2010/10/01
76 DA
– 8
Page 77

Tekniske data
VCE 35 L AC
Netspænding V 220-240
Frekvens Hz 50/60
Max. effekt W 1380
Nominel ydelse W 1200
Beholderindhold l 34
Fyldmængde væske l 19
Luftmængde (max.) m
Undertryk (max.) kPa (mbar) 23,0 (230)
Tilslutningseffekt af el-værktøjet W 100-2200
Kapslingsklasse -- IP X4
Beskyttelsesklasse -- I
Sugeslangetilslutning (C-DN/C-ID) mm 35
Længde x bredde x højde mm 520 x 380 x 580
Typisk driftsvægt kg 12,5
Omgivelsestemperatur (max.) °C +40
Oplyste værdier ifølge EN 60335-2-69
Lydtryksniveau L
Usikkerhed K
pA
pA
Hånd-arm vibrationsværdi m/s
Usikkerhed K m/s
3
/h 158
dB(A) 69
dB(A) 1
2
2
<2,5
0,2
Netkabel H07RN-F 3x1,5 mm
Partnr. Kabellængde
EU 297.534 7,5 m
2
– 9
77DA
Page 78

Før første gangs bruk av appa-
Norsk
anvisningen , følg den og oppbevar den for
senere bruk eller fo overlevering til neste eier.
– Det er tvingende nødvendig å lese sik-
– Hvis bruksanvisningen og sikkerhets-
– Informer straks forhandleren ved trans-
ratet, les denne originale bruks-
kerhetsinstruksene nr. 5.956-249 før
maskinen settes i drift!
anvisningene ikke følges, kan dette
medføre skader på apparatet og fare for
brukeren og andre personer.
portskader.
Innholdsfortegnelse
Miljøvern. . . . . . . . . . . . . . . NO . . .1
Symboler i bruksanvisningen NO . . .1
Forskriftsmessig bruk . . . . . NO . . .1
Maskinorganer . . . . . . . . . . NO . . .2
Symboler på maskinen. . . . NO . . .2
Sikkerhetsanvisninger . . . . NO . . .2
Ta i bruk . . . . . . . . . . . . . . . NO . . .3
Betjening . . . . . . . . . . . . . . NO . . .4
Transport . . . . . . . . . . . . . . NO . . .5
Lagring . . . . . . . . . . . . . . . . NO . . .5
Pleie og vedlikehold . . . . . . NO . . .5
Feilretting . . . . . . . . . . . . . . NO . . .6
Avfallshåndtering . . . . . . . . NO . . .6
Garanti . . . . . . . . . . . . . . . . NO . . .7
Tilbehør og reservedeler . . NO . . .7
EU-samsvarserklæring. . . . NO . . .7
Tekniske data. . . . . . . . . . . NO . . .8
Miljøvern
Materialet i emballasjen kan resirkuleres. Ikke kast emballasjen i husholdningsavfallet, men
lever den inn til resirkulering.
Gamle apparater inneholder
verdifulle materialer som kan resirkuleres. Disse bør leveres inn
til gjenvinning. Batterier, olje og
lignende stoffer må ikke komme
ut i miljøet. Gamle maskiner
skal derfor avhendes i egnede
innsamlingssystemer.
Symboler i bruksanvisningen
Fare
For en umiddelbar truende fare som kan
føre til store personskader eller til død.
몇 Advarsel
For en mulig farlig situasjon som kan føre til
store personskader eller til død.
Forsiktig!
For en mulig farlig situasjon som kan føre til
mindre personskader eller til materielle
skader.
Forskriftsmessig bruk
몇 Advarsel
Apparatet er ment for oppsuging av tørt,
ikke brennbart, ikke helseskadelig støv fra
maskiner og apparater, egnet for støvklasse L etter EN 60 335–2–69. Begrensning:
Det må ikke suges opp kreftfremkallende
stoffer.
– Denne maskinen er beregnet for våt- og
tørr-rengjøring av gulv- og veggflater.
– Denne maskinen egner seg til industri-
elt bruk, f.eks. i hoteller, skoler, sykehus, fabrikker, butikker, kontorer og
utleiefirmaer.
78 NO
– 1
Page 79

Maskinorganer Symboler på maskinen
1 Elektroder
2 Sugeslange
3 Kabelkroker
4 Luftutløp, arbeidsluft
5 Låsing av sugehode
6 Hjul
7 Luftinntak, motor-kjøleluft
8 Smussbeholder
9 Styrerulle
10 Sugehode
11 Sugestusser
12 Gulvdyse (ikke i standard leveringsomfang)
13 Sugerør (ikke i standard leveringsomfang)
14 Bærehåndtak
15 Filterdeksel
16 Albue (ikke i standard leveringsomfang)
17 Dreieregulator for sugeeffekt (min-max)
18 Kontrollampe
19 Stikkontakt
20 Automatisk filterrensing
21 Hovedbryter
22 Foldefilter
23 Rensing av filter
24 Holder for gulvdyse
25 Holder for fugedyse
26 Holder for sugerør
27 Nettledning
28 Typeskilt
ADVARSEL: Maskinen inneholder helseskadelig støv. Tømming og vedlikehold, inkludert
fjerning av støvpose, skal kun utføres av sakkyndig personale som bruker
egnet personlig verneutstyr. Ikke slå på før
hele filtersystemet er installert.
Foldefilter
Bestillings-
337.692
nr.
Papirfilterpose
Bestillings-
296.961
nr.
Avfallspose
Bestillings-
340.766
nr.
Sikkerhetsanvisninger
몇 Advarsel
– Hvis utblåsningsluften tilbakeføres til
rommet, må det være en tilstrekkelig
ventilasjonsrate (L) i rommet. For at
grenseverdiene skal overholdes, må tilbakeført volumstrøm ikke overstige 50
% av friskluftvolumstrømmen (romvolum V
x luftvekslingsrate LW). Uten
R
spesielle ventilasjonstiltak gjelder:
L
=1h–1.
W
– Bruk av apparatet, oppsuging av de
substanser som det er egnet for, og sikker behandling ved deponering av oppsugd materiale, skal kun gjøres av
opplært personale.
– Maskinen inneholder helseskadelig
støv. Tømming og vedlikehold, deriblant fjerning av støvoppsamlingsbeholdere, må bare foretas av
fagpersoner som bærer egnet verneutstyr.
– 2
79NO
Page 80

– Maskinen må ikke brukes uten komplett
filtreringssystem.
– De relevante sikkerhetsreglene som
gjelder for stoffene som behandles må
følges.
Ta i bruk
Apparatet har 2 mulig bruksmåter:
1 Bruk som industristøvsuger (stikkontakt
ikke i bruk)
2 Bruk for støvfjerning (stikkontakt i bruk)
Kob le til sugeslange, og utstyr med inn-
sugingsdyse alt etter bruksmåte, eller
koble til støvproduserende apparat.
몇 Advarsel
Maskinen må bare brukes med alle filterinnsatsene montert. Hvis ikke vil sugemotoren bli skadet, og det vil oppstå helsefare
pga. økt utslipp av finstøv.
Anti-statisk system
Via de jordede tilkoblingspunktene vil statiske ladninger ledes bort. Derved kan gnister og strømstøt forhindres på elektrisk
ledende, elektrostatisk jordet, ekstrautstyr
som er del av leveransen.
Støvsuging
– Apparatet er utstyrt med en papir-filter-
pose med lukkeskyver, bestillingsnr.
296.961 (5 stk.).
– Apparatet er utstyrt med en engangspo-
se med lukkeskyver og lukkestriper, be-
stillingsnr. 340.766 (10 stk.).
Merk:Med dette apparatet kan alle typer
støv til støvklasse L suges opp. Bruk av en
støvpose (bestillingsnummer se Filtersystemer) er i noen land påbudt ved lov.
Merk:Apparatet er egnet som industristøvsuger og som støvfjerner for mobilt bruk, for
oppsuging av tørt, ikke brennbart støv med
MAK-verdi større eller lik 1 mg/m
Forsiktig!
Ved suging skal aldri det flate foldefilteret
fjernes.
– Ved suging av fint støv må du i tillegg
bruke en engangspose eller en papirfil-
terpose.
3
.
Montere papirfilterpose
Figur
Avlås og ta av sugehodet.
Sette på papirfilterpose.
Sett på sugehodet og lås det.
Montere avfallspose
Figur
Avlås og ta av sugehodet.
Sett på engangspose.
Vreng engangsposen over beholderen.
Sett på sugehodet og lås det.
Våtsuging
몇 Advarsel
Ved våtsuging må det ikke suges opp helseskadelig støv.
Ta av papirfilterposen
Figur
Avlås og ta av sugehodet.
Trekk ut papirfilterposen bakover.
Lukkeskyveren trekkes opp og papirfil-
terposen lukkes tett ved uttak.
Kast papirfilterposen i henhold til gjel-
dende regler.
Sett på sugehodet og lås det.
– Ved suging av våt smuss må papirfilter-
posen alltid tas av.
Fjerne avfallspose
Figur
Avlås og ta av sugehodet.
Folde opp avfallspose
Trekk åpningen på avfallsposen bak-
over over sugestussen, og lukk den tett.
Lukk avfallsposen tett vved hjelp av lå-
sestripene under åpningen.
Ta ut avfallsposen.
Kast brukte avfallsposer i henhold til
gjeldende regler.
Sett på sugehodet og lås det.
– Ved suging av våt smuss må avfallspo-
sen alltid tas av.
80 NO
– 3
Page 81

Generelt
Forsiktig!
Ved suging skal aldri det flate foldefilteret
fjernes.
– Ved oppsuging av våt smuss med mø-
bel- eller fugemunnstykket (ekstraut-
styr), eller hvis det overveiende suges
opp vann fra en beholder, anbefales det
at funksjonen "automatisk filterrengjø-
ring" slås av av.
– VEd oppnådd maks. væskenivå slår ap-
paratet seg automatisk av.
– Ved ikke ledende væsker (for eksem-
pel bore-emulsjoner, olje eller fett)
vil apparatet ikke slå seg av ved full
beholder. Fyllingsgraden må stadig
kontrolleres og beholderen må tøm-
mes i rett tid.
– Etter avsluttet våtsuging: Rengjør foldefilte-
ret med filterrensingen. Rengjør elektrode-
ne med en børste. Rengjør beholderen
med en fuktig klut og tørk den.
Clipforbindelse
Figur
Sugeslangen er utstyrt med et clip-system.
Alle C-35/C-DN-35-tilbehørsdeler kan tilkobles.
Betjening
Slå apparatet på
Sett i støpselet.
Slå på apparatet ved hjelp av hovedbryter.
Stille inn sugeytelse
Stille inn sugeeffekten (min-maks) på
dreiebryteren.
Arbeide med elektroverktøy
Fare
Fare for personskader og materielle skader! Stikkontakten er ment for direkte tilkobling av elektroverktøy til sugeren. Enhver
annen bruk av stikkontakten er ikke tillatt.
Sett inn støpselet fra det elektriske
verktøyet i støvsugeren.
Slå på apparatet ved hjelp av hovedbryter.
Kontrollampen lyser, støvsugeren er i
Standby-modus.
Merk:Støvsugeren vil automatisk slås av
og på sammen med elektroverktøyet.
Merk:Støvsugeren har en startforsinkelse
på opp til 0,5 sekund, og vil fortsette å gå i
opp til 15 sekunder etter at den slås av.
Merk: For effektforbruk av elektriske verktøy se Tekniske data.
Figur
Tilkoblingsmuffe tilpasses koblingen på
elektroverktøyet.
Figur
Monter tilkoblingsmuffen på sugeslangen.
Figur
Koble tilkoiblingsmuffen til det elektris-
ke verktøyet.
Automatisk filterrensing
Apparatet har en ny type filterrensing som
er spesielt virksomt for fint støv. Derved
renses det flate foldefilteret automatisk
hvert 15. sekund ved hjelp av luftstøt (pulsenrende støy).
Merk:Den automatiske filterrengjøringen er
slått på fra fabrikken.
Merk:Den automatiske filterrengjøringen
kan bare slås på/av ved påslått aparat.
– Slå av automatisk filterrengjøring:
Bruk bryteren. Kontrollampe i bryteren
slukkes.
– Slå på automatisk filterrengjøring:
Bruk bryteren en gang til. Kontrollampe
i bryteren lyser grønn.
Slå maskinen av
Slå av apparatet ved hjelp av hovedbry-
ter.
Trekk ut nettstøpselet.
Etter hver bruk
Tøm beholderen.
Rengjør maskinen innvendig og utven-
dig ved å tørke av den med en fuktig
klut, og ved å bruke sugefunksjonen.
– 4
81NO
Page 82

Oppbevaring av apparatet
Figur
Oppbevar sugeslange og strømkabel i
henhold til figuren.
Sett maskinen til oppbevaring i et tørt
rom, utilgjengelig for uvedkommende.
Transport
Forsiktig!
Fare for personskader og materielle skader! Pass på vekten av apparatet ved transport.
Ta sugerør med gulvdyse ut av hode-
ren. For løfting, grip apparatet i bære-
håndtaket og i sugerøret.
Ved transport i kjøretøyer skal appara-
tet sikres mot å skli eller velte etter de til
enhver tid gjeldende regler.
Lagring
Forsiktig!
Fare for personskader og materielle skader!
Pass på vekten av apparatet ved lagring.
Dette apparatet skal kun lagres innendørs.
Pleie og vedlikehold
Fare
Før alt arbeide på apparatet skal apparatet
slås av og strømkabelen trekkes ut.
Maskiner for støvfjerning er å anse som sikkerhetsutstyr for forebygging eller fjerning
av risikofaktorer, i samsvar med BGV A1.
– Ved vedlikehold utført av bruker må
maskinen demonteres, rengjøres og
vedlikeholdes så langt det lar seg gjøre
uten at vedlikeholdspersonalet eller an-
dre personer utsettes for fare. Egnede
forsiktighetsforanstaltninger omfatter
giftfjerning før demontering. Sørg for lo-
kalt filtrert tvangsventilasjon på stedet
der maskinen demonteres, rengjøring
av vedlikeholdsflaten og egnede verne-
tiltak for personalet.
– Maskinens ytre skal avgiftes ved støv-
suging og tørkes ren eller behandles
med tetningsmiddel før den fraktes ut
av det farlige området. Alle maskindeler
må anses som forurenset når de bringes ut av det farlige området.
– Ved utføring av vedlikeholds- og repa-
rasjonsarbeid må alle tilskitnede gjenstander som ikke kan bli tilfredsstillende
rengjort, kastes. Slike gjenstander må
kastes i tette poser, i samsvar med gjeldende bestemmelser for håndtering av
denne typen avfall.
몇 Advarsel
Sikkerhetsmekanismene for risikoforebygging må vedlikeholdes regelmessig: dvs.
minst én gang i året sikkerhetsteknisk funksjonskontrolleres av produsenten eller en
opplært person, f.eks. for å påse at maskinen er tett, at filteret ikke er skadet, og at
kontrollmekanismene fungerer som de
skal.
Forsiktig!
Fare for skade! Ikke bruk silikonholdige
pleiemiddel for rengjøring.
– Enkle service- og vedlikeholdsoppga-
ver kan utføres av brukeren selv.
– Rengjør maskinen utvendig og behol-
deren innvendig regelmessig med en
fuktig klut.
몇 Advarsel
Fare på grunn av helsefarlige stoffer. Ved
vedlikeholdsarbeider (f.eks. filterskifte)
bruk åndedrettsmaske P2 eller høyere, og
bruk engangs vernetøy.
Skifte foldefilter
Åpne filterdeksel.
Ta ut foldefilter.
Kast det brukte foldefilteret i en lukket
støvtett pose, i samsvar med gjeldende
bestemmelser.
Fjern smuss som har dannet seg på
renluftssiden.
Sett inn nytt foldefilter.
Lukk filterdeksel, du skal høre det går i
lås.
82 NO
– 5
Page 83

Bytt papirfilterpose
Figur
Avlås og ta av sugehodet.
Trekk ut papirfilterposen bakover.
Lukkeskyveren trekkes opp og papirfil-
terposen lukkes tett ved uttak.
Kast papirfilterposen i henhold til gjel-
dende regler.
Sette på ny papirfilterpose.
Sett på sugehodet og lås det.
Skifte avfallspose
Figur
Avlås og ta av sugehodet.
Folde opp avfallspose
Trekk åpningen på avfallsposen bak-
over over sugestussen, og lukk den tett.
Lukk avfallsposen tett vved hjelp av lå-
sestripene under åpningen.
Ta ut avfallsposen.
Kast brukte avfallsposer i henhold til
gjeldende regler.
Sett på ny avfallspose.
Vreng engangsposen over beholderen.
Sett på sugehodet og lås det.
Elektrodene rengjøres
Avlås og ta av sugehodet.
Rengjør elektrodene med en børste.
Sett på sugehodet og lås det.
Feilretting
Fare
Før alt arbeide på apparatet skal apparatet
slås av og strømkabelen trekkes ut.
Merk:Dersom det oppstår en feil, (f.eks. filterbrudd) må apparatet straks slås av. Før
ny bruk må feilen rettes.
Sugeturbinen går ikke
Kontroller stikkontakt og sikring på
strømforsyningen.
Kontroller strømkabel, støpsel, elektro-
der og stikkontakten på apparatet.
Slå apparatet på.
Sugeturbinen kobler ut
Tøm beholderen.
Sugeturbinen slår seg ikke på etter
at beholderen er tømt
Slå av appratet og vent i 5 sekunder, slå
på igjen etter 5 sekunder.
Elektroder og mellomrommet mellom
elektrodene rengjøres med børste.
Sugekraften avtar
Fjern blokkeringer fra børstehodet, su-
gerøret, sugeslangen eller foldefilteret.
Skifte full papirfilterpose.
Skifte full avfallspose
Sett inn filterdekselet korrekt.
Skifte foldefilter.
Støvutslipp ved suging
Pass på korrekt innføring av foldefilte-
ret.
Skifte foldefilter.
Utkobligsautomatikk (våtsuging)
slår ikke inn
Elektroder og mellomrommet mellom
elektrodene rengjøres med børste.
Fyllingsnivå må stadig kontrolleres ved
væsker som ikke er elektrisk ledende.
Automatisk filterrens fungerer ikke
Sugeslange ikke korrekt tilkoblet.
Automatisk filterrengjøring lar seg
ikke slå av
Kontakt kundetjenesten.
Automatisk filterrengjøring lar seg
ikke slå på
Kontakt kundetjenesten.
Avfallshåndtering
Etter endt levetid må maskinen kastes i
samsvar med gjeldende lovbestemmelser.
– 6
83NO
Page 84

Garanti
Vår ansvarlige salgsorganisasjon for det
enkelte land har utgitt garantibetingelsene
som gjelder i det aktuelle landet. Eventuelle
feil på maskinen blir reparert gratis i garantitiden dersom disse kan føres tilbake til
material- eller produksjonsfeil. Ved behov
for garantireparasjoner, vennligst henvend
deg med kjøpskvitteringen til din forhandler
eller nærmeste autoriserte kundeservice.
Tilbehør og reservedeler
– Det er kun tillatt å anvende tilbehør og
reservedeler som er godkjent av produ-
senten. Originalt tilbehør og originale
reservedeler garanterer for sikker og
problemfri drift av apparatet.
– Et utvalg av de vanligste reservedelene
finner du bak i denne bruksanvisningen.
Rengjøringssett
Bestillingsnr. 369 845
Betegnelse Bestillings-
nr.
Albue (plast) 297.038 1
Sugerør (metall) 300.691 2
Fugemunnstykke 259.627 1
Gulvmunnstykke 300.659 1
Ant.
EU-samsvarserklæring
Vi erklærer hermed at maskinen angitt nedenfor oppfyller de grunnleggende sikkerhets- og helsekravene i de relevante EFdirektivene, med hensyn til både design,
konstruksjon og type markedsført av oss.
Ved endringer på maskinen som er utført
uten vårt samtykke, mister denne erklæringen sin gyldighet.
Produkt: Våt- og tørrsuger
Type: VCE 35 L AC
Relevante EU-direktiver
2006/42/EF (+2009/127/EF)
2004/108/EF
Anvendte overensstemmende normer
EN 55014–1: 2006 + A1: 2009
EN 55014–2: 1997 + A2: 2008
EN 60335–1
EN 60335–2–69
EN 61000–3–2: 2006 + A2: 2009
EN 61000–3–3: 2008
EN 62233: 2008
Anvendte nasjonale normer
-
De undertegnede handler på oppdrag fra,
og med fullmakt fra selskapsledelsen.
Montere gummilepper på gulvdysen
(våtsuging)
Figur
Demontere børstestriper.
Monter gummilepper.
Merk:Den strukturert siden av gummileppene skal peke utover.
84 NO
Dokumentasjonsansvarlig:
E. Rühle
FLEX Elektrowerkzeuge GmbH
Bahnhofstr. 15
71711 Steinheim/Murr
Steinheim/Murr, 2010/10/01
– 7
Page 85

Tekniske data
VCE 35 L AC
Nettspenning V 220-240
Frekvens Hz 50/60
Maks. effekt W 1380
Nominell effekt W 1200
Beholderinnhold l 34
Fyllingsmengde væske l 19
Luftmengde (maks.) m
Undertrykk (maks.) kPa (mbar) 23,0 (230)
Effektforbruk for elektroverktøy W 100-2200
Beskyttelsestype -- IP X4
Beskyttelsesklasse -- I
Sugeslangekobling (C-DN/C-ID) mm 35
Lengde x bredde x høyde mm 520 x 380 x 580
Typisk driftsvekt kg 12,5
Omgivelsestemperatur maks. °C +40
Registrerte verdier etter EN 60335-2-69
Støytrykksnivå L
Usikkerhet K
pA
pA
Hånd-arm vibrasjonsverdi m/s
Usikkerhet K m/s
3
/h 158
dB(A) 69
dB(A) 1
2
2
<2,5
0,2
Nettledning H07RN-F 3x1,5 mm
Best.nr. Kabellengde
EU 297.534 7,5 m
2
– 8
85NO
Page 86

Läs bruksanvisning i original
Svenska
gången, följ anvisningarna och spara driftsanvisningen för framtida behov, eller för
nästa ägare.
– Före första ibruktagning måste Säker-
– Om bruksanvisningen och säkerhets-
– Informera inköpsstället omgående vid
innan aggregatet används första
hetsanvisningar nr. 5.956-249 läsas!
anvisningarna inte följs kan apparaten
skadas och faror uppstå för användaren
och andra personer.
transportskador.
Innehållsförteckning
Miljöskydd . . . . . . . . . . . . . SV . . .1
Symboler i bruksanvisningen SV . . .1
Ändamålsenlig användning SV . . .2
Aggregatelement . . . . . . . . SV . . .2
Symboler på aggregatet. . . SV . . .2
Säkerhetsanvisningar. . . . . SV . . .2
Idrifttagning . . . . . . . . . . . . SV . . .3
Handhavande. . . . . . . . . . . SV . . .4
Transport . . . . . . . . . . . . . . SV . . .5
Förvaring . . . . . . . . . . . . . . SV . . .5
Skötsel och underhåll. . . . . SV . . .5
Åtgärder vid störningar. . . . SV . . .6
Avfallshantering . . . . . . . . . SV . . .7
Garanti . . . . . . . . . . . . . . . . SV . . .7
Tillbehör och reservdelar . . SV . . .7
Försäkran om EU-överens-
stämmelse . . . . . . . . . . . . . SV . . .8
Tekniska data. . . . . . . . . . . SV . . .9
Miljöskydd
Emballagematerialen kan återvinnas. Kasta inte emballaget i
hushållssoporna utan lämna det
till återvinning.
Kasserade apparater innehåller
återvinningsbart material som
bör gå till återvinning. Batterier,
olja och liknande ämnen får inte
komma ut i miljön. Överlämna
skrotade aggregat till ett lämpligt återvinningssystem.
Symboler i bruksanvisningen
Fara
För en omedelbart överhängande fara som
kan leda till svåra skador eller döden.
몇 Varning
För en möjlig farlig situation som kan leda
till svåra skador eller döden.
Varning
För en möjlig farlig situation som kan leda
till lätta skador eller materiella skador.
86 SV
– 1
Page 87

Ändamålsenlig användning
몇 Varning
Maskinen är avsedd för uppsugning av
torrt, ej antändligt, hälsovådligt damm i maskiner och apparater; dammklass L enligt
EN 60 335–2–69. Restriktion: Inga cancerframkallande ämnen får sugas upp medmaskinen.
– Maskinen är avsedd att användas till
våt och torr rengöring av golv- och
väggytor.
– Denna maskin är lämpad för yrkesmäs-
sig användning, t.ex. på hotell, i skolor,
på sjukhus och fabriker, i butiker, på
kontor och av uthyrningsfirmor.
Aggregatelement
1 Elektroder
2 Sugslang
3 Kabelkrok
4 Luftutströmning, arbetsluft
5 Spärr av sughuvud
6 Hjul
7 Luftinströmning, motorkylluft
8 Smutsbehållare
9 Styrrulle
10 Sughuvud
11 Sugfästen
12 Golvmunstycke (ingår ej i leveransen)
13 Sugrör (ingår ej i leveransen)
14 Bärhandtag
15 Filterskydd
16 Krök (ingår ej i leveransen)
17 Vridreglage för sugeffekt (min-max)
18 Kontrollampa
19 Nätuttag
20 Automatisk filterrengöring
21 Huvudströmbrytare
22 Plattfilter
23 Filterrengöring
24 Fäste till golvmunstycke
25 Fäste till fogmunstycke
26 Fäste till sugrör
27 Nätkabel
28 Typskylt
Symboler på aggregatet
VARNING: Maskinen innehåller
hälsovådligt damm. Tömning och
underhåll, inklusive avlägsnande
av dammpåsen, får endast utföras av en sakkunnig person som bär lämplig personlig skyddsutrustning. Starta inte
maskinen innan det kompletta filtersystemet har installerats.
Plattfilter
Beställningsnr.
Pappersfilterpåse
Beställningsnr.
Avfallspåse
Beställningsnr.
337.692
296.961
340.766
Säkerhetsanvisningar
몇 Varning
– När frånluften inte leds ut utomhus,
måste inomhusbanan ha en tillräcklig
luftutbyteshastighet L. För att upprätthålla föreskrivna gränsvärden får den
tillbakaledda volymströmmen uppgå till
maximalt 50 % av friskluftvolymsströmmen (rumsvolym V
het L
). Utan särskilda
W
ventilationsåtgärder gäller: L
– Endast för uppgiften utbildad personal
får använda aggregatet och de substanser för vilka det är avsett; detta gäller även hanteringen av uppsamlade
substanser.
– Apparaten innehåller hälsovådligt
damm. Tömning och underhåll inklusive
hantering av dammuppsamlingsbehållaren får endast utföras av kvalificerad
personal med motsvarande skyddsutrustning.
– 2
x luftutbyteshastig-
R
=1h–1.
W
87SV
Page 88

– Använd aldrig apparaten utan ett kom-
plett filtreringssystem.
– Säkerhetsbestämmelser för det materi-
al som skall hanteras måste beaktas.
Idrifttagning
Apparaten kan användas i 2 driftssätt:
1 Industriell dammsugardrift (stickkontakt
ej belagd)
2 Dammavskiljningsdrift (stickkontakt be-
lagd)
Anslut sugslangen och - beroende på
användningen - sätt på sugdysan eller
anslut till apparaten där damm ska avskijas.
몇 Varning
Sug inte utan filterelement eftersom sugmotorn då kan skadas och hälsoriskerna
ökar p.g.a. förhöjd finstoffsandel!
Anti-Statik-System
Statiska urladdningar leds bort genom de
jordade anslutningsrören. Därigenom förhindras gnistbildning och strömstötar med
det elektrostatiskt jordade tillbehöret som
ingår i leveransen.
Torrsugning
– Apparaten är utrustad med en filterpåse
av papper, med skjutförslutning, beställnr. 296.961 (5 st.).
– Maskinen är utrustad med en avfallspå-
se med förslutningsslid och förslutningsremsa, best. nr 340 766 (10 st.).
Observera:Med denna maskin kan alla
sorters damm upp till dammklass L sugas
upp. Användning av dammpåse (beställningsnummer, se filtersystem) är tvingande
föreskrivet.
Observera:Maskinen är avsedd att användas som industridammsugare för uppsugning och som dammavskiljare på olika
driftsplatser för uppsugning av torrt, ej antändligt damm med MAK-värden högre än
3
1 mg/m
.
Varning
Under sugning får platveckfiltret aldrig tas
bort.
– Vid uppsugning av fint damm måste en
avfallspåse eller en pappersfilterpåse
användas.
Sätt i pappersfilterspåse
Bild
Lossa spärr på sughuvudet och ta av
det.
Sätt på pappersfilterpåsen.
Sätt på sughuvudet och lås fast.
Sätt i avfallspåse
Bild
Lossa spärr på sughuvudet och ta av det.
Sätt avfallspåse på plats.
Drag avfallspåsen över behållaren.
Sätt på sughuvudet och lås fast.
Våtsugning
몇 Varning
Vid våtsugning får inget hälsofarligt damm
sugas upp.
Ta bort pappersfilterpåsen.
Bild
Lossa spärr på sughuvudet och ta av det.
Dra ut pappersfilterpåsen bakåt.
Dra förslutningssliden uppåt och stäng
pappersfilterpåsen ordentligt när den
tas ur.
Avfallshantera den förbrukade pappersfil-
terpåsen enligt gällande föreskrifter.
Sätt på sughuvudet och lås fast.
– Vid uppsugning av våt smuts måste fil-
terpåsen alltid avlägsnas.
Ta bort avfallspåse
Bild
Lossa spärr på sughuvudet och ta av
det.
Dra upp avfallspåsen.
Dra ut avfallspåsens öppning bakåt
över sugrören och förslut den ordentligt.
Förslut avfallspåsen tätt med förslut-
ningsstripsen under öppningen.
Ta ur avfallspåse.
88 SV
– 3
Page 89

Avfallshantera den förbrukade avfalls-
påsen enligt gällande föreskrifter.
Sätt på sughuvudet och lås fast.
– Vid uppsugning av våt smuts måste av-
fallspåsen alltid avlägsnas.
Allmänt
Varning
Under sugning får platveckfiltret aldrig tas
bort.
– Vid uppsugning av våtsmuts med mö-
bel- eller fogmunstycke (tillval), eller om
huvudsakligen vatten sugs upp ur en
behållare, rekommenderar vi att funktionen "Automatisk filterrengöring"
stängs av.
– När max. vätskenivå har uppnåtts
stängs apparaten automatiskt av.
– Med ej ledande vätskor (t.ex. borre-
mulsion, oljor och fett) stängs apparaten inte av när behållaren är full.
Fyllnadsnivån måste ständigt kontrolleras och behållaren måste tömmas i tid.
– Efter avslutad våtsugning: Rengör platt-
veckfilter med filterrengöringen. Rengör
elektroder med en borste. Torka ren behållaren med en fuktig trasa och låt den
torka.
Clipanslutning
Bild
Sugslangen är utrustad med ett clip-system. Alla C-35/C-DN-35 tillbehörsdelar kan
anslutas.
Handhavande
Koppla till aggregatet
Stick i nätkontakten.
Starta maskinen med huvudbrytaren.
Avbryta sugeffekt
Ställa in sugeffekt (min-max) på vrid-
reglaget.
Arbeta med elverktyg
Fara
Risk för person och egendomsskada! Eluttaget är endast avsett för direkt anslutning
av elverktyg till maskinen. All användning
av eluttaget är otillåten.
Förbind elverktygets nätkontakt med
sugen.
Starta maskinen med huvudbrytaren.
Kontrollampan lyser - dammsugaren befin-
ner sig i standby-modus.
Observera:Dammsugaren kopplas till/från
automatisk med elverktyget.
Observera:Dammsugaren har en startfördröjning på 0,5 sekunder och en eftersläpningstid på upp till 15 sekunder.
Observera: Se Tekniska data för elverktygens effektanslutningsvärden.
Bild
Anpassa anslutningsmuffen till elverk-
tygets anslutning.
Bild
Montera anslutningsmuff på sugslang.
Bild
Förbind anslutningsmuff med elverktyg.
Automatisk filterrengöring
Dammsugaren förfogar över en ny slags filterrengöring - särskilt effektiv mot fint
damm. Funktionen gör att plattvecksfiltret
renas automatiskt (pulserande ljud) var
15:de sekund med hjälp av en luftstöt.
Observera:Den automatiska filterrengöringen kopplas in av tillverkaren före leverans.
Observera:Den automatiska filterrengöringen kan endast startas/stängas av när
apparaten är påslagen.
– Stänga av automatisk filterrengöring:
Använd reglaget. Kontrollampa i regla-
get slocknar.
– Starta automatisk filterrengöring:
Tryck upprepade gånger på reglaget.
Kontrollampa i reglaget lyser grön.
– 4
89SV
Page 90

Koppla från aggregatet
Stäng av maskinen med huvudbrytaren.
Drag ur nätkontakten.
Efter varje användning
Töm behållaren.
Rengör apparaten invändigt och utvän-
digt genom uppsugning och torka med
en fuktig trasa.
Förvara aggregatet
Bild
Förvara sugslang och nätsladd som vi-
sat på bilden.
Förvara apparaten i ett torrt rum och
säkra den mot obehörig användning.
Transport
Varning
Risk för person och egendomsskada! Observera vid transport maskinens vikt.
Ta loss sugröret med golvmunstycket
ur fästet. Ta tag i maskinens bärhandtag och sugrör när maskinen ska bäras.
Vid transport i fordon ska maskinen
säkras enligt respektive gällande bestämmelser så den inte kan tippa eller
glida.
Förvaring
Varning
Risk för person och egendomsskada! Observera maskinens vikt vid lagring.
Denna maskin får endast lagras inomhus.
Skötsel och underhåll
Fara
Stäng alltid av aggregatet och lossa nätkontakten innan arbeten på aggregatet utförs.
Dammuppsugande maskiner är säkerhetsanordningar för skydd mot eller åtgärdande
av faror enligt den tyska lagen BGV A1.
– Vid underhåll av användaren ska appa-
raten endast demonteras, rengöras och
underhållas i den utsträckning det är
möjligt utan att faror för underhållsper-
sonalen eller andra personer uppstår.
Lämpliga försiktighetsåtgärder inklude-
rar avgiftning före demonteringen. Vidta
åtgärder för lokalt filtrerad tvångsventi-
lation där apparaten demonteras, ren-
göring av underhållsutrymmet och
lämpliga skyddsutrustningar för perso-
nalen.
– Apparatens yttre ska avgiftas genom
dammsugning och torkas rent eller be-
handlas med tätningsmedel innan den
flyttas från det farliga området. Alla ap-
paratdelar ska behandlas som förore-
nade när de flyttas från det farliga
området.
– Vid underhålls- och reparationsarbete
ska alla förorenade föremål som inte
kan rengöras i tillräckligt hög grad kas-
tas bort. Sådana föremål ska omhän-
dertas i lufttäta påsar i enlighet med
gällande bestämmelser för hantering av
sådant avfall.
몇 Varning
Säkerhetsanordningar, avsedda att skydda
mot faror, måste underhållas regelbundet.
Detta innebär att den säkerhetstekniska
funktionen hos dessa anordningar, t.ex. täthet hos aggregatet, skador på filtret, funktion hos kontrollpunkter, måste kontrolleras
minst en gång om året av tillverkaren eller
annan, för uppgiften kvalificerad person.
Varning
Risk för skada! Använd aldrig rengöringsmedel som innehåller silkon.
– Enklare underhålls- och skötselarbeten
kan genomföras av dig själv.
– Apparatens yta och behållarens insida
ska rengöras regelbundet med en våt
trasa.
몇 Varning
Risker på grund av hälsovådligt damm. Bär
ansiktsmask P2 eller mask med högre värde samt engångsklädsel vid underhållsarbeten (t.ex. filterbyte).
90 SV
– 5
Page 91

Byta plattveckat filter
Öppna filterlocket.
Tag ut plattvecksfilter.
Använt plattvecksfilter placeras i en
dammtät, försluten påse, enligt gällande föreskrifter, när det ska kasseras.
Tag bort smuts som samlats på renluft-
sidan.
Sätt i ett nytt plattvecksfilter.
Tillslut filterskyddet, det hakas hörbart
fast.
Byta pappersfilterpåse
Bild
Lossa spärr på sughuvudet och ta av
det.
Dra ut pappersfilterpåsen bakåt.
Dra förslutningssliden uppåt och stäng
pappersfilterpåsen ordentligt när den
tas ur.
Avfallshantera den förbrukade pappersfil-
terpåsen enligt gällande föreskrifter.
Trä på en ny pappersfilterpåse.
Sätt på sughuvudet och lås fast.
Byt avfallspåse
Bild
Lossa spärr på sughuvudet och ta av
det.
Dra upp avfallspåsen.
Dra ut avfallspåsens öppning bakåt
över sugrören och förslut den ordentligt.
Förslut avfallspåsen tätt med förslut-
ningsstripsen under öppningen.
Ta ur avfallspåse.
Avfallshantera den förbrukade avfalls-
påsen enligt gällande föreskrifter.
Sätt den nya avfallspåsen på plats.
Drag avfallspåsen över behållaren.
Sätt på sughuvudet och lås fast.
Rengöra elektroder
Lossa spärr på sughuvudet och ta av
det.
Rengör elektroder med en borste.
Sätt på sughuvudet och lås fast.
Åtgärder vid störningar
Fara
Stäng alltid av aggregatet och lossa nätkontakten innan arbeten på aggregatet utförs.
Observera:Om ett fel uppträder (t.ex. om
filtret går sönder), måste maskinen omgående stängas av. Felet måste åtgärdas före
driften återupptas.
Sugturbinen fungerar inte
Kontrollera eluttaget och strömförsörj-
ningens säkring.
Kontrollera apparatens nätkabel, nät-
kontakt, elektroder och eluttag.
Slå på apparaten.
Sugturbinen stängs av
Töm behållaren.
Sugturbinen startar inte efter att
behållaren har tömts
Koppla från apparaten och vänta i 5
sekunder, koppla till igen efter 5 sekun-
der.
Rengör både elektroder och mellan-
rummet mellan elektroderna med en
borste.
Sugkraften nedsatt
Avlägsna stopp i sugmunstycke, sug-
rör, sugslang eller plattvecksfilter.
Byt full pappersfilterpåse.
Byt full avfallspåse.
Haka fast filterskyddet ordentligt.
Byt plattveckat filter.
Damm tränger ut under sugning
Kontrollera plattveckfiltrets monterings-
läge.
Byt plattveckat filter.
– 6
91SV
Page 92

Frånkopplingsautomatiken
(våtsugning) fungerar inte
Rengör både elektroder och mellan-
rummet mellan elektroderna med en
borste.
Kontrollera fyllnadsnivån ofta när ej le-
dande vätska används.
Automatiska filterrengöringen
arbetar inte
Sugslang ej ansluten.
Det går inte att stänga av den
automatiska fiterrengöringen
Informera kundservice.
Det går inte att starta den
automatiska fiterrengöringen
Informera kundservice.
Avfallshantering
Apparaten ska föras föreskriftsenligt till avfall efter dess livslängd har förbrukats.
Garanti
I respektive land gäller de garantivillkor
som publicerats av våra auktoriserade distributörer. Eventuella fel på aggregatet repareras utan kostnad under förutsättning
att det orsakats av ett material- eller tillverkningsfel. I frågor som gäller garantin ska du
vända dig med kvitto till inköpsstället eller
närmaste auktoriserade serviceverkstad.
Rengöringsset
Beställ. nr. 369.845
Beteckning Beställ-
ningsnr.
Krök (plast 297.038 1
Sugrör (metall) 300.691 2
Fogmunstycke 259.627 1
Golvmunstycke 300.659 1
Montera in golvmunstyckets gummiläppar (våtsugning)
Bild
Montera av borstavstrykaren.
Montera gummiläpparna.
Observera:Gummiläpparnas strukturerade sida måste peka utåt.
Styck
Tillbehör och reservdelar
– Endast av tillverkaren godkända tillbe-
hör och reservdelar får användas. Original-tillbehör och original-reservdelar
garanterar att apparaten kan användas
säkert och utan störning.
– I slutet av bruksanvisningen finns ett ur-
val av de reservdelar som oftast behövs.
92 SV
– 7
Page 93

Försäkran om
EU-överensstämmelse
Härmed försäkrar vi att nedanstående betecknade maskin i ändamål och konstruktion samt i den av oss levererade versionen
motsvarar EU-direktivens tillämpliga grundläggande säkerhets- och hälsokrav. Vid
ändringar på maskinen som inte har godkänts av oss blir denna överensstämmelseförklaring ogiltig.
Produkt: Våt- och torrdammsugare
Typ: VCE 35 L AC
Tillämpliga EU-direktiv
2006/42/EG (+2009/127/EG)
2004/108/EG
Tillämpade harmoniserade normer
EN 55014–1: 2006 + A1: 2009
EN 55014–2: 1997 + A2: 2008
EN 60335–1
EN 60335–2–69
EN 61000–3–2: 2006 + A2: 2009
EN 61000–3–3: 2008
EN 62233: 2008
Tillämpade nationella normer
-
Undertecknade agerar på order av och
med fullmakt från företagsledningen.
Dokumentationsbefullmäktigad:
E. Rühle
FLEX Elektrowerkzeuge GmbH
Bahnhofstr. 15
71711 Steinheim/Murr
Steinheim/Murr, 2010/10/01
– 8
93SV
Page 94

Tekniska data
VCE 35 L AC
Nätspänning V 220-240
Frekvens Hz 50/60
Max. effekt W 1380
Normeffekt W 1200
Behållarvolym l 34
Påfyllnadsmängd vätska l 19
Luftmängd (max.) m
Undertryck (max.) kPa (mbar) 23,0 (230)
Elverktygens effektanslutningsvärden W 100-2200
Skydd -- IP X4
Skyddsklass -- I
Sugslanganslutning (C-DN/C-ID) mm 35
Längd x Bredd x Höjd mm 520 x 380 x 580
Typisk driftvikt kg 12,5
Omgivningstemperatur (max.) °C +40
Beräknade värden enligt EN 60335-2-69
Ljudtrycksnivå L
Osäkerhet K
pA
pA
Hand-Arm Vibrationsvärde m/s
Osäkerhet K m/s
3
/h 158
dB(A) 69
dB(A) 1
2
2
<2,5
0,2
Nätkabel H07RN-F 3x1,5 mm
2
Artikelnr. Kabellängd
EU 297.534 7,5 m
94 SV
– 9
Page 95

Lue tämä alkuperäisiä ohjeita
Suomi
lytä käyttöohje myöhempää käyttöä tai
mahdollista myöhempää omistajaa varten.
– Turvaohje nro 5.956-249 on ehdotto-
– Käyttöohjeen ja turvaohjeiden huomiot-
– Jos havaitset kuljetusvaurioita, ota välit-
ennen laitteesi käyttämistä, säi-
masti luettava ennen laitteen ensimmäistä käyttökertaa!
ta jättäminen voi aiheuttaa vaurioita laitteeseen ja vaaroja käyttäjälle ja muille
henkilöille.
tömästi yhteys jälleenmyyjään.
Sisällysluettelo
Ympäristönsuojelu . . . . . . . FI . . .1
Käyttöohjeessa esiintyvät sym-
bolit. . . . . . . . . . . . . . . . . . . FI . . .1
Käyttötarkoitus . . . . . . . . . . FI . . .2
Laitteen osat. . . . . . . . . . . . FI . . .2
Laitteessa olevat symbolit . FI . . .2
Turvaohjeet . . . . . . . . . . . . FI . . .2
Käyttöönotto . . . . . . . . . . . . FI . . .3
Käyttö . . . . . . . . . . . . . . . . . FI . . .4
Kuljetus . . . . . . . . . . . . . . . FI . . .5
Säilytys. . . . . . . . . . . . . . . . FI . . .5
Hoito ja huolto . . . . . . . . . . FI . . .5
Häiriöapu . . . . . . . . . . . . . . FI . . .6
Hävittäminen . . . . . . . . . . . FI . . .7
Takuu . . . . . . . . . . . . . . . . . FI . . .7
Varusteet ja varaosat . . . . . FI . . .7
EU-standardinmukaisuustodis-
tus . . . . . . . . . . . . . . . . . . . FI . . .8
Tekniset tiedot . . . . . . . . . . FI . . .9
Ympäristönsuojelu
Pakkausmateriaalit ovat kierrätettäviä. Älä käsittelee pakkauksia kotitalousjätteenä, vaan
toimita ne jätteiden kierrätykseen.
Käytetyt laitteet sisältävät arvokkaita kierrätettäviä materiaaleja, jotka tulisi toimittaa
kierrätykseen. Paristoja, öljyjä
ja samankaltaisia aineita ei saa
päästää ympäristöön. Tästä
syystä toimita kuluneet laitteet
asianmukaisiin keräyspisteisiin.
Käyttöohjeessa esiintyvät
symbolit
Vaara
Välittömästi uhkaava vaara, joka aiheuttaa
vakavan ruumiinvamman tai johtaa kuolemaan.
몇 Varoitus
Mahdollisesti vaarallinen tilanne, joka voi
aiheuttaa vakavan ruumiinvamman tai voi
johtaa kuolemaan.
Varo
Mahdollisesti vaarallinen tilanne, joka voi
aiheuttaa lievän ruumiinvamman tai aineellisia vahinkoja.
– 1
95FI
Page 96

Käyttötarkoitus
몇 Varoitus
Laite soveltuu kuivien, ei palavien, terveydelle haitallisten pölyjen imemiseen koneista ja laitteista; standardin EN 60 335–2–69,
pölyluokassa L mukaisesti. Rajoitus: Syöpää aiheuttavien aineiden imurointi ei ole
sallittua.
– Tämä imuri on suunniteltu lattioiden ja
seinäpintojen märkä- ja kuivapuhdistukseen.
– Tämä laite soveltuu ammattimaiseen
käyttöön, esim. hotelleissa, kouluissa,
sairaaloissa, tehtaissa, kaupoissa, toimistoissa ja välittäjäliikkeissä.
Laitteen osat
1 Elektrodit
2 Imuletku
3 Kaapelikoukku
4 Ilman ulostulo, työilma
5 Imupään lukitus
6 Pyörä
7 Ilman sisääntulo, moottorin jäähdytysilma
8 Pölysäiliö
9 Ohjausrulla
10 Imupää
11 Imukaulus
12 Lattiasuulake (ei kuulu toimitukseen)
13 Imuputki (ei kuulu toimitukseen)
14 Kantokahva
15 Suodattimen kansi
16 Putkikäyrä (ei kuulu toimitukseen)
17 Imutehon kiertosäädin (min-maks)
18 Merkkivalo
19 Pistorasia
20 Automaattinen suodatinpuhdistus
21 Pääkytkin
22 Poimusuodatin
23 Suodattimen puhdistus
24 Lattiasuuttimen pidike
25 Pidike rakosuulakkeelle
26 Pidike imuputkille
27 Verkkokaapeli
28 Tyyppikilpi
96 FI
Laitteessa olevat symbolit
VAROITUS: Tämä laite sisältää
terveydelle vaarallisia pölyjä.
Tyhjennyksen ja huollon, pöly-
pussin poistaminen mukaan luettuna, saavat suorittaa vain asiantuntevat
henkilöt, jotka kantavat soveltuvaa henkilökohtaista suojavarustusta. Älä kytke päälle,
ennen kuin koko suodatinjärjestelmä on
asennettu.
Poimusuodatin
Tilausnro 337.692
Paperisuodatinpussi
Tilausnro 296.961
Hävityspussi
Tilausnro 340.766
Turvaohjeet
몇 Varoitus
– Jos poistoilma palautetaan huonee-
seen, huoneessa on oltava riittävä ilmanvaihtomäärä L. Vaadittujen rajaarvojen noudattamiseksi palautettu tilavuusvirta saa olla enintään 50 % raikasilman tilavuusvirrasta (huonetilavuus
V
x ilmanvaihtomäärä LW). Ilman eri-
R
tyistä tuuletustoimenpidettä pätee:
L
=1h–1.
W
– Vain koulutettu henkilöstö saa käyttää
laitetta, käsitellä aineita, joita sillä imuroidaan ja suorittaa keräytyneen aineen
hävittämisen turvallisella menetelmällä.
– Tämä laite sisältää terveydelle haitallis-
ta pölyä. Vain asiantuntijat, jotka käyttävät vastaavia suojavarusteita, saavat
suorittaa tyhjennys- ja huoltotoimenpiteitä, mukaan lukien pölynkeruusäiliöiden tyhjennyksen.
– 2
Page 97

– Älä käytä laitetta ilman täydellistä suo-
datusjärjestelmää.
– Kaikkia käsiteltäviä aineita koskevia tur-
vamääräyksiä on noudatettava.
Käyttöönotto
Laitteessa on 2 käyttötapaa:
1 teollisuuspölynimurikäyttö (pistorasia ei
käytössä)
2 pölynpoistokäyttö (pistorasia käytössä)
Liitä imuletku ja varusta se käyttömuo-
dosta riippuen imusuuttimella tai liitä se
pölyä tuottavaan laitteeseen.
몇 Varoitus
Imurointi ilman suodatinelementtiä on kielletty, koska muuten imumoottoria vaurioitetaan ja lisääntynyt hienopölyn ulospääsy
aiheuttaa vaaraa terveydelle.
Antistaattinen järjestelmä
Maadoitettu imuletkuliitin johtaa staattiset
lataukset pois. Tällöin voidaan toimitukseen kuuluvia, maadoitettuja sähköä johtavia varusteita käyttäen, estää kipinöiden ja
sähköpurkausten muodostuminen.
Kuivaimu
– Laite on varustettu yhdellä liukusulki-
mella varustetulla kuitusuodatinpussil-
la, tilaus-nro 296.961 (5 kpl).
– Imuri on varustettu yhdellä, liukusulki-
mella ja sulkunauhalla varustetulla pö-
lyn hävityspussilla, tilaus-nro 340.766
(10 kpl).
Huomautus:Tällä laitteella voi imuroida
kaikkia pölyjä pölyluokkaan L saakka. Laki
määrää käyttämään pölynkeruupussia (tilausnumero, katso Suodatinjärjestelmät).
Huomautus: Laite soveltuu teollisuuspölynimurina imurointiin ja pölynpoistolaitteena
paikaltaan siirrettävänä käytettäväksi kuivien, ei palavien pölyjen, joiden MAK-arvo on
suurempi tai yhtä suuri kuin 1 mg/m
3
.
Varo
Imuroinnin aikana ei saa koskaan poistaa
poimusuodatinta.
– Kun imuroidaan hienojakoista pölyä, tu-
lee lisäksi käyttää paperisuodatinpussia tai pölyn hävityspussia.
Paperisuodatinpussin laitto paikalleen
Kuva
Vapauta imupää lukituksesta, poista
imupää.
Aseta paperisuodatinpussi paikalleen.
Aseta imupää paikalleen ja lukitse se.
Hävityspussin laitto paikalleen
Kuva
Vapauta imupää lukituksesta, poista
imupää.
Aseta hävityspussi paikalleen.
Käännä hävityspussin reunat säiliön
reunojen ylitse.
Aseta imupää paikalleen ja lukitse se.
Märkäimu
몇 Varoitus
Märkäimuroinnissa ei saa imuroida terveydelle vaarallisia pölyjä.
Paperisuodatinpussi poistaminen
Kuva
Vapauta imupää lukituksesta, poista
imupää.
Vedä paperisuodatinpussi taaksepäin irti.
Vedä liukusuljinta ylös ja sulje paperi-
suodatinpussi poistettaessa tiiviisti.
Hävitä paperisuodatinpussi lakisääteis-
ten määräysten mukaisesti.
Aseta imupää paikalleen ja lukitse se.
– Imuroitaessa märkää likaa paperisuo-
datinpussi on aina ensin poistettava.
Hävityspussin poistaminen
Kuva
Vapauta imupää lukituksesta, poista
imupää.
Käännä hävityspussin reunat ylös.
Vedä hävityspussin suu pois imukau-
luksen reunojen ympäriltä ja sulje pussi
tiiviisti.
– 3
97FI
Page 98

Sulje hävityspussi tiiviisti sulkunauhalla
aukon alapuolelta.
Poista hävityspussi.
Hävitä käytetty hävityspussi lakisää-
teisten määräysten mukaisesti.
Aseta imupää paikalleen ja lukitse se.
– Hävityspussi on aina poistettava mär-
kää likaa imuroitaessa.
Yleistä
Varo
Imuroinnin aikana ei saa koskaan poistaa
poimusuodatinta.
– Imuroitaessa märkää likaa tyyny- tai ra-
kosuulakkeella (lisävaruste) tai jos imu-
roidaan pääasiassa vettä astiasta, on
suositeltavaa kytkeä toiminto "Auto-
maattinen suodattimenpuhdistus" pois
päältä.
– Kun maksimi nestetäyttötaso on saavu-
tettu, laite kytkeytyy automaattisesti
pois päältä.
– Ei-johtavien nesteiden ollessa ky-
seessä (esimerkiksi porausnesteet,
öljyt ja rasvat) laitetta ei kytketä pois
päältä astian ollessa täynnä. Täyttö-
tasoa on tarkastettava jatkuvasti ja
astia on tyhjennettävä ajoissa.
– Märkäimuroinnin päätyttyä: Puhdista
poimusuodatin suodatinpuhdistuksella.
Puhdista elektrodit harjalla. Puhdista
säiliö kostealla liinalla ja anna kuivua.
Puristinliitos
Kuva
Imuletku on varustettu puristinliitoslukituksella. Kaikki C-35/C-DN-35:n saatavavissa
olevat lisävarusteet voidaan liittää puristinliitokseen.
Käyttö
Laitteen käynnistys
Työnnä virtapistoke pistorasiaan.
Kytke laite pääkytkimellä päälle.
Imutehon säätö
Säädä imuteho kiertosäätimellä (min.-
maks).
Työskentely sähkötyökaluilla
Vaara
Loukkaantumis- ja vahingoittumisvaaravaara! Pistorasia on tarkoitettu vain sähkötyökalujen liittämiseen suoraan imuriin.
Pistorasian käyttö muuhun tarkoitukseen
on kiellettyä.
Liitä sähkötyökalun virtapistoke imuri
pistokkeeseen.
Kytke laite pääkytkimellä päälle.
Merkkivalo syttyy, imuri on valmiustilassa.
Huomautus: Imuri kytketään automaattisesti yhdessä sähkötyökalun kanssa päälle
ja pois päältä.
Huomautus: Imurin käynnistysviive on
enintään 0,5 sekuntia ja jälkikäyntiaika
enintään 15 sekuntia.
Huomautus: Sähkötyökalujen liitäntätehotiedot, katso Tekniset tiedot.
Kuva
Sovella liitosmuhvi sähkötyökalun lii-
täntään.
Kuva
Asenna liitosmuhvi imuletkuun.
Kuva
Liitä liitosmuhvi sähkötyökaluun.
Automaattinen suodattimen
puhdistus
Imuri on varustettu uudenlaisella suodattimen puhdistuksella, erityisen tehokas hienolla pölyllä. Poimusuodatin puhdistetaan
joka 15 sekunti automaattisesti ilmansysäyksellä (kuuluu sykkivä ääni).
Huomautus: Automaattinen suodatinpuhdistus on kytketty päälle jo tehtaalla.
Huomautus: Automaattisen suodatinpuhdistuksen pois-/päällekytkentä on mahdollista vain, kun laite on kytkettynä päälle.
– Automaattisen suodatinpuhdistuksen
poiskytkentä:
Paina kytkintä. Kytkimen valvontalamp-
pu sammuu.
98 FI
– 4
Page 99

– Automaattisen suodatinpuhdistuksen
päällekytkentä:
Paina kytkintä uudelleen. Kytkimen val-
vontalampussa on vihreä valo.
Laitteen kytkeminen pois päältä
Kytke laite pääkytkimellä pois päältä.
Vedä verkkopistoke irti.
Jokaisen käyttökerran jälkeen
Tyhjennä säiliö.
Puhdista laite sisältä ja ulkoa imuroi-
malla ja kostealla liinalla pyyhkimällä.
Laitteen säilytys
Kuva
Säilytä imuletkua ja verkkokaapelia ku-
van mukaisella tavalla.
Säilytä laite kuivassa tilassa ja suojaa
se asiattomalta käytöltä.
Kuljetus
Varo
Loukkaantumis- ja vahingoittumisvaaravaara! Huomioi kuljetettaessa laitteen paino.
Ota imuputki lattiasuulakkeineen pidik-
keestä. Kun kannat laitetta, pidä kiinni
kantokahvasta ja imuputkesta.
Kun kuljetat laitetta ajoneuvoissa, var-
mista laite liukumisen ja kaatumisen varalta kulloinkin voimassa olevien
ohjesääntöjen mukaisesti.
Säilytys
Varo
Loukkaantumis- ja vahingoittumisvaaravaara! Huomioi säilytettäessä laitteen paino.
Tätä laitetta saa säilyttää vain sisätiloissa.
Hoito ja huolto
Vaara
Virtapistoke on vedettävä irti pistorasiasta
ennen kaikkia laitteeseen kohdistuvia töitä.
Pölyä poistavat koneet ovat (Saksan) BGV
A1:n mukaan vaarojen estämiseen tai poistamiseen tarkoitettuja turvalaitteita .
– Kun käyttäjän on laitteen huoltamista
varten, purettava, puhdistettava ja huol-
lettava se, on työ suoritettava mikäli
mahdollista siten, että siitä ei aiheudu
vaaraa huoltohenkilöstölle eikä sivulli-
sille. Sopivat varotoimenpiteet sisältä-
vät myrkkyjen poiston ennen laitteen
purkamista osiin. Ryhdy toimenpiteisiin
paikalla suodatettua pakkoilmanpoistoa
varten siellä, missä laite puretaan osiin,
huoltopaikan puhdistusta ja henkilökun-
nan sopivaa suojaa varten.
– Laitteen ulkopuolelta on poistettava
myrkyt pölynimumenetelmällä ja pyyhit-
tävä puhtaaksi tai käsiteltävä tiivistysai-
neella, ennen kuin se otetaan
vaaralliselta alueelta. Kaikki laitteen-
osat on katsottava likaantuneiksi, kun
ne poistetaan vaaralliselta alueelta.
– Huolto- ja korjaustöiden suorittamisen
yhteydessä on hävitettävä kaikki likaan-
tuneet esineet, joita ei voida tyydyttä-
västi puhdistaa. Tällaiset esineet on
hävitettävä tiiviissä pussissa yhtäpitä-
västi voimassa olevien määräysten
kanssa, jotka koskevat tällaisten jättei-
den hävittämistä.
몇 Varoitus
Vaarojen estämiseen tarkoitetut turvalaitteet on huollettava säännöllisesti. Tämä
tarkoittaa, valmistajan tai asiaan perehdytetyn henkilön on tarkastettava vähintään
kerran vuodessa turvalaitteiden turvallisuustekninen moitteeton toimivuus, esim.
laitteen tiiviys, suodattimen vaurioituminen,
valvontalaitteiden toiminta.
– 5
99FI
Page 100

Varo
Vaurioitumisvaara! Älä käytä puhdistamiseen silikonipitoisia hoitoaineita.
– Yksinkertaiset huolto- ja hoitotyöt voi
tehdä itse.
– Laitteen pinta ja säiliön sisäpuoli on
puhdistettava säännöllisesti kostealla
liinalla.
몇 Varoitus
Terveydelle haitallisen pölyn aiheuttama
vaara terveydelle. Huoltotöissä (esim. suodattimen vaihto) on käytettävä hengityssuojamaskia P2 tai parempaa ja
kertakäyttövaatetusta.
Poimusuodattimen vaihto
Avaa suodattimen kansi.
Poista poimusuodatin.
Hävitä käytetty poimusuodatin pölytii-
viisti suljetussa pussissa lain määräysten mukaan.
Poista kerääntynyt lika puhdasilmapuo-
lelta.
Aseta uusi poimusuodatin paikalleen.
Sulje suodattimen kansi, sen on lukitut-
tuva kuuluvasti.
Paperisuodatinpussin vaihto
Kuva
Vapauta imupää lukituksesta, poista
imupää.
Vedä paperisuodatinpussi taaksepäin irti.
Vedä liukusuljinta ylös ja sulje paperi-
suodatinpussi poistettaessa tiiviisti.
Hävitä paperisuodatinpussi lakisääteis-
ten määräysten mukaisesti.
Aseta uusi paperisuodatinpussi paikalleen.
Aseta imupää paikalleen ja lukitse se.
Hävityspussin vaihtaminen
Kuva
Vapauta imupää lukituksesta, poista
imupää.
Käännä hävityspussin reunat ylös.
Vedä hävityspussin suu pois imukau-
luksen reunojen ympäriltä ja sulje pussi
tiiviisti.
Sulje hävityspussi tiiviisti sulkunauhalla
aukon alapuolelta.
Poista hävityspussi.
Hävitä käytetty hävityspussi lakisää-
teisten määräysten mukaisesti.
Aseta uusi hävityspussi paikalleen.
Käännä hävityspussin reunat säiliön
reunojen ylitse.
Aseta imupää paikalleen ja lukitse se.
Elektrodien puhdistus
Vapauta imupää lukituksesta, poista
imupää.
Puhdista elektrodit harjalla.
Aseta imupää paikalleen ja lukitse se.
Häiriöapu
Vaara
Virtapistoke on vedettävä irti pistorasiasta
ennen kaikkia laitteeseen kohdistuvia töitä.
Huomautus:Häiriön esiintyessä (esim.
suodattimen repeytyminen) laite on heti
kytkettävä pois päältä. Ennen uutta käyttämistä häiriön aiheuttaja on poistettava.
Imuturbiini ei pyöri
Tarkasta virransyötön pistorasia ja su-
lake.
Tarkasta laitteen verkkokaapeli, verk-
kopistoke ja elektrodit ja pistorasia.
Kytke laite päälle.
Imuturbiini kytkeytyy pois päältä
Tyhjennä säiliö.
Imuturbiini ei käynnisty astian
tyhjentämisen jälkeen
Kytke laite pois päältä ja odota 5 sekun-
tia, kytke laite uudelleen päälle 5 sekun-
nin kuluttua.
Puhdista elektrodit sekä elektrodien vä-
linen tila harjalla.
100 FI
– 6
 Loading...