

Page 1
001
ΔϳΒήόϠ
K 5 Compact
59672000 (11/16)
Deutsch 5 English 10 Français 15 Italiano 20 Nederlands 25 Español 30 Português 35 Dansk 40 Norsk 45 Svenska 50 Suomi 55 Ελληνικά 60 Türkçe 65 Русский 70 Magyar 76 Čeština 81 Slovenščina 86 Polski 91 Româneşte 96 Slovenčina 101 Hrvatski 106 Srpski 111 Български 116 Eesti 121 Latviešu 126 Lietuviškai 131 Українська 136 Қазақша 141
146
Page 2
2
Page 3
3
Page 4
4
Page 5

Inhaltsverzeichnis
Sicherheit . . . . . . . . . . . . . . . . . . . . . . . . . . .DE 5
Umweltschutz . . . . . . . . . . . . . . . . . . . . . . . . DE 5
Gerätebeschreibung . . . . . . . . . . . . . . . . . . . DE 6
Montage . . . . . . . . . . . . . . . . . . . . . . . . . . . . DE 6
Inbetriebnahme . . . . . . . . . . . . . . . . . . . . . . . DE 6
Betrieb . . . . . . . . . . . . . . . . . . . . . . . . . . . . . . DE 7
Transport . . . . . . . . . . . . . . . . . . . . . . . . . . . .DE 7
Lagerung . . . . . . . . . . . . . . . . . . . . . . . . . . . . DE 8
Pflege und Wartung. . . . . . . . . . . . . . . . . . . . DE 8
Ersatzteile . . . . . . . . . . . . . . . . . . . . . . . . . . . DE 8
Hilfe bei Störungen . . . . . . . . . . . . . . . . . . . . DE 8
Garantie. . . . . . . . . . . . . . . . . . . . . . . . . . . . . DE 9
Technische Daten . . . . . . . . . . . . . . . . . . . . . DE 9
EU-Konformitätserklärung . . . . . . . . . . . . . . . DE 9
Sicherheit
Lesen Sie vor der ersten Benutzung Ihres
Gerätes diese Originalbetriebsanleitung
und die beiliegenden Sicherheitshinweise.
Handeln Sie danach. Bewahren Sie beide Hefte für späteren Gebrauch oder für Nachbesitzer auf.
Bestimmungsgemäße Verwendung
Verwenden Sie diesen Hochdruckreiniger ausschließlich für den Privathaushalt.
– zum Reinigen von Maschinen, Fahrzeugen, Bau-
werken, Werkzeugen, Fassaden, Terrassen, Gartengeräten usw. mit Hochdruck-Wasserstrahl (bei
Bedarf mit Zusatz von Reinigungsmitteln).
– mit von KÄRCHER zugelassenen Zubehörteilen,
Ersatzteilen und Reinigungsmitteln. Beachten Sie
die Hinweise, die den Reinigungsmitteln beigegeben sind.
Gefahrenstufen
GEFAHR
Hinweis auf eine unmittelbar drohende Gefahr, die zu
schweren Körperverletzungen oder zum Tod führt.
몇 WARNUNG
Hinweis auf eine möglicherweise gefährliche Situation,
die zu schweren Körperverletzungen oder zum Tod führen kann.
몇 VORSICHT
Hinweis auf eine möglicherweise gefährliche Situation,
die zu leichten Verletzungen führen kann.
ACHTUNG
Hinweis auf eine möglicherweise gefährliche Situation,
die zu Sachschäden führen kann.
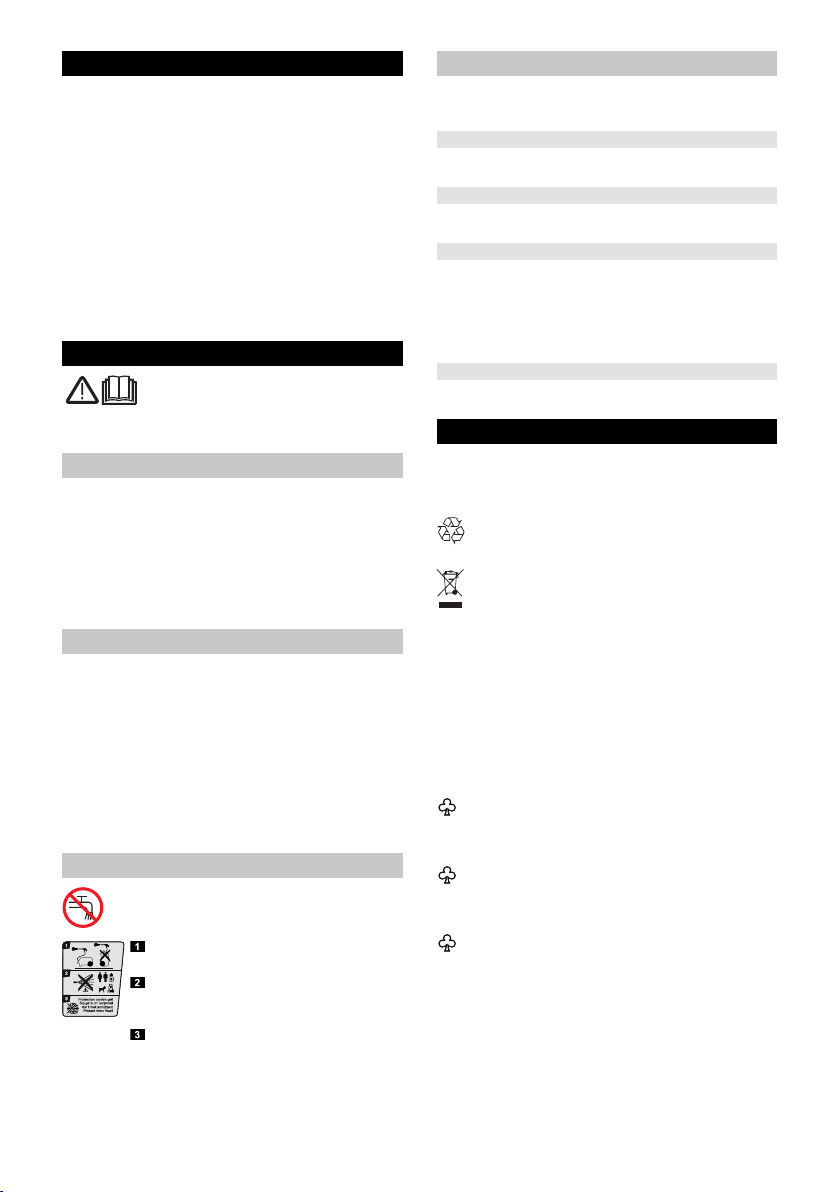
Symbole auf dem Gerät
Das Gerät darf nicht unmittelbar an das öffentliche Trinkwassernetz angeschlossen
werden.
Gerät darf nur in liegender Position
(horizontal) betrieben werden.
Hochdruckstrahl nicht auf Personen,
Tiere, aktive elektrische Ausrüstung oder
auf das Gerät selbst richten.
Gerät vor Frost schützen.
Sicherheitseinrichtungen
몇 VORSICHT
Sicherheitseinrichtungen dienen dem Schutz des
Benutzers und dürfen nicht verändert oder umgangen werden.
Geräteschalter
Der Geräteschalter verhindert den unbeabsichtigten
Betrieb des Gerätes.
Verriegelung Handspritzpistole
Die Verriegelung sperrt den Hebel der Handspritzpistole und verhindert den unbeabsichtigten Start des Gerätes.
Überströmventil mit Druckschalter
Das Überströmventil verhindert eine Überschreitung
des zulässigen Arbeitsdrucks.
Wird der Hebel an der Handspritzpistole losgelassen,
schaltet der Druckschalter die Pumpe ab, der Hochdruckstrahl stoppt. Wird der Hebel gezogen, schaltet
die Pumpe wieder ein.
Motorschutzschalter
Bei zu hoher Stromaufnahme schaltet der Motorschutzschalter das Gerät ab.
Umweltschutz
Hinweise zu Inhaltsstoffen (REACH)
Aktuelle Informationen zu Inhaltsstoffen finden Sie unter:
www.kaercher.de/REACH
Die Verpackungsmaterialien sind recyclebar. Bitte
Verpackungen umweltgerecht entsorgen.
Elektrische und elektronische Geräte enthalten oft
Bestandteile, die bei falschem Umgang oder falscher Entsorgung eine potentielle Gefahr für die
menschliche Gesundheit und die Umwelt darstellen können. Für den ordnungsgemäßen Betrieb
des Gerätes sind diese Bestandteile jedoch notwendig. Mit diesem Symbol gekennzeichnete Geräte dürfen nicht mit dem Hausmüll entsorgt werden.
Altgeräte enthalten wertvolle recyclebare Materialien, die einer Verwertung zugeführt werden sollten. Batterien und Akkus enthalten Stoffe, die
nicht in die Umwelt gelangen dürfen. Bitte Altgeräte sowie Batterien oder Akkus umweltgerecht entsorgen.
Reinigungsarbeiten, bei denen ölhaltiges Abwasser entsteht z. B. Motorenwäsche, Unterbodenwäsche dürfen nur an Waschplätzen mit Ölabscheider durchgeführt werden.
Arbeiten mit Reinigungsmitteln dürfen nur auf flüssigkeitsdichten Arbeitsflächen mit Anschluss an
die Schmutzwasserkanalisation durchgeführt werden. Reinigungsmittel nicht in Gewässer oder Erdreich eindringen lassen.
Die Entnahme von Wasser aus öffentlichen Gewässern ist in einigen Ländern nicht erlaubt.
– 5
5DE
Page 6
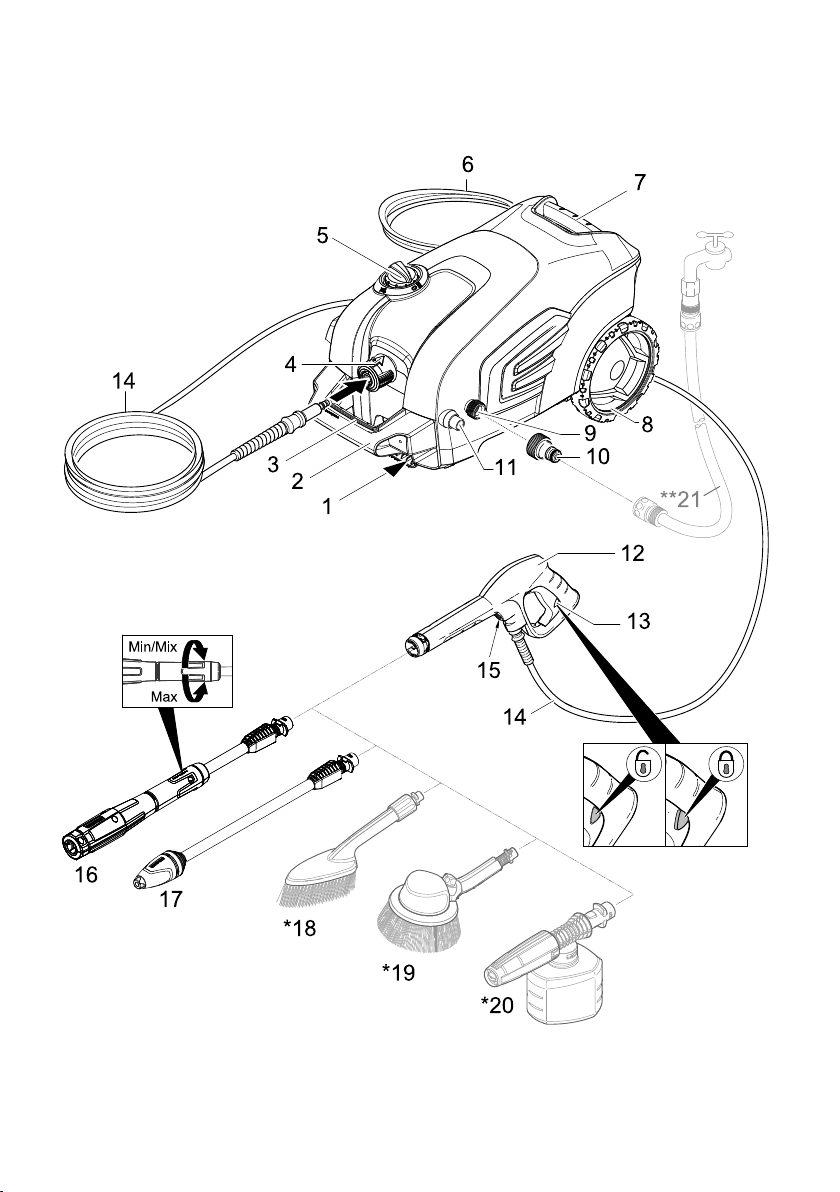
Gerätebeschreibung
In dieser Betriebsanleitung wird die maximale Ausstattung beschrieben. Je nach Modell gibt es Unterschiede
im Lieferumfang (siehe Verpackung).
Abbildungen siehe Ausklappseite 3
1 Aufbewahrung für Zubehör
2 Transportgriff, ausziehbar
3 Tragegriff
4 Schnellkupplung für Hochdruckschlauch
5 Geräteschalter „0/OFF“ / „I/ON“
6 Netzanschlussleitung mit Netzstecker
7 Tragegriff
8 Transportrad
9 Wasseranschluss mit eingebautem Sieb
10 Kupplung für Wasseranschluss
11 Saugschlauch für Reinigungsmittel (mit Filter)
12 Handspritzpistole
13 Verriegelung Handspritzpistole
14 Hochdruckschlauch
15 Taste zum Trennen des Hochdruckschlauches von
der Handspritzpistole
16 Strahlrohr mit Druckregulierung (Vario Power)
Für die gängigsten Reinigungsaufgaben. Der Arbeitsdruck ist stufenlos zwischen „Min“ und „Max“
regelbar. In Stellung „Mix“ kann Reinigungsmittel
zudosiert werden.
Zum Verstellen des Arbeitsdrucks, Hebel der
Handspritzpistole loslassen und Strahlrohr auf gewünschte Stellung drehen.
17 Strahlrohr mit Dreckfräser
Für hartnäckige Verschmutzungen.
* Optionales Zubehör
18 Waschbürste
Zum Arbeiten mit Reinigungsmittel geeignet.
19 Rotierende Waschbürste
Besonders geeignet für die Autoreinigung.
20 Schaumdüse mit Reinigungsmittelbehälter
Reinigungsmittel wird aus dem Behälter angesaugt
und es entsteht ein kraftvoller Reinigungsmittelschaum.
** Zusätzlich erforderlich
21 Gewebeverstärkter Wasserschlauch mit handels-
üblicher Kupplung
– Durchmesser mindestens 1/2 Zoll (13 mm)
– Länge mindestens 7,5 m
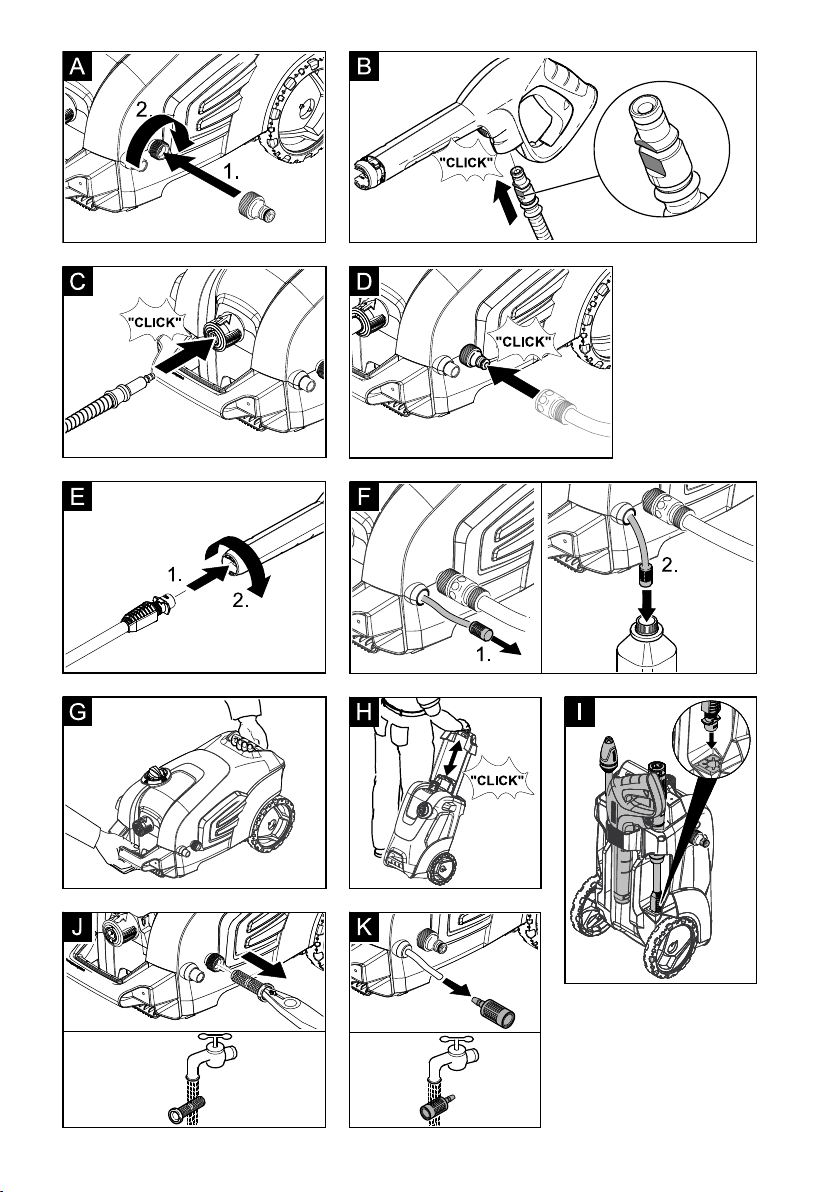
Montage
Dem Gerät lose beigelegte Teile vor Inbetriebnahme
montieren.
Abbildungen siehe Ausklappseite 4
Abbildung
Kupplung auf Wasseranschluss des Gerätes
schrauben.
Abbildung
Hochdruckschlauch in Handspritzpistole stecken,
bis dieser hörbar einrastet.
Hinweis: Auf richtige Ausrichtung des Anschluss-
nippels achten.
Sichere Verbindung durch Ziehen am Hochdruck-
schlauch prüfen.
Inbetriebnahme
Gerät horizontal auf eine ebene Fläche legen.
Abbildung
Hochdruckschlauch in Schnellkupplung stecken,
bis dieser hörbar einrastet.
Netzstecker in Steckdose stecken.
Wasserversorgung
Anschlusswerte siehe Typenschild/Technische Daten.
ACHTUNG
Verunreinigungen im Wasser können die Hochdruckpumpe und das Zubehör beschädigen. Zum Schutz
wird die Verwendung des KÄRCHER-Wasserfilters
(Sonderzubehör, Bestellnummer 4.730-059) empfohlen.
Wasserversorgung aus Wasserleitung
Vorschriften des Wasserversorgungsunternehmens beachten.
ACHTUNG
Schlauchkupplungen aus Metall mit Aquastop können
zur Beschädigung der Pumpe führen! Bitte Schlauchkupplung aus Kunststoff oder KÄRCHER Schlauchkupplung aus Messing verwenden.
Abbildung
Wasserzulaufschlauch auf Kupplung am Wasseranschluss stecken.
Wasserzulaufschlauch an die Wasserversorgung
anschließen.
Wasserhahn vollständig öffnen.
Wasser aus offenen Behältern ansaugen
Dieser Hochdruckreiniger ist mit dem KÄRCHER-Saugschlauch mit Rückschlagventil (Sonderzubehör, Bestellnr. 4.440-238) zum Ansaugen von Oberflächenwasser z. B. aus Regentonnen oder Teichen geeignet
(Maximale Ansaughöhe siehe technische Daten).
Kupplung vom Wasseranschluss entfernen.
Saugschlauch mit Wasser füllen.
Saugschlauch auf Wasseranschluss des Gerätes
schrauben und in Wasserquelle (zum Beispiel Regentonne) hängen.
Gerät vor dem Betrieb entlüften.
Gerät einschalten „I/ON“.
Hebel der Handspritzpistole entsperren.
Hebel ziehen, das Gerät schaltet ein.
Gerät laufen lassen (max. 2 Minuten), bis Wasser
blasenfrei an der Handspritzpistole austritt.
Hebel der Handspritzpistole loslassen.
Hinweis: Wird der Hebel losgelassen, schaltet das
Gerät ab. Der Hochdruck im System bleibt erhalten.
Hebel der Handspritzpistole verriegeln.
6 DE
– 6
Page 7
Betrieb
ACHTUNG
Trockenlauf von mehr als 2 Minuten führt zu Beschädigungen an der Hochdruckpumpe. Baut das Gerät innerhalb von 2 Minuten keinen Druck auf, Gerät abschalten
und gemäß Hinweisen im Kapitel „Hilfe bei Störungen“
verfahren.
ACHTUNG
Beschädigungsgefahr! Gerät darf nur in liegender
Position (horizontal) betrieben werden.
Betrieb mit Hochdruck
몇 VORSICHT
Mindestens 30 cm Strahlabstand bei der Reinigung von
lackierten Oberflächen einhalten, um Beschädigungen
zu vermeiden.
ACHTUNG
Autoreifen, Lack oder empfindliche Oberflächen wie
Holz nicht mit dem Dreckfräser reinigen, Gefahr der Beschädigung.
Abbildung
Strahlrohr in Handspritzpistole einstecken und
durch 90° Drehung fixieren.
Gerät einschalten „I/ON“.
Hebel der Handspritzpistole entsperren.
Hebel ziehen, das Gerät schaltet ein.
Hinweis: Wird der Hebel losgelassen, schaltet das
Gerät ab. Der Hochdruck im System bleibt erhal-
ten.
Betrieb mit Waschbürste
ACHTUNG
Gefahr von Lackschäden
Bei Arbeiten mit der Waschbürste muss diese frei von
Schmutz- oder sonstigen Partikeln sein.
Waschbürste in Handspritzpistole einstecken und
durch 90° Drehung fixieren.
Hinweis: Bei Bedarf können auch die Waschbürsten
zum Arbeiten mit Reinigungsmittel verwendet werden.
Betrieb mit Reinigungsmittel
Hinweis: Reinigungsmittel kann nur im Niederdruck zu-
gemischt werden.
GEFAHR
Bei Verwendung von Reinigungsmitteln ist das Sicherheitsdatenblatt des Reinigungsmittel-Herstellers zu beachten, insbesondere die Hinweise zur persönlichen
Schutzausrüstung.
Abbildung
Saugschlauch für Reinigungsmittel in gewünschter
Länge aus dem Gehäuse ziehen.
Saugschlauch für Reinigungsmittel in einen Behäl-
ter mit Reinigungsmittellösung hängen.
Strahlrohr mit Druckregulierung (Vario Power) ver-
wenden.
Strahlrohr auf Stellung „Mix“ drehen.
Hinweis: Dadurch wird bei Betrieb die Reinigungs-
mittellösung dem Wasserstrahl zugemischt.
Empfohlene Reinigungsmethode
Reinigungsmittel sparsam auf die trockene Ober-
fläche sprühen und einwirken (nicht trocknen) lassen.
Gelösten Schmutz mit Hochdruckstrahl abspülen.
Optional
Schaumdüse
Reinigungsmittellösung in Reinigungsmittelbehäl-
ter der Schaumdüse füllen (Dosierungsangabe auf
Gebinde der Reinigungsmittel beachten).
Schaumdüse mit dem Reinigungsmittelbehälter
verbinden.
Schaumdüse in Handspritzpistole einstecken und
durch 90° Drehung fixieren.
Betrieb unterbrechen
Hebel der Handspritzpistole loslassen.
Hebel der Handspritzpistole verriegeln.
Bei längeren Arbeitspausen (über 5 Minuten) zu-
sätzlich das Gerät ausschalten „0/OFF“.
Betrieb beenden
몇 VORSICHT
Den Hochdruckschlauch nur von der Handspritzpistole
oder dem Gerät trennen, wenn kein Druck im System
vorhanden ist.
Nach Arbeiten mit Reinigungsmittel: Gerät etwa
1 Minute zum klarspülen betreiben.
Hebel der Handspritzpistole loslassen.
Gerät ausschalten „0/OFF“.
Netzstecker aus der Steckdose ziehen.
Wasserhahn schließen.
Hebel der Handspritzpistole drücken, um den noch
vorhandenen Druck im System abzubauen.
Hebel der Handspritzpistole verriegeln.
몇 VORSICHT
Beim Trennen von Zulauf– oder Hochdruckschlauch
kann nach dem Betrieb heißes Wasser aus den Anschlüssen austreten.
Gerät von der Wasserversorgung trennen.
Transport
몇 VORSICHT
Verletzungs- und Beschädigungsgefahr!
Gewicht des Gerätes beim Transport beachten.
Transport von Hand
Abbildung
Gerät an den Tragegriffen hochheben und tragen.
Abbildung
Transportgriff ausziehen, er rastet hörbar ein.
Gerät am Transportgriff ziehen.
Transport in Fahrzeugen
Gerät gegen Verrutschen und Kippen sichern.
– 7
7DE
Page 8

Lagerung
몇 VORSICHT
Verletzungs- und Beschädigungsgefahr!
Gewicht des Gerätes bei der Lagerung beachten.
Gerät aufbewahren
Gerät auf einer ebenen Fläche abstellen.
Trenntaste an der Handspritzpistole drücken und
Hochdruckschlauch von der Handspritzpistole
trennen.
Gehäuse der Schnellkupplung für Hochdruck-
schlauch in Pfeilrichtung drücken und Hochdruck-
schlauch herausziehen.
Abbildung
Handspritzpistole in Aufbewahrung für Handspritz-
pistole stecken.
Strahlrohr in die Aufbewahrung für Strahlrohr ein-
rasten.
Hochdruckschlauch und Netzanschlussleitung am
Gerät verstauen.
Frostschutz
ACHTUNG
Nicht vollständig entleerte Geräte und Zubehör können
von Frost zerstört werden. Gerät und Zubehör vollständig entleeren und vor Frost schützen.
Um Schäden zu vermeiden:
Gerät vollständig von Wasser entleeren: Gerät
ohne angeschlossenen Hochdruckschlauch und
ohne angeschlossene Wasserversorgung ein-
schalten (max. 1 min) und warten, bis kein Wasser
mehr am Hochdruckanschluss austritt. Gerät aus-
schalten.
Gerät mit komplettem Zubehör in einem frostsiche-
ren Raum aufbewahren.
Vor längerer Lagerung, z.B. im Winter zusätzlich die
Hinweise im Kapitel Pflege beachten.
Pflege und Wartung
GEFAHR
Gefahr eines Stromschlags.
Vor allen Arbeiten am Gerät, Gerät ausschalten
und Netzstecker ziehen.
Sieb im Wasseranschluss reinigen
ACHTUNG
Sieb darf nicht beschädigt werden.
Kupplung vom Wasseranschluss entfernen.
Abbildung
Sieb mit einer Flachzange herausziehen.
Sieb unter fließendem Wasser reinigen.
Sieb wieder in den Wasseranschluss einsetzen.
Reinigungsmittelfilter reinigen
Abbildung
Filter vom Saugschlauch für Reinigungsmittel ab-
ziehen und unter fließendem Wasser reinigen.
Ersatzteile
Verwenden Sie ausschließlich Original KÄRCHER Ersatzteile. Eine Ersatzteilübersicht finden Sie am Ende
dieser Betriebsanleitung.
Hilfe bei Störungen
Kleinere Störungen können Sie mit Hilfe der folgenden
Übersicht selbst beheben.
Im Zweifelsfall wenden Sie sich bitte an den autorisierten Kundendienst.
GEFAHR
Gefahr eines Stromschlags.
Vor allen Arbeiten am Gerät, Gerät ausschalten
und Netzstecker ziehen.
Gerät läuft nicht
Hebel der Handspritzpistole ziehen, das Gerät
schaltet ein.
Prüfen ob die angegebene Spannung auf dem Ty-
penschild mit der Spannung der Stromquelle übereinstimmt.
Netzanschlussleitung auf Beschädigung prüfen.
Motor überlastet, der Motorschutzschalter hat aus-
gelöst.
– Gerät ausschalten „0/OFF“.
– Gerät eine Stunde abkühlen lassen.
– Gerät einschalten und wieder in Betrieb nehmen.
Tritt die Störung mehrmalig auf, Gerät durch Kundendienst prüfen lassen.
Gerät läuft nicht an, Motor brummt
Spannungsabfall wegen schwachem Stromnetz oder
bei Verwendung eines Verlängerungskabels.
Beim Einschalten zuerst den Hebel der Handspritz-
pistole ziehen, dann den Geräteschalter auf „I/ON“
stellen.
Gerät kommt nicht auf Druck
Wasserversorgung auf ausreichende Fördermen-
ge überprüfen.
Sieb im Wasseranschluss mit einer Flachzange
herausziehen und unter fließendem Wasser reinigen.
Gerät entlüften: Gerät ohne angeschlossenen
Hochdruckschlauch einschalten und warten (max.
2 Minuten), bis Wasser blasenfrei am Hochdruckanschluss austritt. Gerät ausschalten und Hochdruckschlauch wieder anschließen.
Ansaughöhe 0,5 m beim Ansaugen aus offenem
Behälter überschritten.
Starke Druckschwankungen
Hochdruckdüse reinigen: Verschmutzungen aus
der Düsenbohrung mit einer Nadel entfernen und
von vorne mit Wasser ausspülen.
Wasserzulaufmenge überprüfen.
Gerät undicht
Eine geringe Undichtheit des Gerätes ist technisch
bedingt. Bei starker Undichtheit den autorisierten
Kundendienst beauftragen.
Reinigungsmittel wird nicht angesaugt
Strahlrohr mit Druckregulierung (Vario Power) ver-
wenden.
Strahlrohr auf Stellung „Mix“ drehen.
Filter am Saugschlauch für Reinigungsmittel reini-
gen.
Saugschlauch für Reinigungsmittel auf Knickstel-
len überprüfen.
8 DE
– 8
Page 9

Garantie
In jedem Land gelten die von unserer zuständigen Vertriebsgesellschaft herausgegebenen Garantiebedingungen. Etwaige Störungen an Ihrem Gerät beseitigen
wir innerhalb der Garantiefrist kostenlos, sofern ein Material- oder Herstellungsfehler die Ursache sein sollte.
Im Garantiefall wenden Sie sich bitte mit Kaufbeleg an
Ihren Händler oder die nächste autorisierte Kundendienststelle.
Adressen finden Sie unter:
www.kaercher.com/dealersearch
Technische Daten
Elektrischer Anschluss
Spannung 230
Anschlussleistung 2,1 kW
Schutzgrad IP X5
Schutzklasse I
Netzabsicherung (träge) 10 A
Wasseranschluss
Zulaufdruck (max.) 0,8 MPa
Zulauftemperatur (max.) 40 °C
Zulaufmenge (min.) 10 l/min
Max. Ansaughöhe 0,5 m
Leistungsdaten
Arbeitsdruck 12,5 MPa
Max. zulässiger Druck 14,5 MPa
Fördermenge, Wasser 7,5 l/min
Fördermenge maximal 8,3 l/min
Fördermenge, Reinigungsmittel 0,3 l/min
Rückstoßkraft der Handspritzpistole 20 N
Maße und Gewichte
Länge 516 mm
Breite 295 mm
Höhe 282 mm
Gewicht, betriebsbereit mit Zubehör 13,1 kg
Ermittelte Werte gemäß EN 60335-2-79
Hand-Arm Vibrationswert
Unsicherheit K
Schalldruckpegel L
Unsicherheit K
Schallleistungspegel L
Unsicherheit K
Technische Änderungen vorbehalten.
pA
pA
+
WA
WA
1~50VHz
<2,5
m/s
0,3
m/s
773dB(A)
dB(A)
92 dB(A)
2
2
EU-Konformitätserklärung
Hiermit erklären wir, dass die nachfolgend bezeichnete
Maschine aufgrund ihrer Konzipierung und Bauart sowie in der von uns in Verkehr gebrachten Ausführung
den einschlägigen grundlegenden Sicherheits- und Gesundheitsanforderungen der EU-Richtlinien entspricht.
Bei einer nicht mit uns abgestimmten Änderung der Maschine verliert diese Erklärung ihre Gültigkeit.
Produkt: Hochdruckreiniger
Typ: 1.630-xxx
Einschlägige EU-Richtlinien
2000/14/EG
2014/30/EU
2006/42/EG (+2009/127/EG)
2011/65/EU
Angewandte harmonisierte Normen
EN 50581
EN 55014–1: 2006+A1: 2009+A2: 2011
EN 55014–2: 2015
EN 60335–1
EN 60335–2–79
EN 61000–3–2: 2014
EN 61000–3–3: 2013
EN 62233: 2008
Angewandtes Konformitätsbewertungsverfahren
2000/14/EG: Anhang V
Schallleistungspegel dB(A)
Gemessen: 88
Garantiert: 92
Die Unterzeichnenden handeln im Auftrag und mit Vollmacht der Geschäftsführung.
CEO
Dokumentationsbevollmächtigter:
S. Reiser
Alfred Kärcher GmbH & Co. KG
Alfred-Kärcher-Str. 28 - 40
71364 Winnenden (Germany)
Tel.: +49 7195 14-0
Fax: +49 7195 14-2212
Winnenden, 2016/04/01
Head of Approbation
– 9
9DE
Page 10
Contents
Safety . . . . . . . . . . . . . . . . . . . . . . . . . . . . . . EN 5
Environmental protection. . . . . . . . . . . . . . . . EN 5
Description of the Appliance . . . . . . . . . . . . . EN 6
Assembly. . . . . . . . . . . . . . . . . . . . . . . . . . . . EN 6
Start up . . . . . . . . . . . . . . . . . . . . . . . . . . . . . EN 6
Operation. . . . . . . . . . . . . . . . . . . . . . . . . . . .EN 7
Transport . . . . . . . . . . . . . . . . . . . . . . . . . . . .EN 7
Storage . . . . . . . . . . . . . . . . . . . . . . . . . . . . . EN 8
Care and maintenance . . . . . . . . . . . . . . . . . EN 8
Spare parts . . . . . . . . . . . . . . . . . . . . . . . . . . EN 8
Troubleshooting. . . . . . . . . . . . . . . . . . . . . . . EN 8
Warranty . . . . . . . . . . . . . . . . . . . . . . . . . . . .EN 9
Technical specifications. . . . . . . . . . . . . . . . . EN 9
EU Declaration of Conformity . . . . . . . . . . . . EN 9
Safety
Please read and comply with these original operating instructions and the en-
closed safety instructions. Proceed accordingly. Keep both booklets for future reference or
subsequent owners.
Proper use
This high pressure cleaner is designed for domestic use
only.
– for cleaning machines, vehicles, buildings, tools,
facades, terraces, gardening tools, etc. by means
of a high-pressure water jet (if necessary, with additional cleaning agents).
– with accessories, replacement parts and cleaning
agents approved by KÄRCHER. Please observe
the information accompanying the cleaning agents.
Hazard levels
DANGER
Pointer to immediate danger, which leads to severe injuries or death.
몇 WARNING
Pointer to a possibly dangerous situation, which can
lead to severe injuries or death.
몇 CAUTION
Pointer to a possibly dangerous situation, which can
lead to minor injuries.
ATTENTION
Pointer to a possibly dangerous situation, which can
lead to property damage.
Symbols on the machine
The appliance must not be directly connected to the public drinking water network.
The appliance must only be operated laying down (horizontal).
The high pressure jet must not be directed
at persons, animals, live electrical equipment or at the appliance itself.
Protect the appliance against frost.
Safety Devices
몇 CAUTION
Safety installations serve the protection of the user
and may not be modified or bypassed.
Appliance switch
The appliance switch prevents unintentional operation
of the appliance.
Lock trigger gun
This lock locks the lever of the trigger gun and prevents
the inadvertent start of the appliance.
Overflow valve with pressure switch
The overflow valve prevents the permissible working
pressure from being exceeded.
If the lever on the trigger gun is released the pressure
switch turns off the pump, the high pressure jet is
stopped. If the lever is pulled the pump is turned on
again.
Motor protection switch
The motor protection switch switches off the device if
the power consumption is high.
Environmental protection
Notes about the ingredients (REACH)
You will find current information about the ingredients
at:
www.kaercher.com/REACH
The packaging material can be recycled. Please
arrange for the environmentally appropriate disposal of the packaging.
Electrical and electronic devices often contain
components which could potentially pose a danger to human health and the environment if handled or disposed of incorrectly. However, these
components are necessary for the proper operation of the device. Devices marked with this symbol must not be disposed of with regular household rubbish.
Old appliances contain valuable recyclable materials that should be recycled properly. Batteries
and accumulators contain substances that must
not enter the environment. Please dispose of old
devices and batteries or accumulators in an environmentally friendly way.
Cleaning operations which produce oily waste water, e.g. engine washes, underbody washes, may
only be carried out using washing stations
equipped with an oil separator.
Work with detergents must only be performed on
liquid-tight work surfaces with a connection to the
sewer system. Do not let release detergent into
waters or earth.
The extraction of water from public waters is prohibited in some countries.
10 EN
– 5
Page 11
Description of the Appliance
These operating instructions describe the maximum
equipment. Depending on the model, there are differences in the scopes of delivery (see packaging).
See fold-out page 3 for illustrations
1 Storage for accessories
2 Transport handle, detachable
3 Carrying handle
4 Quick coupling for high pressure hose
5 Appliance switch „0/OFF“ / „I/ON“
6 Mains cable with mains plug
7 Carrying handle
8 Bearing wheel
9 Water connection with integrated sieve
10 Coupling element for water connection
11 Detergent suction hose (with sieve)
12 Trigger gun
13 Lock trigger gun
14 High pressure hose
15 Key to detach the high pressure hose from the trig-
ger gun
16 Spray lance with pressure regulation (Vario Power)
Carrying out the most common cleaning tasks. The
work pressure can be stagelessly regulated between "Min" and "Max". You can add detergent
when "Mix" is selected.
In order to adjust the working pressure, release the
lever of the trigger gun and turn the spray lance to
the desired position.
17 Spray lance with Dirtblaster
For strong contaminations
* Optional accessories
18 Washing brush
Suitable for use with detergents.
19 Rotary washing brush
Especially suitable for cleaning cars.
20 Foam nozzle with detergent container
With powerful foam for effortless cleaning.
** Additionally required
21 Fabric-reinforced water hose with commercially
available coupling.
– Minimum diameter, 1/2 inches (13 mm).
– Minimum length 7.5 m.
Assembly
Mount loose parts delivered with appliance prior to startup.
See fold-out page 4 for illustrations
Illustration
Screw the coupling element to the water connec-
tion on the appliance.
Illustration
Push the high pressure hose into the trigger gun
until it locks audibly.
Note: Make sure the connection nipple is aligned
correctly.
Check the secure connection by pulling on the high
pressure hose.
Start up
Park the appliance laying down (horizontal) on an
even surface.
Illustration
Push the high pressure hose into the quick coupling until it locks audibly.
Insert the mains plug into the socket.
Water supply
For connection values, see type plate/technical data.
ATTENTION
Impurities in the water can damage the high-pressure
pump and the accessories. For protection, the use of
the KÄRCHER water filter (optional accessory, order
no. 4.730-059) is recommended.
Water supply from mains
Observe regulations of water supplier.
ATTENTION
Hose couplings made of metal with aquastop can damage the pump! Please use plastic couplings or KÄRCHER brass couplings.
Illustration
Attach the water supply hose to the coupling on the
water connection.
Connect the water supply hose to the water supply.
Completely open the water tap.
Drawing in water from open reservoirs
This high-pressure cleaner is suited to work with the
KÄRCHER suction hose with backflow valve (Optional
accessory, order no. 4.440-238) to draw in surface water, e.g. from water butts or ponds (see specifications for
max. suction height).
Remove coupling from the water connection.
Fill the suction hose with water.
Screw the suction hose into the water connection of
the appliance and insert it into the water source
(e.g. rainwater drum).
Remove air from appliance before operation.
Turn on the appliance “I/ON”.
Unlock the lever on the trigger gun.
Pull on the lever of the trigger gun; the device will
switch on.
Let the appliance work until the water exits at the
hand spray gun without bubbles (max. 2 minutes).
Release the lever on the trigger gun.
Note: Release the lever of the trigger gun; the device will switch off again. High pressure remains in
the system.
Lock the lever on the trigger gun.
– 6
11EN
Page 12
Operation
ATTENTION
Dry running of more than 2 minutes leads to damage of
the high-pressure pump. If the appliance does not build
up pressure within 2 minutes, switch the appliance off
and proceed in accordance with the instructions in
Chapter "Troubleshooting".
ATTENTION
Risk of damage! The appliance must only be operated laying down (horizontal).
High pressure operation
몇 CAUTION
Keep a distance of at least 30 cm when using the jet for
cleaning painted surfaces to avoid damage.
ATTENTION
Car tyres, paint or sensitive surfaces such as wood
should not be cleaned with the dirt blaster, as there is a
risk of damage.
Illustration
Push the spray lance into the trigger gun and fasten
it by turning it through 90°.
Turn on the appliance “I/ON”.
Unlock the lever on the trigger gun.
Pull on the lever of the trigger gun; the device will
switch on.
Note: Release the lever of the trigger gun; the de-
vice will switch off again. High pressure remains in
the system.
Operation with washing brush
ATTENTION
Risk of damage to the paintwork
When working with the washing brush, it must be free of
dirt or other particles.
Push the washing brush into the trigger gun and
fasten it by a 90° turn.
Note: If required, the washing brushes can be used to
work with detergent.
Operation with detergent
Note: Detergent can only be added when the device is
operated in low pressure mode.
DANGER
When using detergents, the material data safety sheet
issued by the detergent manufacturer must be adhered
to, especially the instructions regarding personal protective equipment.
Illustration
Pull detergent suction hose as far as is required out
of the housing.
Suspend end of detergent suction hose in a con-
tainer filled with detergent.
Use spray lance with pressure regulation (Vario
Power).
Turn the spray lance to "Mix" position.
Note: This will mix the detergent with the water
stream.
Recommended cleaning method
Spray the detergent sparingly on the dry surface
and allow it to react, but not to dry.
Spray off loosened dirt with the high pressure jet.
Optional
Foam nozzle
Fill the detergent solution in the detergent tank of
the foam nozzle (observe dosage instructions on
the packaging of the detergent).
Connect the detergent tank to the foam nozzle.
Connect the foam nozzle to the trigger gun.
Interrupting operation
Release the lever on the trigger gun.
Lock the lever on the trigger gun.
During longer breaks (more than 5 minutes), also
turn the appliance off using the "0/OFF" switch.
Finish operation
몇 CAUTION
Only separate the high-pressure hose from the hand
spray gun or the appliance when there is no pressure in
the system.
After operation with detergent: Run the machine for
approximately 1 minute for a clear rinse.
Release the lever on the trigger gun.
Turn off the appliance "0/OFF".
Disconnect the mains plug from the socket.
Turn off tap.
Press the lever on the trigger gun to release any re-
maining pressure in the system.
Lock the lever on the trigger gun.
몇 CAUTION
When disconnecting the supply or high pressure hose,
hot water may leak from the connections after operation.
Detach the appliance from the water supply.
Transport
몇 CAUTION
Risk of personal injury or damage!
Mind the weight of the appliance during transport.
When transporting by hand
Illustration
Lift appliance by the carrying handles and carry it.
Illustration
Pull out the transport handle until it audibly snaps
into place.
Pull the appliance by its transport handle.
When transporting in vehicles
Secure the appliance against shifting and tipping
over.
12 EN
– 7
Page 13
Storage
몇 CAUTION
Risk of personal injury or damage!
Consider the weight of the appliance when storing it.
Storing the Appliance
Park the machine on an even surface.
Press the disconnect on the trigger gun and re-
move the high pressure hose from the trigger gun.
Push the casing of the quick coupling for the high
pressure hose toward the rear and disconnect the
high pressure hose from the appliance.
Illustration
Insert the trigger gun in its holder.
Engage the spray lance in its compartment.
Stow away the mains cable and the high-pressure
hose on the appliance.
Frost protection
ATTENTION
Appliances and accessories that are not completely
drained can be destroyed by frost. Completely drain appliance and accessories and protect them against frost.
To avoid damage:
Completely drain all water from the appliance:
Switch the appliance on with detached high pres-
sure hose and detached water supply (max. 1 min-
ute) and wait, until no more water exits at the high
pressure connection. Turn off the appliance.
Store the appliance and the entire accessories in a
frost free room.
Prior to extended storage periods, as during the winter,
also observe the instructions in the Care section.
Care and maintenance
DANGER
Risk of electric shock.
Prior to all work on the appliance, switch off the ap-
pliance and pull the power plug.
Clean the sieve in the water connection
ATTENTION
The sieve must not be damaged.
Remove coupling from the water connection.
Illustration
Pull the sieve out using flat pliers.
Clean the sieve under running water.
Reinsert the sieve into the water connection.
Cleaning the detergent filter
Illustration
Remove filter from suction hose for detergent and
clean under running water.
Spare parts
Use only original KÄRCHER spare parts. You will find a
list of spare parts at the end of these operating instructions.
Troubleshooting
You can rectify minor faults yourself with the help of the
following overview.
If in doubt, please consult the authorized customer service.
DANGER
Risk of electric shock.
Prior to all work on the appliance, switch off the ap-
pliance and pull the power plug.
Appliance is not running
Pull on the lever of the trigger gun; the device will
switch on.
Check whether the voltage indicated on the type
plate corresponds to the voltage of the mains supply.
Check the mains connection cable for damages.
Motor overloaded, the motor circuit breaker has
tripped.
– Turn off the appliance "0/OFF".
– Allow the device to cool down for one hour.
– Switch on the device and put it into operation again.
If the malfunction occurs repeatedly, have the device checked by the customer service.
Appliance does not start, motor hums
Voltage reduction due to weak mains supply or when
using an extension cable.
When switching on, first pull the lever of the trigger
gun and then switch the appliance switch to "I/ON".
Pressure does not build up in the appliance
Check water supply for adequate delivery rate.
Pull out the sieve in the water connection using flat-
nose pliers and clean under running water.
Appliance ventilation: Switch the appliance on with
the high-pressure hose detached and operate
(max. 2 minutes) until the water exits the high-pressure connection without bubbles. Switch off appliance and reconnect high-pressure hose.
Suction height of 0.5 m when vacuuming from open
container has been exceeded.
Strong pressure fluctuations
Clean high-pressure nozzle: Remove dirt and de-
bris from the nozzle bore, using a needle and rinse
through with water from the front.
Check water flow quantity.
Appliance is leaking
Slight leakage from the appliance pump is normal.
If the leakage increases contact the authorized
customer service.
No detergent infeed
Use spray lance with pressure regulation (Vario
Power).
Turn the spray lance to "Mix" position.
Clean the detergent suction hose filter.
Check the detergent suction hose for kinks.
– 8
13EN
Page 14

Warranty
The warranty terms published by the relevant sales
company are applicable in each country. We will repair
potential failures of your appliance within the warranty
period free of charge, provided that such failure is
caused by faulty material or defects in manufacturing. In
the event of a warranty claim please contact your dealer
or the nearest authorized Customer Service centre.
Please submit the proof of purchase.
Addresses can be found under:
www.kaercher.com/dealersearch
Technical specifications
Electrical connection
Voltage 230
Connected load 2,1 kW
Protection class IP X5
Protective class I
Mains fuse (slow-blow) 10 A
Water connection
Max. feed pressure 0,8 MPa
Max. feed temperature 40 °C
Min. feed volume 10 l/min
Max. Suction height 0,5 m
Performance data
Working pressure 12,5 MPa
Max. permissible pressure 14,5 MPa
Water flow rate 7,5 l/min
Max. flow rate 8,3 l/min
Detergent flow rate 0,3 l/min
Recoil force of trigger gun 20 N
Dimensions and weights
Length 516 mm
Width 295 mm
Height 282 mm
Weight, ready to operate with acces-
sories
Values determined as per EN 60335-2-79
Hand-arm vibration value
Uncertainty K
Sound pressure level L
Uncertainty K
Sound power level L
K
WA
Subject to technical changes.
pA
pA
+ Uncertainty
WA
1~50VHz
13,1 kg
<2,5
m/s
0,3
m/s
773dB(A)
dB(A)
92 dB(A)
2
2
EU Declaration of Conformity
We hereby declare that the machine described below
complies with the relevant basic safety and health requirements of the EU Directives, both in its basic design
and construction as well as in the version put into circulation by us. This declaration shall cease to be valid if
the machine is modified without our prior approval.
Product: High pressure cleaner
Type: 1.630-xxx
Relevant EU Directives
2000/14/EC
2014/30/EU
2006/42/EC (+2009/127/EC)
2011/65/EU
Applied harmonized standards
EN 50581
EN 55014–1: 2006+A1: 2009+A2: 2011
EN 55014–2: 2015
EN 60335–1
EN 60335–2–79
EN 61000–3–2: 2014
EN 61000–3–3: 2013
EN 62233: 2008
Applied conformity evaluation method
2000/14/EC: Appendix V
Sound power level dB(A)
Measured: 88
Guaranteed: 92
The undersigned act on behalf and under the power of
attorney of the company management.
CEO
Authorised Documentation Representative
S. Reiser
Alfred Kärcher GmbH Co. KG
Alfred-Kärcher-Str. 28 - 40
71364 Winnenden (Germany)
Phone: +49 7195 14-0
Fax: +49 7195 14-2212
Winnenden, 2016/04/01
Head of Approbation
14 EN
– 9
Page 15
Table des matières
Sécurité . . . . . . . . . . . . . . . . . . . . . . . . . . . . . FR 5
Protection de l’environnement. . . . . . . . . . . . FR 5
Description de l’appareil . . . . . . . . . . . . . . . . FR 6
Montage . . . . . . . . . . . . . . . . . . . . . . . . . . . . FR 6
Mise en service . . . . . . . . . . . . . . . . . . . . . . . FR 6
Fonctionnement. . . . . . . . . . . . . . . . . . . . . . . FR 7
Transport . . . . . . . . . . . . . . . . . . . . . . . . . . . .FR 7
Entreposage . . . . . . . . . . . . . . . . . . . . . . . . . FR 8
Entretien et maintenance . . . . . . . . . . . . . . . FR 8
Pièces de rechange. . . . . . . . . . . . . . . . . . . . FR 8
Assistance en cas de panne . . . . . . . . . . . . . FR 8
Garantie. . . . . . . . . . . . . . . . . . . . . . . . . . . . . FR 9
Caractéristiques techniques . . . . . . . . . . . . . FR 9
Déclaration UE de conformité . . . . . . . . . . . . FR 9
Sécurité
Avant la première utilisation de votre appareil, lire attentivement ce manuel d'ins-
tructions original et les consignes de sécurité qu'il contient. Respecter l'ensemble de ces instructions. Conservez les deux livrets pour une utilisation ultérieure ou pour le futur propriétaire.
Utilisation conforme
Ce nettoyeur haute pression ne doit être utilisé que pour
un usage privé:
– pour le nettoyage de machines, véhicules, bâti-
ments, outils, façades, terrasses, outils de jardinage etc. avec un jet d'eau sous pression (et si besoin en ajoutant des détergents).
– avec des accessoires, pièces de rechange et dé-
tergents homologués par KÄRCHER. Veuillez respecter les consignes livrées avec les détergents.
Niveaux de danger
DANGER
Signale la présence d'un danger imminent entraînant de
graves blessures corporelles et pouvant avoir une issue
mortelle.
몇 AVERTISSEMENT
Signale la présence d'une situation éventuellement
dangereuse pouvant entraîner de graves blessures corporelles et même avoir une issue mortelle.
몇 PRÉCAUTION
Remarque relative à une situation potentiellement dangereuse pouvant entraîner des blessures légères.
ATTENTION
Remarque relative à une situation éventuellement dangereuse pouvant entraîner des dommages matériels.
Symboles sur l'appareil
L'appareil ne doit pas être directement raccordé au réseau publique d'eau potable.
L'appareil ne doit être utilisé qu'en position horizontale.
Ne pas diriger le jet haute pression sur
des personnes, des animaux, un équipement électrique actif ou sur l'appareil luimême.
Mettre l'appareil à l'abri du gel.
Dispositifs de sécurité
몇 PRÉCAUTION
Le but des dispositifs de sécurité est de protéger
l'utilisateur. Ils ne doivent en aucun cas être transformés ou désactivés.
Interrupteur principal
L'interrupteur principal empêche un fonctionnement involontaire de l'appareil.
Verrouillage poignée-pistolet
Le verrouillage verrouille le levier de la poignée-pistolet
et empêche un démarrage non désiré de l'appareil.
Clapet de décharge avec pressostat
Le clapet de décharge évite un dépassage de la pression de service admissible.
Si vous relâchez la gâchette, la pompe est éteinte par
un manu contacteur, le jet haute pression est interrompu. Si vous appuyez à nouveau sur le levier, la pompe
est remise en marche.
Disjoncteur-protecteur moteur
Si la consommation de courant est trop élevée, le disjoncteur de protection moteur met l’appareil hors
marche.
Protection de l’environnement
Instructions relatives aux ingrédients (REACH)
Les informations actuelles relatives aux ingrédients se
trouvent sous :
www.kaercher.com/REACH
Les matériels d'emballage sont recyclables. Éliminez l'emballage d'une manière respectueuse de
l'environnement.
Les appareils électriques et électroniques renferment souvent des composants qui peuvent représenter un danger potentiel pour l'intégrité physique et l'environnement s'ils sont mal utilisés ou
éliminés. Ces composants sont pourtant nécessaires au bon fonctionnement de l'appareil. Les
appareils qui présentent ce symbole ne doivent
pas être jetés avec les déchets ménagers.
Les appareils ancien modèle contiennent des matériaux précieux recyclables qui doivent être amenés à un système de recyclage. Les batteries et
les accumulateurs contiennent des substances ne
devant pas être tout simplement jetées. Veuillez
éliminer les anciens appareils ainsi que les batteries ou les accumulateurs d'une manière respectueuse de l'environnement.
Tous travaux de nettoyage produisant des eaux
usées contenant de l’huile, par exemple un nettoyage de moteur ou de bas de caisse, doivent
uniquement être effectués à des postes de lavage
équipés d’un séparateur d’huile.
Les travaux avec du détergent ne doivent être faits
que sur des plans de travail étanches aux liquides,
avec raccord à la canalisation d'eaux usées. Ne
pas laisser le détergent s'infiltrer dans les eaux ou
dans le sol.
Il est dans certains pays interdit de prélever de
l'eau dans les cours d'eau publiques.
– 5
15FR
Page 16
Description de l’appareil
Ces instructions de service décrivent l'équipement
maximum. Suivant le modèle, la fourniture peut varier
(voir l'emballage).
Illustrations, voir page dépliante 3
1 Support pour accessoires
2 Poignée de transport, amovible
3 Poignée de transport
4 Accouplement rapide pour flexible haute pression
5 Interrupteur principal "0/OFF" / "I/ON"
6 Câble d'alimentation secteur avec fiche secteur
7 Poignée de transport
8 Roulette de transport
9 Arrivée d'eau avec tamis intégré
10 Raccord pour l'arrivée d'eau
11 Flexible d'aspiration du détergent (avec filtre)
12 Poignée-pistolet
13 Verrouillage poignée-pistolet
14 Flexible haute pression
15 Touche pour séparer le tuyau à haute pression de
la poignée-pistolet
16 Lance avec réglage de la pression (Vario Power)
Pour les travaux courants de nettoyage. La pression de travail peut être réglée de manière continue
entre « mini » et « maxi » En position « Mix » le détergent peut être dosé.
Pour régler la pression de travail, relâcher le levier
de la poignée pistolet et tourner la lance sur la position souhaitée.
17 Lance avec rotabuse
Pour les salissures tenaces
* Accessoire en option
18 Brosse de lavage
Approprié pour le travail avec du détergent.
19 Brosse de lavage rotative
Particulièrement adapté pour l'auto-nettoyage.
20 Buse de mousse avec récipient de détergent
Le détergent est aspiré hors du récipient et mousse
fortement.
** Nécessaire en supplément
21 Flexible renforcé avec raccord standard.
– Diamètre minimal 1/2 pouce (13 mm)
– Longueur minimale 7,5 m
Montage
Monter les pièces jointes en vrac à l'appareil avant la
mise en service.
Illustrations, voir page dépliante 4
Figure :
Visser le raccord à l'arrivée d'eau de l'appareil.
Figure :
Enficher le flexible haute pression dans la poignéepistolet jusqu'à ce qu'il s'enclenche de manière audible.
Remarque : Veiller à un alignement correct du
nipple de raccordement.
Contrôler que la connexion est bien fixée en tirant
sur le flexible haute pression.
Mise en service
Garer l'appareil horizontalement sur une surface
plane.
Figure :
Enficher le flexible haute pression dans le raccord
rapide jusqu'à son enclenchement audible.
Brancher la fiche secteur dans une prise de cou-
rant.
Alimentation en eau
Données de raccordement, voir plaque signalétique /
caractéristiques techniques
ATTENTION
Des impuretés dans l'eau peuvent endommager la
pompe haute pression et les accessoires. Il est recommandé d'utiliser le filtre à eau KÄRCHER (accessoires
spéciaux, référence 4.730-059).
Raccordement à la conduite d'eau du réseau public
Respecter les prescriptions de votre société distributrice en eau.
ATTENTION
Les coupleurs de flexibles en métal avec Aquastop
peuvent être à l'origine d'un endommagement de la
pompe ! N'utiliser par conséquent qu'un coupleur de
flexible en plastique ou le coupleur de flexible en liaison
de KÄRCHER.
Figure :
Enficher le flexible d'arrivée d'eau sur le raccord
sur le raccord d'alimentation en eau.
Raccorder le flexible d'eau à l'alimentation en eau.
Ouvrir le robinet d'eau complètement.
Aspiration d'eau depuis des réservoirs ouverts
Ce nettoyeur haute pression est approprié pour l'aspiration de l'eau de surface, par ex. des cuves d'eau de
pluie ou étangs (hauteur manométrique maximale cf.
caractéristiques techniques) avec le flexible d'aspiration
avec soupape antiretour Kärcher
ciaux, référence 4.440-238).
Retirer le raccord du raccord d'alimentation en eau.
Remplir d'eau le flexible d'aspiration.
Visser le flexible d'aspiration sur le raccord d'eau
de l'appareil et l'accrocher dans la source d'eau
(par ex. réservoir de pluie).
Purger l'appareil avant l'utilisation.
Interrupteur principal sur "I/ON".
Déverrouiller la manette de la poignée-pistolet.
Tirer le levier, l'appareil se met en service.
Laisser l'appareil en service (2 minutes au maxi-
mum) jusqu'à ce que l'eau ressorte sans bulles au
niveau de la poignée-pistolet.
Relâcher la manette de la poignée-pistolet.
Remarque : Si le levier est relâché, l'appareil se
met hors service. La haute pression est conservée
dans le système.
Verrouiller le levier de la poignée-pistolet.
®
(accessoires spé-
16 FR
– 6
Page 17
Fonctionnement
ATTENTION
Une marche à sec de plus de 2 minutes entraîne des
endommagements de la pompe haute pression. Si l'appareil n'établit pas de pression dans les deux minutes,
le mettre hors service et procéder de la manière indiquée dans les instructions du chapitre "Aide en cas de
défauts".
ATTENTION
Risque d'endommagement! L'appareil ne doit être
utilisé qu'en position horizontale.
Fonctionnement à haute pression
몇 PRÉCAUTION
Une distance d'au moins 30 cm entre la lance et les surfaces peintes est nécessaire pour éviter tout endommagement
ATTENTION
Ne pas nettoyer les pneus, la carrosserie ou les surfaces sensibles telles que le bois avec la rotabuse pour
éviter tout endommagement.
Figure :
Raccorder la lance à la poignée-pistolet et la fixer
en effectuant une rotation à 90°.
Interrupteur principal sur "I/ON".
Déverrouiller la manette de la poignée-pistolet.
Tirer le levier, l'appareil se met en service.
Remarque : Si le levier est relâché, l'appareil se
met hors service. La haute pression est conservée
dans le système.
Fonctionnement avec brosse de lavage
ATTENTION
Risque d'endommagement de la peinture
Lors des travaux avec la brosse de lavage, celle-ci doit
être exempte de salissures et d'autres particules.
Insérer la brosse de lavage dans la poignée pistolet
et fixer avec une rotation de 90°.
Remarque : Si nécessaire, il est également possible
d'utiliser les broches de lavage pour le nettoyage avec
détergent.
Fonctionnement avec détergent
Remarque : L'addition de détergents est uniquement
possible en mode basse pression.
DANGER
Lors de l'utilisation de détergents, la fiche de données
de sécurité du fabricant du détergent doit être respectée, notamment les remarques relatives à l'équipment
de protection personnel.
Figure :
Tirer le flexible d'aspiration pour le détergent du logement à la longueur souhaitée.
Plonger le flexible d’aspiration pour le détergent
dans un récipient contenant une solution de détergent.
Utiliser la lance avec réglage de la pression (Vario
Power).
Tourner la lance sur la position "Mix".
Remarque : Ainsi, la solution de détergent est mélangée au jet d'eau lors du fonctionnement.
Méthode de nettoyage conseillée
Pulvériser le détergent sur la surface sèche et lais-
ser agir sans toutefois le laisser sécher complètement.
Retirer les saletés dissoutes au moyen du jet haute
pression.
Option
Buse à mousse
Remplir la solution de détergent dans le récipient
de détergent de la buse à mousse (en respectant
le dosage indiqué sur le conditionnement du détergent).
Relier la buse à mousse au récipient de détergent.
Insérer la buse à mousse dans la poignée-pistolet
et la fixer en effectuant une rotation de 90 °.
Interrompre le fonctionnement
Relâcher la manette de la poignée-pistolet.
Verrouiller le levier de la poignée-pistolet.
En cas de pauses de longue durée (plus de 5 mi-
nutes), mettre en plus l'appareil hors service avec
l'interrupteur "0/OFF".
Fin de l'utilisation
몇 PRÉCAUTION
Séparer le tuyau haute pression de la poignée-pistolet
ou de l'appareil uniquement quand il n'y a pas de pression dans le système.
Après le travail avec le détergent : exploiter l'appa-
reil pendant 1 minute environ pour le rincer.
Relâcher la manette de la poignée-pistolet.
Mettre l'appareil hors service "0/OFF".
Retirer la fiche secteur de la prise de courant.
Fermer le robinet d'eau.
Actionner la gachette de la poignée-pistolet afin de
faire échapper la pression restante dans le système.
Verrouiller le levier de la poignée-pistolet.
몇 PRÉCAUTION
En cas de séparation du flexible d'amenée ou haute
pression, de l'eau chaude peut s'échapper des raccords
pendant le fonctionnement.
Séparer l'appareil de l'alimentation en eau.
Transport
몇 PRÉCAUTION
Risque de blessure et d'endommagement !
Respecter le poids de l'appareil lors du transport.
Transport manuel
Figure :
Soulever l'appareil avec les poignées de transport
et le porter.
Figure :
Sortir la poignée de transport ; elle s'enclenche de
manière audible.
Tirer l'appareil à l'aide de la poignée de transport.
Transport dans des véhicules
Freiner l'appareil pour l'empêcher de glisser et de
basculer.
– 7
17FR
Page 18
Entreposage
몇 PRÉCAUTION
Risque de blessure et d'endommagement !
Tenir compte du poids de l'appareil lors du stockage.
Ranger l’appareil
Garer l'appareil sur une surface plane.
Appuyer sur la touche de séparation de la poignée-
pistolet et séparer le flexible haute pression de
celle-ci.
Pousser le logement du couplage rapide pour le
flexible haute pression dans le sens de la flèche et
sortir le flexible haute pression.
Figure :
Enficher la poignée-pistolet dans le support de poignée-pistolet.
Enclencher le tube d'acier uniquement dans le support de tube d'acier.
Ranger le flexible haute pression et le câble d'ali-
mentation électrique sur l'appareil.
Protection antigel
ATTENTION
Des appareils et des accessoires qui n'ont pas été complètement vidés peuvent être détruits par le gel. Vider
complètement l'appareil et les accessoires et les mettre
à l'abri du gel.
Pour éviter des dommages :
Vider complètement l'eau de l'appareil : Mettre l'ap-
pareil en service sans le flexible haute pression
raccordé et sans alimentation d'eau raccordé (max.
1 min.) et attendre jusqu'à ce qu'il ne sorte plus
d'eau du raccord haute pression. Désactiver l'appareil.
Conserver l'appareil et l'intégralité des accessoires
dans un endroit à l'abri du gel.
En cas de stockage prolongé, par ex. en hiver, respecter en plus les recommandations fournies au chapitre
Entretien.
Entretien et maintenance
DANGER
Risque d'électrocution.
Avant d'effectuer des travaux sur l'appareil, couper
l'interrupteur principal et débrancher la fiche sec-
teur.
Nettoyer le tamis de l'arrivée d'eau
ATTENTION
Le tamis ne doit pas être endommagé.
Retirer le raccord du raccord d'alimentation en eau.
Figure :
Enlever le tamis avec une pince plate.
Nettoyer le tamis sous l'eau courante.
Remettre en place le tamis dans le raccord d'ali-
mentation en eau.
Nettoyer le filtre pour détergent
Figure :
Retirer le filtre du flexible d'aspiration pour dé-
tergent et le nettoyer à l'eau courante.
Pièces de rechange
Utiliser uniquement des pièces de rechange de la
marque Kärcher
de rechanges à la fin de cette notice.
®
. Vous trouverez une liste des pièces
Assistance en cas de panne
Il est possible de résoudre des pannes sans trop grande
gravité en utilisant la liste suivante.
En cas de doute, s'adresser au service après-vente
agréé.
DANGER
Risque d'électrocution.
Avant d'effectuer des travaux sur l'appareil, couper
l'interrupteur principal et débrancher la fiche secteur.
L'appareil ne fonctionne pas
Tirer le levier de la poignée pistolet, l'appareil se
met en service.
Vérifier que la tension indiquée sur la plaque signa-
létique correspond à la tension de la prise de courant.
Vérifier si le câble d'alimentation est endommagé
Le moteur est surchargé, la protection thermique
du moteur s'est déclenchée.
– Mettre l'appareil hors service "0/OFF".
– Faire refroidir l'appareil pendant une heure.
– Mettre l'appareil sous tension et le remettre en ser-
vice.
Si la panne apparaît à plusieurs reprises, faire vérifier l'appareil par le service après-vente.
L'appareil ne démarre pas, le moteur
ronronne
Chute de tension en raison d'un réseau électrique faible
ou dans le cas de l'utilisation d'un câble de rallonge.
Lors de la mise en service, tirer en premier sur le
levier de la poignée-pistolet, puis mettre l'interrupteur principal sur "I/ON".
L'appareil ne monte pas en pression
Vérifier la présence d'un débit suffisant au niveau
de l'alimentation en eau.
Enlever le tamis de l'arrivée d'eau à l'aide d'une
pince et le nettoyer à l'eau courante.
Purger l'appareil : Mettre l'appareil en service sans
flexible haute pression et attendre (max. 2 minutes)
jusqu'à ce qu'il s'écoule de l'eau sans bulle du raccord haute pression. Mettre l'appareil hors tension
et raccorder le flexible haute pression.
Hauteur d'aspiration de 0,5 m franchie lors de l'as-
piration depuis un réservoir ouvert.
Fluctuations de pression importantes
Nettoyer la buse à haute pression : Ôtez les salis-
sures situées dans l'orifice de la buse à l'aide d'une
aiguille et rincez-la avec de l'eau.
Contrôler la quantité d'eau alimentée.
Appareil non étanche
Une fuite minime au niveau de l'appareil peut sur-
venir sous certaines conditions techniques. Si la
fuite est importante, contacter le service aprèsvente agréé.
Le détergent n'est pas aspirée
Utiliser la lance avec réglage de la pression (Vario
Power).
Tourner la lance sur la position "Mix".
Nettoyer le filtre situé sur le flexible d'aspiration du
détergent.
18 FR
– 8
Page 19
Vérifier que le flexible d’aspiration à détergent n’est
plié en aucun endroit.
Garantie
Dans chaque pays, les conditions de garantie en vigueur sont celles publiées par notre société de distribution responsable. Les éventuelles pannes sur l’appareil
sont réparées gratuitement dans le délai de validité de
la garantie, dans la mesure où celles-ci relèvent d'un
défaut matériel ou d'un vice de fabrication. En cas de recours en garantie, adressez-vous à votre revendeur ou
au service après-vente agréé le plus proche munis de
votre preuve d'achat.
Vous trouverez les adresses sous :
www.kaercher.com/dealersearch
Caractéristiques techniques
Branchement électrique
Tension 230
Puissance de raccordement 2,1 kW
Degré de protection IP X5
Classe de protection I
Protection du réseau (à action retar-
dée)
Arrivée d'eau
Pression d'alimentation (max.) 0,8 MPa
Température d'alimentation (max.) 40 °C
Débit d'alimentation (min.) 10 l/min
Hauteur max. de l'aspiration 0,5 m
Performances
Pression de service 12,5 MPa
Pression maximale admissible 14,5 MPa
Débit (eau) 7,5 l/min
Débit maximum 8,3 l/min
Débit (détergent) 0,3 l/min
Force de réaction sur la poignée-pis-
tolet
Dimensions et poids
Longueur 516 mm
Largeur 295 mm
Hauteur 282 mm
Poids, opérationnel avec acces-
soires
Valeurs définies selon EN 60335-2-79
Valeur de vibrations bras-main
Incertitude K
Niveau de pression acoustique L
Incertitude K
pA
Niveau de pression acoustique L
incertitude K
Sous réserve de modifications techniques.
WA
1~50VHz
10 A
20 N
13,1 kg
2
<2,5
m/s
2
0,3
m/s
pA
WA
773dB(A)
dB(A)
+
92 dB(A)
Déclaration UE de conformité
Nous certifions par la présente que la machine spécifiée
ci-après répond de par sa conception et son type de
construction ainsi que de par la version que nous avons
mise sur le marché aux prescriptions fondamentales stipulées en matière de sécurité et d’hygiène par les directives européennes en vigueur. Toute modification apportée à la machine sans notre accord rend cette déclaration invalide.
Produit: Nettoyeur haute pression
Type: 1.630-xxx
Directives européennes en vigueur :
2000/14/CE
2014/30/UE
2006/42/CE (+2009/127/CE)
2011/65/UE
Normes harmonisées appliquées :
EN 50581
EN 55014–1: 2006+A1: 2009+A2: 2011
EN 55014–2: 2015
EN 60335–1
EN 60335–2–79
EN 61000–3–2: 2014
EN 61000–3–3: 2013
EN 62233: 2008
Procédures d'évaluation de la conformité
2000/14/CE: Annexe V
Niveau de puissance acoustique dB(A)
Mesuré: 88
Garanti: 92
Les soussignés agissent sur ordre et sur procuration de
la Direction commerciale.
CEO
Responsable de la documentation:
S. Reiser
Alfred Kärcher GmbH Co. KG
Alfred-Kärcher-Str. 28 - 40
71364 Winnenden (Germany)
Téléphone : +49 7195 14-0
Télécopieur : +49 7195 14-2212
Winnenden, 2016/04/01
Head of Approbation
– 9
19FR
Page 20

Indice
Sicurezza. . . . . . . . . . . . . . . . . . . . . . . . . . . .IT 5
Protezione dell’ambiente . . . . . . . . . . . . . . . . IT 5
Descrizione dell’apparecchio. . . . . . . . . . . . . IT 6
Montaggio . . . . . . . . . . . . . . . . . . . . . . . . . . . IT 6
Messa in funzione . . . . . . . . . . . . . . . . . . . . . IT 6
Funzionamento . . . . . . . . . . . . . . . . . . . . . . . IT 7
Trasporto . . . . . . . . . . . . . . . . . . . . . . . . . . . .IT 7
Supporto . . . . . . . . . . . . . . . . . . . . . . . . . . . .IT 8
Cura e manutenzione . . . . . . . . . . . . . . . . . . IT 8
Ricambi . . . . . . . . . . . . . . . . . . . . . . . . . . . . .IT 8
Guida alla risoluzione dei guasti . . . . . . . . . . IT 8
Garanzia . . . . . . . . . . . . . . . . . . . . . . . . . . . .IT 9
Dati tecnici. . . . . . . . . . . . . . . . . . . . . . . . . . . IT 9
Dichiarazione di conformità UE . . . . . . . . . . . IT 9
Sicurezza
Prima di utilizzare l'apparecchio per la prima volta, leggere queste istruzioni per
l'uso originali e le avvertenze di sicurezza
in allegato. Agire corrispondentemente e conservare
entrambi i libretti per un uso futuro o per un successivo
proprietario.
Uso conforme a destinazione
Utilizzate questa idropulitrice esclusivamente nell'uso
domestico:
– per la pulizia di macchine, veicoli, edifici, attrezzi,
facciate, terrazzi, attrezzi da giardinaggio ecc. con
getto d'acqua ad alta pressione (se necessario con
l'aggiunta di detergenti).
– con accessori, ricambi e detergenti omologati da
KÄRCHER. Rispettate le indicazioni allegate ai detergenti.
Livelli di pericolo
PERICOLO
Indica un pericolo imminente che determina lesioni gravi o la morte.
몇 AVVERTIMENTO
Indica una probabile situazione pericolosa che potrebbe
determinare lesioni gravi o la morte.
몇 PRUDENZA
Indica una probabile situazione pericolosa che potrebbe
causare lesioni leggere.
ATTENZIONE
Indica una probabile situazione pericolosa che potrebbe
determinare danni alle cose.
Simboli riportati sull’apparecchio
L'apparecchio non deve essere collegato direttamente alla rete idrica pubblica.
L'apparecchio deve essere fatto funzionare solo in posizione giacente (orizzontale).
Il getto ad alta pressione non va mai puntato su persone, animali, equipaggiamenti
elettrici attivi o sull'apparecchio stesso.
Proteggere l'apparecchio dal gelo.
Dispositivi di sicurezza
몇 PRUDENZA
I dispositivi di sicurezza servono alla protezione
dell'utente e non devono essere modificati o essere
raggirati.
Interruttore dell'apparecchio
L'interruttore dell'apparecchio impedisce l'azionamento
accidentale dell'apparecchio.
Blocco della pistola a spruzzo
Il dispositivo di blocco inibisce la leva della pistola a
spruzzo ed impedisce l'azionamento accidentale
dell'apparecchio.
Valvola di troppopieno con pressostato
La valvola di troppo pieno impedisce che venga superata la pressione di esercizio massima consentita.
Se si allenta la leva della pistola a spruzzo, il pressostato spegne la pompa, il getto ad alta pressione si ferma.
Se si tira la leva, si riattiva la pompa.
Salvamotore
In caso di eccessivo assorbimento di corrente il salvamotore provvede a disattivare l’apparecchio.
Protezione dell’ambiente
Avvertenze sui contenuti (REACH)
Informazioni aggiornate sui contenuti sono disponibili
all'indirizzo:
www.kaercher.com/REACH
I materiali d'imballaggio sono riciclabili. Smaltire a
regola d'arte gli imballaggi.
Gli apparecchi elettrici ed elettronici contengono
spesso componenti che, con un utilizzo o smaltimento non corretti, possono costituire un potenziale pericolo per la salute umana e per l'ambiente. Questi componenti sono tuttavia necessari per
un corretto funzionamento dell'apparecchio. Gli
apparecchi contrassegnati con questo simbolo
non devono essere smaltiti con i rifiuti domestici.
Gli apparecchi dismessi contengono preziosi materiali riciclabili che devono essere consegnati al
riciclaggio. Sia le batterie che gli accumulatori
contengono sostanze che non devono essere disperse nell’ambiente. Smaltire gli apparecchi dismessi nonché le batterie e gli accumulatori nel rispetto delle norme ambientali.
I lavori di pulizia durante i quali si produce acqua
di scarico contenente olio, per es. alla pulizia di
motori o di sottoscocche vanno effettuati esclusivamente in luoghi di lavaggio provvisti di separatori d'olio.
Gli interventi con detergenti possono essere eseguiti solo su superfici di lavoro impermeabili con
collegamento alla canalizzazione dell'acqua sporca. Non fare infiltrare il detergente nelle acque di
scarico o nel terreno.
Il prelievo di acqua da impianti di acque pubbliche
in alcuni paesi non è consentito.
20 IT
– 5
Page 21
Descrizione dell’apparecchio
In questo manuale d'uso è descritta la dotazione massima. In base al modello si possono verificare delle differenze nella fornitura (vedi imballaggio).
Per le figure vedi lato pieghevole 3
1 Custodia degli accessori
2 Maniglia per trasporto, estraibile
3 Maniglia di trasporto
4 Giunto rapido per tubo flessibile di alta pressione
5 Interruttore dell'apparecchio „0/OFF“ / „I/ON“
6 Cavo di allacciamento alla rete con connettore
7 Maniglia di trasporto
8 Ruota trasporto
9 Collegamento dell'acqua con filtro montato
10 Giunto per collegamento dell'acqua
11 Tubo flessibile di aspirazione per detergente (con
filtro)
12 Pistola a spruzzo
13 Blocco della pistola a spruzzo.
14 Tubo flessibile alta pressione
15 Tasto per scollegare il tubo flessibile di alta pres-
sione dalla pistola a spruzzo
16 Lancia con regolazione della pressione (Vario Po-
wer)
Per i compiti di pulizia più comuni. La pressione di
esercizio può essere regolata in continuo tra "Min“
e "Max“. In posizione „Mix“ è possibile aggiungere
del detergente.
Per regolare la pressione di lavoro, rilasciare la pi-
stola a spruzzo e girare la lancia alla posizione de-
siderata.
17 Lancia con fresa per lo sporco
Per lo sporco più resistente
* Accessorio opzionale
18 Spazzola di lavaggio
Adatto per interventi con detergenti.
19 Spazzola di lavaggio rotante
Particolarmente indicata per la pulizia/lavaggio
dell'auto.
20 Ugello per schiumatura con contenitore del deter-
gente
Il detergente viene aspirato dal serbatoio e si crea
una potente schiuma detergente.
** Aggiuntivamente necessario
21 Tuble flessibile acqua PVC in fibra-tela con raccor-
do commerciale.
– Diametro minimo 1/2 pollice (13 mm)
– Lunghezza minima 7,5 m
Montaggio
Prima della messa in funzione montare i componenti
singoli dell'apparecchio.
Per le figure vedi lato pieghevole 4
Figura
Avvitare il giunto fornito sul collegamento acqua
dell'apparecchio.
Figura
Introdurre il tubo di alta pressione alla pistola a
spruzzo fino al suo aggancio.
Avviso: Verificare la corretta posizione del nipplo
di raccordo.
Accertarsi del corretto aggancio tirando il tubo fles-
sibile di alta pressione.
Messa in funzione
Posizionare l'apparecchio orizzontalmente su una
superficie piana.
Figura
Introdurre il tubo di alta pressione nel giunto rapido
fino al suo aggancio.
Inserire la spina in una presa elettrica.
Alimentazione dell'acqua
Valori di collegamento: vedi targhetta e Dati tecnici.
ATTENZIONE
Impurità nell'acqua possono danneggiare la pompa ad
alta pressione e gli accessori. Consigliamo come protezione di utilizzare il filtro per l'acqua KÄRCHER (accessorio speciale, codice d'ordine 4.730-059).
Alimentazione da rete idrica
Rispettare le disposizioni fornite dalla società per l'approvvigionamento idrico.
ATTENZIONE
I giunti dei tubi flessibili di metallo con il dispositivo
Aquastop possono causare il danneggiamento della
pompa! Si prega di utilizzare giunti dei tubi flessibili di
plastica oppure quelli della KÄRCHER in ottone.
Figura
Infilare il tubo flessibile di mandata dell'acqua sul
giunto dell'attacco d'acqua.
Collegare il tubo flessibile acqua all'alimentazione
idrica.
Aprire completamente il rubinetto.
Aspirazione di acqua da contenitori aperti
Questa idropulitrice con il tubo di aspirazione KÄRCHER con valvola di non ritorno (accessoro speciale,
N. ordine 4.440-238) è adatta all'aspirazione di acqua di
superficie per es. da raccoglitori di acqua piovana o da
stagni (altezza di aspirazione max. vedi Dati tecnici).
Rimuovere il giunto dall'attacco dell'acqua.
Riempire il tubo flessibile di aspirazione con acqua.
Avvitare il tubo flessibile di aspirazione al raccordo
dell'acqua dell'apparecchio ed agganciarlo alla fonte (ad es. raccoglitore di acqua piovana).
Sfiatare l'aria eventualmente presente all'interno
dell'apparecchio prima dell'utilizzo.
Accendere l'apparecchio „I/ON“.
Sbloccare la leva della pistola a spruzzo.
Tirare la leva e l'apparecchio si attiva.
Fare funzionare l'apparecchio (max. 2 minuti), fin-
ché l’acqua fuoriesce priva di bolle d’aria dalla pistola a spruzzo manuale.
Rilasciare la leva della pistola a spruzzo.
Avviso: Quando si rilascia la leva, l'apparecchio si
spegne. L’alta pressione nel sistema resta invariata.
Bloccare la leva della pistola a spruzzo.
– 6
21IT
Page 22
Funzionamento
ATTENZIONE
Un funzionamento a secco di oltre 2 minuti determina
dei danneggiamenti sulla pompa ad alta pressione. Nel
caso in cui l'apparecchio non produca alcuna pressione
entro 2 minuti, spegnere l'apparecchio e procedere secondo le indicazioni riportate al capitolo „Guida alla risoluzione dei guasti“.
ATTENZIONE
Rischio di danneggiamento! L'apparecchio deve
essere fatto funzionare solo in posizione stesa
(orizzontale).
Funzionamento ad alta pressione
몇 PRUDENZA
Mantenere una distanza minima di 30 cm dal getto durante la pulizia di superfici verniciate, in modo da evitare
danneggiamenti.
ATTENZIONE
Non usare la fresa per pulire pneumatici di auto, vernici
o superfici sensibili, rischio di danneggiamento.
Figura
Inserire la lancia sulla pistola a spruzzo e fissarla
con una rotazione di 90°.
Accendere l'apparecchio „I/ON“.
Sbloccare la leva della pistola a spruzzo.
Tirare la leva e l'apparecchio si attiva.
Avviso: Quando si rilascia la leva, l'apparecchio si
spegne. L’alta pressione nel sistema resta invaria-
ta.
Funzionamento con spazzola di lavaggio
ATTENZIONE
Pericolo di danni alla vernice
Per lavori con spazzola di lavaggio, questa deve essere
esente da sporco o altre particelle.
Infilare la spazzola di lavaggio sulla pistola a spruz-
zo e fissarla con una rotazione di 90°.
Nota: Se necessario, è possibile utilizzare le spazzole
di lavaggio per lavorare con detergenti.
Funzionamento con detergente
Indicazione: Il detergente può essere aggiunto solo
con bassa pressione.
PERICOLO
All'impiego di detergenti va osservato la scheda tecnica
di sicurezza del produttore del detergente, in particolare
le indicazioni riguardo all'equipaggiamento di protezione individuale.
Figura
Estrarre dall'alloggiamento il tubo flessibile di aspi-
razione per detergente necessario.
Appendere il tubo flessibile di aspirazione per de-
tergente in un contenitore con una soluzione deter-
gente.
Utilizzare la lancia con regolazione della pressione
(Vario Power).
Ruotare la lancia in posizione „Mix“.
Avviso: In questo modo durante il funzionamento
al getto d'acqua viene aggiunta la soluzione deter-
gente.
Metodo di pulizia consigliato
Spruzzare misuratamente il detergente e lasciare
agire (non asciugare) sulla superficie asciutta.
Sciacquare lo sporco sciolto con il getto alta pres-
sione.
in opzione
Ugello per schiumatura
Versare la soluzione di detergente nel serbatoio
dell'ugello per schiumatura (osservare le indicazioni sul dosaggio riportate sulla confezione del detergente).
Collegare l'ugello per schiumatura al servatoio del
detergente.
Inserire l'ugello per schiumatura sulla pistola a
spruzzo e fissarla con una rotazione di 90°.
Interrompere il funzionamento
Rilasciare la leva della pistola a spruzzo.
Bloccare la leva della pistola a spruzzo.
Durante pause di lavoro prolungate (più di 5 min.)
spegnere anche l'apparecchio „0/OFF“.
Terminare il lavoro
몇 PRUDENZA
Scollegare il tubo flessibile ad alta pressione dalla pistola a spruzzo o dall'apparecchio, solo quando la pressione è scaricata dal sistema.
Dopo gli interventi con il detergente: Sciacquare
l'apparecchio in funzione per circa 1 minuto.
Rilasciare la leva della pistola a spruzzo.
Spegnere l'apparecchio „0/OFF“.
Togliere la spina di alimentazione dalla presa.
Chiudere il rubinetto.
Premere la leva della pistola a spruzzo in modo da
scaricare la pressione ancora presente nel sistema.
Bloccare la leva della pistola a spruzzo.
몇 PRUDENZA
Quando si scollega il tubo flessibile di mandata o di alta
pressione, dopo il funzionamento potrebbe fuoriuscire
dell'acqua scottante dai raccordi.
Scollegare l'apparecchio dall'alimentazione idrica.
Trasporto
몇 PRUDENZA
Pericolo di lesioni e di danneggiamento!
Per il trasporto osservare il peso dell'apparecchio.
Posizione manuale
Figura
Sollevare l'apparecchio dai manici e trasportarlo.
Figura
Estrarre il manico di trasporto finché si aggancia
udibilmente.
Sollevare l'apparecchio dal manico di trasporto.
Posizione in veicoli
Bloccare l'apparecchio in modo tale che non possa
scivolare o ribaltarsi.
22 IT
– 7
Page 23
Supporto
몇 PRUDENZA
Pericolo di lesioni e di danneggiamento!
Osservare il peso dell'attrezzo quando lo si mette a magazzino.
Deposito dell’apparecchio
Depositare la spazzatrice su una superficie piana.
Premere il tasto di sblocco sulla pistola a spruzzo e
scollegare il tubo flessibile di alta pressione dalla
pistola a spruzzo.
Premere l'alloggiamento del giunto rapido per il
tubo flessibile di alta pressione nella direzione della
freccia ed estrarre il tubo flessibile di alta pressio-
ne.
Figura
Introdurre la pistola a spruzzo nella custodia per la
pistola a spruzzo.
Far innestare la lancia nell'apposito alloggiamento.
Conservare il tubo flessibile di alta pressione e il
cavo di allacciamento alla rete all'apparecchio.
Antigelo
ATTENZIONE
Apparecchi e accessori non completamente svuotati
potrebbero venire danneggiati dal gelo. Svuotare completamente l'apparecchio e gli accessori e proteggerli
dal gelo.
Per evitare danni:
Svuotare completamente l'acqua dall'apparecchio:
accendere l'apparecchio senza il tubo flessibile di
alta pressione collegato e senza l'alimentazione
idrica collegata (max. 1 min) ed attendere fino a
quando dal raccordo di alta pressione non fuorie-
sce più dell'acqua. Spegnere l’apparecchio.
Conservare l'apparecchio e tutti gli accessori in un
ambiente protetto dal gelo.
Prima di depositi di lunga durata, per es. in inverno, rispettare anche le avvertenze riportate al capitolo Cura.
Cura e manutenzione
PERICOLO
Pericolo di scossa elettrica.
Prima di eseguire qualsiasi lavoro, spegnere l'ap-
parecchio e staccare la spina.
Pulizia del filtro nel raccordo dell'acqua
ATTENZIONE
Non danneggiare il filtro.
Rimuovere il giunto dall'attacco dell'acqua.
Figura
Estrarre il filtro con una pinza piatta.
Pulire il filtro sotto acqua corrente.
Inserire il filtro di nuovo nel raccordo dell'acqua.
Pulizia filtro del detergente
Figura
Staccare il filtro dal tubo flessibile di aspirazione
per detergente e lavarlo sotto acqua corrente.
Ricambi
Impiegare solamente ricambi originali KÄRCHER. La lista dei pezzi di ricambio è riportata alla fine del presente
manuale d'uso.
Guida alla risoluzione dei guasti
Piccoli guasti o disfunzioni possono essere eliminati seguendo le seguenti istruzioni.
In caso di dubbi si prega di rivolgersi al servizio assistenza autorizzato.
PERICOLO
Pericolo di scossa elettrica.
Prima di eseguire qualsiasi lavoro, spegnere l'ap-
parecchio e staccare la spina.
L'apparecchio non funziona
Tirare la leva della pistola a spruzzo e l'apparec-
chio si attiva.
Controllare se la tensione dichiarata sulla targhetta
coincide con la tensione della fonte di energia.
Verificare la presenza di eventuali danni sul cavo di
allacciamento alla rete.
Motore sovraccarico, il salvamotore è scattato.
– Spegnere l'apparecchio „0/OFF“.
– Lasciare raffreddare l'apparecchio per un'ora.
– Accendere l'apparecchio e rimetterlo in funzione.
Se il guasto si presenta più volte, rivolgersi al ser-
vizio di assistenza clienti per un controllo.
L'apparecchio non si accende, il motore
emette un ronzio
Calo della tensione a causa di una bassa corrente o in
caso di utilizzo di una prolunga.
All'attivazione tirare prima la leva della pistola a
spruzzo, quindi posizionare l'interruttore dell'appa-
recchio su „I/ON“.
L'apparecchio non raggiunge pressione
Verificare l'alimentazione dell'acqua su sufficiente
portata.
Estrarre il filtro nel raccordo dell'acqua con una pin-
za piatta e lavarlo sotto acqua corrente.
Eliminare l'aria dall' apparecchio: Accendere l'ap-
parecchio senza il tubo flessibile di alta pressione
collegato ed attendere (max. 2 minuti) finché l’ac-
qua che fuoriesce sia priva di bolle d’aria dal rac-
cordo di alta pressione. Spegnere l'apparecchio e
collegare il tubo flessibile di alta pressione.
Altezza di aspirazione di 0,5 m superata durante
l'aspirazione da un contenitore aperto.
Forti variazioni di pressione
Pulire l’ugello ad alta pressione: Rimuovere con un
ago lo sporco dai fori degli ugelli e sciacquare con
acqua dalla parte anteriore.
Controllare l'afflusso di acqua.
L'apparecchio perde
Alcune cause tecniche fanno sì che ci sia una lieve
permeabilità dell'apparecchio. In caso di permeabi-
lità elevata rivolgersi al servizio clienti autorizzato.
Il detergente non viene aspirato
Utilizzare la lancia con regolazione della pressione
(Vario Power).
Ruotare la lancia in posizione „Mix“.
Pulire il filtro sul tubo flessibile di aspirazione per
detergente.
Controllare se il tubo flessibile di aspirazione per
detergente presenti delle incrinature.
– 8
23IT
Page 24
Garanzia
Le condizioni di garanzia valgono nel rispettivo paese di
pubblicazione da parte della nostra società di vendita
competente. Entro il termine di garanzia eliminiamo gratuitamente eventuali guasti all’apparecchio, se causati
da difetto di materiale o di produzione. Nei casi previsti
dalla garanzia si prega di rivolgersi al proprio rivenditore, oppure al più vicino centro di assistenza autorizzato,
esibendo lo scontrino di acquisto.
Gli indirizzi li trovate sotto:
www.kaercher.com/dealersearch
Dati tecnici
Attacco elettrico
Tensione 230
Potenza allacciata 2,1 kW
Grado di protezione IP X5
Classe di protezione I
Protezione rete (fusibile ritardato) 10 A
Collegamento idrico
Pressione in entrata (max.) 0,8 MPa
Temperatura in entrata (max.) 40 °C
Portata (min.) 10 l/min
Max. altezza di aspirazione 0,5 m
Dati potenza
Pressione di esercizio 12,5 MPa
Pressione max. consentita 14,5 MPa
Portata, acqua 7,5 l/min
Portata massima 8,3 l/min
Portata, detergente 0,3 l/min
Forza repulsiva della pistola a spruz-
zo
Dimensioni e Pesi
Lunghezza 516 mm
Larghezza 295 mm
Altezza 282 mm
Peso, pronto all'uso con accessori 13,1 kg
Valori rilevati secondo EN 60335-2-79
Valore di vibrazione mano-braccio
Dubbio K
Pressione acustica L
Dubbio K
pA
Pressione acustica L
Con riserva di modifiche tecniche.
pA
+ Dubbio K
WA
1~50VHz
20 N
2
<2,5
m/s
2
0,3
m/s
773dB(A)
dB(A)
92 dB(A)
WA
Dichiarazione di conformità UE
Con la presente si dichiara che la macchina qui di seguito indicata, in base alla sua concezione, al tipo di costruzione e nella versione da noi introdotta sul mercato,
è conforme ai requisiti fondamentali di sicurezza e di sanità delle direttive UE. In caso di modifiche apportate
alla macchina senza il nostro consenso, la presente dichiarazione perde ogni validità.
Prodotto: Idropulitrice
Modelo: 1.630-xxx
Direttive UE pertinenti
2000/14/CE
2014/30/UE
2006/42/CE (+2009/127/CE)
2011/65/UE
Norme armonizzate applicate
EN 50581
EN 55014–1: 2006+A1: 2009+A2: 2011
EN 55014–2: 2015
EN 60335–1
EN 60335–2–79
EN 61000–3–2: 2014
EN 61000–3–3: 2013
EN 62233: 2008
Procedura di valutazione della conformità applicata
2000/14/CE: Allegato V
Livello di potenza sonora dB(A)
Misurato: 88
Garantito: 92
I firmatari agiscono su incarico e con la procura dell’amministrazione.
CEO
Responsabile della documentazione:
S. Reiser
Alfred Kärcher GmbH & Co. KG
Alfred-Kärcher-Str. 28 - 40
71364 Winnenden (Germany)
Tel.: +49 7195 14-0
Fax: +49 7195 14-2212
Winnenden, 2016/04/01
Head of Approbation
24 IT
– 9
Page 25
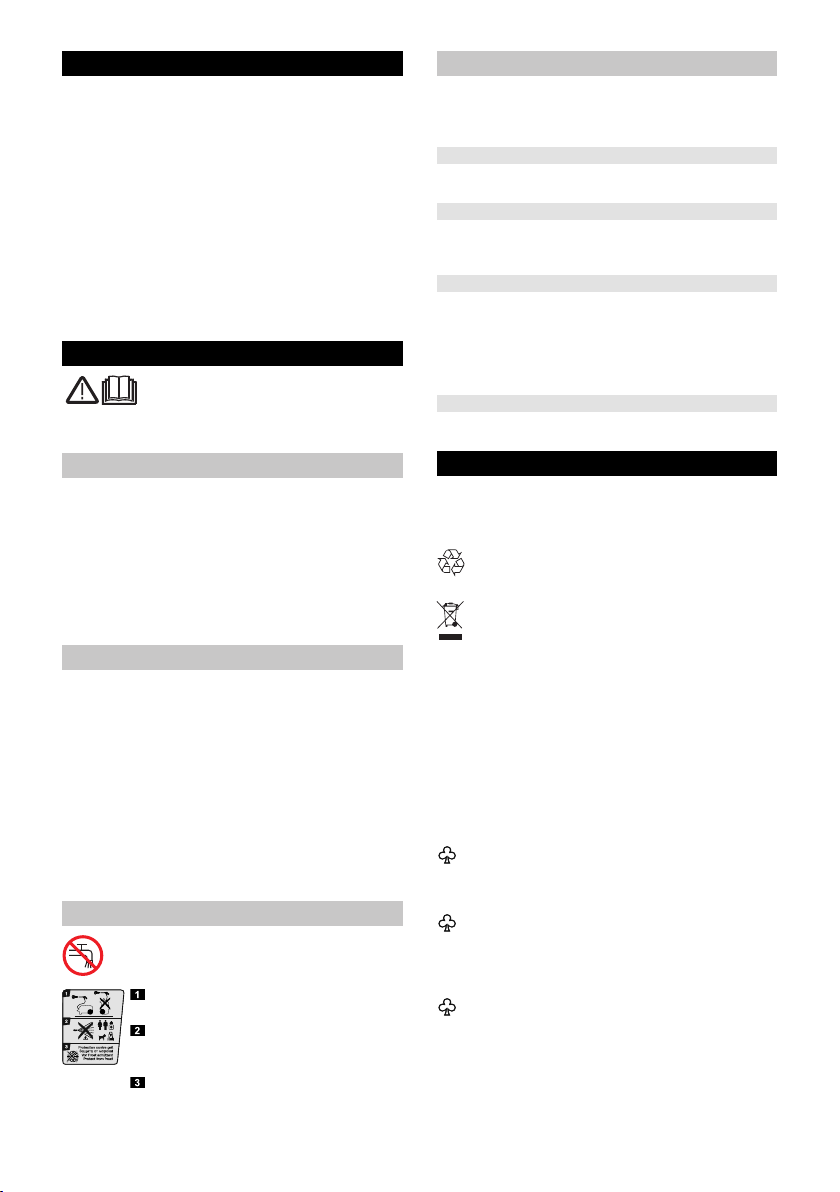
Inhoud
Veiligheid. . . . . . . . . . . . . . . . . . . . . . . . . . . . NL 5
Zorg voor het milieu. . . . . . . . . . . . . . . . . . . . NL 5
Beschrijving apparaat . . . . . . . . . . . . . . . . . . NL 6
Montage . . . . . . . . . . . . . . . . . . . . . . . . . . . . NL 6
Inbedrijfstelling . . . . . . . . . . . . . . . . . . . . . . . NL 6
Werking . . . . . . . . . . . . . . . . . . . . . . . . . . . . .NL 7
Vervoer . . . . . . . . . . . . . . . . . . . . . . . . . . . . . NL 7
Opslag . . . . . . . . . . . . . . . . . . . . . . . . . . . . . . NL 8
Onderhoud . . . . . . . . . . . . . . . . . . . . . . . . . . NL 8
Reserveonderdelen . . . . . . . . . . . . . . . . . . . . NL 8
Hulp bij storingen. . . . . . . . . . . . . . . . . . . . . . NL 8
Garantie. . . . . . . . . . . . . . . . . . . . . . . . . . . . . NL 9
Technische gegevens . . . . . . . . . . . . . . . . . . NL 9
EU-conformiteitsverklaring . . . . . . . . . . . . . . NL 9
Veiligheid
Lees voor het eerste gebruik van uw apparaat deze veiligheidsinstructies en de
originele gebruiksaanwijzing. Neem deze
in acht. Bewaar beide documenten voor later gebruik of
volgende eigenaars.
Reglementair gebruik
Deze hogedrukreiniger is uitsluitend bestemd voor huishoudelijk gebruik:
– voor het reinigen van machines, voertuigen, ge-
bouwen, gereedschap, gevels, terrassen, tuintoestellen, enz. met een hogedrukwaterstraal (indien
nodig met toevoeging van reinigingsmiddelen);
– met door KÄRCHER vrijgegeven toebehoren, re-
serveonderdelen en reinigingsmiddelen. Neem de
instructies in acht die bij de reinigingsmiddelen horen.
Gevarenniveaus
GEVAAR
Verwijzing naar een onmiddellijk dreigend gevaar dat
tot ernstige en zelfs dodelijke lichaamsverwondingen
leidt.
몇 WAARSCHUWING
Verwijzing naar een mogelijke gevaarlijke situatie die tot
ernstige en zelfs dodelijke lichaamsverwondingen kan
leiden.
몇 VOORZICHTIG
Verwijzing naar een mogelijk gevaarlijke situatie die tot
lichte verwondingen kan leiden.
LET OP
Verwijzing naar een mogelijke gevaarlijke situatie die tot
materiële schade kan leiden.
Symbolen op het toestel
Het apparaat mag niet onmiddellijk aangesloten worden op het openbare drinkwaternet.
Het apparaat mag enkel in liggende positie (horizontaal) gebruikt worden.
Richt de hogedrukstraal niet op personen,
dieren, actieve elektrische uitrusting of
het apparaat zelf.
Apparaat tegen vorst beschermen.
Veiligheidsinrichtingen
몇 VOORZICHTIG
Veiligheidsinrichtingen dienen ter bescherming van
de gebruiker en mogen niet veranderd of omzeild
worden.
Apparaatschakelaar
De hoofdschakelaar van het apparaat verhindert de onvoorziene werking van het apparaat.
Vergrendeling handspuitpistool
De vergrendeling blokkeert de hendel van het handspuitpistool en verhindert de onvoorziene start van het
apparaat.
Overstroomklep met drukschakelaar
De omloopklep verhindert de overschrijding van de toegelaten werkdruk.
Wordt de hendel van het handspuitpistool losgelaten,
dan schakelt de drukschakelaar de pomp uit en stopt de
hogedrukstraal. Wordt de hendel aangetrokken, dan
schakelt de drukschakelaar de pomp weer in.
Motorveiligheidsschakelaar
Bij een te hoge stroomopname schakelt de motorveiligheidsschakelaar het apparaat uit.
Zorg voor het milieu
Aanwijzingen betreffende de inhoudsstoffen
(REACH)
Huidige informatie over de inhoudsstoffen vindt u onder:
www.kaercher.com/REACH
Het verpakkingsmateriaal is recyclebaar. Gelieve
verpakkingen op milieuvriendelijke manier te verwijderen.
Elektrische en elektronische apparaten bevatten
vaak onderdelen die een potentieel gevaar kunnen vormen voor de menselijke gezondheid en
het milieu als ze foutief worden gebruikt of niet
correct worden afgevoerd. Deze onderdelen zorgen er desalniettemin voor dat het apparaat naar
behoren functioneert. Apparaten die dit symbool
dragen, mogen niet met het huisvuil worden afgevoerd.
Oude apparaten bevatten waardevolle recyclebare materialen die moeten worden hergebruikt.
Batterijen en accu's bevatten stoffen die niet in het
milieu mogen terechtkomen. Gelieve oude apparaten en batterijen en accu's op milieuvriendelijke
manier te verwijderen.
Reinigingswerkzaamheden waarbij oliehoudend
afvalwater ontstaat, bv. motor- of bodemwas, mogen enkel uitgevoerd worden in wasplaatsen met
olieafscheider.
Werkzaamheden met reinigingsmiddelen mogen
enkel uitgevoerd worden op vloeistofdichte oppervlakken die aangesloten zijn op de vuilwaterafvoer. Laat reinigingsmiddel niet in waterlopen of
de grond dringen.
De afname van water uit openbare waterlopen is
in bepaalde landen niet toegestaan.
– 5
25NL
Page 26

Beschrijving apparaat
In deze gebruiksaanwijzing staat de maximale uitrusting
omschreven. Afhankelijk van het model zijn er verschillen in de leveringspakketten (zie verpakking).
Afbeeldingen zie uitklappagina 3
1 Bewaarplaats voor accessoires
2 Transportgreep, uittrekbaar
3 Handgreep
4 Snelkoppeling voor hogedrukslang
5 Hoofdschakelaar „0/OFF“ / „I/ON“
6 Stroomleiding met stekker
7 Handgreep
8 Transportwiel
9 Wateraansluiting met ingebouwde zeef
10 Koppelinggedeelte voor wateraansluiting
11 Zuigslang voor reinigingsmiddel(met filter)
12 Handpistool
13 Vergrendeling handspuitpistool
14 Hogedrukslang
15 Toets voor het scheiden van de hogedrukslang van
het handspuitpistool
16 Spuitlans met drukregeling (Vario Power)
Voor de meest gangbare reinigingstaken. De werkdruk kan traploos tussen „Min“ en „Max“ ingesteld
worden. In de stand "Mix" kan een dosis reinigingsmiddel toegevoegd worden.
Om de werkdruk te verstellen, laat u de hendel van
het handspuitpistool los en draait u de straalbuis in
de gewenste stand.
17 Spuitlans met vuilfrees
Voor hardnekkig vuil
* Optionele toebehoren
18 Wasborstel
Niet geschikt voor de werking met reinigingsmiddelen.
19 Roterende wasborstel
Uiterst geschikt voor de reiniging van auto's.
20 Schuimsproeier met reinigingsmiddeltank
Reinigingsmiddel wordt uit de tank gezogen en er
ontstaat een krachtig schuim van reinigingsmiddel.
** Extra vereist
21 Versterkte waterslang met courante koppeling
– Diameter minstens 1/2 inch (13 mm)
– Lengte minstens 7,5 m
Montage
Losse onderdelen die bij het apparaat geleverd werden,
moeten voor de inbedrijfstelling gemonteerd worden.
Afbeeldingen zie uitklappagina 4
Afbeelding
De meegeleverde koppeling aan het wateraansluitpunt van het apparaat schroeven.
Afbeelding
Hogedrukslang in handspuitpistool steken tot die
hoorbaar vastklikt.
Instructie: Letten op een correcte uitrichting van
de aansluitnippel.
Veilige verbinding controleren door aan de hoge-
drukslang te trekken.
Inbedrijfstelling
Zet het apparaat horizontaal op een effen opper-
vlak.
Afbeelding
Hogedrukslang in snelkoppeling steken tot die
hoorbaar vastklikt.
Netstekker in het stopcontact steken.
Watertoevoer
Aansluitwaarden zie typeplaatje/Technische gegevens.
LET OP
Verontreinigingen in het water kunnen de hogedrukpomp en de toebehoren beschadigen. Ter bescherming
wordt het gebruik van de KÄRCHER-waterfilter (bijzondere toebehoren, bestelnummer 4.730-059) aanbevolen.
Watertoevoer vanuit de waterleiding
Voorschriften van de watermaatschappij in acht nemen.
LET OP
Slangverbindingen van metaal met aquastop kunnen
leiden tot beschadiging aan de pomp! Gebruik een
slangverbinding van kunststof of een KÄRCHER-slangverbinding van messing.
Afbeelding
Watertoevoerslang op koppeling aan de wateraansluiting steken.
Waterslang aan de watertoevoer aansluiten.
Waterkraan volledig opendraaien.
Water aanzuigen uit open reservoirs
Deze hogedrukreiniger is met de KÄRCHER-zuigslang
met terugslagklep (speciale accessoires, bestelnr.
4.440-238) geschikt voor het opzuigen van oppervlaktewater bv. uit regentonnen of vijvers (max. aanzuighoogte zie technische gegevens).
Verwijder de koppeling van de wateraansluiting.
Zuigslang met water vullen.
Zuigslang op de wateraansluiting van het apparaat
schroeven en in een waterbron (bijvoorbeeld regenton) hangen.
Apparaat voor de werking ontluchten.
Apparaat inschakelen "I/ON".
Hefboom van het handspuitpistool ontgrendelen.
Hendel aantrekken, het apparaat wordt ingescha-
keld.
Apparaat laten draaien (max. 2 minuten), tot water
zonder bellen uit het handspuitpistool komt.
Hefboom van het handspuitpistool loslaten.
Instructie: Wanneer de hendel opnieuw wordt losgelaten, schakelt het apparaat opnieuw uit. Hogedruk blijft in het systeem behouden.
Hefboom van het handspuitpistool vergrendelen.
26 NL
– 6
Page 27

Werking
LET OP
Een droogloop van meer dan 2 minuten leidt tot beschadigingen van de hogedrukpomp. Indien het apparaat
binnen 2 minuten geen druk opbouwt, schakelt u het apparaat uit en gaat u te werk volgens de instructies in het
hoofdstuk „Hulp bij storingen“.
LET OP
Beschadigingsgevaar! Apparaat mag enkel in liggende positie (horizontaal) gebruikt worden.
Werken met hoge druk
몇 VOORZICHTIG
Respecteer bij de reiniging van gelakte oppervlakken
een minimumstraalafstand van 30 cm om beschadigingen te vermijden.
LET OP
Autobanden, lak of gevoelige oppervlakken zoals hout
mogen niet met de vuilfrees gereinigd worden wegens
beschadigingsgevaar.
Afbeelding
Straalpijp in het handspuitpistool steken en vastschroeven door hem 90° te draaien.
Apparaat inschakelen "I/ON".
Hefboom van het handspuitpistool ontgrendelen.
Hendel aantrekken, het apparaat wordt ingescha-
keld.
Instructie: Wanneer de hendel opnieuw wordt losgelaten, schakelt het apparaat opnieuw uit. Hogedruk blijft in het systeem behouden.
Werking met wasborstel
LET OP
Gevaar van lakschade
Bij werkzaamheden met wasborstel moet deze vrij van
vuil en andere deeltjes zijn.
Steek de wasborstel in het handspuitpistool en zet
vast door 90° te draaien.
Aanwijzing: Indien nodig kunnen ook de wasborstels
voor het werken met reinigingsmiddelen gebruikt worden.
Werken met reinigingsmiddel
Instructie: Reinigingsmiddel kan in lage druk toege-
voegd worden.
GEVAAR
Bij gebruik van reinigingsmiddelen moet het veiligheidsgegevensblad van de reinigingsmiddelfabrikant in acht
genomen worden, in het bijzonder de instructies betreffende de persoonlijke veiligheidsuitrusting.
Afbeelding
De zuigslang voor reinigingsmiddel tot de gewenste lengte uit de behuizing trekken.
Reinigingsmiddel-zuigslang in een reservoir met
reinigingsmiddeloplossing hangen.
Straalpijp met drukregeling (Vario Power) gebrui-
ken.
Straalpijp in stand „Mix“ draaien.
Instructie: Daardoor wordt tijdens de werking de
reinigingsmiddeloplossing bij de waterstraal gemengd.
Aanbevolen reinigingsmethode
Reinigingsmiddel in geringe hoeveelheid op het
droge oppervlak sproeien en laten inwerken (niet
laten opdrogen!).
losgekomen vuil met hogedrukstraal afspoelen.
Optioneel
Schuimsproeier
Reinigingsmiddeloplossing in reinigingsmiddeltank
van de schuimsproeier vullen (doseringsindicatie
op de verpakking van het reinigingsmiddel in acht
nemen).
Schuimsproeier verbinden met de reinigingsmid-
deltank.
Schuimsproeier in handspuitpistool steken en vast-
zetten door 90°-draaiing.
Werking onderbreken
Hefboom van het handspuitpistool loslaten.
Hefboom van het handspuitpistool vergrendelen.
Bij langere werkonderbrekingen (langer dan 5 mi-
nuten) het apparaat tevens uitschakelen "0/OFF".
Werking stopzetten
몇 VOORZICHTIG
Scheid de hogedrukslang enkel van het handspuitpistool of het apparaat wanneer geen druk in het systeem
voorhanden is.
Na het werken met reinigingsmiddel: Apparaat on-
geveer 1 minuut laten werken om schoon te spoelen.
Hefboom van het handspuitpistool loslaten.
Apparaat uitschakelen "0/OFF"
Trek de stekker uit het stopcontact.
Draai de waterkraan dicht.
Druk de hendel van het handspuitpistool in, om de
nog aanwezige druk in het systeem af te laten nemen.
Hefboom van het handspuitpistool vergrendelen.
몇 VOORZICHTIG
Bij het scheiden van toevoer- of hogedrukslangen kan
na de werking heet water uit de aansluitingen komen.
Apparaat scheiden van de watertoevoer.
Vervoer
몇 VOORZICHTIG
Verwondings- en beschadigingsgevaar!
Neem bij het transport het gewicht van het apparaat in
acht.
Transport met de hand
Afbeelding
Til het apparaat op en draag het aan de handgrepen.
Afbeelding
Transportgreep uittrekken, hij klikt hoorbaar vast.
Apparaat aan de transportgreep verplaatsen.
Transport in voertuigen
Apparaat beveiligen tegen verschuiven en kante-
len.
– 7
27NL
Page 28
Opslag
몇 VOORZICHTIG
Verwondings- en beschadigingsgevaar!
Neem bij de opslag het gewicht van het apparaat in
acht.
Apparaat opslaan
Apparaat op een egaal oppervlak neerzetten.
Ontgrendelknop op het handspuitpistool induwen
en hogedrukslang van het handspuitpistool scheiden.
Behuizing van de snelkoppeling voor hogedruk-
slang in pijlrichting duwen en hogedrukslang eruit
trekken.
Afbeelding
Handspuitpistool in houder voor handspuitpistool
steken.
Straalpijp laten vastklikken in de houder voor de
straalpijp.
Berg de hogedrukslang en de stroomaansluitlei-
ding op aan het apparaat.
Vorstbescherming
LET OP
Niet volledig leeggemaakte apparaten en toebehoren
kunnen door vorst vernield worden. Maak het apparaat
en de toebehoren volledig leeg en bescherm ze tegen
vorst.
Om schade te vermijden:
Water volledig uit het apparaat aflaten: Apparaat
zonder aangesloten hogedrukslang en zonder aangesloten watertoevoer inschakelen (max. 1 min) en
wachten tot geen water meer uit de hogedrukaansluiting komt. Apparaat uitschakelen.
Apparaat met alle accessoires in een vorstvrije
ruimte bewaren.
Voor langdurige opslag, bv. tijdens de wintermaanden,
moeten tevens de instructies in het hoofdstuk Onderhoud in acht genomen worden.
Onderhoud
GEVAAR
Gevaar van stroomschok
Voor alle werkzaamheden aan het apparaat moet
het apparaat uitgeschakeld en de stekker uitge-
trokken worden.
Zeef in de wateraansluiting reinigen
LET OP
De zeef mag niet beschadigd worden.
Verwijder de koppeling van de wateraansluiting.
Afbeelding
Trek de zeef met een platte tang eruit.
Reinig de zeef onder stromend water.
Zet de zeef opnieuw in de wateraansluiting.
Reinigingsmiddelfilter reinigen
Afbeelding
Filter van de reinigingsmiddel-zuigslang trekken en
onder stromend water reinigen.
Reserveonderdelen
Gebruik uitsluitend originele KÄRCHER-onderdelen.
Een overzicht van de onderdelen vindt u aan het eind
van deze gebruiksaanwijzing.
Hulp bij storingen
Kleinere storingen kunt u zelf oplossen met behulp van
het volgende overzicht.
Bij twijfel neemt u contact op met de bevoegde klantenservice.
GEVAAR
Gevaar van stroomschok
Voor alle werkzaamheden aan het apparaat moet
het apparaat uitgeschakeld en de stekker uitgetrokken worden.
Apparaat draait niet
Trek hendel van het handspuitpistool aan, het ap-
paraat wordt ingeschakeld.
Controleren of de aangegeven spanning op het
typeplaatje overeenkomt met de spanning van de
stroombron.
Stroomleiding op beschadiging controleren.
Motor overbelast, de motorveiligheidsschakelaar is
in werking getreden.
– Apparaat uitschakelen "0/OFF"
– Laat het apparaat een uur afkoelen.
– Schakel het apparaat in en neem het opnieuw in
bedrijf.
Als de storing meermaals optreedt, moet het apparaat door de klantendienst nagezien worden.
Apparaat start niet, motor bromt
Spanningsdaling door zwak stroomnet of bij gebruik van
een verlengsnoer.
Bij het inschakelen eerst de hendel van het hand-
spuitpistool aantrekken en dan de apparaatschakelaar op „I/ON“ stellen.
Apparaat komt niet op druk
Watertoevoer op voldoende volume controleren.
De zeef in het wateraansluitpunt er met een platte
tang uittrekken en onder stromend water reinigen.
Apparaat ontluchten: Apparaat zonder aangeslo-
ten hogedrukslang inschakelen en wachten (max.
2 minuten) tot water zonder bellen uit de hogedrukaansluiting komt. Apparaat uitschakelen en hogedrukslang opnieuw aansluiten.
Aanzuighoogte 0,5 m bij het zuigen uit een open
reservoir overschreden.
Sterke drukschommelingen
Hogedruksproeier reinigen: Verontreinigingen met
een naald uit het gat van de sproeier verwijderen
en met water naar voren toe uitspoelen.
Watertoevoervolume controleren.
Apparaat ondicht
Een geringe ondichtheid van het apparaat is tech-
nisch bepaald. Als de pomp echter erg lekt, moet
contact worden opgenomen met de bevoegde
klantenservice.
Reinigingsmiddel wordt niet aangezogen
Straalpijp met drukregeling (Vario Power) gebrui-
ken.
Straalpijp in stand „Mix“ draaien.
Filter aan de reinigingsmiddel-zuigslang reinigen.
Zuigslang voor reinigingsmiddel controleren op
knikplaatsen.
28 NL
– 8
Page 29

Garantie
In ieder land zijn de door ons bevoegde verkoopkantoor
uitgegeven garantiebepalingen van toepassing. Eventuele storingen aan het apparaat verhelpen wij zonder
kosten binnen de garantietermijn, mits een materiaal of
fabrieksfout de oorzaak van deze storing is. Neem bij
klachten binnen de garantietermijn contact op met uw
leverancier of de dichtstbijzijnde klantenservicewerkplaats en neem uw aankoopbewijs mee.
Adressen vindt u onder:
www.kaercher.com/dealersearch
Technische gegevens
Elektrische aansluiting
Spanning 230
Aansluitvermogen 2,1 kW
Veiligheidsklasse IP X5
Beschermingsklasse I
Netzekering (traag) 10 A
Wateraansluiting
Toevoerdruk (max.) 0,8 MPa
Toevoertemperatuur (max.) 40 °C
Toevoerhoeveelheid (min.) 10 l/min
Max. aanzuighoogte 0,5 m
Vermogensgegevens
Werkdruk 12,5 MPa
Maximaal toegestane druk 14,5 MPa
Opbrengst, water 7,5 l/min
Volume maximaal 8,3 l/min
Opbrengst, reinigingsmiddel 0,3 l/min
Reactiekracht van het pistool 20 N
Afmetingen en gewichten
Lengte 516 mm
Breedte 295 mm
Hoogte 282 mm
Gewicht, bedrijfsklaar met accessoi-
res
Bepaalde waarden conform EN 60335-2-79
Hand-arm vibratiewaarde
Onzekerheid K
Geluidsdrukniveau L
Onzekerheid K
Geluidskrachtniveau L
heid K
WA
Technische wijzigingen voorbehouden.
pA
pA
+ onveilig-
WA
1~50VHz
13,1 kg
<2,5
m/s
0,3
m/s
773dB(A)
dB(A)
92 dB(A)
2
2
EU-conformiteitsverklaring
Hierbij verklaren wij dat de hierna vermelde machine
door haar ontwerp en bouwwijze en in de door ons in de
handel gebrachte uitvoering voldoet aan de betreffende
fundamentele veiligheids- en gezondheidseisen, zoals
vermeld in de desbetreffende EU-richtlijnen. Deze verklaring verliest haar geldigheid wanneer zonder overleg
met ons veranderingen aan de machine worden aangebracht.
Product: Hogedrukreiniger
Type: 1.630-xxx
Van toepassing zijnde EU-richtlijnen
2000/14/EG
2014/30/EU
2006/42/EG (+2009/127/EG)
2011/65/EU
Toegepaste geharmoniseerde normen
EN 50581
EN 55014–1: 2006+A1: 2009+A2: 2011
EN 55014–2: 2015
EN 60335–1
EN 60335–2–79
EN 61000–3–2: 2014
EN 61000–3–3: 2013
EN 62233: 2008
Toegepaste conformiteitsbeoordelingsprocedure
2000/14/EG: Bijlage V
Geluidsvermogensniveau dB(A)
Gemeten: 88
Gegarandeerd: 92
De ondergetekenden handelen in opdracht en met volmacht van de bedrijfsleiding.
CEO
Gevolmachtigde voor de documentatie:
S. Reiser
Alfred Kärcher GmbH & Co. KG
Alfred Kärcher-Str. 28 - 40
71364 Winnenden (Germany)
Tel.: +49 7195 14-0
Fax: +49 7195 14-2212
Winnenden, 2016/04/01
Head of Approbation
– 9
29NL
Page 30
Índice de contenidos
Seguridad . . . . . . . . . . . . . . . . . . . . . . . . . . . ES 5
Protección del medio ambiente . . . . . . . . . . . ES 5
Descripción del aparato. . . . . . . . . . . . . . . . . ES 6
Montaje . . . . . . . . . . . . . . . . . . . . . . . . . . . . . ES 6
Puesta en marcha . . . . . . . . . . . . . . . . . . . . . ES 6
Funcionamiento. . . . . . . . . . . . . . . . . . . . . . . ES 7
Transporte . . . . . . . . . . . . . . . . . . . . . . . . . . . ES 7
Almacenamiento . . . . . . . . . . . . . . . . . . . . . . ES 8
Cuidados y mantenimiento . . . . . . . . . . . . . . ES 8
Piezas de repuesto . . . . . . . . . . . . . . . . . . . . ES 8
Ayuda en caso de avería. . . . . . . . . . . . . . . . ES 8
Garantía . . . . . . . . . . . . . . . . . . . . . . . . . . . .ES 9
Datos técnicos. . . . . . . . . . . . . . . . . . . . . . . . ES 9
Declaración UE de conformidad . . . . . . . . . . ES 9
Seguridad
Antes de poner en marcha por primera
vez el aparato, lea el manual de instruc-
ciones original y las indicaciones de seguridad suministradas. Actúe de acuerdo a ellas. Conserve estos dos manuales para su uso posterior o para
propietarios ulteriores.
Uso previsto
Utilice esta limpiadora de alta presión, exclusivamente,
en el ámbito doméstico:
– para limpiar máquinas, vehículos, obras, herra-
mientas, fachadas, terrazas, herramientas de jardinería etc. con chorro de agua de alta presión (si es
necesario agregar detergente).
– con accesorios autorizados por KÄRCHER, re-
cambios y detergentes. Respetar las indicaciones
de los detergentes.
Niveles de peligro
PELIGRO
Aviso sobre un riesgo de peligro inmediato que puede
provocar lesiones corporales graves o la muerte.
몇 ADVERTENCIA
Aviso sobre una situación propablemente peligrosa que
puede provocar lesiones corporales graves o la muerte.
몇 PRECAUCIÓN
Indicación sobre una situación que puede ser peligrosa,
que puede acarrear lesiones leves.
CUIDADO
Aviso sobre una situación probablemente peligrosa que
puede provocar daños materiales.
Símbolos en el aparato
El aparato no se puede conectar directamente al abastecimiento de agua potable
público.
El aparato solo se puede operar en posición horizontal.
No dirija el chorro de alta presión hacia
personas, animales, equipamiento eléctrico activo, ni apunte con él al propio aparato.
Proteger el aparato de las heladas.
Dispositivos de seguridad
몇 PRECAUCIÓN
Los dispositivos de seguridad sirven para proteger
al usuario y no se pueden modificar o sortear.
Interruptor del equipo
El interruptor del aparato impide el funcionamiento involuntario del mismo.
Bloqueo de la pistola pulverizadora manual
El bloqueo bloquea la palanca de la pistola pulverizadora manual e impide que el aparato se ponga en marcha
de forma involuntaria.
Válvula de derivación con presostato
La válvula de derivación evita sobrepasar la presión de
trabajo permitida.
Cuando se suelta la palanca de la pistola pulverizadora
manual, un presostato desconecta la bomba y el chorro
de alta presión se para. Cuando se acciona la palanca,
se conecta la bomba nuevamente.
Interruptor de guardamotor
Si el consumo de corriente es demasiado alto, el guardamotor desconecta el aparato.
Protección del medio ambiente
Indicaciones sobre ingredientes (REACH)
Encontrará información actual sobre los ingredientes
en:
www.kaercher.com/REACH
Los materiales empleados para el embalaje son
reciclables y recuperables. Rogamos elimine los
envases de forma que no se dañe el medio ambiente.
Los equipos eléctricos y electrónicos contienen a
menudo componentes que pueden representar un
peligro potencial para la salud de las personas y
para el medio ambiente en caso de que se manipulen o se eliminen de forma errónea. Estos componentes son necesarios para el correcto funcionamiento del equipo. Los equipos marcados con
este símbolo no pueden eliminarse con la basura
doméstica.
Los aparatos viejos contienen materiales valiosos
reciclables que deberán ser entregados para su
aprovechamiento posterior. Las baterías y los
acumuladores contienen sustancias que no deben entrar en contacto con el medio ambiente. Eliminar los aparatos usados, batería o acumuladores ecológicamente.
Los trabajos de limpieza que producen aguas residuales que contienen aceite (p. ej., el lavado de
motores o el lavado de los bajos) solo se deben
realizar en zonas de lavado que dispongan de separador de aceite.
Solo se pueden realizar trabajos con detergentes
en superficies herméticas con una conexión al
desagüe de agua sucia. No permitir que se entre
el detergente en las aguas naturales ni penetre en
el suelo.
El uso de agua de aguas naturales públicas no
está permitido en algunos países.
30 ES
– 5
Page 31
Descripción del aparato
En este manual de instrucciones se describe el equipamiento máximo. Según el modelos, hay diferencias en
el contenido suministrado (véase embalaje).
Ilustraciones, véase la contraportada 3
1 Zona de recogida para accesorios
2 Mango para el transporte, despegable
3 Asa de transporte
4 Acoplamiento rápido para manguera de alta pre-
sión
5 Interruptor del aparato „0/OFF“ / „I/ON“
6 Cable de conexión a red y enchufe de red
7 Asa de transporte
8 Rueda de transporte
9 Conexión de agua con filtro incorporado
10 Pieza de acoplamiento para la conexión de agua
11 Manguera de aspiración para detergente (con fil-
tro)
12 Pistola pulverizadora manual
13 Bloqueo de la pistola pulverizadora manual
14 Manguera de alta presión
15 Tecla para separar la manguera de alta presión de
la pistola pulverizadora manual
16 Lanza dosificadora con regulación de la presión
(Vario Power)
Para las tareas de limpieza más habituales. La pre-
sión de trabajo se puede regular sin escalonamien-
to entre "Mín" y "Máx". En la posición "Mix" se
puede dosificar detergente.
Para ajustar la presión de trabajo, soltar la palanca
de la pistola pulverizadora manual y girar la lanza
dosificadora a la posición deseada.
17 Lanza de agua con fresadora de suciedad
Para las suciedades más difíciles de eliminar
* Posibles accesorios
18 Cepillo para lavar
Apto para trabajar con detergentes.
19 Cepillo para lavar giratorio
Especialmente apto para la limpieza de automóvi-
les.
20 Boquilla de espuma con depósito de detergente
El detergente se aspira del depósito y se genera
una potente espuma de detergente.
** También se necesita
21 Manguera de agua de tejido resistente con acopla-
miento habitual en el mercado.
– diámetro de por lo menos 1/2 pulgada (13 mm).
– longitud de por lo menos 7,5 m
Montaje
Antes de la puesta en marcha montar las piezas sueltas
suministradas con el aparato.
Ilustraciones, véase la contraportada 4
Imagen
Atornille la pieza de acoplamiento a la conexión de
agua del aparato suministrada.
Imagen
Introducir la manguera de alta presión en la pistola
pulverizadora manual hasta que esta haga un ruido
al encajarse.
Nota: Procurar que el racor de conexión esté ali-
neado correctamente.
Comprobar si la conexión es segura tirando de la
manguera de alta presión.
Puesta en marcha
Coloque el aparato en horizontal sobre una super-
ficie plana.
Imagen
Introducir la manguera de alta presión en el acoplamiento rápido hasta que esta haga un ruido al encajarse.
Enchufar la clavija de red a una toma de corriente.
Suministro de agua
Valores de conexión: véase la placa de características/
datos técnicos.
CUIDADO
La suciedad en el agua puede dañar la bomba de alta
presión y los accesorios. Como protección se recomienda utilizar el filtro de agua KÄRCHER (accesorios
especiales, referencia de pedido 4.730-059).
Suministro de agua desde la tubería de agua
Tenga en cuenta las normas de la empresa suministradora de agua.
CUIDADO
¡Los acoplamientos de metal de la manguera con
Aquastop pueden dañar la bomba! Utilizar un acoplamiento de manguera de plástico o el acoplamiento de
manguera de KÄRCHER de latón.
Imagen
Insertar la manguera de alimentación de agua en el
acoplamiento de la toma de agua.
Conectar la manguera de agua a la toma de agua.
Abrir totalmente el grifo del agua.
Aspiración del agua de depósitos abiertos
Esta limpiadora de alta presión es apta con la manguera de aspiración KÄRCHER con válvula de retorno (accesorio especial, Ref. 4.440-238) para la aspiración de
agua de superficie, p. ej. de los bidones para agua pluvial o de los estanques (altura de aspiración máxima,
véase los datos técnicos).
Quitar el acoplamiento de la toma de agua.
Llenar de agua la manguera de agua.
Atornillar manguera de aspiración a la conexión de
agua del aparato y colgar en la fuente de agua (por
ejemplo en un bidón para agua pluvial).
Purgue el aire del aparato antes de su puesta en
servicio.
Conectar el aparato „I/ON“.
Desbloquear la palanca de la pistola pulverizadora
manual.
Tirar de la palanca, el aparato se enciende.
Dejar el aparato en funcionamiento (máx. 2 minu-
tos), hasta que salga el agua de la pistola pulverizadora manual sin burbujas.
Suelte la palanca de la pistola pulverizadora ma-
nual.
Nota: Si no se suelta la palanca, el aparato vuelve
a apagarse. La alta presión se mantiene en el sistema.
Bloquear la palanca de la pistola pulverizadora ma-
nual.
– 6
31ES
Page 32

Funcionamiento
CUIDADO
La marcha en vacío durante más de 2 horas provoca
daños en la bomba de alta presión. Si el equipo no genera presión en 2 minutos, desconectar el equipo y proceder conforme a las indicaciones del capítulo "Ayuda
en caso de fallo".
CUIDADO
¡Peligro de daños en la instalación! El aparato solo
se puede operar en posición horizontal.
Funcionamiento con alta presión
몇 PRECAUCIÓN
Mantener una distancia mínima de 30 cm con el chorro
a la hora de limpiar superficies lacadas, para evitar daños.
CUIDADO
No limpiar neumáticos, pintura o superficies delicadas
como la madera con la fresa de suciedad, se pueden
dañar.
Imagen
Inserte la lanza dosificadora en la pistola pulveriza-
dora manual y fíjela girándola 90°.
Conectar el aparato „I/ON“.
Desbloquear la palanca de la pistola pulverizadora
manual.
Tirar de la palanca, el aparato se enciende.
Nota: Si no se suelta la palanca, el aparato vuelve
a apagarse. La alta presión se mantiene en el sis-
tema.
Funcionamiento con cepillo de lavado
CUIDADO
Riesgo de daños en la pintura
Al realizar trabajos con el cepillo de lavado, este tiene
que estar limpio de suciedad u otras partículas.
Inserte el cepillo de lavado en la pistola pulveriza-
dora manual y fíjela girándola 90º.
Indicación: Si es necesario también se pueden utilizar
los cepillos de lavado para los trabajos con detergente.
Funcionamiento con detergente
Indicación:El detergente solo se puede mezclar a baja
presión.
PELIGRO
Si se usan detergentes se debe tener en cuenta la hoja
de datos de seguridad del fabricante del detergente, especialmentelas indicaciones sobre el equipamiento de
protección personal.
Imagen
Saque la manguera de aspiración de detergente de
la carcasa hasta la longitud deseada.
Cuelgue la manguera de aspiración de detergente
en un depósito que contenga una solución de de-
tergente.
Utilizar la lanza dosificadora con regulación de la
presión (Vario Power).
Girar la lanza dosificadora hasta la posición "Mix".
Nota: De este modo se añade durante el funciona-
miento la solución de detergente al chorro de agua.
Método de limpieza recomendado
Rocíe la superficie seca con detergente y déjelo
actuar pero sin dejar que se seque.
Aplicar el chorro de agua a alta presión sobre la su-
ciedad disuelta para eliminarla.
Opcional
Boquilla para espuma
Llenar el depósito de detergente de la boquilla de
espuma con la solución de detergente (tener en
cuenta las indicaciones de dosificación en el bidón
de detergente).
Unir la boquilla de espuma con el depósito de de-
tergente.
Inserte la boquilla de espuma en la pistola pulveri-
zadora manual y fíjela girándola 90°.
Interrupción del funcionamiento
Suelte la palanca de la pistola pulverizadora ma-
nual.
Bloquear la palanca de la pistola pulverizadora ma-
nual.
Durante las pausas de trabajo prolongadas (de una
duración superior a 5 minutos), desconectar además el aparato „0/OFF“.
Finalización del funcionamiento
몇 PRECAUCIÓN
La manguera de alta presión solo se puede separar de
la pistola pulverizadora o el equipo si no hay presión en
el sistema.
Después de trabajar con detergentes: Operar el
aparato aprox. 1 minuto para enjuagar.
Suelte la palanca de la pistola pulverizadora ma-
nual.
Desconectar el aparato "0/OFF".
Saque el enchufe de la toma de corriente.
Cierre el grifo de agua.
Apriete la palanca de la pistola pulverizadora ma-
nual para eliminar la presión que todavía hay en el
sistema.
Bloquear la palanca de la pistola pulverizadora ma-
nual.
몇 PRECAUCIÓN
Al separar el tubo de alimentación o el de alta presión,
puede salir agua muy caliente de las tomas después del
funcionamiento.
Desconectar el aparato del suministro de agua.
Transporte
몇 PRECAUCIÓN
¡Peligro de lesiones y daños!
Respetar el peso del aparato para el transporte.
Transporte manual
Imagen
Levante y transporte el aparato por el asa.
Imagen
Sacar el asa de transporte hasta que se oiga como
encaja.
Tirar del aparato por el asa de transporte.
Transporte en vehículos
Asegurar el aparato para evitar que se deslice o
vuelque.
32 ES
– 7
Page 33

Almacenamiento
몇 PRECAUCIÓN
¡Peligro de lesiones y daños!
Respetar el peso del aparato en el almacenamiento.
Almacenamiento del aparato
Coloque el dispositivo sobre una superficie plana.
Pulsar el botón de desconexión en la pistola pulve-
rizadora manual y desconectar manguera de alta
presión de la pistola pulverizadora manual.
Presionar en la dirección que indica la flecha la car-
casa del acoplamiento rápido para la manguera de
alta presión y extraer la manguera de alta presión.
Imagen
Insertar la pistola pulverizadora manual en la zona
de recogida para pistolas pulverizadoras manuales.
Encajar la lanza dosificadora en la zona de recogi-
da para la lanza dosificadora.
Guardar la manguera de alta presión y el cable de
alimentación en el aparato.
Protección antiheladas
CUIDADO
Los equipos y accesorios que no hayan sido totalmente
vaciados puede ser destrozados por las heladas. Vaciar completamente el equipo y los accesorios y proteger de las heladas.
Para evitar daños:
Vaciar totalmente el aparato, sacando todo el
agua: conectar el aparato (máx. 1 min) con la man-
guera de alta presión y el suministro de agua des-
conectados, hasta que ya no salga agua de la co-
nexión de alta presión. Desconectar el aparato.
Almacenar el aparato en un lugar a prueba de he-
ladas con todos los accesorios.
Antes de almacenar el aparato durante un período prolongado, como por ejemplo en invierno, respetar también las indicaciones del capítulo Cuidados.
Cuidados y mantenimiento
PELIGRO
Riesgo de descarga eléctrica.
Antes de efectuar cualquier trabajo en el aparato,
hay que desconectarlo de la red eléctrica.
Limpie el tamiz en la conexión del agua
CUIDADO
El tamiz no se debe dañar.
Quitar el acoplamiento de la toma de agua.
Imagen
Extraer el tamiz con los alicates de punta plana.
Limpiar el tamiz con agua corriente.
Colocar de nuevo el tamiz en la toma de agua.
Limpiar el filtro de detergente
Imagen
Quitar el filtro de la manguera de aspiración del de-
tergente y limpiarlo colocándolo bajo agua corrien-
te.
Piezas de repuesto
Emplear únicamente repuestos originales de KÄRCHER. Al final de este manual de instrucciones encontrará un listado resumido de repuestos.
Ayuda en caso de avería
Usted mismo puede solucionar las pequeñas averías
con ayuda del resumen siguiente.
En caso de duda, diríjase al servicio de atención al
cliente autorizado.
PELIGRO
Riesgo de descarga eléctrica.
Antes de efectuar cualquier trabajo en el aparato,
hay que desconectarlo de la red eléctrica.
El aparato no funciona
Tirar de la palanca de la pistola pulverizadora ma-
nual, el aparato se conecta.
Comprobar si la tensión indicada en la placa de ca-
racterísticas coincide con la tensión de la fuente de
alimentación.
Comprobar si el cable de conexión a la red presen-
ta daños.
El motor está sobrecargado, el guardamotor se ha
activado.
– Desconectar el aparato "0/OFF".
– Enfríar el aparato durante una hora.
– Conectar y poner de nuevo en funcionamiento el
aparato.
Si la avería se produce varias veces, haga que revisen el aparato en el servicio técnico.
El aparato no arranca, el motor ronronea
Caída de tensión debida a que la red es débil o por el
uso de cable alargador.
Al conectar, primero tirar de la palanca de la pistola
pulverizadora manual, después colocar el aparato
en la posición „I/ON“.
El aparato no alcanza la presión necesaria
comprobar que el suministro de agua tiene sufi-
ciente caudal.
Extraer el tamiz de la conexión del agua con unos
alicates de punta plana y limpiarlo colocándolo
bajo agua corriente.
Purgar el aparato: conectar el aparato sin conectar
la manguera de alta presión y esperar (máx. 2 minutos) hasta que salga el agua sin burbujas por la
conexión de alta presión. Desconectar el aparato y
volver a conectar la manguera de alta presión.
Altura de aspiración 0,5 m al aspirar de recipientes
abiertos superada.
Grandes oscilaciones de la presión
Limpiar la boquilla de alta presión: eliminar las im-
purezas del orificio de la boquilla con una aguja y
aclarar con agua desde la parte delantera.
Comprobar el caudal de agua.
El aparato presenta fugas
El aparato presenta una ligera falta de estanquei-
dad por razones técnicas. En caso de que la falta
de estanqueidad sea grande, contactar al Servicio
técnico autorizado.
El aparato no aspira detergente
Utilizar la lanza dosificadora con regulación de la
presión (Vario Power).
Girar la lanza dosificadora hasta la posición "Mix".
Limpiar el filtro de la manguera de aspiración de
detergente.
– 8
33ES
Page 34

Comprobar si la manguera de aspiración presenta
dobleces.
Garantía
En todos los países rigen las condiciones de garantía
establecidas por nuestra empresa distribuidora. Las
averías del aparato serán subsanadas gratuitamente
dentro del periodo de garantía, siempre que se deban a
defectos de material o de fabricación. En un caso de garantía, le rogamos que se dirija con el comprobante de
compra al distribuidor donde adquirió el aparato o al
servicio al cliente autorizado más próximo a su domicilio.
Aquí encontrará las direcciones:
www.kaercher.com/dealersearch
Datos técnicos
Conexión eléctrica
Tensión 230
Potencia conectada 2,1 kW
Grado de protección IP X5
Clase de protección I
Fusible de red (inerte) 10 A
Conexión de agua
Presión de entrada (máx.) 0,8 MPa
Temperatura de entrada (máx.) 40 °C
Velocidad de alimentación (mín.) 10 l/min
Altura de absorción máx. 0,5 m
Potencia y rendimiento
Presión de trabajo 12,5 MPa
Presión máx. admisible 14,5 MPa
Caudal, agua 7,5 l/min
Caudal máximo 8,3 l/min
Caudal, detergente 0,3 l/min
Fuerza de retroceso de la pistola pul-
verizadora manual
Medidas y pesos
Longitud 516 mm
Anchura 295 mm
Altura 282 mm
Peso, listo para el funcionamiento
con accesorios
Valores calculados conforme a la norma EN 603352-79
Valor de vibración mano-brazo
Inseguridad K
Nivel de presión acústica L
Inseguridad K
pA
Nivel de potencia acústica L
guridad K
WA
Sujeto a modificaciones técnicas.
pA
WA
+ inse-
1~50VHz
20 N
13,1 kg
<2,5
m/s
0,3
m/s
773dB(A)
dB(A)
92 dB(A)
2
2
Declaración UE de conformidad
Por la presente declaramos que la máquina designada
a continuación cumple, tanto en lo que respecta a su diseño y tipo constructivo como a la versión puesta a la
venta por nosotros, las normas básicas de seguridad y
sobre la salud que figuran en las directivas comunitarias correspondientes. La presente declaración perderá
su validez en caso de que se realicen modificaciones en
la máquina sin nuestro consentimiento explícito.
Producto: Limpiadora a alta presión
Modelo: 1.630-xxx
Directivas comunitarias aplicables
2000/14/CE
2014/30/UE
2006/42/CE (+2009/127/CE)
2011/65/UE
Normas armonizadas aplicadas
EN 50581
EN 55014–1: 2006+A1: 2009+A2: 2011
EN 55014–2: 2015
EN 60335–1
EN 60335–2–79
EN 61000–3–2: 2014
EN 61000–3–3: 2013
EN 62233: 2008
Procedimiento de evaluación de la conformidad
aplicado
2000/14/CE: Anexo V
Nivel de potencia acústica dB(A)
Medido: 88
Garantizado: 92
Los abajo firmantes actúan con plenos poderes y con la
debida autorización de la dirección de la empresa.
CEO
Persona autorizada para la documentación:
S. Reiser
Alfred Kärcher GmbH & Co. KG
Alfred-Kärcher-Str. 28 - 40
71364 Winnenden (Germany)
Tele.: +49 7195 14-0
Fax: +49 7195 14-2212
Winnenden, 2016/04/01
Head of Approbation
34 ES
– 9
Page 35

Índice
Segurança . . . . . . . . . . . . . . . . . . . . . . . . . . . PT5
Proteção do meio-ambiente . . . . . . . . . . . . . PT 5
Descrição da máquina. . . . . . . . . . . . . . . . . . PT 6
Montagem . . . . . . . . . . . . . . . . . . . . . . . . . . . PT 6
Colocação em funcionamento. . . . . . . . . . . . PT 6
Funcionamento . . . . . . . . . . . . . . . . . . . . . . . PT 7
Transporte . . . . . . . . . . . . . . . . . . . . . . . . . . . PT 7
Armazenamento . . . . . . . . . . . . . . . . . . . . . . PT 8
Conservação e manutenção . . . . . . . . . . . . . PT 8
Peças sobressalentes . . . . . . . . . . . . . . . . . . PT 8
Ajuda em caso de avarias . . . . . . . . . . . . . . . PT 8
Garantia. . . . . . . . . . . . . . . . . . . . . . . . . . . . . PT 9
Dados técnicos . . . . . . . . . . . . . . . . . . . . . . . PT 9
Declaração UE de conformidade . . . . . . . . . PT 9
Segurança
Antes da primeira utilização deste aparelho leia o manual de instruções original e
os avisos de segurança anexos. Proceda
em conformidade. Guarde os dois documentos para
uma utilização futura ou para o proprietário seguinte.
Utilização conforme o fim a que se destina a
máquina
Utilize esta lavadora de alta pressão unicamente para o
uso privado:
– para a limpeza de máquinas, veículos, edifícios,
ferramentas, fachadas, terraços, aparelhos de jardinagem, etc. com jato de água de alta pressão (se
for necessário com detergentes).
– com acessórios, peças sobressalentes e detergen-
tes homologados pela KÄRCHER. Observe os avisos que acompanham os detergentes.
Níveis do aparelho
PERIGO
Aviso referente a um perigo eminente que pode conduzir a graves ferimentos ou à morte.
몇 ATENÇÃO
Aviso referente a uma possível situação perigosa que
pode conduzir a graves ferimentos ou à morte.
몇 CUIDADO
Aviso referente a uma situação potencialmente perigosa que pode causar ferimentos leves.
ADVERTÊNCIA
Aviso referente a uma situação potencialmente perigosa que pode causar danos materiais.
Símbolos no aparelho
O aparelho não pode ser conectado de imediato à rede de água pública.
O aparelho só pode ser operado numa
posição deitada (horizontal).
O jacto de alta pressão não deve ser dirigido contra pessoas, animais, equipamento eléctrico activo ou contra o próprio
aparelho.
Proteger o aparelho contra congelamento.
Equipamento de segurança
몇 CUIDADO
As unidades de segurança protegem o utilizador e
não podem ser alteradas ou colocadas fora de serviço.
Interruptor do aparelho
O interruptor do aparelho impede a activação inadvertida do aparelho.
Bloqueio da pistola pulverizadora manual
O bloqueio trava a alavanca da pistola e impede um arranque inadvertido do aparelho.
Válvula de descarga com interruptor de pressão
A válvula de descarga evita a ultrapassagem da pressão de serviço permitida.
Se soltar a alavanca da pistola de injecção manual, a
bomba de alta pressão é desligada por um interruptor
manométrico. Se a alavanca for puxada, a bomba volta
a ligar.
Disjuntor do motor
Em caso de consumo de corrente demasiado elevado,
o aparelho é desligado por meio do interruptor de protecção do motor.
Proteção do meio-ambiente
Avisos sobre os ingredientes (REACH)
Informações actuais sobre os ingredientes podem ser
encontradas em:
www.kaercher.com/REACH
Os materiais da embalagem são recicláveis. Eliminar as embalagens de forma a preservar o meio
ambiente.
Muitas vezes, os aparelhos eléctricos e electrónicos contém componentes que, em caso de manuseamento incorrecto ou recolha errada, podem representar um perigo para a saúde e para o ambiente. Contudo, estes componentes são necessários para a operação adequada do aparelho. Os
aparelhos assinalados com este símbolo não podem ser eliminados com o lixo doméstico.
Os aparelhos velhos contêm materiais preciosos
e recicláveis e deverão ser reutilizados. Pilhas e
baterias recarregáveis contêm materiais que não
devem entrar em contacto com o meio ambiente.
Eliminar os aparelhos velhos, assim como as pilhas ou baterias recarregáveis, de acordo com as
normas de preservação do meio ambiente.
Efectuar os trabalhos de limpeza com formação
de águas sujas oleosas, p.ex. lavagem do motor,
lavagem do chassis inferior, só em lugares de lavagem onde existem colectores de óleo.
Os trabalhos com detergentes só podem ser realizados sobre superfícies estanques à água com
uma ligação directa à canalização dos efluentes.
Não permitir a contaminação de lençóis freáticos
ou do solo com detergentes.
Em alguns países é proibido retirar água de rios
ou lagos públicos.
– 5
35PT
Page 36

Descrição da máquina
Neste manual de instruções é descrito o equipamento
completo. Consoante o modelo, existem diferenças no
volume de fornecimento (ver embalagem).
Figuras, ver página desdobrável 3
1 Depósito para acessórios
2 Alça de transporte, extensível
3 Punho de transporte
4 Acoplamento rápido para mangueira de alta pres-
são
5 Interruptor do aparelho "0/OFF" / "I/ON"
6 Cabo de ligação à rede com ficha de rede
7 Punho de transporte
8 Roda de transporte
9 Conexão de água com peneira incorporada
10 Peça de acoplamento para ligação da água
11 Mangueira de aspiração do detergente (com filtro)
12 Pistola de injecção manual
13 Bloqueio da pistola pulverizadora manual
14 Mangueira de alta pressão
15 Botão para separar a mangueira de alta pressão
da pistola pulverizadora manual
16 Lança com regulação da pressão (Vario Power)
Para os trabalhos de limpeza mais frequentes. A
pressão de serviço pode ser ajustada continua-
mente entre "Min" e "Max". Na posição "Mix" é pos-
sível dosear detergente.
Para o ajuste da pressão de serviço, soltar a ala-
vanca da pistola pulverizadora manual e colocar a
lança na posição desejada.
17 Tubo de jacto com fresadora de sujidade
Para sujidade persistente
* Acessórios opcionais
18 Escova de lavagem
Adequado para trabalhos com detergente.
19 Escova de lavagem rotante
Especialmente indicada para a limpeza de auto-
móveis.
20 Bico de espuma com recipiente do detergente
O detergente é aspirado do recipiente, formando
uma forte espuma de limpeza.
** Adicionalmente necessário
21 Mangueira de água de material reforçado com aco-
plamento convencional.
– Diâmetro mínimo 1/2 polegada (13 mm)
– Comprimento mínimo 7,5 m
Montagem
Montar os componentes soltos na embalagem no aparelho, antes de proceder à colocação em funcionamento.
Figuras, ver página desdobrável 4
Figura
Fixar o elemento de acoplamento na conexão de
água da máquina.
Figura
Encaixar a mangueira de alta pressão na pistola
pulverizadora manual, até encaixar audivelmente.
Aviso: ter atenção ao alinhamento correcto do bo-
cal de conexão.
Controlar a ligação segura, puxando pela man-
gueira de alta pressão.
Colocação em funcionamento
Colocar o aparelho horizontalmente sobre uma su-
perfície plana.
Figura
Encaixar a mangueira de alta pressão no acoplamento rápido, até encaixar audivelmente.
Ligue a ficha de rede à tomada de corrente.
Alimentação de água
Para os valores de ligação veja a placa de características / dados técnicos.
ADVERTÊNCIA
Contaminações na água podem danificar a bomba de
alta pressão e os acessórios. Como meio de proteção é
recomendado o filtro de água KÄRCHER (acessórios
especiais, refª 4.730-059).
Alimentação de água a partir da canalização
Respeite as normas da companhia de abastecimento
de água.
ADVERTÊNCIA
Acoplamentos de mangueira em metal com Aquastop
podem causar danos na bomba! P. f. utilizar um acoplamento de mangueira em plástico ou um acoplamento
de mangueira KÄRCHER em latão.
Figura
Colocar a mangueira de admissão da água no acoplamento da ligação da água.
Conectar a mangueira da água na alimentação da
água.
Abrir a torneira totalmente.
Aspirar a água de recipientes abertos
Esta lavadora de alta pressão com tubo de aspiração
KÄRCHER e válvula de retenção (acessório especial,
n.º enc. 4.440-238), é adequada para a aspiração de
água superficial como, por exemplo, de vasilhas de
água pluvial ou lagos domésticos (altura máxima de aspiração, ver dados técnicos).
Remover o acoplamento da ligação de água.
Encher a mangueira de aspiração com água.
Enroscar a mangueira de aspiração na ligação da
água do aparelho e posicionar na fonte de água (p.
ex. bidão com águas pluviais).
Purgar o ar do aparelho, antes deste entrar em funcionamento.
Ligar o aparelho "I/ON".
Desbloquear a alavanca da pistola pulverizadora.
Puxar a alavanca e o aparelho entra em funciona-
mento.
Deixar o aparelho trabalhar (máx. 2 minutos) até a
água sair sem bolhas de ar da pistola pulverizadora manual.
Soltar a alavanca da pistola pulverizadora manual.
Aviso: o aparelho desliga assim que soltar a alavanca. A alta pressão permanece no sistema.
Bloquear a alavanca da pistola pulverizadora.
36 PT
– 6
Page 37

Funcionamento
ADVERTÊNCIA
O funcionamento a seco durante mais de 2 minutos
conduz a danos irreparáveis na bomba de alta pressão.
Se o aparelho não estabelecer nenhuma pressão dentro de 2 minutos, deve desligar o aparelho e proceder
conforme indicado no capítulo "Ajuda em caso de avarias".
ADVERTÊNCIA
Perigo de danos! O aparelho só pode ser operado
numa posição deitada (horizontal).
Funcionamento a alta pressão
몇 CUIDADO
Guardar uma distância do jato mínima de 30 cm durante a limpeza de superfícies lacadas para evitar danos.
ADVERTÊNCIA
Não limpar os pneumáticos de automóveis, a pintura ou
superfícies sensíveis como, por exemplo, madeira, com
a fresa de sujidade, devido ao perigo de danificação.
Figura
Introduzir a lança na pistola manual e rodar 90°
para fixá-la.
Ligar o aparelho "I/ON".
Desbloquear a alavanca da pistola pulverizadora.
Puxar a alavanca e o aparelho entra em funciona-
mento.
Aviso: o aparelho desliga assim que soltar a ala-
vanca. A alta pressão permanece no sistema.
Operação com escova de lavagem
ADVERTÊNCIA
Perigo de danos na pintura
Nos trabalhos com escova de lavagem, esta não deve
conter sujidade ou outras partículas.
Encaixar a escova de lavagem na pistola pulveriza-
dora manual e rodar 90° para fixá-la.
Aviso: Se necessário, é possível utilizar as escovas de
lavagem para trabalhos com o detergente.
Funcionamento com detergente
Aviso: o detergente só pode ser adicionado quando o
aparelho funcionar a baixa pressão.
PERIGO
Em caso de utilização de produtos de limpeza deve-se
ler a ficha técnica de segurança do fabricante do produto de limpeza, especialmente os avisos relativos ao
equipamento de protecção pessoal.
Figura
Extrair o comprimento desejado da mangueira de
aspiração de detergente do seu suporte.
Pendurar a mangueira de aspiração do detergente
num recipiente com o produto.
Utilizar lança com regulação da pressão (Vario Po-
wer).
Ajustar a lança na posição "Mix".
Aviso: Deste modo, a solução de detergente é adi-
cionada ao jacto de água.
Métodos de limpeza recomendados
Espalhar o detergente de forma económica sobre
a superfície seca e deixá-lo actuar (não secar).
Remover a sujidade solta com o jacto de alta pres-
são.
Opcional
Bico de espuma
Encher o detergente no recipiente do detergente
do bico de espuma (ter atenção às indicações de
dosagem na embalagem do detergente).
Ligar o bico de espuma ao recipiente do detergen-
te.
Encaixar o bico de espuma na pistola manual e ro-
dar 90° para fixá-la.
Interromper o funcionamento
Soltar a alavanca da pistola pulverizadora manual.
Bloquear a alavanca da pistola pulverizadora.
Se não trabalhar durante um período prolongado
(superior a 5 minutos) com o aparelho, o mesmo
deve ser desligado "0/OFF".
Desligar o aparelho
몇 CUIDADO
Separar apenas a mangueira de alta pressão da pistola
pulverizadora manual ou do aparelho se o sistema estiver livre de pressão.
Depois de trabalhar com detergente: Operar o apa-
relho durante cerca de 1 minuto para o enxaguamento de água limpa.
Soltar a alavanca da pistola pulverizadora manual.
Desligar o aparelho "0/OFF".
Retirar a ficha de rede da tomada.
Fechar a torneira de água.
Premir a alavanca da pistola de injecção manual
para eliminar a pressão ainda existente no sistema.
Bloquear a alavanca da pistola pulverizadora.
몇 CUIDADO
Durante a separação da mangueira de admissão ou da
mangueira de alta pressão, pode verificar-se a saída de
água quente pelas ligações após o funcionamento.
Separar o aparelho da alimentação da água.
Transporte
몇 CUIDADO
Perigo de ferimentos e de danos!
Ter atenção ao peso do aparelho durante o transporte.
Transporte manual
Figura
Levantar o aparelho no manípulo e transportar.
Figura
Puxar o manípulo de transporte para fora. Este engata audivelmente.
Puxar o aparelho pelo manípulo de transporte.
Transporte em veículos
Proteger o aparelho contra deslizamentos e tom-
bamentos.
– 7
37PT
Page 38

Armazenamento
몇 CUIDADO
Perigo de ferimentos e de danos!
Ter atenção ao peso do aparelho durante o armazenamento.
Guardar a máquina
Estacionar o aparelho sobre uma superfície plana.
Premir o botão de separação na pistola pulveriza-
dora manual e separar a mangueira de alta pres-
são da pistola pulverizadora manual.
Pressionar a carcaça do acoplamento, para man-
gueiras de alta pressão, no sentido da seta e retirar
a mangueira de alta pressão.
Figura
Colocar a pistola pulverizadora no local de armaze-
namento.
Encaixar a lança no respectivo encaixe.
Arrumar a mangueira de alta pressão e o cabo de
ligação à rede no aparelho.
Protecção contra o congelamento
ADVERTÊNCIA
Aparelhos ou acessórios que não tenham sido completamente esvaziados podem ser destruídos pela geada.
Esvaziar completamente o aparelho e acessórios e proteger contra geada.
Para evitar danos:
Esvaziar toda a água do aparelho: ligar o aparelho
sem a mangueira de alta pressão conectada e sem
a alimentação de água conectada (máx. 1 min) e
aguardar até não sair mais nenhuma água da liga-
ção de alta pressão. Desligar o aparelho.
Guardar o aparelho com todos os acessórios um
local protegido contra geada.
Antes de armazenar o aparelho durante um longo período (p. ex. no Inverno), deve-se prestar especial atenção ao capítulo da conservação.
Conservação e manutenção
PERIGO
Perigo de um choque eléctrico.
Desligar o aparelho e retirar a ficha de rede antes
de efectuar quaisquer trabalhos no aparelho.
Limpar o coador na ligação de água
ADVERTÊNCIA
O coador não pode ficar danificado.
Remover o acoplamento da ligação de água.
Figura
Puxar o coador para fora com um alicate de pontas
chatas.
Limpar o coador sob água corrente.
Voltar a inserir o coador na ligação de água.
Limpar o filtro do detergente
Figura
Retirar o filtro da mangueira de aspiração do deter-
gente e limpá-lo com água corrente.
Peças sobressalentes
Utilize exclusivamente peças de reposição originais da
KÄRCHER. No final do presente Manual de instruções,
encontra-se uma lista das peças sobressalentes.
Ajuda em caso de avarias
Com a ajuda da seguinte tabela sinóptica, você mesmo
pode eliminar pequenas avarias.
Em caso de dúvida contacte o serviço de assistência
técnica autorizado.
PERIGO
Perigo de um choque eléctrico.
Desligar o aparelho e retirar a ficha de rede antes
de efectuar quaisquer trabalhos no aparelho.
A máquina não funciona
Puxar a alavanca da pistola pulverizadora manual,
o aparelho entra em funcionamento.
Verificar se a tensão indicada na placa de caracte-
rísticas coincide com a tensão da fonte de alimentação.
Verificar o cabo de rede a respeito de danos.
Sobrecarga do motor, disparo do disjuntor do mo-
tor.
– Desligar o aparelho "0/OFF".
– Deixar o aparelho arrefecer durante uma hora.
– Ligar o aparelho e colocá-lo novamente em funcio-
namento.
Se a avaria ocorrer repetidamente, mandar o aparelho ser inspeccionado pelo Serviço de Assistência Técnica.
O motor não entra em funcionamento, motor
emite zumbido
Queda de tensão devido a rede eléctrica fraca ou utilização de uma extensão.
Durante a activação deve-se puxar primeiro a ala-
vanca da pistola pulverizadora manual e, de seguida, ajustar o interruptor do aparelho em "I/ON".
A máquina não atinge a pressão de serviço
Verificar se a alimentação da água tem um caudal
de débito suficiente.
Extrair o coador da conexão de água por meio de
um alicate de pontas chatas e lavar-lo com água
corrente.
Eliminar o ar da máquina: Ligar o aparelho sem a
mangueira de alta pressão conectada e esperar
(máx. 2 minutos), até a água sair sem bolhas de ar
na respectiva ligação de alta pressão. Desligar o
aparelho e voltar a ligar a mangueira de alta pressão.
Altura de aspiração excedida em 0,5 m durante a
aspiração a partir de um recipiente aberto.
Fortes variações de pressão
Limpar o bocal de alta pressão: Elimine a sujidade
da abertura do bocal com uma agulha e lave pela
frente com água.
Verificar a quantidade de alimentação de água.
Aparelho com fuga
Uma pequena fuga no aparelho é normal e deve-
se a razões técnicas. Se houver fortes fugas de
água, manda inspeccionar pelo Serviço Técnico
autorizado.
O detergente não é aspirado
Utilizar lança com regulação da pressão (Vario Po-
wer).
Ajustar a lança na posição "Mix".
38 PT
– 8
Page 39
Limpar o filtro na mangueira de aspiração do deter-
gente.
Controlar a mangueira de aspiração do detergente
quanto a dobras.
Garantia
Em cada país vigem as respectivas condições de garantia estabelecidas pelas nossas Empresas de Comercialização. Eventuais avarias no aparelho durante o
período de garantia serão reparadas, sem encargos
para o cliente, desde que se trate dum defeito de material ou de fabricação. Em caso de garantia, dirija-se,
munido do documento de compra, ao seu revendedor
ou ao Serviço Técnico mais próximo.
Os endereços podem ser consultados em:
www.kaercher.com/dealersearch
Dados técnicos
Ligação eléctrica
Tensão 230
Potência da ligação 2,1 kW
Grau de protecção IP X5
Classe de protecção I
Protecção de rede (de acção lenta) 10 A
Ligação de água
Pressão de admissão (máx.) 0,8 MPa
Temperatura de admissão (máx.) 40 °C
Quantidade de admissão (mín.) 10 l/min
Máx. altura de aspiração 0,5 m
Dados relativos à potência
Pressão de serviço 12,5 MPa
Pressão máxima admissível 14,5 MPa
Débito, água 7,5 l/min
Caudal de débito máximo 8,3 l/min
Débito, detergente 0,3 l/min
Força de recuo da pistola manual 20 N
Medidas e pesos
Comprimento 516 mm
Largura 295 mm
Altura 282 mm
Peso, operacional com acessórios 13,1 kg
Valores obtidos segundo EN 60335-2-79
Valor de vibração mão/braço
Insegurança K
Nível de pressão acústica L
Insegurança K
pA
Nível de potência acústica L
segurança K
O fabricante reserva-se o direito de proceder a quaisquer alterações técnicas.
WA
pA
WA
+ In-
1~50VHz
<2,5
m/s
0,3
m/s
773dB(A)
dB(A)
92 dB(A)
2
2
Declaração UE de conformidade
Declaramos que a máquina a seguir designada corresponde às exigências de segurança e de saúde básicas
estabelecidas nas Directivas UE por quanto concerne à
sua concepção e ao tipo de construção assim como na
versão lançada no mercado. Se houver qualquer modificação na máquina sem o nosso consentimento prévio,
a presente declaração perderá a validade.
Produto: Lavadora de alta pressão
Tipo: 1.630-xxx
Respectivas Directrizes da UE
2000/14/CE
2014/30/UE
2006/42/CE (+2009/127/CE)
2011/65/UE
Normas harmonizadas aplicadas
EN 50581
EN 55014–1: 2006+A1: 2009+A2: 2011
EN 55014–2: 2015
EN 60335–1
EN 60335–2–79
EN 61000–3–2: 2014
EN 61000–3–3: 2013
EN 62233: 2008
Processo aplicado de avaliação de conformidade
2000/14/CE: Anexo V
Nível de potência acústica dB(A)
Medido: 88
Garantido: 92
Os abaixo assinados têm procuração para agirem e representarem a gerência.
CEO
Responsável pela documentação:
S. Reiser
Alfred Kärcher GmbH & Co. KG
Alfred-Kärcher-Str. 28 - 40
71364 Winnenden (Germany)
Tel.: +49 7195 14-0
Fax: +49 7195 14-2212
Winnenden, 2016/04/01
Head of Approbation
– 9
39PT
Page 40

Indholdsfortegnelse
Sikkerhed . . . . . . . . . . . . . . . . . . . . . . . . . . . DA 5
Miljøbeskyttelse. . . . . . . . . . . . . . . . . . . . . . . DA 5
Beskrivelse af apparatet . . . . . . . . . . . . . . . . DA 6
Montering . . . . . . . . . . . . . . . . . . . . . . . . . . . DA 6
Ibrugtagning . . . . . . . . . . . . . . . . . . . . . . . . . DA6
Drift . . . . . . . . . . . . . . . . . . . . . . . . . . . . . . . . DA 7
Transport . . . . . . . . . . . . . . . . . . . . . . . . . . . .DA 7
Opbevaring . . . . . . . . . . . . . . . . . . . . . . . . . . DA8
Pleje og vedligeholdelse . . . . . . . . . . . . . . . . DA 8
Reservedele . . . . . . . . . . . . . . . . . . . . . . . . . DA 8
Hjælp ved fejl. . . . . . . . . . . . . . . . . . . . . . . . . DA 8
Garanti. . . . . . . . . . . . . . . . . . . . . . . . . . . . . . DA 9
Tekniske data . . . . . . . . . . . . . . . . . . . . . . . . DA 9
EU-overensstemmelseserklæring . . . . . . . . . DA 9
Sikkerhed
Læs den originale driftsvejledning før første gangs brug af maskinen og de vedlag-
te sikkerhedsanvisninger. Følg den nøje.
Opbevar de to hæfter til senere brug eller til senere ejere.
Bestemmelsesmæssig anvendelse
Denne højtryksrenser må kun anvendes til privat brug:
– Til rengøring af maskiner, køretøjer, bygninger,
værktøjer, facader, terrasser, haveredskaber etc.
med højtryksvandstråle (efter behov med tilsætning af rengøringsmiddel).
– Med tilbehør, reservedele og rengøringsmidler, der
er godkendt af Kärcher. Følg de anvisninger, der er
vedlagt rengøringsmidlerne.
Faregrader
FARE
Henviser til en umiddelbar fare, der fører til alvorlige
kvæstelser eller til døden
몇 ADVARSEL
Henviser til en mulig farlig situation, der kan føre til alvorlige kvæstelser eller til døden.
몇 FORSIGTIG
Henviser til en mulig farlig situation, der kan føre til lette
personskader.
BEMÆRK
Henviser til en mulig farlig situation, der kan føre til materiel skade.
Symboler på maskinen
Maskinen må ikke tilsluttes umiddelbart til
det offentlige drikkevandsnet.
Sikkerhedsanordninger
몇 FORSIGTIG
Sikkerhedsanordninger skal beskytte mod kvæ-
stelser og må hverken ændres eller omgås.
Afbryder
Hovedafbryderen forhindrer et utilsigtet brug af maskinen.
Låseanordning på håndsprøjtepistolen
Låseanordningen blokerer sprøjtepistolens greb og forhindrer maskinens utilsigtede start.
Overstrømsventil med trykafbryder
Overstrømsventilen forhindrer, at det maksimalt tilladte
tryk overskrides.
Hvis pistolgrebet slippes, frakobles højtrykspumpen af
en trykafbryder, og højtryksstrålen stopper. Hvis der
trækkes i grebet, kobler trykafbryderen pumpen til igen.
Motorbeskyttelsesafbryder
Ved for højt strømforbrug slukker motorværnet for højtryksrenseren.
Miljøbeskyttelse
Henvisninger til indholdsstoffer (REACH)
Aktuelle oplysninger til indholdsstoffer finder du på:
www.kaercher.com/REACH
Emballagen kan genbruges. Sørg for at bortskaffe
emballagen på en miljømæssigt forsvarlig måde.
Elektriske og elektroniske maskiner indeholder
ofte bestanddele, der ved forkert omgang eller forkert bortskaffelse kan udgøre en mulig fare for
menneskers sundhed og for miljøet. For en korrekt drift af maskinen er disse bestanddele imidlertid nødvendige. Maskiner kendetegnet med dette
symbol må ikke bortskaffes sammen med husholdningsaffaldet.
Udtjente maskiner indeholder værdifulde materialer, der kan og bør afleveres til genbrug. Akku'er
og batterier indeholder stoffer, der ikke må komme
ud i naturen. Gamle apparatet og batterier skal
bortskaffes miljøvenligt.
Rengøringsarbejder, hvor der opstår olieholdigt
spildevand, f.eks. motorvask eller undervognsvask må kun foregå på vaskepladser udstyret med
en olieudskiller.
Arbejder med rensemiddel må kun gennemføres
på arbejdsoverflader som er væsketæt og med tilslutning til spildevandskanalisationen. Rensemiddel må ikke trænge ind i vandløb eller jorden.
I nogle lande er det ikke tilladt at udtage vand fra
kollektivt vand.
Maskinen må kun bruges i liggende position (vandret).
Strålen må ikke rettes mod personer, dyr,
tændt elektrisk udstyr eller mod selve maskinen.
Beskyt maskinen imod frost.
40 DA
– 5
Page 41

Beskrivelse af apparatet
I denne driftsvejledning beskrives det maksimale udstyr. Afhængigt af modellen er der forskelle i leveringen
(se emballagen).
Se hertil figurerne på side 3
1 Opbevaring til tilbehør
2 Transportgreb, som kan trækkes ud
3 Bæregreb
4 Lynkobling til højtryksslangen
5 Hovedafbryder „0/OFF“ / „I/ON“
6 Strømledning med netstik
7 Bæregreb
8 Tranporthjul
9 Vandtilslutning med integreret si
10 Tilkoblingsdel til vandforsyning
11 Sugeslange til rensemiddel (med filter)
12 Håndsprøjtepistol
13 Låseanordning på håndsprøjtepistolen
14 Højtryksslange
15 Knap til at adskille højtryksslangen fra håndsprøjte-
pistolen.
16 Strålerør med trykregulering (Vario Power)
Til de mest almindelige rengøringsopgaver. Arbejdstrykket kan reguleres trinløst imellem "Min" og
"Max". I stilling "Mix" kan rengøringsmidlet doseres.
Til omstilling af arbejdstrykket giver du slip for
håndsprøjtepistolen og drejer strålerøret til den ønskede position.
17 Strålerør med rotordyse
Til svære tilsmudsinger
*Optionalt tilbehør
18 Vaskebørste
Egnet til arbejde med rensemidler.
19 Roterende vaskebørste
Særlig egnet til rengøring af biler.
20 Skumdyse med rensemiddelbeholder
Rensemiddel suges ind fra beholderen og der opstår et effektivt rensemiddelskum.
** Desuden nødvendigt
21 Armeret vandslange med almindelig kobling.
– Diameter min. 1/2 tommer (13 mm)
– Længde min. 7,5 m
Montering
Løse komponenter, som er vedlagt maskinen, skal før
brugen monteres.
Se hertil figurerne på side 4
Figur
Skru den medfølgende koblingsdel på højtryksrenserens vandtilslutning.
Figur
Skru højtryksslangen ind i håndsprøjtepistolen indtil det kan høres at den går i hak.
Bemærk: Tag hensyn til den rigtige orientering af
tilslutningsstykket.
Kontroller om forbindelsen er sikker ved at trække
i højtryksslangen.
Ibrugtagning
Stil apparatet vandret på en plan flade.
Figur
Stik højtryksslangen ind i lynkoblingen indtil det kan
høres at den går i hak.
Sæt netstikket i en stikdåse.
Vandforsyning
Se typeskilt/tekniske data for tilslutningsværdier
BEMÆRK
Forureninger i vandet kan beskadige højtrykspumpen
og tilbehøret. For at beskytte maskinen anbefales brug
af KÄRCHER-vandfilter (specialtilbehør, bestillingsnummer 4.730-059).
Vandforsyning fra vandledning
Læg mærke til vandforsyningsselskabets reglementer.
BEMÆRK
Slangekoblinger af metal med Aquastop kan føre til beskadigelse af pumpen! Brug venligst slangekoblinger af
kunststof eller KÄRCHER slangekoblinger af messing.
Figur
Sæt vandtilløbsslangen på vandtillsutningens kobling.
Slut vandslangen til vandforsyningen.
Åbn for vandhanen.
Opsugning af vand fra åbne beholdere
Denne højtryksrenser er sammen med KÄRCHER-sugeslangen med kontraventil (ekstratilbehør, bestillingsnr. 4.440-238) beregnet til opsugning af overfladevand, som f.eks vand af regntønder eller damme (max.
opsugningshøjde, se tekniske data).
Fjern koblingen fra vandtilslutningen.
Sugeslangen skal fyldes med vand.
Skru sugeslangen på maskinens vandtilslutning og
hæng den i vandkilden (f.eks. regntønde).
Afluft højtryksrenseren inden brug.
Stil hovedafbryderen på "I/ON".
Brug håndsprøjtepistolens greb.
Højtryksrenseren tændes ved at trække i grebet.
Maskinen skal køre (max. 2 minutter), indtil vandet
strømmer ud af håndsprøjtepistolen uden bobler.
Slip pistolgrebets håndtag.
Bemærk: Hvis der gives slip for grebet, afbrydes
maskinen igen. Højtrykket opretholdes i systemet.
Brug håndsprøjtepistolens greb.
– 6
41DA
Page 42

Drift
BEMÆRK
Tørkørsel på mere end 2 minutter fører til skader på højtrykspumpen. Afbryd maskinen hvis den ikke opbygger
tryk indenfor 2 minutter og gå frem ifølge anvisningerne
i kapitel "Hjælp ved fejl".
BEMÆRK
Risiko for beskadigelse! Maskinen må kun bruges i
liggende position (vandret).
Drift med højtryk
몇 FORSIGTIG
Hold mindst 30 cm stråleafstand ved rengøring af lakerede overflader for at undgå lakskader.
BEMÆRK
Bildæk, lakeringer eller følsomme overflader af træ må
ikke renses med snavsfræseren, fare for beskadigelse.
Figur
Strålerør sættes ind i sprøjtepistolen og fikseres
med en 90° omdrejning.
Stil hovedafbryderen på "I/ON".
Brug håndsprøjtepistolens greb.
Højtryksrenseren tændes ved at trække i grebet.
Bemærk: Hvis der gives slip for grebet, afbrydes
maskinen igen. Højtrykket opretholdes i systemet.
Drift med vaskebørste
BEMÆRK
Fare for lakskader
Ved arbejder med vaksebørste, skal den være fri for tilsmudsninger eller andre partikler.
Vaskebørsten sættes ind i sprøjtepistolen og fikse-
res med en 90° omdrejning.
Bemærk: Efter behov kan man også bruge vaskebørsterne til arbejdet med rensemiddel.
Drift med rengøringsmiddel
Bemærk: Der kan kun tilsættes rengøringsmiddel i lav-
tryk.
FARE
Ved brug af rensemidler skal der tages hensyn til sikkerhedsdatabladet af rensemiddelproducenten, især henvisningerne til personlige værnemidler.
Figur
Træk rensemiddel-sugeslangen ud af huset i den
ønskede længde.
Hæng rensemiddel-sugeslangen ned i en beholder
med rensemiddelopløsning.
Brug strålerør med trykregulering (Vario Power).
Drej strålerøret til position "Mix".
Bemærk: På den måde tilsættes der rensemiddelopløsning til vandstrålen under driften.
Anbefalet rensemetode
Sprøjt lidt rengøringsmiddel på den tørre overflade
og lad det virke (skal ikke tørre).
Vask det løsnede snavs af med højtryksstrålen.
Optionel
Skumdyse
Fyld rensemiddelopløsningen ind i skumdysens
rensemiddelbeholder (tag højde for doseringsanvisningen på rensemidlets emballage).
Forbind skumdysen med rensemiddelbeholderen.
Skumdysen sættes ind i sprøjtepistolen og fikseres
med en 90° omdrejning.
Afbrydelse af driften
Slip pistolgrebets håndtag.
Brug håndsprøjtepistolens greb.
Afbryd endvidere maskinen "0/OFF" ved længere
arbejdspauser (mere end 5 minutter).
Efter brug
몇 FORSIGTIG
Højtryksslangen må kun adskilles fra håndsprøjtepistolen eller maskinen, hvis systemet er uden tryk.
Efter arbejde med rensemidler: Tænd maskinen i
ca. 1 minut og skyl med klart vand
Slip pistolgrebets håndtag.
Sluk maskinen "0/OFF“.
Træk stikket ud af stikkontakten.
Luk vandhanen.
Tryk på pistolgrebet for at fjerne det tryk, der er i sy-
stemet.
Brug håndsprøjtepistolens greb.
몇 FORSIGTIG
Hvis tilløbs- og højtryksslangen adskilles efter driften
kan der udtræde varmt vand.
Adskil maskinen fra vandforsyningen.
Transport
몇 FORSIGTIG
Fare for person- og materialeskader!
Hold øje med maskinens vægt ved transporten.
Manuel transport
Figur
Løft maskinen ved hjælp af grebene og bær den.
Figur
Træk grebet helt ud indtil den går i hak.
Træk maskinen i transportgrebet.
Transport i køretøjer
Maskinen sikres/fastgøres, så den ikke kan vælte
eller flytte sig.
42 DA
– 7
Page 43
Opbevaring
몇 FORSIGTIG
Fare for person- og materialeskader!
Hold øje med maskinens vægt ved oplagringen.
Opbevaring af damprenseren
Stil fejemaskinen på et plant underlag.
Tryk på håndsprøjtepistolens skilleknap og adskil
højtryksslangen fra håndsprøjtepistolen.
Tryk huset af lynkoblingen til højtryksslangen i pi-
lens retning og træk højtryksslangen ud.
Figur
Sæt håndsprøjtepistolen i dens holder.
Strålerøret skal gå i hak i opbevaringsstedet.
Opbevar højtryksslangen og strømledningen på
maskinen.
Frostbeskyttelse
BEMÆRK
Ikke fuldstændig tømte maskin- eller tilbehørsdele kan
ødelægges af frost. Tøm maskin- og tilbehørsdele fuldstændig og frostsikre dem.
For at undgå skader:
Tømme maskinen for vand: Tænd maskinen uden
tilsluttet højtryksslange og uden tilsluttet vandforsyning (max. 1 min.) og vent, indtil der ikke længere
kommer vand ud af højtrykstilslutningen. Sluk for
maskinen.
Maskinen og alt tilbehør opbevares i et frostfrit rum.
Inden maskinen opbevares over et længere tidsrum,
f.eks. om vinteren, skal der tages hensyn til anvisningerne i kapitel "Pleje".
Pleje og vedligeholdelse
FARE
Risiko for elektrisk stød.
Træk netstikket og afbryd maskinen inden der ar-
bejdes på maskinen.
Rens filteret i vandtilslutningen.
BEMÆRK
Sien må ikke beskadiges.
Fjern koblingen fra vandtilslutningen.
Figur
Træk sien ud med en flad tang.
Rens sien under rindende vand.
Sæt igen sien i vandtilslutningen.
Rens rengøringsfilteret.
Figur
Træk filteret af rensemiddel-sugeslangen og rens
det under løbende vand.
Reservedele
Benyt udelukkende originale reservedel fra KÄRCHER.
Bag i denne betjeningsvejledning finder De en oversigt
over reservedele.
Hjælp ved fejl
Ved hjælp af denne oversigt kan De selv afhjælpe mindre fejl.
Kontakt den autoriserede kundeservice i tvivlstilfælde.
FARE
Risiko for elektrisk stød.
Træk netstikket og afbryd maskinen inden der ar-
bejdes på maskinen.
Maskinen kører ikke
Maskinen tændes ved at trække i håndsprøjtepi-
stolens greb.
Kontroller, at den angivne spænding på typeskiltet
stemmer overens med strømkildens spænding.
Kontroller nettilslutningskablet for beskadigelse.
Motor overbelastet, motor-beskyttelseskontakten
blev aktiveret.
– Sluk maskinen "0/OFF“.
– Afbryd maskinen, og lad den afkøle i en time.
– Tænd for maskinen, og tag den i brug igen.
Hvis denne fejl forekommer flere gange, skal maskinen kontrolleres af kundeservice.
Maskinen starter ikke, motoren brummer
Spændingstab på grund af et svagt strømnet eller hvis
der bruges en forlængerledning.
Træk først sprøjtepistolens greb ved starten, sæt
så afbryderen til "I/ON".
Maskinen kommer ikke op på det nødvendige
tryk
Kontroller vandforsyningen for tilstrækkelig trans-
portkapacitet.
Træk sien i vandtilslutningen ud med en fladtang
og rens den under løbende vand.
Maskinen skal afluftes: Tænd maskinen uden til-
sluttet højtryksslange og vent (max. 2 minutter),
indtil vandet kommer ud af højtrykstilslutningen
uden bobler. Sluk for maskinen og tilslut højtryksslangen igen.
Indsugningshøjden på 0,5 m blev overskredet ved
opsugning af en åbn beholder.
Kraftige trykudsving
Rens højtryksdysen: Fjern snavs fra dyseborehul-
let med en nål og skyl ved at spule vand fremad.
Kontroller den tilløbende vandmængde.
Maskinen er utæt
Teknisk betinget er maskinen lidt utæt. Kontakt den
autoriserede kundeservice, hvis den er meget
utæt.
Rensemiddel bliver ikke indsuget
Brug strålerør med trykregulering (Vario Power).
Drej strålerøret til position "Mix".
Rens filteret på rensemiddelsugeslangen.
Kontroller rensemiddel-sugeslangen for knæk.
– 8
43DA
Page 44

Garanti
I de enkelte lande gælder de af vore forhandlere fastlagte garantibetingelser. Eventuelle fejl på apparatet afhjælpes gratis inden for garantien, såfremt fejlen kan tilskrives en materiale- eller produktionsfejl. Hvis De ønsker at gøre garantien gældende, bedes De henvende
Dem til Deres forhandler eller nærmeste kundeservice
medbringende kvittering for købet.
Adresser finder De under:
www.kaercher.com/dealersearch
Tekniske data
El-tilslutning
Spænding 230
Tilslutningseffekt 2,1 kW
Beskyttelsesniveau IP X5
Beskyttelsesklasse I
Netsikring (træg) 10 A
Vandtilslutning
Tilførselstryk, maks. 0,8 MPa
Forsyningstemperatur, maks. 40 °C
Forsyningsmængde, min. 10 l/min
Max. indsugningshøjde 0,5 m
Ydelsesdata
Arbejdstryk 12,5 MPa
Maks. tilladt tryk 14,5 MPa
Kapacitet, vand 7,5 l/min
Transportmængde max. 8,3 l/min
Kapacitet, rengøringsmiddel 0,3 l/min
Pistolgrebets tilbagestødskraft 20 N
Mål og vægt
Længde 516 mm
Bredde 295 mm
Højde 282 mm
Vægt, driftsklar med tilbehør 13,1 kg
Oplyste værdier ifølge EN 60335-2-79
Hånd-arm vibrationsværdi
Usikkerhed K
Lydtryksniveau L
Usikkerhed K
Lydeffektniveau L
K
WA
Der tages forbehold for tekniske ændringer.
pA
pA
WA
+ usikkerhed
1~50VHz
<2,5
m/s
0,3
m/s
773dB(A)
dB(A)
92 dB(A)
2
2
EU-overensstemmelseserklæring
Hermed erklærer vi, at den nedenfor nævnte maskine i
design og konstruktion og i den af os i handlen bragte
udgave overholder de gældende grundlæggende sikkerheds- og sundhedskrav i EU-direktiverne. Ved ændringer af maskinen, der foretages uden forudgående
aftale med os, mister denne erklæring sin gyldighed.
Produkt: Højtryksrenser
Type: 1.630-xxx
Gældende EU-direktiver
2000/14/EF
2014/30/EU
2006/42/EF (+2009/127/EF)
2011/65/EU
Anvendte harmoniserede standarder
EN 50581
EN 55014–1: 2006+A1: 2009+A2: 2011
EN 55014–2: 2015
EN 60335–1
EN 60335–2–79
EN 61000–3–2: 2014
EN 61000–3–3: 2013
EN 62233: 2008
Anvendte overensstemmelsesvurderingsprocedurer
2000/14/EF: Bilag V
Lydeffektniveau dB(A)
Målt: 88
Garanteret: 92
Undertegnede agerer på vegne af og med fuldmagt fra
ledelsen.
CEO
Dokumentationsbefuldmægtiget:
S. Reiser
Alfred Kärcher GmbH & Co. KG
Alfred-Kärcher-Str. 28 - 40
71364 Winnenden (Germany)
Tlf.: +49 7195 14-0
Fax: +49 7195 14-2212
Winnenden, 2016/04/01
Head of Approbation
44 DA
– 9
Page 45

Innholdsfortegnelse
Sikkerhet . . . . . . . . . . . . . . . . . . . . . . . . . . . .NO 5
Miljøvern . . . . . . . . . . . . . . . . . . . . . . . . . . . . NO 5
Beskrivelse av apparatet . . . . . . . . . . . . . . . . NO 6
Montering . . . . . . . . . . . . . . . . . . . . . . . . . . . NO 6
Ta i bruk. . . . . . . . . . . . . . . . . . . . . . . . . . . . . NO 6
Drift . . . . . . . . . . . . . . . . . . . . . . . . . . . . . . . . NO 7
Transport . . . . . . . . . . . . . . . . . . . . . . . . . . . .NO 7
Lagring . . . . . . . . . . . . . . . . . . . . . . . . . . . . . NO 8
Pleie og vedlikehold . . . . . . . . . . . . . . . . . . . NO 8
Reservedeler . . . . . . . . . . . . . . . . . . . . . . . . . NO 8
Feilretting. . . . . . . . . . . . . . . . . . . . . . . . . . . . NO 8
Garanti. . . . . . . . . . . . . . . . . . . . . . . . . . . . . . NO 9
Tekniske data . . . . . . . . . . . . . . . . . . . . . . . . NO 9
EU-samsvarserklæring . . . . . . . . . . . . . . . . . NO 9
Sikkerhet
Les disse denne originale bruksanvisningen før apparatet tas i bruk første gang, og
følg de vedlagte sikkerhetsanvisningene.
Følg den. Oppbevar begge deler til senere bruk eller for
annen eier.
Forskriftsmessig bruk
Denne høytrykksvaskeren må kun brukes til private formål.
– for rengjøring av maskiner, biler, bygninger, verk-
tøy, fasader, terrasser, hageutstyr, etc. med høytrykkvannstråle (ved behov tilsatt rengjøringsmidler).
– med tilbehør, reservedeler og rengjøringsmidler
som er godkjent av KÄRCHER. Følg anvisningene
som følger med rengjøringsmiddelet.
Risikotrinn
FARE
Anvisning om en umiddelbar truende fare som kan føre
til store personskader eller til død.
몇 ADVARSEL
Anvisning om en mulig farlig situasjon som kan føre til
store personskader eller til død.
몇 FORSIKTIG
Anvisning om en mulig farlig situasjon som kan føre til
mindre personskader.
OBS
Anvisning om en mulig farlig situasjon som kan føre til
materielle skader.
Symboler på maskinen
Maskinen skal ikke kobles direkte til den offentlige vannforsyningen.
Sikkerhetsinnretninger
몇 FORSIKTIG
Sikkerhetsinnretningen fungerer som beskyttelse
for brukeren, og må ikke endres eller omgås.
Apparatbryter
Apparatbryteren forhindrer utilsiktet bruk av apparatet.
Låsin høytrykkspistol
Låsingen sperrer hendelen på høytrykkspistolen og forhindrer utilsiktet start av apparatet.
Overstrømsventil med trykkbryter
Overstrømsventilen forhindrer at maskinens tillatte arbeidstrykk overskrides.
Hvis spaken på håndsprøytespistolen slippes, slår en
trykkbryter av pumpen, og høytrykksstrålen stopper.
Når spaken betjenes igjen, kobles pumpen inn igjen.
Motorvernbryter
Ved for høyt strømopptak kobler motervernbryteren
maskinen ut.
Miljøvern
Anvisninger om innhold (REACH)
Aktuell informasjon om stoffene i innholdet finner du under:
www.kaercher.com/REACH
Materialet i emballasjen kan resirkuleres. Kvitt deg
med emballasjen på miljøvennlig måte.
Elektriske og elektroniske apparater inneholder
ofte deler som kan utgjøre en potensiell fare for
helse og miljø ved feil bruk eller feil avfallsbehandling. Disse delene er imidlertid nødvendige for korrekt drift av apparatet. Apparater merket med dette symbolet skal ikke kastes i husholdningsavfallet.
Gamle apparater inneholder verdifulle materialer
som kan gjenbrukes og som bør sendest til gjenbruk. Akkumulatorene inneholder stoffer som ikke
må komme ut i miljøet. Vennligst deponer gamle
apparater samt batterier eller oppladbare batterier
på en miljøvennlig måte.
Rengjøringsarbeid som medfører oljeholdig avløpsvann, f. eks. motorvask, karosserivask, må
bare utføres på vaskeplasser med oljeutskiller.
Arbeid med rengjøringsmidler skal kun utføres på
væsketette arbeidsflater med tilkobling til avløpssystemet. Ikke la rengjøringsmiddelet slippe ut til
vann eller jord.
I noen land er det forbudt å ta opp vann fra offentlige vannkilder.
Maskinen skal kun brukes i liggende posisjon (horisontalt).
Høytrykksstrålen må ikke rettes mot personer, dyr, elektrisk utstyr som er på, eller
maskinen selv.
Skal ikke utsettes for frost.
– 5
45NO
Page 46

Beskrivelse av apparatet
I denne bruksanvisningen er den maksimale utrustningen beskrevet. Alt etter modell kan det være ulike leveringsomfang (se emballasjen).
Illustrasjoner se utfoldingsside 3
1 Oppbevaring av tilbehør
2 Transportgrep, uttrekkbar
3 Bærehåndtak
4 Hurtigkobling for høytrykkslange
5 Apparatbryter "0/OFF" / "I/ON"
6 Strømledning med støpsel
7 Bærehåndtak
8 Transporthjul
9 Vanntilkobling med innebygget sil
10 Koblingsdel for vanntilkoblingen
11 Rengjøringsmiddel-sugeslange (med filter)
12 Høytrykkspistol
13 Låsin høytrykkspistol
14 Høytrykksslange
15 Tast for å skille høytrykkslangen fra høytrykkspis-
tolen
16 Strålerør med trykkregulering (Vario Power)
For enkle rengjøringsoppgaver. Arbeidstrykket er
trinnløst regulerbar mellom "Min" og "Max". Rengjøringsmidedel kan doseres i stilling "Mix".
For å regulere arbeidstrykket, slipp hendelen på
høytrykkspistolen og drei strålerøret til ønsket stilling.
17 Strålerør med Rotojet
For hardnakket smuss
* Ekstra tilbehør
18 Vaskebørste
Egnet for bruk med rengjøringsmiddel.
19 Roterende vaskebørste
Spesielt egnet for bilvask.
20 Skumdyse med beholder for rengjøringsmiddel
Rengjøringsmiddel suges opp fra beholderen og
det oppstår et kraftig skum av rengjøringsmiddelet.
** I tillegg kreves
21 Vevforsterket vannslange med alminnelig kobling.
– Minimumsdiameter 1/2 tomme (13 mm).
– Minimumslengde 7,5 m.
Montering
De løse delene som følger apparatet skal monteres før
det tas i bruk.
Illustrasjoner se utfoldingsside 4
Figur
Skru den medfølgende koblingsdelen på vanntilkoblingen på høytrykksvaskeren.
Figur
Sett høytrykkslangen i høytrykkspistolen til du hører den går i lås.
Merk: Pass på riktig innretning av tilkoblingsnippel.
Kontroller sikker tilkobling ved å trekke i høytrykk-
slangen.
Ta i bruk
Sett maskinen horisontalt på en jevn flate.
Figur
Sett høytrykkslangen i hurtigkoblingen til du hører
den går i lås.
Sett støpselet i stikkontakten.
Vanntilførsel
Se typeskilt/tekniske data for tilkoblingsverdier.
OBS
Forurensning i vannet kan skade høytrykkspumpen og
tilbehøret. For beskyttelse anbefales bruk av KÄRCHER vannfilter (spesialtilbehør, bestillingsnr. 4.730-
059).
Vanntilførsel fra vannledning
Følg vannverkets forskrifter.
OBS
Slangekoblinger av metall med Aquastop kan føre til
skader på pumpen! Vennligst bruk slangekoblinger av
plast eller KÄRCHER slangekoblinger av messing.
Figur
Koble vanntilførselsslangen til koblingen på vanntilkoblingen.
Vannslangen kobles til vannforsyningen.
Åpne vannkranen helt.
Suging av vann fra åpen beholder
Denne høytrykksvaskeren er egnet for bruk med KÄRCHER sugeslange med tilbakeslagsventil (spesialtibehør, bestillingsnr. 4.440-238) for oppsuging av overflatevann f.eks. fra regnvanns-tønne eller dammer (maks.
oppsugingshøyde se Tekniske data).
Ta av koblingen fra vanntilkoblingen.
Fyll sugeslangen med vann.
Skru sugeslangen til vanntilkoblingen på maskinen
og heng den i vannkilden (f.eks. regntønne).
Luft maskinen før det tas i bruk.
Slå på apparatet "I/ON".
Lås spaken på håndsprøytepistolen.
Betjen hendelen, og maskinen starter.
La maskinen gå (maks. 2 minutter), til det kommer
boblefritt vann ut av høytrykkspistolen.
Slipp spaken på håndsprøytepistolen.
Merk: Dersom du slipper hendelen igjen, vil apparatet stoppe. Høyt trykk beholdes i systemet.
Lås spaken på håndsprøytepistolen.
46 NO
– 6
Page 47

Drift
OBS
Tørrkjøring i mer enn 2 minutter fører til skader på høytrykkspumpen. Dersom maskinen ikke bygger opp trykk
innen 2 minutter, slå av maskinen og gå frem som beskrevet i kapittel "Feilretting".
OBS
Fare for skade! Maskinen skal kun brukes i liggende
posisjon (horisontalt).
Drift med høytrykk
몇 FORSIKTIG
Hold en avstand på minst 30 cm ved rengjøring av lakkerte flater, for å unngå skader
OBS
Bildekk, lakk eller ømfintlige overflater som treverk skal
ikke rengjøres med smussfreser, det er fare for skader.
Figur
Sett inn ønsket strålerør i høytrykkspistolen og fest
det ved å dreie 90°.
Slå på apparatet "I/ON".
Lås spaken på håndsprøytepistolen.
Betjen hendelen, og maskinen starter.
Merk: Dersom du slipper hendelen igjen, vil apparatet stoppe. Høyt trykk beholdes i systemet.
Drift med vaskebørste
OBS
Fare for lakkskader
Ved arbeid med vaskebørste skal den være fri for
smuss og andre partikler.
Sett inn vaskebørsten i høytrykkspistolen og fest
det ved å dreie 90°.
Merk: Ved behov kan også vaskebørsten brukes
sammen med rengjøringsmiddel.
Bruk av rengjøringsmiddel
Merknad: Rengjøringsmiddel kan kun tilsettes ved bruk
av lavtrykk.
FARE
Ved bruk av rengjøringsmidler skal sikkerhetsdatabladet fra produsenten av rengjøringsmidler følges, spesielt anvisnigner om verneutstyr.
Figur
Trekk ut rengjøringsmiddel sugeslange fra huset til
ønsket lengde.
Heng rengjøringsmiddelsugeslangen ned i en be-
holder med rengjøringsmiddel.
Bruk strålerør med trykkregulering (Vario Power).
Drei strålerøret til stilling "Mix".
Merk: Derved vil rengjøringsløsning blandes med
vannstrålen ved drift.
Anbefalt rengjøringsmetode
Sprøyt litt rengjøringsmiddel på den tørre overfla-
ten og la det virke (men ikke tørke).
Spyl det oppløste smusset vekk med høytrykks-
strålen.
Tilleggsutstyr
Skumdyse
Fyll på rengjøringsmiddel-løsning i rengjøringsmid-
delbeholderen (doseringsangivelser på etikett på
rengjøringsmiddelet følges).
Koble skumdysen til rengjøringsmiddelbeholderen.
Sett inn skumdysen i høytrykkspistolen og fest det
ved å dreie 90°.
Opphold i arbeidet
Slipp spaken på håndsprøytepistolen.
Lås spaken på håndsprøytepistolen.
Ved lengre arbeidspauser (mer enn 5 minutter) må
høytrykksvaskeren i tillegg slås av "0/OFF".
Etter bruk
몇 FORSIKTIG
Høytrykkslangen må bare tas av høytrykkspistolen eller
maskinen når det ikke er noe trykk i systemet.
Etter arbeide med rengjøringsmiddel: Kjør maski-
nen i ca. 1 minutt for å spyle den ren.
Slipp spaken på håndsprøytepistolen.
Slå av apparatet "0/OFF".
Trekk ut støpselet fra veggkontakten.
Steng vannkranen.
Trykk inn spaken på håndsprøytepistolen for å ut-
ligne det gjenværende trykket i systemet.
Lås spaken på håndsprøytepistolen.
몇 FORSIKTIG
Ved frakobling av tilførsels- og høytrykkslange kan det
strømme ut varmt vann fra koblingene etter bruk.
Skill apparatet fra vannforsyningen.
Transport
몇 FORSIKTIG
Fare for personskade og materiell skade!
Pass på vekten av apparatet ved transport.
Transport for hånd
Figur
Løft apparatet i bærehåndtaket og bær det.
Figur
Trekk ut transporthåndtaket, du hører det går i lås.
Trekk maskinen i transporthåndtaket.
Transport i kjøretøy
Sikre maskinen mot å skli eller vippe.
– 7
47NO
Page 48
Lagring
몇 FORSIKTIG
Fare for personskade og materiell skade!
Vær oppmerksom på vekten til apparatet ved lagring.
Oppbevaring av apparatet
Sett høytrykksvaskeren på et jevnt underlag.
Trykk skilletast på høytrykkpistolen og skill høy-
trykkslangen fra høytrykkpistolen.
Huset på hurtigkoblingen for sugeslange trykkes i
pilretningen, og trekk av høytrykkslangen.
Figur
Sett høytrykkspistol i oppbevaring for høytrykkspistol.
Sett inn strålerøret i strålerørsholderen.
Lagre strømkabel og høytrykkslange på maskinen.
Frostbeskyttelse
OBS
Maskiner og tilbehør som ikke er helt tømt kan bli ødelagt av frost. Tøm maskin og tilbehør komplett og sikre
mot frost.
For å unngå skader:
Tømme apparatet helt for vann: Slå på apparatet
uten tilkoblet høytrykkslange og uten tilkoblet vannforsyninf (maks 1 min.) og vent til det ikke kommer
mer vann ut av høytrykkslangen. Slå av maskinen.
Oppbevar apparat med alt utstyr i et frostsikkert
rom.
Før lengre tids lagring, f.eks. om vinteren, pass på anvisningene i kapittelet Pleie.
Pleie og vedlikehold
FARE
Fare for elektrisk støt.
Før alt arbeide på apparatet skal apparatet slås av
og strømkabelen trekkes ut.
Rengjør sil i vanntilkobling
OBS
Silen skal ikke være skadet.
Ta av koblingen fra vanntilkoblingen.
Figur
Trekk ut silen med en flat tang.
Rengjør silen under rennende vann.
Sett inn igjen silen i vanntilkoblingen.
Rengjøre rengjøringsmiddelfilter
Figur
Ta ut filteret fra rengjøringsmiddel-sugeslangen og
rengjør det under rennende vann.
Reservedeler
Det må kun brukes originale KÄRCHER reservedeler.
En reservedelsoversikt finnes på slutten av denne
bruksanvisningen.
Feilretting
Mindre funksjonsfeil kan du ved hjelp av følgende oversikt utbedre selv.
Ved tvilstilfeller, ta kontakt med autorisert kundeservice.
FARE
Fare for elektrisk støt.
Før alt arbeide på apparatet skal apparatet slås av
og strømkabelen trekkes ut.
Apparatet går ikke
Betjen hendelen på høytrykkspistolen og maskinen
starter.
Kontroller at spenningen som er oppgitt på typeskil-
tet er overensstemmende med strømkildens spenning.
Kontroller strømkabelen for skader.
Motor overbelastet, motorvernbryteren er utløst.
– Slå av apparatet "0/OFF".
– La apparatet kjøle ned i én time.
– Slå på apparatet og ta det i bruk igjen.
Dersom feilen oppstår flere ganger, la kundeservice undersøke apparatet.
Apparatet starter ikke, motoren brummer
Spenningsbrudd pga. svakt strømnett eller ved bruk av
skjøteledning.
Ved innkobling trekk først i hendelen på høytrykk-
spistolen, og sett så apparatbryteren til "I/ON".
Høytrykksvaskeren bygger ikke opp trykk
Kontroller at vannforsyningen har tilstrekkelig ma-
tevolum.
Ta ut sugeinntaket i vanntilkoblingen med en flat-
tang, og rengjør det under rennende vann.
Lufte maskinen: Slå på apparatet uten tilkoblet
høytrykkslange og kjør det til det kommer ut vann
(maks. 2 minutter) uten bobler fra høytrykkstilkoblingen. Slå av maskinen og koble på høytrykksslangen igjen.
Innsugingshøyde på 0,5 m ved suging fra åpen be-
holder er overskredet.
Sterke trykksvingninger
Rengjøre høytrykksdyse: Fjern smuss fra dysehul-
lene med en nål, og skyll med vann i retning fra
fremsiden.
Kontroller vanntilførselsmengde.
Apparatet er utett
Små utettheter i apparatet skyldes tekniske årsa-
ker. Ved større utettheter, ta kontakt med autorisert
kundeservice.
Maskinen suger ikke rengjøringsmiddel
Bruk strålerør med trykkregulering (Vario Power).
Drei strålerøret til stilling "Mix".
Rengjør filter på rengjøringsmiddelsugeslange.
Kontroller at sugeslange for rengjøringsmiddel ikke
er i klem ("knekk").
48 NO
– 8
Page 49

Garanti
Vår ansvarlige salgsorganisasjon for det enkelte land
har utgitt garantibetingelsene som gjelder i det aktuelle
landet. Eventuelle feil på maskinen blir reparert gratis i
garantitiden dersom disse kan føres tilbake til materialeller produksjonsfeil. Ved behov for garantireparasjoner, vennligst henvend deg med kjøpskvitteringen til din
forhandler eller nærmeste autoriserte kundeservice.
Adresser finner du under:
www.kaercher.com/dealersearch
Tekniske data
Elektrisk tilkobling
Spenning 230
Kapasitet 2,1 kW
Beskyttelsesklasse IP X5
Beskyttelsesklasse I
Strømsikring (trege) 10 A
Vanntilkobling
Tilførselstrykk (max) 0,8 MPa
Vanntilførsels-temperatur (max) 40 °C
Tilførselsmengde (min) 10 l/min
Maks. sugehøyde 0,5 m
Effektspesifikasjoner
Arbeidstrykk 12,5 MPa
Maks. tillatt trykk 14,5 MPa
Vannmengde 7,5 l/min
Matemengde maks 8,3 l/min
Rengjøringsmiddelmengde 0,3 l/min
Rekylkraft høytrykkspistol 20 N
Mål og vekt
Lengde 516 mm
Bredde 295 mm
Høyde 282 mm
Vekt, driftsklar, med tilbehør 13,1 kg
Registrerte verdier etter EN 60335-2-79
Hånd-arm vibrasjonsverdi
Usikkerhet K
Støytrykksnivå L
Usikkerhet K
Støyeffektnivå L
Det tas forbehold om tekniske endringer.
pA
pA
+ usikkerhet K
WA
1~50VHz
2
<2,5
m/s
2
0,3
m/s
773dB(A)
dB(A)
WA
92 dB(A)
EU-samsvarserklæring
Vi erklærer hermed at maskinen angitt nedenfor oppfyller de grunnleggende sikkerhets- og helsekravene i de
relevante EU-direktivene, med hensyn til både design,
konstruksjon og type markedsført av oss. Ved endringer
på maskinen som er utført uten vårt samtykke, mister
denne erklæringen sin gyldighet.
Produkt: Høytrykksvasker
Type: 1.630-xxx
Relevante EU-direktiver
2000/14/EF
2014/30/EU
2006/42/EF (+2009/127/EF)
2011/65/EU
Anvendte overensstemmende normer
EN 50581
EN 55014–1: 2006+A1: 2009+A2: 2011
EN 55014–2: 2015
EN 60335–1
EN 60335–2–79
EN 61000–3–2: 2014
EN 61000–3–3: 2013
EN 62233: 2008
Anvendt metode for samsvarsvurdering
2000/14/EF: Vedlegg V
Lydeffektnivå dB(A)
Målt: 88
Garantert: 92
De undertegnede handler på oppdrag fra, og med fullmakt fra selskapsledelsen.
CEO
Dokumentasjonsansvarlig:
S. Reiser
Alfred Kärcher GmbH & Co. KG
Alfred-Kärcher-Str. 28 - 40
71364 Winnenden (Germany)
Tlf: +49 7195 14-0
Faks: +49 7195 14-2212
Winnenden, 2016/04/01
Head of Approbation
– 9
49NO
Page 50

Innehållsförteckning
Säkerhet . . . . . . . . . . . . . . . . . . . . . . . . . . . .SV 5
Miljöskydd . . . . . . . . . . . . . . . . . . . . . . . . . . .SV 5
Beskrivning av aggregatet. . . . . . . . . . . . . . . SV 6
Montering . . . . . . . . . . . . . . . . . . . . . . . . . . . SV 6
Idrifttagning . . . . . . . . . . . . . . . . . . . . . . . . . . SV 6
Drift . . . . . . . . . . . . . . . . . . . . . . . . . . . . . . . . SV 7
Transport . . . . . . . . . . . . . . . . . . . . . . . . . . . .SV 7
Förvaring . . . . . . . . . . . . . . . . . . . . . . . . . . . .SV 8
Skötsel och underhåll . . . . . . . . . . . . . . . . . . SV 8
Reservdelar . . . . . . . . . . . . . . . . . . . . . . . . . . SV8
Åtgärder vid störningar . . . . . . . . . . . . . . . . . SV 8
Garanti. . . . . . . . . . . . . . . . . . . . . . . . . . . . . . SV 9
Tekniska data . . . . . . . . . . . . . . . . . . . . . . . . SV 9
EU-försäkran om överensstämmelse . . . . . . SV 9
Säkerhet
Läs igenom denna originalbruksanvisning
och de medföljande säkerhetsanvisning-
arna innan du använder din maskin första
gången. Följ dem. Spara båda häftena för senare behov
eller för nya ägare.
Ändamålsenlig användning
Högtryckstvätten får endast användas för privat bruk.
– för rengöring av maskiner, fordon, verktyg, fasader,
terrasser, trädgårdsredskap o.s.v. med högtrycksstråle (använd vid behov rengöringsmedel).
– tillsammans med av KÄRCHER godkända tillbe-
hör, reservdelar och rengöringsmedel. Beakta anvisningarna som medföljer rengöringsmedlen.
Risknivåer
FARA
Varnar om en omedelbart överhängande fara som kan
leda till svåra personskador eller dödsfall.
몇 VARNING
Varnar om en möjligen farlig situation som kan leda till
svåra personskador eller döden.
몇 FÖRSIKTIGHET
Varnar om en möjligen farlig situation som kan leda till
lättare personskador.
OBSERVERA
Varnar om en möjligen farlig situation som kan leda till
materiella skador.
Symboler på aggregatet
Apparaten får inte anslutas i omedelbar närhet till det offentliga dricksvattennätet.
Apparaten får endast drivas i liggande
(horisontal) position.
Rikta inte högtrycksstråle mot människor,
djur, aktiv elektrisk utrustning eller mot
själva maskinen.
Skydda apparaten mot frost.
Säkerhetsanordningar
몇 FÖRSIKTIGHET
Säkerhetsanordningar är till för att skydda använ-
daren och får inte ändras eller sättas ur spel.
Maskinens strömbrytare
Strömbrytaren förhindrar att aggregatet startas av misstag.
Spärr spolhandtag
Spärren låser spolhandtagets avtryckare och förhindrar
att aggretatet startas av misstag.
Överströmningsventil med tryckbrytare
Överströmningsventieln förhindrar överskridning av tilllåtet arbetstryck.
När avtryckaren på spolröret släpps frånkopplas högtryckspumpen av en tryckbrytare som stoppar högtrycksstrålen. Trycker man in avtryckaren kopplar tryckbrytaren in pumpen igen.
Motorskyddsbrytare
Vid för hög strömförbrukning stänger motorskyddsbrytaren av aggregatet.
Miljöskydd
Upplysningar om ingredienser (REACH)
Aktuell information om ingredienser finns på:
www.kaercher.com/REACH
Emballagematerialen kan återvinnas. Avfallshantera emballag på ett miljövänligt sätt.
Elektriska och elektroniska maskiner innehåller
ofta komponenter som vid felaktig användning eller felaktig avfallshantering kan utgöra en potentiell risk för människors hälsa och för miljön. Dessa
komponenter är dock nödvändiga för att maskinen
ska kunna arbeta korrekt. Maskiner som märkts
med denna symbol får inte kastas i hushållssoporna.
Uttjänta maskiner innehåller värdefulla material
som kan återvinnas och de ska därför lämnas till
ett insamlingsställe. Batterier, engångs och uppladdningsbara, innehåller ämnen som inte får
komma ut i miljön. Avfallshantera uttjänta maskiner och batterier på ett miljövänligt sätt.
Rengöringsarbeten som orsakar oljehaltigt avloppsvatten som t.ex. motortvätt och underredestvätt får endast utföras på tvättplatser med oljeavskiljare.
Arbeten med rengöringsmedel får endast utföras
på vattentäta arbetsytor med anslutning till smutsvattenskanalisationen. Låt inte rengöringsmedel
tränga in i vattendrag eller i jordmånen.
I en del länder är det inte tillåtet att hämta vatten
från allmänna vattendrag.
50 SV
– 5
Page 51

Beskrivning av aggregatet
I denna bruksanvisning beskrivs aggregatet med maximal utrustning. Leveransomfånget varierar allt efter modell (se förpackningen).
Figurer och bilder finns på kartongens utfällbara
sida 3
1 Förvaring för tillbehör
2 Transporthandtag, utdragbart
3 Bärhandtag
4 Snabbkoppling till högtrycksslang
5 Strömbrytare "0/OFF / I/ON"
6 Nätkabel med nätkontakt
7 Bärhandtag
8 Transporthjul
9 Vattenanslutning med inbyggt filter
10 Kopplingsdel för vattenanslutning
11 Sugslang för rengöringsmedel (med filter)
12 Spolhandtag
13 Spärr spolhandtag.
14 Högtrycksslang
15 Knapp för att lossa högtrycksslangen från spol-
handtaget
16 Spolrör med tryckreglering (Vario Power)
För ofta förekommande rengöring. Arbetstrycket
kan regleras steglöst mellan "Min" och "Max". I läge
"Mix" kan rengöringsmedel doseras.
För att ställa in arbetstrycket, släpp spaken på
handsprutan och vrid strålröret till önskat läge.
17 Spolrör med rotojet
Vid hårt fastsittande smuts
* Valfritt tillbehör
18 Tvättborste
Lämpad för arbeten med rengöringsmedel.
19 Roterande tvättborste
Särskilt lämpligt förbilrengöring.
20 Skummunstycke med rengöringsmedelsbehållare
Rengöringsmedlets sugs upp ur behållaren och ett
kraftfullt rengöringsmedelsskum skapas.
** Behövs dessutom
21 Vävförstärkt vattenslang med vanlig koppling.
– Diameter minst 1/2 tum (13 mm)
– Längd minst 7,5 m
Montering
Montera de bifogade lösa delarna på aggregatet innan
det tas i drift.
Figurer och bilder finns på kartongens utfällbara
sida 4
Bild
Skruva fast den medföljande kopplingen på aggregatets vattenanslutning.
Bild
Tryck in högtrycksslangens nippel i spolhandtaget
tills den hakar fast med ett hörbart „klick“.
Hänvisning: Se till att anslutningsnippeln är rätt
placerad.
Kontrollera att förbindelsen sitter säkert genom att
dra i högtrycksslangen.
Idrifttagning
Placera apparaten horisontellt på en jämn yta.
Bild
Tryck in högtrycksslangen i snabbkopplingen tills
den hakar fast med ett hörbart klickande.
Anslut nätkontakt till vägguttag.
Vattenförsörjning
Anslutningsvärde, se typskylt/Tekniska Data.
OBSERVERA
Föroreningar i vattnet kan skada högtryckspumpen eller
tillbehören. Som skydd rekommenderas att man använder KÄRCHER vattenfilter (specialtillbehör, artikelnummer 4.730-059).
Vattenförsörjning från vattenledning
Beakta vattenleverantörens föreskrifter.
OBSERVERA
Slangkopplingar i metall med Aquastop kan orsaka skador på pumpen! Använd en slangkoppling i plast eller
KÄRCHER slangkoppling i mässing.
Bild
Trä på slangen för vattentillförsel på kopplingen på
vattenanslutningen.
Anslut vattenslangen till vattenförsörjningen.
Öppna vattenkranen helt.
Suga upp vatten ur öppna behållare
Denna högtryckstvätt är med KÄRCHER-sugslang med
backventil (specialtillbehör, beställningnr. 4.440-238)
lämpad att suga upp ytvatten t.ex. ur regntunnor eller
dammar (max sughöjd se tekniska data).
Ta bort kopplingen på vattenanslutningen.
Fyll sugslang med vatten.
Skruva fast sugslangen på apparatens vattenans-
lutning och häng ner den i vattenkällan (till exempel
en regntunna).
Lufta aggregatet före användning.
Starta aggregatet "I/ON“ .
Lossa spärren på spolhandtaget.
Aktivera avtryckaren, aggregatet startar.
Låt aggregatet arbeta (max. 2 minuter), tills vatten
utan luftbubblor kommer ut ur sprutpistolen.
Släpp avtryckaren på spolhandtaget.
Hänvisning: Släpps avtryckaren stängs aggregatet av igen. Högtryck blir stående i systemet.
Spärra avtryckaren på spolhandtaget.
– 6
51SV
Page 52

Drift
OBSERVERA
Torrkörning under mer än 2 minuter leder till skador på
högtryckspumpen. Om maskinen inte bygger upp tryck
inom 2 minuter, stäng av maskinen och följ hänvisningarna i kapitlet "Åtgärder vid störning"
OBSERVERA
Risk för skada! Apparaten får endast drivas i liggande (horisontal) position.
Drift med högtryck
몇 FÖRSIKTIGHET
Håll aldrig strålen närmare än 30 cm vid rengöring av
lackerade ytor för att undvika skador.
OBSERVERA
Rengör inte bildäck, lack eller känsliga ytor som trä med
rotorjet, risk för skador.
Bild
Sätt i spolröret i spolhandtaget och fixera det genom att vrida det 90°.
Starta aggregatet "I/ON“ .
Lossa spärren på spolhandtaget.
Aktivera avtryckaren, aggregatet startar.
Hänvisning: Släpps avtryckaren stängs aggregatet av igen. Högtryck blir stående i systemet.
Användning med tvättborste
OBSERVERA
Risk för lackskador.
Vid arbeten med tvättborste måste den vara fri från
smuts eller andra partiklar.
Sätt i tvättborsten i handsprutpistolen och fixera det
genom att vrida det 90°.
Anvisning: Vid behov kan även tvättborstarna användas vid arbeten med rengöringsmedel.
Drift med rengöringsmedel
Hänvisning: Rengöringsmedel kan endast användas i
lågtryck.
FARA
Vid användning av rengöringsmedel måste man beakta
säkerhetsdatabladet från rengöringsmedelstillverkaren,
särskilt anvisningarna om personlig skyddsutrustning.
Bild
Dra ut önskad längd på sugslangen för rengöringsmedel ur kåpan.
Applicera slangen för rengöringsmedel i en behål-
lare med rengöringsmedelslösning.
Använd spolröret med tryckregulator (Vario Po-
wer).
Vrid spolrör till position "Mix".
Anmärkning: Därigenom tillsätts rengöringsmedelslösningen till vattenstrålen vid körning.
Rekommenderade rengöringsmetoder
Spruta sparsamt med rengöringsmedel på den
torra ytan och låt det verka (låt det inte torka).
Spola bort upplöst smuts med högtrycksstråle.
Tillval
Skummunstycke
Häll rengöringsmedelslösning i behållaren för ren-
göringsmedel (observera doseringsanvisningar på
doseringsmedlets förpackning).
Anslut skummunstycket till behållaren för rengö-
ringsmedel.
Sätt i skummunstycket i handsprutpistolen och fix-
era det genom att vrida det 90°.
Avbryta driften
Släpp avtryckaren på spolhandtaget.
Spärra avtryckaren på spolhandtaget.
Vid längre pauser i arbetet (över fem minuter) bör
aggregatet dessutom slås av "0/OFF".
Avsluta driften
몇 FÖRSIKTIGHET
Lossa högtrycksslangen från handsprutpistolen eller
från aggregatet endast när det inte finns något tryck i
systemet.
Efter arbeten med rengöringsmedel Låt maskinen
gå ca 1 minut för att spola rent.
Släpp avtryckaren på spolhandtaget.
Stäng av strömbrytaren "0/OFF“.
Dra ut nätkontakten ur vägguttaget.
Stäng av vattenkranen.
Tryck avtryckaren på spolhandtaget på handspru-
tan för att reducera trycket i systemet.
Spärra avtryckaren på spolhandtaget.
몇 FÖRSIKTIGHET
När tilloppsslangen eller högtrycksslangen tas loss efter
användning kan hett vatten strömma ur anslutningarna.
Koppla bort aggregatet från vattenförsörjningen.
Transport
몇 FÖRSIKTIGHET
Risk för person och egendomsskada!
Tänk på maskinens vikt vid transporten.
Transport för hand
Bild
Lyft och bär maskinen i bärhandtaget.
Bild
Dra ut transporthandtaget, det hakar hörbart fast.
Dra maskinen med hjälp av transporthandtaget.
Transport i fordon
Säkra maskinen så att den inte kan glida eller tippa.
52 SV
– 7
Page 53

Förvaring
몇 FÖRSIKTIGHET
Risk för person och egendomsskada!
Tänk på fordonets vikt vid lagringen.
Förvara aggregatet
Ställ maskinen på ett jämnt underlag.
Tryck på frånskiljningsknappen på handsprutpisto-
len och ta loss högtrycksslangen från handsprutpistolen.
Tryck kåpan på snabbkopplingen till högtrycks-
slangen i pilens riktning och dra ut högtrycksslangen.
Bild
Placera spolhandtaget i dess fäste.
Haka fast strålröret i förvaringen för strålröret.
Förvara högtrycksslangen och nätkabeln vid ma-
skinen.
Frostskydd
OBSERVERA
Maskiner och inte komplett tömda maskiner och tillbehör kan förstöras av frostskador. Skydda maskinen och
tillbehören mot frost.
För att undvika skador:
Töm aggregatet helt på vatten: Slå på aggregatet
utan ansluten högtrycksslang och utan ansluten
vattenförsörjning (max 1 min) och vänta tills det inte
längre kommer ut vatten från högtrycksanslutningen. Stäng av apparaten.
Förvara aggregatet med alla tillbehör i frostsäkert
utrymme.
Beakta innan lägre lagring, t.ex. över vintern, även de
extra anvisningarna i kapitlet om skötsel.
Skötsel och underhåll
FARA
Risk för elektrisk stöt.
Stäng av aggregatet och dra ut nätkontakten innan
arbete utförs på aggregatet.
Rengör sil i vattenanslutningen
OBSERVERA
Silen får inte ta skada.
Ta bort kopplingen på vattenanslutningen.
Bild
Dra ut silen med en plattång.
Rengör silen under rinnande vatten.
Sätt in silen i vattenanslutningen igen.
Rengör rengöringsmedelsfiltret
Bild
Lossa filtret från sugslangen för rengöringsmdel
och rengör det under rinnande vatten.
Reservdelar
Använd endast originalreservdelar från KÄRCHER. En
reservdelslista finns i slutet av denna bruksanvisning.
Åtgärder vid störningar
Med hjälp av följande översikt kan du själv åtgärda ett
flertal störningar.
Kontakta auktoriserad serviceverkstad om du är osäker.
FARA
Risk för elektrisk stöt.
Stäng av aggregatet och dra ut nätkontakten innan
arbete utförs på aggregatet.
Apparaten arbetar inte
Aktivera avtryckaren i spolhandtaget, aggregatet
startar.
Kontrollera om den angivna spänningen på typ-
skylten överensstämmer med strömkällans spänning.
Kontrollera om nätkabeln är skadad.
Motorn är överbelastad, motorskyddsbrytaren har
löst ut.
– Stäng av strömbrytaren "0/OFF“.
– Låt apparaten svalna i eine Stunde.
– Starta apparaten och ta den i drift igen.
Om störningen uppträder flera gånger skall apparaten testas av kundtjänst.
Aggregatet startar inte, motorn går
Spänningsfall på grund av svagt elnät eller vid användning av en förlängningskabel.
Aktivera vid start först i avtryckaren på spolröret
och ställ sedan strömbrytaren på "I/ON".
Aggregatet ger inget tryck
Kontrollera att vattenförsörjningen levererar till-
räcklig mängd vatten.
Lossa filtret i vattenanslutningen med ett plattång
och rengör den under rinnande vatten.
Lufta ur aggregatet: Starta aggregatet utan anslu-
ten högtrycksslang och låt gå (max 2 minuter) tills
vattnet som kommer ut från högtrycksanslutningen
är fritt från luftbubblor. Stäng av aggregatet och anslut högtrycksslangen igen.
Insugningshöjden på 0,5 m vid insugning ur öppen
behållare har överskridits.
Kraftiga tryckvariationer
Rengör högtrycksmunstycke: Ta bort smuts från
munstyckshålet med en nål och spola ut det framifrån med vatten.
Kontrollera vattenflödesmängden.
Aggregatet ej tätt
En lätt otäthet på aggregatet är normal. Kontakta
auktoriserad serviceverksstad om det finns stora
otätheter.
Rengöringsmedel sugs inte in
Använd spolröret med tryckregulator (Vario Po-
wer).
Vrid spolrör till position "Mix".
Rengör filtret på sugslangen för rengöringsmedel.
Kontrollera att slangen för rengöringsmedel inte är
knäckt.
– 8
53SV
Page 54

Garanti
I respektive land gäller de garantivillkor som publicerats
av våra auktoriserade distributörer. Eventuella fel på
aggregatet repareras utan kostnad under förutsättning
att det orsakats av ett material- eller tillverkningsfel. I
frågor som gäller garantin ska du vända dig med kvitto
till inköpsstället eller närmaste auktoriserade serviceverkstad.
Adressen hittar du på:
www.kaercher.com/dealersearch
Tekniska data
Elanslutning
Spänning 230
Anslutningseffekt 2,1 kW
Skyddsgrad IP X5
Skyddsklass I
Nätsäkring (trög) 10 A
Vattenanslutning
Inmatningsstryck (max.) 0,8 MPa
Inmatningstemperatur (max.) 40 °C
Inmatningsmängd (min.) 10 l/min
Max. uppsugningshöjd 0,5 m
Prestanda
Arbetstryck 12,5 MPa
Max. tillåtet tryck 14,5 MPa
Matningsmängd, vatten 7,5 l/min
Maximal matningsmängd 8,3 l/min
Matningsmängd, rengöringsmedel 0,3 l/min
Spolhandtagets rekylkraft 20 N
Mått och vikter
Längd 516 mm
Bredd 295 mm
Höjd 282 mm
Vikt, driftklar med tillbehör 13,1 kg
Fastställda värden enligt SS-EN 60335-2-79
Hand-Arm Vibrationsvärde
Osäkerhet K
Ljudtrycksnivå L
Osäkerhet K
Ljudteffektsnivå L
Tekniska ändringar förbehålls.
pA
pA
WA
+ Osäkerhet K
1~50VHz
2
<2,5
m/s
2
0,3
m/s
773dB(A)
dB(A)
92 dB(A)
WA
EU-försäkran om överensstämmelse
Härmed försäkrar vi att nedanstående betecknade maskin i ändamål och konstruktion samt i den av oss levererade versionen motsvarar EU-direktivens tillämpliga
grundläggande säkerhets- och hälsokrav. Vid ändringar
på maskinen som inte har godkänts av oss blir denna
överensstämmelseförklaring ogiltig.
Produkt: Högtryckstvätt
Typ: 1.630-xxx
Tillämpliga EU-direktiv
2000/14/EG
2014/30/EU
2006/42/EG (+2009/127/EG)
2011/65/EU
Tillämpade harmoniserade normer
EN 50581
EN 55014–1: 2006+A1: 2009+A2: 2011
EN 55014–2: 2015
EN 60335–1
EN 60335–2–79
EN 61000–3–2: 2014
EN 61000–3–3: 2013
EN 62233: 2008
Tillämpad metod för överensstämmelsevärdering
2000/14/EG: Bilaga V
Ljudeffektsnivå dB(A)
Upmätt: 88
Garanterad: 92
Undertecknade agerar på order av och med fullmakt
från företagsledningen.
CEO
Dokumentationsbefullmäktigad:
S. Reiser
Alfred Kärcher GmbH & Co. KG
Alfred-Kärcher-Str. 28 - 40
71364 Winnenden (Germany)
Tel.: +49 7195 14-0
Fax: +49 7195 14-2212
Winnenden, 2016/04/01
Head of Approbation
54 SV
– 9
Page 55

Sisällysluettelo
Turvallisuus . . . . . . . . . . . . . . . . . . . . . . . . . . FI 5
Ympäristönsuojelu. . . . . . . . . . . . . . . . . . . . . FI 5
Laitekuvaus . . . . . . . . . . . . . . . . . . . . . . . . . . FI6
Asennus . . . . . . . . . . . . . . . . . . . . . . . . . . . . FI 6
Käyttöönotto . . . . . . . . . . . . . . . . . . . . . . . . . FI6
Käyttö . . . . . . . . . . . . . . . . . . . . . . . . . . . . . . FI 7
Kuljetus . . . . . . . . . . . . . . . . . . . . . . . . . . . . . FI 7
Säilytys . . . . . . . . . . . . . . . . . . . . . . . . . . . . . FI 8
Hoito ja huolto . . . . . . . . . . . . . . . . . . . . . . . . FI8
Varaosat . . . . . . . . . . . . . . . . . . . . . . . . . . . .FI 8
Häiriöapu . . . . . . . . . . . . . . . . . . . . . . . . . . . .FI 8
Takuu. . . . . . . . . . . . . . . . . . . . . . . . . . . . . . . FI 9
Tekniset tiedot . . . . . . . . . . . . . . . . . . . . . . . . FI9
EY-vaatimustenmukaisuusvakuutus . . . . . . . FI 9
Turvallisuus
Lue tämä alkuperäiskäyttöohje ja mukana
olevat turvaohjeet ennen laitteen ensim-
mäistä käyttöä. Toimi niiden mukaisesti.
Säilytä molemmat ohjeet myöhempää käyttöä tai myöhempää omistajaa varten.
Käyttötarkoitus
Käytä tätä painepesuria yksinomaan yksityisessä kotipaloudessa
– koneiden, ajoneuvojen, rakennusten, työkalujen,
julkisivujen, terassien, puutarhavälineiden jne.
puhdistamiseen käyttäen suurpaineista vesisuihkua (tarvittaessa lisäten puhdistusaineita).
– KÄRCHER:in hyväksymien varusteosien, varaosi-
en ja puhdistusaineiden kanssa. Huomioi ohjeet,
jotka on liitetty puhdistusaineiden mukaan.
Vaarallisuusasteet
VAARA
Huomautus välittömästi uhkaavasta vaarasta, joka voi
aiheuttaa vakavan ruumiinvamman tai johtaa kuolemaan.
몇 VAROITUS
Huomautus mahdollisesta vaarallisesta tilanteesta, joka
voi aiheuttaa vakavan ruumiinvamman tai voi johtaa
kuolemaan.
몇 VARO
Huomautus mahdollisesta vaarallisesta tilanteesta, joka
voi aiheuttaa vähäisiä vammoja.
HUOMIO
Huomautus mahdollisesta vaarallisesta tilanteesta, joka
voi aiheuttaa aineellisia vahinkoja.
Laitteessa olevat symbolit
Laitetta ei saa välittömästi liittää julkiseen
juomavesiverkkoon.
Turvalaitteet
몇 VARO
Turvalaitteet on tarkoitettu loukkaantumisilta suo-
jaamiseksi, niitä ei saa muuttaa eikä ohittaa.
Laitekytkin
Laitekytkin estää laitteen tahattoman käyttämisen.
Suihkupistoolin lukitus
Lukitus lukitsee suihkupistoolin liipaisimen ja estää täten laitteen tahattoman käynnistymisen
Ylivirtausventtiili painekytkimellä
Ylivuotoventtiili estää sallitun käyttöpaineen ylittymisen.
Kun suihkupistoolin liipaisin päästetään irti, kytkee painekytkin pumpun pois päältä, korkeapainesuihku pysähtyy. Kun liipaisimesta vedetään, kytkee painekytkin
taas pumpun päälle.
Moottorin turvakytkin
Jos virranotto on liian korkea, moottorin suojakytkin kytkee laitteen pois päältä.
Ympäristönsuojelu
Huomautuksia materiaaleista (REACH)
Ajantasaisia tietoja ainesosista löytyy osoitteesta:
www.kaercher.com/REACH
Pakkausmateriaalit ovat kierrätettäviä. Huolehdi
pakkausten ympäristöystävällisestä hävittämisestä.
Sähkö- ja elektroniikkalaitteet sisältävät usein rakenneosia, jotka voivat aiheuttaa mahdollisen
vaaran ihmisten terveydelle ja ympäristölle, jos niitä käsitellään väärin tai ne hävitetään väärin.
Nämä rakenneosat ovat kuitenkin tarpeellisia, jotta laite toimisi asianmukaisesti. Tällä symbolilla
merkittyjä laitteita ei saa hävittää tavallisena talousjätteenä.
Käytetyt laitteet sisältävät arvokkaita kierrätettäviä
materiaaleja, jotka tulee toimittaa kierrätykseen.
Paristot ja akut sisältävät aineita, joita ei saa päästää ympäristöön. Huolehdi vanhojen laitteiden
sekä paristojen ja akkujen ympäristöystävällisestä
hävittämisestä.
Puhdistustöitä, joissa syntyy öljynpitoista jätevettä, esim. moottorinpesu, alustanpesu, saa suorittaa vain pesupaikoissa, joissa on öljyn erottimet.
Jos töissä käytetään puhdistusaineita, puhdistuksia saa suorittaa vain vesitiiviillä lattiapinnoilla, jotka on liitetty likavesiviemäröintiin. Älä päästä puhdistusaineita vesistöihin tai imeytymään maaperään.
Veden ottaminen julkisista vesistöistä on joissakin
maissa kiellettyä.
Laitetta saa käyttää vain makaavassa
asennossa (vaakasuorassa).
Suihkua ei saa suunnata ihmisiin, eläimiin, jännitteellisiin sähkövarusteisiin tai
itse laitteeseen.
Suojaa laite jäätymiseltä.
– 5
55FI
Page 56

Laitekuvaus
Tässä käyttöohjeessa kuvataan maksimivarustus. Mallien varustetaso vaihtelee, katso kuvaus laatikon kyljestä.
Kuvat, katso avattavalla kansisivu 3
1 Lisävarusteiden säilytyspaikka
2 Kuljetuskahva, ulosvedettävä
3 Kantokahva
4 Korkeapaineletkun pikaliitin
5 Laitekytkin „0/OFF“ / „I/ON“
6 Verkkojohto, jossa on verkkopistoke
7 Kantokahva
8 Kuljetuspyörä
9 Suodattimella varustettu vesiliitäntä
10 Tulovesiliitäntä
11 Puhdistusaineen imuletku (varustettu suodattimel-
la)
12 Suihkupistooli
13 Suihkupistoolin lukitus
14 Korkeapaineletku
15 Paina painiketta korkeapaineletkun irroittamiseksi
suihkupistoolista
16 Paineensäädöllä (Vario Power) varustettu suihku-
putki
Tarkoitettu yleisimpiin puhdistustehtäviin. Työpai-
ne on säädettävissä portaattomasti välillä „Min“ ja
„Max“. Asennossa „Mix“ voidaan veteen annostella
puhdistusainetta.
Tyäpaineen säätämiseksi, vapauta käsiruiskupis-
toolin liipaisin ja kierrä ruiskuputkea haluttuun
asentoon.
17 Suihkuputki ja Pyörivä pistesuutin
Pinttyneen lian poistoon.
* Valinnaiset varusteet
18 Pesuharja
Soveltuu töihin, joissa käytetään puhdistusaineita.
19 Pyörivä pesuharja
Soveltuu erityisesti autojen puhdistamiseen.
20 Vaahtosuutin puhdistusainesäiliöllä
Säiliöstä imetään puhdistusainetta ja syntyy teho-
kasta puhdistusainevaahtoa.
** Lisäksi tarvitaan
21 Kudosvahvistettu vesiletku tavallisella kaupasta
saatavalla liittimellä.
– Läpimitta vähintään 1/2 tuuma (13 mm)
– Pituus vähintään 7,5 m
Asennus
Kiinnitä laitteen mukana irtonaisena tulleet osat laitteeseen ennen käyttöönottamista.
Kuvat, katso avattavalla kansisivu 4
Kuva
Ruuvaa mukana toimitettu liitin laitteen vesiliitän-
tään.
Kuva
Pistä korkeapaineletku niin syvälle suihkupistoo-
liinkäsiruiskupistooliin, että kuulet sen napsahta-
van lukitukseen.
Huomautus: Huomioi liitinnipan oikea suuntaus.
Kokeile liitoksen pitävyys korkeapaineletkusta ve-
tämällä.
Käyttöönotto
Aseta laite vaakasuoraan tasaiselle alustalle.
Kuva
Pistä korkeapaineletku käsiruiskupistooliin niin,
että kuulet sen napsahtavan lukitukseen.
Liitä virtapistoke pistorasiaan.
Vedensyöttö
Liitäntäarvot katso tyyppikilpi/tekniset tiedot.
HUOMIO
Veden epäpuhtaudet voivat vahingoittaa korkeapainepumppua ja varusteita. Vahinkojen estämiseksi suosittelemme käyttämään KÄRCHER-vesisuodatinta (lisävaruste, tilausnumero 4.730-059).
Vedensyöttö vesijohdosta
Noudata vesilaitoksen ohjeita.
HUOMIO
Metallisten letkuliittimien käyttäminen Aquastop:issa voi
johtaa pumpun vaurioitumiseen! Käytä muovista valmistettua letkuliitintä tai messingistä valmistettua KÄRCHER-letkuliitintä.
Kuva
Pistä vedentuloletku vesiliitännän liittimeen.
Liitä vesiletku vedensyöttöön.
Avaa vesihana kokonaan.
Veden ottaminen avoimista säiliöistä
Käyttämällä KÄRCHERin pohjaventtiilillä varustettua
imuletkua (erityisvaruste, tilausnumero 4.440-238)
tämä korkeapainepesuri soveltuu pintavesien imemiseen esim. sadevesitynnyreistä tai lammista (katso
maks. imukorkeus kohdasta Tekniset tiedot).
Irrota liitin vesiliitännästä.
Täytä imuletku vedellä.
Ruuvaa imuletku kiinni laitteen vesiliittimeen ja ri-
pusta letkun toinen pää vedenottopisteeseen
(esim. sadevesitynnyriin).
Poista ilma laitteesta ennen käyttöä.
Kytke laite päälle "I/ON".
Vapauta suihkupistoolin liipaisin lukituksesta.
Vedä liipaisimesta, laite käynnistyy.
Anna laitteen käydä (maks. 2 minuuttia), kunnes
käsiruiskupistoolista tulevassa vedessä ei ole ilmakuplia.
Päästä suihkupistoolin vipu irti.
Huomautus: Kun ote liipaisimesta irrotetaan, kone
pysähtyy. Järjestelmä pysyy korkeapaineisena
Lukitse suihkupistoolin liipaisin.
56 FI
– 6
Page 57

Käyttö
HUOMIO
Yli 2 minuuttia kestävä kuivakäynti vahingoittaa korkeapainepumppua. Jos laitteeseen ei muodostu painetta 2
minuutin sisällä, kytke laite pois ja toimi luvun "Apu häiriötapauksissa" ohjeiden mukaan.
HUOMIO
Vaurioitumisvaara! Laitetta saa käyttää vain vaakatasossa (horisontaalisesti).
Käyttö suurpaineella
몇 VARO
Pidä maalattuja pintoja puhdistettaessa, vaurioiden
välttämiseksi, vähintään 30 cm:n suihkutusetäisyys
HUOMIO
Älä puhdista autonrenkaita, maalipintoja tai arkoja pintoja kuten puuta likajyrsimella, vahingoittumisvaara.
Kuva
Pistä suihkuputki pistooliin ja kiinnitä paikalleen
kiertämällä putkea 90°.
Kytke laite päälle "I/ON".
Vapauta suihkupistoolin liipaisin lukituksesta.
Vedä liipaisimesta, laite käynnistyy.
Huomautus: Kun ote liipaisimesta irrotetaan, kone
pysähtyy. Järjestelmä pysyy korkeapaineisena
Pesuharjan käyttäminen
HUOMIO
Maalipinnan vahingoittumisvaara
Pesuharjassa ei puhdistettaessa saa olla lika- tai muita
hiukkasia.
Pistä pesuharja käsiruiskupistooliin ja kiinnitä pai-
kalleen kiertämällä 90°.
Huomautus: Tarvittaessa myös pesuharjoja voi käyttää
puhdistusaineilla suoritettavaan puhdistamiseen.
Käyttö puhdistusaineella
Huomautus: Puhdistusainetta voidaan lisätä vain pien-
paineella.
VAARA
Puhdistusaineita käytettäessä on huomioitava puhdistusaineen valmistajan turvaohjeet ja noudatettava erityisesti henkilökohtaista suojavarustusta koskevia ohjeita.
Kuva
Vedä puhdistusaineen imuletkua ulos kotelosta ha-
lutun pituuden verran.
Ripusta puhdistusaineen imuletku astiaan, jossa
on puhdistusaineliuosta.
Käytä paineensäädöllä (Vario Power) varustettua
suihkuputkea.
Kierrä suihkuputki asentoon „Mix“.
Huomautus: Tällöin laitetta käytettäessä vesisuih-
kuun lisätään puhdistusaineliuosta.
Suositeltavat puhdistusmenetelmät
Suihkuta puhdistusainetta säästeliäästi kuivalle
pinnalle ja anna sen vaikuttaa (ei kuivua).
Huuhdo irrotettu lika pois korkeapainesuihkulla.
Valinnaiset
Vaahtosuutin
Kaada puhdistusaineliuos vaahtosuuttimen puh-
distusainesäiliöön (noudata puhdistusaineen pakkauksessa olevaa annostusohjetta).
Liitä vaahtosuutin puhdistusainesäiliöön.
Pistä vaahtosuutin käsiruiskupistooliin ja kiinnitä
paikalleen 90° kiertämällä.
Käytön keskeytys
Päästä suihkupistoolin vipu irti.
Lukitse suihkupistoolin liipaisin.
Pidempien työtaukojen (yli 5 minuuttia) ajaksi laite
on lisäksi kytkettävä pois päältä „0/OFF“.
Käytön lopetus
몇 VARO
Irrota korkeapaineletku käsiruiskupistoolista tai laitteesta vain, kun järjestelmässä ei ole painetta.
Kun on työskennelty puhdistusaineita käyttäen:
Huuhtele laite puhtaaksi käyttämällä sitä n. 1 minuutin ajan.
Päästä suihkupistoolin vipu irti.
Kytke laite pois päältä "0/OFF".
Vedä virtapistoke irti pistorasiasta.
Sulje vesihana.
Paina suihkupistoolin vipua järjestelmässä vielä
olevan paineen laskemiseksi ulos.
Lukitse suihkupistoolin liipaisin.
몇 VARO
Irrotettaessa syöttö- tai korkeapaineletkua käytön jälkeen, liittimistä voi purkautua ulos kuumaa vettä.
Irrota laite vedensyötöstä.
Kuljetus
몇 VARO
Loukkaantumis- ja vaurioitumisvaara!
Huomioi kuljetettaessa laitteen paino.
Kuljetus käsin
Kuva
Nosta ja kanna laitetta kantokahvoista.
Kuva
Vedä kuljetuskahva ulos, se napsahtaa kuuluvasti
lukitukseen.
Vedä laitetta kuljetuskahvasta.
Kuljetus ajoneuvoissa
Varmista laite siirtymisen ja kaatumisen varalta.
– 7
57FI
Page 58
Säilytys
몇 VARO
Loukkaantumis- ja vaurioitumisvaara!
Huomioi säilytettäessä laitteen paino.
Laitteen säilytys
Pysäytä laite tasaiselle pinnalle.
Paina käsiruiskupistoolin irrotuspainiketta ja irrota
korkeapaineletku käsiruiskupistoolista.
Työnnä korkeapaineletkun pikaliittimen koteloa
nuolen suuntaan ja vedä korkeapaineletku ulos.
Kuva
Pistä suihkupistooli pitimeensä.
Lukitse ruiskuputki säilytyspaikkaansa.
Ripusta korkeapaineletku ja verkkoliitäntäjohto lait-
teeseen.
Suojaaminen pakkaselta
HUOMIO
Pakkanen voi vaurioittaa laitteita ja varusteita, jotka ei
ole täysin tyhjennetty vedestä. Tyhjennä laite ja varusteet täysin vedestä ja suojaa jäätymiseltä.
Vaurioiden välttämiseksi:
Veden poistaminen laitteesta: Käynnistä laite ilman
korkeapaineletkua ja vesiliitäntää (maks. 1 min) ja
odota kunnes korkeapaineliittimestä ei tule enää
vettä. Kytke laite pois päältä.
Säilytä laitetta kaikkine varusteineen pakkaselta
suojatuissa tiloissa.
Jos säilytys on pitempiaikaista, esim talven ajaksi, huomioi lisäksi luvussa Hoito olevat ohjeet.
Hoito ja huolto
VAARA
Sähköiskun vaara
Virtapistoke on vedettävä irti pistorasiasta ennen
kaikkia laitteeseen kohdistuvia töitä.
Vesiliitännän sihdin puhdistus
HUOMIO
Sihtiä ei saa vaurioittaa.
Irrota liitin vesiliitännästä.
Kuva
Vedä sihti lattapihdillä ulos.
Puhdista sihti juoksevassa vedessä.
Aseta sihti takaisin vesiliitäntään.
Puhdistusainesuodattimen puhdistaminen
Kuva
Vedä suodatin irti puhdistusaineen imuletkusta ja
puhdista suodatin juoksevassa vedessä.
Varaosat
Käytä vain alkuperäisiä KÄRCHER-varaosia. Varaosaluettelo löytyy tämän käyttöohjeen lopusta.
Häiriöapu
Pienemmät häiriöt voit itse poistaa seuraavan yhteenvedon avulla.
Epäselvissä tapauksissa käänny valtuutetun asiakaspalvelun puoleen.
VAARA
Sähköiskun vaara
Virtapistoke on vedettävä irti pistorasiasta ennen
kaikkia laitteeseen kohdistuvia töitä.
Laite ei toimi
Vedä suihkupistoolin vivusta, laite käynnistyy.
Tarkasta, onko tyyppikilvessä ilmoitettu jännite
sama kuin virtalähteen jännite.
Tarkasta, onko verkkojohto vaurioitunut.
Moottori ylikuormittunut, moottorinsuojakytkin on
lauennut.
– Kytke laite pois päältä "0/OFF".
– Anna laitteen jäähtyä yhden tunnin ajan.
– Kytke laite päälle ja ota se uudelleen käyttöön.
Jos häiriö toistuu useammin, tarkastuta laite asiakaspalvelussa.
Laite ei käynnisty, moottori murisee
Jännite on pudonnut liian matalaksi, johtuen heikosta
sähköverkosta tai jatkojohdon käytöstä.
Vedä laitetta päälle kytkettäessä ensin suihkupis-
toolin liipaisimesta, aseta sitten laitekytkin asentoon „I/ON“.
Laitteeseen ei tule painetta
Tarkasta, että vedensyötön syöttömäärä on riittä-
vä.
Vedä suodatin ulos vesiliitännästä lattapihtiä käyt-
täen ja puhdista sihti juoksevassa vedessä.
Ilmanpoisto laitteesta: Käynnistä laite ilman kor-
keapaineletkua ja odota (kork. 2 minuuttia), kunnes
korkeapaineliittimestä tulee vettä ilman ilmakuplia.
Kytke laite pois päältä ja kiinnitä korkeapaineletku
jälleen takaisin paikalleen.
Aloitusimukorkeus 0,5 m on ylittynyt imettäessä
avoimesta astiasta.
Suuret paineenvaihtelut
Korkeapainesuuttimen puhdistus: Poista suuttimen
reiän likaantumat neulan avulla ja huuhtele reikää
edestäpäin vedellä.
Tarkasta veden tulomäärä.
Laite ei ole tiivis
Laitteen vähäinen epätiiviys on tekniikasta johtu-
vaa ja normaalia. Jos epätiiviys on suurempaa, ota
yhteys valtuutettuun asiakaspalveluun.
Laite ei ime puhdistusainetta
Käytä paineensäädöllä (Vario Power) varustettua
suihkuputkea.
Kierrä suihkuputki asentoon „Mix“.
Puhdista puhdistusaineen imuletkun suodatin.
Tarkasta, että puhdistusaineen imuletku ei ole nur-
jahtanut.
58 FI
– 8
Page 59
Takuu
Kussakin maassa ovat voimassa valtuuttamamme
myyntiorganisaation julkaisemat takuuehdot. Materiaali- ja valmistusvirheistä aiheutuvat virheet laitteessa korjaamme takuuaikana maksutta. Takuutapauksessa ota
yhteys ostotositteen kanssa jälleenmyyjään tai lähimpään valtuutettuun huoltoon.
Osoitteet löydät sivustoltamme:
www.kaercher.com/dealersearch
Tekniset tiedot
Sähköliitäntä
Jännite 230
Liitosjohto 2,1 kW
Suojausluokka IP X5
Kotelointiluokka I
Verkkosulake (hidas) 10 A
Vesiliitäntä
Tulopaine (maks.) 0,8 MPa
Tulolämpötila (maks.) 40 °C
Tulomäärä (min.) 10 l/min
Maks. alkuimukorkeus 0,5 m
Suoritustiedot
Työpaine 12,5 MPa
Maks. sallittu paine 14,5 MPa
Syöttömäärä, vesi 7,5 l/min
Pumppausmäärä maks. 8,3 l/min
Syöttömäärä, puhdistusaine 0,3 l/min
Käsiruiskupistoolin takaiskuvoima 20 N
Mitat ja painot
Pituus 516 mm
Leveys 295 mm
Korkeus 282 mm
Paino, käyttövalmiina varusteineen 13,1 kg
Mitatut arvot EN 60335-2-79 mukaisesti
Käsi-käsivarsi tärinäarvo
Epävarmuus K
Äänenpainetaso L
Epävarmuus K
Äänitehotaso L
Oikeus teknisiin muutoksiin pidätetään.
pA
pA
+ epävarmuus K
WA
1~50VHz
2
<2,5
m/s
2
0,3
m/s
773dB(A)
dB(A)
92 dB(A)
WA
EY-vaatimustenmukaisuusvakuutus
Vakuutamme, että alla mainitut tuotteet vastaavat suunnittelultaan ja rakenteeltaan sekä valmistustavaltaan
EU-direktiivien asianomaisia turvallisuus- ja terveysvaatimuksia. Jos tuotteeseen/tuotteisiin tehdään muutoksia, joista ei ole sovittu kanssamme, tämä vakuutus
ei ole enää voimassa.
Tuote: korkeapainepesuri
Tyyppi: 1.630-xxx
Yksiselitteiset EU-direktiivit
2000/14/EY
2014/30/EU
2006/42/EY (+2009/127/EY)
2011/65/EU
Sovelletut harmonisoidut standardit
EN 50581
EN 55014–1: 2006+A1: 2009+A2: 2011
EN 55014–2: 2015
EN 60335–1
EN 60335–2–79
EN 61000–3–2: 2014
EN 61000–3–3: 2013
EN 62233: 2008
Sovellettu yhdenmukaisuuden analysointimenetelmä
2000/14/EY: Liite V
Äänen tehotaso dB(A)
Mitattu: 88
Taattu: 92
Allekirjoittaneet toimivat yrityksen johton puolesta ja sen
valtuuttamina.
CEO
Dokumentointivaltuutettu:
S. Reiser
Alfred Kärcher GmbH & Co. KG
Alfred-Kärcher-Str. 28 - 40
71364 Winnenden (Germany)
Puh.: +49 7195 14-0
Faksi: +49 7195 14-2212
Winnenden, 2016/04/01
Head of Approbation
– 9
59FI
Page 60

Πίνακας περιεχομένων
Ασφάλεια . . . . . . . . . . . . . . . . . . . . . . . . . . . . EL 5
Προστασία περιβάλλοντος. . . . . . . . . . . . . . . EL 5
Περιγραφή συσκευής. . . . . . . . . . . . . . . . . . . EL 6
Συναρμολόγηση. . . . . . . . . . . . . . . . . . . . . . . EL 6
Έναρξη λειτουργίας . . . . . . . . . . . . . . . . . . . . EL 6
Λειτουργία . . . . . . . . . . . . . . . . . . . . . . . . . . .EL 7
Μεταφορά . . . . . . . . . . . . . . . . . . . . . . . . . . . EL7
Αποθήκευση . . . . . . . . . . . . . . . . . . . . . . . . . EL 8
Φροντίδα και συντήρηση . . . . . . . . . . . . . . . . EL 8
Ανταλλακτικά . . . . . . . . . . . . . . . . . . . . . . . . . EL 8
Αντιμετώπιση βλαβών . . . . . . . . . . . . . . . . . . EL 8
Εγγύηση . . . . . . . . . . . . . . . . . . . . . . . . . . . . EL 9
Τεχνικά χαρακτηριστικά . . . . . . . . . . . . . . . . . EL 9
Δήλωση Συμμόρφωσης των ΕE . . . . . . . . . . EL 9
Ασφάλεια
Πριν από την πρώτη χρήση της συσκευής
σας, διαβάστε αυτές τις γνήσιες οδηγίες
ξεις ασφαλείας. Ενεργείτε πάντα σύμφωνα με αυτές.
Φυλάξτε τα δύο βιβλιαράκια για μεταγενέστερη χρήση ή
για τον επόμενο ιδιοκτήτη.
Χρησιμοποιήστε αυτό το σύστημα καθαρισμού υψηλής
πίεσης αποκλειστικά για οικιακή χρήση:
–
–
ΚΙΝΔΥΝΟΣ
Υποδείξεις για άμεσα επαπειλούμενο κίνδυνο, ο οποίος
μπορεί να έχει ως συνέπεια σοβαρό ή θανάσιμο τραυματισμό.
몇 ΠΡΟΕΙΔΟΠΟΙΗΣΗ
Υποδείξεις για μια δυνητικά επικίνδυνη κατάσταση, η
οποία μπορεί να έχει ως συνέπεια σοβαρό ή θανάσιμο
τραυματισμό.
몇 ΠΡΟΣΟΧΗ
Υπόδειξη για μια ενδεχομένως επικίνδυνη κατάσταση, η
οποία μπορεί να οδηγήσει σε ελαφρό τραυματισμό.
ΠΡΟΣΟΧΗ
Υπόδειξη για μια δυνητικά επικίνδυνη κατάσταση, η
οποία μπορεί να έχει ως συνέπεια υλικές ζημίες.
λειτουργίας και τις συνοδευτικές υποδεί-
Χρήση σύμφωνα με τους κανονισμούς
για τον καθαρισμό μηχανημάτων, οχημάτων, οικο-
δομών, εργαλείων, προσόψεων, βεραντών, μηχα-
νημάτων κήπου κ.λπ. με ριπή νερού υψηλής πίεσης
(κατά περίπτωση με προσθήκη απορρυπαντικών).
με τα εγκεκριμένα από την KÄRCHER παρελκόμενα,
ανταλλακτικά και απορρυπαντικά. Λάβετε υπόψη τις
υποδείξεις που συνοδεύουν τα απορρυπαντικά.
Επίπεδα ασφαλείας
Σύμβολα στη συσκευή
Η συσκευή δεν πρέπει να συνδεθεί απευθείας στο δημόσιο δίκτυο πόσιμου νερού.
Η συσκευή επιτρέπεται να λειτουργεί μόνο
σε επίπεδη (οριζόντια) θέση.
Η δέσμη υψηλής πίεσης δεν πρέπει να κατευθύνεται πάνω σε άτομα, ζώα, ενεργοποιημένο ηλεκτρικό εξοπλισμό ή στην ίδια
τη συσκευή.
Προστατεύετε τη συσκευή από τον παγετό.
Μηχανισμοί ασφάλειας
몇 ΠΡΟΣΟΧΗ
Οι διατάξεις ασφαλείας αποσκοπούν στην προστα-
σία του χρήστη και δεν πρέπει να τροποποιούνται ή
να παραλείπονται.
Διακόπτης συσκευής
Ο διακόπτης του μηχανήματος αποτρέπει την τυχαία
ενεργοποίηση του μηχανήματος.
Ασφάλεια πιστολέτου χειρός
Η ασφάλεια κλειδώνει το μοχλό του πιστολέτου χειρός
αποτρέπει την
και
τος.
Βαλβίδα υπερχείλισης με διακόπτη πίεσης
Η βαλβίδα υπερχείλισης εμποδίζει την υπέρβαση της
επιτρεπτής πίεσης εργασίας.
Όταν αφήσετε ελεύθερο τον μοχλό του πιστολέτου χειρός, απενεργοποιείται ο διακόπτης πίεσης της αντλία
και διακόπτεται η δέσμη υψηλής πίεσης. Τραβώντας
τον μοχλό ο διακόπτης πίεσης θέτει πάλι την αντλία σε
λειτουργία.
Διακόπτης προστασίας κινητήρα
Εάν υπάρξει υπέρβαση της κατανάλωσης ρεύματος, ο
διακόπτης προστασίας του κινητήρα απενεργοποιεί το
μηχάνημα.
τυχαία ενεργοποίηση του μηχανήμα-
Προστασία περιβάλλοντος
Υποδείξεις για τα συστατικά (REACH)
Ενημερωμένες πληροφορίες για τα συστατικά μπορείτε
να βρείτε στη διεύθυνση:
www.kaercher.com/REACH
Τα υλικά συσκευασίας είναι ανακυκλώσιμα. Απορρίψτε τη συσκευασία με οικολογικό τρόπο.
Οι ηλεκτρικές και οι ηλεκτρονικές συσκευές συχνά
περιλαμβάνουν εξαρτήματα, που σε περίπτωση
λανθασμένης μεταχείρισης ή απόρριψης μπορούν
να αποτελέσουν εστία κινδύνου για την υγεία και
το περιβάλλον. Αυτά τα εξαρτήματα είναι όμως
απαραίτητα για τη σωστή λειτουργία της συσκευής. Οι συσκευές που φέρουν αυτό το σύμβολο δεν
επιτρέπεται να πετιούνται στα σκουπίδια.
Οι παλιές συσκευές περιέχουν πολύτιμα ανακυκλώσιμα υλικά, τα οποία θα πρέπει να διατίθενται
για ανακύκλωση. Οι μπαταρίες και οι συσσωρευτές περιέχουν υλικά, τα οποία δεν επιτρέπεται να
καταλήξουν στο περιβάλλον. Απορρίψτε τις παλιές συσκευές, τις μπαταρίες ή τους συσσωρευτές
με περιβαλλοντικά ορθό τρόπο.
Οι εργασίες καθαρισμού, κατά τις οποίες προκύπτουν απόνερα που περιέχουν λάδια, π.χ. πλύσιμο κινητήρων, πλύσιμο του κάτω μέρους των οχημάτων, επιτρέπονται μόνο σε πλυντήρια που διαθέτουν διαχωριστή λαδιών.
Οι εργασίες με απορρυπαντικό μπορούν να εκτελούνται μόνο σε υδατοστεγείς επιφάνειες εργασίας με σύνδεση στο σύστημα απορροής βρώμικου
νερού. Το απορρυπαντικό δεν πρέπει να καταλήγει στα υπόγεια ύδατα ή στο έδαφος.
Η λήψη νερού από δημόσιες πηγές δεν επιτρέπεται σε ορισμένες χώρες.
60 EL
– 5
Page 61

Περιγραφή συσκευής
Σε αυτές τις οδηγίες λειτουργίας περιγράφεται ο μέγιστος δυνατός εξοπλισμός. Στο παραδοτέο υλικό υπάρχουν διαφορές ανάλογα με το μοντέλο (ανατρέξτε στη
συσκευασία).
Εικόνες, βλ. αναδιπλούμενη σελίδα 3
1 Θήκη για εξαρτήματα
2 Λαβή μεταφοράς, αποσπώμενο
3 Λαβή μεταφοράς
4 Ταχυσύνδεσμος ελαστικού σωλήνα υψηλής πίεσης
5 Διακόπτης μηχανήματος „0/OFF“ / „I/ON“
6 Αγωγός σύνδεσης δικτύου με ρευματολήπτη
7 Λαβή μεταφοράς
8 Τροχός μεταφοράς
9 Σύνδεση νερού με ενσωματωμένη σίτα
10 Σύζευξη για τη σύνδεση με το δίκτυιο παροχής νε-
ρού
11 Ελαστικός σωλήνας αναρρόφησης απορρυπαντι-
κού (με φίλτρο)
12 Πιστολέτο χειρός
13 Ασφάλεια πιστολέτου χειρός
14 Ελαστικός σωλήνας υψηλής πίεσης
15 Πλήκτρο διαχωρισμού του ελαστικού σωλήνα υψη-
λής πίεσης από το πιστολέτο χειρός
16 Σωλήνας εκτόξευσης με ελεγκτή πίεσης (Vario
Power)
Για τις απλούστερες εργασίες καθαρισμού. Η πίεση
εργασίας μπορεί να ρυθμιστεί αδιαβάθμητα μεταξύ
των θέσεων "Min" και "Max". Στη θέση "Mix" μπο-
ρείτε να προσθέσετε απορρυπαντικό.
Για τη ρύθμιση της πίεσης εργασίας, αφήστε τη
σκανδάλη του πιστολέτου χειρός και περιστρέψτε
το σωλήνα ρίψης στην επιθυμητή θέση.
17 Σωλήνας ψεκασμού με φρέζα ρύπων
Για επίμονους ρύπους
* Προαιρετικός εξοπλισμός
18 Βούρτσα πλυσίματος
Ενδείκνυται για εργασία με απορρυπαντικό.
19 Περιστρεφόμενη βούρτσα πλυσίματος
Ιδιαίτερα κατάλληλο για τον καθαρισμό αυτοκινή-
των.
20 Ακροφύσιο αφρού με δοχείο απορρυπαντικού
Το απορρυπαντικό αναρροφάται από το δοχείο και
δημιουργείται ένας ισχυρός αφρός απορρυπαντι-
κού.
** Επιπροσθέτως απαραίτητο
21 Ελαστικός σωλήνας νερού με ενισχυμένους ιστούς
και τυπικό σύνδεσμο.
– Διάμετρος τουλάχιστον 1/2 ίντσα (13 mm)
– Μήκος τουλάχιστον 7,5 m.
Συναρμολόγηση
Πριν την ενεργοποίηση συναρμολογήστε στο μηχάνημα
τα μη συνδεδεμένα συνοδευτικά εξαρτήματα.
Εικόνες, βλ. αναδιπλούμενη σελίδα 4
Εικόνα
Βιδώστε το τεμάχιο ζεύξης που περιέχεται στη συ-
σκευασία στην σύνδεση νερού του μηχανήματος.
Εικόνα
Εισάγετε τον ελαστικό σωλήνα υψηλής πίεσης στο
πιστολέτο χειρός έως ότου κλειδώσει με το χαρα-
κτηριστικό ήχο.
Υπόδειξη: Φροντίστε να ευθυγραμμίσετε σωστά
τους οδηγούς σύνδεσης.
Βεβαιωθείτε ότι η σύνδεση είναι ασφαλής τραβώ-
ντας τον ελαστικό σωλήνα υψηλής πίεσης.
Έναρξη λειτουργίας
Αποθέστε τη συσκευή οριζόντια σε μια επίπεδη
επιφάνεια.
Εικόνα
Εισάγετε τον ελαστικό σωλήνα υψηλής πίεσης
στον ταχυσύνδεσμο, έως ότου κλειδώσει με το χαρακτηριστικό ήχο.
Εισάγετε τον ρευματολήπτη στην πρίζα.
Παροχή νερού
Τιμές σύνδεσης, βλ. Πινακίδα τύπου/Τεχνικά χαρακτηριστικά.
ΠΡΟΣΟΧΗ
Οι προσμίξεις στο νερό μπορεί να προκαλέσουν ζημιά
στην αντλία υψηλής πίεσης και στα παρελκόμενα. Για
προστασία συνιστάται η χρήση του φίλτρου νερού
KÄRCHER (ειδικό παρελκόμενο, αριθμός παραγγελίας
4.730-059).
Παροχή νερού από τον αγωγό νερού
Τηρείτε τους κανονισμούς της υπηρεσίας του δικτύου
ύδρευσης.
ΠΡΟΣΟΧΗ
Οι μεταλλικοί σύνδεσμοι
μπορεί να προκαλέσουν βλάβη στην αντλία! Χρησιμοποιήστε ένα συνθετικό σύνδεσμο ελαστικού σωλήνα ή
έναν ορειχάλκινο σύνδεσμο ελαστικού σωλήνα της
KÄRCHER.
Εικόνα
Τοποθετήστε τον ελαστικό σωλήνα προσαγωγής
νερού στο σύνδεσμο της σύνδεσης νερού.
Συνδέστε τον ελαστικό σωλήνα νερού στην παρο-
χή νερού.
Ανοίξτε εντελώς τη βάνα νερού.
Αναρρόφηση νερού από ανοιχτό δοχείο
παρόν μηχάνημα
Το
κνυται για χρήση με τον ελαστικό σωλήνα αναρρόφησης της KARCHER με βαλβίδα αντεπιστροφής (ειδικός
εξοπλισμός, κωδ. παραγγελίας 4.440-238) για αναρρόφηση επιφανειακών υδάτων, π.χ., από δοχεία όμβριων
υδάτων ή μικρές λίμνες (μέγιστο ύψος αναρρόφησης,
βλ. τεχνικά χαρακτηριστικά).
Αφαιρέστε το σύνδεσμο από τη σύνδεση νερού.
Γεμίστε τον ελαστικό σωλήνα αναρρόφησης με νε-
ρό.
Βιδώστε τον ελαστικό σωλήνα αναρρόφησης στη
σύνδεση νερού της συσκευής και αναρτήστε τον
στην πηγή νερού (για παράδειγμα στο δοχείο όμβριων υδάτων).
Εξαέρωση της συσκευής πριν από τη λειτουργία.
Ενεργοποιήστε το μηχάνημα στο „I/ON“.
Απασφαλίστε τον μοχλό του πιστολέτου χειρός.
Πατώντας ξανά το μοχλό τίθεται το μηχάνημα και
πάλι σε λειτουργία.
Αφήστε τη συσκευή να λειτουργήσει (έως 2 λεπτά),
μέχρις ότου αρχίσει να βγαίνει νερό χωρίς φυσαλίδες από το πιστολέτο χειρός.
Ελευθερώστε τον μοχλό του πιστολέτου.
Υπόδειξη: Εάν αφήσετε το μοχλό, το μηχάνημα θα
απενεργοποιηθεί ξανά. Η υψηλή πίεση διατηρείται
στο σύστημα.
Ασφαλίστε το μοχλό του πιστολέτου χειρός.
ελαστικού σωλήνα με Aquastop
καθαρισμού υψηλής πίεσης ενδεί-
– 6
61EL
Page 62

Λειτουργία
ΠΡΟΣΟΧΗ
Η λειτουργία χωρίς υλικό για περισσότερα από 2 λεπτά
προκαλεί ζημιές στην αντλία υψηλής πίεσης. Εάν η συσκευή δεν αναπτύξει πίεση εντός 2 λεπτών, απενεργοποιήστε την και ενεργήστε σύμφωνα με τις υποδείξεις
στο κεφάλαιο "Βοήθεια σε περίπτωση βλάβης".
ΠΡΟΣΟΧΗ
Κίνδυνος πρόκλησης ζημιάς! Η συσκευή επιτρέπεται να λειτουργεί μόνο σε επίπεδη (οριζόντια) θέση.
Λειτουργία με υψηλή πίεση
몇 ΠΡΟΣΟΧΗ
Κατά τον καθαρισμό, τηρείτε μια ελάχιστη απόσταση
30 cm από τις λακαρισμένες επιφάνειες, προκειμένου να
αποφύγετε ενδεχόμενες ζημιές.
ΠΡΟΣΟΧΗ
Μην καθαρίζετε με τη φρέζα ρύπων ελαστικά αυτοκινήτων, βαμμένα αντικείμενα ή ευαίσθητες επιφάνειες,
όπως ξύλο. Κίνδυνος βλάβης.
Εικόνα
Εισάγετε το σωλήνα ρίψης στο πιστολέτο χειρός
και στερεώστε τον περιστρέφοντάς τον κατά 90°.
Ενεργοποιήστε το μηχάνημα στο „I/ON“.
Απασφαλίστε τον μοχλό του πιστολέτου χειρός.
Πατώντας ξανά το μοχλό τίθεται το μηχάνημα και
πάλι σε λειτουργία.
Υπόδειξη:
απενεργοποιηθεί ξανά. Η υψηλή πίεση διατηρείται
στο σύστημα.
Εάν αφήσετε
το μοχλό, το μηχάνημα θα
Λειτουργία με βούρτσα πλυσίματος
ΠΡΟΣΟΧΗ
Κίνδυνος βλάβης στη βαφή
Κατά την εργασία
πρέπει να είναι απαλλαγμένη από ρύπους ή άλλα σωματίδια.
Τοποθετήστε
το χειρός και στερεώστε την με περιστροφή 90°.
Υπόδειξη: Αν χρειάζεται, μπορούν να χρησιμοποιηθούν και οι βούρτσες πλυσίματος με απορρυπαντικό.
με βούρτσα πλυσίματος, η βούρτσα
τη βούρτσα
πλυσίματος στο πιστολέ-
Λειτουργία με απορρυπαντικό
Υπόδειξη: Το απορρυπαντικό μπορεί να προστεθεί μό-
νον υπό χαμηλή πίεση.
ΚΙΝΔΥΝΟΣ
Σε περίπτωση χρήσης απορρυπαντικού λάβετε υπόψη
το φύλλο δεδομένων ασφαλείας του κατασκευαστή του
απορρυπαντικού και ιδιαίτερα τις υποδείξεις για τα μέσα
ατομικής προστασίας.
Εικόνα
Τραβήξτε τον ελαστικό σωλήνα αναρρόφησης
απορρυπαντικού από το περίβλημα στο επιθυμητό
μήκος.
Κρεμάστε τον ελαστικό σωλήνα αναρρόφησης
απορρυπαντικού σε δοχείο με απορρυπαντικό.
Χρησιμοποιήστε έναν σωλήνα εκτόξευσης με ελε-
γκτή πίεσης (Vario Power).
Περιστρέψτε το σωλήνα ρίψης στη θέση "Mix".
Υπόδειξη: Έτσι προστίθεται καθαριστικό διάλυμα
στον πίδακα νερού κατά τη λειτουργία της συσκευ-
ής.
Προτεινόμενη μέθοδος καθαρισμού
Ψεκάστε με οικονομία το απορρυπαντικό σε στε-
επιφάνεια και
γνή
γνώσει).
αφήστε το να δράσει (όχι να στε-
62 EL
Ξεπλένετε τους διαλυμένους ρύπους, ψεκάζοντας
με ριπή υψηλής πίεσης.
Προαιρετικό
Ακροφύσιο αφρού
Γεμίστε το δοχείο απορρυπαντικού του ακροφυσί-
ου αφρού με διάλυμα απορρυπαντικού (λάβετε
υπόψη τις συστάσεις δοσολογίας στη συσκευασία
του απορρυπαντικού).
Συνδέστε το ακροφύσιο αφρού με το δοχείο απορ-
ρυπαντικού.
Τοποθετήστε το ακροφύσιο ατμού στο πιστολέτο
χειρός και στερεώστε το περιστρέφοντάς το κατά
90°.
Διακοπή λειτουργίας
Ελευθερώστε τον μοχλό του πιστολέτου.
Ασφαλίστε το μοχλό του πιστολέτου χειρός.
Σε περίπτωση μεγάλων διαλειμμάτων από τις ερ-
γασίες (πάνω από 5 λεπτά) απενεργοποιήστε επιπλέον το μηχάνημα στη θέση „0/OFF“.
Τερματισμός λειτουργίας
몇 ΠΡΟΣΟΧΗ
Αποσυνδέετε τον εύκαμπτο σωλήνα υψηλής πίεσης από
το πιστόλι ψεκασμού χειρός ή τη συσκευή μόνο όταν δεν
υπάρχει πίεση στο σύστημα.
Μετά την εργασία με απορρυπαντικό: Ενεργοποιή-
στε τη συσκευή για 1 λεπτό, ώστε να πραγματοποιήσει έκπλυση.
Ελευθερώστε τον μοχλό του πιστολέτου.
Απενεργοποιήστε το μηχάνημα στη θέση „0/OFF“.
Αποσυνδέστε το ρευματολήπτη από την πρίζα.
Κλείστε τη βρύση.
Πιέστε τον μοχλό του πιστολέτου για να εξαλείψετε
την εναπομένουσα πίεση του συστήματος.
Ασφαλίστε το μοχλό του πιστολέτου χειρός.
몇 ΠΡΟΣΟΧΗ
Κατά την αποσύνδεση του ελαστικού σωλήνα προσαγω-
υψηλής πίεσης είναι δυνατόν να εξέλθει καυτό
γής ή
νερό από τις συνδέσεις μετά τη λειτουργία.
Αποσυνδέστε
νερού.
το μηχάνημα
από το δίκτυο παροχής
Μεταφορά
몇 ΠΡΟΣΟΧΗ
Κίνδυνος τραυματισμού και βλάβης!
Κατά τη μεταφορά λάβετε υπόψη το βάρος της συσκευής.
Μεταφορά με το χέρι
Εικόνα
Σηκώστε και μεταφέρετε τη συσκευή από τις λαβές
μεταφοράς.
Εικόνα
Τραβήξτε προς τα έξω τη λαβή μεταφοράς, ώσπου
να κλειδώσει με ένα χαρακτηριστικό ήχο.
Τραβήξτε τη συσκευή από τη λαβή μεταφοράς.
Μεταφορά σε οχήματα
Ασφαλίστε τη συσκευή έναντι της ολίσθησης και
της ανατροπής.
– 7
Page 63

Αποθήκευση
몇 ΠΡΟΣΟΧΗ
Κίνδυνος τραυματισμού και βλάβης!
Κατά την αποθήκευση λάβετε υπόψη το βάρος της συσκευής.
Φύλαξη της συσκευής
Αποθέστε το μηχάνημα σε επίπεδη επιφάνεια.
Πιέστε το πλήκτρο απόσπασης του πιστολέτου χει-
ρός και αφαιρέστε τον ελαστικό σωλήνα υψηλής πί-
εσης από το πιστολέτο χειρός.
Πιέστε το περίβλημα του ταχυσυνδέσμου του ελα-
στικού σωλήνα υψηλής πίεσης προς την κατεύθυν-
ση του βέλους και τραβήξτε τον ελαστικό σωλήνα
υψηλής πίεσης.
Εικόνα
Τοποθετήστε το πιστολέτο χειρός στη θήκη φύλα-
ξης του πιστολέτου χειρός.
Ασφαλίστε το σωλήνα ψεκασμού στην ειδική για το
σκοπό αυτόν θήκη φύλαξης.
Αποθηκεύστε τον ελαστικό σωλήνα υψηλής πίεσης
και το καλώδιο τροφοδοσίας στη συσκευή.
Αντιπαγετική προστασία
ΠΡΟΣΟΧΗ
Οι συσκευές και τα παρελκόμενα που δεν έχουν εκκενωθεί πλήρως μπορεί να καταστραφούν σε περίπτωση παγετού. Εκκενώστε εντελώς τη συσκευή και τα παρελκόμενα και προστατέψτε
Για να αποφύγετε τις βλάβες:
Αδειάστε
γοποιήστε το μηχάνημα χωρίς να έχετε συνδέσει
τον ελαστικό σωλήνα υψηλής πίεσης και το σωλή-
να παροχής νερού (έως 1 λεπτό) και περιμένετε,
έως ότου το νερό σταματήσει να εκρέει από τη σύν-
δεση υψηλής πίεσης. Απενεργοποιήστε το μηχάνη-
μα.
Αποθηκεύετε το μηχάνημα μαζί με όλα τα εξαρτή-
ματα σε χώρο όπου δεν επικρατεί παγετός.
Πριν από την αποθήκευση για μεγαλύτερο διάστημα,
π.χ. το χειμώνα, λάβετε επιπλέον υπόψη τις υποδείξεις
στο κεφάλαιο Φροντίδα.
τα από τον παγετό.
εντελώς το
νερό από το μηχάνημα: Ενερ-
Φροντίδα και συντήρηση
ΚΙΝΔΥΝΟΣ
Κίνδυνος ηλεκτροπληξίας.
Πριν από όλες τις εργασίες στη συσκευή, απενερ-
γοποιήστε τη συσκευή και τραβήξτε το φις από την
πρίζα.
Καθαρισμός του φίλτρου σύνδεσης νερού
ΠΡΟΣΟΧΗ
Το φίλτρο δεν πρέπει να υποστεί βλάβη.
Αφαιρέστε το σύνδεσμο από τη σύνδεση νερού.
Εικόνα
Αφαιρέστε το φίλτρο με μια επίπεδη τανάλια.
Καθαρίστε το φίλτρο με τρεχούμενο νερό.
Τοποθετήστε ξανά το φίλτρο στη σύνδεση νερού.
Καθαρισμός του φίλτρου απορρυπαντικού
Εικόνα
Αφαιρέστε το φίλτρο από τον ελαστικό σωλήνα
αναρρόφησης απορρυπαντικού και ξεπλύνετέ το
κάτω από τρεχούμενο νερό.
Ανταλλακτικά
Χρησιμοποιείτε αποκλειστικά γνήσια ανταλλακτικά
KARCHER. Επισκόπηση ανταλλακτικών θα βρείτε στο
τέλος των παρόντων οδηγιών χειρισμού.
Αντιμετώπιση βλαβών
Με τη βοήθεια του παρακάτω πίνακα μπορείτε να αντιμετωπίσετε μόνες/οι σας απλές βλάβες.
Εάν έχετε αμφιβολίες, παρακαλούμε απευθυνθείτε στην
εξουσιοδοτημένη υπηρεσία εξυπηρέτησης πελατών.
ΚΙΝΔΥΝΟΣ
Κίνδυνος ηλεκτροπληξίας.
Πριν από όλες τις
γοποιήστε τη συσκευή και τραβήξτε το φις από την
πρίζα.
Η συσκευή δεν λειτουργεί
Η συσκευή τίθεται σε λειτουργία με τράβηγμα της
σκανδάλης του πιστολέτου χειρός.
Ελέγξτε εάν συμφωνεί η τάση που αναγράφεται στην
πινακίδα τύπου με την τάση της πηγής ρεύματος.
Ελέγξτε τον αγωγό σύνδεσης δικτύου για τυχόν
βλάβες.
Υπερφόρτωση κινητήρα, ο διακόπτης κυκλώματος
κινητήρα ενεργοποιήθηκε.
– Απενεργοποιήστε το μηχάνημα στη θέση „0/OFF“.
– Αφήστε τη συσκευή να κρυώσει για μία ώρα.
– Ενεργοποιήστε και θέστε σε λειτουργία τη συ-
σκευή.
Εάν η βλάβη επανεμφανιστεί αρκετές φορές, καλέστε την υπηρεσία εξυπηρέτησης πελατών προκειμένου να ελέγξει τη συσκευή.
Το μηχάνημα δεν ενεργοποιείται, ο
Μείωση της τάσης λόγω αδύναμης παροχής ρεύματος
δικτύου ή χρήσης ενός καλωδίου προέκτασης.
Κατά την ενεργοποίηση, τραβήξτε πρώτα το μοχλό
του πιστολέτου χειρός και στη συνέχεια ρυθμίστε
το διακόπτη του μηχανήματος στη θέση „I/ON“.
Η συσκευή δεν αναπτύσσει πίεση
Ελέγξτε εάν είναι επαρκής η ποσότητα παρεχόμε-
νου νερού.
Με μια μικρή πένσα, τραβήξτε προς τα έξω το φίλ-
τρο της σύνδεσης νερού και ξεπλύνετέ το κάτω από
τρεχούμενο νερό.
Εξαέρωση της συσκευής: Ενεργοποιήστε τη συ-
σκευή χωρίς να έχετε συνδέσει τον ελαστικό σωλήνα υψηλής πίεσης και περιμένετε (έως 2 λεπτά),
μέχρις ότου από τη σύνδεση υψηλής πίεσης σταματήσει να εκρέει νερό με φυσαλίδες. Θέστε τη συσκευή εκτός λειτουργίας και συνδέστε πάλι τον ελαστικό σωλήνα υψηλής πίεσης.
Υπέρβαση του ύψους αναρρόφησης των 0,5 m
κατά την αναρρόφηση από ανοικτό δοχείο.
Έντονες διακυμάνσεις πίεσης
Καθαρίστε το ακροφυσίο υψηλής πίεσης: Αφαιρέ-
στε τις ακαθαρσίες από την οπή του ακροφυσίου με
μια βελόνα και ξεπλύνετε από την μπροστινή πλευρά με νερό.
Ελέγξτε την ποσότητα προσαγωγής νερού.
εργασίες στη συσκευή, απενερ-
κινητήρας βουίζει
– 8
63EL
Page 64

Το μηχάνημα δεν είναι στεγανό
Μια ελάχιστη διαρροή στο μηχάνημα θεωρείται φυσι-
ολογική για τεχνικούς λόγους. Σε περίπτωση έντονης
έλλειψης στεγανότητας, ενημερώστε την εξουσιοδο-
τημένη υπηρεσία εξυπηρέτησης πελατών.
Το απορρυπαντικό δεν αναρροφάται
Χρησιμοποιήστε έναν σωλήνα εκτόξευσης με ελε-
γκτή πίεσης (Vario Power).
Περιστρέψτε το σωλήνα ρίψης στη θέση "Mix".
Καθαρίστε το φίλτρο στον ελαστικό σωλήνα απορ-
ρυπαντικού.
Ελέγξτε τον ελαστικό σωλήνα αναρρόφησης απορ-
ρυπαντικού για τυχόν τσακίσματα.
Εγγύηση
Σε κάθε χώρα ισχύουν οι όροι εγγύησης που εκδόθηκαν
από την αρμόδια εταιρία μας προώθησης πωλήσεων.
Αναλαμβάνουμε τη δωρεάν αποκατάσταση οποιασδήποτε βλάβης στη συσκευή σας, εφόσον οφείλεται σε
αστοχία υλικού ή κατασκευαστικό σφάλμα, εντός της
προθεσμίας που ορίζεται στην εγγύηση. Σε περίπτωση
που επιθυμείτε να κάνετε χρήση της εγγύησης, παρακαλούμε απευθυνθείτε με την απόδειξη αγοράς στο κατάστημα από το οποίο προμηθευτήκατε τη συσκευή ή
στην πλησιέστερη εξουσιοδοτημένη υπηρεσία τεχνικής
εξυπηρέτησης πελατών μας.
Διευθύνσεις μπορείτε να βρείτε στην ιστοσελίδα:
www.kaercher.com/dealersearch
Τεχνικά χαρακτηριστικά
Ηλεκτρολογική σύνδεση
Τάση 230
Ισχύς σύνδεσης 2,1 kW
Βαθμός προστασίας IP X5
Κατηγορία προστασίας I
Ασφάλεια δικτύου (βραδείας τήξης) 10 A
Υδραυλική σύνδεση
Πίεση προσαγωγής (μέγ.) 0,8 MPa
Θερμοκρασία προσαγωγής (μέγ.) 40 °C
Ποσότητα προσαγωγής (ελάχ.) 10 l/min
Μέγ. ύψος αναρρόφησης 0,5 m
Στοιχεία ισχύος
Πίεση λειτουργίας 12,5 MPa
Μέγ. επιτρεπόμενη πίεση 14,5 MPa
Παροχή, νερό 7,5 l/min
Παρεχόμενη ποσότητα, μέγιστη 8,3 l/min
Παροχή, απορρυπαντικό 0,3 l/min
Δύναμη οπισθοδρόμησης πιστολέ-
του χειρός
Διαστάσεις και βάρη
Μήκος 516 mm
Πλάτος 295 mm
Ύψος 282 mm
1~50VHz
20 N
Βάρος, έτοιμο για λειτουργία με εξαρ-
13,1 kg
τήματα
Μετρούμενες τιμές κατά EN 60335-2-79
Κραδασμοί στο χέρι/στο βραχίονα
Αβεβαιότητα K
Επιτρεπόμενη στάθμη ηχητικής ισχύος L
pA
Αβεβαιότητα K
pA
Επιτρεπόμενη στάθμη ηχητικής ισχύ-
+ Αβεβαιότητα K
ος L
WA
Με την επιφύλαξη τεχνικών αλλαγών.
WA
<2,5
0,3
773dB(A)
92 dB(A)
m/s
m/s
dB(A)
2
2
Δήλωση Συμμόρφωσης των ΕE
Δια της παρούσης δηλώνουμε ότι το μηχάνημα που χαρακτηρίζεται παρακάτω, με βάση τη σχεδίαση και την
κατασκευή του, υπό τη μορφή που διατίθεται στην αγορά, πληροί στις σχετικές βασικές απαιτήσεις ασφαλείας
και υγιεινής των οδηγιών της ΕE. Η παρούσα δήλωση
παύει να ισχύει σε περίπτωση τροποποιήσεων του μηχανήματος χωρίς προηγούμενη συνεννόηση μαζί μας.
Προϊόν: Σύστημα καθαρισμού υψηλής πίε-
Τύπος: 1.630-xxx
Σχετικές οδηγίες των ΕE
2000/14/EΚ
2014/30/EE
2006/42/EK (+2009/127/EK)
2011/65/EE
Εφαρμοσθέντα εναρμονισμένα πρότυπα
EN 50581
EN 55014–1: 2006+A1: 2009+A2: 2011
EN 55014–2: 2015
EN 60335–1
EN 60335–2–79
EN 61000–3–2: 2014
EN 61000–3–3: 2013
EN 62233: 2008
Εφαρμοσθείσα διαδικασία συμμόρφωσης
2000/14/EΚ: Παράρτημα V
στάθμη ηχητικής πίεσης dB(A)
Μετρημένη: 88
Εγγυημένη: 92
Οι υπογράφοντες ενεργούν κατ' εντολή του και με εξουσιοδότηση της διεύθυνσης της επιχείρησης.
CEO
Υπεύθυνος τεκμηρίωσης:
S. Reiser
Alfred Karcher GmbH & Co. KG
Alfred-Karcher-Str. 28 - 40
71364 Winnenden (Germany)
Τηλ.: +49 7195 14-0
Φαξ: +49 7195 14-2212
Winnenden, 2016/04/01
σης
Head of Approbation
64 EL
– 9
Page 65

İçindekiler
Güvenlik . . . . . . . . . . . . . . . . . . . . . . . . . . . .TR 5
Çevre koruma . . . . . . . . . . . . . . . . . . . . . . . . TR 5
Cihaz tanımı . . . . . . . . . . . . . . . . . . . . . . . . . TR6
Montaj . . . . . . . . . . . . . . . . . . . . . . . . . . . . . . TR 6
İşletime alma . . . . . . . . . . . . . . . . . . . . . . . . . TR6
Çalıştırma . . . . . . . . . . . . . . . . . . . . . . . . . . .TR 7
Taşıma. . . . . . . . . . . . . . . . . . . . . . . . . . . . . . TR 7
Depolama . . . . . . . . . . . . . . . . . . . . . . . . . . . TR8
Koruma ve Bakım . . . . . . . . . . . . . . . . . . . . . TR 8
Yedek parçalar. . . . . . . . . . . . . . . . . . . . . . . . TR 8
Arızalarda yardım . . . . . . . . . . . . . . . . . . . . . TR 8
Garanti. . . . . . . . . . . . . . . . . . . . . . . . . . . . . . TR 9
Teknik Bilgiler . . . . . . . . . . . . . . . . . . . . . . . . TR 9
AB uygunluk bildirisi . . . . . . . . . . . . . . . . . . . TR 9
Güvenlik
Cihazınızı ilk defa kullanmadan önce bu
orijinal kullanım kılavuzunu ve birlikte veri-
len güvenlik uyarılarını okuyun. Buna göre
davranın. Her iki kitabı da daha sonra tekrar kullanmak
ya da cihazın sonraki kullanıcılarına iletmek üzere saklayın.
Kurallara uygun kullanım
Bu yüksek tazyikli temizleyiciyi sadece evinizde şu
amaçlar için kullanın.
– makineleri, araçları, inşaat malzemesini, aletleri,
bina cephesini, terasları, bahçe malzemeleri v.s.
yüksek tazyikle temizlemek (gerektiğinde temizlik
maddesi katkısı kullanarak).
– KÄRCHER firmasının onayladığı aksesuar parça-
ları, yedek parçalar ve temizlik maddeleri de dahildir. Temizlik maddelerinin ekinde yer alan uyarıları
dikkate alın.
Tehlike kademeleri
TEHLIKE
Ağır bedensel yaralanmalar ya da ölüme neden olan direkt bir tehlikeye yönelik uyarı.
몇 UYARI
Ağır bedensel yaralanmalar ya da ölüme neden olabilecek olası tehlikeli bir duruma yönelik uyarı.
몇 TEDBIR
Hafif yaralanmalara neden olabilecek olası tehlikeli bir
duruma yönelik uyarı.
DIKKAT
Maddi hasarlara neden olabilecek olası tehlikeli bir duruma yönelik uyarı.
Cihazdaki semboller
Cihaz, açık içme suyu şebekelerine direkt
olarak bağlanmamalıdır.
Güvenlik tertibatları
몇 TEDBIR
Güvenlik tertibatları kullanıcıyı korur ve değiştiril-
memelidir veya herhangi bir işlem yapılmamalıdır.
Cihaz şalteri
Cihaz şalteri cihazın istenmeden çalıştırılmasını önler.
El püskürtme tabancasının kilidi
Kilit, el püskürtme tabancasının kolunu bloke eder ve cihazın farkında olmadan çalıştırılmasını önler.
Basınç şalterli taşma valfı
Taşma valfı, izin verilen çalışma basıncının aşılmasını
önler.
El tabancasının kolu bırakılırsa bir basınç şalteri pompayı kapatır, yüksek basınçlı tazyik durdurulur. Kol çekilirse, pompa tekrar açılır.
Motor koruma şalteri
Akım çekişinin çok yüksek olması durumunda motor koruma şalteri cihazı kapatır.
Çevre koruma
İçindekiler hakkında uyarılar (REACH)
İçindekiler hakkında ayrıntılı bilgileri bulabileceğiniz adres:
www.kaercher.com/REACH
Ambalaj malzemeleri geri dönüştürülebilir. Lütfen
ambalajları çevreye zarar vermeden tasfiye edin.
Elektrikli ve elektronik cihazlar genellikle, yanlış
kullanıldıklarında veya yanlış şekilde tasfiye edildiklerinde insan sağlığı ve çevre için tehlikeli olabilecek bileşenler içerir. Cihazın kurallara uygun
şekilde işletilmesi için bu bileşenlerin bulunması
gereklidir. Bu simge ile işaretlenmiş cihazlar evsel
çöpler ile birlikte tasfiye edilmemelidir.
Eski cihazlarda, yeniden değerlendirme işlemine
tabi tutulması gereken değerli geri dönüşüm malzemeleri bulunmaktadır. Piller ve şarjlı piller çevreye yayılmaması gereken, zararlı maddeler içerir.
Eski cihazları ve pilleri ya da şarjlı pilleri çevreye
uyumlu şekilde tasfiye edin.
Örneğin motorların yıkanması, zeminin yıkanması
gibi yağ içerikli atık suyun oluştuğu temizlik çalışmaları sadece yıkama yerlerinde yağ seperatörüyle yapılmalıdır.
Temizlik maddeleriyle yapılacak çalışmalar sadece, pis su kanalizasyonuna bağlantısı olan sıvı geçirmez yüzeylerde gerçekleştirilmelidir. Temizlik
maddesinin suya ve toprağa karışmasını önleyin.
Açık sulardan su alınması bazı ülkelerde yasaktır.
Cihaz, sadece yatar pozisyonda (yatay)
çalıştırılmalıdır.
Yüksek basınçlı tazyiki insanlara, hayvanlara, elektrikli aletlere ve makinenin kendisine doğru tutmayın.
Cihazı donmaya karşı koruyun.
– 5
65TR
Page 66

Cihaz tanımı
Bu kullanım kılavuzunda maksimum donanım açıklanmaktadır. Modele bağlı olarak teslimat kapsamında
farklar olabilir (Bkz. Ambalaj).
Şekiller Bkz. Katlanır sayfa 3
1 Aksesuar saklama bölümü
2 Taşıma kolu, çıkartılabilir
3 Taşıma kolu
4 Yüksek basınç hortumu için hızlı bağlantı
5 Cihaz şalteri „0/OFF“ / „I/ON“
6 Elektrik fişiyle birlikte şebeke bağlantı kablosu
7 Taşıma kolu
8 Taşıma tekerleği
9 Entegre süzgeçli su bağlantısı
10 Su bağlantısının bağlantı parçası
11 Temizlik maddesi emme hortumu (filtreli)
12 El püskürtme tabancası
13 El püskürtme tabancasının kilidi
14 Yüksek basınç hortumu
15 Yüksek basınç hortumunu el püskürtme tabanca-
sından ayırma tuşu
16 Basınç ayarlı püskürtme borusu (Vario Power)
En yaygın temizlik görevleri için. Çalışma basıncı,
„Min“ ve „Max“ arasında kademesiz olarak ayarlanabilir „Mix“ konumunda temizlik maddesi eklenebilir.
Çalışma basıncını ayarlamak için, el püskürtme tabancasının kolunu bırakın ve püskürtme borusunu
istediğiniz konuma döndürün.
17 Kir frezeli püskürtme borusu
İnatçı kirler için
* Opsiyonel aksesuarlar
18 Yıkama fırçası
Temizlik maddesi ile çalışmak için uygundur.
19 Dönebilen yıkama fırçaları
Araç temizliği için çok uygundur.
20 Temizlik maddesi haznesiyle birlikte köpük memesi
Temizlik maddesi hazneden emilir ve güçlü bir temizlik maddesi köpüğü oluşur.
** Ek olarak gereklidir
21 Piyasada bulunan bir kavramaya sahip, kumaş tak-
viyeli su hortumu.
– Çap minimum 1/2 inç (13 mm)
– Uzunluk minimum 7,5 m
Montaj
Cihazla birlikte gelen gevşek parçaları işletime almadan
önce yerine takın.
Şekiller Bkz. Katlanır sayfa 4
Şekil
Gönderilen kavrama parçasını cihazın su girişine
takın.
Şekil
Duyulur şekilde kilitlenene kadar yüksek basınç
hortumunu el püskürtme tabancasına sokun.
Not: Bağlantı nipelinin doğru hizada olmasına dik-
kat edin.
Yüksek basınç hortumundan çekerek bağlantının
güvenli olup olmadığını kontrol edin.
İşletime alma
Cihazı yatay olarak düz bir yüzeye koyun.
Şekil
Duyulur şekilde kilitlenene kadar yüksek basınç
hortumunu hızlı bağlantıya sokun.
Elektrik fişini prize takın.
Su beslemesi
Bağlantı değerleri için Bkz. Tip levhası/Teknik bilgiler.
DIKKAT
Sudaki kirlenmeler yüksek basınç pompası ve aksesuarlara zarar verebilir. Korumak için, KÄRCHER su filtresinin (özel aksesuar, sipariş numarası 4.730-059) kullanılması önerilir.
Su boru hattından su beslemesi
Su besleme işletmesinin talimatlarını dikkate alın.
DIKKAT
Aquastop bulunan metal hortum kavramaları pompanın
zarar görmesine neden olabilir! Lütfen plastik hortum
kavraması veya KÄRCHER pirinç hortum kavraması
kullanın.
Şekil
Su besleme hortumunu su bağlantısındaki kavramaya takın.
Su hortumunu su beslemesine bağlayın.
Su musluğunu tamamen açın.
Açık kaplardan su emilmesi
Bu yüksek basınçlı temizleyici, tek yönlü valf (özel aksesuar, Sipariş No. 4.440-238) bulunan KÄRCHER emme
hortumuyla Örn; yağmur havuzları ya da göletlerden
(maksimum emme yüksekliği için Bkz. Teknik bilgiler)
yüzey suyunun emilmesi için uygundur.
Kavramayı su bağlantısından çıkartın.
Emme hortumuna su doldurun.
Süpürme hortumunu cihazın su bağlantısına vida-
layın ve su kaynağının içine (Örn; yağmur çukuru)
asın.
Kullanmadan önce cihazın havasını alın.
Cihazı açın "I/ON".
El tabancasının kolundaki kilidi açın.
Kolu çekin, cihaz çalışır.
Su kabarcıksız şekilde el püskürtme tabancasın-
dan çıkana kadar cihazı çalıştırın (en fazla 2 dakika).
El tabancasının kolunu bırakın.
Not: Kol tekrar bırakılırsa, cihaz tekrar kapanır.
Yüksek basınç sistemde kalır.
El püskürtme tabancasının kolunu kilitleyin.
66 TR
– 6
Page 67

Çalıştırma
DIKKAT
2 dakikadan daha uzun süreli kuru çalışma, yüksek basınç pompasında hasarlara neden olur. Cihaz 2 dakika
içinde basınç oluşturmazsa, cihazı kapatın ve "Arızalarda yardım" bölümündeki uyarılara göre hareket edin.
DIKKAT
Hasar görme tehlikesi! Cihaz, sadece yatar pozisyonda (yatay) çalıştırılmalıdır.
Yüksek basınçla çalışma
몇 TEDBIR
Hasar oluşumunu önlemek için, boyalı üst yüzeyleri temizlerken minimum 30 cm püskürtme mesafesine uyulmalıdır
DIKKAT
Araç lastikleri, cila veya ahşap gibi hassas yüzeyleri kir
frezesiyle temizleyin, hasar tehlikesi.
Şekil
Püskürtme borusunu el püskürtme tabancasına ta-
kın ve 90° döndürerek sabitleyin.
Cihazı açın "I/ON".
El tabancasının kolundaki kilidi açın.
Kolu çekin, cihaz çalışır.
Not: Kol tekrar bırakılırsa, cihaz tekrar kapanır.
Yüksek basınç sistemde kalır.
Yıkama fırçasıyla çalışma
DIKKAT
Boya hasarı tehlikesi
Yıkama fırçasıyla yapılan çalışmalarda, fırçada kir veya
başka partiküller olmamalıdır.
Yıkama fırçasını el püskürtme tabancasına takın
ve 90° döndürerek sabitleyin.
Uyarı: Gerekirse, yıkama fırçaları temizlik maddesiyle
çalışma için de kullanılabilir.
Temizlik maddesiyle çalışma
Not: Temizlik maddesi, sadece alçak basınçta karıştırı-
labilir.
TEHLIKE
Temizlik maddelerinin kullan
sel koruyucu donanım olmak üzere temizlik maddesi
üreticisinin güvenlik bilgi formuna dikkat edilmelidir.
Şekil
Temizlik maddesi emme hortumunu istediğiniz
uzunlukta muhafazadan çekin.
Temizlik maddesi emme hortumunu temizlik mad-
desi çözeltisi dolu bir kaba asın.
Basınç
Püskürtme borusunu „Mix“ konumuna getirin.
ayarlı püskürtme
lanın.
Not: Bunun sonucunda, çalışma sırasında temizlik
maddesi çözeltisi püskürtülen suya karıştırılır.
ılması sırasında, başta kişi-
borusu (Vario Power) kul-
Önerilen temizlik yöntemleri
Temizlik maddesini ekonomik bir şekilde üst yüze-
ye sıkın ve etkili olmasını (kurutmayın) sağlayın.
Çözülen kiri yüksek basınç huzmesiyle yıkayın.
Opsiyonel
Köpük memesi
Temizlik maddesi çözeltisini köpük memesinin te-
mizlik maddesi haznesine doldurun (temizlik maddesi bidonundaki dozaj bilgisine dikkat edin).
Köpük memesini temizlik maddesi haznesine bağ-
layın.
Köpük memesini el püskürtme tabancasına takın
ve 90° döndürerek sabitleyin.
Çalışmaya ara verme
El tabancasının kolunu bırakın.
El püskürtme tabancasının kolunu kilitleyin.
Uzun çalışma molalarında (5 dakikanın üstünde)
ek olarak cihazı kapatın "0/OFF".
Çalışmanın tamamlanması
몇 TEDBIR
Yüksek basınç hortumunu, sadece sistemde basınç
yoksa el püskürtme tabancası ya da cihazdan ayırın.
Temizlik maddesiyle çalışmadan sonra: Cihazı
yakl. 1 dakika yıkama için çalıştırın.
El tabancasının kolunu bırakın.
Cihazı kapatın "0/OFF".
Cihazın fişini prizden çekin.
Musluğu kapatın.
Mevcut basıncı sistemden azaltmak için el taban-
casının kolunu bastırın.
El püskürtme tabancasının kolunu kilitleyin.
몇 TEDBIR
Besleme veya yüksek basınç hortumunun ayrılması sırasında, çalışmanın ardı
çıkabilir.
Cihazı su beslemesinden ayırın.
ndan bağlantılardan sıcak su
Taşıma
몇 TEDBIR
Yaralanma ve hasar tehlikesi!
Taşıma sırasında cihazın ağırlığına dikkat edin.
Elle taşıma
Şekil
Şekil
taşıma kollarından
Cihazı
Taşıma kolunu dışarı çekin, duyulur şekilde yerine
oturur.
Cihazı taşıma kolundan çekin.
Araçlarda taşıma
Cihazı kaymaya ve devrilmeye karşı emniyete alın.
yukarı kaldırın ve taşıyın.
– 7
67TR
Page 68

Depolama
몇 TEDBIR
Yaralanma ve hasar tehlikesi!
Depolama sırasında cihazın ağırlığına dikkat edin.
Cihazın saklanması
Cihazı düz bir yüzeye bırakın.
El püskürtme tabancasındaki ayırma tuşuna basın
ve yüksek basınç hortumunu el püskürtme taban-
casından ayırın.
Yüksek basınç hortumunun hızlı bağlantısının göv-
desini ok yönünde bastırın ve yüksek basınç hortu-
munu dışarı çekin.
Şekil
El püskürtme tabancasını el püskürtme tabancası-
nın saklama parçasına takın.
Püskürtme borusunu, püskürtme borusunun sakla-
ma bölümüne oturtun.
Yüksek basınç hortumunu ve elektrik bağlantı hat-
tını cihaza yerleştirin.
Antifriz koruma
DIKKAT
Tam olarak boşaltılmamış cihazlar ve aksesuarlar donma nedeniyle tahrip olabilir. Cihazı ve aksesuarlarını tamamen boşaltın ve donmaya karşı koruyun.
Hasarları önlemek için:
Cihazdaki suyun komple boşaltılması: Yüksek ba-
sınç hortumu ve su besleme bağlı değilken cihazı
çalıştırın (maksimum 1 dakika) ve yüksek basınç
bağlantısından su çıkmayana kadar bekleyin. Ci-
hazı kapatın.
Cihazı komple aksesuarları ile birlikte donyama
karşı korunmuş bir bölümde saklayın.
Örn. kış aylarında olduğu gibi uzun süreli depolamadan
önce, bakım bölümündeki uyarılara dikkat edin.
Koruma ve Bakım
TEHLIKE
Elektrik çarpması tehlikesi.
Cihazdaki tüm çalışmalardan önce cihazı kapatın
ve elektrik fişini çekin.
Su bağlantısındaki süzgecin temizlenmesi
DIKKAT
Süzgeç zarar görmemelidir.
Kavramayı su bağlantısından çıkartın.
Şekil
Süzgeci bir düz penseyle dışarı çekin.
Süzgeci akar su altında temizleyin.
Süzgeci su bağlantısına takın.
Temizlik maddesi filtresinin temizlenmesi
Şekil
Filtreyi temizlik maddesi emme hortumundan çekin
ve suyun altında temizleyin.
Yedek parçalar
Sadece orijinal KÄRCHER yedek parçaları kullanın. Bir
yedek parça genel bakışını bu kullanım kılavuzunun sonunda bulabilirsiniz.
Arızalarda yardım
Küçük arızaları aşağıdaki genel bakışın yardımıyla kendiniz giderebilirsiniz.
Şüphe etmeniz durumunda, yetkili müşteri hizmetlerine
başvurun.
TEHLIKE
Elektrik çarpması tehlikesi.
Cihazdaki tüm çalı
ve elektrik fişini çekin.
El püskürtme tabancasının kolunu çekin, cihaz ça-
lışır.
Tip etiketinde belirtilen gerilimin güç kaynağındaki
gerilimle aynı olup olmadığını kontrol edin.
Şebeke bağlantı kablosuna hasar kontrolü yapın.
Motorda aşırı yük, motor koruma şalteri devreye
girdi.
Cihazı kapatın "0/OFF".
–
– Cihazı bir saat süreyle soğumaya bırakın.
–
Cihazı çalıştırın ve kullanmaya başlayın.
Arıza birkaç kez ortaya çıkarsa, müşteri hizmetlerine cihazı kontrol ettirin.
Cihaz çalışmaya başlamıyor, motordan ses
Zayıf elektrik şebekesi ya da bir uzatma kablosunun kullanılması nedeniyle voltaj düşüşü.
Çalıştırma sırasında ilk önce el püskürtme taban-
casının kolunu çekin, daha sonra cihazı "I/ON" konumuna getirin.
Cihaz basınca gelmiyor
Su beslemesinde yeterli sevk miktarı olup olmadı-
ğını kontrol edin.
Su bağlantısındaki süzgeci düz bir penseyle dışarı
çıkartın ve suyun altında temizleyin.
Cihazdaki havanın boşaltılması: Yüksek basınç
hortumu bağlanmadan cihazı açın ve su kabarcıksız bir şekilde yüksek basınç bağlantısından dışarı
çıkana kadar (maksimum 2 dakika) bekleyin. Cihazı kapatın ve yüksek basınç hortumunu tekrar bağlayın.
Açık hazneden emme sırasında 0,5 m emme yük-
sekliği aşıldı.
Güçlü basınç dalgalanmaları
Yüksek basınç memesinin temizlenmesi: Meme
deliğindeki kirleri bir iğneyle çıkartın ve suyla öne
doğru yıkayın.
Su besleme miktarını kontrol edin.
Cihazda az bir sızıntı olması teknik olarak normal-
dir. Ağır sızıntılarda yetkili müşteri hizmetini çağırın.
Temizlik maddesi emilmiyor
Basınç ayarlı püskürtme borusu (Vario Power) kul-
lanın.
Püskürtme borusunu „Mix“ konumuna getirin.
Temizlik maddesi emme hortumundaki filtreyi te-
mizleyin.
Temizlik maddesi emme hortumunda bükülme yer-
leri olup olmadığını kontrol edin.
şmalardan önce cihazı kapatın
Cihaz çalışmıyor
geliyor
Cihaz sızdırıyor
68 TR
– 8
Page 69

Garanti
Her ülkede yetkili distribütörümüz tarafından verilmiş
garanti şartları geçerlidir. Garanti süresi içinde cihazınızda oluşan muhtemel hasarları, arızanın kaynağı üretim veya malzeme hatası olduğu sürece ücretsiz olarak
karşılıyoruz. Garanti hakkınızdan yararlanmanızı gerektiren bir durum olduğu zaman, ilgili faturanız ile birlikte satıcınıza veya size en yakın yetkili servisimize başvurunuz.
Adresleri burada bulabilirsiniz:
www.kaercher.com/dealersearch
Teknik Bilgiler
Elektrik bağlantısı
Gerilim 230
Bağlantı gücü 2,1 kW
Koruma derecesi IP X5
Koruma sınıfı I
Şebeke sigortası (gecikmeli) 10 A
Su bağlantısı
Besleme bas 0,8 MPa
Besleme sıcaklığı (maks.) 40 °C
Besleme miktar 10 l/min
Maksimum emme yüksekliği 0,5 m
Performans değerleri
Çalışma basıncı 12,5 MPa
Maksimum müsaade edilen basınç 14,5 MPa
Besleme miktarı, su 7,5 l/min
Maksimum sevk miktarı 8,3 l/min
Besleme miktarı, temizlik maddesi 0,3 l/min
El püskürtme tabancasının geri tep-
me kuvveti
Ölçüler ve ağırlıklar
Uzunluk 516 mm
Genişlik 295 mm
Yükseklik 282 mm
Çalışmaya hazır aksesuarla birlikte
ağırlık
60335-2-79'a göre belirlenen değerler
El-kol titreşim değeri
Güvensizlik K
Ses basıncı seviyesi L
Güvensizlik K
Ses basıncı seviyesi L
lik K
WA
Teknik değişiklik yapma hakkı saklıdır.
pA
pA
+ Güvensiz-
WA
1~50VHz
20 N
13,1 kg
<2,5
m/s
0,3
m/s
773dB(A)
dB(A)
92 dB(A)
2
2
AB uygunluk bildirisi
İşbu belge ile aşağıda tanımlanan makinenin konsepti
ve tasarımı ve tarafımızdan piyasaya sürülen modeliyle
AB yönetmeliklerinin temel teşkil eden ilgili güvenlik ve
sağlık yükümlülüklerine uygun olduğunu bildiririz. Onayımız olmadan cihazda herhangi bir değişiklik yapılması
durumunda bu beyan geçerliliğini yitirir.
Ürün: Yüksek basınç temizleyicisi
Tip: 1.630-xxx
İlgili AB yönetmelikleri
2000/14/EG
2014/30/EU
2006/42/EG (+2009/127/EG)
2011/65/EU
Kullanılmış olan uyumlu standartlar
EN 50581
EN 55014–1: 2006+A1: 2009+A2: 2011
EN 55014–2: 2015
EN 60335–1
EN 60335–2–79
EN 61000–3–2: 2014
EN 61000–3–3: 2013
EN 62233: 2008
Kullanılan uyumluluk değerlendirme yöntemleri
2000/14/EG: Ek V
Ses şiddeti dB(A)
Ölçülen: 88
Garanti edilen: 92
İmzası bulunanlar, işletme yönetimi adına ve işletme
yönetimi tarafından verilen vekalete dayanarak işlem
yapar.
CEO
Dokümantasyon yetkilisi:
S. Reiser
Alfred Kärcher GmbH & Co. KG
Alfred-Kärcher-Str. 28 - 40
71364 Winnenden (Germany)
Tel.: +49 7195 14-0
Faks: +49 7195 14-2212
Winnenden, 2016/04/01
Head of Approbation
– 9
69TR
Page 70

Оглавление
Безопасность . . . . . . . . . . . . . . . . . . . . . . . . RU 5
Защита окружающей среды . . . . . . . . . . . . RU 5
Описание прибора. . . . . . . . . . . . . . . . . . . . RU 6
Монтаж . . . . . . . . . . . . . . . . . . . . . . . . . . . . . RU 6
Начало работы. . . . . . . . . . . . . . . . . . . . . . . RU 6
Эксплуатация. . . . . . . . . . . . . . . . . . . . . . . . RU 7
Транспортировка . . . . . . . . . . . . . . . . . . . . . RU 8
Хранение . . . . . . . . . . . . . . . . . . . . . . . . . . . RU8
Уход и техническое обслуживание. . . . . . . RU 8
Запасные части . . . . . . . . . . . . . . . . . . . . . . RU 8
Помощь в случае неполадок . . . . . . . . . . . RU 8
Гарантия. . . . . . . . . . . . . . . . . . . . . . . . . . . . RU 9
Технические данные . . . . . . . . . . . . . . . . . . RU 10
Заявление о соответствии ЕU . . . . . . . . . . RU 10
Безопасность
Перед первым использованием устройства необходимо прочесть настоящую
тации и прилагаемые указания по безопасности. Далее действовать в соответствии с ними. Сохранять
обе брошюры для дальнейшего пользования или
для следующего владельца.
Данный моечный аппарат высокого давления предназначен только для использования в домашнем хозяйстве.
– для мойки машин, автомобилей, строений, ин-
– При этом применению подлежат принадлежно-
ОПАСНОСТЬ
Указание относительно непосредственно грозящей опасности, которая приводит к тяжелым
увечьям или к смерти.
몇 ПРЕДУПРЕЖДЕНИЕ
Указание относительно возможной потенциально
опасной ситуации, которая может привести к тяжелым увечьям или к смерти.
몇 ОСТОРОЖНО
Указание на потенциально опасную ситуацию, которая может привести к получению легких
травм.
ВНИМАНИЕ
Указание относительно возможной потенциально
опасной ситуации, которая может повлечь материальный ущерб.
оригинальную инструкцию по эксплуа-
Использование по назначению
струментов, фасадов, террас, садовых принад-
лежностей и т.д. с помощью струи воды под вы-
соким давлением (при необходимости с добав-
лением моющих средств).
сти, запасные части и чистящие средства, раз-
решенные для использования фирмой
KÄRCHER. Указания, приложенные к чистящим
средствам, подлежат соблюдению.
Степень опасности
Символы на приборе
Запрещается напрямую подключать
устройство к трубопроводу с питьевой
водой.
Устройство должно эксплуатироваться только в лежащем положении
(горизонтально).
Не направлять струю воды под высоким напором на людей, животных,
включенное электрическое оборудование или на само устройство.
Защищать прибор от мороза.
Защитные устройства
몇 ОСТОРОЖНО
Защитные устройства служат для защиты
пользователей. Видоизменение защитных
устройств или пренебрежение ими не допускается.
Приборный выключатель
Главный выключатель препятствует непроизвольной работе аппарата.
Блокировка ручного пистолета-распылителя
Блокировка блокирует рычаг ручного пистолетараспылителя и защищает от непроизвольного запуска аппарата.
Перепускной клапан с пневматическим реле
Перепускной клапан предотвращает превышение
допустимого рабочего давления.
Если рычаг ручного пистолета-распылителя отпу-
манометрический выключатель
скается,
насос, подача струи воды под высоким давлением
прекращается. При нажатии на рычаг насос снова
включается.
Выключатель защиты двигателя
При чрезмерном напряжении в сети, выключатель
защиты двигателя отключает прибор.
отключает
Защита окружающей среды
Инструкции по применению компонентов
(REACH)
Актуальные сведения о компонентах приведены на
веб-узле по следующему адресу:
www.kaercher.com/REACH
Упаковочные материалы поддаются вторичной переработке. Упаковку необходимо утилизировать без ущерба для окружающей среды.
Электрические и электронные приборы часто
содержат компоненты, которые при неправильном обращении или ненадлежащей утилизации представляют потенциальную опасность для людей и экологии. Тем не менее
данные компоненты необходимы для правильной работы прибора. Приборы, обозначенные
этим символом, запрещено утилизировать
вместе с бытовыми отходами.
Отслужившие устройства содержат пригодные
для вторичного использования ценные материалы, которые должны передаваться на переработку. Батареи и аккумуляторы содержат вещества, которые не должны попасть в окружающую среду. Отслужившие устройства, такие
как батареи или аккумуляторы, утилизировать
согласно требованиям по защите окружающей
среды.
70 RU
– 5
Page 71

по очистке,
Работы
зуется отходящая вода, содержащая масла,
например, промывка двигателя, мойка днища,
должны производиться только на моечных
площадках с маслоотделителем.
Работы с моющими средствами должны проводиться только на рабочих поверхностях, не
проницаемых для жидкостей, с подключением
к бытовой канализации. Моющие средства не
должны попадать в водоемы или почву.
Забор воды из открытых водоемов в некоторых
странах не разрешен.
в результате которых обра-
Описание прибора
В данном руководстве по эксплуатации дано описание прибора с максимальной комплектацией. Комплектация отличается в зависимости от модели (см.
упаковку).
Рисунки см. на вкладке 3
1 Место для хранения принадлежностей
2 Рукоятка, вытягивается
3 Рукоятка для ношения прибора
4 Быстроразъемное соединение для подключе-
ния высоконапорного шланга
5 Главный выключатель „0/OFF“ / „I/ON“ (0/ВЫКЛ
/ I/ВКЛ)
6 Сетевой кабель со штепсельной вилкой
7 Рукоятка для ношения прибора
8 Транспортное колесо
9 Элемент для подключения водоснабжения со
встроенным сетчатым фильтром
10 Cоединительный элемент для подключения во-
ды,
11 Всасывающий шланг для моющего средства (с
фильтром)
12 Ручной пистолет-распылитель
13 Блокировка ручного пистолета-распылителя
14 Шланг высокого давления
15 Кнопка для отсоединения шланга высокого дав-
ления от ручного пистолета-распылителя
16 Струйная трубка с регулятором давления (Vario
Power)
Трубка предназначена для самых распростра-
ненных задач по чистке. Рабочее давление ре-
гулируется бесступенчато между „Min“ и „Max“.
В положении „Mix“ возможно добавление мою-
щего средства.
Для регулировки рабочего давления следует
отпустить рычаг пистолета-распылителя и по-
вернуть струйную трубку в желаемое положе-
ние.
17 Cтруйная трубка с фрезой для удаления грязи
Для устойчивых загрязнений
* Дополнительные принадлежности
18 Моющая щетка
Предназначена для работы с моющим средст-
вом.
19 Вращающаяся моющая щетка
Особенно подходит для мойки автомобилей.
20 Насадка для чистки пеной с баком для моющего
средства
Моющее средство всасывается из бака и обра-
зует эффективную моющую пену.
** Дополнительно требуется
21 Армированный водяной шланг со стандартной
муфтой
– минимальный диаметр 1/2 дюйма (13 мм)
– минимальная длина 7,5 м.
Монтаж
Перед началом эксплуатации аппарата установить
прилагаемые незакрепленные части.
Рисунки см. на вкладке 4
Рисунок
Находящуюся в комплекте соединительную
муфту подсоедините к элементу аппарата для
подачи воды.
Рисунок
Вставить шланг высокого давления в ручной пи-
столет-распылитель до щелчка.
Указание: Соблюдать правильность располо-
жения соединительного ниппеля.
Проверить надежность крепления, потянув за
шланг высокого давления.
Начало работы
Поставить устройство на горизонтальную по-
верхность.
Рисунок
Вставить высоконапорный шланг в быстроразъ-
емное соединение до щелчка.
Вставить сетевую штепсельную вилку в розет-
ку.
Подача воды
Параметры для подключения указаны на заводской
табличке и в разделе "Технические данные".
ВНИМАНИЕ
Загрязнения, содержащиеся в воде, могут вызвать повреждения насоса высокого давления и
принадлежностей. Для защиты рекомендуется
использовать водяной фильтр KÄRCHER (специальные принадлежности, номер для заказа 4.730-
059).
Подача воды из водопровода
Соблюдайте предписания предприятия водоснабжения.
ВНИМАНИЕ
Шланговые муфты
ты от протечек Aquastop могут привести к повреждению насоса! Необходимо использовать
шланговую муфту из пластмассы или муфту фирмы KÄRCHER из латуни.
Рисунок
Вставить шланг подачи воды в соответствую-
щее соединение.
Подсоединить водяной шланг к водопроводу.
Полностью откройте водопроводный кран.
Подача воды из открытых водоемов
Данный высоконапорный моющий аппарат со всасывающим шлангом KARCHER и обратным клапаном (специальные принадлежности, номер заказа.
4.440-238) предназначен для всасывания воды из
открытых резервуаров, например, из бочек для дождевой воды или прудов (максимальную высоту
всасывания см. в разделе "Технические данные").
Снять муфту с подвода воды.
Заполнить всасывающий шланг водой.
из металла с системой защи-
– 6
71RU
Page 72

Привинтить всасывающий шланг к элементу по-
дачи воды на приборе и поместить в источник
воды (например, в дождевую бочку).
Перед эксплуатацией удалить воздух из аппарата.
Включить аппарат „I/ON“ (I/ВКЛ).
Разблокировать рычаг ручного пистолета-рас-
пылителя.
Потянуть за рычаг, аппарат включится.
Оставить устройство включенным (не более,
чем на 2 минуты) до тех пор, пока из высоконапорного пистолета-распылителя не начнет выходить вода без пузырьков воздуха.
Отпустить рычаг ручного пистолета-распылите-
ля.
Указание: Если рычаг снова освободится, аппарат снова отключится. Высокое давление сохраняется в системе.
Заблокировать рычаг ручного пистолета-распы-
лителя.
Эксплуатация
ВНИМАНИЕ
Работа всухую в течение более 2 минут приводит
к выходу из строя насоса высокого давления. Если
устройство в течение 2 минут не набирает давление, то его следует выключить и действовать
в соответствии с указаниям, которые приводятся в главе „Помощь в
ВНИМАНИЕ
Опасность повреждения! Устройство разрешается использовать только в лежачем (горизонтальном) положении.
Режим работы высокого давления
몇 ОСТОРОЖНО
При мойке лакированный поверхностей следует
выдерживать расстояние 30 см от форсунки до
поверхности, чтобы избежать повреждения лакировки.
ВНИМАНИЕ
Не чистить автомобильные шины, лакокрасочное
покрытие или чувствительные поверхности (например, деревянные) с применением фрезы для
удаления грязи.
ждения.
Рисунок
Наденьте на ручной пистолет-распылитель
струйную трубку и зафиксируйте ее, повернув
на 90°.
Включить аппарат „I/ON“ (I/ВКЛ).
Разблокировать рычаг ручного пистолета-рас-
пылителя.
Потянуть за рычаг, аппарат включится.
Указание: Если рычаг снова освободится, аппарат снова отключится. Высокое давление сохраняется в системе.
Режим с моющей щеткой
ВНИМАНИЕ
Риск повреждения лакокрасочного покрытия
Перед работой с моющей щеткой следует убедиться в том, что она очищена от грязи или других посторонних частиц.
Моющую
и зафиксировать, повернув на 90°.
случае неполадок“.
Существует опасность повре-
щетку вставить
в ручной распылитель
Указание: В случае необходимости моющие щетки
также можно использовать для работы с моющим
средством.
Режим работы с моющим средством
Примечание: Моющее средство может добавлять-
ся только при низком давлении.
ОПАСНОСТЬ
При применении чистящих средств следует соблюдать требования сертификата безопасности
производителя,
применения средств индивидуальной защиты.
Рисунок
Всасывающий шланг для моющего средства
вытащить из корпуса на необходимую длину.
Опустить всасывающий шланг для моющего
средства в резервуар с раствором моющего
средства.
Использовать струйную трубку с регулятором
давления (Vario Power).
Повернуть струйную трубку в положение „Mix“.
Указание: Такми образом, при эксплуатации
раствор моющего средства смешивается со
струей воды.
Рекомендуемый способ мойки
Экономно
хой поверхности и дать ему подействовать (не
позволять высыхать).
Растворенную грязь смыть струей высокого
давления.
Дополнительно
Насадка для чистки пеной
Залить раствор моющего средства в бак для
моющего средства, который подсоединяется к
насадке для чистки пеной (соблюдая указания
по дозировке на емкости для моющего средст-
ва).
Подсоединить насадку для чистки пеной к баку
для моющего средства.
Наденьте на ручной пистолет-распылитель на-
садку для чистки пеной и зафиксируйте ее, по-
вернув на 90°.
особенно указания относительно
разбрызгать моющее
средство по су-
Перерыв в работе
Отпустить рычаг ручного пистолета-распылите-
ля.
Заблокировать рычаг ручного пистолета-распы-
лителя.
Во время продолжительных перерывов в рабо-
те (свыше 5 минут) аппарат следует выключать
„0/OFF“ (0/ВЫКЛ).
Окончание работы
몇 ОСТОРОЖНО
Отсоединять шланг высокого давления от пистолета-разбрызгивателя или устройства, когда в
системе отсутствует давление.
После работы с моющим средством: С целью
полоскания дать прибору поработать около 1
минуты.
Отпустить рычаг ручного пистолета-распылите-
ля.
Выключить аппарат "0/OFF" (0/ВЫКЛ).
Вытащите штепсельную вилку из розетки.
закрыть водный кран.
72 RU
– 7
Page 73

нажать рычаг ручного пистолета-распылителя
для сброса давления в системе.
Заблокировать рычаг ручного пистолета-распы-
лителя.
몇 ОСТОРОЖНО
При снятии питающего или высоконапорного
шланга во время работы может образоваться
утечка горячей воды в местах соединения.
Отделить аппарат от водоснабжения.
Транспортировка
몇 ОСТОРОЖНО
Опасность травм и повреждений!
При транспортировке следует обратить внимание на вес устройства.
Транспортировка вручную
Рисунок
Поднять высоко прибор за ручки и перенести.
Рисунок
Вытянуть до щелчка рукоятку для транспортировки.
Прибор тянуть за ручку для транспортирования.
Транспортировка на транспортных
средствах
Зафиксировать прибор от смещения и опроки-
дывания.
Хранение
몇 ОСТОРОЖНО
Опасность травм и повреждений!
При хранении следует обратить внимание
устройства.
Хранение прибора
Установить устройству на ровную поверхность.
Нажать размыкающую кнопку на ручном писто-
лете-распылителе
шланг от ручного пистолета-распылителя.
Нажать на корпус быстроразъемного соедине-
ния для высоконапорного шланга в направлении, указанном стрелкой, и вынуть высоконапорный шланг.
Рисунок
Вставить ручной пистолет-распылитель в держатель.
Зафиксировать струйную трубку в соответствующем держателе.
Сложить шланг высокого давления и сетевой
шнур на приборе.
и отделить
высоконапорный
Защита от замерзания
ВНИМАНИЕ
Не полностью опорожненные устройства и оборудование могут быть повреждены разрушению при
воздействии мороза. Полностью опорожнить
устройство и принадлежности, а также обеспечить защиту от мороза.
Во избежание повреждений:
Из аппарата следует полностью удалить воду.
Включить аппарат без подключенного шланга
высокого давления и без присоединенного водоснабжения (максимум на 1 минуту) и подождать до тех пор, пока не прекратиться вытекание воды из шланга высокого давления. Выключите аппарат.
на вес
Храните прибор и все принадлежности в защи-
щенном от мороза помещении.
При длительном хранении, например зимой, дополнительно следует принять во внимание указания в
разделе "Уход".
Уход и техническое обслуживание
ОПАСНОСТЬ
Опасность поражения электрическим током.
Перед проведением любых работ по
ванию устройство следует выключить и из-
влечь штепсельную вилку из розетки.
обслужи-
Очистка сетки в подводе воды
ВНИМАНИЕ
Сетку нельзя повреждать.
Снять муфту с подвода воды.
Рисунок
Вытянуть сетку плоскогубцами.
Сетку очищать под проточной водой.
Снова вставить сетку в подвод воды.
Очистка фильтра для моющего средства
Рисунок
Снимите
моющего средства и промойте его проточной
водой,
фильтр из
всасывающего шланга для
Запасные части
Используйте только оригинальные запасные части
фирмы KARCHER. Описание запасных частей находится в конце данной инструкции по эксплуатации.
Помощь в случае неполадок
Небольшие неисправности можно устранить самостоятельно с помощью следующего описания.
В случае сомнения следует обращаться в уполномоченную службу сервисного обслуживания.
ОПАСНОСТЬ
Опасность поражения электрическим током.
Перед проведением любых работ по обслужи-
ванию устройство следует выключить и из-
влечь штепсельную вилку из розетки.
Прибор не работает
Вытянуть рычаг ручного пистолета-распылите-
ля, прибор включится.
Проверьте соответствие напряжения, указанно-
го в заводской табличке, напряжению источника
электроэнергии.
Проверить сетевой кабель на повреждения.
Мотор перегружен, сработал защитный автомат
электродвигателя.
– Выключить аппарат "0/OFF" (0/ВЫКЛ).
Дать устройству
–
– Включить устройство и снова приступить к ра-
боте.
Если неисправность повторяется, поручить
проверку устройства сервисной службе.
остыть в течение одного часа.
– 8
73RU
Page 74
Прибор не включается, двигатель гудит
Падение напряжения из-за слабой электросети или
при использовании удлинителя.
При выключении прежде всего вынуть рычаг
ручного пистолета-распылителя, затем установить выключатель аппарата в положение „I/ON“
(I/ВКЛ).
Давление в приборе не увеличивается
Проверить достаточность объема подачи воды.
Выньте с помощью плоскогубцев сетевой
фильтр из элемента для водоснабжения и промойте его проточной водой.
Удаление воздуха из прибора: Включить аппа-
рат без подключенного высоконапорного шланга и подождать (не более 2 минут), пока из высоконапорного шланга не начнет выходить вода
без пузырьков воздуха. Выключить прибор и заново подсоединить высоконапорный шланг.
Превышена высота всасывания 0,5 м при вса-
сывании из открытого резервуара.
Сильные перепады давления
Очистить форсунку высокого давления: Игол-
кой удалить загрязнение из отверстия форсунки
и промыть ее спереди водой.
Проверьте количество подаваемой воды.
Прибор негерметичен
Незначительная негерметичность аппарата об-
условлена техническими особенностями. При
сильной негерметичности обратитесь в авторизованную службу сервисного обслуживания.
Чистящее средство не всасывается
Использовать струйную трубку с регулятором
давления (Vario Power).
Повернуть струйную трубку в положение „Mix“.
Очистить фильтр во всасывающем шланге мо-
ющего средства.
Проверить всасывающий шланг для моющего
средства на перегибы.
Гарантия
В каждой стране действуют соответственно гарантийные условия, изданные уполномоченной организацией сбыта нашей продукции в данной стране.
Возможные неисправности прибора в течение гарантийного срока мы устраняем бесплатно, если
причина заключается в дефектах материалов или
ошибках при изготовлении. В случае возникновения
претензий в течение гарантийного срока просьба
обращаться, имея при себе чек о покупке, в торговую организацию, продавшую вам прибор или в ближайшую уполномоченную службу сервисного обслуживания.
адреса вы сможете найти на веб-странице:
www.kaercher.com/dealersearch
74 RU
– 9
Page 75
Технические данные
Электрическое подключение
Напряжение 230
Потребляемая мощность 2,1 kW
Степень защиты IP X5
Класс защиты I
Сетевой предохранитель (инер-
тный)
Подключение водоснабжения
Давление напора (макс.) 0,8 MPa
Температура подаваемой воды
(макс.)
Количество подаваемой воды
(мин.)
Макс. высота всасывания 0,5 m
Рабочие характеристики
Рабочее давление 12,5 MPa
Макс. допустимое давление 14,5 MPa
Подача, вода 7,5 l/min
Максимальная подача 8,3 l/min
Подача, моющее средство 0,3 l/min
Сила отдачи ручного пистолета-
распылителя
Размеры и вес
Длина 516 mm
Ширина 295 mm
высота 282 mm
Вес, в готовности к эксплуатации и
с принадлежностями
Значение установлено согласно стандарту EN
60335-2-79
Значение вибрации рука-плечо
Опасность K
Уровень шума дб
Опасность K
Уровень мощности шума L
сность K
Сохраняется право на внесение технических изменений.
а
pA
+ опа-
WA
WA
1~50VHz
10 A
40 °C
10 l/min
20 N
13,1 kg
<2,5
m/s
0,3
m/s
773dB(A)
dB(A)
92 dB(A)
2
2
Заявление о соответствии ЕU
Настоящим мы заявляем, что нижеуказанный прибор по своей концепции и конструкции, а также в
осуществленном и допущенном нами к продаже исполнении отвечает соответствующим основным
требованиям по безопасности и здоровью согласно
директивам ЕU. При внесении изменений, не согласованных с нами, данное заявление теряет свою силу.
Продукт высоконапорный моющий при-
Тип: 1.630-xxx
Основные директивы ЕU
2000/14/ЕС
2014/30/EU
2006/42/EC (+2009/127/EC)
2011/65/ЕC
Примененные гармонизированные нормы
EN 50581
EN 55014–1: 2006+A1: 2009+A2: 2011
EN 55014–2: 2015
EN 60335–1
EN 60335–2–79
EN 61000–3–2: 2014
EN 61000–3–3: 2013
EN 62233: 2008
Примененный порядок оценки соответствия
2000/14/ЕС: Приложение V
Уровень мощности звука dB(A)
Измерено: 88
Гарантировано: 92
Нижеподписавшиеся лица действуют по поручению
и по доверенности руководства предприятия.
CEO
уполномоченный по документации:
S. Reiser
Alfred Kaercher GmbH & Co. KG
Alfred-Kaercher-Str. 28 - 40
71364 Winnenden (Germany)
Тел.: +49 7195 14-0
Факс: +49 7195 14-2212
Winnenden, 2016/04/01
бор
Head of Approbation
– 10
75RU
Page 76

Tartalomjegyzék
Biztonság. . . . . . . . . . . . . . . . . . . . . . . . . . . .HU 5
Környezetvédelem. . . . . . . . . . . . . . . . . . . . . HU 5
Készülék leírása . . . . . . . . . . . . . . . . . . . . . . HU 6
Összeszerelés. . . . . . . . . . . . . . . . . . . . . . . . HU 6
Üzembevétel . . . . . . . . . . . . . . . . . . . . . . . . . HU 6
Üzem . . . . . . . . . . . . . . . . . . . . . . . . . . . . . . . HU 7
Szállítás. . . . . . . . . . . . . . . . . . . . . . . . . . . . . HU 7
Tárolás . . . . . . . . . . . . . . . . . . . . . . . . . . . . . HU 8
Ápolás és karbantartás . . . . . . . . . . . . . . . . . HU 8
Alkatrészek . . . . . . . . . . . . . . . . . . . . . . . . . . HU 8
Segítség üzemzavar esetén . . . . . . . . . . . . . HU 8
Garancia . . . . . . . . . . . . . . . . . . . . . . . . . . . .HU 9
Műszaki adatok . . . . . . . . . . . . . . . . . . . . . . . HU 9
EU konformitási nyilatkozat . . . . . . . . . . . . . . HU 9
Biztonság
Készüléke első használata előtt olvassa el
az eredeti üzemeltetési útmutatót és a
mellékelt biztonsági utasításokat. Ezek
alapján járjon el. Tartsa meg a mindkét füzetet későbbi
használatra, vagy az esetleges új tulajdonos számára!
Rendeltetésszerű használat
Ez a magasnyomású tisztítóberendezés kizárólag magánháztartásban használható:
– gépek, járművek, épületek, szerszámok, homlok-
zatok, teraszok, kerti gépek stb. magasnyomású
vízsugárral (szükség esetén tisztítószer hozzáadásával) történő tisztításához.
– a KÄRCHER által jóváhagyott tartozékokkal, pótal-
katrészekkel és tisztítószerekkel. Vegye figyelembe a tisztítószerekhez mellékelt utasításokat.
Veszély fokozatok
VESZÉLY
Közvetlenül fenyegető veszélyre való figyelmeztetés,
amely súlyos testi sérüléshez vagy halálhoz vezet.
몇 FIGYELMEZTETÉS
Lehetséges veszélyes helyzetre való figyelmeztetés,
amely súlyos testi sérüléshez vagy halálhoz vezethet.
몇 VIGYÁZAT
Figyelmeztetés esetlegesen veszélyes helyzetre,
amely könnyű sérüléshez vezethet.
FIGYELEM
Lehetséges veszélyes helyzetre való figyelmeztetés,
amely anyagi kárhoz vezethet.
Szimbólumok a készüléken
A készüléket nem szabad közvetlenül a nyilvános ivóvízellátáshoz csatlakoztatni.
A készüléket csak fekvő helyzetben (vízszintesen) szabad üzemeltetni.
A magasnyomású sugarat soha ne irányítsa személyek, állatok, aktív elektromos szerelvények vagy maga a készülék
felé.
A készüléket fagy ellen védje.
Biztonsági berendezések
몇 VIGYÁZAT
A biztonsági berendezések a felhasználó védelmét
szolgálják és ezeket nem szabad megváltoztatni
vagy megkerülni.
Készülék kapcsoló
A készülékkapcsoló megakadályozza a készülék véletlen üzemeltetését.
Kézi szórópisztoly zárja
A zár lezárja a kézi szórópisztoly karját és megakadályozza a készülék véletlen beindítását.
Túlfolyószelep nyomás kapcsolóval
A túlfolyószelep megakadályozza az engedélyezett
munkanyomás túllépését.
Ha a kézi szórópisztoly karját elengedi, akkor a nyomáskapcsoló a szivattyút lekapcsolja, a magasnyomású sugár leáll. Ha a kart meghúzza, a szivattyú ismét
bekapcsol.
Motor védőkapcsoló
Túl nagy áramfelvétel esetén a motorvédő kapcsoló kikapcsolja a készüléket.
Környezetvédelem
Megjegyzések a tartalmazott anyagokkal kapcsolatban (REACH)
Aktuális információkat a tartalmazott anyagokkal kapcsolatosan a következő címen talál:
www.kaercher.com/REACH
A csomagolóanyagok újrahasznosíthatók. Kérjük
a csomagolást környezetkímélő módon ártalmatlanítsa.
Az elektromos és az elektronikus készülékek
gyakran tartalmaznak olyan alkotóelemeket, amelyek helytelen kezelés vagy helytelen ártalmatlanítás esetén potenciális veszélyt jelenthetnek az
emberi egészségre és a környezetre. A készülék
szabályszerű üzemeltetéséhez azonban szükség
van ezekre az alkotóelemekre. Az ilyen szimbólummal megjelölt készülékeket nem szabad a
háztartási hulladékkal együtt ártalmatlanítani.
A használt készülékek értékes újrahasznosítható
anyagokat tartalmaznak, amelyeket újrahasznosító helyen kell elhelyezni. Az elemek és az akkumulátorok olyan anyagokat tartalmaznak, amelyeknek nem szabad a környezetbe kerülni. Kérjük, az elhasznált készüléket, valamint az elemet
vagy az akkumulátort környezetkímélő módon távolítsa el.
Tisztítási munkákat, amelyeknél olajtartalmú
szennyvíz keletkezik pl. motormosás, alvázmosás
csak olajleválasztóval ellátott mosóhelyen szabad
elvégezni.
Tisztítószeres munkát csak szennyvízcsatornához csatlakoztatott vízzáró munkafelületen szabad végezni. A tisztítószert ne hagyja vizekbe
vagy a talajba jutni.
A szabad vizekből való vízvétel néhány országban nem megengedett.
76 HU
– 5
Page 77
Készülék leírása
Jelen használati útmutatóban a maximális felszereltség
van leírva. A szállítási terjedelem modellenként eltérő
(lásd a csomagoláson).
Az ábrákat lásd a 3. kihajtható oldalon
1 A tartozékok tárolója
2 Szállító markolat, kihúzható
3 Fogantyú
4 Gyorscsatlakozó magasnyomású tömlőhöz
5 Készülékkapcsoló „0/OFF“ / „I/ON“
6 Hálózati csatlakozóvezeték hálózati csatlakozóval
7 Fogantyú
8 Szállításhoz használt kerék
9 Vízcsatlakozás beépített szűrővel
10 Csatlakozóelem a vízcsatlakozáshoz
11 Tisztítószer szívócső (szűrővel)
12 Kézi szórópisztoly
13 Kézi szórópisztoly zárja
14 Magasnyomású tömlő
15 Gomb a magasnyomású tömlő leválasztásához a
kézi szórópisztolyról
16 Sugárcső nyomásszabályozóval (Vario Power)
A legáltalánosabb tisztítási feladatokhoz. A munkanyomás fokozat nélkül „Min“ és „Max“ között szabályozható. „Mix“ állásban tisztítószert lehet
hozzáadagolni.
A munkanyomás beállításához engedje el a kézi
szórópisztoly karját és a sugárcsövet forgassa a kívánt állásra.
17 Sugárcső szennymaróval
A makacs szennyeződésekhez
* Opcionális tartozék
18 Mosókefe
Alkalmas munkavégzésre tisztítószerrel.
19 Forgó mosókefe
Különösen alkalmas autók tisztításához.
20 Habfúvóka tisztítószer tartóval
A tisztítószert a tartályból felszívja és erős tisztítószer hab képződik.
** Továbbá szükséges
21 Megerősített anyagú víztömlő kereskedelmi forga-
lomban kapható csatlakozóval.
– Átmérő legalább 1/2 coll (13 mm)
– Hosszúság legalább 7,5 m
Összeszerelés
Üzembevétel előtt szerelje fel a mellékelt különálló alkatrészeket.
Az ábrákat lásd a 4. kihajtható oldalon
Ábra
Csavarozza a szállított csatlakozó alkatrészt a ké-
szülék vízcsatlakozójára.
Ábra
Helyezze a magasnyomású tömlőt a kézi szóró-
pisztolyba, amíg ez hallhatóan bekattan.
Megjegyzés: Ügyeljen a csatlakozási nipli helyes
beállítására.
A biztos csatlakozást a magasnyomású tömlő
meghúzásával ellenőrizni.
Üzembevétel
A készüléket vízszintesen állítsa le, sík felületen.
Ábra
Helyezze a magasnyomású tömlőt a gyorscsatlakozóba, amíg ez hallhatóan bekattan.
Dugja be a hálózati dugót a dugaljba.
Vízellátás
A csatlakozási értékeket lásd a típus táblán/Műszaki
adatoknál.
FIGYELEM
A vízben lévő szennyeződések megrongálhatják a magasnyomású szivattyút és a tartozékokat. A védelem érdekében ajánlott a KÄRCHER vízszűrő használata (különleges tartozék, megrendelési szám: 4.730-059).
Vízellátás a vízvezetékből
Vegye figyelembe víz-szolgáltató vállalat előírásait.
FIGYELEM
A fémből készült Aquastoppal ellátott tömlőcsatlakozók
a szivattyú rongálódásához vezethetnek! Kérem, használjon műanyag tömlőcsatlakozót vagy a sárgarézből
készült KÄRCHER tömlőcsatlakozót.
Ábra
A víz táplálóvezetéket a vízcsatlakozásra helyezni.
Csatlakoztassa a víztömlőt a vízellátáshoz.
Teljesen nyissa ki a vízcsapot.
Víz kiszívása nyitott tartályokból
Ez a a magasnyomású tisztító a KÄRCHER visszacsapó szeleppel ellátott szívótömlővel (különleges tartozék,
megrend. szám 4.440-238) felületi vizek pl. esővíztartályból vagy tóból, felszívására alkalmas (A maximális
felszívási magasságot lásd a Műszaki adatoknál).
Távolítsa el csatlakozót a vízcsatlakozásról.
Töltse fel a szívócsövet vízzel.
A szívótömlőt csavarja a készülék vízcsatlakozójá-
hoz, és engedje bele a vízforrásba (például esővíztartály).
Használat előtt légtelenítse a készüléket.
Kapcsolja be a készüléket „I/ON“.
Oldja ki a kézi szórópisztoly karját.
Húzza meg a kart, a készülék bekapcsol.
Hagyja járni a készüléket (max. 2 perc), amíg a víz
buborékmentesen nem jön ki a kézi szórópisztolyból.
Engedje el a kézi szórópisztoly karját.
Megjegyzés: Ha a kart ismét elengedi, akkor a készülék ismét lekapcsol. A magasnyomás megmarad a rendszerben.
A kézi szórópisztoly karját lezárni.
– 6
77HU
Page 78

Üzem
FIGYELEM
2 percnél hosszabb szárazmenet a magasnyomású szivattyú rongálódásához vezet. Ha a készülék 2 percen
belül nem épít fel nyomást, akkor kapcsolja ki a készüléket és a „Segítség üzemzavar esetén“ c.fejezet utasításainak megfelelően járjon el.
FIGYELEM
Rongálódásveszély! A készüléket csak fekvő helyzetben (vízszintesen) szabad üzemeltetni.
Nagynyomású üzem
몇 VIGYÁZAT
Lakkozott felületek tisztításánál tartsa be a legalább 30
cm-es sugártávolságot a rongálódások elkerülése érdekében.
FIGYELEM
Járműgumikat, lakkot vagy érzékeny felületeket, mint
pl. fát ne tisztítson szennymaróval, rongálódás veszélye
áll fenn.
Ábra
A sugárcsövet helyezze be a kézi szórópisztolyba
és 90°-os elfordítással rögzítse.
Kapcsolja be a készüléket „I/ON“.
Oldja ki a kézi szórópisztoly karját.
Húzza meg a kart, a készülék bekapcsol.
Megjegyzés: Ha a kart ismét elengedi, akkor a ké-
szülék ismét lekapcsol. A magasnyomás megma-
rad a rendszerben.
Üzem mosókefével
FIGYELEM
Lakksérülések veszélye
A mosókefének munka esetén szennytől vagy más részecskéktől mentesnek kell lennie.
A mosókefét helyezze be a kézi szórópisztolyba és
90°-os elfordítással rögzítse.
Megjegyzés: Szükség esetén a mosókeféket is lehet
tisztítószeres munkához használni.
Használat tisztítószerrel
Megjegyzés: Tisztítószer csak alacsony nyomás mel-
lett keverhető hozzá.
VESZÉLY
Tisztítószer használata esetén figyelembe kell venni a
tisztítószer gyártójának biztonsági adatlapját, különös
tekintettel a személyes védelmi felszerelésre vonatkozó
utasításokra.
Ábra
A tisztítószer szívócsövét a kívánt hosszúságban
ki kell húzni a burkolatból.
A tisztítószer szívócsövet lógassa be egy tisztító-
szeroldatot tartalmazó tartályba.
Használja a nyomásszabályozós sugárcsövet (Va-
rio Power).
Állítsa a sugárcsövet a „Mix“ állásba.
Megjegyzés: Ezáltal az üzem alatt a tisztítószerol-
datot a vízsugárhoz keveri.
Javasolt tisztítási módszer
Takarékosan permetezze fel a tisztítószert a szá-
raz felületre és hagyja hatni (ne hagyja megszáradni).
A feloldott szennyeződést magasnyomású sugár-
ral mossa le.
Opcionális
Habfúvóka
Tisztítószeroldatot töltse a habfúvóka tisztítószer
tartályába (vegye figyelembe az adagolási adatokat a tisztítószer csomagolásán).
A habfúvókát csatlakoztassa a tisztítószer tartály-
hoz.
A habfúvókát helyezze be a kézi szórópisztolyba
és 90°-os elfordítással rögzítse.
A használat megszakítása
Engedje el a kézi szórópisztoly karját.
A kézi szórópisztoly karját lezárni.
Hosszabb munkaszünetekben (5 percen túl) továb-
bá kapcsolja ki a készüléket „0/OFF“.
Használat befejezése
몇 VIGYÁZAT
A magasnyomású tömlőt csak akkor válassza le a kézi
szórópisztolyról vagy a készülékről, ha már nincs nyomás a rendszerben.
Tisztítószeres munkavégzés után: Működtesse a
készüléket kb. 1 percig, hogy tisztára öblítse.
Engedje el a kézi szórópisztoly karját.
A készüléket kikapcsolni "0/OFF" .
Húzza ki a hálózati csatlakozót az aljzatból.
Zárja el a vízcsapot.
Nyomja a kézi szórópisztoly karját, hogy a rend-
szerben még meglevő nyomást kiengedje.
A kézi szórópisztoly karját lezárni.
몇 VIGYÁZAT
A bevezető- vagy a magasnyomású tömlő leválasztásánál az üzem után forró víz léphet ki a csatlakozásokból.
Válassza le a készüléket vízellátásról.
Szállítás
몇 VIGYÁZAT
Sérülés- és rongálódásveszély!
Szállítás esetén vegye figyelembe a készülék súlyát.
Szállítás kézzel
Ábra
készüléket a
A
vigye.
Ábra
A szállítófogantyút addig húzza ki, amíg hallhatóan
bekattan.
A készüléket a szállítófogantyúnál húzza.
A készüléket elcsúszás és borulás ellen biztosítani
kell.
hordó fogantyúknál emelje meg és
Szállítás járműben
78 HU
– 7
Page 79
Tárolás
몇 VIGYÁZAT
Sérülés- és rongálódásveszély!
Tárolás esetén vegye figyelembe a készülék súlyát.
A készülék tárolása
A készüléket sík területen állítsa le.
Nyomja meg a leválasztó gombot a kézi szórópisz-
tolyon és válassza le a magasnyomású tömlőt a
kézi szórópisztolyról.
A magasnyomású tömlő gyorscsatlakozó házát
nyomja a nyíl irányába, és húzza ki a magasnyo-
mású tömlőt.
Ábra
A kézi szórópisztolyt helyezze a kézi szórópisztoly
tárolójába.
A sugárcsövet kattintsa be a sugárcső tartójába.
A magasnyomású tömlőt és a hálózati csatlakozó-
vezetéket a készüléken elhelyezni.
Fagyás elleni védelem
FIGYELEM
A nem teljesen kiürített készüléket vagy tartozékokat a
fagy megrongálhatja. A készüléket és a tartozékokat
teljesen ürítse ki és óvja a fagytól.
Károk elkerülése érdekében:
A készülékből teljesen ürítse ki a vizet: A készülé-
ket magasnyomású tömlő és vízellátás csatlakoz-
tatása nélkül kapcsolja be (max. 1 perc) és várjon,
amíg nem jön ki víz a magasnyomású csatlakozó-
ból. A készüléket kikapcsolni.
A készüléket az össze tartozékkal együtt fagymen-
tes helyen tárolja.
Hosszabb tárolás előtt, ill. tél idején vegye figyelembe
az "Ápolás" fejezet utasításait is.
Ápolás és karbantartás
VESZÉLY
Áramütés veszélye.
A készüléken történő bármiféle munka előtt kap-
csolja ki a készüléket és húzza ki a hálózati csatla-
kozót.
A vízcsatlakozás szűrőjének tisztítása
FIGYELEM
A szűrőt nem szabad megsérteni.
Távolítsa el csatlakozót a vízcsatlakozásról.
Ábra
Laposfogóval húzza ki a szűrőt.
A szűrőt folyóvíz alatt tisztítsa meg.
A szűrőt helyezze be ismét a vízcsatlakozóba.
Tisztítószer szűrőt megtisztítani
Ábra
Húzza le a szűrőt a tisztítószer szívócsőről és fo-
lyóvíz alatt tisztítsa meg.
Alkatrészek
Kizárólag eredeti KÄRCHER alkatrészeket használjon.
Ezen Gépkönyv végén találhatja a pótalkatrészek rövid
áttekintését.
Segítség üzemzavar esetén
A kisebb meghibásodásokat a következő áttekintő táblázat segítségével Ön is megszüntetheti.
Kétség esetén kérjük, forduljon jogosult ügyfélszolgálathoz.
VESZÉLY
Áramütés veszélye.
A készüléken történő bármiféle munka előtt kap-
csolja ki a készüléket és húzza ki a hálózati csatlakozót.
A készülék nem megy
Húzza meg a kézi szórópisztoly karját, a készülék
bekapcsol.
Ellenőrizze, hogy a feszültség adata a típustáblán
megegyezik-e az áramforrás feszültségével.
Vizsgálja meg a hálózati csatlakozóvezetéket eset-
leges sérülésekre.
A motor túl van terhelve, a motorvédő kapcsoló ki-
oldott.
– A készüléket kikapcsolni "0/OFF" .
– Hagyja a készüléket egy óráig lehűlni.
– Kapcsolja be és helyezze ismét üzembe a készülé-
ket.
Ha az üzemzavar többször fellép, a készüléket ellenőriztesse a szerviz szolgálattal.
A készülék nem indul, a motor zúg
Feszültségesés gyenge áram hálózat vagy hosszabbító
kábel használata miatt.
Bekapcsoláskor először a kézi szórópisztoly karját
húzza meg, azután állítsa a készülékkapcsolót „I/
ON“ -ra.
A készülék nem termel nyomást
Ellenőrizze a vízellátás megfelelő szállítási men-
nyiségét.
A vízcsatlakozóban található szűrőszitát húzza ki
laposfogóval és tisztítsa meg folyó víz alatt.
A készülék légtelenítése: Készüléket magasnyo-
mású tömlő csatlakoztatása nélkül bekapcsolni, és
várni (max. 2 percig), amíg a víz buborékmentesen
jön ki a magasnyomású csatlakozásból. Kapcsolja
ki a készüléket, és kösse vissza a magasnyomású
tömlőt.
Nyílt tartályból történő felszívás esetén meghalad-
ta a 0,5 m felszívási magasságot.
Erős nyomásingadozások
Magasnyomású fúvóka tisztítása: A szennyeződé-
seket a szórófej furatból egy tű segítségével távolítsa el és vízzel előrefelé öblítse ki.
Ellenőrizze a vízellátás mennyiségét.
A készülék szivárog
A készülék kismértékű szivárgása műszaki okok
miatt lehetséges. Erős szivárgás esetén hívja a jóváhagyott szerviz szolgálatot.
Nem szívja fel a tisztítószert
Használja
rio Power).
Állítsa a sugárcsövet a „Mix“ állásba.
Tisztítsa ki a tisztítószer szívócső szűrőjét.
Ellenőrizze, hogy a tisztítószer szívócső nem törik-
e meg valahol.
a nyomásszabályozós
sugárcsövet (Va-
– 8
79HU
Page 80

Garancia
Minden országban az illetékes forgalmazónk által kiadott garancia feltételek érvényesek. Az esetleges
üzemzavarokat az Ön készülékén a garancia lejártáig
költségmentesen elhárítjuk, amennyiben anyag- vagy
gyártási hiba az oka. Garanciális esetben kérjük, forduljon a vásárlást igazoló bizonylattal kereskedőjéhez
vagy a legközelebbi hivatalos szakszervizhez.
A címeket a következő helyen találja:
www.kaercher.com/dealersearch
Műszaki adatok
Elektromos csatlakozás
Feszültség 230
Csatlakozási teljesítmény 2,1 kW
Védelmi fokozat IP X5
Védelmi osztály I
Hálózati biztosító (lomha) 10 A
Vízcsatlakozás
Hozzáfolyási nyomás (max.) 0,8 MPa
Hozzáfolyási hőmérséklet (max.) 40 °C
Hozzáfolyási mennyiség (min.) 10 l/min
Max. felszívási magasság 0,5 m
Teljesítmény adatok
Üzemi nyomás 12,5 MPa
Max. megengedett nyomás 14,5 MPa
Szállított mennyiség, víz 7,5 l/min
Maximális szállítási mennyiség 8,3 l/min
Szállított mennyiség, tisztítószer 0,3 l/min
A kézi szórópisztoly visszalökő erő-
hatása
Méret és súly
Hossz 516 mm
Szélesség 295 mm
Magasság 282 mm
Súly, üzemkészen a tartozékkal 13,1 kg
Az EN 60335-2-79 szerint megállapított értékek
Kéz-kar vibrációs kibocsátási érték
Bizonytalanság K
Hangnyomás szint L
Bizonytalanság K
Hangnyomás szint L
ság K
WA
Műszaki változtatások joga fenntartva.
pA
pA
+ bizonytalan-
WA
1~50VHz
20 N
<2,5
m/s
0,3
m/s
773dB(A)
dB(A)
92 dB(A)
2
2
EU konformitási nyilatkozat
Ezennel tanúsítjuk, hogy az alábbiakban megnevezett
gép tervezése és építési módja alapján az általunk forgalomba hozott kivitelben megfelel az EU irányelvek vonatkozó, alapvető biztonsági és egészségügyi követelményeinek. A gép jóváhagyásunk nélkül történő módosítása esetén ez a nyilatkozat elveszti érvényességet. A
készülék megfelel az EU-ban és Magyarországon (HU)
harmonizált szabványoknak.
Termék: Nagynyomású tisztító
Típus: 1.630-xxx
Vonatkozó európai közösségi irányelvek:
2000/14/EK
2014/30/EU
2006/42/EK (+2009/127/EK)
2011/65/ЕU
Alkalmazott harmonizált szabványok:
EN 50581
EN 55014–1: 2006+A1: 2009+A2: 2011
EN 55014–2: 2015
EN 60335–1
EN 60335–2–79
EN 61000–3–2: 2014
EN 61000–3–3: 2013
EN 62233: 2008
Követett megfelelés megállapítási eljárás:
2000/14/EK: V. függelék
Hangteljesítményszint dB(A)
Mért: 88
Garantált: 92
Alulírottak az ügyvezetés megbízásából és felhatalmazásával lépnek fel.
CEO
A dokumentációért felelős személy:
S. Reiser
Alfred Kärcher GmbH & Co. KG
Alfred-Kärcher-Str. 28 - 40
71364 Winnenden (Germany)
Tel.: +49 7195 14-0
Fax: +49 7195 14-2212
Winnenden, 2016/04/01
Head of Approbation
80 HU
– 9
Page 81

Obsah
Bezpečnost . . . . . . . . . . . . . . . . . . . . . . . . . . CS5
Ochrana životního prostředí . . . . . . . . . . . . . CS 5
Popis zařízení . . . . . . . . . . . . . . . . . . . . . . . . CS6
Montáž. . . . . . . . . . . . . . . . . . . . . . . . . . . . . . CS 6
Uvedení do provozu . . . . . . . . . . . . . . . . . . . CS 6
Provoz . . . . . . . . . . . . . . . . . . . . . . . . . . . . . . CS 6
Přeprava . . . . . . . . . . . . . . . . . . . . . . . . . . . .CS 7
Ukládání . . . . . . . . . . . . . . . . . . . . . . . . . . . .CS 7
Ošetřování a údržba . . . . . . . . . . . . . . . . . . . CS 8
Náhradní díly . . . . . . . . . . . . . . . . . . . . . . . . . CS8
Pomoc při poruchách . . . . . . . . . . . . . . . . . . CS 8
Záruka . . . . . . . . . . . . . . . . . . . . . . . . . . . . . . CS 8
Technické údaje. . . . . . . . . . . . . . . . . . . . . . . CS 9
EU prohlášení o shodě . . . . . . . . . . . . . . . . . CS 9
Bezpečnost
Před prvním použitím přístroje si přečtěte
tento originální provozní návod a přilože-
né bezpečnostní instrukce. Jednejte podle
nich. Uschovejte si obě příručky pro pozdější použití
nebo pro dalšího majitele.
Používání v souladu s určením
Tento vysokotlaký čistič používejte výhradně v domácnosti.
– na čištění strojů, vozidel, budov, nářadí, fasád, te-
ras, zahradního náčiní apod. vysokotlakým paprskem vody (dle potřeby použijte čisticí prostředky).
– pouze příslušenství, náhradní díly a čisticí pro-
středky schválené firmou KÄRCHER. Při používání
čisticích prostředků se řiďte pokyny na nich uvedenými.
Stupně nebezpečí
NEBEZPEČÍ
Upozornění na bezprostředně hrozící nebezpečí, které
vede k těžkým fyzickým zraněním nebo k usmrcení.
몇 VAROVÁNÍ
Upozornění na potencionálně nebezpečnou situaci, která by mohla vést k těžkým fyzickým zraněním nebo
usmrcení.
몇 UPOZORNĚNÍ
Upozornění na případnou nebezpečnou situaci, která
může vést k lehkým fyzickým zraněním.
POZOR
Upozornění na potenciálně nebezpečnou situaci, která
může mít za následek poškození majetku.
Symboly na zařízení
Přístroj nesmí být připojen přímo k veřejné
vodovodní síti.
Bezpečnostní prvky
몇 UPOZORNĚNÍ
Bezpečnostní zařízení slouží k ochraně uživatele a
nesmějí být měněny či obcházeny.
Přístrojový spínač
Vypínač na zařízení zabraňuje zařízení v nahodilému
provozu.
Zajištění ruční stříkací pistole
Pojistné ústrojí blokuje páčku ruční stříkací pistole a
brání nahodilému spuštění zařízení.
Přepadový ventil s tlakovým spínačem
Přepadový ventil brání překročení přípustného pracovního tlaku.
Uvolněním páčky na ruční stříkací pistoli vypne tlakový
spínač čerpadlo a vysokotlaký vodní paprsek se přeruší. Přitažením páčky se čerpadlo opět zapne.
Motorový jistič
V případě přílišné spotřeby proudu ochranný spínač
motoru vypne zařízení.
Ochrana životního prostředí
Informace o obsažených látkách (REACH)
Aktuální informace o obsažených látkách naleznete na
adrese:
www.kaercher.com/REACH
Obalové materiály jsou recyklovatelné. Při likvidaci obalu berte ohled na životní prostředí.
Elektrické a elektronické přístroje jsou často tvořeny složkami, které při nesprávném používání nebo
nesprávné likvidaci mohou představovat potenciální riziko pro lidské zdraví a životní prostředí.
Tyto složky jsou však nezbytné pro správnou
funkci zařízení. Přístroj označený tímto symbolem
nesmíte likvidovat v domovním odpadu.
Vysloužilá zařízení obsahují cenné recyklovatelné
materiály, které by měly být odevzdány k recyklaci. Baterie a akumulátory obsahují látky, které se
nesmějí dostat do životního prostředí. Staré přístroje nebo akumulátory zlikvidujte ekologicky.
Čisticí práce, při kterých vzniká odpadová voda
obsahující olej např. při čištění motoru či podvozku automobilu, se smějí provádět výhradně na
místech k tomu určených disponujících odlučovačem oleje.
Práce s čisticími prostředky se smí provádět pouze na nepropustných pracovních plochách s připojením ke kanalizaci. Nenechte proniknout čisticí
prostředek do vodních toků nebo do zeminy.
Odběr vody z veřejných vodních zdrojů není v některých zemích dovoleno.
Zařízení se smí používat pouze ve vodorovné (horizontální) poloze.
Vysokotlakým vodním paprskem se nesmí mířit na osoby, zvířata, elektrickou
výstroj pod napětím ani na zařízení samotné.
Přístroj chraňte před mrazem.
– 5
81CS
Page 82

Popis zařízení
V provozní příručce je popsáno maximální vybavení. V
závislosti na modelu se liší obsah dodávky (viz obal).
Ilustrace najdete na rozkládací stránce 3
1 Uložení pro příslušenství
2 Přepravní držadlo, vytažitelná
3 Držadlo
4 Rychlopřípojka pro vysokotlakou hadici
5 Vypínač na přístroji "0/OFF" / "I/ON"
6 Síťové napájecí vedení se zástrčkou
7 Držadlo
8 Přepravní kolo
9 Vodní přípojka s integrovaným sítkem
10 Spojovací element pro přívod vody
11 Sací hadice na čisticí prostředek (s filtrem)
12 Ruční stříkací pistole
13 Zajištění ruční stříkací pistole
14 Vysokotlaká hadice
15 Tlačítko k oddělení vysokotlaké hadice od ruční
stříkací pistole
16 Používejte ocelovou trubku s regulací tlaku (Vario
Power)
Pro obvyklé čištění. Pracovní tlak lze nastavit stupňovitě mezi „Min“ a „Max“. V poloze "Mix" je možné
provádět přídavné dávkování čisticího prostředku.
Chcete-li nastavit pracovní tlak, povolte páčku na
ruční stříkací pistoli a stříkací trubku natočte do požadované polohy.
17 Vysokotlaká trubka s frézou na nečistoty
Pro těžká znečištění
* Dodatečné příslušenství
18 Mycí kartáč
Hodí se pro práci s čisticími prostředky.
19 Rotující mycí kartáč
Zvláště vhodná k čištění automobilů.
20 Pěnová tryska s nádobou na čisticí prostředek
Čisticí prostředek je odsáván z nádoby a vzniká silná čisticí pěna.
** Navíc je potřeba
21 Tkaninou vyztužená hadice se standardní přípoj-
kou.
– minimální průměr 1/2 palce (13 mm)
– minimální délka 7,5 m
Montáž
Před uvedením do provozu namontujte díly volně přiložené k zařízení.
Ilustrace najdete na rozkládací stránce 4
Ilustrace
Spojku našroubujte na vodovodní přípojku zaříze-
ní.
Ilustrace
Zasuňte vysokotlakou hadici do ruční stříkací pisto-
le tak, aby slyšitelně zaskočila.
Upozornění: Dbejte na správné seřízení připojo-
vací matice.
Prověřte bezpečné spojení tahem za vysokotlakou
hadici.
Uvedení do provozu
Umístěte stroj na rovné ploše ve vodorovné poloze.
Ilustrace
Zasuňte vysokotlakou hadici do rychlopřípojky tak,
aby slyšitelně zaskočila.
Zapojte síťovou zástrčku do zásuvky.
82 CS
Přívod vody
Hodnoty připojení viz typový štítek, resp. Technické
údaje.
POZOR
Nečistoty ve vodě mohou poškodit vysokotlaké čerpadlo a příslušenství. Na ochranu doporučujeme použití
vodního filtru KÄRCHER (zvláštní příslušenství, obj.
číslo 4.730-059).
Zásobování vodou z přívodu vody
Dbejte pokynů příslušné místní organizace zajišťující
zásobování vodou.
POZOR
Hadicové armatury z kovu včetně zajištění proti prosaku
Aquastop mohou být příčinou poškození čerpadla! Používejte prosím hadici spojky z plastu nebo hadicovou
spojku KÄRCHER z mosazi.
Ilustrace
Nasaďte hadici přívodu vody na spojku u vodovodní přípojky.
Vodní hadici připojte k vodovodní síti.
Zcela otevřete vodovodní kohoutek.
Nasávání vody z otevřených nádrží
Tento vysokotlaký čistič je díky sací hadici KÄRCHER
se zpětným ventilem (zvláštní příslušenství obj. č.
4.440-238) vhodný k nasávání povrchové vody např. z
kádí na dešťovou vodu nebo tůní apod. (ohledně max.
sací výšky viz technická data).
Odmontujte spojku z vodovodní přípojky.
Naplňte sací hadici vodou.
Sací hadici našroubujte na vodní přípojku přístroje
a zavěste do vodního zdroje (např. kádě na dešťovou vodu).
Před uvedením do provozu přístroj odvzdušněte.
Zapněte přístroj "I/ON".
Odjistěte páčku na stříkací pistoli.
Zatáhněte za páčku, zařízení se zapne.
Nechte běžet přístroj tak dlouho (max. 2 minuty),
až s ruční stříkací pistole vychází voda bez bublinek.
Uvolněte stisk páčky na stříkací pistoli.
Upozornění: Jestliže se páčka znovu uvolní, zařízení se znovu vypne. Vysoký tlak zůstává v systému zachován.
Zajistěte páčku stříkací pistole.
Provoz
POZOR
Chod nasucho po dobu delší než 2 minuty vede k poškození vysokotlakého čerpadla. Pokud p
2 minut nevytvoří tlak, vypněte jej a postupujte podle pokynů v kapitole „Nápověda při poruchách“.
POZOR
Nebezpečí poškození! Přístroj smí být provozován
pouze v horizontální poloze (v leže).
řístroj během
Provoz s vysokým tlakem
몇 UPOZORNĚNÍ
Při čištění lakovaných povrchů dodržujte minimální
vzdálenost 30 cm, abyste zabránili poškození plochy.
POZOR
Nečistěte pneumatiky, lak nebo citlivé povrchy jako dřevo pomocí frézy na nečistoty, hrozí poškození.
Ilustrace
Stříkací trubku nasaďte na stříkací pistoli a otočením o 90° ji zajistěte.
– 6
Page 83

Zapněte přístroj "I/ON".
Odjistěte páčku na stříkací pistoli.
Zatáhněte za páčku, zařízení se zapne.
Upozornění: Jestliže se páčka znovu uvolní, zaří-
zení se znovu vypne. Vysoký tlak zůstává v systé-
mu zachován.
Provoz s mycím kartáčem
POZOR
Nebezpečí poškození laku.
Při práci s čistícím kartáček musí být kartáč zabaven
nečistot nebo jiných částic.
Mycí kartáč nasaďte na stříkací pistoli a otočením
o 90° jej zajistěte.
Upozornění: Je-li potřeba, je možné při práci s čisticím
prostředkem použít také mycí kartáče.
Provoz s použitím čisticího prostředku
Upozornění: Čisticí prostředek lze přidávat pouze při
nízkém tlaku.
NEBEZPEČÍ
Používáte-li čisticí prostředky musíte dodržovat bezpečnostní list výrobce čisticího prostředku, zejména
upozornění na osobním ochranném vybavení.
Ilustrace
Vytáhněte sací hadici na čisticí prostředek v poža-
dované délce z pouzdra.
Zavěste hadici na čisticí prostředek do nádoby s
roztokem čisticího prostředku.
Používejte ocelovou trubku s regulací tlaku (Vario
Power).
Stříkací trubku natočte do polohy „Mix“.
Upozornění: Tímto způsobem se roztok čisticího
prostředku za provozu přimíchává k vodnímu pa-
prsku.
Doporučovaná metoda čištění
Čisticí prostředek úsporně nastříkejte na suchý po-
vrch a nechte působit (ne však zaschnout).
Uvolněnou nečistotu opláchněte paprskem vyso-
kého tlaku.
Volitelně
Pěnová tryska
Naplňte nádobu na čisticí prostředek roztokem čis-
ticího prostředku (řiďte se pokyny k dávkování na
nádobě s čisticím prostředkem).
Připojte pěnovou trysku k nádobě na čisticí prostře-
dek.
Pěnovou trysku nasaďte na stříkací pistoli a otoče-
ním o 90° ji zajistěte.
Přerušení provozu
Uvolněte stisk páčky na stříkací pistoli.
Zajistěte páčku stříkací pistole.
Při delších přestávkách v práci (přes 5 minut) pří-
stroj ještě vypněte vypínačem „0/OFF“.
Ukončení provozu
몇 UPOZORNĚNÍ
Vysokotlakou hadici odpojujte od ruční stříkací pistole
nebo od za
Po
Uvolněte stisk páčky na stříkací pistoli.
Zařízení vypněte „0/OFF“.
Vytáhněte zástrčku ze sítě.
řízení pouze, pokud v systému není tlak.
práci s
dobu 1 minuty zapnutý, aby mohlo dojít k vypláchnutí.
čisticím prostředkem: Nechte přístroj na
Zavřete vodovodní kohoutek.
Stiskněte páčku na stříkací pistoli za účelem od-
stranění zbylého tlaku ze systému.
Zajistěte páčku stříkací pistole.
몇 UPOZORNĚNÍ
Při oddělování přívodní nebo vysokotlaké hadice může
po provozu z přípojek vytékat horká voda.
Odpojte zařízení od přívodu vody.
Přeprava
몇 UPOZORNĚNÍ
Nebezpečí úrazu a nebezpečí poškození!
Dbejte na hmotnost přístroje při přepravě.
Ruční přeprava
Ilustrace
Zařízení zvedněte a přenášejte uchopením za držadlo.
Ilustrace
Vysuňte madlo pro přenášení, je patrné zaklapnutí.
Přístroj tahejte za přepravní úchyt.
Přeprava ve vozidle
Zajistěte přístroj proti sklouznutí a převrácení.
Ukládání
몇 UPOZORNĚNÍ
Nebezpečí úrazu a nebezpečí poškození!
Dbejte na hmotnost přístroje při jeho uskladnění.
Uložení přístroje
Přístroj odstavte na rovné ploše.
Stiskněte tlačítko pro odpojení na ruční stříkací pis-
toli a odpojte vysokotlakou hadici od ruční stříkací
pistole.
Kryt rychlopřípojky pro vysokotlakou hadici tlačte
ve směru šipky a vysokotlakou hadici vytáhněte.
Ilustrace
Ruční stříkací pistoli zasuňte do uložení pro ruční
stříkací pistoli.
Stříkací trubku zaaretujte v uložení pro stříkací
trubku.
Vysokotlakou hadici a síťový kabel uložte do uklá-
dacího prostoru přístroje.
Ochrana proti zamrznutí
POZOR
Ne zcela vyprázdněné přístroje a příslušenství mohou
být znehodnoceny mrazem. Zcela vyprazd
a příslušenství a chraňte je před mrazem.
Aby nedošlo ke škodám:
Ze zařízení vypusťte veškerou vodu: zařízení za-
pněte bez připojené vysokotlaké hadice a bez připojeného přívodu vody (na max. 1 minutu) a počkejte, dokud z vysokotlakého přípoje nepřestane
vytékat voda. Zařízení vypněte.
Zařízení
Před dlouhodobým uskladněním, např. v zimě navíc dodržujte pokyny v kapitole Péče.
s úplným
to chráněné před mrazem.
příslušenstvím ukládejte na mís-
ňuje přístroj
– 7
83CS
Page 84

Ošetřování a údržba
NEBEZPEČÍ
Nebezpečí úrazu elektrickým proudem.
Před každou prací na zařízení vždy zařízení vypně-
te a vytáhněte síťovou zástrčku.
Vyčistěte síto na přívodu vody
POZOR
Síto nesmí být poškozeno.
Odmontujte spojku z vodovodní přípojky.
Ilustrace
Vytáhněte síto pomocí plochých kleští.
Vyčistěte síto pod tekoucí vodou.
Síto opět nasaďte do vodovodní přípojky.
Vyčistěte filtr na čisticí prostředek
Ilustrace
Sejměte filtr ze sací hadice na čisticí prostředky a
opláchněte jej pod tekoucí vodou.
Náhradní díly
Používejte výhradně originální náhradní díly firmy
KÄRCHER. Přehled náhradních dílů najdete na konci
tohoto provozního návodu.
Pomoc při poruchách
Drobné poruchy můžete odstranit sami s pomocí následujících údajů.
V případě nejistoty se laskavě obraťte na autorizovaný
zákaznický servis.
NEBEZPEČÍ
Nebezpečí úrazu elektrickým proudem.
Před každou prací na zařízení vždy zařízení vypně-
te a vytáhněte síťovou zástrčku.
Přístroj neběží
Zatáhněte za páčku stříkací pistole, zařízení se za-
pne.
Zkontrolujte, zda napětí uvedené na typovém štítku
přístroje souhlasí s napětím zdroje elektrického
proudu.
Zkontrolujte, zda není síťové napájecí vedení po-
škozeno.
Přetížení motoru, jistič motoru se aktivoval.
– Zařízení vypněte „0/OFF“.
– Přístroj nechte vychladnout po dobu jedné hodiny.
– Přístroj zapněte a znovu uveďte do provozu.
Pokud se porucha objeví opakovaně, nechte přístroj zkontrolovat zákaznickou službou.
Zařízení se nerozbíhá, motor hučí
Pokles napětí v důsledku slabé elektrické sítě nebo při
použití prodlužovacího kabelu.
Při zapínání nejprve přitáhněte páčku ruční stříkací
pistole a teprve poté přepněte vypínač zařízení na
"I/ON".
Zařízení nelze natlakovat
Zkontrolujte, zda je u přívodu vody dostatečný prů-
tok.
Síto ve vodní přípojce vyjměte plochými kleštěmi a
vyčistěte je pod tekoucí vodou.
Zařízení odvzdušněte: Zařízení zapněte bez připo-
jené vysokotlaké hadice a čekejte (max. 2 minuty),
dokud z vysokotlaké přípojky nezačne vystupovat
voda bez bublin. Zařízení vypněte a znovu připojte
vysokotlakou hadici.
Sací výška 0,5 m překročena při sání z otevřené
nádrže.
Silné kolísání tlaku
Vyčistěte vysokotlakou trysku: Odstraňte jehlou
nečistoty z otvoru trysky a zpředu ji propláchněte
vodou.
Zkontrolujte množství přiváděné vody.
Zařízení je netěsné
Mírná
netěsnost zařízení je podmíněna technicky.
Při značné netěsnosti je třeba řešením pověřit autorizovaný zákaznický servis.
Čisticí prostředek není nasáván
Používejte ocelovou trubku s regulací tlaku (Vario
Power).
Stříkací trubku natočte do polohy „Mix“.
Filtr očistěte na sací hadici čisticího prostředku.
Zkontrolujte, zda na sací hadici nejsou zlomy.
Záruka
V každé zemi platí záruční podmínky vydané příslušnou
distribuční společností. Případné poruchy zařízení odstraníme během záruční lhůty bezplatně, pokud byl jejich příčinou vadný materiál nebo výrobní závady. V případě uplatňování nároku na záruku se s dokladem o zakoupení obraťte na prodejce nebo na nejbližší oddělení
služeb zákazníkům.
Adresy najdete zde:
www.kaercher.com/dealersearch
84 CS
– 8
Page 85

Technické údaje
Připojení elektrického proudu
Napětí 230
Příkon 2,1 kW
Stupeň krytí IP X5
Třída krytí I
Síťová pojistka (pomalá) 10 A
Přívod vody
Přívodní tlak (max.) 0,8 MPa
Teplota přívodu (max.) 40 °C
Přiváděné množství (min.) 10 l/min
Max. sací výška 0,5 m
Výkonové parametry
Pracovní tlak 12,5 MPa
Max. přípustný tlak 14,5 MPa
Čerpané množství vody 7,5 l/min
Maximální výkon čerpadla 8,3 l/min
Čerpané množství čisticího prostřed-ku0,3 l/min
Síla zpětného nárazu vysokotlaké
pistole
Rozměry a hmotnost
Délka 516 mm
Šířka 295 mm
Výška 282 mm
Hmotnost přístroje připraveného k
provozu s příslušenstvím
Zjištěné hodnoty dle EN 60335-2-79
Hodnota vibrace ruka-paže
Kolísavost K
Hladina akustického tlaku L
Kolísavost K
pA
Hladina akustického výkonu L
Kolísavost K
Technické změny jsou vyhrazeny.
WA
pA
WA
1~50VHz
20 N
13,1 kg
<2,5
m/s
0,3
m/s
773dB(A)
dB(A)
+
92 dB(A)
EU prohlášení o shodě
Tímto prohlašujeme, že níže označené stroje odpovídají jejich základní koncepcí a konstrukčním provedením,
stejně jako námi do provozu uvedenými konkrétními
provedeními, příslušným zásadním požadavkům o bezpečnosti a ochraně zdraví směrnic EU. Při jakýchkoli na
stroji provedených změnách, které nebyly námi odsouhlaseny, pozbývá toto prohlášení svou platnost.
Výrobek: Vysokotlaký čistič
Typ: 1.630-xxx
Příslušné směrnice EU:
2000/14/ES
2014/30/EU
2006/42/ES (+2009/127/ES)
2011/65/EU
Použité harmonizační normy
EN 50581
EN 55014–1: 2006+A1: 2009+A2: 2011
EN 55014–2: 2015
EN 60335–1
EN 60335–2–79
EN 61000–3–2: 2014
EN 61000–3–3: 2013
EN 62233: 2008
Použitý postup posuzování shody:
2000/14/ES: Příloha V
Hladinu akustického dB(A)
Namerenou: 88
Garantovanou: 92
Podepsaní jednají v pověření a s plnou mocí jednatelství
CEO
2
2
Osoba zplnomocněná sestavením dokumentace:
S. Reiser
Alfred Kärcher GmbH & Co. KG
Alfred-Kärcher-Str. 28 - 40
71364 Winnenden (Germany)
Tel.: +49 7195 14-0
Fax: +49 7195 14-2212
Winnenden, 2016/04/01
Head of Approbation
– 9
85CS
Page 86

Vsebinsko kazalo
Varnost . . . . . . . . . . . . . . . . . . . . . . . . . . . . . SL 5
Varstvo okolja . . . . . . . . . . . . . . . . . . . . . . . . SL5
Opis naprave . . . . . . . . . . . . . . . . . . . . . . . . . SL 6
Montaža. . . . . . . . . . . . . . . . . . . . . . . . . . . . .SL 6
Zagon . . . . . . . . . . . . . . . . . . . . . . . . . . . . . . SL 6
Obratovanje. . . . . . . . . . . . . . . . . . . . . . . . . . SL7
Transport . . . . . . . . . . . . . . . . . . . . . . . . . . . .SL 7
Skladiščenje . . . . . . . . . . . . . . . . . . . . . . . . . SL8
Vzdrževanje. . . . . . . . . . . . . . . . . . . . . . . . . . SL8
Nadomestni deli. . . . . . . . . . . . . . . . . . . . . . . SL 8
Pomoč pri motnjah . . . . . . . . . . . . . . . . . . . . SL 8
Garancija . . . . . . . . . . . . . . . . . . . . . . . . . . . .SL 9
Tehnični podatki. . . . . . . . . . . . . . . . . . . . . . . SL 9
Izjava EU o skladnosti . . . . . . . . . . . . . . . . . . SL 9
Varnost
Pred prvo uporabo Vaše naprave preberite to originalno navodilo za uporabo in pri-
ložene varnostne napotke. Ravnajte v
skladu z njimi. Oba zvezka shranite za kasnejšo uporabo ali za naslednjega lastnika.
Namenska uporaba
Ta visokotlačni čistilnik uporabljajte izključno za privatno gospodinjstvo:
– za čiščenje strojev, vozil, zgradb, orodja, fasad, te-
ras, vrtnega orodja itd. z visokotlačnim vodnim curkom (po potrebi z dodatkom čistilnih sredstev).
– z deli pribora, nadomestnimi deli in čistilnimi sred-
stvi, ki jih dopušča podjetje KÄRCHER. Upoštevajte navodila, ki so priložena čistilnim sredstvom.
Stopnje nevarnosti
NEVARNOST
Opozorilo na neposredno nevarnost, ki vodi do težkih
telesnih poškodb ali smrti.
몇 OPOZORILO
Opozorilo na možno nevarno situacijo, ki lahko vodi do
težkih telesnih poškodb ali smrti.
몇 PREVIDNOST
Opozorilo na možno nevarno situacijo, ki lahko vodi do
lažjih poškodb.
POZOR
Opozorilo na možno nevarno situacijo, ki lahko vodi do
premoženjskih škod.
Simboli na napravi
Naprave se ne sme priključiti neposredno na
javno omrežje pitne vode.
Varnostne naprave
몇 PREVIDNOST
Varnostne naprave služijo za zaščito uporabnika in
se jih ne sme spreminjati ali ignorirati.
Stikalo naprave
Stikalo naprave preprečuje nehoteno delovanje naprave.
Zapah ročne brizgalne pištole
Zapah zapira ročico ročne brizgalne pištole in preprečujejo nehoten vklop naprave.
Prelivni ventil s tlačnim stikalom
Prelivni ventil preprečuje prekoračitev dovoljenega delovnega tlaka.
Če ročico na ročni brizgalni pištoli spustite, tlačno stikalo izklopi črpalko, visokotlačni curek se ustavi. Če ročico
povlečete, se črpalka ponovno vklopi.
Stikalo za zaščito motorja
V primeru previsoke porabe električne energije izklopi
motorno zaščitno stikalo stroj.
Varstvo okolja
Opozorila k sestavinam (REACH)
Aktualne informacije o sestavinah najdete na:
www.kaercher.com/REACH
Embalažni materiali so primerni za recikliranje.
Embalažo zavrzite okolju prijazno.
Električne in elektronske naprave imajo pogosto
sestavne dele, ki pri nepravilnem ravnanju ali odstranjevanju med odpadke lahko predstavljajo nevarnost za zdravje ljudi in okolje. Ti sestavni deli
so kljub temu pomembni za pravilno delovanje naprav. Naprav, označenih s tem simbolom, ne smete odvreči med gospodinjske odpadke.
Stare naprave vsebujejo dragocene za recikliranje
primerne materiale, ki jih je treba odvesti za ponovno uporabo. Baterije in akumulatorske baterije
vsebujejo snovi, ki ne smejo priti v okolje. Prosimo, da stare naprave ter baterije ali akumulatorske baterije zavržete na okolju prijazen način.
Čiščenja, pri katerih nastaja odpadna voda, ki vsebuje olje, npr. pranje motorjev, pranje podvozij, se
smejo izvajati le na mestih za pranje z izločevalnikom olja.
Dela s čistili se smejo izvajati le na delovnih površinah, ki so neprepustne za tekočine, in imajo priključek na kanalizacijo za umazano vodo. Preprečite pronicanje čistil v vodotoke ali zemljo.
Odvzem vode iz javnih voda v nekaterih državah
ni dovoljen.
Napravo se sme uporabljati le v ležečem
položaju (horizontalno).
Visokotlačnega curka se ne sme usmerjati v osebe, živali, aktivno električno opremo ali na samo napravo.
Napravo zaščitite pred zmrzaljo.
86 SL
– 5
Page 87

Opis naprave
V tem navodilu za uporabo je opisana maksimalna
oprema. Glede na model prihaja do razlik v obsegu dobave (glejte embalažo).
Za slike glejte razklopno stran 3
1 Shranjevalo za pribor
2 Transportni ročaj, izvlečna
3 Ročaj
4 Hitri priključek za visokotlačno gibko cev
5 Stikalo naprave „0/OFF“ / „I/ON“
6 Omrežni priključni vodnik z omrežnim vtičem
7 Ročaj
8 Transportno kolo
9 Vodni priključek z vgrajenim sitom
10 Spojni del za priključek za vodo
11 Gibka sesalna cev za čistilno sredstvo (s filtrom)
12 Ročna brizgalna pištola
13 Zapah ročne brizgalne pištole
14 Visokotlačna cev
15 Tipka za ločitev visokotlačne gibke cevi od ročne
brizgalne pištole
16 Brizgalna cev z reguliranjem tlaka (Vario Power)
Za običajne čistilne naloge. Delovni tlak se lahko
zvezno regulira med "Min" in Max". V položaju
„Mix“ se lahko dodaja čistilno sredstvo.
Za nastavljanje delovnega tlaka spustite ročico ročne brizgalne pištole in brizgalno cev zavrtite na želeni položaj.
17 Brizgalna cev s strgalom za umazanijo
Za trdovratno umazanijo
* Opcijski pribor
18 Krtača za pranje
Primerno za delo s čistilnimi sredstvi.
19 Rotacijska krtača za pranje
Posebej primerna za avtomobilsko čiščenje.
20 Šoba za peno s posodo za čistilo
Iz posode se sesa čistilo in nastane učinkovita
pena čistila.
** Dodatno potrebno
21 S platnom ojačana gibka vodna cev z običajnim pri-
ključkom.
– Premer najmanj 1/2 cole (13 mm)
– Dolžina najmanj 7,5 m
Montaža
Pred zagonom montirajte napravi prosto priložene dele.
Za slike glejte razklopno stran 4
Slika
Priložen spojni del privijte na vodni priključek na-
prave.
Slika
Vtaknite visokotlačno gibko cev v ročno brizgalno
pištolo, dokler se slišno ne zaskoči.
Opozorilo: Pazite na pravilno usmerjenost pri-
ključne električne napeljave.
Preverite varno povezavo s potegom za visokoto-
lačno cev.
Zagon
Napravo postavite vodoravno na ravno površino.
Slika
Vtaknite visokotlačno gibko cev v hitri priključek,
dokler se slišno ne zaskoči.
Omrežni vtič vtaknite v vtičnico.
Oskrba z vodo
Priključne vrednosti glejte na tipski tablici / v tehničnih
podatkih.
POZOR
Nečistoče v vodi lahko poškodujejo visokotlačno črpalko in pribor. Za zaščito se priporoča uporaba vodnega
filtra podjetja KÄRCHER (poseben pribor, naročniška
številka 4.730-059).
Oskrba z vodo iz vodovoda
Upoštevajte predpise vodovodnega podjetja.
POZOR
Kovinske cevne spojke z Aquastop-om lahko vodijo do
poškodb črpalke! Uporabite plastično cevno spojko ali
KÄRCHER-jevo medeninasto cevno spojko.
Slika
Gibko cev za dotok vode nataknite na spojko na vodnem priključku.
Gibko vodno cev priključite na oskrbo z vodo.
Vodno pipo popolnoma odprite.
Sesanje vode iz odprtih posod
Ta visokotlačni čistilnik je s KÄRCHERjevo gibko sesalno cevjo s protipovratnim filtrom (posebni pribor, naroč.št. 4.440-238) primeren za sesanje površinske vode
npr. iz sodov za deževnico ali ribnikov (za maksimalno
višino črpanja glejte tehnične podatke).
Odstranite spojko z vodnega priključka.
Gibko sesalno cev napolnite z vodo.
Gibko sesalno cev privijte na vodni priključek na-
prave in obesite v vodni vir (na primer sod za deževnico).
Pred obratovanjem napravo odzračite.
Vklopite napravo "I/ON".
Deblokirajte ročico ročne brizgalne pištole.
Potegnite ročico, naprava se vklopi.
Pustite napravo, da teče (max. 2 minuti), dokler
voda na ročni brizgalni pištoli ne izstopa brez mehurčkov.
Spustite ročico ročne brizgalne pištole.
Opozorilo: Če se ročica ponovno spusti, se naprava ponovno izklopi. Visok tlak se v sistemu ohrani.
Zaprite ročico ročne brizgalne pištole.
– 6
87SL
Page 88

Obratovanje
POZOR
Suhi tek, ki traja več kot 2 minuti, lahko vodi do poškodb
visokotlačne črpalke. Če naprava v 2 minutah ne izgradi
nobenega tlaka, napravo izklopite in postopajte v skladu
z napotki v poglavju „Pomoč pri motnjah“.
POZOR
Nevarnost poškodb! Naprava se sme uporabljati le
v ležečem položaju (horizontalno).
Delo z visokom tlakom
몇 PREVIDNOST
Pri čiščenju lakiranih površin upoštevajte razdaljo curkam najmanj 30 cm, da preprečite poškodbe
POZOR
Avtomobilskih gum, laka ali občutljivih površin kot je les
ne čistite s strgalom za umazanijo, nevarnost poškodbe.
Slika
Brizgalno cev vtaknite v ročno brizgalno pištolo in
jo pritrdite z obračanjem za 90°.
Vklopite napravo "I/ON".
Deblokirajte ročico ročne brizgalne pištole.
Potegnite ročico, naprava se vklopi.
Opozorilo: Če se ročica ponovno spusti, se napra-
va ponovno izklopi. Visok tlak se v sistemu ohrani.
Obratovanje s pralno krtačo
POZOR
Nevarnost poškodb laka
Pri delih s pralno krtačo mora biti le-ta brez umazanije
ali drugih delcev.
Pralno krtačo vtaknite v ročno brizgalno pištolo in jo
pritrdite z obračanjem za 90°.
Opozorilo: Po potrebi se lahko uporabijo tudi pračne krtače za delo s čistilnim sredstvom.
Obratovanje s čistilom
Napotek: Čistilno sredstvo se lahko dodaja le v podro-
čju nizkega tlaka.
NEVARNOST
Pri uporabi čistilnih sredstev je treba upoštevati varnostni list proizvajalca čistilnega sredstva, še posebej napotke o osebni zaščitni opremi.
Slika
Gibko sesalno cev za čistilno sredstvo v želeni dol-
žini izvlecite iz ohišja.
Gibko sesalno cev za čistilno sredstvo obesite v
posodo z raztopino čistilnega sredstva.
Uporabite brizgalno cev z reguliranjem tlaka (Vario
Power).
Brizgalno cev obrnite na položaj "Mix".
Opozorilo: S tem se pri obratovanju raztopina či-
stilnega sredstva primeša vodnemu curku.
Priporočljiva metoda čiščenja
Čistilno sredstvo varčno razpršite po suhi površini
in pustite, da učinkuje (vendar se ne sme posušiti).
Raztopljeno umazanijo splaknite z visokotlačnim
curkom.
Opcijsko
Šoba za peno
Raztopino čistilnega sredstva napolnite v posodo
za čistilo šobe za peno (upoštevajte navedbe doziranja na navoju čistilnega sredstva).
Šobo za peno spojite s posodo za čistilo.
Šobo za peno vtaknite v ročno brizgalno pištolo in
jo pritrdite z obračanjem za 90°.
Prekinitev obratovanja
Spustite ročico ročne brizgalne pištole.
Zaprite ročico ročne brizgalne pištole.
Pri daljših delovnih premorih (več kot 5 minut) na-
pravo dodatno izklopite „0/OFF“.
Zaključek obratovanja
몇 PREVIDNOST
Visokotlačno gibko cev ločite z ročne pršilne pištole ali
naprave le, če v sistemu ni tlaka.
Po delu s čistilnimi sredstvi: Naprava naj za spira-
nje deluje približno 1 minuto.
Spustite ročico ročne brizgalne pištole.
Izklopite napravo "0/OFF".
Izvlecite omrežni vtič iz vtičnice.
Zaprite pipo.
Pritisnite
Zaprite ročico ročne brizgalne pištole.
몇 PREVIDNOST
Ob ločitvi dovodne ali visokotlačne gibke cevi lahko po
obratovanju iz priključkov izstopa vroča voda.
Napravo ločite z oskrbe z vodo.
ročico ročne
ma izpustite še obstoječi tlak.
brizgalne pištole, da iz siste-
Transport
몇 PREVIDNOST
Nevarnost osebnih poškodb in poškodb stvari!
Pri transportu upoštevajte težo naprave.
Ročni transport
Slika
Napravo dvignite in nosite za nosilne ročaje.
Slika
Izvlecite transportni ročaj, le-ta se slišno zaskoči.
Napravo vlecite za transportni ročaj.
Transport v vozilih
Napravo zavarujte proti zdrsu in prevrnitvi.
88 SL
– 7
Page 89

Skladiščenje
몇 PREVIDNOST
Nevarnost osebnih poškodb in poškodb stvari!
Pri shranjevanju upoštevajte težo naprave.
Shranjevanje naprave
Postavite napravo na ravno površino.
Pritisnite ločilno na ročni brizgalni pištoli in ločite vi-
sokotlačno gibko cev od ročne brizgalne pištole.
Ohišje hitrega priključka za visokotlačno gibko cev
pritisnite v smeri puščice in izvlecite visokotlačno
gibko cev.
Slika
Ročno brizgalno pištolo vtaknite v shranjevalo za
ročno brizgalno pištolo.
Brizgalno cev zaskočite v shranjevalo za brizgalno
cev.
Visokotlačno gibko cev in omrežni priključni kabel
pospravite na napravo.
Zaščita pred zamrznitvijo
POZOR
Zmrzal lahko uniči naprave in pribor, pri katerih voda ni
bila popolnoma izpraznjena. Napravo in pribor popolnoma izpraznite in zaščitite pred zmrzaljo.
Da preprečite škode:
Popolna izpraznitev vode iz naprave: Napravo
vklopite brez priključene visokotlačne gibke cevi in
brez priključene oskrbe z vodo (max. 1 min.) in po-
čakajte, dokler iz visokotlčanega priključka ne iz-
stopa več voda. Izklopite napravo.
Napravo s celotnim priborom shranjujte v prostoru,
varnem pred zmrzaljo.
Pred daljšim shranjevanjem, npr. v času zime, dodatno
upoštevajte napotke v poglavju Vzdrževanje.
Vzdrževanje
NEVARNOST
Nevarnost električnega udara.
Pred vsemi deli na napravi, izklopite napravo in iz-
vlecite omrežni vtič.
Čiščenje sita v vodnem priključku
POZOR
Sito se ne sme poškodovati.
Odstranite spojko z vodnega priključka.
Slika
Sito izvlecite s kleščami.
Sito očistite pod tekočo vodo.
Sito ponovno vstavite v vodni priključek.
Čiščenje filtra za čistilno sredstvo
Slika
Filter izvlecite iz gibke sesalne cevi za čistilno sred-
stvo in ga očistite pod tekočo vodo.
Nadomestni deli
Uporabljajte samo originalne KÄRCHER jeve nadomestne dele. Pregled nadomestnih delov boste našli na
koncu tega navodila za uporabo.
Pomoč pri motnjah
Manjše motnje lahko odpravite sami s pomočjo naslednjega pregleda.
V primeru dvoma se obrnite pooblaščeni servisni službi.
NEVARNOST
Nevarnost električnega udara.
Pred vsemi deli na napravi, izklopite napravo in iz-
vlecite omrežni vtič.
Naprava ne deluje
Potegnite ročico ročne brizgalne pištole, naprava
se vklopi.
Preverite, ali na tipski tablici navedena napetost
ustreza napetosti vira električnega toka.
Omrežni priključni vodnik preglejte glede poškodb.
Motor je preobremenjen, sprožilo se je zaščitno sti-
kalo motorja.
– Izklopite napravo "0/OFF".
– Pustite, da se naprava eno uro ohlaja.
– Napravo vklopite in jo ponovno zaženite.
Če se motnja večkrat pojavi, naj napravo preveri
uporabniški servis.
Naprava se ne zažene, motor brenči
Padec napetosti zaradi šibkega električnega omrežja ali
ob uporabi električnega podaljška.
Ob vklopu najprej povlecite ročico ročne brizgalne
pištole, nato stikalo naprave postavite na „I/ON“.
Naprava ne dosega zadostnega tlaka
Preverite zadostni pretok oskrbe z vodo.
Sito v priključku za vodo izvlecite s ploščatimi kle-
ščami in ga očistite pod tekočo vodo.
Prezračite napravo: Napravo vklopite brez priklju-
čene visokotlačne gibke cevi in počakajte (največ 2
minuti), dokler voda na visokotlačnem priključku ne
izstopa brez mehurčkov. Napravo izklopite in ponovno priklopite visokotlačno cev.
Višina črpanja 0,5 m pri sesanju iz odprte posode
prekoračena.
Močna nihanja tlaka
Čiščenje visokotlačne šobe: Iz šobne izvrtine z iglo
odstranite umazanijo in jo od spredaj splaknite z
vodo.
Preverite količino dotoka vode.
Naprava je netesna
Neznatna
Pri močnejši netesnosti se obrnite na pooblaščeno
servisno službo.
netesnost naprave
Čistilno sredstvo se ne vsesava
Uporabite brizgalno cev z reguliranjem tlaka (Vario
Power).
Brizgalno cev obrnite na položaj "Mix".
Očistite filter na gibki sesalni cevi za čistilno sred-
stvo.
Preverite gibko sesalno cev za čistilno sredstvo
glede pregibov.
je tehnično pogojena.
– 8
89SL
Page 90
Garancija
V vsaki državi veljajo garancijski pogoji, ki jih določa
naše prodajno predstavništvo. Morebitne motnje na napravi, ki so posledica materialnih ali proizvodnih napak,
v času garancije brezplačno odpravljamo. V primeru
uveljavljanja garancije, se z originalnim računom obrnite na prodajalca oziroma najbližji uporabniški servis.
Naslove najdete na:
www.kaercher.com/dealersearch
Tehnični podatki
Električni priključek
Napetost 230
Priključna moč 2,1 kW
Stopnja zaščite IP X5
Razred zaščite I
Omrežna varovalka (inertna) 10 A
Vodni priključek
Pritisk dotoka (maks.) 0,8 MPa
Temperatura dotoka (maks.) 40 °C
Količina dotoka (min.) 10 l/min
Max. sesalna višina 0,5 m
Podatki o zmogljivosti
Delovni tlak 12,5 MPa
Maks. dovoljeni tlak 14,5 MPa
Črpalna količina, voda 7,5 l/min
Črpalna količina, maksimalna 8,3 l/min
Črpalna količina, čistilno sredstvo 0,3 l/min
Povratna sila ročne brizgalne pištole 20 N
Mere in teže
Dolžina 516 mm
Širina 295 mm
Višina 282 mm
Teža, pripravljeno za uporabo s pri-
borom
Ugotovljene vrednosti v skladu z EN 60335-2-79
Vrednost vibracij dlan-roka
Negotovost K
Nivo hrupa L
Negotovost K
Nivo hrupa ob obremenitviL
gotovost K
Pridržujemo si pravico do tehničnih sprememb.
pA
pA
+ ne-
WA
WA
1~50VHz
13,1 kg
<2,5
m/s
0,3
m/s
773dB(A)
dB(A)
92 dB(A)
2
2
Izjava EU o skladnosti
S to izjavo potrjujemo, da spodaj omenjeni stroj zaradi
svoje zasnove in načina izdelave ustreza temeljnim varnostnim in zdravstvenim zahtevam EU-standardov. Ta
izjava izgubi svojo veljavnost, če kdo napravo spremeni
brez našega soglasja.
Proizvod: visokotlačni čistilec
Tip: 1.630-xxx
Zadevne EU-direktive:
2000/14/ES
2014/30/EU
2006/42/ES (+2009/127/ES)
2011/65/ЕU
Uporabljene usklajene norme:
EN 50581
EN 55014–1: 2006+A1: 2009+A2: 2011
EN 55014–2: 2015
EN 60335–1
EN 60335–2–79
EN 61000–3–2: 2014
EN 61000–3–3: 2013
EN 62233: 2008
Postopek ocenjevanja skladnosti:
2000/14/ES: Priloga V
Raven zvočne moči dB(A)
Izmerjeno: 88
Zajamčeno: 92
Podpisniki ravnajo po navodilih in s pooblastilom vodstva podjetja.
CEO
Pooblaščenec za dokumentacijo:
S. Reiser
Alfred Kärcher GmbH & Co. KG
Alfred-Kärcher-Str. 28 - 40
71364 Winnenden (Germany)
Tel.: +49 7195 14-0
Faks: +49 7195 14-2212
Winnenden, 2016/04/01
Head of Approbation
90 SL
– 9
Page 91

Spis treści
Bezpieczeństwo . . . . . . . . . . . . . . . . . . . . . . PL 5
Ochrona środowiska . . . . . . . . . . . . . . . . . . . PL 5
Opis urządzenia . . . . . . . . . . . . . . . . . . . . . . PL 6
Montaż. . . . . . . . . . . . . . . . . . . . . . . . . . . . . . PL 6
Uruchamianie . . . . . . . . . . . . . . . . . . . . . . . . PL 6
Działanie . . . . . . . . . . . . . . . . . . . . . . . . . . . . PL 7
Transport . . . . . . . . . . . . . . . . . . . . . . . . . . . .PL 7
Przechowywanie . . . . . . . . . . . . . . . . . . . . . . PL 8
Czyszczenie i konserwacja . . . . . . . . . . . . . . PL 8
Części zamienne . . . . . . . . . . . . . . . . . . . . . . PL 8
Usuwanie usterek . . . . . . . . . . . . . . . . . . . . . PL 8
Gwarancja . . . . . . . . . . . . . . . . . . . . . . . . . . . PL9
Dane techniczne . . . . . . . . . . . . . . . . . . . . . . PL 9
Deklaracja zgodności UE . . . . . . . . . . . . . . . PL 9
Bezpieczeństwo
Przed pierwszym użyciem urządzenia należy przeczytać niniejszą oryginalną in-
strukcję obsługi i dołączone przepisy bezpieczeństwa. Postąpić zgodnie z tym wskazaniem.
Obydwa zeszyty zachować do późniejszego wykorzystania lub dla następnego użytkownika.
Użytkowanie zgodne z przeznaczeniem
Myjka wysokociśnieniowa przeznaczona jest wyłącznie
do zastosowania w gospodarstwach domowych:
– do czyszczenia maszyn, pojazdów, budynków, na-
rzędzi, fasad, tarasów, urządzeń ogrodowych itp.
przy użyciu strumienia wody pod wysokim ciśnieniem (w razie potrzeby z dodatkiem środków
czyszczących).
– w połączeniu z akcesoriami, częściami zamienny-
mi i środkami czyszczącymi dopuszczonymi przez
firmę KÄRCHER. Przestrzegać wskazówek dołączonych do środków czyszczących.
Stopnie zagrożenia
NIEBEZPIECZEŃSTWO
Wskazówka dot. bezpośredniego zagrożenia, prowadzącego do ciężkich obrażeń ciała lub do śmierci.
몇 OSTRZEŻENIE
Wskazówka dot. możliwie niebezpiecznej sytuacji, mogącej prowadzić do ciężkich obrażeń ciała lub śmierci.
몇 OSTROŻNIE
Wskazówka dot. możliwie niebezpiecznej sytuacji, która
może prowadzić do lekkich zranień.
UWAGA
Wskazówka dot. możliwie niebezpiecznej sytuacji, która
może prowadzić do szkód materialnych.
Symbole na urządzeniu
Urządzenia nie można podłączać bezpo-
średnio do sieci wodociągowej.
Urządzenie można używać jedynie na le-
żąco (poziomo).
Nie wolno kierować strumienia wysokociśnieniowego na ludzi, zwierzęta, czynny
osprzęt elektryczny ani na samo urządzenie.
Urządzenie chronić przed mrozem.
Zabezpieczenia
몇 OSTROŻNIE
Urządzenia zabezpieczające zapewniają ochronę
użytkownika i nie wolno ich zmieniać ani pomijać.
Wyłącznik urządzenia
Wyłącznik zapobiega niepożądanemu włączeniu się
urządzenia.
Blokada pistoletu natryskowego
Blokada zablokowuje dźwignię pistoletu natryskowego i
zapobiega niezamierzonemu włączeniu się urządzenia.
Zawór przelewowy z wyłącznikie ciśnieniowym
Zawór przelewowy zapobiega przekroczeniu dopuszczalnego ciśnienia roboczego.
Po zwolnieniu dźwigni pistoletu natryskowego wyłącz-
ciśnieniowy wyłącza
nik
Po pociągnięciu za dźwignię pompa ponownie się włącza.
Stycznik silnikowy
Przy zbyt wysokim poborze mocy stycznik silnikowy wyłącza urządzenie.
pompę i strumień wody ustaje.
Ochrona środowiska
Wskazówki dotyczące składników (REACH)
Aktualne informacje dotyczące składników znajdują się
pod:
www.kaercher.com/REACH
Materiały użyte do opakowania nadają się do recyklingu. Opakowania poddać utylizacji przyjaznej
dla środowiska naturalnego.
Urządzenia elektryczne i elektroniczne często zawierają materiały, które rozporządzane lub utylizowane niewłaściwie, mogą potencjalnie być niebezpieczne dla zdrowia ludzkiego i środowiska.
Są jednak kluczowe dla prawidłowego funkcjonowania urządzenia. Urządzenia oznaczone tym
symbolem nie mogą być usuwane z odpadami domowymi.
Zużyte urządzenia zawierają cenne surowce wtórne, które należy oddać do utylizacji. Baterie i akumulatory zawierają substancje, które nie mogą
przedostać się do środowiska. Zużyte sprzęty, takie jak baterie lub akumulatory poddać utylizacji
przyjaznej dla środowiska naturalnego.
Czyszczenie, podczas którego powstają ścieki zawierające olej, np. mycie silnika lub podłogi samochodu, dozwolone jest tylko w myjniach wyposażonych w separator oleju.
Prace przy użyciu środków czyszczących można
wykonywać jedynie na szczelnych powierzchniach roboczych z przyłączem kanalizacji ściekowej. Nie pozwolić na przedostanie się środków
czyszczących do ziemi ani do wód.
Pobieranie wody z wód publicznych jest w niektórych krajach niedozwolone.
– 5
91PL
Page 92

Opis urządzenia
W niniejszej instrukcji obsługi opisane jest maksymalne
wyposażenie. W zależności od modelu istnieją różnice
w zakresie dostawy (patrz opakowanie).
Ilustracje, patrz strona rozkładana 3
1 Schowek na akcesoria
2 Uchwyt transportowy, wysuwany
3 Uchwyt do noszenia przenoszenia
4 Szybkozłącze węża wysokociśnieniowego
5 Wyłącznik urządzenia „0/OFF“ / „I/ON“
6 Przewód zasilający z wtyczką
7 Uchwyt do noszenia przenoszenia
8 Kółko transportowe
9 Przyłącze wody z wbudowanym sitem
10 Złączka do przyłącza wody
11 Wąż ssący na środek czyszczący (z filtrem)
12 Pistolet natryskowy
13 Blokada pistoletu natryskowego
14 Wąż wysokociśnieniowy
15 Przycisk do oddzielenia węża wysokociśnieniowe-
go od pistoletu natryskowego
16 Lanca z regulacją ciśnienia (Vario Power)
Do najczęstszych zadań czyszczenia. Ciśnienie robocze można regulować stopniowo w zakresie od
„Min“ do „Max“. W pozycji „Mix“ można dolać dawkę środka czyszczącego.
W celu dokonania zmiany ciśnienia roboczego należy zwolnić dźwignię pistoletu natryskowego i
ustawić lancę w żądanej pozycji.
17 Lanca z frezem do zanieczyszczeń
Do przywartych zanieczyszczeń, trudnych do usunięcia
* Wyposażenie opcjonalne
18 Szczotka do mycia
Nadaje się do pracy ze środkami czyszczącymi.
19 Obrotowa szczotka do mycia
Nadaje się szczególnie do czyszczenia samochodów.
20 Dysza pianowa ze zbiornikiem środka czyszczące-
go
Środek czyszczący zasysany jest ze zbiornika i powstają mocna piana na bazie środka czyszczącego.
** Wymagany dodatkowo
21 Wąż do wody ze wzmocnioną tkaniną i ze złączem
dostępnym na rynku.
– Średnica min. 1/2 cala (13 mm)
– Długość min. 7,5 m
Montaż
Przed uruchomieniem zamontować luźno dołączone
części do urządzenia.
Ilustracje, patrz strona rozkładana 4
Rysunek
Przykręcić dołączoną złączkę do przyłącza wody
na urządzeniu.
Rysunek
Włożyć wąż wysokociśnieniowy do pistoletu natry-
skowego, aż się w słyszalny sposób zatrzaśnie.
Wskazówka: Zwrócić uwagę na właściwe ustawie-
nie złączki przyłączeniowej.
Sprawdzić bezpieczeństwo połączenia przez po-
ciągnięcie węża wysokociśnieniowego.
Uruchamianie
Ustawić urządzenie poziomo na równej powierzch-
ni.
Rysunek
Włożyć wąż wysokociśnieniowy do szybkozłącza,
aż się w słyszalny sposób zatrzaśnie.
Włożyć wtyczkę sieciową do gniazdka.
Doprowadzenie wody
Wartości przyłączenia patrz tabliczka znamionowa/
dane techniczne.
UWAGA
Zanieczyszczenia znajdujące się w wodzie mogą
uszkodzić pompę wysokociśnieniową i akcesoria. W
celu zapewnienia ochrony zaleca się stosowanie filtra
wodnego KÄRCHER (wyposażenie specjalne, nr katalogowy 4.730-059).
Dopływ wody z instalacji wodnej
Przestrzegać przepisów lokalnego przedsiębiorstwa
wodociągowego.
UWAGA
Złącza węży z metalu z Aquastop mogą prowadzić do
uszkodzenia pompy! Należy używać złącz węży z tworzywa sztucznego lub złącz węży KÄRCHER z mosiądzu.
Rysunek
Założyć wąż doprowadzający wodę na złącze przyłącza wody.
Podłączyć wąż do dopływu wody.
Całkowicie otworzyć kran.
Zasysanie wody z otwartych zbiorników
Ta myjka wysokociśnieniowa nadaje się wraz wężem
ssącym KÄRCHER z zaworem zwrotnym (wyposażenie
specjalne, nr katalogowy 4.440-238) do zasysania
wody powierzchniowej np. z beczek na deszczówkę lub
stawów (maks. wysokość zasysania, patrz dane techniczne).
Usunąć złącze przyłącza wody.
Napełnić wężyk do zasysania wodą.
Przykręcić wąż ssący przy przyłączu wody urzą-
dzenia i zawiesić przy źródle wody (np. zbiornik
wody deszczowej).
Przed użyciem należy odpowietrzyć urządzenie.
Włączyć urządzenie „I/ON”.
Odblokować dźwignię pistoletu natryskowego.
Pociągnąć za dźwignię, urządzenie się włącza.
Włączyć urządzenie (na maks. 2 minuty), aż z pi-
stoletu natryskowego zacznie wydobywać się
woda bez bąbelków.
Zwolnić dźwignię pistoletu natryskowego.
Wskazówka: Gdy zwalnia się dźwignię, urządzenie znowu się odłącza. Nadciśnienie pozostaje w
systemie.
Zablokować dźwignię pistoletu natryskowego.
92 PL
– 6
Page 93
Działanie
UWAGA
Praca na sucho trwająca przez ponad 2 minuty prowadzi do uszkodzenia pompy wysokociśnieniowej. Jeżeli
urządzenie nie wytworzy ciśnienia w ciągu 2 minut, należy je wyłączyć i postąpić zgodnie ze wskazówkami z
rozdziału „Usuwanie usterek“.
UWAGA
Niebezpieczeństwo uszkodzenia! Urządzenie można używać jedynie na leżąco (poziomo).
Praca z wysokim ciśnieniem
몇 OSTROŻNIE
W celu uniknięcia uszkodzeń, w trakcie czyszczenia powierzchni lakierowanych zachować co najmniej 30-centymetrowy odstęp.
UWAGA
Nie czyścić opon samochodowych, lakieru ani wrażliwych powierzchni, jak drewno, za pomocą frezu do zanieczyszczeń; niebezpieczeństwo uszkodzenia.
Rysunek
Włożyć lancę w pistolet natryskowy i zablokować,
obracając o 90°.
Włączyć urządzenie „I/ON”.
Odblokować dźwignię pistoletu natryskowego.
Pociągnąć za dźwignię, urządzenie się włącza.
Wskazówka: Gdy zwalnia się dźwignię, urządze-
nie znowu się odłącza. Nadciśnienie pozostaje w
systemie.
Praca ze szczotką myjącą
UWAGA
Niebezpieczeństwo uszkodzenia lakieru
W pracach przy użyciu szczotki należy zadbać o to, by
była ona pozbawiona zanieczyszczeń
czek.
Włożyć szczotkę myjącą do pistoletu natryskowe-
go i zablokować, obracając o 90°.
Wskazówka: W razie potrzeby do pracy z użyciem
środków czyszczących można też użyć szczotek myjących.
Praca ze środkiem czyszczącym
Wskazówka:
pod niskim ciśnieniem.
NIEBEZPIECZEŃSTWO
W przypadku zastosowania środków czyszczących należy uwzględnić dane z karty charakterystyki substancji
producenta środka czyszczącego szczególnie wskazówki dot. osobistego wyposażenie ochronnego.
Rysunek
Zawiesić wąż ssący środka czyszczącego w zbior-
Zastosować lancę z regulacją ciśnienia (Vario Po-
Obrócić lancę do położenia „Mix“.
Środek czyszczący
Z obudowy wyciągnąć wąż ssący na środek czysz-
czący na odpowiednią długość.
niku ze środkiem czyszczącym.
wer).
Wskazówka: W ten sposób miesza się przy pracy
roztwór środka czyszczącego ze strumieniem wo-
dy.
i innych cząste-
można dodawać tylko
Zalecana metoda czyszczenia
Cienko spryskać suchą powierzchnię środkiem
czyszczącym i pozostawić na pewien czas (ale nie
do wyschnięcia).
Spłukać rozpuszczony brud strumieniem wysoko-
ciśnieniowym.
Opcjonalnie
Dysza pianowa
Napełnić zbiornik roztworem środka czyszczącego
(zważać na dane dotyczące dozowania na opakowaniu środka czyszczącego).
Połączyć dyszę pianową ze zbiornikiem środka
czyszczącego.
Włożyć dyszę pianową w pistolet natryskowy i za-
blokować, obracając o 90°.
Przerwanie pracy
Zwolnić dźwignię pistoletu natryskowego.
Zablokować dźwignię pistoletu natryskowego.
W przypadku dłuższych przerw w pracy (ponad 5
minut) dodatkowo wyłączać urządzenie „0/OFF“.
Zakończenie pracy
몇 OSTROŻNIE
Wąż wysokociśnieniowy odłączać od pistoletu natryskowego lub urządzenia tylko wtedy, gdy układ pozbawiony jest ciśnienia.
Po pracy ze środkiem czyszczącym: Urządzenie
przepłukać do czysta przez ok. 1 min.
Zwolnić dźwignię pistoletu natryskowego.
Wyłączyć urządzenie „0/OFF”.
Wyciągnąć wtyczkę z gniazdka.
Zakręcić kran.
Nacisnąć dźwignię pistoletu natryskowego, aby
całkowicie usunąć ciśnienie z systemu.
Zablokować dźwignię pistoletu natryskowego.
몇 OSTROŻNIE
Przy odłączeniu węża dopływowego lub wysokociśnieniowego, po pracy może z przyłączy wydostawać się
gorąca woda.
Oddzielić urządzenie od dopływu wody.
Transport
몇 OSTROŻNIE
Niebezpieczeństwo zranienia i uszkodzenia!
Zwrócić uwagę na ciężar urządzenia w czasie transportu.
Transport ręczny
Rysunek
Podnosić i nosić urządzenie stosując uchwyt nośny.
Rysunek
Wyjąć uchwyt transportowy; zaskakuje on w słyszalny sposób.
Pociągnąć urządzenie za uchwyt transportowy
Transport w pojazdach
Zabezpieczyć urządzenie przed przesunięciem i
przewróceniem się.
– 7
93PL
Page 94
Przechowywanie
몇 OSTROŻNIE
Niebezpieczeństwo zranienia i uszkodzenia!
Przy składowaniu wziąć pod uwagę ciężar urządzenia.
Przechowywanie urządzenia
Pozostawić urządzenie na równej powierzchni.
Nacisnąć przycisk oddzielający pistoletu natrysko-
wego i oddzielić wąż wysokociśnieniowy od pisto-
letu natryskowego.
Nacisnąć obudowę szybkozłącza węża wysokociś-
nieniowego w kierunku strzałki i wyjąć wąż wysoko-
ciśnieniowy.
Rysunek
Włożyć pistolet natryskowy do schowka.
Umieścić rurkę strumieniową w odpowiednim
schowku.
Umieścić wąż wysokociśnieniowy i przewód zasila-
jący przy urządzeniu.
Ochrona przeciwmrozowa
UWAGA
Nie w pełni opróżnione urządzenia i akcesoria mogą
ulec zniszczeniu przez mróz. Całkowicie opróżnić urządzenie i akcesoria i chronić je przed mrozem.
W celu uniknięcia szkód:
Całkowicie opróżnić urządzenie z wody: Włączyć
urządzenie bez podłączonego węża wysokociśnie-
niowego i bez podłączonego dopływu wody (maks.
1 min.) i zaczekać, aż z przyłącza wysokociśnienio-
wego już nie będzie się wydobywać woda. Wyłą-
czyć urządzenie.
Przechowywać urządzenie z wszystkimi akcesoria-
mi w ogrzewanym pomieszczeniu.
Przed dłuższym okresem przechowywania, np. w zimie
należy zwrócić uwagę na wskazówki w rozdziale
„Ochrona przeciwmrozowa.
Czyszczenie i konserwacja
NIEBEZPIECZEŃSTWO
Niebezpieczeństwo porażenia prądem.
Przed przystąpieniem do wszelkich prac przy urzą-
dzeniu należy odłączyć przewód sieciowy od zasi-
lania.
Oczyścić filtr sitowy na przyłączu wody
UWAGA
Nie wolno uszkodzić sitka.
Usunąć złącze przyłącza wody.
Rysunek
Wyjąć sitko używając szczypiec płaskich.
Czyścić sitko po wodą bieżącą.
Ponownie włożyć sitko do przyłącza wody.
Czyszczenie filtra środka czyszczącego
Rysunek
Zdjąć filtr z węża ssącego środka czyszczącego i
oczyścić go pod bieżącą wodą.
Części zamienne
Stosować wyłącznie oryginalne części zamienne firmy
KÄRCHER. Lista części zamiennych znajduje się na
końcu niniejszej instrukcji obsługi.
Usuwanie usterek
usterki można usunąć samodzielnie, korzysta-
Mniejsze
jąc z poniższych wskazówek.
W razie wątpliwości prosimy zwrócić się do autoryzowanego serwisu.
NIEBEZPIECZEŃSTWO
Niebezpieczeństwo porażenia prądem.
Przed przystąpieniem do wszelkich prac przy urzą-
dzeniu należy odłączyć przewód sieciowy od zasilania.
Urządzenie nie działa
Pociągnąć za dźwignię pistoletu natryskowego,
urządzenie się włącza.
Sprawdzić, czy napięcie sieciowe podane na tab-
liczce znamionowej odpowiada napięciu źródła
prądu.
Skontrolować przewód zasilający pod kątem
uszkodzeń.
Silnik przeciążony, zadziałał stycznik silnikowy.
– Wyłączyć urządzenie „0/OFF”.
– Schłodzić urządzenie przez jedną godzinę.
– Włączyć urządzenie i ponownie zacząć pracę.
Jeżeli usterka powtórzy się kilkakrotnie, należy od-
dać urządzenie do sprawdzenia do serwisu.
Urządzenie się nie uruchamia, silnik warczy
Spadek napięcia z powodu słabej sieci elektrycznej
albo używania przedłużacza.
Przy włączaniu najpierw pociągnąć za dźwignię pi-
stoletu natryskowego, potem ustawić wyłącznik
urządzenia na „I/ON“.
Urządzenie nie wytwarza ciśnienia
Sprawdzić dopływ wody pod kątem wystarczającej
przepustowości.
Wyciągnąć szczypcami płaskimi sito z przyłącza
wody i oczyścić je pod bieżącą wodą.
Odpowietrzyć urządzenie: Włączyć urządzenie bez
podłączonego węża wysokociśnieniowego i zacze-
kać (maks. 2 minuty), aż z przyłącza wysokociśnie-
niowego zacznie wydobywać się woda bez bąbel-
ków. Wyłączyć urządzenie i ponownie podłączyć
wąż wysokociśnieniowy.
Przekroczona wysokość zasysania 0,5 m przy za-
sysaniu z otwartego zbiornika.
Silne wahania ciśnienia
Czyszczenie dyszy wysokociśnieniowej: Usunąć
zanieczyszczenia z otworu dyszy za pomocą igły i
wypłukać wodą od przodu.
Sprawdzić ilość dopływającej wody.
Nieszczelne urządzenie
Niewielka nieszczelność urządzenia wynika z jej
konstrukcji. W przypadku większej nieszczelności
zlecić naprawę w autoryzowanym serwisie.
Środek czyszczący nie jest zasysany
Zastosować lancę z regulacją ciśnienia (Vario Po-
wer).
Obrócić lancę do położenia „Mix“.
Oczyścić filtr przy wężu ssącym środka czyszczą-
cego.
Sprawdzić wąż ssący środka czyszczącego czy nie
ma załamań.
94 PL
– 8
Page 95
Gwarancja
W każdym kraju obowiązują warunki gwarancji określone przez odpowiedniego lokalnego dystrybutora. Ewentualne usterki urządzenia usuwane są w okresie gwarancji bezpłatnie, o ile spowodowane są błędem materiałowym lub produkcyjnym. W sprawach napraw gwarancyjnych prosimy kierować się z dowodem zakupu do
dystrybutora lub do autoryzowanego punktu serwisowego.
Adresy podano pod:
www.kaercher.com/dealersearch
Dane techniczne
Podłączenie do sieci
Napięcie 230
Pobór mocy 2,1 kW
Stopień zabezpieczenia IP X5
Klasa ochrony I
Bezpiecznik sieciowy (zwłoczny) 10 A
Przyłącze wody
Ciśnienie dopływowe (maks.) 0,8 MPa
Temperatura doprowadzenia (maks.) 40 °C
Ilość doprowadzenia (min.) 10 l/min
Maks. wysokość ssania 0,5 m
Wydajność
Ciśnienie robocze 12,5 MPa
Maks. dopuszczalne ciśnienie 14,5 MPa
Ilość pobieranej wody 7,5 l/min
Maks. ilość przetłaczanej cieczy 8,3 l/min
Ilość pobieranego środka czyszczą-
cego
Siła odrzutu pistoletu natryskowego 20 N
Wymiary i ciężary
Długość 516 mm
Szerokość 295 mm
Wysokość 282 mm
Ciężar, urządzenie gotowe do pracy
wraz z akcesoriami
Wartości określone zgodnie z EN 60335-2-79
Drgania przenoszone przez kończyny górne
Niepewność pomiaru K
Poziom ciśnienie akustycznego L
Niepewność pomiaru K
Poziom mocy akustycznej L
pewność pomiaru K
Zastrzega się prawo wprowadzania zmian technicznych.
pA
+ Nie-
WA
WA
1~50VHz
0,3 l/min
13,1 kg
2
<2,5
m/s
2
0,3
m/s
pA
773dB(A)
dB(A)
92 dB(A)
Deklaracja zgodności UE
Niniejszym oświadczamy, że określone poniżej urządzenie odpowiada pod względem koncepcji, konstrukcji
oraz wprowadzonej przez nas do handlu wersji obowiązującym wymogom dyrektyw UE dotyczącym wymagań
w zakresie bezpieczeństwa i zdrowia. Wszelkie nie
uzgodnione z nami modyfikacje urządzenia powodują
utratę ważności tego oświadczenia.
Produkt: Myjka wysokociśnieniowa
Typ: 1.630-xxx
Obowiązujące dyrektywy UE
2000/14/WE
2014/30/UE
2006/42/WE (+2009/127/WE)
2011/65/UE
Zastosowane normy zharmonizowane
EN 50581
EN 55014–1: 2006+A1: 2009+A2: 2011
EN 55014–2: 2015
EN 60335–1
EN 60335–2–79
EN 61000–3–2: 2014
EN 61000–3–3: 2013
EN 62233: 2008
Zastosowana metoda oceny zgodności
2000/14/WE: Załącznik V
Poziom mocy akustycznej dB(A)
Zmierzony: 88
Gwarantowany: 92
Z upoważnienia zarządu przedsiębiorstwa.
CEO
Pełnomocnik dokumentacji:
S. Reiser
Alfred Kärcher GmbH & Co. KG
Alfred-Kärcher-Str. 28 - 40
71364 Winnenden (Germany)
tel.: +49 7195 14-0
faks: +49 7195 14-2212
Winnenden, 2016/04/01
Head of Approbation
– 9
95PL
Page 96

Cuprins
Siguranţa . . . . . . . . . . . . . . . . . . . . . . . . . . . .RO 5
Protecţia mediului înconjurător . . . . . . . . . . . RO 5
Descrierea aparatului . . . . . . . . . . . . . . . . . . RO 6
Montare . . . . . . . . . . . . . . . . . . . . . . . . . . . . .RO 6
Punerea în funcţiune . . . . . . . . . . . . . . . . . . . RO 6
Funcţionarea . . . . . . . . . . . . . . . . . . . . . . . . . RO 7
Transport . . . . . . . . . . . . . . . . . . . . . . . . . . . .RO 7
Depozitarea . . . . . . . . . . . . . . . . . . . . . . . . . . RO8
Îngrijirea şi întreţinerea . . . . . . . . . . . . . . . . . RO 8
Piese de schimb . . . . . . . . . . . . . . . . . . . . . . RO 8
Remedierea defecţiunilor . . . . . . . . . . . . . . . RO 8
Garanţie. . . . . . . . . . . . . . . . . . . . . . . . . . . . . RO 9
Date tehnice . . . . . . . . . . . . . . . . . . . . . . . . . RO9
Declaraţie UE de conformitate . . . . . . . . . . . RO 9
Siguranţa
Citiţi aceste instrucţiuni din manualul de
utilizare original înainte de prima utilizare
a aparatului dumneavoastră şi instrucţiunile de siguranţă anexate. Respectaţi aceste instrucţiuni. Păstraţi aceste manuale pentru viitoarele utilizări
sau pentru viitorul posesor.
Utilizarea corectă
Utilizaţi acest aparat de curăţat sub presiune exclusiv
pentru gospodăria particulară.
– la curăţarea maşinilor, vehiculelor, utilajelor, faţa-
delor, teraselor, aparatelor de grădinărit, etc. cu jet
de apă sub presiune (în caz de nevoie cu adăugarea de soluţie de curăţat).
– cu accesoriile, piesele de schimb şi soluţiile de cu-
răţat autorizaţi de KÄRCHER. Respectaţi instrucţiunile de utilizare ale soluţiilor de curăţat.
Trepte de pericol
PERICOL
Indicaţie referitoare la un pericol iminent, care duce la
vătămări corporale grave sau moarte.
몇 AVERTIZARE
Indicaţie referitoare la o posibilă situaţie periculoasă,
care ar putea duce la vătămări corporale grave sau
moarte.
몇 PRECAUŢIE
Indică o posibilă situaţie periculoasă, care ar putea
duce la vătămări corporale uşoare.
ATENŢIE
Indicaţie referitoare la o posibilă situaţie periculoasă,
care ar putea duce la pagube materiale.
Simboluri pe aparat
Aparatul nu poate fi racordat direct la reţeaua publică de alimentare cu apă.
Aparatul poate fi pus în funcţiune doar în
poziţie culcată (orizontală).
Nu îndreptaţi jetul de înaltă presiune spre
persoane, animale, echipamente electrice active sau asupra aparatului însuşi.
Feriţi aparatul de îngheţ.
Dispozitive de siguranţă
몇 PRECAUŢIE
Dispozitivele de siguranţă servesc pentru protecţia
utilizatorului şi nu este permisă modificarea sau
scoaterea din funcţiune a acestora.
Comutator principal
Comutatorul aparatului împiedică pornirea accidentală
a aparatului.
Zăvor pistol de pulverizat
Zăvorul blochează maneta pistolului de pulverizat şi împiedică pornirea accidentală a aparatului.
Supapă de preaplin cu întrerupător manometric
Supapa de preaplin previne depăşirea presiunii de lucru
admise.
Dacă mânerul pistolului manual de stropit este eliberat,
întrerupătorul manometric decuplează pompa, iar jetul
sub presiune se opreşte. Dacă se trage de mâner, pompa porneşte din nou.
Întrerupător pentru protecţia motorului
În cazul unui consum de curent prea mare, comutatorul
de protecţie al motorului întrerupe funcţionarea aparatului.
Protecţia mediului înconjurător
Observaţii referitoare la materialele conţinute (REACH)
Informaţii actuale referitoare la materialele conţinute puteţi găsi la adresa:
www.kaercher.com/REACH
Materialele de ambalare sunt reciclabile. Vă rugăm să dezafectaţi ambalajele într-un mod compatibil cu mediul înconjurător.
Aparatele electrice și electronice conțin adesea
componente care pot reprezenta un potențial pericol pentru sănătatea persoanelor, în cazul manevrării sau eliminării incorecte. Însă, aceste componente sunt necesare pentru funcționarea corespunzătoare a aparatului. Aparatele marcate cu
acest simbol nu trebuie aruncate în gunoiul menajer.
Aparatele vechi conţin materiale reciclabile valoroase, care pot fi supuse unui proces de revalorificare. Bateriile şi acumulatorii conţin substanţe,
care nu au voie să ajungă în mediul înconjurător.
Eliminaţi aparatele uzate, cum ar fi bateriile şi acumulatorii în mod ecologic.
Lucrările de curăţare la care se obţine apă reziduală cu un conţinut de ulei de maşină, de exemplu
spălarea motoarelor şi a şasiurilor trebuie să fie
efectuate numai în locuri special amenajate cu
dispozitive de separare şi de înlăturare a uleiului
de maşină.
Lucrările cu soluţii de curăţat pot fi efectuate doar
pe suprafeţe impermeabile cu racord la sistemul
de canalizare a apei uzate. Nu lăsaţi soluţiile de
curăţat să ajungă în ape sau sol.
Prelevarea de apă din sursele de apă publice nu
este permisă în unele ţări.
96 RO
– 5
Page 97

Descrierea aparatului
În acest manual este descrisă dotarea maximă. În funcţie de model pachetele de livrare pot diferi (vezi ambalajul).
Pentru imagini vezi pagina interioară 3
1 Spaţiu de depozitare pentru accesorii
2 Mâner pentru transport, extensibilă
3 Mâner pentru transport
4 Cuplaj rapid pentru furtunul de înaltă presiune
5 Comutatorul aparatului „0/OFF“ / „I/ON“
6 Cablu de reţea cu ştecher
7 Mâner pentru transport
8 Roată de transport
9 Racord de apă cu sită inclusă
10 Piesă de cuplare pentru conexiunea de apă
11 Furtun de aspiraţie pentru detergent (cu filtru)
12 Pistol de pulverizare
13 Zăvor pistol de pulverizat
14 Furtun de înaltă presiune
15 Buton de detaşare a furtunului de înaltă presiune
de pistolul de pulverizat
16 Lance cu reglaj de presiune (Vario Power)
Pentru lucrările de curăţare uzuale. Presiunea de
lucru poate fi reglată fără trepte între „Min” şi „Max”.
În poziţia „Min” puteţi adăuga soluţia de curăţat.
Pentru reglarea presiunii de lucru, eliberaţi maneta
pistolului manual de stropit şi rotiţi lancea în poziţia
dorită.
17 Lance cu freză pentru murdărie
Pentru murdărie persistentă
* Accesorii opţionale
18 Perie pentru spălat
Este adecvat pentru funcţionare cu soluţie de curăţat.
19 Perie rotativă pentru spălat
Destinat în special pentru curăţarea autovehiculelor.
20 Duză de spumă cu rezervor de soluţie de curăţat
Soluţia de curăţat este aspirată din rezervor şi se
generează o spumă puternică de soluţie de curăţat.
** Se necesită suplimentar
21 Furtun cu inserţie textilă cu cuplaj uzual.
– Diametru minim 1/2 ţoli (13 mm)
– Lungime minimă 7,5 m
Montare
Înainte de punerea în funcţiune montaţi piesele nefixate, livrate împreună cu aparatul.
Pentru imagini vezi pagina interioară 4
Figură
Se înşurubează piesa de cuplare de la racordul de
apă al aparatului, livrată odată cu furnitura.
Figură
Împingeţi furtunul de presiune în pistolul de pulverizare, până când se aude că acesta intră în locaş.
Observaţie: Atenţie la poziţia corectă a niplului de
conectare.
Verificaţi trăgând de furtunul de înaltă presiune,
dacă îmbinarea s-a făcut corect.
Punerea în funcţiune
Amplasaţi aparatul orizontal pe o suprafaţă plană.
Figură
Introduceţi furtunul de înaltă presiune în cuplajul rapid, până când se aude că acesta intră în locaş.
Introduceţi ştecherul în priză.
Alimentarea cu apă
Pentru valorile de racordare se vor consulta datele tehnice/plăcuţa de tip.
ATENŢIE
Impurităţile din apă pot afecta pompa de înaltă presiune
şi accesoriile. Pentru protecţia acestora vă recoman-
dăm filtrul de apă KÄRCHER (accesoriu special, nr. de
comandă 4.730-059).
Alimentarea cu apă din conducta de apă
Respectaţi prevederile companiei de furnizare a apei.
ATENŢIE
Racordurile de furtun din metal prevăzute cu Aquastop
pot cauza deteriorarea pompei! De aceea vă rugăm să
folosiţi racorduri de furtun din plastic sau racordul de furtun KÄRCHER din alamă.
Figură
Racordaţi furtunul de alimentare cu apă la cuplajul
de la racordul de apă.
Conectaţi furtunul de apă la sursa de alimentare cu
apă.
Deschideţi robinetul de apă în totalitate.
Aspirarea apei din rezervoare deschise
Acest aparat de curăţare sub presiune poate fi folosit cu
furtunul de absorbţie KÄRCHER cu supapă de refulare
(accesoriu special, nr. de comandă 4.440-238) şi este
adecvat pentru aspirarea apei de la suprafaţă, de ex.
din rezervoare cu apă de ploaie sau din iazuri (înălţimea
maximă de aspirare vezi Datele tehnice).
Îndepărtaţi cuplajul de la racordul de apă.
Umpleţi cu apă furtunul de aspirare.
Înşurubaţi furtunul de aspirare pe racordul de apă
al aparatului şi atârnaţi-l într-un recipient cu apă (de
ex. rezervorul de apă de ploaie).
Evacuaţi aerul înainte de a utiliza aparatul.
Porniţi aparatul „I/ON“.
Deblocaţi maneta pistolului de stropit.
Trageţi maneta, aparatul porneşte.
Lăsaţi aparatul să funcţioneze (max. 2 min.) până
ce apa este evacuată prin pistol fără bule de aer.
Eliberaţi maneta pistolului.
Observaţie: Dacă eliberaţi maneta, aparatul se
opreşte din nou. Presiunea înaltă rămâne acumulată în sistem.
Blocaţi maneta pistolului de stropit.
– 6
97RO
Page 98

Funcţionarea
ATENŢIE
Funcţionarea uscată timp de mai mult de 2 minute poate
duce la deteriorarea pompei de înaltă presiune. În cazul
în care aparatul nu generează presiune timp de 2 minute, opriţi-l şi procedaţi conform instrucţiunilor din capitolul "Remedierea defecţiunilor".
ATENŢIE
Pericol de deteriorare! Aparatul poate fi pus în funcţiune doar în poziţie culcată (orizontală).
Utilizarea cu presiune înaltă
몇 PRECAUŢIE
La curăţarea suprafeţelor lăcuite, trebuie respectată o
distanţă minimă de 30 cm, pentru a evita deteriorarea
acestora.
ATENŢIE
Nu curăţaţi roţile autovehiculelor, vopseaua şi suprafe-
ţele sensibile, cum ar fi lemnul cu freza pentru murdărie,
pericol de deterioarare.
Figură
Montaţi lancea la pistolul de pulverizare manual şi
fixaţi-o prin rotire la dreapta 90°.
Porniţi aparatul „I/ON“.
Deblocaţi maneta pistolului de stropit.
Trageţi maneta, aparatul porneşte.
Observaţie: Dacă eliberaţi maneta, aparatul se
opreşte din nou. Presiunea înaltă rămâne acumulată în sistem.
Operare cu perie de spălat
ATENŢIE
Pericol de deterioarare a vopselei
În cazul lucrărilor cu perie de apă aveţi grijă, ca aceasta
să nu conţină
Introduceţi
Indicaţie: Dacă este nevoie în cazul funcţionării cu soluţie de curăţat puteţi folosi şi periile rotative.
Indicaţie: Detergentul poate fi adăugat numai la utilizarea cu presiune joasă.
PERICOL
La utilizarea detergenţilor ţineţi cont de fişa tehnică de
siguranţă a producătorului detergentului, mai ales indicaţiile referitoare la echipamentul de protecţie personală.
Figură
Introduceţi furtunul de aspirare pentru soluţia de
Folosiţi lancea cu reglaj de presiune (Vario Power).
Rotiţi lancea în poziţia „Min”.
impurităţi sau alte particule.
peria de
manual şi fixaţi-o prin rotire la dreapta 90°.
spălat în pistolul de pulverizare
Utilizarea cu soluţie de curăţat
Extrageţi furtunul de aspirare pentru soluţia de curăţat din carcasă la lungimea dorită.
curăţat întrun rezervor cu soluţie de curăţat.
Observaţie: Prin acesta, în timpul funcţionării, soluţia de curăţat se amestecă cu jetul de apă.
Metoda de curăţare recomandată
Se pulverizează cu economie soluţie de curăţat pe
suprafaţa uscată şi se lasă să acţioneze (nu să se
usuce).
Mizeria desprinsă se spală cu jetul de înaltă presi-
une.
Opţional
Duză de spumă
Introduceţi soluţia de curăţat în rezervorul pentru
soluţia de curăţat al duzei de spumă (ţineţi cont de
instrucţiunile de dozare de pe ambalajul soluţiei de
curăţat).
Conectaţi duza de spumă la rezervorul pentru solu-
ţia de curăţat.
Introduceţi duza de spumă în pistolul de pulveriza-
re manual şi fixaţi-o prin rotire la dreapta 90°.
Întreruperea utilizării
Eliberaţi maneta pistolului.
Blocaţi maneta pistolului de stropit.
În cazul pauzelor mai lungi (peste 5 min) se deco-
nectează aparatul de la întrerupător „0/OFF“.
Încheierea utilizării
몇 PRECAUŢIE
Deconectaţi furtunul de presiune de la pistol sau de la
aparat numai atunci, când sistemul de află în stare depresurizată.
După funcţionare cu soluţie de curăţat: Pentru clă-
tire lăsaţi aparatul să funcţioneze circa un minut.
Eliberaţi maneta pistolului.
Opriţi aparatul „0/OFF“.
Trageţi fişa din priză.
Închideţi robinetul de apă.
Apăsaţi maneta pistolului pentru a elimina presiu-
nea încă existentă în sistem.
Blocaţi maneta pistolului de stropit.
몇 PRECAUŢIE
În cazul detaşării furtunului de alimentare sau a celui de
presiune înaltă, după utilizare poate să curgă apă fierbinte din racorduri.
Deconectaţi aparatul de la sursa de alimentare cu
apă.
Transport
몇 PRECAUŢIE
Pericol de rănire şi deteriorare a aparatului!
La transport ţineţi cont de greutatea aparatului.
Transportul manual
Figură
Ridicaţi aparatul de la mânerele de transport şi
transportaţi-l în acest fel.
Figură
Trageţi în afară mânerul de transport, până când
auziţi că acesta intră în locaş.
Trageţi aparatul de mânerul de transport.
Transportul în vehicule
Asiguraţi aparatul contra alunecării şi răsturnării.
98 RO
– 7
Page 99

Depozitarea
몇 PRECAUŢIE
Pericol de rănire şi deteriorare a aparatului!
La depozitare ţineţi cont de greutatea aparatului.
Depozitarea aparatului
Amplasaţi aparatul pe o suprafaţă plană.
Apăsaţi butonul de separare de pe pistolul manual
de pulverizat şi separaţi furtunul de înaltă presiune
de pistolul manual de pulverizat.
Apăsaţi carcasa cuplajului rapid pentru furtunul de
înaltă presiune în sensul săgeţii şi trageţi furtunul
de înaltă presiune în afară.
Figură
Introduceţi pistolul de pulverizare în spaţiul de depozitare a pistolului.
Fixaţi lancea în suportul destinat pentru aceasta.
Depozitaţi furtunul de înaltă presiune şi cablul de
alimentare la aparat.
Protecţia împotriva îngheţului
ATENŢIE
Dacă nu goliţi complet aparatul şi accesoriile, acestea
pot fi distruse de îngheţ. Goliţi complet aparatul şi accesoriile acestuia şi feriţi-le de îngheţ.
Pentru evitarea deteriorărilor:
Goliţi în totalitate apa din aparat: Porniţi aparatul cu
furtunul de înaltă presiune şi racordul la sursa de
alimentare cu apă deconectaţi (max. 1 minut) şi aşteptaţi până când nu mai iese apă din racordul de
presiune înaltă. Opriţi aparatul.
Aparatul şi toate accesoriile trebuie depozitate într-
o încăpere ferită de îngheţ.
În cazul depozitării pe perioade îndelungate, de ex. iarna, ţineţi cont suplimentar de indicaţiile din capitolul Îngrijire.
Îngrijirea şi întreţinerea
PERICOL
Pericol de electrocutare.
Înaintea tuturor lucrărilor la aparat, opriţi aparatul şi
scoateţi ştecherul din priză.
Curăţarea sitei din racordul de apă
ATENŢIE
Aceasta nu poate fi deteriorată.
Îndepărtaţi cuplajul de la racordul de apă.
Figură
Trageţi afară sita cu un cleşte.
Curăţaţi sita sub apă curentă.
Apoi montaţi la loc sita în racordul de apă.
Curăţarea filtrului de soluţie de curăţat
Figură
Se scot filtrele de la furtunul de aspiraţie detergent
şi se curăţă sub jet de apă.
Piese de schimb
Utilizaţi numai piese de schimb KÄRCHER originale.
Lista pieselor de schimb se află la sfârşitul acestor instrucţiuni de utilizare.
Remedierea defecţiunilor
Multe defecţiuni pot fi remediate de către dvs. apelând
la ajutorul următoarei prezentări de ansamblu.
În caz de neclarităţi vă rugăm să vă adresaţi serviciului
pentru clienţi autorizat.
PERICOL
Pericol de electrocutare.
Înaintea tuturor lucră
scoateţi ştecherul din priză.
Aparatul nu funcţionează
Trageţi
Verificaţi dacă tensiunea indicată pe plăcuţa de tip
Verificaţi cablul de alimentare, pentru a vedea dacă
Motor suprasolicitat, întrerupătorul pentru protecţia
– Opriţi aparatul „0/OFF“.
– Lăsaţi aparatul să se răcească timp de o om oră.
– Porniţi aparatul şi începeţi din nou lucrul.
maneta pistolului
aparatul porneşte.
coincide cu tensiunea sursei de alimentare.
este deteriorat.
motorului a fost declanşat.
Dacă defecţiunea survine în mod repetat, duceţi
aparatul la service pentru a fi verificat.
Aparatul nu porneşte, motorul scoate
Cădere de tensiune din cauza reţelei slabe de curent
sau în cazul utilizării unui prelungitor.
La pornire trageţi mai întâi maneta pistolului de pul-
verizare şi reglaţi apoi comutatorul pe "I/ON".
Aparatul nu ajunge la presiunea dorită
Verificaţi alimentarea cu apă în privinţa cantităţii de
alimentare suficiente.
Se scoate, cu un cleşte, filtrul de la racordul de apă
şi se spală sub jet de apă.
Evacuarea aerului din aparat: Porniţi aparatul cu
furtunul de înaltă presiune deconectat şi lăsaţi-l să
funcţioneze (max. 2 min.), până ce apa iese pe ieşirea de înaltă presiune fără a conţine bule de aer.
Opriţi aparatul şi racordaţi furtunul de înaltă presiune.
S-a depăşit înălţimea de aspirare de 0,5 m la aspi-
rare din rezervor deschis.
Oscilaţii puternice de presiune
Curăţaţi duza de înaltă presiune: îndepărtaţi cu un
ac murdăria din gaura duzei şi apoi clătiţi din faţă
cu apă.
Verificaţi cantitatea de apă de alimentare.
Aparatul nu este etanş
O mică neetanşeitate a aparatului este condiţiona-
tă de motive tehnice. În caz de neetanşeitate mare,
adresaţi-vă service-ului.
Soluţia de curăţat nu este aspirată
Folosiţi lancea cu reglaj de presiune (Vario Power).
Rotiţi lancea în poziţia „Min”.
Curăţaţi filtrul furtunului de aspirare a soluţiei de cu-
răţat.
Verificaţi furtunul de aspiraţie pentru soluţia de cu-
răţat să nu fie îndoit.
rilor la aparat, opriţi aparatul şi
manual pentru pulverizat,
zgomot
– 8
99RO
Page 100

Garanţie
În fiecare ţară sunt valabile condiţiile de garanţie publicate de distribuitorul nostru din ţara respectivă. Eventuale defecţiuni ale acestui aparat, care survin în perioada
de garanţie şi care sunt rezultatul unor defecte de fabricaţie sau de material, vor fi remediate gratuit. Pentru a
putea beneficia de garanţie, prezentaţi-vă cu chitanţa
de cumpărare la magazin sau la cea mai apropiată unitate de service autorizată.
Pentru adrese accesaţi:
www.kaercher.com/dealersearch
Date tehnice
Racord electric
Tensiune 230
Puterea absorbită 2,1 kW
Grad de protecţie IP X5
Clasa de protecţie I
Siguranţă pentru reţea (temporizată) 10 A
Racordul de apă
Presiunea de circulare (max.) 0,8 MPa
Temperatura de circulare (max.) 40 °C
Debitul de circulare (min.) 10 l/min
Înălţimea maximă de absorbţie 0,5 m
Caracteristicile de performanţă
Presiunea de lucru 12,5 MPa
Presiunea maximă admisă 14,5 MPa
Debit, apă 7,5 l/min
Debit maxim 8,3 l/min
Debit, agent de curăţare 0,3 l/min
Reculul pistolului de pulverizat 20 N
Dimensiuni şi masa
Lungime 516 mm
Lăţime 295 mm
Înălţime 282 mm
Greutate în stare de funcţionare cu
accesorii
Valori determinate conform EN 60335-2-79
Valoare vibraţie mână-braţ
Nesiguranţă K
Nivel de zgomot L
Nesiguranţă K
Nivelul puterii energiei L
ranţă K
WA
Se rezervă dreptul la modificări tehnice.
pA
pA
+ nesigu-
WA
1~50VHz
13,1 kg
<2,5
m/s
0,3
m/s
773dB(A)
dB(A)
92 dB(A)
2
2
Declaraţie UE de conformitate
Prin prezenta declarăm că aparatul desemnat mai jos
corespunde cerinţelor fundamentale privind siguranţa în
exploatare şi sănătatea incluse în directivele UE aplicabile, datorită conceptului şi a modului de construcţie pe
care se bazează, în varianta comercializată de noi. În
cazul efectuării unei modificări a aparatului care nu a
fost convenită cu noi, această declaraţie îşi pierde valabilitatea.
Produs: Aparat de curăţare sub presiune
Tip: 1.630-xxx
Directive UE respectate:
2000/14/CE
2014/30/UE
2006/42/CE (+2009/127/CE)
2011/65/UE
Norme armonizate utilizate:
EN 50581
EN 55014–1: 2006+A1: 2009+A2: 2011
EN 55014–2: 2015
EN 60335–1
EN 60335–2–79
EN 61000–3–2: 2014
EN 61000–3–3: 2013
EN 62233: 2008
Procedura de evaluare a conformităţii:
2000/14/CE: Anexa V
Nivel de zgomot dB(A)
măsurat: 88
garantat: 92
Semnatarii acţionează în numele şi prin împuternicirea
conducerii societăţii.
CEO
Însărcinat cu elaborarea documentaţiei:
S. Reiser
Alfred Kärcher GmbH & Co. KG
Alfred-Kärcher-Str. 28 - 40
71364 Winnenden (Germany)
Tel.: +49 7195 14-0
Fax: +49 7195 14-2212
Winnenden, 2016/04/01
Head of Approbation
100 RO
– 9
 Loading...