

Page 1
K 55
English 2
Français 9
Español 16
59634850 09/09
Page 2
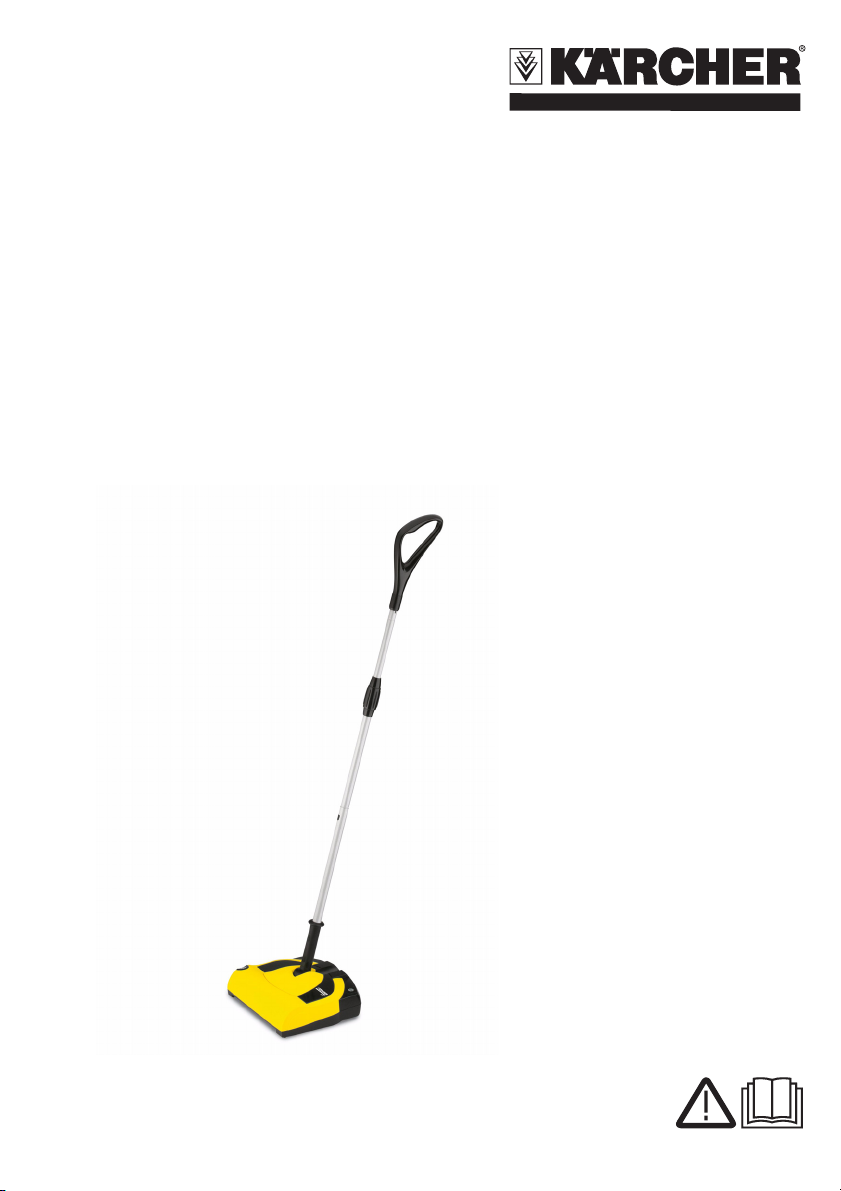
Cordless Electric Broom OPERATOR MANUAL
Specifications 2
Proper use 2
Customer Support 2
MODEL OVERVIEW 3
IMPORTANT SAFETY INSTRUCTIONS 4
START UP 5
OPERATING INSTRUCTIONS 6
Maintenance and Care 7
Service 8
Troubleshooting 8
Disposing of old device and battery pack 8
Specifications
Operating time when
max. 30
min
battery is fully charged
(depends on the flooring)
4,8
Working voltage of the
V
battery
Charging current for
14
h
empty battery
5,8
130
4,4
V
mA
lbs
Voltage of the charger
Charging current
Weight (incl. battery)
Battery type NiCd
Part No. 1.258-505.0
Serial no.
Proper use
– Use this battery operated appliance
only for personal use, use only the
accessories and spare parts approved by KÄRCHER.
– The appliance is not suitable for
cleaning deep-pile carpets and wet
floors.
– The appliance is not suitable for
cleaning concrete, gravel, etc.
The manufacturer is not responsible for
any damages that may occur on account of improper use or wrong operations.
Customer Support
In the U.S. or Canada, please call
1-800-537-4129 for warranty issues
and visit www.karcherresidential.com
for technical support and product assistance.
Please take a moment to register your
pressure washer online at
www.karcher-register.com. Be sure
to save your purchase receipt, it will be
required for repairs covered by warranty.
2 English
Page 3
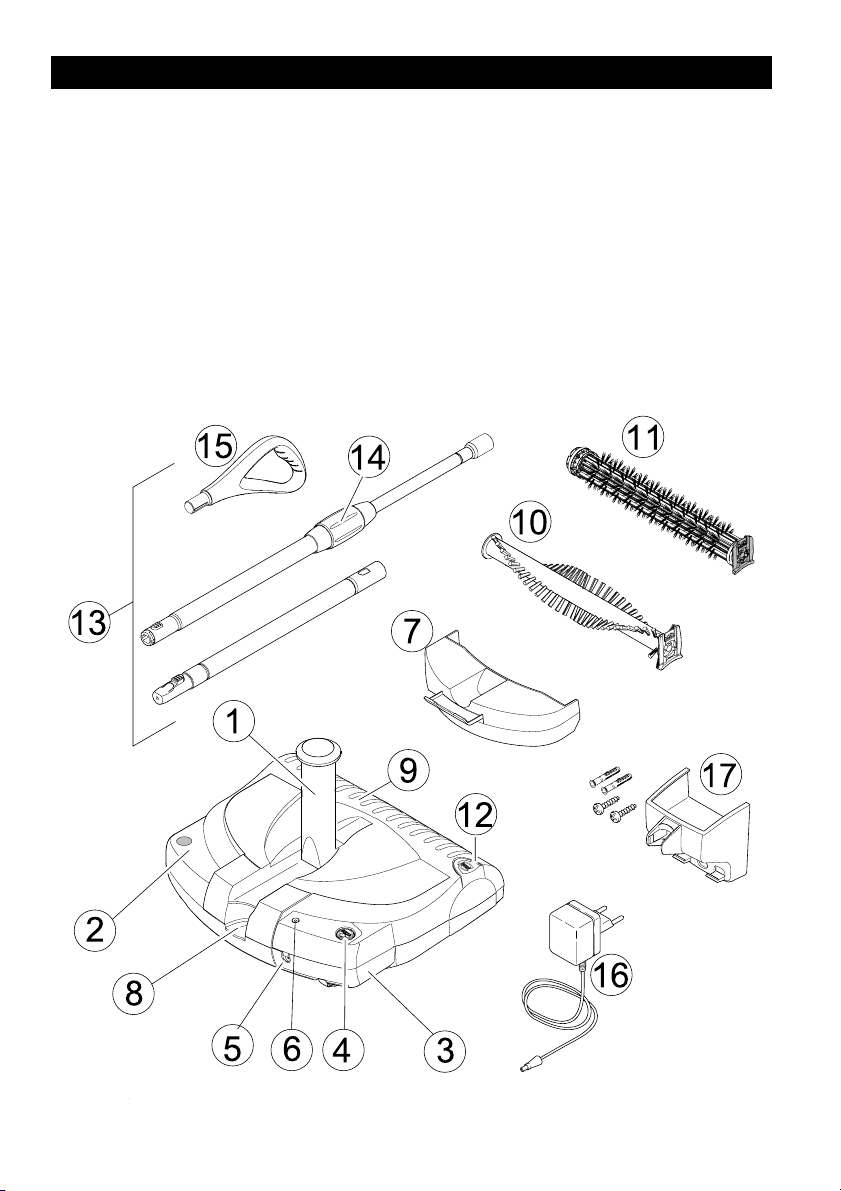
MODEL OVERVIEW
1 Joint at the appliance
2 ON/OFF foot switch
3 Rechargeable battery, detachable
4 Unlocking button, battery
5 Charging box
6 Charging display
7 Dirt container, detachable
8 Unlocking the lid of dirt container
9Casing
10 Brush roller, changeable
11 Brush roller with cleaning cover (an-
imal hair brush), can be interchanged
12 Unlocking button for the changeable
brush
13 Telescopic strut, adjustable height
14 Turning handle
15 Handle
16 Charger with charging cable
17 Wall mount with fasteners
For household use only!
English 3
Page 4
IMPORTANT SAFETY INSTRUCTIONS
When using this product basic precautions should always be followed, including the following:
WARNING
To reduce the risk of fire, electric
shock, or injury:
Do not use outdoors or on wet sur-
faces.
Use only as described in this manu-
al.
Do not use with damaged cord or
plug. If appliance is not working as it
should, has been dropped, damaged, left outdoors, or dropped into
water, return it to a service center or
call customer service.
Do not unplug by pulling on cord. To
unplug, grasp the plug, not the cord.
Do not handle plug or appliance with
wet hands.
Do not put any object into openings.
Do not use with any openings
blocked; keep free of dust, lint, hair
and anything that may reduce air
flow.
Keep hair, loose clothing, fingers
and all parts of body away from
openings and moving parts.
Turn off all controls before unplug-
ging.
Do not use appliance in an enclosed
space where oxygen, flammable, explosive or toxic vapors are given off
or in an area where flammable dust
is present.
Do no allow appliance to be used as
a toy. Close attention is necessary
when used by children.
Do not use extension cords or out-
lets with inadequate current carrying
capacity.
Do not incinerate or mutilate batter-
ies as they will explode at high temperatures.
Do not pick up anything that is burn-
ing or smoking such as cigarettes,
matches or hot material.
Do not allow the battery to run down
completely before charging. In doing
so, serious problems may occur in
the battery life cycle.
Do not pick up flammable or com-
bustible liquids such as gasoline or
use in areas where they are present.
Store the adapter indoors in a cool
dry area not exposed to the weather
to avoid electrical shock and/or
cleaner damage.
Only use the adapter provided by the
manufacturer to recharge the appliance.
Always disconnect cord from electri-
cal outlet before servicing appliance.
Only charge the unit indoors.
4 English
Page 5
START UP
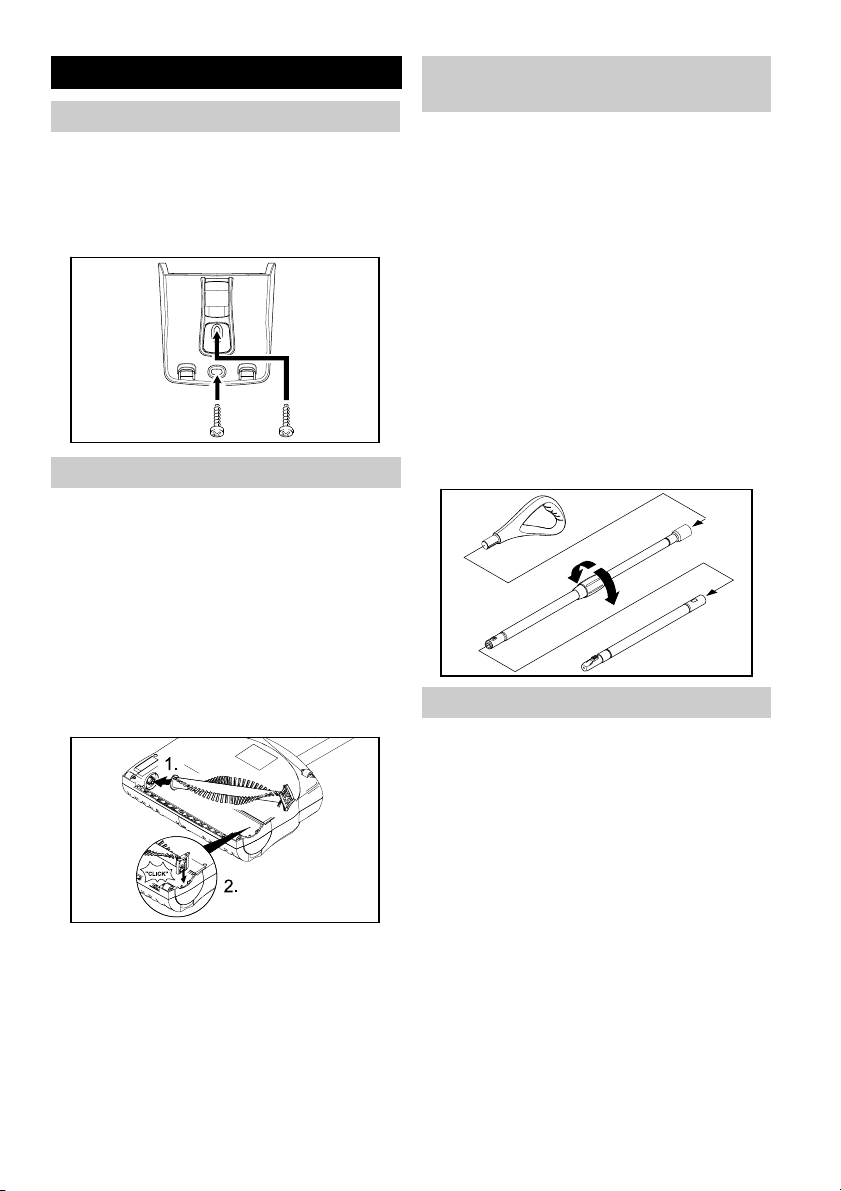
Installing the wall unit
The wall mount is to be used for storing
the appliance and the charger.
Î Fix the enclosed wall mount at an
easily accessible point near to a
socket - the fastener is enclosed.
Insert the brush roller
The brush roller has not yet been inserted in the appliance at the time of delivery. Please insert the brush roller
before starting the appliance.
Î Turn the casing.
Î Insert the brush roller in the side-in-
take.
Î Press in the holder of the brush roller
into the intake and check that it is sitting properly.
Installing the telescopic handle
and adjusting the handle height
The telescopic strut consists of 3 parts.
While assembling it, make sure that the
parts lock into each other.
Î Insert the handle on the longer strut
with turning handle.
Î Insert together the longer and short-
er struts; while assembling it, press
the locking button.
Î Insert the entire strut with the locking
button into the joint on the appliance.
Î Loosen the handle and pull out the
strut to the desired working height;
turn the handle to the correct posi-
tion and tighten using the turning
handle.
Inserting and charging the battery
The battery has not yet been inserted in
the appliance at the time of delivery.
Please insert the battery before commissioning the appliance.
Î Remove the rechargeable battery
from its packing.
Î Insert the battery into the intake until
it locks.
Î Charge the battery: The battery can
be charged when it is in the appli-
ance or removed from it. Note: The
following section describes the
charging process when the battery is
in the appliance.
Î Insert the charger delivered with the
appliance into a proper socket.
English 5
Page 6
Î
Important note for charging: Always switch off the appliance otherwise the battery will not get charged.
Î Insert the charging cable in the
charging box at the battery.
Î When the operating display glows, it
means the charging process has
started. The charging time for an
empty battery is approx. 14 hours.
Note: If the operating display does
not glow, switch off the machine because otherwise the charging process cannot start.
Î Remove the plug from the charger
socket and disconnect the charger
from mains power after you have finished charging.
OPERATING INSTRUCTIONS
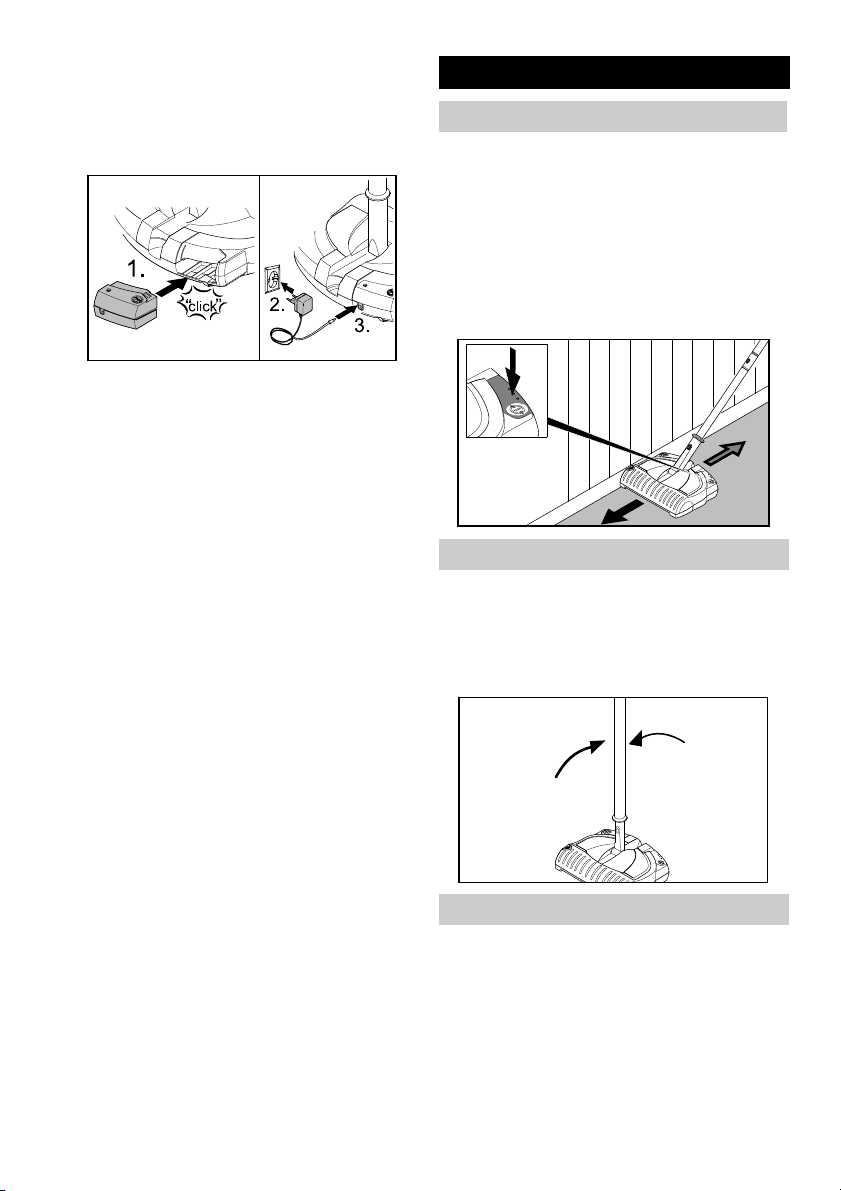
Starting the work
Î Switch on the appliance; press the
on/off foot switch to do so.
Î Move the appliance forward and
backward to clean it.
Î Use the right side (the side with an
unlocking button for the changeable
brush) for cleaning close to the edges.
Interrupting the work
Î Switch off the appliance; press the
on/off foot switch to do so.
Î Place the telescopic strut in an up-
right position during breaks; there is
a stopper that holds it in position.
6 English
Finishing your work
Î Switch off the appliance when fin-
ished.
Î Empty dirt container after each
cleaning.
Page 7
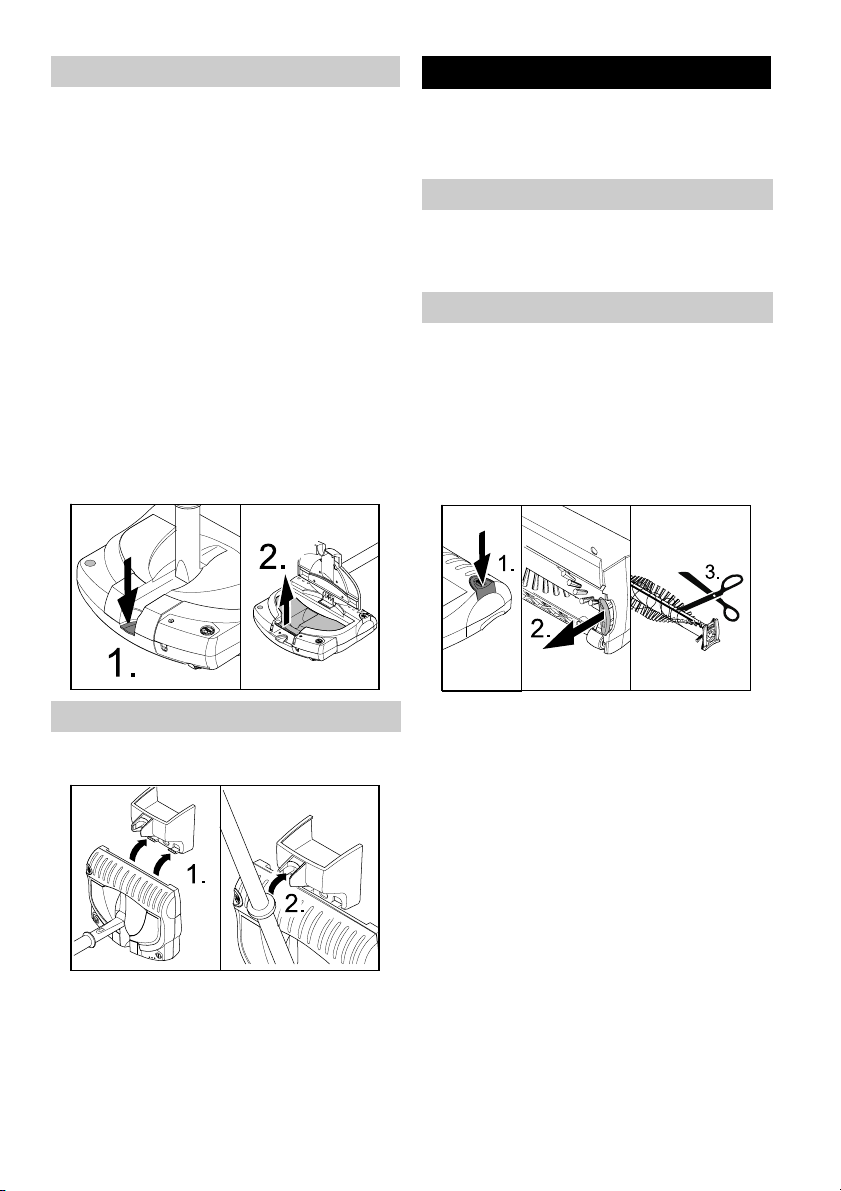
Emptying the dirt container
The dirt container can be removed in 2
ways:
1) Hold the appliance high at the joint
with one hand and unlock the lid of the
dirt container. Note: Hold the casing
firmly so that it doesn't open downward
too fast.
2) Place the appliance on the floor and
unlock the lid of the dirt container.
Note: Hold the telescopic strut firmly so
that it doesn't fall down.
Î Unlock lid of the dirt container and
pull it upward.
Î Lift the dirt container upward at the
handle and empty it.
Î Reinsert the dirt container and close
the lid.
Maintenance and Care
Caution
Remove the battery prior to any care
and maintenance work.
Cleaning the device
Î Wipe the appliance using a damp
cloth. Do not use any aggressive
agents, such as cleaning powder.
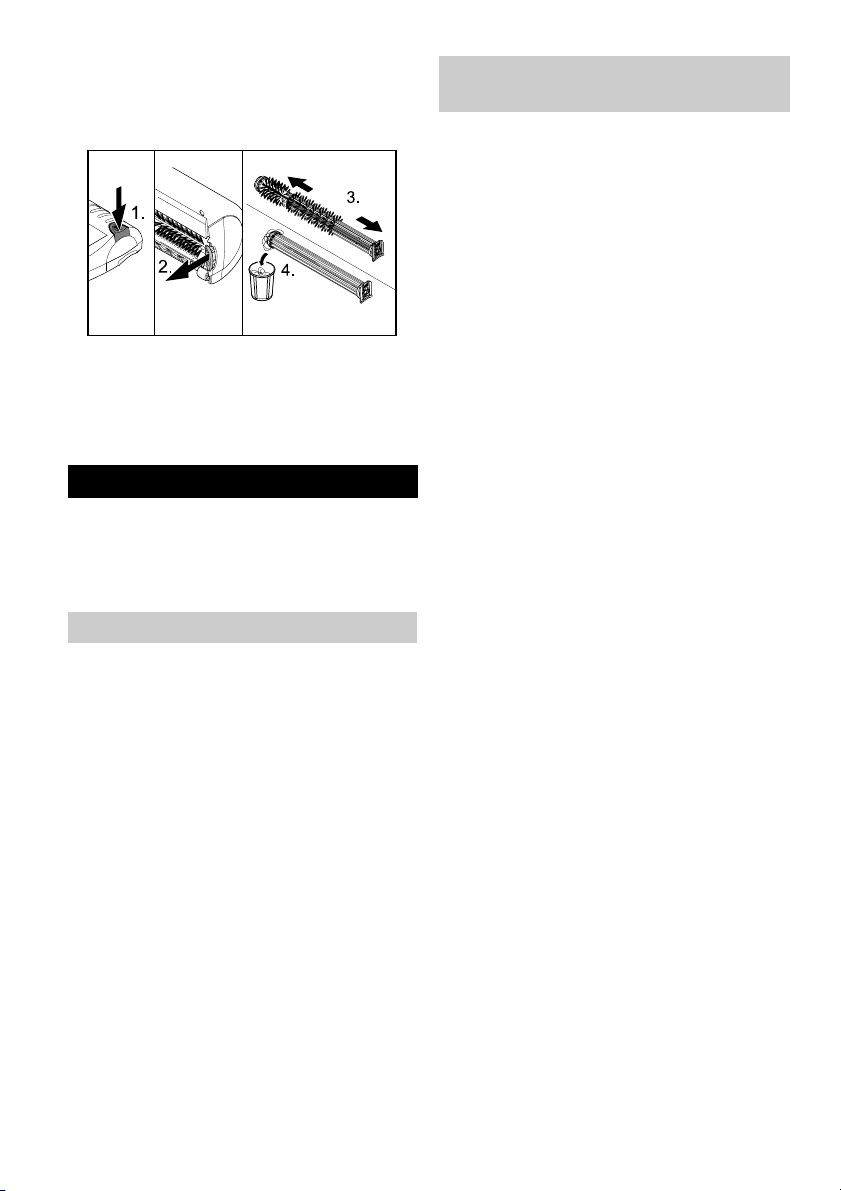
Change/ clean the brush roller
Brush roller
Î Press the unlocking button and re-
move the brush roller.
Î Remove wound up hair using a knife
or scissors. Move the knife along the
defined cutting edge and then re-
move the loosened hair.
Storing the appliance
Î Store the appliance in the wall
mount.
Î Alternatively, you can also store the
device at the handle; if required, turn
the handle (refer section "Adjust
telescopic strut and handle").
Î Charge the battery.
Î Insert the cleaned or new brush roll-
er and ensure that it sits properly.
Clean the brush roller with the cleaning cover (animal hair brush)
Note: Please clean animal hair brush
after each use!
Î Press the unlocking button and re-
move the brush roller.
Animal hair that has wounded can be
removed in the most simple way:
Î Pull out the cleaning cover from the
brush roller; the hair that has come
off remains stuck there and can be
disposed off in the household gar-
bage.
English 7
Page 8
Note: First cut the long animal or human hair that has got wounded with
the help of a knife or scissors; then
remove the cover.
Î After cleaning, insert back the cover.
Î Insert the cleaned or new brush roll-
er and ensure that it sits properly.
Service
Risk of injury
Turn off the appliance and remove the
mains plug prior to any care and maintenance works.
Troubleshooting
Operating display does not glow
Î The appliance is switched on during
the charging process.
Switch off the appliance using the
On/Off switch.
Appliance does not clean properly
Î Clean or replace the brush rollers
(refer chapter "Replace/ clean brush
roller").
Î Charge the battery (refer chapter
"Charging the battery“).
Dirt is being thrown out of the appliance
Î Empty the full dirt container (refer
chapter "Empty dirt container").
Disposing of old device and bat-
tery pack
Î Arrange for the proper environmen-
tally friendly disposal of the old device. Please remove the battery
pack prior to disposing of the device.
Battery disposal
To preserve natural resources, please
recycle or dispose of expired battery
pack properly.
THIS PRODUCT CONTAINS A NICKELCADMIUM BATTERY. IT MUST BE DISPOSED OF PROPERLY. LOCAL, SATE,
OR FEDERAL LAWS MAY PROHIBIT DISPOSAL OF NICKEL-CADMIUM BATTERIES IN ORDINARY TRASH. CONSULT
YOUR LOCAL WASTE AUTHORITY FOR
INFORMATION REGARDING AVAILABLE
RECYCLING AND/OR DISPOSAL OPTIONS.
Î
Remove the battery pack with its
casing and dispose of properly.
There is no need to disassemble the
plastic casing.
몇 Warning
– Do not open the battery, as there is
a risk of an electrical short; also, irritating or caustic vapors can escape.
8 English
Page 9

Balai électrique sans fil - NOTICE D'UTILISATION
Caractéristiques 9
Utilisation conforme 9
Assistance 9
GÉNÉRALITÉS 10
CONSIGNES DE SECURITE IMPOR-
TANTES
DEMARRAGE 12
MODE D'EMPLOI 13
Entretien, maintenance 14
Service 15
Assistance en cas de panne 15
Éliminer l'appareil usé et l'accumulateur 15
11
Caractéristiques
Temps de service d'un
maxi30min
accumulateur plein (en
fonction du sol)
Tension locale de l'accu-
4,8 V
mulateur
Temps de charge d'un
14 h
accumulateur vide
Tension de l'appareil de
5,8 V
charge
Courant de charge 130 mA
Poids (y compris l'accu-
4,4 lbs
mulateur)
Type d'accumulateur NiCd
N° de pièce 1.258-505.0
N° de série
Utilisation conforme
– Cet appareil ne doit être utilisé que
pour un usage domestique, pour
nettoyer à l'intérieur avec des accessoires et des pièces de rechange tolerées par Kärcher
®
– Cet appareil n'est pas approprié
pour nettoyer des tapis à longues fibres ansi que des sols mouillés.
– Cet appareil n'est pas approprié
pour nettoyer du béton lavé, du
cailloutis ou des choses semblables.
Le fabricant décline toute responsabilité
en cas de dommages dus à une utilisation non conforme ou incorrecte de l'appareil.
Assistance
Pour faire valoir une demande en garantie, appeler : 1-800-537-4129. Tous
les autres informations sont disponibles
sous : www.karcherresidential.com
Prenez le temps d'enregistrer votre nettoyeur haute pression en ligne en vous
adressant à
www.karcher-register.com. Veillez à
conserver précieusement votre bon
d'achat, dont la présence est nécessaire en cas de réparation sous le couvert
de la garantie.
Français 9
Page 10

GÉNÉRALITÉS
1 Joint à l'appareil
2 Interrupteur à pied- Marche/Arrêt
3 Accumulateur, amovible
4 Bouton de déverrouillage, accumu-
lateur
5 Prise de charge
6
Affichage d'état de service de charge
7 Récipient récupérateur, amovible
8 Déverrouillage, couvercle du réci-
pient récupérateur
9 Boîtier
10 Rouleau de brosse, échangeable
11 Rouleau de brosse avec douille de
nettoyage (brosse en poils d'animaux), échangeable
12 Bouton de déverrouillage, brosse
d'échange
13 Manche télescopique, réglable en
hauteur
14 Poignée rotative
15 Poignée
16 Appareil de charge avec câble de
charge
17
Support mural avec matérial de fixation
A usage domestique seulement !
10 Français
Page 11

CONSIGNES DE SECURITE IMPORTANTES
En utilisant ce produit, toujours observer une certaine prudence élémentaire,
incluant notamment:
AVERTISSEMENT
Afin de réduire les risques d'incendie, d'électrocution et de blessures,
prendre les précautions suivantes :
Ne pas utiliser à l'extérieur ou sur des
surfaces humides.
Respecter impérativement les consignes d'utilisation de ce manuel.
Ne pas mettre l'appareil en service en
cas d'endommagement du cordon ou
de la prise. Si l'appareil ne fonctionne
pas correctement, s'il est tombé, s’il a
été endommagé, s’il est resté à l’extérieur ou est tombé dans l’eau, le retourner à un centre de service.
Ne pas tirer sur le cordon électrique
pour débrancher l'appareil. Tirer au niveau de la fiche pour déconnecter l'appareil du secteur.
Ne pas manipuler l’appareil ou la fiche
électrique avec les mains mouillées.
Ne rien introduire dans les orifices. Ne
pas utiliser l’appareil si l’un des orifices
est obstrué. Protéger les orifices de la
poussière, des peluches, des cheveux
et autres matières susceptibles de réduire le débit d'air.
Veiller à ne pas approcher les cheveux,
vêtements larges, doigts ou toute autre
partie du corps des orifices et composants mobiles de l’appareil.
Désactiver toutes les commandes
avant de débrancher l'appareil.
Ne pas utiliser l'appareil dans un espace clos dans lequel se dégagent de
l'oxygène, des vapeurs inflammables,
explosibles ou toxiques, ou dans un endroit renfermant des poussières inflammables.
Cet appareil n'est pas un jouet. Ne jamais le laisser sans surveillance lorsqu'il est utilisé à proximité d'enfants.
Ne pas utiliser de rallonges ou de prises
n'ayant pas la capacité de transmission
électrique voulue.
Ne pas faire brûler ou endommager les
piles qui risquent d'exploser à hautes
températures.
Ne pas ramasser de substances brûlantes ou dégageant de la fumée, telles
que des cigarettes, allumettes ou des
substances très chaudes.
Veiller à ce que la pile ne se vide pas
complètement, avant de la recharger.
Sinon, la longévité de la pile risque d'en
souffrir sérieusement.
Ne pas aspirer de liquides inflammables
ou combustibles, tels que de l’essence
avec l'appareil et ne pas utiliser non
plus ce dernier dans des zones susceptibles de contenir de tels produits.
Conserver l'adaptateur dans un endroit
abrité, sec et frais, à l'abri d'intempéries,
afin d'éviter tout risque d'électrocution
et/ou d'endommagement du nettoyeur.
N'utiliser que l'adapteur fourni par le fabricant pour recharger l'appareil.
Toujours déconnecter l'appareil du
secteur, avant de procéder à de
quelconques opérations d'entretien.
Ne recharger l'unité qu'à l'intérieur.
Français 11
Page 12

DEMARRAGE
Monter le support mural
Le support mural sert à maintenir l'appareil et l'appareil de charge.
Î Monter le support mural ci-joint à un
endroit bien accessible près d'une
prise de courant - le matérial de fixation est joint.
Installation du rouleau de brosse
Lors de la livraison, le rouleau de brosse n'est pas encore installé sur l'appareil. L'installer avant la mise en marche.
Î Faire tourner le boîtier.
Î Installer le rouleau de brosse dans le
logement latéral.
Î Insérer le support du rouleau de
brosse dans le logement et vérifier
qu'il est correctement placé.
Monter le manche télescopique et
la poignée; en régler la hauteur
Le manche télescopique se compose
de 3 pièces. Faire attention au montage
que les pièces s'enclenchent.
Î Mettre la poignée sur le manche plus
long avec la poignée rotative.
Î Assembler le manche plus long et le
manche plus court, pour cela pres-
ser l'encoche.
Î Mettre le manche complet avec l'en-
coche dans la charnièrs de l'appa-
reil.
Î Desserrer la poignée rotative et al-
longer le manche à la hauteur sou-
haitée, tourner la poignée dans la
position correcte et serrer à l'aide de
la poignée rotative.
Mettre l'accumulateur en place et
le charger
À la livraison, l'accumulateur n'est pas
encore inséré dans l'appareil. Veuillez
le poser avant la mise en service.
Î Retirer l'accumulateur de l'emballa-
ge.
Î Insérer l'accumulateur dans le com-
partiment, jusqu'à ce qu'il s'encli-
quette.
Î Charger l'accumulateur: Le charge-
ment de l'accumulateur peut s'effec-
tuer à l'état monté ou démonté.
Remarque :Le chargement avec un
accumulateur monté est décrit ci-
après.
12 Français
Page 13

Î Brancher l'appareil de chargement
livré avec l'appareil dans une prise
de courant réglementaire.
Î Remarque important pour le char-
gement: Eteindre absolument l'appareil, sinon l’accumulateur ne sera
pas chargé.
Î Brancher le câble de charge dans la
prise de charge à l'accumulateur.
Î Si l'affichage de service est allumé,
le processus de charge commence.
Le temps de chargement d'un accumulateur vide est d'environ 14 heures.
Remarque :Si l'affichage de service
n’est pas allumé, veuillez éteindre
l'appareil.
Î Une fois le processus de charge-
ment achevé, débrancher le câble
de chargement de la prise de chargement et déconnecter le chargeur
du secteur.
MODE D'EMPLOI
Commencer le travail
Î Mettre l'appareil en marche. Pour
cela appuyer sur l'interrupteur à pied
Marche/Arrêt.
Î Pour le nettoyage, faire aller et venir
l'appareil en avant et en arrière.
Î Pour le nettoyage près du bord, utili-
ser le côté droit (côté où se trouve le
bouton de déverrouillage de la brosse d'échange).
Interrompre le travail
Î Eteindre l'appareil. Pour cela ap-
puyer sur l'interrupteur à pied Marche/Arrêt.
Î En cas de pause, mettre le manche
téléscopique en position verticale,
une retenue maintient le manche
dans cette position..
Fin des travaux
Î En fin de service éteindre l'appareil.
Î Vider le récipient collecteur après
chaque nettoyage.
Français 13
Page 14

Vider le récipient collecteur
Le récipient collecteur peut être retiré
de 2 manières :
1) Lever l'appareil d'une main au niveau
de l'articulation et déverrouiller le couvercle du récipient collecteur.
Remarque : retenir l'appareil pour qu'il
ne s'ouvre pas trop vite.
2) Poser l'appareil sur le sol et déverrouiller
le couvercle du récipient collecteur.
Remarque
: bien retenir le manche télés-
copique pour qu’il ne puisse pas tomber.
Î Deverrouiller le couvercle du réci-
pient collecteur et le relever.
Î Retirer le récipient collecteur, au ni-
veau de la poignée et le vider.
Î Remettre le récipient collecteur en
place et refermer le couvercle.
Entretien, maintenance
Attention :
Retirer l'accumulateur avant d'effectuer
des travaux de maintenance et de réparation sur l'appareil.
Nettoyage de l’appareil
Î Essuyer l'extérieur de l’appareil avec
un chiffon humide. Ne pas utiliser de
produits agressifs (des poudres à ré-
curer par exemple).
Changer/nettoyer le rouleau de
brosse
Rouleau de brosse
Î Appuyer sur le le bouton de déver-
rouillage et retirer le rouleau de bros-
se.
Î Couper, à l'aide d'un couteau ou de
ciseaux, les cheveux qui se sont
éventuellement enroulés. Éliminer
ensuite les cheveux ou fibres, après
les avoir coupés.
Rangement de l’appareil
Î
Mettre l'appareil dans le support mural
Î L'appareil peut être aussi accroché
au niveau de la poignée ; pour cela,
tourner la poignée (voir le chapitre
« Réglage du manche téléscopique
et de la poignée ».
Î Charger l'accumulateur.
14 Français
.
Î Remettre le rouleau de brosse net-
toyé ou neuf en place et s'assurer de
sa bonne assise.
Nettoyage du rouleau de brosse et de
la douille de nettoyage (brosse en
poils d'animaux)
Remarque : nettoyer la brosse à ani-
maux après chaque utilisation!
Î Appuyer sur le le bouton de déver-
rouillage et retirer le rouleau de bros-
se.
Page 15

Il est possible de retirer facilement les
poils d'animaux coincés :
Î Retirer la douille de nettoyage du
rouleau de brosse, les poils coincés
y restent accrochés et peuvent être
mis au rebut avec les ordures ménagères.
Remarque : les longs poils humains
ou d'animaux coincés autour de la
douille doivent d'abord être découpés à l'aide d'un couteau ou de ciseaux, par exemple.
Î Remettre la douille en place après le
nettoyage.
Î Remettre le rouleau de brosse net-
toyé ou neuf en place et s'assurer de
sa bonne assise.
Service
Risque de blessures
Avant tout travail d'entretien et de maintenance, mettre l'appareil hors tension
et débrancher la fiche secteur.
Assistance en cas de panne
L'affichage de service ne s'allume pas
Î L'appareil est mis en service pen-
dant le processus de charge.
Éteindre l'appareil avec l'interrupteur
Marche/Arrêt.
L'appareil ne nettoye pas bien
Î Nettoyer ou changer le rouleau de
brosse (cf. le chapitre "Changer/nettoyer le rouleau de brosse").
Î Charger l'accumulateur (cf. le chapi-
tre "Charger l'accumulateur").
Des impuretés sont rejetées hors de
l'appareil
Î Vider le récipient collecteur plein
(voir le chapitre « Vider le récipient
collecteur »).
Éliminer l'appareil usé et l'accumu-
lateur
Î Pour la mise en rebut de l'appareil,
veiller à l'éliminer de manière à ne
pas porter préjudice à l'environnement.
Réglementation concernant les piles
Pour préserver l'environnement, remettre
les piles usées à un centre de recyclage
ou les éliminer en bonne et due forme.
CE PRODUIT CONTENANT UNE PILE
NICKEL-CADMIUM, IL DOIT ÊTRE ÉLIMINÉ DANS LES RÈGLES DE L'ART. LES
RÉGLEMENTATIONS LOCALES; NATIONALES OU FÉDÉRALES INTERDISANT
L'ÉLIMINATION DE PILES NICKEL-CADMIUM DANS LES ORDURES MÉNAGÈRES, CONSULTER L'AUTORITÉ LOCALE
RESPONSABLE DE L'ÉLIMINATION DE
DÉCHETS POUR TOUTE INFORMATION
RELATIVE AU RECYCLAGE ET/OU À LA
RÉGLEMENTATION DE MISE AU REBUT.
Î
Retirer les piles avec leur boîtier et
les mettre au rebut en bonne et due
forme. Il n'est pas nécessaire de désassembler le boîtier en plastique.
몇 Avertissement
Ne pas ouvrir l'accumulateur
–
que de court-circuit ! Il est en outre
possible que des vapeurs irritantes ou
des fluides agressifs s'en échappent.
, Ris-
Français 15
Page 16

Escobilla eléctrica inalámbrica MANUAL DEL OPERARIO
Especificaciones 16
Uso previsto 16
Soporte 16
VISTA GENERAL DEL MODELO 18
INSTRUCCIONES DE SEGURIDAD IM-
PORTANTES
ARRANQUE 19
INSTRUCCIONES DE FUNCIONA-
MIENTO
Cuidado y mantenimiento 21
Servicio 22
Ayuda en caso de avería 22
Eliminar el aparato usado y la batería 23
18
20
Especificaciones
Tiempo de servicio con
máx.30mín
la batería llena (dependiendo del tipo de pavimento)
Tensión de trabajo de la
4,8 V
batería
Tiempo de carga cuando
14 h
la batería esté vacía
Tensión del cargador 5,8 V
Corriente de carga 130 mA
Peso (incl. batería) 4,4 lbs
Tipo de batería NiCd
Nº de pieza 1.258-505.0
Nº de serie
Uso previsto
– Utilice este aparato que funciona
con batería exclusivamente para fines particulares, para limpiar interiores, con los accesorios y piezas de
repuesto autorizadas por KÄRCHER.
– El aparato no es apto para alfom-
bras de pelo alto ni para pavimentos
húmedos.
– El aparato no es apto para hormigón
lavado, grava o similares.
El fabricante no asume responsabilidad
alguna por los daños que pudieran derivarse de un uso inadecuado o incorrecto.
Soporte
En EE.UU: o Canadá, llame al 1-800537-4129 para temas de garantía y visi-
te www.karcherresidential.com para
el servicio técnico y asesoramiento sobre productos..
Registre su limpiadora a alta presión
online en www.karcher-register.com.
Guarde bien el ticket de compra, será
necesario para reparaciones que cubra
la garantía.
16 Español
Page 17

VISTA GENERAL DEL MODELO
1 Articulación del aparato
2 Interruptor de pedal de conexión y
desconexión
3 Batería, extraíble
4 Botón de desbloqueo, batería
5 Clavija de carga
6 Indicador de carga
7 Recipiente para suciedad, extraíble
8 Desbloqueo, tapa del recipiente
para suciedad
9Carcasa
10 Cepillo rotativo, cambiable
11 Cepillos cilíndricos con casquillo de
limpieza (cepillo para pelos de animales), cambiable
12 Botón de desbloqueo, cepillo cam-
biable
13 Mango telescópico, de altura regula-
ble
14 Empuñadura giratoria
15 Mango
16 Cargador con cable
17 Soporte de pared con material de fi-
jación
Sólo para uso doméstico.
Español 17
Page 18

INSTRUCCIONES DE SEGURIDAD IMPORTANTES
Al utilizar este producto, tome siempre
las precauciones básicas, incluidas las
siguientes:
ADVERTENCIA
Para reducir el riesgo de fuegos, descarga eléctrico o lesiones:
Noo usar en exteriores o sobre su-
perficies húmedas.
Usar exclusivamente como se des-
cribe en este manual.
No usar con el cable o la clavija da-
ñados. Si el aparato no funciona
como debería, se ha caído al suelo,
dañado, dejado al aire libre, o caído
al agua, devuélvalo a servicio o a la
centralita de atención al cliente.
No tirar del cable para desenchufar
el aparato. Para desechufar, tire de
la clavija no del cable.
No manipular la clavija ni el aparato
con las manos mojadas.
No introducir objetos en los orificios.
No usar con cualquiera de los orificios bloqueados; mantener sin polvo, pelusa, pelo y cualquier otra
cosa que pueda reducir el flujo de aire.
Mantener el cabello, la ropa floja, los
dedos y todas las partes del cuerpo
alejadas de los orificios y partes móviles.
Apagar los mandos de control antes
de desenchufar.
No usar el aparato en un lugar cerra-
do donde se desprendan vapores de
oxígeno, inflamables, explosivos o
tóxicos o en una zona donde haya
polvo inflamable.
No permita que el aparato se use
como juguete. Prestar mucha atención cuando se use cerca de niños.
No use alargadores o enchufes con
una capacidad trasmisora de corriente incorrecta.
No incinerar ni destrozar las bate-
rías, pueden explotar a temperaturas altas.
No coger nada que esté ardiendo o
echando humo, como cigarrillos, cerillas o material caliente.
No dejar que la batería se descar-
gue del todo antes de cargarla. De lo
contrario puede tener problemas
con el ciclo de vida de la batería.
No coger líquidos inflamables o
combustibles, como gasolina, ni utilizar el aparato en áreas donde estén presentes.
Almacenar el adaptador en el inte-
rior en una zona seca no expuesta a
la climatología para evitar descargas
eléctricas y/o daños al aparato de
limpieza.
Usar sólo el adaptador suministrado
por el fabricante para recargar el
aparato.
Desenchufar siempre el cable del
enchufe antes de realizar el mantenimiento del aparato.
Cargar el equipo sólo en interiores.
18 Español
Page 19

ARRANQUE
Montar el soporte de pared
El soporte de pared sirve para guardar
el aparato y el cargador.
Î Montar el soporte de pared suminis-
trado en un lugar que tenga buen acceso y esté cerca de un enchufe - el
material de fijación viene incluido.
Colocar cepillos rotativos
El cepillo rotativo no viene colocado en
el aparato. Colocarlo antes de la puesta
en marcha.
Î Gire la carcasa.
Î Colocar el cepillo rotativo en la ranu-
ra lateral.
Î Presionar el soporte del cepillo con-
tra la ranura y comprobar que está
bien colocado.
Montar el mango telescópico y el
mango de mano y ajustar la altura
El mango telescópico tiene 3 partes.
Cuando lo monte procure que encajen
bien.
Î Insertar el mango para mano sobre
el mango largo con la empuñadura
giratoria.
Î Unir el mango largo y el corto, pre-
sionar para ello la muesca.
Î Insertar el mango completo con la
muesca hacia delante en la parte ar-
ticulada del aparato.
Î Soltar la empuñadura giratoria y ex-
traerla hasta la posición de trabajo
deseada, girar el mango en la posi-
ción correcta y apretar la empuñadu-
ra giratoria.
Colocar y cargar la batería
La batería no viene colocada en el aparato. Colocarla antes de la puesta en
marcha.
Î Sacar la batería del embalaje.
Î Introducir la batería en el alojamien-
to hasta que encaje.
Î Cargar la batería: Se puede cargar
la batería cuando está la batería en
el aparato o cuando está fuera del
aparato. Indicación: A continuación
se describe el proceso de carga con
la batería integrada en el aparato.
Î Introducir el cargador suministrado
en el enchufe de forma correcta.
Español 19
Page 20

Î
Indicación importante sobre el
proceso de carga: Es importante
que se apague el aparato, de lo contrario no se cargará la batería.
Î Insertar el cable del cargador en la
clavija de carga de la batería.
Î Si se ilumina el indicador de funcio-
namiento comenzará el proceso de
carga. El tiempo de carga cuando la
batería esté vacía es de aprox. 14
horas.
Nota: Si no se ilumina el indicador
de funcionamiento, apagar el aparato, de lo contrario no podrá comenzar el proceso de carga.
Î Una vez finalizado el proceso de
carga, desenchufar el cable de carga de la clavija de carga y desenchufar el cargador de la red.
INSTRUCCIONES DE FUNCIO-
NAMIENTO
Comenzar el trabajo
Î
Encender el aparato, pulse para ello el
interruptor de conexión y desconexión.
Î Para limpiar mueva el aparato hacia
delante y hacia atrás.
Î Para limpiar las zonas cercanas a
las esquinas, utilice el lateral derecho (lateral con el botón de desbloqueo del cepillo cambiable).
Interrumpir el trabajo
Î Apagar el aparato, pulse para ello el
interruptor de conexión y desconexión.
Î Si se realiza pausas en el trabajo,
colocar el mango telescópico verticalmente, un dispositivo de bloqueo
lo mantendrá en esta posición.
20 Español
Finalizar el trabajo
Î Cuando se finalice el trabajo apagar
el aparato.
Î Vaciar el recipiente para suciedad
después de cada limpieza.
Page 21

Vaciar el depósito acumulador de
suciedad
Se puede sacar el recipiente acumulador de suciedad de dos formas:
1) Se sujeta el aparato con una mano
por la parte articulada y se desbloquea
la tapa del recipiente para suciedad. In-
dicación: Para ello sujete bien la carcasa para que no se baje demasiado
rápido.
2) Colocar el aparato en el suelo y desbloquear la tapa del recipiente acumulador de suciedad. Indicación: Al hacerlo
sujetar bien el mango telescópico para
que no se mueva hacia abajo de forma
incontrolada.
Î Desbloquear y levantar la tapa del
recipiente acumulador de suciedad.
Î Sacar el recipiente por el asa y va-
ciarlo.
Î Colocar de nuevo el recipiente y ce-
rrar con la tapa.
Î También se puede colgar el aparato
del mango, si es necesario gírelo
(véase el capítulo "Ajustar el mango
telescópico y el mango de mano").
Î Cargar la batería.
Cuidado y mantenimiento
Atención:
Antes de realizar los trabajos de conservación y mantenimiento en el aparato, quite la batería.
Limpieza del aparato
Î Limpie el exterior del aparato con un
paño húmedo. No utilice agentes
abrasivos (como, p. ej., polvos de
fregar).
Cambio/limpieza del cepillo
rotativo
Cepillo rotativo
Î Presionar el botón de desbloqueo y
extraer el cepillo rotativo.
Î Para retirar los pelos que estén en-
ganchados se puede utilizar un cu-
chillo o unas tijeras. Cortar a lo largo
del canto de corte y quite los pelos
sueltos.
Almacenamiento del aparato
Î Colgar el aparato en el soporte de la
pared.
Î Colocar de nuevo los cepillos rotati-
vos nuevos o limpios y comprobar si
está bien encajados.
Español 21
Page 22

Limpiar el cepillo rotativo con el casquillo de limpieza (cepillo para pelos
de animales)
Nota: limpie los pelos de animal des-
pués de cada uso.
Î Presionar el botón de desbloqueo y
extraer el cepillo rotativo.
Los pelos de animales que queden enredados se pueden quitar muy fácilmente:
Î Extraiga la carcasa de limpieza del
cepillo rotativo, los pelos sueltos
quedan colgados de ella, y se pue-
den eliminar con la basura conven-
cional.
Indicación: Cortar primero con un
cuchillo o unas tijeras los pelos lar-
gos de animales o personas que se
hayan enredado en el casquillo y
después extraer este último.
Servicio
Peligro de lesiones
Apague el aparto y desenchufe la clavija de red antes de efectuar los trabajos
de cuidado y mantenimiento.
Ayuda en caso de avería
El indicador de funcionamiento no se
ilumina.
Î El aparato está encendido durante el
proceso de carga.
Apagar el aparato con el interruptor
de conexión/desconexión.
El aparato no limpia bien.
Î Limpiar o cambiar el cepillo rotativo
(véase el capítulo "Cambiar/limpiar
el cepillo rotativo")
Î Cargar la batería (véase el capítulo
"Cargar la batería").
El aparato lanza suciedad hacia afuera.
Î Vaciar el recipiente cuando esté lle-
no (véase el capítulo "Vaciar el recipiente acumulador de suciedad").
Î Introducir de nuevo el casquillo des-
pués de haberlo limpiado.
Î Colocar de nuevo los cepillos rotati-
vos nuevos o limpios y comprobar si
está bien encajados.
22 Español
Page 23

Eliminar el aparato usado y la
batería
Î Eliminar el aparato usado de forma
ecológica. Antes de eliminarlo, sacar
la batería.
Eliminación de la batería
Para cuidar los recursos naturales, recicle o elimine la batería usada correctamente.
ESTE PRODUCTO CONTIENE UNA BATERÍA DE NÍQUEL-CADMIO. DEBE SER ELIMINADA CORRECTAMENTE. LAS LEYES;
LOCALES; ESTATALES O FEDERALES
PUEDEN PROHIBIR LA ELIMINACIÓN DE
LAS BATERÍAS DE NÍQUEL-CADMIO EN
LA BASURA CONVENCIONAL. CONSULTE A LAS AUTORIDADES LOCALES RESPONSABLES DE LOS DESECHOS PARA
SABER QUÉ OPCIONES DE RECICLAJE
Y/O ELIMINACIÓN EXISTEN.
Î
Quitar la batería con carcasa incluida y eliminar correctamente. No es
necesario desmontar la carcasa de
plástico.
몇 Advertencia
– No abrir la batería, hay peligro de
que se produzca un cortocircuito,
adicionalmente puede producirse la
salida de vapores irritantes o líquidos corrosivos.
Español 23
Page 24

59634850 (09/09)
 Loading...