

Page 1
K 3.350
HIGH PRESSURE WASHER - OPERATOR MANUAL
NETTOYEUR HAUTE PRESSION - MANUEL D'UTILISATION
MANUAL DE USUARIO DEL LIMPIADOR DE ALTA PRESIÓN
English 3
Français 20
Español 39
59637800 (01/11)
Page 2

2
Page 3
HIGH PRESSURE WASHER OPERATOR MANUAL
HIGH PRESSURE WASHER OPER-
ATOR MANUAL . . . . . . . . . . . 3
MODEL OVERVIEW . . . . . . . 4
IMPORTANT SAFETY INSTRUC-
TIONS . . . . . . . . . . . . . . . . . . 5
ASSEMBLY INSTRUCTIONS . . 7
OPERATING INSTRUCTIONS . . 8
USING THE ACCESSORIES . 10
WORKING WITH DETERGENTS . 10
TAKING A BREAK ..five minutes or
more . . . . . . . . . . . . . . . . . . . 11
SHUTTING DOWN & CLEAN-UP . 12
WINTERIZING AND LONG-TERM
STORAGE . . . . . . . . . . . . . . 13
CARE AND MAINTENANCE IN-
STRUCTIONS . . . . . . . . . . . 13
CLEANING TIPS . . . . . . . . . 14
OPTIONAL CLEANING ACCESSO-
RIES. . . . . . . . . . . . . . . . . . . 16
TROUBLESHOOTING . . . . . 18
Safety Alert Symbols
DANGER
indicates “an imminently hazardous situation which, if not avoided, will result
in death or serious injury.”
WARNING
indicates “a potentially hazardous situation which, if not avoided, could result
in death or injury.”
CAUTION
indicates “a potentially hazardous situation which, if not avoided, may result
in minor or moderate injury or in property damage incidents.”
Specifications
Max. Pressure 1800 PSI Max. Water Flow 1.5 GPM Amp draw 13 AMPS Voltage 120 V
Part No. 1.602-700.0 Serial no.
For household use only!
Owner/User Responsibility
The owner and/or user must have an
understanding of the manufacturer’s
operating instructions and warnings
before using this pressure washer.
Warning information should be emphasized and understood.
If the operator is not fluent in English,
the manufacturer’s instructions and
warnings shall be read to and discussed with the operator in the operator’s native language by the purchaser/
owner, making sure that the operator
comprehends its contents.
Owner and/or user must study and
maintain for future reference the manufacturers’ instructions.
Customer Support
USA and Canada
In the U.S. or Canada, please call
1-800-537-4129 for warranty issues
and visit www.karcher-help.com for
technical support and product assistance.
Please take a moment to register your
pressure washer online at
www.karcher-register.com. Be sure to
save your purchase receipt, it will be required for repairs covered by warranty.
Customer Support
Mexico
Call: 01-800-024-13-13 for help or visit our website: www.karcher.com.mx
English 3
Page 4
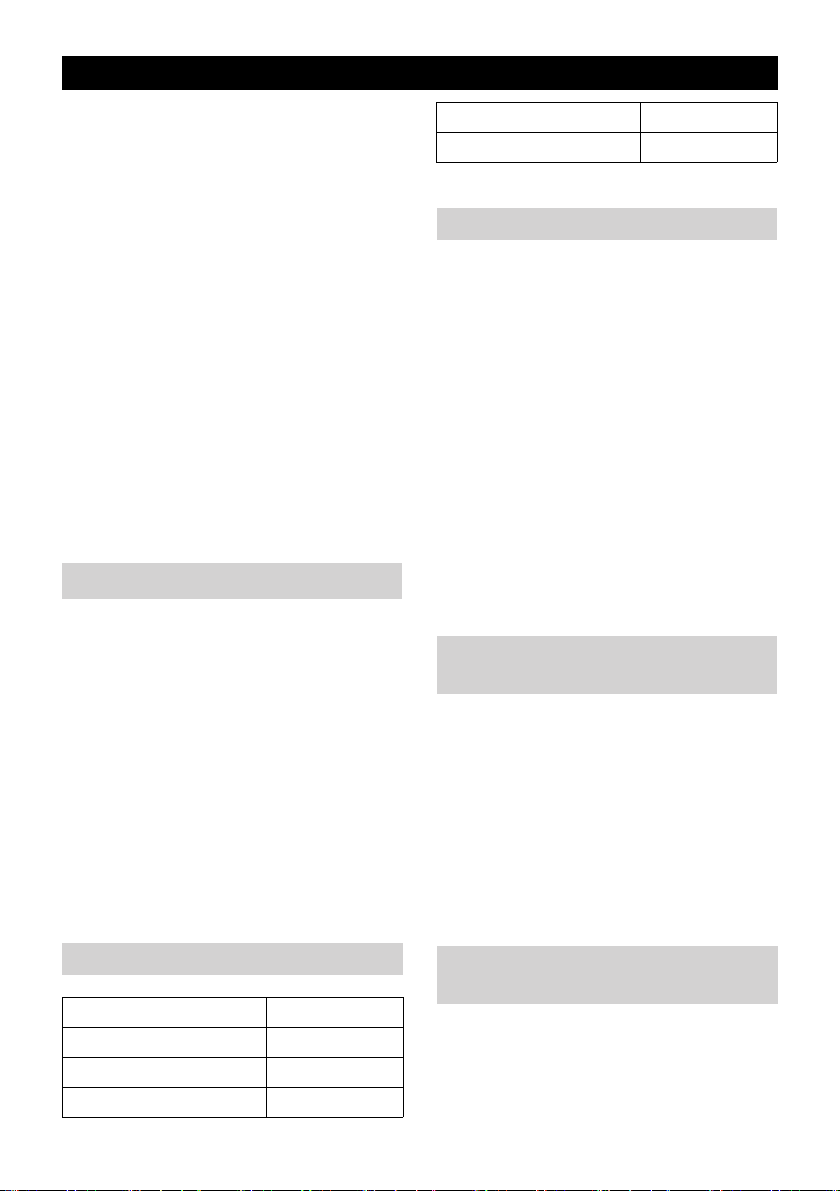
MODEL OVERVIEW
1 Garden hose connector (female)
2 Water inlet connector
3 Water inlet with filter
4 High pressure outlet
5 ON/OFF switch
6 Detergent tank (removeable)
7 Storage for trigger gun
8 Transport handle
9 Accessory storage
10 Power cord with Ground Fault Cir-
cuit Interrupter (GFCI)
11 Wheels
12 Trigger gun
13 Trigger gun safety lock
14 Key to detach the high pressure
hose from the trigger gun
15 High pressure hose
16 Dirtblaster ® (Rotary spray wand)
17 Vario Power Spray wand
4 English
Page 5

IMPORTANT SAFETY INSTRUCTIONS
WARNING
When using this product basic precautions should always be followed, including the following:
To reduce the risk of injury, close
supervision is necessary when a
product is used near children.
Know how to stop the product and
bleed pressures quickly. Be thoroughly familiar with the controls.
Stay alert – watch what you are do-
ing.
Do not operate the product when fa-
tigued or under the influence of alcohol or drugs.
Keep operating area clear of all per-
sons.
Do not overreach or stand on unsta-
ble support. Keep good footing and
balance at all times.
Follow the maintenance instruc-
tions specified in the manual.
This product is provided with a
Ground Fault Circuit Interrupter
built into the power cord plug. If replacement of the plug or cord is
needed, use only identical replacement parts.
WARNING
Risk of Injection or Injury – Do Not
Direct Discharge Stream At Persons.
High pressure jets can be danger-
ous if misused. The jet must not be
directed at persons, animals, electrical devices, or the unit itself.
Wear safety goggles.
WARNING
Risk Of Explosion – Do not spray
flammable liquids.
Do not use acids, alkaline, solvents,
or any flammable material in this
product. These products can cause
physical injuries to the operator and
irreversible damage to the machine.
CAUTION
Gun Kicks Back – Hold with both
hands.
The Trigger Gun Safety Lock pre-
vents the trigger from accidentally
being engaged. This safety feature
DOES NOT lock trigger in the ON
position.
WARNING – Risk of Electrocu-
tion
Inspect cord before using – Do not
use if cord is damaged.
Keep all connections dry and off the
ground.
Do not touch plug with wet hands. Do not use extension cord with this
product.
Connect to individual branch circuit
only.
CAUTION
This unit has been designed for use
with cleaning detergents recommended by the manufacturer. The use of
other cleaning detergents may affect
the operation of the machine and void
the warranty.
WARNING
Do not spray electrical apparatus and
wiring.
Do not use with flammable liquids and
toxic chemicals.
Injection hazard: equipment can cause
serious injury if the spray penetrates
English 5
Page 6

the skin. do not point the gun at anyone
or any part of the body. In case of penetration seek medical aid immediately.
This system is capable of producing
12400 kPa /1800 PSI to avoid rupture
and injury, do not operate this pump
with components rated less than
12400 kPa /1800 PSI working pressure (including but not limited to spray
guns, hose and hose connections).
Before servicing, cleaning or removing
any parts, shut off power and relieve
pressure.
GROUNDING INSTRUCTIONS
This product must be grounded. If it
should malfunction or breakdown,
grounding provides a path of least resistance for electric current to reduce
the risk of electric shock. This product
is equipped with a cord having an
equipment-grounding conductor and a
grounding plug. The plug must be
plugged into an appropriate outlet that
is properly installed and grounded in
accordance with all local codes and ordinances.
DANGER
Improper connection of the equipmentgrounding conductor can result in a
risk of electrocution. Check with a qualified electrician or service personnel if
you are in doubt as to whether the outlet is properly grounded. Do not modify
the plug provided with the product - if it
will not fit the outlet, have a proper outlet installed by a qualified electrician.
Do not use any type of adapter with this
product.
GROUND FAULT CIRCUIT IN-
TERRUPTER PROTECTION
CI) built into the plug of the power-supply cord. This device provides
additional protection from the risk of
electric shock. Should replacement of
the plug or cord become necessary,
use only identical replacement parts
that include GFCI protection.
WATER SUPPLY
(Cold Water Only)
CAUTION
When connecting the water inlet to the
water supply mains, local regulations
of your water company must be observed. In some areas the unit must
not be connected directly to the public
drinking water supply. This is to ensure
that there is no feedback of chemicals
into the water supply. Direct connection via a receiver tank or backflow preventer, for example, is permitted.
Dirt in the feed water will damage the
unit. To avoid this risk, we recommend
fitting a water filter.
Garden hose must be at least 1/2
inch or 5/8 inch in diameter.
Flow rate of water supply must not
fall below 2 GPM (gallons per min-
ute).
Flow rate can be determined by
running the water for one minute
into an empty 5-gallon container.
The water supply temperature must
not exceed 104°F/40°C.
Never use the pressure washer to
draw in water contaminated with
solvents, e.g. paint thinners, gaso-
line, oil, etc.
Always prevent debris from being
drawn into the unit by using a clean
water source.
This pressure washer is provided with
a ground-fault circuit-interrupter (GF-
6 English
Page 7
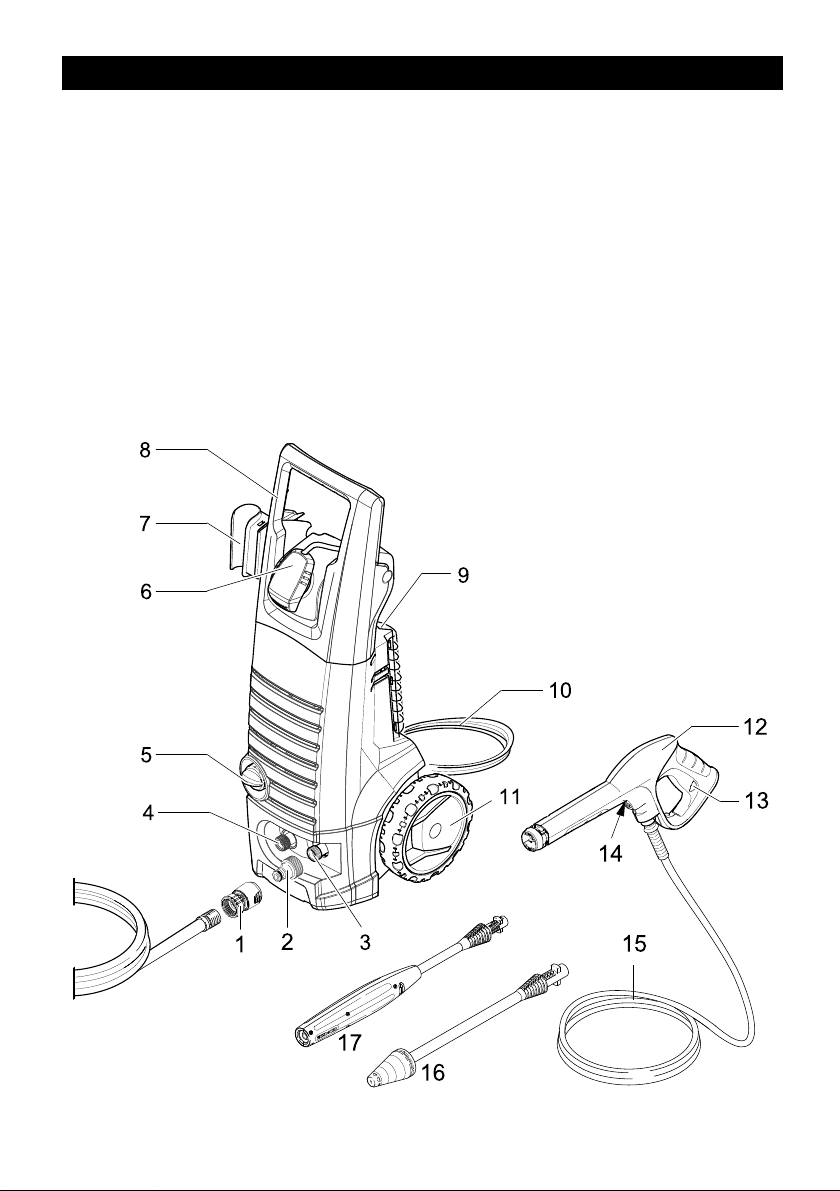
ASSEMBLY INSTRUCTIONS
For more detailed information on
how to assemble this pressure
washer, please visit
www.karcherresidential.com/
assembly
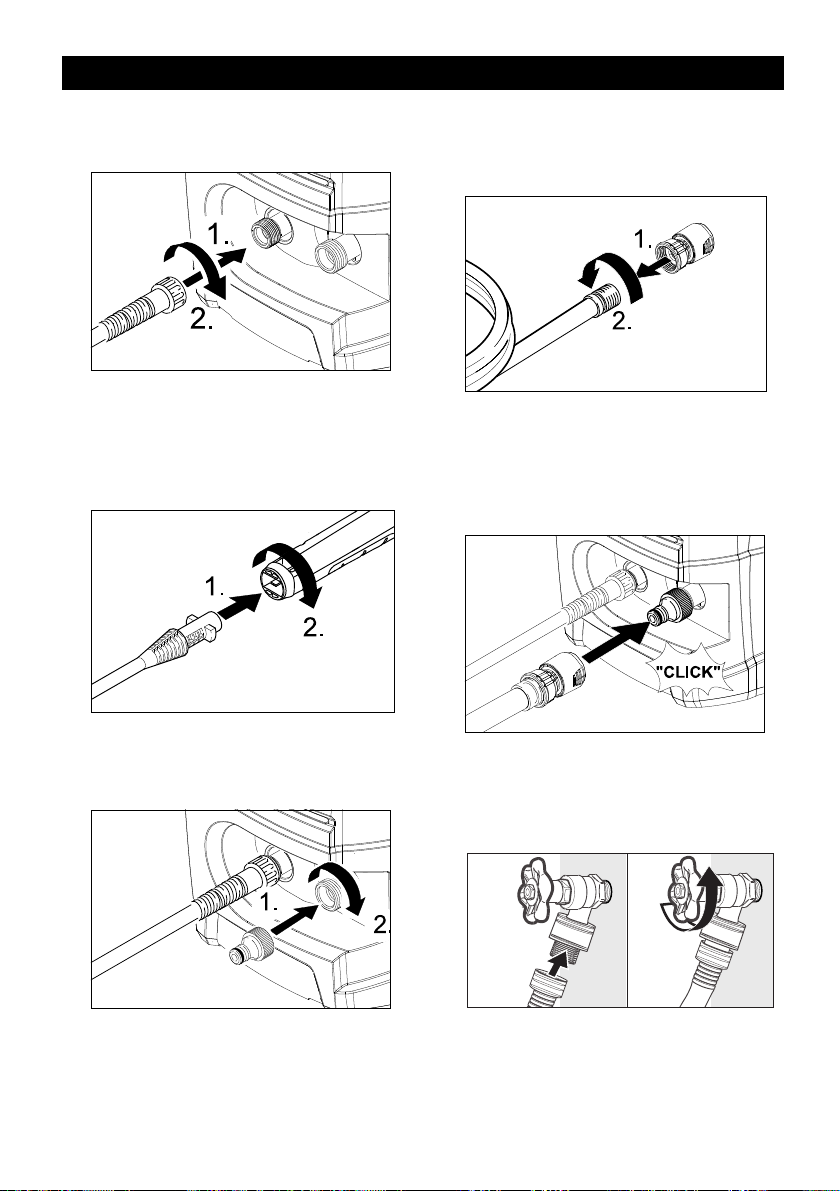
Assembly
STEP 1:
STEP 2:
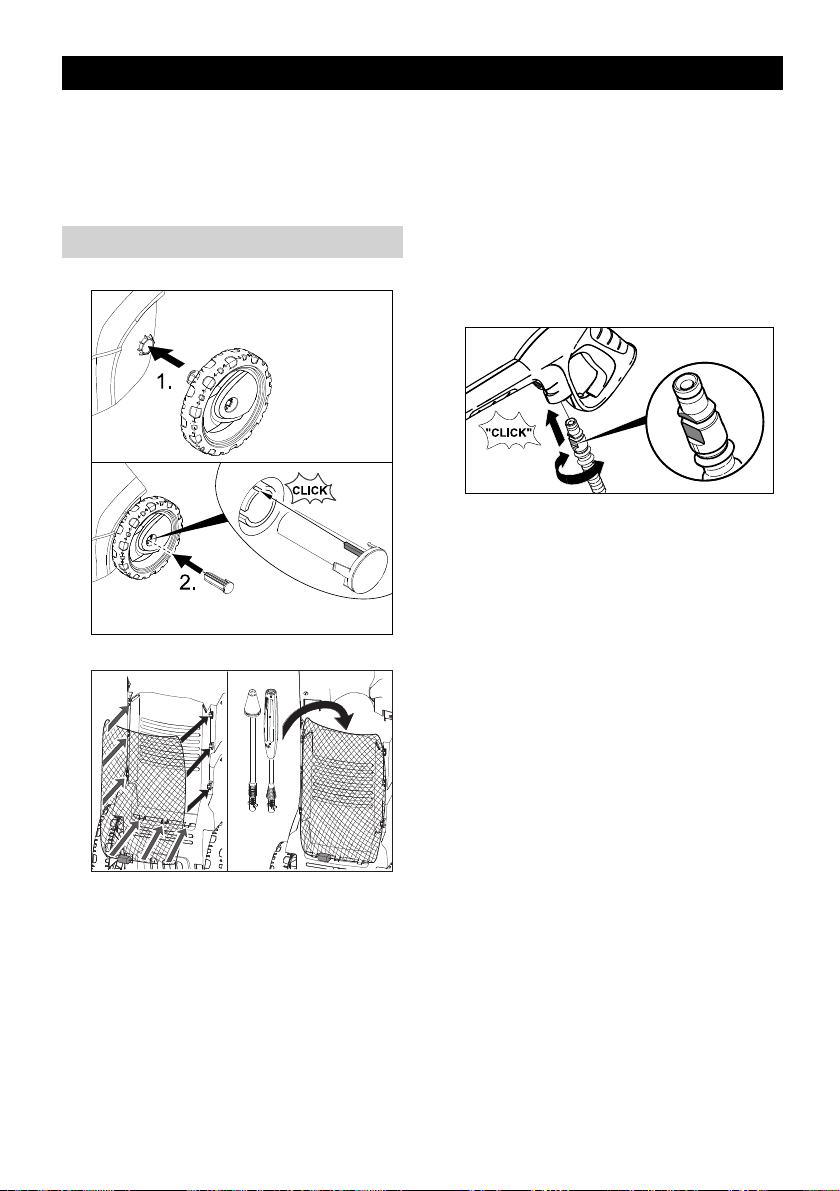
Connect the high pressure hose to
the hand spray gun
STEP 3:
Push the high pressure hose into
the trigger gun until it locks audibly.
Note: Make sure the connection
nipple is aligned correctly.
Check the secure connection by
pulling on the high pressure hose.
Disconnect:
Press the disconnect key on the
trigger gun and remove the high
pressure hose from the trigger gun.
English 7
Page 8
OPERATING INSTRUCTIONS
STEP 1:
Connect the high pressure hose to
the unit’s high pressure outlet.
STEP 2:
Insert the spray wand of your
choice into the trigger gun. Press in
against the spring tension and twist
into locked position.
STEP 4:
Screw the supplied garden hose
connector on to the end of your gar-
den hose.
STEP 5:
Push the garden hose connector on
to the water inlet connector and
make sure you hear it click into
place before proceeding.
STEP 3:
Install the supplied connector to the
unit’s water inlet.
8 English
STEP 6:
Connect garden hose to the cold
water source and turn water on
completely.
Page 9

STEP 7:
Plug the Ground Fault Circuit Interrupter (GFCI) into a receptacle.
Press RESET button, indicator
should be “ON”.
Press TEST button, indicator
should be “OFF”.
Press RESET button for use.
We recommend that you test the
GFCI as part of your startup procedure each time you use your pressure washer. To learn how to
peform this test on your unit, visit
http://www.karcherresidential.com/
gfci_test.php for detailed instructions for your type of GFCI.
WARNING
Do not use if above test fails.
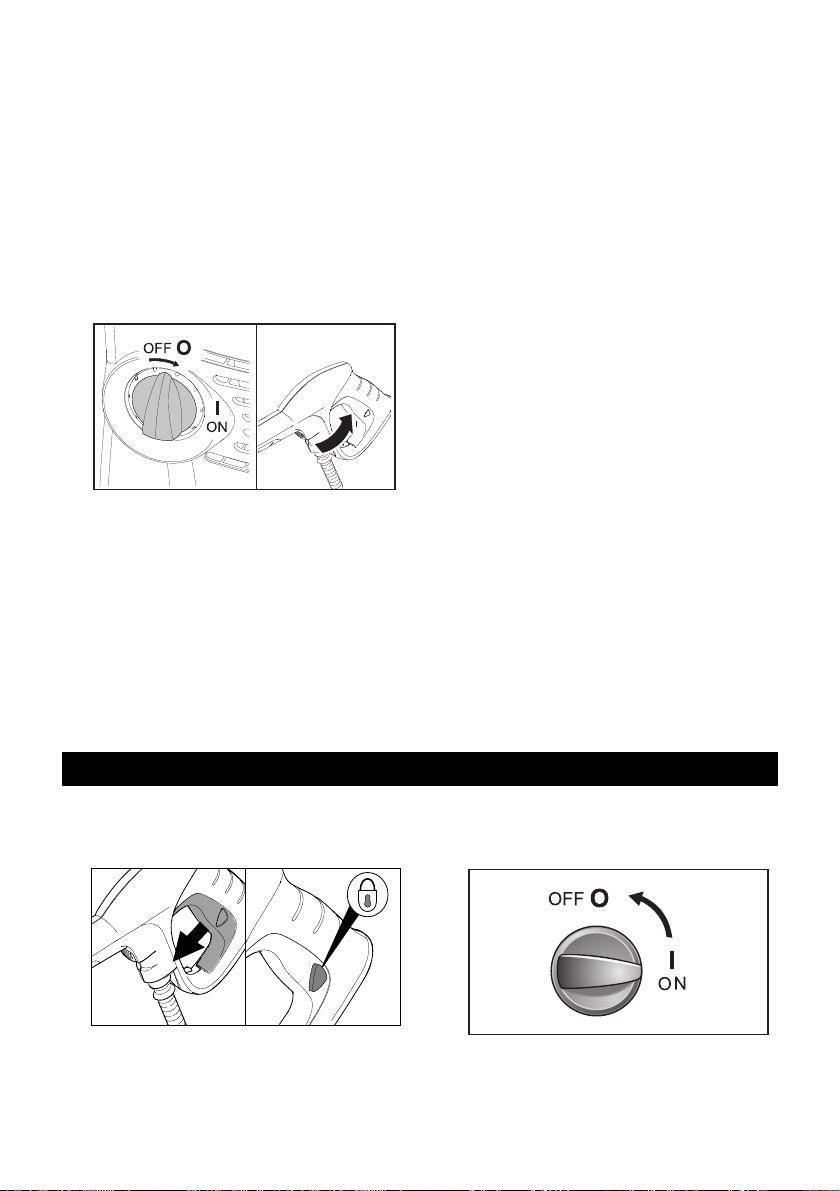
STEP 9:
Turn on the high pressure washer
(I/ON).
The motor starts only if the trig-
ger of the gun is pulled and shuts
off when the trigger is released.
Note:
This pressure washer has been tested
by Kärcher’s quality assurance team. A
small amount of water may be present
in the water inlet or outlet. This is normal and will not affect the performance
of the pressure washer.
STEP 8:
Unlock the trigger gun safety lock.
Trigger the gun to eliminate trapped
air, wait for a steady flow of water to
emerge from the spray nozzle.
English 9
Page 10
USING THE ACCESSORIES
WARNING
To avoid serious injury never point
spray nozzle at yourself, other persons or animals.
Always test an inconspicuous area
before cleaning with high pressure.
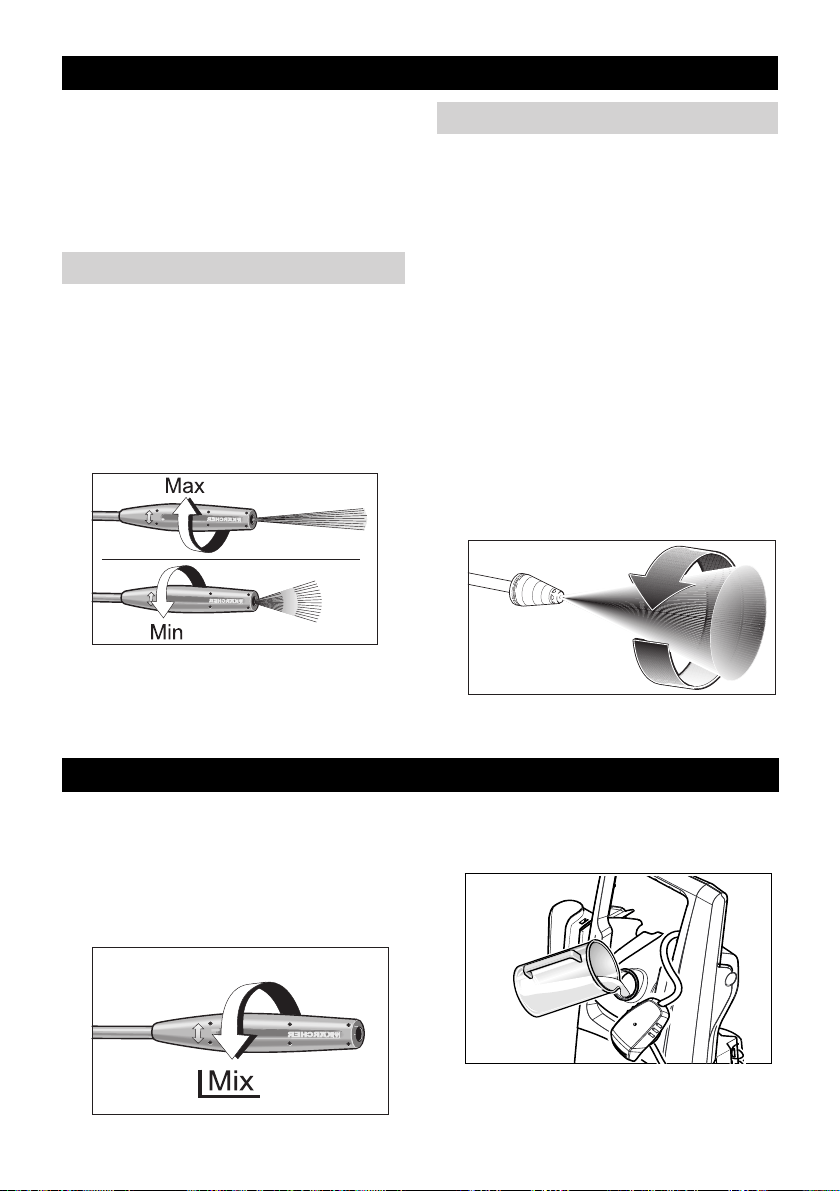
Vario Power Spray Wand
The Vario Power Spray Wand allows you to adjust the cleaning pressure.
To clean at maximum pressure, the
wand must be positioned to the high
pressure setting (Max).
For lower pressure turn the wand
collar in the minus (Min) direction.
To apply detergent, the wand must
be positioned to the lower pressure
setting (Mix).
Dirtblaster
This nozzle features a 0º pencil jet
®
which rotates 360º for maximum dirt
cutting action, effectively increasing
cleaning performance up to 50%.
This nozzle combines the cleaning
performance of a 0º pencil jet with
the surface coverage of a wide an-
gle nozzle.
Not recommended for soft mate-
rials, siding, painted surfaces,
decks or autos.
Before cleaning any surface an in-
conspicuous area should be
cleaned to test spray pattern and
distance for maximum cleaning re-
sults.
WORKING WITH DETERGENTS
Detergents can only be applied at low pressure setting (Mix).
STEP 1:
Install the Vario Power Spray Wand. Set the spray wand to the low pressure setting (Mix).
10 English
STEP 2:
Fill the Detergent Tank with the se-
lected detergent.
Page 11
STEP 3:
Turn on the pressure washer (I).
Pull trigger to operate unit. Liquid
detergent is drawn into the unit and
mixed with water. Apply detergent
to work area. Do not allow detergent to dry on surface.
STEP 4:
To rinse, move the VPS out of „Mix“ position and pull trigger to operate unit.
STEP 5:
Cleaning up: Always draw fresh
water through the detergent tank or
siphon tube when done to flush any
remaining detergents from the injection system.
For best results see Cleaning Tips for specific information on how to clean different surfaces.
Always Use Kärcher ® Detergent for Best Results
Kärcher ® biodegradable detergents
are specially formulated to protect the
environment and your pressure washer. The special formula won’t clog the
suction tube filter and will protect the
internal parts of the pressure washer
for a longer life. For Kärcher ® Detergents, check your retailer or visit our
website:
www.buykarcher.com
CAUTION
Never use:
– Bleach, Chlorine products and oth-
er corrosive chemicals
– Liquids containing solvents (i.e.,
paint thinners, gasoline, oils)
– Tri-sodium phosphate products
– Ammonia products
– Acid-based products
These chemicals will harm the unit and will damage the surface being cleaned.
Use of these items will void the warranty.
TAKING A BREAK ..five minutes or more
STEP 1:
Release trigger and engage gun safety lock.
STEP 2:
Turn pressure washer to OFF (0)
position.
English 11
Page 12
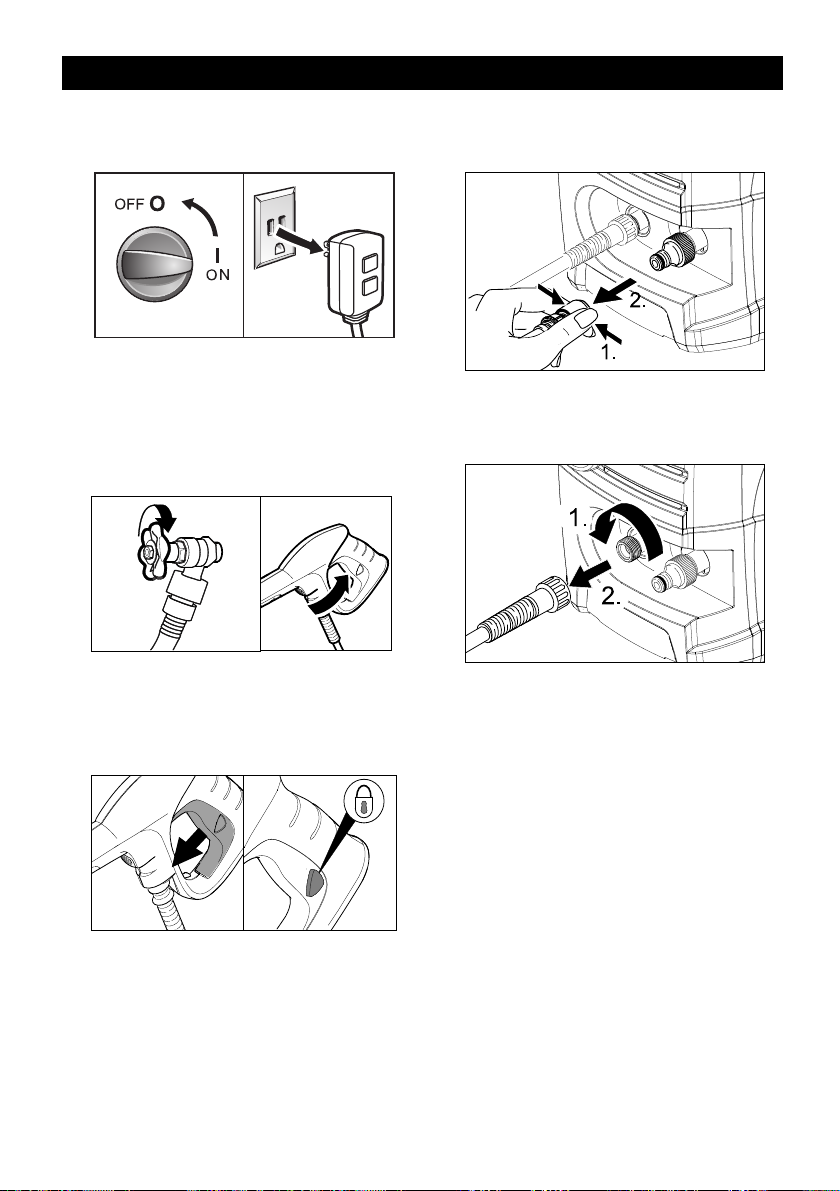
SHUTTING DOWN & CLEAN-UP
STEP 1:
Turn the switch to OFF (0) position
and unplug cord from outlet.
STEP 2:
Turn off the water source.
STEP 3:
Press trigger to release water pressure.
STEP 4:
Release trigger and engage gun
safety lock.
STEP 5:
Disconnect the garden hose from
the water inlet on the unit.
STEP 6:
Disconnect the high pressure hose
from the high pressure outlet.
12 English
Page 13
WINTERIZING AND LONG-TERM STORAGE
1: Disconnect all water connec-
tions.
2: Turn on the machine for a few
seconds, until the water which had
remained in the pump exits, turn off
immediately.
3: Do not allow high pressure hose
to become kinked.
4: Store the machine and accesso-
ries in a room which does not reach
freezing temperatures. DO NOT
store near furnace or other sources
CARE AND MAINTENANCE INSTRUCTIONS
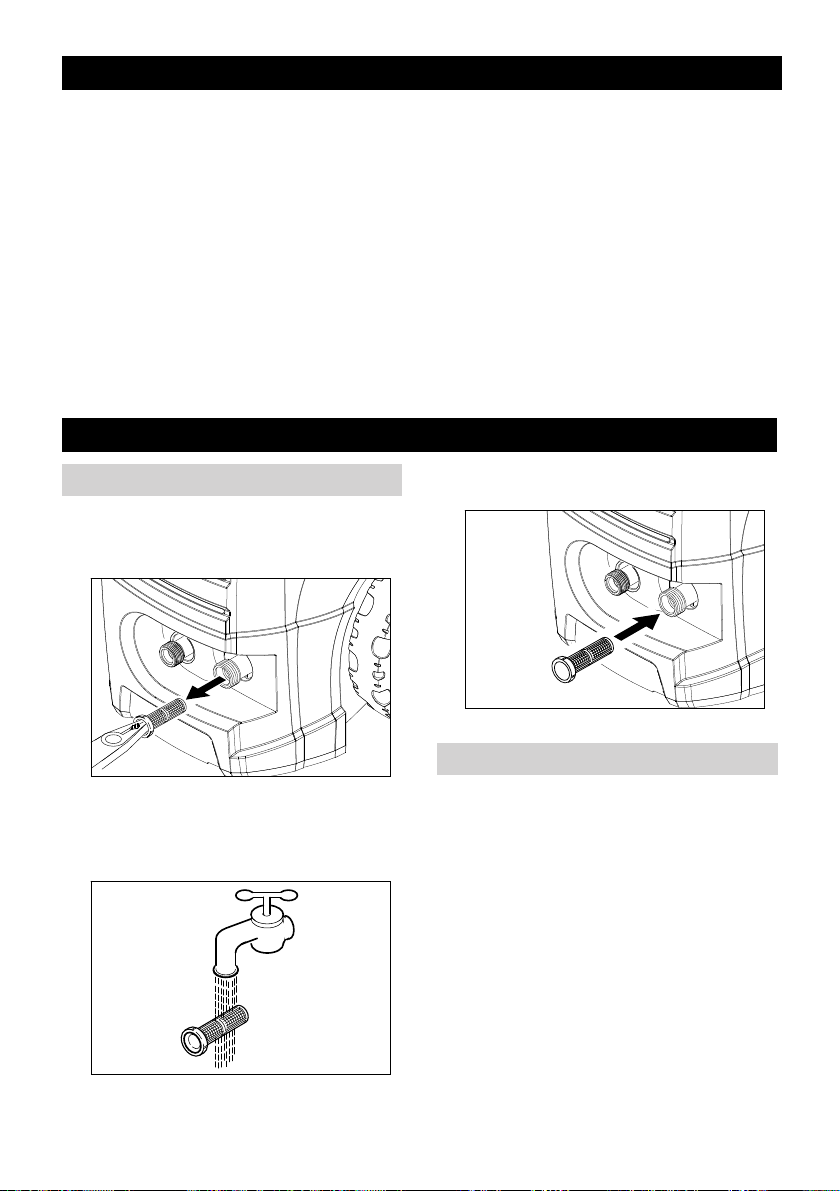
Cleaning the water inlet filter
STEP 1:
Pull out water inlet filter with flatnose pliers.
of heat as it may dry out the pump
seals.
CAUTION
Failure to follow the above directions
will result in damage to the pump assembly and accessories and will void
the warranty.
Kärcher ® also recommends the regular
practice of using a pump protector like
“Kärcher ® Pump Guard” to prevent
cold weather damage during storage in
the winter months.
STEP 3:
Reinsert water inlet filter.
STEP 2:
Rinse out water inlet filter in warm water.
Maintenance
The unit is maintenance-free.
English 13
Page 14

CLEANING TIPS
CAUTION
Before cleaning any surface an in-
conspicuous area should be
cleaned to test spray pattern and
distance for maximum cleaning results.
If painted surfaces are peeling or
chipping, use extreme caution as
pressure washer may remove the
loose paint from the surface.
When using on surfaces which
might come in contact with food,
flush surfaces with plenty of drinking water.
For additional cleaning tips and a
complete video library, visit our
website:
www.karcherresidential.com
Deck Cleaning
(with or without detergent). Pre-rinse
deck and surrounding area with fresh
water. If using detergent, apply to surface at low pressure. For best results,
limit your work area to smaller sections
of approximately 25 square feet. Allow
detergent to remain on surface 1-3
minutes. Do not allow detergent to dry
on surface. Rinse at high pressure in a
long sweeping motion keeping the
spray nozzle approximately 3-6 inches
from the cleaning surface. Always
clean from top to bottom and from left
to right. When moving on to a new section of the cleaning surface, be sure to
overlap the previous section to eliminate stop marks and ensure a more
even cleaning result.
Cars, Boats & Motorcycles
(with or without detergent). Pre-rinse
vehicle with fresh water. If using deter-
House Siding
(with or without detergent). Pre-rinse
cleaning surface with fresh water. If using detergent, apply to surface at low
pressure (for best results, limit your
work area to sections of approximately
6 feet and always apply detergent from
bottom to top). Allow detergent to remain on surface 1-3 minutes. Do not
allow detergent to dry on surface, if
surface appears to be drying, simply
wet down surface with fresh water. If
needed, use special wash brush attachment (not included) to remove
stubborn dirt. Rinse at high pressure
from top to bottom in an even sweeping motion keeping the spray nozzle
approximately 6 inches from the cleaning surface.
Cement Patios, Brick and Stone
(with or without detergent). Pre-rinse
cleaning surface with fresh water. If using detergent or Degreaser, apply to
surface at low pressure. For best results, limit your work area to smaller
sections of approximately 25 square
feet. Allow detergent or Degreaser to
remain on surface 1-3 minutes. Do not
allow detergent to dry on surface.
Rinse at high pressure in a sweeping
motion keeping the spray nozzle approximately 3-6 inches from the cleaning surface. Always clean from top to
bottom and from left to right. For removing extremely stubborn stains, use
the Dirtblaster ® Nozzle.
gent, apply to surface at low pressure.
For best results, clean one side of vehicle at a time and always apply detergent from bottom to top, do not allow
14 English
Page 15

detergent to dry on surface. If needed,
use special wash brush attachment
(not included) to remove stubborn dirt.
Rinse at high pressure in a sweeping
motion keeping the spray nozzle approximately 6-8 inches from the cleaning surface (distance should increase
when rinsing pin-striping or other sensitive surfaces). Always clean from top
to bottom and from left to right. For best
results, wipe surface dry with a chamois or soft dry cloth.
Barbecue Grills, Outdoor Power
Equipment & Gardening Tools
(with or without detergent). Pre-rinse
cleaning surface with fresh water. If using detergent or Degreaser, apply detergent at low pressure. Allow
detergent to remain on surface 1-3
minutes. Do not allow detergent to dry
on surface. Rinse at high pressure
keeping the spray nozzle approximately 3-6 inches from the cleaning surface.
For removing extremely stubborn dirt,
it may be necessary to move the spray
nozzle even closer to the surface for
greater dirt cutting action.
Patio & Lawn Furniture
(with or without detergent). Pre-rinse
furniture and surrounding area with
fresh water. If using detergent, apply to
surface at low pressure. Allow detergent to remain on surface 1-3 minutes.
Do not allow detergent to dry on surface. If needed use special Wash
Brush Attachment (not included) to remove stubborn dirt. Rinse at high pressure in a sweeping motion keeping the
spray nozzle approximately 3-6 inches
from the cleaning surface. For best results, clean from top to bottom and
from left to right.
English 15
Page 16

OPTIONAL CLEANING ACCESSORIES
Optional accessories are available to
further enhance your cleaning capabilities. These accessories are accurate
as of the printing date of this manual.
Please check our website for pricing
and up-to-date information.
Pump Guard
Specially formulated to protect your
pressure washer from freezing, corrosion and premature wear. The Pump
Guard also adds lubrication to valves
and seals to prevent sticking. Highly
recommended for all Kärcher ® pressure washers!
Part No. 9.558-998.0
25 Ft. Extension High-Pressure
Hose
Extension Hose for all Kärcher ® high pressure washers between the original equipment hose and gun up to 2000 PSI.
Part No. 2.642-588.0
66" Extension Wand (Four piece)
Need to clean second story windows or
other high areas? Increase the reach
of your pressure washer by up to 66"
with this extension kit. Includes 4 aluminum sections for variable length. 66"
fully assembled. Fits most Kärcher ®
pressure washers up to 2300 PSI.
(bayonet)
Part No. 2.640-746.0
Rotating Wash Brush (bayonet)
For more effortless cleaning of all
smooth surfaces (painted, glass and
plastic) try the Kärcher ® Rotating Wash
Brush. Use it on your automobile,
house siding or windows. The water
pressure from your pressure washer
causes the inner brushes to gently
spin, making your cleaning job much
easier. The angle of brush head is adjustable to help you reach difficult areas. Excellent for the application of
detergent. A must-have accessory designed for Kärcher ® pressure washers
up to 2300 PSI. (bayonet)
Part No. 2.640-743.0
Soft Clean Washing Brush
Made with soft bristles that will not
harm painted surfaces. Easily attaches
directly to the trigger gun. Ideal for
stubborn dirt on cars, boats, patio furniture and other surfaces. Great for applying detergent. Fits most Kärcher ®
pressure washers up to 2300 PSI.
(bayonet)
Part No. 2.640-740.0
25 ft. Pipe Cleaning Kit (bayonet)
Need to clean blocked pipes, drains or
downspouts? The Kärcher ® pipe
cleaning kit is the answer! The pipe
cleaner propels itself forward while simultaneously flushing out debris. For
example, insert the cleaning nozzle in
the base of a downspout, pull the trigger on the pressure washer gun and
watch as the nozzle shoots out leaves
and other debris while climbing upward. Connects directly to the trigger
gun of most Kärcher ® pressure washers up to 2300 PSI. (bayonet)
Part No. 2.640-747.0
Wet Sandblasting Kit (bayonet)
Why spend hours stripping old paint
and rust by hand using harsh chemicals? Let the Kärcher ® Wet Sandblasting Kit do the work! Attach the kit to
your pressure washer, add abrasive
16 English
Page 17

material and attack the rust and paint
with our eco-friendly alternative. Fits
most Kärcher ® pressure washers up to
2300 PSI. (bayonet)
Part No. 2.638-792.0
Detergent Foamer Attachment
Ideal for applications which require a
thick foam. Simply fill the resevoir cup
with liquid pressure washer detergent
to generate a foam spray. Connects directly to the trigger gun. Fits most
Kärcher ® pressure washers up to
2300 PSI. (bayonet)
Part No. 6.964-507.0
T 200 Wide Area Surface Cleaner
For cleaning surfaces such as patios,
terraces and driveways without splashback, there is no better solution than
the Kärcher ® T 200. It saves time by
cleaning a one foot wide area gently as
it hovers, providing consistent, streakfree cleaning. When you finish cleaning the patio and driveway, remove the
wand and use the handle to clean garage doors and other vertical surfaces.
Includes two nozzles which spin at
high speed for optimum results. Our
top selling accessory for Kärcher ®
pressure washers up to 2300 PSI.
(bayonet)
Part No. 2.642-188.0
English 17
Page 18

TROUBLESHOOTING
CAUTION
Symptom Cause Solution
Motor will not start On/Off switch is in the “OFF”
(0) position.
Power cord is not plugged in. Plug in power cord.
Electrical outlet does not sup-
ply adequate power.
Tripped GFCI plug. Press “RESET” button on GFCI
Tripped circuit breaker. Switch off pressure washer.
Unit does not
reach high pressure.
Output pressure varies high and low.
Diameter of garden hose is too small.
Water supply is restricted. Check garden hose for kinks,
Not enough inlet water supply.
Water inlet filter is clogged. Remove filter and rinse out in
Spray wand is on low pressure position.
Not enough inlet water supply.
Pump is sucking air. Check that hoses and fittings
Water inlet filter is clogged. Remove filter and rinse out in
Discharge nozzle is obstructed.
Calcified gun, hose or spray wand.
Disconnect the machine from the power source before making any repair.
Turn switch to the “ON” (I) position
Try a different outlet.
plug.
The reset comes automatically
once the temperature of the
unit drops.
Replace with a 5/8 inch or larger garden hose.
leaks and blockage.
Open water source full force.
warm water.
Turn spray wand to high pres-
sure position.
Turn water on full force. Check
garden hose for kinks, leaks or
blockage.
are air tight. Turn off machine
and purge pump by squeezing
trigger gun until a steady flow of
water emerges through the
nozzle.
warm water.
Blow out or remove debris with
a fine needle.
Run distilled vinegar through
detergent suction tube.
18 English
Page 19

Symptom Cause Solution
No detergent. Detergent suction tube not
Check connection.
properly connected to the
machine.
Detergent is too thick. Dilute detergent, for best re-
sults use Kärcher ® detergent.
Filter on detergent suction
tube is clogged.
Damaged or clogged deter-
gent suction tube.
Spray wand is in high pres-
sure position.
Discharge nozzle is obstruct-
ed.
Garden hose connection leaks.
Loose fittings. Tighten fittings. Missing/worn rubber washer. Insert new washer.
Spray wand leaks. Spray wand not properly at-
tached.
Run warm water through filter
to remove debris.
Remove obstruction or replace
detergent suction tube.
Turn spray wand tip to low
pressure position.
Blow out or remove debris with
fine needle.
Insert the spray wand into the
trigger gun. Carefully press in
against the spring tension and
twist into the locked position.
Broken o-ring or plastic in-
Call Customer Support
sert.
Pump is noisy. Pump is sucking air. Check that hoses and fittings
are air tight. Turn off machine
and purge pump by squeezing
trigger gun until a steady flow of
water emerges through the
nozzle.
Water leaks from
pump (up to 10
drops per minute is
Loose fittings. Check that all fittings are tight. Water seals are damaged or
Call Customer Support
worn.
permissible).
Oil Drip. Oil seals are damaged or
Call Customer Support
worn.
If you encounter any additional difficulties not listed, please visit our website.
USA / Canada:
www.karcher-help.com
México:
www.karcher.com.mx
English 19
Page 20

NETTOYEUR HAUTE PRESSION - MANUEL D'UTILISATION
GÉNÉRALITÉS . . . . . . . . . . 21
CONSIGNES DE SÉCURITÉ IM-
PORTANTES . . . . . . . . . . . . 22
INSTRUCTIONS DE MONTAGE . 25
MODE D'EMPLOI. . . . . . . . . 26
UTILISATION DES ACCESSOIRES . 28
EMPLOI DE DÉTERGENTS . 28
PRENDRE UNE PAUSE ...cinq mi-
nutes ou plus . . . . . . . . . . . . 29
ARRÊT DE L'APPAREIL ET NET-
TOYAGE . . . . . . . . . . . . . . . 30
REMISAGE HIVERNAL ET ENTREPOSAGE A LONG TERME . 31
INSTRUCTIONS D'ENTRETIEN ET
DE MAINTENANCE . . . . . . . 31
CONSEILS DE NETTOYAGE . 32
ACCESSOIRES DE NETTOYAGE
EN OPTION . . . . . . . . . . . . . 34
DÉPANNAGE. . . . . . . . . . . . 36
Symboles d'alerte de sécurité
DANGER
Identifie “une situation de danger imminent qui, si elle n'est pas évitée, entraîne la mort ou des blessures
graves”.
AVERTISSEMENT
Identifie “une situation de danger potentiel qui, si elle n'est pas évitée, pourrait
entraîner la mort ou des blessures”.
ATTENTION
Identifie “une situation de danger potentiel qui, si elle n'est pas évitée, peut
éventuellement entraîner des blessures légères ou modérées” ou des
dommages matériels.
Caractéristiques
Pression max. 1800 PSI
Débit d'eau max. 1.5 GPM
Ampérage 13 AMPS
Tension 120 V
N° de pièce 1.602-700.0
N° de série
A usage domestique seulement !
Responsabilité du propriétaire/
de l'utilisateur
Avant d'utiliser ce nettoyeur pression,
le propriétaire et/ou l'utilisateur doit impérativement avoir pris connaissance
des consignes d'utilisation et mises en
garde du fabricant.
Il est nécessaire d'insister sur les avertissements et de les comprendre.
Si l'utilisateur ne parle pas couramment
l'anglais, l'acheteur/le propriétaire doit
lire les consignes et mises en garde du
fabricant avec l'utilisateur dans la langue
maternelle de ce dernier et s'assurer qu'il
en comprend bien le contenu.
Le propriétaire et/ou l'utilisateur doit se
familiariser avec les consignes du fabricant et les conserver afin de pouvoir
s'y référer ultérieurement.
Service client USA et Canada
Pour faire valoir une demande en garantie, appeler : 1-800-537-4129. Tous
les autres informations sont disponibles sous : www.karcher-help.com
Prenez le temps d'enregistrer votre
nettoyeur haute pression en ligne en
vous adressant à
www.karcher-register.com. Veillez à
conserver précieusement votre bon
d'achat, dont la présence est nécessaire en cas de réparation sous le couvert de la garantie.
Assistance Mexique
Appeler : 01-800-024-13-13 pour obtenir de l'aide ou visiter notre site Web :
www.karcher.com.mx
20 Français
Page 21

GÉNÉRALITÉS
1 Raccord pour tuyau d'arrosage (fe-
male)
2 Raccord pour arrivée d'eau
3 Arrivée d'eau avec tamis
4 Sortie haute pression
5 Interrupteur marche/arrêt
6 Réservoir de détergent (amovible)
7 Support pour la poignée-pistolet
8 Poignée de transport
9 Compartiment de rangement des
accessoires
10 Cordon d'alimentation avec dis-
joncteur différentiel
11 Roues
12 Poignée-pistolet
13 Verrouillage de sécurité de la poi-
gnée-pistolet
14 Touche pour séparer le flexible haute
pression de la poignée-pistolet
15 Tuyau à haute pression
16 Dirtblaster ® (lance rotative)
17 Lance Vario
Français 21
Page 22

CONSIGNES DE SÉCURITÉ IMPORTANTES
AVERTISSEMENT
En utilisant ce produit, toujours observer une certaine prudence élémentaire, incluant notamment:
Afin de minimiser les risques de
blessure, ne jamais laisser l'appareil sans surveillance lorsque celuici est utilisé à proximité d'enfants.
Il est impératif de savoir arrêter et
mettre l'appareil hors pression rapidement. Une connaissance approfondie des commandes est
nécessaire.
Rester attentif – se concentrer sur
la tâche en cours.
L'utilisateur ne doit jamais faire
usage de l'appareil lorsqu'il est fatigué ou sous l'emprise d'alcool ou
de drogues.
Veiller à ce qu'aucun individu ne se
trouve dans la zone de travail.
Ne jamais passer ou monter sur
des supports instables. Toujours
rester stable et équilibré.
Respecter les consignes d'entre-
tien figurant dans le manuel.
Ce produit est fourni avec un dis-
joncteur différentiel monté dans la
fiche du cordon d'alimentation. Si le
remplacement de la fiche ou du cordon d'alimentation s'avère nécessaire, n'utiliser que des pièces de
rechange identiques.
AVERTISSEMENT
Risque de projection ou de blessure – Ne pas diriger le jet de vapeur en direction d'individus.
En cas d'utilisation incorrecte, les
jets haute pression peuvent être
dangereux. Ne jamais diriger les
jets de vapeur en direction d'indivi-
dus, d'animaux, de dispositifs élec-
triques ou de l'appareil lui-même.
Le port de lunettes de protection est
obligatoire.
AVERTISSEMENT
Risque d'explosion – Ne pas vapo-
riser de liquides inflammables.
N'utiliser en aucun cas d'acides, de
solutions alcalines, de solvants ou
de produits inflammables dans cet
appareil. Ces produits peuvent être
à l'origine de blessures graves ou
d'endommagement irréversible de
l'appareil.
ATTENTION
Le pistolet génère une force de pro-
pulsion – Le maintenir toujours à
deux mains.
Le dispositif de sécurité de la poi-
gnée-pistolet permet d'éviter tout
actionnement accidentel de la gâ-
chette. Ce dispositif de sécurité NE
verrouille PAS la gâchette en posi-
tion marche (ON).
AVERTISSEMENT
– Risque d'électrocution
Examiner la cordon avant de l'utili-
ser – Ne pas utiliser de cordon en-
dommagée.
Garder toutes les connexions au
sec et ne pas les laisser à terre.
Ne pas toucher la fiche avec les
mains mouillées.
Ne pas utiliser que des rallonges.
Brancher à une dérivation distincte.
22 Français
Page 23

ATTENTION
Cette machine a été conçue pour être
utilisée avec des détergents du fabricant. L'utilisation d'autres détergents
peut altérer le fonctionnement de la
machine et annuler la garantie.
AVERTISSEMENT
Il est dangereux de trop arroser le matériel et les câbles électriques.
Risque d´injection de peinture: le matériel peut entraîner des graves blessures s´il y a pénétration de la peau par
la peinture. Ne jamais pointer le pistolet vers une personne ou vers soimême. en cas d´accident, demander
immédiatement des soins médicaux.
Cet appareil peut produire une pression de 12400 kPa /1800 PSI afin d´éviter des ruptures et des blessures, ne
pas utiliser cette pompe avec des éléments dont la pression nominale de
service est inférieure à 12400 kPa /
1800 PSI (y compris les pulvérisateurs,
tuyaux flexibles et raccords).
Couper le courant et détendre la pression avant de procéder au dépannage,
au nettoyage, ou d´enlever toute
pièce.
Instructions de mise à terre
Ce produit doit-être mis à la terre. En
cas de mauvais fonctionnement ou de
panne, la mise à la terre établit un chemin de moindre résistance pour le courant électrique afin de réduire le risque
de décharge électrique. Ce produit est
équipé d'un cordon doté d'un conducteur de mise à la terre de l'équipement
et d'une prise de mise à la terre. La
prise doit être branchée dans une prise
appropriée qui est correctement installée et mise à la terre en conformité
avec les codes et ordonnances locaux.
DANGER
Un conducteur de mise à la terre
d'équipement incorrectement branché
peut entraîner un risque d'électrocution. Vérifier avec un électricien ou un
technicien d'entretien qualifié en cas
de doute sur la mise à terre correcte de
la prise. Ne pas modifier la fiche fournie avec le produit - si elle ne peut pas
être branchée, faire installer une prise
appropriée par un électricien qualifié.
Ne pas utiliser n'importe quel type
d'adaptateur avec ce produit.
Protection par disjoncteur diffé-
rentiel
Ce produit est fourni avec un disjoncteur différentiel intégré dans la fiche de
cordon d'alimentation. Ce dispositif
fournit une protection supplémentaire
contre les risques de décharges électriques. Utiliser des pièces de rechange identiques en cas de
remplacement du cordon ou de la
fiche.
ALIMENTATION EN EAU
(eau froide seulement)
ATTENTION
Lors de la connexion de l'entrée d'eau
à la canalisation d'alimentation en eau,
les régulations locales de votre compagnie d'eau doivent être observées.
Dans certaines zones, l'appareil ne
doit pas être connecté directement à
l'alimentation en eau potable publique.
Il s'agit de s'assurer qu'il n'y a pas de
retour de produits chimiques dans l'alimentation en eau. Une connexion directe par l'intermédiaire d'un réservoir
de réception ou d'un disconnecteur hydraulique par exemple est autorisée.
D'éventuelles impuretés dans l'eau
d'alimentation endommagent l'appa-
Français 23
Page 24

reil. Pour prévenir ce risque, nous recommandons d'installer un filtre à eau.
Le tuyau d'eau doit avoir un dia-
mètre d'au moins 1/2“ (13 mm) ou
5/8“ (16 mm).
Le débit d'alimentation en eau ne
doit pas être inférieur à 7,6 l/min
(litres par minute).
Le débit peut être déterminé en lais-
sant couler de l'eau pendant une
minute dans un bidon vide de 20
litres.
La température de l'eau d'alimenta-
tion ne doit pas excéder 40°C/
104°F.
Ne jamais utiliser le nettoyeur à
haute pression pour aspirer de l'eau
contaminée par des solvants, des
diluants, de l'essence, de l'huile,
etc.
Toujours utiliser une source d'eau
propre pour éviter d'aspirer des débris.
24 Français
Page 25

INSTRUCTIONS DE MONTAGE
Pour de plus amples détails quant à
la manière d'assembler ce nettoyeur haute pression, consulter le
site
www.karcherresidential.com/
assembly
Montage
ETAPE 1 :
ETAPE 2 :
Relier le flexible haute pression à la
poignée-pistolet
ETAPE 3 :
Enficher le flexible haute pression
dans la poignée-pistolet jusqu'à ce
qu'il s'enclenche de manière audible.
Remarque : Veiller à un alignement
correct du nipple de raccordement.
Contrôler que la connexion est bien
fixée en tirant sur le flexible haute
pression.
Débrancher:
Appuyer sur la touche de sépara-
tion de la poignée-pistolet et sépa-
rer le flexible haute pression de
celle-ci.
Français 25
Page 26

MODE D'EMPLOI
ETAPE 1 :
Fixer le tuyau à haute pression à la
sortie haute pression de l'appareil.
ETAPE 2 :
Fixer la lance choisie à la poignéepistolet. Presser contre le ressort et
tourner en position verrouillée.
ETAPE 4 :
Visser le tuyau de jardin fourni sur
l'extrémité de votre tuyau de jardin.
ETAPE 5 :
Relier le tuyau de jardin au raccord
d'arrivée d'eau et s'assurer qu'un
clic audible soit perceptible, avant
de continuer.
ETAPE 3 :
Mettre le raccord fourni sur l'arrivée
d'eau de l'unité.
26 Français
ETAPE 6 :
Raccorder le tuyau d'arrosage à la
source d'eau froide et ouvrir com-
plètement le robinet.
Page 27

ETAPE 7 :
Brancher l'interrupteur de protection contre les courts-circuits à la
masse (GFCI) dans une prise appropriée.
Appuyer sur le bouton RESET, l'indicateur devrait être sur "ON".
Appuyer sur le bouton TEST, l'indicateur devrait être sur "OFF".
Appuyer sur le bouton RESET pour
la mise en service.
Nous vous recommandons de tester le GFCI comme partie intégrante de votre procédeure de
démarrage à chaque fois que vous
utilisez votre nettoyeur haute pression. Pour apprendre comment réaliser ce test sur votre unité, visitez
http://www.karcherresidential.com/
gfci_test.php où vous trouverez des
instructions détaillées pour votre
type de GFCI.
AVERTISSEMENT
Ne pas mettre l'appareil en service si le
test ci-dessus échoue.
obtenir un jet d'eau régulier à la
lance.
ETAPE 9:
Mettre le nettoyeur à haute pres-
sion en marche (I/ON).
Le moteur démarre seulement
lorsque la gâchette est actionnée
et s'éteint lorsque celle-ci est re-
lâchée.
Remarque :
Cette laveuse à pression a été testée
par l’équipe d’assurance de la qualité
de Toujours utiliser les détergents Kärcher ®. Il est possible qu’une petite
quantité d’eau soit présente dans l’entrée d’eau ou la sortie d’eau. Ceci est
normal et n’aura aucun effet sur le rendement de la laveuse à pression.
ETAPE 8 :
Déverrouiller la sécurité de la poignée-pistolet. Appuyer sur la gâchette pour purger l'air jusqu'à
Français 27
Page 28

UTILISATION DES ACCESSOIRES
AVERTISSEMENT
Afin d'éviter de graves blessures, ne
jamais pointer la lance sur soi-même,
d'autres personnes ou des animaux.
Toujours tester sur une zone discrète avant de procéder au nettoyage haute pression.
Lance Vario
La lance Vario permet de régler la
pression de nettoyage.
Pour nettoyer à la pression maxi-
male, la lance doit être tournée en
position haute pression (Max).
Pour réduire la pression, tourner la
lance vers la position basse pression (Min).
Dirtblaster
Cette buse comporte un jet crayon
®
de 0° en rotation sur 360° pour une
efficacité maximale du décrassage,
permettant d'augmenter les perfor-
mances de nettoyage jusqu'à 50%.
La buse allie le pouvoir nettoyant
d'un jet crayon de 0° au pouvoir
couvrant d'une buse à grand angle.
Non recommandé pour les maté-
riaux tendres, les revêtements de fa-
çades, les surfaces peintes, les
terrasses en bois et les automobiles.
Avant de nettoyer une quelconque
surface, procéder à un essai sur
une petite surface discrète pour dé-
terminer le mode d'action et la dis-
tance qui produiront les meilleurs
résultats de nettoyage.
Pour appliquer du détergent, la
lance doit être tournée en position
basse pression (Mix).
EMPLOI DE DÉTERGENTS
Les détergents ne peuvent être appliqués qu'à basse pression (Mix).
ETAPE 1 :
Monter la lance Vario. Régler la lance
en position de basse pression (Mix).
28 Français
ETAPE 2 :
Remplir le réservoir avec le déter-
gent prêt à l'emploi choisi.
Page 29

ETAPE 3 :
Mettre le nettoyeur à haute pression en marche (I). Appuyer sur la
gâchette pour faire fonctionner
l'appareil : le détergent liquide est
aspiré dans l'appareil et mélangé à
l'eau. Appliquer le détergent sur la
surface à nettoyer. Ne pas laisser
sécher.
ETAPE 4 :
Pour rincer, placer le VPS hors position “ « Mix » et tirer le déclencheur pour faire fonctionner l’unité.
ETAPE 5 :
Nettoyage : Une fois les travaux de
nettoyage terminés, il convient de
toujours rincer le réservoir à détergent à l'eau propre afin d'éliminer
tout résidu de détergent du système d'injection.
Pour obtenir les meilleurs résultats,
voir les conseils donnant des informations propres au nettoyage des
différents types de surfaces.
Toujours utiliser les détergents Kärcher® pour produire les meilleurs résultats.
Les détergents biodégradables de
Kärcher ® sont spécialement élaborés
pour ménager l'environnement et le
nettoyeur à haute pression. La formule
spéciale évite d'encrasser le filtre du
tuyau d'aspiration et protège les pièces
internes du nettoyeur à haute pression
pour en prolonger la durée de vie. Pour
obtenir des détergents Kärcher ®,
s'adresser au revendeur ou visiter
notre site Web :
www.buykarcher.com
ATTENTION
Ne jamais utiliser :
– javellisant, produits à base de
chlore et autres produits chimiques
corrosifs
– liquides contenant des solvants
(p.ex. diluants pour peintures, es-
sence, huiles)
– produits à base de trisodium de
phosphate
– produits à base d'ammoniaque
– produits à base d'acide
Ces produits chimiques endommagent
l'appareil et altèrent la surface à nettoyer.
L'utilisation de ces produits entraînera l'annulation de la garantie.
PRENDRE UNE PAUSE ...cinq minutes ou plus
ETAPE 1 :
Relâcher la gâchette et engager le
verrouillage de sécurité du pistolet.
ETAPE 2 :
Arrêter le nettoyeur à haute pres-
sion en tournant l'interrupteur sur
OFF (0).
Français 29
Page 30

ARRÊT DE L'APPAREIL ET NETTOYAGE
ETAPE 1 :
Tourner l'interrupteur d’alimentation sur OFF (0) et débrancher le
cordon de la prise.
ETAPE 2 :
Fermer l'arrivée d'eau.
ETAPE 3 :
Appuyer sur la gâchette pour évacuer la pression de l'eau.
ETAPE 5 :
Débrancher le tuyau d'arrosage de
l'entrée d'eau sur l'appareil.
ETAPE 6 :
Débrancher le tuyau à haute pres-
sion de la sortie haute pression.
ETAPE 4 :
Relâcher la gâchette et engager le
verrouillage de sécurité du pistolet.
30 Français
Page 31

REMISAGE HIVERNAL ET ENTREPOSAGE A LONG TERME
1: Débrancher tous les raccorde-
ments d'eau.
2: Mettre l'appareil en marche pen-
dant quelques secondes pour évacuer toute l'eau restant dans les
pompes, puis l'arrêter immédiatement.
3: Ne pas laisser le tuyau d'arro-
sage tordu.
4: Ranger l'appareil et les acces-
soires dans une pièce à l'abri du
gel. NE PAS stocker près d'un fourneau ou d'autres sources de cha-
leur, afin d'éviter un dessèchement
des joints de la pompe.
ATTENTION
L'inobservation des instructions ci-dessus cause des dégâts au bloc-pompe
et aux accessoires en outre, d'entraîner l'annulation de la garantie .
Kärcher ® recommande d'utiliser correctement un dispositf de protection de
pompe tel que "Kärcher ® Pump Guard"
afin de garantir un meilleur stockage
au cours de l'hiver.
INSTRUCTIONS D'ENTRETIEN ET DE MAINTENANCE
Nettoyage du filtre d'admission
d'eau
ETAPE 1 :
Sortir le filtre d'arrivée d'eau avec
une pince plate.
ETAPE 3 :
Remettre le filtre d'arrivée d'eau.
ETAPE 2 :
Rincer le filtre d'arrivée d'eau à
l'eau chaude.
Maintenance
L'appareil n'exige aucune maintenance.
Français 31
Page 32

CONSEILS DE NETTOYAGE
ATTENTION
Avant de nettoyer une quelconque
surface, procéder à un essai sur
une petite surface discrète pour déterminer le mode d'action et la distance qui produiront les meilleurs
résultats de nettoyage.
Si des surfaces peintes s'écaillent,
procéder avec une extrême précaution car le nettoyeur à haute pression peut détacher la peinture à ces
endroits.
Rincer abondamment à l'eau po-
table les surfaces traitées pouvant
éventuellement entrer en contact
avec de la nourriture.
Terrasses en bois
(avec ou sans détergent). Commen-
cer par un prérinçage de la terrasse et
des abords à l'eau fraîche. S'il est prévu d'utiliser du détergent pour terrasses et clôtures en bois Kärcher ®,
l'appliquer à basse pression. Pour obtenir de meilleurs résultats, limiter la
surface de travail à environ 2,3 mètres
carrés. Laisser le détergent agir 1-3
minutes sur la surface. Ne pas laisser
sécher. Rincer à haute pression d'un
ample mouvement de balayage en
maintenant la buse à environ 7,5-15
cm de la surface à nettoyer. Toujours
nettoyer de haut en bas et de gauche à
droite. En entamant une nouvelle section de la surface à nettoyer, veiller à
chevaucher la section précédente afin
de ne pas laisser de marques et d'assurer un résultat uniforme.
Revêtements de façades
(avec ou sans détergent) Commen-
cer par un prérinçage à l'eau fraîche.
S'il est prévu d'utiliser du presso-net
Kärcher ®, l'appliquer à basse pression
sur la surface (pour obtenir de
meilleurs résultats, limiter la surface de
travail à des sections d'environ 1,8
mètre et toujours appliquer le détergent de bas en haut). Laisser le détergent agir 1-3 minutes sur la surface.
Ne pas laisser sécher. Si la surface
semble sécher, il suffit de la mouiller
avec de l'eau fraîche. Au besoin, utiliser l'embout spécial à brosse de lavage (non compris) pour éliminer la
saleté tenace. Rincer à haute pression
de haut en bas d'un mouvement de balayage régulier en maintenant la buse
à environ 15 cm de la surface à nettoyer.
Patios de ciment, briques et
pierres
(avec ou sans détergent) Commen-
cer par un prérinçage à l'eau fraîche.
S'il est prévu d'utiliser du presso-net ou
du dégraisseur Kärcher ®, l'appliquer à
basse pression. Pour obtenir de
meilleurs résultats, limiter la surface de
travail à environ 2,3 mètres carrés.
Laisser le presso-net ou le dégraisseur
agir 1 - 3 minutes sur la surface. Ne
pas laisser sécher. Rincer à haute
pression d'un mouvemant de balayage
en maintenant la buse à environ 7,5 15 cm de la surface à nettoyer. Toujours nettoyer de haut en bas et de
gauche à droite.. Pour éliminer la saleté extrêmement tenace, utiliser la
lance rotative.
32 Français
Page 33

Autos, bateaux et motos
Meubles de patio et de jardin
(avec ou sans détergent) Commen-
cer par un prérinçage du véhicule à
l'eau fraîche. S'il est prévu d'utiliser du
détergent pour véhicules Kärcher ®,
l'appliquer à basse pression. Pour otenir de meilleurs résultats, nettoyer un
côté du véhicule après l'autre et toujours appliquer le détergent de bas en
haut. Ne pas laisser sécher. Au besoin,
utiliser l'embout spécial à brosse de lavage (non compris) pour éliminer la saleté tenace. Rincer à haute pression
d'un mouvemant de balayage en maintenant la buse à environ 15-20 cm de la
surface à nettoyer (augmenter la distance pour des surfaces fragiles). Toujours nettoyer de haut en bas et de
gauche à droite. Pour obtenir de
meilleurs résultats, essuyer la surface
avec une peau de chamois ou un chiffon doux.
Grilles de barbecue, équipe-
ments mécaniques d'extérieur et
outils de jardinage
(avec ou sans détergent) Commen-
cer par un prérinçage des meubles et
des abords à l'eau fraîche. S'il est prévu d'utiliser du presso-net Kärcher ®,
l'appliquer à basse pression. Laisser le
détergent agir 1-3 minutes sur la surface. Ne pas laisser sécher. Au besoin,
utiliser l'embout spécial à brosse de lavage (non compris) pour éliminer la saleté tenace. Rincer à haute pression
d'un mouvemant de balayage en maintenant la buse à environ 7,5-15 cm de
la surface à nettoyer. Pour obtenir de
meilleurs résultats, nettoyer de haut en
bas et de gauche à droite.
(avec ou sans détergent) Commencer par un prérinçage à l'eau fraîche.
S'il est prévu d'utiliser du presso-net ou
du dégraisseur Kärcher ®, l'appliquer à
basse pression. Laisser le détergent
agir 1-3 minutes sur la surface. Ne pas
laisser sécher. Rincer à haute pression
en maintenant la buse à environ 7,5-15
cm de la surface à nettoyer. Pour éliminer la saleté extrêmement tenace, il
peut s'avérer nécessaire d'approcher
la buse plus près de la surface afin
d'augmenter l'efficacité du nettoyage.
Français 33
Page 34

ACCESSOIRES DE NETTOYAGE EN OPTION
Des accessoires sont disponibles en
option afin d'augmenter encore l'efficacité du nettoyage : Ces accessoires
sont disponibles à la date d'impression
du présent catalogue. Veuillez consulter notre site Web pour de plus amples
informations sur les prix et les nouveautés.
Protecteur de pompe
Formule spéciale pour protéger le nettoyeur à haute pression contre le gel,
la corrosion et l'usure prématurée. Le
protecteur de pompe ajoute également
du lubrifiant aux valves et joints afin de
prévenir les adhérences. Hautement
recommandé pour tous les nettoyeurs
à haute pression Kärcher ® !
N° de pièce 9.558-998.0
Flexible d'extension à haute pres-
sion 7.5 m
Le flexible d'extension à tous les nettoyeurs à haute pression Kärcher ®
entre le flexible de l'équipement d'origine et la machine jusqu'à 2000 PSI.
N° de pièce 2.642-588.0
Extension de lance 66" (1,67 m)
(quatre pièces)
Comment nettoyer des fenêtres au
deuxième étage ou d'autres zones en
hauteur ? Ce kit d'extension permet
d'augmenter de 66" le rayon d'action
du nettoyeur à haute pression. Comprend 4 sections en aluminium pour
une longueur variable. Longueur complètement assemblée de 66". Convient
à la plupart des nettoyeurs à haute
pression Kärcher ® jusqu'à 2300 PSI.
(Baïonnette)
N° de pièce 2.640-746.0
Brosse de lavage rotative
(baïonnette)
Pour un nettoyage à moindre effort de
toute surface lisse (peinture, verre et
plastique), la brosse rotative Kärcher ®
s'impose. Elle s’utilise sur les voitures,
les revêtements de façades ou les fenêtres. La pression de l'eau du nettoyeur à haute pression fait tourner
douce men les brosses intérieures,
exigeant ainsi moins d'effort pour le
travail de nettoyage. L'angle de la tête
de brosse est ajustable pour faciliter
l'acès aux moindres recoins. Excellent
pour l'application de détergent. Un accessoire indispensable pour les nettoyeurs à haute pression Kärcher ®
jusqu'à 2300 PSI. (Baïonnette)
N° de pièce 2.640-743.0
Brosse de rinçage douce
Faite de poils doux qui n'endommagent pas les surfaces peintes. Se fixe
facilement sur la poignée-pistolet.
Idéale contre la saleté tenace sur les
voitures, les bateaux, les meubles de
patio et autres surfaces. Parfaite pour
l'application de détergent. Convient à
la plupart des nettoyeurs à haute pression Kärcher ® jusqu'à 2300 PSI.
(Baïonnette)
N° de pièce 2.640-740.0
Kit de nettoyage de conduite
25 Ft. (7,5 m) (baïonnette)
Des conduites, gouttières ou canalisations bouchées à nettoyer ? La réponse est un kit de nettoyage de
conduite Kärcher ® ! Le nettoyeur de
conduites se propulse lui-même en
avant, tout en évacuant les débris. Par
exemple, en insérant la buse de net-
34 Français
Page 35

toyage au bas de la gouttière, il suffit
d'appuyer sur la gâchette du pistolet du
nettoyeur à haute pression pour voir la
buse dégager des feuilles et autres débris tout en grimpant vers le haut. Se
branche directement sur la poignéepistolet de la plupart des nettoyeurs à
haute pression Kärcher ® jusqu'à
2300 PSI. (Baïonnette)
N° de pièce 2.640-747.0
Kit de sablage humide (baïon-
nette)
Pourquoi passer des heures à décaper
d'anciennes peintures ou de la rouille à
la main à l'aide de produits chimiques
agressifs ? Alors qu'il suffit de laisser le
kit de sablage humide Kärcher ® s'en
charger ! Fixer le kit sur le nettoyeur à
haute pression, ajouter l'abrasif et attaquer la rouille et la peinture avec notre
alternative ménageant l'environnement. Convient à la plupart des nettoyeurs à haute pression Kärcher ®
jusqu'à 2300 PSI. (Baïonnette)
N° de pièce 2.638-792.0
Embout moussant
gner du temps en agissant sur une largeur de 30 cm, assurant ainsi un
nettoyage régulier, sans traces. Après
avoir terminé le nettoyage du patio ou
de l'allée, il suffit d'enlever la lance et
d'utiliser la poignée pour nettoyer les
portes du garage et autres surfaces
verticales. Comprend deux buses tournant à grande vitesse pour produire
des résultats parfaits. Notre accessoire
le plus vendu pour les nettoyeurs à
haute pression Kärcher ® jusqu'à
2300 PSI. (Baïonnette)
N° de pièce 2.642-188.0
Idéal pour les applications requérant
une mousse épaisse. Il suffit de remplir
le réservoir avec du détergent liquide
de nettoyeur à haute pression pour
produire un jet moussant. Se fixe directement sur la poignée-pistolet.
Convient à la plupart des nettoyeurs à
haute pression Kärcher ® jusqu'à 2300
PSI. (Baïonnette)
N° de pièce 6.964-507.0
Nettoyeur grande surface T-Ra-
cer
Pour nettoyer des surfaces telles que
patios, terrasses et allées sans bordures, il n'y a pas de meilleure solution
que le T-Racer de Kärcher ®. Il fait ga-
Français 35
Page 36

DÉPANNAGE
ATTENTION
Symptôme Cause Solution
Le moteur ne démarre pas.
L'appareil n'atteint
pas le niveau de
haute pression.
Assurer que l'interrupteur
principal est sur OFF (O).
Cordon d'alimentation non
branché.
Prise fournissant un courant
insuffisant.
Fiche GFCI disjonctée. Appuyez sur le bouton "RE-
Disjoncteur déclenché. Arrêter le nettoyeur à haute
Diamètre du tuyau d'arrosage insuffisant.
Débit d'eau restreint. Vérifier si le tuyau d'arrosage
Alimentation d'eau insuffisante.
Filtre d'admission d'eau encrassé.
Lance en position basse
pression.
Débrancher l'appareil du secteur avant
de procéder à une quelconque réparation.
Tourner l’interrupteur du moteur en position ON (I).
Brancher le cordon d'alimentation.
Essayer une autre prise.
SET" de la fiche GFCI.
pression. Réinitialisation automatique, attendre que la température baisse.
Remplacer par un tuyau d'arrosage de 5/8" ou plus.
est tordu, s'il présente des
fuites ou est bouché.
Ouvrir le robinet d'eau à fond.
Retirer le filtre et le rincer à
l'eau tiède.
Mettre la lance en position
haute pression.
36 Français
Page 37

Symptôme Cause Solution
La pression de
sortie varie.
Alimentation d'eau insuffisante.
Ouvrir le robinet d'eau à fond.
Vérifier si le tuyau d'arrosage
est tordu, s'il présente des
fuites ou est bouché.
Pompe aspirant de l'air. Vérifier l'étanchéité des tuyaux
et raccords. Arrêter l'appareil et
purger la pompe en appuyant
sur la gâchette jusqu'à obtenir
un jet d'eau régulier à la sortie
de la buse.
Filtre d'admission d'eau encrassé.
Retirer le filtre et le rincer à
l'eau tiède.
Buse obstruée. Souffler dans la buse ou retirer
le débris à l'aide d'une aiguille.
Calcification du pistolet, du
tuyau ou de la lance.
Faire couler du vinaigre distillé
dans le tube d'aspiration de détergent.
Il n'y a pas de détergent.
Tube d'aspiration de détergent mal raccordé à l'appa-
Vérifier le raccord.
reil.
Détergent trop épais. Diluer le détergent; pour de
meilleurs résultats, utiliser du
détergent Kärcher ®.
Filtre ou tube d'aspiration de
détergent obstrué.
Faire couler de l'eau tiède à travers le filtre pour éliminer les
débris.
Tube d'aspiration de détergent endommagé ou obstrué.
Lance en position haute
pression.
Eliminer l'obstruction ou remplacer le tube d'aspiration de
détergent.
Tourner l'extrémité de la lance
en position basse pression.
Buse obstruée. Souffler dans la buse ou retirer
le débris à l'aide d'une aiguille.
Le raccord du
tuyau d'arrosage
fuit.
Raccords desserrés. Serrer les raccords.
Rondelle caoutchouc perdue
Monter une nouvelle rondelle.
ou usée.
Français 37
Page 38

Symptôme Cause Solution
La lance fuit. Lance mal fixée. Réinsérer la lance dans la poi-
gnée-pistolet. Presser soigneusement contre le ressort et
tourner en position verrouillée.
Joint torique ou insert plastique brisé.
La pompe est
bruyante.
La pompe présente des fuites
d'eau (jusqu'à 10
gouttes par minute
sont admissibles).
De l'huile
s'égoutte.
En cas d'apparition d'un problème ne
figurant pas dans cette liste, faire
rendre sur le site Web.
Pompe aspirant de l'air. Vérifier l'étanchéité des tuyaux
Raccords desserrés. Vérifier si tous les raccords
Joints d'eau endommagés ou
usés.
Joints d'huile endommagés
ou usés.
Appeler le service après-vente.
et raccords. Arrêter l'appareil et
purger la pompe en appuyant
sur la gâchette jusqu'à obtenir
un jet d'eau régulier à la sortie
de la buse.
sont bien serrés.
Appeler le service après-vente.
Appeler le service après-vente.
États-Unis / Canada :
www.karcher-help.com
Mexique :
www.karcher.com.mx
38 Français
Page 39

MANUAL DE USUARIO DEL LIMPIADOR DE ALTA PRESIÓN
VISTA GENERAL DEL MODELO . 40
INSTRUCCIONES IMPORTANTES
DE SEGURIDAD . . . . . . . . . 41
INSTRUCCIONES DE MONTAJE . 44
INSTRUCCIONES DE FUNCIONA-
MIENTO . . . . . . . . . . . . . . . . 45
UTILIZACIÓN DE LOS ACCESO-
RIOS . . . . . . . . . . . . . . . . . . 47
TRABAJAR CON DETERGENTES . 47
TOMARSE UN DESCANSO de cinco
minutos o más . . . . . . . . . . . 48
APAGADO Y LIMPIEZA. . . . 49
PROTECCIÓN CONTRA LOS
AGENTES INVERNALES Y ALMACENAMIENTO PROLONGADO . 50
INSTRUCCIONES DE CONSERVACIÓN Y MANTENIMIENTO . 50
CONSEJOS DE LIMPIEZA . 51
ACCESORIOS DE LIMPIEZA OP-
CIONALES . . . . . . . . . . . . . . 53
LOCALIZACIÓN Y REPARACIÓN
DE AVERÍASG. . . . . . . . . . . 55
Símbolos de aviso de seguridad
PELIGRO
indica “una situación de peligro inminente que, si no se evita, puede causar
lesiones graves e incluso la muerte”.
ADVERTENCIA
indica “una situación de peligro potencial que, si no se evita, puede causar
lesiones e incluso la muerte”.
ATENCIÓN
indica “una situación de peligro potencial que, si no se evita, puede causar
lesiones de poca importancia o leves",
o daños materiales.
Especificaciones
Máx. presión 1800 PSI
Máx. caudal de agua 1.5 GPM
Corriente 13 AMPS
Tensión 120 V
Nº de pieza 1.602-700.0
Nº de serie
Sólo para uso doméstico.
Responsabilidades del
propietario/usuario
El propietario y/o el usuario deben
comprender bien las instrucciones de
servicio y advertencias del fabricante
antes de empezar a utilizar este limpiador de alta presión.
Debe prestarse especial atención y tener muy claras las advertencias.
Si el operador no habla bien el español, el propietario/comprador debe responsabilizarse de leer y comentar las
instrucciones y las advertencias en su
lengua natal, y asegurarse de que entienda a la perfección su contenido.
El propietario y/o el usuario deben leer
y guardar como referencia para el futuro las instrucciones del fabricante.
Ayuda a clientes
EE.UU. y Canadá
En EE.UU: o Canadá, llame al
1-800-537-4129 para temas de garantía y visite www.karcher-help.com
para el servicio técnico y asesoramiento sobre productos.
Registre su limpiadora a alta presión online en www.karcher-register.com.
Guarde bien el ticket de compra, será
necesario para reparaciones que cubra
la garantía.
Soporte México
Llame al: 01-800-024-13-13 si necesita ayuda o visite nuestra página Web:
www.karcher.com.mx
Español 39
Page 40

VISTA GENERAL DEL MODELO
1 Conector para manguera de jardín
(female)
2 Conector para entrada de agua
3 Entrada de agua con filtro
4 Salida de alta presión
5 Interruptor de encendido/apagado
6 Depósito de detergente (desmonta-
ble)
7 Zona de recogida para pistola pul-
verizadora manual
8 Asa de transporte
9 Soporte de accesorios
10 Cable de potencia con interruptor de
circuito de avería por puesta a tierra
11 Ruedas
12 Pistola de disparo
13 Pestillo de seguridad de la pistola
de disparo
14 Tecla para separar la manguera de
alta presión de la pistola pulveriza-
dora manual
15 Manguera de alta presión
16 Dirtblaster ® (Lanza rotativa de alta
presión)
17 Lanza de alta presión variable
40 Español
Page 41

INSTRUCCIONES IMPORTANTES DE SEGURIDAD
ADVERTENCIA
Al utilizar este producto, tome siempre
las precauciones básicas, incluidas las
siguientes:
Para reducir el riesgo de lesiones,
es preciso vigilar atentamente si se
usa el producto cerca de niños.
Es necesario saber cómo parar rá-
pidamente el producto y parar hemorragias. Estar familiarizado con
los mandos.
Estar atento, prestar atención a lo
que se está haciendo.
No ponga en funcionamiento el pro-
ducto si está cansado o está bajo la
influencia de alcohol o drogas.
Mantenga la zona de trabajo libre
de personas.
No sobrecargar o colocar sobre un
soporte inestable. Mantener el
equilibrio en todo momento.
Seguir las instrucciones de mante-
nimiento especificadas en el manual.
Este producto se suministra con un
interruptor de circuito de avería por
puesta a tierra, que está montado
en el enchufe del cable de potencia.
Si es necesario reemplazar el enchufe o el cable, utilice sólo piezas
de repuesto idénticas.
ADVERTENCIA
Riesgo de inyección o lesiones - no
dirigir el chorro directamente sobre
personas.
Los aparatos a alta presión pueden
resultar peligrosos si se usan de
forma incorrecta. No se debe dirigir
el aparato a personas, animales,
dispositivos eléctricos o la equipo
mismo.
Utilizar gafas de seguridad.
ADVERTENCIA
Riesgo de explosión - no pulverizar
sobre líquidos inflamables.
No usar ácidos, alcalinos, disolven-
tes, o cualquier material inflamable
con este producto. Estos productos
pueden causar heridas físicas al
operario y daños irreparables a la
máquina.
ATENCIÓN
La pistola tiene efecto de retroces-
co - sujetar con las dos manos.
El seguro del gatillo de la pistola
evita que el gatillo salte de forma in-
voluntaria. El dispositivo de seguri-
dad NO bloquea el gatillo en la
posición ON (encendido).
ADVERTENCIA – Riesgo de elec-
trocución
Examine el cable eléctrico antes
del uso – No utilice cable dañados.
Mantenga todas las conexiones se-
cas y alejadas del suelo.
No toque el enchufe con las manos
mojadas.
No se debe usar el cable de exten-
sión para esta máquina.
Conéctese solo a un circuito eléctri-
co individual.
ATENCIÓN
Este aparato ha sido diseñado para
ser utilizado con detergentes de limpieza del fabricante. El uso de otros
detergentes de limpieza puede afectar
al funcionamiento del aparato y hacer
que deje de tener validez la garantía.
Español 41
Page 42

ADVERTENCIA
No pulverice aparatos eléctricos ni cableado.
No use líquidos inflamables y productos químicos tóxicos.
Peligro de inyección: el equipo puede
causar heridas greves si el pulverizador penetra la piel, no dirija la pistola a
nadie ni ninguna parte del cuerpo. En
caso de penetración, consulte inmediatamente a un médico.
Este sistema es capaz de producir
12400 kPa/1800 PSI para evitar ruptura y heridas, no opere esta bomba con
componentes que tenga una tasa menor de 12400 kPa /1800 PSI de presión de trabajo (incluido pero no
limitado a pistolas pulverizadoras,
mangueras y conectoras de mangueras).
Antes de realizar el mantenimiento,
limpieza o retirada de cualquiera de las
piezas, desconectar el interruptor y aliviar la presión.
Instrucciones de puesta a tierra
Este producto se tiene que poner a tierra. Si funcionase mal o si se rompiese, la puesta a tierra proporcionaría
una circuito menos resistente a la
energía eléctrica para reducir el riesgo
de electrochoque. Este producto está
equipado con un cable que tiene un
conductor a tierra y un enchufe a tierra
para el equipo. El enchufe se tiene que
enchufar a un tomacorriente adecuado, que esté correctamente instalado y
puesto a tierra conforme a todas las
normas y reglamentos locales.
PELIGRO
Si la conexión del conductor a tierra
del equipo es incorrecta puede existir
riesgo de electrochoque. En caso de
duda, compruebe con ayuda de un
electricista cualificado o del personal
del servicio técnico que el tomacorriente está correctamente puesto a tierra.
No modifique el enchufe proporcionado con el producto; si no encaja en el
tomacorriente, pida a un electricista
cualificado que le instale un tomacorriente adecuado. No utilice ningún
tipo de adaptador con este producto.
Protección mediante interruptor
de circuito de avería por puesta a
tierra
Este producto se suministra con un interruptor de circuito de avería por
puesta a tierra montado en el enchufe
del cable de potencia. Este aparato
proporciona una protección adicional
contra el riesgo de electrochoque. Si
es necesario reemplazar el enchufe o
el cable, utilice piezas idénticas.
SUMINISTRO DE AGUA (sólo
agua fría)
ATENCIÓN
Al conectar la toma de agua a la red de
suministro del agua, es obligatorio respetar la normativa local establecida
por la compañía del agua. En algunas
zonas, está prohibido conectar la unidad directamente a la red pública de
suministro de agua potable. Esto es
así para garantizar que no penetren
sustancias químicas en la red de suministro del agua. Sí se permite efectuar
la conexión directamente por ejemplo
a través de un depósito receptor o un
dispositivo antirretorno.
Si el agua de alimentación está sucia,
la unidad sufrirá daños. Para evitar
este riesgo, le recomendamos que
monte un filtro de agua.
42 Español
Page 43

La manguera de agua tiene que te-
ner al menos 1/2“ (13 mm) pulgadas de diámetro.
El caudal de agua no debe ser infe-
rior a 450 l/h (litros por hora).
El caudal de agua se puede deter-
minar llenando de agua un recipiente vacío de 8 litros durante un
minuto.
La temperatura de la toma de agua
no debe sobrepasar los 104°F/
40°C.
No utilice nunca el limpiador a pre-
sión para aspirar agua contaminada con disolventes como, p. ej.,
diluyentes de pintura, gasolina,
aceite, etc.
Evite siempre que la unidad aspire
residuos utilizando una fuente de
abastecimiento cuya agua esté limpia.
Español 43
Page 44

INSTRUCCIONES DE MONTAJE
Para obtener información más de-
tallada sobre cómo montar esta limpiadora a presión, visitar
www.karcherresidential.com/assembly
Montaje
PASO 1:
PASO 2:
Conectar la manguera de alta presión
con la pistola pulverizadora manual
PASO 3:
Introducir la manguera de alta pre-
sión en la pistola pulverizadora ma-
nual hasta que esta haga un ruido
al encajarse.
Nota: Procurar que el racor de co-
nexión esté alineado correctamente.
Comprobar si la conexión es segu-
ra tirando de la manguera de alta
presión.
Desconecte:
Pulsar el botón de desconexión en
la pistola pulverizadora manual y
desconectar manguera de alta pre-
sión de la pistola pulverizadora ma-
nual.
44 Español
Page 45

INSTRUCCIONES DE FUNCIONAMIENTO
PASO 1:
Conecte la manguera de alta presión a la salida de alta presión de
launidad.
PASO 2:
Inserte la lanza de alta presión de
su elección en la pistola de disparo.
Empújelo en sentido contrario al de
la tensión que ejerce el muelle y gírelo hasta que quede en la posición
de bloqueo.
PASO 4:
Enroscar el conector de manguera
suministrado al extremo de su man-
guera de jardín.
PASO 5:
Empujar el conector de la mangue-
ra de jardín al conector de la toma
de agua y asegúrese de oir el clic
cuando encaje antes de seguir.
PASO 3:
Instalar el conector suministrado a
la toma de agua del equipo.
PASO 6:
Conecte la manguera de jardín a la
toma de agua fría y abra el agua del
todo.
Español 45
Page 46

PASO 7:
Conectar el interruptor del circuito
de toma a tierra (GFCI) a un enchufe.
Pulsar el botón RESET, el indicador debe ponerse en "ON".
Pulsar el botón TEST, el indicador
debe ponerse en "OFF".
Pulsar el botón RESET para usar.
Recomendamos que pruebe el
GFCI como parte de su procedimiento de arranque cada que use
su arandela de presión. Para conocer cómo realizar esta prueba en su
unidad, visite http://www.karcherresidential.com/gfci_test.php para
más información para su modelo de
GFCI.
ADVERTENCIA
No usar si el test anterior da error.
PASO 9:
Encienda el limpiador de alta pre-
sión (I/ON).
El motor sólo arranca si se pre-
siona el gatillo de la pistola, y se
desconecta cuando se libera el
gatillo.
Nota:
Esta lavadora a presión ha sido probada por el equipo de control de calidad
de Kärcher ®. Puede haber una pequeña cantidad de aqua en la entrada o
salida del aqua. Esto es normal y no
afecta el rendimiento de la lavadora a
presión.
PASO 8:
Desbloquee el pestillo de seguridad
de la pistola de alta presión. Dispare la pistola para eliminar el aire
aprisionado y espere hasta que salga un caudal de agua constante de
la boquilla de alta presión.
46 Español
Page 47

UTILIZACIÓN DE LOS ACCESORIOS
ADVERTENCIA
Para evitar heridas graves, nunca
dirija la boquilla de alta presión hacia usted mismo, hacia otras personas o hacia animales.
Haga una prueba siempre en las
áreas que pasan desapercibidas
antes de limpiar con alta presión.
Lanza variable de alta presión
accionada mecánicamente
La lanza variable de alta presión accionada mecánicamente le permite ajustar la presión de limpieza.
Para limpiar a la presión máxima, la lan-
za de alta presión se tiene que posicionar en el ajuste de alta presión (Max).
Para una presión menor, gire el anillo de
la lanza en dirección al mínimo (Min).
Dirtblaster
Esta boquilla cuenta con chorro fino
®
de 0º que rota 360º para que la ac-
ción erosiva sea máxima, lo que au-
menta de forma efectiva la potencia
de limpieza hasta un 50%. Esta bo-
quilla combina la potencia de lim-
pieza del chorro fino de 0º con la
cobertura de superficie de la boqui-
lla de gran ángulo.
Non recommandé pour les maté-
riaux tendres, les revêtements de
façades, les surfaces peintes, les
terrasses en bois et les automo-
biles.
Antes de limpiar cualquier superfi-
cie, se debe limpiar una parte de la
misma que sea poco visible para
probar el ajuste del chorro a presión
y la distancia para obtener los me-
jores resultados de limpieza.
Para aplicar detergente, la lanza se
tiene que posicionar en el ajuste de
presión más baja (Mix).
TRABAJAR CON DETERGENTES
Los detergentes sólo se pueden
aplicar a baja presión (Mix).
PASO 1:
Monte la lanza variable de alta presión accionada mecánicamente.
Gire la boquilla al ajuste de baja presión (Míx).
PASO 2:
Llene el depósito de detergente con
el detergente seleccionado.
Español 47
Page 48

PASO 3:
Encienda el limpiador de alta presión (I). Presione el gatillo para poner en funcionamiento la unidad: el
detergente líquido es succionado
en la unidad y mezclado con agua.
Aplique detergente al área de trabajo. No deje que se seque el detergente sobre la superficie.
PASO 4:
Para enjuagar, mueva la VPS fuera
de la posición "Mix" y tire del disparador para operar la unidad.
PASO 5:
Limpieza: Al terminar, haga correr
siempre agua limpia por el depósito
del detergente para eliminar todos
los restos del sistema de inyección.
Para obtener mejores resultados,
consulte la sección de consejos de
limpieza para obtener información
específica sobre cómo limpiar diferentes superficies.
Utilice siempre detergente Kärcher®
para obtener los mejores resultados
Los detergentes biodegradables de
Kärcher ® han sido especialmente concebidos para proteger el medio ambiente y el limpiador a presión. Su
fórmula especial no obstruirá el filtro
de la manguera de succión y protegerá
las piezas internas del limpiador de
alta presión para que su vida útil sea
más larga. Para adquirir los detergentes Kärcher ®, diríjase a su comerciante
minorista o visite nuestra página Web:
www.karcher.com.mx
ATENCIÓN
No utilice nunca:
– Lejía, productos que contengan
cloro ni otro tipo de productos quí-
micos corrosivos
– Líquidos que contengan disolven-
tes (p. ej., diluyentes de pintura, ga-
solina, aceites)
– Productos de fosfato trisódico
– Productos con amoniaco
– Productos con base ácida
Los productos químicos mencionados
dañarán la unidad y dañarán la superficie que se limpie.
El uso de estos productos invalidará la garantía.
TOMARSE UN DESCANSO de cinco minutos o más
PASO 1:
Suelte el gatillo y accione el pestillo
de seguridad de la pistola.
48 Español
PASO 2:
Ponga el limpiador a presión en la
posición de apagado (0).
Page 49

APAGADO Y LIMPIEZA
PASO 1:
Gire el interruptor y póngalo en la
posición de apagado (0); después,
desenchufe el cable del tomacorriente.
PASO 2:
Cierre el grifo del agua.
PASO 3:
Presione el gatillo para que salga la
presión.
PASO 5:
Desconecte la manguera de jardín
de la toma de agua de la unidad.
PASO 6:
Desconecte la manguera de alta
presión de la salida de alta presión.
PASO 4:
Suelte el gatillo y accione el pestillo
de seguridad de la pistola.
Español 49
Page 50

PROTECCIÓN CONTRA LOS AGENTES INVERNALES Y ALMA-
CENAMIENTO PROLONGADO
1: Desconecte todas las conexiones de agua.
2: Encienda el aparato durante unos
segundos hasta que haya salido el
agua que haya quedado en la bomba, y apáguelo inmediatamente.
3: Evite que la manguera de alta
presión se retuerza.
4: Almacene el aparato y los acce-
sorios en una habitación que no llegue a temperaturas bajo cero. NO
lo almacene cerca de hornos u
otras fuentes de calor, ya que se
podrían secar las juntas de estan-
queidad de la bomba.
ATENCIÓN
Si no se cumplen las instrucciones
mencionadas arriba, el grupo de la
bomba y los accesorios sufrirán daños
y anular su garantía.
Kärcher ® también recomienda el práctica general de usar un protector de
bomba como "Protección de bomba
Kärcher ®" para ayudar en el almacenamiento durante los meses de invierno.
INSTRUCCIONES DE CONSERVACIÓN Y MANTENIMIENTO
Limpieza del filtro de entrada de
agua
PASO 1:
Sacar el filtro de entrada de agua
con pinzas planas.
PASO 2:
Enjuagar el filtro de entrada de
agua en agua caliente.
PASO 3:
Reinsertar de nuevo el filtro.
Mantenimiento
La unidad no necesita mantenimiento.
50 Español
Page 51

CONSEJOS DE LIMPIEZA
ATENCIÓN
Antes de limpiar cualquier superfi-
cie, se debe limpiar una parte de la
misma que sea poco visible para
probar el ajuste del chorro a presión
y la distancia para obtener los mejores resultados de limpieza.
Si las superficies pintadas se están
pelando o descarapelando, extreme las precauciones, ya que el limpiador a presión podría arrancar la
pintura suelta de la superficie.
Cuando se utilice en superficies
que puedan entrar en contacto con
comida, enjuáguelas abundantemente con agua potable.
Limpieza de cubiertas
(con o sin detergente). Preenjuague
la cubierta y el área circundante con
agua limpia. Si utiliza Deck Wash de
Kärcher ®, aplíquelo en la superficie a
baja presión. Para obtener mejores resultados, divida el área de trabajo en
pequeñas secciones de aprox. 2.5 metros cuadrados. Deje el Deck Wash sobre la superficie durante 1-3 minutos.
No deje que se seque el detergente
sobre la superficie. Enjuague a alta
presión mediante un movimiento de
barrido, manteniendo la boquilla de
alta presión a aprox. 8 a 15 cm de la
superficie a limpiar. Limpie siempre de
arriba a abajo y de izquierda a derecha. Cuando pase a la siguiente sección de la superficie a limpiar,
asegúrese de solapar la nueva sección
con la sección anterior para evitar que
queden marcas de separación y garantizar, así, un resultado homogéneo.
Paredes de la casa
(con o sin detergente). Preenjuague
la superficie a limpiar con agua limpia.
Si utiliza Paredes de Kärcher ®, aplíquelo a la superficie a baja presión
(para obtener mejores resultados, divida la zona de trabajo en secciones de
aproximadamente 2 m y aplique siempre el detergente de abajo a arriba).
Deje el detergente para alta presión
sobre la superficie durante 13 minutos. No deje que el detergente
se seque sobre la superficie. Si ve que
la superficie se va a secar, simplemente moje la superficie con agua limpia.
Si es necesario, utilice un accesorio
especial con cepillo de lavado (no incluido) para quitar la suciedad difícil.
Enjuague a alta presión mediante un
movimiento de barrido homogéneo,
manteniendo la boquilla de alta presión a aprox. 15 centímetros de la superficie a limpiar.
Patios de cemento, ladrillos y
piedras
(con o sin detergente). Preenjuague
la superficie a limpiar con agua limpia.
Si utiliza detergente para alta presión ó
desengrasante de Kärcher ®, aplíquelo
en la superficie a baja presión. Para
obtener mejores resultados, divida el
área de trabajo en pequeñas secciones de aprox. 2.5 metros cuadrados.
Deje el detergente para alta presión ó
desengrasante sobre la superficie durante 1-3 minutos. No deje que se seque el detergente sobre la superficie.
Enjuague a alta presión mediante un
movimiento de barrido, manteniendo la
boquilla de alta presión a aprox. 8 a 15
cm de la superficie a limpiar. Limpie
Español 51
Page 52

siempre de arriba a abajo y de izquierda a derecha. Para quitar manchas especialmente difíciles, utilice la boquilla
desincrustante.
Autos, lanchas y motos
dad especialmente difícil, puede ser
necesario tener que poner la boquilla
de alta presión más cerca para que la
potencia de limpieza sea mayor.
Mobiliario de patios y jardines
(con o sin detergente). Preenjuague
el vehículo con agua limpia. Si utiliza
Touchless Vehicle Wash de Kärcher ®,
aplíquelo en la superficie a baja presión. Para obtener mejores resultados,
limpie un lado del vehículo cada vez y
aplique siempre el detergente de abajo
a arriba. No deje que el detergente se
seque sobre la superficie. Si es necesario, utilice un accesorio especial con
cepillo de lavado (no incluido) para quitar la suciedad difícil. Enjuague a alta
presión mediante un movimiento de
barrido y manteniendo la boquilla pulverizadora a aprox. 15 a 20 centímetros de la superficie a limpiar (la
distancia se debe incrementar en el
caso de que se enjuaguen superficies
con ranuras u otras superficies delicadas). Limpie siempre de arriba a abajo
y de izquierda a derecha. Para obtener
mejores resultados, seque la superficie con una gamuza o un trapo suave
y seco.
Parrillas de asadores, equipos
con motor exteriores y herra-
mientas de jardín
(con o sin detergente). Preenjuague
el mueble y el área circundante con
agua limpia. Si utiliza detergente para
alta presión de Kärcher ®, aplíquelo a la
superficie a baja presión. Deje el Pressure Wash sobre la superficie durante
1-3 minutos. No deje que se seque el
detergente sobre la superficie. Si es
necesario, utilice un accesorio especial con cepillo de lavado (no incluido)
para quitar la suciedad difícil. Enjuague a alta presión mediante un movimiento de barrido, manteniendo la
boquilla de alta presión a aprox. 8 a 15
cm de la superficie a limpiar. Para obtener mejores resultados, limpie de
arriba a abajo y de izquierda a derecha.
(con o sin detergente). Preenjuague
la superficie a limpiar con agua limpia.
Si utiliza detergente para alta presión o
desengrasante, aplique el detergente
a baja presión. Deje el detergente para
alta presión sobre la superficie 1-3 minutos. No deje que el detergente se
seque sobre la superficie. Enjuague a
alta presión manteniendo la boquilla
pulverizadora a aprox. 8 a 15 cm de la
superficie a limpiar. Para quitar sucie-
52 Español
Page 53

ACCESORIOS DE LIMPIEZA OPCIONALES
Disponemos de accesorios de limpieza opcionales para mejorar la capacidad de limpieza. Estos accesorios son
precisos desde la fecha de impresión
de este manual. Consulte nuestra página Web para obtener información
acerca de precios e información actualizada.
Protector de bomba
Especialmente indicado para proteger
el limpiador a presión de las heladas,
la corrosión y el desgaste prematuro.
El protector de bomba también añade
lubricante a las válvulas y juntas de estanqueidad para prevenir del engarrotamiento. ¡Muy recomendable para
todos los limpiadores a presión de
Kärcher ®!
Nº de pieza 9.558-998.0
Manguera alargadora para lim-
piadoras de presión de 7.5 m
Manguera alargadora para limpiadoras de presión Kärcher ® entre la manguera del equipo original y la máquina
(hasta 2000 PSI).
Nº de pieza 2.642-588.0
Extensión de lanza de alta pre-
sión de 1.7 m (cuatro piezas)
¿Necesita limpiar ventanas de segundos pisos u otras áreas altas? Aumente el alcance del limpiador a presión
hasta 1.7 m con este kit alargador. Incluye 4 piezas de aluminio para que la
longitud sea variable. De 1.7 m montado por completo. Encaja en la mayoría
de limpiadores a presión de Kärcher ®
de hasta 2300 PSI. (bayoneta)
Nº de pieza 2.640-746.0
Cepillo de lavado rotatorio (ba-
yoneta)
Para que la limpieza de las zonas más
delicadas (superficies pintadas, cristal
y plástico) le cueste menos esfuerzo,
pruebe el cepillo de lavado rotatorio
Kärcher ®. Utilícelo en el automóvil, paredes o ventanas de casa. La presión
del agua del limpiador a presión hace
que giren suavemente los cepillos internos, haciendo mucho más fácil la tarea de limpieza. El ángulo de la cabeza
del cepillo es ajustable para ayudarle a
llegar a áreas de difícil acceso. Excelente para la aplicación de detergente.
Un accesorio imprescindible diseñado
para los limpiadores a presión de
Kärcher ® de hasta 2300 PSI. (bayoneta)
Nº de pieza 2.640-743.0
Cepillo de lavado de suave
Hecho con cerdas suaves que no dañan las superficies pintadas. Se monta
fácilmente en la pistola de disparo.
Ideal para la suciedad difícil de autos,
lanchas, muebles de patios y otras superficies. Fantástico para la aplicación
de detergente. Encaja en la mayoría
de limpiadores a presión de Kärcher ®
de hasta 2300 PSI. (bayoneta)
Nº de pieza 2.640-740.0
Kit de limpieza de tuberías de
7.5 m (bayoneta)
¿Necesita limpiar tubos, desagües o
bajadas de agua atascados? ¡El kit de
limpieza de tuberías de Kärcher ® es la
solución! El limpiador de tubos se propulsa así mismo hacia delante y quita
a la vez la suciedad. Por ejemplo, inserte la boquilla de limpieza en la base
Español 53
Page 54

de una bajada de agua, presione el gatillo del limpiador a presión y observe
como la boquilla hace saltar las hojas y
la suciedad conforme asciende por la
tubería. Se conecta, directamente, a la
pistola de disparo de la mayoría de los
limpiadores a presión de Kärcher ® de
hasta 2300 PSI. (bayoneta)
Nº de pieza 2.640-747.0
Kit de limpieza mediante asper-
sión de arena húmeda (bayone-
ta)
¿Por qué emplear horas rascando la
pintura vieja y el óxido a mano usando
productos químicos fuertes? ¡Deje que
haga el trabajo el kit de limpieza mediante aspersión de arena húmeda!
Monte el kit en el limpiador a presión,
añada material abrasivo y ataque el
óxido y la pintura con nuestra alternativa ecológica. Encaja en la mayoría de
limpiadores a presión de Kärcher ® de
hasta 2300 PSI. (bayoneta)
Nº de pieza 2.638-792.0
Accesorio espumador de deter-
gente
área a un pie suavemente mientras "levita", proporcionando una limpieza
consistente sin rayar. Cuando termine
de limpiar el patio o camino, quite el
pulverizador y utilice el asa para limpiar las puertas del garaje y otras superficies verticales. Incluye dos
boquillas que giran a gran velocidad
para que el resultado sea óptimo.
Nuestro accesorio líder en ventas para
limpiadores a presión de Kärcher ® de
hasta 2300 PSI. (bayoneta)
Nº de pieza 2.642-188.0
Ideal para aplicaciones que requieren
mucha espuma. Simplemente llene el
tapón del depósito con detergente líquido para el limpiador a presión para
generar la pulverización de espuma.
Se conecta, directamente, a la pistola
de disparo. Encaja en la mayoría de
limpiadores a presión de Kärcher ® de
hasta 2300 PSI. (bayoneta)
Nº de pieza 6.964-507.0
Limpiador de superficies de zo-
nas amplias T 200
Para limpiar superficies como patios,
terrazas y caminos sin salpicar. No hay
solución mejor que el T 200 de
Kärcher ®. Ahorra tiempo al limpiar un
54 Español
Page 55

LOCALIZACIÓN Y REPARACIÓN DE AVERÍASG
ATENCIÓN
Síntoma Causa Solución
El motor no arran-caEl interruptor de encendido/
apagado está en la posición
de “apagado” (O).
El cable eléctrico no está enchufado.
El tomacorriente eléctrico no
suministra la corriente adecuada.
Tomacorriente GFCI equivocado.
El interruptor automático
está desconectado.
La unidad no llega
a la alta presión.
El diámetro de la manguera
de jardín es demasiado pequeño.
El suministro de agua está
restringido.
El suministro de agua de entrada no es suficiente.
El filtro de entrada de agua
está obstruido.
La lanza de alta presión está
en la posición de baja presión.
Desconecte el aparato de la fuente de
alimentación antes de hacer cualquier
reparación.
Gire el interruptor hasta la posición de “encendido” (I).
Enchufe el cable eléctrico.
Inténtelo con otro tomacorriente.
Pulsar el botón "RESET" del
enchufe GFCI.
Apague el limpiador a presión.
El reencendido será automático, por tanto, espere hasta que
la temperatura baje.
Sustituir con una manguera de
jardín de 5/8 pulgadas o más.
Compruebe si la manguera de
jardín tiene grietas, fugas o si
está obstruida.
Abra la toma de agua del todo.
Quite el filtro y enjuáguelo en
agua caliente.
Ponga la lanza de alta presión
en la posición de alta presión.
Español 55
Page 56

Síntoma Causa Solución
La presión de salida varía entre alta
y baja presión.
No entra detergente.
La conexión de la
manguera de jardín fuga.
El suministro de agua de entrada no es suficiente.
La bomba está succionando
aire.
El filtro de entrada de agua
está obstruido.
La boquilla de descarga está
obstruida.
Pistola, manguera o lanza de
alta presión calcificados.
La manguera de succión de
detergente no está correctamente conectada al aparato.
El detergente está demasiado espeso.
El filtro de la manguera de
succión de detergente está
obstruido.
La manguera de succión de
detergente está dañado u
obstruido.
La lanza de alta presión está
en la posición de alta presión.
La boquilla de descarga está
obstruida.
Las conexiones están sueltas.
No hay arandela de hule o
está desgastada.
Abra el grifo de agua del todo.
Compruebe si la manguera de
jardín tiene grietas, fugas o si
está obstruida.
Compruebe que las mangueras y conectores están bien
apretados. Apague el aparato y
purgue la bomba apretando la
pistola de disparo hasta que
salga un caudal constante de
la boquilla.
Quite el filtro y enjuáguelo en
agua caliente.
Limpie con aire comprimido o
quite la suciedad con una aguja fina.
Vierta vinagre destilado por la
manguera de succión de detergente.
Compruebe la conexión.
Diluya el detergente. Para obtener mejores resultados utilice
detergente Kärcher ®.
Deje correr agua caliente por el
filtro para quitar la suciedad.
Quite la obstrucción o reemplace la manguera de succión de
detergente.
Ponga la punta del pulverizador telescópico en la posición
de baja presión.
Limpie con aire comprimido o
quite la suciedad con una aguja fina.
Apriete las conexiones.
Inserte una arandela nueva.
56 Español
Page 57

Síntoma Causa Solución
La lanza de alta
presión fuga.
La lanza de alta presión no
está montado correctamente.
Inserte la lanza de alta presión
en la pistola de disparo. Presiónelo en contra de la tensión
que ejerce el muelle y gírelo
hasta que quede en la posición
de bloqueo.
La bomba hace
ruido.
Anillo tórico o inserción de
plástico rotos.
La bomba está succionando
aire.
Llame al Servicio de asistencia
al cliente.
Compruebe que las mangueras y conectores están bien
apretados. Apague el aparato y
purgue la bomba apretando la
pistola de disparo hasta que
salga un caudal constante de
la boquilla.
Fuga agua de la
bomba (hasta 10
gotas por minuto
es permisible).
Las conexiones están sueltas.
Las juntas de estanqueidad
de agua están dañadas o
Compruebe que todos los accesorios están apretados.
Llame al Servicio de asistencia
al cliente.
desgastadas.
Goteo de aceite. La juntas de estanqueidad de
aceite están dañadas o des-
Llame al Servicio de asistencia
al cliente.
gastadas.
Si tiene más problemas de los que están indicados, visite nuestra página
web.
USA / CDN:
www.karcher-help.com
México:
www.karcher.com.mx
Español 57
Page 58

58
Page 59

59
Page 60

59637800_K 3.350
 Loading...