

Page 1
※ご使用前にこの説明書を良くお読みになり十分に理解してください。
Before beginning assembly, please read these instructions thoroughly!
Bitte lesen Sie die Anweisungen vor Gebrauch genau durch!
Veuillez attentivement lire les instructions avant lÕemploi!
R
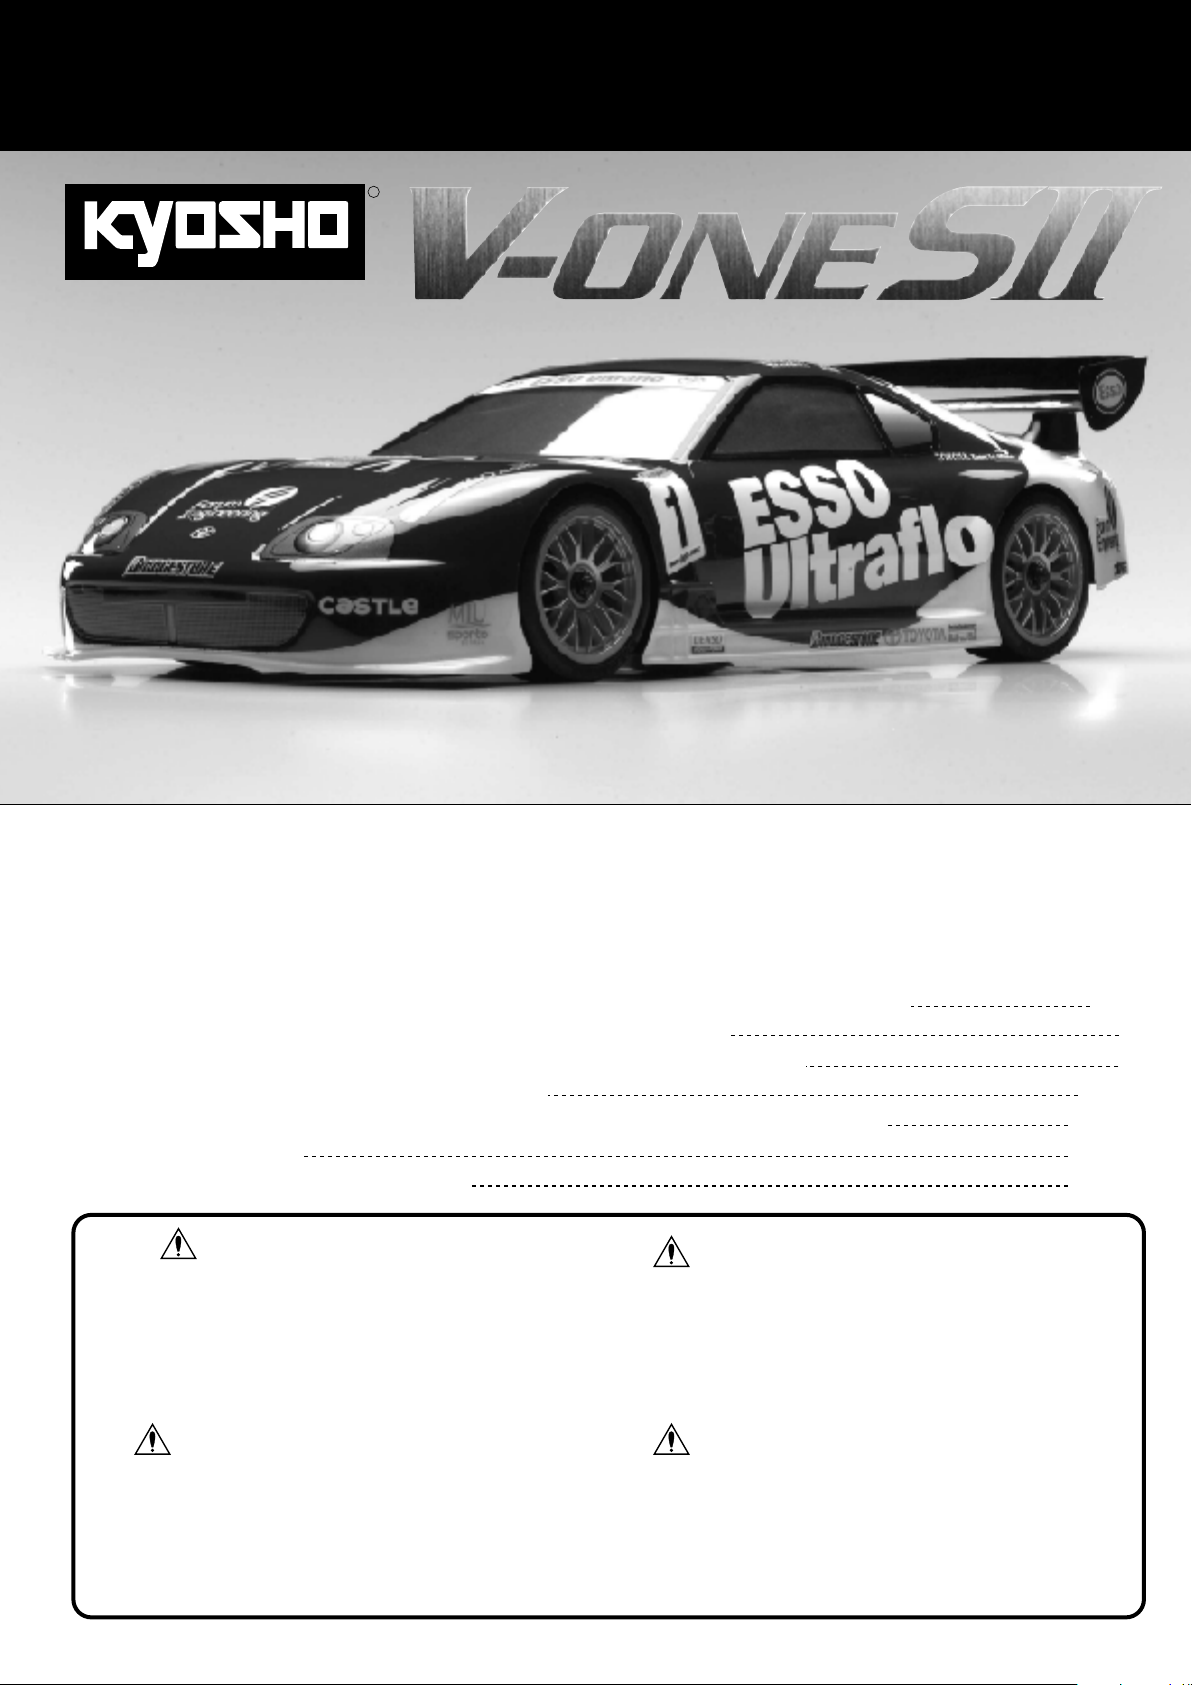
THE FINEST RADIO CONTROL MODELS
ラジオコントロール12‑15エンジンツーリングカーシリーズ
組立/取扱説明書
ピュアテンGPV‑ONESII4WD
エッソウルトラフロースープラ
INSTRUCTION MANUAL
RADIO CONTROLLED .12-.15 ENGINE POWERED TOURING CAR SERIES
PureTen GP V-ONE S II 4WD
ESSO Ultraflo Supra
●キットの他にそろえる物/Required for operation / Das notwendige Zubehšr / Mat riel n cessaire
●プロポの準備/Radio preparation / Die RC-Anlage / Pr paration de la radio
●組立て前の注意/Before you begin / Bevor Sie beginnen / Avant de commencer
●本体の組立て/Assembly / Das Bauen / Assemblage
●取扱いの注意/Operating your model safely / Zu Ihrer Sicherheit / Consignes de s curit
●分解図/Exploded View
●パーツリスト/Spare parts & Optional parts
安全のための注意事項
この無線操縦模型は玩具ではありません!
●この商品は高い性能を発揮するように設計されています。組立てに不慣れな方
は、模型を良く知っている人にアドバイスを受け確実に組立ててください。
●小さい部品があるので、組立て作業は幼児の手がとどかない所で必ずおこなっ
てください。
●動かして楽しむ場所は、万一の事故を考えて安全を確認してから、責任をもっ
てお楽しみください。
●組立てた後も、説明書がいつでも見られるように大切に保管してください。
●AnfŠnger sollten mšglichst Rat bei Modellbaukundigen einholen, um das Modell richtig
zusammenzubauen und gefahrlos bedienen zu kšnnen.
●Bauen Sie dieses Modell nur au§er Reichweite von Kindern zusammen!
●Treffen Sie genŸgend Sicherheitsvorkehrungen, bevor Sie Ihr Modell bedienen! Sie
alleine tragen die Verantwortung fŸr Ihr Modell und dessen gefahrlose Bedienung!
●Bitte bewahren Sie diese Dokumentation zur spŠteren Verwendung auf.
ACHTUNG!
Dieses Modell ist kein Spielzeug!
2 ~ 3
5 ~ 28
29 ~ 35
36 ~ 37
38 ~ 41
3
4
UNDER SAFETY PRECAUTIONS
This radio control model is not a toy!
●First-time builders should seek the advice of experienced modellers before
beginning assembly and if they do not fully understand any part of the
construction.
●Assemble this kit only in places out of childrenÕs reach!
●Take enough safety precautions prior to operating this model. You are responsible
for this modelÕs assembly and safe operation!
●Always keep this instruction manual ready at hand for quick reference, even after
completing the assembly.
※製品改良のため、予告なく仕様を変更する場合があります。 Specifications are subject to be changed without prior notice!
Technische nderungen sind ohne vorherige AnkŸndigungen mšglich! Les sp cifications peuvent changer sans pr avis!
© 2003 KYOSHO CORPORATION/禁無断転載複製
●Si vous tes d butant dans le mod le r duit, prenez conseils aupr s de mod listes con-firm
s afin dÕutiliser votre mod le dans des conditions optimales.
●Assemblez ce kit en dehors de la port e de jeunes enfants!
●Prenez des pr cautions lors de lÕutilisation. Vous seul tes responsable des volutions
de votre mod le. La soci t KYOSHO ou son distributeur ne peuvent en aucun cas tre
tenus responsables des accidents pouvant survenir lors de lÕutilisation de ce mod le!
●Gardez cette notice ˆ port e de main afin de vous y r f rer rapidement.
ATTENTION!
Ce mod le nÕest pas un jouet!
(和英独仏)
No. 31122
Page 2
キットの他にそろえる物 / REQUIRED FOR OPERATION / DAS NOTWENDIGE ZUBEHÖR / MATÉRIEL NÉCESSAIRE
BEC仕様2チャンネル2サーボ無線操縦機(プロポ)
Minimum 2 channel radio with 2 servos.
1
Eine 2-Kanal BEC Fernlenkanlage mit 2 Servos.
Radio type B.E.C. 2 voies avec 2 servos
■スティックタイプ
Stick-type
Knüppelsteuerung
A manches
■ハンドルタイプ
Wheel-type
Drehknopfsteuerung
A volant
●リバーススイッチを使用する場合は、プロポに付属の説
明書を参考に設定してください。
●In case of using reverse switch, refer to instruction
manual included in the radio set.
●Beachten Sie die Bedienungsanleitung des Herstellers
des Fernsteuersystems
●Pour utiliser les inverseurs de servos, se référer à la
notice de la radio.
使用できるサーボサイズ
Suitable size servos
Passende Servos
Servos compatibles
38~41mm
19~20mm
地上用(自動車用)のプロポ(2チャンネル2サーボ仕様)セットを
必ず使用してください。(地上用以外使用禁止)
CAUTION: Only use a radio suitable for surface use!
注意
WICHTIG: Benutzen Sie ausschließlich eine 2-Kanal RC-Anlage mit
2 Servos für den Autobereich!
IMPORTANT: N’utilisez qu’une radio 2 voies avec 2 servos pour voitures!
•
■電池ボックス
Battery Box
Batteriehalter
Boîtier à piles
プロポセットに付いているときは必要ありません。
• If a battery box not included with your radio system, one
must be purchased separately.
• Wenn der Batteriehalter schon mit der RC-Anlage geliefert
wird, brau-chen Sie keinen gesondert kaufen.
• S’il est déjà fourni avec l’ensemble radio, il est inutile
d’acheter un boîtier à piles séparé.
■単3乾電池
AA-size Batteries
AA Trockenbatterien
AAAA
AAAA AAAA
Piles type AA
●プロポの取扱いは、プロポに付属の説明書を参考にしてください。
● For more information on the radio, refer to its instruction manual.
● Für mehr Einzelheiten über die RC-Anlage, lesen Sie bitte die
Gebrauchsanweisung der RC-Anlage durch.
● Lisez la notice de la radio pour plus d’informations.
燃料と始動用具
Required for engine starting:
2
Zum Starten von Verbrennungsmotoren benötigtes Zubehör:
Pour faire démarrer le moteur thermique:
No.73201
スーパースターターパック
■グロー燃料
Glow Fuel
Super Starter Pack
●エンジン始動に必要な用具セット
塗料(ボディ塗装用)
Paints (for painting the body shell)
3
Farben (zur Lackierung der Karosserie)
Peintures (pour peindre la carrosserie)
■筆
PAINT BRUSH
FUEL
ガソリンや灯油は使用禁止。
WARNING: Never use petrol or kerosene!
警告
注意
VORSICHT: Verwenden Sie niemals handelsübliches
Benzin und Diesel!
ATTENTION: N’utilisez jamais ni de l’essence ni du gasoil!
■プラグヒーター/充電器
Plug Heater / AC Charger
スプレーカラーを使用する場合、缶の説明を良く読んでください。
CAUTION: Before using Kyosho Spray Colours, always read the
instructions thoroughly!
WICHTIG: Lesen Sie bitte zuerst die Gebrauchsanleitung der Spray farben sorgfältig durch!
IMPORTANT: Avant l’utilisation des Kyosho Spray Colors, lisez atten tivement les explications!
■プラグレンチ
Plug Wrench
No.2230
ポリカカラー
(筆ぬり塗料)
POLYCA COLOR
(Brush paints)
(Pinselfarben)
(Peintures à pinceau)
2
No.76301 ~ 76711
京商スプレーカラー
KYOSHO SPRAY COLOR
No.1947
マスキングカバーシート
MASKING SHEET
E
U
L
P
R
A
O
P
F
F
F
K
O
Y
H
S
O
S
P
O
R
L
A
O
Y
E
U
L
P
R
A
O
P
F
F
F
K
O
Y
H
S
O
S
P
O
R
L
A
O
Y
C
C
I
N
T
R
R
マスキングテープとビニール
I
N
T
シートが一体になった広範囲
R
R
マスク用テープです。
For safe masking jobs, use this plastic masking
sheet featuring one self-adhesive edge.
Page 3
組立てに必要な工具
Tools required
4
Die notwendigen Werkzeuge
Les outils utilisés
キットに入っている工具
TOOLS INCLUDED
GELIEFERTE WERKZEUGE
OUTILS FOURNIS
■六角レンチ
Hex Wrench
Sechskantschlüssel
Clé allen (1.5mm, 2mm, 2.5mm, 5mm)
(1.5mm, 2mm, 2.5mm, 5mm)
(1.5mm, 2mm, 2.5mm, 5mm)
(1.5mm, 2mm, 2.5mm, 5mm)
■+ドライバー(大、中、小)
Phillips Screwdriver (L, M, S)
Kreuzschlitzschraubendreher
Tournevis cruciforme
■ラジオペンチ
Needle Nose Pliers
Flachzange
Pinces plates
■ニッパー
Wire Cutters
Seitenschneider
Pince coupante
使用する工具の取扱いには、十分注意してください。
CAUTION: Handle tools carefully!
WICHTIG: Gehen Sie vorsichtig mit Werkzeugen um!
注意
IMPORTANT: Maniez les outils avec prudence!
■カッターナイフ
Sharp Hobby Knife
Scharfes Bastelmesser
Cutter
■キリ
Awl
Spitzahle
Poinçon
KYOSHO スペシャルグルー
KYOSHO Special Glue
瞬間接着剤
Instant Glue
Sekundenkleber
Colle cyanoacrylate
No.96154
KYOSHO
Special Glue
ラウンドカッター&サンダー
■十字レンチ
Cross Wrench
Kreuzschlüssel
Clé en croix
■グリス
Grease
Fett
Graisse
GREASE
CURVED SCISSORS & SANDER
LEXANSCHERE
CISEAUX A LEXAN
ボディのカット、仕上げ用。
曲線部分も楽に作業ができます。
For trimming body shells. Makes cutting curved lines easy!
Schneidet ohne Probleme auch Kurven. Für Karosserien
aus Lexan.
Coupe le long de lignes courbées. Pour les carrosseries.
プロポの準備 / RADIO PREPARATION / DIE RC-ANLAGE / PRÉPARATION DE LA RADIO
●プロポを下の順番にしたがってセットします。
Set up the radio as explained below.
Bereiten Sie die RC-Anlage wie unten beschrieben vor.
Préparez votre radiocommande comme ci-dessous.
ON
2
12
11
7
OFF
9
6
2
PO
W
ER
ON
Mo
d
e
l
N
o
.
K
T
-
3
S
T
.
D
/
R
No.1829
ナイフエッジリーマー
KNIFE EDGE REAMER
No.695101
REIBAHLE
ALESOIR SPECIAL
下穴加工が不要で、直接1 ~ 15mmの穴あけができる工具です。
No need to pre-drill! Drills neat 1 ~ 15mm holes directly!
Unerläßlich, nützlich! Diese Ahle bohrt Ihnen 1 ~ 15mm
Löcher, einfach und sauber!
Un must! Permet de faire des trous de 1 ~ 15mm sans
effort! Idéal pour les carrosseries.
3
ON
8
10
12
送信機
▲
Transmitter
Sender
T
H
.
T
R
I
M
Émetteur
P
O
W
E
R
S
T
.
T
R
I
M
OFF
▲スイッチ
Switch
Schalter
Interrupteur
4
▲電池ボックス
Battery Box
Batteriehalter
Boîtier à piles
5
1
ON
7
11
OFF
●始める時
1
送信機に単3乾電池をセットする。
2
送信機のアンテナをのばす。
3
電池ボッ クスに単3乾電 池を セット
する。
電池ボックスのコネクターをつなぐ。
4
受信機のアンテナをのばす。
5
トリムを中央にセットする。
6
送信機のスイッチを入れる。
7
8
受信機のスイッチを入れる。
9
ハンドル/トリガーを動かしてサーボ
が動いているか確認。
●終わる時
10
受信機のスイッチを切る。
11
送信機のスイッチを切る。
12
送信機のアンテナを縮める。
9
D
IG
I
TA
L P
R
O
P
O
R
TIO
N
A
L R
A
D
IO
C
O
N
TR
O
L S
Y
S
TE
M
P
E
R
FE
X
K
T-3
6
1
●START
1
Insert AA-size batteries into the
Transmitter.
2
Extend the Transmitter antenna.
3
Insert the AA-size dry batteries into
the battery box.
4
Plug in the battery box.
Unwind the Receiver antenna.
5
Center the Transmitter trims.
6
Switch "ON" the Transmitter.
7
Switch "ON" the Receiver.
8
9
Make sure the servos move according to your transmitter inputs.
●FINISH
10
Switch "OFF" the Receiver.
11
Switch "OFF" the Transmitter.
12
Retract the Transmitter antenna.
▲サーボ
Servo
●ANFANG
1
Setzen Sie die AA Batterien in den
Sender ein.
2
Ziehen Sie die Senderantenne aus.
3
Setzen Sie die AA Batterien in den
Batteriehalter ein.
4
Schließen Sie den Batteriehalter an.
Entspulen Sie die Empfängerantenne.
5
Stellen Sie die Trimmer neutral.
6
Schalten Sie den Sender an.
7
Schalten Sie den Empfänger an.
8
9
Überprüfen Sie, ob die Servos sich Ihrer Richtung entsprechend verhalten.
●ENDE
10
Schalten Sie den Empfänger aus.
11
Schalten Sie den Sender aus.
12
Ziehen Sie die Senderantenne ein.
▲受信機
Receiver
Empfänger
Récepteur
●DEBUT
1
2
3
4
5
6
7
8
9
●FIN
10
11
12
Installez les piles type AA dans
l’émetteur.
Déployez l’antenne de l’émetteur.
Installez les piles type AA dans le
boîtier à piles.
Ensuite, branchez le boîtier à piles.
Déployez l’antenne du récepteur.
Mettez les trims au neutre.
Mettez l’émetteur sur “ON”.
Mettez le récepteur sur “ON”.
Vérifiez si les servos bougent selon
vos maneuvres sur l’émetteur.
Mettez le récepteur sur “OFF”.
Mettez l’émetteur sur “OFF”.
Rentrez l’antenne de l’émetteur.
3
Page 4
組立て前の注意 / BEFORE YOU BEGIN / BEVOR SIE BEGINNEN / AVANT DE COMMENCER
組立ての前に下記のことに注意してください。
1
●この説明書を良く読み、構造を理解する。
●キットの内容を確かめる。
※万一不良、不足がありましたら、お買い求めの販売店か、当社「ユーザー
相談室」までご連絡ください。
●小さな部品の形やサイズを間違えないようにする。図を参考にして
確認しながら組立てる。
●TPビス締めるときは・・・
締めこみが固くても部品が固定されるまで締めてください。
ただし、部品が変形するまで締めるとビスがきかなくなります。
Before assembling, please read the following carefully:
●First, read this instruction manual and understand the model’s con-struction.
●Check the contents of this kit.
Should parts be missing, immediately contact the retail shop or your nearest
Kyosho distributor.
●Do not take the wrong screw or small part. Compare it to the true-toscale dia-gram in each assembly step, then install it.
●When tightening a self-tapping (TP) screw:
Even if feeling hard, tighten a TP screw until the part will be securely
attached. However, do not overtighten it as the plastic thread inside the part
may strip!
Lesen Sie folgendes vor dem Zusammenbau aufmerksam durch:
●Lesen Sie zuerst die Bauanleitung ganz durch und verstehen Sie
den Aufbau Ihres Modelles.
●Überprüfen Sie den Verpackungsinhalt.
Sollten Teile fehlen, wenden Sie sich direkt an Ihren Fachhändler oder an
den Kyosho-Vertreiber in Ihrem Land.
●
Verwechseln Sie Schrauben sowie kleine Bauteile nicht! Vergleichen Sie
sie vor dem Einbau mit den Darstel-lungen in Originalgröße in den Baustufen.
●Beachten Sie beim Festziehen einer Treibschraube folgendes:
Schrauben Sie solange, bis das anzubringende Teil sicher und fest sitzt.
Achten Sie jedoch darauf, daß Sie den Gewindegang im Material nicht überdrehen!
Avant l’assemblage, veuillez lire les points suivants attentivement:
●Lisez d’abord complètement cette notice; ainsi vous aurez un aperçu
du déroulement et pourrez mieux vous orienter.
●Vérifiez ensuite le contenu du kit.
Si jamais il y a des pièces manquantes, adressez-vous directement à votre
magazin spécialisé ou au distributeur Kyosho dans votre pays.
●Ne confondez pas les vis et les petites pièces! Vérifiez-les à l’aide
des illus-trations dans chaque plage de montage, puis assemblez les.
●Lorsque vous serrez une vis autotaraudeuse:
Serrez jusqu’à ce que la pièce à monter soit bien installée. Pourtant, veillez
à ne pas trop la serrer puisque vous risquez d’abîmer le filet dans la pièce.
Correct
Richtig
Bon
説明書の見かた
2
How to read the instruction manual:
フロントサスペンション
Front Suspension
1
4
5 x 10mm
キングピン
5
King Pin
Achsschenkelbolzen
Vis de fusée
メタル
Metal Bushing
Metallager
Palier métal
〔説明例 Example Exemple Beispiel〕
Vordere Aufhängung
Suspension avant
A
4
B
C
4
So funktioniert die Bauanleitung:
Comment lire les instruction:
No.4, No.5, No.6
D
6
C
Wrong
Falsch
Mauvais
A: この項目で組立てるおおよその場所。
B: 小物部品の名前、原寸図、使用数。
C: キット内の部品は、ビス類を除いてキー
5
7
D
5
No.が付けられています。スペアパーツを
購入する時はキーNo.を参照して下さい。
D: 説明書内では多くのマークが使用されて
います。マークに注意して組立てを進め
てください。マークの説明は、各ページ
の下にあります。
A: Indicates the number of the assembly step
and the part that will be assembled.
B: Key Number, Part Name, True-to-scale
Diagram, Quantity Used.
C: All parts except screws are identified by key
numbers. For purchasing spare parts, find
the key number of the part needed in the
spare parts list and refer to the left column to
look up the corresponding order number.
D: This instruction manual uses several
symbols. Please note them during the entire
assembly at the bottom of each page.
4
A: Die Nummer der Baustufe sowie das zu bau--
ende Teil werden angegeben.
B: Teilenummer, Teilename, Darstellung in
Origi-nalgröße und Anzahl.
C: Die Teilenummer stellt den Bezug zu unserer
Bestellnummer her. Am Ende der Bauanlei-tung finden Sie eine Ersatzteilliste, die zu der
Teilenummer die entsprechende Bestellnum-mer liefert.
D: Diese Bauanleitung verwendet verschiedene
Piktogramme, deren Bedeutungen unten auf
jeder Seite erklärt werden.
A: Numéro de la plage de montage et le nom de
la pièce à assembler.
B: Numéro de référence de la pièce, nom, illu--
stration en grandeur réelle et quantité
utilisée.
C: Toutes les pièces, exceptées les vis, sont
iden-tifiées par un numéro de référence. Pour
l’achat de pièces de rechange, trouvez ce
numéro dans la liste pour pièces de rechange
à la fin de cette notice. Toute à la gauche de
cette même liste, vous trouverez ainsi le
numéro de commande correspondant.
D: Cette notice utilise des icônes dans les
plages de montage. Référez-vous au bas de
Page 5
ランナー付プラパーツ配置図
/ ARRANGEMENT OF PLASTIC PARTS ON RUNNERS
Die Kunststoffteile an den Spritzlingen / Nomenclature des grappes de pièces plastique
No.2
部分の部品は、使用しません。
Shaded Parts are not used.
Schattiert dargestellte Teile werden nicht benötigt.
Les pièces grisées ne sont pas utilisées.
31
23 24
No.3
99
34
33
35
32
30
39 28
30
100
94
19
18
91
20
22
22
21
No.4
81
64
101
101
82
82
65
97
83
93
98
95
92
92
84
63
5
Page 6
ランナー付プラパーツ配置図
/ ARRANGEMENT OF PLASTIC PARTS ON RUNNERS
Die Kunststoffteile an den Spritzlingen / Nomenclature des grappes de pièces plastique
部分の部品は、使用しません。
No.5
Shaded Parts are not used.
Schattiert dargestellte Teile werden nicht benötigt.
Les pièces grisées ne sont pas utilisées.
162
165
164
62
62
62
62
166
61
58
61
161
167
163
160
56
60
60
55
No.6 No.9
41
G-6
42
36
36
43
3838 39 39
G-4 G-4
G-1 G-1
G-4
G-7 G-7
G-10
G-4
G-8
G-3G-2
G-6
G-5G-5
G-8
G-3 G-2
6
Page 7
1
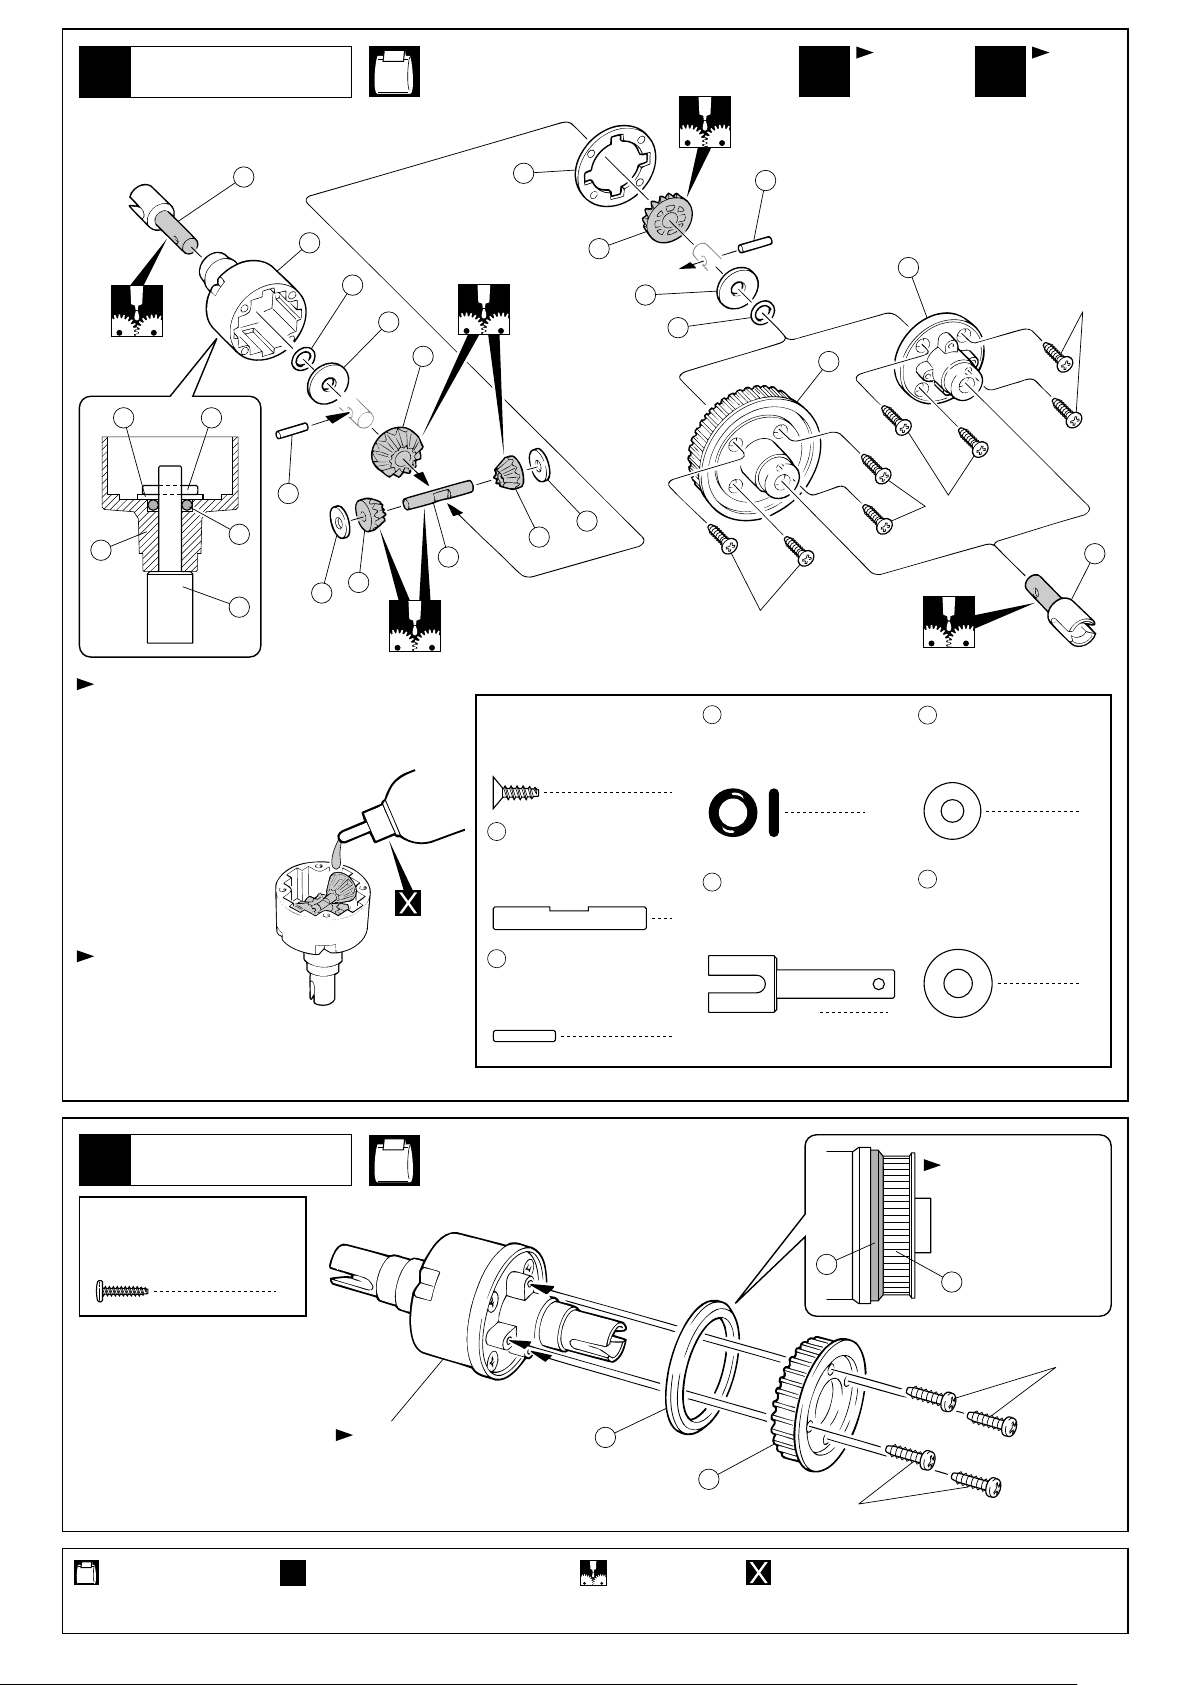
デフギヤ
Differential
Différentiel
Diferencial
No.1
フロント用 リヤ用
x1 x1
For Front
Vorne
Avant
For Rear
Hinten
Arrière
8
1
11
10
13
13
1
フロント用 (別売オプション)
(No.SIL50000 シリコンオイル#50000)
For Front (Optional parts)
(No.SIL50000 Silicon Oil #50000)
Alternativ kann das Silikonöl Best.-Nr. SIL50000
(50.000 cps) verwendet werden
Pour l'avant utiliser de l'huile silicone de grade #50000
(Réf. SIL50000 - non-inclus)
リヤ用 (別売オプション)
(No.SIL5000 シリコンオイル#5000)
For Rear (Optional parts)
(No.SIL5000 Silicon Oil #5000)
Für hinten (Tuningteile)
(Best.-Nr. SIL-5000 Silikonöl 5000 cps)
Pour l'arrière. (Pièces options)
(Huile Silicone #5000 - Réf. HM-H5000)
11
8
6
9
10
7
オイル
Oil
Öl
Huile
14
6
12
2.6 x 8mm
TP F/H Screw
SK Treibschraube
Vis TP F/H 2.6x8mm
1224 x 27mm
Shaft
Welle
Axe 4x27mm
13
2 x 11mm
Pin
Stift
Axe 2x11mm
7
10
< >リヤ用
< >
For Rear
< >
Hinten
< >
Arrière
9
TPサラビス
シャフト
ピン
11
11
8
8
4
13
5
2.6x8mm
Oリング P5
O-ring P5
O-Ring P5
Joint thorique P5
デフジョイント
Differential Shaft
Welle Differential
Axe Différentiel
4
4
< >フロント用
< >
For Front
< >
Vorne
2
< >
Avant
2.6x8mm
9 4 x 10mm
Shim
Unterlegscheibe
Rondelle de callage
10
5 x 12mm
Shim
Unterlegscheibe
Rondelle de callage
2.6x8mm
8
シム
4
シム
4
デフギヤ
Differential
2
2 x 8mm
TP Screw
LK Treibschr
Vis TP 2x8mm
使用する袋詰。
Part bags used.
Verwendeter Teilebeutel.
Sachet utilisé.
TPビス
Différentiel
Diferencial
No.1
4
フロント用
For Front
Vorne
Avant
1セット組立てる(例)。
x1
Assemble as many times as specified.
Sooft wie angegeben zusammenbauen.
Assemblez aussi souvent qu’indiqué.
4
グリスを塗る。
Apply grease.
Fetten.
Graissez.
向きに注意。
Note the direction.
Einbaurichtung beachten.
Notez le sens.
4
3
2x8mm
3
2x8mm
別購入品。
Must be purchased separately!
Das Teil ist nicht im Bausatz enthalten!
Doit être acheté séparément!
7
Page 8
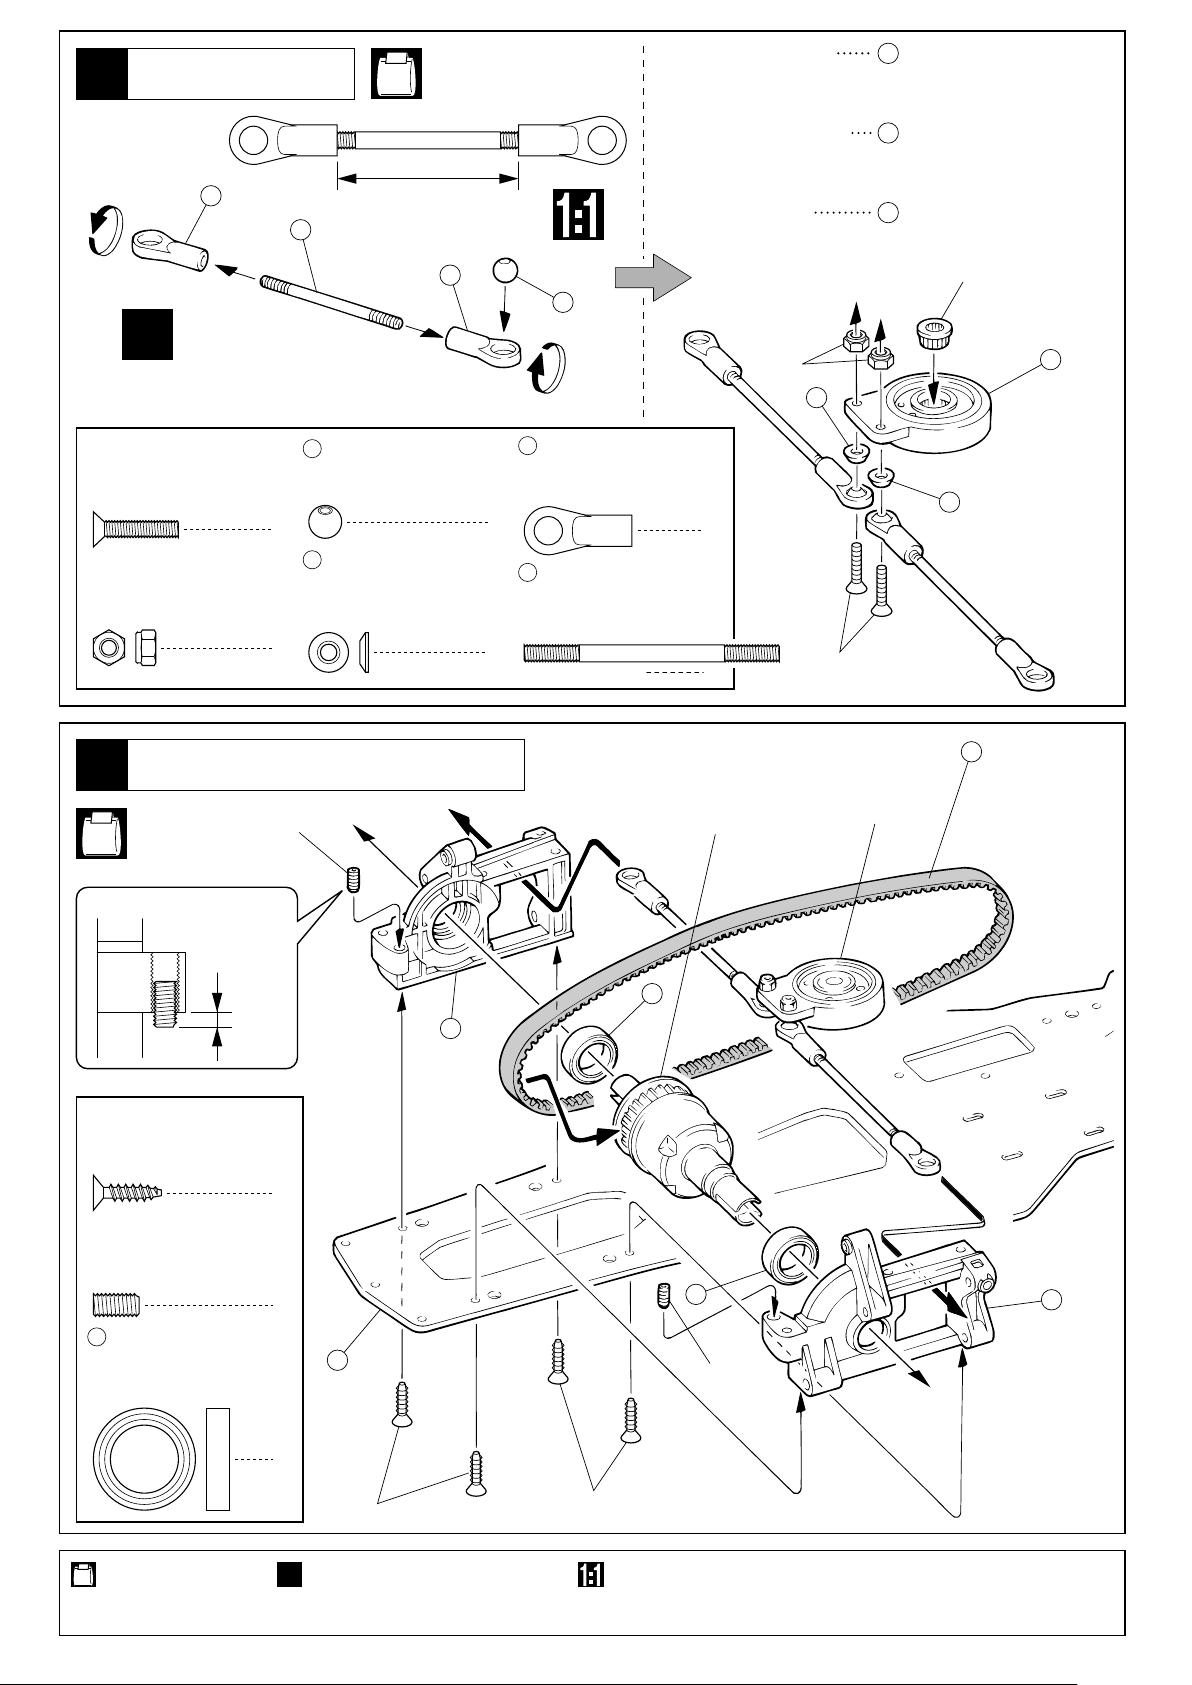
ステアリング
Steering
3
16
Lenkung
Direction
15
No.2, No.10
約32mm
approx. 32mm environ 32mm
ca. 32mm
16
17
HITEC
FUTABA
KO
JR
SANWA
21
セレーションキャップ(H)
Serrated Cap (H)
Servo Adapter (H)
Bague crantée (H)
19
セレーションキャップ(F)
Serrated Cap (F)
Servo Adapter (F)
Bague crantée (F)
20
セレーションキャップ(KJS)
Serrated Cap (KJS)
Servo Adapter (KJS)
Bague crantée (KJS)
x2
3 x 15mm
F/H Screw
SK Schraube
Vis F/H 3x15mm
3mm
Nylon Nut
Kunststoffmutter
Ecrou nylon
4
サラビス
ナイロンナット
フロントバルクヘッド
Front Bulkhead
No.2, No.8,
No.10
約3mm
approx. 3mm
ca. 3mm
environ 3mm
17
5.8mm
ボール
Ball
Kugel
Rotule
2
30
テーパープラワッシャー
Tapered Plastic Washer
Scheibe, konisch
Rondelle plastique incurvée
2
Getriebekasten, vorn
Cellule avant
4x8mm
16
5.8mm
ボールエンド
Ball End
Kugelpfanne
Chape
2
15
3 x 45mm
Adjustable Rod
Gewindestange
Biellette règlable
2
アジャスタブルロッド
3mm
4
2
デフギヤ(フロント用)
Gear Differential (For Front)
Gear Differential (Vorne)
Différentiel (Avant)
30
3x15mm
ステアリング
Steering
Lenk
Direction
30
27
ベルト(大)
Belt (big)
Zahnriemon, groß
Courroie (grande)
18
3 x 12mm
TP F/H Screw
SK Treibschraube
Vis TP F/H 3x12mm
4 x 8mm
Set Screw
Gewindestift
Vis BTR 4x8mm
26
12 x 18mm
Ball Bearing
Kugellager
使用する袋詰。
Part bags used.
Verwendeter Teilebeutel.
Sachet utilisé.
TPサラビス
セットビス
ベアリング
Roulements à billes
24
4
2
25
2
3x12mm
2セット組立てる(例)。
x2
Assemble as many times as specified.
Sooft wie angegeben zusammenbauen.
Assemblez aussi souvent qu’indiqué.
26
26
4x8mm
3x12mm
原寸図。
True-to-scale diagram.
Maßstabsgetreue Darstellung.
Illustration à l’échelle.
23
8
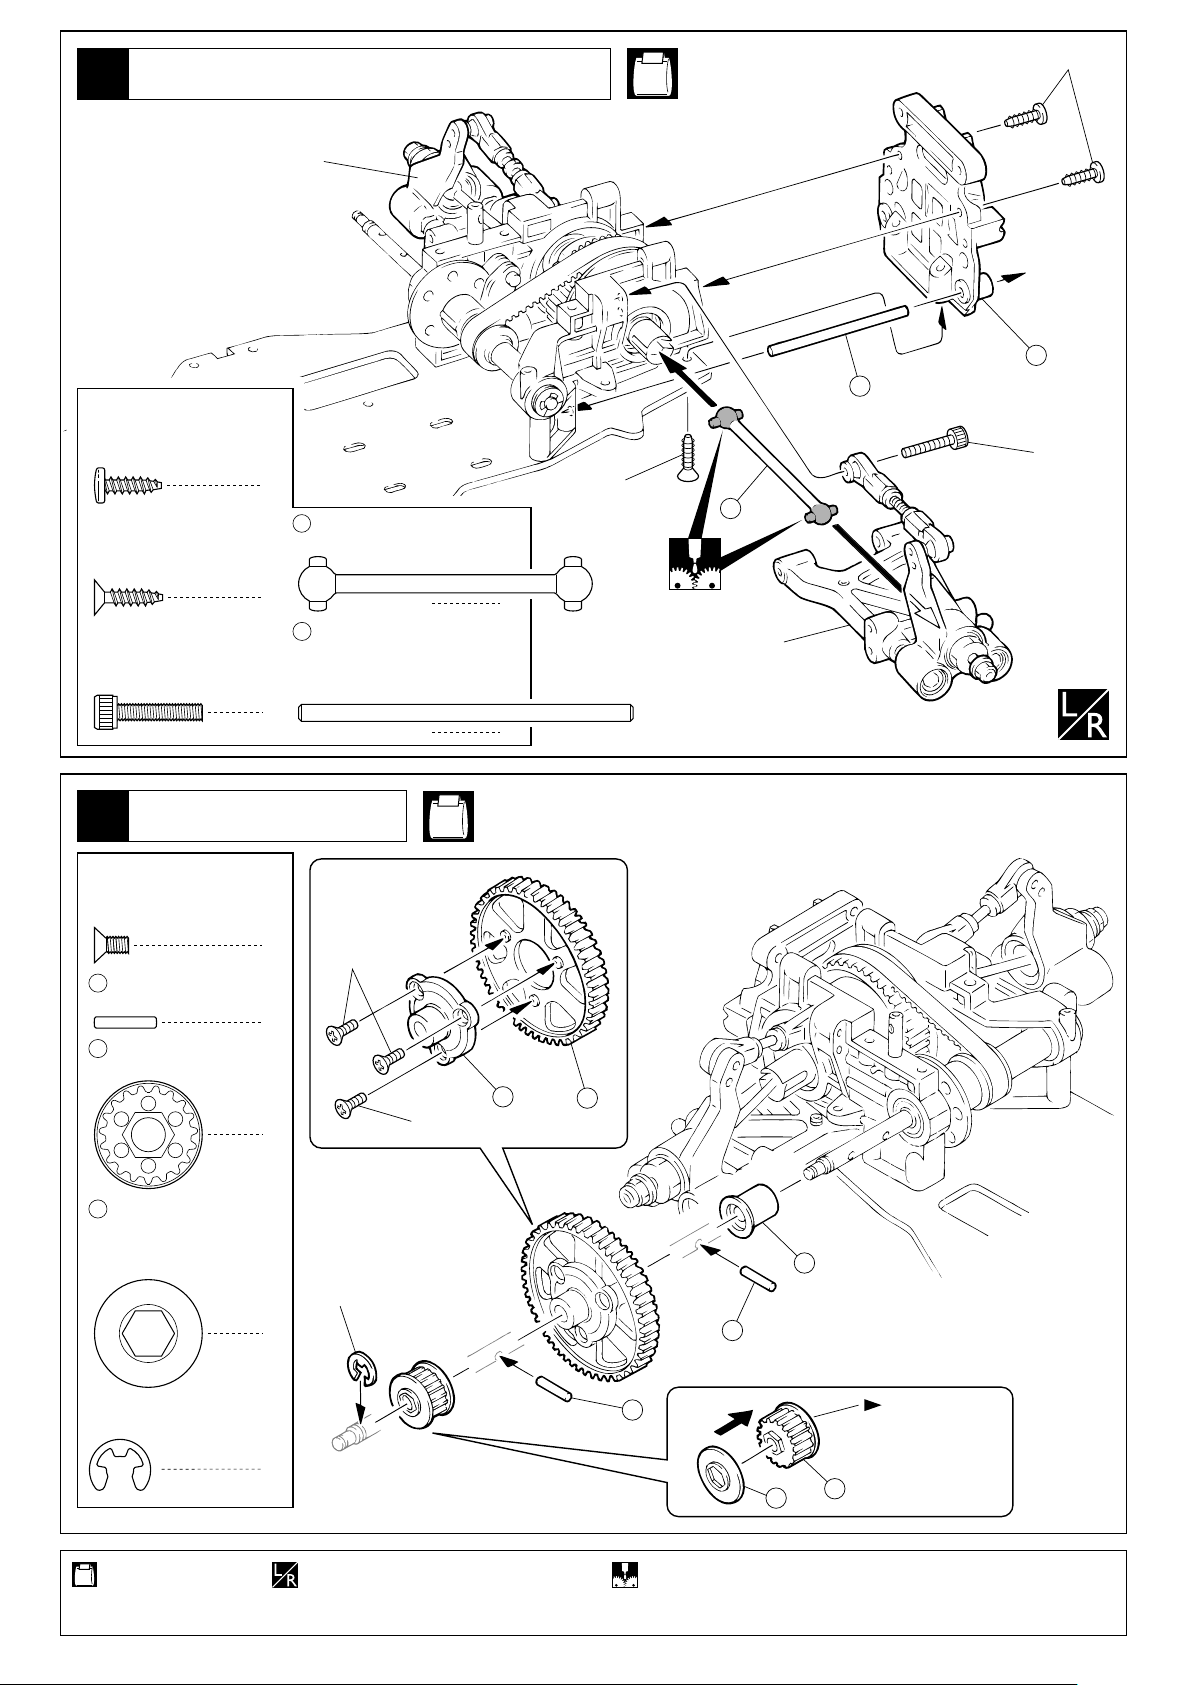
Page 9
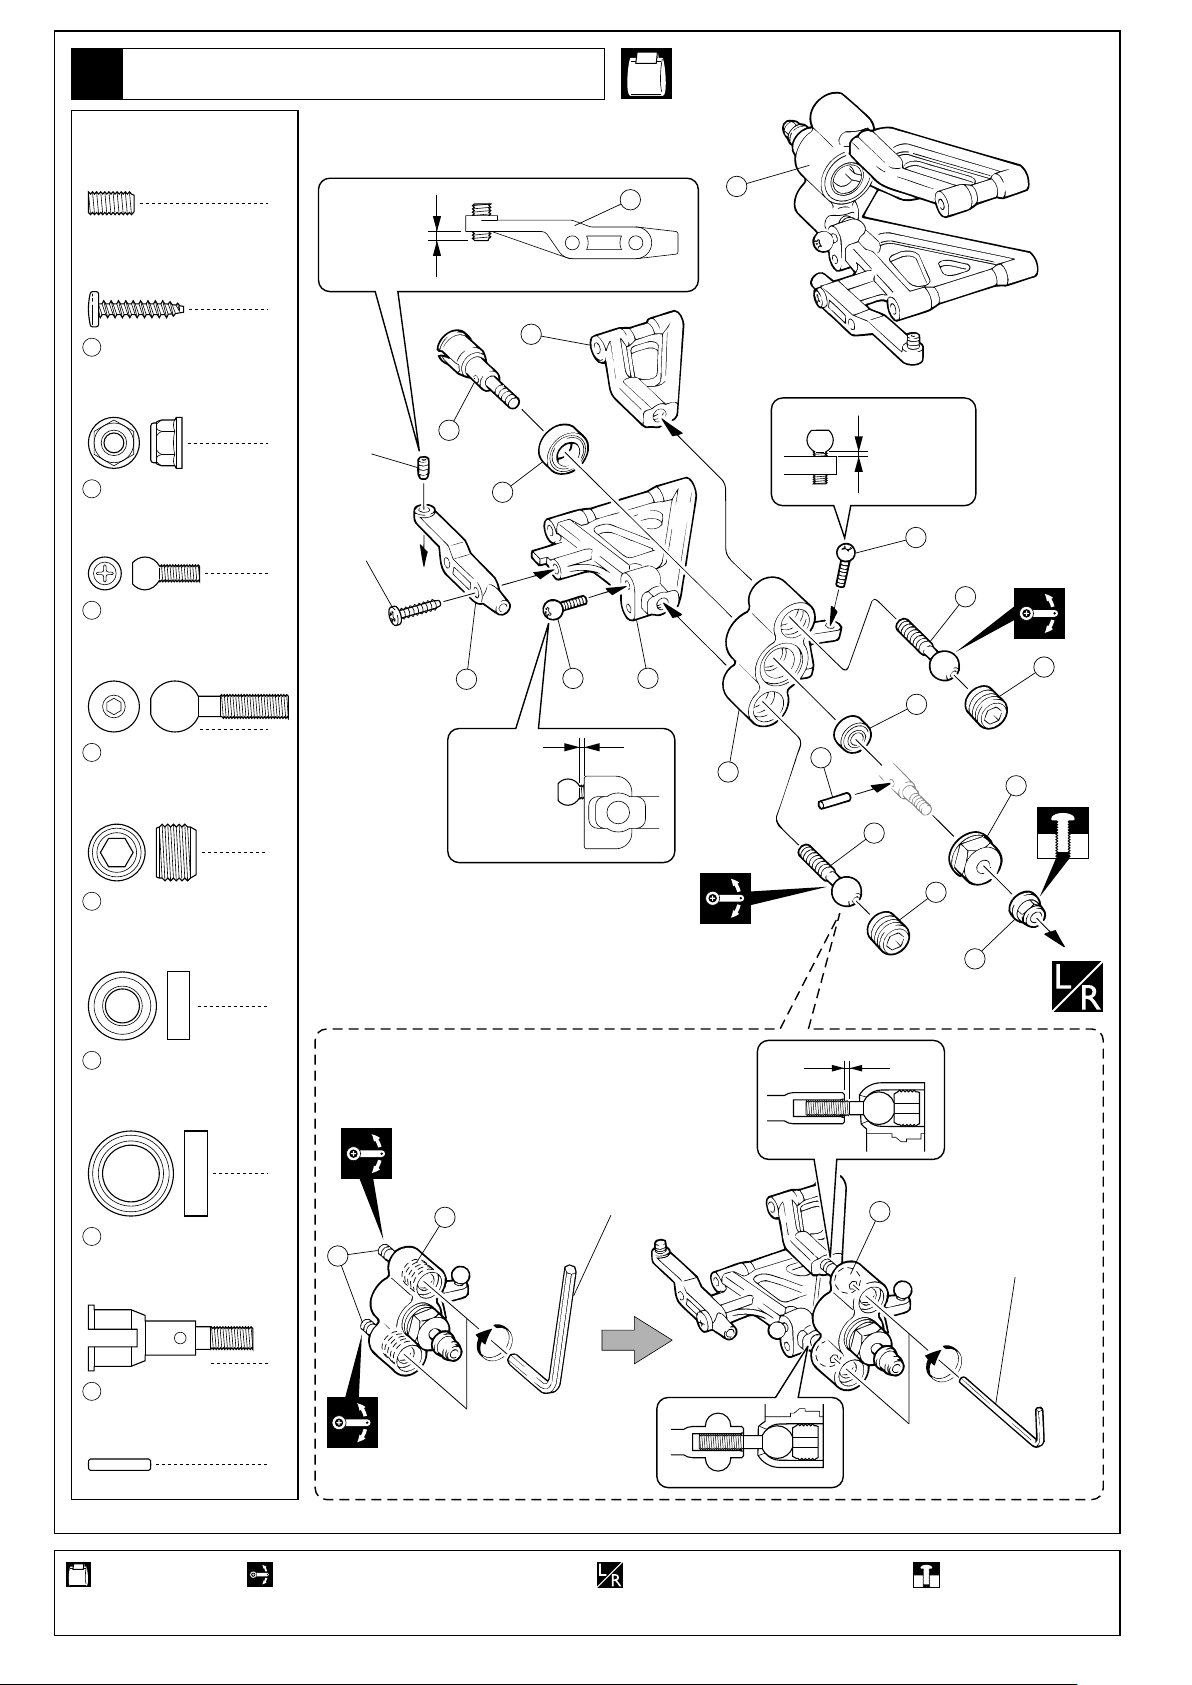
フロントサスアーム
5
Front Suspension Arm
4 x 8mm
Set Screw
Gewindestift
Vis BTR 4x8mm
3 x 15mm
TP Screw
LK Treibschr
Vis TP 3x15mm
146
49
45
46
セットビス
TPビス
4mm
フランジ付ナイロンナット
Flanged Nylon Nut
Stoppmutter
Ecrou Nylstop épaulé
5.8mm
ピロボール(銀)
Pillow Ball (silver)
Kugelschraube (silber)
Rotule (argent) 5.8mm
9mm
ピロボール
Pillow Ball
Kugelschraube
Rotule 9mm
9mm
ピロボールナット
Pillow Ball Nut
Kugelschraube
Ecrou de rotule
Vordere Aufhängung Querlenker
Suspension Triangle avant
約2mm
2
approx. 2mm
ca. 2mm
environ 2mm
2
2
4x8mm
4
4
4
3x15mm
左側用
< >
< >
For Left
< >
Links
< >
Gauche
44
31
47
33
約1mm
approx. 1mm
ca. 1mm
environ 1mm
49
33
32
No.2, No.6,
No.8, No.10
29
28
13
約1mm
approx. 1mm
ca. 1mm
environ 1mm
49
48
45
右側用
< >
< >
For Right
< >
Rechts
< >
Drolte
45
36
46
48
6 x 12mm
Ball Bearing
Kugellager
47
10 x 15mm
Ball Bearing
Kugellager
ホイルシャフト
44
Wheel Shaft
Welle Felge
Axe Roue
13
2 x 11mm
Pin
Stift
Axe 2x11mm
ベアリング
Roulements à billes
ベアリング
Roulements à billes
ピン
46
4mm
146
2
1mm
六角レンチ(
2
46
Hex Wrench (5mm)
Sechskantschlüssel (5mm)
Clé Hexagonale (5mm)
45
2
2
5mm
)
六角レンチ(
45
Hex Wrench (2.5mm)
Sechskantschlüssel (2.5mm)
Clé Hexagonale (2.5mm)
2.5mm
)
使用する袋詰。
Part bags used.
Verwendeter Teilebeutel.
Sachet utilisé.
可動するように組立てる。 左右同じように組立てる。
Ensure smooth, non-binding movement when assembling.
Das Teil muß sich leicht bewegen lassen.
La pièce doit pouvoir pivoter autour de la vis.
Assemble left and right sides the same way.
Bauen Sie eine linke und eine rechte Seite.
Assemblez le côté gauche comme le côté droit.
仮止め。
Temporarily tighten.
Vorläufig festziehen.
Vissez temporairement.
9
Page 10
フロントサスアーム
Front Suspension Arm
6
No.2,
No.8,
No.10
51
50
Vordere Aufhängung Querlenker
Suspension Triangle avant
3x3mm
右側用
For Right
Rechts
Drolte
3x3mm
51
E2.5
E2.5
E2.5
E-ring
E-Ring E2.5
Clips 2.5mm
54
Oリング P3
O-ring P3
O-Ring P3
Joint thorique P3
50
3 x 74mm
Welle Axe 3x74mm
シャフト
バンパー
Bumper
7
3 x 10mm
F/H Screw
SK Schraube
Vis F/H 3x10mm
サラビス
3 x 3mm
Gewindestift Vis BTR 3x3mm
53
2
51
2
Shaft
Stoßstange
Pare-choc
3
52
50
セットビスEリング
スイングシャフト
Halbwelle Cardan
3 x 47mm
Welle Axe 3x47mm
シャフト
Set Screw
2
Swing Shaft
2
Shaft
2
2
No.5, No.10
3 x 10mm
LK Treibschr Vis TP 3x10mm
3mm
ナイロンナット
Kunststoffmutter Ecrou nylon
TPビス
TP Screw
6
Nylon Nut
3
54
53
左側用
For Left
Links
Gauche
3x10mm
55
60
53
34
35
3x10mm
60
56
3x10mm
使用する袋詰。
Part bags used.
Verwendeter Teilebeutel.
Sachet utilisé.
10
3mm
グリスを塗る。
Apply grease.
Fetten.
Graissez.
3x10mm
59
3x10mm
左右同じように組立てる。
Assemble left and right sides the same way.
Bauen Sie eine linke und eine rechte Seite.
Assemblez le côté gauche comme le côté droit.
Page 11
リヤバルクヘッド
Rear Bulkhead
8
ブレーキピストン
69
Bremse Kolben Piston frein
Brake Piston
Getriebekasten, hinten
Cellule arrière
No.4, No.10
1
66
64
約6mm
approx. 6mm
ca. 6mm
environ 6mm
ブレーキシャフト
66
Bremsewelle Axe frein
3 x 15mm
Cap Screw
Inbusschraube
Vis
キャップビス
Brake Shaft
リヤバルクヘッド
Rear Bulkhead
9
19T
71
Riemenrad Poulie
スパーギヤシャフト
78
Welle Axe intermédiaire
プーリ
Pulley
1
Spur Gear Shaft
向きに注意。
Note the direction.
Einbaurichtung beachten.
1
2
Notez le sens.
上
Top
Oben
Haut
Getriebekasten, hinten
Cellule arrière
No.3, No.8
13
2 x 11mm
Stift Axe 2x11mm
ピン
Pin
68
67
69
3x15mm
68
78
13
73
をカットする。
Cut off.
Überschüssiges
Material abschneiden!
Couper à dimension.
13
2
71
74
19の刻印
"19" Inscription
1
Aufschrift: 19
Inscrit "19"
リヤバルクヘッド
Rear Bulkhead
10
No.1, No.3, No.4,
No.8, No.10
E5
Eリング
E-ring
E-Ring E5
Clips 5mm
1
48
6x12mm
ベアリング
Ball Bearing
Kugellager
Roulements à billes
26
12x18mm
Ball Bearing
Kugellager
Roulements à billes
ベアリング
Getriebekasten, hinten
Cellule arrière
79
4 x 8mm
セットビス
Set Screw
Gewindestift
Vis BTR 4x8mm
3 x 12mm
2
TP F/H Screw
SK Treibschraube
Vis TP F/H 3x12mm
75
2
TPサラビス
ベアリングキャップ
Ball Bearing Cap
Kugellagerabdeckung
Flasque de roulement a bille
64
4x8mm
48
80
ベルト(小)
Belt (Small)
Zahnriemon, Klein
Courroie (Petit)
26
79
2
4
26
63
48
1
3x12mm
3x12mm
リヤデフAssy
Rear Differential Assembly
Differentialgetriebe, hinten
Différentiel arrière assemblé
4x8mm
E5
75
この面まで
しめこむ。
Screw up to
the end.
Einschrauben,
wie dargestellt.
Visser
complètement.
使用する袋詰。/ ゴム系接着剤で接着する。/
Verwendeter Teilebeutel. / Sachet utilisé.
Part bags used. /
Gummikleber. / Collez avec de la colle a caoutchouc.
Apply rubber type glue. /
11
Page 12
リヤサスアーム
11
Rear Suspension Arm
Hintere Aufhängung Querlenker
Suspension Triangle arrière
No.4, No.6,
No.8, No.10
85
82
4 x 8mm
Set Screw
Gewindestift
Vis BTR 4x8mm
86
3 x 15mm
Cap Screw
Inbusschraube
Vis
146
49
45
セットビス
4 x 25mm
Set Screw
Gewindestift
Vis BTR 4x25mm
4mm
Flanged Nylon Nut
Stoppmutter
5.8mm
Pillow Ball (silver)
9mm
Pillow Ball
Kugelschraube
Rotule 9mm
セットビス
キャップビス
フランジ付ナイロンナット
Ecrou Nylstop épaulé
ピロボール(銀)
Kugelschraube (silber)
Rotule (argent) 5.8mm
ピロボール
約2mm
approx. 2mm
ca. 2mm
2
2
2
environ 2mm
4x8mm
81
約1mm
approx. 1mm
ca. 1mm
environ 1mm
49
44
2
穴の広い方から入れる。
Insert from wider side.
Von der breiteren Seite
her einfUühren.
Insérer côté boule.
Lのマーク
Marked “L”
L links markiert
Marqué “L”
3x15mm
85
約8mm
approx. 8mm
ca. 8mm
environ 8mm
86
x2
82
47
45
2
左側用
< >
< >
For Left
< >
Links
< >
Gauche
83
45
48
13
36
146
46
46
4mm
46
9mm
ピロボールナット
Pillow Ball Nut
Kugelschraube
Ecrou de rotule
48
6 x 12mm
Ball Bearing
Kugellager
47
10 x 15mm
Ball Bearing
Kugellager
ホイルシャフト
44
Wheel Shaft
Welle Felge
Axe Roue
ベアリング
Roulements à billes
ベアリング
Roulements à billes
4
4
45
2
2
13
2 x 11mm
Pin
Stift
Axe 2x11mm
6.8mm
85
Pillow Ball
Kugelschraube
Rotule 6.8mm
2
46
ピン
ピロボール
六角レンチ(
Hex Wrench (5mm)
Sechskantschlüssel (5mm)
Clé Hexagonale (5mm)
82
2
4
5mm
)
6.8mm
ボールエンド
Ball End
Kugelpfanne
Chape
Rのマーク
Marked “R”
R links markiert
Marqué “R”
4
84
45
六角レンチ(
Hex Wrench (2.5mm)
Sechskantschlüssel (2.5mm)
Clé Hexagonale (2.5mm)
2.5mm
)
右側用
< >
< >
For Right
< >
Rechts
< >
Drolte
使用する袋詰。
Part bags used.
Verwendeter Teilebeutel.
Sachet utilisé.
12
可動するように組立てる。 2セット組立てる(例)。 左右同じように組立てる。
Ensure smooth, non-binding movement when assembling.
Das Teil muß sich leicht bewegen lassen.
La pièce doit pouvoir pivoter autour de la vis.
x2
Assemble as many times as specified.
Sooft wie angegeben zusammenbauen.
Assemblez aussi souvent qu’indiqué.
Assemble left and right sides the same way.
Bauen Sie eine linke und eine rechte Seite.
Assemblez le côté gauche comme le côté droit.
原寸図。
True-to-scale diagram.
Maßstabsgetreue Darstellung.
Illustration à l’échelle.
仮止め。
Temporarily tighten.
Vorläufig festziehen.
Vissez temporairement.
Page 13
リヤサスアーム
12
Rear Suspension Arm
3 x 10mm
TP Screw (silver)
LK Treibschr (silber)
Vis TP (argent) 3x10mm
3 x 12mm
TP F/H Screw
SK Treibschraube
Vis TP F/H 3x12mm
3 x 15mm
Cap Screw
Inbusschraube
Vis
TPビス(銀)
TPサラビス
キャップビス
Hintere Aufhängung Querlenker
Suspension Triangle arrière
右側用
For Right
Rechts
Drolte
2
53
スイングシャフト
Halbwelle Cardan
2
87
3 x 59mm
Shaft
Welle
Axe 3x59mm
2
Swing Shaft
シャフト
No.4, No.8, No.10
3x10mm
65
87
3x15mm
3x12mm
53
2
左側用
For Left
Links
Gauche
2
スパーギヤ
Spur Gear
13
3 x 6mm
F/H Screw
SK Schraube
Vis F/H 3x6mm
13
71
77
サラビス
2 x 11mm
Stift Axe 2x11mm
19T
Riemenrad Poulie
プーリフランジ(小)
Pulley Flanged (S)
Riemenrad, klein
Poulie de courroie (Petite)
プーリ
ピン
Pulley
Getriebe
Couronne latérale
3
Pin
2
1
1
3x6mm
E5
3x6mm
No.3, No.8, No.10
88
90
89
13
E5
Eリング
E-Ring E5 Clips 5mm
使用する袋詰。
Part bags used.
Verwendeter Teilebeutel.
Sachet utilisé.
E-ring
1
左右同じように組立てる。
Assemble left and right sides the same way.
Bauen Sie eine linke und eine rechte Seite.
Assemblez le côté gauche comme le côté droit.
13
グリスを塗る。
Apply grease.
Fetten.
Graissez.
77
19の刻印
"19" Inscription
Aufschrift: 19
Inscrit "19"
71
13
Page 14

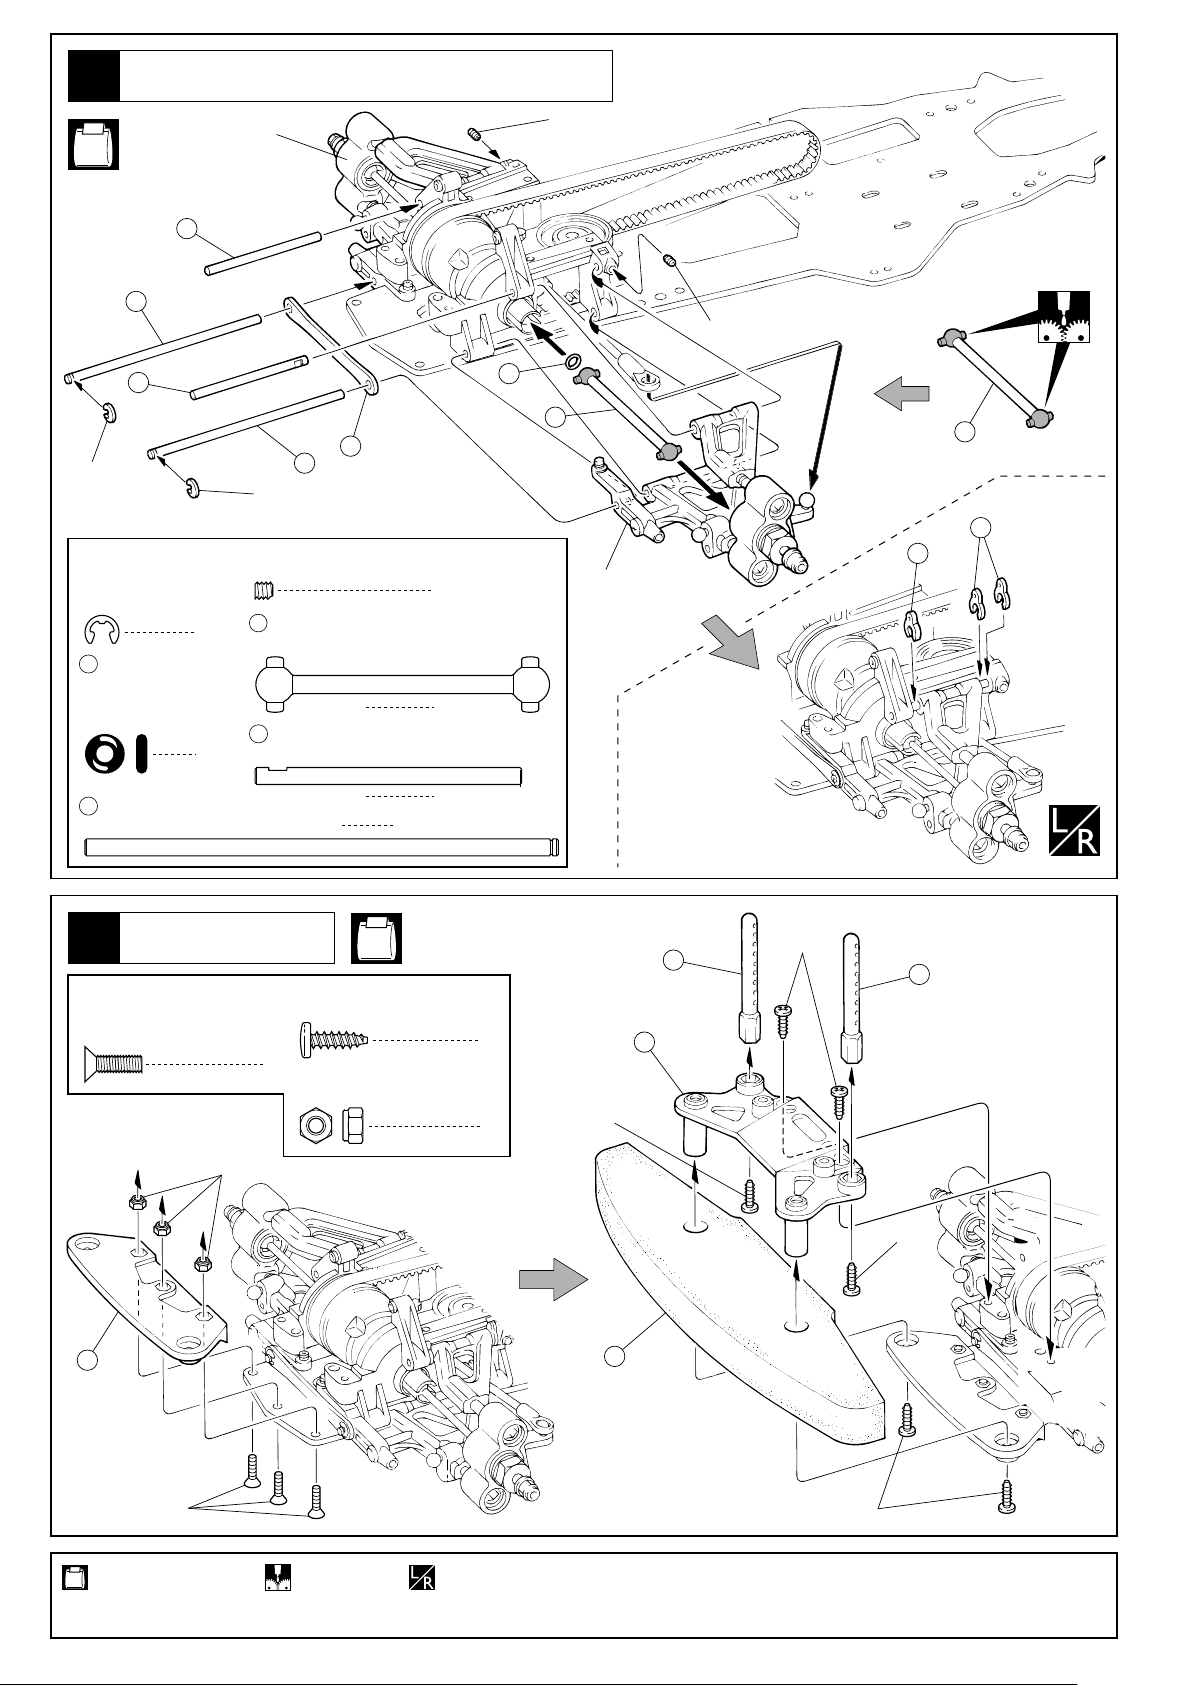
ミドルシャフト
14
Middle Shaft
No.3, No.8, No.10
48
6 x 12mm
Ball Bearing
Kugellager
Roulements à billes
ベアリング
Welle
Axe intermédiaire
E5
76
76
プーリフランジ(大)
Pulley Flanged (L)
Riemenrad, groß
Poulie de courroie (Large)
70
向きに注意。
Note the direction.
Einbaurichtung beachten.
27
Notez le sens.
1
72
18T
プーリ
Pulley
Riemenrad
Poulie
70
27T
プーリ
Pulley
Riemenrad
Poulie
ミドルシャフト
15
Middle Shaft
2
13
1
E5
E-ring
E-Ring E5
Clips 5mm
96
1
27の刻印
"27" Inscription
Aufschrift: 27
Inscrit "27"
2 x 11mm
Pin
Stift
Axe 2x11mm
Eリング
ミドルシャフト
Middle Shaft
Welle
Axe intermédiaire
Welle
Axe intermédiaire
ピン
13
2
1
1
No.1, No.10
48
18の刻印
"18" Inscription
Aufschrift: 18
Inscrit "18"
77
91
48
77
プーリフランジ(小)
Pulley Flanged (S)
Riemenrad, klein
Poulie de courroie (Petite)
72
18
96
13
1
3 x 12mm
TP F/H Screw
SK Treibschraube
3 x 8mm
F/H Screw
SK Schraube
Vis F/H 3x8mm
TPサラビス
Vis TP F/H 3x12mm
2
サラビス
1
27
ベルト(大)
Belt (big)
Zahnriemen, groß
Courroie (grande)
80
ベルト(小)
Belt (small)
Zahnriemen, klein
Courroie (petit)
ビスの種類に注意!
Note the types of screws !
Auf verschiedene Schraubentypen achten !
Vérifier bien le type de vis à utiliser !
3x8mm
3x12mm
使用する袋詰。
Part bags used.
Verwendeter Teilebeutel.
Sachet utilisé.
14
注意して組立てる所。
Pay close attention here!
Vorsicht! Wichtiger Hinweis!
Attention! Avis important!
Page 15

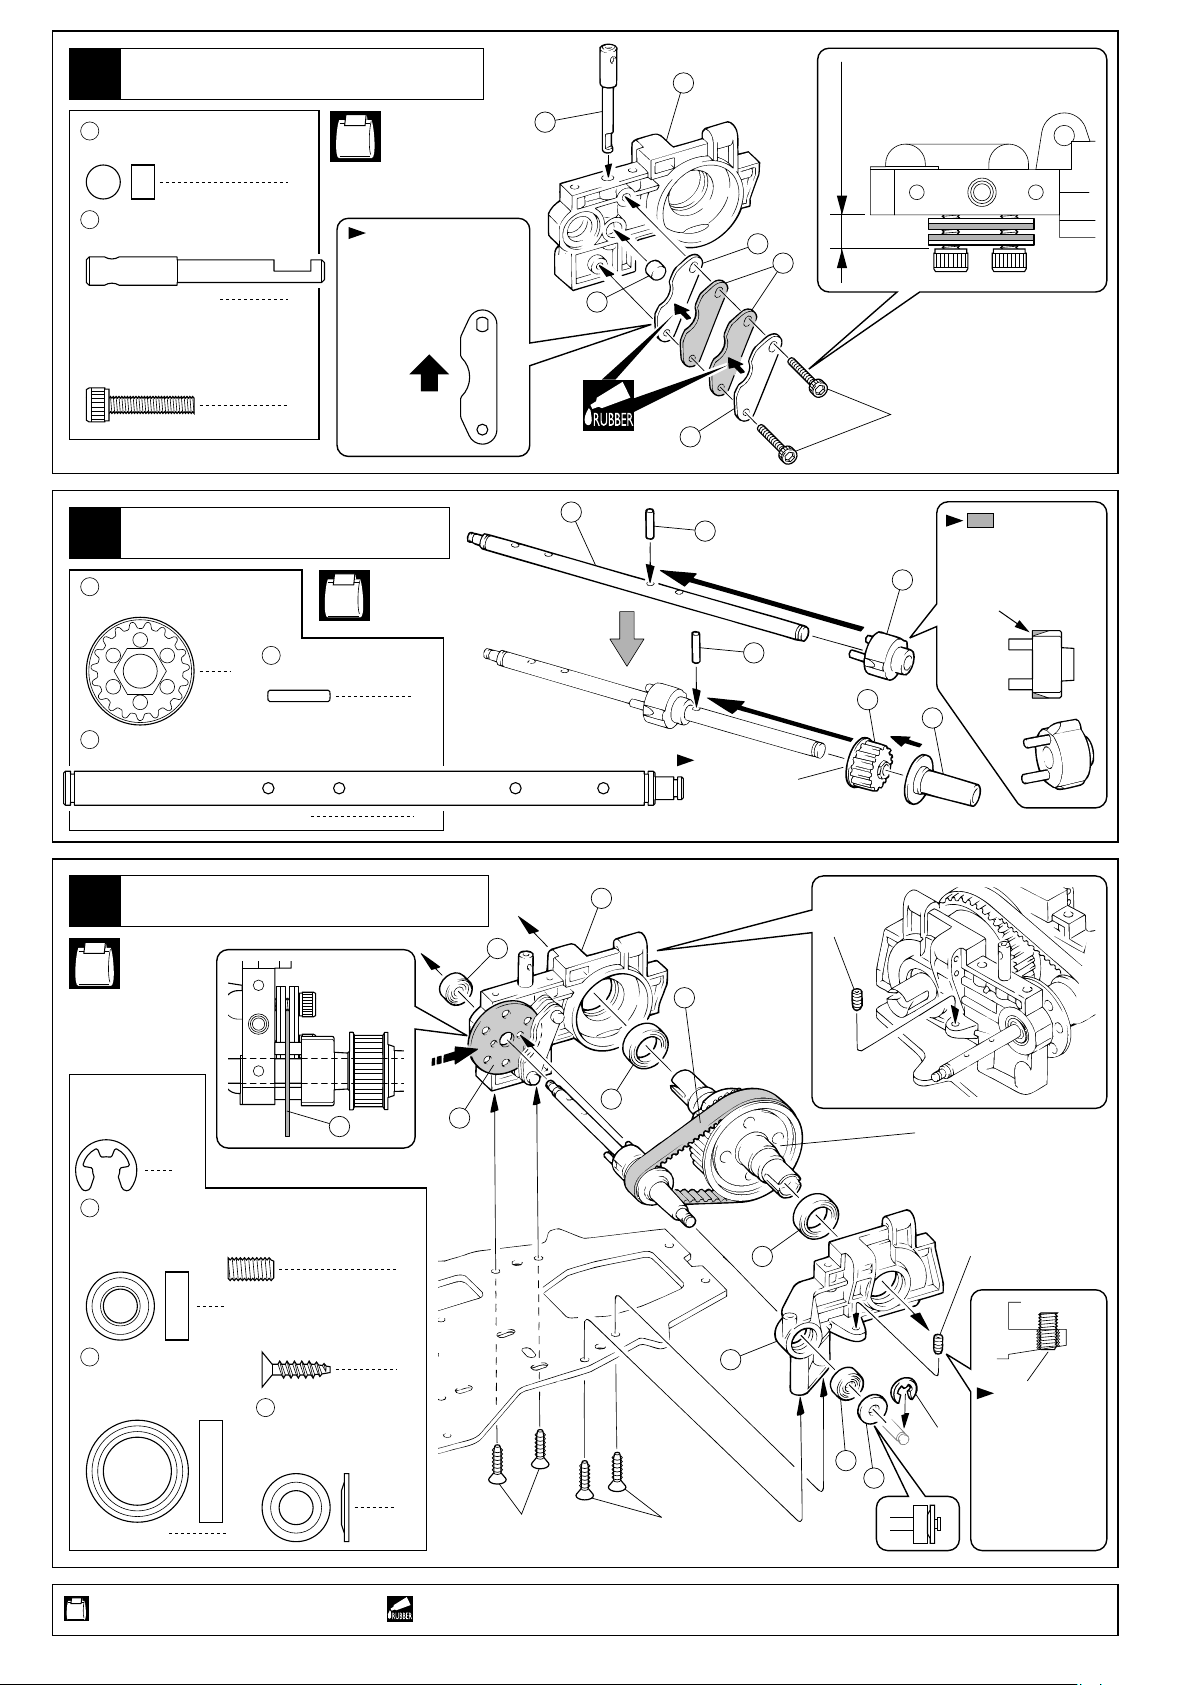
ミドルシャフト
16
Middle Shaft
Welle
Axe intermédiaire
3x10mm
3x10mm
No.3, No.10
3 x 10mm
TP Screw (silver)
LK Treibschr (silber)
3 x 12mm
TP F/H Screw
SK Treibschraube
Vis TP F/H 3x12mm
17
112
マニホールド
Manifold
Krümmer
Coude d'échappement
113
TPビス(銀)
Vis TP (argent) 3x10mm
TPサラビス
エンジン
Engine
ガスケット
Gasket
Dichtung
Joint d'échappement
Verbrennungsmotor
Moteur
3x10mm
99
4
92
2
92
3x12mm (TP F/H)
No.6, No.7, No.10
エンジン
Engine
Verbrennungsmotor
Moteur
紙1枚分のすき間をつくって
固定する。
Tighten the screws with one
sheet of paper inserted
between both gears.
Legen Sie vor dem Festziehen
der Schrauben ein Stück Papier
zwi-schen beide Zahnräder.
Serrez les vis en insérant une
feuille de papier entre les
dents des pignons.
111
エンジンマウントプレート
Engine Mount Plate
Motorplatte
Plaque support moteur
3 x 8mm
F/H Screw
SK Schraube
Vis F/H 3x8mm
3 x 6mm
Screw (silver)
LK Schraube (silber)
Vis (argent) 3x6mm
2.6 x 25mm
Screw
LK Schraube
Vis 2.6x25mm
使用する袋詰。
Part bags used.
Verwendeter Teilebeutel.
Sachet utilisé.
サラビス
ビス(銀)
ビス
2.6x25mm
3
3x8mm
4
2
をカットする。
Cut off shaded portion.
Schneiden Sie die schraffierten Flächen heraus.
Coupez la partie grisée.
3x6mm
3x6mm
15
Page 16

ダンパー
18
Shock Absorber
16
5.8mm
ボールエンド(L)
Ball End (L)
Kugelpfanne (L)
Chape (L)
136
ダンパーシャフト
Shock Shaft
Kolbenstange
Tige d'amortisseur
Stoßdämpfer
Amortisseur
2
G1
136
No.9
E2.5
フロント用
For Front
Vorne
Avant
G2
リヤ用
For Rear
Hinten
Arrière
x4
16
約13mm
approx. 13mm
ca. 13mm
environ 13mm
G-2
ボールエンド(S)
Ball End (S)
Kugelpfanne (S)
Chape (S)
ダンパー
19
Shock Absorber
オイル
Oil
Öl
Huile
4
E2.5
Eリング
E-Ring E2.5 Clips 2.5mm
2
E-ring
Stoßdämpfer
Amortisseur
ピストンを下げ、オイル
を図の位置まで入れる。
Pull down the piston and
slowly fill in oil.
Kolben nach unten ziehen,
langsam mit Öl befUullen.
Placer le piston en position
basse puis remplir
0 ~ 1mm
ピストン
Piston
Kolben
Piston
ゆっくり上下させ、気泡をとる。
Then, gently move the piston up
and down to get rid of air bubbles.
Bewegen Sle den Kolben langsam
auf und ab, bis keine Luftblasen
mehr lm Öl sind.
Puis, actionner doucement le
piston de bas en haut, afin
d ' éliminer les bulles d ' air.
doucement d ' huile.
139
G3
138
137
E2.5
8
137
もう一度図の位置
までオイルを足す。
Add oil one more time
up to the brim.
Dämpfer nochmals bis
zum Rand befüllen.
Ajouter de l ' huile encore
une fois, jusqu ' au niveau.
を にかぶせ、あふれた
138 137
オイルをふきとり、 G3を
組立てる。
Put onto , wipe up any
138
excess oil and screw on G3
together with .
Setzen Sie die Dämpferversch luß kappe auf und schraubcn
Sie den Dämpfer zu.
Wischen Sie ausgetretenes
Öl vom Dämpfer ab.
Installer la membrane sur
le corps . supprimer
les exces d ' huile et visser
le bouchon avec G3 .
137
シャフトに布をまき、つかむ。
Cover the shaft with cloth
before gripping it with pliers.
Schützen Sie die Kolbenstange
mit etwas Stoff oder Papier.
Pour ne pas rayer avec la pince,
protégez la tige avec du papier
ou du tissu.
139
137
139
138
139
フロント用
For Front
x2
x2
x2
x2
スムーズに動くか確認する。
スムーズに動かないときは、オイルを
入れ直す。
Ensure smooth piston move-ment.
Should a piston not move smoothly.
Der Dämpfer muß sich leicht bewegen
lassen, ggf. die Befüllung wiederholen.
S ' assurer que le piston puisse opére
doucement. sinon.
Vorne
Avant
リヤ用
For Rear
Hinten
Arrière
フロント用
For Front
Vorne
Avant
リヤ用
For Rear
Hinten
Arrière
ダンパー
20
Shock Absorber
17
5.8mm
Kugel Rotule
ボール
Ball
4
G5
G4
140
使用する袋詰。/
Verwendeter Teilebeutel. / Sachet utilisé.
Part bags used. /
16
Stoßdämpfer
Amortisseur
スプリングを縮めてG6を入れる。
フロント用
For Front
Vorne
Avant
厚さ2mmのスペーサーを使用します。
Use 2mm size spacer.
2 mm Spacer verwenden.
Utiliser la bague d'espacement 2mm.
リヤ用
For Rear
Hinten
Arrière
厚さ1.5mmのスペーサーを使用します。
Use 1.5mm size spacer.
1.5 mm Spacer verwenden.
Utiliser la bague d'espacement 1,5mm.
2セット組立てる(例)。/
x2
Sooft wie angegeben zusammenbauen. / Assemblez aussi souvent qu’indiqué.
Assemble as many times as specified. /
2mm
1.5mm
Compress the spring and install G6.
Drücken Sie die Feder zusammen
und schieben Sie G5 auf.
Compresser le ressort pour monter G6.
G6
x2
x2
17
フロント用
For Front
Vorne
Avant
リヤ用
For Rear
Hinten
Arrière
Page 17

フロントダンパーステー
Front Shock Stay
21
Vordere Dämpferbrücke
Support amortisseurs avant
98
3x18mm
No.3, No.10
ノーマルダンパーステーを取付ける場合
In case of using Normal Front Shock Stay.
Bei Verwendung der serienmäßigen Dämpferbrücke
Dans le cas ou vous utilisez le support
d'amortisseurs standard.
3 x 18mm
Cap Screw
Inbusschraube
Vis
ワイドフロントダンパーステーを取付ける場合
In case of using Wide Front Shock Stay.
Bei Verwendung der breiten Dämpferbrücke.
Dans le cas ou vous utilisez le support
d'amortisseurs large.
ボディの形状によって使用出来ない場合があります。
It may not be available with some shape of bodies.
Paßt ggf. nicht bei allen Karosserien
Il peut s'averer inutisable avec certaines carrosseries.
キャップビス
2
フロントダンパー
Front Shock
Stoßdämpfer, vorn
Amortisseurs avant
.
3x18mm
3x12mm
フロントダンパー
Front Shock
Stoßdämpfer, vorn
Amortisseurs avant
97
3x12mm
3x10mm
3 x 12mm
F/H Screw
SK Schraube
Vis F/H 3x12mm
サラビス
リヤダンパーステー
Rear Shock Stay
22
No.3, No.5,
No.10
3 x 10mm
TP Screw
LK Treibschr
Vis TP 3x10mm
3 x 12mm
F/H Screw
SK Schraube
Vis F/H 3x12mm
3 x 15mm
Cap Screw
Inbusschraube
Vis
TPビス
サラビス
キャップビス
3 x 10mm
Cap Screw
Inbusschraube
Vis
2
キャップビス
Hintere Dämpferbrücke
Support amortisseurs arrière
3x10mm
61
2
2
2
2
3x10mm
100
3x12mm
61
3x15mm
3x12mm
リヤダンパー
Rear Shock
Stoßdämpfer, hinten
Amortisseurs arrière
使用する袋詰。/
Verwendeter Teilebeutel. / Sachet utilisé.
Part bags used. /
17
Page 18

サーボセイバー
23
Servo Saver
3x15mm又は、3x18mmを
サーボによって使い分ける。
Use 3x15mm or 3x18, depending on servo size.
3x15 oder 3x18 mm je nach Servo verwenden.
Utiliser les vis de 3x15mm ou 3x18mm selon vos servos.
Servo Saver
Sauve-servo
39
39
ステアリングサーボ
Steering Servo
Lenkservo
Servo de direction
38
38
39
No.5, No.6, No.10
38
3x15mm又は、3x18mmを
サーボによって使い分ける。
Use 3x15mm or 3x18,
depending on servo size.
3x15 oder 3x18 mm je nach
Servo verwenden.
Utiliser les vis de 3x15mm ou
3x18mm selon vos servos.
39
スロットルサーボ
Throttle Control Servo
Gasservo
Servo de gaz
160
向きに注意。
Note the direction.
Einbaurichtung beachten.
Notez le sens.
必ずサーボ付属のゴムグロメット
を入れてください。
Insert rubber grommet included
in the radio set.
Gummilager einsetzen.
Insérer les supports servos
(inclus avec votre radio)
comme indiqué.
使用するサーボに合わせる。
Set up according the
servo you use.
Servo ggf. einpassen.
Utiliser les vis de 3x15mm ou
3x18mm selon vos servos.
38
3 x 15mm
TP Screw
LK Treibschr
Vis TP 3x15mm
3 x 18mm
TP Screw
LK Treibschr
Vis TP 3x18mm
TPビス
TPビス
8
8
メカボックス
Radio Box
24
2.6 x 25mm
Screw
RK Schraube
Vis 2.6x25mm
ビス
RC Box
Boîtier radio
プロポに付属
Come with radio.
Im Lieferumfang der
Fernsteuerung enthalten.
Livré avec la radio-commande.
162
スイッチ
Switch
Schalter
Interrupteur
3 x 10mm
TP Screw
LK Treibschr
Vis TP 3x10mm
1
TPビス
No.5, No.10
3
3x10mm
2.6x25mm
3x10mm
161
コードを通す。
Cords come like picture.
Kabel durch die Einkerbung ziehen.
Connecter les fiches moteurs
comme indiqué sur le schéma.
使用する袋詰。
Part bags used.
Verwendeter Teilebeutel.
Sachet utilisé.
18
別購入品。
Must be purchased separately!
Das Teil ist nicht im Bausatz enthalten!
Doit être acheté séparément!
Page 19

メカボックス
Radio Box
25
電池ボックス
Battery Box
Batteriehalter
Boîtier à piles
RC Box
Boîtier radio
No.10
145
スナップピン
Snap Pin
Karosserieklammer
Insérer le clips
145
スナップピン
Snap Pin
Karosserieklammer
Insérer le clips
1
26
メカボックス
Radio Box
プロポの説明書を参考に、コネクターを接続する。
Connect as per radio instruction manual.
Schließen Sie die Servos gemäß der
Bedienungsanleitung Ihrer RC-Anlage an.
Branchez selon la notice de la radio.
Receiver
Empfänger
Récepteur
RC Box
Boîtier radio
受信機
No.5, No.10
133
アンテナ
Antenna
Antenne
Antenne
145
スナップピン
Snap Pin
Karosserieklammer
Insérer le clips
163
1
145
1
3
2
すき間をあける。
Take a space.
Abstand einhalten.
Mettre un espace.
使用する袋詰。 別購入品。
Part bags used.
Verwendeter Teilebeutel.
Sachet utilisé.
6mm
Must be purchased separately!
Das Teil ist nicht im Bausatz enthalten!
Doit être acheté séparément!
150
両面テープ
Double-sided Tape
Doppelseitiges Klebeband
Adhésif double face
注意して組立てる所。
Pay close attention here!
Vorsicht! Wichtiger Hinweis!
Attention! Avis important!
番号の順に組立てる。
Assemble in the specified order.
In der angegebenen Reihenfolge zusammenbauen.
Assemblez dans l’ordre indiqué.
19
Page 20

アッパーデッキ
Upper Deck
27
3x10mm
(F/H)
Obere Chassisplatte
Platine supérieure
燃料タンクが左右に少し動く程度に3x10mmサラビス
168
を締め込む。
Adjust to have the play of Fuel Tank by loosening the
3x10mm F/H screws.
Die 3x10 mm SK Schrauben losen, um den Tank zu justieren.
le reservoir doit avoir un peu de jeu. Effectuer le reglage
par l'intermediaire des vis F/H 3 x 10.
No.5, No.7, No.10
3x10mm(F/H)
3 x 10mm
F/H Screw
SK Schraube
Vis F/H 3x10mm
3x10mm
3 x 10mm
TP Screw
LK Treibschr
Vis TP 3x10mm
2
TPビスサラビス
3
164
3x10mm(F/H)
0
アッパーデッキ
Upper Deck
28
3 x 10mm
TP Screw (silver)
LK Treibschr (silber)
Vis TP (argent) 3x10mm
TPビス(銀)
Obere Chassisplatte
Platine supérieure
3x10mm
7
168
165
128
シリコンチューブ
150mmにカット
Cut the Silicone Tube to 150mm Length.
128
Silikonschlauch auf 150mm ablängen.
Découper une longueur de 150mm de la durite silicone .
128
120 130 140 150 160 170 180mm110100908070605040302010
3x10mm
No.10
3x10mm
3x10mm
128
裏から見た図。
Wheels seen from within the car.
Felgen aus dem lnneren des
Fahrzeugs betrachtet.
Roues vues de l’intérleur.
中立
Neutral
Neutral
Neutre
使用するサーボに合わせる。
Servo ggf. einpassen. / Utiliser les vis correpondantes vos servos.
2.6 x 10mm
LK Treibschr Vis TP 2.6x10mm
3 x 10mm
TP Screw (silver)
LK Treibschr (silber)
Vis TP (argent) 3x10mm
TPビス ビス
TPビス(銀)
/ Set up according the servo you use.
TP Screw
2.6 x 10mm
LK Schraube Vis 2.6x10mm
1
3 x 10mm
Cap Screw
Inbusschraube
Vis
1
Screw
キャップビス
1
1
使用する袋詰。/
Verwendeter Teilebeutel. / Sachet utilisé.
Part bags used. /
20
注意して組立てる所。 /
Vorsicht! Wichtiger Hinweis! / Attention! Avis important!
Pay close attention here! /
Page 21

29
リンケージ
Linkage
Gestänge
Tringlerie
No.2, No.6
3 x 3mm
Set Screw
Gewindestift
Vis BTR 3x3mm
2.6 x 10mm
Screw
LK Schraube
Vis 2.6x10mm
12622mm
127
2.6mm
Nylon Nut
Kunststoffmutter
Ecrou nylon
セットビス
ビス
ストッパー
Stopper
Stellring
Arretoir
リンケージスプリング
Linkage Spring
Gestänge Feder
Ressort Tringlerie
ナイロンナット
123
3
1
123
126
1
70mm
3x3mm
2.6mm
12622127
126123
16mm
10mm
127
123
1
22
3x3mm
126
123
ブレーキロッド
Brake Rod
Bremsgestänge
Tringlerie de frein
約5mm
approx. 5mm
ca. 5mm
environ 5mm
2.6x10mm
2
124
3x3mm
124
使用する袋詰。 別購入品。
Part bags used.
Verwendeter Teilebeutel.
Sachet utilisé.
Must be purchased separately!
Das Teil ist nicht im Bausatz enthalten!
Doit être acheté séparément!
43
101
128
シリコンチューブ25mmにカット
Cut the Silicone Tube to 25mm Length.
Silikonschlauch auf 25mm ablängen.
Découper une longueur de 25mm de la durite silicone .
をカットする。 原寸図。
Cut off shaded portion.
Schneiden Sie die schraffierten Flächen heraus.
Coupez la partie grisée.
128
128
可動するように組立てる。
Ensure smooth, non-binding movement when assembling.
Das Teil muß sich leicht bewegen lassen.
La pièce doit pouvoir pivoter autour de la vis.
128
True-to-scale diagram.
Maßstabsgetreue Darstellung.
Illustration à l’échelle.
21
Page 22

リンケージの確認
Linkage checking
30
Gestänge
Tringlerie
Place as illustration shown. /
図の動きになるように の位置を調整する。/
Gestänge montieren, wie dargestellt. / Placer la pièce comme indiqué sur l'illustration. /
126
126
126
Full Throttle
Vollgas
Plein gaz
Neutral
Neutral
Neutre
approx. 1mm
ca. 1mm
environ 1mm
スロットルストップスクリュー
Throttle Stop Screw
Vergaser-Anschlagschraube
Vis de ralenti
126
Position where brake starts working.
Darstellung zeigt die Gestängeposition,
ab der die Bremskraft eintritt.
Position de début de fonctionnement
du frein.
126
ブレーキニュートラルスロットルハイ
Brake
Bremse
Frein
約1mm約1mm
approx. 1mm
ca. 1mm
environ 1mm
スプリングが縮む。ブレーキが効きはじめる位置。
Spring shrink.
Justieren Sie die Feder.
Ressort legèrement comprimé.
スロットルストップ
スクリューで調整する。
Adjust the throttle stop
screw thus.
Justierung wie in der
Darstellung gezeigt.
Ajuster la vis d'arrêt avec
la commande de gaz.
マフラー
Muffler
31
3 x 3mm
Set Screw
Gewindestift
Vis BTR 3x3mm
4 x 4mm
Set Screw
Gewindestift
Vis BTR 4x4mm
セットビス
セットビス
Resonanzrohr
Echappement
128
1
1
No.7, No.10
シリコンチューブ175mmにカット
Cut the Silicone Tube to 175mm Length.
128
Silikonschlauch auf 175mm ablängen.
Découper une longueur de 175mm de la durite silicone .
128
128
135
ストラップ(M)
Strap (M)
Kabel (M)
Collier (M)
曲げる。
Biegen. Courbez.
使用する袋詰。/
Verwendeter Teilebeutel. / Sachet utilisé.
Bend.
Part bags used. /
22
3x3mm
4x4mm
169
10mm
余分をカットする。/
Überschüssiges Material abschneiden. / Coupez l’excès.
Cut off excess. /
169
129
マフラー
Muffler
Resonanzrohr
Echappement
130
マフラージョイント
パイプ
Muffler Joining Pipe
Silikonverbinder
Durite d'échappement
Page 23

エアークリーナー
Air Cleaner
32
Luftfilter
Filtre à air
No.7
171
170
33
タイヤ
Wheels
144
Räder
Roues
143
インナースポンジ
Inner Sponge
Reifeneinlage
Mousse de pneus
刻印が外側。
Marks face outwards.
Die Schrift zeigt nach außen.
Harquage vers l ' extérieur.
142
x4
ホイールを回しながら半分くらいタイヤにいれる。 タイヤを強くひっぱりホイールを押しこむ。 ピッタリはめてからタイヤとホイールのつなぎ目に
Fit wheels inside tyres as shown.
Schieben Sie die Felge in den Reifen wie dargestellr.
Insérer la jante dans le pneu comme indiqué.
使用する袋詰。
Part bags used.
Verwendeter Teilebeutel.
Sachet utilisé.
4セット組立てる(例)。
x4
Assemble as many times as specified.
Sooft wie angegeben zusammenbauen.
Assemblez aussi souvent qu’indiqué.
Twist the tyre onto the wheel.
Ziehen Sie den Reifen auf die Felge.
Faire pivoter la jante pour l ' installer.
瞬間接着剤で接着する。 ゴム系接着剤で接着する。
Apply instant glue (CA glue, super glue).
Verwenden Sie Sekundenkleber.
Collez avec de la colle cyanoacrylate.
瞬間接着剤を流し接着する。
After fitting wheels to tyres, apply instant glue
as shown.
Setzen Sle dle Relfen auf die Felgen und lassen
Sie einen Tropfen Sekundenkleber ln der Naht
zwlschen Reifen und Felge entlang laufen.
Après assemblage, collez le bord du pneu
sur la jante.
Apply rubber type glue.
Gummikleber.
Collez avec de la colle a caoutchouc.
23
Page 24

34
タイヤ
Wheels
Räder
Roues
< >
フロント
< >
Front
< >
Vorne
< >
Avant
< >
リヤ
< >
Rear
< >
Hinten
< >
Arrière
いったんはずして取付け直します。
Remove when adjust.
Hängen Sie das gestänge aus.
Retirer la commande pour la régler.
35
ボディ
Body Shell
Karrosserie
Carrosserie
6mm
マフラーの排気口の穴。
Drill holes for muffler tail pipe.
Bohrung für Resonanzrohr.
Perçer un trou pour la sortie
d'échappement.
6mm
3mm
左右同じように組立てる。
Assemble left and right sides the same way.
Bauen Sie eine linke und eine rechte Seite.
Assemblez le côté gauche comme le côté droit.
24
3mm
をカットする。
Cut off shaded portion.
Schneiden Sie die schraffierten Flächen heraus.
Coupez la partie grisée.
3mmの穴をあける(例)。
3mm
Drill holes with the specified diameter.
Bohren Sie Löcher im angegebenen Ø.
Percez des trous dans le Ø indiqué.
Page 25

塗装
Painting
36
塗装前に、洗剤で油やよごれを洗う。 ウインドウ部分に、内側から
1
Before painting, use a neutral detergent
to remove any oil residues and dirt.
Bevor Sie beginnen, reinigen Sie die Karrosserie
gründlich mit einem milden Haushaltsreiniger.
Avant de peindre, nettoyez la carrosserie
soigneusement avec un produit vaisselle.
Lackierung
Peinture
2
マスキングシートを貼る。
Mask the windows from the inside.
Maskieren Sie die Fenster von innen.
Masquez les fenêtres de l’intérieur.
塗分けはパッケージ写真も
3
参考にしてください。
Refer to the pictures on the
box for the color scheme.
Nehmen Sie Bezug auf die
Verpackung, wenn Sie lackieren.
Reportez-vous aux illustrations
sur la boîte.
京商スプレーカラーでボディ内側を塗装する。/
Lackieren Sie die Karrosserie von innen mit Kyosho Sprayfarben. / Peingnez la carrosserie avec des peintures en spray de chez Kyosho.
No.76301
No.76302
No.76324
カルソニックブルー
Blue
Blau
Bleu
ホワイト
White
ブラック
Black
カルソニックブルー
Blue
Weiß
Blanc
Schwarz
Noir
Schwarz
Noir
Paint the body shell from the inside using Kyosho spray colors. /
塗装後、ボディ表面の保護ビニールシート
4
をはがしておく。
After painting, remove the protective
film from the body shell.
Ziehen Sie den Schutzfilm
von der Karrosserie ab.
Enlevez le film protecteur
de la carrosserie.
ブラック
Black
Schwarz
Noir
ブラック
Black
Schwarz
Noir
マスキング
Mask Windows
Abdecken mit Maskierfolie
Caches vitres
カルソニック
ブルー
Blue
Blau
Bleu
White
Weiß
Blanc
プラパーツ
Plastic Parts
37
3 x 8mm
Screw
LK Schraube
Vis 3x8mm
3mm
Nylon Nut
Kunststoffmutter
Ecrou nylon
ビス
ナイロンナット
マスキング
Mask Windows
Abdecken mit Maskierfolie
Caches vitres
Karrosserie Zubehör
Accessoires
3mm
ワッシャー
Washer
Scheibe
Rondelle 3mm
2
2
ホワイトホワイトホワイト
White
Weiß
Blanc
150
両面テープ
Double-sided Tape
Doppelseitiges Klebeband
Adhésif double face
4
3x8mm
3mm
150
両面テープ
Double-sided Tape
Doppelseitiges Klebeband
Adhésif double face
White
Weiß
Blanc
3mm
3mm
3mm
25
Page 26

38
デカール
Decals
Aufkleber
Autocollants
図の位置に から順にデカールをはる。
Apply the decals to the positions indicated in numerical order.
Tragen Sie die Aufkleber in der Reihenfolge ihrer Nummern auf.
Appliquez les autocollants dans l’ordre de leur numéro.
1
カッコの中は反対側用のデカールナンバーです。
The decal numbers between brackets are only for the opposite side.
Die Aufkleber in Klammern slnd für die andere Selte.
Les autocollants entre parenthéses sont pour le côté opposé.
4
20
37 3839
5 5
1
43 43
44
7 8
11 121210 1315 19 18
44
17
3
20
44
2 7 6 9
23
14 16 18 45
( )
26 27 34 46
( )
28 29
44
( )
24 25
42 42
39
2 x 8mm
TP Screw
LK Treibschr
Vis TP 2x8mm
145
ボディピン
Body Pin
Karosserieklammer
Goupille de carrosserie
40
ボディマウント
Body Mounts
TPビス
41
Karrosseriestützen
Fixations de carrosserie
No.10
4
4
2x8mm
62
145
( )
21 22
62
145
2x8mm
31
30
145
2x8mm
62
( )
32 33
2x8mm
35
145
2x8mm
36
62
2x8mm
使用する袋詰。/ 余分をカットする。/
Verwendeter Teilebeutel. / Sachet utilisé.
Part bags used. /
Überschüssiges Material abschneiden. / Coupez l’excès.
26
Cut off excess. /
Page 27

オプションパーツの取付
Installation of optional parts
Die Montage von Tuningteilen
Tendeur de courroie (pièce option)
2 x 10mm
Cap Screw
Inbusschraube
Vis
E3
E-ring
E-Ring E3
Clips 3mm
走行上の注意
Safety Precautions
走行時は、必ずボディを装着してください。
必要以上に前進/ブレーキの操作を繰り返すことは、おやめください。
下記の場所での走行は、故障の原因になりますのでおやめください。
・シャシーにからむような草の生えているところ。
・泥地、砂地、砂利の多いところ。
定期的に、各部のビス類が緩んでないか確認してください。
Always run your car with the body shell fitted!
Avoid changing the running direction too often and too abruptly.
Do not run your car on ground:
• that is overgrown with grass.
• that is muddy, sandy or rocky.
Check all screws, nuts etc. on a regular basis for looseness.
キャップビス
2
Eリング
2
Sicherheitsvorkehrungen
Mesures de sécurité
2x10mm
2x10mm
BRG003
94
BRG003
Bedienen Sie Ihr Auto, nur wenn die Karrosserie montiert ist!
Wechseln Sie die Fahrtrichtung nicht zu oft oder zu abrupt.
Vermeiden Sie Gelände, das:
• mit Gras überwachsen ist.
• schlammig, sandig oder steinig ist.
Überprüfen Sie regelmäßig alle Schrauben, Muttern usw. auf festen Sitz.
N’opérez votre voiture que lorsque la carrosserie est montée!
Ne changez pas de direction trop brusquement ou trop fréquemment.
N’opérez pas votre voiture sur du terrain:
• recouvert d’herbe.
• boueux, sableux ou recouvert de pierres.
Vérifiez régulièrement la visserie.
E3
MEMO
オプションのベアリングの品番。(例 : No.BRG003)
Ball bearings are optional ! (with optional part no.)
BRG003
Wahlweise Kugellager (Jeweils mit Best.-Nr.)
Les roulements sont en option. (avec les pièces en option N )
27
Page 28

セッティングガイド
ADJUSTMENT
ダンパー(1)
Shock (1)
1
G5ダンパーカラーの種類、個数を変えて、車高の調整ができます。
Adjust the ride height by changing the guantity and / or type of shock
collars used.
G5 (2mm)
G5 (1.5mm)
G5 (1mm)
キャンバー角
(前後とも約1°)
Camber Angle
(for front & rear
approx. 1°)
G5を減らす。
Decreasing G5 shock collar width.
車高
Ride Height
全幅 約200mm
Width approx. 200mm
約5mm
approx. 5mm
車高が上がる。G5を増やす。
Ride height becomes higher.Increasing G5 shock collar width.
車高が下がる。
Ride height becomes lower.
キャンバー角
(前後とも約1°)
Camber Angle
(for front & rear
approx. 1°)
キャスター
Caster
3
スペーサーの取付位置を変えて、キャスター角を
34 35
フロントサスペンション
Front Suspension
変更できます。
Adjust the caster by changing the location of the Spacer.
34 35
35 34
キャスター角 約6°キャスター角 約14°
Caster : approx. 6 Caster : approx. 14
一般的にキャスター
角を大きくすると、
コーナリング特性が
マイルドになる。
Generally, the bigger
the caster, the milder
cornering becomes.
キャンバー
Camber
4
ピロボールの締込量でキャンバー角の調整ができます。
Adjust the camber by tightening or unscrewing the pillow ball.
< Front >
フロント
スイングシャフトが脱落するので、
53
ゆるめすぎないこと
Do not loosen too much since will
Swingshaft fall out.
キャンバー角は、約1°に調整してください。
Adjust camber approx. 1°
ダンパー(2)
Shock (2)
2
ダンパースプリング、オイルをオプションパーツと変えるこ
とで、ステアリング特性を変えることができます。
Adjust the steering behaviour by changing the spring tension and / or
type of shock oil.
ダンパーのかたさ かたい
Spring stiffness Hard Soft
ステアリング特性
Steering
characteristics
< Spring >
スプリング
スプリングのかたさ
Spring stiffness
92491
オンロードスプリング(S)
On-road
Shock Spring(S)
< Shock Oil >
ダンパーオイル
ダンパーのかたさ
Shock stiffness
シリコンオイル
Silicone Oil
フロント
リヤ
Rear Grip gets lower. Grip gets higher.
# 600
(96609)
シャープ マイルド
Sharp MildFront
タイヤのグリップが低くなる。 タイヤのグリップが高くなる。
かたい やわらかい
Hard Soft
イエロー オレンジグリーン
Yellow OrangeGreen
かたい やわらかい
Hard Soft
(96608)
# 500
# 400
(96607)
# 300
(96605)
やわらかい
# 200
(96603)
# 100
(96601)
53
キャンバー角 大
Camber Angle (Large)
キャンバー角 小
Camber Angle (Small)
リヤサスペンション
Rear Suspension
< Rear >
リヤ
キャンバー角は、約1°に調整してください。
Adjust camber approx. 1°
キャンバー角 大
Camber Angle (Large)
キャンバー角 小
Camber Angle (Small)
ステアリング特性はマイルド傾向になる。
Steering becomes milder.
コーナリング初期の反応が良くなる。
Enters corners more aggressively.
トー角
Toe Angle
Steering Characteristics
コーナリング初期にリヤタイヤがすべりにくくなる。
Gives rear tires more grip when entering corners.
コーナリング初期にリヤタイヤがすべりやすくなる。
Rear tire grip becomes worse when entering corners.
六角レンチ(2.5mm)
Hex Wrench (2.5mm)
特性
Steering Characteristics
約2°
approx. 2°
約2°
approx. 2°
リヤにトー角を少しつけると、
走行安定性が向上します。
Rear toe angle give stability.
六角レンチ(2.5mm)
Hex Wrench (2.5mm)
特性
28
Page 29

Model No.KT-3
POWER ON
POWER
ST.D/R
ST.TRIM TH.TRIM
取扱いの注意 / Operating your model safely / Zu Ihrer Sicherheit / Consignes de sécurité
次のような時、場所では走らせない。思わぬ事故の原因になります。
WARNING: Do NOT operate the model in the following places and situations: (Non-observance may lead to accidents!)
警告
走行時は、必ずボディを装着してください。
必要以上に前/後進の操作を繰り返すことは、おやめください。
下記の場所での走行は、故障の原因になりますのでおやめください。
・シャシーにからむような草の生えているところ。
・泥地、砂地、砂利の多いところ。
定期的に、各部のビス類が緩んでないか確認してください。
●走行させてはいけない場所。
1.自動車道路。
2.小さな子供のそば、人の多いところ。
3.民家の近く、公園など。
4.室内、せまいところ。
※人にケガをさせる原因になります。また、物をこ
わしたり、他人の迷惑になります。
●プロポ関係の電池残量が少ない時。
電池が減ってくる とコントロール ができなくなり、
暴走や衝突の原因なります。
●近くで無線操縦模型を楽しんでいる人がいる。
同じバンドでの同 時走行はできま せん。コントロー
ルができなくなり、暴走や衝突の原因なります。
●車の動きがおかしい??とき
すぐに走行を中止 して原因を調べ てください。原因
不明のまま走行さ せると、思わぬ 故障や事故の原因
になります。
VORSICHT: Bedienen Sie Ihr Modell niemals an folgenden Orten und unter folgenden Umständen!
ATTENTION: N’utilisez pas votre modèle dans les endroits suivants!
CH-2 CH-1
BATT.
01
Always run your car with the body shell mounted!
Avoid changing the running direction too often and
too abruptly.
Do not run your car on ground:
• that is overgrown with grass.
• that is muddy, sandy or rocky.
Check all screws, nuts etc. on a regular basis for
looseness.
Operate your model ONLY in spacious areas
with no people around! Do NOT operate it:
1. on roads!
2. in places where children and many people gather!
3. in residential districts and parks!
4. indoors and in limited space!
* Non-observance may account for personal injury
and property damage!
Always check the radio batteries!
Radio reception will be reduced if weak batteries are
used, You may lose control of your car when running
this way and this could lead to accidents.
Keep in mind that people around you may
also operate a radio control model!
NEVER share the same frequency with somebody
else at the same time! Signals will be mixed and you
will lose control of your model. This may lead to
accidents!
When the model is behaving strangely . .!
Immediately stop the model and check the reason.
As long as the problem is not cleared, do NOT
operate it! This may lead to further trouble and
unforeseen acci-dents!
Bedienen Sie Ihr Auto, nur wenn die Karrosserie
montiert ist!
Wechseln Sie die Fahrtrichtung nicht zu oft oder
zu abrupt.
Vermeiden Sie Gelände, das:
• mit Gras überwachsen ist.
• schlammig, sandig oder steinig ist.
Überprüfen Sie regelmäßig alle Schrauben, Muttern
usw. auf festen Sitz.
Bedienen Sie Ihr Modell nur an sicheren und
geräumigen Orten. Bedienen Sie es niemals:
1. auf öffentlichen Straßen!
2. dort, wo sich Leute und Kleinkinder aufhalten!
3. in Wohngebieten und Parks!
4. in engen, begrenzten Orten oder in Räumen!
* Nichtbeachtung kann Verlet-zung von Personen
sowie Sachschäden zur Folge haben!
Überprüfen Sie die Batterien der RC-Anlage!
Sobald die Batterien nachlassen, lassen auch das
Sende- und Empfangvermögen nach. Die Bedienung
Ihres Modelles mit schwachen Batterien kann zum
Ver-lust Ihres Modelles und schweren Unfällen führen!
Bedenken Sie, daß auch andere in Ihrer Umgebung
ein ferngesteuertes Modell bedienen könnten!
Stellen Sie sicher, daß niemand zur selben Zeit die-selbe Frequenz in Ihrer Umgebung benutzt! Das
kann zum Ver-lust Ihres Model-les sowie zu schweren
Unfällen führen.
Wenn Ihr Modell nicht normal funktioniert, . . . :
Unterbrechen Sie die Bedienung augenblicklich und
untersuchen Sie die Ursache. Solange sie nicht
geklärt ist, bedienen Sie niemals Ihr Modell! Das
könn-te schwere Unfälle zur Folge haben!
05
N’opérez votre voiture que lorsque la carrosserie
est montée!
Ne changez pas de direction trop brusquement
ou trop fréquemment.
N’opérez pas votre voiture sur du terrain:
• recouvert d’herbe.
• boueux, sableux ou recouvert de pierres.
Vérifiez régulièrement la visserie.
Pour éviter tout accident, n’utilisez jamais votre
modèle :
1. à proximité de routes!
2. dans un endroit avec des enfants et promeneurs!
3. à proximité de résidences, d’écoles et d’hôpiteux!
4. à l’intérieur ou dans un endroit étroit!
* Ne pas respecter ces consignes peut entraîner la
perte de votre modèle et avoir des conséquences
fatales.
Quand les piles de la radio sont déchargées:
Si les piles sont insuffisamment chargées, l’émission
et la réception de la radio deviennent faibles.
L’utilisation de votre modèle avec des piles
insuffisamment chargées peut entraîner la perte de
votre modèle ainsi que des accidents graves!
Assurez-vous que personne n’utilise votre fréquence au même instant!
N’utilisez jamais la même fréquence que quelqu’un
d’autre. Cela pourrait entraîner la perte de votre
modèle ainsi que des accidents graves!
Quand le fonctionnement de votre modèle est étrange:
Arrêtez immédiatement votre modèle et trouvez la
cause. Sinon, vous risquez la perte de votre modèle
ainsi que des accidents graves!
29
Page 30

取扱いの注意 / Operating your model safely / Zu Ihrer Sicherheit / Consignes de sécurité
事故やケガ等の危険防止のため、次のことを必ずお守りください。
WARNING: In order to avoid accidents and personal injury, be sure to observe the following:
VORSICHT: Zur Unfall- und Sachschadenvermeidung, beachten Sie bitte auch folgendes:
警告
ATTENTION: Respectez les consignes suivantes afin de faire évoluer votre modèle en toute sécurité:
●燃料の取扱いの注意。
1. 取扱いは、必ず屋外で。
2. 模型用グロー燃料を必ず使用。
3. 火気には絶対に近づけない。
4. 飲んだり、目に入れたりしない。
5. 保管は、キャップをしっかり締め幼児の
手の届かない冷暗所に置く。
6. 使用後の空き缶は、火中に投げ入れない。
●回転している部分に、指や物などを入れない。
●走行直後は、エンジン、マフラー周辺は高温に
なっているので、すぐにはさわらない。
禁止
PROHIBITED
VERBOTEN
DEFENDU
●Handling fuel safely:
1. Handle fuel only outdoors!
2. Only use glow fuel for radio control models!
3. Never use fuel indoors or in places with open fires
and sources of heat!
4. Never swallow fuel or let it into your eyes!
5. Store fuel only in cool, dry and dark places out of
children's reach! Tightly shut the cap!
6. Do not dispose of empty fuel cans into a fire! There
is danger of explosion!
●Do not put fingers or any objects inside rotat-
ing and moving parts!
●Right after use, do not touch the engine and
muffler! Danger of burning yourself!
●Zum sicheren Gebrauch von Kraftstoff:
1. Kraftstoff nur draußen gebrauchen!
2. Nur Kraftstoff für RC-Modelle gebrauchen!
3. Kraftstoff niemals drinnen oder in der Nähe von
Feuer- und Hitzequellen gebrauchen!
4. Kraftstoff niemals schlucken! Vorsicht auch vor
Kraftstoffspritzer in die Augen!
5. Kraftstoff nur in kühlen, trockenen und dunklen
Orten außer Reichweite von Kindern aufbewaren!
Sorgfältig verschließen!
6. Niemals leere Kanister in ein offenes Feuer werfen!
Explosionsgefahr!
●Stecken Sie niemals Ihre Finger in bewegende
oder sich drehende Teile.
●
Nach dem Fahren, fassen Sie niemals den Verbrennungs-
motor und den Schalldämpfer an! Verbrennungsgefahr!
禁止
PROHIBITED
VERBOTEN
DEFENDU
禁止
PROHIBITED
VERBOTEN
DEFENDU
●Consignes de sécurité:
1. Utiliser seulement à l’intérieur!
2. Utiliser seulement pour modèles radio-télécom-mandés!
3. Ne jamais utiliser à l’intérieur et à proximité d’un
feu ou d’une source de chaleur!
4. Ne jamais avaler! Attention aux projections dans
les yeux!
5. Toujours garder dans un endroit frais, sec et sombre
hors de portée des enfants! Bien visser le capuchon!
6. Ne jamais jeter un bidon vide dans un feu! Danger
d’explosion!
●Ne jamais mettre vos doigts dans des parties
en mouvement!
●Après utilisage, ne jamais toucher le moteur
et le silencieux! Danger de brûlures!
30
禁止
PROHIBITED
VERBOTEN
DEFENDU
Page 31

エンジンカーの取扱いについて
HOW TO HANDLE ENGINES IN GP CARS
エンジン各部名称と働き/ENGINE DESCRIPTION / Der Verbrennungsmotor / Description du moteur
スロットルストップスクリュー
アイドリング時のスロットル
レバーの開き具合を調整する。
Idle Adjustment Screw:
Adjusts the carburetor opening
when idling.
Anschlagschraube für Leerlauf:
Mechanische Justierung für
Leerlaufdrehzahl.
Vis de réglage du ralenti:
règle l'ouverture du carburateur.
スロットルレバー
混合気の量を調整しエンジンの
回転数を制御する。
Throttle Lever:
Adjusts amount of air-fuel mixture
inflow and controls engine rpm.
Drosselküken:
Die Anlenkung des Drosselkükens
wird mit dem Gasservo verbunden.
Levier de gaz:
règle le mélnage air-carburant
et définit le régime moteur.
キャブレター
燃料と空気を混ぜ混合気を作り、その量で
エンジンの回転数をコントロールする。
Carburetor:
Mixes air and fuel appropriately to control
engine running.
Vergaser:
Der Vergaser regelt das Luft-Treibstoffgemisch.
Carburateur:
mélange l'air et le carburant de manière appropriée.
グロープラグ
圧縮された混合気に点火する。
Glow Plug:
Ignites the compressed air-fuel mixture.
Glühkerze:
Die Glühkerze sorgt für die Zündung
des Treibstoffgemisches.
Bougie à incandescence:
provoque l'explosion du mélange
air-carburant comprimé.
リコイルスターター
エンジンを始動させる。
Recoil Starter:
Starts the engine.
Anreißstarter:
Durch Ziehen am Anreißstarter
wird der Motor gestartet.
Tirrette de démarrage:
assure le démarrage du moteur.
ニードル
混合気の燃料の量を調整する。
Needle Valve:
Adjusts the amount of fuel
inflow for the mixture.
Düsennadel:
Mit der Düsennadel wird die
Treibstoffmenge reguliert,
die der Motor erhält.
Pointeau:
règle l'arrivée d'essence
dans le carburateur.
エンジンは精密部品で構成されています。不用意に
分解等をすると、エンジン本来の性能を発揮できな
くなることがあります。
Engines include many high-precision parts.
If disassembling engines carelessly,
their original performance may be lost!
走行前のチェック/
□ビスなどのゆるみはありませんか?
□可動部分はスムーズに動きますか?
また、グリス等適切に塗ってありますか?
□エアクリーナーはついていますか?
また、汚れて目詰まりしていませんか?
□
燃料パイプの詰まりやひび割れ、接続の不良はありませんか?
□
マフラーや、エキゾーストパイプ等の接続に不良はありませんか?
□
送・受信機の電池はありますか?また、確実に固定されていますか?
□サーボ、リンケージはスムーズで正確に動作しますか?
□走行場所は安全ですか?
□
近くで同じバンドで無線操縦模型をしている人はいませんか?
□ Ensure all screws are securely tightened.
□ Ensure all moving parts move without binding.
Are they greased for non-binding movement?
□ Install an air cleaner. Ensure it is clean and not clogged.
□ Ensure the fuel lining is proof, with no cracks.
Ensure it is not clogged.
□ Ensure the muffler and exhaust are damage-free.
□ Ensure the radio batteries are fresh.
Are they securely installed?
□ Ensure servos and linkages move without binding.
□ Ensure the area of operation is safe.
□ Ensure nobody is on your frequency at the same time.
CHECKLIST BEFORE RUNNING / Die Checkliste vor dem Start / Points a verifier avant le demarrage
Der Motor enthält viele empfindliche Präzisionsteile.
Achten Sie beim Zerlegen und Zusammenbau darauf,
daß Sie alle Teile richtig montieren! Andernfalls kann
der Motor beschädigt werden!
Le moteur est compose de nombreuses pieces de haure
precision. Si vous ne le demontez pas soigneusement.
les perrormances pourraient s'en ressentir!
□ Überprüfen Sie, ob alle Schrauben festgezogen sind.
□ Überprüfen Sie, ob alle beweglichen Teile leichtgängig und an
den entsprechenden Stellen gefettet sind.
□ Ist der Luftfilter richtig montiert?
□ Achten Sie auf einen knickfreien Verlauf des Treibstoffschlauches im Modell.
□ Überprüfen Sie, ob der Auspuff fest am Motor montiert ist.
□
Überprüfen Sie, ob die Akkus / Batterien für die RC-Anlage geladen / frisch sind.
□
Überprüfen Sie, ob die Servoanlenkungen sich leichtgängig bewegen können.
□
Achten Sie darauf, daß das Gelände für den Betrieb Ihres Modells geeignet ist.
□ Achten Sie auf eine Frequenzkontrolle!
□ Assurez-vous que toutes lesvis soien bien serrées.
□ Assurez-vous que les pièces en mouvement ne cognent rien.
Sont elles bein graissées?
□ Installez un filtre à air. Assurez-ous qu'il soit propre.
□ Assurez-vous que les tubes d'arrivée d'essence soient correctement
installés et propres
□ Assurez-vous que l'échappement ne soit pas endommagé.
□ Assurez-vous que les batteries soient bien chargées. Sont-elles bien fixées?
□ Assurez-bous que les servos et leurs connections peuvent être utilisés
sans rien cogner.
□ Assurez-vous que la piste où vous roule est sûre.
□ Assurez-vous que personne n'emploie la même fréquence que vous
en même temps.
31
Page 32

エンジンの始動 / ENGINE STARTING / Den Motor starten / Demarrage moteur
燃料の蒸気、排気ガスは有害ですので、必ず屋外で
警告
取扱ってください。
WARNING
タンクに燃料を入れる。
1
Fill in the fuel.
Befüllen Sie den Tank.
Versez le carburant.
▲
タンク内にゴミやホコリが入らないように注意する。
Ensure that dirt does not enter the fuel tank.
Achten Sie darauf, daß kein Schmutz in
den Treibstoff gelangt.
Evitez que la poussière ne s'introduise
dans votre réservoir.
送信機、受信機の順にスイッチをいれる。
2
First, switch on the transmitter and next, the receiver.
Schalten Sie zuerst den Sender, dann den Empfänger ein.
Allumez d'abord l'émetteur et ensuite, le récepteur.
Since exhausts and fuel vapors are noxious to
health, use fuel only outdoors!
▲
スロットルレバーがスローの位置にあるか確認すること。
Check if the throttle lever is in the idle position (slow).
Achten Sie darauf, daß der Vergaser auf Leerlauf steht!
Verifiez si le levier de gaz est en polition neutre.
模型エ
model
engine
fuel
ンジン用燃料
プラグヒートをつなぐ。
5
Connect the glow plug heater.
Schließen Sie den Glühkerzenakku an die Glühkerze an.
Connectez le chauffe-bougie.
6
エンジンを始動する。
Start the engine
Anlassen des Motors
Démarrez le moteur
1
送信機のスロットルトリムを上げ始動しやすくする。
Engine starting becomes easier when raising the throttle trim.
Öffnen Sie das Drosselküken im Vergaser wie dargestellt über
die Gastrimmung am Sender.
Le démarrage du moteur se fait plus facilement si vous levez
le stick de gaz.
スロットルトリム
Throttle Trim
Gastrimmung
Stick de gaz
ON
ニードルを調整。
3
ON
スロー
Idle
Adjust the needle valve.
Einstellung der Düsennadel.
Réglage du pointeau
ニードルが止まるまで軽くしめる。(時計回り)
1
Gently screw in the needle valve (clockwise rotation).
Schließen Sie vorsichtig die Düsennadel (Drehen im
Uhrzeigersinn).
Vissez complètement, et sans forcer,la vis de pointeau (dans le
sens des aiguilles d'une montre)
エンジンの説明書を参考に指定回転ゆるめる。(反時計回り)
2
Refer to the engine instruction manual and unscrew the needle
valve as specified (counter clockwise rotation).
Öfnen Sie die Düsennadel 1,5 Umdrehungen (Drehen gegen den
Uhrzeigersinn).
Référez-vous aux instructions du manuel de
montage et dévissez la vis de pointeau
comme indiqué (dans le sens ontraire
des aiguilles
4
燃料をキャブレターに送る。
Put some fuel into the carburetor.
Geben Sie etwas Treibstoff in den
Vergaser
Mettre un peu de carburant dans
le carburateur.
▲
キャブレターに燃料が入ったら、リコイルスターターを2〜3回
*エアクリーナーを外してキャブレターを指で
ふさぎ、リコイルスターターを1回引きます。
(燃料がキャブレターまで行きます。)
その後エアクリーナーを取り付けます。
*Remove the air cleaner once,
place your finger on the carburetor.
Pull the recoil starter.
(Fuel comes to the carburetor.)
Replace the air cleaner.
*Luftfilter abnehmen, Vergaseröffnung
mit dem Finger vollständig abdichten
und den Anreißstarter betätigen, bis
Treibstoff zum Vergaser gelangt.
Abschließend den Luftfilter wieder montieren.
*Retirer le filtre à air puis, mettre le
doigt sur le carburateur.
Tirer le démarreur.
(Le carburant entre dans le carburateur.)
Replacer le filtre à air.
引くと、エンジン内に燃料が行きわたり、始動しやすくなる。
Engine starting becomes easier when some fuel enters the carburetor and spreads through the engine after pulling the recoil starter
2 to 3 times.
Ziehen Sie den Anreißstarter 2-3 mal durch, damit der Treibstoff
in den Brennraum gelangt.
Le démarrage du moteur s'effectuera plus facilement quand
le carburant sera dans le carburateur et sera répar dans le moteur
après avoirtiré 2 ou 3 fois la terette de démarrage.
2
下記の方法でエンジンを始動する。
Start the engine in either of the following ways:
Starten Sie den Motor auf eine der dargestellten Arten.
Démarrez le moteur comme indiqué ci-dessous:
リコイルスターター
Recoil Starter
Anreißstarter
Tirette de démarrage
7
1
2
エンジンを暖気運転する。
Run the engine up.
Das Einstellen des Motors.
スターターボックス
Starter Box
Startbox
Banc de démarrage
ハンドスターター
Starter
Anlasser
Démarreur
Augmentez le regime moteur.
1
スロットルスティックを少し上げてエンジンを温める。
Move the throttle control a little up to enhance engine run up.
Geben Sie etwas Gas, nachdem der Motor angesprungen ist.
Levez le stick de gaz pour accroitre le regime moteur.
スロットルスティック
Throttle Stick
Gasknüppel
Stick de gaz
2
エンジンの回転が安定したら、スロットルスティックと
スロットルトリムを戻して、プラグヒートをはずす。
When rpm become stable, lower the throttle control and trim,
and disconnect the glow plug heater.
10 Sekunden nach dem Anspringen des Motors kann der
Glühkerzenakku entfernt werden.
Quand le régime moteur se stabilise,baissez le stick de gaz
et déconnectez le chauffe-bougie.
32
Page 33

8
エンジンを止めるときはエアークリーナーを外して、キャブレターを指で押さえる。
For stopping the engine, squeeze the air cleaner.
Zum Stoppen des Motors wird der Luftfilter zusammengedrückt.
Pour arreter le moteur,exercez une pression sur le filtre a air.
始動後のエンジン本体、マフラーなどは、高温になってい
ますので、やけどをしないよう十分に注意してください。
The engine and muffler get hot! Do not touch
警告
WARNING
VORSICHT
ATTENTION
them during and right after operation!
Der Motor und der Auspuff werden sehr heiß.
Nicht berühren, Verletzungsgefahr!
Le moteur et l'echappement sont tres chauds!
Ne les touchez pas pendant ou juste après l'utilisation.
ブレークイン / BREAK IN / Lassen Sie den Motor einlaufen / Rodage
9
エンジン停止後、受信機、送信機の順にスイッチを切る。
After stopping the engine, first switch off the receiver, then
the transmitter.
Nach Abstellen des Motors erst den Empfänger, dann den
Sender ausschalten.
Après avoir arrêté le moteur, éteignez d'abord le récepteur,
ensuite l'émetteur.
OFF
OFF
●ブレークインとは、新しいエンジンの慣らし運転のことです。
ブレークインをおこなわないとエンジンに潤滑オイルがまわら
ないために、すぐにエンジンが焼き付いてしまいます。エンジ
ンを長持ちさせるためにブレークインは必ず行ってください。
The break-in is necessary to "prepare" brandnew engines to regular
and smooth running! If you fail to break-in an engine, the lubricating
oil inside does not circulate and the engine will be caked with burns;
running becomes difficult and engine life is shortened.
Neue Motoren müssen generell eingelaufen werden. Ohne diese
Einlaufphase entwickeln die Motoren nicht ihre volle Leistung und
lassen sich nur schwer einstellen. Es besteht eine erhebliche
Beschädigungsgefahr des Motors.
Le redage est necessaire pour preparer les nouveaux moteurs a une
utilisation reguliere et sans problemes. Si bous ne rodezs pas votre moteur,
le graissage de votre moteur ne se fera pas correctement. L'utilisation
sera difficile et la duree de vie de votre moteur en sera raccourgie.
ブレークイン中は、エンジンの回転を上げすぎると焼
き付きの原因になりますので注意してください。
During the break-in, do not operate the engine with
注意
CAUTION
WICHTIG
ATTENTION
1
タイヤのあたらない台の上に車を置く。
Place the car on top of a stand
with the wheels aloof from the ground.
Bocken Sie das Fahrzeug so auf,
daß sich alle Räder frei drehen können.
Placez votre modèle sur un support,
les roues n'ayant pas
de contact avec le sol.
high rpm! Serious damage may be the result.
Während der Einlaufphase muß der Motor sehr fett
eingestellt sein. Vermeiden Sie hohe Drehzahlen,
Beschädigungsgefahr!
Pendant le rodage,ne faites pas monter le moteur
en regime. Les conséquences pourraient être graves!
スロットルスティック:スローの位置。
▼
Move the throttle control to slow.
Lassen Sie den Motor mit mittlerer Drehzahl und fetter Einstellung laufen.
Baissez le stick de gaz.
スロットルトリム:エンジンが止まらない
▼
程度に上げておく。
Move the throttle trim up, ensuring the engine
will not stall.
Kontrollieren Sie die Drehzahl am Gasknüppel.
Relevez le stick de gaz, pour que lo moteur ne
cale pas.
この時、ニードルは始動した位置からしめこまないようにしてください。
At this moment, do not tighten the needle valve any further.
Regeln Sie mit der Düsennadel den Motor so ein, daß er sehr fett läuft.
A ce moment, ne serrez plus le pointeau.
3
走行させながらブレークインを続ける。エンジンをいたわる
つもりで走行させ、10〜20°ずつニードルをしめこむ。
Next, continue performing the break-in
while running the car. Always screw in
the needle valve 10 to 20° at a time in
order not to damage the engine.
Lassen Sie nun den Motor beim Betrieb
des Modells weiter einlaufen.
Schließen Sie die Düsennadel mit jeder
Tankfüllung in kleien Schritten,
bis der Motor seine volle Leistung abgibt.
Ensuite,continuez le rodage en fasant evoluer votre modele.
Revissez le pointeau de 10 a 20 chaque fois,
pour ne pas abimer votre moteur.
4
10タンク程度走行したらブレークインは終了。
Run the engine 10 tanks to complete the break-in.
Nach 10 Tankfüllungen ist der Einlaufprozeß vollendet.
Pour terminer le rodage,faites evoluer votre modele ainsi pendant
10 pleins.
ニードル
Needle Valve
Düsennadel
Pointeau
「エンジンの始動」の手順でエンジンを始動する。
2
Start the engine as specified in the chapter < ENGINE STARTING >.
Starten Sie den Motor, wie zuvor beschrieben.
Démmarrez le moteur comme indiqué dans le chapitre
'DEMARRAGE DU MOTEUR'
5
通常走行のニードル位置は1と3/4回転を目安にしてください。
これより大きくしめこむとオーバーヒートの原因となります。
The needle valve setting for normal engine running lies between
1 and 3/4 turns screwed out from closed position.
Screwing it further in ,excessive heat may be generated.
Die Düsennadeleinstellung für den normalen Betrieb des Motors l
iegt bei ca. 1,4 Umdrehungen.
LL faut dévisser le pointeau d'1 tour 3/4 (après l'avoir vissé
complètement) pour obtenir un règlage normal du moteur.
D'autres règlages peuvent entrainer une surchauffe du moteur.
33
Page 34

エンジン調整ENGINE ADJUSTMENT
●ブレークインが終了してから の順で調整してください。
Adjust in the order and once the break-in is completed.
Stellen Sie den Motor nach Punkt und ein.
Le rodage terminé, suivez les instructions suivantes:
ニードル調整(最高回転数の調整)
1
Needle Valve Adjustment (Maximum Rpm Adjustment)
Einstellung der Düsennadel für Vollgasbereich.
Règlage à haut régime.
「エンジンの始動」の手順でエンジンを始動し、車を走行させます。
1
Start the engine as explained in the chapter <ENGINE STARTING>
and run your car.
Starten Sie den Motor.
Faites démarrer votre moteur comme indiqué dand le chapitre
'DEMARRAGE DU MOTEUR' et faites évoluer votre modèle.
直線でスロットルスティックをハイにした時の車のスピードを見ま
2
す。ニードルを10〜20°ずつしめこむと、スピードが上がってきま
す。最高スピードが得られる所が、ニードルの最良位置です。
Watch the speed of your car running down a straight with the
throttle control moved to high. When screwing in the needle valve
10 ~20 , speed increases. When your car's speed reaches the
peak, the needle valve setting is optimal.
Beobachten Sie Ihr Modell bei Vollgas auf der Rennstrecke. Je
weiter Sie die Düsennadel schließen, desto höher dreht der Motor
und umso schneller fährt Ihr Fahrzeug. Wenn die maximale
Geschwindigkeit erreicht ist, ist der Motor optimal eingestellt.
Achten Sie darauf, daß der Motor immer noch eine leichte
Rauchfahne zieht bei Vollgas.
Faites évoluer votre modèle sur une pente en ligne droite en
placant le stick de gaz vers le haut. En resserrant le pointeau de 10
à 20, la vitesse augmente.
Quand vous aurez atteint la vitesse maximum, le règlage du
pointeau sera optimal.
そこからさらにしめこむと、エンジンの排気が見えなくなったり、
3
スピードが途中から落ちてきます。そのまま走行を続けると、エ
ンジンが壊れてしまいます。すぐにニードルをゆるめてください。
ニードルの最良位置から10〜20°ゆるめた位置が、通常走行の位
置です。
When screwing the needle valve further in, exhausts become invisible and rpm decrease. Running the engine with this setting
damages the engine. Immediately unscrew the needle valve.
Note that for normal running, the needle valve is screwed out 10
~20 from the valve's optimal setting position!
Wenn Sie den Motor zu mager einstellen, verschwindet die
Rauchfahne und Ihr Motor überhitzt, die Drehzahl fällt ab.
En continuant à serrer la pointeau,les fumees d'échappement
disparaissent et la vitesse diminue. Utiliser votre moteur dans
ces conditions pourrait l'endommager. Dévissez immédiatement
le pointeau. Notez que pour un usage normal,lepointeau doit être
dévissé de 10 à 20 de son reglage optimal.
1 2
1 2
1 2
ニードル
Needle Valve
Düsennadel
Pointeau
2
スロットルストップスクリュー(アイドリング回転数の調整)
Idle Adjustment Screw (Idling Rpm Adjustment)
Einstellung der Düsennadel für Leerlaufbereich.
Règlage du ralenti.
▲
スロットルスティックは中立にして調整する。
Adjust with throttle control in neutral.
Stellen Sie den Gasknüppel auf Leerlauf.
Placez la commande de gaz en position neutre.
スロットルストップスクリュー
Idle Adjustment Screw
Anschlagschraube für Leerlaufdrehzahl
Vis de ralenti
中立
Neutral
Leerlauf
Neutre
エンジンが止まってしまう。
The engine stalls.
Der Motor geht aus.
Le moteur cale.
1/8〜1/4回転ずつしめる。
Screw in 1/8~1/4 turns.
Schraube 1/4 Umdrehung hineindrehen.
Vissez d'un 1/8-1/4 de tour.
▲
スロットルスティックが中立の時、ブレーキを効かせなくても
車が走りださないように調整します。
When the throttle control is in neutral, the car does not
speed off even when not applying the brakes!
Die Einstellung ist optimal, wenn das Fahrzeug ohne Bremse
stehen bleibt und der Motor im Leerlauf nicht ausgeht.
Si la commande est au neutre,la vitesse ne diminue pas
même si on actionne le frein
車が走り出してしまう。
The car rolls forward.
Das Modell rollt vorwärts.
La voiture avance.
1/8〜1/4回転ずつゆるめる。
Unscrew in 1/8~1/4 turns.
Schraube 1/4 Umdrehung herausdrehen.
Devissez d'1/8-1/4 de tour.
走行後の手入れMAINTENANCE
□一日の走行が終わったらタンクから燃料を抜いてください。
□燃料を抜きとった後エンジンを始動し残りの燃料を使いきる。
(燃料が残っていると次回エンジンが始動しにくくなります。)
□車やエンジンの汚れを、きれいにとる。
□ビスがゆるんでないか各部をチェックしてください。
□回転部にグリスを塗ります。
□受信機用バッテリーははずしておきましょう。
□Before putting your car aside, draw out any fuel from the tank.
□Next, restart the engine to combust remaining fuel. Leaving fuel
inside the engine will make engine starting difficult.
□Wipe off dirt and oil.
□Check all parts for screw looseness.
□Grease all moving parts.
□Disconnect the receiver batteries.
34
□Entfernen Sie nach dem Betrieb sämtliche Treibstoffreste aus
dem Tank.
□Starten Sie nochmals den Motor um den restlichen Treibstoff aus der
Leitung aufzubrauchen. Lassen Sie niemals Treibstoffreste im Tank!
□Entfernen Sie sämtliche Verbrennungsrückstände vom Modell.
□Überprüfen Sie alle Schrauben auf festen Sitz.
□Bewegliche Teile wenn nötig mit Fett nachschmieren.
□Entfernen Sie den Akku aus dem Modell.
□Videz votre réservoir après utilisation.
□Ensuite,redémarrez le moteur afin de brûler le carburant restant
dans le moteur Si vous laissez du carburant dans le moteur,
les démarrages ultérieurs seront plus difficiles.
□Nettoyez la poussière et l'huile.
□Vérifez si toures les vis et écrous sont bien serrés.
□Graissez toutes les pièces en mouvement.
□Déconnectez les batteries du récepteur.
Page 35

故障?と思う前に
症 状
エンジンがかからない。
リコイルスターターが
引けない。
エンジンはかかるが、
すぐ止まってしまう。
原 因
キャブレターに燃料が行っていない。
プラグが赤熱していない。
キャブレターの調整不良。
オーバーチョーク。
(エンジン内に燃料が入りすぎている。)
リコイルスターターの故障。
燃料が入っていない。
燃料フィルター、エアクリーナーが
つまっている。
オーバーヒートしている。
プラグの不良。
キャブレターの調整不良。
□チョークボタンを押し、キャブレターに燃料
を送る。
□プラグヒートが正しく接続されているか確認
する。
□プラグヒートの電池を新しい電池と交換す
る、ニカドバッテリーの場合は充電する。
□新しいプラグと交換する。
□説明書を良く読み、もう一度キャブレターを
調整する。
□プラグをはずし、燃料が出なくなるまでリコ
イルスターターを引く。
□リコイルスターターの修理については、ユー
ザー相談室にお問い合わせください。
□燃料を燃料タンクに入れる。
□燃料フィルター、エアクリーナーを洗浄す
る。または、新しい物と交換する。
□エンジンが冷えてから、キャブレターのニード
ルを約30°ゆるめて(反時計回り)再度エンジン
をかける。
□新しいプラグと交換する。
□説明書を良く読み、もう一度キャブレターを調
整する。
対 策
THE ENGINE DOES NOT START OR IMMEDIATELY STALLS / Der Motor zundet nicht oder geht sofort wieder aus
Le moteur ne demarre pas ou cale immediatement
PROBLEM CAUSE
Fuel does not get into the carburetor.
Der Motor bekommt keinen Treibstoff
Le carburant n'arrive pas au carburateur
The engine does not start.
Der Motor springt nicht an
Le moteur ne démarre pas
The recoil starter is difficult to pull.
Der Anreißstarter läßt sich
nicht betätigen.
La tirette de demarreur resiste.
The engine starts but
immediately stalls.
Der Motor springt an und
geht wieder aus.
Lemoteur demarre mais
cale immediatement.
The glow plug is not heated.
Die Glühkerze glüht nicht
Labougie ne chauffe pas
Wrong carburetor setting.
Falsche Vergasereinstellung
Mauvais reglage du carburateur
Overchoked.
(The cylinder is flooded with fuel.)
Der Brennraum ist mit Treibstoff gefüllt.
Le cylindre est plein de carburant.
The recoil starter is damaged.
Der Anreißstarter ist defekt.
Le système est endommage.
No fuel.
Motor hat keinen Treibstoff.
Pas de carburant.
The fuel filter and air cleaner are clogged.
Treibstoff- oder Luftfilter sind verschmutzt.
Le filtre à air et/ou à carburant sont bouchés
Overheated.
Motor überhitzt.
Température trop élevée.
The glow plug is defective.
Glühkerze defekt.
La bougie est morte.
Wrong carburetor setting.
Falsche Vergasereinstellung.
Mauvais règlage du carbu.
□Push the primer button for priming the carburetor.
Drücken Sie den Pumpknopf, um Treibstoff zu fördern.
Pressez sur un bouton d'amoucage
□Check if the glow plug heater is correctly connected.
Überprüfen Sie den Anschluß des Glühkerzenakkus
Verifiez le chauffe bougie
□Replace with fresh batteries or recharge the Ni-Cd
battery.
Laden Sie den Glühkerzenakku auf.
Rechargez ou remplacez l'accu de chauffe bougie
□Replace with a new glow plug.
Tauschen Sie die Glühkerze.
Remplacez la bougie
□Read the instruction manual again and reset.
Nehmen Sie erneut die Grundeinstellung vor.
Relisez le chapitre concernant les règlages du
carburateur.
□Remove the glow plug and vigorously pull the recoil
starter to expel excess fuel.
Schrauben Sie die Glühkerze heraus und ziehen Sie
den Anreißstarter kräftig durch, damit überschüssiger
Treibstoff austritt.
Enlevez la bougie et tirez le démarreur pour expulser
l'excédent.
□Replace with a new recoil starter.
Tauschen Sie den Anreißstarter aus.
Remplacez la tirette.
□Fill in fuel.
Betanken Sie das Modell.
Remplissez se réservoir.
□Clean the fuel filter and air cleaner, or replace them.
Reinigen Sie Luft- und Treibstoffilter.
Nettoyez les filtres ou remplacez-les.
□Thoroughly cool the engine, unscrew the needle valve
30 and start the engine again.
Lassen Sie den Motor abkühlen, stellen Sie die
Düsennadel etwas fetter.
Laissez le moteur refroidir, dévissez le pointeau d'1/4
de tour et redémarrez.
□Replace with a new glow plug.
Tauschen Sie die Glühkerze.
Remplacez la bougie.
□Read the instruction manual again and reset.
Nehmen Sie erneut die Grundeinstellung vor.
Relisez le chapitre concernant les règlages de
carburation.
REMEDY
35
Page 36

分解図
EXPLODED VIEW
EXPLOSIONSZEICHNUNG
VUE ECLATEE
92638
145
VZ040
163
G
55
1180
51
145
FT22
VZ007
29
VZ017
92638
VZ005
62
60
33
FT22
VZ040
162
D
VZ003
62
60
56
A
35
VZ007
VZ040
161
VZ003
92638
145
W5161
59
150
145
BRG008
26
W5161
VZ022BK
一部パーツ販売していないパーツがあります。
Note that some parts are not sold as spare parts!
Vorsicht! Einige Teile sind nicht als Ersatzteile erhŠltlich!
Attention! Quelques pi ces ne sont pas ˆ
acheter comme pi ces de rechange!
1705
133
VZ010
39
39
VZ010
I
92638
G
F
VZ010
38
VZ010
31
32
17
G-3
VZ003
VZ003
OT32
38
C
139
165
VZ003
34
VZ001
24
W5161-2GM
VZ040
98
38
VZ011
VZ010
VZ017
51
138
137
E2.5
W5161
97
VZ011
50
VZ016
G-1
136
G-4
140
G-6
G-2
E2.5
92442
160
39
VZ039
26
VZ016
50
VZ010
39
E
VZ010
38
VZ087
169
92051
13
BRG008
B
VZ019
52
144
143
92445MS
142
VZ010
164
VZ0158
23
VZ040
VZ001
D
VZ0093
F
53
44
VZ013
O
168
54
VZ014
47
BRG014
33
77
92301
W5018
27
VZ003
E5
VZ008B
VZ036
92051
13
35
49
16
VZ003
1284
32
1808VZ037
126
LA43
VZ005
30
OT32
17
LA43
16
31
VZ003
146
LA43
16
92032
15
VZ003
34
VZ005
28
1180
1790
128
VZ0094
VZ003
45
80
71
VZ0092
FZ74
VZ071
VZ008B
VZ038
90
I
15
9
22
92032
ORG05
11
6
VZ012
45
FZ75
46
FM317B
VZ009
88
19
20
21
18
E5
16
10
7
12
1284
49
FZ74
48
123
VZ009
89
FM317B
LA43
VZ012
14
BS107
FZ75
46
BRG006
36
VZ041
VZ041
127
126
1808
48
VZ009
VZ021
VZ010
BRG006
VZ008B
76
VZ008B
70
80
48
BRG006
9
6
7
10
13
125
64
VZ071
54
66
VZ0158
92051
VZ041
VZ011
99
VZ002
91
H
VZ012
W5018
A
101
124
VZ020
VZ030
ORG05
11
B
XXXXX
VZ037
VZ012
J
48
VZ0091
N
VZ0091
N
VZ020
69
VZ023
79
BRG006
77
27
13
C
1180
84
11
966
VZ008B
VZ036
92051
VZ0158
1790
128
VZ006
ORG05
VZ008B
72
10
7
25
43
87
67
13
VZ033
VZ010
VZ018
VZ012
11
26
92985
92051
92
BS107
12
ORG05
BRG008
68
96
VZ030
92696
13
H
14
92051
78
VZ035
110
VZ009
VZ021
73
VZ008B
71
LD70
9
7
10
VZ034
VZ008B
E
92071
109
VZ004
81
128
VZ012
VZ071
80
M
1790
J
108
107
VZ0095
74
LD70
106
105
O
92638
145
92051
13
VZ008B
K
104
103
100
VZ0158
BRG008
26
K
BS125
GT5
92070
VZ011
63
48
92442
VZ002
75
BRG006
L
74901
FT22
62
61
VZ008B
144
143
E5
81
VZ014
44
VZ004
129
101
VZ002
65
53
VZ013
142
171
170
92971
VZ011
VZ018
87
1284
49
92445MS
RM11
61
13
62
FT22
L
85
92051
BRG014
47
M
FT22
101
145
92841
74901-12
111
VZ011
W5161
E2.5
W5161
92638
FZ74
45
113 112
102
17
OT32
16
VZ006
83
46
146
PureTen GP V-One S 4WD© 2003 KYOSHO CORPORATION / 禁無断転載複製
39057
6591
130
LA43
82
86
82
85
FZ75
1180
92601
139
G-3
138
92841
1701
135
W5161-2GM
G-1
W5161
136
137
G-4
140
G-6
VZ004
FZ74
45
46
BRG006
48
VZ010
36
FZ75
36
37
Page 37

品番
No.
VZ001
VZ002
VZ003
VZ004
VZ005
VZ006
VZ007
VZ008B
VZ009
VZ010
VZ011
VZ012
VZ013
VZ014
VZ015
VZ016
VZ017
VZ018
VZ019
VZ020
VZ021
VZ022
BK
VZ023
VZ030
VZ033
VZ034
VZ035
VZ036
VZ038
VZ039
VZ040
VZ041
VZ071
VZ087
BRG006
BRG008
BRG014
パーツ名
Part Names
フロントバルクヘッド
Front Bulkhead
リヤバルクヘッド
Rear Bulkhead
フロントサスアームセット
Front Suspension Arm Set
リヤサスアームセット
Rear Suspension Arm Set
フロントナックルアーム
Front Knockle Arm
リヤアップライト
Rear Upright
バンパー
Bumper
プーリーセット
Pulley Set
デフプーリーセット
Differential Pulley Set
ドライブワッシャーセット
Drive Washer Set
ダンパーステーセット
Shock Stay Set
デフギヤセット
Differential Gear Set
ホイールシャフト
Wheel Shaft
スイングシャフト
Swingshaft
デフジョイント
Differential Joint
フロントロアーサスシャフト
Front Lower Suspention Shaft
フロントアッパーサスシャフト
Front Upper Suspention Shaft
リヤロアーサスシャフト
Rear Lower Suspention Shaft
フロントサスプレート
Front Suspension Plate
ブレーキシャフトセット
Brake Shaft Set
デフパッキン
Differential Packing
ウレタンバンパー(ブラック)
Urethane Bumper (Black)
ブレーキディスク
Brake Disk
センターパーツ(S用)
Center Parts (for V-One S)
メインシャシー(S用)
Main Chassis (for V-One S)
スパーギヤシャフト(S用)
Spur Gear Shaft (for V-One S)
ミドルシャフト(S用)
Middle Shaft (for V-One S)
ドライブベルト S3-396
Drive Belt S3-396
スパーギヤ46T(S用)
Spur Gear 46T (for V-One S)
アッパーデッキ
Upper Deck
メカボックス / プラパーツ
Receiver Box / Plastic Parts
ロッドセット
Rod Set
ドライブベルト 192
Drive Belt 192
マフラーステー
Muffler Stay
シールドベアリング(6x12x4mm) 2入り
Shield Bearing (6x12x4mm) 2pcs.
シールドベアリング(12x18x4mm) 2入り
Shield Bearing (12x18x4mm) 2pcs.
シールドベアリング(10x15x4mm) 2入り
Shield Bearing (10x15x4mm) 2pcs.
スペアパーツ SPARE PARTS
内容(キーNo.と入数)
Quantity
23 24
x 1
63 64 65
31 32 3533
81 86
28 29
83 84
55 5856
70 72 74 75 7673
71
2 3 54
114x 2
2.6x8mmTPサラビス
2.6x8mm TP Flat Head Screw
2x8mmTPバインドビス
2x8mm TP Bind Screw
41 4342
36 3938
97 98
7
13 44
53
813x 2
50
51
87
52
66 69
14
59
79
25
78
13
96
13
27
90
160
161
3x3mmセットビス
3x3mm Set Screw
80
169
48
26
47
x 1
x 234x 4
82
x 2
x 1
x 1
x 2
10 11
x 2
x 2
x 2
x 2
x 2
x 1
x 1
x 5
x 1
x 1
93 9491
x 1
x 1
x 4
x 1
x 2
x 1
x 1
x 1
162 163 164 165 166 167
127 123 126124
x 1 x 2
x 1
x 3
x 2
x 2
x 2
x 4
30
x 4
x 1
77
x 3
88 89
x 1
x 4
10099x 1
101
x 4 6 9 x 8
92
x 1
Eリング(E5)
E-ring (E5)
Eリング(E5)
E-ring (E5)
x 1
x 1
x 8
x 4
x 4
x 2
x 2
x 1
x 1
x 2
★定価
500
500
600
600
500
500
400
600
700
400
500
900
600
600
600
400
300
300
300
300
400
400
300
400
2000
500
400
800
400
350
600
450
700
300
1000
1800
1200
★発送
手数料
200
(一律)
★FOR JAPANESE MARKET ONLY.
品番
No.
BS107
BS125
FT22
FZ74
FZ75
FM317
B
GT5
LA43
ORG05
OT32
RM11
W5018
W5161
1180
1284
1700
KP/KY
1701
KP/KY
1705
1790
1808
1879
6591
39057
74901
74901
-12
92971
92032
92070
92071
92301
92442
92601
BK
92638
92696
92841
92985
キットの部品の一部にはスペアパーツとして販売していない物があります。
京商ではオプションパーツを販売していますのでお買い求めください。
Some of the parts included are not available as spare parts. Purchase
optional parts instead.
パーツ名
Part Names
ベベルシャフト
Bevel Shaft
クラッチシュー
Clutch Shoe
ボディマウント
Body Mount
9mmピロボール
9mm Pillow Ball
9mmピロボールナット
9mm Pillow Ball Nut
サーボセイバー(10)
Servo Saver (10)
パイロットシャフト
Pilot Shaft
5.8mmボールエンド
5.8mm Ball End
クラッチベアリング
Clutch Bearing
シリコンOリング(P5/オレンジ)10入
Silicone O-ring (P5/Orange) 10pcs.
5.8mmボール
5.8mm Ball
エアーフィルター(AB15)
Air Filter (AB15)
Oリングセット
O-ring Set
レーシングダンパーSS
Racing Shock SS
4mmフランジ付ナイロンナット
4mm Flanged Nylon Nut
5.8mmピロボール(銀)
5.8mm Pillow Ball (Silver)
蛍光ストラップ(S)
Fluorescent Strap (S)
蛍光ストラップ(M)
Fluorescent Strap (M)
カラーアンテナ(白)
Color Antenna (White)
カラーシリコンチューブ
Color Silicone Tube
ロッドストッパー
Rod Stopper
ホビーグリス
Hobby Grease
マフラーガスケット
Muffler Gasket
マニホールド(S用)
Manifold (for V-One S)
GS15-Rエンジン(リコイル付)
GS15-R Engine (Recoil Starter)
エンジンプレート
Engine Plate
サイレントストリークマフラー
Silent Streak Muffler
アジャストロッド(45mm)
Adjustable Turn Buckle (45mm)
2x11mmピン
2x11mm Pin
フライホイール
Flywheel
クラッチベル(16T)
Clutch Bell (16T)
燃料タンク 75cc
75cc Fuel Tank
スリックタイヤ(ハイグリップ)
Slick Tire (high grip)
耐熱マフラージョイントパイプ
Muffler Joint Pipe
スナップピン
Snap Pin
ブレーキパッド
Brake Pad
6.8mm座付ボール
6.8mm Flanged Ball
ハードブレーキライニング
Hard Brake Pads
内容(キーNo.と入数)
Quantity
12
x 2
106
144143
x 1
62
x 2
x 1
x 1
x 1
2.6x25mmビス
2.6x25mm Screw
x 2
x 4
22
x 2
x 2
105
x 2
60 61
45
x 3
46
x 3
19 20 21
18
x 1 set
104
16
x 12
107 108 110
11
x 10
17
x 10
170 171
54
x 4
2 set
146
x 5
49
x 8
134
x 18
135
x 18
133
x 6
128
x 2
126
x 5
113
x 5
112
x 1 set
113
x 1
102
x 1 set
111
x 1
129
x 1 set
15
x 2
13
x 10
103
109
168
x 1
130
x 2
145
x 10
68
x 2
85
x 10
67
x 4
★定価
550
500
400
250
300
500
400
300
580LD70
400
250
250
350
1200
200
200
各180
各250
500
400
250
150
200
1600
13000
400
1200
300
30092051
600
600
1000
850
800
200
300
500
400
★発送
手数料
200
(一律)
38
Page 38

品番
No.
VZW003
VZW004
VZW005
VZW006
VZW007
VZW008
VZW009
VZW010
VZW011
VZW014
VZW015
92986
VZW019
VZW020
VZW021
VZW024V
VZW024V
-8
VZW028
VZW030
VZW031
VZW032
VZW034
-45
VZW036
VZW037
VZW038
VZ068
VZ075
UM128
VZ072
-2517
VZ072
-3017
VZ072
-3517
VZ073
-3516
VZ073
-4016
VZ073
-4516
VZ077
FM337
TSW4
W0136
W0141
W0154
1708
1776
パーツ名
Part Names
V-Oneリヤスタビライザーセット
V-One Rear Stabilizer Set
V-Oneフロントスタビライザーセット
V-One Front Stabilizer Set
SPメインシャシー(S用)
Special Main Chassis (for V-One S)
2スピードトランスミッションセット(S用)
2-Speed Transmisson Set (for V-One S)
カーボンアッパーデッキ(S用)
Carbon Upper Plate (for V-One S)
リジットアクスル
Rigid Axle
LSDギヤセット
LSD Gear Set
ドライブワッシャーセット
Drive Washer Set
クーリングファンセット
Cooling Fan Set
SPリヤベルト(192)
SP Rear Belt (192)
SPブレーキディスク
SP Brake Disk
ソフトブレーキライニング
Soft Brake Lining
スペシャルロールバー(S用)
Special Roll Bar (for V-One S)
アルミハードデフケース
Aluminum Hard Diff Case
フロントワンウェイシャフト(S用)
Front Oneway Shaft (for V-One S)
64チタン/9mmボールスクリュー
64Ti/9mmBallScrew
64チタン/9mmボールスクリュー
64 Ti / 9mm Ball Screw
アルミドライブプーリー&ダブルディスクホルダー
Aluminum Drive Poller & Double Disk Holder
64チタン/ミドルシャフト
64 Ti / Middle Shaft
64チタン/スパーギヤシャフト
64 Ti / Spur Gear Shaft
SPアルミリヤダンパーステー
SP Aluminum Rear Shock Stay
64チタン/スイングシャフト(45)
64 Ti / Swingshaft (45)
64チタン/フロントロアーサスシャフト
64 Ti / Front Lower Suspention Shaft
64チタン/フロントアッパーサスシャフト
64 Ti / Front Upper Suspention Shaft
64チタン/リヤロアーサスシャフト
64 Ti / Rear Lower Suspention Shaft
アジャスタブルロッド(45)
Adjustable Rod (45)
V-Oneダンパー
V-One Shock
4.8mmボールスタッド
4.8mm Ball Stud
フロントスプリング(2.5x1.7)金
Front Spring (2.5x1.7) Gold
フロントスプリング(3x1.7)黒
Front Spring (3x1.7) Black
フロントスプリング(3.5x1.7)銀
Front Spring (3.5x1.7) Silver
リヤスプリング(3.5x1.6)金
Rear Spring (3.5x1.6) Gold
リヤスプリング(4x1.6)黒
Rear Spring (4x1.6) Black
リヤスプリング(4.5x1.6)銀
Rear Spring (4.5x1.6) Silver
アッパーロッド(20)
Upper Rod (20)
9mmボールスクリュー
9mm Ball Screw
ブレーキディスクホルダー
Brake Disk Holder
5.8mmハードボール
5.8mm Hard Ball
3mmテーパーワッシャー
3mm Tapered Washer
6.8mm座付ハードボール(3mm穴)
6.8mm Flanged Hard Ball (w/3mm hole)
カラーアンテナ(黒キャップ付)
Color Antenna (Black Cap)
ピットボックス
Pit Box
オプションパーツ(1) OPTIONAL PARTS (1)
内容(キーNo.と入数)
Quantity
80
に替えて使用。
Replacementfor80.
セットで使用
Use together.
VZ079, FM314と合せて使用
Use with VZ079, FM314.
45
に替えて使用、2本入り
Includes2pcs.Replacementfor45.
45
に替えて使用、8本入り
Includes8pcs.Replacementfor45.
71 73 74
に替えて使用。
Replacementfor717374.
96
に替えて使用。
Replacementfor96.
78
に替えて使用。
Replacementfor78.
100
に替えて使用。
Replacementfor
53
に替えて使用。
Replacementfor53.
50
に替えて使用。
Replacementfor50.
51
に替えて使用。
Replacementfor51.
87
に替えて使用。
Replacementfor87.
に替えて使用, 2本入
15
Includes 2pcs. Replacement for 15 .
下記パーツとセットで使用
Use it with following parts.
に替えて使用
49
Replacement for
V-Oneダンパー用, ハード2本入
For V-One shock, Includes 2pcs (Hard)
V-Oneダンパー用, ミディアム2本入
For V-One shock, Includes 2pcs (Medium)
V-Oneダンパー用, ソフト2本入
For V-One shock, Includes 2pcs (Soft)
V-Oneダンパー用, ハード2本入
For V-One shock, Includes 2pcs (Hard)
V-Oneダンパー用, ミディアム2本入
For V-One shock, Includes 2pcs (Medium)
V-Oneダンパー用, ソフト2本入
For V-One shock, Includes 2pcs (Soft)
に替えて使用
86
Replacement for
高強度&高精度
High precision and intencity
73
に替えて使用。
Replacementfor73.
に替えて使用, 10個入
17
Includes 10pcs. Replacement for 17
, に替えて使用, 10個入
30
101
Includes 10pcs. Replacement for 30 101
に替えて使用, 10個入
85
Includes 10pcs. Replacement for 85
サイズ / 420x240x330mm
Size / 420x240x330mm
100
.
49
86
★定価
1500
1500
4800
4800
3500
1000
7500
1300
2800
900
1700
400
800
1800
2000
1800
6400
1700
1200
1500
2500
3500
1300
1300
1100
500
3200
400
400
400
400
400
400
400
400
900
1300
500
450
700
500
6800
★発送
手数料
200
(一律)
品番
No.
1829
1948
73001
39064
39070
39308
39648
FD49
39673
56410
695036
695037
71161
73201
73401
74902
80311
80312
80411
87651
92050
92211
92212
92213
92415
92491
94402
96046
96152
96153
96154
96155
96405
96421
96422
96508
96625
96981
APP02
パーツ名
Part Names
ラウンドカッター&サンダー
Hobby Shears & Sander
エアークリーナーオイル
Air Cleaner Oil
BPモデルエンジンフュール
Glow Fuel
チューンドサイレンサー(ニップル付)
Tuned Silencer (Nipple)
マニホールド(側方)
Manifold (for Side)
燃料フィルター(M)
Fuel Filter (M)
スペシャルエンジンマウント
Special Engine Mount
フライホイール CZ
Flywheel CZ
ベスペル¨クラッチシュー
Vespel¨ Clutch Shoe
プレシジョン キャンバーゲージ
Precision Camber Gauge
フロントアッパーサスアーム
FrontUpperSus.Arm.
リヤアッパーサスアーム
RearUpperSus.Arm.
6V X-FORCE 600 ニカドバッテリー
6V X-FORCE 600 NiCd-Battery
スーパースターターパック
Super Starter Pack
BP燃料ピークパワー
BP Fuel Peak Power
GSグロープラグ
GS Glow Plug
タイヤフィッティングツール
Tire Fitting Tool
トーアングルゲージ(200mm)
Toe Angle Gauge (200mm)
スペシャル テーパーリーマー
Taper Reamer
ロッキングジグ&レンチ
Locking Jig & Wrench
ボールポイント 六角レンチ 5mm
Ball-Point Hex Wrench 5mm
メンテナンス スタンド
Maintenance Stand
マルチ車高ゲージ
Multi Ride Height Gauge
燃料タンク(75cc皿付)
Fuel Tank (75cc Plate)
ダンパースプリングダイヤルアジャスター
Shock Spring Dial Adjuster
リヤウィングスペーサー
Rear Wing Spacer
燃料チューブ
Fuel Tube
チタンアジャストロッド 46mm
Titanium Adjust Rod 46mm
オンロードスプリングセット(S)
On-road Spring Set (S)
ロックタイト(中強度)
Loctite (medium strength)
シムセット(6mm)
6mm Shim Set
シリコンシール
Silicone Seal
ネジレスキュー
Screw Rescuer
KYOSHOスペシャルグルー(14g)
KYOSHO Special Glue (14g)
KYOSHOスペシャルプライマー(220ml)
Kyosho Special Primer (220ml)
パワークリーナー
Power Cleaner
クイックフュールポンプ(250cc)
Quick Fill Fuel Bottle (250cc)
クイックフュールポンプ(500cc)
Quick Fill Fuel Bottle (500cc)
HGジョイントグリス
HG Joint Grease
SPベアリングリキッド
SP Bearing Liquid
モリブデン グリススプレー
Molybdenum Coat
APPブレーキセット
APP Brake Set
★FOR JAPANESE MARKET ONLY.
内容(キーNo.と入数)
Quantity
曲線部分のボディカットも容易
Handy tool for round cut
★定価
1000
★発送
手数料
200
(一律)
1000
1000
5000
2000
1000
OSエンジン取り付けの
場合にセットで使用
Use together for O.S. Engine
2500
650
2800
1400
31 51
に替えて使用。
Replacementfor
82
に替えて使用。
Replacementfor82.
受信機用ニカドバッテリー
Ni-Cd battery for Receiver
3151
4200
3800
3800
3600
R/Cエンジン用グロー燃料
Glow fuel for R/C Engine
3600
500
120080151
180080152
ボディのマウント用穴開けに便利
Handy to drill holes for body mount.
1800
800
850
作業性アップの専用スタンド
Convenient stand for work
1800
80092022
VZW007と合せて使用
Use with VZW007.
1500
1600
400
2.4x6x1000mm
に替えて使用, 2本入
15
Includes 2pcs. Replacement for 15 .
700
700
800
ネジのゆるみ防止剤
Stops loosing screw
0.1、0.2、0.3、各10枚入り
Includes 10pcs each 0.1, 0.2, 0.3
900
450
800
ネジ回し補助剤
Support to unscrew.
瞬間接着剤
Instant Glue
500
700
2000
800
スピーディーな給油が可能
For quick charge!
スピーディーな給油が可能
For quick charge!
900
1200
800
ベアリング本来の性能を発揮
Retrieves potentiality of Bearing.
1000
1600
67 68 79
に替えて使用。
Replacementfor676879.
3800
39
Page 39

品番
No.
74901
-14BL
BRG003
695015
695015
-1
695015
-2
695018
品番
No.
39171
パーツ名
Part Names
SPシリンダーヘッド(GS-15R)
SP Cylinder Head (GS-15R)
シールドベアリング(4x8x3mm)
Shield Bearing (4x8x3mm)
パワーユニバーサルシャフト
Power Universal Shaft
スイングシャフト
Swing Shaft
ホイールシャフト
Wheel Shaft
アクティブデフセット
Active Differential Gear Set
パーツ名
Part Names
メルセデスCLK DTMボディ
Mercedes CLK DTM Body Shell
39171-1スポンサーデカール(メルセデスD2)
Sponsor Decal (Mercedes D2)
カストロールNSXボディ
39172
Castrol NSX Body Shell
39172-1スポンサーデカール(カストロールNSX)
Sponsor Decal (Castrol NSX)
コルベットC5-Rボディ
39173
Corvette C5-R Body Shell
39173-1スポンサーデカール(コルベットC5-R)
Sponsor Decal (Corvette C5-R)
ZEROマクラーレンボディ
39174
ZERO McLaren Body Shell
39174-1スポンサーデカール(ZEROマクラーレン)
Sponsor Decal (ZERO McLaren)
カルソニックスカイラインGT-Rボディ
39179
CALSONIC SKYLINE GT-R Body Shell
39179-1スポンサーデカール(カルソニックGT-R)
Sponsor Decal (CALSONIC GT-R)
カストロールトムススープラボディ
39184
Castrol TOM'S SUPRA Body Shell
39184-1スポンサーデカール(カストロールトムススープラ)
Sponsor Decal (Castrol TOM'S SUPRA)
オプションパーツ(2) OPTIONAL PARTS (2)
内容(キーNo.と入数)
Quantity
★定価
2500
1000
2800
900
950
3800
★発送
手数料
200
(一律)
品番
No.
695019
695030
695031
695032
695034
695035
パーツ名
Part Names
デフトルクゲージ
Differential Gear Torque Gauge
アルミドライブプーリー18T(V-One)
Aluminum Drive Pulley 18T (V-One)
アルミドライブプーリー19T(V-One)
Aluminum Drive Pulley 19T (V-One)
アルミドライブプーリー27T(V-One)
Aluminum Drive Pulley 27T (V-One)
アルミドライブプーリー32T(V-One)
Aluminum Drive Pulley 32T (V-One)
V-One ブレーキブラケット&ステフナー
V-One Brake Bracket & Stiffener
ボディ BODY SHELL
内容(キーNo.と入数)
Quantity
ボディ, デカール, ウイング, マスキングシート
Body, Decals, Wing Spoiler, Masking Sheet
デカール, スポンサーデカール
Body Decals, Sponsor Decals
ボディ, デカール, ウイング, マスキングシート
Body, Decals, Wing Spoiler, Masking Sheet
デカール, スポンサーデカール
Body Decals, Sponsor Decals
ボディ, デカール, ウイング, マスキングシート
Body, Decals, Wing Spoiler, Masking Sheet
デカール, スポンサーデカール
Body Decals, Sponsor Decals
ボディ, デカール, マスキングシート, プラパーツ
Body, Decals, Masking Sheet, Plastic Parts
デカール, スポンサーデカール
Body Decals, Sponsor Decals
ボディ, デカール, マスキングシート
Body, Decals, Masking Sheet
デカール, スポンサーデカール
Body Decals, Sponsor Decals
ボディ, デカール, ウイング, マスキングシート
Body, Decals, Wing Spoiler, Masking Sheet
デカール, スポンサーデカール
Body Decals, Sponsor Decals
★定価
2500
1000
2500
1200
2500
1000
2500
1000
2500
1200
2500
2000
★発送
手数料
200
(一律)
品番
No.
39241
パーツ名
Part Names
ヴォクゾールアストラボディ
VAUXHALL ASTRA Body Shell
39241-1スポンサーデカール(ヴォクゾールアストラ)
Sponsor Decal (
無限NSX2002ボディ
39242
MUGEN NSX 2002 Body Shell
39242
スポンサーデカール(無限NSX2002)
-1
Sponsor Decal (MUGEN NSX 2002)
VAUXHALL ASTRA
※auセルモスープラのボデイはNo.39184のカストロールトムススープラと共通です。
*No.39184 Castrol TOM'S SUPRA Body Shell is same as "au CERUMO SUPRA 2002 Body Shell".
スポンサーデカール(auセルモスープラ2002)
39243
Sponsor Decal (au CERUMO SUPRA 2002)
-1
プラスeタイサンアドバンポルシェ911GT3Rボディ
39247
PLUS e TAISAN ADVAN PORSCHE 911 GT3R Body Shell
スポンサーデカール(プラスeタイサンアドバンポルシェ911GT3R)
39247
Sponsor Decal (PLUS e TAISAN ADVAN PORSCHE 911 GT3R)
-1B
CLK DTM 2002 AMGメルセデスボディ
39249
CLK DTM 2002 AMG Mercedes Body Shell
スポンサーデカール(CLK DTM 2002 AMGメルセデス)
39249
Sponsor Decal (CLK DTM 2002 AMG Mercedes)
-1
※エッソウルトラフロースープラのボデイはNo.39184のカストロールトムススープラと共通です。
*No.39184 Castrol TOM'S SUPRA Body Shell is same as "ESSO Ultraflo Supra Body Shell".
スポンサーデカール(エッソウルトラフロースープラ)
39250
Sponsor Decal (ESSO Ultraflo Supra)
-1
★FOR JAPANESE MARKET ONLY.
内容(キーNo.と入数)
Quantity
★定価
1600
(一律)
1200
1200
1600
2000
2600
★ FOR JAPANESE MARKET ONLY.
内容(キーNo.と入数)
Quantity
ボディ, デカール, ウイング, マスキングシート
Body, Decals, Wing Spoiler, Masking Sheet
デカール, スポンサーデカール
)
Body Decals, Sponsor Decals
ボディ, デカール, ウイング, マスキングシート
Body, Decals, Wing Spoiler, Masking Sheet
デカール, スポンサーデカール
Body Decals, Sponsor Decals
★定価
2500
(一律)
1800
2500
2000
2500
デカール, スポンサーデカール
Body Decals, Sponsor Decals
ボディ, デカール, ウイング, マスキングシート
Body, Decals, Wing Spoiler, Masking Sheet
デカール, スポンサーデカール
Body Decals, Sponsor Decals
ボディ, デカール, ウイング, マスキングシート
Body, Decals, Wing Spoiler, Masking Sheet
デカール, スポンサーデカール
Body Decals, Sponsor Decals
デカール, スポンサーデカール
Body Decals, Sponsor Decals
2000
2500
2200
2500
2000
2500
2000
★発送
手数料
200
★発送
手数料
200
品番
No.
92445
パーツ名
Part Names
カラーホイール(メッシュ/白)
Color Wheel (mesh / white)
92445Bカラーホイール(メッシュ/黒)
Color Wheel (mesh / black)
カラーホイール(メッシュ/ガンメタ)
92445
Color Wheel (mesh / gunmetallic)
G
92445Sカラーホイール(メッシュ/シルバーメッキ)
Color Wheel (mesh/silver chrome)
92445KOカラーホイール(メッシュ/蛍光オレンジ)
Color Wheel (mesh / F.Orange)
ホイール(5本スポーク / 白)
92561
Wheel (5-spoke / white)
92561BKホイール(5本スポーク / 黒)
Wheel (5-spoke / black)
92561Gホイール(5本スポーク / 金)
Wheel (5-spoke / gold)
スリックタイヤ(ハイグリップタイプ)
92442
Slick Tire (high grip type)
-25
92442
スリックタイヤ(ハイグリップタイプ)
-30
Slick Tire (high grip type)
92442
スリックタイヤ(ハイグリップタイプ)
-40
Slick Tire (high grip type)
92012Wエアロ24ホイール(15本スポーク / 白)
Aero 24 Wheel (15-spoke / white)
40
ホイール/タイヤ WHEEL / TIRE
内容(キーNo.と入数)
Quantity
26mm幅
Width 26mm
26mm幅
Width 26mm
26mm幅
Width 26mm
26mm幅
Width 26mm
26mm幅
Width 26mm
26mm幅
Width 26mm
26mm幅
Width 26mm
26mm幅
Width 26mm
26mm幅
Width 26mm
26mm幅
Width 26mm
26mm幅
Width 26mm
24mm幅
Width 24mm
★定価
400
400
400
500
400
400
400
500
1000
1000
1000
400
★発送
手数料
200
(一律)
品番
No.
パーツ名
Part Names
92012BKエアロ24ホイール(15本スポーク / 黒)
Aero 24 Wheel (15-spoke / black)
エアロ24ホイール(15本スポーク / 8個入り)
92012
Aero 24 Wheel (15-spoke / 8 pcs)
-8W
インナーフォーム24M(24mm)
92013
Inner Foam 24M (24mm)
92014
Vスリックタイヤ M-25MN
-25B
V Slick Tire M-25MN
92014
Vスリックタイヤ M-30MN
-30B
V Slick Tire M-30MN
92014
Vスリックタイヤ M-35MN
-35B
V Slick Tire M-35MN
92014
Vスリックタイヤ M-40MN
-40
V Slick Tire M-40MN
92141
Gスリックタイヤ #24
-24B
G Slick Tire #24
92141
Gスリックタイヤ #27
-27B
G Slick Tire #27
92141
Gスリックタイヤ #30
-30
G Slick Tire #30
92141
Gスリックタイヤ #33
-33
G Slick Tire #33
92141
Gスリックタイヤ #36
-36
G Slick Tire #36
★ FOR JAPANESE MARKET ONLY.
内容(キーNo.と入数)
Quantity
24mm幅
Width 24mm
24mm幅
Width 24mm
24mm幅用
For 24mm width tires.
24mm幅
Width 24mm
24mm幅
Width 24mm
24mm幅
Width 24mm
24mm幅
Width 24mm
24mm幅
Width 24mm
24mm幅
Width 24mm
24mm幅
Width 24mm
24mm幅
Width 24mm
24mm幅
Width 24mm
★定価
400
800
200
1100
1100
1100
1100
1200
1200
1200
1200
1200
★発送
手数料
200
(一律)
Page 40

SCREW・NUT etc.ビス・ナット類
品番
No.
1101
1102
1103
1104
1105
1106
1110
1111
1112
1113
1114
1115
1118
1119
1120
1121
1122
1123
1124
1125
1126
1127
1128
1129
1130
1131
サイズ(mm)
Size (mm)
ナベビス
Round Head Screw
2x6・2x8・2x10・2x15 5 each 10 each
2.6x8・2.6x10・2.6x12・2.6x14
3x4・3x6・3x8・3x10・3 x12
3x14・3x16・3x18・3x20
4x6・4x8・4x10・4x12
3x22・3x24・3x26・3x28
バインドビス
Bind Screw
2.6x4・2.6x6・2.6x8・2.6x12
3x4・3x6・3x8・3x10・3x12
3x14・3x16・3x18・3x20
4x6・4x8・4x10・4x12
3x22・3x25・3x28・3x30
4x15・4x18・4x20・4x22
サラビス
Flat Head Screw
2.6x8・2.6x10・2.6x12・2.6x14
3x6・3x8・3x10・3x12
3x14・3x16・3x18・3x20
4x8・4x10・4x15・4x20
3x22・3x24・3x26・3x28
3x30・3x32・3x34・3x35
キャップビス
Cap Screw
2x8・2x10・2x12・2x14
2.6x8・2.6x10・2.6x12・2.6x14
3x8・3x10・3x12・3x14
3x15・3x16・3x18・3x20
3x25・3x30・3x35・3x40
4x10・4x15・4x20
4x25・4x28・4x30
4x35・4x40・4x45
入数(各)
QUANTITY
●200 ●200
5 each
5 each
5 each
5 each
5 each
●200
5 each
5 each
5 each
5 each
5 each
5 each
●200
5 each
5 each
5 each
5 each
5 each
5 each
●200
2 each
2 each
2 each
2 each
2 each
2 each
2 each
2 each
品番
No.
1132
1133
1134
1135
1136
1137
1140
1141
1142
1143
1147
1148
1149
1150
1153
1154
1157
1160
1161
1162
1163
1164
1165 3x20・3x25 3 each
サイズ(mm)
Size (mm)
ナベタッピングビス
Round Head Self-Tapping Screw
2x4・2x6・2x8・2x10 5 each
2.6x6・2.6x8・2.6x10・2.6x12
3x6・3x8・3x10・3x12・3x14
3x15・3x16・3x18・3x20
3x25・3x30・3x35
2.6x14・2.6x15・2.6x16・2.6x18
バインドタッピングビス
Bind Self-Tapping Screw
2.6x6・2.6x8・2.6x10・2.6x12
3x6・3x8・3x10・3x12・3x14
3x15・3x16・3x18・3x20
4x10・4x15・4x18
サラタッピングビス
Flat Head Self-Tapping Screw
2.6x6・2.6x8・2.6x10・2.6x12
3x6・3x8・3x10・3x12・3x14
3x15・3x16・3x18・3x20
4x15・4x20・4x25
フランジ付キャップビス
Flanged Cap Screw
3x6・3x8・3x10
4x8・4x10・4x12
サラ小丸ビス
Flat Head Screw
2x8・2x10
セットビス
Set Screw
3x6・3x12・3x14・3x16
3x3・3x4・3x5・3x10
4x4・4x5・4x8・4x12
5x4・5x5・5x6
5x30・5x40
入数(各)
QUANTITY
●200
5 each
5 each
5 each
5 each
5 each
●200
5 each
5 each
5 each
5 each
●200
5 each
5 each
5 each
5 each
●200
2 each
2 each
●200
10 each
●200
3 each
3 each
3 each
3 each
3 each
● FOR JAPANESE MARKET ONLY.
品番
No.
1171
2mm・2.6mm
1172
3mm・4mm
1174
3mm
1175
4mm
1177
2.6mm
1178
3mm
1179
4mm
1180
4mm
1185
2mm・2.6mm・3mm
1186
4mm・5mm
1380
E1.5
1381
E2.0
1382
E2.5
1383
E3.0
1384
E4.0
1385
E5.0
1386
E6.0
1387
E7.0
1390
E10.0
ここに明記された以外のビス、ナット等は
『ユーザー相談室』にお問い合わせください。
径
mm
ナット
Nut
フランジ付ナット
Flanged Nut
ナイロンナット
Nylon Nut
フランジ付ナイロンナット
Flanged Nylon Nut
ワッシャー
Washer
Eリング
E-Clips
入数(各)
QUANTITY
10 each
●200
10 pcs
10 pcs
●200
5 pcs
5 pcs
5 pcs
●200
5 pcs
●200
10 each
10 each
●150
10 pcs
10 pcs
10 pcs
10 pcs
10 pcs
10 pcs
10 pcs
6 pcs
6 pcs
品番
No.
シリコンオイル #100
SIL0100
Silicone Oil #100
シリコンオイル #150
SIL0150
Silicone Oil #150
シリコンオイル #200
SIL0200
Silicone Oil #200
シリコンオイル #250
SIL0250
Silicone Oil #250
シリコンオイル #300
SIL0300
Silicone Oil #300
シリコンオイル #350
SIL0350
Silicone Oil #350
シリコンオイル #400
SIL0400
Silicone Oil #400
シリコンオイル #450
SIL0450
Silicone Oil #450
シリコンオイル #500
SIL0500
Silicone Oil #500
シリコンオイル #550
SIL0550
Silicone Oil #550
シリコンオイル #600
SIL0600
Silicone Oil #600
シリコンオイル #700
SIL0700
Silicone Oil #700
シリコンオイル #800
SIL0800
Silicone Oil #800
シリコンオイル #900
SIL0900
Silicone Oil #900
シリコンオイル #1000
SIL1000
Silicone Oil #1000
シリコンオイル #1100
SIL1100
Silicone Oil #1100
シリコンオイル #1200
SIL1200
Silicone Oil #1200
パーツ名
Part Names
内容
Content
ダンパーセッティング用
For Shock setting
ダンパーセッティング用
For Shock setting
ダンパーセッティング用
For Shock setting
ダンパーセッティング用
For Shock setting
ダンパーセッティング用
For Shock setting
ダンパーセッティング用
For Shock setting
ダンパーセッティング用
For Shock setting
ダンパーセッティング用
For Shock setting
ダンパーセッティング用
For Shock setting
ダンパーセッティング用
For Shock setting
ダンパーセッティング用
For Shock setting
ダンパーセッティング用
For Shock setting
ダンパーセッティング用
For Shock setting
ダンパーセッティング用
For Shock setting
ダンパーセッティング用
For Shock setting
ダンパーセッティング用
For Shock setting
ダンパーセッティング用
For Shock setting
★定価
600
600
600
600
600
600
600
600
600
600
600
600
600
600
600
600
600
★発送
手数料
200
(一律)
Oilオイル類
★FOR JAPANESE MARKET ONLY.
品番
No.
SIL5000
SIL6000
SIL7000
SIL10000
SIL30000
SIL40000
SIL50000
SIL100000
パーツ名
Part Names
シリコンオイル #5000
Silicone Oil #5000
シリコンオイル #6000
Silicone Oil #6000
シリコンオイル #7000
Silicone Oil #7000
シリコンオイル #10000
Silicone Oil #10000
シリコンオイル #30000
Silicone Oil #30000
シリコンオイル #40000
Silicone Oil #40000
シリコンオイル #50000
Silicone Oil #50000
シリコンオイル #100000
Silicone Oil #100000
内容(キーNo.と入数)
Quantity
デフセッティング用
For Differential Gear setting
デフセッティング用
For Differential Gear setting
デフセッティング用
For Differential Gear setting
デフセッティング用
For Differential Gear setting
デフセッティング用
For Differential Gear setting
デフセッティング用
For Differential Gear setting
デフセッティング用
For Differential Gear setting
デフセッティング用
For Differential Gear setting
★定価
600
600
600
600
600
600
600
600
★発送
手数料
200
(一律)
41
Page 41

THE FINEST RADIO CONTROL MODELS
京商ホームページ
http://www.kyosho.co.jp/
R
メーカー指定の純正部品を使用して
安全にR/Cを楽しみましょう。
京商株式会社
〒243-0034 神奈川県厚木市船子153
●ユ−ザ−相談室直通電話 046-229-4115
お問い合わせは:月曜〜金曜(祝祭日を除く) 10:00〜18:00
PRINTED IN JAPAN61920305-1
 Loading...