

Page 1
※ご使用前にこの説明書を良くお読みになり充分に理解してください。
Before use, please carefully read the explanations!
Bitte lesen Sie die Anweisungen vor Gebrauch genau durch!
Veuillez attentivement lire les instructions avant lÕemploi!
Lea cuidadosamente este manual antes de comenzar el montajie
R
THE FINEST RADIO CONTROL MODELS
S
T
A
BO
G
N
I
C
RA
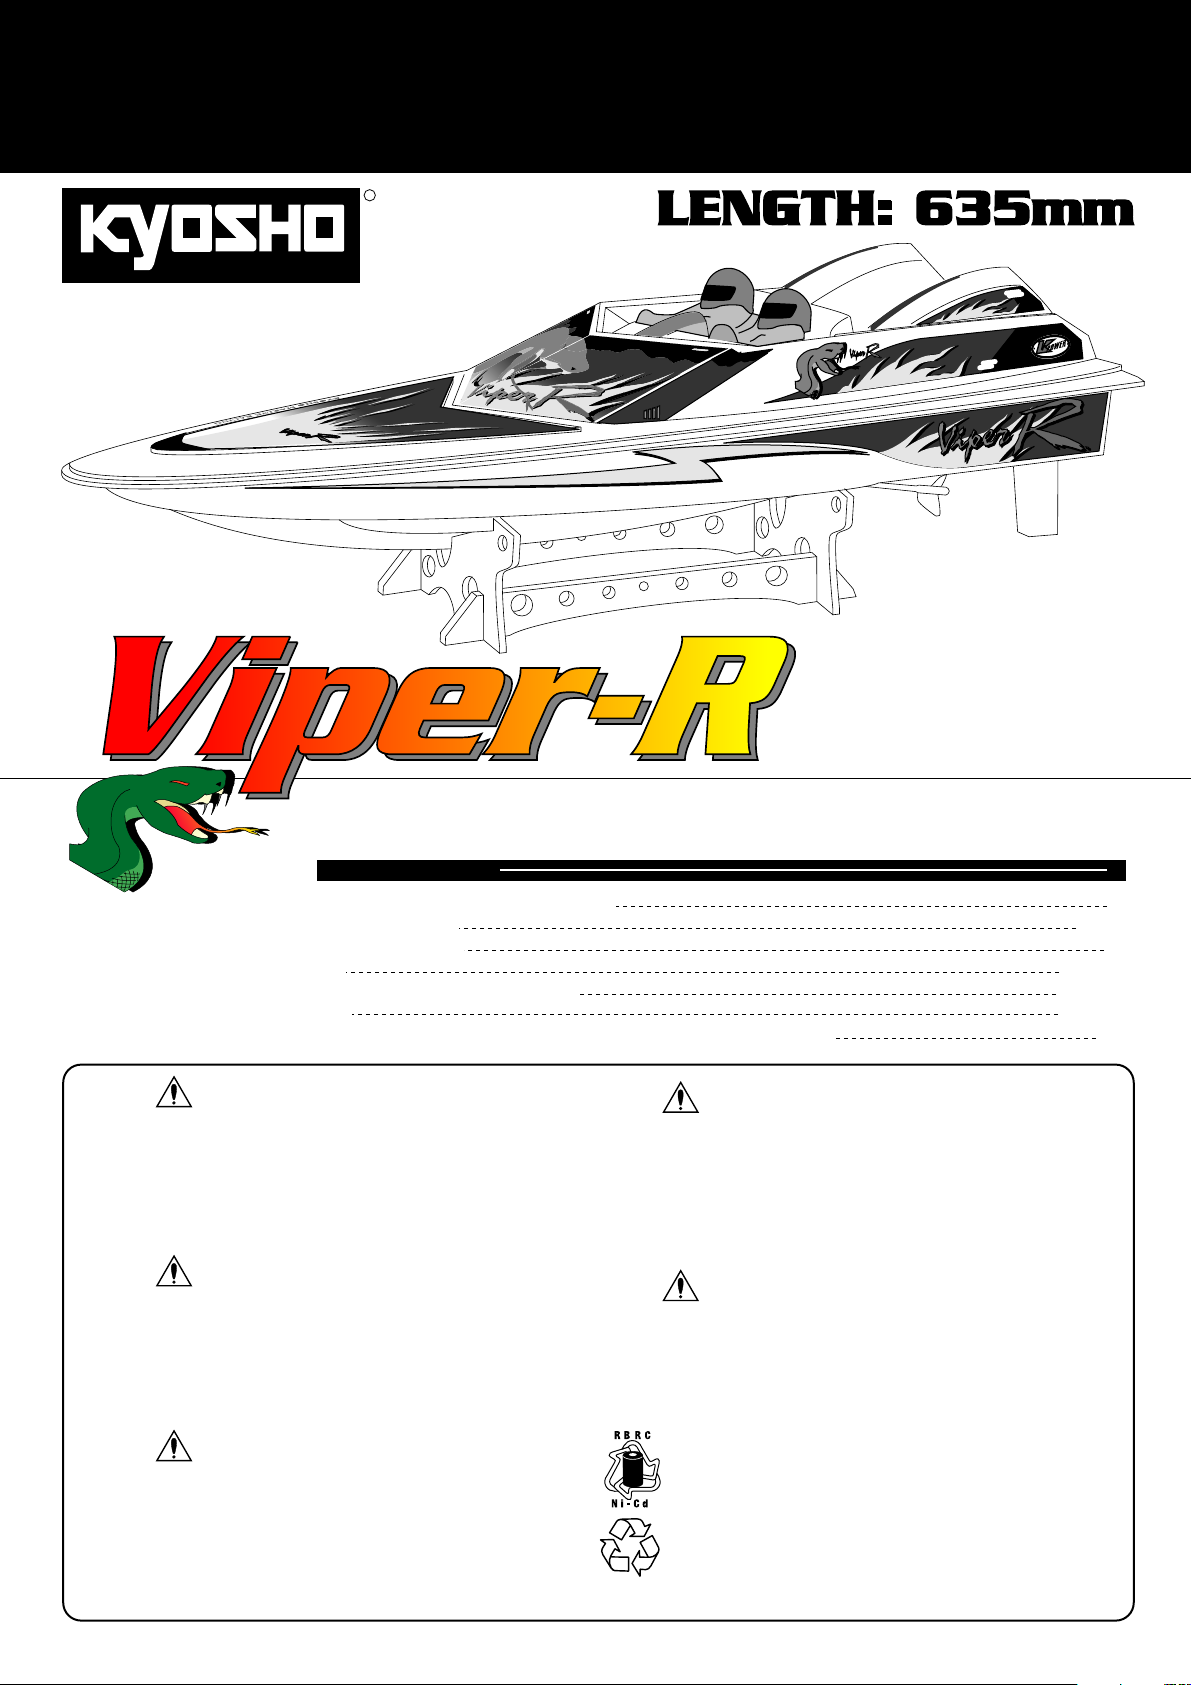
RADIO CONTROLLED ELECTRIC POWERED
HIGH PERFORMANCE SPORT BOAT
目 次 INDEX
●キットの他にそろえる物 / REQUIRED FOR OPERATION
●組立て前の注意 / BEFORE YOU BEGIN
●プロポの準備/RADIO PREPARATION
●本体の組立て / ASSEMBLY
●取扱いの注意 / OPERATING YOUR MODEL SAFELY
●分解図/EXP;ODED VIEW
●スペアパーツ・オプションパーツリスト/SPARE PARTS & OPTIONAL PARTS
安全のための注意事項
この無線操縦模型は玩具ではありません!
●この商品は高い性能を発揮するように設計されています。組立てに不慣れな方は、
模型を良く知っている人にアドバイスを受け確実に組立ててください。
●小さい部品があるので、組立て作業は幼児の手がとどかない所で必ずおこなってく
ださい。
●動かして楽しむ場所は、万一の事故を考えて安全を確認してから、責任をもってお
楽しみください。
●組立てた後も、説明書がいつでも見られるように大切に保管してください。
●Si vous tes d butant dans le mod le r duit, prenez conseils aupr s de mod listes con--
firm s afin dÕutiliser votre mod le dans des conditions optimales.
●Assemblez ce kit en dehors de la port e de jeunes enfants!
●Prenez des pr cautions lors de lÕutilisation. Vous seul tes responsable des
volutions de votre mod le. La soci t KYOSHO ou son distributeur ne peuvent en
aucun cas tre tenus responsables des accidents pouvant survenir lors de
lÕutilisation de ce mod le!
●Gardez cette notice ˆ port e de main afin de vous y r f rer rapidement.
SAFETY PRECAUTIONS
●First-time builders should seek advice from people having building experience in order
to assemble the model correctly and to produce its performance to full extent.
●Assemble this kit only in places out of childrenÕs reach!
●Take enough safety precautions prior to operating this model. You are responsible for
this modelÕs assembly and safe operation!
●Always keep this instruction manual ready at hand for quick reference, even after
completing the assembly.
This radio control model is not a toy!
●Los no inicados en este hobby deber‡n ser aconsejados por expertos antes de
comenzar el montaje de este modelo.
●Realice el montaje en un lugar fuera del alcance de los ni–os.
●Siempre extreme las medidas de seguridad. Usted es el œnico responsable del
funcionamiento de su modelo.
●Mantenga este manual a mano.
ACHTUNG!
●AnfŠnger sollten mšglichst Rat bei Modellbaukundigen einholen, um das Modell
richtig zusammenzubauen und gefahrlos bedienen zu kšnnen.
●Bauen Sie dieses Modell nur au§er Reichweite von Kindern zusammen!
●Treffen Sie genŸgend Sicherheitsvorkehrungen, bevor Sie Ihr Modell bedienen!
Sie alleine tragen die Verantwortung fŸr Ihr Modell und dessen gefahrlose
Bedienung!
●Bitte bewahren Sie diese Dokumentation zur spŠteren Verwendung auf.
※製品改良のため、予告なく仕様を変更する場合があります。 Specifications are subject to change without prior notice!
Technische nderungen sind ohne vorherige AnkŸndigungen mšglich! Les sp cifications peuvent changer sans pr avis!
© 1997 KYOSHO/禁無断転載複製
Dieses Modell ist kein Spielzeug!
Ni-Cd
ATTENTION!
Ce mod le nÕest pas un jouet!
CONSEJOS DE SEGURIDAD
Este modelo de Radio Control no es un juguete
・不要になったニカドバッテリーは、貴重な資源を守るために廃棄しないでリサイクル
協力店へお持ち下さい。
・The product you have purchased is powered by a rechargeable battery. The battery is
recyclable. At the end of its useful life, under various national / state and local laws, it
may be illegal to dispose of this battery into the municipal waste stream. Check with
your local solid waste officials for details in your area for recycling options or proper
disposal.
・Dieses Modell wird von einem Nickel-Cadmium Akkumulator betrieben. Er ist wieder
aufladbar. Entsorgen Sie einen verbrauchten Akku fachgerecht an entsprechender
Stelle.
・Ce mod le est aliment par un accu Ni-Cad. Il est rechergeable. Notez quÕˆ la fin de
sa vie utile, lÕaccu doit tre trait comme d chet apart
・Este kit utiliza una bater’a NiCd recargable, la cual es reciclable. No la arroje a la
basura. Devu lvala a la tienda donde la adquiri— cuando se estropee.
組立/取扱説明書
INSTRUCTION MANUAL
バイパーR
2
2〜4
3
5〜10
11〜13
14〜15
16
(和英独仏西)
No. 40751
Page 2
キットの他にそろえる物 REQUIRED FOR OPERATION
■無線操縦機(プロポ)セット
RADIO CONTROL SET
●プロポの取扱いは、プロポに付属の説明書を
参考にしてください。
For radio equipment operation, refer to the manual
included with the radio.
組立に必要な工具(別購入品) TOOLS REQUIRED (Purchase separately!)
■+ドライバー(大、中、小)
Phillips Screw Driver (L.M.S)
■ラジオペンチ
Needle Nose Pliers
■単3乾電池 12本
AA-size Batteries 12pcs.
■電池ボックス
Battery Box
●プロポセットに付いているときは
AAAA AAAA
AAAA
必要ありません。
If already supplied with the radio,
there is no need to purchase
a battery box separately.
■ハサミ
Scissors
■7.2Vニカドバッテリー
7.2V Ni-Cd Battery
7.2V-1300mAh SCR 充電式ニカドバッテリー
■充電器
CHARGER
■ニッパー
Wire Cutters
THE FINEST RADIO CONTROL MODELS
R
600-1100mAh
Ni-Cd BATTERY
WARNING HOT
For 7.2-8.4V
FUSE 7.5A
Rechargeable
Ni-Cd BATTERY
KYOSHO CORPORATION JAPAN
7.5
DELTA PEAK AUTO-CUTOFF
E
RG
A
CH
START
WARNING HOT
■カッターナイフ
Sharp Hobby Knife
■キリ
Awl
組立て前の注意/BEFORE YOU BEGIN
BEVOR SIE BEGINNEN / AVANT DE COMMENCER / ANTES DE EMPEZAR
組立ての前に下記のことに注意してください。
1
●この説明書を良く読み、構造を理解する。
●キットの内容を確かめる。
※万一不良、不足がありましたら、お買い求めの販売
店か、当社「ユーザー相談室」までご連絡ください。
●小さな部品の形やサイズを間違えないようにする。図を
参考にして確認しながら組立てる。
●TPビス締めるときは・・・
締めこみが固くても部品が固定されるまで締めてくだ
さい。
ただし、部品が変形するまで締めるとビスがきかなく
なります。
Before assembling, please read the following carefully:
●First, read this instruction manual and understand the modelÕs con-struction.
●Check the contents of this kit.
Should parts be missing, immediately contact the retail shop or your nearest
Kyosho distributor.
●Do not take the wrong screw or small part. Compare it to the true-to-scale dia--
gram in each assembly step, then install it.
●When tightening a self-tapping (TP) screw:
Even if feeling hard, tighten a TP screw until the part will be securely attached.
However, do not overtighten it as the plastic thread inside the part may strip!
■瞬間接着剤
Instant Glue
■エポキシ接着剤
Epoxy Glue
Epoxy A
Epoxy B
Correct
Richtig
Bon
Correcto
Wrong
Falsch
Mauvais
Mal
Avant lÕassemblage, veuillez lire les points suivants attentivement:
●Lisez dÕabord compl tement cette notice; ainsi vous aurez un aper u du d
roulement et pourrez mieux vous orienter.
●V rifiez ensuite le contenu du kit.
Si jamais il y a des pi ces manquantes, adressez-vous directement ˆ votre
magazin sp cialis ou au distributeur Kyosho dans votre pays.
●Ne confondez pas les vis et les petites pi ces! V rifiez-les ˆ lÕaide des illus-trations dans chaque plage de montage, puis assemblez les.
●Lorsque vous serrez une vis autotaraudeuse:
Serrez jusquÕˆ ce que la pi ce ˆ monter soit bien install e. Pourtant, veillez ˆ
ne pas trop la serrer puisque vous risquez dÕab”mer le filet dans la pi ce.
Lesen Sie folgendes vor dem Zusammenbau aufmerksam durch:
●Lesen Sie zuerst die Bauanleitung ganz durch und verstehen Sie den Aufbau
Ihres Modelles.
●†berprŸfen Sie den Verpackungsinhalt.
Sollten Teile fehlen, wenden Sie sich direkt an Ihren FachhŠndler oder an den
Kyosho-Vertreiber in Ihrem Land.
●
Verwechseln Sie Schrauben sowie kleine Bauteile nicht! Vergleichen Sie sie vor dem
Einbau mit den Darstel-lungen in Originalgrš§e in den Baustufen.
●Beachten Sie beim Festziehen einer Treibschraube folgendes:
Schrauben Sie solange, bis das anzubringende Teil sicher und fest sitzt. Achten
Sie jedoch darauf, da§ Sie den Gewindegang im Material nicht Ÿberdrehen!
2
Antes de comenzar el montaje, lea atentamente lo siguiente:
●
Lea, en primer lugar, este manual para obtener una idea general.
●
Compruebe la conformidad de todas las piezas.
Si faltara alguna pieza, contacte con la tienda donde lo adquiri—.
No se admitir‡n reclamaciones en modelos en proceso de montaje.
●
Antes de colocar las piezas y tornillos, asegurese mirando la tabla en cada paso.
●
A la hora de apretar Tornillos Autorroscantes(TP):
Apri telos firmemente en la pieza donde corresponda.
No intente apretarlos demasiado, ya que podr’an deformar la pieza.
Page 3
説明書に使われているマーク
2
Symbols used throughout the instruction manual, comprise:
エポキシ接着剤で接着する。
Apply epoxy glue.
Verwenden Sie 2-Komponentenkleber.
Collez avec de la colle poxy.
Aplique pegamento epoxy.
瞬間接着剤で接着する。
Apply instant glue (CA glue, super glue).
Verwenden Sie Sekundenkleber.
Collez avec de la colle cyanoacrylate.
Aplique pegamento cianoacrilato.
2mmの穴をあける(例)。
Drill holes with the specified diameter.
2mm
Lšcher bohren im angegebenen ¯.
Percez des trous dans le ¯ indiqu .
Perfore agujeros con el di‡metro se–alado.
左右同じように組立てる。
Assemble left and right sides the same way.
Bauen Sie eine linke und eine rechte Seite.
Assemblez le c™t gauche comme le c™t droit.
Realice el montaje de igual forma en ambos lados.
可動するように組立てる。
Ensure smooth non-binding movement while assembling.
Das Teil mu§ sich leicht bewegen lassen.
La pi ce doit pouvoir pivoter autour de la vis.
Asegœrese que la pieza se mueve libremente.
プロポの準備 RADIO PREPARATION
ハンドル
Handle
スピードコントロール
スティック
CH-2 CH-1
Speed Control Stick
スピードコントロール
トリム
Speed Control Trim
バッテリーカバー
Battery Cover
スロットル側のリバーススイッチを
リバースにしてください。
Switch the throttle reverse switch
(transmitter).
●プロポを下の順番にしたがってセットします。
Set up a radio control system as indicated below.
各コネクターを接続する。
1
Plug in connectors.
単3乾電池をセットする。
2
Install the AA-size batteries.
送信機のアンテナを最後まで引き出す。
3
縮めて使用すると電波の到達距離が短く
なるので注意する。
Extend the transmitter antenna. If not, the
range of the transmitter will not be sufficient!
受信機のアンテナをほどく。
4
縮めて使用すると電波の到達距離が短く
なるので注意する。
Undo the receiver antenna. If not, the
range of the receiver will not be sufficient!
送信機の各トリムレバーを中央にする。
5
Center all trims. (Transmitter)
送信機のスイッチを入れる。
6
Switch on. (Transmitter)
受信機のスイッチを入れる。
7
Switch on. (Receiver)
送信機のスティックを操作しサーボが
8
作動するか確認する。
Check that the servos move according
to your inputs. (Transmitter)
アンテナ
Antenna
電源スイッチ
Switch
BATT.
グリスを塗る。
Apply grease.
Fetten.
Graissez.
Apriete temporalmente.
禁止事項(してはいけないこと)。
Do not do that!
Nicht tun! Verboten!
D fense de faire!
No realice esa operaci—n!
注意して組立てる所。
Pay close attention here!
Vorsicht! Wichtiger Hinweis!
Attention! Avis important!
Preste atenci—n.
スピードコントロール
スティック
Speed Control Stick
●前進、後進の操作は
このスティックでお
ラダースティック
Rudder Stick
ラダートリム
Rudder Trim
CH-2 CH-1
BATT.
こないます。
For forward move ment & reverse
run.
アンテナ
Antenna
スイッチ
Switch
コネクター
Connector
受信機のスイッチを切る。
9
Switch off. (Receiver)
送信機のスイッチを切る。
10
Switch off. (Transmitter)
送信機のアンテナを縮める。
11
Retract the antenna. (Transmitter)
●
重要な注意事項があるマークです。
Do not overlook this symbol!
Beachten Sie dieses Symbol!
ÁAviso! Preste atenci—n en este paso.
本説明書のプロポイラストは、Futaba取扱説明書より転載しました。
スピードコントロールトリム
Speed Control Trim
●船が走り出さないように
このトリムで調整します。
Adjust so boat will not
speed off at once.
コネクター
Connector
受信機
Receiver
プロポセットに付属している取扱 説明書も
あわせてお読みください。
In addition to this page, read the instruc-tion
manual supplied with your radio as well.
をカットする。
Cut off shaded portion.
Schneiden Sie die schraffierten FlŠchen heraus.
Coupez la partie gris e.
Corte la zona oscurecida.
別購入品。
Must be purchased separately!
Teil ist nicht im Bausatz enthalten.
Doit tre achet s parement.
Debe comprarse por separado.
Warning!
必ずお読みください。
Notez ce symbole!
ラダースティック
Rudder Stick
●左右へ曲がるときの操
作はこのスティックで
おこないます。
CH-2 CH-1
前
BATT.
進
後
進
BATT
左 右
ラダートリム
Rudder Trim
●船がまっすぐ走るように
このトリムで調整します。
For adjusting straightline
running.
スピードコントロールサーボ
Speed Control Servo
CH.2
CH.1
For steering (left and
right bends).
ラダーサーボ
Rudder Servo
電池ボックス
Battery Box
3
Page 4
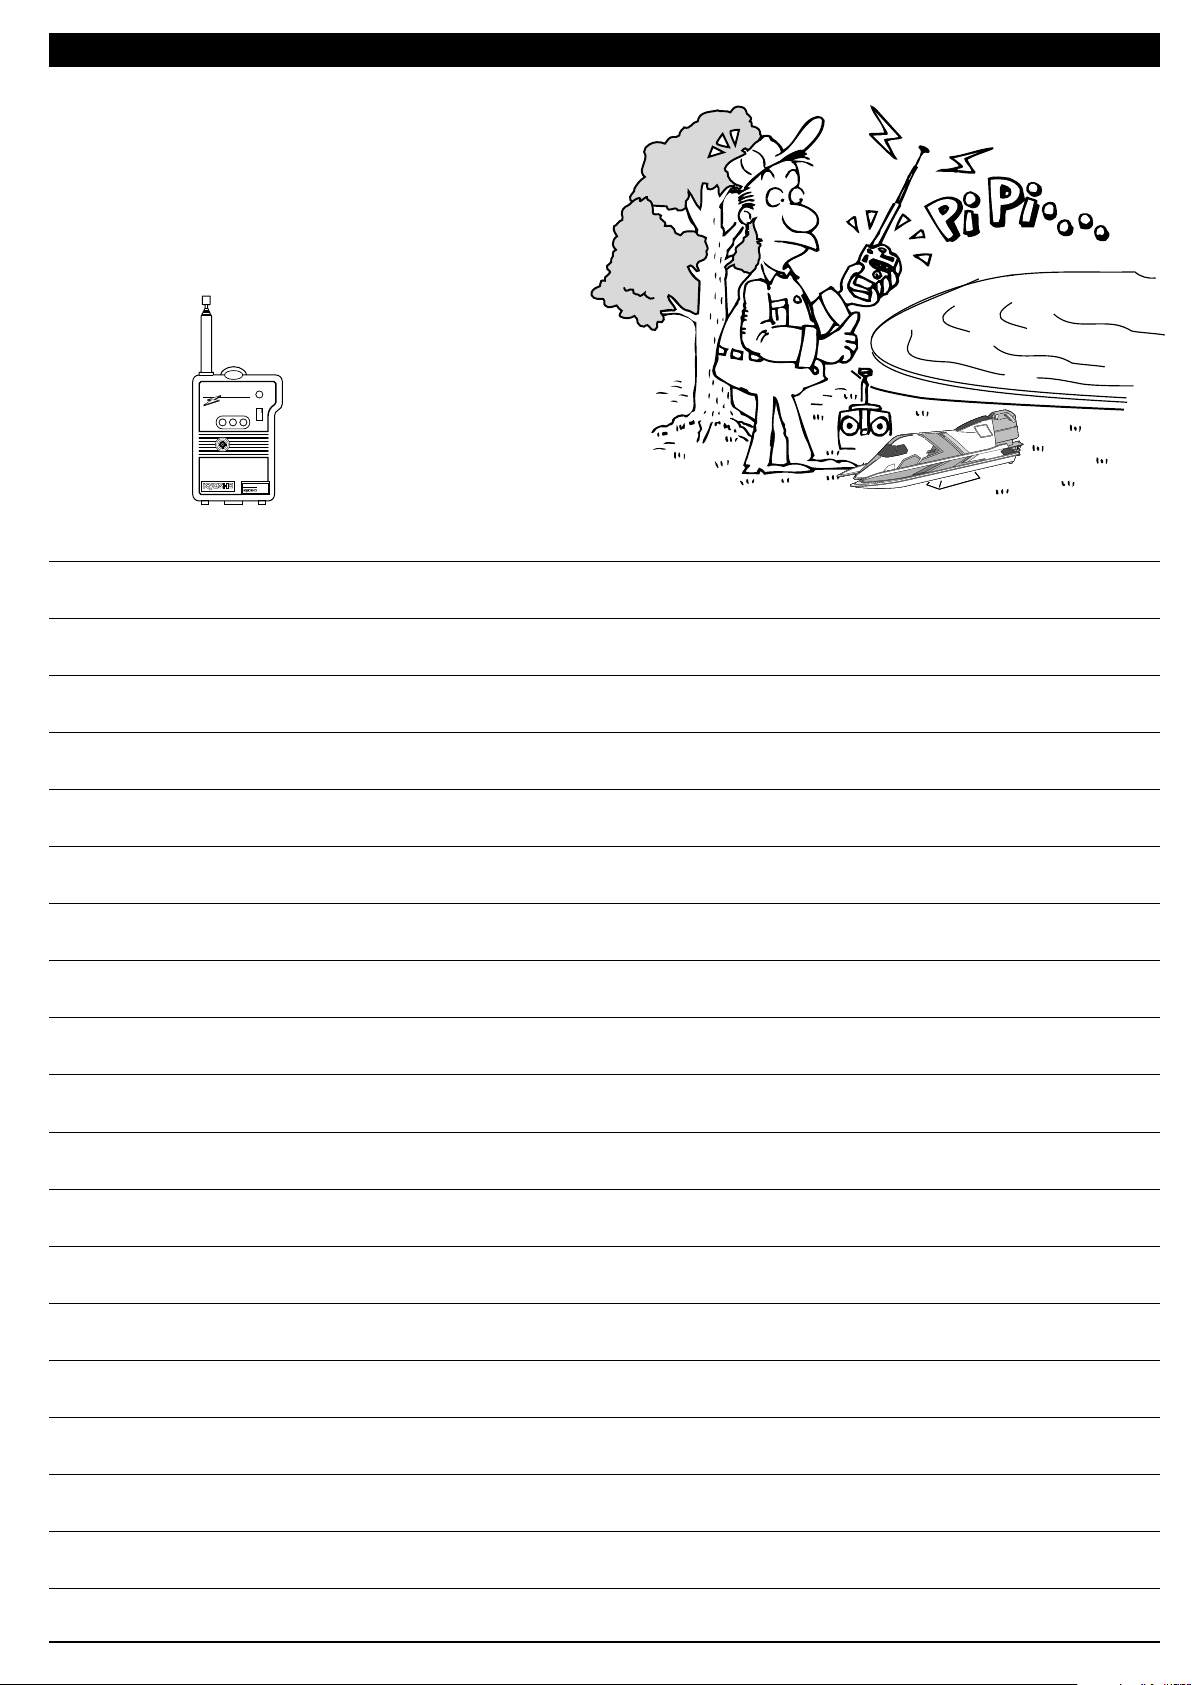
パーソナルバンドモニターについて ABOUT THE "PERSONAL FREQUENCY MONITOR"
愛車の発進前に、使うバンドのクリスタルをセット
してスイッチオン!同一バンドの電波をキャッチ
するとブザー音とLEDの光で警告。
Before launching your beloved car model, plug the crystal
of your frequency into the Personal Fre-quency Monitor. As
soon as you switch it on, you'll know for sure through an
interference signal and LED lamps whether somebody else
is on your fre-quency or not!
No.80590 (27MHz)
No.80591 (40MHz)
PERSONAL
BAND MONITOR
CORPORATION
No.80591
KYOSHO CORPRATION
27MHZ
KYOSHO
ON
OFF
専用クリスタル別売
JRMSA
Special crystals are
08
available at Kyosho!
●6,000
4
Page 5

船台
1
/ Stand
StŠnder / Support / Soporte
No.4
3
2
1
船体
2
/ Hull
Rumpf / Coque / Casco
No.3
4
4
5
4
5
船体
3
3 x 8 mm
3 x 16 mm
Parts bag used.
Verwendeter Teilebeutel.
Sachet utilis .
Bolsa utilizada.
/ Hull
Rumpf / Coque / Casco
TPビス
TP Screw
Treibschraube
Vis autotaraudeuse
Tornillo 3 x 8mm TP
TPビス
TP Screw
Treibschraube
Vis autotaraudeuse
Tornillo 3 x 16mm TP
No.3
1
3 x 8 mm
2
エポキシ接着剤で接着する。使用する袋詰。
Apply epoxy glue.
Verwenden Sie 2-Komponentenkleber.
Collez avec de la colle poxy.
Aplique pegamento epoxy.
6
3
2
4
1
7
3 x 16 mm
瞬間接着剤で接着する。
Apply instant glue (CA glue, super glue).
Verwenden Sie Sekundenkleber.
Collez avec de la colle cyanoacrylate.
Aplique pegamento cianoacrilato.
8
9
番号の順に組立てる。
Assemble in the specified order.
Bauen Sie die Stufen in der angegebenen Reihenfolge.
Assemblez dans lÕordre indiqu .
Realice el montaje en el orden se–alado.
5
Page 6

船体
4
/ Hull
Rumpf / Coque / Casco
No.3, No.7
3 mm
5
2 x 6mm
3 x 6mm
ナイロンナット
Nylon Nut
Stoppmutter
Ecrou Nylstop
Tuerca Nylon 3 mm
1
プロポ
/ Radio
RC-Anlage / Radio / Equipo de radio
ビス
Screw
Schraube
Vis
Tornillo 2 x 6mm
1
ビス
Screw
Schraube
Vis
Tornillo 3 x 6mm
1
3 x 6 mm
11
13mm
3 mm
No.2, No.3, No.7
2 x 6 mm
10
10
ラダーサーボ
Rudder Servo
Ruderservo
Servo de direction
Servo de direcci—n
平行
Parallel
Parallel
Parall le
Paralelo
溝に合わせる。
Aligh with the ditch.
In eine Linie mit der Markierung
bringen.
Aligner sur la fente.
Alinear con la ranura.
両面テ−プ
12
Double-sided Tape
Doppelseitiges Klebeband
Adh sif ˆ double face
Cinta adhesiva de doble cara
サーボの大きさに合わせる。
Depends on the size of servo.
AbhŠngig von der Grš§e des Servos.
Depend de la taille des servos.
Depende del tama–o del servo.
プロポ
6
RC-Anlage / Radio / Equipo de radio
2 x 6mm
3 x 8mm
スピードコントロールサーボ
使用する袋詰。
Parts bag used.
Verwendeter Teilebeutel.
Sachet utilis .
Bolsa utilizada.
/ Radio
ビス
Screw
Schraube
Vis
Tornillo 2 x 6mm
TPビス
TP Screw
LK Treibschraube
Vis autotaraudeuse
Tornillo 3 x 8mm TP
Speed Control Servo
Servo de aceleraci—n
Gasservo
Servo de vitesse
注意して組立てる所。
Pay close attention here!
Vorsicht! Wichtiger Hinweis!
Attention! Avis important!
Preste atenci—n.
1
2
No.2, No.7
13mm
3 x 8 mm
をカットする。
Cut off shaded portion.
Schneiden Sie die schraffierten FlŠchen heraus.
Coupez la partie gris e.
Corte la zona oscurecida.
2 x 6 mm
プロポ動作を確認をする。
Check for proper servo operation.
Kontrollieren Sie richtiges Funktionieren der Servos.
Contr™lez le fonctionnement correct des servos.
Asegœrese que los servos se mueven proporcionalmente
a los movimientos de la emisora.
中立 前進
Neutral
Neutral
Neutre
Neutro
別購入品
Must be purchased separately!
Teil ist nicht im Bausatz enthalten.
Doit tre achet s parement.
Debe comprarse por separado.
0.5~1mm
両面テ−プ
12
Double-sided Tape
Doppelseitiges Klebeband
Adh sif ˆ double face
Cinta adhesiva de doble cara
サーボの大きさに合わせる。
Depends on the size of servo.
AbhŠngig von der Grš§e des Servos.
Depend de la taille des servos.
Depende del tama–o del servo.
可動するように組立てる。
Ensure smooth non-binding movement while assembling.
Das Teil mu§ sich leicht bewegen lassen.
La pi ce doit pouvoir pivoter autour de la vis.
Asegœrese que la pieza se mueve libremente.
Forward
VorwŠrts
Avant
Hacia
6
Page 7

プロポ
7
/ Radio
RC-Anlage / Radio / Equipo de radio
13
マジックテ−プ
Magic Tape
Klettenband
Bande velcro
Velcro
50mm
カットする。
Cut off.
Abschneiden.
Couper.
Cartar.
0 5040
電池ボックス
Battery Box
Batteriehalter
Bo”tier ˆ piles
Portapilas
mm
No.2
受信機
Receiver
EmpfŠnger
R cepteur
Receptor
コネクターをつなぐ。
Plug in.
Anschlie§en.
Branchez.
Conecte.
アンテナ
Antenna
Antenne
Antenne
Antena
両面テ−プ
12
Double-sided Tape
Doppelseitiges Klebeband
Adh sif ˆ double face
Cinta adhesiva de doble cara
40mm
カットする。
Cut off.
Abschneiden.
Couper.
Cartar.
プロポ
8
プロポ
9
/ Radio
RC-Anlage / Radio / Equipo de radio
/ Radio
RC-Anlage / Radio / Equipo de radio
スイッチ
Switch
Schalter
Interrupteur
Interruptor
No.1
スイッチ
Switch
Schalter
Interrupteur
Interruptor
14
スイッチ
Switch
Schalter
Interrupteur
Interruptor
使用する袋詰。
Parts bag used.
Verwendeter Teilebeutel.
Sachet utilis .
Bolsa utilizada.
別購入品
Must be purchased separately!
Teil ist nicht im Bausatz enthalten.
Doit tre achet s parement.
Debe comprarse por separado.
コネクターをつなぐ。
Plug in.
Anschlie§en.
Branchez.
Conecte.
コネクターをつなぐ。
Plug in.
Anschlie§en.
Branchez.
Conecte.
7
Page 8

船体
10
/ Hull
Rumpf / Coque / Casco
No.2
部分に 15 クリアテープを貼る。
Attach clear tape 15 to the place.
Bringen Sie das transparente Klebeband 15 an der markierten Stelle an.
Fixer l'adhesif 15 a cet emplacement.
Coloque cinta transparente 15 en.
テープが重なる部分にすきまがないようにする。
Attach tape certainly for complete waterproofing.
Bringen Sie das Klebeband auf dem Modell an,
um die entsprechenden Stellen abzudichten.
Pour une parfaite etancheite appliquer l'adhesif.
Colocar cinta adhesiva.
部分に 16 スポンジテープを貼る。
Attach sponge tape 16 to the place.
Bringen Sie das Schaumstoffband 16 an der
markierten Stelle an.
Fixer la mousse adhesive 16 a cet emplacement.
Coloque cinta adhesiva de esponja 16 en.
ニカドバッテリー
11
Akku / Accu Ni-Cd / Bater’a Ni-Cd
/ Ni-Cd Battery
マジックテ−プ
13
Magic Tape
Klettenband
Bande velcro
Velcro
100mm
カットする。
Cut off.
Abschneiden.
Couper.
Cartar.
No.2
0 50 100
船体
12
/ Hull
Rumpf / Coque / Casco
No.1, No.3, No7
mm
A-2
7.2V ニカドバッテリー
Ni-Cd Battery
Akku
Accu Ni-Cd
Bateria Ni-Cd
走行時のみつなぐ。
Connect when using the model.
Verbindung herstellen zum Betrieb
des Modells.
Brancher lors de l'utilisation du modele.
Conectar a la hora de utilizar el modelo.
3 x 8 mm
3 x 8mm
使用する袋詰。
Parts bag used.
Verwendeter Teilebeutel.
Sachet utilis .
Bolsa utilizada.
8
TPビス
TP Screw
LK Treibschraube
Vis autotaraudeuse
Tornillo 3 x 8mm TP
3 x 8 mm
3
A-3
A-1
3 x 8 mm
別購入品
Must be purchased separately!
Teil ist nicht im Bausatz enthalten.
Doit tre achet s parement.
Debe comprarse por separado.
可動するように組立てる。
Ensure smooth non-binding movement while assembling.
Das Teil mu§ sich leicht bewegen lassen.
La pi ce doit pouvoir pivoter autour de la vis.
Asegœrese que la pieza se mueve libremente.
17
A-1
Page 9

船体
13
/ Hull
Rumpf / Coque / Casco
No.1, No.3, No.7
A-2
3 x 8 mm
3 x 8mm
14
TPビス
TP Screw
LK Treibschraube
Vis autotaraudeuse
Tornillo 3 x 8mm TP
船体
/ Hull
Rumpf / Coque / Casco
開く 閉る
Open Close
3
18
A-3
3 x 8 mm
A-1
開く 閉る
Open Close
船体
15
/ Hull
Rumpf / Coque / Casco
マジックテ−プ
13
Magic Tape
Klettenband
Bande velcro
Velcro
10mm
カットする。
Cut off.
Abschneiden.
Couper.
Cartar.
No.2, No.5
17 18 の周りを 15 クリアテープで
目止めすると防水効果がさらに高くな
ります。
Attach clear tape 15 around 17 and 18 .
Bringen Sie das transparente Klebeband
15 an den Teilem 17 und 18 an,
um die entsprechenden Stellen abzudichten.
Fiexer l'adhesif 15 autour du 17 et
18 . ceci contribuera a une meilleure
etancheite.
Colocar cinta transparente 15 entre
17 y 18 . Mejorar‡ la estanqueidad.
マジックテ−プ
13
Magic Tape
Klettenband
19
Bande velcro
Velcro
10mm
カットする。
Cut off.
Abschneiden.
Couper.
Cartar.
20
アンテナ
Antenna
Antenne
Antenne
Antena
10
mm
0 50
50mm
20
10mm
mm
使用する袋詰。
Parts bag used.
Verwendeter Teilebeutel.
Sachet utilis .
Bolsa utilizada.
可動するように組立てる。
Ensure smooth non-binding movement while assembling.
Das Teil mu§ sich leicht bewegen lassen.
La pi ce doit pouvoir pivoter autour de la vis.
Asegœrese que la pieza se mueve libremente.
注意して組立てる所。
Pay close attention here!
Vorsicht! Wichtiger Hinweis!
Attention! Avis important!
Preste atenci—n.
9
Page 10

デカール
16
Aufkleber / Autocollants / Adhesivos
/ Decals
( )
18 19
下図を参考にデカールをはってください。
Place the decals as shown below.
Bringen Sie die Aufkleber wie unten beschrieben an.
Placez les autocollants comme cl-dessous.
Coloque los adhesivos como muestra el dibujo.
( )
3
2
R
E
G
N
A
D
D
AN
R
E
G
G
E
N
R
A
D
( )
24 25
ATS
BO
NG
RACI
20 21
R
A
C
N
I
G
B
O
A
T
S
( )
( )
22 23
17
完成
Complete
12
S
T
A
O
B
G
I
N
C
A
R
1
4
5
10
11
15
14
S
T
A
O
B
G
N
I
C
A
R
10
Page 11

警告
取扱いの注意 OPERATING YOUR MODEL SAFELY
事故やケガ等の危険防止のため、次のことを必ずお守りください。
WARNING: In order to avoid accidents and personal injury, be sure to observe the following:
●R/Cボートは、湖や河川などの水辺で楽しむものです。
操縦する方や同行の方が思わぬ事故に合わないように
注意し安全な場所で走航させてください。
With R/C boats, discover a new world of pleasure.
Wheth-er you run your boat on lakes, rivers or elsewhere, take precautionary measures to avoid accidents.
●ケガの恐れがあるので回転部分に手や物を入れないよ
うにしてください。
Do not put your hands or any objects into rotating
parts, as this could result in serious accidents!
●走航直後はモーターやニカ
ドバッテリーなど熱くなっ
ていることがあるのでしば
らくさわらない。
The motor and Ni-Cd
battery get hot from run-ning. Do not touch them
Ni-Cd
Battery
7.2V
for a while after running.
●充電 中 は、ニ カ ドバッ テ
リー、充電器ともに発熱す
るので燃えやすい物の上で
の充電は火災等、事故の恐
BA
TTERYBATTERY
れがありますのでおやめく
ださい。
Never put the charger and Ni-Cd battery near flam-mable material while charging as this may cause fires!
●ニカドバッテリーの分解、改造は絶対にしない。
when disassembling or modifying Ni-Cd batteries.
Never do that!
P
O
WER
1400
7.2
V
破裂危険
EXPLOSIVE
●ニカドバッテリーは有害重金属が使用されています。
火中に投げ入れて破裂すると非常に危険ですので、絶
対しないでください。
Never dispose of Ni-Cd batteries into a fire, as these
can explode or emit noxious gases from heavy met-als
used in Ni-Cd batteries !
●次のような時や、次のような場所では走航させないで
ください。思わぬ事故の原因となります。
For accident prevention, do not run your model under
the following circumstances:
人が多い場所。
in places where many people gather!
河川が増水しているとき、また流れが速いとき。
when rivers are swollen or their current is strong!
同じバンドの無線操縦模型がそばにいるとき。
Also make sure that nobody is using the same
frequency as you do at the same time!
01
05
プロポの電池残量が少ないとき。
with weak radio batteries!
船の動きがおかしい???とき。
when the boat behaves or operates strangely!
?
?
?
?
?
7.
7.
2
2
N
N
V
V
i-C
i-C
d B
d B
atter
atter
y
y
破裂危険
EXPLOSIVE
●不要になったニカドバッテリーは捨てずに販売店にお
戻しください。
Do not dispose of Ni-Cd batteries! Return them to the
retail shop!
●走航させない時は、必ず電源スイッチを
『OFF』にし、安全のため必ずニカドバ
ッテリーのコネクターを抜き、本体より
外しておく。
発熱、発火の原因になります。
When NOT using the model, always
switch off the receiver and transmitter!
Furthermore, disconnect the Ni-Cd
battery and remove it from the model!
This may lead to overheat and fires!
確認する
CHECK
11
Page 12

走行前のチェック PRE-RUN CHECKLIST
ゆるんでいるビスはありませんか。
プロポの電池はありますか。
ニカドバッテリーの充電はしていますか。
ラダーの動きはプロポの動きとあってますか。
スピードコントローラーの動きはプロポの動き
とあってますか。
走航場所は安全な所ですか。
近くで同じバンドで無線操縦模型をしている人は
いませんか。
ニカドバッテリーは確実に固定されていますか。
スクリューのとりつけは確実ですか。
回転部分にはグリスが塗ってありますか。
可動部分に当たる物はありませんか。
走航手順 PROPER OPERATING PROCEDURES
走航用のバッテリーを充電。
Fully charge the Ni-Cd battery.
送信機の電池をチェック。
Check the transmitter batteries
CH-2 CH-1
BATT.
Are all screws securely tightened?
Are the radio batteries fully charged?
Is the Ni-Cd battery fully charged?
Does the rudder operate according to your inputs
on the transmitter?
Does the speed controller operate according to your
inputs on the transmitter?
Is the Ni-Cd battery securely attached?
Is the running area safe?
Is nobody on your frequency when running at the
same time in the same area?
Is the propeller securely attached?
Are all rotating parts greased?
Can all moving parts move freely, without binding?
スピードコントローラーがオフであるこ
31 2
とを確認。
Ensure that the speed control servo is in
off position.
ニカドバッテリーのコネクターをつなぐ。
4
Connect the Ni-Cd battery.
受信機のスイッチを入れる。
7
Switch on the receiver
ON
走航場所が安全であることを確認。
10
Make sure the running area is safe.
船を回収する。
1
After finishing running, collect your
boat.
送信機のアンテナをのばす。
5
Extend the transmitter antenna
C
H-
2
BAT
T
.
C
H-
1
ラダーがプロポのスティックの
8 9
動きとあっているか確認。
Make sure the rudder operates according
to your inputs on the transmitter.
CH-2 CH-1
BATT.
左 右
6
前
進
走行が終わったら AFTER RUNNING . . .
受信機のスイッチを切る。
2
Switch off the receiver.
3
送信機のスイッチを入れる。
Switch on the transmitter.
ON
CH-2 CH-1
BATT.
OFF
スピードコントローラーがプロポの
スティックの動きとあっているか確認。
Make sure the speed controller operates
according to your inputs on the transmitter.
CH-2 CH-1
BATT.
送信機のスイッチを切る。
Switch off the transmitter.
ON
OFF
ニカドバッテリーのコネクター
4 5
をはずす。
Disconnect the Ni-Cd battery.
12
OFF
船体の汚れ水分をきれいにとる。
Remove dirt from the hull.
CH-2 CH-1
BATT.
OFF
●走航させない時は、必ず電源スイッチを『OFF』
にし、安全のため必ずニカドバッテリーのコネク
ターを抜き、本体より外しておく。
発熱、発火の原因になります。
When NOT using the model, always switch
off the receiver and transmitter!
Furthermore, disconnect the Ni-Cd
and remove it from the model!
This may lead to overheat and fires!
ON
battery
確認する
CHECK
Page 13

日常の整備 EVERYDAY MAINTENANCE
ねじ、ナットのゆるみ、老化をチェック。
回転部分にはグリスを塗っておく。
コードが可動部分にこすれたりして破損している
ときは修理する。
サーボのコードや受信機のアンテナ線が破損して
いるときは、使用しているプロポメーカーに修理を
依頼する。
部品が摩耗または破損していないかチェック。
船体の汚れをとる。
船体に入っている水をぬき、よく乾かす。
故障かなと思う前に
症 状
サーボが動かない。
モーターがまわらない。
原 因
送信機の電池がない。
配線をまちがえている。
ニカドバッテリーの容量不足。
配線をまちがえている。 説明書をよく読んで配線する。
コネクターの接触不良。
モーターの故障。 モーターを交換する。
Make sure screws and nuts are securely tightened
and other parts are not worn.
Grease all rotating parts.
Repair the wiring should cords be damaged or drag
into rotating parts.
Should servo cords and the receiver antenna be
damaged, return them to the manufacturer for repair.
Make sure all parts are neither worn nor damaged.
Remove dirt from the hull.
Draw out water from inside the hull.
対 策
送、受信機のスイッチを入れる。送、受信機のスイッチがはいっていない。
新しいものに交換する。
プロポの説明書をよく読んでコネクターを
接続する。
ニカドバッテリーを充電する。
コネクターのはめこみをきつくする。
モーターはまわるが走らない。
スクリューを手でまわすと重い
またはまわらない。
スピードコントロールスティ
ックをはなしても船がとまら
ない。
PROBLEM CAUSE
Servo does not operate.
Motor does not rotate.
ジョイントがついていない。
または、ビスがゆるんでいる。
回転部分にゴミやホコリがつまっている。
リンケージの調整不良。 プロポのトリムで調整する。
ジョイントを止めているビスを
しめる。
ゴミやホコリを取り除きグリスを塗っておく。
このとき、全開に入らないようなら説明書
を読んでリンケージをもう一度調整する。
TROUBLESHOOTING
REMEDY
Switch on.Transmitter and/or receiver is not switched on.
Transmitter batteries are weak.
Improper radio installation.
Ni-Cd battery capacity is insufficient.
Improper radio installation. Correct as per instruction manual.
Loose connectors.
Motor trouble. Replace with new motor.
Replace with new batteries.
Correct as per radio instruction
manual.
Recharge Ni-Cd battery.
Make connectors tighter (e.g. with
minus screwdriver).
Motor rotates but boat will not run.
When rotating by hand, propeller
feels heavy or does not rotate.
Even when releasing speed
control, boat will not stop.
Joint is not installed.
Or, screws are loose.
Dirt entered rotating parts. Clean and regrease.
Improper linkage adjustment. Adjust speed control trim on transmitter.
Tighten screws holding joint.
Should speed controller not return to
neutral, readjust linkages as per instruction manual.
13
Page 14

●
EXPLODED VIEW
13
90497
13
90497
22
96551L
19
VP-31
13
90497
29
94753
13
90497
12
96441
12
12
96441
96441
11
94754
4
94751
14
15
94752
VP-32
A-2
94755
18
30
VP-32
94551
21
94582
6
31
94713
25
26
94722
23
24
94713
27
94713
28
10
94713
94427
9
94751
4
VP-32
17
A-2
8
94582
7
94582
20
JA-3
3
1705
94755
A-3
94755
A-1
94755
A-3
94755
A-1
94755
5
VP-30
16
94450
キットの部品の一部にはスペアパーツとして販売していない物があります。京商ではオプションパーツを販売していますのでお買い求めください。
Some of the parts included are not available as spare parts. Purchase optional parts instead.
94450
16
1
JA-3
13
90497
2
JA-3
VIPER-R
1514
Page 15

パ−ツは、キットに使用しているパ−ツをセットして、品番単位で発売しております。必
要なパ−ツを確認して、そのキーNo.が含まれているセット品番、セットパ−ツ名及び数
量をご記入の上、郵便振込(送金手数料が安くてすむ)にてお申し込みください。
《注文方法》
(1)郵便局へ行き、そなえつけの払込用紙に次
の(2)〜(5)を記入して下さい。
(2)口座番号/00210‑4‑47271
加入者名/京商株式会社と記入します。
(3)あなたの1.郵便番号2.住所3.氏名4.電
話番号を必ず記入して下さい。(住所・氏
名には必ずフリガナをふって下さい。)
(4)注文したい、1.品番2.パ−ツ名3.注文数
を必ず記入して下さい。
(5)代金は、1.パ−ツ価格×数量2.送料(2個
以上お求めの場合は、1個分の送料で一番高
い送料だけで結構です)1+2の合計金額に消
費税をプラスして下さい。
(6)郵便局の窓口へ手数料(60〜110円)をそえ
てお申し込み下さい。
(2)
00
※ ※
0 0 2 1 0 4 4 7 2 7 1
加
各票
入
者
の※印欄
名
は
通
払込
信
人にお
(例)
いて記載
欄
してくだ
払
込
人
さい
住
所
氏
名
払 込 取 扱 票 払込票兼受領証
口座番号 (右詰めにご記入ください)
※
京商株式会社
※
品番 部品名 数量
(4)
1901 ベアリング 2
送料
消費税(部品+送料合計金額x5%)
合計
(郵便番号 )
※
(3)
(電話番号 ‑ ‑ )
裏面の注意事項をお読みください。(郵政省)
金
千 百 十 万 千 百 十 円
額
料
金
受
付
局
日
附
印
スペアパーツ SPARE PARTS
品番 パーツ名 内容(キーNo.と入数)
No. Part Names Quantity
船体(バイパーR)
VP-30
Hull (VIPER-R)
キャビン(バイパーR)
VP-31
Cabin (VIPER-R)
ハッチ
VP-32
Hatch
デカール(バイパーR)
VP-33
Decal (VIPER-R)
スクリューシャフト
94713
Propeller Shaft
モーターマウント(バイパーR)
94722
Motor Mount (VIPER-R)
スクリュー(D31xP1.4)
94727
Propeller (D31xP1.4)
フレキシブルブーツ
94751
Flexible Boots
防水テープ
94752
Waterproofing Tape
4mm防水リング
94753
4mm Waterproofing Ring
ロッドストッパー(2mm)
94754
Rod Stopper (2mm)
ハッチノブ
94755
Hatch Knob
5 x 1
19
x 1
14 17 18
x 1
デカール x 1
one set
25 26 27 28
24
x 1
10
x 2
4 x 2
15
x 1
29
x 5
11
x 1
A-1 x 4
A-2 x 2
A-3 x 2
x 1
★定価
★送料
7500 TEL
1500 270
1500 190
1500 190
1000 130
300 130
800 130
300 130
450 130
300 90
350 90
400 130
【お急ぎの方は】『ユーザー相談室』宛に現金書留でお申し込み下さい。
※電話でのご注文は、お受けできませんのでご了承下さい。
振込連絡まで
約10日間
きた!
パ−ツの価格には、消費税は含まれておりません。また、定価、送
料、消費税は平成9 年 12 月1日現在のもので、法規改正、運賃
改定、諸事情などにともない変更になりますので、ご了承ください。
1 5 6 4
殊 扱
特 取
1,400
1,564
90
74
(5)
(2)
口
※
座
0 0 2 1 0 4
番
※
号
記
載
加
切り
※
事
入
者
項
取らない
京商株式会社
名
を
訂
金
正
千 百 十 万 千 百 十 円
し
※
で郵便局
額
た
場
合
※
払
は
にお出
込
そ
人
の
住
しくださ
箇
所
所
氏
に
名
訂
い
正
印
料
(消費税込み)
を
押
し
て
金
く
だ
特
さ
殊
い
取
扱
右詰めにご記入ください
4 7 2 7 1
1 5 6 4
(3)
受付局日附印
円
★ FOR JAPANESE MARKET ONLY.
品番 パーツ名 内容(キーNo.と入数)
No. Part Names Quantity
船台
JA-3
1705
90497
94450
94582
94551
96551L
96441
Stand
カラーアンテナ(白)
Color Antenna (White)
マジックテープ
Magic Tape
防水スポンジテープ
Waterproofing Sponge Tape
ハイドロラダーセット
Hydro Rudder Set
防水ロッドブーツ
Waterproofing Rod Boots
モータースイッチ(L)
Motor Switch
(L)
スポンジテープ(1mm)
Sponge Tape (1mm)
TELマ−クは、地域によって送料が異なりますので、
『ユーザー相談室』宛、電話にてお問い合わせ下さい。
1 3 x 1 2 x 2
20
x 6
13
x 2
16
x 1
6 7
8 x 1
21
x 5
30
x 1
12
x 1
★定価
750 270
500 130
300 90
200 130
500 130
400 90
900 130
300 90
3〜4日間
★送料
品番 パーツ名 内容
No. Part Names Description
防水ゴム袋
TR-12
Waterproofing Bag
ル・マンAP36Lスペシャル
2461
Le Mans AP36L Special
フラップセット
94301
Trim Tab
■パーツ入手について
京商のパーツなら
すぐ揃う
パーツの入手難を解決するのが「パーツ直送便」システ
ムです。必要なパーツがお店で品切れの時は、そのシス
テムを扱っている販売店に注文いただくと、京商より直
接パーツが入手できます。代金はお店で、パーツは直接
京商からお届けします。詳しくは、左記の看板のある販
売店にお問い合わせください。
© 1997 KYOSHO/禁無断転載複製
受信機、電池ボックス用
for receiver & battery box
高性能モーター
high performance motor
走航姿勢調整用
for adjusting boat position
オプションパーツ OPTIONAL PARTS
★定価
★送料
150 90
4800 TEL
800 130
品番 パーツ名 内容
No. Part Names Description
金属スクリュー
94428
Metal Propeller
トリムフィン(S)
94471
Trim Fin (S)
ウォータージャケットセット
94741
Water Jacket Set
TELマ−クは、地域によって送料が異なりますので、
『ユーザー相談室』宛、電話にてお問い合わせ下さい。
〒243‑0034神奈川県厚木市船子153
●ユ−ザ−相談室直通TEL.0462(29)4115
お問い合わせは:月曜〜金曜(祝祭日を除く)10:00〜18:00
★ FOR JAPANESE MARKET ONLY.
★定価
10 と交換 1個入
instead of
1PCS.
10
走航姿勢調整用
for adjusting boat position
モーター水冷用パーツ
for water-cooled motor specifications
R
THE FINEST RADIO CONTROL MODELS
京商株式会社
64559712
★送料
2500 130
250 130
2000 130
PRINTED IN TAIWAN
 Loading...