

Kyosho SPREE 10 SPORTS User Manual
※ご使用前にこの説明書を良くお読みになり十分に理解してください。
Before beginning assembly, please read these instructions thoroughly!
R
WINGSPAN : 1200mm (47.2")
GP
エンジンプレーン
VERSION
For Intermediate
and
Advanced Flyers
中・上級者向
組立/取扱説明書
INSTRUCTION MANUAL
目 次
●組立て前の注意
BEFORE YOU BEGIN
●キットの他にそろえる物・組立に必要な工具
REQUIRED FOR OPERATION・TOOLS REQUIRED
●キットに入っているもの
INCLUDED PARTS
●プロポの準備
RADIO PREPARATION
●本体の組立て
ASSEMBLY
●分解図
EXPLODED VIEW
●スペアパーツ
SPARE PARTS
●
取扱いの注意
OPERATING YOUR MODEL SAFELY
INDEX
安全のための注意事項
この無線操縦模型は玩具ではありません!
●この商品は高い性能を発揮するように設計されていますので組立
てに不慣れな方は、模型を良く知っている人にアドバイスを受け
確実に組立ててください。
●組立て作業は、幼児の手のとどかない所で必ず行ってください。
●動かして楽しむ場所は万一の事故を考えて、安全を確認してから
責任をもってお楽しみください。
●組立てた後も説明書がいつでも見られるように大切に保管してく
ださい。
・不要になったニカドバッテリーは、貴重な資源を守るために廃棄しないでリサイクル協力店へお持ちください。
・The product you have purchased is powered by a rechargeable battery. The battery is recyclable. At the end of its useful life, under
various national / state and local laws, it may be illegal to dispose of this battery into the municipal waste stream. Check with your local
solid waste officials for details in your area for recycling options or proper disposal.
2
2~3
3
4
5~16
17
18
19
UNDER SAFETY PRECAUTIONS
This radio control model is not a toy!
●First-time builders should seek the advice of experienced modellers
before beginning assembly and if they do not fully understand
any part of the construction.
●Assemble this kit only in places out of childrenÕs reach!
●Take care before operating this model.
You are responsible for this modelÕs assembly and safe operation!
●Always keep this instruction manual ready at hand for quick
reference, even after completing the assembly.
※製品改良のため、予告なく仕様を変更する場合があります。
2004 KYOSHO CORPORATION
/禁無断転載複製
*SPECIFICATIONS ARE SUBJECT TO BE CHANGED WITHOUT NOTICE.
No.11152
組立て前の注意
BEFORE YOU BEGIN
◆組立てる前に説明書を良く読んで、おおよその構造を理解してから組立てに入ってください。
Read through the manual before you begin, so you will have an overall idea of what to do.
◆
キットの内容をお確かめください。万一不良、不足がありましたら、お買い求めの販売店にご相談いただくか、当社「ユーザー相談室」までご連絡ください。
Check all parts. If you find any defective or missing parts, contact your local dealer or our Kyosho Distributor.
●
無線操縦飛行機が初めてという方は、調整等を経験者のアドバイスを受けながら確実に行ってください。中途半端な組上がり
の機体を飛ばすのは大変危険です。
●
無線操縦飛行機が初めてという方には、単独飛行はできませんので、必ず経験者の指導を受けてください。
●
この機体は、2サイクルの.10〜.15エンジン用に設計されていますのでこれ以上のエンジンを使用し、過激な飛行をおこなうと
破損するだけでなく、大変危険ですので絶対におやめください。
●
First-time fliers should seek advice on pre-flight adjustments and assembly from experienced fliers. Remember that
flying a badly assembled or badly adjusted aircraft is very dangerous!
●
In the beginning, novice fliers should always be assisted by an experienced flier and should never fly alone!
●
This model aircraft is designed to be powered by 2cycle .10-.15.engine. Installing more powerful engine or flying this model
aggressivelymay lead to serious damage and accidents!
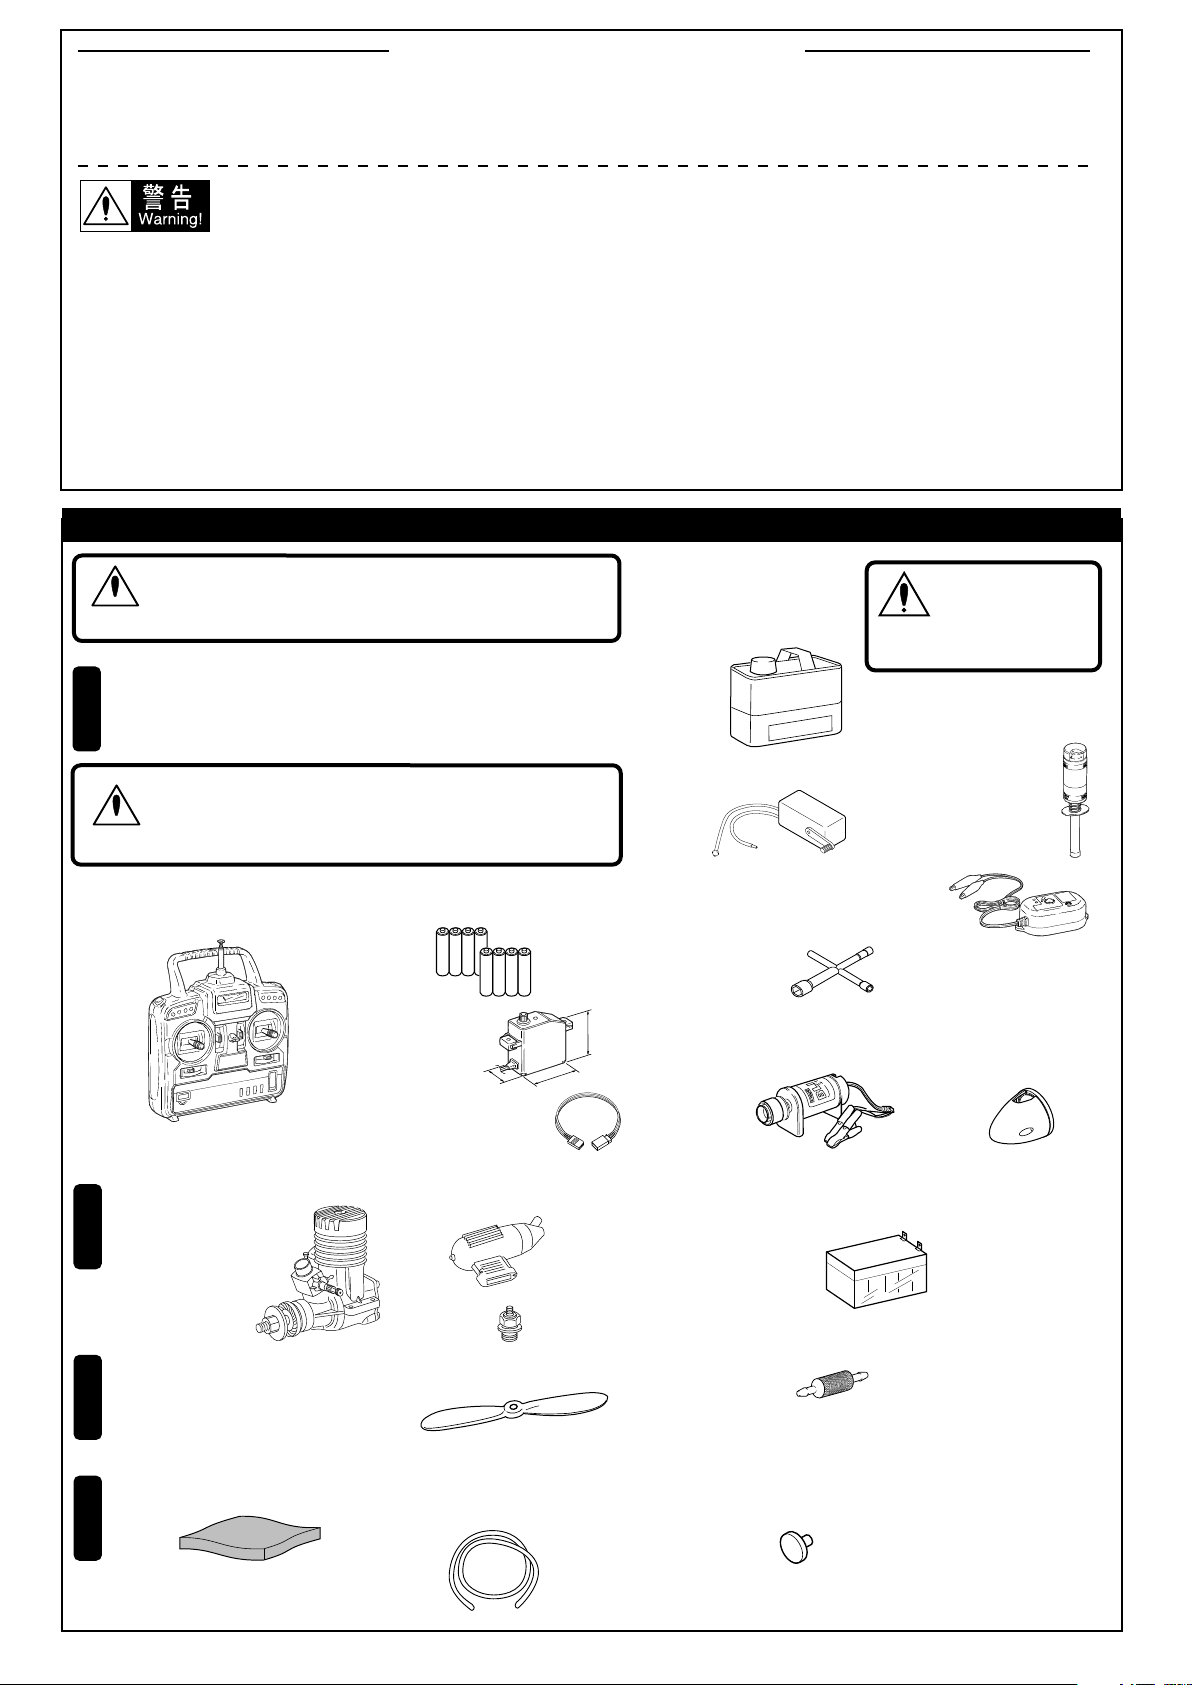
キットの他にそろえる物
下記商品のメーカー、サイズ等は、販売店とご相談ください。
CAUTION: For details concerning the equipment listed below
注意
1
警告
プロポの取扱いは、プロポに付属の説明書を参考にしてください。
For proper radio operation, refer to its manual.
2
3
4
(size, maker, etc.), check with your hobby shop.
4チャンネル以上の飛行機用無線操縦機(プロポ)セット
(マイクロサーボx4)と乾電池。
A Minimum 4 channel radio for
and AA-size batteries.
aircraft
(with 4 micro servos),
空用(飛行機用)のプロポセット(4チャンネル以上)を必
ず使用してください。(空用以外使用禁止)
CAUTION: Only use a minimum 4 channel transmitter, configured
for aircraft!
■
飛行機用4チャンネル以上のプロポ
A minimum 4 channel transmitter,
configured for aircraft.
エンジン及びマフラー
Engine and Muffler
■飛行機用エンジン
Model Aircraft Engine
2サイクル .10〜.15
2-stroke .10~.15
プロペラ及びスピンナーナット
Propeller and Spinner Nut
*ご使用になるエンジンに合った
サイズをお買い求めください。
Purchase a propeller that will match your engine.
■スポンジシート
Sponge Sheet
(No other radio may be used!)
■単3乾電池x8本(送信機用)
AA-size Batteries (For Transmitter)
AAAA
■
マイクロサーボ
Micro Servo
11~13mm
■エルロンサーボ用
延長コード(100mm)
1 x Extension Lead (Aileron)
■マフラー
Muffler
■プラグ
Glow Plug
■プロペラ
Propeller
■シリコンチューブ
Fuel line
●
No. 92213
AAAA
REQUIRED FOR OPERATION
燃料、始動用具
5
Required for engine starting
■グロー燃料
Glow Fuel
Glow Fuel
uel
e f
gin
el en
d
o
m
■燃料ポンプ
Fuel Pump
●
26~28mm
26~30mm
No. 80701
No. 80702
●
■プラグレンチ
Plug Wrench
さらに用意すると良いもの
6
Useful Additional Equipment
■
スターター
■スターター用12Vバッテリー
●
シールドバッテリー
Sealed Battery
■燃料フィルター
Fuel Filter
●
■フュールチューブストッパー
●
エフチャージャーEPポンプ
F-Charger EP pump
エフチャージャーHPポンプ
F-Charger HP pump
エンジン始動用
Engine
Starter
12V Battery
No. 71481
No. 39308
Fuel Tube Stopper
No. 91490
ガソリンや灯油は
使用禁止
WARNING: Gasoline
警告
or kerosene cannot
be used!
■プラグヒーター/充電器
Plug Heater / Charger
●
No.695144
スパークブースター
Spark Booster
No.695142
●
DC急速充電器
DC Quick Charger
■スピンナー
Spinner
(約300mm)
(approx.300mm)
2
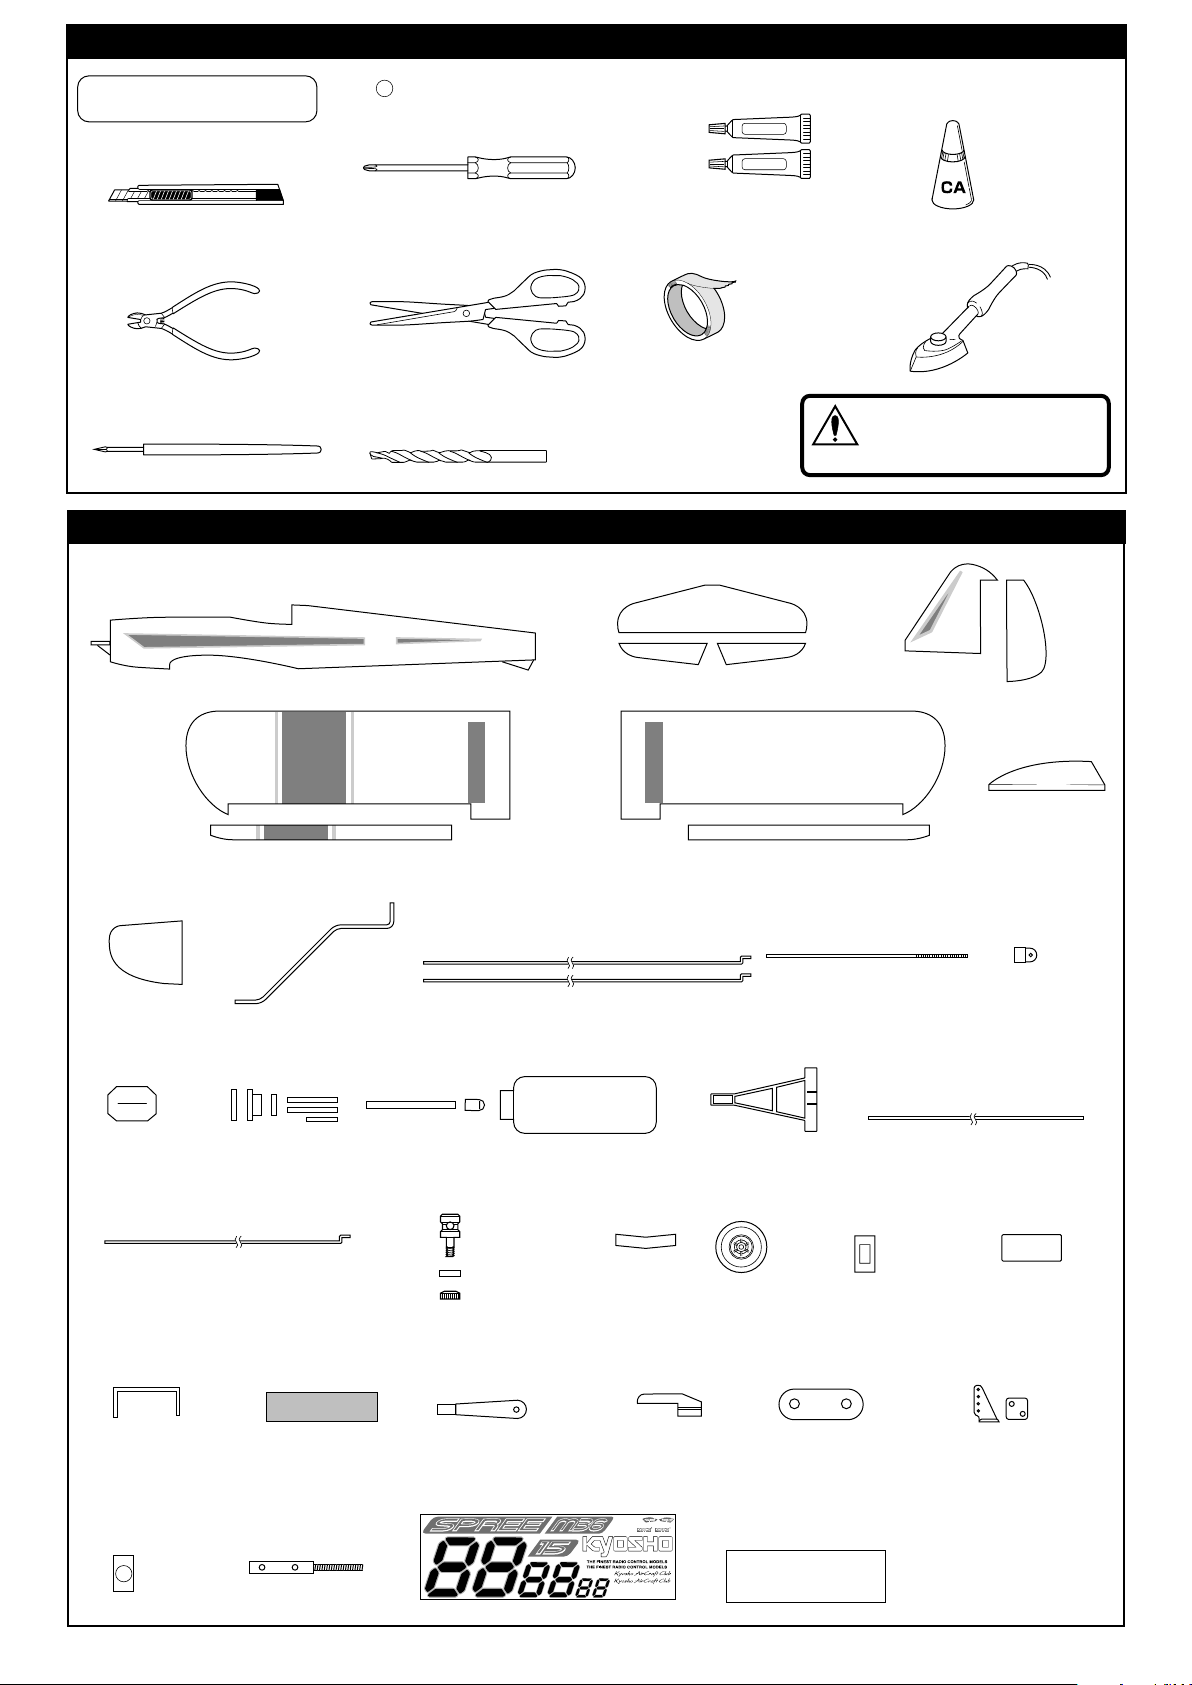
組立に必要なもの
REQUIREDFOROPERATION
用意する工具・その他
REQUIRED
■カッターナイフ
Sharp Hobby Knife
■ニッパー
Wire Cutters
■キリ
Awl
胴体
Fuselage
■+ドライバー(大、中、小)
Phillips Screwdriver (L.M.S)
■ハサミ
Scissors
■ドリル
Drill
キットに入っているもの
水平尾翼
Horizontal Tail
■エポキシ接着剤
Epoxy glue
Epoxy A
Epoxy B
■セロハンテープ
Cellophane Tape
KITCONTENTS
■瞬間接着剤(低粘度)
CA glue , Instant glue
■アイロン
(ハンディタイプ)
Iron
使用する工具の取扱いには、十分
注意してください。
CAUTION: Handle tools carefully!
注意
垂直尾翼
Vertical Tail
ラダー
Rudder
エレベーター(左)
Elevator(L)
主翼
(左)
Main Wing
(L)
エルロン(左) エルロン(右)
Aileron(L)
カウリング
Cowling
グラスヒンジ
(15個)
Hinge(15pcs)
エンコンロッド エンコンリンケージストッパー
Throttle Rod Throttle Linkage stopper
メインギヤ(2個)
Main Landing Gear(2pcs)
燃料タンク120cc エンジンマウント
Fuel Tank
エレベーターロッド
Elevator Rod
ラダーロッド
Rudder Rod
主翼
(右)
Main Wing
(R)
カンザシ
Wing joint
タイヤ(2個)
Tire(2pcs)
エレベーター(右)
Elevator(R)
エルロンロッド(2個)
Aileron Rod(2pcs)
Engine Mount
Aileron(R)
PPパイプ
PP Pipe
エルロン
サーボベッド
Aileron Servo Mount
キャノピー
Canopy
エルロンホーン
チップ(2個)
Horn chip(2pcs)
主翼補強板
Main Wing Support
エレベーター
ジョイント
Elevator Joinner
タイヤストッパー
(4個)
Tire Stopper
(4pcs)
キャノピー
デカール
Canopy Decal
ロッドアジャスター
ジョイント(2個)
Rod Adjuster Joint
(2pcs)
ロッドアジャスター
(2個)
Rod Adjuster
(2pcs)
デカール
Decal
ロッドキーパー(2個)
Rod Keeper
(2pcs)
メインギヤストッパー
(2個)
Rod Adjuster(2pcs)
ビス・ナット類
Screw / Nut
ホーン(2個)
Horn(2pcs)
3

説明書に使われているマーク
瞬間接着剤で接着する。
Apply instant glue
(CA glue, super glue).
エポキシ接着剤で接着
する。
Apply epoxy glue.
番号の順に組立てる。
Assemble in the
specified order.
余分をカットする。
Cut o
ff e
x
cess.
左右同じように組立てる。
Assemble left and right
sides the same way.
注意して組立てる所。
Pay close attention here!
別購入品
Must be purchased separately!
キリで穴をあける
(例1.5㎜)
Make hole with Awl. (example: 2mm).
1.5mm
可動するように組立てる。
Ensure smooth non-binding
movement while assembling.
をカットする。
Cut off shaded portion.
Symbolsusedthroughouttheinstructionmanual,comprise:
2セット組立てる(例)。
Assemble as many times
x
2
as specified.
シリコンシール剤を充てんする。
Fill in with Silicon Sealant.
●重要な注意事項が
あるマークです。
必ずお読みください。
Do not overlook
this symbol!
完成機に張ってあるフィルムは、温度や湿度など気候条件が工
の時から変化すると、多少タルミが出ることがあります。
場組立
飛行には、
さしつかえありませんが、アイロンをあててタルミをとってください。
また、フィルムの重ね目に低粘度瞬間接着剤を流すとはがれにくくな
ります。
The film covering may loosen slightly from heat and humidity after
leaving the factory where it was assembled. This doesn't affect flight
however; ironing can restore the film tension. Also, applying low
あて布
with cover (cloth)
低温
low setting
viscosity glue along the seams will prevent lifting.
プロポの準備
キットの組立てに入る前に、ニカドバッテリーを充電器の説明にしたがって充電しておきます。
1
A new Ni-Cd battery must charge before use. Refer to the charger instruction manual for charging.
プロポを下の順序にしたがってセットします。
2
Set up the radio as explained below.
RADIO PREPARATION
2
▼サーボ
Servo
1
あて布をしたアイロンを低温であて、
必要に応じて温度を上げてゆく。
温度を上げすぎるとフイルムが溶ける
ので注意する
Use an iron covered with a cloth!
Start at low setting. Increase the set-ting
if necessary. If it is too high, you
may damage the film.
11
8
送信機
▲
Transmitter
ON
6
OFF
10
●始める時
●終わる時
1
単3乾電池をセットする。(送信機)
2
アンテナをのばす。(送信機)
3
ニカドをつなぐ。
4
アンテナをのばす。(受信機)
5
トリムレバーを中央にセットする。
6
スイッチを入れる。(送信機)
7
スイッチを入れる。(受信機)
8
スティックを動かしてサーボが動くか確認する。
9
スイッチを切る。(受信機)
10
スイッチを切る。(送信機)
11
アンテナを縮める。(送信機)
受信機
Receiver
▲
▲バッテリー
Battery
¥START
1
2
3
4
5
6
7
8
¥FINISH
9
10
11
5
7 9
4
3
Install AA-size batteries. (Transmitter)
Extend the antenna. (Transmitter)
Connect the Ni-Cd battery.
Extend the antenna. (Receiver)
Center the trims.
Switch on. (Transmitter)
Switch on. (Receiver)
Make sure the servos are in command.
Switch off. (Receiver)
Switch off. (Transmitter)
Retract the antenna. (Transmitter)
4
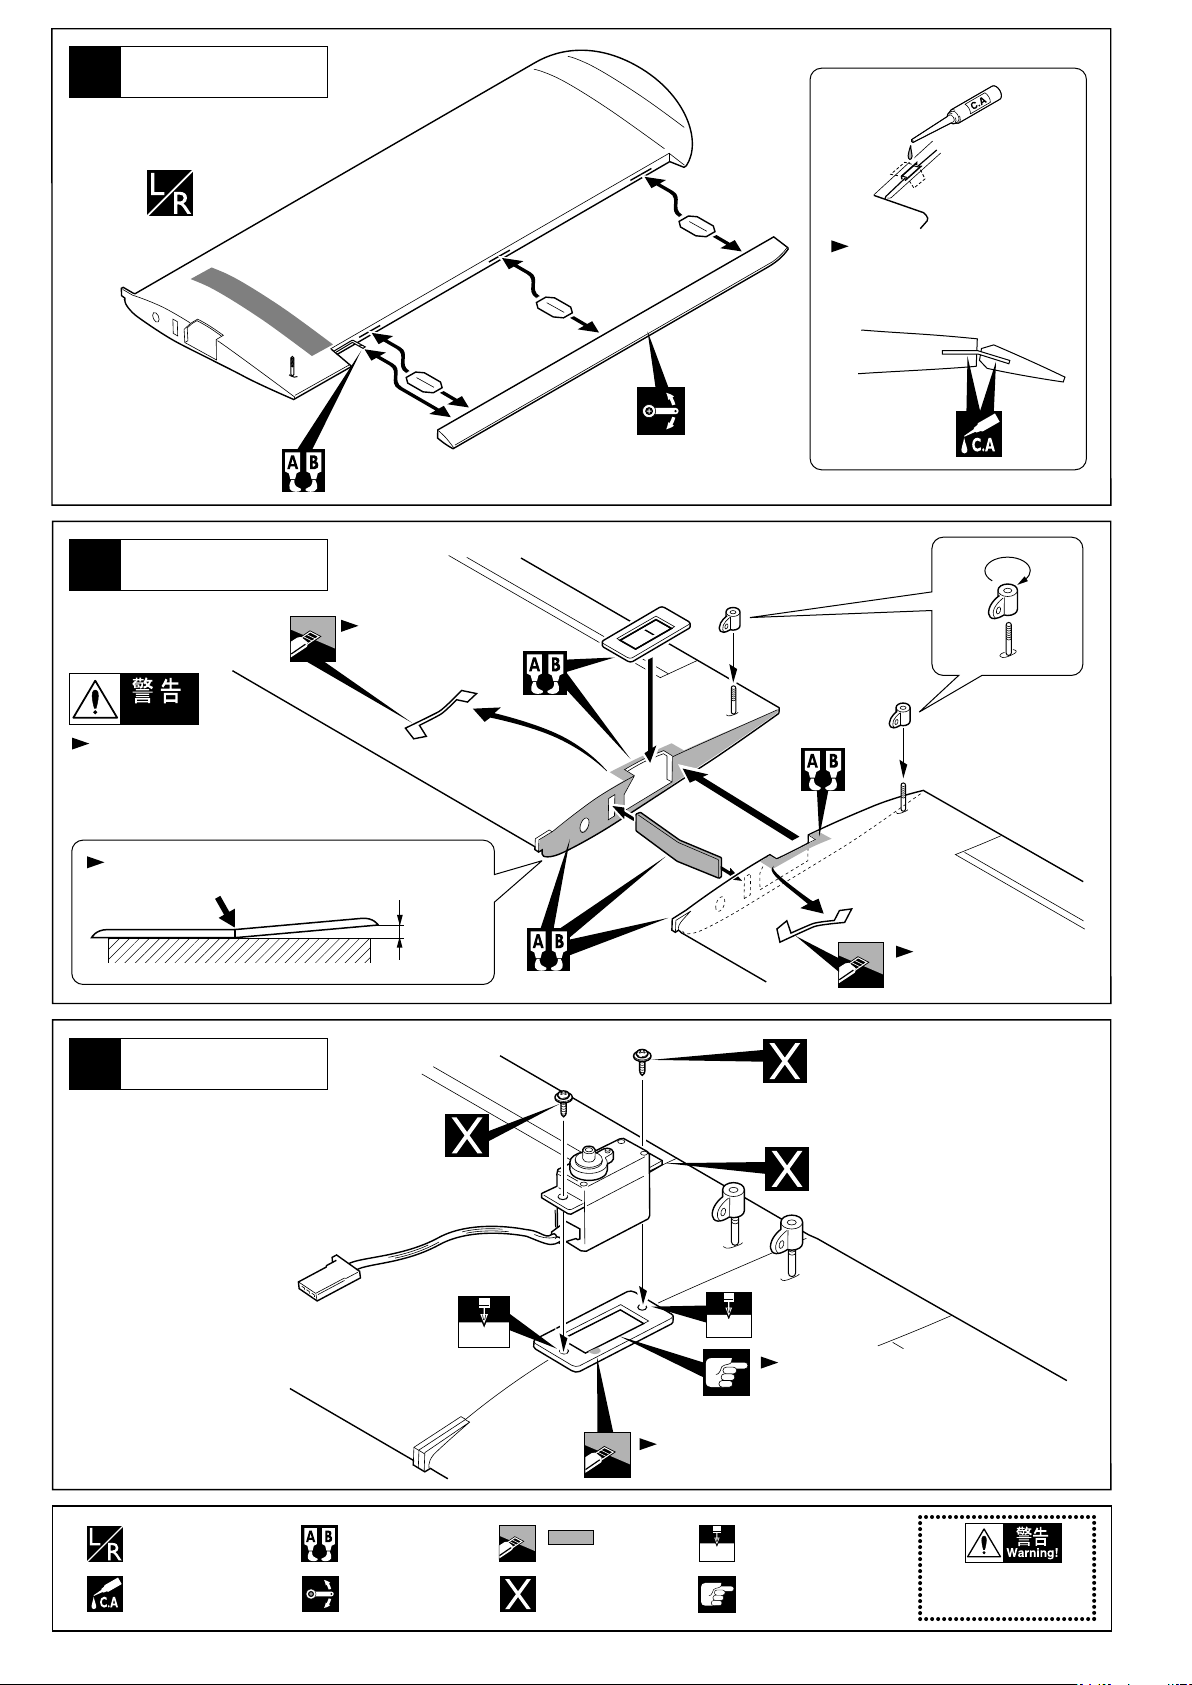
1
2
主翼
Main Wing
低粘度瞬間接着剤がヒンジにし
みこむ様にして確実に接着する。
Install the hinges completely
before applying instant glue.
主翼
Main Wing
フィルムのみカットする。
Cut the film only.
Warning!
確実に取付ける。
飛行中にはずれると操縦不能に
なり事故につながります。
Fix wing securely to fuselage. Loss of wing will
result in no control and crashes.
平らな台に置き、ねじれない様にピッタリ合わせる。
Align wings exactly on a flat bench top.
約62mm
Approx
62mm
主翼
3
Main Wing
サーボに付属
Included with Servo
フィルムのみカットする。
Cut the film only.
サーボに付属
Included with Servo
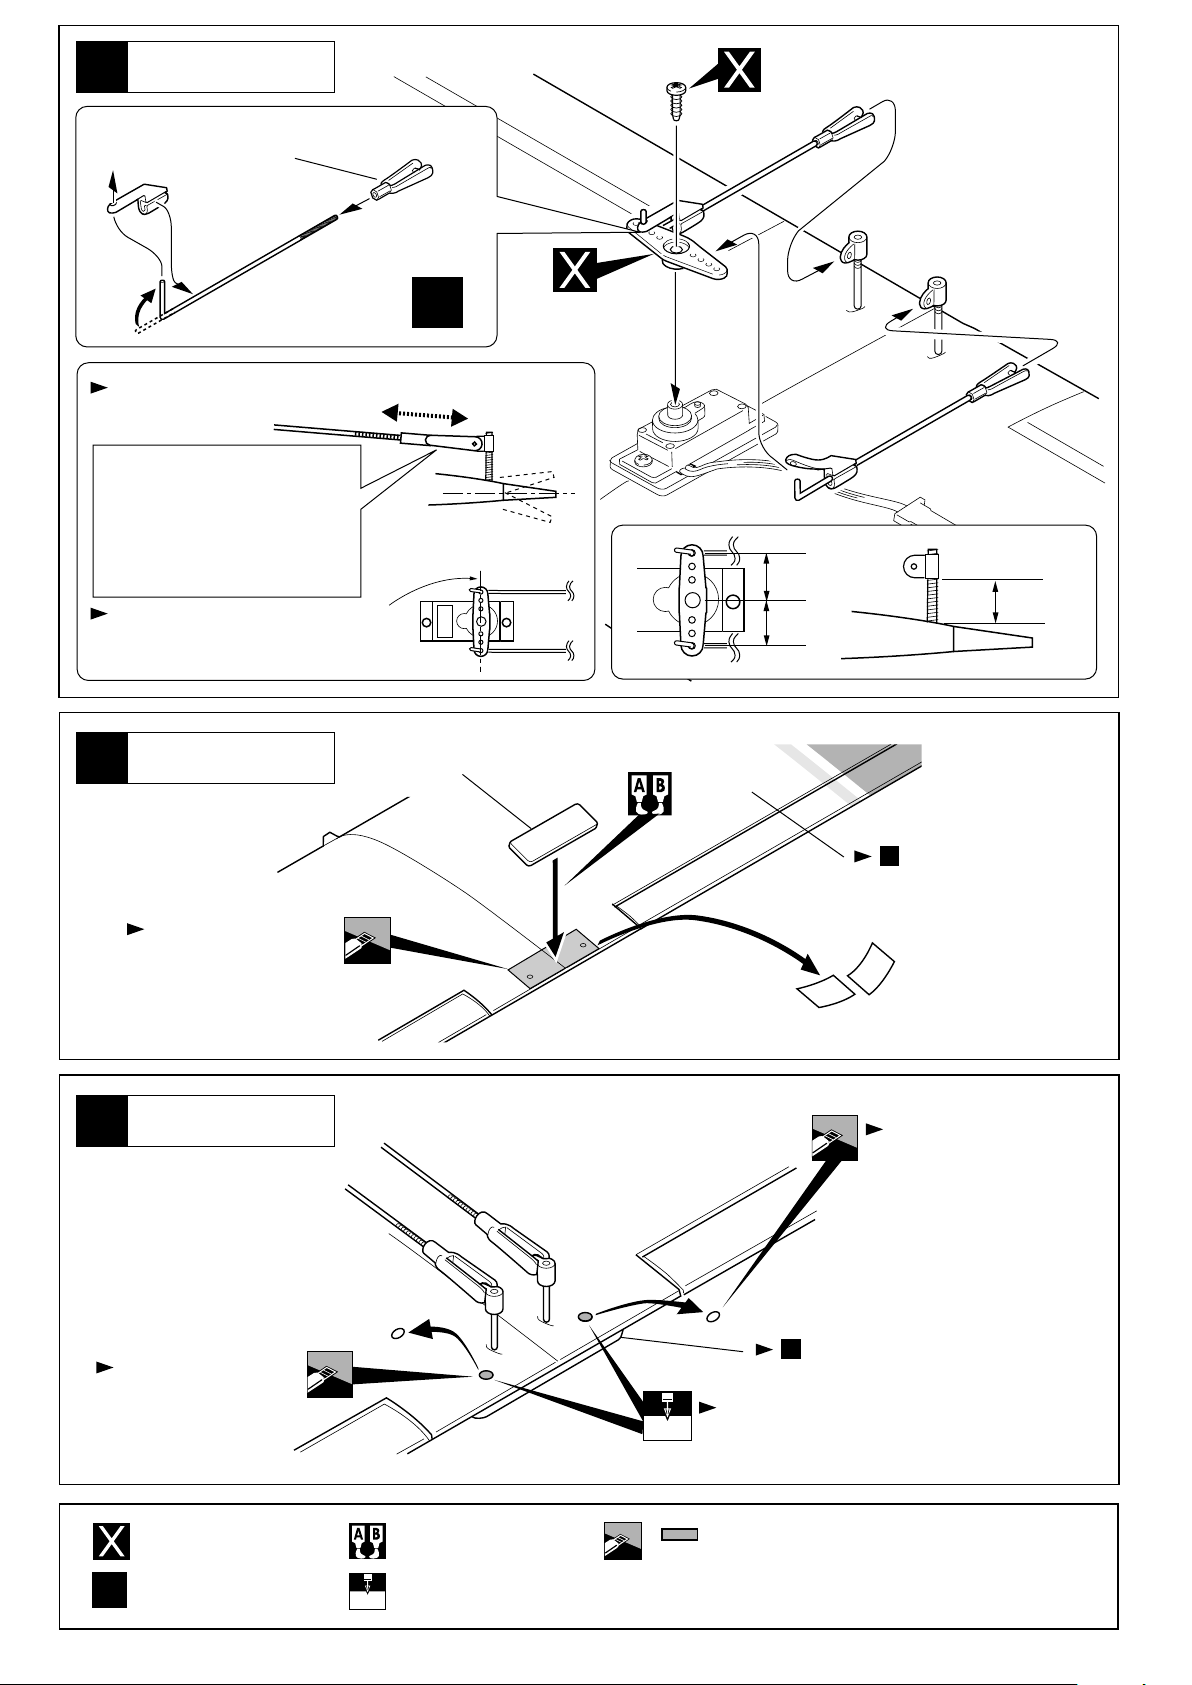
エルロンサーボ
Aileron Servo
左右同じように組立てる。
Assemble left and right
sides the same way.
瞬間接着剤で接着する。
Apply instant glue
(CA glue, super glue).
エポキシ接着剤で接着
する。
Apply epoxy glue.
可動するように組立てる。
Ensure smooth non-binding
movement while assembling.
1.5mm
をカットする。
Cut off shaded portion.
別購入品
Must be purchased
separately!
1.5mm
サーボの大きさに合わせてカット。
Cut to match the Servo.
サーボのコードを通すための切り込みを入れる。
Cut for Servo Lead.
キリで穴をあける
(例1.5㎜)
Make hole with Awl.
1.5mm
(example: 1.5mm).
注意して組立てる所。
Pay close attention here!
●
重要な注意事項があるマークです。
必ずお読みください。
Don'toverlookthissymbol!
5
4
主翼
Main Wing
サーボに付属
Included with Servo
アジャスター
Adjuster
ニュートラル調整
Place servo horn neutral to adjust.
1の場合アジャスターを回して
伸ばす。
Adjust to plain.
2の場合アジャスターを回して
縮める。
Adjust to plain.
ホーンは主翼に対して平行になるように。
Hornshouldbeparalleltomainwing.
主翼
5
Main Wing
x2
主翼補強板
Main Wing Support
サーボに付属
Included with
Servo
1
2
10mm
10mm
4
の主翼裏面。
The other side.
12mm
フィルムのみカットする。
Cut the film only.
主翼
Main Wing
6
フィルムのみカットする。
Cut the film only.
3.1mm
フィルムのみカットする。
Cut the film only.
5
で取付けた主翼補強板。
Main Wing Suppot
穴をガイドにドリルで主翼補強板を貫通させる。
Drill holes
別購入品
Must be purchased separately!
2セット組立てる(例)。
Assemble as many times
x
2
as specified.
エポキシ接着剤で接着
する。
Apply epoxy glue.
キリで穴をあける(例2㎜)
Make hole with Awl.
2mm
(example: 2mm).
をカットする。
Cut off shaded portion.
6
 Loading...