

KYOSHO MINI-Z OVERLAND MV-01 ASF 2.4GHz User Manual [en, ja]
※ご使用前にこの説明書を良くお読みになり十分に理解してください。
Before beginning assembly, please read these instructions thoroughly.
ミニッツオーバーランドMV-01シャシーセットASF2.4GHz
MINI-Z OVERLAND MV-01 Chassis Set ASF 2.4GHz
組立/取扱説明書
Instruction Manual
目次
/ Index
1. 安全のための注意事項
Safety Precautions
2.セット内容
Content
3.セットの他に必要な物
Equipments not included
4.各部の名称
Glossary of Main Parts
5.走行の準備
Before Operating
6.走行させましょう
Let's Drive!
7.上手な走行テクニック
Operating Tips
8.各部の交換
Replacement for each part
●分解図
Exploded View
●スペアパーツ
Spare Parts
●故障かな・・!?
Trouble Shooting
●京商スペアパーツ・オプションパーツの購入方法
●組立や、操作上で不明な点のお問い合わせ方法
R
THE FINEST RADIO CONTROL MODELS
3~7
8
9
10
11~13
14~29
30~31
32~37
38~39
38
40~41
42
43
※製品改良のため、予告なく仕様を変更する場合があります。
*Specifications are subject to change without prior notice!
© Copyright 2010 KYOSHO CORPORATION / 禁無断転載複製
30280-T01
はじめに
About This Model
ミニッツオーバーランドシリーズをお買い上げいただきましてありがとうございます。
このミニッツオーバーランドシリーズは最新の2.4GHzASF制御システムを搭載した高性能小型R/C
カーです。
新型レシーバーアンプユニットRA-18Mは処理速度を大幅に向上したCPUを搭載し反応速度を大幅に向上。
さらに高効率FETを採用することで鋭い加速を実現しています。
これらの性能を存分にお楽しみ頂くために、この組立/取扱説明書をよくお読みになり十分に理解して
ください。
また、ミニッツオーバーランドシリーズには様々なオプションパーツを用意しています。
スピードアップ、ドレスアップ等、あなただけのチューンナップをお楽しみ頂けます。
Thank you for purchasing this product. This series uses the latest 2.4 GHz ASF system. The increased
processing speed of the RA-18M receiver amp unit delivers significantly faster response and the use of
high-efficiency FET contributes to sharp acceleration. For maximum enjoyment of this product,
please read this manual. A wide range of MINI-Z optional parts are available.
下記のホームページアドレスからオプションパーツリストをご覧ください。
Please refer to the website below for the option parts list.
http://www.kyosho.com/mini-z-support/
2
1
Safety Precautions安全のための注意事項
組立て・走行の前に必ずお読みください。
Please read carefully before assembling and operating your model.
:生命や身体に重大な被害が発生する可能性がある危険を示します。警告マーク
WARNING!
PROHIBITED
●この商品は高い性能を発揮するように設計されています。組立てに不慣れな方は、模型を良く知っている人にアド
バイスを受け確実に組立ててください。
●
It is highly recommended that first-time builders seek advice of experienced modelers before beginning assembly.
●小さい部品があるので、組立て作業は幼児の手がとどかない所で必ずおこなってください。
●Assemble this kit only in places out of children’s reach!
●動かして楽しむ場所は、万一の事故を考えて安全を確認してから、責任をもってお楽しみください。
●Take enough safety precautions prior to operating this model. You are responsible for this model’s assembly
and safe operation!
: This symbol indicates where caution is essential to avoid injury to yourself or others.
:事故や故障の原因となるため、やってはいけないことを示します。禁止マーク
: This symbol points out actions that you should NOT do to avoid possible damage or accidents.
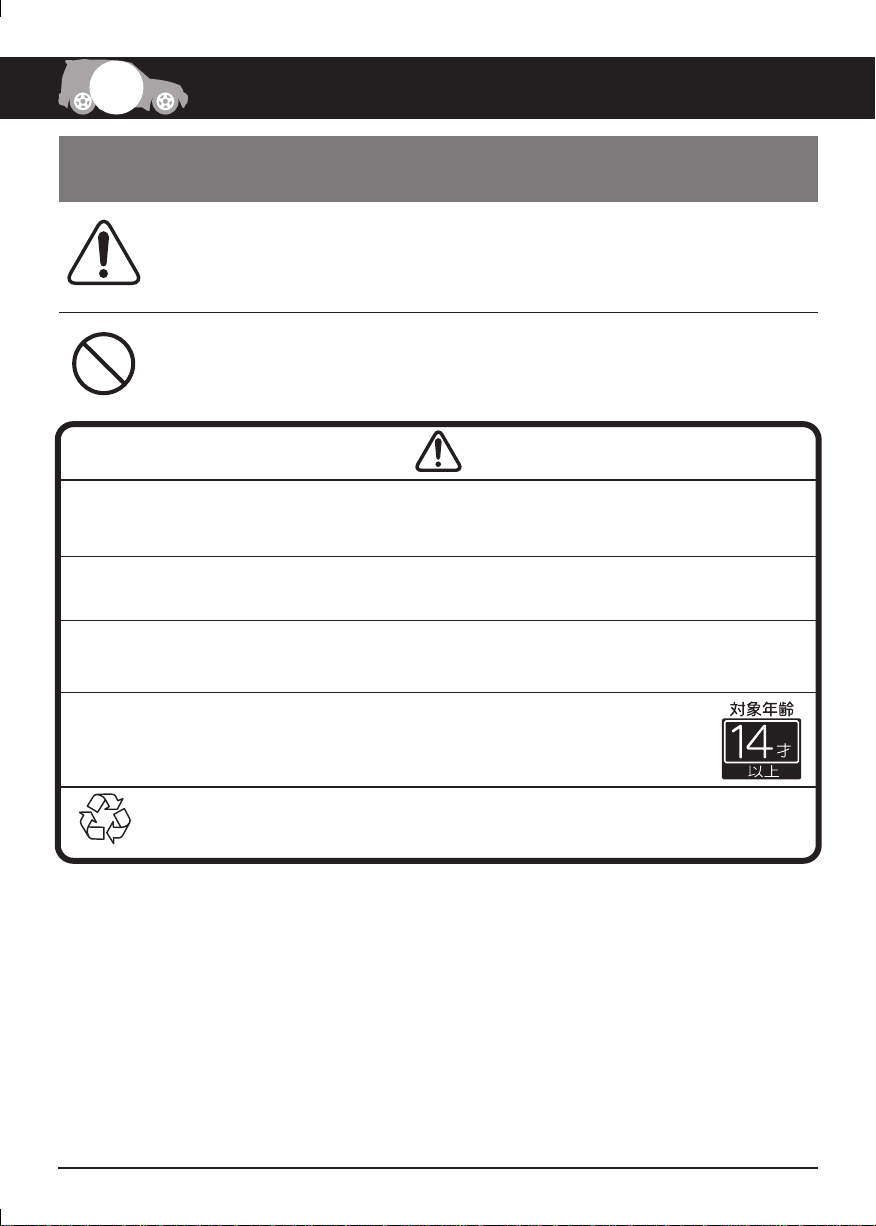
●この商品は14才以上を対象に設計してます。玩具ではありません。
This model is not a toy. It is designed for users over 14 years of age.
●
・不要になったバッテリーは、貴重な資源を守るために廃棄しないでリサイクル協力店へお持ちください。
・
The product you have purchased is powered by a rechargeable battery. The battery is recyclable. At the end of its useful life, under various national /
state and local laws, it may be illegal to dispose of this battery into the municipal waste stream. Check with your local solid waste officials for details in
Ni-Cd
your area for recycling options or proper disposal.
Ni-MH
3
1
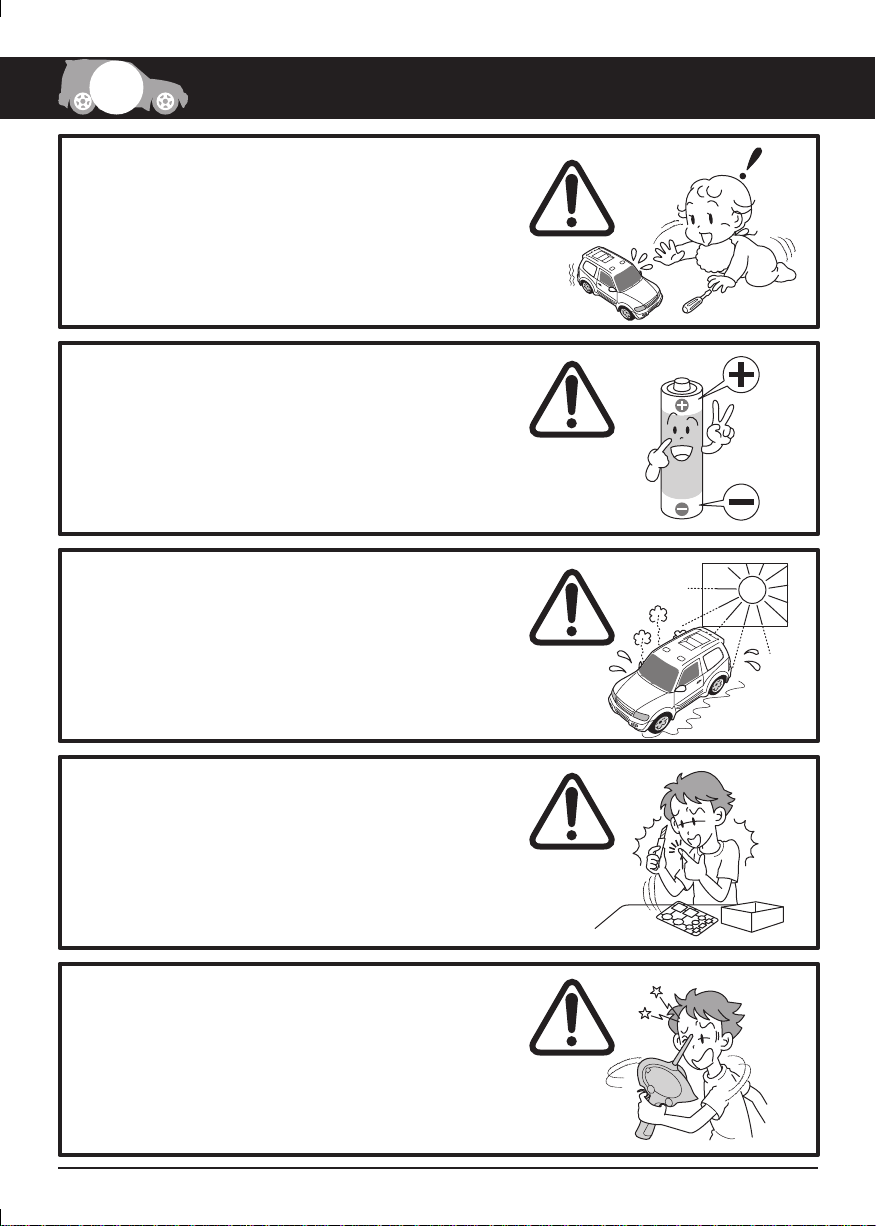
小さな部品や、とがった部品がありますので、十分注意してください。
また、小さなお子様のいる場所での作業・保管はさけてください。
As the product includes small and sharp parts, assemble and
store this product only in places out of the reach of children.
電池は指定の電池を使用し、逆接続・分解は絶対にしないでください。
発熱や破損の原因となり大変危険です。
Never disassemble the polarity required for installation.
This may lead to damage and leakage.
故障や破損、変型の原因となるため高温・多湿の場所での長期保管は
しないでください。
Do not store this model in a high-temperature or humid area nor
under direct sunlight.
Safety Precautions安全のための注意事項
ケガの恐れがありますのでカッターやニッパー、ドライバーなどの工具
の取扱いには十分注意してください。
Cutters, wire cutter and screwdrivers need careful handling.
アンテナの先端でケガをする恐れがあります。顔に付近けたり、
振り回したりしないでください。
As the front end of the antenna may be dangerous,
do not swing or aim it toward faces.
4
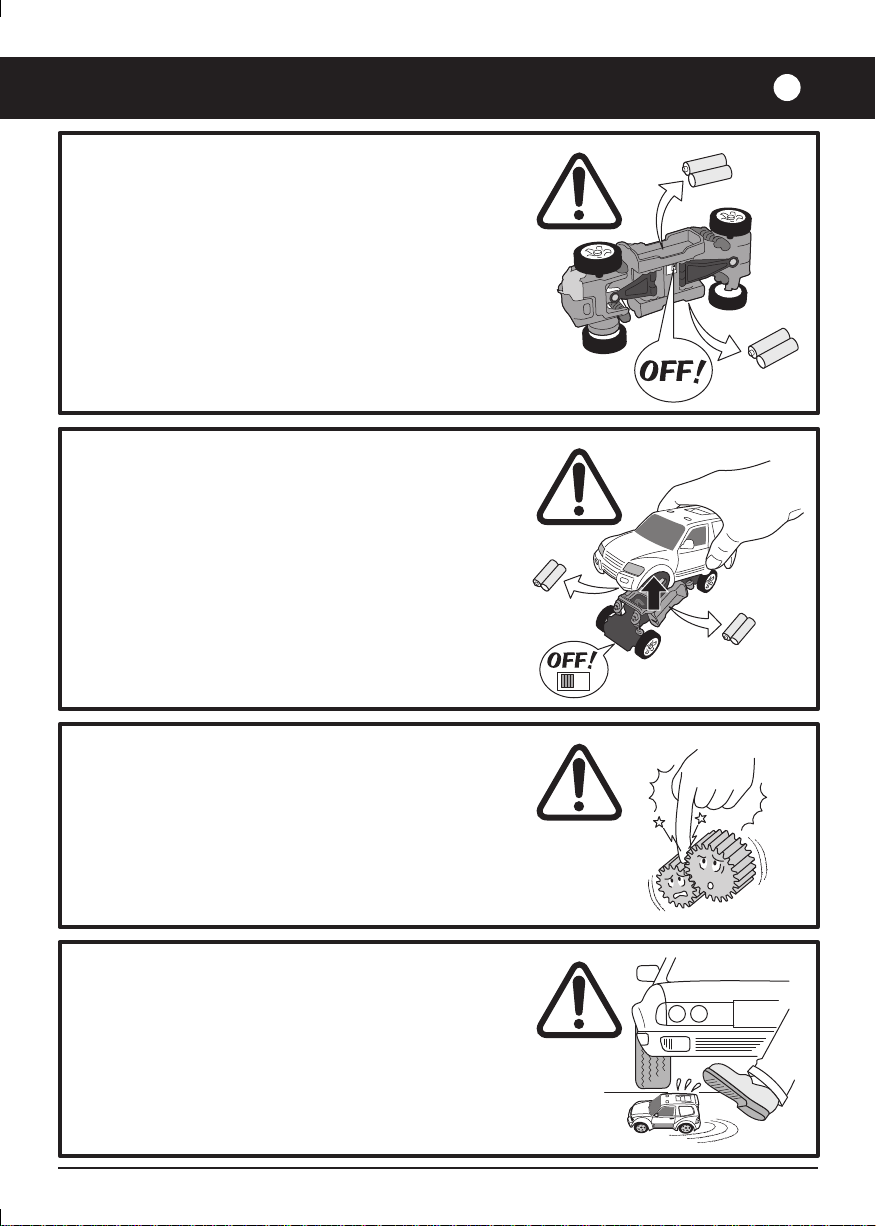
ミニッツシリーズは本体のスイッチをOFFにしても微弱電流が
流れています。
電源を完全にOFFにする為には全ての電池を取外すことが必要です。
電池を入れたままにした場合、発熱、発火、電池の液漏れ等が
考えられますので、走行後は必ず全ての電池を取外してください。
Even when the power on the MINI-Z model is switched OFF, there is
still a low current flowing. In order to turn the power OFF completely,
all batteries must be removed from the model. If batteries are left
in the model, the batteries may overheat, ignite or leak.
Please remove all batteries after use.
ボディを外す時は必ず電源スイッチをOFFにし車体の
電池を外してください。基板や端子に触れると大変危険です。
Always turn power switch OFF and remove batteries when
removing
terminals is dangerous.
the body. Touching the circuit board and battery
1
ケガの恐れがありますのでギヤ等の回転部分に
指や手をはさまないでください。
Do not touch moving gears. They can cause injury.
車の走っている所や幼児が近くにいる所、人ごみでは
走行させないでください。事故の原因となり危険です。
Do not operate the model on public roads, in crowded places
and near children. It may cause accidents.
5
1
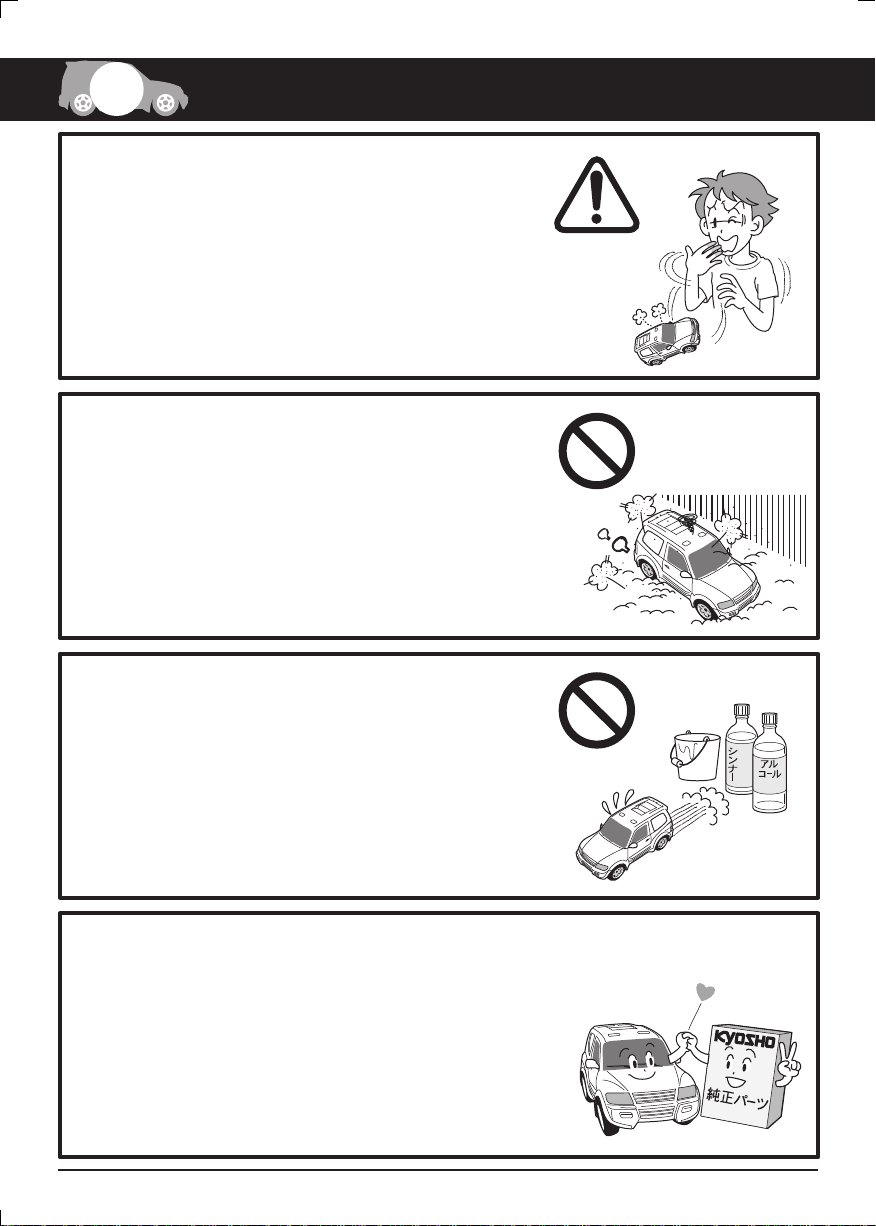
走行中や走行後は乾電池やモーターが発熱することがあります。
危険ですので十分冷えてから触るようにしてください。
During and after operation, the motor and batteries will be hot.
Do not touch them until they have had time to cool down.
砂やホコリ、水のたまっている所、毛足の長いじゅうたんでは
走行させないでください。故障の原因となります。
Do not run your car in sandy, dusty, wet conditions, or on thick/soft
carpet. Such surfaces can damage its operating parts.
Safety Precautions安全のための注意事項
ボディの汚れは軽く拭き取る程度にしてください。
水やシンナー・アルコールでは絶対に洗わないでください。
Do not use water, alcohol, or thinner to clean your car's body.
Simply wipe it down with a clean, soft cloth.
純正オプションパーツ以外の組込みや車体の改造はしないでください。
故障の原因となります。
Do not install any option parts not made by Kyosho for this model.
To avoid causing irreparable damage, do not attempt any modifications.
6
Thinner
Alcohol
Option Parts

1
ミニッツシリーズの保護回路について
Safety Precautions for the MINI-Z Series
/ Circuit Breaker保護回路
保護回路はモーターの配線に組込まれており、走行中モーターへの負荷が大きい場合やモーターの故障により大電流
が流れた場合、保護回路が作動しモーターへの電源供給をカットします。
これにより一時的にモーターが動かなくなります。
保護回路が作動した場合には、車を回収し電源をOFFにして電池を全て取外してください。
約5分ほどで保護回路は自動的に復帰して再び走行が可能になります。
(保護回路が作動した場合、表面が熱くなりますのでヤケド等に注意してください。)
The motor wiring is fitted with a circuit breaker that cuts power to the motor when heavy loads or damage to the
motor causes excessive electrical current flow. When this occurs, the motor will stop running.
Once the circuit breaker has been tripped, retrieve the model, turn the power off and remove all batteries.
After about 5 minutes, the circuit breaker automatically resets and model can be operated again.
*When the circuit breaker is activated, the surface becomes hot. Use sufficient caution to avoid burns.
/ If the Circuit Breaker Trips Repeatedly繰り返し保護回路が作動する場合
繰り返し保護回路が作動する場合には下記の不具合が考えられます。必ず原因となる不具合を解決してから走行を
お楽しみください。
Possible reasons for the circuit breaker tripping repeatedly are outlined below. Be sure to rectify the cause of the
problem before operating the model.
1. 車が障害物等にぶつかりそれ以上進めない場合に、無理に進もうとしている!!
The model is being forced against an obstacle and cannot move forward
対処方法→障害物等にぶつかりそれ以上進めない場合には、すぐにスロットル・トリガーをニュートラルに戻して
ください。
Solution → Stop applying the throttle and return it to neutral.
2. 駆動系(ギヤやタイヤ等)の回転抵抗が大きい!!
Resistance in the drive train (gears & tires)
対処方法→ モーターを取外した状態で車体を転がして、駆動系がスムーズに回転しているかどうかを確認します。
スムーズに回転しない場合には、ほこりや糸くずが絡み付いていることが考えられます。ギヤ、シャフト、
ベアリングのゴミや糸くずを取除き駆動系がスムーズに回転するようにメンテナンスを行ってください。
それでも症状が改善しない場合には、モーターの故障や寿命が考えられます。その場合には新品の
モータ
することができます。
Solution → Remove the motor and roll the chassis to check if the drive system is rotating smoothly.
If it is not rotating smoothly, it is possible that dirt or fibers (threads etc.) may be caught. Remove and clean the
gears, shafts and bearings of dirt and fibers. If this still doesn't resolve the problem, the motor may be damaged
or worn out. In this case, replace with a new motor. Or, install the optional bearing set to reduce resistance
through the drive system.
3. ギヤ比の調整が適当では無い!!
Gear ratio is not set correctly
対処方法→ 走行させる場所の広さに比べて高速向きなセッティングを行った場合に起こりやすくなります。
レディセットの工場出荷状態のギヤ比(最も加速力が良いギヤ比)に戻して走行を行ってください。
Solution → This can occur if the gear ratio is too high-geared for the space available to run the model.
Rectify by returning to the model's original gear ratio setting (this is also the ratio for optimal acceleration).
4. 連続走行による過負荷!!
Excessive loads from continual operation
対処方法→気温が高い場合や連続走行を行った場合には保護回路が作動しやすくなります。このような場合には
5分から10分の走行ごとに休憩しモーター等を冷ましてください。モーターやFETの寿命を延ばすこと
ができます。
Solution → If the model is operating at high temperatures or has been run continuously for some time, the circuit
breaker trips more easily. Allow the model to cool down after each 5 to 10 minutes of operation.
This will also increase the life of the motor and FET.
ーに交換してください。またオプションのベアリングセットを装着することで回転抵抗を小さく
7
2
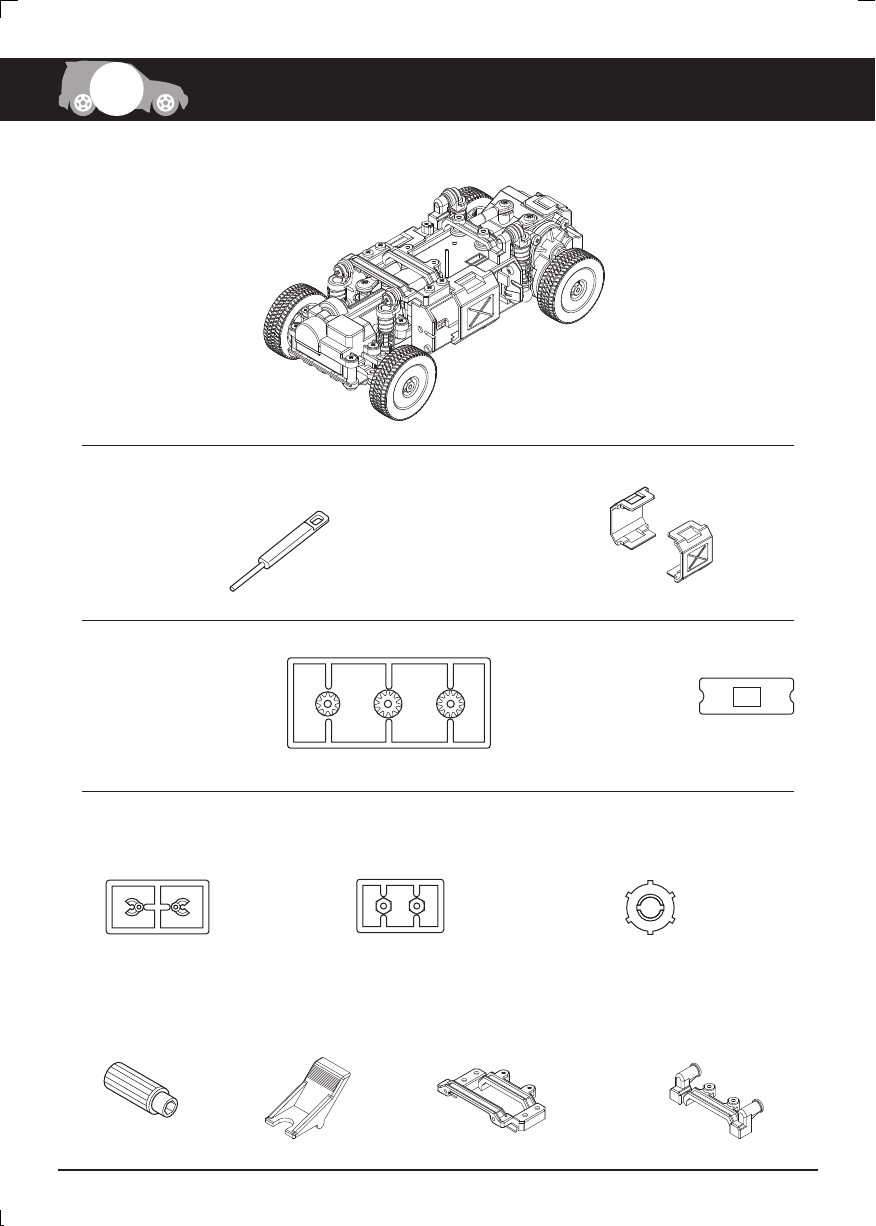
Contentセット内容
*シャシー
*Chassis
*ペアリングスティック
*Pairing Stick
*交換用ピニオンギヤセット *モータースペーサー
*Pinion Gear Set
(for replacement)
*Cリング(スペア)
*C-ring (Spare)
*ホイールレンチ
*Wheel Wrench
*ピニオンツール
*Pinion Tool
*ホイールナット(スペア)
*Wheel Nut (Spare)
*バッテリーホルダー
*Battery Holder
*Motor Spacer
*フロントダンパーステー
*Front Shock Stay
*デフロックプレート
*Deff.Lock Plate
*リヤダンパーステー(2種)
*Rear Shock Stay (2-type)
8

3
Equipments not includedセットの他に必要な物
*PERFEX KT-18 送信機
(コントローラー)
*PERFEX KT-18 Transmitter
(Controller)
精密ドライバーか、 ドライバー(小)
*
+ +
*A Phillips Screwdriver (Precision type or a small sized)
*カッター
*Cutter
*ニッパー
*Wire Cutter
*走行用単4アルカリ乾電池
又は単4型ニッケル水素バッテリー ………4本
*4-AAA sized Alkaline Batteries or UM-4 sized
NiMH (Nickel-Metal Hydride) Batteries 4 pieces
*送信機用単3又は単4アルカリ乾電池
*AAA sized or UM-4 sized Alkaline Batteries
*又は京商・近藤科学株式会社製
2.4GHz ASF方式対応の送信機
*Or, 2.4GHz ASF compatible transmitter
from Kyosho / Kondo Science Inc.
*ボディセット(オートスケールコレクション)
*Body Set (Auto Scale Collection)
単4型
AAA
4
UM-4
走行には、より高性能なNo.ORI13203/ORI13204/
ORI13206単4型ニッケル水素バッテリー(別売)が
経済的です。
※オキシライドバッテリー等の特殊な乾電池は使用しないでください。
Do not use Oxyride or other special type batteries.
カバーが破れている電池や種類の違う電池を
まぜて使わないでください。
Do not use any damaged batteries.
カバーの破れ
Damaged
9
4
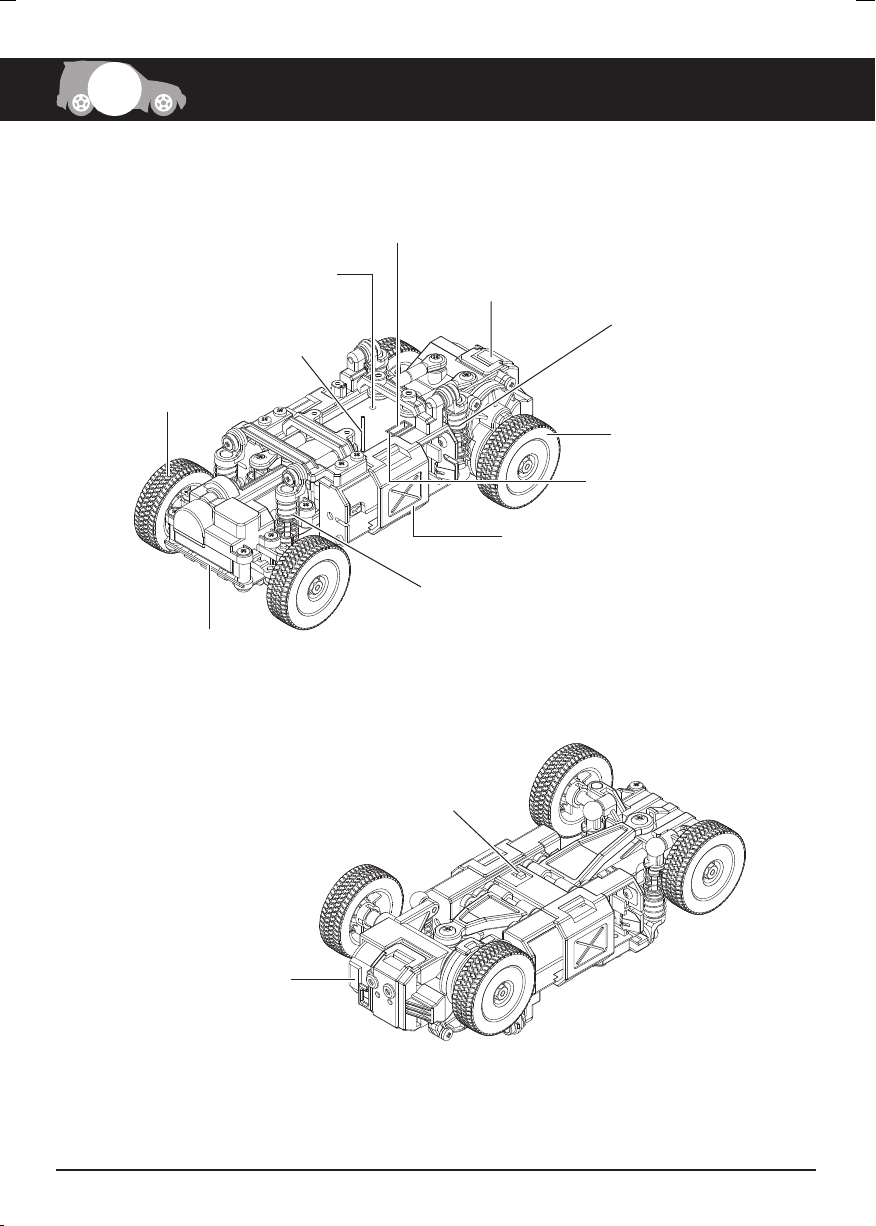
Glossary of Main Parts各部の名称
I.C.S.コネクター
I.C.S. Connector
フロントタイヤ
Front Tire
シャシー
Chassis
ペアリングボタン
Pairing Button
アンテナ
Antenna
パワーユニット
Power Unit
リヤダンパーユニット
Rear Shock Unit
リヤタイヤ
Rear Tire
LEDインジケーター
LED Indicator
バッテリーホルダー
Battery Holder
フロントダンパーユニット
Front Shock Unit
電源スイッチ
Power Switch
モーター
Motor
10
5
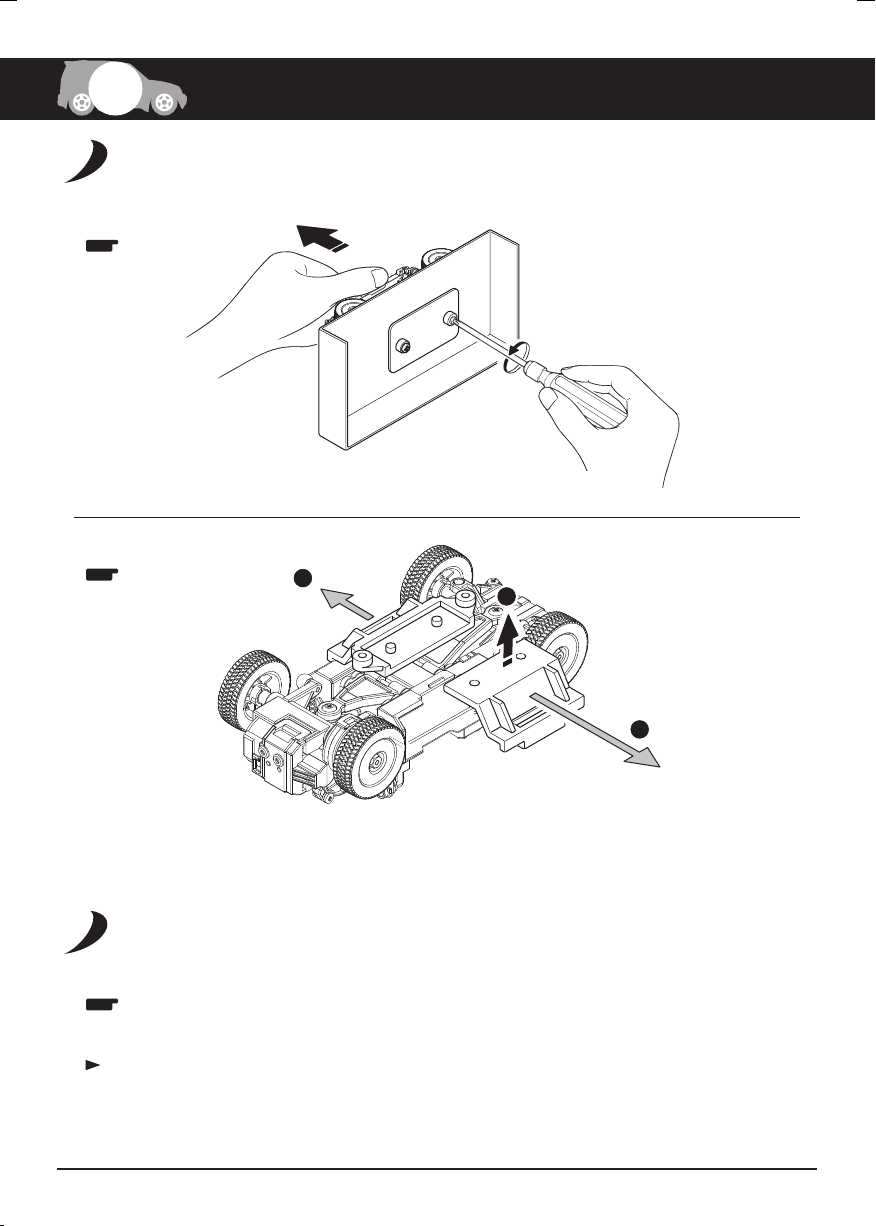
シャシーの組立て
Assembly of Chassis
1
2
Before Operating走行の準備
3
1
2
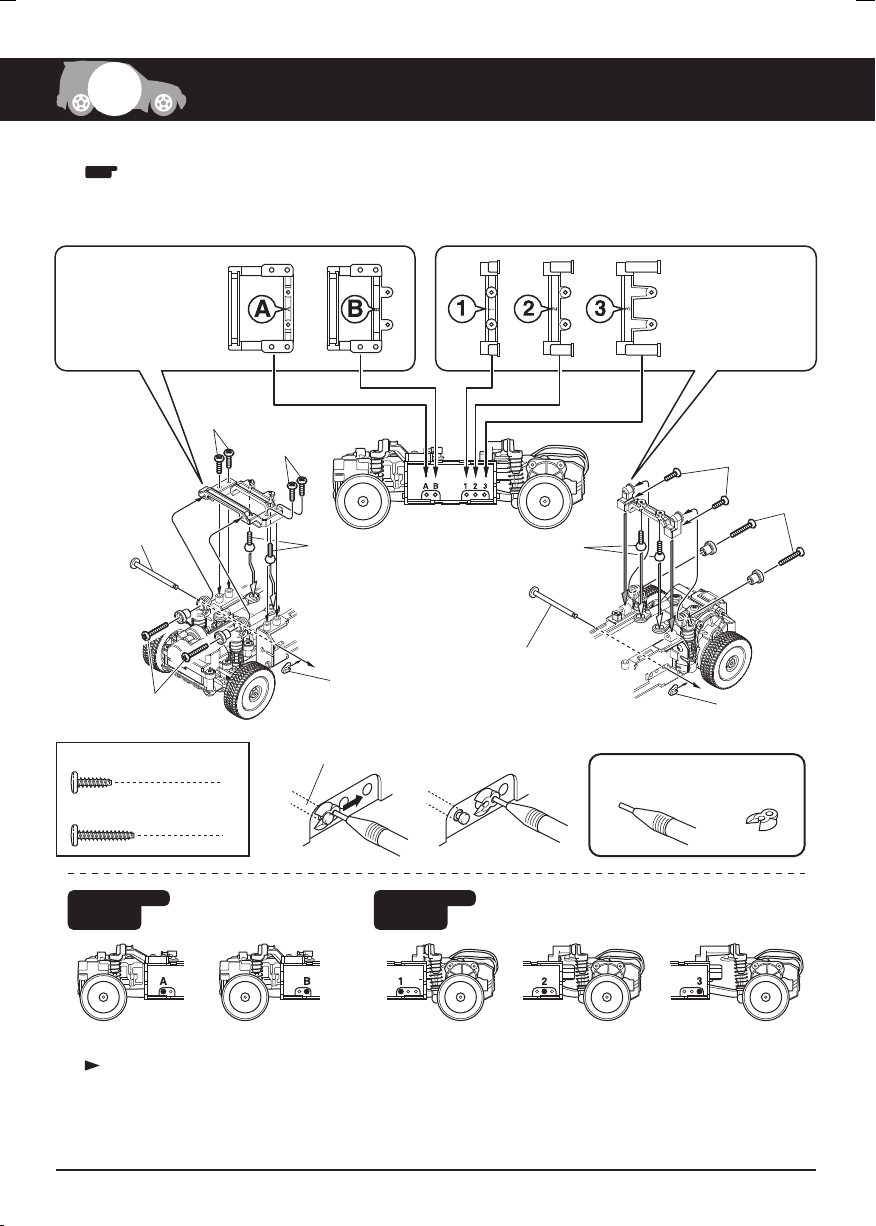
ホイールベースの確認
Checking Wheelbase
使用するボディに適合したホイールベースをウェブサイト(http://www.kyosho.com/mini-z-support/)のミニッツ
1
オーバーランド用オプションパーツリストの「5データ表」の「サスペンションシャフト位置」で確認してください。
Confirm body and wheelbase compatibility by referring to 'Suspension Shaft Position' on 5 Data Table from the
MINI-Z Overland's Optional Parts List that can be downloaded from
「フロント」が「A」、「リヤ」が「3」の場合はそのままご使用ください。
その他の場合は次のページの手順2に従ってホイールベースを変更してください。
Bodies compatible with Front = A and Rear = 3 can be used without any change to the wheelbase.
For other combinations, please follow Step 2 on the following page to adjust the wheelbase.
http://www.kyosho.com/mini-z-support/
11
.
5
ホイールベース調整
2
Adjustment of Wheelbase
*サスペンションシャフトの取付位置に対応したダンパーステーに交換します。
*Replace shock stays in accordance with the suspension shaft positions.
Before Operating走行の準備
フロントダンパーステー
Front Shock Stay
2x6mm
サスペンション
シャフト
Suspension Shaft
2x10mm
2 x 6mm
TPビス
TP Screw
2 x 10mm
TP Screw
TPビス
リヤダンパーステー
Rear Shock Stay
2x6mm
4.8mm
ピロボール
Pillow Ball
Cリング
C-ring
サスペンションシャフト
Suspension Shaft
6
4
4.8mm
ピロボール
Pillow Ball
サスペンションシャフト
Suspension Shaft
シャープペンシル
Plastic Pencil Tip
2x6mm
2x10mm
Cリング
C-ring
Cリング
C-ring
フロント
Front
このセットに付属のホイール・タイヤは、そのままどのボディセットにも使用できます。
ボディセットに付属のタイヤ・ホイールを使用する場合は「8各部の交換」の「タイヤ」を参照して、
取付けてください。
Wheels and tires included with this set can be used with any body set.
If using the wheels and tires included with the body set, refer to the section 'Tires' in '8 Replacing Each Part'
and install accordingly.
リヤ
Rear
12
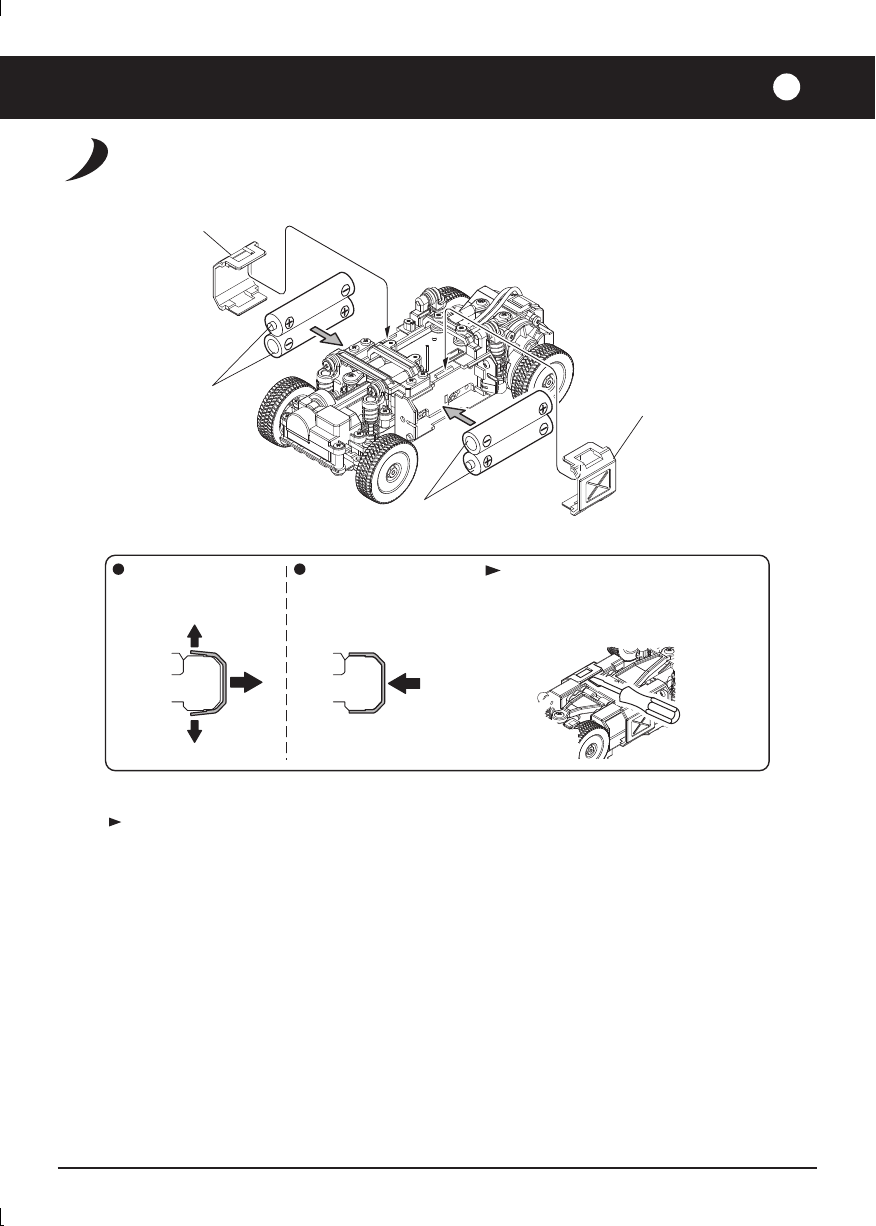
電池の入れ方
Battery Installation
5
バッテリーホルダー
Battery Holder
*
単4アルカリ乾電池(4本)
*
AAA Batteries, Notice the polarity to be installed.
バッテリーホルダー
Battery Holder
*
取外し 取付け 外しにくい場合は、マイナスの
To remove Battery Holder. To attach Battery Holder.
ドライバーなどを用いる。
If it is not easy to remove the battery
holder, try with a flat blade screwdriver.
送信機の電池の入れ方は、送信機の取扱説明書をご覧ください。
For installation of transmitter batteries, please refer to your transmitter's instruction manual.
13
6
Let's Drive! 走行させましょう
電源の入れ方
Turn the Power Switch ON
ここから先は、使用する送信機がPERFEXKT-18の場合の説明となっております。
その他の送信機を使用する場合は、お手持ちの送信機の取扱説明書をご覧ください。
Instructions from this point onwards relate to use with the PERFEX KT-18 transmitter.
If using a different transmitter, refer to the instructions included with your transmitter.
初めてお買い上げ頂いた車体(ミニッツオーバーランド)を使用する場合には、ペアリングという設定が
必要です。
To use this transmitter with a previously purchased chassis (MINI-Z OVERLAND), it must undergo a pairing
adjustment.
ペアリングとは・・・
What is pairing?
お買い上げ頂いた車体に使用する送信機のIDを記憶させる作業のことです。使用する送信機を変更する場合
にもペアリングを行ってください。車体と送信機をその組合せで使用する、最初の1回目だけに行います。
Pairing is the process of registering the transmitter's ID with your chassis. If you change transmitters, please
perform pairing. Pairing process is not required after the first time.
<>
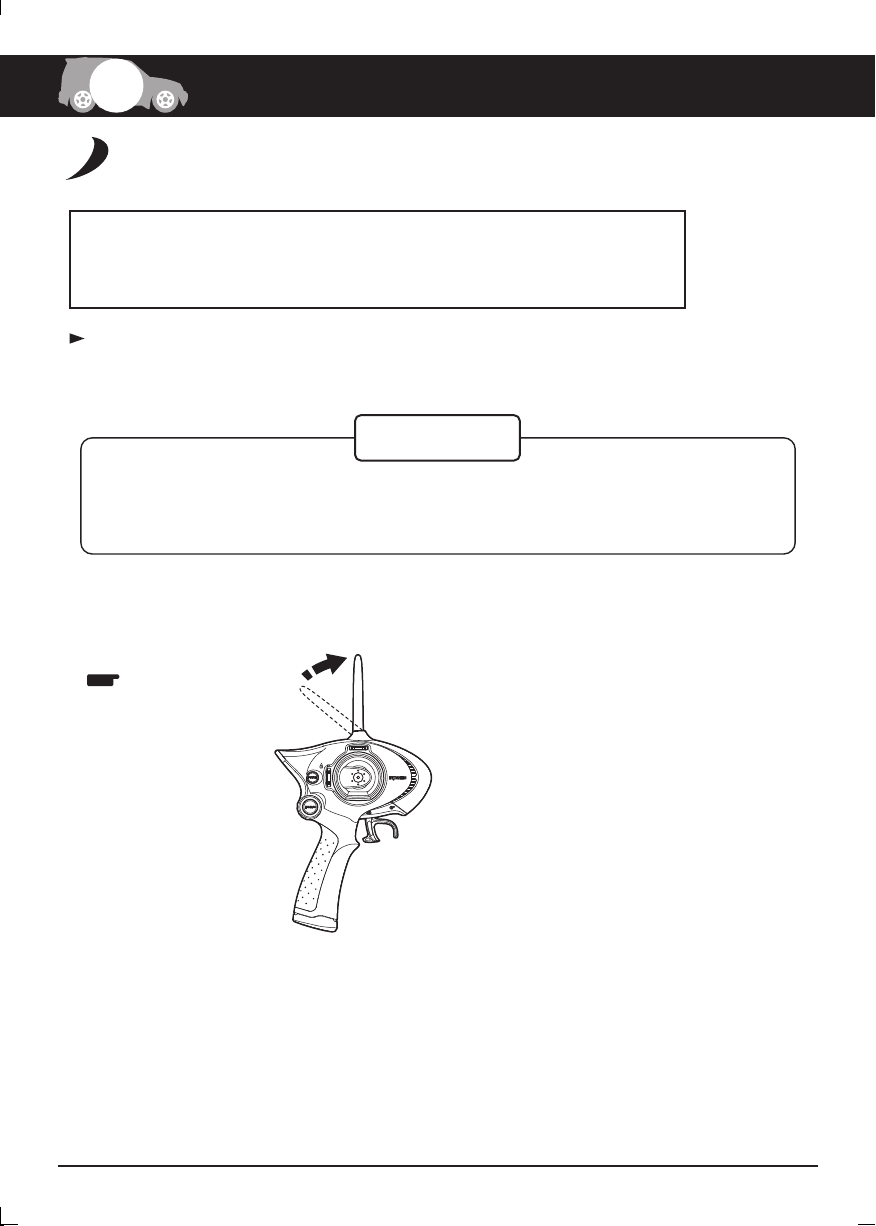
ペアリングの方法
< >How to complete pairing
アンテナを立てる。
1
Antenna
14
 Loading...