

Page 1
※ご使用前にこの説明書を良くお読みになり十分に理解してください。
Before commencing assembly, please read these instructions thoroughly.
Bitte lesen Sie die Anweisungen vor Gebrauch genau durch!
Veuillez attentivement lire les instructions avant l’emploi!
Lea cuidadosamente este manual de instrucciones antes de comenzar el montaje
R
THE FINEST RADIO CONTROL MODELS
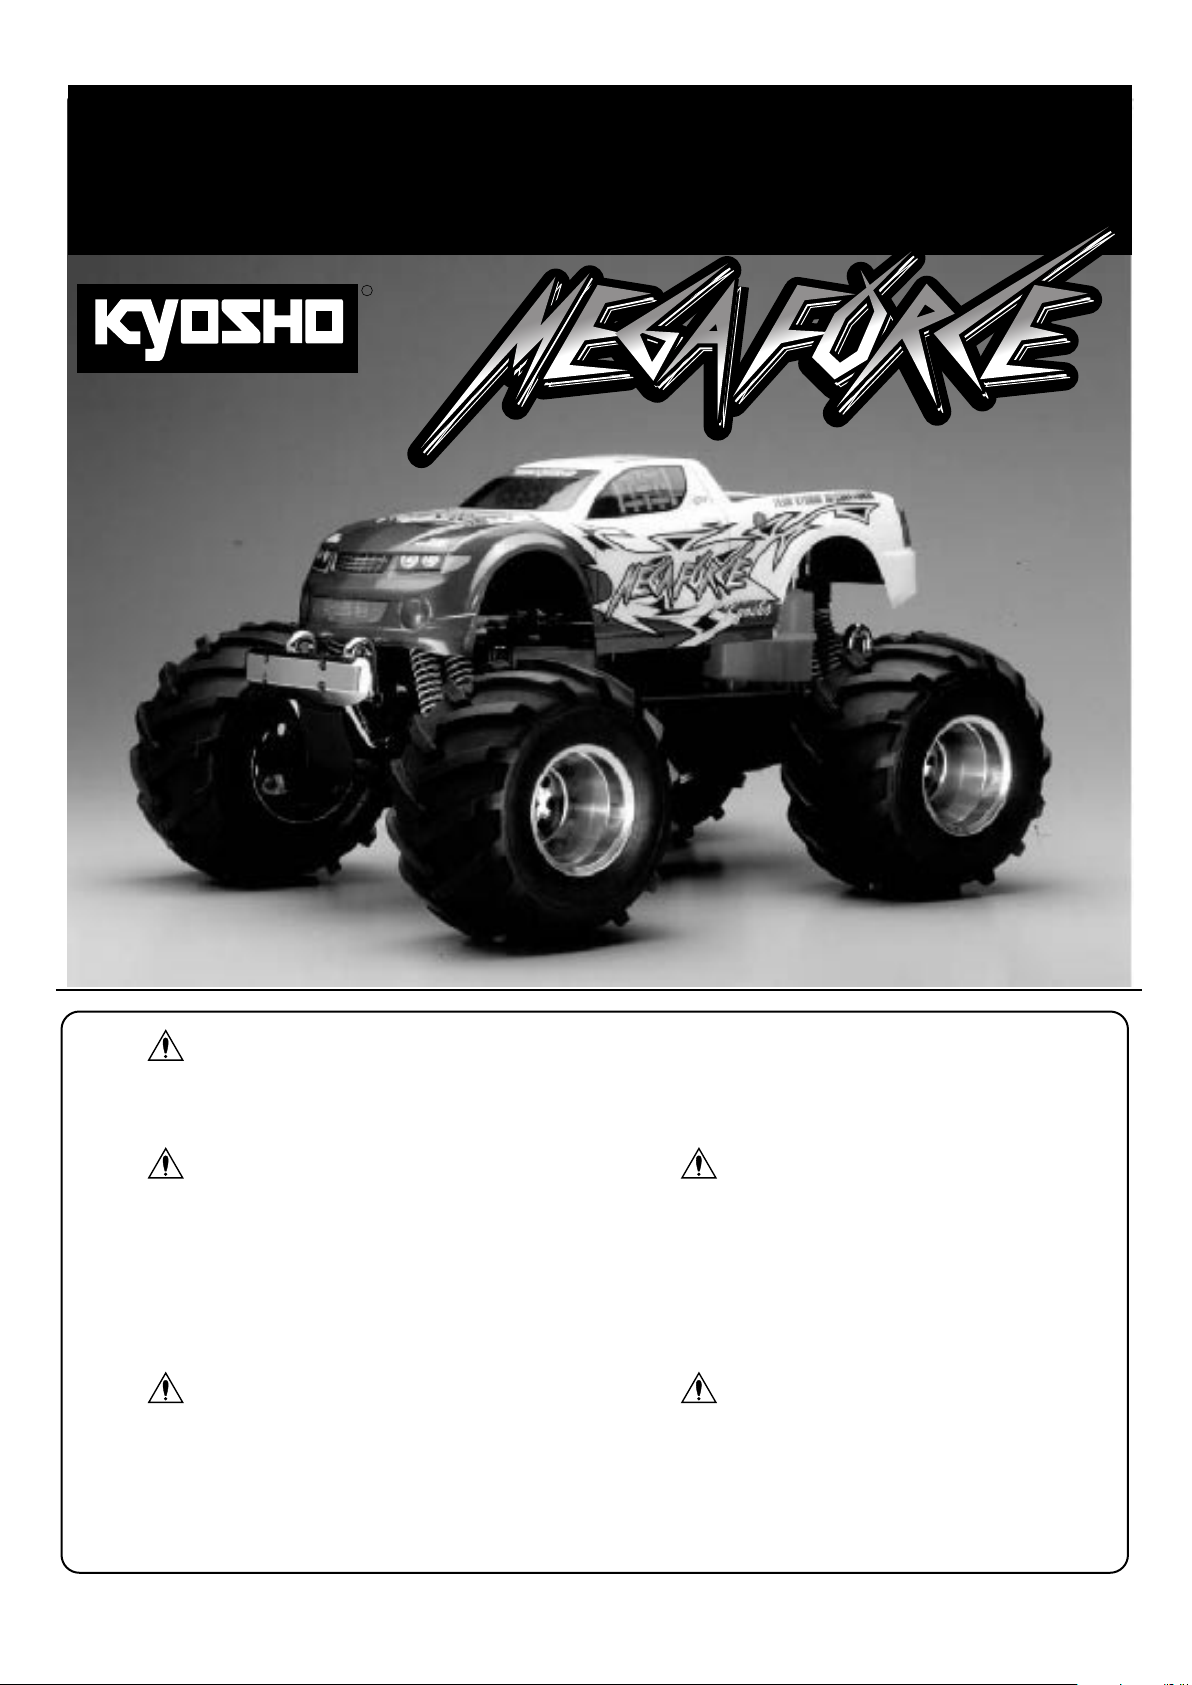
MEGA FORCE
RADIO CONTROLLED
.15 ENGINE POWERED
MONSTER TRUCK
安全のための注意事項
この無線操縦模型は玩具ではありません!
●
この商品は高い性能を発揮するように設計されています。組立てに不慣れな方
は、模型を良く知っている人にアドバイスを受け確実に組立ててください。
SAFETY PRECAUTIONS
This radio control model is not a toy!
●First-time builders should seek the advice of experienced modellers
before commencing assembly and if they do not fully understand any
part of the construction.
●Assemble this kit only in places out of children’s reach!
●Take enough safety precautions prior to operating this model. You are
responsible for this model’s assembly and safe operation!
●Always keep this instruction manual ready at hand for quick reference,
even after completing the assembly.
ACHTUNG!
Dieses Modell ist kein Spielzeug!
●Anfänger sollten möglichst Rat bei Modellbaukundigen einholen, um das
Modell richtig zusammenzubauen und gefahrlos bedienen zu können.
●Bauen Sie dieses Modell nur außer Reichweite von Kindern zusammen!
●Treffen Sie genügend Sicherheitsvorkehrungen, bevor Sie Ihr Modell
bedienen! Sie alleine tragen die Verantwortung für Ihr Modell und
dessen gefahrlose Bedienung!
INSTRUCTION MANUAL
メガフォース
●小さい部品があるので、組立て作業は幼児の手がとどかない所で必ずお
こなってください。
●動かして楽しむ場所は、万一の事故を考えて安全を確認してから、責任
をもってお楽しみください。
●
組立てた後も、説明書がいつでも見られるように大切に保管してください。
ATTENTION!
Ce modèle n’est pas un jouet!
●
Si vous êtes débutant dans le modèle réduit, prenez conseils auprès de
modélistes con-firmés afin d’utiliser votre modèle dans des conditions
optimales.
●Assemblez ce kit en dehors de la portée de jeunes enfants!
●Prenez des précautions lors de l’utilisation. Vous seul êtes responsable
des évolutions de votre modèle. La société KYOSHO ou son
distributeur ne peuvent en aucun cas être tenus responsables des
accidents pouvant survenir lors de l’utilisation de ce modèle!
PRECAUCIONES DE SEGURIDAD
Este modelo R/C no es un juguete
●Los no iniciados en este hobby deberán ser aconsejados por expertos
antes de comenzar el montaje de este modelo.
●Realice el montaje en un lugar fuera del alcance de los niños.
●Siempre extreme las medidas de seguridad. Usted es el único
responsable del funcionamiento de su modelo.
●Mantenga este manual siempre a mano
組立/取扱説明書
※製品改良のため、予告なく仕様を変更する場合があります。 Specifications are subject to change without prior notice! Technische Änderungen sind ohne vorherige Ankündigungen möglich!
Les spécifications peuvent changer sans préavis!
© 2001 KYOSHO/禁無断転載複製
El fabricante puede modificar los kits sin previo aviso
No. 31181
(和英独仏西)
Page 2
安全のための注意事項/
SAFETY PRECAUTIONS / Sicherheitshinweise /
PRECAUTIONS D'EMPLOIS / Precauciones de seguridad
メガフォースは、本格的な無線操縦模型です。玩具ではありません!
MEGA FORCE is a radio control model, not a toy!
Überprüfen Sie Ihr Fahrzeug auf mögliche Beschädigungen nach dem Betrieb!
Ce modèle réduit n'est pas un jouet !
Su MEGA FORCE es un modelo de Radio Control, no es un juguete
メガフォースを楽しむために、走行前の組立てや、走行後のメンテナンス、オプションの交換などをおこないます。
In order to enjoy running the MEGA FORCE, you need to finish assembly before operation.
Do routine maintenance work after operation. Replacement parts and option parts are available separately.
Vor dem Betrieb, muß das Modell gemäß dieser Anleitung montiert werden. Überprüfen Sie das Modell auf
Beschädigungen nach dem Fahrbetrieb. Ersatz-und Tuningteile können über den Fachhandel bezogen werden.
Assembler votre MEGA FORCE avant de l'utiliser. Effectuer une maintenance de votre MEGA FORCE après
chaque utilisation. Consulter la liste des options et pièces de rechange à la fin de la notice.
Para poder disfrutar de su MEGA FORCE deberá completar el montaje antes de ponerlo en marcha.
アルカリ乾電池や充電式の電池は、使い方を誤ると大きな電流が流れ、発熱や液(電解液)漏れの可能性があります。
Improper usage with Alkaline cells or rechargeable batteries may damage the electronics for the car or the radio.
Entfernen Sie die Batterien aus Fahrzeug und Sender nach dem Fahrbetrieb!
L'utilisation de piles ou batteries défectueuses peut causer des dommages à l'électronique de la voiture ou la radio.
Un uso indebido de las baterías recargables podrían dañar el equipo de radio.
メガフォースを安全に取扱うために下記の事項を、必ずお守りください。
In order to operate MEGA FORCE safely, be sure to adhere to the following:
Beachten Sie die folgenden Sicherheitshinweise
RESPECTER LES CONSIGNES DE SECURITE SUIVANTES :
Respete los siguientes consejos de seguridad:
警告
Warning !
Achtung !
Attention !
Aviso !
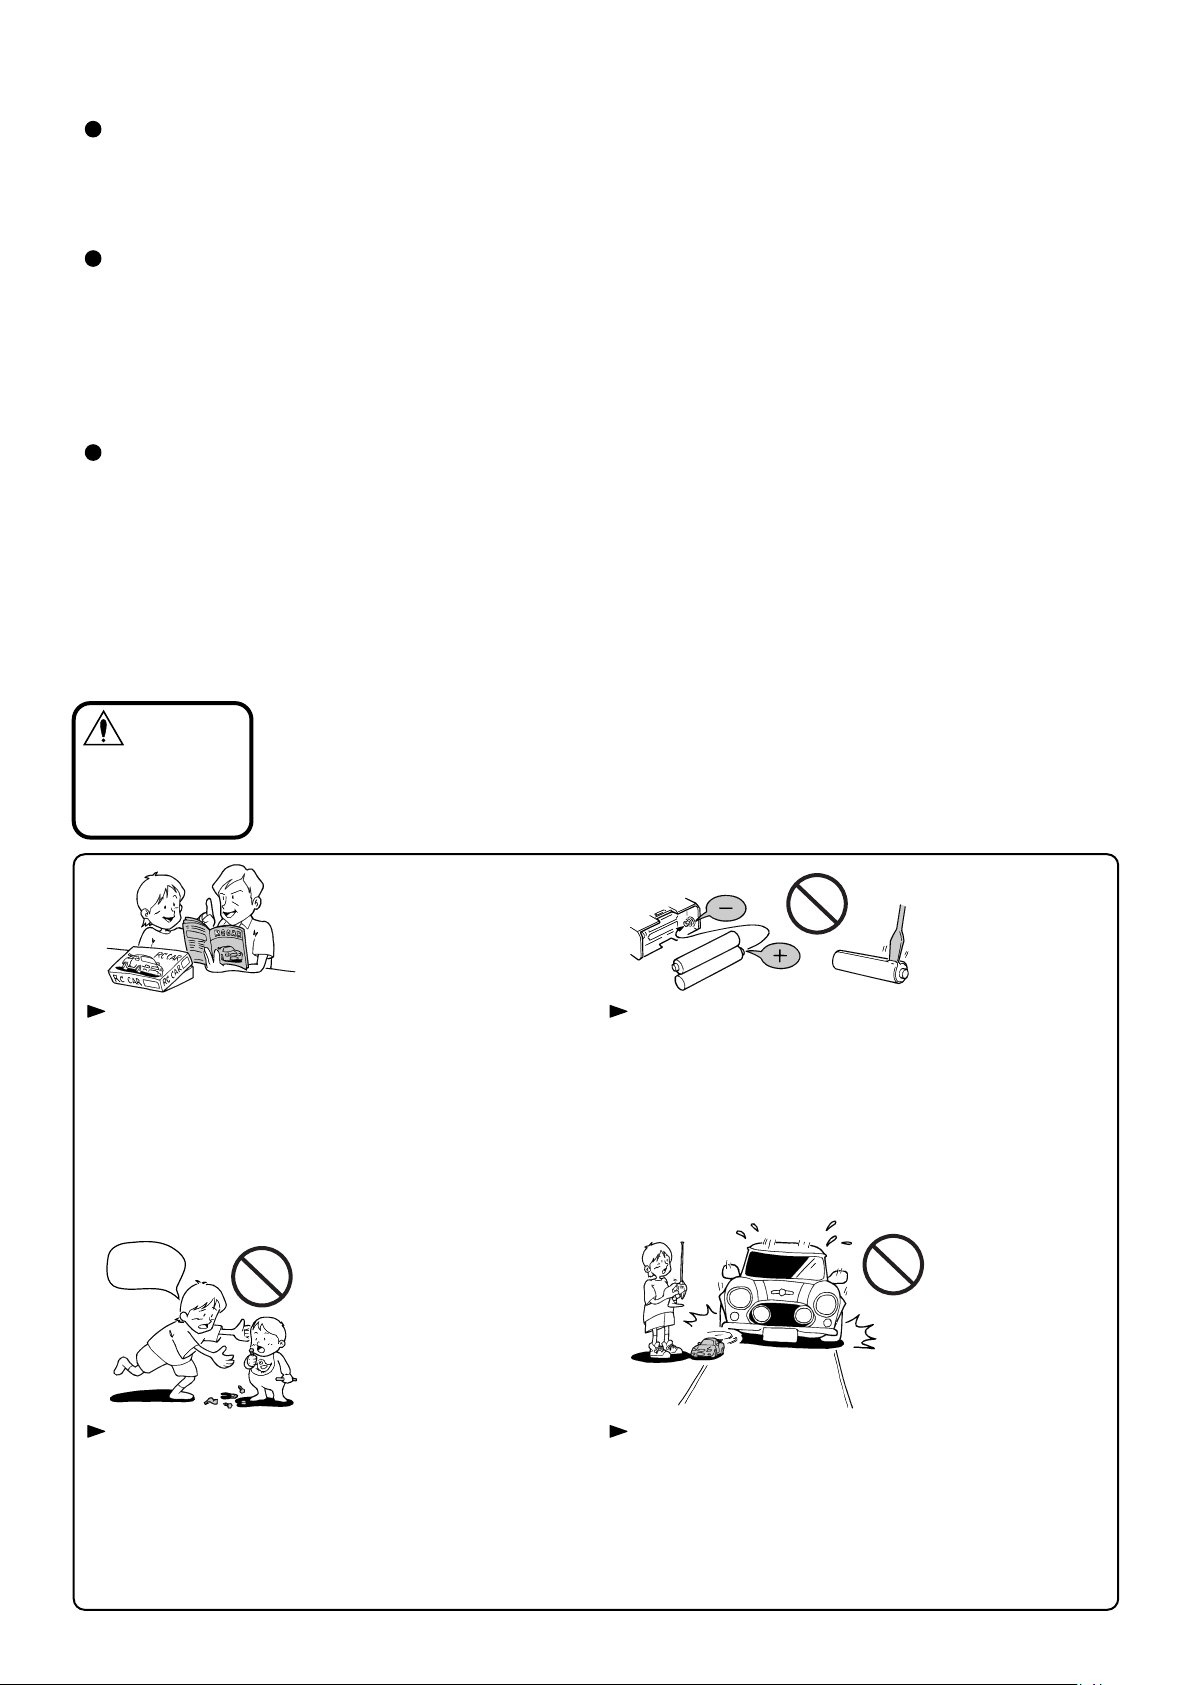
組立て前に必ず説明書を最後までお読みください。また、組立てに不
慣れな方は、模型を良く知っている人にアドバイスを受け確実に組立
てください。
Be sure to read thoroughly the manual before you begin. First-time
builders should seek advice from people having building experience
in order to assemble the model correctly.
Befolgen Sie exakt die Anweisungen in dieser Anleitung.
Lire attentivement la notice de montage. Pour les débutants il est
recommandé de s'encadrer d'une personne expérimentée afin
d'assembler correctement votre MEGA FORCE.
Asegúrese de leer enteramente el manual antes de empezar.
Los principiantes en este hobby deberán pedir consejo a expertos
antes de comenzar el montaje.
*この説明を守らないと生命や身体に重大な被害が発生する可能性がある危険を示します。
*This shows you possibility of significant damage to life and/or body if the following explanations are not adhered.
*Beachten Sie bitte die folgenden Hinweise.
*Problèmes et dommages possibles dans le cas du non respect des consignes de sécurité.
*Le indica la posibilidad de sufrir un accidente si no sigue los consejos.
NO !
電池は逆接続・分解は絶対にしないでください。
破損や液漏れなどの原因になります。
Never reverse connection/disassemble the battery. This may lead to
damage and leakage.
Batterien / Akkus nicht verpolt einsetzen!
Ne jamais ouvrir les batteries ou inverser les connecteurs sous peine
de court-circuit pouvant entraîner de sérieux dommages.
Coloque las pilas/baterías respetando siempre la polaridad indicada.
Nunca intente desmontarlas.
小さな部品や、とがった部品がありますので、十分注意してください。
また、小さなお子様のいる場所での作業・保管はさけてください。
As the product includes small and sharp parts, assemble and store
this product only in places out of the reach of children.
Nicht in Kinderhände gelangen lassen!
L'assemblage de votre MEGA FORCE doit être fait à l'écart des
jeunes enfants. Garder hors de porté des enfants les pièces
de votre MEGA FORCE.
Realice el montaje fuera del alcance de los niños ya que su kit
contiene piezas pequeñas.
2
車道・人ごみ・幼児の近くでは走行させないでください。
事故の原因となります。
Do not operate the model on public roads, in crowded places and
near infant It may cause accidents.
Lassen Sie das Modell niemals auf öffentlichen Straßen fahren.
Utiliser votre MEGA FORCE à l'écart du public et de la circulation
automobile.
No ruede su modelo en calles, carreteras, lugares públicos ni
cerca de colegios ya que podría ocasionar un accidente.
Page 3
注意
Cautions !
Achtung !
Attention !
Precaución
*この説明を守らないと軽傷程度の被害または、物損事故が発生する恐れがあります。
*
This shows you possibility of minor injury and/or damage of material property if the following explanations are not adhered.
*Beachten Sie bitte die folgenden Hinweise.
*
Les dessins çi-dessous vous montrent les précautions d'emploi à prendre afin d'utiliser sans risque votre MEGA FORCE.
*Le indica la posibilidad de accidentes y daños materiales si no sigue los siguientes consejos.
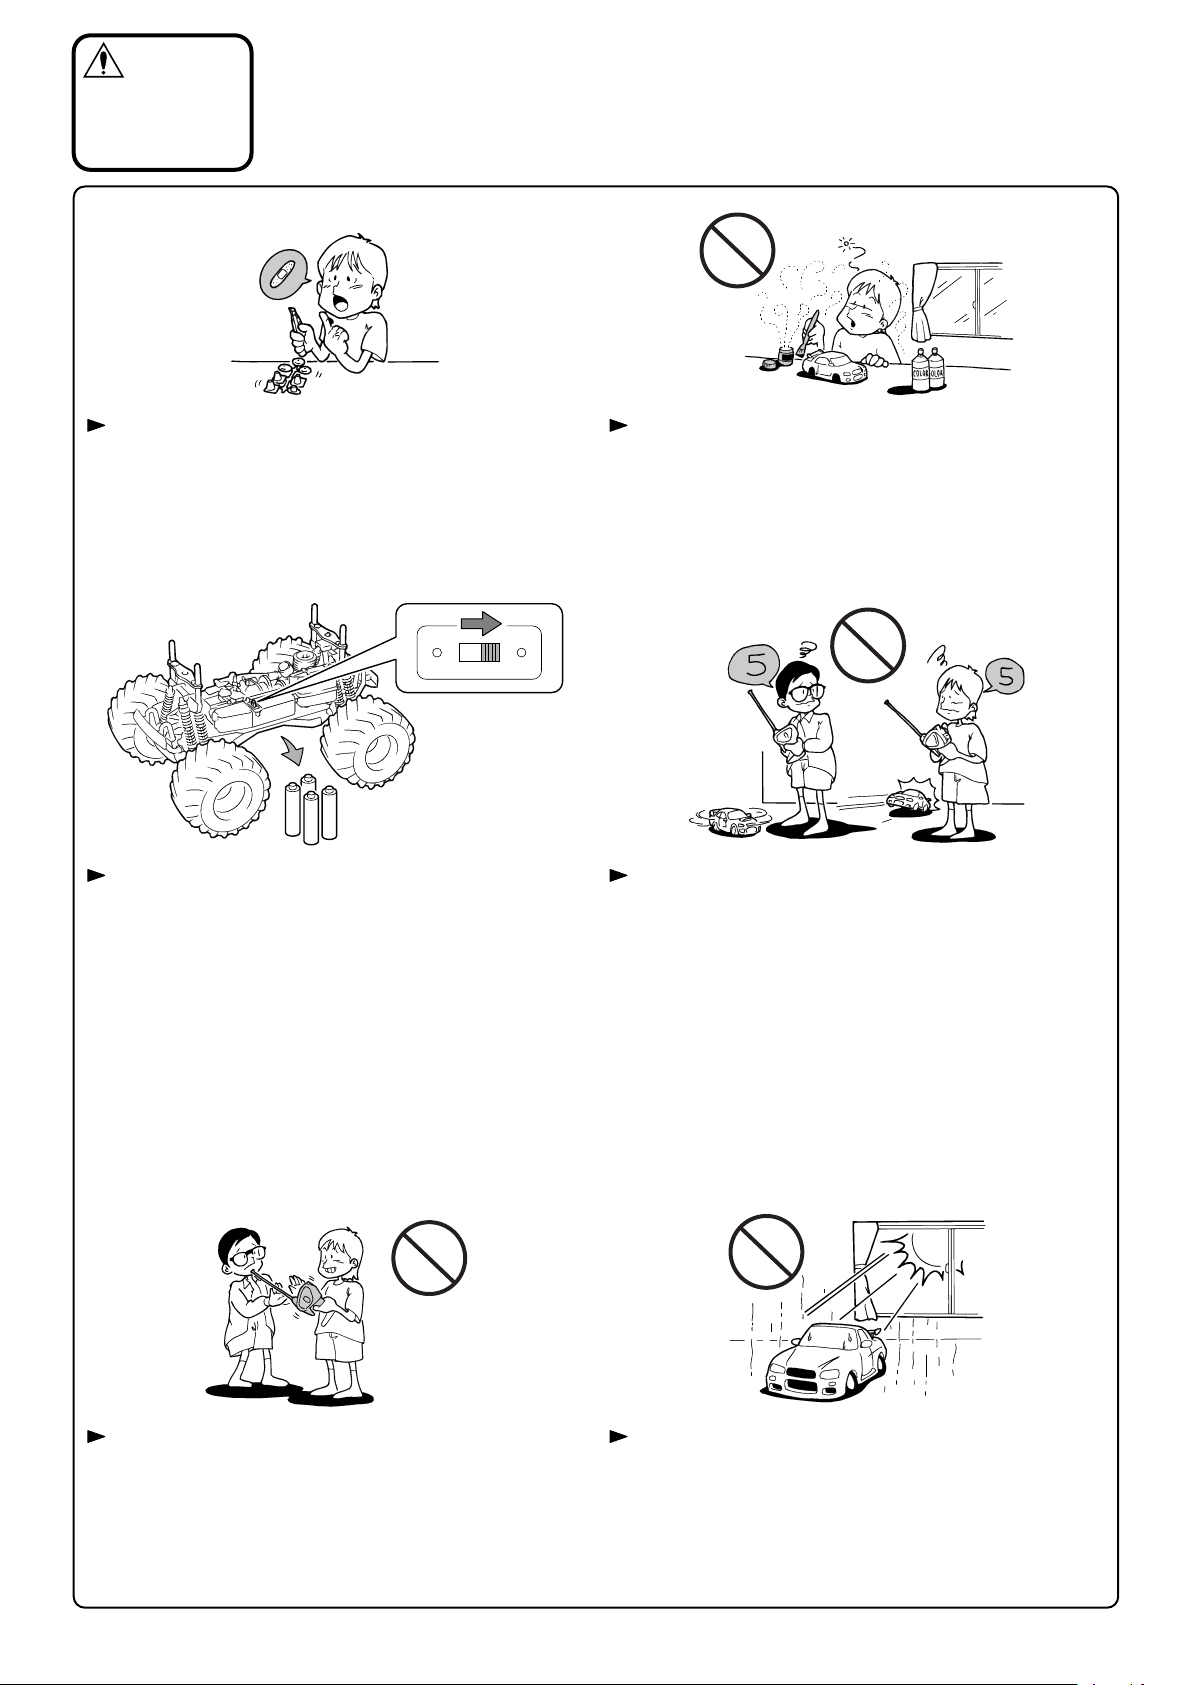
カッターやニッパー、ドライバーなど工具の取り扱いには十分
注意してください。
Cutters, nippers and screwdrivers need careful handling.
Vorsicht im Umgang mit Werkzeug!
Utiliser avec précaution cutters, ciseaux, tournevis ou poinçons
dans les phases de montage ou d'entretien de votre MEGA FORCE.
Maneje las herramientas, cuchilla, destornilladores, etc...
con precaución.
ON
OFF
走行後や、走行させない時は必ず電源スイッチをOFFにし、車体
と送信機の電池を取り外してください。誤作動や電池の発熱・液
漏れなど危険な場合があります。
When not using the model, always switch off the receiver and
transmitter. Furthermore, disconnect the batteries and remove
them from the model and the transmitter. This may be dangerous
such as overheat and leakage.
Nach dem Fahrbetrieb die Batterien / Akkus aus Sender und
Modell entfernen!
Lorsque vous n'utilisez plus votre MEGA FORCE éteindre le récepteur
puis le l'émetteur. Retirer ensuite les batteries de votre radio et de
votre MEGA FORCE puis les entreposer à l'écart des enfants et de
toutes sources de chaleur ou d'humidité.
Cuando no vaya a utilizar el modelo, desconecte el receptor y
luego la emisora. Retire las pilas del compartimento y también
las de la emisora.
塗装する場合は室内の換気に十分注意し、作業を行ってください。
Painting must be done only in a well-ventilated area.
Lackieren Sie die Karosserie nur an einem gut belüfteten Ort!
L'utilisation de peinture, le cas échéant doit s'effectuer dans un
lieu ventillé.
Realice el pintado en una zona con buena ventilación.
同じ周波数の近くでは走行させないでください。
混信によりコントロール不能で暴走の原因になります。
Never share the same frequency with somebody else at the same
time. Radio signals will be mixed and you will lose control of your
model. This may lead to accidents.
Sprechen Sie Ihre Frequenzen mit anderen Piloten ab!
Toujours se renseigner sur les fréquences radios utiliser par les
autres utilisateurs afin d'éviter tout incident.
Compruebe siempre las frecuencias antes de empezar a rodar.
Si hubiera otro modelista utilizando la misma frecuencia que
usted, podría perder el control de su modelo causando un
serio accidente.
アンテナの先端でケガをする恐れがありますので顔付近に近づけ
たりしないでください。
As the front end of the antenna may be dangerous, do not aim
it toward faces.
Vorsicht mit der Antennenspitze, Verletzungsgefahr!
Faire attention à ce que l'antenne de votre radio ne blesse personne.
La antena de la emisora extendida puede ser peligrosa.
Manténgala siempre alejada de las caras de las personas.
温度の高くなる場所や湿度の高い場所などは長期間の保管はしな
いでください。
Do not store this model in a high-temperature/humidity area or in
direct sunlight.
Modell nicht direkter Sonneneinstrahlung aussetzen!
Ne pas exposer votre MEGA FORCE à l'humidité ou une source
de chaleur trop importante.
No guarde su modelo en ambientes muy calurosos o muy húmedos.
3
Page 4
取扱いの注意 /
Operating your model safely / Zu Ihrer Sicherheit / Consignes de sécurité / CONSEJOS DE SEGURIDAD
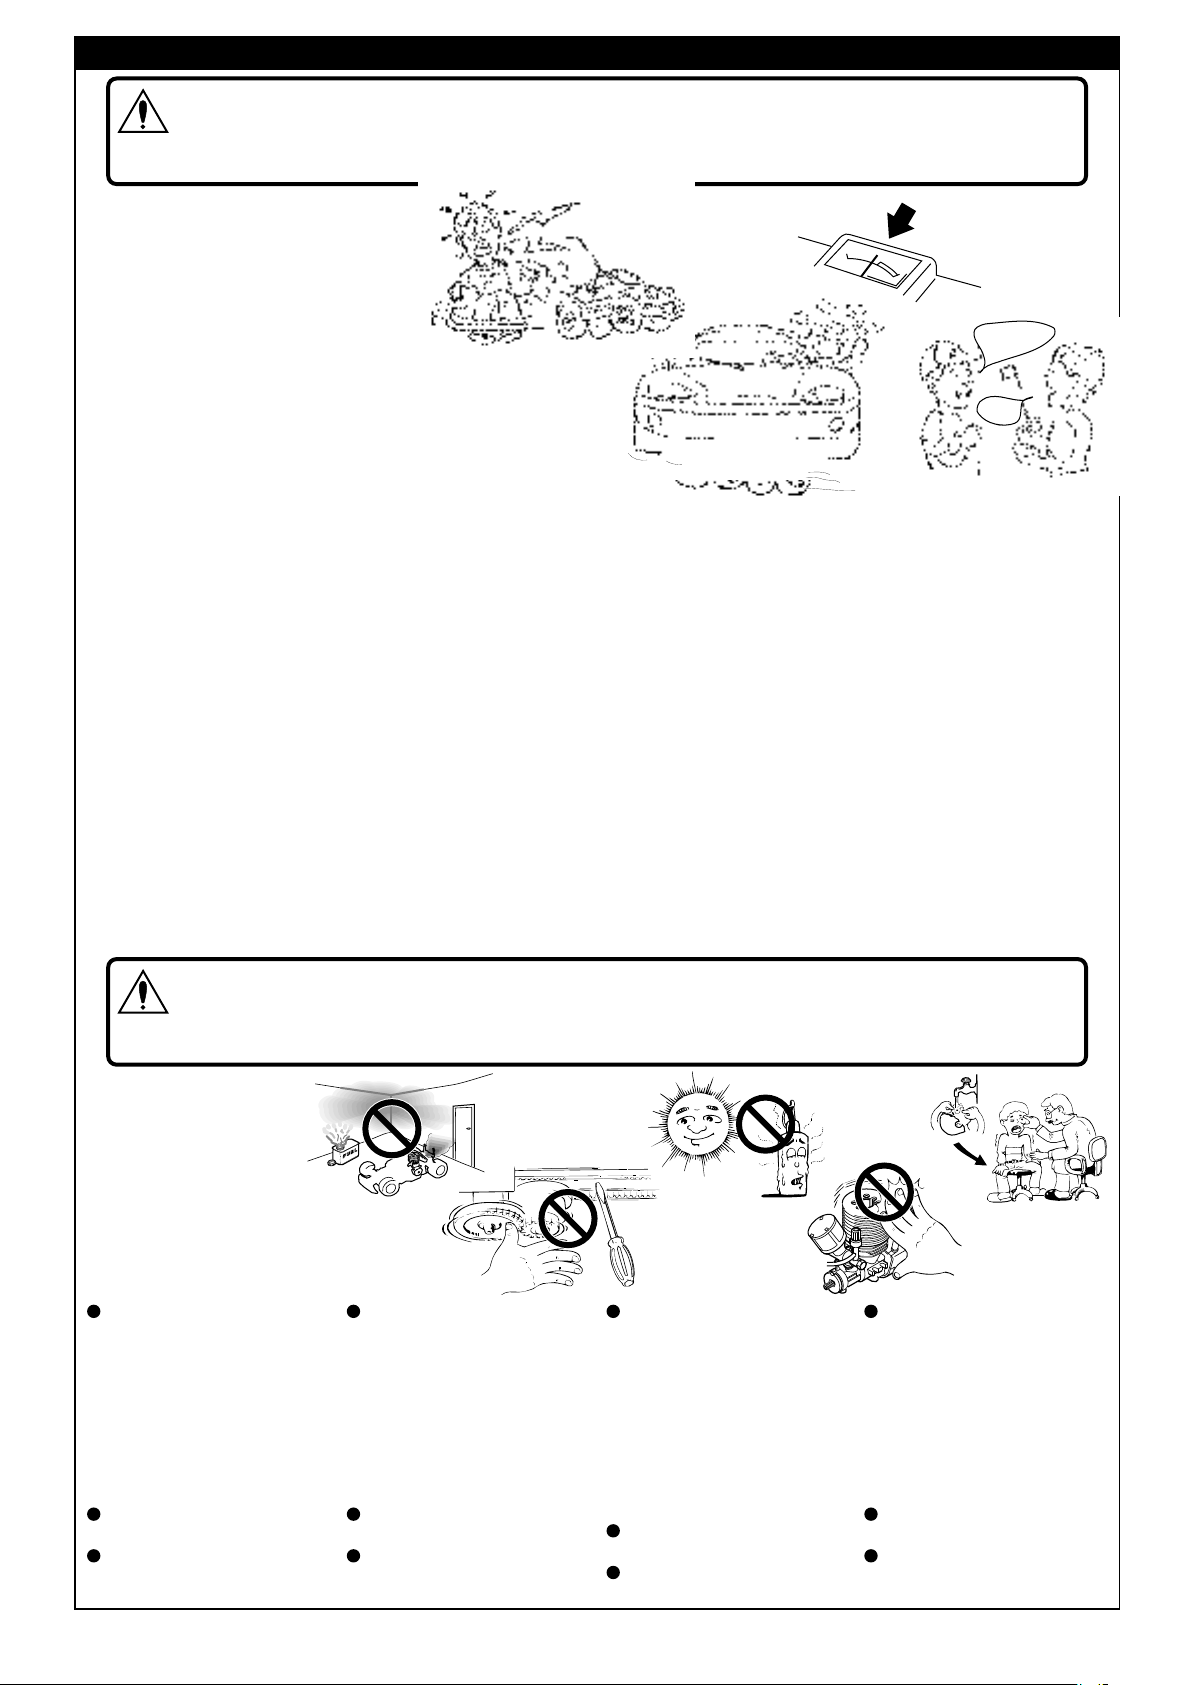
次のような時、場所では走らせない。思わぬ事故の原因になります。
WARNING: Do NOT operate the model in the following places and situations: (Non-observance may lead to accidents!)
VORSICHT: Bedienen Sie Ihr Modell niemals an folgenden Orten und unter folgenden Umständen!
警告
ATTENTION: N’utilisez pas votre modèle dans les endroits suivants!
AVISO: NO utilice su modelo en los lugares y condiciones indicados (El no seguimiento podría ocasionar un accidente)
●走行させてはいけない場所。
1.自動車道路。
2.小さな子供のそば、人の多いところ。
3.民家の近く、公園など。
4.室内、せまいところ。
※人にケガをさせる原因になります。また、物をこわし
たり、他人の迷惑になります。
●プロポ関係の電池残量が少ない時。
電池が減っ てくるとコ ントロール ができなく なり、暴走
や衝突の原因なります。
●近くで無線操縦模型を楽しんでいる人がいる。
同じバンド での同時走 行はできま せん。コン トロールが
できなくなり、暴走や衝突の原因なります。
●車の動きがおかしい??とき
すぐに走行 を中止して 原因を調べ てください 。原因不明
のまま走行させると、思わぬ故障や事故の原因になります。
Operate your model ONLY in spacious areas
with no people around! Do NOT operate it:
1. on roads!
2. in places where children and many
people gather!
3. in residential districts and parks!
4. indoors and in limited space!
* Non-observance may account for
personal injury and property damage!
Always check the radio batteries!
With weak dry batteries, transmission and
reception of the radio fall off. You may lose control
of your model when operating it under such
condition. This may also lead to serious accidents!
Keep in mind that people around you
may also operate a radio control model!
NEVER share the same frequency with
somebody else at the same time! Signals
will be mixed and you will lose control of
your model. This may lead to accidents!
When the model is behaving strangely . .!
Immediately stop the model and check the
reason. As long as the problem is not
cleared, do NOT operate it! This may lead
to further trouble and unforeseen acci-
Bedienen Sie Ihr Modell nur an sicheren und
geräumigen Orten. Bedienen Sie es niemals:
1. auf öffentlichen Straßen!
2.
dort, wo sich Leute und Kleinkinder aufhalten!
3. in Wohngebieten und Parks!
4.
in engen, begrenzten Orten oder in Räumen!
*
Nichtbeachtung kann Verlet-zung von
Personen
Überprüfen Sie die Batterien der RC-Anlage!
Sobald die Batterien nachlassen, lassen auch
das Sende- und Empfangvermögen nach.
Die Bedienung Ihres Modelles mit schwachen
Batterien kann zum Ver-lust Ihres Modelles
und schweren Unfällen führen!
Bedenken Sie, daß auch andere in Ihrer Umgebung
ein ferngesteuertes Modell bedienen könnten!
Stellen Sie sicher, daß niemand zur selben
Zeit die-selbe Frequenz in Ihrer Umgebung
benutzt! Das kann zum Ver-lust Ihres
Model--les sowie zu schweren Unfällen
Wenn Ihr Modell nicht normal funktioniert, . . . :
Unterbrechen Sie die Bedienung augenblicklich
und untersuchen Sie die Ursache. Solange sie
nicht geklärt ist, bedienen Sie niemals Ihr Modell!
Das könn-te schwere Unfälle zur Folge haben!
Pour éviter tout accident, n’utilisez
jamais votre modèle :
1. à proximité de routes!
2.
dans un endroit avec des enfants et promeneurs!
3.
à proximité de résidences, d’écoles et d’hôpiteux!
4. à l’intérieur ou dans un endroit étroit!
* Ne pas respecter ces consignes peut
entraîner la perte de votre modèle et
avoir des conséquences fatales.
Quand les piles de la radio sont déchargées:
Si les piles sont insuffisamment chargées,
l’émission et la réception de la radio deviennent
faibles. L’utilisation de votre modèle avec des piles
insuffisamment chargées peut entraîner la perte de
votre modèle ainsi que des accidents graves!
Assurez-vous que personne n’utilise
votre fréquence au même instant!
N’utilisez jamais la même fréquence que
quelqu’un d’autre. Cela pourrait entraîner la perte
de votre modèle ainsi que des accidents graves!
Quand le fonctionnement de votre modèle est étrange:
Arrêtez immédiatement votre modèle et
trouvez la cause. Sinon, vous risquez la
perte de votre modèle ainsi que des
accidents graves!
01
05
Maneje su modelo SOLO en espacios abiertos
donde no se congruegue gente. NO ruede en:
1. Calles ni carreteras.
2. Lugares donde jueguen niños.
3. En áreas residenciales.
4. En lugares sin ventilación.
* Respete siempre estos consejos.
¡ Compruebe siempre el nivel de carga de las baterías !
Cuando el nivel de carga de las baterías es
bajo, la transmisión y recepción de su
equipo de radio podría fallar ocasionando la
pérdida de control de su modelo.
No siga utilizando su modelo hasta haberlas
recargado o cambiado por unas nuevas.
Recuerde que puede haber más modelistas
utilizando la misma frecuencia que usted.
NUNCA utilice la misma frecuencia que
esté siendo utilizada por otro modelista.
Las señales podrían mezclarse
ocasionando un accidente.
Si el modelo se comporta de forma extraña . .
Detenga el modelo inmediatamente y
compruebe la causa del fallo. NO vuelva a
utilizar su modelo hasta haber solucionado
el problema.
事故やケガ等の危険防止のため、次のことを必ずお守りください。
WARNING: In order to avoid accidents and personal injury, be sure to observe the following:
VORSICHT: Zur Unfall- und Sachschadenvermeidung, beachten Sie bitte auch folgendes:
警告
ATTENTION: Respectez les consignes suivantes afin de faire évoluer votre modèle en toute sécurité:
AVISO: Lea los siguientes consejos para prevenir posibles accidentes.
●
燃料の取扱いの注意。
1. 取扱いは、必ず屋外で。
2. 模型用グロー燃料を必ず使用。
3. 火気には絶対に近づけない。
4. 飲んだり、目に入れたりしない。
5. 保管は、キャップをしっかり締め
幼児の手の届かない冷暗所に置く。
6.
使用後の空き缶は、火中に投げ入れない。
●
回転している部分に、指や物などを入れない。
●
走行直後は、エンジン、マフラー周辺は高温
になっているので、すぐにはさわらない。
Handling fuel safely:
1. Handle fuel only outdoors!
2. Only use glow fuel for radio control
models!
3. Never use fuel indoors or in places with
open fires and sources of heat!
4.
Never swallow fuel or let it into your eyes!
5. Store fuel only in cool, dry and dark
places out of children's reach! Tightly
shut the cap!
6. Do not dispose of empty fuel cans into a
fire! There is danger of explosion!
1. Kraftstoff nur draußen gebrauchen!
2.
Nur Kraftstoff für RC-Modelle gebrauchen!
3.
Kraftstoff niemals drinnen oder in der Nähe
von Feuer- und Hitzequellen gebrauchen!
4. Kraftstoff niemals schlucken! Vorsicht
auch vor Kraftstoffspritzer in die Augen!
5.
Kraftstoff nur in kühlen, trockenen und
dunklen Orten außer Reichweite von Kindern
aufbewaren! Sorgfältig verschließen!
6. Niemals leere Kanister in ein offenes
Feuer werfen! Explosionsgefahr!
Do not put fingers or any objects
inside rotating and moving parts!
Right after use, do not touch the
engine and muffler! Danger of
burning yourself!
禁止
PROHIBITED
VERBOTEN
DEFENDU
PROHIBIDO
Zum sicheren Gebrauch von Kraftstoff:
Stecken Sie niemals Ihre Finger in
bewegende oder sich drehende Teile.
Nach dem Fahren, fassen Sie niemals den
Verbrennungsmotor und den Schalldämpfer
an! Verbrennungsgefahr!
禁止 禁止
PROHIBITED
VERBOTEN
DEFENDU
PROHIBIDO
Consignes de sécurité:
1. Utiliser seulement à l’intérieur!
2. Utiliser seulement pour modèles radio-
télécom-mandés!
3.
Ne jamais utiliser à l’intérieur et à proximité
d’un feu ou d’une source de chaleur!
4. Ne jamais avaler! Attention aux
projections dans les yeux!
5. Toujours garder dans un endroit frais,
sec et sombre hors de portée des
enfants! Bien visser le capuchon!
6. Ne jamais jeter un bidon vide dans un
feu! Danger d’explosion!
Ne jamais mettre vos doigts dans
des parties en mouvement!
Après utilisage, ne jamais toucher le moteur
et le silencieux! Danger de brûlures!
禁止
PROHIBITED
VERBOTEN
DEFENDU
PROHIBIDO
PROHIBITED
VERBOTEN
DEFENDU
PROHIBIDO
Manejo del combustible:
1. Uselo siempre en espacios abiertos.
2. Utilice combustible "Cyclone".
3. NO lo utilice en lugares cerrados ni
cercanos a fuentes de calor, chispas,
etc...
4. NO lo trague ni permita que entre en
contacto con los ojos.
5. Guárdelo en un lugar seco, fresco y
fuera del alcance de los niños.
6. NO arroje las latas vacías al fuego.
NO toque las piezas mecánicas
mientras estén en funcionamiento.
No toque el motor mientras esté
caliente ya que podría quemarse.
4
Page 5
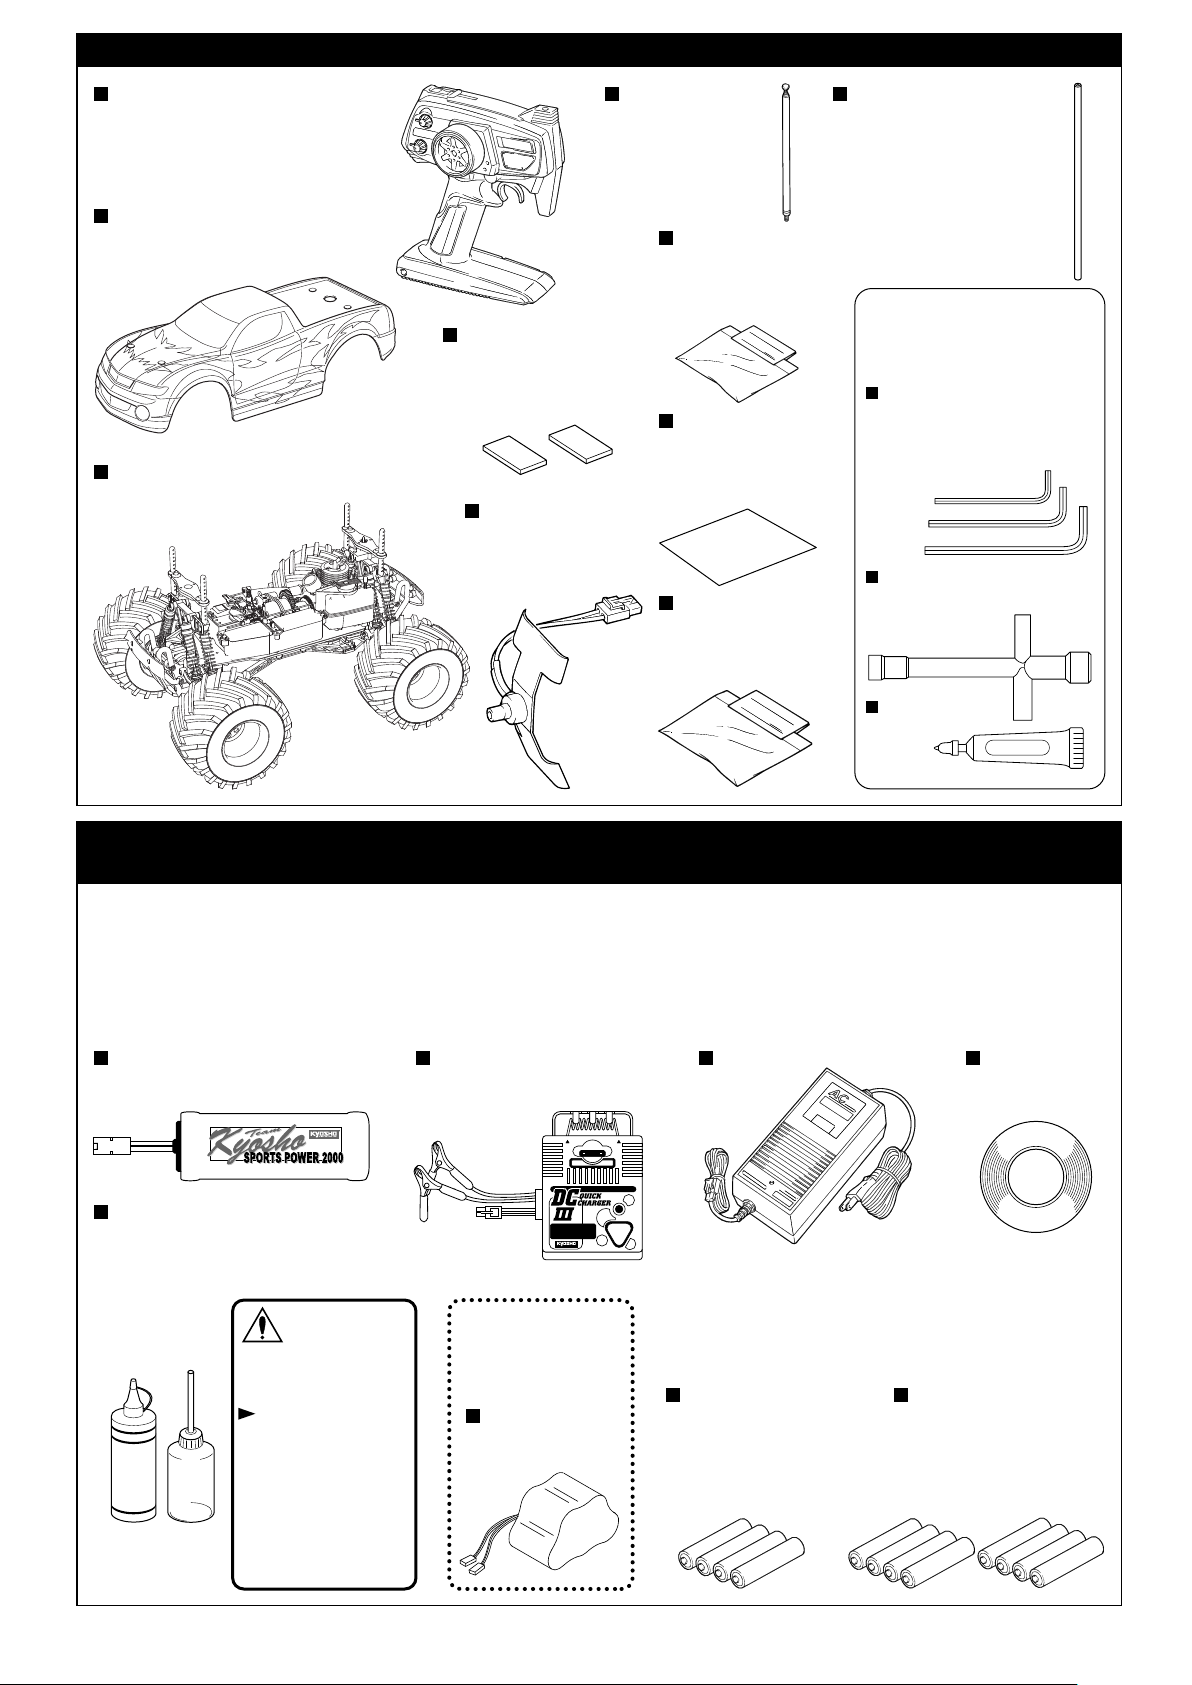
セット内容 /
Contents / Inhalt / CONTENU DE VOTRE VALISETTE / Contenido
PERFEX KT-2 送信機(コントローラー) 送信アンテナ
PERFEX KT-2 Transmitter (Controller)
Perfex Fernsteuerung KT-02
PERFEX KT-2 Radiocommande 2 voies
Emisora PERFEX KT-2
Transmitter Antenna
Senderantenne
Antenne radio
Antena emisora
ボディ
Body
Karosserie
Carrosserie
Carrocería
ダンパースペーサー
Shock Spacer
Spacer für Stoßdämpfer
Entretoise d'amortisseur
Casquillo Amortiguador
両面テープ
Double-sided Tape
Doppelseitiges Klebeband
Adhésif double face
Cinta adhesiva doble cara
デカール
Decal Sheet
シャシー(車体)
Chassis
Chassis
Chassis
Chasis
コネクターユニット
Connector Unit
Kontaktbrücke
Aufkleber
Planche d'autocollant
Hoja de adhesivos
Unité de connection
Unidad conexión
ビスセット
Screw Set
Schrauben Satz
Kit visserie
Tornillos
受信アンテナパイプ
Receiver Antenna Pipe
receiver antenna pipe: Antennenhülse
Antenne de réception
Tubo de antena
セットに入っている工具
TOOLS INCLUDED
GELIEFERTE WERKZEUGE
OUTILS FOURNIS
HERRAMIENTAS INCLUIDAS
六角レンチ(1.5mm, 2mm, 2.5mm)
Hex Wrench (1.5mm, 2mm, 2.5mm)
Sechskantschlüssel (1.5mm, 2mm, 2.5mm)
Clé allen (1.5mm, 2mm, 2.5mm)
Llaves allen (1.5mm, 2mm, 2.5mm)
1.5mm
2.0mm
2.5mm
十字レンチ
Cross Wrench
Kreuzschlüssel
Clé en croix
Llave de cruz
グリス
Grease
Fett
Graisse
Grasa
GREASE
セットの他に必要な物 /
Required Additional / Erforderliches Werkzeug /
OUTILS NECESSAIRES (NON INCLUS !) / Equipo Necesario
電動スターターを使用する為、組立/取扱説明書に示した他に7.2V-1200mAh〜3000mAhのバッテリーとそのバッテリーに適合する充電器が必要です。
ブースターコード(プラグヒーター)等は必要ありません。※
With the use of an electric starter, you need a 7.2V-1200mAh~3000mAh battery and a charger compatible with the battery in addition to what is required
in the assembly instruction.
Für den Betrieb des Elektrostarters ist ein 7,2V Akku mit 1.200 bis 3.000mAh erforderlich. Zusätzlich wird ein passendes Ladegerät für den Akku benötigt.
Pour utiliser votre démarreur électrique, vous devez vous procurer une batterie 7,2V - 1500mAh (minimum) ainsi qu'un chargeur de batterie
Al utilizar un arrancador eléctrico, necesitará una batería 7.2V-1200mAh~3000mAh y un cargador para cargar esta batería.
No.71901 No.71501 No.72921
7.2V Sports Power BATTERY Tape
RECHARGEABLE Ni-Cd BATTERY
KYOSHO CORPORATION NO.71901
No.71901
グロー燃料、燃料ポンプ
Glow Fuel & Fuel Pump
Kraftstoff & Tankflasche
Carburant & Pipette
Combustible y Biberón
警告
WARNING
VORSICHT
ATTENTION
AVISO
ガソリンや灯油は使用禁止。
Never use gasoline
and kerosene!
HANDY
FUEL
Verwenden Sie niemals
handelsübliches Benzin
und Diesel!
N’utilisez jamais ni de
l’essence ni du gasoil!
Nunca utilice gasolina
ni otros combustibles!
DCクイックチャージャーIII ACクイックチャージャーIII7.2V スポーツパワー2000 バッテリー
DC QUICK CHARGER III
7.5
FUSE 7.5A
WARNING HOT
DELTA PEAK AUTO-CUTOFF
For 7.2-8.4V
600-1100mAh
Ni-Cd BATTERY
< >車体用
< >
For Car
< >
Für das Auto
< >
Pour la voiture
< >Para el coche
6V-600mAh
ニカドバッテリー
Ni-Cd Battery
ビニールテープ
WARNING HOT
E
RG
HA
C
T
R
A
T
S
(Japaanese market only)
< >車体用
< >
For Car
< >
Für das Auto
< >
Pour la voiture
< >送信機用
< >
For Transmitter
< >
Für den Sender
< >
Pour la radiocommande
< >Para la emisora < >Para el coche
単3アルカリ乾電池………8本単3アルカリ乾電池………4本
AA Alkaline Dry Batteries
4 pieces
4 St. AA Trockenbatterien
4 batteries de type R6 pour
votre radiocommande
4 Pilas alcalinas AA
AA Alkaline Dry Batteries
8 pieces
8 St. AA Trockenbatterien
8 batteries de type R6 pour
votre radiocommande
8 Pilas alcalinas AA
5
Page 6
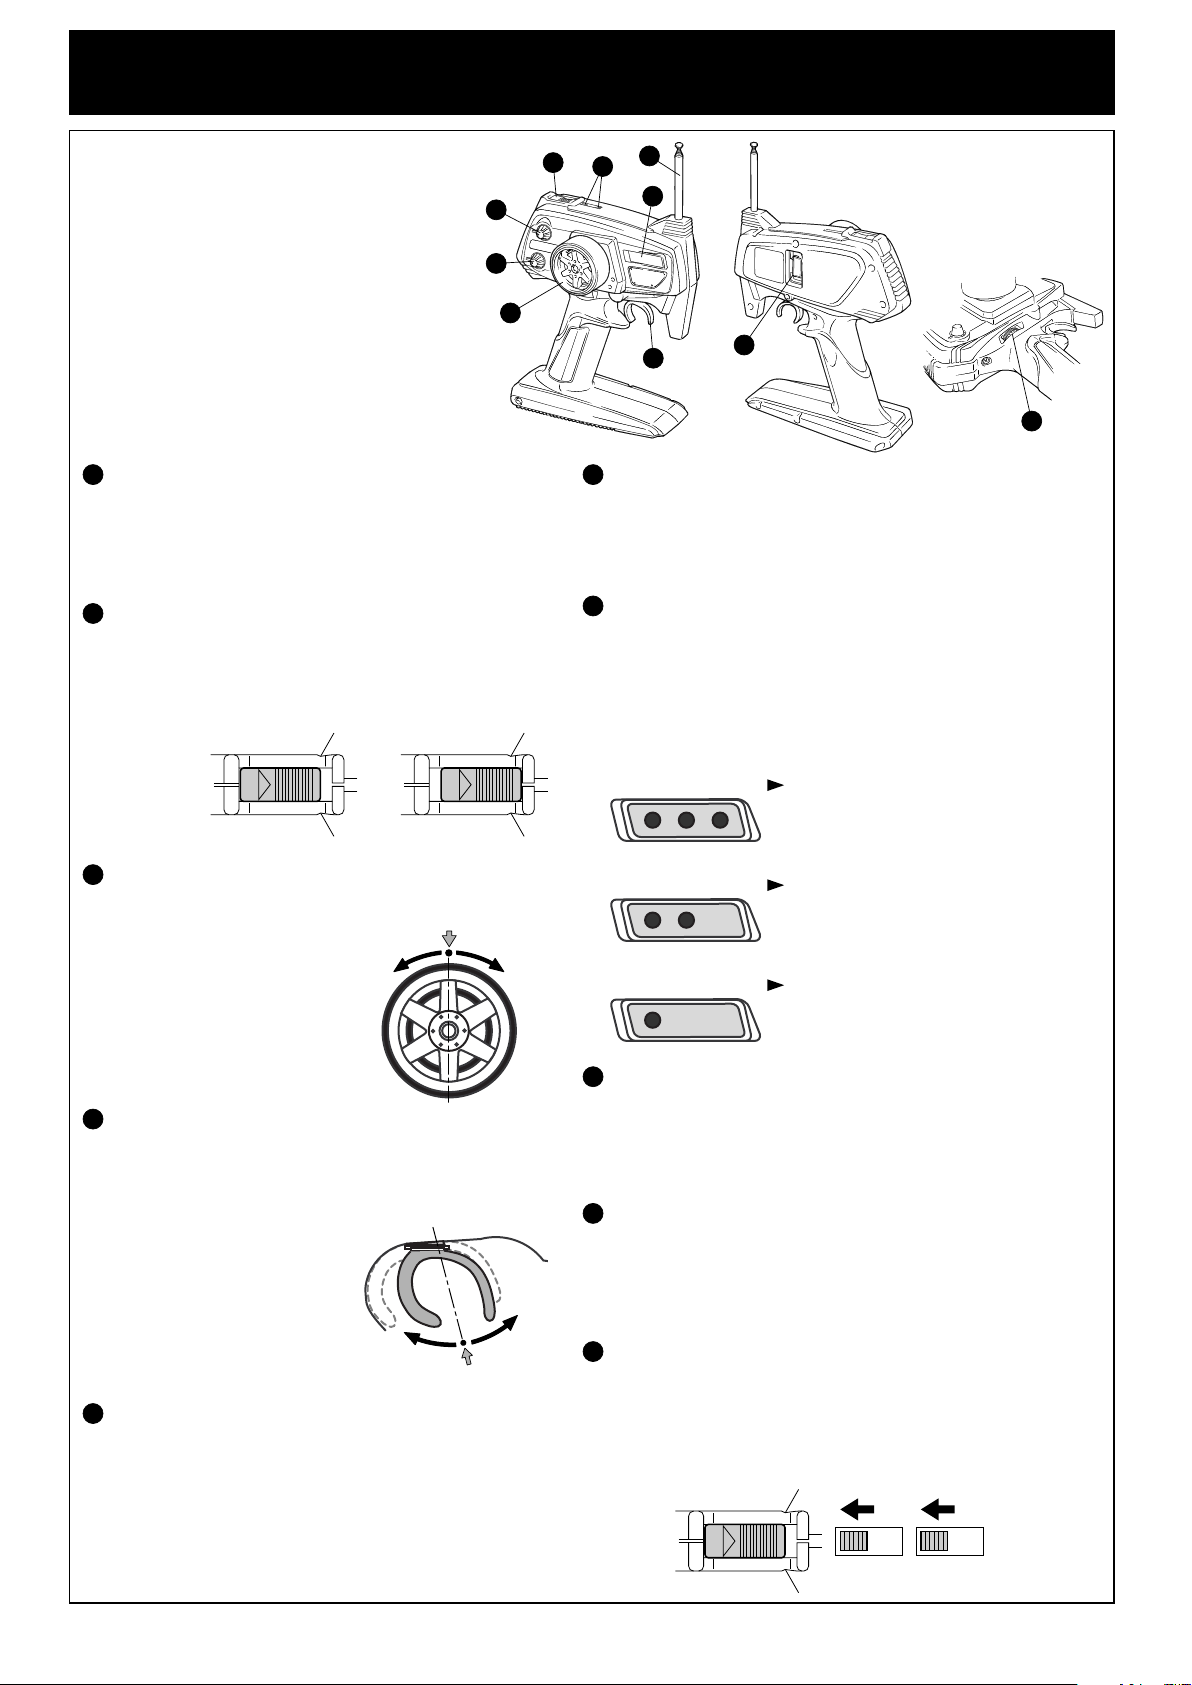
送信機の準備 /
Transmitter Preparation / Der Sender /
PREPARATION RADIO / Preparación Equipo R/C
各部の説明
Functional Explanations
Die Funktionen
5
Les fonctions de votre radiocommande :
Funciones
1
送信アンテナ /
L'antenne radio / Antena Emisora
電波を発信します。
To transmit radio waves
Zur Abstrahlung der Sendeleistung
Permet l'émission des commandes vers le récepteurs
Emite las ondas
2
電源スイッチ /
Intérupteur ON/OFF / Interruptor
電源のON, OFFをします。
To switch ON/OFF the Power
Ein- / Ausschalter für Sender
Permet d'éteindre et d'allumer votre radio
Para conectar y desconectar la emisora
3
ステアリングホイール /
Volant de direction / Volante de Dirección
左右のコントロールをします。
To control steering right/left directions
A. Neutral B. Left C. Right
Zur Steuerung der Lenkung,
A=neutral; B=links; C=rechts
Permet le contrôle de direction
droite/gauche de votre modèle.
A. Neutre B. Gauche C. Droite
Para girar a la derecha/izquierda
A. Neutral B. Izquierda C. Derecha
4
スロットルトリガー /
Gashebel / Gachette de gaz / Gatillo de Gas
前進・後進のコントロールをします。
To control forward speed and reverse speed A. Neutral B. Forward C. Reverse
Zur Steuerung des Elektromotors, A=neutral; B=vorwärts; C=rückwärts
Permet le contrôle de la vitesse (avant/arrière)
A. Neutre B. Marche avant C. Marche arrière
Para controlar la marcha adelante y atrás.
A. Neutral B. Adelante C. Atrás
5
ステアリングトリム /
Trim de direction / Trim Dirección
ニュートラル位置の微調整をします。
To precisely adjust the neutral position
Zur Justierung der Neutrallage
Permet d'ajuster avec précision la position du neutre
Para ajustar la posición neutral de la dirección
Transmitter Antenna / Senderantenne /
Power Switch / Schalter /
POWER
Steering Wheel / Lenkrad /
A
ニュートラル
左 右
Throttle Trigger /
B
前進
A
ニュートラル
Steering Trim / Trimmung für Lenkung /
6
POWER
ONOFF
10
1
2
7
3
4
9
8
6
スロットルトリム /
Trimmung für Gas / Trim de gaz / Trim Gas
ニュートラル位置の微調整をします。
To precisely adjust the neutral position
Zur Justierung der Neutrallage
Permet d'ajuster avec précision la position du neutre
Para ajustar la posición neutral
7
LEDインジケーター /
LED Anzeige / Indicateur de batterie / Indicador LED
電源スイッチがONの時に、電池の残量を表示します。
This shows you remaining amount of the battery capacity with the Power Switch turned ON.
A. Operative B. Be careful C. Do Not operate (Change the Batteries)
Anzeige der Spannung des Senderakkus, A=voll; B=halb entladen; C=leer,
Betrieb einstellen Akkus laden!
L'indicateur de batterie vous informe sur l'état de charge de vos piles ou batteries.
Indica el nivel de carga de las baterías al estar conectado el interruptor.
A. Operativa B. Cuidado C. NO utilizar (Cambiar Baterías)
CB
8
ステアリングD/Rアジャスター /
Dual Rate für Lenkung / Dual Rate / Dual Rate Dirección
ステアリングの舵角を調整します。
To adjust Steering Angle
Zur Justierung des maximalen Lenkausschlags
Permet d'ajuster le débattement de la direction
Para variar el ángulo de la dirección
9
送信用クリスタル /
Quarz / Quartz / Cristal Emisora
周波数の変更をするときに交換します。
To replace Crystal for changing Radio Frequency
Steckquarz zur Bestimmung der Sendefrequenz
Détermine la fréquence d'émission et de réception de votre radio.
Para cambiar el Cristal y variar la frecuencia
C
後進
10
リバーススイッチ /
Inverseur de servos / Interruptor Inversión
下図の位置になっていることを確認する。
Make sure the Servo Reversing Switches are positioned as shown in the drawing below.
Setzen Sie die Schalter für Servo Reverse so, wie in der Zeichnung dargestellt!
S'assurer que l'interrupteur d'inversion des servos soit positionné comme indiqué
sur le schéma ci-dessous.
Asegurarse que los Interruptores de Inversion se encuentran tal y como muestra el dibujo.
Throttle Trim /
LED Indicator /
A 使用可
A Operetive
A Der Akku ist voll
A Tout va bien
A Operativa
B 要注意
B Be careful
B Der Akku ist halb entladen
B Attention !
B Cuidado
C 使用不可(乾電池を交換してください。)
C Do Not operate (Change the Batteries)
C Der Akku ist leer
C
Changer vos piles ou Recharger vos batteries
C No utilizar (Cambiar baterías)
Steering D/R Adjuster /
Crystal for Transmitter /
Reverse Switch / Servoreverse /
POWER
OFF
6
Page 7
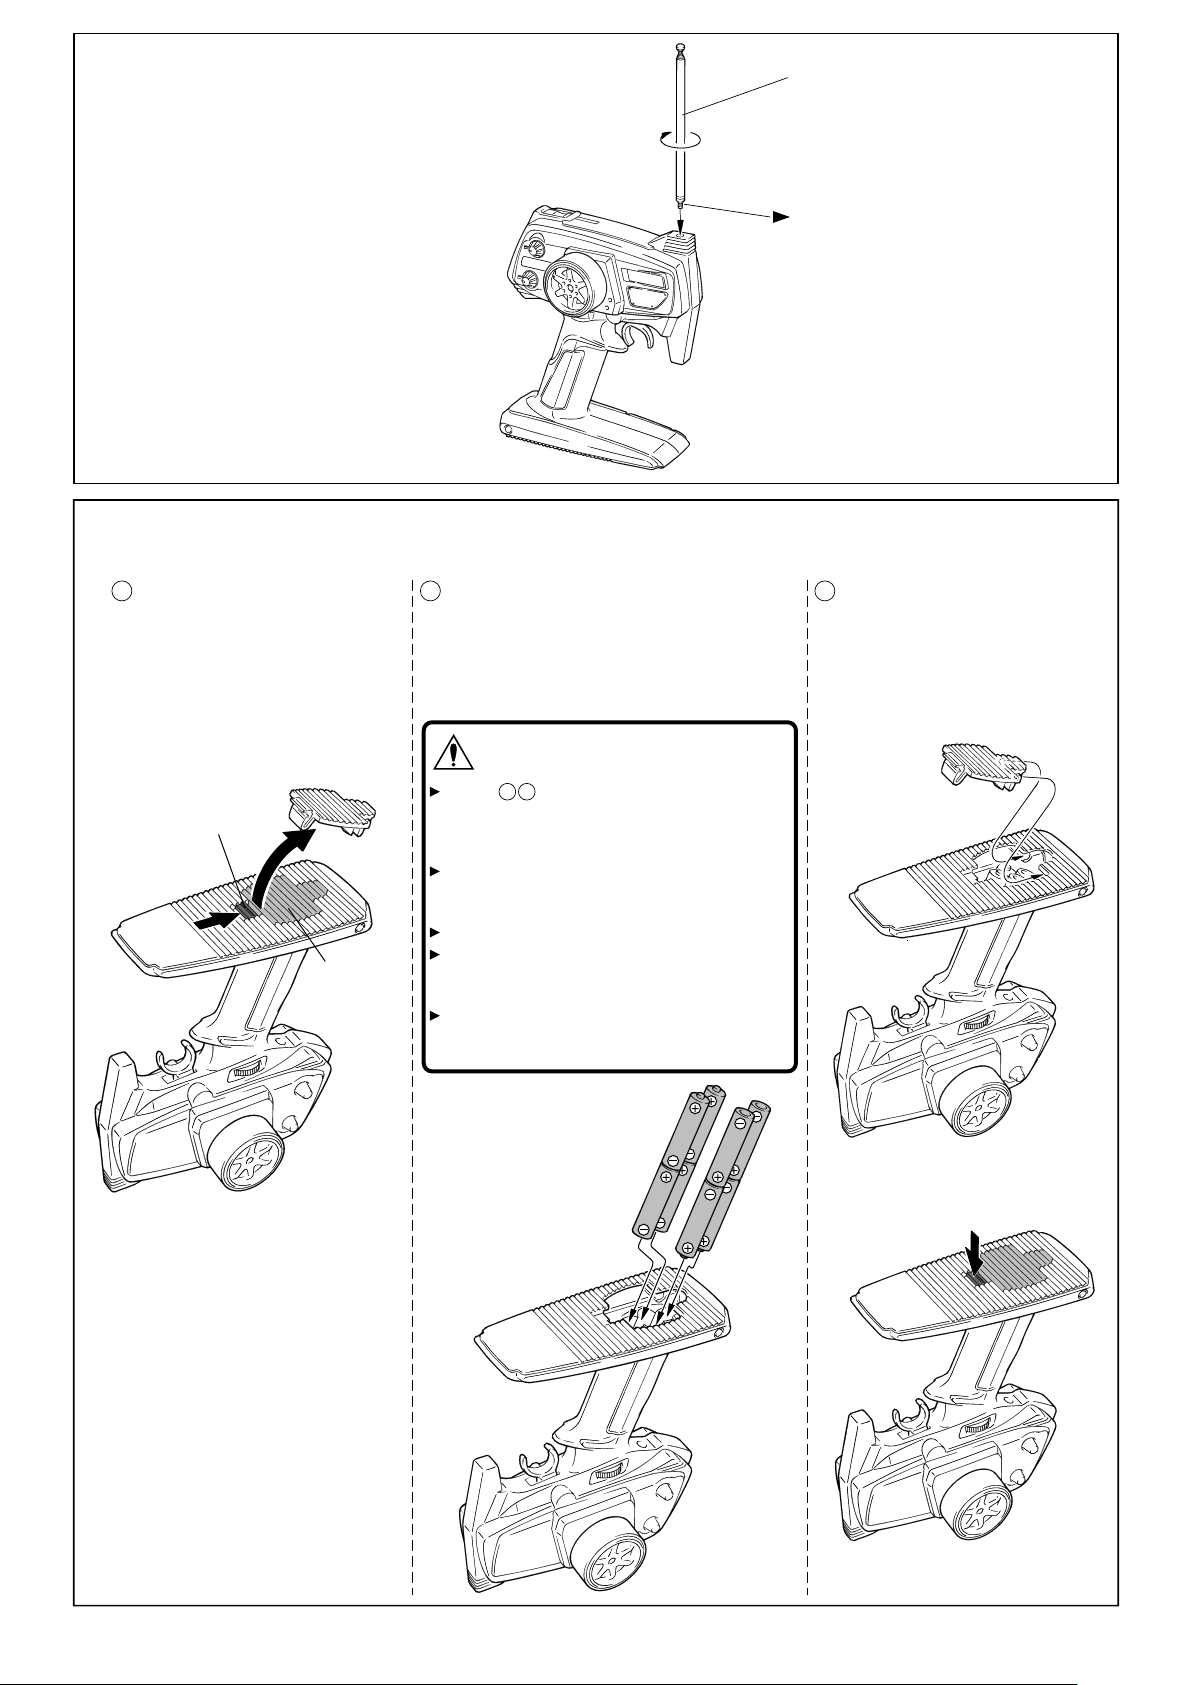
アンテナの取付け
Installation of Antenna
Montage der Antenne
Installation de l'antenne
Instalación de la Antena
送信アンテナ
Transmitter Antenna
Senderantenne
Antenne d'émission
Antena emisora
止まるまでネジ込む。
Screw-in to the base
Antenne einschrauben
Pas de vis de fixation
Enroscar en la base
電池のセット /
Loading batteries / Das Laden der Akkus /
Batteries radio / Instalación Baterías
1 2 3
フタをはずす。
Remove the lid.
Deckel abnehmen
Retirer le cache
Retire la tapa
押す
Push.
Drücken
Pousser
Empuje
フタ
Lid
Deckel
Cache radio
Tapa
単3乾電池8本を図のように入れる。 フタをしめる。
Load 8 AA Alkaline Batteries as shown in the
following illustration.
8 Batterien oder geladene Akkus in den Sender einsetzen
Placer selon le schéma çi-dessous les 8 piles
ou batterie de type R6
Instale 8 pilas alcalinas AA tal y como muestra el dibujo.
Cautions / Achtung /
注意 /
Attention ! / Atención
電池は、 をまちがえると液漏れをおこす事が
+ –
あります。電池は、種類や残量の異なる物をまぜ
て使用しないでください。また、交換する時は、
8本全て同じ種類の新しい物と交換してください。
If the batteries are loaded with improper terminals,
the batteries may leak. Do not mix different batteries.
Always use same kind and fresh new batteries.
Auf korrekte Polung achten!
Toujours utiliser des piles ou batteries chargées.
Ne jamais utiliser des piles ou batteries usagées
ou défectueuses
Instale siempre las pilas respetando la polaridad.
No mezcle diferentes tipos de pilas.
Utilice siempre pilas nuevas.
Close the lid. It is snapped into place.
Deckel schließen
Replacer le cache batterie comme indiqué.
Cierre la tapa y colóquela en su lugar
7
Page 8
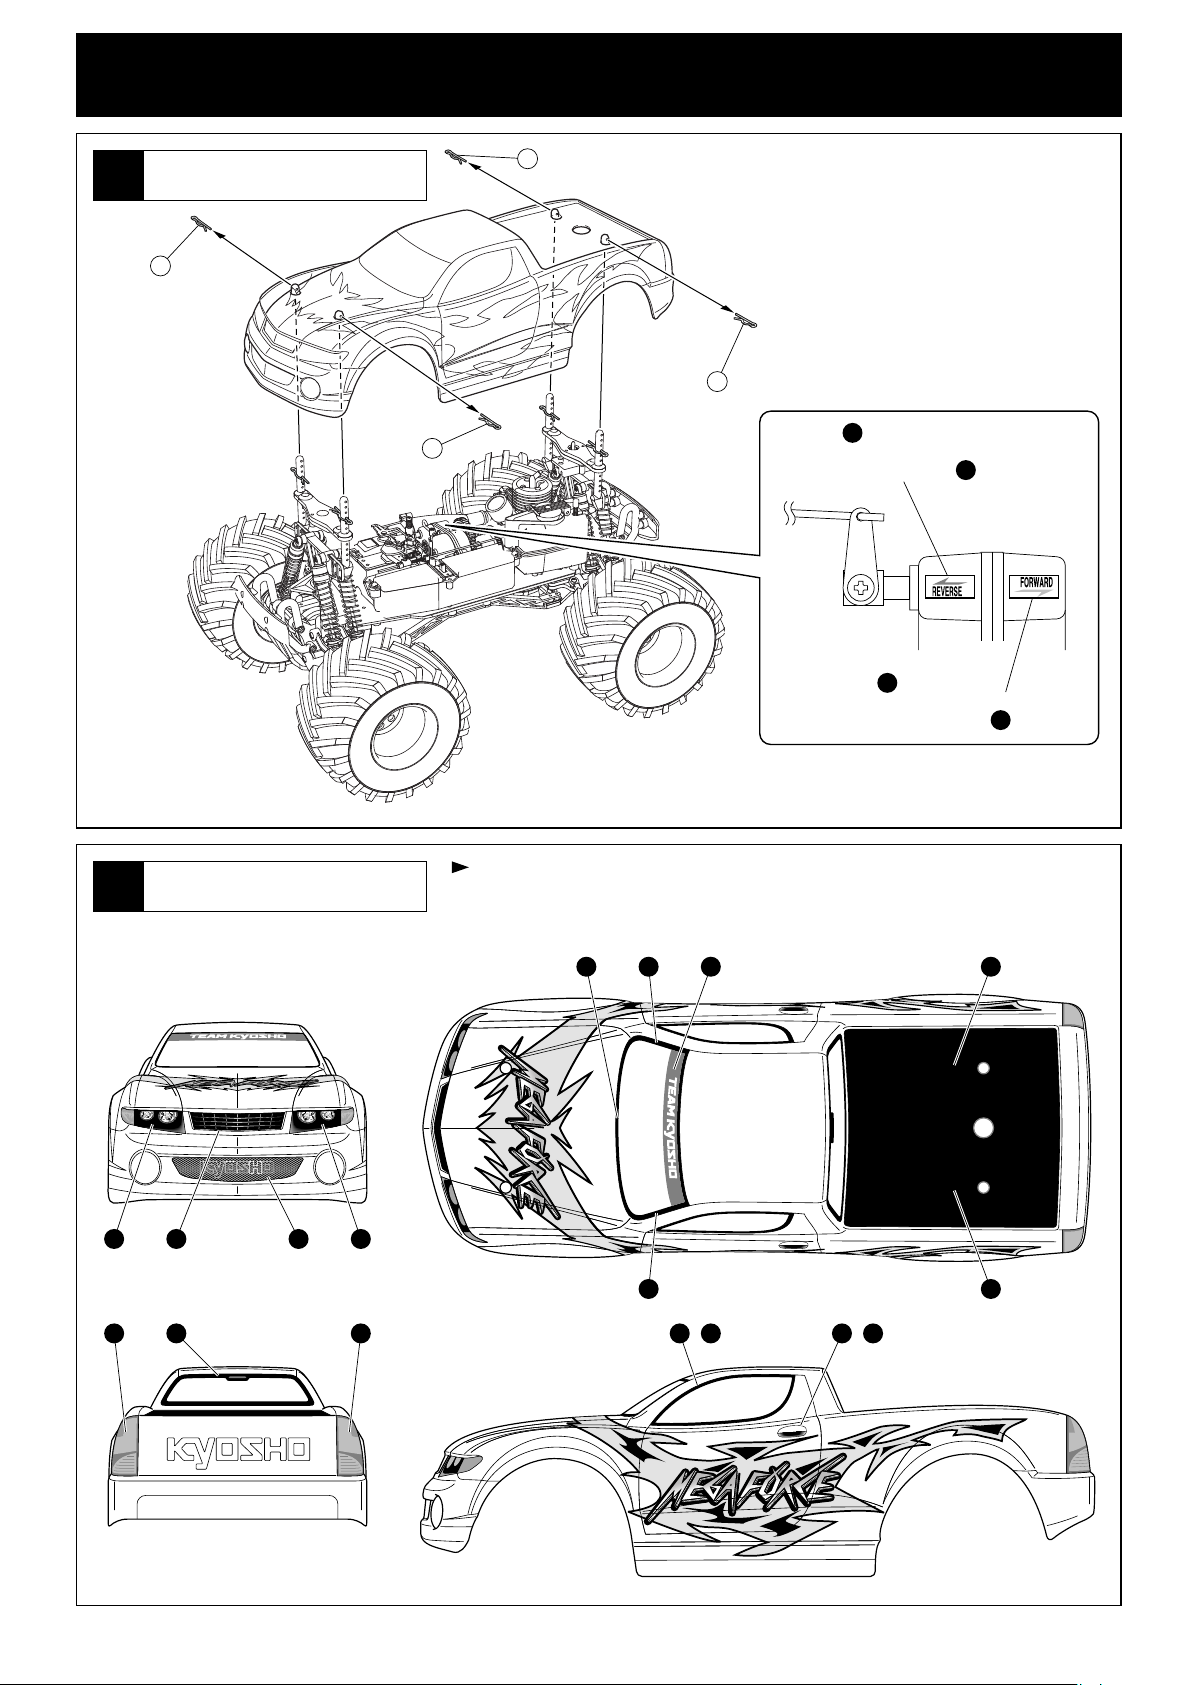
車体の準備 /
MONTAGE DU CHASSIS / Montaje del Chasis
Assembly of the Chassis / Die Montage des Chassis /
ボディ /
Carrosserie / Carrocería
1
142
Body Shell / Karrosserie /
142
142
142
デカール 4
Decals, Aufkleber, Autocollants,
Colocación de Adhesivos
デカール 5
Decals, Aufkleber, Autocollants,
Colocación de Adhesivos
4
5
Decals / Aufkleber / デカール/
Autocollants / Adhesivos
2
9 87 6
20 2113
カッコの中は反対側用のデカールナンバーです。
The decal numbers between brackets are only for the opposite side.
Die Aufkleber in Klammern slnd für die andere Selte.
Les autocollants entre parenthéses sont pour le côté opposé.
Los adhesivos numerados entre paréntesis corresponden al lado opuesto.
11
12 10 17
12 16
( )
14 15
( )
18 19
8
Page 9
車体用バッテリーの取付 /
Akku / Accu / Batería
3
Battery /
171
アンテナパイプ
Antenna Pipe
Antennenrohr
Tube d’antenne
Tubo antena
単3アルカリ乾電池(4本)
AA Alkaline Dry Batteries
4 pieces
4 St. AA Trockenbatterien
4 batteries de type R6 pour
votre radiocommande
4 pilas alcalinas AA
受信機スイッチ
Receiver Switch
Empfänger Schalter
Interrupteur Récepteur
Interruptor receptor
受信機が入っています。
Receiver
Empfänger
Récepteur
Receptor
コネクターユニット /
Die Akkueinheit / Unité de connection / Unidad conexión
4
202
両面テープ
Double-sided Tape
Doppelseitiges Klebeband
Adhésif double face
Cinta adhesiva doble cara
201
コネクターユニット
Connector Unit
Kontaktbrücke
Unité de connection
Unidad conexión
Connector Unit /
ON
OFF
テープで固定する。
Bind them together with tape.
Mit Klebeband sichern
Sécuriser l'ensemble avec
de l'adhésif.
Asegúrelos con cinta adhesiva
7.2V1200〜3000mAhのバッテリー(充電済みのもの)
7.2V1200~3000mAh Battery (already charged)
7,2V Akku
Batterie 7,2V - 1500mAh (minimum)
Batería 7.2V1200-3000mAh
別購入品
Must be purchased separately!
Das Teil ist nicht im Bausatz enthalten!
Doit être acheté séparément!
Debe comprarse por separado
9
Page 10

走行前のチェック /
Pre-Run Check / Vor dem Start / Pre-Run Check / Comprobaciones Previas
走行前に毎回チェックします。 /
Check every time before driving / Vor jedem Fahrbetrieb prüfen! /
Avant chaque utilisation / Comprobar siempre antes de rodar
送信機(スイッチ)
1
Transmitter (Switch)
Schalter für Fernsteuerung
Radiocommande
Emisora (Interruptor)
シャシー(スイッチ)
2
Chassis (Switch)
Schalter für Modell
Chassis
Chasis (Interruptor)
ステアリング(トリム)
3
Steering (Trim)
Trimmung für Lenkung
Direction (Trim)
Dirección (Trim)
左 右
Left
links
Gauche
Izquierda
Right
rechts
Droite
Derecha
ON
POWER
フロントタイヤを浮かせて調整します。
Keep the front tires in the air while adjusting the steering trim.
Heben Sie die Vorderräder an, während Sie die Trimmung
der Lenkung vornehmen!
Soulever le train avant de la voiture afin d'ajuster le trim de direction.
Mantenga las ruedas en el aire mientras ajusta el trim de direccion.
いっぱいまで
伸ばす。
Antenna
Antenne
Antenne
Antena
シャシーのスイッチをONにする。
Turn On the chassis's switch.
Modell einschalten.
Mettre l'interrupteur sur ON.
Conecte el interruptor
Cautions / Achtung /
注意 /
Attention ! / Atención
ゆるんでいないか確認します。
送信アンテナがゆるんでいると操縦不能の
原因になります。
Check if it is loosen. If the antenna is not firmly
fixed, it can cause the car to go out of control
Auf feste Verschraubung der Antenne im
Gehäuse achten!
Vérifier que votre antenne est bien visser dans la radio
Asegurarse que la antena está bien fijada ya que
de no ser así podría perder el control de su modelo.
ON
OFF
シャシーのスイッチを "ON" にした時、
フロントタイヤが左右に曲っている場
合に調整します。
For adjusting the front tires left and right.
Zur Justierung der Lenkung
A utiliser pour ajuster le neutre de la direction.
Para ajustar el punto neutro de la dirección
ステアリングホイールに指を触れない(ニュートラル)ときタイヤがまっすぐになるようにステアリングトリムで微調整します。
Precisely adjust the steering trim in case the front tires are not straight when the steering wheel is placed at neutral position.
Die Räder müssen exakt auf neutral stehen, wenn das Lenkrad auf neutral steht!
Ajuster à l'aide du trim la position du neutre de la direction
Ajuste con el trim de dirección en caso que las ruedas delanteras no rodaran en línea recta estando el volante en posición neutral.
走行させる時に再調整します。 /
Ajuster la direction avec le trim lorsque la voiture roule. / Ajuste de nuevo al rodar con el modelo
ステアリングのチェック
4
Check the Steering
Überprüfen Sie die Lenkung
Vérifier la commande de direction
Comprobación de la dirección
ニュートラル
左 右
Left
links
Gauche
Izquierda
Neutral
neutral
Neutre
Neutral
Right
rechts
Droite
Derecha
Left
links
Gauche
Izquierda
Adjust again when running. / Die Feinjustierung erfolgt im Fahrbetrieb /
フロントタイヤを少し浮かせます。
Keep the front tires in the air while adjusting the steering trim.
Heben Sie die Vorderräder an, während Sie die Trimmung
der Lenkung vornehmen!
Soulever le train avant de la voiture afin d'ajuster le trim de direction.
Mantenga las ruedas en el aire mientras ajusta el trim de direccion.
ステアリングホイールを操作してフロントタイヤの動きをチェック。
Operate the steering wheel to check if the front tires move correctly.
Beim Drehen des Lenkrads müssen sich die Vorderräder bewegen
Actionner la direction de gauche à droite de façon à vérifier son bon fonctionnement.
Mueva el volante de dirección para observar si las ruedas se mueven de forma correcta.
Right
rechts
Droite
Derecha
左左 右 右
Left
links
Gauche
Izquierda
Right
rechts
Droite
Derecha
*ステアリングホイールの操作量に応じて舵角が変わります。
操作量が大きいほど、舵角も大きくなります。
*
Amount of front tire movement varies according to the amount of the steering wheel movement.
If the wheel is turned all the way left or right, the front tires will also steer all the way right or left.
* Die Vorderräder bewegen sich sinngemä§ zur Drehung am Lenkrad.
*
La vitesse de rotation du volant de la radiocom-mande est proportionnelle à celle des roues.
*
El recorrido de las ruedas será proporcional al movimiento que usted proporcione al volante.
Si lo gira a la izquierda ó a la derecha, las ruedas también girarán a la izquierda ó a la derecha.
フロントタイヤが左右逆の動きになる時はP6 リバーススイッチの位置を
確認してください。
If turning the transmitter wheel causes the front tires to move in the direction opposite to that
shown in the diagram, change the position of the Servo Reversing Switch (see page 6).
Üerprüfen Sie die Laufrichtung der Lenkung, ggf. Servolaufrichtung am Sender umkehren!
Vérifier que la direction de la voiture corresponde à la direction donnée au volant
de la radiocommande. Dans le cas contraire, changer la position de l'interrupteur
d'inversion de servo de direction (voir page 6).
Si al mover el volante de direccion las ruedas se mueven en direccion opuesta a
la mostrada en el dibujo, cambie la posicion del Interruptor de Inversion.
10
10
Page 11

ステアリングD/Rアジャスター
5
Steering D/R Adjuster
Dual Rate Justierung am Sender
Réglage du débattement
de la direction.
Dual Rate dirección
舵角が少なくなる 舵角が多くなる
Steering angle is less
Kleiner Lenkausschlag
Le débattement est moins important.
Menor ángulo de dirección
広いコース向き 狭いコース向き
For wide cornering tracks.
Für große Kurvenradien und
unempfindliches Ansprechverhalten
Pour un virage large.
Para circuitos con curvas abiertas.
舵角が少ない 舵角が多い
Steering angle will give
you less steering.
Ausschlag kleiner
L'angle de direction vous procure
moins de débattement à la direction.
Menor recorrido de la dirección.
ステアリングD/Rアジャスター /
Réglage du débattement de la direction. / Ajuste del Dual Rate.
ステアリングホイールを操作したときの舵角(切れ角)を、ステアリングD/Rアジャスターで調整します。
Use Steering D/R Adjuster to adjust amount of steering angle when steering wheel is operated.
Mit der Dual Rate Funktion kann der maximale Lenkausschlag begrenzt werden.
Utiliser le Dual Rate afin d'obtenir le débattement de la direction souhaitée.
Utilice el Dual Rate de dirección para variar la cantidad del ángulo de dirección al mover el volante.
*好みに合せて操縦しやすい位置に調整します。
*Adjust to have a place you prefer.
*Stellen Sie den maximalen Lenkausschlag ein!
*Ajustez selon votre pilotage.
*Ajuste según sus necesidades de pilotaje.
Steering angle will give
you more steering.
Ausschlag größer
L'angle de direction vous procure
plus de débattement à la direction.
Mayor recorrido de la dirección.
Steering D/R Adjuster / Dual Rate Justierung am Sender /
Steering angle is more
Großer Lenkausschlag
Angle de direction important.
Mayor ángulo de dirección
For tight cornering tracks.
Für kleine Kurvenradien und sehr
direktes Ansprechverhalten
Lors d'un virage serré.
Para circuitos con curvas pronunciadas
スロットルリンケージのチェック
6
Check the Throttle
Überprüfen Sie die Gasfunktion
Vérifier la commande d'accélération
Comprobación de la aceleración
前 後
Forward
vorwärts
Avant
Adelante
Reverse
rückwärts
Arrière
Atrás
前進
Forward
vorwärts
Avant
Adelante
前進
Forward
vorwärts
Avant
Adelante
ニュートラル
Neutral
neutral
Neutre
Neutro
ニュートラル
Neutral
neutral
Neutre
Neutral
前進
Forward
vorwärts
Avant
Adelante
約1mm
approx. 1mm
ca. 1mm
environ 1mm
aprox. 1mm
ニュートラル
Neutral
neutral
Neutre
Neutral
全開
Full Throttle
Vollgas
Plein gaz
Gas Máximo
約1mm
approx. 1mm
ca. 1mm
environ 1mm
aprox. 1mm
後進
Reverse
rückwärts
Arrière
Atrás
エアクリーナーを外す。
Remove the air cleaner.
Entfernen Sie den Luftfilter.
Retirer le filtre à air.
Filtro de Aire
前進、後進の動きが逆になる場合はP6
10
リバーススイッチの位置を確認してください。
If forward and reverse are opposite, see if your
transmitter has a servo reversing switch. (P6-10)
Wenn Vorwärts und Rückwärts umgekehrt funktionieren,
betätigen Sie bitten den Servo Reverse (Umkehr)
Schalter am Sender.
Si la commande radio gaz/frein est inversée,
utiliser l'interrupteur d'inversion de servo. (P6 - 10)
Si se mueve en sentido contrario, compruebe
el interruptor de inversion. (P6 - 10)
図の動きになるように、六角レンチ(1.5mm)
で★印ロッドストッパーの位置を調整する。
Use a 1.5mm hex wrench to adjust the positions
of the rod stoppers (*) as shown in the drawing.
Verwenden Sie den 1.5 mm Inbusschlüssel, um die
Position des Stangen-Anschlag's wie gezeigt zu justieren.
Ajuster la position de la bague d'arrêt comme indiqué
sur le schéma, en utilisant la clé hexagonale (1.5mm).
Utilice una llave allen 1.5mm para ajustar las posiciones de
los topes de los tirantes (*) tal y como muestra el dibujo.
六角レンチ(1.5mm)/
Sechskantschlüssel (1.5mm) / Clé allen (1.5mm) /
Llave allen (1.5mm)
Hex Wrench (1.5mm) /
後進
Reverse
rückwärts
Arrière
Atrás
約3/4開いている
It should be opened approximately 3/4.
Es sollte sich zu ca. 3/4 öffnen.
Il peut être ouvert apporximativement au 3/4.
Abrir aproximadamente 3/4.
後進
Reverse
rückwärts
Arrière
Atrás
11
Page 12

エンジン各部名称と働き /
7
ENGINE DESCRIPTION / Der Verbrennungsmotor /
Description du moteur / PARTES DEL MOTOR
ニードル
混合気の燃料の量を調整する。
Needle Valve:
Adjusts the amount of fuel inflow for the mixture.
Düsennadel:
Mit der Düsennadel wird die Treibstoffmenge
reguliert, die der Motor erhält.
Pointeau:
règle l'arrivée d'essence dans le carburateur.
Aguja:
Ajusta la cantidad de combustible de la mezcla
スロットルストップスクリュー
アイドリング時のスロットルレバーの開き具合を調整する。
Idle Adjustment Screw:
Adjusts the carburetor opening when idling.
Anschlagschraube für Leerlauf:
Mechanische Justierung für Leerlaufdrehzahl.
Vis de réglage du ralenti:
règle l'ouverture du carburateur.
Tornillo de Ralentí:
Ajusta la abertura del carburador a ralentí.
キャブレター
燃料と空気を混ぜ混合気を作り、その量でエンジン
の回転数をコントロールする。
Carburetor:
Mixes air and fuel appropriately to control engine running.
Vergaser:
Der Vergaser regelt das Luft-Treibstoffgemisch.
Carburateur:
mélange l'air et le carburant de manière appropriée.
Carburador:
Mezcla el aire y el combustible.
グロープラグ
圧縮された混合気に点火する。
Glow Plug:
Ignites the compressed air-fuel mixture.
Glühkerze:
Die Glühkerze sorgt für die Zündung des
Treibstoffgemisches.
Bougie à incandescence:
provoque l'explosion du mélange aircarburant comprimé.
Bujía:
Provoca la ignición de la mezcla aire-combustible.
リコイルスターター
エンジンを始動させる。
Recoil Starter:
Starts the engine.
Anreißstarter:
Durch Ziehen am Anreißstarter wird der
Motor gestartet.
Tirrette de démarrage:
assure le démarrage du moteur.
Arancador manual:
Arranca el motor
スロットルレバー
混合気の量を調整しエンジンの回転数を制御する。
Throttle Lever:
Adjusts amount of air-fuel mixture inflow
and controls engine rpm.
Drosselküken:
Die Anlenkung des Drosselkükens wird
mit dem Gasservo verbunden.
Levier de gaz:
règle le mélnage air-carburant et définit
le régime moteur.
Mando de gas:
Ajusta la cantidad de aire-combustible de la mezcla.
エンジンは精密部品で構成されています。不用意に分解等をすると、エンジン本来の性能を発揮できなくなることがあります。
Engines include many high-precision parts. If disassembling engines carelessly, their original performance may be lost!
Der Motor enthält viele empfindliche Präzisionsteile. Achten Sie beim Zerlegen und Zusammenbau darauf, daß Sie alle Teile richtig montieren!
Andernfalls kann der Motor beschädigt werden!
Le moteur est compose de nombreuses pieces de haure precision. Si vous ne le demontez pas soigneusement. les perrormances pourraient s'en ressentir!
Los motores incorporan gran cantidad de piezas de alta precisión. Cuando desmonte el motor, realice todas las operaciones con sumo cuidado.
ニードルを調整 /
Réglage du pointeau / Ajuste de la aguja
1 2
ニードルが止まるまで軽くしめる。
(時計回り)
Gently screw in the needle valve
(clockwise rotation).
Schließen Sie vorsichtig die Düsennadel
(Drehen im Uhrzeigersinn).
Vissez complètement, et sans forcer,la vis de pointeau
(dans le sens des aiguilles d'une montre)
Apriete suavemente la aguja
(Hacia la derecha).
その他走行前のチェック /
8
Adjust the needle valve. / Einstellung der Düsennadel. /
約1と1/2回転ゆるめる。(反時計回り)
Refer to the engine instruction manual and unscrew the
needle valve as specified (counter clockwise rotation).
Öfnen Sie die Düsennadel 1,5 Umdrehungen
(Drehen gegen den Uhrzeigersinn).
Référez-vous aux instructions du manuel de montage
et dévissez la vis de pointeau comme indiqué
(dans le sens ontraire des aiguilles d'une montre).
Lea las instrucciones del motor y afloje la aguja tal y
como se indique (Hacia la izquierda).
CHECKLIST BEFORE RUNNING / Die Checkliste vor dem Start /
1
2
Points a verifier avant le demarrage / COMPROBACIONES PREVIAS
ビスなどのゆるみはありませんか?
可動部分はスムーズに動きますか?また、グリス等適切に塗ってありますか?
エアクリーナーはついていますか?また、汚れて目詰まりしていませんか?
燃料パイプの詰まりやひび割れ、接続の不良はありませんか?
マフラーや、エキゾーストパイプ等の接続に不良はありませんか?
Ensure all screws are securely tightened.
Ensure all moving parts move without binding.
Are they greased for non-binding movement?
Install an air cleaner. Ensure it is clean and not clogged.
Ensure the fuel lining is proof, with no cracks. Ensure it is not clogged.
Ensure the muffler and exhaust are damage-free.
Ensure the radio batteries are fresh. Are they securely installed?
Ensure servos and linkages move without binding.
Ensure the area of operation is safe.
Ensure nobody is on your frequency at the same time.
Überprüfen Sie, ob alle Schrauben festgezogen sind.
Überprüfen Sie, ob alle beweglichen Teile leichtgängig und an den
entsprechenden Stellen gefettet sind.
Ist der Luftfilter richtig montiert?
Achten Sie auf einen knickfreien Verlauf des Treibstoffschlauches im Modell.
Überprüfen Sie, ob der Auspuff fest am Motor montiert ist.
Überprüfen Sie, ob die Akkus / Batterien für die RC-Anlage geladen / frisch sind.
Überprüfen Sie, ob die Servoanlenkungen sich leichtgängig bewegen können.
Achten Sie darauf, daß das Gelände für den Betrieb Ihres Modells geeignet ist.
Achten Sie auf eine Frequenzkontrolle!
送・受信機の電池はありますか?また、確実に固定されていますか?
サーボ、リンケージはスムーズで正確に動作しますか?
走行場所は安全ですか?
近くで同じバンドで無線操縦模型をしている人はいませんか?
Assurez-vous que toutes lesvis soien bien serrées.
Assurez-vous que les pièces en mouvement ne cognent rien.
Sont elles bein graissées?
Installez un filtre à air. Assurez-ous qu'il soit propre.
Assurez-vous que les tubes d'arrivée d'essence soient correctement installés et propres
Assurez-vous que l'échappement ne soit pas endommagé.
Assurez-vous que les batteries soient bien chargées. Sont-elles bien fixées?
Assurez-bous que les servos et leurs connections peuvent être utilisés sans rien cogner.
Assurez-vous que la piste où vous roule est sûre.
Assurez-vous que personne n'emploie la même fréquence que vous en même temps.
Asegúrese que todos los tornillos y tuercas están bien fijados
Asegúrese que todas las piezas móviles se mueven suavemente.
Instale un filtro de aire. Asegúrese que está bien limpio.
Asegúrese que el macarrón de combustible no está obstruido.
Asegúrese que el codo y el escape están en perfecto estado.
Asegúrese que las baterías están perfectamente cargadas.
Asegúrese que los varillajes se mueven perfectamente.
Asegúrese que el área está despejada
También que nadie esté utilizando la misma frecuencia que usted.
12
Page 13

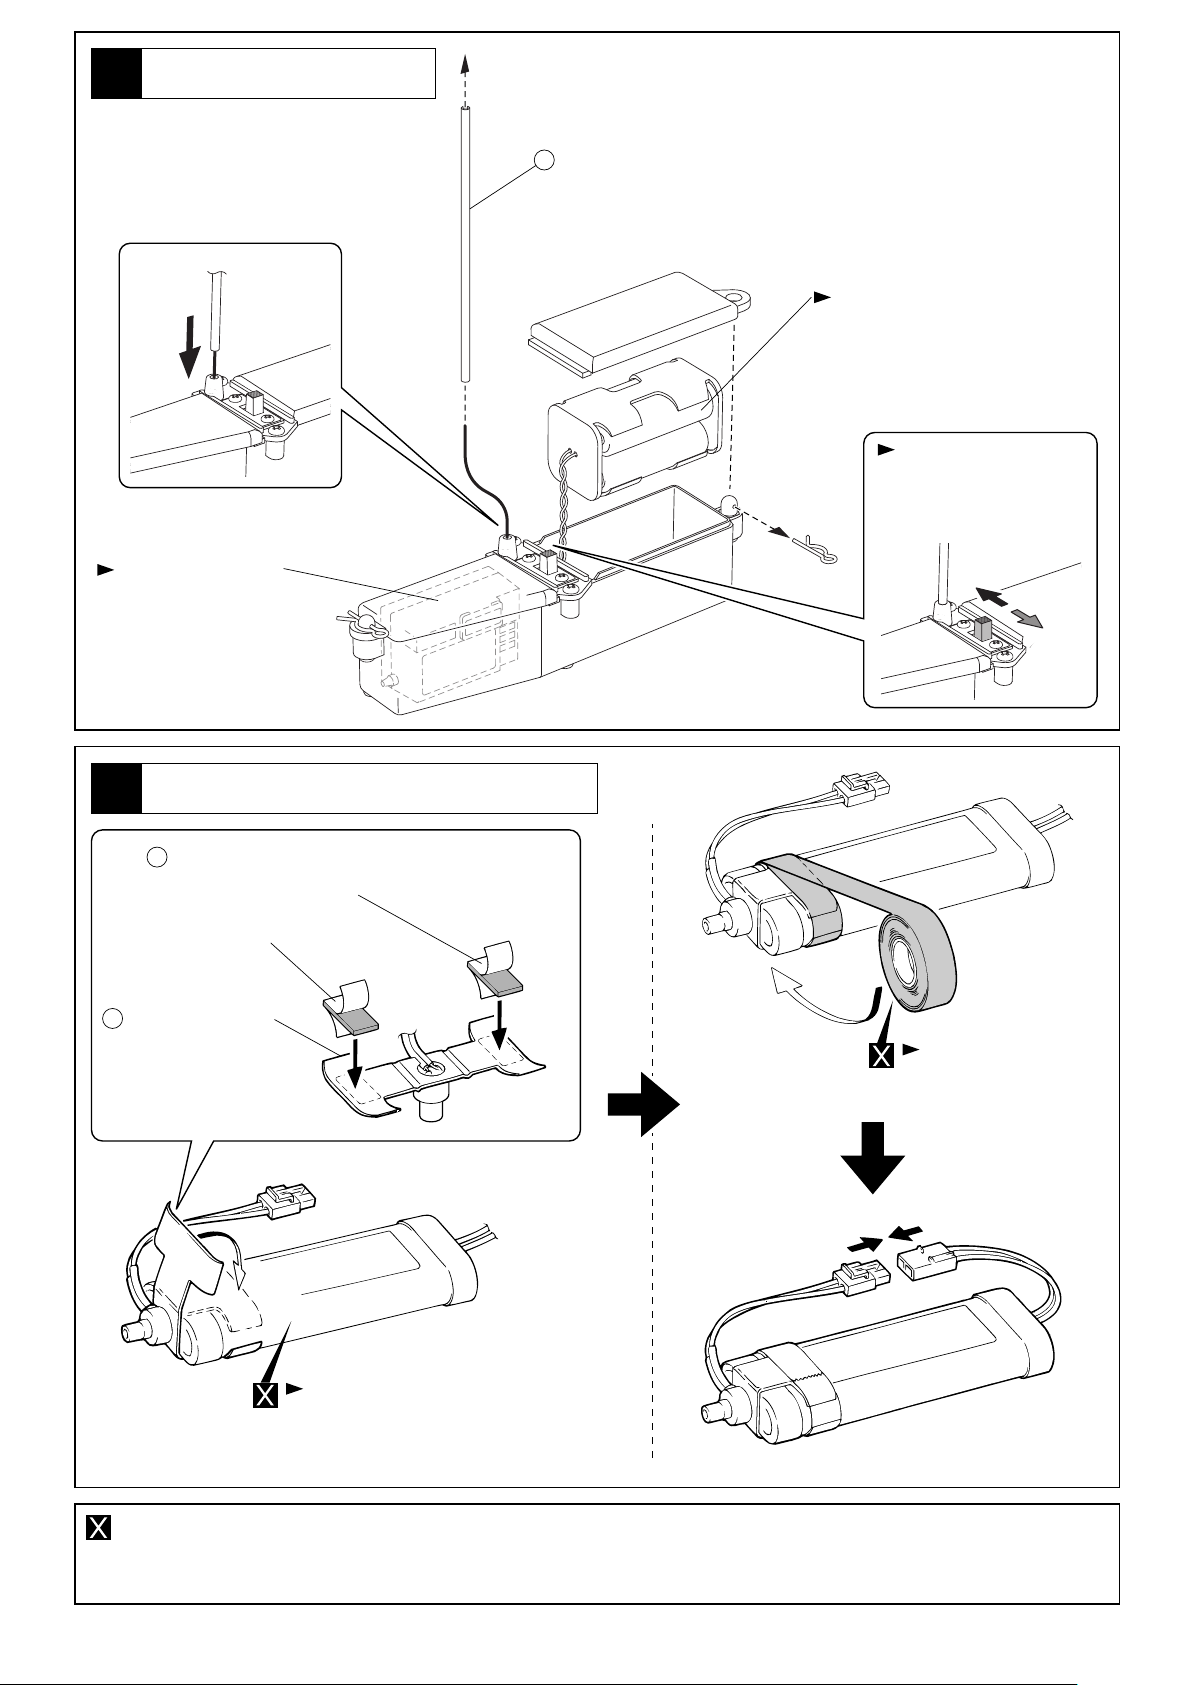
エンジンのスタート方法 /
電動スターター用の7.2Vバッテリーを充電し、満充電になったものを用意します。
1
Get ready a fully charged 7.2V battery.
Laden Sie den 7,2V Akku auf
Se munir vous d'une batterie 7,2V chargée.
Carguecompletamenteunabatería7,2V.
コネクターユニットのコネクターと7.2Vバッテリーのコネクターを接続します。
2
Join the connector unit and the battery.
Verbinden Sie den Akku mit der Kontaktbrücke
Assembler l'unité de connection à la batterie.
Una la unidad de conexión con la batería.
送信機、受信機の順で電源を入れます。リンケージが正しく動作するか、確認します。
3
キャブレターが約1mm開いていることを確認した後、エアクリーナーを取り付けます。
Power on the transmitter first, then the receiver. Check if the linkage will move properly.
After confirming that the carburetor is open about 1mm, fix the air cleaner.
RC-Anlage einschalten und auf Funktion überprüfen. Der Vergaserspalt im
Leerlauf beträgt 1 mm. Anschließend den Luftfilter montieren.
Brancher la radio en premier, puis le r=E9cepteur. Vérifer le bon fonctionnement des tringleries.
Ouvrir le carburateur à 1mm environ puis fixer le filtre à air.
Conecte en primer lugar la emisora, luego el receptor. Compruebe que el varillaje se mueve correctamente.
Una vez confirme que la abertura del carburador es de 1mm, instale el filtro de aire.
ニュートラルになっていることを確認し、7.2Vバッテリーを、スターター配線ユニットに接続します。
4
(以後、スタートします。)このときに、スターターがいきおい良く回転すれば正常です。(2〜3秒で中止します。)
See if the clearances are the same as shown in the right side illustration, then connect
the 7.2V battery with the starter wiring unit. (It will start.) If the starter rotates fast,
the setting is normal. (Keep it running only for 2 or 3 Seconds.)
Überprüfen Sie die Geometrie der Vergaseranlenkung. Sie muß exakt wie in der
Skizze dargestellt justiert sein. Schließen Sie jetzt die Akkueinheit an der
Startereinheit an - der Anlasser dreht den Motor durch. Springt der Motor nicht
an, ziehen Sie die Akkueinheit nach spätestens 5 Sekunden wieder ab.
Vérifier à ce que l'espace soit identique à celui de l'illustration de droite,
puis enclencher la batterie 7,2V équipée de son unité de connection comme
indiqué. Ca démarre !!. Si le démarreur tourne vite, tout va bien.
(Maintenir la batterie dans le démarreur 2 ou 3 secondes au plus !!!).
Compruebe que los ajustes coinciden con los del dibujo derecho, conecte la
batería 7.2V y el arrancador. (arrancará) Si el arrancador gira rápido, el ajuste
es normal. (Manténgalo en funcionamiento durante 2 ó 3 segundos).
Way of Starting Engine / So starten Sie den Motor / Comment utiliser le démarreur / Arranque del Motor
< >ニュートラル
< >
Neutral
< >
neutral
< >
Neutre
< >
Neutral
A
1mm
スターターを5秒以上連続して回転させると、
発熱し、火災の恐れがあります。
If you make it run for over 5 seconds, the
警告
WARNING
VORSICHT
ATTENTION
AVISO
チョークボタン
Choke Button.
Kaltstarter
Pompe d'amorçage.
Botón de Cebado
燃料タンクに燃料を入れ、チョークボタンを押し、キャブレターに燃料を送ります。次にスターターをスタートします。このとき、スターターを5秒以
5
上連続して回さないで下さい。スターターがいきおい良く回っていても、エンジンが始動しないときは、チョークポンプを1〜2回押して、再びスタート
します。エンジンが始動したらすぐにスタートをやめて下さい。すぐに のリンケージを指で軽く押し、エンジンの回転数が上昇するか確認します。
※エンジンの回転数を上げすぎないように注意。また、エンジンスタート時には、自動でプラグヒートされていますので、その他のプラグ
ヒーターは必要ありません。
Fill the fuel tank, push the choke button to feed the fuel into the carburetor, then engage the starter. Do not run the starter over 5 seconds. If the engine
does not start, push the choke button once or twice. Once the engine starts, disengage the starter immediately. See if the engine runs faster by pushing
the linkage (B) with a finger lightly. When the engine is in the starting process, the glow plug is heated automatically, you need not use any plug heater.
Betanken Sie das Modell und dr¸cken Sie den Pumpknopf am Tank, bis Treibstoff am Vergaser anlangt. Schließen Sie jetzt den Starter an.
Springt der Motor nicht an, Akku nach spätestens 5 Sekunden wieder abziehen. Drücken Sie nochmals den Pumpknopf. Wiederholen Sie die
Startprozedur, bis der Motor läuft. So wie der Motor anspringt, Akkueinheit abziehen. Während des Startvorgangs wird die Glühkerze automatisch
beheizt, ein separater Glow Starter ist nicht erforderlich.
Remplir le réservoir et amorçer le carburant en actionnant la pompe située sur le réservoir. Enclencher la batterie du démarreur. Ne pas la laisser plus
de 5 secondes. Si le moteur ne démarre pas retirer la batterie et actionner de nouveau la pompe d'amorçage 1 ou 2 fois. Une fois le moteur en marche,
retirer immédiatement la batterie du démarreur. Vérifier que le moteur accélère normalement en actionnant à la main la tringlerie de gaz/frein (B).
Lors de la mise en route du moteur, le chauffe bougie s'actionne automatiquement.
Llene el depósito de combustible, pulse el botón de cebado para que el combustible llegue al carburador. No haga funcionar el arrancador durante
más de 5 segundos. Si el motor no arranca, pulse el botón de cebado una ó dos veces más. Una vez arranque el motor, desconecte el arrancador
inmediatamente. Observe si el motor gira más rápido empujando la varilla (B) con el dedo. Cuando el motor se encuentra en el proceso de arranque
la bujía se pondrá incandescente de manera automática, de manera que no tendrá que utilizar calentador de bujías.
A
starter will generate heat or even set on fire.
Wenn der Starter länger als 5 Sekunden läuft,
erwärmt sich der Motor übermäßig stark
und wird beschädigt.
Attention à ne pas laisser la batterie connectée au
demarreur plus de 5 secondes, il peut chauffer
et s'endommager.
No lo haga funcionar durante más de 5 segundos
ya que se podría sobrecalentar y dañarse.
13
Page 14

スターターが回転しない場合 /
In case the starter does not run / Falls der Anlassermotor sich nicht dreht / Dans le cas ou le moteur ne fonctionne pas / Si el motor no funciona
注意
CAUTION
WICHTIG
IMPORTANT
AVISO
スターター配線ユニット、コネクターユニットが正常に接続されているにもかかわらず、スターターが回転しない場合には、エンジンに
燃料が入りすぎていることが考えられます。
Despite the starter wiring unit and connector units are properly hooked up, still the starter will not drive the engine to start properly, you can
think of the engine fed with excessive fuel.
Sind alle Anschlüsse korrekt und der Akku voll geladen, überprüfen Sie, ob der Motor zu viel Treibstoff im Kurbelgehäuse hat.
Vérifier que l'unité de connection placée sur la batterie est bien positionnée et que le moteur n'est pas noyé.
Si observa que, a pesar de estar realizando bien el proceso, el motor sigue sin arrancar, el motor podría estar inundado de combustible.
次の手順で余分な燃料をエンジンから抜きます。
Remove the excessive fuel by the following steps.
Entfernen Sie den Treibstoff wie folgt:
Si un trop plein de carburant est constaté, effectuer les étapes suivantes :
Elimine el combustible sobrante de la siguiente manera:
プラグを外します。 布をかぶせます。
Take off the glow plug.
Glühkerze demontieren
Retirer la bougie.
Desenrosque la bujía
スターターが回転しない場合には、すぐにスタートをやめて下さい。
If the starter does not rotate, stop the starting process promptly.
Falls sich der Anlassermotor nicht dreht, Startvorgang sofort abbrechen!
Si le démarreur ne tourne pas, stopper le processus de démarrage aussitôt.
Si el arrancador no gira, interrumpa el proceso de arranque inmediatamente
21
Cover the engine head with a cloth.
Zylinderkopföffnung mit einem Tuch abdecken
Recouvrir à l'aide d'un chiffon la culasse du moteur.
Cubra la culata con un trapo
14
そのままスタートし、余分な燃料を
3
排出します。その後プラグを元通り
に取り付けて、再びスタートします。
Eliminate the excessive fuel by driving
the engine with the starter. Then reset
the plug and try to start the engine.
Betätigen Sie den Starter, der überschüssige
Kraftstoff wird ausgeblasen
Eliminer le trop plein de carburant en demarrant
le moteur à l'aide du démarreur électrique.
Puis retirer le démarreur électrique,
replacer la bougie et le chauffe bougie du
démarreur et essayer de démarrer à nouveau.
Elimine el combustible sobrante aplicando
el arrancador. Después coloque de nuevo
la bujía y arranque el motor.
Page 15

エンジンが始動しない場合 /
When the engine does not start / Fehlersuche, falls der Motor nicht anspringt / Lorsque le moteur ne démarre pas / Si el motor no arranca
スターターはいきおいよく回転しますか?
Is the starter running powerfully?
Dreht sich der Anlassermotor schnell genug?
Le démarreur électrique fonctionne normalement?
Funciona el arrancador correctamente?
燃料はキャブレターまできていますか?
Has the fuel come to the carburetor?
Ist der Treibstoff am Vergaser angelangt?
Le carburant arrive normalement dans le
carburateur?
Ha llegado el combustible al carburador?
Yes
エアクリーナーを外し、キャブレターは
1mm以上開いていますか?
Remove the air cleaner, do you see the
carburetor open more than 1mm?
Entfernen Sie den Luftfilter. Ist der Vergaser
mehr als 1 mm geöffnet?
Retirer le filtre à air et vérifier si le carburateur
n'est pas ouvert à plus de 1mm !
Desmonte el filtro de aire, fíjese si la
abertura del carburador más ancha de 1mm.
No
Is the battery for the starter fully charged?
Ist der Akku voll geladen?
La batterie est-elle chargée correctement?
Está la batería completamente cargada ?
No
バッテリーを充電します。スターター用のバッテリーは充電されていますか?
Charge the battery.
Akku laden
Charger la batterie.
Cargue la batería
YesYes
正しく配線してください。スターターユニットの配線は正しいですか?
No
Is the wiring for the starter unit properly hooked up?
Ist die Verkabelung korrekt vorgenommen worden?
L'unité de connection placée sur la batterie est bien positionnée?
Están las conexiones del arrancador bien fijadas?
Wire the system correctly.
Verdrahtung korrekt vornehmen
Les cables sont bien branchés.
Conectar correctamente
Yes
燃料がエンジンに入りすぎています。プラグを外し、スタートさせ、余分な燃料を抜きます。
その後再びスタートさせてください。
The engine is flooded with fuel. Remove the glow plug and drive the engine with the starter to expel
the excessive fuel. Try to restart the engine.
Der Motor hat zuviel Treibstoff im Kurbelgehäuse. Schrauben Sie die Glühkerze heraus und betätigen
Sie den Elektrostarter.
Le moteur est noyé de carburant. Retirer la bougie et éliminer le trop plein de carburant en demarrant
le moteur à l'aide du démarreur électrique. Essayer de démarrer à nouveau.
El motor está inundado de combustible. Desmonte la bujía y aplique el arrancador para eliminar el
combustible sobrante. Intente arrancar el motor.
No
チョークボタンを押し燃料を送ります。
Push the choke button to feed fuel.
Pumpknopf drücken, um Treibstoff
zum Vergaser zu pumpen.
Actionner la pompe à carburant.
Pulse el botón de cebado
スロットルストップスクリューを調整して、約1mmキャブレターを開きます。
No
Open the carburetor for 1mm by adjusting the idle adjustment screw.
Vergaserspalt exakt auf 1 mm justieren
Ouvrir le carburateur à 1mm en ajustant la vis de règlage.
Abra el carburador para que tenga 1mm ajustando con el tornillo de ralentí.
燃料が送れない。
Fuel does not flow.
Es fließt kein Treibstoff
Le carburant ne déborde pas.
El combustible no pasa
ニードルを正しい位置へセットしてください。
Set the needle valve at the right point.
Korrigieren Sie die Vergasereinstellungen
Règler le pointeau.
Ajuste la aguja
Yes
プラグを取り外し、図のようにして
プラグが赤熱していますか?
Take off the plug and see if it is red hot.
Glüht die Glühkerze?
Retirer la bougie et regarder si le
filament est rouge.
Desmonte la bujía y compruebe
si se pone incandescente.
この状態でスタートし、
プラグの状態を確認します。
Start the engine and see
the condition of the engine.
Starten Sie den Motor
Démarrer le moteur et
vérifier l'état du moteur.
Arranque el motor y observe
su funcionamiento.
一度取り外す。
Unscrew temporarily.
Dévissez temporairement.
Vorläufig abschrauben.
Aflojar de manera temporal.
その他エンジンが始動しない場合 /
外気温が5℃以下のとき。
When the ambient temperature is below 5 C.
Die Außentemperatur beträgt unter 5 C
Si la température ambiante est inférieure à 5ºC.
Si la temperatura exterior es inferior a 5 C
エンジンがオーバーヒートしている。
The engine overheats.
Der Motorüberhitzt
Le moteur surchauffe.
El motor se calienta
When the engine does not start / Fehlersuche, falls der Motor nicht anspringt / Lorsque le moteur ne démarre pas / Si el motor no arranca
青
Blue
Blau
Bleu
Azul
No
Yes
エンジンを温める。
Warm up the engine.
Motor vorwärmen
Préchauffer le moteur.
Caliente el motor
エンジンが冷えてから始動する。
Restart the engine after it cools down.
Motor abkühlen lassen, dann erneut starten
Redémarrer le moteur une fois la température redescendue
Vuelva a arrancarlo una vez se haya enfriado
プラグを交換します。
Exchange the glow plugs.
Glühkerze tauschen
Changer la bougie.
Cambie la bujía
チョークポンプを1〜2回押し、
キャブレターを約2mm開き、
再びスタートしてみます。
Push the choke pump once or twice.
Pumpknopf 1-2 mal drücken
Amorçer le carburant en actionnant la
pompe 1 ou 2 fois.
Pulse el botón de cebado 1-2 veces
15
Page 16

エンジンを止めるときはエアークリーナーを指で押さえる。
1
For stopping the engine, squeeze the air cleaner.
Zum Stoppen des Motors wird der Luftfilter zusammengedrückt.
Pour arreter le moteur,exercez une pression sur le filtre a air.
Para parar el motor, apriete el filtro de aire.
始動後のエンジン本体、マフラーなどは、高温になって
いますので、やけどをしないよう充分注意してください。
The engine and muffler get hot! Do not touch them
警告
WARNING
VORSICHT
ATTENTION
AVISO
during and right after operation!
Der Motor und der Auspuff werden sehr heiß.
Nicht berühren, Verletzungsgefahr!
Le moteur et l'echappement sont tres chauds!
Ne les touchez pas pendant ou juste après l'utilisation.
El motor y el escape se calientan durante su funcionamiento.
Deje que se enfríen antes de tocarlos.
エンジン停止後、受信機、送信機の順にスイッチを切る。
2
After stopping the engine, first switch off the receiver, then the transmitter.
Nach Abstellen des Motors erst den Empfänger, dann den
Sender ausschalten.
Après avoir arrêté le moteur, éteignez d'abord le récepteur,
ensuite l'émetteur.
Una vez pare el motor, desconecte el receptor y luego la emisora.
OFF
ON
OFF
POWER
ブレークイン/
ブレークインとは、新しいエンジンの慣らし運転のことです。
ブレークインをおこなわないとエンジンに潤滑オイルがまわらないために、
すぐにエンジンが焼き付いてしまいます。エンジンを長持ちさせるために
ブレークインは必ず行ってください。
The break-in is necessary to "prepare" brandnew engines to regular and
smooth running! If you fail to break-in an engine, the lubricating oil inside
does not circulate and the engine will be caked with burns; running becomes
difficult and engine life is shortened.
Neue Motoren müssen generell eingelaufen werden. Ohne diese
Einlaufphase entwickeln die Motoren nicht ihre volle Leistung und lassen
sich nur schwer einstellen. Es besteht eine erhebliche Beschädigungsgefahr
des Motors.
Le redage est necessaire pour preparer les nouveaux moteurs a une utilisation
reguliere et sans problemes. Si bous ne rodezs pas votre moteur, le graissage
de votre moteur ne se fera pas correctement. L'utilisation sera difficile et la
duree de vie de votre moteur en sera raccourgie.
El rodaje es necesario para preparar los motores nuevos para quefuncionen
perfectamente. Si no realiza el rodaje de manera correcta, el aceite no
lubricará el motor, y por consiguiente su funcionamiento y vida útil se verán
afectados de forma importante.
ブレークイン中は、エンジンの回転を上げすぎると
焼き付きの原因になりますので注意してください。
During the break-in, do not operate the engine with
注意
CAUTION
WICHTIG
ATTENTION
ATENCION
「エンジンの始動」の手順でエンジンを始動する。
1
Start the engine as specified in the
chapter < ENGINE STARTING >.
Starten Sie den Motor, wie zuvor beschrieben.
Démmarrez le moteur comme indiqué dans le chapitre
'DEMARRAGE DU MOTEUR'
Arranque el motor tal y como se indica
en el capítulo < ARRANQUE DEL MOTOR >
スロットルトリガー:ニュートラルの位置。
Move the throttle control to slow.
Lassen Sie den Motor mit mittlerer
Drehzahl und fetter Einstellung laufen.
Baissez le stick de gaz.
Coloque el gas en la posición mínimo
この時、ニードルは始動した位置からしめこまないようにしてください。
At this moment, do not tighten the needle valve any further.
Regeln Sie mit der Düsennadel den Motor so ein, daß er sehr fett läuft.
A ce moment, ne serrez plus le pointeau.
En este punto, no apriete más la aguja.
high rpm! Serious damage may be the result.
Während der Einlaufphase muß der Motor sehr fett
eingestellt sein. Vermeiden Sie hohe Drehzahlen,
Beschädigungsgefahr!
Pendant le rodage,ne faites pas monter le moteur en
regime. Les conséquences pourraient être graves!
Durante el rodaje, no haga funcionar el motor a altas
rpm ya que podría resultar dañado.
BREAK IN / Lassen Sie den Motor einlaufen / Rodage / RODAJE
ニュートラル
Neutral
neutral
Neutre
Neutral
走行させながらブレークインを続ける。エンジンをいたわるつもりで
2
走行させ、10〜20°ずつニードルをしめこむ。
Next, continue performing the break-in while running the car.
Always screw in the needle valve 10 to 20° at a time in order not to
damage the engine.
Lassen Sie nun den Motor beim Betrieb des Modells weiter einlaufen.
Schließen Sie die Düsennadel mit jeder Tankfüllung in kleien Schritten,
bis der Motor seine volle Leistung abgibt.
Ensuite,continuez le rodage en fasant evoluer votre modele.
Revissez le pointeau de 10 a 20 chaque fois, pour ne pas abimer
votre moteur.
Ahora continúe con el rodaje mientras rueda su modelo.
Siempre apriete la aguja en intervalos de 10-20° para nodañar el motor.
ニードル
Needle Valve
Düsennadel
Pointeau
Aguja
2〜3タンク程度走行したらブレークインは終了。
3
Run the engine 2~3 tanks to complete the break-in.
Nach 2~3 Tankfüllungen ist der Einlaufprozeß vollendet.
Pour terminer le rodage,faites evoluer votre modele ainsi
pendant 2~3 pleins.
Consuma 2-3 depósitos para completar el rodaje.
通常走行のニードル位置は1と1/4回転を目安にしてください。
4
これより大きくしめこむとオーバーヒートの原因となります。
The needle valve setting for normal engine running lies between 1 and 1/4
turns screwed out from closed position.
Screwing it further in ,excessive heat may be generated.
Die Düsennadeleinstellung für den normalen Betrieb des Motors l iegt bei
ca. 1/4 Umdrehungen.
LL faut dévisser le pointeau d'1 tour 1/4 (après l'avoir vissé complètement)
pour obtenir un règlage normal du moteur.
D'autres règlages peuvent entrainer une surchauffe du moteur.
El ajuste óptimo para un funcionamiento correcto se encuentra entre 1 y
1/4 de vuelta desde la posición cerrada al máximo.
Si la aprieta más, el motor podría sobrecalentarse.
16
Page 17

エンジン調整 /
Engine Adjustment / Motor Einstellung / Réglages moteur / AJUSTE DEL MOTOR
ブレークインが終了してから の順で調整してください。
Adjust in the order and once the break-in is completed.
1 2
Stellen Sie den Motor nach Punkt und ein.
1 2
1 2
Le rodage terminé, suivez les instructions suivantes:
Ajuste siguiendo el orden una vez haya terminado el rodaje.
ニードル調整(最高回転数の調整)
1
Needle Valve Adjustment (Maximum Rpm Adjustment)
1 2
Einstellung der Düsennadel für Vollgasbereich.
Règlage à haut régime.
Ajuste de la aguja (Ajuste de las rpm máximas)
1
「エンジンの始動」の手順でエンジンを始動し、車を走行させます。
Start the engine as explained in the chapter <ENGINE STARTING>
and run your car.
Starten Sie den Motor.
Faites démarrer votre moteur comme indiqué dand le chapitre
'DEMARRAGE DU MOTEUR' et faites évoluer votre modèle.
Arranque el motor tal y como se indica en el capítulo
< ARRANQUE DEL MOTOR > y ruede su modelo.
2
直線でスロットルトリガーをハイにした時の車のスピードを見ます。
ニードルを10〜20°ずつしめこむと、スピードが上がってきます。
最高スピードが得られる所が、ニードルの最良位置です。
Watch the speed of your car running down a straight with the throttle control
moved to high. When screwing in the needle valve 10 ~20 , speed increases.
When your car's speed reaches the peak, the needle valve setting is optimal.
Beobachten Sie Ihr Modell bei Vollgas auf der Rennstrecke. Je weiter Sie die
Düsennadel schließen, desto höher dreht der Motor und umso schneller fährt
Ihr Fahrzeug. Wenn die maximale Geschwindigkeit erreicht ist, ist der Motor
optimal eingestellt. Achten Sie darauf, daß der Motor immer noch eine leichte
Rauchfahne zieht bei Vollgas.
Faites évoluer votre modèle sur une pente en ligne droite en placant le stick de
gaz vers le haut. En resserrant le pointeau de 10 à 20, la vitesse augmente.
Quand vous aurez atteint la vitesse maximum, le règlage du pointeau sera optimal.
Observe la velocidad de su modelo al rodar en línea recta con el gas abierto
al máximo. Cuando apriete la aguja 10 ~20 , la velocidad se incrementará.
Cuando su modelo alcance la velocidad máxima, el ajuste será el óptimo.
3
そこからさらにしめこむと、エンジンの排気が見えなくなったり、スピー
ドが途中から落ちてきます。そのまま走行を続けると、エンジンが壊れて
しまいます。すぐにニードルをゆるめてください。ニードルの最良位置か
ら10〜20°ゆるめた位置が、通常走行の位置です。
When screwing the needle valve further in, exhausts become in-visible and
rpm decrease. Running the engine with this setting damages the engine.
Immediately unscrew the needle valve. Note that for normal running, the
needle valve is screwed out 10 ~20 from the valve's optimal setting position!
Wenn Sie den Motor zu mager einstellen, verschwindet die Rauchfahne
und Ihr Motor überhitzt, die Drehzahl fällt ab.
En continuant à serrer la pointeau,les fumees d'échappement disparaissent et la
vitesse diminue. Utiliser votre moteur dans ces conditions pourrait l'endommager.
Dévissez immédiatement le pointeau. Notez que pour un usage normal,
lepointeau doit être dévissé de 10 à 20 de son reglage optimal.
Si aprieta la aguja más, los humos del escape se volverán invisibles y las rpm
decrecerán. Rodar el motor con este ajuste podría dañarlo. Para un funcionamiento
normal, la aguja deberá aflojarse 10 ~20 desde la posición de ajuste óptimo.
ニードル
Needle Valve
Düsennadel
Pointeau
Aguja
スロットル
ストップスクリュー
Idle Adjustment Screw
Anschlagschraube für
Leerlaufdrehzahl
Vis de ralenti
Tornillo de Ralentí
スロットルストップスクリュー(アイドリング回転数の調整)
2
Idle Adjustment Screw (Idling Rpm Adjustment)
Einstellung der Düsennadel für Leerlaufbereich.
Règlage du ralenti.
Tornillo de Ralentí (Ajuste de las rpm)
スロットルトリガーは中立にして調整する。
Adjust with throttle control in neutral.
Stellen Sie den Gasknüppel auf Leerlauf.
Placez la commande de gaz en position neutre.
Ajuste con el gas en posición neutral.
中立
Neutral
Leerlauf
Neutre
Neutral
エンジンが止まってしまう。 車が走り出してしまう。
The engine stalls.
Der Motor geht aus.
Le moteur cale.
El motor se cala
Screw in 1/8~1/4 turns.
Schraube 1/4 Umdrehung hineindrehen.
Vissez d'un 1/8-1/4 de tour.
Apriete 1/8~1/4 de vuelta.
スロットルトリガーが中立の時、車が走りださないように調整します。
When the throttle control is in neutral, the car does not speed off even!
Die Einstellung ist optimal, wenn das Fahrzeug ohne Bremse stehen
bleibt und der Motor im Leerlauf nicht ausgeht.
Si la commande est au neutre,la vitesse ne diminue pas même si on actionne le frein
Al estar el gatillo de gas en posición neutral, el modelo deberá permanecer sin moverse.
スロットルストップスクリュー
Idle Adjustment Screw
Anschlagschraube für Leerlaufdrehzahl
Vis de ralenti
Tornillo de Ralentí
The car rolls forward.
Das Modell rollt vorwärts.
La voiture avance.
El modelo avanza
1/8〜1/4回転ずつゆるめる。1/8〜1/4回転ずつしめる。
Unscrew in 1/8~1/4 turns.
Schraube 1/4 Umdrehung herausdrehen.
Devissez d'1/8-1/4 de tour.
Afloje 1/8~1/4 de vuelta.
走行上の注意 /
十分にスピードが落ちてから、前後進の変速操作を行ってください。スピードが落ちてない状態での変速操作や急激な変速操作は、QRCミッションが破損する原因
になりますので絶対に行わないでください。
走行時は、必ずボディを装着してください。
必要以上に前/後進の操作を繰り返すことは、おやめください。
下記の場所での走行は、故障の原因になりますのでおやめください。
・シャシーにからむような草の生えているところ。
・泥地、砂地、砂利の多いところ。
Always reduce to a slow running speed before shifting between forward
and reverse. To protect the clutch mechanism, avoid sudden or too
frequent shifting between forward and reverse.
Always run your car with the body shell mounted!
Avoid changing the running direction too often and too abruptly.
Do not run your car on ground:
• that is overgrown with grass.
• that is muddy, sandy or rocky.
Ensure the throttle and QRC linkages move smoothly without binding.
It may happen that changing the running direction is difficult espe-cially when driving up
a steep way or running on bumpy ground. This, however, does not indicate any trouble.
Check all screws, nuts etc. on a regular basis for looseness.
The gearing etc. may be damaged if you do not use the engine supplied.
Ändern Sie die Laufrichtung, lassen Sie den Antrieb jedoch vorher
auslaufen! Vermeiden Sie häufige Laufrichtungsänderungen, ohne
den Antrieb auslaufen zu lassen, erhöhte Verschleißgefahr!
Bedienen Sie Ihr Auto, nur wenn die Karrosserie montiert ist!
Wechseln Sie die Fahrtrichtung nicht zu oft oder zu abrupt.
Vermeiden Sie Gelände, das:
• mit Gras überwachsen ist.
• schlammig, sandig oder steinig ist.
Sorgen Sie dafür, daß das Gas - und QRC-Gestänge nicht bindet.
Es kommt vor, daß der Fahrtrichtungswechsel nicht mühelos ist, besonders dann, wenn Ihr Auto
einen steilen Weg herauffährt oder auf holprigem Ge-lände fährt. Dies bedeutet jedoch keinen Defekt.
Überprüfen Sie regelmäßig alle Schrauben, Muttern usw. auf festen Sitz.
Es besteht die Gefahr, daß u.a. das Getriebe beschädigt wird, wenn nicht der
gelieferte Verbrennungsmotor oder ein Motor eingebaut wird.
Safety Precautions / Sicherheitsvorkehrungen / Mesures de sécurité / Precauciones de Seguridad
走行毎に、QRC/スロットルリンケージがスムースに動作するか確認してください。
坂道、段差などタイヤが駆動しているときは、前/後進が切り替わりにくく
なる場合がありますが、故障ではありません。
定期的に、各部のビス類が緩んでないか確認してください。
標準エンジン以外のエンジンの使用は、ギヤ等の破損の原因になりますのでおやめください。
Ralentir la vitesse avant de passer en marche arrière.
Eviter de passer de la marche avant à la marche arrière trop brutalement.
N’opérez votre voiture que lorsque la carrosserie est montée!
Ne changez pas de direction trop brusquement ou trop fréquemment.
N’opérez pas votre voiture sur du terrain:
• recouvert d’herbe.
• boueux, sableux ou recouvert de pierres.
Vérifiez que les tringleries de gaz et de QRC bougent sans effort.
Il arrive que le changement de direction ne se fasse que difficile-ment, surtout
quand la voiture monte un chemin en pente ou roule sur du terrain bosselé.
Cela n’indique aucune panne.
Vérifiez régulièrement la visserie.
Il y a danger d’endommager l’embrayage etc. si vous n’installez pas le moteur
fourni ou un moteur.
Siempre intente reducir la velocidad antes de cambiar el sentido de la
marcha adelante-atras. Para proteger el mecanismo del embrague, evite
cambiar el sentido de la marcha de manera brusca.
Ruede siempre con la carrocería instalada en el motor
Evite cambiar el sentido de la marcha de manera brusca.
No ruede su modelo en:
• terrenos con hierba alta.
• terrenos con arena, barro y piedras.
Asegúrese que los varillajes y la unidad QRC funcionan perfectamente.
Puede ocurrir que sea un poco difícil cambiar el sentido de la marcha cuando ruede
por terrenos abruptos. No se preocupe ya que esto es normal.
Compruebe que todos los tornillos y tuercas están bien fijados.
Utilice el motor incluido en el kit.
17
Page 18

走行後の手入れ /
一日の走行が終わったらタンクから燃料を抜いてください。
燃料を抜きとった後エンジンを始動し残りの燃料を使いきる。
(燃料が残っていると次回エンジンが始動しにくくなります。)
車やエンジンの汚れを、きれいにとる。
Before putting your car aside, draw out any fuel from the tank.
Next, restart the engine to combust remaining fuel. Leaving
fuel inside the engine will make engine starting difficult.
Wipe off dirt and oil.
Check all parts for screw looseness.
Grease all moving parts.
Disconnect the receiver batteries.
Entfernen Sie nach dem Betrieb sämtliche Treibstoffreste aus dem Tank.
Starten Sie nochmals den Motor um den restlichen Treibstoff aus der
Leitung aufzubrauchen. Lassen Sie niemals Treibstoffreste im Tank!
Entfernen Sie sämtliche Verbrennungsrückstände vom Modell.
Überprüfen Sie alle Schrauben auf festen Sitz.
Bewegliche Teile wenn nötig mit Fett nachschmieren.
Entfernen Sie den Akku aus dem Modell.
Maintenance / Wartung / Maintenance / MANTENIMIENTO
ビスがゆるんでないか各部をチェックしてください。
回転部にグリスを塗ります。
受信機用バッテリーははずしておきましょう。
Videz votre réservoir après utilisation.
Ensuite,redémarrez le moteur afin de brûler le carburant restant dans le moteur Si vous
laissez du carburant dans le moteur, les démarrages ultérieurs seront plus difficiles.
Nettoyez la poussière et l'huile.
Vérifez si toures les vis et écrous sont bien serrés.
Graissez toutes les pièces en mouvement.
Déconnectez les batteries du récepteur.
Antes de guardar su modelo, vacíe todo el combustible del depósito.
Ahora aplique el arrancador para eliminar el combustible sobrante.
Dejar combustible en el motor podría dificultar los arranques sucesivos
Limpie toda la suciedad
Compruebe todos los tornillos y tuercas.
Engrasar las piezas indicadas.
Desconecte las baterías del receptor.
ブレーキを使用する場合のリンケージ
Linkage for using a brake.
Gestänge für die Bremsenbetätigung
Tringlerie utilisée pour le frein.
Varillaje para utilizar freno.
使用しない。
Do not use.
Nicht verwenden!
Ne pas utiliser.
No hacer agujero
ニュートラル
Neutral
neutral
Neutre
QRCロックプレート
QRC Lock Plate
QRC Verriegelungsplatte
Plaque de maintien
Placa QRC
Neutral
ニュートラル /
neutral / Neutre / Neutral
Neutral /
使用しない。
Do not use.
Nicht verwenden!
Ne pas utiliser.
No hacer agujero
ワッシャー
Washer
Scheibe
Rondelle
Arandela
187
186
3x10mm
15mm
約1mm
approx. 1mm
ca. 1mm
environ 1mm
aprox. 1mm
3x12mm
3x10mm
3x10mm
203
アジャスターナット
Adjuster Nut
Justier-Mutter
Ecrou de réglage
Tuerca ajuste
エアクリーナーを外す。
Remove the air cleaner.
Entfernen Sie den Luftfilter.
Retirer le filtre à air.
Filtro Aire
前進(全開)
Forward
Vorwärts
Avant
Adelante
ブレーキ
Brake
Bremse
Frein
Freno
18
Forward /
前進 /
vorwärts / Avant / Adelante
ブレーキ /
Brake /
Bremse / Frein / Freno
縮んでいる。/
Verbunden
Contracted. /
(* funny word - please show me the drawing or context)
Comprimer. / Se comprime.
約1mm /
approx. 1mm / ca. 1mm /
environ 1mm / aprox. 1mm
/
全開
Full Throttle
Vollgas
Plein gaz
Gas Máximo
Page 19

スリッパークラッチ/
Slipper Clutch / Rutschkupplung /
Système de glissement / Slipper Clutch
4mm
ナイロンナット
Nylon Nut
Kunststoffmutter
Ecrou nylon
Tuerca Nylon
スリッパークラッチ部分の4mmナイロンナット締め込み量は、必ず図のように1.5mm〜2mmの範囲まで締め込んでください。
締め込み過ぎや締め込み不足はギヤ破損等の原因となります。
The 4mm Nylon Nut must be positioned as shown in the drawing, 1.5mm to 2mm from the end. Wrong placement of the nut will result in gear damage.
Die M4 Stoppmutter so justieren, wie dargestellt (1,5 - 2 mm)! Andernfalls kann das Getriebe Schaden nehmen!
L'écrou Nylon 4mm doit être positionné comme indiqué sur le schéma (de 1,5 à 2mm avant la fin). Un mauvais serrage risque d'endommager la pignonerie.
La tuerca de nylon 4mm debe ser posicionada tal y como muestra el dibujo ya que de no ser asi podria causar roturas.
スリッパークラッチは、走行時や変速ショックからギヤを保護する機構です。
The Slipper Clutch relieves stress on the gears to prevent damage from abrupt back-and-forth shifting
Die Rutschkupplung schützt das Getriebe bei abruptem Wechsel zwischen Vorwärts- und Rückwärtsfahrt.
Le système de glissement (Slipper) permet de ménager la pignonerie lors des changements de vitesse trop violent.
El Slipper Clutch previene de posibles roturas debido al cambio abrupto del sentido de la marcha.
QRCユニット
QRC Unit
QRC-Einheit
Unité QRC
Unidad QRC
1.5mm ~ 2mm
ダンパースペーサー/
Shock Spacer / Stoßdämpfer Abstandshalter /
Bagues Amortisseur / Casquillo amortiguador
ダンパースペーサーは、シャシー付属のものの他に4種類付属しています。走行場所に合わせて選択してください。
The kit includes 4 extra shock spacers that can be used to adjust spring tension for best results on any terrain.
Der Baukasten enthält 4 zusätzliche Spacer zur Justierung der Federvorspannung der Stoßdämpfer.
Ce kit contient 4 entretoises pemettant d'ajuster la tension des ressorts d'amortisseurs pour une meilleure adhérance sur toutes les pistes.
El kit incluye 4 casquillos para poder variar la tension de los muelles de los amortiguadores.
スプリングを少し縮めながら
取り付ける。
To install spacers, push down on the spring
as shown in the drawing.
Zur Montage der Spacer, die Feder herunterdrücken
(siehe Zeichnung).
Pour installer les entretoises presser le ressort
d'amortisseur comme indiqué sur le schéma.
Para instalar los casquillos, empuje el
muelle tal y como muestra el dibujo.
5mm
ダンパースペーサー
Shock Spacer
Stoßdämpfer Abstandshalter
Bagues Amortisseur
Casquillo amortiguador
10mm
3mm
2mm
1mm
19
Page 20

(1)
分解図
EXPLODED VIEW
EXPLOSIONSZEICHNUNG
VUE ECLATEE
DESPIECE
注意:使用するプラグについて!
ENYA製のプラグは使用できません。
O.S.製のプラグを使用する場合は、プラグ
キャップの内側(1)をドライバー等で少
し広げてください。
CAUTION : GLOW PLUG
Not available with ENYA Glow Plug.
In case of using .O.S Glow Plug, widen
inside of Plug Cap (1) with tools such
as a driver.
Vorsicht: Gluhkerze
Nicht verfugbar mit Enya Gluhkerze!
Beim Einsatz einer OS Gluhkerze,
den Stecker vorsichtig aufbiegen!
ATTENTION !
Le système de démarrage n'est
pas compatible avec les bougies
OS et ENYA.
AVISO: BUJIA
No disponible con bujía ENYA.
En caso de utilizar bujías O.S.,
agrande la tapa (1) con un
destornillador.
74003
201
74001-5
92
74001-1
74002
159
74901ES
57
88899091
20
74001-6
93
94
74001-1
74001-5
96
74001-5
95
97
74001-3
87
74001-4
98
74001-3
Page 21

分解図 /
Exploded View / Explosionszeichnung / Eclaté / Despiece
QRCユニット /
QRC Unit / QRC-Einheit /
Unité QRC / Unidad QRC
92131-047
RS155
49
92131-03
92131-04
47
92131-01
3x12mm(TP
RS152
3x12mm
3x12mm(TP
48
39
38
37
)
92131-09
42
43
43
92131-07
46
)
4x4mm
RS154
50
92131-09
40
3x10mm(TP
96474
36
17
4444
45
92985
)
96996
3x10mm
92131-08
5251
41
3x3mm
92131-09
49
RS154
50
92131-03
30
92131-01
34
3x12mm(TP
RS155
29
24
)
92131-03
53
33
92131-02
92131-02
22
92131-04
54
92131-01
SM55
55
17
92131-047
31
92631-06
20
92131-06
25
96996
17
92131-02
26
92631-06
23
2.6x5mm(FH)
56
96996
92131-06
32
92131-04
92131-05
19
92131-02
27
17
96996
24
17
21
96996
92131-02
92131-06
28
17
36
96996
92131-01
35
96474
46
92131-07
4x4mm
デフギヤ /
Differential / Gear Differential /
Différentiel / Diferencial
MT020
13
96592
12
2.6x10mm(TP/FH
グリスを塗る。
Apply grease.
Fetten.
Graissez.
Aplicar grasa
)
10
MT019
920517
920526
15
MT008
VZ012
11
2
4
MT008
VZ012
MT021
96996
18
1717
356
VZ012
920517
42
16
208
MT019
MT019
12
96592
MT0089
14
MT008
2.6x10mm(TP
)
53
BS1071
VZ012
920517
VZ012/920526
MT019/VZ0218
MT020
13
21
Page 22

エンジン /
Engine / Verbrennungsmotor /
Moteur / Motor
3mm
84
92102
2.6x10mm
83
RS164
82
2.6x10mm
4x4mm
MT016
79
80
86
MT009
3x10mm
1790
3x8mm
3x10mm(TP
85
92972
68
)
92102
LD70
67
75767778
AB16
LD70
6624
3x10mm(TP
1701KP/KY
BS125
3mm
)
92973
71
69
7474
92973
70
92973
72
92070
GT5
62
MT032
61
3x8mm(FH
73
92601
63
92973/
6591
92131-03
60
81
)
1790
86
74901ES
57
58
3x30mm
MT031
646465
)
)
92131-01
59
3x8mm(FH
3x8mm(FH
ダンパー /
Shock Absorber / Stoßdämpfer /
Amortisseur / Amortiguador
99
103103
W5143
約100mm
/ approx. 100mm
ca. 100mm / environ 100mm
aprox. 100mm
22
W5143
W5143
116115114113112
107106105104102101100
3x16mm(TP
W5143
)
110109 111
MT030
108
W0136
111
Page 23

サーボマウント /
Servo Mounts / Servo Befestigungen /
Support servo / Soportes servos
MT016
172
181
MT012
3x6mm
3x10mm(TP
)
3x12mm(TP
MT009
180
3x10mm(TP
3x3mm
MT009
MT016
182
)
3x3mm
3x10mm(TP
)
)
3x10mm(TP
)
2x8mm(TP
179
184184
175
3x3mm
MT009
MT016/1808
MT009
178
179
MT016/1808
MT016
185
MT009
2x8mm(TP
184184
)
3x3mm
183
MT016
)
MT009
174
MT009
173
176
MT009
177
MT009
メカボックス /
Radio Box / RC Box /
Boîtier radio / Caja de radio
139
1284
170
92638
154
MT009
3x10mm
167
MT012
2x4mm(TP
3x12mm(TP
171
1705
)
)
2x10mm
MT012
169
MT016
186
3x10mm(TP
MT009
187
2mm
)
92638
170
MT012
168
166
3x10mm(TP
MT012
)
3x10mm(TP
MT012
166
MT012
165
3x10mm(TP
)
)
23
Page 24

シャシー /
Chassis / Das Chassis /
Chassis / Chasis
< >フロント
< >
Front
< >
Vorne
< >
Avant
< >Parte delantera
3x18mm(TP
)
134
3x12mm(TP
MT023
MT013
136
FM29
3x10mm(TP
1284
)
MT002
118
139
139
142
142
140
MT010
)
1284
139139
138
141
MT010
MT010
MT005
140
131
3x10mm(TP
MT005
3x12mm
(TP)
MT002
117
MT010
MT005
147
92122
)
122
151
150
149
148
FM29
142
142
145
144
143
MT001
151
152
139
139
131
146
145
144
143
154
1284
MT018
153
MT005
92122
MT009
MT005
3x10mm(TP
シャシー /
)
Chassis / Das Chassis /
Chassis / Chasis
< >リヤ
< >
Rear
< >
Hinten
< >
Arrière
< >Parte trasera
3x10mm
134
MT013
137
3mm
MT023
FM29
MT013
135
3x18mm(TP
142
142
MT010
140
1284
139
139
3x12mm(TP
MT002
117
)
MT027
120
)
139
MT014
123
123
1284
119
MT026
MT002
MT010
140
139
138
1284
MT010
MT014
120
121
124
124
142
142
FM29
MT001
119
141
MT002
118
3x10mm
(TP)
125
MT003
127
MT010
74002
159
3x16mm(TP
MT002
139
MT024
1284
126
)
MT028
123
123
MT018
155
156
MT028
126
MT022
128
BS16
129
3x18mm(TP
MT027
MT029
)
129
92122
131
155
BS16
MT018
130
133
MT003
132
134
MT006
BS52
MT023
24
158
MT005
131
92122
121
139
MT001
1284
155
MT018
156
MT029
126
MT028
MT018
155
125
MT001
122
MT024
127
131
MT028
126
MT003
92122
124
124
MT026
128
MT003
130
MT022
BS16
129
129
BS16
132
BS52
133
134
MT006
MT023
Page 25

シャシー /
Chassis / Das Chassis /
Chassis / Chasis
3x10mm
3x12mm(TP
MT011
157
)
MT015
164
)
MT025
163
3x12mm(TP
3x12mm(TP
MT011
161
MT025
163
)
MT011
160
MT011
162
3x12mm(TP
)
タイヤ /
Wheels / Räder/
Roues / Ruedas
3x12mm(TP/FH
)
188
3x8mm(FH
MT004
)
3x12mm(TP/FH
MT011
162
3x16mm(TP
)
MT005
158
3x16mm(TP
)
MT011
157
MT007
189
)
3x12mm(TP/FH
MT007
190
)
3x12mm(TP/FH
)
134
MT023
25
Page 26

品番
No.
クラッチベル(14T)
AB16
Clutch Bell (14T)
8x16x5mmベアリング
8x16x5mm Ball Bearing
2.6x16mmシャフト
BS52
2.6x16mm Shaft
ベベルシャフト
BS107
Bevel Shaft
クラッチシュー
BS125
Clutch Shoe
ボディピン
FM29
Body Pin
パイロットシャフト
GT5
Pilot Shaft
クラッチベアリング
LD70
Clutch Bearing
サスアームセット
MT001
Suspension Arm Set
バルクヘッドセット
MT002
Bulkhead Set
ナックルアームセット
MT003
Knuckle Arm Set
ホイールセット
MT004
Wheel Set
サーボセイバーセット
MT005
Servo Saver Set
ドライブワッシャー
MT006
Drive Washer
タイヤ
MT007
Tire
デフギヤボックス
MT008
Differential Gear Box
リンケージパーツセット
MT009
Linkage Parts Set
ダンパーステーセット
MT010
Shock Stay Set
ロアフレームセット
MT011
Lower Frame Set
ラジオボックスセット
MT012
Radio Box Set
バンパーセット
MT013
Bumper Set
サスプレート
MT014
Suspension Plate
メインシャシー
MT015
Main Chassis
リンケージロッドセット
MT016
Linkage Rod Set
ボディセット(メガフォース)
MT017
Body Set (MEGA FORCE)
デカール(メガフォース)
MT017-1
Decal Set (MEGA FORCE)
ボールエンドセット
MT018
Ball End Set
ベベルギヤセット
MT019
Bevel Gear Set
デフジョイント(A)
MT020
Differential Joint (A)
デフジョイント(B)
MT021
Differential Joint (B)
ホイールシャフト
MT022
Wheel Shaft
ホイールロックボルト
MT023
Wheel Lock Bolt
スイングシャフト
MT024
Swing Shaft
センターシャフト
MT025
Center Shaft
3x34mmスクリューピン
MT026
3x34mm Screw Pin
パーツ名
Part Names
スペアパーツ(1) SPARE PARTS (1)
内容(キーNo.と入数)
Quantity
67
x 1
129
x 2
132
x 10
1 x 2
65
64
142
63
24 6866
121 122
117 118 119
127 130
188
146
147 148 149 150 152 158
143 144 145 151
133
189 190
9
80
178
2x6mm TPバインドビス
2x6mm Self-Tapping Bind Screw
138 141
ボディマウントチューブA
Body Mount Tube A
ボディマウントチューブB
Body Mount Tube B
165 167 168 169 172
166
135 136 137
120
164
79
184
3x3mmセットビス
3x3mm Set Screw
ボディ デカール
body, decals
デカール
decals
155
7 8
5 x 4
2.6x10mm TPサラビス
2.6x10mm Self-Tapping Flat Head Screw
13
18
128
134
125
163
124
x 1
x 2
x 10
x 1
x 1
x 2
x 1
x 2
x 2
x 2
x 4
x 2
11 14 15
154 173 174 175 176
180 179 187
x 2
x 2
x 1
181 182 183 186
x 4
x 8
x 2
x 2
x 2
x 4
x 2
x 2
x 4
x 1
x 1
140
x 4
x 2
157
x 1
185
153
10 16
x 2
x 1
x 1
162160 161
x 1
スペーサー
Spacer
x 1
x 1
208
x 1 x 2
x 1
177
x 2
x 2
x 2
x 2
x 2
x 4
x 1
x4
★定価
380
650
180
550
500
150
400
580
500
400
400
1400
1000
300
3000
300
500
1000
1000
700
1000
400
2300
700
4000
1500
600
800
600
600
800
300
800
1000
300
★発送
手数料
200
(一律)
品番
No.
MT027
MT028
MT029
MT030
MT031
MT032
RS152
RS154
RS155
RS159
RS164
SM55
VZ012
VZ021
W0136
W5143
1284
1701KP
1701KY
1705
1790
1808
1879
6591
74001
74001-1
74001-3
74001-4
74001-5
74001-6
74002
74003
74901ES
パーツ名
Part Names
4x46mmスクリューピン
4x46mm Screw Pin
5x13mmキングピン
5x13mm King Pin
アジャスタブルロッド(50mm)
Adjustable Rod (50mm)
ダンパースプリング(メガフォース)
Shock Spring (MEGA FORCE)
エンジンマウント
Engine Mount
クーリングファンスペーサー
Cooling Fan Spacer
ディスクプレート
Disk Plate
スリッパーシート
Slipper Sheet
スリッパープレート
Slipper Plate
ブレーキレバー
Brake Lever
エアーフィルター
Air Filter
スプリング
Spring
デフギヤセット
Differential Gear Set
デフパッキン
Differential Packing
5.8mmハードボール
5.8mm Hard Ball
スポーツショック(L)
Sports Shock (L)
5.8mmピロボール(銀)
5.8mm Pillow Ball (Silver)
蛍光ストラップ(M)
Fluorescent Strap (M)
蛍光ストラップ(M)
Fluorescent Strap (M)
カラーアンテナ(白)
Color Antenna (White)
カラーシリコンチューブ
Color Silicone Tube
ロッドストッパー
Rod Stopper
ホビーグリス
Hoby Grease
マフラーガスケット
Muffler Gasket
電動スターターユニット
(GS15R)
Electric Starter Unit
(GS15R)
スターターケース
Starter Case
スターターモーター
Starter Motor
ワンウェイシャフト
Oneway Shaft
ギヤセット
Gear Set
ワンウェイベアリング
Oneway Bearing
スターター配線ユニット
Starter Wiring Unit
コネクターユニット
Connect Unit
GS15Rエンジン(電動スターター)
GS15R Engine (Electric Starter)
2x11mmピン
2x11mm Pin
★FOR JAPANESE MARKET ONLY.
内容(キーNo.と入数)
Quantity
123
x 4
126
x 4
156
x 4
108
x 4
58
x 1
61
x 1
43
x 2
50
x 2
49
x 2
40
x 1
81 82 83
55
3 5 6 x 4
2 4 x 8
8 x 5
111
99
107
116
103 110
139
74
74
171
86
184
XX
69
87 88 89
94 95 96 97 98
ビスセット
Screw Set
88 89 90 91 94
2.6x8mmビス
2.6x8mm Screw
2.6x6mmTPビス
2.6x6mm TP Screw
97 98
3x4mmナベビス
3x4mm R/H Screw
87
92 95 96
93
159
3x15mm TPバインドビス
3x15mm TP Bind Screw
201
57
7 x 10
x 1 sets
x 1
x 10
100 101 102 104 105 106
109 111 112 113 114 115
x 2
x 4
x 8
x 18
x 18
x 6
XX
x 1
x 2
x 5
x 1
x 5
90 91 9392
x 1
x 1
x 1
x 4
x 1
x 1
x 2
x 1
x 1
x 1
x 1
x 2
x 1
x 1
★定価
300
300BS16
400
1000
400
300
100
100
200
100
300
120
900
400
500
1000
200
250
250
500
400
250
150
200
2800
600
1400
400
500
900
1200
900
14000
30092051
★発送
手数料
200
(一律)
26
Page 27

スペアパーツ(2) SPARE PARTS (2)
★FOR JAPANESE MARKET ONLY.
品番
No.
92052
92070
92102
92122
92131
92131-01
92131-02
92131-03
92131-04
92131-05
92131-06
92131-07
92131-08
キットの部品の一部にはスペアパーツとして販売していない物があります。京商ではオプションパーツを販売していますのでお買い求めください。
Some of the parts included are not available as spare parts. Purchase optional parts instead.
パーツ名
Part Names
Oリング(P5)
O-ring (P5)
フライホイール
Flywheel Set
燃料タンク(125cc)
Fuel Tank (125cc)
6.8mmピロボール
6.8mm Pillow Ball
QRCユニット(メガフォース)
QRC Unit (MEGA FORCE)
QRCミッションケース
QRC Mission Case
QRCギヤセット
QRC Gear Set
QRCスパーギヤセット
QRC Spur Gear Set
QRCスパーギヤシャフト
QRC Spur Gear Shaft
QRCクラッチシャフト
QRC Clutch Shaft
QRCギヤシャフト
QRC Gear Shaft
QRCシャフトジョイント
QRC Shaft Joint
ブレーキディスク
Brake Disk
内容(キーNo.と入数)
Quantity
6 x 10
62
x 0
84 85
x 1
131
x 10
XX XX XX
33 34 35 37 38 5939
3x8mm TPバインドビス
3x8mm Self-Tapping Bind Screw
21 22 26 27 29 30
2x10mmピン
2x10mm Pin
2.6x6mmサラビス
2.6x6mm Flat Head Screw
48 51 52 53 60
31 47 54
Eリング(E5.0)
E-ring (E5.0)
19
25 28 32
46
45
x 1 sets
x 1
x 1
x 1
x 2
x 2
x 1
x 1
x 2
x 1
x 1
x 2
x 1
★定価
400
600
1500
700
3800
500
400
400
300
300
300
400
300
★発送
手数料
200
(一律)
品番
No.
QRC ブレーキシャフト
92131-09
QRC Brake Shaft
十字レンチ
92191
Cross Wrench
耐熱マフラージョイントパイプ
92601BK
Muffler Joint Pipe
QRCクラッチピン
92631-06
QRC Clutch Pin
QRCクラッチ
92631-07
QRC Clutch
スナップピン(小)
92638
Snap Pin (Small)
サイレントストリークマフラー
92972
Silent Streak Muffler
マニホールドASSY
92973
Manifold ASSY
ハードブレーキライニング
92985
Hard Brake Pads
スポンジテープ(1mm)
96441
Sponge Tape (1mm)
6x12x4mmベアリング
96474
6x12x4mm Ball Bearing
12x18x4mmベアリング
96592
12x18x4mm Ball Bearing
5x10x4mmベアリング
96996
5x10x4mm Ball Bearing
パーツ名
Part Names
内容(キーNo.と入数)
Quantity
41 42
186
x 1
3x3mmセットビス
3x3mm Set Screw
XX
x 1
73
x 2
23
x 5
20
x 1
170
x 10
75 76 77 78
69 70 71 72
2.6x10mmバインドビス
2.6x10mm Bind Screw
3x30mmキャップビス
3x30mm Cap Screw
3mmフランジ付ナット
3mm Flanged Nut
44
x 4
202
x 1
36
x 2
12
x 2
17
x 4
x 1
x 1
x 1
x 2
x 2
x 2
★定価
300
500
800
200
350
200
1200
1100
400
300
1000
1800
1000
★発送
手数料
200
(一律)
品番
No.
5.8mmボールエンド
LA43
5.8mm Ball End
SPブレーキローター
SPW51
SP Brake Rotor
LSDギヤセット
VZW009
LSD Gear Set
ツインキャッププロショック(L)
W5183
Twin Cap Pro Shock (L)
ショックスプリング(L)#60
W5183-60
Shock Spring (L) #60
ショックスプリング(L)#65
W5183-65
Shock Spring (L) #65
ショックスプリング(L)#70
W5183-04
Shock Spring (L) #70
ショックスプリング(L)#75
W5183-75
Shock Spring (L) #75
ショックスプリング(L)#80
W5183-80
Shock Spring (L) #80
カラードアンテナ(蛍光ピンク)
1706
Colored Antenna (Fluorescent Pink)
カラードアンテナ(蛍光イエロー)
1707
Colored Antenna (Fluorescent Yellow)
品番
No.
Part Names
シリコンオイル(100)
96601
Silicone Oil (100)
シリコンオイル(150)
96602
Silicone Oil (150)
シリコンオイル(200)
96603
Silicone Oil (200)
シリコンオイル(250)
96604
Silicone Oil (250)
シリコンオイル(300)
96605
Silicone Oil (300)
シリコンオイル(350)
96606
Silicone Oil (350)
パーツ名
Part Names
パーツ名
内容(キーNo.と入数)
Quantity
W5183と合わせて使用
Need W5183
ステンレス製, 高耐久
Stainless, High strength
LSD効果でコーナリング性能をアップ
To improve Cornering characteristics with LSD effects.
アルミ製, 高精度
Aluminium, High Quality
ソフト
Soft
ハード
Hard
*標準品はW5183-80よりハードです。
*Standard spring is harder than W5183-80.
蛍光ピンク
Fluorescent Pink
蛍光イエロー
Fluorescent Yellow
内容
Qty.
ダンパー用
for shocks.
★発送
★定価
手数料
各600 200
(一律)
オプションパーツ OPTIONAL PARTS
★定価
1000
7500
3500
品番
No.
Part Names
シリコンオイル(400)
96607
Silicone Oil (400)
シリコンオイル(500)
96608
Silicone Oil (500)
シリコンオイル(600)
96609
Silicone Oil (600)
シリコンオイル(800)
96610
Silicone Oil (800)
シリコンオイル(450)
96611
Silicone Oil (450)
シリコンオイル(550)
96612
Silicone Oil (550)
★発送
手数料
300
200
(一律)
550
550
300
550
550
500
500
パーツ名
品番
No.
カラードアンテナ(黒)
1708
Colored Antenna (Black)
エアークリーナーオイル
1948
Air Cleaner Oil
燃料フィルター
39308
Fuel Filter
ベスペル®クラッチシュー(KC45)
39673
Vespel® Clutch Shoe (KC45)
6v X-FORCE 600ニカドバッテリー
71161
6v X-FORCE 600 Ni-Cd Battery
SPシリンダーヘッド(GS15R)
74901-14BL
SP Cylinder Head (GS15R)
耐熱マフラージョイントパイプ
92601R
Muffler Joint Pipe
マフラーキャップ
92606
Muffler Cap
クイックフュールポンプ(250cc)
96421
Quick Fill Fuel Bottle (250cc)
クイックフュールポンプ(500cc)
96422
Quick Fill Fuel Bottle (500cc)
内容
Qty.
ダンパー用
for shocks.
★定価
各600 200
パーツ名
Part Names
★発送
手数料
(一律)
品番
No.
96613
96614
96531
96615
96616
★FOR JAPANESE MARKET ONLY.
内容(キーNo.と入数)
Quantity
黒色
Black
ホコリからエンジンを守る
Protect engine from dust.
燃料のゴミをシャットアウト
Shuts out dirt from fuel
耐久性に優れる
Long life time.
充電池, 受信機用
Rechargeable batteries for receiver.
アルミ削り出し, ブルーアルマイト加工済
Aluminum, Blue alumite processed
高耐久, 赤色
High strength, Red
マフラー先端用のキャップ
Exhaust cover.
燃料給油用
aid for fueling
燃料給油用
aid for fueling
★定価
500
1000
1000
2800
3800
2500
800
250
900
1200
★FOR JAPANESE MARKET ONLY.
パーツ名
Part Names
シリコンオイル(700)
Silicone Oil (700)
シリコンオイル(900)
Silicone Oil (900)
シリコンオイル(1000)
Silicone Oil (1000)
シリコンオイル(1100)
Silicone Oil (1100)
シリコンオイル(1200)
Silicone Oil (1200)
内容
Qty.
ダンパー用
for shocks.
★定価
各600 200
★発送
手数料
200
(一律)
★発送
手数料
(一律)
27
Page 28

SCREW ・ NUT etc.ビス・ナット類
品番
No.
1101
1102
1103
1104
1105
1106
1110
1111
1112
1113
1114
1115
1118
1119
1120
1121
1122
1123
1124
1125
1126
1127
1128
1129
1130
1131
サイズ(mm)
Size (mm)
ナベビス
Round Head Screw
2x6 • 2x8 • 2x10 • 2x15 5 each 10 each
2.6x8 • 2.6x10 • 2.6x12 • 2.6x14
3x4 • 3x6 • 3x8 • 3x10 • 3 x12
3x14 • 3x16 • 3x18 • 3x20
4x6 • 4x8 • 4x10 • 4x12
3x22 • 3x24 • 3x26 • 3x28
バインドビス
Bind Screw
2.6x4 • 2.6x6 • 2.6x8 • 2.6x12
3x4 • 3x6 • 3x8 • 3x10 • 3x12
3x14 • 3x16 • 3x18 • 3x20
4x6 • 4x8 • 4x10 • 4x12
3x22 • 3x25 • 3x28 • 3x30
4x15 • 4x18 • 4x20 • 4x22
サラビス
Flat Head Screw
2.6x8 • 2.6x10 • 2.6x12 • 2.6x14
3x6 • 3x8 • 3x10 • 3x12
3x14 • 3x16 • 3x18 • 3x20
4x8 • 4x10 • 4x15 • 4x20
3x22 • 3x24 • 3x26 • 3x28
3x30 • 3x32 • 3x34 • 3x35
キャップビス
Cap Screw
2x8 • 2x10 • 2x12 • 2x14
2.6x8 • 2.6x10 • 2.6x12 • 2.6x14
3x8 • 3x10 • 3x12 • 3x14
3x15 • 3x16 • 3x18 • 3x20
3x25 • 3x30 • 3x35 • 3x40
4x10 • 4x15 • 4x20
4x25 • 4x28 • 4x30
4x35 • 4x40 • 4x45
入数(各)
QUANTITY
●200 ●200
5 each
5 each
5 each
5 each
5 each
●200
5 each
5 each
5 each
5 each
5 each
5 each
●200
5 each
5 each
5 each
5 each
5 each
5 each
●200
2 each
2 each
2 each
2 each
2 each
2 each
2 each
2 each
品番
No.
1132
1133
1134
1135
1136
1137
1140
1141
1142
1143
1147
1148
1149
1150
1153
1154
1157
1160
1161
1162
1163
1164
1165 3x20 • 3x25 3 each
サイズ(mm)
Size (mm)
ナベタッピングビス
Round Head Self-Tapping Screw
2x4 • 2x6 • 2x8 • 2x10 5 each
2.6x6 • 2.6x8 • 2.6x10 • 2.6x12
3x6 • 3x8 • 3x10 • 3x12 • 3x14
3x15 • 3x16 • 3x18 • 3x20
3x25 • 3x30 • 3x35
2.6x14 • 2.6x15 • 2.6x16 • 2.6x18
バインドタッピングビス
Bind Self-Tapping Screw
2.6x6 • 2.6x8 • 2.6x10 • 2.6x12
3x6 • 3x8 • 3x10 • 3x12 • 3x14
3x15 • 3x16 • 3x18 • 3x20
4x10 • 4x15 • 4x18
サラタッピングビス
Flat Head Self-Tapping Screw
2.6x6 • 2.6x8 • 2.6x10 • 2.6x12
3x6 • 3x8 • 3x10 • 3x12 • 3x14
3x15 • 3x16 • 3x18 • 3x20
4x15 • 4x20 • 4x25
フランジ付キャップビス
Flanged Cap Screw
3x6 • 3x8 • 3x10
4x8 • 4x10 • 4x12
サラ小丸ビス
Flat Head Screw
2x8 • 2x10
セットビス
Set Screw
3x6 • 3x12 • 3x14 • 3x16
3x3 • 3x4 • 3x5 • 3x10
4x4 • 4x5 • 4x8 • 4x12
5x4 • 5x5 • 5x6
5x30 • 5x40
入数(各)
QUANTITY
●200
5 each
5 each
5 each
5 each
5 each
●200
5 each
5 each
5 each
5 each
●200
5 each
5 each
5 each
5 each
●200
2 each
2 each
●200
10 each
●200
3 each
3 each
3 each
3 each
3 each
● FOR JAPANESE MARKET ONLY.
品番
No.
1171
2mm • 2.6mm
1172
3mm • 4mm
1174
3mm
1175
4mm
1177
2.6mm
1178
3mm
1179
4mm
1180
4mm
1185
2mm • 2.6mm • 3mm
1186
4mm • 5mm
1380
E1.5
1381
E2.0
1382
E2.5
1383
E3.0
1384
E4.0
1385
E5.0
1386
E6.0
1387
E7.0
1390
E10.0
ここに明記された以外のビス、ナット等は
『ユーザー相談室』にお問い合わせください。
径
mm
ナット
Nut
フランジ付ナット
Flanged Nut
ナイロンナット
Nylon Nut
フランジ付ナイロンナット
Flanged Nylon Nut
ワッシャー
Washer
Eリング
E-Clips
入数(各)
QUANTITY
10 each
●200
10 pcs
10 pcs
●200
5 pcs
5 pcs
5 pcs
●200
5 pcs
●200
10 each
10 each
●150
10 pcs
10 pcs
10 pcs
10 pcs
10 pcs
10 pcs
10 pcs
6 pcs
6 pcs
メーカー指定の純正部品を使用して
安全にR/Cを楽しみましょう。
R
THE FINEST RADIO CONTROL MODELS
京商株式会社
〒243-0034 神奈川県厚木市船子153
●ユ−ザ−相談室直通 電話番号 046-229-4115
お問い合わせは:月曜〜金曜(祝祭日を除く) 10:00〜18:00
PRINTED IN KOREA68430112-2
 Loading...