

Page 1
※ご使用前にこの説明書を良くお読みになり十分に理解してください。
B efore commenc ing as s embly, pleas e read thes e ins truc tions thoroughly.
エンジン
取扱説明書
G S 21R
ENGINE
INS TR UC TIO N S HE E T
No.74022
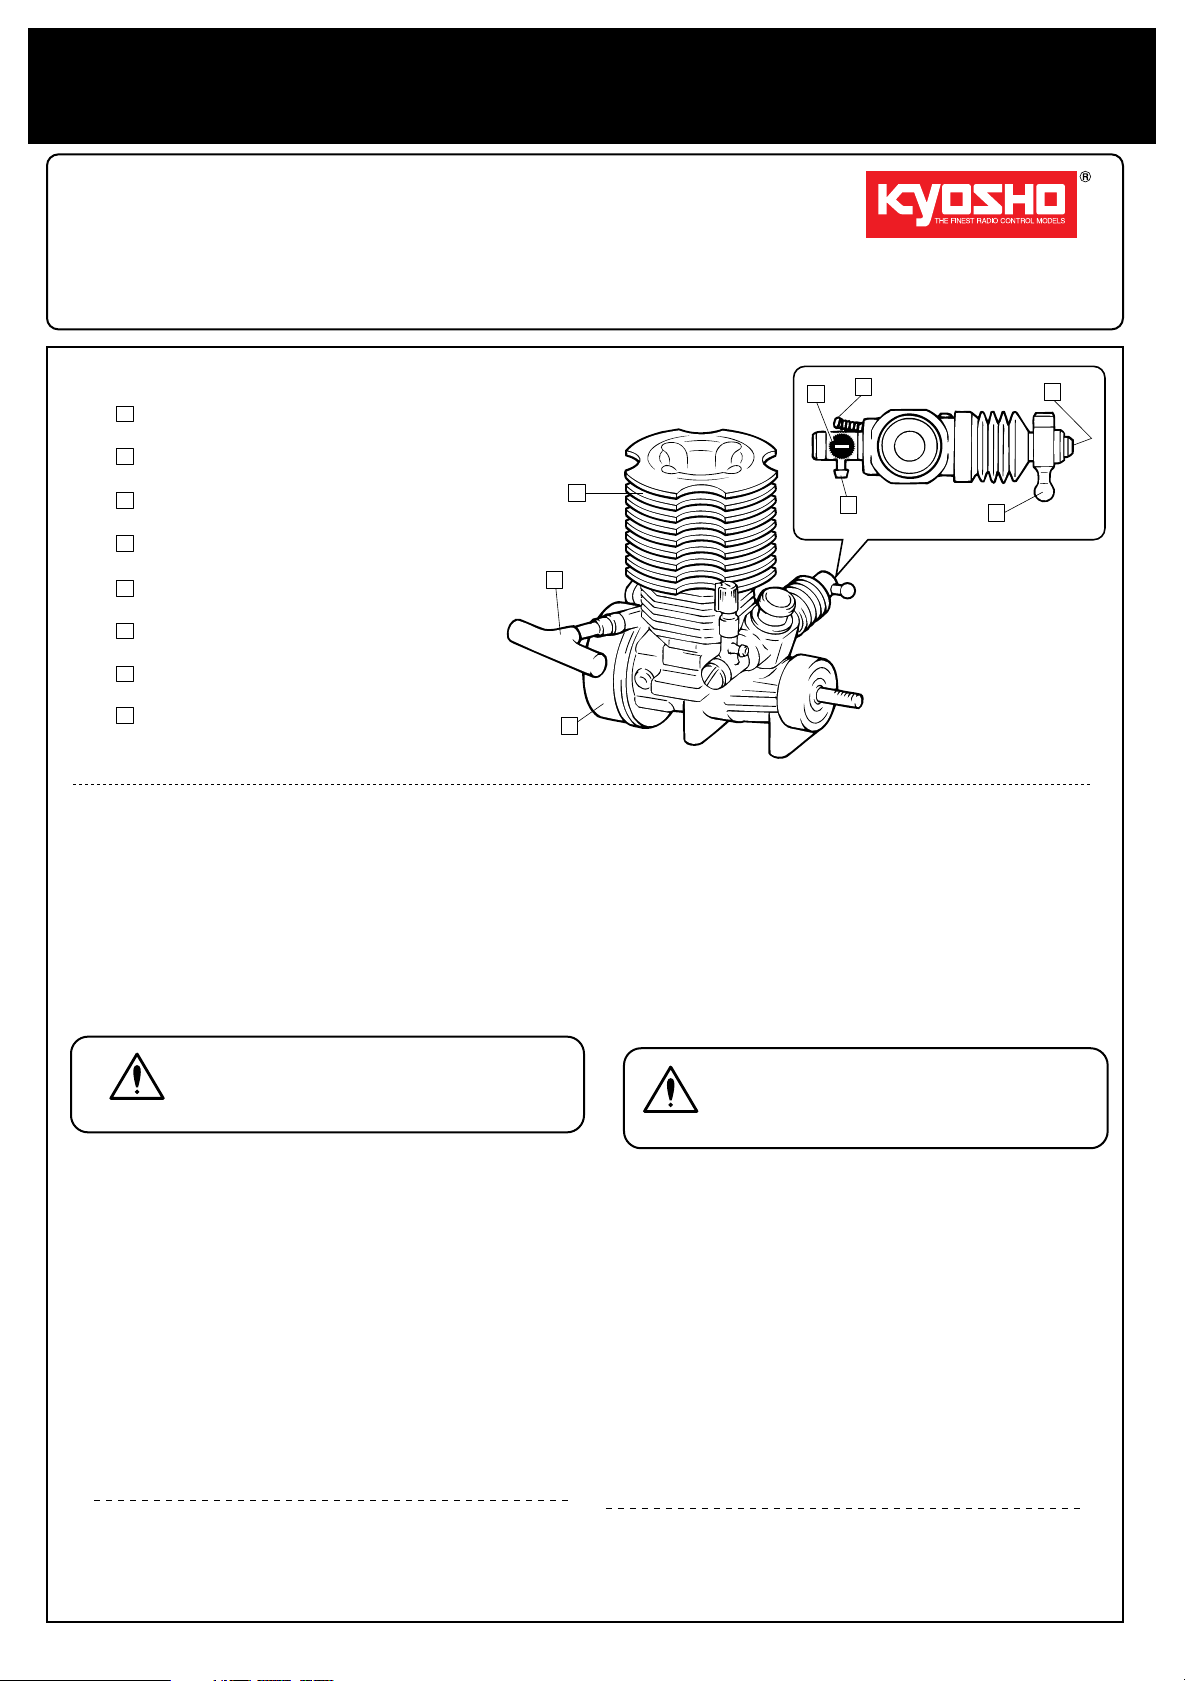
●エンジン各部の名称
1
ヘッド
HE AD
2
ニードルバルブ
NE E DL E V ALV E
3
燃料入口
F UE L INLE T
4
スロットルバルブ調整ネジ
THR OT TLE V ALV E ADJ US TME NT S C R E W
スターターノブ
5
S TA RT ER K NOB
スロットルレバー
6
THR OT TLE LE VE R
混合気調整用ネジ
7
AIR /F UE L MIXTUR E AD JU S TME NT S C RE W
8
リコイルスターター(No.74721)
R E CO IL ST AR TE R (No,7 47 21 )
1
5
8
●エンジン始動するために必要なもの(別売)
1. 模型用燃料
模型専門店で販売されているグロー燃料を使用してください。
(B Pハンディフュール K YO S HO N O .73001)
(B Pフュール ピークパワーK YO SHO No.73401)
(プロスペックフュール レーシング No.73801)
(プロスペックフュール バギー No.73802)
2. グロープラグ(GSグロープラグNo.74902)
高性能なグロープラグを使用してください。
ガソリンや灯油、アルコールなど
は、絶対に使用しない。
警告
OS /A5, R 5 E NY A/No. 4, N o. 5 等。
火災の原因になります。
4
2
3
7
6
●E QU IP ME NT NE CE S S A R Y FOR S TAR T ING
THE E NG INE (NO T INC LUDE D)
1. F uel for R /C models :
Us e glow fuel (a va ilable in a ll R /C hobby s hops).
(B P Ha ndy F uel from K Y OS HO No. 73001)
(K YOS HO P R O S pec F uel R AC ING N o. 73801)
(K Y O S HO P R O S pec F uel B UG G Y N o. 73802)
2. G low P lug:
Us e a high performance glow plug.
(O.S . / A5, R 5; E NY A / No.4, No.5)
Ne v er us e ga s oline , kero s ene or
alc oho l ins tead of glow fuel!
Warning
This may caus e fires !
3. ブースターコード/プラグヒート用電池
グロープラグを赤熱させるために使うものです。
(電池ホルダーセット K YO SHO No.F D-30)
(ワンタッチプラグヒートセット K YOS HO No.96411)
4. プラグレンチ
グロープラグの点検、取り替え用に使うものです。
(ロッキングジグ&レンチセット K YO SHO No.80312)
5. 燃料フィルター
(燃料フィルター K YO SHO No.1876)
上記以外にグロー燃料を給油するために、燃料ポンプ
があると便利です。
(クイックフュールポンプ250cc/500ccKYOSHONo.
96421/96422)
3. B ooster C ord or O ne-touch G low P lug Heater, a nd
B a tteries :
Us ed for hea ting a nd electrifying the glow plug.
(B attery Ho lder S et from K Y OS HO No. FD-30)
4. P lug Wrench:
F or removals when exa mining or exchanging the glow plug.
(L oc kin g J ig & W r enc h S et from K Y OS HO No. 80312)
5. F uel F ilter:
(F uel F ilter from K Y O SHO No . 1876)
A fuel bottle comes in very handy for quick and neat
refillings of the tank.
(Q uic k-F ill Fuel B ottle 250cc / 500c c from K YOS HO
No . 96421 / 96422)
Page 2
●エンジンの搭載 ●E NG INE MO UNT ING
エンジンの搭載方法は、各キットによって位置が異なる
ため、必ずキットの説明書に従ってエンジン搭載を行っ
てください。
The position for mounting the engine depends largely on the
model itse lf! F ollow the ins truction ma-nual s upplied with the
model to mount the e ngine properly.
●
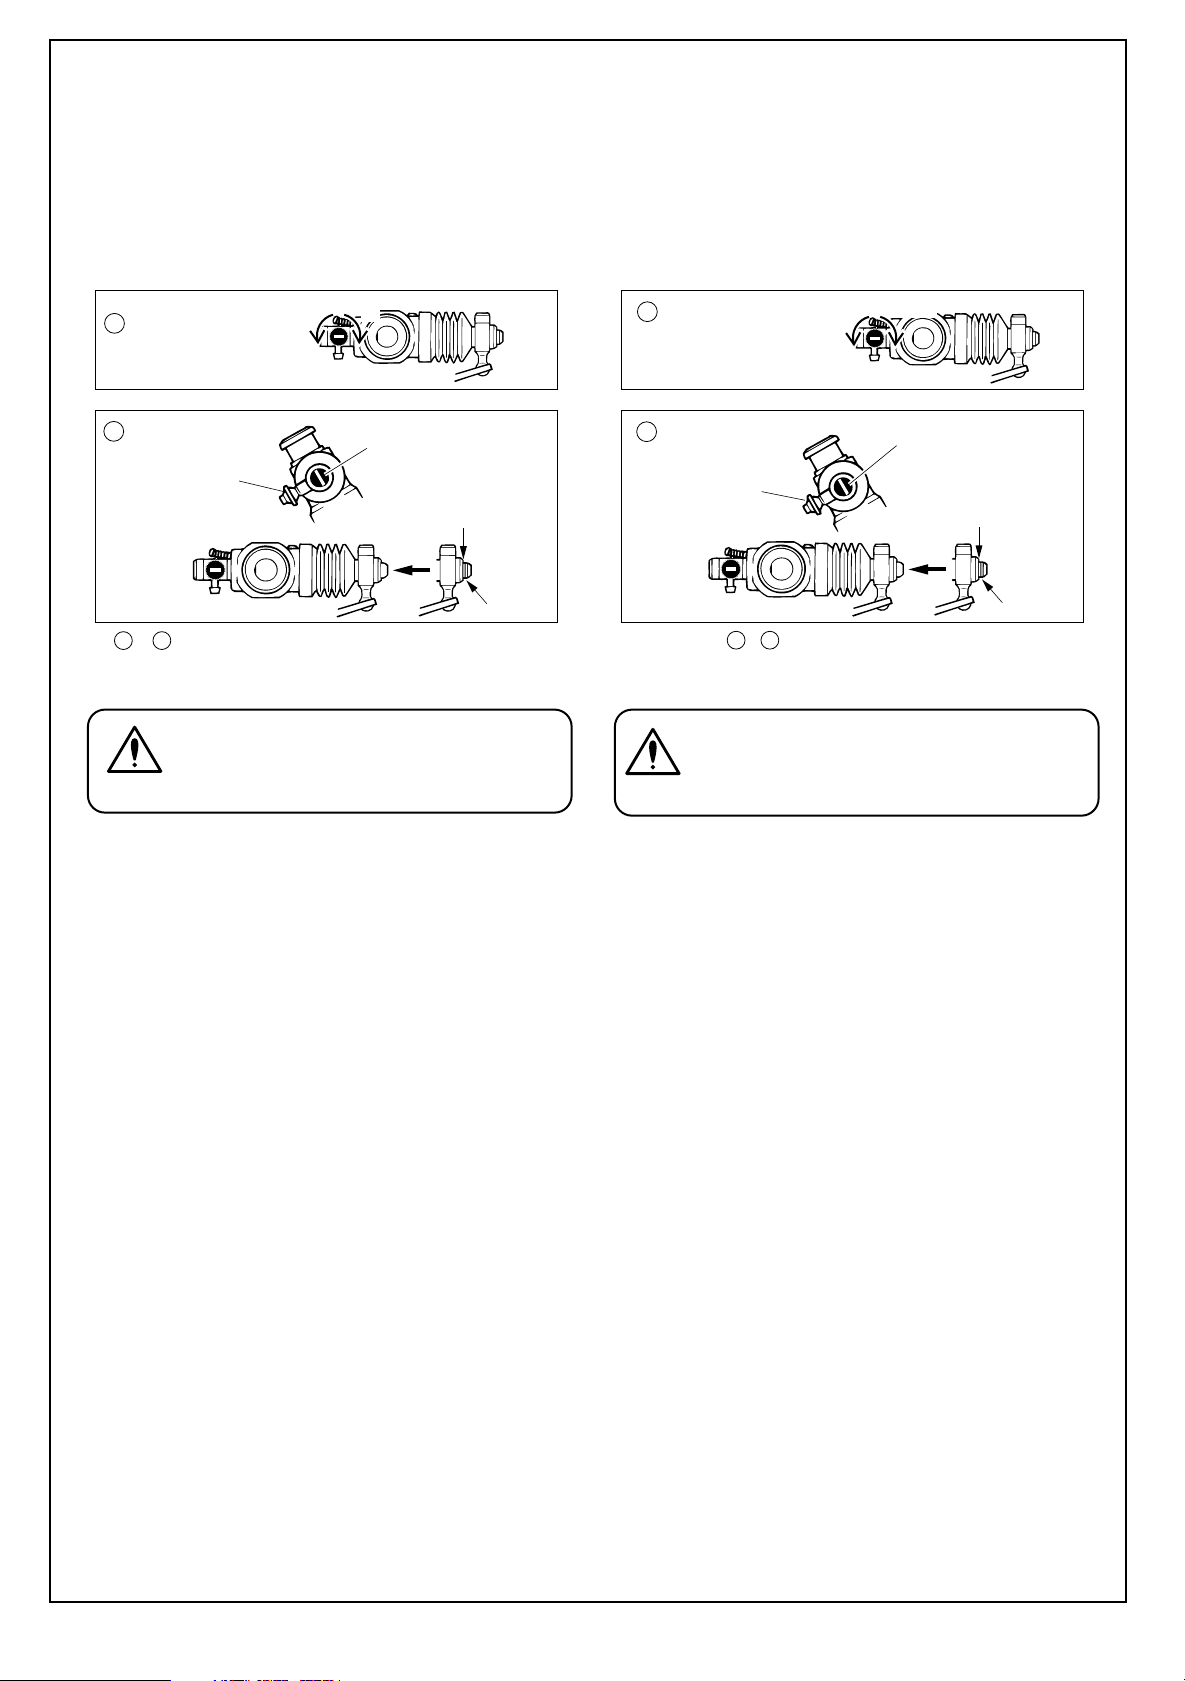
エンジンのならし運転前の調整部品標準位置
G S 21R エンジンのニードルバルブと混合気調整ネジを、
標準位置で調整してください。
1
ニードルバルブ
全閉から3回転
開いた状態。
2
混合気調整ネジ
回らないように
手で押さえる。
(〜は、使用するグロープラグ、グロー燃料の種類
によって多少調整が必要になる場合があります。)
21
開 閉
混合気調整ネジ
ミゾが全て
隠れるように動かす。
ミゾ
エンジンが熱いうちは、ニードル
バルブ以外に直接さわらない。
警告
ヤケドの原因になります。
●E NG INE S TA R TING & B R E AK -IN
Adjus t the needle valve a nd a ir/fuel mixture adjustment
screw to their s tandard position as follows:
1
Ne edle V alve
3 turns uns crewed
from clos ed pos ition.
2
Air/Fuel Mixture
Adjustment
Hold tight s o it
will not rotate.
Adjus tments ~ may slighty va ry according to the type
of glow plug a nd glow fuel.
As long a s the engine is hot, avoid
tou c h-ing a nythin g exc ept the needle
Warning
valv e! If dis reg a rding this warning,
Uns crew Tighten
Air/Fuel Mixture
Adjus tment S crew
Tighten until the
groove dis appea rs .
G roove
21
●エンジン始動とならし運転(ブレークイン)
下記の手順を参考にエンジン始動とならし運転を進めてく
ださい。
1.ニードルバルブは始動時に、いっぱいまでしめた位置よ
り、3回転ゆるめた位置にセットしてください。
2.燃料タンクに燃料を入れます。スロットルレバーを全開
(ハイ)にし、チョーク(チョークボタン付の場合は、2〜
3回押す。ない場合は、キャブレターに燃料を2〜3滴入れ
る。)を行い、スロットルレバーをスローにします。
注意:燃料タンク内にゴミなどがないか、よく確認してから
燃料を入れてください。
3.グロープラグにブースターコード又は、ワンタッチプラ
グヒートを使って通電(赤熱)させます。
4.リコイルスターターノブを続けて数回(20〜30cm位)すば
やく連続して引きます。
注意:ロープを50cm以上引かないで下さい。いっぱいで
引くと、ロープや内部のスプリングが切れてしまう
ことがあります。
5.エンジンが始動したら5〜10秒位待った後、ブースターコ
ード又は、ワンタッチプラグヒートをはずしてください。
6.次に走行させますが、2〜3タンクは全開にしないように
してください。(ならし走行)
それ以降のならし走行中も、いきなりハイパワーにしない
で、ニードルを1/8回転ずつしめていき、エンジンをいた
わるつもりでゆっくり走行させてください。
注意:1タンクごとに、必ず自然冷却してください。
●E NG INE S TA R TING & B R E AK -IN
P roc eed a s follows when s tarting a nd breaking the engine in:
1. Ma ke s ure the needle va lve is uns crewed 3 turns from
clos ed pos ition.
2. F ill fuel into the tank. Move the throttle lever to the high
position, prime the engine (push the choke button 2 ~ 3
times or put 2 ~ 3 drops of fuel directly into the carburetor)
and move the throttle lever back to the s low throttle pos ition.
C AUT ION : c arefully chec k if no dirt or de pos its clo g
the tank !
3. Attach the booster cord or one-touch glow plug
hea ter to the engine in order to electrify the glow plug.
4. Quickly pull the re coil s tarter rope (s tarter knob) s ev-e r-al
times. Only pull out 20 - 30cm of cord.
C aution: B e ca reful no t to pull out mo re tha n 50cm
of cord bec aus e y ou ma y tear it and the
s pring in s ide the recoil s tarter !
5. Once the engine is started, wait 5 ~ 10 seconds before de-taching the boos ter cord or one-touch glow plug hea ter.
6. R un the engine a nother 2 ~ 3 tanks and make sure you do
not apply full throttle. Als o afterwards, do not incre a s e R P M
abruptly! T ighten the ne edle va lve by 1/8 turns a nd continue
to run the engine, handling it gently.
C aution: After eac h tank , allo w the en-gine to c ool
off natura lly !
Page 3

7.ならし走行中に、スロットルバルブ調整ネジで、アイド
リング回転数を調整します。右方向(時計回り)に回すと、
アイドリング回転数は高くなります。調整の目安として
は、クラッチがつながる回転数と、エンジンがストップ
してしまう回転数の中間ぐらいですが、なるべく低いほ
うがよいでしょう。
しめると回転が上がる。 ゆるめると回転が下がる。
▲
広い
▲
せまい
7. During the break-in, a djus t the idle rpm with the throttle
valve a djustment s crew. If rotating it clock-wise (right), idle
rpm increase. Idle rpm are halfway between rpm when the
clutch engages and rpm when the e ngine stalls . S et idle
rpm towards the lower end if pos s ible.
Tighten the throttle va lve
adjus tment s crew to
increase rpm.
▲
Wide opening
Uns crew the throttle
valve adjustment scre w
to dec reas e rpm.
▲
Na rrow opening
スロットルバルブ調整ネジ
8.ニードルの調整をくり返し行い、スロットルをハイにし
たとき、車のスピードが最も早くなった所がニードルバ
ルブの最良位置です。
そこからさらに閉じると、スピードが落ちてきます。その
まま走行を続けると、エンジンがこわれてしまいます。す
ぐにニードルバルブを開いてください。ニードルバルブ最
良位置から10°〜20°開いた位置が、通常走行位置です。
9.通常走行位置が決まったら、混合気調整ネジで、加速時
の混合気を調整します。
車をアイドリング(スロー)で停止させスロットルを高速
側に操作します、この時マフラーから白煙を多く出しな
がら、エンジン回転の上がりがもたつくときは、アイド
リング(スロー)時の燃料が多すぎるので、混合気調整ネ
ジを右(時計回り)に30°〜40°回してください。(混合気
がうすくなる)
又、エンジンが止まったり、白煙がほとんど出ないでエ
ンジン回転の上がりが少し遅れるときは、アイドリング
(スロー)時の燃料が少なすぎるので、混合気調整ネジ
を左(反時計回り)へ30°〜40°回してください。(混合気
がこくなる)
混合気調整ネジは、30°〜40°位、少しずつ回します。
※
ニードルバルブの最良位置は、使用するグロープラグ及び、
グロー燃料の種類によって多少異なる場合があります。
※ニードルバルブの最良位置は、天候によっても多少左右
されます。
ニードルバルブの最良位置は、全閉より2と1/2回転とし
それ以上、しめ込むとエンジンをこわす可能性がありま
すので注意してください。
注意:エンジンの調整はすべて走行させながら行ってくだ
さい、タイヤを空転させての空ぶかしは、エンジン
破損につながります。
Throttle V alve Adjustment S crew
8. Now a djust the nee dle valve. Its optimum s etting is when
the e ngine performs bes t and the throttle control is in the
high pos ition. If tightening it further, engine R P M will drop,
leading to engine damage. O nce you have found the needle
valve's optimum setting, uns crew it 10 ~ 20° for norma l
opera tion.
9. Once the s etting for norma l operation is done, set the
air/fuel mix-ture a djus tment s crew. S top the car and move
the throttle control from the idle posi-tion to high pos ition. If
fumes exiting the muffler are white and rpm increas e slowly,
fuel is too a bundant during the idle. To lean the mixture,
rotate the air/fuel mixture a d-justment screw clockwise (right),
ea ch time 30 ~ 40° . In the oppos ite case, if the engine s talls ,
fumes are not visible and rpm increase slowly, fuel is not
abunda nt e nough. T his time, richen the mixture and rotate
the s crew a nticlockwise (left), each time 30 ~ 40°.
No te: T he optimu m s etting may vary ac cording to
the kin d of glow plug and glow fu el us ed!
No te: T he optimu m s etting may vary due to cha ng--
ing wea ther conditions !
The bes t pos ition of Needle-V a lve mus t be ope ned
the Ne edle-V alv e mo re than 2 and 1/2
tur ns from the fully c los ed pos ition.
Warning! C los ing the Ne edle-V alv e too
muc h ca rries the ris k of s erious ly
da maging the engine.
C aution: Do thes e adju s tments (fr om s tep 8) only
while running your c ar! T he engin e will
be damaged if the whe els ar e al oof fr om
●使用後の手入れ
*終了する場合、燃料タンク内に残った燃料は全て抜いて
ください。
*エンジン内部も同じように燃料を抜いてください。内部
に燃料が残ったまま、長期間そのままにしておくと次回
使用する時にエンジンが始動しにくくなりますので注意
してください。
*エンジン外部の汚れは、メタノールを使ってブラシ等で
落してください。尚、作業中は火気に十分注意してくだ
さい。
ガソリンやシンナーなどは、絶対に
警告
使用しない。火災の原因になります。
●MA INT E NANC E
*After running the engine, draw out any leftover fue l from the
fuel tank.
*Dra w out fuel from ins ide the engine as well. Fuel that
rema ins inside the engine, may clog the e ngine a nd make it
difficult to s tart.
*R emove any dirt from the outside of the e ngine using
methanol a nd a brus h. Do not allow fire or any exces -s ive
hea t s ource to come into contact with methanol which is
highly inflammable! This may caus e fires !
Ne v er us e ga s oline or thinner when
clea ning!
Warning
3
This may caus e F ires !
Page 4

G S 21R エンジン分解図
6510-27
6520-18
6520-42
E XP L ODE D V IE W
6510-27
6520-16
6520-39/43
品 番
No.
6510-27
6520-10
6520-12
6520-13
6520-14
6520-15
6520-16
6520-17
6520-17-1
6520-17-2
6520-17-3
6520-17-4
6520-15
6520-18
6520-14
6520-40
6520-41
パーツ名
P art Na mes
ニードルセット
Ne edle V alve Set
シム
S him
ピストンピン
P iston P in
コネクティングロッド
C onnecting R od
キャブレターストッパー
C arburetor S topper
ダストカバー
Dus t C over
キャブレターシール
C arburetor S eal
リコイルスターターアッセンブリー
R ecoil S tarter A ss embly
ワンウェイ、シャフトセット
O neway & S haft S et
バックプレート
B ack P late
リコイルスターター
R ecoil S tarter
Oリング、シム
O-ring & S him
6520-10
6520-12
★定価
400
200
300
600
200
250
100
3500
1200
600
800
100
6520-30B B
★発送
手数料
200
(一律)
6520-34
6520-13
6520-32
6520-34
6520-18
6520-14
品 番
No.
6520-18
6520-30B B
6520-32
6520-34
6520-38
6520-39
6520-40
6520-41
6520-42
6520-43
6520-38
6520-17
6520-17-2
6520-17-4
★定価
200
3200
200
3200
800
2500
250
1800
3000
2500
6520-17-3
★発送
手数料
200
(一律)
6520-41
パーツ名
P art Na mes
スクリューセット
S crew S et
クランクケース(G S-21R )
C rankcas e (G S -21R )
ヘッドガスケット(G S-21X & G S -21R )
He ad G as ket (G S -21X & GS -21R )
ピストン、シリンダーセット(G S -21R )
P iston & C ylinder Set ( G S -21R )
バックカバー
B ack C over
キャブレターアッセンブリー(8mm)
C arburetor As sembly (8mm)
フライホイルスペーサー
F lywheel S pacer
クランクシャフト
C ranks haft
S Pシリンダーヘッド
S P C ylinder Head
キャブレターアッセンブリー(7mm)
C arburetor As sembly (7mm)
パーツの価格には、消費税は含まれておりません。 また、定価、発送手
数料、消費税は平 成13年 6月1日現在のもので、 法規改正、運賃改定、
諸事情などにともない変更になりますので、ご了承ください。
6520-17-1
★F or J apane se market only!
メーカー指定の純正部品を使用して
安全にR/Cを楽しみましょう。
※製品改良のため、予告なく仕様を変更する場合があります。
S PE CIF IC ATI ONS A RE S UB JE C T TO C HAN GE WIT HO UT NOT IC E .
© 2001 KY OS HO / 禁無断転載複製
京商株式会社
〒243-003 4 神奈川県厚木市船子153
●ユ−ザ−相談室直通TE L.046-229-4115
お問い合わせは:月曜〜金曜(祝祭日を除く) 10:00〜17:00
6301 0106- 1 PR IN TE D IN JAP AN
 Loading...