

KYOSHO GP ULTIMA RB RACING SPORTS User Manual
※ご使用前にこの説明書を良くお読みになり十分に理解してください。
GP
VERSION
GAS
POWERED
Before commencing assembly, please read these instructions thoroughly.
Bitte lesen Sie die Anweisungen vor Gebrauch genau durch!
Veuillez attentivement lire les instructions avant lÕemploi!
Lea cuidadosamente este manual antes de comenzar el montaje
R
THE FINEST RADIO CONTROL MODELS
INSTRUCTION MANUAL
組立/取扱説明書
GPアルティマRBレーシングスポーツ
この説明書は、ARRとreadyset 共通です。
ARR は、 〜 〜 までを組立ててください。
readyset は、 〜 を組立ててください。
20ページの、プロポのセットアップを必ず確認してください。
This is instruction manual for both ARR and Readyset version.
ARR version need to assemble step number to to .
Readyset version need to assemble step number to .
Make sure to check page 20 "radio set-up" before start your model.
Diese Bauanleitung bezieht sich auf die ARR und die Readyset Version.
Bitte beachten Sie fŸr die ARR Version die Baustufen bis bis .
Bitte beachten Sie fŸr die Readyset Version die Baustufen
†berprŸfen Sie die Einstellungen Ihrer RC-Anlage gemŠ§ Seite 20, bevor
Sie mit dem Betrieb des Modells beginnen.
21 22 26
33
29 31 38
35 37 38
21 22 26 29 31 38
33 35 37 38
21 22 26 29 31 38
33 35 37 38
bis
.
安全のための注意事項
この無線操縦模型は玩具ではありません!
●この商品は高い性能を発揮するように設計されています。組立てに不慣れな方は、模
型を良く知っている人にアドバイスを受け確実に組立ててください。
Notice de montage pour les versions ARR et Readyset.
Version ARR : Etapes a a .
Version Readyset : Etapes a .
Lire attentivement la page 20 avant la mise en route de votre modele.
Este manual de instrucciones sirve para la versi—n ARR y la versi—n Readyset.
Si usted ha adquirido la versi—n ARR solamente deber‡ realizar los pasos
26 29 31 38
al al .
Si usted posee la versi—n Readyset solamente deber‡ realizar desde el al .
Asegœrese de comprobar la p‡gina n¡20 "preparaci—n del equipo de radio"
antes de rodar con su modelo.
●小さい部品があるので、組立て作業は幼児の手がとどかない所で必ずおこなっ
●動かして楽しむ場所は、万一の事故を考えて安全を確認してから、責任をもっ
●組立てた後も、説明書がいつでも見られるように大切に保管してください。
SAFETY PRECAUTIONS
●First-time builders should seek advice from people having building experience in order to
assemble the model correctly and to produce its performance to full extent.
●Assemble this kit only in places out of childrenÕs reach!
●Take enough safety precautions prior to operating this model. You are responsible for this
modelÕs assembly and safe operation!
●Always keep this instruction manual ready at hand for quick reference, even after completing
the assembly.
●AnfŠnger sollten mšglichst Rat bei Modellbaukundigen einholen, um das Modell richtig
zusammenzubauen und gefahrlos bedienen zu kšnnen.
●Bauen Sie dieses Modell nur au§er Reichweite von Kindern zusammen!
●Treffen Sie genŸgend Sicherheitsvorkehrungen, bevor Sie Ihr Modell bedienen! Sie
alleine tragen die Verantwortung fŸr Ihr Modell und dessen gefahrlose Bedienung!
●Bitte bewahren Sie diese Dokumentation zur spŠteren Verwendung auf.
※製品改良のため、予告なく仕様を変更する場合があります。 Specifications are subject to change without prior notice!
Technische nderungen sind ohne vorherige AnkŸndigungen mšglich! Les sp cifications peuvent changer sans pr avis!
© 2001 KYOSHO/禁無断転載複製
This radio control model is not a toy!
ACHTUNG!
Dieses Modell ist kein Spielzeug!
El fabricante se reserva el derecho de introducir modificaciones en los kits sin previo aviso
●Si vous tes d butant dans le mod le r duit, prenez conseils aupr s de mod listes
●Assemblez ce kit en dehors de la port e de jeunes enfants!
●Prenez des pr cautions lors de lÕutilisation. Vous seul tes responsable des
●Gardez cette notice ˆ port e de main afin de vous y r f rer rapidement.
●Los no inicados en este hobby deber‡n ser aconsejados por expertos antes de
comenzar el montaje de este modelo.
●Realice el montaje en un lugar fuera del alcance de los ni–os.
●Siempre extreme las medidas de seguridad. Usted es el œnico responsable del
funcionamiento de su modelo.
●Mantenga este manual a mano.
21 22 26 29 31 38
33 35 37 38
21 22
33 35 37 38
てください。
てお楽しみください。
ATTENTION!
Ce mod le nÕest pas un jouet!
con-firm s afin dÕutiliser votre mod le dans des conditions optimales.
volutions de votre mod le. La soci t KYOSHO ou son distributeur ne peuvent
en aucun cas tre tenus responsables des accidents pouvant survenir lors de
lÕutilisation de ce mod le!
CONSEJOS DE SEGURIDAD
Este modelo de Radio Control no es un juguete
(和英独仏西)
No. 31092
目次/Index / Inhaltsverzeichnis / Sommaire / Indice
●キットの他にそろえる物Required for operation / Das notwendige Zubehšr / Mat riel n cessaire / Material necesario
●プロポの準備Radio preparation / Die RC-Anlage / Pr paration de la radio / Preparaci—n Equipo de Radio
●組立て前の注意Before you begin / Bevor Sie beginnen / Avant de commencer / Antes de empezar
●本体の組立てAssembly / Das Bauen / Assemblage / Montaje
●取扱いの注意Operating your model safely / Zu Ihrer Sicherheit / Consignes de s curit / Consejos de seguridad
●分解図Exploded View/Explosionszeichnung/Eclat /Despiece
●スペアパーツ/オプションパーツSpare parts & optional parts / Repuestos y Piezas Opcionales
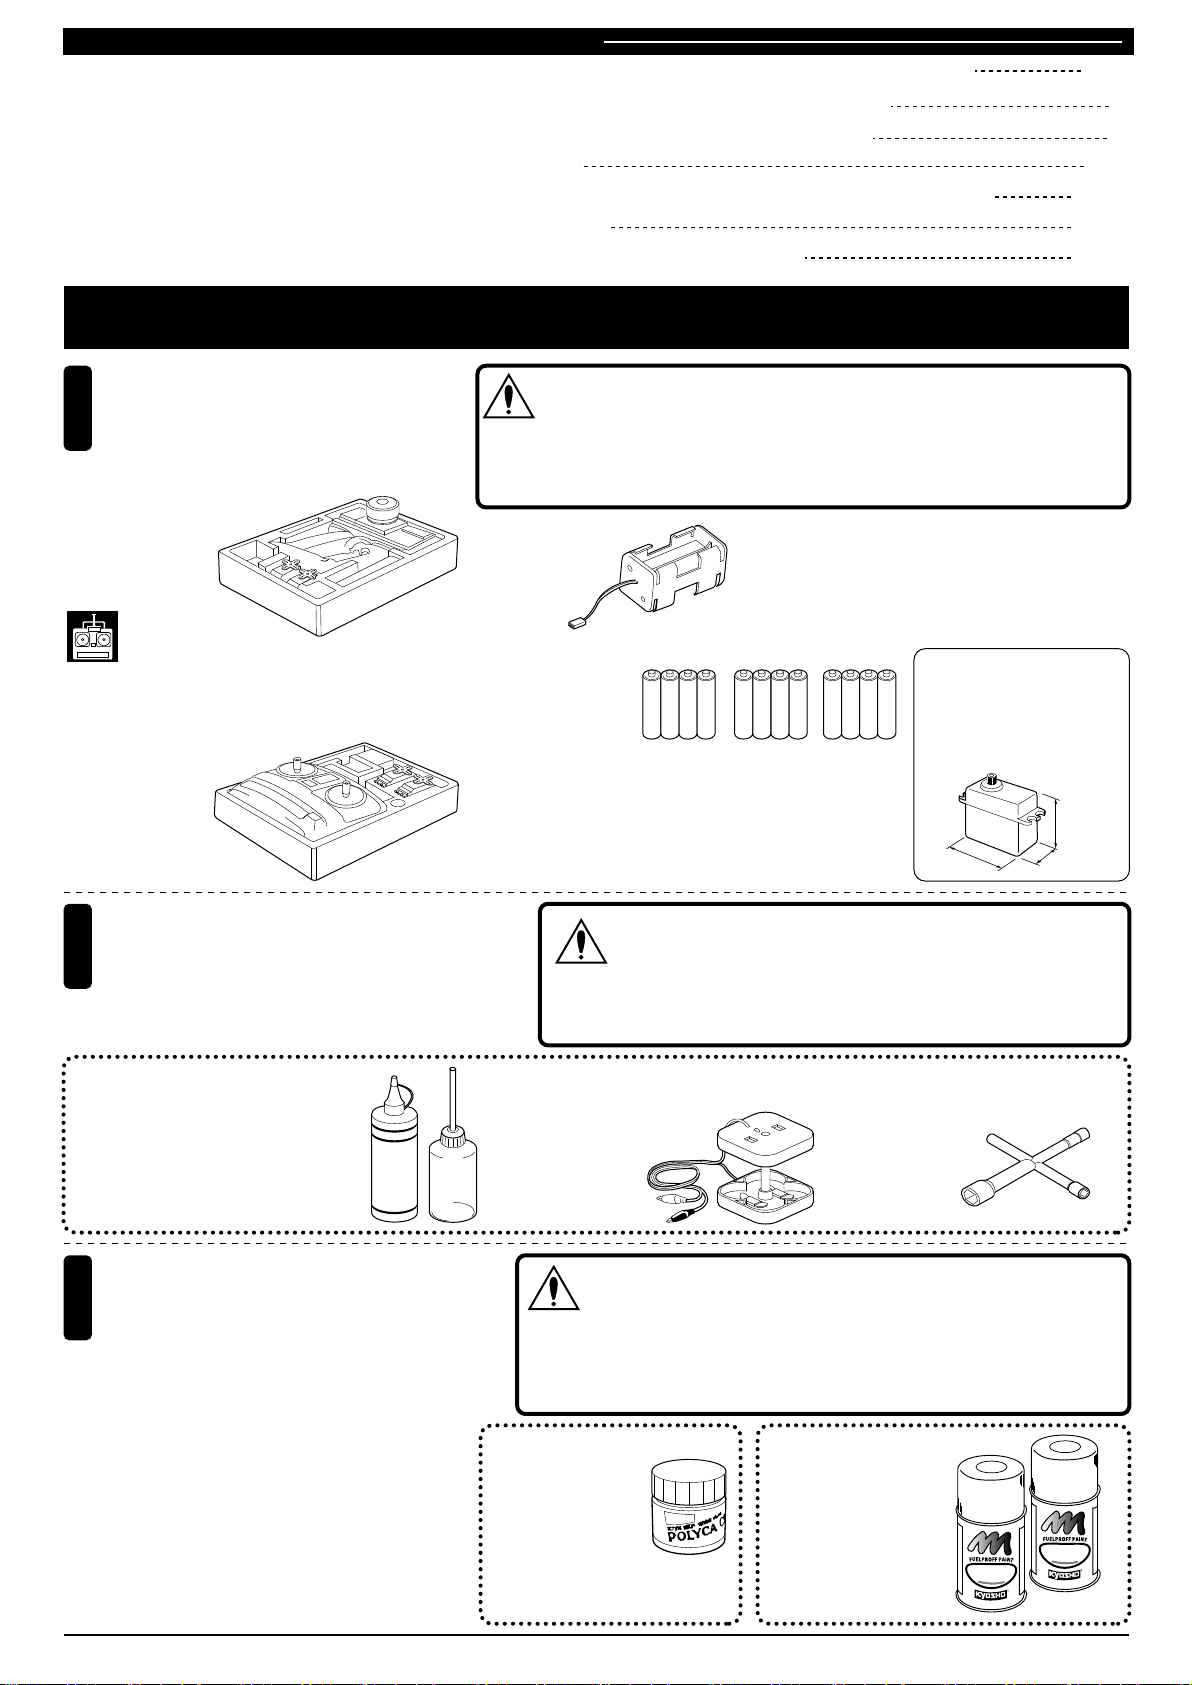
キットの他にそろえる物 / REQUIRED FOR OPERATION
DAS NOTWENDIGE ZUBEH…R / MATƒRIEL NƒCESSAIRE / PARA SU FUNCIONAMIENTO
2~3
3
4
5~20
21~27
28~29
30~31
2チャンネル2サーボ無線操縦機(プロポ)
Minimum 2 channel radio with 2 servos.
1
Eine 2-Kanal Fernlenkanlage mit 2 Servos.
Radio 2 voies avec 2 servos.
Equipo de Radio de dos canales con dos servos.
■ハンドルタイプ / Wheel-type
Drehknopfsteuerung / A volant
Emisora tipo volante
readysetには付属。
Come with readyset.
Im Readyset enthalten.
Livr dans la version Readyset.
Incluido en el Readyset.
■スティックタイプ / Stick-type
KnŸppelsteuerung / A manches
Emisora tipo sticks
燃料と始動用具
Required for engine starting:
2
Zum Starten von Verbrennungsmotoren benštigtes Zubehšr:
Pour faire d marrer le moteur thermique:
Equipo necesario para el arranque del motor:
地上用(自動車用)のプロポ(2チャンネル2サーボ仕様)セットを必ず使用し
てください。(地上用以外使用禁止)
CAUTION: Only use a surface radio with 2 channels and 2 servos!
注意
WICHTIG: Benutzen Sie ausschlie§lich eine 2-Kanal RC-Anlage mit 2 Servos
fŸr den Autobereich!
IMPORTANT: NÕutilisez quÕune radio 2 voies avec 2 servos pour voitures!
AVISO: Utilice siempre una emisora para coche R/C de 2 canales con dos servos!
■電池ボックス
Battery Box
Batteriehalter
Bo”tier ˆ piles
Portapilas
● プロポセットに付いているときは必要ありません。
● If already included with the radio, no battery box needs to be
purchased separately.
● Wenn der Batteriehalter schon mit der RC-Anlage geliefert wird,
brau--chen Sie keinen gesondert kaufen.
● SÕil est d jˆ fourni avec lÕensemble radio, il est inutile dÕacheter un
bo”tier ˆ piles s par .
● El portapilas viene incluido en su equipo de radio.
■単3乾電池
AA-size Batteries
AA Trockenbatterien
Piles type AA
AAAA
AAAA AAAA
Bater’as tipo AA
●プロポの取扱いは、プロポに付属の説明書を参考にしてください。
● For more information on the radio, refer to its instruction manual.
● FŸr mehr Einzelheiten Ÿber die RC-Anlage, lesen Sie bitte die
Gebrauchsanweisung der RC-Anlage durch.
● Lisez la notice de la radio pour plus dÕinformations.
● Lea el manual de instrucciones de su equipo de radio.
ガソリンや灯油は使用禁止
WARNING: Never use gasoline and kerosene!
VORSICHT: Verwenden Sie niemals handelsŸbliches
警告
Benzin und Diesel!
ATTENTION: NÕutilisez jamais ni de lÕessence ni du gasoil!
AVISO: Nunca utilice gasolina
使用できるサーボサイズ
Suitable servos
Passende Servos
Servos compatibles
Dimensiones apropiadas
para los servos
31~36mm
38~41mm
16~20mm
No.73301 スターターパック
●エンジン始動に必要な用具セット
■グロー燃料、燃料ポンプ
Glow Fuel & Fuel Pump
Kraftstoff & Tankflasche
Carburant & Pipette
Combustible y Biber—n
HANDY
FUEL
塗料(ボディ塗装用)
Paints (for painting the body shell)
3
Farben (zur Lackierung der Karosserie)
Peintures (pour peindre la carrosserie)
Pintura (Para el pintado de la carrocer’a)
※readysetはボディ塗装済です。
Readyset version include factory painted body.
Die Readyset Version beinhaltet die fertig lackierte Karosserie.
La carroserie de la version Readyset est peinte en usine.
La versi—n Readyset incluye la carrocer’a pintada.
2
■ブースターコード
Booster Cord
Starterbatteriebox
Chauffe bougie
Calentador de buj’as
スプレーカラーを使用する場合、缶の説明を良く読んでください。
CAUTION: Before using Kyosho Spray Colors, always read the
explanations!
注意
WICHTIG: Lesen Sie bitte zuerst die Gebrauchsanleitung der Spray farben sorgfŠltig durch!
IMPORTANT: Avant lÕutilisation des Kyosho Spray Colors, lisez atten tivement les explications!
AVISO: Antes de comenzar a pintar, lea las instrucciones.
No.2230
ポリカカラー
(筆ぬり塗料)
POLYCA COLOR
(Brush paints)
(Pinselfarben)
(Peintures ˆ pinceau)
(Para pincel)
■プラグレンチ
Plug Wrench
KreuzschlŸssel
Cl ˆ bougie
Llave de cruz
No.76301
~ 76711
京商スプレーカラー
KYOSHO
SPRAY COLOR
K
O
Y
H
S
O
S
P
R
O
R
L
A
O
Y
C
K
O
Y
H
S
O
S
P
R
O
R
L
A
O
Y
C
R
R
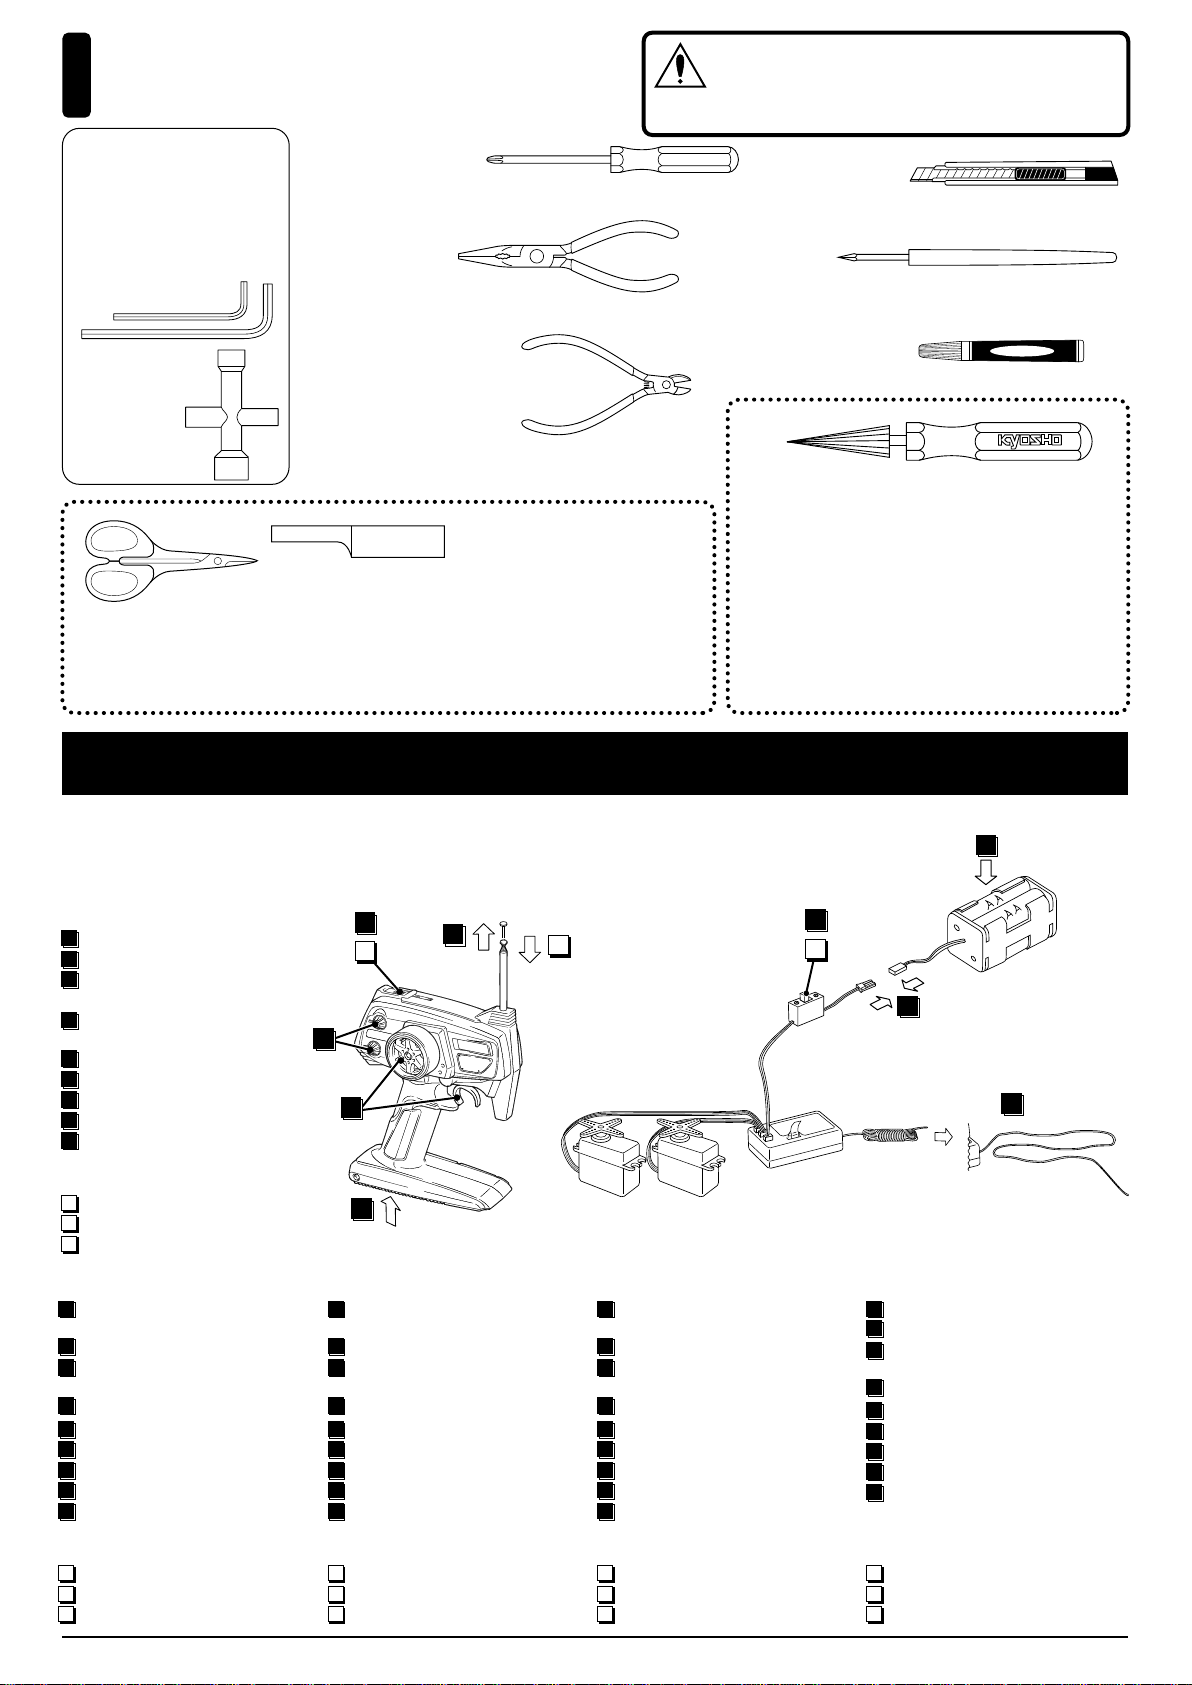
組立てに必要な工具
Tools required
4
Die notwendigen Werkzeuge
Les outils utilis s
Herramientas necesarias
キットに入っている工具
TOOLS INCLUDED
GELIEFERTE WERKZEUGE
OUTILS FOURNIS
HERRAMIENTAS INCLUIDAS
■六角レンチ(1.5 / 2mm)
Hex Wrench (1.5 / 2mm)
SechskantschlŸssel (1.5 / 2mm)
Cl allen (1.5 / 2mm)
Llaves Allen (1.5 / 2mm)
■十字レンチ
Cross Wrench
KreuzschlŸssel
Cl en croix
Llave de cruz
■+ドライバー(大、中、小)
Phillips Screw Driver (l, m, s)
Kreuzschlitzschraubendreher
Tournevis cruciforme
Destornilladores Phillips
■ラジオペンチ
Needle Nose Pliers
Flachzange
Pinces plates
Alicates de punta fina
■ニッパー
Wire Cutters
Seitenschneider
Pince coupante
Alicate cortacables
使用する工具の取扱いには、十分注意してください。
CAUTION: Handle tools carefully!
WICHTIG: Gehen Sie vorsichtig mit Werkzeugen um!
注意
IMPORTANT: Maniez les outils avec prudence!
AVISO: Maneje las herramientas cuidadosamente!
■カッターナイフ
Sharp Hobby Knife
Scharfes Bastelmesser
Cutter
Cuchilla de Hobby
■キリ
Awl
Spitzahle
Poin on
Punz—n
■瞬間接着剤
Instant Glue
Sekundenkleber
Colle cyanoacrylate
Pegamento cianocrilato
ボディのカット、仕上げ用。曲線部分も楽に作業が
できます。
For trimming bodies. Cutting along curved lines never
ラウンドカッター&サンダー
ROUND CUTTER & SANDER
LEXANSCHERE
CISEAUX A LEXAN
TIJERAS Y LIJADOR
was so easy!
Schneidet ohne Probleme auch Kurven. FŸr Karosserien
aus Lexan.
Coupe le long de lignes courb es. Pour les carrosseries.
Para recortar las carrocer’as con la m‡xima precisi—n.
プロポの準備 / RADIO PREPARATION
DIE RC-ANLAGE / PRƒPARATION DE LA RADIO / PREPARACION EQUIPO DE RADIO
●プロポを下の順番にしたがってセットします。
Set up the radio as explained below.
Bereiten Sie die RC-Anlage wie unten beschrieben vor.
Pr parez votre radiocommande comme ci-dessous.
Prepare el equipo de radio tal y come se indica a continuaci—n:
●始める時
1
送信機に単3乾電池をセットする。
2
送信機のアンテナをのばす。
3
電池ボックスに単3乾電池をセッ
トする。
電池ボ ックス のコネ クター をつ
4
なぐ。
受信機のアンテナをのばす。
5
トリムを中央にセットする。
6
送信機のスイッチを入れる。
7
受信機のスイッチを入れる。
8
9
動かし てサー ボが動 いてい るか
確認。
●終わる時
受信機のスイッチを切る。
10
11
送信機のスイッチを切る。
12
送信機のアンテナを縮める。
6
ON
11
7
OFF
2
9
1
No.1829
12
送信機
▲
Transmitter
Sender
ƒmetteur
Emisora
▲サーボ
Servo
Seovo
スペシャルテーパーリーマー
SPECIAL TAPER REAMER
No.80311
REIBAHLE
ALESOIR SPECIAL
HERRAMIENTA TALADRO CARROCER’A
下穴加工が不要で、直接1 ~ 15mmの穴あけができる工具です。
No need to pre-drill! Drills neat 1 ~ 15mm holes directly!
UnerlŠ§lich, nŸtzlich! Diese Ahle bohrt Ihnen 1 ~ 15mm
Lšcher, einfach und sauber!
Un must! Permet de faire des trous de 1 ~ 15mm sans
effort! Id al pour les carrosseries.
Perfora agujeros desde 1 a 15mm.
3
ON
8
10
OFF
▲電池ボックス
4
▲スイッチ
Switch
Schalter
Interrupteur
Interruptor
▲受信機
Receiver
EmpfŠnger
R cepteur
Receptor
Battery Box
Batteriehalter
Bo”tier ˆ piles
Portapilas
5
●START
1
Insert the AA-size dry batteries into
the transmitter.
2
Extend the transmitter antenna.
3
Insert the AA-size dry batteries into
the battery box.
4
Plug in the battery box.
Unwind the receiver antenna.
5
Center the trims.
6
Switch on the transmitter.
7
Switch on the receiver.
8
9
Make sure the servos move
according to your transmitter inputs.
●FINISH
Switch off the receiver.
10
11
Switch off the transmitter.
12
Retract the transmitter antenna.
●ANFANG
1
Setzen Sie die AA Batterien in den
Sender ein.
2
Ziehen Sie die Senderantenne aus.
3
Setzen Sie die AA Batterien in den
Batteriehalter ein.
4
Schlie§en Sie den Batteriehalter an.
Entspulen Sie die EmpfŠngerantenne.
5
Stellen Sie die Trimmer neutral.
6
Schalten Sie den Sender an.
7
Schalten Sie den EmpfŠnger an.
8
9
†berprŸfen Sie, ob die Servos sich Ihrer
Richtung entsprechend verhalten.
●ENDE
Schalten Sie den EmpfŠnger aus.
10
11
Schalten Sie den Sender aus.
12
Ziehen Sie die Senderantenne ein.
●DEBUT
1
Installez les piles type AA dans lÕ
metteur.
2
D ployez lÕantenne de lÕ metteur.
3
Installez les piles type AA dans le
bo”tier ˆ piles.
4
Ensuite, branchez le bo”tier ˆ piles.
D ployez lÕantenne du r cepteur.
5
Mettez les trims au neutre.
6
Mettez lÕ metteur sur ÒONÓ.
7
Mettez le r cepteur sur ÒONÓ.
8
9
V rifiez ˆ ce que les servos bougent
selon vos maneuvres sur lÕ metteur.
●FIN
Mettez le r cepteur sur ÒOFFÓ.
10
11
Mettez lÕ metteur sur ÒOFFÓ.
12
Rentrez lÕantenne de lÕ metteur.
●PRINCIPIO
Coloque las pilas AA en la emisora.
1
Extienda la antena de la emisora.
2
Coloque las pilas AA en el portapilas.
3
4
Conecte el portapilas.
Extienda la antena del receptor.
5
Coloque los trims en neutro.
6
Conecte la emisora.
7
Conecte el receptor.
8
9
Asegœrese que los servos se
mueven proporcionalmente a los
movimientos de los sticks — volante.
●FINAL
Desconecte el receptor.
10
11
Desconecte la emisora.
12
Pliegue la antena de la emisora.
3
BEVOR SIE BEGINNEN / AVANT DE COMMENCER / ANTES DE EMPEZAR
組立ての前に下記のことに注意してください。
1
●この説明書を良く読み、構造を理解する。
●キットの内容を確かめる。
※万一不良、不足がありましたら、お買い求めの販
売店か、当社「ユーザー相談室」までご連絡ください。
●小さな部品の形やサイズを間違えないようにする。図
を参考にして確認しながら組立てる。
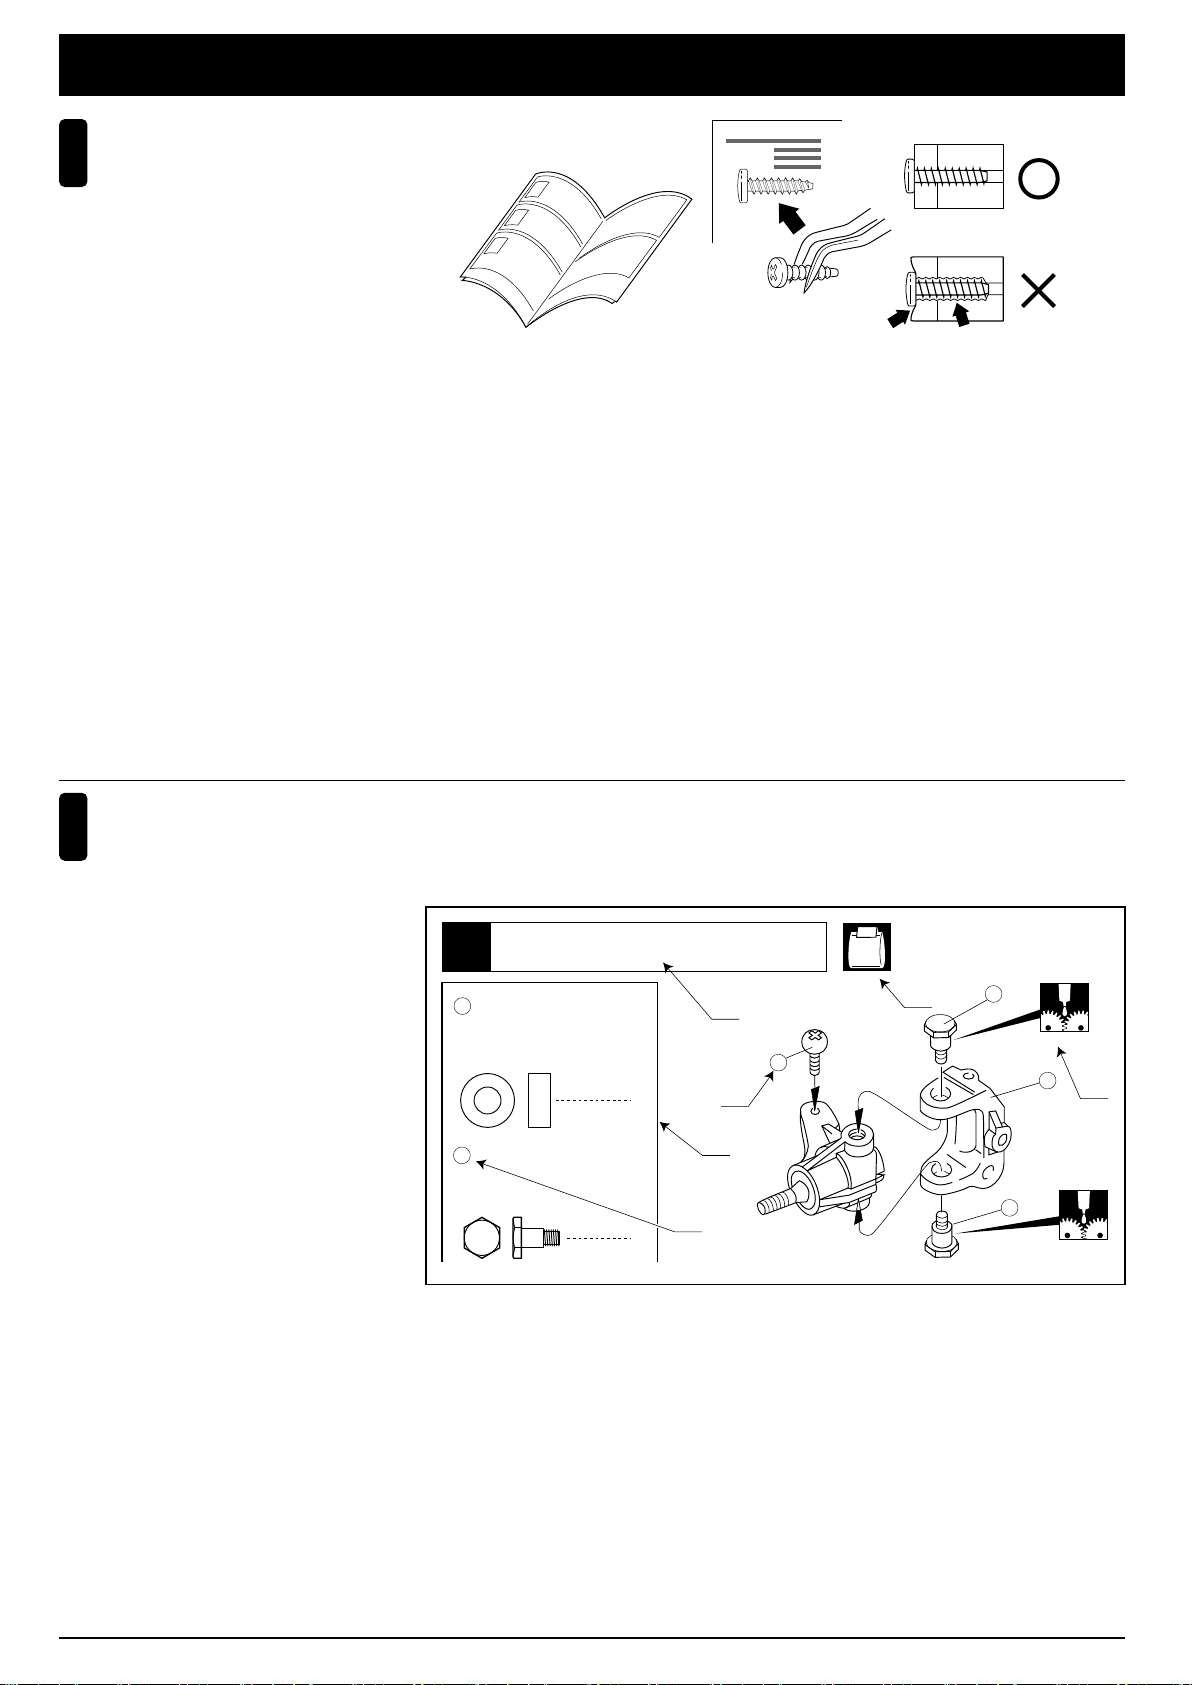
●TPビス締めるときは・・・
締めこ みが固くても部品が固定されるまで締めて
ください。
ただし 、部品が変形するまで締めるとビスがきか
なくなります。
組立て前の注意 / BEFORE YOU BEGIN
Correct
Richtig
Bon
Correcto
Wrong
Falsch
Mauvais
Mal
Before assembling, please read the following carefully:
●First, read this instruction manual and understand the modelÕs con-struction.
●Check the contents of this kit.
Should parts be missing, immediately contact the retail shop or your nearest
Kyosho distributor.
●Do not take the wrong screw or small part. Compare it to the true-to-scale dia-gram in each assembly step, then install it.
●When tightening a self-tapping (TP) screw:
Even if feeling hard, tighten a TP screw until the part will be securely attached.
However, do not overtighten it as the plastic thread inside the part may strip!
Lesen Sie folgendes vor dem Zusammenbau aufmerksam durch:
●Lesen Sie zuerst die Bauanleitung ganz durch und verstehen Sie den Aufbau
Ihres Modelles.
●†berprŸfen Sie den Verpackungsinhalt.
Sollten Teile fehlen, wenden Sie sich direkt an Ihren FachhŠndler oder an den
Kyosho-Vertreiber in Ihrem Land.
●Verwechseln Sie Schrauben sowie kleine Bauteile nicht! Vergleichen Sie sie vor
dem Einbau mit den Darstel-lungen in Originalgrš§e in den Baustufen.
●Beachten Sie beim Festziehen einer Treibschraube folgendes:
Schrauben Sie solange, bis das anzubringende Teil sicher und fest sitzt.
Achten Sie jedoch darauf, da§ Sie den Gewindegang im Material nicht
説明書の見かた
2
How to read the instruction manual:
So funktioniert die Bauanleitung:
Comment lire les instruction:
C—mo leer el manual de instrucciones:
A: この項目で組立てるおおよその場所。
B: 小物部品の名前、原寸図、使用数。
C: キット内の部品は、ビス類を除いてキー
No.が付けられています。スペアパーツを
購入する時はキーNo.を参照して下さい。
フロントサスペンション
Front Suspension
1
D: 説明書内では多くのマークが使用されて
います。マークに注意して組立てを進め
てください。マークの説明は、各ページ
の下にあります。
A: Indicates the number of the assembly step
and the part that will be assembled.
4
5 x 10mm
メタル
Metal Bushing
Metallager
Palier m tal
B: Key Number, Part Name, True-to-scale
Diagram, Quantity Used.
C: All parts except screws are identified by key
numbers. For purchasing spare parts, find
the key number of the part needed in the
spare parts list and refer to the left column to
look up the corresponding order number.
キングピン
5
King Pin
Achsschenkelbolzen
Vis de fus e
D: This instruction manual uses several
symbols. Please note them during the entire
assembly at the bottom of each page.
Avant lÕassemblage, veuillez lire les points suivants
●Lisez dÕabord compl tement cette notice; ainsi vous aurez un aper u du d
roulement et pourrez mieux vous orienter.
●V rifiez ensuite le contenu du kit.
Si jamais il y a des pi ces manquantes, adressez-vous directement ˆ votre
magazin sp cialis ou au distributeur Kyosho dans votre pays.
●Ne confondez pas les vis et les petites pi ces! V rifiez-les ˆ lÕaide des illus-trations dans chaque plage de montage, puis assemblez les.
●Lorsque vous serrez une vis autotaraudeuse:
Serrez jusquÕˆ ce que la pi ce ˆ monter soit bien install e. Pourtant, veillez ˆ
ne pas trop la serrer puisque vous risquez dÕab”mer le filet dans la pi ce.
Antes de comenzar el montaje, lea atentamente lo siguiente:
●Lea, en primer lugar, este manual para obtener una idea general.
●Compruebe la conformidad de todas las piezas.
Si faltara alguna pieza, contacte con la tienda donde lo adquiri—.
No se admitir‡n reclamaciones en modelos en proceso de montaje.
●Antes de colocar las piezas y tornillos, asegurese mirando la tabla en cada
paso.
●A la hora de apretar Tornillos Autorroscantes(TP):
Apri telos firmemente en la pieza donde corresponda.
No intente apretarlos demasiado, ya que podr’an deformar la pieza.
〔説明例Example〕
〔ExempleBeispielEjemplo〕
Vordere AufhŠngung
Suspension avant
A
4
C
6
No.4, No.5, No.6
D
5
7
B
C
4
5
D
A: Die Nummer der Baustufe sowie das zu bau--
ende Teil werden angegeben.
B: Teilenummer, Teilename, Darstellung in
Origi-nalgrš§e und Anzahl.
C: Die Teilenummer stellt den Bezug zu unserer
Bestellnummer her. Am Ende der Bauanlei-tung finden Sie eine Ersatzteilliste, die zu der
Teilenummer die entsprechende Bestellnum-mer liefert.
D: Diese Bauanleitung verwendet verschiedene
Piktogramme, deren Bedeutungen unten auf
jeder Seite erklŠrt werden.
4
A: Num ro de la plage de montage et le nom de
la pi ce ˆ assembler.
B: Num ro de r f rence de la pi ce, nom, illu--
stration en grandeur r elle et quantit utilis e.
C: Toutes les pi ces, except es les vis, sont
iden-tifi es par un num ro de r f rence. Pour
lÕachat de pi ces de rechange, trouvez ce
num ro dans la liste pour pi ces de rechange
la fin de cette notice. Toute ˆ la gauche de
cette m me liste, vous trouverez ainsi le num
ro de commande correspondant.
D: Cette notice utilise des ic™nes dans les
plages de montage. R f rez-vous au bas de
chaque page pour savoir leur signification.
A: Indica el nœmero del Paso y la Parte a ser
montada.
B: Nœmero, Nombre de la Pieza, Dibujo a
escala real, Cantidad utilizada.
C: Todas las piezas, excepto los tornillos vienen
identificadas por un nœmero. Para
comprarlas por separado,
ˆ
mire el nœmero en la lista de piezas y apunte
la referencia de la columna izquierda.
D: Este manual de instrucciones utiliza diversos
s’mbolos.
T ngalos en cuenta durante el montaje.
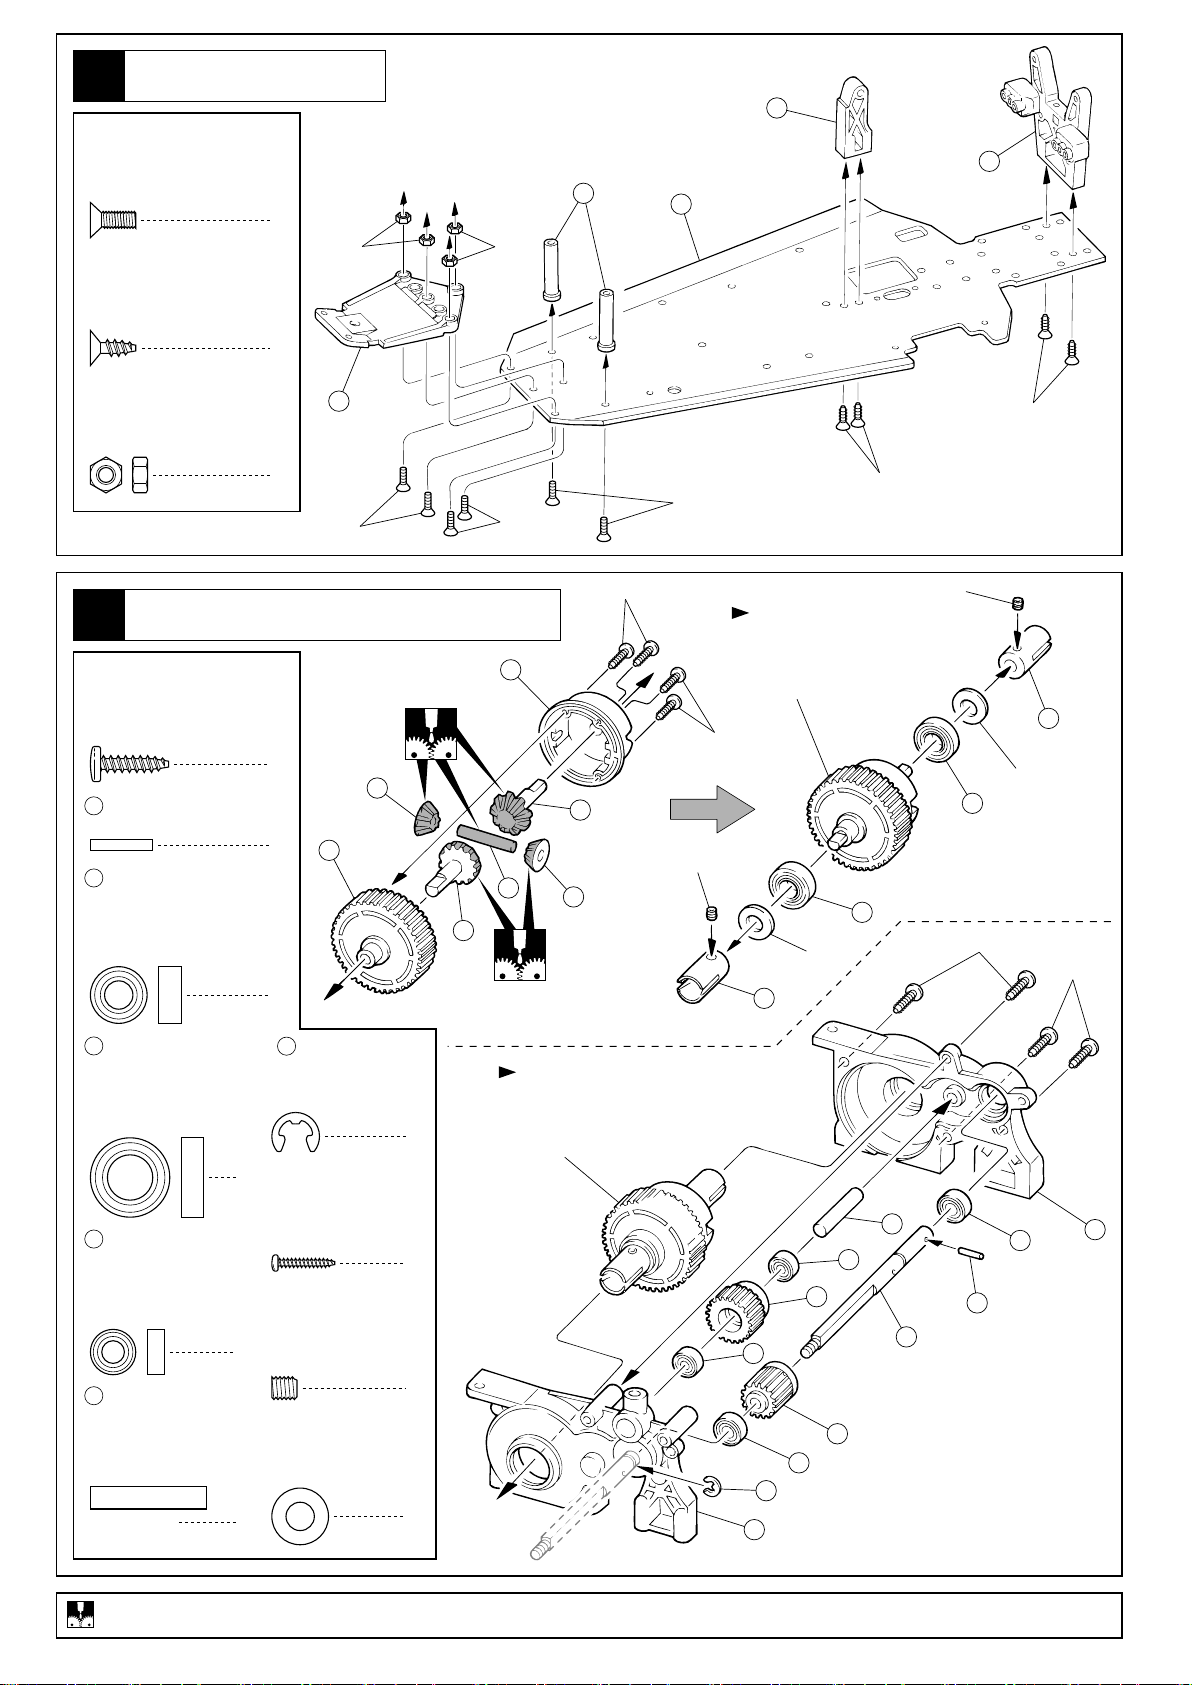
シャシー
Das Chassis / Chassis / Chasis
1
3 x 8mm
F/H Screw
SK Schraube
Vis F/H 3x8mm
Tornillo 3x8mm F/H
3 x 8mm
TP F/H Screw
SK Treibschraube
Vis TP F/H 3x8mm
/ Chassis
サラビス
6
TPサラビス
Tornillo 3x8mm TP F/H
4
3mm
3mm
120
121
122
123
3mm
Nut
Mutter
Ecrou
Tuerca 3mm
2
3 x 12mm
TP Screw
LK Treibschr
Vis TP 3x12mm
ナット
10
4
3x8mm(F/H)
ギヤボックス
/ Getriebegehäuse
Gearbox / Carter de différentiel / Caja de transmisión
TPビス
Tornillo 3x12mm TP
4
4
19
2 x 11mm
Axe 2x11mm Pasador
123
5 x 10mm
Ball Bearing
Kugellager
Roulements à billes
Rodamiento
Pin Stift
ピン
ベアリング
1
2
2
3
3x8mm(F/H)
1
3
5
4
2x10mm
3x8mm(F/H)
2x10mm
4x4mm
3x8mm
4x4mm
向きに注意。
Note the direction.
Einbaurichtung beachten.
Notez le sens.
Fíjese en el dibujo.
124
5mm
8
3x8mm
8
5mm
124
3x12mm
3x12mm
124
8 x 14mm
Ball Bearing
Kugellager
Rodamiento
125
4 x 8mm
Ball Bearing
Kugellager
Rodamiento
127
4 x 20.5mm
Shaft
Welle
Axe 4x20.5mm
Eje 4x20.5mm
グリスを塗る。
Fetten. / Graissez. / Aplicar grasa.
ベアリング
Roulements à billes
2
ベアリング
Roulements à billes
2
シャフト
1
/ Apply grease.
176
E4
Eリング
E-ring
E-Ring E4
Clips 4mm
Clip E4
2 x 10mm
TP Screw
RK Treibschr
Vis TP 2x10mm
4 x 4mm
Set Screw
Gewindestift
Vis BTR 4x4mm
5mm
Washer
Scheibe
TPビス
Tornillo 2x10mm TP
セットビス
Prisionero 4x4mm
ワッシャー
Rondelle 5mm
Arandela 5mm
向きに注意。
Note the direction.
Einbaurichtung beachten.
1
4
Notez le sens.
Fíjese en el dibujo.
126
125
127
19
123
131
129
125
2
128
123
176
2
130
5
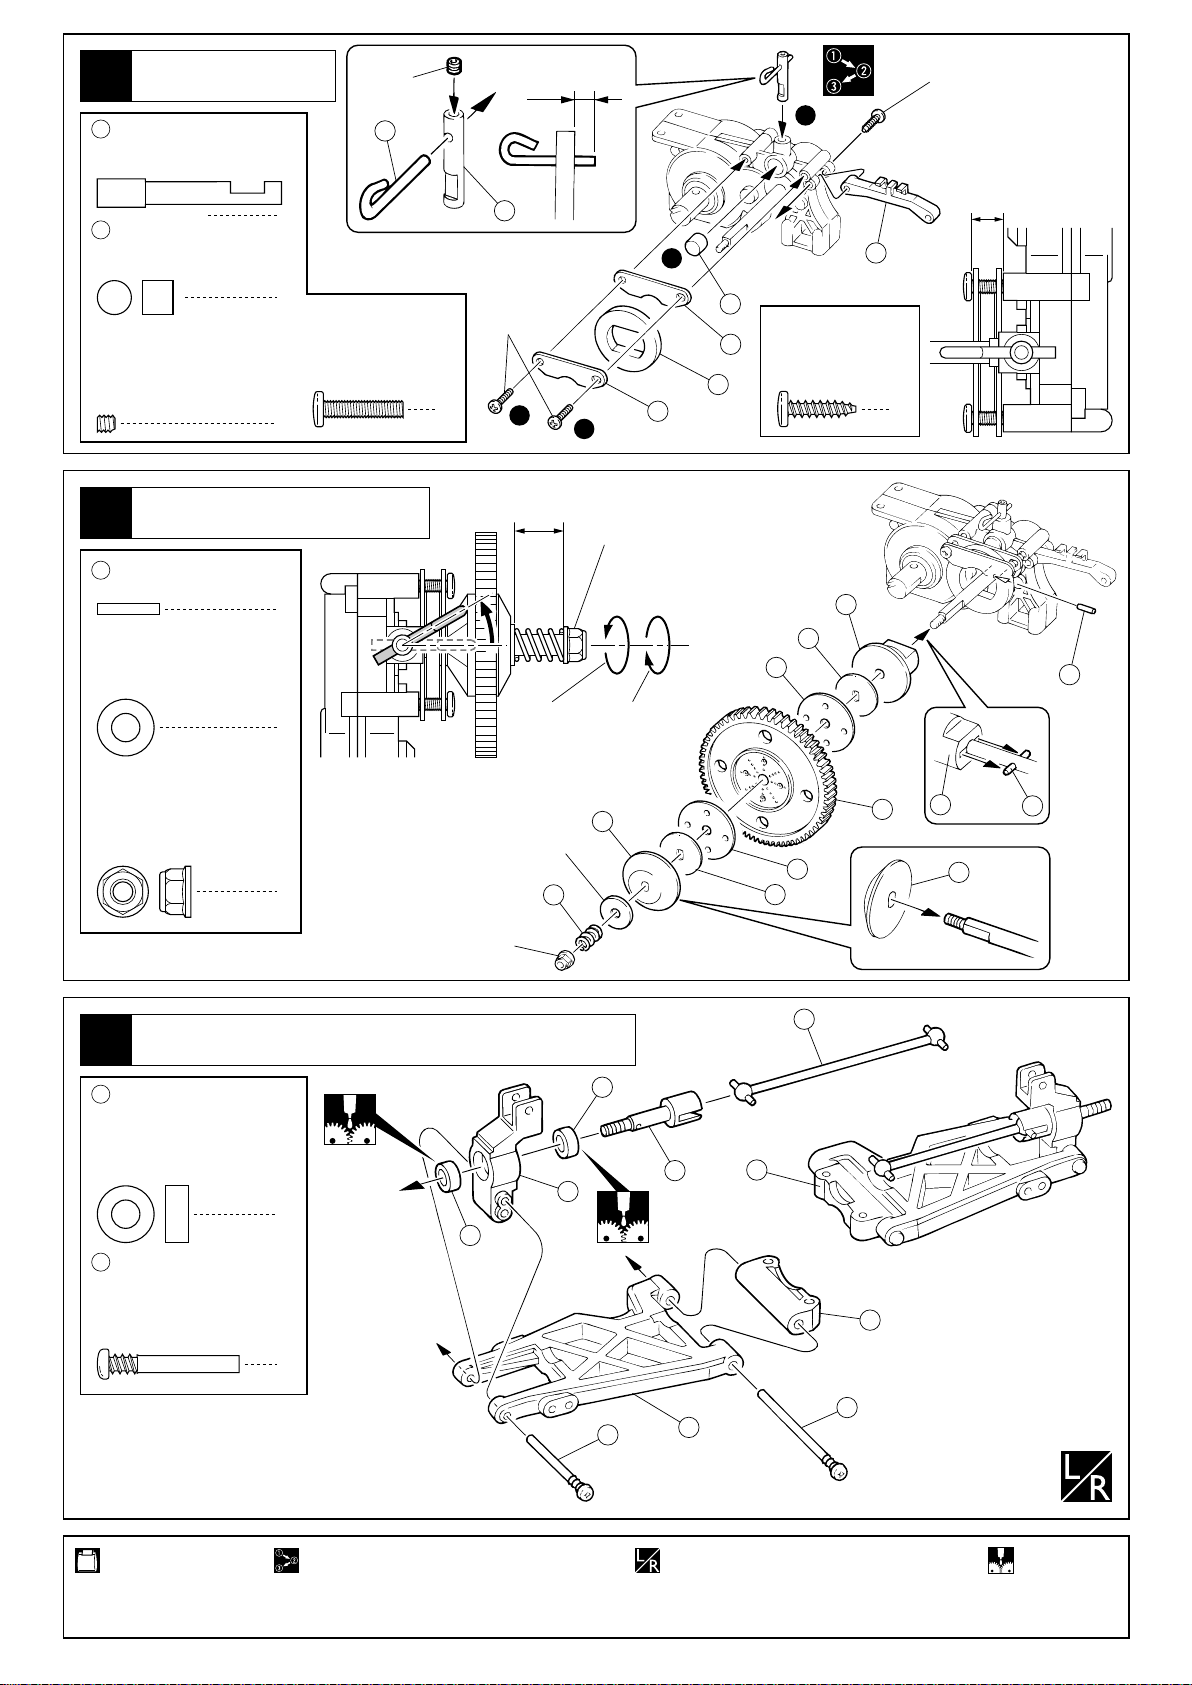
ブレーキ
Bremse / Frein / Freno
3
ブレーキシャフト
132
Brake Shaft Bremsewelle
Axe frein Eje freno
163
ブレーキカム
Brake Cam Bremsklotz
Came de frein Placa freno
3 x 3mm
Set Screw
Gewindestift
Vis BTR 3x3mm
Prisionero 3x3mm
メインギヤ
Couronne principale / Corona
4
19
2 x 11mm
Axe 2x11mm Pasador
5mm
Washer
Scheibe
Rondelle 5mm
Arandela 5mm
4mm
ナイロンナット
Nylon Nut
Kunststoffmutter
Ecrou nylon
Tuerca Nylon
/ Brake
セットビス
ピン
ワッシャー
/ Main Gear / Das Getriebe
Pin Stift
1
1
3 x 14mm
Screw
LK Schraube
Vis 3x14mm
Tornillo 3x14mm
1
1
1
1
3x3mm
133
ビス
5mm
132
3x14mm
2
3
approx. 9.5mm ca. 9.5mm
約9.5mm
environ 9.5mm aprox. 9.5mm
締まる
Tighten
Festziehen
Serrer
Apretar
5mm
140
3
4mm
139
2
135
ナイロンナット
Nylon Nut
Kunststoffmutter
Ecrou nylon
Tuerca Nylon
緩む
Loosen
Lšsen
Desserrer
Aflojar
134
163
135
137
175
1
153
3 x 12mm
TP Screw
LK Treibschr
Vis TP 3x12mm
TPビス
Tornillo 3x12mm TP
138
175
136
137
3x12mm
1
約7.5mm
approx. 7.5mm
ca. 7.5mm
environ 7.5mm
aprox. 7.5mm
138
139
19
19
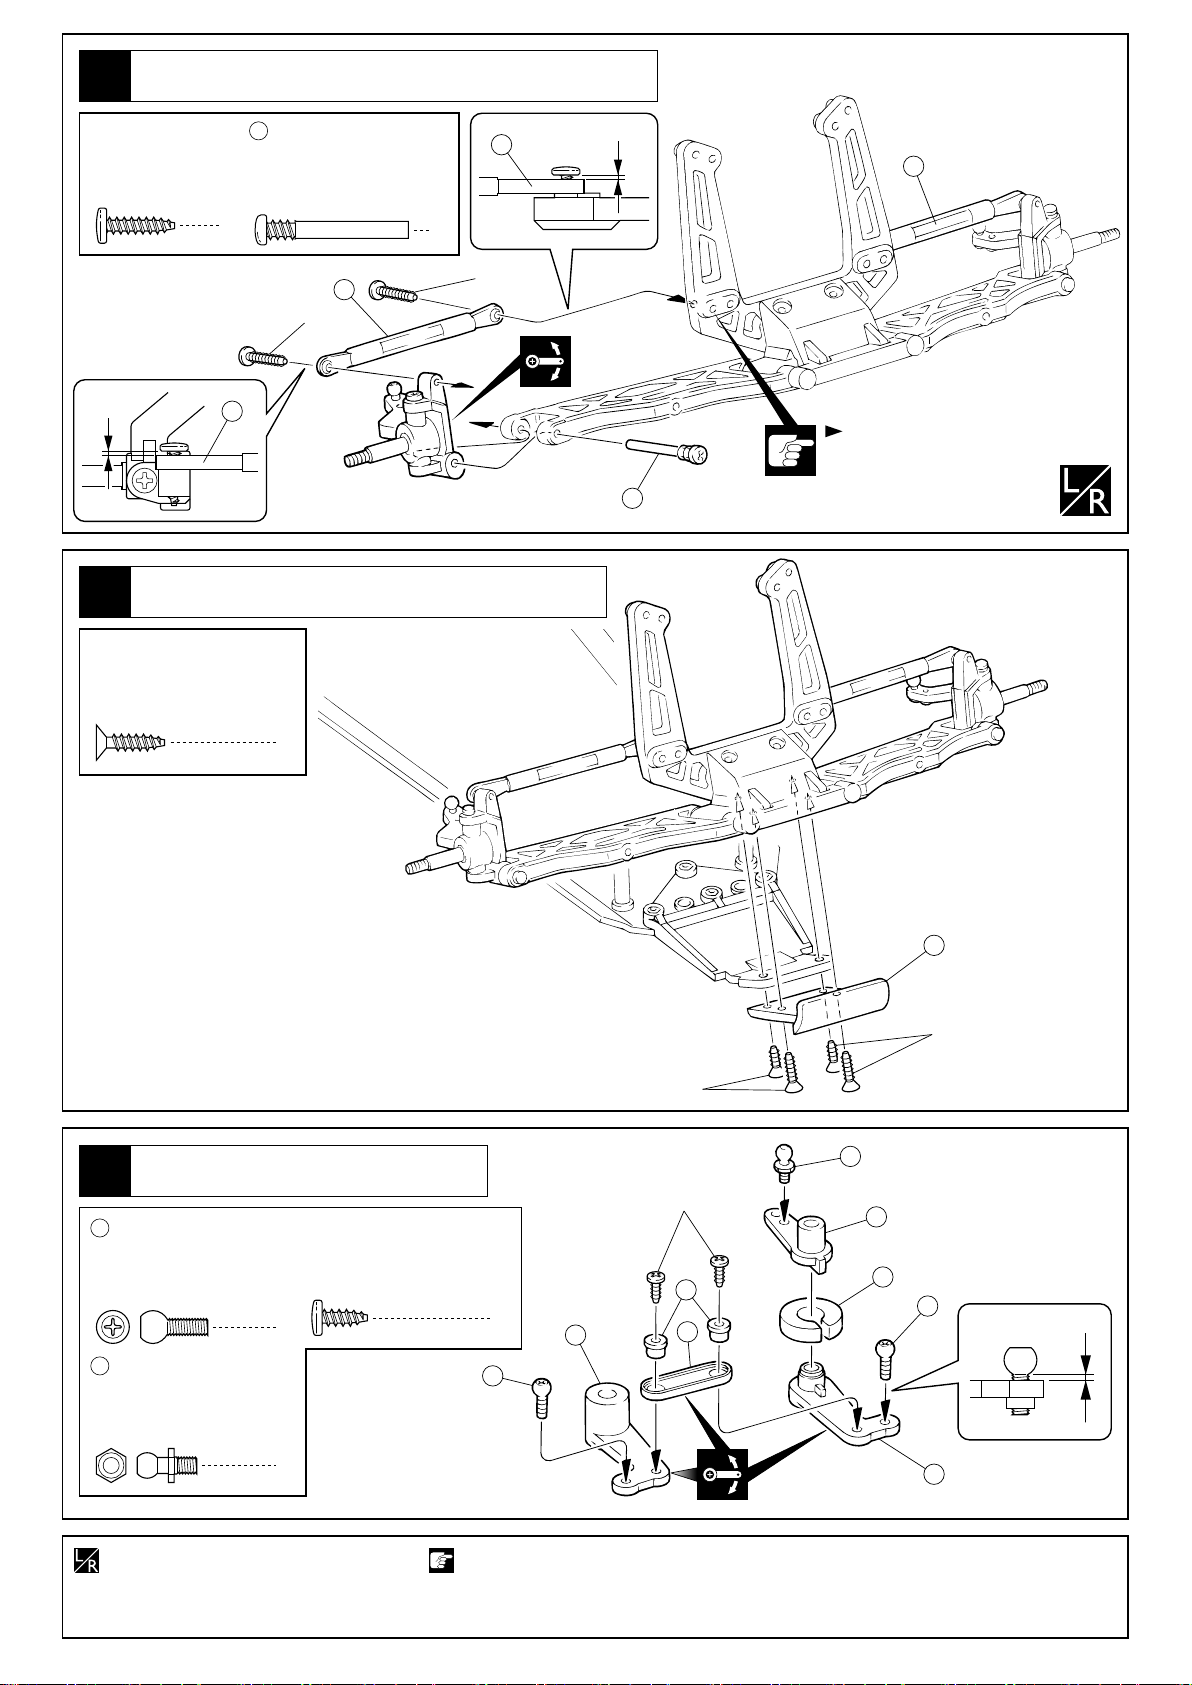
リヤサスペンション
5
Suspension arri re / Suspensi—n Trasera
22
5 x 10mm
Metal Bushing
Lager
3 x 25mm
30
Screw Pin
Schraubachse
Vis 3x25mm
メタル
Bague M tal 5x10mm
Casquillo Met‡lico 5x10mm
スクリューピン
Tornillo Pasador 3x25mm
/ Rear Suspension / Hintere AufhŠngung
4
2
< Left >
左側用
< Links Gauche >
< Izquierda >
22
4mm
33
22
29
28
32
31
35
30
31
< Right >
右側用
< Rechts Drolte >
< Derecha >
Part bags used.
Verwendeter Teilebeutel.
Sachet utilis .
Bolsa a utilizar.
6
番号の順に組立てる。使用する袋詰。
Assemble in the specified order.
In der angegebenen Reihenfolge zusammenbauen.
Assemblez dans lÕordre indiqu .
Realice el montaje en el orden indicado.
左右同じように組立てる。
Assemble left and right sides the same way.
Bauen Sie eine linke und eine rechte Seite.
Assemblez le c™t gauche comme le c™t droit.
Realice el montaje de igual forma en ambos lados.
グリスを塗る。
Apply grease.
Fetten.
Graissez.
Aplicar grasa.
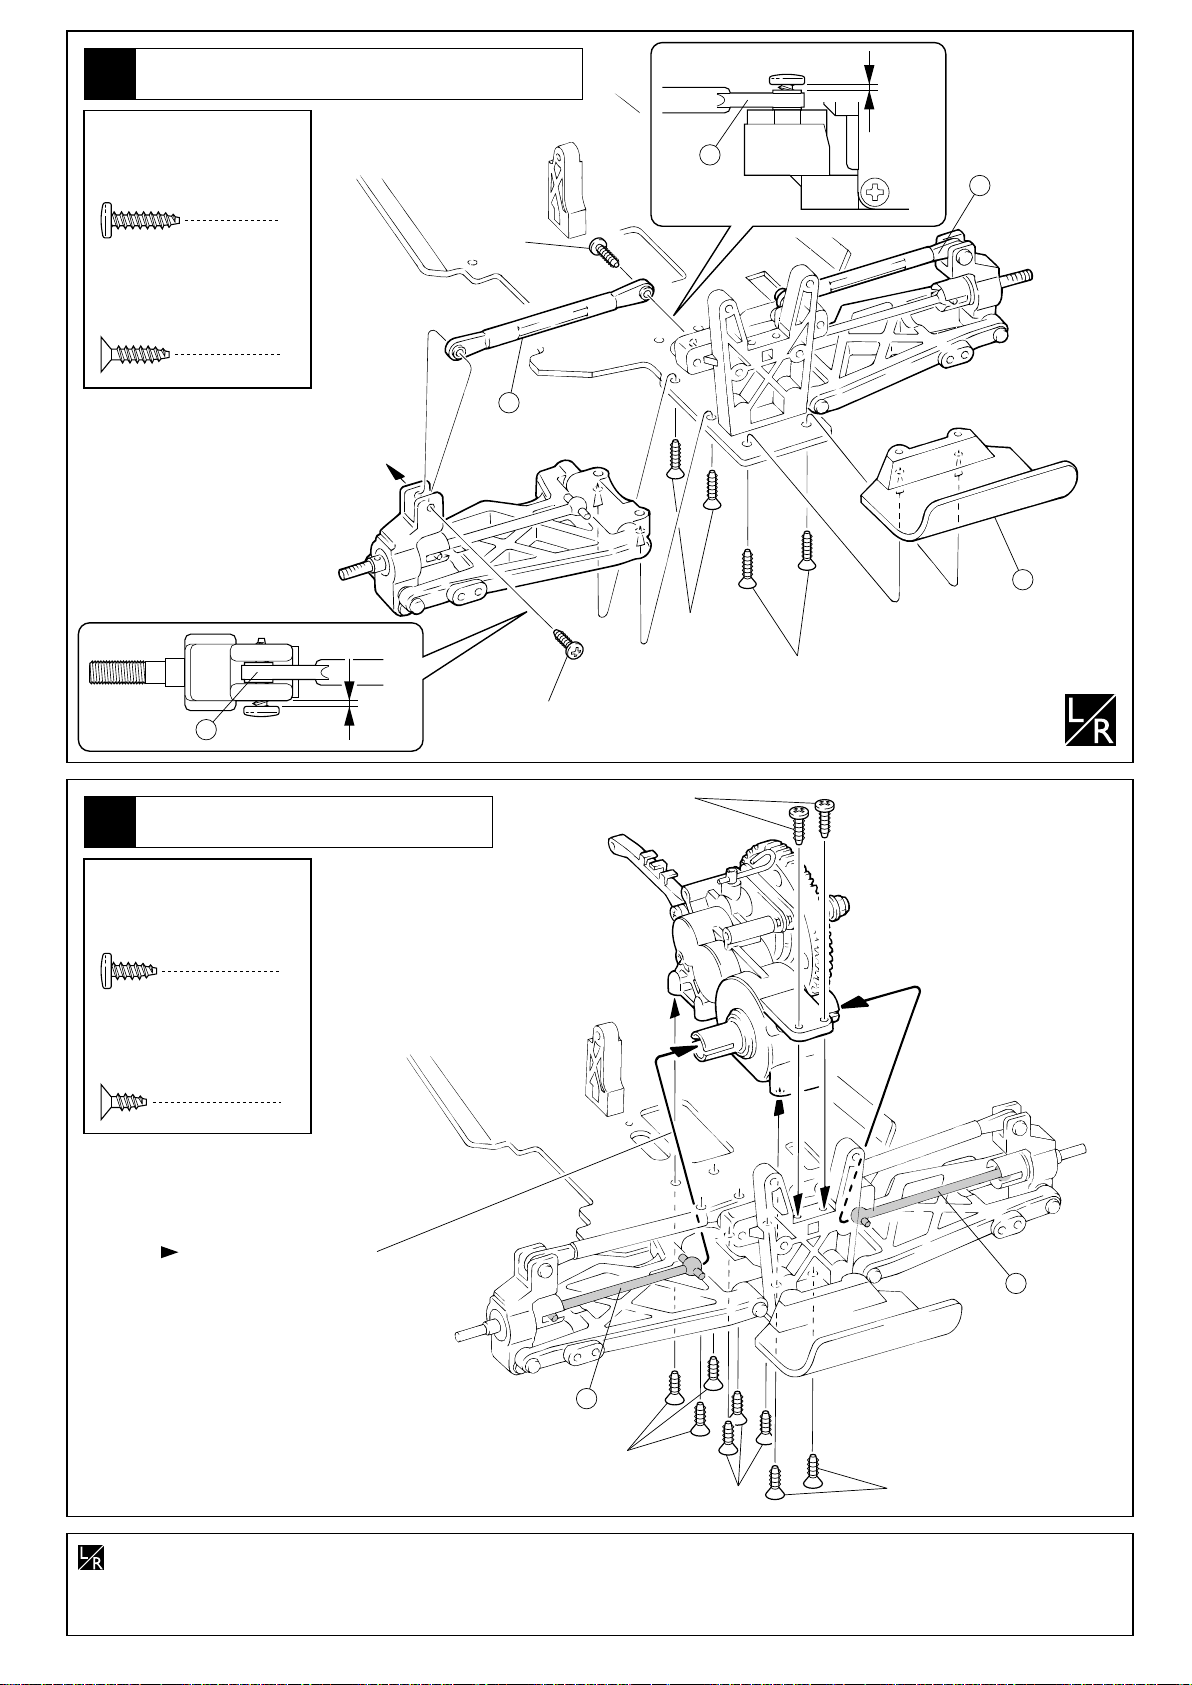
リヤサスペンション
6
Suspension arri re / Suspensi—n Trasera
/ Rear Suspension / Hintere AufhŠngung
0.5mm
3 x 12mm
TP Screw
LK Treibschr
Vis TP 3x12mm
3 x 12mm
TP F/H Screw
SK Treibschraube
Vis TP F/H 3x12mm
TPビス
Tornillo 3x12mm TP
4
TPサラビス
Tornillo 3x12mm TP F/H
6
36
0.5mm
36
36
3x12mm
36
141
3x12mm(F/H)
3x12mm(F/H)
3x12mm
ギヤボックス
Carter de diff rentiel / Caja de transmisi—n
7
3 x 8mm
TP Screw
LK Treibschr
Vis TP 3x8mm
Tornillo 3x8mm TP
3 x 8mm
TP F/H Screw
SK Treibschraube
Vis TP F/H 3x8mm
TPビス
TPサラビス
Tornillo 3x8mm TP F/H
スイングシャフトを入れる。
Insert swing shaft.
Halbwelle einbauen, wie dargestellt
Introduire le cardan dans la noix.
Colocar el palier.
/ Gearbox / GetriebegehŠuse
2
8
3x8mm
35
左右同じように組立てる。
Assemble left and right sides the same way.
Bauen Sie eine linke und eine rechte Seite.
Assemblez le c™t gauche comme le c™t droit.
Realice el montaje de igual forma en ambos lados.
35
3x8mm(F/H)
3x8mm(F/H)
3x8mm(F/H)
7
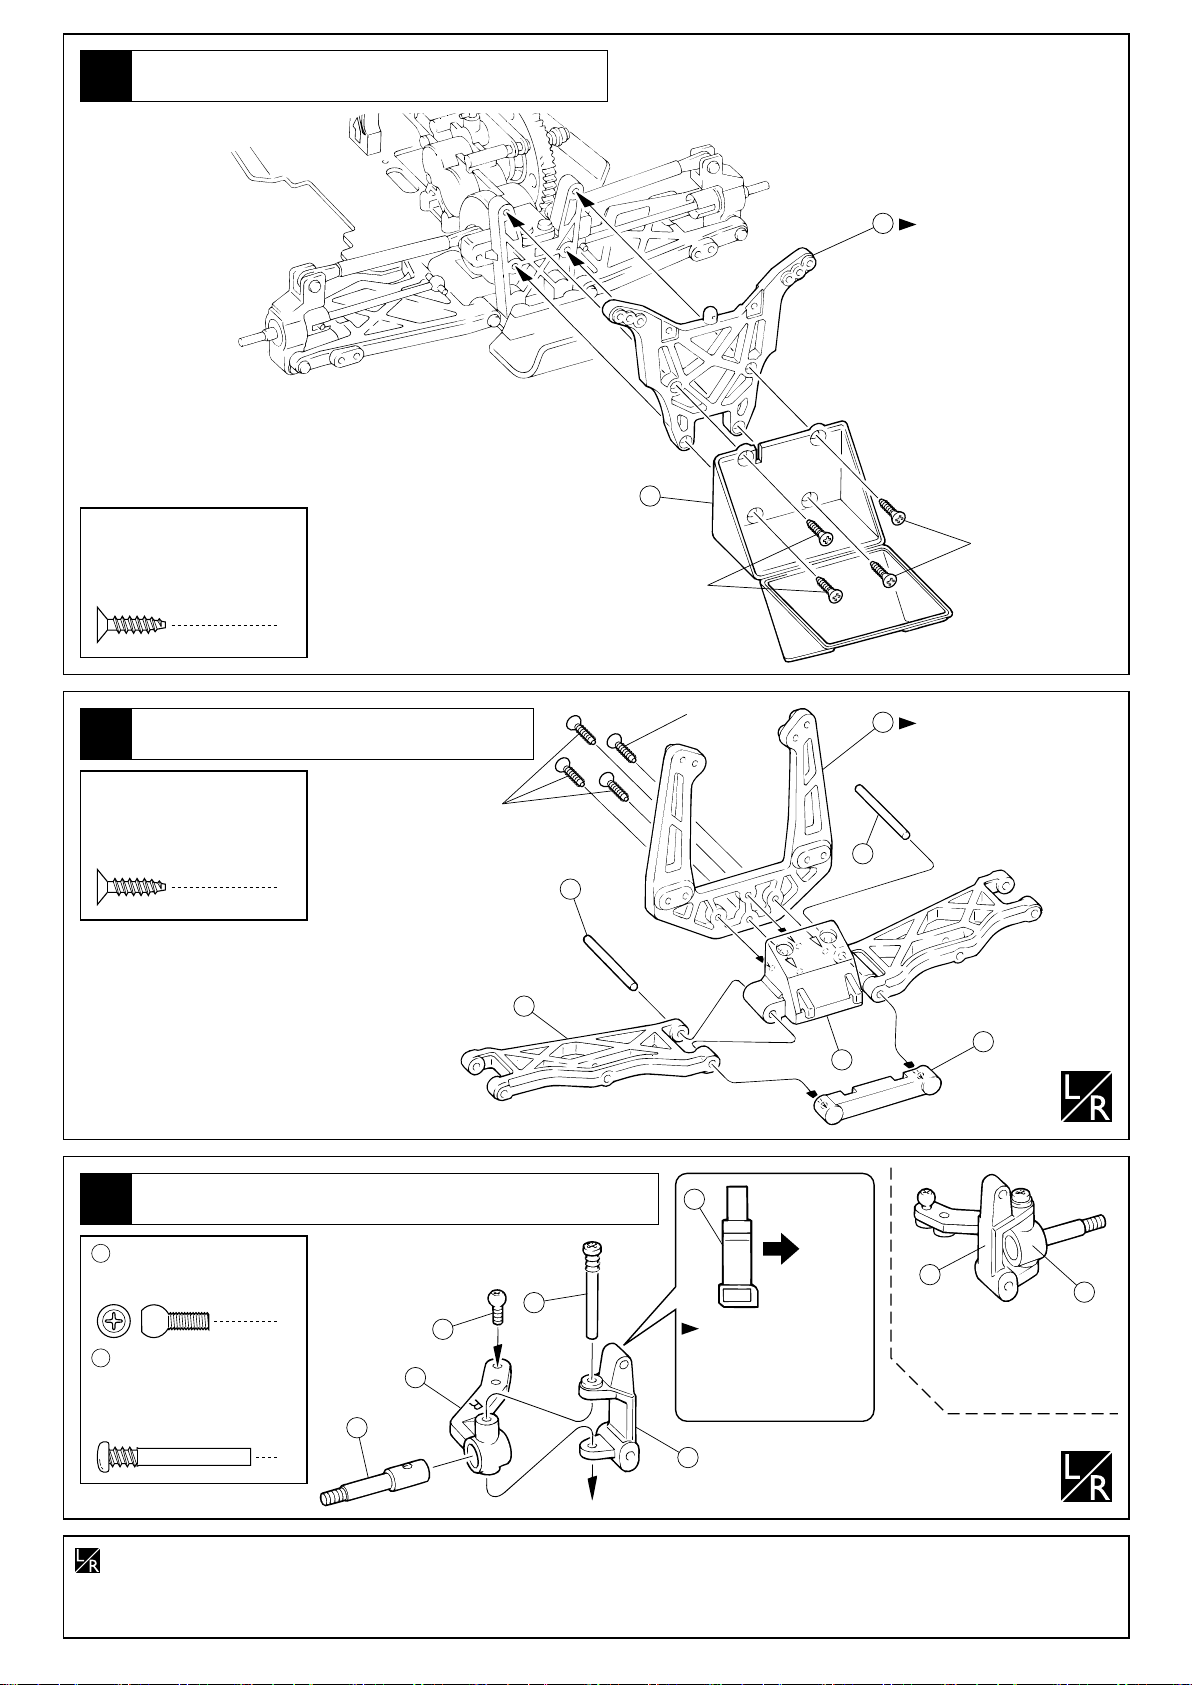
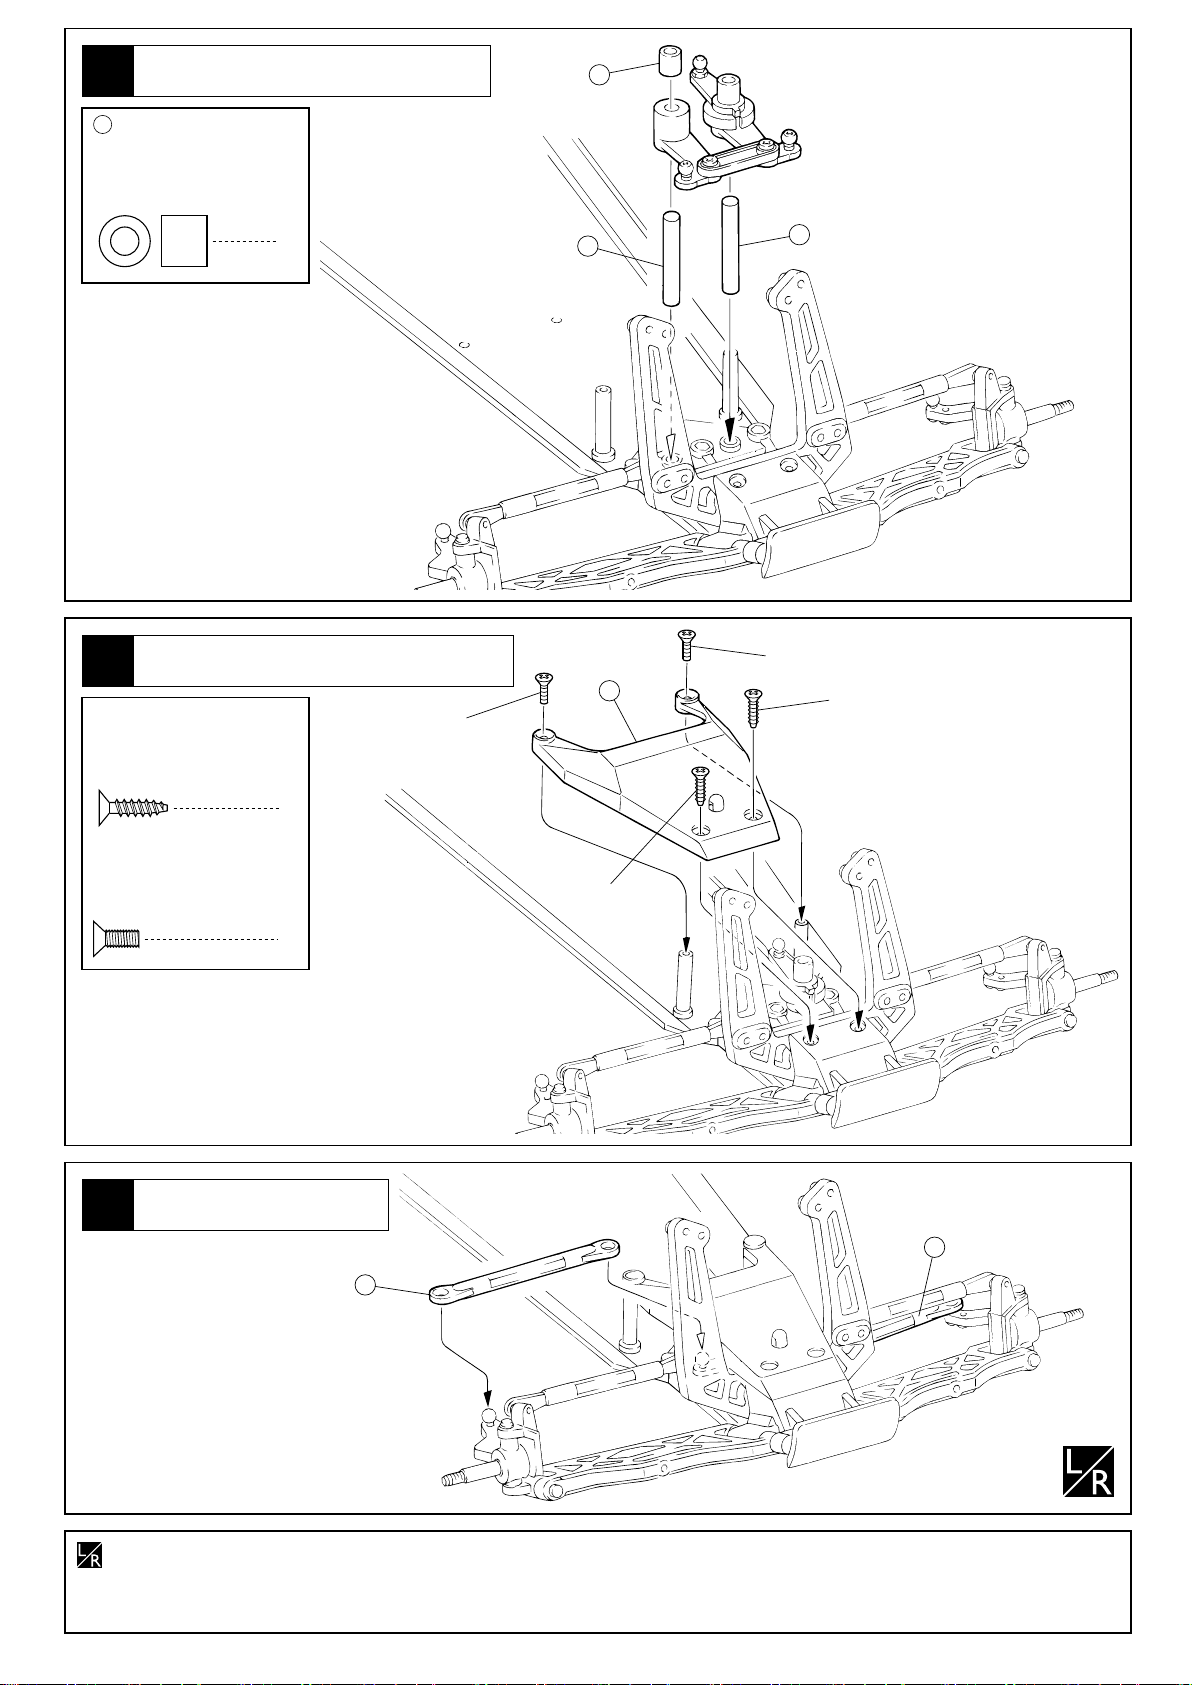
リヤダンパーステー
Support amortisseurs arri•re / Soporte Amortiguadores Trasero
8
3 x 12mm
TP F/H Screw
SK Treibschraube
Vis TP F/H 3x12mm
TPサラビス
Tornillo 3x12mm TP F/H
/ Rear Shock Stay / Hintere DŠmpferbrŸcke
4
142
3x12mm
13
向きに注意。
Note the direction.
Einbaurichtung beachten.
Notez le sens.
F’jese en el dibujo.
3x12mm
フロントサスペンション
9
Suspension avant / Suspensi—n Delantera
3 x 12mm
TP F/H Screw
SK Treibschraube
Vis TP F/H 3x12mm
TPサラビス
Tornillo 3x12mm TP F/H
フロントサスペンション
10
Vordere AufhŠngung / Suspension avant / Suspensi—n Delantera
5.8mm
47
29
ピロボール
Pillow Ball Kugelschraube
Rotule 5.8mm R—tula 5.8mm
3 x 25mm
Screw Pin
Schraubachse
Vis 3x25mm
スクリューピン
Tornillo Pasador 3x25mm
/ Front Suspension / Vordere AufhŠngung
3x12mm
4
/ Front Suspension
< Right >
右側用
< Rechts Drolte >
< Derecha >
2
44
47
R
43
2
37
29
42
3x12mm
38
向きに注意。
Note the direction.
Einbaurichtung beachten.
Notez le sens.
F’jese en el dibujo.
42
41
39
45
向きに注意。
Note the direction.
R
Einbaurichtung beachten.
Notez le sens.
F’jese en el dibujo.
前
Front
Vorne
Avant
Parte
Delantera
L
46
< Left >
左側用
< Links Gauche >
< Izquierda >
107
45
左右同じように組立てる。
Assemble left and right sides the same way.
Bauen Sie eine linke und eine rechte Seite.
Assemblez le c™tŽ gauche comme le c™tŽ droit.
Realice el montaje de igual forma en ambos lados.
8
フロントサスペンション
11
Vordere AufhŠngung / Suspension avant / Suspensi—n Delantera
3 x 12mm
TP Screw
LK Treibschr
Vis TP 3x12mm
TPビス
Tornillo 3x12mm TP
4
3 x 25mm
29
Screw Pin
Schraubachse
Vis 3x25mm
/ Front Suspension
スクリューピン
Tornillo Pasador 3x25mm
2
36
0.5mm
< Left >
左側用
< Links Gauche >
< Izquierda >
36
< Right >
右側用
< Rechts Drolte >
36
3x12mm
< Derecha >
0.5mm
フロントサスペンション
12
Vordere AufhŠngung / Suspension avant / Suspensi—n Delantera
3 x 12mm
TP F/H Screw
SK Treibschraube
Vis TP F/H 3x12mm
TPサラビス
Tornillo 3x12mm TP F/H
36
/ Front Suspension
4
3x12mm
29
この穴を使う。
Use this hole.
Dieses Loch benutzen.
Utiliser ce trou.
Utilice este agujero.
サーボセイバー
13
Sauve-servo / Salvaservos
5.8mm
47
102
ピロボール
Pillow Ball
Kugelschraube
Rotule 5.8mm
R—tula 5.8mm
4.5mm
Pillow Ball
Kugelschraube
Rotule 4.5mm
R—tula 4.5mm
ピロボール
/ Servo Saver / Servosaver
3 x 8mm
TP Screw
LK Treibschr
Vis TP 3x8mm
Tornillo 3x8mm TP
2
1
TPビス
47
49
3x12mm
3x12mm
102
3x8mm
52
55
2
50
54
53
47
1mm
51
左右同じように組立てる。
Assemble left and right sides the same way.
Bauen Sie eine linke und eine rechte Seite.
Assemblez le c™t gauche comme le c™t droit.
Realice el montaje de igual forma en ambos lados.
注意して組立てる所。
Pay close attention here!
Vorsicht! Wichtiger Hinweis!
Attention! Avis important!
Preste atenci—n.
9
サーボセイバー
14
Sauve-servo / Salvaservos
57
5 x 9 x 8mm
Servo Saver Collar
サーボセイバーカラー
Lager fŸr Servosaver
Entretoise de sauve-servo
Casquillo salvaservos
/ Servo Saver / Servosaver
57
1
ボディマウント
Fixations de carrosserie / Soportes de carrocer’a
15
3 x 12mm
TP F/H Screw
SK Treibschraube
Vis TP F/H 3x12mm
TPサラビス
Tornillo 3x12mm TP F/H
/ Body Mounts / KarrosseriestŸtzen
2
3x8mm(F/H)
56
58
56
3x8mm(F/H)
3x12mm(F/H)
3 x 8mm
F/H Screw
SK Schraube
Vis F/H 3x8mm
Tornillo 3x8mm F/H
16
サラビス
タイロッド
SpurstŠnge / Biellette / Tirante
/ Tie Rod
3x12mm(F/H)
2
60
60
左右同じように組立てる。
Assemble left and right sides the same way.
Bauen Sie eine linke und eine rechte Seite.
Assemblez le c™t gauche comme le c™t droit.
Realice el montaje de igual forma en ambos lados.
10
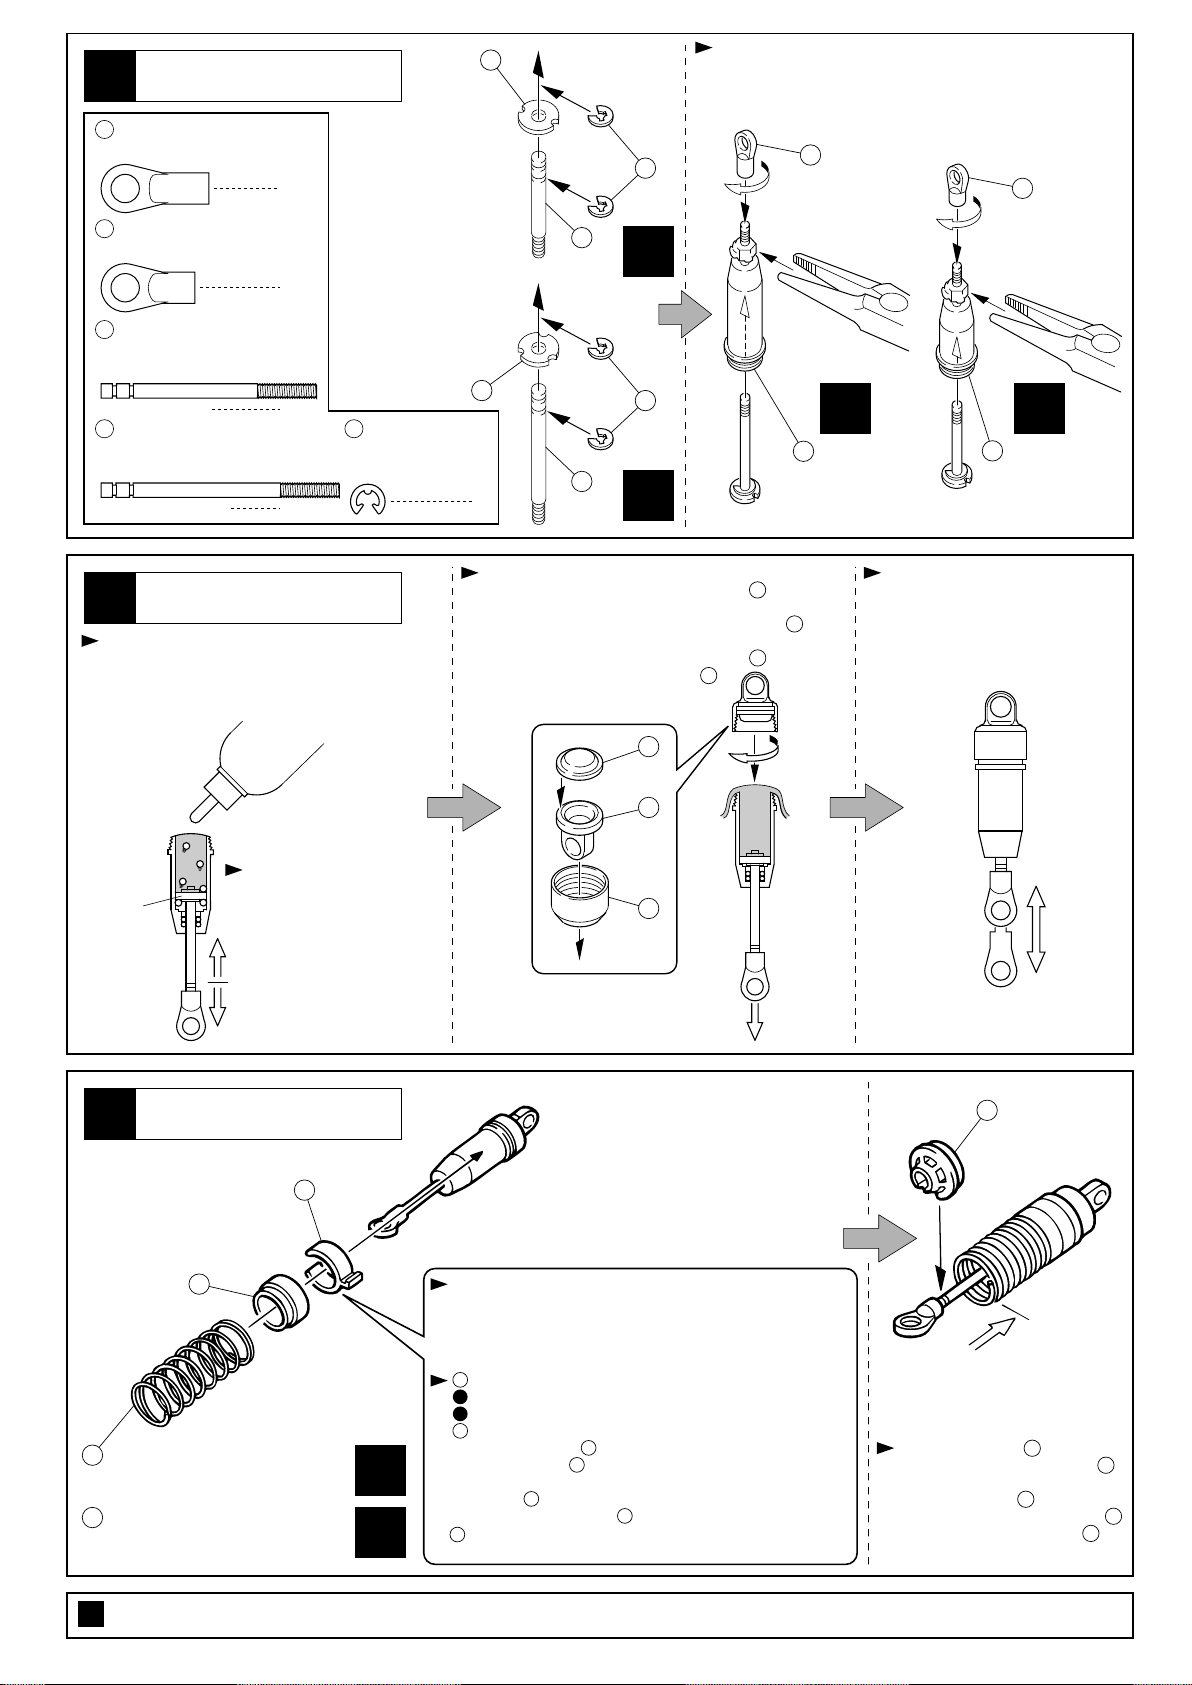
ダンパー
17
Amortisseur / Amortiguador
117
5.8mm
Kugelpfanne (L) Chape (L)
R—tula (L)
118
5.8mm
Kugelpfanne (M) Chape (M)
R—tula (M)
ダンパーシャフト(S)
68
Shock Shaft (S) Kolbenstange, kurz
Axe d'amortisseur court Eje amortiguador corto
ダンパーシャフト(M)
67
Shock Shaft (M) Kolbenstange, Mittleres
Axe d'amortisseur Moyenne Eje amortiguador Medio
/ Shock / Sto§dŠmpfer
ボールエンド(L)
ボールエンド(M)
Ball End (L)
Ball End (M)
105
-2
< >
フロント用
< >
For Front
< >
Vorne
< >
2
Avant
< >
Delantero
65
シャフトに布をまき、つかむ。
Cover the shaft with cloth before gripping it with pliers.
Kolbenstange mit Papier umwickeln, bevor Sie sie mit der Zange greifen!
Proteger l ' axe avec du tissus avant de l ' acgripper avec une pince.
Proteja el eje con un pa–o antes de sujetarlo con los alicates.
117
(L)
118
(M)
68
67
x2
65
x2
x2 x2
69
リヤ用(長)
For Rear (Long)
Hinten (Lang)
Arri re (Longue)
Traseros (Largos)
70
フロント用(短)
For Front (Short)
Vorne (Kurz)
Avant (Courte)
Delanteros (Cortos)
< >
2
2
2
リヤ用
< >
For Rear
< >
Hinten
< >
Arri re
< >
Trasero
65
E2.5
Eリング
E-ring E-Ring E2.5
Clips 2.5mm
Clip E2.5
105
8
-2
ダンパー
18
Amortisseur / Amortiguador
ピストンを下げ、オイルをもり上がるまで入れる。
Pull down the piston and slowly pour in oil.
Ziehen Sie den Kolben herunter und fŸllen Sie …l ein.
Descendez le piston et remplissez le dÕhuile ˆ ras bord.
Tire del pist—n hacia abajo y vierta aceite lentamente.
ピストン
Piston
Kolben
Piston
Pist—n
ダンパー
19
Amortisseur / Amortiguador
/ Shock / Sto§dŠmpfer
/ Oil
オイル
Huile
Aceite
上下させ、気泡をとる。
Move the piston up and down
to get rid of air bubbles.
Bewegen Sie den Kolben auf
und ab, um Luftein-schlŸsse
austreten zu lassen.
Faites monter et descendre
afin dÕ vacuer les bulles dÕair.
Mueva el pist—n hacia arriba y
abajo para eliminar las burbujas
de aire.
/ Shock / Sto§dŠmpfer
ピストンを下げてゆっくりとしめ、余分なオイルを出す。 スムーズに動くか確認する。
Keep the piston pulled down and screw on causing
excessive oil to overflow.
Halten Sie den Kolben unten und schrauben Sie
langsam auf. Ggf. …l abwischen.
Avec le piston descendu, vissez lentement .
Mantenga el pist—n abajo y apriete
limpiando el aceite sobrante.
73
73
73
73
Confirm that each piston moves up
and down smoothly.
PrŸfen Sie, ob der DŠmpfer Wirkung zeigt.
V rifiez que le piston navigue librement.
Asegœrese que el pist—n funciona
suavemente.
71
72
73
77
76
75
108
フロントスプリング(短)
Front Spring (Short) / Vorne Feder (Kurz)
Ressort Avant (Courte) / Muelle delantero (Corto)
109
リヤスプリング(長)
Rear Spring (Long) / Hinten Feder (Lang)
Ressort Arri re (Longue) / Muelle trasero (Largo)
2セット組立てる(例)。
x2
Sooft wie angegeben zusammenbauen. / Assemblez aussi souvent quÕindiqu . / Repita las veces se–aladas.
/ Assemble as many times as specified.
x2
x2
スプリング調整用。
For adjusting the spring tension.
Zur Justierung der Federvorspannung.
Bagues de r glage de tension de ressort.
Para regular la tensi—n del muelle.
76
は5種類あるので ………
1
車高の前後が、水平になるように
2
走行させながら ………
76
exists in 5 widths. For a level front / rear end ride height,
adjust the amount of . When adjusting, always run your car.
Der Abstandshalter existiert in 5 Grš§en. Justieren Sie hiermit
die Bodenfreiheit des Fahrzeugs an der Vorder- und Hintcrachse.
Les bagues existent dans 5 paisseurs diff rentes. choisir le
nombre et l ' paisseur de pour les r glages de suspension.
est‡ disponible en 5 anchuras. Elija la que m‡s se adapte al
76
tipo de terreno.
76
種類,個数を調整する。
76
76
76
スプリングを縮めて を入れる。
Compress the spring and install .
DrŸcken Sie die Feder zusammen
und schieben Sie auf.
Compresser le ressort pour monter .
Comprima el muelle e Instale .
77
77
77
77
77
11
 Loading...