

Kyosho FX-101 Series Instruction Manual
※ご使用前にこの説明書を良くお読みになり十分に理解してください。
Before beginning assembly, please read these instructions thoroughly.
1:43 Scale Radio Controlled Electric Powered Racing Car
2.4GHz 2ch Digital Proportional R/C System
FX-101 Series
Complete Chassis Set
コンプリートシャシーセット
取扱説明書
Instruction Manual
目次 /
1.
安全のための注意事項 / Safety Precautions
2.
セット内容 / Items Included
3.
セットの他に必要な物 / Required Additional
4.
各部の名称 / Glossary of Main Parts
5, バッテリーの充電 / Charging Battery
6.
走行の準備 / Before Operating
7.
走行させましょう / Let's Drive!
8.
上手な走行テクニック / Operating Tips
Index
3~8
9
10~11
12~15
16~19
20~26
27~44
45~46
9.
各部の交換 / Replacement for Each Part.
●
分解図・スペアパーツ / Exploded View, Spare Parts
●
故障かな・・!? / Trouble Shooting
●京商スペアパーツ・オプションパーツの購入方法
●組立や、操作上で不明な点のお問い合わせ方法
※製品改良のため、予告なく仕様を変更する場合があります。
*Specifications are subject to be changed without prior notice!
© Copyright 2009 KYOSHO CORPORATION / 禁無断転載複製
DNFX-T13
47~59
60~63
64
66
67

はじめに
About This Model
この度はdNaNo FXシリーズをお買い上げいただきまして、誠にありがとうございます。
このdNaNo FXシリーズは最新の2.4GHz ASFデジタルプロポーショナルシステム、ICタグ方式
ラップカウントシステムに対応した高性能小型R/Cカーです。
2.4GHz ASFデジタルプロポーショナルシステムはハイパフォーマンス・ハイレスポンスを可能
にし、専用ICタグの搭載により新型ラップカウントシステムとID管理システムに対応しています。
(ICタグについては後述の「ICタグについて」をご覧ください。)この性能を存分にお楽しみい
ただくために、この取扱説明書をよくお読みになり内容を十分に理解してください。
また、dNaNo FXシリーズは様々なオプションパーツ・スペアパーツ、他の車種に変更する
ためのFitting Parts などを用意しています。スピードアップ・ドレスアップ等、あなただけの
チューンナップをお楽しみいただけます。
Thank you for purchasing the dNaNo FX Series.
The dNaNo FX Series is a high performance mini R/C car using the latest 2.4GHz ASF digital
proportional system and is compatible with IC tag lap count systems.
The high performance and response 2.4GHz proportional system includes a special IC tag that
is compatible with ID management systems as well as the latest lap count systems.
(Please refer to "About the IC Tag" covered later). To get the maximum performance possible and
most satisfaction from this product, please read this instruction manual carefully.
In addition, Fitting Parts are available for using optional parts and spare parts as well as transforming
the dNaNo FX Series into a different chassis type. Customize your machine for increased
performance or to add your own personal style.
下記のホームページアドレスからオプションパーツリストをご覧ください。
Please refer to the website below for the option parts list.
http://www.dnano.jp/support/
2
安全のための注意事項
1
Please read carefully before assembling and operating your model.
Safety Precautions
組立て・走行の前に必ずお読みください。
警告マーク
WARNING!
禁止マーク
PROHIBITED
●
この商品は高い性能を発揮するように設計されています。組立てに不慣れな方は、模型を良く
:生命や身体に重大な被害が発生する可能性がある危険を示します。
: This symbol indicates where caution is essential to avoid injury to yourself or others.
:事故や故障の原因となるため、やってはいけないことを示します。
: This symbol points out actions that you should NOT do to avoid possible damage
or accidents.
知っている人にアドバイスを受け確実に組立ててください。
●
First-time builders should seek the advice of experienced modellers before beginning assembly
and if they do not fully understand any part of the construction.
●
小さい部品があるので、組立て作業は幼児の手がとどかない所で必ずおこなってください。
●
Assemble this kit only in places out of childrenÕs reach!
●
動かして楽しむ場所は、万一の事故を考えて安全を確認してから、責任をもってお楽しみください。
●
Take enough safety precautions prior to operating this model. You are responsible for this modelÕs
assembly and safe operation!
●
この商品は14才以上を対象に設計してます。玩具ではありません。
●
This model is not a toy. It is designed for users over 14 years of age.
・不要になったバッテリーは、貴重な資源を守るために廃棄しないでリサイクル協力店へお持ちください。
・The product you have purchased is powered by a rechargeable battery. The battery is recyclable. At the end of its
useful life, under various national / state and local laws, it may be illegal to dispose of this battery into the municipal
Ni-Cd
Li-ion
waste stream. Check with your local solid waste officials for details in your area for recycling options or proper
Ni-MH
disposal.
3

安全のための注意事項
1
小さな部品や、とがった部品がありますので、十分注意してください。
また、小さなお子様のいる場所での作業・保管はさけてください。
As the product includes small and sharp parts, assemble and
store this product only in places out of the reach of children.
電池は指定の電池を使用し、逆接続・分解は絶対にしないでください。
発熱や破損の原因となり大変危険です。
Never disassemble the polarity required for installation.
This may lead to damage and leakage.
Safety Precautions
故障や破損、変型の原因となるため高温・多湿の場所での長期保管は
しないでください。
Do not store this model in a high-temperature/humidity area or in
direct sunlight.
ケガの恐れがありますのでカッターやニッパー、ドライバーなどの
工具の取り扱いには十分注意してください。
Cutters, wire cutter and screwdrivers need careful handling.
アンテナの先端でケガをする恐れがあります。顔に付近けたり、
振り回したりしないでください。
As the front end of the antenna may be dangerous,
do not swing or aim it toward faces.
4

dNaNoシリーズは本体のスイッチをOFFにしても充電器を使用していなくても、
それぞれ微弱電流が流れています。電源を完全にOFFにする為には全ての電池を
取り外すことが必要です。電池を入れたままにした場合、発熱、発火、電池の
液漏れ等が考えられますので、走行後は必ず全ての電池を取り外してください。
Even if the dNaNo Series machine is switched OFF and the charger is not being
used, a small amount of electrical current is still flowing. To completely switch
power OFF, remove all batteries. If batteries are left in the model, the batteries
may overheat, ignite or leak. Please remove all batteries after use.
ボディを外す時は必ず電源スイッチをOFFにしてください。
基板や端子に触れると大変危険です。
Always turn the power switch OFF when removing the body.
Do not touch the circuit board or battery terminals.
1
ケガの恐れがありますのでギヤ等の回転部分に指や手をはさまないでください。
Do not touch moving gears. They can cause injury.
車の走っている所や幼児が近くにいる所、人ごみでは走行させないでください。
事故の原因となり危険です。
Do not operate the model on public roads, in crowded places
or near infants. It may cause accidents or Injury.
5

安全のための注意事項
1
走行中や走行後は乾電池やモーターが発熱することがあります。
危険ですので十分冷えてから触るようにしてください。
During and after operation, the motor and batteries will be hot.
Do not touch them until they have had time to cool down.
砂やホコリ、水のたまっている所、毛足の長いじゅうたんでは
走行させないでください。故障の原因となります。
Do NOT run your car in sandy, dusty, wet conditions, or on
thick/soft carpet. Such surfaces can damage its operating parts.
Safety Precautions
ボディの汚れは軽く拭き取る程度にしてください。水やシンナー・
アルコールでは絶対に洗わないでください。
Do NOT use water, alcohol, or thinner to clean your car's body.
Simply wipe it down with a clean, soft cloth.
純正オプションパーツ以外の組み込みや車体の改造はしないでください。
故障の原因となります
Do NOT install any option parts not made by Kyosho for this model.
To avoid causing irreparable damage, do NOT attempt any modifications.
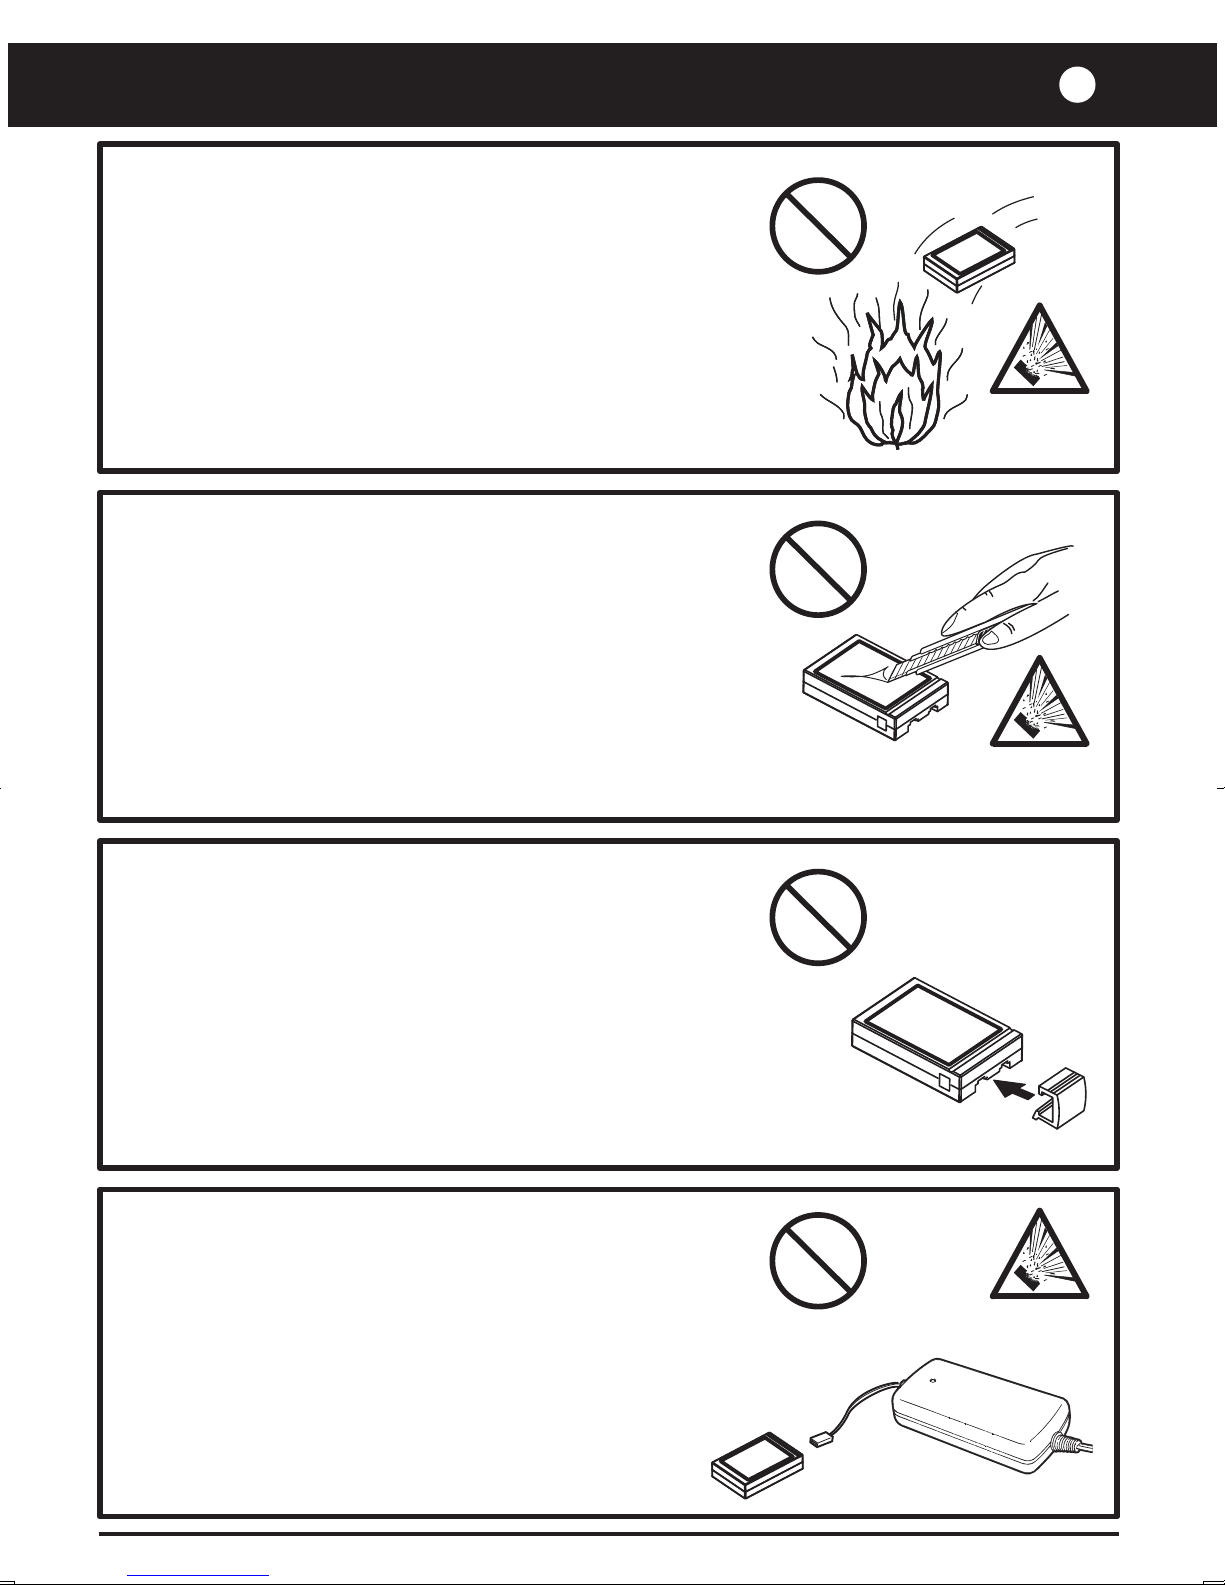
リチウムポリマーバッテリーは有害重金属が使用されています。
破裂すると非常に危険ですので絶対に火中に投げ入れないでください。
Lithium Polymer batteries contain toxic metals.
An exploding battery is extremely dangerous, so never put in fire.
ショートによる火災事故のおそれがあるのでリチウムポリマーバッテリーの
分解、改造は絶対にしないでください。
Short circuit may cause fire or accident, so never disassemble or
modify the Lithium Polymer battery.
1
破裂危険
Explosion Risk
ショートによる火災事故のおそれがあるのでリチウムポリマーバッテリーを
保管するときは、バッテリーカバーを必ず付けてください。
Short circuit can cause fire, so make sure the battery cover is attached
when storing the Lithium Polymer battery.
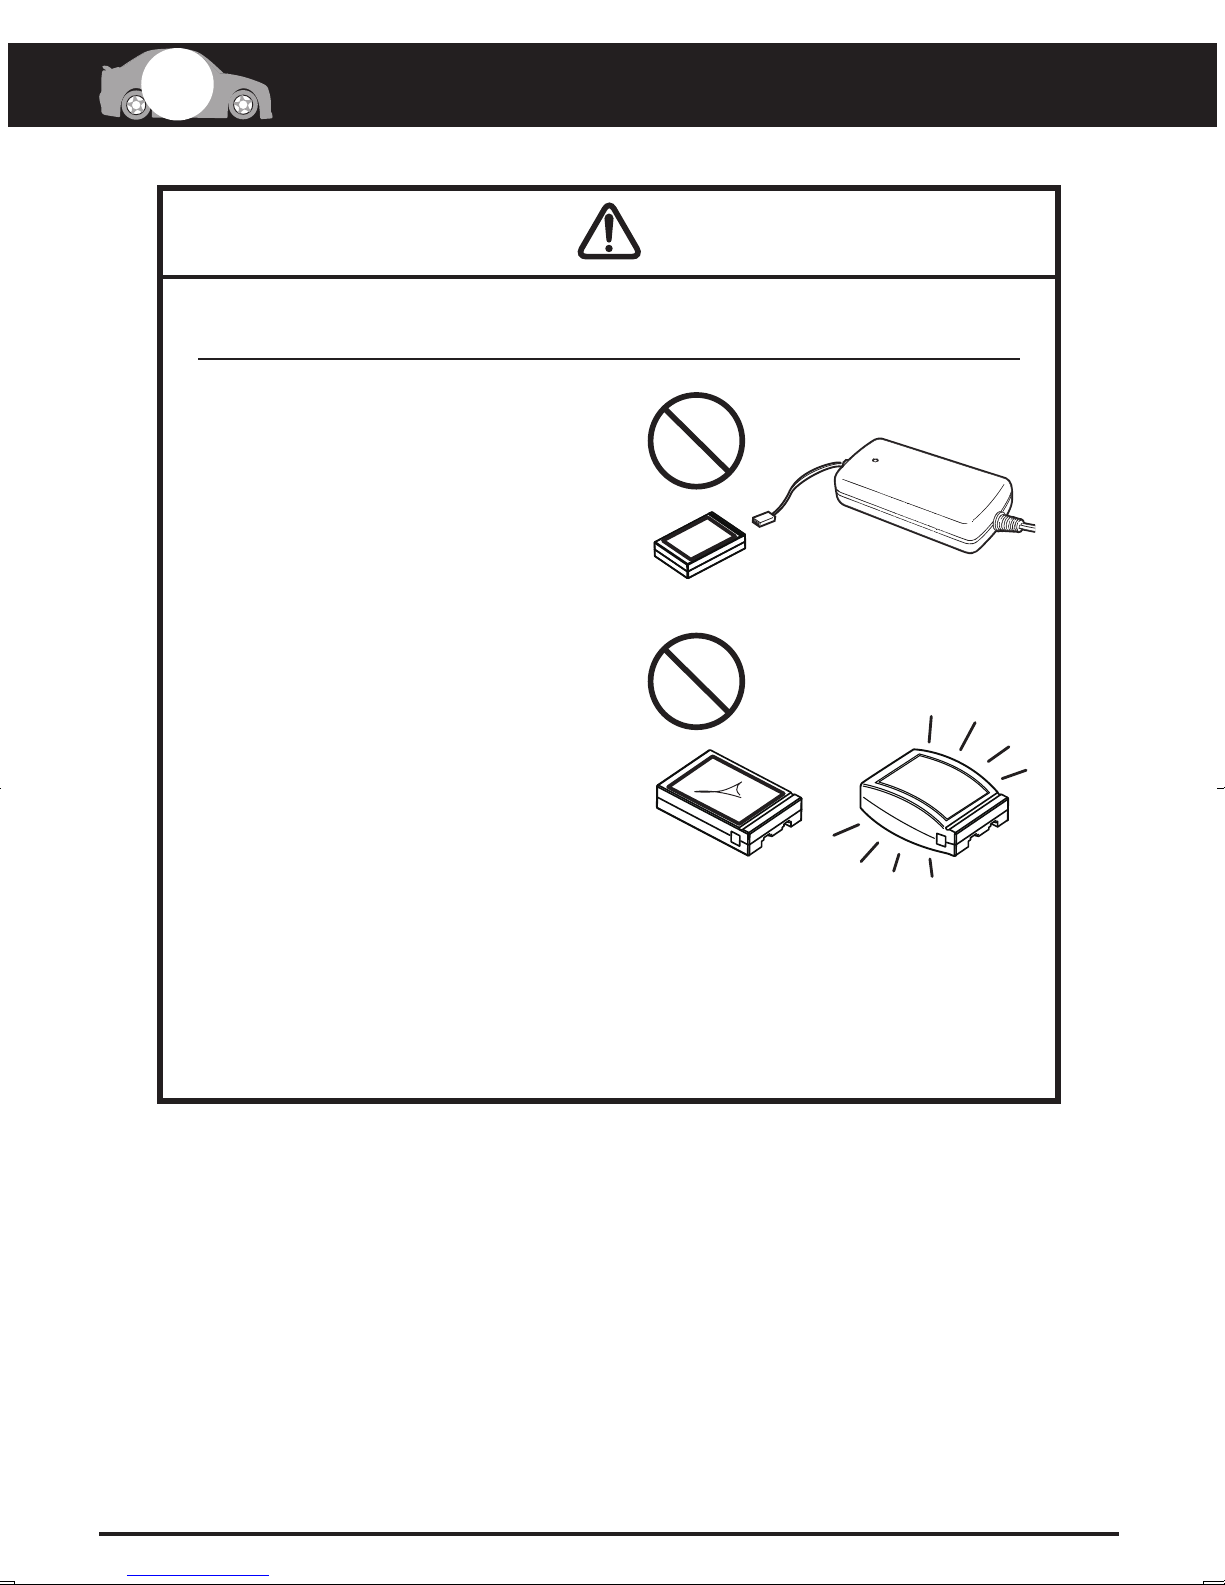
純正の充電器以外での充電は、絶対におやめください。
Use only the battery charger specified.
破裂危険
Explosion Risk
破裂危険
Explosion Risk
7

安全のための注意事項
1
充電中は、充電器のそばを離れないでください。
Continually monitor the charger while charging is in progress.
充電器を直射日光の下など高温になる場所では使用
しないでください。
Do NOT operate the charger in direct sunlight or in high
temperatures.
Safety Precautions
充電器は乳幼児の手の届かないところで使用、保管してください。
Operate and store the charger out of reach of children.
充電器は落としたり、大きなショックを与えないでください。
Avoid drops or severe shocks to the charger.
充電中は、リチウムポリマーバッテリー、充電器ともに発熱するので
燃えやすい物の上での充電は火災等、事故の恐れがありますのでおや
めください。
While charging, the Lithium Polymer battery and charger become hot.
Do NOT charge on top of inflammable materials as this may cause fire.
8

2
セット内容
Items Included
*ムービングシャシー
*Moving Chassis
タイプ 1
Type 1
*お買い上げ頂いたムービングシャシー・オートスケールコレクション(ボディ)が1つ入っています。
*Includes one moving chassis and one Auto Scale Collection (body) model.
付属ツール
Included tools
*ツールA
*Tool A
タイプ 2
Type 2
*ツールB
*Tool B
*オートスケールコレクション
*Auto Scale Collection
*精密ドライバー(#00)
*A Phillips Screwdriver
*ツールC
*Tool C
*付属ツールはオプションパーツの取付けにも使用する場合がありますので大切に保管してください。
*The included tools can also be used to install option parts. Please keep for future use.
付属パーツ
Included parts
*交換用ピニオンギヤセット
*Pinion Gear Set (for replacement)
*ツールD
*Tool D
*ビスセット
*Screw Set
9

セットの他に必要な物
3
*PERFEX KT-18 送信機
(コントローラー)
*PERFEX KT-18 Transmitter
(Controller)
Required Additional
*又は京商・近藤科学株式会社製
2.4GHz ASF方式対応の送信機
*Or, 2.4GHz ASF compatible transmitter
from Kyosho / Kondo Science Inc.
*No.32003 ポータブルクイック
チャージャー(専用急速充電器)
*No.32003 PORTABLE QUICK
CHARGER(Special Quick Charger)
精密ドライバーか、 ドライバー(小)(#0もしくは#1)* + +
*A Phillips Screwdriver (Precision type or a small sized) (#0 or #1)
*カッター
*Cutter
*
No.32004 3.7V-130mAh Li-Poバッテリー
(専用バッテリー)
*No.32004 3.7V-130mAh Li-Po
(Lithium Polymer) Battery
(Special Battery)
*ニッパー
*Wire Cutter
10
●
送信機用
For Transmitter
3
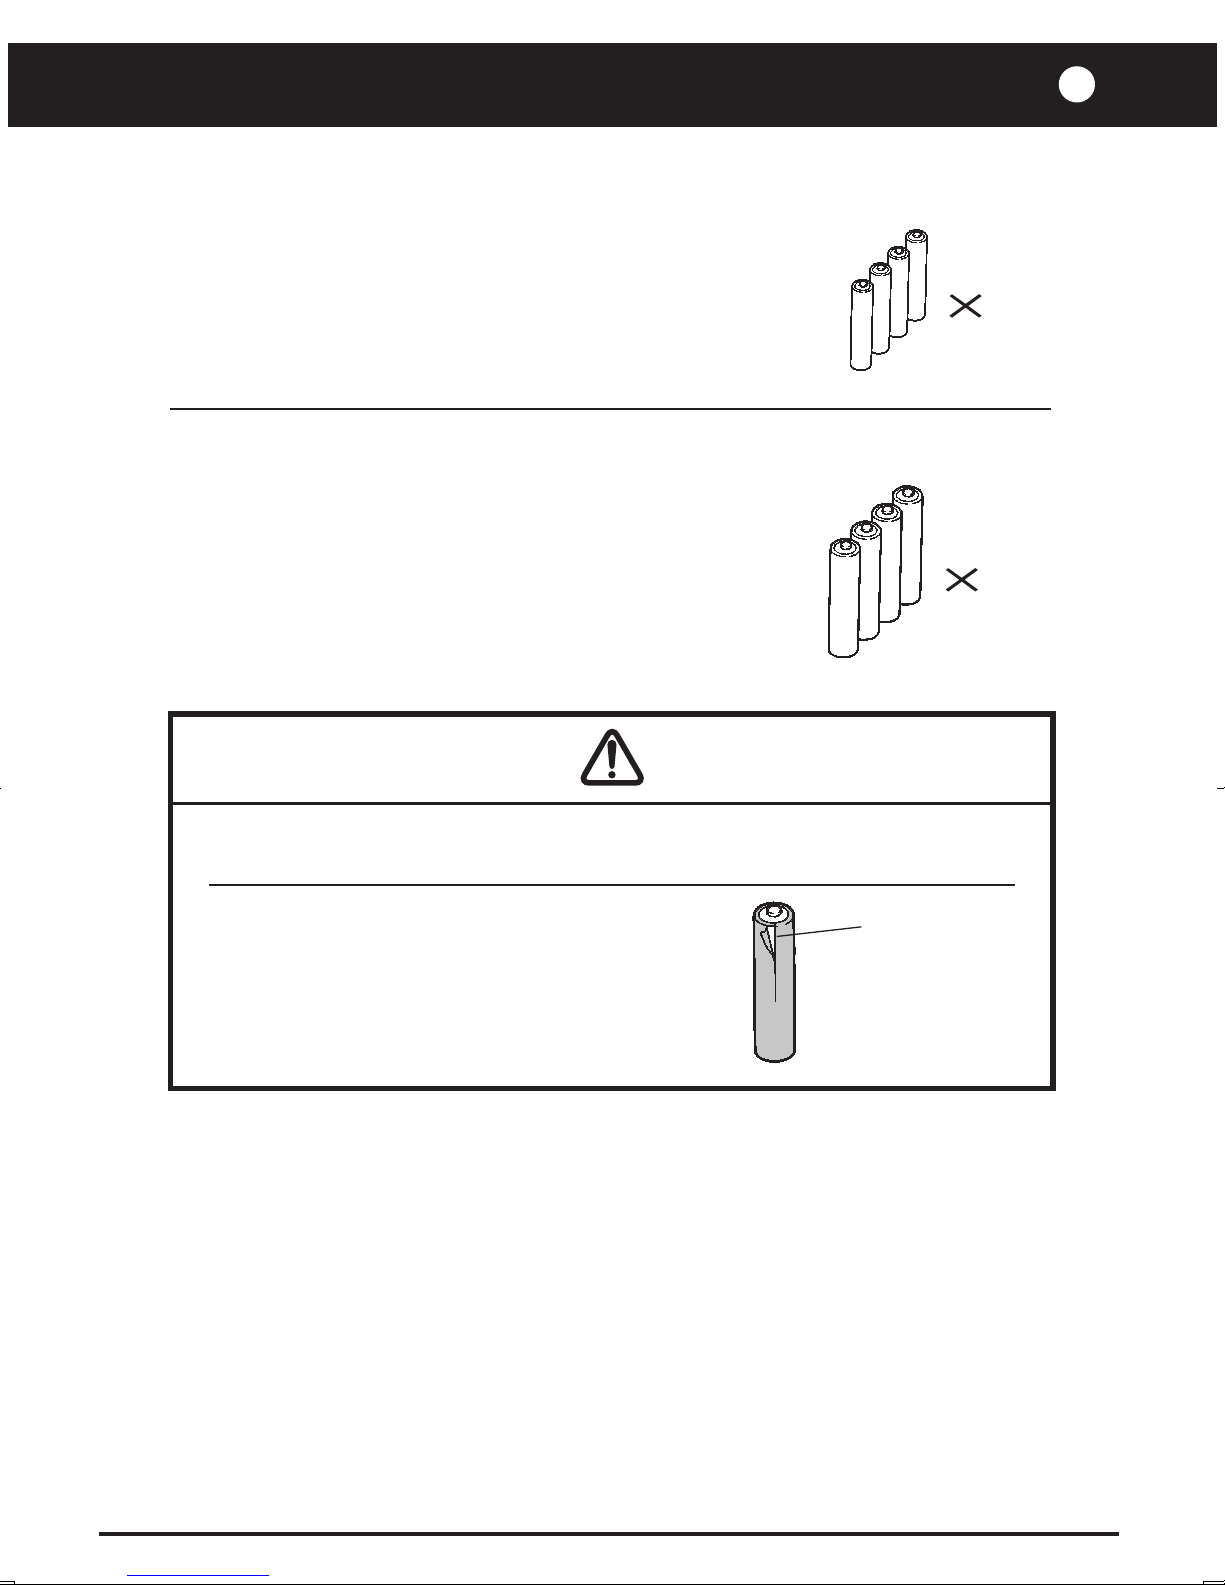
*単4型アルカリ乾電池又は
単4型ニッケル水素バッテリー………4本
*4-AAA sized Alkaline Batteries or UM-4 sized
Ni-MH (Nickel-Metal Hydride) Batteries 4 pieces
●
バッテリーチャージャー用
For Battery Charger
*単3型アルカリ乾電池又は
単3型ニッケル水素バッテリー………4本
*3-AA sized Alkaline Batteries or UM-3 sized
Ni-MH (Nickel-Metal Hydride) Batteries 4 pieces
※オキシライドバッテリー等の特殊な乾電池は使用しないでください。
Do not use Oxyride or other special type batteries.
AAA
UM-4
単4型
AA
UM-3
単3型
4
4
カバーが破れている電池や種類の違う電池をまぜて
使わないでください。
Do not use any damaged batteries.
カバーの破れ
Damaged
11
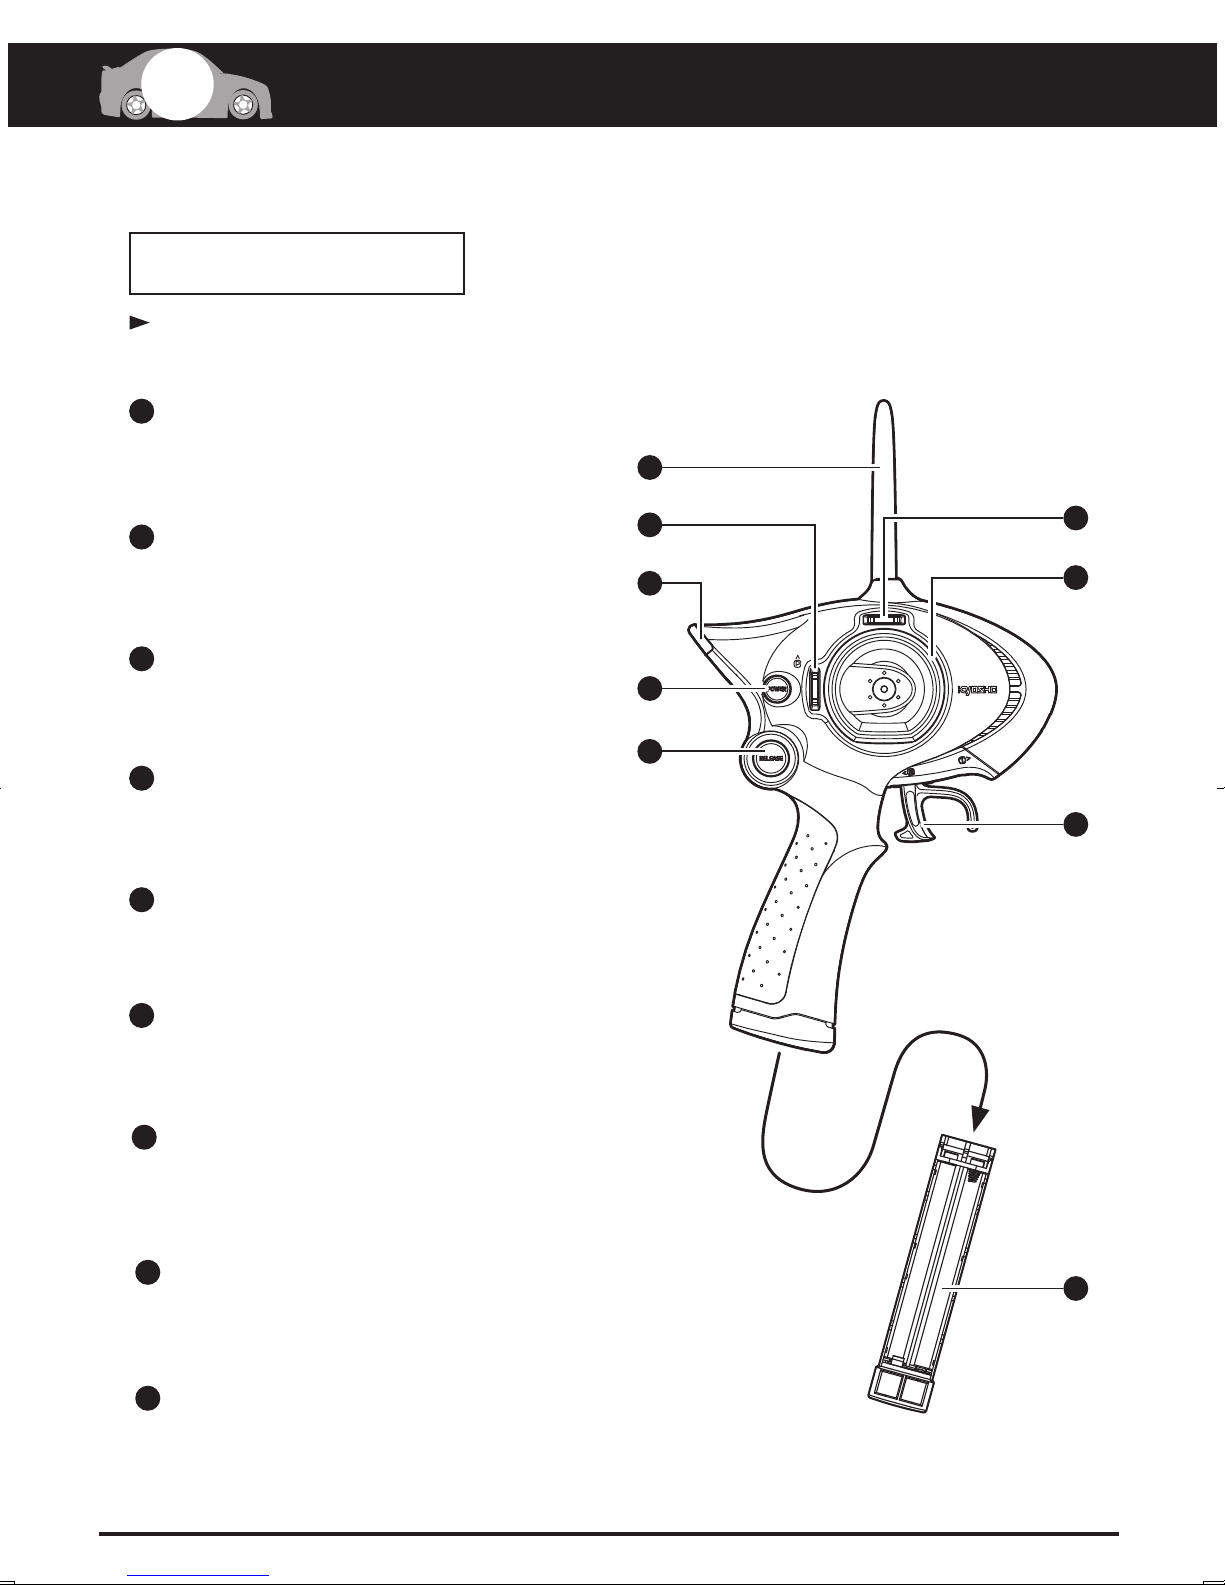
各部の名称
4
送信機
Transmitter
PERFEX KT-18を使用する場合
When using PERFEX KT-18
その他の送信機をご使用になる場合には、その送信機に付属する取扱説明書をご覧になってください。
If using a different transmitter, refer to the transmitter's instruction manual.
1
送信機用アンテナ
Transmitter Antenna
電波を発信します。
To transmit radio waves.
電源スイッチ
2
Power Switch
電源のON, OFFをします。
To switch ON/OFF the Power.
Glossary of Main Parts
1
6
7
5
3
ステアリングホイール
3
Steering Wheel
左右のコントロールをします。
To control steering right/left directions.
2
8
スロットルトリガー
4
Throttle Trigger
前進・後進のコントロールをします。
To control forward speed and reverse speed.
ステアリングトリム
5
Steering Trim
左・右のニュートラル位置の微調整をします。
To precisely adjust the neutral position.
6
スロットルトリム
Throttle Trim
前進・後進のニュートラル位置の微調整をします。
To precisely adjust the neutral position.
7
LEDインジケーター
LED Indicator
電源がONの時に点灯します。点滅方法で現在のモードを表示します。
Lights up with power is ON. Pattern of flashes indicates current operating mode.
4
バッテリーボックスリリースボタン
8
Battery Box Release Button
バッテリーボックスを取り出す時に使用します。
Use when removing battery box.
バッテリーボックス
9
Battery Box
単4型乾電池を4本入れます。
Insert four AAA-size batteries.
9
12

ムービングシャシー
Moving Chassis
ムービングシャシーは大きく分けて13~16ページのように2種類のメインフレームと
3種類のモーターケースに分かれています。
お手持ちのシャシータイプをご確認ください。
Moving chassis can be mainly divided into 2 types of mainframe (as in p13-p16)
and 3 types of motorcase. Be sure to understand which chassis type is your vehicle.
4
タイプ 1
Type 1
タイプ 2
Type 2
タイプ2専用ボディ以外が搭載可能です。
軽量・低重心でコーナーリング性能に
優れています。
Compatible with body for type 1 chassis.
Light weight and low CG characteristics
allow superior turning abilities.
全てのボディが搭載可能です。
Compatible with all types of body shells.
※以降のイラストは全てタイプ1ですがタイプ2も同様です。
Illustration from here will show type 1 as an example.
13
4
MMタイプ
Type MM
フロントタイヤ
Front Tire
各部の名称
Glossary of Main Parts
バッテリーホルダー
Battery Holder
アンテナ
Antenna
パワーユニット(モーターを含む)
Power Unit (Includes Motor)
リヤタイヤ
Rear Tire
フロントボディマウント
Front Body Mount
拡張コネクター
Extension Connector
I.C.Sコネクター
I.C.S. Connector
I.C.タグ
I.C.Tag
ペアリングボタン
Pairing Button
電源スイッチ
Power Switch
LEDインジケーター
(ICタグの下にあります)
LED Indicator
(below the IC Tag)
14
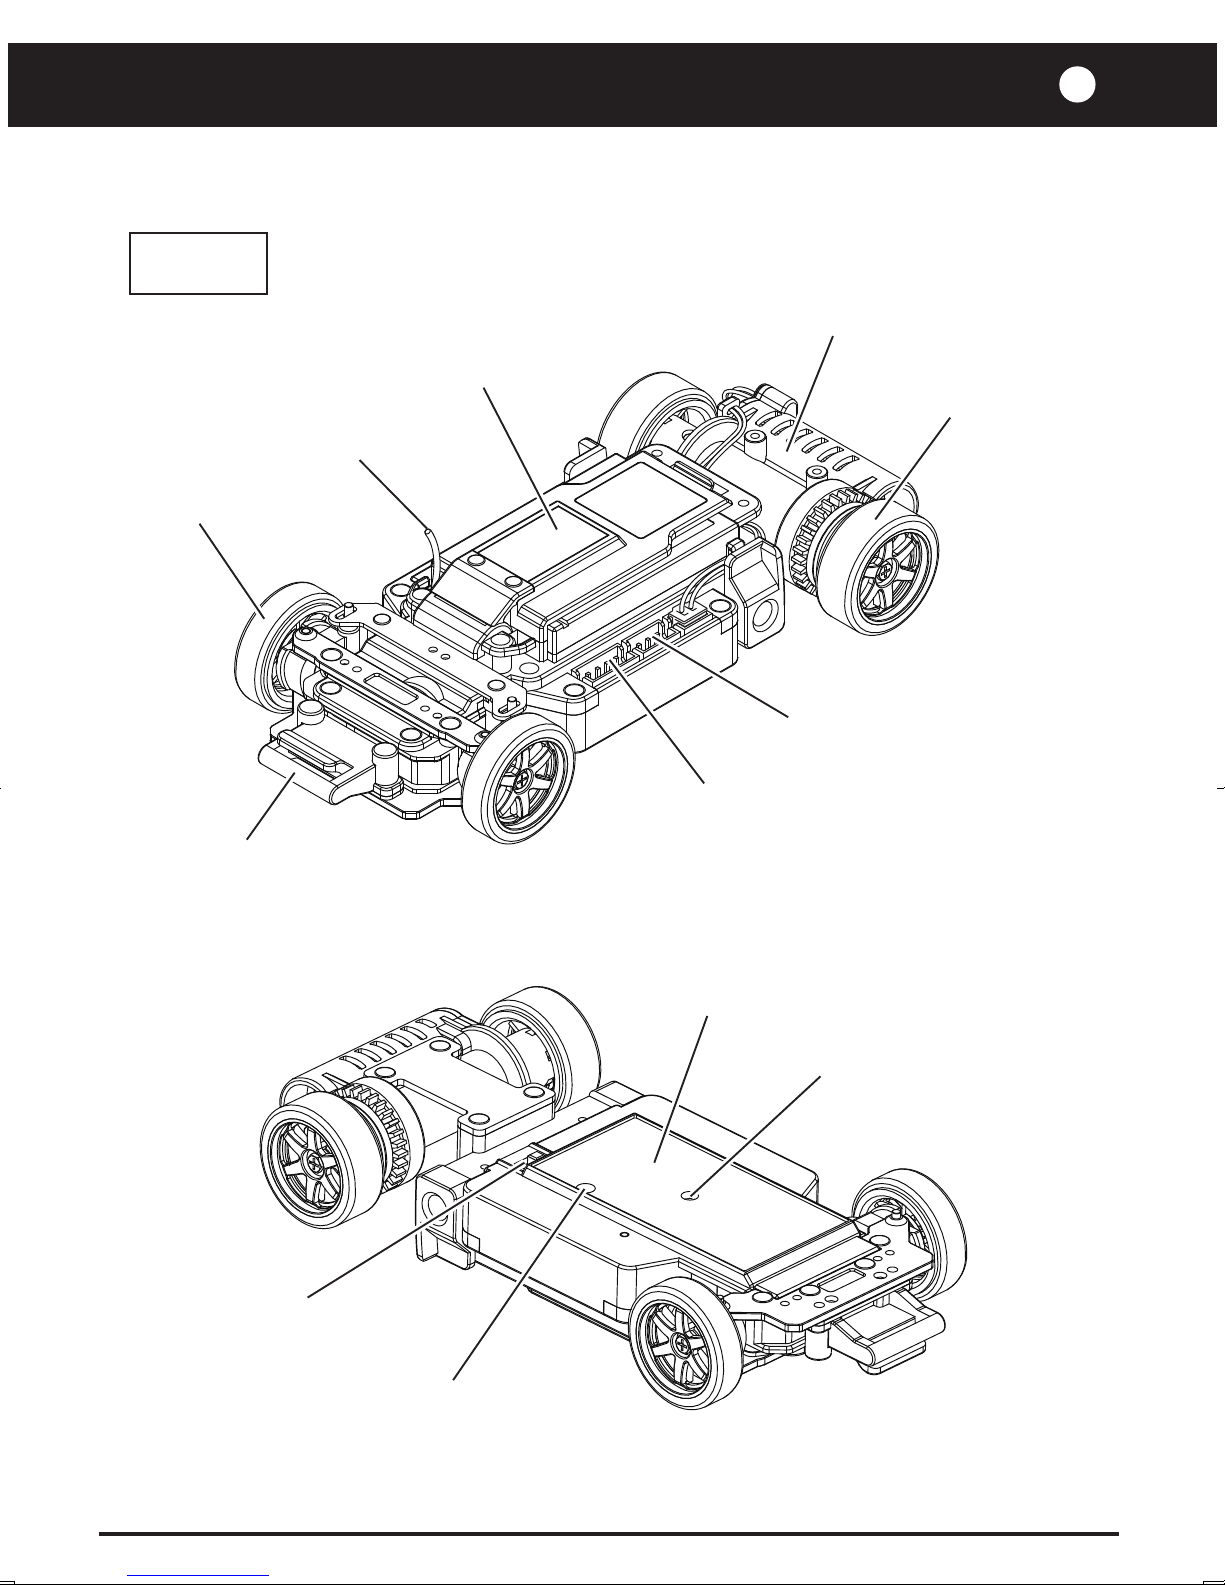
RMタイプ
Type RM
フロントタイヤ
Front Tire
アンテナ
Antenna
バッテリーホルダー
Battery Holder
4
パワーユニット(モーターを含む)
Power Unit (Includes Motor)
リヤタイヤ
Rear Tire
フロントボディマウント
Front Body Mount
拡張コネクター
Extension Connector
I.C.Sコネクター
I.C.S. Connector
I.C.タグ
I.C.Tag
ペアリングボタン
Pairing Button
電源スイッチ
Power Switch
LEDインジケーター
(ICタグの下にあります)
LED Indicator
(below the IC Tag)
15
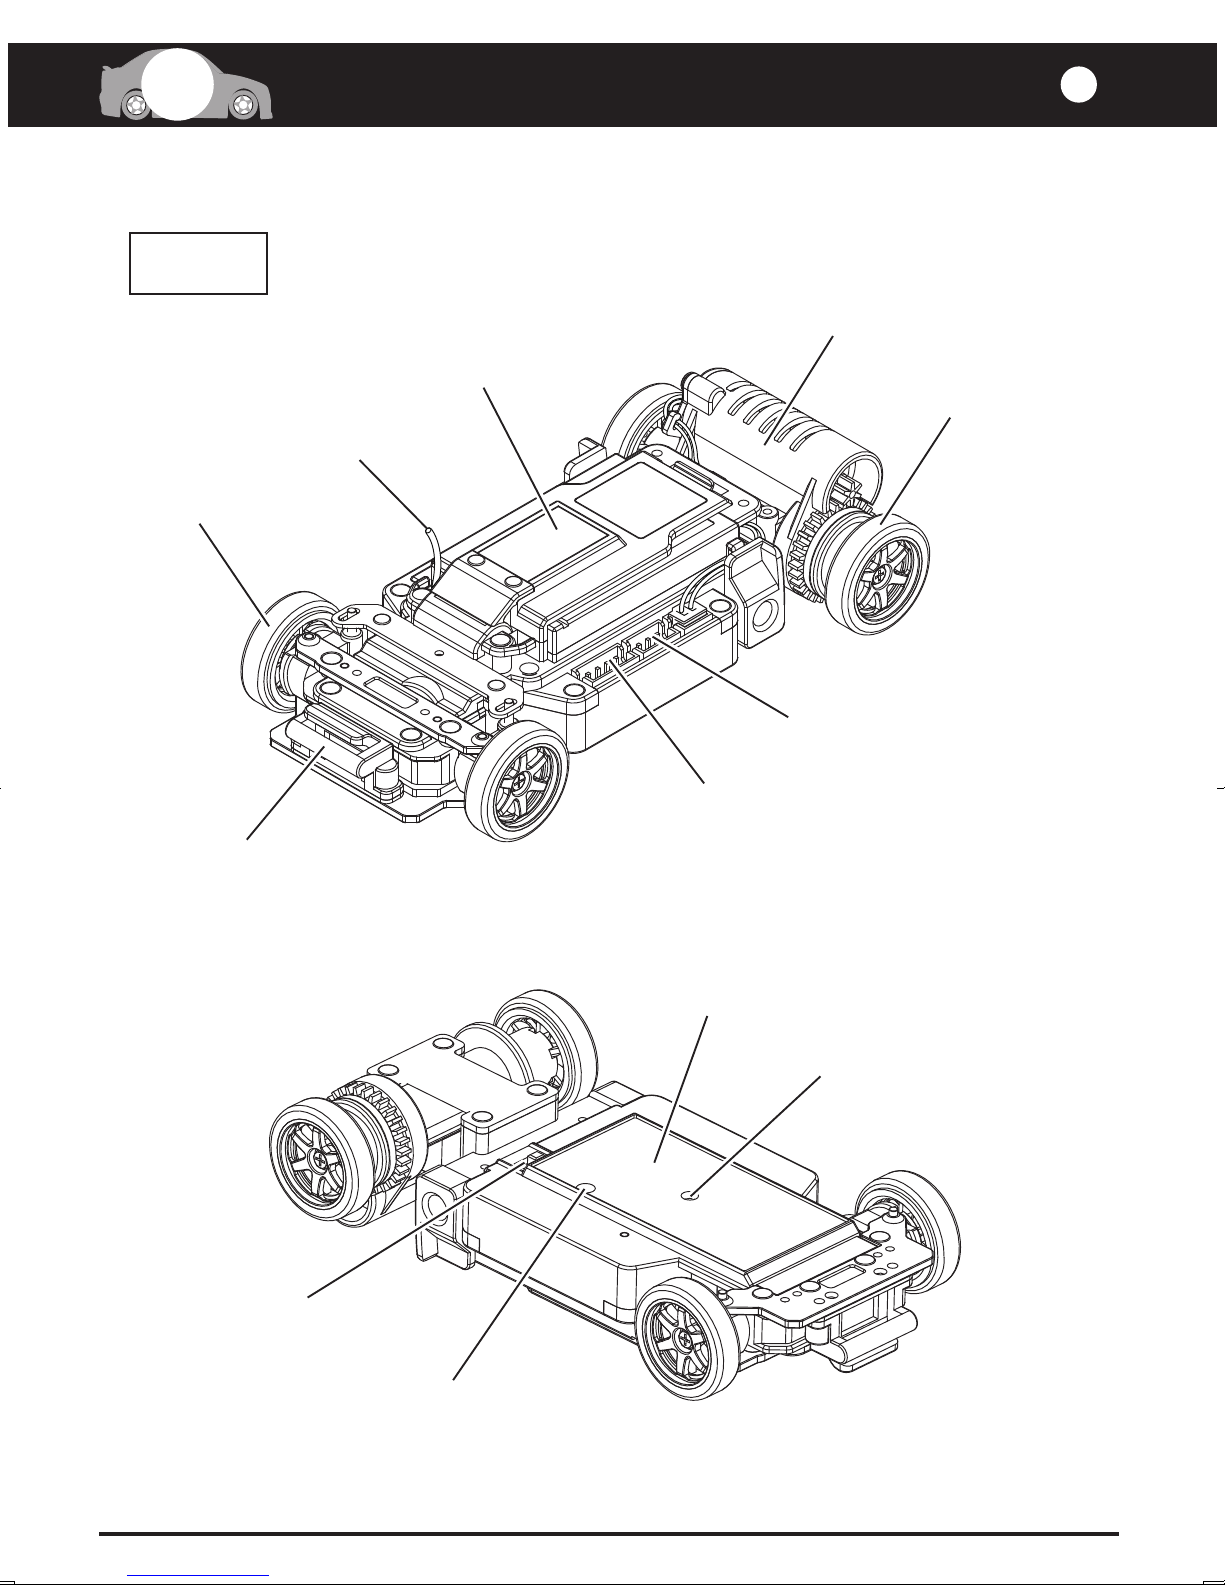
4
HMタイプ
Type HM
フロントタイヤ
Front Tire
各部の名称
Glossary of Main Parts
バッテリーホルダー
Battery Holder
アンテナ
Antenna
4
パワーユニット(モーターを含む)
Power Unit (Includes Motor)
リヤタイヤ
Rear Tire
フロントボディマウント
Front Body Mount
拡張コネクター
Extension Connector
I.C.Sコネクター
I.C.S. Connector
I.C.タグ
I.C.Tag
ペアリングボタン
Pairing Button
電源スイッチ
Power Switch
LEDインジケーター
(ICタグの下にあります)
LED Indicator
(below the IC Tag)
16
バッテリーの充電
5
※安全のための注意事項を良く読んで、正しく充電してください。
Please read carefully and charge battery accordingly.
純正の充電器以外での充電は、絶対に
おやめください。
Use only the battery charger specified.
傷ついたり、変形したバッテリーは絶対に
充電しないでください
火災などの重大な事故の原因になります。
Do not attempt to charge a damaged battery.
This may cause fire or serious damage.
Charging Battery
誤った取り扱いをした場合、リチウムポリマーバッテリーがふくらむ場合があります。
この場合、非常に危険ですので、「リチウムポリマーバッテリーの処分のしかた」に従
って処理をしてください。
Incorrect use may cause the Lithium Polymer battery to expand. If this occurs it is
extremely dangerous. Please dispose of according to the section on "Disposing of a
Lithium Polymer Battery".
17
バッテリーの充電
5
Charging Battery
充電のしかた
Charging Battery
走行する前に充電を行ってください。
Charge battery before operating
充電器に単3型乾電池(充電地)を入れる。
1
Insert AA-size batteries into the charger.
ふたを開ける
Open cover Close cover
*単3型アルカリ乾電池、又は、
ニッケル水素バッテリー(4本)
AA-size alkaline or Nickel
Metal Hydride batteries (x 4)
ふたを閉める
充電器に専用バッテリーを接続する。
2
Connect charger to special battery.
バッテリーカバーを外す。
Remove battery cover.
図の向きに入れる。
Install as shown in
the drawing.
バッテリーはラベル面を上
にして,端子を充電器の端子
に合わせて挿し込む
Insert with battery label facing
up and align battery terminals
with the charger terminals.
動作確認用LEDランプ
Function Indicator LED
裏面
Back
18

LED表示を確認し、充電が完了したらバッテリーを外す。
3
(充電器の取扱説明書も併せてご覧ください。)
Check the LED is indicating charging is complete and remove the battery.
(Refer together with the battery charger's manual)
5
5
充電用単3型電池残量なし
Charging
Green
バッテリーを外す。
Remove battery.
充電時間は約30分です。
Charging time is about 30 minutes.
上記は最長時間です。継ぎ足し充電の場合は短くなります。
30 minutes is maximum charge time. Top up charging is shorter.
Complete
Light off
AA batteries out of power
エラー充電中 充電済
Error
上部:緑色 赤色緑色 消灯
Upper : Green Red
下部:赤色
Lower : Red
LED表示が緑色(充電中)であるにもかかわらず、充電時間が40分より長い場合はすぐに充電をやめて、
そのバッテリーの使用を中止してください。
If charging continues for longer than 40 minutes, immediately stop charging even if the LED is still green.
Do not use the battery.
バッテリーが満充電の場合、充電済のLED表示になり、充電は行われません。
If the battery is fully charged and the LED is off, charging will stop.
LED表示が緑色/赤色(充電用単3電池残量なし)の場合は、電池を交換してください。
If the LED shows Green / Red (AA batteries are out of power). Replace the AA-size batteries.
LED表示が赤色(エラー)の場合は、バッテリーに異常があります(例:電圧異常)。この場合、保護
回路が働き充電は行われません。
If the LED is red (error), the battery is not functioning normally e.g. voltage. If this occurs, the circuit
protection is activated and charging will stop.
長期間使用していないバッテリーは電圧が下がり、充電を開始してもLED表示が緑色にならない場合
がありますが、故障・劣化を起こしていなければ数分後にLED表示は緑色になり充電を開始します。
For batteries that haven't been used for a long period of time and have a lower voltage, the LED may
not light green for a few minutes after charging has started, provided the battery is not damaged or worn out.
充電中にリチウムポリマーバッテリーが変形した場合は、単3型電池を取り外し、充電器ご
と「リチウムポリマーバッテリーの処分のしかた」に従って処理してください。リチウムポ
リマーバッテリーを無理に取り外そうとするとケガやヤケドの原因となることがあります。
If the Lithium Polymer battery changes shape during charging, remove the AA batteries and
dispose of the charger together with the Lithium Polymer battery as per the section "Disposing
of a Lithium Polymer Battery". Forcibly remove the battery can result in burns or injury.
19

バッテリーの充電
5
リチウムポリマーバッテリーの処分のしかた
Disposing of a Lithium Polymer Battery
破損したり、ふくらんだバッテリーは再充電せず、次の手順で処分してください。
Do not attempt to charge a damaged or swollen battery. Dispose of properly by following
the steps below.
ビン等に食塩水を入れる。
1
Fill a glass container with water and salt.
Charging Battery
その中にバッテリーを一日入れて放電させる。
2
Leave the battery in the glass for one day.
リサイクル協力店に持って行く。
3
Return battery to a collection point for recycling.
20
 Loading...