

Page 1
INSTRUCTION MANUAL
Water-proof
Handheld Infrared
Thermometer
MODEL 5510
KYORITSU ELECTRICAL INSTRUMENTS
WORKS, LTD.
Caution
5510 is one of the portable
laser applied instruments which
are regulated by the consumer
product safety law.
Do not look into the laser beam.
●
● Do not aim the laser beam at
human beings.
● Keep the instrument out of
children's reach.
Please follow the precautions below for use
to keep the instrument's functions proper and
to enable accurate measurement.
Safety Precautions
● Do not contact this product with a measuring object.
This is a contactless thermometer. Contact with a hot section may
cause unrepairable damages or inaccurate readings.
● Do not damage the measuring window (plastic lens).
Do not contact a hard object with the measuring window.
Do not let a foreign object penetrate the measuring window, or drop
a hard object on the measuring window.
Although this instrument applies a shockproof structure, do not give
●
an excessive shock to the instrument.
● Do not bring the instrument closer to an electrostatic object.
Emissivity of this instrument can be selected (0.8 to 1.0). When the
●
emissivity setting is different from that of a measuring object, an
inaccurate reading will occur.
● The sudden changes of the ambient temperature will cause
inaccurate readings. Wait a while to let the temperature of the
instrument stabilize, and then measure.
Remove batteries from the instrument, if the instrument is not in use
●
for a long period or is put in storage.
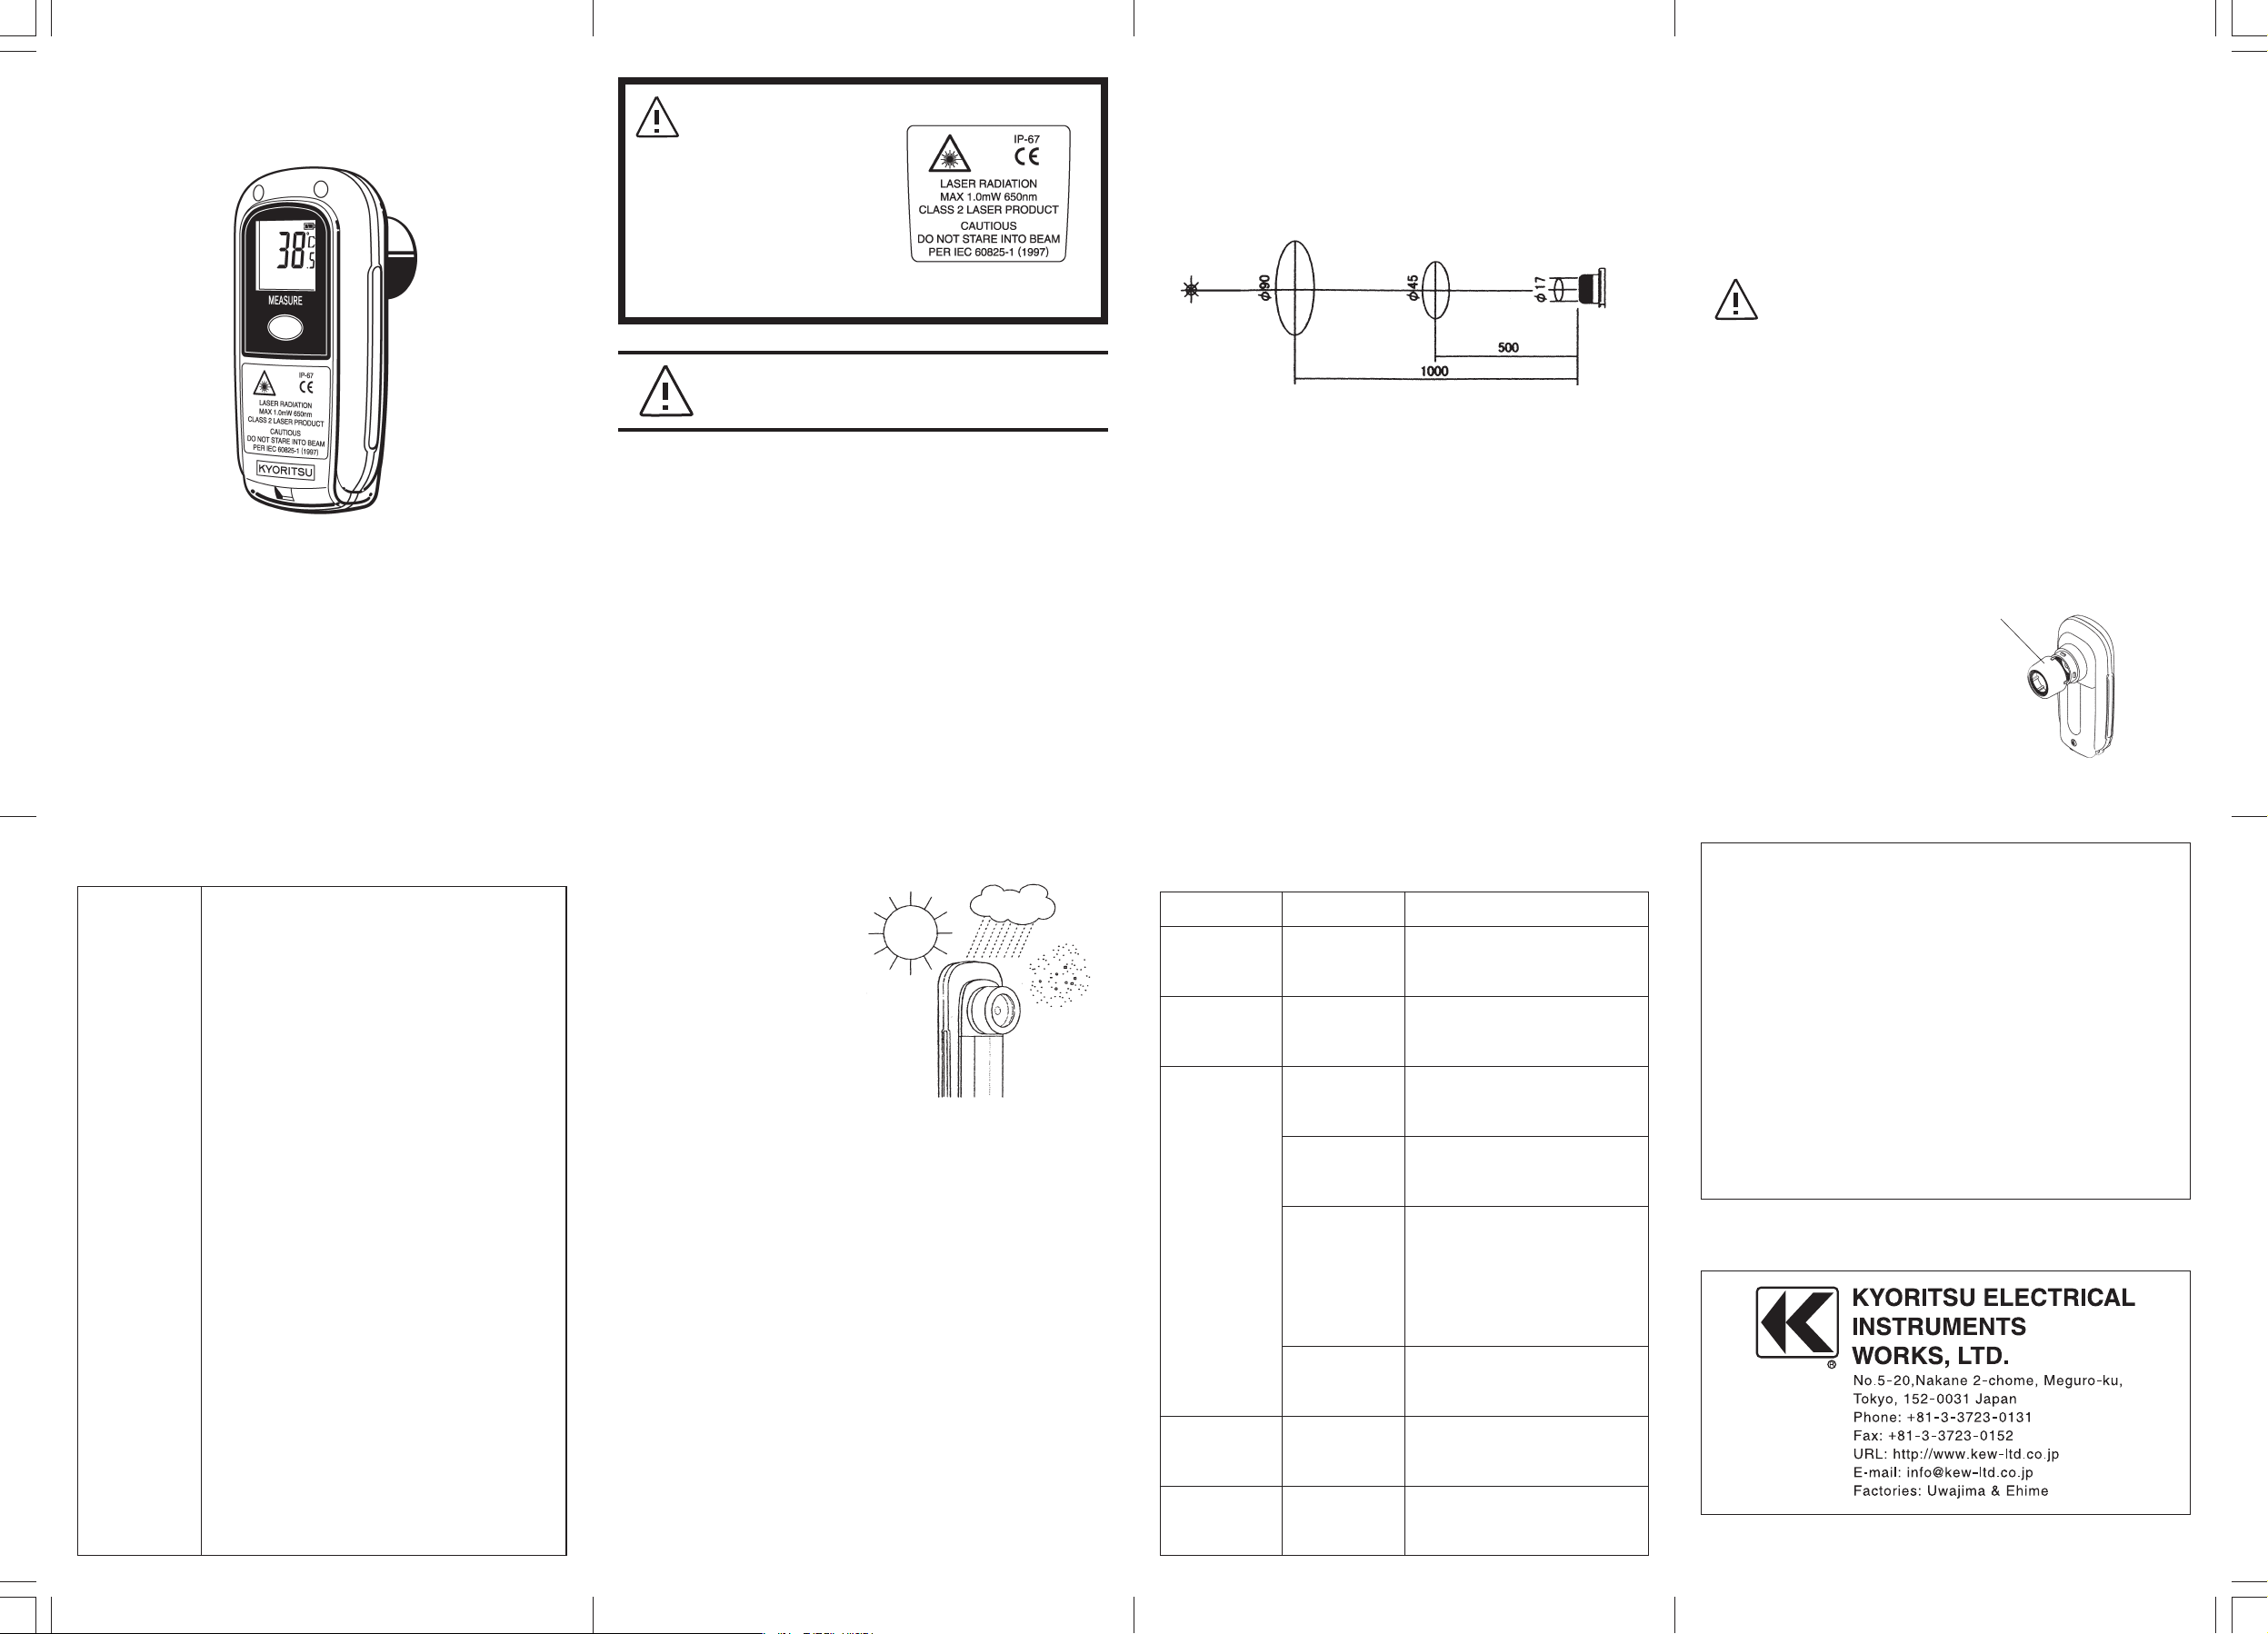
■ Relation of Distance and Measuring Diameter
The relation between the distance and measuring diameter is as
follows.
The more the distance increases, the larger area is needed.
For accurate reading, a sufficient measuring area should be ensured.
The above measuring diameter is defined as an area which allows
capture of more than 90% of energy.
■ Maintenance
Measuring Window
The measuring window applies a waterproof structure (IP67). If watersoluble stains adhere to the window, wash the measuring window with
the tap water. Dry the measuring window well after washing. Please
note that measurement with the measuring window wet will cause
inaccurate readings. If oil-soluble stains adhere to the measuring
window, wipe it with a cloth dipped in the diluted neutral detergent and
rinse it.
Note
Do not use chemical agents such as thinner, benzin or alcohol since
these may cause a crack or fog on the surface of the measuring
window, and consequently it may change the infrared radiation
transmittance of the plastic lens.
Plastic Lens
Dust, stains and scratches on the measuring window cause inaccurate
readings. Wipe such stains off with a soft cloth or cotton bud for camera
or glasses. To get rid of tough stains, remove the top hood(rubber) by
drawing it, wipe the lens with a cloth dipped in the diluted neutral
detergent and rinse it. After getting rid of the stains, put the top hood
back to the previous place by putting the projection along its edge and
the ones on the case together. After putting it, make sure of fitting it to
the correct position.
Hood
■ Specifications Environmental Precautions
●
Do not use or store the
Type
Measuring Range
Display Resolution
Measuring Accuracy
Repeatability
Response
Measuring Diameter
Collimation
Water -Proof Property
Auto Power Off
Shock Proof Property
Operating Temperature
Operating Humidity
Storage Temperature
Battery
Battery Life
Housing material
Dimension
Weight
Accessories
Approved Standard
5510
−40 to 300℃
0.5℃. 1℃ for below−20℃ and over 100℃ .
When the ambient temperature is 25±2℃ and the emissivity
(ε) is 1,
0 to 300℃ :
0 to−30℃ : ±3℃±1dg't
below −30℃ : ±5℃±1dg't
within 1℃±1dg't
1sec (90% response)
φ45mm/500mm (Optical sensitivity:90%)
Before shipment: 0.95. The value can be altered between 0.8
and 1.0 with the slide switch at the lower part of the battery
compartment (by 0.05 steps).
Laser beam (650nm 1mW JIS class2) specifies the center.
IP67
If no key is pressed for 30 seconds, the power is shut off
automatically.
This instrument or its function/performance will not be
damaged even if it is dropped on the vinyl tile floor from 1
meter high.
0 to 50℃
90% rH and below (no condensation)
−20 to 55℃ (no condensation) (Note): In the case of longterm storage, the batteries should be removed.
2 AAA alkaline cell batteries
Approximately 10 hours for continuous use
ABS (antibacterial)
120×60×54mm (Maximum value for each direction)
Approx. 123g
2 AAA alkaline cell batteries, instruction manual, strap
CE marking:EMI EN61326 ClassB ,EMS EN61326 Annex C
Stability:±5.0℃ under EMC test environment at 25℃
bigger value of either of ±1% of the
measured value ±1dg't or ±2℃ ±1dg't.
instrument in a location
where the instrument is
exposed to the direct
sunlight, dust, lampblack
and corrosive gas, or where
the temperature and/or
humidity is high. Otherwise
the measuring window gets
soiled or deteriorated, which
causes inaccurate readings.
●
As this instrument applies a waterproof structure (IP67), a slight
wetting will not damage the instrument. When the plastic lens is wet,
however, wipe the lens carefully so as not to scratch it as the wetting
condition will cause inaccurate readings.
●
Keep the instrument away from an object which radiates a strong
electromagnetic wave.
■ Troubleshooting
Symptoms
No display appears
Laser beam is not
emitted or is weak.
Abnormal reading
Unstable reading
No reading appears
but display is 'OL.'
Cause
Bat t e r ies have
been e xh austed
or t hey are n ot
placed correctly.
Battery voltage is
low.
Plastic lens is dirty.
A heat source nearby
affects.
Emissivity is not
selected properly.
Measuring target
area is too small.
Unit is affected by
a rapid temperature
change.
Out of measuring
t e m p e r a t u r e
range.
Countermeasures
Replace or place them correctly.
Measure me nt is po ssible. Re pl ace
batteri es when the l aser mar ker is
necessary.
Clean the plastic lens referring
to the "Maintenance" section.
Shield the heat source by a shielding
plate.
If emissivity is unknown, refer to
"Reference" section. Also, measure the
temperature by a contact type
thermometer and select adequate
emissivity so that temperature of this
instrument becomes equivalent to that
of the contact type thermometer.
Check the tar ge t a rea and keep a
sufficient area for measurement.
Le a ve th e unit f or st abi liz ing i t s
temperature and measure.
Check the target to be measured.
DISTRIBUTOR
92—1513B
Page 2

Usage and Part Names
Battery
(1) Installing Batteries
Loose the screw at the lower part of the battery cover, pressing the
battery compartment cover as shown and remove it. Install batteries
positioning the negative and positive poles properly as shown inside
the compartment, and bolt up the screw, put the cover back.
Note:
If the battery cover does not fit tightly, water-proof property will be deteriorated, or the performance
will be deteriorated due to water penetration in the unit.
Don't bolt up the screw too tightly, as putting the battery compartment cover.
(2) Replacing Batteries
Residual quantity of the batteries is displayed on the low battery symbol in the display part. When the
low battery symbol becomes the batteries have been exhausted. Replace the batteries with
new batteries.
Note:
When replacing batteries, do replace 2 batteries at the same time.
Battery Cover
Measurement Display
Aim the measuring window at the measuring target, and press
the MEASURE key. Holding down the MEASURE key, confirm if
the laser beam irradiates the measuring position properly. Adjust
the position, if the laser beam does not irradiate the measuring
position properly. During holding down the MEASURE key,
measuring continues. When the MEASURE key is released, the
measured value is hold for about 30 seconds, and then the
power is shut off with the Auto Power Off function.
If the measuring window is aimed at a new target and the
MEASURE key is pressed while the measured value is being
hold, the temperature of the new target will be measured. When
the MEASURE key is released, the newly measured temperature
will be hold.
Laser Mark
Lighting during measurement
Display
measured value
Display
Display emissivity
(except emissivity 0.95)
Low Battery Symbol
Lighting during
measuring
Blinking during
holding
Display
measurement unit
Settings
Normally only the object emissivity is selectable. The emissivity is set
at 0.95 at the factory. The emissivity is displayed during measurement
(except for emissivity 0.95. When nothing appears on the display, it
means that the emissivity is 0.95.) Five variations of emissivity
ranging from 0.8 to 1.0 can be set per 0.05 steps.
The emissivity can be altered by setting the 3 digits (2nd, 3rd and 4th
digits from left) of the 4-digit slide switch in the lower part of the
battery compartment. The setting mode of the slide switch is
displayed below the battery part. Remove the batteries, and set as
required according to the displayed setting mode.
If necessary, the measurement unit can be switched to Fahrenheit (F)
(with the left most digit of the 4-digit slide switch.)
Battery compartment
Setting mode display
(Emissivity setting example)
Measuring Window
Hood
Body
Display part
MEASURE
key
■ Setting Emissivity (Reference)
Quantity of infrared radiation emitted from objects depends on the objects' material,
surface conditions, measuring temperatures and so on. The table below shows
emissivity of some objects. Please note that these values are just for reference. Please
also refer to the estimated emissivity using the separately sold black body tape.
◆ Emissivity of Objects
Material
Water, Ice
Soil
Concrete (wet)
Concrete (dry)
Ceramics
Stone, Asbestos
Plastics
Rubber (black)
Emissivity
0.98
0.92to0.96
0.96to0.98
0.91to0.95
0.85to0.95
0.92
0.90to0.95
0.95
Material
Cloth, Fabric (colored)
Leather, Fur
Human skin
Vegetable, Fruit
Dough
Meat
Copper oxide
Ferric oxide
Emissivity
0.95
0.96
0.99
0.98
0.98
0.98
0.50to0.60
0.70to0.80
4-digit side switch
0 1 1
ε= 0.80
℃/°F switching
0:℃ 1:°F
Screw for the battery
compartment cover
Battery Cover
Strap
Wood
Paper
◆ Estimated Emissivity Using the Black Body Tape
If a measuring object accepts sticking of adhesive tapes, stick a piece of the
black body tape (emissivity: 0.94) to the object, and measure the temperature
after setting the emissivity to 0.95.
0.98
0.92
Painted surface
Tile
0.80
0.80
 Loading...