

Page 1

Basics Guide
©2010 Sprint. SPRINT and the logo are trademarks of Sprint.
Other marks are the property of their respective owners.
“SANYO” is a registered trademark of SANYO Electric Co.,
Ltd. and is used under license. KYOCERA is a registered
trademark of Kyocera Corporation. Kyocera manufactures
and markets the SANYO line of wireless products.
SANYO Zio
www.sprint.com
TM
Page 2
Consejo: Para encontrar esta guía para usuarios en español,
por favor visita a
Support > Devices.
To find this basics guide in Spanish, please visit
www.sprint.com and click Support > Devices.
Important Privacy Message – Sprint’s policies often do not
apply to third-party applications. Third-party applications may
access your personal information or require Sprint to disclose
your customer information to the third-party application
provider. To find out how a third-party application will collect,
access, use, or disclose your personal information, check the
application provider’s policies, which can usually be found on
their website. If you aren’t comfortable with the third-party
www.sprint.com y haz clic en
application’s policies, don’t use the application.
Page 3

Table of Contents
Tip: Looking for something? If you don’t see it in the headings
listed here, try the Index on page 139.
Introduction . . . . . . . . . . . . . . . . . . . . . . . . . . . . . . . i
Your Device’s Menu. . . . . . . . . . . . . . . . . . . . . . . . i
Section 1: Getting Started . . . . . . . . . . . . . . . . . 1
1A. Setting Up Service . . . . . . . . . . . . . . . . . . . 2
Setting Up Your Device . . . . . . . . . . . . . . . . . . . . . . 2
Activating Your Device . . . . . . . . . . . . . . . . . . . . . . 3
Setting Up Your Voicemail . . . . . . . . . . . . . . . . . . . 4
Sprint Account Passwords . . . . . . . . . . . . . . . . . . . 5
Getting Help . . . . . . . . . . . . . . . . . . . . . . . . . . . . . . . 5
Section 2: Your Device . . . . . . . . . . . . . . . . . . . . 7
2A. Device Basics . . . . . . . . . . . . . . . . . . . . . . . 8
Your Device . . . . . . . . . . . . . . . . . . . . . . . . . . . . . . . . 8
Viewing the Display Screen . . . . . . . . . . . . . . . . . 10
Turning Your Device On and Off . . . . . . . . . . . . . 13
Battery and Charger . . . . . . . . . . . . . . . . . . . . . . . 14
Navigating Through the Menus . . . . . . . . . . . . . . 16
Screen Overview . . . . . . . . . . . . . . . . . . . . . . . . . . 18
Displaying Your Phone Number . . . . . . . . . . . . . 24
Making and Answering Calls . . . . . . . . . . . . . . . 24
Entering Text . . . . . . . . . . . . . . . . . . . . . . . . . . . . . . 31
2B. Settings . . . . . . . . . . . . . . . . . . . . . . . . . . . . 35
Sound Settings . . . . . . . . . . . . . . . . . . . . . . . . . . . 35
Display Settings . . . . . . . . . . . . . . . . . . . . . . . . . . . 37
Location Settings . . . . . . . . . . . . . . . . . . . . . . . . . . 39
Synchronizing Accounts . . . . . . . . . . . . . . . . . . . 40
Search Settings . . . . . . . . . . . . . . . . . . . . . . . . . . . 42
Messaging Settings . . . . . . . . . . . . . . . . . . . . . . . 43
Airplane Mode . . . . . . . . . . . . . . . . . . . . . . . . . . . . 44
TTY Use With Sprint Service . . . . . . . . . . . . . . . . 44
Using the Hearing Aid Device Compatibility
Function . . . . . . . . . . . . . . . . . . . . . . . . . . . . . . . . . 46
Security Settings . . . . . . . . . . . . . . . . . . . . . . . . . . 46
Application Settings . . . . . . . . . . . . . . . . . . . . . . . 48
Privacy Settings . . . . . . . . . . . . . . . . . . . . . . . . . . . 50
Accessibility Settings . . . . . . . . . . . . . . . . . . . . . . 50
2C. Call Log . . . . . . . . . . . . . . . . . . . . . . . . . . . . 51
Viewing the Call Log . . . . . . . . . . . . . . . . . . . . . . 51
Call Log Options . . . . . . . . . . . . . . . . . . . . . . . . . . 52
Page 4

Making a Call From the Call Log . . . . . . . . . . . . 52
Saving a Number From the Call Log . . . . . . . . . 52
Erasing the Call Log . . . . . . . . . . . . . . . . . . . . . . . 53
2D. Contacts . . . . . . . . . . . . . . . . . . . . . . . . . . . 54
Displaying the Contacts List . . . . . . . . . . . . . . . . 54
Adding a New Contacts Entry . . . . . . . . . . . . . . 54
Contacts Entry Options . . . . . . . . . . . . . . . . . . . . 55
Editing a Contacts Entry . . . . . . . . . . . . . . . . . . . 56
Assigning a Ringer Type for an Entry . . . . . . . . 56
Assigning a Picture to an Entry . . . . . . . . . . . . . 56
Finding Contacts Entries . . . . . . . . . . . . . . . . . . . . 57
Deleting Entries . . . . . . . . . . . . . . . . . . . . . . . . . . . . 57
Adding Entries to Your Favorites . . . . . . . . . . . . . 57
2E. Calendar & Tools . . . . . . . . . . . . . . . . . . . . 58
Calendar . . . . . . . . . . . . . . . . . . . . . . . . . . . . . . . . 58
Alarm Clock . . . . . . . . . . . . . . . . . . . . . . . . . . . . . . . 61
Calculator . . . . . . . . . . . . . . . . . . . . . . . . . . . . . . . . 63
Updating Your Device . . . . . . . . . . . . . . . . . . . . . 63
2F. Voice Services . . . . . . . . . . . . . . . . . . . . . . 64
Automatic Speech Recognition (ASR) . . . . . . . 64
Text-to-Speech . . . . . . . . . . . . . . . . . . . . . . . . . . . 65
2G. microSD Card . . . . . . . . . . . . . . . . . . . . . . 66
Your Device’s microSD Card and Adapter . . . . 66
microSD Card Settings . . . . . . . . . . . . . . . . . . . . . 68
Connecting Your Device to Your Computer . . . 68
Important Connection Information . . . . . . . . . . . 69
2H. Camera . . . . . . . . . . . . . . . . . . . . . . . . . . . . . 71
Taking Pictures . . . . . . . . . . . . . . . . . . . . . . . . . . . . 71
Recording Videos . . . . . . . . . . . . . . . . . . . . . . . . . 74
Opening Gallery . . . . . . . . . . . . . . . . . . . . . . . . . . 76
2I. Bluetooth . . . . . . . . . . . . . . . . . . . . . . . . . . 77
Turning Bluetooth On and Off . . . . . . . . . . . . . . . 77
Using the Bluetooth Settings Menu . . . . . . . . . . 78
Pairing Bluetooth Devices . . . . . . . . . . . . . . . . . . 78
Section 3: Sprint Service . . . . . . . . . . . . . . . . . 81
3A. Sprint Service: The Basics . . . . . . . . . . 82
Voicemail . . . . . . . . . . . . . . . . . . . . . . . . . . . . . . . . . 82
Messaging . . . . . . . . . . . . . . . . . . . . . . . . . . . . . . . 85
Caller ID . . . . . . . . . . . . . . . . . . . . . . . . . . . . . . . . . . 87
Call Waiting . . . . . . . . . . . . . . . . . . . . . . . . . . . . . . . 88
Making a 3-Way Call . . . . . . . . . . . . . . . . . . . . . . . 88
Call Forwarding . . . . . . . . . . . . . . . . . . . . . . . . . . . 88
Page 5

Roaming . . . . . . . . . . . . . . . . . . . . . . . . . . . . . . . . . 89
3B. Web and Data Services . . . . . . . . . . . . . . 92
Getting Started With Data Services . . . . . . . . . . 92
Wi-Fi . . . . . . . . . . . . . . . . . . . . . . . . . . . . . . . . . . . . . 98
Email . . . . . . . . . . . . . . . . . . . . . . . . . . . . . . . . . . . 100
Gmail . . . . . . . . . . . . . . . . . . . . . . . . . . . . . . . . . . . 101
Using Google Talk . . . . . . . . . . . . . . . . . . . . . . . . 104
Using the Android Market . . . . . . . . . . . . . . . . . 107
Creating a Google Account . . . . . . . . . . . . . . . . 110
Sprint Zone . . . . . . . . . . . . . . . . . . . . . . . . . . . . . . 111
3C. Entertainment: TV and Music . . . . . . . 112
TV . . . . . . . . . . . . . . . . . . . . . . . . . . . . . . . . . . . . . . 112
Music . . . . . . . . . . . . . . . . . . . . . . . . . . . . . . . . . . . 114
Streaming Music . . . . . . . . . . . . . . . . . . . . . . . . . 117
YouTube . . . . . . . . . . . . . . . . . . . . . . . . . . . . . . . . . 117
3D. GPS Navigation . . . . . . . . . . . . . . . . . . . . 119
GPS Services . . . . . . . . . . . . . . . . . . . . . . . . . . . . 119
Sprint Navigation . . . . . . . . . . . . . . . . . . . . . . . . . 119
Google Maps . . . . . . . . . . . . . . . . . . . . . . . . . . . . 120
Section 4: Safety and Warranty
Information . . . . . . . . . . . . . . . . . . . . . . . . . . . . . 123
4A. Important Safety Information . . . . . . . . 124
General Precautions . . . . . . . . . . . . . . . . . . . . . . 124
Maintaining Safe Use of and Access to Your
Device . . . . . . . . . . . . . . . . . . . . . . . . . . . . . . . . . . 125
Using Your Device With a Hearing Aid
Device . . . . . . . . . . . . . . . . . . . . . . . . . . . . . . . . . . 126
Caring for the Battery . . . . . . . . . . . . . . . . . . . . . 128
Radio Frequency (RF) Energy . . . . . . . . . . . . . 128
Owner’s Record . . . . . . . . . . . . . . . . . . . . . . . . . . 131
User Guide Proprietary Notice . . . . . . . . . . . . . 131
4B. Manufacturer’s Warranty . . . . . . . . . . . . 132
Manufacturer’s Warranty . . . . . . . . . . . . . . . . . . 132
4C. End User License Agreement . . . . . . . 135
End User License Agreement . . . . . . . . . . . . . . 135
Index. . . . . . . . . . . . . . . . . . . . . . . . . . . . . . . . . . . 139
Page 6

Page 7

Introduction
Your Device’s Menu
This Basics Guide introduces you to Sprint® service and
all the features of your new device. It’s divided into four
sections:
⽧ Section 1: Getting Started
⽧ Section 2: Your Device
⽧ Section 3: Sprint Service
⽧ Section 4: Safety and Warranty Information
Note: Because of updates in device software, this printed
guide may not be the most current version for your
device. Visit
to access the most recent version of the user guide.
WARNING: Please refer to the Important Safety Information
www.sprint.com and sign on to My Sprint
section on page 124 to learn about information
that will help you safely use your device. Failure
to read and follow the Important Safety
Information in this guide may result in serious
bodily injury, death, or property damage.
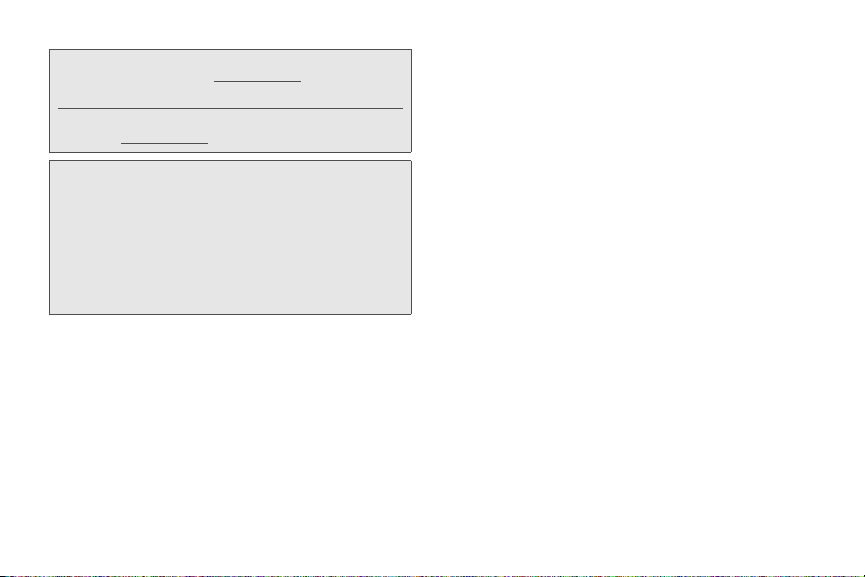
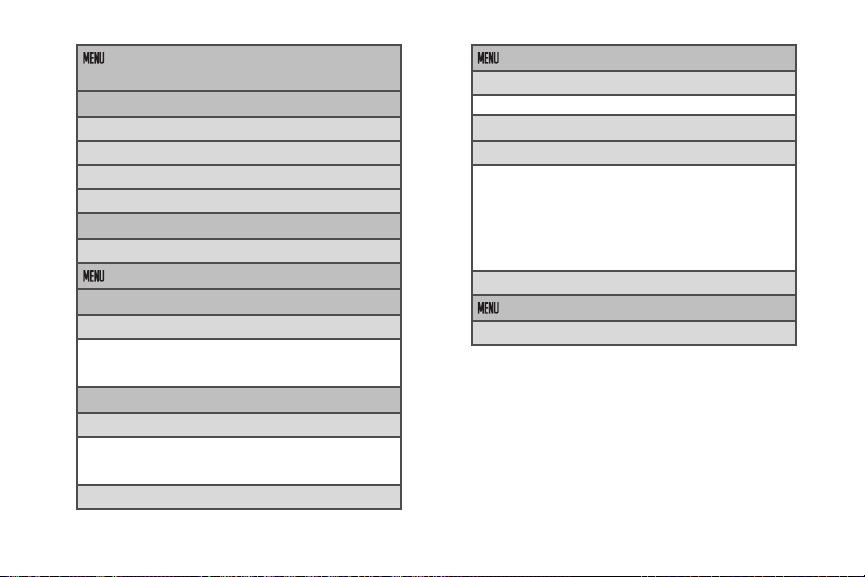
The following table outlines your device’s main menu
structure. For more information about using your
device’s menus, see “Navigating Through the Menus”
on page 16.
Touch to display the Home screen and then touch
to open the following menus:
䢇 Add ()
䢇 Wallpaper ()
䢇 Search ()
䢇 Notifications ()
䢇 Settings ()
In the Settings menu, you may see and adjacent
to a list entry. Touch to reveal additional options
(“sub-options”). Touch to enable or disable the
feature. A green check mark indicates the feature is
enabled.
i
Page 8
ii
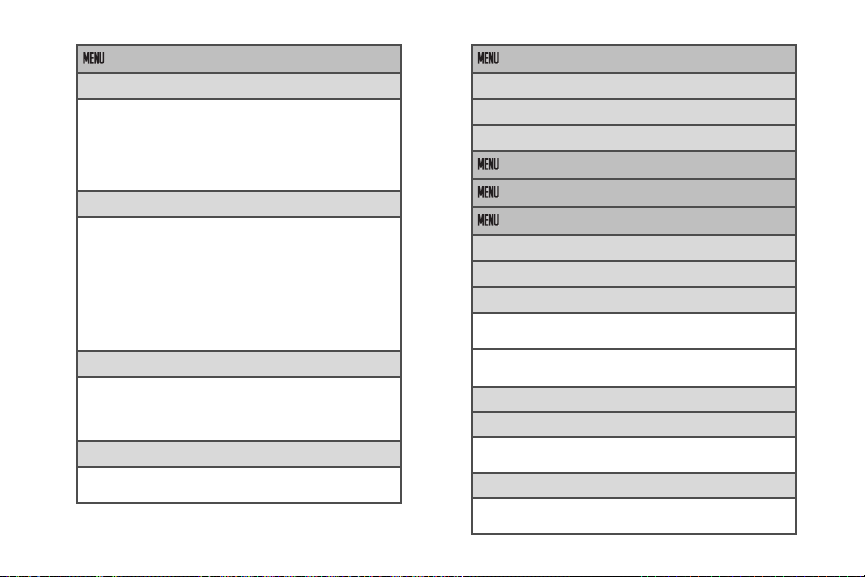
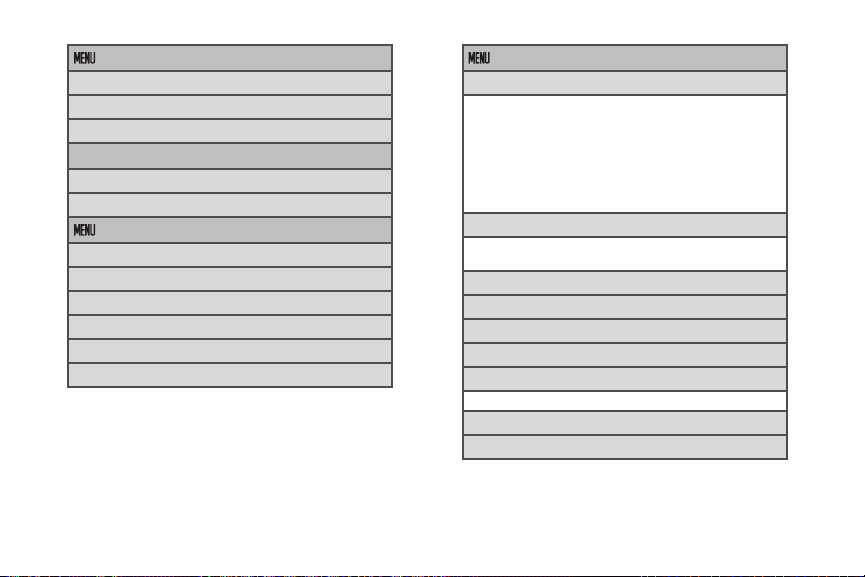
> Add
1: Shortcuts
1: Applications 2: Bookmark
3: Contact 4: Direct dial
5: Direct message 6: Directions & Navigation
7: Exchange Email 8: Gmail label
9: Latitude 10: Music playlist
11: Settings
2: Widgets
1: Analog clock 2: Calendar
3: Exchange Email - Calendar
4: Exchange Email - Email
5: Exchange Email - Tasks
6: Exchange Email - Universal
7: Latitude 8: Music
9: Picture frame 10: Power Control
11: Search 12: Voicemail
13: YouTub e
3: Folders
1: New folder 2: All contacts
3: All Emails 4:
5:
Contacts with phone numbe rs
6: Starred contacts
Bluetooth received
4: Wallpapers
1: Gallery 2: Pack Wallpapers
3: Wallpaper gallery
> Wallpaper
1: Gallery
2: Pack Wallpapers
3: Wallpaper gallery
> Search
> Notifications
> Settings > Wireless & networks
1: Airplane mode (On/Off)
2: Wi-Fi (On/Off)
3: Wi-Fi settings
1: Wi-Fi (On/Off) 2: Network notification (On/Off)
3: Add WPS network
Wi-Fi networks:
1: Add Wi-Fi network
4: Bluetooth (On/Off)
5: Bluetooth settings
1: Bluetooth (On/Off) 2: Device name
3: Discoverable (On/Off) 4: Scan for devices
6: Mobile networks
1: Data roaming (On/Off) 2: Data roaming guard
3: System select
Page 9
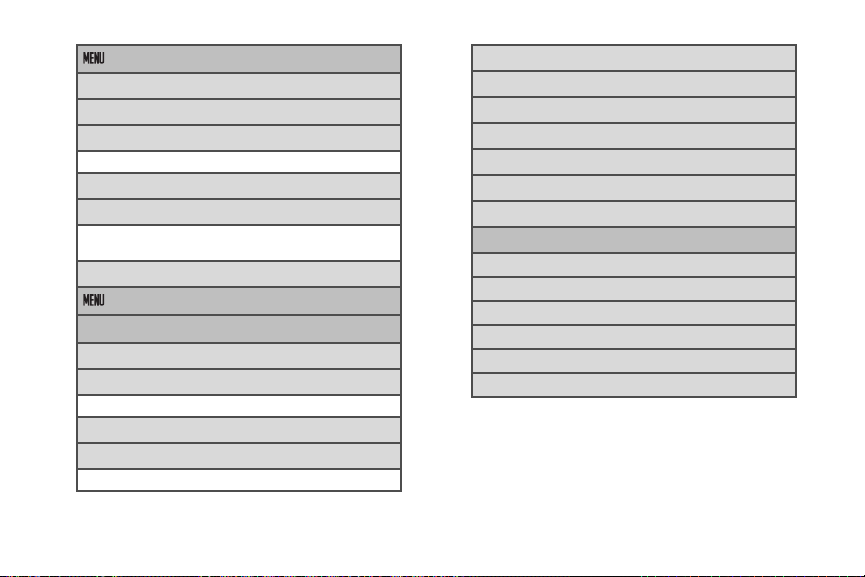
> Settings > Call settings
1: Voicemail
2: Call guard (On/Off)
3: System select
1: Sprint only 2: Automatic
4: DDTM mode (On/Off)
5: TTY mode
1: TTY Off 2: TTY Full
3: TTY HCO 4: TTY VCO
6: Voice Privacy (On/Off)
> Settings > Sound & display
Sound settings:
1: Silent mode (On/Off)
2: Ringer volume
1: Use incoming call volume for notifications
3: Media volume
4: Phone ringtone
1: Preloaded ringtones 2: User added ringtones
5: Phone vibrate (On/Off)
6: Notification ringtone
7: Audible touch tones (On/Off)
8: Audible selection (On/Off)
9: Haptic feedback (On/Off)
10: SD card notifications (On/Off)
11: Hearing Aid (On/Off)
Display settings:
1: Orientation (On/Off)
2: Animation
3: Brightness
4: Key Backlight (On/Off)
5: Auto backlight (On/Off)
6: Screen timeout
iii
Page 10
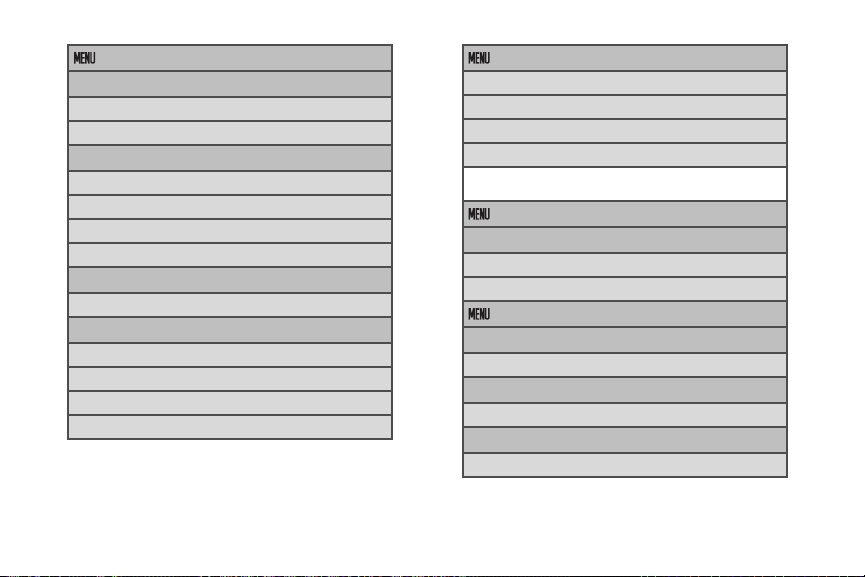
> Settings > Location & security
My Location:
1: Use wireless networks (On/Off)
2: Use GPS satellites (On/Off)
Screen unlock pattern:
1: Set unlock pattern/Change unlock pattern
2: Require pattern (On/Off)
3: Use visible pattern (On/Off)
4: Use tactile feedback (On/Off)
Passwords:
1: Visible passwords (On/Off)
Credential storage:
1: Use secure credentials (On/Off)
2: Install from SD card
3: Set password
4: Clear storage
iv
> Settings > Applications
1: Unknown sources (On/Off)
2: Manage applications
3: Running services
4: Development
1: USB debugging (On/Off) 2: Stay awake (On/Off)
3: Allow mock locations (On/Off)
> Settings > Accounts & sync
General sync settings:
1: Background data (On/Off)
2: Auto-sync (On/Off)
> Settings > Privacy
Location:
1: Use My Location (On/Off)
Settings:
1: Back up my settings (On/Off)
Personal data:
1: Factory data reset
Page 11
> Settings > SD card, USB Mass
Storage & phone storage
SD card:
1: Total space
2: Available space
3: Unmount SD card
4: Format SD card
Internal phone storage:
1: Available space
> Settings > Search
Web search:
1: Google search settings
1: Show web suggestions (On/Off)
2: Search history (On/Off)
3: Manage search history
Quick Search Box:
1: Searchable items
1: Browser (On/Off) 2: Contacts (On/Off)
3: Apps (On/Off) 4: Music (On/Off)
5: Voicemail (On/Off)
2: Clear search shortcuts
> Settings > Language & keyboard
1: Select locale
1: English 2: Espa ñol
Text settings:
1: Android keyboard
1: Vibrate on keypress (On/Off)
2: Sound on keypress (On/Off)
3: Auto-capitalization (On/Off)
Word suggestion settings:
1: Quick fixes (On/Off)
2: Show suggestions (On/Off)
3: Auto-complete (On/Off)
2: User dictionary
> Settings > Accessibility
1: Accessibility (On/Off)
v
Page 12
> Settings > Text-to-speech
1: Listen to an example
2: Install voice data
3: Always use my settings (On/Off)
Default settings:
1: Speech rate
2: Language
> Settings > Date & time
1: Automatic (On/Off)
2: Set date
3: Select time zone
4: Set time
5: Use 24-hour format (On/Off)
6: Select date format
vi
> Settings > About phone
1: S tatus
1: Battery status 2: My phone number
3: Battery level 4: MIN
5: PRL Version 6: ESN
7: MEID 8: Network
9: Signal strength 10: Mobile network type
11: Service state 12: Roaming
13: Mobile network state 14: Wi-Fi MAC address
15: Bluetooth address 16: Up time
2: Update Android
1: Check for Android Updates Now
2: Schedule Check (On/Off)
3: Update Firmware
4: Update Profile
5: Update PRL
6: Battery use
7: Legal information
1: Open source licenses 2: Google legal
8: System tutorial
9: Model number
Page 13
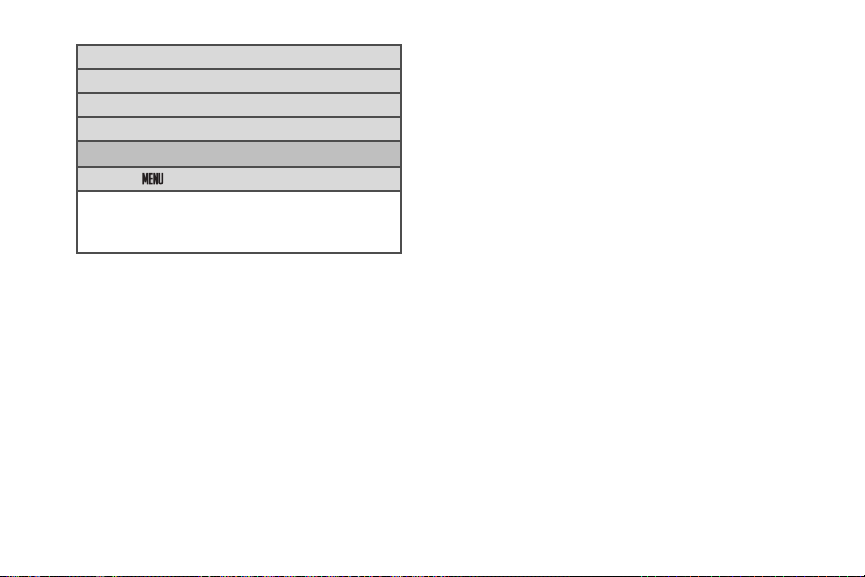
10: Firmware version
11: Baseband version
12: Kernel version
13: Bui ld n umb er
In Use Menu
Press to display the following options:
1: Show tonepad
2: Swap calls/Merge calls/Add call
3: End call 4: Mute
5: Speaker 6: Bluetooth
vii
Page 14

Page 15

Section 1
Getting Started
Page 16
⽧ Setting Up Your Device (page 2)
1A. Setting Up Service
Q
U
A
L
COMM 3G CD
MA
Q
UA
L
COMM 3
G
CDMA
⽧ Activating Your Device (page 3)
⽧ Setting Up Your Voicemail (page 4)
⽧ Sprint Account Passwords (page 5)
⽧ Getting Help (page 5)
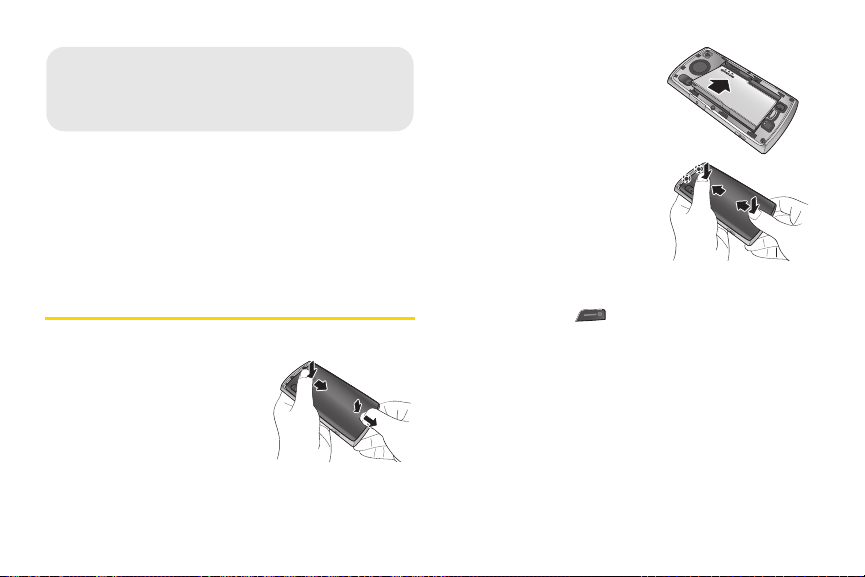
Setting Up Your Device
1. Install the battery.
䡲 Remove the battery from
its packaging.
䡲 Press and hold the back
cover latch with your
thumbnail and slide the
cover down with the other
thumb to remove the
cover.
2 1A. Setting Up Service
䡲 Insert the battery into the
opening on the back of
the device, making sure
the connectors align.
Gently press down to
secure the battery.
䡲 Position the back cover
over the battery
compartment, making
sure the locking tabs
align. Gently slide the
cover upward with your
thumbs until you hear a
slight click.
2. Press and hold to turn the device on.
䡲 If your device is activated, it will turn on, search for
Sprint service, and enter standby mode.
䡲 If your device is not yet activated, see “Activating
Your Device” on page 3 for more information.
Page 17
Activating Your Device
䢇 If you purchased your device at a Sprint Store, it is
probably activated and ready to use.
䢇 If you received your device in the mail and it is for a new
Sprint account or a new line of service, it is designed to
activate automatically. To confirm your activation,
make a phone call.
䢇 If you received your device in the mail and you are
activating a new device for an existing number on your
account, you will need to go online to activate your
new device.
䡲 From your computer’s Web browser, go to
www.sprint.com/activate and complete the
onscreen instructions to activate your device.
Note: If you are having difficulty with activation, contact Sprint
Customer Service by dialing
other phone.
1-888-211-4727 from any
Sprint ID
Once your device is activated, the next thing you will
need to do is to install an initial ID Pack. ID Packs are
bundles of applications, ringtones, wallpapers, settings,
and more. ID Packs are installed using an application
called Sprint ID. You can install as many ID Packs as
you wish, and you can easily switch from one ID Pack
to another without losing any applications already
installed.
Installing Your First ID Pack
Note: Your device must be activated, your battery should be
fully charged, and you should be in a network coverage
area before you install an ID Pack.
1. Touch Install service pack on the Welcome screen.
(If the lock screen appears, unlock it by dragging
the Unlock icon [ ] to the right side of the screen.)
2. Touch an ID Pack on the Browse Packs screen.
3. Read the information screen for a description of
the ID Pack and touch
4. Touch Continue on any following screens until you
see the
Downloading... progress bar.
Download and Install.
1A. Setting Up Service 3
Setting Up Service
Page 18
5.
Tou ch OK to close the Congratulations! dialog box.
Setting Up Your Voicemail
Switching ID Packs
1. Tou ch > .
2. Touch an ID Pack to replace your current pack.
– or –
Get New to install a new ID Pack and follow
Tou ch
steps 2–5 of “Installing Your First ID Pack.”
Note: Certain features of Sprint ID are subject to change. For
the most up-to-date information about using Sprint ID,
please see the User Guide at www.sprint.com
.
Making Your First Call
1. From the Home screen, touch Phone to access the
onscreen phone keypad.
2. Use your phone keypad to enter a phone number.
3. Touch on the screen, or press .
Note: You should fully charge your battery before proceeding.
See “Charging the Battery” on page 15 for details.
4 1A. Setting Up Service
Your device automatically transfers all unanswered
calls to your voicemail, even if your device is in use or
turned off. You should set up your Sprint Voicemail and
personal greeting as soon as your device is activated.
Always use a password to protect against unauthorized
access.
1. Touch > > Voicemail.
2. In the Personalize your voicemail dialog box, touch
Personalize now.
3. Follow the voice prompts to:
䡲 Create your password.
䡲 Record your name announcement.
䡲 Record your greeting.
Note: Voicemail Password
Sprint strongly recommends that you create a
password when setting up your voicemail to protect
against unauthorized access. Without a password,
anyone who has access to your device is able to
access your voicemail messages.
Page 19

For more information about using your voicemail, see
“Voicemail” on page 82.
Sprint Account Passwords
As a Sprint customer, you enjoy unlimited access to
your personal account information, your voicemail
account, and your data services account. To ensure
that no one else has access to your information, you
will need to create passwords to protect your privacy.
Account User Name and Password
If you are the account owner, you will create an account
user name and password when you sign on to
www.sprint.com. (Click Sign in and then click Sign up
now! to get started.) If you are not the account owner (if
someone else receives the bill for your Sprint service),
you can get a sub-account password at
Voicemail Password
You’ll create your voicemail password when you set up
your voicemail. See “Setting Up Your Voicemail” on
page 4 for more information on your voicemail
password.
www.sprint.com.
Data Services Password
With your Sprint device, you may elect to set up an
optional data services password to control access and
authorize Premium Service purchases.
For more information, or to change your passwords,
sign on to
Service at
www.sprint.com or call Sprint Customer
1-888 -211- 4727.
Getting Help
Managing Your Account
Online: www.sprint.com
䢇 Access your account information.
䢇 Check your minutes used (depending on your Sprint
service plan).
䢇 View and pay your bill.
䢇 Enroll in Sprint online billing and automatic payment.
䢇 Purchase accessories.
䢇 Shop for the latest Sprint phones.
䢇 View available Sprint service plans and options.
1A. Setting Up Service 5
Setting Up Service
Page 20

䢇 Learn more about data services and other products
like games, ringers, screen savers, and more.
From Your Sprint Phone
䢇 Touch to check minute usage and
account balance.
䢇 Touch to make a payment.
䢇 Touch to access a summary of your
Sprint service plan or get answers to other questions.
From Any Other Phone
䢇 Sprint Customer Service: 1-8 88-211-4727.
䢇 Business Customer Service: 1-800-927-2199.
Sprint 411
Sprint 411 gives you access to a variety of services and
information, including residential, business, and
government listings; movie listings or showtimes;
driving directions, restaurant reservations, and major
local event information. You can get up to three pieces
of information per call, and the operator can
automatically connect your call at no additional charge.
6 1A. Setting Up Service
There is a per-call charge to use Sprint 411, and you
will be billed for airtime.
䊳 Touch .
Sprint Operator Services
Sprint Operator Services provides assistance when you
place collect calls or when you place calls billed to a
local telephone calling card or third party.
䊳 Touch .
For more information or to see the latest in products
and services, visit us online at
www.sprint.com.
Page 21

Section 2
Your Device
Page 22
⽧ Your Device (page 8)
2A. Device Basics
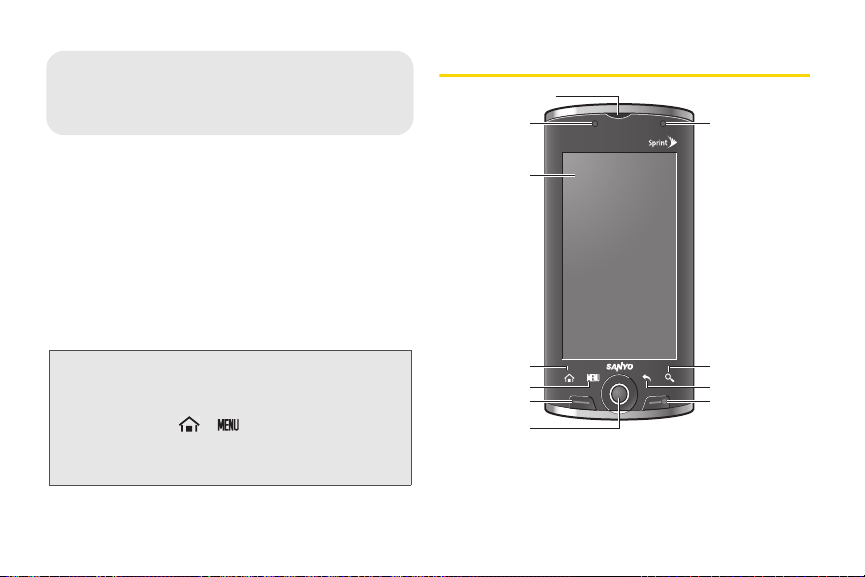
11. LED Indicator
8. END/POWER Key
2. Light Sensor
1. Earpiece
3. Display Screen
6. TALK Key
4. HOME Key
7. Trackball
5. MENU Key
10. SEARCH Key
9. BACK Key
⽧ Viewing the Display Screen (page 10)
⽧ Turning Your Device On and Off (page 13)
⽧ Battery and Charger (page 14)
⽧ Navigating Through the Menus (page 16)
⽧ Screen Overview (page 18)
⽧ Displaying Your Phone Number (page 24)
⽧ Making and Answering Calls (page 24)
⽧ Entering Text (page 31)
Tip: Device Software Upgrades – Updates to your device’s
software may become available from time to time. Sprint
will automatically upload critical updates to your device.
You can also use the menu to check for and download
updates. Touch
Update Android, Update Firmware, Update Profile, or
Update PRL
updates.
8 2A. Device Basics
>
> Settings > About phone >
to search for and download available
Your Device
Page 23
QUALCOMM 3G CDMAQUAL CO MM 3G C DM A
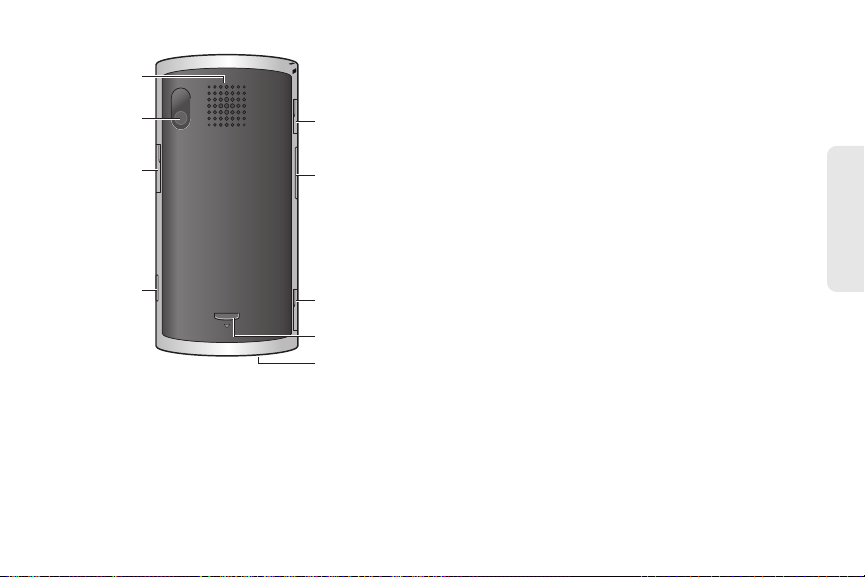
13. Camera Lens
14. microSD
Card Slot
15. Camera Button
18. Charger/Accessory
Jack
19. Volume Button
20. Headset Jack
12. Speaker
16. Microphone
17. Back Cover
Latch
Key Functions
1. Earpiece lets you hear the caller and automated
2. Light Sensor automatically brightens the display
prompts.
when you are in sunlight or a bright room and
dims it in darker places.
3. Display Screen displays all the information needed
to operate your device, such as the call status, the
Contacts list, the date and time, and the signal and
battery strength.
4. HOME Key returns you to the Home screen. Touch
and hold to show the recently used applications.
5. MENU Key lets you open the menus of the current
screen or application.
6. TALK Key allows you to place or receive calls,
answer Call Waiting, use 3-Way Calling, activate
Voice Dialer, view the Call log tab, or turn on the
screen backlight while turned off.
7. Trackball allows you to highlight or select an item
on the screen.
8. END/POWER Key lets you turn the device on or off,
end a call, or turn the screen backlight on or off.
9. BACK Key returns you to the previous screen or
closes the dialog box.
10. SEARCH Key allows you to activate the Search
function to search information on your device and
the Internet.
2A. Device Basics 9
Device Basics
Page 24
11.
LED Indicator shows your device’s battery status. It
also flashes for incoming calls or pending
notifications.
12. Speaker lets you hear the different ringers and
sounds. It also lets you hear the caller’s voice in
speakerphone mode.
13. Camera Lens, as part of the built-in camera, lets
you take pictures and videos.
14 . microSD Card Slot allows you to insert a microSD
card to support external memory.
15. Camera Button lets you activate the camera and
camcorder and take pictures and videos.
16. Microphone allows other callers to hear you clearly
when you are speaking to them.
17. Back Cover Latch allows you to release the latch
and remove the back cover.
18. Charger/Accessory Jack allows you to connect the
device charger to charge the battery or a USB
cable (included) to transfer files to and from a
computer. CAUTION! Inserting an accessory into
the incorrect jack may damage the device.
10 2A. Device Basics
19. Volume Button allows you to adjust the ringer
volume when you are not on a call, or the voice
volume during a call.
20. Headset Jack allows you to plug in an optional
headset for convenient, hands-free conversations.
CAUTION! Inserting an accessory into the incorrect
jack may damage the device.
Viewing the Display Screen
Your device’s display screen provides information
about your device’s status and options.
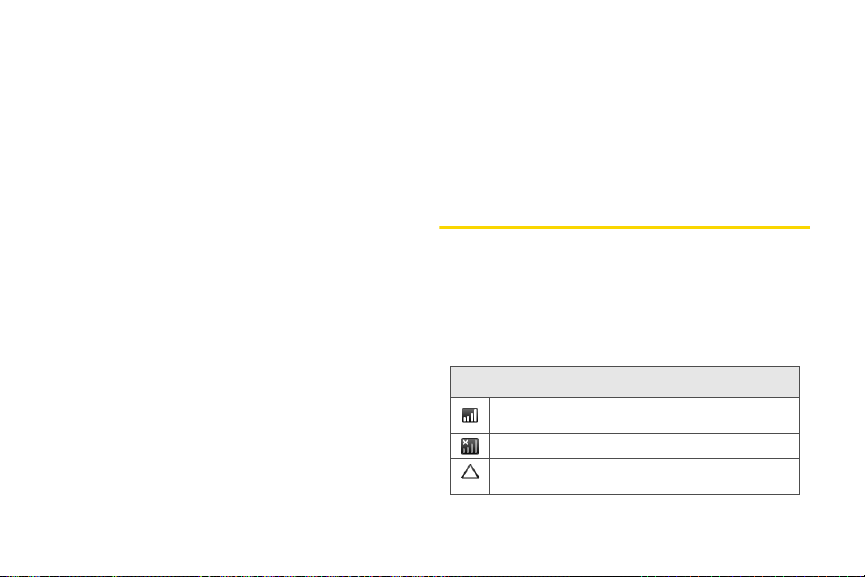
Status Bar Icons
The following list identifies the symbols you will see on
the status bar at the top of your device’s display screen:
Status Bar Icons
Your device’s current signal strength. (More bars =
stronger signal.)
Your device cannot find a usable signal.
Your device is “roaming” off the Nationwide Sprint
Network.
Page 25
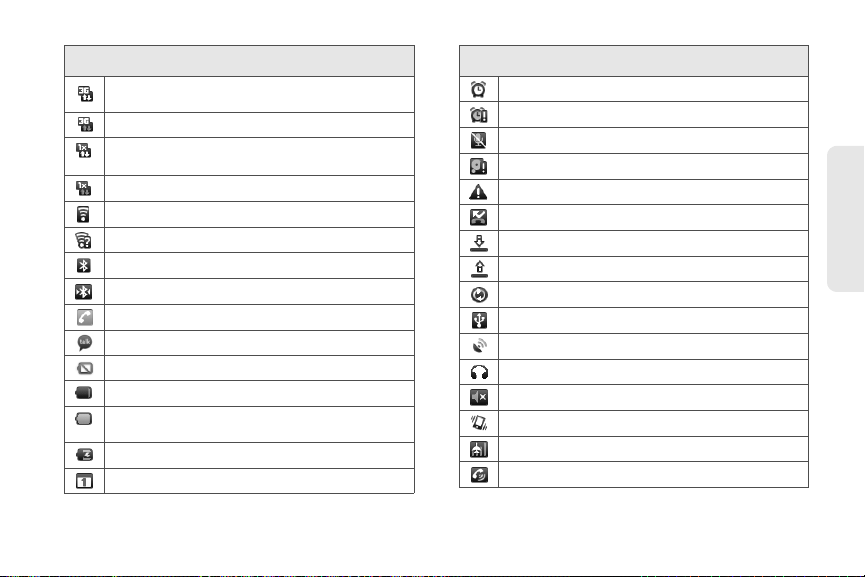
Status Bar Icons
Sprint 3G data service (EVDO) is available. When
active, the icon is animated.
Sprint 3G data service (EVDO) is currently dormant.
Sprint 1xRTT data service is available. When active,
the icon is animated.
Data service is currently dormant.
A Wi-Fi connection is available.
An open Wi-Fi network is available.
Bluetooth is enabled.
The Bluetooth data connection is active.
A voice call is in progress.
A chat is in progress.
The battery is completely discharged.
The battery charge is low.
The battery is fully charged. (The less green showing,
the less charge there is remaining.)
The battery is charging.
You have calendar notifications.
Status Bar Icons
An alarm is set.
Alarm is in snooze mode.
The microphone is muted.
The memory is full.
An error has occurred.
You have missed voice calls.
A download is in progress.
An upload is in progress.
Synchronization is in progress.
The USB port is connected.
GPS is active.
A headset is connected.
Silent mode is active.
Silent mode and Vibrate mode are active.
Airplane mode is active.
Speakerphone is on.
2A. Device Basics 11
Device Basics
Page 26
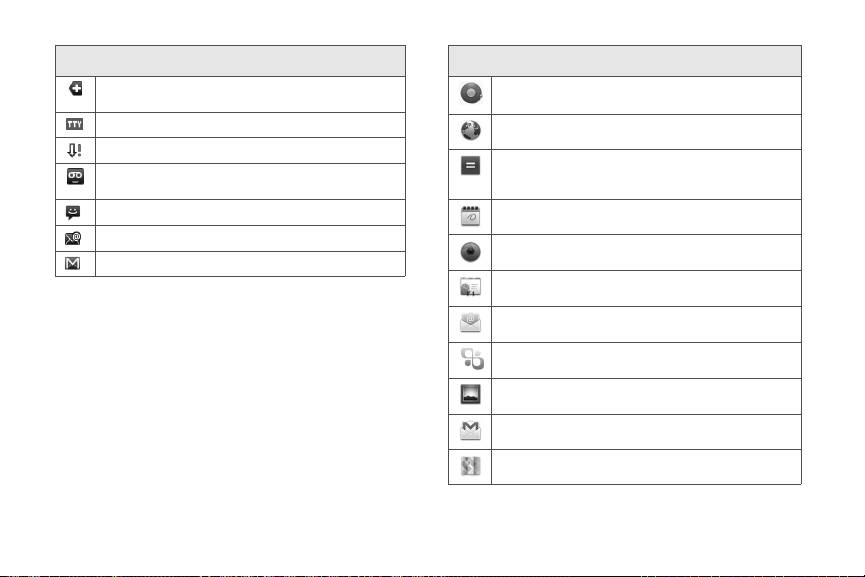
Status Bar Icons
More icons are hidden. The number shows the
number of hidden icons.
TTY mode is enabled.
A software upgrade is available.
You have new voicemail messages. The number
shows the number of new voicemail messages.
You have new messages.
You have new email messages.
You have new Gmail messages.
Application Descriptions
The following is a listing of the default applications
found on the Applications Launcher screen.
(Depending on which ID pack is active, some of these
may also appear on the Home screen).
12 2A. Device Basics
Application Icons
Alarm Clock
which allows you to set multiple alarms.
Browser
Calculator
application which allows you to perform basic
mathematical functions.
Calendar
Camera
Contacts
contacts.
Email
accounts.
Exchange Email
(corporate email) application.
Gallery
microSD card.
Gmail
Maps
– Launches the alarm clock application
– Launches the Internet browser.
– Launches the onscreen calculator
– Launches the calendar application.
– Launches the built-in camera.
– Displays the Contacts tab listing your
– Provides an access to your Internet email
– Launchs the Exchange Email
– Displays images and videos stored in the
– Provides an access to your Gmail account.
– Launches Google Maps.
Page 27
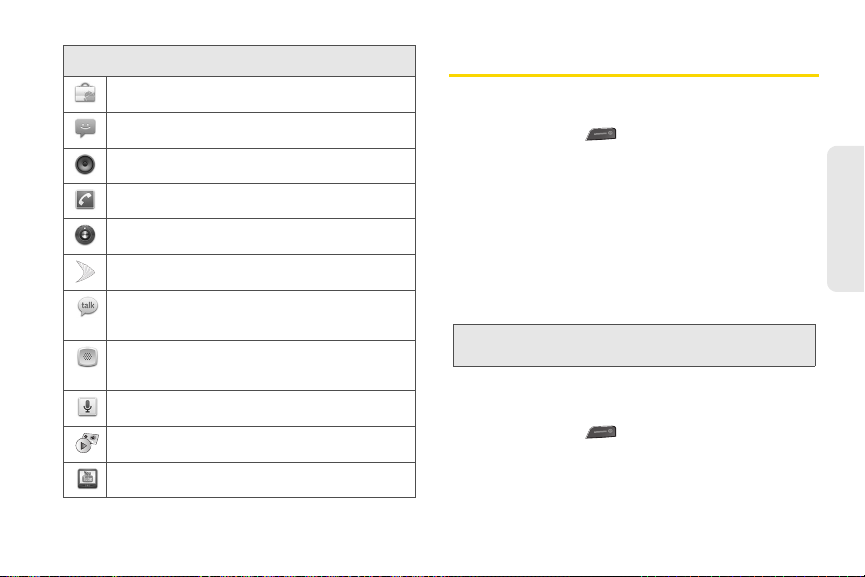
Application Icons
Market
– Allows you to browse and download games
and applications on Android Market.
Messaging
multimedia messages.
Music
Phone
Settings
Sprint Zone
your account, download new apps, etc.
Tal k
you chat with family and friends over the Internet for
free.
Voice Dialer
which allows you to make calls, open an application,
etc. using voice commands.
Voice Search
using voice commands.
Voicemail
application.
YouTu be
– Provides access to your text and
– Launches the built-in music player.
– Launches the phone dialer.
– Provides access to the Settings menu.
– Launches the application to manage
– Launches a Web-based application that lets
– Launches the built-in voice dialer,
– Allows you to launch a Google search
– Launches the visual voicemail
– Provides access to the YouTube website.
Turning Your Device On and Off
Turnin g Your Device On
䊳 Press and hold .
Once your device is on and finds a signal, it
automatically enters standby mode – the device’s idle
state. At this point, you are ready to begin making and
receiving calls.
If your device is unable to find a signal after five
minutes of searching, a Power Save feature is activated
and your device searches for a signal periodically
without your intervention. When a signal is found, your
device automatically returns to standby mode.
Tip: The Power Save feature conserves your battery power
when you are in an area where there is no signal.
Turnin g Your Device Off
1. Press and hold for two seconds. The
Phone options window appears.
2. Touch Power off > OK to turn the device off.
2A. Device Basics 13
Device Basics
Page 28

Battery and Charger
Q
U
A
L
COMM 3G CD
MA
WARNING: Use only Sprint-approved or Kyocera-approved
Sprint-approved or Kyocera-approved batteries and
accessories can be found at Sprint Stores or through
Kyocera; or call 1-866-866-7509 to order. They are also
available at
Battery Capacity
Your device is equipped with a Lithium Ion (Li-Ion)
battery. It allows you to recharge your battery before it is
fully drained. The battery provides up to 4.6 hours of
continuous digital talk time.
When the battery level drops to 10%, the LED indicator
begins flashing red. When the battery level drops
below 5%, the battery icon changes to and a popup window warns you that the battery is low. When the
14 2A. Device Basics
batteries and chargers with your device. The
failure to use a Sprint-approved or Kyoceraapproved battery and charger may increase the
risk that your device will overheat, catch fire, or
explode, resulting in serious bodily injury, death,
or property damage.
www.sprint.com.
battery level drops to approximately 1%, the device
shuts down.
Note: Long backlight settings, searching for service, vibrate
mode, browser use, and other variables may reduce
the battery’s talk and standby times.
Tip: Watch your device’s battery level indicator and charge the
battery before it runs out of power.
Installing the Battery
䊳 See “Setting Up Your Device” on page 2.
Removing the Battery
1. Make sure the device is off so that you do not lose
any stored numbers or messages.
2. Press and hold the back cover
latch with your thumbnail and
slide the cover down with the
other thumb to remove the cover.
3. Lift the battery up and remove it
from the device.
Page 29
Tip: Hook your fingernail under the tab at the top left side of
the battery to facilitate removal.
WARNING: Do not handle a damaged or leaking Li-Ion
battery as you can be burned.
Charging the Battery
Keeping track of your battery’s charge is important. If
your battery level becomes too low, your device
automatically turns off, and you will lose any
information you were just working on.
Always use a Sprint-approved or Kyocera-approved
desktop charger, travel charger, or vehicle power
adapter to charge your battery.
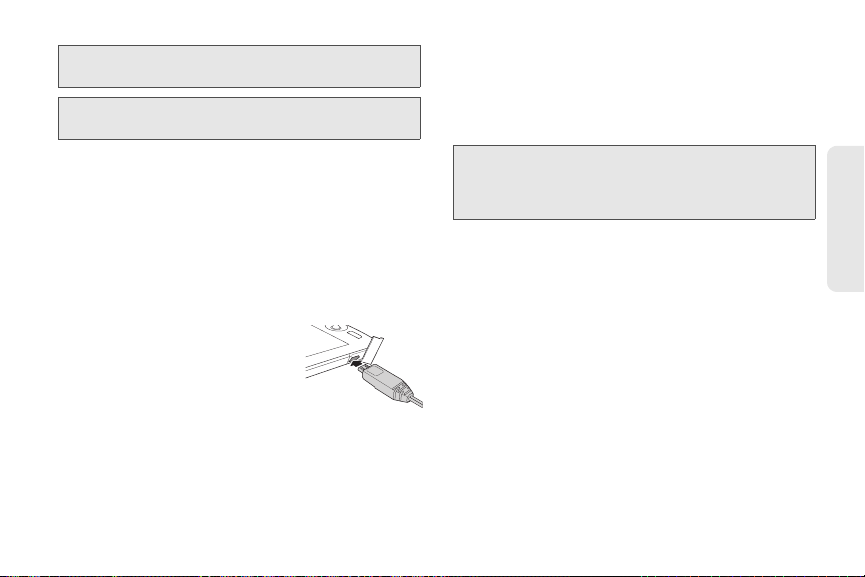
䊳 Plug the flat end of the charger
into the device’s charger/
accessory jack and the other
end into an electrical outlet.
䡲 A solid red indicator light
means the battery is
charging.
䡲 A flashing red indicator light means the battery is
low.
䡲 A solid green indicator light means the battery is
fully charged.
With the Sprint-approved Li-Ion battery, you can
recharge the battery before it becomes completely run
down.
WARNING: Do not remove the battery while it is charging.
Always remove the charger from the wall outlet
first before removing the USB cable from the
device.
2A. Device Basics 15
Device Basics
Page 30

Extending Your Battery Life
Active applications, backlight levels, and Bluetooth and
GPS use all contribute to draining your battery. The
following is a list of helpful tips that can help conserve
your battery’s charge:
䢇 Reduce your backlight on time. See “Changing the
Backlight Time Length” and “Changing the Key
Backlight Time Length” on page 38.
䢇 Turn Bluetooth off when not in use. See “Turning
Bluetooth On and Off” on page 77.
䢇 Turn Wi-Fi off when not in use. See “Turning Wi-Fi On
and Off” on page 98.
䢇 Turn GPS off when not needed. Most applications
using this function will periodically query the GPS
satellites for your current location; each query drains
your battery. See “Location Settings” on page 39.
䢇 Do not wait until your battery is completely depleted
before charging your device. Repeated complete
discharging and recharging can reduce the storage
capacity of any battery over time.
䢇 Turn off Automatic application sync. See
“Synchronizing Accounts” on page 40.
16 2A. Device Basics
䢇 Add a Power Control Widget to your Home screen to
deactivate features such as Wi-Fi, Bluetooth, GPS,
and synchronization and to reduce the screen’s
brightness setting. See “Adding an Item” on page 21.
䢇 Check running services and close any unnecessary
applications. See “To view and control currently
running services:” on page 49.
Navigating Through the Menus
Menu Navigation
Tou ch: To type using the onscreen
QWERTY keyboard, select items such
as application and settings icons, or
press onscreen buttons, simply touch
them with your finger. A light touch
works best.
Page 31

Touch and hold: To open the available
options for an item (for example, a link
in a Web page), simply touch and hold
the item.
Slide: Quickly
drag your finger vertically or
horizontally across the screen.
Drag: Press and hold your finger
before you start to move it. Do
not release your finger until you
have reached the target position.
There are two ways to navigate through the menus on
the display screen:
䢇 Using your finger: Touch, Touch and Hold, Drag, or
Slide an item or screen to open applications or
option windows or to select an item, etc.
䢇 Using the trackball: Simply roll the trackball to move
through the items up and down or right and left, and
press it to select an item.
Selecting Menu Items
For example, to view the current battery usage:
1. Touch to go to the Home screen.
2. Touch .
3. Touch Settings.
4. Scroll your finger bottom up across the screen and
touch
About phone.
5. Touch Battery use.
For the purposes of this guide, the above steps
condense into:
䊳 Touch > > Settings > About phone >
Battery use.
Backing Up Within a Menu
To go back to the previous screen:
䊳 Touch .
To return to the Home screen:
䊳 Touch .
2A. Device Basics 17
Device Basics
Page 32

Screen Overview
1.
4.
3.
2.
5.
6.
Screen Lock
The display screen will automatically lock to prevent
accidental activation after the time specified for the
screen timeout. (See “Changing the Backlight Time
Length” on page 38.)
Unlocking the Display Screen
䊳 Press , , or the trackball, and drag the
Unlock icon( ) to the right side of the screen.
Note: When an unlock pattern is set for the device, you will be
required to draw the set pattern instead. See “Your
Device’s Unlock Pattern Feature” on page 46.
Locking the Display Screen Manually
䊳 Press . The backlight turns off.
Home Screen Overview
The Home screen is
the starting point for all
applications. You can
access applications,
view call notifications
and battery or
connection status.
1. Status Bar:
䡲 Displays
notification and
device status
icons.
䡲 Touch and hold to
display the date.
䡲 Drag down to display the Notifications panel.
2. Home Screen: Displays shortcut icons, widgets,
wallpapers, and folders.
3. Shortcuts: Icons that launch applications such as
Voicemail, Contacts, Phone, Email, Alarm Clock,
etc. These function the same as shortcuts on your
computer.
18 2A. Device Basics
Page 33

4. ID Pack: Allows users to switch the ID pack or get a
new pack.
5. Applications Launcher: Touch to display a list of
applications installed on the device.
6. Phone: Launches the phone dialer.
Note: From any application screen, touch to go back to
the Home screen.
Device Keys
Your device has four main keys that can be used on
any screen for added convenience and usability:
Home Key
The Home key ( ) takes you back to your Home
screen.
Menu Key
The MENU key ( ) opens a contextual menu for the
current screen or application. When on the Home
screen, the following menu options are available:
䢇 Add ( ) lets you add one of the following functions
to a selected screen: Shortcuts, Widgets, Folders, or
Wallpapers. See “Customizing Your Home Screen”
on page 21.
䢇 Wallpaper ( ) lets you change the current screen’s
wallpaper image. This image can be obtained from
either your Pictures folder or from any of the available
images within the device’s Wallpaper gallery. See
“Changing the Wallpaper” on page 21.
䢇 Search ( ) displays the Quick Search box that can
be used to search for a key term both on the device
or online. See “Search Key” on page 20.
䡲 For example, entering the word “Pa” will display
any matching entries from your device’s Contacts
list, current device applications, online Android or
Google apps, or from any online Web page via
Google search.
䢇 Notifications ( ) opens the Notifications panel. It
does the same thing as dragging the status bar
down on the Home screen. See “Using the
Notifications Panel” on page 24.
䢇 Settings ( ) provides quick access to the device’s
Settings menu. See “2B. Settings” on page 35. The
Settings menu can also be accessed by touching
> >
Settings.
2A. Device Basics 19
Device Basics
Page 34

Back Key
Search Matches
(Device & Web)
Quick Search
Box
Google Search
Voice Search
The Back key ( ) returns you to the previously active
screen. If the QWERTY keyboard is currently open, this
key closes the keyboard.
Search Key
The Search key ( ) displays the Quick Search box
that can be used to search for a key term both on the
device or online. In some instances, this key opens a
search box specific to only the current application.
Touch again to open the Quick Search box.
Touching Voice Search ( ) initiates the search
function but without the need to use the QWERTY
keyboard.
1. Touch . The Quick Search Box, the Google
Search key, the Voice Search key, and a keyboard
appear.
2. Enter the information you want to search. As you
type, matching information is displayed on the
screen.
3. To select a matched item, touch the item. To
search the Internet using Google, touch .
Extended Home Screen
Slide your finger left or right across the Home screen to
display the Home screen extensions. The extra screens
provide ample space for icons, widgets, shortcuts, and
other items.
20 2A. Device Basics
Page 35

Customizing Your Home Screen
Adding an Item
1. Touch and hold an empty spot on the Home
screen or touch
Add to Home screen window appears.
2. Select the type of item you want to add:
䡲 Shortcuts: Select to add a shortcut option:
Applications, Bookmark, Contact, Direct dial,
Direct message, Directions & Navigation,
Exchange Email, Gmail label, Latitude,
Music playlist, or Settings. (Most of these options
will expand to allow you to choose specific items.)
䡲 Widgets: Select to add a widget (a mini-version of
an application) such as an analog clock,
calendar, music player, power control, etc.
䡲 Folders: Select to add a folder to organize your
Home screen items. See “Creating a Folder” on
page 22.
䡲 Wallpapers: Select to change the Home screen’s
wallpaper. See “Changing the Wallpaper” on this
page.
> > Add. The
Repositioning an Item
1. Touch and hold the item that you want to
reposition. The item becomes movable.
2. Drag the item to the desired location.
3. Release your finger to finalize the repositioning.
Note: To reposition an item to the extended Home screen,
drag the item to the edge of the screen until the Home
screen extends. Then release your finger to reposition
the item to your desired location.
Removing an Item
1. Touch and hold the item that you want to remove.
The item becomes movable and the applications
tab icon changes into .
2. Drag the item to .
3. When the item and the icon turn red, release your
finger.
Changing the Wallpaper
1. From the Home screen, touch > Wallpaper.
2. Select one of the following options:
2A. Device Basics 21
Device Basics
Page 36

䡲 Gallery: Select to use saved or captured pictures
on your device. You can crop the picture before
setting it as wallpaper.
䡲 Wallpaper gallery: Select to use preset wallpapers.
3. Touc h Save or Set wallpaper.
Creating a Folder
1. From the Home screen, touch > Add >
Folders.
2. On the Select folder screen, select one of the
following options:
䡲 New folder: Select to create a new folder with no
items inside.
䡲 All contacts: Select to create a Contacts folder.
䡲 All Emails: Select to create an Email folder.
䡲 Bluetooth received: Select to create a folder of files
received using Bluetooth.
䡲 Contacts with phone numbers: Select to create a
folder of Contacts that have phone numbers.
䡲 Starred contacts: Select to create a folder of your
favorite contacts.
22 2A. Device Basics
Renaming a folder
1. Touch a folder to open it.
2. Touch and hold the title bar of the folder. The
Rename folder window opens.
3. Enter the new folder name.
4. Touch OK when done.
Putting Home screen shortcuts into a folder
1. Touch and hold an item. The item becomes
movable.
2. Drag the item to a folder.
Accessing items inside a folder
1. Touch a folder to open it.
2. Touch the icon of the application you want to
access.
Page 37

Accessing Recently Used Applications
Your device keeps a running list of your six most
recently used applications.
1. Touch and hold to open the recently used
applications window.
2. Touch an icon to open the related application.
Changing the Screen Orientation
Your device is capable of automatically changing the
orientation of some onscreen content.
The device’s built-in accelerometer senses movement
and changes to the device’s angle and orientation. This
allows the device to change the onscreen content
(images, Web pages, etc.) to properly display based on
the current angle. (Some screens may not
automatically change.)
Device Basics
To activate the auto -rotate feature:
1. Touch > > Settings > Sound & display.
2. Touch Orientation to select that option. (A check
mark indicates this feature is enabled.)
2A. Device Basics 23
Page 38

Using the Notifications Panel
The Notifications panel indicates new message events
(data sync status, new messages, calendar events, call
status, etc).
1. Drag the status bar down the screen.
2. Tap a notification entry to open the associated
application.
Note: The Notifications panel can also be opened on the
Home screen by touching > Notifications.
24 2A. Device Basics
Displaying Your Phone Number
䊳 Touch > > Settings > About phone >
Status.
Your phone number and other information about your
device and account will be displayed.
Making and Answering Calls
Making Calls
1. Touch > .
– or –
Touch > >
2. Enter a phone number
using the phone keypad. (If
you make a mistake while
dialing, touch to erase
the numbers.)
3. Touch .
(To make a call when you
are roaming and
Phone.
Call Guard
Page 39

is enabled, touch Agree. See “Call Guard” on page
90.)
4. Press when you are finished.
Tip: To redial your outgoing call, press and touch
next to the entry on the Call log tab.
You can also place calls from your device by using
your Contacts (page 30), Call log listings (page 52),
and Automatic Speech Recognition (ASR) (page 64).
Dialing Options
When you enter numbers on the phone keypad, some
of the dialing options may available by touching .
䢇 Add to contacts: Add the number to the Contacts list.
䢇 Add 2-sec pause: to insert a two-second pause. (See
“Dialing and Saving Phone Numbers with Pauses”
on page 29.)
䢇 Add wait: to insert a wait pause. (See “Dialing and
Saving Phone Numbers with Pauses” on page 29.)
Answering Calls
1. Make sure your device is on. (If your device is off,
incoming calls go to voicemail.)
2. Press .
– or –
Drag the picture ID (or Android icon) to the top of
the screen if the screen is locked.
– or –
Touch if the screen is unlocked.
Your device notifies you of incoming calls in the
following ways:
䢇 The device rings or vibrates.
䢇 The indicator light flashes.
䢇 The screen displays an incoming call message.
If the caller is listed in your Contacts, the contact’s
name appears. You may also see the caller’s phone
number, if available.
You may also select one of the following options:
䢇 Press the volume button to mute the ringer.
䢇 Press to send the call to your voicemail box.
䢇 Drag the picture ID (or Android icon) to the bottom
left corner if the screen is locked, or drag the slider
2A. Device Basics 25
Device Basics
Page 40

bar to the left if the screen is unlocked to ignore the
call.
䢇 Drag the picture ID (or Android icon) to the bottom
right corner if the screen is locked, or drag the slider
bar to the right if the screen is unlocked to send a
text message to the caller.
Answering a Roam Call With Call Guard Enabled
Call Guard is an option that helps you manage your
roaming charges when making or receiving calls while
outside the Nationwide Sprint Network. See “Roaming”
on page 89 for more information about roaming.
䊳 Tou ch Agree to answer the call. (See “Call Guard”
on page 90 for additional information.)
Note: When your device is off, calls go directly to voicemail.
Ending a Call
䊳 Press .
Missed Call Notification
When you do not answer an incoming call, appears
on the status bar.
26 2A. Device Basics
To display a Missed Call entry from the Notifications panel:
1. Drag the status bar down to open the Notifications
panel.
2. Touch Missed call(s) to open the Call log tab.
3. Touch an entry with a missed call icon ( ) to
open it. (To dial the phone number, touch next
to the entry.)
Calling Emergency Numbers
You can place calls to 911 (dial ), even if
your device is locked with a screen unlock pattern or
your account is restricted.
Note: After you have placed an emergency call, your device
automatically enters Emergency mode.
During an emergency call, the following options are
available on the screen or by touching :
䢇 Touch to activate speakerphone mode.
䢇 Touch Contacts to display your Contacts list.
䢇 Touch Bluetooth to transfer the call to a connected
Bluetooth device.
Page 41

䢇 Touch End call to finish the emergency call.
Tip: Your phone number will be displayed on the screen
during an emergency call.
To exit Emergency mode:
1. Press to end a 911 call.
2. Touch and then press within five
seconds after touching .
Enhanced 911 (E911) Information
This device features an embedded Global Positioning
System (GPS) chip necessary for utilizing E911
emergency location services where available.
When you place an emergency 911 call, the GPS
feature of your device seeks information to calculate
your approximate location. Depending on several
variables, including availability and access to satellite
signals, it may take up to 30 seconds or more to
determine and report your approximate location.
Important: Always report your location to the 911 operator
when placing an emergency call.
designated emergency call takers, known as
Public Safety Answering Points (PSAPs) may not
be equipped to receive GPS location information
from your device.
Some
In-Call Options
Unlocking the Screen
The device screen is locked automatically during a call
to avoid accidentally touching the screen.
To unlock the screen:
䊳 Drag the Unlock icon ( ) to the status bar.
The screen and the device offer the following options
during a call:
䢇 Touch to route the device's audio through the
speaker.
WARNING: Because of higher volume levels, do not place
䢇 Touch to disable the microphone.
the device near your ear during speakerphone
use.
2A. Device Basics 27
Device Basics
Page 42

䢇 Drag the Ton ep ad tab ( ) upward to enter the dial
tones. Drag downward to hide it.
䢇 Press the volume button up or down to adjust the
speaker volume.
Further options may be available by touching
during a call:
䢇 Add call to place a second call while putting the
current caller on hold.
䢇 End call to end a call.
䢇 Bluetooth to route the device's audio through a
connected Bluetooth device.
䢇 Swap calls to switch from the current call to the one
on hold.
䢇 Merge calls to merge two open calls to start a 3-way
call.
Note: Enable Voice Privacy in Call settings to enhance the
privacy mode.
28 2A. Device Basics
End-of-Call Screen
After you finish a call, the device briefly displays the
caller’s or recipient’s name (if it is in your Contacts),
phone number, and the duration of the call on the End
call screen. Then the screen displays the
Call log tab for
outgoing calls where further options may be available.
See “Viewing the Call Log” on page 51.
Saving a Phone Number
The number of Contacts entries you can store in your
device is limited only by available memory space. Your
device automatically sorts the Contacts entries
alphabetically. (For more information, see “2D.
Contacts” on page 54.)
To s ave a numb er:
1. Touch > and enter a phone number.
2. Touch > Add to contacts.
3. Touch Create new contact or an existing contact.
4. Touch any field to enter the details.
5. Enter all the necessary details and touch Done to
save the entry.
Page 43

Finding a Phone Number
You can search Contacts for entries by name.
1. On the Home screen, touch Contacts.
-or-
Phone screen, touch the Contacts tab.
On the
2. Touch .
3. Enter the first letter or letters of an entry. (The more
letters you enter, the more specific the search.) All
Contacts entries matching the entered letters will
be displayed.
4. To display the contact details, touch an entry from
the list.
Dialing and Saving Phone Numbers with Pauses
You can dial or save phone numbers with pauses for
use with automated systems, such as voicemail or
credit card billing numbers.
There are two types of pauses available on your device:
䢇 Add wait: Sends the next set of numbers when you
touch on the pop-up window.
䢇 Add 2-sec pause: Automatically sends the next set of
numbers after two seconds.
Note: You can have multiple pauses in a phone number and
combine wait and two-second pauses.
To dial or save phone numbers with pauses:
1. Touch > and all or part of a number.
2. Touch > Add wait or Add 2-sec pause.
3. Enter additional numbers.
4. Touch to dial the number.
– or –
Touch >
your Contacts.
Note: When dialing a number with a wait pause, touch
on the pop-up window.
Add to contacts to save the number in
2A. Device Basics 29
Device Basics
Page 44

Dialing From the Contacts List
1. On the Home screen, touch Contacts.
-or-
Phone screen, touch the Contacts tab.
On the
2. Scroll through the list, touch the entry you want to
call and touch
Call [label].
Dialing From the Favorites List
1. On the Home screen, touch Contacts and then
touch the
– or –
On the
Favorites tab.
Phone screen, touch the Favorites tab.
2. Scroll through the list and touch . A call is made
when the Favorite has only one phone number
registered. The
Favorite has multiple phone numbers registered.
Touch the number you want to dial to make a call.
Call using window opens if the
Plus (+) Code Dialing
When placing international calls, Plus Code Dialing
automatically enters the international access code for
30 2A. Device Basics
your location (for example, 011 for international calls
made from the U.S.).
1. On the Phone screen, touch and hold until you
see a “
+” on the display screen.
2. Enter the country code and phone number, and
then touch . (The device automatically
prepends the access code for international dialing,
followed by the country code and phone number.)
Page 45
Entering Text
Your device provides convenient ways to enter letters,
numbers, and symbols whenever you are prompted to
enter text (for example, when adding a Contacts entry
or when using email and text messaging).
Your device has the following onscreen keyboards:
Alphabet Keyboard, Number & Symbol Keyboard, and
Phone Keypad. The keyboard that is displayed depends
on the type of information required.
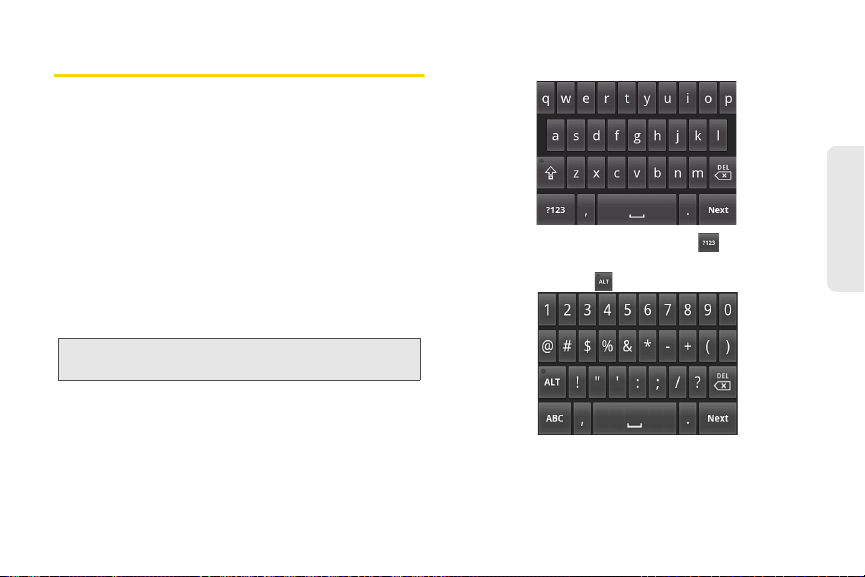
QWERTY Keyboard
The QWERTY keyboard is activated whenever an
alphanumeric entry is required. The Alphabet keyboard
layout looks similar to a computer keyboard.
Note: Key appearance may vary depending on the selected
application.
Alphabet Keyboard: Touch a text field which requires
alphanumeric entry to activate.
Number & Symbol Keyboard: Touch on the
Alphabet keyboard to activate. You can display more
symbols by touching .
2A. Device Basics 31
Device Basics
Page 46
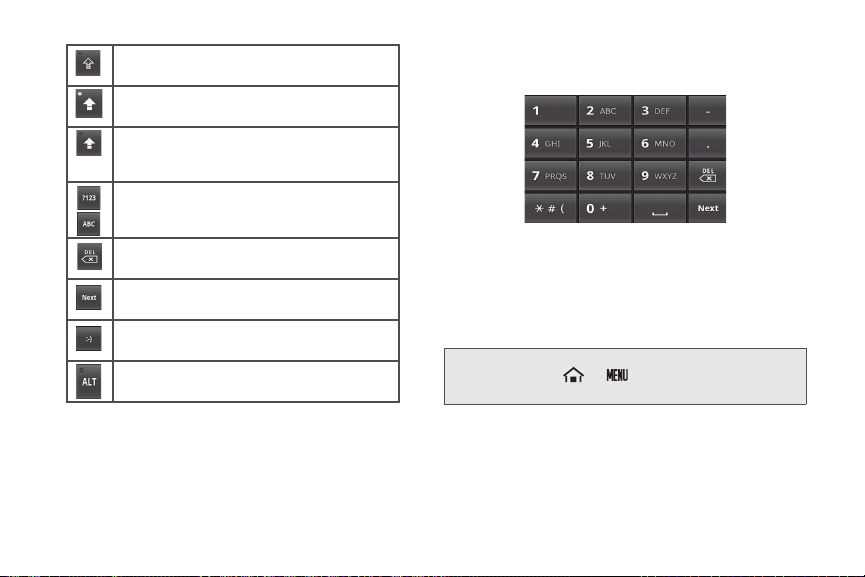
Touch to toggle between lower case, upper
case, and Caps lock
Indicates Caps lock is turned on. Touch once to
turn off Caps lock
Indicates the first letter will be entered in upper
case, but succeeding characters will be
entered in lower case.
Touch to toggle between the Alphabet
keyboard and Number & Symbol keyboard.
Touch and hold to access the settings menus.
Touch to delete a character. Touch and hold to
delete multiple characters.
Touch to go to the next text entry field.
Touch to insert a smiley. Touch and hold to
view and select other smileys.
Touch to display more symbols.
32 2A. Device Basics
.
.
Touch a text field that requires numeric input to activate.
Using Landscape Mode
For added convenience, you can switch to landscape
mode by rotating the device 90º to the left
(counterclockwise). This widens the keyboard and
allows you to type using two thumbs.
Phone Keypad
Note: To use this feature, ensure that the Orientation box is
checked in > > Settings
Sound & display.
>
Page 47

Copying and Pasting Text
In applications that require text entry, such as
Messaging, use the copy and paste functions to copy
and paste text from one application to another.
1. Open the application or received message that
you want to copy text from.
2. Touch and hold the text body to display the options
menu.
3. Touch Copy message text or Copy all to copy the
text.
4. Open the application that you want to paste the
text to.
5. Touch and hold the text box where you want to
paste the text.
6. Touch Paste.
Copying Text From a Web Page
1. When viewing a Web page, touch > More >
Select text.
2. Touch and drag your finger to highlight the text that
you want to copy.
3. Release your finger to copy the highlighted text to
the clipboard.
4. Open the application that you want to paste the
selected text to.
5. Touch and hold the text box where you want to
paste the text.
6. Touch Paste.
Copying a URL
1. To copy a URL, touch and hold the URL to display
the options menu.
2. Touch Copy link URL or Copy page url.
3. Open the application that you want to paste the
URL to.
4. Touch and hold the text box where you want to
paste the URL.
5. Touch Paste.
2A. Device Basics 33
Device Basics
Page 48

Language & Keyboard Settings
Language
1. Tou ch
2. To uch English or Español.
Android Keyboard
䊳 Tou ch
䢇 Vibrate on keypress: Touch to activate vibration when
䢇 Sound on keypress: Touch to activate a clicking
䢇 Auto-capitalization: Touch to automatically set the first
Word Suggestion Settings
䢇 Quick fixes: Touch to add a period when you press
34 2A. Device Basics
>
Select locale.
>
Android keyboard
Tip: You can also display the Android keyboard settings
menu by touching and holding
touching Android keyboard settings on the keyboard.
>
Settings
>
Settings
.
>
Language & keyboard
>
Language & keyboard
or and then
a key is touched.
sound when a key is touched.
letter of a sentence to upper case.
the space key twice to indicate sentence completion.
䢇 Show suggestions: Touch to display suggested words
as you type.
䢇 Auto-complete: Touch to enter a highlighted word
automatically if a space or punctuation symbol is
>
typed.
User Dictionary
Select to add user preset words to the dictionary.
Adding Words in the Dictionary
>
1. From the Language & Keyboard settings screen,
touch
User dictionary > > Add.
2. Type the word you want to add, and touch OK.
Customizing Words in the Dictionary
1. From the Language & keyboard settings screen,
touch
User dictionary.
2. Touch a word you want to customize, and do one
of the following:
䡲 To edit the word, touch Edit.
䡲 To delete the word from the dictionary, touch
Delete.
Page 49

⽧ Sound Settings (page 35)
2B. Settings
⽧ Display Settings (page 37)
⽧ Location Settings (page 39)
⽧ Synchronizing Accounts (page 40)
⽧ Search Settings (page 42)
⽧ Messaging Settings (page 43)
⽧ Airplane Mode (page 44)
⽧ TTY Use With Sprint Service (page 44)
⽧ Using the Hearing Aid Device Compatibility Function
(page 46)
⽧ Security Settings (page 46)
⽧ Application Settings (page 48)
⽧ Privacy Settings (page 50)
⽧ Accessibility Settings (page 50)
Sound Settings
Ringer Types
Ringer types help you identify incoming calls and
messages. You can assign ringer types to voice calls
and notifications.
Selecting Ringer Types for Voice Calls
1. Touch > > Settings > Sound & display >
Phone ringtone.
Note: The Settings menu can also be accessed from the
Applications Launcher screen.
2. Touch Preloaded ringtones or User added ringtones,
and touch a ringtone from the available list. The
ringtone briefly plays when selected.
3. Touch OK to assign a ringer.
Tip: You can assign individual ringtones to your Contacts. See
“Assigning a Ringer Type for an Entry” on page 56.
Settings
2B. Settings 35
Page 50

Selecting Ringer Types for Notifications
1. Touch > > Settings > Sound & display >
Notification ringtone.
2. Touch a ringtone from the available list. The
ringtone briefly plays when selected.
3. Touc h OK to assign a ringer.
Enabling Other Sound Features
You can set the device to play an audible tone or to
vibrate when you use the phone keypad, touch the
screen, or recei ve SD card notifi cat ions.
1. Touch > > Settings > Sound & display.
2. To uch Audible touch tones, Audible selection,
Haptic feedback, or SD card notifications to activate
the feature.
䡲 Audible touch tones plays a tone while using the
phone keypad.
䡲 Audible selection plays a sound when making
any onscreen selection.
䡲 Haptic feedback vibrates when pressing keys
and on certain UI interactions.
36 2B. Settings
䡲 SD card notifications plays a sound for SD card
notifications.
Adjusting the Volume Settings
Adjust the volume settings of both the device and
Media playback to suit your needs and your
environment.
1. Touch > > Settings > Sound & display.
2. Touch either Ringer volume or Media volume.
Note: If you clear the “Use incoming call volume for
notifications” check box on the ringer volume settings
screen, you can select the notification volume
separately.
3. Touch and drag the onscreen slider to adjust the
volume level.
4. Touch OK.
Tip: You can adjust the ringer volume in standby mode (or
the earpiece volume during a call) by using the volume
button on the left side of your device.
Page 51

Setting Vibration
To set your device to vibrate instead of making any
sounds (except for media and alarm sounds):
䊳 Press the volume button down in standby mode
until you see on the screen.
To set your device to always vibrate in addition to any
ringer settings:
1. Touch > > Settings > Sound & display.
2. Touch Phone vibrate to enable vibration. (A check
mark indicates this feature is enabled.)
Silence All
The Silence All option allows you to mute all sounds
(except for media and alarm sounds).
To activate Silence All:
䊳 Press the volume button down in standby mode
until you see on the screen.
– or –
Touch > >
Silent mode.
Settings > Sound & display >
To deactivate Silence All:
䊳 Press the volume button up repeatedly to select a
volume level.
Display Settings
Window Animation
This feature lets you set the degree of animation for
onscreen transitions.
1. Touch > > Settings > Sound & display >
Animation.
2. Touch No animations, Some animations, or All
animations.
Settings
Adjusting the Brightness
Adjust your screen’s brightness to suit your
surroundings.
1. Touch > > Settings > Sound & display >
Brightness.
2. Touch and drag the Brightness slider left or right to
adjust the screen contrast.
2B. Settings 37
Page 52

3.
Tou ch OK.
Note: This feature is not available when Auto backlight is
enabled. See “Setting Auto Backlight” below.
Setting Auto Backlight
1. Touch > > Settings > Sound & display.
2. To uch Auto backlight to automatically adjust the
backlight of the screen with the light sensor.
Changing the Backlight Time Length
Select the delay time before the screen automatically
turns off.
1. Touch > > Settings > Sound & display >
Screen timeout.
2. Select a time setting.
Note: Long backlight settings reduce the battery’s talk and
standby times.
Changing the Key Backlight Time Length
The Home, Menu, Back, and Search keys remain backlit
for eight seconds by default after you press them. You
38 2B. Settings
can synchronize the length with the time set for the
screen timeout.
1. Touch > > Settings > Sound & display.
2. Touch Key Backlight. (A check mark indicates this
feature is enabled.)
Display Language
You can choose to display your device’s onscreen
menus in English or in Spanish.
1. Touch > > Settings >
Language & keyboard > Select locale.
2. Select English or Español.
Adjusting the Date and Time Manually
Your device obtains its time and date information by
using the network-provided date, time, and time zone.
These values can be changed manually.
1. Touch > > Settings > Date & time.
2. Clear the Automatic check box if necessary.
3. Touch Set date. Adjust the date, month, and year
by tapping + or -. Touch
Set when finished.
Page 53

4. Touch Select time zone, and then select a time
zone from the onscreen list. Scroll down the list to
view additional time zones.
5. Touch Set time. Adjust the hour and minute by
tapping + or -. Touch the
the value. Touch
AM or PM icon to change
Set when finished.
6. Touch Use 24-hour format to toggle between 12-
hour or 24-hour format.
7. Touch Select date format to select how the date
information is displayed on your device.
Location Settings
Your device is equipped with a Location feature for use
in connection with location-based services.
The Location feature allows the network to detect your
position. Turning Location off will hide your location
from everyone except 911.
Note: Turning Location on will allow the network to detect
your position using GPS technology, making some
Sprint applications and services easier to use. Turning
Location off will disable the GPS location function for all
purposes except 911, but will not hide your general
location based on the cell site serving your call. No
application or service may use your location without
your request or permission. GPS-enhanced 911 is not
available in all areas.
To enable your device’s Location feature via wireless
networks:
1. Touch > > Settings > Location & security.
2. Touch Use wireless networks. (A check mark
indicates this feature is enabled.)
3. Read the disclaimer and touch Agree.
2B. Settings 39
Settings
Page 54

To enable your device’s Location feature via GPS:
1. Touch > > Settings > Location & security.
2. To uch Use GPS satellites. (A check mark indicates
this feature is enabled.)
䡲 This service uses available GPS to pinpoint your
location within certain applications such as
Google Maps.
Synchronizing Accounts
Google accounts provide the ability to synchronize
calendar events and Contacts, and corporate accounts
provide the ability to synchronize Contacts. Your device
provides the ability to synchronize data from a variety of
different sources or sites. These accounts include
Google accounts, corporate Exchange email server
accounts, and social sites such as Facebook, Twitter,
and MySpace. You need to add those accounts to the
Manage accounts list.
To enable the auto-sync feature:
1. Touch > > Settings > Accounts & sync.
40 2B. Settings
2. Touch Auto-sync. (A check mark indicates the
feature is enabled.)
Note: You need to enable Background data to enable the
auto-sync feature.
Synchronizing Your Google Account
By default, your device doesn’t manage any accounts.
These must be manually added. To have your device
manage an existing Google account:
1. Touch > > Settings > Accounts & sync.
2. Touch Add account > Google.
3. Click Next > Sign in.
Note: If you do not already have a Google account, touch
Create and follow the onscreen prompts to create your
new account. (See “Creating a Google Account” on
page 110.)
4. Touch the Username (@gmail.com) and Password
fields and enter your information.
5. Tap Sign in. Your device then communicates with
the Google servers to confirm your information.
Your existing Gmail account then appears within
the
Manage accounts area of the screen.
Page 55

䡲 Any changes or updates to your Gmail account
are then automatically updated to your device.
To configure Google management settings:
1. Touch > > Settings > Accounts & sync.
2. Touch the Google account name to open the
account’s synchronization settings screen.
3. Touch the types of data you wish to synchronize
(
Sync Picasa Web Albums, Sync Calendar,
Sync Contacts, or Sync Gmail). (A check mark
indicates the feature is enabled.)
4. Touch to return to the previous screen.
Synchronizing Your Corporate Account
By default, your device doesn’t manage any corporate
accounts. These must be manually added.
Note: Once a corporate email account is created, it is
automatically added as a managed account.
To add a new corporate account:
1. Touch > > Settings > Accounts & sync.
2. Touch Add account > Corporate.
3. Follow the onscreen prompts to create your new
corporate email account.
䡲 Any changes or updates to your corporate
account are then automatically updated to your
device.
To configure the corporate management settings:
1. Touch > > Settings > Accounts & sync.
2. Touch the account name to open the account’s
synchronization settings screen.
3. Touch the settings you wish to change.
䡲 Account settings:
● Account name displays the name used by the
device to track the account.
● Your name displays the name used in the
From field within your outgoing email.
● Email check frequency configures the
frequency which the device queries the
remote server for new email changes. Choose
from:
Automatic (Push), Never,
Every 5 minutes, Every 10 minutes,
Every 15 minutes, Every 30 minutes, or
Every hour.
2B. Settings 41
Settings
Page 56

● Amount to synchronize assigns the sync
range for incoming and outgoing email
between your device and your external
exchange server. To specify the period that the
device and server should synchronize email,
choose from:
One week, Two weeks, or
One month.
● Default account assigns this account as the
default used when sending out new email.
● Email notifications displays a status bar icon
() when new email has been received.
● Select ringtone assigns an audible ringtone
when a new or upcoming event is pending.
● Vibrate assigns a vibration when a new or
upcoming event is pending.
● Incoming settings provides access to the
domain, password, and exchange server
parameter fields.
● Sync contacts synchronizes the contacts
between your device and the remote
exchange server.
● Forward with files includes any attached files
with forwarded email messages.
42 2B. Settings
● Signature allows you to create an outgoing
email signature attached to new email sent
from your device.
4. Touch to return to the previous screen.
Search Settings
You can use your device’s search settings to configure
some aspects of Google Web search (for example,
whether it makes suggestions below the Quick Search
Box as you type), and what device features you want to
include in searches.
Configuring the Search Settings
1. Touch > > Settings > Search.
2. Touch any of the following search options to
change the settings:
䡲 Google search settings opens a screen where
you can set your Google search preferences.
● Show web suggestions also includes search
matches from Google’s online search engine.
Page 57

● Search history determines whether you also
wish to include personalized search history
results in the list of matches.
● Manage search history helps to manage the
personalized search history associated with
your current registered Google account.
䡲 Searchable items opens a screen where you can
choose the search categories included in device
searches.
● Categories include: Browser, Contacts, Apps,
Music, and Voicemail.
䡲 Clear search shortcuts erases the history of
recently selected search results.
Messaging Settings
Your device’s advanced messaging capabilities let you
send and receive many different kinds of messages
without placing a voice call.
Adjusting Message Settings
1. Touch > > Messaging > > Settings.
2. Adjust the following fields according to your needs:
䡲 Delete old messages: Enable this option to
automatically delete old messages when a
predetermined limit is reached.
䡲 Text message limit: Set the number of text
messages to save.
䡲 Multimedia message limit: Set the number of
multimedia messages to save.
䡲 Auto-retrieve: Enable this option to automatically
retrieve the entire contents of your MMS message.
When selected, the MMS message header,
message body, and any attachments will
automatically download to your device. If you
disable this option, only the MMS message
header will be retrieved and shown in the
message list.
䡲 Roaming auto-retrieve: Disable this option if you
want only the MMS message headers to
download while roaming. Enable this option to
automatically download your complete
multimedia messages even while roaming.
䡲 Notifications: Enable this option if you wish to
receive a notification on the status bar when a
new text or multimedia message arrives.
2B. Settings 43
Settings
Page 58

䡲 Select ringtone: Set a ringer to sound when a
new message is received. After selecting this
option, select a unique ringtone for new text and
multimedia messages. A sample will play briefly
upon selection.
䡲 Vibrate: Enable this option if you want the device
to vibrate when a new text or multimedia
message is received.
Airplane Mode
Airplane Mode allows you to use many of your device’s
applications when you are in an airplane or in any
other area where making or receiving calls or data is
prohibited. When you set your device to Airplane Mode,
you cannot make or receive any calls or access online
information.
1. Press and hold . The Phone options window
appears.
2. To uch Airplane mode (Airplane mode is OFF) to
enable. Touch
to disable.
– or –
44 2B. Settings
Airplane mode (Airplane mode is ON)
1. Touch > > Settings > Wireless & networks.
2. Touch Airplane mode. (A check mark indicates this
feature is enabled. Touch
disable the feature.)
While in Airplane Mode, the airplane mode icon ( )
will appear on the status bar.
Airplane mode again to
TTY Use With Sprint Service
A TTY (also known as a TDD or Text Telephone) is a
telecommunications device that allows people who are
deaf, hard of hearing, or who have speech or language
disabilities to communicate by telephone.
Your device is compatible with select TTY devices.
Please check with the manufacturer of your TTY device
to ensure that it is compatible with digital cell phones.
Your device and TTY device will connect via a special
cable that plugs into your device’s headset jack. If this
cable was not provided with your TTY device, contact
your TTY device manufacturer to purchase the
connector cable.
Page 59

To turn TTY Mode on or off:
1. Touch > > Settings > Call settings >
TTY mode.
2. Touch an option:
䡲 TTY Off: Disables TTY mode.
䡲 TTY Full: Enables TTY mode.
䡲 TTY HCO: Enables TTY in Hearing Carry Over
mode and you can hear.
䡲 TTY VCO: Enables TTY in Voice Carry Over mode
and you can talk.
The TTY icon ( ) will appear on the status bar when
your device is in TTY mode.
To access the state Telecommunications Relay
Service (TRS) for assistance with TTY calls:
䊳 Dial and touch to reach an
operator.
For additional information about Sprint Relay Services
and TTY compatibility, call Sprint Relay Customer
Service at
800-676-3777 or visit www.sprintrelay.com.
Note: When enabled, TTY mode may impair the audio quality
of non-TTY devices connected to the headset jack.
WARNING: 911 Emergency Calling
Sprint recommends that TTY users make
emergency calls by other means, including
Telecommunications Relay Services (TRS),
analog cellular, and landline communications.
Wireless TTY calls to 911 may be corrupted
when received by public safety answering points
(PSAPs), rendering some communications
unintelligible. The problem encountered appears
related to software used by PSAPs. This matter
has been brought to the attention of the FCC,
and the wireless industry and the PSAP
community are currently working to resolve this.
2B. Settings 45
Settings
Page 60
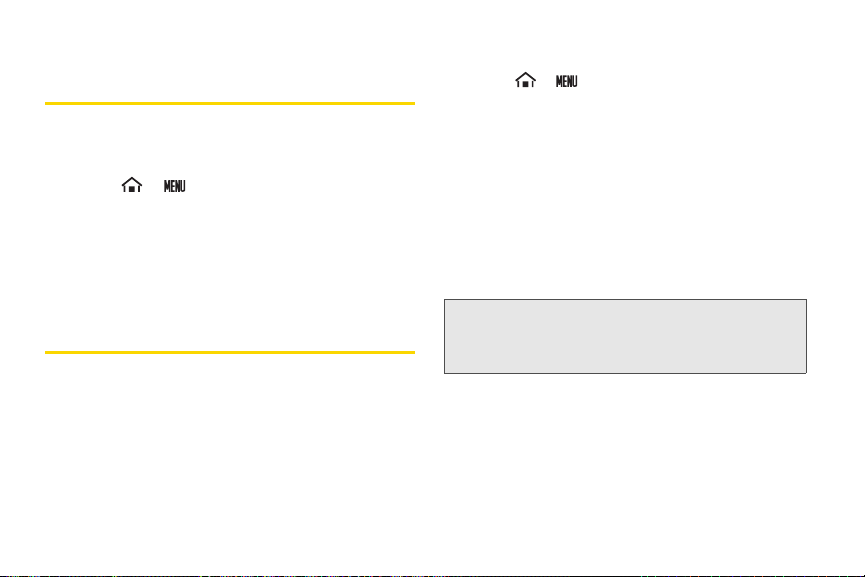
Using the Hearing Aid Device Compatibility Function
Your device has been tested and rated for hearing aid
device compatibility. To use this function effectively, set
the hearing aid option to
On.
1. Touch > > Settings > Sound & display.
2. To uch Hearing Aid. (A check mark indicates this
feature is enabled.)
For more information about hearing aid device
compatibility, see “Using Your Device With a Hearing
Aid Device” on page 126.
Security Settings
Your Device’s Unlock Pattern Feature
You can increase your device’s security by creating a
screen unlock pattern (disabled by default). When
enabled, you must draw the correct unlock pattern on
the screen to unlock and regain access to the device.
46 2B. Settings
Creating an Unlock Pattern
1. Touch > > Settings > Location & security >
Set unlock pattern.
2. Read the information on the screen, and then
touch
Next.
3. Review the onscreen tutorial on pattern creation,
and then touch
4. Draw your pattern by touching your first onscreen
point, and then, without removing your finger from
the screen, drag your finger over adjacent points
until all the points are connected by a gray line and
each is highlighted with a green circle.
Important: You must slide your finger on the screen to create
5. When you have connected at least four dots in a
vertical, horizontal, or diagonal direction, lift your
finger from the screen.
6. Touch Continue to record the pattern .
7. Confirm the new pattern by redrawing it and then
touch
Confirm.
Next.
the pattern and not touch individual dots. If you
make a mistake or a point is not properly
selected, a red circle will appear.
Page 61
The next time you turn on the device or the screen, you
will need to draw the unlock pattern that you created in
the preceding steps.
Note: You can make calls to 911 even if the screen is
locked. Touch Emergency call to open the
Emergency Dialer screen.
Configuring the Unlock Pattern Settings
After an unlock pattern is created, additional options
are available in the Location & security menu.
To hide the unlock drawing pattern:
1. Touch > > Settings > Location & security.
2. Touch Use visible pattern to deselect this option.
䡲 Clearing this option prevents the unlock pattern
from displaying on the unlock screen.
To vibrate the screen when you draw the pattern:
1. Touch > > Settings > Location & security.
2. Touch Use tactile feedback to select the option.
To change the unlock pattern:
1. Touch > > Settings > Location & security >
Change unlock pattern.
2. Draw the current unlock pattern on the screen.
3. Follow steps 4-8 in “Creating an Unlock Pattern” to
register a new unlock pattern.
To reset the unlock pattern:
1. Touch > > Settings > Location & security.
2. Clear the Require pattern check box.
3. Draw the current unlock pattern.
What to do if you have forgotten your pattern:
If you fail to draw the correct unlock pattern on the
screen after five attempts, you are prompted to wait for
30 seconds before you can try again.
䊳 If you have forgotten your screen unlock pattern,
touch
Forgot pattern? and sign in using your
Google Account name and password to create a
new screen unlock pattern before regaining
access to the Home screen.
2B. Settings 47
Settings
Page 62

Setting Visible Password
This feature shows your passwords as you type them.
1. Touch > > Settings > Location & security.
2. To uch th e Visible passwords check box to select
this feature.
Setting Security Storage
This feature allows applications to access secure
certificates.
1. Touch > > Settings > Location & security >
Set password.
2. Enter and confirm your password and touch OK.
Credential storage is enabled.
3. Confirm the Use secure credentials check box is
selected.
Note: You can change the password by touching
Set password and then entering the current and new
passwords.
4. To cancel this feature, touch Clear storage > OK.
48 2B. Settings
Installing Encrypted Certificates From the SD Card
1. Touch > > Settings > Location & security >
Install from SD card.
2. Touch an available certificate.
3. Follow the onscreen instructions.
Application Settings
Application Settings allows you to manage applications
installed in the device.
To install non-Market applications:
1. Touch > > Settings > Applications.
2. Touch Unknown sources. (A check mark indicates
this feature is enabled.)
Page 63

To configure the Manage applications screen:
1. Touch > > Settings > Applications >
Manage applications. The Manage applications
screen appears.
2. Touch for the following options:
䡲 Sort by size: to sort the applications on the
Manage applications screen from largest to
smallest.
䡲 Sort: to sort the applications on the Manage
applications screen alphabetically.
䡲 Filter: to select the applications to be displayed on
the Manage applications screen. Select from
Running, and Downloaded.
To clear an application’s cache or data:
1. Touch > > Settings > Applications >
Manage applications.
2. Touch an application > Clear data or Clear cache.
3. Touch OK to confirm.
To uninstall downloaded applications:
1. Touch > > Settings > Applications >
Manage applications.
2. Touch the application you wish to remove and
Uninstall > OK.
touch
Important: Only applications that you have installed yourself
can be uninstalled. Preinstalled applications
cannot be removed.
To view and control currently running services:
1. Touch > > Settings > Applications >
Running services .
2. Touch an available service to manage it further.
To set options for application development:
1. Touch > > Settings > Applications >
All,
Development.
2. The following options are available:
䡲 USB debugging: to enable debug mode when
USB is connected. Read the disclaimer and touch
OK to confirm.
䡲 Stay awake: to prevent the screen from going into
sleep mode while charging.
䡲 Allow mock locations: to allow mock locations.
Note: Unless you have a specific reason for changing these
settings, you should leave them at the default settings.
Settings
2B. Settings 49
Page 64
Privacy Settings
Using Your Location
You can give permission to use your location for some
Google services, such as Google Search and Google
Maps.
1. Touch > > Settings > Privacy.
2. To uch Use My Location. (A check mark indicates
this feature is enabled.)
Backing Up Your Settings
You can back up your settings to a Google server.
1. Touch > > Settings > Privacy.
2. To uch Back up my settings. (A check mark
indicates this feature is enabled.)
50 2B. Settings
Resetting Your Device
Resetting the device restores all the factory defaults,
including the ringer types and display settings. All data,
including downloaded applications are deleted.
Important: Back up your important data before you perform
1. Touch > > Settings > Privacy >
2. Read the disclaimer and touch Reset phone.
3. If required, draw your unlock pattern to confirm the
4. If you are certain that you would like to restore all
a factory reset of the device.
Factory data reset. (You will see a disclaimer.)
reset process.
factory settings, touch
Erase everything.
Accessibility Settings
When you download an application with an
accessibility feature, it may be listed under Accessibility
settings and its settings might be configured by
touching the application.
To display the list of downloaded applications with
accessibility features:
䊳 Touch > > Settings > Accessibility.
Page 65

⽧ Viewing the Call Log (page 51)
2C. Call Log
⽧ Call Log Options (page 52)
⽧ Making a Call From the Call Log (page 52)
⽧ Saving a Number From the Call Log (page 52)
⽧ Erasing the Call Log (page 53)
Shortcut: You can also press from standby mode to
Tip: Drag the status bar down to reveal the Notifications panel
Note: The call log records only calls that occur while the
display your call log.
to see a missed call notification. See “Missed Call
Notification” on page 26.
device is turned on. If a call is received while your
device is turned off, it will not be included in the call log.
If you return a call from the voicemail menu, it will not be
included in your device’s call log.
Viewing the Call Log
The call log is a list of the phone numbers (or Contacts
entries) for calls you placed, accepted, or missed. The
call log makes redialing a number fast and easy. It is
continually updated as your device automatically adds
new numbers to the beginning of the list.
Each entry contains the phone number (if it is
available) and Contacts entry name (if the number is in
your Contacts).
䊳 Touch > > Call log.
Call Log Icons
You can determine if an entry was an incoming,
outgoing, or missed call from the icons shown below.
= Incoming Call
= Outgoing Call
= Missed Call
Call Log
2C. Call Log 51
Page 66
Call Log Options
䊳 Touch a call log entry to open the overview page
where the call details are displayed at the top and
any available options are listed underneath:
䡲 Call [contact] to return the phone call.
䡲 Send text message to send a text message to the
entry.
䡲 View contact/Add to contacts to display the entry's
information or save the number to Contacts.
䊳 Touch and hold an entry to display the options
menu:
䡲 Call [number] to return the phone call.
䡲 View contact/Add to contacts to display the entry’s
information or save the number to Contacts.
䡲 Edit number before call to edit the number and
then call the number.
䡲 Send text message to send a text message to the
entry.
䡲 Remove from call log to delete the call information
from call log.
52 2C. Call Log
䊳 Touch > Clear call log to delete all call log
entries.
Making a Call From the Call Log
䊳 Press and touch adjacent to the entry you
would like to call.
Saving a Number From the Call Log
1. Touch an entry.
2. To uch Add to contacts.
3. From the Contacts screen, touch
Create new contact or touch an existing Contact
entry name to save the number to an existing entry.
4. Touch any field to enter the details.
5. Enter all the necessary details and touch Done to
save.
Once you have saved the number, the call log list
reflects the newly saved data.
Page 67

Note: You cannot save phone numbers from calls identified
as Unknown, No Caller ID, Restricted or
Private Number.
Erasing the Call Log
You can delete either an individual or all current entries
from your call log list.
To delete a single call log entry:
1. Press and touch and hold an entry you want
to delete.
2. Touch Remove from call log.
To delete all call log entries:
䊳 Press and touch > Clear call log.
Call Log
2C. Call Log 53
Page 68

⽧ Displaying the Contacts List (page 54)
2D. Contacts
Add field
button
Remove
field button
Field label
button
⽧ Adding a New Contacts Entry (page 54)
⽧ Contacts Entry Options (page 55)
⽧ Editing a Contacts Entry (page 56)
⽧ Assigning a Ringer Type for an Entry (page 56)
⽧ Assigning a Picture to an Entry (page 56)
⽧ Finding Contacts Entries (page 57)
⽧ Deleting Entries (page 57)
⽧ Adding Entries to Your Favorites (page 57)
Displaying the Contacts List
䊳 On the Home screen, touch Contacts.
Your device automatically sorts the Contacts entries
alphabetically.
54 2D. Contacts
Adding a New Contacts Entry
1. On the Home screen, touch Contacts > >
New contact.
– or –
Enter a phone number on the Phone screen and
touch
2. Touch any field to launch the keyboard, and enter
the name, phone number, email, and other contact
details.
> Add to contacts > Create new contact.
Page 69
䡲 Touch to assign a picture to the entry. See
“Assigning a Picture to an Entry” on page 56.
䡲 To add more fields, touch the Add field button. To
remove a field, touch the
䡲 To change the field label, touch the Field label
Remove field button.
button and touch an available option.
䡲 Scroll up or down to move through the contact
fields.
3. To save a contact, touch Done.
Tip: ICE - In Case of Emergency
To make it easier for emergency personnel to identify
important contacts, you can list your local emergency
contacts under “ICE” in your device’s Contacts list. For
example, if your mother is your primary emergency
contact, list her as “ICE–Mom” in your Contacts. To list
more than one emergency contact, use “ICE1–___,”
“ICE2–___,” etc.
Contacts Entry Options
䊳 Touch the picture ID ( ) to display icons of
available applications, and then touch an icon to
launch an application.
䊳 Touch, or touch and hold, a Contacts entry for the
following options:
䡲 Call [number/label] or Call contact to call the
contact.
䡲 Tex t [number/label] or Text con tac t to send a text
message to the contact.
䡲 Email [label] to send an email to the contact.
䡲 View contact to display the contact's overview
page.
䡲 Add to favorites/Remove from favorites to add the
contact to, or remove the contact from, the
favorites list.
䡲 Edit contact to edit the contact's details.
䡲 Delete contact to delete the current Contacts entry
from your device.
䊳 Touch a Contacts entry and then touch :
䡲 Edit contact to edit the entry.
䡲 Share to share the data via messaging.
䡲 Options to assign a ringtone to the entry or to
send calls from the entry directly to voicemail.
䡲 Delete contact to delete the entry.
2D. Contacts 55
Contacts
Page 70

Editing a Contacts Entry
Assigning a Picture to an Entry
1. From the Contacts list, touch and hold the entry
you want to edit, and touch
Edit contact.
2. Touch the field you wish to edit, and then add or
edit the information.
3. Touc h Done to save your change.
Assigning a Ringer Type for an Entry
Assign a ringer type to a Contacts entry so that you can
identify the caller by the ringer type.
1. From the Contacts list, touch an entry > >
Options.
2. To uch Ringtone, select an option and touch OK.
56 2D. Contacts
Assign a picture to display each time a certain contact
calls you.
1. From the Contacts list, touch and hold the entry
you want to assign a picture to, and touch
Edit contact.
2. Touch and select an image to assign in one of
the following ways:
䡲 Touch and select an image from your Gallery.
䡲 Touch on the top right of the screen to take a
new picture and assign it to this entry. Touch
to return to your Gallery and touch and select the
new image.
3. Crop the image as required and touch Save to
assign the image.
Page 71

Finding Contacts Entries
1. From the Contacts list, touch .
2. Enter the contact's name. As you type, contacts
with matching names appear below the search
box.
3. Touch a matching contact in the list to open its
Details screen.
Deleting Entries
1. From the Contacts list, touch and hold the entry
you want to delete, and touch
2. Touch OK to confirm the deletion.
Delete contact.
Adding Entries to Your Favorites
The Favorites tab is a listing that can help you quickly
access your most used or preferred Contacts entries.
1. On the Home screen, touch Contacts.
2. Touch the contact you want to add to Favorites.
3. Touch the star to the right of the contact’s name.
The star turns gold.
Contacts
2D. Contacts 57
Page 72

⽧ Calendar (page 58)
2E. Calendar & Tools
⽧ Alarm Clock (page 61)
⽧ Calculator (page 63)
⽧ Updating Your Device (page 63)
Calendar
Your Calendar helps organize your time and reminds
you of important events.
Viewing the Calendar
1. Tou ch > > Calendar.
Note: If you have not already signed into your Google
account via your device, you may be asked to do so
before you can access the Calendar. (See “Creating a
Google Account” on page 110.)
58 2E. Calendar & Tools
2. To change a view, touch and select Agenda,
Day, Week, Month, or Toda y. Touch to hide the
menu options.
Adding an Event to the Calendar
1. On the Calendar screen, touch a day to which you
would like to add an event and touch
New event.
2. Touch the What field and enter a title for the event.
3. Select a From/To dates for the event by touching
the corresponding fields, and adjusting the month,
day, and year by tapping + or -.
䡲 Touch Set when finished.
4. Select a time for the event by touching the time
field and then adjusting the hour and minute by
tapping + or -.
䡲 Touch the AM or PM button to change the value
when the 24 hour setting is not on. See “Adjusting
the Date and Time Manually” on page 38.
䡲 Touch Set when finished.
5. Touch the All day field to assign this as an all day
event. If assigned, the time fields are removed.
>
Page 73

6. Enter a location for the event in the Where field.
7. Enter a description for the event in the Description
field.
8. Enter the email addresses of the people you want
to invite to the event in the
Guests field. If they use
Google Calendar, they’ll receive an invitation in
their calendar as well as by email.
9. Select a recurrence cycle for the event by touching
the
Repetition field.
10. Select a reminder time by touching the Reminders
field.
䡲 Touch - to remove a Reminder.
䡲 Touch + to enter additional Reminder.
Note: A maximum of five Reminder fields can be added.
11. Touch Done to save the event.
Event Reminders
When you have an upcoming event, the calendar icon
appears on the status bar.
1. Touch the status bar, and then slide your finger
down the screen to open the Notifications panel.
2. Touch an upcoming event name from the
onscreen list to display the event within the
Calendar notifications screen.
3. Choose from the following options:
䡲 Touch an event item on the list to edit the
reminder option.
䡲 Touch Snooze all to postpone all event reminders
for five minutes.
䡲 Touch Dismiss all to dismiss all event reminders.
䡲 Touch to keep these reminders in place and
close the Notifications panel.
To configure event reminder settings:
1. From the Calendar screen, touch > More >
Settings.
2. Configure the following options:
䡲 Set alerts & notifications to specify how you are
reminded of upcoming events,
Status bar notification, or Off. You must have a
Alert,
reminder assigned to an event for this to be
active.
䡲 Select ringtone to select an audio ringtone that will
sound as a reminder. Touch a ringtone to play an
2E. Calendar & Tools 59
Calendar / Tools
Page 74

audio sample. Touch OK to accept the ringtone
assignment.
䡲 Vibrate to add a vibration feature to the reminder.
This is useful if your device is muted or you are in
a noisy environment.
䡲 Default reminder time to assign a default time for
every new event reminder. This becomes the
default reminder time.
3. Touch to return to the calendar.
Viewing Events
1. Tou ch > > Calendar > > Agenda.
2. Touch an event to display the details.
Going to the Current Day’s Calendar Menu
䊳 From the Calendar screen, touch > Tod ay.
Editing an Existing Event
1. Tou ch > > Calendar > > Agenda.
2. Touch an event to reveal the event details.
60 2E. Calendar & Tools
3.
Tou ch >
event, you will be prompted to select
Change only this event, Change all events in the series
or
Change this and all future events
Edit event
. If the event is a repeating
.
4. Edit the name, location, repetition, reminders, etc.
5. Touch > Show extra options for further options.
䡲 Shown me as: Select your status to display as
Busy or Available.
䡲 Privacy: Select your privacy setting from Default,
Private, or Public.
6. Scroll to the bottom of the page and touch Done to
save the changes.
Erasing a Day’s Events
1. Touch > > Calendar > > Agenda.
2. Touch an event to reveal the event details.
3. Touch > Delete event > OK.
,
Page 75
Note: If the day for which you are erasing events contains a
repeating event, you will be prompted to select
Only this event, This & future events, or All events.
Select Only this event to erase a single occurrence,
This & future events to erase this event going forward,
All events to erase all occurrences of the event (past/
present/future), or Cancel
repeating event.
to cancel the deletion of the
Hiding Declined Events
䊳 From the Calendar screen, touch > More >
Settings > Hide declined events.
Alarm Clock
Your device comes with a built-in alarm clock that has
multiple alarm capabilities.
Setting an Alarm
1. Touch > > Alarm Clock.
Note: When you first open the alarm clock, three alarms are
set up by default and ready for you to customize. These
alarms are turned off by default.
2. Touch an alarm to select it.
Note: A new alarm can also be created by touching >
Add alarm.
3. Touch the Time field to adjust the hour and minute
by tapping + or -.
䡲 Touch the AM or PM button to change the value if
the 24 hour setting is not on.
䡲 Touch Set when finished.
4. Touch Ringtone to se lect a ringtone that w ill pl ay as
an alarm.
䡲 Touch a ringtone to hear a sample.
䡲 Touch OK to accept the ringtone assignment.
5. Touch Vibrate to add a vibration feature to the
alarm.
6. Touch the Repeat field to select a repeat status for
the alarm.
䡲 Select the days you want the alarm to be active
and touch
OK.
7. Enter a unique name for this alarm by touching the
Label field, entering a new label, and touching OK.
2E. Calendar & Tools 61
Calendar / Tools
Page 76

8.
Tou ch Done to return to the Alarm clock. A check
mark indicates the alarm is set for the event.
Note: The number of hours and minutes left before the alarm
goes off is briefly displayed onscreen after you set the
new alarm time.
To delete an Alarm:
1. Tou ch > > Alarm Clock.
2. Select an alarm.
3. Touc h > Delete alarm.
To customize the onscreen clock:
1. Tou ch > > Alarm Clock.
2. Touch the onscreen alarm clock.
3. Scroll your finger across the bottom field to view
available options.
4. Touch the desired image to activate the new clock
face.
62 2E. Calendar & Tools
To hide the onscreen clock:
1. Touch > > Alarm Clock.
2. Touch > Hide clock.
Alarm Settings
䊳 From the Alarm clock screen, touch > Settings.
䡲 Alarm in silent mode to sound the alarm even
while the device is in silent mode.
䡲 Alarm volume to set the alarm volume.
䡲 Snooze duration to set the snooze duration from 5
to 30 minutes in 5 minute intervals.
䡲 Side button behavior to select the behavior of the
side buttons when pressed while the alarm
sounds. Choose from:
None, Snooze, or Dismiss.
Page 77

Calculator
Your device comes with a built-in calculator.
1. Touch > > Calculator.
2. Enter numbers by touching the onscreen keys.
䡲 Touch to clear a number.
䡲 Touch and hold to clear an entire number.
䡲 Touch > Advanced panel to access more
advanced features such as (Sine),
(Cosine), (Tangent) etc.
3. Touch to close the calculator.
Updating Your Device
You can update your device using the Update options.
䊳 From the Home screen, touch > Settings >
About phone.
䡲 Update Android to download and install Android
updates. Select
Scheduled Check.
Check for Android Updates Now or
䡲 Update Firmware to automatically download and
install any available updates. You may be required
to power your device off and back on to complete
the software upgrade.
䡲 Update Profile to automatically update your online
user profile information. If you choose to change
your user name and select a new one online, you
must then update the user name on your device.
䡲 Update PRL to automatically update the PRL
(preferred roaming list)
Note: You can also update your device from the Sprint Zone.
(See page 111.)
.
2E. Calendar & Tools 63
Calendar / Tools
Page 78

⽧ Automatic Speech Recognition (ASR) (page 64)
2F. Voice Services
⽧ Text-to-Speech (page 65)
Automatic Speech Recognition (ASR)
You can use your device’s built-in automatic speech
recognition (ASR) software (Voice Dialer) to dial a phone
number in your Contacts or to launch device functions. All
you have to do is talk into the device, and ASR will
recognize your voice and complete tasks by itself.
Activating the Voice Dialer
䊳 Tou ch > > Voice Dialer.
Shortcut: Press and hold .
The device prompts you to say a command from the
list displayed onscreen. When the application
64 2F. Voice Services
recognizes the command, it executes the command
right away.
If the application does not recognize the number,
name, or application name, it will find the most likely
matches and display a list. Touch a selection or touch
Cancel to exit the Voice Dialer.
Tip: Use ASR in a quiet environment so it can accurately
recognize your commands.
Making a Voice Call With the Voice Dialer
1. Press and hold .
2. When prompted to speak, say “Call [contact]” or
“
Dial [number].”
䡲 For example, say “Call John Smith on mobile,” to
call John Smith’s mobile phone. Your device dials
the number stored for the contact “John Smith”
with the label “Mobile.”
Page 79

Opening an Application With the Voice Dialer
1. Press and hold .
2. When prompted to speak, say “Open [application
name].”
䡲 For example, say “Open Calendar,” to open the
Calendar. The application screen is displayed.
Opening a Settings Menu With the Voice Dialer
1. Press and hold .
2. When prompted to speak, say “Open [settings menu
name].”
䡲 For example, say “Open sound & display settings.”
The settings menu screen is displayed.
Text-to-Speech
Your device can convert text into speech in some
downloaded applications. You may select the language
you hear or adjust its speed.
1. Touch > > Settings > Text-to-speech.
2.
Touch
Install voice data
the voice data from Android Market. (You will be
asked to set up a Google Account if you have not
already done so. See “Creating a Google Account ”
on page 110.) Once the data is installed, you can
access other Text-to-speech menus.
3. Touch Speech rate and select a speed.
4. Touch Language and select a language.
5. Touch Listen to an example to play a short
demonstration of the set speech synthesis.
6. Touch the Always use my settings check box to
keep your settings.
and download and install
2F. Voice Services 65
Voice Services
Page 80

⽧ Your Device’s microSD Card and Adapter (page 66)
2G. microSD Card
⽧ microSD Card Settings (page 68)
⽧ Connecting Your Device to Your Computer (page 68)
⽧ Important Connection Information (page 69)
Your Device’s microSD Card and Adapter
The microSD Card
Your device is equipped with a microSDTM (Secure
Digital) memory card to expand the device’s available
memory space. It allows you to store images, videos,
and music data in your device.
Note: You cannot download application files to the microSD
card.
66 2G. microSD Card
Inserting the microSD Card
1. Open the microSD card slot cover.
2. Insert a microSD card into the slot
with the metal contacts facing the
back of the device.
3. Gently push the microSD card until
it snaps into place.
4. Close the microSD slot cover.
Note: Be sure to use only recommended microSD cards (up
to 32GB). Using non-recommended microSD cards
could cause data loss and damage your device.
Removing the microSD Card
When you need to remove the
device is turned on, you must unmount the
avoid damaging it or corrupting stored data.
1. Touch > > Settings >
SD card, USB Mass Storage & phone storage.
2. Touch Unmount SD card.
3. Open the microSD card slot cover.
4. Gently push the microSD card inward to eject it.
microSD card
while the
card
first to
Page 81

5. Remove the card from the slot and close the slot
cover.
Note: You can easily damage the microSD card and its
adapter by improper operation. Please be careful when
inserting, removing, or handling it.
DO NOT remove a microSD card while files are being
accessed or transferred. Doing so will result in loss or
damage of data.
Make sure your battery is fully charged before using the
microSD card. Your data may become damaged or
unusable if the battery runs out while using the
microSD card.
microSD Adapter
The supplied microSD adapter allows you to use
microSD cards in other SD-compatible devices, like
computers, cameras, and printers. Before using the
microSD card with an SD-compatible device, you will
need to insert the microSD card into the microSD
adapter.
To insert the microSD card into the microSD adapter:
䊳 With the label side of the microSD card facing up,
insert the card into the supplied microSD adapter,
and gently slide the card until it is fully inserted.
To remove the microSD card from the microSD adapter:
䊳 Hold the front edge of the microSD card, and
gently pull it out to remove it from the adapter.
Write Protection
The microSD adapter has a built-in Write Protection
lock to prevent accidental overwriting or removal of
your data when the microSD card and adapter are
inserted in another device.
䊳 Slide the Write Protection lock tab down into the
“Lock” position to prevent overwriting of data. To
allow data to be added or removed from the
microSD card, slide the Write Protection lock tab
up into the normal position.
microSD Card
2G. microSD Card 67
Page 82
microSD Card Settings
Viewing Card and Device Memory
Your device allows you to review the memory allocation
of both your device’s internal storage and that of the
microSD card.
1. Touch > > Settings >
SD card, USB Mass Storage & phone storage.
2. Review the available information.
䡲 The storage capacity page is divided into two
sections:
3. Touch to return to the previous page.
Formatting the microSD Card
Formatting a microSD card permanently removes all
files stored on the card.
1. Touch > > Settings >
SD card, USB Mass Storage & phone storage.
2. To uch Unmount SD card to release the microSD
card from its use by the device. The icon
68 2G. microSD Card
SD card and Internal phone storage.
appears on the status bar to indicate the card is
unmounted.
3. Once released, touch Format SD card >
Format SD card > Erase everything.
䡲 Once completely formatted, the card is
automatically remounted (reconnected for use by
the device).
Important: The formatting procedure erases all the data on
the microSD card, after which the files CANNOT
be retrieved. To prevent the loss of important data,
please check the contents before you format the
card.
Connecting Your Device to Your Computer
Before using your device’s mass storage capabilities,
you need to prepare your device’s data services to
synchronize with your desktop or laptop computer.
Once you have connected the device to the computer,
you can transfer your data to or from the microSD card.
Page 83

1. Connect your device to your computer using a
compatible USB cable. (Wait for the connection to
be completed. When connected, the host
computer will automatically detect your device.)
2. The USB icon ( ) now appears on the left side of
the status bar on your device.
3. Drag the status bar down, or from the Home
screen, touch >
Notifications to open the
Notifications panel.
4. Touch USB connected > Mount to copy files
between your computer and your device's
microSD card.
5. Locate the newly created drive letter on your
computer. You can now begin to use the microSD
card as a storage device.
To remove the connection:
䊳 When you have finished transferring data, click the
USB device icon on you computer's taskbar, and
follow the onscreen instructions to safely unplug
the USB cable.
Important Connection Information
䢇 No driver installation is required for Windows 2000/
ME/XP/Vista/7 users. If you use Windows 98/98SE,
you have to download and install the USB Mass
Storage Driver from the Sprint website at
www.sprint.com.
䢇 To avoid loss of data, DO NOT remove the USB
cable, the microSD card, or the battery while files are
being accessed or transferred.
䢇 DO NOT use your computer to change or edit folder
or file names on the microSD card, and do not
attempt to transfer large amounts of data from the
computer to the microSD card. Doing so may cause
the microSD card to fail.
䢇 DO NOT turn off or restart your computer, or put it
into standby mode, while using a mass storage
device. Doing so will result in loss or damage of data.
䢇 The internal microSD card can only be mounted for
use by either the device or a connected computer.
Prior to accessing the card via a different method, it
microSD Card
2G. microSD Card 69
Page 84

must first be unmounted from its current device
(device or computer-USB).
Important: The internal microSD card can only share a
connection with one device at a time, either your
device or your computer (via its USB connection),
not both.
70 2G. mi cr oSD Card
Page 85

2. Using the device’s display screen as a viewfinder,
2H. Camera
aim the camera lens at your subject.
⽧ Taking Pictures (page 71)
⽧ Recording Videos (page 74)
⽧ Opening Gallery (page 76)
Note: You need to insert a microSD card into your device to
use the camera and camcorder features. All pictures
and videos will be stored on the inserted microSD card.
Taking Pictures
Taking pictures with your device’s built-in camera is as
simple as choosing a subject, pointing the lens, and
pressing a button.
1. Touch > > Camera to activate camera
mode.
Shortcut: To activate camera mode, you can also press and
hold the camera button ( ). (See illustration
on page 9.)
3. Press the camera button or touch until the
shutter sounds. (Your device automatically saves
the picture to the DCIM folder on the microSD
card.)
Camera Settings
1. From camera mode, touch > Settings to open
the camera settings.
2. Touch one of the following options:
䡲 White balance to compensate for color differences
found within different lighting conditions. Choose
from:
Auto, Incandescent, Daylight, Fluorescent, or
Cloudy.
2H. Camera 71
Camera
Page 86

䡲 Color effect to add a color effect to the image.
Choose from:
None, Mono, Sepia, Negative, or
Aqua.
䡲 Store location to activate the built-in GPS
application and attach the current location
information to the pictures you will take. Choose
from:
On or Off.
䡲 Lens shading to adjust the light volume around the
lens. Choose from:
䡲 Night mode to boost the camera’s sensitivity in low
light levels. Choose from:
䡲 Picture size to select from: 3.2M Pixels, 2.0M Pixels,
Enable or Disable.
Enable or Disable.
0.8M Pixels, or VGA.
䡲 Picture quality to select from: Super fine, Fine, or
Normal.
䡲 Focus mode to select the range in which the lens
can focus. Choose from:
䡲 Auto exposure to select the exposure metering
range from:
Frame average, Center weighted, or
Auto, Macro, or Off.
Spot metering.
3. Touch to return to the previous screen.
72 2H. Cam era
Picture Options
1. From the camera mode, touch > Gallery >
.
2. Touch one or more images to select, or one of the
following options:
䡲 Select All to select all images in the folder.
䡲 Deselect All to cancel all selection.
3. Touch one of the following options. Some options
deal only one image at a time:
䡲 Share to share the image via one of the following
options:
● Messaging to insert the image into a new
outgoing MMS message (multimedia text
message).
● Picasa to upload the image to your Picasa
account. Touch
process.
● Bluetooth to send the image to another device
or computer via Bluetooth.
● Gmail to attach the image to a new Gmail
message.
Upload to complete the
Page 87

● Send Email to attach the image to a new email
message.
䡲 Delete to delete the image.
䡲 More to access additional image options:
● Details to display image details such as file
name, file type, date taken and folder name.
● Set as to assign the image to either a
Contact’s display image or the wallpaper. See
“Assigning Pictures” below.
● Crop to crop the image. Touch Save to save
the cropped image as a separate data.
● Rotate Left to rotate the image
counterclockwise.
● Rotate Right to rotate the image clockwise.
Assigning Pictures
After taking a picture, assign it as a picture ID for a
Contacts entry or as the Home screen background
image (wallpaper).
1. Take a picture. (See “Taking Pictures” on page 71.)
2. Touch > Gallery.
3. Touch a thumbnail to open the image.
4. Touch > More > Set as, and select an option:
䡲 Contact icon to assign the picture to a Contacts
entry as a picture ID. Touch an entry from the
Contacts tab, crop the image and touch
Save to
assign the picture.
䡲 Wallpaper to assign the picture as a background
image. Crop the image and touch
Save to assign
the picture.
Playing a Slideshow
1. From the pictures gallery, touch a thumbnail to
open the image.
2. Touch Slideshow to start a slideshow.
䡲 To stop the slideshow, touch the screen.
2H. Camera 73
Camera
Page 88

Recording Videos
In addition to taking pictures, you can record, view, and
send videos with your device’s built-in video camera.
1. Activate camera mode, and then move the slider to
the Video icon .
2. Using the device’s display screen as a viewfinder,
aim the camera lens at your subject.
3. Press the camera button or touch to begin
recording.
4. Press the camera button again or touch to stop
recording. (Your device automatically saves the
video within the DCIM folder on the microSD card.)
74 2H. C am er a
Previewing Videos
䊳 Touch a video to play. Touch to rewind/
pause/fast forward the video clip.
Camcorder Settings
1. From camcorder mode, touch > Settings.
2. Touch one of the following options:
䡲 Video quality to select from: WVGA, VGA, CIF,
QVGA, or QCIF.
䡲 Video duration to select the maximum recording
time per video clip. Choose from:
30 seconds (for MMS), 10 mi nut es, 30 minutes, or
60 minutes.
Page 89

䡲 White balance to compensate for color differences
found within different lighting conditions. Choose
from:
Auto, Incandescent, Daylight, Fluorescent, or
Cloudy.
䡲 Color effect to add a color effect to the image.
Choose from:
None, Mono, Sepia, Negative, or
Aqua.
䡲 Lens Shading to adjust the light volume around
the lens. Choose from:
䡲 Night mode to boost the camcorder’s sensitivity in
low light levels. Choose from:
䡲 Focus mode to select the range the lens focuses.
Choose from:
䡲 Auto exposure to select the exposure metering
range from:
Auto, Macro, or Off.
Frame average, Center weighted, or
Enable or Disable.
Enable or Disable.
Spot metering.
3. Touch to return to the previous screen.
Video Options
1. From camcorder mode, touch > Gallery >
.
2. Touch one or more images to select or one of the
following options:
䡲 Select All to select all images in the folder.
䡲 Deselect All to cancel all selection.
3. Touch one of the following options:
䡲 Share to share the video clip via one of the
following options:
● Messaging to insert the video clip into a new
outgoing MMS message (multimedia text
message).
● Yo uTube to upload the video clip to your
YouTube account. Touch
Upload to complete
the process.
● Bluetooth to send the video clip to another
device or computer via Bluetooth.
● Gmail to attach the video clip to a new Gmail
message.
● Send Email to attach the video clip to a new
email message.
䡲 Delete to delete the video clip.
2H. Camera 75
Camera
Page 90

䡲 More > Details to display video clip details such
as file name, file type, date taken, and folder
name.
Opening Gallery
You can use Gallery to view pictures and play videos
that you’ve taken with your device’s camera,
downloaded, or copied onto your microSD card.
1. Tou ch > > Gallery.
76 2H. Camera
2. Scroll left or right to view more albums.
3. Touch an album to open it.
4. Touch an image to view a picture or a video.
Gallery Options
The Gallery options are available by touching to
edit, share, and perform other operations to the images
in your Gallery. See “Picture Options” on page 72 and
“Video Options” on page 75 for details.
Additional options may also be available:
䢇 Touch on the top right to activate camera mode.
Touch to return to Gallery.
䢇 Touch an album and then touch on the top
right to change the view between spread and
stacked. The images are sorted according to the
date they were captured in stacked view.
䢇 Touch an image and then touch Slideshow to view
the images in the folder slideshow. (See “Playing a
Slideshow” on page 73.).
Page 91

⽧ Turning Bluetooth On and Off (page 77)
2I. Bluetooth
⽧ Using the Bluetooth Settings Menu (page 78)
⽧ Pairing Bluetooth Devices (page 78)
About Bluetooth
Bluetooth is a short-range communications technology
that allows you to connect wirelessly to a number of
Bluetooth devices, such as headsets and hands-free
car kits, and Bluetooth-enabled handhelds, computers,
and wireless phones. The Bluetooth communication
range is usually up to approximately 30 feet.
Turning Bluetooth On and Off
By default, your device’s Bluetooth feature is set to Off.
Bluetooth operates in three modes:
䢇 On: Bluetooth is turned on. Your device can detect
other Bluetooth devices but other devices cannot
detect your device.
䢇 Discoverable: Bluetooth is turned on. Your device can
detect other Bluetooth devices and other devices
can also detect your device for 120 seconds.
䢇 Off: Bluetooth is turned off. Information cannot be
sent or received when Bluetooth is turned off.
Note: Activating Bluetooth can drain your battery faster and
reduce your available usage times. It is recommended
that if you do not need it active, turn it off. It is also
recommended to turn off your Bluetooth within
locations that prohibit its use.
To turn Bluetooth on:
1. Touch > > Settings > Wireless & networks.
2. Touch the Bluetooth field to select the feature. (A
check mark indicates this feature is enabled.)
When active, appears on the status bar.
3. To make your device discoverable, touch
Bluetooth settings, and then select the Discoverable
Bluetooth
2I. Bluetooth 77
Page 92
check box to enable other Bluetooth devices to
detect your device for 120 seconds.
To turn Bluetooth off:
1. Touch > > Settings > Wireless & networks.
2. To uch th e Bluetooth field to deactivate Bluetooth.
Bluetooth Status Indicators
The following icons show your Bluetooth connection
status at a glance:
– Bluetooth is active
– Bluetooth data connection is active
Using the Bluetooth Settings Menu
The Bluetooth Settings menu allows you to set up your
device’s Bluetooth service.
To access the Bluetooth Settings menu:
1.
Touch > >
Bluetooth settings
䡲 Verify your Bluetooth is active.
78 2I. Bl uetooth
Settings
.
>
Wireless & networks
2. Set your Bluetooth options: Device name,
Discoverable, and Scan for devices.
䡲 Touch Device name and rename your device for
Bluetooth. Touch
䡲 Touch Discoverable to make your device visible,
OK to save.
allowing it to be detected by other devices for
pairing and communication.
Note: Your device is visible for up to 120 seconds (two
minutes). This value appears as a countdown within
Discoverable field.
the
䡲 Touch Scan for devices to search for visible
external Bluetooth-compatible devices such as
headsets, devices, printers, and computers.
Pairing Bluetooth Devices
Paired Devices
The Bluetooth pairing process allows you to establish
trusted connections between your device and another
>
Bluetooth device. When you pair devices, they share a
passkey, allowing for fast, secure connections while
bypassing the discovery and authentication process.
Page 93

To pair your device with another Bluetooth device:
1. Verify your Bluetooth is active.
2. From the Bluetooth settings page, touch
Discoverable. Your device must be visible to
successfully pair with an external device.
3. Touch Scan for devices. Your device will display a
list of discovered in-range Bluetooth devices.
4. Touch a device you would like to pair with, enter a
passkey, if necessary, and touch
Note: Some devices may be paired by touching Pair when
the option is available.
OK.
5. The device will be paired when it enters the same
passkey.
Note: For car kits, enter “0000” or “1234.” If it does not work,
consult the Bluetooth devices documentation.
Due to different specifications and features of other
Bluetooth-compatible devices, display and operations
may be different, and functions such as transfer or
exchange may not be possible with all Bluetoothcompatible devices.
Note: Pairing between two Bluetooth devices is a one-time
process. Once a pairing has been created, the devices
will continue to recognize their partnership and
exchange information without having to re-enter a
passkey again.
To disconnect Bluetooth devices:
1.
Touch > >
Bluetooth settings
Settings
.
>
Wireless & networks
2. Under the Bluetooth devices section, touch and
hold the connected device.
3. On the options menu, touch Disconnect.
To unpair Bluetooth devices:
1.
Touch > >
Bluetooth settings
Settings
.
>
Wireless & networks
2. Under the Bluetooth devices section, touch and
hold the paired device.
3. On the options menu, touch Unpair or
Disconnect & unpair (when connected).
2I. Bluetooth 79
>
Bluetooth
>
Page 94

Page 95

Section 3
Sprint Service
Page 96

⽧ Voicemail (page 82)
3A. Sprint Service:
The Basics
⽧ Messaging (page 85)
⽧ Caller ID (page 87)
⽧ Call Waiting (page 88)
⽧ Making a 3-Way Call (page 88)
⽧ Call Forwarding (page 88)
⽧ Roaming (page 89)
Voicemail
Always use a password to protect against unauthorized
access.
1. Touch > > Voicemail.
2. In the Personalize your voicemail dialog box, touch
Personalize now.
3. Follow the voice prompts to:
䡲 Create your password.
䡲 Record your name announcement.
䡲 Record your greeting.
Note: Voicemail Password
Sprint strongly recommends that you create a
password when setting up your voicemail to protect
against unauthorized access. Without a password,
anyone who has access to your device is able to
access your voicemail messages.
Setting Up Your Voicemail
Your device automatically transfers all unanswered
calls to your voicemail, even if your device is in use or
turned off. You should set up your Sprint Voicemail and
personal greeting as soon as your device is activated.
82 3A. Sprint Service: The Basics
Visual Voicemail
Visual voicemail gives you a quick and easy way to
access your voicemail. Now you can find exactly the
message you are looking for without having to listen to
every voicemail message first. This new feature
periodically goes out to your voicemail and gathers the
Page 97

caller information from all of the current voicemail
messages. It then compiles a list of all the caller names
and numbers along with the length of time and priority
level of each voicemail message.
Voicemail Notification
There are several ways your device alerts you to a new
message:
䢇 By sounding the assigned ringer type.
䢇 By the LED blinking green (slow).
䢇 By displaying at the top of your screen.
New Voicemail Message Alerts
When you receive a new voice message, your device
alerts you and prompts you to check your voicemail.
To check your voicemail:
1. Touch > > Voicemail.
2. Touch the voicemail you want to listen to.
Visual Voicemail Settings
䊳 Touch > > Voicemail > > Settings to
display the following options:
䡲 Notifications: to select how you want to be notified
for new voicemail messages.
䡲 Pictures: to select whether to show or hide
pictures associated with Contacts entries.
䡲 Speakerphone: to select whether to enable
speakerphone.
䡲 Change greeting: to change your voicemail
greeting message.
䡲 From name: to specify the name to be attached to
your voice messages.
䡲 Check for upgrade: to see if an update is available
for the application software.
3A. Sprint Service: The Basics 83
Sprint Service
Page 98

Note: When you are roaming off the Nationwide Sprint
Network, you may not receive notification of new
voicemail messages. Sprint recommends that you
periodically check your voicemail by dialing 1 + area
code + your wireless phone number. When your
voicemail answers, touch and enter your
password. Roaming rates apply when you access
voicemail while roaming off the Nationwide Sprint
Network.
Your device accepts messages even when it is turned
off. However, your device notifies you of new messages
only when it is turned on and you are in a Sprint service
area.
Retrieving Your Voicemail Messages
You can manually retrieve your messages directly from
your wireless device or from any other touch-tone
phone. To dial from your wireless device, either speed
dial your voicemail or use the menu keys.
84 3A. Sprint Service: The Basics
Using One-Touch Message Access
䊳 Touch and hold on the Phone screen. (Your
device will dial your voicemail box.)
Note: You are charged for airtime minutes when you are
accessing your voicemail from your wireless device.
Using Another Phone to Access Messages
1. Dial your wireless phone number.
2. When your voicemail answers, press .
3. Enter your password.
Page 99

Voicemail Key Guide
Here’s a quick guide to your keypad functions while
listening to voicemail messages.
Date/Time Send Reply Advance
message, a new message icon will appear on the
status bar.
There are two types of messaging, Text Messaging
(SMS) and Multimedia Messaging (MMS).
Multimedia messages consist of both text and
multimedia files, such as pictures, videos, or voice
recordings.
Replay Rewind Forward
Erase Return Call Save
Cancel Help Skip
Messaging
With messaging, you can send and receive instant
messages between your device and another
messaging-ready device. When you receive a new
Composing Messages
1. Touch > > Messaging > New message.
2. Touch the To field and enter your phone number or
email information using the QWERTY keyboard. As
you enter either a phone number or email address,
if the information matches a current contact’s entry
information, you will see a match. When you see a
match, touch the associated name to complete the
addressing.
3. Touch Next when you have finished entering
recipients.
4. Touch the Type to compose field and enter your
message.
3A. Sprint Service: The Basics 85
Sprint Service
Page 100

5.
To access more features, touch for the
following options:
䡲 Add subject to add a subject to the message.
䡲 Attach to add a file attachment. See “Attaching
Files to a Message” below.
䡲 Insert smiley to add smiley icons to the message.
䡲 Discard to discard the message.
䡲 All threads to save the message as draft and close
the compose message screen.
6. Review your message and touch Send.
Attaching Files to a Message
1. On the message composition screen, touch >
Attach.
2. Select a multimedia attachment type:
䡲 Pictures: Opens the Gallery application. Select the
picture you wish to send with the outgoing
message.
䡲 Capture picture: Opens the camera application.
Take a picture, and then touch
image in your message.
86 3A. Sprint Service: The Basics
OK to use this
䡲 Videos: Opens the Gallery application. Use the
onscreen navigation to select a video and attach
it to your outgoing message.
䡲 Capture video: Opens the camcorder application.
Shoot a video, and touch
OK to use this video in
your message.
䡲 Audio: Opens the Select audio window. Select an
audio file and touch
䡲 Record audio: Opens the message recording
OK.
application. Record an audio clip and touch either
Use this recording, or Discard.
䡲 Slideshow: Opens the Edit slideshow screen.
● Touch Add slide to create a new slide. (This is
a placeholder for new images to be added,
similar to a playlist.)
● Touch the created slide (example, Slide 1),
touch
Add picture, and then select the picture
you want to add to the slide.
● Touch the text field below the image to enter a
caption for the picture.
● Touch > Preview (to preview the slide),
Remove picture (to delete the currently
 Loading...