

Page 1
SANYO
Get started
All you need to know to get going.
Page 2
Welcome!
Get Your Device Ready
Sprint is committed to developing technologies that give you the ability to
get what you want when you want it, faster than ever before. This booklet
introduces you to the basics of getting started with Sprint and your new
Sanyo Zio™. As you’ll quickly discover, it’s easy to customize your device’s
apps, appearance, and more with Sprint ID; explore the Android Market™,
browse the Web at 3G speed; send email, text, or picture messages; watch
movies or TV; and get turn-by-turn driving directions. Because there’s less
waiting, and more doing, on the Now Network.™
The services described in this guide may require a subscription to a service plan and/or may incur additional charges. Not all services will work on
all devices. Coverage is not available everywhere. See www.sprint.com/coverage for more details.
Important Privacy Message. Sprint’s policies often do not apply to third-party applications. Third-party applications may access your personal
information or require Sprint to disclose your customer information to the third-party application provider. To fi nd out how a third-party application
will collect, access, use, or disclose your personal information, check the application provider’s policies, which can usually be found on their
website. If you aren’t comfortable with the third-party application’s policies, don’t use the application.
©2010 Sprint. SPRINT and the logo are trademarks of Sprint. Android and Android Market are trademarks of Google, Inc. “SANYO” is a registered
trademark of SANYO Electric Co., Ltd. and is used under license. KYOCERA is a registered trademark of Kyocera Corporation. Kyocera
manufactures and markets the SANYO line of wireless products.
Install the Battery
1. Press and hold the back cover latch with
your thumbnail and slide the cover down
with the other thumb to remove the cover.
2. Insert the battery, contacts side fi rst, and
gently press into place.
3. Replace the cover, making sure all tabs
have aligned, and gently slide the cover up
until you hear a slight click.
Charge the Battery
1. Plug the charger into the charger/
accessory jack on the lower-left side
of your device.
2. Plug the charger into an electrical outlet.
Turn the Device On
• Press and hold to turn your device on.
Unlock the Screen
• Press and hold the Unlock icon ( ) and then
slide your fi nger to the right.
Turn Off the Display Screen
• Press .
Page 3
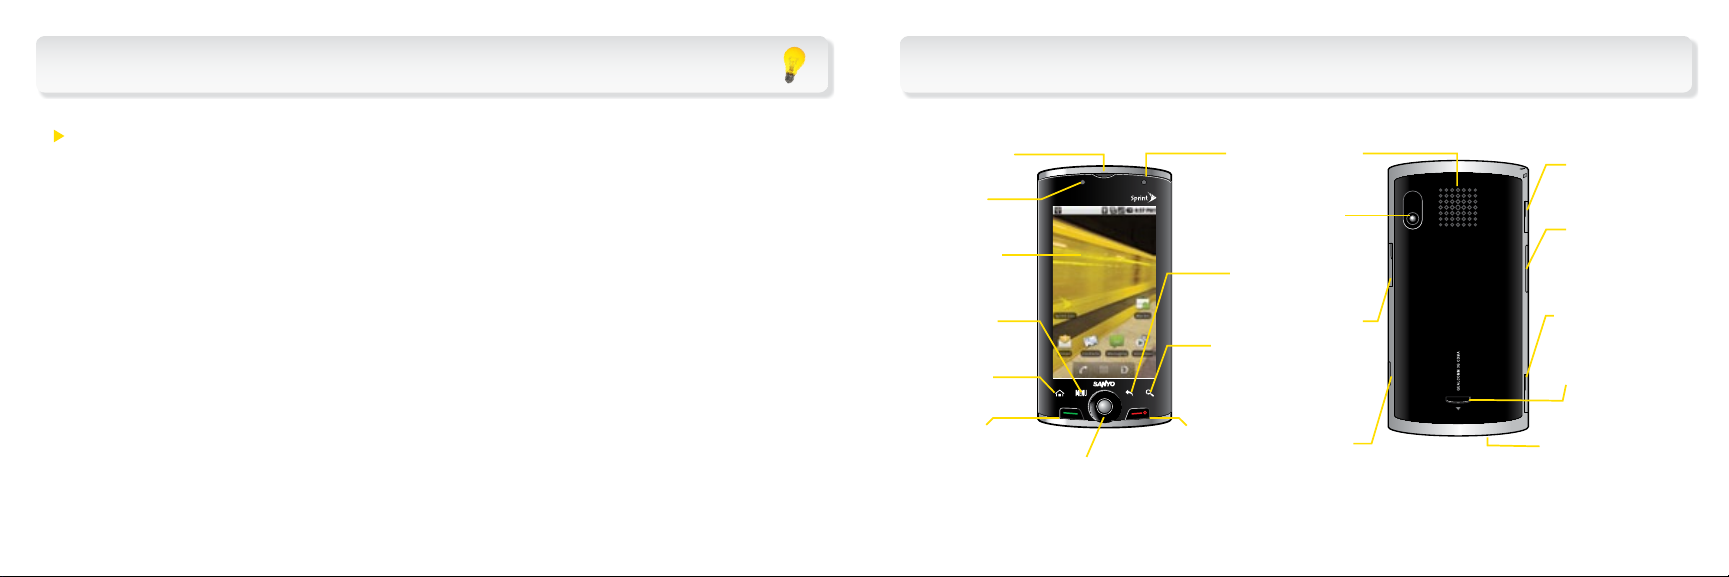
Activate Your Device
Your Sanyo Zio™
Activate Your Device
• If you purchased your device at a Sprint
Store, it is probably activated and ready
to use.
• If you received your device in the mail, and it
is for a new Sprint account or a new line of
service, your device is designed to activate
automatically when you fi rst turn it on. To
confi rm your activation, make a phone call.
• If you received your device in the mail and
you are activating a new device for an
existing number on your account, go to
sprint.com/activate and follow the
instructions.
If your device is still not activated or you do not
have access to the Internet, contact Sprint
Customer Service at 1-888-211-4727 for
assistance.
Earpiece SpeakerLED
Light
Sensor
Display
Screen
MENU
Key
HOME
Key
TALK
Key
Trackball
Indicator
BACK
Key
SEARCH
Key
END/POWER
Key
Camera
Lens
microSD
Card Slot
Camera
Button
Headset
Jack
Volume
Button
Charger/
Accessory
Jack
Back Cover
Latch
Microphone
Page 4
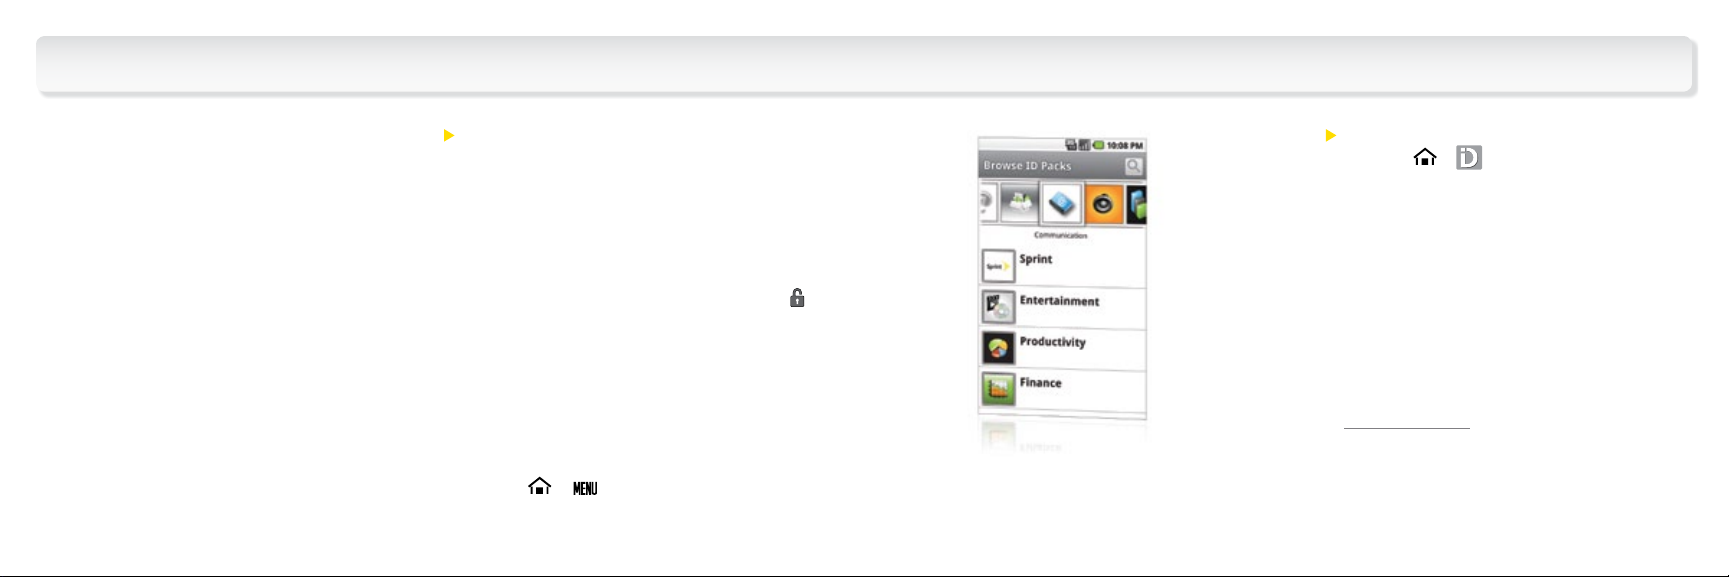
Sprint ID
Once your device is activated, the next thing
you will need to do is install an initial ID Pack.
ID Packs are bundles of applications,
ringtones, wallpapers, settings, and more.
ID Packs are installed using an application
called Sprint ID.
You can have as many as six ID packs
installed at any one time, and you can easily
switch from one ID Pack to another without
losing any applications already installed. For
example, when you install the Sprint ID Pack,
Sprint applications such as Sprint TV, Sprint
Navigator, NASCAR Sprint Cup Mobile, and
Sprint Football Live will remain in your
applications.
Install Your First ID Pack
Note: Your device must be activated, your
battery should be fully charged, and you
should be in a network coverage area before
you install an ID Pack.
1. On the Welcome to Sprint ID screen, touch
Install an ID. (If the lock screen appears,
unlock it by dragging the UNLOCK icon [
to the right side of the screen.)
2. Touch an ID Pack on the Sprint ID screen.
3. Read the information screen for a description
of the ID Pack and touch Install.
4. Read the Terms & Conditions and
touch Agree to begin the download.
5. Wait for the download to fi nish and
touch
6. Touch Notifi cations > ID ready to install.
> .
Switch ID Packs
1. Touch
2. Touch an ID Pack to replace your
current pack.
—or—
Touch Get New to install a new ID Pack
and follow steps 2–6 of “Install Your
]
First ID Pack.”
Note: Certain features of Sprint ID
are subject to change. For the most
up-to-date information about using
Sprint ID, see the User Guide at
www.sprint.com.
> .
Page 5
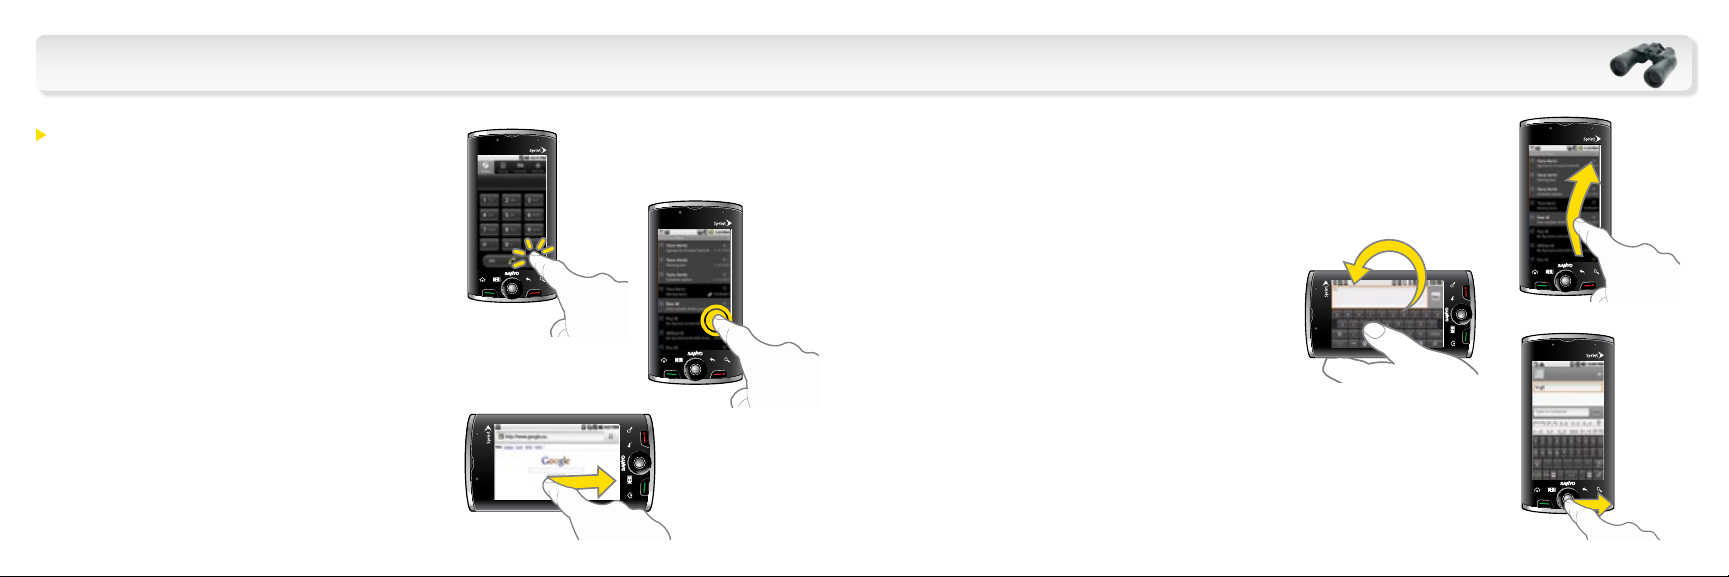
Getting Around Your Device
Move Around Your Device’s Menus and
Screens
Touch: When you want to type using the
onscreen keyboard, select items such as
application and settings icons, or press
onscreen buttons, simply touch them with your
fi nger. A light touch works best.
Touch and hold: To open the available options
for an item (for example, a link in a Web page),
simply touch and hold the item.
Drag: Touch and hold your fi nger with some
pressure before you start to move it. Do not
release your fi nger until you have reached the
target position.
Slide: Quickly drag your fi nger vertically or
horizontally across the screen.
Touch
Drag or Slide
Touch
and hold
Flick: Move your fi nger in lighter, quicker
strokes than sliding. This fi nger gesture is
always used in a vertical motion, such as when
scrolling through contacts or a message list.
Rotate: Automatically change the screen
orientation from portrait to landscape by
turning the device counterclockwise.
Note: Not all applications support the
rotation feature.
Trackball: Press or roll the trackball to
select or highlight items on the screen.
Flick
Rotate
Trackball
Page 6

Make and Answer Calls
Contacts
Make Your First Phone Call
1. Touch > .
2. Enter a phone number using the phone
keypad. (The number will appear just
above the keypad as you enter it. Touch
to delete one or more digits.)
3. As you enter digits, any matches with
numbers already in Contacts will appear.
You can select one of those matches or
continue entering digits.
4. Touch
.
Answer an Incoming Call
• Press .
• Drag the picture ID (or Android icon) to the
top of the screen if the display is locked.
• Touch
if the display is unlocked.
Ignore an Incoming Call
• Drag the picture ID (or Android icon) to the
bottom left corner of the screen if the display
is locked.
• Drag the slider bar to the left if the display
is unlocked.
Mute the Ringer on a Call
To mute the ringer:
• Press the volume button.
Save a Phone Number
1. Touch > and enter a phone number
using the onscreen keypad.
2. Touch
3. Touch Create new contact or an
existing contact.
4. Touch any fi eld to enter the details.
5. Enter all the necessary details and touch
Done to save the entry.
> Add to contacts.
Retrieve a Phone Number
1. Touch > > Contacts, and then
touch
2. Enter the fi rst letter or letters of an entry.
3. Touch the contact to display the contact’s
phone number(s).
.
Add a New Contacts Entry
1. Touch > > Contacts.
2. Touch
3. Touch any fi eld to launch the keyboard,
and enter the name, phone number, and
other contact details.
4. Add more data fi elds or a picture if desired,
and touch Done.
> New Contact.
Page 7

Voicemail
Customize Your Home Screen
Set Up Your Voicemail
All unanswered calls are automatically
transferred to your voicemail, even if your
phone is in use or turned off. You should set
up your voicemail and personal greeting as
soon as your device is activated:
1. Touch
2. In the Personalize your voicemail window,
touch Personalize now.
3. Follow the voice prompts to create
your password and record your name
and greeting.
Voicemail Password
(do not share):
> > Voicemail.
____________________
Sprint strongly recommends setting a
voicemail password. Without a password,
anyone who has access to your device can
access your messages and place outbound
calls through your wireless account.
Retrieve Your Voicemail
From your mobile device:
1. Touch
2. Touch a message to listen to it.
From any other phone:
1. Dial your wireless phone number.
2. When your voicemail answers, press
3. Enter your password.
> > Voicemail.
.
*
Put your favorite applications right on
your Home screen, ready to access
with just a touch of your fi nger.
Add an Item to Your Home Screen
1. Touch > > Add.
2. On the Add to Home screen, touch the item
you wish to add (Shortcuts, Widgets, Folders
or Wallpapers).
For example, to add a Facebook
1. From the Add to Home screen, touch
Widgets > Facebook.
2. If the widget is too large for the free space on
the screen, slide to a screen with suffi cient
space, and repeat step 1.
®
widget:
From your new Facebook widget, you can
access your Profi le, Friends, Photos, and
many other of your favorite Facebook
features.
Page 8

Messaging
Keep in touch your way using text and
picture messaging or email. Easy
®
access to AOL, Hotmail, Yahoo!
Mail,
and Gmail™.
Send a Text (SMS) Message
1.
Touch
>
New message.
2. Enter the phone number of the recipient
in the To: text box.
3. Touch Type to Compose and then type
your message.
4. When you are fi nished, touch Send.
> Messaging >
Send a Picture (MMS) Message
1. Follow steps 1 – 3 for sending a
text message.
2. Touch
3. Touch a media type (Pictures, Videos, etc.)
to open the Gallery application.
4. Touch a picture or clip to select it.
5. Add additional pictures or clips, if desired.
6. If you are satisfi ed with your message,
touch Send.
> Attach.
Set Up a POP3/IMAP Email Account
1. Touch > > Email.
2. Enter the Email address and Password and
then touch Next.
3. Enter a name for the account (optional) and
your name (shown in outgoing messages)
and touch Done.
Check for New Email Messages
1. Touch > > Notifi cations.
2. Touch New email to open your email
account.
3. Touch an email message to read it.
Page 9

Camera & Camcorder
Wi-Fi
Capture your life’s moments as
stunning digital photos or crisp
videos and share them at a
touch of the screen.
Take a Picture or Record a Video
1. Touch > > Camera. (To record a
video, move the slider to the camcorder
icon [
2. Frame your subject in the screen.
3. Touch
—or—
Touch to begin capturing video, and
touch
4. Touch a thumbnail on the Gallery screen to
share or delete your picture or video.
]).
to take a photo.
to stop recording.
Share
1. Touch > > Gallery .
2. Touch the photos or videos you want to
share.
3. Touch
option (Bluetooth, Picasa [pictures only],
YouTube [videos only], Messaging, Gmail,
Send Email, or Email.)
4. Follow the onscreen instructions for the
chosen sharing method.
> Share and then touch a sharing
Connect to a Wi-Fi network with one
quick touch to check email, access a
corporate intranet, or browse the Web.
Connect
1. Touch > > Settings > Wireless &
networks.
2. Touch the Wi-Fi check box to turn Wi-Fi on.
3. Touch Wi-Fi settings to display a list of
available networks.
4. Touch a Wi-Fi network to connect.
If necessary, enter the security key
and touch Connect.
Page 10

Web
Android Market
Find sports scores, news, and weather.
Shop online. On-the-go access lets
you browse full-color versions of your
favorite websites.
Go Online
1. Touch > > Browser.
2. From the SprintWeb™ home page, select
categories, navigate to websites, read blogs,
download content, and more.
• Touch a category to open it.
• For more options, touch
any page.
from
Personalize your
device with a huge
selection of apps,
games, ringers,
and screensavers.
Browse and Download
1. Touch > > Market.
2. The fi rst time you visit Android Market™,
a Terms of Service window will appear.
Touch Accept to continue.
3. To fi nd what you want quickly:
• Browse through featured apps and games.
Scroll through the list when you open
Android Market.
• Browse by categories. First, touch Apps or
Games, and then touch a category. You can
fi lter the category by Top paid, Top free, or
Just in.
• Search for an app or game. Touch
the Android Market home screen, enter the
name or keyword, and then touch
4. Touch an app or game to read a description
and user reviews.
5. Touch Install (for free applications) or Buy
(for paid applications).
on
again.
Page 11

Sprint Zone
Sprint TV, Movies & Radio
Enhance your Sprint experience.
The free Sprint Zone application
makes it a snap to manage your
account, get tips and tricks for your
device, fi nd recommended apps,
and more.
Get in the Zone
1.Touch > > Sprint Zone.
2. From the Sprint Zone Web page, scroll up or
down and touch an item to check your
account, read the latest news about your
device, load an application, and more.
Live TV and video on demand. Complete
episodes and clips of your favorite
primetime shows and movies. Over 50
channels of news, entertainment,
weather, sports, and streaming music.*
Watch
1. Touch > > Sprint TV.
2. Touch a channel or category. If prompted,
select Preview or select Subscribe to
purchase access.
3. Touch an item to play it.
Note: If you don’t see this application on the
Applications Launcher screen, you can
download it for free from Sprint Zone:
• Touch
Applications. Follow the onscreen prompts to
download and install the Sprint ID Pack.
> > Sprint Zone > Sprint
* Coverage not available everywhere. Content and
lineup subject to change. Select channels also
available for casual usage. Go to sprint.com/tvguide
for more information.
Page 12

GPS Navigation
Battery-Saving Tips
Sprint Navigation lets you see and hear
turn-by-turn directions to a known
address, or fi nd nearby restaurants,
stores, banks, or gas stations. Get
information about traffi c and
alternate routes
Navigate
1. Touch > > Sprint Navigation.
2. Follow the onscreen instructions to
access, launch, and use.
Note: If you don’t see this application on the
Applications Launcher screen, you can
download it for free from Sprint Zone:
• Touch
Applications. Follow the onscreen prompts to
download and install the Sprint ID Pack.
> > Sprint Zone > Sprint
Manage the Display Brightness and Screen
On-Time
1. Touch
display > Brightness to modify the backlight
setting as desired.
To turn off the screen, press the END/POWER
2.
key. The device will continue to function.
—or—
Add a Power Control widget to your Home
screen. (See “Customize Your Home Screen”
in this guide for more information about
adding widgets.)
> > Settings > Sound &
Manage Your Device’s Wireless Functions
Disable the Wi-Fi, Bluetooth, and GPS
functions of the device when you’re not using
them.
• Touch
networks and disable any of these functions
that are not in use.
For more useful tips about battery care
and safety, see the User Guide at
www.sprint.com.
> > Settings > Wireless &
Page 13

Manage Your Account
Helpful Sprint Information
Online: www.sprint.com
•
make a payment, see your bills, enroll in
online billing
• check minute usage and account balance
• see or modify the details of your Sprint
service plan
• get detailed instructions and
download content
From Your Sprint Phone
Touch
•
and account balance
Touch
•
Touch
•
your Sprint service plan or get answers to other
questions
to check minute usage
to make a payment
to access a summary of
Touch
•
service, upgrade your device, purchase
accessories, or access other
account services
to add a new line of
From Any Other Phone
• Sprint Customer Service:
Dial 1-888-211-4727
• Business Customer Service:
Dial 1-800-927-2199
Total Equipment Protection
The protection you need so you can
be worry free
Should anything happen to your device,
you’ll have a worry-free way to ensure that
you get connected again soon.
• Coverage includes:
Loss, theft, routine maintenance, physical or
liquid damage, mechanical or electrical
problems, failure from normal wear and tear.
• For more information:
See the Total Equipment Protection
brochure available at any participating retail
location or go to sprint.com/tep for more
details. To enroll within 30 days of activation,
call 1-800-584-3666.
Total Equipment Protection is a service provided by
Asurion Protection Services, LLC, Continental Casualty
Company’s (a CNA company) licensed agent for the
customers of Sprint.
Sprint 411
Dial 411 for nationwide listings, movie
show times, restaurant reservations, driving
directions and more. Spanish-speaking
operators are available. See sprint.com
for pricing and more details.
Page 14

Resources
For Your Device
• This Get Started Guide to get you up and
running.
• Basics Guide – Get the most from the
services and features available on your
new Sanyo Zio™.
• Web – Visit www.sprint.com to access the
User Guide, how-to videos, tutorials, and
helpful support information.
For the Environment
Recycle your old phone safely and
conveniently using the addressed recycling
envelope packaged with your new device.
Visit sprint.com/recycle for more details.
Please tell us what you think
about your new phone.
We are interested in your initial impressions of this new Sprint
phone. Within two weeks of your phone purchase, please go to
the website http://labs.sprint.com/sprintphonesurvey to
complete a brief survey. Your feedback will help us provide the
wireless features and services you want most.
Thank you for choosing Sprint.
Page 15

Printed in China 5KKTE73KFNRA-
 Loading...