

Page 1
PRINT
OPERATION GUIDE
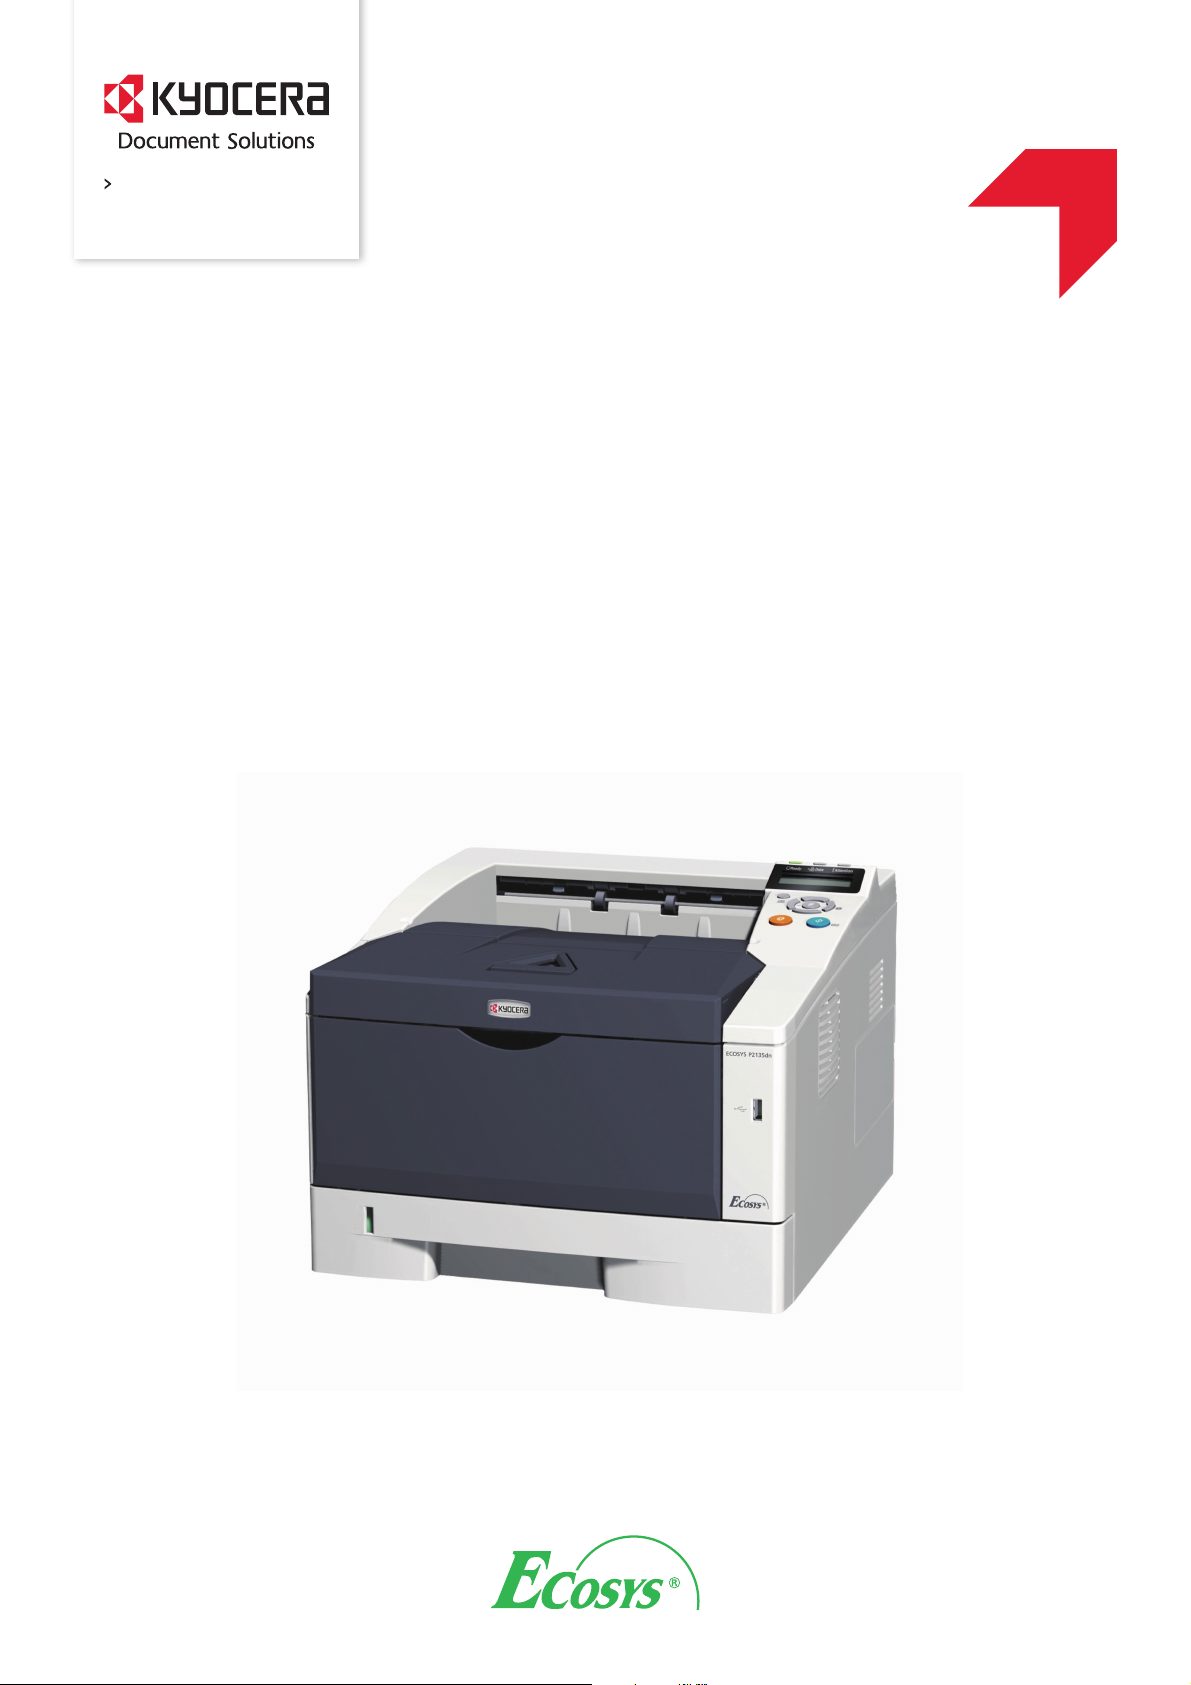
ECOSYS P2135dn
Page 2
This Operation Guide is for model ECOSYS P2135dn.
Note This Operation Guide contains information that corresponds
to using both the inch and metric versions of these machines.
The inch versions of these machines are shown in the screens in
this guide. If you are using the metric version, use the messages
provided for the inch version as reference only. In the body text,
only the inch messages are given if these versions differ only in
capitalization. When there is even a slight difference in the
message, we have listed the information for the inch version
followed, in brackets, by the corresponding information for the
metric version.
This Operation Guide is intended to help you operate the machine
correctly, perform routine maintenance and take a simple
troubleshooting action as necessary, so that you can always use the
machine in good condition.
Please read this Operation Guide before you start using the machine,
and keep it close to the machine for easy reference.
We recommend the use of our own brand supplies. We will not be liable
for any damage caused by the use of third party supplies in this
machine.
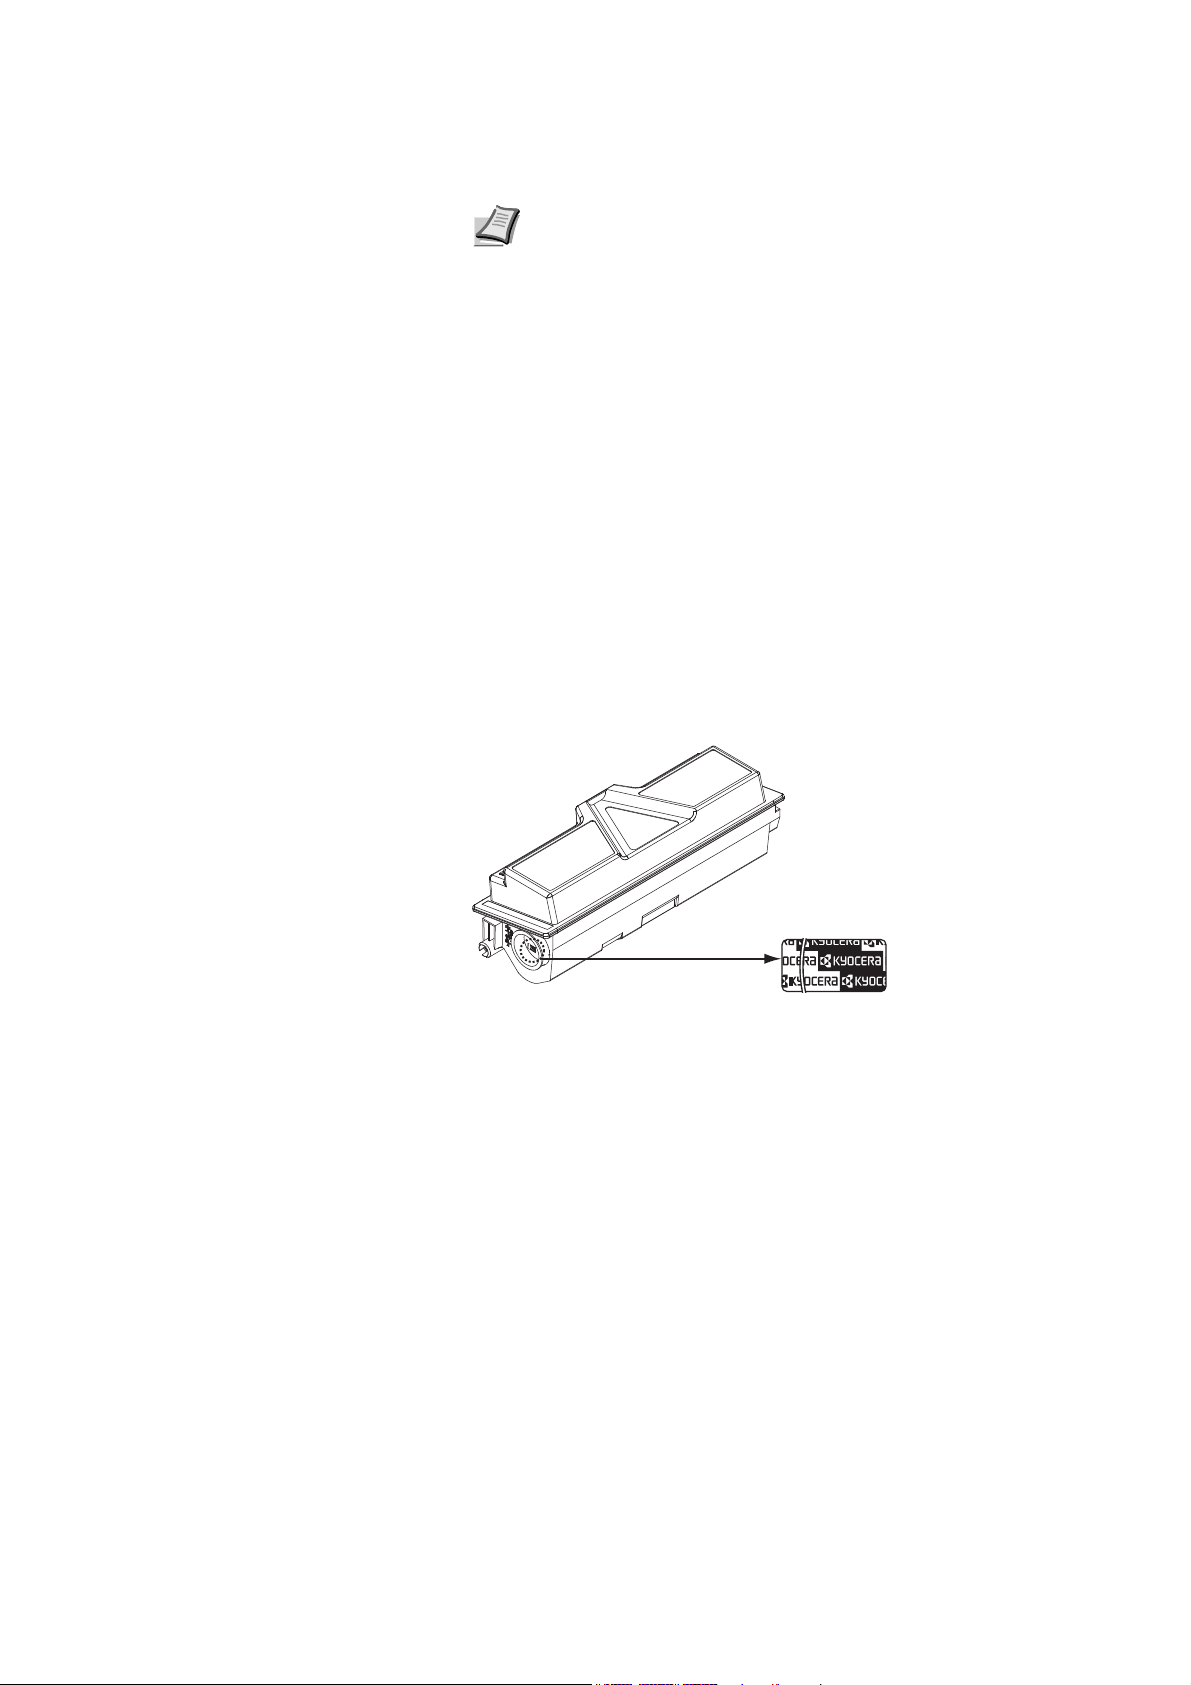
A label shown in the illustration assures that the supplies are our own
brand.
Page 3

Contents
1 Machine Parts ............................................................................. 1-1
Components at the Front of the Printer ................................... 1-2
Components at the Rear of the Printer ..................................... 1-2
Operation Panel .......................................................................... 1-3
2 Loading Paper ............................................................................. 2-1
Preparing the Paper ................................................................... 2-2
Loading Paper into Cassette ..................................................... 2-2
Loading Paper into MP (Multi-Purpose) Tray ........................... 2-5
Paper Stopper ............................................................................. 2-6
3 Connecting and Printing ............................................................ 3-1
Connections ................................................................................ 3-2
Printing a Network Interface Status Page ................................ 3-6
Command Center RX .................................................................. 3-7
Installing the Printer Driver ..................................................... 3-14
Printing ...................................................................................... 3-21
Printing by AirPrint ................................................................... 3-23
Status Monitor .......................................................................... 3-24
Energy Saver Function ............................................................ 3-28
4 Maintenance ................................................................................ 4-1
General Information ................................................................... 4-2
Toner Container Replacement .................................................. 4-2
Maintenance Kit Replacement ................................................... 4-5
Cleaning the Printer ................................................................... 4-6
Prolonged Non-Use and Moving of the Printer ........................ 4-9
5 Troubleshooting ......................................................................... 5-1
General Guidelines ..................................................................... 5-2
Print Quality Problems ............................................................... 5-3
Error Messages ........................................................................... 5-5
Ready, Data, and Attention Indicators ...................................... 5-9
Clearing Paper Jams ................................................................ 5-10
6 Appendix ..................................................................................... 6-1
Specifications ............................................................................. 6-2
Environmental Standard Requirements ................................... 6-4
Index .................................................................................... Index-1
i
Page 4

ii
Page 5

Legal and Safety
Information
Please read this information before using your machine. This chapter
provides information on the following topics:
Legal Information iv
License Agreements vi
Safety Information xii
Symbols xvii
Installation Precautions xviii
Precautions for Use xx
About the Operation Guide xxii
Conventions in This Guide xxiii
iii
Page 6

Legal Information
CAUTION NO LIABILITY IS ASSUMED FOR ANY
DAMAGE CAUSED BY IMPROPER INSTALLATION.
Notice on Software
SOFTWARE USED WITH THIS PRINTER MUST SUPPORT THE
PRINTER'S EMULATION MODE. The printer is factory-set to emulate
the PCL. The emulation mode can be changed.
Notice
The information in this guide is subject to change without notification.
Additional pages may be inserted in future editions.
The user is asked to excuse any technical inaccuracies or typographical
errors in the present edition.No responsibility is assumed if accidents
occur while the user is following the instructions in this guide. No
responsibility is assumed for defects in the printer's firmware (contents of
its read-only memory).
This guide, and any copyrightable subject matter sold or provided with or
in connection with the sale of the page printer, are protected by
copyright. All rights are reserved. Copying or other reproduction of all or
part of this guide, or any copyrightable subject matter without the prior
written consent of KYOCERA Document Solutions Inc. is prohibited. Any
copies made of all or part of this guide, or any copyrightable subject
must contain the same copyright notice as the material from which the
copying is done.
Regarding Tradenames
• PRESCRIBE and ECOSYS are registered trademark of Kyocera
Corporation.
• KPDL is a trademark of Kyocera Corporation.
• Microsoft, Windows, Windows XP, Windows Server 2003, Windows
Vista, Windows Server 2008, Windows 7, Windows Server 2012,
Windows 8 and Internet Explorer are registered trademarks or
trademarks of Microsoft Corporation in the U.S.A. and/or other
countries.
• PCL is a trademark of Hewlett-Packard Company.
• Adobe Acrobat, Adobe Reader and PostScript are trademarks of
Adobe Systems, Incorporated.
• Ethernet is a registered trademark of Xerox Corporation.
• NetWare is a registered trademark of Novell, Inc.
• IBM is a registered trademark of International Business Machines
Corporation.
• AppleTalk, Bonjour, Macintosh, and Mac OS are trademarks of Apple
Inc., registered in the U.S. and other countries.
• All European language fonts installed in this machine are used under
licensing agreement with Monotype Imaging Inc.
iv
Page 7

• Helvetica, Palatino and Times are registered trademarks of Linotype
GmbH.
• ITC Avant Garde Gothic, ITC Bookman, ITC ZapfChancery and ITC
ZapfDingbats are registered trademarks of International Typeface
Corporation.
• UFST™ MicroType® fonts by Monotype Imaging Inc. are installed in
this machine.
• AirPrint and the AirPrint logo are trademarks of Apple Inc.
• iOS is a trademark or registered trademark of Cisco in the U.S. and
other countries and is used under license by Apple Inc.
All other brands and product names are registered trademarks or
trademarks of their respective companies. Thedesignations ™ and ® will
not be used in this Operation Guide.
v
Page 8

License Agreements
IBM Program License Agreement
THE DEVICE YOU HAVE PURCHASED CONTAINS ONE OR MORE
SOFTWARE PROGRAMS (“PROGRAMS”) WHICH BELONG TO
INTERNATIONAL BUSINESS MACHINES CORPORATION (“IBM”).
THIS DOCUMENT DEFINES THE TERMS AND CONDITIONS UNDER
WHICH THE SOFTWARE IS BEING LICENSED TO YOU BY IBM. IF
YOU DO NOT AGREE WITH THE TERMS AND CONDITIONS OF THIS
LICENSE, THEN WITHIN 14 DAYS AFTER YOUR ACQUISITION OF
THE DEVICE YOU MAY RETURN THE DEVICE FOR A FULL
REFUND. IF YOU DO NOT SO RETURN THE DEVICE WITHIN THE 14
DAYS, THEN YOU WILL BE ASSUMED TO HAVE AGREED TO THESE
TERMS AND CONDITIONS.
The Programs are licensed not sold. IBM, or the applicable IBM country
organization, grants you a license for the Programs only in the country
where you acquired the Programs. You obtain no rights other than those
granted you under this license.
The term “Programs” means the original and all whole or partial copies of
it, including modified copies or portions merged into other programs. IBM
retains title to the Programs. IBM owns, or has licensed from the owner,
copyrights in the Programs.
1. License
Under this license, you may use the Programs only with the device on
which they are installed and transfer possession of the Programs and
the device to another party.
If you transfer the Programs, you must transfer a copy of this license and
any other documentation to the other party. Your license is then
terminated. The other party agrees to these terms and conditions by its
first use of the Program.
You may not:
1. use, copy, modify, merge, or transfer copies of the Program except as
provided in this license;
2. reverse assemble or reverse compile the Program; or
3. sublicense, rent, lease, or assign the Program.
2. Limited Warranty
The Programs are provided “AS IS.”
THERE ARE NO OTHER WARRANTIES COVERING THE
PROGRAMS (OR CONDITIONS), EXPRESS OR IMPLIED,
INCLUDING, BUT NOT LIMITED TO, THE IMPLIED WARRANTIES OF
MERCHANTABILITY AND FITNESS FOR A PARTICULAR PURPOSE.
Some jurisdictions do not allow the exclusion of implied warranties, so
the above exclusion may not apply to you.
3. Limitation of Remedies
IBM's entire liability under this license is the following;
For any claim (including fundamental breach), in any form, related in any
way to this license, IBM's liability will be for actual damages only and will
be limited to the greater of:
vi
Page 9

1. the equivalent of U.S. $25,000 in your local currency; or
2. IBM's then generally available license fee for the Program
This limitation will not apply to claims for bodily injury or damages to real
or tangible personal property for which IBM is legally liable.
IBM will not be liable for any lost profits, lost savings, or any incidental
damages or other economic consequential damages, even if IBM, or its
authorized supplier, has been advised of the possibility of such
damages. IBM will not be liable for any damages claimed by you based
on any third party claim. This limitation of remedies also applies to any
developer of Programs supplied to IBM. IBM's and the developer's
limitations of remedies are not cumulative. Such developer is an
intended beneficiary of this Section. Some jurisdictions do not allow
these limitations or exclusions, so they may not apply to you.
4. General
You may terminate your license at any time. IBM may terminate your
license if you fail to comply with the terms and conditions of this license.
In either event, you must destroy all your copies of the Program. You are
responsible for payment of any taxes, including personal property taxes,
resulting from this license. Neither party may bring an action, regardless
of form, more than two years after the cause of action arose. If you
acquired the Program in the United States, this license is governed by
the laws of the State of New York. If you acquired the Program in
Canada, this license is governed by the laws of the Province of Ontario.
Otherwise, this license is governed by the laws of the country in which
you acquired the Program.
Typeface Trademark Acknowledgement
All resident fonts in this printer are licensed from Monotype Imaging Inc.
Helvetica, Palatino and Times are registered trademarks of Linotype-Hell
AG. ITC Avant Garde Gothic, ITC Bookman, ITC ZapfChancery and ITC
Zapf Dingbats are registered trademarks of International Typeface
Corporation.
Monotype Imaging License Agreement
1. ”Software” shall mean the digitally encoded, machine readable,
scalable outline data as encoded in a special format as well as the
UFST Software.
2. You agree to accept a non-exclusive license to use the Software to
reproduce and display weights, styles and versions of letters,
numerals, characters and symbols (“Typefaces”) solely for your own
customary business or personal purposes at the address stated on
the registration card you return to Monotype Imaging. Under the
terms of this License Agreement, you have the right to use the Fonts
on up to three printers. If you need to have access to the fonts on
more than three printers, you need to acquire a multi-user license
agreement which can be obtained from Monotype Imaging.
Monotype Imaging retains all rights, title and interest to the Software
and Typefaces and no rights are granted to you other than a License
to use the Software on the terms expressly set forth in this
Agreement.
vii
Page 10

3. To protect proprietary rights of Monotype Imaging, you agree to
maintain the Software and other proprietary information concerning
the Typefaces in strict confidence and to establish reasonable
procedures regulating access to and use of the Software and
Typefaces.
4. You agree not to duplicate or copy the Software or Typefaces, except
that you may make one backup copy. You agree that any such copy
shall contain the same proprietary notices as those appearing on the
original.
5. This License shall continue until the last use of the Software and
Typefaces, unless sooner terminated. This License may be
terminated by Monotype Imaging if you fail to comply with the terms
of this License and such failure is not remedied within thirty (30) days
after notice from Monotype Imaging. When this License expires or is
terminated, you shall either return to Monotype Imaging or destroy all
copies of the Software and Typefaces and documentation as
requested.
6. You agree that you will not modify, alter, disassemble, decrypt,
reverse engineer or decompile the Software.
7. Monotype Imaging warrants that for ninety (90) days after delivery,
the Software will perform in accordance with Monotype Imagingpublished specifications, and the diskette will be free from defects in
material and workmanship. Monotype Imaging does not warrant that
the Software is free from all bugs, errors and omissions.
8. THE PARTIES AGREE THAT ALL OTHER WARRANTIES,
EXPRESSED OR IMPLIED, INCLUDING WARRANTIES OF
FITNESS FOR A PARTICULAR PURPOSE AND
MERCHANTABILITY, ARE EXCLUDED.
9. Your exclusive remedy and the sole liability of Monotype Imaging in
connection with the Software and Typefaces is repair or replacement
of defective parts, upon their return to Monotype Imaging.
10.IN NO EVENT WILL MONOTYPE IMAGING BE LIABLE FOR LOST
PROFITS, LOST DATA, OR ANY OTHER INCIDENTAL OR
CONSEQUENTIAL DAMAGES, OR ANY DAMAGES CAUSED BY
ABUSE OR MISAPPLICATION OF THE SOFTWARE AND
TYPEFACES.
11. Massachusetts U.S.A. law governs this Agreement.
12.You shall not sublicense, sell, lease, or otherwise transfer the
Software and/or Typefaces without the prior written consent of
Monotype Imaging.
13.Use, duplication or disclosure by the Government is subject to
restrictions as set forth in the Rights in Technical Data and Computer
Software clause at FAR 252-227-7013, subdivision (b)(3)(ii) or
subparagraph (c)(1)(ii), as appropriate. Further use, duplication or
disclosure is subject to restrictions applicable to restricted rights
software as set forth in FAR 52.227-19 (c)(2).
14.YOU ACKNOWLEDGE THAT YOU HAVE READ THIS
AGREEMENT, UNDERSTAND IT, AND AGREE TO BE BOUND BY
ITS TERMS AND CONDITIONS. NEITHER PARTY SHALL BE
BOUND BY ANY STATEMENT OR REPRESENTATION NOT
CONTAINED IN THIS AGREEMENT. NO CHANGE IN THIS
AGREEMENT IS EFFECTIVE UNLESS WRITTEN AND SIGNED BY
PROPERLY AUTHORIZED REPRESENTATIVES OF EACH PARTY.
BY OPENING THIS DISKETTE PACKAGE, YOU AGREE TO
ACCEPT THE TERMS AND CONDITIONS OF THIS AGREEMENT.
viii
Page 11

GPL/LGPL
This product contains GPL (http://www.gnu.org/licenses/gpl.html) and/or
LGPL (http://www.gnu.org/licenses/lgpl.html) software as part of its
firmware. You can get the source code, and you are permitted to copy,
redistribute and modify it under the terms of GPL/LGPL. For further
information including availability of the source code,
visit http://www.kyoceradocumentsolutions.com/gpl/.
Open SSLeay License
Copyright © 1998-2006 The OpenSSL Project. All rights reserved.
Redistribution and use in source and binary forms, with or without
modification, are permitted provided that the following conditions are met:
1 Redistributions of source code must retain the above copyright
notice, this list of conditions and the following disclaimer.
2 Redistributions in binary form must reproduce the above copyright
notice, this list of conditions and the following disclaimer in the
documentation and/or other materials provided with the distribution.
3 All advertising materials mentioning features or use of this software
must display the following acknowledgment:
"This product includes software developed by the OpenSSL Project
for use in the OpenSSL Toolkit. (http://www.openssl.org/)"
4 The names "OpenSSL Toolkit" and "OpenSSL Project" must not be
used to endorse or promote products derived from this software
without prior written permission.
For written permission, please contact [email protected].
5 Products derived from this software may not be called "OpenSSL"
nor may "OpenSSL" appear in their names without prior written
permission of the OpenSSL Project.
6 Redistributions of any form whatsoever must retain the following
acknowledgment: "This product includes software developed by the
OpenSSL Project for use in the OpenSSL Toolkit (http://
www.openssl.org/)"
THIS SOFTWARE IS PROVIDED BY THE OpenSSL PROJECT "AS IS"
AND ANY EXPRESSED OR IMPLIED WARRANTIES, INCLUDING, BUT
NOT LIMITED TO, THE IMPLIED WARRANTIES OF
MERCHANTABILITY AND FITNESS FOR A PARTICULAR PURPOSE
ARE DISCLAIMED. IN NO EVENT SHALL THE OpenSSL PROJECT OR
ITS CONTRIBUTORS BE LIABLE FOR ANY DIRECT, INDIRECT,
INCIDENTAL, SPECIAL, EXEMPLARY, OR CONSEQUENTIAL
DAMAGES (INCLUDING, BUT NOT LIMITED TO, PROCUREMENT OF
SUBSTITUTE GOODS OR SERVICES; LOSS OF USE, DATA, OR
PROFITS; OR BUSINESS INTERRUPTION) HOWEVER CAUSED AND
ON ANY THEORY OF LIABILITY, WHETHER IN CONTRACT, STRICT
LIABILITY, OR TORT (INCLUDING NEGLIGENCE OR OTHERWISE)
ARISING IN ANY WAY OUT OF THE USE OF THIS SOFTWARE, EVEN
IF ADVISED OF THE POSSIBILITY OF SUCH DAMAGE.
Original SSLeay License
Copyright © 1995-1998 Eric Young ([email protected]) All rights
reserved.
ix
Page 12

This package is an SSL implementation written by Eric Young
([email protected]). The implementation was written so as to conform
with Netscapes SSL.
This library is free for commercial and non-commercial use as long as the
following conditions are adhered to. The following conditions apply to all
code found in this distribution, be it the RC4, RSA, lhash, DES, etc., code;
not just the SSL code. The SSL documentation included with this
distribution is covered by the same copyright terms except that the holder
is Tim Hudson ([email protected]).
Copyright remains Eric Young's, and as such any Copyright notices in the
code are not to be removed.
If this package is used in a product, Eric Young should be given attribution
as the author of the parts of the library used.
This can be in the form of a textual message at program startup or in
documentation (online or textual) provided with the package.
Redistribution and use in source and binary forms, with or without
modification, are permitted provided that the following conditions are met:
1 Redistributions of source code must retain the copyright notice, this
list of conditions and the following disclaimer.
2 Redistributions in binary form must reproduce the above copyright
notice, this list of conditions and the following disclaimer in the
documentation and/or other materials provided with the distribution.
3 All advertising materials mentioning features or use of this software
must display the following acknowledgement:
"This product includes cryptographic software written by Eric Young
([email protected])"
The word 'cryptographic' can be left out if the rouines from the library
being used are not cryptographic related :-).
4 If you include any Windows specific code (or a derivative thereof)
from the apps directory (application code) you must include an
acknowledgement:
"This product includes software written by Tim Hudson
([email protected])"
THIS SOFTWARE IS PROVIDED BY ERIC YOUNG "AS IS" AND ANY
EXPRESS OR IMPLIED WARRANTIES, INCLUDING, BUT NOT
LIMITED TO, THE IMPLIED WARRANTIES OF MERCHANTABILITY
AND FITNESS FOR A PARTICULAR PURPOSE ARE DISCLAIMED. IN
NO EVENT SHALL THE AUTHOR OR CONTRIBUTORS BE LIABLE
FOR ANY DIRECT, INDIRECT, INCIDENTAL, SPECIAL, EXEMPLARY,
OR CONSEQUENTIAL DAMAGES (INCLUDING, BUT NOT LIMITED
TO, PROCUREMENT OF SUBSTITUTE GOODS OR SERVICES; LOSS
OF USE, DATA, OR PROFITS; OR BUSINESS INTERRUPTION)
HOWEVER CAUSED AND ON ANY THEORY OF LIABILITY,
WHETHER IN CONTRACT, STRICT LIABILITY, OR TORT (INCLUDING
NEGLIGENCE OR OTHERWISE) ARISING IN ANY WAY OUT OF THE
USE OF THIS SOFTWARE, EVEN IF ADVISED OF THE POSSIBILITY
OF SUCH DAMAGE.
The licence and distribution terms for any publically available version or
derivative of this code cannot be changed. i.e. this code cannot simply be
copied and put under another distribution licence [including the GNU
Public Licence.]
x
Page 13

Compliance and Conformity
This equipment has been tested and found to comply with the limits for a
Class B digital device, pursuant to Part 15 of the FCC Rules. These
limits are designed to provide reasonable protection against harmful
interference in a residential installation. This equipment generates, uses
and can radiate radio frequency energy and, if not installed and used in
accordance with the instructions, may cause harmful interference to
radio communications. However, there is no guarantee that interference
will not occur in a particular installation. If this equipment does cause
harmful interference to radio or television reception, which can be
determined by turning the equipment off and on, the user is encouraged
to try to correct the interference by one or more of the following
measures:
• Reorient or relocate the receiving antenna.
• Increase the separation between the equipment and receiver.
• Connect the equipment into an outlet on a circuit different from that
to which the receiver is connected.
• Consult the dealer or an experienced radio/TV technician for help.
• The use of a non-shielded interface cable with the referenced device
is prohibited.
CAUTION — The changes or modifications not expressly approved by
the party responsible for compliance could void the user's authority to
operate the equipment.
This device complies with Part 15 of FCC Rules and RSS-Gen of IC
Rules.
Operation is subject to the following two conditions; (1) this device may
not cause interference, and (2) this device must accept any interference,
including interference that may cause undesired operation of the device.
* The above warning is valid only in the United States of America.
xi
Page 14
Safety Information
Laser Safety
This printer is certified as a Class 1 laser product under the U.S.
Department of Health and Human Services (DHHS) Radiation
Performance Standard according to Radiation Control for Health and
Safety Act of 1968. This means that the printer does not produce
hazardous laser radiation. Since radiation emitted inside the printer is
completely confined within protective housings and external covers, the
laser beam cannot escape from the printer during any phase of user
operation.
Laser Notice
This printer is certified in the U.S. to conform to the requirements of
DHHS 21 CFR Subchapter for Class I (1) laser products, and elsewhere
is certified as a Class I laser product conforming to the requirements of
IEC 825.
DANGER CLASS 3B INVISIBLE LASER RADIATION
WHEN OPEN. AVOID DIRECT EXPOSURE TO BEAM.
CAUTION Use of controls or adjustments or performance
of procedures other than those specified herein may result
in hazardous radiation exposure.
Radio Frequency Transmitter
This machine contains a transmitter module. We, the manufacturer
(KYOCERA Document Solutions) hereby declare that this equipment
(page printer), model ECOSYS P2135dn is in compliance with the
essential requirements and other relevant provisions of Directive
1999/5/EC.
Radio Tag Technology
In some countries, the radio tag technology used in this equipment to
identify the toner container may be subject to authorization, and the use
of this equipment may consequently be restricted.
xii
Page 15
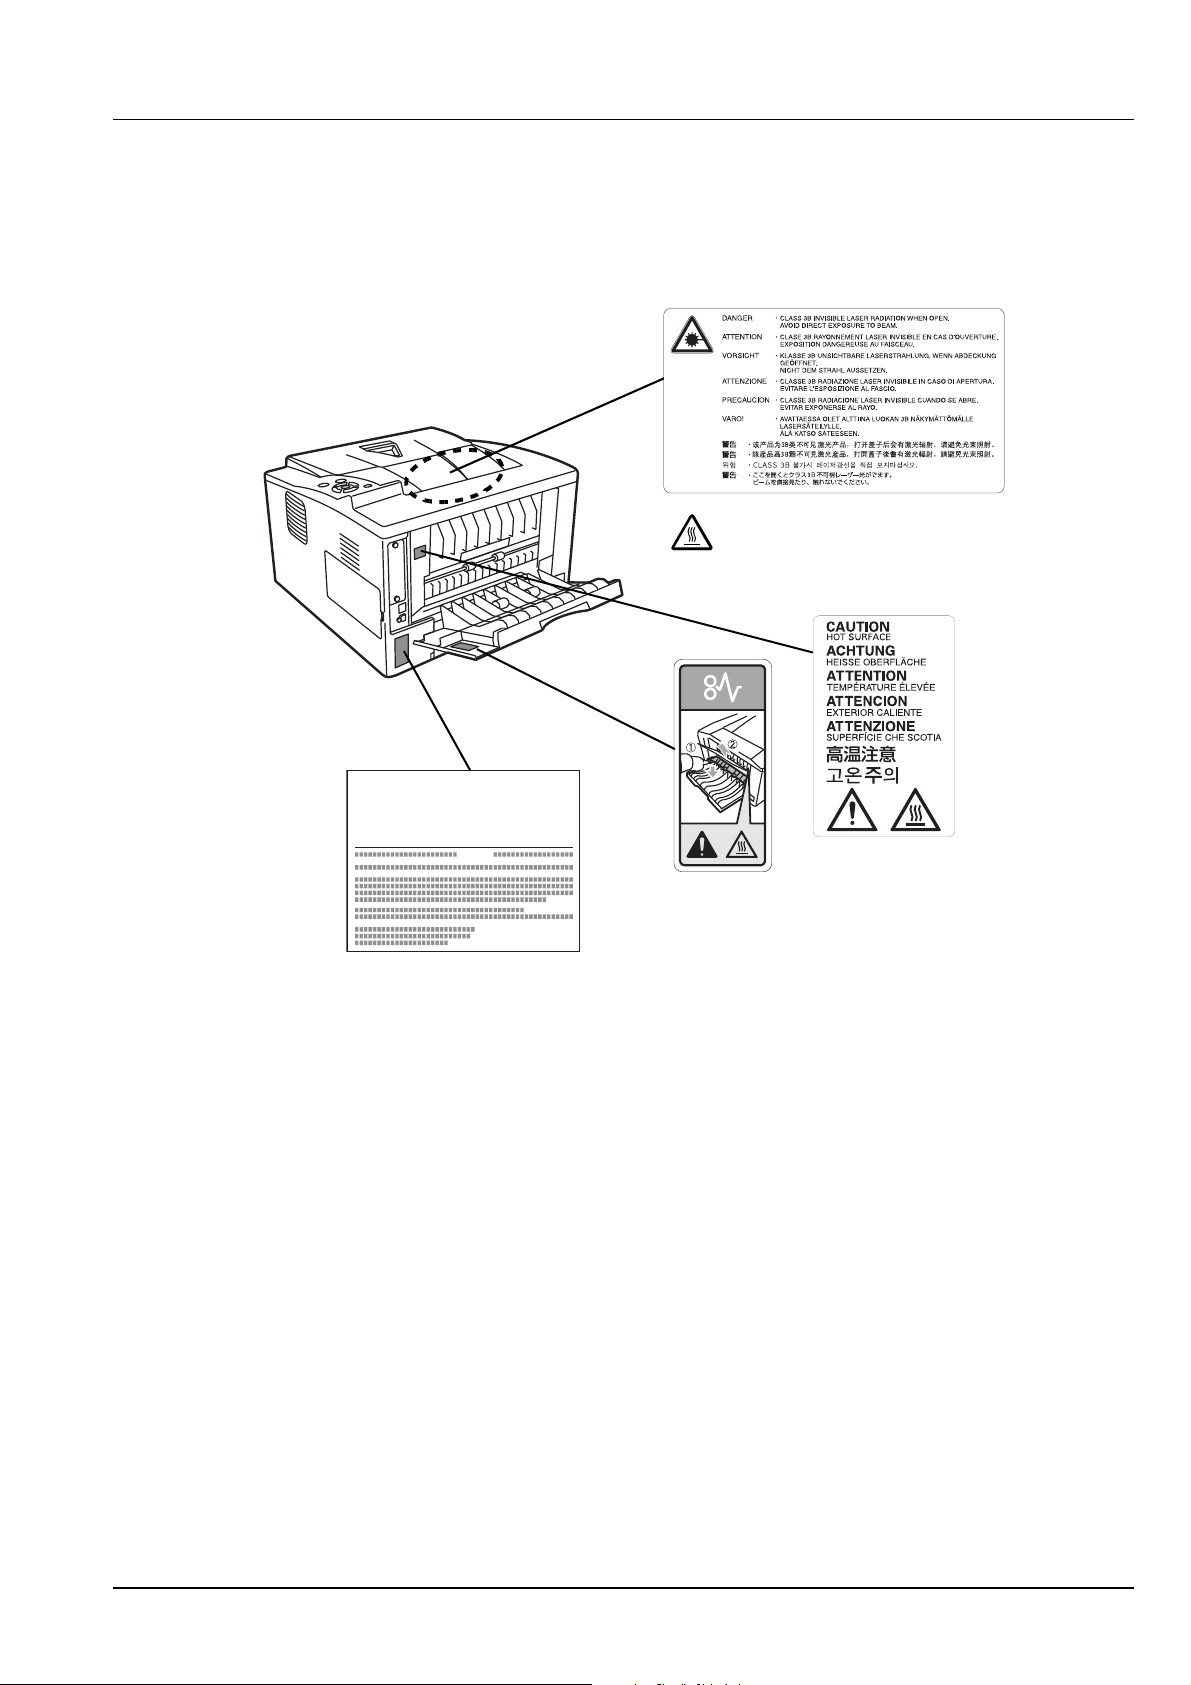
Caution Labels
Laser inside the printer
(Laser radiation warning)
Laser inside the printer
(Laser radiation warning)
High temperature inside. Do not
touch parts in this area, because
there is a danger of getting
burned.
The printer bears any of the following labels.
ECOSYS P2135dn
CDRH Regulations
The Center for Devices and Radiological Health (CDRH) of the U.S.
Food and Drug Administration implemented regulations for laser
products on August 2, 1976. These regulations apply to laser products
manufactured after August 1, 1976. Compliance is mandatory for
products marketed in the United States. A label indicating compliance
with the CDRH regulations must be attached to laser products marketed
in the United States.
Ozone Concentration
These printers generate ozone gas (O3), which may concentrate in the
place of installation and cause an unpleasant smell. To minimize the
concentration of ozone gas to less than 0.1ppm, we recommend you not
to install the printer in a confined area where ventilation is blocked.
xiii
Page 16

Canadian Department of Communications
Compliance Statement
This Class B digital apparatus complies with Canadian ICES-003.
Avis de conformité aux normes du ministere
des Communications du Canada
Cet appareil numérique de la classe B est conforme à la norme NMB003 du Canada.
EN ISO 7779
Maschinenlärminformations-Verordnung 3. GPSGV, 06.01.2004: Der
höchste Schalldruckpegel beträgt 70 dB (A) oder weniger gemäß EN
ISO 7779.
EK1-ITB 2000
Das Gerät ist nicht für die Benutzung im unmittelbaren Gesichtsfeld am
Bildschirmarbeitsplatz vorgesehen. Um störende Reflexionen am
Bildschirmarbeitsplatz zu vermeiden, darf dieses Produkt nicht im
unmittelbaren Gesichtsfeld platziert werden.
Disclaimer
KYOCERA Document Solutions will not be liable to customers or any
other person or entity for any loss or damage caused or alleged to be
caused directly or indirectly by equipment sold or furnished by us,
including but not limited to, any interruption of service, loss of business
or anticipatory profits, or consequential damages resulting from the use
or operation of the equipment or software.
Safety Instructions Regarding the
Disconnection of Power
Caution: The power plug is the main isolation device! Other switches on
the equipment are only functional switches and are not suitable for
isolating the equipment from the power source.
VORSICHT: Der Netzstecker ist die Hauptisoliervorrichtung! Die
anderen Schalter auf dem Gerät sind nur Funktionsschalter und können
nicht verwendet werden, um den Stromfluß im Gerät zu unterbrechen.
xiv
Page 17

Energy Saving Control Function
The device comes equipped with a Low Power Mode where energy
consumption is reduced after a certain amount of time elapses since the
device was last used, as well as a Sleep where printer functions remain
in a waiting state but power consumption is still reduced to a minimum
when there is no activity with the device within a set amount of time.
Low Power Mode
The device automatically enters Low Power Mode when 1 minute has
passed since the device was last used. The amount of time of no activity
that must pass before Low Power Mode is activated may be lengthened.
For more information refer to Low Power Timer (Low Power Mode timer
timeout time) section of the Advanced Operation Guide.
Sleep
For Europe
The device automatically enters Sleep when 15 minutes have passed
since the device was last used. The amount of time of no activity that
must pass before Sleep is activated may be lengthened. For more
information, refer to Sleep Timer (Sleep timer timeout setting) section of
the Advanced Operation Guide.
Except for Europe
The device automatically enters Sleep when 1 minute has passed since
the device was last used. The amount of time of no activity that must
pass before Sleep is activated may be lengthened. For more information,
refer to Sleep Timer (Sleep timer timeout setting) section of the
Advanced Operation Guide.
Automatic 2-Sided Print Function
This device includes 2-sided printing as a standard function. For
example, by printing two 1-sided originals onto a single sheet of paper as
a 2-sided print, it is possible to lower the amount of paper used. For
more information refer to Duplex (Duplex Printing) section of the
Advanced Operation Guide.
Printing in duplex mode reduces paper consumption and contributes to
the conservation of forest resources. Duplex mode also reduces the
amount of paper that must be purchased, and thereby reduces cost. It is
recommended that machines capable of duplex printing be set to use
duplex mode by default.
Resource Saving - Paper
For the preservation and sustainable use of forest resources, it is
recommended that recycled as well as virgin paper certified under
environmental stewardship initiatives or carrying recognised ecolabels,
which meet EN 12281:2002*1 or an equivalent quality standard, be
used.
This machine also supports printing on 64 g/m² paper. Using such paper
containing less raw materials can lead to further saving of forest
resources.
*1: EN12281:2002 "Printing and business paper - Requirements for copy
paper for dry toner imaging processes"
xv
Page 18

Your sales or service representative can provide information about
recommended paper types.
Environmental benefits of "Power Management"
To reduce power consumption when idle, this machine is equipped with
a power management function that automatically activates energysaving mode when the machine is idle for a certain period of time.
Although it takes the machine a slight amount of time to return to READY
mode when in energy-saving mode, a significant reduction in energy
consumption is possible. It is recommended that the machine be used
with the activation time for energy-saving mode set to the default setting.
Energy Star (ENERGY STAR®) Program
We have determined as a participating company in the International
Energy Star Program that this product is compliant with the standards laid
out in the International Energy Star Program.
®
ENERGY STAR
of developing and promoting the use of products with high energy
efficiency in order to help prevent global warming. By purchasing
ENERGY STAR
emissions of greenhouse gases during product use and cut energyrelated costs.
is a voluntary energy efficiency program with the goal
®
qualified products, customers can help reduce
xvi
Page 19
Symbols
The sections of this guide and parts of the machine marked with symbols
are safety warnings meant to protect the user, other individuals and
surrounding objects, and ensure correct and safe usage of the machine.
The symbols and their meanings are indicated below.
DANGER: Indicates that serious injury or even death will very
possibly result from insufficient attention to or incorrect
compliance with the related points.
WARNIN G: Indicates that serious injury or even death may
result from insufficient attention to or incorrect compliance with
the related points.
CAUTION: Indicates that personal injury or mechanical
damage may result from insufficient attention to or incorrect
compliance with the related points.
The following symbols indicate that the related section includes safety
warnings. Specific points of attention are indicated inside the symbol.
.... [General warning]
.... [Warning of danger of electrical shock]
.... [Warning of high temperature]
The following symbols indicate that the related section includes
information on prohibited actions. Specifics of the prohibited action are
indicated inside the symbol.
.... [Warning of prohibited action]
.... [Disassembly prohibited]
The following symbols indicate that the related section includes
information on actions which must be performed. Specifics of the
required action are indicated inside the symbol.
.... [Alert of required action]
.... [Remove the power plug from the outlet]
[Always connect the machine to an outlet with a ground
....
connection]
Please contact your service representative to order a replacement if the
safety warnings in this Operation Guide are illegible or if the guide itself
is missing. (fee required)
xvii
Page 20
Installation Precautions
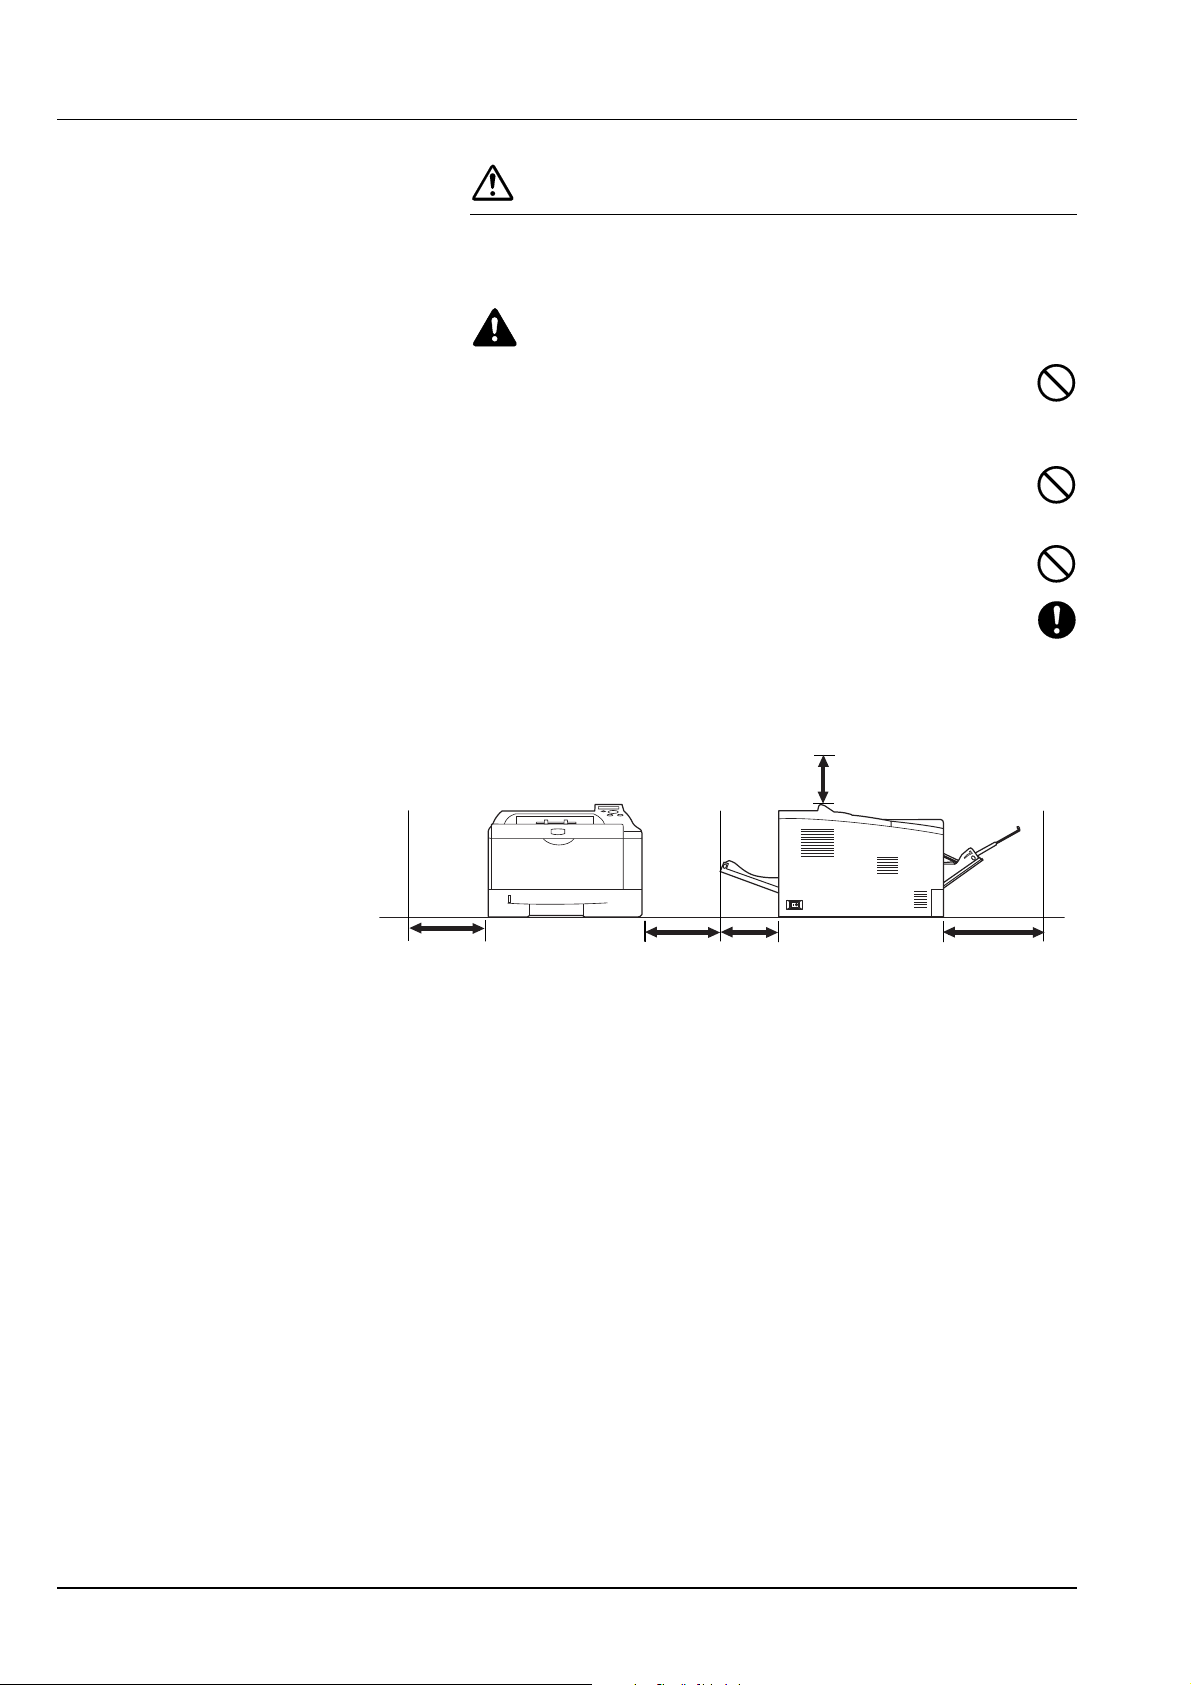
11-13/16"
(300mm)
7-7/8"
(200mm)
11-13/16"
(300mm)
19-11/16"
(500mm)
15-3/4"
(400mm)
Environment
Caution
Avoid placing the machine on or in locations which are unstable
or not level. Such locations may cause the machine to fall down
or fall over. This type of situation presents a danger of personal
injury or damage to the machine.
Avoid locations with humidity or dust and dirt. If dust or dirt
become attached to the power plug, clean the plug to avoid the
danger of fire or electrical shock.
Avoid locations near radiators, heaters, or other heat sources, or
locations near flammable items, to avoid the danger of fire.
To keep the machine cool and facilitate changing of parts and
maintenance, allow access space as shown below. Leave
adequate space, especially around the rear cover, to allow air to
be properly ventilated out of the printer.
xviii
Other Precautions
Adverse environmental conditions may affect the safe operation and
performance of the machine. Install in an air-conditioned room
(recommended room temperature: around 23°C (73.4°F), humidity:
around 60 % RH), and avoid the following locations when selecting a site
for the machine.
• Avoid locations near a window or with exposure to direct sunlight.
• Avoid locations with vibrations.
• Avoid locations with drastic temperature fluctuations.
• Avoid locations with direct exposure to hot or cold air.
• Avoid poorly ventilated locations.
During printing, some ozone is released, but the amount does not cause
any ill effect to one's health. If, however, the printer is used over a long
period of time in a poorly ventilated room or when printing an extremely
large number of copies, the smell may become unpleasant. To maintain
the appropriate environment for print work, it is suggested that the room
be properly ventilated.
Page 21
Power Supply/Grounding the Machine
Warning
Do not use a power supply with a voltage other than that
specified. Avoid multiple connections in the same outlet. These
types of situations present a danger of fire or electrical shock.
Plug the power cord securely into the outlet. If metallic objects
come in contact with the prongs on the plug, it may cause a fire or
electric shock.
Always connect the machine to an outlet with a ground
connection to avoid the danger of fire or electrical shock in case
of an electric short. If an earth connection is not possible, contact
your service representative.
Other precautions
Connect the power plug to the closest outlet possible to the machine.
The power supply cord is used as the main disconnect device. Ensure
that the socket/outlet is located/installed near the equipment and is
easily accessible.
Handling of plastic bags
Warning
Keep the plastic bags that are used with the machine away from
children. The plastic may cling to their nose and mouth causing
suffocation.
Introduction-xix
Page 22
Precautions for Use
Cautions when using the machine
Warning
Do not place metallic objects or containers with water (flower
vases, flower pots, cups, etc.) on or near the machine. This
situation presents a danger of fire or electrical shock should they
fall inside.
Do not remove any of the covers from the machine as there is a
danger of electrical shock from high voltage parts inside the
machine.
Do not damage, break or attempt to repair the power cord. Do not
place heavy objects on the cord, pull it, bend it unnecessarily or
cause any other type of damage. These types of situations
present a danger of fire or electrical shock.
Never attempt to repair or disassemble the machine or its parts as
there is a danger of fire, electrical shock or damage to the laser. If
the laser beam escapes, there is a danger of it causing blindness.
If the machine becomes excessively hot, smoke appears from the
machine, there is an odd smell, or any other abnormal situation
occurs, there is a danger of fire or electrical shock. Turn the main
power switch off () immediately, be absolutely certain to remove the
power plug from the outlet and then contact your service representative.
If anything harmful (paper clips, water, other fluids, etc.) falls into
the machine, turn the main power switch off () immediately.
Next, be absolutely certain to remove the power plug from the
outlet to avoid the danger of fire or electrical shock. Then contact your
service representative.
Do not remove or connect the power plug with wet hands, as
there is a danger of electrical shock.
Always contact your service representative for maintenance or
repair of internal parts.
Introduction-xx
Caution
Do not pull the power cord when removing it from the outlet. If the
power cord is pulled, the wires may become broken and there is a
danger of fire or electrical shock. (Always grasp the power plug
when removing the power cord from the outlet.)
Always remove the power plug from the outlet when moving the
machine. If the power cord is damaged, there is a danger of fire or
electrical shock.
If the machine will not be used for a short period of time
(overnight, etc.), turn the power switch off (O). If it will not be used
for an extended period of time (vacations, etc.), remove the power
plug from the outlet for safety purposes during the time the machine is
not in use.
Always hold the designated parts only when lifting or moving the
machine.
For safety purposes, always remove the power plug from the
outlet when performing cleaning operations.
Page 23
If dust accumulates within the machine, there is a danger of fire or
other trouble. It is therefore recommended that you consult with
your service representative in regard to cleaning of internal parts.
This is particularly effective if accomplished prior to seasons of
high humidity. Consult with your service representative in regard
to the cost of cleaning the internal parts of the machine.
Other precautions
Do not place heavy objects on the machine or cause other damage to
the machine.
Do not open the upper front cover, turn off the main power switch, or pull
out the power plug during printing.
When lifting or moving the machine, contact your service representative.
Do not touch electrical parts, such as connectors or printed circuit
boards. They could be damaged by static electricity.
Do not attempt to perform any operations not explained in this
handbook.
Use shielded interface cables.
Caution
Use of controls or adjustments or performance of procedures other than
those specified herein may result in hazardous radiation exposure.
Cautions when Handling Consumables
Caution
Do not attempt to incinerate parts which contain toner. Dangerous
sparks may cause burns.
Keep parts which contain toner out of the reach of children.
If toner happens to spill from parts which contain toner, avoid
inhalation and ingestion, as well as contact with your eyes and
skin.
• If you do happen to inhale toner, move to a place with fresh air and
gargle thoroughly with a large amount of water. If coughing
develops, contact a physician.
• If you do happen to ingest toner, rinse your mouth out with water and
drink 1 or 2 cups of water to dilute the contents of your stomach. If
necessary, contact a physician.
• If you do happen to get toner in your eyes, flush them thoroughly
with water. If there is any remaining tenderness, contact a physician.
• If toner does happen to get on your skin, wash with soap and water.
Do not attempt to force open or destroy parts which contain toner.
Other precautions
After use, always dispose of the Toner Container in accordance with
Federal, State and Local rules and regulations.
Store all consumables in a cool, dark location.
If the machine will not be used for an extended period of time, remove
the paper from the cassette, return it to its original package and reseal it.
Introduction-xxi
Page 24

About the Operation Guide
This Operation Guide contains the following chapters:
1 Machine Parts
This chapter explains the names of parts.
2 Loading Paper
This chapter explains paper specifications for this printer and how to
load paper into the cassette or MP tray.
3Printing
This chapter explains how to install the printer driver, print from your PC,
and use the application software included in the DVD-ROM.
4 Maintenance
This chapter explains how to replace the toner container and how to care
for your printer.
5 Troubleshooting
This chapter explains how to handle printer problems that may occur,
such as paper jams.
6 Specifications
This chapter lists the specifications of this printer.
Introduction-xxii
Page 25

Conventions in This Guide
This manual uses the following conventions.
Convention
Italic
Typeface
Bold Used to denote buttons on the
Bracket Bold Used to denote operation panel
Note Used to provide additional or
Important Used to provide important
Caution Cautions are statements that
Warning Used to alert users to the
Description
Used to emphasize a key word,
phrase or reference to additional
information.
software.
keys.
useful information about a
function or feature.
information.
suggest mechanical damage as
a result of an action.
possibility of personal injury.
Example
Refer to Print Quality Problems on page
5-3.
To start printing, click OK.
Press [GO] to resume printing.
Note Do not remove the toner
container from the carton until you
are ready to install it in the printer.
IMPORTANT Take care not to touch
the transfer roller (black) during
cleaning.
CAUTION When pulling the paper, pull
it gently so as not to tear it. Torn pieces
of paper are difficult to remove and may
be easily overlooked, deterring the
paper jam recovery.
WARNING If you ship the printer,
remove and pack the developer unit
and drum unit in a plastic bag and ship
them separately from the printer.
Introduction-xxiii
Page 26

Introduction-xxiv
Page 27

1 Machine Parts
This chapter identifies machine parts and operation panel keys.
Components at the Front of the Printer 1-2
Components at the Rear of the Printer 1-2
Operation Panel 1-3
Machine Parts 1-1
Page 28
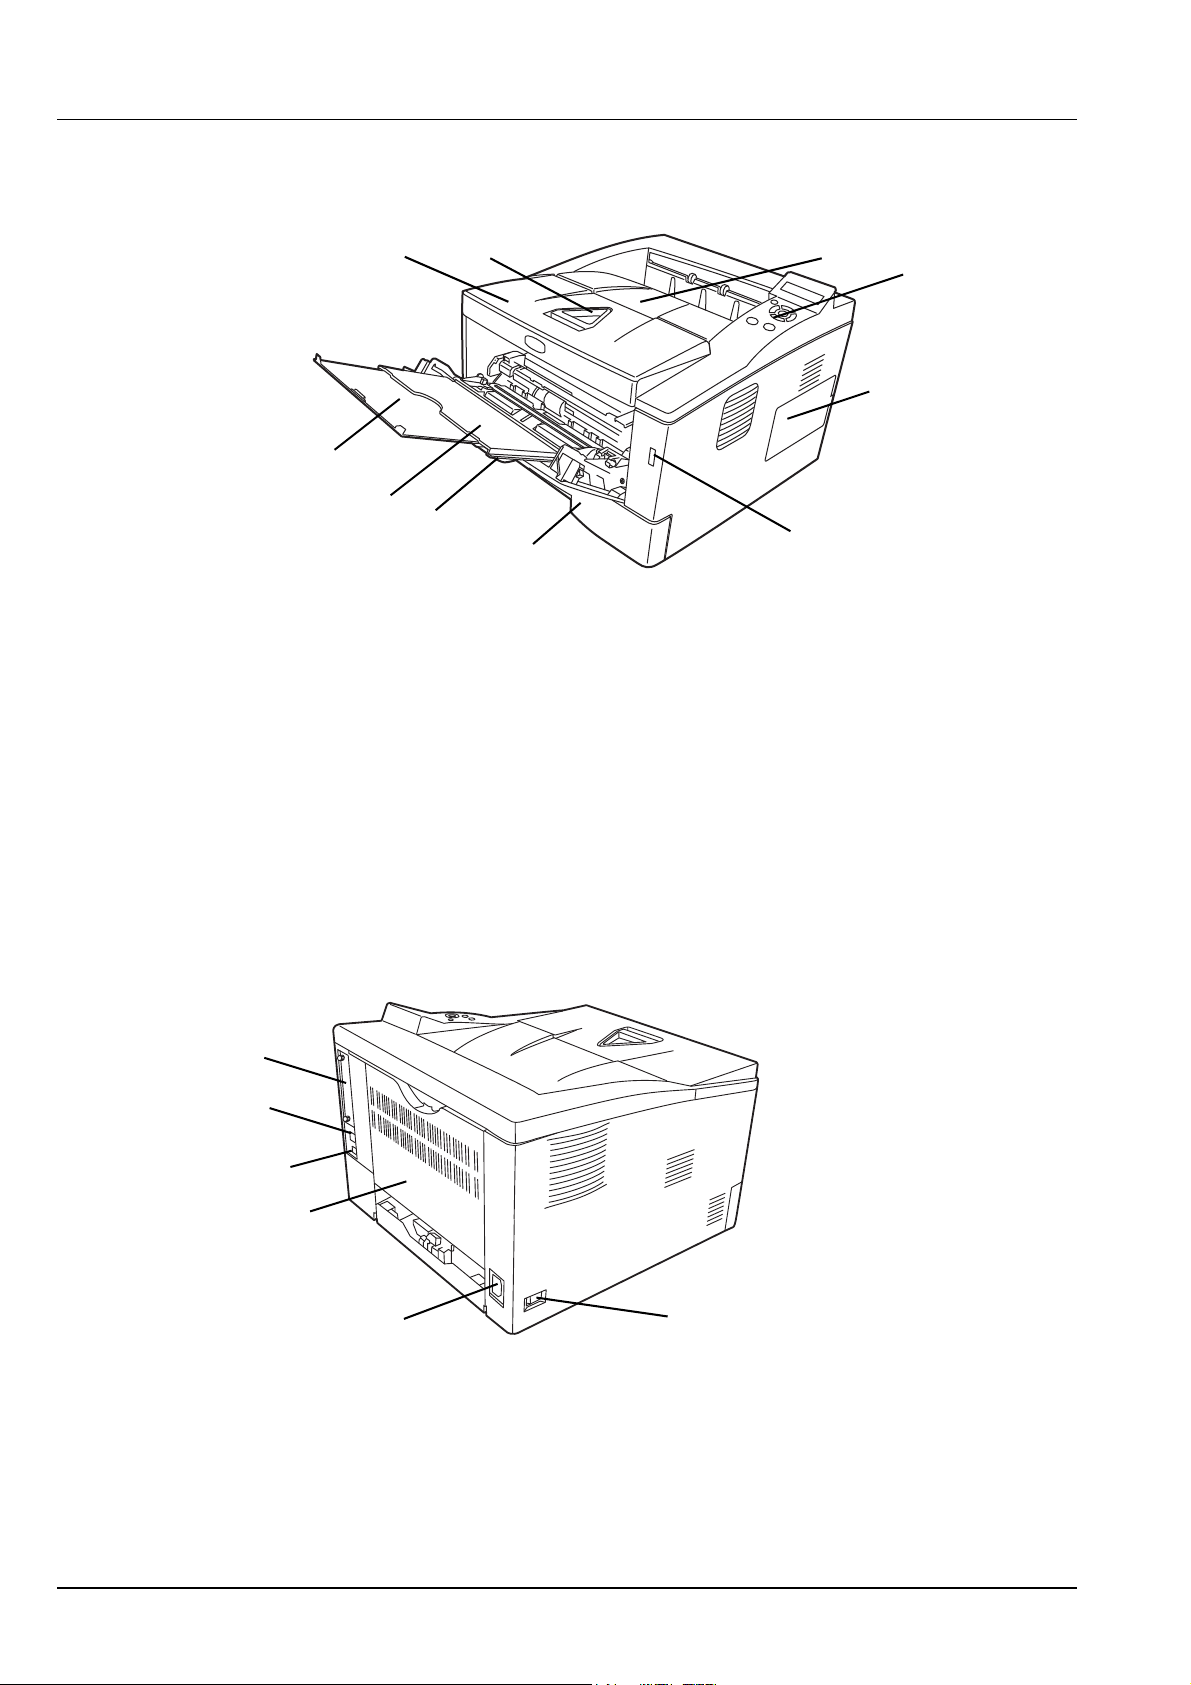
Components at the Front of the Printer
1
2
3
4
6
7
8
9
10
5
11
14
12
15
13
16
1 Top Cover
2 Paper Stopper
3 Top Tray
4 Operation Panel
5 USB Memory Slot
6 Right Cover
7 Paper Cassette
8 Front Cover
9 MP Tray
10 Subtray
Components at the Rear of the Printer
1-2 Machine Parts
11 Network Interface Connector
12 USB Interface Connector
13 Rear Cover
14 Power Cord Connector
15 Power Switch
16 Optional Interface Slot Cover
Page 29
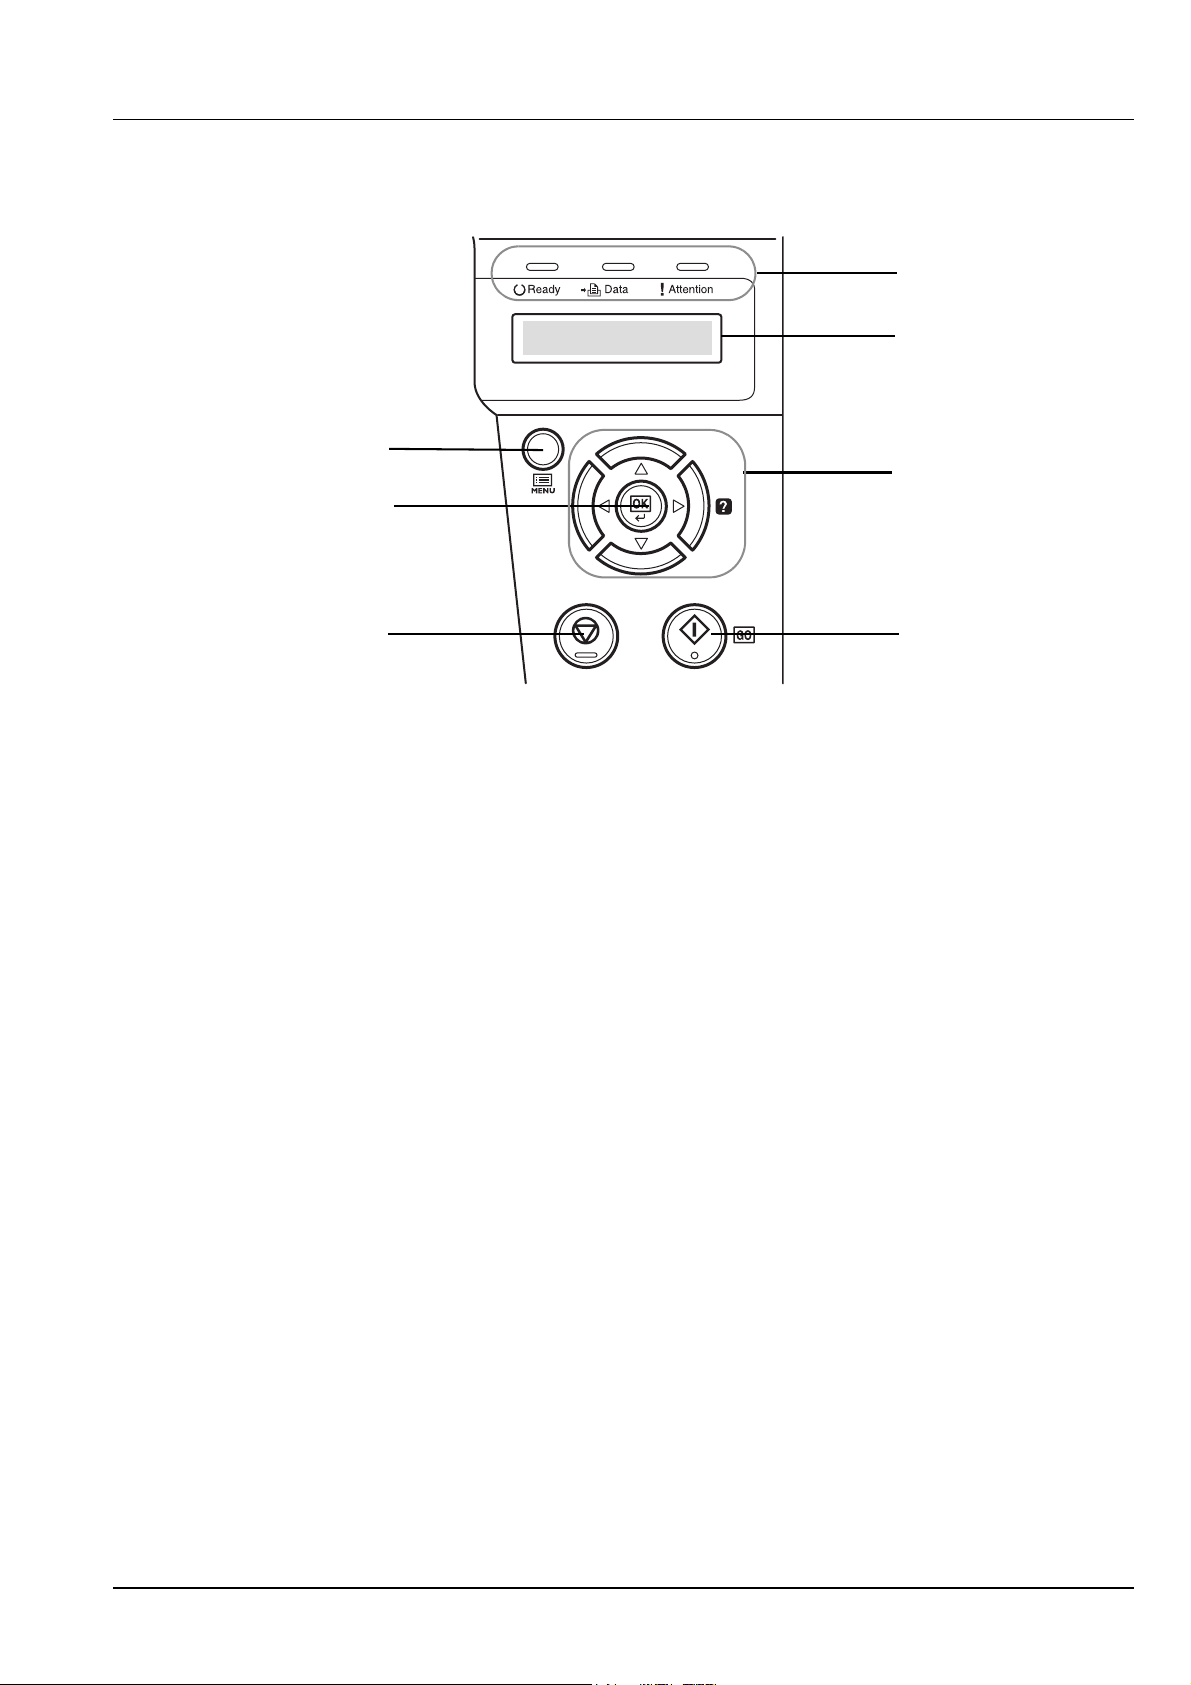
Operation Panel
2
1
3
4
5
6
7
1 Indicators
2 Message Display
3 Cursor Keys
4[GO] Key
5 [Cancel] Key
6[OK] Key
7 [MENU] Key
Machine Parts 1-3
Page 30

1-4 Machine Parts
Page 31

2 Loading Paper
This chapter explains how to load paper into the cassette or MP tray.
Preparing the Paper 2-2
Loading Paper into Cassette 2-2
Loading Paper into MP (Multi-Purpose) Tray 2-5
Loading Paper 2-1
Page 32
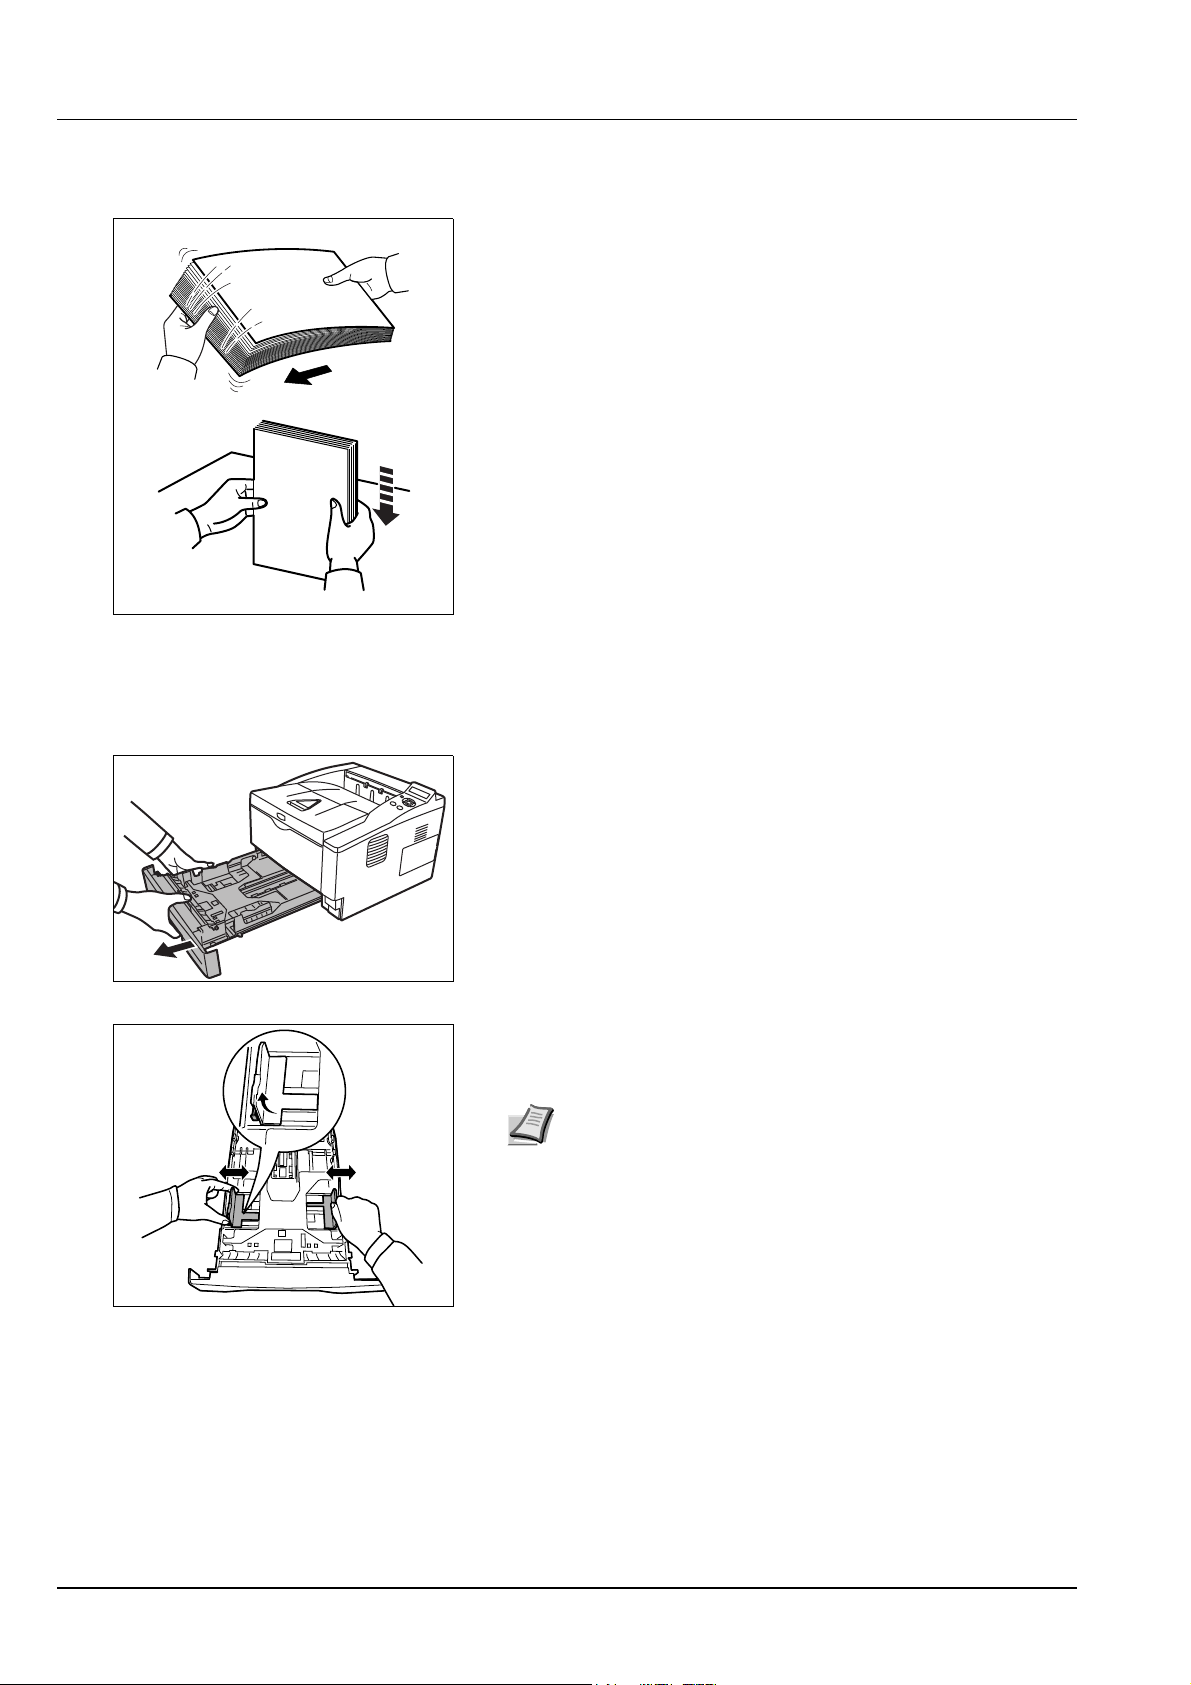
Preparing the Paper
After removing paper from the packaging, fan through the sheets to
separate them prior to loading.
If using paper that has been folded or is curled, straighten it prior to
loading. Failure to do so may result in a paper jam.
IMPORTANT Ensure paper is not stapled and clips are removed.
Loading Paper into Cassette
250 sheets of 11 × 8 1/2" or A4 paper (80 g/m²) may be loaded into the
Cassette.
1 Pull the cassette completely out of the printer.
IMPORTANT When pulling the cassette out of the printer, ensure
it is supported and does not fall out.
2 Adjust the position of the width guides located on the left and right
sides of the cassette. Press the release button on the left guide and
slide the guides to the paper size required.
Note Paper sizes are marked on the cassette.
2-2 Loading Paper
Page 33
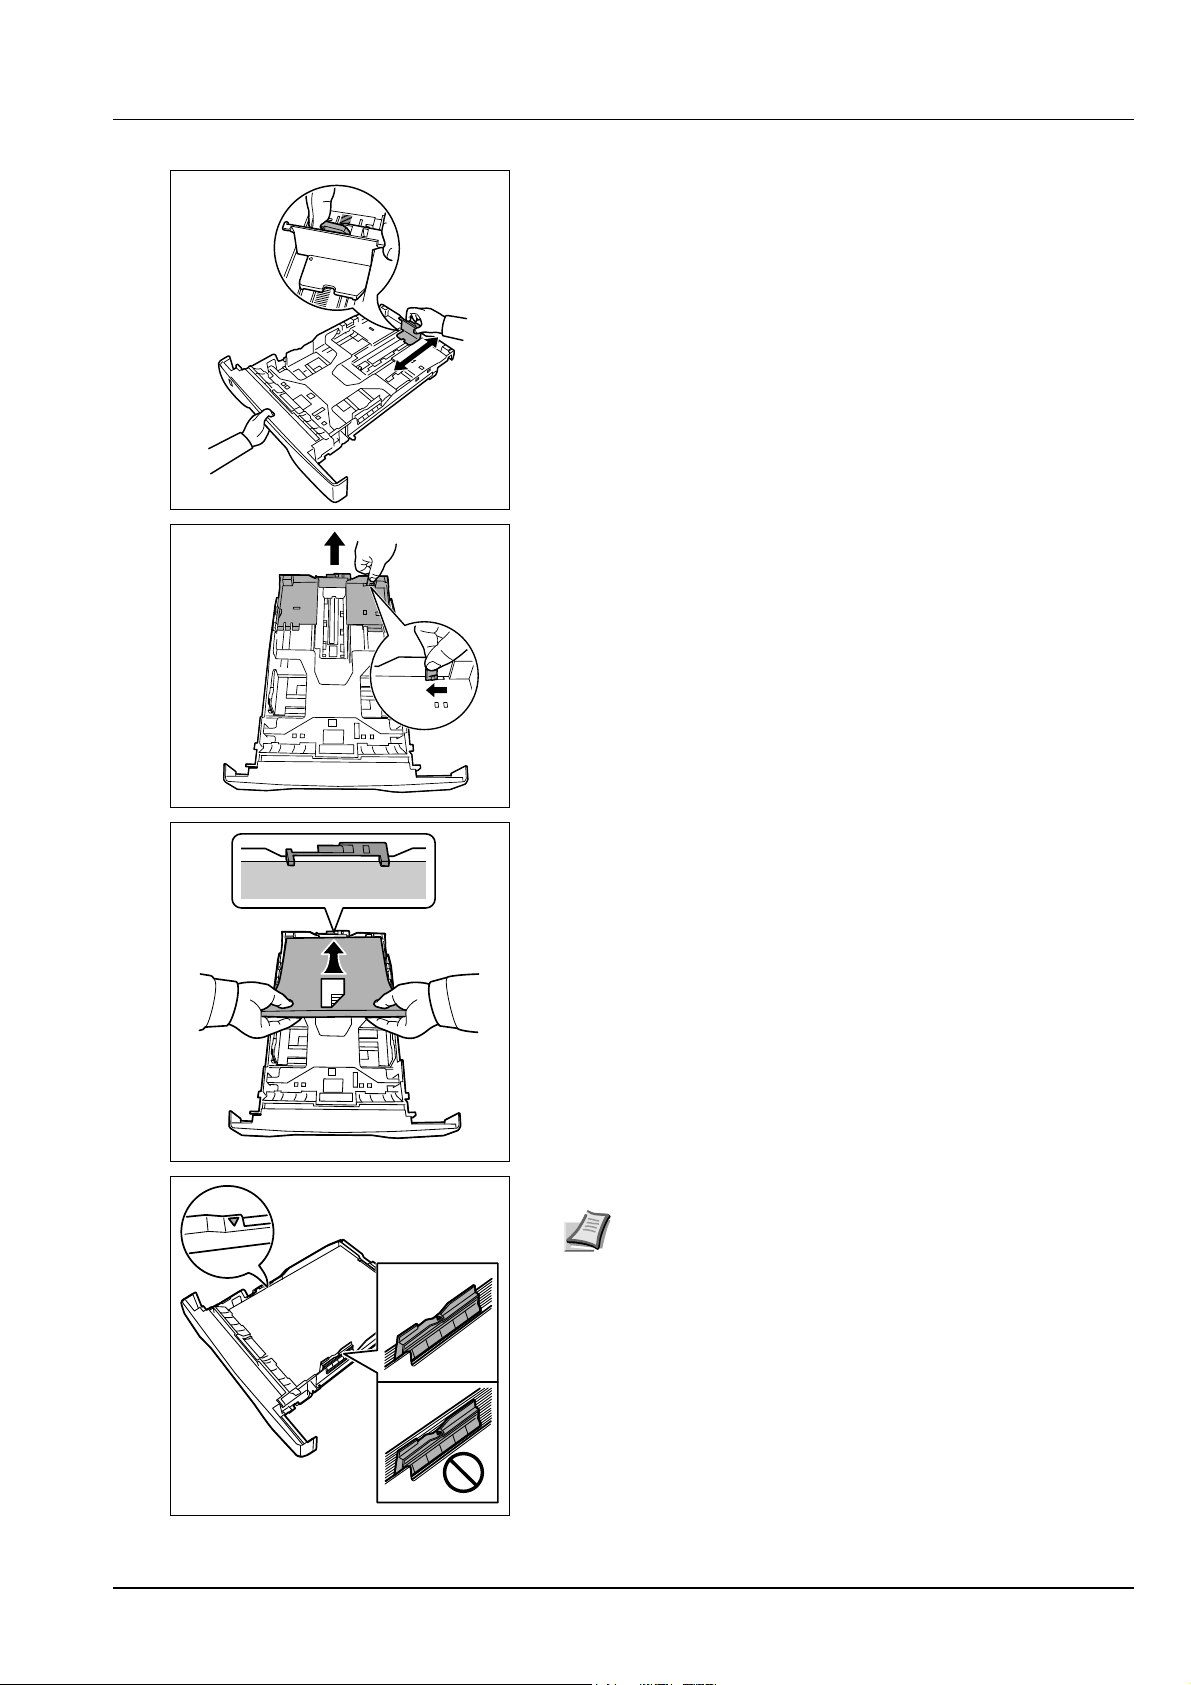
3 Adjust the paper length guide to the paper size required.
If you are going to use paper that is longer than A4, pull out the
extension paper cassette by pushing the release lever one by one
and adjust it to the desired paper size.
4 Load the paper in the cassette. Ensure the side to be printed is
facing down and the paper is not folded, curled, or damaged.
Note Do not load paper above the triangle mark located on
the width guide.
Loading Paper 2-3
Page 34
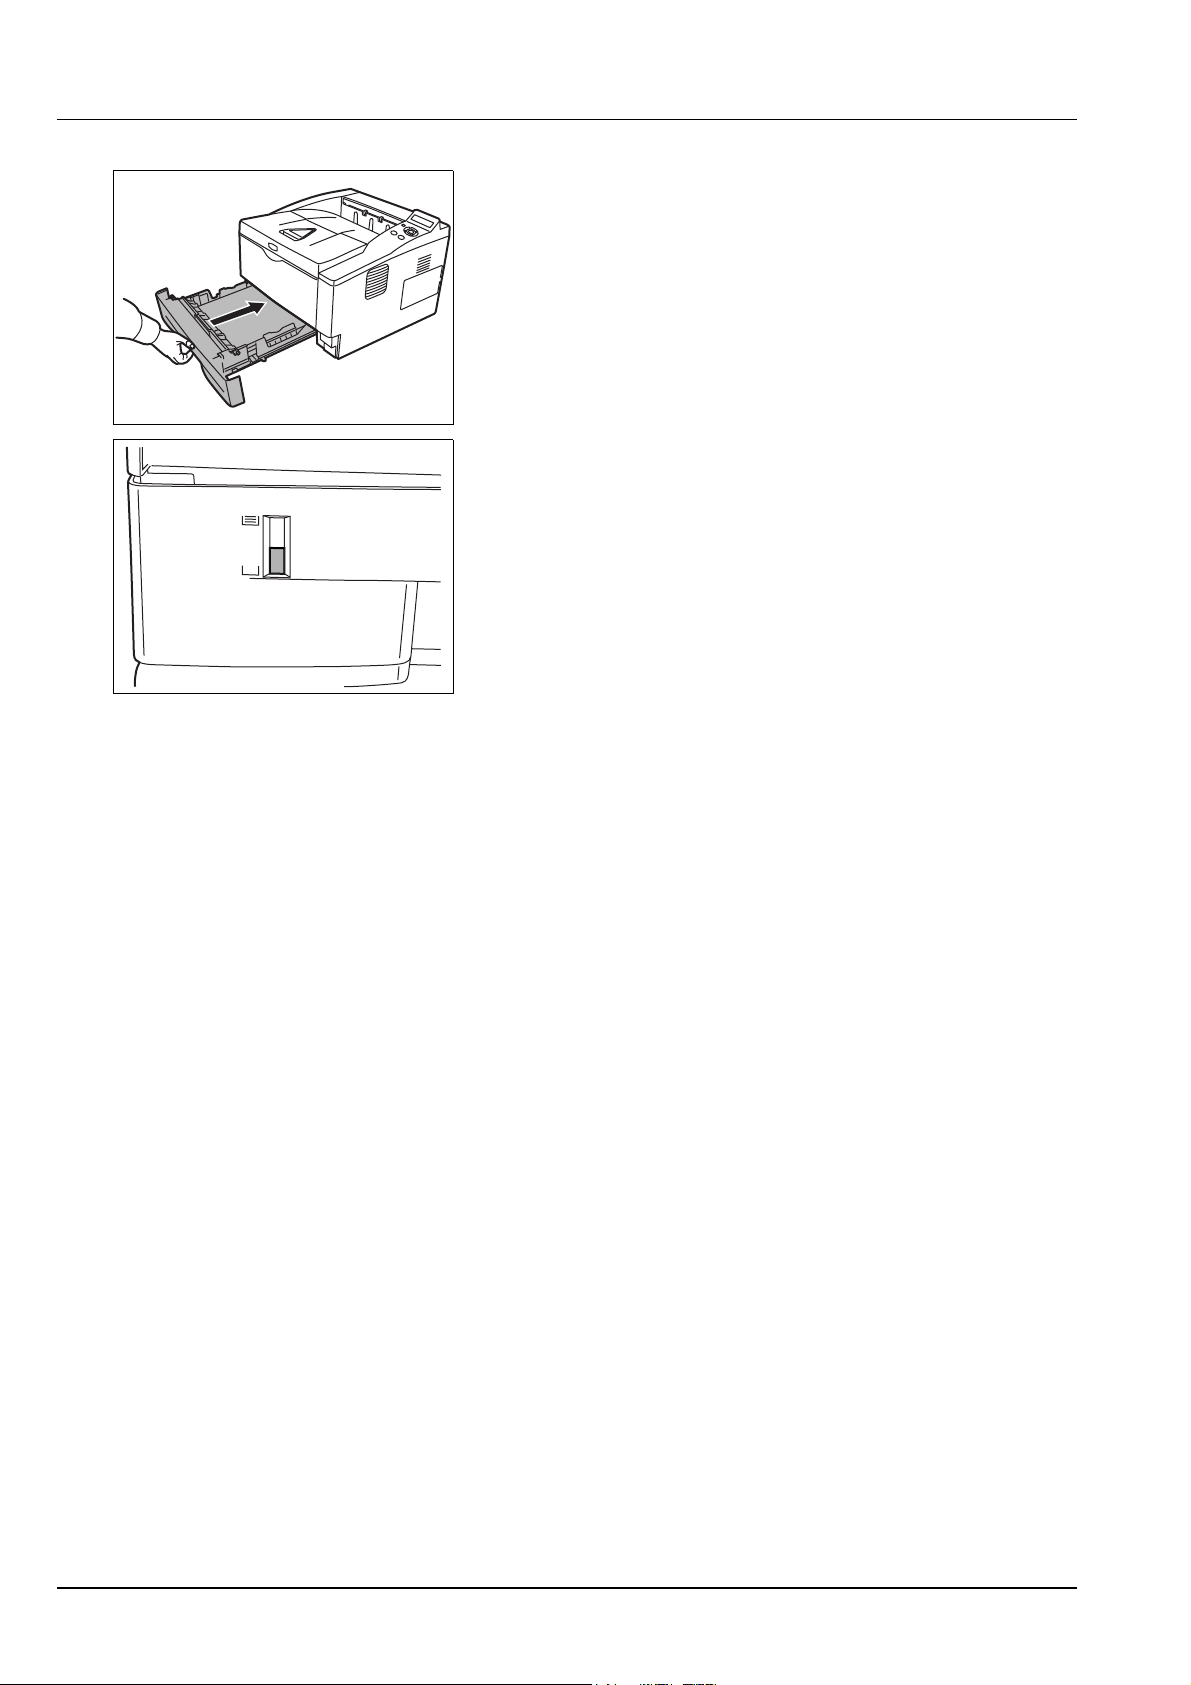
5 Insert the paper cassette into the slot in the printer. Push it straight in
as far as it will go.
There is a paper gauge on the left side of the front of the paper
cassette to indicate the remaining paper supply. When paper is
exhausted, the pointer will go down to the level of (empty).
6 Specify the paper size and type for the cassette using control panel.
For more information, refer to Advanced Operation Guide.
2-4 Loading Paper
Page 35
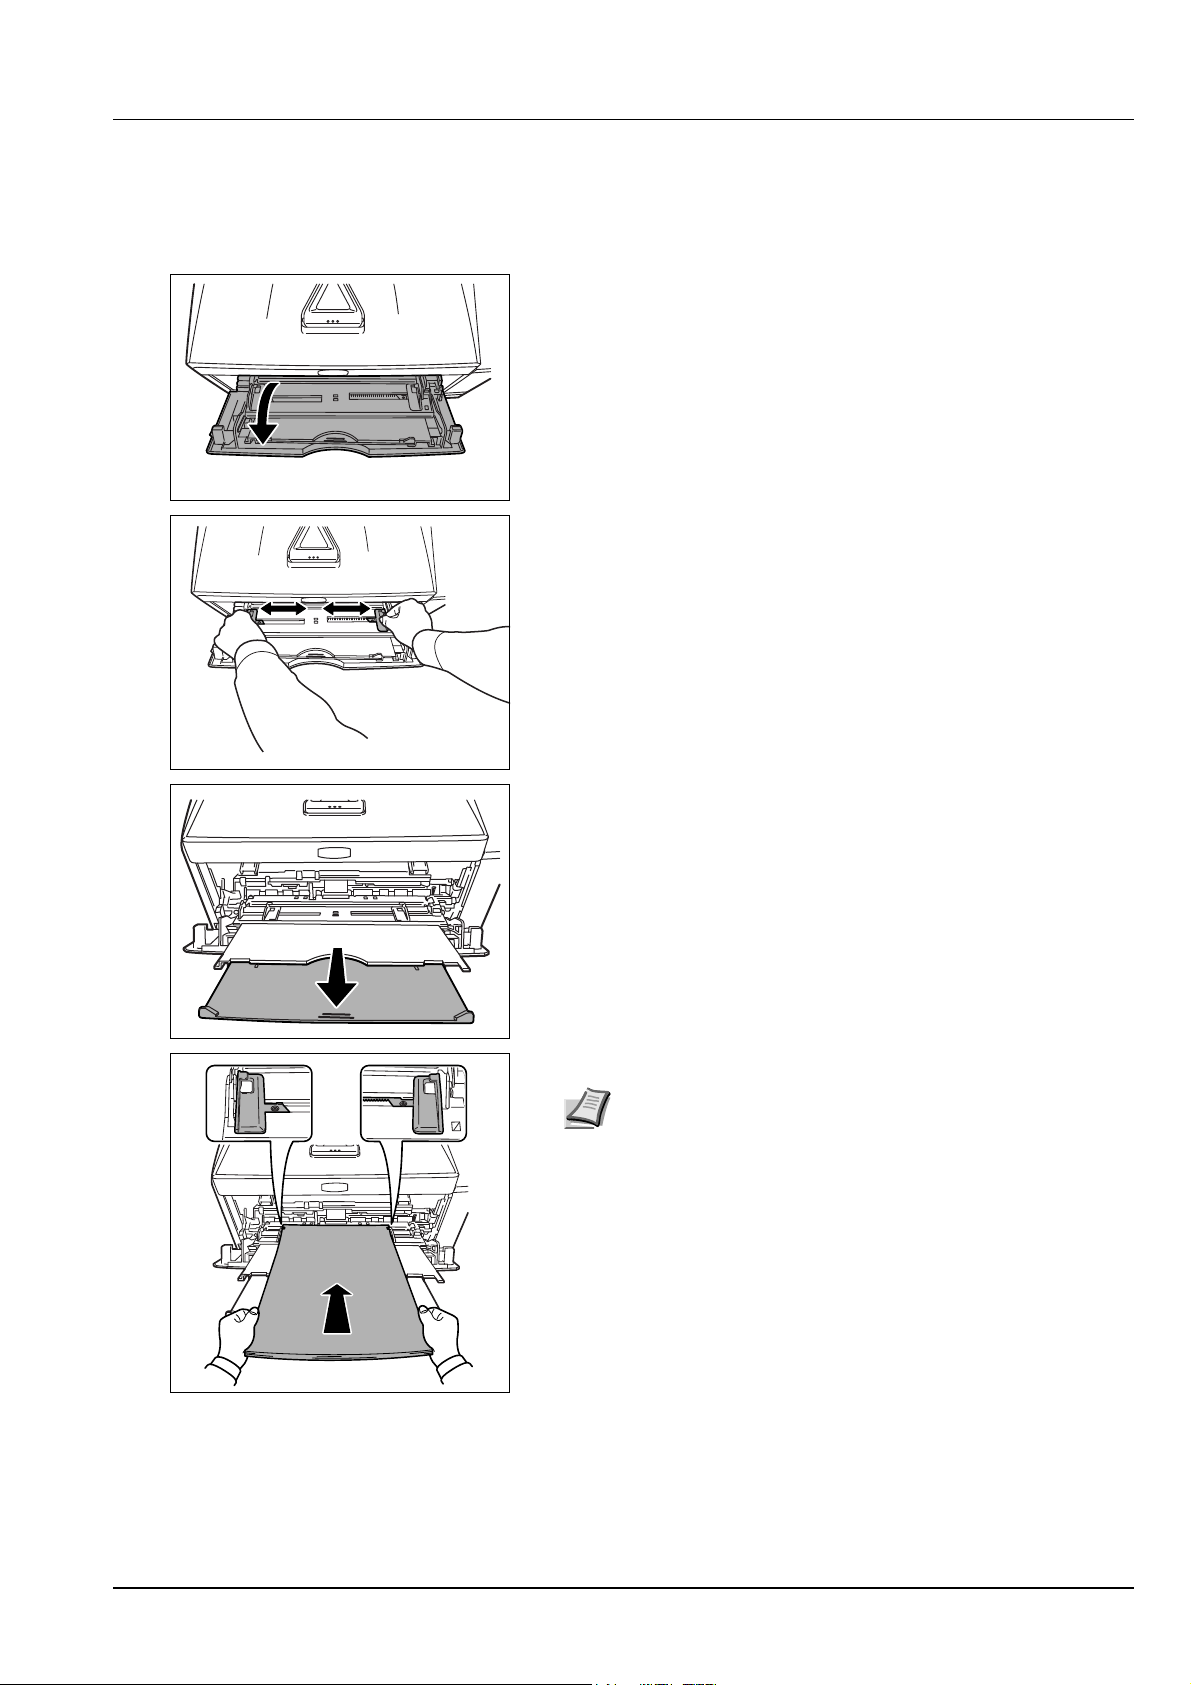
Loading Paper into MP (Multi-Purpose) Tray
This machine can load up to 50 sheets of 11 × 8 1/2" or A4 paper
(80 g/m²) into the MP tray.
1 Pull the MP tray towards you until it stops.
2 Adjust the position of the paper guides on the MP tray. Standard
paper sizes are marked on the MP tray. For standard paper sizes,
slide the paper guides to the corresponding mark.
3 Pull out the subtray.
4 Align the paper with the paper guides and insert as far as it will go.
Note Do not load more paper than exceeds the tab of the MP
tray.
Loading Paper 2-5
Page 36
Correct
Correct
Correct
Incorrect
1
2
Incorrect
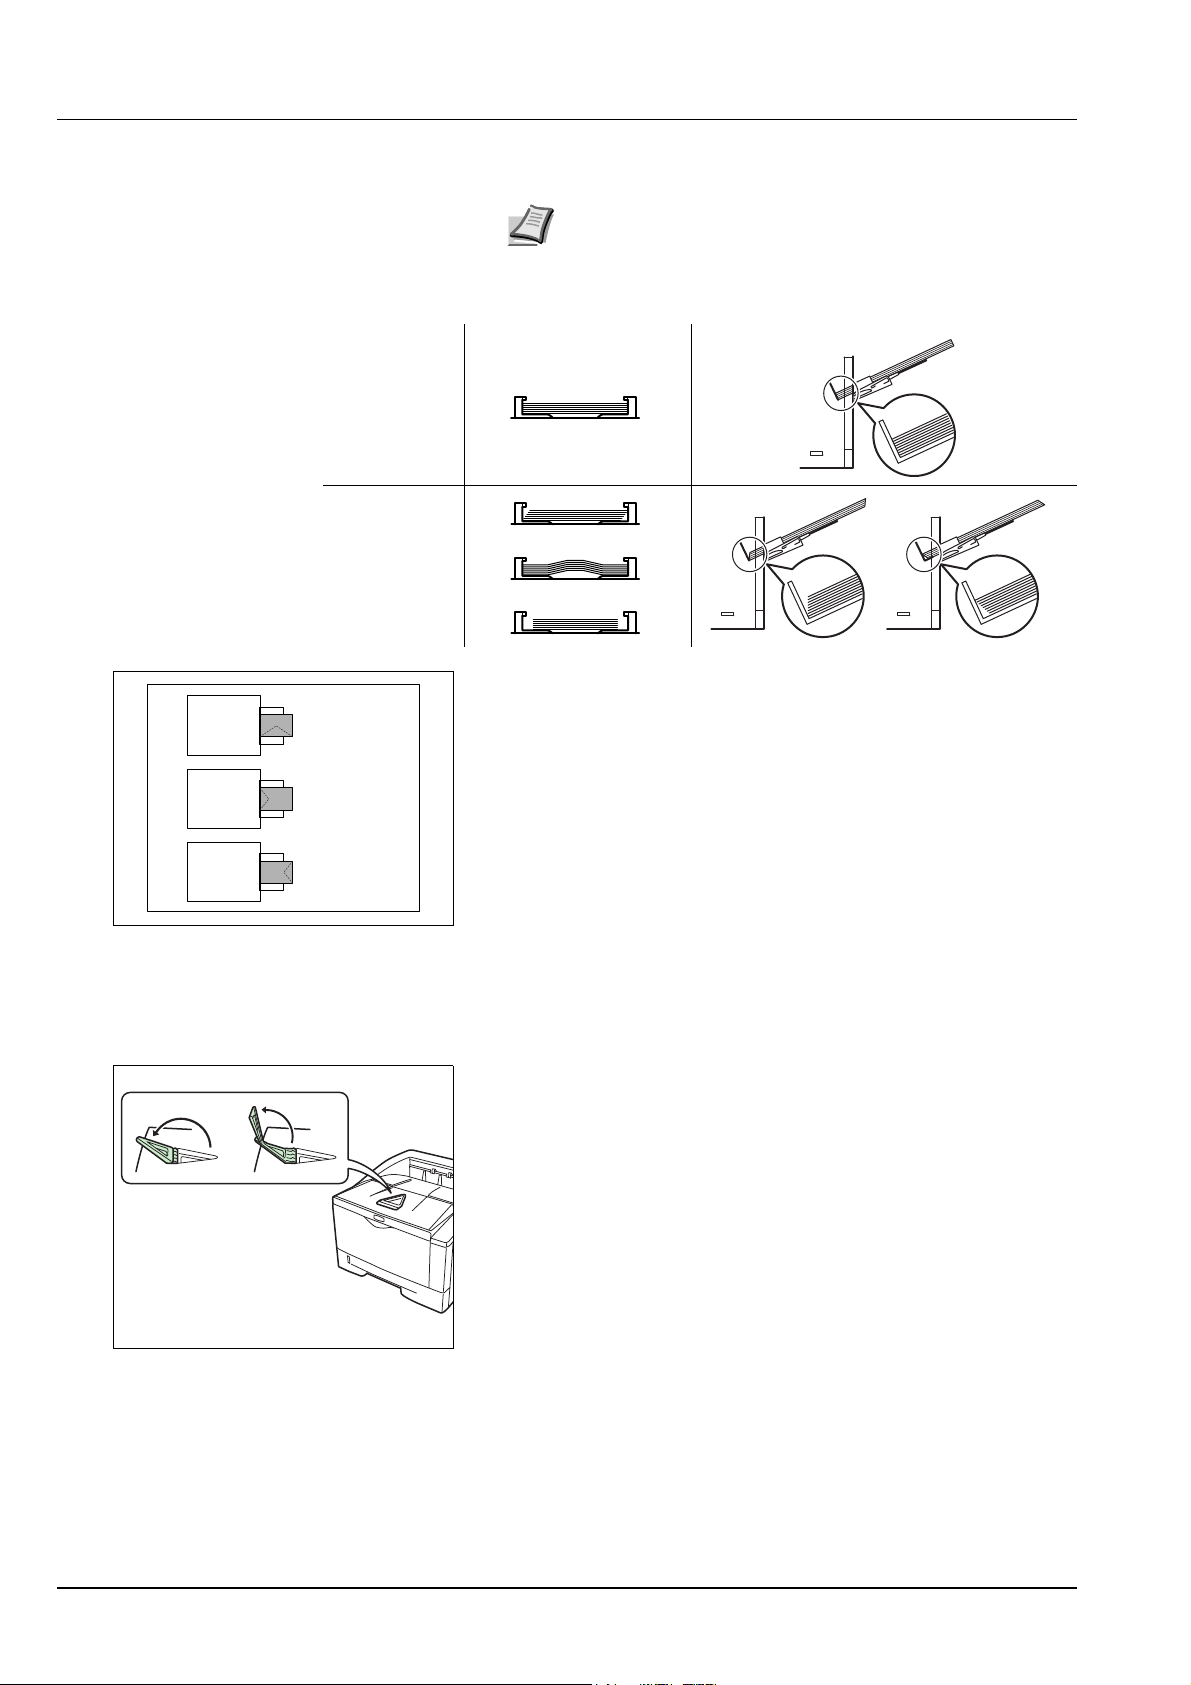
Note If the paper is considerably curled in one direction, for
example, if the paper is already printed on one side, try to roll
the paper in the opposite direction to counteract the curl.
Printed sheets will then come out flat.
When loading envelope, place with the envelope flap closed and
keep the printing side face-up. Insert envelope against the guide
with the flap on the front or left side until they stop.
5 Specify the paper size and type for MP tray using control panel. For
more information, refer to Advanced Operation Guide.
Paper Stopper
Open the paper stopper shown in the figure.
2-6 Loading Paper
Page 37

3 Connecting and Printing
This chapter explains how to start up the printer, print from your PC, and
use the application software included in the DVD-ROM.
Connections 3-2
Changing Network Interface Parameters 3-4
Printing a Network Interface Status Page 3-6
Command Center RX 3-7
Installing the Printer Driver 3-14
Printing 3-21
Printing by AirPrint 3-23
Status Monitor 3-24
Energy Saver Function 3-28
Connecting and Printing 3-1
Page 38
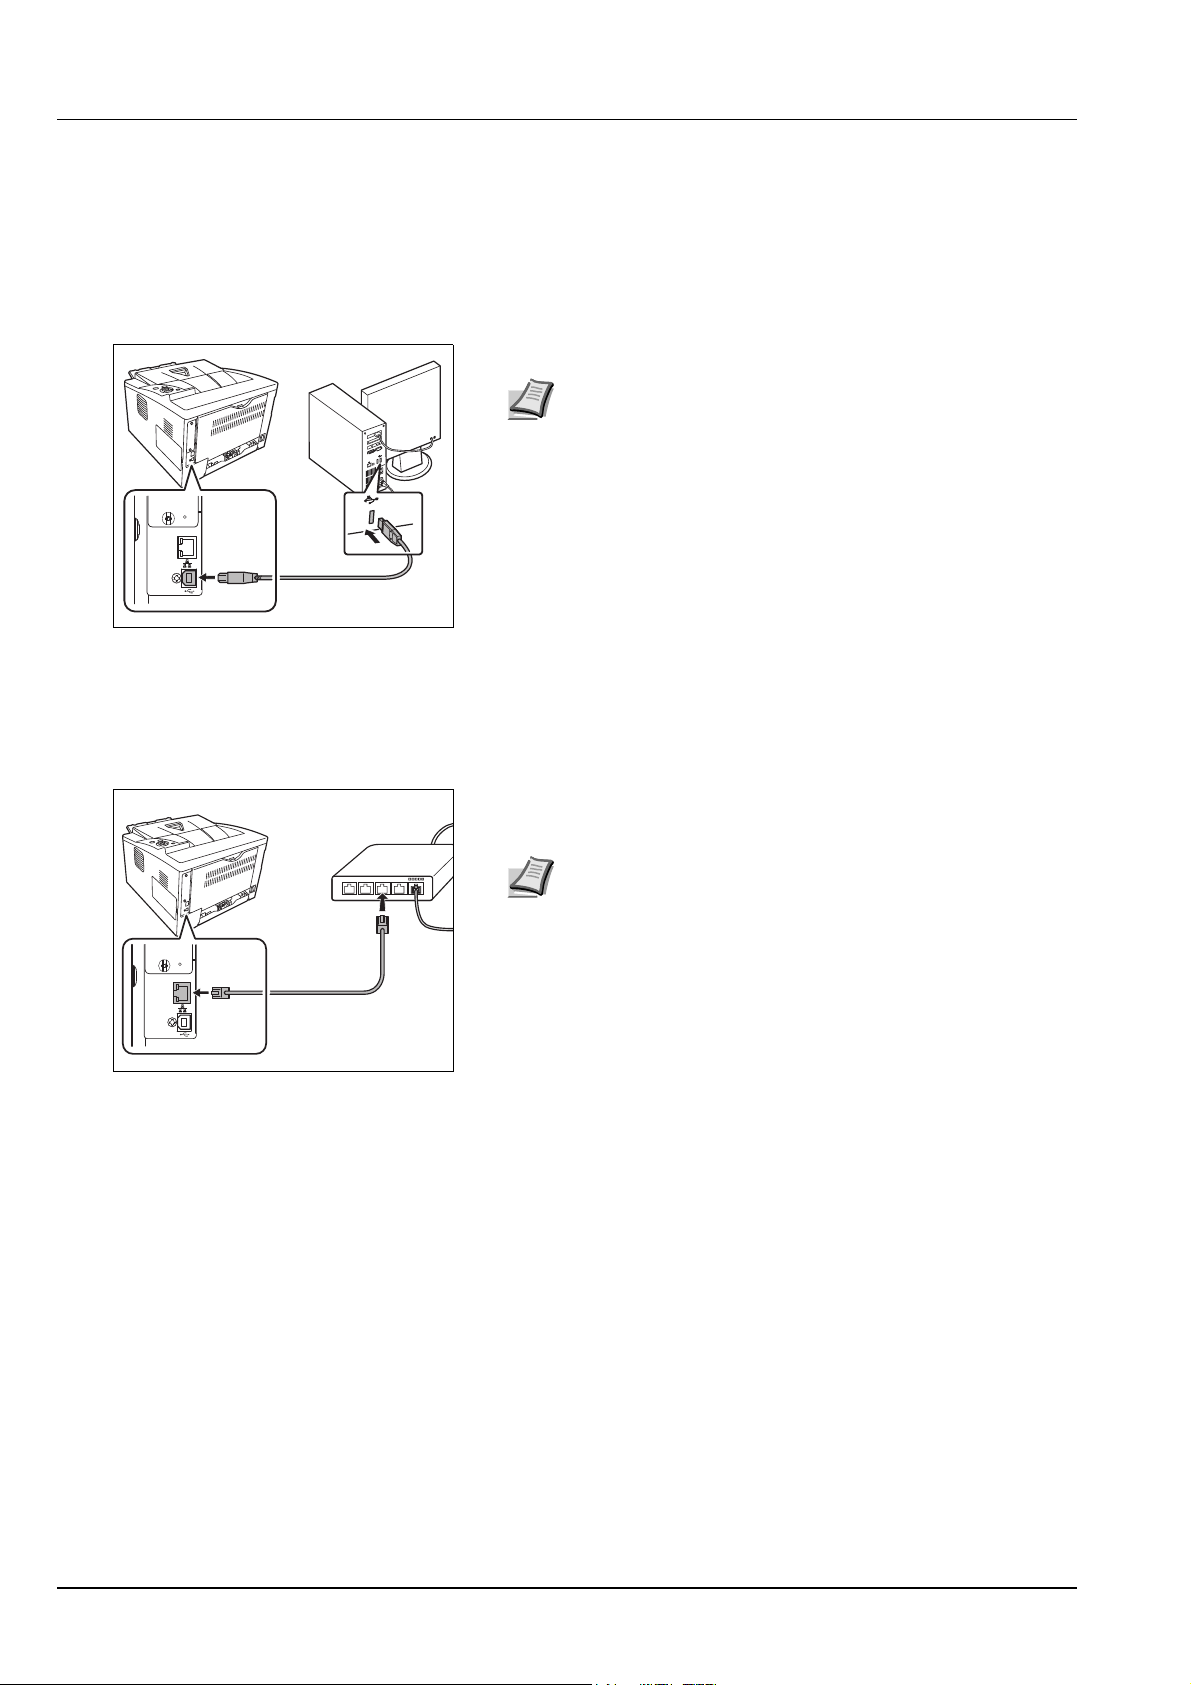
Connections
This section explains how to start up the printer.
Connecting the USB Cable
Follow the steps as below for connecting the USB cable.
1 Connect the USB cable to the USB Interface Connector.
Note Use a USB cable with a rectangular Type A plug and a
square Type B plug. This cable is sold separately.
2 Connect the other end of the USB cable to the computer's USB
interface connector.
Connecting the Network Cable
Follow the steps as below for connecting the network cable.
1 Remove the cap attached to the printer.
2 Connect the printer to the PC or your network device.
Note Use shielded interface cables. These cables are sold
separately.
3-2 Connecting and Printing
Page 39
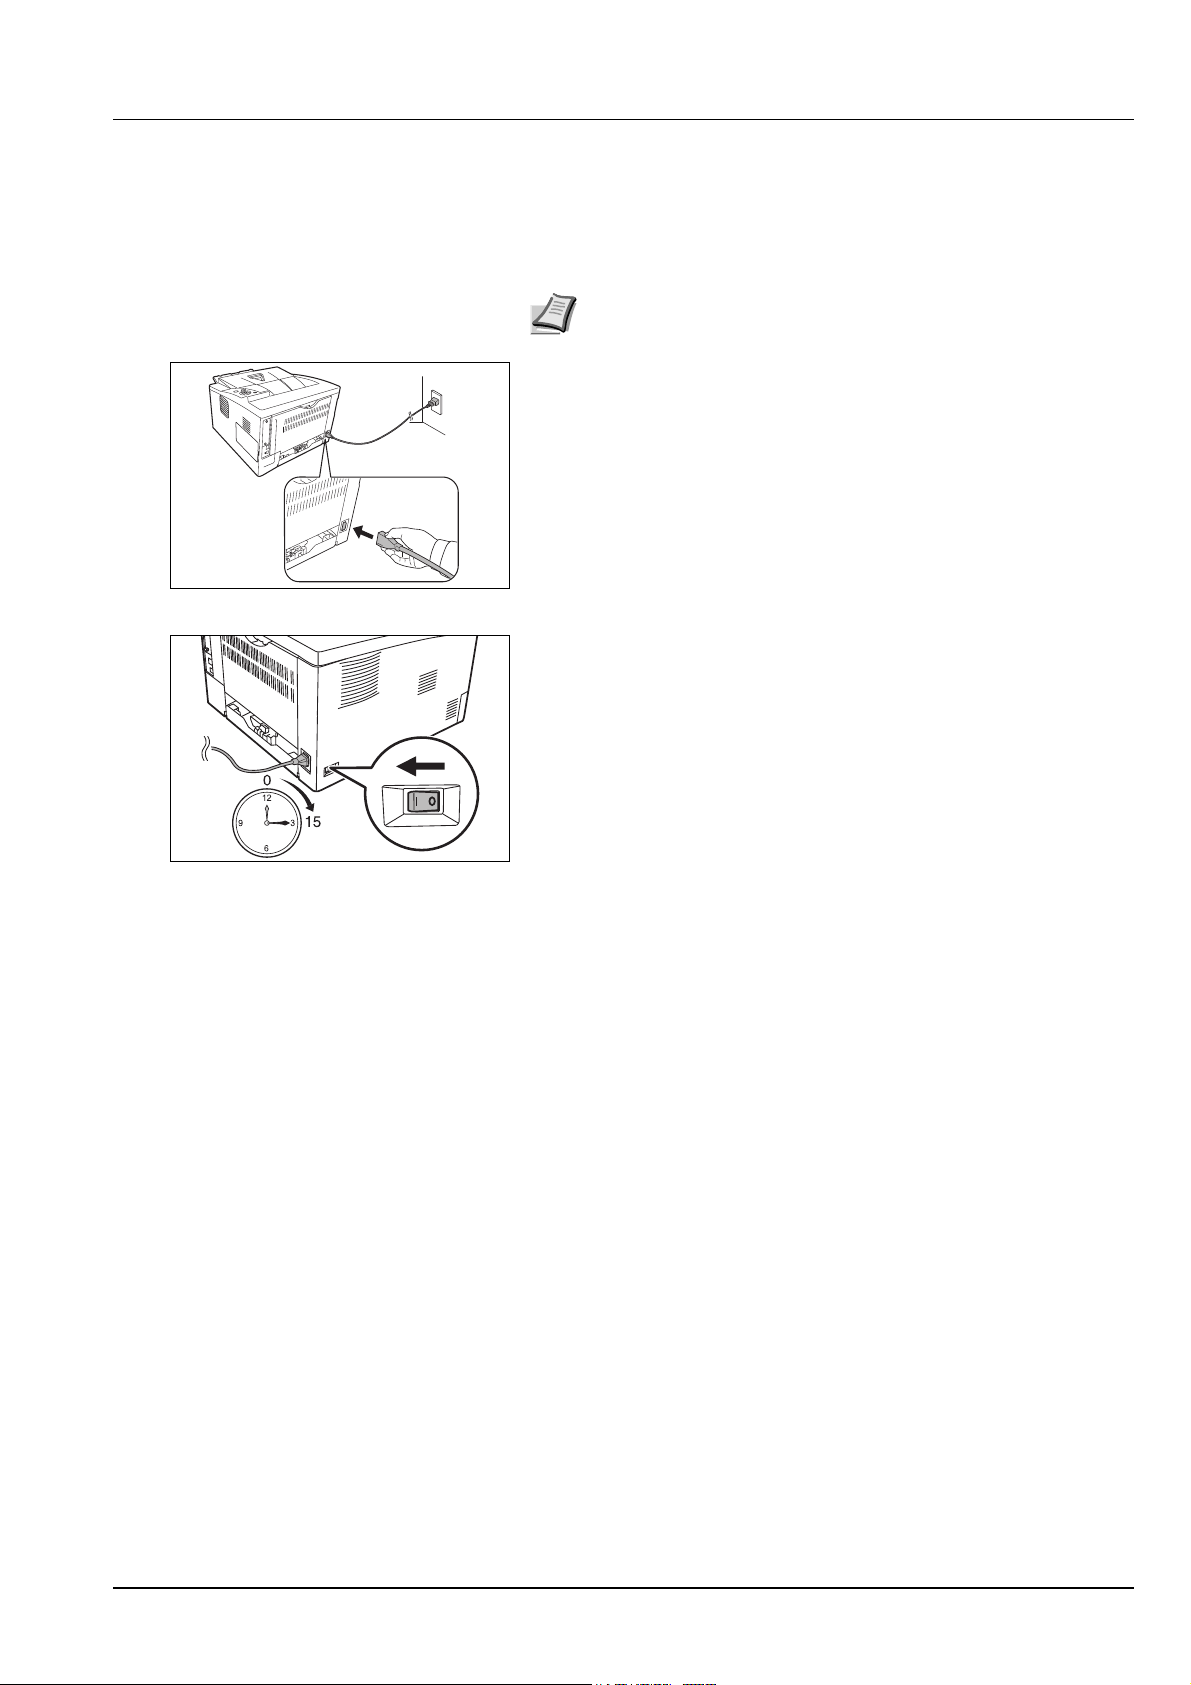
Connecting the Power Cord
Install the printer close to an AC wall outlet. If an extension cord is used,
the total length of the power cord plus extension should be 5 meters (16
feet) or less.
Note Ensure the printer's power switch is off. Only use the power
cord supplied with the printer.
1 Connect the power cord to the Power Cord Connector at the rear of
the printer.
2 Connect the other end of the power cord to a power outlet.
3 Press the Power Switch to On ( | ). The printer begins to warm up.
IMPORTANT If you install the starter toner container and switch
on the power, after a moment the message
wait(Adding toner)
switched on after toner installation, there will be a delay of
approximately 15 minutes before the printer gets ready to print.
Once the [Ready] indicator lights, printer installation is complete.
is displayed. When the printer is first
Please
Connecting and Printing 3-3
Page 40
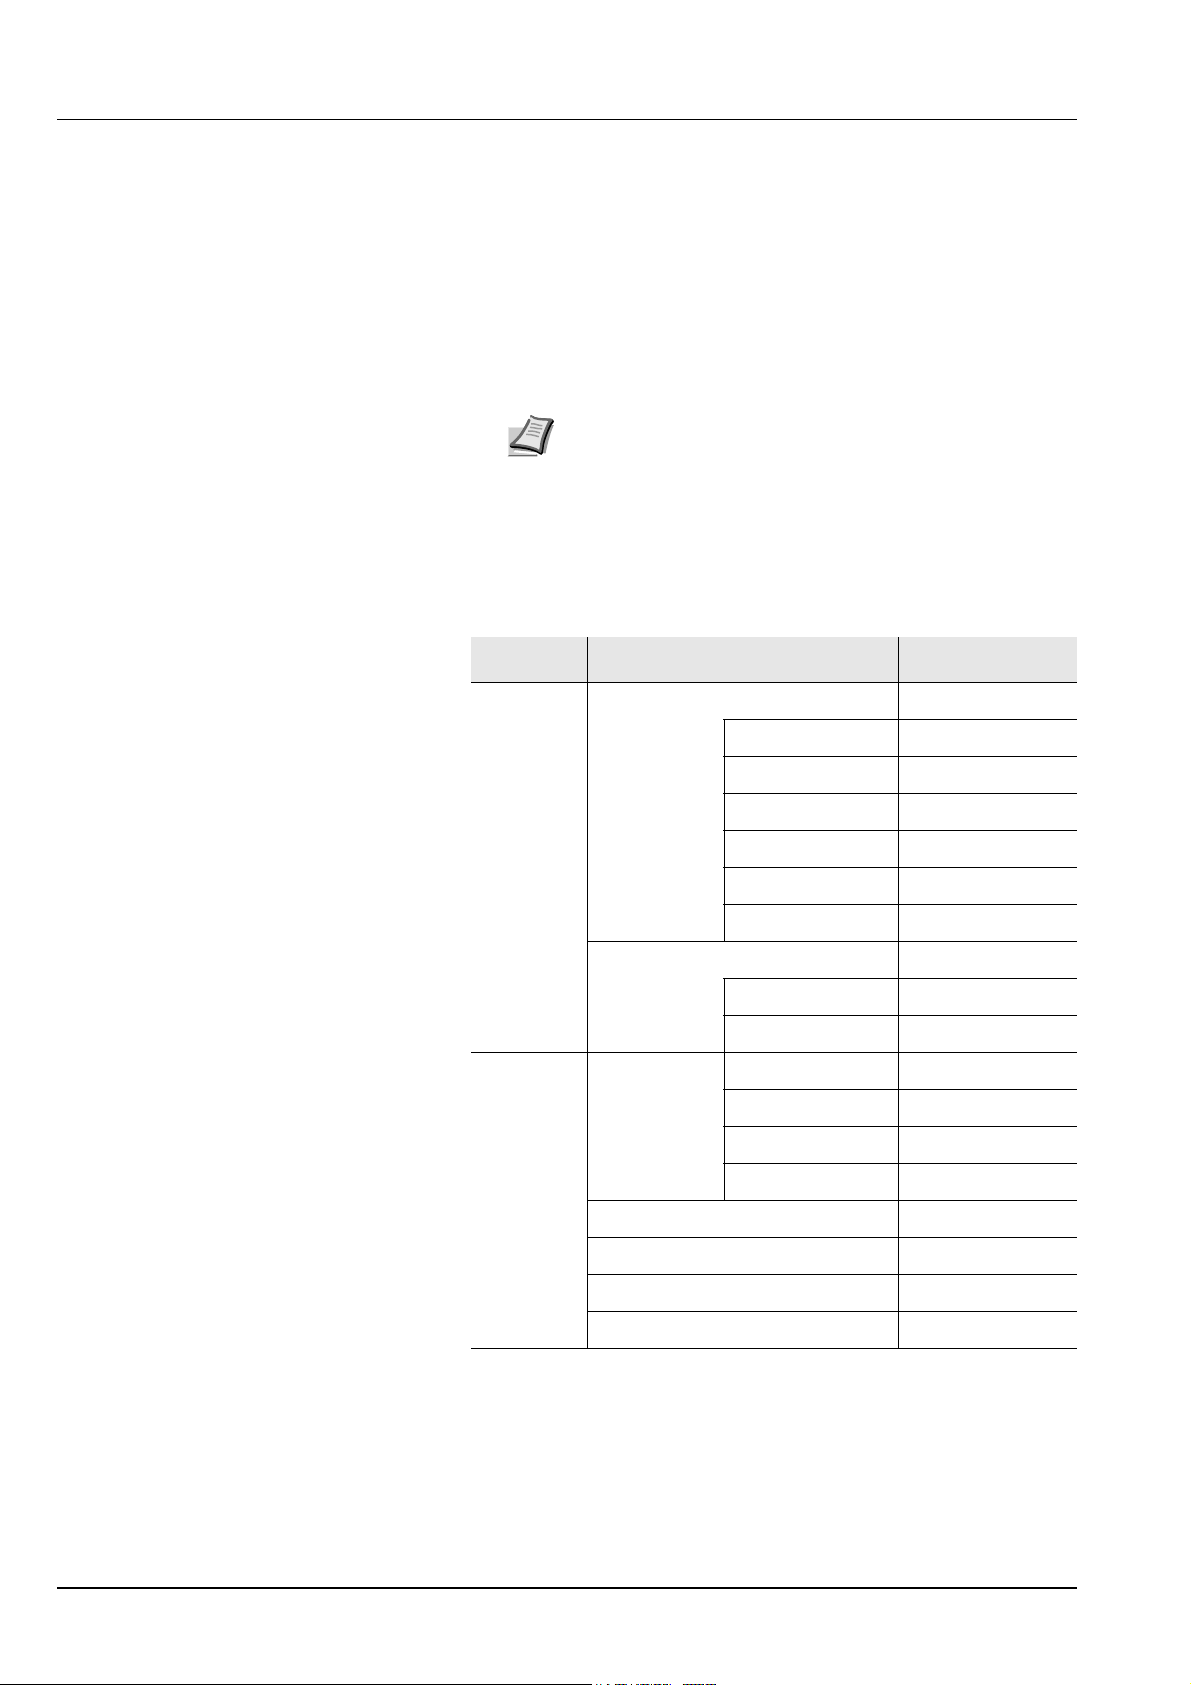
Changing Network Interface Parameters
This printer supports TCP/IP, TCP/IP (IPv6), IPP, SSL Server and the
IPSec protocols and Security Level.
The table below shows the items required for each of the settings.
Configure the printer's network parameters as appropriate for your PC
and your network environment.
For details of the procedure, refer to the Using the Operation Panel
section of the Advanced Operation Guide.
Note When Command Center RX is used, network
parameters and security settings can be conveniently changed
and checked from your PC. For more information, refer to
Command Center RX User Guide.
If the optional IB-50 or IB-51 is installed then NetWare and
AppleTalk settings are possible. For details, refer to Optional
Network section of the Advanced Operation Guide.
Menu Submenu Setting
Network TCP/IP On/Off
DHCP On/Off
Auto-IP On/Off
IP Address IP address
Subnet Mask IP address
Gateway IP address
Bonjour On/Off
TCP/IP (IPv6) On/Off
RA (Stateless) On/Off
DHCPv6 On/Off
Security I/F Block USB Host Block/Unblock
USB Device Block/Unblock
Option I/F Block/Unblock
USB Storage Block/Unblock
WSD-PRINT On/Off
Enhanced WSD On/Off
EnhancedWSD (SSL) On/Off
IPP On/Off
3-4 Connecting and Printing
Page 41
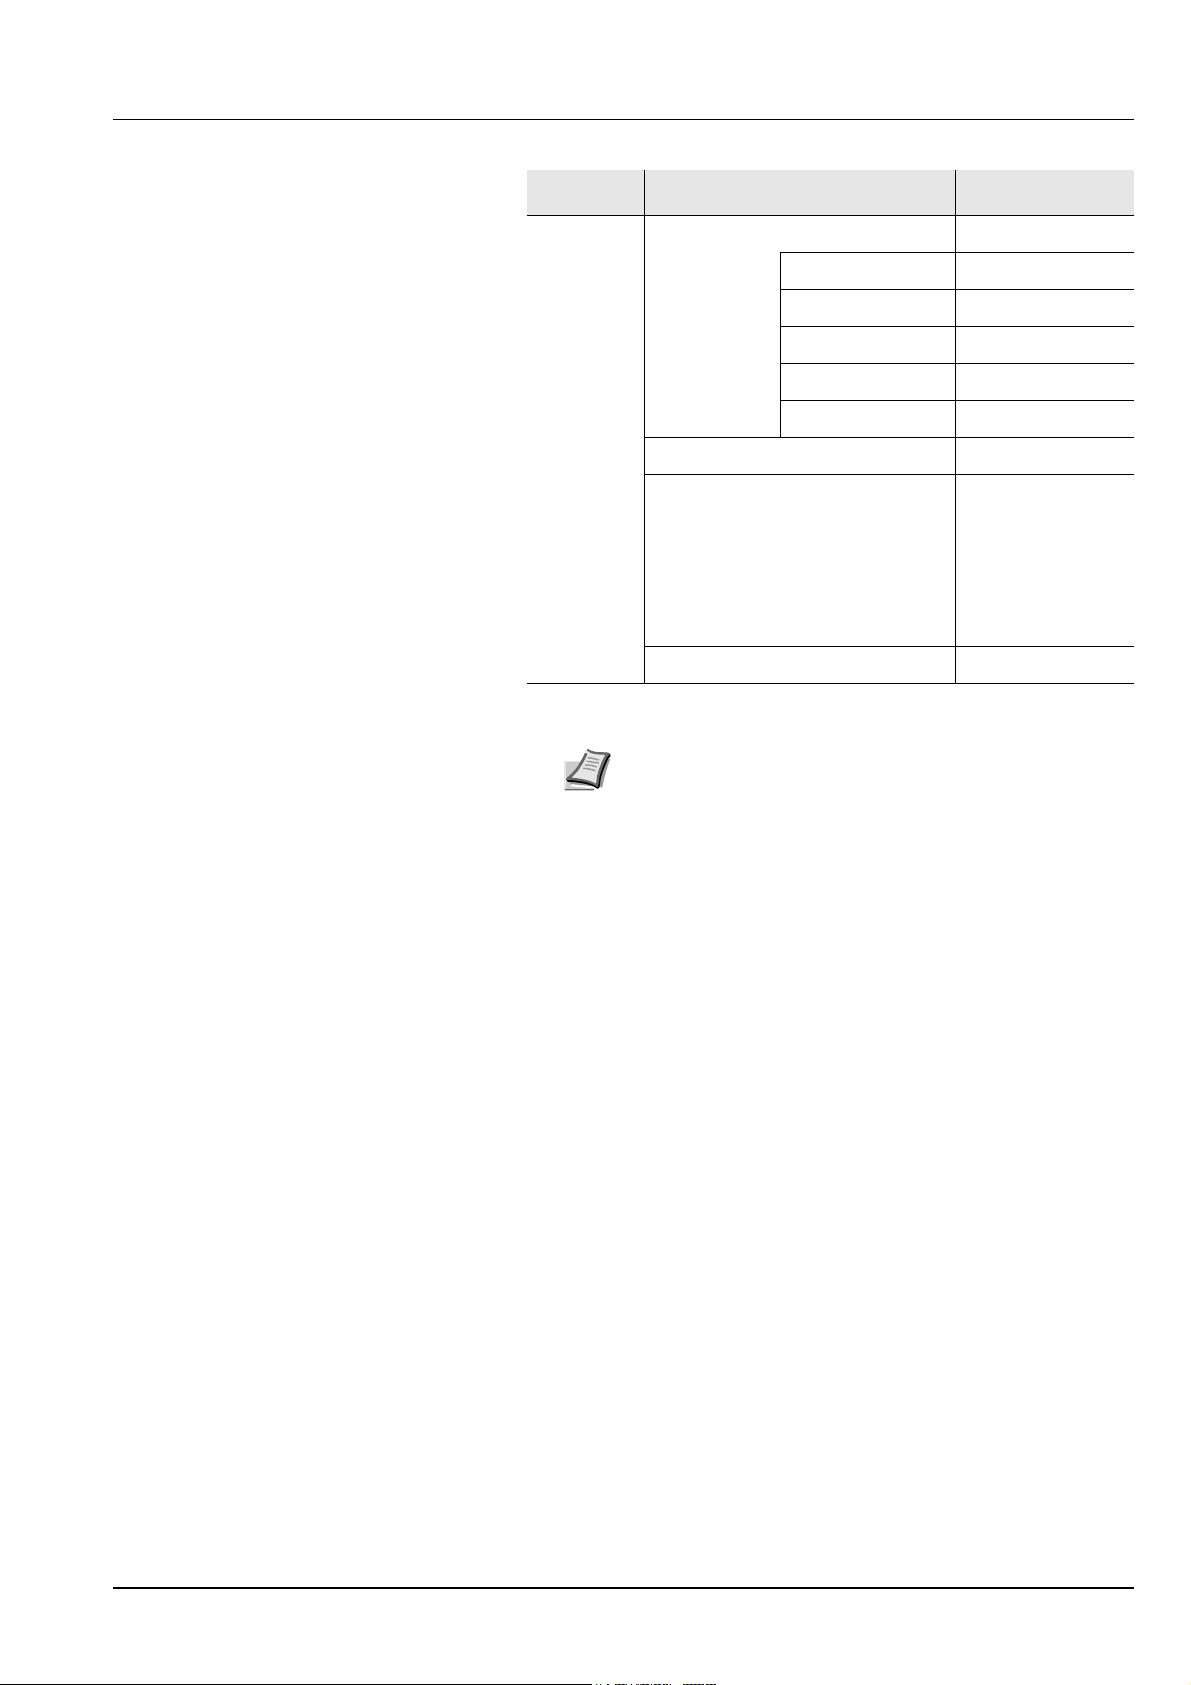
Menu Submenu Setting
SSL Server On/Off
DES On/Off
3DES On/Off
AES On/Off
IPP over SSL On/Off
HTTPS On/Off
IPSec On/Off
LAN Interface Auto/
10BASE-Half/
10BASE-Full/
100BASE-Half/
100BASEFull/
1000BASE-T
Security Level High/Low
Note After all network related settings have been done, turn
the machine OFF and ON again. This is mandatory to make
the settings effective!
Connecting and Printing 3-5
Page 42

Printing a Network Interface Status Page
Adjust/Maintenance >
>>Print
Network Status Page?
You can print out a status page for the network interface. The network
status page shows the network addresses, and other information under
various network protocols about the network interface.
Adjust/Maintenance
Adjust/Maintenance is used to adjust the print quality and to carry out
printer maintenance.
The options available in Adjust/Maintenance are as follows:
• Restart Printer
• Service
IMPORTANT Service is primarily a menu used by service
representative for maintenance work. There is no need for customers
to use this menu.
1 Press [MENU].
2 Press or repeatedly until Adjust/Maintenance > appears.
3 Press while Adjust/Maintenance > is displayed.
4 Press or repeatedly until >Service > appears.
5 Press .
6 Press or repeatedly until >>Print Network Status Page
appears.
7 Press [OK]. A question mark (?) appears.
8 Press [OK]. Processing appears and a status page is printed out.
9 When printing ends, the display returns to Ready.
3-6 Connecting and Printing
Page 43
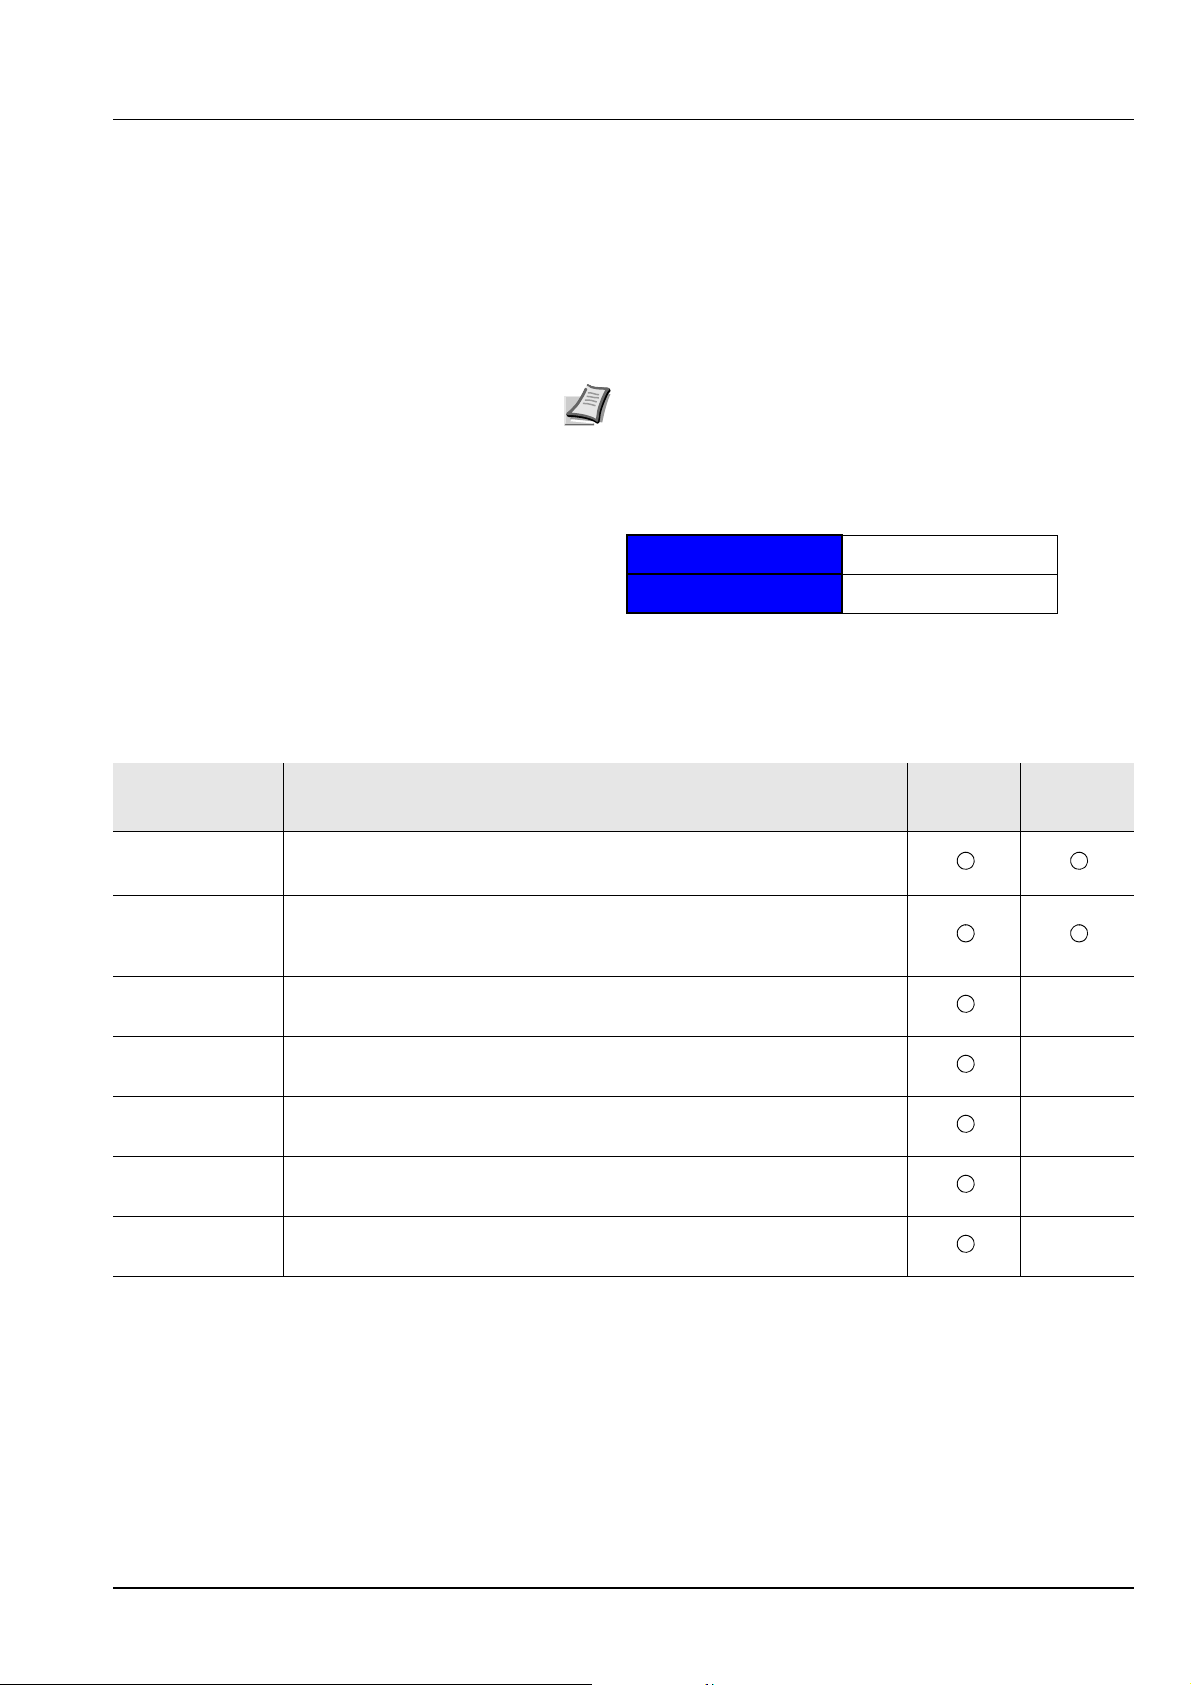
Command Center RX
Login User Name Admin
Login Password Admin
If the machine is connected to the network, you can configure various
settings using Command Center RX.
This section explains how to access Command Center RX, and how to
change security settings and the host name.
For details on Command Center RX, refer to the Command Center RX
User Guide.
Note To fully access the features of the Command Center RX
pages, enter the User Name and Password and click Login.
Entering the predefined administrator password allows the
user to access all pages and Settings on the navigation menu.
The factory default setting for the default user with
administrator privileges is shown below.
* Upper case and lower case letters are distinguished
(case sensitive).
Settings that the administrator and general users can configure in
Command Center RX are as follows.
Setting Description
Device
Information
Job Status Displays all device information, including print jobs and job log history.
Device Settings Configure the advanced settings of the machine.
Function
Settings
Network Settings Configure the network advanced settings.
Security Settings Configure the security advanced settings.
Management
Settings
The machine's structure can be checked.
Configuration, Counter, About Command Center RX
Printing Jobs Status, Printing Job Log
Paper/Feed/Output, Energy Saver/Timer, Date/Time, System
Configure the advanced function settings.
Common/Job Defaults, Printer, E-mail
General, TCP/IP, Protocol
Device Security, Network Security, Certificates
Configure the advanced management settings.
Authentication, Notification/Report, History Settings, SNMP, Reset
Administrator
General
User
—
—
—
—
—
Connecting and Printing 3-7
Page 44
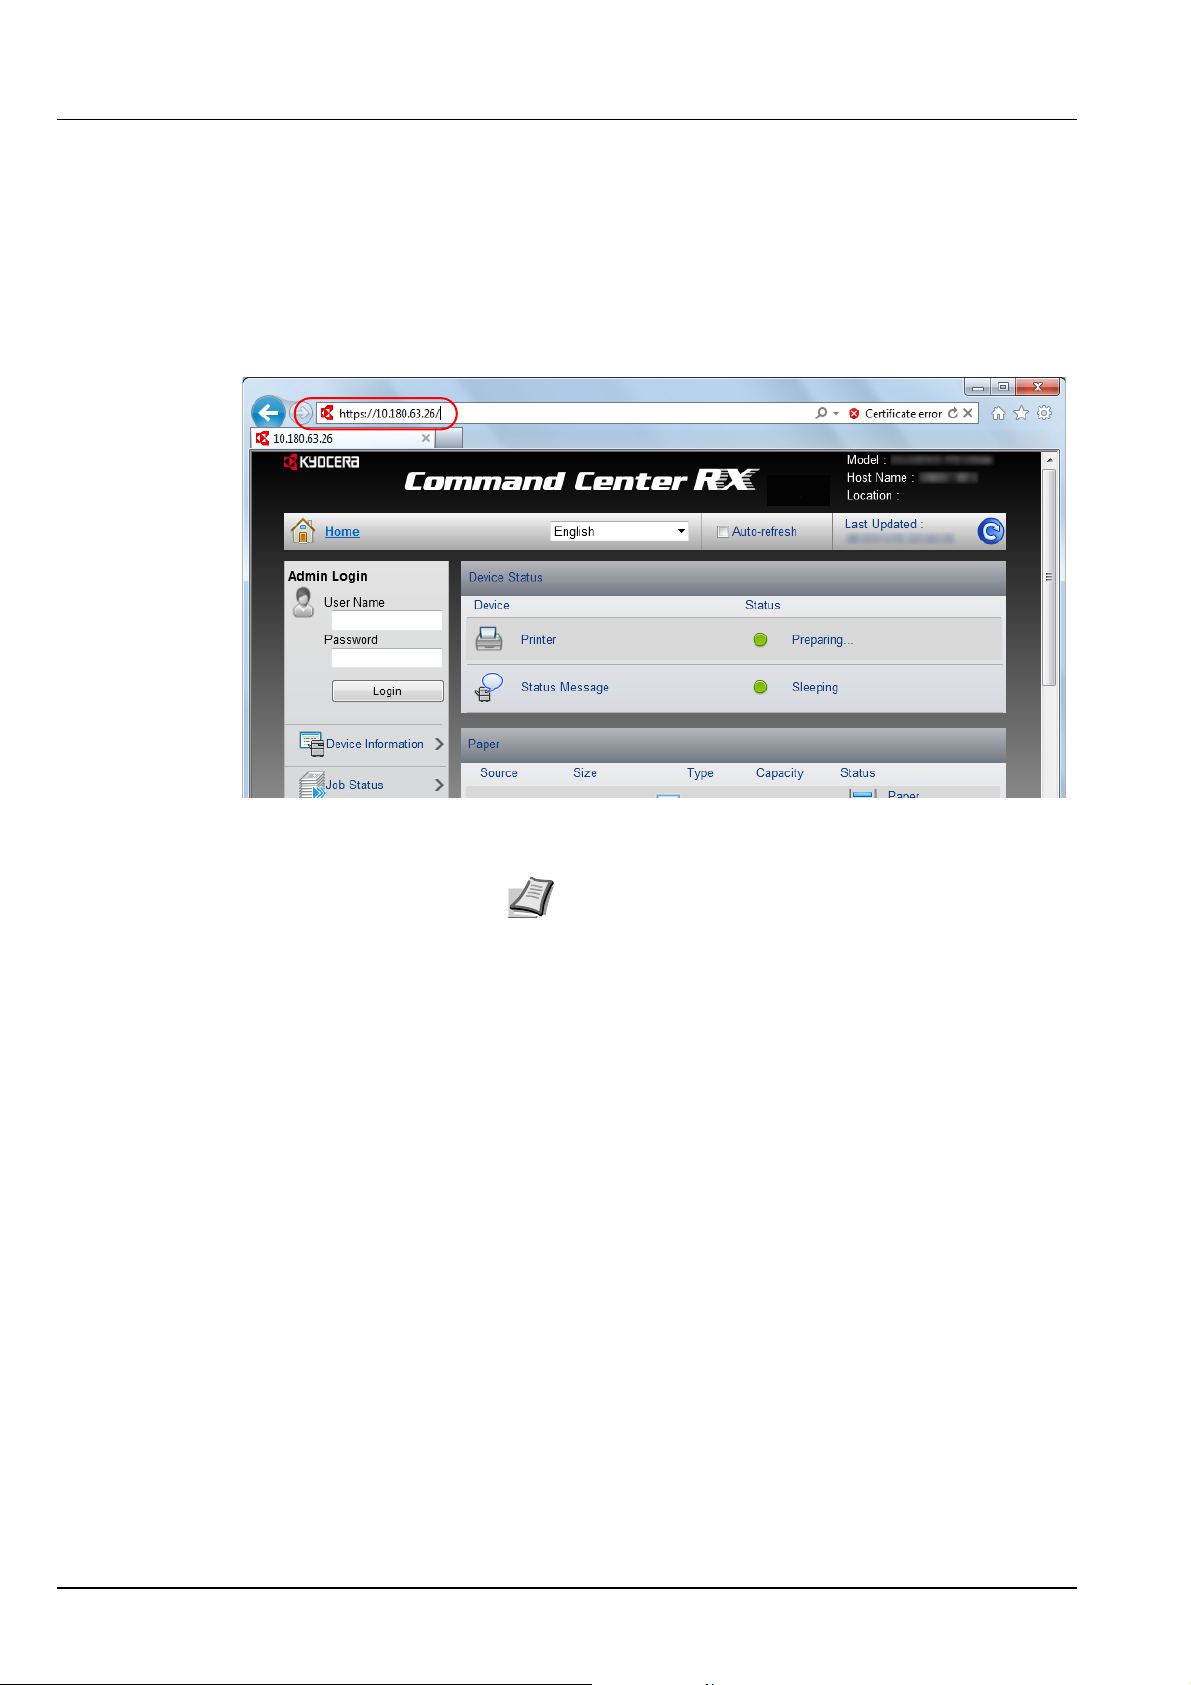
Accessing Command Center RX
1 Launch your Web browser.
2 In the address or location bar, enter the machine's IP address or the
host name.
Examples: https://192.168.48.21/ (for IP address)
https://P001 (if the host name is "P001")
The web page displays basic information about the machine and
Command Center RX as well as their current status.
Note If the screen There is a problem with this website's
security certificate. is displayed, configure the certificate. For
details on Certificates, refer to the Command Center RX User
Guide.
You can also continue the operation without configuring the
certificate.
3 Select a category from the navigation bar on the left of the screen.
When you log in to the machine as an administrator, you will see
Device Settings, Function Settings, Network Settings, Security
Settings, and Management Settings.
3-8 Connecting and Printing
Page 45
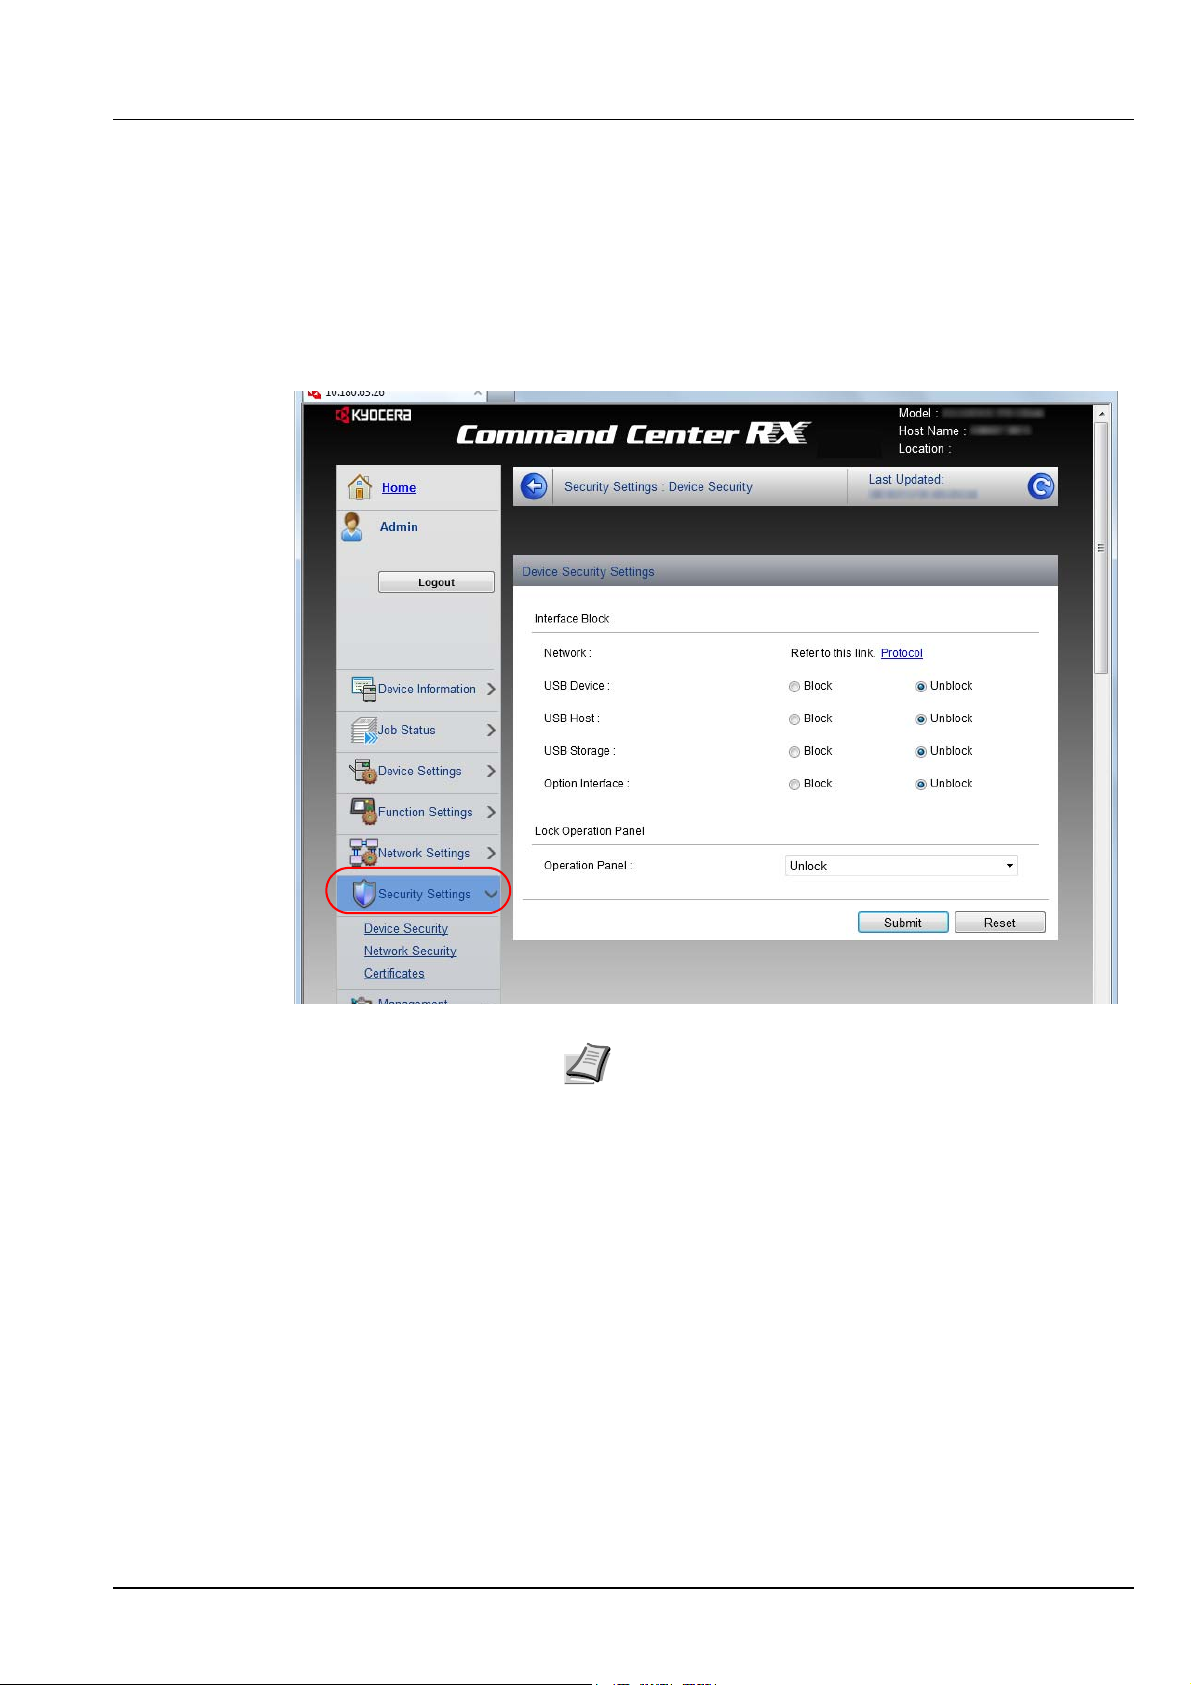
Changing Security Settings
This section explains how to change the security settings.
Access Command Center RX by referring to Accessing Command
Center RX on page 3-8.
1 From the Security Settings menu, select the setting you want to
configure. The configurable settings are Device Security, Network
Security, and Certificates.
Note The configurable settings within Device Security and
Network Security can also be configured from the machine's
System Menu.
For details, refer to the Using the Operation Panel section of
the Advanced Operation Guide.
For details on settings related to certificates, refer to the
Command Center RX User Guide.
Connecting and Printing 3-9
Page 46
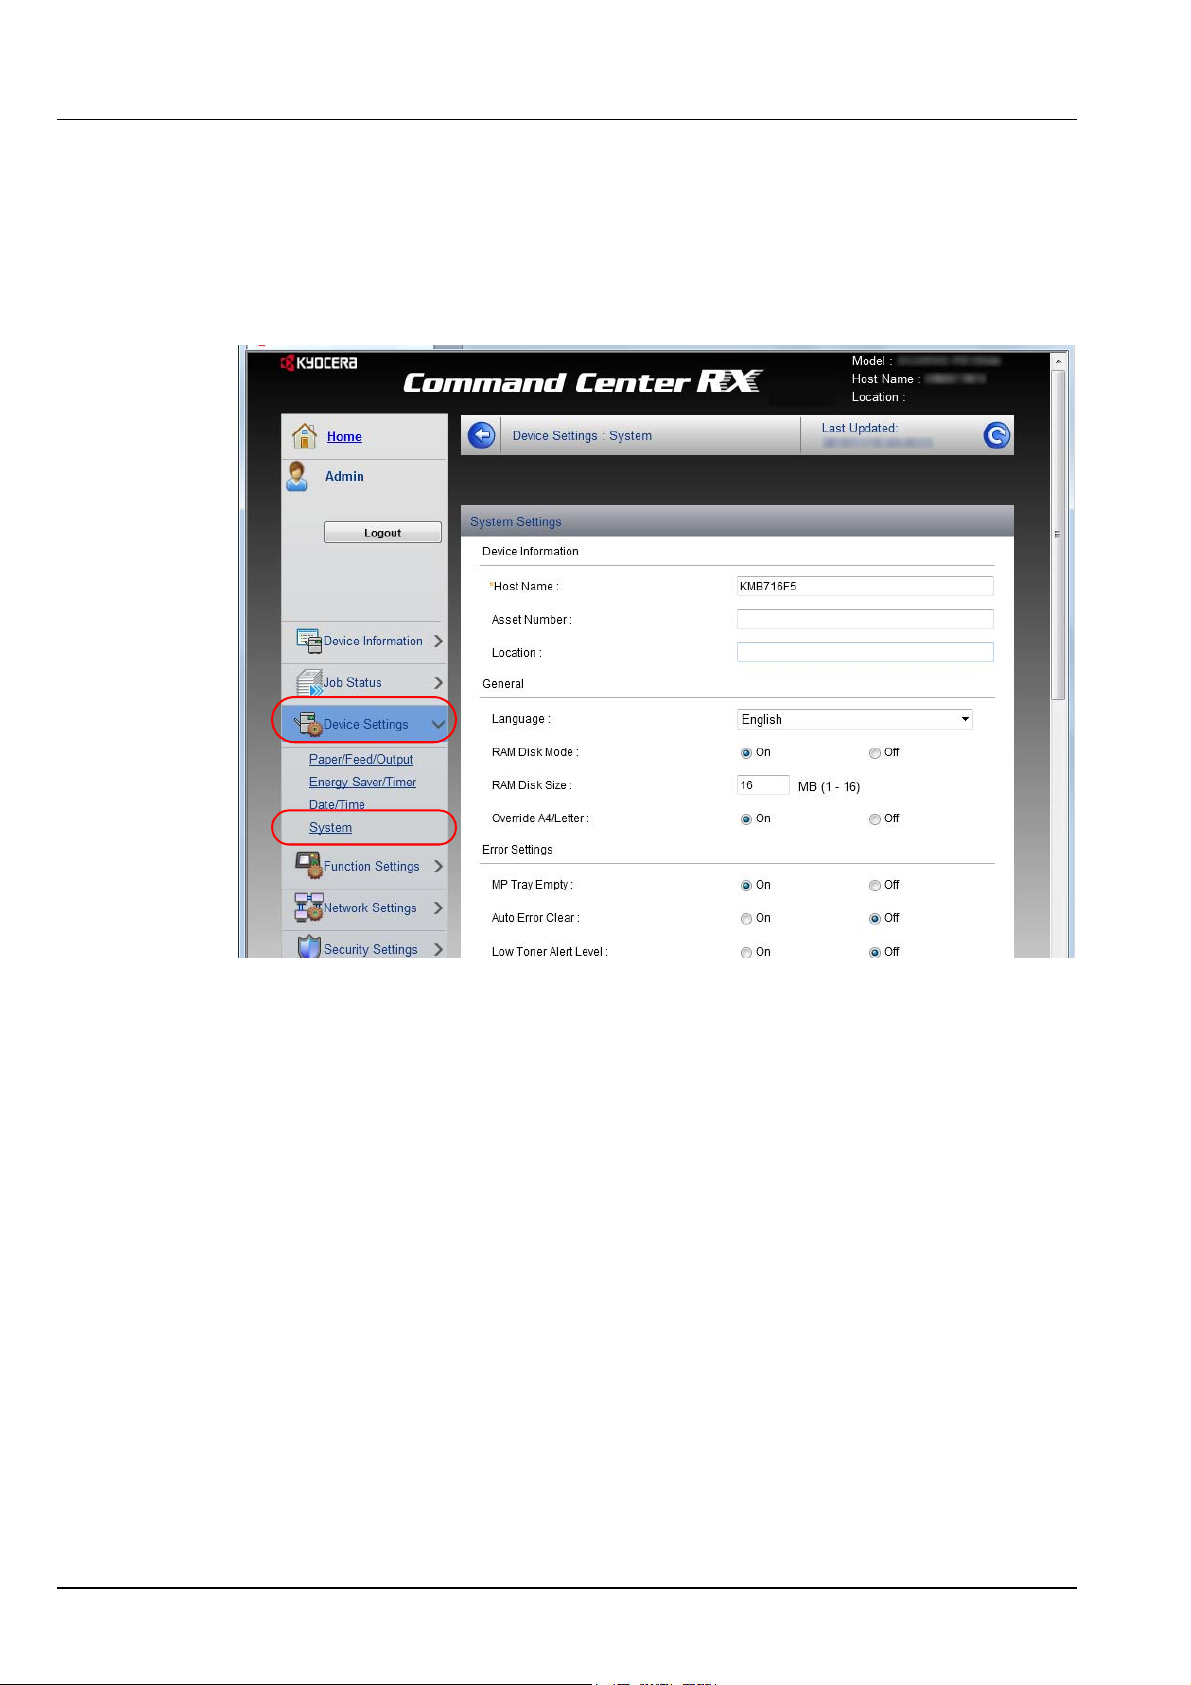
Changing Device Information
Change the device information of the machine.
1 Access Command Center RX by referring to Accessing Command
Center RX on page 3-8.
2 From the Device Settings menu, select System.
3 Enter the device information, and then click Submit.
IMPORTANT After changing the setting, restart the network or turn
the machine OFF and then ON.
To restart the network interface card, click
Settings
menu, and then click Restart Network in Restart.
Reset in the Management
3-10 Connecting and Printing
Page 47
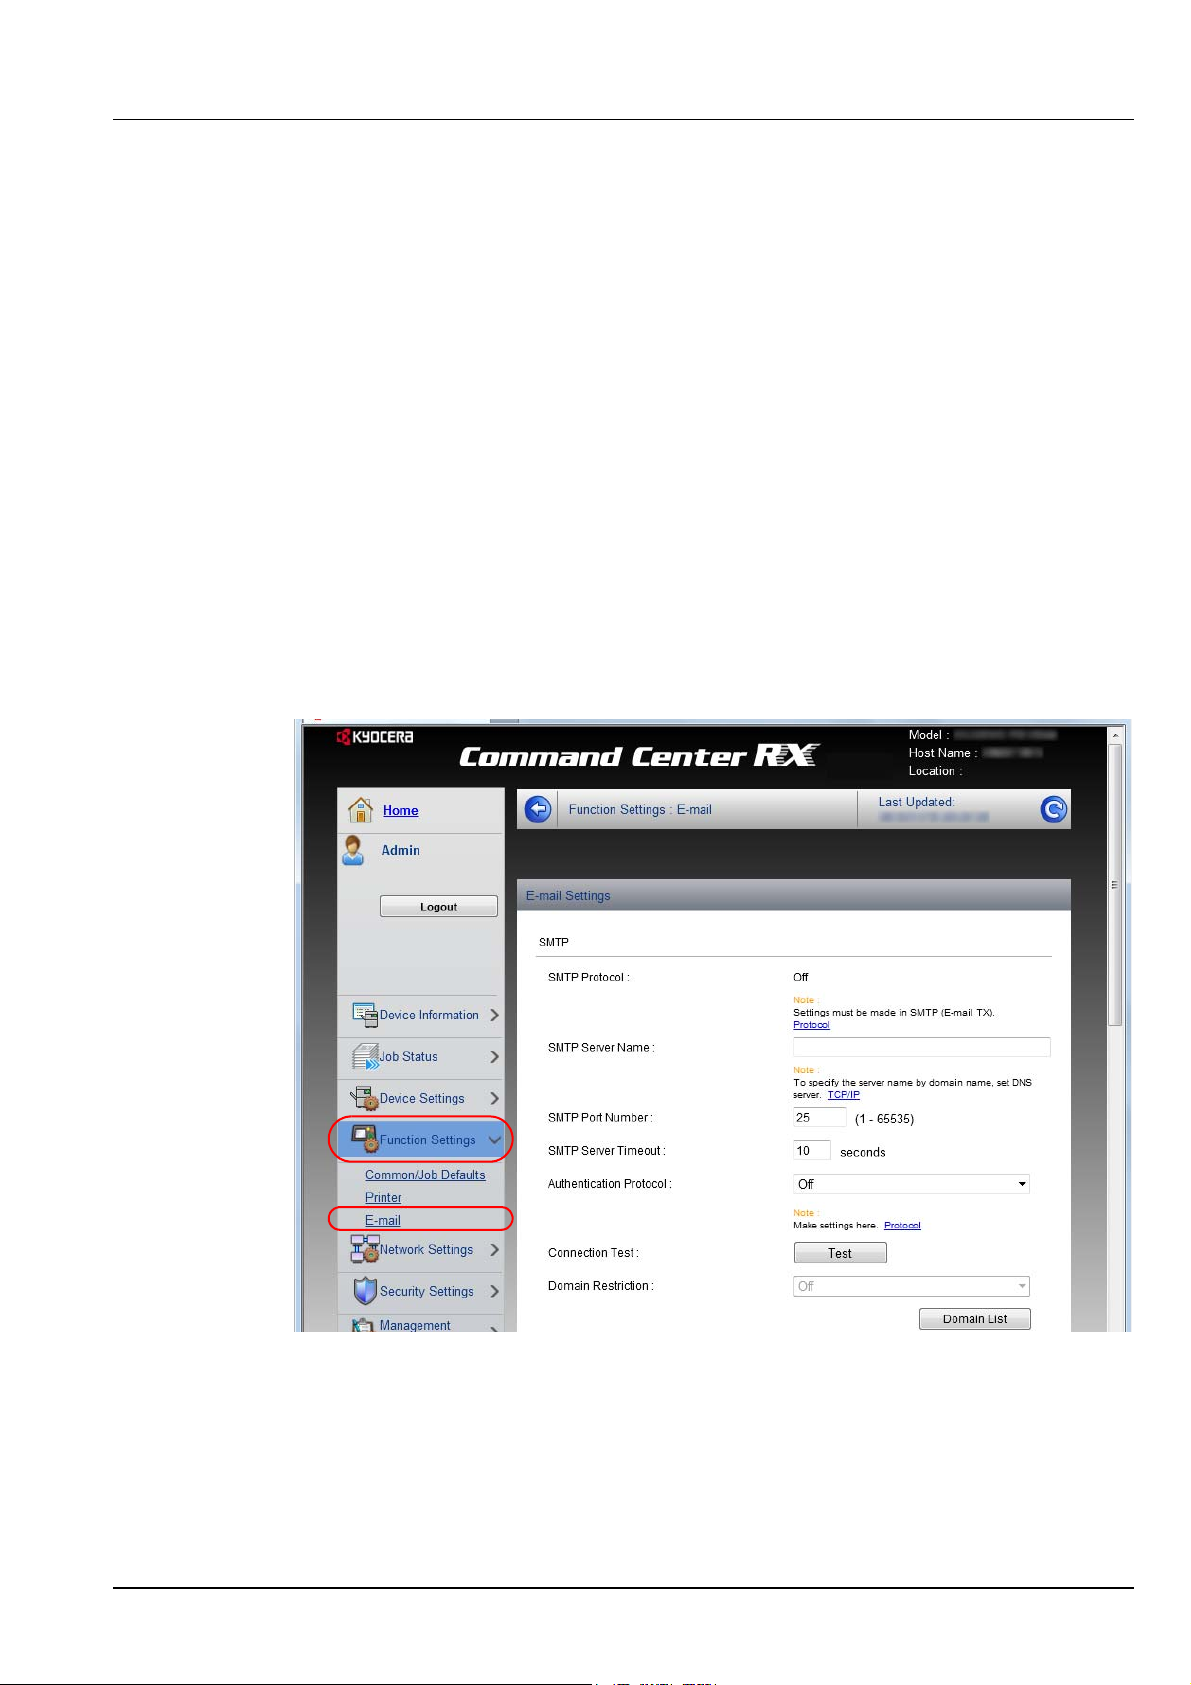
E-mail settings
By configuring the SMTP settings, you can send E-mail notifications on
completed jobs.
To use this function, this machine must be connected to a mail server
using the SMTP protocol.
In addition, check the following.
• The network environment used to connect this machine to the mail
server
A full-time connection via a LAN is recommended.
• SMTP settings
Use Command Center RX to register the IP address or host name of
the SMTP server.
• If limits have been set on the size of E-mail messages, it may not be
possible to send very large E-mails.
• The procedure for specifying the SMTP settings is explained below.
1 Access Command Center RX by referring to Accessing Command
Center RX on page 3-8.
2 From the Function Settings menu, click E-mail.
Connecting and Printing 3-11
Page 48

3 Enter the appropriate values to each field.
Setting Description
SMTP Set to send e-mail from the machine.
SMTP Protocol Set SMTP protocol. Set the SMTP (E-mail TX) setting to On on
the Protocol Settings page.
SMTP Server
Name
SMTP Port
Number
SMTP Server
Timeout
Authentication
Protocol
SMTP Security Set SMTP security.
POP before
SMTP Timeout
Connection Test Tests to confirm that the settings are correct.
Domain
Restriction
POP3 Set to receive e-mail at the machine.
POP3 Protocol Set POP3 protocol. Set the POP3 (E-mail RX) setting to On on
Enter the host name or IP address of the SMTP server.
Specify the port number to be used for SMTP. Use the SMTP
default port 25.
Set the amount of time to wait before time-out in seconds.
Set whether SMTP authentication is used. To use
authentication, enter the user information for authentication.
Turn on SMTP Security in SMTP (E-mail TX) on the
Protocol Settings page.
Specify the time in seconds until the connection to the POP
server times outs. This can be set when POP before SMTP is
selected in Authentication Protocol.
Set whether or not domains are restricted. Click the Domain
List and enter the domain names of addresses to be allowed or
rejected. Restriction can also be specified by e-mail address.
the Protocol Settings page.
Check Interval Specify the interval for checking for incoming e-mail in minutes.
Run once now Click Receive to connect to the POP3 server immediately and
check for incoming E-mails.
Domain
Restriction
POP3 User
Settings
Set whether or not domains are restricted. Click the Domain
List and enter the domain names of addresses to be allowed or
rejected. Restriction can also be specified by e-mail address.
Configure the settings for POP3 user accounts and the POP3
server. You can configure up to three users.
3-12 Connecting and Printing
Page 49

Setting Description
E-mail
Send
Settings
E-mail Size Limit Enter the maximum size of E-mail that can be sent in kilobytes.
When E-mail size is greater than this value, an error message
appears and E-mail sending is cancelled. Use this setting if you
have set E-mail Size Limit for SMTP server. If not, enter a value
of 0 (zero) to enable E-mail sending regardless of the size limit.
Sender Address Enter the E-mail address of the person responsible for the
machine, such as the machine administrator, so that a reply or
non-delivery report will go to a person rather than to the
machine. The sender address must be entered correctly for
SMTP authentication. The maximum length of the sender
address is 128 characters.
Signature Enter the signature. The signature is free form text that will
appear at the end of the E-mail body. It is often used for further
identification of the machine. The maximum length of the
signature is 512 characters.
Function Default Change the function default settings in Common/Job Defaults
Settings page.
4 Click Submit.
Connecting and Printing 3-13
Page 50
Installing the Printer Driver
Ensure the printer is plugged in and connected to the PC before installing
the printer driver from the DVD-ROM.
Note Installation on Windows must be done by a user logged
on with administrator privileges.
When connected by USB cable, Plug and Play is disabled on
this device when in Sleep mode. To continue the installation,
press the GO key to wake the device from Low Power Mode or
Sleep before continuing.
KX XPS DRIVER cannot be installed on Windows XP.
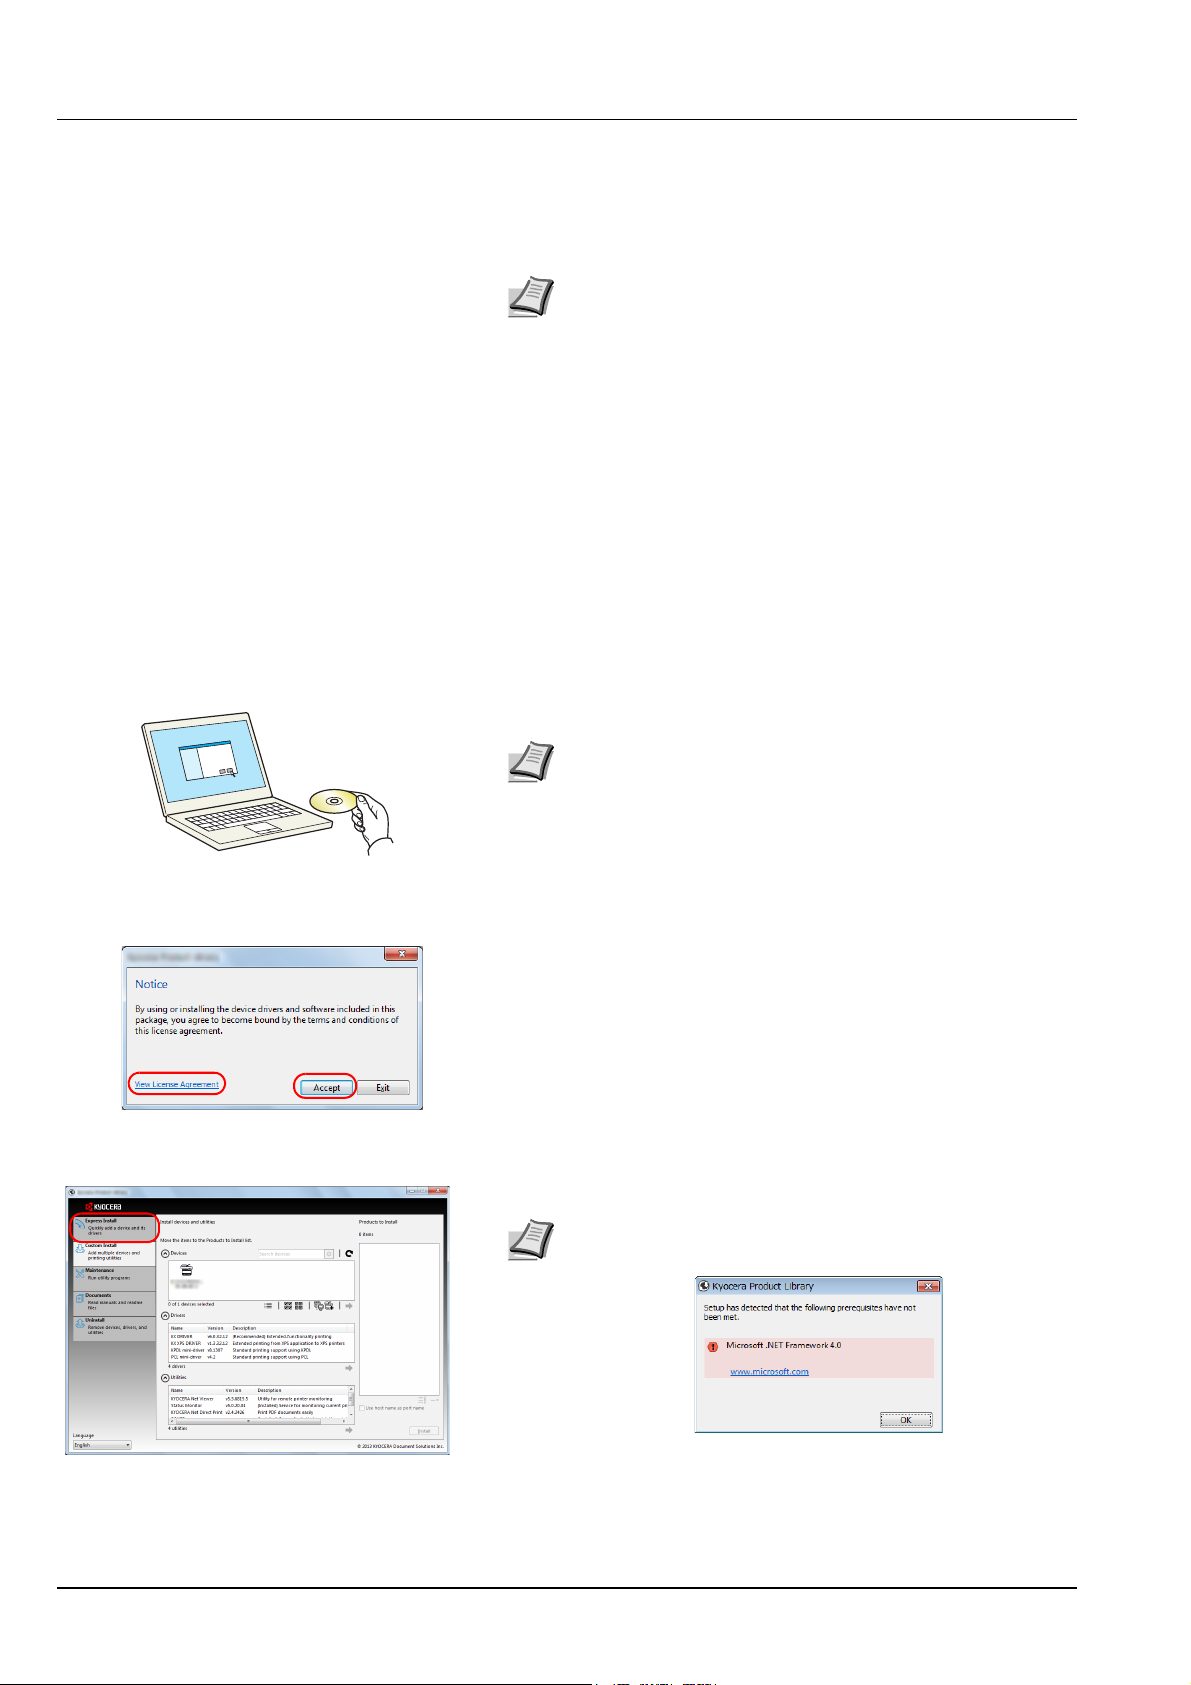
Installing Printer Driver in Windows
Express Install
The following procedure is an example for installing the software in
Windows 7 using Express Install.
For details, refer to Custom Installation in the Custom Install on page 3-
16.
1 Insert the DVD-ROM.
Note Installation on Windows must be done by a user logged
on with administrator privileges.
If the Welcome to the Found New Hardware Wizard dialog
box displays, select Cancel.
If the autorun screen is displayed, click Run setup.exe.
If the user account management window appears, click Yes
(Allow).
2 Click View License Agreement and read the License Agreement.
Click Accept.
3 Select Express Install tab.
Note To install Status Monitor, it is necessary to install
Microsoft .NET Framework 4.0 beforehand.
3-14 Connecting and Printing
Page 51
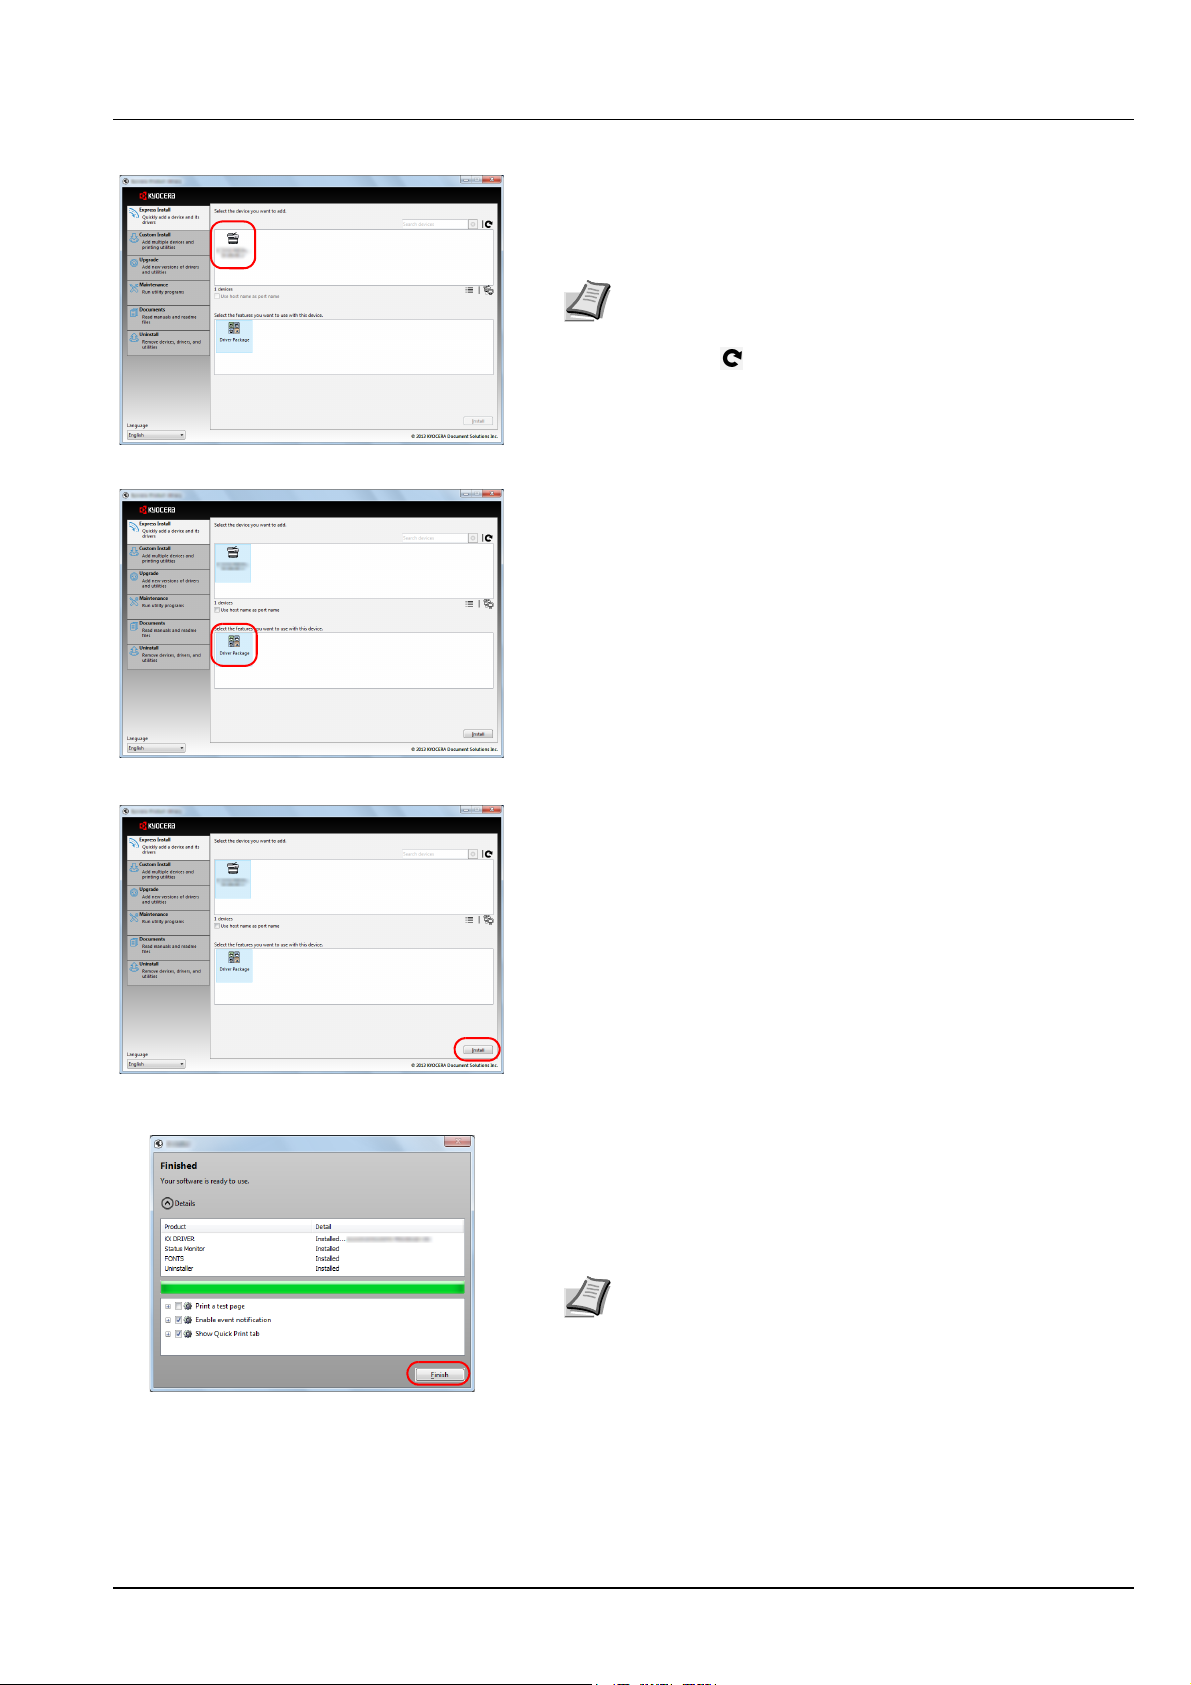
4 Select the device to be installed.
You can also select Use host name for port name and set to use the
host name of the standard TCP/IP port. (A USB connection cannot be
used.)
Note The machine cannot be detected unless it is on. If the
computer fails to detect the machine, verify that it is connected
to the computer via a network or USB cable and that it is turned
on and click (Reload).
5 Select the package to be installed.
Packages include the following software:
• Driver Package
KX DRIVER, Status Monitor, Fonts
6 Click Install.
7 Finish the installation.
When Your software is ready to use appears, you can use the
software. To print a test page, click the Print a test page checkbox
and select the machine.
Click Finish to exit the wizard.
Note When you have selected Device settings in Windows
XP, the dialog box for device setting will appear after Finish is
clicked. Configure the settings for options installed on the
machine. Device settings can be configured after the
installation is completed. For details, refer to the Device
Settings in the Printer Driver User Guide on the DVD-ROM.
If a system restart message appears, restart the computer by
following the screen prompts. This completes the printer driver
installation procedure.
Connecting and Printing 3-15
Page 52
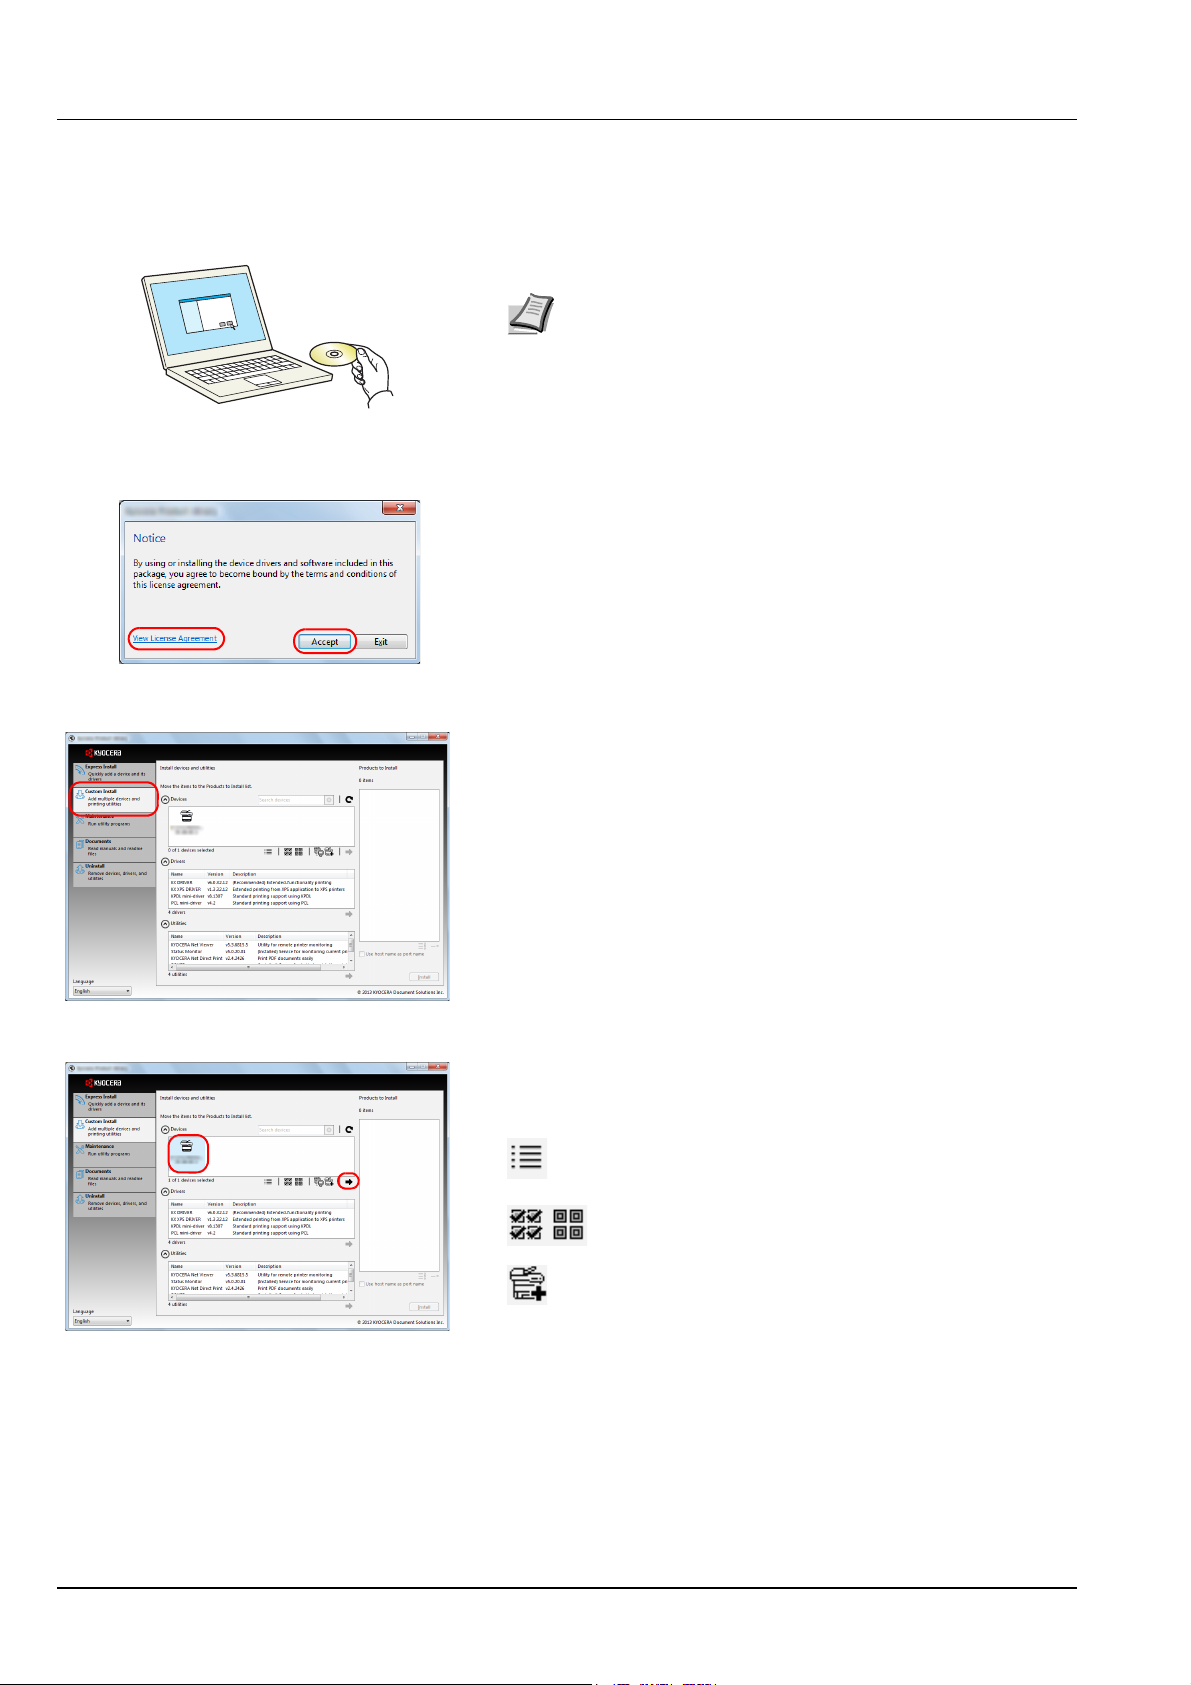
Custom Install
The following procedure is an example for installing the software in
Windows 7 using Custom Install.
1 Insert the DVD-ROM.
Note Installation on Windows must be done by a user logged
on with administrator privileges.
If the Welcome to the Found New Hardware Wizard dialog
box displays, select Cancel.
If the autorun screen is displayed, click Run setup.exe.
If the user account management window appears, click Yes
(Allow).
2 Click View License Agreement and read the License Agreement.
Click Accept.
3 Select Custom Install tab.
4 Select the device to be installed, and click the arrow button to move
it to the Products to Install list.
The following buttons are available.
:
This button is used to switch the display between icon and
text display.
: This button is used to select multiple items.
: If the target device is not displayed, press this button to
directly select the device to be used.
3-16 Connecting and Printing
Page 53
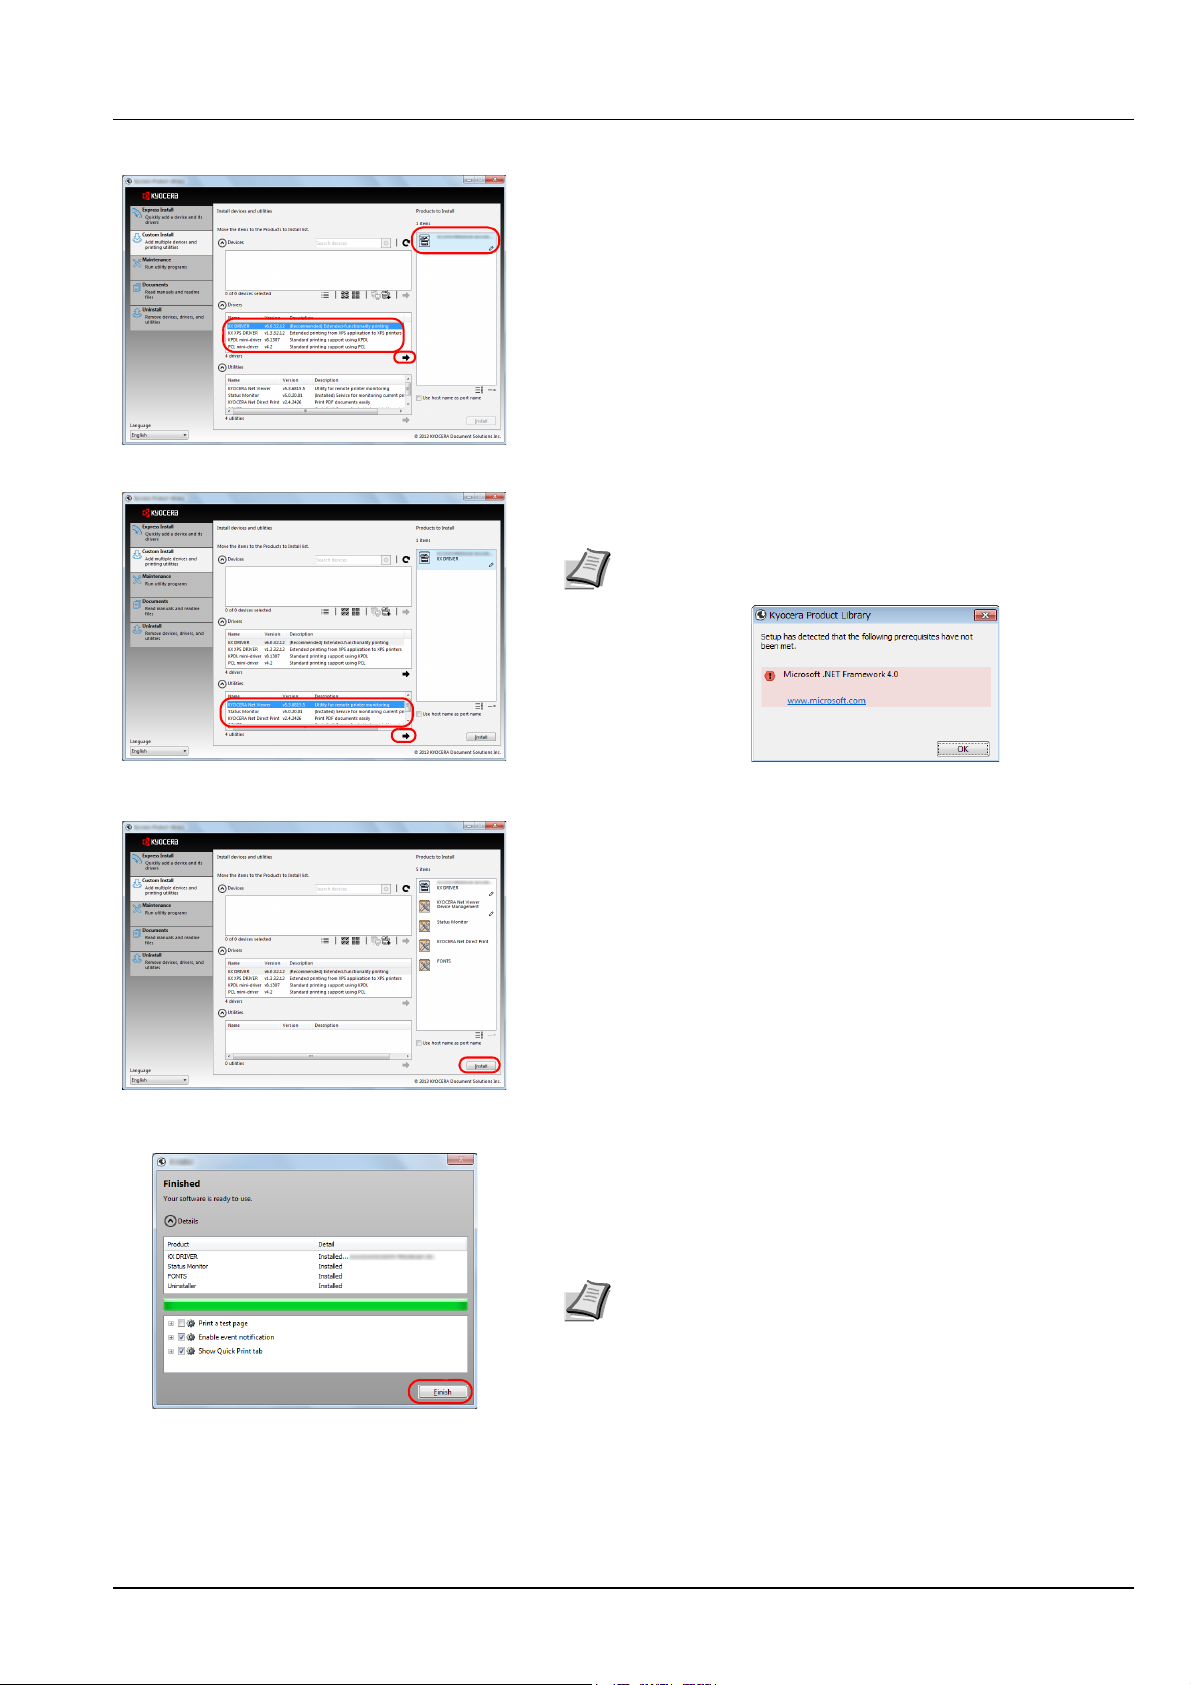
5 Select the device to be installed and driver to be installed, and then
click the arrow button to move it to the Products to Install list.
6 Select the utility to be installed, and then click the arrow button to
move it to the Products to Install list.
Note To install Status Monitor, it is necessary to install
Microsoft .NET Framework 4.0 beforehand.
7 Click Install.
8 Finish the installation.
When Your software is ready to use appears, you can use the
software. To print a test page, click the Print a test page checkbox
and select the machine.
Click Finish to exit the wizard.
Note When you have selected Device settings in Windows
XP, the dialog box for device setting will appear after Finish is
clicked. Configure the settings for options installed on the
machine. Device settings can be configured after the
installation is completed. For details, refer to the Device
Settings in the Printer Driver User Guide on the DVD-ROM.
If a system restart message appears, restart the computer by
following the screen prompts. This completes the printer driver
installation procedure.
Connecting and Printing 3-17
Page 54
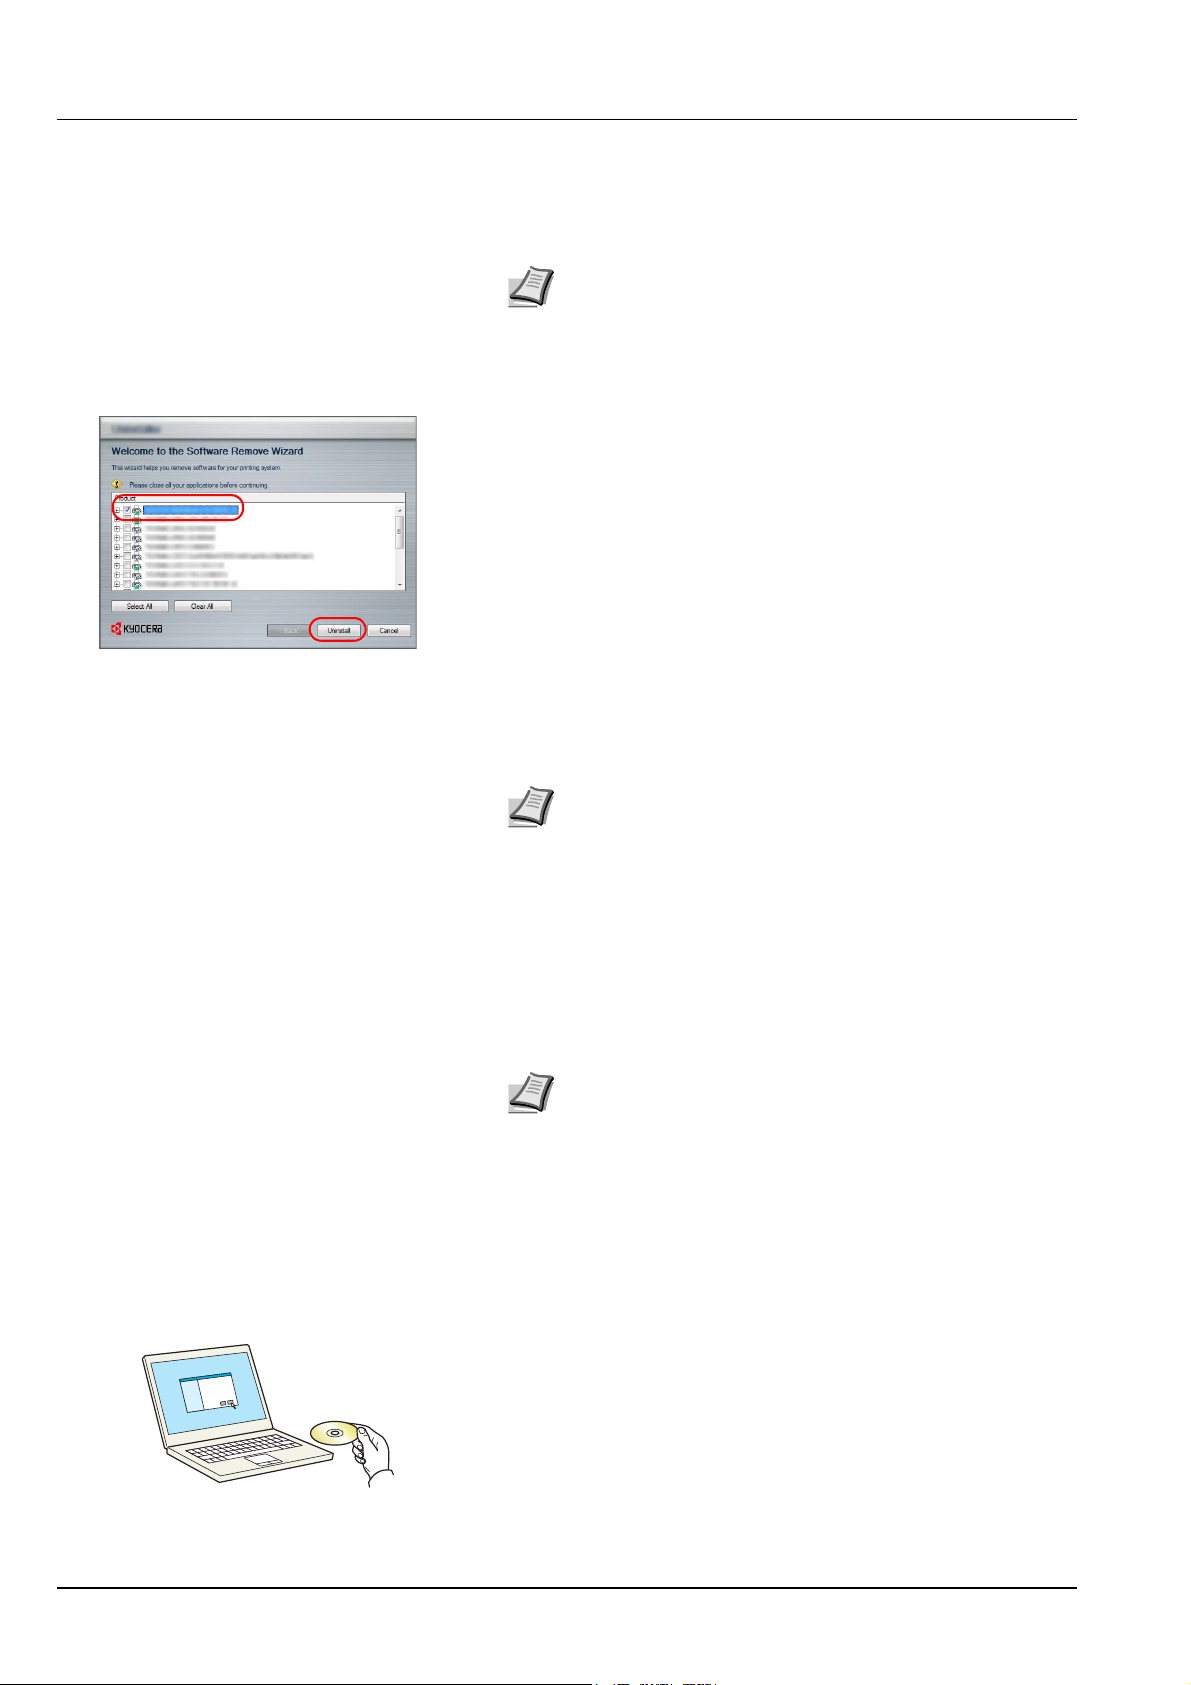
Uninstalling the Software
Perform the following procedure to delete the Software from your
computer.
Note Uninstallation on Windows must be done by a user
logged on with administrator privileges.
1 Click Start button on the Windows and then select All Programs,
Kyocera, and Uninstall Kyocera Product Library to display the
Uninstall Wizard.
2 Place a check in the check box of the software to be deleted.
Click Uninstall.
3 If a system restart message appears, restart the computer by
following the screen prompts. This completes the software
uninstallation procedure.
Note The software can also be uninstalled using the Product
Library.
In the Product Library installation screen, click Uninstall, and
follow the on-screen instructions to uninstall the software.
Installing Printer Driver in Macintosh
The machine's printer functionality can be used by a Macintosh
computer.
The following is an explanation for installation in MAC OSX 10.7.
Note Installation on MAC OS must be done by a user logged
on with administrator privileges.
When printing from a Macintosh computer, set the machine's
emulation to KPDL or KPDL(Auto). For details, refer to the
Using the Operation Panel section of the Advanced Operation
Guide.
If connecting by Bonjour, enable Bonjour in the machine's
network settings. For details, refer to the Using the Operation
Panel section of the Advanced Operation Guide.
In the Authenticate screen, enter the name and password used
to log in to the operating system.
1 Insert the DVD-ROM.
3-18 Connecting and Printing
Page 55
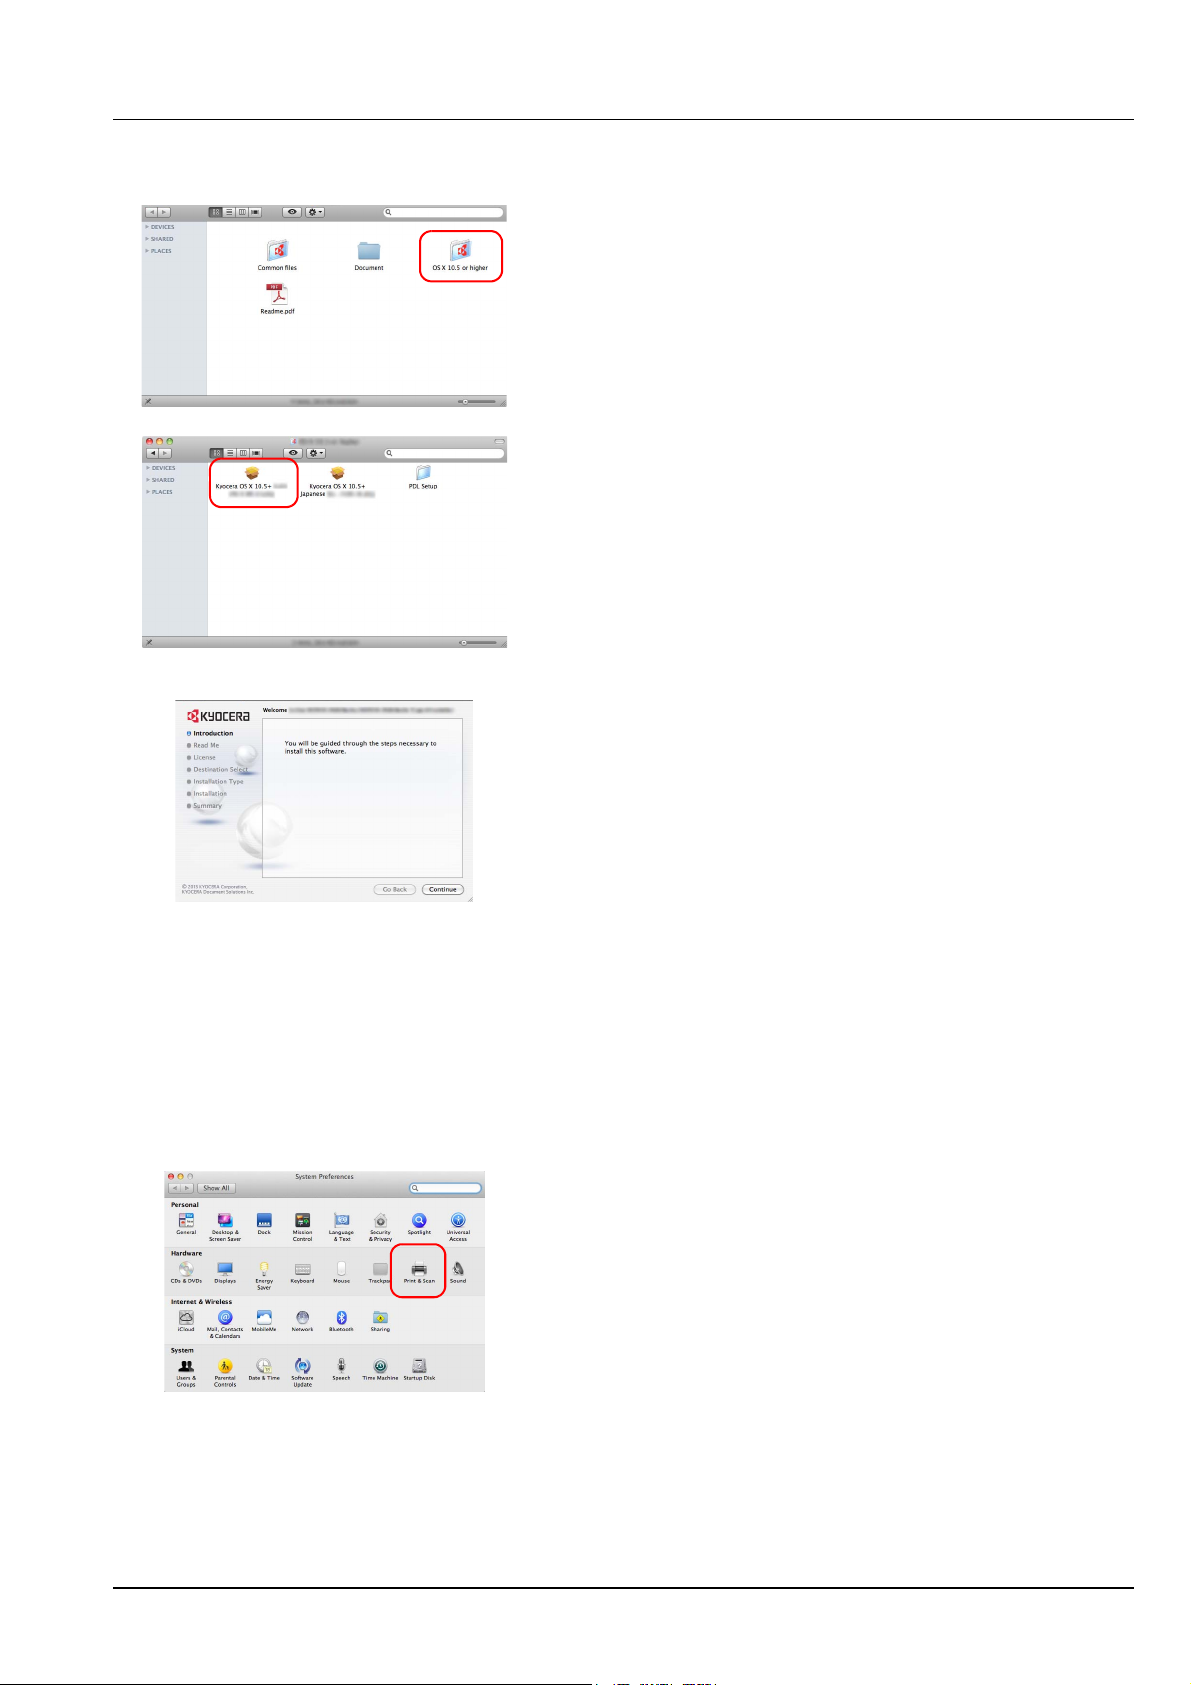
2 Double-click the Kyocera icon.
3 Double-click OS X 10.5 or higher.
4 Double-click Kyocera OS X 10.5+.
5 The printer driver installation program starts up.
6 Install the printer driver as directed by the instructions in the
installation software.
This completes the printer driver installation.
If a USB connection is used, the machine is automatically recognized
and connected.
If an IP connection is used, the settings below are required.
7 Open System Preferences and click Print & Scan.
Connecting and Printing 3-19
Page 56
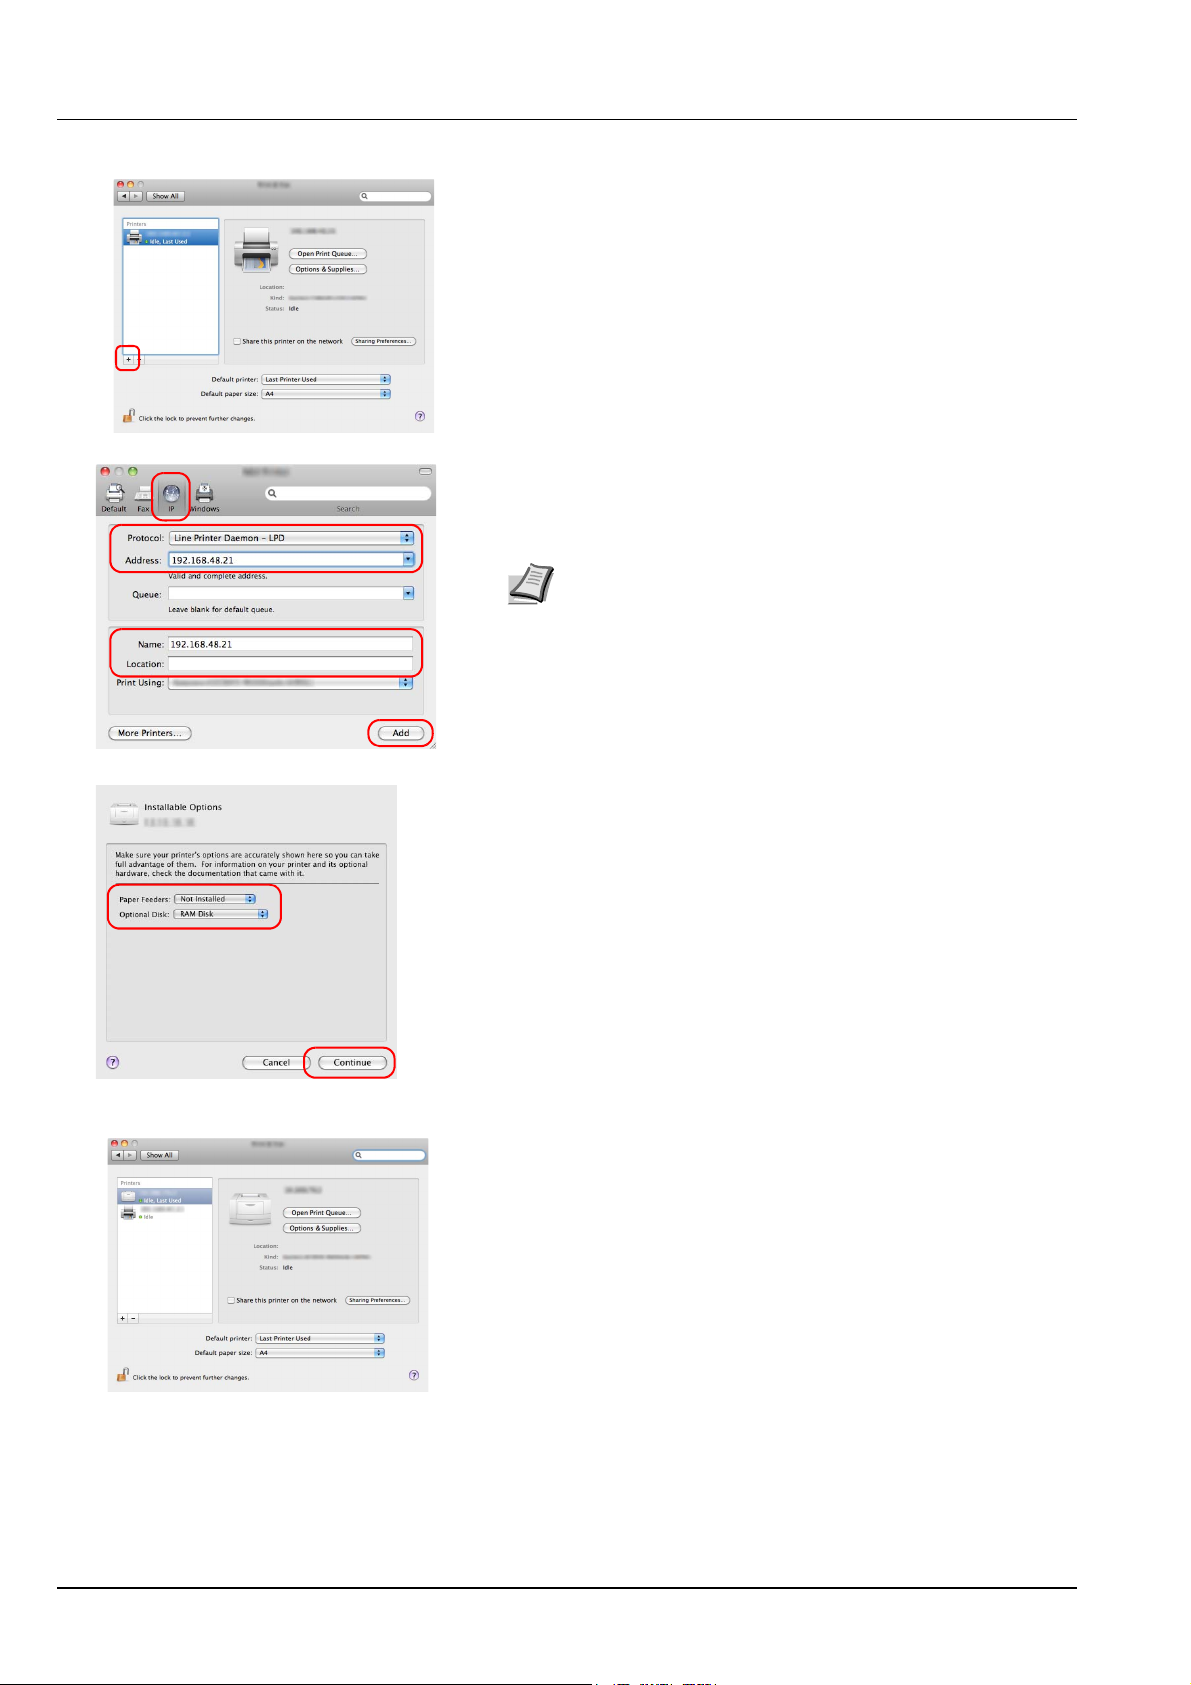
8 Click the plus symbol (+) to add the installed printer driver.
9 Click the IP icon for an IP connection and then enter the IP address
and printer name.
The number entered in Address will automatically appear in Name.
Change if needed.
Note When using a Bonjour connection, select Default and
click the item that appears in Printer Name. The driver with the
same name as the machine automatically appears in Driver.
10Select the options available for the machine and click Continue.
11The selected printer is added.
3-20 Connecting and Printing
Page 57
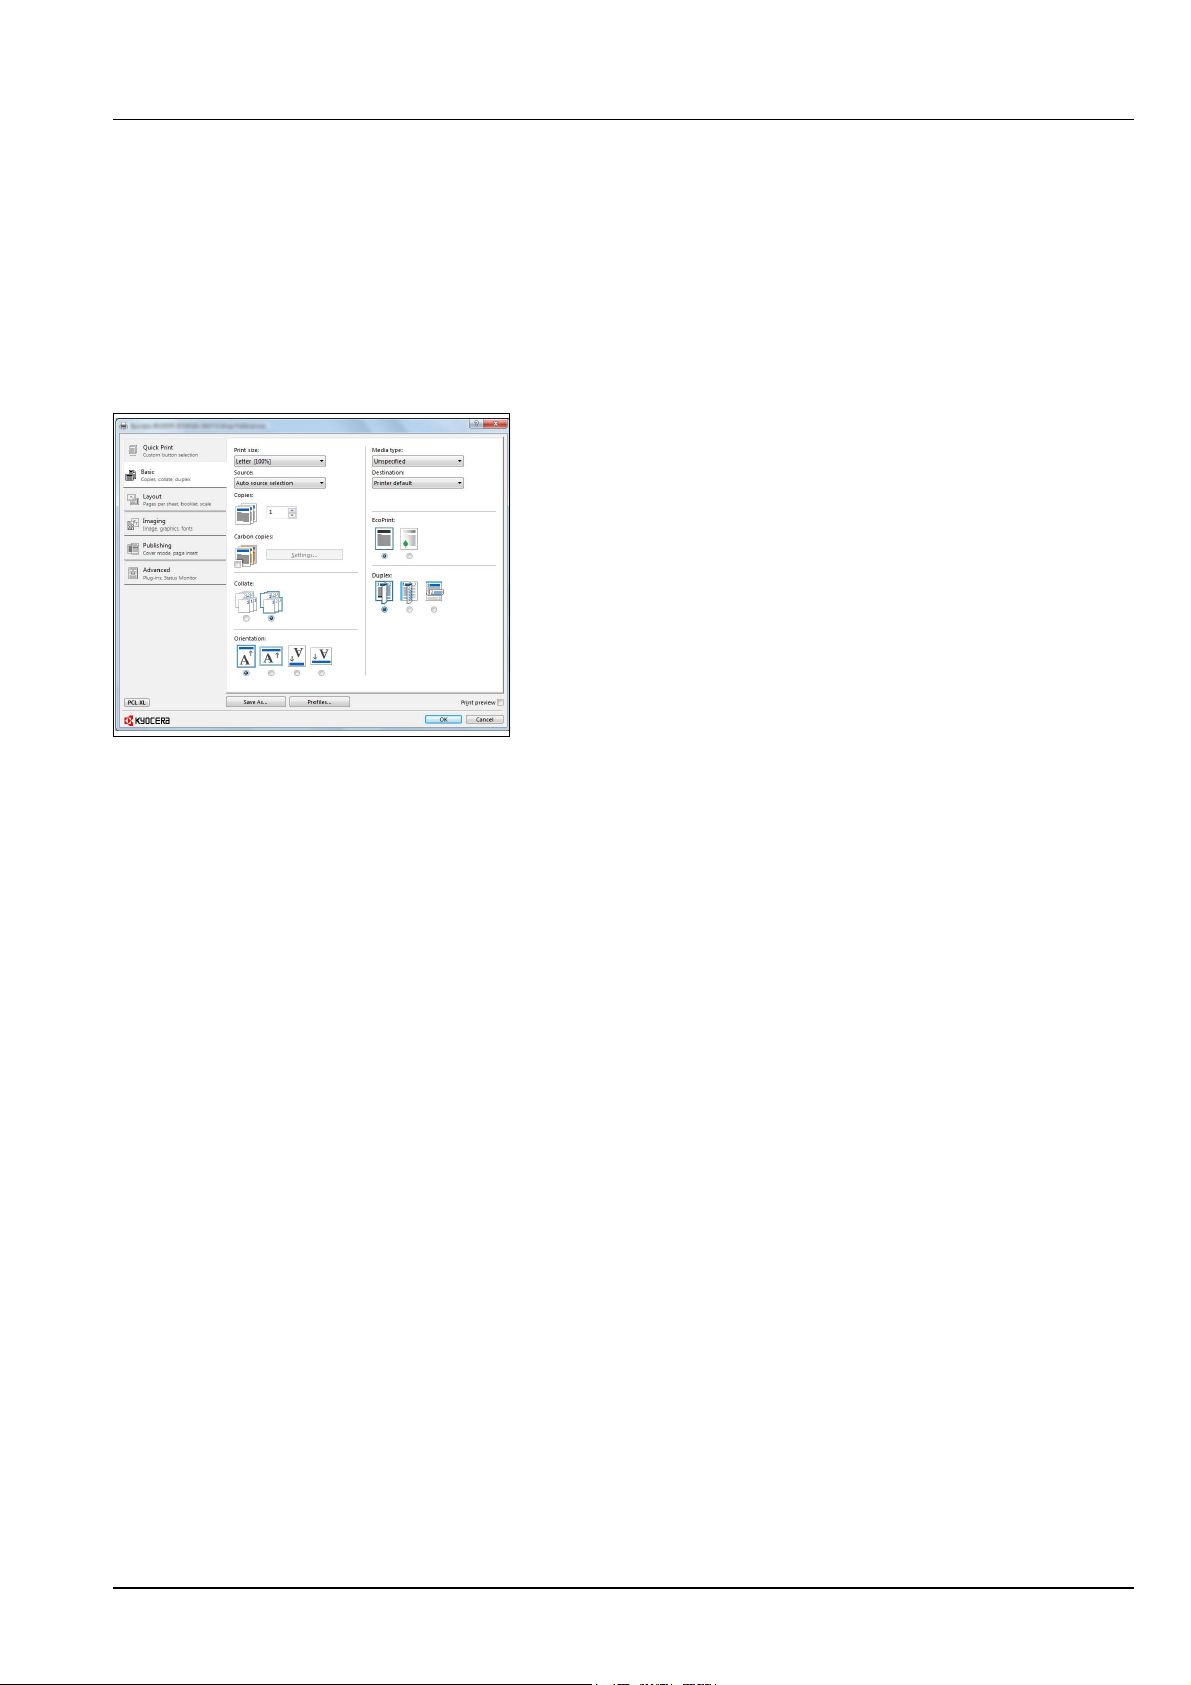
Printing
This section explains the printing procedure from an application
software. You can specify the printing settings from each tab on KX
Driver. KX Driver is stored in the DVD-ROM (Product Library). For more
information, refer to the Printer Driver User Guide in the DVD-ROM.
About KX Driver
KX Driver consists of the following tabs.
Quick Print
Use this tab to define basic print options into group profiles that can be
accessed quickly and easily.
Basic
Use this tab to select the page size and orientation. The paper source
and duplex printing are also selected.
Layout
Use to create multiple pages on a single sheet of paper. Also contains
the scaling option.
Imaging
Select this tab to change the print quality, and the font or graphic
settings.
Publishing
Use to add covers or page inserts to your output. You can also produce a
set of transparencies with a blank or printed sheet interleaved using
Transparency Interleaving.
Advanced
Use this tab to configure settings for adding text pages or watermarks to
print data.
Connecting and Printing 3-21
Page 58
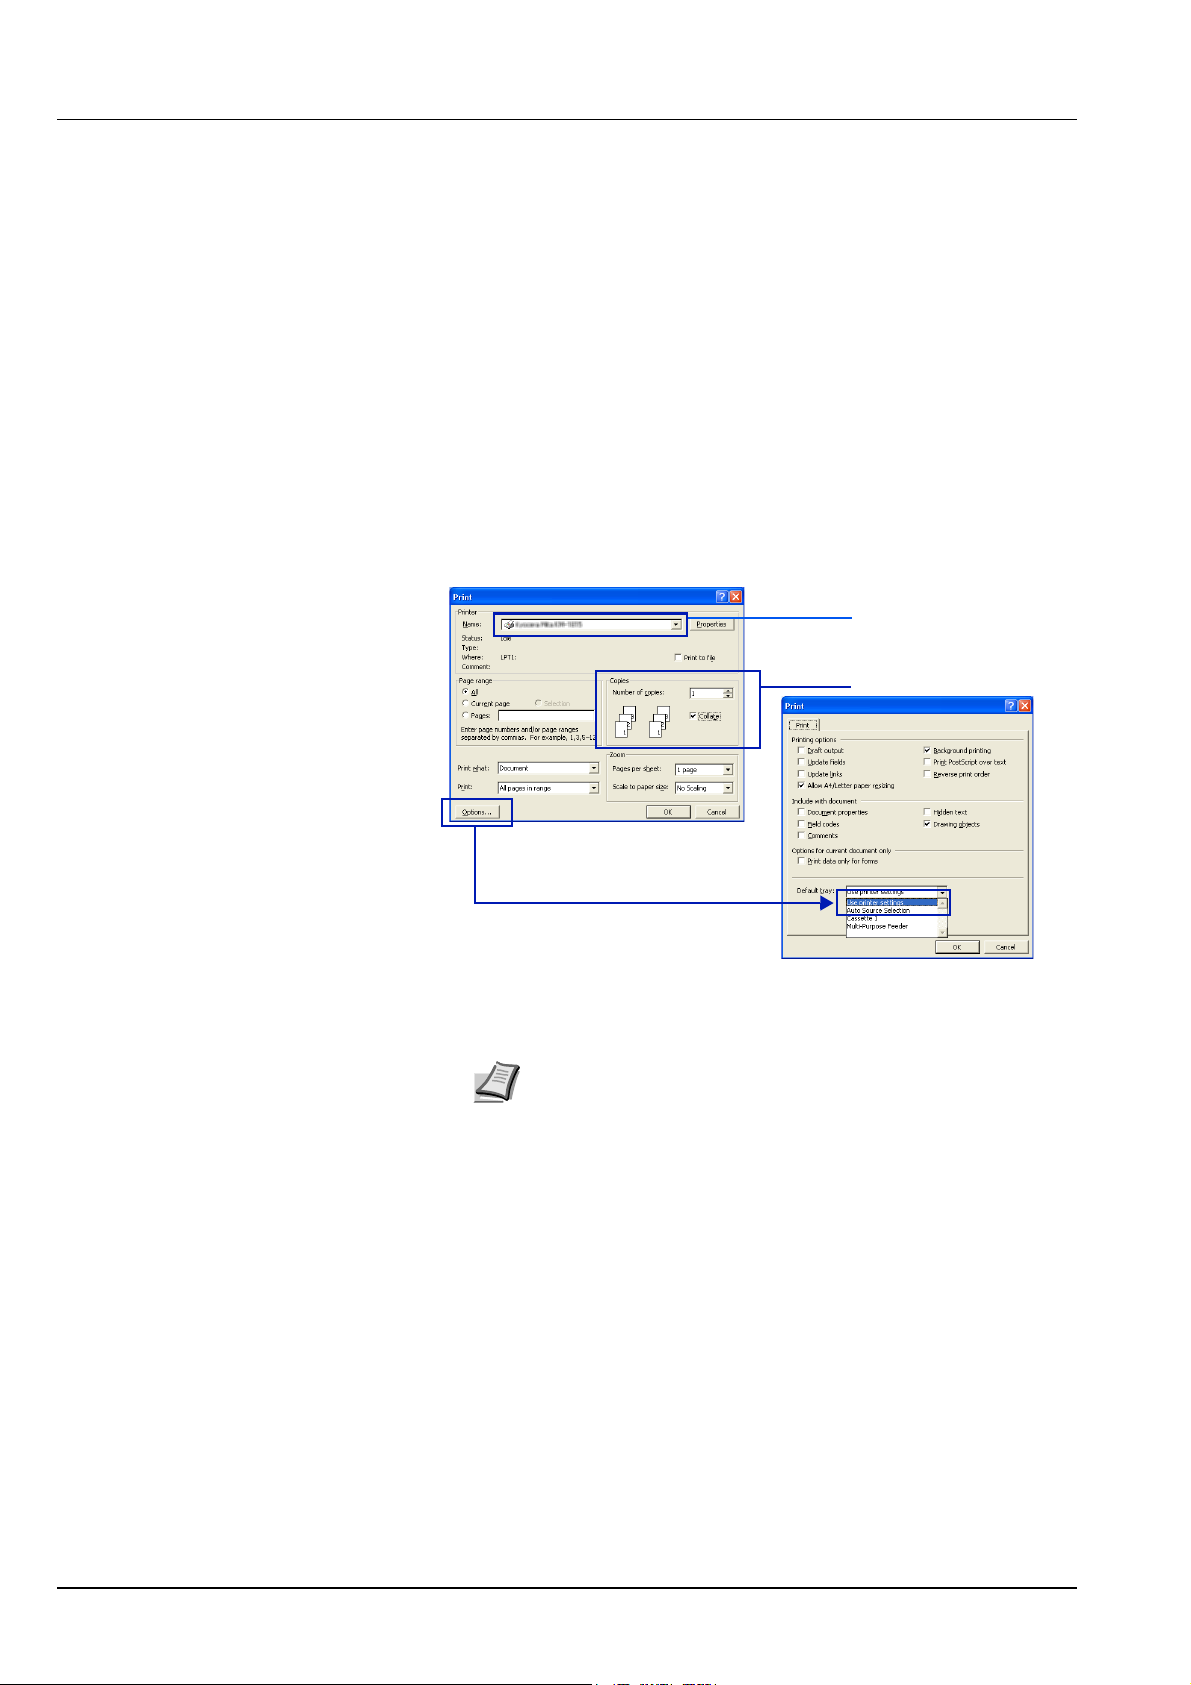
Printing from Application Software
3
4
The steps required to print a document created with an application are
explained below. You can select the printing Paper Size and Output
Destination.
1 Load the paper required into the paper cassette.
2 From the application File menu, select Print. The Print dialog box
displays.
3 Click the drop down list of printer names. All the printers installed in
Windows are listed. Click the name of the machine.
4 Use Number of copies to enter the number of prints required. Up to
999 copies can be entered.
For Microsoft Word, we recommend that you click Options and
specify Use printer settings for the Default tray.
5 To start printing, click OK.
Note For information on how to use the printer driver software,
refer to Printer Driver User Guide.
3-22 Connecting and Printing
Page 59

Printing by AirPrint
AirPrint is a printing function that is included standard in iOS 4.2 and
later products, and Mac OS X 10.7 and later products.
This function enables you to connect and print to any AirPrint compatible
device without installing a printer driver.
To allow the machine to be found when printing by AirPrint, you can set
machine location information in Command Center RX.
For details, refer to the Command Center RX User Guide.
Connecting and Printing 3-23
Page 60
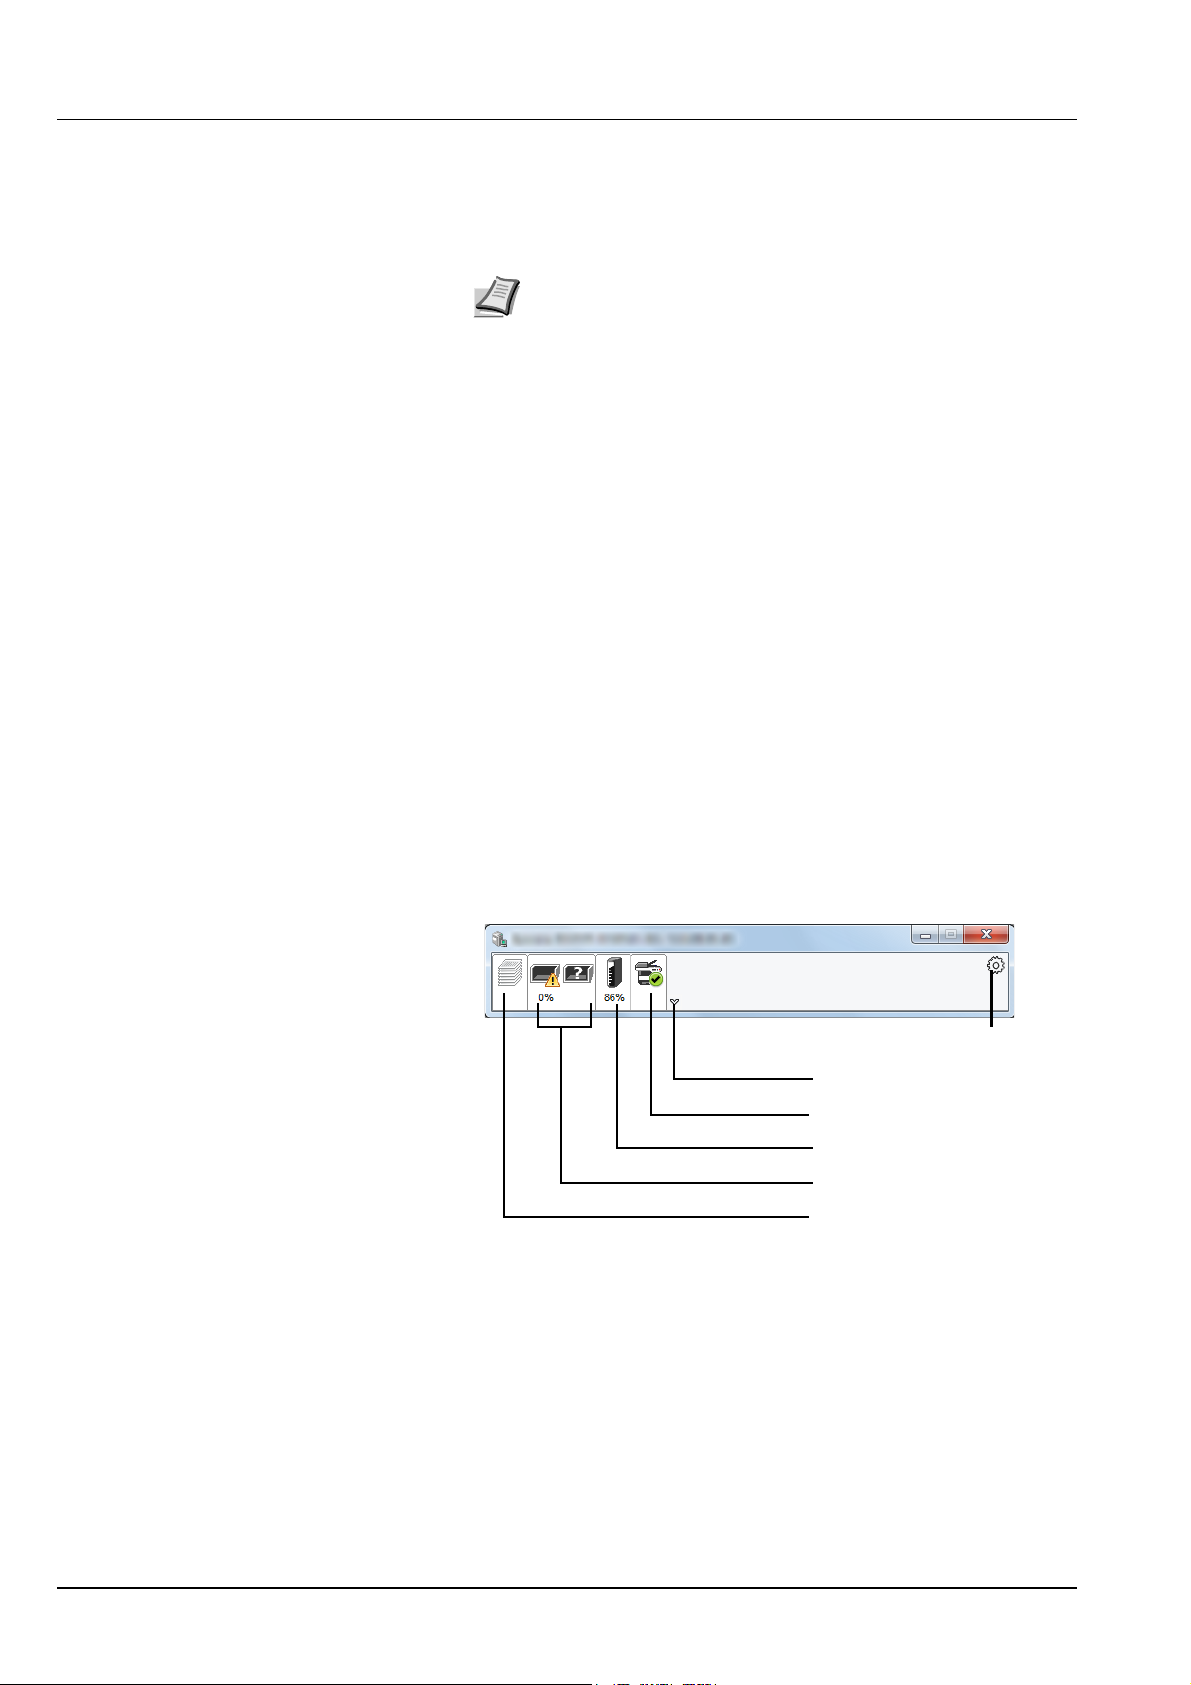
Status Monitor
Expand button
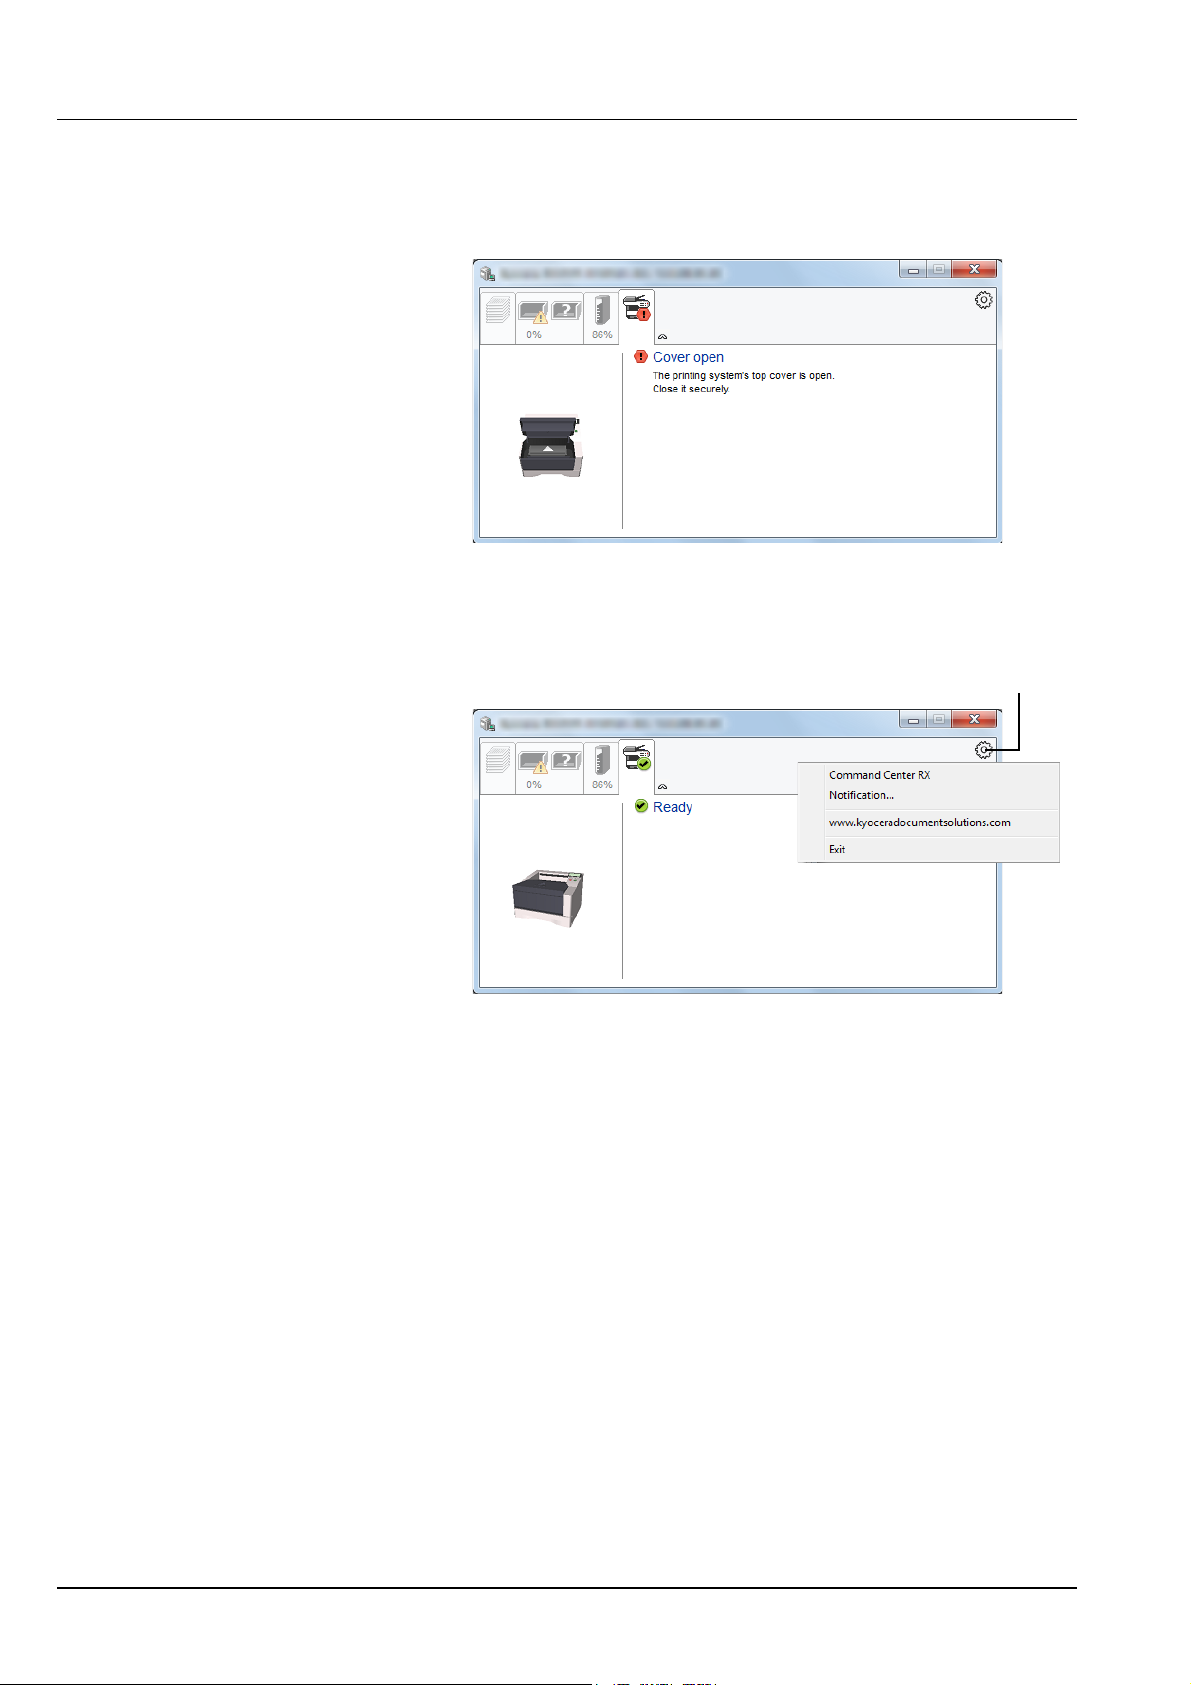
Alert Tab
Toner Status Tab
Paper Tray Status Tab
Printing Progress Tab
Settings icon
The Status Monitor monitors the printer status and provides an ongoing
reporting function.
Note When you activate Status Monitor, check the status below.
• KX Driver is Installed.
• Either Enhanced WSD or EnhancedWSD(SSL) are set to On
in Security section of the Advanced Operation Guide.
Accessing the Status Monitor
The Status Monitor also starts up when printing is started.
Exiting the Status Monitor
Use either of the methods listed below to exit the Status Monitor.
• Exit manually:
Click the settings icon and select Exit in the menu to exit the Status
Monitor.
• Exit automatically:
The Status Monitor automatically shuts down after 7 minutes if it is
not being used.
Status Monitor Display
The display of the Status Monitor is as follows.
Quick View State
The status of the printer is displayed using icons. Detailed information is
displayed when the Expand button is clicked.
Detailed information is displayed by clicking on each icon tab.
3-24 Connecting and Printing
Page 61
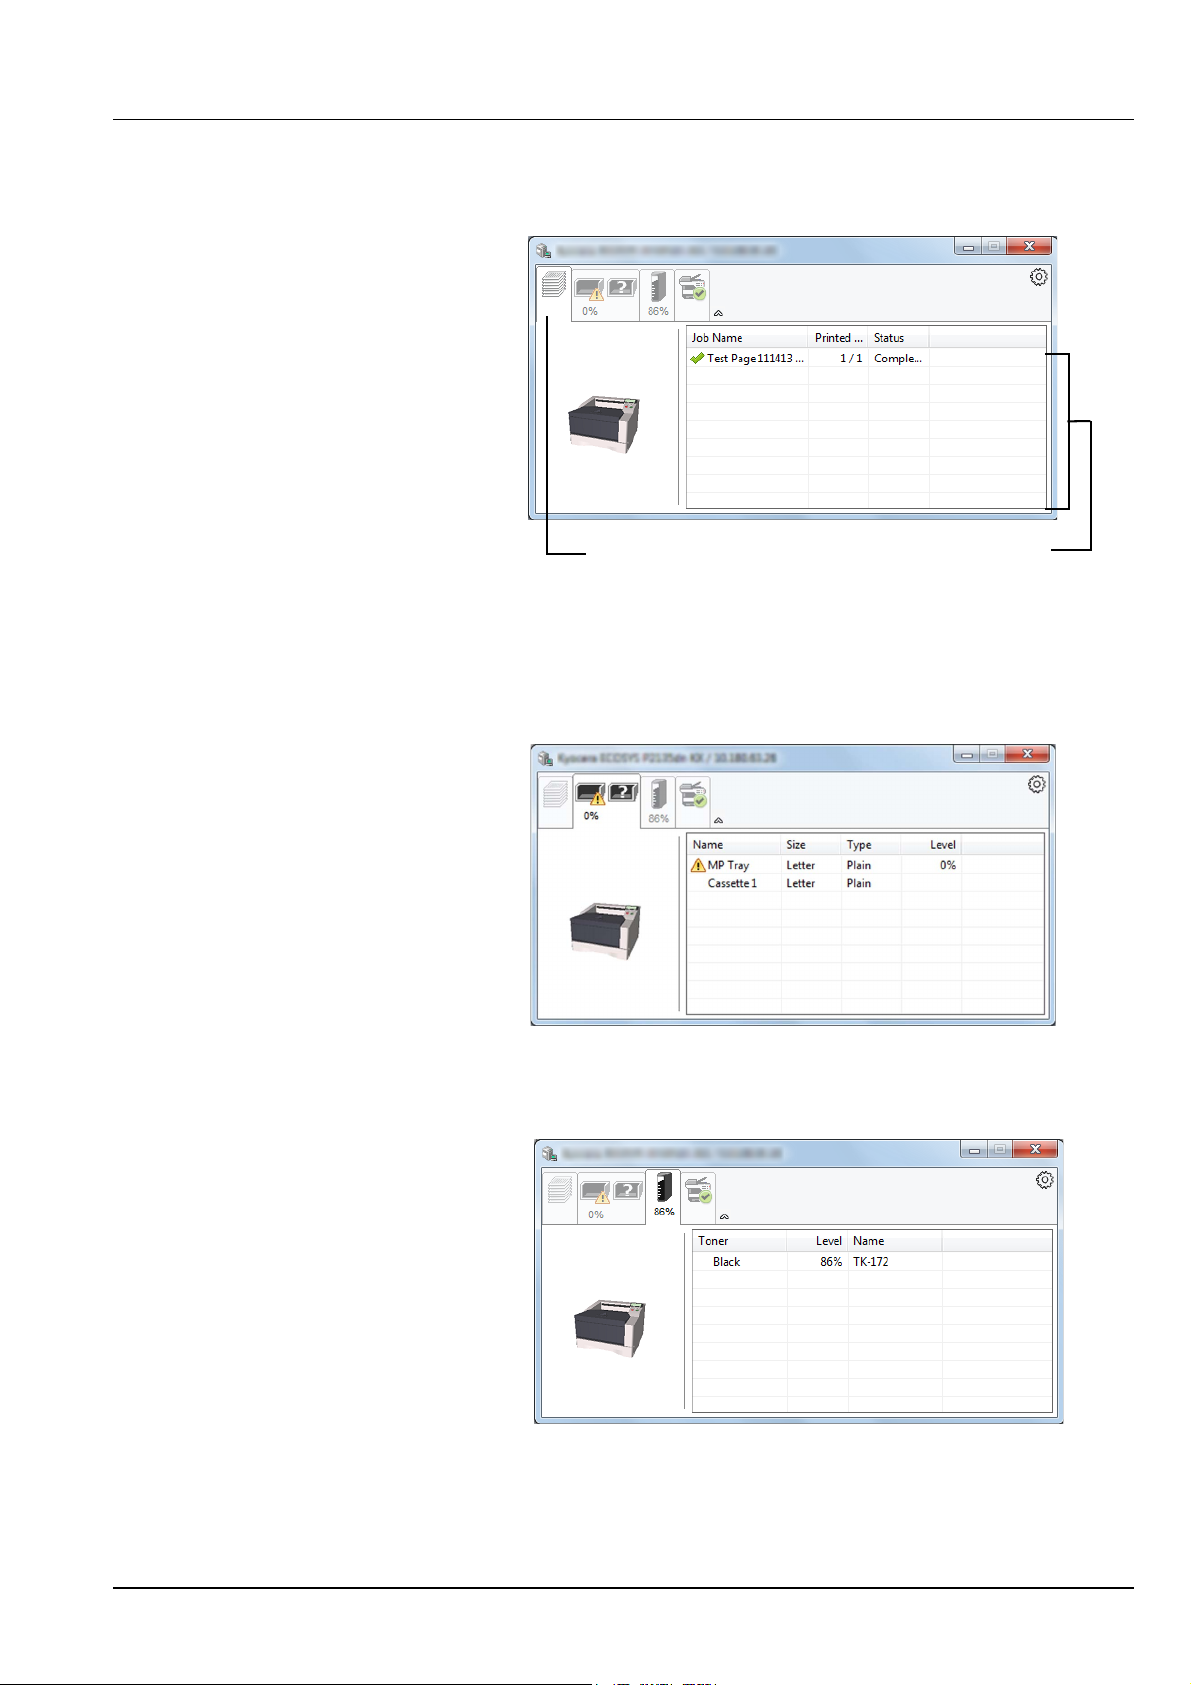
Printing Progress Tab
Status icon
Job list
The status of the print jobs is displayed.
Select a job on the job list and it can be canceled using the menu
displayed with a right-click.
Paper Tray Status Tab
Information is displayed about the paper in the printer and about the
amount of paper remaining.
Toner Status Tab
The amount of toner remaining is displayed.
Connecting and Printing 3-25
Page 62
Alert Tab
Settings icon
If an error occurs, a notice is displayed using a 3D image and a
message.
Status Monitor Context Menu
The following menu is displayed when the settings icon is clicked.
• Command Center RX
If the printer is connected to a TCP/IP network and has its own IP
address, use a web browser to access the Command Center RX to
modify or confirm the network settings. For more information, refer to
the Command Center RX User Guide.
This menu is not displayed when using USB connection.
• Notification…
This sets the display of the Status Monitor. For details, refer to
Status Monitor Notification Settings on page 3-27.
• www.kyoceradocumentsolutions.com
Open our website.
•Exit
Exits the Status Monitor.
3-26 Connecting and Printing
Page 63
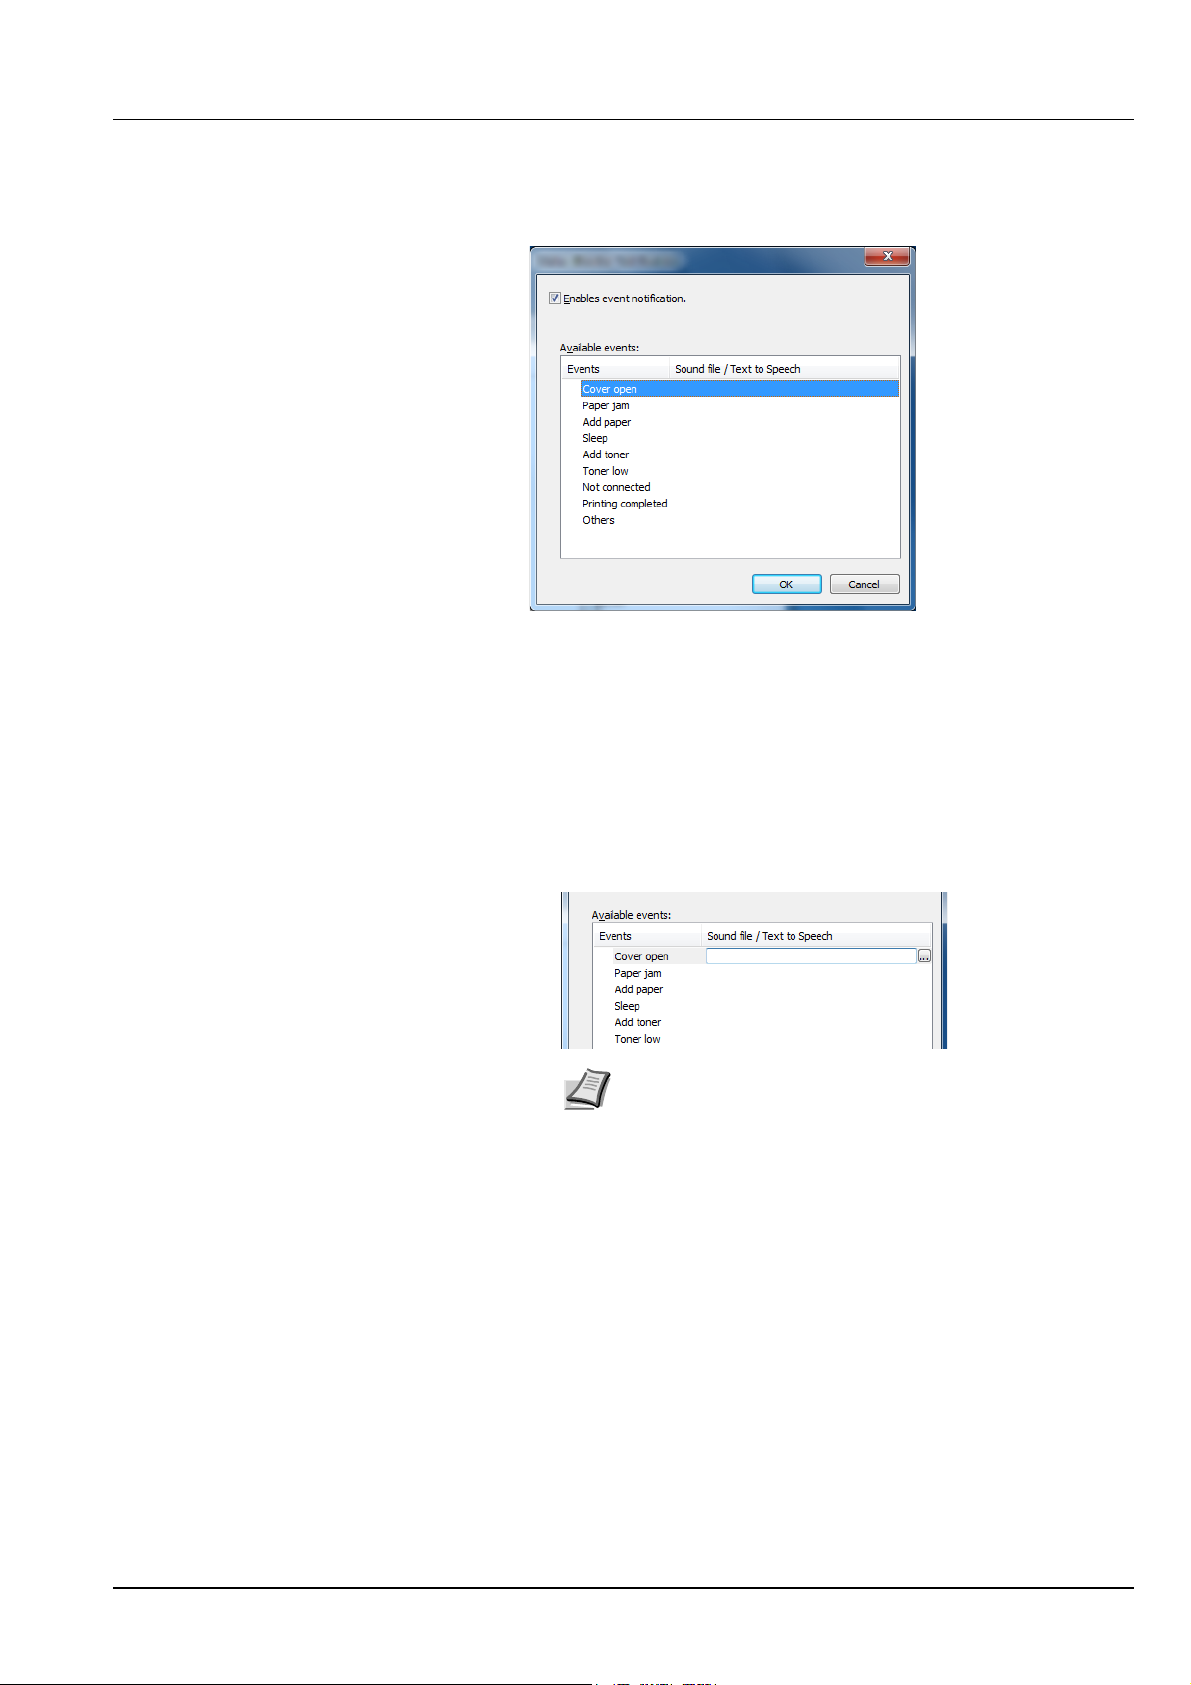
Status Monitor Notification Settings
The Status Monitor settings and event list details are displayed.
Select whether notification is performed when an error in the event list
occurs.
1 Select Enable event notification.
If this setting is set to Off, then the Status Monitor will not start up even
when printing is executed.
2 Select an event to use with the text to speech function in Available
events.
3 Click Sound file / Text to Speech column.
Click the browse (...) button to notify the event by sound file.
Note The available file format is WAV.
When customizing the message texts to read on the screen aloud,
enter the texts in the text box.
Connecting and Printing 3-27
Page 64

Energy Saver Function
Low Power Mode
When the set time (factory setting is 1 minute) elapses after the printer is
last used, the printer automatically enters low power mode. The
message display backlight and lights turn off and power consumption is
reduced. This status is referred to as Low Power Mode.
The amount of time of no activity that must pass before Low Power
Mode is activated may be lengthened. For more information refer to Low
Power Timer (Low Power Mode timer timeout time) section of the
Advanced Operation Guide.
If print data is received during Low Power Mode, the message display
lights up and printing starts.
To resume, press [GO]. The printer will be ready to operate within
8 seconds or less.
Note that ambient environmental conditions, such as ventilation, may
cause the machine to respond more slowly.
Sleep
For Europe
When the set time (factory setting is 15 minutes) elapses after the printer
is last used, the printer automatically enters sleep mode. The message
display backlight and lights turn off to minimize power consumption. This
status is referred to as Sleep.
To use the printer, press [GO]. The printer will be ready to operate within
16.5 seconds or less.
For more information about configuring settings, refer to Sleep Timer
(Sleep timer timeout setting) section of the Advanced Operation Guide.
Except for Europe
When the set time (factory setting is 1 minute) elapses after the printer is
last used, the printer automatically enters sleep mode. The message
display backlight and lights turn off to minimize power consumption. This
status is referred to as Sleep.
For more information about configuring settings, refer to Sleep Timer
(Sleep timer timeout setting) section of the Advanced Operation Guide.
There are two sleep modes: Quick Recovery and Energy Saver. The
default setting is Energy Saver mode.
Quick Recovery Mode
The recovery from the sleep mode is faster than when using Energy
Saver mode.
The message display goes off when sleep mode is entered and the
Ready indicator flashes.
The machine recovers quickly when [GO] is pressed. The machine also
automatically recovers and prints when a job is detected.
If print data is received during Sleep, the print job is performed while the
message display remains unlit.
To use the printer, press [GO].
3-28 Connecting and Printing
Page 65

Note that ambient environmental conditions, such as ventilation, may
cause the machine to respond more slowly.
For more information about configuring settings, refer to Sleep Timer
(Sleep timer timeout setting) section of the Advanced Operation Guide.
Energy Saver Mode
This mode reduces power consumption even more than quick recovery
mode, and allows Sleep mode to be set separately for each function.
To use the printer, press [GO]. The printer will be ready to operate within
16.5 seconds or less.
For more information on Energy Saver settings, refer to Sleep Level Set.
(Sleep level setting) section of the Advanced Operation Guide.
If the Low Power Timer is equal to the Sleep Timer, a Sleep mode is
preceded.
Connecting and Printing 3-29
Page 66

3-30 Connecting and Printing
Page 67

4 Maintenance
This chapter explains how to replace the toner container and clean the
printer
.
General Information 4-2
Toner Container Replacement 4-2
Cleaning the Printer 4-6
Prolonged Non-Use and Moving of the Printer 4-9
Maintenance 4-1
Page 68

General Information
This chapter describes basic maintenance tasks you can perform for the
printer. You can replace the toner container according to the printer's
display.
Also, the internal parts need periodic cleaning.
Note Information Collection on Memory Chips - The memory chip
attached to the toner container is designed to improve
convenience for the end user; to support the recycling operation of
empty toner containers; and to gather information to support new
product planning and development. The information gathered is
anonymous - it cannot be associated to any specific individual and
the data is intended to be used anonymously.
Toner Container Replacement
The message identifies the toner status at two stages of toner usage.
• When the printer becomes low on toner, the message Toner low is
displayed. Note the replacement is not always necessary at this
stage.
• If you ignore the above status and continue printing, the message
Replace toner
toner container must then be replaced immediately.
In either case, replace the toner container.
is displayed just before the toner is used up. The
Frequency of Toner Container Replacement
Assuming an average toner coverage of 5 % and EcoPrint mode turned
off, the toner container will need replacing approximately once every
7,200 pages.
You can print a status page to check how much toner remains in the
toner container. The Toner Gauge in the consumables status section on
the status page shows a progress bar, which roughly represents how
much toner is left in the toner container.
Starter Toner Container
The toner container packed with the new printer is a starter toner
container. The starter toner container lasts an average of 2,300 pages.
Ton er K i ts
For best results, we recommend that you only use genuine Kyocera
Parts and Supplies.
A new toner kit contains the following items:
• Toner Container
• Plastic waste bag for old toner container
• Installation Guide
Note Do not remove the toner container from the carton until you
are ready to install it in the printer.
4-2 Maintenance
Page 69
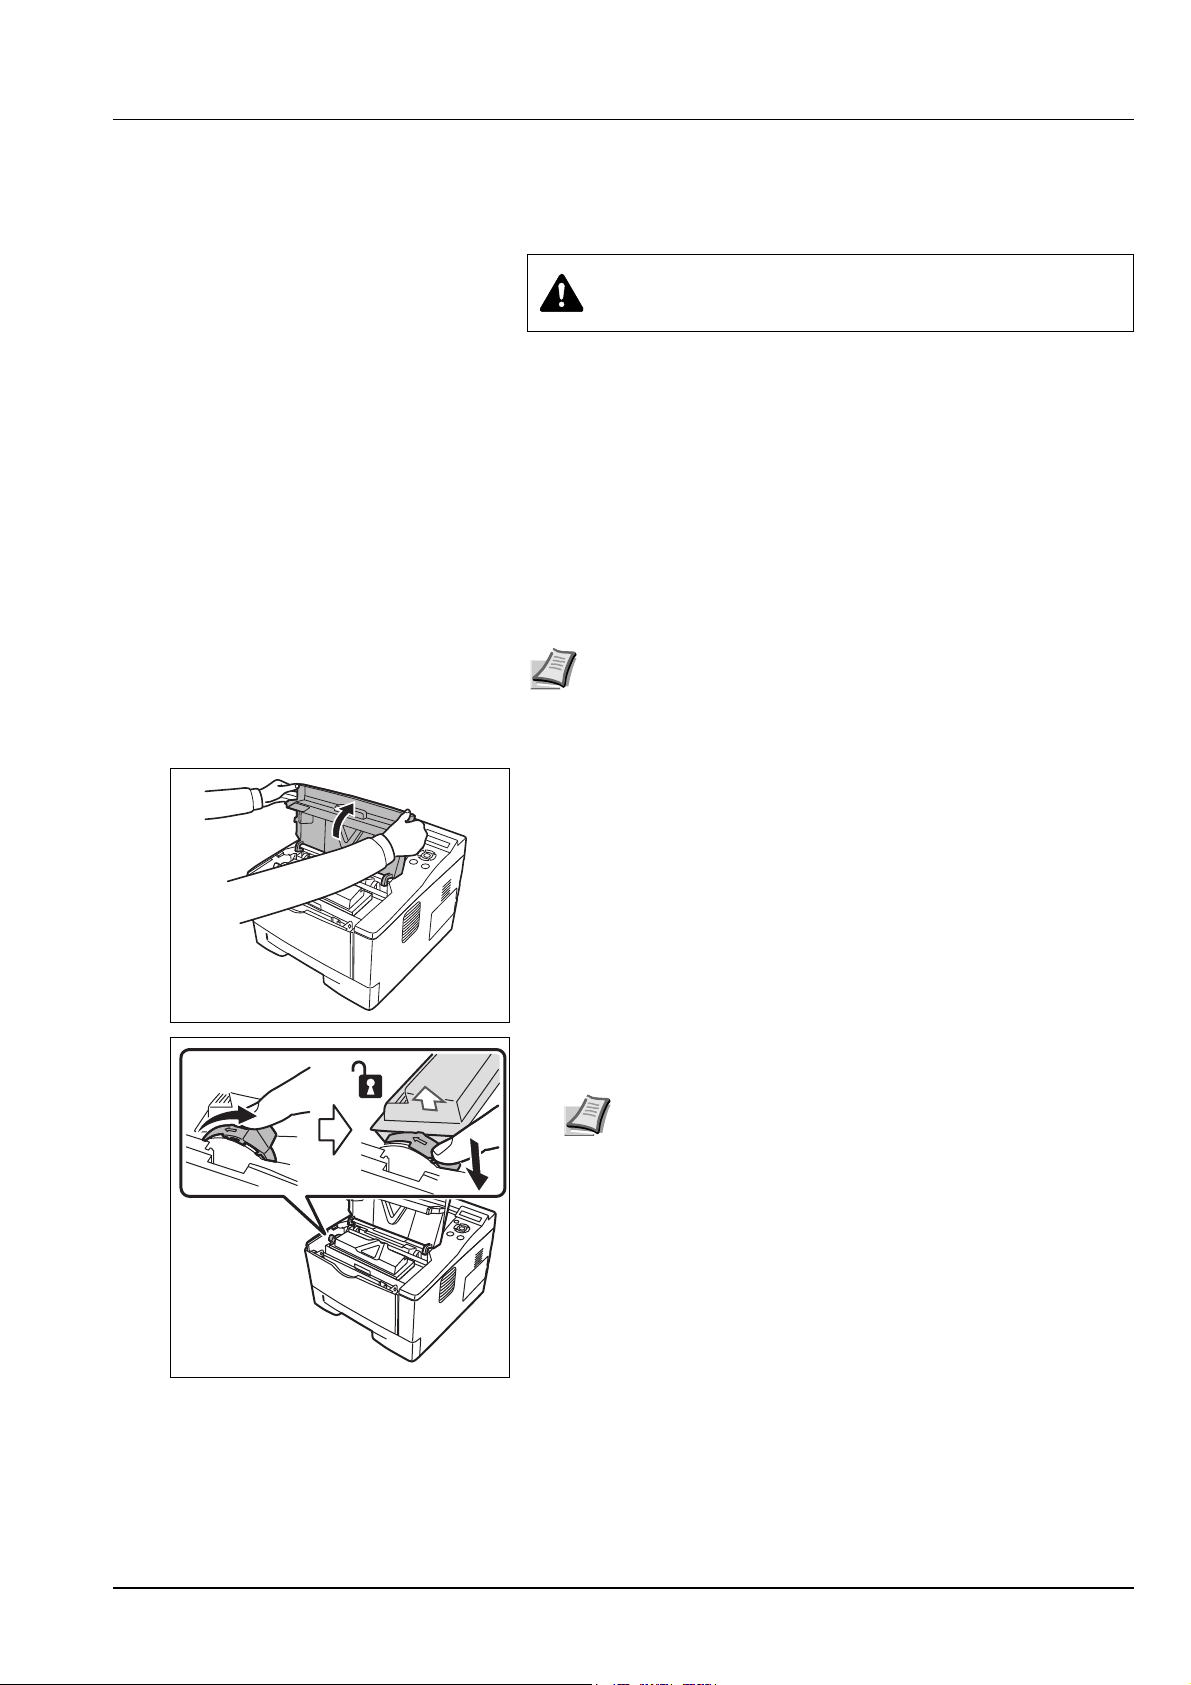
Replacing the Toner Container
This section explains how to replace the toner container.
CAUTION Do not attempt to incinerate parts which contain
toner. Dangerous sparks may cause burns.
IMPORTANT During toner container replacement, temporarily move
storage media and computer supplies (such as floppy disks) away
from the toner container. This is to avoid damaging media by the
magnetism of toner.
IMPORTANT Kyocera Document Solutions Inc. is not liable against
any damages or problems arising from the use of toner containers other
than those designated as original Kyocera toner containers. For optimum
performance, it is also recommended to use only the Kyocera toner
containers which are specifically intended for use in your country or
region. If the toner container for another destinations is installed, the
printer will stop printing.
Note You do not have to turn printer power off before starting
the replacement. Any data that may be processing in the printer
will be deleted if you turn the printer power off
.
1 Open the top cover.
2 Turn the lock lever to the unlock position. Push the lock lever to the
position marked by the arrow and pull out the toner container.
Note Put the old toner container in the plastic bag (supplied
with the new toner kit) and discard it later according to the local
code or regulations for waste disposal.
Maintenance 4-3
Page 70
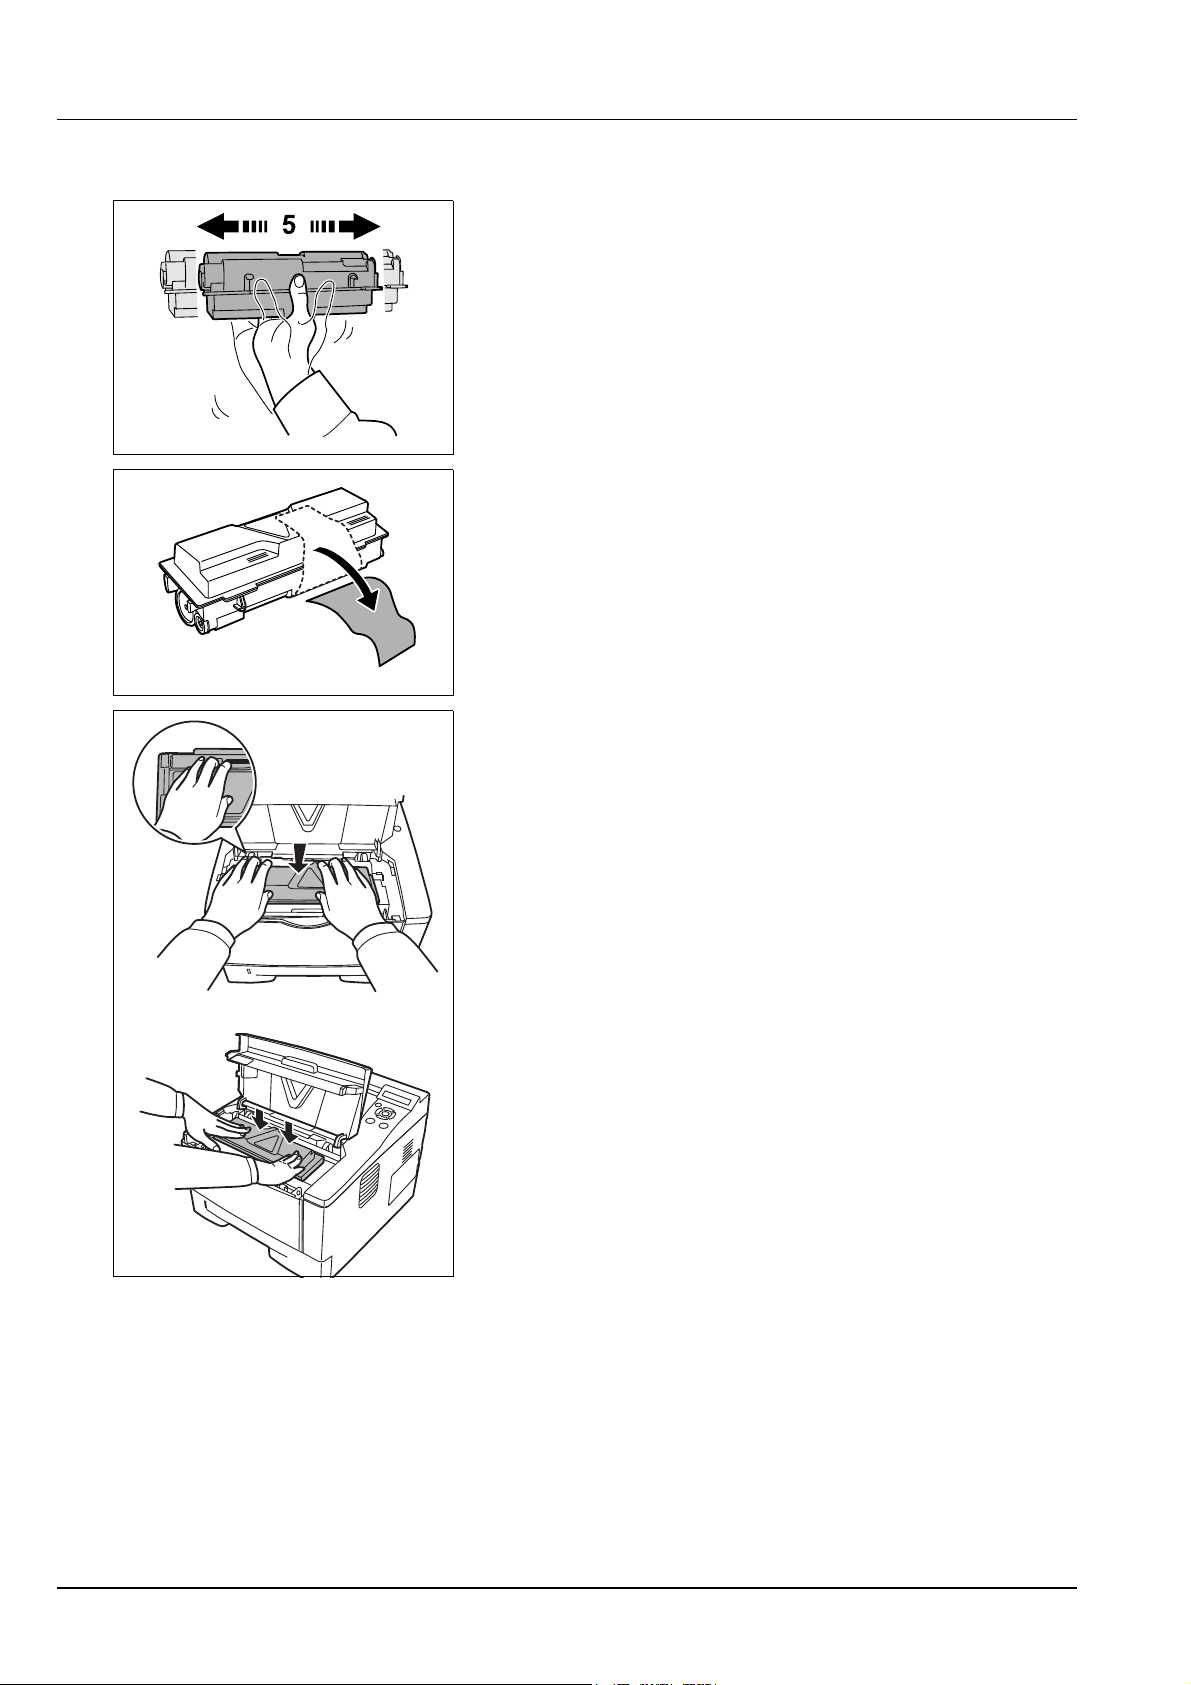
3 Take the new toner container out of the toner kit. Shake the new
toner container at least 5 times as shown in the figure in order to
distribute the toner evenly inside the container.
4 Remove the label from the toner container.
5 Install the new toner container in the printer. Push firmly on the top of
the container at the positions marked PUSH, until you hear a click.
4-4 Maintenance
Page 71
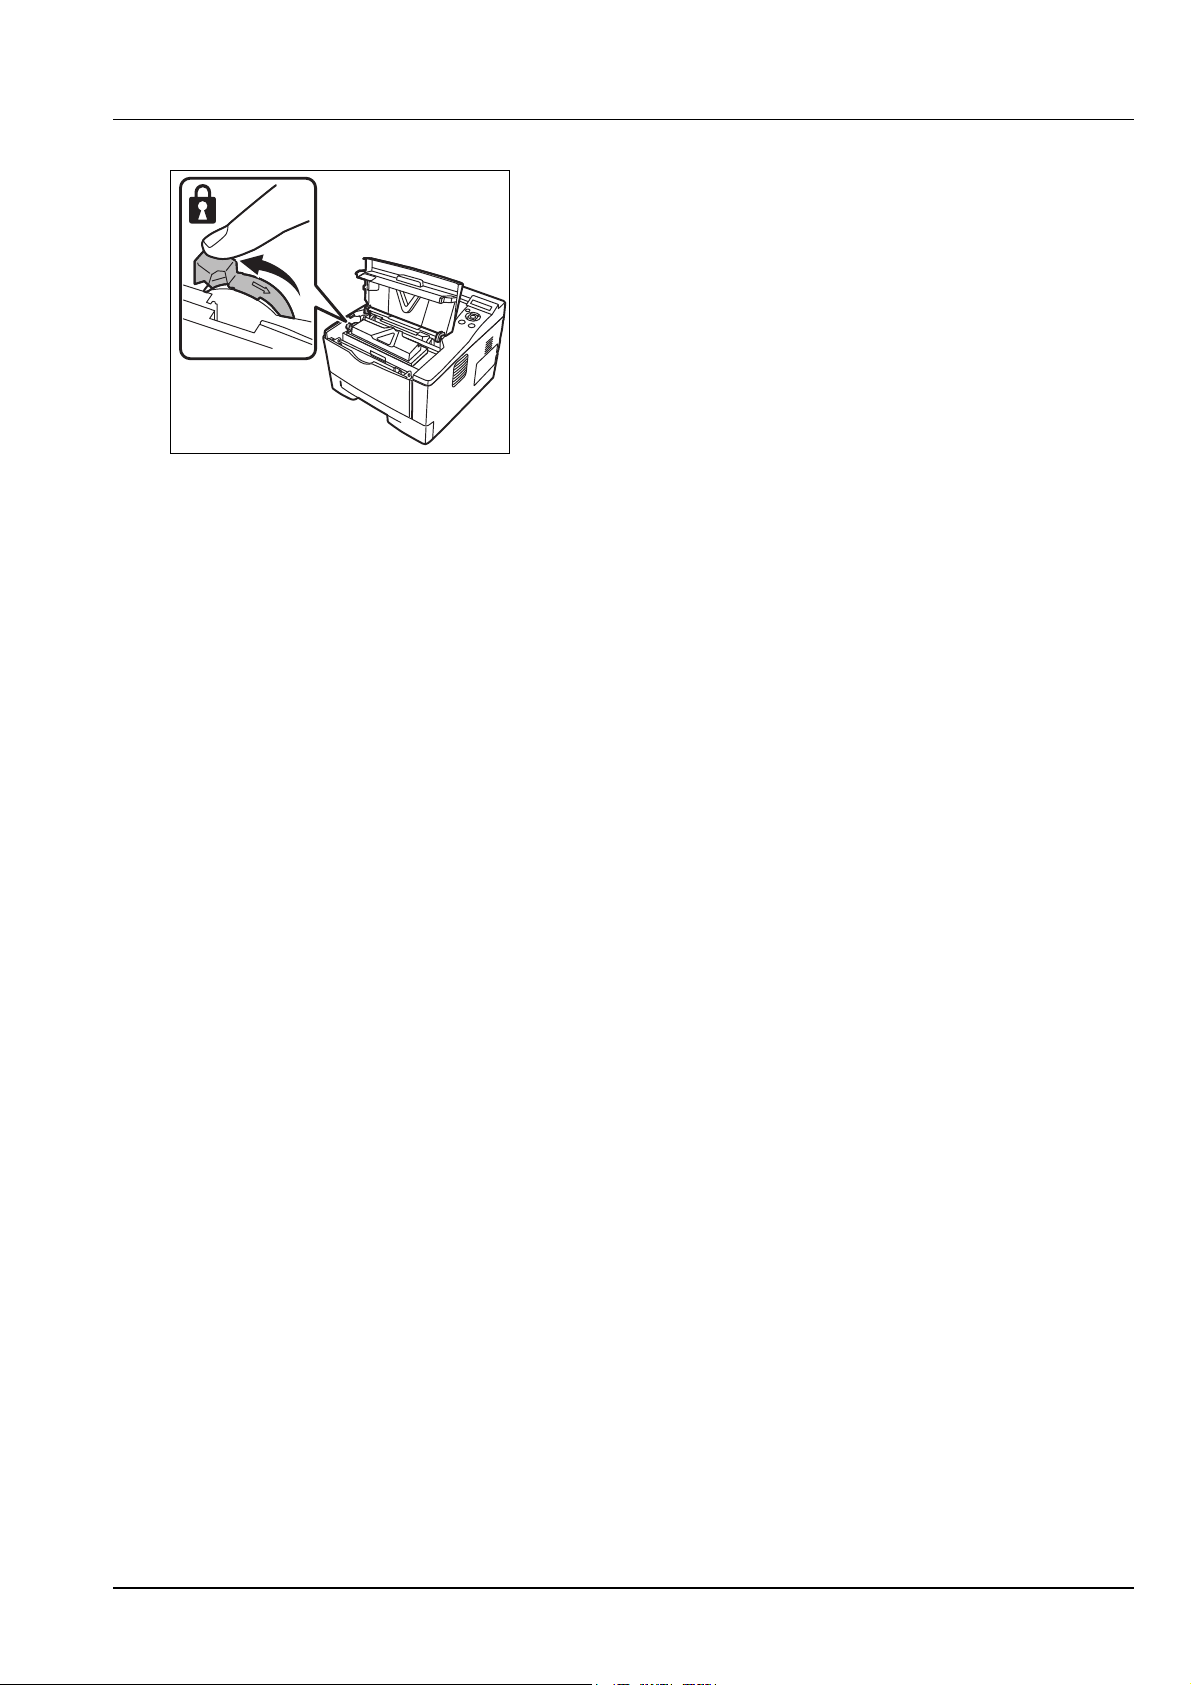
6 Turn the lock lever to the lock position.
7 Close the top cover.
Maintenance Kit Replacement
When the machine prints 100,000 pages, a message is displayed
indicating that the maintenance kit should be replaced. The maintenance
kit must then be replaced immediately.
To replace the maintenance kit, contact your service technician.
IMPORTANT When the waste toner in the drum unit is almost full,
Warning waste toner box is displayed. Replace the maintenance
kit.
Maintenance 4-5
Page 72
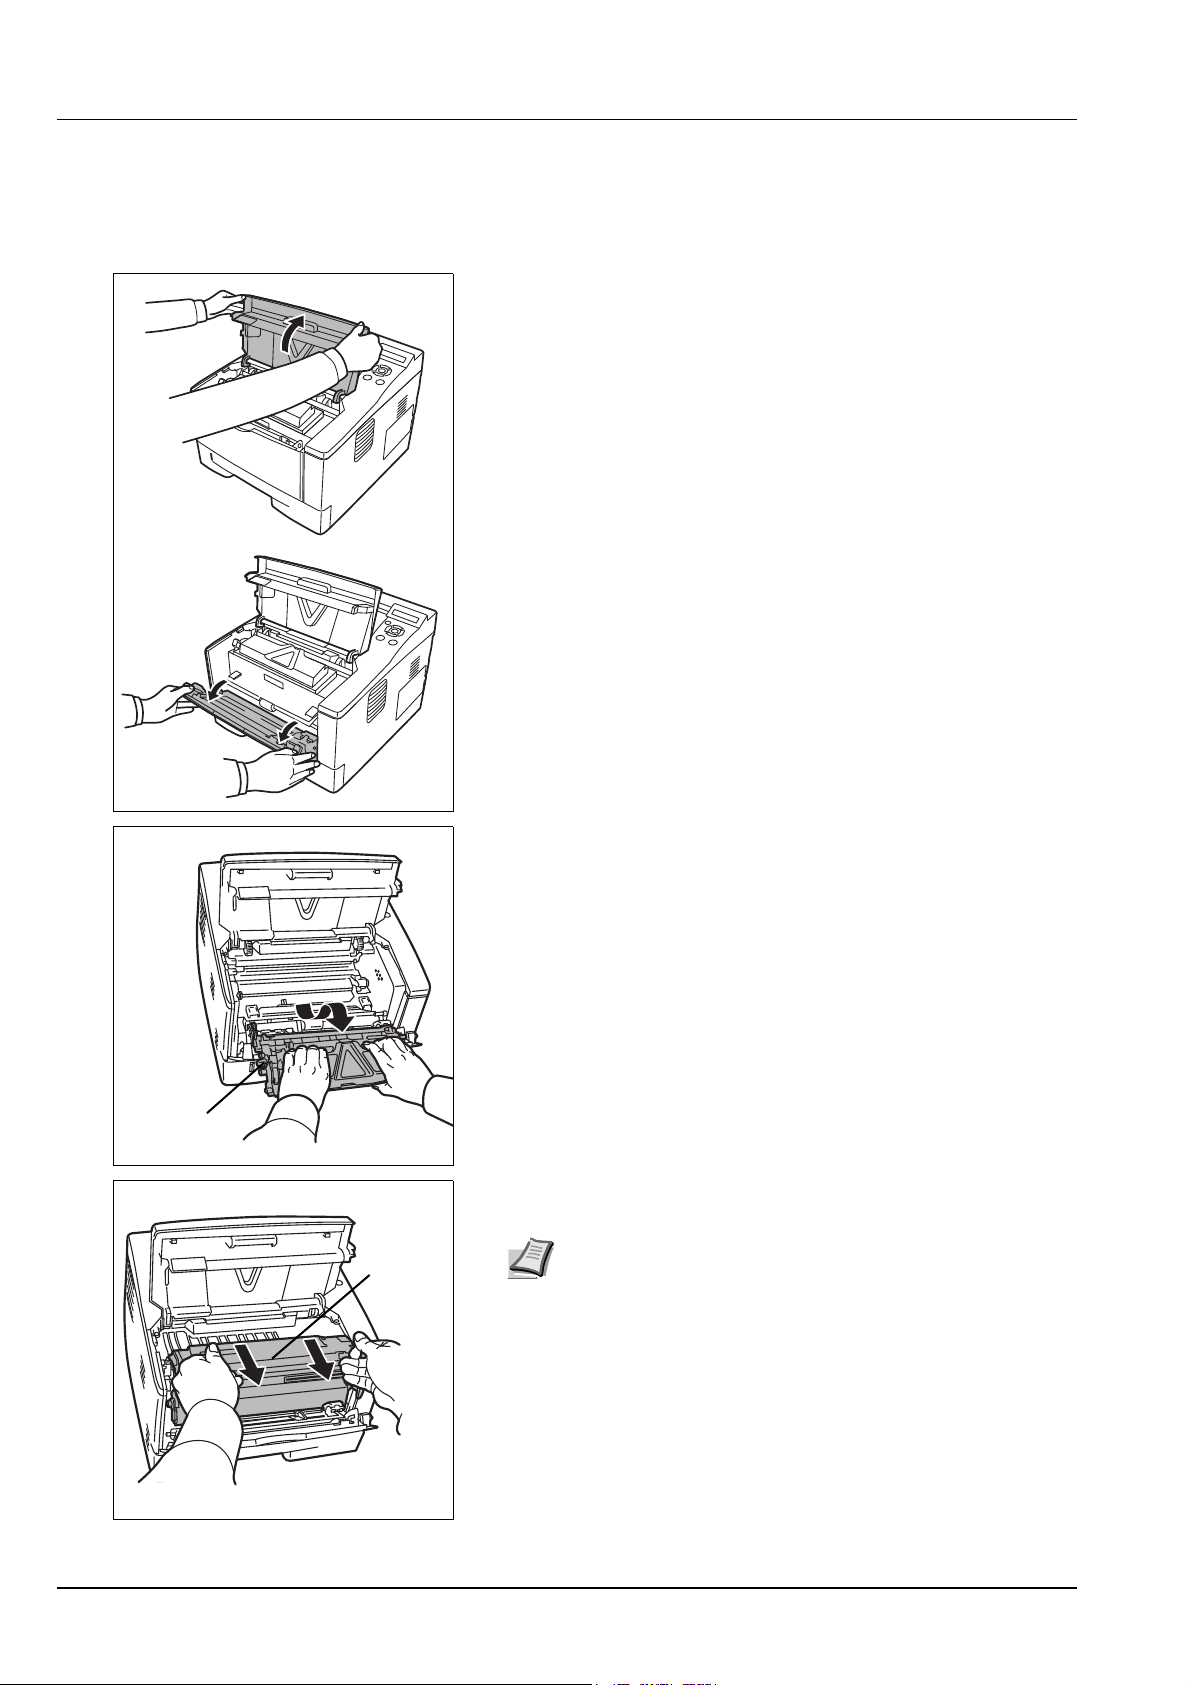
Cleaning the Printer
Developer
Unit
Drum
Unit
To avoid print quality problems, the interior of the printer must be
cleaned with every toner container replacement.
1 Open the top cover and front cover.
2 Lift the developer unit together with the toner container out of the
printer.
3 Remove the drum unit from the printer by holding the green levers
with both hands.
Note The drum unit is sensitive to light. Never expose the
drum unit to light for more than five minutes.
4-6 Maintenance
Page 73
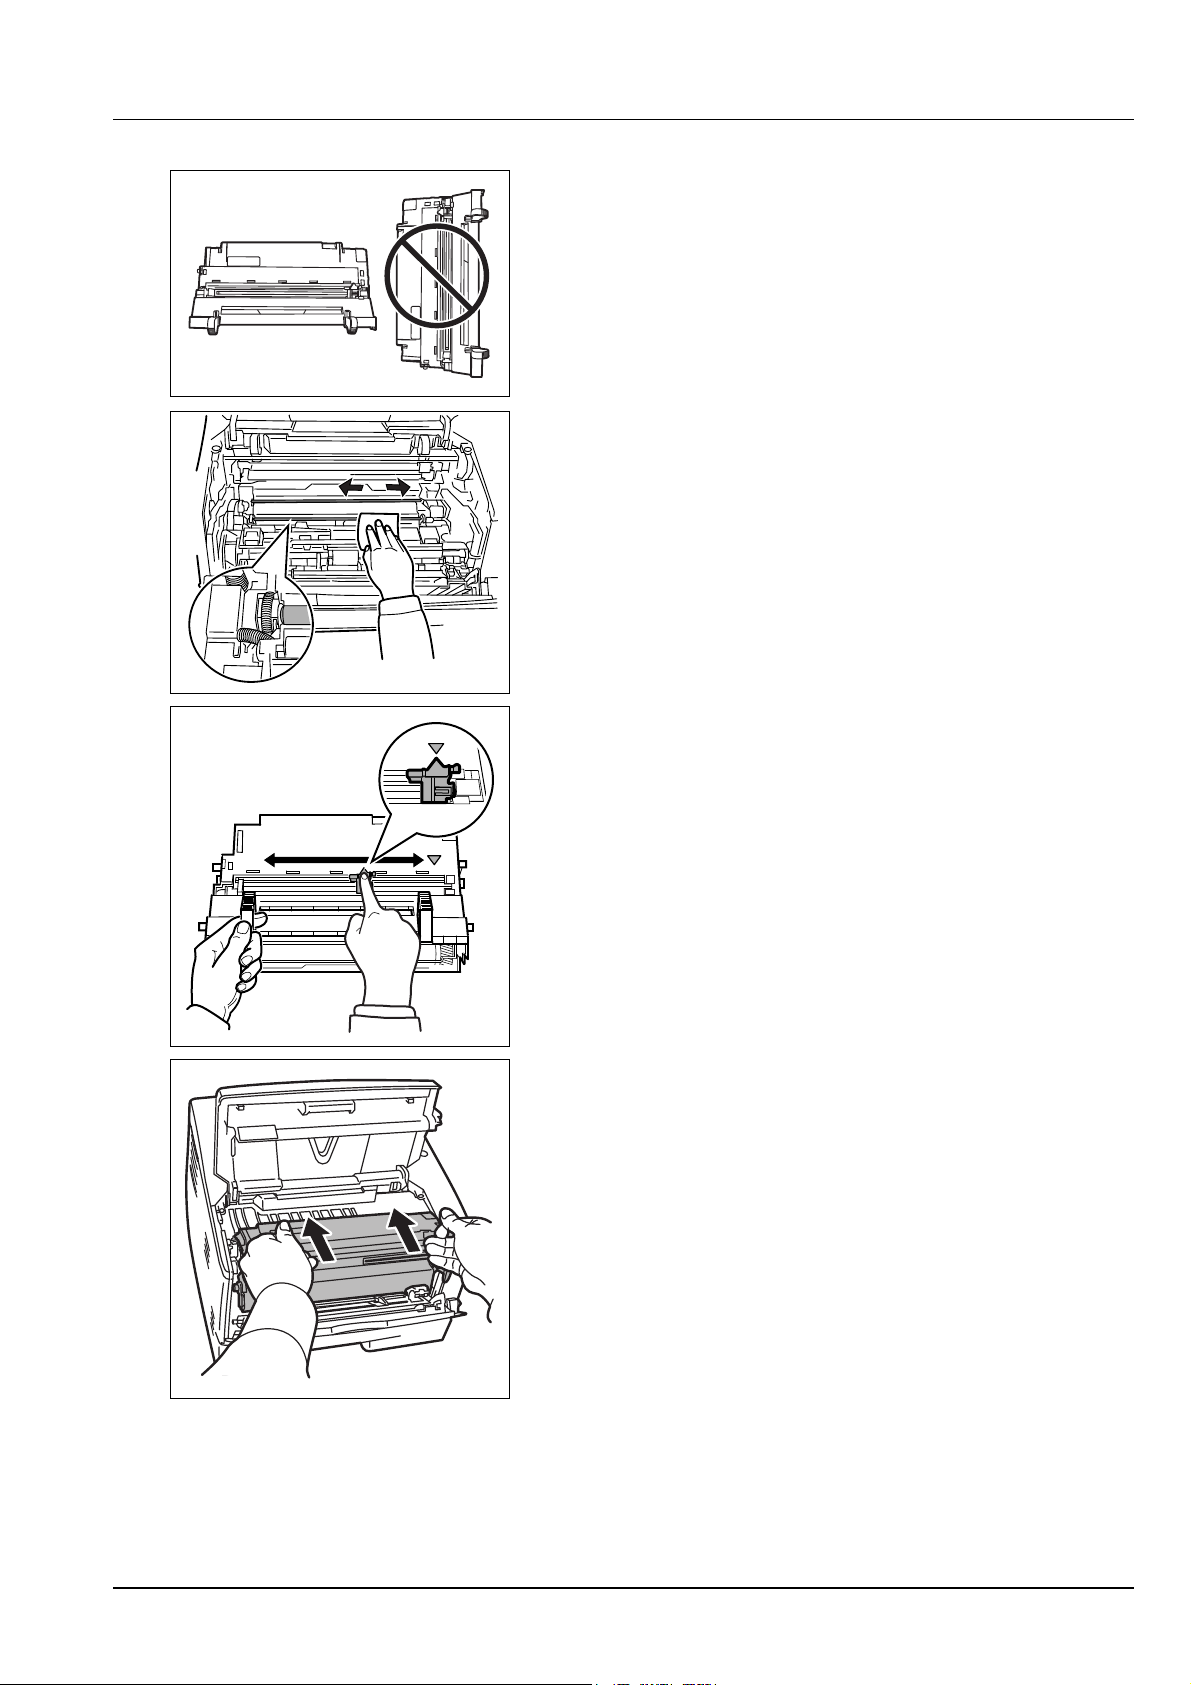
4 Place the drum unit flat on a clean, level surface.
IMPORTANT Do not place the drum unit on end.
5 Use a clean, lint free cloth to clean dust and dirt away from the metal
registration roller.
IMPORTANT Take care not to touch the transfer roller (black)
during cleaning.
6 On the drum unit, slide the charger cleaner (green) back and forth 2
or 3 times to clean the charger wire, then return it to its original
position (CLEANER HOME POSITION).
IMPORTANT Remove the fixing tape on the charger cleaner in
case of the first cleaning.
After cleaning, make sure you restore the charger cleaner to its
home position.
7 When cleaning is complete, return the drum unit to the original
position.
Maintenance 4-7
Page 74
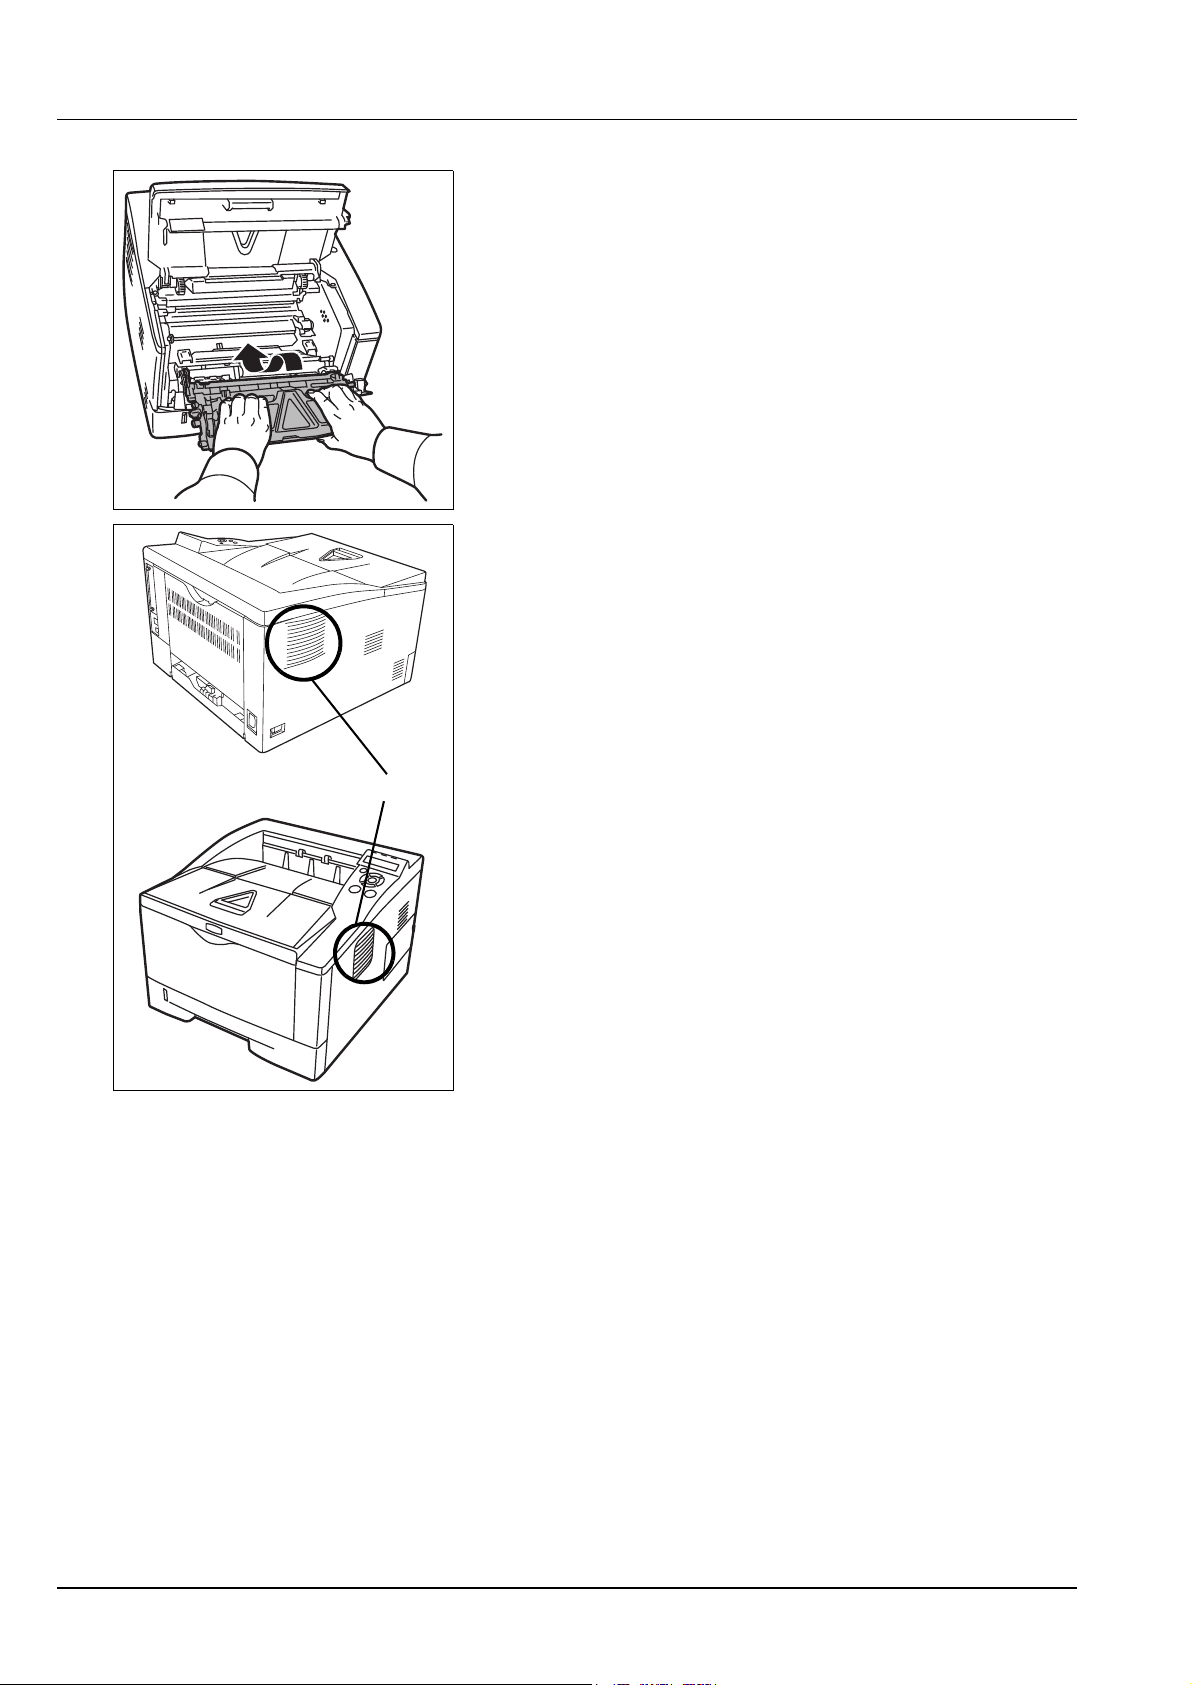
8 Return the developer unit to its position, aligning the guides at both
Vent
ends with the slots in the printer. Then, close the front cover and top
cover.
9 Use a lint free cloth to clean dust and dirt away from the vent on the
left and the right side of the machine.
4-8 Maintenance
Page 75
Prolonged Non-Use and Moving of the Printer
Prolonged Non-use
If you ever leave the printer unused for a long period of time, remove the
power cord from the wall outlet.
We recommend you consult with your dealer about the additional actions
you should take to avoid possible damage that may occur when the
printer is used next time.
Moving the Printer
When you move the printer:
• Move it gently.
• Keep it as level as possible to avoid spilling toner inside the printer.
• Be sure to consult a service technician before attempting long
distance transportation of the printer.
WARNING If you ship the printer, remove and pack the
developer unit and drum unit in a plastic bag and ship them
separately from the printer.
Maintenance 4-9
Page 76

4-10 Maintenance
Page 77

5 Troubleshooting
This chapter explains how to handle printer problems, understand error
messages, and clear paper jams
General Guidelines 5-2
Print Quality Problems 5-3
Error Messages 5-5
Ready, Data, and Attention Indicators 5-9
Clearing Paper Jams 5-10
.
Troubleshooting 5-1
Page 78

General Guidelines
The table below provides basic solutions for problems you may
encounter with the printer. We suggest you consult this table to
troubleshoot the problems before calling for service repairs.
Symptom Check Items Corrective Actions
Print quality is poor. – Select half speed mode using the printer driver.
Refer to Print Quality Problems on page 5-3.
Text is missing on the
Windows test page.
Paper is jammed. – Refer to Clearing Paper Jams on page 5-10.
Nothing lights on the
operation panel even
when power is turned on
and the fan makes no
noise.
The printer prints a status
page but data from the
computer is not being
printed.
Vapor is emitted near the
top tray.
– This is a problem specific to the Windows OS. It is
not a printer problem. It does not affect print quality.
Check the power cord is property
plugged into power outlet.
Check the power switch is in the
On ( | ) position.
Check program files and application
software.
Check the interface cable. Connect both ends of the interface cable securely.
Check if the temperature is low near
the location of the printer, or if the
paper that is being used has been
exposed to humidity.
Connect both ends of the power cord securely. Try
replacing the power cord. Refer to Installation Guide
for more information.
Refer to the Installation Guide for more information.
Try printing another file or using another print
command. If the problem occurs with a specific file or
application, check the printer settings for that
application.
Try replacing the printer cable. Refer to the
Installation Guide for more information.
Depending on the operating environment of the
printer and the condition of the paper, heat
generated during printing can evaporate water
moisture in the printed paper, emitting vapor from the
printer. In this case, printing can be continued
without any problem.
To correct this, increase the temperature in the room,
and use paper that has been stored in a dry place.
Tips
Printer problems may be solved easily by following the tips below. When
you have encountered a problem that cannot be solved following the
guidelines above, try the following:
• Restart the computer you are using to send print jobs to the printer.
• Obtain and use the latest version of the printer driver. The latest
versions of printer drivers and utilities are available at:
http://www.kyoceradocumentsolutions.com.
• Make sure that the procedures for printing are correctly followed in
the application software. Consult the documentation supplied with
the application software.
5-2 Troubleshooting
Page 79
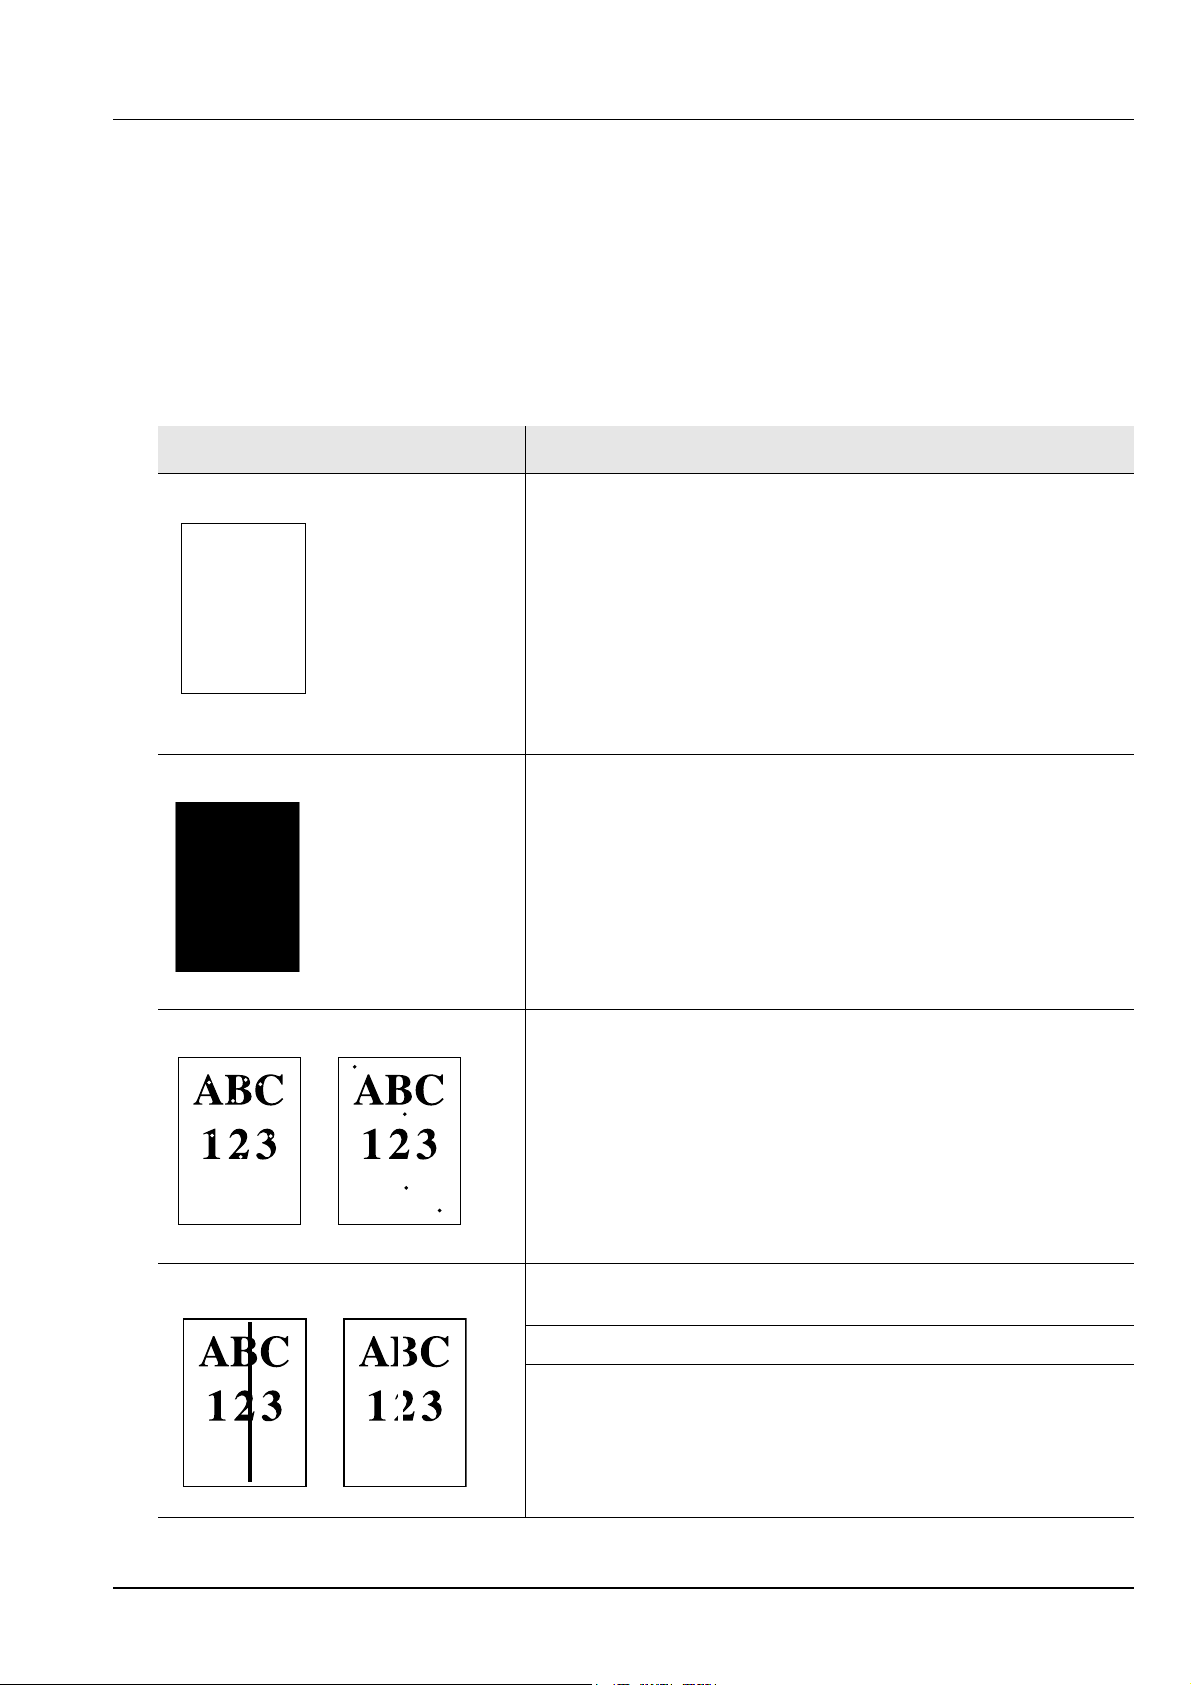
Print Quality Problems
The tables and diagrams in the following sections define print quality
problems and the corrective action you can conduct to solve the
problems. Some solutions may require cleaning or replacing parts of the
printer.
If the suggested corrective action will not solve the problem, call for
service representative.
Printed Results Corrective Action
Completely blank printout Check the toner container.
Open the front cover and check that the toner container is correctly
installed in the printer. Refer to Toner Container Replacement on
page 4-2.
Full single-color printout Contact your service representative.
Dropouts, stray dots Drum or developer unit may be damaged. If the problem is not solved
even after printing several pages, call for service representative.
Vertical streaks Check the toner container and if necessary replace. Refer to Toner
Container Replacement on page 4-2.
Clean the charger wire. Refer to Cleaning the Printer on page 4-6.
Check the charger cleaner of the drum unit is in its original position.
Refer to Cleaning the Printer on page 4-6.
Troubleshooting 5-3
Page 80
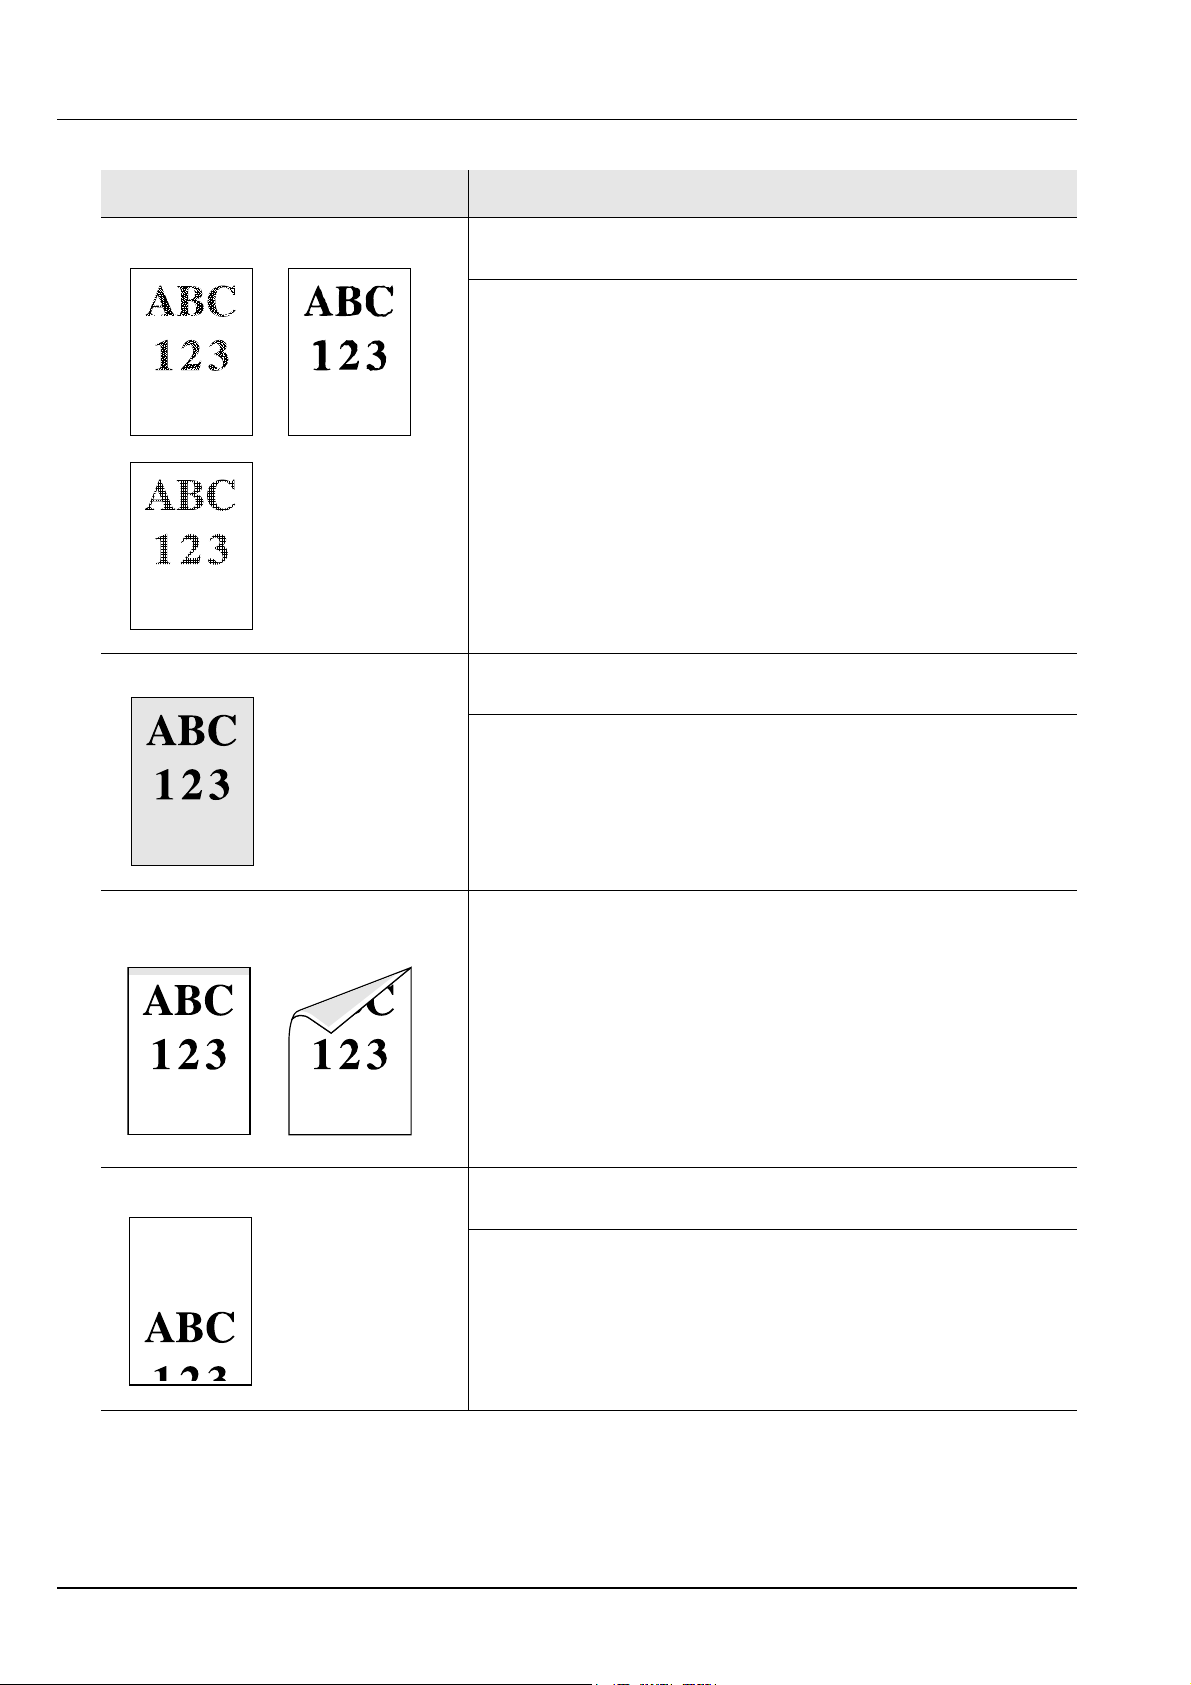
Printed Results Corrective Action
Faint or blurred printing Check the toner container and if necessary replace. Refer to Toner
Container Replacement on page 4-2.
Clean the charger wire. Refer to Cleaning the Printer on page 4-6.
Gray background Check the toner container and if necessary replace. Refer to Toner
Container Replacement on page 4-2.
Check the developer unit and drum unit are installed correctly. Refer
to Cleaning the Printer on page 4-6.
Dirt on the top edge or back of the
paper
Printing incomplete or out of position Check that the printing settings are correct in the application software
If the problem is not solved even after printing several pages, clean
the registration roller. Refer to Cleaning the Printer on page 4-6.
If the problem is not solved after cleaning, call for service
representative.
and the printer driver.
Check whether the problem is being caused by a PRESCRIBE
command error. If the problem occurs only with a specific file or
program, the most likely cause is an error in a parameter to a
command or command syntax.
5-4 Troubleshooting
Page 81
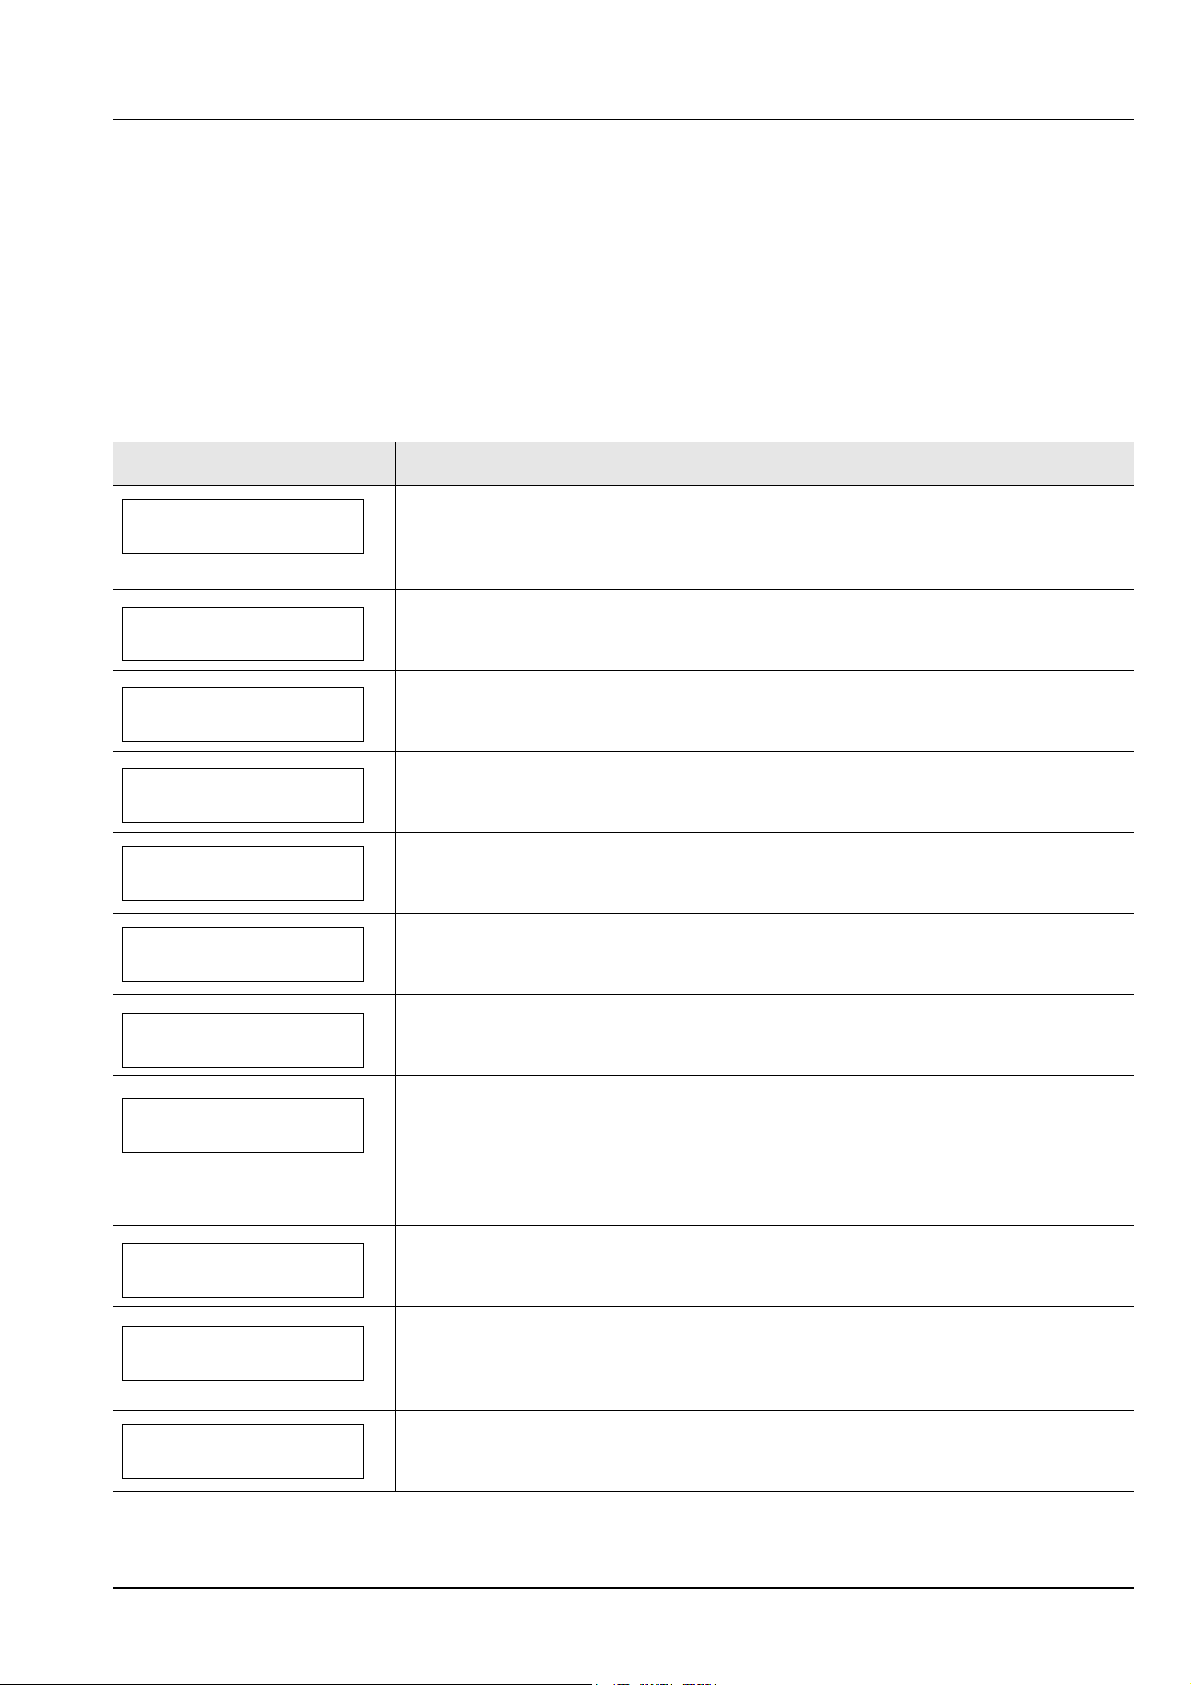
Error Messages
The following table lists errors and maintenance messages that you can
be dealt with by yourself.
If Call service or Error.Power off. is displayed, turn off the
printer then turn it back on to see if the printer has recovered. If the
printer has not recovered, turn off the printer, disconnect the power cord,
and contact your service representative or authorized service center.
Some errors cause the alarm to sound. To stop the alarm, press
[Cancel].
Message Corrective Action
The paper has run out in the paper source displayed. Supply paper according to the
Add paper MP Tray
Call service
F###
Call service
#
## #
:0123456
paper source displayed (paper cassettes, MP tray, or optional paper feeders).This
message is displayed alternately with messages indicating the printer status, such as,
Ready, Please wait, and Processing.
F### represents a controller error (#=0, 1, 2, ...). Call for service representative. The
printer does not operate when this message is displayed.
#### represents a mechanical error (#=0, 1, 2, ...). Call for service representative. The
printer does not operate when this message is displayed. The total number of pages
printed is also indicated, e.g. 0123456.
Canceling data
Cassette # not loaded
Close top cover
Device busy
Duplex disabled
Press GO
Error.Power off.
F###
Error.Power off.
F000
Displayed when data is being canceled.
The corresponding paper cassette is not installed. Install the cassette. The cassette
number can be 1 (topmost) to 4 (bottom).
The top cover of the printer is open. Close the printer top cover.
This message is displayed when Remove Device was selected while a USB flash
memory was being used.
The previous screen is displayed again 1 or 2 seconds.
You attempted to print with a paper size and paper type that cannot be used for duplex
printing. Press [GO] to print onto one-side of the paper only.
You can select an alternative paper size and type by pressing the or . You can also
press [MENU] and change the tray setting inside the menu, which will automatically
cancel the error and output resumes. At the same time [ATTENTION] indicator will light
up and [READY] indicator will start flashing.
Turn the power switch off and then back on again. If this message still remains, turn the
power switch off, and contact your service representative or authorized service center.
The printer controller and operation panel cannot exchange data. Turn the printer off
and unplug it from the mains power supply. Then contact your service representative or
authorized service center. See the back page of this manual for the relevant phone
numbers.
Replace Maintenance Kit which is displayed on the message display. Replacement of
Install MK
the maintenance kit is necessary at every 100,000 pages of printing and requires
professional servicing. Contact your service technician.
Troubleshooting 5-5
Page 82
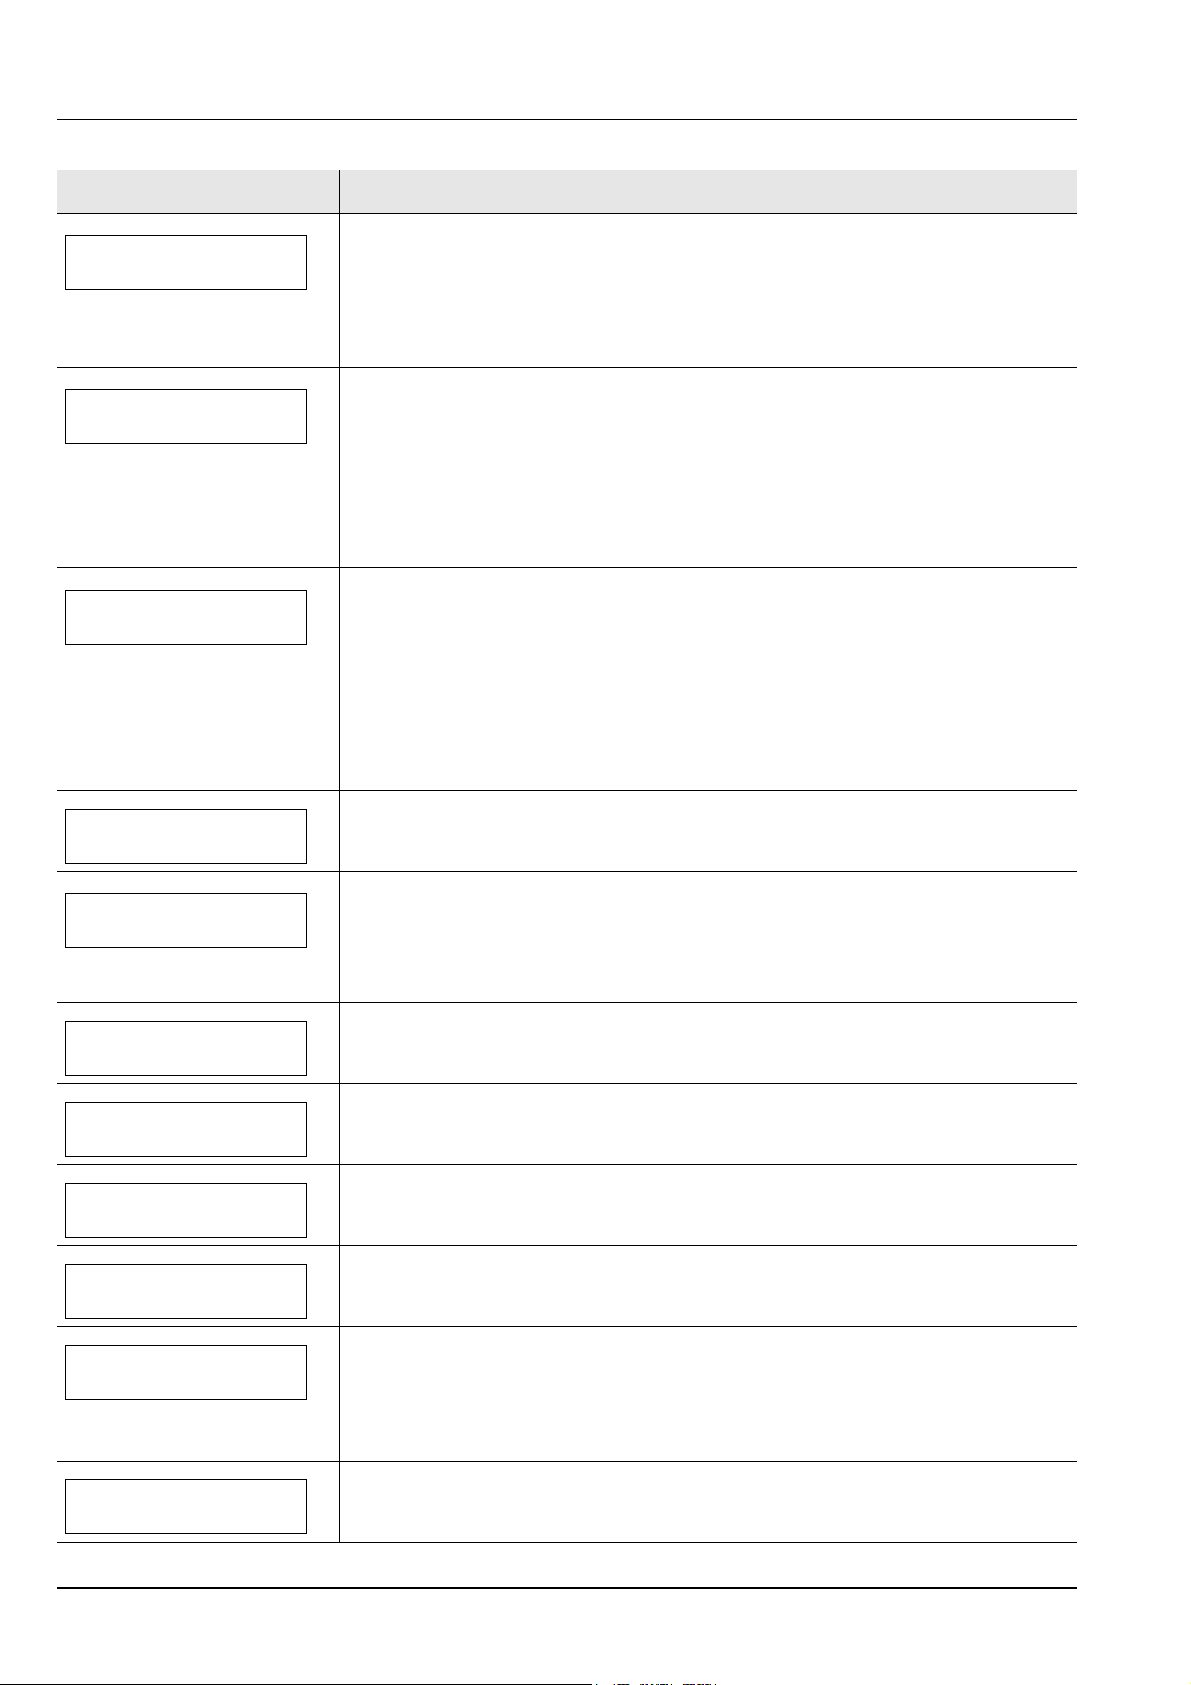
Message Corrective Action
Current print processing cannot continue because of occurrence of KPDL error which
KPDL error ##
Press GO
is categorized by ##. To print out an error report, display >>Error Report from the
menu system, and select On. Press [GO] to resume printing. You can abandon printing
by pressing [Cancel].
If Auto Error Clear is set to On, printing will be automatically resumed after a
preset period of time.
The paper cassette matching the paper size and paper type of the print job is empty.
Load Cassette #
(A4)/(PLAIN)
Load paper into the paper cassette as displayed in place of #. Press [GO] to resume
printing.
If you want to print from a different paper source, press or to display Use
alternative? and you can change the source for paper feeding. After selecting a
paper source and pressing [MENU], Paper Settings > appears. By pressing the
, the paper type settings menu appears. After setting the correct paper type, press
[OK] and printing starts.
There is no paper cassette installed in the printer that matches the paper size and
Load MP Tray
(A4)/(PLAIN)
paper type of the print job. Set paper in the MP tray. Press [GO] to resume printing.
(Note that feeding the paper having a paper size which does not match the current
paper size from the MP tray can cause paper jam.)
If you want to print from a different paper source, press or to display Use
alternative? and you can change the source for paper feeding. After selecting a
paper source and pressing [MENU], Paper Settings > appears. By pressing the
, the paper type settings menu appears. After setting the correct paper type, press
[OK] and printing starts.
Low security
Memory overflow
Press GO
Missing
developer unit
No multi copies
Press GO
Paper jam
#####################
Paper path error
Print overrun
Press GO
This message is displayed when Low was selected in Security Level.
The total amount of data received by the printer exceeds the printer’s internal memory.
Try adding more memory. Press [GO] to resume printing. You can abandon printing by
pressing [Cancel].
If Auto Error Clear is set to On, printing will be automatically resumed after a
preset period of time.
The developer unit is either not installed or incorrectly inserted. Insert the developer
unit securely.
Multiple copies cannot be printed because the RAM disk is disabled is not installed.
There is no available RAM disk space. Delete unnecessary files. Press [GO] to print
error report.
A paper jam has occurred. The location of the paper jam is indicated in place of the #’s.
For details, refer to Clearing Paper Jams on page 5-10.
When one or more optional feeders are installed, this message will appear if any of the
paper feeders or the printer cassette upper than the selected one is not properly
closed.
The print job transferred to the printer was too complex to print on a page. Press [GO]
to resume printing. (A page break may be automatically inserted in some places.)
You can abandon printing by pressing [Cancel].
If Auto Error Clear is set to On, printing will be automatically resumed after a
preset period of time.
A RAM disk error has occurred. Look at the error code given in place of ## and refer to
RAM disk error ##
Storage Error Codes on page 5-8. To ignore the RAM disk error, press [GO].
Press GO
5-6 Troubleshooting
Page 83
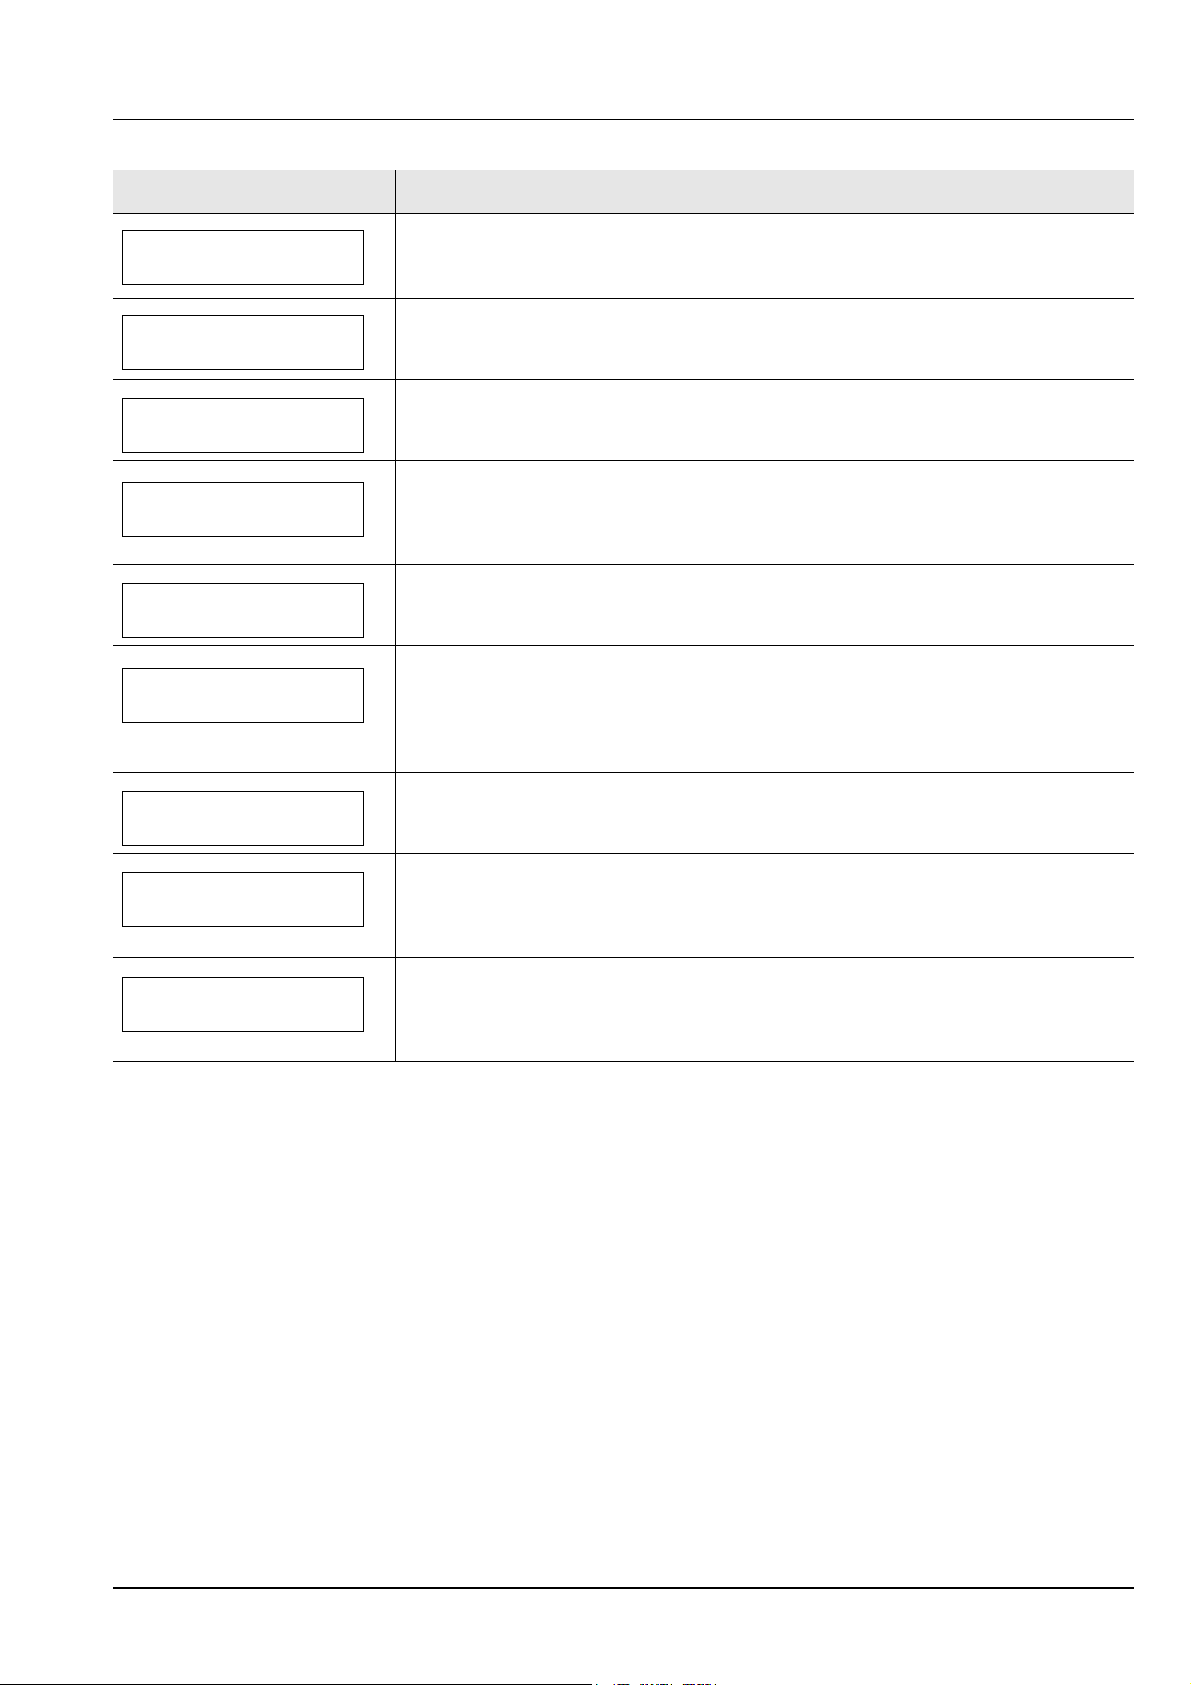
Message Corrective Action
Toner has run out in the toner container. Replace the toner container using a new toner
Replace toner
kit. The printer does not operate when this message is displayed.
Replace the toner container using a new toner kit.
Toner low
Displayed when the installed toner is not the original Kyocera product. Install original
Unknown toner
installed
Kyocera toner.
This message is displayed if the installed toner container's regional specification does
Unknown toner PC
not match the printer's. The printer will stop printing.
Use only the Kyocera toner containers which are specifically intended for use in your
country or region.
An error has occurred in the USB flash memory. Look at the error code given in place
USB memory error ##
Press GO
of ## and refer to USB Flash Memory Errors on page 5-8. To return the printer to the
print-ready status, press [GO].
When the cassette does not contain any paper that matches the print data (paper size
Use alternative?
Cassette 1
and type), this message allows you to specify an alternative cassette to use instead. A
paper source number is only displayed when an optional paper feeder is installed. To
print from a different paper source, refer to Paper Feed Mode (Setting the paper feed
source) section in the Advanced Operation Guide.
Warning Waste
toner box
Wrong ID
Wrong Password
The waste toner in the drum unit is almost full. Replace the maintenance kit.
The ID or Password entered for the Security or Administrator function is not correct.
Check the ID or Password.
For more information, refer to Security section and Admin (Administrator settings)
section in the Advanced Operation Guide.
The password does not match the password set. Enter the correct password. For more
information, refer to Security section and Admin (Administrator settings) section in the
Advanced Operation Guide.
Troubleshooting 5-7
Page 84

Storage Error Codes
USB Flash Memory Errors
Code Meaning
01 The amount of data that can be saved at once has been exceeded. Split the
large file into multiple smaller files.
The USB flash memory is write protected. Remove the write protection.
The USB flash memory is broken.
Even if the problem is not solved, format the USB flash memory with the
device or use the new USB flash memory compatible with the printer.
04 There is no available space. Delete unnecessary files, etc., in order to free up
space.
RAM Disk Errors
Code Meaning
01 Format error. Try turning the power off and on again.
02 RAM disk mode is Off. Turn RAM disk mode On from the operation panel.
04 No disk space. Purge unnecessary files.
05 Specified file is not on disk.
06 Insufficient printer memory to support the RAM disk system. Expand printer
memory.
5-8 Troubleshooting
Page 85
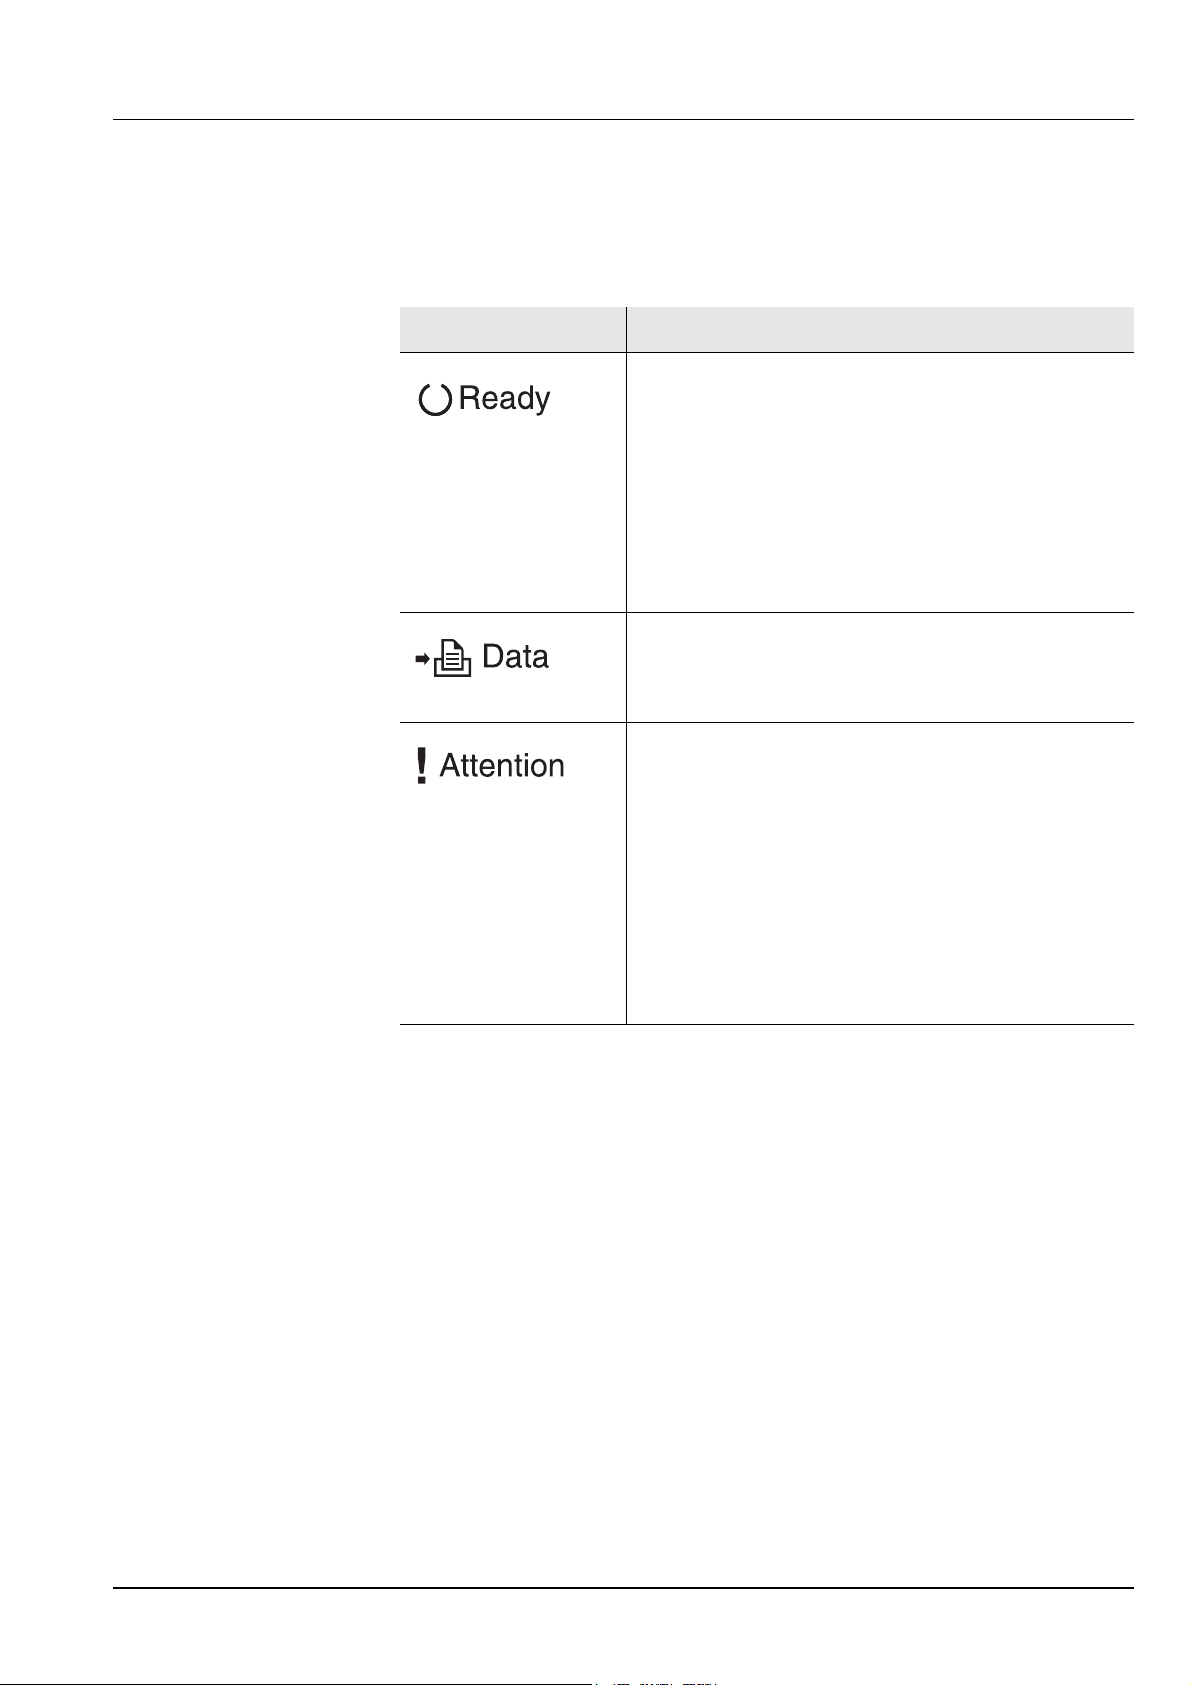
Ready, Data, and Attention Indicators
The following indicators light during normal operation and whenever the
printer needs attention. Depending on the status of lighting, each
indicator has the following meaning:
Indicator Description
Flashing. Indicates an error that you can resolve. Refer to
Error Messages on page 5-5.
On. Indicates that the printer is ready. The printer prints the
data it receives.
Off. [Cancel] was pressed during Ready is displayed.
Data can be received but will not be printed. To resume
printing, press [Cancel] again.
Printing is canceling.
Also, indicates when paper jam occurred, toner has run
out, cover is open, and so on.
Flashing. Indicates that a data is being received.
On. Indicates either that data received is being processed
before printing starts, or that data received is being written
to or read from a RAM disk or USB flash memory.
Flashing. Indicates that the printer is ready to print when
Please wait is displayed. Also indicates that the
corresponding paper cassette is not installed.
Indicates that the printer requires maintenance such as
adding paper, cleaning the printer, replacement of
maintenance kit, preparing the toner container.
On. Indicates when paper jam occurred, toner has run out,
cover is open, and so on. If the message includes Press
GO, press [GO] to resume printing.
The ID or Password entered for the Security or
Administrator is not correct. Check the ID or Password, and
enter the correct ID or password.
Troubleshooting 5-9
Page 86
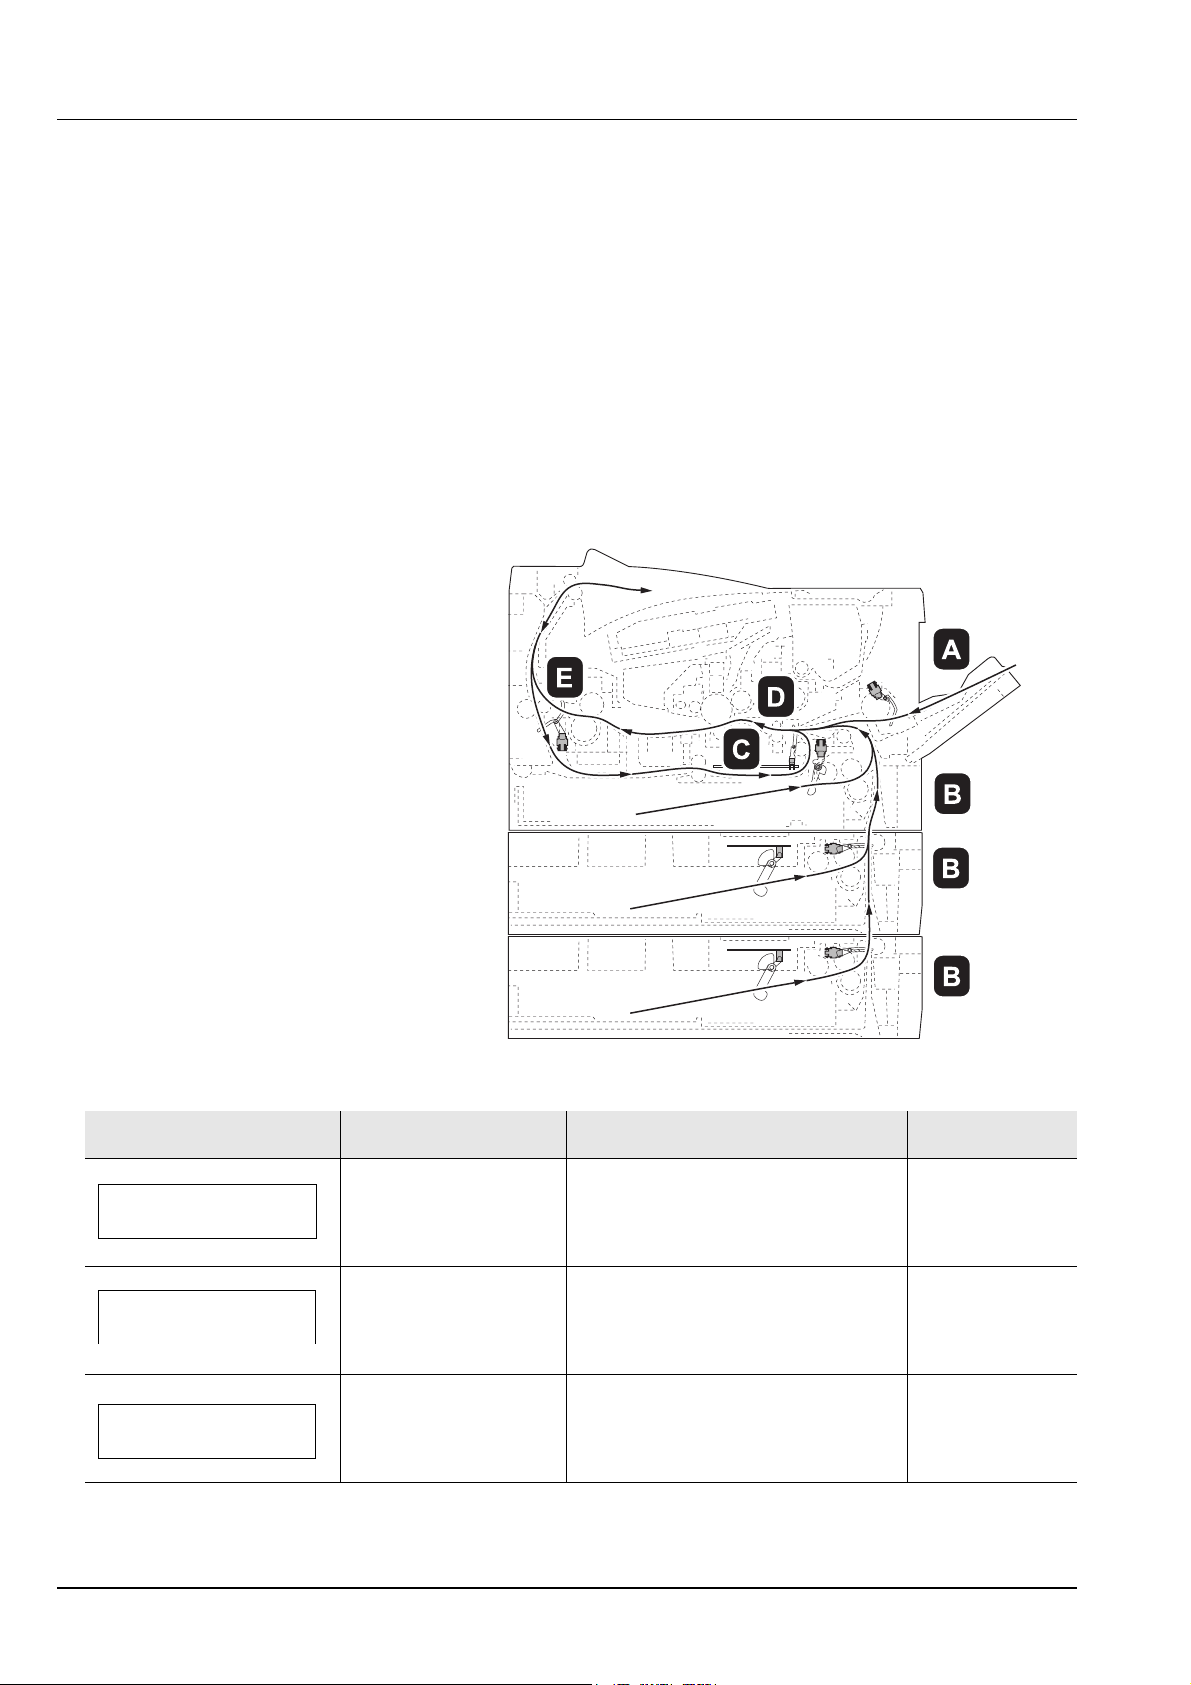
Clearing Paper Jams
If paper jams in the paper transport system, or no paper sheets are fed
at all, the Paper jam message appears and the location of the paper
jam (the component where the paper jam has occurred) is also
indicated. Status Monitor or Command Center RX can indicate the
location of the paper jam (the component where the paper jam has
occurred). Remove the paper jam. After removing the paper jam, the
printer will resume printing.
Possible Paper Jam Locations
The figure below shows the printer's paper paths including the optional
paper feeder. The locations where paper jams might occur are also
shown here, with each location explained in the table below. Paper jams
can occur in more than one component on the paper paths.
Paper jam message Paper jam location Description Reference page
A Paper jam at the MP tray. page 5-12
Paper jam
MP Tray
Paper jam
Cassette 1
Paper jam
Duplexer
B Paper jam at the paper cassettes.
The cassette number can be 1.
C Paper jam inside the duplexer. page 5-14
page 5-13
5-10 Troubleshooting
Page 87
Paper jam message Paper jam location Description Reference page
D Paper jam inside the printer. page 5-15
Paper jam
Printer
E Paper jam at the rear cover. page 5-17
Paper jam
Rear Cover
General Considerations for Clearing Jams
Bear in mind the following considerations when attempting paper jam
removal:
CAUTION When pulling the paper, pull it gently so as not
to tear it. Torn pieces of paper are difficult to remove and
may be easily overlooked, deterring the paper jam recovery.
• If paper jams occur frequently, try using a different type of paper,
replace the paper with paper from another ream, or flip the paper
stack over. The printer may have problems if paper jams recur after
the paper is replaced.
• Whether or not the jammed pages are reproduced normally after
printing is resumed, depends on the location of the paper jam.
Troubleshooting 5-11
Page 88
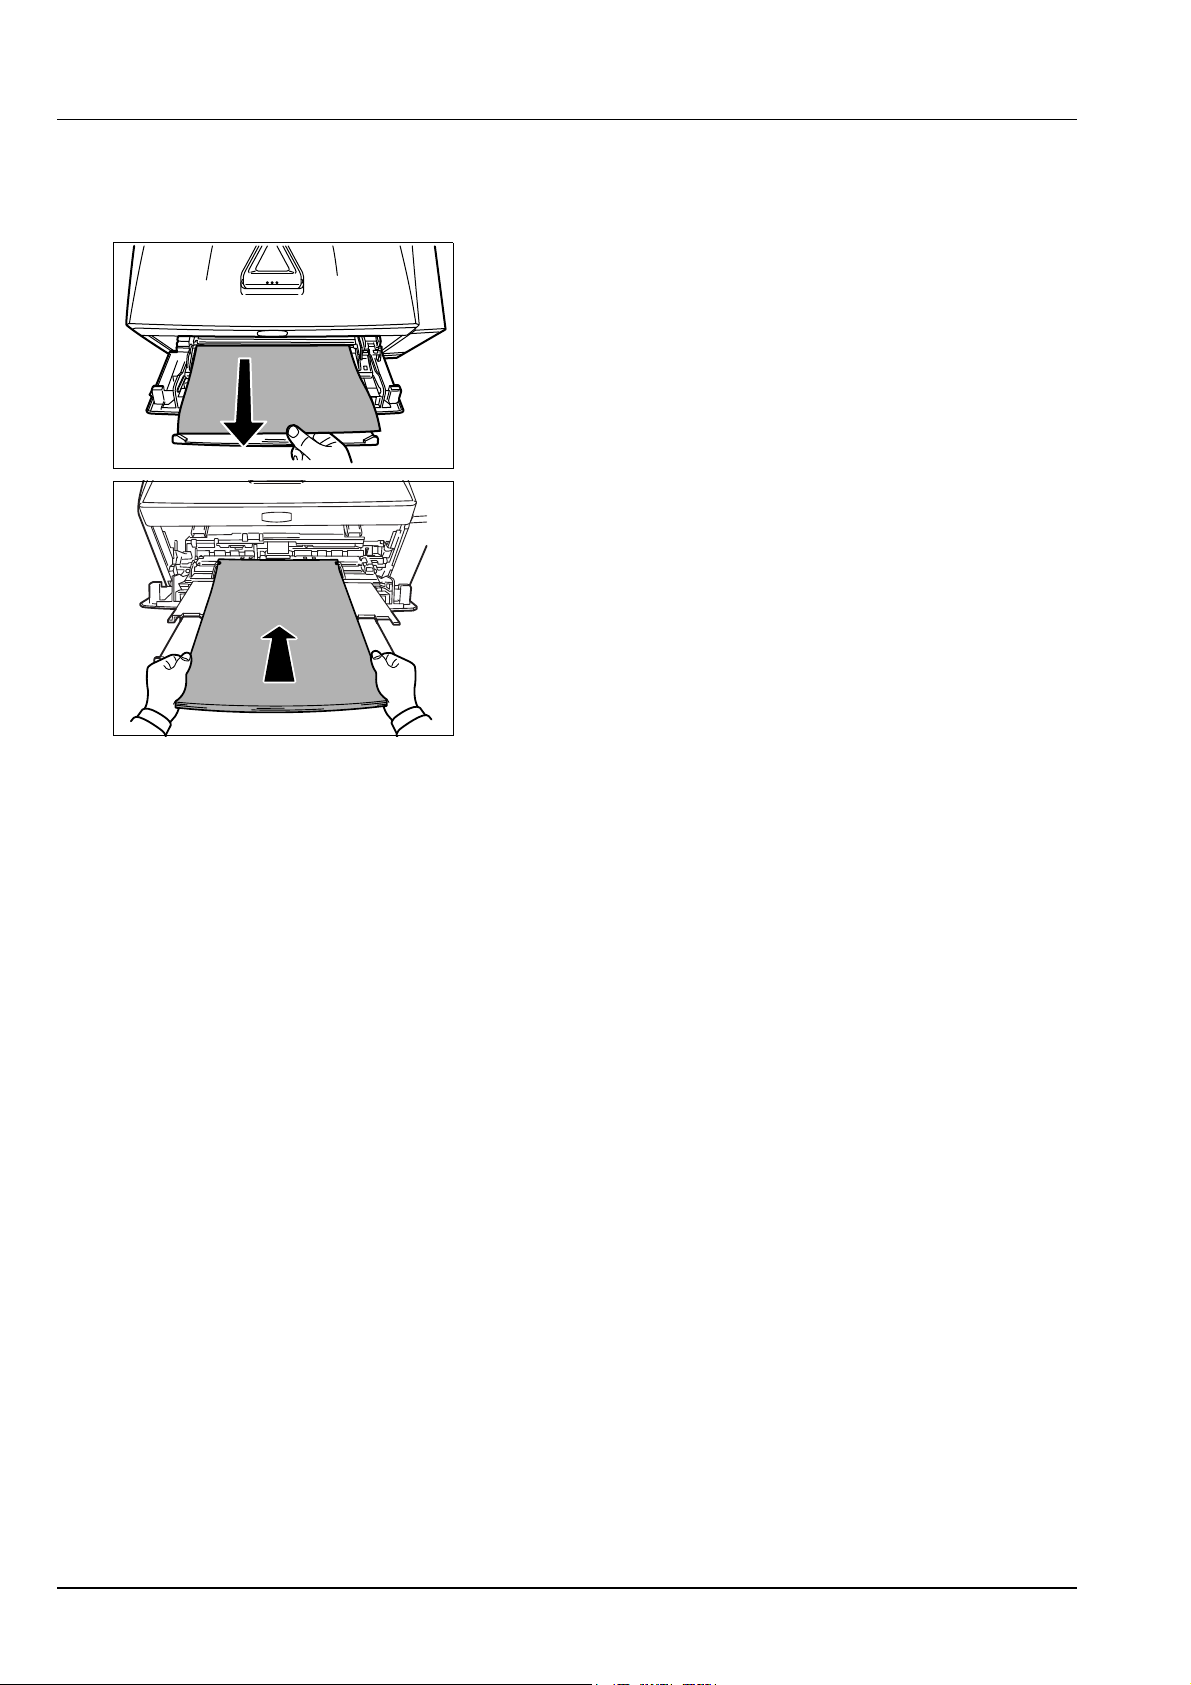
MP Tray
1 Remove the paper jammed at the MP tray.
IMPORTANT Do not try to remove paper that has already been
partially fed. Proceed to Inside the Printer on page 5-15.
2 Reload the MP tray. Open and close the top cover to clear the error
and the printer warms up and resumes printing.
5-12 Troubleshooting
Page 89
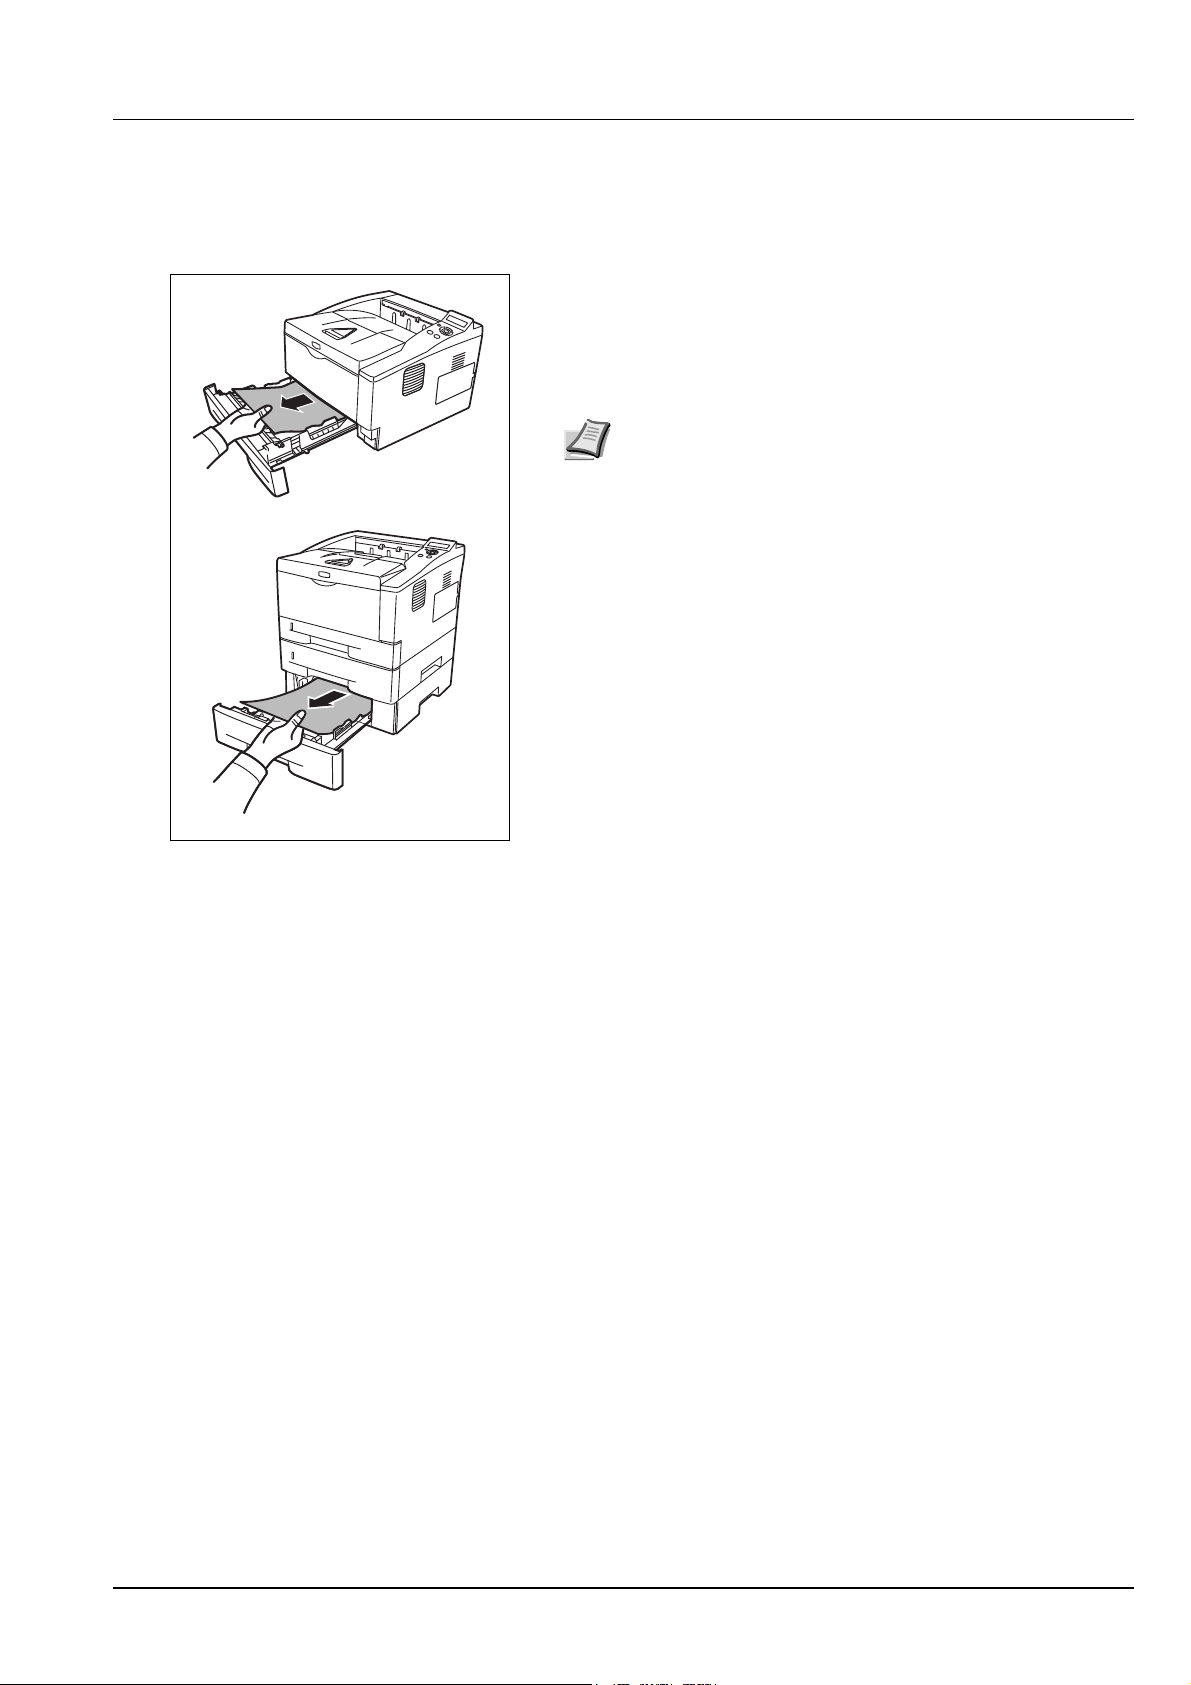
Paper Cassette/Paper Feeder
1 Pull out the cassette or optional paper feeder.
2 Remove any partially fed paper.
IMPORTANT Do not try to remove paper that has already been
partially fed. Proceed to Inside the Printer on page 5-15.
Note Check to see if paper is loaded correctly. If not, reload
the paper.
3 Push the cassette back in securely. The printer warms up and
resumes printing.
Troubleshooting 5-13
Page 90
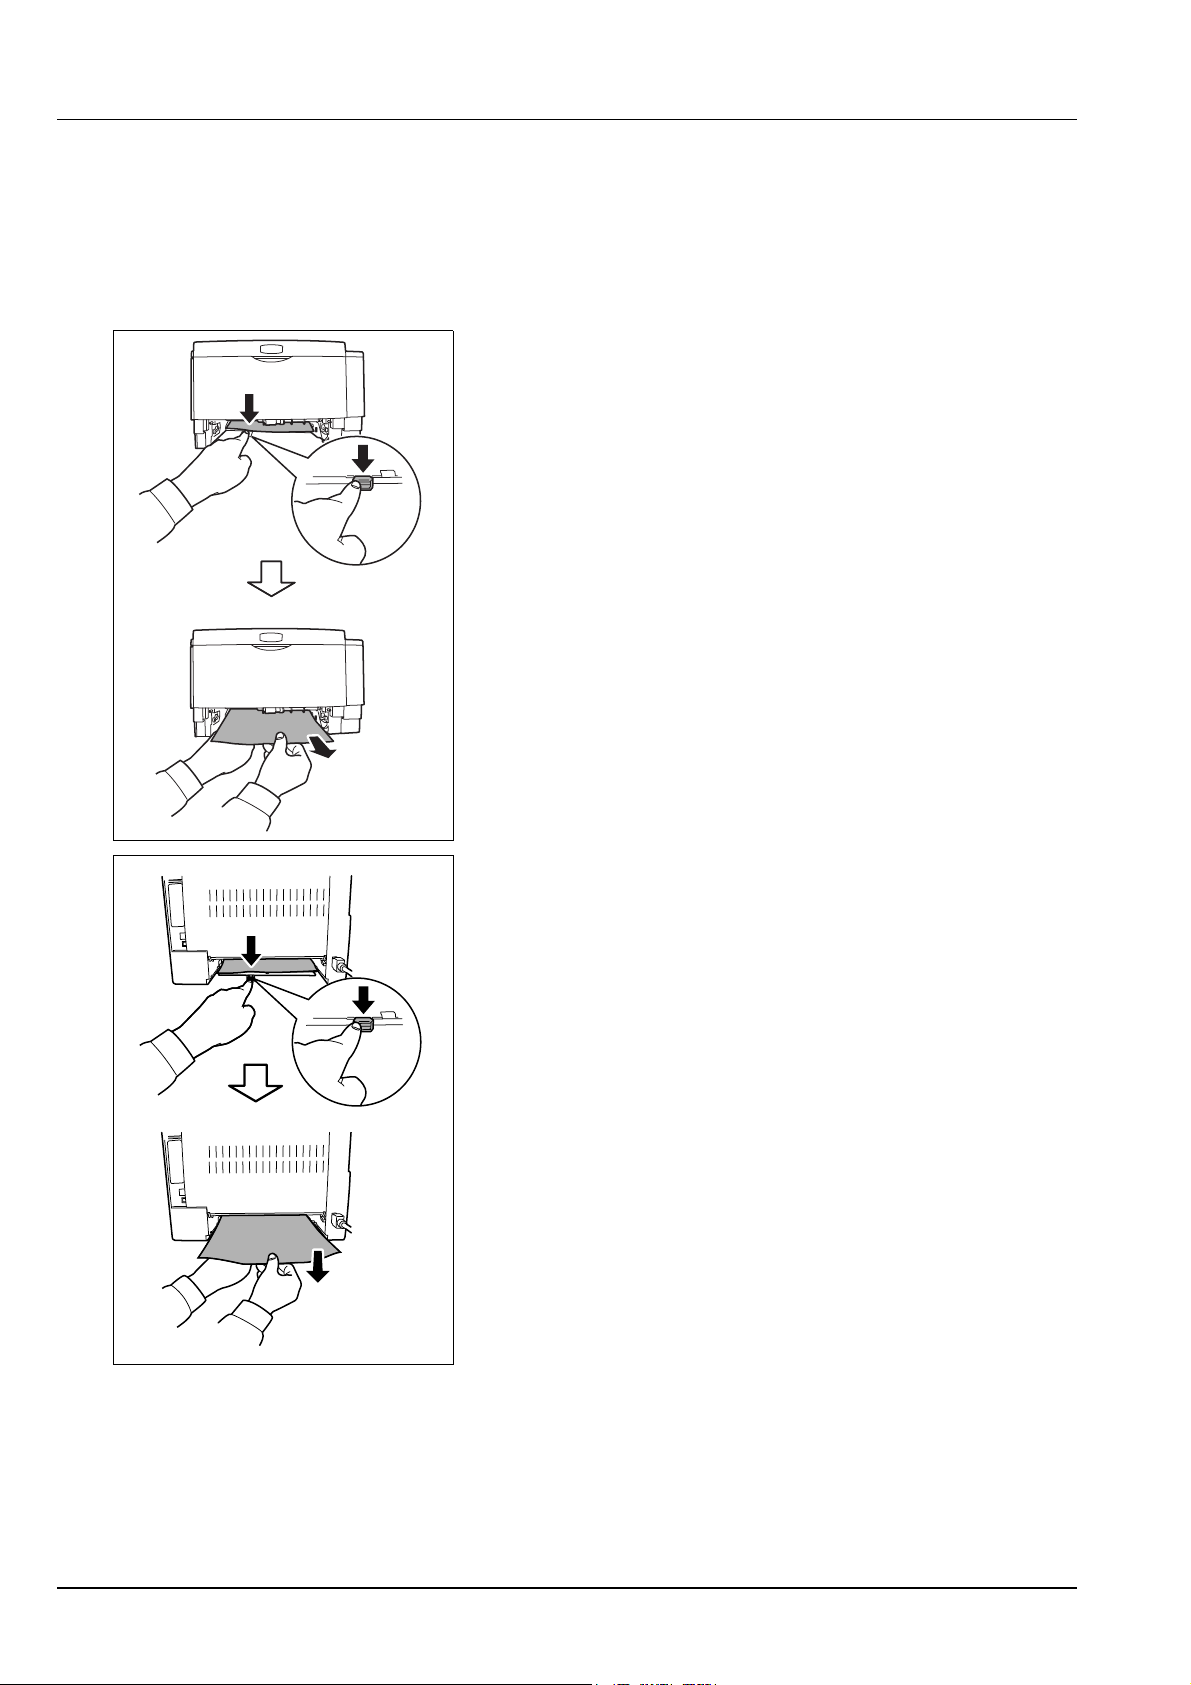
Duplexer
Paper is jammed in the duplexer. Remove the jammed paper using the
procedure given below.
1 Pull the paper cassette all the way out of the printer.
2 Open the duplexer’s cover in front of the printer and remove any
jammed paper.
Open the duplexer’s cover at the rear of the printer and remove any
jammed paper.
3 Push the cassette back in securely, and open and close the top
cover to clear the error. The printer warms up and resumes printing.
5-14 Troubleshooting
Page 91
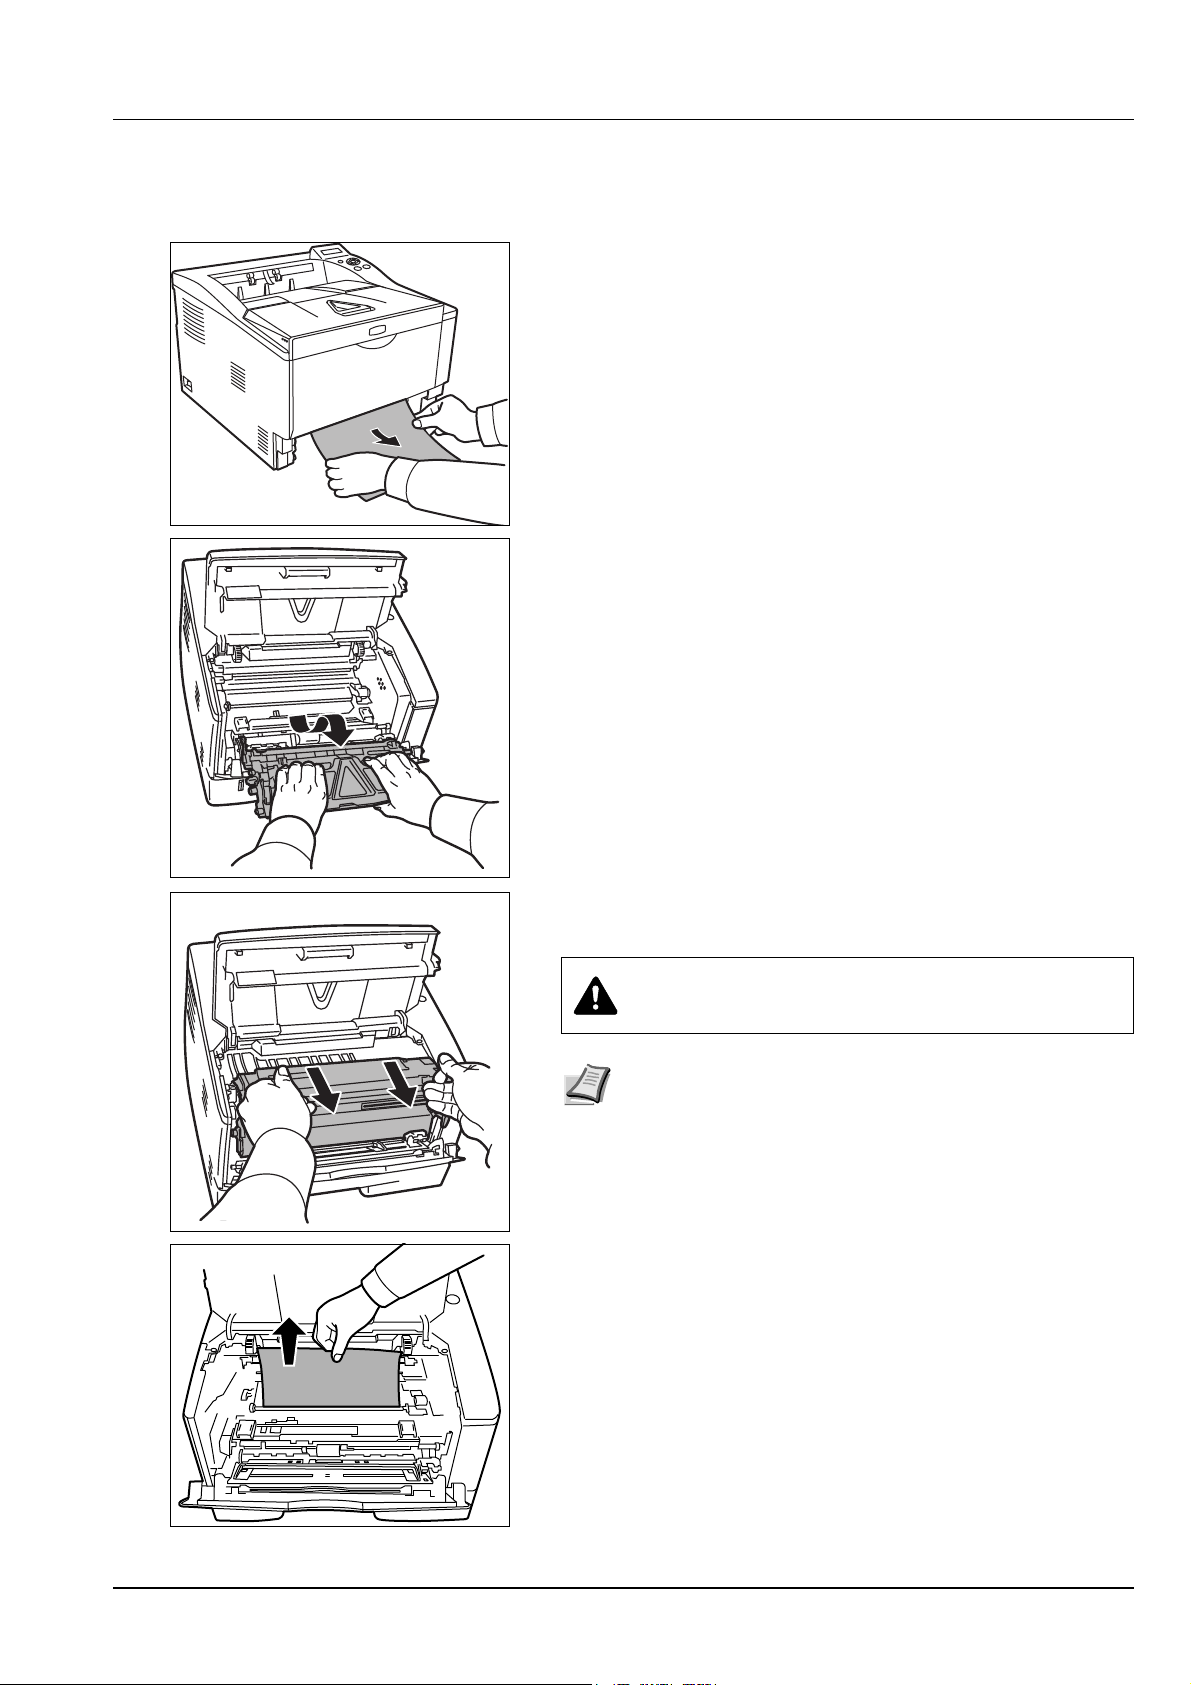
Inside the Printer
1 Pull the paper cassette all the way out of the printer. Remove any
partially fed paper.
IMPORTANT Do not try to remove paper that has already been
partially fed. Proceed to step 2.
2 Open the top cover and front cover, and lift the developer unit
together with the toner container out of the printer.
3 Remove the drum unit from the printer by holding the green levers
with both hands.
CAUTION The fuser unit inside the printer is hot. Do not
touch it, as it may result in burn injury.
Note The drum is sensitive to light. Never expose the drum
unit to light for more than five minutes.
4 If the jammed paper appears to be pinched by rollers, pull it along
the normal running direction of the paper.
Troubleshooting 5-15
Page 92
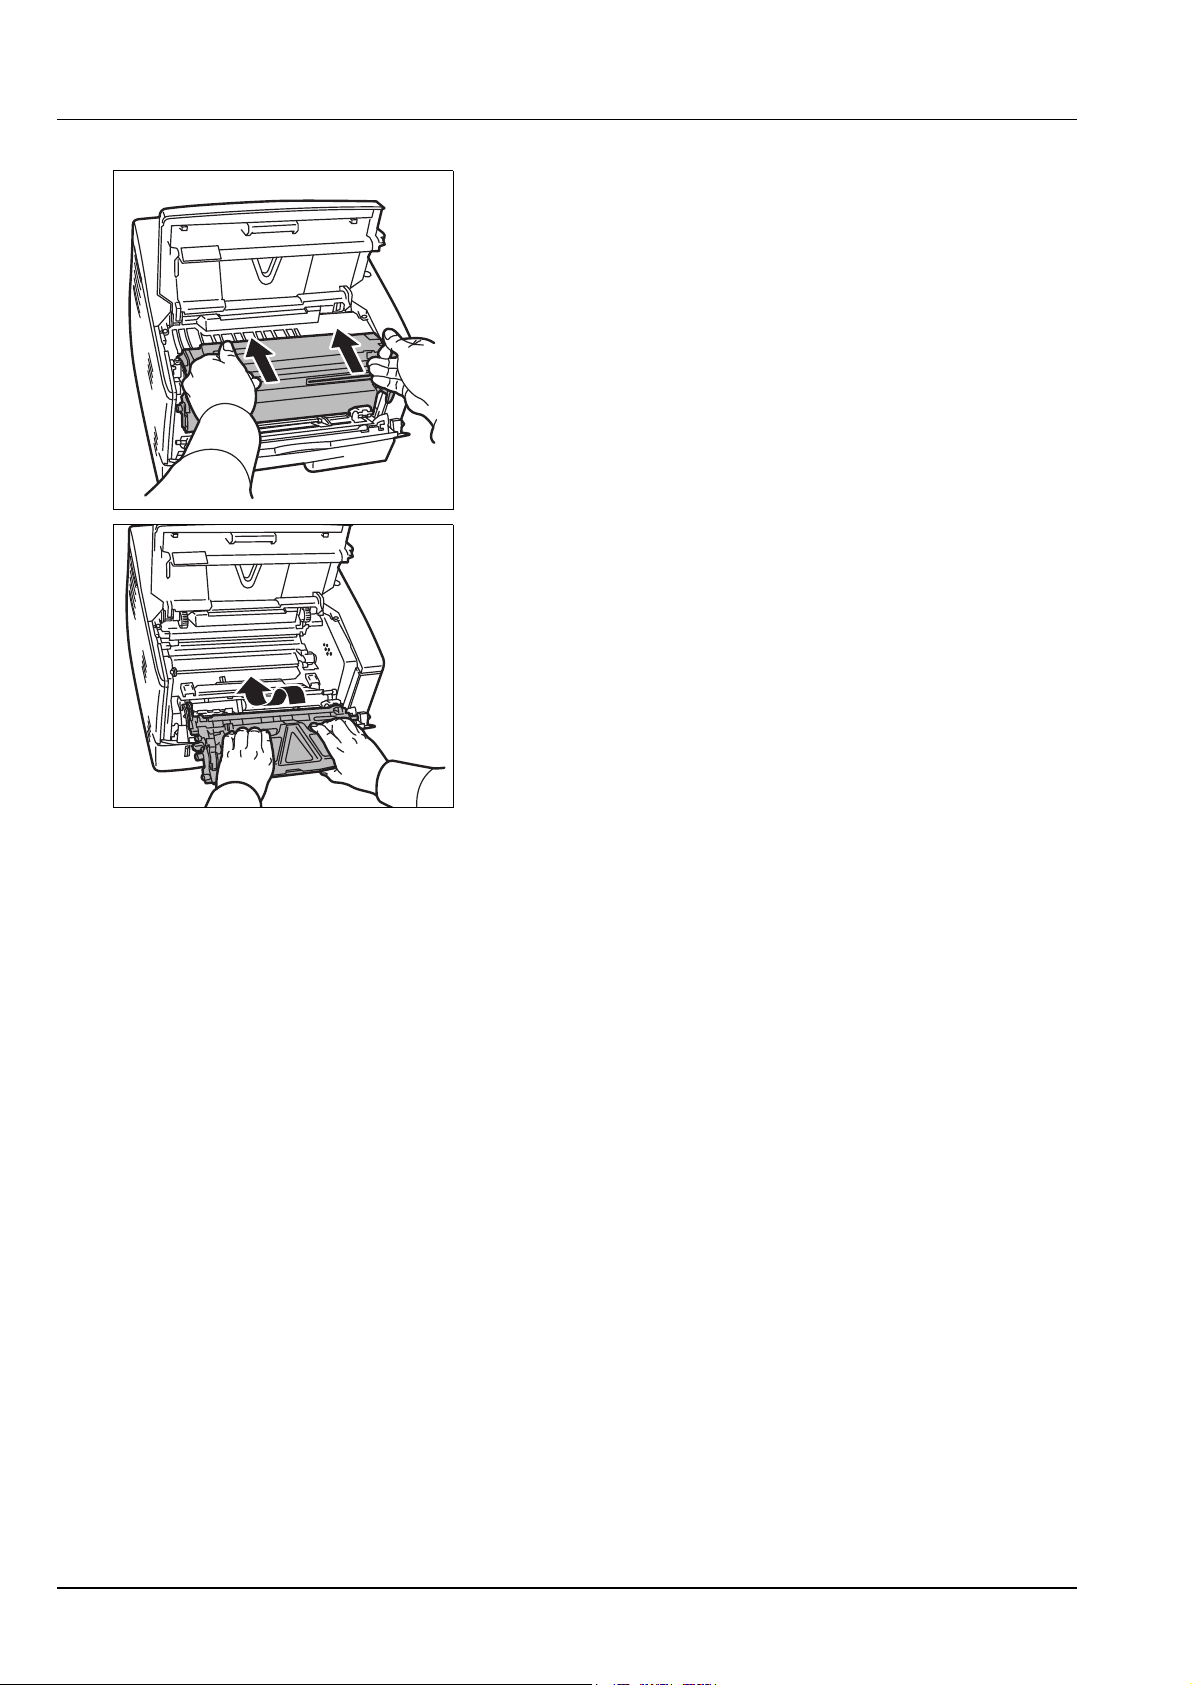
5 Return the drum unit to its position, aligning the guides at both ends
with the slots in the printer.
6 Insert the developer unit together with the toner container, back into
the machine. Close the top cover and the front cover. The printer
warms up and resumes printing.
5-16 Troubleshooting
Page 93
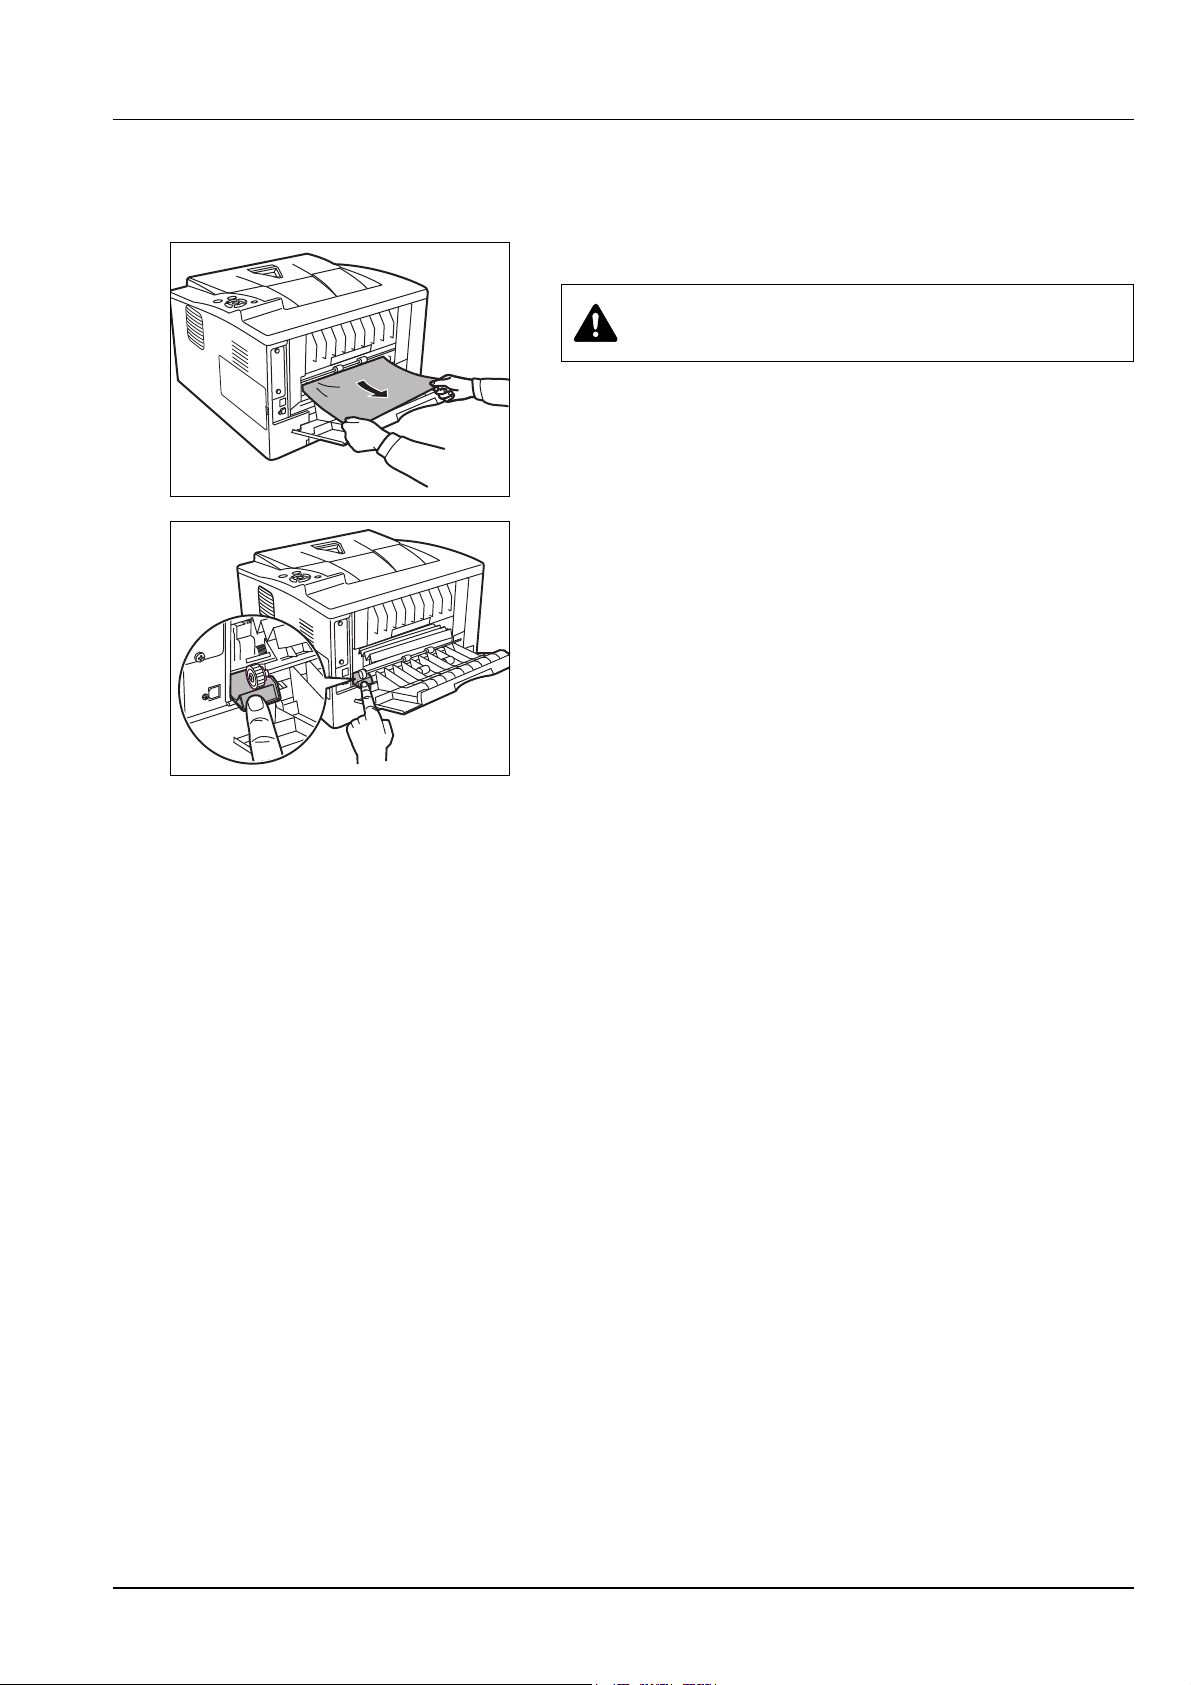
Rear Cover
1 Open the rear cover and remove the jammed paper by pulling it out.
CAUTION The fuser unit inside the printer is hot. Do not
touch it, as it may result in burn injury.
If the paper is jammed inside the fuser unit, open the fuser cover and
remove the paper by pulling it out.
2 Close the rear cover, and open and close the top cover to clear the
error. The printer warms up and resumes printing.
Troubleshooting 5-17
Page 94

5-18 Troubleshooting
Page 95

6 Appendix
This section lists the following information of this printer.
Specifications 6-2
Environmental Standard Requirements 6-4
Appendix 6-1
Page 96

Specifications
Item Description
Note These specifications are subject to change without notice.
Type
Printing Method
Paper Weight Cassette
MP Tray
Paper Type Cassette
MP Tray
Paper Size Cassette Envelope C5, Executive, Letter, Legal , A4, B5, A5, A6, ISO B5, Custom,
Paper Feeder Envelope C5, Executive, Letter, Legal , A4, B5, A5, ISO B5, Custom, Oficio II,
MP Tray Envelope Monarch, Envelope #10, Envelope DL, Envelope C5, Executive,
Printing Speed Simplex A4/Letter: 35 ppm/37 ppm
Duplex A4/Letter: 19 ppm/20 ppm
Desktop
Electrophotography, laser scan
60 to 120 g/m² (Duplex: 60 to 105 g/m²)
60 to 220 g/m²
Plain, Preprinted, Bond, Recycled, Rough, Letterhead, Color (Colour),
Prepunched, High Quality, Custom 1 to 8
Plain, Transparency, Preprinted, Labels, Bond, Recycled, Rough, Vellum,
Letterhead, Color (Colour), Prepunched, Envelope, Cardstock, Thick paper,
High Quality, Custom 1 to 8
Oficio II, 216 × 340 mm, 16K, Statement, Folio
216 × 340 mm, 16K, Statement, Folio
Letter, Legal, A4, B5, A5, A6, B6, Envelope #9, Envelope #6, ISO B5, Custom,
Hagaki, Oufuku Hagaki, Oficio II, 216 × 340 mm, 16K, Statement, Folio,
Youkei 2, Youkei 4
A5: 17 ppm
First Print Time (A4, feed from
Cassette)
Warm-up Time
(22°C/71.6°F,
60 %RH)
Paper Capacity Cassette (1 to 3)
Output Tray
Capacity
Continuous printing
Resolution Fine 1200 mode, Fast 1200 mode, 600 dpi, 300 dpi
Operating
Environment
Supported OS
Power on
Sleep
MP Tray
Simplex
Duplex
Temperature
Humidity
Altitude
Brightness
8 seconds or less
16.5 seconds or less
16.5 seconds or less
250 sheets (80 g/m², 11 × 8 1/2"/A4 or smaller)
50 sheets (80 g/m², 11 × 8 1/2"/A4 or smaller)
250 sheets (80 g/m²)
200 sheets (80 g/m²)
1 to 999 sheets
10 to 32.5°C/50 to 90.5°F
15 to 80 %
2,500 m/8,202 ft maximum
1,500 lux maximum
Microsoft Windows 2000/XP/Vista/7/8, Windows Server 2003/2008/2012 R2
Mac OS X 10.5 or later
6-2 Appendix
Page 97

Item Description
Interface
USB
Network
USB Interface: 1
USB Memory Slot: 1
Network Interface: 1 (10 BASE-T/100 BASE-TX/1000BASE-T)
Option eKUIO slot: 1
PDL
Emulation PCL 6, KPDL, KPDL (AUTO), Line Printer, IBM Proprinter, EPSON LQ-850
Memory
Standard
Maximum
Dimension (W × D × H) 375 × 393 × 267 mm
Weight (without toner container)
Power Requirements
Power
Consumption
Maximum 931 W
During printing 519 W (U.S.A./Canada), 499 W (European countries)
PRESCRIBE
256 MB
1280 MB
14 3/4 × 15 1/2 × 10 1/2"
12 kg/26.5 lb
120 V AC, 60 Hz, 8.0 A/220 to 240 V AC, 50/60 Hz, 4.2 A
During standby 10.6 W (U.S.A./Canada), 11 W (European countries) when EcoFuser is On.
64.2 W (U.S.A./Canada), 61.8 W (European countries) when EcoFuser is Off.
Sleep mode
2.9 W (U.S.A./Canada), 2.5 W (European countries)
Options
Power off 0.1 W or less
Expanded memory, Paper Feeder (250-sheet × 2)
Appendix 6-3
Page 98

Environmental Standard Requirements
This machine conforms to the following environmental standard
requirements.
• Time for switching to Sleep mode (default):
15 minutes (For Europe), 1 minute (Except for Europe)
• Time for switching to Low power mode (default): 1 minute
• Duplex Printing: Standard Equipment
• Durable paper for feeding: Paper made of 100 % recycled paper
Note Contact your dealer or service representative for recommended
paper types
.
6-4 Appendix
Page 99

Index
C
Cassette
loading paper ............................................................2-2
Charger cleaner ...............................................................4-7
Cleaning
charger wire ..............................................................4-7
printer .......................................................................4-6
registration roller .......................................................4-7
Clearing paper jams
duplexer ..................................................................5-14
inside the printer .....................................................5-15
MP tray ...................................................................5-12
paper cassette ........................................................5-13
paper feeder ...........................................................5-13
rear cover section ...................................................5-17
Command Center RX ......................................................3-7
Components
at the front of the printer ...........................................1-2
at the rear of the printer ............................................1-2
Connection
power cord ................................................................3-3
USB cable .................................................................3-2
Conventions in this guide ................................................ xxiii
D
Developer unit
clearing paper jams ................................................5-15
Drum unit
clearing paper jams ................................................5-15
maintenance .............................................................4-6
Duplexer
clearing paper jams ................................................5-14
troubleshooting .........................................................5-2
I
Inside the printer
clearing paper jams ................................................5-15
Installation method
custom mode ..........................................................3-16
express mode .........................................................3-14
Installation precautions ...................................................xviii
Installing the printer driver ..............................................3-14
Mac OS ...................................................................3-18
Windows PC ...........................................................3-14
L
Loading paper
Cassette ....................................................................2-2
MP tray .....................................................................2-5
Lock lever
toner container ..........................................................4-3
Low Power Mode ...........................................................3-28
M
Machine parts ...................................................................1-1
Maintenance
Toner container replacement, cleaning .....................4-1
Moving printer ..................................................................4-9
MP tray
clearing paper jams ................................................5-12
components ..............................................................1-2
loading paper ............................................................2-5
E
Environmental standard requirements .............................6-4
Error messages
of RAM disk ..............................................................5-8
of USB flash memory ................................................5-8
tabled, with corrective actions ..................................5-5
Express mode
installation method ..................................................3-14
F
Front cover
components ..............................................................1-2
Fuser unit
clearing paper jams ................................................5-17
G
General problems
N
Names
Operation panel ........................................................1-3
O
Operation panel
components ..............................................................1-2
indicators, keys, overview .........................................1-3
Optional interface slot cover
components ..............................................................1-2
P
Paper Cassette
components ..............................................................1-2
Paper cassette
clearing paper jams ................................................5-13
Paper feeder
clearing paper jams ................................................5-13
Index-1
Page 100

Paper gauge .....................................................................2-4
Paper guides ....................................................................2-5
Paper length guide ...........................................................2-3
Paper stopper
components ..............................................................1-2
Possible paper jam locations .........................................5-10
Power cord
connection .................................................................3-3
Power cord connector
components ..............................................................1-2
Power switch
components ..............................................................1-2
Preparing paper ...............................................................2-2
Print
Application software ................................................3-22
Printing from Application Software .................................3-22
Print quality problems
troubleshooting .........................................................5-3
Prolonged non-use ...........................................................4-9
R
Rear cover
components ..............................................................1-2
Rear cover section
clearing paper jams .................................................5-17
Registration roller
cleaning .....................................................................4-7
Replacement
toner container .................................................. 4-2, 4-3
Replacing toner container ................................................4-3
Right cover
components ..............................................................1-2
Turning on the power ....................................................... 3-3
U
USB cable
connection ................................................................ 3-2
USB interface connector
components .............................................................. 1-2
S
Sleep ..............................................................................3-28
Energy Saver Mode ................................................3-29
Quick Recovery Mode .............................................3-28
Specifications ...................................................................6-2
Environmental specifications ....................................6-4
Starter container
toner container ..........................................................4-2
Subtray
components ..............................................................1-2
T
Tips ...................................................................................5-2
Toner container
how to replace ...........................................................4-3
replacement ..............................................................4-2
Ton e r k it
toner container, plastic waste bag, installation guide 4-2
Top cover
components ..............................................................1-2
Top t r a y
components ..............................................................1-2
Troubleshooting ...............................................................5-1
general problems ......................................................5-2
print quality problems ................................................5-3
Index-2
 Loading...