

Page 1
MULTIFUNCTIONAL DIGITAL SYSTEMS
Operator’s Manual
for FAX Unit
Page 2

©2009 KYOCERA MITA Corporation All rights reserved
Page 3

Preface 1
Preface
Thank you for purchasing the FAX Unit MP-80/FAX System(T).
This Operator's Manual describes how to use the fax functions, troubleshooting and its maintenance, etc.
Before using the fax functions, thoroughly read and understand this Operator's Manual. To ensure that the fax functions
are used in optimum working conditions, keep this Operator's Manual in a handy place for future reference.
Page 4

2 Notice to Users
Notice to Users
For U.S.A. only
WARNING FCC Notice: Part 15 and Part 18
This equipment has been tested and found to comply with the limits for a Class A digital device, pursuant to Part 15 and
Part 18 of the FCC Rules. These limits are designed to provide reasonable protection against harmful interference when
the equipment is operated in a commercial environment. This equipment generates, uses, and can radiate radio frequency
energy and, if not installed and used in accordance with this guide, may cause harmful interference to radio
communications. Operation of this terminal in a residential area is likely to cause harmful interference in which case the
user will be required to correct the interference at his/her own expense.
Warning: Changes or modification made to this equipment, not expressly approved could void the user’s authority to
operate the equipment.
WARNING FCC Notice: Part 68
This equipment complies with Part 68 of the FCC rules and the requirements adopted by the ACTA. On the rear cover of
this equipment is a label that contains, among other information, a product identifier in the format US: AAAEQ##TXXXX. If
requested, this number must be provided to the telephone company.
This device is equipped with a USOC RJ11C connector.
A plug and jack used to connect this equipment to the premises wiring and telephone network must comply with the
applicable FCC Part 68 rules and requirements adopted by the ACTA. A compliant telephone cord and modular plug is
provided with this product. It is designed to be connected to a compatible modular jack that is also compliant. See
installation instructions for details.
The REN is used to determine the number of devices that may be connected to a telephone line. Excessive RENs on a
telephone line may result in the devices not ringing in response to an incoming call. In most but not all areas, the sum of
RENs should not exceed five (5.0). To be certain of the number of devices that may be connected to a line, as determined
by the total RENs, contact the local telephone company. For products approved after July 23, 2001, the REN for this
product is part of the product identifier that has the format US: AAAEQ##TXXXX. The digits represented by ## are the
REN without a decimal point (e.g., 03 is a REN of 0.3).
For earlier products, the REN is separately shown on the label.
If this equipment causes harm to the telephone network, the telephone company will notify you in advance that temporary
discontinuance of service may be required. But if advance notice isn't practical, the telephone company will notify the
customer as soon as possible. Also, you will be advised of your right to file a complaint with the FCC if you believe it is
necessary.
The telephone company may make changes in its facilities, equipment, operations or procedures that could affect the
operation of the equipment. If this happens the telephone company will provide advance notice in order for you to make
necessary modifications to maintain uninterrupted service.
If trouble is experienced with this equipment, for repair or warranty information, please contact KYOCERA MITA
AMERICA, INC. at 1-973-808-8444. If the equipment is causing harm to the telephone network, the telephone company
may request that you disconnect the equipment until the problem is resolved.
Connection to party line service is subject to state tariffs. Contact the state public utility commission, public service
commission or corporation commission for information.
The Telephone Consumer Protection Act of 1991 makes it unlawful for any person to use a computer or other electronic
device, including Fax machines, to send any message unless such message clearly contains in a margin at the top or
bottom of each transmitted page or on the first page of the transmission, the date and time it is sent and an identification of
the business or other entity, or other individual sending the message and the telephone number of the sending machine or
such business, other entity, or individual. (The telephone number provided may not be a 900 number or any other number
for which charges exceed local or long-distance transmission charges.)
In order to program this information into your Fax machine, you should complete the following steps: complete the setup
procedures listed for station ID number and name. See P.99 “Registering the terminal ID”.
CAUTION — To reduce the risk of fire, use only No.26 AWG or larger telecommunication line cord.
Page 5

Notice to Users 3
For Canada only
NOTICE: The Industry Canada label identifies certified equipment. This certification means that the equipment meets
telecommunications network protective, operational and safety requirements as prescribed in the appropriate Terminal
Equipment Technical Requirements document(s). The Department does not guarantee the equipment will operate to the
user’s satisfaction.
Before installing this equipment, users should ensure that it is permissible to be connected to the facilities of the local
telecommunications company. The equipment must also be installed using an acceptable method of connection. The
customer should be aware that compliance with the above conditions may not prevent degradation of service in some
situations.
Repairs to certified equipment should be coordinated by a representative designated by the supplier.
Any repairs or alterations made by the user to this equipment, or equipment malfunctions, may give the
telecommunications company cause to request the user to disconnect the equipment.
Users should ensure for their own protection that the electrical ground connections of the power utility, telephone lines and
internal metallic water pipe system, if present, are connected together. This precaution may be particularly important in
rural areas.
CAUTION: Users should not attempt to make such connections themselves, but should contact the appropriate electric
inspection authority, or electrician, as appropriate.
The Ringer Equivalence Number of your facsimile is 0.3
NOTICE: The Ringer Equivalence Number (REN) assigned to each terminal device provides an indication of the
maximum number of terminals allowed to be connected to a telephone interface. The termination on an interface may
consist of any combination of devices subject only to the requirement that the sum of the Ringer Equivalence Numbers of
all the devices does not exceed 5.
CAUTION — To reduce the risk of fire, use only No.26 AWG or larger telecommunication line cord.
This Class A digital apparatus complies with Canadian ICES-003.
AVI S: L’etiquette d’lndustrie Canada identifie le marériel homologué. Cette étiquette certifie que le matériel est conforme
aux normes de protection, d’exploitation et de sécurité des réseaux de télécommunications, comme le prescrivent les
documents concernant les exigences techniques relatives au matériel terminal. Le Ministére n’assure toutefois pas que le
matériel fonctionnera à la satisfaction de l’utilisateur.
Avant d’installer ce matériel, l’utilisateur doit s’assurer qu’il est permis de le raccorder aux installations de l’entreprise
locale de télécommunication. Le matériel doit également être installé en suivant une méthode acceptée de raccordement.
L’abonné ne doit pas oublier qu’il est possible que la conformité aux conditions énoncées ci-dessus n’empêche pas la
dégradation du service dans certaines situations.
Les réparations de materiel homologué doivent être coordonnées par un représentant désigné par le fournisseur.
L’entreprise de télécommunications peut demander à l’utilisateur de débrancher un appareil à la suite de réparations ou
de modifications effectuees par l’utilisateur ou à cause de mauvais fonctionnement.
Pour sa propre protection, l’utilisateur doit s’assurer que tous les fils de mise à la terre de la source d’énergie électrique,
des lignes téléphoniques et des canalisations d’eau métalliques, s’il y en a, sont raccordés ensemble. Cette précaution est
particulièrement importante dans les régions rerales.
Avertissement: L’utilisateur ne doit pas tenter de faire ces raccordements luimême; il doit avoir recours à un service
d’inspection des installations électriques, ou à un électricien, selon le cas.
L’indice d’equivalence de la sonnerie de ce matériel 0.3.
AVI S: L’indice d’équivalence de la sonnerie (IES) assigné à chaque dispositif terminal indique le nombre maximal de
terminaux qui peuvent être raccordés à une interface. La terminaison d’une interface téléphonique peut consister en une
combinaison de quelques dispositifs, à la seule condition que la somme d’indices d’equivalence de la sonnerie de tous les
dispositifs n’excède pas 5.
ATTENTION – Pour réduire les risques d’incendie, utiliser uniquement des conducteurs de telecommunications 26 AWG
au de section superleure.
Cet appareil numérique de la classe A est conforme à la norme NMB-003 du Canada.
Page 6

4 Notice to Users
For EU only
Warning: This is a Class A product. In a domestic environment this product may cause radio interference in which case
the user may be required to take adequate measures.
Working environment
From EMC (Electromagnetic Compatibility) point of view, the operation of this product is being restricted in following environments:
Medical Environments: This product is not certified as a medical product according to the Medical Product Directive 93/42/EEC.
Domestic environments (e.g. a private living room with TV / Radio sets in the nearby surrounding area) because this is a so
called EMC class A product. In a domestic environment this product may cause radio interference in which case the user may be
required to take adequate measures!
Any consequences resulting from the use of this product in restricted working environments are not the responsibility.
The consequences of the use of this product in restricted working environments may be an electromagnetic interference with other
devices or machines in the nearby surrounding area. This can result into malfunction including data loss / data error pertaining to this
product or the other devices / machines involved in the electromagnetic interference.
Furthermore, for general safety reasons, the use of this product in environments with explosive atmospheres is not permitted.
CE compliance
This product is labelled with the CE mark in accordance with the provisions of the applicable European Directives, notably the Low
Voltage Directive 2006/95/EC, the Electromagnetic Compatibility Directive 2004/108/EC and the Radio Equipment and
Telecommunications Terminal Equipment Directive 1999/5/EC.
Page 7
Before Reading This Manual 5
Before Reading This Manual
How to read this manual
Symbols in this manual
In this manual, some important items are described with the symbols shown below. Be sure to read these items before
using this equipment.
Other than the above, this manual also describes information that may be useful for the operation of this equipment with
the following signage:
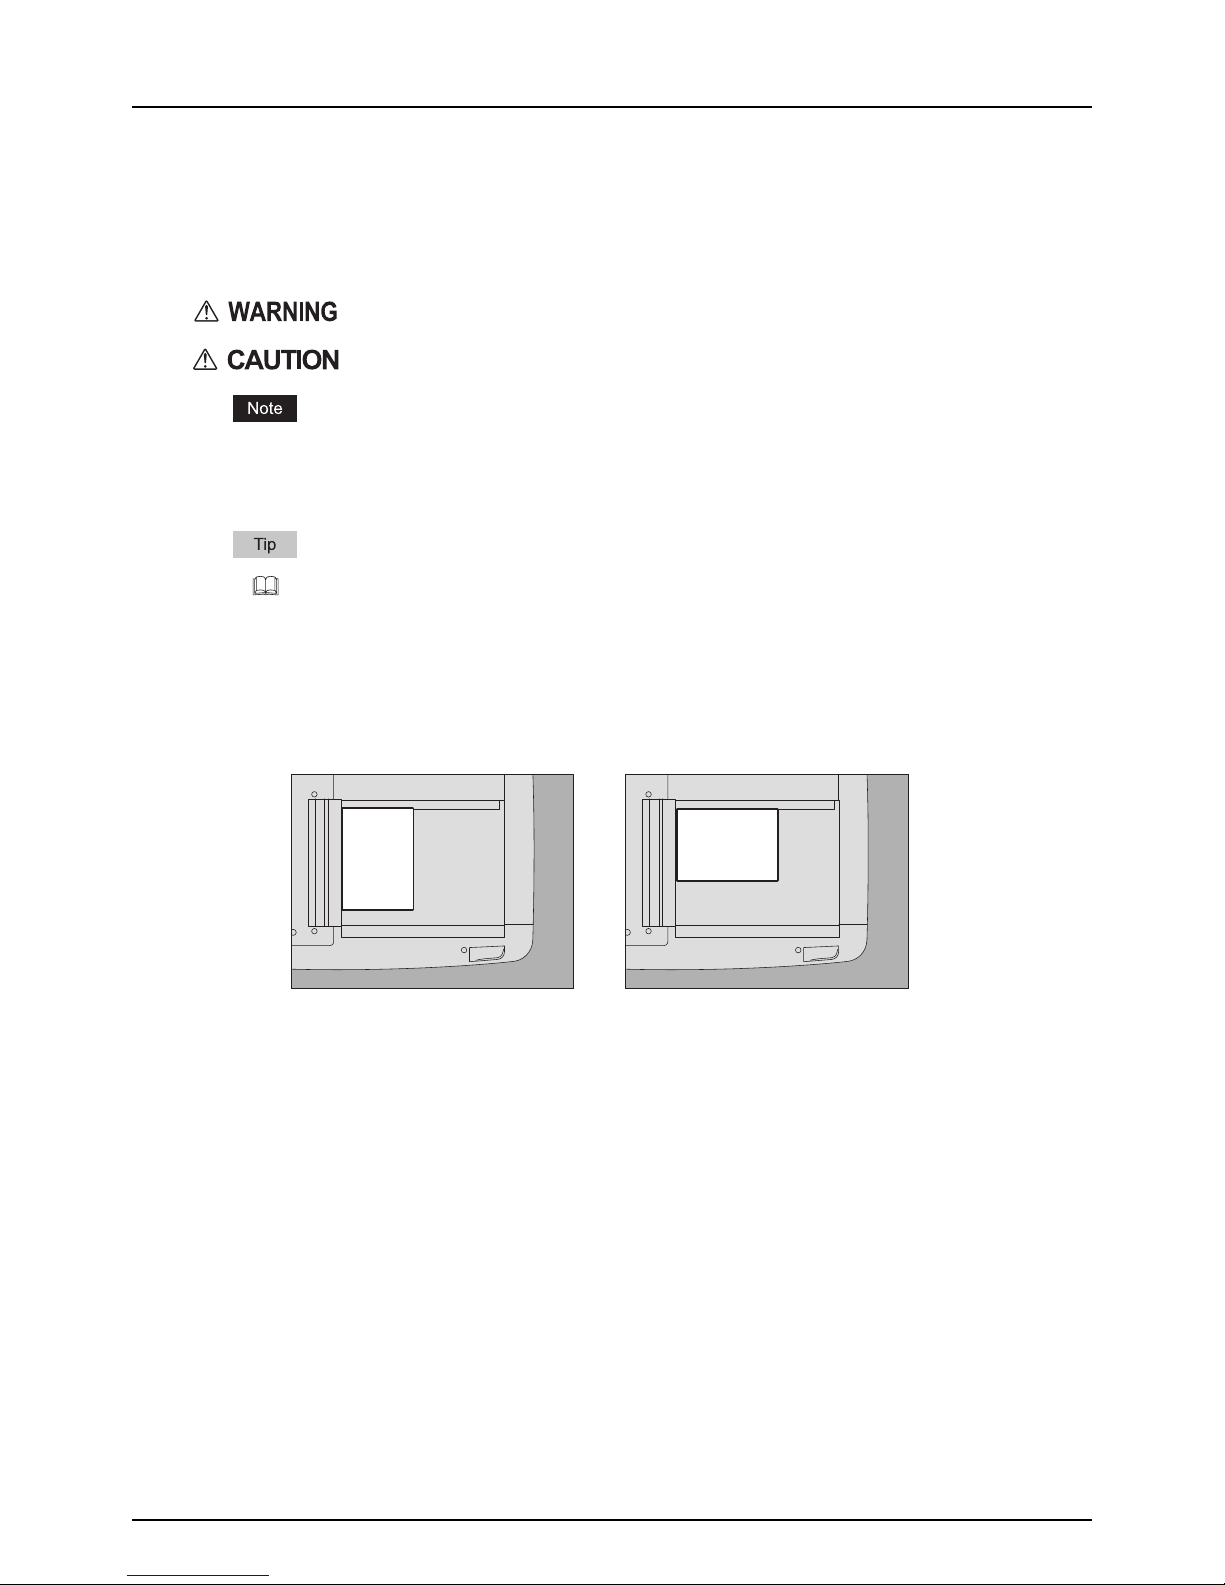
Description of original/paper direction
Paper or originals of A4, B5 or LT size can be placed either in a portrait direction or in a landscape direction. In this
manual, “-R” is added to this paper size when this size of paper or original is placed in a landscape direction.
e.g.) A4 size original on the original glass
Paper or originals of A3, B4, LD or LG can only be placed in a landscape direction, therefore “-R” is not added to these
sizes.
Screens
Screens in this manual may differ from the actual ones depending on the use-environment of the equipment such as
the installing status of options.
Screens of when paper in the A/B format is used are given in this manual. If you use paper in the LT format, the display
or the order of buttons may differ from that of your equipment.
Trademarks
The company names and product names in this manual are the trademarks of their respective companies.
Accessories
Accessories Provided for FAX System(T)
Modular cable: 1
Operator's Manual: 1
Indicates a potentially hazardous situation which, if not avoided, could result in death, serious
injury, or serious damage, or fire in the equipment or surrounding assets.
Indicates a potentially hazardous situation which, if not avoided, may result in minor or moderate
injury, partial damage to the equipment or surrounding assets, or loss of data.
Indicates information to which you should pay attention when operating the equipment.
Describes handy information that is useful to know when operating the equipment.
Pages describing items related to what you are currently doing. See these pages as required.
Placed in a portrait direction: A4 Placed in a landscape direction: A4-R
Page 8

6 General Precautions
General Precautions
When power failure occurs
Neither Fax nor telephone functions of the device are available in the event of a power failure.
You can use the external telephone to dial a number to make a call or to receive a call. (See the operator’s manual of
your telephone set for details.)
The originals stored in the memory might be deleted completely.
Settings or registration contents such as the date and time or the address book data will not be deleted.
All data pertaining to time and destinations set in a certain function such as a delayed communication or polling
reception may be deleted.
If a power failure has occurred during the scanning of an original or while printing a list, the message “POWER
FAILURE” appears on the touch panel. In this case, the job in progress might have been deleted due to the power
failure. Check the communication status.
If the data of originals stored in a memory has been deleted due to the power failure, a power failure list will be printed
out when power is restored.
Page 9

CONTENTS 7
CONTENTS
Preface....................................................................................................................................... 1
Notice to Users ......................................................................................................................... 2
Before Reading This Manual ................................................................................................... 5
General Precautions................................................................................................................. 6
Chapter 1 BEFORE USING FAX
Description of Each Component........................................................................................... 10
Control panel ....................................................................................................................... 10
Touch panel......................................................................................................................... 12
Options ................................................................................................................................ 13
Connecting Cables ................................................................................................................. 14
Chapter 2 SENDING/RECEIVING A FAX
Sending a Fax ......................................................................................................................... 16
Basic procedures................................................................................................................. 16
Handling an original............................................................................................................. 19
Setting the transmission conditions ..................................................................................... 23
Specifying the recipient ....................................................................................................... 27
Other transmissions.............................................................................................................34
Receiving a Fax ...................................................................................................................... 36
Reception mode ..................................................................................................................36
Originals and paper .............................................................................................................38
Chapter 3 CHECKING AND CANCELING THE COMMUNICATIONS
Checking Communications ................................................................................................... 42
Checking reserved transmissions........................................................................................ 42
Checking communication status (log).................................................................................. 43
Canceling the Transmission.................................................................................................. 45
Canceling the memory transmission ................................................................................... 45
Canceling direct transmissions............................................................................................ 47
Canceling reserved transmissions....................................................................................... 48
Chapter 4 ADVANCED FUNCTIONS
Transmitting 2-Sided Originals ............................................................................................. 50
Priority Transmission............................................................................................................. 52
Polling Communication ......................................................................................................... 53
Polling transmission............................................................................................................. 53
Polling reception.................................................................................................................. 55
Mailbox Transmission............................................................................................................56
Registering/printing/deleting an original .............................................................................. 57
Sending/retrieving an original .............................................................................................. 61
Creating/modifying/deleting a mailbox................................................................................. 64
Chain Dial Communication.................................................................................................... 71
Delayed Transmission Reservation...................................................................................... 72
Page 10

8 CONTENTS
Recovery Transmission ......................................................................................................... 73
Onramp Gateway .................................................................................................................... 74
Offramp Gateway.................................................................................................................... 75
Save as File ............................................................................................................................. 76
Chapter 5 PRINTING LISTS AND REPORTS
Printing Lists & Reports Manually ........................................................................................ 80
Journal (transmission journal/reception journal).................................................................. 80
Reservation list .................................................................................................................... 81
Mailbox/relay box report ...................................................................................................... 82
Printing Lists & Reports Automatically ................................................................................ 83
Lists/Reports Samples...........................................................................................................84
Transmission journal ........................................................................................................... 84
Reception journal................................................................................................................. 85
Reservation list .................................................................................................................... 85
Mailbox/relay box report ...................................................................................................... 86
Memory transmission report ................................................................................................ 87
Transmission report.............................................................................................................88
Multi transmission report ..................................................................................................... 88
Multi polling report ............................................................................................................... 89
Relay TX orig. terminal report.............................................................................................. 89
Relay TX relay station report ............................................................................................... 90
Relay TX end terminal report............................................................................................... 90
Relay station report ............................................................................................................. 91
Mailbox reception report ...................................................................................................... 91
Power failure list .................................................................................................................. 92
Chapter 6 SETTING ITEMS
User Settings .......................................................................................................................... 94
Fax settings ......................................................................................................................... 94
Administrator Settings........................................................................................................... 97
Registering the terminal ID.................................................................................................. 99
Setting the initial setup ...................................................................................................... 100
Setting RX printing............................................................................................................. 102
Setting recovery transmission ........................................................................................... 104
Setting 2nd Line for FAX Unit ............................................................................................ 105
Chapter 7 TROUBLESHOOTING AND SPECIFICATIONS
Troubleshooting ................................................................................................................... 108
Error codes........................................................................................................................ 108
Error messages ................................................................................................................. 108
Transmission/reception trouble ......................................................................................... 109
Specifications of FAX System(T) ........................................................................................ 110
INDEX ................................................................................................................................................................... 111
Page 11

1.BEFORE USING FAX
This chapter describes the basics of this equipment you should learn before you start using it.
Description of Each Component...........................................................................................10
Control panel ........................................................................................................................................................10
Touch panel ..........................................................................................................................................................12
Options .................................................................................................................................................................13
Connecting Cables................................................................................................................. 14
Page 12

1 BEFORE USING FAX
10 Description of Each Component
Description of Each Component
Control panel
This section describes the buttons on the control panel used for the fax functions. For any details of the control panel not
covered in this document, refer to the Quick Start Guide.
This equipment (FAX System(T))
1. [FAX] button
Use this button to display the fax screen when you use the fax function.
When you use the Internet Fax function, you also press this button. For details of the Internet Fax function, refer to
the Scanning Guide.
2. [USER FUNCTIONS] button
Use this button when you register/make settings such as initial setting for the fax function.
3. Digital keys
Use these keys to enter fax numbers, etc.
4. [FUNCTION CLEAR] button
Use this button to clear all current selected functions and return to the default settings.
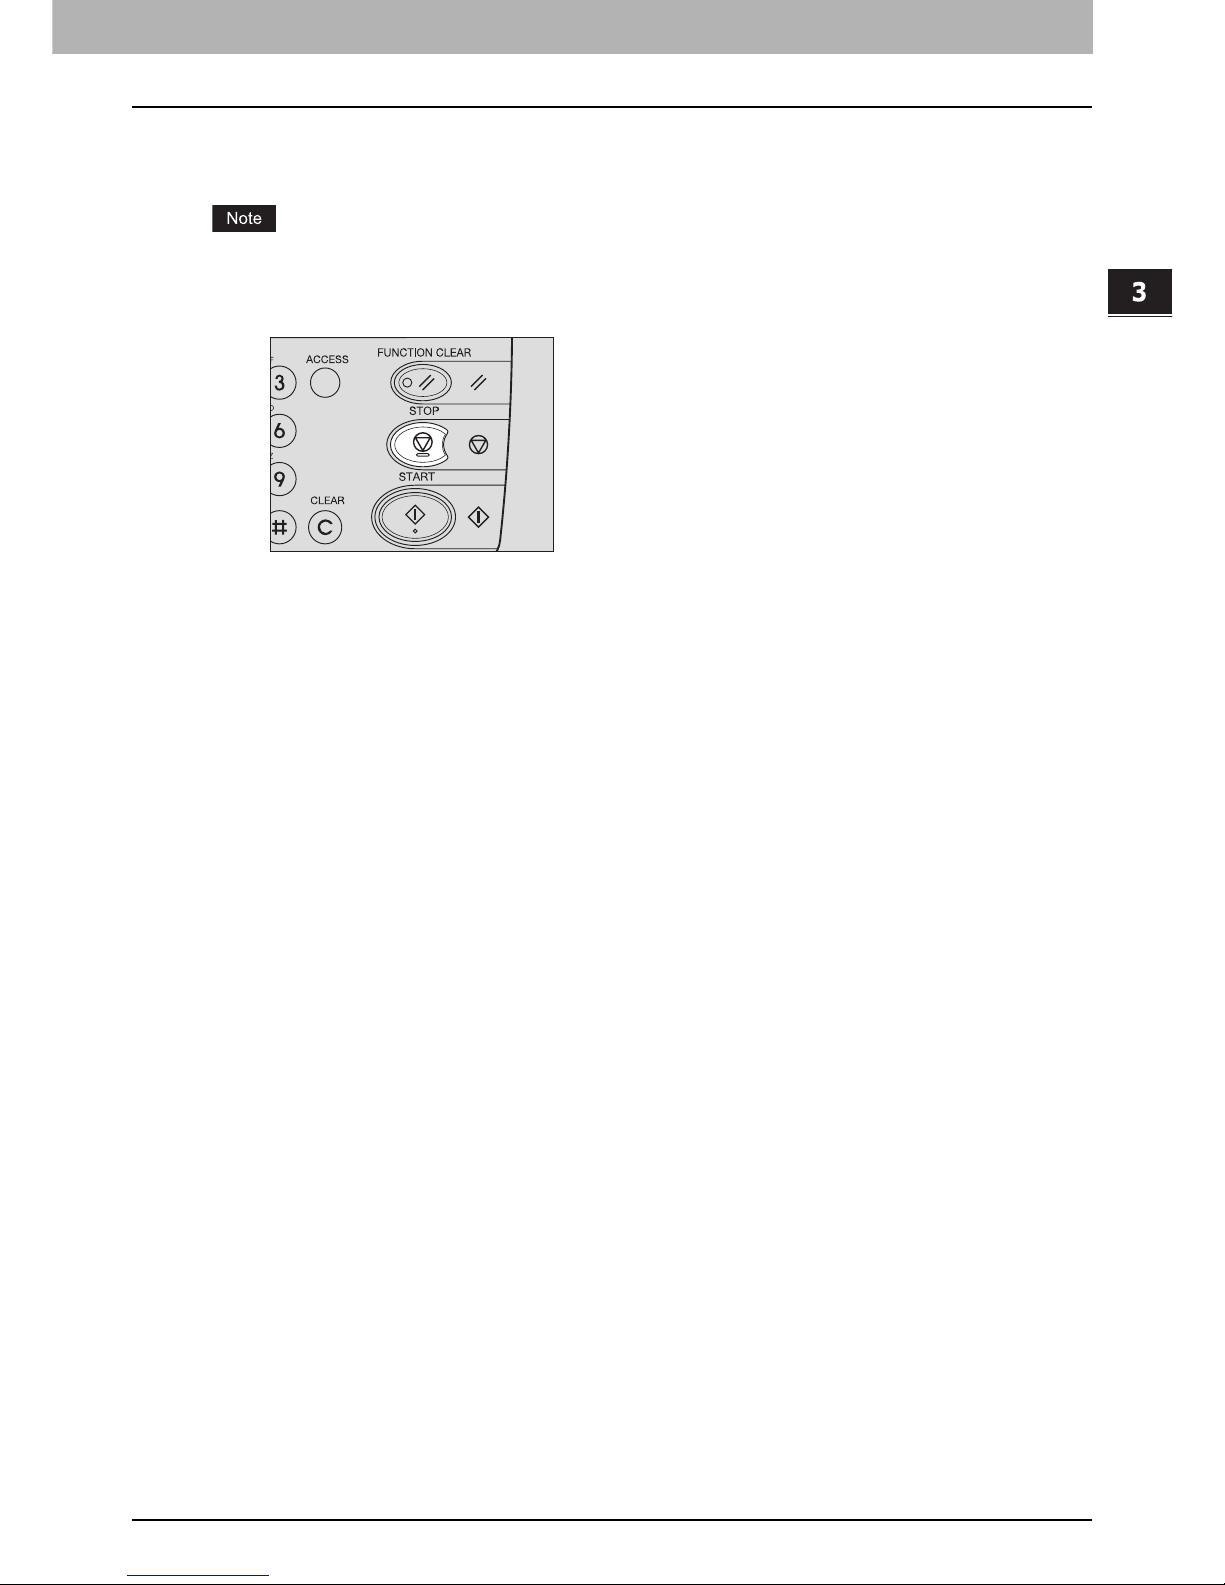
5. [STOP] button
Use this button to stop any scanning in progress.
6. [START] button
Use this button to start scanning a document for fax transmission.
8
9
10
1
4
5
6
7311 2
Page 13

1.BEFORE USING FAX
Description of Each Component 11
1 BEFORE USING FAX
7. [CLEAR] button
Use this button to cancel entered numbers.
8. Alarm lamp
This lamp lights when an error occurs and this equipment needs some actions to be taken.
9. MEMORY RX
This lamp lights when there is a received document which is not printed yet and its data remain in memory.
10. LINE
This lamp lights when a telephone line is busy.
11. Touch panel
P.12 “Touch panel”
Page 14
1 BEFORE USING FAX
12 Description of Each Component
Touch panel
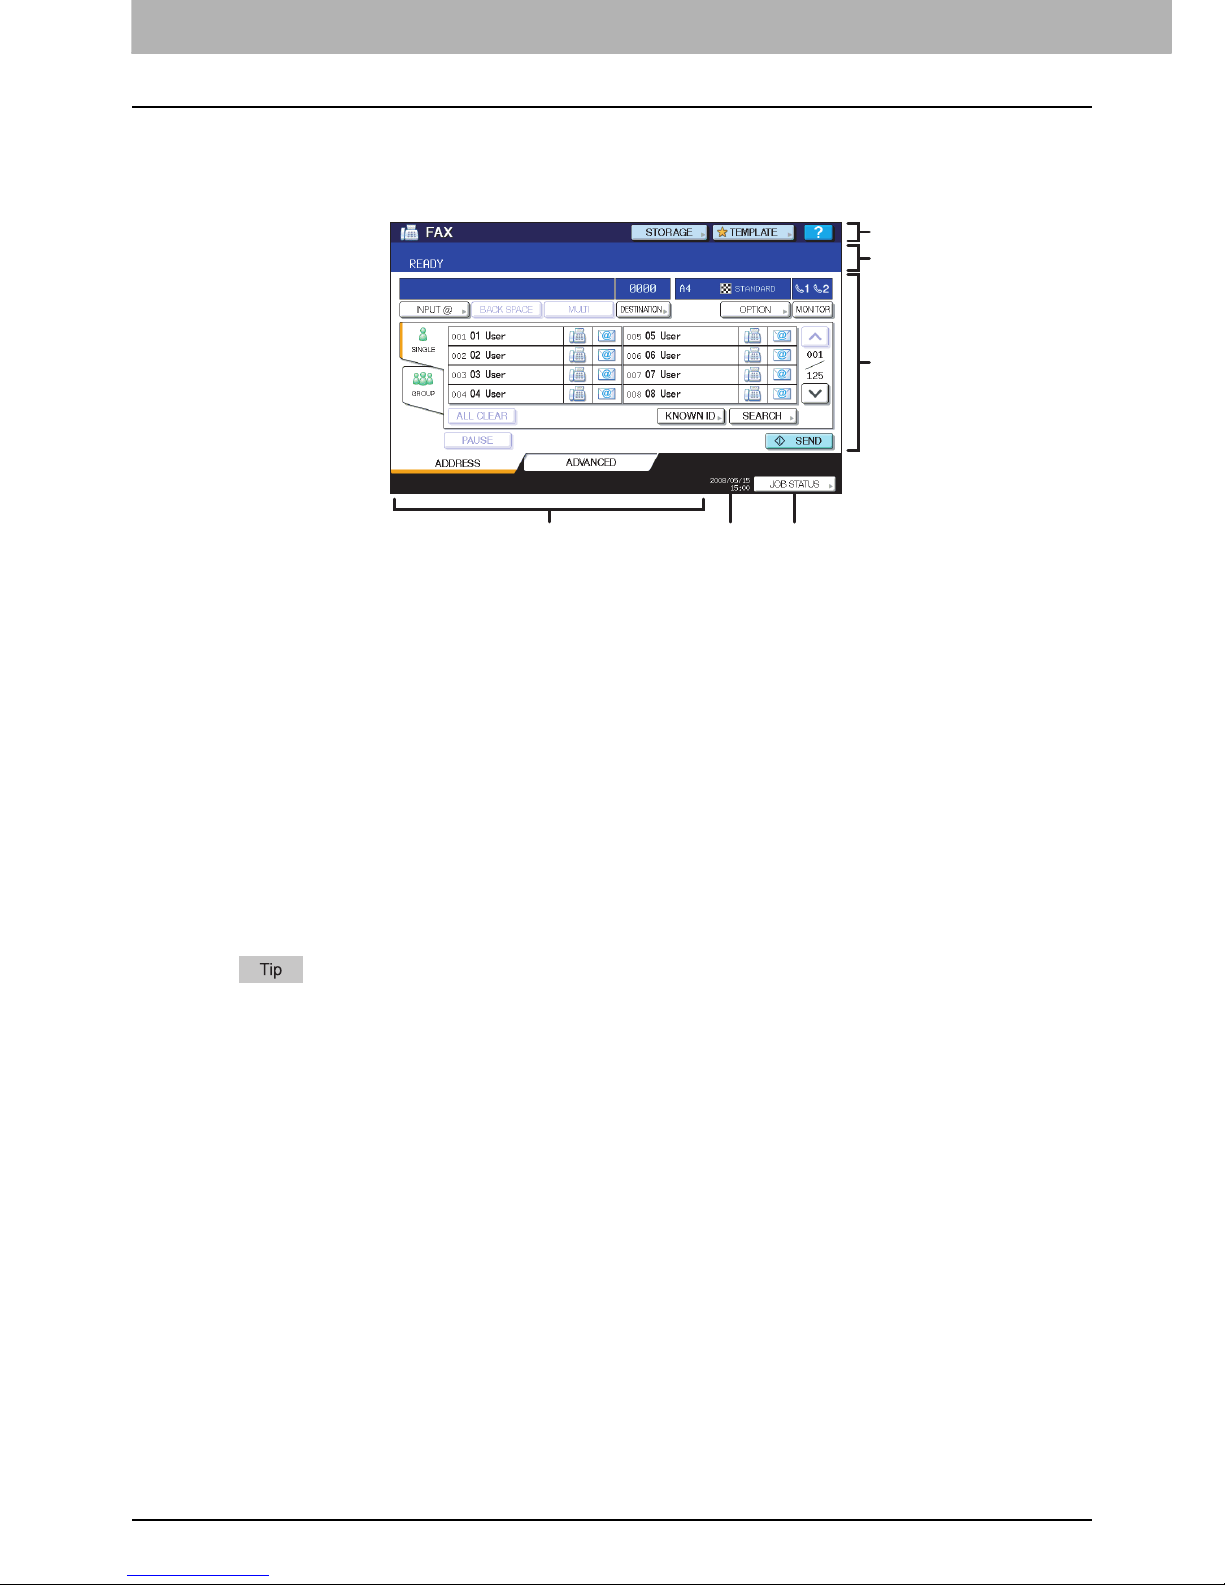
This section describes the fax screen on the touch panel. For any details of the touch panel not covered in this document,
refer to the Quick Start Guide.
1. Header area
The name of the currently selected function and buttons related to the current status of this equipment are shown here.
2. Message area
Various messages such as the status of this equipment and operating instructions are shown here.
3. Operation object area
Operation-related buttons and text boxes are shown here.
4. Alert message area
Messages are shown here to inform you of various alerts such as replacement time of toner cartridges and waste
toner boxes.
5. Date and time
The current date and time are shown here.
6. [JOB STATUS] button
Use this button to view the job status or its history.
When this equipment is managed under the department management or user management, key in user
information such as the department code, user name and password to display the operation screen. For details of
the operation, refer to the Quick Start Guide.
1
3
2
456
Page 15
1.BEFORE USING FAX
Description of Each Component 13
1 BEFORE USING FAX
Options
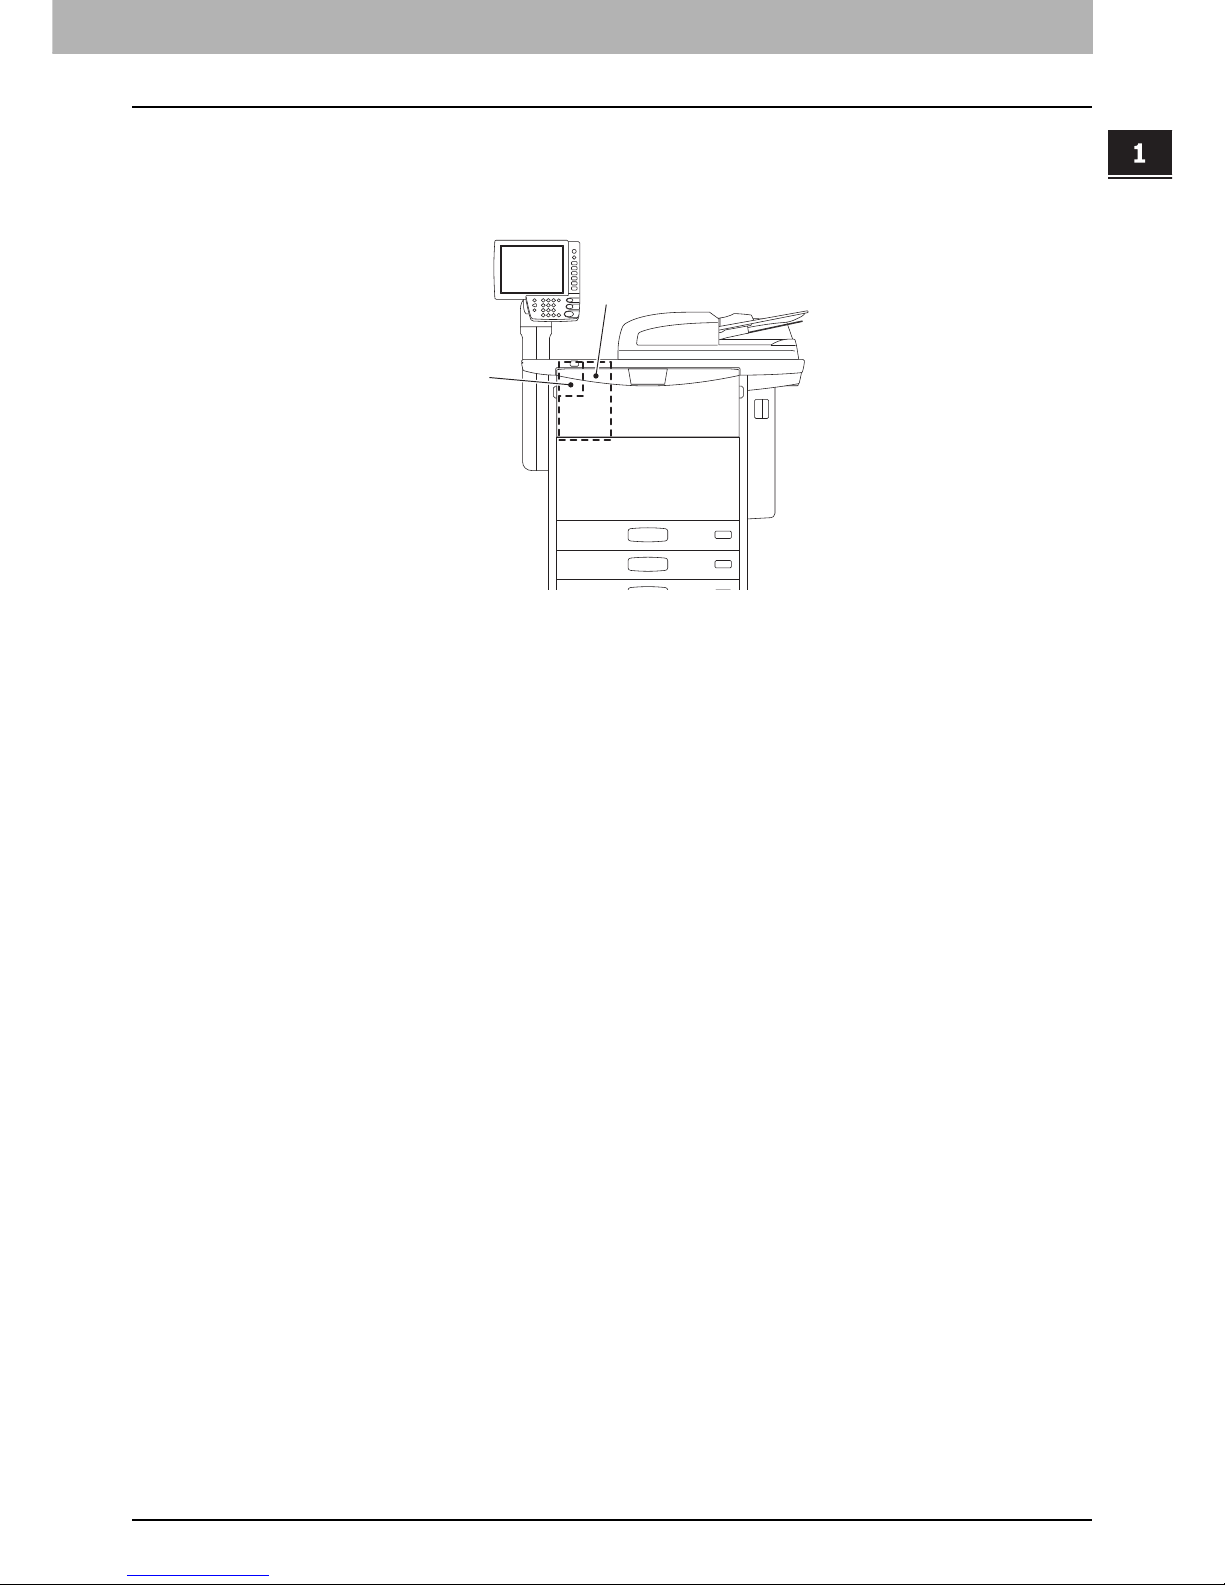
This section describes the options related to the fax function.
This equipment (FAX System(T))
1. FAX Unit (FAX System(T))
This is the unit to use the fax function.
2. 2nd Line for FAX Unit (MP-80)
This board enables the use of 2 lines for sending and receiving a fax.
2
1
Page 16
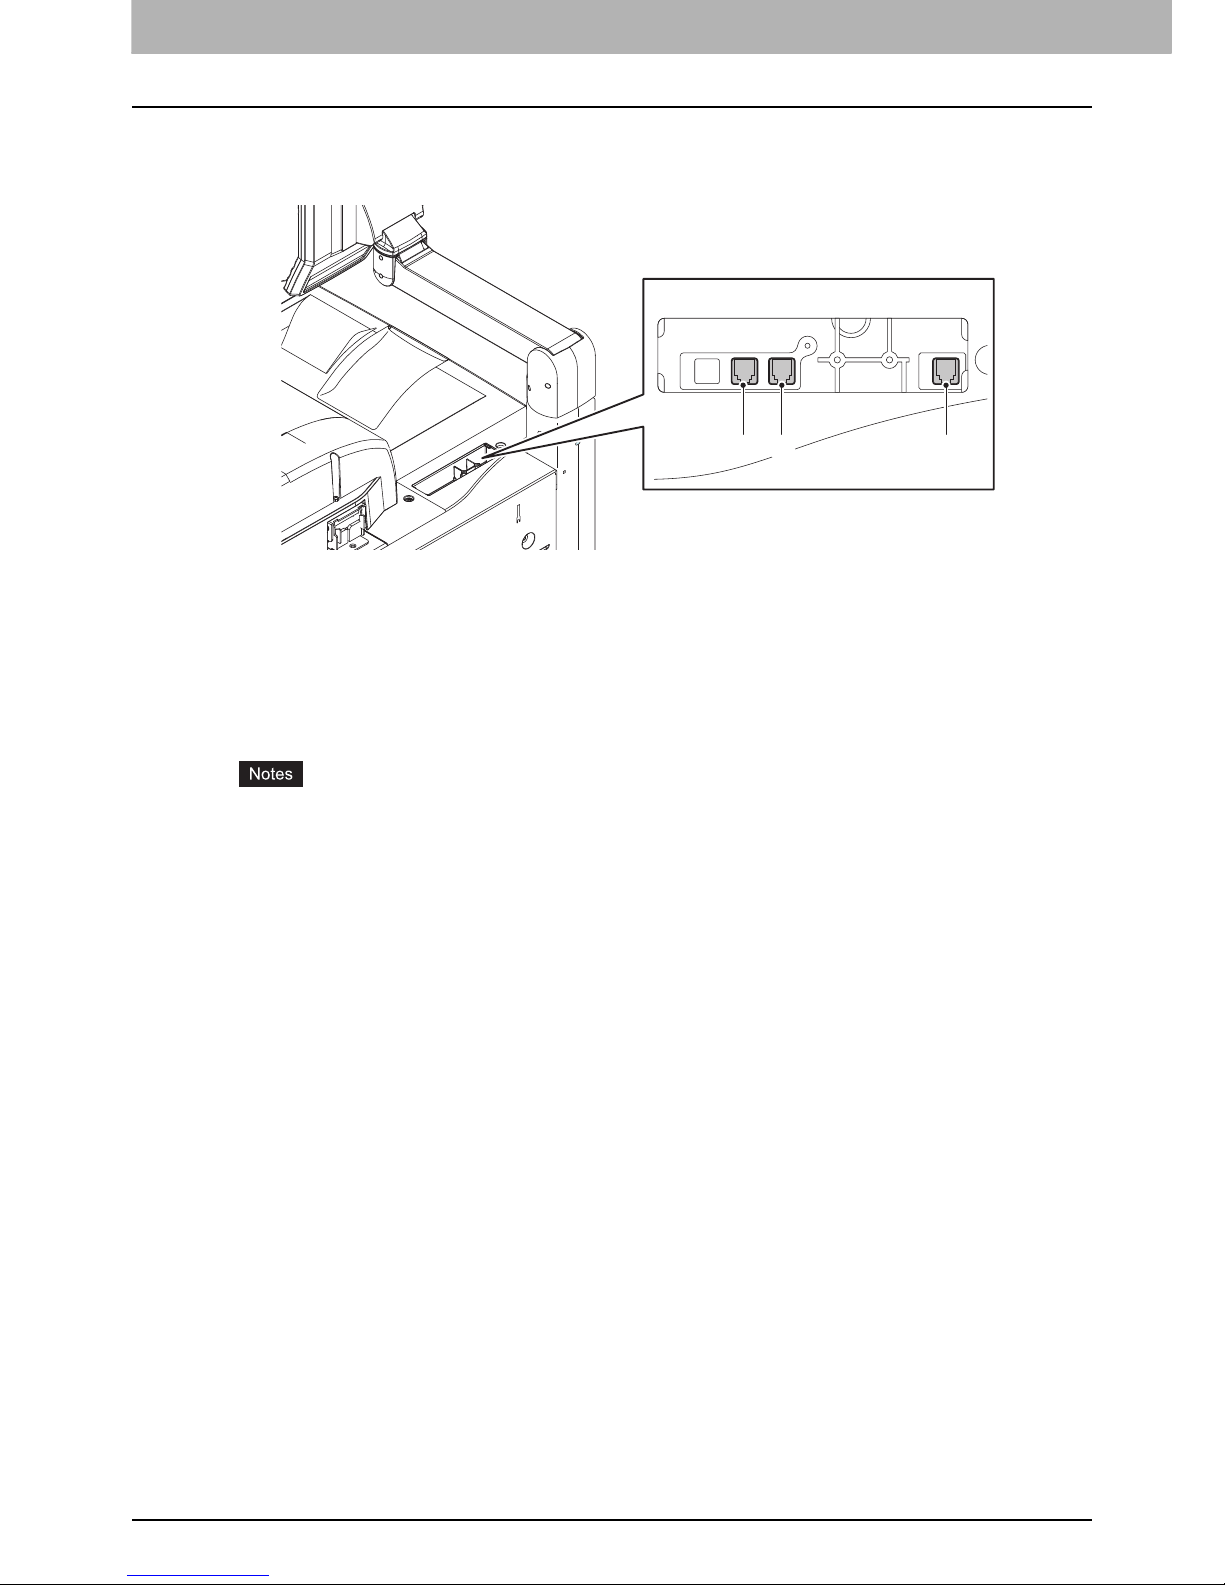
1 BEFORE USING FAX
14 Connecting Cables
Connecting Cables
Be sure that the power of this equipment is turned OFF before connecting the cables.
This equipment (FAX System(T))
1. LINE2
Connect a telephone line when the 2nd Line for FAX Unit (optional) is installed.
2. LINE
Connect a telephone line.
3. TEL
Connect an external telephone.
Do not connect this equipment and the external telephone to a telephone connector in parallel.
Use the external telephone without an answerphone (or with the function off) to be connected with the TEL.
123
Page 17

2.SENDING/RECEIVING A FAX
This chapter describes how to send and receive a fax.
Sending a Fax.........................................................................................................................16
Basic procedures..................................................................................................................................................16
Handling an original..............................................................................................................................................19
Setting the transmission conditions ......................................................................................................................23
Specifying the recipient ........................................................................................................................................27
Other transmissions .............................................................................................................................................34
Receiving a Fax ...................................................................................................................... 36
Reception mode ...................................................................................................................................................36
Originals and paper ..............................................................................................................................................38
Page 18
2 SENDING/RECEIVING A FAX
16 Sending a Fax
Sending a Fax
Basic procedures
This section describes the basic procedures to send a fax. For details of in-depth operations, see the page under each
procedure as required.
Besides the basic sending functions described in this page, there are various useful ways to send a fax. These procedures
are described in the following pages.
P.34 “Other transmissions”
P.49 “ADVANCED FUNCTIONS”
1
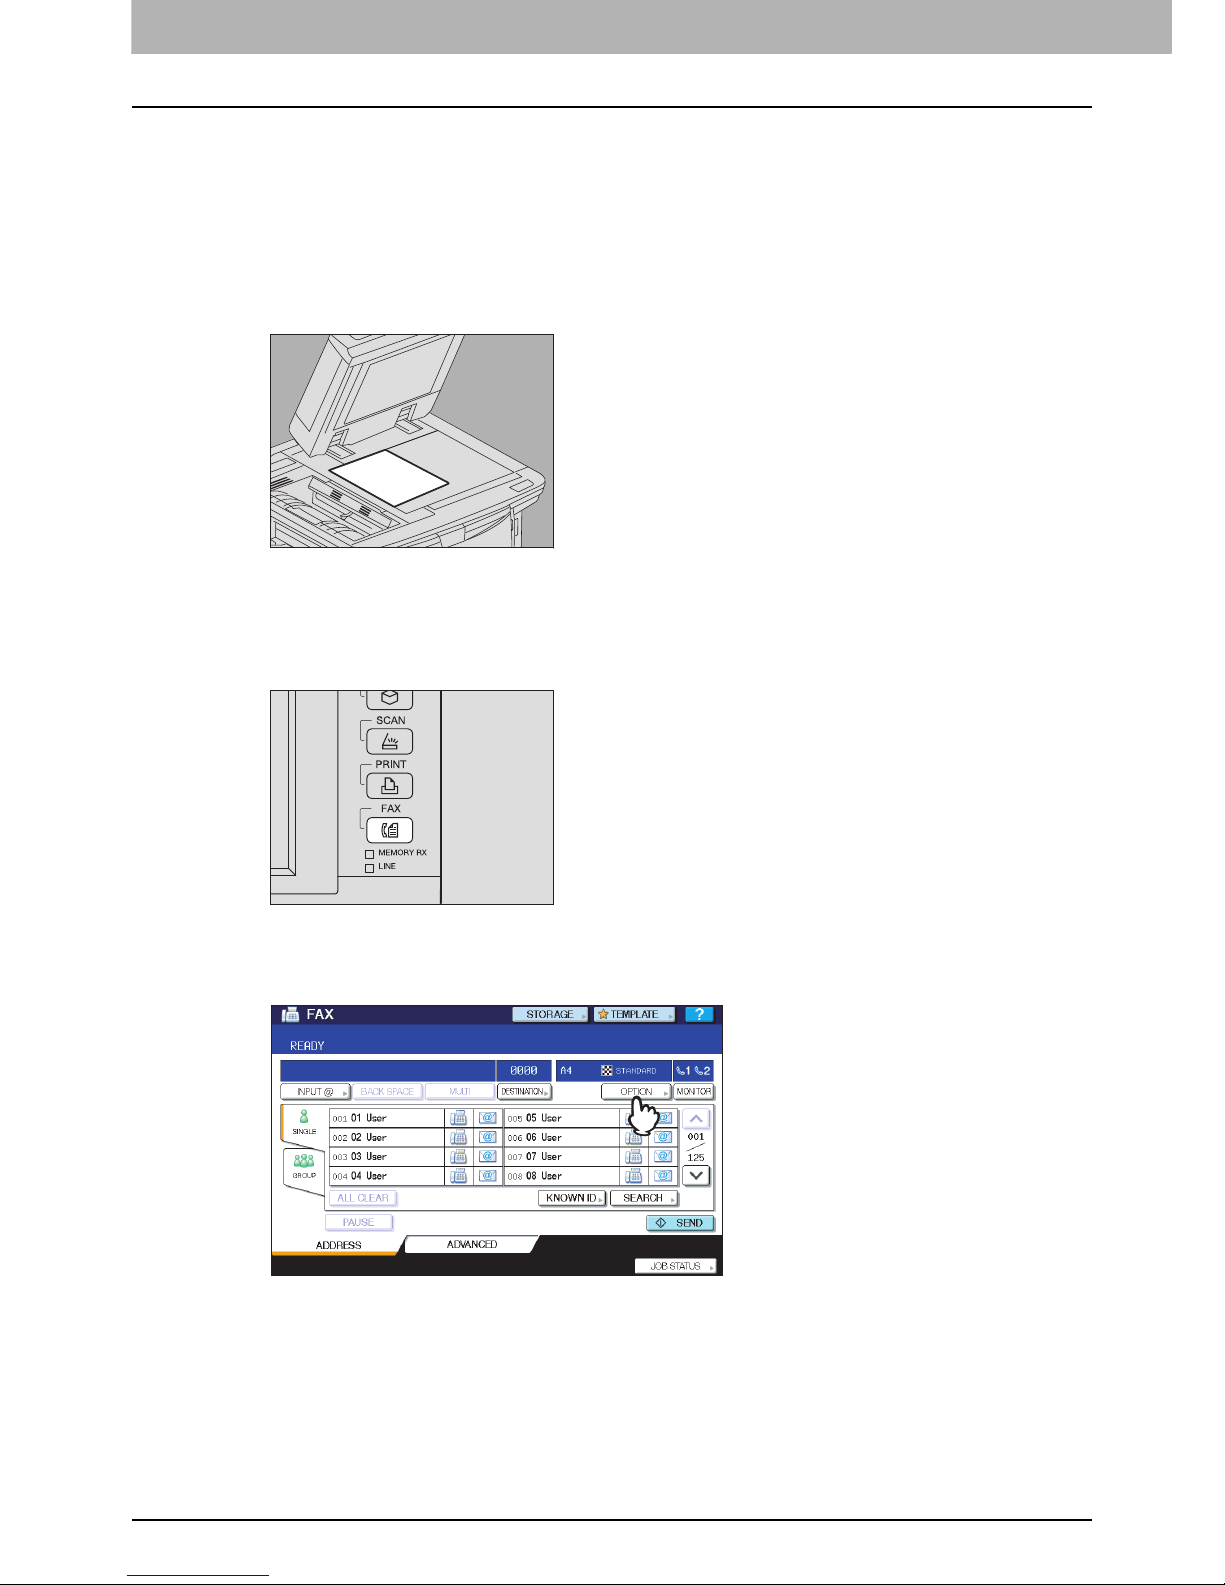
Place the original(s).
Check the original size and scanning range, etc. Place the original(s) on the original glass or RADF (Reversing
Automatic Document Feeder) in the correct direction. (The illustration above shows the original placed on the
original glass.)
P.19 “Handling an original”
2
Press the [FAX] button on the control panel.
The fax screen is displayed. If you leave the screen unattended for the period of the auto clear setting time (45 sec
by manufacture default), the screen returns to the default one automatically.
3
Press [OPTION] and set the transmission conditions.
The transmission condition setting screen is displayed. Set the transmission conditions such as resolution, original
mode, exposure and transmission mode, as required.
P.23 “Setting the transmission conditions”
Page 19
2.SENDING/RECEIVING A FAX
Sending a Fax 17
2 SENDING/RECEIVING A FAX
4
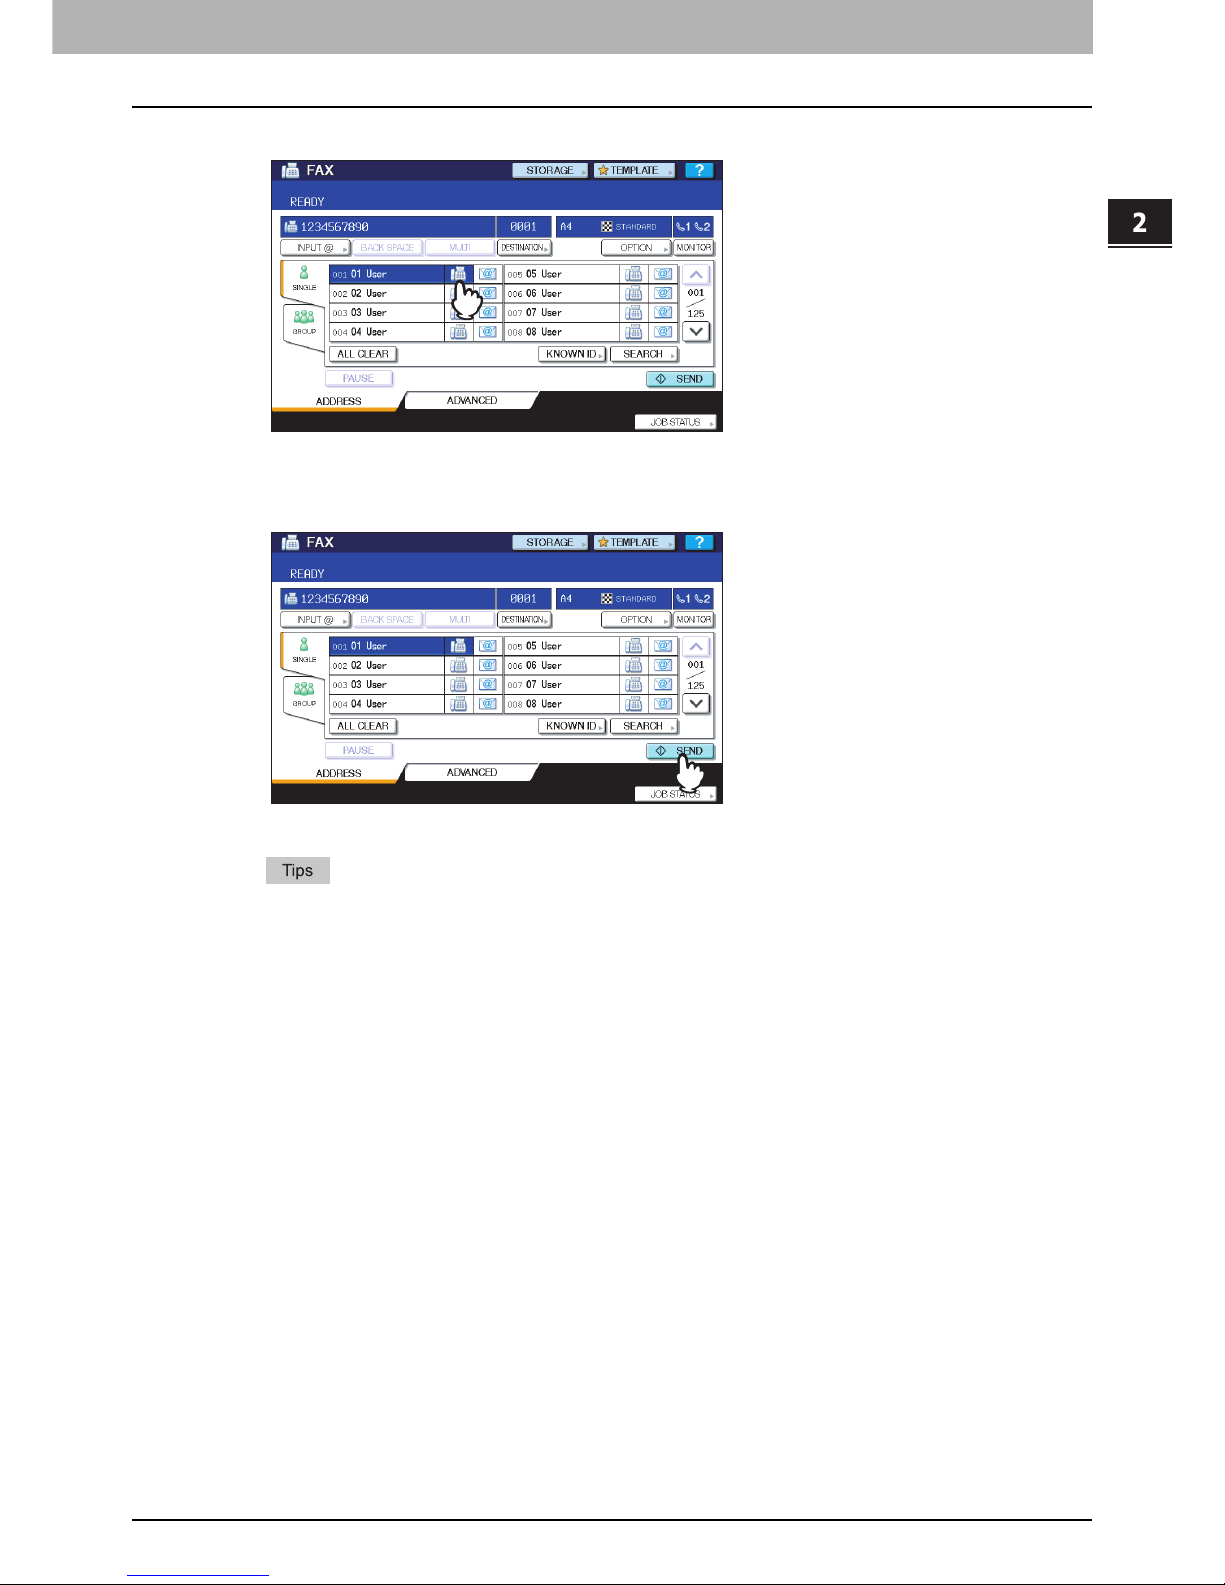
Specify the recipient.
To specify the recipient, dial the number using the digital keys on the control panel or use the address book.
P.27 “Specifying the recipient”
5
Press [SEND].
The fax is sent or reserved.
Alternatively, you can press the [START] button on the control panel.
In the memory transmission mode, the original is scanned into memory. Once a connection has been made,
this equipment automatically starts sending the scanned document. In the direct transmission mode, the fax
number is dialed immediately, and the scanned document will be sent. (Transmission conditions can be set
in the transmission condition setting screen.)
If memory becomes full halfway through scanning the original(s) in the memory transmission mode, that
original will not be stored in memory. When that happens, reduce the number of originals you are sending,
or try sending them in the direct transmission mode.
You can check the status of the current sending. You can also cancel the transmission (deletes the job).
P.41 “CHECKING AND CANCELING THE COMMUNICATIONS”
Page 20
2 SENDING/RECEIVING A FAX
18 Sending a Fax
Redial function
In the memory transmission mode, if the fax cannot be sent due to a busy-line, the fax number is redialed automatically to
send the fax. By default, this equipment redials 3 times at 1-minute intervals.
Batch transmission function
If there are multiple transmission jobs to the same recipient in memory, you can send them at once using this function,
resulting in reduction of communication costs. However, if their recipients are the same but their transmission conditions
vary or if users or departments are different when this equipment is managed under the department management or user
management, this function is not applied to those reserved jobs.
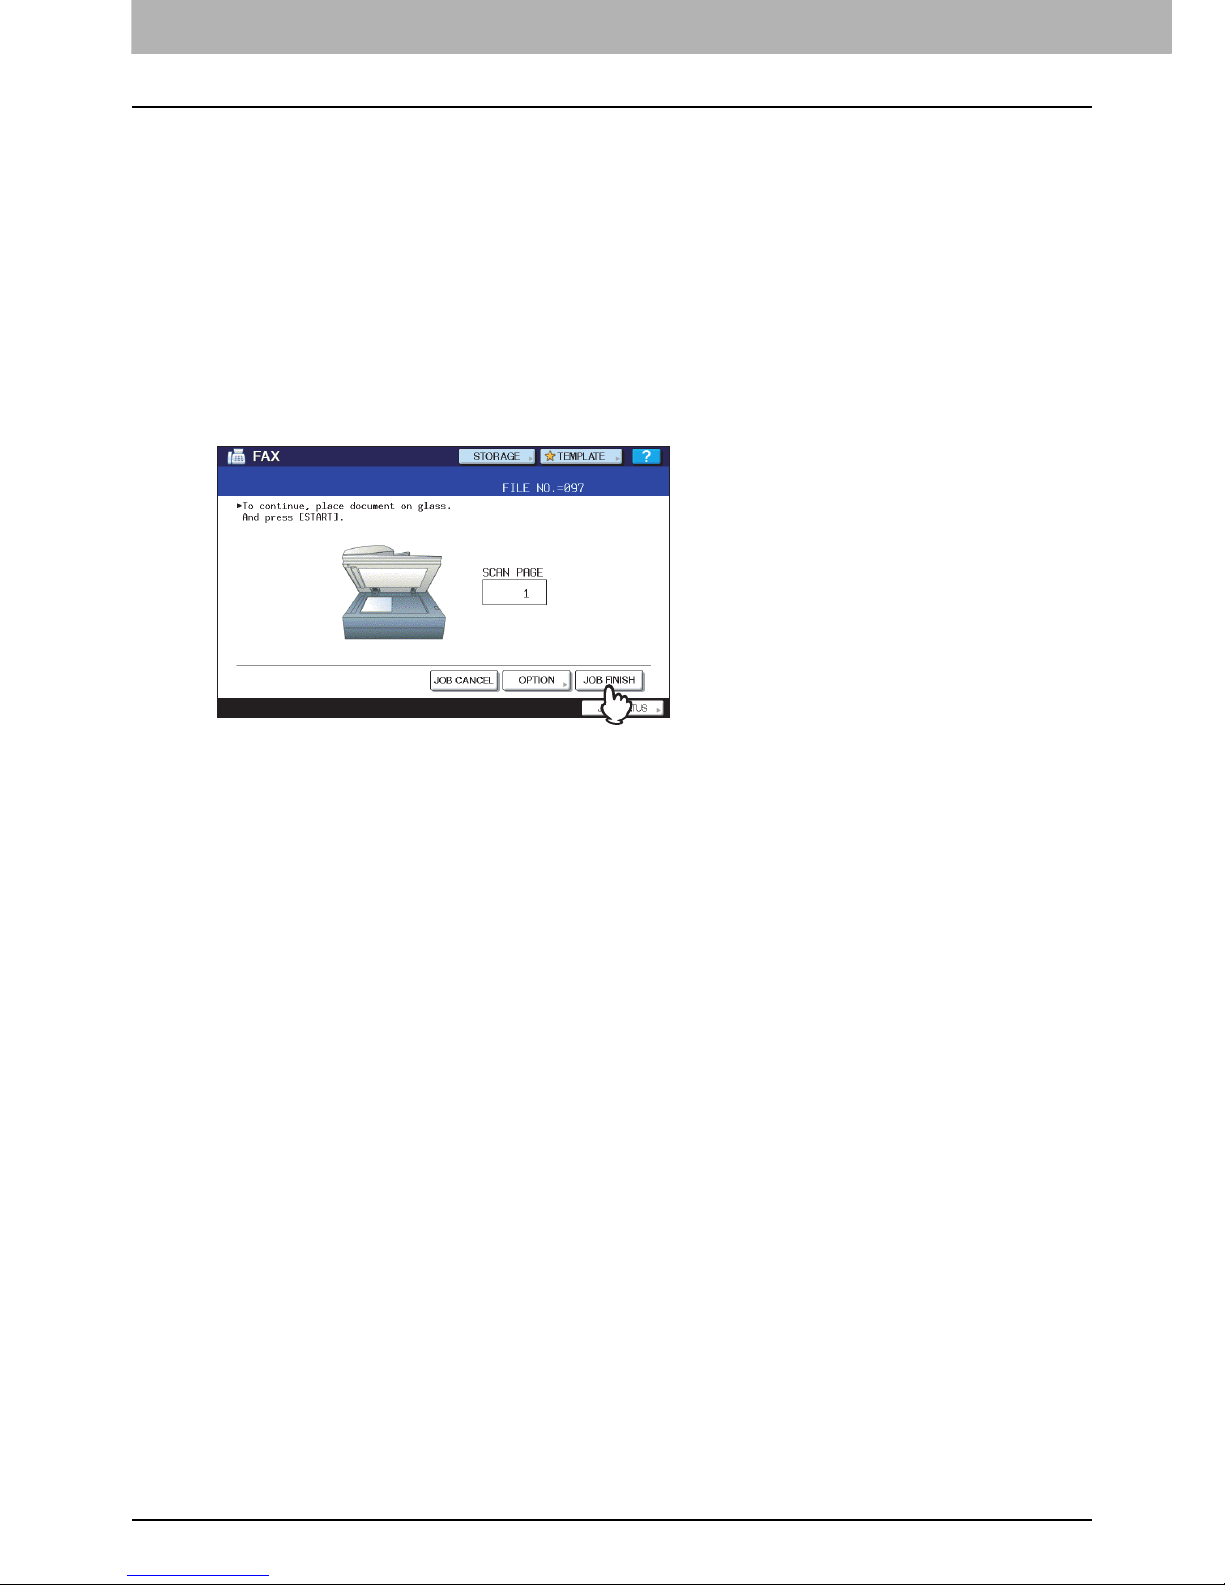
Sending the next original
If an original is placed on the original glass and its scanning is completed, the confirmation screen for the next original is
displayed. If you want to continue scanning of the next original, place it on the original glass, and then press [START]
button on the control panel. Once all the originals are scanned, press [JOB FINISH].
If you leave the screen unattended for approximately 45 sec., the scanned originals are sent.
To cancel the transmission in the memory transmission mode, press [JOB CANCEL].
P.45 “Canceling the memory transmission”
To change the transmission conditions for each page, press [OPTION].
P.26 “Changing the settings for each page”
Page 21
2.SENDING/RECEIVING A FAX
Sending a Fax 19
2 SENDING/RECEIVING A FAX
Handling an original
Originals that can be sent
This equipment can send a fax of the following originals.
You can place 1-sided or 2-sided originals of the media types, such as standard paper, recycled paper and paper having
holes (2, 3 or 4 holes) for filing, on the RADF (Reversing Automatic Document Feeder). On the original glass, you can
place 1-sided originals of the above media types as well as OHP film, tracing paper, booklets and three-dimensional
objects.
Do not place any heavy objects (4 kg/9 lb. or over) on the original glass and do not press on it with force.
If the original is any of the following sizes, it is automatically rotated and sent as described below.
A4 A4-R
A5-R A5
B5-R A5
LT LT-R
ST-R ST
Original scanning range
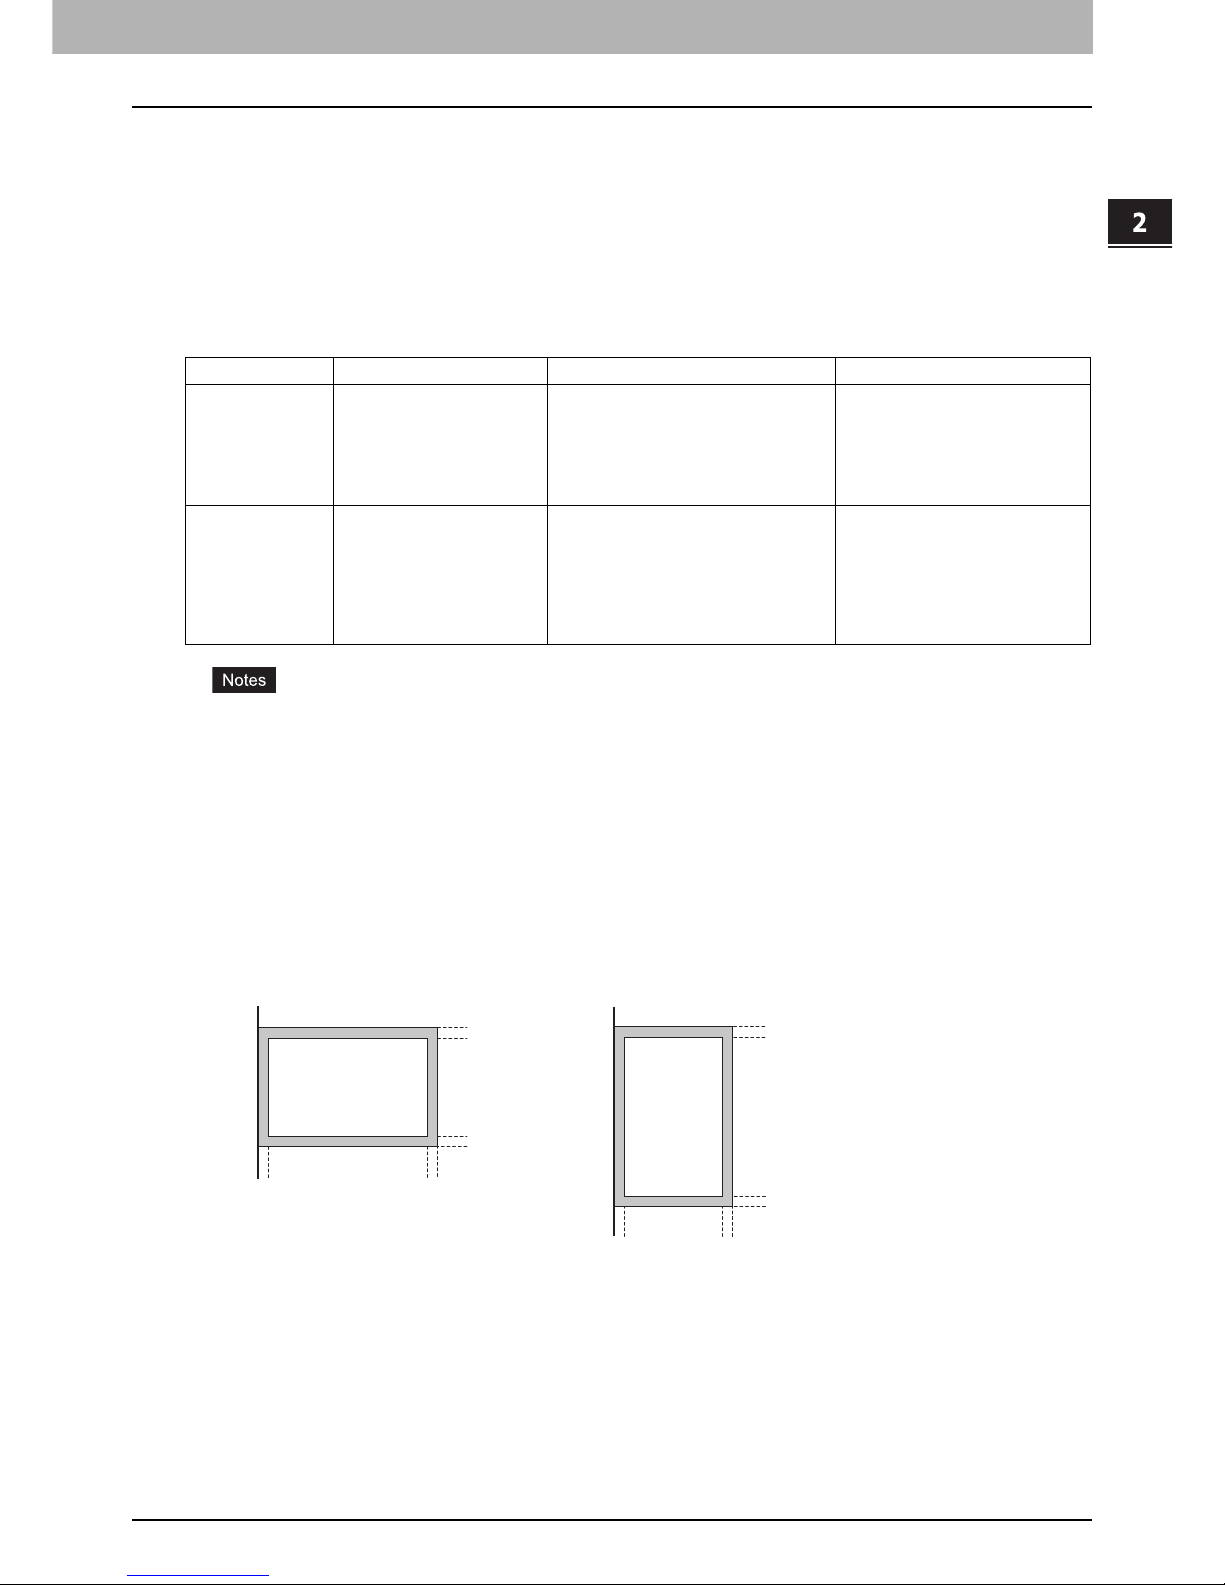
The following figures show the original scanning area. Any information in the shaded area is not printed on the paper.
1. LD, LG, LT-R, ST-R, COMP, A3, A4-R, A5-R, B4, B5-R, FOLIO
2. LT, ST, A4, A5, B5
Location Maximum size Paper weight Original size
Original glass Length: 297 mm (11.69")
Width: 432 mm (17.01")
North American format:
LD, LG, LT, LT-R, ST, ST-R,
COMP
A/B format:
A3, A4, A4-R, A5, A5-R, B4, B5,
B5-R, FOLIO
RADF Length: 297 mm (11.69")
Width: 432 mm (17.01")
1-sided originals
35 - 209 g/m
2
(9.3 - 110 lb.)
2-sided originals
50 - 157 g/m
2
(13.3 - 41.8 lb.)
North American format:
LD, LG, LT, LT-R, ST-R, COMP
A/B format:
A3, A4, A4-R, A5-R, B4, B5, B5R, FOLIO
(ST/A5 is not available)
12
5 mm
(0.2 inch)
5 mm
(0.2 inch)
5 mm
(0.2 inch)
5 mm
(0.2 inch)
5 mm
(0.2 inch)
5 mm
(0.2 inch)
5 mm
(0.2 inch)
5 mm
(0.2 inch)
Page 22
2 SENDING/RECEIVING A FAX
20 Sending a Fax
Placing the original(s) on the original glass
This section describes how to set an original on the original glass. Originals are sent in the order they are placed on the
original glass.
Do not place any heavy objects (4 kg/9 lb. or over) on the original glass and do not press on it with force.
Breaking the glass could injure you.
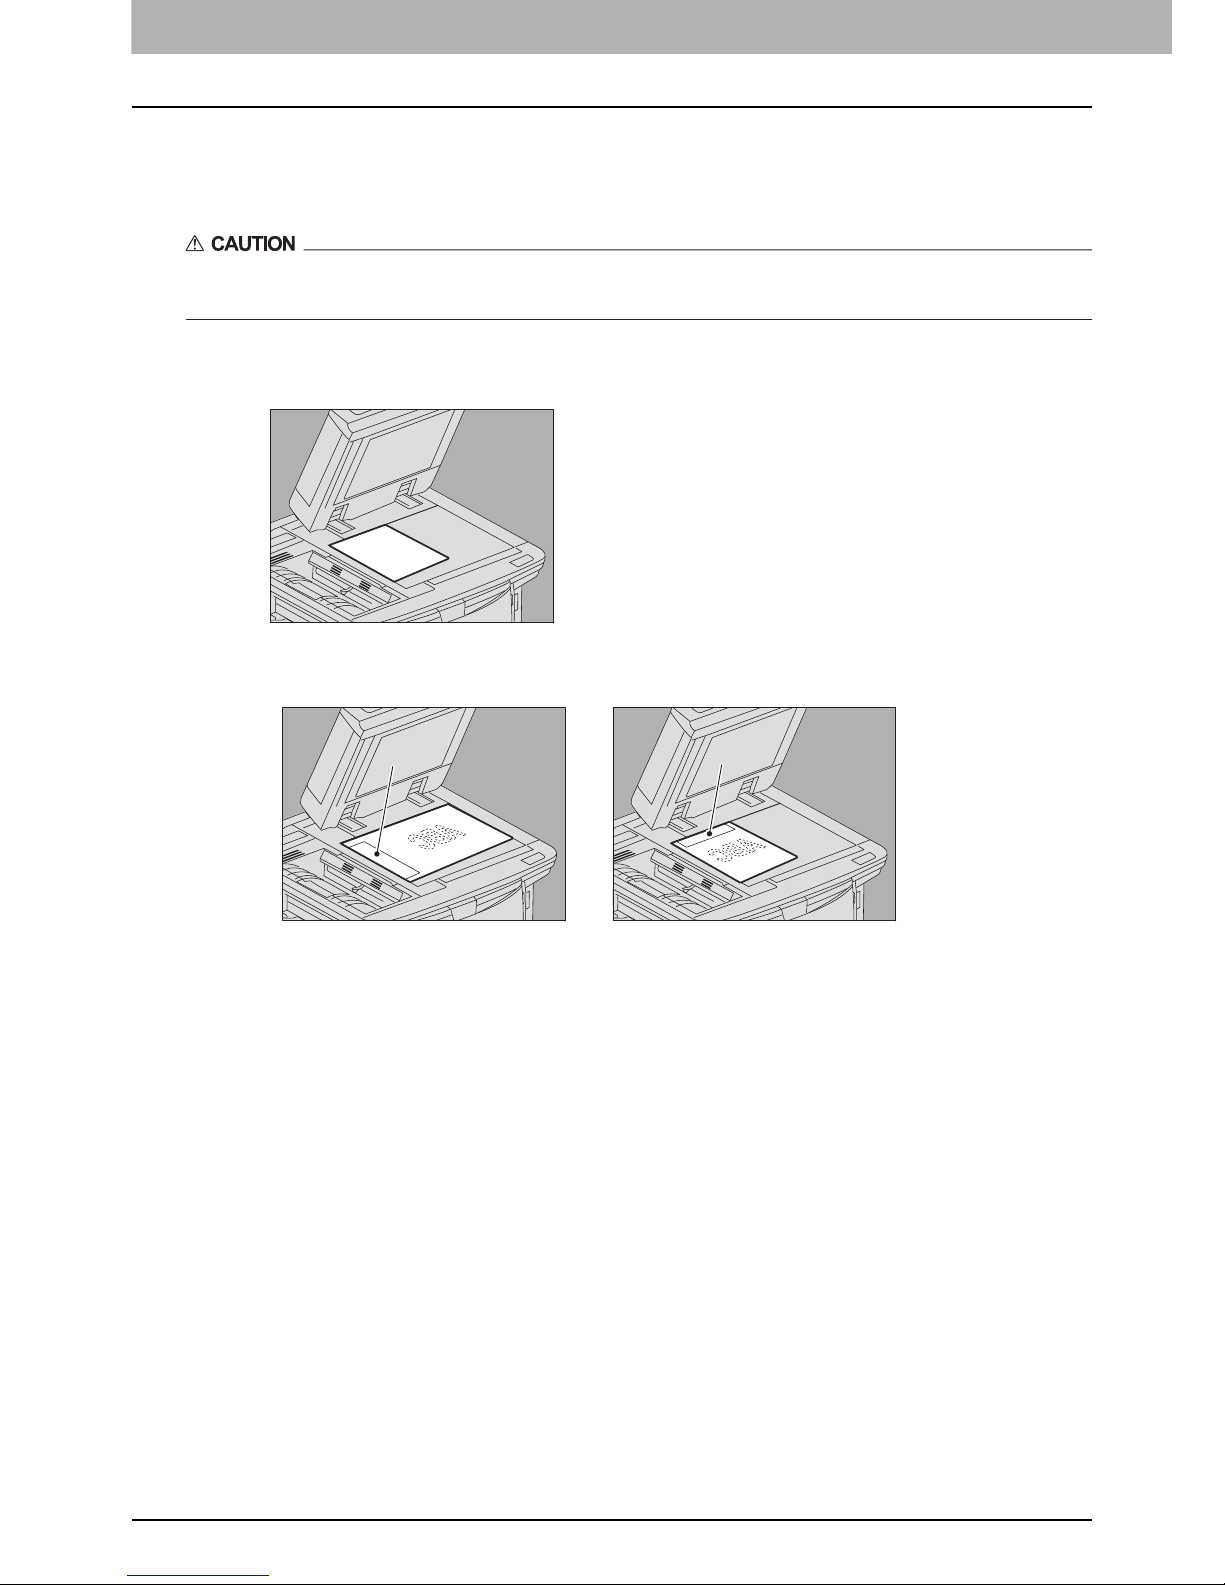
1
Raise the Original Cover or RADF (Reversing Automatic Document Feeder), and place
the original with its face down on the glass.
Raise it 60 degrees or more for the detection of the original.
2
Align the original against the left inner corner of the glass.
Different size originals can also be sent in one transmission.
When an original of any size other than LT/A4 is placed in the direction shown in the above left figure,
transmission to a recipient is carried out so that the pre-entered sender information is printed in position A in the
figure.
When an original of LT/A4 size is placed in the direction shown in the above right figure, transmission to a
recipient is carried out so that the pre-entered sender information is printed in position B in the figure.
The pre-entered sender information shows what is registered in the Terminal ID.
P.99 “Registering the terminal ID”
3
Lower the Original Cover or RADF slowly.
A
B
Page 23

2.SENDING/RECEIVING A FAX
Sending a Fax 21
2 SENDING/RECEIVING A FAX
Placing the original(s) on the RADF
This section describes how to set the original(s) on the RADF (Reversing Automatic Document Feeder, optional). When
the originals are placed on the RADF, the uppermost page is the first to be scanned and sent.
1
After aligning the originals, place them with their face up and slide the guides to rest
against the edges of the originals.
Regardless of their sizes, originals are acceptable up to 100 sheets (35 to 80 g/m2 (9.3 to 20 lb.)) or 16 mm
(0.62") in height.
2-sided originals can be set and sent.
P.50 “Transmitting 2-Sided Originals”
When an original of any size other than LT/A4 is placed in the direction shown in the above left figure,
transmission to a recipient is carried out so that the pre-entered sender information is printed in position A in the
figure.
When an original of LT/A4 size is placed in the direction shown in the above right figure, transmission to a
recipient is carried out so that the pre-entered sender information is printed in position B in the figure.
The pre-entered sender information shows what is registered in the Terminal ID.
P.99 “Registering the terminal ID”
A
B
Page 24
2 SENDING/RECEIVING A FAX
22 Sending a Fax
Sending different width originals
To set different width originals, adjust the side guides to the widest original size, and then align the original against the
front side. Available combinations of the original size are as follows.
A/B format: A3, A4, B4, B5, A4-R, FOLIO
North American format: LD, LT, COMP, LG, LT-R
To send different width originals, you need to enable “DIFFERENT WIDTH” as a transmission condition.
P.23 “Setting the transmission conditions”
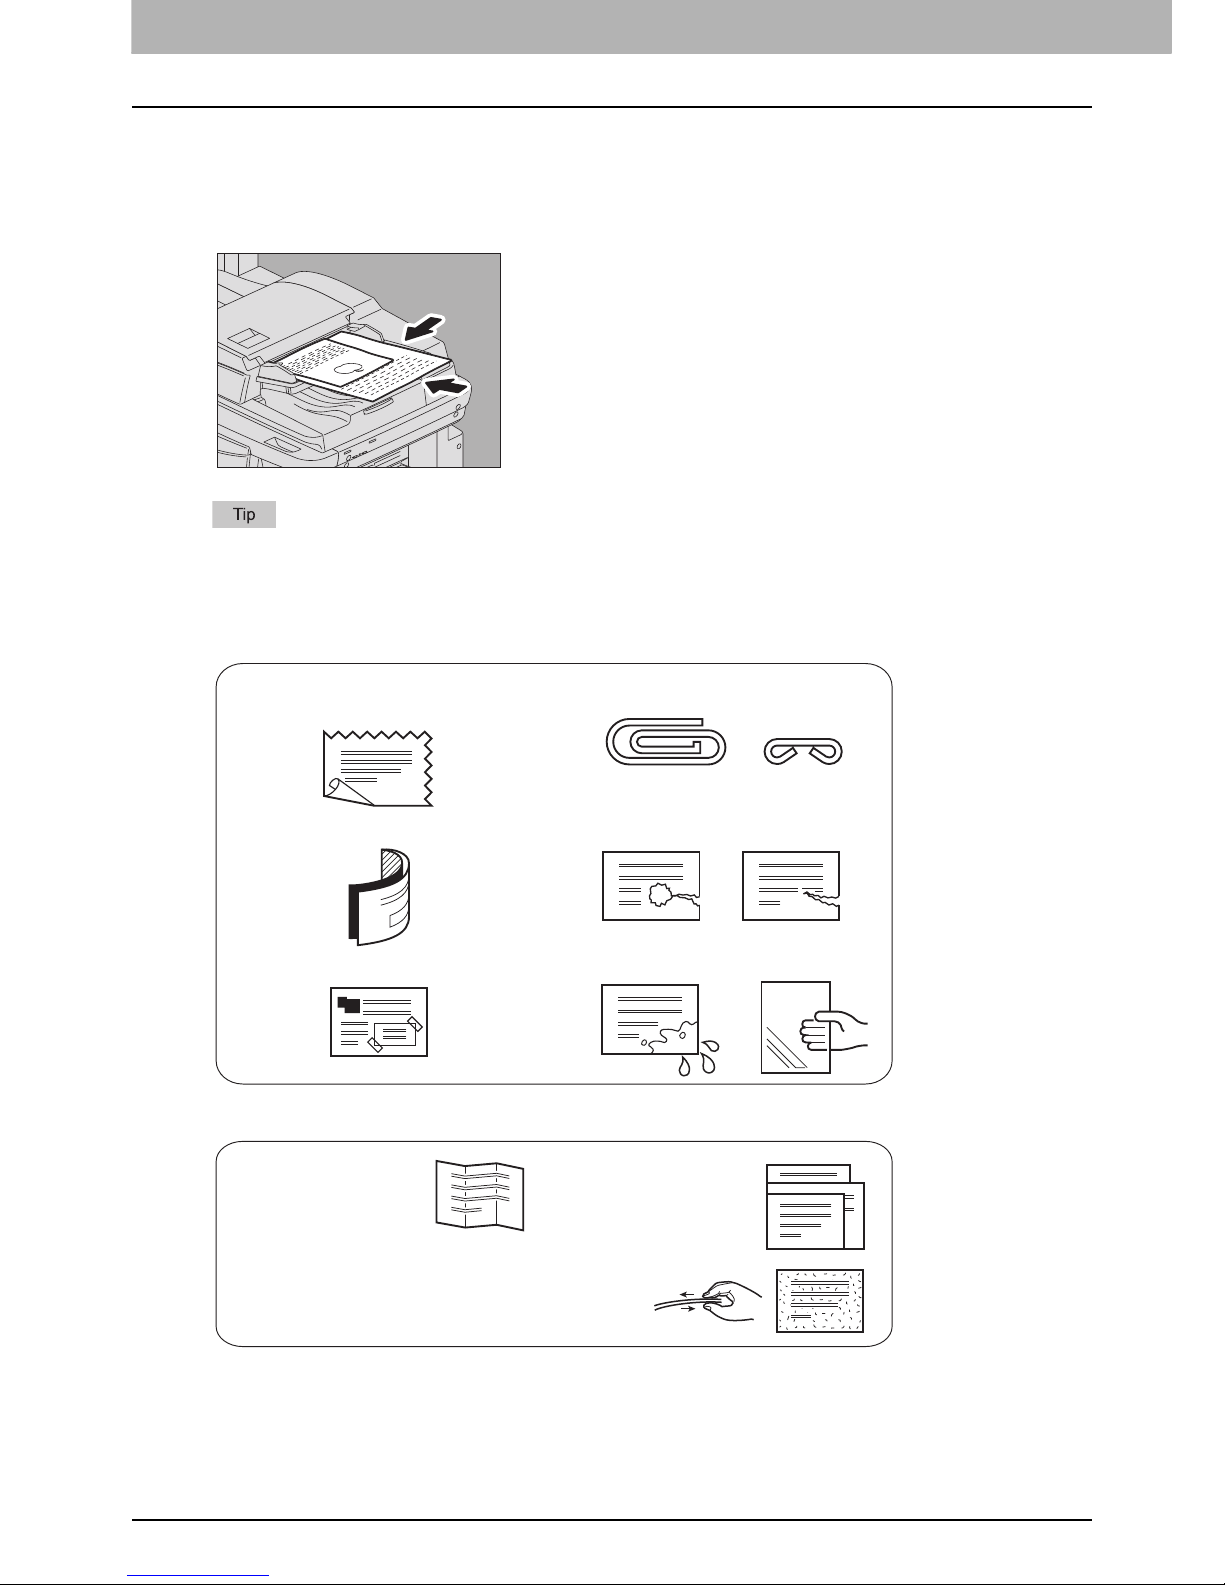
Precautions for using the RADF
Do not use the following originals as they may misfeed or become damaged:
The following originals should be handled carefully:
(1) Badly wrinkled or folded originals. In
particular, originals whose leading edge
are curled may fail to be fed.
(4) Clipped or stapled originals
(2) Originals with carbon paper (5) Originals with holes or torn originals
(3) Taped, pasted or clipped (cut out)
originals
(6) Damp originals (7) OHP film originals
(1) Folded or curled
originals should be
smoothed out before
being used.
(3) Originals sticking to each other, or originals that are
surface-treated may fail to separate properly.
(2) Originals with the
same width can be set
at a time. (Do not mix
originals with different
widths.)
Page 25
2.SENDING/RECEIVING A FAX
Sending a Fax 23
2 SENDING/RECEIVING A FAX
Setting the transmission conditions
You can set the fax transmission conditions.
The transmission conditions are only applied to the current transmission. They return to the default settings after
the transmission.
Each default setting of resolution, original mode, exposure, transmission mode and ECM is adjustable.
P.94 “Fax settings”
Making settings
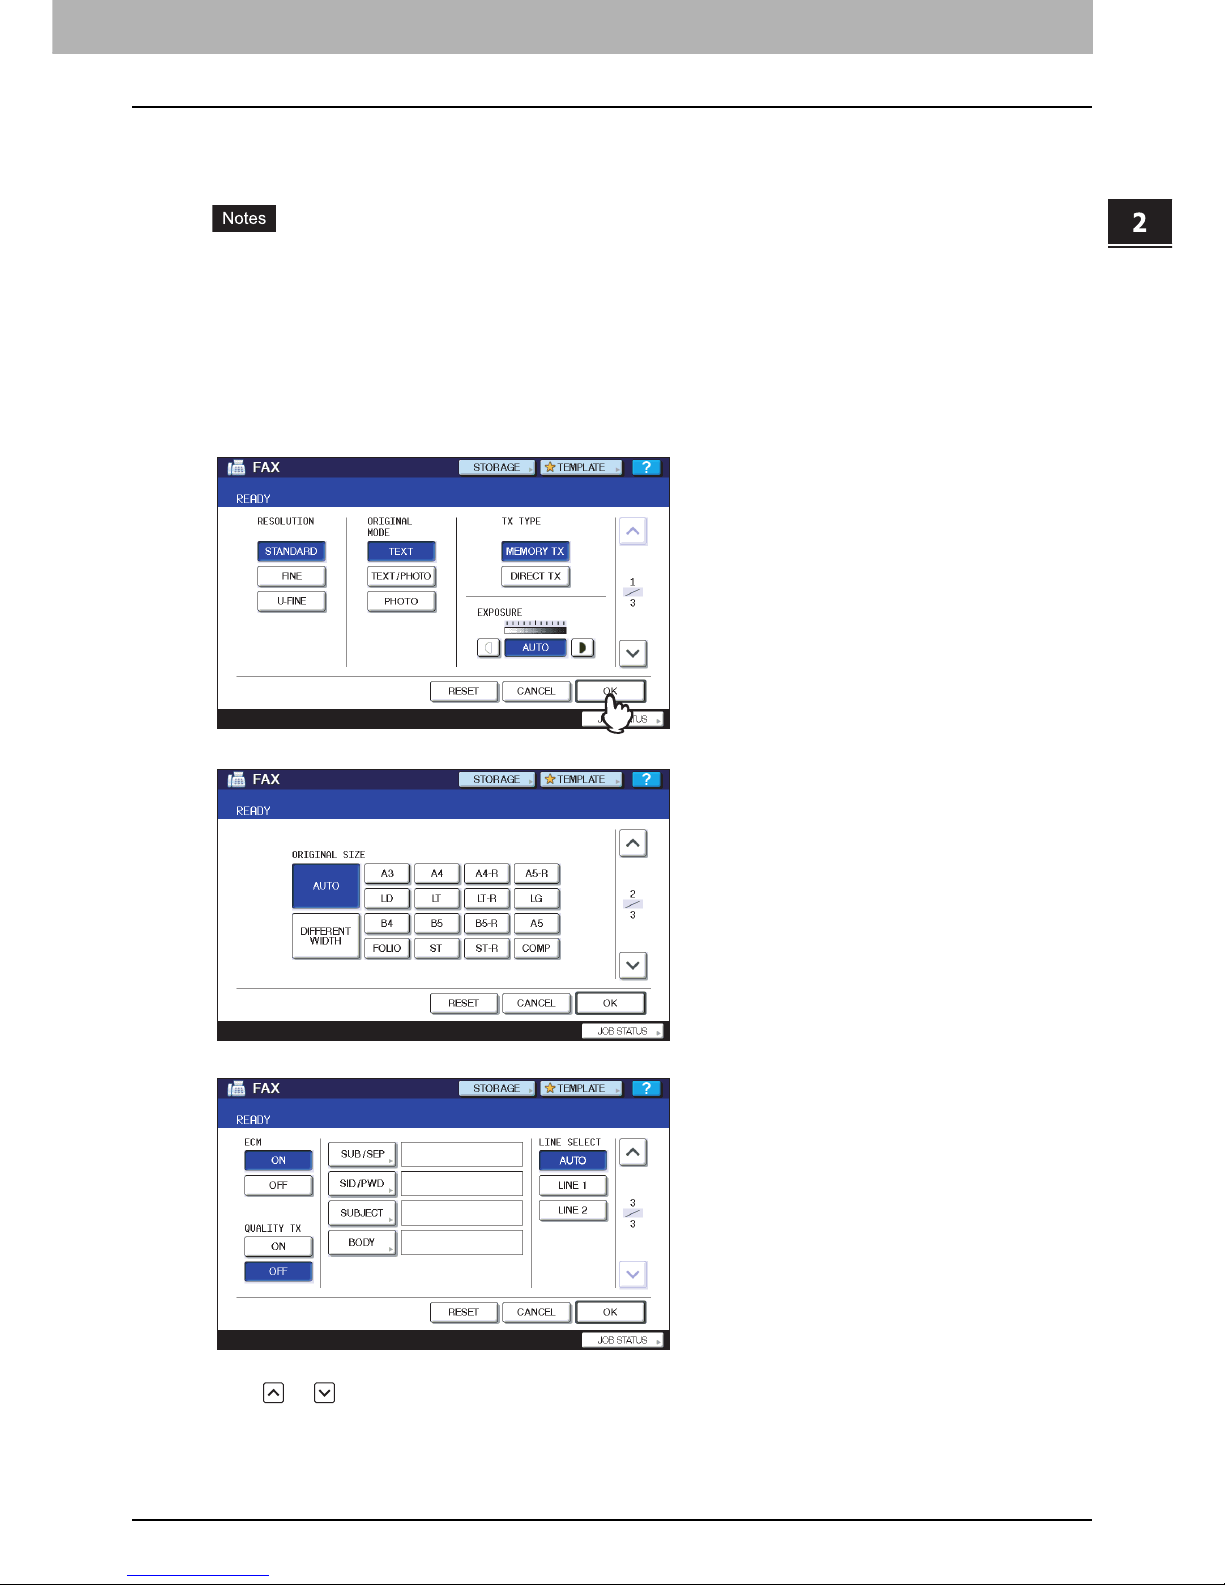
Pressing [OPTION] on the fax screen will display the transmission condition setting screen as shown below. Set each
setting item, and then press [OK].
Press or to switch the pages.
To cancel the operation and return to the previous screen, press the [RESET].
Page 26

2 SENDING/RECEIVING A FAX
24 Sending a Fax
RESOLUTION
Set the resolution based on the fineness of the original.
If the recipient’s fax machine is not capable of receiving originals at the same resolution, the resolution is automatically
converted before being sent to the recipient. The higher the resolution is, the longer it takes to send an original.
ORIGINAL MODE
Set the scanning mode based on the type of the original.
In the TEXT/PHOTO mode or PHOTO mode, transmission time may be longer than that in the TEXT mode.
TX TYPE
Set the fax transmission mode.
EXPOSURE
Set the density at which the original is to be scanned.
ORIGINAL SIZE
Set the scan size of the original.
If the recipient’s fax machine is not capable of receiving originals of B5/B5-R size, this equipment may reduce that size
before sending it. To avoid this, when the original to be set is B5 and B5-R size, specify A4 and A4-R size respectively.
STANDARD: This is suitable for an original with regular size text.
FINE: This is suitable for an original with small size text and fine illustrations.
U-FINE: This is suitable for an original with ultra-fine illustrations.
TEXT: This is suitable for an original with text and line drawings.
TEXT/PHOTO: This is suitable for an original with a mixture of text and photos.
PHOTO: This is suitable for an original with photos.
MEMORY TX: Send the original after the scanned data are saved in the memory. Up to 100 transmissions can be
reserved. Up to 1000 pages can be sent in one transmission.
DIRECT TX: Send the original directly as it is being scanned. Once a page has been scanned and sent, the next
page is scanned and sent. Therefore, it takes longer to scan and send all pages. However, you can
confirm on the fly that each page is sent to the recipient.
AUTO: This equipment automatically detects the contrast of the original, and scans it with the optimum density.
Manual:
Press or to set the desired contrast.
AUTO: The size of the original is automatically determined before the original is scanned.
DIFFERENT WIDTH: Select this function to load the originals with different width into the RADF (Reversing
Automatic Document Feeder).
Specified size: The original is scanned at the preset size regardless of its actual size.
Page 27

2.SENDING/RECEIVING A FAX
Sending a Fax 25
2 SENDING/RECEIVING A FAX
ECM
Switch the ECM (Error Correction Mode) communication ON or OFF. ECM is an internationally standardized
communication mode that automatically corrects errors that occur during fax transmissions. With this setting option ON,
even when the transmitted data have been affected by noise during communication, this mode allows good
communication without image distortion by automatically resending the parts that have been affected.
Both the sender and the receiver must have the ECM function to make ECM communication available.
When affected by noise during communication, communication time is slightly longer than usual. Even when the
ECM communication is used, an error may occur depending on the line status.
The ECM communication is not available for voice communication.
QUALITY TX
Switch Quality TX ON or OFF. When this mode is set to ON, originals are sent at a slower speed than usual and the
chances of errors occurring decrease.
SUB/SEP, SID/PWD
For the communication compatible with ITU-T (International Telecommunications Union Telecommunications) standards,
specify a sub-address or password to be sent to the recipient's fax machine. (Up to 20 digits can be entered.)
To use this function, the recipient’s fax machine must be capable of setting an ITU-T compatible subaddress or
password.
SUBJECT, BODY
The subject and body of the Internet Fax are shown here. This is not used for sending a standard fax.
LINE SELECT
Specify the line to be used for sending a fax when the 2nd Line for FAX Unit (optional) is installed.
P.105 “Setting 2nd Line for FAX Unit”
SUB (Subaddress) : Information to send data of the original to the fax machine.
SEP (Selective Polling) : Information to retrieve data of the original from the fax machine.
SID (Sender Identification) : Password for SUB.
PWD (Password) : Password for SEP.
AUTO: The line is switched automatically.
LINE1: The 1st line is used.
LINE2: The 2nd line is used.
Page 28

2 SENDING/RECEIVING A FAX
26 Sending a Fax
Changing the settings for each page
You can change the scanning conditions (RESOLUTION, MODE, EXPOSURE and ORIGINAL) for each page.
1
When the scanning of the original is completed, the confirmation screen for the next
original is displayed. Press [OPTION].
The illustration above shows the original placed on the original glass. If an original is placed on the RADF
(Reversing Automatic Document Feeder) and you press the [STOP] button on the control panel halfway through
the scanning, it halts and the confirmation screen is displayed.
2
The setting screen for the scanning conditions is displayed. Change the setting, and
then press [OK].
P.23 “Making settings”
Page 29
2.SENDING/RECEIVING A FAX
Sending a Fax 27
2 SENDING/RECEIVING A FAX
Specifying the recipient
You can specify the recipient fax number. There are various ways to specify it, such as Direct entry with digital keys and
Address book entry.
To use the address book, you need to register recipients’ fax numbers to the book in advance. For details of the
operation, refer to the MFP Management Guide or COMMAND CENTER Guide.
Direct entry with digital keys
Direct entry is the method for specifying the recipient's fax number using the digital keys.
1
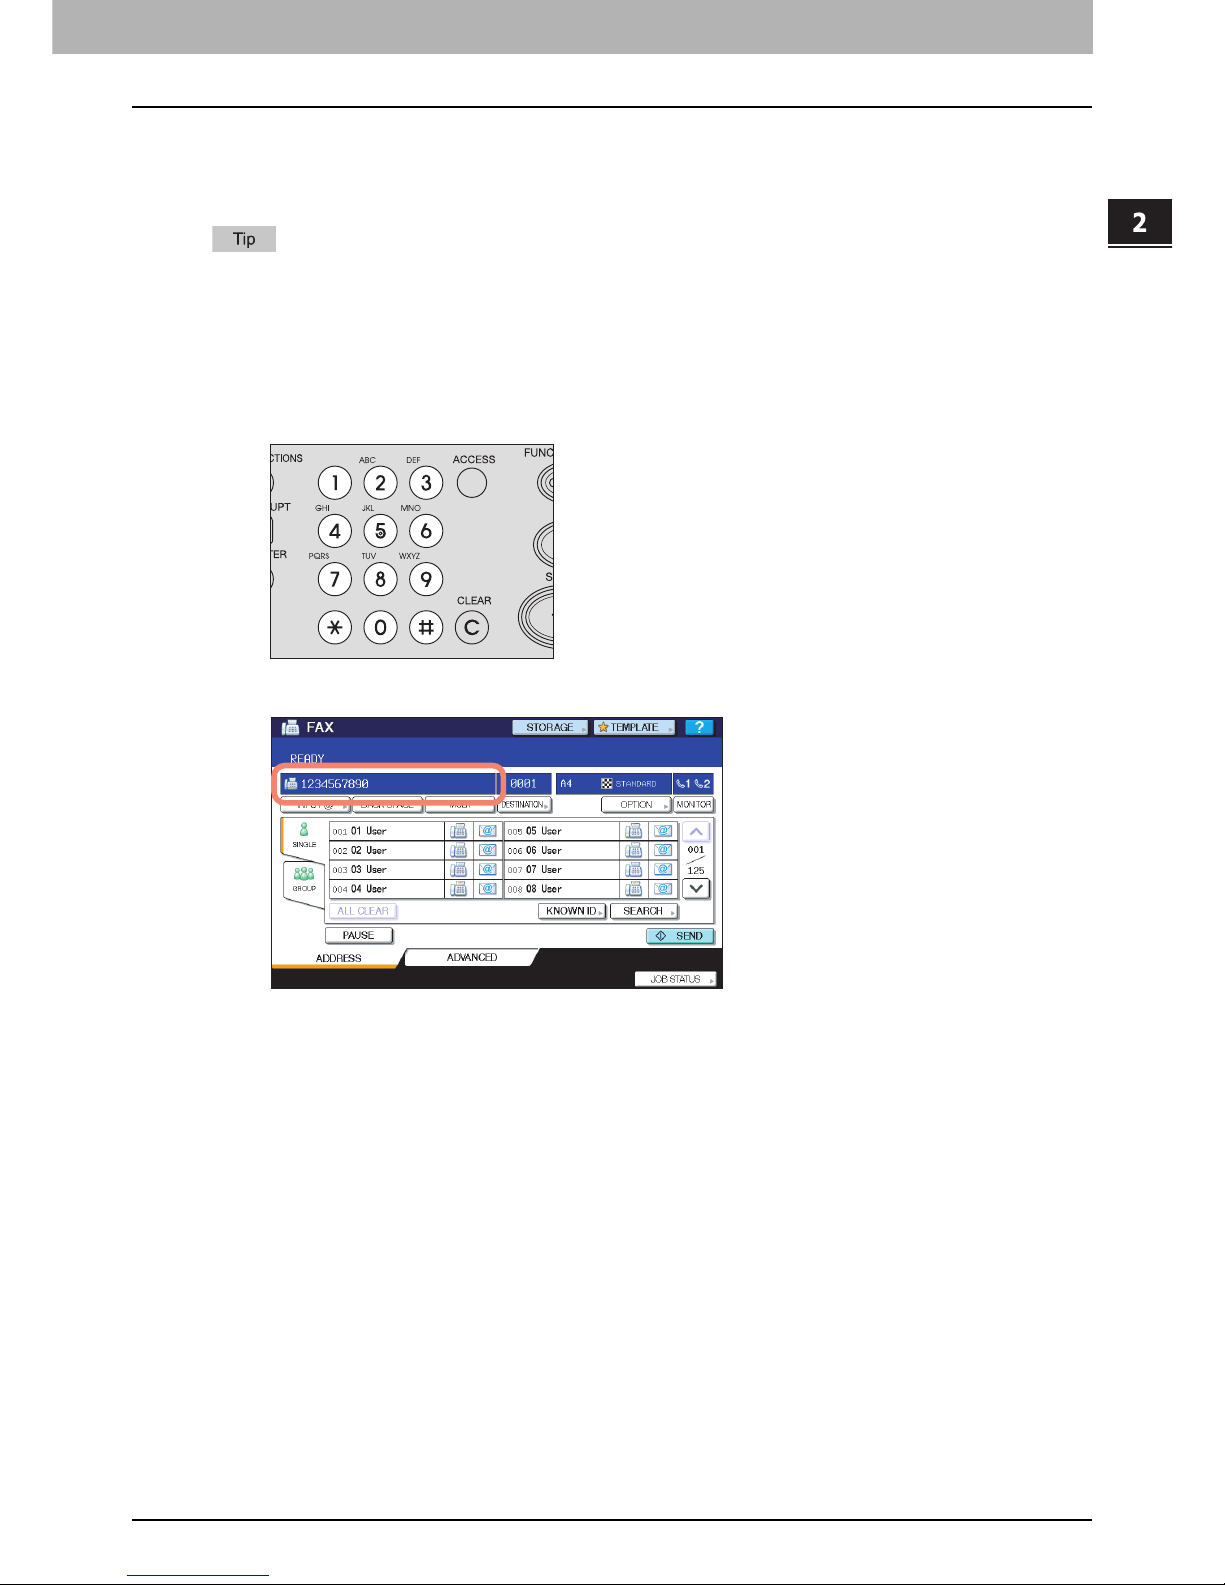
Key in the recipient's fax number using the digital keys on the control panel.
2
Confirm the fax number displayed on the fax screen.
To delete each entered value, press [BACK SPACE].
To delete all the entered values at once, press the [CLEAR] button on the control panel.
In the memory transmission mode, you can send the same document to multiple recipients (up to 400
recipients) at once. Press [MULTI], and then enter the recipient's fax number. Repeat this operation until you
specify all the recipients. You can also specify up to a total of 400 recipients' fax numbers by combining with
other entry methods.
To confirm all the selected recipients or delete unnecessary recipients, press [DESTINATION].
P.33 “Confirming the recipients”
Page 30
2 SENDING/RECEIVING A FAX
28 Sending a Fax
Specifying the recipient in the address book
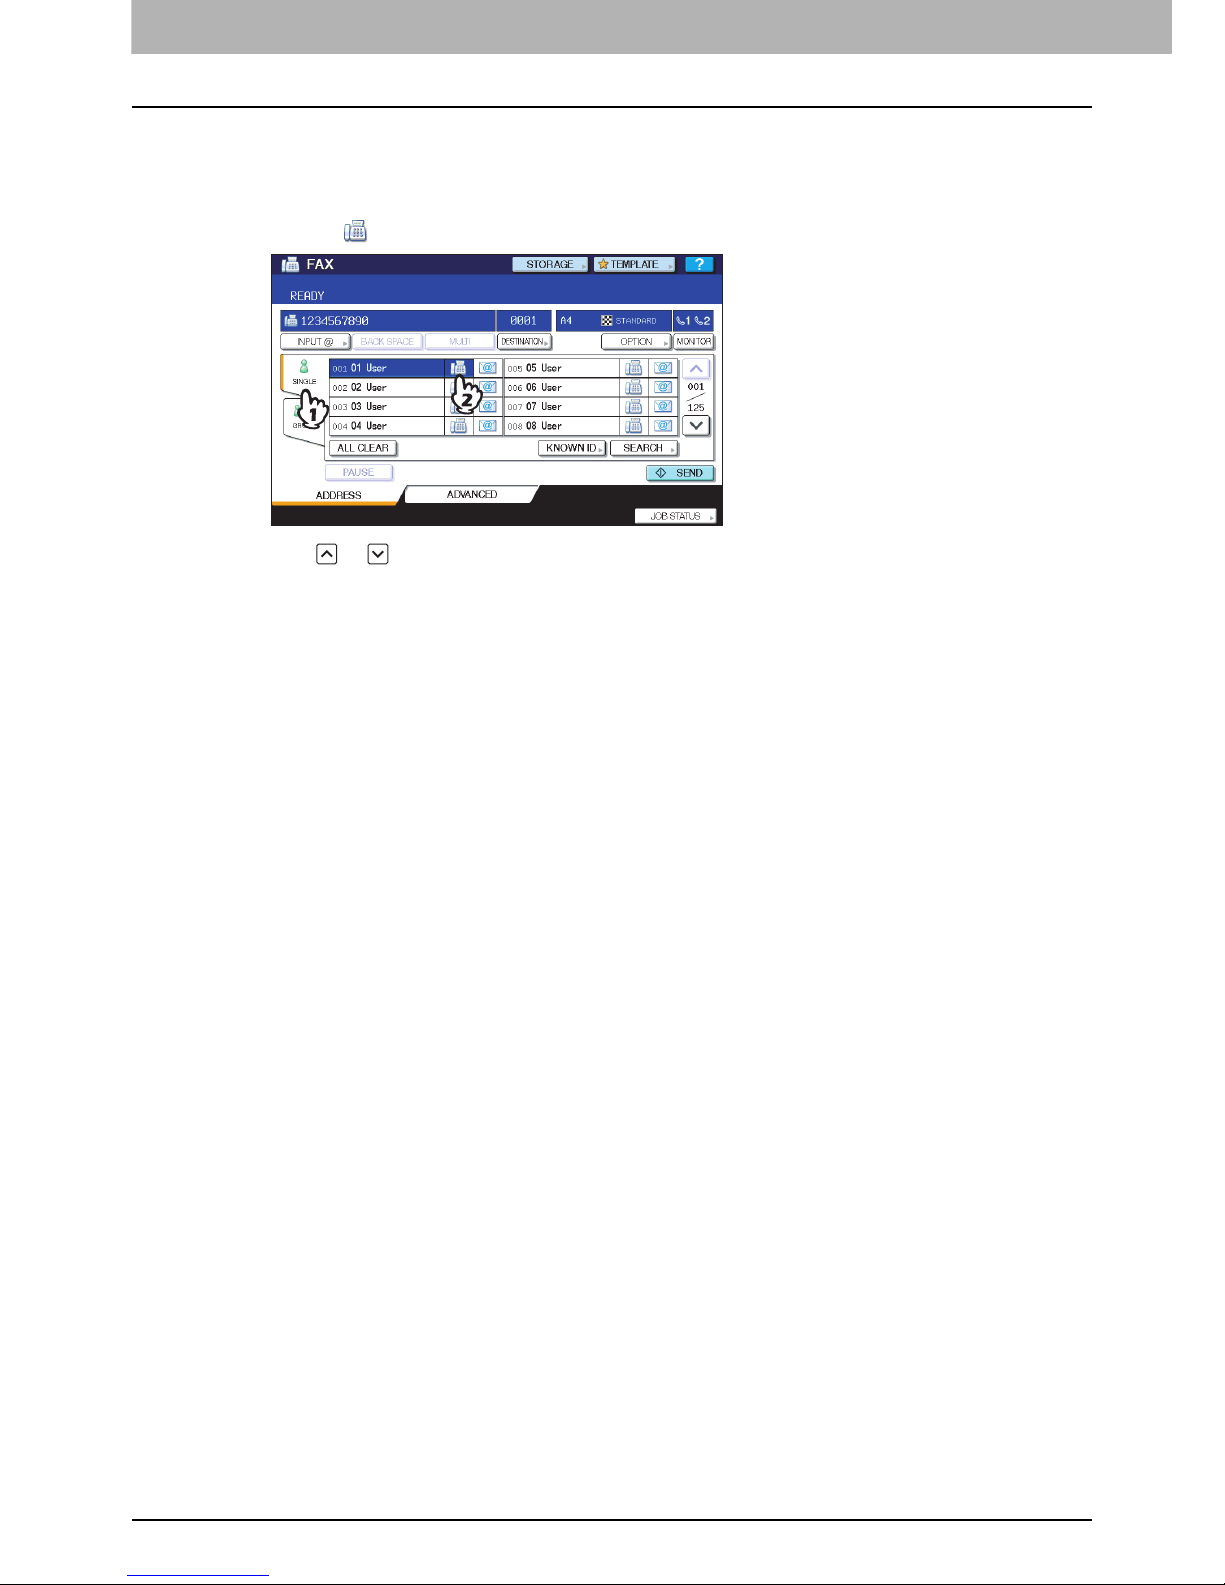
In the address book, you can specify the recipient.
1
Press [SINGLE] tab to display the list of the addresses, and then press the recipient’s
FAX icon ( ).
Press or to switch the pages.
Alternatively, you can select the recipient by pressing the address name box. In such case, if a fax number and
an E-mail address have been registered to the recipient's address, both of them are selected.
To cancel the selected recipient, press it again.
In the memory transmission mode, you can send the same document to multiple recipients (up to 400
recipients) at once. Repeat this selection until you select all the recipients. For the multi-address transmission,
you can also specify the recipients (up to a total of 400 recipients) by combining with other entry methods.
To confirm all the selected recipients or delete unnecessary recipients, press [DESTINATION].
P.33 “Confirming the recipients”
Page 31
2.SENDING/RECEIVING A FAX
Sending a Fax 29
2 SENDING/RECEIVING A FAX
Group entry
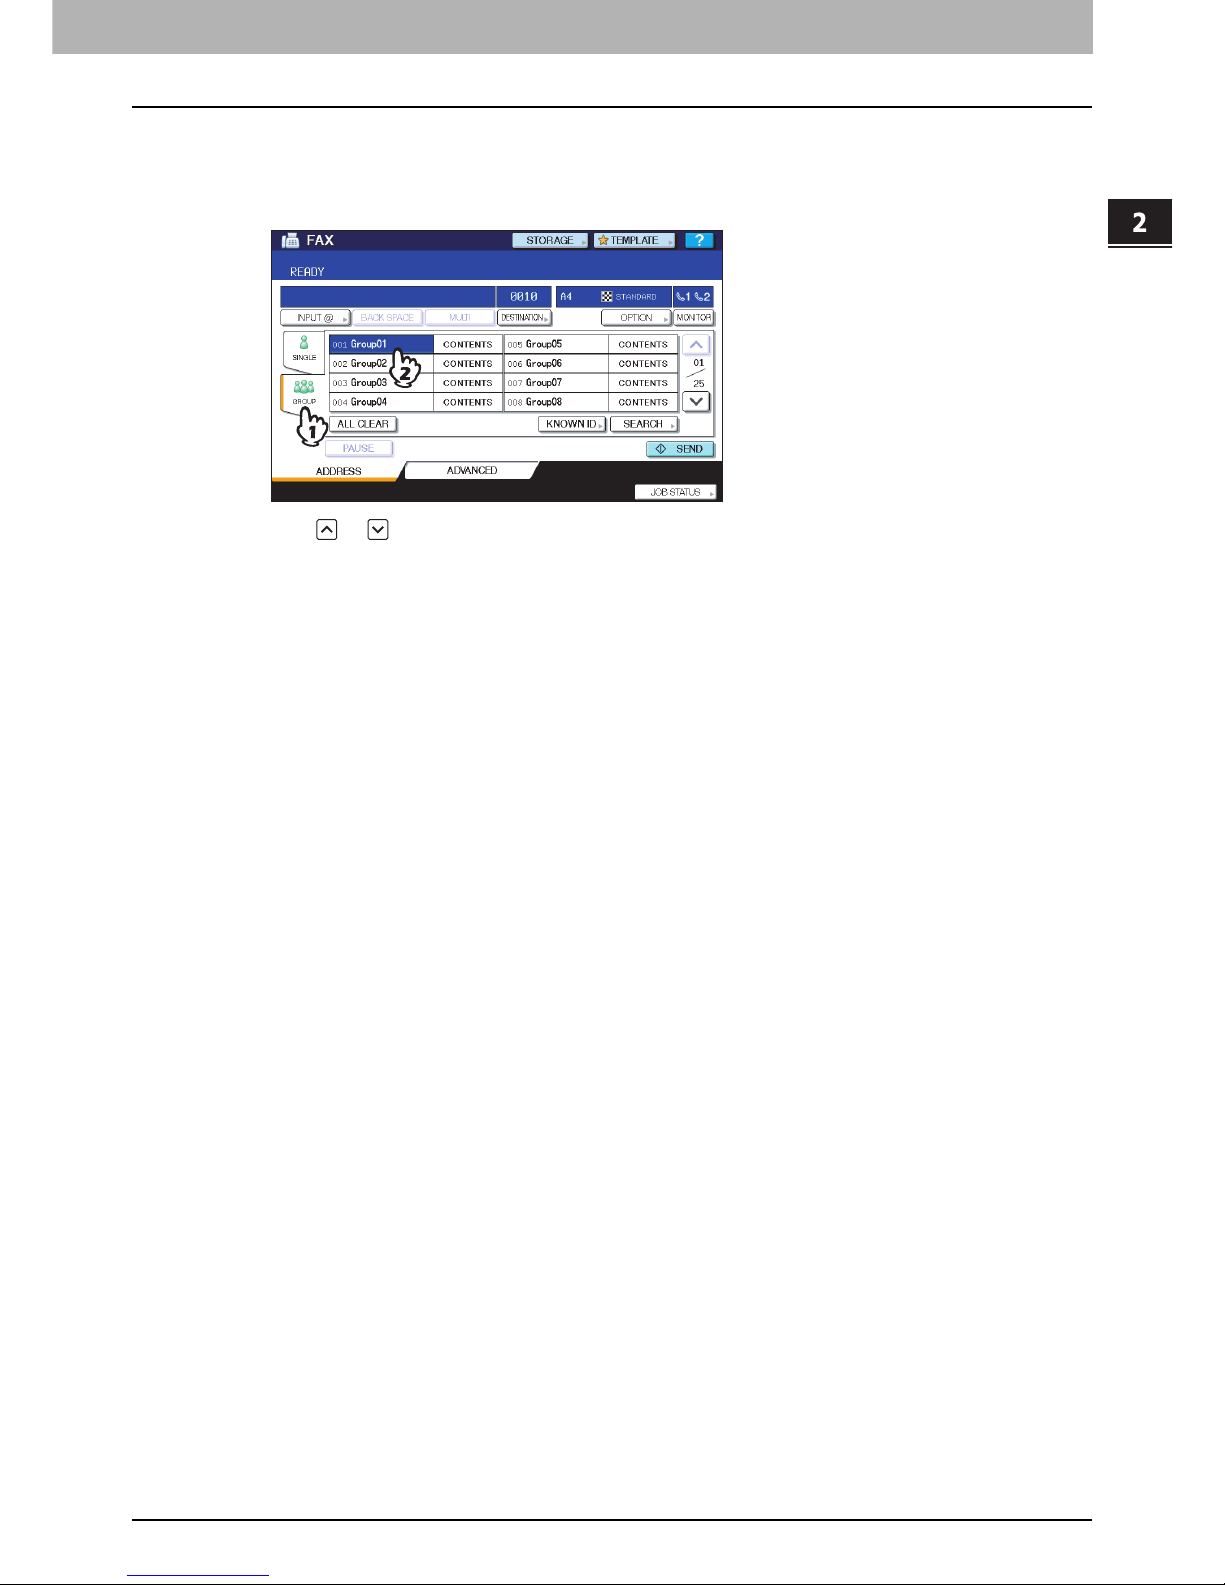
In the address book, you can specify the group to which you want to send a fax.
1
Press [GROUP] tab to display the list of the groups, and then press the group name.
Press or to switch the pages.
To cancel the selected group, press it again.
To confirm the addresses registered in that group, press [CONTENTS].
In the memory transmission mode, you can specify multiple groups (up to 200 groups, up to a total of 400
recipients) to send the same document at once. Repeat this selection until you select all the recipients. For the
multi-address transmission, you can also specify the recipients (up to a total of 400 recipients) by combining
with other entry methods.
To confirm all the selected recipients or delete unnecessary recipients, press [DESTINATION].
P.33 “Confirming the recipients”
Page 32
2 SENDING/RECEIVING A FAX
30 Sending a Fax
Searching for by ID number
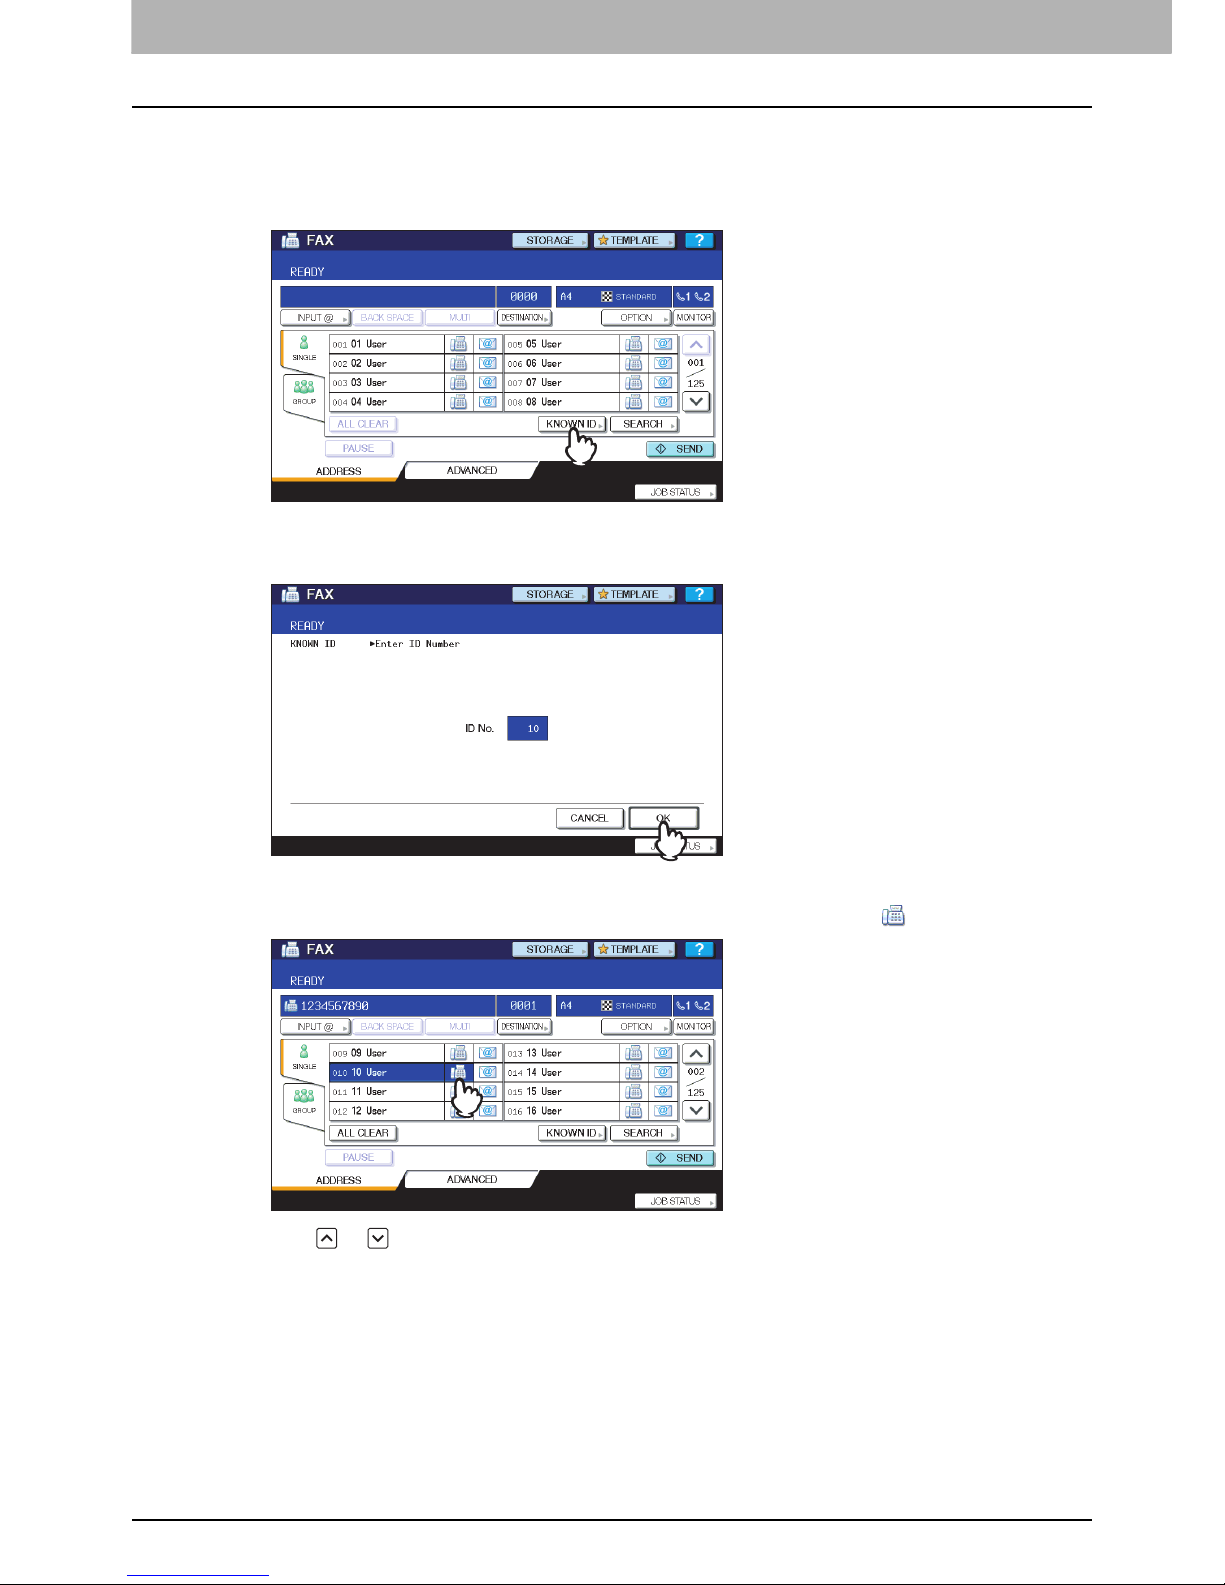
You can search for a specific recipient from the address book using the ID number.
1
Press [KNOWN ID].
2
Key in the desired ID number (1 to 1000) using the digital keys on the control panel, and
then press [OK].
The ID number is the one shown in the destination name box. The number ranges from 001 to 1000.
3
The page of the entered ID number is displayed. Press FAX icon ( ).
Press or to switch the pages.
Alternatively, you can select the recipient by pressing the address name box. In such case, if a fax number and
an E-mail address have been registered to the recipient's address, both of them are selected.
To cancel the selected recipient, press it again.
In the memory transmission mode, you can send the same document to multiple recipients (up to 400
recipients) at once. Repeat this selection until you select all the recipients. For the multi-address transmission,
you can also specify the recipients (up to a total of 400 recipients) by combining with other entry methods.
To confirm all the selected recipients or delete unnecessary recipients, press [DESTINATION].
P.33 “Confirming the recipients”
Page 33
2.SENDING/RECEIVING A FAX
Sending a Fax 31
2 SENDING/RECEIVING A FAX
Searching for the recipient's fax number
You can search for the recipient's fax number from the address book and LDAP server.
To search for the recipient's fax number from the LDAP (Lightweight Directory Access Protocol) server, the name of
the LDAP server to be connected is required to be registered to this equipment in advance. For details of the LDAP
server, ask your network administrator.
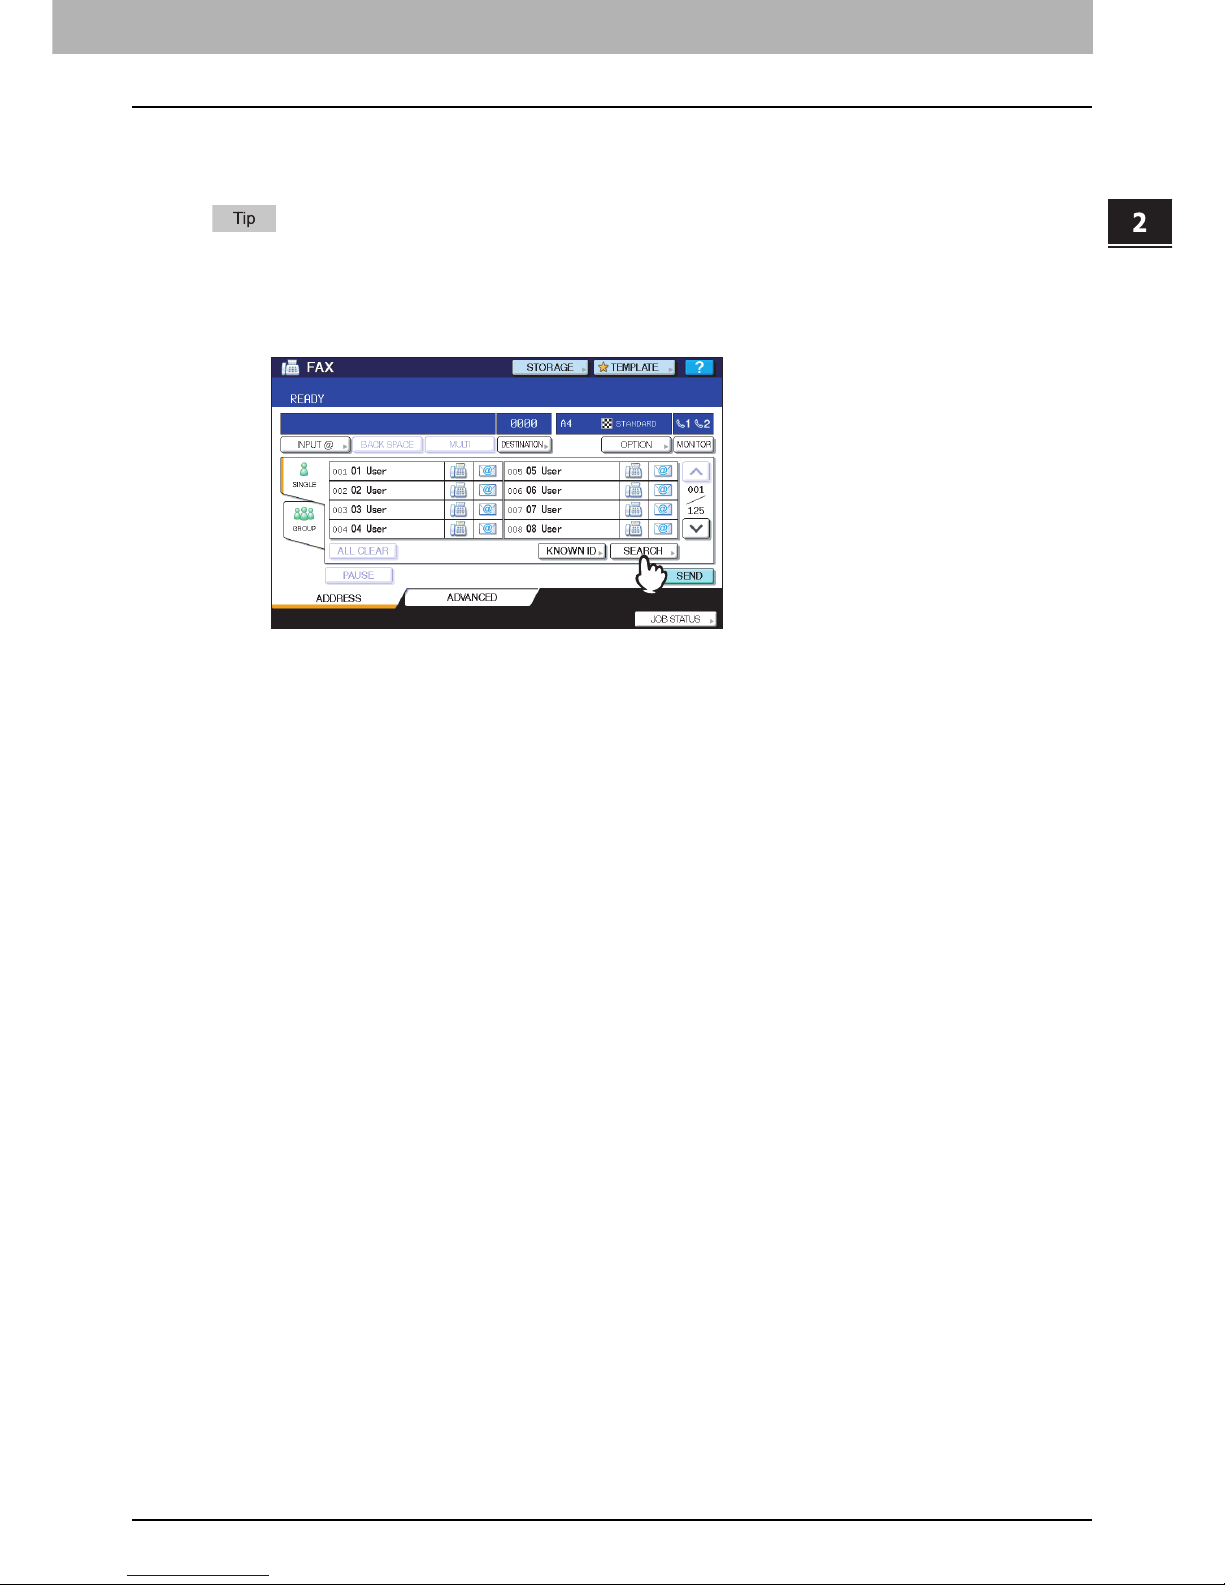
1
Press [SEARCH].
To display the recipient search menu, press [SEARCH] while the address list is displayed. Perform this
operation when you want to search the LDAP server.
To display the group search menu, press [SEARCH] while the group list is displayed.
Page 34
2 SENDING/RECEIVING A FAX
32 Sending a Fax
2
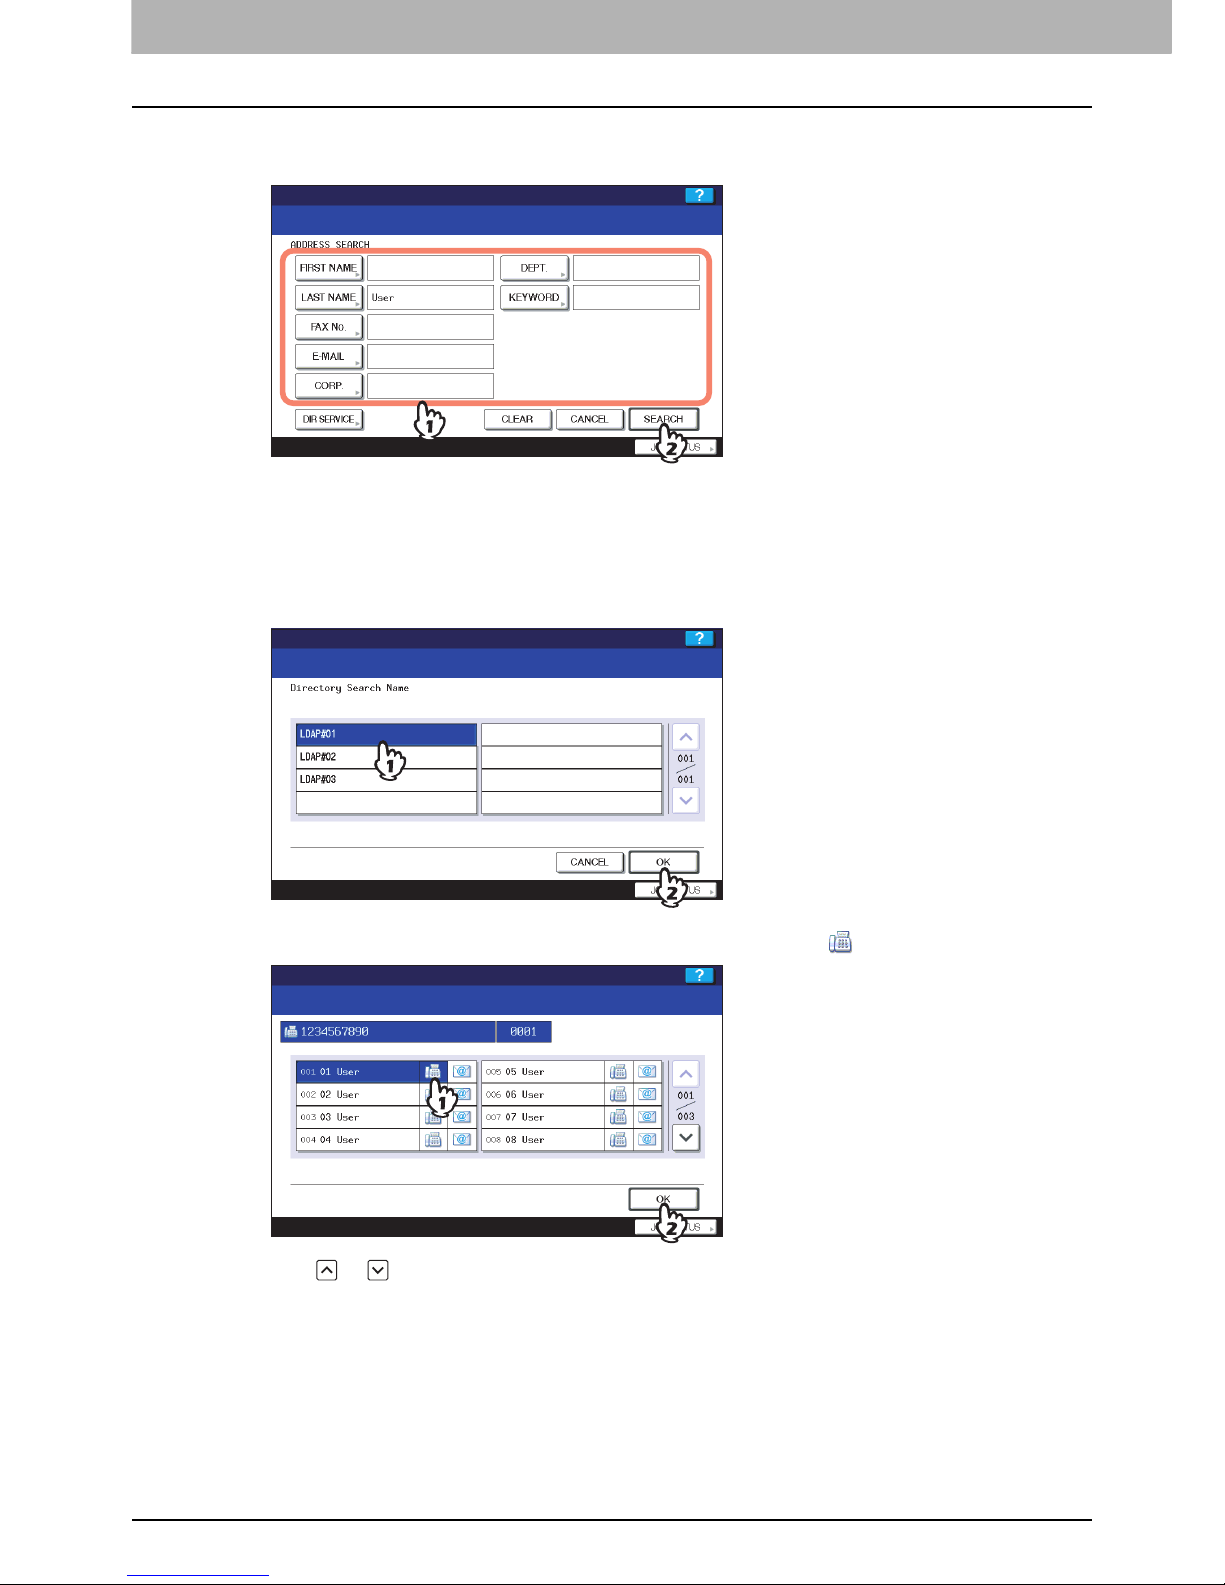
Press the button of the keyword category you want to search. Enter the keyword. Press
[SEARCH].
For details of the operation to enter characters, refer to the Quick Start Guide.
To cancel the entered keyword, press [CLEAR].
You can search for the desired recipient's fax number by specifying multiple keywords.
Selecting the LDAP server
To search for the recipient's fax number in the LDAP server, press [DIR SERVICE] in the recipient search menu.
The list of the LDAP servers is displayed. Press the LDAP server name you want to search, and then press [OK].
3
The search result is displayed. Press the desired FAX icon ( ), and then press [OK].
Press or to switch the pages.
Alternatively, you can select the recipient by pressing the address name box. In such case, if a fax number and
an E-mail address have been registered to the recipient's address, both of them are selected.
To cancel the selected recipient, press it again.
In the memory transmission mode, you can send the same document to multiple recipients (up to 400
recipients) at once. Repeat this selection until you select all the recipients. For the multi-address transmission,
you can also specify the recipients (up to a total of 400 recipients) by combining with other entry methods.
To confirm all the selected recipients or delete unnecessary recipients, press [DESTINATION].
P.33 “Confirming the recipients”
Page 35
2.SENDING/RECEIVING A FAX
Sending a Fax 33
2 SENDING/RECEIVING A FAX
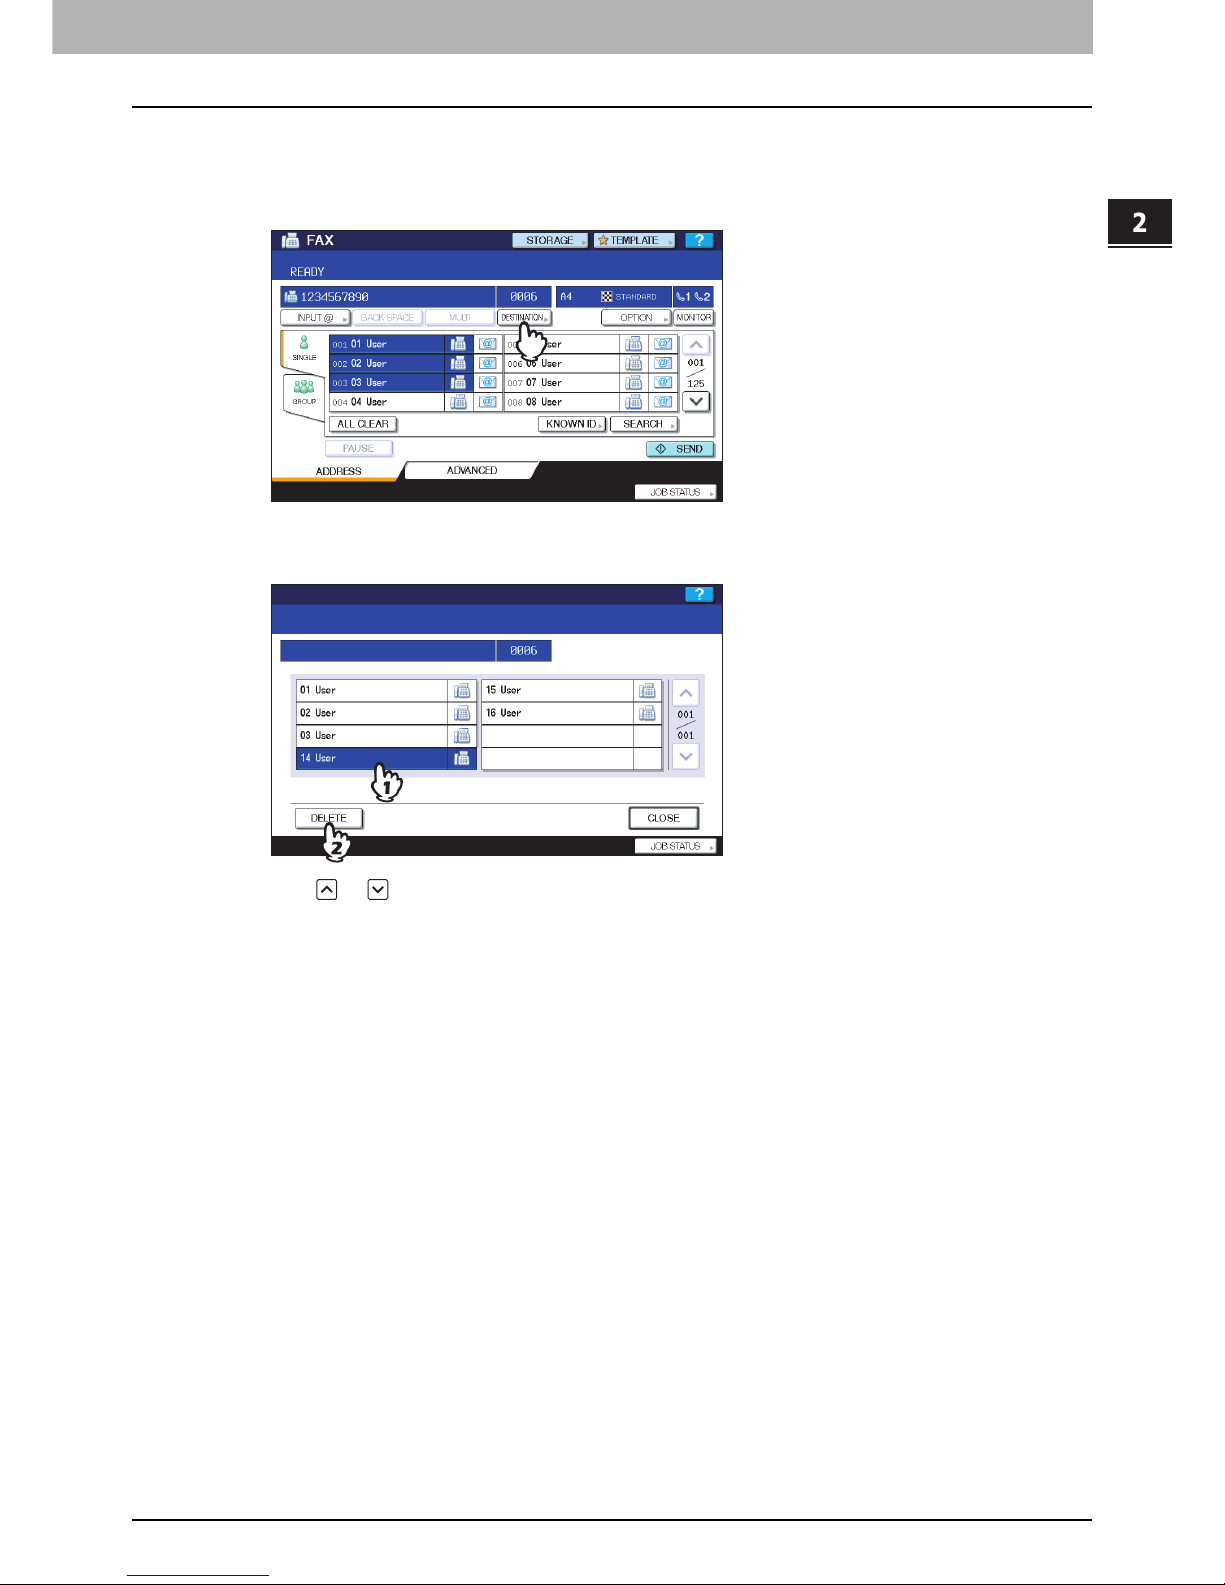
Confirming the recipients
You can confirm the recipients which you specified or delete unnecessary recipients.
1
Press [DESTINATION].
2
The recipient list screen is displayed. Select the recipient you want to delete, and then
press [DELETE].
Press or to switch the pages.
Press [CLOSE] to return to the previous screen.
Page 36
2 SENDING/RECEIVING A FAX
34 Sending a Fax
Other transmissions
On-hook transmission
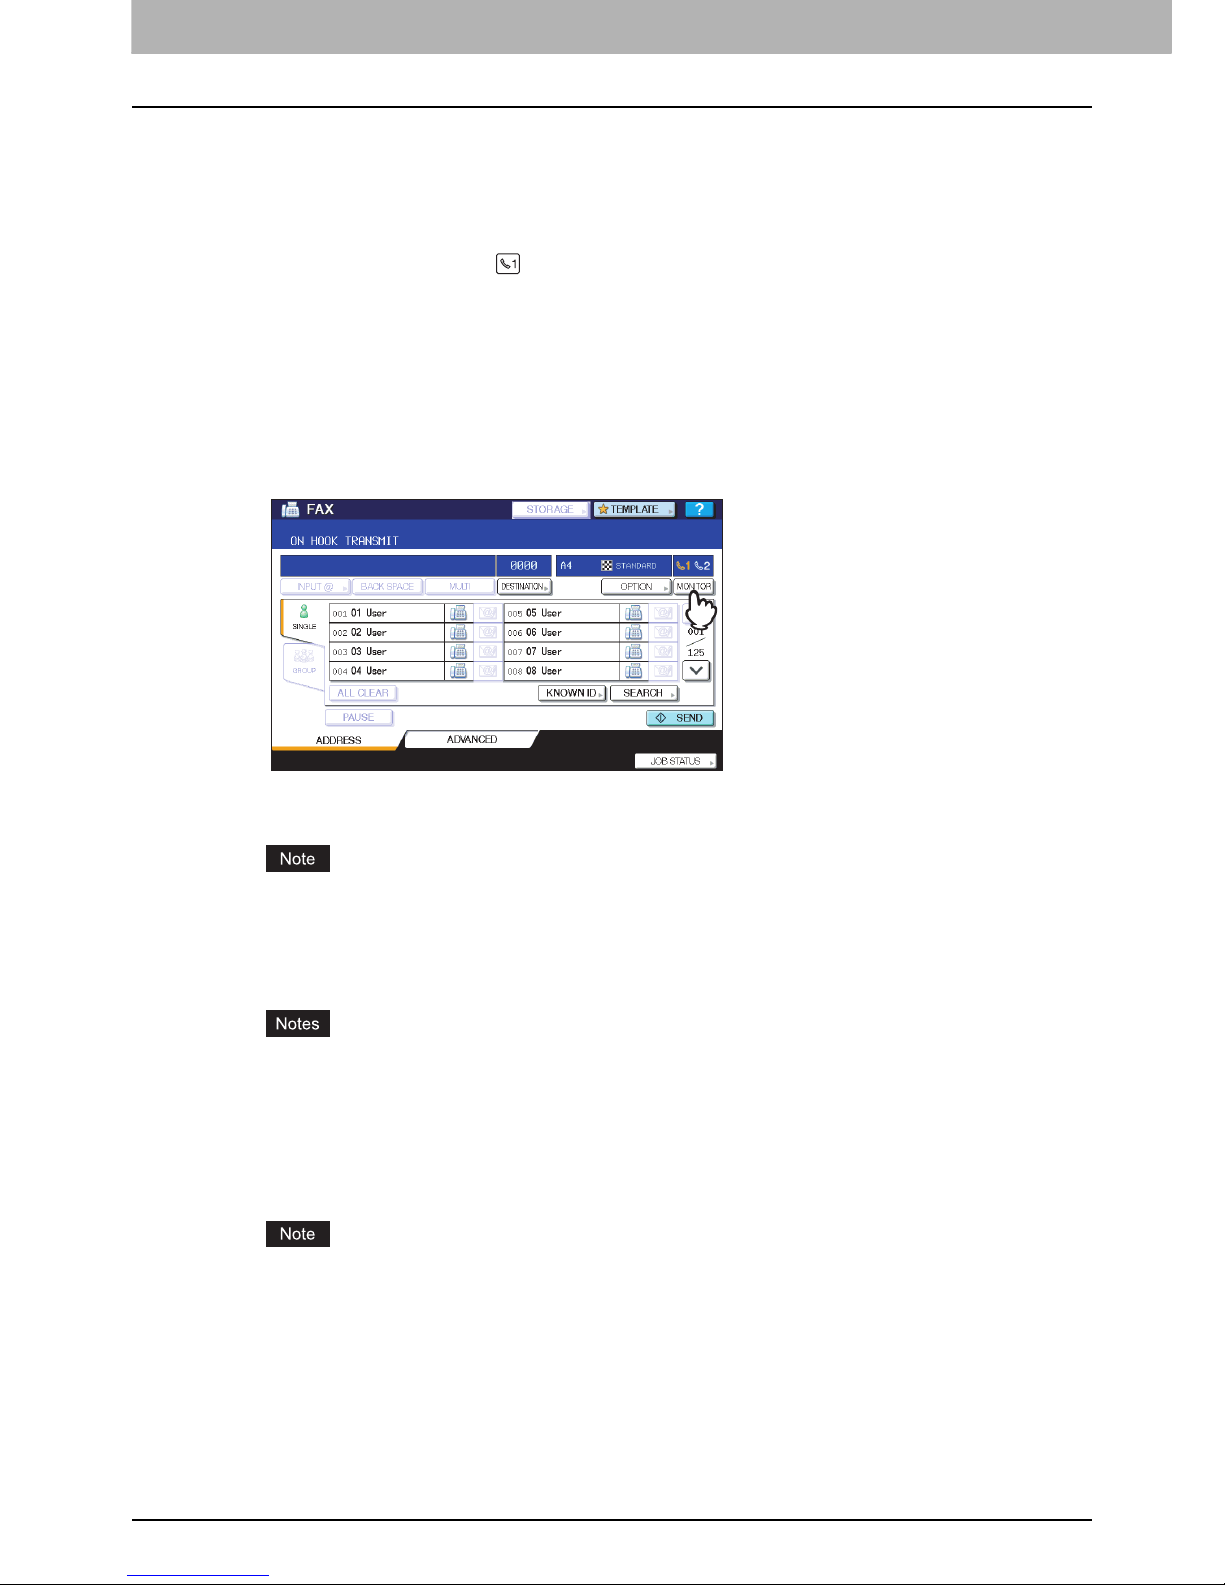
In this mode, you can dial and perform direct fax transmission without picking up the handset of the external telephone.
On-hook Transmission is available when on the upper right of the screen is OFF.
1
Place the original(s).
P.19 “Handling an original”
2
Press the [FAX] button on the control panel.
P.16 “Basic procedures”
3
Press [OPTION] and set the transmission conditions.
P.23 “Setting the transmission conditions”
4
Press [MONITOR].
Make sure that you hear the dial tone from the built-in speaker.
To cancel the operation, press [MONITOR] again.
To use the [SEARCH] to specify the recipients, you must specify the recipient in advance by following the
procedures below. Specify the recipients, and then press [MONITOR].
5
Specify the recipients.
P.27 “Specifying the recipient”
For direct entry, each press of a digital key on the control panel dials a number. If you make a mistake when
dialing the fax number, press [MONITOR] to cut the line, and then press it again to redial.
If you specified the recipient with the [SEARCH], press [MONITOR], and then [DIAL].
6
When you hear the answer tone (short high-pitched tone) through the built-in speaker
indicating the connection has been made with the recipient’s machine, press [SEND].
P.16 “Basic procedures”
When you hear the other party’s voice answering the call before pressing [SEND], pick up the handset of the
external telephone. Then ask him/her to perform operation of the fax reception.
Page 37

2.SENDING/RECEIVING A FAX
Sending a Fax 35
2 SENDING/RECEIVING A FAX
Off-hook transmission
In this mode, you can pick up the handset of the external telephone to dial and perform direct fax transmission. Off-hook
Transmission is available when on the upper right of the screen is OFF.
1
Place the original(s).
P.19 “Handling an original”
2
Press the [FAX] button on the control panel.
P.16 “Basic procedures”
3
Press [OPTION] and set the transmission conditions.
P.23 “Setting the transmission conditions”
4
Pick up the handset of the external telephone.
5
Use the external telephone to dial the fax number.
P.27 “Specifying the recipient”
When you use the external telephone to dial, the machine dials each number you enter. If you make a mistake
when dialing the fax number, replace the handset to cut the line, and then pick up the handset again to redial.
6
When you hear the answer tone (short high-pitched tone) through the built-in speaker
indicating the connection has been made with the recipient’s machine, press [SEND].
P.16 “Basic procedures”
When you hear the other party’s voice answering the call before pressing [SEND], ask him/her to perform
operation of the fax reception.
7
Replace the handset of the external telephone.
Page 38
2 SENDING/RECEIVING A FAX
36 Receiving a Fax
Receiving a Fax
Reception mode
This section describes how to receive a fax. Refer to the appropriate section for your current reception mode. The
reception mode can be set on the ADMN menu. For details of the current setting, ask your administrator. Besides the
receiving methods described in this page, there are various useful ways to receive a fax. These procedures are described
in the following pages.
P.53 “Polling Communication”
P.56 “Mailbox Transmission”
AUTO reception
Faxes are automatically received during an incoming call. Users do not have to do anything when receiving a fax.
When the 2nd Line for FAX Unit (optional) is installed, the reception mode of the 2nd line is limited to “AUTO
reception”.
MANUAL reception
Faxes are manually received by using an external telephone when you have an incoming call.
1
Pick up the handset of the external telephone when you have an incoming call.
If the incoming call is a telephone call, you can start talking.
2
If you hear a tone (fax signal) through the handset of the external telephone, press the
[FAX] button on the control panel.
P.16 “Basic procedures”
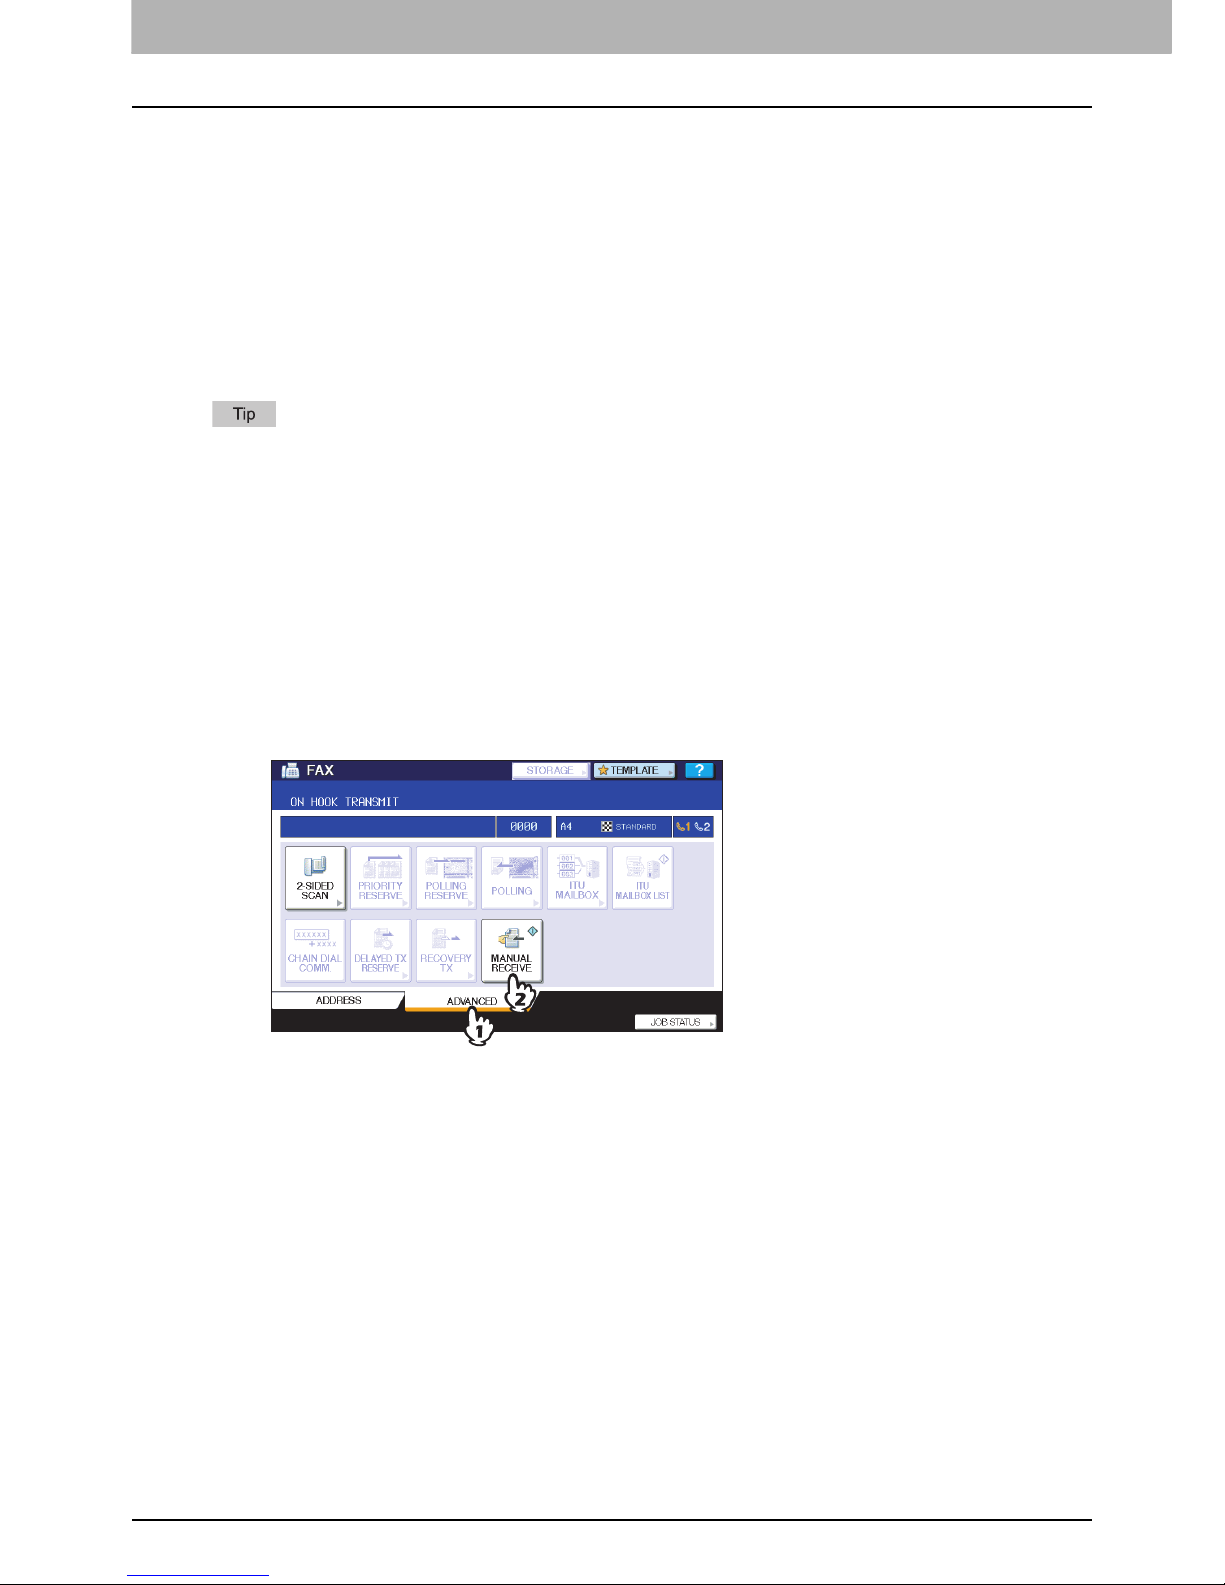
3
Press the [ADVANCED] tab, and then press [MANUAL RECEIVE].
4
When the message indicating that receiving faxes is possible appears, press the
[START] button on the control panel and replace the handset of the external telephone.
Page 39

2.SENDING/RECEIVING A FAX
Receiving a Fax 37
2 SENDING/RECEIVING A FAX
Memory reception
In the following conditions, faxes cannot be printed. If this happens, received fax data are stored in the memory, and
printing is resumed as soon as this equipment is ready. As the memory reception function is always enabled, you do not
need to make any setting.
During copying or printing
During printing of received copy of the originals
During printing of lists and reports
When paper has run out
When a paper jam occurs
When toner has run out
Page 40

2 SENDING/RECEIVING A FAX
38 Receiving a Fax
Originals and paper
Acceptable size of paper
A3, B4, A4, B5, A5, FOLIO, LD, LG, LT, ST and COMP sized paper are available.
The printing range of each size of paper is as follows: As shown in the figures below, if an original document contains any
information in the shaded area, it is not printed on the paper.
Set the paper in the drawers or the Large Capacity Feeder (optional). The bypass tray is not available.
Regardless of whether or not the Finisher (optional) is installed, paper exits on the receiving tray.
Drawers can be set for fax use only. For details of the operation, refer to the Copying Guide.
Default setting for RX printing
To print the received fax, the paper with the same width as the original is used. Depending on the length of the original,
“RX reduction printing” or “Discard printing” (both of them are set to ON by manufacture default) are applied.
P.102 “Setting RX printing”
When an original is shorter or the same as the paper printing area
It is printed in the original size.
When an original is longer than the paper printing area
It is printed according to the following priority:
When an original is up to 10 mm (0.4 inch) longer than the printing area: the part of the originals that exceeds the
paper printing area is discarded.
When an original exceeds the printing area by more than 10 mm (0.4 inch): the original image is reduced to 75 %
(reduction printing). If the image still cannot be fitted into the printing area, paper larger than the original is selected. In
case there is no larger paper available, the original is printed with the image divided.
5 mm
(0.2 inch)
5 mm
(0.2 inch)
5 mm
(0.2 inch)
5 mm
(0.2 inch)
5 mm
(0.2 inch)
5 mm
(0.2 inch)
5 mm
(0.2 inch)
5 mm
(0.2 inch)
Page 41
2.SENDING/RECEIVING A FAX
Receiving a Fax 39
2 SENDING/RECEIVING A FAX
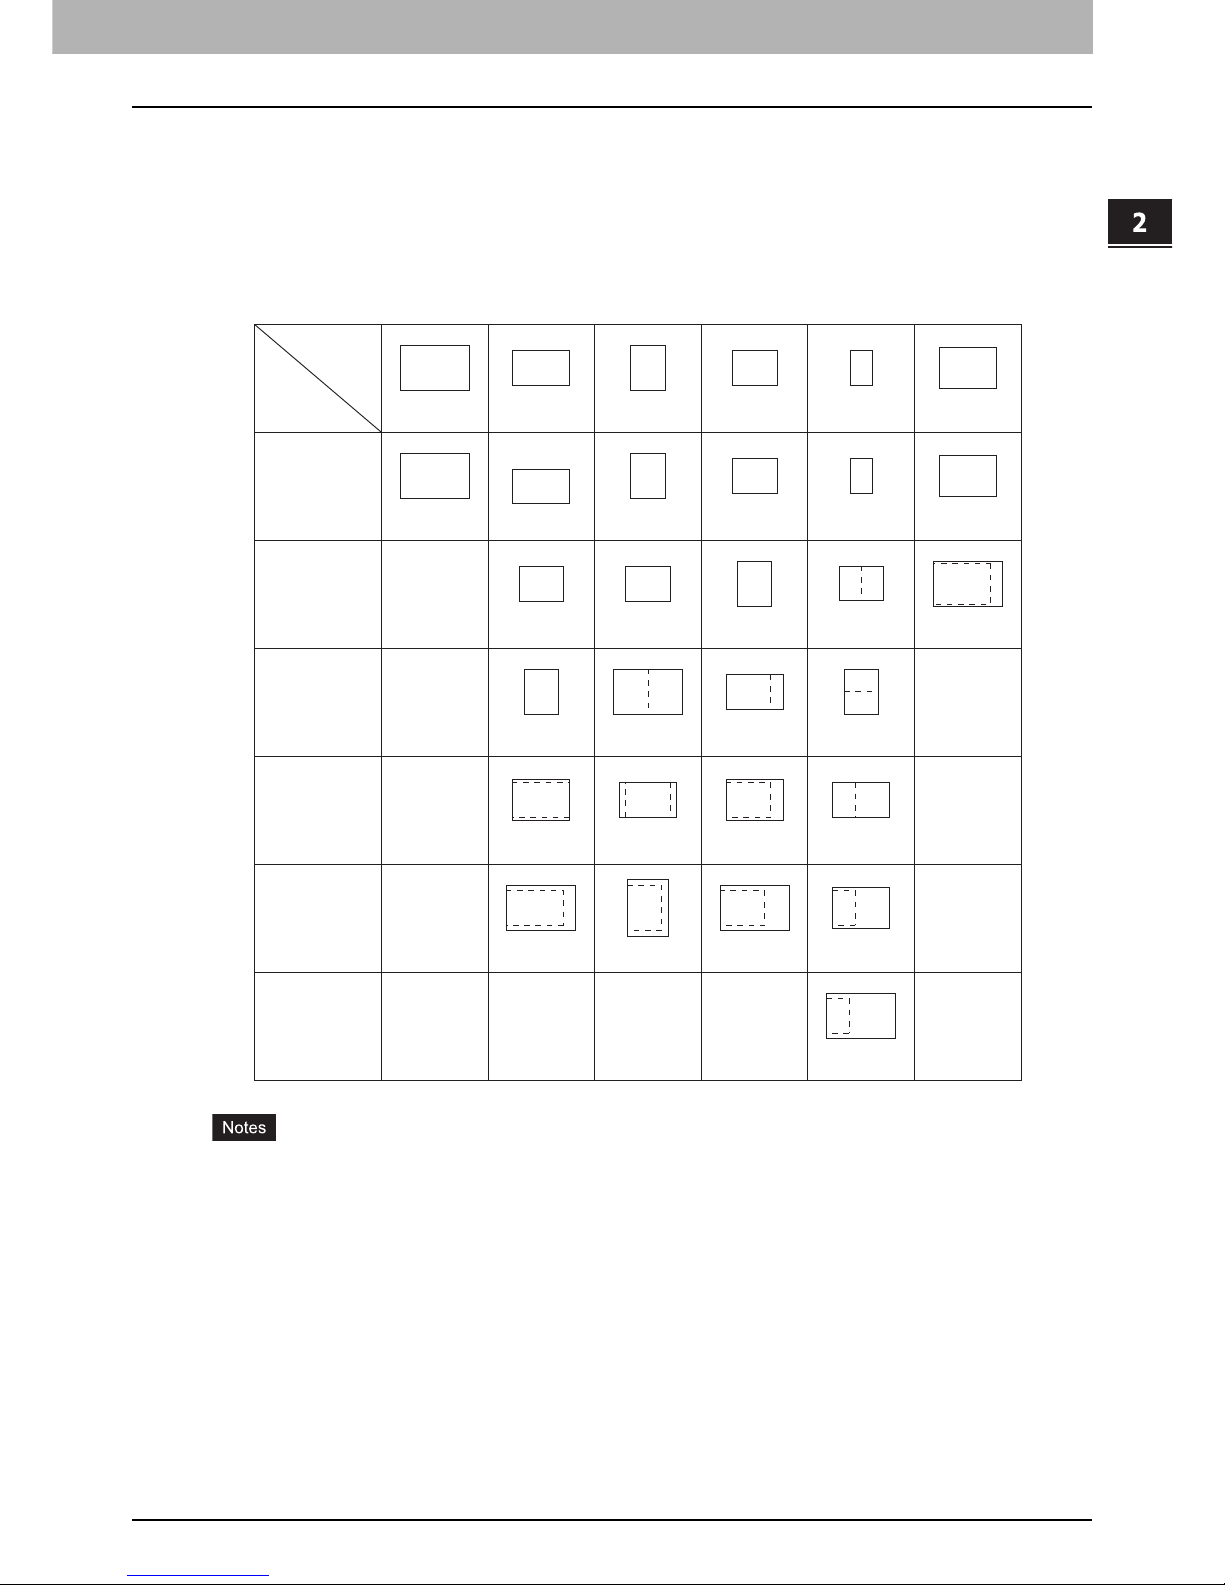
Paper priority when there is no same size paper
When both “RX reduction printing” and “Discard printing” are set to ON, paper is selected according to the following
priority:
1. Paper of the same size and the same orientation as the original
2. Paper of the same size but with a different orientation to the original
3. Paper of the same orientation but larger than the original
North American format
When the corresponding paper size is not available, in most cases, the scanned original is printed on paper of a
larger size. However, the sender’s fax machine may reduce the scanned original to fit the paper size available in
the recipient’s fax machine (this equipment). (Ex. LD LT)
The paper priority varies according to the “RX reduction printing” and “Discard printing” settings. For details,
contact your service technician.
Size of Original
being Received
Priority
Ledger Legal Letter Letter Statement COMP
Ledger Legal Letter Letter Statement COMP
COMP
Ledger
Ledger
Letter
Reduced to 75%
Letter
Reduced to 75%
Ledger
Legal
COMP
Legal
COMP
Ledger
Letter
Legal
COMP
Letter Letter Letter
Ledger
1
2
3
4
5
6
Page 42
2 SENDING/RECEIVING A FAX
40 Receiving a Fax
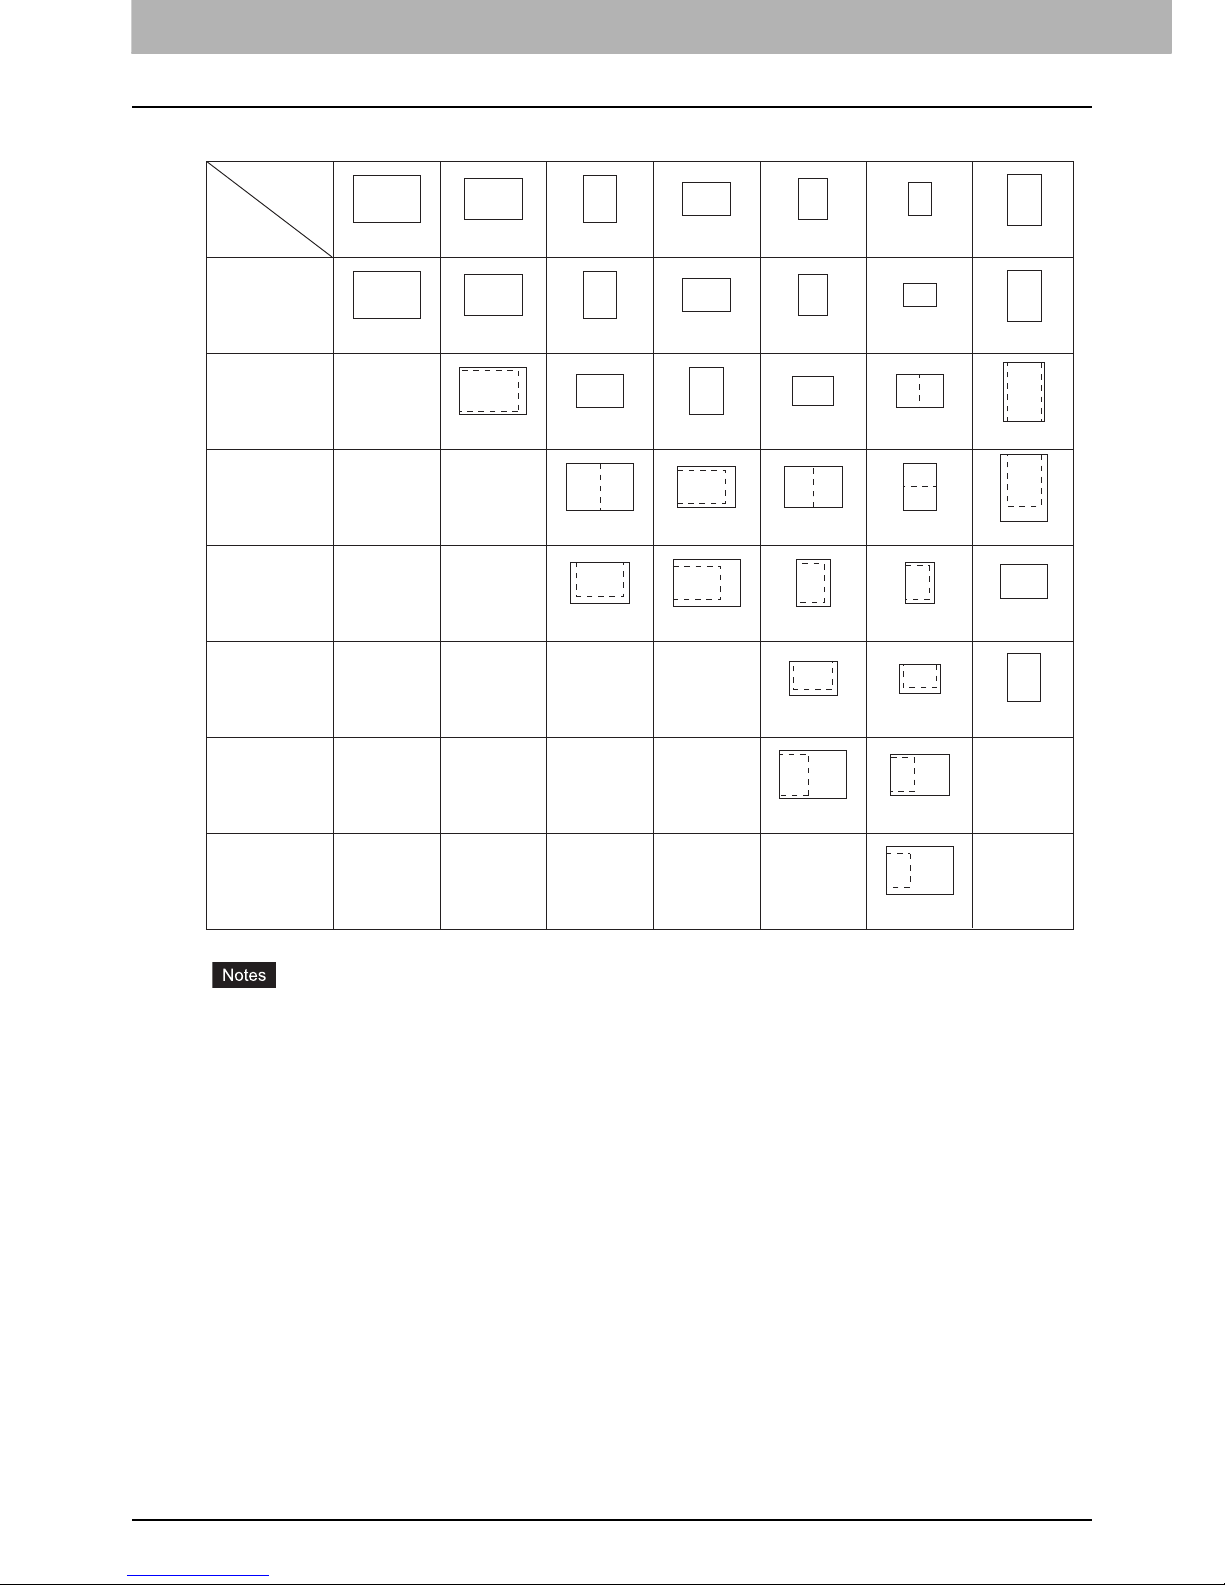
A/B format
When the corresponding paper size is not available, in most cases, the scanned original is printed on paper of a
larger size. However, the sender’s fax machine may reduce the scanned original to fit the paper size available in
the recipient’s fax machine (this equipment). (Ex. A3 A4)
The paper priority varies according to the “RX reduction printing” and “Discard printing” settings. For details,
contact your service technician.
Priority
Size of Original
being Received
A3 B4 A4 A5
A5
A4 B5
A3 B4
A4 A4
A4
A4 A4 B5
B5A3
A3
B4 A4
A4
B5
B4
A3
A3
B5
B4
A3
A4
B4
1
2
3
4
5
6
7
FOLIO
B4
FOLIO
A3
A4
Reduced to 75%
A4
Reduced to 75%
Page 43

3.CHECKING AND CANCELING THE
COMMUNICATIONS
This chapter describes how to check and cancel fax communications.
Checking Communications................................................................................................... 42
Checking reserved transmissions ........................................................................................................................42
Checking communication status (log)...................................................................................................................43
Canceling the Transmission.................................................................................................. 45
Canceling the memory transmission ....................................................................................................................45
Canceling direct transmissions.............................................................................................................................47
Canceling reserved transmissions .......................................................................................................................48
Page 44
3 CHECKING AND CANCELING THE COMMUNICATIONS
42 Checking Communications
Checking Communications
Checking reserved transmissions
You can check reserved fax transmissions.
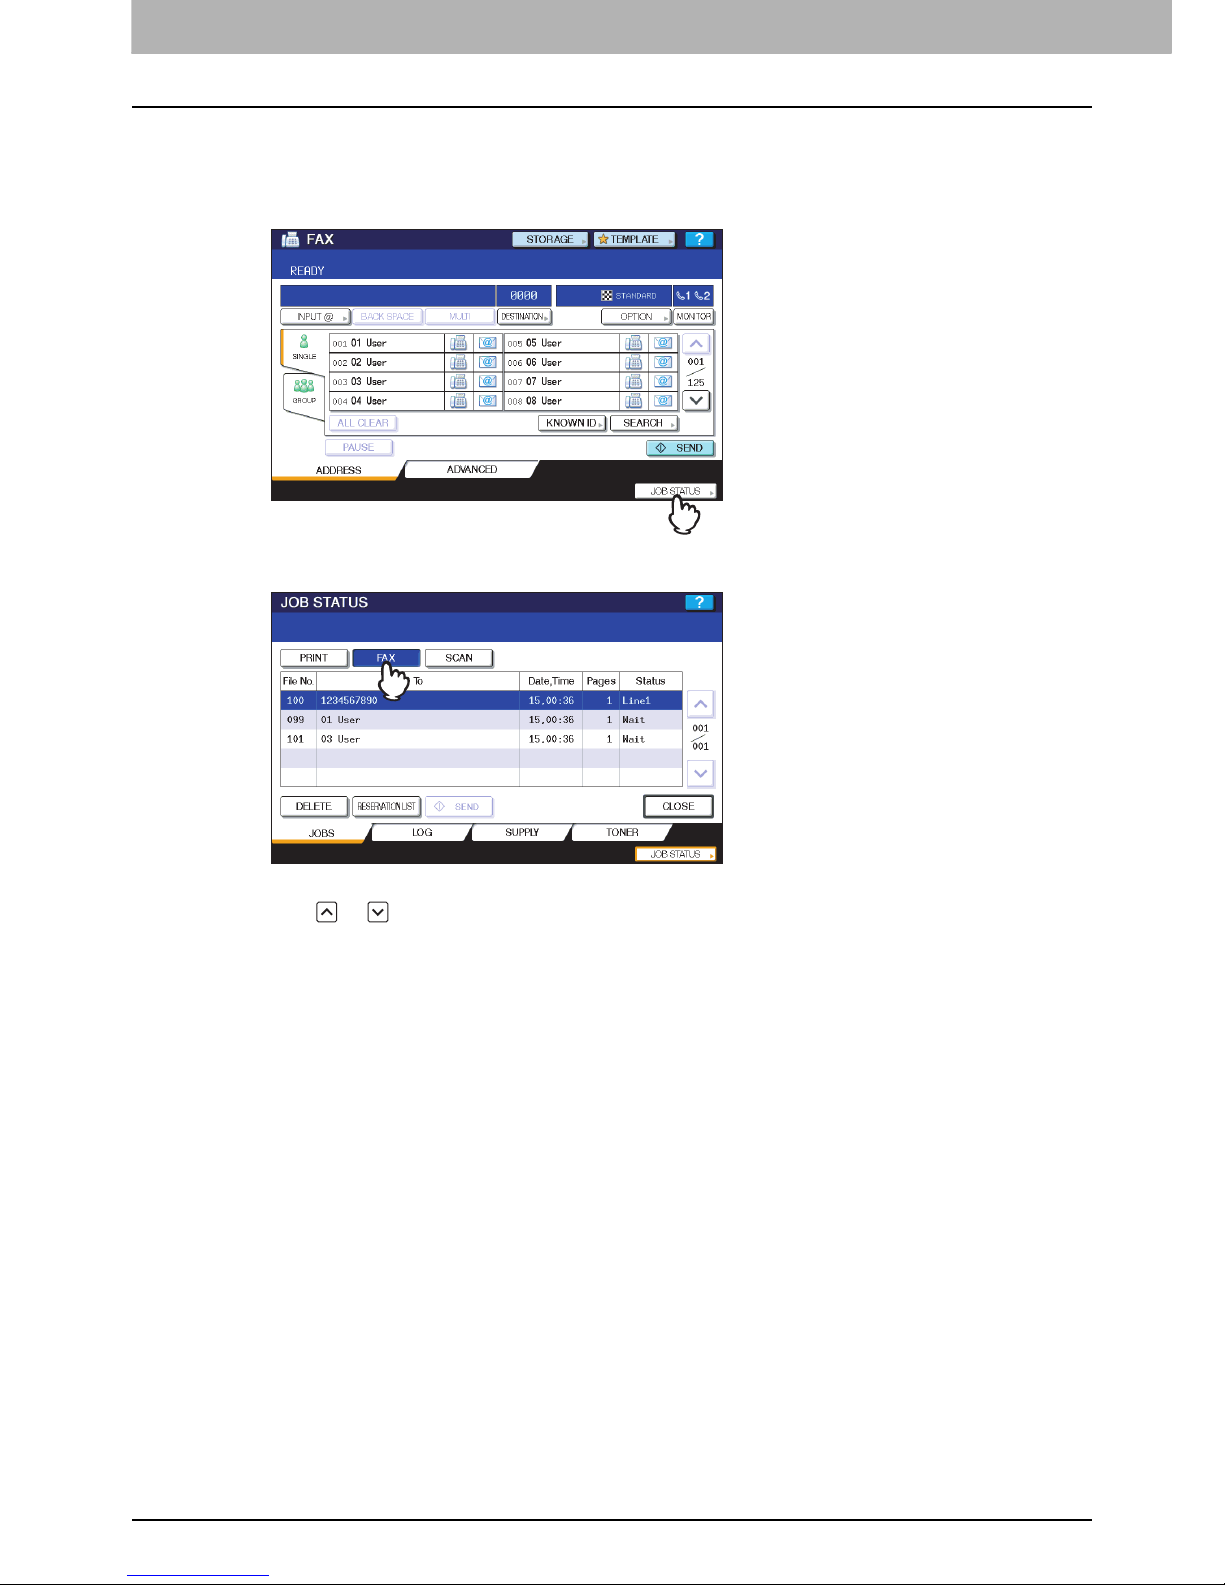
1
Press [JOB STATUS].
2
Select [FAX].
Reserved transmission jobs are listed in the reversed chronological order from top to bottom.
Press or to switch the pages.
To print the list of the reserved transmissions jobs, press [RESERVATION LIST].
In the “Status” column, the status of each job is indicated with the following:
Line1: Sending on the 1st line.
Line2: Sending on the 2nd line.
Network: Reserved for sending via Internet Fax.
Delayed: Reserved with the time to send specified.
Wait: Communication is in the standby queue.
Invalid: Under standby due to an invalid department code (Network Fax). For details of Network Fax
function, refer to the Network Fax Guide.
Page 45
3.CHECKING AND CANCELING THE COMMUNICATIONS
Checking Communications 43
3 CHECKING AND CANCELING THE COMMUNICATIONS
Checking communication status (log)
You can check the log of fax transmissions and receptions.
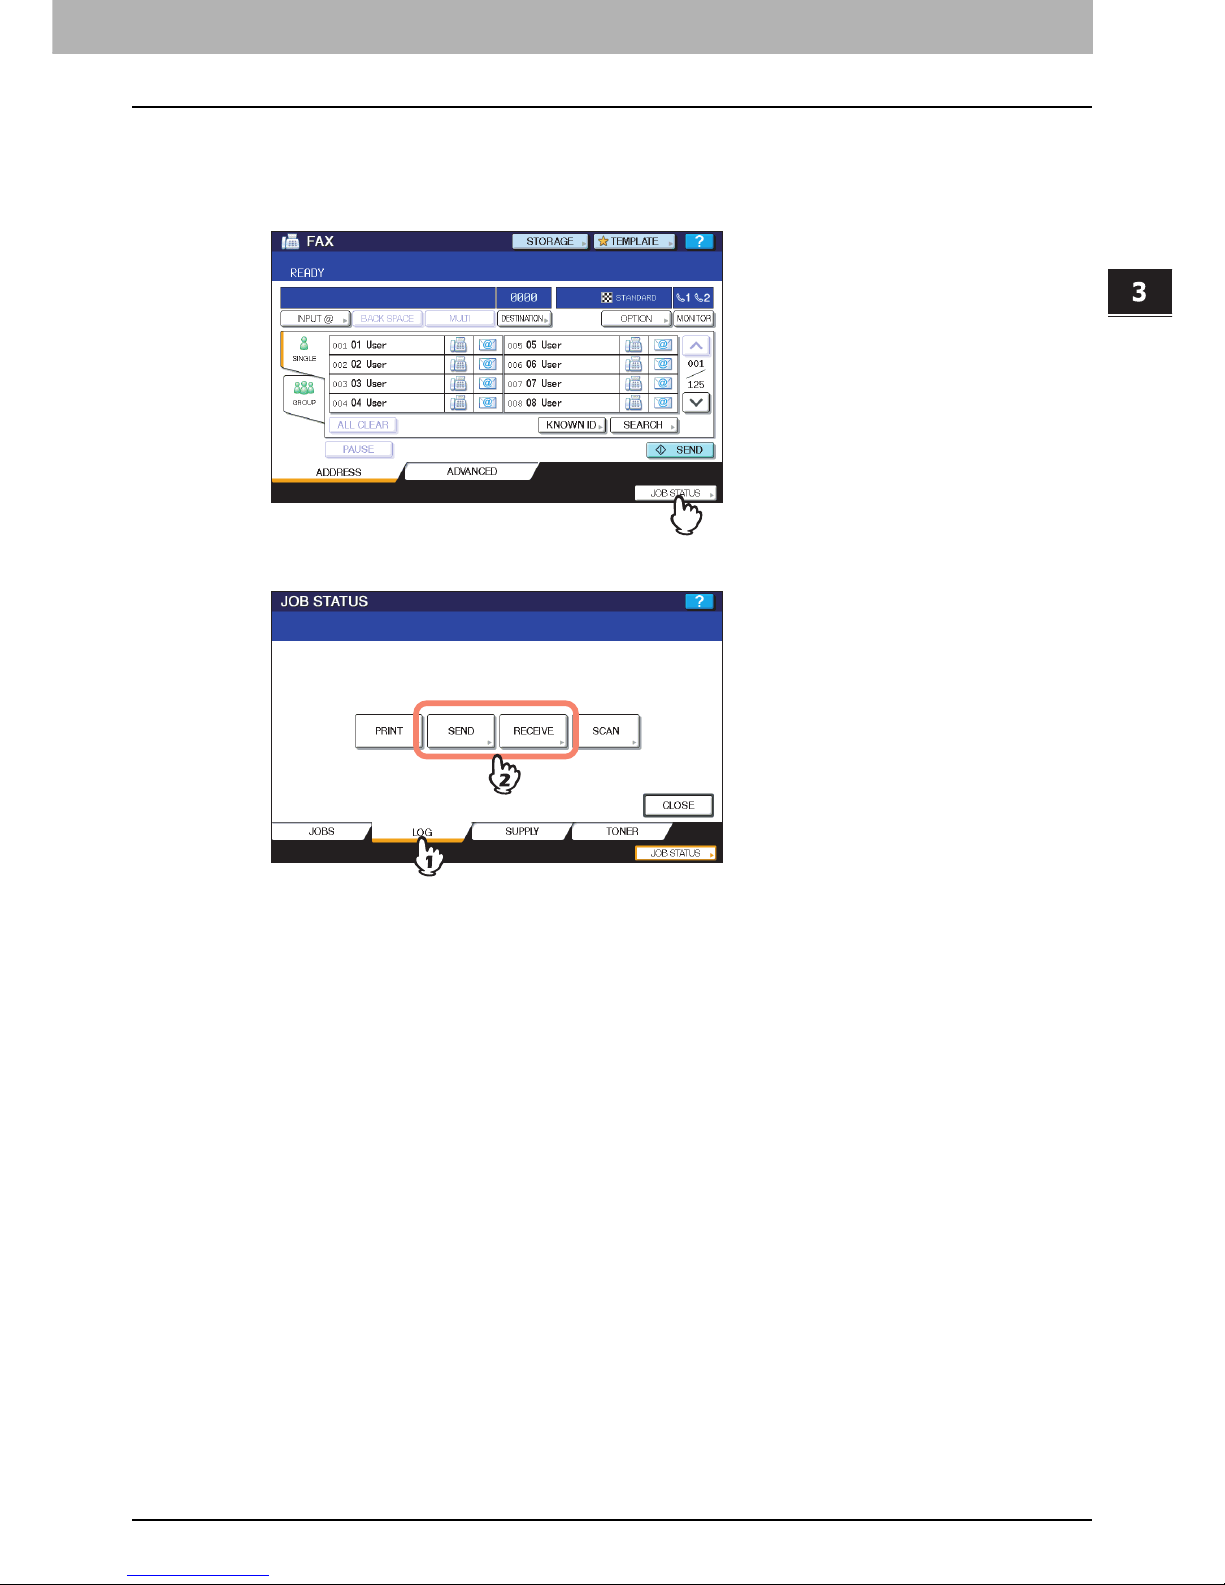
1
Press [JOB STATUS].
2
Select the [LOG] tab, and then press [SEND] or [RECEIVE].
Page 46
3 CHECKING AND CANCELING THE COMMUNICATIONS
44 Checking Communications
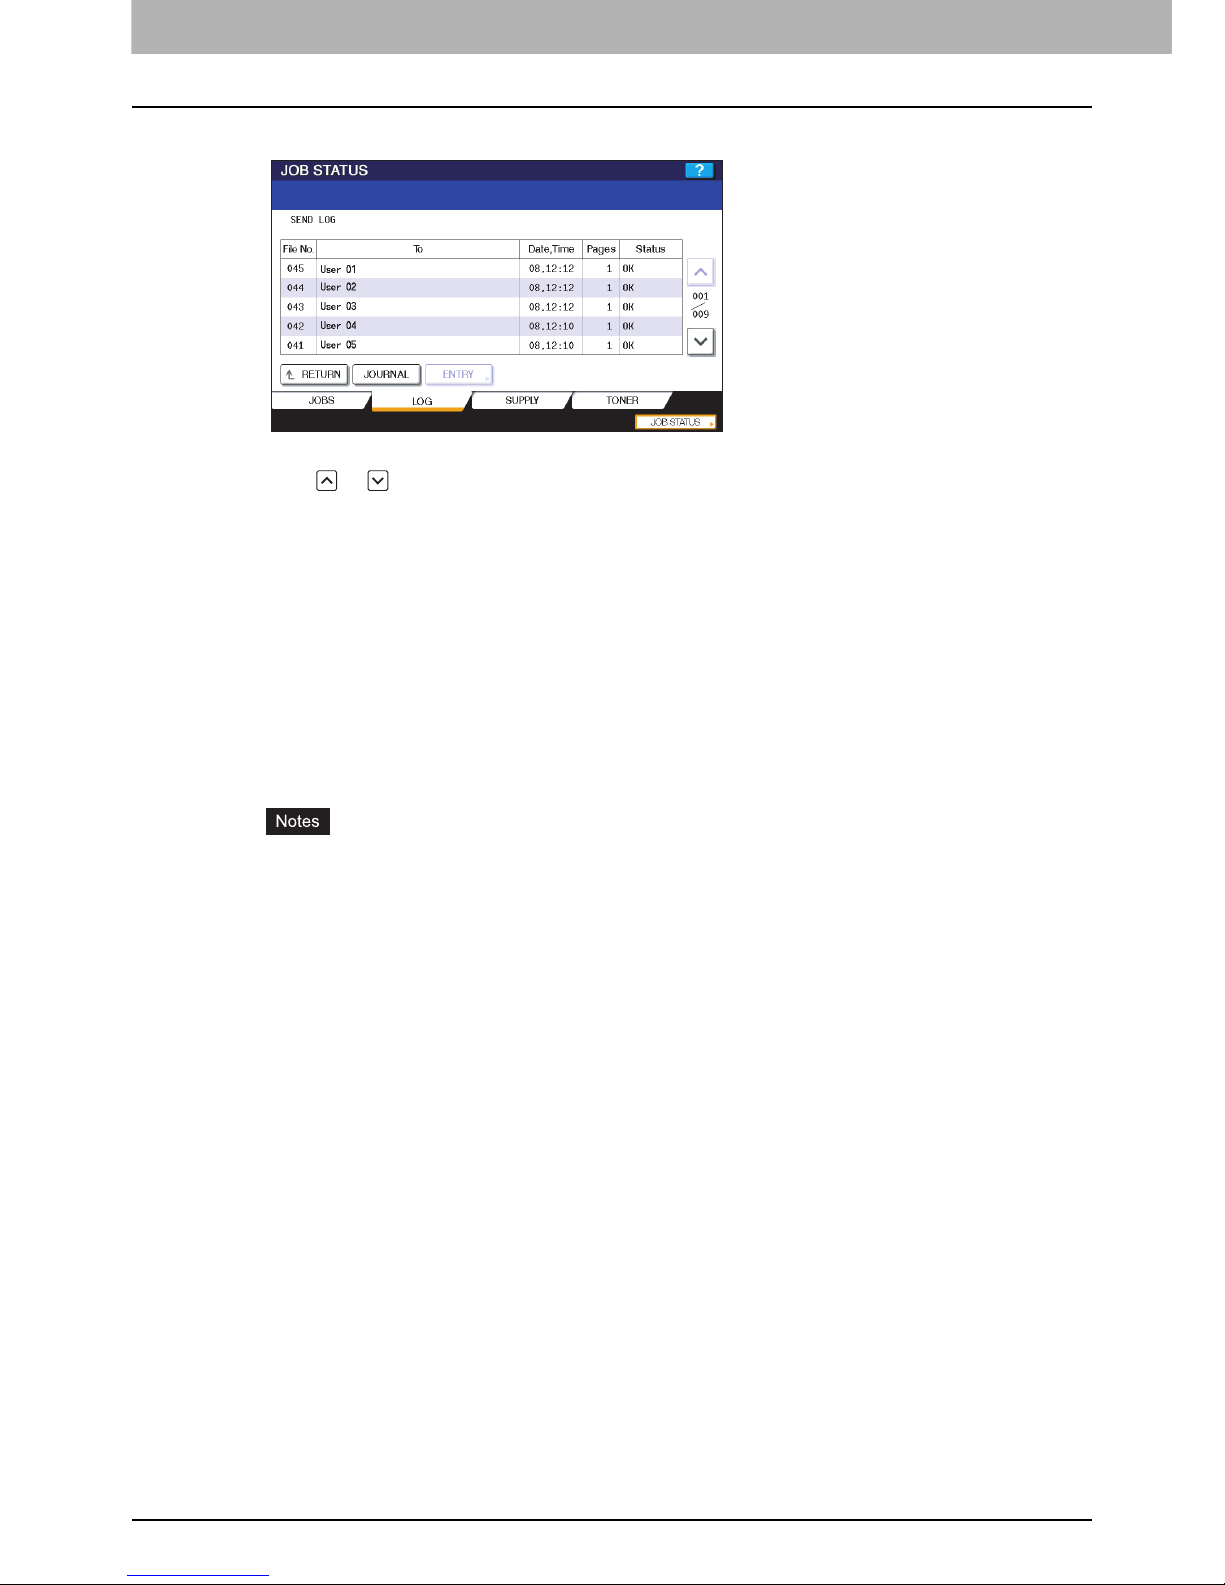
3
The list of the communication status is displayed.
Transmissions or receptions are listed in the reversed chronological order from top to bottom.
Press or to switch the pages.
Up to the latest 40 or 120 transmission/reception records can be listed on the log. The maximum number can
be set on the ADMN menu. For details of the operation, refer to the MFP Management Guide.
To print the log of transmissions or receptions, press [JOURNAL].
P.80 “Journal (transmission journal/reception journal)”
In the “Status” column, the status is indicated with the following:
Registering recipients’ fax numbers to the address book
To register recipient's fax numbers in the address book from the send/receive log screen, select a record in the
send or receive log, and then press [ENTRY]. For details of the registration to the address book, refer to the MFP
Management Guide.
Fax and E-mail transmissions whose recipients are specified with direct entry or entry using the LDAP
server can be registered to the address book from the Send log.
Polling and E-mail receptions whose recipients are specified with direct entry or entry using the LDAP
server can be registered to the address book from the Receive log.
OK: Transmission or reception succeeded.
4-digit error code: Transmission or reception failed.
P.108 “Error codes”
Page 47
3 CHECKING AND CANCELING THE COMMUNICATIONS
Canceling the Transmission 45
Canceling the Transmission
Canceling the memory transmission
You can cancel the memory transmission during scanning.
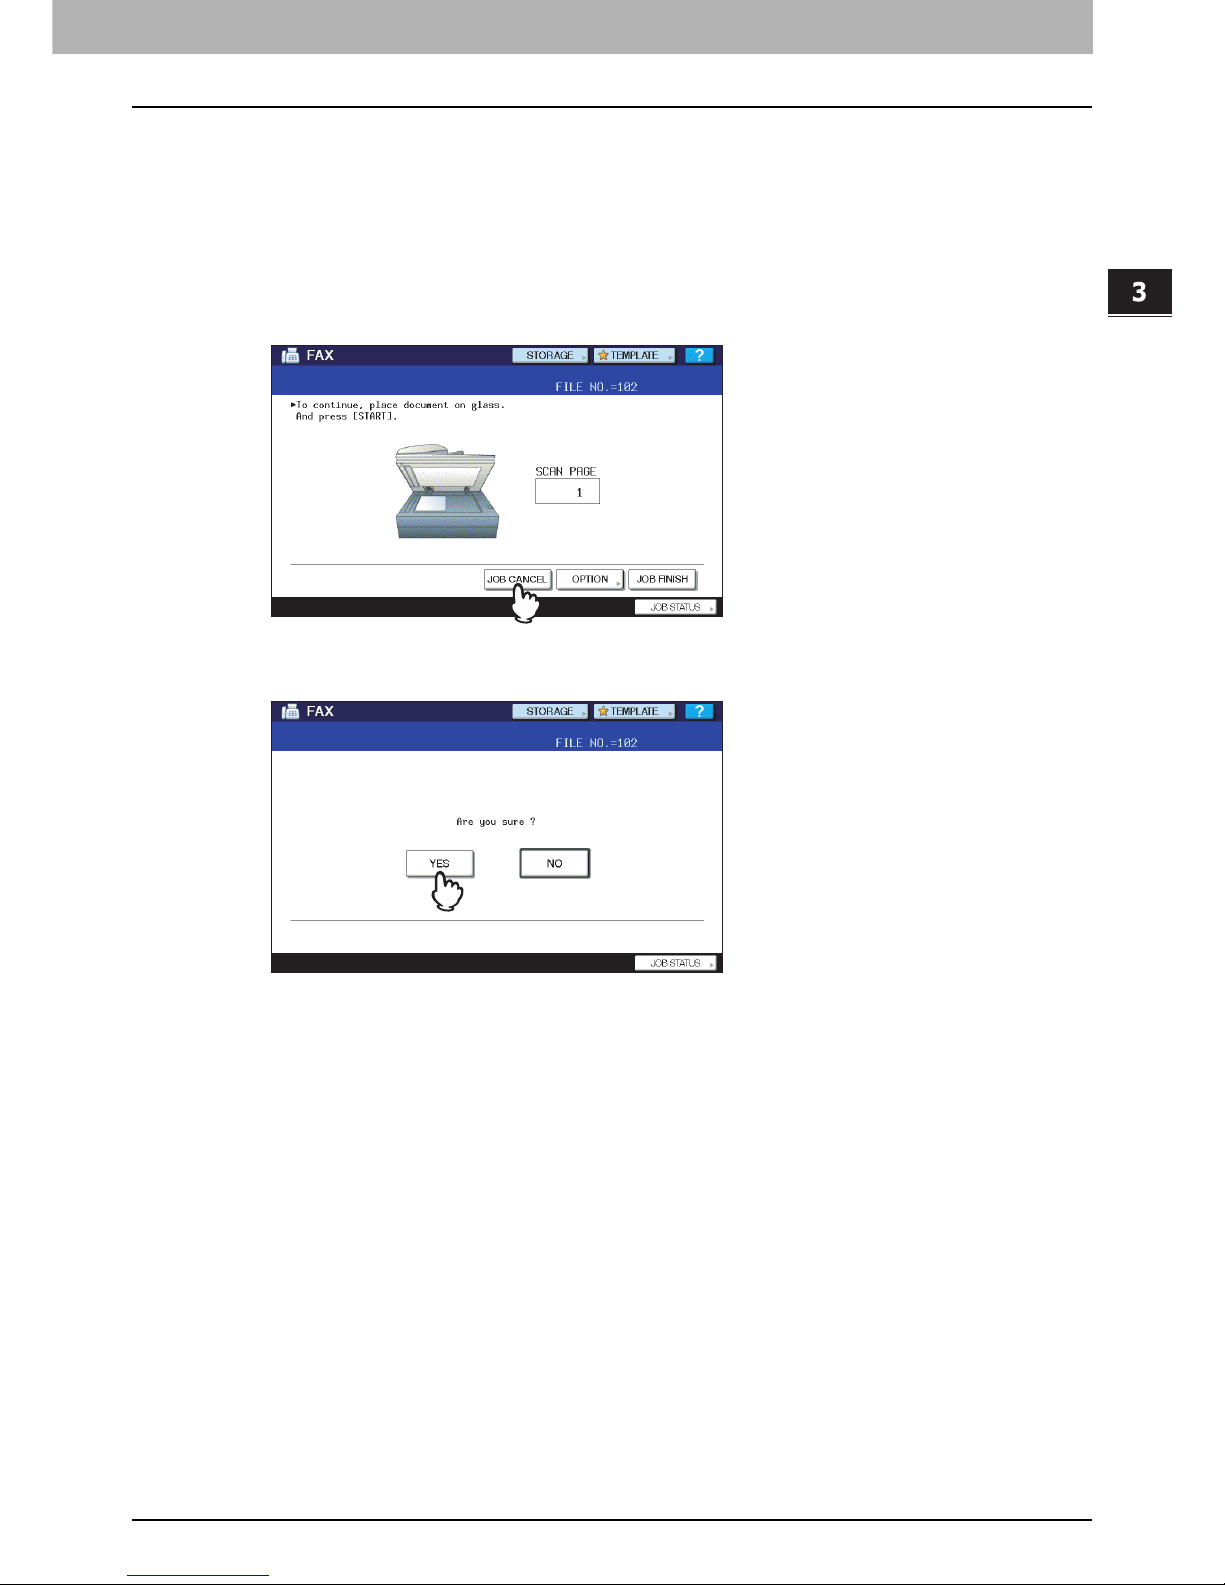
When using the original glass
This section describes how to cancel the memory transmission when an original is placed on the original glass.
1
When scanning is completed, the confirmation screen for the next original is displayed.
Press [JOB CANCEL].
If you leave the screen unattended for approximately 45 sec. after it appears, the scanned original is sent.
2
The confirmation screen for the deletion is displayed. Press [YES].
Page 48
3 CHECKING AND CANCELING THE COMMUNICATIONS
46 Canceling the Transmission
When using the RADF (Reversing Automatic Document Feeder)
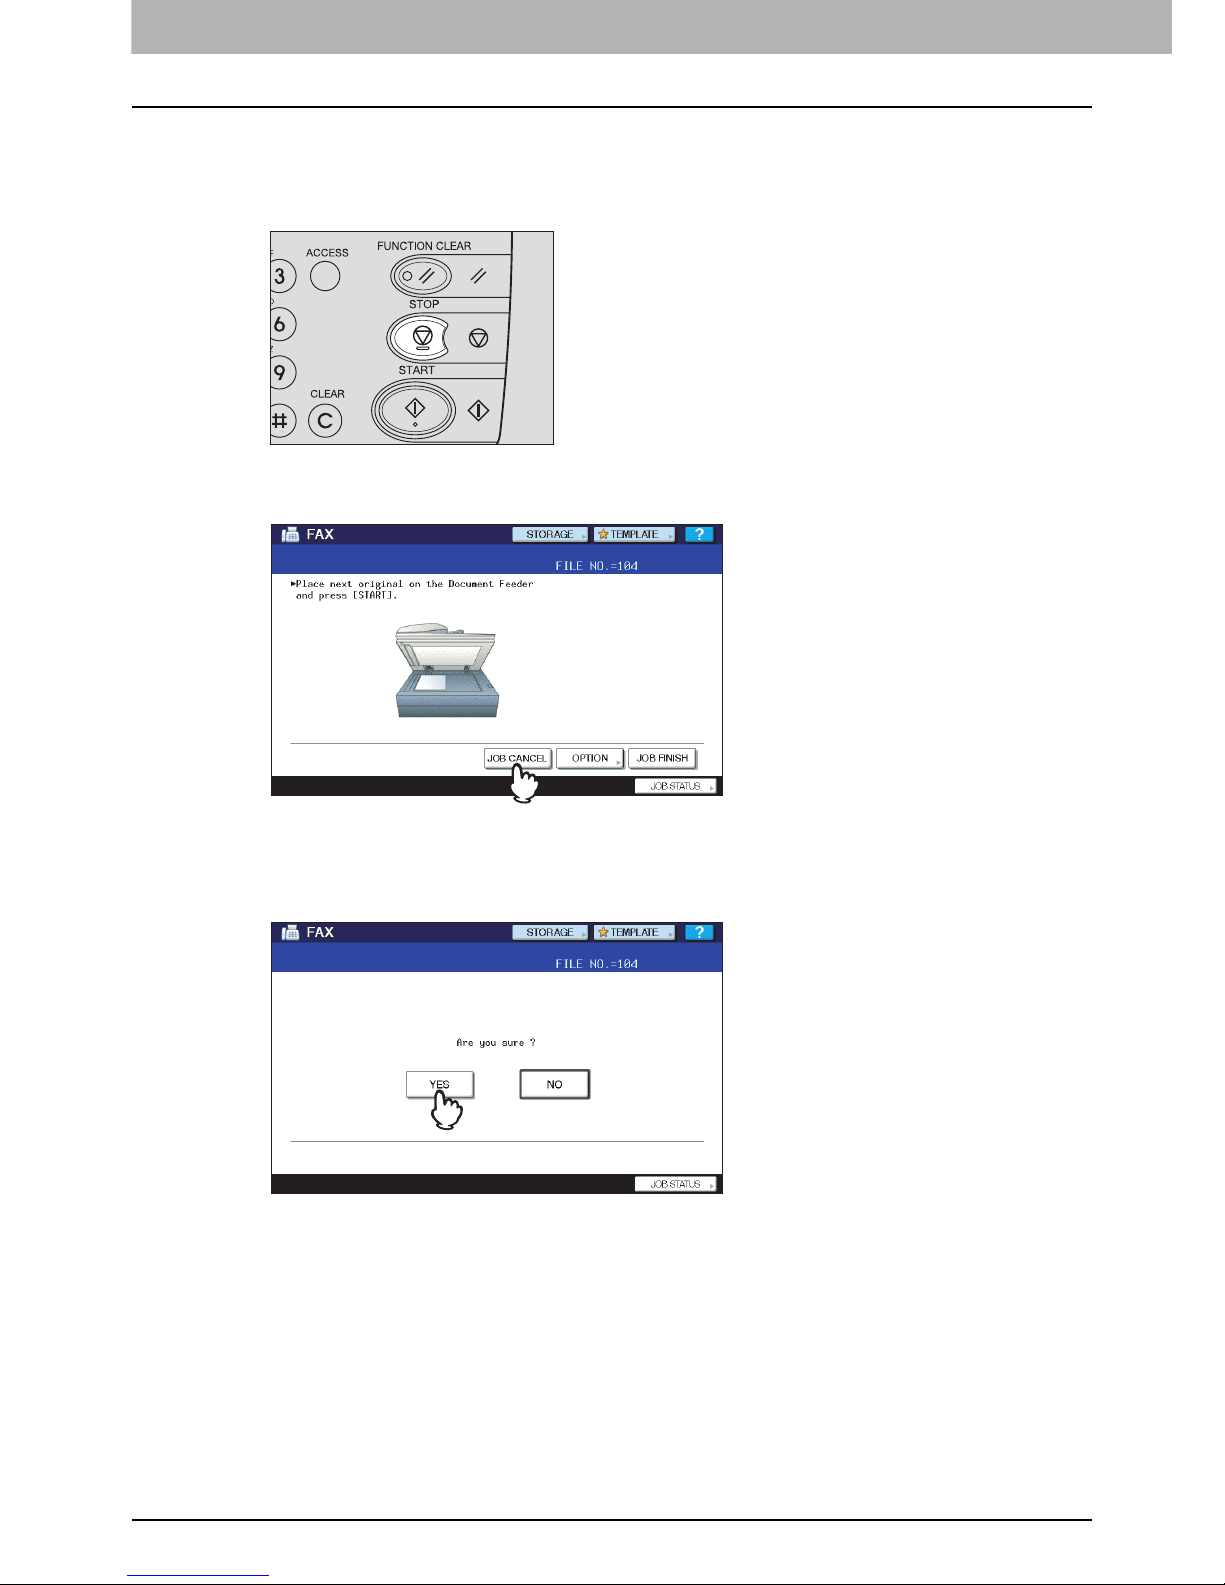
This section describes how to cancel the memory transmission when an original is placed on the RADF.
1
Press the [STOP] button on the control panel while the originals are being scanned.
Scanning is paused.
2
The confirmation screen for the next original is displayed. Press [JOB CANCEL].
If you press [JOB FINISH], the scanned originals are sent.
If you leave the screen for the next original unattended for approximately 45 sec. after it appears, the memory
transmission is canceled.
3
The confirmation screen for the deletion is displayed. Press [YES].
Page 49
3.CHECKING AND CANCELING THE COMMUNICATIONS
Canceling the Transmission 47
3 CHECKING AND CANCELING THE COMMUNICATIONS
Canceling direct transmissions
You can cancel the direct transmission during scanning.
Even if you cancel transmission in the direct TX mode, the part of the original that was scanned before transmission is
canceled has been sent.
1
Press the [STOP] button on the control panel while the original is being scanned.
The scanning and transmission are stopped.
Page 50
3 CHECKING AND CANCELING THE COMMUNICATIONS
48 Canceling the Transmission
Canceling reserved transmissions
You can display the list of the reserved transmissions, and cancel the reserved transmissions that are in the queue or in
progress.
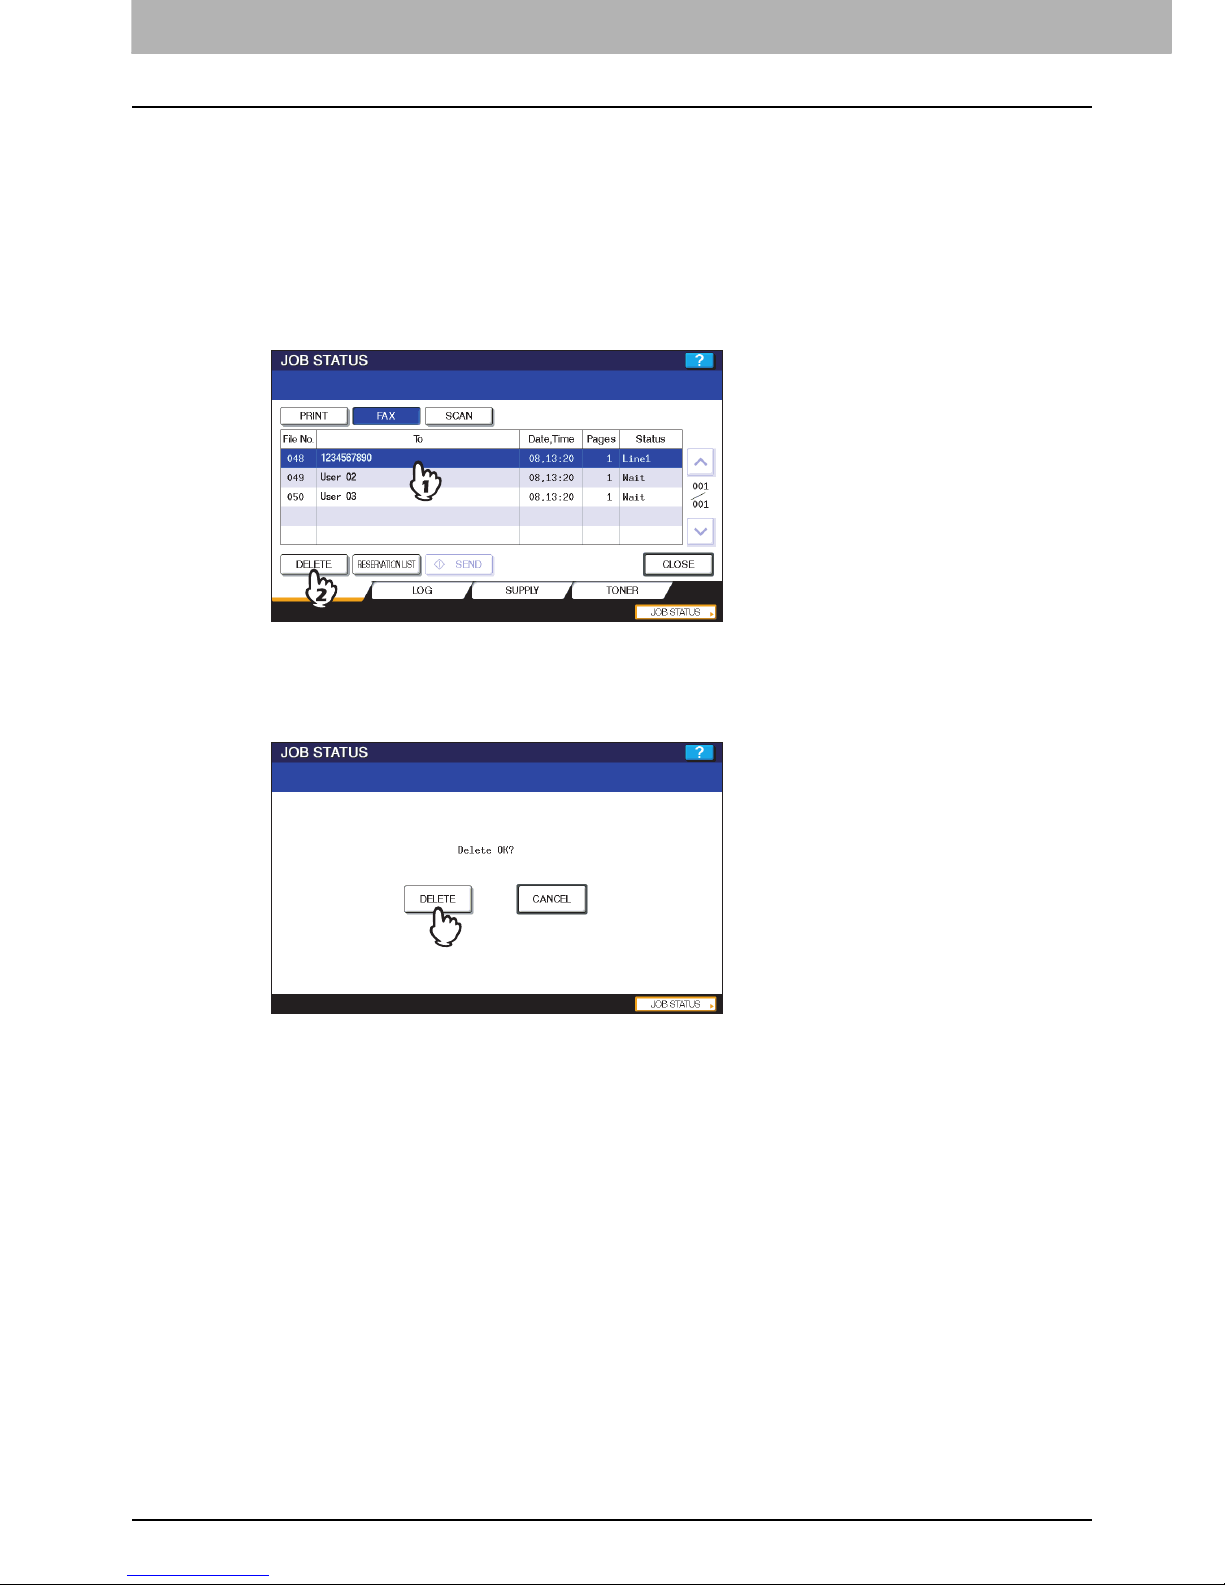
1
Press [JOB STATUS], and then select the [FAX] tab.
The list of the reserved transmissions is displayed. This step is the same as that for checking the reserved
transmission.
P.42 “Checking reserved transmissions”
2
Select the reserved transmission you want to delete, and then press [DELETE].
In the “Status” column, you can check the status of the reservation. “Wait” indicates that the data are waiting to be
sent. “Line1” and “Line2” indicates that the data are being sent. Delayed transmission reservation and polling
transmission/reception can be canceled.
3
The confirmation screen for the deletion is displayed. Press [DELETE].
Page 51

4.ADVANCED FUNCTIONS
This chapter describes useful functions of this equipment.
Transmitting 2-Sided Originals ............................................................................................. 50
Priority Transmission.............................................................................................................52
Polling Communication .........................................................................................................53
Polling transmission .............................................................................................................................................53
Polling reception...................................................................................................................................................55
Mailbox Transmission............................................................................................................56
Registering/printing/deleting an original ...............................................................................................................57
Sending/retrieving an original ...............................................................................................................................61
Creating/modifying/deleting a mailbox .................................................................................................................64
Chain Dial Communication....................................................................................................71
Delayed Transmission Reservation...................................................................................... 72
Recovery Transmission ......................................................................................................... 73
Onramp Gateway.................................................................................................................... 74
Offramp Gateway.................................................................................................................... 75
Save as File............................................................................................................................. 76
Page 52
4 ADVANCED FUNCTIONS
50 Transmitting 2-Sided Originals
Transmitting 2-Sided Originals
You can send a copy of 2-sided originals by fax using the RADF (Reversing Automatic Document Feeder).
Note that each setting will automatically return to its default setting when transmission is completed.
1
Place the original(s) on the RADF.
P.19 “Handling an original”
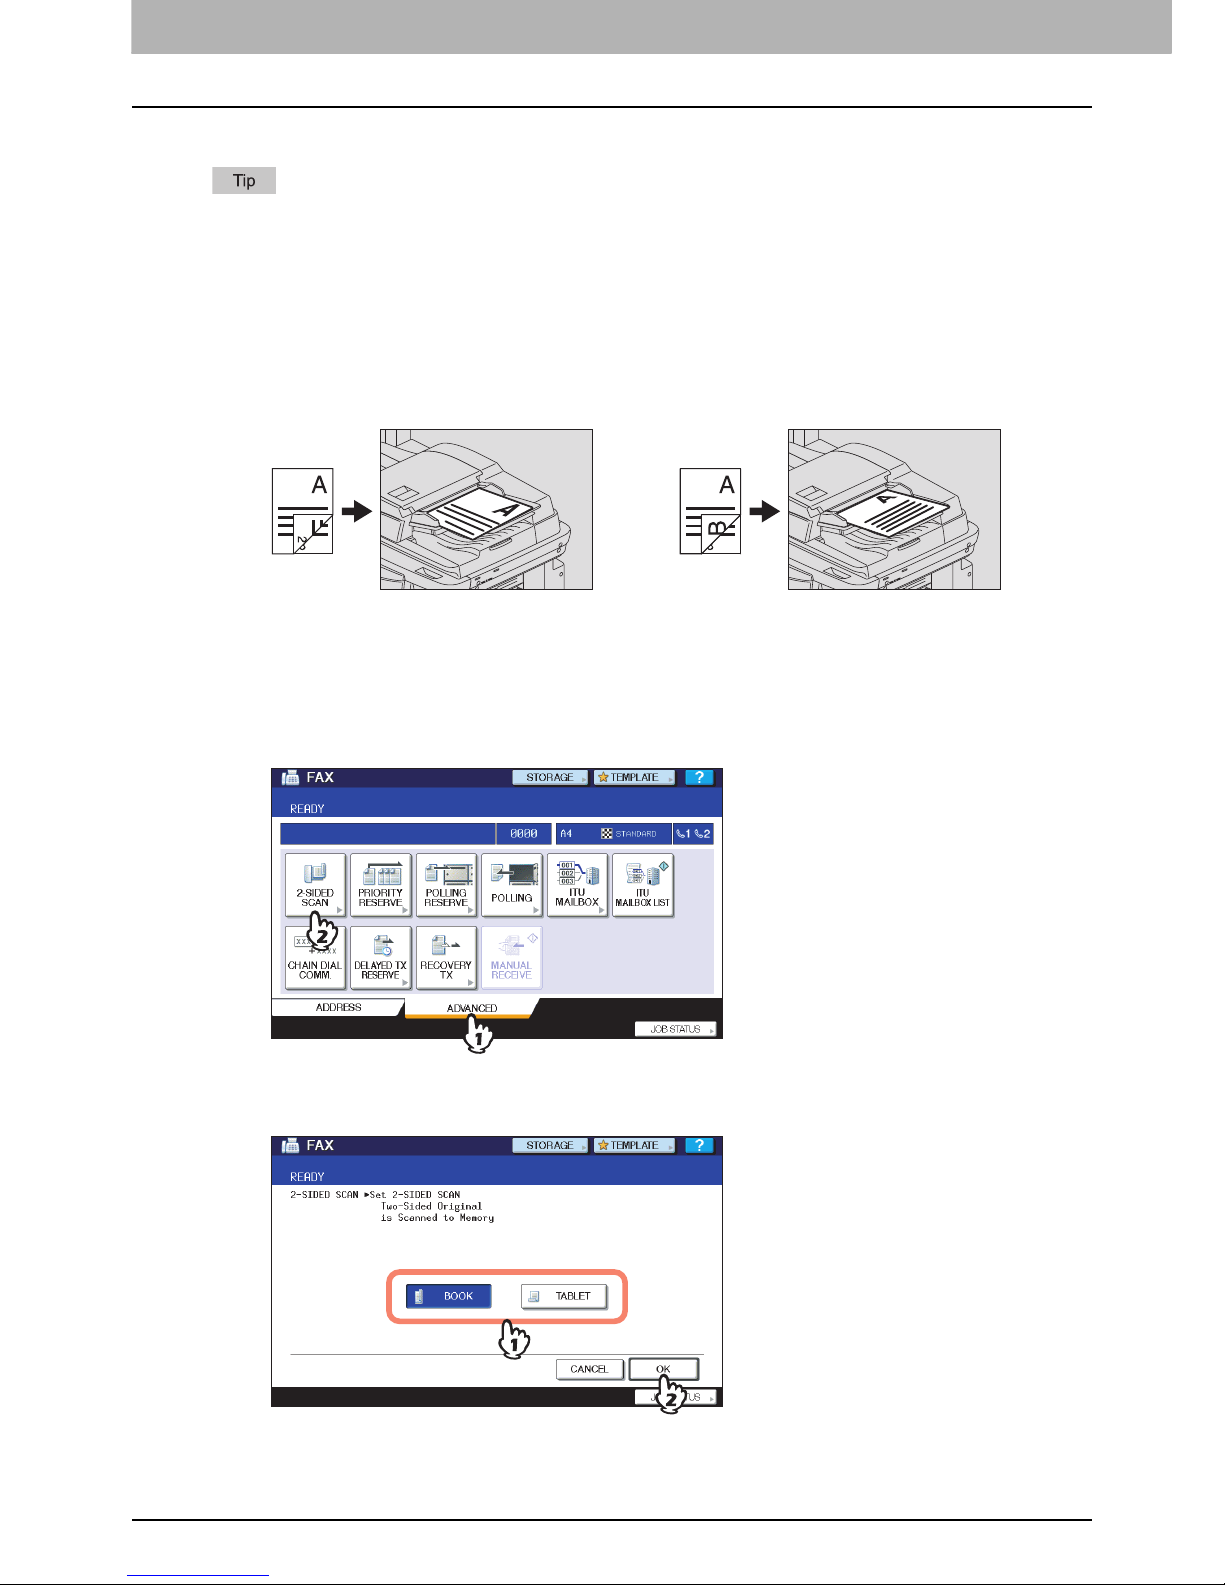
When you place a 2-sided original of the LT/A4 size, change the direction of the original depending on its bound
position as follows:
1. Right-to-left (book-type) original
2. Top-to-bottom (tablet-type) original
2
Press the [FAX] button on the control panel.
P.16 “Basic procedures”
3
Press [OPTION] and set the transmission conditions.
P.23 “Setting the transmission conditions”
4
Select the [ADVANCED] tab, and then press [2-SIDED SCAN].
5
Press [BOOK] or [TABLET] depending on the bound position of the original(s), and
then press [OK].
6
Specify the recipient’s fax number.
P.27 “Specifying the recipient”
1 2
Page 53

4.ADVANCED FUNCTIONS
Transmitting 2-Sided Originals 51
4 ADVANCED FUNCTIONS
7
Press [SEND].
P.16 “Basic procedures”
Page 54
4 ADVANCED FUNCTIONS
52 Priority Transmission
Priority Transmission
You can send a fax prior to other reserved transmissions (including redial standby).
Note that each setting will automatically return to its default setting when transmission is completed.
1
Place the original(s).
P.19 “Handling an original”
2
Press the [FAX] button on the control panel.
P.16 “Basic procedures”
3
Press [OPTION] and set the transmission conditions.
P.23 “Setting the transmission conditions”
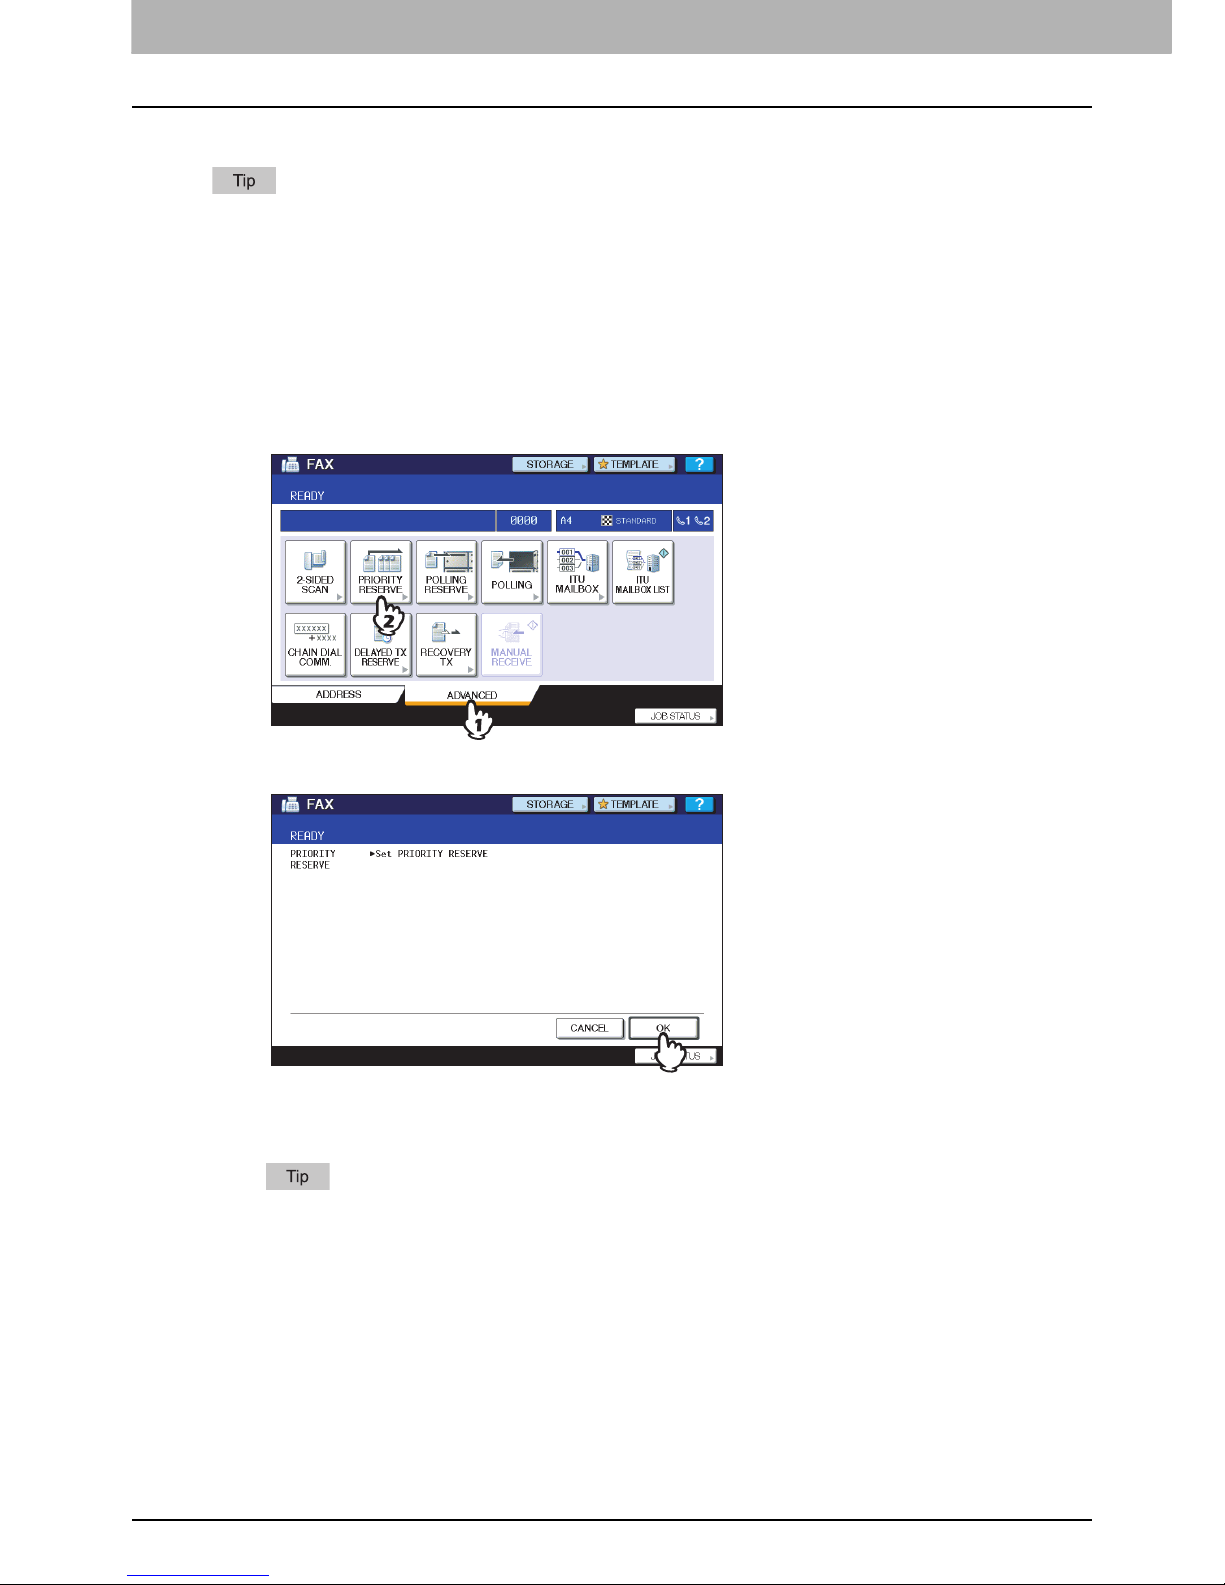
4
Press the [ADVANCED] tab, and then press [PRIORITY RESERVE].
5
Press [OK].
6
Specify the recipient’s fax number.
P.27 “Specifying the recipient”
In the priority transmission mode, you cannot specify multiple recipients’ fax numbers.
7
Press [SEND].
P.16 “Basic procedures”
Page 55
4 ADVANCED FUNCTIONS
Polling Communication 53
Polling Communication
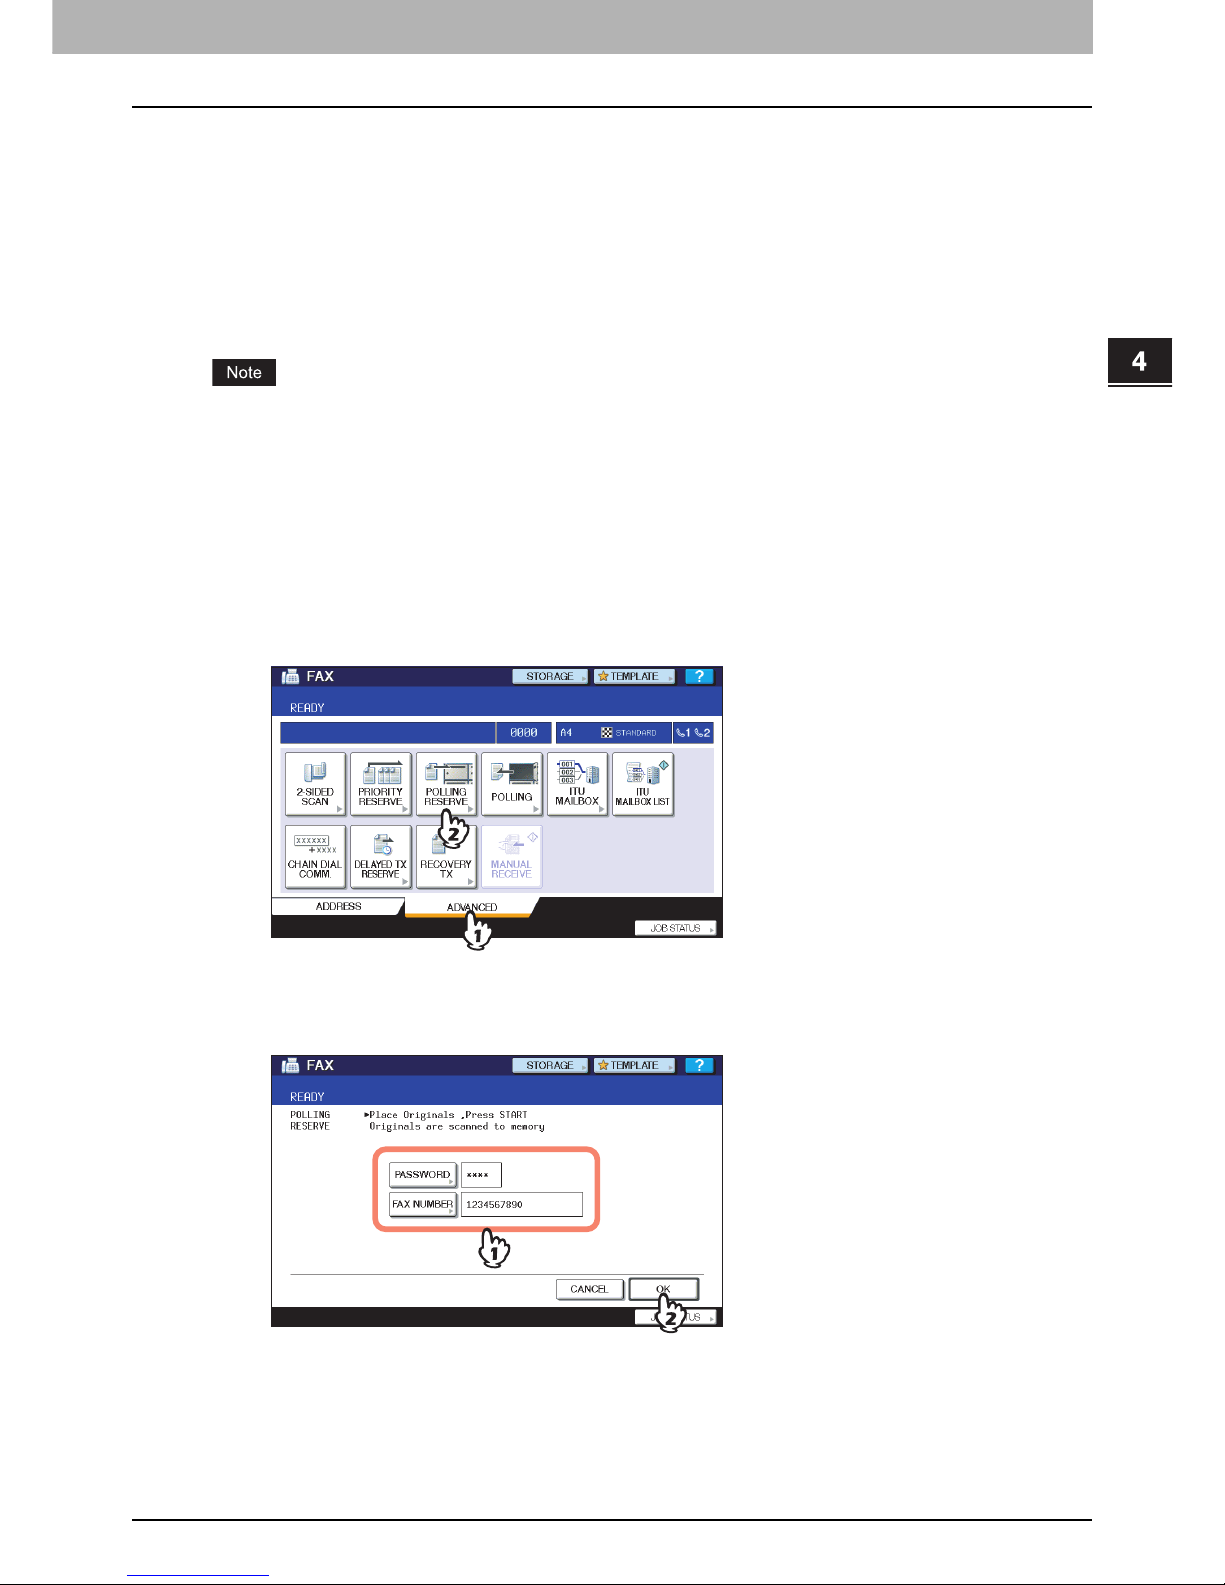
The polling communication function allows you to receive pending originals in the sender's fax machine by manually
operating the receiving fax machine. In this document, the operation in which this equipment is used as the sender's fax
machine is called “polling transmission” while that in which it is used as the recipient's fax machine is called as “polling
reception”.
Polling transmission
Upon request of a recipient's fax machine, this equipment sends an original document stored into the memory to the
recipient. By setting a password or a recipient's telephone number to an original stored into the memory, you can permit
specific recipients to receive the original using the polling transmission.
To use the polling communication function with the password verification applied, the fax machines of both the sender
and recipient have to be the same series machines (MFP).
1
Place the original(s).
P.19 “Handling an original”
2
Press the [FAX] button on the control panel.
P.16 “Basic procedures”
3
Press [OPTION] and set the transmission conditions.
P.23 “Setting the transmission conditions”
4
Press the [ADVANCED] tab, and then press [POLLING RESERVE].
5
To set the password or fax number (the recipient’s telephone number), press
[PASSWORD] or [FAX NUMBER] button. On the entry screen that appears, key in the
password (4 digits) or fax number (a maximum of 20 digits), and then press [OK].
You do not have to set both the password and the fax number.
If you have to set neither a password nor a fax number, leave both blank and press [OK].
Page 56

4 ADVANCED FUNCTIONS
54 Polling Communication
6
Press the [START] button on the control panel.
Upon request of the recipient's fax machine, the data of the original stored into memory are sent automatically.
Once they are sent, they are deleted from memory.
You can delete the data of the original from memory by canceling the polling transmission.
P.48 “Canceling reserved transmissions”
Page 57
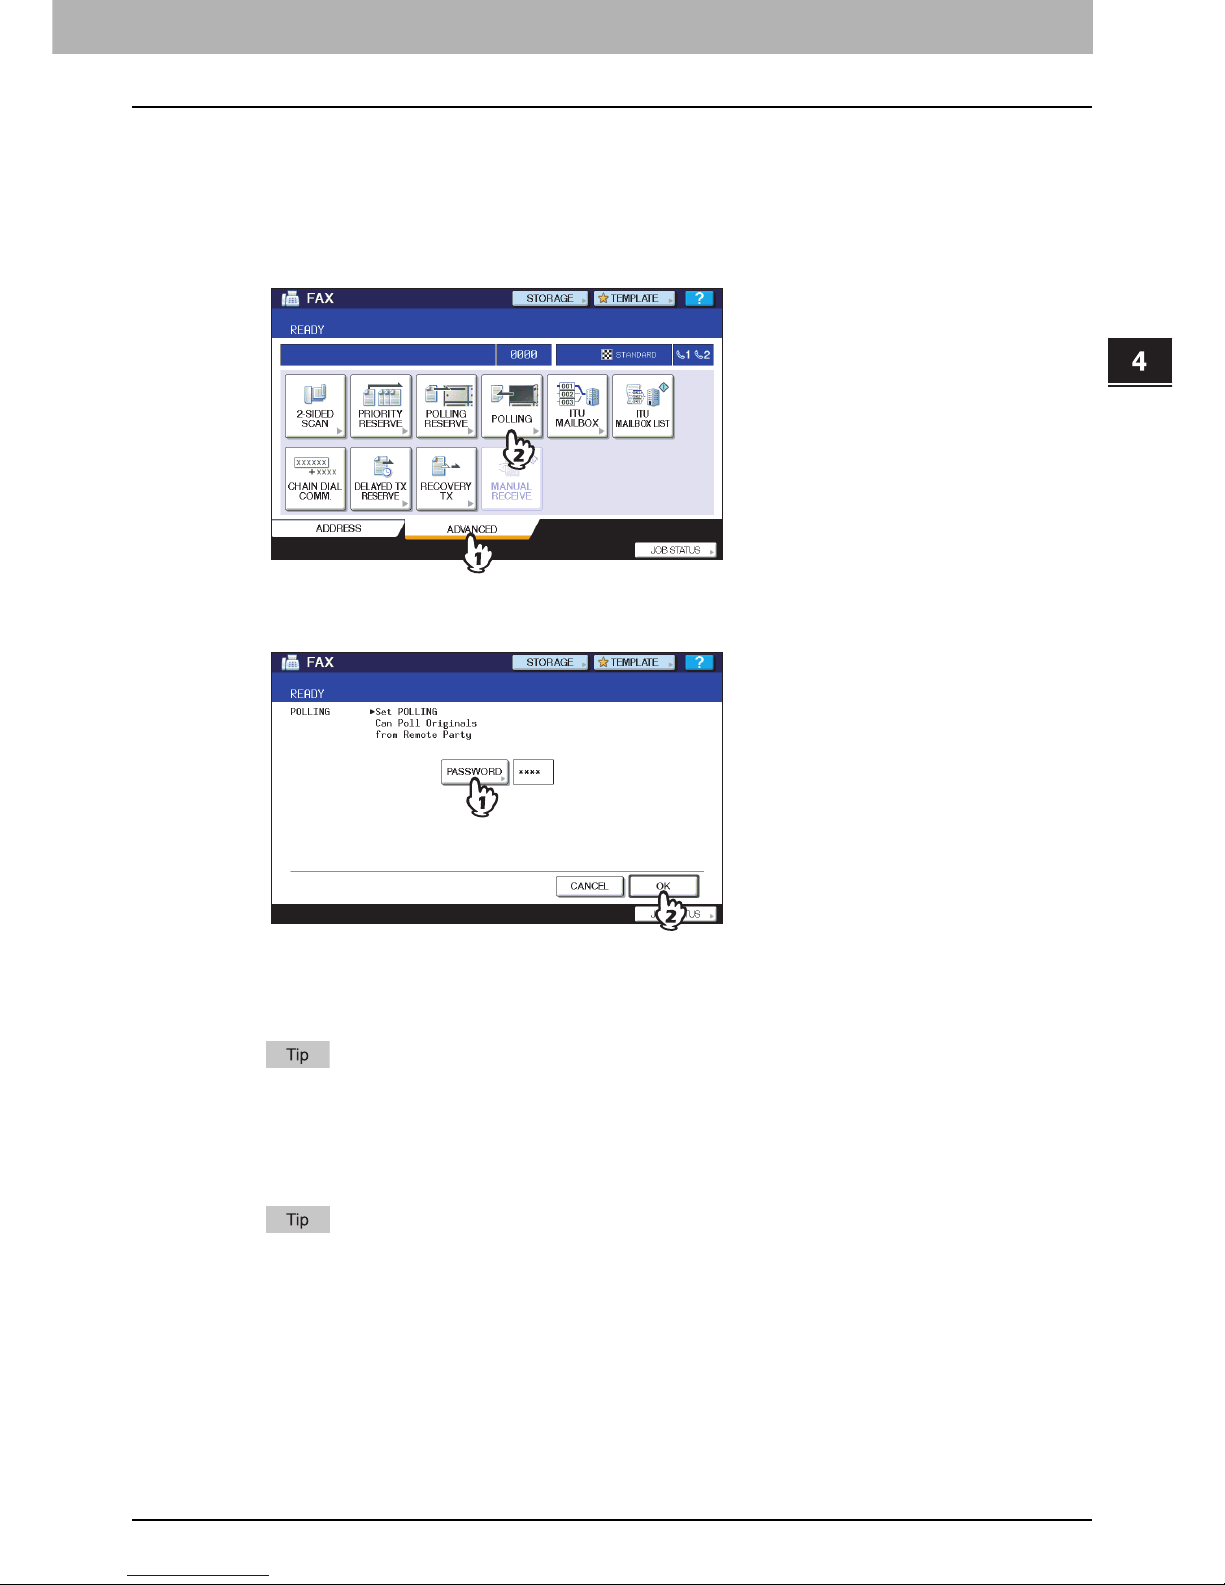
4.ADVANCED FUNCTIONS
Polling Communication 55
4 ADVANCED FUNCTIONS
Polling reception
This equipment requests the sender's fax machine to send the data of the original.
1
Press the [FAX] button on the control panel.
P.16 “Basic procedures”
2
Press the [ADVANCED] tab, and then press [POLLING].
3
If the password is set to the data of the original in the sender’s fax machine, press
[PASSWORD] to display the entry screen. Key in the password, and then press [OK].
If you do not have to key in the password, leave this entry box blank, and then press [OK].
4
Specify the sender’s fax number.
P.27 “Specifying the recipient”
This equipment supports two types of receptions: Individual polling reception in which you specify a recipient’s
fax number and Multi-polling reception in which you specify multiple recipients’ fax numbers.
5
Press [SEND].
P.16 “Basic procedures”
With the delayed transmission reservation, you can perform the polling reception on a specific date and time. To
do that, set the date and time before pressing [SEND].
P.72 “Delayed Transmission Reservation”
Page 58
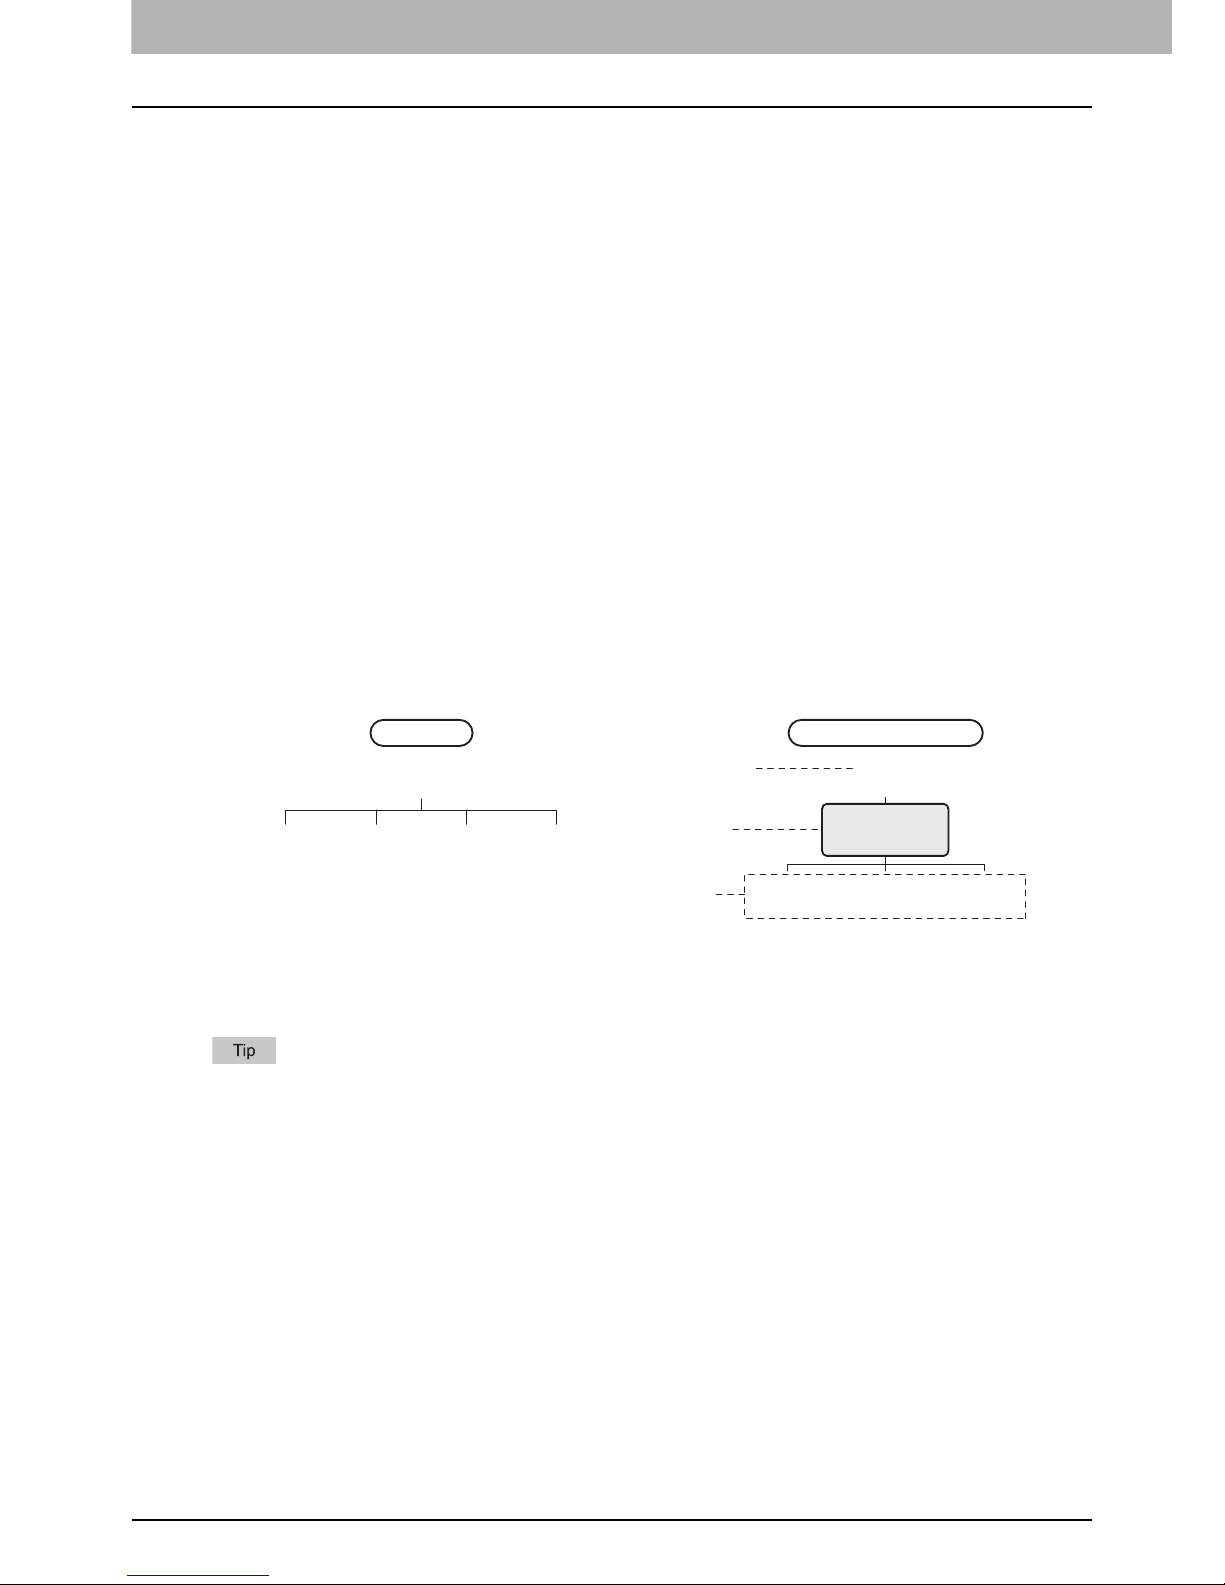
4 ADVANCED FUNCTIONS
56 Mailbox Transmission
Mailbox Transmission
This function is used to communicate between fax machines compatible with a mailbox function (ITU-T compatible). The
owners of these fax machines can input or retrieve the data of the originals in the mailbox.
There are 3 types of mailbox: confidential mailbox, bulletin board mailbox and relay station mailbox. To perform mailbox
communication, the mailboxes must be created in advance. An individual password for each box can be set for security
protection.
P.64 “Creating/modifying/deleting a mailbox”
Confidential mailbox
Once data of an original are retrieved from this mailbox, these data will be deleted. This mailbox is suitable for registering
an original you want to send to a specific recipient. If a new original is registered in this mailbox in which another original
exists, the mailbox will contain both of the originals.
Bulletin board mailbox
No matter how many times an original is retrieved from this mailbox, the original will not be deleted. This mailbox is
suitable for registering an original you want to send to multiple recipients. If a new original is registered in this mailbox in
which another original exists, the existing original will be replaced with the new original and the new one will be stored in
the mailbox.
Relay station mailbox
Using this mailbox, an original sent from a fax machine is relayed to pre-registered multiple recipients. To inform a user of
the result of the relay, a report called RELAY TX END TERMINAL REPORT can be sent to a specific recipient. A copy of
the original can be printed out (regularly or when an error occurs).
<Example of how to use the relay station mailbox>
If you want to send a copy of an original from an office in Los Angels to multiple offices in New York, you first send it from
the one in Los Angels to one of the offices in New York where the relay station mailbox is set up, so that it is relayed to the
other offices in New York. This will reduce communication costs.
If you create a forward mailbox whose number is the fax number of the sender, you can use the TSI function. Using
this function, this equipment forwards the original sent from the sender whose fax number is set to the mailbox
number, based on the pre-set agent (Save as file / Email / Store to e-Filing). This can be set from COMMAND
CENTER. For details of the operation, refer to the COMMAND CENTER Guide.
LA office
(
213
)
NY office A
(
Relay Mailbox
)
(
212
)
NY office A
(
212
)
NY office B
(
212
)
NY office C
(
212
)
LA office
(
213
)
VIA RELAY MAILBOX
NY office B
(
local
)
NY office C
(
local
)
NY office D
(
local
)
* 4 long-distance calls
NY office D
(
212
)
NORMAL
Relay Originator
Relay Station
Relay
Destination
* 1 long-distance call to the NY office A
(relay mailbox) and 3 local calls between
the NY office A (relay mailbox) and each
office.
Page 59
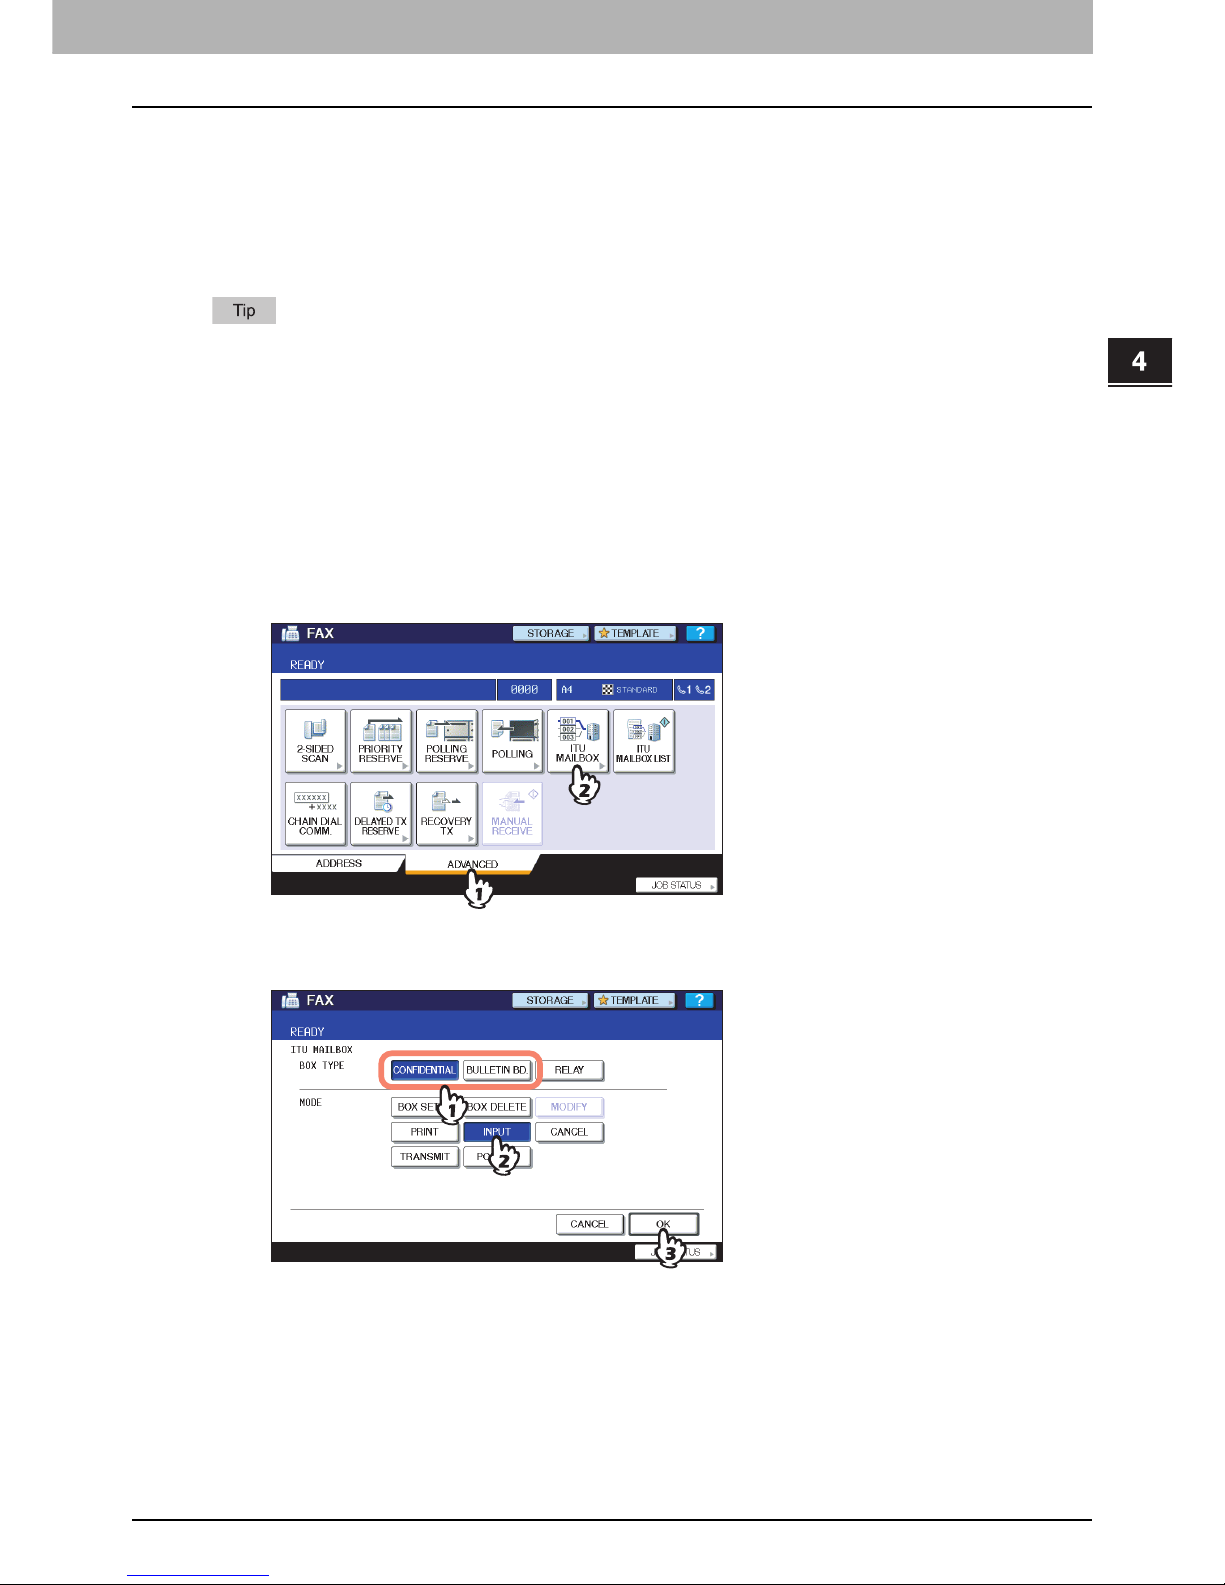
4.ADVANCED FUNCTIONS
Mailbox Transmission 57
4 ADVANCED FUNCTIONS
Registering/printing/deleting an original
This section describes the operations of the mailbox in this equipment.
Registering an original
You can register an original to the confidential or bulletin board mailbox in this equipment.
To register the originals to confidential or bulletin board mailbox, the confidential or bulletin board mailbox must be
created in advance.
P.64 “Creating/modifying/deleting a mailbox”
1
Place the original(s).
P.19 “Handling an original”
2
Press the [FAX] button on the control panel.
P.16 “Basic procedures”
3
Press [OPTION] and set the transmission conditions.
P.23 “Setting the transmission conditions”
4
Press the [ADVANCED] tab, and then press [ITU MAILBOX].
5
In the “BOX TYPE” group, press [CONFIDENTIAL] or [BULLETIN BD.]. In the “MODE”
group, press [INPUT], and then [OK].
If the selected mailbox has not been set, an error message is displayed and you are unable to proceed.
Page 60
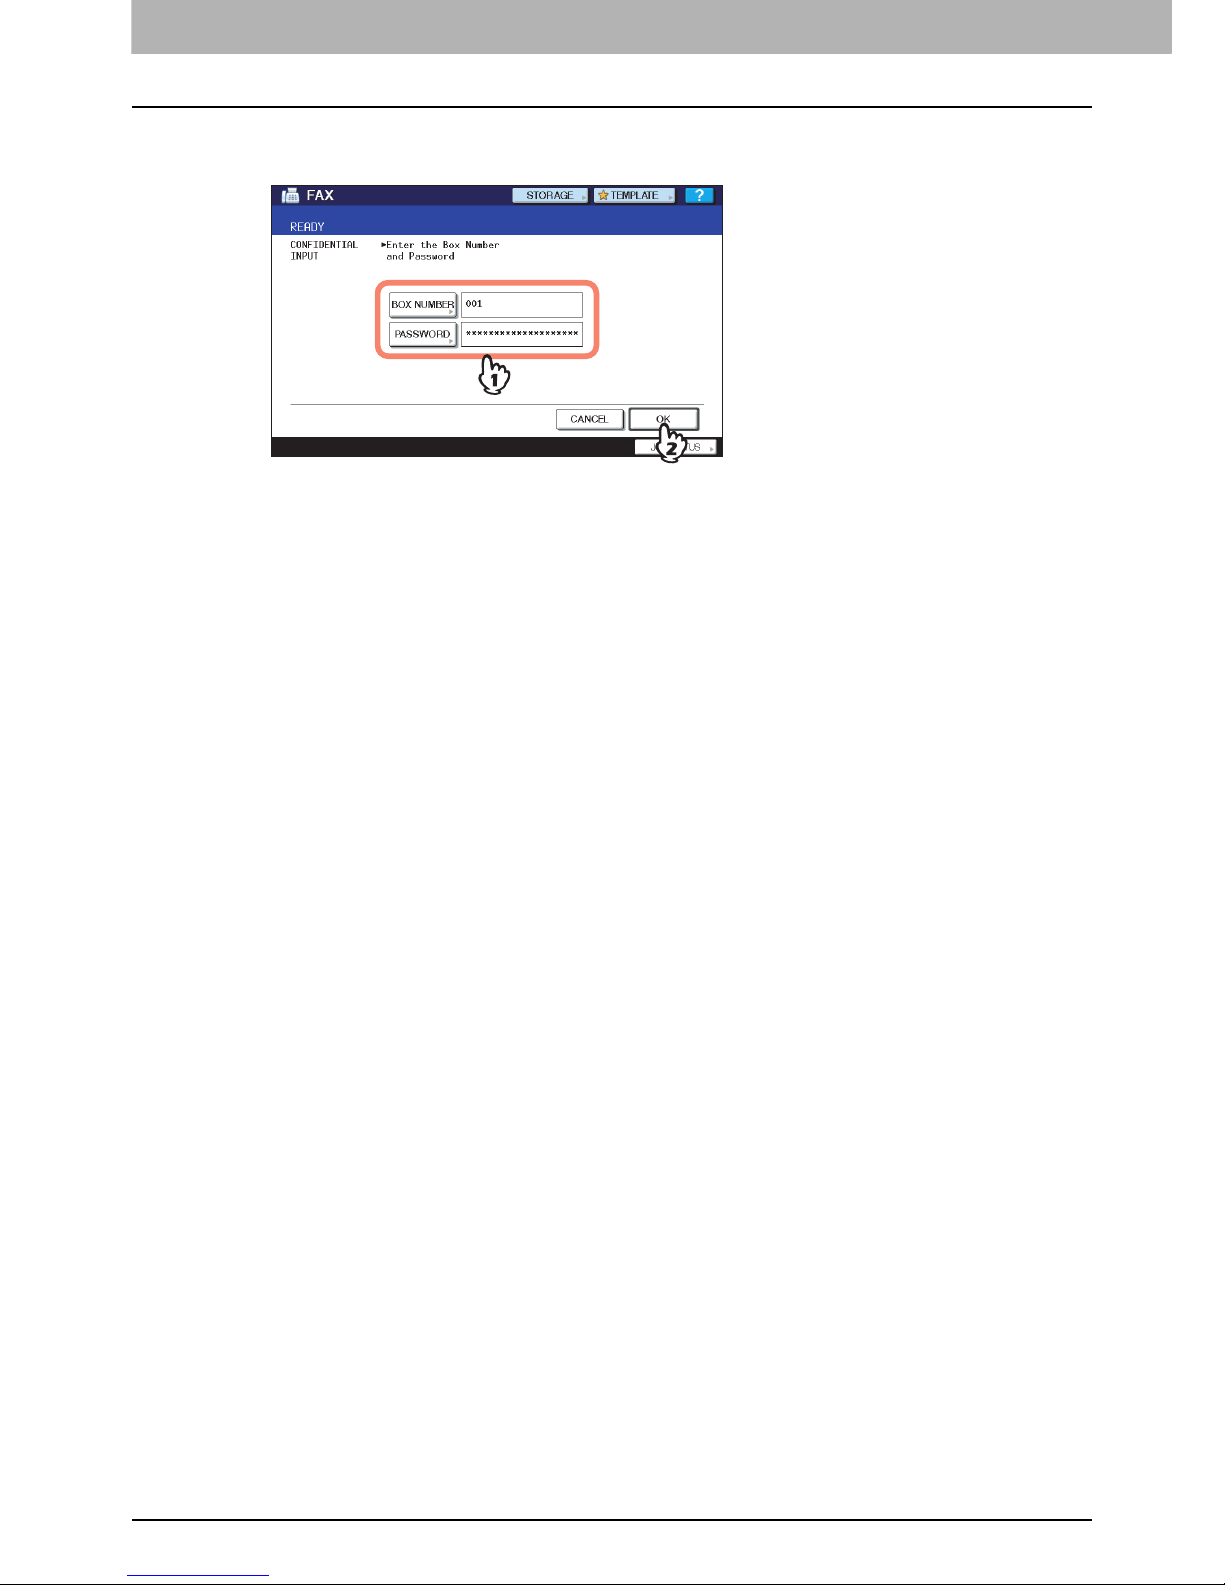
4 ADVANCED FUNCTIONS
58 Mailbox Transmission
6
Press [BOX NUMBER] to display the entry screen. Key in the box number, and then
press [OK].
If a password has been set to the selected bulletin board mailbox, key in the password in the same way as the
box number. If you have selected the confidential mailbox, it is not necessary to key in a password since it is not
verified.
If the box number or password is incorrect, an error message is displayed and you are unable to proceed.
7
Press the [START] button on the control panel.
When you cancel the registration, press the [STOP] button on the control panel, and then [JOB CANCEL] on the
touch panel.
Page 61
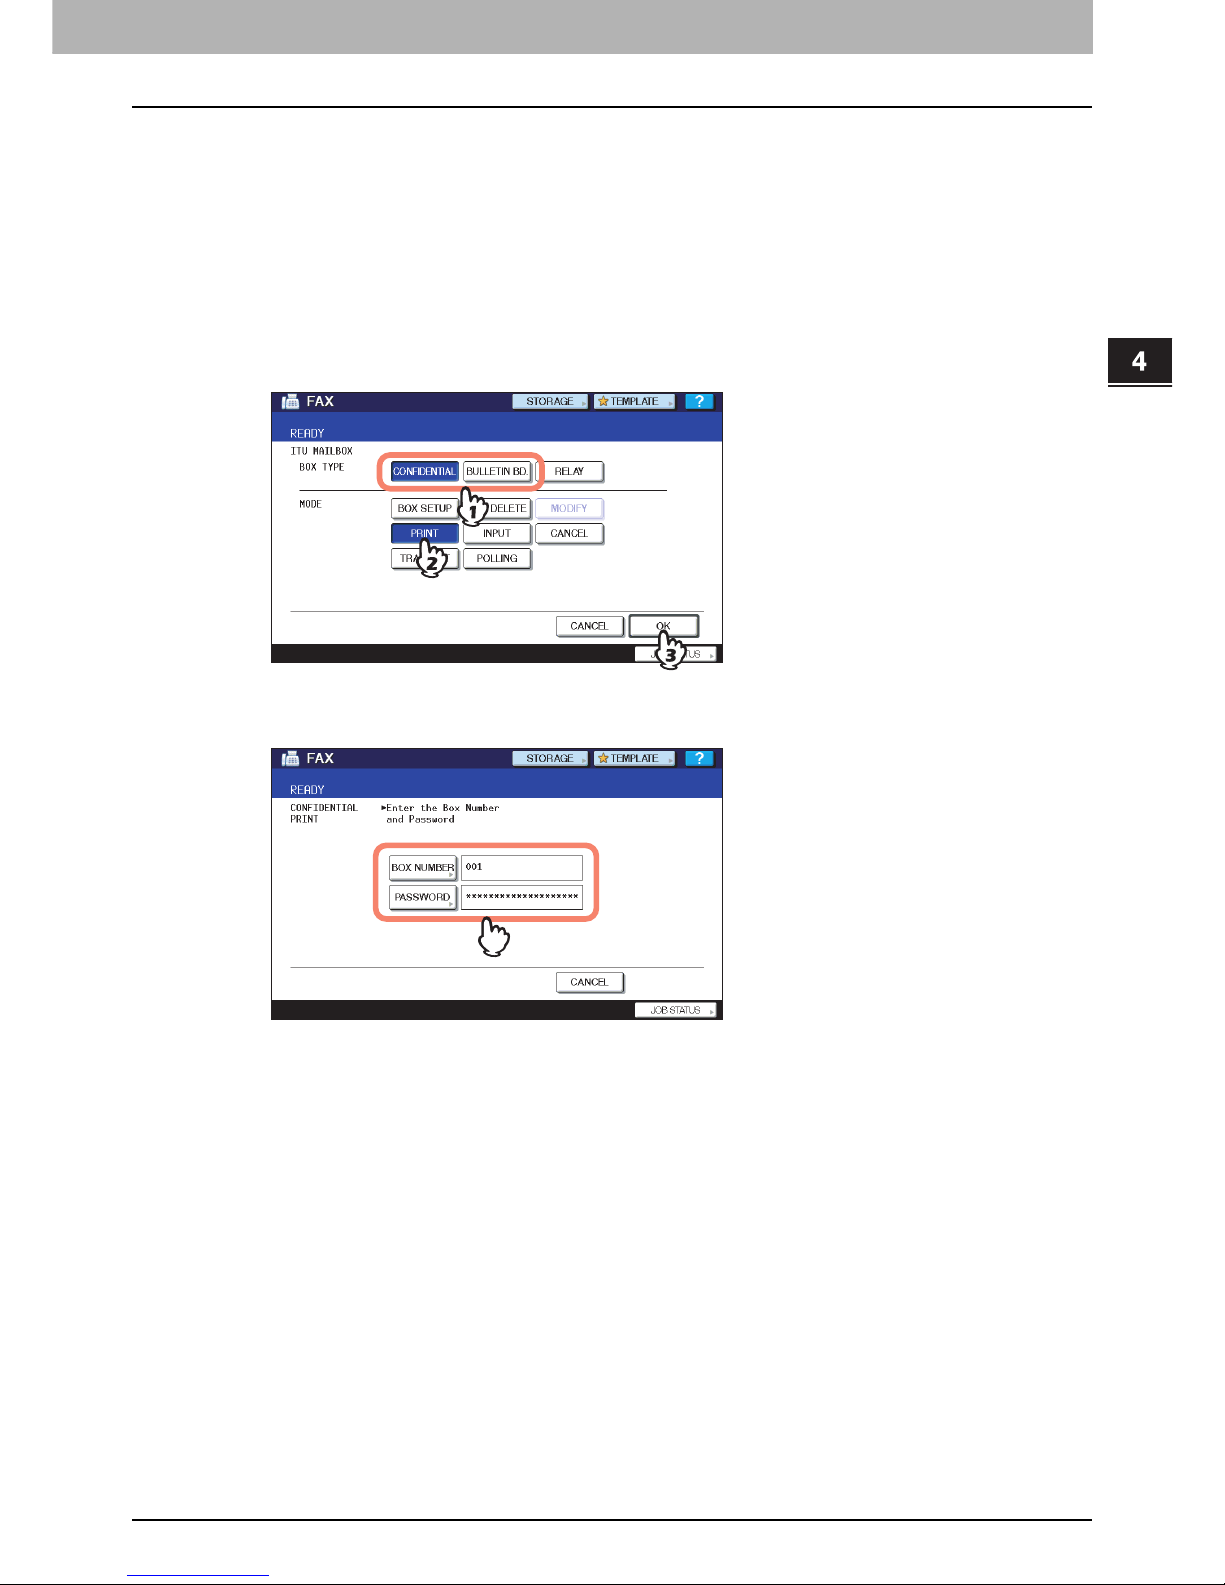
4.ADVANCED FUNCTIONS
Mailbox Transmission 59
4 ADVANCED FUNCTIONS
Printing an original
You can print the original registered in the confidential or bulletin board mailbox in this equipment.
1
Press the [FAX] button on the control panel.
P.16 “Basic procedures”
2
Press the [ADVANCED] tab, and then press [ITU MAILBOX].
This screen is the same as the one you see when you register the original.
P.57 “Registering an original”
3
In the “BOX TYPE” group, press [CONFIDENTIAL] or [BULLETIN BD.]. In the “MODE”
group, press [PRINT], and then [OK].
If the selected mailbox has not been set, an error message is displayed and you are unable to proceed.
4
Press [BOX NUMBER] to display the entry screen and key in the box number.
If a password has been set to the selected confidential mailbox, key in the password in the same way as the box
number. If you have selected the bulletin board mailbox, it is not necessary to key in a password since it is not
verified.
5
Press the [START] button on the control panel.
If the box number or password is incorrect, an error message is displayed and you are unable to proceed.
Page 62
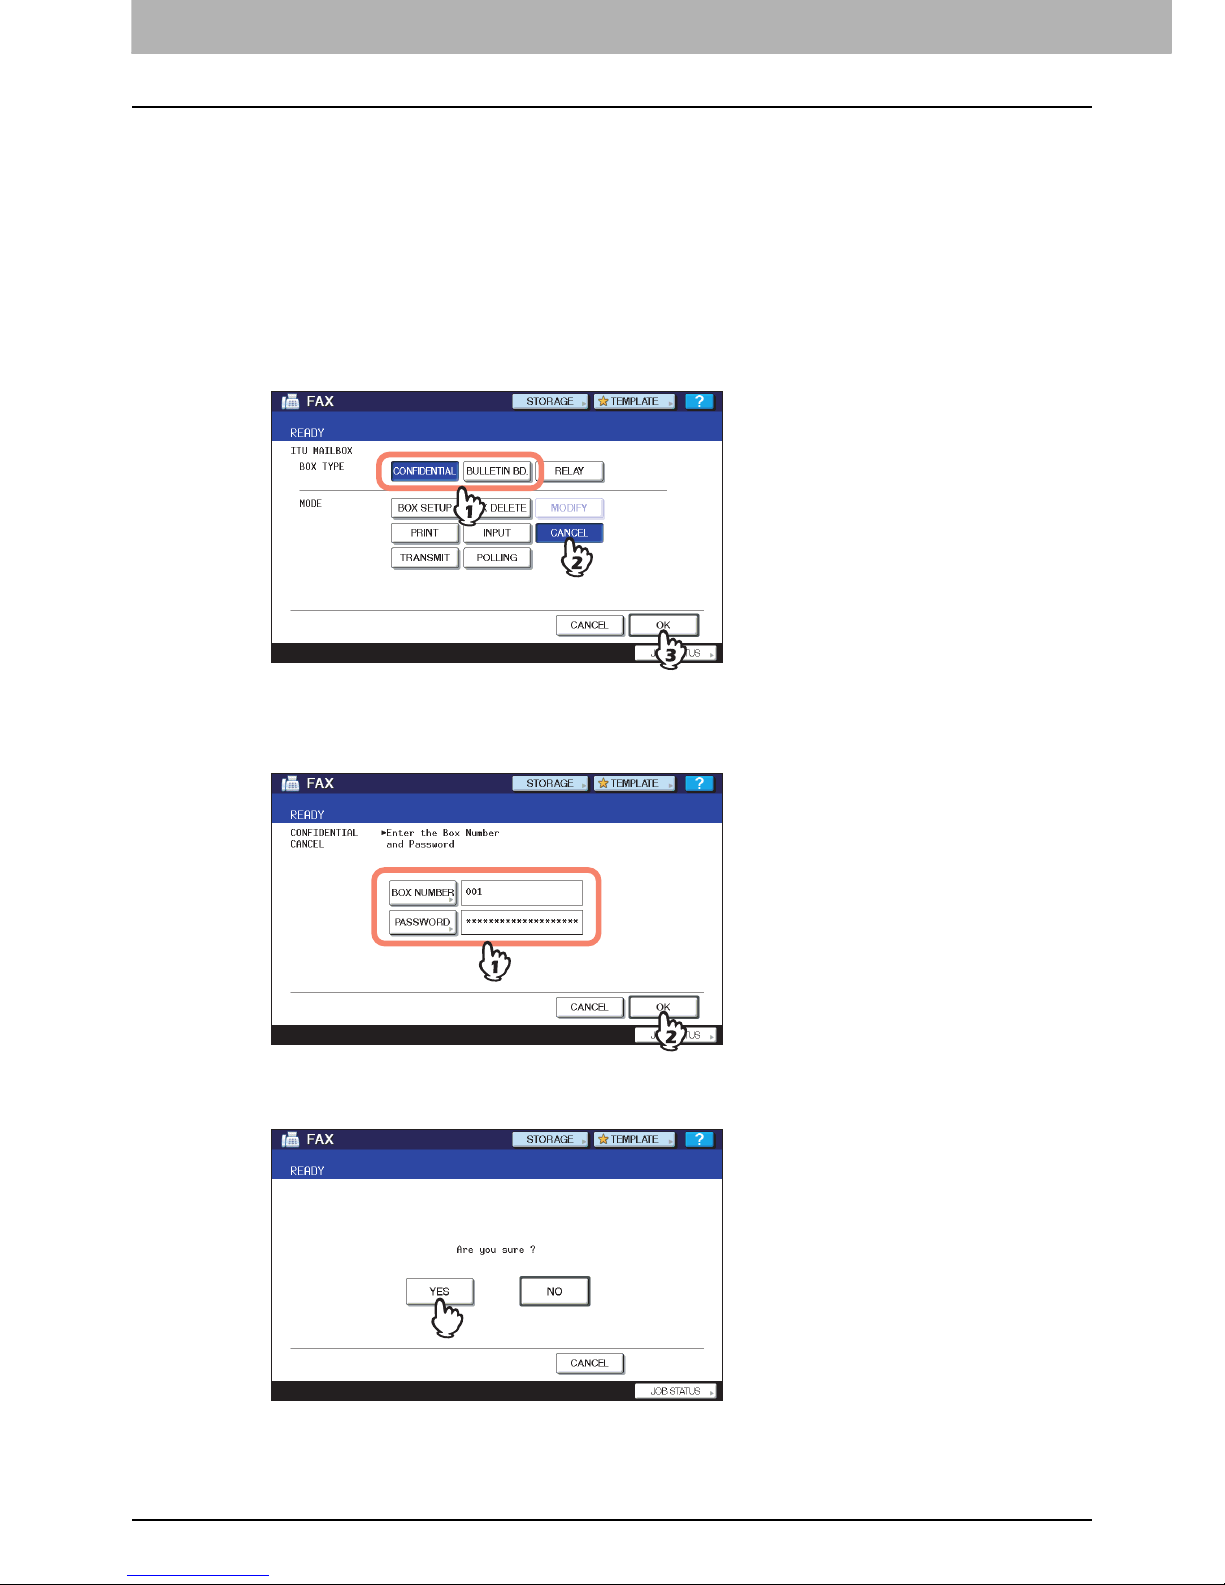
4 ADVANCED FUNCTIONS
60 Mailbox Transmission
Deleting an original
You can delete the original registered in the confidential or bulletin board mailbox in this equipment.
1
Press the [FAX] button on the control panel.
P.16 “Basic procedures”
2
Press the [ADVANCED] tab, and then press [ITU MAILBOX].
This screen is the same as the one you see when you register the original.
P.57 “Registering an original”
3
In the “BOX TYPE” group, press [CONFIDENTIAL] or [BULLETIN BD.]. In the “MODE”
group, press [CANCEL], and then [OK].
If the selected mailbox has not been set, an error message is displayed and you are unable to proceed.
4
Press [BOX NUMBER] to display the entry screen. Key in the box number, and then
press [OK].
If a password has been set to the selected mailbox, key in the password in the same way as the box number.
5
The confirmation screen for the deletion is displayed. Press [YES].
If the box number or password is incorrect, an error message is displayed and you are unable to proceed.
Page 63
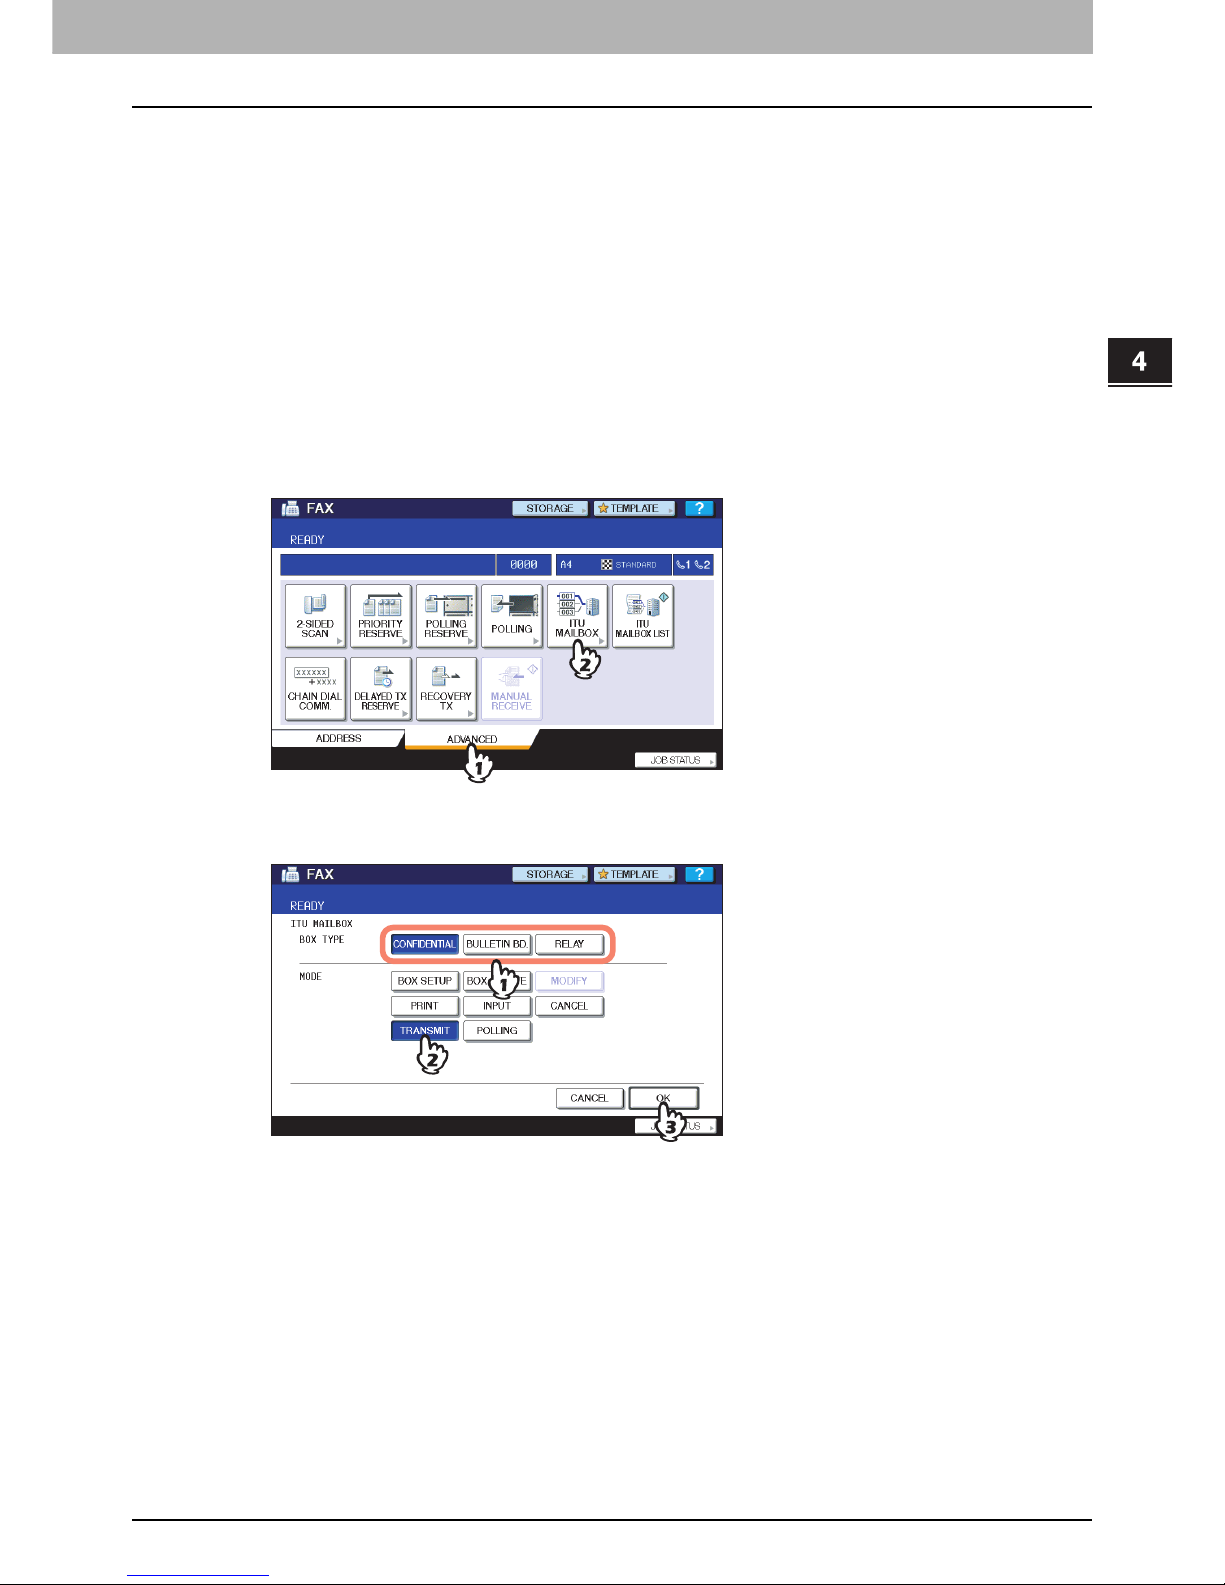
4.ADVANCED FUNCTIONS
Mailbox Transmission 61
4 ADVANCED FUNCTIONS
Sending/retrieving an original
This section describes the operations of the mailbox in the recipient's fax machine.
Sending an original
You can send an original to the confidential/bulletin board/relay station mailbox in this equipment.
1
Place the original(s).
P.19 “Handling an original”
2
Press the [FAX] button on the control panel.
P.16 “Basic procedures”
3
Press [OPTION] and set the transmission conditions.
P.23 “Setting the transmission conditions”
4
Press the [ADVANCED] tab, and then press [ITU MAILBOX].
5
In the “BOX TYPE” group, press [CONFIDENTIAL], [BULLETIN BD.] or [RELAY]. In the
“MODE” group, press [TRANSMIT], and then [OK].
Page 64
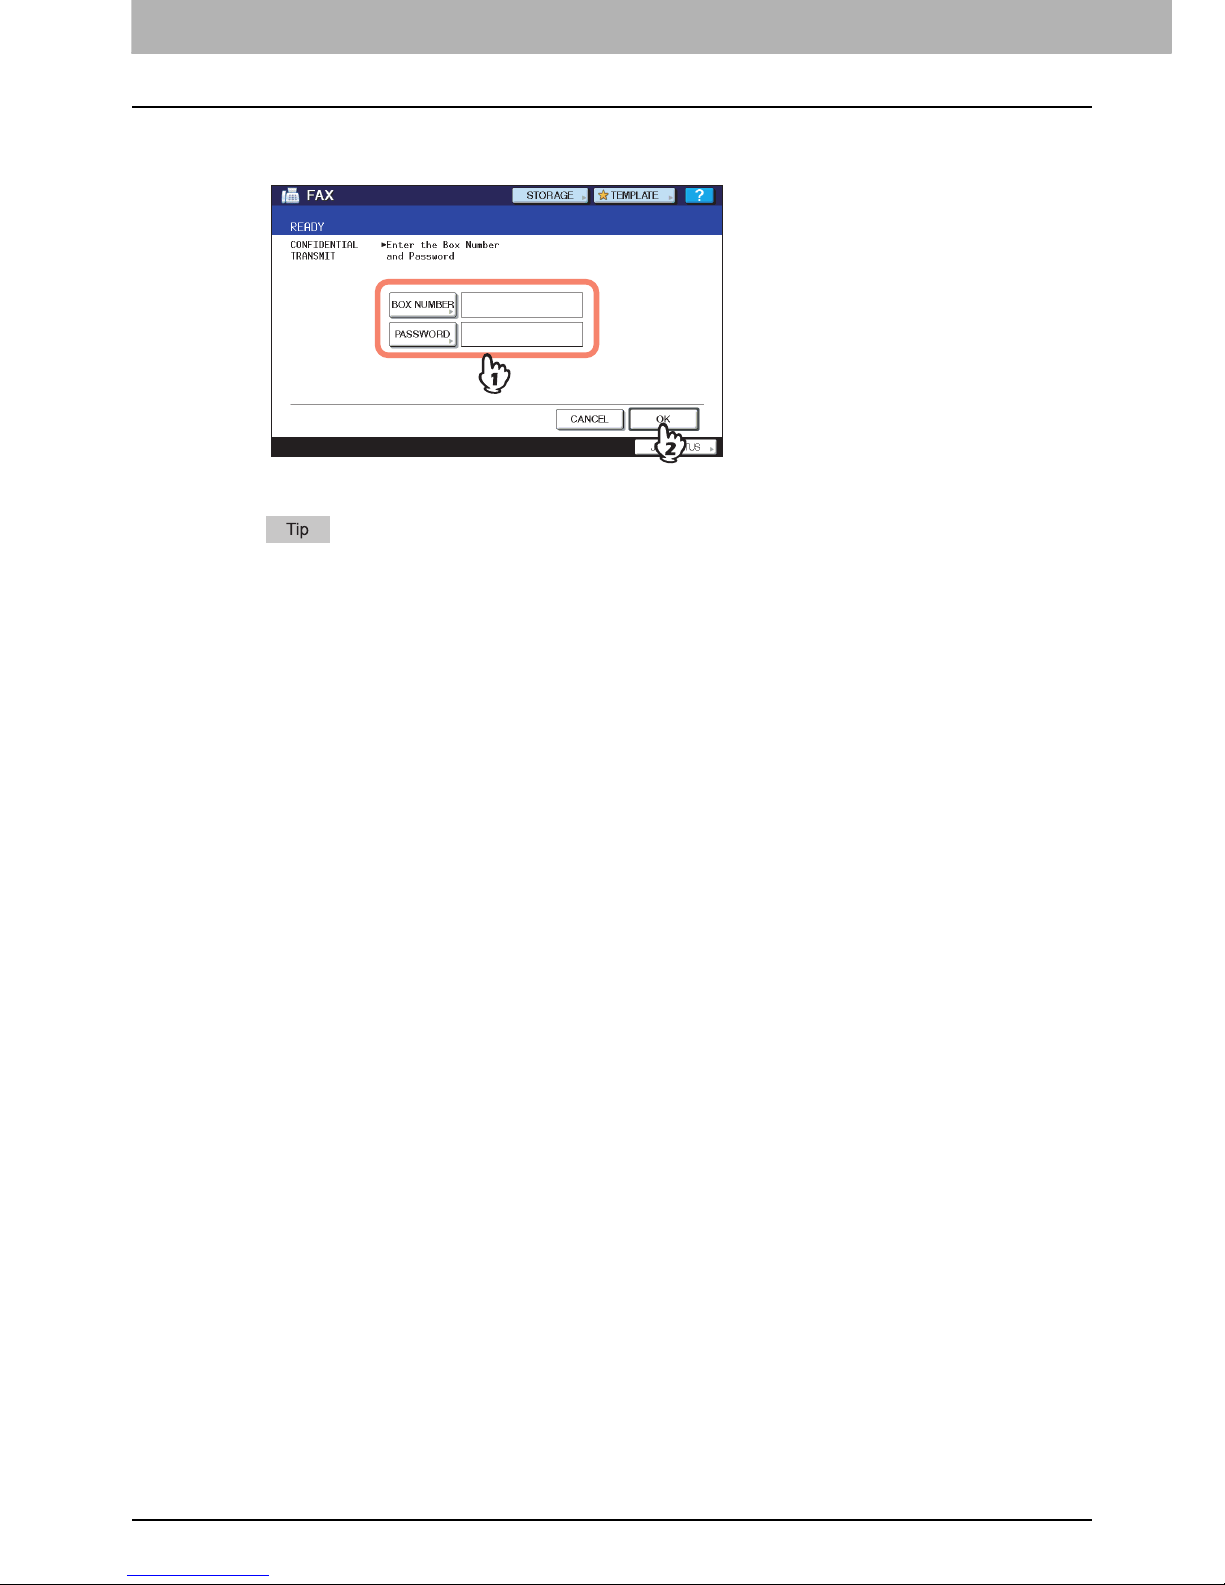
4 ADVANCED FUNCTIONS
62 Mailbox Transmission
6
Press [BOX NUMBER] to display the entry screen. Key in the box number, and then
press [OK].
If a password has been set to the selected mailbox, key in the password in the same way as the box number.
The box number and the password you specified here are sent to the recipient’s fax machine as SUD (box
number) and SID (password) of the command compatible with the ITU-T standards.
7
Specify the recipient’s fax number.
P.27 “Specifying the recipient”
8
Press [SEND].
P.16 “Basic procedures”
You can cancel the transmission of the original.
P.45 “Canceling the Transmission”
Page 65
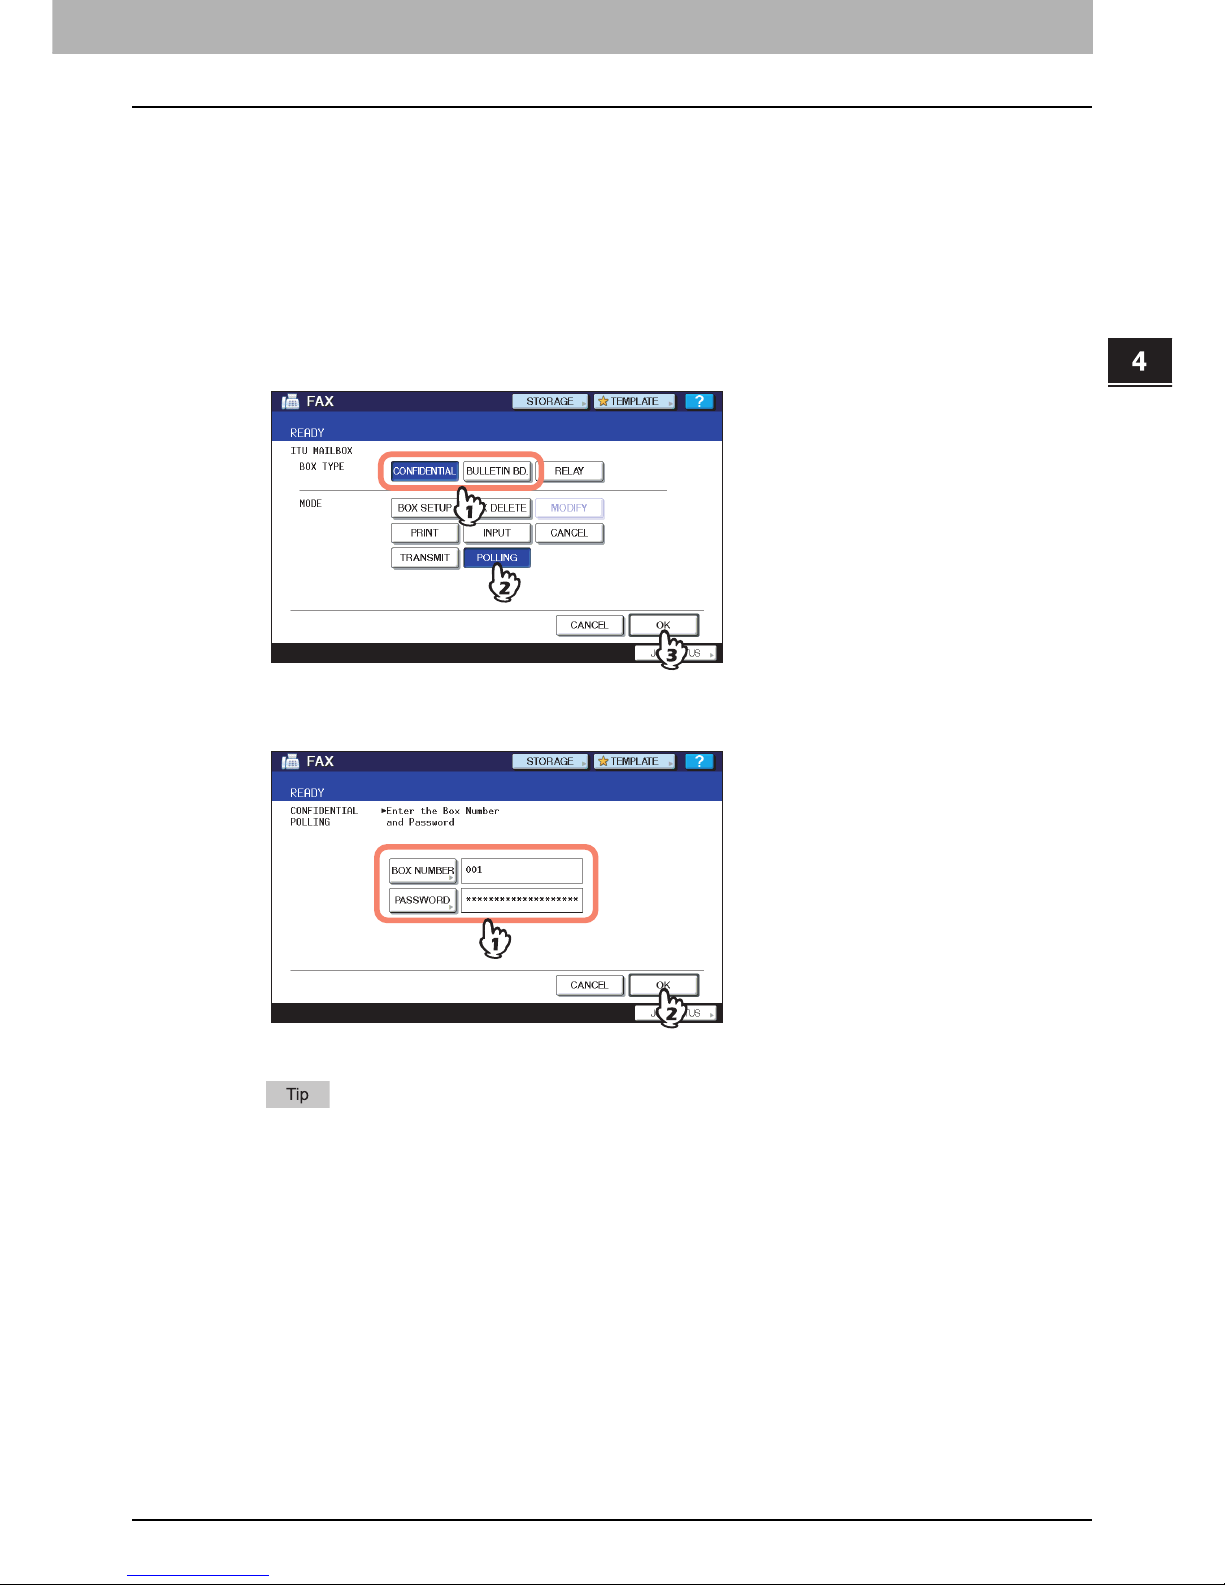
4.ADVANCED FUNCTIONS
Mailbox Transmission 63
4 ADVANCED FUNCTIONS
Retrieving an original
You can retrieve an original from the confidential or bulletin board mailbox in the recipient's fax machine.
1
Press the [FAX] button on the control panel.
P.16 “Basic procedures”
2
Press the [ADVANCED] tab, and then press [ITU MAILBOX].
This screen is the same as the one you see when you send the original.
P.61 “Sending an original”
3
In the “BOX TYPE” group, press [CONFIDENTIAL] or [BULLETIN BD.]. In the “MODE”
group, press [POLLING], and then [OK].
4
Press [BOX NUMBER] to display the entry screen. Key in the box number, and then
press [OK].
If a password has been set to the selected mailbox, key in the password in the same way as the box number.
The box number and the password you specified here are sent to the recipient’s fax machine as SUD (box
number) and SID (password) of the command compatible with the ITU-T standards.
5
Specify the recipient's fax number.
P.27 “Specifying the recipient”
6
Press [SEND].
P.16 “Basic procedures”
Page 66
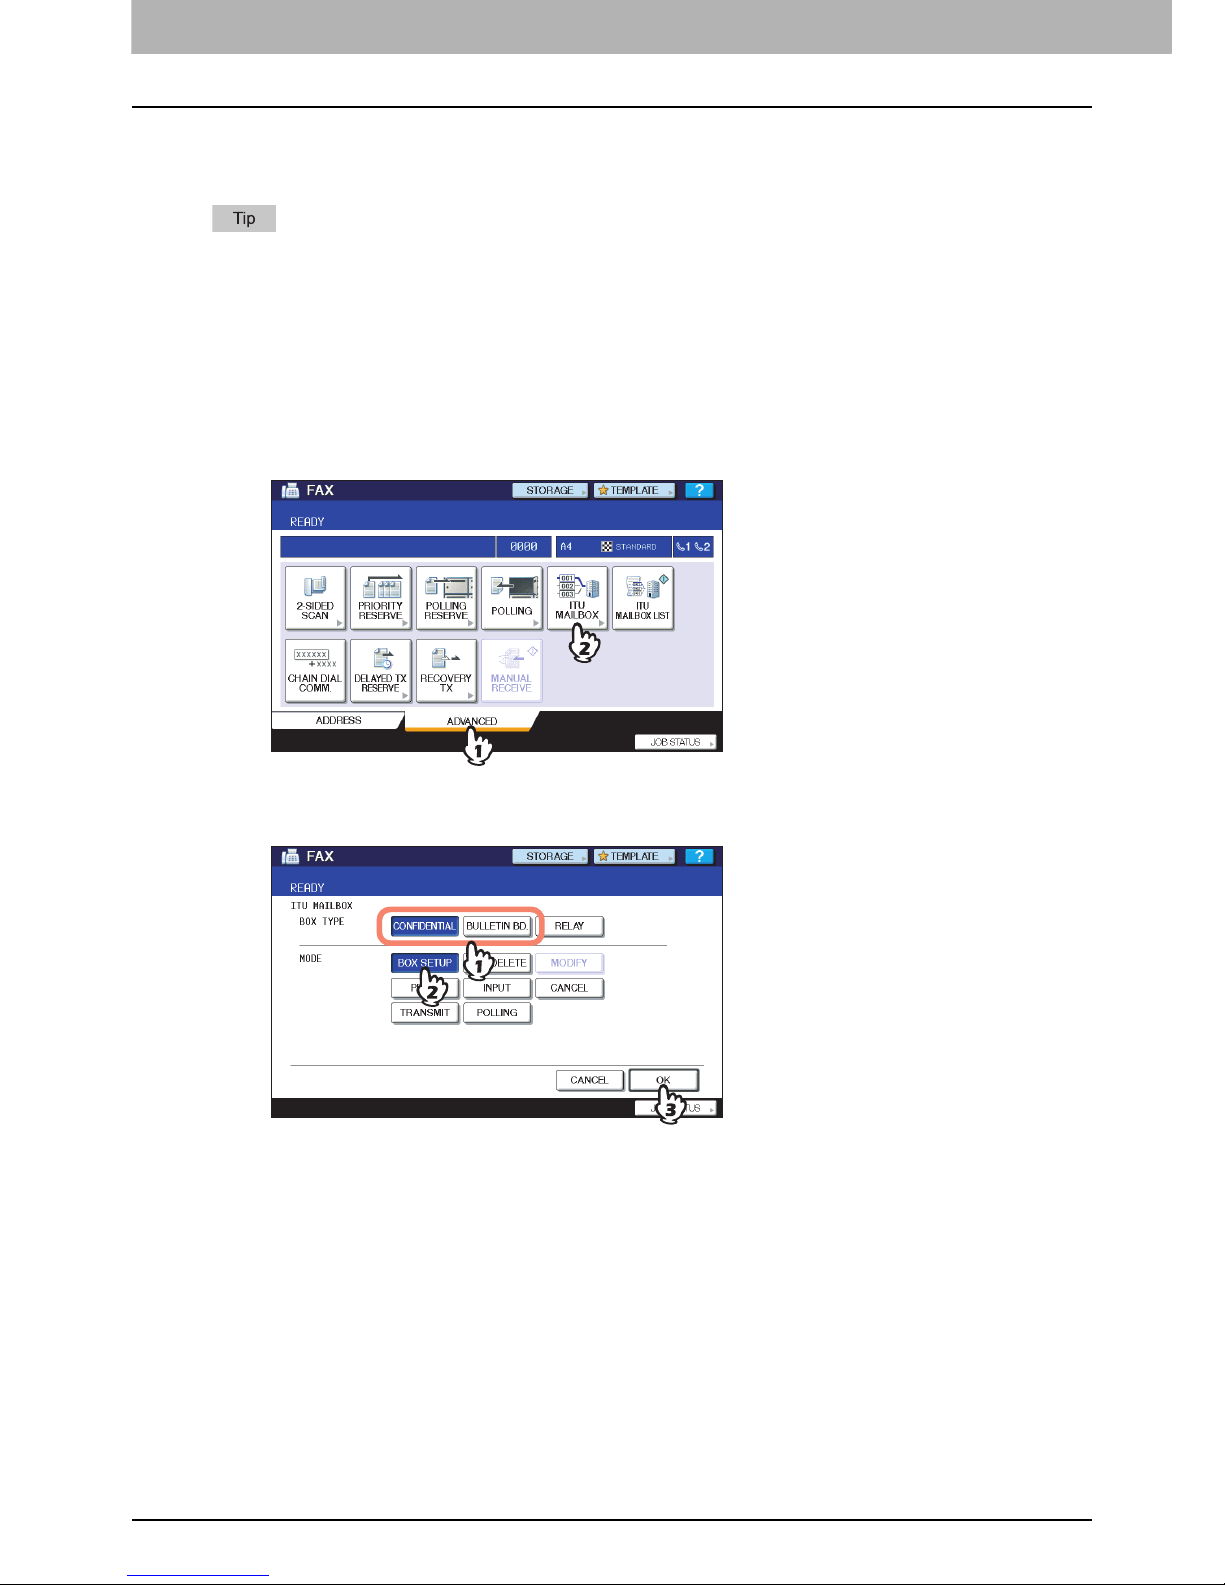
4 ADVANCED FUNCTIONS
64 Mailbox Transmission
Creating/modifying/deleting a mailbox
This section describes how to manage the mailbox in this equipment.
In the list, you can view the status of the mailbox registered to this equipment.
P.82 “Mailbox/relay box report”
Creating the confidential or bulletin board mailbox
You can create the confidential or bulletin board mailbox in this equipment.
1
Press the [FAX] button on the control panel.
P.16 “Basic procedures”
2
Press the [ADVANCED] tab, and then press [ITU MAILBOX].
3
In the “BOX TYPE” group, press [CONFIDENTIAL] or [BULLETIN BD.]. In the “MODE”
group, press [BOX SETUP], and then [OK].
Page 67
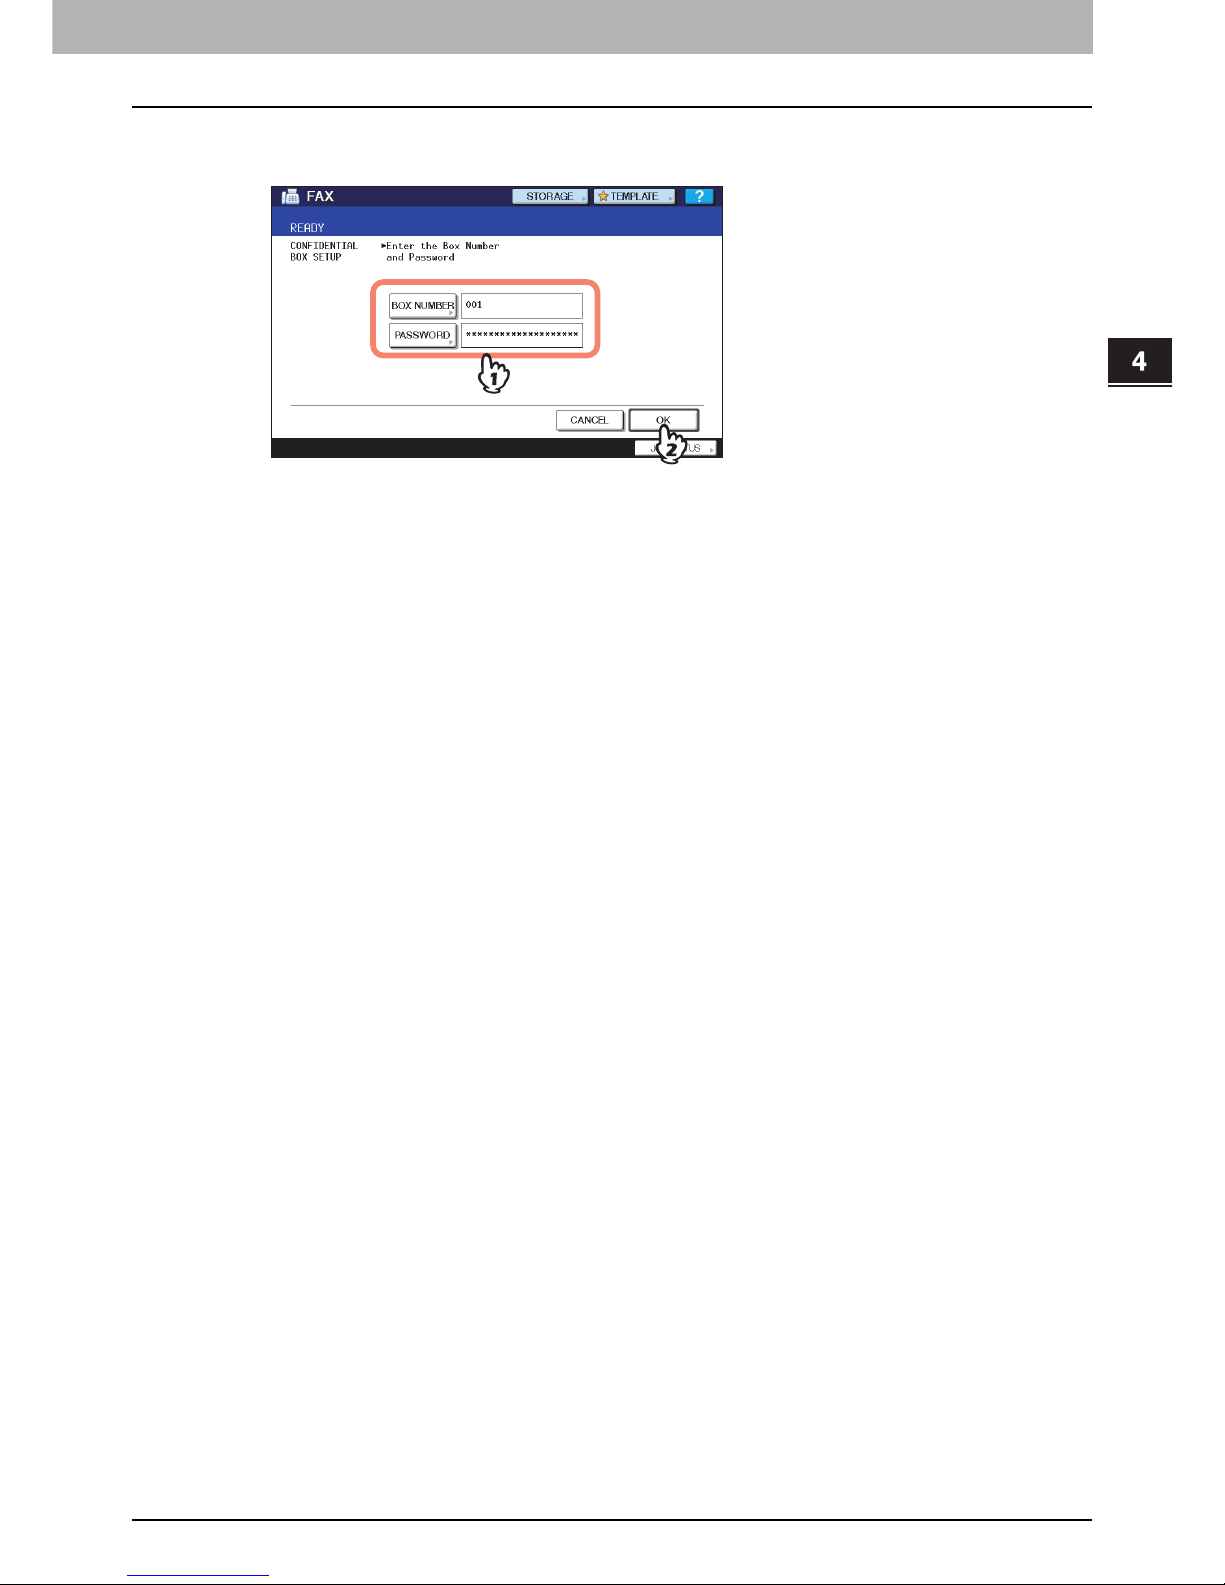
4.ADVANCED FUNCTIONS
Mailbox Transmission 65
4 ADVANCED FUNCTIONS
4
Press [BOX NUMBER] to display the entry screen, key in the box number(s) (a
maximum of 20 digits), and then press [OK].
If you want to set a password (a maximum of 20 digits), key in the password in the same way as the box
number.
If the box number or password keyed in has already been registered, an error message is displayed and you
are unable to proceed.
Page 68
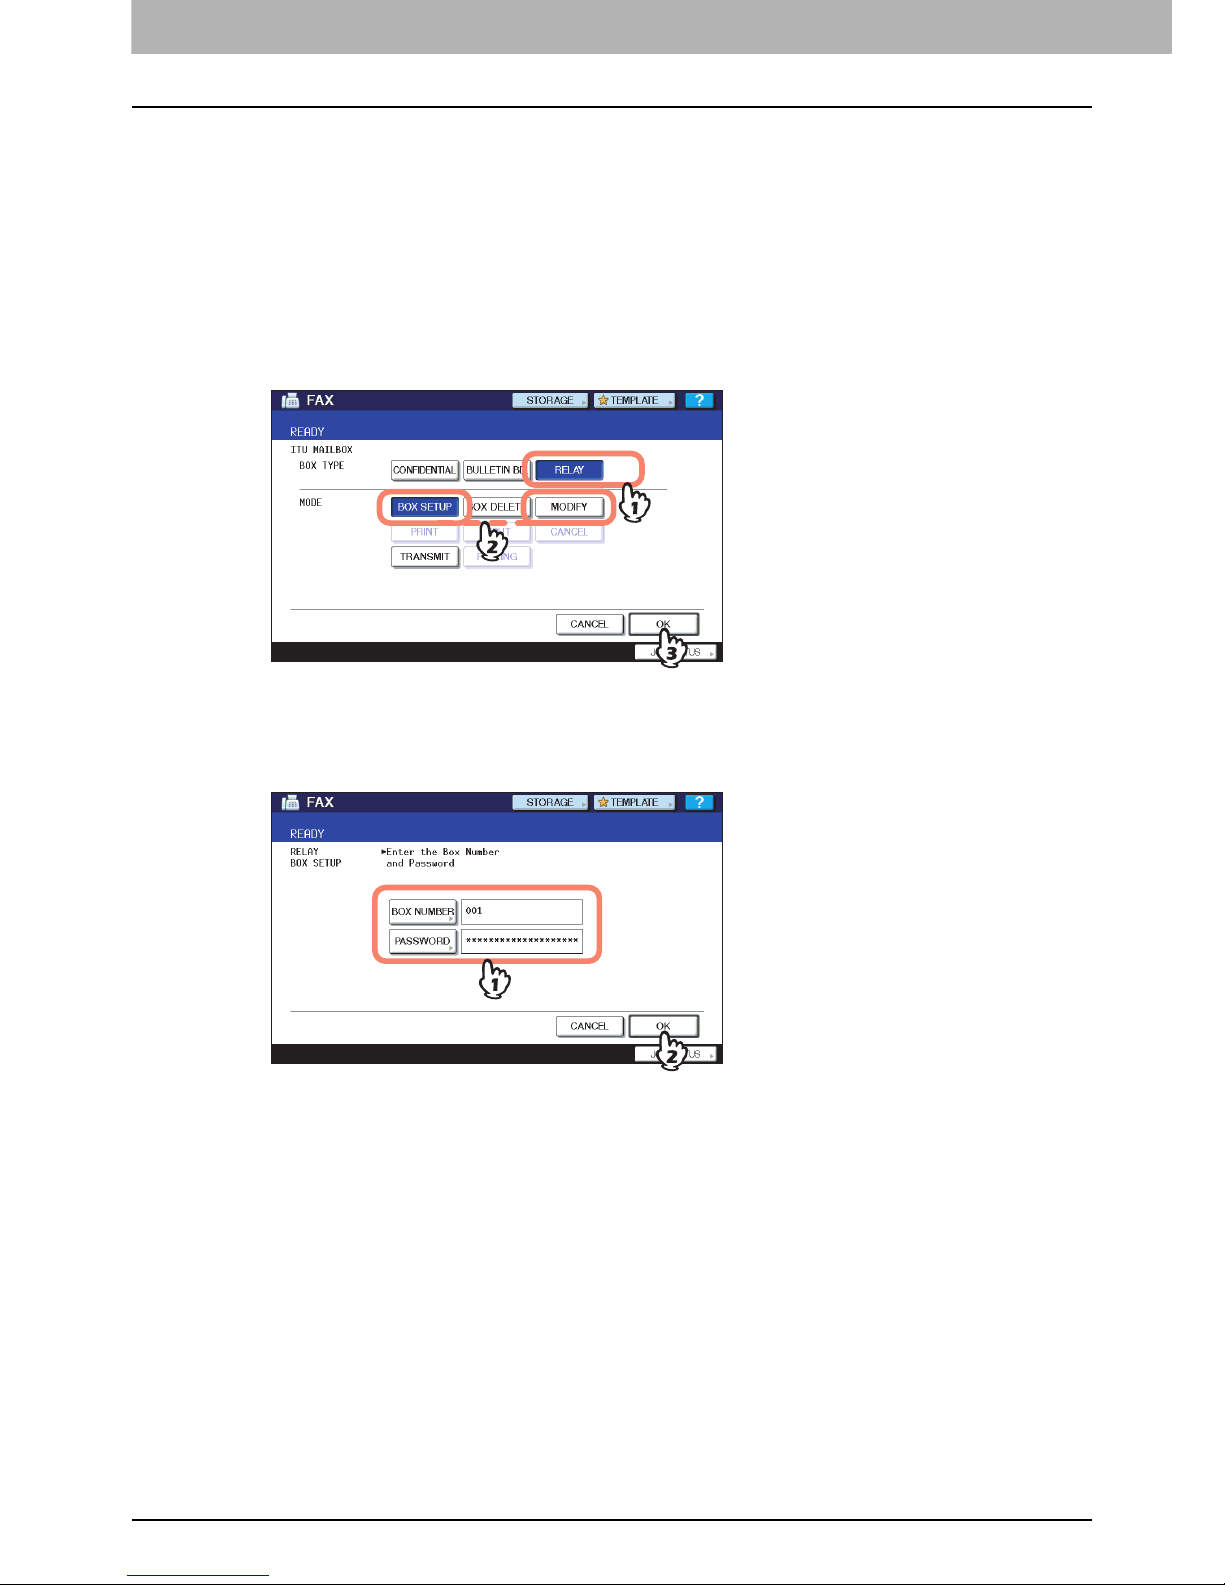
4 ADVANCED FUNCTIONS
66 Mailbox Transmission
Creating/modifying a relay station mailbox
You can create or modify the relay station mailbox.
1
Press the [FAX] button on the control panel.
P.16 “Basic procedures”
2
Press the [ADVANCED] tab, and then press [ITU MAILBOX].
This screen is the same as the one you see when you create the confidential/bulletin board mailbox.
P.64 “Creating the confidential or bulletin board mailbox”
3
In the “BOX TYPE” group, press [RELAY]. In the “MODE” group, press [BOX SETUP] or
[MODIFY], and then [OK].
If the selected mailbox is not set at the time of modification, an error message is displayed and you are unable to
proceed.
4
Press [BOX NUMBER] to display the entry screen. Key in the box number(s) (a
maximum of 20 digits), and then press [OK].
If you want to set a password (a maximum of 20 digits), key in the password in the same way as the box
number.
If the box number or password is incorrect, an error message is displayed and you are unable to proceed.
Page 69
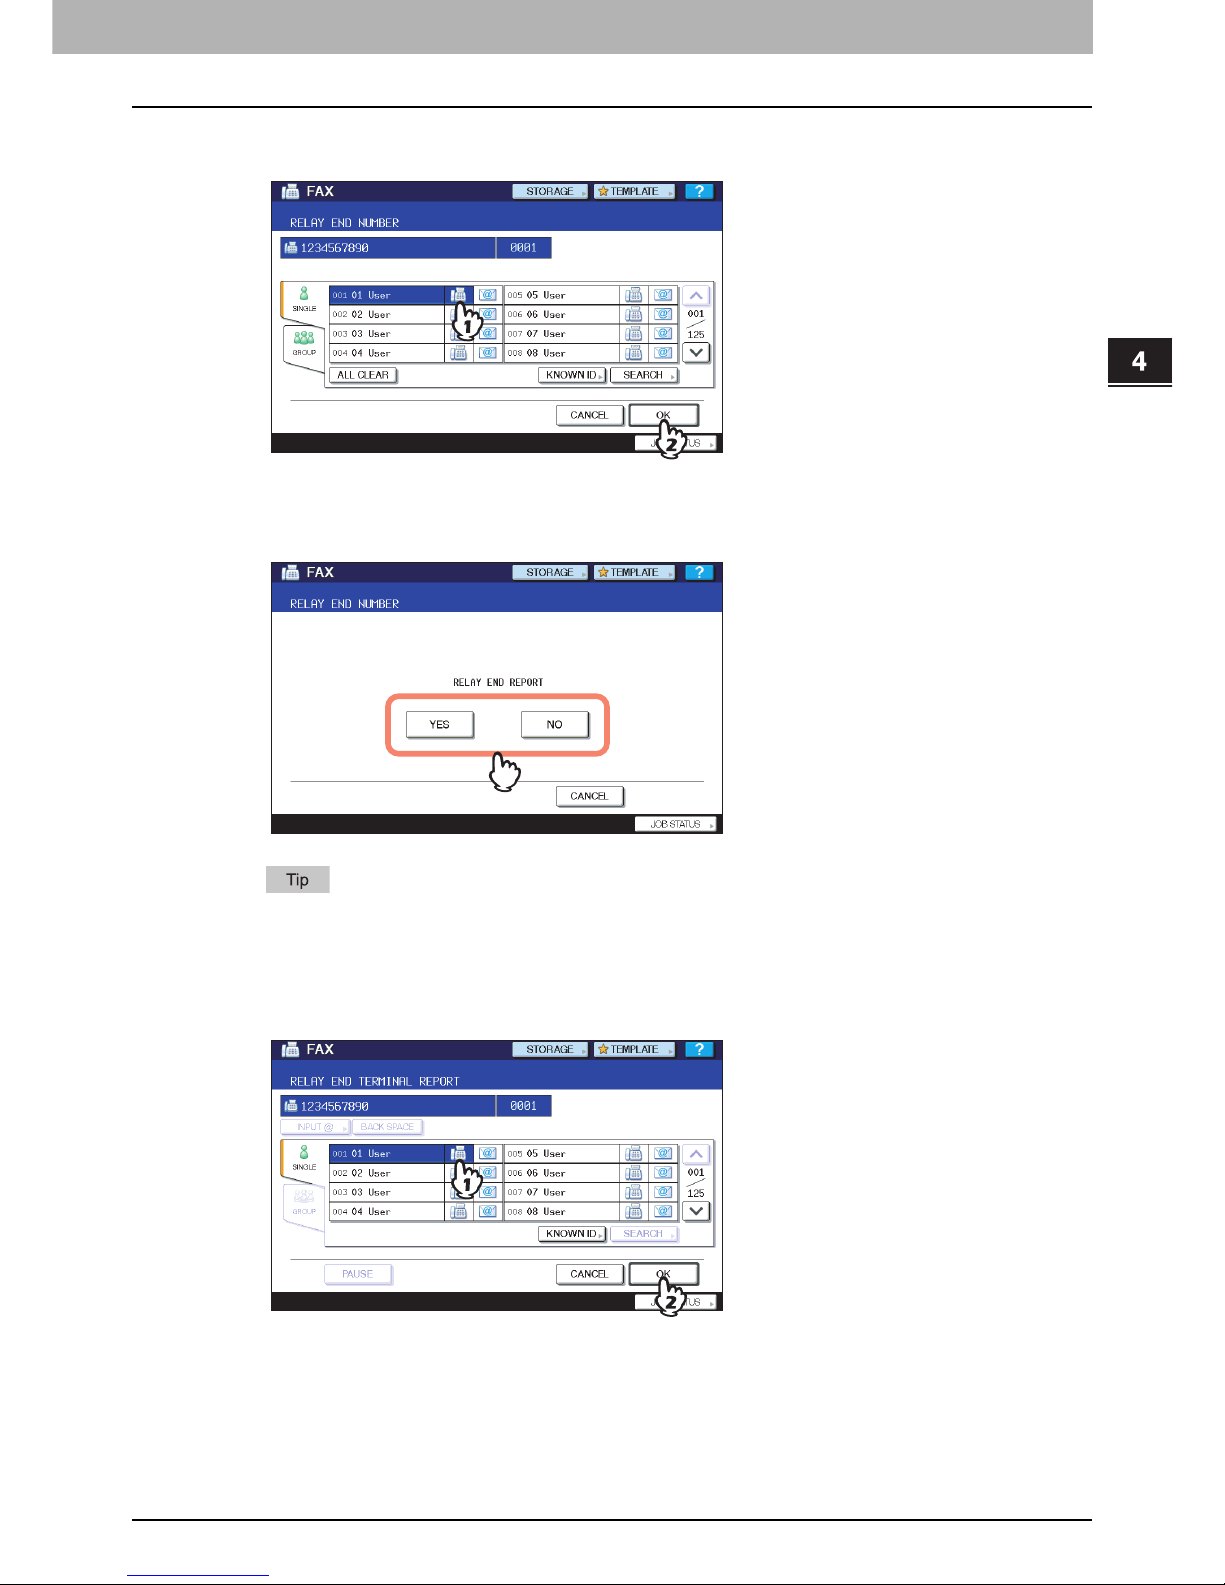
4.ADVANCED FUNCTIONS
Mailbox Transmission 67
4 ADVANCED FUNCTIONS
5
Specify the recipient to be registered, and then press [OK].
P.27 “Specifying the recipient”
Specify the recipient from the address book because this cannot be done with direct dialing.
6
The confirmation screen for sending a relay transmission report is displayed. If you
want to send the report, select [YES]. If not, select [NO].
By default, the relay transmission end terminal report is sent when a communication error occurs. On the
ADMN menu, you can make setting so that the report can be sent automatically. For details of the operation,
refer to the MFP Management Guide.
7
Specify the recipient to which you want to send the report, and then press [OK].
P.27 “Specifying the recipient”
Only one recipient can be specified.
Page 70
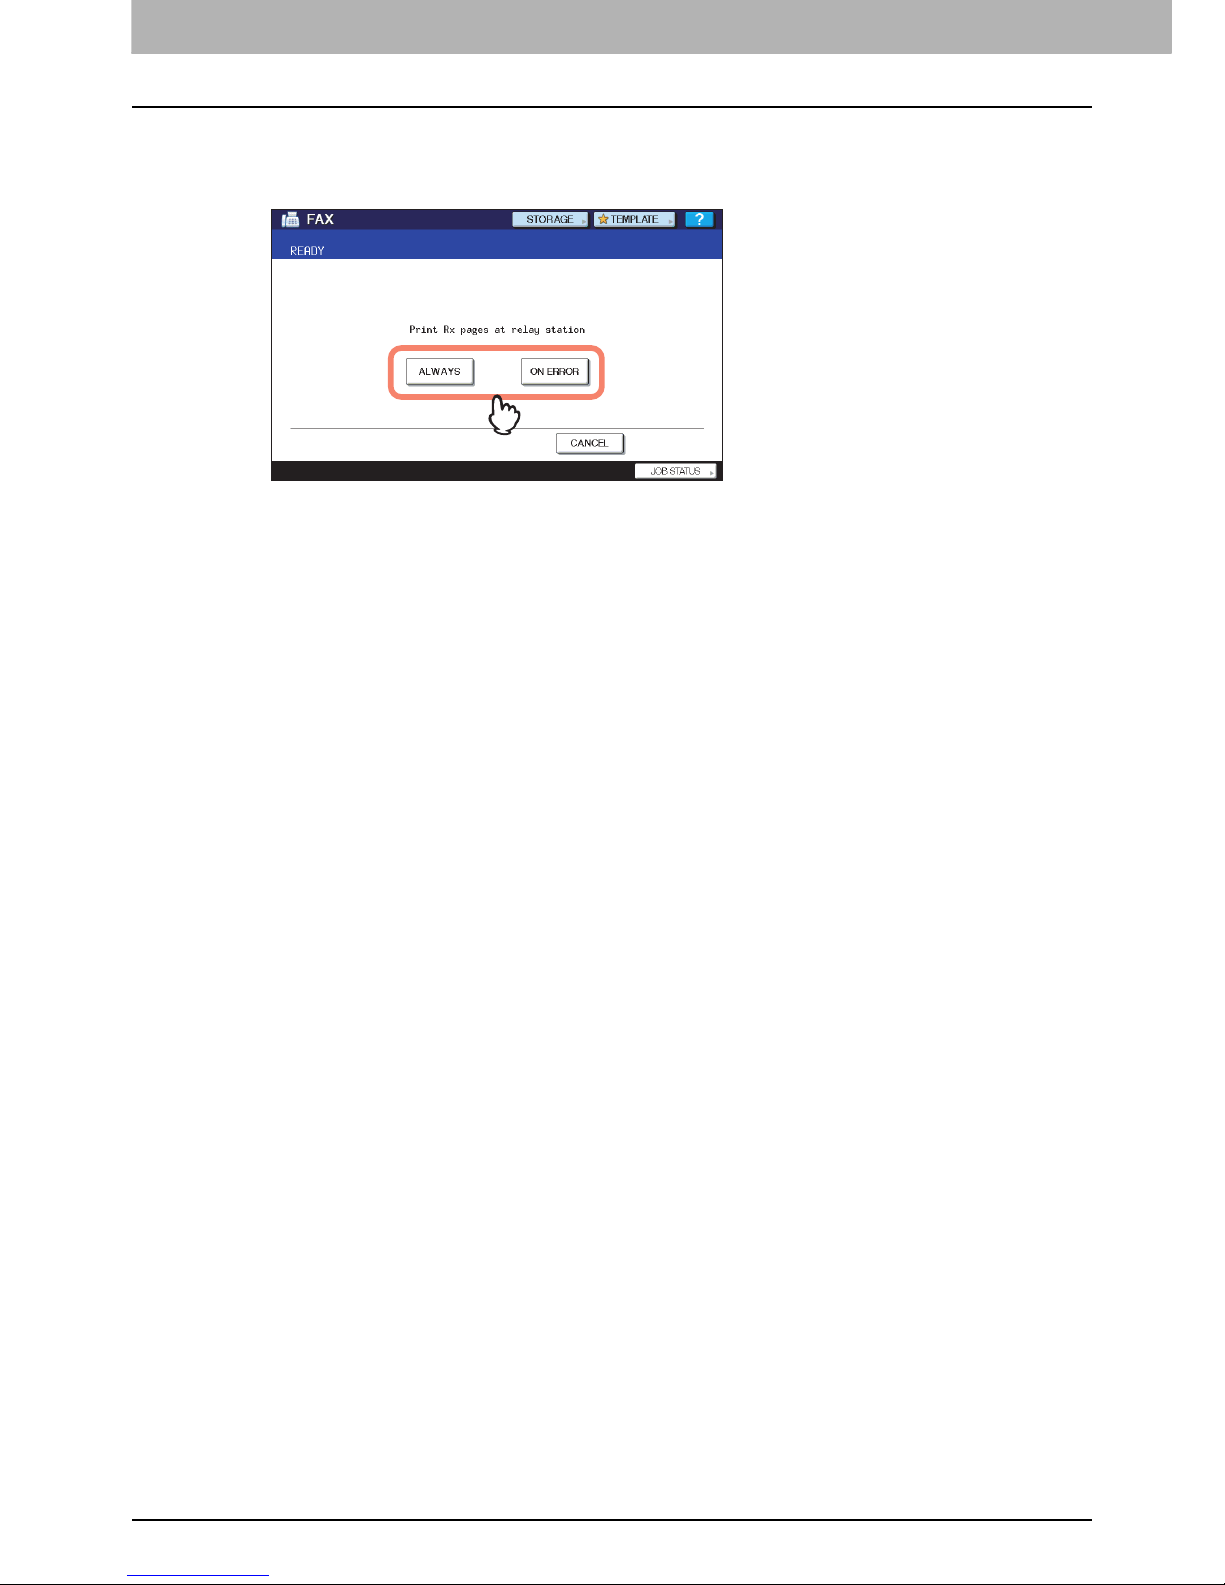
4 ADVANCED FUNCTIONS
68 Mailbox Transmission
8
The confirmation screen for printing the received copy of the original is displayed. If
you want to print it out whenever a copy of the original is delivered, press [ALWAYS]. If
you want to print it out only when an error occurs, press the [ON ERROR].
Page 71
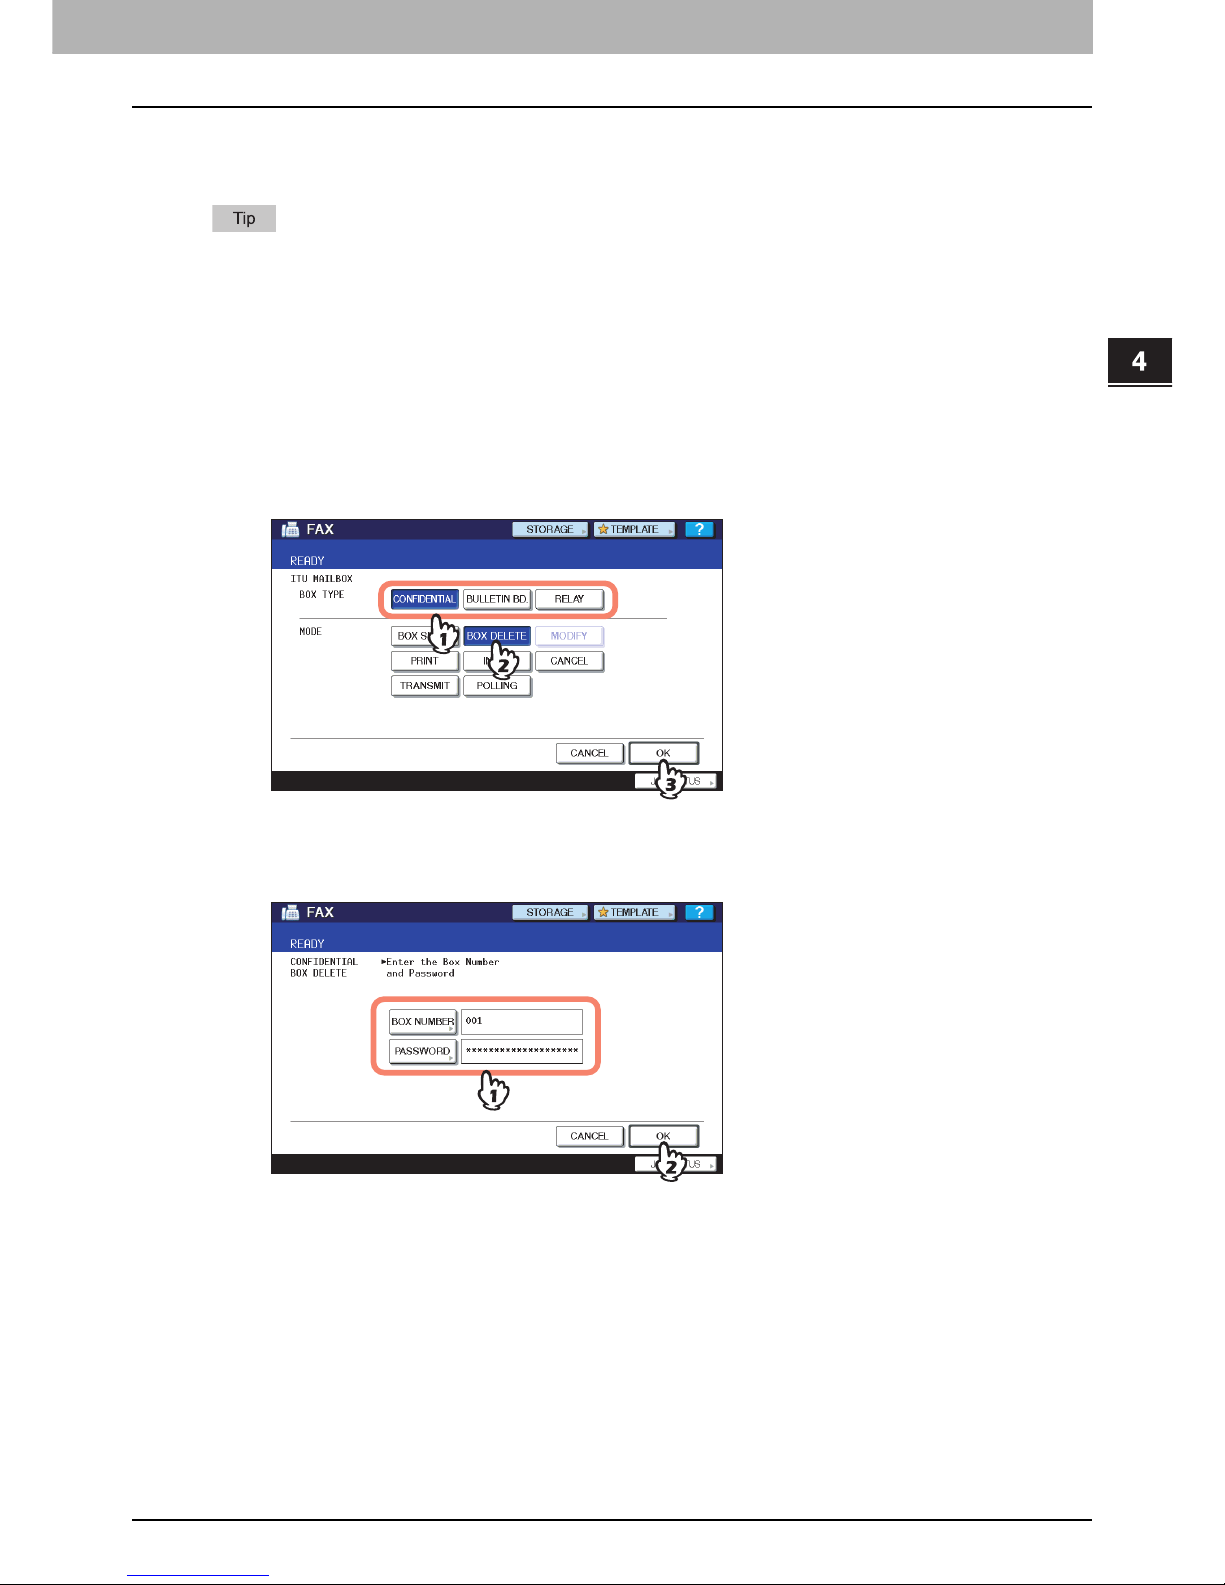
4.ADVANCED FUNCTIONS
Mailbox Transmission 69
4 ADVANCED FUNCTIONS
Deleting a mailbox
You can delete the confidential/bulletin board/relay station mailbox registered in this equipment.
The confidential and bulletin board mailbox in which the original is registered is not deletable. To delete the mailbox,
delete the original in advance.
P.60 “Deleting an original”
1
Press the [FAX] button on the control panel.
P.16 “Basic procedures”
2
Press the [ADVANCED] tab, and then press [ITU MAILBOX].
This screen is the same as the one you see when you create the confidential/bulletin board mailbox.
P.64 “Creating the confidential or bulletin board mailbox”
3
In the “BOX TYPE” group, press [CONFIDENTIAL], [BULLETIN BD.] or [RELAY]. In the
“MODE” group, press [BOX DELETE], and then [OK].
If the selected mailbox has not been set, an error message is displayed and you are unable to proceed.
4
Press [BOX NUMBER] to display the entry screen. Key in the box number, and then
press [OK].
If a password has been set to the selected mailbox, key in the password in the same way as the box number.
Page 72
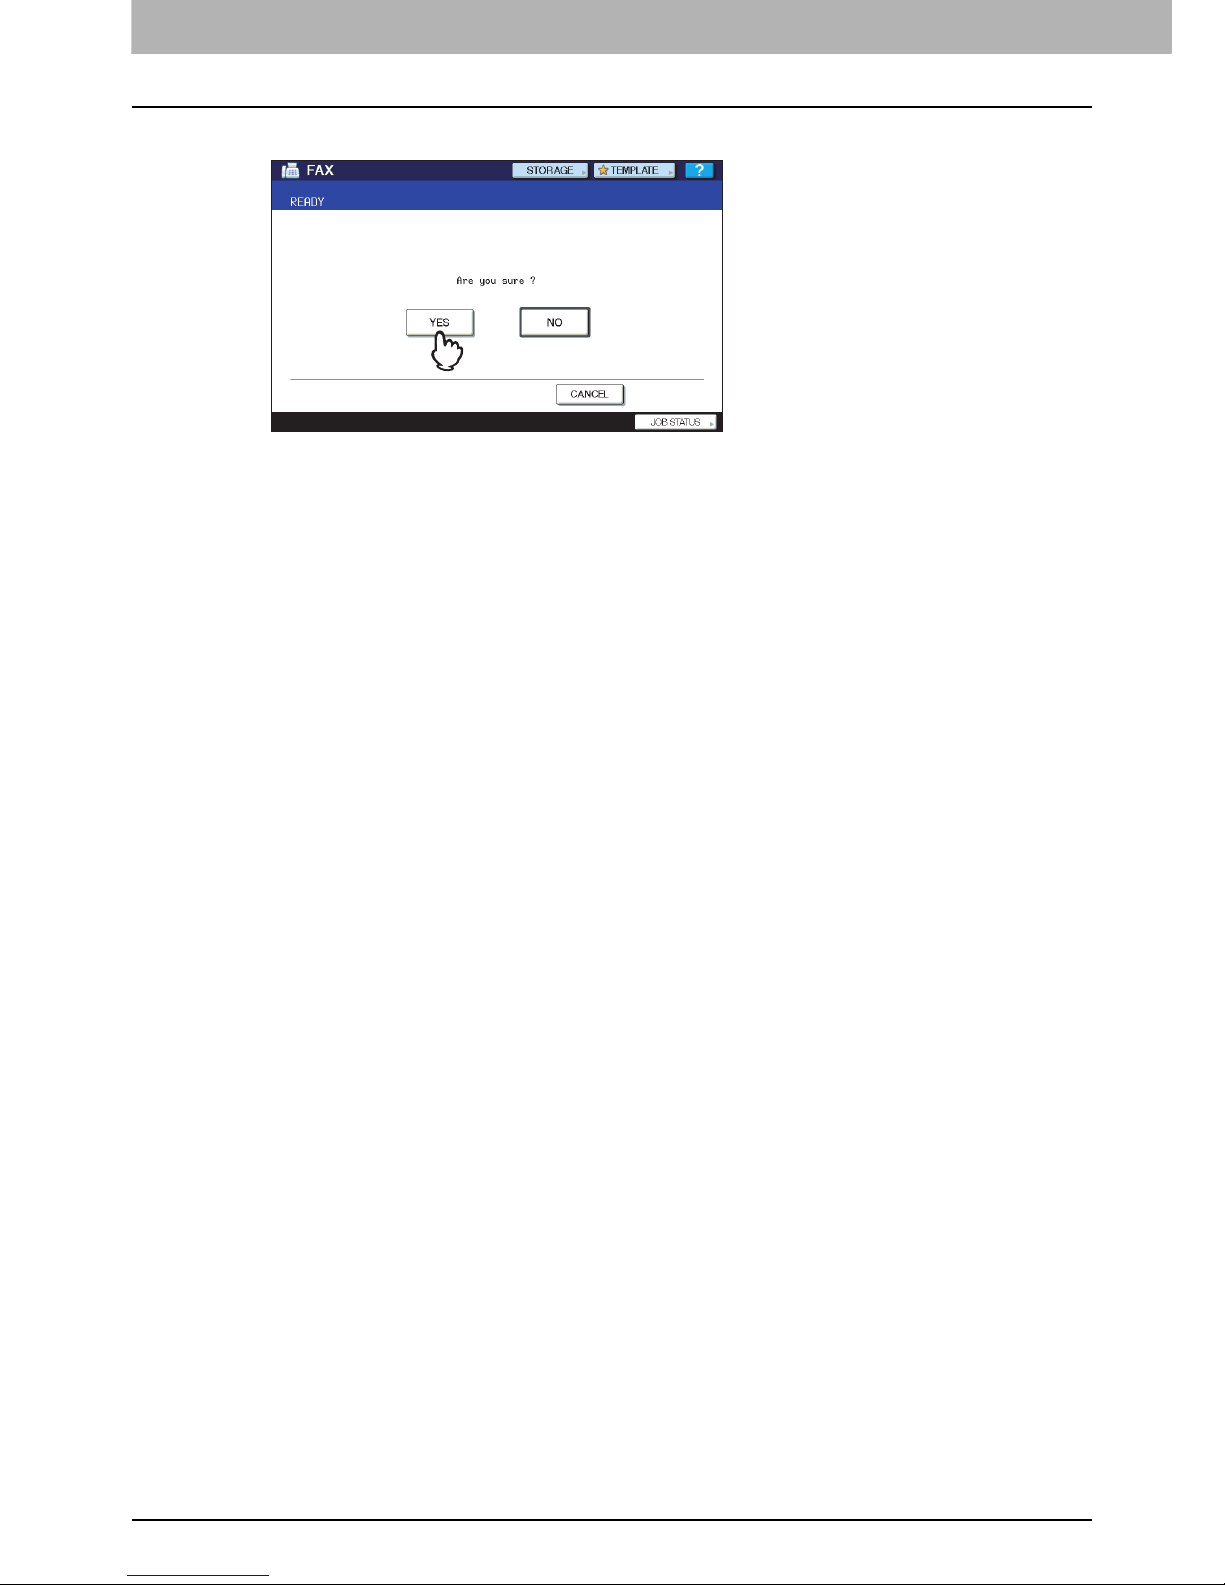
4 ADVANCED FUNCTIONS
70 Mailbox Transmission
5
The confirmation screen for the deletion is displayed. Press [YES].
If the box number or password is incorrect, an error message is displayed and you are unable to proceed.
Page 73
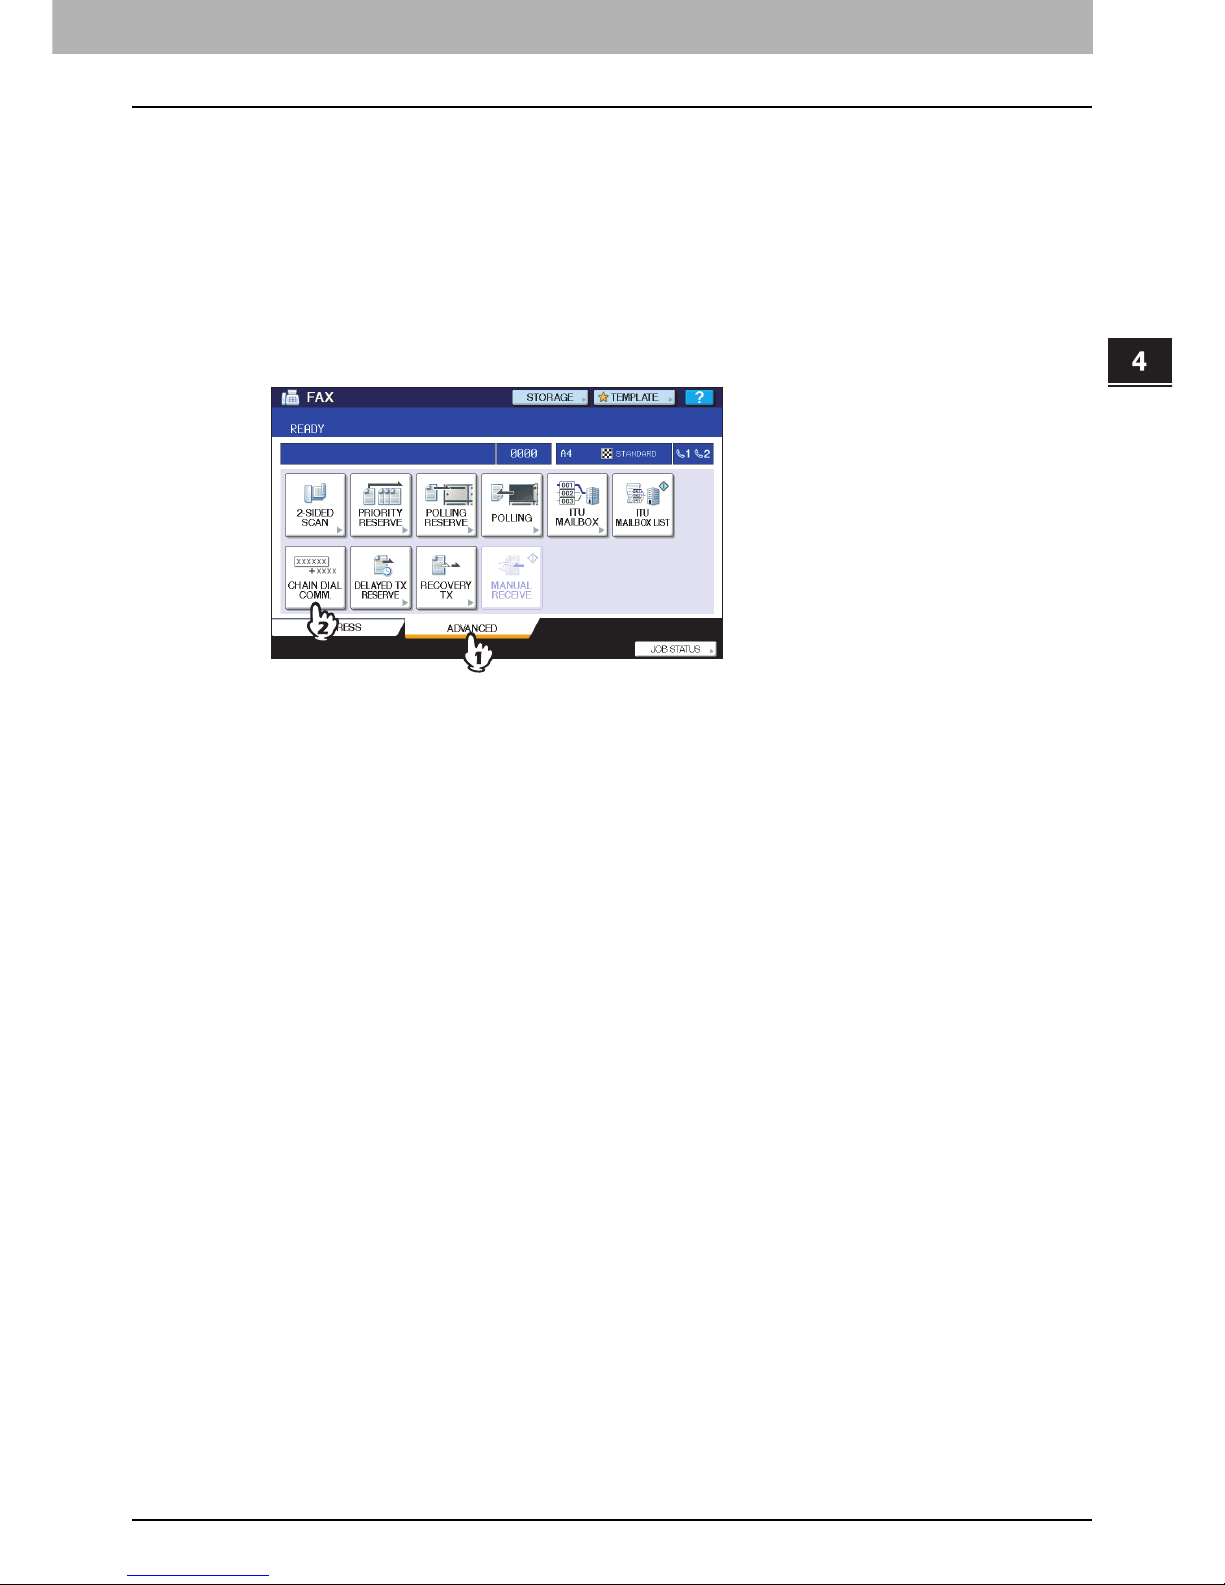
4 ADVANCED FUNCTIONS
Chain Dial Communication 71
Chain Dial Communication
You can chain pre-registered sets of numbers to form a dialing string. For example, you can form the desired number by
specifying sets of numbers registered in the address book sequentially such as region code, area code and fax numbers.
1
Place the original(s).
P.19 “Handling an original”
2
Press the [FAX] button on the control panel.
P.16 “Basic procedures”
3
Press [OPTION] and set the transmission conditions.
P.23 “Setting the transmission conditions”
4
Press the [ADVANCED] tab, and then press [CHAIN DIAL COMM.].
5
Repeat this operation until the desired number is formed.
P.27 “Specifying the recipient”
You can form the dialing number which is up to 128 digits in length. The numbers are chained in the order you
specify them.
6
Press [SEND].
P.16 “Basic procedures”
Page 74
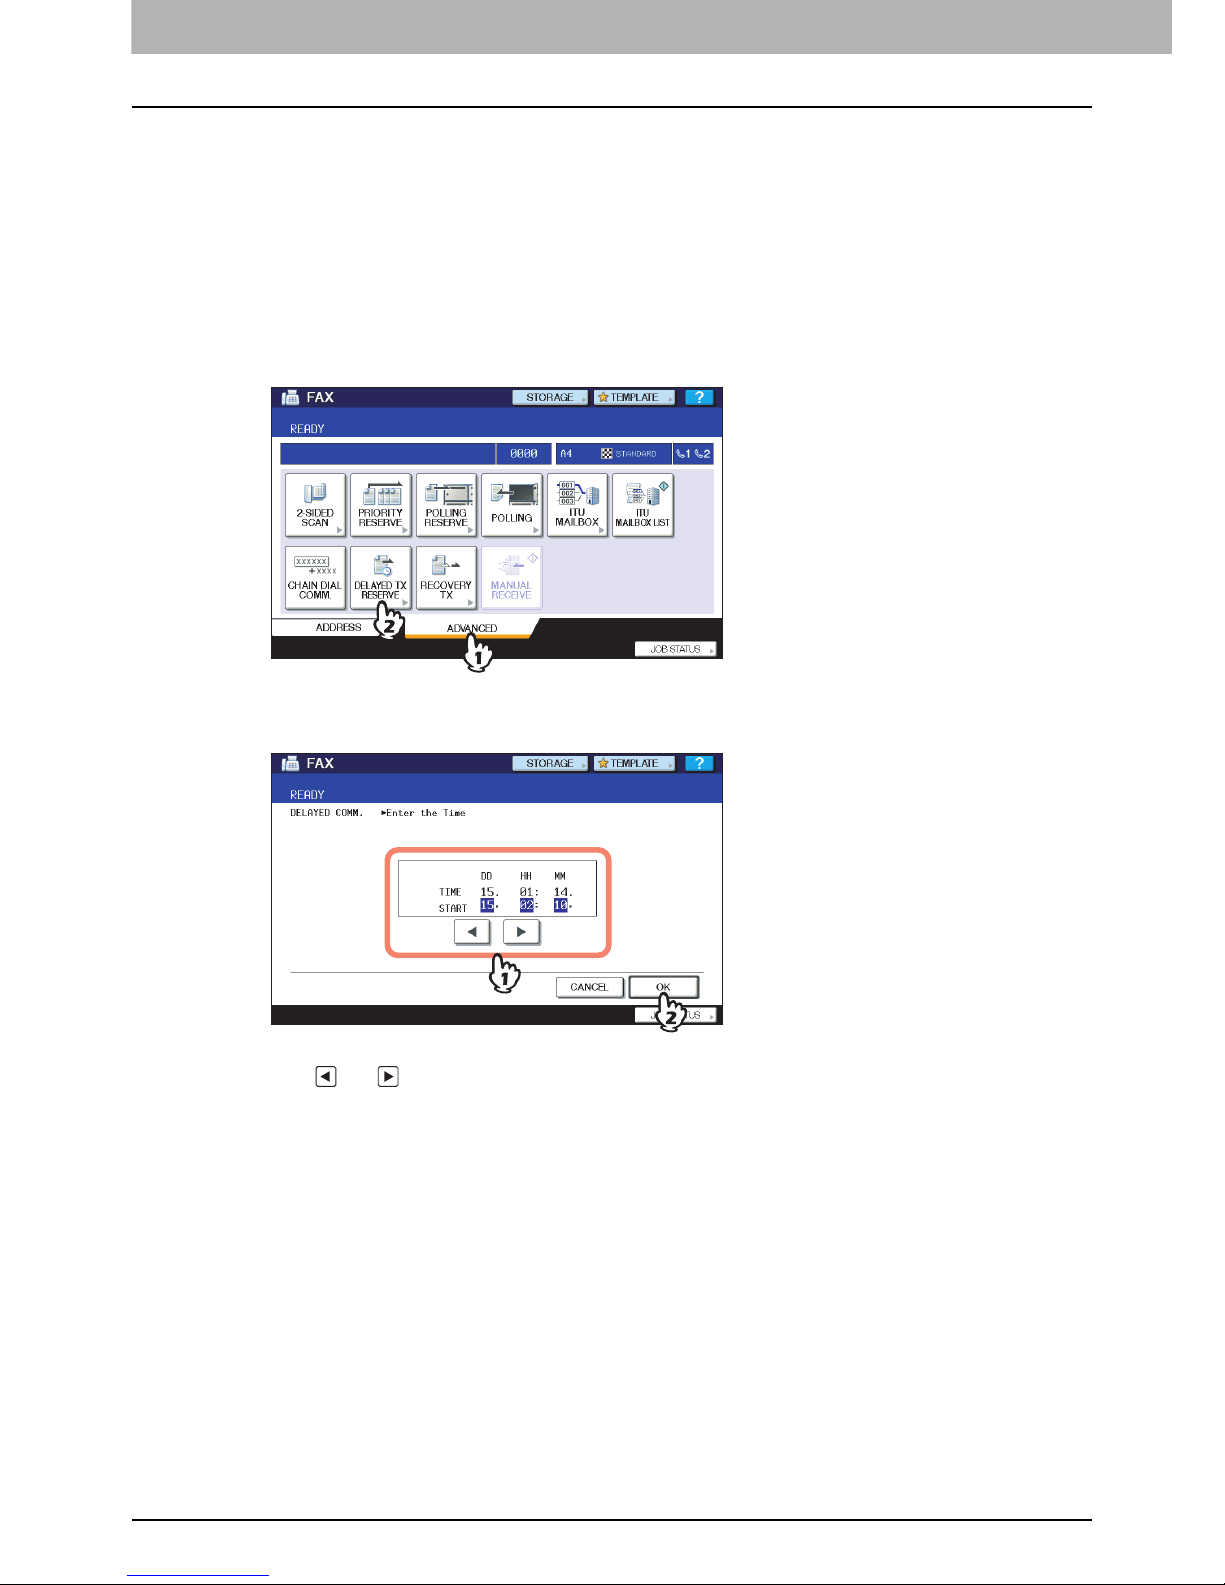
4 ADVANCED FUNCTIONS
72 Delayed Transmission Reservation
Delayed Transmission Reservation
You can send a fax at a specified date and time. It is useful when you want to make use of off-peak discounts (e.g.
nighttime) or you want to send a fax to a country which has a time difference.
1
Place the original(s).
P.19 “Handling an original”
2
Press the [FAX] button on the control panel.
P.16 “Basic procedures”
3
Press [OPTION] and set the transmission conditions.
P.23 “Setting the transmission conditions”
4
Press the [ADVANCED] tab, and then press [DELAYED TX RESERVE].
5
Key in the date, hour, and minute using the digital keys on the control panel, and then
press [OK].
The acceptable range of reservation is up to one month later.
Press and to move the cursor.
Specify the time on a 24-hour basis.
To correct the entry, press the [FUNCTION CLEAR] button on the control panel, and then key in the correct
number.
6
Specify the recipient’s fax number.
P.27 “Specifying the recipient”
7
Press [SEND].
P.16 “Basic procedures”
Canceling delayed transmission reservation
You can cancel the delayed transmission reservation and send a fax in a normal manner. On the reserved
transmission confirmation screen, select the transmissions job, and then press [SEND].
P.42 “Checking reserved transmissions”
Page 75
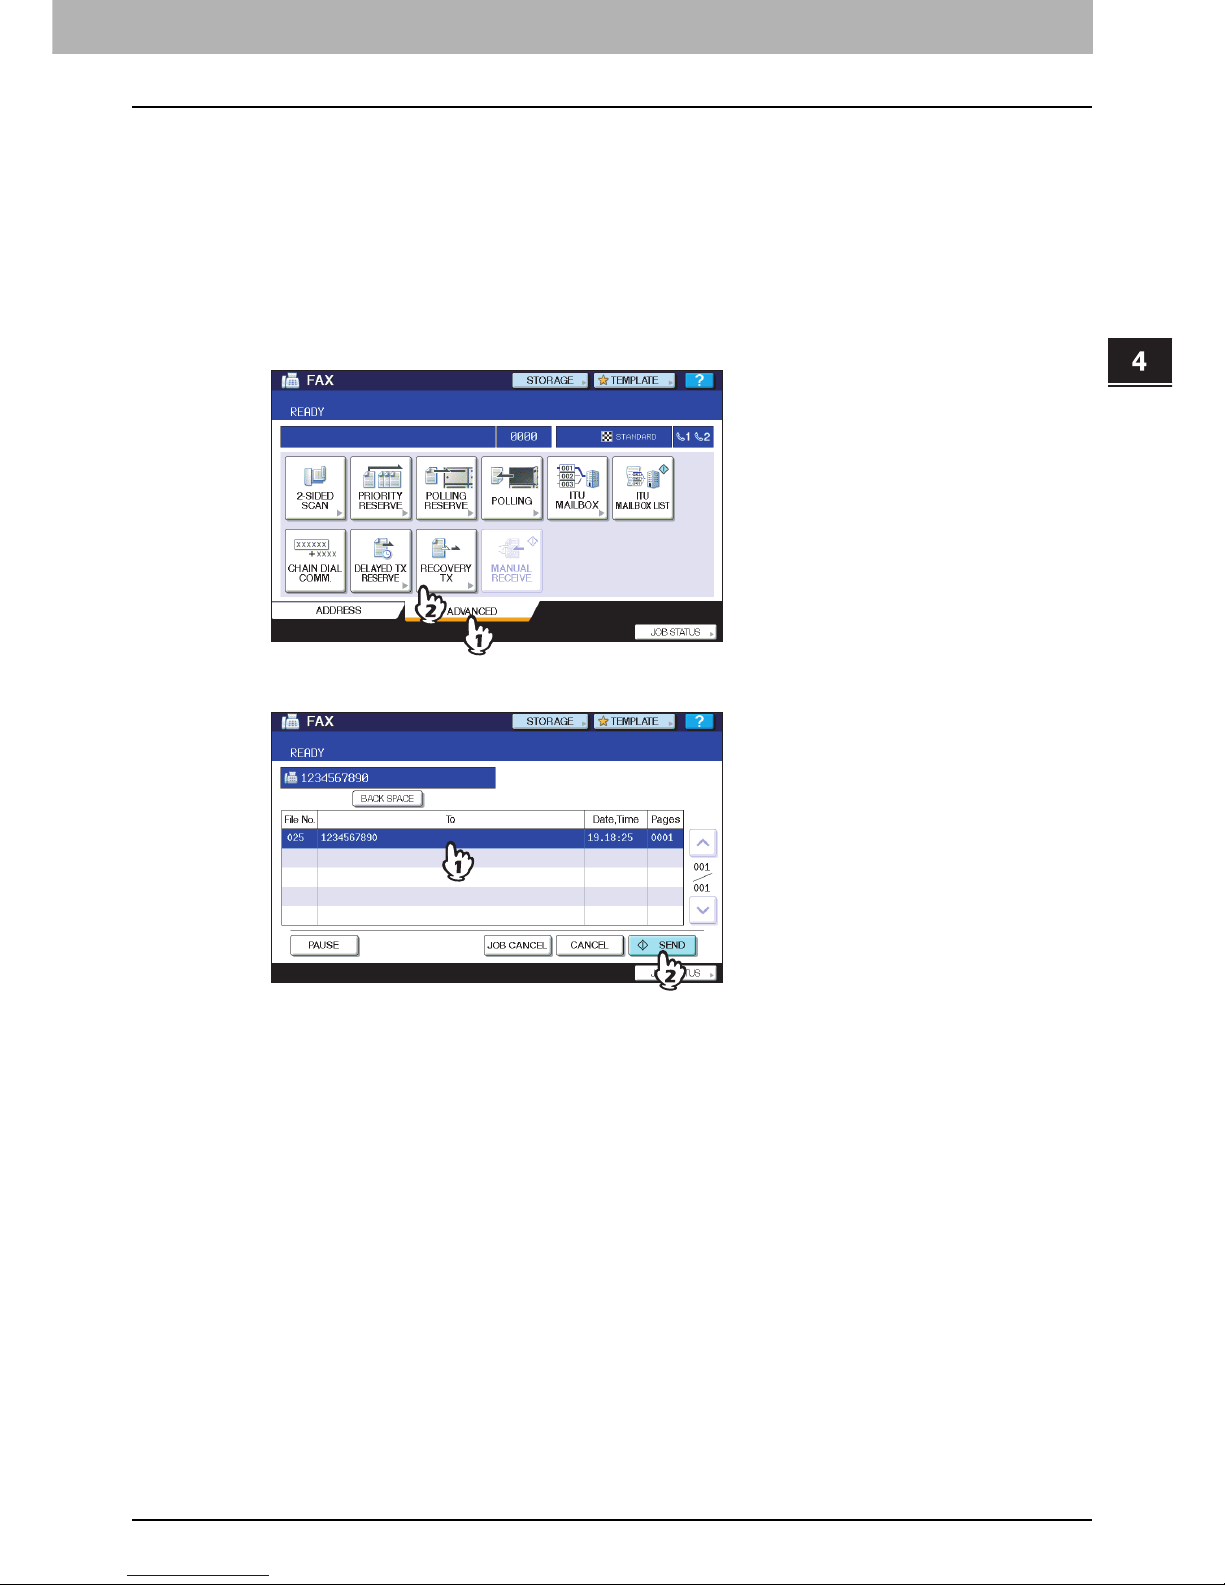
4 ADVANCED FUNCTIONS
Recovery Transmission 73
Recovery Transmission
You can save the data of originals, which were not sent after redialing a specified number of times, in the memory and
resend them without placing the originals. Enabling or disabling this function or a period of time for the data to be retained
can be set on the ADMN menu. For the details of the current setting, ask your administrator.
P.104 “Setting recovery transmission”
1
Press the [FAX] button on the control panel.
P.16 “Basic procedures”
2
Press [OPTION] and set the transmission conditions.
P.23 “Setting the transmission conditions”
3
Press the [ADVANCED] tab, and then press [RECOVERY TX].
4
Select the transmission job, and then press [SEND].
You can change the fax number which is specified with the direct entry method.
To delete the selected transmission job, press [JOB CANCEL].
Page 76
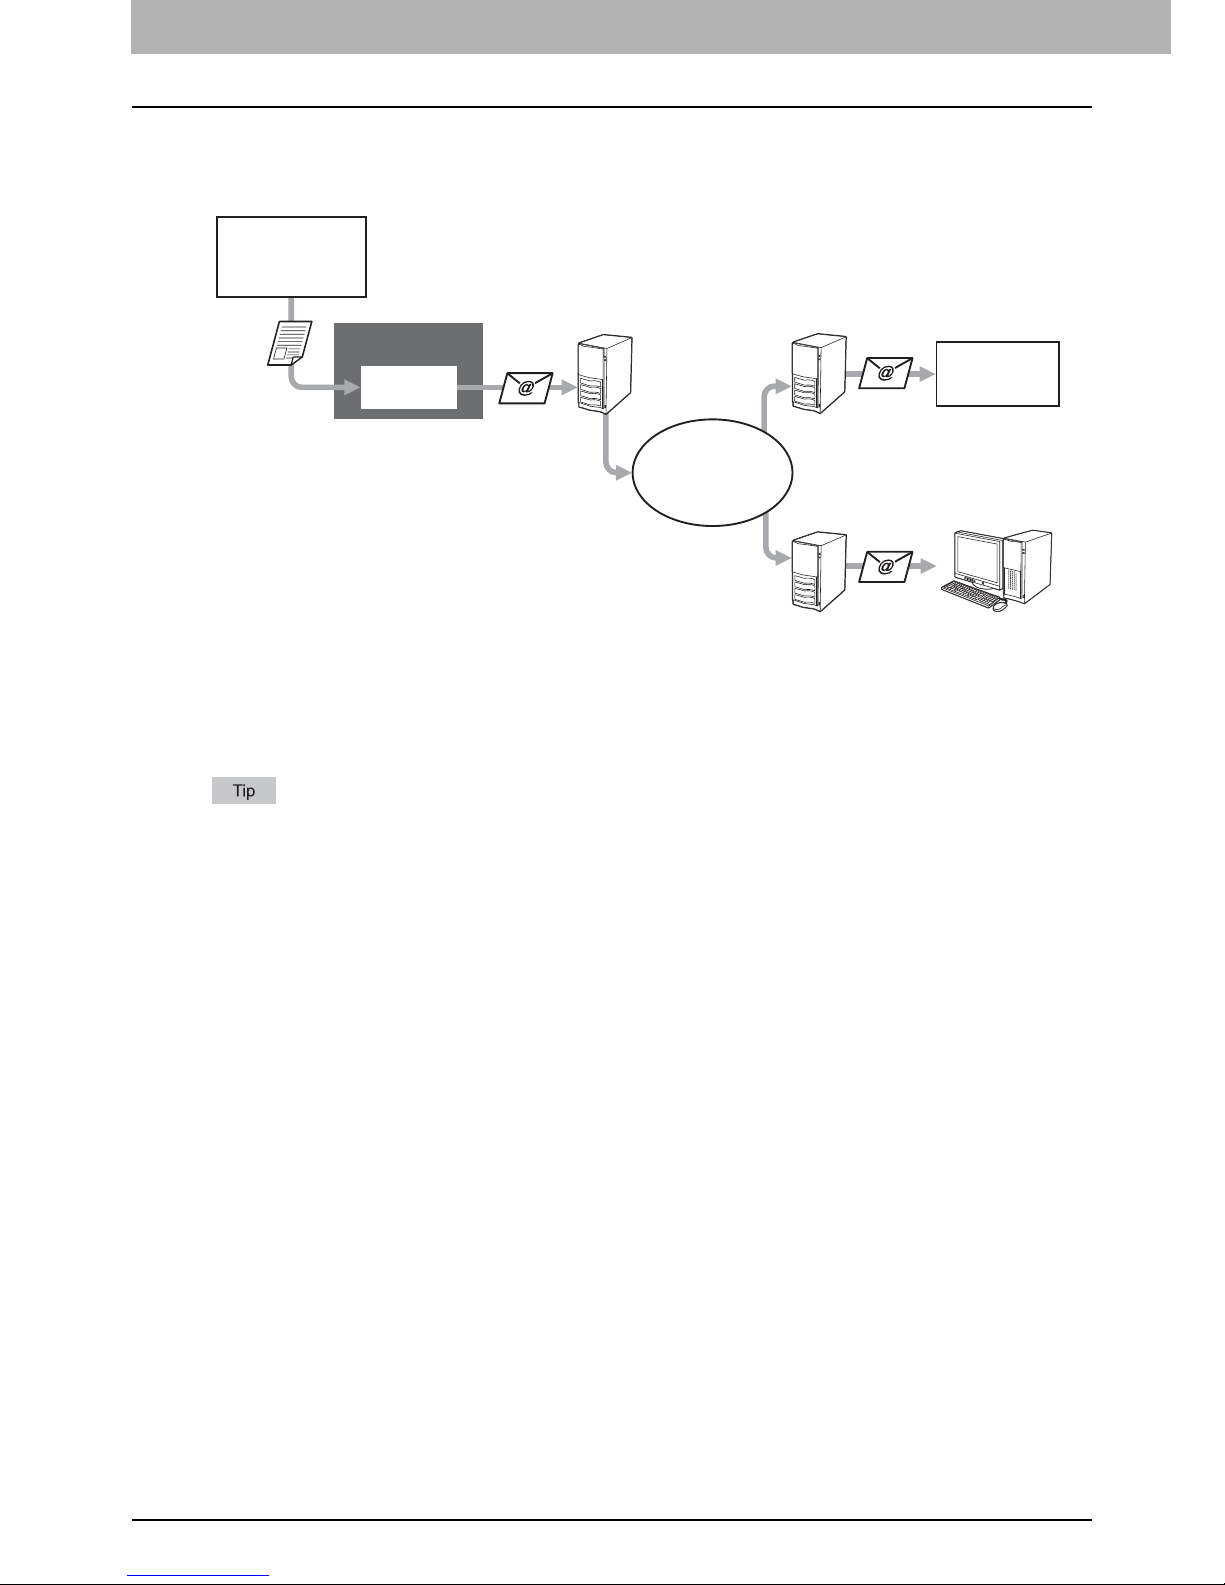
4 ADVANCED FUNCTIONS
74 Onramp Gateway
Onramp Gateway
The onramp gateway function allows for an original sent from another mailbox-supported fax machine to be converted into
E-mail data, which will be sent to a pre-registered E-mail address, via the mailbox (relay station) in this equipment.
Fax numbers and E-mail addresses can be registered to the mailbox used for an onramp gateway transmission. That
mailbox is the same as the one used for the mailbox transmission. For details of how to create/modify/delete a relay
station mailbox, see the following section.
P.64 “Creating/modifying/deleting a mailbox”
To use the onramp gateway, you need to set an E-mail address and Internet Fax to this equipment. For details of the
operation, refer to the COMMAND CENTER Guide.
ITU-T Compatible
G3 Fax machine
Internet
Intranet
This Equipment
Relay Box
Internet Fax
machine
Client Computer
Mail ServerMail Server
Mail Server
2. The fax is converted to an E-mail
and sent to the E-mail address
registered in the Relay Box.
3. The E-mail (Internet Fax) is received
through the Network.
3. The E-mail is received through the
Network.
1. A fax is sent to the Relay Box
of the equipment through the
public telephone line.
Page 77
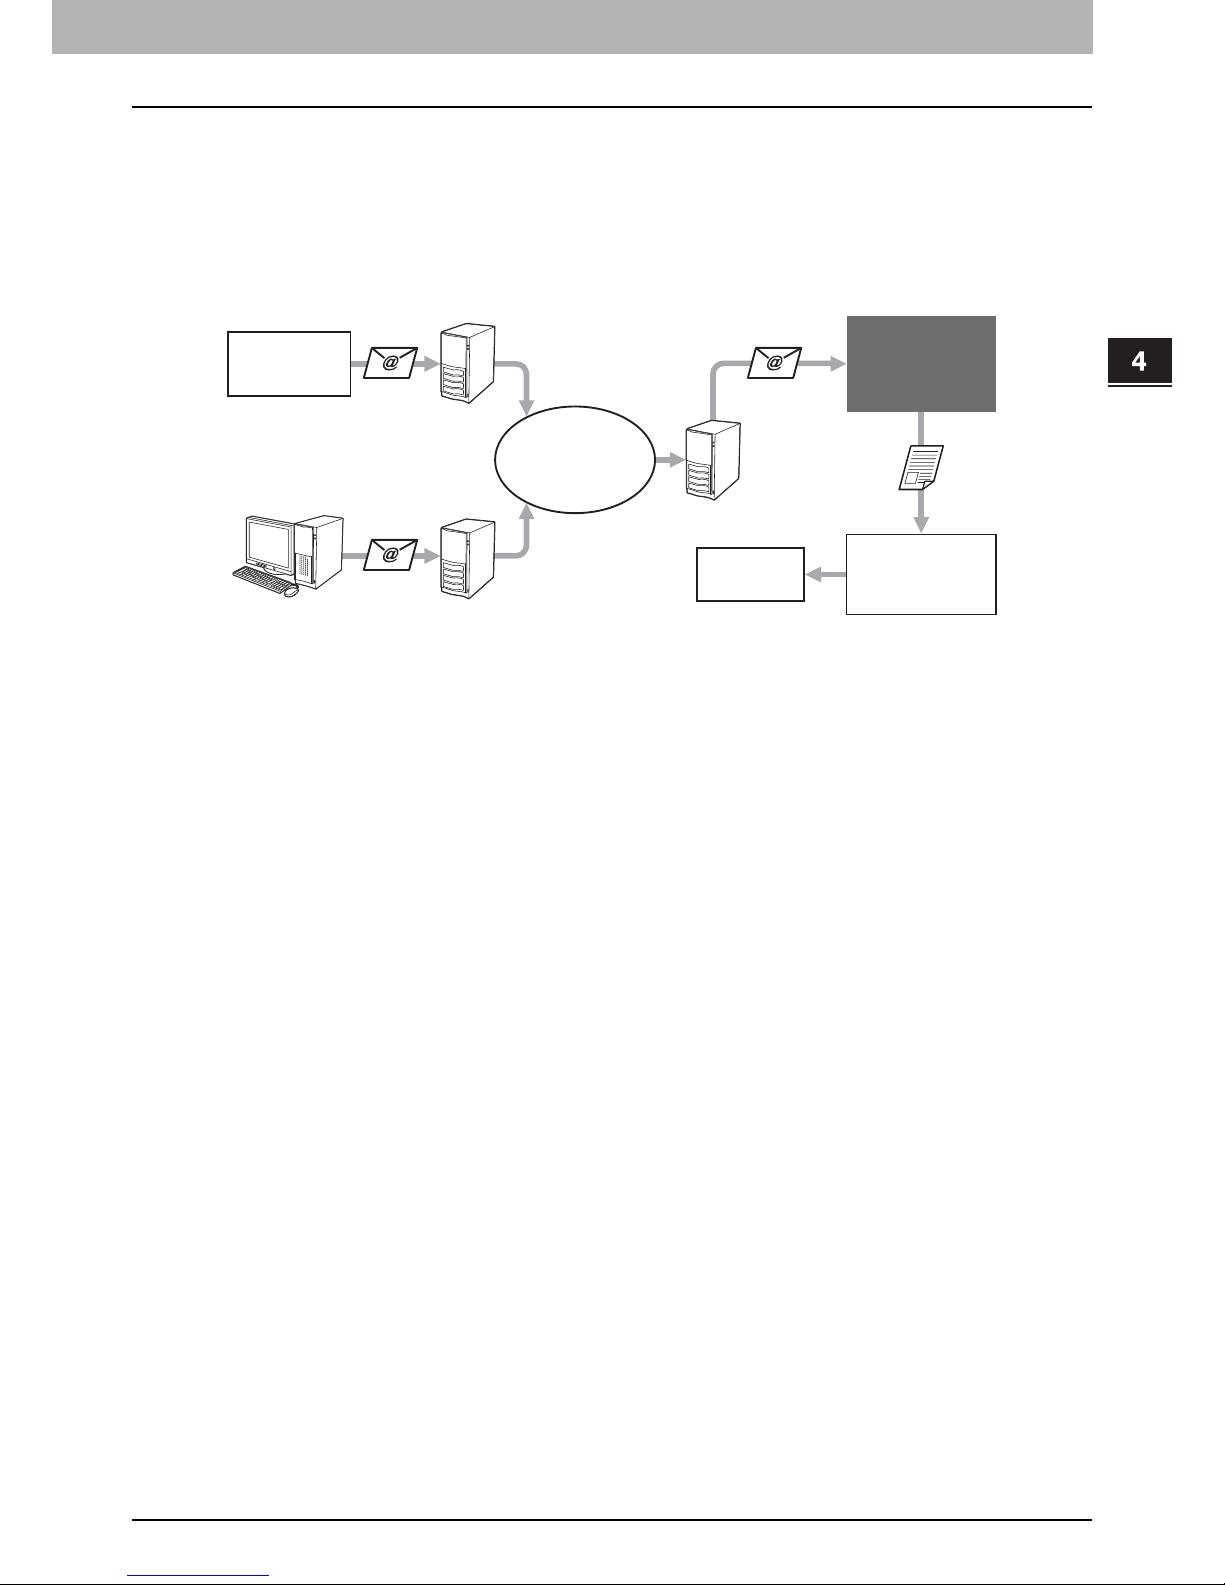
4 ADVANCED FUNCTIONS
Offramp Gateway 75
Offramp Gateway
The offramp gateway function allows for E-mail or Internet Fax sent from another device to be converted into standard fax
data via this equipment, which will be sent to the recipient specified by the sender via a public telephone line. This is useful
in reducing communication costs by using a combination of both the Internet and public telephone lines. For example,
when sending documents long distances, such as overseas, the Internet can be used to send the document to a machine
in the country of destination and then it will be forwarded to a target fax machine as fax data via a public telephone line.
Specifying an E-mail address
When you want to use this equipment as a relay station to perform an offramp gateway transmission, ask the sender to
specify an E-mail address as follows.
y FAX=xxxxxxxx@FQDN
The fax number of the final recipient is specified in “xxxxxxxx”.
e.g.: In case that the fax number is “1234567890” and the domain name of this equipment (FQDN) is “host1.kmifax.com”, the fax should be sent to
[email protected]
Sending to a subaddress
y FAX=xxxxxxxx/T33S=yyyy@FQDN
The fax number of the final recipient is specified in “xxxxxxxx” and the subaddress in “yyyy”.
e.g.: In case that the fax number is “1234567890”, the subaddress is “1234”, and the domain name of this equipment
(FQDN) is “host1.km-ifax.com”, the fax should be sent to
FAX=1234567890/[email protected]
Setting up the SMTP server
SMTP is a server protocol for sending and receiving E-mails. T o use the offramp gateway function, you need to set up the
SMTP server so that this equipment can receive E-mails and Internet Fax using SMTP. For details of the operation, refer
to the COMMAND CENTER Guide.
This equipment
Subaddress
Destination
Mail Server
(SMTP)
1. The domain name of this equipment
and the fax number of the final
recipient are specified and an Internet
Fax is sent.
2. The E-mail and the Internet
Fax in which the domain name
of this equipment is specified
are received, and are sent to
this equipment.
3. The received E-mail and the Internet
Fax are converted to the standard
fax, and are sent to the final
recipient's fax machine.
1. The domain name of this equipment
and the fax number of the final
recipient are specified and an E-mail
is sent.
4. If a subaddress is specified in the recipient of the
received fax, the fax is sent to the subaddress
destination.
G3 Fax machine
Internet
Intranet
Internet Fax
machine
Client Computer
Mail Server
Mail Server
Page 78
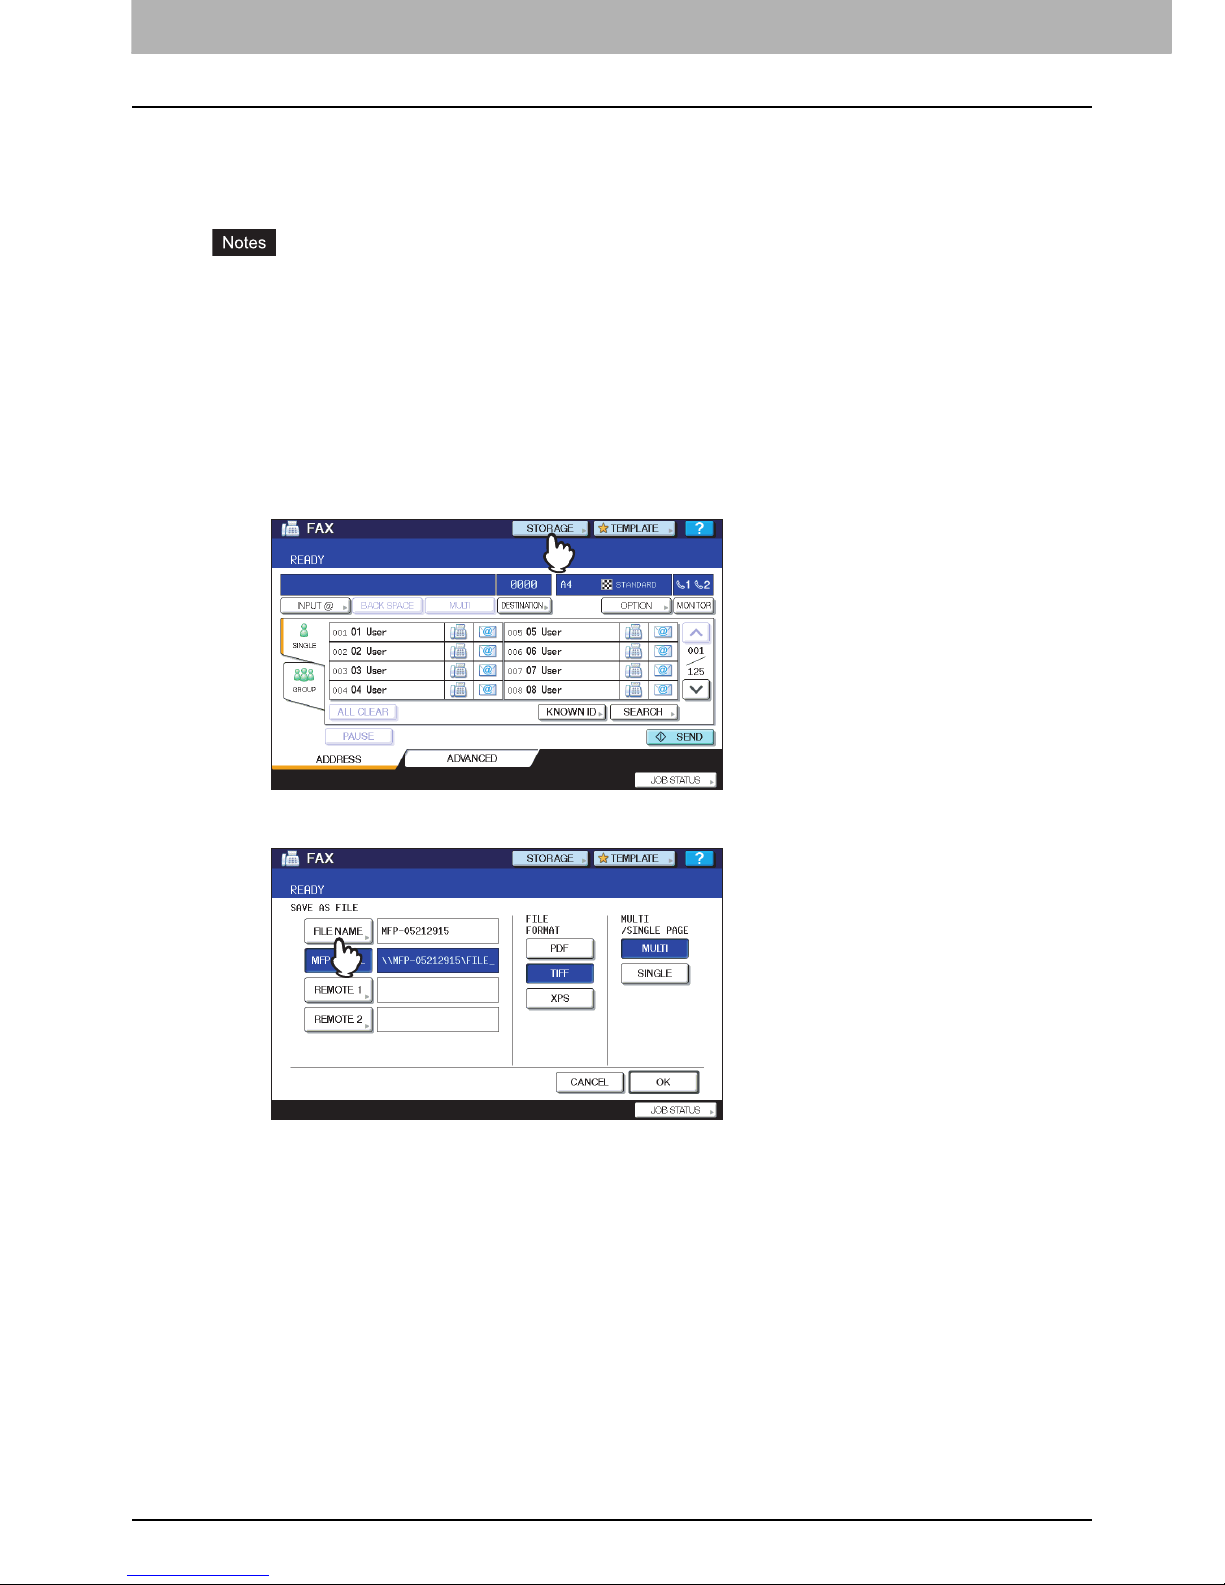
4 ADVANCED FUNCTIONS
76 Save as File
Save as File
While sending a fax, you can save the fax as a file to a shared folder in this equipment or in a client computer. That file can
be accessed from client computers on a network. To save a fax as a file into a shared folder in a client computer, you must
make the “Save as file” setting of this equipment in advance. For details of the operation, refer to the COMMAND
CENTER Guide.
Be sure to back up the files in the shared folder to protect them from unexpected data loss events.
If the forced encryption function for PDF security
*
is enabled, this function is not available. For the details of the
security settings, refer to the MFP Management Guide.
* The PDF security may not be available depending on the equipment.
1
Place the original(s).
P.19 “Handling an original”
2
Press the [FAX] button on the control panel.
P.16 “Basic procedures”
3
Press [STORAGE].
4
Press [FILE NAME], and then enter the file name (a maximum of 45 characters).
If you press [FILE NAME], the on-screen keyboard appears. For details of the operation to enter characters, refer
to the Quick Start Guide.
Page 79
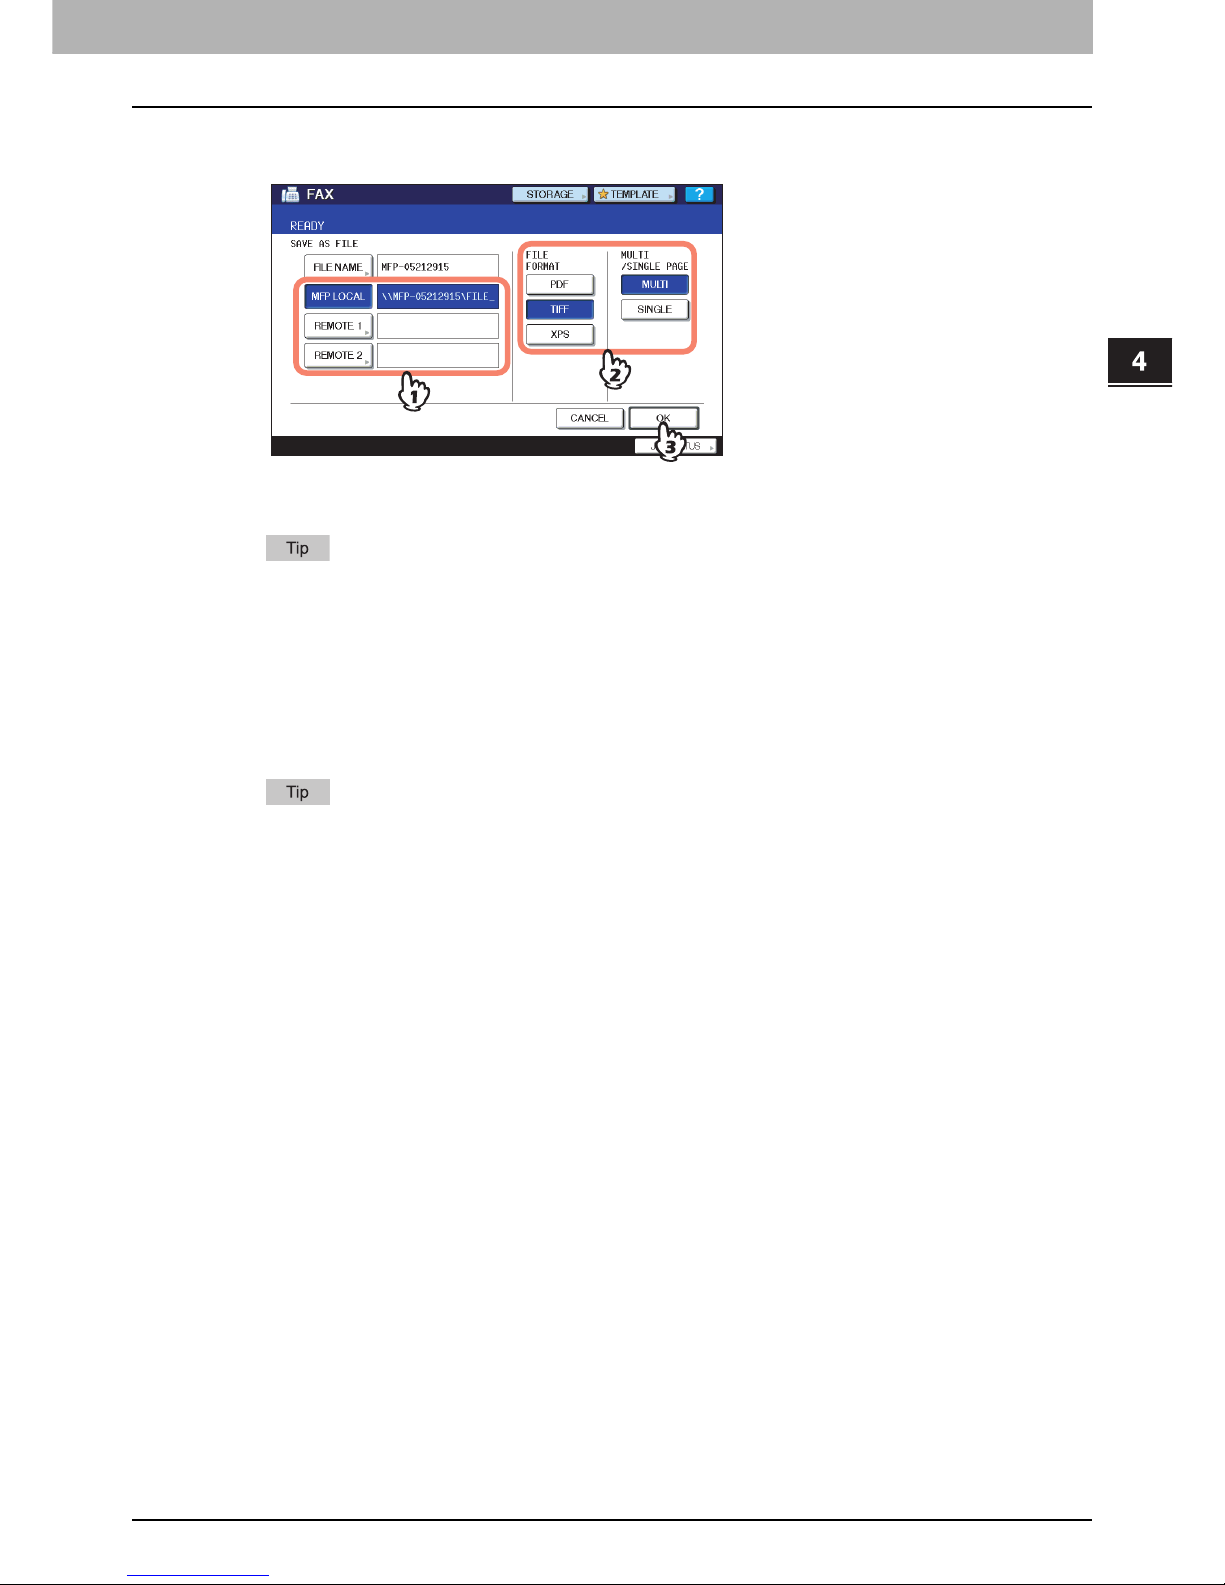
4.ADVANCED FUNCTIONS
Save as File 77
4 ADVANCED FUNCTIONS
5
Select the location where you want to save the file and the file format, and then press
[OK].
When PDF-MULTI, TIFF-MULTI, or XPS-MULTI is selected, the file should be saved as a multiple-page file. When
PDF-SINGLE, TIFF-SINGLE, or XPS-SINGLE is selected, the file should be saved as a single-page file.
When a file is saved in the shared folder of the hard disk in this equipment, it is saved in the “TXFAX” folder
under the “FILE_SHARE” folder. When PDF-SINGLE, TIFF-SINGLE, or XPS-SINGLE is selected, another
folder with the same file name is automatically created in the “TXFAX” folder in which the file is saved.
6
Specify the recipient's fax number.
P.27 “Specifying the recipient”
7
Press [SEND].
P.16 “Basic procedures”
When fax transmission is completed, storing of the data of the original is also completed. However, if a fax
cannot be sent after redialing a specified number of times, only the storing of the data of the original is
completed.
Page 80

Page 81

5.PRINTING LISTS AND REPORTS
This chapter explains how to print lists and reports.
Printing Lists & Reports Manually ........................................................................................80
Journal (transmission journal/reception journal)...................................................................................................80
Reservation list.....................................................................................................................................................81
Mailbox/relay box report .......................................................................................................................................82
Printing Lists & Reports Automatically................................................................................ 83
Lists/Reports Samples...........................................................................................................84
Transmission journal ............................................................................................................................................84
Reception journal .................................................................................................................................................85
Reservation list.....................................................................................................................................................85
Mailbox/relay box report .......................................................................................................................................86
Memory transmission report.................................................................................................................................87
Transmission report..............................................................................................................................................88
Multi transmission report ......................................................................................................................................88
Multi polling report ................................................................................................................................................89
Relay TX orig. terminal report ..............................................................................................................................89
Relay TX relay station report................................................................................................................................90
Relay TX end terminal report ...............................................................................................................................90
Relay station report ..............................................................................................................................................91
Mailbox reception report.......................................................................................................................................91
Power failure list ...................................................................................................................................................92
Page 82
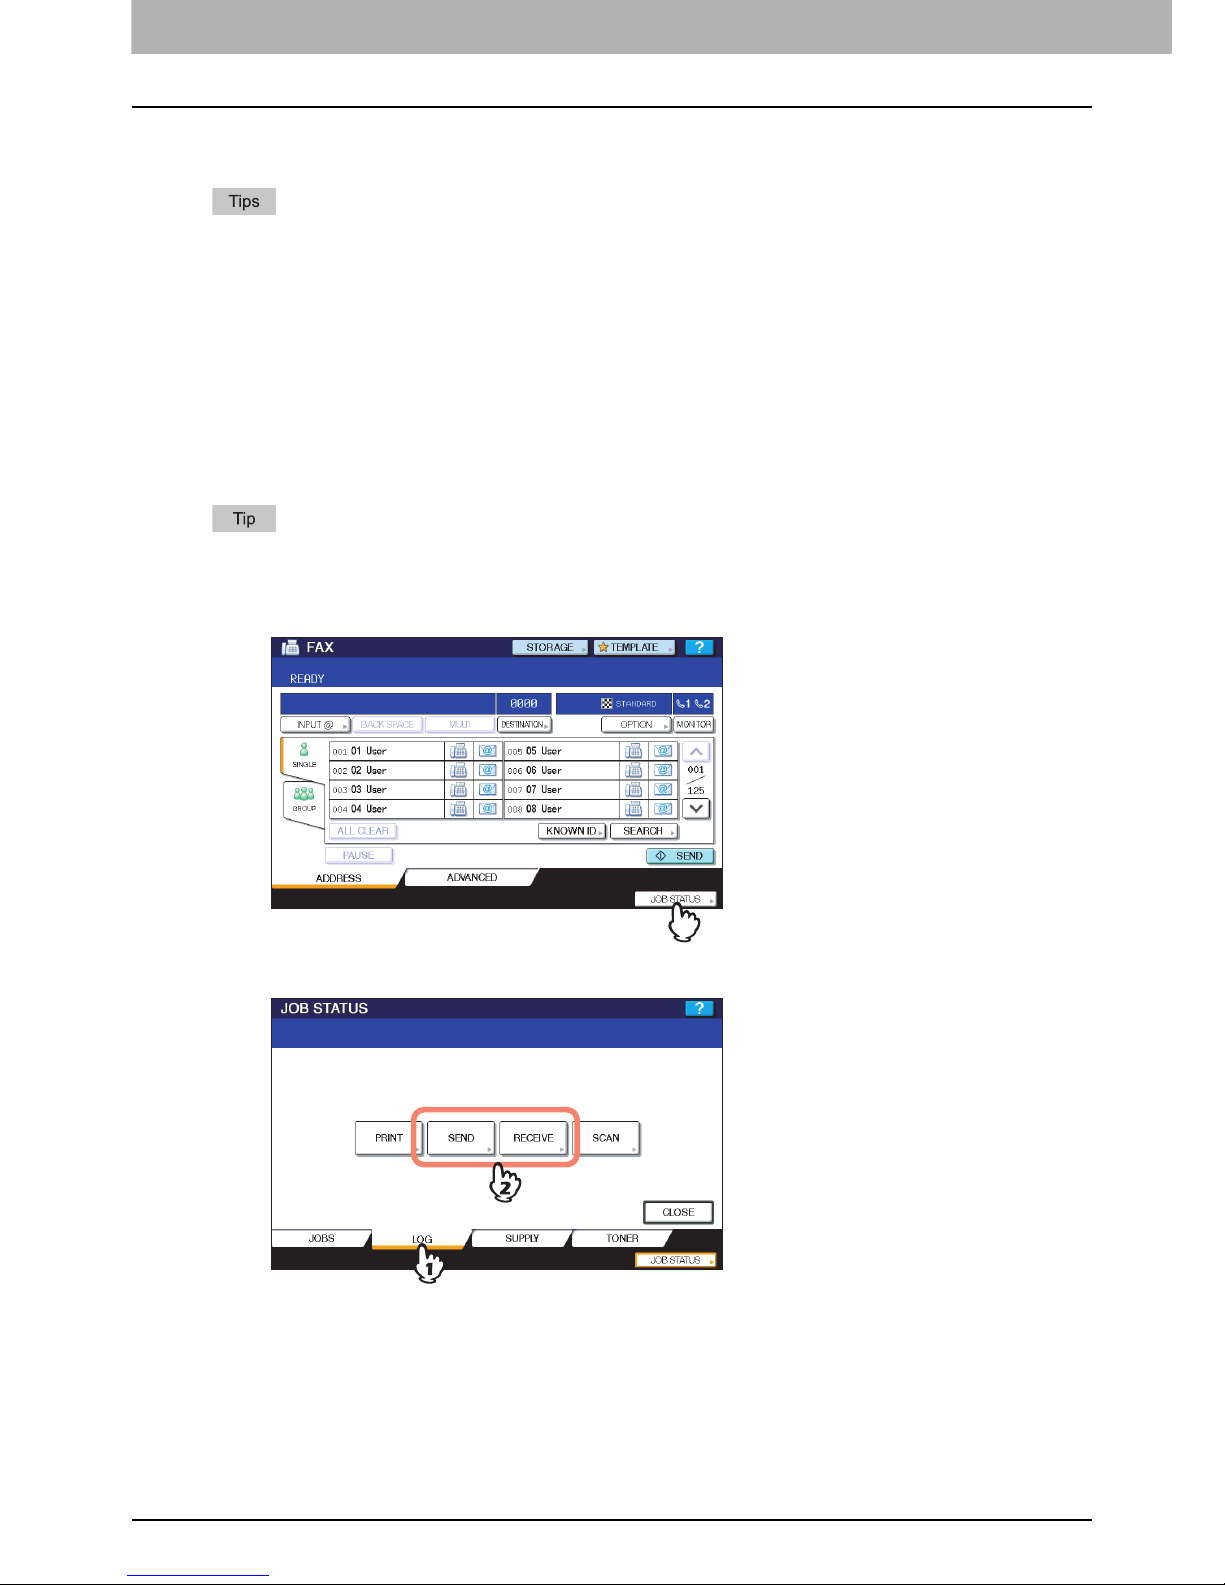
5 PRINTING LISTS AND REPORTS
80 Printing Lists & Reports Manually
Printing Lists & Reports Manually
You can print lists and reports (journals) manually. For samples of lists and reports, see the following section.
P.84 “Lists/Reports Samples”
Lists and reports are printed on LT/A4-size paper. If this equipment has run out of LT/A4-size paper, lists and
reports will be printed on larger sized paper.
In addition to the lists described in this section, the following lists can be printed manually: For details of the
operation, refer to the MFP Management Guide.
Journal (transmission journal/reception journal)
You can print a list of transmissions and receptions.
This equipment logs up to the latest 40 or 120 transmission/reception records. This number can be set on the ADMN
menu. For details of the operation, refer to the MFP Management Guide.
1
Press [JOB STATUS].
2
Select the [LOG] tab, and then press [SEND] or [RECEIVE].
ADDRESS BOOK INFORMATION: List of recipients registered in the address book.
GROUP NUMBER INFORMATION: List of recipients registered in the address book as a group.
FUNCTION LIST: List of the user settings.
Page 83
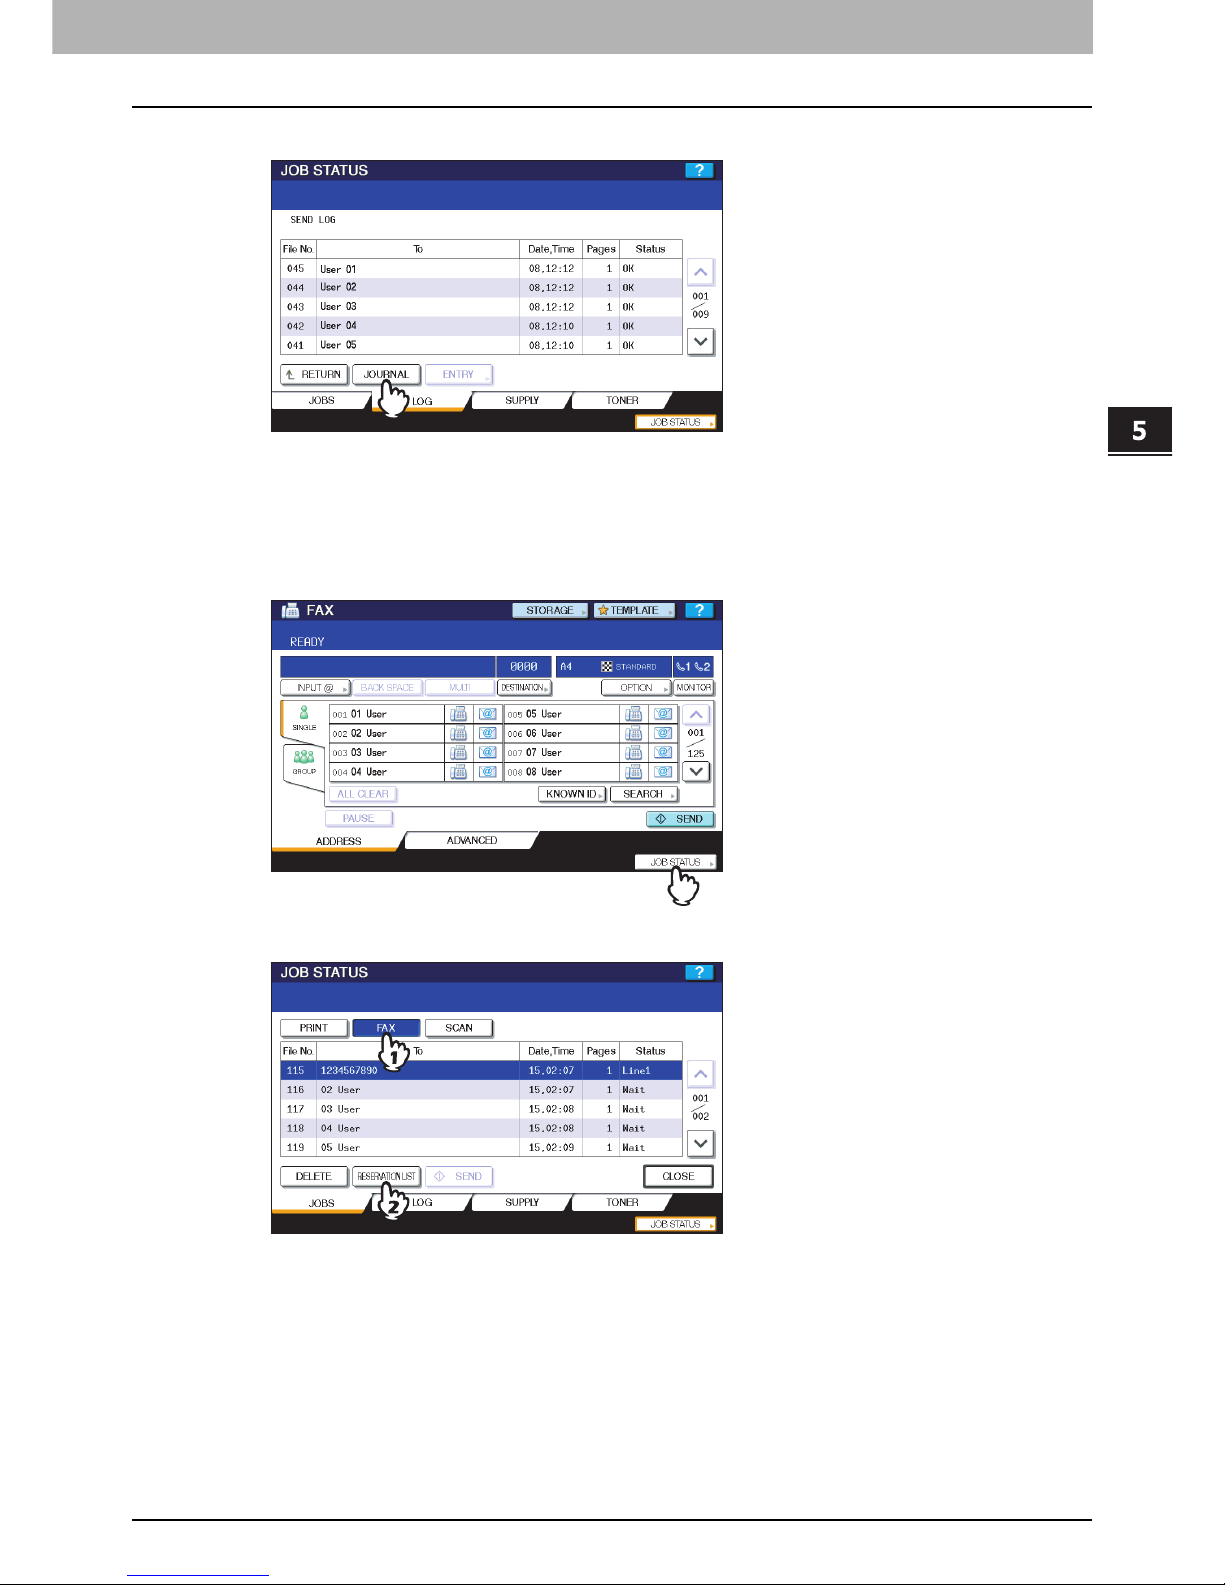
5.PRINTING LISTS AND REPORTS
Printing Lists & Reports Manually 81
5 PRINTING LISTS AND REPORTS
3
Press [JOURNAL].
If [JOURNAL] is pressed with the transmission/reception records selected, the journal of the selected file is printed.
Reservation list
You can print a list of the reserved transmissions.
1
Press [JOB STATUS].
2
Press the [FAX], and then press [RESERVATION LIST].
Page 84
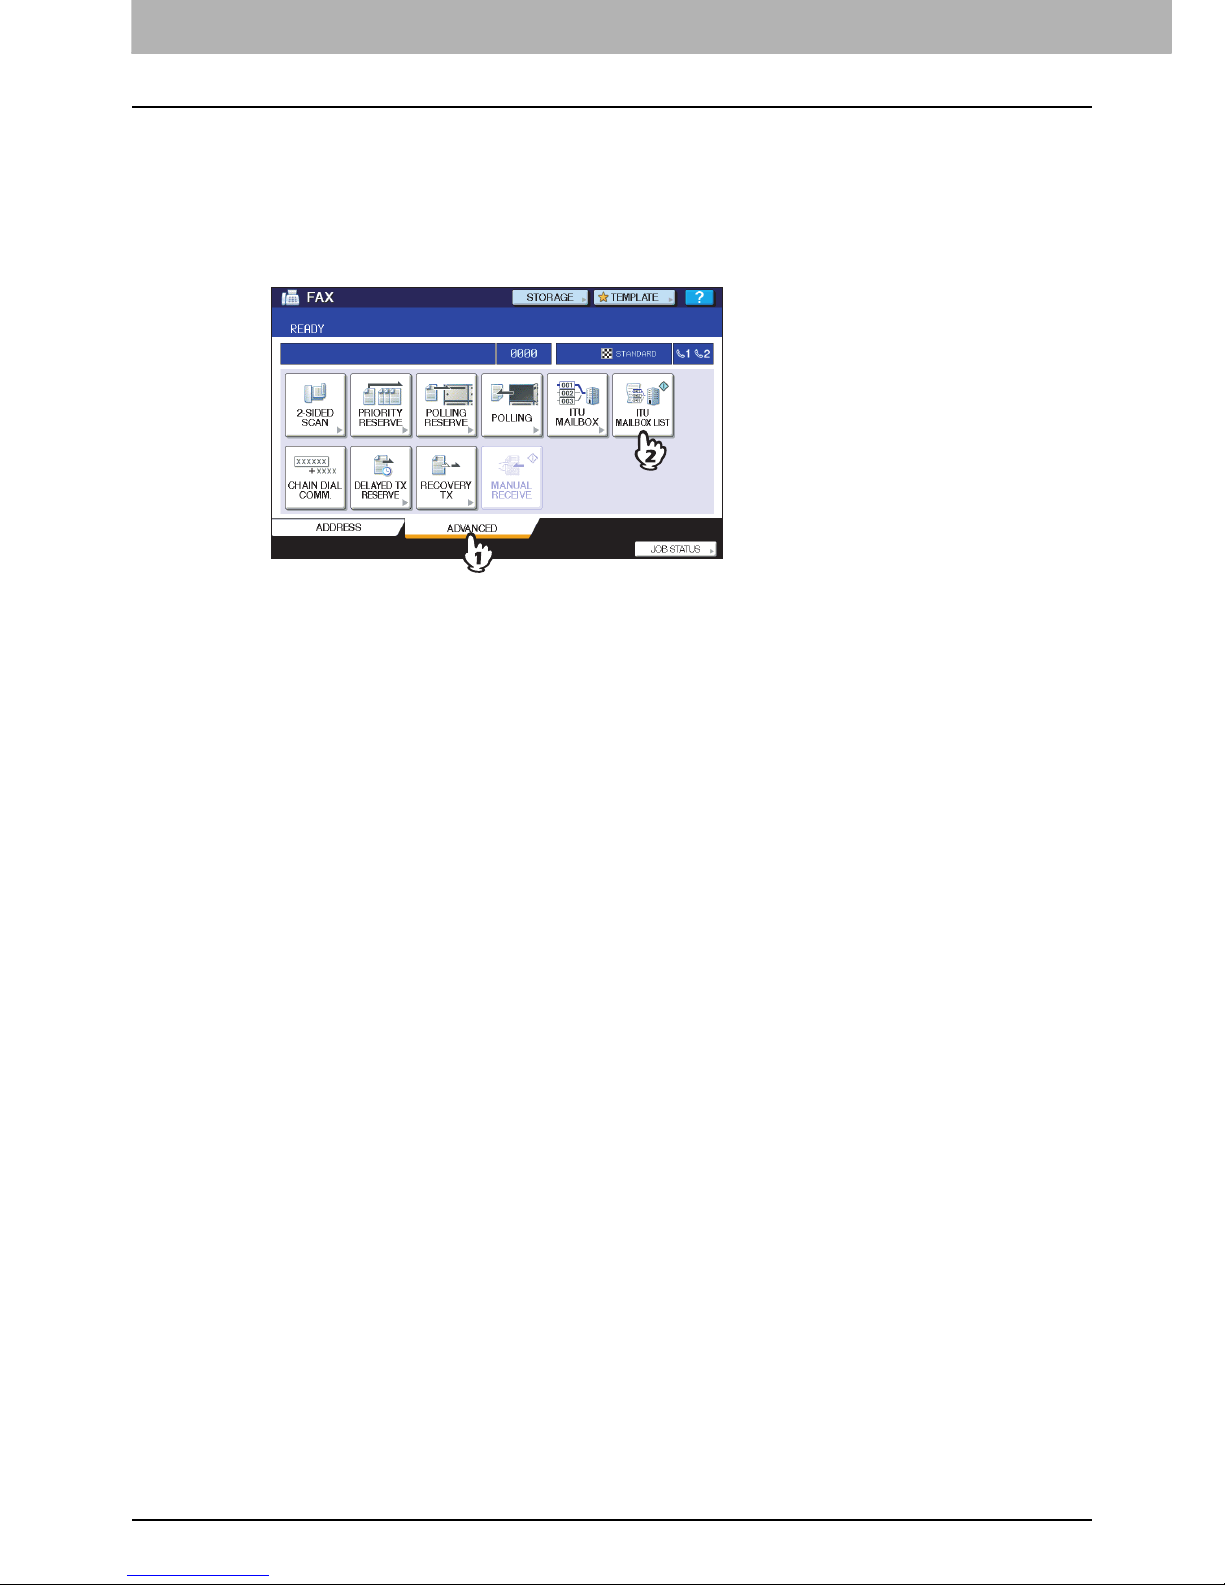
5 PRINTING LISTS AND REPORTS
82 Printing Lists & Reports Manually
Mailbox/relay box report
You can print a list of the current status of the mailboxes registered to this equipment.
1
Press the [FAX] button on the control panel.
P.16 “Basic procedures”
2
Press the [ADVANCED] tab, and then press [ITU MAILBOX LIST].
Page 85

5 PRINTING LISTS AND REPORTS
Printing Lists & Reports Automatically 83
Printing Lists & Reports Automatically
You can print lists and reports automatically. For samples of lists and reports, see the following section.
P.84 “Lists/Reports Samples”
Lists and reports are automatically printed according to the settings that the administrator made, so no user operation
is required. For details of the setting operation, refer to the MFP Management Guide.
The available lists/reports to be printed automatically are as follows:
TRANSMISSION JOURNAL
When this equipment completes 40 or 120 transmission jobs, the transmission journal is printed.
RECEPTION JOURNAL
When this equipment completes 40 or 120 reception jobs, the reception journal is printed.
MEMORY TRANSMISSION REPORT
When the memory transmission is completed, the report is printed. (You have an option to add a reduced image of the
transmitted document.)
TRANSMISSION REPORT
When the direct transmission is completed, the report is printed.
MULTI TRANSMISSION REPORT
When the multi-address transmission is completed, the report is printed. (You have an option to add a reduced image of
the transmitted document.)
MULTI POLLING REPORT
When a multi-polling RX is completed, the report is printed.
RELAY TX ORIG. TERMINAL REPORT
When the document transmission from an originator terminal to a relay station is completed during the mailbox
transmissions, the report is printed. (You have an option to add a reduced image of the transmitted document.)
RELAY TX RELAY STATION REPORT
When a document transmission from a relay station to an end terminal is completed during the mailbox transmissions, the
report is printed. (You have an option to add a reduced image of the transmitted document.)
RELAY TX END TERMINAL REPORT
When the document transmission from a relay station to an end terminal is completed during the mailbox transmissions,
the report is sent to an originator terminal. (You have an option to add a reduced image of the transmitted document.)
RELAY STATION REPORT
When a relay station in this equipment receives an original during the mailbox transmissions, the report is printed.
MAILBOX RECEPTION REPORT
When the confidential or bulletin board mailbox in this equipment receives an original during the mailbox receptions, the
report is printed.
POWER FAILURE LIST
When a loss of data in memory occurs due to an unexpected event such as a power failure during transmission/reception,
a list of jobs related to that data is printed. No user setting operation is required for printing this report. When you turn ON
this equipment after a power failure, the report is printed automatically.
Page 86
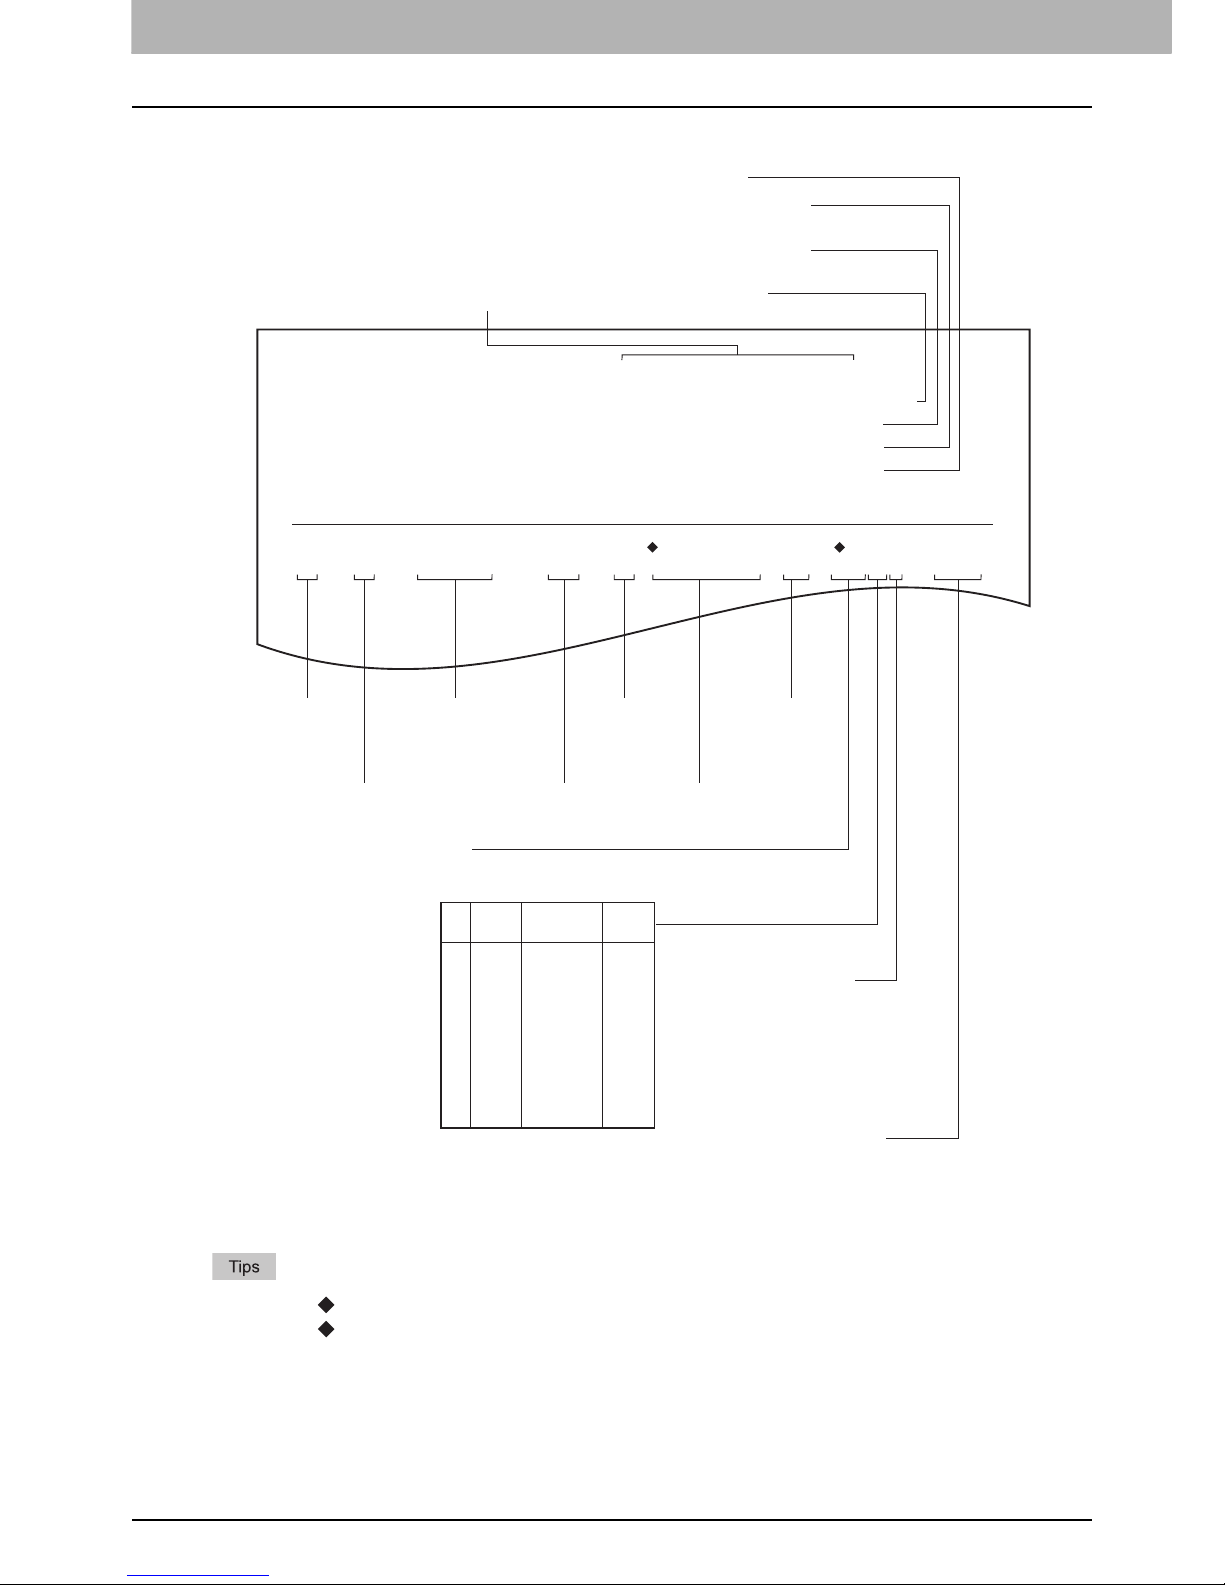
5 PRINTING LISTS AND REPORTS
84 Lists/Reports Samples
Lists/Reports Samples
Transmission journal
The mark in the “TO” column indicates that the 2ND FAX registered in the address book is used.
The mark in the “MODE” column indicates that the 2nd line is used.
For error codes in the “STATUS” column, see the following section.
P.108 “Error codes”
NO. FILE NO. DATE TIME DURATION PGS TO DEPT MODE STATUS
001 002 05.15 16:59 00:23 1 Redfield HS EC 603 OK
002 010 05.15 17:33 00:00 0 2123456789 P 00B5
TRANSMISSION JOURNAL
XXXXXXXXXXX XXXX-XXX
TIME : 05-15-'08 17:55
FAX NO.1 : 2131234567
FAX NO.2 : 2131235678
NAME : Aaabbb L.A.
Serial number
for communication
File number of
communication
Communication
result and
error code
OK: Succeeded
4-digit error code: Failed
Special communication mode
P: Polling communication
SB: Mailbox communication
SR,R: Relay mailbox communication
SF,F: Forward mailbox communication
ML: Internet Fax communication
I: N/W-Fax communication
O: Offramp Gateway communication
The number of
pages for the
communication
Fax name or
telephone number
Date and time
when starting
communication
Communicating
period of time
Communication mode
EC: ECM communication
G3: G3 communication
Journal (or list)
outputting date and time
Sender’s Fax number
(Line1)
Sender’s Fax number
(Line2: Optional)
Terminal ID
ROM version
Department code
(blank if not
controlled with
department code)
0
1
2
3
4
5
6
8
B
D
1
st
(bps)
2,400
4,800
7,200
9,600
12,000
14,400
V.34
2
nd
(Resolution)
8 x 3.85
8 x 7.7
8 x 15.4
16 x 15.4
300 dpi
600 dpi
150 dpi
3
rd
(Mode)
MH
MR
MMR
JBIG
Page 87
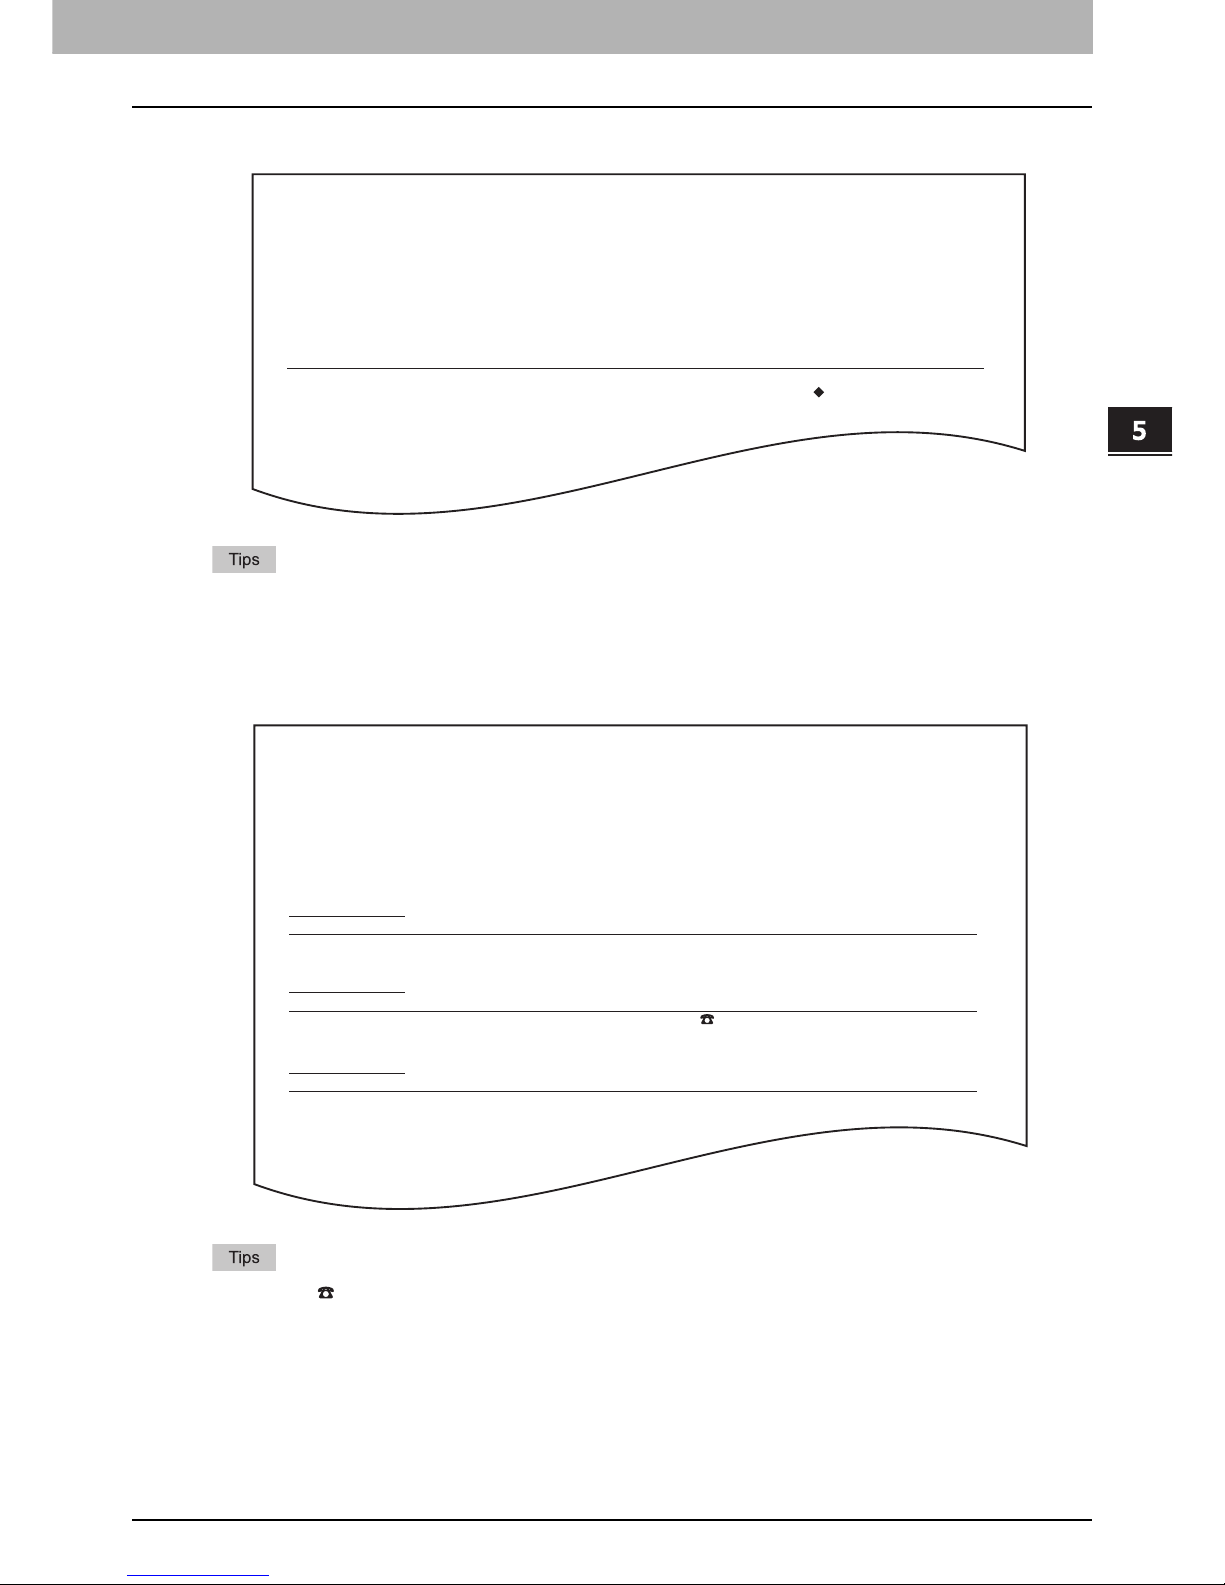
5.PRINTING LISTS AND REPORTS
Lists/Reports Samples 85
5 PRINTING LISTS AND REPORTS
Reception journal
What is included in this journal is the same as in the transmission journal.
For error codes in the “STATUS” column, see the following section.
P.108 “Error codes”
Reservation list
The mark in the “TO” column indicates that the recipient is specified with the direct entry method.
The mark G in the “TO” column indicates that the recipient is specified with the group entry method.
NO. FILE NO. DATE TIME DURATION PGS FROM DEPT MODE STATUS
001 003 05.15 14:23 00:00 0 Aaabbb USA HQ NG 00B1
002 007 05.15 17:20 00:32 1 3109998888 EC 603 OK
RECEPTION JOURNAL
XXXXXXXXXXX XXXX-XXX
TIME : 05-15-'08 17:55
FAX NO.1 : 2131234567
FAX NO.2 : 2131235678
NAME : Aaabbb L.A.
TX/RX
FILE NO. DATE TIME FUNCTION PGS TO DELAY TIME
017 05.15 18:41 MULTI TX 1 G ABC EXPRESS
RESERVATION LIST
TIME : 05-15-'08 18:41
FAX NO.1 : 2131234567
FAX NO.2 : 2131235678
NAME : Aaabbb L.A.
RECOVERY TX
FILE NO. DATE TIME FUNCTION PGS TO
013 05.15 18:01 MULTI TX 1
2153334444
PC JOB
FILE NO. DATE TIME FUNCTION PGS TO DELAY TIME
003 05.15 17:40 MULTI TX 2 Cccddd CORPORATION
Page 88
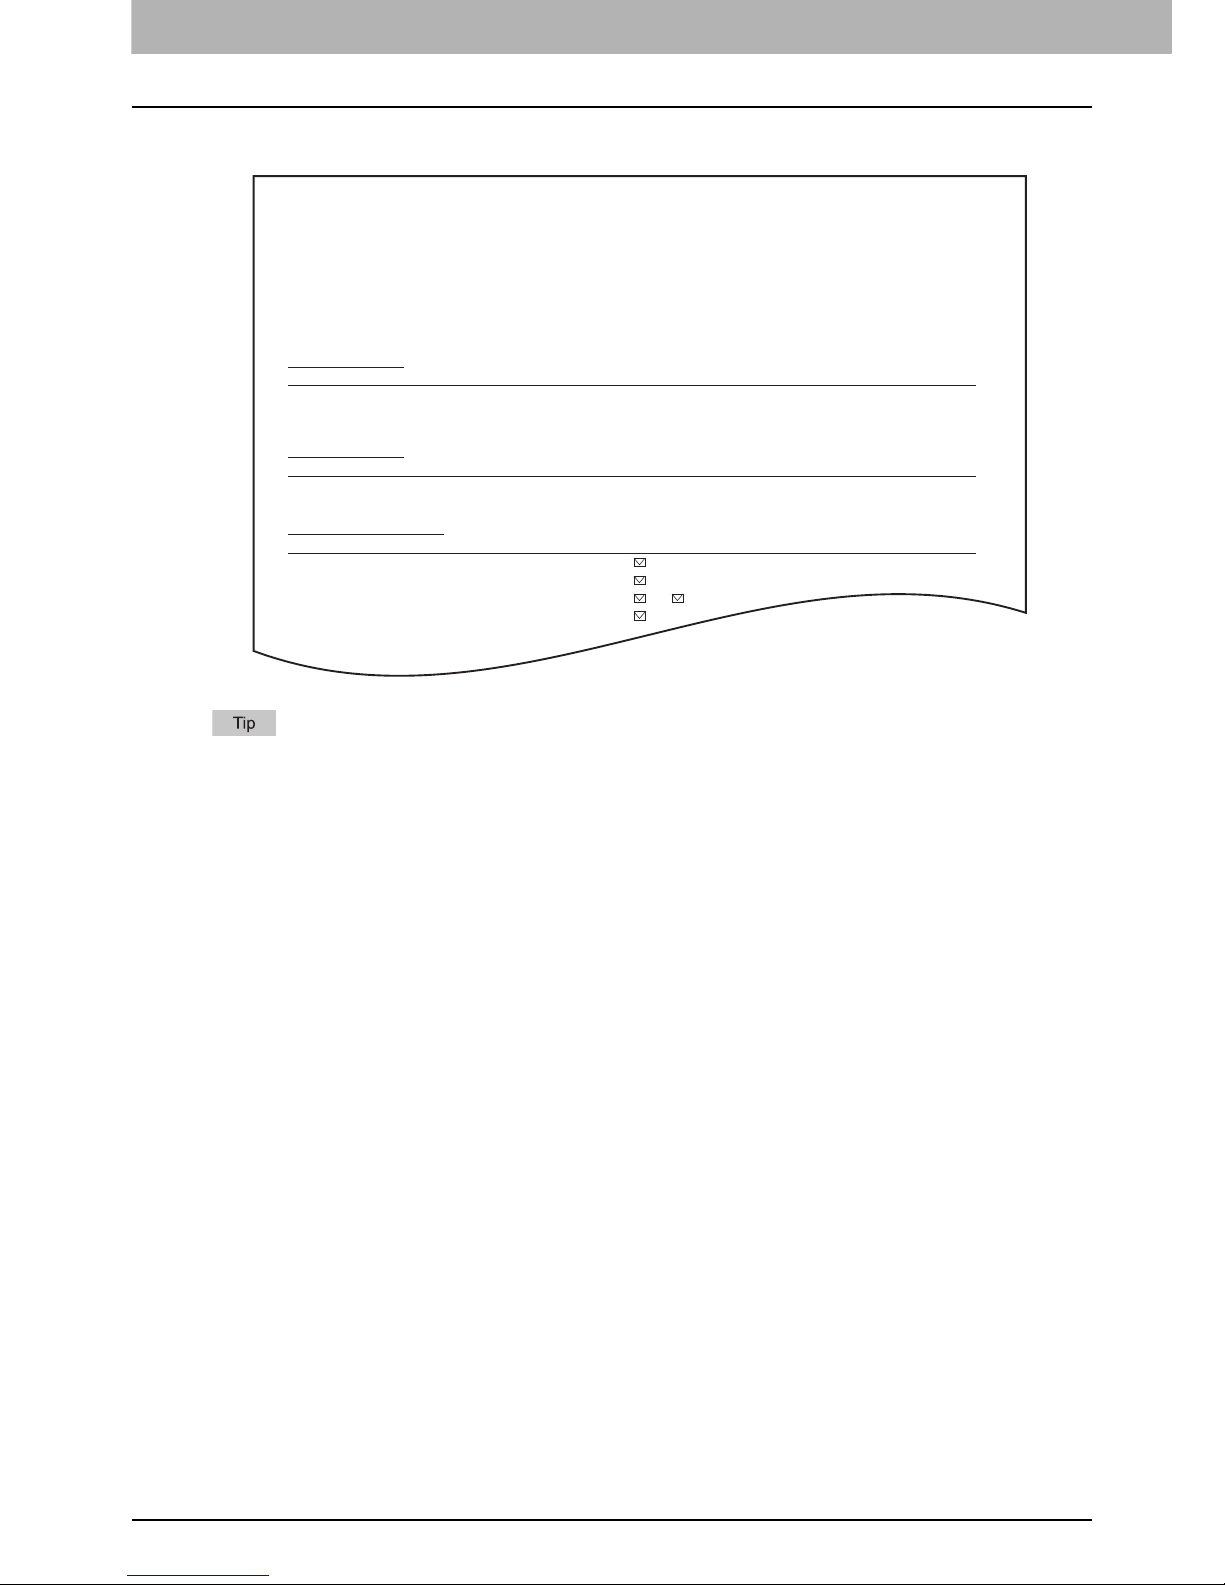
5 PRINTING LISTS AND REPORTS
86 Lists/Reports Samples
Mailbox/relay box report
A 3-digit number in the “END STATION” field indicates an Email address or the ID of a group.
MAIL BOX
BOX NO. BOX TYPE PGS FILE NO. DATE TIME FROM
11222 BULLETIN BD.
11231 CONFIDENTIAL 1 008 05.15 17:24 LOCAL
MAILBOX/RELAY BOX REPORT
TIME : 05-15-'08 18:00
FAX NO.1 : 2131234567
FAX NO.2 : 2131235678
NAME : Aaabbb L.A.
RELAY
BOX NO. END STATION REPLY TO NUMBER
12345 ADDRESS 001 002 003 004 005 12345
GROUP 001 002
FORWARD/INBOUND FAX(TSI)
BOX NO. AGENT DESTINATION
22222 E-MAIL To: ADDRESS: 001
GROUP : 001
Cc: ADDRESS: 002 003
GROUP : 002
Page 89
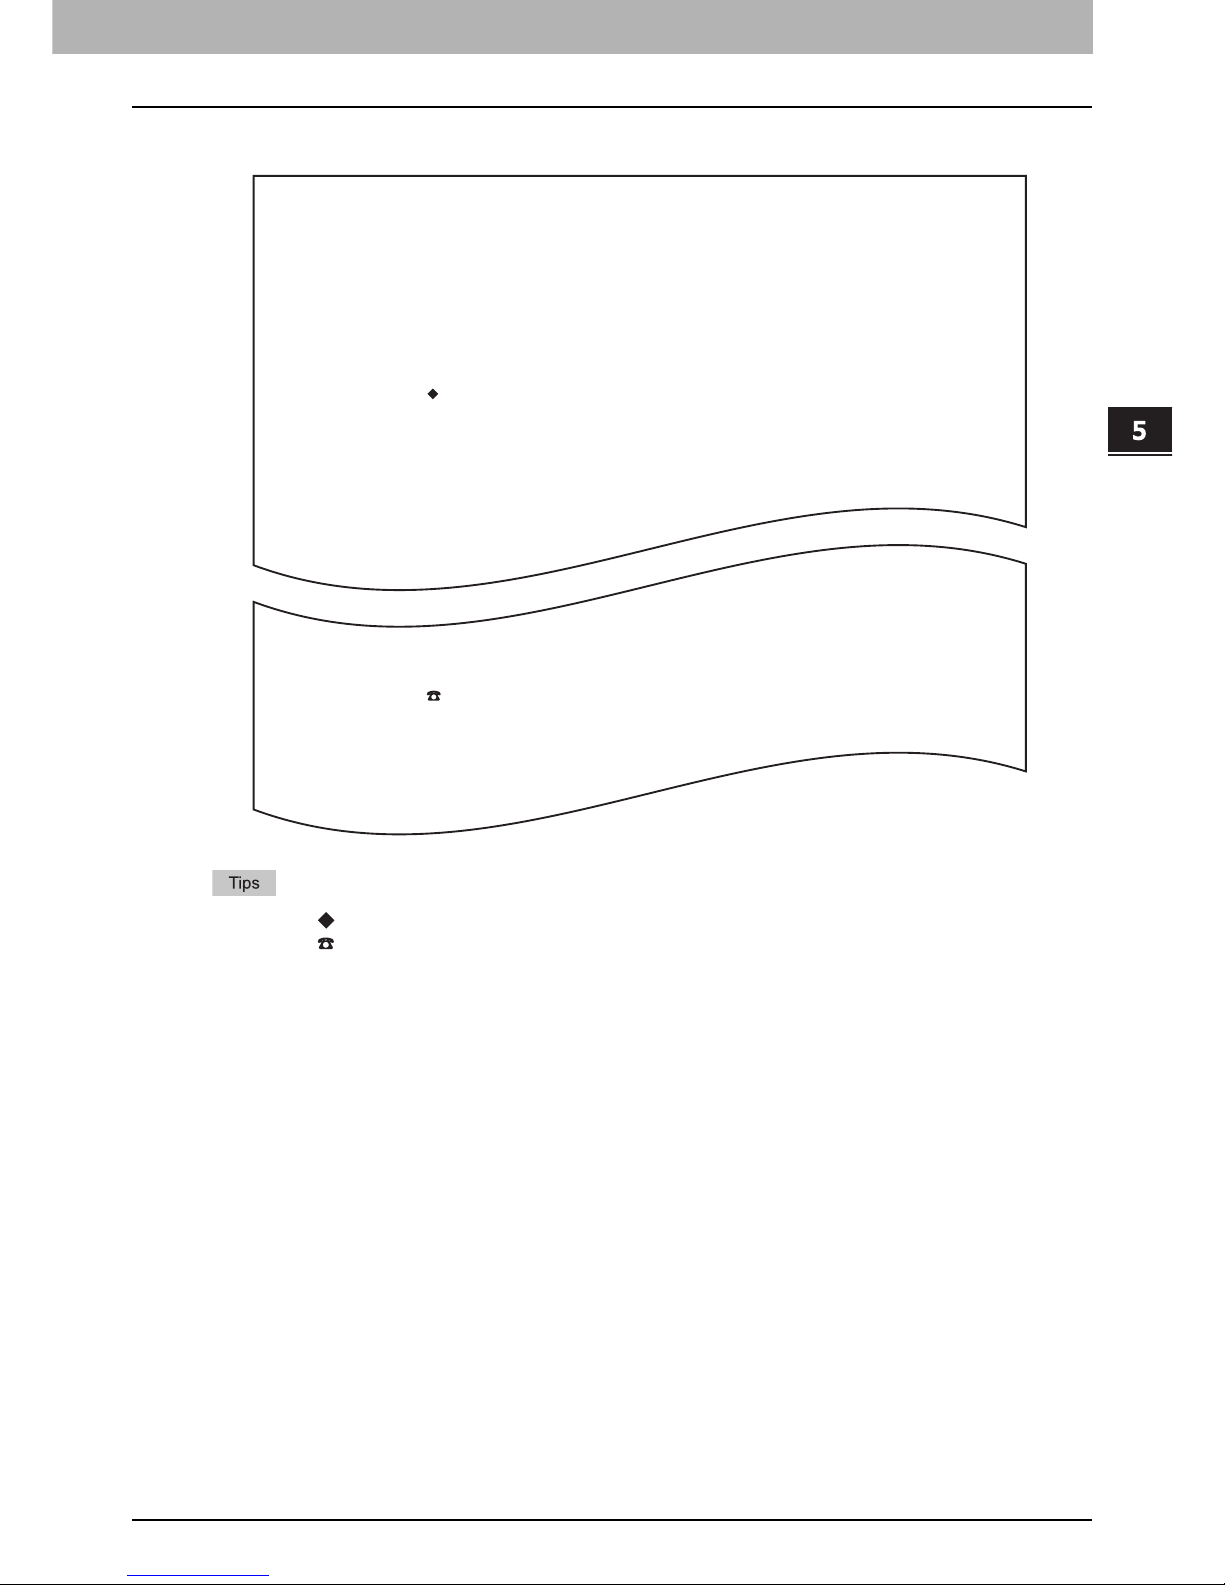
5.PRINTING LISTS AND REPORTS
Lists/Reports Samples 87
5 PRINTING LISTS AND REPORTS
Memory transmission report
The mark in the “TO” column indicates that the 2ND FAX registered in the address book is used.
The mark in the “TO” column indicates that the recipient is specified with the direct entry method.
For error codes in the “STATUS” column, see the following section.
P.108 “Error codes”
FILE NO. : 004
DATE : 05.15 17:11
TO : ABC EXPRESS
DOCUMENT PAGES : 1
START TIME : 05.15 17:13
END TIME : 05.15 17:14 (STORED TIME : 05.15 23:14)
PAGES SENT : 0
STATUS : 0050
MEMORY TRANSMISSION REPORT
TIME : 05-15-'08 17:48
FAX NO.1 : 2131234567
FAX NO.2 : 2131235678
NAME : Aaabbb L.A.
*** TX FAILURE NOTICE ***
FILE NO. : 005 (ITU MAILBOX : 12345 )
DATE : 05.15 17:25
TO : 2221234555
DOCUMENT PAGES : 1
START TIME : 05.15 17:30
END TIME : 05.15 17:31 (STORED TIME : 05.15 23:31)
PAGES SENT : 1
STATUS : OK
Page 90
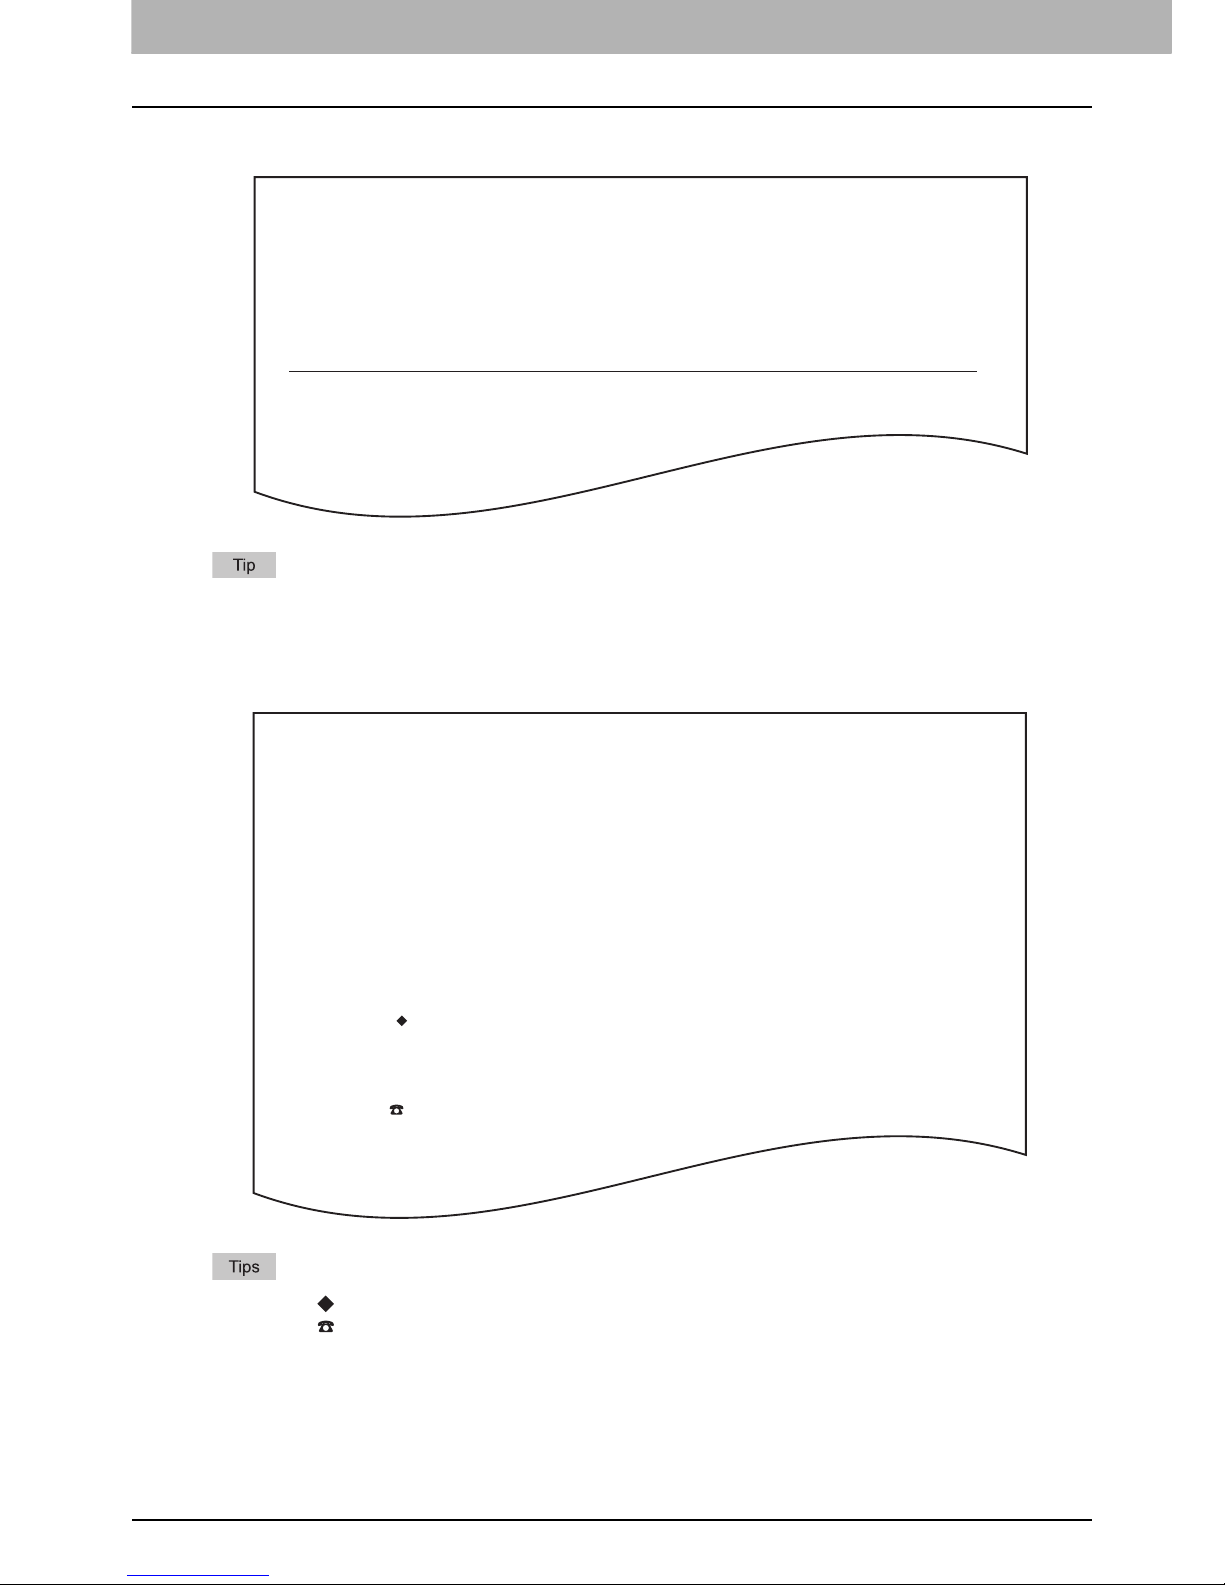
5 PRINTING LISTS AND REPORTS
88 Lists/Reports Samples
Transmission report
For the error codes displayed in the “STATUS” column, see the following section.
P.108 “Error codes”
Multi transmission report
The mark in the “ADDRESS BOOK” column indicates that the 2ND FAX registered in the address book is used.
The mark in the “FAX NUMBER” column indicates that the recipient is specified with the direct entry method.
NO. FILE NO. DATE TIME DURATION PGS TO DEPT MODE STATUS
002 007 05.15 17:20 00:32 1 3109998888 EC 603 OK
TRANSMISSION REPORT
XXXXXXXXXXX XXXX-XXX
TIME : 05-15-'08 17:55
FAX NO.1 : 2131234567
FAX NO.2 : 2131235678
NAME : Aaabbb L.A.
FILE NO. : 013
DATE : 05.15 18:01
DOCUMENT PAGES : 1
START TIME : 05.15 18:01
END TIME : 05.15 18:17 (STORED TIME : 05.16 00:17)
SUCCESSFUL
ADDRESS BOOK
001 Aaabbb ADMIN
UNSUCCESSFUL
FAX NUMBER PAGES SENT
3109998888 0
MULTI TRANSMISSION REPORT
TIME : 05-15-'08 18:17
FAX NO.1 : 2131234567
FAX NO.2 : 2131235678
NAME : Aaabbb L.A.
Page 91
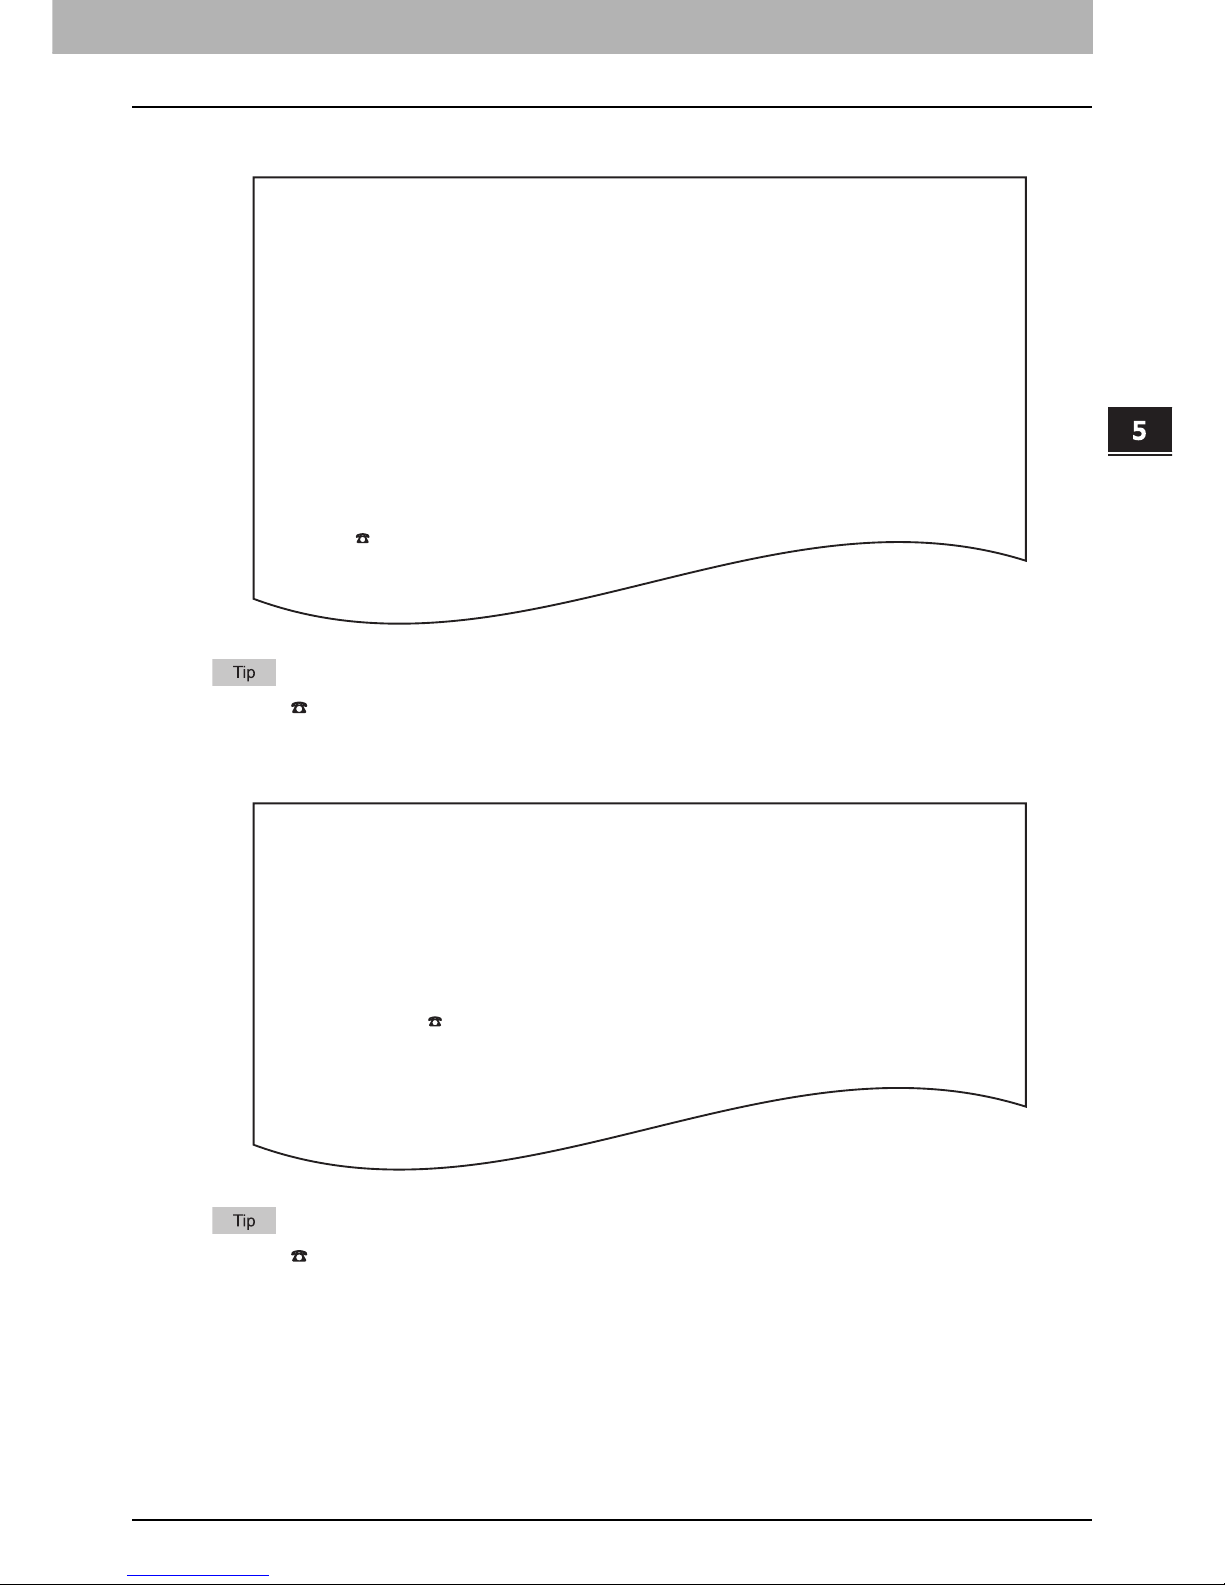
5.PRINTING LISTS AND REPORTS
Lists/Reports Samples 89
5 PRINTING LISTS AND REPORTS
Multi polling report
The mark in the “FAX NUMBER” column indicates that the recipient is specified with the direct entry method.
Relay TX orig. terminal report
The mark in the “TO” column indicates that the recipient is specified with the direct entry method.
FILE NO. : 014
DATE : 05.15 18:02
START TIME : 05.15 18:17
END TIME : 05.15 18:18
SUCCESSFUL
ADDRESS BOOK
001 Cccddd ADMIN
UNSUCCESSFUL
FAX NUMBER
2139998888
NOT AVAILABLE
MULTI POLLING REPORT
TIME : 05-15-'08 18:18
FAX NO.1 : 2131234567
FAX NO.2 : 2131235678
NAME : Aaabbb L.A.
FILE NO. : 016
DATE : 05.15 18:22
TO : 2139998888
RELAY BOX : 12345
DOCUMENT PAGES : 1
START TIME : 05.15 18:22
END TIME : 05.15 18:22
PAGES SENT : 1
STATUS : OK
RELAY TX ORIG. TERMINAL REPORT
TIME : 05-15-'08 18:22
FAX NO.1 : 2131234567
FAX NO.2 : 2131235678
NAME : Aaabbb L.A.
Page 92

5 PRINTING LISTS AND REPORTS
90 Lists/Reports Samples
Relay TX relay station report
The mark in the “ADDRESS BOOK” column is appended when the 2ND FAX registered in the address book is
used for transmission.
Relay TX end terminal report
FILE NO. : 013
DATE : 05.15 14:45
DOCUMENT PAGES : 3
FROM : 7141234567
START TIME : 05.15 14:45
END TIME : 05.15 14:46
RELAY BOX : 12345
SUCCESSFUL
GROUP NUMBER
002 USA 1 ADDRESS BOOK 001
005 ASIA 1
UNSUCCESSFUL
ADDRESS BOOK PAGE SENT
001 Cccddd ADMIN 0
RELAY TX RELAY STATION REPORT
TIME : 05-15-'08 14:46
FAX NO.1 : 2131234567
FAX NO.2 : 2131235678
NAME : Aaabbb L.A.
FILE NO. : 013
DATE : 05.15 14:45
DOCUMENT PAGES : 3
FROM : 7141234567
START TIME : 05.15 14:45
END TIME : 05.15 14:46
RELAY BOX : 12345
SUCCESSFUL
ADDRESS BOOK
005 XYZ CORPORATION
UNSUCCESSFUL
ADDRESS BOOK PAGES SENT
001 Cccddd ADMIN 0
RELAY TX END TERMINAL REPORT
TIME : 05-15-'08 14:46
FAX NO.1 : 2131234567
FAX NO.2 : 2131235678
NAME : Aaabbb L.A.
Page 93
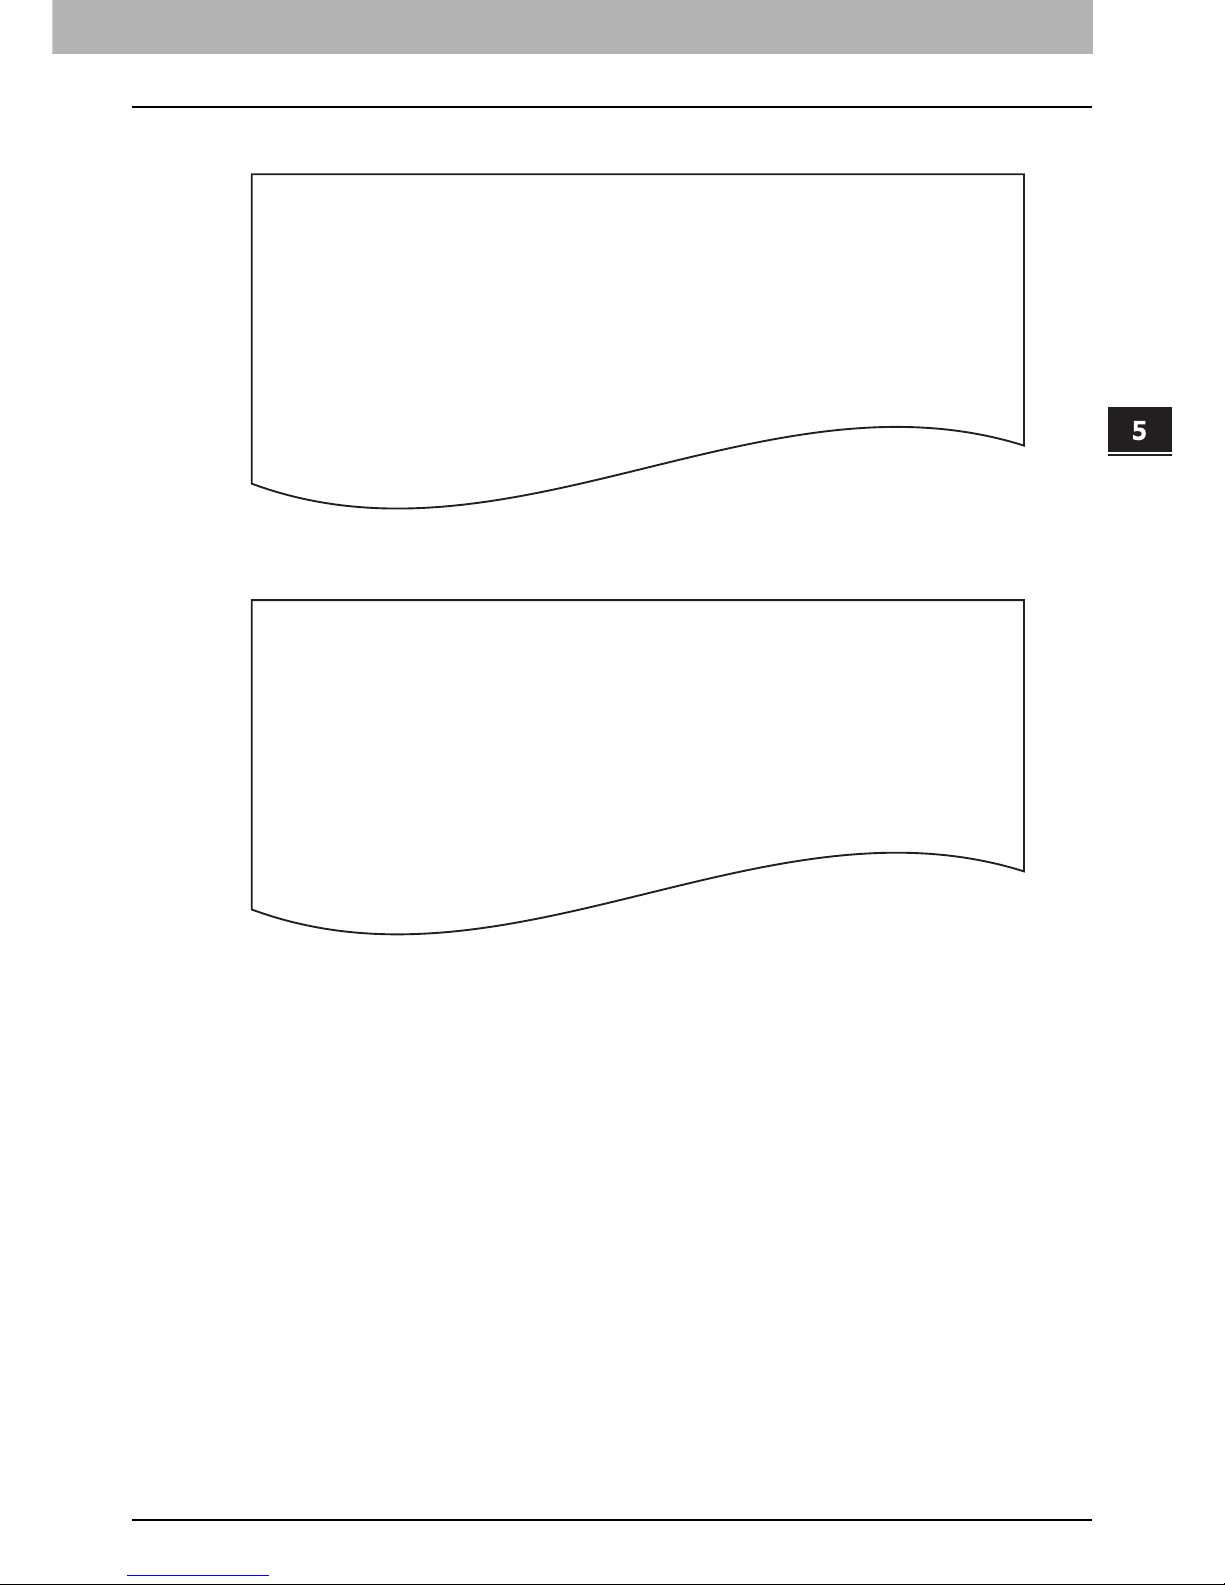
5.PRINTING LISTS AND REPORTS
Lists/Reports Samples 91
5 PRINTING LISTS AND REPORTS
Relay station report
Mailbox reception report
FILE NO. : 734
DATE : 05.15 13:33
RELAY BOX : 777
DOCUMENT PAGES : 1
FROM : 214
RELAY STATION REPORT
TIME : 05-15-'08 13:33
FAX NO.1 : 2131234567
NAME : Aaabbb L.A.
FILE NO. : 016
DATE : 05.15 18:22
BOX NUMBER : 12345
BOX TYPE : CONFIDENTIAL
DOCUMENT PAGES : 1 (TOTAL 2 )
FROM : LOCAL
MAILBOX RECEPTION REPORT
TIME : 05-15-'08 18:22
FAX NO.1 : 2131234567
FAX NO.2 : 2131235678
NAME : Aaabbb L.A.
Page 94
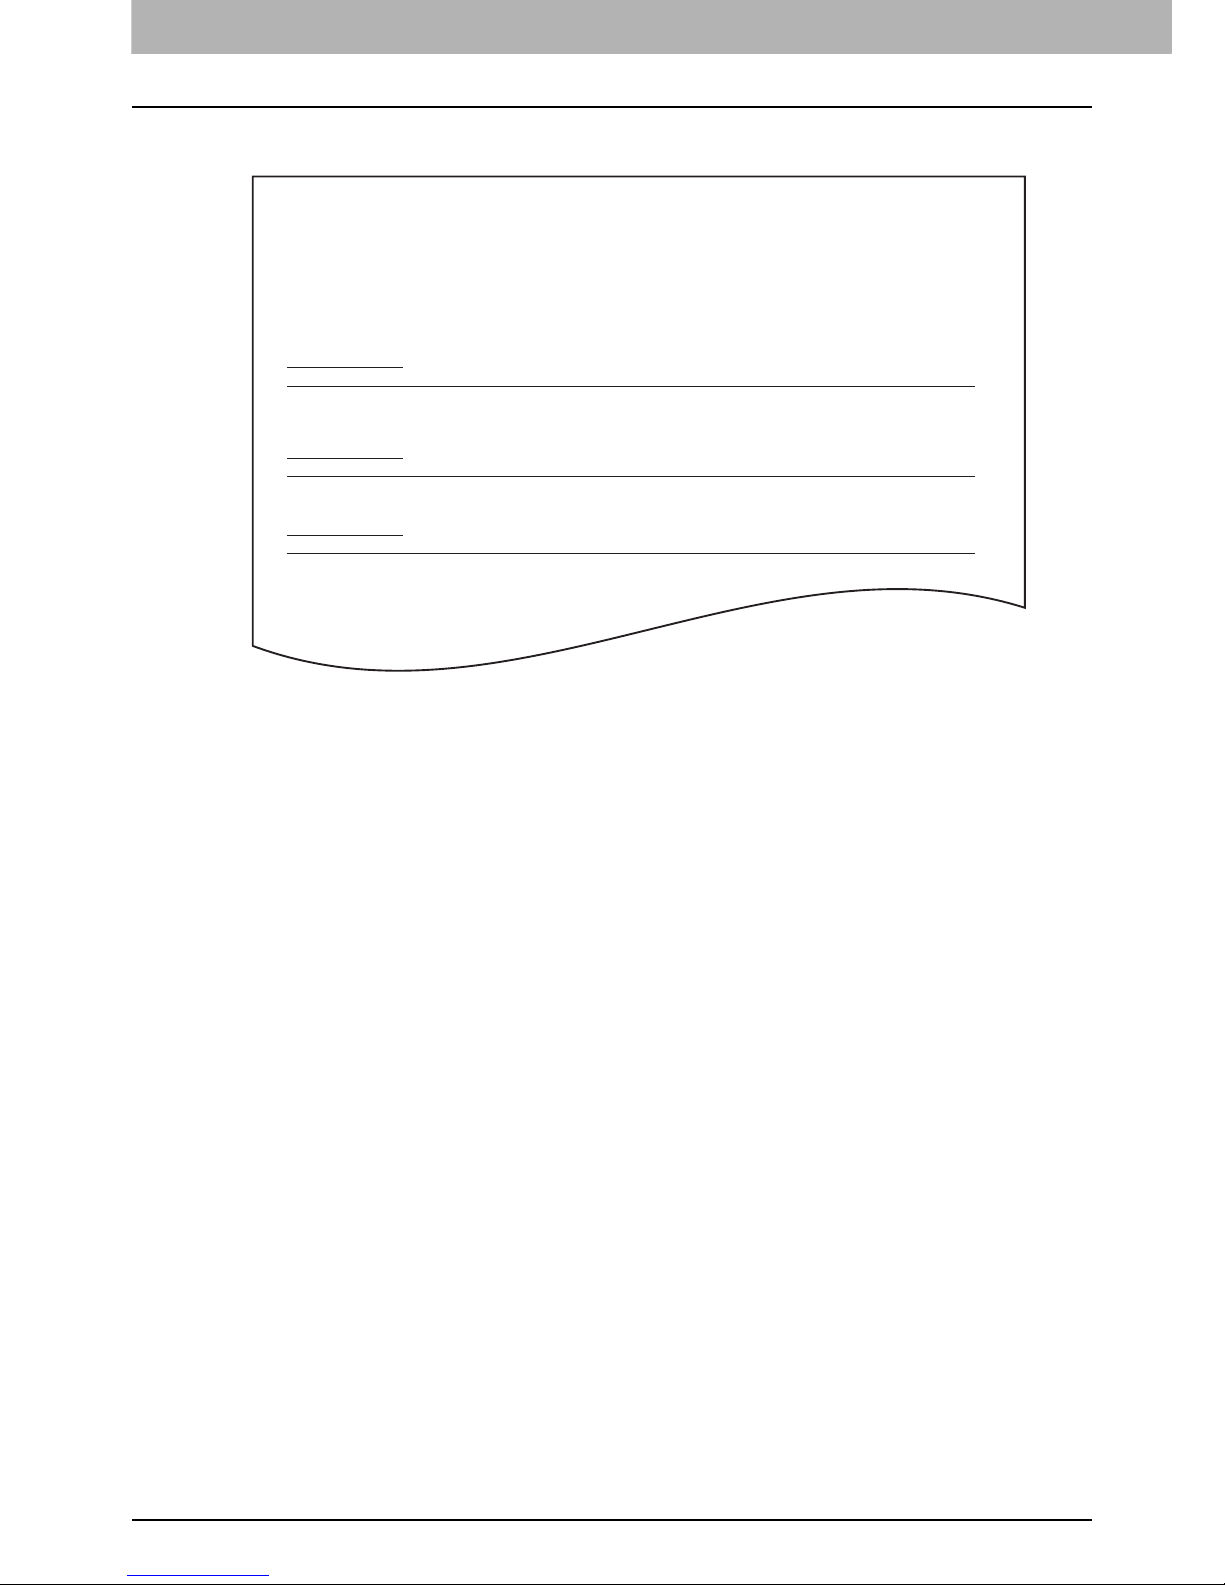
5 PRINTING LISTS AND REPORTS
92 Lists/Reports Samples
Power failure list
TX/RX
FILE NO. FUNCTION
044 POLLING RX
045 MULTI TX
POWER FAILURE LIST
TIME : 05-15-'08 17:53
FAX NO.1 : 2131234567
FAX NO.2 : 2131235678
NAME : Aaabbb L.A.
MEMORY RECEPTION
FILE NO.
029
PC JOB
FILE NO. FUNCTION
049 SINGLE TX
050 MULTI TX
Page 95

6.SETTING ITEMS
This chapter describes the user and administrator settings related to the fax function.
User Settings .......................................................................................................................... 94
Fax settings ..........................................................................................................................................................94
Administrator Settings........................................................................................................... 97
Registering the terminal ID...................................................................................................................................99
Setting the initial setup .......................................................................................................................................100
Setting RX printing .............................................................................................................................................102
Setting recovery transmission ............................................................................................................................104
Setting 2nd Line for FAX Unit.............................................................................................................................105
Page 96
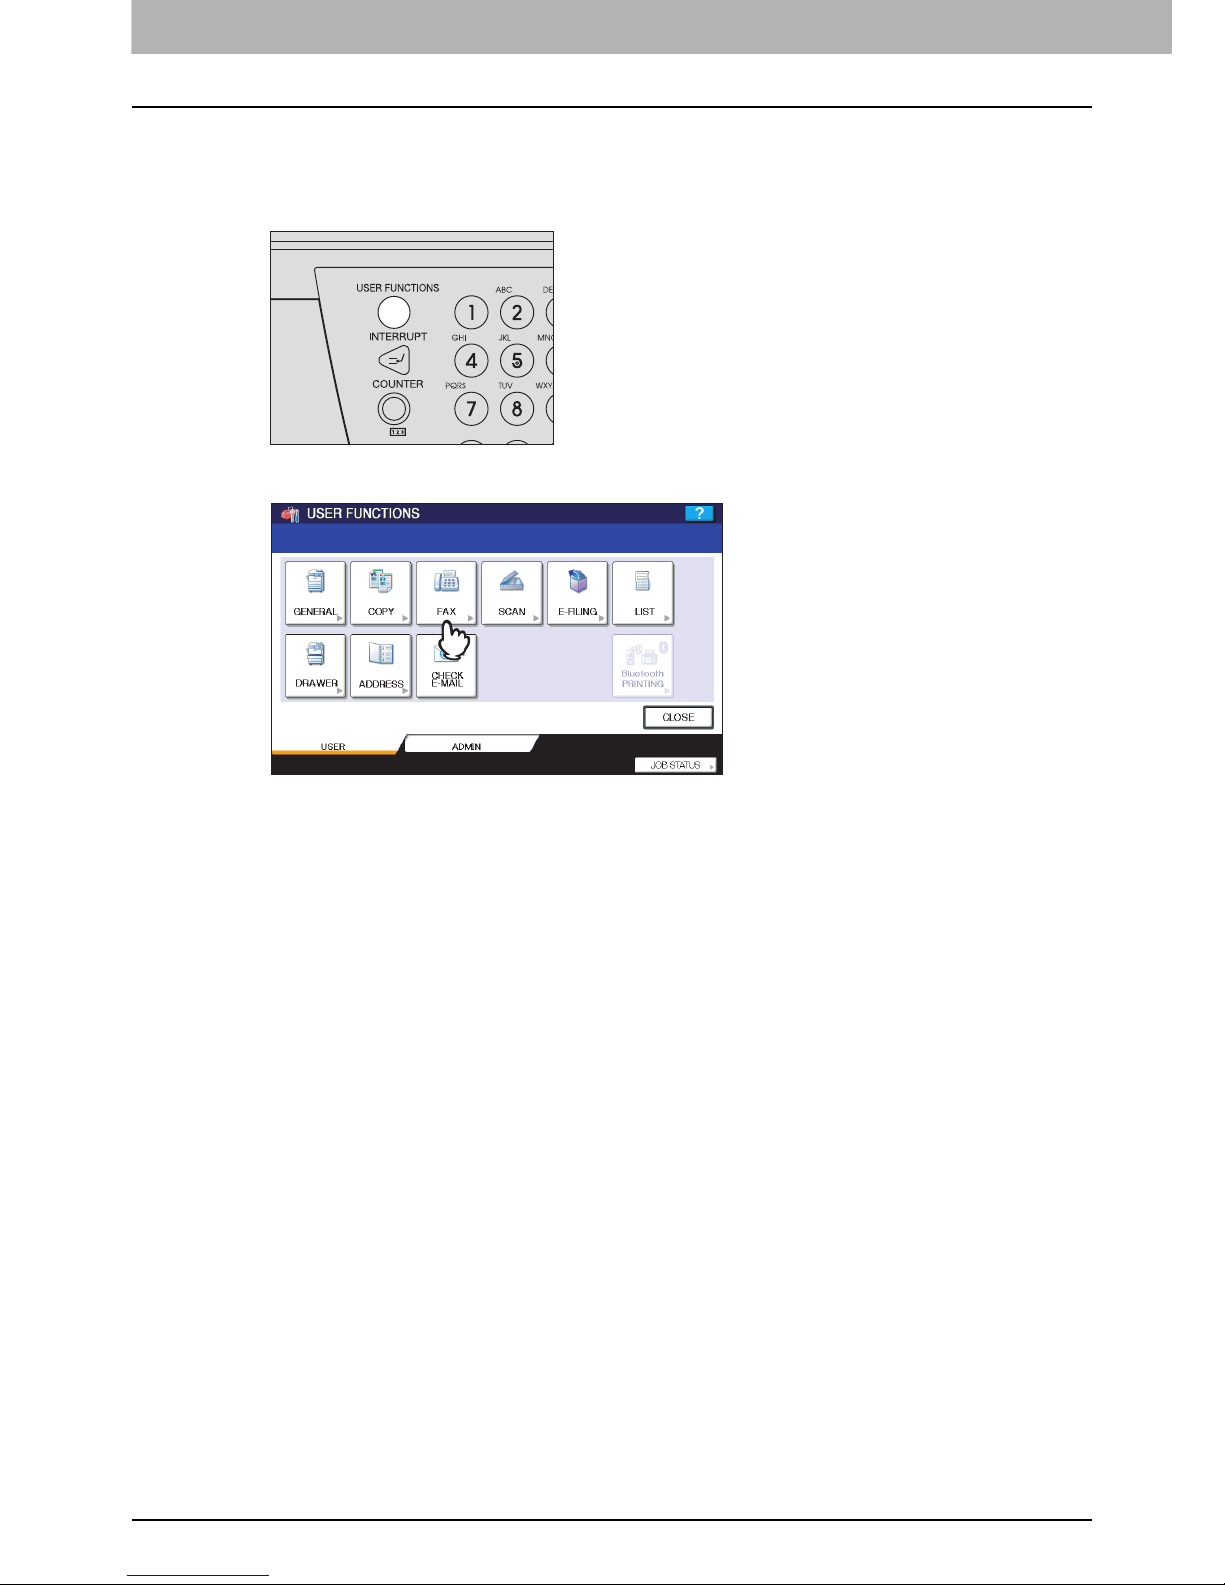
6 SETTING ITEMS
94 User Settings
User Settings
Fax settings
Set the initial settings for the fax transmission functions.
1
Press the [USER FUNCTIONS] button on the control panel.
2
Press [FAX].
Page 97
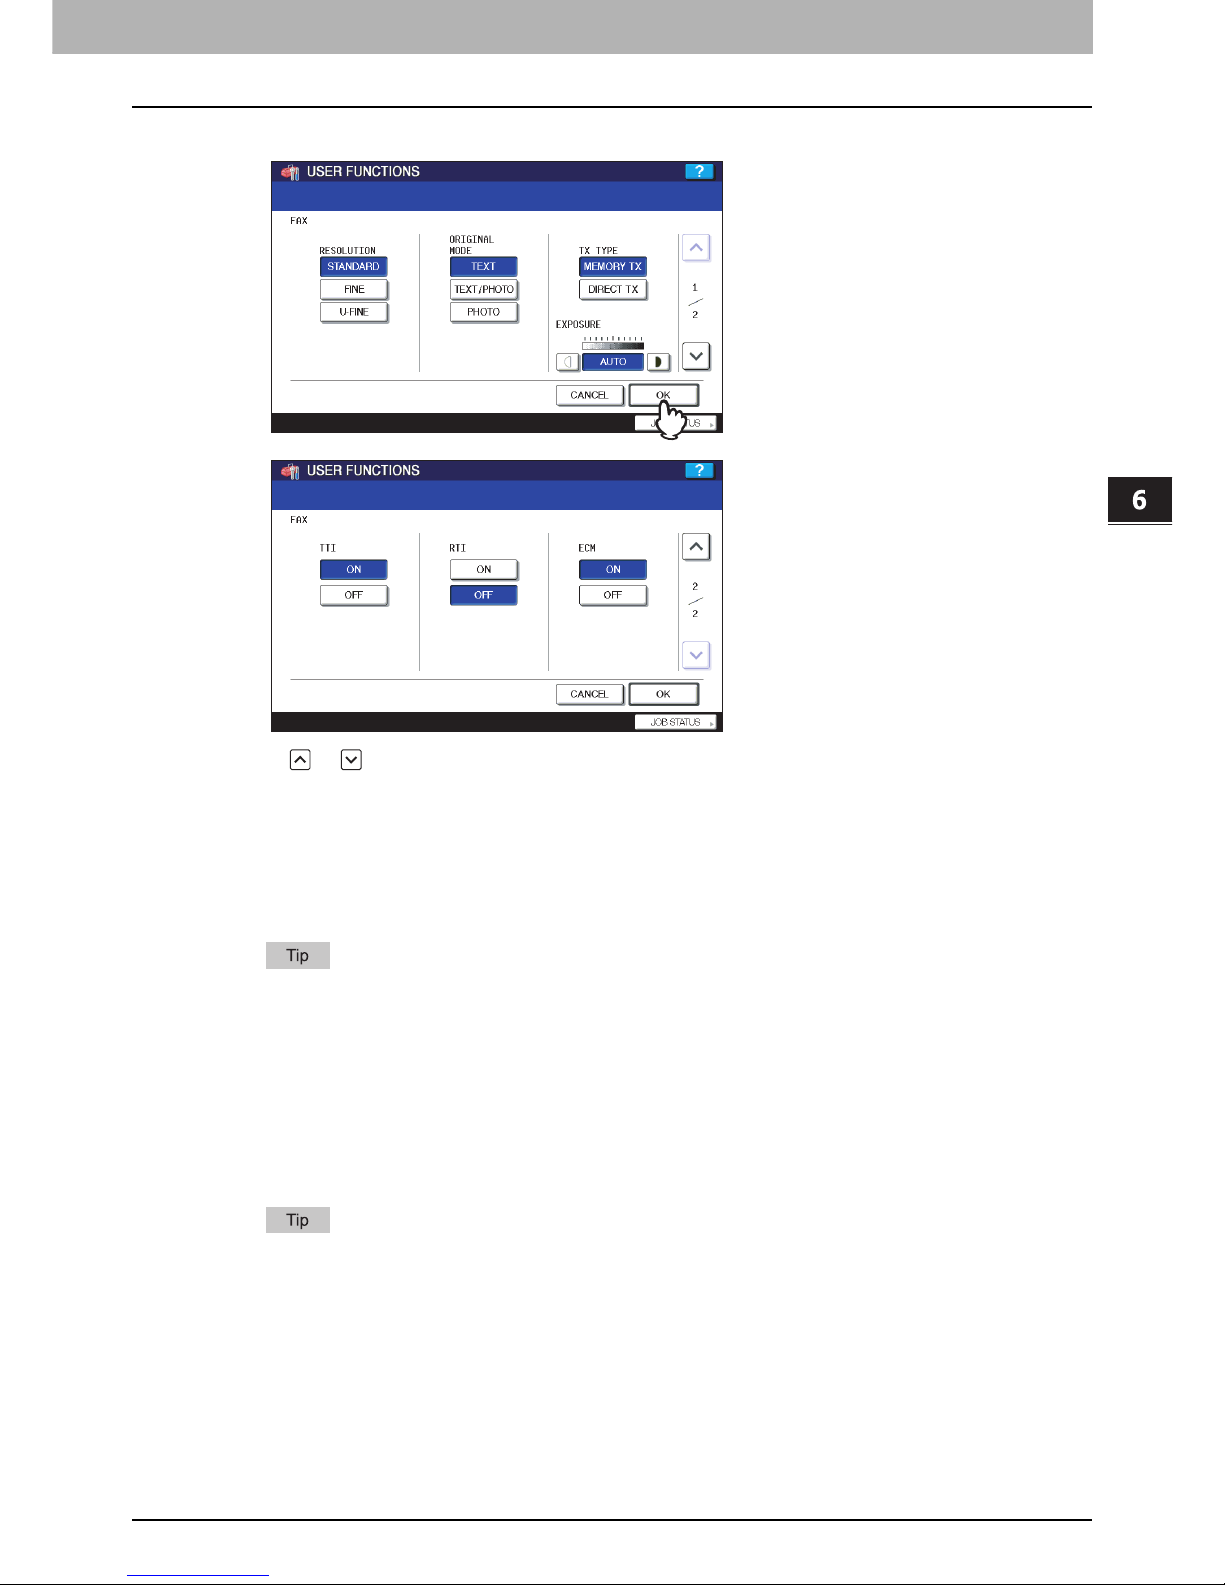
6.SETTING ITEMS
User Settings 95
6 SETTING ITEMS
3
Set each setting item, and then press [OK].
Press or to switch the pages.
RESOLUTION
Set the resolution based on the fineness of the original.
If the recipient’s fax machine is not capable of receiving originals at the same resolution, the resolution is
automatically converted before being sent it to the recipient. The higher the resolution is, the longer it takes to
send an original.
ORIGINAL
Set the scanning mode based on the type of the original.
In the TEXT/PHOTO mode or PHOTO mode, transmission time may be longer than in the TEXT mode.
STANDARD: This is suitable for an original with regular size text.
FINE: This is suitable for an original with small size text and detailed illustrations.
U-FINE: This is suitable for an original with ultra-detailed illustrations.
TEXT: This is suitable for an original with text and line drawings.
TEXT/PHOTO: This is suitable for an original with a mixture of text and photos.
PHOTO: This is suitable for an original with photos.
Page 98

6 SETTING ITEMS
96 User Settings
TX TYPE
Set the fax transmission mode.
EXPOSURE
Set the density at which the original is to be scanned.
TTI
Switch the TTI recording ON or OFF. To enable this feature, the Terminal ID must be registered to this equipment in
advance.
P.99 “Registering the terminal ID”
Setting this item may not be required since it may not be displayed on the screen (it depends on your country or
region).
RTI
Switch the RTI recording ON or OFF. To enable this feature, the Terminal ID must be registered to this equipment in
advance.
P.99 “Registering the terminal ID”
ECM
Switch the ECM (Error Correction Mode) communication ON or OFF.
ECM is an internationally standardized communication mode that automatically corrects errors that occur during
fax transmissions. With this setting option ON, even when the transmitted data have been affected by noise during
communication, this mode allows good communication without image distortion by automatically resending the part
that have been affected.
Both the sender and the receiver must have the ECM function to make ECM communication available.
When affected by noise during communication, communication time is slightly longer than usual. Even
when the ECM communication is used, an error may occur depending on the line status.
The ECM communication is not available for voice communication.
MEMORY TX: Send the original after the scanned data are saved in the memory. Up to 100 transmissions can
be reserved. Up to 1000 pages can be sent in one transmission.
DIRECT TX: Send the original directly as it is being scanned. Once a page has been scanned and sent, the
next page is scanned and sent. Therefore, it takes longer to scan and send all pages. However,
you can confirm on the fly that each page is sent to the recipient.
AUTO: This equipment automatically detects the contrast of the original, and scans it with the optimum
contrast.
MANUAL: Press or to set the desired contrast.
Page 99
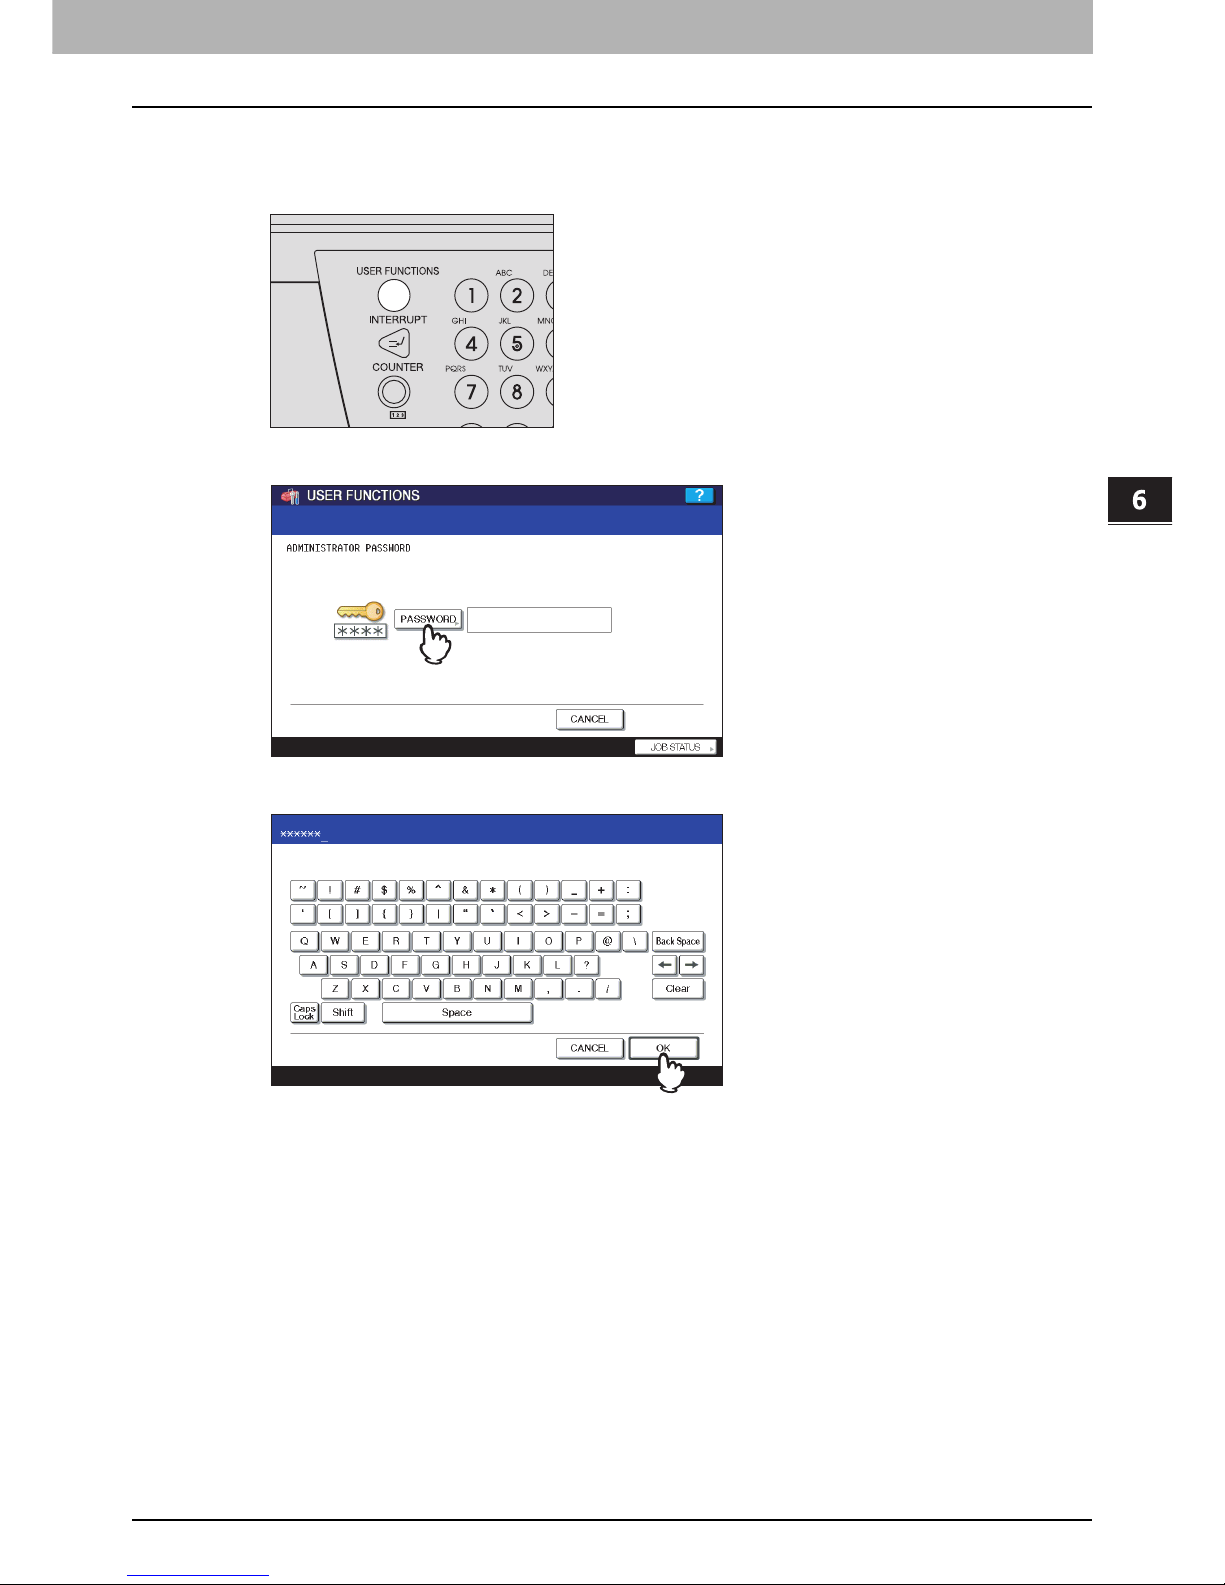
6 SETTING ITEMS
Administrator Settings 97
Administrator Settings
This section describes the FAX menu managed by the administrator.
Follow the procedures below to display the menu you want to operate.
1
Press the [USER FUNCTIONS] button on the control panel.
2
Press [ADMIN] tab, and then press [PASSWORD].
3
Enter the administrator password, and then press [OK].
Page 100
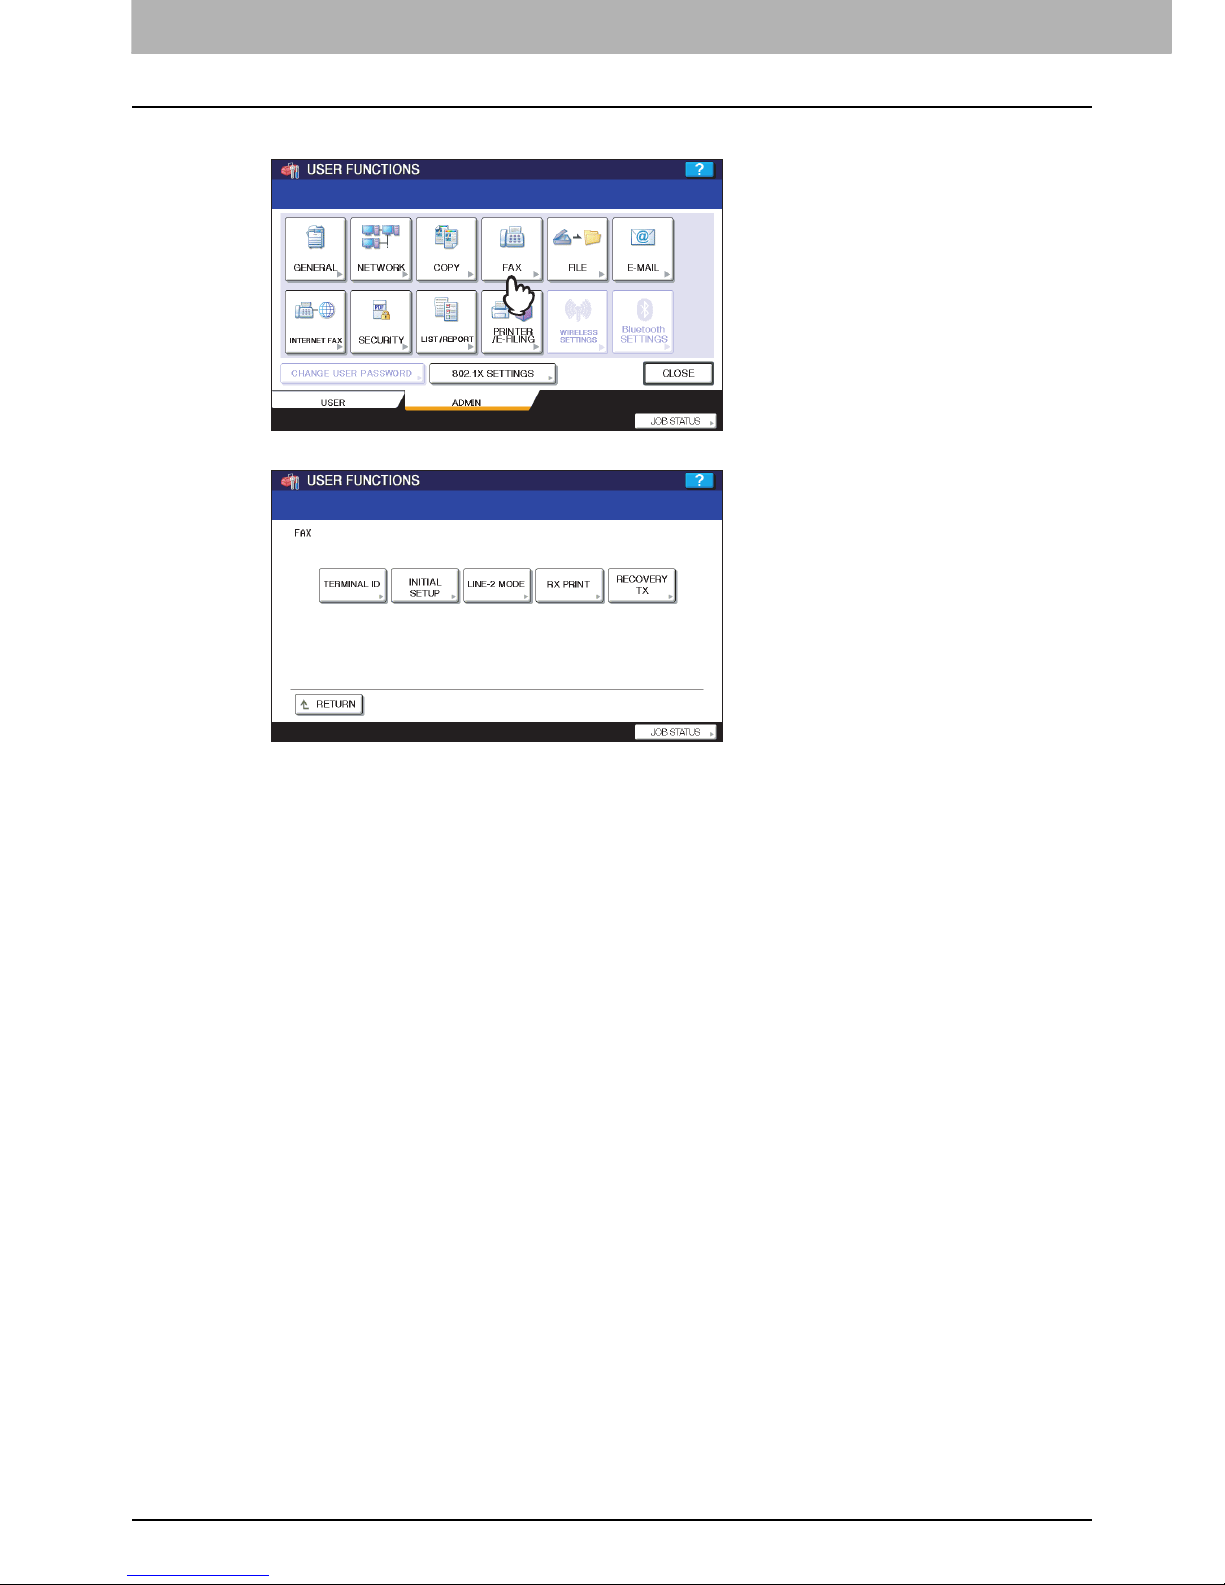
6 SETTING ITEMS
98 Administrator Settings
4
Press [FAX].
The FAX menu is displayed.
The following section describes each menu.
 Loading...