

Page 1
XXXXXXXX
User Guide
Contents
Getting Ready
Basic Operations
Safety Precautions
Appendix
GBDE
Page 2
Preface
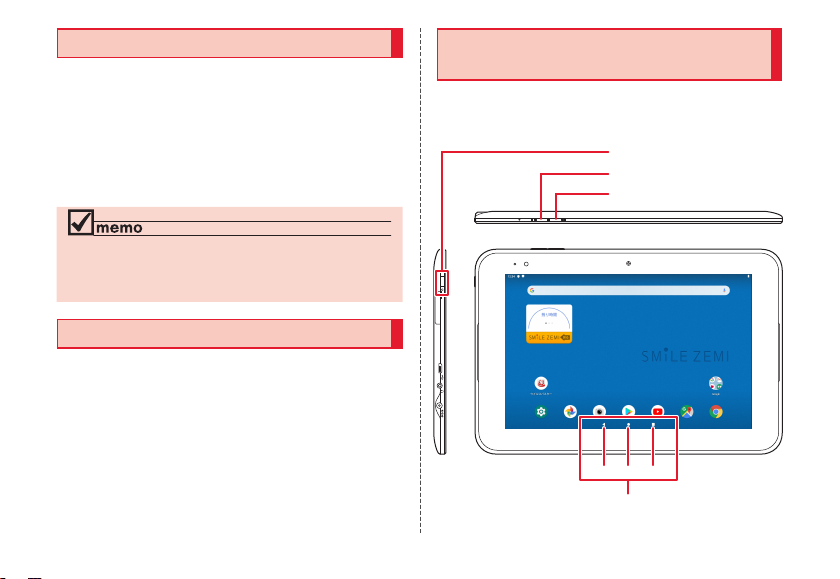
Navigation bar
(Volume down button)
F (Power button)
Thank you for buying this product.
Before using the product, be sure to read "User Guide"
(this manual) to ensure correct use.
After you have finished reading the manuals, be sure to
keep them accessible.
• Reproduction of the content of this manual in part or
in whole is prohibited.
◎The battery is built into the product.
◎Illustrations in this manual are only for reference. They
may look different from the actual product.
Operating Instructions
Descriptions of this manual are based on the product
switched to Android mode.
■"User Guide" (This Manual)
Handles only basic operations for main features.
Regarding Notations Used in This
Document
■Note on Button Illustrations
In this manual, buttons are simplified as shown below.
r (Volume up button)
l
C H N
1
Page 3

■Description of Operations for Selecting
Actual screen
Item/Icon/Button etc.
Notations used for operation procedures in this manual
are as follows.
Description Explanation
Home screen →
[
] → [ ]
In sleep mode,
(Power
F
button)
• Tapping is to select a button or icon displayed on the
screen by lightly tapping it with your finger.
2
Tap " (Chrome)" on the home
screen.
Tap [
]
In sleep mode, press F
(Power button).
■Notes on Illustrations/Screenshots
The illustrations and screenshots in this manual may
look different from the actual illustrations or screens.
Note that part of the screen etc. may be omitted.
Some icons
etc. are
omitted in this
manual.
Notations used in this manual
Page 4
◎In this manual, the operations with horizontally oriented
screens are provided as examples. With vertically
oriented screens, descriptions for menu item/icon/onscreen button may be different.
◎Menu items, layers and icons described in this manual
may be different according to functions being used and
conditions.
◎In this manual, "microSD™ memory card (commercially
available)", "microSDHC™ memory card (commercially
available)", and "microSDXC™ memory card
(commercially available)" are abbreviated as "microSD
memory card (commercially available)" or "microSD".
◎Company names and product names referred to in this
manual are trademarks or registered trademarks of the
respective companies. The TM, ® marks may be omitted
in this manual.
3
Page 5
Contents
Preface ............................................................................ 1
Operating Instructions ..................................................... 1
Regarding Notations Used in This Document ................. 1
Contents ..................................................4
Getting Ready ..........................................5
Contents
Names and Functions of Parts ....................................... 5
Using microSD Memory Card ......................................... 7
Charging ......................................................................... 8
Turning the Power On/Off ............................................. 10
Using the Touch Panel .................................................. 11
Initial Settings ............................................................... 12
Setting Wi-Fi
Start Screen .................................................................. 17
Basic Operations ..................................18
Using the Home Screen ................................................ 18
Taking Screenshot ....................................................... 18
Setting Do Not Disturb .................................................. 18
Setting Home Screen .................................................... 19
Activating the Apps ....................................................... 19
Notification Panel .......................................................... 20
Setting Airplane Mode .................................................. 21
Setting Functions .......................................................... 21
Setting Battery Saver .................................................... 22
44
® ..................................................................................................................16
Safety Precautions ................................23
When Using the Product ............................................... 23
Safety Precautions (Observe Strictly) ........................... 25
Material List .................................................................. 33
Handling Precautions .................................................... 34
Notes on Using Bluetooth
Function ........................................................................ 39
®
/Wireless LAN (Wi-Fi®)
Appendix ................................................42
Updating Software ........................................................ 42
Troubleshooting ............................................................. 43
After-Sales Service ....................................................... 44
Main Specifications ....................................................... 45
General Notes ............................................................... 46
FCC Compliance Information ....................................... 49
Simplified EU Declaration of Conformity ....................... 49
Product Disposal ........................................................... 50
Intellectual Property Rights ........................................... 51
Page 6

Names and Functions of Parts
②
③
⑤
⑦⑥ ⑨⑧
①
⑩ ⑩
④
Getting Ready
Power button
①
F
Press to power ON/OFF, activate/deactivate sleep
mode, etc.
microSD memory card slot cover
②
External connection terminal
③
Used for connecting an external connection device,
etc.
Earphone microphone terminal
④
Used for connecting earphones (commercially
available) or other accessories.
Charging terminal
⑤
Used for connecting the AC adapter.
Notification (charging) light
⑥
The light works as follows.
Power on Green Illuminates
On charge Red Illuminates
Charge completed Green Illuminates
Remaining amount of the
battery is 5% below
Light sensor
⑦
Color Behavior
Red Flashes
Detects the ambient light level to adjust the display
brightness.
Display (touch panel)
⑧
In camera (lens)
⑨
Speaker
⑩
Outputs notification sounds, alarms, etc.
Getting Ready
5
Page 7
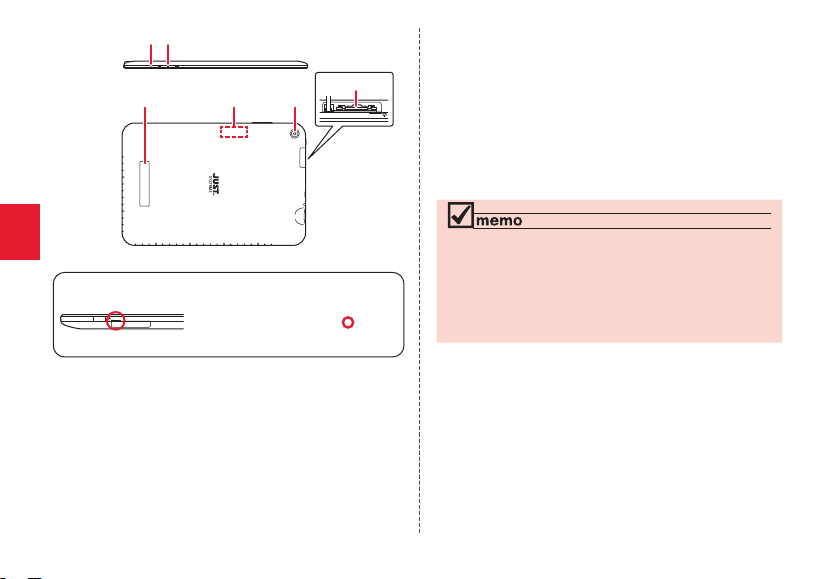
⑪ ⑫
Microphone
⑪
⑫
rl
⑬
⑮⑭
⑯
Press to adjust volume.
Name plate sticker
⑬
Built-in Bluetooth
⑭
Out camera (lens)
⑮
microSD memory card slot
⑯
* The antenna is built into the product. Covering the antenna
with your hand might affect communication quality.
Volume up / down button
®
/ Wi-Fi® antenna
*
Getting Ready
■ How to open the card slot cover
Insert a fingernail a small way into
one of the corners marked ○
pull open the cover.
6
and
◎The exterior case of the product is not removable.
Removing the exterior case with force may cause
damage or malfunction.
◎The battery is built into the product and it is not removable.
To force stop and reboot the product, refer to "Forcing the
Product to Shut Down and Restart" (▶P. 10)
.
Page 8
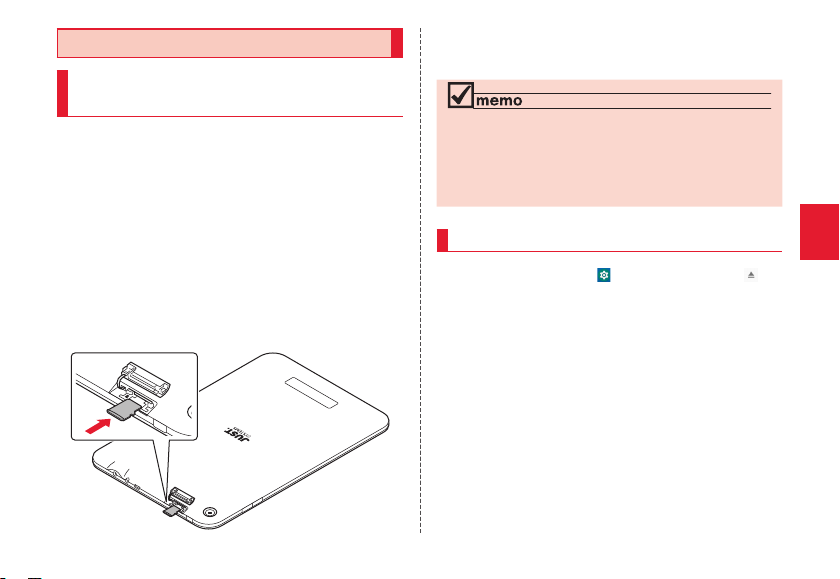
Using microSD Memory Card
Attaching/Removing microSD
Memory Card
■Attaching microSD Memory Card
Open the microSD memory card slot
1
cover of the product
Confirm the insertion direction of the
2
microSD memory card, and slowly insert
it into the slot until it clicks
When inserting the card into the product, confirm the
card is locked with snaps. Be aware that the card may
fly out if you release your finger before the card is
locked. Be careful about it.
Close the microSD memory card slot
3
cover
◎The microSD memory card has a back and front side/top
and bottom orientation. Trying to insert the card forcefully
may cause confinement or damage.
◎This product supports microSDXC™ memory cards with
maximum capacities of 512 GB.
Removing microSD Memory Card
Home screen → [ ] → [Storage] → [ ]
1
The card is unmounted.
Open the microSD memory card slot
2
cover of the product
Slowly push the microSD memory card
3
toward the slot until it clicks
Pull out the microSD memory card with fingers on
when you hear "click". Keep your fingers on while the
microSD memory card comes out of the slot. Be aware
that the card may fly out if you release your finger
while pressing hard.
Getting Ready
7
Page 9
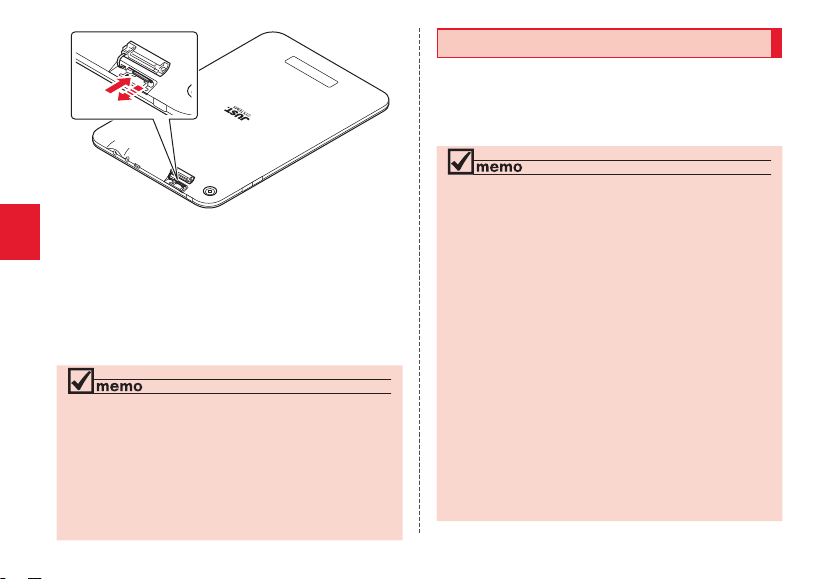
Slowly pull the microSD memory card
4
Slowly pull out the card as straight as possible.
Getting Ready
Depending on the microSD memory card, it is difficult
to pull out from the slot due to the failure of unlocking.
In that case, remove the card by pulling lightly with
your fingers.
Close the microSD memory card slot cover
5
◎Do not touch the terminal pert of microSD memory card.
◎Do not pull out the microSD memory card forcefully.
Doing so might cause a fault or loss of data.
◎After using the product for a long time, the removed microSD
memory card may become warm. This is not a malfunction.
◎When you remove the microSD memory card, be sure to
unmount the card properly to prevent data corruption or
erasure (▶P. 7).
8
Charging
The internal battery is not fully charged at the time of
purchase. Charge the battery before using the product.
When the red light turns into green, the charging will
be completed.
◎The product may become warm while charging or during
other operations, this is not abnormal.
◎Charging the product while using the camera function,
the charging time may take longer than usual.
◎Doing various operations with the AC adapter connected,
the battery life may get short due to the short time
charging/discharging.
◎When temperature of environment or the product is
extremely high or low, charging may be stopped even
if charging is started. Charge the battery at room
temperature as much as possible.
◎Make sure the connection is correct if the charging light
of the product blinks in red. If the charging light continues
to blink, immediately stop charging, and contact the
support center on the back cover.
◎Right after 100% is displayed on a sleep mode screen while
charging, the charging light may not turn to green, but the light
will turn to green soon and the charging will be completed.
◎Keep a metal accessory or conductive materials (metal
pieces, pencil lead, etc.) from coming in contact with the
connection terminal and prevent them from getting inside.
Page 10
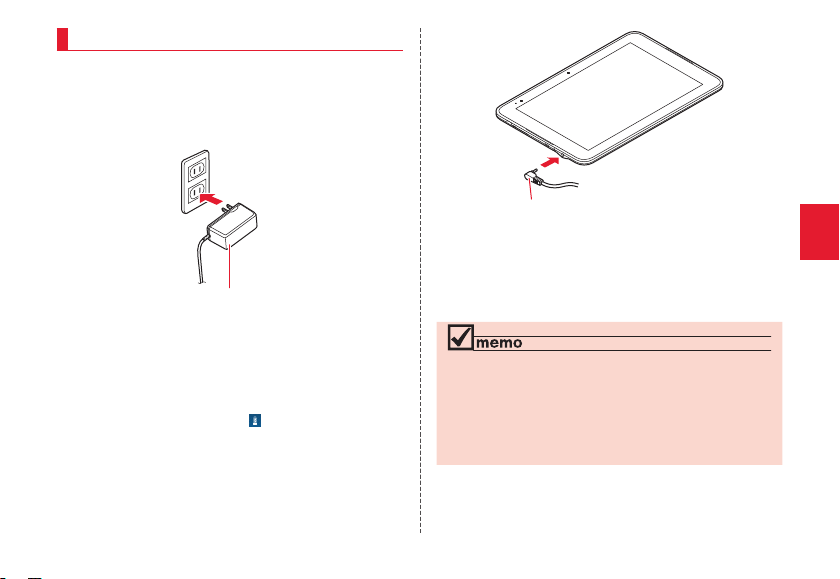
Charging with the AC Adapter
Supplied AC adapter
How to charge the product using the supplied AC
adapter is described here.
Connect the power plug of the supplied
1
AC adapter to an outlet (100V - 240V AC)
Insert the DC plug of the supplied AC
2
adapter to straight into the charging
terminal
Make sure that the charging light turns into red. When
the battery power turns on, "
bar.
When charging is complete, the charging light turns
into green.
" appears on the status
Supplied AC adapter
When charging is complete, pull out the
3
plug straight from the charging terminal
Unplug the power plug of the supplied AC
4
adapter from the outlet
◎Note that applying unnecessary force with the AC
adapter connected to the charging terminal may cause
damage.
◎When the battery is charged in the case that the batteries
run out, charging light may not turn to green soon, but
charging is started.
Getting Ready
9
Page 11
Turning the Power On/Off
Turning the Power On
Press and hold F (Power button) until
1
the notification light turns on
The start screen appears (▶P. 17).
• For the first time you turn on the product, the initial
settings activate. Set them as required.
◎When logos are being displayed on the screen, do not
Getting Ready
touch the screen because the initial setting of the touch
panel activates. Doing so may prevent the touch panel
from working properly
◎Press F (Power button) when the screen is on or turn
the screen off with no operation for a certain period, the
product enters sleep mode.
10
.
Turning the Power Off
Press and hold F (Power button) for at
1
least 1 second
[Power off]
2
Forcing the Product to Shut Down
and Restart
You can force the product to power off and reboot
when the screen does not respond, or the power
cannot be turned off.
Press and hold F (Power button) and
1
(Volume up button) at the same time
r
for at least 11 seconds
◎If you turn off the product forcibly and restart, an unsaved
data will be lost. Do not perform except when the product
does not respond.
Page 12
Using the Touch Panel
The product is equipped with a touch panel, allowing
you to operate by touching directly the screen with
your fingers.
■Tap/Double-tap
Lightly touch a screen and then
immediately release your finger.
Tapping a screen twice in the
same position is called doubletap.
■Long-touch
Keep touching an item, button,
etc.
■Slide/Swipe
While lightly touching the screen,
trace it up and down, or sideways
in order to view hidden content.
■Flick
Touch the screen and flick up/
down/left/right.
■Zoom-in/Zoom-out
While touching the screen with
two fingers, move the fingers
away and closer to each other.
Getting Ready
■Drag
While lightly touching the screen,
trace to the desired position.
11
Page 13
Initial Settings
When you turn on the product for the first time
after purchasing the product, follow the on-screen
instructions to set language preferences, Wi-Fi
Google account, and so on.
■Setting up Google Account
Set up Google account to use Google apps such as
"Gmail" and "Play Store".
Setting items are as below (besides the items below,
register "First name" and "Last name").
User name Register your Google account (user ID) and a
Getting Ready
Password Register password for the Google account.
Tap [
1
12
character string for mail address. You can register
a desired name, but a name already registered
by another user cannot be set.
日本語(日本
)] → [English] → Select
the language region → [START]
• If you use Japanese, leave [
selected.
日本語(日本
®
,
)] (Japanese)
Set up the Wi-Fi® network to connect as
2
required
• If you tap "SKIP" → [CONTINUE], an input screen
for date & time appears. Set up them and proceed
to step 10. From here on, follow the on-screen
instructions.
Copy apps and data
3
• To copy, [NEXT] → follow the on-screen instructions.
• To not copy, tap "DON'T COPY".
Page 14
[Create account] → [For myself] / [For my
4
child]
• If you have a Google account, enter a mail address
or phone number → [Next].
Enter "First name" and "Last
5
name" → [Next] → Enter the birthday and
gender → [Next] → Enter a user name
you want → [Next]
Checking registration of user name starts.
➡
Getting Ready
➡
13
Page 15
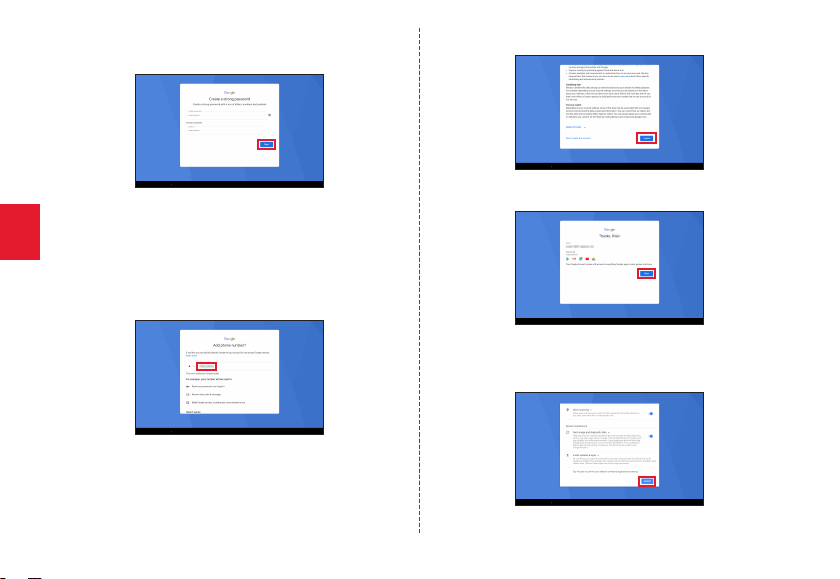
Enter a password → Reenter the
6
password for confirmation → [Next]
Set up the phone number
7
• To set up, check the country and enter a phone
Getting Ready
14
number → [Yes, I'm in]* → follow on the on-screen
instructions.
• To not set up, tap "Skip".
* Text message for Google verification code will be sent to the set
phone number.
Check the contents, then [I agree]
8
Check the contents, then [Next]
9
Confirm the Google service settings →
[ACCEPT]
Page 16
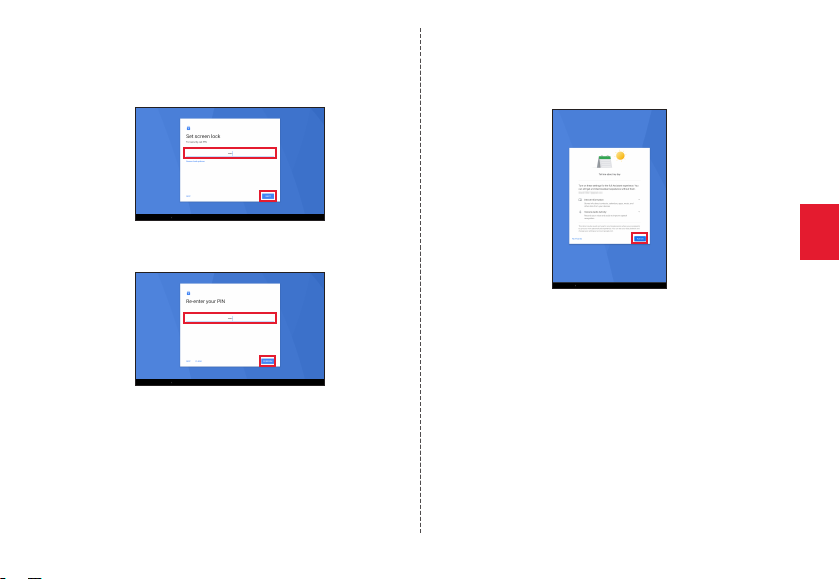
Set up the screen lock
• To set up, enter a PIN → [NEXT] → reenter the PIN
[CONFIRM]
→
• To not set up, tap [SKIP] → [SKIP ANYWAY].
Set up the Google Assistant
• To set up, [Turn on] → follow the on-screen
instructions.
• To not set up, tap [No Thanks].
➡
Set up the Google Pay
• To set up, [Add a card] → follow the on-screen
instructions.
• To not set up, tap [Skip].
Getting Ready
15
Page 17
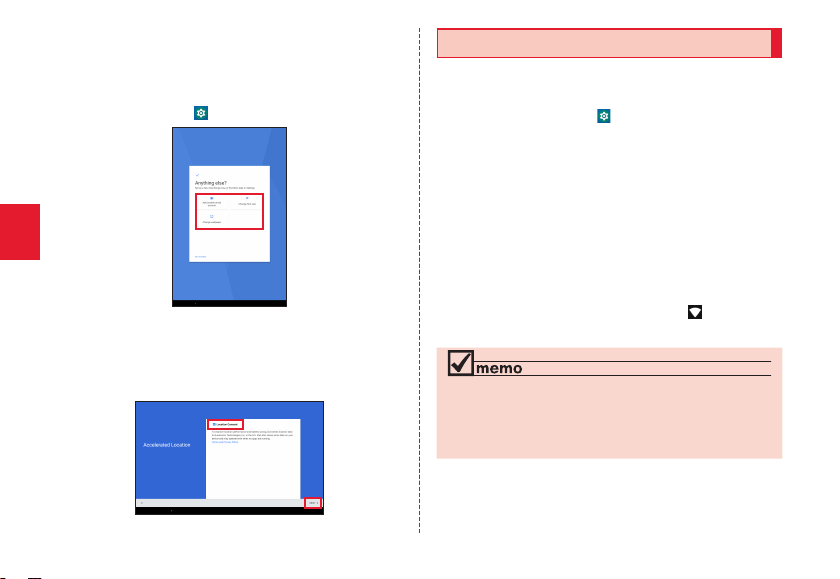
Set up other settings as required
• To set up, make desired settings, return to the
previous screen, and tap [DONE FOR NOW].
• To not set up, tap "NO THANKS". After settings are
completed, tap [
Getting Ready
Set up the accelerated location
• To set up, check the box → tap [NEXT].
• To not set up, leave the box unchecked → tap
[NEXT].
] to check the settings.
16
Setting Wi-Fi
®
Use your home wireless LAN (Wi-Fi®) or public wireless
LAN to connect to the Internet.
Home screen → [ ]
1
[Network & internet] → [Wi-Fi] → "ON"
2
Wi-Fi setting screen appears, and available Wi-Fi®
networks are listed.
Select a Wi-Fi® network to connect →
3
[CONNECT]
• If you connect a security-protected Wi-Fi® network,
enter a password (security key)
* A password (security key) is set up at an access point. For details,
contact a network administrator.
• When the connection is completed, " " appears in
the status bar.
◎The battery is consumed faster when the wireless LAN
®
(Wi-Fi
) function is set to on. You are recommended to
turn off the wireless LAN (Wi-Fi
it.
*
→ [CONNECT]
®
) function when not using
Page 18

Start Screen
①
②
《
Start screen
》
The start screen is displayed when you turn the
product on or cancel the sleep mode.
Switching to the Home Screen
from the Start Screen
You can switch to the home screen with the following
operations when the start screen appears.
Swipe/flick
1
The home screen appears (▶P. 18). Or, the previous
screen which the product turns to sleep mode
appears.
Clock display
①
Notifications
②
Double-tap a notification to activate notified app.
•
Sleep Mode
Press F (Power button) while the backlight is turned
on or perform no operation for a certain period, the
screen goes off temporarily and the product enters
sleep mode. Doing the following operation, cancel the
sleep mode.
In sleep mode, press F (Power button)
1
◎To change the time to enter sleep mode, home screen →
[
] → [Display] → [Advanced] → [Sleep], and select the
time.
◎When you press F (Power button) to display the
screen in sleep mode, do not touch the screen. Doing so
may prevent the touch panel from working properly.
Getting Ready
17
Page 19

Basic Operations
①
②
③
《
Home screen
》
Using the Home Screen
The home screen consists of multiple screens. Slide/flick
right or left to switch the screen.
◎Alternatively, hold down F (Power button) for at least 1
second → [Screenshot] to take a screenshot.
◎Screenshots are saved to the internal storage. You can
check saved screenshots on the "Photos", "Files", and so
on.
◎Screenshot may not operate depending on an app and
function.
Setting Do Not Disturb
Set to Do Not Disturb so as not to disturb others around
you in public places.
Basic Operations
Status bar
①
Shortcuts/Folders
②
Quick launch area
③
Taking Screenshot
Press F (Power button) and l (Volume down
button) at the same time for at least 1 second to save
the currently-displayed screen as image (screenshot).
After screenshot is completed, open the notification
panel to check the saved image.
18
Setting Do Not Disturb (Vibration)
Press r (Volume up button) or l
1
(Volume down button)
• Volume adjustment bar is displayed.
[ ]
2
• An icon of the bar is switched to [ ].
Page 20

Setting Do Not Disturb (Mute)
Press
1
(Volume down button)
• Volume adjustment bar is displayed.
[ ] → [ ]
2
• An icon of the bar is switched to [ ].
(Volume up button) or l
r
Setting Home Screen
Set various displays of the home screen.
Home screen → Long-touch an empty
1
space
The setting screen of the home screen appears.
Home settings Show Google apps or notification dots
2
Widgets Add widgets to the home screen.
Wallpapers Change wallpapers on the home
Set the required items
3
on the home screen, and add an icon
to the home screen.
screen.
Activating the Apps
Tap an app icon to use its function.
Home screen → Tap an app/folder to
1
activate
• If you tap a folder, tap an app to activate from the
app list in the folder.
Basic Operations
19
Page 21

Notification Panel
②
①
③
④
⑤
Slide down the status bar
1
Notification panel is displayed.
to hide the notification panel.
• Tap
Date area
①
Quick settings tile
②
Basic Operations
Turn on/off frequently-used functions.
Slide down the notification panel to view a hidden
tile, brightness adjustment slider, and settings menu
icon.
Tap "Edit" to select an icon to display.
Information (notification) area
③
Check the product status and notification. By
tapping a notification, the corresponding app
activates depending on the information type.
Manage notifications
④
Customize the method of displaying notifications.
20
CLEAR ALL
⑤
Tap to clear all notifications. However, some
notifications cannot be cleared.
◎Alternatively, slide up the notification panel to hide the
panel.
◎To clear a notification individually, flick a notification to be
cleared right or left.
Page 22

Setting Airplane Mode
When Airplane mode is turned on, wireless functions
are disabled (packet communication, wireless LAN
®
), and Bluetooth®).
(Wi-Fi
Settings menu → [Network & internet] →
1
" " of "Airplane mode" to turn on.
Tap
When Airplane mode is turned on, " " appears in the
status bar.
◎When Airplane mode is turned on, communication such
as messaging, wireless LAN (Wi-Fi
disabled.
◎If Airplane mode is turned on, wireless LAN (Wi-Fi
®
Bluetooth
can be turned on. Follow the instructions given
by the respective company or institution regarding the
use of the product in a plane or hospital.
®
), and Bluetooth® are
®
) and
Setting Functions
Set and manage various functions from the settings
menu.
Home screen → [ ]
1
The settings menu is displayed.
List of the Settings Menu Items
Items Settings
[Network &
internet]
Connected
devices
Apps &
notifications
Battery Display remaining level and consuming
Display Make screen display settings such as
Sound Make sound settings such as Do Not
Set up network such as Wi-Fi
mode.
Set up devices connected to the product
such as Bluetooth
Make settings of apps and notifications
such as checking name, version, and
memory usage for an app, turning on/off
and uninstalling app, blocking notifications,
and selecting notifications to display on a
start screen.
level of the battery. And also, set up the
battery saver, etc.
brightness, screen orientation and font.
Disturb, vibration, ring sound, notification
sound and touch sound.
®
and USB.
®
and airplane
Basic Operations
21
Page 23

Items Settings
Storage Check memory capacity of the internal
Security & location Make settings of location infor mation and
Accounts Manage online service accounts, and make
Accessibility Make accessibility service settings such as
Google Check information on Google account and
System Make settings of language for use,
Basic Operations
storage or microSD memory card, and
initialize the microSD memory card.
security.
basic settings on data synchronization.
text size to be displayed.
service, and change settings.
character input, date & time. And also,
set up backup to Google server, reset the
product, and check information on the
product. Also, system update is available
here.
22
Setting Battery Saver
Reduce the product's performance, and limit
background data.
Settings menu → [Battery] → [Battery
1
Saver]
[TURN ON NOW]
2
Battery saver activates. " " appears in the status bar.
◎Email, messaging, and other apps that rely on syncing
may not updated unless it is activated.
◎Battery saver is turned off automatically while charging.
Page 24

Safety Precautions
When Using the Product
• Before you start using the product, make sure to
read the "Safety Precautions" in this manual to ensure
correct use.
• Use this data communication terminal so that you
can hold the product at least 1.5 cm away from your
body and also do not contain metal parts between
the product and your body.
Communication may not be possible in poor reception
•
areas. Communication may be interrupted if you move
into poor reception areas during communications.
• Since this product uses radio waves, the possibility of
communication intercepts by third parties cannot be
eliminated.
Since the product is a radio station under the Radio Law,
•
you may be asked to temporarily submit the product for
inspection in accordance with the Radio Law.
•
The Company is not liable for any damages arising
from earthquakes, lightning, storms, floods or other
natural disasters, as well as fires, actions by third
parties, other accidents, intentional or mistaken
operation by the customer, or use under other unusual
conditions outside the responsibility of the Company.
• The Company is not liable for any incidental damages
(change/disappearance of described content, loss of
business income, disruption of business, etc.) arising
from use or inability to use the product.
• The Company is not liable for any damages arising
from failure to observe the described content of this
manual.
• The Company is not liable for any damages arising,
for example, from malfunction caused by combination
with connected devices or software not related to the
Company.
• Captured image data or downloaded data may
sometimes be altered or lost due to faults, repair or
other handling of the product. The Company is not
liable for any damage or lost income resulting from
recovery of these data.
• It is recommended you keep a copy of important data
in your PC's hard disk, etc. Whatever the cause of the
defect or malfunction may be, the Company assumes
no responsibility for alteration or loss of saved data.
• Contents saved in the product, such as contacts,
mails and favorites, might be altered or lost by an
accident, fault, repair or mishandling. Be sure to keep
a copy of important contents. Note that the Company
assumes no responsibility for any damages or lost
profits resulting from altered or lost contents.
Safety Precautions
23
Page 25

• Note that content data (both charged or free content)
saved on the product cannot be returned to the
customer when the product is replaced for repair of a
fault, for example.
• The product uses liquid crystal for its display. The
main display response speed may become slow
when the ambient temperature is low, which is due
to the characteristics of liquid crystal and is not a
malfunction. The main display response speed will
return to normal at room temperature.
• Although the display used on the product is made
using high-precision technology, some pixels
(dots) might be lit or out at all times. This is not a
malfunction.
• You are recommended to store copies of individual
data such as photos/movies you took and music in
your PC by sending each file as mail attachment,
etc. Note, however, that you may not be able to make
copies of some copyrighted data even by the above-
Safety Precautions
mentioned means.
• Do not discard the product together with regular
trash. Please cooperate in the collection of the
product when the product is no longer needed
to protect the environment and effectively use
resources.
24
◎Reproduction of the content of this manual in part or in
whole is prohibited.
◎The content of this manual is subject to change without
notice.
◎Some functions may not be available due to OS
specification changes, or service changes/end, etc.
◎Every effort has been made in the preparation of this
manual. Should you notice any unclear points, omissions,
etc., feel free to contact us.
Page 26

Safety Precautions (Observe Strictly)
DANGER
WARNING
CAUTION
Before using the product, thoroughly read this
■
"Safety Precautions" for proper use.
These precautions are intended to protect you
■
and others around you. Read and follow them
carefully to avoid injury, damage to the product or
damage to property.
The signs below differentiate between the levels
■
of danger that can occur if the product is not
used within the specified guidelines.
This sign denotes that "death or
serious injury
from improper use".
This sign denotes that "death or
serious injury
improper use".
This sign denotes that "minor injury*2
or damage to property
from improper use".
*1 Serious injury: This refers to loss of sight, injury, burns (high- and low-
*2 Minor injury: This refers to injuries, burns (high- and low-temperature),
temperature), electric shock, broken bones, injuries with
residual aftereffects from poisoning, etc., and injuries
requiring hospital admission for treatment or long term
hospital attendance as an outpatient.
electric shock, etc. that do not require hospital admission for
treatment or long-term hospital attendance as an outpatient.
*1
may directly result
*1
may result from
*3
may result
*3 Physical damage: This refers to extended damage to buildings, furniture,
livestock, or pets.
■Explanation of Graphic Symbols Used
in This Manual
Indicates an
action that is not
allowed.
Indicates that
disassembly is
not allowed.
Indicates
that use in a
place where
the product
is likely to get
wet or allowing
the product to
get wet is not
allowed.
Indicates that
handling with
wet hands is not
allowed.
Indicates an
action based on
instructions that
must be done.
Indicates that the
power plug must
be disconnected
from the power
outlet.
Safety Precautions
25
Page 27

■Precautions Common to the Main Unit,
DANGER
Internal Battery, Charger, Peripheral
Devices
Do not use, store or leave the product in hot places
(e.g. by the fire, near a heater, under a kotatsu or
futon, in direct sunlight, in a car in the hot sun).
Doing so may cause fire, burns, injuries, or electric
shock.
Do not put the product into or near a heating
cooking device such as a microwave oven or
IH cooker, or high-pressure container such as a
pressure cooker.
Doing so may cause fire, burns, injuries, or electric
shock.
Do not put sand, dirt, or mud on the product or put
it on them directly. Do not touch the product with
Safety Precautions
hands to which sand or others adhere.
Doing so may cause fire, burns, injuries, or electric
shock.
Do not charge when the product is wet with water
(drinking water, perspiration, seawater, urine of pet
animals, etc.).
Also, do not charge in places where it comes into
contact with water such as a bathroom.
Doing so may cause fire, burns, injuries, or electric
shock.
26
Do not subject the product to strong pressure or
break the product. Especially when bringing the
product putting in a bag, etc., do not let the product
hit against surroundings or being put between the
objects.
Doing so may cause fire, burns, or injury due to builtin battery damage.
* Examples to avoid
• Putting the product in a bag and catching them in a door
or a door of car
• Stepping on the product on a soft object such as a sofa,
bed, or bedding, or on a floor
Do not disassemble or modify in that manner.
Doing so may cause fire, burns, injuries, or electric
shock.
Do not try to remove the internal battery of the
product.
Doing so may cause fire, burns, or injuries.
Do not try to remove the rear cover of the product.
Doing so may cause fire, burns, or injuries.
Do not let the product get wet with water (drinking
water, perspiration, seawater, urine of pet animals,
etc.).
Doing so may cause fire, burns, injuries, or electric
shock.
Do not put water (drinking water, perspiration,
seawater, urine of pet animals, etc.) into the
charging terminal or the external connection
terminal.
Doing so may cause fire, burns, injuries, or electric
shock.
Page 28

Use the optional products specified by the
WARNING
CAUTION
Company.
Not doing so may cause fire, burns, injuries, or electric
shock.
Do not drop, trample, or throw the product or give
a strong force or vibration to it.
Doing so may cause fire, burns, injuries, or electric
shock.
Do not allow conductive materials (metal pieces,
pencil lead, etc.) to come in contact with the
charging terminal or the external connection
terminal, and do not allow dust to get inside.
Doing so may cause fire, burns, injuries, or electric
shock.
Do not cover or wrap the product with bedding, etc.
while using or charging the product.
Doing so may cause fire or burns.
If charging is not completed after the specified
charging time, stop charging.
Overcharging may cause fire, burns, or injuries.
Make sure to turn off the product or stop charging
before you get close to places where a flammable
gas or dust can be generated.
Ignition of flammable gas may cause an explosion or
fire.
Follow the instructions given by the respective
institution regarding the use of the product in a
gas station.
Do not charge the product in a gas station.
Be careful not to drop the product when using in a
gas station. Do not use the product, especially while
refueling.
Ignition of flammable gas may cause an explosion or
fire.
Perform the following operations while using,
charging, or keeping the product if there are
odors, noise, smoke, overheating, discoloring,
deformation, or other abnormalities.
• Remove the power plug from the wall outlet.
• Turn the product off.
Not doing the above operations may cause fire, burns,
injuries, or electric shock.
Do not use the damaged product.
Doing so may cause fire, burns, or injuries.
Do not leave the product on unstable or sloping
surfaces.
The product may fall and cause injuries.
Do not use or store the product in humid or dusty
places, or places that get hot.
Doing so may cause fire, burns, or electric shock.
Safety Precautions
27
Page 29

■Main Unit
DANGER
WARNING
Safety Precautions
28
When children use the product, do not let them
use incorrectly without instruction by an adult for
proper use.
Doing so may cause injuries.
Do not store the product within the reach of babies.
Especially, be careful where you store small parts.
Doing so may cause accidental swallowing, injuries,
or electric shock.
Be careful when using the product continuously
or charging as it gets hot. Also, avoid touching the
product continuously falling asleep unintentionally.
The product or AC adapter may become hot when
using continuously such as applications, data
communication, watching videos, or while charging.
Depending on your physical predisposition and
physical condition, contacting continuously with a high
temperature part may cause skin redness, itching,
rash, or low-temperature burns.
Do not throw the product into fire or apply heat.
Doing so may cause fire, burns, or injuries.
Do not apply excessive force such as sticking a
sharp object (nails, etc.) into the product, hitting it
with a hard object (hammer, etc.) or stepping on it.
Doing so may cause fire, burns, or injuries.
If the substance inside the main unit comes
into contact with your eyes, mouth and so on,
immediately rinse the area with clean water, and
then see a doctor right away.
Not doing so may cause loss of sight or poor physical
condition due to the influence of the substance inside
the main unit.
Do not watch a repeatedly flickering screen for a
long time.
Doing so may cause muscle spasms or loss of
consciousness, etc.
Do not allow water or other liquids (drinking water,
perspiration, seawater, urine of pet animals, etc.),
metal pieces, flammable material or foreign object
into the microSD memory card slot on the product.
Do not mistake the slot and direction of the
microSD memory card.
Doing so may cause fire, burns, injuries, or electric
shock.
Do not expose the camera lens part to direct
sunlight for an extended period.
Doing so may cause fire, burns, or injuries by the lightcollecting mechanism of the lens part.
Page 30

Turn off the product or set it to Airplane mode
before going aboard an airplane.
Since using the product on airplanes is restricted,
follow the instructions given by the respective airlines.
The product's signals may adversely affect on-board
electronic equipment.
If you commit a prohibited act while using the product
on an airplane, you might be punished by law.
Follow the instructions given by the respective
medical institution regarding the use of the product
in a hospital.
Turn off the product in areas where the use of the
product is prohibited.
The product's signals may affect electronic equipment
and electronic medical equipment.
If you have a weak heart, be careful about
notification sound volume settings.
Sudden notification sound surprises you, it may cause
harmful effect on heart.
To use electronic medical equipment, check with
electronic medical equipment manufacturer or
vendor to determine how devices are affected by
radio waves before using.
Not doing so may cause harmful effect on electronic
medical equipment, etc.
Turn the product off near high-precision electronic
control equipment or electronic equipment using
low-power signals.
Not doing so may cause the equipment to fail or
malfunction.
* Examples of electronic equipment to avoid
A hearing aid, an implanted pacemaker, an
implanted cardioverter-defibrillator, other electronic
medical equipment, or other automatic control
devices, etc. To use an implanted pacemaker,
an implanted cardioverter-defibrillator, or other
electronic medical equipment, check with electronic
medical equipment manufacturer or vendor to
determine how devices are affected by radio waves
before using.
When the display or camera lens part is
accidentally broken, be careful of broken glass or
exposed internal parts of the product.
Not doing so may cause burns, injuries, or electric
shock with damaged parts or exposed parts.
If the internal battery leaks or gives off a strange
smell, immediately remove the product from the
vicinity of open flames.
The battery fluid is flammable and could ignite,
causing a fire, explosion, etc.
Be careful not to let your pet bite the product.
May cause the battery to ignite, burst, heat, or leak,
and may cause fire, burns, or injuries.
Safety Precautions
29
Page 31

Safety Precautions
CAUTION
30
If the display breaks and the fluid leaks out from
inside, do not let the fluid contact with the skin on
your face or hands, or clothes.
Doing so may cause eye or skin problems.
If the substance inside the display enters your eyes,
mouth, and so on, or comes into contact with your skin
or clothes, immediately rinse the area with clean water.
If the fluid enters your eyes, mouth, and so on,
immediately see a doctor after rinsing.
Do not discard the old product together with
regular trash.
Doing so may cause fire, burns, or injuries. Also,
may cause environmental disruption. If you dispose
of the product, follow the instructions of your local
municipality that has a battery recycling program.
If fluid leaks out from the internal battery, do not
let the fluid contact with the skin on your face or
hands, or clothes.
Doing so may cause eye or skin problems.
If the substance inside the display enters your eyes,
mouth, and so on, or comes into contact with your skin
or clothes, immediately rinse the area with clean water.
If the fluid enters your eyes, mouth, and so on,
immediately see a doctor after rinsing.
To use the product in car, check with automobile
manufacturer or dealer to determine how vehicle
devices are affected by radio waves before using.
In rare cases, using the product in some vehicle
models can cause the vehicles electronic equipment
to malfunction. In that case, stop using the product
immediately.
If you develop skin problems, stop using the
product immediately, and see a doctor.
Itching, rashes, eczema, etc. sometimes occurs
depending on your physical constitution and
condition.
For material of each part ▶P. 33 "Material List"
Make sure that there is no adhered metal pieces
(cutter blade, staples, etc.) as the speaker part of
this product generates magnetism.
Not doing so may cause injuries with adhered metal
pieces.
Use the product in a well-lighted area and put
some distance between you and the display when
watching the display.
Using the product in dark places or near eyes may
affect your vision.
Page 32

■Charger
WARNING
Do not use if the cord of the AC adapter is
damaged.
Doing so may cause fire, burns, or electric shock.
Do not touch the AC adapter if you hear thunder.
Doing so may cause electric shock.
Do not short the charging terminal while it is
connected to an outlet. Do not allow any part of
your body such as your hands or fingers to come
into contact with the charging terminal.
Doing so may cause fire, burns, or electric shock.
Do not place heavy objects on the cord of the AC
adapter, or do not pull the cord with excessive
force.
Doing so may cause fire, burns, or electric shock.
When you plug/unplug the AC adapter into/from
the outlet, do not contact metal objects with the
jack.
Doing so may cause fire, burns, or electric shock.
Do not connect a transformer for overseas travel
(travel converter) to the AC adapter.
Doing so may cause ignition, overheating, or electric
shock.
Do not apply excessive force on the connection
part with the AC adapter connected to the product.
Doing so may cause fire, burns, injuries, or electric
shock.
Do not touch the cord, charging terminal or power
plug of the AC adapter with wet hands.
Doing so may cause fire, burns, or electric shock.
Use the product at the specified power supply
voltage.
When charging the product overseas, use the AC
adapter for global use.
Incorrect power supply voltage may cause fire, burns,
or electric shock.
AC adapter: 100V AC (Connect to an AC outlet for
internal household use)
AC adapter for global use: 100V AC to 240V AC
(Connect to an AC outlet for internal household use)
Wipe off dust on the power plug.
Not doing so may cause fire, burns, or electric shock.
Fully plug the AC adapter into the outlet.
Not doing so may cause fire, burns, or electric shock.
When you disconnect the power plug from an
outlet, do not pull the cord of the AC adapter with
excessive force. Instead, grasp the adapter to
disconnect.
Pulling the cord of the AC adapter may damage the
cord and cause fires, burns, electric shock, etc.
Safety Precautions
31
Page 33

Safety Precautions
CAUTION
WARNING
32
When plugging/unplugging the AC adapter into/
from the product, do not pull the cord with
excessive force. Instead, plug/unplug it straightly
toward the jack to connect.
Not doing so may cause fire, burns, injuries, or electric
shock.
Stop using the product immediately if you notice
deformation of the charging terminal. Also, stop
using the product after recovering the original form
of the terminal.
Short-circuiting of the charging terminal may cause
fire, burns, injuries, or electric shock.
When the AC adapter is not used for a long time,
disconnect the power plug from the outlet.
Not doing so may cause fire, burns, or electric shock.
Immediately remove the power plug from the outlet
if water or other fluids (drinking water, perspiration,
seawater, urine of pet animals, etc.) get on the
adapter.
Not doing so may cause fire, burns, or electric shock.
Always remove the power plug from an outlet when
cleaning the equipment.
Not doing so may cause fire, burns, or electric shock.
Do not keep touching the AC adapter when
connected to an outlet.
Doing so may cause burns.
■Use near Medical Instruments and
inside Medical Facilities
Wearers of medical equipment such as implanted
pacemakers or defibrillators must carry and use the
product at least 15 cm away from the implanted device.
Radio waves may affect the performance of electronic
medical equipment.
When using electronic medical devices as home
medical treatment other than an implanted
pacemaker and an implanted cardioverter defibrillator
outside medical facilities, check individually with the
manufacturer of the electronic medical equipment
regarding the influence of radio waves.
Radio waves may affect the performance of electronic
medical equipment.
Make sure that the product will not emit any
signals (turn off power, put it in Airplane mode,
etc.) if within 15 cm of those around you, such as
where crowded and you cannot move freely.
Since there may be people with an implanted
pacemaker or an implanted cardioverter-defibrillator
nearby. Radio waves may affect the performance of
electronic medical equipment.
When using the product in medical facilities, be
sure to observe the regulations of the facility.
Radio waves may affect the performance of electronic
medical equipment.
Page 34

■Digitizer Pen
CAUTION
Store small parts such as the spare pen tip out of
small children's reach.
Swallowing small parts by accident may cause
suffocation or injuries.
Do not press or hit the pen tip strongly against the
display.
Doing so may damage the display and cause
malfunction.
Do not apply excessive load or pressure on the
pen tip.
Doing so might cause a failure or malfunction.
Be careful not to pinch your finger when you attach
the pen tip.
Doing so may cause injuries.
Do not swing the digitizer pen at a person.
Doing so may cause accidents such as injuries or
breakage.
Do not use the digitizer pen with a broken or
sharpened tip.
Doing so may damage the display and cause
malfunction.
Use the supplied digitizer pen.
Using other products may cause malfunction or
damage the product.
Material List
Main Unit
■
Part Material Surface
Exterior case PC + GF
Display Strengthened
Power button PC resin Heat cured
Exterior panel (all
circumferential side),
volume up/down button,
camera lens circumference
Camera lens PMMA resin Chemically
microSD memory card slot
cover
AC Adapter
■
Main unit (exterior) PC resin
Cable PVC resin
Plug Nickel plating
Part Material
resin
glass
PC resin UV cured acrylic
PC resin/TPE
resin
Treatment
Heat cured
urethane coating
Chemically
strengthened
processing
acrylic coating +
UV cured acrylic
coating
coating
cured
processing
Heat cured
acrylic coating +
UV cured acrylic
coating
Safety Precautions
33
Page 35

Digitizer Pen
■
Part Material Surface
Main unit ABS resin Pen tip POM resin Bitter coating
Eraser POM resin -
Handling Precautions
These precautions are provided to prevent product
faults and to ensure that performance can be fully
demonstrated. Thoroughly read these precautions to
ensure correct use.
Precautions Common to the Main Unit, Internal
■
Battery, Charger, Peripheral Devices
●Do not apply excessive force to the product during use.
Be sure not to put the product into a tightly packed bag
or place a heavy object on the product in a bag. Doing so
might damage the display or internal circuit board resulting
in a malfunction.
Safety Precautions
Keeping an external connection device connected to
the external connection terminal, earphone microphone
terminal, or charging terminal might damage the connector
resulting in a malfunction. Such damage and malfunction
are not covered by the warranty, even if there is no external
damage.
●Do not use the product in extremely hot, cold or humid places.
(Use within an ambient temperature range of 5℃ to 35℃
and humidity range of 35% to 85%.)
34
Treatment
●Do not use in places subject to lots of dust or vibration.
Doing so may cause malfunction.
●Clean the external connection terminal, earphone
microphone terminal, and charging terminal with dry cotton
swabs, etc. every now and then. Soiling may result in a poor
connection. Do not exert a strong force to clean the external
connection terminal, earphone microphone terminal, or
charging terminal to prevent deformation.
●Clean the product with a soft dry cloth (such as the type
used for eyeglasses). Forcefully rubbing with a dry cloth
may scratch the display. The display may be stained if
splash or smear is left attached to the surface. Wiping
the product using alcohol, thinner, benzene, detergent,
etc. might erase the printing on the outer cover or cause
malfunction.
●Use as far away as possible from land-line phones, TVs and
radios. Use nearby might affect them.
●The product may become warm while charging or during
other operations, depending on the situation, but this is not
abnormal.
●Do not place near corrosive chemicals or in places
where corrosive gas is generated. Doing so may cause
malfunction.
●Do not use outside when you can hear thunder. Doing so
might risk lightning strikes and electric shock.
●Use only the operation-verified peripheral devices. Use of
other peripheral devices might cause malfunction.
Page 36

●Do not put the product in a cooking apparatus such as
microwave oven or a pressure vessel. Doing so may cause
malfunction.
●The customer is not allowed to disassemble, modify or
repair the product. Doing so may cause malfunction.
Modification of the product is in violation of the Radio Law
and Telecommunications Business Law.
●Do not allow your finger or conductive foreign objects (metal
fragments, pencil leads, etc.) to come into contact with or
get inside the connection terminal, earphone microphone
terminal, and charging terminal to avoid them from shortcircuit. Doing so may cause malfunction.
●In the event that the product gets wet while charging,
immediately disconnect the power plug of the AC adapter.
●Do not use the product while driving a car or motorbike,
riding a bicycle or walking. Use of a tablet while driving a
car or motorbike is prohibited by law. Use of a tablet while
riding a bicycle may be punishable by some regulations.
●Using or charging the product in a bag or while it is covered
with bedding might cause malfunction.
●When using an AC adapter or external device, insert/remove the
connector straight to/from the terminal. Make sure the orientation
of the connector. Unless it is correct, it may cause a fault.
●Do not expose the camera lens part to direct sunlight for an
extended period. Doing so may cause malfunction.
●Do not store the product in places subject to direct sunlight
(e.g. in a car), places that get hot, places that get extremely
cold, and in humid or dusty places. Doing so may cause
malfunction.
●Do not leave the product on unstable or sloping surfaces.
Be careful especially when the product is charging. The
product may fall and cause malfunction.
●For charging the product, do not exceed the rating of an
outlet or wiring device by starburst connection etc.
Main Unit
■
●The battery is built into the product and it is not user
replaceable. For information on battery replacement,
contact the support center on the back cover.
●Do not forcefully press, tap or intentionally subject the
display to strong impact. Doing so might cause scratching
or damage.
●Do not forcefully press your fingernails, sharp objects, or
hard objects against buttons or display surface. Doing so
may cause scratching or damage.
●The touch panel is designed to be lightly touched by
fingers. Avoid pressing forcefully or using sharp objects
(fingernail, ballpoint pen, pin, etc.).
The touch panel might not respond to the following types of
operation. These may also result in malfunction.
with fingernails
・
with gloved fingers
・
with another object placed on the operation area
・
with a protective film or sticker adhered
・
Safety Precautions
35
Page 37

●Never use the modified product. Use of a modified device
violates the Radio Law and Telecommunications Business
Law.
The product has acquired such certification as conformity
with technical regulations for a specified radio station based
on the Radio Law and conformity with technical regulations
for a terminal device based on the Telecommunications
Business Law, and the "Technical Conformity Mark " is
indicated in the name plate sticker on the product.
If the modification is made to the internal components,
the certifications of conformity with technical regulations
will become invalid. Never use the product without these
certifications valid. Doing so violates the Radio Law and
Telecommunications Business Law.
●Take care not to place magnetized items such as magnetic
cards, speakers and TV sets near the product as it might
cause malfunction.
Putting strong magnetism close to the product might cause
false operation.
●Do not bring magnetized cards such as cash cards, credit
cards and prepaid cards closer to the product. Doing so
may result in loss of recorded information.
Safety Precautions
●When you put the product in your bag, etc., take care so
that the display does not come in contact with metal objects
or other hard objects. Doing so may cause scratching or
damage. Contacting metal or other hard parts with the
display may cause scratching or damage.
36
●When suddenly brought into a warm place from a cold
place, or when in a humid location, or when used where
temperature suddenly changes (e.g. near the air discharge
port of an air conditioner), water droplets (i.e. condensation)
sometimes are formed inside the product. Note that when
used under conditions such as this, humidity might cause
corrosion or a fault.
●Camera lens part or inside of the display may mist over
(dew formation) because of usage environment such as
temperature or humidity. This is not malfunctioning or
abnormal.
●Environment for easily generating dew formation on the
camera lens part or inside of the display
In the following cases, such as large temperature change or
high humidity, camera lens part or inside of the display mist
over because of usage environment.
Bring the product from a high temperature land into a low
・
temperature water.
Bring the product from a cold place into a warm place
・
such as an indoor.
Open/Close the microSD memory card slot cover in a high
・
humidity environment.
●How to reduce condensation
Do not use the product in places that get hot and humid,
and sandy or dusty places. Leave the product with the
microSD memory card slot cover opened for a while until
the condensation is cleared when the ambient temperature
is held constant.
Page 38

●While writing/reading data to/from a microSD memory card,
do not subject the product to vibration or impact, or turn off
the power. Doing so may cause data loss or malfunction.
●Do not cover the sensor with your finger or put a sticker on
it. May hinder the sensor from detecting the ambient light
level and functioning correctly.
●Keep the microSD memory card slot cover closed when
using the product. Using the product with the cover
opened can allow dust, liquid, etc. to enter and may cause
malfunction.
●Do not allow liquids, metal objects, or other foreign objects
to get inside of the microSD memory card slot. Doing so
may cause malfunction.
●Do not give strong impact on the product such as dropping,
throwing, stomping. Doing so may cause malfunction.
●Do not place the product directly on sand at a beach, etc.
If sand or other small particles get inside the microphone,
speaker, or the product, it may cause the volume to drop or
malfunction.
Touch Panel
■
●Any soiling on the display surface may cause false
operation. Wipe the display with a soft, dry cloth.
●Putting stickers or sheets (e.g. commercially available
protective films, peep prevention sheets) on the display
might cause incorrect operation of the touch panel.
●When carrying the product in your bag, etc., take care not
to put the touch panel close to metals or other conductive
materials, as it might cause false operation of the touch panel.
Internal Battery
■
(The internal battery of the product is a
lithium-ion battery.)
The internal battery is not fully charged at
the time of purchase. Charge the battery
before using the product. Also charge the
battery after long periods of disuse before
using the product.
●Use in very hot or cold environments, for example, when left
in an automobile with the windows closed in summer, will
cause the battery capacity to drop and shorten the available
battery usage time. This will also shorten the internal
battery's service life. Try to use the internal battery as much
as possible at room temperature.
●After the internal battery is charged, battery power
decreases bit by bit even if the product is not used. The
internal battery may be discharged if the product is not
used for a long time. We recommend charging the battery
before use.
●The internal battery is a consumable accessory. If the
performance of an internal battery does not recover (e.g. the
usable time after each charge has become extremely short),
the internal battery is at the end of service life, so stop using
the product. Since the battery is built into the product, the
support center keeps your product and replaces the battery
for a fee. Please note that you may not be able to use the
product for a certain period. Please understand. Note that
the length of service life varies depending on the usage
condition, etc.
Safety Precautions
37
Page 39

●The internal battery may swell up as it approaches the end
of its battery life. This is due to the properties of lithium-ion
batteries, and is not a problem in terms of safety.
Charger
■
●Do not wrap the cord of the AC adapter around the adapter
unit. Do not forcibly bend the AC adapter plug or the
connection between the connector and power cord. Do not
place heavy objects on the cord of the AC adapter or USB
connection cable, or do not pull the cord with excessive
force. Doing so may cause malfunction.
●When unplugging the power plug of the AC adapter from
the power outlet, hold and pull the power plug. If you pull
the cable, it might be damaged.
Camera
■
●When photographing important occasions, take a trial shot
and check the shot image to make sure it is correctly shot.
●Do not shoot in areas where shooting is prohibited.
Copyrights and Rights of Portrait of Portrait
■
Safety Precautions
●You are not allowed to copy, distribute, publish, modify or
edit the data you shot, recorded or downloaded using the
product without consent of the copyright holder, except for
personal use, under the copyright law.
In addition, do not use or modify portraits or names of other
individuals without their consent, as it may infringe on rights
of portrait.
Note that shooting and recording might be restricted at
some live performances, shows and exhibitions even for
personal use.
38
●Be careful about the copyright and portrait right when
posting photos you shot, etc. on Internet homepages.
Backup Content On the Product
■
●Please back up important content registered to the product
or downloaded to the product from an outside source.
Content recorded to memory on the product sometimes is
cleared, altered, and so on by unexpected factors, such as
static electricity or a fault, repair, mishandling, etc.
FCC Certification Information
■
●The product is certified by Federal Communications
Commission (FCC).
The product's FCC ID is JOYKB18.
Also, FCC ID is indicated in the name plate sticker on the
product.
Page 40

Notes on Using Bluetooth®/
Wireless LAN (Wi-Fi®) Function
• The Bluetooth® function of the product conforms to
domestic standards of Japan, FCC standards, and
has been certified.
• Use of the Bluetooth
countries or regions. If you use the product overseas,
check the relevant laws and regulations of the
country/region you visit.
• The wireless LAN (Wi-Fi
conforms to domestic standards of Japan, FCC
standards, and has been certified.
• Use of the Wireless LAN (Wi-Fi
in some countries or regions. If you use the product
overseas, check the relevant laws and regulations of
the country/region you visit.
• The 2.4 GHz band used by wireless LAN (Wi-Fi
and Bluetooth
devices. For this reason, the communication speed
and connectable range may be decreased, or
disconnection may occur, due to interference from
other devices.
• Do not use this product in places where
electromagnetic waves are generated or near
electric products, AV and OA equipment, or other
magnetized devices.
®
function is limited in some
®
) function of the product
®
) function is limited
®
devices is operated by various other
®
)
• Subjecting this product to magnetic or electrical
noise might increase noise, prevent it from performing
communications, and so on. (This product is
particularly susceptible to noise when it is used near
a microwave oven.)
• Using this product near a TV, radio or similar
appliance might cause reception interference, disrupt
TV images, and so on.
• Searching might not be successful if there are
multiple wireless LAN (Wi-Fi
®
) access points near the
product or the same channel is being used.
• Since using the product on airplanes is restricted,
follow the instructions given by the respective airlines.
• The communication speed and connectable
range vary depending on the distance between
communication devices, obstacles and the devices
used.
Safety Precautions
39
Page 41

Cautions on Using 2.4 GHz Band
The frequencies used by the Bluetooth® and/or
Wireless LAN (Wi-Fi
in the 2.4 GHz band. In this frequency band, other
similar wireless stations, in-plant wireless stations for
mobile unit identification that require a license for use,
such as factory production lines, specific small power
wireless stations that do not require licenses, amateur
wireless stations (collectively called "other wireless
stations" from here on) are operated in addition to
home electrical appliances such as microwave ovens,
devices for industrial, scientific and medical devices.
1. Before using the product, make sure that "other
wireless stations" are not in operation nearby.
2. In the event that instances of radio wave
interference have occurred between the product
and "other wireless stations", immediately either
relocate the product or stop operation of the device
Safety Precautions
(stop emission of radio waves).
40
®
) function of the product are
◎Connections between the product and all other Bluetooth®
and wireless LAN (Wi-Fi
confirmed. Therefore, connections with all Bluetooth
wireless LAN (Wi-Fi
◎This product supports security features for wireless
communications that are compliant with the Bluetooth
and wireless LAN (Wi-Fi
security may not be sufficient depending on the usage
environment and configuration. Be careful when making
data communication using Bluetooth
function (Wi-Fi
◎Wireless LAN (Wi-Fi
freely connected anywhere within the radio wave range,
as it uses radio waves for exchanging information.
However, not making security settings allows the risk of
malicious use by third parties. While at the customer's
discretion and responsibility, it is recommended that you
make security settings before using the product.
◎The Company assumes no responsibility for leakage of
data or information that may occur during Bluetooth
wireless LAN (Wi-Fi
◎Since Bluetooth
the same frequency band, using the both functions at
the same may cause radio wave interference resulting in
decreased communication speed or disconnection from
the network. If connection fails, stop using either of the
®
Bluetooth
and wireless LAN (Wi-Fi®) functions.
®
) devices have not been
®
) devices are not guaranteed.
®
) standard specifications, but the
®
®
).
®
) has the advantage that it can be
®
) communication.
®
and wireless LAN (Wi-Fi®) functions use
or wireless LAN
®
®
and
®
/
Page 42

Bluetooth® and wireless LAN (Wi-Fi®) functions of the
product use frequencies in the 2.4 GHz band.
®
• Bluetooth
This product uses the 2.4 GHz band. FH-SS is used
function: 2.4FH1/XX1
2.4FH1/XX1
as the modulation scheme. The interference distance
is about 10 m or less.
The band of mobile unit identification devices cannot
be avoided.
®
• Wireless LAN (Wi-Fi
This product uses the 2.4 GHz band. DS-SS and
) function: 2.4DS4/OF4
OFDM are used as the modulation schemes. The
interference distance is about 40 m or less.
This means that all bandwidths are used, and that
band of mobile unit identification devices can be
avoided.
Available channels vary depending on countries.
For use in an airplane, check with the airline company
in advance.
Cautions on Using 5 GHz Band
Outdoor use of 5.2 GHz/5.3 GHz band (W52/W53) is
prohibited under the Radio Law,
except communications with a base station or a land
mobile relay station for 5.2 GHz band high output
power data communication system.
The used channels of the product are as follows.
• W52 (5.2 GHz band / 36, 38, 40, 44, 46, 48 ch)
• W53 (5.3 GHz band / 52, 54, 56, 60, 62, 64 ch)
• W56 (5.6 GHz band / 100, 102, 104, 108, 110, 112,
116, 118, 120, 124, 126, 128, 132, 134, 136, 140 ch)
Safety Precautions
41
Page 43

Appendix
Updating Software
You can update the product to the most recent
software for optimal performance and to get the latest
enhancements.
®
Use Wi-Fi
update the software.
• It is recommended to back up your data before
• For details, refer to the support information on the
• If software update has failed or stopped, perform the
• If the software update fails, it may become impossible
• Software update may not be available overseas.
Appendix
• Any operations are not available during software
42
functions of this product to download and
■Notes on Software Update
updating software.
Kyocera homepage.
same procedure again.
to operate the product. If you cannot use the product,
contact the support center on the back cover.
update. Alarm does not work, either.
Downloading Software into the
Product to Update
Downloading updated software via the Internet directly
from the product is available.
Home screen → [ ] → [System] →
1
[Advanced] → [System update]
From here on, follow the on-screen instructions.
◎After a software update, the product cannot revert to the
previous version software.
Page 44

Troubleshooting
Before you assume that the product is malfunctioning,
confirm the following contents.
Trouble Detail
Cannot turn on
power
Cannot charge
the product
Cannot operate/
The screen does
not respond/
Cannot turn off
the power
The power
is turned off
automatically
The power is
turned off while
the wake-up logo
is displayed
Is the internal battery charged? P. 8
(Power button) pressed and
F
held until the notification light turns
?
on
Is the AC adapter correctly
connected?
Is the product at a high or low
temperature? The product may
stop charging depending on a
temperature.
Is the accessory (the supplied AC
adapter) used for charging?
Press and hold F (Power
button) and r (Volume up
button) at the same time for at
least 11 seconds to force the
product to shut down and restart.
Is the internal battery adequately
charged? P. 8
Is the internal battery adequately
charged?
Page
P. 10
P. 8
P. 9
P. 8
P. 10
P. 8
Trouble Detail
" " (out of
service area)
appears
Cannot operate
button/touch
panel
A message
indicating that
charging is
necessary is
displayed
The product can
only be used a
short time
Display is dark Is the temperature of the product
Is the product in a place where
signal is good enough?
Is the built-in antenna covered
with finger, etc.?
Is the power turned on? P. 10
Turn off the power and then turn it
on again.
The battery is almost empty.
Is the battery adequately
charged?
• Charge until the red charging
light turns green.
Does the internal battery have
adequate service life remaining?
Is the product left in the place for
a long period where "
service area) appears?
Stop using/disabling unused apps
or functions.
or battery high? The display may
become dark depending on the
temperature of the product.
" (out of
Page
-
P. 6
P. 10
P. 8
P. 8
P. 37
-
-
-
If you cannot find the solution to your problem in the above
items, contact the support center on the back cover.
Appendix
43
Page 45

After-Sales Service
When Asking for Repair
For repair, contact our support center below.
■ Smile Zemi Support Center
0120-XXX-XXX
From some IP phones (Call charges must be paid
by the customers)
Business hours: 10:00 to 20:00
* Except for our special holidays (December 31st, Januar y 1st)
0X-XXXX-XXXX
Warranty Policy
1. The terminal will be repaired for free or replaced
with the substitute terminal for free if the terminal
is malfunctioning under conditions of proper use
within the warranty period.
* The substitute ter minal is a new terminal, or a terminal equal to a new
one in performance and reliability.
* Contact out suppor t center.
2. Replacements will be charged in principle in the
following cases even within the warranty period.
Appendix
• When the terminal is malfunctioning or damaged
due to fall and so on by careless use
• When the terminal is malfunctioning or damaged
due to use for purposes other than the original
intent of the terminal
44
• When the terminal is malfunctioning or damaged
due to use with products that the Company does
not permit the use
• When the terminal is malfunctioning or damaged
due to reasons not caused by the product
• When the terminal is malfunctioning or damaged
due to disassembly or modification
• When the terminal is malfunctioning or damaged
due to entry of liquids or foreign objects
• When the terminal is malfunctioning or damaged
due to lightnings, earthquakes, storms, floods or
other natural disasters, pollutions, salt damages,
smoke damages, abnormal voltages, and so on
• When the terminal is malfunctioning or damaged
due to fault, misuse, and mishandling by the
customer
• Replacement of consumable parts such as battery
• Abrasion, scratches, or dents on the surface of
the terminal resulting from normal use
3. This warranty is valid only in Japan.
4. Since the warranty will not be reissued, keep it
properly.
Others
The warranty does not limit your legal rights.
If you have any question out-of-warranty repair, and so
on, contact our support center.
Page 46

Main Specifications
■ Main Unit
Display Approx. 10.1 inches, approx. 16.77 million
Weight Approx. 550g
Dimensions
(W × H × D)
Internal memory
Charging
times
(estimate)
Camera image pixel CMOS
Effective out-camera pixels Approx. 5 million pixels
Effective in-camera pixels Approx. 5 million pixels
Wireless LAN (Wi-Fi
Bluetooth
function
colors, Transparent TFT
1280 × 800 dots (WXGA)
Approx. 269 × 179 × 10.2 mm
*1
Supplied AC
adapter
®
) function IEEE802.11a/b/g/n
®
Compatible
version
ROM: Approx. 16 GB
RAM: Approx. 2 GB
Approx. 360 minutes
compatible
Bluetooth® standards
Ver.4.2 compatible *
Bluetooth®
function
Output Bluetooth® standards
Communication
*3
range
Supported
Bluetooth profile
Class 1
Within 10 m with no
obstacles in the range
Generic Access Profile
*4
Serial Port Profile
Advanced Audio
Distribution Profile
Audio/Video Remote
Control Profile (Version
1.3)
Object Push Profile
Headset Profile
Human Interface Device
Profile
Phone Book Access
Profile
Message Access Profile
HID over GATT Profile
Frequency bands 2.4 GHz/5 GHz band
*1 Since the storage is shared by data and apps, storage space may be
2
reduced depending on the usage of apps.
*2 It is confir med that the product and all Bluetooth® devices are compliant
with Bluetooth® standards designated by Bluetooth SIG, and they are
authenticated. However, procedures may differ or data transfer may not
be possible depending on the device's characteristics or specifications.
*3 It changes according to objects obstructing devices and signal
reception.
*4 Specifications provided in Bluetooth® standards for making
communication between Bluetooth®-compatible devices in accordance
with their intended use.
Appendix
45
Page 47

■ AC Adapter
Input 100V - 240V AC 0.3A 50/60 Hz
Output 5.0V DC 1.2A
Charging
temperature
range
Dimensions
(W × H × D)
Weight Approx. 90g
■ Digitizer Pen
Dimensions
Weight Approx. 10g
■ Radio Frequency Specification
Frequency range Maximum high-frequency power
2,402~2,482 MHz
5,170~5,330 MHz
5,490~5,710 MHz
Appendix
◎The continuous standby time may drop to less than
half depending on the battery charging status, usage
environment such as temperature, reception condition at
the location where the product is used, and the function
settings.
5 ℃ to 35
℃
AC adapter main unit: Approx. 71 × 30 × 45
mm
Cable length: Approx. 1.2 m (except for
connector insertion plug)
Length: Approx. 141.3 mm
Diameter: Approx. 10.5 to 13.5 mm
20mW
6.4mW
10mW
46
General Notes
XXXXX】
This model 【KCrelating to effects of radio wave exposure as set forth by the
Federal Communications Commission (FCC). Refer to the
following.
is confirmed to comply with guidelines
FCC RF Exposure Information
Your wireless tablet personal computer is a radio transmitter
and receiver. It is designed and manufactured not to exceed
the emission limits for exposure to radio frequency (RF) energy
set by the Federal Communications Commission of the U.S.
Government.
The guidelines are based on standards that were developed
by independent scientific organization through periodic and
thorough evaluation of scientific studies. The standards include
a substantial safety margin designed to assure the safety of all
persons, regardless of age and health.
The exposure standard for wireless handsets employs a unit of
measurement known as the Specific Absorption Rate, or SAR.
The SAR limit set by the FCC is 1.6 W/kg. The tests are
performed in positions and locations (e.g. worn on the body) as
required by the FCC for each model.
The highest SAR value for this model wireless tablet personal
computer as reported to the FCC when tested for use worn on
the body in a holder or carry case, is 1.381 W/kg.
Body-worn Operation; This device was tested for typical bodyworn operations with the wireless tablet personal computer kept
0.0 cm from the body. The use of beltclips, holsters and similar
accessories should not contain metallic components in its
assembly.
Page 48

The use of accessories that do not satisfy these requirements
may not comply with FCC RF exposure requirements, and
should be avoided. The FCC has granted an Equipment
Authorization for this model wireless tablet personal computer
with all reported SAR levels evaluated as in compliance with
the FCC RF emission guidelines. SAR information on this model
wireless tablet personal computer is on file with the FCC and
can be found under the Display Grant section of (http://www.fcc.
gov/oet/ea/) after searching on FCC ID JOYKB18.
Additional information on Specific Absorption Rates (SAR) can
be found on the FCC website at (https://www.fcc.gov/general/
radio-frequency-safety-0).
The World Health Organization has stated that present
scientific information does not indicate the need for any special
precautions for the use of mobile devices. They note that if you
want to reduce your exposure then you can do so by limiting the
length of calls or using a hands-free device to keep the mobile
phone away from the head and body.
World Health Organization
http://www.who.int/emf
FCC Notice
This device complies with part 15 of the FCC Rules. Operation
is subject to the following two conditions: (1) This device may
not cause harmful interference, and (2) this device must accept
any interference received, including interference that may cause
undesired operation.
Note:
This equipment has been tested and found to comply with
the limits for a Class B digital device, pursuant to part 15
of the FCC Rules. These limits are designed to provide
reasonable protection against harmful interference in a
residential installation. This equipment generates, uses, and
can radiate radio frequency energy and, if not installed and
used in accordance with the instructions, may cause harmful
interference to radio communications.
However, there is no guarantee that interference will not occur
in a particular installation. If this equipment does cause harmful
interference to radio or television reception, which can be
determined by turning the equipment off and on, the user is
encouraged to try to correct the interference by one or more of
the following measures:
- Reorient or relocate the receiving antenna.
- Increase the separation between the equipment and receiver.
- Connect the equipment into an outlet on circuit different from
that to which the receiver is connected.
- Consult the dealer or an experienced radio/TV technician for
help and for additional suggestions.
Warning
The user is cautioned that changes or modifications not
expressly approved by the manufacturer could void the user’s
authority to operate the equipment.
Appendix
47
Page 49

ISED Canada
This device complies with ISED Canada licence-exempt RSS
standard(s). Operation is subject to the following two conditions:
(1) this device may not cause interference, and (2) this device
must accept any interference, including interference that may
cause undesired operation of the device.
This Class B device complies with Canadian ICES-003.
●
Notice:
(i) the device for operation in the band 5150-5250 MHz is only
for indoor use to reduce the potential for harmful interference
to co-channel mobile satellite systems;
(ii) the maximum antenna gain permitted for devices in the
bands 5250-5350 MHz and 5470-5725 MHz shall comply
with the e.i.r.p. limit; and
(iii)
the maximum antenna gain permitted for devices in the band
5725-5825 MHz shall comply with the e.i.r.p. limits specified for
point-to-point and non point-to-point operation as appropriate.
(iv) Users should also be advised that high-power radars are
allocated as primary users (i.e. priority users) of the bands
5250-5350 MHz and 5650-5850 MHz and that these radars
could cause interference and/or damage to LE-LAN devices.
Appendix
Radiation Exposure Statement:
The product comply with the Canada portable RF exposure
limit set forth for an uncontrolled environment and are safe for
intended operation as described in this manual. The further RF
exposure reduction can be achieved if the product can be kept
as far as possible from the user body or set the device to lower
output power if such function is available.
48
Avis de ISED Canada
L
e présent appareil est conforme aux CNR d’ISED Canada
applicables aux appareils radio exempts de licence. L’exploitation
est autorisée aux deux conditions suivantes:(1) l’appareil ne
doit pas produire de brouillage, et (2) l’utilisateur de l’appareil
doit accepter tout interférence radioélectrique subi, même si le
brouillage est susceptible d’en compromettre le fonctionnement.
Cette appareil de Classe B est conforme à la norme
●
canadienne ICES-003.
Note:
(i) l'appareil pour une utilisation dans la plage de bande 5150-
5250 MHz n'est destiné qu'à un usage en intérieur pour
réduire les interférences potentiellement dangereuses pour
les systèmes satellites mobiles à canal partagé;
(ii) le gain d'antenne maximal permis pour les appareils dans
les plages de bande 5250-5350 MHz et 5470-5725 MHz doit
être conforme à la limite e.i.r.p. ; et
(iii) le gain d'antenne maximal permis pour les appareils dans la
plage de bande 5725-5825 MHz doit être conforme avec les
limites e.i.r.p. spécifiées pour les utilisations point à point et
nonpoint à point de manière adéquate.
(iv) Les utilisateurs doivent être avertis que des radars très
puissants sont assignés comme utilisateurs primaires (i.e.
utilisateurs prioritaires)des bandes 5250-5350 MHz et
5650-5850 MHz et que ces radars peuvent provoquer des
interférences et/ou des dégâts aux appareils LE-LAN.
Page 50

Déclaration d'exposition aux radiations:
Le produit est conforme aux limites d'exposition pour les
appareils portables RF pour les Etats-Unis et le Canada établies
pour un environnement non contrôlé. Le produit est sûr pour
un fonctionnement tel que décrit dans ce manuel. La réduction
aux expositions RF peut être augmentée si l'appareil peut être
conservé aussi loin que possible du corps de l'utilisateur ou que
le dispositif est réglé sur la puissance de sortie la plus faible si
une telle fonction est disponible.
European RF Exposure Information
Your mobile device is both a radio transmitter and receiver, and
is designed not to exceed limits for exposure to radio waves
recommended by international guidelines. These guidelines
were produced by independent scientific organization, ICNIRP,
and include safety margins designed to protect all persons,
r
egardless of age and condition of health. The guidelines apply
a unit of measurement known as the Specific Absorption Rate
(SAR). The SAR limit for mobile devices is 2 W/kg, and the
highest SAR value for this device was XXXXX W/kg*.
As testing measures SAR at the highest transmitting power of a
device, actual SAR tends to be lower during ordinary operation.
Lower SAR levels are typical during ordinary operation as
automatic changes are made within the device to ensure the
network can be reached with minimal power.
The World Health Organization (WHO) has stated that present
scientific information does not indicate the need for any special
precautions to be adopted when using mobile devices. WHO
also notes that those wishing to reduce exposure may do
so by limiting call length and by using a ‘hands-free’ device
to distance the phone from the head and body. For further
information, please see the WHO website: http://www.who.int/
peh-emf/en/
* Note that tests are also carried out in accordance with international testing
guidelines.
FCC Compliance Information
The product is certified by Federal Communications Commission
(FCC).
The FCC ID of this product is JOYKB18.
FCC ID is indicated in the sticker on the back side of this
product.
Simplified EU Declaration of
Conformity
The simplified EU declaration of conformity referred to in Article
10(9) shall be provided as follows:
Hereby, KYOCERA Corporation declares that the radio
equipment type KC-XXXXX is in compliance with Directive
2014/53/EU. The full text of the EU declaration of conformity is
available at the following internet address:
http://www.kyoceramobilephone.com/en/
-NoteThe following frequency bands are restricted to indoor use only:
5150 - 5250 MHz (802.11a/n/ac) in US
5150 - 5350 MHz (802.11a/n/ac) in EU
XXXX/
Appendix
49
Page 51

Safety Information
To prevent possible hearing damage, do not
listen at high volume levels for long periods.
Product Disposal
Battery:
This product is a unibody (one-piece) device, so the back cover
and battery cannot be removed. Please be careful. Observe the
following precautions.
• Do not attempt to open the back cover.
• Do not take out the battery, replace it, or dismantle it.
• Do not damage the back cover of the product.
• Do not incinerate the product or dispose of it like you would
household rubbish.
Dispose of the product (including the internal battery) in
accordance with the environmental regulations of your region.
When cellular devices and accessories
bearing this mark have reached the end of
their product lives, it is necessary to bring
them to a given waste collection point.
• The waste collection box for each part, located at the waste
Appendix
treatment facility in your area
• The waste collection box at the retail store
To prevent these waste products from polluting the environment,
they are recycled.
50
European countries:
Waste collection points are free to use. It is necessary to bring
all products bearing this mark to a collection point.
Non-European countries:
If your area lacks suitable waste collection or if it has a recycling
facility for the parts of devices bearing this mark, it is necessary
to take them to the collection point for recyclables. Do not throw
them out with normal rubbish.
Page 52

Intellectual Property Rights
Trademarks
Company names and product names referred to in this
manual are trademarks or registered trademarks of the
respective companies.
Google, Android, Google Play and other marks are trademarks of
Google LLC.
THIS PRODUCT IS LICENSED UNDER THE MPEG-4 VISUAL
PATENT PORTFOLIO LICENSE FOR THE PERSONAL AND NONCOMMERCIAL USE OF A CONSUMER FOR (i)ENCODING VIDEO
IN COMPLIANCE WITH THE MPEG-4 VISUAL STANDARD ("MPEG4 VIDEO") AND/OR (ii) DECODING MPEG-4 VIDEO THAT WAS
ENCODED BY A CONSUMER ENGAGED IN A PERSONAL AND
NONCOMMERCIAL ACTIVITY AND/ OR WAS OBTAINED FROM A
VIDEO PROVIDER LICENSED BY MPEG LA TO PROVIDE MPEG4 VIDEO. NO LICENSE IS GRANTED OR SHALL BE IMPLIED FOR
ANY OTHER USE. ADDITIONAL INFORMATION INCLUDING THAT
RELATING TO PROMOTIONAL, INTERNAL AND COMMERCIAL
USES AND LICENSING MAY BE OBTAINED FROM MPEG LA, LLC.
SEE HTTP://WWW.MPEGLA.COM.
THIS PRODUCT IS LICENSED UNDER THE AVC PATENT
PORTFOLIO LICENSE FOR THE PERSONAL USE OF A
CONSUMER OR OTHER USES IN WHICH IT DOES NOT
RECEIVE REMUNERATION TO (i) ENCODE VIDEO IN
COMPLIANCE WITH THE AVC STANDARD (“AVC VIDEO”)
AND/OR (ii) DECODE AVC VIDEO THAT WAS ENCODED BY
A CONSUMER ENGAGED IN A PERSONAL ACTIVITY AND/
OR WAS OBTAINED FROM A VIDEO PROVIDER LICENSED
TO PROVIDE AVC VIDEO. NO LICENSE IS GRANTED OR
SHALL BE IMPLIED FOR ANY OTHER USE. ADDITIONAL
INFORMATION MAY BE OBTAINED FROM MPEG LA, LLC. SEE
HTTP://WWW.MPEGLA.COM
microSD, microSDHC, and microSDXC are trademarks of SD3C, LLC.
®
Bluetooth
and logo are registered trademarks owned by the
Bluetooth SIG, Inc., and KYOCERA Corporation is licensed to
use those trademarks.
®
Wi-Fi
, WPA®, Wi-Fi CERTIFIED logo, and Wi-Fi Direct® are
registered trademarks of Wi-Fi Alliance.
Wi-Fi CERTIFIED™ is trademarks of Wi-Fi Alliance.
All other company names and product names in this manual are
trademarks or registered trademarks of respective companies.
Appendix
51
Page 53

License
Users of the product are authorized to use software installed into
the product described in this instruction manual. Pay attention to
the following points when using the software.
(a) The software installed on this product or part of it may not be
altered, delivered, modified, analyzed, reverse-engineered,
derived, and any such actions are prohibited.
(b) Illegally importing the sof tware or a part of it is prohibited.
(c) This Software is provided without implied warranties
of merchantability, fitness for a particular purpose and
noninfringement of third party rights.
Note that the existing license agreement takes priority for usage
of GNU General Public License (GPL), GNU Library/Lesser
General Public License (LGPL) included in software, software
based on other open source software license and software that
KYOCERA Corporation is licensed.
For information on the Open source software, refer to "Open
Source Software" as follows;
Appendix
52
■Open Source Software
Note that the existing license agreement takes priority for usage of
GNU General Public License (GPL), GNU Library/Lesser General
Public License (LGPL) included in software, software based on
other open source software license and softw are that KYOCERA
Corporation is licensed. The exact terms of GPL, LGPL and some
other licenses are reproduced in "About tablet" in this product. For
details, refer to KYOCERA homepage.
This pro duct include s sof tware copyrighted by KYOCERA Corporation
and licensed sof tware.
Copyright of the soft ware designed and developed complying with
the open source s oftware s tandard belongs to KY OCERA Corporation
or the third parties, distribution, reproduction, transformation and
transmission over public lines without consent of KYOCERA
Corporation are prohibited, unless you are authorized or permit ted by
Copyright Law.
OpenSSL License
OpenSSL License
【
Copyright © 1998-2011 The OpenSSL Project. All rights
reserved.
This product includes software developed by the OpenSSL
Project for use in the OpenSSL Toolkit. (http://www.openssl.org/)
THIS SOFTWARE IS PROVIDED BY THE OpenSSL PROJECT
''AS IS'' AND ANY EXPRESSED OR IMPLIED WARRANTIES,
INCLUDING, BUT NOT LIMITED TO, THE IMPLIED
WARRANTIES OF MERCHANTABILITY AND FITNESS FOR
A PARTICULAR PURPOSE ARE DISCLAIMED. IN NO EVENT
SHALL THE OpenSSL PROJECT OR ITS CONTRIBUTORS BE
】
Page 54

LIABLE FOR ANY DIRECT, INDIRECT, INCIDENTAL, SPECIAL,
EXEMPLARY, OR CONSEQUENTIAL DAMAGES (INCLUDING,
BUT NOT LIMITED TO, PROCUREMENT OF SUBSTITUTE
GOODS OR SERVICES;
LOSS OF USE, DATA, OR PROFITS; OR BUSINESS
INTERRUPTION) HOWEVER CAUSED AND ON ANY THEORY
OF LIABILITY, WHETHER IN CONTRACT, STRICT LIABILITY,
OR TORT (INCLUDING NEGLIGENCE OR OTHERWISE)
ARISING IN ANY WAY OUT OF THE USE OF THIS SOFTWARE,
EVEN IF ADVISED OF THE POSSIBILITY OF SUCH DAMAGE.
Original SSLeay License
【
Copyright © 1995-1998 Eric Young (eay@cryptsoft.com) All rights
reserved.
This product includes cryptographic software written by Eric
Young
(eay@cryptsoft.com)
THIS SOFTWARE IS PROVIDED BY ERIC YOUNG ''AS IS''
AND ANY EXPRESS OR IMPLIED WARRANTIES, INCLUDING,
BUT NOT LIMITED TO, THE IMPLIED WARRANTIES OF
MERCHANTABILITY AND FITNESS FOR A PARTICULAR
PURPOSE ARE DISCLAIMED. IN NO EVENT SHALL THE
AUTHOR OR CONTRIBUTORS BE LIABLE FOR ANY
DIRECT, INDIRECT, INCIDENTAL, SPECIAL, EXEMPLARY,
OR CONSEQUENTIAL DAMAGES (INCLUDING, BUT NOT
LIMITED TO, PROCUREMENT OF SUBSTITUTE GOODS
OR SERVICES; LOSS OF USE, DATA, OR PROFITS; OR
BUSINESS INTERRUPTION)
HOWEVER CAUSED AND ON ANY THEORY OF LIABILITY,
WHETHER IN CONTRACT, STRICT LIABILITY, OR TORT
(INCLUDING NEGLIGENCE OR OTHERWISE) ARISING IN
ANY WAY OUT OF THE USE OF THIS SOFTWARE, EVEN IF
ADVISED OF THE POSSIBILITY OF SUCH DAMAGE.
】
Appendix
53
Page 55

For inquiries, call:
・ Any inquiries such as the product, operation procedure, or repair, contact our support center below.
When asking for repair
For repair, prepare t
Support Center
0120-XXX-XXX
From some IP phones (Call charges must be paid by the customers) 0X-XXXX-XXXX
Business hours: 10:00 to 20:00
* Except for our special holiday (December 31st, January 1st).
* Not available from overseas.
he warranty included with the product and contact our support center below.
濡れた状態での充電は、
異 常 な 発 熱・焼 損 な ど の原 因とな り
大変危険です。
September 2019, 1st Edition
 Loading...