

Page 1
Page 2

S2000i User Guide
This manual is based on the production version of
the Kyocera S2000i phone. Software changes may
have occurred after this printing. Kyocera reserves
the right to make changes in technical and product
specifications without prior notice. The products
and equipment described in this documen tation are
manufactured under license from QUALCOMM
Incorporated under one or more of the following
U.S. patents:
4,901,307 5,109,390 5,267,262 5,416,797 5,506,865 5,544,196 5,657,420 5,101,501 5,267,261 5,414,796 5,504,773 5,535,239 5,600,754 5,778,338 5,228,054 5,337,338 5,710,784 5,056,109 5,568,483 5,659,569 5,490,165 5,511,073
The Kyocera Wireless Corp. (“KWC”) products
described in this manual may include copyrighted
KWC and third party software stored in
semiconductor memories or other media. Laws in
the United States and other countries preserve for
KWC and third party software providers certain
exclusive rights for copyrighted software, such as
the exclusive rights to distribute or reproduce the
copyrighted software. Accordingly, any copyrighted
software contained in the KWC products may not
be modified, reverse engineered, distributed or
reproduced in any manner not permitted by law.
Furthermore, the purchase of the KWC products
shall not be deemed to grant—either directly or by
implication, estoppel, or otherwise—any license
under the copyrights, patents, or patent
applications of KWC or any third party software
provider, except for the normal, non-exclusive
royalty-free license to use that arises by operation
of law in the sale of a product.
Kyocera is a registered trademark of Kyocera Corporation. Brick Attack and Race 21 are trademarks of Kyocera Wireless Corp. QUALCOMM is a registered trademark of QUALCOMM Incorporated.
Openwave is a trademark of Openwave Systems
ii
Incorporated. eZiText is a registered trademark of
Zi Corporation. TransFlash is a trademark of
SanDisk Corporation. Bluetooth trademarks are
owned by Bluetooth SIG, Inc. and used by Kyocera
Wireless Corp. under license.
All other trademarks are the property of their respective owners.
Copyright © 2008 Kyocera Wireless Corp. All rights reserved.
Ringer Tones Copyright © 2000-2008 Kyocera Wireless Corp.
82-K8214-1EN, Rev. 001
FCC notice
This device complies with part 15 of the FCC rules.
Operation is subject to the following two conditions:
(1) This device may not cause harmful interference,
and (2) This device must accept any interference
received, including interference that may cause
undesired operation. To maintain compliance with
FCC RF exposure guidelines, if you wear a handset
on your body, use the Kyocera Wireless Corp.
(KWC) supplied and approved accessory designed
for this product. Using accessories that are not
supplied or approved by KWC may violate FCC RF
exposure guidelines. Other accessories used with
this device for body-worn operations must not
contain any metallic components and must provide
at least 15mm separation distance including the
antenna and the u ser’s body.
THIS MODEL PHONE MEETS THE GOVERNMENT’S REQUIREMENTS FOR EXPOSURE TO RADIO WA VES.
Your wireless phone is a radio transmitter and
receiver. It is designed and manufactured to not
exceed the emission limits for exposure to radio
frequency (RF) energy set by the Federal
Communications Commission of the U.S.
Government. These limits are part of
comprehensive guidelines and establish permitted
Page 3

levels of RF energy for the general population. The
guidelines are based on standards that were
developed by independent scientific organizations
through periodic and thorough evaluation of
scientific studies. The standards include a
substantial safety margin designed to assure the
safety of all persons, regardless of age and health.
The exposure standard for wireless mobile phones employs a unit of measurement known as the Specific Absorption Rate, or SAR. The SAR limit set by the FCC is 1.6 W/kg.*
Tests for SAR are conducted using standard operating positions specified by the FCC with the phone transmitting at its highest certified power level in all tested frequency bands.
Although the SAR is determined at the highest certified power level, the actual SAR level of the phone while operating can be well below the maximum value.
This is because the phone is designed to operate a t multiple power levels so as to use only the power required to reach the network. In general, the closer you are to a wireless base station antenna, the lower the power output.
Before a phone model is available for sale to the
public, it must be tested and certified by the FCC
that it does not exceed the limit established by the
government-adopted requirement for safe
exposure. The tests are performed in positions and
locations (e.g., at the ear and worn on the body) as
required by the FCC for each model.
Body-worn measurements differ among phone
models, depending upon availability of accessories
and FCC requirements. While there may be
differences between the SAR levels of various
phones and at various positions, they all meet the
government requirement for safe exposure.
The FCC has granted an Equipment Authorization
for this model phone with all reported SAR levels
evaluated as in compliance with the FCC RF
emission guidelines. SAR information on this model
phone is on file with the FCC and can be found
under the Display Grant section
www.fcc.gov/oet/fccid after searching on the
FCC ID: OVF-K33BI01.
Additional information on SAR can be found on the
Cellular Telecommunications and Internet
Association (CTIA) web-site at
www.wow- com.co m.
* In the United States and Canada, the SAR limit for
mobile phones used by the public is 1.6 watts/kg
(W/kg) averaged over one gram of tissue. The
standard incorporates a substantial margin of
safety to give additional protection for the public
and to account for any variations in measurements.
Caution
The user is cautioned that changes or modifications not expressly approved by the party responsible for compliance could void the warranty and user’s authority to operate the equipment.
Optimizing your phone’s performance
Use the guidelines in this guide to learn how to optimize the performance and life of your phone and battery.
Air bags
If you have an air bag, DO NOT place installed or portable phone equipment or other objects over the air bag or in the air bag deployment area. If equipment is not properly installed, you and your passengers risk serious injury.
User Guide iii
Page 4

Medical devices
Pacemakers—Warning to pacemaker wearers:
Wireless phones, when in the ‘on’ position, have
been shown to interfere with pacemakers. The
phone should be kept at least six (6) inches away
from the pacemaker to reduce risk.
The Health Industry Manu facturers Association and the wireless technology research community recommend that you follow these guidelines to minimize the potential for interference.
• Always keep the phone at least six inches
(15 centimeters) away from your pacemaker
when the phone is turn ed on.
• Do not carry your phone near your heart.
• Use the ear opposite the pacemaker.
• If you have any reason to suspect that
interference is taking place, turn off your
phone immediately.
Hearing aids—Some digital wireless phones may
interfere with hearing aids. In the event of such
interference, you may want to consult your
carrier or call the customer service line to
discuss alternatives.
Other medical devices—If you use any other
personal medical device, consult the manufacturer
of the device to determine if it is adequately
shielded from external RF energy. Your physician
may be able to help you obtain this information.
In health care facilities—Turn your phone off in
health care facilitie s when instructed. Hospitals and
health care facilities may be using equipment t hat is
sensitive to external RF energy.
Potentially unsafe areas
Posted facilities—Turn your phone off in any
facility when posted notices require you to do so.
Aircraft—FCC regulations prohibit using your
phone on a plane that is in the air. Turn your phone
off before boarding aircraft.
iv
Vehicles—RF signals may affect improperly
installed or inadequately shielded electronic
systems in motor vehicles. Check with the
manufacturer of the device to determine if it is
adequately shielded from external RF energy. Your
auto manufacturer may be able to help you obtain
this information.
Blasting areas—Turn off your phone where
blasting is in progress. Observe restrictions, and
follow any regulations or rules.
Potentially explosive atmospheres—Turn off your
phone when you are in any area with a potentially
explosive atmosphere. Obey all signs and
instructions. Sparks in such areas could cause
an explosion or fire, resulting in bodily injury or
death.Areas with a potentially explosive
atmosphere are often, but not always,
clearly marked.
They include:
• fueling areas such as gas stations
• below deck on boats
• transfer or storage facilities for fuel or chemicals
• vehicles using liquefied petroleum gas, such as
propane or butane
• areas where the air contains chemicals or
particles such as grain, dust, or metal powders
• any other area where you would normally be
advised to turn off your vehicle engine
Using phone with care
Use only in normal position (to ear). Avoid dropping, hitting, bending, or sitting on the phone.
Avoiding magnetic environments
Keep the phone away from magnets which can cause improper functioning of the phone.
Keeping phone dry
Keep the phone dry. Damage can result if the phone gets wet. Water damage is not covered under warranty.
Page 5

Resetting the phone
If the screen seems frozen and the keypad does not respond to keypresses, reset the phone by completing the following steps:
1. Remove the battery door.
2. Remove and replace the battery.
If the problem persists, return the phone to the dealer for service.
Accessories
Use only Kyocera-approved accessories with Kyocera phones. Use of any unauthorized accessories may be dan gerous and will invalidate the phone warranty if said accessories cause damage or a defect to the phone.
Radio Frequency (RF) energy
Your telephone is a radio transmitter and receiver.
When it is on, it receives and sends out RF energy.
The network controls the power of the RF signal.
This power level can range from 0.006 to 0.6 watts.
In August 1996, the U.S. Federal Communications
Commission (FCC) adopted RF exposure
guidelines with safety levels for hand-held wireless
phones. These guidelines are consistent with the
safety standards previously set by both U.S. and
international standards bodies in the following
reports:
• ANSI C95.1 (American National Standards
Institute, 1992)
• NCRP Report 86 (National Council on
Radiation Protection and Measurements, 1986)
• ICNIRP (International Commission on NonIonizing Radiation Protection, 1996)
Your phone complies with the standards set by these reports and the FCC guidelines.
E911 mandates
Where service is available, this handset complies with the Phase I and Phase II E911 Mandates issued by the FCC.
Hearing Aid Compatibility (HAC) features
This phone has received a HAC performance rating
(designated by the letter M followed by a number).
The rating for this phone is identified on the outside
of this phone’s original packaging. While there is no
guarantee, digital wireless phones that receive a
minimum of an M3 rating should provide acceptable
performance with most hearing aids. Hearing loss
and hearing aids are highly individualized, however,
so optimal performance cannot be guaranteed.
Other factors, such as type of hearing aid device or
degree of hearing loss, also can affect a phone’s
performance for a particular user.
Hearing aids and wireless phones
A hearing aid uses a microphone to collect and
convert sound waves to electrical signals. The
hearing aid then amplifies and converts the
electrical signals back to audible sounds for the
hearing aid user to hear. Radio Frequency (RF)
emissions generated by digital wireless phones
often interfere with the operation of a hearing aid’s
microphone, distorting the amplified audible sound.
In addition, hearing aid microphones tend to collect
ambient noise and amplify these sounds, interfering
with the desired audio transmission.
ANSI standard
To diminish interference between wireless phones
and hearing aids, the FCC requires wireless
carriers to offer phones that meet the American
National Standards Institute (ANSI) C63.19
standard for reduced RF emissions. Wireless
phones that comply with the FCC’s hearing aidcompatibility (HAC) regulations must receive a
minimum rating of “M3” for RF emissions under the
ANSI C63.19 standard. The “M” rating refers to the
phone’s RF emissions level for use with hearing
aids operating in the microphone setting.
User Guide v
Page 6
The higher the phone’s “M” rating, the more likely the phone is compatible with a hearing aid operating in the microphone setting. Hearing aids also have ratings similar to wireless phones. Most newer hearing aid models receive at least an M2 rating.
To determine the level of compatibility between
your hearing aid and this HAC-certified phone,
combine the M rating of your hearing aid and the M
rating of this phone. For example, if you pair an M3
hearin g aid with an M4 phone, you will ach ieve a
combined rating of 7.
• Any combined rating equal to or greater than 6
provides excellent performance.
• Any combined rating equal to 5 offers
good performance.
• Any combined rating equal to 4 offers
acceptable performance.
T-Ratings—Phones rated T3 or T4 meet FCC
requirements and are likely to be more usable with
a hearing device’s telecoil (“T Switch” or
“Telephone Switch”) than unrated phones. T4 is the
better/higher of the two ratings. (Note that not all
hearing devices have telecoils in them.)
Hearing devices may also be measured for
immunity to this type of interference. Your hearing
device manufacturer or hearing health professional
may help you choose the proper rating for your
mobile phone. The more immune your hearing aid
is, the less likely you are to experience interference
noise from mobile phones.
Battery and charger specifications
Charger Input Ouput
CE90-R2238 100-240 VAC / 50/60 Hz 5V 350mA
CV90-R2672 100-240 VAC / 50/60 Hz 4.5V 1.2A
CV90-R274A 100-240 VAC / 50/60 Hz 4.5V 600mA
Standard Battery (5mm):
CV90-K3880 3.7V / 790 mAh
Kyocera Wireless Corp.
www.kyocera-wireless.com
To purchase accessories, visit
www.kyocera-wireless.com/store.
vi
Page 7

TABLE OF CONTENTS
1 Getting Started . . . . . . . . . . . . . . . . . . . . . . 1
Phone battery. . . . . . . . . . . . . . . . . . . . . . . . . . . .1
Purchasing accessories . . . . . . . . . . . . . . . . . . . .2
Finding your phone’s serialnumber. . . . . . . . . . .3
Phone activation. . . . . . . . . . . . . . . . . . . . . . . . . .3
Phone overview . . . . . . . . . . . . . . . . . . . . . . . . . .4
Main menu. . . . . . . . . . . . . . . . . . . . . . . . . . . . . .7
Basic navigation. . . . . . . . . . . . . . . . . . . . . . . . . .8
Guide conventions . . . . . . . . . . . . . . . . . . . . . . . .8
2 Basic Functions . . . . . . . . . . . . . . . . . . . . . 9
Powering up. . . . . . . . . . . . . . . . . . . . . . . . . . . . .9
Making phone calls . . . . . . . . . . . . . . . . . . . . . . .9
Answering phone calls . . . . . . . . . . . . . . . . . . . . .9
Ending phone calls. . . . . . . . . . . . . . . . . . . . . . .10
Verifying your phone number. . . . . . . . . . . . . . .10
Activating voice dialing. . . . . . . . . . . . . . . . . . . .10
3 Call Features . . . . . . . . . . . . . . . . . . . . . . 11
Volume control . . . . . . . . . . . . . . . . . . . . . . . . .11
Hold call . . . . . . . . . . . . . . . . . . . . . . . . . . . . . .11
Speed dialing . . . . . . . . . . . . . . . . . . . . . . . . . . .11
1-Touch dialing . . . . . . . . . . . . . . . . . . . . . . . . .11
Voicemail. . . . . . . . . . . . . . . . . . . . . . . . . . . . . .11
Data and fax calls. . . . . . . . . . . . . . . . . . . . . . . .12
Roaming calls . . . . . . . . . . . . . . . . . . . . . . . . . .12
Emergency services . . . . . . . . . . . . . . . . . . . . . .13
Airplane mode . . . . . . . . . . . . . . . . . . . . . . . . . .13
4 Text Entry . . . . . . . . . . . . . . . . . . . . . . . . . 14
Text entry modes . . . . . . . . . . . . . . . . . . . . . . . .14
Text entry quick reference . . . . . . . . . . . . . . . . .15
5 Recent Calls . . . . . . . . . . . . . . . . . . . . . . . 17
Call lists . . . . . . . . . . . . . . . . . . . . . . . . . . . . . . .17
Call timers . . . . . . . . . . . . . . . . . . . . . . . . . . . . .18
6 Messages . . . . . . . . . . . . . . . . . . . . . . . . . 19
Text messages . . . . . . . . . . . . . . . . . . . . . . . . . .19
Phone User Guide vii
Erase messages . . . . . . . . . . . . . . . . . . . . . . . . .21
Working with messages . . . . . . . . . . . . . . . . . . .21
Message settings . . . . . . . . . . . . . . . . . . . . . . . .22
7 Contacts . . . . . . . . . . . . . . . . . . . . . . . . . . 25
Viewing Contacts list . . . . . . . . . . . . . . . . . . . . .25
Adding contacts . . . . . . . . . . . . . . . . . . . . . . . . .25
Working with contacts . . . . . . . . . . . . . . . . . . . .26
Contact groups. . . . . . . . . . . . . . . . . . . . . . . . . .29
Searching contacts. . . . . . . . . . . . . . . . . . . . . . .29
Contacts count. . . . . . . . . . . . . . . . . . . . . . . . . .30
8 My stuff . . . . . . . . . . . . . . . . . . . . . . . . . . . 31
My ringtones . . . . . . . . . . . . . . . . . . . . . . . . . . .31
My games. . . . . . . . . . . . . . . . . . . . . . . . . . . . . .31
My graphics. . . . . . . . . . . . . . . . . . . . . . . . . . . .32
My other stuff. . . . . . . . . . . . . . . . . . . . . . . . . . .32
My sounds . . . . . . . . . . . . . . . . . . . . . . . . . . . . .32
9 Tools . . . . . . . . . . . . . . . . . . . . . . . . . . . . . 33
Voice memo. . . . . . . . . . . . . . . . . . . . . . . . . . . .33
Scheduler . . . . . . . . . . . . . . . . . . . . . . . . . . . . .33
Alarm clock. . . . . . . . . . . . . . . . . . . . . . . . . . . .35
Tip calculator . . . . . . . . . . . . . . . . . . . . . . . . . .36
Calculator . . . . . . . . . . . . . . . . . . . . . . . . . . . . .36
Timer. . . . . . . . . . . . . . . . . . . . . . . . . . . . . . . . .37
Stopwatch . . . . . . . . . . . . . . . . . . . . . . . . . . . . .37
World clock. . . . . . . . . . . . . . . . . . . . . . . . . . . .37
10 Settings. . . . . . . . . . . . . . . . . . . . . . . . . . . 38
Menu options. . . . . . . . . . . . . . . . . . . . . . . . . . .38
Sounds. . . . . . . . . . . . . . . . . . . . . . . . . . . . . . . .38
Display. . . . . . . . . . . . . . . . . . . . . . . . . . . . . . . .40
Convenience . . . . . . . . . . . . . . . . . . . . . . . . . . .42
Accessories . . . . . . . . . . . . . . . . . . . . . . . . . . . .44
Voice Features . . . . . . . . . . . . . . . . . . . . . . . . . . 45
Network. . . . . . . . . . . . . . . . . . . . . . . . . . . . . . .47
Security . . . . . . . . . . . . . . . . . . . . . . . . . . . . . . .48
Phone information. . . . . . . . . . . . . . . . . . . . . . .50
Page 8

11 Voice Commands. . . . . . . . . . . . . . . . . . . 51
Voice dial list . . . . . . . . . . . . . . . . . . . . . . . . . . 51
Voice commands. . . . . . . . . . . . . . . . . . . . . . . . 51
12 Getting Help . . . . . . . . . . . . . . . . . . . . . . . 53
Customer support. . . . . . . . . . . . . . . . . . . . . . . 53
Qualified service . . . . . . . . . . . . . . . . . . . . . . . . 54
Phone accessories. . . . . . . . . . . . . . . . . . . . . . . 54
Become a product evaluator. . . . . . . . . . . . . . . 54
13 Consumer Limited Warranty. . . . . . . . . . 55
Index . . . . . . . . . . . . . . . . . . . . . . . . . . . . . . . . . 57
viii
Page 9

1GETTING STARTED
Phone battery
Installing the battery
To install the battery:
NK With the back of the
phone facing you, push
down on the back
cover.
OK Slide the back cover
toward the bottom of
the phone and remove.
PK Place the battery in the
phone casing with the
metal contacts toward
the bottom of the
phone.
QK Place the back cover
side tabs into the
openings on the sides of
the battery well.
RK Slide the back cover
forward until it clicks
closed.
kçíÉW To remove the battery,
make sure the phone is turned off.
Charging the battery
You must have at least a partial charge in the
battery to make or receive calls.
To charge the battery:
NK Connect the AC adapter
to the jack on the
bottom of the phone.
OK Plug the adapter into a
wall outlet.
The battery icon in the upper-right corner of the
screen shows whether the phone is:
√ Charging (animated icon)
√ Partially charged
√ Fully charged
t~кебеЦW The battery does not charge if you are
in a call while it is connected to an AC adapter.
Recharging the battery
You can safely recharge the battery at any time,
even if it has a partial charge.
Battery care
General safety guidelines
√ Do not disassemble or open the battery.
√ Do not crush, bend, deform, puncture, or
shred the battery.
User Guide 1
Page 10

√ Do not attempt to insert foreign objects into
the battery.
√ Do not immerse the battery or expose it to
water or other liquids. Even if a battery
appears to dry out and operate normally,
internal parts can slowly corrode and pose a
safety hazard.
√ Always keep the battery between 15°C and
25°C (59°F and 77°F). Do not expose the
battery to extremes of temperature, fire, or
other hazards such as a cooking surface, iron,
or radiator.
√ Never use any damaged battery.
√ Only use the battery for its intended phone.
√ Only use the battery with a qualified charger.
Use of an unqualified battery charger may
present a risk of fire, explosion, leakage, or
other hazard. If you are unsure about
whether a charger is qualified, contact
customer support.
√ Do not short-circuit the battery or allow
metallic conductive objects—such as
keys, coins, or jewelry—to contact the
battery’s terminals.
√ Replace the battery only with another qualified
battery. Use of an unqualified battery may
present a risk of fire, explosion, leakage, or
other hazard. If you are unsure about whether
a replacement battery is compatible, contact
customer support.
√ Promptly dispose of used batteries in
accordance with local regulations and
recycle if possible. Do not dispose as
household waste.
√ Supervise all battery usage by children.
√ Avoid dropping the phone or battery. If the
phone or battery is dropped, especially on a
hard surface, an internal short-circuit can
occur and pose a safety hazard. If you
suspect battery damage, take it to a service
center for inspection.
√ Improper battery use may result in fire,
explosion, or other hazard.
Common causes of battery drain
√ Playing games or using the Web.
√ Keeping backlighting on.
√ Operating in digital mode when far away from
a base station or cell site.
√ Using data cables or accessories.
√ Operating when no service is available, or
service is available intermittently.
√ High earpiece and ringer volume settings.
√ Repeating sound, vibration, or lighted alerts.
Purchasing accessories
To purchase accessories for your new phone,
such as a hands-free headset, carrying case, or
car power adapter, please visit your carrier’s
website.
2 Purchasing accessories
Page 11

Finding your phone’s serial number
To activate your account, you need your phone's
serial number. To locate the number:
NK Turn your phone off.
OK Hold your phone face down.
PK Unlock the back cover.
QK Locate the groove on the left side of the
phone. Unsnap the hooks and remove the
back cover.
RK Remove the battery by pulling back on the top
edge of the battery.
SK Your phone's serial number is an 18-digit
number located below the first barcode,
next to the D.
TK Write down the serial number.
kçíÉW With your phone turned on, you can also
select
jÉåì > pЙннбеЦл > mÜçåÉ=áåÑç >
_ìáäÇ áåÑç to find your phone’s ID number.
Phone activation
Activating your account
Before you can start talking, messaging, or
downloading, you need to activate service. To
activate your account, do one of the following with
your phone's serial number.
• Go to your carrier’s website and click
on Activate.
• Call your carrier at 1-888-322-1122.
User Guide 3
Programming your phone
Once your account is activated, you need to
program your phone number into your phone.
When you are ready, follow these steps to
program your phone:
NK Turn on your phone. Program your phone
using the external number keypad. DO NOT
use the internal QWERTY keyboard.
OK Dial #-#-8-4-7-4-4-6-#.
PK You are now in the Programming menu.
Scroll down to "Activate Phone" and hit "OK”.
QK Your screen will say, "Do you want to activate
your phone now ?" Select "Yes".
RK Your phone will connect to the network, and
then the screen will say “Hi. Press Start to
continue the activation process”. Scroll
down to “Start” and hit “OK”.
SK Your phone will say “We’re getting your
phone number for you,” then your phone will
display your new phone number. Write it
down.
TK Scroll down to “Finish” and hit “OK” to
complete the activation process. Your phone
will turn off and back on by itself.
It might take a couple of hours to set up the
network. Once set up, your phone displays a text
message informing that you can start talking. Also,
it may take up to 4 hours for Web, Voicemail, and
Top-Up features to come online.
Page 12
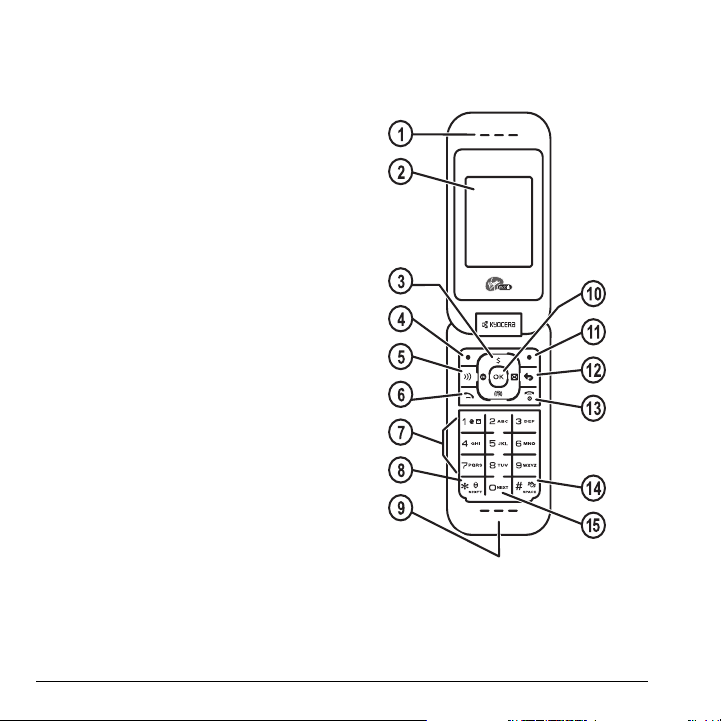
Phone overview
Getting to know your phone
The following illustration shows the phone in
open position.
NK Earpiece speaker.
OK Main screen.
PK
k~îáÖ~íáçå key scrolls through lists and text
entry fields and accesses shortcuts from the
main screen.
QK Left softkey selects items that appear on the
lower left of the display, or accesses the
pЙннбеЦл menu at the main screen.
RK pйЙ~вЙкйЬзеЙ key activates the
speakerphone and answers incoming calls.
SK
pÉåÇ key starts or answers a call. Press once
to display the All calls list and twice to redial
the last number dialed. Press and hold to
activate voice command.
TK Keypad for entering numbers, letters, or
symbols.
UK
pÜáÑí=G key changes the text mode in text
entry.
VK Microphone.
NMK
lh key selects a menu item or option.
NNK Right softkey accesses the Contacts list and
other menu options.
NOK
_~Åâ key returns you to the previous screen
and erases characters in text entry.
NPK
båÇ key turns the phone on and off, ends a
call or browser session, and returns you to
the main screen.
NQK
pé~ÅÉ=@ key enters a space during text entry.
Press and hold to activate or deactivate Silent
mode.
NRK
M=kÉñí key cycles through word choices
during text entry.
4 Phone overview
Page 13
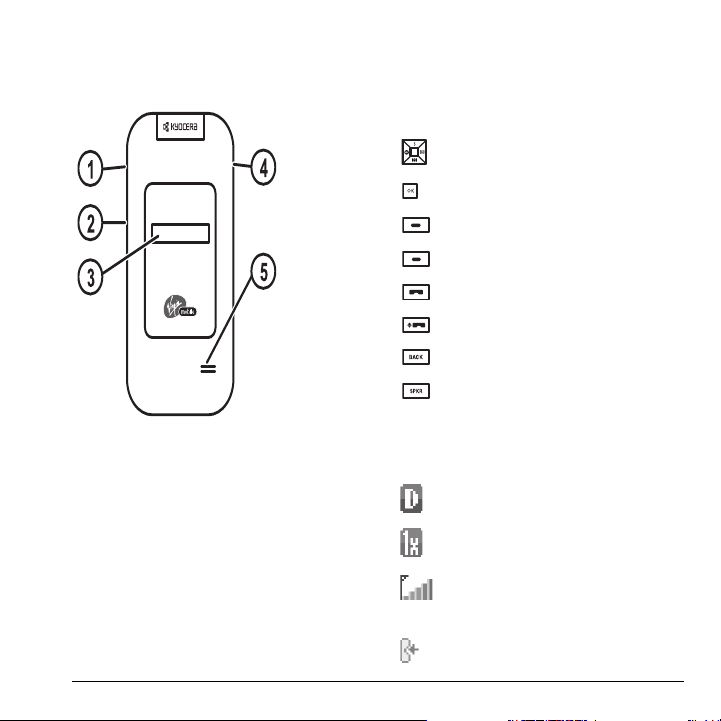
The following illustration shows the phone in
closed position. With the phone closed, the keys
are locked to prevent accidental key presses.
Common keys
The following list the frequently-pressed keys.
Throughout this user guide, these keys are
referred as follows:
Navigation key
OK key
Left softkey
Right softkey
Send key (also referred to as the Talk key)
End key (also referred to as the Power key)
Back key
Speakerphone key
NK Jack for hands-free headset only (sold
separately).
OK
sздмгЙ key to raise or lower speaker
volume.
PK External screen displays time, caller ID,
signal, and battery strength.
QK Jack for AC adapter (included) and data
cable (sold separately).
t~кебеЦW Inserting an accessory into the
incorrect jack damages the phone.
RK External speaker.
User Guide 5
Screen icons
These icons may appear on your phone’s screen:
The phone is operating in IS95 digital mode.
The phone is operating in IS2000 (1X)
digital mode.
The phone is receiving a signal. You can
make and receive calls. Fewer bars indicate
a weaker signal.
A call is in progress.
Page 14
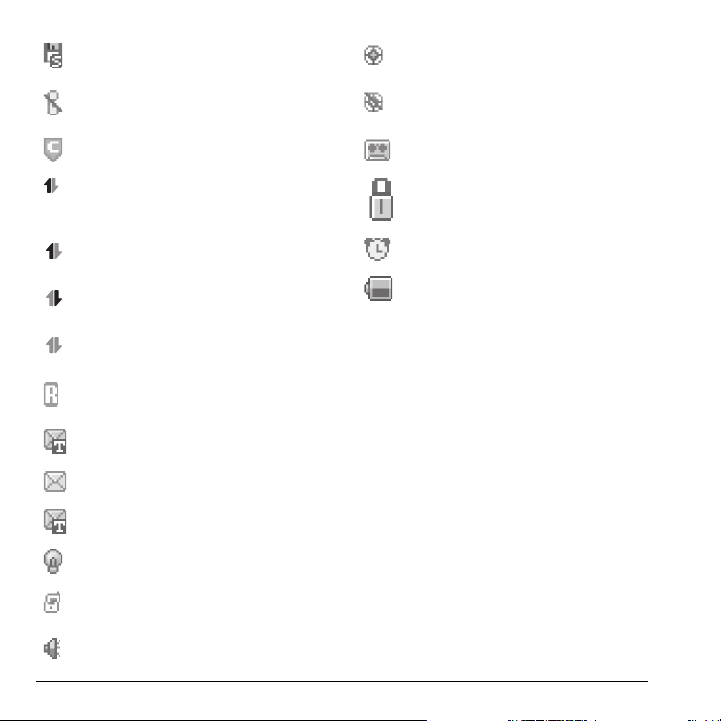
The phone has a standard speed data
connection.
The phone is not receiving a signal. You
cannot make or receive calls.
Content is DRM protected.
Position location is set to your service
provider and to emergency services.
Position location is set to emergency services
only.
The phone is set to auto answer.
Data service is available and active on your
phone. Check with your service provider for
availability.
(blinking) The phone is sending high-speed
data.
(blinking) The phone is receiving highspeed data.
Data service is available, but the phone is
dormant.
The phone is roaming outside of its home
service area.
New text message.
New voice message.
New voice and text message.
The phone is set to light up instead of ring.
The phone is set to vibrate or to vibrate and
then ring.
The phone is in privacy mode, accessing a
secure Web site or with files locked.
The alarm clock is set.
The battery is fully charged. The more black
bars, the fuller the charge.
The speakerphone is on.
6 Phone overview
Page 15

Main menu
The contents of the main menu are as follows:
Recent Calls
All
Incoming
Outgoing
Missed
Erase Call List
Call Timer
Messages
New Text Msg
Voicemail
Inbox
Sent Msgs
Outbox
Saved Msgs
Drafts
Msg Settings
Erase Msg
kçíÉW The menu items on your phone can change depending on the services provided. Check with your service
provider.
Contacts
View All
Add New
View Groups
Speed Dial List
Voice Dial List
Contacts Count
Media Galley
Images
Sounds
Browser
Launches the Browser
Games & Apps
Games & Apps
Settings
Help
Tools/Utilities
Voice Memo
Scheduler
Alarm Clock
Tip Calculator
Calculator
Timer
Stopwatch
World Clock
Settings
Preferences
Convenience
Accessories
Voice Features
Network
Security
Phone Info
User Guide 7
Page 16

Basic navigation
You press your phone keys to access the various
menus and other features of your phone. Some of
the basic frequently used keys are as follows:
•
iЙСн=зйнбзе=Дмннзе: Select items that appear
on the lower left of the display. At the main
screen, you can select
• oбЦЬн=зйнбзе=Дмннзе: Select items that appear
on the lower right of the display. At the main
screen, you can select
• k~îáÖ~íáçå=âÉó: Scroll through menus and
options. You can access the following
shortcuts from the main screen.
Ó Scroll left to launch
Ó Scroll right to access
Ó Scroll up to access
Ó Scroll down to view
• lh=âÉó: Select a menu item.
• _~Åâ=âÉó: Return to the previous menu level.
• båÇLmçïÉê=âÉó: Return to the main screen.
jÉåì.
`çåí~Åíë.
tЙД=_кзплЙк.
pÉåÇ=íÉñí=ãëÖ.
jу=^ЕЕзмен.
oЙЕЙен=Е~ддл.
Guide conventions
In this guide the following conventions are used
when describing phone features.
pЙдЙЕн means to press the left or right option
button, or the
display. For example, “select
press the left option button at the main screen to
access the main menu.
mêÉëë means to press a phone key. For example,
“press the
you to press the
pЕкздд means to press the k~îáÖ~íáçå key to move
though a list on the display. For example, “scroll
through your contacts list to choose a contact”
means to press the
scroll through the list on the display.
The greater than symbol “>” tells you to select an
option from a menu or list. For example,
pЙннбеЦл means to:
NK Press the left option button at the main
OK Scroll to the pЙннбеЦл option.
PK Press the lh key to select pЙннбеЦл.
lh key to select an item on the
pÉåÇ key to make a phone call” tells
pÉåÇ key on your phone.
screen to select
jÉåì” tells you to
k~îáÖ~íáçå key up or down to
jÉåì.
jÉåì >
8 Basic navigation
Page 17

2BASIC FUNCTIONS
This section explains basic functionality of your
phone. For more detailed explanations of your
phone’s features, refer to the later chapters.
Powering up
To turn on your phone, press and hold the båÇ
key and wait until the phone display lights up.
To turn off your phone, press and hold the
key until the phone turns off.
båÇ
Making phone calls
Make sure you are in an area where a signal can
be received. Look for the signal strength icon on
the main screen. The more bars you see in this
symbol, the stronger the signal. If there are no
bars, move to where the signal strength is better.
When the phone has been idle for a while with no
signal, it changes to power save mode. When you
see “Power Save” on your phone’s screen, press
any key to return to normal operating mode.
You can make a phone call in one of the
following ways.
Call using numbers
At the main screen:
NK Enter a phone number.
OK Press the pÉåÇ key.
Call using contacts
At the main screen:
NK Select
OK Highlight a contact and press the pÉåÇ key.
`çåí~Åíë to open your Contacts list.
Call using voice commands
You can use voice commands to call a contact
from your voice dial list or to dial a phone
number. For more information, see “Voice
Commands” on page 51.
Redial a number
At the main screen:
NK Press the pÉåÇ key once to open your call
history.
OK Highlight a phone number or contact and
press the
pÉåÇ key.
qáéW To redial the last number called, received or
missed, press the
pÉåÇ key twice.
Answering phone calls
When a call comes in, the phone rings, vibrates,
or lights up. The phone number of the caller also
appears if it is not restricted. If the number is
stored in your Contacts list, the contact’s name
appears.
There are several ways you can answer a phone
call:
User Guide 9
Page 18

Answer using earpiece
Press the pÉåÇ key or any key with Any Key
Answer enabled. For more information, see “Any
key answer” on page 44.
Answer using speakerphone
Press the pйЙ~вЙкйЬзеЙ key.
Answer using flip
You can set the phone to answer immediately
when you open the flip. This feature does not
apply to incoming data or fax calls. For more
information, see “Open to answer” on page 44.
Ending phone calls
To end a phone call, press the båÇ key or close
the flip.
Verifying your phone number
To verify your phone number, select pЙннбеЦл >
mÜçåÉ=fåÑç > _ìáäÇ=fåÑç.
Activating voice dialing
At the main screen:
NK Press and hold the pÉåÇ key.
OK Follow the prompts.
For more information, see “Voice Commands” on
page 51.
10 Ending phone calls
Page 19

3CALL FEATURES
This chapter describes call features such as
volume, holding calls, speed dialing, and other
features.
t~кебеЦW In the absence of voicemail, this
feature drops the call.
Hold call
Volume control
You have several ways to control the volume of
your phone.
Adjust volume during a call
To adjust the earpiece volume during a call, press
the
sздмгЙ key up or down.
Use the speakerphone
Your phone has a built-in speakerphone. To turn
on the speakerphone, press the
key.
The speakerphone icon appears on the main
screen when the speakerphone is on.
To turn off the speakerphone, press the
pйЙ~вЙкйЬзеЙ key again.
kçíÉW If you press the
an incoming call, you will answer the call.
Silence an incoming call
To silence the phone without answering the call
press the
båÇ key or select pбдЙеЕЙ.
To silence the phone and answer the call, press
the
båÇ key and then press the pÉåÇ key.
User Guide 11
pйЙ~вЙкйЬзеЙ
pйЙ~вЙкйЬзеЙ key during
Use this feature to place incoming calls on hold
until you are ready to answer them. See “Hold
call” on page 43.
Speed dialing
Use the Speed Dial feature to assign a one- or twodigit shortcut to a contact. Before you can use
speed dialing, you must save a phone number as a
contact and assign a speed dial location to it. See
“Contact number” on page 26.
To call a contact that has a speed dial location.
NK Enter the one- or two-digit speed dial
location.
OK Press the Send key.
1-Touch dialing
This feature is the fastest way to speed dial a
contact that has a speed dial location. See “1Touch dialing” on page 42.
Voicemail
Configure your voicemail
Before your phone can receive voicemail
messages, you must set up a password and record
Page 20

a personal greeting with your service provider.
When you have set up your voicemail, all
unanswered calls to your phone are automatically
transferred to voicemail, even if your phone is in
use or turned off.
NK Press and hold the
OK Follow the system prompts to create a
password and record a greeting.
N key.
Check voicemail
When a voice message is received, your screen
displays a notification along with a voicemail
message icon at the top of your screen. The
symbol flashes if the message is urgent. If you see
a notification:
NK Select
OK Follow the system prompts to retrieve the
kçíÉW To clear the screen without checking
messages, select
If you see only the voicemail message icon:
NK Select jÉåì > jÉëë~ÖÉë > sзбЕЙг ~б д.
OK If you have set up your voicemail, select `~ää
PK Follow the system prompts to retrieve the
`~ää to call your voicemail number.
message.
fЦезкЙ.
to call your voicemail number.
message.
Set voicemail alert
You can set the phone to beep or vibrate every five
minutes to remind you that you have voicemail.
For more information, see “Alerts” on page 23.
Data and fax calls
Your phone may be able to receive certain data or
faxes. See “Data and fax calls” on page 50.
Roaming calls
Control roaming calls
You can restrict your phone from making a call
when roaming. See “Roam option” on page 47.
Set roaming alert
You can set the phone to alert you when you roam
outside of your home service area. See “Roaming
service alert” on page 47.
Set roam ringer
You can set a ringer to indicate when an incoming
call is subject to roaming charges. See “Roam
ringer” on page 39.
Set call guard
You can set the phone to warn you before you
answer or place a call while roaming. See “Roam
call alert” on page 48.
12 Data and fax calls
Page 21

Emergency services
Call emergency service
You can call an emergency code, even if your
phone is locked or your account is restricted.
When you call, your phone enters Emergency
mode. This enables the emergency service
exclusive access to your phone to call you back, if
necessary. To make or receive regular calls after
dialing the code, you must exit this mode.
To dial an emergency code:
NK Enter your 3-digit emergency code.
OK Press the
kçíÉW Regardless of your 3-digit emergency code
(911, 111, 999, 000, etc.), your phone operates
as described.
pÉåÇ key.
Exit emergency services
When you have completed the emergency call:
NK Select bñáí.
OK Select
kçíÉW To determine who has access to your
location, see “Location” on page 48.
bñáí again to confirm your choice.
Airplane mode
While in an airplane, you can set your phone to
Airplane mode where your phone does not emit
RF signals. See “Airplane mode” on page 42.
User Guide 13
Page 22

4TEXT ENTRY
You can enter letters, numbers, and symbols in
contacts, text messages, and your banner.
Text entry modes
The current text entry mode (and capitalization
setting, when applicable) are indicated by icons.
NOP: numbers only mode.
√
√
^ЗЗ=pугДзд: symbol mode.
kçíÉW The mode you start in depends on the task
you are doing. For example, when entering a
phone number, you are in numbers only mode.
When entering a name for a contact, you are in
normal alpha mode.
Enter numbers
Chars: 152
Send To:
Message:
Send
The text entry screen has the following features:
NK The number of remaining characters you can
type. Allowed length of messages can vary
depending on your service.
OK Text entry fields.
PK Current capitalization setting.
QK Current text entry mode.
There are six text entry modes:
√
fелЙкн=mкЙлЙн=qЙсн: quick text mode.
√
^_`: all uppercase alpha mode.
√
^ÄÅ: sentence alpha mode.
√
o~éáÇ: rapid entry mode.
14 Text entry modes
Options
√ To enter a number while in numbers only
mode, press a number key once.
√ To enter a number while in normal alpha or
rapid mode, press and hold a number key
until the number appears on the screen.
Enter words letter by letter
NK Press a key once for the first letter, twice for
the second letter, and so on.
OK Wait for the cursor to move right and enter
the next letter.
kçíÉW To enter a space, press the
pé~ÅÉ=@ key.
Enter words quickly
When you press a series of keys using rapid
mode, your phone checks its dictionary and
guesses at the word you are trying to spell.
NK For each letter of the word you want, press
the key once. For example, to enter the word
“any” press the
O > S > V keys.
Page 23

OK If the word doesn’t match what you want,
press the
M=kÉñí key to check other word
matches.
PK When you see the word you want, press the
pé~ÅÉ=@ key.
Enter symbols
While entering text in normal alpha mode, you
can enter symbols by pressing the
see the symbol you want. Using this method, you
have access to the following symbols:
K=]=\=>=J=I=C=W=Ú
To access the full set of symbols:
NK From the text entry screen, select lйнбзел >
^ЗЗ=pугДзд.
OK Scroll up or down to view the list of symbols.
PK Press the number key corresponding to the
symbol to enter it.
N key until you
Change default text entry mode
You can change the default text entry mode when
creating a text message. For more information,
see “Entry mode” on page 24.
Change modes
Sometimes you need to change modes. For
example, to enter numbers in an email address
while in normal alpha mode, you must change to
numbers only mode, enter the numbers, and then
change back to normal alpha mode to complete
the address.
To change text entry modes, press and hold the
pÜáÑí=G key until the icon for your desired mode
appears at the top of the screen. You can also
select
lйнбзел and a different mode.
Capitalization
You can change capitalization at any time while
entering text. Simply press the
choose upper or lower case while in normal
alpha mode.
pÜáÑí=G key to
Text entry quick reference
This table gives instructions for entering letters,
numbers, and symbols.
User Guide 15
Page 24

qçKK aç=íÜáëKKK
bенЙк=~=дЙннЙк Use normal alpha mode and press a key until you see your desired letter.
For more options, see “Text entry modes” on page 14.
bенЙк=~=емгДЙк Use numbers only mode and press a key. For more options, see “Text
entry modes” on page 14.
bенЙк=~=лугДзд In either normal alpha mode, press the
båíÉê=~=ëé~ÅÉ Press the
bê~ëÉ=~=ÅÜ~ê~ÅíÉê Press the
bк~лЙ=~дд=ЕЬ~к~ЕнЙкл Press and hold the
symbol. For more options, see “Text entry modes” on page 14.
pé~ÅÉ=@ key.
_~Åâ key.
_~Åâ key.
N key until you find your desired
jзоЙ=Емклзк=кбЦЬн=зк=дЙСн Scroll left or right.
jзоЙ=Емклзк=мй=зк=Ззпе Scroll up or down.
`Ь~еЦЙ=нЙсн=Йенку=гзЗЙл Press and hold the
`~йбн~дбтЙ=~еу=дЙннЙк In normal alpha mode, press the
iзпЙкЕ~лЙ=~еу=дЙннЙк In normal alpha mode, press the
fåáíá~ä=Å~éë In normal alpha mode, press the
pÜáÑí=G key.
pÜáÑí=G key. Choose uppercase.
pÜáÑí=G key. Choose lowercase.
pÜáÑí=G key. Choose sentence case.
pЙдЙЕн=лзСн=зйнбзел=зе=лЕкЙЙе Press the appropriate left or right softkey.
16 Text entry quick reference
Page 25

5RECENT CALLS
Call lists
Details on the calls you made, received, or missed
are stored in the Recent Calls list and are
identified by the following icons:
Outgoing call
Incoming call
Missed call (flashing)
View recent calls
NK Select jÉåì > oЙЕЙен=`~ддл and one of the
following:
Ó
^ää displays all calls made or received.
Ó
fеЕзгбеЦ displays calls answered.
Ó
lмнЦзбеЦ displays calls made.
Ó
jбллЙЗ displays calls received, but not
answered.
OK Highlight a recent call.
PK Press the
pÉåÇ key to call the number or
select
lйнбзел and one of the following:
Ó
p~îÉ creates a new contact or sáÉï
displays the contact details.
Ó
pÉåÇ=qÉñí=jëÖ sends a text message to
the number.
Ó
bк~лЙ=oЙЕзкЗ deletes the call from the
call list.
kçíÉW If the phone number is classified as
“secret,” you must enter your four-digit lock code
to access it.
Missed calls
When you have missed a call, “Missed Call”
appears on your screen. You can do one of the
following:
√ To clear the screen, select
√ To view the call details, select
the OK key.
√ To return the call, select
Send key.
lh.
`~ääë and press
`~ääë and press the
Set alert for missed calls
You can set an alert to beep every five minutes
after you have missed a call. See “Alerts” on
page 23.
Erase call list
You can erase your phone’s call lists.
NK Select
OK Select
jÉåì > oЙЕЙен=`~ддл > bê~ëÉ=`~ää=
> ^ää, fеЕзгбеЦ, lмнЦзбеЦ, or jбллЙЗ.
iáëí
vÉë.
User Guide 17
Page 26

Call timers
View call timers
To track the number and duration of calls made
and received on your phone, select
oЙЕЙен=`~ддл > `~ää=qáãÉê and one of the
following:
√
^ää tracks all calls you have made and
received. You cannot reset this timer.
√
oЙЕЙен tracks all calls you have made and
received since you last reset this timer. To
reset this timer to zero, select
√
eçãÉ tracks calls you have made and
received in your home service area since you
last reset this timer. To reset this timer to zero,
select
oÉëÉí.
√
oç~ã tracks calls you have made and
received while roaming since you last reset
this timer. To reset this timer to zero, select
oÉëÉí.
√
hбдзДунЙ=`зменЙк tracks the total data sent
and received in kilobyte. To reset this timer to
zero, select
√
fеЕзгбеЦ tracks calls you have received since
lйнбзел > oÉëÉí.
you last reset this timer. To reset this timer to
zero, select
√
lмнЦзбеЦ tracks calls you have made since
oÉëÉí.
you last reset this timer. To reset this timer to
zero, select
oÉëÉí.
jÉåì >
oÉëÉí.
Time your calls
Your phone can alert with a short beep ten
seconds before each minute passes during a call.
For more information, see “Minute alert” on
page 44.
18 Call timers
Page 27

6MESSAGES
This chapter describes how to send, receive, and
erase messages from your phone. For information
on voicemail messages, see “Voicemail” on
page 11.
kçíÉW The features and menus described in this
chapter may vary depending on services available
in your area. Check with your service provider for
details and possible usage charges.
Text messages
You can only send text messages to phones
capable of receiving them or to email addresses.
Create a text message
NK Select jÉåì > jÉëë~ÖÉë > kÉï=qÉñí=jëÖ.
OK At the Send To field, enter a recipient’s phone
number or email address by either:
Ó Selecting
Ó Entering a new address manually. See
You can message up to ten recipients at
once. Use comma or spaces to separate
addresses. If you select stored contacts, this
is done automatically. Scroll down to move to
the next field when done.
PK At the Message field, enter the message.
User Guide 19
lйнбзел > oЙЕЙен=iблн,
oЙЕЙен `~ддл, `зен~Енл or dкзмйл to
access your stored contacts.
“Text Entry” on page 14.
QK Select
pÉåÇ.
Include preset text and other extras
During text entry, you can insert prewritten text
(preset text), symbols, or contacts.
NK From the text entry screen, select
and one of the following:
Ó
fелЙкн=mкЙлЙн=qЙсн inserts prewritten text
from a list.
Ó
^ЗЗ=pугДзд inserts a symbol. Press the
corresponding number to select a
symbol.
OK Complete your message.
PK Select
pÉåÇ.
lйнбзел
Use text message options
When you are ready to send a text message, you
have several options for how and when you want it
received.
NK After composing your message, select
lйнбзел and one of the following:
Ó
p~îÉ=jÉëë~ÖÉ saves the message to the
Drafts folder.
Ó
p~оЙ=~л=mкЙлЙн=qЙсн saves your
composed message as a prewritten
message.
Ó
aЙдбоЙку > jлЦ=oЙЕЙбйн > lå alerts you
when a recipient has received your
message.
Page 28

Ó aЙдбоЙку > mкбзкбну > kçêã~ä or
rкЦЙен sets the message priority.
Ó
aЙдбоЙку > `~ддД~Ев=kмгДЙк > lå
includes your callback number with the
message.
Ó
aЙдбоЙку > páÖå~íìêÉ > lå includes
your callback number with the message.
Ó
pЙннбеЦл > `~ддД~Ев=kмгДЙк sets your
callback number. Enter a number and
select
lh.
Ó
pЙннбеЦл > pÉåÇ=i~íÉê > fггЙЗб~нЙ or
pÉí=qáãÉ specifies the time to send the
message.
Ó
pЙннбеЦл > s~дбЗбну=mЙкбзЗ > pÉí=qáãÉ
sets a defined expiration time limit for a
message.
OK After selecting options, select
`äçëÉ.
PK Complete your message.
QK Select
pÉåÇ.
Retrieve a text message
When a text message is received, your phone
displays a notification and the message icon
appears at the top of your screen. The message
icon flashes if the message is urgent. Urgent
messages are also marked in the Inbox.
Message notifications
If you see a message notification, select fåÄçñ to
view messages. Scroll to a message and select
sáÉï to open it.
To clear a message notification, select
fЦезкЙ.
Message icons
If you see the message icon, select jÉåì >
jÉëë~ÖÉë > fåÄçñ. Scroll to a message and
select
sáÉï to open it.
View a text message
The options available when viewing a text message
may vary. Check with your service provider.
NK Select
OK Select a message to view. If the message is
PK Select
kçíÉW If a graphic is too large or incorrectly
formatted and is not received with the message,
an icon appears.
jÉåì > jÉëë~ÖÉë > fåÄçñ.
long, scroll down to view entire message.
oÉéäó to create a response message or
lйнбзел and one of the following:
Ó
bê~ëÉ deletes the message.
Ó
cçêï~êÇ forwards the message.
Ó
oÉéäó=ïáíÜ=`çéó replies to the message
with a copy of the original attached.
Ó
p~îÉ=jÉëë~ÖÉ saves the message to the
Saved folder.
Ó
p~оЙ=~л=mкЙлЙн=qЙсн saves the message
text as preset text, which can be inserted
into other messages. Graphics are not
saved.
Ó
içÅâ protects the message from
accidental deletion.
Ó
pЙеЗЙк displays the sender information.
20 Text messages
Page 29

Erase messages
It is a good idea to erase old messages to free up
memory in your phone.
You can erase messages as you send or read
them, erasing them one at a time or all at once.
Erase a single message
NK Select jÉåì > jÉëë~ÖÉë > fåÄçñ, pÉåí=
, lмнДзс, p~îÉÇ=jëÖë, or aê~Ñíë.
jëÖë
OK Scroll to the message you want to erase.
PK Select lйнбзел > bê~ëÉ.
QK At the notification, select vÉë to erase the
message.
kçíÉW You can erase a scheduled message from
the Outbox, but you cannot cancel delivery of the
message.
Erase all messages
NK Select jÉåì > jÉëë~ÖÉë > bê~ëÉ=jëÖ >
fеДзс, lмнДзс, pЙен=jлЦл, p~оЙЗ=jлЦл,
aк~Снл or ^дд.
To erase messages from all folders, select
^ää.
OK At the notification,select vÉë to erase the
messages.
Working with messages
This section provides some tips about messaging
with your phone.
Unable to send messages
You may not be able to send or receive messages
if your phone’s memory is nearly full, or if digital
service is not available at the time. To free up
memory, erase old messages. See “Erase
messages” on page 21.
Appended messages
If you go over the character limit for a single
message, the phone may automatically append an
empty segment to your message to make space.
fгйзкн~енW Your service provider charges you
for each message segment.
When you start a message, the maximum
character limit appears once you are in the
message entry field. This number counts down as
you enter characters, until it reaches 0.
If you continue to enter text after this counter
reaches 0, a message segment may be appended.
When you reach the message size limit, you are
prompted to edit the message or alerted that the
message is being appended.
kçíÉW Appended messages may not be available
on all phones. Check with your service provider.
User Guide 21
Page 30

Receive incoming calls while
creating messages
If you receive a call while creating a message you
will receive a notification. You can do the
following:
√ Select
fЦезкЙ to not answer the call but return
to the message screen.
√ Press the
pÉåÇ key to answer the call and save
the message to the Drafts folder.
Complete messages in Drafts folder
To continue composing a message in the Drafts
folder:
NK Select
OK Select
PK Complete your message.
QK Select pÉåÇ.
jÉåì > jÉëë~ÖÉë > aê~Ñíë and the
message you want to complete.
bÇáí.
View messages in Sent folder
To view messages in the Sent folder, select
jÉåì > jÉëë~ÖÉë > pÉåí=jëÖë.
Scroll through the list of messages. One of
the following indicators may appear next to
each message:
The scheduled message was sent and
delivered as scheduled. You cannot
cancel delivery of the message.
The message has been received.
The message has never been sent or
has not been sent since it was last
modified. You can cancel delivery of
the message
The message has been sent to more
than one recipient.
View failed or pending messages
Failed or pending messages are stored in your
Outbox folder. To view messages in the Outbox
folder, select
list of failed or pending messages appears with the
following symbols.
jÉåì > jÉëë~ÖÉë > lмнДзс. Your
The message is pending and will be sent
when possible. You can cancel delivery
of the message.
The message cannot be sent because
service is not available. An alert appears
on your phone if the message cannot
be sent.
Message settings
Message settings help configure your phone’s text
message settings.
22 Message settings
Page 31

Alerts
Choose your alerts for voicemail, pages, or
messages.
NK Select
jÉåì > jÉëë~ÖÉë > jлЦ=pЙннбеЦл >
^дЙкнл > jëÖ=^äÉêí, m~ÖÉ=^äÉêí, or sçáÅÉ=
.
^äÉêí
OK Select an alert.
kçíÉW If you select an alert with an & Remind, the
phone notifies you once when receiving a new
message and notifies you again every five minutes.
To stop a reminder alert, select
fЦезкЙ.
Signature
The signature you create is included at the end of
all outgoing messages, but does not appear in the
message creation screen.
NK Select
jÉåì > jÉëë~ÖÉë > jлЦ=pЙннбеЦл >
páÖå~íìêÉ > `млнзг > kÉñí.
OK Enter your signature in the text field.
PK Select lh to save the signature.
kçíÉW The characters in the signature are
included in the total character count of the
message.
Edit preset text
Your phone comes with prewritten messages
(preset text), such as “Please call me,” which you
can insert into the body of a text message. You can
edit these messages or create new ones. Your
phone stores up to 40 preset text messages, with
up to 100 characters per message.
NK Select
jÉåì > jÉëë~ÖÉë > jлЦ=pЙннбеЦл >
bЗбн=mкЙлЙн=qЙсн and one of the following:
Ó Scroll to a preset text message and select
bÇáí.
Ó Select
kÉï=jëÖ to create a new preset
text message.
OK Enter or edit the text.
PK Select
p~îÉ.
kçíÉW You can also save a message you have
written or received as preset text.
Callback number
Set a callback number to let recipients know
where to call you back.
NK Select
jÉåì > jÉëë~ÖÉë > jлЦ=pЙннбеЦл >
`~ддД~Ев=kмгДЙк > `млнзг > kÉñí.
OK Enter a number in the text field.
PK Select lh to save the number.
Auto save
To set your phone to automatically save outgoing
messages to the
jÉëë~ÖÉë > jлЦ=pЙннбеЦл > ^ìíç=p~îÉ and one
of the following:
√
aç=kçí=p~îÉ does not save the outgoing
messages.
√
mкзгйн allows you to choose whether to save
your message when you send it.
pÉåí=jëÖë folder, select jÉåì >
User Guide 23
Page 32

√ ^ìíç=p~îÉ saves all outgoing messages to the
pÉåí=jëÖë folder.
Auto-erase
You can set your phone to erase message
automatically when memory is needed for
incoming messages.
Select
jÉåì > jÉëë~ÖÉë > jлЦ=pЙннбеЦл >
^ìíçJbê~ëÉ and one of the following:
√
aáë~ÄäÉÇ erases no messages.
√
fåÄçñ=jëÖë erases old messages in your
Inbox when memory is needed.
√
pÉåí=jëÖë erases old messages in the pÉåí=
folder when memory is needed.
jëÖë
√
_çíÜ erases old messages in both your Inbox
and Sent folder when memory is needed.
Entry mode
You can change the default text entry mode when
creating a text message. This setting applies only
to the Message field, not the Send To field.
Select
jÉåì > jÉëë~ÖÉë > jлЦ=pЙннбеЦл >
båíêó=jçÇÉ and one of the following:
√
^ÄÅ selects the sentence mode.
√
^_` selects the all uppercase mode.
√
NOP selects the number only mode.
√
o~éáÇ selects the rapid entry mode.
Text message receipt
You can request a notification when a recipient
has received your text message. Select
jÉåì >
jÉëë~ÖÉë > jлЦ=pЙннбеЦл > qЙсн=jлЦ=oЙЕЙбйн >
oЙимЙлн.
Voicemail number
Set the number your phone calls to retrieve
voicemail. Often your voicemail number is
automatically programmed by your service
provider.
NK Select
OK Select bÇáí.
PK Enter the voicemail number. Use lйнбзел >
QK Select p~îÉ.
jÉåì > jÉëë~ÖÉë > jлЦ=pЙннбеЦл >
sзбЕЙг~бд=kмгДЙк.
qáãÉ=m~ìëÉ or e~êÇ=m~ìëÉ to enter pauses.
24 Message settings
Page 33

7CONTACTS
Use your phone’s Contacts list to store
information about a person or company. Each
contact entry can have up to six phone numbers,
two email addresses, two Web addresses, two
street addresses, and a space for notes.
Viewing Contacts list
To view existing contacts in your phone, select
jÉåì > `çåí~Åíë > sáÉï=^ää. Your Contacts list is
listed alphabetically.
qáéW You can also select
screen to view the directory.
Scroll to a contact and do one of the following:
√ Press the
√ Press the
√ Select
√ Select
pÉåÇ key to call the highlighted
contact.
lh key to view the highlighted
contact’s details.
kÉï to add a new contact.
lйнбзел and choose one of the
following:
Ó
`~ää calls the contact.
Ó
pÉåÇ=qÉñí=jëÖ sends a text message.
Ó
sáÉï=`çåí~Åí shows the contact details.
Ó
bÇáí=`çåí~Åí enables editing the contact.
Ó
bê~ëÉ=`çåí~Åí deletes the contact.
Ó
`çåí~Åíë=jÉåì accesses the contact
menu.
`çåí~Åíë from the main
Adding contacts
Add contact from main screen
To add a contact to your Contacts list:
NK From the main screen, enter a phone
number to save (including the area code).
OK Select
PK Enter a name for the contact. For more
QK Enter additional phone numbers, email
RK When you are done entering the information,
Add contact from contacts menu
To add a contact to your Contacts list:
NK Select jÉåì > `çåí~Åíë > ^ÇÇ=kÉï.
OK Enter a name for the contact. When you are
PK Enter a primary number for the contact.
QK Enter additional phone numbers, email
p~îÉ > p~îÉ=kÉï=`çåí~Åí.
information, see “Text Entry” on page 14.
addresses, Web addresses, and notes, if
needed. Scroll up or down to move through
the contact fields.
select
p~îÉ.
done, scroll down to move to the next field.
For more information, see “Text Entry” on
page 14.
addresses, Web addresses and note, if
needed. Scroll up or down to move through
the contact fields.
User Guide 25
Page 34

RK When you are done entering information,
select
p~îÉ.
Add code or extension
When you save the phone number of an
automated service, you may include a pause to
stop dialing, where you can wait to dial an
extension.
NK From the main screen, enter a phone
number.
OK Select
PK Enter the remaining numbers.
QK Complete the contact and select p~îÉ.
lйнбзел and a type of pause:
Ó
qáãÉ=m~ìëÉ causes the phone to stop
dialing for two seconds.
Ó
e~êÇ=m~ìëÉ causes the phone to stop
dialing until you select
oÉäÉ~ëÉ=while making the call.
lйнбзел >
Working with contacts
Contact details
To edit the details of an existing contact:
NK Select jÉåì > `çåí~Åíë > sáÉï=^ää.
OK At the Contacts list, select a contact.
PK At the contact’s detail screen, select
QK Edit or add phone numbers, email
addresses, Web addresses, and notes. Scroll
up or down to move through the contact
fields.
bÇáí.
RK When you are done entering the information,
select
p~îÉ.
Contact name
To work on the name of an existing contact:
NK Select jÉåì > `çåí~Åíë > sáÉï=^ää.
OK At the Contacts list, select a contact.
PK At the contact’s detail screen, scroll to the
contact name.
QK Select
lйнбзел and one of the following:
Ó
oбеЦЙк assigns a specific ringer to the
contact.
Ó
mбЕнмкЙ assigns a specific picture to the
contact.
Ó
bê~ëÉ=`çåí~Åí deletes the entire contact.
Contact number
To work on the number of an existing contact:
NK Select jÉåì > `çåí~Åíë > sáÉï=^ää.
OK At the Contacts list, select a contact.
PK At the contact’s detail screen, scroll to a
contact number.
QK Select
lйнбзел and one of the following:
Ó
`~ää calls the contact.
Ó
pÉåÇ=qÉñí=jëÖ sends a text message.
Ó
mкЙйЙеЗ displays the contact’s detail
screen for you to change the number
(adding an area code) or other data of
the contact.
26 Working with contacts
Page 35

Ó ^ÇÇ=péÉÉÇ=aá~ä adds the number to your
speed dial list.
Ó
sбЙп=kмгДЙк displays the number.
Ó
bк~лЙ=kмгДЙк deletes the number from
the contact.
Ó
pЙЕкЙн/kзн=pЙЕкЙн makes the number
secret, hiding it from the screen until you
enter the lock code.
Ó
mкбг~ку=kмгДЙк makes this number the
primary number for the contact.
Ó
^ÇÇ=íç=dêçìé adds the number to the
business, personal, or custom group.
Contact email address
To work on the email address of an existing
contact:
NK Select
OK At the Contacts list, select a contact.
PK At the contact’s detail screen, scroll to ‘a
QK Select
jÉåì > `çåí~Åíë > sáÉï=^ää.
contact email address.
lйнбзел and one of the following:
Ó
pÉåÇ=qÉñí=jëÖ sends a text message.
Ó
sбЙп=^ЗЗкЙлл displays the email
address.
Ó
^ÇÇ=íç=dêçìé adds the email address to
the business, personal, or custom group.
Ó
bк~лЙ=^ЗЗкЙлл deletes the email address
from the contact.
Ó
pЙЕкЙн/kзн=pЙЕкЙн makes the email
address secret, hiding it from the screen
until you enter the lock code.
Contact Web address
To work on the Web address of an existing
number.
NK Select
jÉåì > `çåí~Åíë > sáÉï=^ää.
OK At the Contacts list, select a contact.
PK At the contact’s detail screen, scroll to a
contact Web address.
QK Select
lйнбзел and one of the following:
Ó
i~ìåÅÜ=tÉÄ launches the Web browser
and goes to the Web address.
Ó
sáÉï=tÉÄ displays the Web address.
Ó
bê~ëÉ=tÉÄ deletes Web address from the
contact.
Ó
pЙЕкЙн/kзн=pЙЕкЙн makes the Web
address secret, hiding it from the screen
until you enter the lock code.
Contact street address
To work on the street address of an existing
number:
NK Select
OK At the Contacts list, select a contact.
PK At the contact’s detail screen, scroll to a
jÉåì > `çåí~Åíë > sáÉï=^ää.
contact street address.
User Guide 27
Page 36

QK Select lйнбзел and one of the following:
Ó
sбЙп=^ЗЗкЙлл displays the street
address.
Ó
bк~лЙ=^ЗЗкЙлл deletes street address
from the contact.
Ó
pЙЕкЙн/kзн=pЙЕкЙн makes the street
address secret, hiding it from the screen
until you enter the lock code.
Contact note
To work on the note of an existing number:
NK Select
jÉåì > `çåí~Åíë > sáÉï=^ää.
OK At the Contacts list, select a contact.
PK At the contact’s detail screen, scroll to the
contact note.
QK Select
lйнбзел and one of the following:
Ó
sáÉï=kçíÉ displays the note.
Ó
bê~ëÉ=kçíÉ deletes the note from the
contact.
Ó
pЙЕкЙн/kзн=pЙЕкЙн makes the note secret,
hiding it from the screen until you enter
the lock code.
Assign ringer
To assign a ringer to a contact:
NK Select
OK At the Contacts list, select a contact.
PK At the contact’s detail screen, scroll to the
jÉåì > `çåí~Åíë > sáÉï=^ää.
contact name.
QK Select
lйнбзел > oбеЦЙк > ^ллбЦе=oбеЦЙк
and a ringer from the list. Scroll to play the
ringers.
Assign picture
To assign a picture to a contact:
NK Select jÉåì > `çåí~Åíë > sáÉï=^ää.
OK At the Contacts list, select a contact.
PK At the contact’s detail screen, scroll to the
contact name.
QK Select
lйнбзел > mбЕнмкЙ and one of the
following:
Ó
^ллбЦе=mбЕнмкЙ assigns a picture to the
contact. Select
kind of picture to assign:
or
`~ääÉê=faë.
Ó
rе~ллбЦе=mбЕнмкЙ removes the assigned
fã~ÖÉë to choose what
p~îÉÇ=fã~ÖÉë
picture from the contact.
kçíÉW With Mobile Phone Tools (MPT) for
Kyocera you can transfer digital pictures to your
phone. To purchase MPT or other accessories
visit
пппKвузЕЙк~JпбкЙдЙллKЕзгLлнзкЙ.
Assign number type
After you assign a number type, an icon appears
in front of the contact number.
NK Select
OK At the Contacts list, select a contact.
PK At the contact’s detail screen, select bÇáí.
jÉåì > `çåí~Åíë > sáÉï=^ää.
28 Working with contacts
Page 37

QK Press down twice to scroll to the number
type dropdown and press the
lh key.
RK Select dÉåÉê~ä, tç êâ, eçãÉ, jзДбдЙ,
m~ÖÉê or c~ñ. The appropriate icon appears
next to the number in your phone lists.
SK Select
p~îÉ.
Contact groups
You can assign your contacts to groups. Your
phone comes with two default groups, Business
pÉåÇ=qÉñí=jëÖ sends a text message.
Ó
Customize groups
NK Select jÉåì > `çåí~Åíë > sбЙп=dкзмйл.
OK At the Groups list, select a group.
PK Select
lйнбзел and one of the following:
Ó
oбеЦЙк assigns a ringer to the group.
Ó
mбЕнмкЙ assigns a picture to the group.
Ó
bê~ëÉ deletes the group.
Ó
bÇáí enables editing the group.
and Personal. You can also create your own
groups.
NK Select
jÉåì > `çåí~Åíë > sбЙп=dкзмйл.
OK Select kÉï.
PK Enter a name for the group, and select kÉñí.
QK Select the contacts from the list provided. A
check mark appears next to each selection
you make. You can also remove checkmarks.
RK After selecting your desired contacts, select
açåÉ.
Your new group appears the next time you view
your groups.
Use groups
NK Select jÉåì > `çåí~Åíë > sбЙп=dкзмйл.
OK At the Groups list, scroll to a group.
PK Select
User Guide 29
lйнбзел and one of the following:
Ó
sáÉï displays the group details.
Ó
bÇáí enables editing the group.
Ó
bê~ëÉ deletes the group.
Searching contacts
To find a phone number or contact, you can
search the Contacts list, check the Frequent List,
or use Fast Find.
Contacts list
To search your Contacts list, select jÉåì >
`çåí~Åíë and one of the following:
√
sáÉï=^ää lists the entire Contacts list.
√
sбЙп=dкзмйл lists the existing groups.
√
péÉÉÇ=aá~ä=iáëí or sçáÅÉ=aá~ä=iáëí shows the
contacts on the specified list.
You can also use the
main screen to view the Contacts list. To quickly
get down the list, enter the first letter of the
contact. You can skip to that letter of the alphabet.
`çåí~Åíë shortcut from the
Page 38

Frequent list
With Frequent List enabled, you can see 15 of
your most frequently called contacts. For more
information, see “Frequent list” on page 44.
Fast find
With Fast Find enabled, you can press one or two
keys to view close matches of the number. For
more information, see “Fast find” on page 43.
Contacts count
To check the status of the stored contacts on the
phone (with a maximum of 500), select
`çåí~Åíë > `çåí~Åíë=`çìåí.
jÉåì >
30 Contacts count
Page 39

8MY STUFF
My ringtones
The My ringtones folder stores your preloaded
and downloaded ringtones. You can download
ringtones to your phone from the Web site or
directly from your phone using
Select
jÉåì > jу=лнмСС > jу=кбеЦнзеЙл >
dЙн гзкЙ=кбеЦнзеЙл. Charges apply.
Downloading ringtones
Before downloading, make sure you have enough
money in your account; otherwise you can Top-Up
your account.
NK At the main screen, scroll left to launch
OK Follow the prompts to purchase and
The downloaded ringtones are stored in the
jÉåì > jу=лнмСС > jу=кбеЦнзеЙл folder in
your phone.
and then search for ringtones.
_кзплЙк
download the selected ringtone.
Assigning downloaded ringtones
NK Select jÉåì > jу=лнмСС > jу=кбеЦнзеЙл.
OK Select a downloaded ringtone and
tЙД=_кзплЙк.
tÉÄ=
pÉí=~ëKKK.
kçíÉW The downloaded ringtone is also listed in
the Ringtones folder and available to assign to
individual contacts or as the Personal or Business
ringer. See “Add contact from main screen” on
page 25 and “Assign message alert to contacts”
on page 34.
My games
You can download games to your phone from the
Web site or directly from your phone using
. Select jÉåì > jу=лнмСС > jó=Ö~ãÉë >
_кзплЙк
dЙн=гзкЙ=Ц~гЙл. Charges apply.
kçíÉW If you don’t have enough money in your
account, you need to Top-Up before downloading.
NK At the main screen, scroll left to launch
UK Follow the prompts to purchase and
The downloaded games are stored in the
jу=лнмСС > jó=Ö~ãÉë folder in your phone.
and then search for games.
_кзплЙк
download the selected games.
tÉÄ=
tÉÄ=
jÉåì >
User Guide 31
Page 40

My graphics
You can download wallpapers and screensavers to
your phone from the Web site or directly from your
phone using
лнмСС
Charges apply.
kçíÉW If you don’t have enough money in your
account, you need to Top-Up before downloading.
NK At the main screen, scroll left to launch
VK Follow the prompts to purchase and
The downloaded graphics are stored in the
jÉåì > jу=лнмСС > jу=Цк~йЬбЕл folder in
your phone.
kçíÉW You can assign downloaded graphics as
either screensavers or wallpapers.
To assign downloaded graphics:
NK At the main screen, select
OK Select jу=йбЕнмкЙл, tЙД=Цк~йЬбЕл,
PK Scroll to the graphic you want to assign and
QK Select
tЙД=_кзплЙк. Select jÉåì > jó=
> jу=Цк~йЬбЕл > dЙн=гзкЙ=Цк~йЬбЕл.
and then search for graphics.
_кзплЙк
download the selected graphic.
> jу=Цк~йЬбЕл.
лнмСС
t~ддй~йЙкл, pЕкЙЙел~оЙкл or `~ддЙк=faл,
and then
lh.
select
lйнбзел.
^ллбЦе or pÉí=ÇÉÑ~ìäí, and press the
lh key.
jÉåì > jó=
tÉÄ=
My other stuff
You can download other stuff to your phone from
the Web site or directly from your phone using
tЙД=_кзплЙк. Select jЙем > jу=лнмСС > jу=
знЬЙк=лнмСС
> dЙн=гзкЙ=лнмСС. Charges apply.
kçíÉW If you don’t have enough money in your
account, you need to Top-Up before downloading.
NK At the main screen, scroll left to launch
and then search for applications.
_кзплЙк
tÉÄ=
NMK Follow the prompts to purchase and
download the selected application.
The downloaded applications are stored in the
jÉåì > jу=лнмСС > jу=знЬЙк=лнмСС folder in
your phone.
My sounds
You can record and save voice memos and all
received, attached sound files to My sounds. To
listen to saved sounds or recorded voice memos:
NK At the main screen, select
> jу=лзмеЗл.
лнмСС
OK Select p~оЙЗ=лзмеЗл or sзбЕЙ=гЙгзл and
then
lh.
PK Highlight a sound and select lйнбзел.
QK Highlight
oЙЕзкЗ=еЙп, bк~лЙ, iзЕвLrедзЕв,
oЙе~гЙ, aЙн~бдл, or bк~лЙ=~дд and press the
lh key.
jÉåì > jó=
32 My graphics
Page 41

9TOOLS
Your phone comes with tools and games. Some of
the games or tools described here may not be
available on your phone.
If you receive an incoming call while you are
playing a game, the game is paused and exited.
You can return to play once the call alert ends.
Games do not remain paused if the phone is
turned off or loses power.
Voice memo
The Voice Memo tool enables you to record and
play back audio memos.
Record voice memos
To record new voice memos, do the following:
NK Select jÉåì > qççäë > sçáÅÉ=jÉãç >
oЙЕзкЗ=kЙп or press and hold the right
Navigation key as a shortcut.
OK Say your voice memo. Select
are done.
PK Select
If an incoming call is received while you are
recording a memo, the memo is saved and the
incoming call screen appears.
p~îÉ to save your memo.
Review voice memos
To play and use voice memos, do the following:
Ó Scroll up or down to change the month, day and year.
píçé when you
NK Select
oЙЕзкЗЙЗ=jЙгзл.
OK At the file list, highlight a file.
PK Select mä~ó to play the memo or select
lйнбзел and one of the following:
Ó
bê~ëÉ deletes the memo.
Ó
içÅâ prevents erasing the memo
accidentally.
Ó
oÉå~ãÉ renames the memo.
Ó
aÉí~áäë displays the details of the file.
Ó
bê~ëÉ=^ää deletes all memos stored.
Scheduler
The Scheduler enables you to schedule events and
set reminder alerts.
Create an event
NK Select jÉåì > qçç äë > pЕЬЙЗмдЙк > ^ÇÇ=
kÉï=bîÉåí
OK At the Event Name field, enter a name. Scroll
down to move to the next field when done.
PK At the Type field, choose an event. Press the
lh key and select a choice from the list.
QK At the Date field, modify the date, if needed.
Press
Ó Scroll left or right to move between the
month, day and year fields.
jÉåì > qççäë > sçáÅÉ=jÉãç >
.
lh to change the date.
User Guide 33
Page 42

Press the lh key to save the date and move
to the next field.
RK At the Time field, modify the time, if needed.
Press
lh to change the time.
Ó Scroll left or right to move between the
hour, minute and AM/PM fields.
Ó Scroll up or down to change hour,
minute and AM/PM.
Press the
lh key to save the time and move
to the next field.
SK At the Duration field, modify the duration of
event, if needed. Press
lh to change the
duration.
Ó Scroll left or right to move between the
hour and minute fields.
Ó Scroll up or down to change the hour
and minute.
Press the
lh key to save the duration and
move to the next field.
TK At the Priority field, choose a priority. Press
the
lh key and select a choice from the list.
UK At the Reminder field, choose a reminder.
Press the
lh key and select a choice from
the list.
VK At the Reminder Sound field, choose a
reminder sound alerts. Press the
lh key and
select a choice from the list.
NMK At the Silent Mode field, press the
and select
lÑÑ to leave on normal sounds or
lh key
aмкбеЦ=bоЙен to place the phone in silent
mode during the duration of the event.
NNK At the Recurring Event field, make the event
recurring, if needed. Press the
lh key and
select a choice from the list.
NOK Select
p~îÉ to save the event.
View events
You can view the events saved to the scheduler.
View by date
NK Select jÉåì > qçç äë > pЕЬЙЗмдЙк and one
of the following:
Ó
sáÉï=jçåíÜ displays the current month.
Days with events are highlighted. Scroll
the calendar. Press the
date.
Ó
sáÉï=a~ó displays the current date.
Scroll right or left to move to another
date.
Ó
dç=íç=a~íÉ chooses a specific date.
Scroll left or right to move between the
month, day and year fields. Scroll up or
down to change month, day and year.
Press
lh to select the date.
OK At the day view, do one of the following:
Ó Select an existing event to view the event
detail.
Ó Scroll to a time and select
create a new event.
lh key to select a
^ÇÇ=kÉï to
34 Scheduler
Page 43

Ó Select lйнбзел > dç=íç=qçÇ~ó to return
to the current date.
Ó Select
lйнбзел > dç=íç=a~íÉ to select a
specific date.
Ó Select
lйнбзел > bк~лЙ=~дд=bоЙенл to
delete all event for that date.
View by list
NK Select jÉåì > qççäë > pЕЬЙЗмдЙк > sáÉï=
^дд=bоЙенл
.
OK At the event list, select one of the following:
Ó Scroll to an event and select
sáÉï to
display the event detail.
Ó Select
lйнбзел > pçêí=Äó=qáãÉ to sort
events by time.
Ó Select
lйнбзел > pçêí=Äó=qóéÉ to sort
events by type.
Ó Select
lйнбзел > pзкн=Ду=mкбзкбну to sort
events by priority.
Ó Select
lйнбзел > bк~лЙ=^дд=bоЙенл to
delete all events.
Modify an event
You can modify existing events.
From the event detail screen, you can select lh to
return to the previous screen or
the following:
√
bÇáí edits the event.
√
bê~ëÉ deletes the event.
√
pÉåÇ creates a message containing the event.
lйнбзел and one
`çéó creates an event with the existing event
√
information.
Scheduler settings
You can change the default settings of your
scheduler.
Select
jÉåì > qççäë > pЕЬЙЗмдЙк > pЙннбеЦл
and one the following:
√
pЕЬЙЗмдЙк=eзмкл changes the work day.
√
^мнз=aЙдЙнЙ deletes events automatically.
√
mкбзкбну prioritizes new events.
√
oЙгбеЗЙк assigns reminders for new events.
√
oЙгбеЗЙк=pзмеЗ assigns sound alerts for
new event reminders.
√
pбдЙен=jзЗЙ sets the phone to silent mode for
new events.
Alarm clock
You can set up to four alerts with your phone’s
three alarm clocks and one quick alarm.
kçíÉW The alert occurs only if the phone is on.
Set the alarm clocks
NK Select jÉåì > qçç äë > ^ä~êã=`äçÅâ.
OK Scroll to one of the alarms and select pÉí.
PK At the Alarm Time field, modify the time, if
needed. Press
Ó Scroll left or right to move between the
hour, minute and AM/PM fields.
Ó Scroll up or down to change the hour, minute and AM/PM.
lh to change the time.
User Guide 35
Page 44

Press the lh key to save the time and move
to the next field.
QK At the Alarm Sound field, choose a sound.
Press the
lh key and select a choice from
the list.
RK At the Recurring field, make the alarm
recurring, if needed. Press the
lh key and
PK Select the percentage amount to tip. The new
bill amount is shown.
QK Select
açåÉ to return to menu or péäáí to
split the bill.
To split the bill enter number of guests and
select
kÉñí. The new bill amount with splits
is shown. Select
açåÉ to return to menu.
select a choice from the list.
SK At the Alarm Note field, enter a note. Press
the
lh key.
TK Select p~îÉ to set the alarm(s).
When the alarm rings, select lÑÑ to turn off the
alarm or
pеззтЙ to silence the alarm for 10
minutes.
qáéW Opening the flip turns off the alarm.
Set the quick alarm
NK Select jÉåì > qççäë > ^ä~êã.
OK Highlight the quick alarm and select pÉí.
PK At the Time field, select a time option. A
notification shows the quick alarm is on.
When the quick alarm rings, select
the alarm or
oÉëÉí to set the quick alarm again.
lÑÑ to turn off
Tip calculator
The Tip Calculator helps you calculate how much
tip to include with a bill.
NK Select
OK Enter the amount of your bill and select
36 Tip calculator
jÉåì > qççäë > qáé=`~äÅìä~íçê.
kÉñí.
Calculator
The Calculator can perform basic mathematical
operations.
NK Select
OK Enter the first number.
PK Select mathematical operation.
QK Enter the second number. Press the
RK Select
jÉåì > qççäë > `~äÅìä~íçê.
Ó Scroll left to multiply.
Ó Scroll right to divide.
Ó Scroll up to add.
Ó Scroll down to subtract.
The chosen operation is highlighted.
to perform the operation. The result is
lh key
shown.
bñáí to return to menu or lйнбзел and
one of the following:
Ó
jH adds displayed result to the value
stored in memory.
Ó
jo displays currently stored value on the
screen.
Ó
j` clears value currently stored in
memory.
Page 45

Timer
The Timer counts down for the specified time,
and beeps when that amount of time has elapsed.
NK Select
OK At the Set Timer, enter the time length.
PK If needed, select
QK To work the timer, select the following
When the countdown is complete, select
silence the alarm.
jÉåì > qççäë > qáãÉê > pÉí.
Ó Scroll left or right to move between the
hours, minutes and seconds fields.
Ó Scroll up or down to change the hours,
minutes and seconds.
sounds to change the sound.
options:
Ó
pí~êí begins the countdown.
Ó
píçé pauses the countdown.
Ó
oÉëÉí clears the timer.
pçìåÇ and one of the
lÑÑ to
Stopwatch
The Stopwatch counts time for you.
NK Select jÉåì > qççäë > píçéï~íÅÜ.
OK To work the stopwatch, select the following
options:
Ó
pí~êí begins counting.
Ó
píçé pauses counting.
Ó
oÉëÉí clears the stopwatch.
_~Åâ key to return to the menu.
Press the
World clock
The world clock enables you to check times in
cities around the world in relation to your local
time.
Set the world clock
NK Select jÉåì > qçç äë > tçêäÇ `äçÅâ.
The world clock menu displays your local
date and time on the first line.
OK Scroll left or right to select a different time
zone, or up and down to view other cities on
the same time zone.
Search the world clock
From the world clock menu, you can search by
city or country.
NK Select
OK Enter the first letter(s) of your desired city or
PK Select the city or country from the list.
jÉåì > qççäë > tçêäÇ `äçÅâ >
lйнбзел > pÉ~êÅÜ=`áíó or pЙ~кЕЬ=`зменку.
country.
User Guide 37
Page 46

10 SETTINGS
Menu options
The contents of the Settings menu are as follows:
Sounds
Ringers
Roam Ringer Activation
Ringer Mode
Volume
Flip Sounds
Pwr On/Off
Key Sounds
kçíÉW Some features are not available on all phones. Check with your service provider.
Display
Wallpaper
Screensaver
Main Menu View
My Banner
My Ticker
Backlighting
Brightness
Language
Time/Date Format
Convenience
Airplane Mode
Auto-Hyphen
1-Touch Dialing
Auto Redial
Hold Call
Fast Find
Frequent List
Missed Call Alert
Minute Alert
Open to Answer
Any Key Answer
Sounds
Your phone has several settings that control the
sound. You can select from a variety of ringers
Voice Features
Automatic Add
Expert Mode
Display Results
Digit Lengths
Voice Answer
Voice Wake-Up
Voice Training
Accessories
Headset Sounds
Auto-Answer
Pwr Backlighting
Com Port Speed
TTY Device
Hearing Aid
Ringers
You can change the ringer for your phone. You
can also assign ringers for different tasks.
Network
Privacy Alert
Voice Privacy
Roam/Svc Alert
Roam Option
Set Phone Line
Web Alert
Roam Call Alert
Location
Security
Lock Phone
Limit Calls
Emergency Numbers
Erase Contacts
New Lock Code
Phone Info
Build Info
Icon Keys
and control the volume.
38 Menu options
Page 47

Ringer types
Your phone has multiple ringers you can choose
to use for all incoming calls, incoming business
calls, and incoming personal calls.
NK Select
jÉåì > pЙннбеЦл > pзмеЗл >
oбеЦЙкл > oбеЦЙк=qуйЙ, _млбеЙлл=oбеЦЙк,
or
mЙклзе~д=oбеЦЙк.
OK Select a ringer. (Scroll down the list to hear
the ringers.)
Roam ringer
Your phone can alert you to roaming calls with a
specific ringer. Select
pзмеЗл > oбеЦЙкл > oз~г=oбеЦЙк > bå~ÄäÉÇ.
jÉåì > pЙннбеЦл >
Roam ringer activation
Your phone can alert you to roaming calls with
a specific ringer. Select
pзмеЗл > oз~г=oбеЦЙк=^Енбо~нбзе > bå~ÄäÉÇ.
jÉåì > pЙннбеЦл >
Ringer mode
Your phone is set to make sounds when you
receive calls, press keys, navigate through menus,
and receive alerts (such as new messages).
You can silence all sounds and set the phone to
vibrate or light up when you receive calls and
alerts.
Select
jÉåì > pЙннбеЦ > pзмеЗл > oбеЦЙк jзЗЙ
and one of the following:
√
kзкг~д=pзмеЗл rings for the incoming call or
alert (in effect, returning phone to a nonsilent mode).
√
sáÄê~íÉ=låäó vibrates for the duration of the
incoming call or other alerts.
√
sáÄÉ=qÜÉå=oáåÖ vibrates for the first 10
seconds and then rings for the remainder of
the incoming call alert.
√
iбЦЬнл=lеду lights up for the duration of the
incoming call or other alerts.
You can also press and hold the
the
sздмгЙ key???) to toggle between Vibrate Only
pé~ÅÉ=@ key (or
mode and Normal Sounds mode.
kçíÉW The phone rings when attached to an
external power source (such as a charger), even
if all sounds have been silenced.
Vol ume
You can control the volume of your phone’s
features.
Volume controls
To control the volume of the phone’s ringer,
speakerphone, earpiece, and keypad:
NK Select
OK Scroll right to increase the volume or left to
jÉåì > pЙннбеЦл > pзмеЗл >
sздмгЙ > oбеЦЙк sздмгЙ, pйвкйЬзеЙ=
sздмгЙ
, b~кйбЙЕЙ=sздмгЙ, or hЙу=sздмгЙ.
decrease the volume.
User Guide 39
Page 48

PK Press the lh key to save.
Smart volume
To automatically adjust the volume during a call,
based on surrounding noise levels, select
pЙннбеЦл > pзмеЗл > sздмгЙ > pã~êí=
> bå~ÄäÉÇ.
sздмгЙ
jÉåì >
Flip sounds
To assign specific sounds for when your phone’s
flip opens or closes:
NK Select
jÉåì > pЙннбеЦл > pзмеЗл > cäáé=
> cäáé=léÉå or cдбй=`дзлЙЗ.
pзмеЗл
OK Select a sound. (Scroll down the list to hear
the sounds.)
Power on/off
Your phone plays a sound when powering on and
off. Select
jÉåì > pЙннбеЦл > pзмеЗл > mïê=låL
> bå~ÄäÉÇ.
lÑÑ
Key Sound
To choose the sound the phone makes when you
press its keys, select
pзмеЗл > hЙу=pзмеЗ > qзеЙ, `дбЕв, or lСС.
jÉåì > pЙннбеЦл >
Display
Wallpaper
You can select a wallpaper for your phone’s home
screen. Select
t~ääé~éÉê and one of the following options:
√ Scroll to select a wallpaper.
√ Select
picture.
√ Select
image from your images folder.
√ Select
picture taken with your phone’s camera.
√ Select
details.
Screensaver
Screensavers appear on the home screen,
activated 10 seconds after the last keypress.
Incoming calls and alerts override the
screensavers.Select
>
pЕкЙЙел~оЙк and one of the following options:
√ Scroll to select a screensaver.
√ Select
picture.
√ Select
image from your images folder.
√ Select
picture taken with your phone’s camera.
√ Select
details.
jÉåì > pЙннбеЦл > aáëéä~ó >
lйнбзел > sáÉï to see the enlarged
lйнбзел > p~îÉÇ=fã~ÖÉë to select an
lйнбзел > `~гЙк~=mбЕнмкЙл to select a
lйнбзел > aÉí~áäë to view the file
jÉåì > pЙннбеЦл > aáëéä~ó
lйнбзел > sáÉï to see the enlarged
lйнбзел > p~îÉÇ=fã~ÖÉë to select an
lйнбзел > `~гЙк~=mбЕнмкЙл to select a
lйнбзел > aÉí~áäë to view the file
40 Display
Page 49

Main menu view
To display menus in various formats, select
jÉåì > pЙннбеЦл > aáëéä~ó > j~áå=jÉåì=sáÉï
and one of the following:
√
dêáÇ displays icons of each menu item, with
its name at the bottom of the screen.
√
iáëí displays a list of each menu item.
The next time you select jÉåì from the home
screen, you see the menu style you selected.
My banner
The banner is the personal label for your phone,
which appears on the home screen above the time
and date. To change your banner:
NK Select
OK Select bÇáí and press the _~Åâ key to clear
PK Enter your new text (no more than 14
jÉåì > pЙннбеЦл > aáëéä~ó > jó=
.
_~ååÉê
the current banner.
characters) and select
p~îÉ.
Backlighting
Your screen lights up while you are in a call or
when you press a key on the keypad. The
backlight automatically turns off when the phone
is inactive.
Set backlight duration
You can set the length of time that bright
backlighting remains on. Select
pЙннбеЦл > aáëéä~ó > _~ЕвдбЦЬнбеЦ > aìê~íáçå
and one of the following:
√
aáë~ÄäÉÇ turns backlighting off.
√
T=лЙЕзеЗл, NR=лЙЕзеЗл, or PM=лЙЕзеЗл
(default) turns backlighting on for a set time
after your last keypress.
√
T=ëÉÅLáå=Å~ää, NR=ëÉÅLáå=Å~ää, or PM=ëÉÅLáå=Å~ää
turns backlighting on for the duration of a
call, and for a set time after your last keypress.
kçíÉW The “in call” settings drain the battery
more quickly.
jÉåì >
Power save mode
My ticker
The ticker is the personal label for your phone. To
change your ticker:
NK Select
OK Select lйнбзел > bÇáí and press the _~Åâ
PK Enter your new text and select
User Guide 41
jÉåì > pЙннбеЦл > aáëéä~ó >
jу qбЕвЙк.
key to clear the current ticker.
p~îÉ.
You can activate the power save mode to dim the
backlight and conserve battery life. The power
save mode sets the backlight of the phone to the
lowest level. Select
_~ЕвдбЦЬнбеЦ > mïê=p~îÉ=jçÇÉ > lå.
jÉåì > pЙннбеЦл > aáëéä~ó >
Brightness
To change the brightness of the display:
NK Select jÉåì > pЙннбеЦл > aáëéä~ó >
_кбЦЬнеЙлл.
Page 50

OK Scroll to change the brightness.
PK Press the lh key to save.
Language
Your phone can display alternative languages.
Select
jÉåì > pЙннбеЦл > aáëéä~ó > i~åÖì~ÖÉ
and a language.
Time and date format
Your phone can display different time/date
formats. Select
qáãÉLa~íÉ=cçêã~í and a format.
jÉåì > pЙннбеЦл > aáëéä~ó >
Convenience
Your phone has several settings that may make
your phone more convenient to use.
Airplane mode
While in an airplane, it is normally required that
you turn off your mobile phone because it emits
RF signals that interfere with air traffic control. In
Airplane mode, however, your phone does not
emit RF signals. You cannot make or receive calls,
send text messages, or use the browser, but you
can play games, use the Scheduler, set the clock,
and make emergency calls to the designated
emergency numbers. Please check with
uniformed personnel before operating your
phone in Airplane mode.
To set your phone to Airplane mode, select
jÉåì > pЙннбеЦл > `зеоЙебЙеЕЙ > ^áêéä~åÉ=
jçÇÉ
> lh > bå~ÄäÉÇ.
If you turn on Airplane mode, you can also set the
time and date manually.
Auto-hyphen
Auto-hyphenation, when enabled, automatically
inserts hyphens into your phone numbers to be
consistent with the U.S. dialing plan, such as
1-222-333-4444. Select
`зеоЙебЙеЕЙ > ^мнзJeуйЬЙе > bå~ÄäÉÇ.
jÉåì > pЙннбеЦл >
1-Touch dialing
The 1-Touch Dialing feature is the fastest way to
call a speed dial location. To call a contact with
speed dial, press and hold the speed dialing
location.
kçíÉW If it is a two-digit number, press the first
digit briefly, then press and hold the second digit.
For example, if the speed dialing location is 15,
press 1 briefly, then press and hold 5.
To use 1-Touch dialing, you must enable 1-Touch
dialing on your phone and have a speed dial
location assigned to a contact.
To enable 1-touch dialing, select
pЙннбеЦл > `зеоЙебЙеЕЙ > NJqçìÅÜ=aá~äáåÖ >
bå~ÄäÉÇ.
jÉåì >
Auto redial
Use this setting to select whether to enable your
phone to repeat a call when the called number is
busy or there is no answer. Select
pЙннбеЦл > `зеоЙебЙеЕЙ > ^ìíç=oÉÇá~ä >
bå~ÄäÉÇ or aáë~ÄäÉÇ.
jÉåì >
42 Convenience
Page 51

Hold call
The Hold Call feature enables you to place
incoming calls on hold until you are ready to
answer them.
kçíÉW The Hold Call feature does not work with
the Open to Answer feature enabled. See “Open to
answer” on page 44.
Enable hold call feature
NK Select jÉåì > pЙннбеЦл > `зеоЙебЙеЕЙ >
eçäÇ=`~ää > bå~ÄäÉÇ.
If you have not recorded a hold message, you
need to record one, such as “Please hold. I’ll
answer in a minute.”
OK Record the message twice, as prompted.
PK Select
The next time a call comes in, you can place it on
hold.
Place a call on hold
You can place a call on hold once you have
enabled this feature.
kçíÉW If you are already on a call and you receive
another call, you cannot place the incoming call
on hold. With no call waiting enabled, the call
goes to voicemail.
p~îÉ to save the message or lйнбзел
and one of the following.
Ó
mä~ó to replay your message.
Ó
oЙJoЙЕзкЗ to record your message
again.
Ó
bñáí to exit.
When a call comes in, do the following:
NK Select
eçäÇ=`~ää to place the caller on hold
and play your recorded hold message.
OK Select
^елпЙк to speak to the caller on hold
or
båÇ=`~ää to hang up without speaking.
Change the hold message
NK Select jÉåì > pЙннбеЦл > `зеоЙебЙеЕЙ >
eçäÇ=`~ää > oЙJoЙЕзкЗ=jлЦ.
OK Record the message twice, as prompted.
PK Select p~îÉ to save the message or lйнбзел
and one of the following.
Ó
mä~ó to replay your message.
Ó
oЙJoЙЕзкЗ to record your message
again.
Ó
bñáí to exit.
Fast find
With Fast Find enabled, you can press one or two
keys to view close matches of the number you are
looking for.
NK From the home screen, press the keys
corresponding to the letters of the name you
want to find. A matching contact or speed
dial entry appears.
OK Scroll to your desired contact and press the
`~ää key to call the number.
To enable Fast Find, select jÉåì > pЙннбеЦл >
`зеоЙебЙеЕЙ > c~ëí=cáåÇ > bå~ÄäÉÇ.
User Guide 43
Page 52

Frequent list
From the home screen, select `çåí~Åíë. The last
15 of your most frequently called contacts appear
with the Frequent List enabled. Scroll past the
double line to view the entire Contacts list.
To enable Frequent List, select
pЙннбеЦл > `зеоЙебЙеЕЙ > cкЙимЙе н=iблн >
bå~ÄäÉÇ.
jÉåì >
Missed call alert
Your phone can alert you after you missed a call.
Select
jÉåì > pЙннбеЦл > `зеоЙебЙеЕЙ >
jбллЙЗ=`~дд=^дЙкн and one of the following:
√
aáë~ÄäÉÇ turns off the sound alert.
√
sбДк~нЙ, _ЙЙй, cкЙЙп~у, d~гЙ, _дззй,
tбееЙк, or wбдзСзе sets the phone to alert you
once when a new message is received.
√
sбДк~нЙ=C=oЙгбеЗ, _ЙЙй=C=oЙгбеЗ,
cкЙЙп~у=C=oЙгбеЗ, d~гЙ=C=oЙгбеЗ, _дззй=
C=oЙгбеЗ
oЙгбеЗ
when a new message is received and then
notify you again every five minutes. To stop a
reminder alert, select
, tбееЙк=C=oЙгбеЗ, or wбдзСзе=C=
sets the phone to notify you once
fЦезкЙ.
Minute alert
Your phone can alert with a short beep ten
seconds before each minute passes during a call.
Select
jÉåì > pЙннбеЦл > `зеоЙебЙеЕЙ >
jбемнЙ=^дЙкн > bå~ÄäÉÇ.
Open to answer
This feature enables you to answer a call by
opening the flip. Select
`зеоЙебЙеЕЙ > lйЙе=нз=^елпЙк > bå~ÄäÉÇ.
jÉåì > pЙннбеЦл >
Any key answer
To set the phone to answer calls when you press
any key, select
`зеоЙебЙеЕЙ > ^еу=hЙу=^елпЙк > bå~ÄäÉÇ (to
answer calls with any key except the
or
k~îáÖ~íáçå key).
jÉåì > pЙннбеЦл >
båÇ, _~Åâ,
Accessories
This section describes settings that affect
accessories you use with your phone.
Headset sounds
With a headset attached to your phone, you can
play the ringer through the headset or phone
speaker.
Select
jÉåì > pЙннбеЦл > ^ЕЕЙллзкбЙл >
eЙ~ЗлЙн=pзмеЗл and one of the following.
√
lмн=зС=йЬзеЙ rings from the phone speaker.
√
lìí=çÑ=ÜÉ~ÇëÉí rings from the headset.
Auto answer
With a headset or hands-free kit attached to your
phone, you can set the phone to answer
automatically.
44 Accessories
Page 53

Select jÉåì > pЙннбеЦл > ^ЕЕЙллзкбЙл > ^ìíçJ
> ^СнЙк=R=pЙЕзеЗл. The phone
^елпЙк
automatically answers after 5 seconds.
Power backlighting
You can set backlighting to remain on when using
an external power source, such as the AC adapter,
with the phone.
kçíÉW Power backlighting may not be available
with the optional desktop charger or other
accessories.
Select
jÉåì > pЙннбеЦл > ^ЕЕЙллзкбЙл > mïê=
_~ЕвдбЦЬнбеЦ
√
√
qáéW Use the power backlighting as a night light
when traveling.
and one of the following.
kçêã~ä sets power backlighting to normal.
^äï~óë=lå keeps power backlighting with an
accessory.
Com port speed
The Com Port Speed sets the data rate at which
your phone connects to a laptop or PC. Select
jÉåì > pЙннбеЦл > ^ЕЕЙллзкбЙл > `çã=mçêí=
and a speed.
péÉÉÇ
There may be a higher charge for making calls
using high-speed data in areas where 1X service is
available. Check with your service provider for
details.
User Guide 45
TTY device
You can connect the phone to a teletype (TTY)
device for the hearing impaired.
kçíÉW Enable TTY only when using the phone with
a TTY device.
NK Connect the TTY device to the phone.
OK Enter
PK At the notification, select lh.
QK Select qqv=lå to connect or qqv=lÑÑ to not
@@UUV with your keypad and select
qqv or select jÉåì > pЙннбеЦл >
^ЕЕЙллзкбЙл > qqv=aЙобЕЙ.
connect.
Hearing aid
Enable your phone to operate with a T-coil
Hearing Aid device. Select
^ЕЕЙллзкбЙл > eÉ~êáåÖ=^áÇ > lh > bå~Ä äÉÇ.
kçíÉW Enable Hearing Aid only when using your
phone with a T-coil Hearing Aid device.
jÉåì > pЙннбеЦл >
Voice Features
The following features enable you to customize
the voice commands.
Automatic add
By default, your phone automatically enables
voice dialing for each new contact you add to your
Contacts list as long as the contact name contains
at least one alphabet but no more than five words
or components. You can select
pЙннбеЦл > sзбЕЙ=cЙ~нмкЙл > ^ìíçã~íáÅ=^ÇÇ >
jÉåì >
Page 54

aáë~ÄäÉÇ to disable the voice dialing for new
contacts.
Expert mode
The expert mode enables you to speak the
command after you hear a tone instead of
speaking a command following the initial voice
prompts. Select
sзбЕЙ cЙ~нмкЙл > bсйЙкн=jзЗЙ and one of
jÉåì > pЙннбеЦл >
the following:
√
kçêã~ä sets phone to default voice prompts.
√ bсйЙкн sets phone to sound tones instead of
voice prompts.
Display results
The display results enables your phone to show
either one voice recognition candidate or up to
three ones. Select
sзбЕЙ cЙ~нмкЙл > aблйд~у=oЙлмднл and one of the
jÉåì > pЙннбеЦл >
following:
√
pбеЦдЙ=_Йлн presents you only one voice
recognition result.
√
qÜêÉÉ=_Éëí presents you up to three voice
recognition results.
Digit lengths
Use the digit lengths to determine whether to limit
your dialed numbers to North American numbers
or any numbers. Select
jÉåì > pЙннбеЦл >
sзбЕЙ cЙ~нмкЙл > aбЦбн=iЙеЦнЬл and one of
the following:
√
kзкнЬ=^гЙкбЕ~е recognizes only digit strings
of lengths that correspond to valid North
American dialing numbers of 7-digits,
10-digits, or 1+10-digits to improve accuracy.
√
mЙкгбн=^дд allows any digit strings of 4 to 14
digit lengths.
Voice answer
You can use your voice to answer a call when
using a hands-free accessory.
Enable voice answer
Select jÉåì > pЙннбеЦл > sзбЕЙ=cЙ~нмкЙл >
sзбЕЙ=^елпЙк > tбнЬ=^ЕЕЙллзку to enable
answering calls with an accessory.
kçíÉW To use the voice answer feature, you must
have the
^мнзJ^елпЙк feature disabled (see
“Auto answer” on page 44), the
option selected (see “Headset sounds” on
page 44), and the phone set to
(see “Ringer mode” on page 39).
Use voice answer
When you receive an incoming call, the phone
prompts “Incoming call, answer?”. If the caller is
recognized as a contact entry in your phone, the
phone prompts “Incoming call from (Name),
answer?”. Say “Yes” to answer or “No” to silence
the alert without answering.
lìí=çÑ=ÜÉ~ÇëÉí
kзкг~д=pзмеЗл
46 Voice Features
Page 55

Voice wake-up
You can activate voice dialing by saying “wake up”
twice. Select
cЙ~нмкЙл
enable calls with an accessory.
To wake up the phone:
NK Say “Wake Up” and listen for a tone.
OK Say “Wake Up” again until you hear two tones.
If the phone does not recognize your Wake Up
command, see “Voice training” on page 47.
jÉåì > pЙннбеЦл > sçáÅÉ=
> sçáÅÉ=t~âÉJré > tбнЬ=^ЕЕЙллзку to
Voice training
You can train your phone to recognize specifically
your voice for numbers. Use voice training only
when you find your voice not recognized with
acceptable accuracy.
If your phone is having trouble recognizing your
voice, select
sзбЕЙ cЙ~нмкЙл > sçáÅÉ=qê~ áå áåÖ > lh >
qк~ бе kмгДЙкл . Follow the prompts for each
number until training is complete.
jÉåì > pЙннбеЦл >
Network
Privacy Alert
You can set your phone to alert you when
enhanced digital CDMA privacy is lost or
regained. Select
mêáî~Åó=^äÉêí > bå~ÄäÉÇ.
jÉåì > pЙннбеЦл > kЙнпзкв >
Voice privacy
You can also set your phone to use enhanced
digital CDMA privacy. Select
kЙнпзкв > sçáÅÉ=mêáî~Åó > båÜ~åÅÉÇ.
jÉåì > pЙннбеЦл >
Roaming service alert
Use this setting if you want the phone to alert you
when you roam outside of your home service
area.
Select
jÉåì > pЙннбеЦл > kЙнпзкв > oç~ãLpîÅ=
and one of the following:
^äÉêí
√
aáë~ÄäÉÇ turns roaming service alert off.
√
tÜÉå=åç=ëîÅ alerts you with three tones
decreasing in pitch when service is lost and
three tones increasing in pitch when service is
acquired again.
√
lå=êç~ã=ÅÜ~åÖÉ alerts you with two
decreasing tones when roaming service is
acquired and three increasing tones when
home area service is acquired again.
√
lå=~åó=ÅÜ~åÖÉ alerts you with three
increasing tones if there is a change in
roaming service or three decreasing tones if
the phone loses service.
Roam option
You can restrict your phone from making a call
when roaming. Select
kЙнпзкв > oз~г=lйнбзе > ^ìíçã~íáÅ (allows
roaming) or
jÉåì > pЙннбеЦл >
kç=oç~ãáåÖ (disallows roaming).
User Guide 47
Page 56

Set phone line
Your phone can have two service accounts, or
phone lines, associated with it. Each phone line
has its own phone number. Select
pЙннбеЦл > kЙнпзкв > pÉí=mÜçåÉ=iáåÉ and one
of the two lines.
When you are using one line, you cannot receive
calls from the other. It would be as if the phone
were “off” for that number. Your voicemail,
however, still takes messages. All contacts and
settings are shared for both lines.
kçíÉW You must first establish a second phone
line with your service provider. Once established,
a second phone number becomes available in the
menu for selection.
jÉåì >
Web alert
You can set an alert to confirm the start or exit of
the browser. Select
kЙнпзкв > tÉÄ=^äÉêí and one of the following:
√
^í=pí~êí prompts you when you start a session.
√
^í=båÇ prompts you when you end a session.
√
_çíÜ prompts you when you start or end a
session.
√
kз=mкзгйнл sets no prompts.
jÉåì > pЙннбеЦл >
Roam call alert
You can set the phone to warn you before you
answer or place a call while roaming. Select
jÉåì > pЙннбеЦл > kЙнпзкв > oç~ã=`~ää=
^äÉêí
> `~дд=mкзгйн.
The phone emits a distinctive ring to indicate
when you are roaming during a call. To accept or
place a call while roaming, you must press 1.
kçíÉW Call Prompt is disabled when the phone is
in Emergency Mode.
Location
This setting enables you to share your location
information with network services other than
emergency services (for example, 911, 111, 999
and 000) in areas where service has been
implemented.
This feature works only when your phone is in
digital mode. You do have the option of turning off
the locator to emergency services.
Select
jÉåì > pЙннбеЦл > kЙнпзкв > içÅ~íáçå
and one of the following.
√
VNN=låäó (default) shares your position
information only with emergency services
when you call your 3-digit emergency code.
√
içÅ~íáçå=lå shares your position
information, in addition to emergency
services.
Security
This section describes all the features involved in
securing your phone and preventing access to
personal information. All security features are
shielded by a four-digit lock code.
48 Security
Page 57

Lock phone
When your phone is locked, you can call only
emergency numbers or your service provider’s
customer service number. You can still receive
incoming calls.
NK Select
jÉåì > pЙннбеЦл > pЙЕмкбну.
OK Enter your four-digit lock code.
PK Select içÅâ=mÜçåÉ and one of the following:
Ó
kÉîÉê leaves the phone always unlocked.
Ó
lе=йзпЙк=мй locks the phone every time
you turn it on.
Ó
kçï locks the phone immediately.
Do the following to unlock the phone:
NK From the home screen, select rедзЕв.
OK Enter your four-digit lock code.
Limit calls
You can limit the calls that can be made from your
phone to emergency numbers, your contacts, and
your service provider’s numbers.
NK Select
OK Enter your four-digit lock code.
PK Select iáãáí=`~ääë and one of the following:
jÉåì > pЙннбеЦл > pЙЕмкбну.
Ó
kç=iáãáí: does not limit calls.
Ó
iбгбн=lмнЦзбеЦ limits outgoing calls
while incoming calls still work.
Ó
iáãáí=^ää limits both incoming and
outgoing calls.
Emergency numbers
The emergency numbers feature enables you to
specify three personal phone numbers you can
call when the phone is locked.
NK Select
jÉåì > pЙннбеЦл > pЙЕмкбну.
OK Enter your four-digit lock code.
PK Select bгЙкЦЙеЕу=kмгДЙкл.
QK Select an rе~ллбЦеЙЗ slot.
RK Enter the number and select açåÉ.
You can view these numbers only when entering
them for the first time.
To make a call to an emergency number from a
locked phone, you must dial the number
(including area code) exactly as it was stored in
Emergency Numbers.
Erase contacts
You can erase all entries from your Contacts list.
NK Select jÉåì > pЙннбеЦл > pЙЕмкбну.
OK Enter your four-digit lock code.
PK Select bê~ëÉ=`çåí~Åíë and one of the
following:
Ó
kç exits without erasing contacts.
Ó
vÉë erases all contacts. A confirmation
prompt appears to verify your decision.
QK Select
vÉë to confirm.
User Guide 49
Page 58

New lock code
The lock code is typically 0000 or the last 4 digits
of your phone number. To change your lock code
from the default provided by the service provider:
NK Select
OK Enter your four-digit lock code.
PK Select içÅâ=`çÇÉ.
QK At the confirmation, select vÉë.
RK Enter a new four-digit code.
SK Re-enter your new lock code.
jÉåì > pЙннбеЦл > pЙЕмкбну.
Phone information
You can access information regarding your
phone. Select
and one of the following:
√
_ìáäÇ=fåÑç shows specific software and
hardware information.
√
fÅçå=hÉó shows the icons used by your
phone.
jÉåì > pЙннбеЦл > mÜçåÉ=fåÑç
50 Phone information
Page 59

11 VOICE COMMANDS
You can call a contact, dial a phone number,
access menus, or find contact information from
your voice dial list using voice commands.
kçíÉW You cannot use voice recognition to end a
call; you must press the
open.
båÇ key when the flip is
Voice dial list
To call or find a contact using voice dial, you must
add the contact to your voice dial list. The contact
name must not have more than five words or
components for voice recognition.
Add contacts
To add a contact to your voice dial list:
NK Select jÉåì > `çåí~Åíë > sçáÅÉ=aá~ä=iáëí.
OK At the contact list, highlight a contact and
press the
lh key. A check mark appears next
to a name when voice dialing is active. Check
each name you want to use with voice
dialing.
PK Select
Remove contacts
To add a contact to your voice dial list:
NK Select
OK At the contact list, highlight a check marked
p~îÉ.
jÉåì > `çåí~Åíë > sçáÅÉ=aá~ä=iáëí.
contact and press the
lh key. No check
mark appears next to a name when voice
dialing is inactive. Uncheck each name you
want to remove from voice dialing.
PK Select
p~îÉ.
Voice commands
Start voice commands
NK Press and hold the pÉåÇ key to initiate voice
commands. The phone prompts,
“Say a command”.
OK Say one of the following commands and
follow the voice prompts.
Ó “
`çåí~Åí=Yå~ãÉ[” calls a contact on
your voice dial list.
Ó “
aб~д=kмгДЙк=Y@[” calls by speaking
the digits of the phone number.
Ó “
YлЬзкнЕмн=е~гЙ[” sends you to a
menu item.
Ó “
cáåÇ=`çåí~Åí” allows you to find a
contact from your voice dial list.
Call a contact name
NK If you haven’t already done so, add the
person you want to call to the Voice Dial List.
See “Voice dial list” on page 51.
OK From the main screen, press and hold the
pÉåÇ key. The phone prompts, “Say a
command”.
User Guide 51
Page 60

PK Say “Contact” and the name of the person
you want to call.
The phone prompts, “Please repeat” or “Say
a name” if it does not recognize the name. If
the name you spoke matches a contact in the
Voice Dial List, the phone prompts: “Name,
correct?” Say “Yes” to make the call, “No” to
select a similar name, or “Cancel” to cancel
the phone call.
If the phone finds multiple voice tags that
sound like the name you said, the phone lists
the names and asks you to verify which name
to call. Say “Yes” when you hear the correct
name or “No” when you hear an incorrect
one.
QK Press the
båÇ key to end the call.
Call a number
NK From the main screen, press and hold the
pÉåÇ key. The phone prompts, “Say a
command”.
OK Say “Dial number” and then speak the digits
of the number you want to call. If you pause,
the phone prompts you, “Did you say
<number>” or “Say a number” if it does not
recognize the name. Say “Yes” to make the
call or “No” to cancel the phone call.
PK Press the
båÇ key to end the call.
Use shortcuts
NK From the main screen, press and hold the
pÉåÇ key. The phone prompts, “Say a
command”.
OK Say the name of the menu item you want to
access or say “Shortcut” to view a list of
menu items. The phone prompts, “Say one of
the shortcuts”.
PK Say the name of the menu item you want
to access.
Find contacts
You can use voice commands to find contact
information for contacts in your Voice Dial List.
NK From the main screen, press and hold the
pÉåÇ key. The phone prompts, “Say a
command”.
OK Say “Find contact”. The phone prompts, “Say
a name”.
The phone prompts, “Please repeat” or “Say
a name” if it does not recognize the name. If
the name you spoke matches a contact in the
Voice Dial List, the phone prompts: “Name,
correct?” Say “Yes” to make the call, “No” to
select a similar name, or “Cancel” to cancel
the search.
52 Voice commands
Page 61

12 GETTING HELP
Customer support
Your service provider’s customer support
department may be accessible directly from your
phone when you dial a number, such as *611
(check with your service provider). They can
answer questions about your phone, phone bill,
call coverage area, and specific features available
to you, such as call forwarding or voicemail.
For questions about the phone features, refer to
the materials provided with your phone, or visit
пппKвузЕЙк~JпбкЙдЙллKЕзг.
For additional questions, you may contact the
Kyocera Wireless Corp. Customer Care Center in
any of the following ways:
√ Web site:
√ Email: phone-help@kyocera-wireless.com.
√ Phone: 1-800-349-4478 (U.S. and Canada) or
√ Customer support phone numbers are also
Argentina: 0-800-666-0052
Australia: 1-800-507-000
Brazil: 0-800-55-2362
Chile: 800-43-1212
пппKвузЕЙк~JпбкЙдЙллKЕзг.
1-858-882-1401.
available in the following countries:
Colombia: 01-800-700-1546
India: Toll fee#: 1-600-121214
Mexico: 001-866-650-5103
New Zealand: 0-800-990-100
Panama: 001-800-51-934
Puerto Rico: 1-866-664-6443
Venezuela 0-800-100-2640
Toll#: 0124-284-5000
Before requesting support, please try to
reproduce and isolate the problem. When you
contact the Customer Care Center, be ready to
provide the following information:
√ The name of your service provider.
√ The actual error message or problem you are
experiencing.
√ The steps you took to reproduce the problem.
√ The phone’s mobile equipment identifier
(MEID).
kçíÉW To locate the MEID, select
mÜçåÉ=fåÑç > _ìáäÇ=fåÑç and scroll down to
jbfa: for the 11-digit number. If your phone
uses an electronic service number (ESN),
replaces
jbfaW.
pЙннбеЦл >
bpkW
User Guide 53
Page 62

Qualified service
If the problem with your phone persists, return
the phone with all accessories and packaging to
the dealer for qualified service.
Phone accessories
To shop for phone accessories, visit
пппKвузЕЙк~JпбкЙдЙллKЕзгLлнзкЙ. You may also
call us at 800-349-4188 (U.S.A. only) or
858-882-1410.
Become a product evaluator
To participate in the testing and evaluation of
Kyocera Wireless Corp. products, including
cellular or PCS phones, visit
пбкЙдЙллKЕзг
.
ДЙн~KвузЕЙк~J
54 Qualified service
Page 63

13 CONSUMER LIMITED WARRANTY
Kyocera Wireless Corp. (“KYOCERA”) offers you a
limited warranty that the enclosed product or
products (the “Product”) will be free from
defects in material and workmanship for a period
that expires one year from the date of sale of the
Product to you, provided that you are the original
end-user purchaser of the Product and provided
that your purchase was made from an authorized
supplier. Transfer or resale of a Product will
automatically terminate warranty coverage with
respect to that Product. This limited warranty is
not transferable to any third party, including but
not limited to any subsequent purchaser or owner
of the Product.
KYOCERA shall, at its sole and absolute discretion,
either repair or replace a Product (which unit
may use refurbished parts of similar quality and
functionality) if found by KYOCERA to be defective
in material or workmanship, or if KYOCERA
determines that it is unable to repair or replace
such Product, KYOCERA shall refund the purchase
price for such Product, provided that the subject
Product (i) is returned, with transportation
prepaid, to a KYOCERA authorized service center
within the one year warranty period, and (ii) is
accompanied by a proof of purchase in the form
of a bill of sale or receipted invoice which
evidences that the subject Product is within the
one year warranty period (“Proof of Purchase”).
User Guide 55
After the one year warranty period, you must pay
all shipping, parts and labor charges.
This limited warranty does not cover and is void
with respect to the following: (i) any Product
which has been improperly installed, repaired,
maintained or modified; (ii) any Product which
has been subjected to misuse (including any
Product used in conjunction with hardware
electrically or mechanically incompatible or used
with accessories not approved by KYOCERA),
abuse, accident, physical damage, abnormal
operation, improper handling, neglect, exposure
to fire, water or excessive moisture or dampness
or extreme changes in climate or temperature;
(iii) any Product operated outside published
maximum ratings; (iv) cosmetic damage; (v) any
Product on which warranty stickers or Product
serial numbers have been removed, altered, or
rendered illegible; (vi) cost of installation,
removal or reinstallation; (vii) signal reception
problems (unless caused by defects in material
and workmanship); (viii) damage the result of
fire, flood, acts of God or other acts which are not
the fault of KYOCERA and which the Product is not
specified to tolerate, including damage caused by
mishandling, shipping and blown fuses; (ix)
consumables (such as fuses); or (x) any Product
which has been opened, repaired, modified or
altered by anyone other than KYOCERA or a
KYOCERA authorized service center.
Page 64

USE ONLY KYOCERA APPROVED ACCESSORIES
WITH KYOCERA PHONES. USE OF ANY
UNAUTHORIZED ACCESSORIES MAY BE
DANGEROUS AND WILL INVALIDATE THE PHONE
WARRANTY IF SAID ACCESSORIES CAUSE
DAMAGE OR A DEFECT TO THE PHONE.
KYOCERA SPECIFICALLY DISCLAIMS LIABILITY
FOR ANY AND ALL DIRECT, INDIRECT, SPECIAL,
GENERAL, PUNITIVE, EXEMPLARY, AGGRAVATED,
INCIDENTAL OR CONSEQUENTIAL DAMAGES,
EVEN IF ADVISED OF THE POSSIBILITY THEREOF,
WHETHER FORESEEABLE OR UNFORESEEABLE
OF ANY KIND WHATSOEVER, INCLUDING BUT
NOT LIMITED TO LOSS OF PROFITS,
UNANTICIPATED BENEFITS OR REVENUE,
ANTICIPATED PROFITS ARISING OUT OF USE OF
OR INABILITY TO USE ANY PRODUCT (FOR
EXAMPLE, WASTED AIRTIME CHARGES DUE TO
THE MALFUNCTION OF A PRODUCT) OR
CONTRIBUTION OR INDEMNITY IN RESPECT OF
ANY CLAIM RELATED TO A PRODUCT.
REPAIR OR REPLACEMENT OF A DEFECTIVE
PRODUCT OR REFUND OF THE PURCHASE PRICE
RELATING TO A DEFECTIVE PRODUCT, AS
PROVIDED UNDER THIS WARRANTY, ARE YOUR
SOLE AND EXCLUSIVE REMEDIES FOR BREACH
OF THE LIMITED WARRANTY, AND SUBJECT TO
THIS WARRANTY, THE PRODUCTS ARE
APPROVED AND ACCEPTED BY YOU “AS IS”.
KYOCERA MAKES NO OTHER WARRANTIES,
REPRESENTATIONS OR CONDITIONS OF ANY
KIND, ORAL OR VERBAL, EXPRESS OR IMPLIED,
STATUTORY OR OTHERWISE, WITH RESPECT TO
THE PRODUCTS, INCLUDING BUT NOT LIMITED
TO ANY IMPLIED WARRANTY OR CONDITION OF
MERCHANTABILITY OR FITNESS FOR A
PARTICULAR PURPOSE OR AGAINST
INFRINGEMENT OR ANY IMPLIED WARRANTY OR
CONDITION ARISING OUT OF TRADE USAGE OR
OUT OF A COURSE OF DEALING OR COURSE OF
PERFORMANCE. NO DEALER, DISTRIBUTOR,
AGENT OR EMPLOYEE IS AUTHORIZED TO MAKE
ANY MODIFICATION OR ADDITION TO THIS
WARRANTY.
Some jurisdictions do not allow the exclusion or
limitation of incidental or consequential damages,
or allow limitations on how long an implied
warranty lasts, so the above limitations or
exclusions may not apply to you. This limited
warranty gives you specific legal rights, and you
may also have other rights which vary from
jurisdiction to jurisdiction.
For warranty service information, please call the
following telephone number from anywhere in the
continental United States and Canada: 1-800-3494478 or 858-882-1401.
Please call or write for the location of the Kyocera
Wireless Corp. authorized service center nearest
you and for procedures for obtaining warranty
service.
56 Become a product evaluator
Page 65

INDEX
Numerics
1-touch dialing, 42
A
accessories, 54
headsets, 44
settings, 44
T-coil hearing aid, 45
TTY device, 45
accessory, v, 2
activation of phone, 3
adding
air bag, iii
aircraft, iv
airplane mode, 42
alarm clock, 35
alert
alerts
appended messages, 21
auto redial, 42
auto retrieve, 23
auto-erase, 24
Phone User Guide 57
, 25
contacts
extensions, 26
voice dial list, 51
privacy
, 47
, 48
browser
messages, 23
minute, 44
missed call, 44
pages, 23
roaming calls, 48
roaming service, 47
vibrating, 39
voicemail, 23
auto-hyphenation, 42
automatic add, 45
B
back cover
lock
, 3
backlighting
banner, 41
battery
brightness, 41
browser
business ringers, 39
C
calculator, 36
calendar, See scheduler
call lists
call timers, 18
callback number, 23
calls
, 45
power
settings, 41
caring
, 1
charging, 1
installing, 1
recharging, 1
, 48
alerts
erasing
, 17
viewing, 17
text message, 20
, 17
call lists
emergency, 13
ending, 10
holding, 43
limiting, 49
roaming, 12
silencing, 11
voice commands, 51
capitalization, 15
changing modes, text entry, 15
com port speed, 45
contacts, 25
adding, 25
adding to a group, 27
assign number type, 28
assign picture, 26, 28
assign ringer, 26, 28
calling numbers, 26
customizing, 26
directory, 25
editing, 25, 26
email addresses, 27
erase, 26
erasing, 25, 27, 49
fast find, 43
frequent list, 44
groups, 29
list, 25
memory, 30
notes, 28
primary number, 27
searching, 29
secret, 27
sending text message, 26
speed dial list, 27
street addresses, 27
viewing all, 25
voice search, 52
web addresses, 27
Page 66

convenience settings, 42
convention
using this guide
countdown timer, 37
counter
kilobyte
creating
groups
customer support, 53
customizing contacts, 26
D
default text mode, changing, 24
dialing
1-touch
speed, 11
voice list, 51
digit lengths, 46
directory, contacts, 25
display
backlighting
banner, 41
brightness, 41
language, 42
main menu, 41
screensavers, 40
settings, 40
ticker, 41
time/date format, 42
display results, 46
download, 31
drafts folder, 22
E
earpiece, 10
volume, 39
editing contacts, 26
electronic serial number (ESN).
, 8
, 18
, 29
, 42
, 41
See MEID (mobile equipment
ID)
email addresses
emergency
entering
erasing
ESN (electronic serial number).
See MEID (mobile equipment
ID)
evaluation, product
expert mode, 46
F
flip
folders
frequent list, 44
G
game
groups, 29
, 27
, 13
calls
numbers, 49
, 14
letters
numbers, 14
symbols, 15
text, 15
, 49
contacts
multimedia messages, 21
, 54
answering calls
draft
inbox, 20
sent, 22
downloading
assign picture, 29
assign ringer, 29
creating, 29
erase, 29
sending text message, 29
, 44
, 22
, 31
H
hands-free
auto answer
headsets
auto answer
sounds, 44
hearing aid, iv, v
hearing-impaired usage, iv, v
help, getting, 53
hold calls, 43
I
icons, 5, 50
text message, 20
incoming calls, 17
K
key
navigation
keypad
sounds
volume, 39
keys
frequently used
kilobyte counter, 18
L
language, 42
left option button, 8
lights only alerts, 39
limiting calls, 49
location information, 48
lock
back cover
lock code, 50
locking
phone
text messages, 20
, 44
, 44
, 8
, 40
, 5
, 3
, 49
58
Page 67

M
main menu, 7, 41
medical device, iv
MEID (mobile equipment ID)
menus
main
, 7
main view, 41
settings, 38
messages
alerts
, 23
appended, 21
auto-erase incoming, 24
callback number, 23
completing, 22
default text mode, 24
incoming calls, 22
quicktext, 23
settings, 22
signature, 23
text messages, 19
unable to send, 21
minute alerts, 44
missed call
, 44
alert
missed calls, 17
deal with, 17
mobile equipment ID (MEID)
modes
multimedia message
multimedia messages
my graphics, 32
my ringtones, 31
, 42
airplane
ringers, 39
text entry, 14
, 22
sent
auto retrieve
, 23
my sounds, 32
N
navigation key, 8
network
location information
network settings, 47
notes, contacts, 28
notifications
text messages
O
open to answer, 44
Outbox, 22
outgoing calls, 17
P
pacemaker, iv
pages alerts, 23
personal ringers, 39
phone
accessories
activating, 3
answering calls, 9
codes, 26
extensions, 26
icons, 5
making calls, 9
overview, 3, 4
programming, 3
resetting, v
safety, iii
turning on and off, 9
phone information, 50
phone line
setting
power
backlighting
on and off sounds, 40
, 20
, 2
, 48
, 45
, 48
prepend, 26
primary number, 27
priority
text message
privacy alert, 47
Q
quick alarm, 36
quicktext, 23
R
rapid entry, 14
receipt request
text messages
recent calls, 17
redial, 42
redialing, 9
replying
text messages
resetting phone, v
restrict roaming, 47
right option button, 8
ringers, 38
business, 39
mode, 39
personal, 39
roam, 39
silent mode, 39
type, 39
volume, 39
ringtone
downloading
roaming
call alerts
restrict, 47
service alerts, 47
S
safety, iii
, 20
, 31
, 48
, 24
, 20
Phone User Guide 59
Page 68

scheduler, 33
creating events, 33
modifying events, 35
settings, 35
viewing events, 34
screensavers, 40
searching
contacts directory
fast find, 43
voice commands, 52
world clock, 37
security
emergency numbers
erasing contacts, 49
limiting calls, 49
lock code, 50
locking phone, 49
settings, 48
sent folder, 22
setting
alarm clock
quick alarm, 36
world clock, 37
settings
accessories
convenience, 42
display, 40
menu, 38
messages, 22
network, 47
phone information, 50
scheduler, 35
security, 48
sounds, 38
signature, 23
text message, 20
smart sound, 40
, 35
, 44
, 29
, 49
software
build information
software build, 50
sounds
flip closed
, 40
flip open, 40
keypad, 40
ringers, 38
settings, 38
silence all, 39
volume, 39
speakerphone, 10, 11
volume, 39
speed
stopwatch, 37
support, customer, 53
symbols, 15
T
T-coil hearing aid, 45
teletype, 45
text entry, 14
text messages
, 45
com port
dialing, 11
capitalization, 15
changing modes, 15
current mode, 14
default mode, 24
letters, 14
numbers, 14
quick reference, 15
rapid entry, 14
, 19
creating
erasing, 21
forwarding, 20
icon, 20
, 50
locking, 20
notification, 20
options, 19
quicktext, 19
replying, 20
request receipt, 19, 24
retrieving, 20
saving, 19, 20
send later, 20
sender information, 20
set priority, 20
validity period, 20
viewing, 20
ticker, 41
time calls, 44
timer, 37
tip calculator, 36
tools
alarm clock
calculator, 36
scheduler, 33
stopwatch, 37
timer, 37
tip calculator, 36
voice memo, 33
world clock, 37
turning on and off, 9
V
validity period
text message
vehicle, iv
vibrating call alerts, 39
viewing contacts, 25
voice
dial list
privacy, 47
, 35
, 20
, 51
60
Page 69

voice answer, 46
voice commands, 45, 51
calling contacts, 51
calling numbers, 52
find contacts, 52
shortcuts, 52
voice dial list, 51
voice dialing
adding contacts
, 51
removing contacts, 51
voice memos, 33
erasing, 33
locking, 33
playing, 33
recording, 33
voice recognition, 51
voice training, 47
voice wake-up, 47
voicemail, 11
alerts, 23
number, 24
volume, 39
adjusting, 11
earpiece, 39
keypad, 39
ringers, 39
smart sound, 40
speakerphone, 39
W
wallpaper, 40
web
addresses
, 27
alerts, 48
world clock, 37
searching, 37
Phone User Guide 61
Page 70

Kyocera Wireless Corp.
www.kyocera-wireless.com
82-K8214-1EN, Rev. 001
 Loading...