

Page 1
Operating Instructions
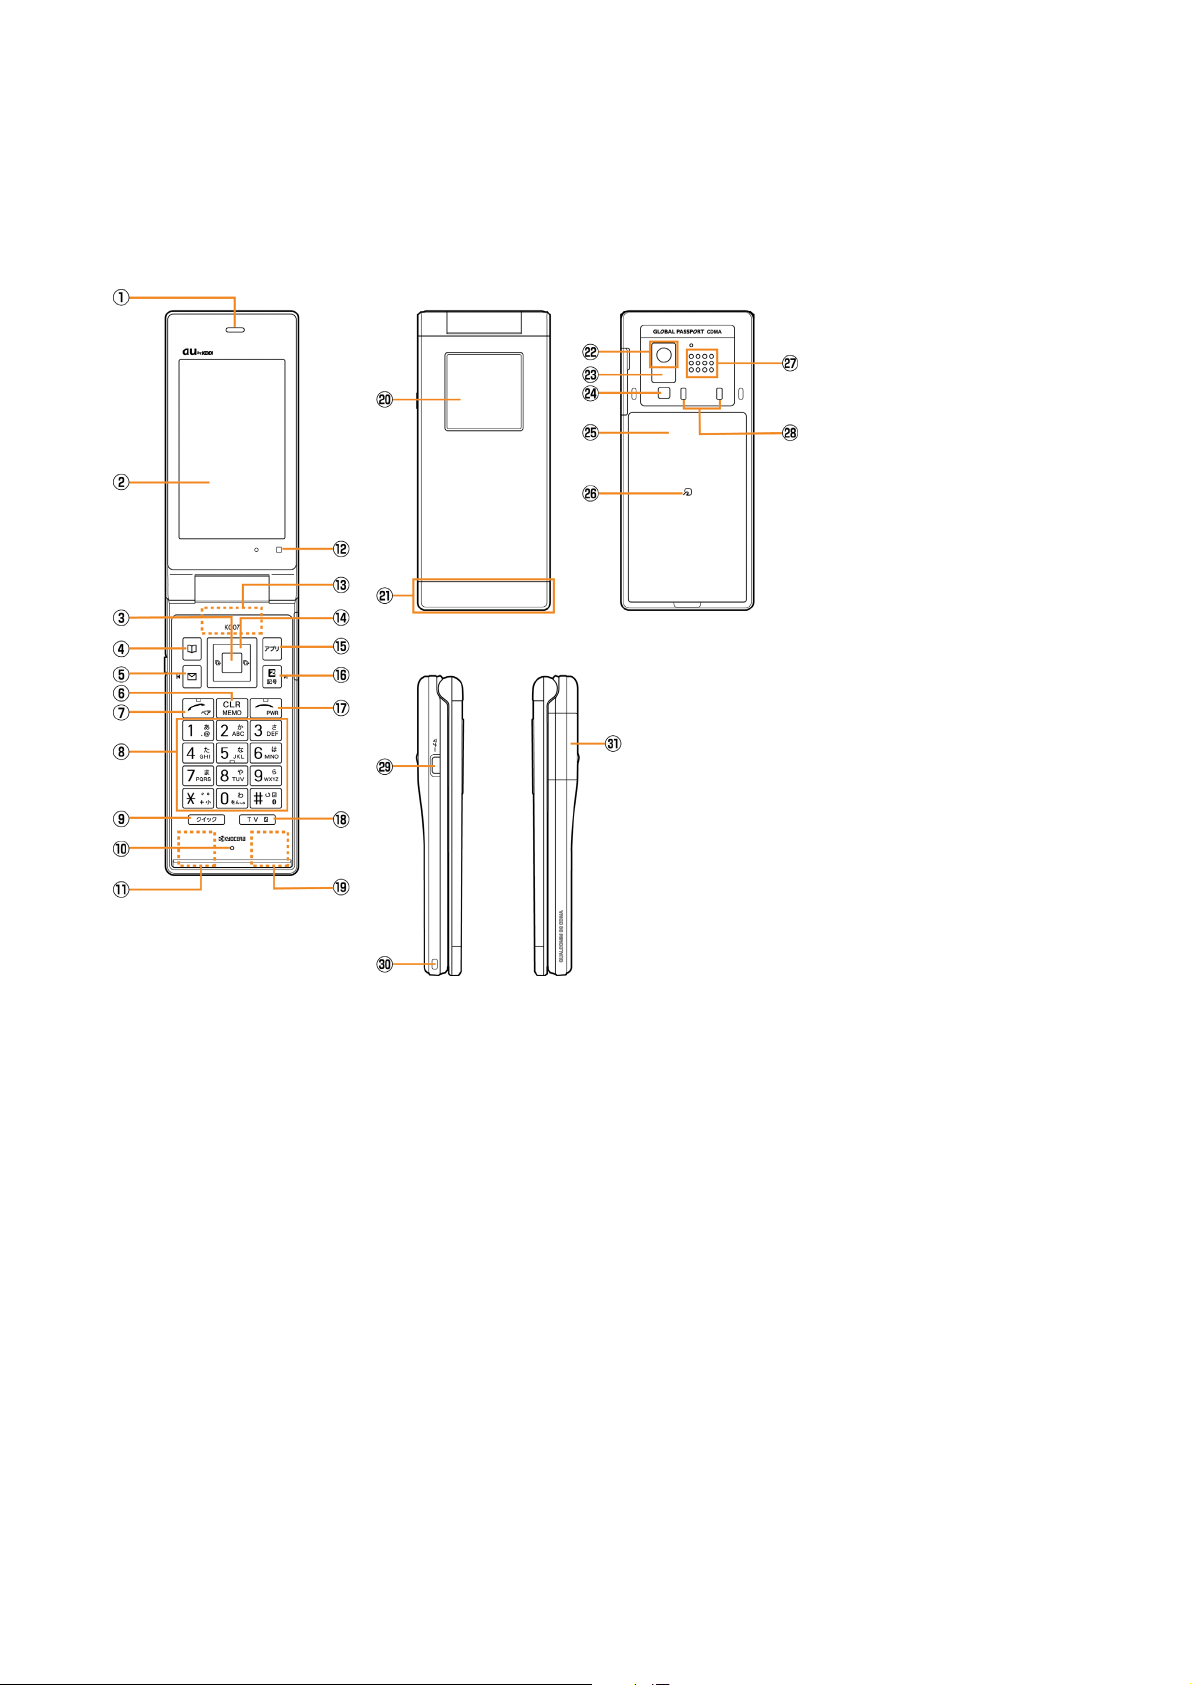
Name & Function of Parts
a Earpiece
b Main Display
c OK key
d Address book key
e Mail key
f Clear /Memo key
g Answer/Pair key
h Number keys
i Quick key
j Microphone
k Built-in antenna(Sub antenna
l Optical sensor
m Built-in antenna(Main antenna)
n Cursor key
o Application key
p EZ key
)
q Power/End key
r TV key
s Built-in antenna(for
t Sub Display
u Illumination
v Camera lens
w Infrared port
x Flash/Camera start indicator
y Battery pack/cover
z FeliCa mark
A Speaker
B Charging terminals
C Manner key
D Strap hole
E External connection jack/cover
Bluetooth)
- 1 -
Page 2
■ Power saving during standby
In order to minimize the power consumption, the K007 display turns automatically to power saving mode
when key operation is stopped for a while.
The indication restores with key operation.
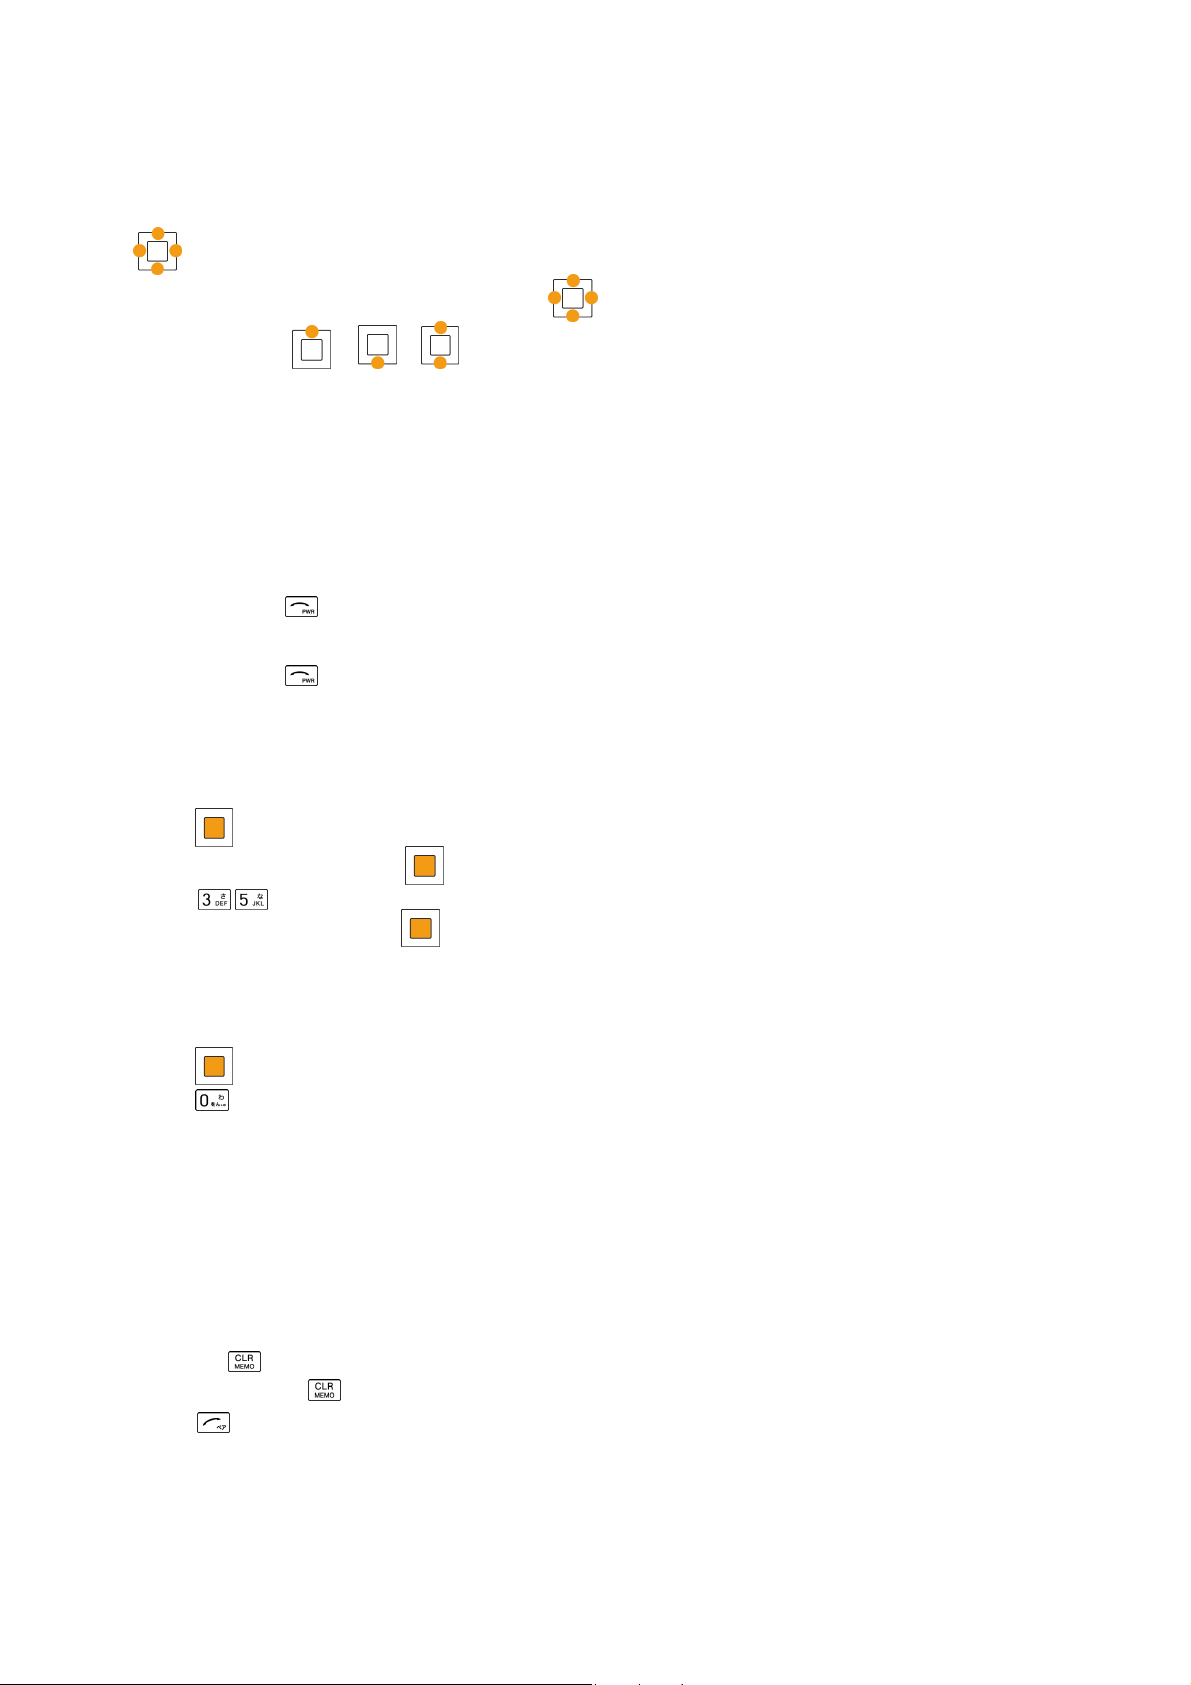
■
key
In this manual, the point at which to press the
Example) Press
or →
key is indicated as shown below.
Getting Ready to Make a Call
1. Charging with the AC Adapter
The battery charger can be charged by directly inserting the AC Adapter connector into the external
connection terminal on the K007 Main Unit.
2. Turning the power on
Press and hold or more than one second.
◆Turning the power off
Press and hold
for more than one second.
Switch to English
1. Press
2. Select "機能設定" and press
3. Press
4. Select "English" and press (Set).
on the standby screen.
.
(選択).
Displaying your own phone number
1. Press
2. Press
on the standby screen.
to display your au telephone number.
Making a Call
1. Enter the phone number you want to call on the standby screen.
Area code - Local code - Subscriber's number.
<Example> 03-0001-XXXX
Always include the area code, even when calling to a number in the same area you are in.
If you enter a wrong number:
● Press
● Press and hold
2. Press
briefly - the last dialed digit will be deleted.
- the entire phone number will be deleted.
to make a call.
- 2 -
Page 3

Making an International Call
1. Enter the phone number you want to call using the following pattern on the standby screen.
International dial code - Country code - Area code - Subscriber's number
2. Press
<Example> to call United States, number 212-123-XXXX in the USA.
1 Pressing "005345" Access code
2 Pressing "1" Country code of United States: 1
to make a call.
Operation Explanation
3 Pressing "212"
4 Pressing "123-XXXX" Subscriber's number: 123-XXXX
5
Press
※ When the first number of the area code is "0", press the area code number without "0".
Area code ※ : 212
The following operation is the same as the normal telephone
operation.
Adjusting the receiver volume
1. During a call, press
: Volume level raised.
: Volume level lowered.
.
Answering a call
1. The ringer tone sounds/vibrator buzzes, and the incoming call lamp flashes.
2. Press
An incoming call can also be answered by pressing any of the
If you do not answer the call or the caller disconnects before the call is answered,
"
to answer the call.
~
, , , , ,
Missed Call X " will be displayed. (A number appears in the "X".)
keys.
Entering characters
This is the method of entering names for registering address book and writing mail.
1. Press
2. Select the entry mode you want.
漢字
カナ
カタカナ
AB・ab
12
ABCD・
abcd
(Char.Type).
"Kanji", "Hiragana" entry mode (full size)
"Katakana" entry mode (full size)
"Katakana" entry mode (half size)
"Alphanumeric" entry mode (full size)
"Number" entry mode (full size)
"Alphanumeric" entry mode (half size)
1234
Sym
Face
"Number" entry mode (half size)
"Pictographs" entry mode
"Symbol" entry mode
"Face marks" entry mode
- 3 -
Page 4
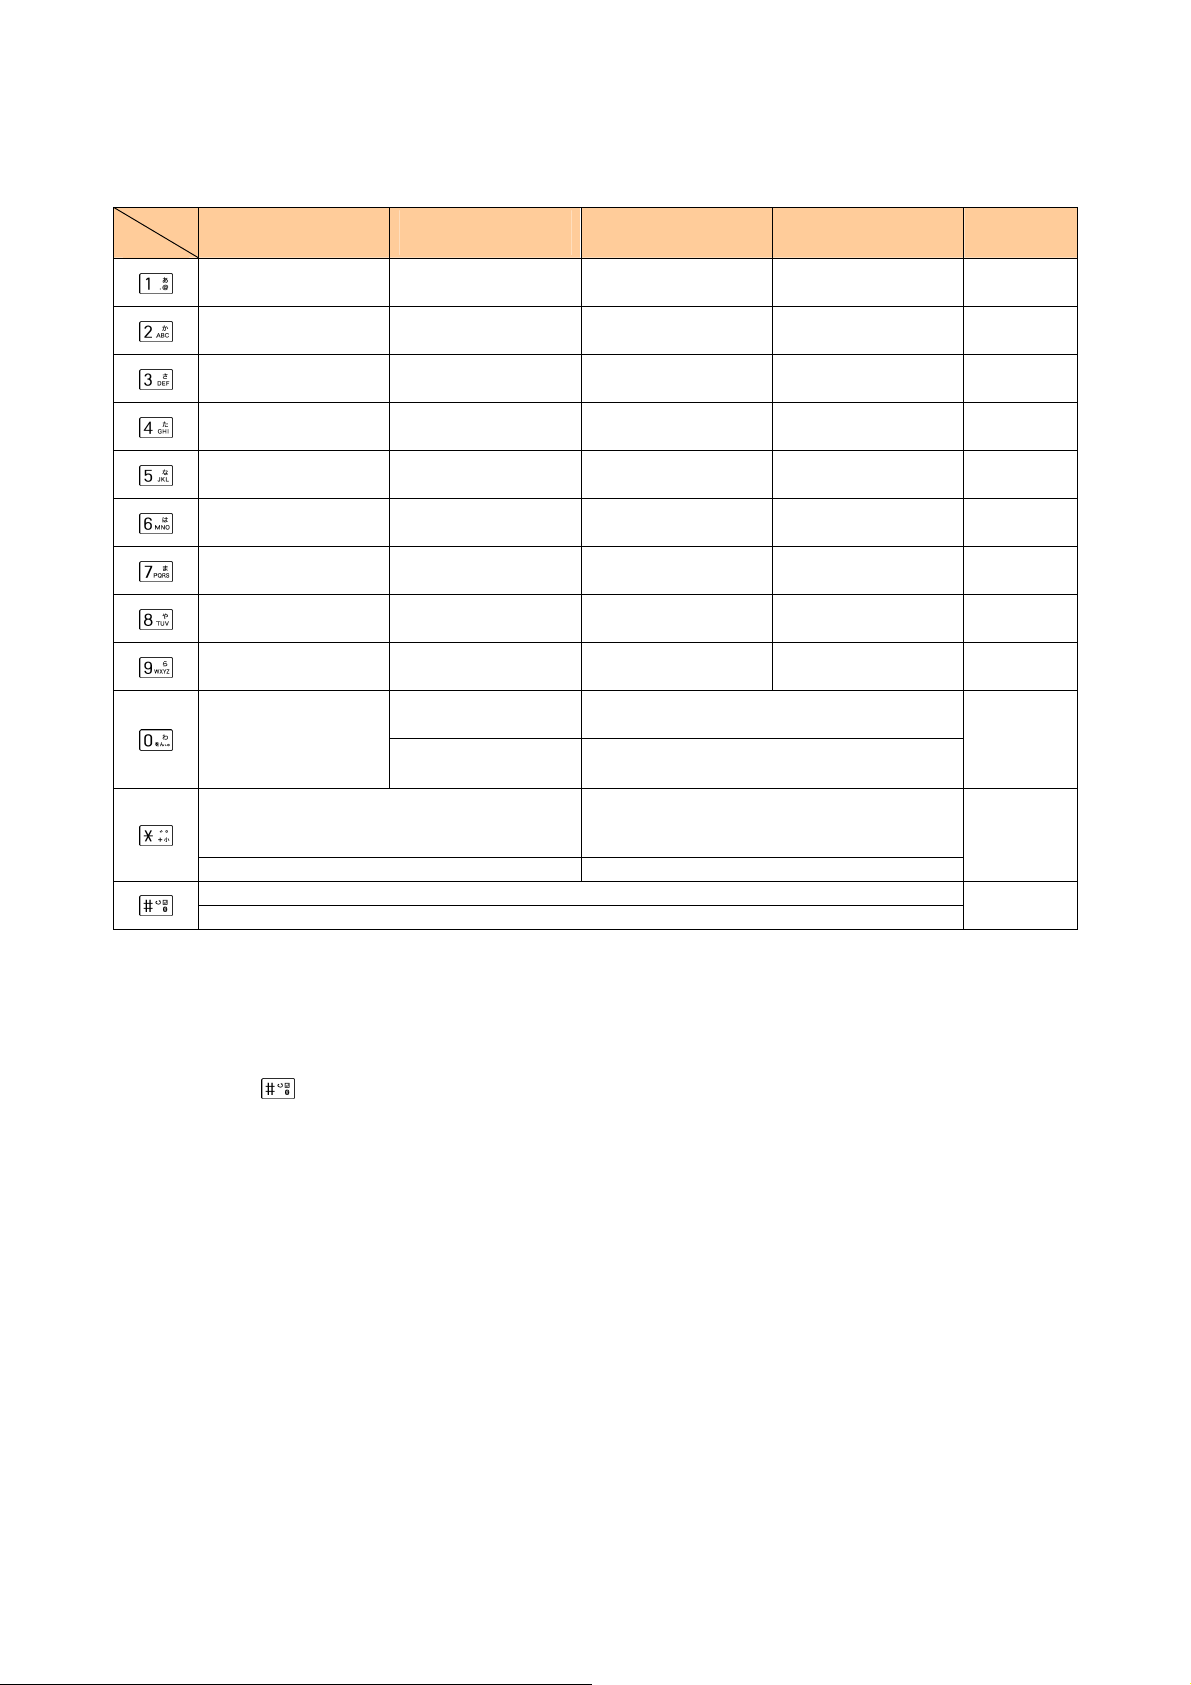
[Assignment of characters and key functions]
Characters are assigned to each key as shown below. Press a key repeatedly to cycle through characters
assigned to that key.
Entry mode
key
Kanji・Hiragana
漢字
あいうえおぁぃぅぇぉ アイウエオァィゥェォ . @ - _ / : ~ 1 . @ - _ / : ~ 1 1
Katakana
カナ・カタカナ
Alphanumeric
AB・ABCD
Alphanumeric
ab・abcd
Number
12・1234
かきくけこ カキクケコ ABC2 abc2 2
さしすせそ サシスセソ DEF3 def3 3
たちつてとっ タチツテトッ GHI4 ghi4 4
なにぬねの ナニヌネノ JKL5 jkl5 5
はひふへほ ハヒフヘホ MNO6 mno6 6
まみむめも マミムメモ PQRS7 pqrs7 7
やゆよゃゅょ ヤユヨャュョ TUV8 tuv8 8
らりるれろ ラリルレロ WXYZ9 wxyz9 9
[ カナ] ワヲンヮ、。ー
わをんゎ、。-・~!?
(space)
(before confirm)゛ (Voiced Sound symbol)
゜(Semi-voiced Sound symbol)
Switches lowercase/uppercase
(after confirm)
、。-・~!?(スペース) (after confirm) . , - ! ?
-・.!?(space)0
[ カタカナ] ワヲン、。ー
-・.!?(space)0
(before confirm)Reverse toggle of entered characters
(after confirm)line change
[AB] [ab] 0(space)! ?
[ABCD] [abcd]
<=>?@[¥]^_` { | }
(before confirm)
Switcheslowercase/uppercase
~
・ , ’ ”_ .-
0(space) ! " #$%& ' ( )* + , - . / : ;
0
.
line change
Remarks:
■ “~”can be inputted only when inputting full-sized characters.It changes to“
~
”when inputting helf-sized
characters.
■ It is not likely to be able to change line on the input of part of character screen.
■ Inputting voiced sound symbol/semi-voiced sound symbol or switching uppercase/lowcase can be done
by pressing
(A list of
Pictographs, Face marks, and Characters is displayed if you press it after the inputted character is
after inputting the character.
set.)
< Example >つ→っ→づ→つ ハ→バ→パ→ハ a→A→a
- 4 -
Page 5

Registering in the Address Book
You can register frequently used phone numbers and E-mail addresses.
Up to 1000 addresses can be registered in the address book.
■ Registering in the address book
1. Press and hold
The screen to register a contact is displayed.
2. Enter the item you want.
for more than one second on the standby screen.
Select the icon of the item you want by
and press
(Select) to enter it.
As for the items you can enter, see "Items to register in the address book".
3. Press
(Reg) .
■ Items to register in the address book
The following data can be put in the address book.
Up to 12 full size (24 half size) characters.
Up to 24 half size characters.
Registered automatically after "Name" is entered.
Up to 32 digits.
Selecting from 7 Phone number types.
Up to 64 half size alphanumeric characters.
Selecting from 6 E-mail address types.
You can classify it into 20 classes for managing.
An image stored in the data folder is selected.
You can set the display of the registered image.
Up to 66 byte.
Setting the action (ringer, lamp) for voice call reception.
Basic
Name
Reading
Phone No.1~3
E-mail Address 1~3
Group
Image
Call Img Dsp
Obtain GPS Info
Incoming Call
Set
Other
E-Mail Receive
C-Mail Receive
Secret Setup
Blood Type
Birthday
Star Sign
Address
Memo
Setting the action (ringer, lamp, ring time) for E-mail reception.
Setting the action (ringer, lamp, ring time) for C-mail reception.
Setting not to display the content of the address book.
Selecting from 4 blood types and “No Settings”.
Inputting date of birth.
Selecting from 13 constellations and “No Settings”.
Up to 40 full size (80 half size) characters.
Up to 40 full size (80 half size) characters.
- 5 -
Page 6

Calling from the Address Book
Saved phone number in the Address Book can be loaded and a call is placed to that number.
1. Press
2. Use
on the standby screen.
to scroll through and display the name you want.
3. Press .
Creating and Sending E-Mail
1. Press
2. Use
Icons
on the standby screen.
to select “Create New”and press
: ”Address”to which you send E-Mail
: ”Subject”of E-Mail
: ”Attachment”of E-Mail
.
: ”Text”which is the mail contents.
3. Use
4. Press
5. Use
6. Enter the address and press
7. Press
8. Use
7. Enter the subject and press
8. Use
9. Enter the body sentences and press
10. Press
to select “ [Address] ” and press
(Select).
to select “Direct Input” and press
(OK).
(OK) .
to select “ [Subject] ” and press
(OK).
to select “ [Text] ” and press
(Send).
(OK).
(Select).
( Select).
(Select).
(Select).
Reading Received C-Mail
■ When you receive C-Mail
The message “
The received C-Mail is stored in the Inbox.
1. Use
to select “
Received C-Mail is displayed.
■ Reading C-Mail from the Inbox
C-Mail can be read from the Standby Screen when any now-read mail read again.
1. Press and hold
2. Use
3. Use
4. Use
to select“ Inbox” and press
to select the folder including the C-Mail to read and press
to select the C-Mail to read and press
[C-Mail] # ” appears when receive new C-Mail.
[C-Mail] # ” and press
for more than one second on the standby screen.
(Select) .
(OK) .
(View) .
(Select) .
- 6 -
Page 7

Using the EZweb Service
1. Press
2. Select " Top Menu/Search" and press
on the standby screen.
(Select).
To access information sites (sites that provide information):
Select the desired information site,and press
■ Pressing
to au one Top.
returns the display to the previous display.Holding down for a longer time returns you
(Select).
Pressing
you can scroll the display up and down by pressing
exits EZweb.
.
List of Basic Setup
■ M0 Profile
Mode No. Function Description
M0 Profile Displaying own phone number and E-mail address
■ M1 Time / Toll / Sub
Mode No. Function Description
M11 Inquire Tool Inquiring the call charge
M12 Call Time / Tool Confirming the last call time and charge
M121 Voice Call Confirming about voice call
M122 Voice Call(OS) Confirming about voice call(overseas)
M13 Tool Display Displaying estimated charge after call
M14 Tool Rate Setting the multiplication of charge
M15 PCSit ViewerRate Confirming the last charge about PC Site Viewer
M16 Subscription Connecting the site for various application
■ M2 Sound/Vib/Lamp
Mode No. Function Description
M21 Incoming Setup Setting for reception
M211 Incoming Call Setting for voice call reception
M212 E-Mail Receive Setting for E-mail reception
M213 Unreg E-Mail Setting for unreg E-Mail reception
M214 Message Receive Setting for message reception
M215 C-mail Receive Setting for C-mail reception
M216 NewsFlash Receive Setting for NewsFlash reception
M22 Machi-Uta Setup Setting for Machi-Uta
M23 Operation Tone Setting for operation tone
M231 Keypad Tone Setting key-in confirm tone volume
M232 OK Tone Setting OK tone volume
M233 NG Tone
M234 Opening Tone
M235 Closing Tone
M236 RechargeStartTn
M237 RechargeComp.Tn
M238 Wake-Up Tone
M239 Power OFF Tone
M24 Earphone Setup Setting for earphone
M241 Earphone Type Setting of kind of earphone
M242 Sound Output Seting at output destination of earphone
M243 Auto Answer Setting for answering calls automatically
M25 Lamp Setup Setting for various lamp
M251 Talking Lamp
M252 Information Lamp
M253 Mail Send Lamp
Setting NG tone volume
Setting sound/ volume of opening tone
Setting sound/ volume of closing tone
Setting recharge start tone volume
Setting recharge complete tone volume
Setting wake-up tone
Setting power OFF
Setting for lamp while talking
Setting for Information lamp
Setting for Mail Send lamp
- 7 -
Page 8

M254 Close Lamp
M255 Event Lamp
M256 Birthday Lamp
M257 RechargeStartLamp
M258 RechargeComp.Lamp
M26 Key Illum. Setup
M261 Incm Call Illum.
M262 Outg Call Illum.
M263 Mail Sending Illum.
M264 Wake-Up Illum.
M265 Power OFF Illum.
M266 Open Illum.
M267 Event Illum.
M268 Birthday Illum.
M269 Information Illum.
M260 Talk Start Illum.
M26** EZweb Start Illum.
M26# Infrared Illum.
Bluetooth Illum.
Camera Shoot Illum.
■ M3 Screen Display
Mode No. Function Description
M31 Main Display Setting Main display
M311 Standby Screen Setting image to display on standby screen
M312 Information Setup Setting information to display on standby screen
M313 Mail Sendg Scrn
M314 Mail Rcvg Scrn
M315 EZ Connect Scrn Setting image to display while connecting to EZweb
M316
M32 Sub Display Setting Sub Display
M321 Clock Setting clock of Sub display
M322 Lighting Time Setting lighting time of Sub display
M323 Font Color Setting font color of Sub display
M33 Disp. Lighting Setting lighting of display and keys
M331 Main Display Light Setting lighting of main display
M332 Key Light Setting lighting of keys
M333 Recharging Display Setting lighting of recharging display
M34 Font Size Setting character size
M331 Input Size
M332 Mail Display
M333 EZweb Display
M334 Address Book
M335 History
M336 Phone No.
M35 Set Language Setting the English/Japanese display
M36 Power Saving Mode Setting low-power consumption for increasing the life of battery
■ M4 Privacy/Rstr
Mode No. Function Description
M41 Security Lock Locked setting
M411 Auto Lock Setting auto lock
M412 Close & Lock Setting Close & Lock
M413 FeliCa Lock Setting FeliCa lock
M414 AddresBookLock Setting addres book lock
M415 Rem. Ctrl Lock Setting remote auto lock
M42 User Restrict Restricted user’s setting
M421 Dial Restrict Disabling dial-up calls
M422 EZweb Restrict Restricting EZweb access
M423 PCSiteViewerRstr Restricting the start of PC Site Viewer
M424 Mail Restrict Restricting mail access
M425 EZapps Restrict Restricting EZappli access
M426 MediaTuner Rstr Restricting MediaTuner
M427 Secret Mode Setting Secret
M43 Incom ing Reject Rejecting designated unwanted phone numbers
Graphic Stand
Setting for Close lamp
Setting for Event lamp
Setting for Birthday lamp
Setting for RechargeStartlamp
Setting for RechargeComp.lamp
Setting for Key Illumination
Setting for Incm Call
Setting for Outg Call
Setting for Mail Sending
Setting for Wake-Up
Setting for Power OFF
Setting for Open
Setting for Event
Setting for Birthday
Setting for Information
Setting for Talk Start
Setting for EZweb Start
Setting for Infrared
Setting for Bluetooth
Setting for Camera Shoot
Setting image to display while sending mail
Setting image to display while receiving mail
Setting image to display while charging
Setting character size for input
Setting character size for mail display
Setting character size for EZweb display
Setting character size for address book
Setting character size for history
Setting character size for phone number
Illum.
Illum.
Illum.
Illum.
Illum.
Illum.
Illum.
Illum.
Illum.
Illum.
Illum.
Illum.
Illum.
Illum.
- 8 -
Page 9

M431 Specified No. Rejecting Incom ing form specified numbers
M432 ID Unset Rejecting Incom ing form ID Unset
M433 Payphone Rejecting Incom ing form payphone
M434 Not Support Rejecting Incom ing form Not Suppor
M435 Unreg Adres Bk
M436 Reject All Rejecting all Incom ing calls while roaming abroad
M437 Save Incm History Set whether to save or not to save in incoming history
M44 Change Lock No. Changing lock number
M45 Reset Various resets
M451 Learning Reset Initializing the character memory
M452 Function Reset Initializing all functions
M453 Memory Reset Initializing all memories
M454 EZapps Reset Initializing the EZapplis
M455 All Reset Initializing all functions and memories
M46 Caller ID Announcing your number to the other party
M47 PIN Code Setup PIN code setting
M471 Change PIN Code Changing PIN code
M472 Need/No Setup Setting whether to input PIN code when powered ON or using au certificate
M48 Cert. Setup Certificate setting
M481 Cert. Disp Displaying downloaded certificate in detail
M482 Confirm Disp Setting whether to display check screen when sending certificate
M483 Root CA Setting to display Root Certificate
M49 Emer. Position On emergency call,location information notified to emergency can be viewed
M40 Incoming Display Setting to display while incoming call
■ M5 User Support
Mode No. Function Description
M51 Input Setting for the character input
M511 User Dictionary Registering words in the list
M512 Edit Phrase Editting phrases
M513 Edit Face Mark Editting Emoticon
M514 Input Setup Setting for the input prediction
M515 D/L Dictionary Registering the dictionary downloaded from EZweb
M516 Write Now Setup Setting for Write Now
M52 Emission OFF Restricting call and transmission functions
M53 Network Setting for network service
M531 Play Voice Mail Listening to messages
M532 Voice Mail1 Setting the answering message service 1
M533 Voice Mail2 Setting the answering message service 2
M534 Voice Mail OFF Stopping the answering message service
M535 Change Ans. Msg Recording/Confirming/Changing response messages
M536 Eng. Guidance Switching to English language guidance
M537 Jpn. Guidance Switching to Japanese language guidance
M538 Call Waiting ON Setting call waiting service
M539 Call Waiting OFF Stopping call waiting service
M54 Prior new Ntc Displaying pop-up when interrupted dyring other function
M55 Clock Setting autonomous working
M551 Auto Time Adj Setting auto time set
M552 Auto Power On Setting auto power ON
M553 Auto Power Off Setting auto power OFF
M56 BlogUp Setting BlogUp
M57 Open & Anser Setting for Open & Anser
M58 No.Append Setup Registering prefix or area code memory
M581 Prefix Setup Registering prefix
M582 AreaCodeMemory Registering area code memory
M59 Data Comm/USB Exchanging dada connecting phone to PC
M591 Conn. Environment Checking connection
M592 Ext.Mem.TransMd Exchanging microSD data with external device
M593 USB Setup Setting operation when connecting USB cable
M594 USB Charge Setting for USB charge
M50 Maintenance Updating software or checking for failure in the phone
M501 Software Update Beginning to update
M502 Check Menu checking for failure in the phone
M503 StatsDataSending Setting status data sending of au phone
Rejecting Incom ing form numbers not
registered in Address Book
- 9 -
Page 10

■ Guide Function (M#)
Mode No. Function Description
M# Guide Function Displaying the operation instructions for functions other than M functions
M#1 Operation Guide Displaying the operation instructions for functions
M#2 Top Icon Guide Displaying explanation of top icon on screen
M#3 au Online Manual Connecting to EZweb au Online Manual and check the operations
Specifications
Weight: approximately XX g (including battery pack)
Continuous talk time: approximately XX minutes ★
Continuous standby time: approximately XX hours ★
Dimensions (H/W/D): approximately XX mm x XX mm x XX mm ※
※ The height and depth are the dimensions when the telephone is folded.
★Used Japan
●The continuous talk time and continuous standby time are the average values of when the signals can be
received normally while the telephone is in the standstill status.
The operation time may be reduced to utmost half due to charging conditions, temperature, and other
operation environment conditions, signal condition at the location of use, function setting, roaming area.
FCC Notice
This device complies with part 15 of the FCC Rules. Operation is subject to the following two
conditions: (1) This device may not cause harmful interference, and (2) this device must accept any
interference received, including interference that may cause undesired operation.
Note:
This equipment has been tested and found to comply with the limits for a Class B digital device,
pursuant to part 15 of the FCC Rules. These limits are designed to provide reasonable protection
against harmful interference in a residential installation. This equipment generates, uses, and can
radiate radio frequency energy and, if not installed and used in accordance with the instructions, may
cause harmful interference to radio communications. However, there is no guarantee that interference
will not occur in a particular installation. If this equipment does cause harmful interference to radio or
television reception, which can be determined by turning the equipment off and on, the user is
encouraged to try to correct the interference by one or more of the following measures:
- Reorient or relocate the receiving antenna.
- Increase the separation between the equipment and receiver.
- Connect the equipment into an outlet on circuit different from that to which the receiver is connected.
- Consult the dealer or an experienced radio/TV technician for help and for additional suggestions.
Warning
The user is cautioned that changes or modifications not expressly approved by the manufacturer could
void the user’s authority to operate the equipment.
FCC RF EXPOSURE INFORMATION
Warning! Read this information before using your phone.
In August 1996, the Federal Communications Commission (FCC) of the United States, with its action in
Report and Order FCC 96-326, adopted an updated safety standard for human exposure to radio
frequency electromagnetic energy emitted by FCC regulated transmitters. Those guidelines are
consistent with the safety standard previously set by both U.S. and international standards bodies. The
- 10 -
Page 11

design of this phone complies with the FCC guidelines and these international standards.
Body-worn Operation
This device was tested for typical body-worn operations with the back of the phone kept 0.59 inches
(1.5 cm) from the body. To comply with FCC RF exposure requirements, a minimum separation
distance of 0.59 inches (1.5 cm) must be maintained between the user’s body and the back of the
phone, including the antenna. All beltclips, holsters and similar accessories used by this device must
not contain any metallic components. Body-worn accessories that do not meet these requirements may
not comply with FCC RF exposure limits and should be avoided.
Turn off your phone before flying
You should turn off your phone when boarding any aircraft. To prevent possible interference with
aircraft systems, U.S. Federal Aviation Administration (FAA) regulations require you to have permission
from a crew member to use your phone while the plane is on the ground. To prevent any risk of
interference, FCC regulations prohibit using your phone while the plane is in the air.
- 11 -
 Loading...