

Page 1

USB Analog TV Stick II Installation Manual
Contents
V1.0
Chapter 1 : USB Analog TV Stick II Hardware Installation................................................................................2
1.1 Package Contents.................................................................................................................................2
1.2 System Requirements...........................................................................................................................2
1.3 Hardware Installation...........................................................................................................................3
Chapter 2 : USB Analog TV Stick II Quick Installation......................................................................................4
Chapter 3 : USB Analog TV Stick II Quick Uninstallation .................................................................................6
Chapter 4: Remote Control Description(Depends on the product you bought.)...................................................7
Chapter 5 : FAQ .................................................................................................................................................8
1. How to check if the driver has been installed successfully or not? ...................................................8
2. How to check if the Remote Control can work fine?.........................................................................8
3. How to uninstall all of device driver and software utility?................................................................9
4. Remove old Version Applications......................................................................................................9
5. LiveUpdate Icon...............................................................................................................................10
Note: For multi language installation manual, please install Adobe Acr obat Reader from autorun after
inserting the CD into the CD ROM. Click “Browse” and open Documents file where multi language
installation manuals are in.
1
Page 2

Chapter 1 : USB Analog TV Stick II Hardware Installation
1.1 Package Contents
Unpack your USB Analog TV Stick II package and make sure that all items are intact. The following items
should be included in your package:
z USB Analog TV Stick II (Model No# UB390-A)
z Quick Start Guide
z USB Extension Cable
z Multi-Cable Input (for AV/S-Video, Audio, FM)
z FM Antenna
z Remote Control (Including Battery)
z PAL/M TO F/F Connector
z CD-ROM with Driver, HyperMedia Center Software
z CD-ROM with Image Library CG PAK and DV Loops
z CD-ROM with CyberLink Softwares (PowerDirector 6 & PowerProducer 4)
1.2 System Requirements
z Intel Pentium IV, 1.6GHz or Equivalent AMD Athlon
z 512MB RAM of System Memory
z 1 Available USB 2.0 Port
z Graphics Card with 64MB Memory (Must Support DirectX 9.0c)
z AC97 Compatible Sound Card
z 2GB Free HD Space
z CD-ROM Drive (For Software Installation)
z Microsoft Windows ® XP SP2/XP MCE 2005/Windows Vista
For Microsoft Windows Media Center, Time-shifting and recording
z Intel Pentium IV 3.0GHz or equivalent AMD CPU or above
z 1024MB RAM of system memory or above
z Graphics Card with 64MB Memory (Must Support DirectX 9.0c)
z AC97 Compatible Sound Card
z Free HD space for recording(e.g. record 1 hour programs takes around 1.8G)
z CD-ROM Drive (For Software Installation)
z Microsoft Windows ® XP SP2/XP MCE 2005/Windows Vista
2
Page 3
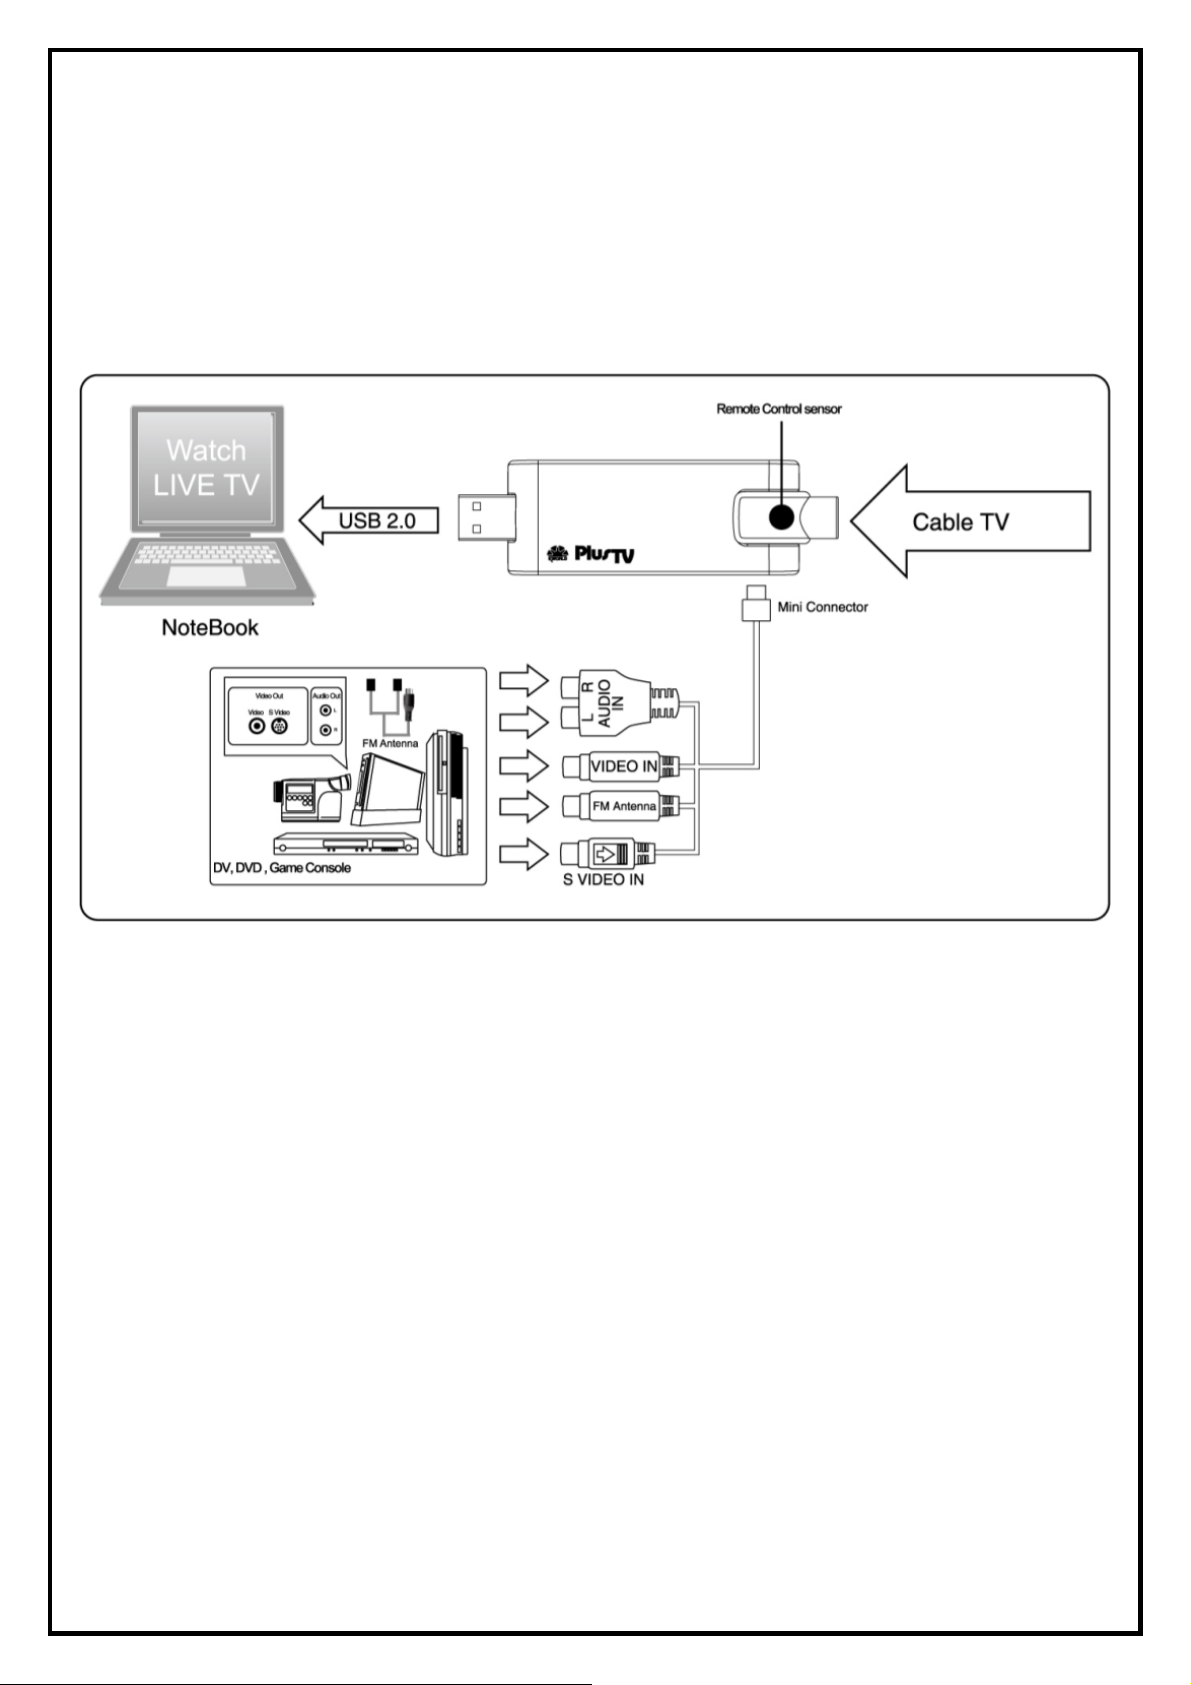
1.3 Hardware Installation
Please follow the steps shown below for installation of your USB Analog TV Stick II and follow the pictorial
guide below for peripheral connections.
1. Plug an antenna for analog TV reception into the TV connector on USB Analog TV Stick II
2. Connect the USB Analog TV Stick II hardware to your laptop or desktop PC using a USB 2.0
port.
3. If the Windows hardware wizard appears, cancel out of this screen and continue to the next
step.
3
Page 4

Chapter 2 : USB Analog TV Stick II Quick Installation
The USB Analog TV Stick II package comes with complete Windows software utilities. These utilities can
be found on the CD-ROM in this package. During installation, it is highly recommended to disable any
sub-programs. These include applications such as antivirus software and system monitoring applications.
1. Please insert the USB Analog TV Stick II device into
your Notebook. The “Found New Hardware
Wizard” window will pop up. Please click [ Cancel ]
and you can make use of USB Analog TV Stick II
Quick Installation for proper installation
2. Insert the installation CD into the CD ROM device. As
the picture shows, the autorun page will appear. Please
choose [ Multimedia software and driver] .
Note1: Your USB device must be plugged in the USB port
before installation.
Note2: If you already installed old version Applications,
Please refer to Chapter 5 FAQ-4. Naturally you
can skip the steps.
3. Please choose [ Quick Installation] .
4
Page 5

4. Please read the End User License and then click
[ Agree ] to continue.
5. The Quick Installation provides you with two choices
to install. Please choose “Typical Installation” for
complete device driver and software installation, or
choose “ Custom Installation” to set up options
according to your personal needs. Click [ Next ] to
continue.
6. Now the Quick Installation Complete. Please choose
[ Yes, I want to restart my computer now ] to restart
your computer (Recommend) and click [ Finish ] to
end the installation.
5
Page 6

Chapter 3 : USB Analog TV Stick II Quick Uninstallation
1. If you want to uninstall device driver and software
utility, please click [Quick Uninstallation].
Note1: Your USB device must plug in the original USB
port before uninstallation.
Note2: There is another way to uninstall device driver and
software utility, please refer to Chapter 5 FAQ 3.
2. The Quick Uninstallation provides you with two
choices to uninstall. Please choose “Typical
Uninstallation” for complete device driver and
software uninstallation, or choose “Custom
Uninstallation” to remove options according to your
personal needs. Finally, click [Uninstall] to continue.
3. Now the Quick Uninstallation Complete. Please
choose “Yes, I want to restart my computer now” to
restart your computer (Recommend) and click [Finish]
to end the installation.
6
Page 7

Chapter 4: Remote Control Description(Depends on the product you bought.)
(Power)
Zoom
CH+/CH- Switches to the next/previous channel. VOL-/VOL+ Decrease/increase the volume.
Numeric
Keypad
Rec Record the current program. Mute Turn on/off the Audio.
Play Play or pause the recorded file.
F2
(Green key)
F4
(Blue key)
Turns on/off the HyperMedia Center
Program
Switch viewing modes (Full Screen/
Windows)
Keypad for channel selection
Enter Stop
Move Down
Move Right
Capture the on-screen mage to a file
List EPG(Electric Program Guide)
Source
Shut Down Shut down the PC.
F1
(Red key)
F3
(Yellow key)
Switch Video Source
(Antenna/Cable)
Switch to the previously selected
channel
Stop the playback or recording of
the current program.
Move Up
Move Left
Return to Home page
Return to “tv” page
7
Page 8

Chapter 5 : FAQ
1. How to check if the driver has been installed successfully or not?
Ans :Right click on “My Computer” on the desktop and choose “Properties”. Once in “Properties”
window, click on “Device Manager” in Hardware panel. Click on the plus icon of “Sound, video and
game controllers” to open the device list. See Fig.1 below.
Fig.1
How to check if the Remote Control can work fine?
2.
Ans : 1) You have to check if the “Remote Control” utility is installed or not. Please refer to Fig. 2
2) You have to check if the driver has been installed or not. See FAQ-1.
3) You can check if the “Remote Control” icon is loaded in the right-bottom of task bar.
See Fig.3. below.
Fig. 2 Fig. 3
8
Page 9

3. How to uninstall all of device driver and software utility?
Ans:1) You can put the installation CD into CD-ROM device to execute [ Quick Uninstallation ] .
2) You can also follow the step ( [ Start ] → [ All Programs ] → [ KWorld Multimedia ] →
[ Uninstallation ] → [ QuickUninstallation ] ) to Uninstall. Please refer to Fig.4
Fig.4
4. Remove old Version Applications.
1). The Install Wizard will detect Applications version automatically. If you already installed an old
Version, it will pop-up a warning window. Please click [ Yes ] to continue. Otherwise click [ No ] to
reverse current version Application and install new driver.
2). If you want to completely remove old version Applications, Please click [ OK ] to continue.
3). Please click [ Finish ] to continue.
4). Install Wizard will proceed to remove Remote Utilities. Please click [ Yes ] to continue.
9
Page 10

5). Please click [ Finish ] to finish the Uninstallation.
5. LiveUpdate Ic on
Ans : Double click on “LiveUpdate” icon, then Please follow the on-screen instructions to update the latest
Driver/AP via internet.
10
 Loading...