

Page 1

Table of Contents V1.0
Chapter 1: Introduction
1-1 Features
1-2 Installing the Software
1-3 Activating TiVme
1-4 Initial Setup
1-5 Uninstalling the Drivers and Software
1-6 Signal Source
1-7 Remote Control Overview
1-8 Remote Control Remap Tool
Chapter 2: TiVme Digital TV
2-1 TiVme Digital TV Interface
2-2 Regular TV Mode
2-3 Control Buttons for Regular TV mode
2-4 Channel Settings
2-5 Multi-Channel Preview
2-6 Resume
2-7 Snapshot
2-8 Capture
2-9 Time Shifting
2-10 Video Setting
2-11 Display Ratio
2-12 Electronic Program Guide
2-13 Teletext
2-14 Subtitle
2-15 The Tool Menu
2-16 Multi-view
Chapter 3: TiVme Cable/Antenna TV
3-1 Introducing TiVme Cable/Antenna TV Interface
3-2 Regular TV Mode
3-3 Control Buttons
3-4 Channel Settings
3-5 Multi-Channel Preview
3-6 Resume
3-7 Snapshot
3-8 Capture
3-9 Time Shifting
3-10 Video Setting
3-11 Display Ratio
3-12 The Tool Menu
02
02
03
05
05
06
06
07
10
11
11
11
11
12
13
13
13
14
15
16
16
17
17
18
18
20
23
23
23
23
24
24
24
25
25
27
28
28
29
32
32
32
32
33
33
34
35
36
36
37
37
37
38
39
40
40
41
41
43
45
45
46
46
49
Chapter 4: TiVme FM Radio
4-1 TiVme FM Radio Interface
4-2 FM Radio Mode
4-3 Control Buttons
4-4 Channel Settings
4-5 Capture
4-6 Time Shifting
4-7 The Tool Menu
Chapter 5: S/Composite Video Cable Input
5-1 S/Composite Video Interface
5-2 S/Composite Video Mode
5-3 Control Buttons
5-4 Channel Settings
5-5 Snapshot
5-6 Capture
5-7 Time Shifting
5-8 Video Setting
5-9 Display Ratio
5-10 The Tool Menu
Chapter 6: Schedule Record
Chapter 7: Playback
7-1 Control Buttons for Playback Mode
Chapter 8: OSD
Chapter 9: Setup
Chapter 10: Appendix
1
Page 2
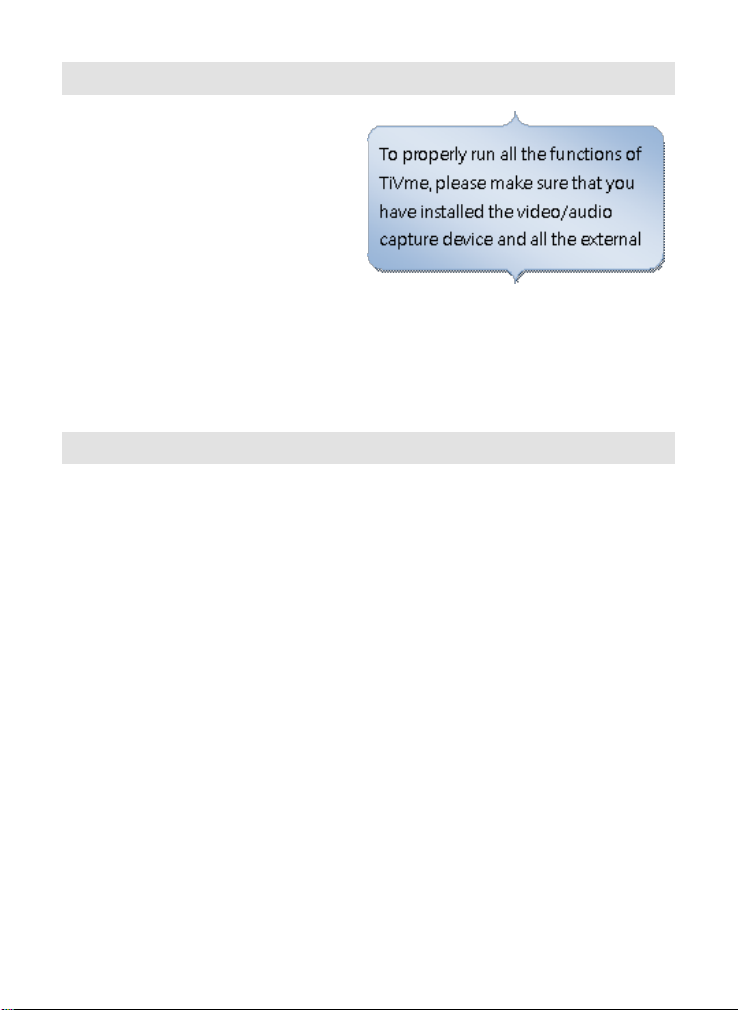
Chapter 1 : Introduction
Thanks for purchasing KWorld
product. It is highly recommended
that you check all the functions
that the device supports carefully
before using the program. This
manual will guide you through the
essential inform ation of how to
use this application program.
TiVme is a multi-functional, graphical and easy-to-use application software
that offers yo u the most compre hensive multimedia entertainment
enjoyment . Ple ase not ice t hat the mult imedi a fun ctions may v ary
depending on the product you purchased.
1-1 Features
․
A multi-functional, graphical software application program that consumes
less RAM space and CPU capacity.
․
Time-shifting: You will never miss a scene of the show.
․
PIP/POP (Picture-In-Picture/Picture-Out-Picture: allows you to watch
in multi-displays and drag/adjust screens. You can watch different TV
programs simultaneously.
․
Multi-viewing of programs/channels (programs/channels multi-viewed
must be from the same stream/TV service provider)
․
Supports 3x3, 4x4, 5x5, L Type and Circle Type multi-channel preview.
․
Schedule-recording your favorite TV shows.
․
Supports analog recording in MPEG1, MPEG2, MPEG4, H.264, PSP, and
IPod formats
․
Digital Zoom in Original, 2X, 3X and 4X
․
Adjustments in viewing windows: Full Screen, Sizable Screen and
Borderless Screen
․
Supports Program stream (PS) and Transport stream (TS) digital
recording format.
․
Supports decoding of digital TV for HDTV and H.264
․
Live Update: offers the most recent updates for your software.
2
Page 3
1-2 Installing the Software
1.Once you have properly installed the
hardware, the “Found New Hardware
Wizard” dialog box will appear.
Please click “Cancel” and have your
KWorld Installation CD ready for
easier and faster installation.
2.Please wait for the installation main
screen to appear after you insert the
installation CD into your CD-ROM.
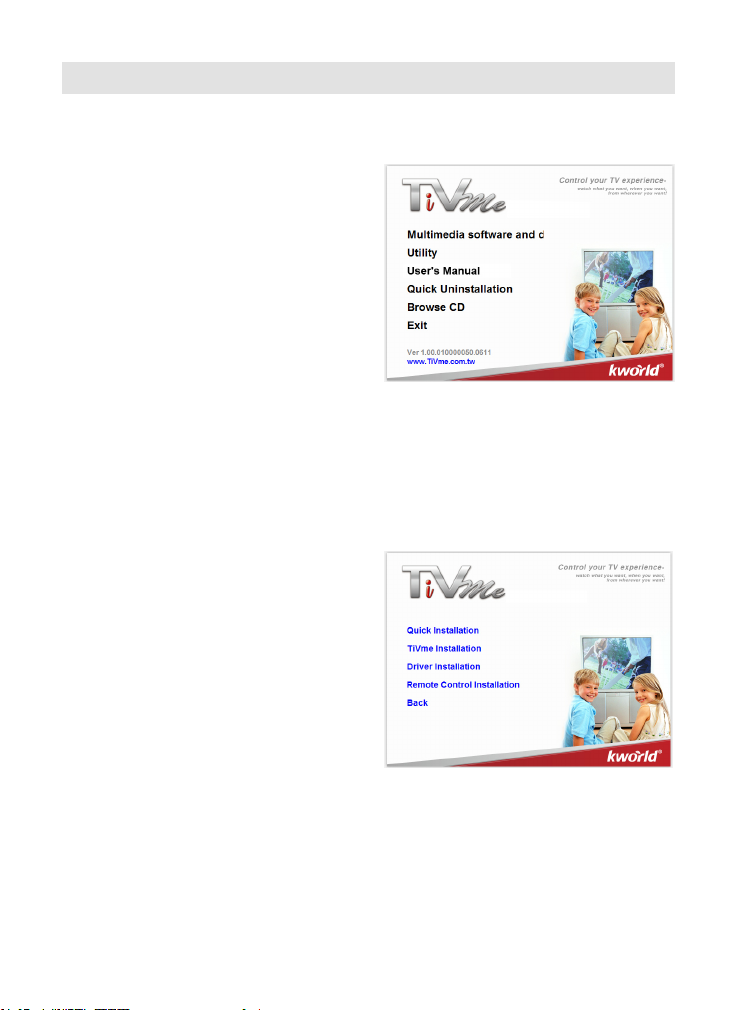
3.The installation main screen will
appear. It is recommended to choose
“Multimedia Software and driver”.
For advanced users, they can go
to “Utility”to install the software and
program individually.
Attention: For advanced users who wish to install the software and
program individually, they must install “Microsoft.Net Framework” rst in
order to install TiVme.
4.You will see a list of installation
options at the left side of the
window. It is recommended to
click ”Quick Installation”. “Quick
Installation”will install all the
necessary programs and software
for you. You can also install TiVme,
driver program or the remote utility
individually up to your demand.
Attention: Vista users may see a dialog box asking you if you like to
continue to install the unknown software in your computer. Please choose
“Yes” to continue. Please be noted that it is because either Vista autodetects softwares that your computer has never installed or it is about
Microsoft certication. Please do not worry as it will not be the potential
cause of problems happen to your computer.
3
Page 4
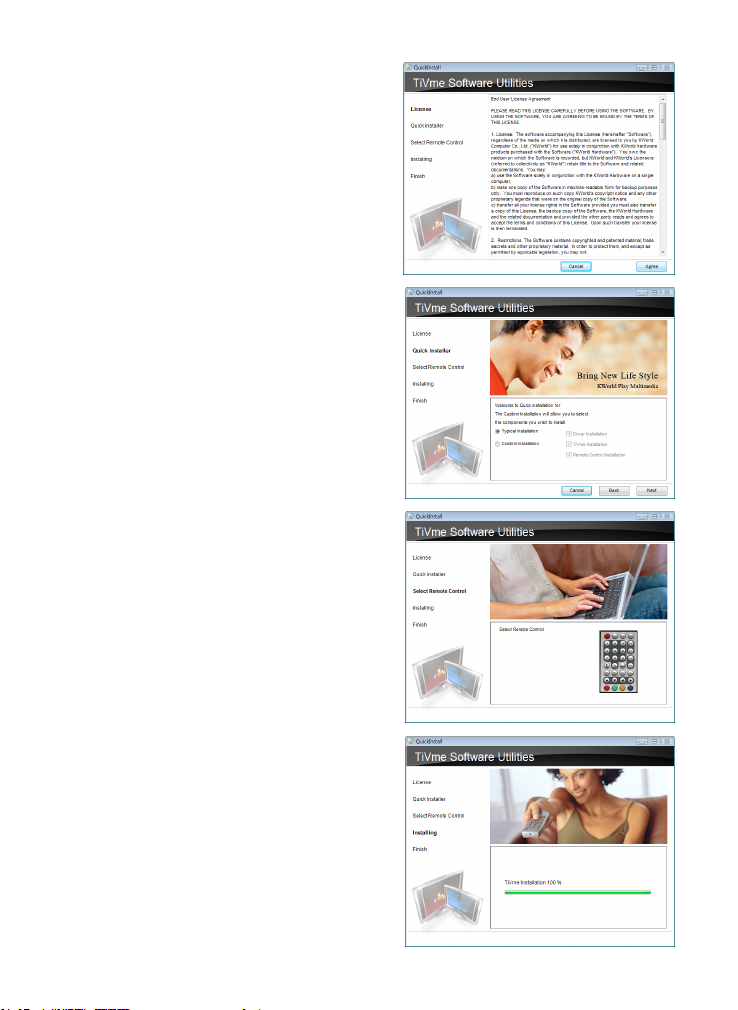
5.Please read the “End User License
Agreement”and click “Agree”.
6.You can choose “Typical Installation”
or “Custom Installation”.“Typical
Installation” will install all the
necessary driver,TiVme software and
remote utility.You can also choose
“Custom Installation” to install the
program or software individually. Click
“Next” when you made your selection.
7.Please choose the remote control
according to the one provided by the
product you purchased. Click “Install”
after you choose the remote.
8.The installation will take a moment.
Please wait.
4
Page 5
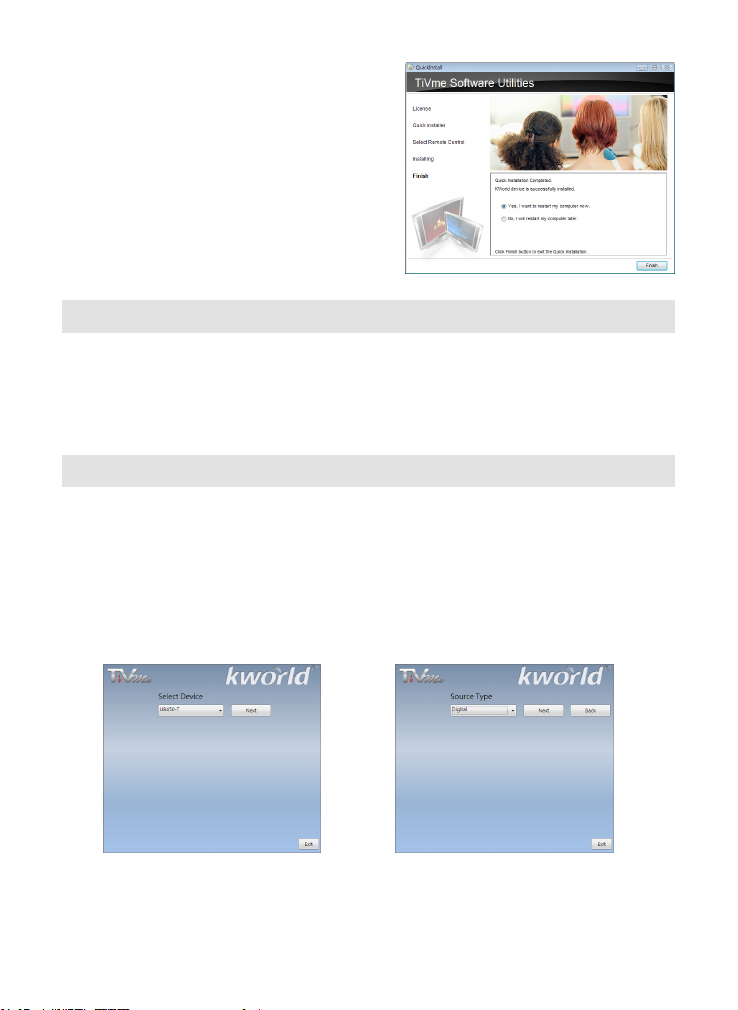
9.When the installation is complete,
the system will ask you whether you
would like to restart your computer.
Please click “Yes, I want to restart
my computer Now” to ensure the
installation is totally completed.
1-3 Activating TiVme
1.Double-click on the TiVme icon on your PC desktop
2.To run it from the “Programs” menu, move your mouse cursor to “Start”
“Programs” “KWorld Multimedia” “TiVme” “TiVme”.
1-4 Initial Setup
When you activate TiVme for the rst time, the system will guide you through
the necessary steps of channel scanning.
1.Please select the device
type (e.g. digital, analog
or hybrid) you purchased
and click “Next”.
2.Select the signal source (the signal
strength may vary depending on
the product you purchased and
the area you live), and click “Next”
5
Page 6
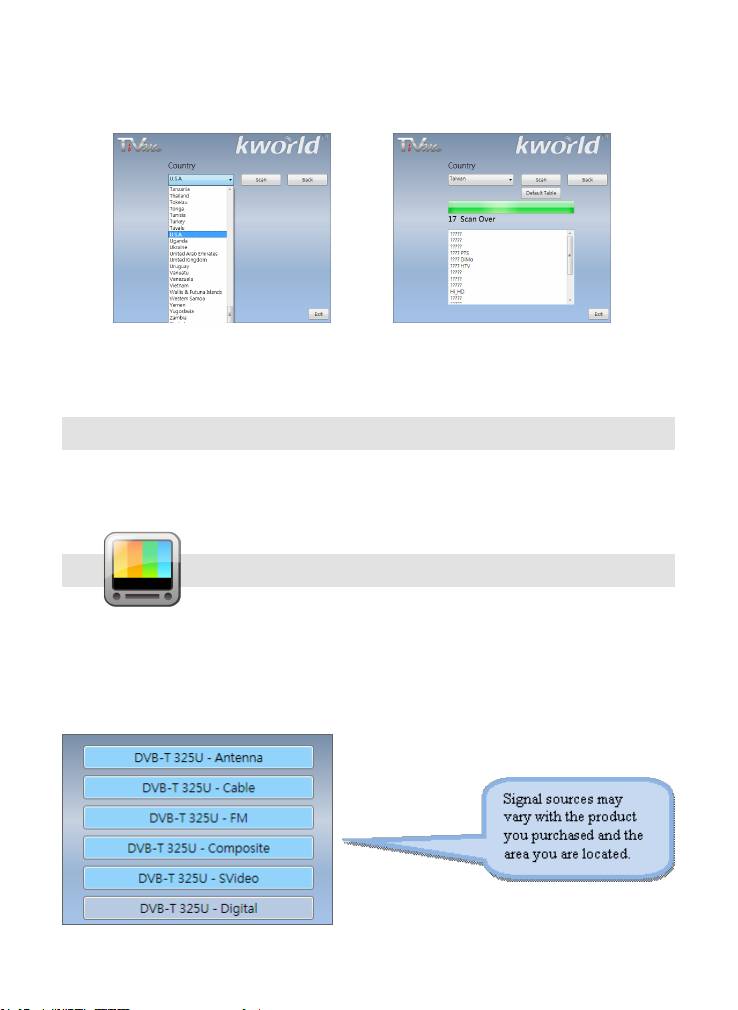
3.Please select the country
you live and then click
“Channel Scan.”
Note: you may load default channel list to watch TV without the waiting time for
channel scanning.
4.Click “Exit” to finish the
setup after the scanning
is completed.
1-5 Uninstalling the Drivers and Software
To uninstall the program, point your mouse cursor to “Start” “Programs”
“KWorld Multimedia” “TiVme” “Uninstall TiVme”
.
1-6 Signal Source
Select your device and signal source such as Digital, analog (Cable or
Antenna), Composite, S-Video, or FM. TiVme will input the signal source you
select. It is recommended that you select the signal source that your device
supports.
6
Page 7
Notes:
Source
Source
Shut
Down
1
CH+
2
3
6
5
4
7
8
9
0
CH-
Vol+
Vol-
Rec
Stop
Play
Mute
Turns on/off the Application Program
Switch viewing modes (Full Screen/ Windows)
Switches to the next/previous channel.
Keypad for channel selection
Enter
Record the current program.
Play or pause the recorded file.
Move Down
Move Right
Sleep Timer
Channel preview
Switch Video Source (TV 1,TV 2)
Shut down the PC.
Decrease / increase the volume.
Switch to the previously selected channel
Stop the playback or recording of the current program.
Turn on/off the Audio.
Move Up
Move Left
Time-Shifting
Capture the on-screen image
(Power)
Zoom
CH+/CH-
Numeric Keypad
Rec
Play
F2 (Green key)
F4 (Blue key)
Source
Shut Down
VOL-/VOL+
Stop
Mute
F1 (Red key)
F3 (Yellow key)
1.Antenna TV: If you choose Antenna TV, please make sure your antenna (for
analog TV reception) is properly installed and is able to receive signals.
2.Cable TV: If you want to watch Cable TV, please ensure that you have
properly plugged your analog (cable) TV cord to the wall outlet of your cable
TV.
3.FM: to listen to FM radio, please make sure that the product you purchased
supports this function.
4.S-Video and Composite Video: if you want to watch DVD videos through
the S-Video or Composite Video input, please check if the device you have
supports this function.
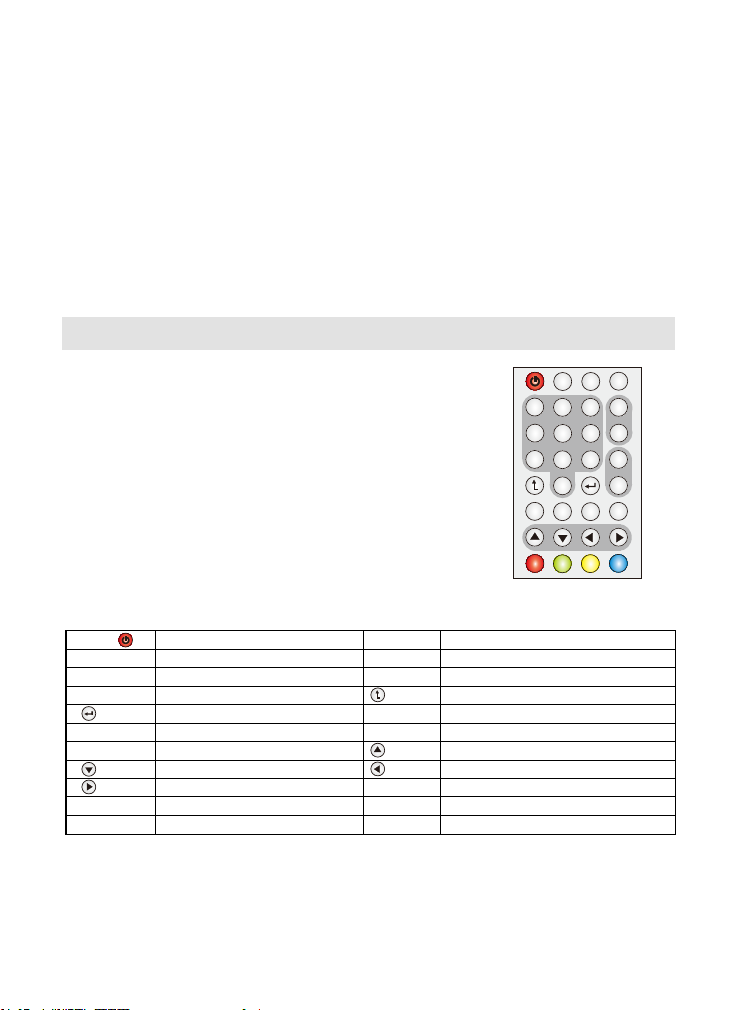
1-7 Remote Control Overview
You can enjoy your multimedia experience with the
remote control included in the package (as illustrated
below). The type of remote varies depending on the
model you purchased and please keep in mind that
not all products come with remotes.
Remote control buttons and descriptions:
Model 1
7
Page 8
Button and Function:
Turn on / off
Shut down the PC
Video Source switch
(Antenna / Cable / Memory / Composite / S-Video)
Audio switch(Stereo / SAP / Mono)
Number keys(0~9)
Recall
Mute
Switch between full screen and window mode
Return to main page
Return to last page
Arrow keys
Enter
Volume up / down
Channel up / down
Time-Shifting
Record
Playback
EPG(Only for digital TV)
Teletext(Only for digital TV)
Snapshot
Sleep timer
Preset mode(A:Default / B:Theater / C:Sport)
Adjustment
(Brightness / Contrast / Saturation / Hue / Sharpness)
Adjust screen ratio between 4:3 / 16:9 / 16:10
1. Minimize
2. Switch screen 1 / screen 2(Only for dual TV product)
8
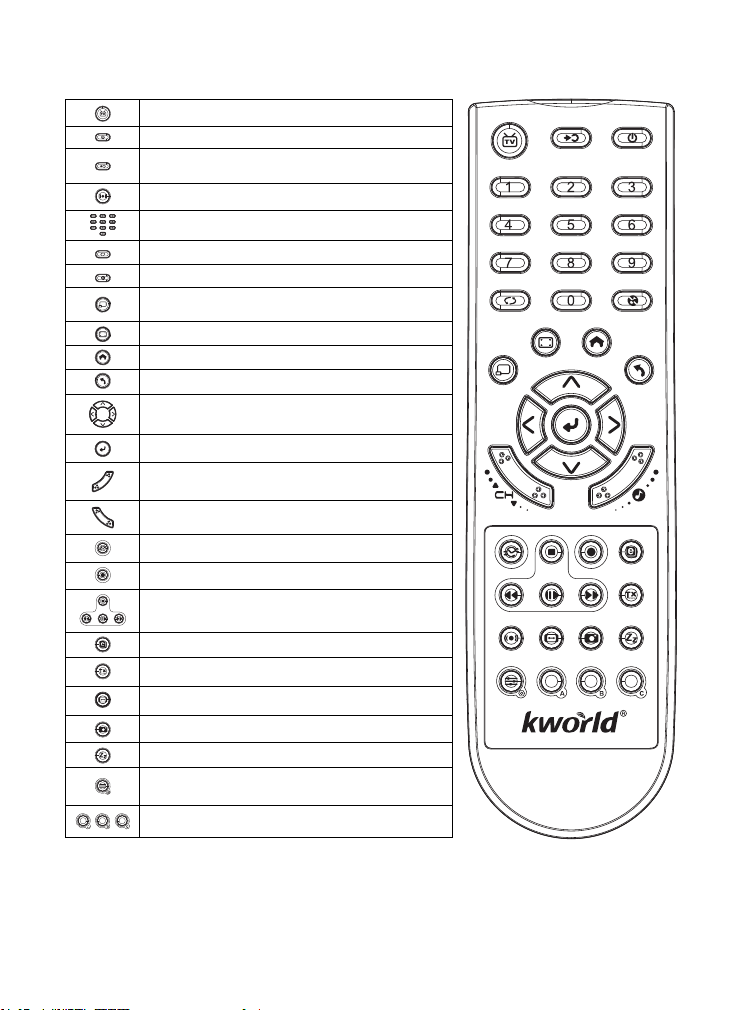
Model 2
Page 9
Activate/deactivate TiVme
Switch between the antenna and cable TV signal
(for analog TV)
Shut down the computer (press it once to show the
message confirming if you wish to shut down. Then,
press it again to shut down the computer)
Channel preview
Take snapshots of TV scenes
Mute (the sound is off)
Turn on/off the stereo
Volume up & volume down
Time shifting
(pause, rewind or fast forward a TV program)
Rewind & fast forward
Change display ratio
OSD (on screen display)
Turn on/off the Theater Mode
Teletext
Stop (during the playback mode)
Go to the beginning / the end of the playback file
Capture & record the program you are watching
Go to last / next channel
Minimize the TiVme
Zoom the image
Switch video source
Enter/confirm a selection
Return to previously accessed channel
Number keys (e.g. enter channel numbers)
N/A
If you would like to redefine/remap the functions of the control buttons, please refer to the chapter
1-8 "Remote Control Remap Tool" in TiVMe User manual
Stop
POWER
SUB TV
PREVIEW
SNAP
SHUP
DOWN
MUTE
TIMESHIFT
FUN1 FUN2 FUN3 FUN4
STOP REC
MIN
STERO
SOURCE
ZOOM
SUB TV
PREVIEW
SNAP
SHUP
DOWN
Mute
Stereo
Time shift
Stop
FUN1
FUN2
FUN3
FUN4
REC
MIN
Zoom
0-9
Source
Play & Pause (during the playback)
9
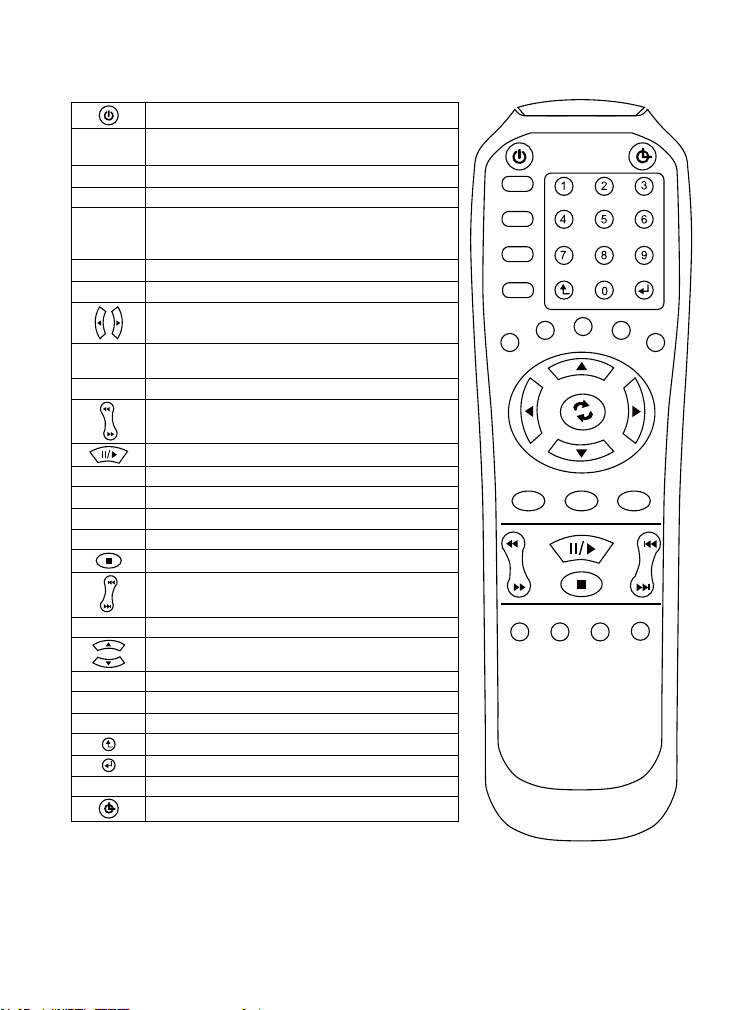
Model 3
Page 10
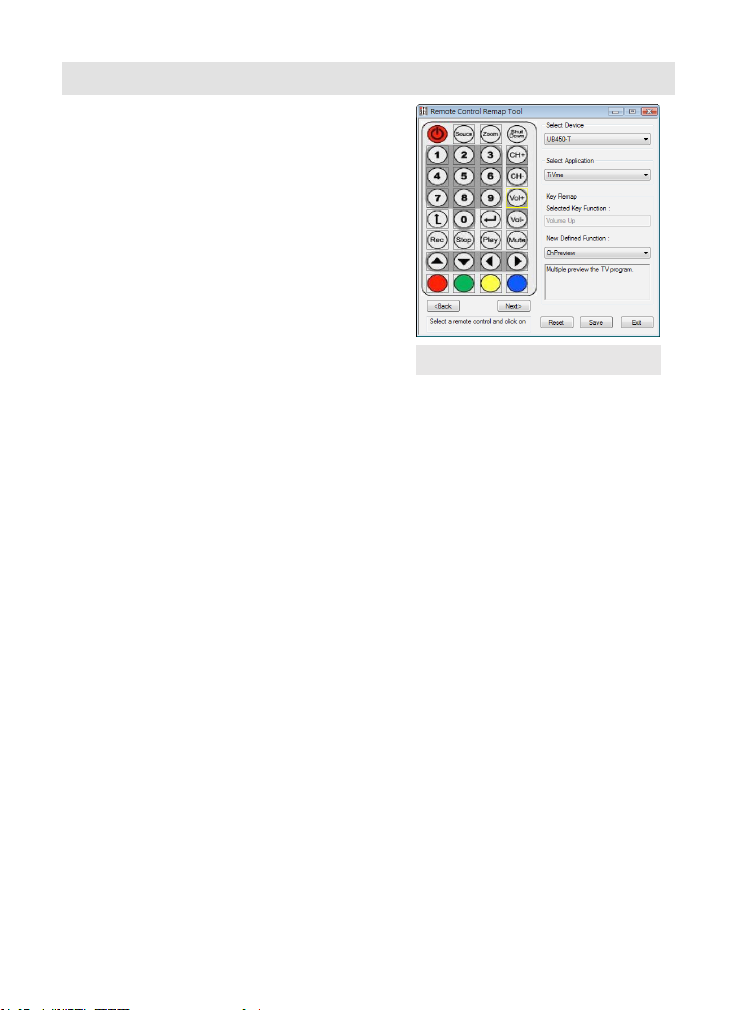
1-8 Remote Control Remap Tool
If you have installed the remote control
program during the installation, you may
redene/remap the functions of the control
buttons. If you want to remap the control
buttons for your remote control, please
mo v e you r m ous e c urs o r to Too lba r,
located at the bottom ri ght of your PC
desktop. Right-click the Remote Control
ic on and c hoo se “Se tting ” and y ou a
window like the gure below will appear.
This gure i s for reference only, please refer
to the remote comes with your device.
Select Device:Please select and conrm the device you are using.
Select Application:Please select and confirm the application program you are
accessing.
Key Remap
Selected Key Function:Move your mouse cursor to the button that you want to
remap and click on it. For instance, if you select and click the “Volume Down”
key, you will see the function of this key in the space right below “Selected Key
Function”.
New Dened Function: Remap new function for the selected control button. You
can drag out a list on the arrow at the right to choose the functions.
Back:move to the previous remote control for remapping
Next:move to the next remote control for remapping
Reset:return to the default setting
Save:save changes
Exit:cancel the changes or exit the remap tool
The List of Functions for Remote Control Buttons
1.Backward
2.ChannelRecall
3.ChPreview
4.Close Current TV Window
5.DisplayRatio
6.Down
7.Enter
8.EPG
9.Forward
10.GotoBegin
11.GotoEnd
12.Home
13.Left
14.Min
15.Mode 1
16.Mode 2
17.Mode 3
18.Mute
19.NextChannel
20.Num 0
21.Num 1
22.Num 2
23.Num 3
24.Num 4
25.Num 5
26.Num 6
27.Num 7
28.Num 8
29.Num 9
30.Num 0
31.OSD
32.Play
33.PreChannel
34.PrePage
35.Record
36.Right
37.Snapshot
38.Source
39.Stereo
40.Stop
41.SubTV
42.Swap
43.Switch Screen
44.Teletext
45.TheaterMode
10
46.TimeShift
47.Up
48.Volume Down
49.Volume Up
50.Sleeptimer
51.MCE Music Library
52.MCE Video Library
53.MCE Live TV
54.MCE Picture Library
55.Go to Last Page for WMC
Page 11
Chapter 2 : TiVme Digital TV
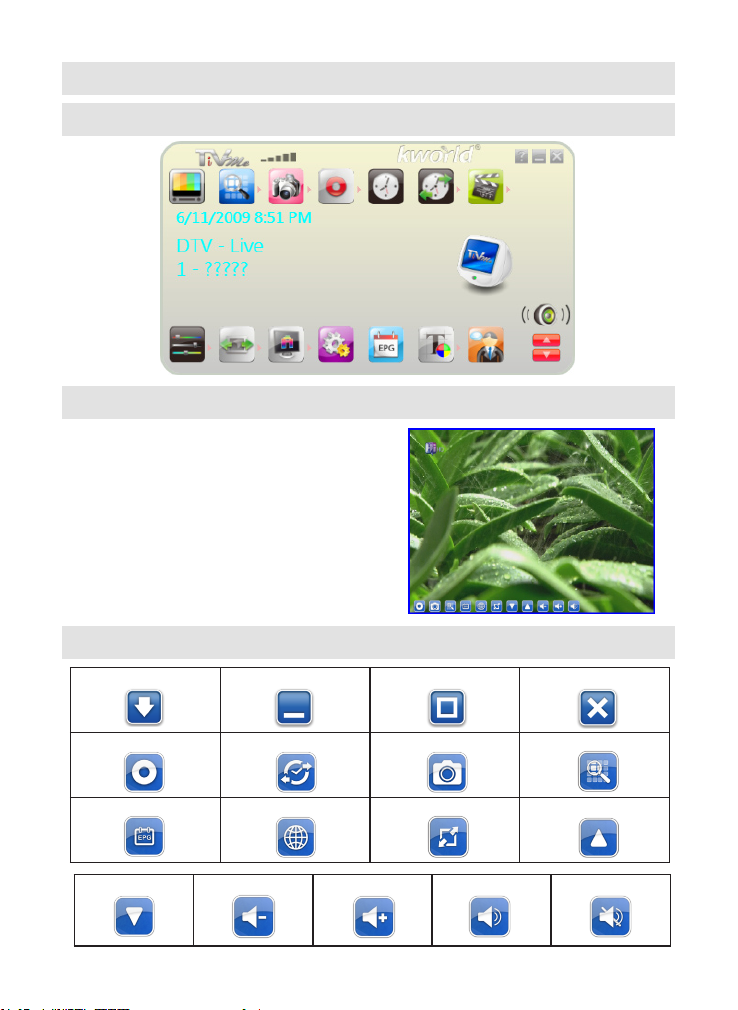
2-1 TiVme Digital TV Interface
2-2 Regular TV Mode
You can watch live TV with TiVme, once
you have done your initial setup. There
are some control buttons giving useful
functions to your viewing.
Note: Make sure your device supports
digital signal in order to watch digital TV.
2-3 Control Buttons for Regular TV mode
Always on top Minimize Maximize Exit/close
Capture Time Shifting Snapshot Channel Preview
EPG SAP Display Ratio Channel Up
Channel Down Volume Down Volume Up Audio Mute
11
Page 12
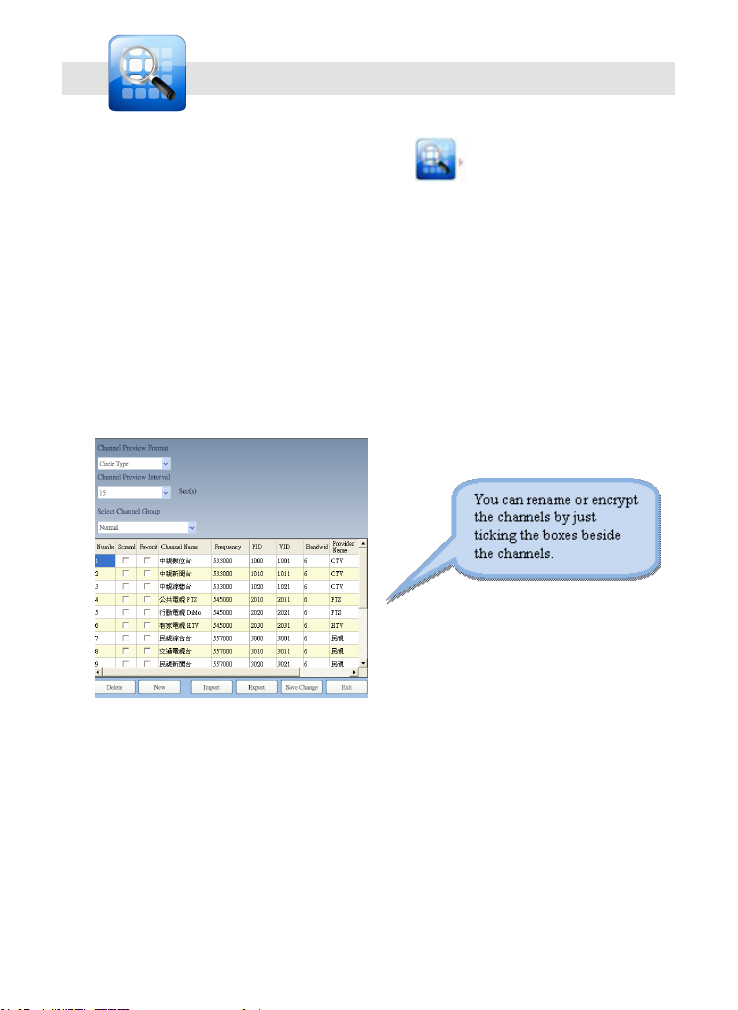
2-4 Channel Settings
When you click on the arrow beside it ,
You can do some settings for your channels.
a.Channel-preview format: choose channel preview format in 3X3 / 4X4 / 5X5 /
L /Circle Type
b.Channel Preview Interval: set channel preview interval in 3/5/10/15/30 (secs)
c.Select Channel Group: load in “Normal” or “My Favorite” channels.
d.Delete: delete a selected channel
e.New: add a new channel
f.Import: import channel table from le folders
g.Export: export channel table from le folders
h.Save Change: save the change you made for the channel list
i.Exit: close/exit Channel Setting
12
Page 13
2-5 Multi-Channel Preview
You can click the Channel Setting icon
to enable multi-channel preview.
2-6 Resume
You can resume by right-clicking to
enable “Stop Channel Preview”.
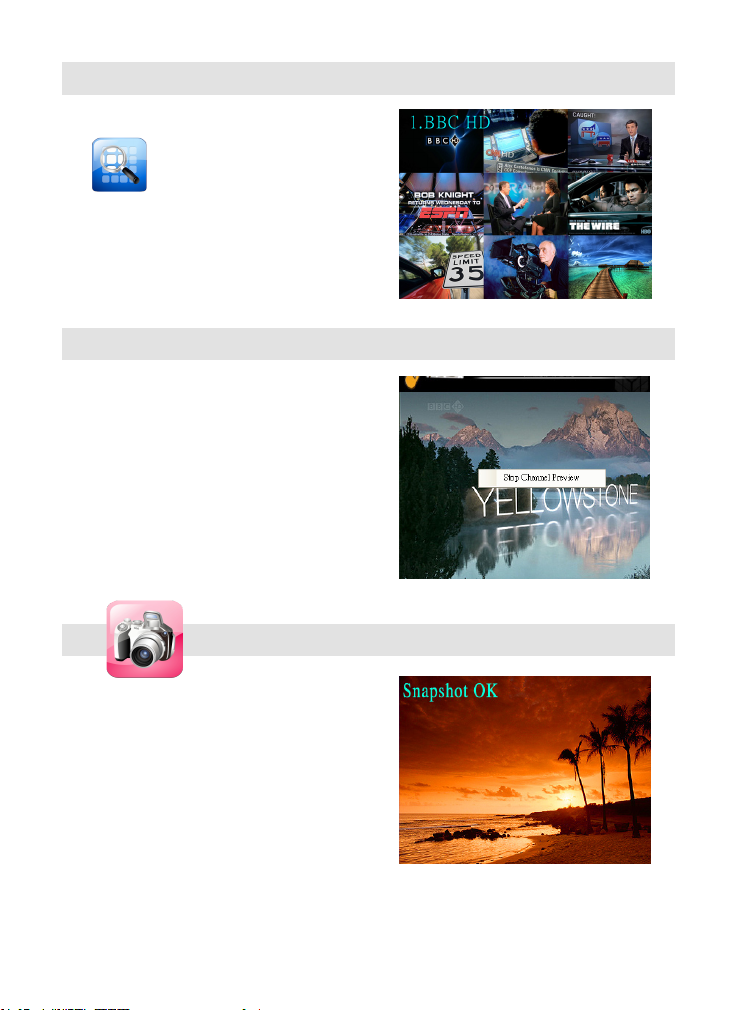
2-7 Snapshot
You can click the “Snapshot” icon to
take snapshots. When the screen
shows “Snapshot OK”, it means the
image has been successfully taken
into your le folder as picture les.
13
Page 14
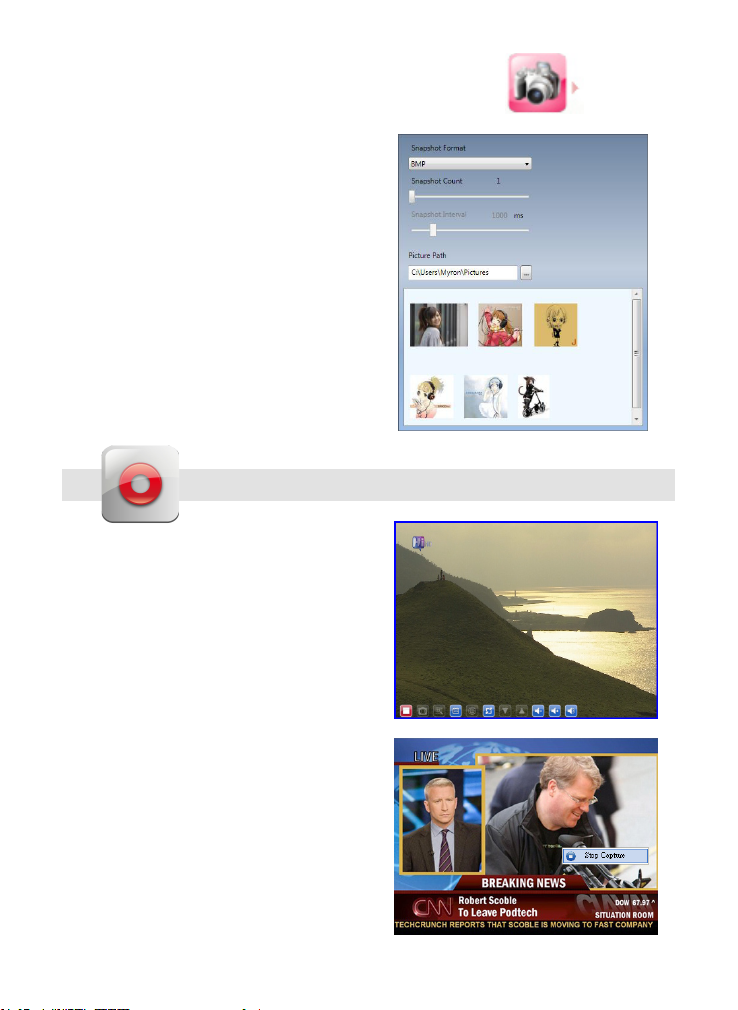
When you click on the arrow beside the Snapshot icon
You can congure the settings for “Snapshot”:
a. Snapshot Format: You can capture
your favorite scenes of the shows and
save in BMP, JPG, PNG and TIFF
formats.
b. Snapshot Count and Snapshot
Interval: Snapshot Count indicates
the number of snapshot pictures and
Snapshot Interval (unit: ms) means
the time interval between snapshots.
Both can be changed to meet your
preferences.
c. Picture Path: You can select the
storage path for your snapshot
pictures with “Picture Path”.
2-8 Capture
You can click it to capture the scenes
you like. Once you capture the scene,
it is saved in your Video Path. Click it
again to resume to regular TV mode.
Another way to resume is to right click
on the screen and then enable “Stop
Capture”.
14
Page 15
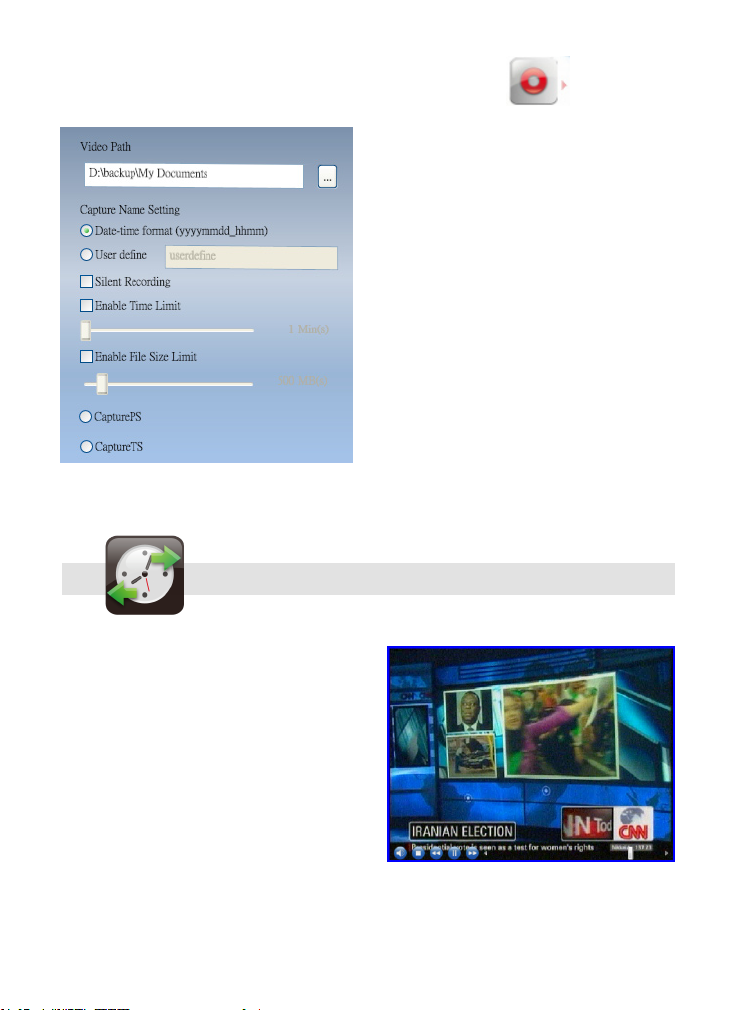
When you click on the scroll-arrow beside the Capture
icon, You can congure the settings for “Capture”:
Video Path: allows you to change your
storage path.
Silent Recording: enables muterecording to prevent potential distraction
when you are working on something
on your PC. (Note: the sound is muted
during recording. When you watch your
recorded le, the sound is kept).
Capture Name Setting: file-naming
option. The default is “Date-time format”,
or you can put a specic name in “User
dene”.
Enable Time Limit: sets the recording
time-length. The recording will stop
once the time is reached.
Enable File Size Limit : sets limit for
recording files. The recording will stop
once the le size is reached.
CapturePS/CaptureTS: selects
recording in PS/TS formats.
2-9 Time Shifting
This icon enables Time-shifting function
once clicked. Time Shifting function
records the TV program you are currently
watching. This function enables you to
pause/fast-forward/rewind TV shows so
you won’t miss any part when you left
the show for something else.
Note: All the recorded scenes can be
saved in your chosen storage directory
by clicking
15
Page 16

Control Buttons for Time-shifting Mode:
Audio Stop Backward Pause Forward Control scroll for
2-10 Video Setting
Clicking on the arrow beside this icon enables
you to adjust the Saturation, Brightness, Contrast,
Blue and Red. You can also activate DxVA function.
The video setting you congure can be applied to all
channels or you may return to default value.
Note: not all the video cards support DxVA function.
You may also adjust the VMR
Type (VMR 7 or VMR 9)
2-11 Display Ratio
Time-shift
If you click on the arrow beside this icon , You can set the screen ratio
individually for each channel: Free/4:3/16:9/Base on source. (The “Base On
Source” option is only supported in Digital TV).
16
Page 17

2-12 Electronic Program Guide
You can receive and view
information of TV programs of
each digital TV channel with
this function.
Note: only devices that support digital TV signal can enable EPG.
2-13 Teletext
Activates Teletext function. Please be noted that this function can only be
enabled in certain countries. If you click on the arrow beside it , you can set
Teletext page based on the default standard colors (red, blue, yellow, green) or
by entering digits into the white boxes under Main Page/Sub Page.
17
Page 18

2-14 Subtitle
Turn on/off the subtitles (only available in specic TV programs that support this
function).
2-15 The Tool Menu
While you are watching digital TV on
TiVme, you can enable the Tool Menu
with a mouse right-click. The Tool Menu
allows you to access and activate
functions of TiVme, which provides you
another option besides the icons on the
interface.
a.Always On Top: enables TiVme to
remain on top of all other application
windows. It is the same if you click
on the Always On Top at the upper
right corner of the regular TV mode
window.
b.Display Ratio: you can adjust your
display ratio when you move your
mouse cursor to the arrow at the right
of this option. There are Free, 4:3,
16:9, Base On Source, and Apply To
All Channel. It is the same as you
click on the Display Ratio function
icon on the interface.
18
Page 19

Free: the initial ratio when you start TiVme and you can adjust it by dragging the
edge of the TiVme window.
Base On Source: the display ratio will be based on the signal source.
Apply To All Channel: if you select this option, the adjusted display ratio will be
applied to all of your available channels.
c.Preview Window: you can change your TV viewing screen to Full Screen,
Sizable Screen or Borderless Screen.
d.Channel List Type: there are two types of Channel List Type – Normal or My
Favorite. You can select which type to load your channel list. It is the same
as you do in the Channel Setting page. The default is Normal.
e.Channel List: displays your available channels. It’s the same as you open the
Channel Setting.
f.Channel Preview: you can decide which type of channel preview –
3x3, 4x4, 5x5, L Type or Circle Type.
19
Page 20

g. Capture: you can choose to capture the TV scenes in TS or PS formats.
h.Time Shifting: enable Time Shifting mode. It is the same as you click on the
Time Shifting icon on the main interface.
i.Snapshot: activate Snapshot function to take the Snapshot. You can also do
the same if you click on the Snapshot icon on the main interface.
2-16 Multi-view
j.allows you to multi-view channels/programs. Once you move your mouse
cursor to the error at the right, you can select “Start Multi-view”. You can then
watch multiple channels/programs that are from the same signal frequency
at the same time.
․Start Multi-view: When you activate
Multi-view by selecting “Start Multiview”, notice that two other viewing
screens appear within the main TV
screen.
No t e: yo u c an th en drag the su b
screens that were in the main viewing
screen out
Not e: The tw o s ub s cre e ns
that were dragged out can be
enlarged an d r eloca ted up to
your viewing demands.
20
Page 21

․
P.I.P/P.O.P: once you activate Multi-view,
you can enable multi-view in Picture-inPicture/Picture-out-Picture mode.
․
Stop Multi-view: select this option to stop Multi-view. Once you selected it,
the two sub screens will go off.
․
TV Wall: you may also select the TV Wall option from the Multi-view.
Note: when you move your mouse to
the arrow at the right, you can choose
th e num be rs f or y our TV w al l. F or
instance, if you choose “3”, then you
will have 3 TV screens showing the
same TV program.
Note: please keep in mind that TV Wall
allows you to see a program in multiple
screens. Like Multi-view, it starts with sub
screens similar to P.I.P/P.O.P but then you
can drag them out to enlarge or relocate.
21
Page 22

k. EPG: start EPG (Electronic Program Guide). It is the same if you click the
EPG icon on the main interface.
l. SAP: turn on the SAP function. However, not all channels support this
function.
m.Digital Zoom: there are 4 zooming
formats -- Original, 2X, 3X and 4X.
n.Add/Remove to my favorite: add a channel to My Favorite or remove a
channel from My Favorite.
o.Channel Up: go to the next channel on the channel list
p.Channel Down: go to the last channel on the channel list
q.Channel Recall: return to the previously accessed channel
r. Mute On: enable/disable the mute function
s. Volume Up: increase the volume
t.Volume Down: decrease the volume
u.Hide Panel: hide or show the control panel (the TiVme interface)
v. Exit: close/exit TiVme window
22
Page 23

Chapter 3 : TiVme Cable/Antenna TV
3-1 IntroducingTiVme Cable/Antenna TV Interface
3-2 Regular TV Mode
Once you have completed your initial setup for
TiVme cable/antenna TV, you can watch live TV
with TiVme. There are control buttons for you to
conveniently navigate the TV window.
Note: Please make sure your device is properly
connected to the cable TV plug if you would
like to watch cable TV. For antenna TV, please
properly install the antenna rst.
3-3 Control Buttons
Always on top Minimize Maximize Exit/close
Capture Time Shifting Snapshot Channel Preview
Close Caption De-noise SAP SAP Display Ratio Channel Up
23
Page 24

3-4 Channel Settings
When you click on the arrow beside it ,
You can do some settings for your channels.
Channel-preview format: choose
channel preview format in 3X3 / 4X4 /
5X5 / L /Circle Type
Channel Preview Interval: set channel
preview interval in 3/5/10/15/30 (secs)
Select Channel Group: load in “Normal”
or “My Favorite” channels.
Delete: delete a selected channel
New: add a new channel
Import: import channel table from file
folders
Export: export channel table from file
folders
Save Change: save the change you
made for the channel list
Exit: close/exit Channel Setting
S-Video Video Standard: select PAL or
NTSC video standard
Composite Video Standard: select PAL
or NTSC video standard
3-5 Multi-Channel Preview 3-6 Resume
You can click the Channel Setting icon
to enable multi-channel preview.
You can resume by right-clicking to
enable “Stop Channel Preview”.
24
Page 25

3-7 Snapshot
You can click the “Snapshot” icon to
take snapshots. When the screen shows
“Snapshot OK”, it means the image has
been successfully taken into your file
folder as picture les.
When you click on the arrow beside the
Snapshot icon ,You can congure the
settings for “Snapshot”:
a. Snapshot Format: You can capture
your favorite scenes of the shows and
save in BMP, JPG, PNG and TIFF
formats.
b. Snapshot Count and Snapshot
Interval: Snapshot Count indicates
the number of snapshot pictures and
Snapshot Interval (unit: ms) means
the time interval between snapshots.
Both can be changed to meet your
preferences.
c. Picture Path: You can select the
storage path for your snapshot
pictures with “Picture Path”.
3-8 Capture
You can click it to capture the scenes you
like. Once you capture the scene, it is
saved in your Video Path. Click it again to
resume to regular TV mode.
25
Page 26

Another way to resume is to right click
on the screen and then enable “Stop
Capture”
When you click on the scroll-arrow beside the Capture icon ,
You can congure the settings for “Capture”:
Video Path: allows you to change your
storage path.
Silent Recording: enables mute-recording to
prevent potential distraction.
Capture Name Setting: file-naming option.
The default is “Date-time format”, or you can
put a specic name in “User dene”.
Enable Time Limit: sets the recording timelength. The recording will stop once the time
is reached.
Enable File Size Limit: sets limit for
recording files. The recording will stop once
the le size is reached.
Capture Bitrate: set the bit rate for the video
capture (in Kps).
Capture Resolution: choose your capture
resolution at 720x576, 720x480, 640x400,
352x288, 352x240, 320x240.
apture Format: You can select video/image
capture formats. TiVme supports the following
formats: MPEG1, VCD, MPEG2, DVD,
MPEG4, MPEG4_PSP, MPEG_iPod, H264,
H264_PSP, H264_iPod.
26
Page 27

3-9 Time Shifting
This icon enables Time-shifting
function once clicked. Time Shifting
function records the TV program you
are currently watching. This function
enables you to pause/fast-forward/
rewind TV shows so you won’t miss
any part when you left the show for
something else.
Note: All the recorded scenes can be
saved in your chosen storage
directory by clicking
Control Buttons for Time-shifting Mode:
Audio Stop Backward Pause Forward Control scroll for
27
Time-shift
Page 28

3-10 Video Setting
Clicking on the arrow beside this icon enables
you to adjust the Brightness, Contrast Hue, Hue,
Saturation and Sharpness. The video setting that you
congure can be applied to all channels or you may
return to default value.
You may also adjust the VMR Type
Note: you can only modify TV position in analog TV.
(VMR 7 or VMR 9).
3-11 Display Ratio
If you click on the arrow beside this icon , You can set the screen ratio
individually for each channel: Free/4:3/16:9/Base on source. (The “Base On
Source” option is only supported in Digital TV).
28
Page 29

3-12 The Tool Menu
While you are watching cable/antenna
TV on TiVme, you can enable the Tool
Menu with a mouse right-click. The
Tool Menu allows you to access and
activate functions of TiVme, which
provides you another option besides
the icons on the interface.
29
Page 30

Always On Top: enables TiVme to remain on top of all other application
windows. It is the same if you click on the Always On Top at the upper right
corner of the regular TV mode window.
Display Ratio: you can adjust your display ratio when you move your mouse
cursor to the arrow at the right of this option. There are Free, 4:3, 16:9, and
Apply To All Channel. It is the same as you click on the Display Ratio function
icon on the interface.
Preview Window: you can change your TV viewing screen to Full Screen,
Sizable Screen or Borderless Screen.
Source Input: switch your source input
Channel List Type: there are two types
of Channel List Type – Normal or My
Favorite. You can select which type to load
your channel list. It is the same as you do
in the Channel Setting page. The default is
Normal.
Channel List: displays your available
channels. It’s the same as you open the
Channel Setting.
30
Page 31

Channel Preview: you can decide
which type of channel preview – 3x3,
4x4, 5x5, L Type or Circle Type.
Capture: select your video/image
capture format, including MPPEG1,
VCD, MPEG2, DVD, AVI, MPEG4,
MPEG 4 (PSP), MPEG 4 (iPod), H.264,
H.264(PSP), H.264(iPod).
Time Shifting: enable Time Shifting mode. It is the same as you click on the
Time Shifting icon on the main interface.
Snapshot: activate Snapshot function to take the Snapshot. You can also do
the same if you click on the Snapshot icon on the main interface.
SAP: turn on the SAP function. However, not all channels support this function.
Close Caption: activates the close caption. Please keep in mind that not all
channels/programs supports this function.
De-Noise: activates the De-Noise function.
Digital Zoom: there are 4 zooming formats -- Original, 2X, 3X and 4X.
Add/Remove to my favorite: add a channel to My Favorite or remove a
channel from My Favorite.
Channel Up: go to the next channel on the channel list
Channel Down: go to the last channel on the channel list
Channel Recall: return to the previously accessed channel
Audio: mute on or off
Volume Up: increase the volume
Volume Down: decrease the volume
Hide Panel: hide or show the control panel (the TiVme interface)
Exit: close/exit TiVme window
31
Page 32

Chapter 4 : TiVme FM Radio Interface
4-1 TiVme FM Radio Interface
4-2 FM Radio Mode
You can listen to FM radio on TiVme. You
may access the FM radio either from initial
setup (select FM when asked to select the
signal) or from Signal Source (switch to
FM). There are control buttons for you to
easily navigate the radio functions.
PS. To access the FM radio function, your
device must support FM function and
reception.
4-3 Control Buttons
Always on top Minimize Maximize Exit/close
Capture Time Shifting Minus Frequency Add Frequency Channel Up
Channel Down Volume Down Volume Up Audio Mute
32
Page 33

4-4 Channel Settings
When you click on the arrow beside it , You can do some settings for your
channels.
Select Channel Group: load in “Normal” or
“My Favorite” channels.
Delete: delete a selected channel
New: add a new channel
Import: import channel table from file
folders
Export: export channel table from file
folders
Save Change: save the change you made
for the channel list
Exit: close/exit Channel Setting
4-5 Capture
You can click it to capture the
radio program you like. Once
you capture it, it is saved in your
Video Path. Click it again to
resume to regular radio mode.
Another way to resume is to
right click on the screen and
then enable “Stop Capture”.
When you click on the scroll-arrow beside the Capture icon ,
You can congure the settings for “Capture”:
33
Page 34

Video Path: allows you to change your
storage path.
Silent Recording: enables muterecording to prevent potential distraction.
Capture Name Setting: le-naming option.
The default is “Date-time format”, or you
can put a specic name in “User dene”.
Enable Time Limit: sets the recording
time-length. The recording will stop once
the time is reached.
Enable File Size Limit: sets limit for
recording files. The recording will stop
once the le size is reached.
4-6 Time Shifting
This icon enables Time-shifting function
once clicked. Time Shifting function
records the program you are currently
watching. This function enables you to
pause/fast-forward/rewind the shows
so you won’t miss any part when you
left the show for something else.
Note: All the recorded scenes can be
saved in your chosen storage
directory by clicking
Control Buttons for Time-shifting Mode:
Audio Stop Backward Pause Forward Control scroll for
34
Time-shift
Page 35

4-7 The Tool Menu
While you are listening radio on TiVme,
you can enable the Tool Menu with a
mouse right-click. The Tool Menu allows
you to access and activate functions of
TiVme, which provides you another option
besides the icons on the interface.
Always On Top: enables TiVme to remain on top of all other application
windows. It is the same if you click on the Always On Top at the upper right
corner of the regular TV mode window.
Channel List Type: there are two
types of Channel List Type – Normal
or My Favorite. You can select which
type to load your channel list. It is the
same as you do in the Channel Setting
page. The default is Normal.
Channel List: displays your available channels. It’s the same as you open the
Channel Setting.
Time Shifting: enable Time Shifting mode. It is the same as you click on the
Time Shifting icon on the main interface.
35
Page 36

Capture: activates the Capture function
Hide Panel: hide or show the control panel (the TiVme interface)
Add/Remove to my favorite: add a channel to My Favorite or remove a
channel from My Favorite.
Channel Up: go to the next channel on the channel list
Channel Down: go to the last channel on the channel list
Channel Recall: return to the previously accessed channel
Mute On: enable/disable the mute function
Volume Up: increase the volume
Volume Down: decrease the volume
Exit: close/exit TiVme window
Chapter 5 : S/Composite Video Cable Input
You can watch videos or DVD on TiVme through S-Video cable input or
Composite Video cable input. First, plug the cables into your device and then
connect the cables to your DVD player or other video-playing entertainment
device. After that, plug your device that is connected to DVD player onto your
computer and you will be able to watch DVD or other recorded videos on
TiVme.
5-1 S/Composite Video Interface
36
Page 37

5-2 S/Composite Video Mode
You can access to S-Video/Composite
Video mode from Signal Source on
the interface and input videos.
Note: the device you are using must
come with cable connector to support
this function.
5-3 Control Buttons
Always on top Minimize Maximize
Exit/close Capture Snapshot Display Ratio
Volume Down Volume Up Audio Mute
5-4 Channel Settings
When you click on the arrow beside it , You can do some settings for your
channels.
Note: there is no channel function in S-Video/Composite Video mode, but you
can congure video standard.
37
Page 38

S-Video Video Standard: you can set
the S-Video video standard. There are
two standards: NTSC and PAL.
Composite Video Standard: you can
set the Composite video standard. There
are two standards: NTSC and PAL.
5-5 Snapshot
You can click the “Snapshot” icon to take snapshots. When the screen shows
“Snapshot OK”, it means the image has been successfully taken into your le
folder as picture les.
When you click on the arrow beside the Snapshot icon ,
You can congure the settings for “Snapshot”:
a.Snapshot Format: You can capture
your favorite scenes of the shows and
save in BMP, JPG, PNG and TIFF
formats.
b.Snapshot Count and Snapshot
Interval: Snapshot Count indicates
the number of snapshot pictures and
Snapshot Interval (unit: ms) means
the time interval between snapshots.
Both can be changed to meet your
preferences.
c.Picture Path: You can select the
storage path for your snapshot
pictures with “Picture Path”.
38
Page 39

5-6 Capture
You can click it to capture the scenes you
like. Once you capture the scene, it is saved
in your Video Path. Click it again to resume
to regular TV mode.
When you click on the scroll-arrow beside
the Capture icon , You can congure the
settings for “Capture”:
Video Path: allows you to change
your storage path.
Silent Recording: enables muterecording to prevent potential
distraction.
Capture Name Setting: file-naming
option. The default is “Date-time
format”, or you can put a specific
name in “User dene”.
Enable Time Limit: sets the recording
time-length. The recording will stop
once the time is reached.
Enable File Size Limit: sets limit for
recording les. The recording will stop
once the le size is reached.
Capture Bitrate: set the bit rate for
the video capture (in Kps).
Capture Resolution: choose your
capture resolution at 720x576,
720x480, 640x400, 352x288,
352x240, 320x240.
Capture Format: You can select
video/image capture formats. TiVme
supports the following formats:
MPEG1, VCD, MPEG2, DVD,
MPEG4, MPEG4_PSP, MPEG_iPod,
H264, H264_PSP, H264_iPod.
39
Page 40

5-7 Time Shifting
This icon enables Time-shifting
function once clicked. Time Shifting
function records the TV program you
are currently watching. This function
enables you to pause/fast-forward/
rewind TV shows so you won’t miss
any part when you left the show for
something else.
Note: All the recorded scenes can be
saved in your chosen storage
directory by clicking
Control Buttons for Time-shifting Mode:
Audio Stop Backward Pause Forward Control scroll for
5-8 Video Setting
Clicking on the arrow beside this icon enables
you to adjust the Brightness, Contrast Hue, Hue,
Saturation and Sharpness. The video setting that you
congure can be applied to all channels or you may
return to default value.
You may also adjust the VMR Type
Note: you can only modify TV position in analog TV.
(VMR 7 or VMR 9).
40
Time-shift
Page 41

5-9 Display Ratio
If you click on the arrow beside this icon , You can set the screen ratio
individually for each channel: Free/4:3/16:9/Base on source. (The “Base On
Source” option is only supported in Digital TV).
5-10 The Tool Menu
While you are watching videos on TiVme
through S/Composite Video, you can
enable the Tool Menu with a mouse
right-click. The Tool Menu allows you to
access and activate functions of TiVme,
which provides you another option
besides the icons on the interface.
41
Page 42

Always On Top: enables TiVme to remain on top of all other application
windows. It is the same if you click on the Always On Top at the upper right
corner of the regular TV mode window.
Display Ratio: you can adjust your display ratio when you move your mouse
cursor to the arrow at the right of this option. There are Free, 4:3, 16:9, and
Apply To All Channel. It is the same as you click on the Display Ratio function
icon on the interface.
Preview Window: you can change your TV viewing screen to Full Screen,
Sizable Screen or Borderless Screen.
Source Input: you can switch your
source input
Snapshot: activate Snapshot function to take the Snapshot. You can also do
the same if you click on the Snapshot icon on the main interface.
Digital Zoom: there are 4 zooming
formats -- Original, 2X, 3X and 4X.
Mute: enable/disable mute function
Volume Up: increase volume
Volume Down: decrease volume
Hide Panel: hide the control panel (the TiVme interface)
Exit: exit/close TiVme
42
Page 43

Chapter 6 : Schedule Record
You can set the time and program for your recording schedule. The system will
automatically record the program for you when the time is reached. When you
click the Schedule-record icon, you will see a window like the picture below.
Schedule List: you can “Add”, “Edit”,
“Delete” or “Clear” your schedule
recording list.
Note: If you didn’t add any new
schedule, the list would be empty.
If you click “Add”, you can create a new
recording schedule like the picture below.
Capture Setting
․
Select a Capture Device: select
the device you are using
․
Capture Source Type: select the
source type of the TV program you
want to record
․
Channel Name: ch o o s e the
channel name from the list
․
Capture Format: ch o ose your
recording format
․
Audio Option: co n figur e your
audio setting
․
SAP Option: p leas e be awa r e
that not all the TV channel/program
supports SAP
Time Option Setting
․
Start Time: set the starting time for the recording
․
End Time: set the ending time for the recording
․
Record Rule: dene record rule. The default is Once Only
․
Record in Silent Mode: enable/disable silent recording
43
Page 44

S.R.P.O: schedule record in poweroff. When you activate this function, the
system will go into a hibernation mode
before the time you set for recording.
The system will “wake up” to start the
scheduled recording around 3 ~ 5 minutes
before the time you set for schedule
recording. Please be noted that power-off
means the system will go into hibernation,
and make sure your computer system
supports Hibernation in order to enable
this function.
Setting
Save Path: You configure the “Save Path” for your recorded file by click on
“Select”.
File Name Setting: There are two choices for “File Name Setting”: “Use
datetime formats file name” and “Use Specific Name”. The “Use datetime
formats le name” is the default. All the le that you want to save will be named
in a date-time manner, such as “20090512_XXXX” for instance. Users can input
any specic name for their les in “Use specic name”.
System Option: you may dene the system option
after record. The defaultis ‘No Action”.
Log: the log shows the information your
scheduled recording if you have set any
recording schedule.
44
Page 45

Chapter 7 : Playback
When you click on this icon , you can choose a recorded le for playback,
or a le from folders in your PC. (Note: continuous le playback is available)
․
Add: add a selected file to the playlist at
the bottom half of the window
․
Add All: add all the les to the playlist
․
Delete: delete a le from the playlist
․
Delete All: delete all the les on the playlist
․
Play: play the selected le that are on the
playlist at the bottom half of Playback
․
Exit: exit Playback
․
When you selected a file for playback,
TiVme will plays the video for you i n
another screen as illustrated below.
7-1 Control Buttons for Playback Mode
Backward Play Pause Forward Stop
Previous File Next File Repeat (on) Repeat (off) Display Ratio
Audio Volume Up Volume Down Control Slide for Playback
45
Page 46

Chapter 8 : OSD
The OSD function enables you to adjust the font color, font size and displaying
location for the on-screen displayed texts on the TV. To do so, just click on
the arrow beside it .For example, when you change the font color, the text
appears on the screen turn to the color you adjusted (please refer to the picture
below, the one at the right). You may also enable/disable OSD (on-screen
display) texts by ticking the “Enable OSD” box on/off.
Chapter 9 : Setup
Enter the software setting page.
46
Page 47

a.Sleep: set the sleep timer for
the system. You can make the
system to close application,
log off, hibernate, shut down or
reboot when the time is up.
b.Analog Setting: set de-noise level
to allow better analog quality. You
may also tick “Use Adv De-Noise”
for advanced de-noise.
c.Live Update: you can enable auto
update. Once you enable it, TiVme
will download the system update
automatically (if there is a new
version. If not, it won’t do anything).
If you click “Check”, TiVme will
display version status.
Note: Before you want to update,
please check if you have the
Internet connection rst.
47
Page 48

d.Scan Setting: re-run the channel
scan. It is the same steps as you
run for the initial setup for TiVme,
recommended if you like to re-scan
channels.
e.UI:congure the user-interface, such
as “Enable Transparent UI”, “Panel
Size”, “Font Color” and “Boarder
Size”. You can also customize your
background by ticking on “Enable
customize background” and then
you can browse and select files
from your PC folders.
f.Other: congure settings like Multi-
Language, Auto open last source
when execute Application, and Boss
Key Setting (Position Key, Min Key
and Restore Key”).
Multi-Language: change the
language for the interface. Auto
open last source when execute
TiVme: when you tick the box,
TiVme will run the signal
48
Page 49

Chapter 10 : Appendix
Technical Support
Thank you for reading this manual. If there is any further inquiry, please
contact us at www.kworld-global.com
The information contained in this documentation is for reference only. The text, images and charts
of this documentation have been processed with intensive care and we have been dedicated
to ensure the accuracy and completeness. However, the content of this document is subject to
change without notice and no liability nor responsibility is assumed for any loss or damage arising
from any kind of misunderstood, improper uses of the hardware, software, and documents.
KWorld Computer Co., Ltd.
6/F, No. 113, Jian 2nd Road
Jhonghe City, Taipei County 235
Taiwan (R.O.C.)
http://global.kworld-global.com
@ 2009 KWorld Computer Co., Ltd. All rights reserved. All KWorld trademarks and logos are
registered trademarks of KWorld Computer Co., Ltd. All other trademarks and logos presented in
this material are the property of their respective owner. KWorld Computer Co. Ltd. reserves the
right to revise the specifications mentioned above. No part of this documentation can be copied,
reproduced or distributed in any kind of print or electronic forms without legal permission.
49
 Loading...