

INSTRUCTION MANUAL
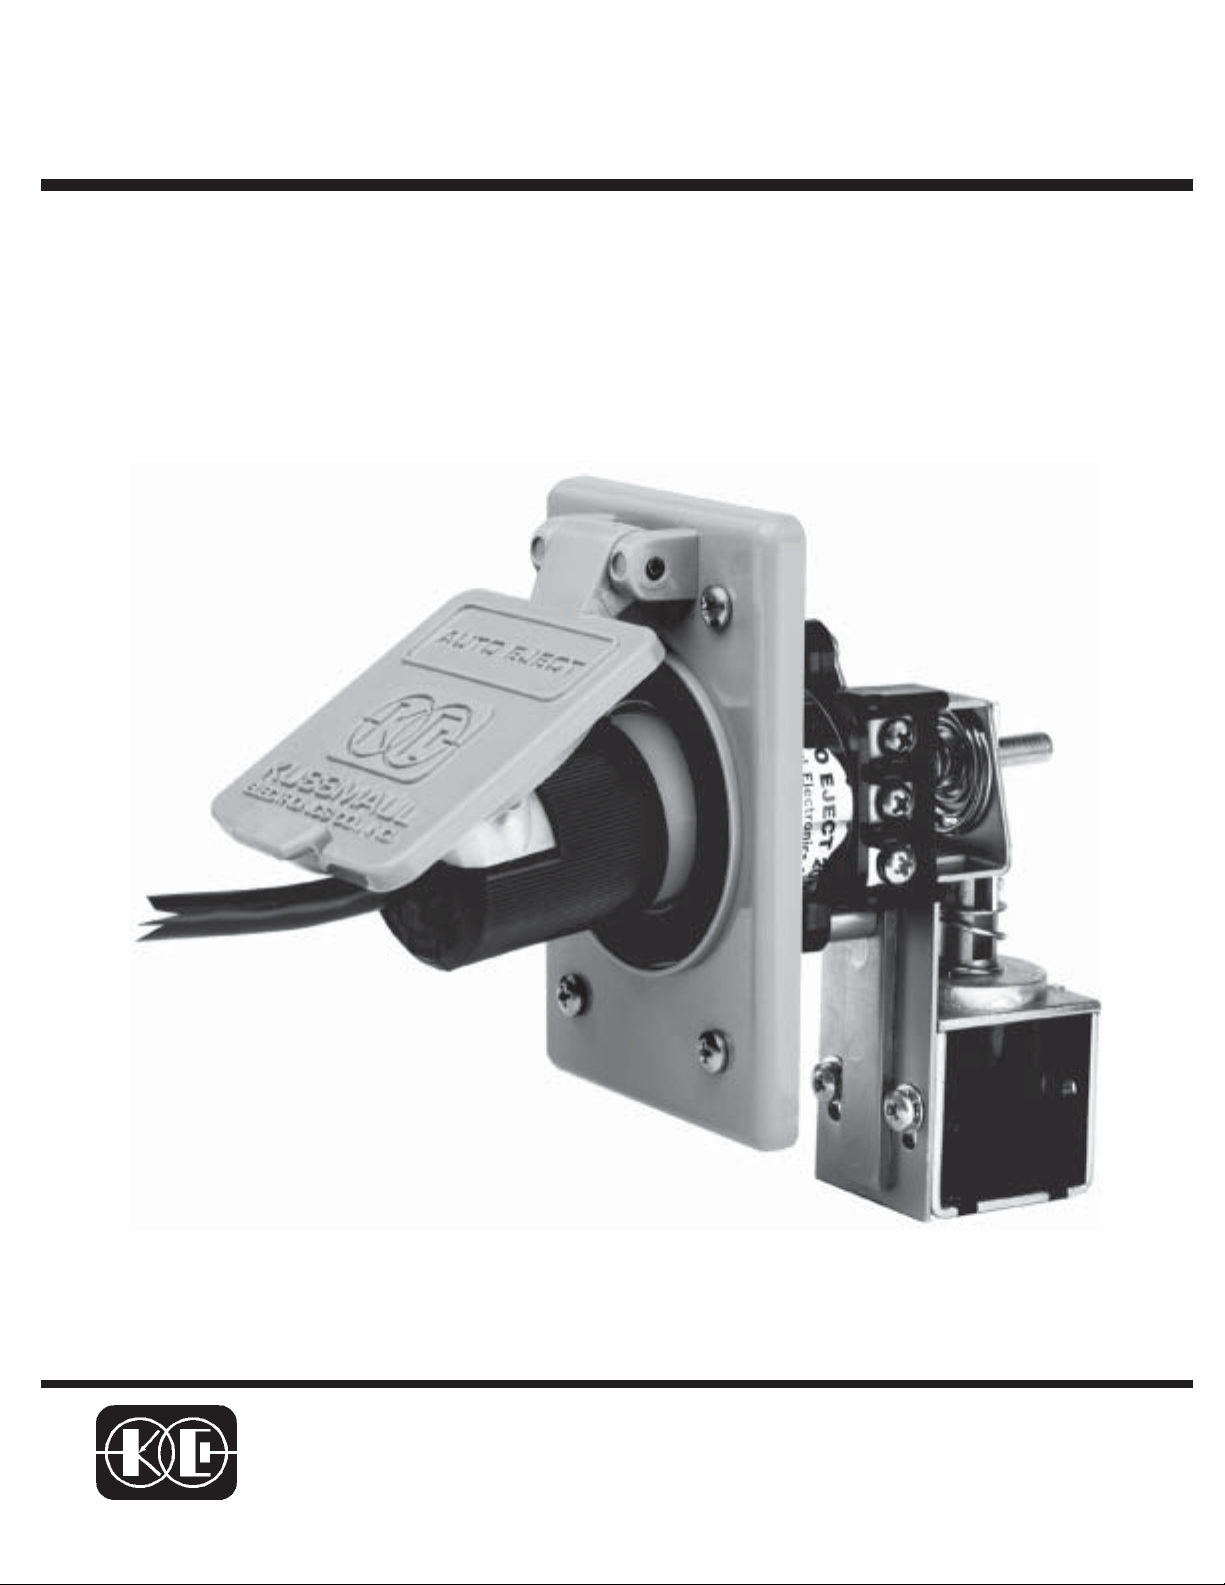
AUTO EJECT WP
AUTOMATIC SHORE LINE DISCONNECT
2-10-00
file: 091-18WP-XX
1 YEAR WARRANTY
KUSSMAUL ELECTRONICS CO., INC.
170 CHERRY AVE., WEST SAYVILLE, N.Y. 11796-1221
TEL: in NY 631-567-0314 TOLL FREE: 800-346-0857 FAX: 631-567-5826

CAUTION
The AUTO EJECT must be
connected to the starter
circuit so that the solenoid is
energized only while the engine
is cranking. If the solenoid is
energized continuously it will
OVERHEAT and BURN OUT.
If the AUTO EJECT is
installed where the rear
mechanism can accumulate
dirt, grime or water you must
install a 091-18CP
Rear Enclosure.
FAILURE TO FOLLOW
THESE CAUTION
NOTES WILL VOID THE
W ARRANTY

INSTALLATION INSTRUCTIONS
1. Locate a convenient place on the vehicle to mount the AUTO EJECT. A minimum clearance
of 4” behind the mounting panel is required as well as 3 3/4” below the center line to clear the
ejection mechanism.
2. Place the template in position and center punch in 7 places.
3a. Drill 2 holes, 1/2” diameter. IMPORTANT THESE HOLES MUST BE DRILLED FIRST.
3b. Drill 4 mounting holes, 3/16” diameter and one, 2 1/4” clearance hole for the AUTO EJECT.
4. Connect one terminal of the solenoid on the AUTO EJECT to the vehicle ground and the other
solenoid terminal to the vehicle’s starter. USE #16 GAUGE WIRE OR HEAVIER.
5. Crimp the ring lugs on the wire and connect the Green, Black, and White power wires to the
accessories on the vehicle.
6. Test installation by installing mating connector into the AUTO EJECT. Energizing the starter
should energize the solenoid and eject the connector.
7. Keep connector and contacts of the AUTO EJECT clean. Clean contacts with WD-40 solvent
as required. Lubricate contacts monthly with “vaseline” to insure free operation.
NOTE: USE ONLY CORD CONNECTOR SUPPLIED WITH THE AUTO EJECT
All connectors are not identical, using a substitue may result in unreliable
operation or failure of the AUTO EJECT to operate.
#8 Screw
Weather
Proof Cover
Gasket
Note: The Auto Eject is on the
outside of the truck wall.
#8 Hex Nut
Green
Black
White
Ring lugs supplied
Note: use 12 gauge wire for 20 amps
and 14 gauge wire for 15 amps.
Ground
Line
Neutral
Solenoid
T o Battery
Truck Wall
Chassis
Ground
Vehicle S tarter

3.250 2.125
C
L
C
L
C
L
1.875
3/16” DIA HOLE
2 1/4” DIA HOLE
DRILL THESE TWO HOLES FIRST
C
L
1/2” DIA HOLE
Hole Template
AUTO EJECT
DYNAMIC DISCONNECT
MODEL # 091-18-098
The Model 091-18-098 Dynamic Disconnect is a
coupling device wired between an Auto Eject and the
vehicle and serves to only connect the A.C. power
after the plug has been inserted into the Auto Eject.
Upon vehicle startup the Dynamic Disconnect opens
the load circuit before ejecting the plug. By providing
the time delays on both application and removal of
power, no arcing can occur at the connector. Note
A.C. power must be present at the shore line connector in order to operate the Dynamic Disconnect.
AUTO EJECT
ENCLOSURE
MODEL # 091-18CP
The Enclosure is fabricated from aluminum and
contains a cutout and captive fasteners to mate with
the Auto EJect mounting screws. Providing protection from road dirt and damage, this unit suggested
for all Auto Eject installations in which the mechanism is exposed to the elements or subject to
damage.

INSTALLATION RECORD & WARRANTY
Date Installed
Installed By
Vehicle Identification
Vehicle Owner
W ARRANTY
All product of Kussmaul Electronics Company Inc. are warranted to be free
of defects of material or workmanship. Liability is limited to repairing or
replacing at our factory, without charge, any material or defects which
become apparent in normal use within 1 years from the date the equipment
was shipped.
Kussmaul Electronics Company, Inc. shall have no liability for damages of
any kind to associated equipment arising from the installation and /or use of
the Kussmaul Electronics Company, Inc. products. The purchaser, by the
acceptance of the equipment, assumes all liability for any damages which
may result from its installation, use or misuse, by the purchaser, his or its
employees or others.
 Loading...