

Page 1

User’s guide
EEB 9800.0
072588 IC1
Page 2

For your information...
Warranty
Be sure to read the information in this manual carefully before you use your
oven. You’ll find important information about safety and how to use, maintain
and service your appliance to ensure a long service life. If you experience any
problems, first be sure to read the chapter titled, “What to do if trouble
occurs...”. Usually it's easy to solve minor problems yourself and avoid unnecessary service costs.
Please keep this manual in a safe place and pass it on to future owners for
their information and safety.
The following symbols are used in this operating manual:
The warning triangle will alert you about possible health risks or things
=
that can cause potential damage to your appliance.
You'll find useful hints and information when you see this symbol.
F
This warranty is extended to the original purchaser and succeeding owners for
products purchased for ordinary home use. It does not cover its use in
commercial situations. Should the appliance be sold by the original purchaser
during the warranty period, the new owner will continue to be protected until
the expiration date of the original purchaser's warranty period. Save your dated
receipt or other evidence of the installation/occupancy date. Proof of original
purchase date is needed to obtain service under warranty. The warranty
applies even if the owner should move during the warranty period.
KÜPPERSBUSCH does not assume any responsibility for consequential or
incidental damages. This warranty provides you with certain legal rights. You
may also have other rights which may vary from state to state.
What Is Covered
For one full year from the date of the original purchase, we will provide parts,
service and labor in your home to repair or replace any part of the oven that
fails because of a defect in materials or workmanship. This service is provided
free of charge. All warranty service will be provided by an authorized technician
during normal business hours.
What Isn’t Covered
1. Service by an unauthorized agency will not be reimbursed. Likewise, the
warranty doesn't cover any damage or repairs due to service performed by
an unauthorized agency, or by the use of unauthorized parts.
2. Service visits to teach you how to use the appliance.
3. Service visits to correct the installation. You are responsible for providing
electrical wiring and other connecting facilities.
4. Reset circuit breakers or replace home fuses.
5. Damage resulting from accident, alteration, misuse, improper installation,
abuse or installation not in accordance with local electrical codes, or
improper storage of the appliance.
6. Repairs due to other than normal household use.
For technical information and/ or
replacement parts, please contact the
Küppersbusch Customer Care line
at
1-800-459-0844
For the most efficient assistance,
please have the Model and Serial
numbers for the appliance available.
2 EEB 9800.0 USA
Page 3

Contents
For your information... . . . . . . . . . . . . . . . . . . . . . . . . . . . . . . 2
Warranty . . . . . . . . . . . . . . . . . . . . . . . . . . . . . . . . . . . . . . . 2
Contents. . . . . . . . . . . . . . . . . . . . . . . . . . . . . . . . . . . . . . . . 3
Safety instructions. . . . . . . . . . . . . . . . . . . . . . . . . . . . . . . . . 4
Before using the appliance for the first time. . . . . . . . . . . . . . . 4
Disposing of the packaging and the old appliance
Setting the clock
Initial cleaning
Your appliance at a glance . . . . . . . . . . . . . . . . . . . . . . . . . 5
The control panel - sensor keys and displays . . . . . . . . . . . . . . 6
General information on your oven . . . . . . . . . . . . . . . . . . . . . . 7
General Information
Oven trays
Rack levels
Telescopic glide-out shelves (acc.-no. 601)
Turning the oven light on and off
Using your oven . . . . . . . . . . . . . . . . . . . . . . . . . . . . . . . . . . 8
General Information
Explanation of the colored symbols.
Switching on the oven
Selecting a roasting programe
Selecting a baking programe
Select the heating programe
Altering the cooking temperature
Altering / Setting the cooking time
Setting the finish time
Automatic turn-on and shut-off
Change automatic weight
Switching the oven off
Resuming interrupted programes
Blend in the actual oven temperature
d / weight system
Additional functions . . . . . . . . . . . . . . . . . . . . . . . . . . . . . . . . 9
Rapid heating J
Memory function M / N
Roasting. . . . . . . . . . . . . . . . . . . . . . . . . . . . . . . . . . . . . . . 10
Selecting a programe
Turning the roast
Roasting on the oven rack
Roasting in a pan
Roast using the heating programes
Some instructions on roasting programes
Overview of roasting programes
Guideline values for roasting using the heating programes
Roasting thermometer and core temperature function . . . . . . . 12
Correct roasting thermometer insertion
Using the roasting thermometer
Setting the core temperature function
Setting delayed cooking begin
Recommended core temperatures
Baking . . . . . . . . . . . . . . . . . . . . . . . . . . . . . . . . . . . . . . . . 13
Selecting a programe
Baking programe overview
Baking with heating programes
Baking pizza
Notes on the table: “Guidelines for baking”
Guidelines for baking
Grilling
Guidelines for grilling
Defrosting and proving
Preserving
L
Overview of heating programes. . . . . . . . . . . . . . . . . . . . . . . 17
The minute minder
The child safety lock
Activating / deactivating the child safety lock
t . . . . . . . . . . . . . . . . . . . . . . . . . . . . . 17
h . . . . . . . . . . . . . . . . . . . . . . . . . . . . 17
Setting optional functions. . . . . . . . . . . . . . . . . . . . . . . . . . . 18
Overview of optional functions
1. Select language
2. Activate “Optional functions” selection menu
3a. Memory functions 1 and 2
3b. Eco function ON / OFF
3c. Maximum cooking time
4. End selection mode
How to use the telescopic glide-out shelves (acc.-no. 601) . . . . 19
Inserting the oven trays correctly
Pulling out the trays
Pushing in the trays
Shelf levels, cooking times and temperatures
Special accessories
Cleaning and Care . . . . . . . . . . . . . . . . . . . . . . . . . . . . . . . . 20
For all surfaces
Remove caking
Information about the cleaning scraper
The use of oven sprays - information
Enamel
Stainless steel
Glass
Aluminium
Door sealing
Knobs
Removing and installing the oven door
Removing and installing the side racks
Folding heating element down/up
Unscrewing/reinstalling the individual telescopic glide-out shelves (acc.-no. 601)
Regenerating the ökotherm® catalyst
What to do if trouble occurs.... . . . . . . . . . . . . . . . . . . . . . . . 22
Replacing a halogen bulb
Replacing the door sealing
After Sales Service . . . . . . . . . . . . . . . . . . . . . . . . . . . . . . . 23
Rating Label . . . . . . . . . . . . . . . . . . . . . . . . . . . . . . . . . . . . 24
EEB 9800.0 USA 3
Page 4
Safety instructions
■ Be sure your appliance is properly installed and grounded by a qual-
ified technician.
■ Check after installation that the fastening screws are securely seated
and that the appliance cannot be moved.
■ KÜPPERSBUSCH built-in ovens may only be connected to the
corresponding KÜPPERSBUSCH built-in cook tops by a qualified and
authorized technician. Only qualified personnel should perform
installations and repairs on electrical appliances. Do not repair or
replace any part of the appliance unless specifically recommended in
this manual. Do not put your safety at risk.
■ Do not operate the appliance until it has been properly installed
within cabinetry.
■ Do not leave children alone! Children should not be left alone or
unattended in area where appliance is in use. They should never be
allowed to sit or stand on any part of the appliance.
■ The surfaces of the oven door and the appliance are hot when in
operation. Do not let children in, on or around the appliance or its
controls!
■ Never use your appliance for warming or heating the room.
■ Make sure connection cables for electrical devices are not jammed
in the oven door.
■ WARNING! Never use steam and/or pressure cleaning machines to
clean the oven! This can damage the unit and increase the risk of
personal injury.
■ The appliance is intended for residential use only. Use for any other
purpose is at the owner’s risk and could be dangerous. The manufacturer cannot be held responsible for damage caused by improper
use of this appliance.
■ When performing repairs and replacing oven light bulbs, be sure to
disconnect the power supply by either removing the plug or manually
“tripping” the circuit breaker.
■ Do not store objects in your oven that could become a hazard if the
oven is unintentionally turned on.
■ CAUTION! Items of interest to children should not be stored in cabinets
above a cooktop. A child can be seriously injured by climbing on a cooktop
to reach items.
■ Do not heat unopened food containers. Build-up of pressure may
cause container to burst and result in injury.
■ Heat resistant oven mitts/gloves are recommended when placing
items in the oven, turning them, or removing them from the oven.
The top heating element and oven racks can become very hot and
cause burns, even though they are dark in color.
■ Use only dry potholders. Moist or damp potholders on hot surfaces
may result in burns from steam. Do not let potholder touch hot heating elements. Do not use a towel or other bulky cloth.
■ Always place oven racks in desired location while oven is cool. If rack
must be moved while oven is hot, do not let potholder contact hot
heating element in the oven.
■ Be careful when opening the oven door when the oven is hot. Don't
position yourself directly in front of the oven door. Allow hot air or
steam to escape before placing or removing food.
■ Wear proper apparel. Loose-fitting or hanging garments should not
be stored in an oven or near surface units.
■ Do not use water on grease fires. Smother fire or flame or use dry
chemical or foam-type extinguisher.
■ The oven door must close well. In the event of damage to the hinges
or to the glass pane, do not use the appliance until it's been repaired
and checked by a qualified professional.
■ If the door sealing is damaged, it must be replaced. The oven must
not be used with damaged door sealing.
■ Keep the oven vent ducts unobstructed.
■ Always be sure to close the oven door completely.
■ Keep a distance of at least 5 cm (2 inches) from the grill and top
heat.
■ Only use the original roasting thermometer.
■ Do not jam the cable of the roasting thermometer in the oven door.
■ Take roasting thermometer out of the oven when not being used.
■ Keep it at a distance of at least 5 cm (2 inches) from the grill and
top heat.
Before using the appliance for
the first time
Disposing of the packaging and the old appliance
Be sure to dispose of the transport packaging properly. Disposal should not
have a negative impact on the environment. Recycling the packaging saves
raw materials and reduces the amount of waste.
Be sure to dispose of your old appliance properly, as well. Even if it can no
longer be used, it still contains useful materials. Before discarding an old
appliance, disconnect the power cord and remove the door to prevent it from
becoming a hazard.
Setting the clock
The clock must be set before the oven is used and whenever power has been
disconnected to the appliance. The display in such cases is ”0.00”.
– Touch the surface next to the
OFF-key
and <set time> is displayed.
– Set the current time using the knob.
– Confirm with
Initial cleaning
– Remove labels, accessories and packaging from the oven.
– Clean the appliance before preparing food for the first time. Clean the drip
pan, oven rack etc. with a damp cloth and a solution of warm water and a
non-abrasive detergent. Dry the interior with a soft cloth.
– Heating the oven
Close the oven door.
Heat up the oven with top heat/bottom heat
minutes.
Make sure that the room is well ventilated.
e on the left until it blinks
j
C at 480 °F / 250 °C for 60
4 EEB 9800.0 USA
Page 5
Your appliance at a glance
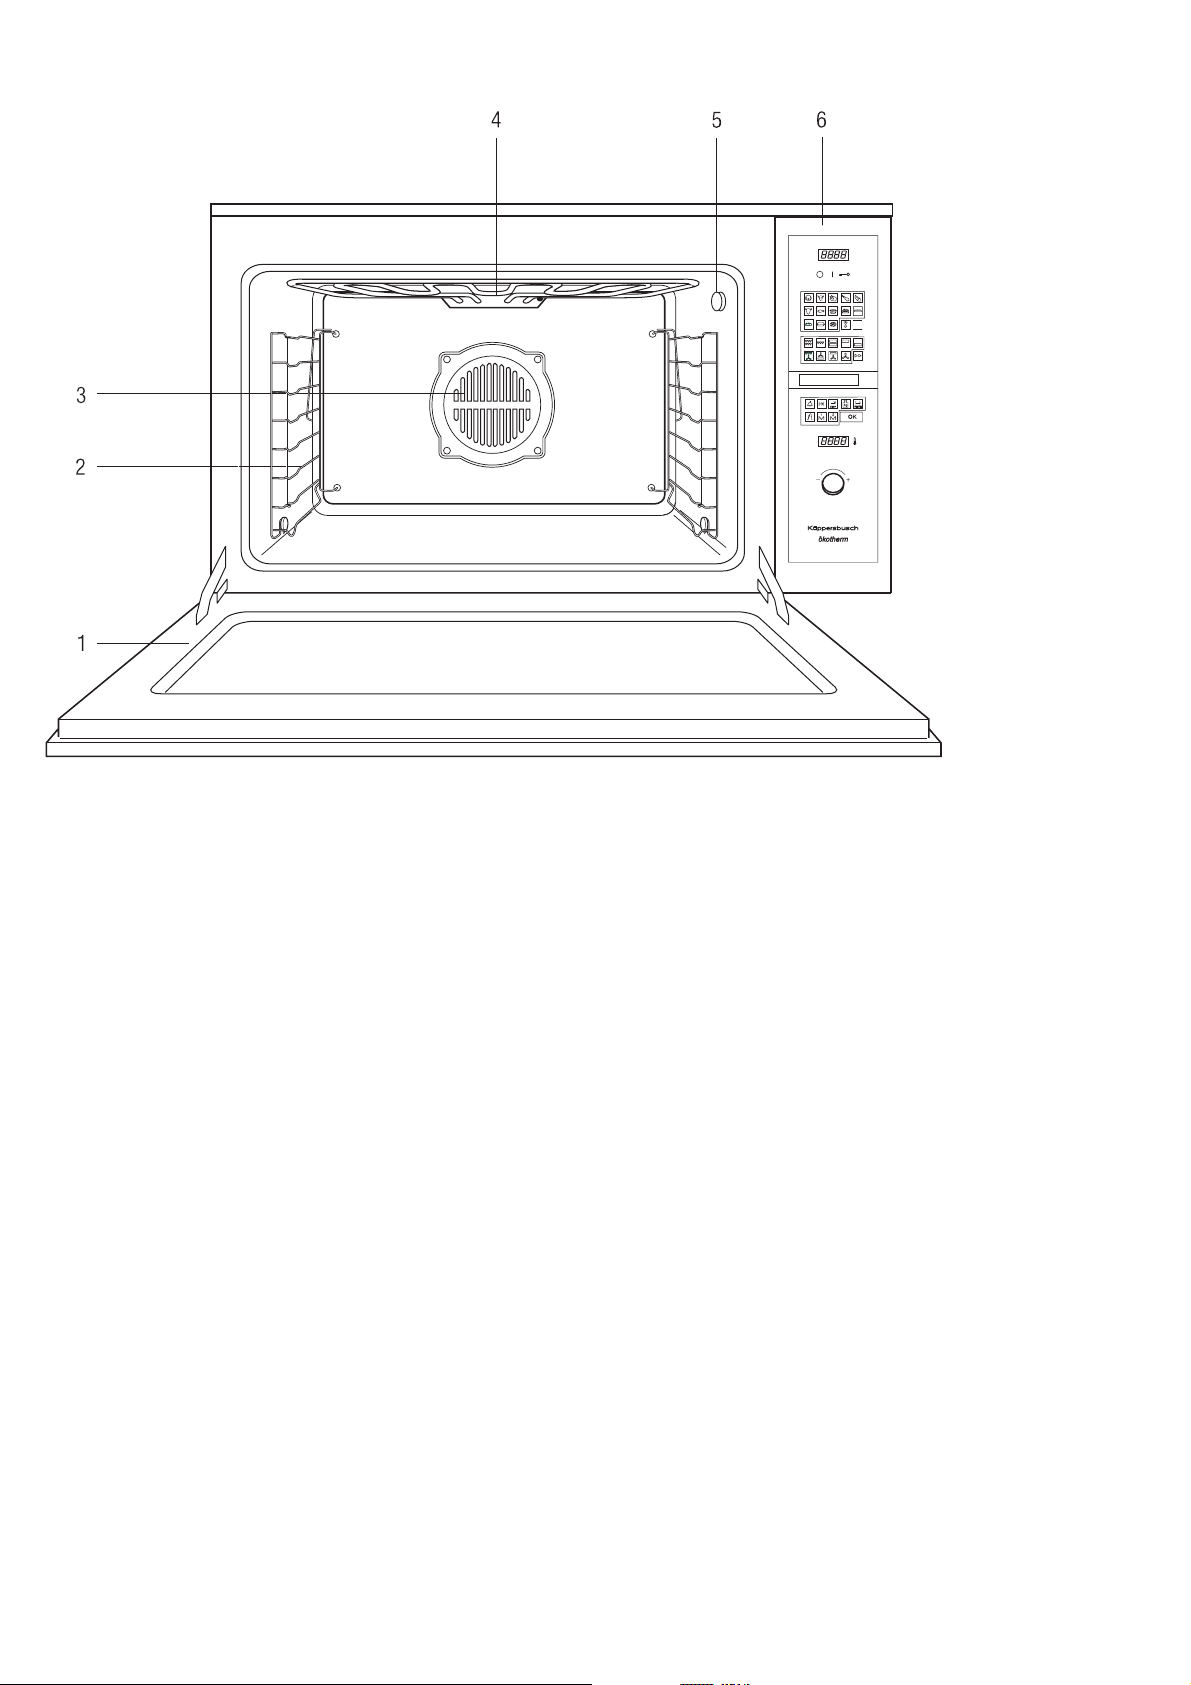
1 Oven door
2Rack levels
3Hot air fan
4 Fold-down grill (top heat and grill)
5 Socket for roasting thermometer
6 Control panel
An overview of the control panel is given on page 6.
Accessories supplied:
Oven Rack
2 Baking tray (enamel)
Drip pan (enamel)
Roasting thermometer
Accessories available:
Maxi Pizza stone (acc. no. 146)
Telescopic glide-out shelves (acc. no. 601)
for the telescopic glide-out shelves:
Oven rack, depressed, e.g. for large poultry (acc. no. 752)
Glass drip pan, for use with accessory item 752 (acc. no. 753)
EEB 9800.0 USA 5
Page 6
The control panel - sensor keys and displays
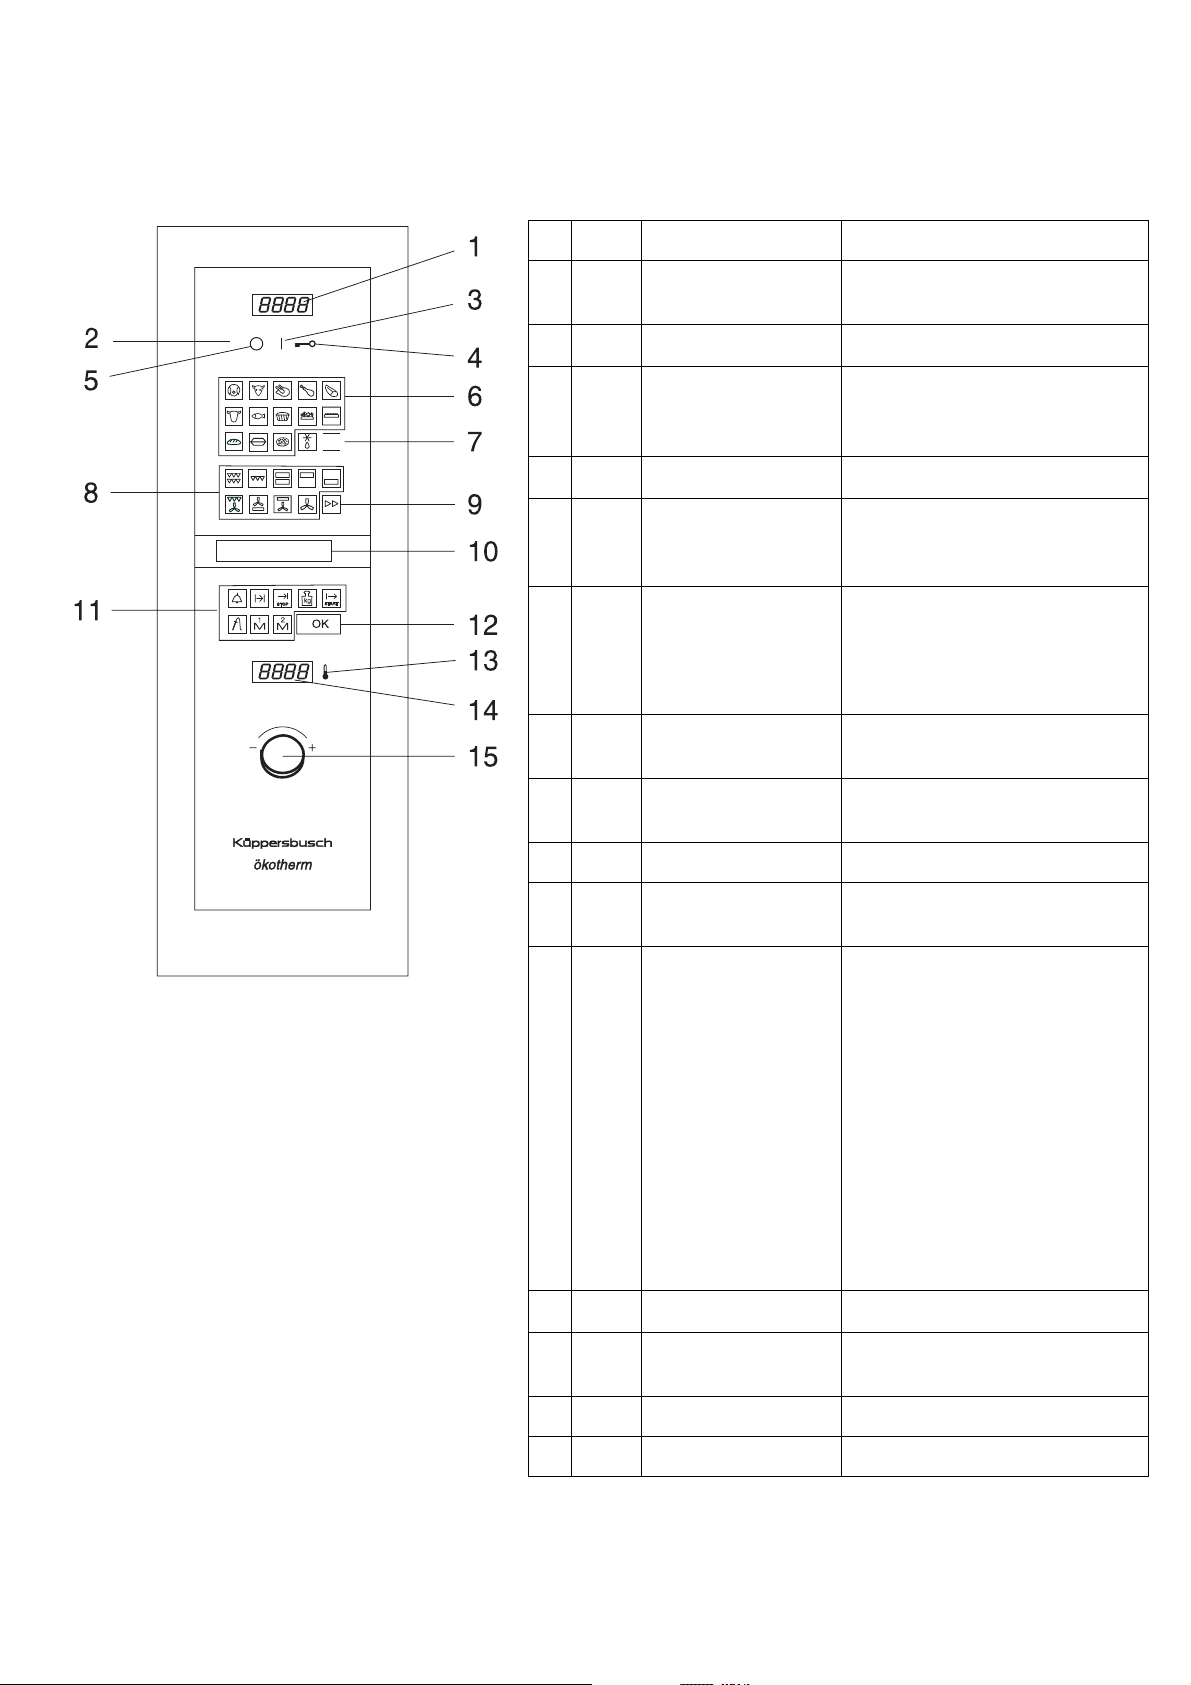
All oven functions are controlled from this panel.
All the sensor fields are simultaneously sensor keys that react to even the lightest touch.
F
The knob can be retracted by gently turning it and returned to its original position by turning the other way. It is can be turned either way.
F
1 Time display clock.
2Time key
(invisible)
3
ii
4
h
ON-key switches the oven on (standby mode).
Children’s safety key for activating / de-activating the child lock
for setting the time.
h, see page 17, for information on using
the additional functions, see page 18.
5
e
6 /
8
6 Keys roasting programme basic programes for roasting meat and fish.
7 Key defrosting programme “Defrosting and proving L”,
8 Keys heating programes displays and sensors for the various heating
OFF-key switches the oven off.
Programmes and functions
(symbols / sensor keys)
Keys baking programmes basic programes for baking cakes and
are both display symbols and sensor keys
with which to select programmes or
functions.
See page 11 for an overview.
pizza. See page 13 for an overview.
see page 16.
means. See page 17 for an overview.
9 Key rapid heating additional function, see page 9.
10 Text display shows information on the next step, current
settings and other details.
11
t
u
n
d
r
m
12
j
13
g
14 Temperature display indicates the set oven temperature.
Key minute minder for setting the minute minder, see page 17.
Key cooking time for setting the cooking time, see page 8.
Key finish time for setting the finish time, see page 8.
Automatic weight system
key
Key core temperature
function.
Key cooking begin for setting cooking begin by using core
OK-key for confirming input.
Actual temperature
selection key
for adjusting the system weight
page 9.
for setting the core temperature see
“Roasting thermometer and core
temperature function” on page 12.
temperature function.
displays a brief text giving current baking
oven temperature.
d, see
15 Knob for changing all variable values.
6 EEB 9800.0 USA
Page 7
General information on your oven
General Information
Please note the safety instructions on page 4!
=
Attention! Risk of overheating! Do not cover the bottom of the oven
=
with aluminum foil, or place any kind of pot or pan directly on it. This can
cause heat to build up and it can damage the enamel.
When the oven is in use, it becomes hot. In order to cool the housing,
F
the cooling fan is switched on as soon as the housing heats up. The
cooling fan continues to run until the housing has cooled down - even
after the appliance has been switched off. The fan noises are normal.
If you are preparing a dish with alcohol or yeast as an ingredient, and
F
are using Hot air convection, Intensive hot air convection or Pizza Mode,
there will be a noticeable vinegar odor. If you find the odor disturbing,
use Top/Bottom Heat or another alternate mode.
Oven trays
If you use telescopic glide-out shelves (acc. no. 601) please note the
F
instructions on page 19.
Baking trays:
■ Lift slightly when removing.
Place the baking trays back into the over, with the sloping edge pointing
toward the oven door.
■ Push the drip pan and baking tray with the two slots right at the back into
the oven.
Telescopic glide-out shelves (acc.-no. 601)
These are oven rails that are
available as accessories. They
replace the side racks and make it
easier to work in a hot oven.
Trays or oven racks are placed on
the glide-out shelves. They can be
pulled out separately and
independently of each other. If
your oven is fitted with glide-out
shelves, please read the
instructions on page 19.
Turning the oven light on and off
If the knob is in the depressed position, the lighting is OFF.
– Press it in to have it extend fully.
This turns the lighting ON.
To turn if OFF again, depress the knob.
The lighting is independent of oven operation. The light can also be turned off
while the oven is in use. This will save energy and increase the life of the
halogen lamps.
Oven rack:
■ Make sure the catches of the
racks always point toward the
back (away from you).
Rack levels
If you use telescopic glide-out shelves (acc. no. 601) please note the
F
instructions on page 19.
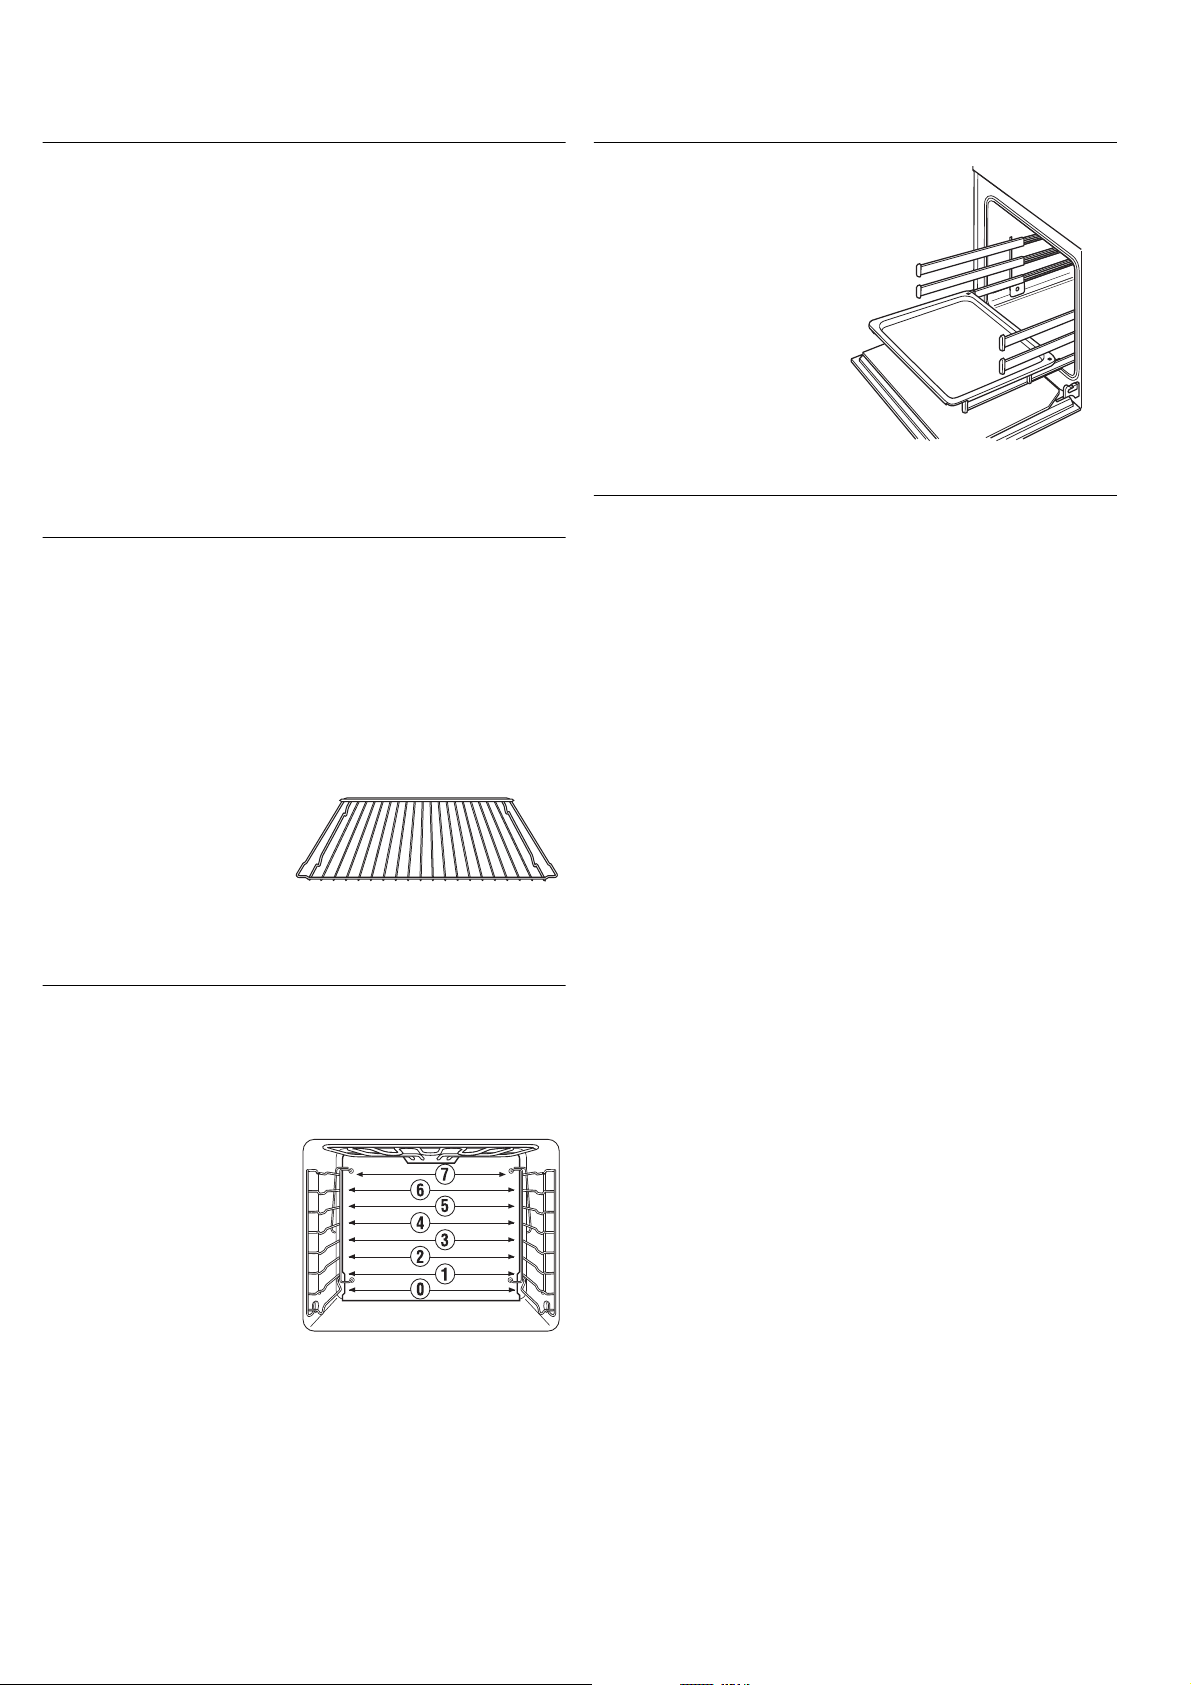
There are eight levels in the side racks. The rack levels are numbered from 0
to 7 from the bottom up. For example, the drip pan can be inserted into rack
level 0.
Side racks:
Rack level 0 is the lowest
possible level.
EEB 9800.0 USA 7
Page 8

Using your oven
General Information
A safety cut-out prevents the oven being accidentally left on for extended
F
periods. Once the maximum cooking time set has expired, the oven turns
off if operation has been continuous. If you want to use the oven for
longer, you will have to switch it on again for the remaining time. Please
see “Setting optional functions” on page 18 for how to set maximum
cooking time.
After a few minutes operation, the knob is secured against unintentional
F
use. It must first be turned before it is re-activated and settings can be
re-adjusted.
In some programes, the fan turns ON and OFF. This is intentional.
F
Explanation of the colored symbols.
Color Means
green symbol can be selected
red symbol is active
red / green symbol has to be set now
orange symbol is active but has been modified
Not all programes and functions can be combined with one another.
F
Those that cannot be so combined cannot be selected, i.e. do not
illuminate.
-<...>+ in the text display means: values can be changed using the knob.
F
Only baking programes Bread
– Select the sub-programe desired with the knob and confirm your choice by
touching
Only baking programes Bread
– Set the weight of the material to be cooked with the knob.
This setting governs cooking time and temperature.
– If you wish, change the predefined cooking time and cooking temperature.
– Now start the programe by touching
All other baking programes:
– If you wish, change the predefined cooking time and cooking temperature.
– Now start the programe by touching
j.
Z and fruit cake X:
Z:
j.
j.
Select the heating programe
The oven is switched on, the text display shows <select programe ok>.
– Heating programes:
Touch the sensor key with the symbol for the programe you wish to select.
– If you wish, change the predefined cooking temperature.
– Cooking duration and end are not pre-set but can be input. (See ”Altering
/ Setting the cooking time” and ”Setting the finish time”).
– Now start the programe by touching
j.
Altering the cooking temperature
Switching on the oven
– Touch the sensor keyi.
The programe symbols illuminate green. The oven is ready for use and the
text display shows <select programe OK>.
– Select a programe.
If you do not select a programe within 10 seconds, the oven will switch
F
off again.
Selecting a roasting programe
The oven is switched on, the text display shows <select programe ok>.
– Touch the sensor key with the symbol for the programe you wish to select.
The symbol illuminates red and the ”automatic weight system” blinks
green / red.
– Set the weight of the material to be cooked with the knob.
This setting governs cooking time and temperature.
– If you wish, change the predefined cooking time and cooking temperature.
– Now start the programe by touching
j.
Selecting a baking programe
The oven is switched on, the text display shows <select programe ok>.
– Touch the sensor key with the symbol for the programe you wish to select.
The symbol lights up red.
Cooking temperature is pre-set in all programes and shown on the
temperature display.
When you select a baking and roasting programe, you can only alter the
cooking temperature within certain limits. The heating programes’ temperature
is in the range 32 °F / 0 °C (no temperature setting) to 555 °F / 290 °C and
freely selectable.
– Altering the cooking temperature: Turn knob.
Altering / Setting the cooking time
Cooking duration in the baking and frying programes is pre-set but
changeable. No cooking duration is pre-set in the heating programes.
– Touch the sensor key
<Cooking time ok>.
– This time can be changed with the knob as desired.
– Confirm with
j.
u: The text display shows, for example,
Setting the finish time
Cooking completion is the moment the oven is turned off.
You can combine the cooking duration u and the cooking completion
F
n. See ”Automatic turn-on and shut-off”.
– Touch the sensor key
or if the duration has already been chosen e.g. <end of cooking 13.24>.
– This time can be changed with the knob as desired.
– Confirm the modification with
n: The display shows <set end of cook time ok>
j.
8 EEB 9800.0 USA
Page 9

Automatic turn-on and shut-off
If you wish use the oven’s time-delay feature, you may pre-select both cooking
time and finish time. The automatic start time itself cannot be specified, but
this is derived from both settings.
Example:
It is 8.00 and you wish to have your roast ready at 13.00. The roast needs to
be cooked for 90 minutes.
– Change the cooking time
– Then change the finish time
– Confirm with
The oven turns on at 11.30 and off at 13.00.
j.
ufrom 0.00 to 1.30.
n from 9.30 to 13.00.
Change automatic weight d / weight system
Additional functions
Rapid heating J
Use this function to have the oven heat at higher performance to the
temperature set.
The ”Rapid heating” J function can be added in many heating
F
programes. (See ”Using your oven” on page 8.)
– Choose a heating programe and then touch ”Rapid heating”
keys light up red.
– Select all the values as usual and confirm your input with
When heating has completed, the illuminated ”Rapid heating” symbol J
F
no longer shows red.
J. Both sensor
j.
In the roasting programes and the ”Bread Z” baking programe, cooking time
and temperature can be selected dependent on the weight. The text display
requests you to select the weight of the food to be cooked.
In these programes, input weight immediately after selecting the
programe.
Switching the oven off
– Touch the key e.
The oven is switched off.
If you have accidentally turned the oven off while a programe is running,
F
you can resume that programe.
Resuming interrupted programes
Did you accidentally turn the oven off while a programe was running?
– Switch the oven on again. The text display will ask you: <progr. interrupted!
Continue? OK>
– Confirm by touching
j.
Blend in the actual oven temperature
Memory function M / N
The oven has a memory function you can use to store two programes you
have composed yourself as additional programes.
Saving an additional programe:
– Select a baking, roasting or heating programe.
– Set the desired temperature and time.
– Then select ”Rapid heating”
– Hold the memory sensor
<programe saved>.
The programe set can now be saved with
every other baking, roasting or heating programe.
Choosing an additional programe:
– Press the M or N sensor and confirm by touching j.
The programe starts.
The values set can be changed without such changes being saved.
J if applicable.
M or N depressed, until the text displays
M or N and can be used like
– Touch the key g. The current oven temperature is briefly displayed.
EEB 9800.0 USA 9
Page 10

Roasting
We recommend that you use the roasting thermometer. As cooking
F
duration is determined by it, it is optimally adjusted to roasting. It
cannot be adjusted. Please read the notes on page 12.
Selecting a programe
1. Set the roasting programe.
Cooking temperature is determined based on the weight of the food to be
cooked or cooking duration if the thermometer is not used. Both values are
pre-set but can be changed (see page 8).
If you use the roasting thermometer you must adjust the core temperature
(see page 12)
or
2. Select the heating programe
Every heating programe is turned on with a pre-set temperature. This
temperature can be changed.
Cooking duration and expiry can be set (see page 8.) when roasting, as can
cooking begin and core temperature when the thermometer is used. (see
page 12).
Roast using the heating programes
If cooking using the thermometer, the cooking time is determined
F
automatically and the notes that follow can be ignored.
The programes and figures in the tables are for a cold oven, unless
F
otherwise stated.
■ Cooking time depends on the type of meat, its quality and its thickness.
To measure the joint, lift it slightly, as a joint tends to compress under its
own weight. Information on this is given in the table ”Roast using the
heating programes” on page 11.
■ If the meat you are roasting has a layer of fat, cook it twice as long.
■ If you are cooking several small pieces of meat or small poultry in the oven,
increase the cooking time by about 10 minutes per piece. Roast a single
chicken for about an hour, roast two chickens 65-75 minutes.
Rack levels (count from bottom!):
A rule of thumb is: the bigger the roast the lower the oven rack should be
inserted.
For large roast, the following applies:
Turning the roast
In the heating programes, turn the food to be roasted over after about
2/3 of the total time to ensure even cooking.
In the hot air
In the roasting programes a signal reminds you to turn the food over after
about 70% of the total cooking time.
B program this turning over is not needed.
Roasting on the oven rack
Use the drip pan and the oven rack.
F
■ Cook large roasts directly in the drip pan or on the oven rack with the drip
pan inserted underneath (i.e. turkey, 3-4 chickens).
■ We recommend to cook the fish in upright position (as if it were swimming)
in the drip pan. By doing this you do not have to turn the fish:
It does not brake as easily and the cooking is more even. If the fish does
not stay in upright position it can be for example propped up with vegetable
or put over a cup: Set the cup upside down into the drip pan and put the
fish with its open side over the cup.
Roasting in a pan
■ Roast lean meats in the roasting pan with the lid closed (i.e. veal roast,
marinated beef, braised beef or frozen meat). The meat remains juicier that
way.
■ Use any kind of pan (stainless steel, enameled, cast iron or glass) that
doesn’t have plastic or wooden handles.
■ If you use an earthenware cooking pot, follow the manufacturer’s
instructions.
The following procedure is recommended:
– Rinse out the pan with water or grease it lightly.
– Prepare the meat with desired spices and place it into the pan. Put the lid
on the pan and place the pan on the rack in the cold oven.
– Select the right roasting programe or the Intensive Hot air convection pro-
H to between 355-390 °F / 180-200 °C.
grame
Grille roasting
Intensive hot air convection HDrip pan: rack level 0, Oven rack: rack level 1
Hot air convection B
Top/Bottom heat C
K
Drip pan: rack level 0, Oven rack: rack level 1
Drip pan: rack level 1, Oven rack: rack level 2
Drip pan: rack level 1, Oven rack: rack level 2
Some instructions on roasting programes
The programes and figures in the tables are for a cold oven, unless
F
otherwise stated.
The roasting programes are automatically adjusted to the food weight and
F
it is hence important you set the weight immediately after choosing
your programe and before changing e.g. cooking time, temperature or
core temperature, (see page 8)!
When using the roasting programes without the roasting thermometer
The roasting programes are set to deal with pieces of fish or meat up to 7 cm
thick without any fat layer. Select the automatic weight system after entering
the weight and adjust the roasting programe if needed as below:
■ Cooking time is shorter for several pieces.
■ Cooking time is greatly increased for meat with a fat layer.
■ Food over 7 cm thick weighing less than 6.6 lb / 3 kg increase cooking
time 10 minutes per additional cm over the pre-set value.
■ Food over 6.6 lb / 3 kg the cooking time as set is OK as differences are
compensated for by the pre-set duration.
10 EEB 9800.0 USA
Page 11

Overview of roasting programes
Dial
symbol
O
P
Q
R
S
T
U
Name Preset
temperature
Roast pork depending on weight 1.1 – 22 lb
Roast veal depending on weight 1.1 – 13 lb
Poultry (whole bird) depending on weight 1.1 – 22 lb
Chicken drumsticks depending on weight 1.1 – 4.4 lb
Fillet steak depending on weight 1.1 – 8.8 lb
Joint of beef depending on weight 1.1 – 11 lb
Fish depending on weight 1.1 – 11 lb
Preset
cooking time
Automatic
weight system
0.5 – 10 kg
0.5 – 6 kg
0.5 – 10 kg
0.5 – 2 kg
0.5 – 4 kg
0.5 – 5 kg
0.5 – 5 kg
Roasting
thermometer
recommended 1 Pork, game
recommended 1 Veal, roast ham, stuffed roast, venison, mincemeat roast
recommended 1 Poultry (whole bird), e.g. chicken, duck, goose
not possible 2 or 3 Poultry pieces, e.g. chicken drumsticks, breast of duck
recommended 3 Steak, e.g. game, veal, pork, beef
recommended 1 Beef, lamb, knuckle of veal
recommended 1 Whole fish
Guideline values for roasting using the heating programes
The recommended temperatures for the preferred operating modes are highlighted.
Rack
level
Cooking with the oven
Large pieces of poultry weighing over 4.4 lb / 2 kg
.
Type of meat Recommended
roasting programe
Joint of beef
Roast beef
Fillet
Veal
Roast pork
Smoked loin of pork
Shoulder of pork
Roast pork with
crackling
Game
Fillet of game
Lamb
Duck
Goose
Chicken
Turkey
Fish
* whole chicken 45 - 60 min.
T
S
S
P
O
P
O
O
O
S
P
Q
Q
Q
Q
U
Hot air
convection
320 / 160 340-375 / 170-190 320 / 160 18
355 / 180 390-430 / 200-220 355 / 180 355-390 / 180-200 8-10
355 / 180 390-430 / 200-220 355 / 180 355-390 / 180-200 8
320 / 160 340-375 / 170-190 320 / 160 320-355 / 160-180 12
320 / 160 340-375 / 170-190 320 / 160 320-355 / 160-180 12-15
320 / 160 340-375 / 170-190 320 / 160 320-355 / 160-180 8
320 / 160 340-375 / 170-190 320 / 160 320-355 / 160-180 12-15
320 / 160 340-375 / 170-190 320 / 160 320-355 / 160-180 12-15
320 / 160 340-375 / 170-190 320 / 160 15
355 / 180 355-390 / 180-200 355 / 180 355-390 / 180-200 8-10
300-320 /
320 / 160 340-375 / 170-190 320 / 160 320-355 / 160-180 12
320 / 160 340-375 / 170-190 320 / 160 320-355 / 160-180 12
320 / 160 355-390 / 180-200 320 / 160 320-355 / 160-180 8*
320 / 160 355-375 / 180-190 320 / 160 320-355 / 160-180 12
320 / 160 390-430 / 200-220 8
B
150-160
Top heat/
Bottom heat
340-375 / 170-190 320 / 160 15
C
Temperature in °F / °C
Grill frying K Intensive hot air convection H Roasting time
per cm of the
thickness of the
joint in mins.
EEB 9800.0 USA 11
Page 12
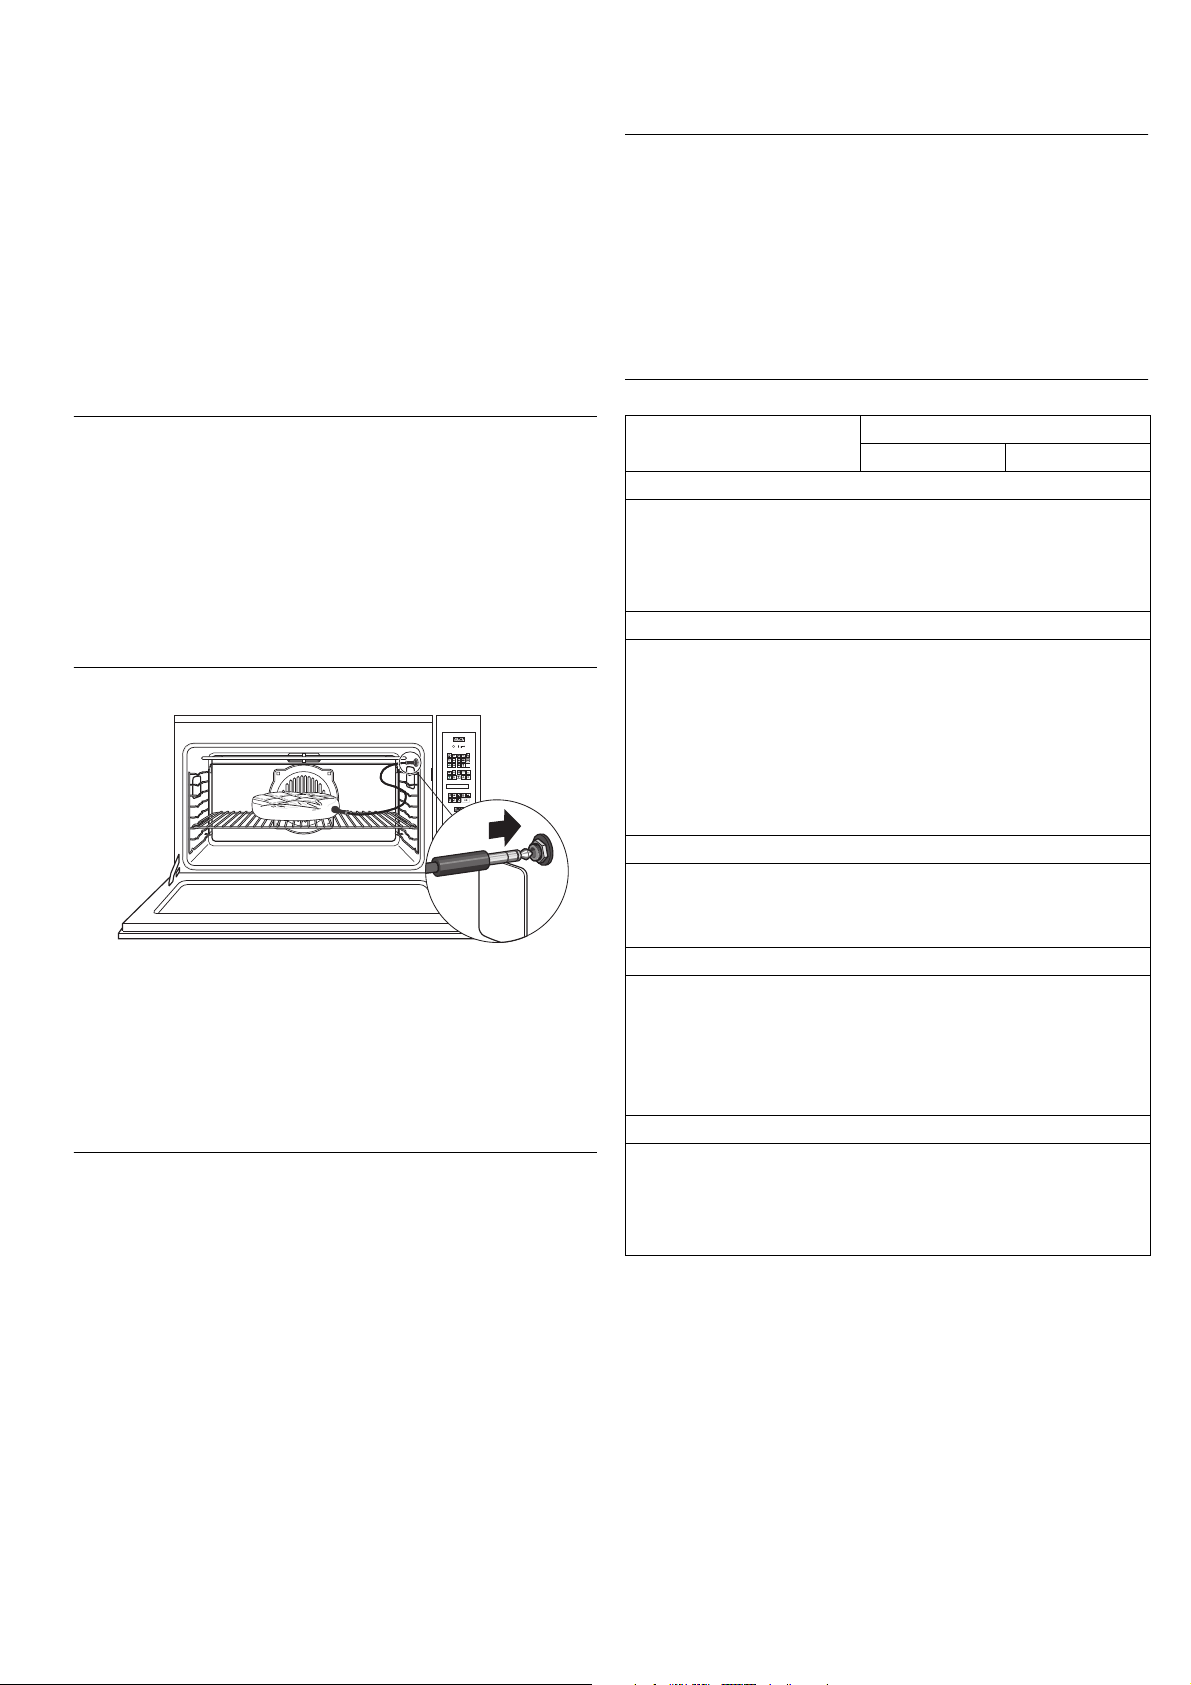
Roasting thermometer and core temperature function
The roasting thermometer measures the temperature inside the food. When
the core temperature has reached a certain value, the roast is done just right:
Not too dry and not too bloody.
Cooking time depends on how long it takes for the internal temperature
F
to reach the set core temperature. It is not adjustable. The cooking time
can vary with the weight and type of meat and with the cooking
temperature and programe.
The roasting thermometer can be used with virtually all roasting and
F
heating programes. Those not so useable cannot be selected and hence
are not illuminated.
Correct roasting thermometer insertion
■ Insert the tip of the roasting thermometer horizontally from the side right
into the center of the food.
■ Always insert the roasting thermometer into the roast up to the handle.
■ The tip must not be located near the fat or the bone of the meat.
■ When cooking poultry, don’t touch any bones when inserting the roasting
thermometer.
Using the roasting thermometer
– Place the prepared roast with the roasting thermometer inserted in the oven.
– Insert the roasting thermometer plug into the jack at the top right of the
oven side wall.
The text display states: <roasting probe plugged in>
– Close the oven door.
Setting delayed cooking begin
As no fixed cooking time is set, it is not possible to set a finish time. To have
the oven start at a later time, cooking start can be set.
– After setting core temperature (see above) touch the ”starting time”
m. The text display states <Start in 0h 0 min.>. The time of the
sensor
start set is shown on the clock display.
– Change the start time with the knob and confirm by touching
j.
Recommended core temperatures
Dish Core temperature
in °F in °C
Beef
Roast beef/Fillet of beef, rare 105-115 40-45
Roast beef/Fillet of beef, medium 120-130 50-55
Roast beef/Fillet of beef, well done 140-150 60-65
Joint of beef 175-185 80-85
Pork
Loin of pork 150-160 65-70
Roast pork/ham 175-185 80-85
Neck, knuckle of pork 175-185 80-85
Chops, rack of ribs 165-175 75-80
Chops without the bone 160 70
Smoked loin of pork 150-160 65-70
Meat loaf 160-165 70-75
Veal
Roast veal 160-165 70-75
Roast veal stuffed with kidneys 165-175 75-80
Knuckle of veal 175-185 80-85
Game
Meat of game 165-175 75-80
Rack of game 140-160 60-70
Fillet of game, rare 105-115 40-45
Fillet of game, medium 120-130 50-55
Fillet of game, well done 140-150 60-65
Setting the core temperature function
Lamb 175-185 80-85
The roasting thermometer must already be in the holster!
F
– Turn the oven on. The display states: <Select programe ok>
– Select one of the programes illuminated green by touching the sensor.
– Roasting programes only: set the weight with the knob.
– All programes: Touch the ”core temperature function” sensor
set will be shown.
– Change the set core temperature with the knob if desired.
– Confirm by touching
The programe starts. The top line of the display shows the current core temperature and the lower that set.
After about 70 % of the cooking time, an audio signal sounds and the
F
message ”please turn the roast” displays.
Turn the roast. The programe resumes when the door is closed.
Once the preset core temperature is reached, the oven automatically switches
off and a signal sounds.
j.
r, the value
12 EEB 9800.0 USA
Stuffed roast 160-165 70-75
Poultry 185-195 85-90
Fish 160-175 70-80
Page 13

Baking
Selecting a programe
1. Set baking programe.
Baking temperature and duration are pre-set but can be changed.
or
2. Select the heating programe
Every heating programe is turned on with a pre-set temperature. This
temperature can be changed.
Duration can also be changed, as can cooking end, (see page 8).
Baking programe overview
All baking programes are only suitable for baking at one level. If you want to bake at several levels at once, please use the Hot air convection programe B.
F
Dial
symbol
V
X
Y
Z
Name Preset temperature
(range available)
Pound cake 320 °F (285-340 °F)
160 °C (140-170 °C)
Fruit cake*
Fruit cake 1 340 °F (300-355 °F)
170 °C (150-180 °C)
Fruit cake 2 340 °F (300-355 °F)
170 °C (150-180 °C)
Flat cake with a
dry topping
Bread*
White bread 355 °F (320-375 °F)
340 °F (300-355 °F)
170 °C (150-180 °C)
180 °C (160-190 °C)
Preset cooking
time
70 minutes none 2 no preheating
50 min. none 2 no preheating
35 min. none 2 no preheating
Depending on
weight
Automatic
weight
system
1.1 -4.4 lb
0.5 -2 kg
Rack level(s)
none Tray-baked cakes, sponges, yeast dough, short pastry
none 2 no preheating
Preheating Cooking with the oven
time
time
time
time
2 with prehea-
ting time
Cakes in tins, e.g. cake mixture, yeast dough, cheesecake,
fruit loaf
with very moist fruit topping
with slightly moist or normal fruit topping
Tray-baked cakes, sponges, yeast dough, short pastry
without fruit topping
Rye- and wheatflour bread
Coarse wholemeal
bread
Soufflé 355 °F (320-375 °F)
a
Pizza 355 °F (375-500 °F)
b
* These programes have sub-programes. Select with the knob.
Notes on the pre-set values:
The baking programes are based on 1.1 lb / 500 gr. of pastry / dough or 2.2 lb / 1 kg raw potatoes or raw vegetables.
■ If you are cooking larger quantities, you should reduce the temperature slightly and increase the cooking time by around 10 minutes per 2.2 lb / 1 kg.
■ For smaller quantities use a high temperature and a shorter cooking time.
355 °F (320-375 °F)
180 °C (160-190 °C)
355 °F (320-375 °F)
180 °C (160-190 °C)
180 °C (160-190 °C)
250 °C (190-260 °C)
Depending on
weight
Depending on
weight
60 min. none 2 no preheating
35 min. none 0 with prehea-
2.2 -8.8 lb
1-4 kg
2.2 -6.6 lb
1-3 kg
1 with prehea-
ting time
1 no preheating
time
time
ting time
Gratin dishes and casseroles with raw vegetables,
potatoes, noodles
Pizza and speciality doughs on a baking tray
EEB 9800.0 USA 13
Page 14

Baking with heating programes
Notes on rack levels are given in a table on page 15!
F
Hot air convection B
No need to preheat the oven - baking is possible on several levels
F
simultaneously.
Rack levels:
1 tray: 3rd rack level from the bottom
2 trays: 3rd and 6th rack levels from the bottom
■ If you are baking several cakes in baking pans at the same time, add about
5 to 10 minutes for each additional tray used.
■ You can take out one baking tray at a time if you wish, and leave the others
to continue baking.
■ If your recipe doesn’t include directions for baking by hot air convection,
bake it using Hot air convection # , at a temperature of 320 °F / 160 °C.
■ Important! When baking cakes with a moist fruit topping, the development
of humidity is particularly high. Do not bake more than two cakes at the
same time.
Top/Bottom heat C
Preheating - baking on one level
F
■
Preheating:
J
Use the ”Rapid heat” function
■ Black metal or aluminum pans are ideal.
Intensive hot air convection
There´s no need to preheat the oven - baking on one level
F
■ Use only for baking large, flat cakes with a dry topping, (i.e. crumble
topping.)
Pizza mode
Baking on one level
F
■ for moist cakes
■ for pizzas: preheat the oven with a baking tray or a pizza stone (accessory)
■ for bread: preheat
I
and wait until the symbol no longer shows red.
H
– Small pizzas: Put dough with topping on the preheated baking tray.
– Place the baking tray in rack level 0 once the audio signal has sounded.
– When the door closes, the programe starts and has a baking time of
12 minutes.
Baking pizzas on the pizza stone
– Prepare the pizza dough as described above.
– Place the pizza stone on the oven rack and insert at rack level 0.
– Preheat the oven using the ”Pizza Mode” heating programe to 480 °F / 250
°C for about 30 minutes.
– Dust the lifter with flour before placing the dough on top. Add toppings
quickly so the dough doesn't get moist. Don't leave the pizza on the lifter
for too long, or the dough won't slide off.
– When the oven is preheated, push the pizza off the lifter onto the hot pizza
stone.
– Bake for approximately 8 - 12 minutes.
Notes on the table: “Guidelines for baking”
The table on page 15 contains a list of cakes etc., the necessary
temperatures, cooking times and rack levels.
A range of temperatures are provided, because it depends on the composition,
quantity and shape of the dough.
■ Try using the lower temperature the first time. Only select a higher
temperature if you need more browning or if the baking time is too long.
■ If your recipes don’t provide specific temperatures, use a similar cake in the
chart as a guide.
■ If your food items are of varying height, it will affect the degree of browning
at the beginning of the baking process. Do not change the temperature
setting, as the differences in browning intensity will even out during the
course of baking.
Baking pizza
Select the ”Pizza” b or the baking programe or the ”Pizza Mode” I
F
heating programe.
– If you use a pizza stone (separate accessory), the pizza gets a particularly
crispy base. Preheat for at least 30 minutes! Read the instructions enclosed
with the pizza stone.
Basic recipe for pizza dough
4 ¼ cups of all-purpose flour, 2 ¼ of dry yeast, 1 ½ cups of lukewarm water,
2 tablespoons of olive oil, 2 teaspoons salt, 2 teaspoons of sugar
To bake pizza on a baking tray
– Make a yeast dough out of the specified ingredients.
– Let the dough rise for approx. 30 minutes until it has doubled in size.
– Knead the dough for a few minutes and allow it to rise for another
15 minutes.
– Start the ”Pizza”
–Grease the baking tray.
If you are making small, round pizzas, insert the baking tray into the oven
and preheat.
– Roll out the dough, place on a baking tray and form an edge.
– Add your desired toppings quickly, so the dough doesn't get moist.
b baking programe – the oven preheats.
14 EEB 9800.0 USA
Page 15

Guidelines for baking
The recommended temperatures for the preferred operating modes are highlighted. Please refer to the notes on the table on p.14.
Recommended
Type of cake or biscuit
Cake mixture
Ring cake
Tin cake
Madeira cake
Gateaux and flans
Flan bases
Fine fruit flans
Small biscuits
Large flat cakes:
with a dry topping
with a moist topping
Kneaded dough
Flan bases
Cheese cake
Small bisquits
Large flat cakes:
with a dry topping
with a moist topping
Leavened dough
Ring cake
Yeast cake
Rich sweet bread (preheated)
Small biscuits
Large flat cakes:
with a dry topping
with a moist topping
Sponge cake
Gateaux and flans
Rolls
Biscuits made with white of egg
Meringue
Cinnamon stars
Macaroons
Other doughs
Puff pastry
Puff pastry made with leavened
dough
Puff pastry made with curd
cheese
Choux pastry
Dough made with curd cheese
and oil
Honey cake
Bread and pizza
Leaven and bread made with
yeast (preheat: 445 °F/230 °C,
prebake: 10 min., 445 °F/230 °C)
Bread made with yeast/white
bread.
Pretzels (preheat:
Pizza (preheat: 480°F/250 °C)
445 °F/
baking program
Rack
level
230°C)
Program Rack
level
Hot air convection
Temperature
in °F / °C
B Top heat/Bottom heat C Intensive hot air convection H
Pizza mode I
Rack
level
Temperature
in °F / °C
Rack
Level
Temperature
in °F / °C
Baking
duration
in
minutes
2 W 2 300-320 / 150-160 1 340-355 / 170-180 50-65
2 W 2 300-320 / 150-160 1 340-355 / 170-190 50-70
2 W 2 300-320 / 150-160 1 320-355 / 160-180 60-70
2 W 2 300-320 / 150-160 1 340-355 / 170-180 40-60
2 340-355 / 170-180 2 355-390 / 180-200 20-30
2 W 2 300-320 / 150-160 1 340-355 / 170-180 2 I 300-320 / 150-160 45-60
2 300/ 150 2 340-355/ 170-180 15-30
2 Y 2 300-320 / 150-160 2 355-375 / 180-190 2 H 300-320 / 150-160 25-35
2 X 2 320-340 / 160-170 2 340-355 / 170-180 2 I 320-340 / 160-170 35-50
2 340-355 / 170-180 2 355-390 / 180-200 25-35
2 285-300 / 140-150 1 320-340 / 160-170 2 I 285-300 / 140-150 70-90
2 285-300 / 140-150 2 355-375 / 180-190 15-35
2 Y 2 300-320 / 150-160 2 355-375 / 180-190 2 H 300-320 / 150-160 25-35
2 X 2 320-340 / 160-170 2 340-355 / 170-180 2 I 320-340 / 160-170 30-50
2 W 2 300-320 / 150-160 1 350-355 / 175-180 40-65
2 W 2 300-320 / 150-160 2 350-355 / 175-180 40-50
2 W 2 300-320 / 150-160 2 350-355 / 175-180 50-70
2 285-300 / 140-150 2 355-390 / 180-200 15-30
2 Y 2 300-320 / 150-160 2 350-355 / 175-180 2 H 300-320 / 150-160 30-40
2 X 2 320-340 / 160-170 2 340-355 / 170-180 2 I 320-340 / 160-170 30-50
2 300-320 / 150-160 2 350-355 / 175-180 30-40
2 340-355 / 170-180 2 355-390 / 180-200 12-25
2 175-195 / 80-90 2 210-250 / 100-120 80-120
2 210-250 / 100-120 2 250-285 / 120-140 20-40
2 210-250 / 100-120 2 250-285 / 120-140 20-50
2 340-355 / 170-180 2 375-410 / 190-210 15-30
2 340-355 / 170-180 2 375-410 / 190-210 30-40
2 320-355 / 160-180 2 355-390 / 180-200 30-40
2 340-355 / 170-180 2 375-410 / 190-210 30-40
2 300-320 / 150-160 2 340-355 / 170-180 30-40
2 285-300 / 140-150 2 340-355 / 170-180 20-35
1 Z 1 355/ 180 1/2 I 320 / 160 50-65
2 Z 2 355 / 180 2 390 / 200 2 I 355 /180 30-50
2 390 / 200 2 430 / 220 15-20
0
b
0 I 480 /250 8-12
EEB 9800.0 USA 15
Page 16

Grilling
Preserving
Always close the oven door when grilling!
=
For small amounts of food to be grilled: select heating programe F or
F
for larger amounts of food to be grilled: select heating programe
The preset temperature is ideal for grilling small and medium sized items.
F
When grilling larger items, select a temperature between 390 and
480 °F (200-250 °C) to avoid burning the food.
– Select heating programe
– Preheat the oven for 5 minutes.
– Put the food on the oven rack.
– Slide the drip pan into rack level 0 or 1 and place your oven rack on the
rack level recommended in the table.
– Close the oven door.
F or G.
G.
Guidelines for grilling
Dish Rack
level
Pork chops/cutlet 6 6-8 4-6 8-9 5-7
Fillet of pork 5 10-12 8-10 12-13 8-10
Sausages 6 6-8 4-6 8-10 5-7
Shish kebabs 4 7-8 5-6 8-10 7-10
Meatballs 4 8-10 6-8 10-15 10-12
Beef steak 6 4-6 3-5 6-7 4-6
Slices of liver 6 3-4 2-3 4-5 3-4
Veal cutlet 5 5-7 4-5 7-8 5-6
Veal steak 5 6-8 4-6 8-9 5-6
Mutton chops 5 8-10 6-8 10-11 7-8
Lamb chops 5 8-10 6-8 10-11 7-8
Half a chicken 3 10-12 8-10 14-15 10-11
Fillet of fish 6 6-7 4-5 7-8 5-6
Trout 4 4-7 3-6 8-11 5-6
Toast 5 2-3 2-3 2-3 2-3
Toasted sandwiches 4 6-8 6-8
Grill Large area grill
st
side 2d side 1st side 2d Side
1
in minutes
Attention! Do not use jars with twist-off® lids if the lids have been
=
already in use. The jars could explode under certain circumstances!
Use conventional preservative jars with a rubber ring and glass lid or
F
standard jars with a twist-off
Do not use metal cans.
Do not pour water into the drip pan! Steam will escape from the vapor
F
opening - you could be burned! Place a cup of water in the drip pan, not
on the bottom of the oven!
Use the Pizza mode I.
F
■ Use only fresh food and follow a recipe.
■ Prepare only six quart-sized preserving jars at a time.
■ Use jars that are the same height and fill 3/4 full with the same contents.
■ The jars shouldn’t touch each other.
– Place the drip pan on the first rack level from the bottom.
– Set 1 cup with water in the drip pan.
– Select Pizza mode
After 10-20 minutes (jars with a capacity of 1 qt.) the liquid in the jars will
start to bubble, beginning usually with the jar located on the front right.
Fruit
– Turn the oven off and keep the jars in the closed oven for another 30 min.
(shorten time to approx. 15 min if you're preserving very sensitive fruit like
strawberries.)
Vegetables and meat
– When the liquid starts to bubble, turn the oven down to 210 °F / 100 °C
and continue to heat for another 30-60 minutes.
– Turn the oven off and keep the jars in the closed oven for another 30 min.
I at 320 °F / 160 °C and follow preserving process.
®
lid (new lids only).
Defrosting and proving L
Defrosting
Select the ”Defrost/proving” programe L with a temperature of max. 95
F
°F / 35 °C for delicate foods such as butter or cream cakes.
For higher temperatures please select hot air convection programe
When defrosting frozen dinners, please follow the instructions on the
F
packaging.
– Remove the frozen food from the packaging, place it in a dish and insert
into the oven with the rack on the third rack level from the bottom.
–Select
B or L and set the temperature.
Fermentation:
Ideal for raising yeast dough.
F
– Select the heating programe
L and a temperature of 95 °F / 35 °C.
B.
16 EEB 9800.0 USA
Page 17

Overview of heating programes
An overview of roasting and baking programes is to be found under ”Overview of roasting programes” on page 11 and ”Baking programe overview” on
F
page 13.
Dial symbol Name Preset temperature
(range available)
Large area grill 555 °F / 290 °C Shelf on position 2 Grilling large quantities
Rack level(s) Cooking with the oven
G
F
Grilling 555 °F / 290 °C 2 Grilling small portions.
C
Top/Bottom heat 345 °F / 175 °C 2 Preheating, baking sponges and moist cakes
Top heat 430 °F / 220 °C 2 Browning toppings
D
E
Bottom heat 355 °F / 180 °C 2 Prebaking very moist cake
K
Grille roasting 320 °F / 160 °C 2 Roasting meat, fish and poultry
Pizza mode 320 °F / 160 °C 2 Baking bread, pizzas and moist cakes, making preserves.
I
H
Intensive hot air
convection
Hot air convection 320 °F / 160 °C 2
320 °F / 160 °C 2 Baking large flat cakes with a dry topping (such as a crumble topping), intensive roasting
B
The minute minder t
of large joints and large poultry such as goose or turkey.
for roasting, baking and cooking on several levels
The child safety lock h
The minute minder display has priority over all others. This text display
F
shows the minute minder even when the oven is on!
The minute minder alarm is a pure reminder function and does not turn
F
the oven off!
If a programe has been selected beforehand the key will not illuminate,
F
as the minute minder has no influence on any programe cycle. The
minute minder can be used despite this.
– Touch the key
displayed.
– Set the duration in minutes with the knob.
Duration and current time will be displayed as will the estimated end time.
– Confirm with
When the time set expires an audio signal sounds that you can turn off by
pressing
The time running can be changed by touching the t key again and
F
re-setting using the knob.
t. The symbol blinks green/red and <minute minder> is
j: The minute minder operates.
j.
The child lock prevents accidental maladjustment of the oven and offers
additional child protection.
When the child safety lock is activated, the oven can only be turned off.
The values input cannot be changed and the oven cannot be turned on.
Activating / deactivating the child safety lock
Touch the sensor key with the symbol”h”. The text display states: <child
safety lock -<...>+>. After a brief period, the child lock status displays: <child
lock inactive> or <child safety lock active>.
Activating the child safety lock:
– Turn the knob clockwise until <child safety lock active> is displayed.
– Confirm with
Deactivating the child safety lock:
– Turn the knob counter-clockwise until <child lock inactive> is displayed.
– Confirm with
j! The child lock is activated now.
j! The child lock is deactivated now.
EEB 9800.0 USA 17
Page 18

Setting optional functions
Overview of optional functions
Select language The language used in the display can be selected.
Available special functions:
Demonstration mode Only accessible to KÜPPERSBUSCH Customer Service!
Memory functions
1 and 2
Eco function When the eco function is activated the clock display
Maximum cooking
time
Memory function 1:
After 20 minutes operation without automated shutoff,
an audio signal will sound every 10 minutes and must
be acknowledged. The oven shuts off when the max.
cooking time has been reached.
Memory function 2:
After 20 minutes operation without automated shutoff,
an audio signal will sound every 10 minutes and must
be acknowledged. If it is not, the oven switches off
after a further 5 minutes operation.
is turned off with the oven and power consumption cut
to a minimum.
After this set time the oven switches off automatically
(safety shutdown).
Default setting: 6 hours.
minimum possible 2 hours,
maximal possible: 28 hours, but temperature is cut to
120° C from 6 hours to cooking time expiry.
3a. Memory functions 1 and 2
Text display shows: <Memory function ok>.
– Touch the sensor key
– Turn the knob to the desired position: <Memory OFF ok>,
<Memory function 1 ok> and <Memory function 2 ok>.
– Confirm the selection with
j.
j.
3b. Eco function ON / OFF
Text display shows: <Eco function ok>.
– Touch the sensor key
The text display shows <Eco function off>or <Eco function on>.
– To activate the eco function, turn the knob clockwise to <Eco function ON>,
then anti-clockwise for<Eco function OFF>.
– Confirm the selection with
j.
j.
3c. Maximum cooking time
Text display shows: <max. cooking time 6 h ok>
–Touch sensor
– Confirm the selection with
j and use the knob to set the desired maximum time.
j.
4. End selection mode
The special functions can be altered within the first few minutes after
F
a power cut-off (plug or fuse pulled), and before you touch the ON
sensor for the first time!
1. Select language
– After power cut-off please wait until <USA AM/PM CLOCK / °F / Pound ok>
is displayed. According to the pre-selection you will see a different lan-
guage than ”USA AM/PM CLOCK / °F / Pound ok”.
– Use the knob to select language if it is not displayed as having been
selected already.
– Confirm with
Eine andere, für die USA vorgesehene Ländereinstellung ist:
F
<USA 24h / °C / kg ok>
j .
2. Activate “Optional functions” selection menu
– After selecting your language, touch the child lock” h sensor. The text
display shows <optional functions select ok>
– Turn the knob clockwise until the desired function can be chosen. Touch
the sensor key
Several such functions can be set in sequence.
j.
– Turn the knob clockwise until the text display <quit selection ok> is
displayed.
– Confirm with
j.
18 EEB 9800.0 USA
Page 19
How to use the telescopic glide-out shelves (acc.-no. 601)
Take care when working with a hot oven. Use cloths, oven gloves or
=
similar.
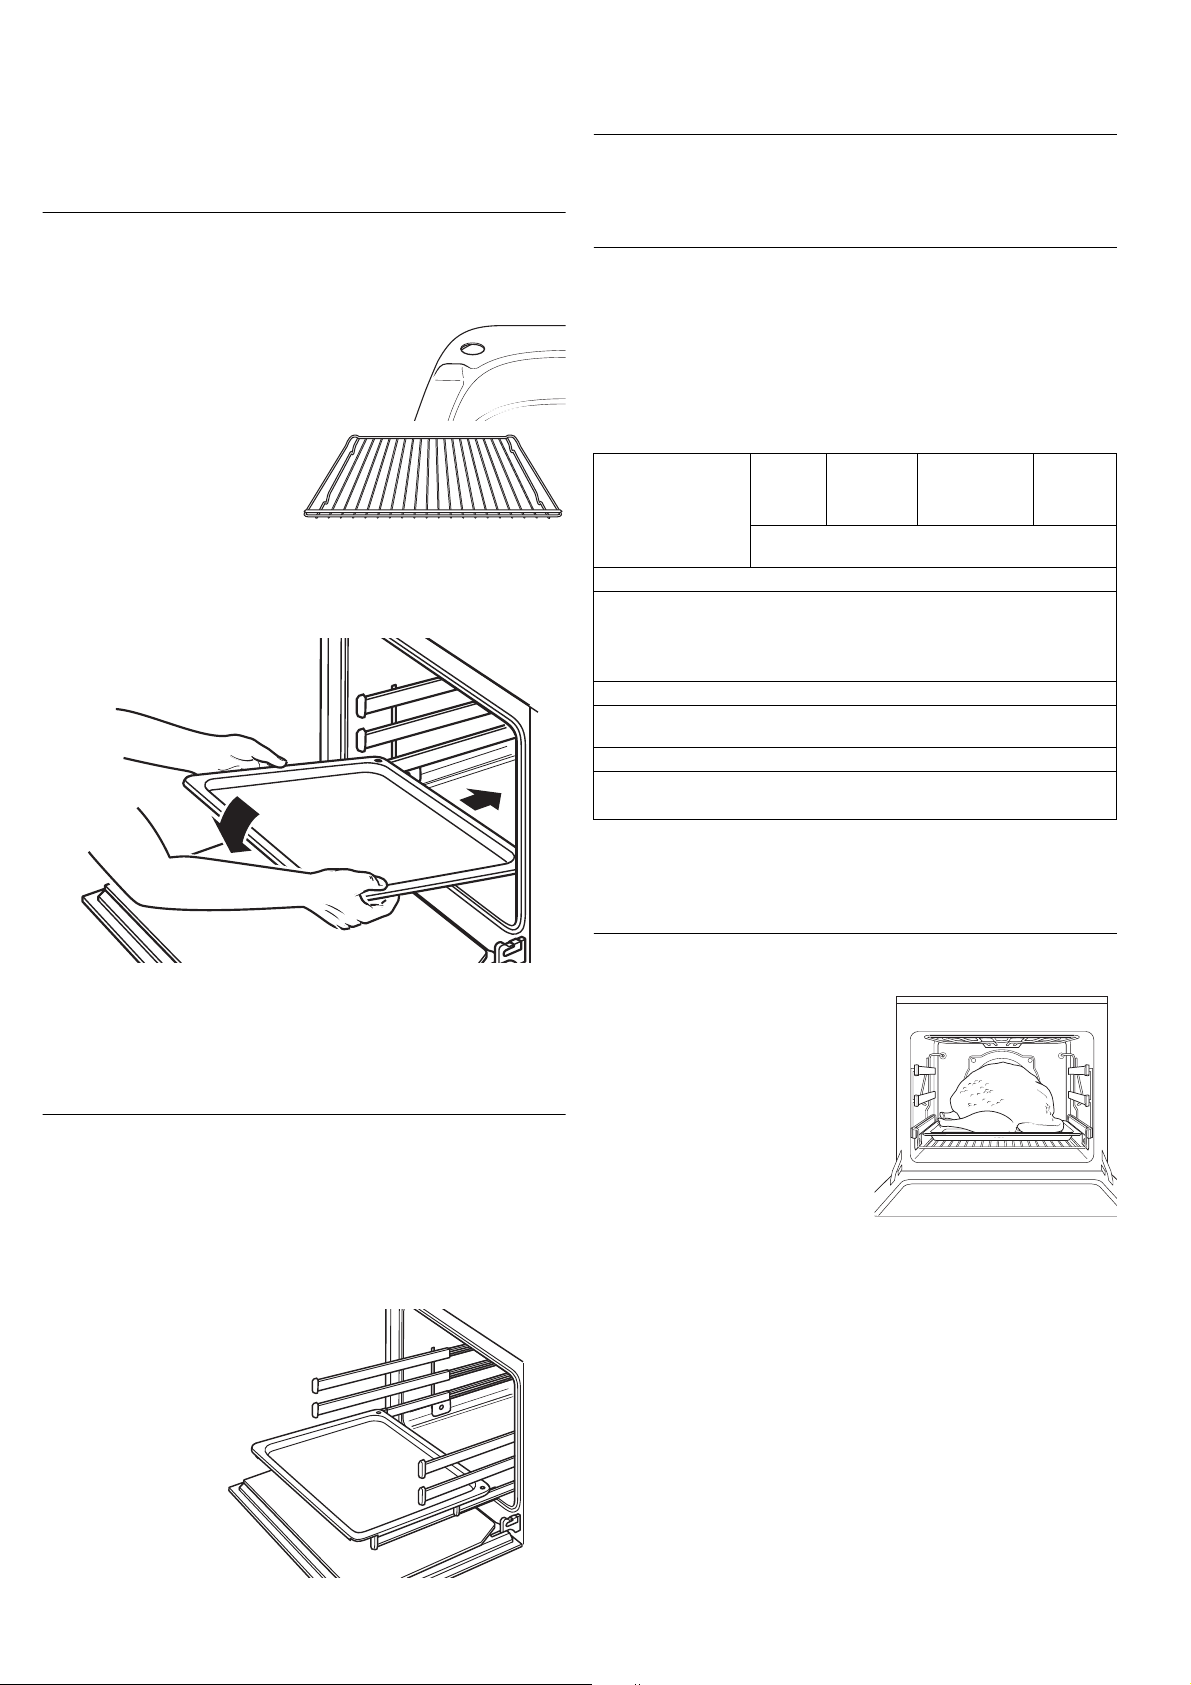
Inserting the oven trays correctly
The individual telescopic glide-out shelves must be pushed fully into the
F
oven to safely position the trays and oven racks!
– Push all the glide-out shelves fully into the oven.
– Turn the trays so that the holes are at the rear
and that oven racks with
cross bars point towards the
front.
– Place the trays and oven racks with the back edge on the front side of the
glide-out shelf and push them into the oven.
Pushing in the trays
– Slowly push the glide-out shelves right in full using a cloth or similar.
Shelf levels, cooking times and temperatures
The individual telescopic glide-out shelves have three shelf levels (1-3) which
are counted from the bottom up. The recommended times, temperatures and
modes in the instructions for use of your oven also apply to the use of the
individual telescopic glide-out shelves.
The shelf levels given in this users guide are only suitable for shelf racks.
We recommend the following levels for the individual telescopic glide-out
F
shelves:
Food Hot air
convection
Baking
Cake on 1 baking tray 2 1 2
Cakes on 2 baking trays 1, 3
Cake in tins
(e.g.rings cake)
Roasting - drip tray and rack tray
Large pieces of meat and
poultry
Grilling
Flat pieces of meat/fish 3
Thick pieces of meat/fish 2
* For roasting very large poultry please use the depressed rack tray with the glass drip pan
(accessory).
Top hea t /
bottom heat
B
(counted from bottom up)
11
1* 1* 1*
C
Intensive hot air
convection
Pizza mode
Rack levels
H
I
Grill
or
F
G
Do not try to clasp the holes in the back of the oven. The holes are con-
F
ditional to production and do not have any function!
Pulling out the trays
– Pull the trays and oven racks out of the oven using cloths or similar.
The trays can be pulled out by their front edge up to the front edge of the
individual telescopic glide-out shelves.
The oven racks do not move on the glide-out shelves when they are being
pulled out.
The two top racks can be pulled out to the simple length, the bottom
F
more slightly further.
Special accessories
Rack tray, depressed, and glass drip pan:
For roasting very large poultry, you need
the depressed oven rack with the glass
drip pan. And for cooking in two dishes
at two levels, you can get the necessary
space with the depressed oven rack at
the lowest level.
Accessory numbers:
Rack tray, depressed: acc.-no. 752
Glass drip pan: acc.-no. 753
EEB 9800.0 USA 19
Page 20

Cleaning and Care
Carefully read this chapter before you use your appliance the first time. If it’s
cleaned properly and regularly, it will remain beautiful and clean for many
years. Here are a few tips for cleaning and maintaining the appliance surfaces.
For all surfaces
Do not, under any circumstances, use steam or pressure cleaning
=
machines to clean the appliance! Damage caused to your appliance by
cleaning it this way can make it lethally dangerous.
Risk of burning! Make sure the appliance has cooled down before
=
cleaning.
Please follow the instructions provided with the cleaning agents you plan
=
to use.
Clean the appliance each time you use it. Dirt that isn’t removed will burn into
the surface when you switch it on again and will be difficult or impossible to
remove.
Use a damp cloth or a soft sponge with warm water and a little detergent to
clean light amounts of surface dirt. Always wipe off the surface completely
with cold water to remove residues from cleansers than can cause
discoloration and stains. Wipe dry afterwards.
For information about cleaning individual surfaces and parts and removing
F
heavy dirt, review the information below.
VSR O-FIX-C is perfect for the cleaning of glass ceramic, enamel and the
F
coated door interior. It is available from KÜPPERSBUSCH Customer
Service.
Do not use any
- Harsh cleansers or cleansers with bleach or active oxygen, chlorine or corrosive components.
- Abrasive or harsh cleansers or scouring products like steel wool, soap-filled
steel wool, metal or plastic sponges or similar products with an abrasive
surface.
Remove caking
Be sure to soak any crusty food debris with a wet cloth. It will make it easier
to remove the dirt.
Information about the cleaning scraper
Be careful! The blade of the cleaning scraper is very sharp and will cut!
=
Always keep the cleaning scraper flat on the
surface and push the dirt away.
Don't scratch the surface with the edge of the
=
scraper and don't damage the sealing with
the edge.
Enamel
Oven interior, front, baking trays, drip pan
Some plastic sponges with an abrasive side can be used. However, some
products have grains in the abrasive side of the sponge that can scratch the
surface.
Test the sponge on a small surface before using!
A cleaning scraper for glass ceramic surfaces is perfect for removing
F
heavy dirt.
Use VSR O- FIX-C to clean your oven. Oven spray can also be used.
F
Stainless steel
Stainless steel door front, control panel, telescopic glide-out shelves
(acc. no. 601)
Stainless steel is easily scratched!
=
Do not use a cleaning scraper!
Remove any calcium deposits, grease spots and starch as soon as pos-
=
sible or stains will appear!
A cleanser for stainless steel is perfect. Be sure to clean the stainless steel
with a stainless steel cleanser at least once a week. This creates a protective
film for the stainless steel surface and will prevent discoloration.
You should clean the stainless steel surfaces with a stainless steel cleanser
at least once a week. This will create a protective film to prevent the stainless
steel surface from discoloring.
Glass
Inside of the door - coated glass
Don’t use oven spray because it can destroy the coated glass surface if
=
used frequently.
To remove heavy dirt, use a cleaning scraper for glass ceramic surfaces.
VSR O- FIX-C or glass detergent is ideal to clean your glass ceramic sur-
F
face.
Door front, control panel
Using a damp cloth or soft sponge, clean the front of the oven with
F
warm water and a little detergent. You may use glass cleaners.
Aluminium
Door ledges and handles in aluminium
Aluminium is very sensitiv to scratches and oven spray spray causes
=
damage!
Do not use a cleaning scraper!
Door sealing
The use of oven sprays - information
Since dirt can collect under the sealing, be sure to remove the door seal-
Please follow the instructions from the manufacturer. Oven sprays dam-
=
age aluminum, lacquered surfaces and plastic!
Do not spray into the opening of the ventilator at the backplate! The
=
ökotherm
For environmental reasons, don’t use oven spray at all. However, if you do use
it, just spray it in the oven interior and on enamel baking trays.
®
catalyst will be destroyed if you use oven spray.
20 EEB 9800.0 USA
F
ing when cleaning the oven. See “Replacing the door sealing” on
page 23.
Clean the sealing with detergent or dishwashing liquid.
Knobs
Using a damp cloth or soft sponge, clean the knobs with warm water and a
little detergent.
Page 21
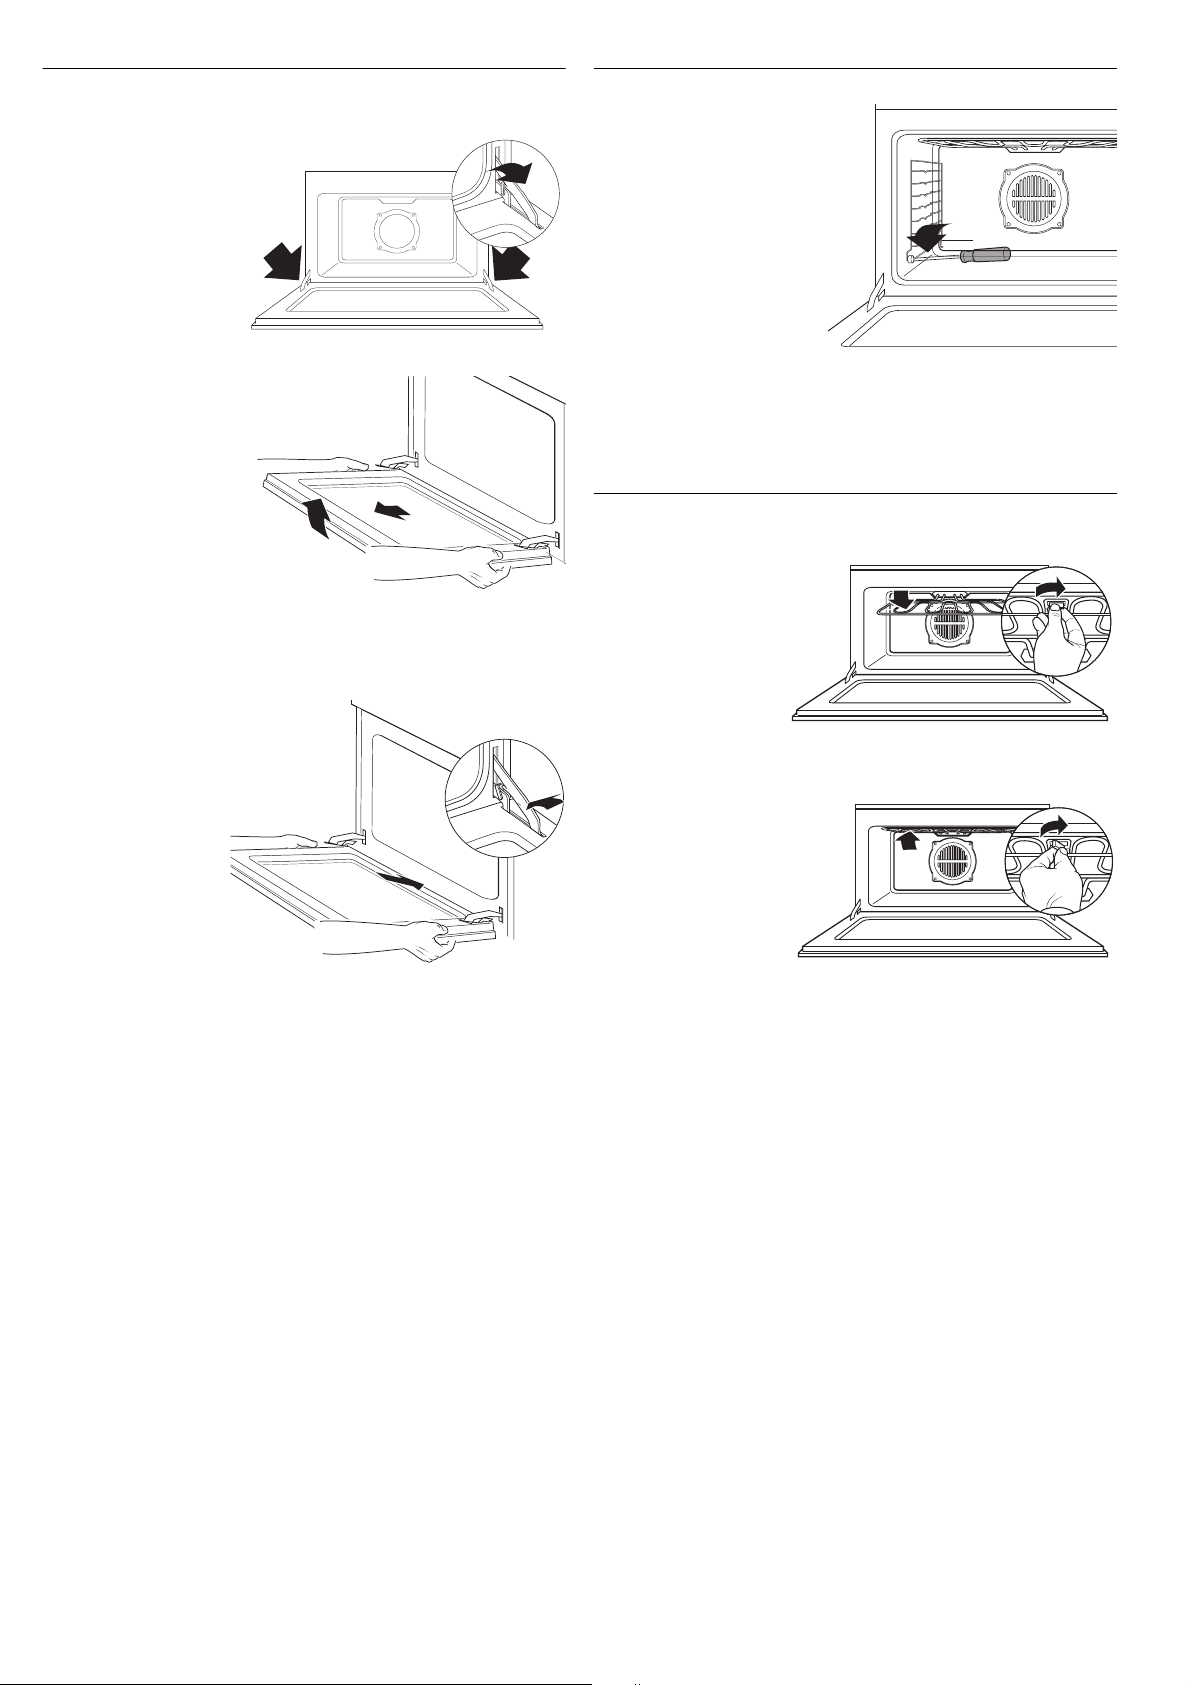
Removing and installing the oven door
Removing and installing the side racks
Removing the oven door
– Open the oven door as far
as it will go.
– Fold up the clamps on the
door hinges.
– Take hold of the oven door
on both sides and close it
slowly. When the oven door
is about half-closed, the
hinges will fall out of the
catches.
The oven door can now be
removed.
Reassembling the oven door
– Take hold of the oven
door on both sides and
push the hinges into
the appropiate holes on
the oven.
– Slowly open the oven
door until it is fully
open.
– Fold down the clamps
on the door hinges.
– Close the oven door.
Removing the side racks.
– Loosen the screws.
– Remove the slot-in racks.
Installing side racks
– Insert side racks and tighten
down in front.
Folding heating element down/up
Folding heating element (top heat/grill) down
– Open lock and fold hea-
ting element down.
Folding heating element up
– Fold heating element up
and close again with
the lock.
EEB 9800.0 USA 21
Page 22
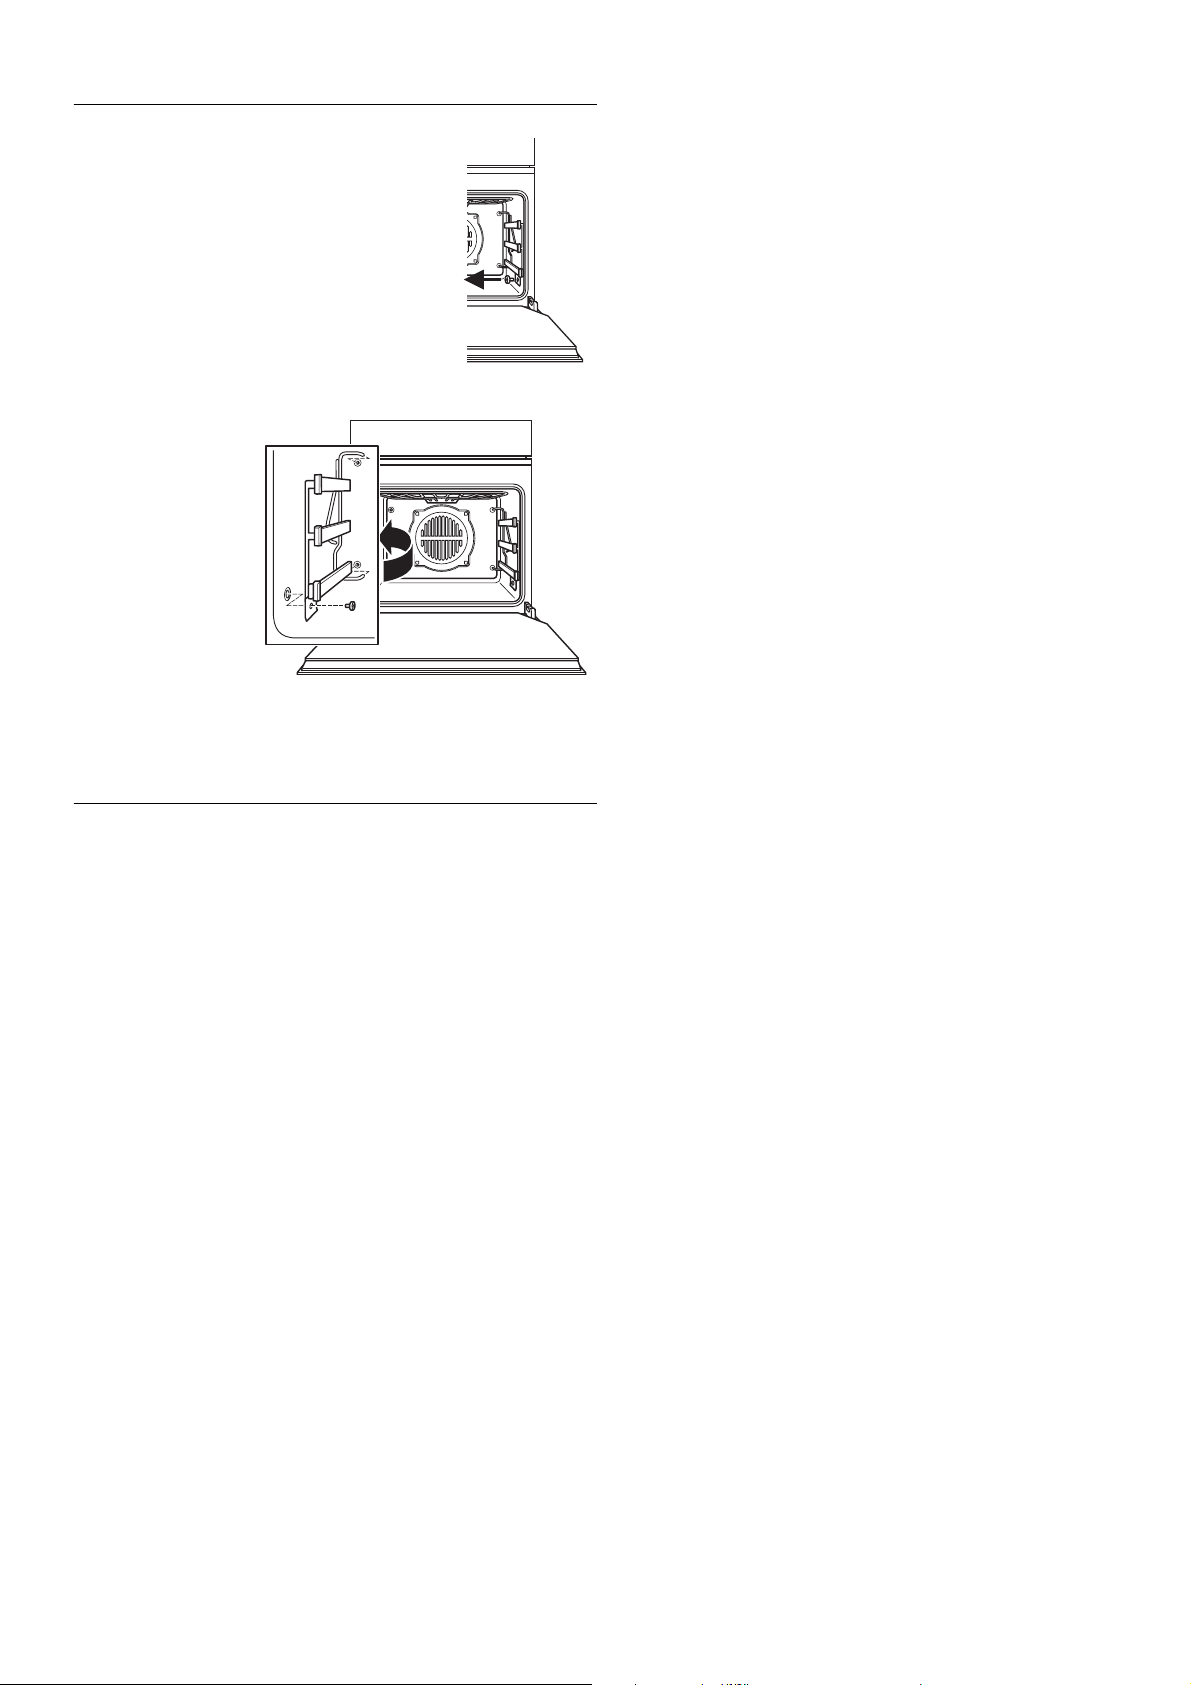
Unscrewing/reinstalling the individual telescopic
glide-out shelves (acc.-no. 601)
Unscrewing the individual telescopic glide-out
shelves
If you want, you can screw the individual telescopic
glide-out shelves off the side walls with a screwdriver
so that it is easier to clean the walls.
– For this purpose unscrew the bottom holding
screw on each side.
Reinstalling the individual telescopic glide-out shelves
– Insert the individual
telescopic glide-out
shelves at the back
into the holes in the
intermediate wall and
screw the individual
telescopic glide-out
shelves at the bottom
front to the side walls.
Regenerating the ökotherm® catalyst
The ökotherm catalyst scrubs the grease particles and odor arising when
roasting in Hot air convection mode. The catalyst cleansing capability is usually
adequate. In rare cases of very intensive roasting of very large amounts of
food grease particles may settle on the catalyst. Next time you use hot air
convection, e.g. for baking a pizza, the deposits will be disposed of over time.
Should you feel the catalyst cleansing effect has weakened (e.g. if there is a
strong odour), the catalysts can be regenerated by removing the fatty deposits:
J
B.
.
– Select the programe Hot air convection
– Then touch the Rapid Heating sensor
– Set the temperature to 555 °F / 290 °C and cooking duration u to
60 minutes.
– Touch the sensor key
j.
What to do if trouble occurs...
Use a qualified technician for repairs!
=
However, there are some problems that you can handle yourself. First, check
and see if there have been any operating errors. Remember--repairs during
the guarantee period are not free of charge if they are caused by operating
errors or non-observance of the following instructions:
What is to be done if…
... neither sensors nor lighting function?
Please check: Is the mains plug in the wall socket? Is the domestic fusing
OK? Power failure?
... one or more sensors don’t react to touch but the lighting can
be turned on?
Possible cause: The sensors constantly adapt in sensitivity to ambient
conditions. Unfavorable conditions such as e.g. if you lean against them for
a lengthy period, may cause then not to react for several minutes.
Wait for about 15 minutes or pull the relevant fuse and then re-insert it.
Repeat this procedure if necessary!
The keys have adapted and now react to touch again.
... one or more sensors don’t react to touch despite repeating this
procedure?
Possible cause: Faulty sensor key or component.
If you’ve repeated the procedure and the keys still don’t react, pull the fuse
again and then contact our Customer Service.
... if <demonstration mode> is displayed and the oven won’t
heat?
Have this mode de-activated by Customer Service!
... the oven door glass cracked?
Switch the oven off and have the door replaced by Customer Service.
... the door sealing is damaged?
Replace the door sealing. (See page 23) Do not use the oven with a dama-
ged sealing!
...the oven lighting is defective?
The oven can still be used. Replace the halogen bulbs as soon as possible
- when the oven has cooled down - see “Replacing a halogen bulb”).
...there is a powerful odor?
Regenerate the ökotherm®-catalyst (see page 22).
... the oven generates a strong smell of vinegar?
Cooking a dish containing alcohol or yeast using programes with Hot air
convection will produce a vinegar smell.
one of the modes without fan, such as Top/Bottom heat.
... fruit juice or albumin gets onto enameled surfaces?
This is a harmless enamel change that cannot be changed.
If you find the smell disturbing, use
22 EEB 9800.0 USA
Page 23
Replacing a halogen bulb
After Sales Service
Attention! The halogen bulb become very hot after being in use for a
=
while. Only change the bulbs when they have cooled down.
Only replace the halogen bulbs with bulbs of the same type. You can
=
obtain new halogen bulbs from KÜPPERSBUSCH Customer Service.
Do not grip the halogen bulbs with your bare hands. Finger marks burn
F
into the bulb glass and reduce the light intensity and service life of the
bulbs.
If the fitting has become solid due e.g. to dirt or long use then glass may
=
splinter during removal. Hold a towel or cloth over the fitting to catch any
splinters.
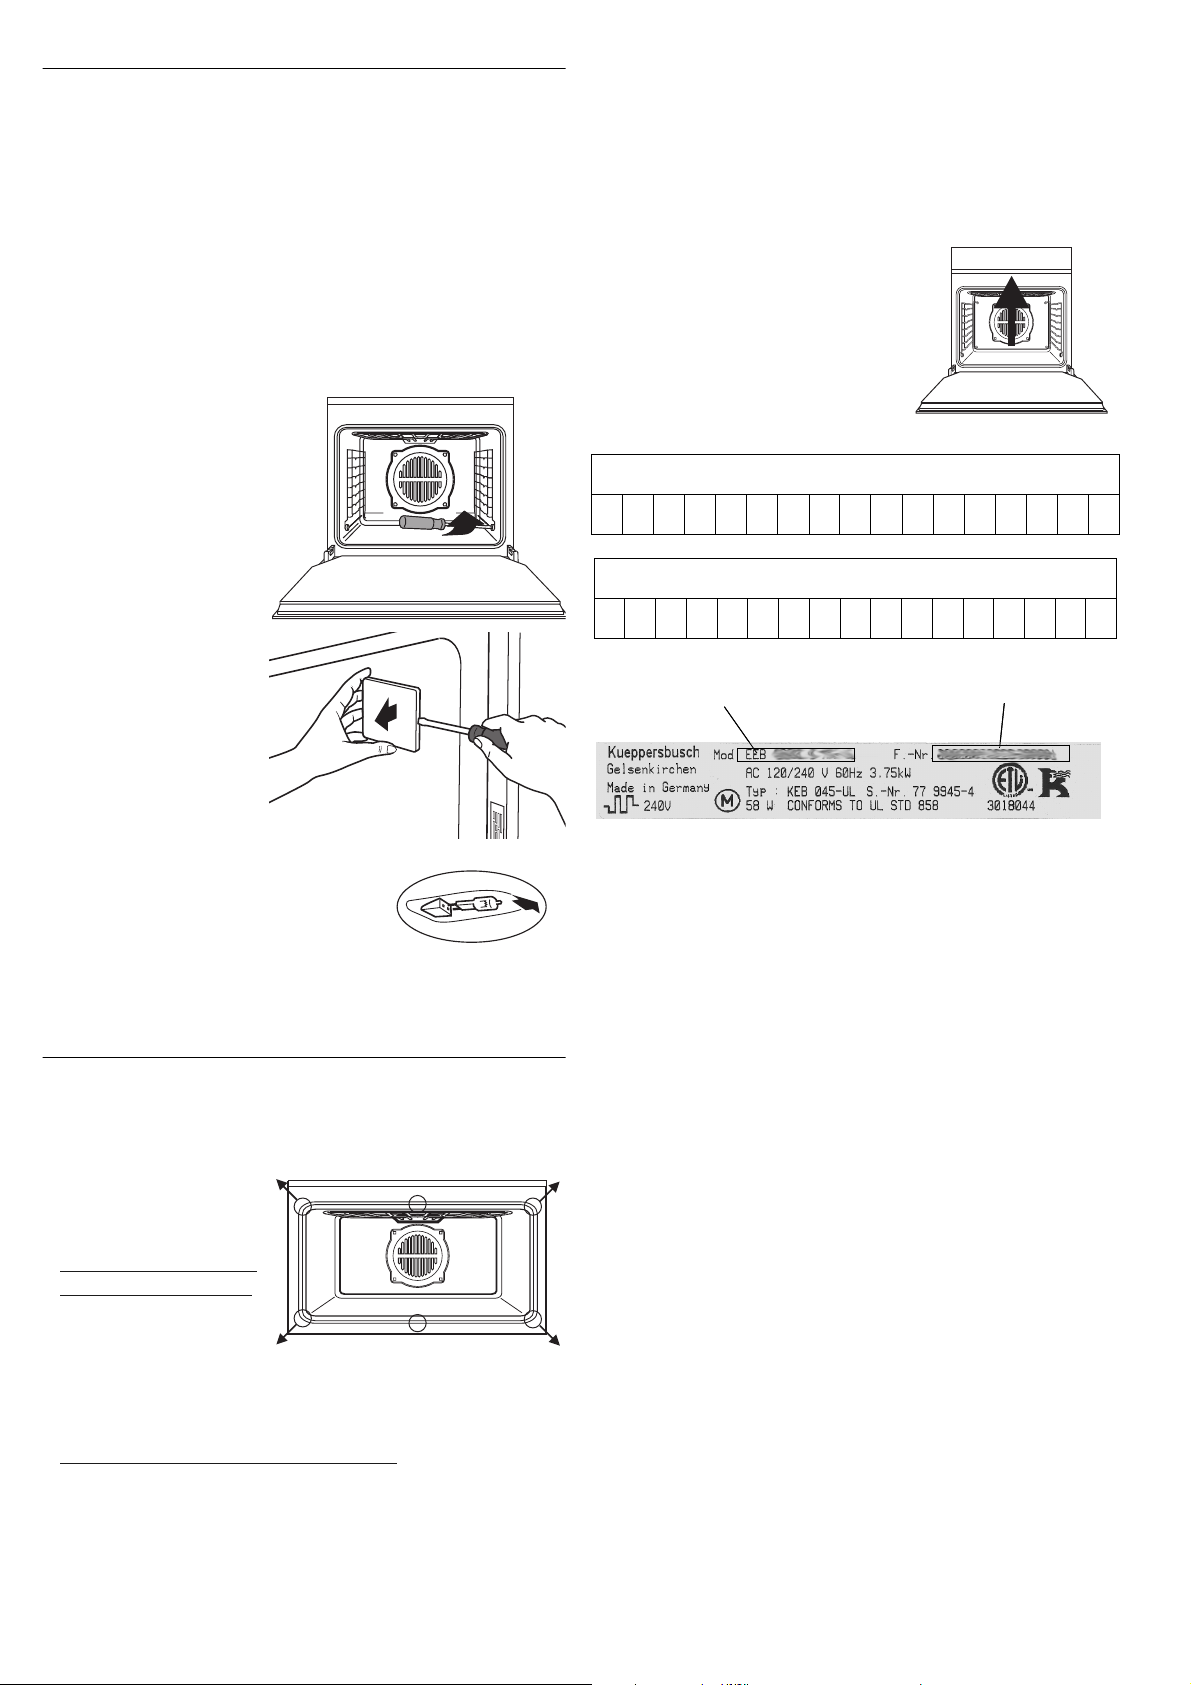
Changing the halogen lamp:
– Unscrew the shelf rack.
– Carefully lever out the glass
cover with a screwdriver.
In the event of a problem that you can’t easily fix yourself, or for spare part
service, please contact the Küppersbusch Customer Care line at
1-800-459-0844
.
Always have the information from the identification panel handy when
F
calling Customer Service.
The rating label for the oven is located on
the underside of the front panel and is visible when the oven door is open.
– Make a note of this information in case
you have to consult our customer service.
Production-no. oven
Model designation oven
Model
Production number
– Remove the halogen bulb from its socket.
– Hold the new bulb with a cloth (i.e. tissue) and
push it into the socket.
– Reinstall the glass cover.
– Screw the shelf rack on again.
Replacing the door sealing
Do not use the oven with damaged or missing door sealing!
=
If the sealing is damaged or can't be cleaned anymore, it must be replaced.
You can get a new sealing from KÜPPERSBUSCH Customer Service.
Removing the sealing
– To remove the sealing, gently
pull each corner out.
– Anschließend die beiden Mit-
telbefestigungen aushängen.
Fitting the new sealing
– Clasp one corner after the
other into the oven front. Be
sure not to bend or mutilate
the hooks!
– Die beiden Mittelbefestigungen wieder einhängen.
EEB 9800.0 USA 23
Page 24

KÜPPERSBUSCH USA
4920 W. Cypress Street, Suite 106
Tampa, Florida 33607
Telephone: 800-459-0844 Fax: 813-288-8604
Customer Care line: 1 - 800 - 459 - 0844
www.kuppersbuschusa.com
KÜPPERSBUSCH USA is a division of Teka USA
 Loading...