

Kuppersbusch EEB 670.0 Instruction Manual
BEDIENUNGSANWEISUNG
mit Montageanweisungen
Instructions for use and installation instructions
Instructions d’ utilisation et avis de montage
Gebruiksaanwijzing en montagehandleiding
EEB 670.0
07 22 21 G51
For your information
Contents
Please read the information in this leaflet carefully. It contains important instructions for the safety, installation, use and maintenance of your cooker.
The cooker is to be used only for preparation of food in the home.
Please keep the instructions for use carefully in a safe place.
Conditions of guarantee
The conditions of guarantee applicable for this product are subjeci to those
published by the representative in the relevant country.
Details regarding the same may be obtained from the dealer from whom
the appliance was purchased. For claims under guarantee the sales receipt
must be produced.
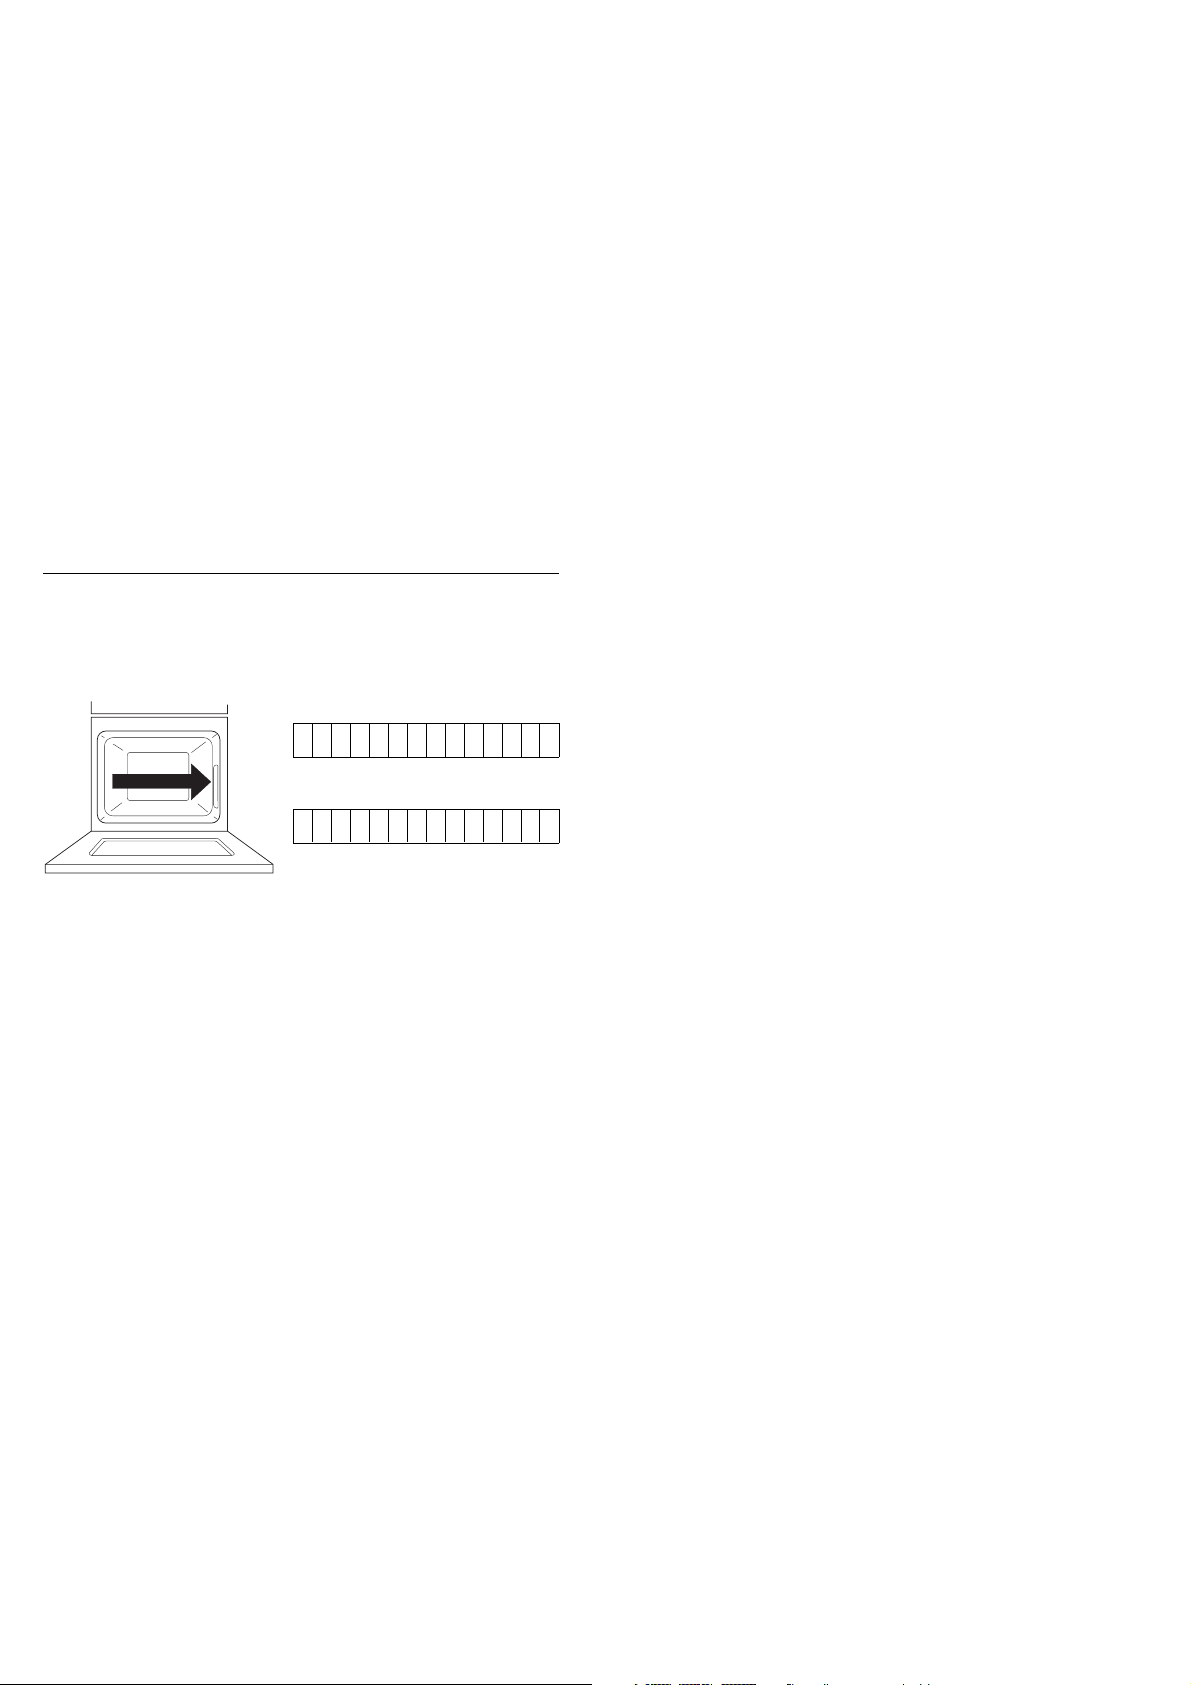
Nameplate
is located on the right-hand side strip and is visible when the oven door is
open. Please note the following information for when you contact the service centre:
F-number
Model designation oven
Your appliance at a glance. . . . . . . . . . . . . . . . . . . 24
The operation fascia . . . . . . . . . . . . . . . . . . . . . . . . . 25
Operation elements and displays
Important notes on operation
Safety instructions . . . . . . . . . . . . . . . . . . . . . . . . . . . 26
for connecting up and functioning
for the oven
for the core temperature probe
The ökotherm® converter . . . . . . . . . . . . . . . . . . . . 26
Before using the appliance for the first time . 26
Disposing of the packaging and the old appliance
Initial cleaning
Setting the time
The minute minder
The childproof lock . . . . . . . . . . . . . . . . . . . . . . . . . . 27
Using the childproof safety lock
Deactivating the childproof lock
The oven lamp . . . . . . . . . . . . . . . . . . . . . . . . . . . . . . 27
The backmobil
Using the backmobil
Shelf levels
Slide-in accessories
®
. . . . . . . . . . . . . . . . . . . . . . . . . . . . . 27
®
Using the oven . . . . . . . . . . . . . . . . . . . . . . . . . . . . . . 28
Switching on the oven
Switching the oven off
Selecting the heating mode or a programme
Changing the cooking temperature
Displaying the current temperature
The minute minder
Setting or changing the core temperature
Programmes. . . . . . . . . . . . . . . . . . . . . . . . . . . . . . . . . 29
Heating programmes
Baking and roasting programmes
The core temperature probe . . . . . . . . . . . . . . . . . 31
Using the core temperature probe
Tips for correct use
Standard core temperatures
Applications . . . . . . . . . . . . . . . . . . . . . . . . . . . . . . . . . 32
Roasting
Standard temperatures for roasting
Baking
Baking standards
Baking pizza
Defrosting and proving
Preserving
Large area grilling
Cleaning and care . . . . . . . . . . . . . . . . . . . . . . . . . . . 38
backmobil
Oven
Regenerating ökotherm
®
®
converter
Help in case of faults . . . . . . . . . . . . . . . . . . . . . . . . 39
Installation instructions for fitter . . . . . . . . . . . . . . 39
Electrics
Installation dimensions
Installation in a fitted kitchen
EEB 670.0 23

Your appliance at a glance
1Clock
2 Symbol fields for heating programmes,
roasting and baking programmes
3 Programme selection dial
4 Oven temperature selection dial
5 Operation fascia
6 Fold-down infra-read grill/top heat
7 Holder for core temperature sensor
8 Hot air suction vent
9 Runner
10 Frame
11 backmobil
12 Oven door
®
Optional accessories
Grilling rack with lifter acc. no. 125
Pizza slab acc. no. 145
Roasting grid acc. no. 124
Baking tray acc. no. 441
Baking tray (Email) acc. no. 541
Baking tray (aluminium) acc. no. 542
Drip pan acc. no. 543
24 EEB 670.0
The operation fascia
The operation fascia enables you to control all the functions of the oven.
The functions are selected via selection dials, regulators and sensor keys and then the cooking times and the temperatures are set. The set temperature and
time are indicated in the display. The symbol fields indicate the programme or the heating mode.
They have the following meanings:
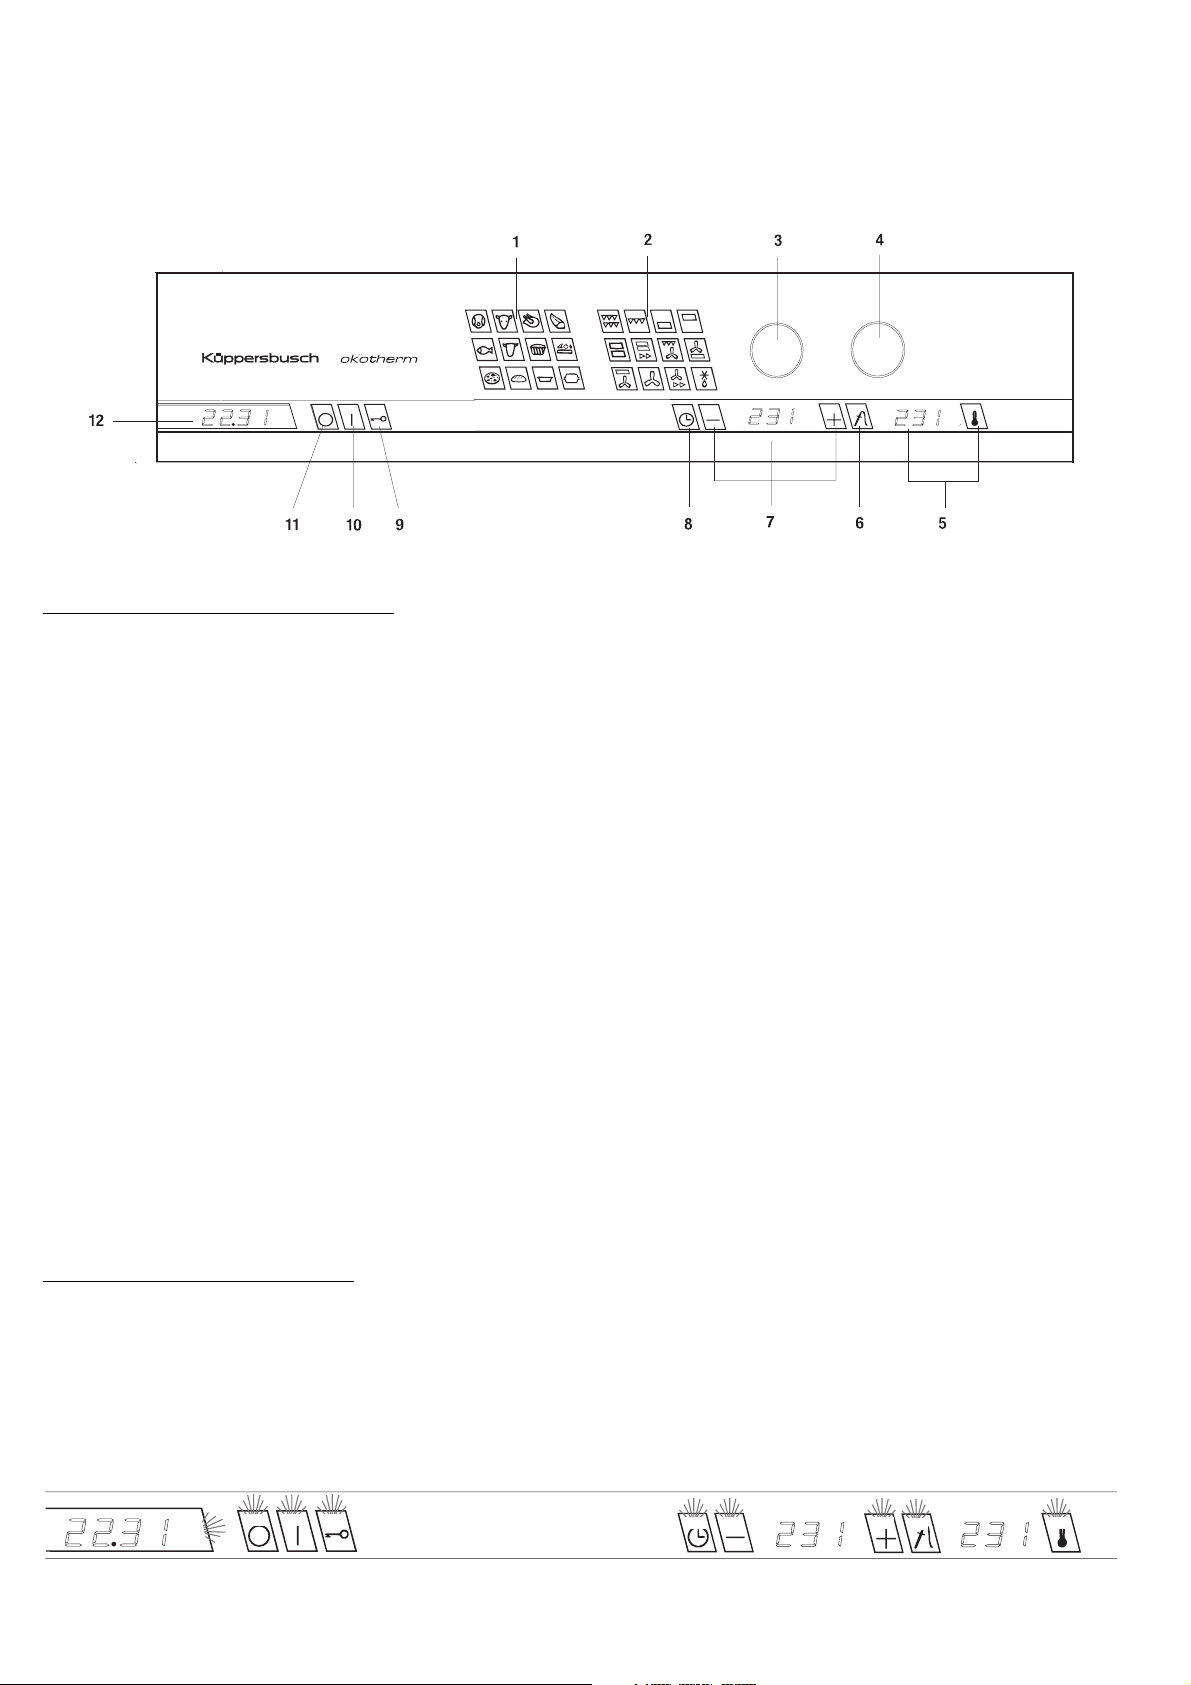
Operation elements and displays
1 Symbol fields for baking, roasting
2 and heating programmes
3 Programme selection dial Used to select the baking, roasting and heating programmes and to set the clock.
4 Oven temperature selection dial Used to set and change the oven temperature
5 Oven temperature indicator with key to view
the current temperature
6 Key to view the current core temperature When this key is touched the current core temperature appears briefly. The pilot light indicates
7 Display for minute minder, cooking time and
core temperature with adjustment keys
8 Key to switch off the appliance automatically Activates the automatic switch-off function.
9 Key to activate the childproof lock Locks the oven functions and those of the front cooking zones
10 Key to switch the oven on Switches the oven on.
11 Key to switch the oven off Switches the oven off.
12 Clock Always indicates the current time. The clock does not influence the oven functions.
Appear against a green background when the oven is switched on.
If a programme has been selected the symbol field will light up red.
Can be turned to the right or to the left.
Always indicates the set oven temperature. If the key is activated, the current temperature will
appear briefly.
that the core temperature sensor has been inserted into the food.
Displays the time when the minute minder is set. The cooking time is displayed when the minute
minder has been activated. The core temperature is displayed when the core temperature sensor
has been inserted into the food. The adjustment keys are used to alter the time or the temperature.
Important notes on operation
- All the keys are sensor keys that react to even the slightest touch.
- Touch the sensor keys in the part where they are sensitive (above the symbol) as this is where the sensors are located.
An exception is the sensor key for the clock. The sensitive zones of the sensor keys are illustrated in the drawing at the bottom of the page. There
are no such markings on the sensor keys themselves.
EEB 670.0 25
Safety instructions
for connection and operation
Before using the appliance for the
first time
Only Küppersbusch fitted hobs have been designed and tested for use
on top of a Küppersbusch fitted oven. Other hobs must not be used.
The cookers may only be connected to the mains, maintained and repaired by a qualified electrician according to valid safety regulations. Work
carried out incorrectly places your safety at risk.
Do not put the appliance into operation unless it has been built in!
The surfaces of the oven are very hot when in operation. Always keep
children away!
Connection leads of electrical appliances may not get jammed in the
hot oven door.
Steam and/or pressure cleaning machines must not be used to clean
the oven! The appliance could be damaged in such a way that your life
could be at risk.
Warning! This appliance must be earthed!
The cooker is to be used only for the preparation of food in the home.
Oven
When carrying out repairs and replacing oven light bulbs, the cooker
must be disconnected from the mains (switch off the fuse).
Never store any objects in your oven which could cause a hazard if the
oven is unintentionally switched on.
Take special care when working in the hot oven. Use a dish cloth, oven
gloves or similar.
The oven door must close well. In the event of damage to the door sealing, hinges, sealing surfaces or to the glass pane, do not use your cooker until it has been repaired and checked by a qualified person.
Caution! When opening and closing the oven door, do not reach into
the hinge. Risk of injury!
Always close the oven door completely when preparing food in the oven.
Keep at least 5 cm away from the grill and top heat.
Core temperature probe
Only use the original core temperature probe.
Do not jam the cable of the core temperature probe in the oven door.
Take probe out of the oven when not being used.
Keep it at a distance of at least 5 cm from the grill and top heat.
The ökotherm®-converter
Disposing of the packaging and the old appliance
Dispose of the transport packaging in such a way that is not harmful to
the environment.
If the appliance is purchased in Germany the dealer who sold you the appliance will dispose of the transport packaging for you.
Recycling the packaging saves raw materials and reduces the amount of
waste disposed appliances still contain useful materials. Dispose of your
old appliance at a collection point for recycling useful materials.
Before disposing of your old appliance ensure that it cannot be used
any longer. This will prevent misuse.
Initial cleaning
Remove foreign objects and packaging.
Before preparing meals for the first time clean the inside of the oven and
all accessories thoroughly.
Clean the baking sheets, drip pan, gridiron, core temperature probe etc.
with a damp cloth and a little washing-up liquid
Heating up the oven:
Shut the oven door.
Heat up the oven by switching on the top and bottom heat at 250 °C for
60 minutes. Air the kitchen well while you are doing this.
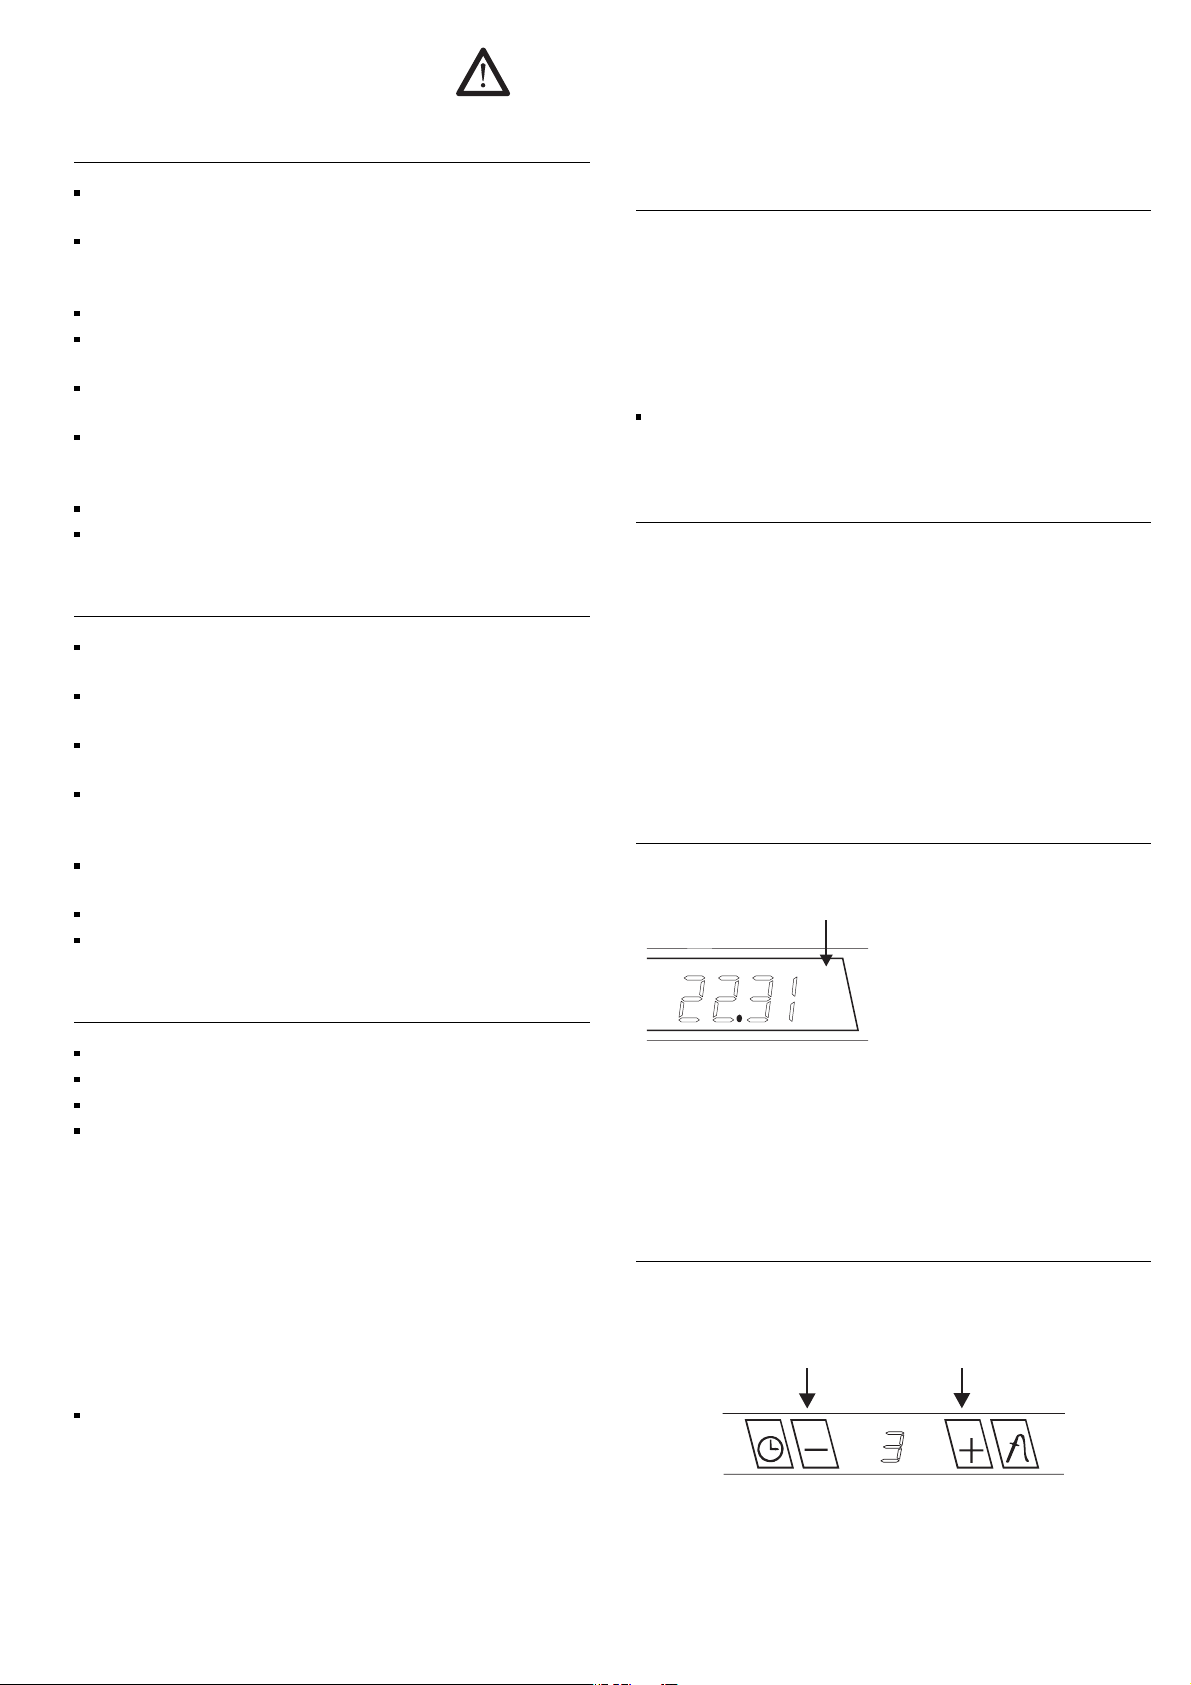
Setting the time
This is done as follows:
Touch the glass on the right of
-
the clock until you hear a signal.
The digits will flash.
Now set the time using the pro-
-
gramme selection dial (the selection dial nearest to the clock). The
clock will stop flashing approx. 5 seconds after you have set the time.
The time setting is then stored.
In order to set the clock again, you must repeat the above procedure.
The clock always shows the current time. It is independent of the oven functions.
The ökotherm®-converter immediately removes greasy substances, odours
and suspended particles from the oven air during roasting and baking. It
immediately converts odours and greasy fumes into odourless, humid air
before they even leave the oven. This process consumes no energy. On
the contrary, it releases it.
The air that leaves the oven is clean and no fatty deposits have a chance
of settling on kitchen units.
Should the cleansing effect loose its effectiveness, simply regenerate
the ökotherm
®
-converter (see page 38).
The minute minder
The minute minder has a switch-off function for the time setting of the baking, roasting and heating programmes of the oven. If the oven is not switched on, the minute minder has no switch-off function.
- Set the time using the adjustment keys,
The set time will appear in the display.
- When the set time has come to an end an acoustic signal will sound.
To switch off the signal press the
26 EEB 670.0
or .
key.
The childproof lock
®
The backmobil
Your cooker has a childproof lock which you can activate in order to
protect the appliance from unintentional or unauthorised activation.
Using the childproof safety lock
When pressed, the pad that is labelled with a key will activate the childproof safety lock. It can only be activated when the oven is switched on.
Press the “childproof safety
-
lock” pad .
The following three control lamps will light up on the operation fascia:
“Oven on” pad
-
“Minute minder” pad
-
“Core temperature probe” pad
-
After approx. 10 minutes the appliance will switch off.
The childproof lock saves the oven settings.
The existing temperature settings of the oven remain the same or can be
turned down. New temperature settings are not possible. When the stove
is switched on again, only the two rear cooking zones will heat up.
The fact that the childproof lock has been activated is only apparent
when the oven has been switched on (even for the cooking zones).
To return the oven to full functioning condition the childproof lock must be
deactivated.
,
.
Deactivating the childproof lock
This is done with the aid of the keys of the flashing pilot lights
The backmobil® is one of the oven’s standard accessories. The backmo-
®
makes it easier for you to use the oven.
bil
For successful roasting or baking it is important to select the correct shelf
level for baking sheets and gridirons. The backmobil enables you to correctly position the baking sheets and gridirons even before you put them into
the oven.
Using the backmobil
Caution! The backmobil
oven gloves, pan holders etc.
®
®
and the lock can be very hot. Use oven cloths,
®
Gliding the backmobil
oven:
Press down the lever.
Sliding the backmobil
oven:
Slide in slowly until it lt looks into position.
out of the
®
into the
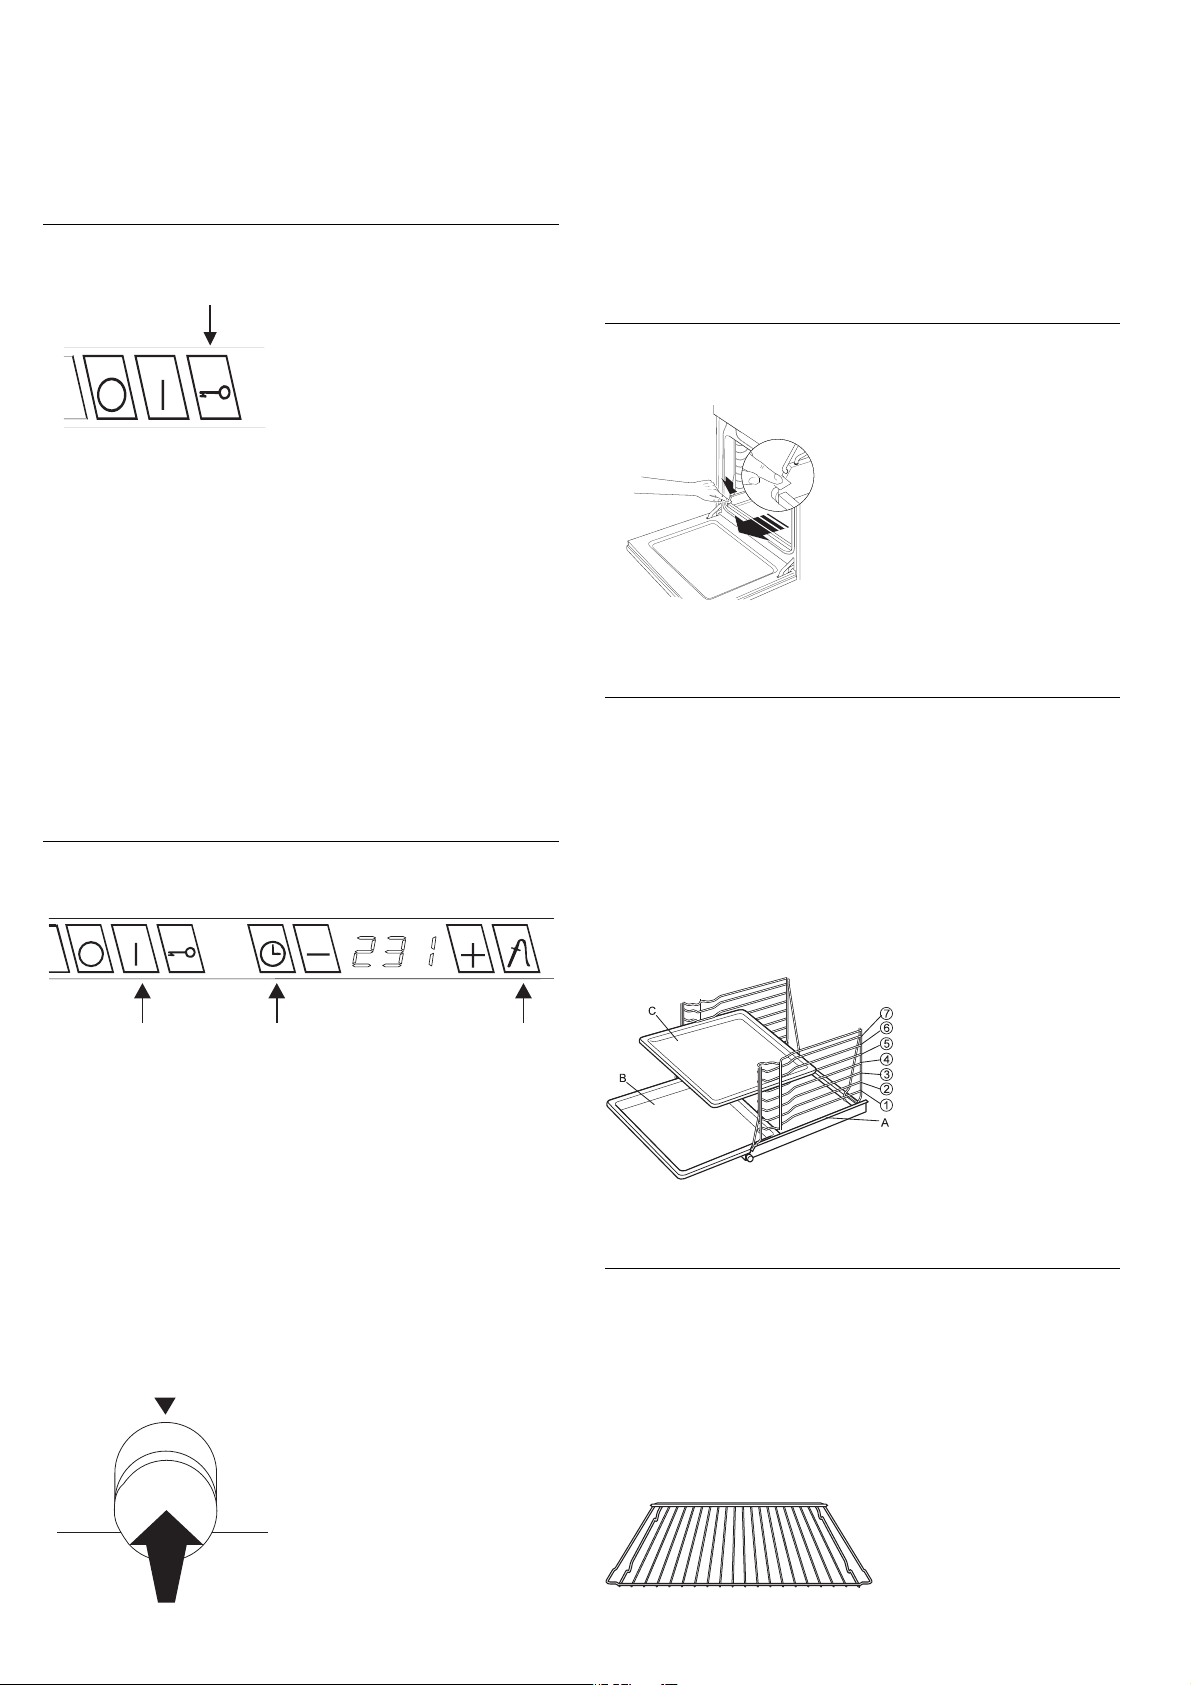
Shelf levels
The backmobil® has a frame and seven shelf levels. The shelf levels are
counted from bottom to top.
Example:
Shelf level 5: slide the baking sheet onto the 5th shelf from the bottom.
A roasting tin can be slid into the frame. The gridiron and the baking
sheets are inserted onto the shelf rails according to the cooking requirements. Instructions on which shelf to use can be found in the baking and
roasting table.
The following diagram of the backmobil
and shows a roasting tin in the frame and a baking sheet on shelf 5.
®
illustrates the shelf levels (1-7)
Touch the keys of the three flashing pilot lights (marked by an arrow
-
in the drawing). First of all touch the two keys on the left and then
the key on the right.
An acoustic signal will sound when the childproof lock has been deactivated again. The pilot lights will stop flashing and the whole cooker is
ready for operation again.
The oven light
The oven light is on , when the pop-out programme selection knob
(1st knob from the left) is fully extended. The light works regardless of
which operation mode has been selected. The light can also be switched
off while the oven is in use. This will help save energy.
The oven light is turned off when the
pop-out programme selection knob
has been pressed inwards.
If the knob is reactivated the light will
go on again.
When you have finished using the
oven, press the programme selection
knob inwards again!
EEB 670.0 27
1 - 7 shelf rails
A frame
B roasting tin in the frame
C baking sheet on shelf 5
Slide-in accessories
Do not cover the bottom of the oven with aluminium foil!
Baking trays:
Lift slightly when removing.
After baking trays are placed back into the oven, the sloping edge of the
tray must point towards the oven door.
Push the drip pan and baking trays with the two slots right at the back
into the oven.
Rack:
Please ensure that the catches of
the racks always point towards
the back (away from you).
 Loading...