

Page 1
Gebrauchs-
und Einbauanweisung
EN
FR
NI
Instructions for use and installation
Manuel de montage et d’utilisation
Montage- en gebruiksaanwijzingen
EEB 6550.8
EEBK 6550.8
3172403-000
Page 2

What you will fi nd here
Read the instructions in this manual carefully before turning on your oven.
Here you will fi nd the most important instructions regarding the safety,
use, care and maintenance of your appliance, so that it will give you
lasting enjoyment.
If your oven becomes damaged at any time, consult the chapter
‘Assistance in the event of malfunction’ before you do anything else. You
may be able to repair small malfunctions yourself and save unnecessary
service costs.
Keep these instructions in a safe place. Give these instructions to new
owners for their information and safety.
The following symbols appear in this manual:
The warning triangle draws attention to health hazards or damage
that may be caused to the appliance.
This indicates advice and instructions.
Contents
Pot roasting
Roasting with conventional cooking functions
Instructions for automatic cooking recipes
Automatic cooking recipe chart
Suggested roast settings for conventional oven cooking
Thermoprobe and inside temperature function ........ 39
How to insert the thermoprobe correctly
Using the thermoprobe
Suggested temperatures for cooking with the thermoprobe
Semi-automatic cooking with thermoprobe
Slow cooking ................................................ 40
Setting the heat mode/cooking temperature
Suggested settings for slow cooking
Baking with cooking settings .............................. 42
Baking pizza
Instructions for the chart: Suggested baking settings
Suggested baking settings
Grilling
Suggested grill settings
Defrosting
Time chart for defrosting food
Making preserves
Oven features ................................................ 28
Control Panel - Sensor keys and instructions ..................
28
Safety Warnings ............................................ 29
Connection and use
Oven
Thermoprobe
Before First Use ............................................. 29
Remove packaging and the old appliance
Setting the clock
First cleaning
General oven information ................................. 30
General advice
Shelf levels
Turning the oven light on and off
Oven Use ..................................................... 30
General instructions
Turning on the oven
Selecting a conventional cooking setting
Conventional oven cooking functions ................... 32
Shortcut to conventional cooking functions
Automatic cooking
Important information about automatic cooking with recipes
Changing the weight of the food to be cooked
Changing the cooking temperature
Changing/setting the cooking time
Setting the end time
Turning on and off automatically
Oven Switch-Off
Child safety lock ............................................ 45
Turning the child safety lock on / off
Cleaning and care .......................................... 45
For all surfaces
Removing baked-on dirt
Using a scraper to clean
Using an oven spray - instructions
Chrome features
Stainless steel
Enamel
Door glass
Door gasket
Oven door assembly and disassembly
Shelf runner assembly and disassembly
Folding down / away the heating element
Regeneration of the ökotherm® catalyst ............... 47
Regeneration of the ökotherm® catalyst
Assistance in the event of malfunction .................. 48
What to do if… .............................................. 48
Maintenance ................................................. 48
Changing the oven light
Changing the door gasket
Technical information ...................................... 49
Assembly instructions for technical personnel ......... 49
Electricity
Measurements for assembly
Assembly in kitchen unit
Additional settings .......................................... 35
Alarm setting
Stand-by mode
Roasting ...................................................... 35
Setting a programme
Turning the roast over
Roasting on the grid shelf
EEB 6550.8
27
Page 3
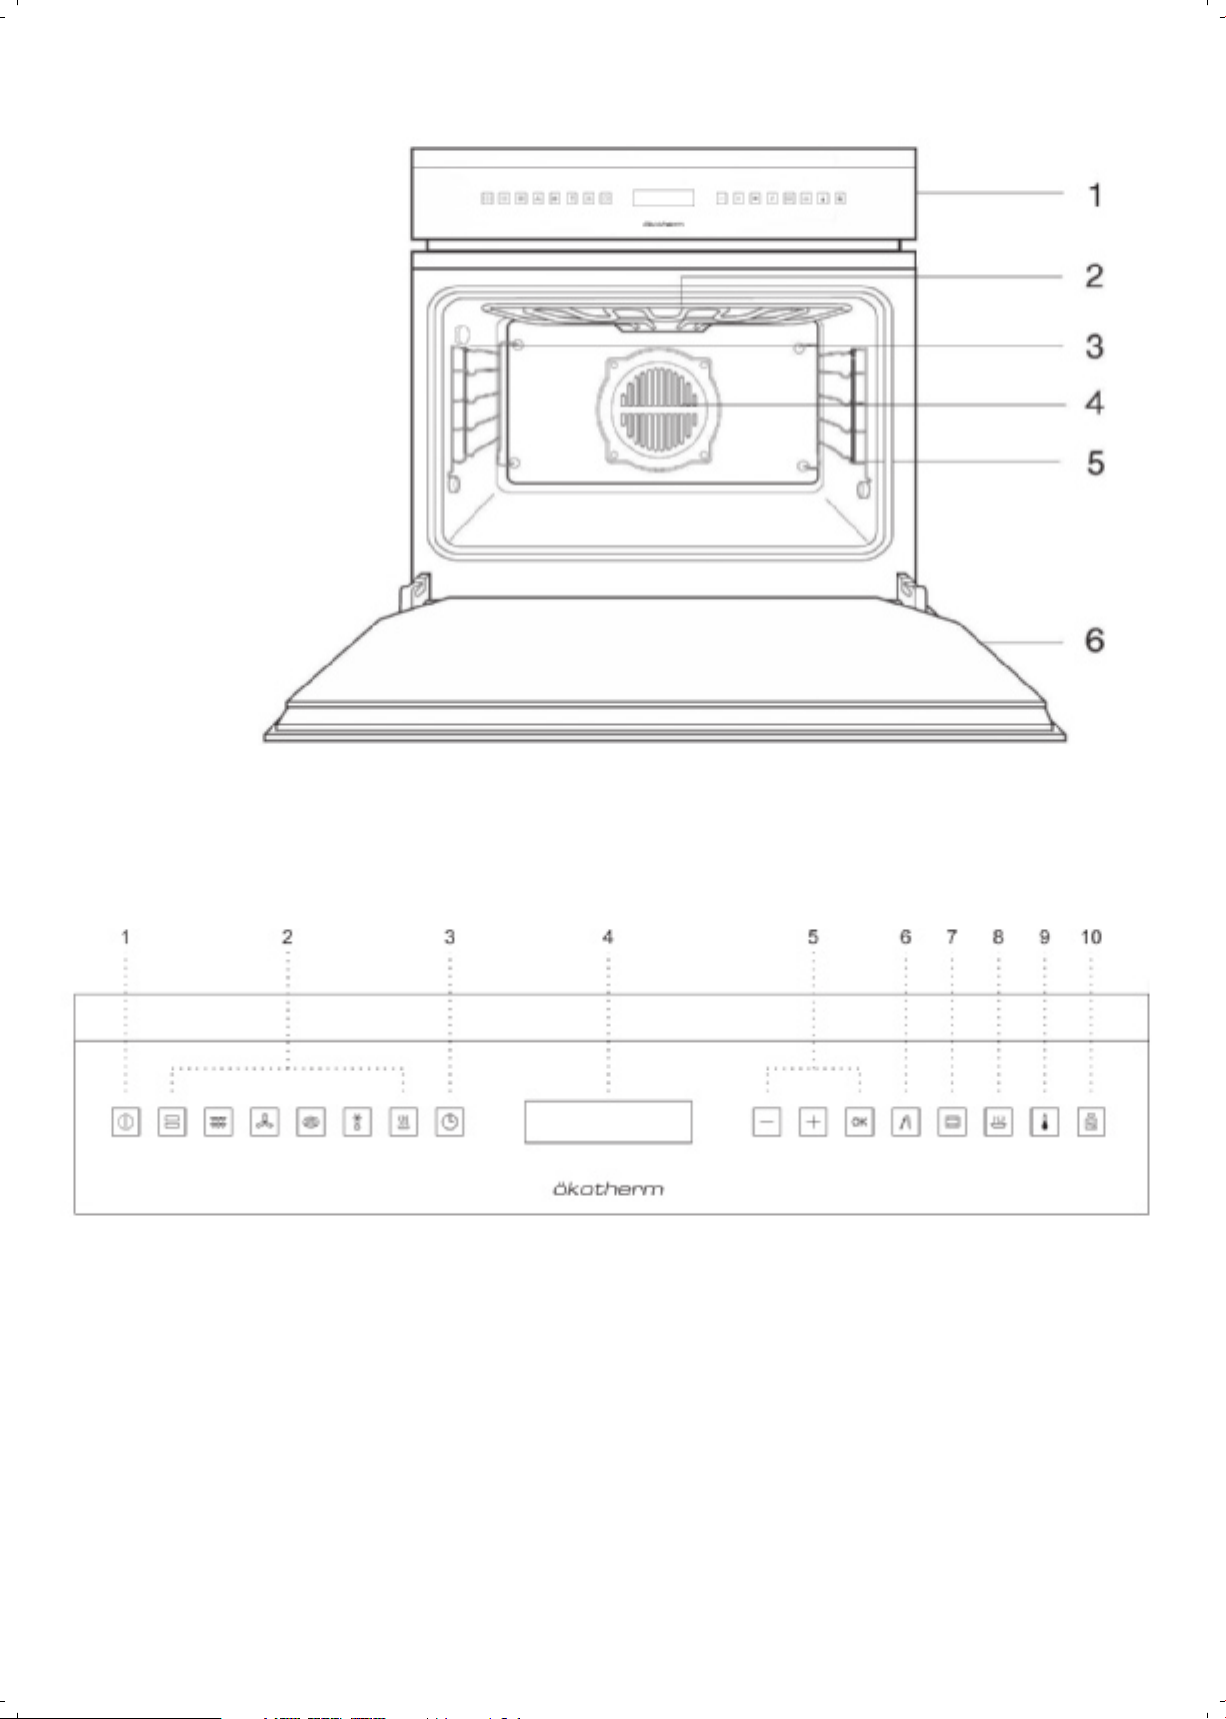
Oven features
1 Control panel
2 Fold down grill (Top heat/Grill)
3 Socket for roasting thermoprobe
4 Hot air fan
5 Shelf levels
6 Oven door
Accessories included:
Grid shelf
Enamel roasting tray
Enamel baking tray
Special accessories:
Pizza stone (acc. No. 145)
Grid (acc. No. 124)
Oven tray (acc. No. 541)
Baking tray (acc. No. 543)
Control Panel - Sensor keys and instructions
The control panel operates all oven settings.
1 Oven power switch.
2 Cooking functions shortcuts.
3 Electronic timer functions.
4 Information display.
5 Menu scrolling and functions selection.
6 Temperature setting with roasting thermoprobe.
7 Conventional cooking functions menu.
8 Automatic cooking functions menu
9 Cooking temperature settings.
10 Food weight settings.
28
EEB 6550.8
Page 4
Safety Warnings
Connection and use
Thermoprobe
Only use the original thermoprobe.
Do not trap the thermoprobe cable in the oven door.
Only KÜPPERSBUSCH hobs have been manufactured and tested for use
over a KÜPPERSBUSCH oven. Do not use other hobs.
Any handling or repair to the appliance, including replacement of the
feed cable, should be carried out by authorised Technical Service
Personnel using original spare parts. Repairs or handling by others may
damage the appliance or cause malfunctioning that could be hazardous
to your safety.
Do not allow children to come near the oven while in use as it can reach
very high temperatures.
Children should be supervised to ensure they do not play with the
appliance.
This appliance is not for use by persons (including children) with
reduced physical, sensorial or mental capacity, or those lacking
experience and knowledge, except if they have been supervised and
instructed regarding use of the device by a person responsible for their
safety.
Oven
Unplug your oven if it malfunctions.
The oven must always be operated with the door closed.
The manufacturer takes no responsibility for any use of the oven other
than for the home preparation of food.
Only use the oven after it has been installed inside the kitchen unit.
Do not store oil, fats or infl ammable materials inside the oven. This may
be dangerous if the oven is turned on.
Do not lean or sit on the open oven door. You could damage it, as well
as endangering your safety.
Remove from the oven if it is not being used.
Keep at a minimum distance of 5 cm from the grill and the top
elements.
Before First Use
Remove packaging and the old appliance
Remove packaging and recycle in an environmentally-friendly way.
In Germany, the transport packaging is returned to the store where the
appliance has been purchased. By returning the packaging material, raw
materials are saved and also fewer waste products are generated. Old
appliances still contain valuable material. Leave your old appliance at a
collection point for valuable materials. Old appliances must be rendered
inoperative before disposing of them in order to prevent improper use.
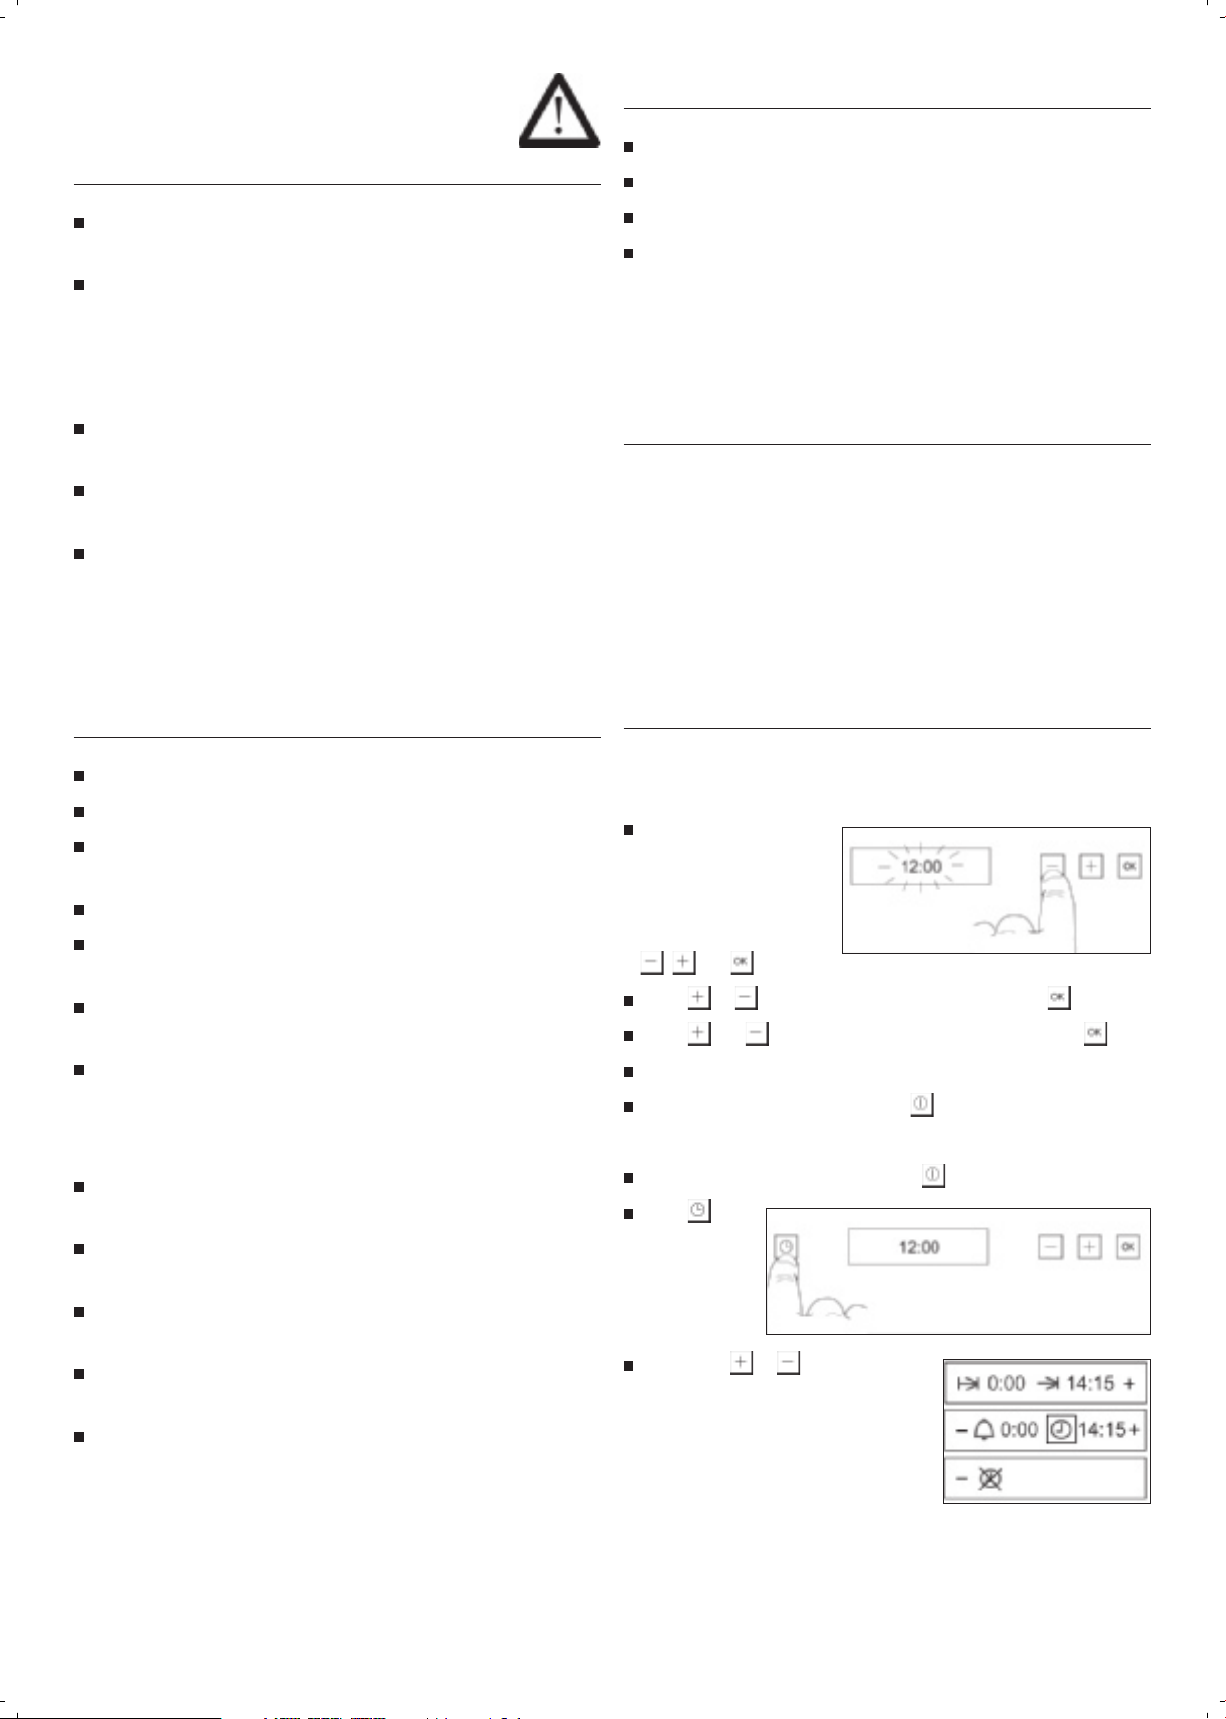
Setting the clock
The clock must be set before fi rst use and after a power failure. Whenever
this occurs, the ‘12.00’ reading will fl ash on the display.
When you connect your
oven to a power supply,
you will see 12:00 fl ashing on the display and
the symbols
, and light up.
Touch or on the glass to set the hour. Then touch .
Touch and on the glass to set the minutes. Then touch .
In order to cook food in the oven, place the tray or grid shelf supplied
with it over the shelf runners inside the oven cavity. The tray and grid
shelf have a system to make their partial outward movement easy for
food handling.
Do not place containers or food on the bottom surface of the oven.
Always use the trays and grid.
Do not pour water on the bottom surface of the oven when in use; this
may damage the enamel.
Open the oven door as little as possible during cooking. This will reduce
power consumption.
Use protective oven gloves when performing operations inside the
oven.
It is normal for condensation to occur on the oven door when cooking
dishes with a high liquid content.
You will then hear a double beep confi rming the time is set.
The oven will display the time set and lit up in white.
If you want to change the time:
If the oven is off, turn it on by touching .
Touch .
This symbol
will light up in
red.
If you touch or , you will see the
5 clock functions on the display.
EEB 6550.8
29
Page 5

When you have
chosen
the time setting
function
, touch .
You will then see the current time on
the display.
Touch or on the glass to set the hour .
Touch and on the glass to set the minutes .
Shelf levels
Model EEB6550.8
There are 8 shelf runners
on the sides. They are
numbered 1 to 8 from the
bottom up.
You will then hear a double beep confi rming the time is set.
First cleaning
– Remove packaging and accessories from the oven.
– Before preparing food for the fi rst time, the appliance must be
cleaned.
Clean the inside of the oven, oven trays, grease tray, grid shelf etc. with
a damp cloth and a little dishwashing detergent.
– Heat the oven.
Close the oven door.
Heat the oven to 200° C with top and bottom heat
Ensure the kitchen is well ventilated while doing this.
for 60 minutes.
General oven information
General advice
Follow the safety warnings given previously!
Caution, Danger of overheating! When using the oven, do not cover
the bottom with aluminium foil or place pots, frying pans or the like
inside. If this happens, the oven will overheat, causing damage to the
enamel.
Model EEBK 6550.8
There are 5 shelf runners on
the sides. The shelf levels
are numbered 1 to 5 from
the bottom up.
Shelf runners
Shelf level 1 is the lowest shelf.
Turning the oven light on and off
The inside light will go on:
When the oven door is open. If the door is not closed after a certain
amount of time, the light will turn off to reduce power consumption.
When any cooking function is set. The light will turn off after a certain
time.
If you want to turn the light on during cooking, touch
fi nger on for a few seconds, the light will stay on for the duration of
the cooking. To turn the light off, touch again.
. If you keep your
Oven Use
The oven becomes hot when in use. The cooling fan turns on when
the oven overheats. The cooling fan will remain on until the oven has
cooled down, even after the appliance has been turned off. The noises
made by the fan are normal and do not mean that it is damaged.
When preparing a dish with alcohol or yeast with settings that use hot
air, there may be a vinegary smell. If the smell is unpleasant, use a
function that does not include the fan, such as top/bottom heat.
The electronic clock features Touch-Control technology. To operate,
simply touch the glass control symbols with your fi ngertip. The touch
control sensitivity continuously adapts to changing conditions. Make
sure that the glass surface of the control panel is clean and free of any
obstacles when turning on the oven.
If the clock does not respond correctly when you touch the glass,
you will need to turn off the oven for a few seconds and then turn it
back on after a few seconds. Doing this causes the sensors to adjust
automatically so that they will react once more to fi ngertip control.
30
General instructions
In some settings the fan turns itself on and off; this does not mean it
is damaged.
Turning on the oven
To cook with your oven, touch . You will
then see the different oven use options lit up in
white.
Shortcut to the most common
cooking functions: These controls
provide immediate access to the
most frequently used cooking functions.
EEB 6550.8
Page 6

: Electronic Clock Settings. These let you programme timer
functions for use with your oven.
, and .
: Conventional oven cooking functions. This enables you to select
any cooking function by combining different heat sources.
: Automatic cooking recipe settings. Simply put the food into the
oven and indicate its weight on the display; the oven will cook it for you
automatically.
If you do not set any function or recipe, the oven will turn itself off
again, showing the current time and
in white.
Selecting a conventional cooking setting
will change to red. Touch
to set one of the following cooking
functions. (See Conventional oven
cooking functions below).
When you have set the desired function, touch .
You will hear a double beep confi rming the chosen function has been
set. The oven will begin cooking and in most cases you will see the
following information on the display:
The set function, the pre-programmed
cooking temperature for that function
and the clock or timer function if any
have been set.
or
Turn the oven on by touching .
Touch , which will light
up on the control panel.
If you wish to change the cooking function, press and follow the
above instructions.
During cooking will fl ash, indicating that the oven is transmitting
heat to the food.
After the thermostat is turned off the fi rst time, you will hear a sound
indicating that pre-heating has fi nished.
EEB 6550.8
31
Page 7
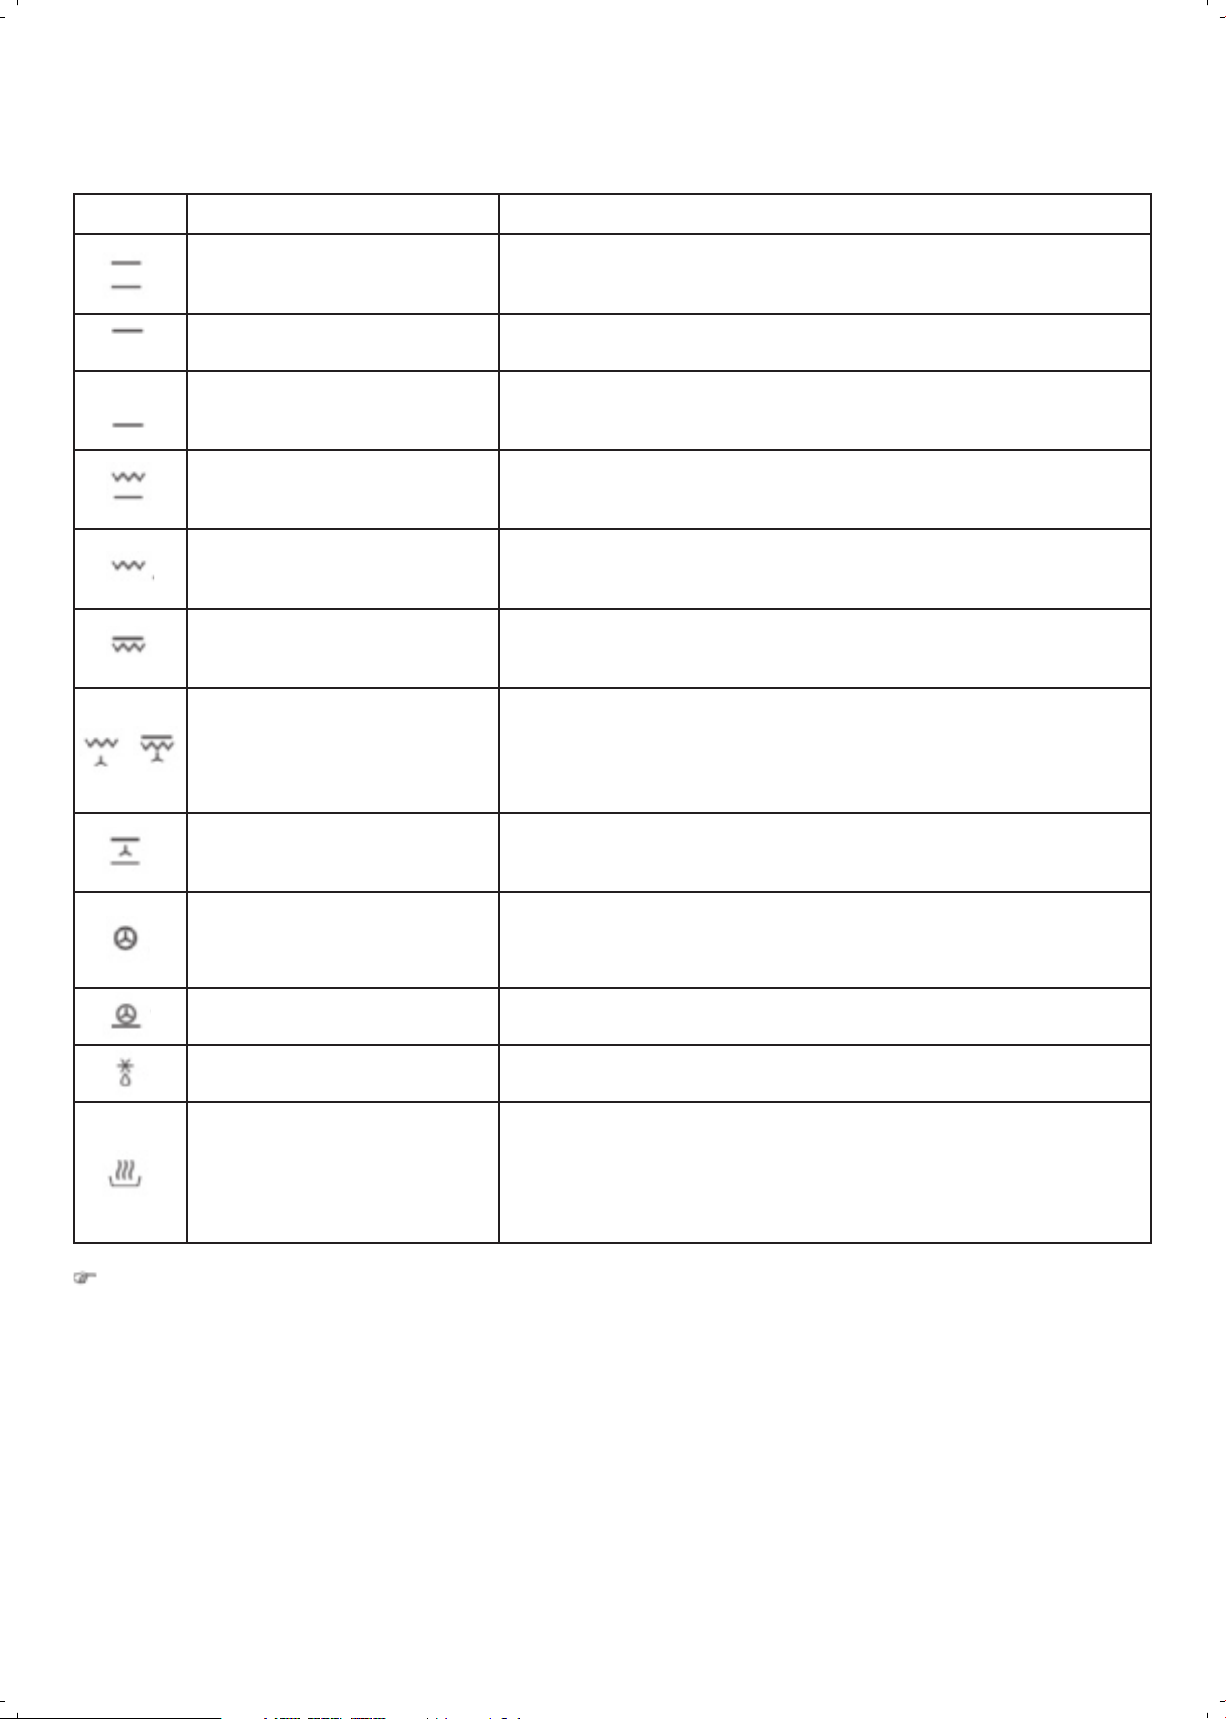
Conventional oven cooking functions
There are many conventional oven cooking functions and they are described below.
Symbol Cooking function Suitable for
Top/bottom heat
Top heat For when you need to heat food gently. Plate warming.
Bottom heat
Grill and bottom heat
(EEBK6550.8 only)
Grill
Larger surface grill
Fan-forced hot air
Turbo fan with top and bottom heat
This function is for use when baking cakes where the heat should be even to give a
spongy texture.
Heat only comes from lower part. Suitable for warming dishes or letting dough or
similar products rise.
Ideal for roasts. This setting can be used with any size cuts of meat.
Toasting and browning. This setting allows the surface to be cooked without affecting the inside
of the food. Suitable for fl at foods such as steaks, ribs, fi sh and open toasted sandwiches.
For toasting larger surfaces than possible with the Grill setting, in addition to greater
toasting power for faster food browning.
For even roasting and simultaneous surface browning. Ideal for mixed grills.
Perfect for bulky pieces such as poultry and game. The meat should be placed
on the grid shelf with the tray below to collect meat juices.
Suitable for roasts and cakes. The fan spreads the heat evenly throughout the inside of
the oven to reduce cooking time and temperature.
The fan distributes the heat coming from an element located at the back of the oven. As
Hot air
Pizza mode Ideal for cooking pizzas and baking pies, fruit tarts and sponge cakes.
Defrosting See corresponding section
Food warming
The door must be closed during use with Grill, Larger surface grill or fan-forced hot air.
a result of the evenly distributed temperature, food can be cooked on two levels at the
same time.
This function provides the right level of heat to keep prepared food warm in the oven
until you are ready to serve. The interior temperature of the oven varies in this setting
between 50 and 80° C. Meat can be kept warm at 60° C inside the oven. Large cuts of
meat can be warmed for 1 to 2 hours, and smaller cuts for 30-40 minutes.
32
EEB 6550.8
Page 8
Shortcut to conventional cooking functions
When you turn the oven on (by
touching ), you have shortcuts to
the following cooking functions, which
will be lit up in white:
Touch the symbol for the
desired cooking function.
You will hear a double beep confi rming the function has been set. The
oven will begin cooking and in most cases you will see the following
information on the display:
The programmed function, the
pre-programmed cooking temperature
for that setting and the clock or timer
function if any have been set.
is an automatic cooking recipe. If you want to change it, please
consult the next section.
Important information about automatic cooking
with recipes
When you select a recipe and enter a weight, the oven automatically cal-
culates the temperature and cooking time needed, but these values can
be changed. Cooking time starts from a cold oven unless pre-heating
has been specifi cally indicated.
It is very important to select the correct food weight so that the ingre-
dients will be properly cooked.
When cooking with a thermoprobe, the oven will determine the cooking
temperature only. The cooking time will depend on the temperature
setting programmed for the thermoprobe.
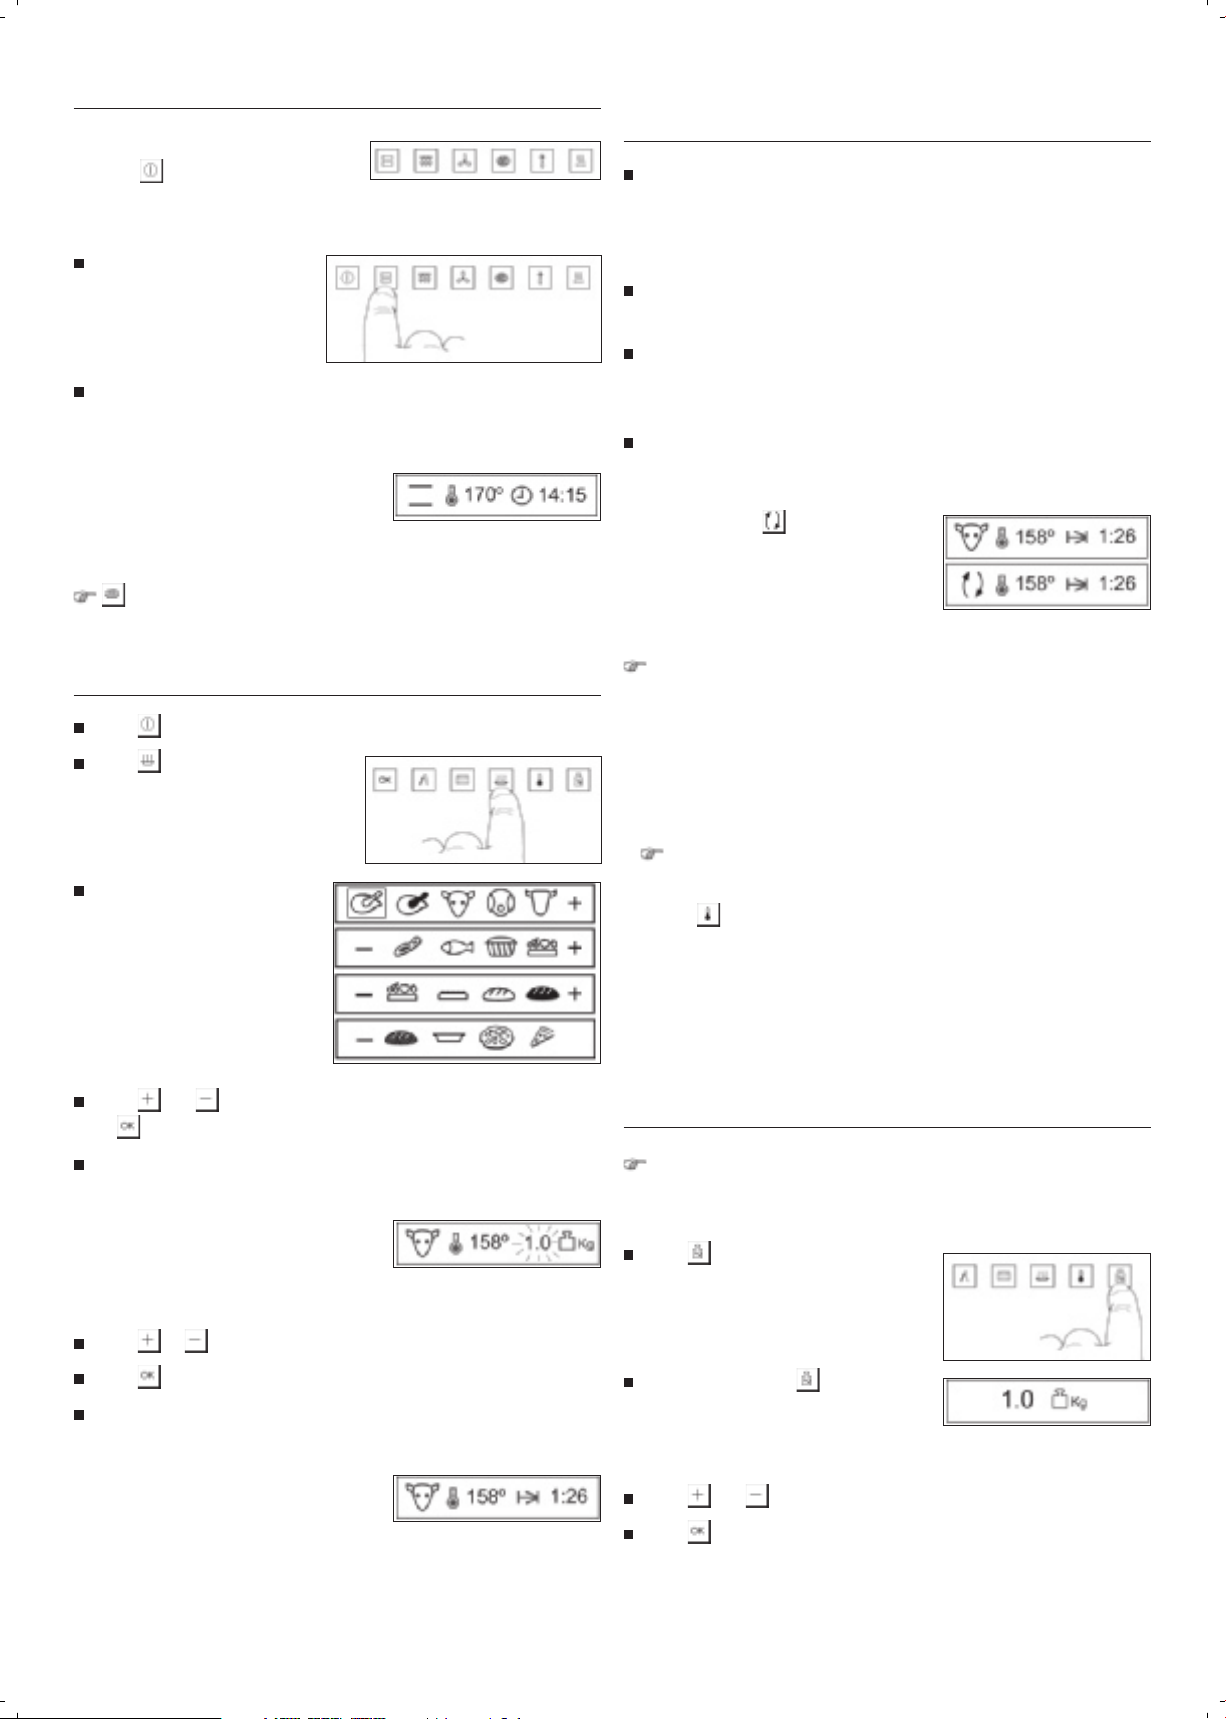
With roasting programmes, after a certain time has passed the oven will
advise you that the joint of meat should be turned over. When it is time
to do this, the oven will beep.
You will also see on the display
until you have turned the roast over. If
you do not turn the roast over, the oven
will continue cooking according to the
programmed automatic cooking recipe.
Automatic cooking
Touch to turn the oven on.
Touch . This will light up in red.
The display will show the diffe-
rent automatic cooking recipes
available with the oven:
Touch and to select the desired recipe. Then touch
the
symbol.
You will hear a double beep confi rming your setting and the display will
show the following information:
The symbol for the chosen recipe and
its automatic cooking temperature are
shown. The pre-programmed weight for
this option fl ashes.
For white bread, rye bread, thin-crust and thick-crust pizza base
recipes, the oven should be pre-heated fi rst. In this way the oven will
be at the ideal temperature for the best results. Pre-heating is not
needed for the other recipes.
Follow these instructions when cooking with these recipes:
– Set the recipe fi rst. The oven will begin pre-heating.
Do not put the food into the oven until the signal is given.
– During pre-heating, the symbol of the programmed recipe and the
symbol
– When the set temperature is reached, the oven will beep. You can now
put the food into the oven.
– The oven will continue to beep until you put the food in.
– The food will be cooked automatically according to the recipe settings.
will fl ash on the display.
Changing the weight of the food to be cooked
If you wish to change the food weight, the cooking time or tempe-
rature may change automatically according to the parameters of the
programmed recipe. To change the weight of the food:
Touch . This will light up in red.
Touch or to change the weight of the food.
Touch to accept the selection.
You will hear a double beep confi rming the programmed recipe. The oven
will begin cooking and you will see the following information on the display:
The symbol for the chosen recipe, the
automatic cooking temperature and
calculated cooking time will be shown.
EEB 6550.8
The display will show and the
weight of the food to be cooked
according to the recipe you have
programmed.
Touch and to change the weight.
Touch . The two beeps you hear after that will confi rm the new
weight has been set.
33
Page 9

Changing the cooking temperature
The cooking temperature is pre-programmed for all cooking functions.
It is only possible to adjust the temperature within a predetermined range
when using the automatic cooking function. The temperature can be freely
selected for conventional cooking functions in a range between 50° C
(no temperature adjustment) and 250° C.
If you want to change the cooking temperature:
Touch . This will light up in red.
Touch . This will light up in red.
If you touch or , you will see
the 5 clock functions on the display:
cooking time, end time, alarm, setting
the clock and stand-by mode.
You will see the symbol and the set
temperature for this cooking function
on the display.
Touch and to set the new cooking temperature.
Touch . The two beeps you hear after that will confi rm the new
temperature has been set.
Changing/setting the cooking time
The cooking time is pre-programmed for the automatic cooking recipes
but can be changed. There is no pre-programmed time for conventional
cooking functions.
Touch . This will light up in red.
If you touch or , you will see
the 5 clock functions on the display:
cooking time, end time, alarm, setting
the clock and stand-by mode.
Touch or to select the end time
setting , followed by . You will
see and the current time on the
display.
Touch or
Touch
and see
When the programmed end time is reached, the oven will switch itself
off, an alarm will sound briefl y and and will start fl ashing.
Touch to stop the alarm. The oven will display the current time and
lit up in white. The oven is now off.
to set the end time.
. You will hear a double beep
and the cooking time.
Turning on and off automatically
If you wish to use the oven at a later time, the cooking time and end
time can be combined. The cooking start time, when the oven turns on
automatically, is programmed as a combination of both settings and
cannot be set on its own.
Example:
It is 8:00 and at 13:00 I want to remove a roast from the oven that will
take 90 minutes to cook.
When you have selected the cooking
time function, , touch . You will
see and the 0:00 reading on the display.
Touch or to set the cooking
time. Touch . You will hear a double
beep and see and the programmed
cooking time.
When the programmed cooking time has fi nished, the oven will switch
itself off, an alarm will sound briefl y and and will start fl ashing.
Touch to stop the alarm. The oven will display the current time and
lit up in white. The oven is now off.
Setting the end time
The end time is when the oven turns off.
You can combine the cooking time and the end time. See “Turning on
and off automatically”.
Enter 1:30 as the cooking time, following the instructions explained in
the section “Setting the cooking time”.
Then, change the end time from 9:30 to 13.00, following the instruc-
tions “Setting the end time”.
The settings are automatically accepted.
Set the conventional cooking or automatic cooking function. Put the
food for roasting in the oven.
The oven will turn on at 11:30 and will fi nish cooking at 13:00.
Oven Switch-Off
Touch . The oven is off. You will be able to see the correct time and the
symbol in white on the display.
34
EEB 6550.8
Page 10

Additional settings
Alarm setting
Roasting
Use of the thermoprobe is recommended. The cooking time is determined by the thermoprobe, making its design ideal for roasting.
You can set an alarm on your oven, even if it is not being used.
Touch . This will light up in red.
If you touch or , you will see
the 5 clock functions on the display:
cooking time, end time, alarm, setting
the clock and stand-by mode.
Touch the alarm setting, , followed
by . You will see the symbol and
the 0:00 reading on the display.
Set the time for the alarm to sound by
touching or . Touch . You will
hear a double beep and see and the
set alarm time on the display.
When the set time is reached, an alarm will sound and and will
start fl ashing. Touch to stop the alarm.
Stand-by mode
This mode permits you to choose between having the display on (showing
the time) or off (stand-by, with nothing displayed). When the display is
off, touching any part of the glassed front will bring up the clock again,
and will light up. When the oven is turned off, the display will gradually turn itself off.
Setting a programme
1. Setting an automatic cooking recipe
The temperature is determined from the weight of the roast. The cooking
time is also determined if you intend to roast without the thermoprobe.
Both values are pre-programmed but can be changed (see previous
sections).
Before using the thermoprobe, set the weight.
Or
2. Setting a conventional cooking function
Each cooking function is associated with a pre-programmed temperature.
This temperature can be changed. You can set the cooking time and end
time. If you use the thermoprobe, you can set the cooking start time and
the oven temperature.
Turning the roast over
With the conventional cooking functions, the joint of meat must be
turned over after about 2/3 of the cooking time has passed so that it
browns evenly. If using a hot air function, you do not need to turn the
roast.
For automatic cooking recipes, once approximately 70% of the time has
passed, an alarm will sound so to alert you that the roast needs turning
over.
Roasting on the grid shelf
Touch . This will light up in red.
If you touch or , you will see
the 5 clock functions on the display:
cooking time, end time, alarm, setting
the clock and stand-by mode.
Touch , followed by . The display
will then show the two options for this
function,
(display on).
Touch or to set the desired function. Touch . You will hear a
double beep confi rming the chosen function has been set.
(display off) and
Use tray and grid shelf.
Large roasts can be prepared directly on the tray or on the grid shelf
with the tray below (e.g. turkey, goose, 3-4 chickens or pork hocks).
We recommend that when cooking fi sh this way, it should be standing
on the tray (in its swimming position). In this way, it will not need to
be turned, it does not fall apart as easily and is cooked more evenly. If
the fi sh does not stand upright by itself you can place it over a bed of
vegetables or over a coffee cup. Put the cup upside-down on the tray
and cover it with the fi sh so that it is inside the gut opening.
Pot roasting
Lean cuts of meat roast better in a covered casserole (e.g. veal that is
pot roasted or stewed in vinegar; beef or frozen meat stew). The meat
will be juicier.
You can use any type of pot or casserole (steel, enamelled, cast iron or
glass) provided it does not have wooden or plastic handles and that it is
heat-resistant.
EEB 6550.8
35
Page 11

If you use an earthenware casserole, read the manufacturers instruc-
tions. The following is recommended:
Instructions for automatic cooking recipes
– Rinse the pot or casserole with water or use a little oil or fat.
– Seal the prepared (dressed) meat in a pan on the hob.
– Place it in the pot or casserole. Cover with the lid and place it in the
cold oven on the grid shelf.
Set the automatic cooking recipe or the turbo fan with top heat function,
or , at 180-200° C.
Roasting with conventional cooking functions
When roasting with the thermoprobe the cooking time is automatically
determined, therefore the following instructions do not need to be
followed.
The settings and information in the charts refer to a cold oven unless
otherwise specifi ed.
The cooking time of the roast depends on the type, quality and height of
the meat.
As the weight of the meat makes it fall, carefully press the sides of the
piece with both hands in order to determine its height. Instructions are
provided in the chart “Roasting with heat settings”
The cooking time for meat with a layer of fat may increase to twice the
length.
The settings and information in the charts refer to an oven that has
not been preheated unless otherwise specifi ed.
The roasting settings automatically adapt to the weight of the food to
be cooked, for this reason it is important to set the weight directly
after selecting the setting and before modifying the cooking time,
the cooking temperature or the inside temperature (see previous
sections).
If using an automatic cooking recipe
The roasting programmes are designed for one piece of meat or fi sh up to
7cm thick and without a layer of fat. Enter the correct weight and modify
the recipe, taking into account:
If there are several pieces, the cooking time will need to be extended.
If there is one piece thicker than 7cm and weighing less than 3kg, the
cooking time should be increased by 10 minutes for each centimetre
with respect to the pre-programmed value.
If there is one piece weighing more than 3 kg, the cooking time
corresponds to the predetermined value, as the differences balance out
throughout the pre-programmed cooking time.
If roasting several small pieces of meat or small birds in the oven, the
cooking time should be increased by about 10 minutes per piece. For
example, the roasting time for one chicken is approximately 60 mins.
Two chickens will need between 65 and 75 mins.
Shelf levels (count from the bottom up):
As a general rule: The bigger the roast the lower the grid shelf should be
in the oven.
For larger roasts:
Hot air + grill
Grid shelf: Shelf level 2
Hot air
Grid shelf: Shelf level 2
Top/bottom heat
Grid shelf: Shelf level 2
or : Tray: Shelf level 1
: Tray: Shelf level 1
: Tray: Shelf level 1
36
EEB 6550.8
Page 12

Automatic cooking recipe chart
Your oven offers the possibility of cooking with the following recipes. You only need to set the desired recipe, specify the weight of the food to be
cooked and put it in the oven.
There is no need to worry about anything else; the oven will cook it for you, with perfect results.
Available recipes are shown below:
SYMBOL
RECIPES
Chicken –
poultry
Chicken/poultry
thighs and
drumsticks
Veal ----
Pork ----
Beef - lamb ----
Chops/steak ----
Fish ----
----
----
PREHEATING
TEMPERATURE COOKING TIME WEIGHT RANGE DISHES
According
to weight
According
to weight
According
to weight
According
to weight
According
to weight
According
to weight
According
to weight
According
to weight
According
to weight
According
to weight
According
to weight
According
to weight
According
to weight
According
to weight
0.5 – 10Kg
0.5 – 2Kg
0.5 – 6Kg Veal, meatloaf, stuffed roast
0.5 – 10Kg Pork, suckling pig
0.5 – 5Kg Beef, lamb, veal shin
0.5 – 4Kg
0.5 – 5Kg Varied fi sh
Chicken, duck, turkey,
goose etc.
Chicken/duck thighs
and drumsticks
Beef or pork chops/steak,
roast beef
Cakes in
moulds
Fruit pie
Cakes
White bread YES 160-190° C
Rye bread
Wholemeal
bread
Melted cheese
toppings
Thick-crust
pizza
---- 140-170° C 70 min ------
---- 150-180° C 50 min ------ Fruit fi lling
---- 150-180° C ---- ------ Sponge cakes
YES 160-190° C
160-190° C
---- 160-190° C 40 min ------
YES 200-260° C 12 min ------
According
to weight
According
to weight
According
to weight
Cupcakes, muffi ns,
cheesecake
0.5 – 2Kg
1 – 4Kg
1 – 3Kg
Vegetables, pasta, potatoes
with melted cheese
EEB 6550.8
Thin-crust pizza YES
37
Page 13

Suggested roast settings for conventional oven cooking
Hot air
Meat type
Roast veal 160 170-190 160 160 18
Roast beef 180 200-220 180 180-200 8-10
Steak 180 200-220 180 180-200 8
Rosé veal 160 170-190 160 160-180 12
Roast pork 160 170-190 160 160-180 12-15
Baked pork chops 160 170-190 160 160 8
Pork shoulder 160 170-190 160 160-180 12-15
Roast pork with crackling 160 170-190 160 160-180 12-15
Game 160 170-190 160 15
Wild boar 160 170-190 160 15
Game steak 180 180-200 180 180-200 8-10
Recommended
roasting setting
Top/bottom heating
Grilling
Temperature in °C
Fan-forced
hot air
Cooking time
Per cm meat height
in mins.
Lamb 150-160 170-190 160 15
Duck 160 170-190 160 160-180 12
Goose 160 170-190 160 160-180 12
Chicken 160 180-200 160 160-180 8*
Turkey 160 180-190 160 160-180 12
Fish 160 200-220 8
*whole chicken 45-60 minutes
38
EEB 6550.8
Page 14

Thermoprobe and inside
temperature function
The thermoprobe measures the inside temperature of the food being roasted. When the temperature detected by the probe has reached a set value,
the roast is perfectly cooked: not too dry or too rare, but ‘just right’.
Cooking continues until the inside temperature of the roast has rea-
ched the corresponding temperature. This is the reason why it cannot
be set or adjusted. Cooking time can vary depending on the size and
type of meat, the roasting temperature and the programmed cooking
function.
The thermoprobe can be used with all cooking functions.
How to insert the thermoprobe correctly
Pierce the pointed tip of the thermoprobe horizontally through one side
into the middle of the food to be roasted.
Insert the thermoprobe fully to the handle.
The tip must not be resting close to fat or bone, or inside a hollow
cavity (e.g. in poultry).
Take care when preparing poultry that the thermoprobe does not come
into contact with any bones.
Using the thermoprobe
If you wish to modify the thermoprobe temperature setting at any
time during cooking, touch
setting using and . Touch . You will hear a doble beep
confi rming the change has been made.
. You can then change the temperature
Suggested temperatures for cooking with
the thermoprobe
Dish
Beef
Rare roast beef/fi llet steak 40-45
Medium roast beef/fi llet steak 50-55
Well done roast beef/fi llet steak 60-65
Other roast cuts 80-85
Pork
Pork fi llet 65-70
Roast pork/ham 80-85
Rib roast/pork hock 80-85
Pork loin 75-80
Chops on the bone 70
Spareribs 65-70
Meatloaf 70-75
Inside temperature
in °C
Put the dressed roast with the inserted thermoprobe into the oven.
Plug the thermoprobe pin into
the socket located at the top
left-hand side of the oven.
When you plug the probe in, the display
will show the symbol and the
recommended cooking temperature will
fl ash.
If you want to change the recommended temperature, touch and
. Touch .
Select a cooking function or automatic cooking recipe.
During cooking, the display will show
and the temperature currently
measured by the thermoprobe,
alternating with the selected
temperature.
When the inside temperature of the roast reaches the temperature you
have programmed it for, the oven will turn off, an alarm signal will
sound for a few seconds and will blink.
Touch to stop the alarm. The roast is just right and ready to serve.
Veal
Roast veal 70-75
Roast veal kidney 75-80
Veal shin 80-85
Game
Game meat 75-80
Loin 60-70
Rare fi llet 40-45
Medium fi llet 50-55
Well done fi llet 60-65
Roast lamb 80-85
Stuffed meat 70-75
Poultry 85-90
Fish 70-80
Semi-automatic cooking with thermoprobe
This function can be used to set the cooking start time. Once the thermoprobe has detected the selected temperature, the oven will turn off.
You will not be able to set the cooking time because this is determined by
when the pre-programmed temperature inside the meat is measured by
the thermoprobe.
EEB 6550.8
39
Page 15

You should be present when the cooking fi nishes as the roast is just
right for serving. If you leave the roast in the oven, it will continue to
cook with the heat inside the oven and the result will not be as ideal.
To set this function, connect the thermoprobe.
Touch . This will light up in red.
If you touch or , you will see
the 5 clock functions on the display.
When you have programmed the
cooking start time, , touch . You
will see and the current time on the
display.
Slow cooking
Cooking at low temperatures leaves the meat especially tender, even
though it takes longer to cook. The meat can be ready to eat longer
without drying out.
Suitable for tender cuts of veal, beef, pork and lamb. It is also suitable
for chicken, turkey, duck and goose breasts (boneless).
It is not suitable for game and horse meat. Lengthy cooking of these
types of meat produces a typically strong smell.
– Remove the fat and skin before preparation (except duck breast).
– Seal the meat in a pan or pot on both sides (also both ends).
As a general rule the longer you seal the meat the shorter the time you
will need for cooking. Seal thicker cuts of meat longer than thinner
pieces. The length of the cuts of meat does not infl uence the time
needed to seal the meat.
Setting the heat mode/cooking temperature
Touch or
cooking start time. Touch
hear a double beep. You will see
and the programmed cooking time.
The oven will stay off.
At the set time, the oven will turn on and cook the food.
When the inside temperature of the roast reaches the temperature you
have programmed it for, the oven will turn off, an alarm signal will
sound for a few seconds and will blink.
Touch to stop the alarm. The oven is now off.
The roast is just right and ready to serve.
to programme the
. You will
– Heat the oven with the grid shelf and roasting tray for 20 minutes so
that the temperature on the inside of the oven is even.
– Select the hot air,
top/bottom heat,
– Set the temperature and cooking time according to the chart.
As a general rule, cook thicker cuts of meat at 80°C and thinner cuts
at 70°C.
– Do not cover the meat while cooking, even if using small pieces of
meat.
Do not use the thermoprobe. It is not reliable enough for this style
of cooking. Slow cooking means the juice from the meat does not
remain inside but it is distributed evenly throughout the piece.
– You can carve the meat immediately after cooking; it does not need to
stand for a time as in the case of conventional cooking.
You may keep the meat warm in the oven at 60°C. The thicker cuts of
meat for approximately 1-2 hours, and thinner pieces for 30-40 mins.
, heat mode. Alternatively, you can choose
.
40
EEB 6550.8
Page 16

Suggested settings for slow cooking
Meat type
Pork
Steak 400-600 g 5 60-90 80
Pork fi llet 800-1,000 g 7 90-105 80
Ham 1,000-1,500 g 10-12 230-250 80
Chops 800-1,000 g 8-10 120-140 80
Spareribs 1,000-1,500 g 10-12 120-150 80
Beef
Steak 700-1,200 g 5-9 100-140 80
Rib steak 1,500-1,800 g 10-12 150-180 80
Roast beef 700-1,800 g 10-12 120-180 70
Silverside, beef knuckle 1,500-2,000 g 10-12 200-230 80
Skirt steak 1,500-1,800 g 10-15 150-200 80
Veal
Steak 500-800 g 5-6 90-110 80
Veal fi llet 1,000-1,500 g 8-10 110-120 80
Silverside, veal knuckle 1,500-1,800 g 10-12 140-160 80
Weight Sealing (mins) Cooking time (mins) Temperature
Lamb
Lamb loin chops 400-600 g 3-5 60-80 70
Leg of lamb
(boned) 2,000-2,500 g 10-12 200-250 70
Poultry
Chicken breast 400-600 g 3-4 50-60 70
Duck breast 400-600 g 4-5 70-80 70
EEB 6550.8
41
Page 17

Baking with cooking settings
Hot air
Preheating is not required – you can bake different things on different
levels at the same time.
Shelf levels:
1 tray: shelf level 2 from bottom
2 trays: shelf levels 1 and 4 from the bottom
When baking several fl at sponges or cakes in moulds the baking time is
extended by 5-10 minutes per tray.
Take out the trays individually, start with the more golden cakes fi rst.
Bake with hot air at 160° C when the recipe that you are following
does not give instructions for hot air.
NB: For cakes garnished with moist fruits, the level of humidity will be
particularly high. Bake only one cake at a time.
Top/bottom heat
Baking on one shelf
Preheating: -Select the heating mode «Hot air/Bottom heat»
Blackplate and aluminium baking moulds are particularly suitable for
this function.
Fan-forced hot air
No preheating required – bake on one shelf
Only for fl at cakes with dry garnish e.g. cake with a layer of sugar.
Pizza Mode
Bake on one shelf
for moist cakes
for pizza: preheat
for bread: preheat
or
Baking pizza
Select the baking setting
– When a pizza stone (special accessory) is used, the pizza crust will turn
out be extra crisp. Preheating time: 30 mins minimum!
.
If baking a small round pizza, put the tray in the oven to preheat too.
– Roll out the dough, place it on the oven tray and shape an edge.
– Cover the dough with the topping of your choice but do so quickly so
that the dough does not become too moist.
– Small pizzas: place the pizza bases on the preheated tray.
– Place the tray on shelf level 1 after the alarm sounds.
– After the door is closed, the 12-minute programme will start.
Baking the pizza on the stone
– Prepare the pizza dough as described above.
– Place the pizza stone on the grid shelf and put it on shelf level 1.
– Preheat the oven with heating mode
– Place the dough on the fl oured pizza shovel and quickly cover it with the
topping so that it does not become too moist. The topped pizza should
not be on the pizza shovel for too long as the dough may stick to it.
– Once the oven is preheated, push the pizza from the shovel onto the
stone.
– Bake for 8-12 mins without changing the settings.
at 250°C for 30 mins.
Instructions for the chart: Suggested baking
settings
The chart below features a selection of cakes and pastries with the
required temperatures, cooking times and shelf level for each case.
In most cases, the temperature range is specifi ed given that the
temperature depends largely on how the dough is made, the quantity
and the mould used.
We recommend that at the start you use the lower temperature and only
choose the higher temperature if necessary, e.g. if you require a more
intense golden colour or if the baking time is too long.
If you cannot fi nd instructions for a specifi c recipe, use instructions for
a similar cake or pastry.
Differences in the height of the food can result in differences in the
level of brownness. In such cases the temperature setting should not
be changed. Any difference in the brownness will even out during the
baking process.
Follow the instructions that come with the pizza stone.
Basic pizza recipe
250 g fl our, 20 g yeast, 125 ml warm water, 3 soup spoons of oil (olive),
salt.
Baking pizza on the oven tray
– Make leavened dough with the ingredients specifi ed.
– Leave the dough to stand until the volume has doubled (approximately
30 minutes).
– Knead the dough for a few minutes and leave to stand for a further 15
minutes.
– Start the oven setting
– Grease the oven tray.
, the oven will preheat.
42
EEB 6550.8
Page 18

Suggested baking settings
The values for the modes that should preferentially be used are highlighted.
Recommended
Cakes and pastries
Sponge cake recipe
Flat sponge cake in mould 1 150-160 1 170-180 50-65
Cake in mould 1 150-160 1 170-190 50-70
Fruit cake 1 150-160 1 160-180 60-70
Flat sponge cake 2 150-160 1 170-180 40-60
Sponge base 2 170-180 2 180-200 20-30
Fruit-garnished fl at sponge 2 150-160 1 170-180 2
Cupcakes 2 150 2 170-180 15-30
Large fl at sponge (oven tray)
Dry coating 2 150-160 2 180-190 2
Moist garnishing 2 160-170 1 170-180 2
Shortcrust pastry
Pie base 2 170-180 2 180-200 25-35
Baked cheesecake 1 140-150 1 160-170 2
Small pastries 2 140-150 2 180-190 15-35
Large fl at pies
Dry garnishing 2 150-160 2 180-190 2
Moist garnishing 2 160-170 1 170-180 2
baking setting
Height Setting Height
Hot air
Temperature in °C
Top/bottom heat
Height
Temperature in °C
Fan-forced hot air
Pizza Mode
Height
Temperature in °C
150-160 45-60
150-160 20-35
160-170 35-50
140-150 70-90
150-160 25-35
160-170 30-50
Cooking time
In mins
Leavened dough
Pie in mould 1 150-160 1 175-180 40-65
Brioche 2 150-160 2 175-180 40-50
Christmas loaf (preheat) 1 150-160 1 175-180 50-70
Small pastries 2 140-150 2 180-200 15-30
Large fl at pies
Dry garnishing 2 150-160 2 175-180 2
Moist garnishing 2 160-170 1 170-180 2
Sponge cake recipe
Flat sponge cake 2 150-1690 2 175-180 30-40
Swiss rolls 3 170-180 2 180-200 12-25
Meringue base recipes
Meringues 2 80-90 2 100-120 80-120
Cinnamon stars 2 100-120 2 120-140 20-40
Almond meringue biscuits 2 100-120 2 120-140 20-50
Other types of pastry
Pastry 2 170-180 2 190-210 15-30
Puff pastry 2 170-180 2 190-210 30-40
Cottage cheese pie 2 160-180 2 180-200 30-40
Choux pastry 2 170-180 2 190-210 30-40
Cottage cheese pie with oil 2 150-160 2 170-180 30-40
Honey pastry 2 140-150 2 170-180 20-35
150-160 30-40
160-170 30-50
Bread and Pizza
Sourdough bread
(preheat: 230°C,
preheat: 10 min at 230°C) 1 180 1 180 1
Leavened bread /
White bread (preheat) 1 180 1 200 1
Savoury bread rolls / German-style
pretzels (preheat: 230°C 3 200 3 220 15-20
Pizza (preheat: 250°C)
EEB 6550.8
1 250 8-12
180 70
180 30-60
43
Page 19

Grilling
2. Touch or to select the HI or LO defrosting levels. Touch .
Grill with the oven door closed only.
.
Select heating mode
Set the temperature to 250°C.
In the case of large cuts, it is better to select a temperature between
200 and 250°C so that the meat does not burn.
– Heating mode
– Preheat the oven for 5 mins.
– Put the food for grilling on the grid shelf.
– Place the tray on shelf level 1 or 2 counting from the bottom; place the
grid shelf on the shelf level specifi ed in the chart.
– Close the oven door.
.
Suggested grill settings
Grill
Type of meat
Pork chops 4 10-12 8-10
Belly pork 4 12-15 8-10
Pork fi llet 4 10-12 8-10
Filleted liver 5 5-6 4-5
Bratwurst 4 8-10 6-8
Meat skewer 3 9-11 7-8
Beef steak, rare 5 6-7 5-6
Beef steak, medium 5 7-9 6-7
Veal steak 4 8-10 7-8
Lamb chop 4 7-8 6-7
Height
Side 1.
In minutes
Side 2.
3. You will then hear 2 beeps confi rming your setting.
When defrosting, remember:
Food should be removed from its packaging and placed on the oven
tray or on a dish.
Defrost large cuts of meat or fi sh by placing them on the grid shelf with
a tray underneath to collect any liquid.
Meat and fi sh do not need to be completely thawed before cooking. It is
enough for the surface to be soft to enable it to be seasoned.
Food should always be cooked after defrosting.
Do not refreeze defrosted food.
Time chart for defrosting food.
See the following chart for defrosting times and temperature levels.
Food Type
Bread 1/2 kg 35 min
Cake 1/2 kg 25 min
Fish 1/2 kg 30 min
Fish 1 kg 40 min
Chicken 1 kg 75 min
Chicken 1.5 90 min
Steak 1/2 kg 40 min
Mincemeat 1/2 kg 60 min
Mincemeat 1 kg 120 min
The times shown in the chart are suggested. The time needed for
defrosting will depend on the ambient temperature, weight of the food
and how deeply frozen it is.
Weight
LO level
Temperature
Weight
HI level
Temperature
Making preserves
Chicken thighs 3 15-18 10-12
Half chicken 3 18-20 10-12
Fish fi llet 5 6-7 4-5
Trout 3 5-7 4-6
TToast 5 2-3 2-3
Open toasted sandwich 4 6-8
Defrosting
The defrost function works by means of a 2-level system of hot air. HI is
for meats in general and LO is for fi sh, cakes, pastries and bread.
1. When you select the
(follow the instructions in “Selecting
a conventional cooking function”), the
display will show:
44
function
Caution If using jars with twist-off® lids, do not use the same lid twice. This could lead to the jars smashing under certain circumstances
if used too often.
Suitable containers for preserves are clip top jars with a rubber
sealing ring or ordinary containers with twist-off® lid (with a new lid
only).
Metal tins are not suitable.
Do not spill water in the tray. Too much steam would suddenly escape
when the oven door is opened. Place a cup with water in the baking
tray, not in the bottom of the oven.
EEB 6550.8
Page 20

.
Select Pizza Mode
Only use fresh produce and prepare according to the usual recipes.
Make no more than 6 jars holding 1 litre each.
Use the same size jars. Fill them to ¾ their capacity with the same
content.
Do not let the jars touch each other.
Cleaning and care
Please read this chapter before using the appliance for the fi rst time.
If it is cleaned as it should be and regularly cared for, the oven should
stay beautiful and as good as new for many years. Here is a series
of instructions that allow you to care for and clean all of the surfaces
thoroughly, without damaging them.
– Place the baking tray on shelf level 1 counting from the bottom.
– Put a cup fi lled with water in the baking tray.
– Set to Pizza mode
After 10 to 20 minutes, the liquid in the fi rst jars begins to pearl,
normally fi rst of all in the front right jar.
Fruit
– Next, turn off the oven and leave the jars to stand for 30 mins. (approx.
15 mins with delicate fruit such as strawberries) inside the closed oven.
Vegetables and meat
– When the liquid pearls, reduce to 100° C and continue to cook for 30 to
60 mins.
– Next, turn off the oven and leave the jars to stand for 30 mins.
at 160° C and observe the preserving process.
Child safety lock
The child safety lock protects the oven against settings being changed
accidentally, and offers additional protection for small children.
When the child safety lock is active, it is only possible to turn the oven
off. It is not possible to change the settings or to turn on the oven.
For all surfaces
Do not use steam and/or pressure cleaning devices on the oven. The
appliance could become damaged and may create a situation where
there is danger of death.
Danger of burning Leave the appliance to cool until you can touch it
with your hand before cleaning it.
Follow the instructions for all cleaning products.
Clean the appliance after each use. Stains or baked-on food that have not
been removed may burn the next time the appliance heats up. Often, these
types of stains or dirt cannot be removed without leaving marks.
If there are light stains, clean the surfaces with a cloth, brush or soft
sponge and hot water and some dishwashing detergent. Rinse with cold
water so that there is no detergent left which might decolour the surface
or cause more stains. Dry with a cloth immediately after.
Here are some instructions for more diffi cult-to-remove stains concerning the different surfaces and elements.
VSR 0-FIX-C is ideal for cleaning glass-ceramic, enamel and the surface of the inside of the door. This cleaning powder can be purchased
from the KÜPPERBUSCH after-sales service.
Turning the child safety lock on / off
Turning the child safety lock on:
First turn on the oven by touching , if it is off.
Next, touch
and at the same time.
You will hear 1 prolonged beep and see
is locked.
If the glass fronted panel is touched at any time,
indicating the oven is locked.
Turning the child safety lock off:
Touch and at the same time.
You will hear 1 prolonged beep. The oven is unlocked.
on the display. The oven
will be displayed,
Never clean with:
– aggressive products or bleaches that contain active oxygen, chlorine or
other corrosive ingredients.
– cleaning products that can cause scratches, such as abrasive agents,
steel wool, soapy steel wool, hard brushes, metal scourers, plastic
sponges or sponges with a surface that scratches (scouring side).
Removing baked-on dirt
Baked-on dirt has to be softened fi rst of all. The best way is by using a
damp cloth. The dirt can then be removed more easily.
Using a scraper to clean
Careful! Danger of cutting! The scraper blades are very sharp.
Always use the scraper at a low angle to the surface and for pushing the
baked-on dirt.
EEB 6550.8
45
Page 21

Do not scratch with the corners
of the scraper and be careful not
to damage the gaskets with the
scraper.
Using an oven spray - instructions
Always read the manufacturer’s instructions.
Oven spray can damage aluminium, varnished and plastic surfaces.
Do not spray the fan opening on the back wall. The ökotherm®
catalyst will be destroyed if it comes into contact with oven spray
cleaner.
For environmental reasons, oven sprays should be avoided. However, if
you still wish to continue using one, only use it on the inside of the oven
and the enamelled oven trays.
Chrome features
Door glass
Inside of the door-glass fi nishing
Avoid using oven spray because regularly use may destroy the glass
fi nish.
A scraper is suitable for removing stubborn dirt.
For a thorough clean we recommend VSR 0-FIX-C or window cleaner.
Door front, control panel
Clean the front of the oven only with hot water and some dishwashing
detergent. Use a cloth or soft sponge. You can use window cleaner.
Door gasket
Remove the door gasket before cleaning so that dirt cannot accumulate beneath it. See ‘Changing the door gasket’.
If necessary, you can clean it with dishwashing detergent or in the dishwasher.
Front and handle of door with black chrome features.
Immediately remove traces of lime, grease and egg white. Stains will
form if they are not removed.
This fi nish is especially prone to scratches and is damaged by oven
sprays. Do not clean with a scraper, scourer or hard fi bre sponge.
Only clean with hot water and dishwashing detergent and use a soft
cloth or sponge.
Stainless steel
Stainless steel door front, control panel
Stainless steel is particularly prone to scratches. Do not clean with a
scraper.
Immediately remove traces of lime, grease and egg white. Stains will
form if they are not removed.
We recommend that you treat stainless steel surfaces with a suitable
product once a week. Such products protect the stainless steel against
decolouring by forming a protective fi lm.
Enamel
Oven door assembly and disassembly
Model EEB6550.8
Removing the oven door.
– Open the oven door fully.
– Fold down the supports on the door
hinges.
– Hold the oven door with both hands and almost fully
close it.
– Slightly lift the door and remove hinges from the
slots by pulling them forward.
Oven cavity, front, trays
You may use some plastic sponges that have a scourer side. However,
some products have a grainy texture in the scourer side that causes
scratches. You should try it out in a spot where any scratches will not be
noticed.
A scraper is suitable for removing stubborn dirt.
For a thorough clean we recommend VSR 0-FIX-C. Oven spray can be
used on this surface.
46
EEB 6550.8
Page 22

Attaching the oven door.
– Hold the oven door with both hands and insert the hinges in the corres-
ponding slots. The hinge should fi t snugly.
– Slowly open the door fully.
– Again lower the supports on the door
hinges.
– Close the oven door.
Shelf runner assembly and disassembly
Removing the shelf runners
– Remove the shelf runners by loosening them from the chrome nuts that
are located on the sides of the oven.
– Remove the shelf runner.
Assembling the shelf runners
– Position the shelf runners and attach the nuts.
Model EEBK6550.8
Removing the oven door.
– Open the oven door fully.
– Insert the safety pins in the door hinge
slots.
– Hold the oven door with both hands and almost fully
close it.
– Slightly lift the door and remove hinges from the slots by pulling them
forward.
Caution. Danger of injury. Do not remove
the safety pins from the holes. The hinge is
tightened. The hinge must be tightened when
assembling. After removing the pins it is
impossible to tighten and secure the hinge.
Attaching the oven door.
– Hold the oven door with both hands and insert the hinges in the
corresponding slots. The hinge should fi t snugly.
Folding down / away the heating element
Fold down the heating element (Top heat /Grill)
– Open the lock and fold down the
heater element.
Fold away the heating element.
– Fold away the heating element and
close it again with the lock.
Regeneration of the ökotherm®
catalyst
The ökotherm® catalyst dissolves the grease particles and smells
produced when roasting with the Hot Air cooking setting. This process is
suffi cient with the normal use of the Hot Air setting. In special cases
(well-cooked roasts in large quantities) it is possible that small grease
particles will be deposited on the catalyst. When you use the oven again
e.g. when cooking a pizza, they will be gradually dissolved.
– Slowly open the door fully.
EEB 6550.8
If you believe that the catalyst is not cleaning as well as it should
(it smells a lot) you can regenerate it by eliminating the remains of
accumulated grease.
Regeneration of the ökotherm® catalyst
– Select the Hot Air service function.
– Set the thermostat to 200° C and
– heat the empty oven for 60 mins.
47
Page 23

Assistance in the event
Maintenance
of malfunction
Repairs must only be carried out by an authorised professional.
You may be able to solve some malfunctions yourself. First check if there
has been a problem with the way it is being used. Repairs during the
guarantee period are not exempt from costs in the case of an error in
the way it is being used or if you have not noticed one of the following
situations.
What to do if…
... the sensors or lights do not work.
Check: Is the socket plugged in? Is the fuse in good condition? Has there
been a power failure? Is the child safety lock on?
... one or several sensors do not react to contact but it is possible to
connect the lighting.
Possible cause: The sensors continuously adapt their sensitivity to
ambient conditions. In unfavourable circumstances e.g. if someone leans
on them for a long period of time, it may take several minutes until the
sensors react again.
Wait approximately 15 seconds or disconnect and reconnect the fuse.
Repeat the procedure again if necessary.
Changing the oven light
Caution The halogen lamps become very hot when they are on for a
long period of time. Only change the lamps when they are cold.
Caution, danger of electric shock Before opening the cover of the
oven lamp you must disconnect the appliance from the electrical
supply. Disconnect or unscrew the fuse, or unplug from the power
source.
Only replace the halogen lamps with the same type. New halogen
lamps can be purchased from the Küppersbusch After-Sales Service.
Do not touch the halogen lamps with your bare hands. Fingerprints
will burn on the surface of the glass and reduce both the luminosity
and its useful life.
When the glass cover does not immediately loosen (for example,
because of the dirt after prolonged use), levering it out, may cause
the glass to crack. If this happens, hold a cloth on the glass cover so
as to catch the glass.
Changing the halogen lamp
– Remove the shelf runners.
The keys will then be reset and will react again on contact.
... one or several sensors do not react after the fuse has been disconnected and then reconnected.
Possible cause: Faulty sensor key or element.
After disconnecting and reconnecting the fuse twice, disconnect the fuse
again and inform the after-sales service.
... The glass in the door is broken.
Switch off the oven and ask the after-sales service to change the door.
... The door gasket is damaged.
Replace the door gasket. See ‘Change the door gasket’.
Do not use the oven if the door gasket is damaged.
... the oven light is not working
The oven can still be used. Change the halogen lamp as soon as possible
– make sure the oven is off and cold. See ‘Changing the oven light’.
…there is a strong smell.
Regenerate the ökotherm® catalyst. See ‘Regeneration of the ökotherm®
catalyst’.
there is a strong smell of vinegar while cooking.
– Remove the glass cover carefully by
levering it with a screwdriver.
– Remove the halogen lamp from the
interior.
– Insert the new halogen lamp using a cloth or paper towel.
– Replace the glass cover by pressing until it locks in.
– Reassemble the shelf runners.
You will notice a vinegary smell when preparing dishes containing alcohol
or yeast on hot air settings. If the smell is unpleasant, use a setting that
does not include the fan, such as top/bottom heat.
... there are fruit juice or egg white stains on enamelled parts.
This is a minor change in the enamel that cannot be turned to its original
state.
48
EEB 6550.8
Page 24

Changing the door gasket
Assembly and installation must be carried out with complete protection
to prevent accidental contact.
Do not use the oven without a gasket or with a damaged one.
If the gasket is damaged or can no longer be cleaned, it must be changed.
A new gasket can be purchased from the KÜPPERSBUSCH After-Sales
Service.
Removing the gasket
– To remove the gasket you must
carefully pull it outwards at each of the
corners.
Positioning the new gasket
– Attach one corner after the other to the front of the oven.
Be careful to not bend the clasps.
Technical information
If you need to contact the after-sales service or order spare parts, you
must provide the technical information supplied.
The oven’s technical information is on
the right, on the side frame. You can see
it when the door is open.
The appliance is ready to be plugged in and can only be connected to a
socket with an earth connection installed in accordance with the pertinent regulations. Changing a socket or a connection line must only be
carried out by a specialised electrician in accordance with the pertinent
regulations.
If the socket cannot be accessed after the assembly, then an omni-
polar separation device with a minimum 3mm contact distance must be
installed to meet the pertinent security regulations.
The socket of the appliance must be within the assembly space.
The unit where the oven is installed must be resistant to a temperature
of 90°C. This is especially relevant for plywood, sealed, plastic, glued
and varnished surfaces. The front of adjoining units must withstand a
temperature of at least 70°C.
The appliance must be assembled horizontally on a fl at and stable
surface. The surface must not be folding.
If the unit is not secured to the wall it must be screwed to a common
corner unit.
Electricity
The appliance must be connected to a socket connected to the power grid.
Model EEB6550.8
Total power: at 230 V: 3.6 Kw
at 235 V: 3.7 Kw
– For possible after-sales inquiries, make a note of the following
information:
Oven serial number
Oven model number
Assembly instructions
for technical personnel
Only KÜPPERSBUSCH hobs have been manufactured and tested for use
over a KÜPPERSBUSCH oven. Do not use other hobs.
All current legal requirements must be met as well as the standard
connection terms of the electricity supplier.
Turn off the power when connecting, repairing and changing the oven
bulb. Disconnect the fuse and unplug from the power source.
Voltage: 230-240 V, 50 Hz
Fuse: 16 A
Modelo EEBK6550.8
Total power: at 230 V: 3.2 Kw
Voltage: 220-240 V, 50 Hz
Fuse: 16 A
Measurements for assembly
Model EEB6550.8
EEB 6550.8
49
Page 25

Model EEBK6550.8
Assembly in kitchen unit
Assembly of oven in kitchen unit
– Insert the plug into the socket.
– Fully insert the oven into the cupboard unit. Take care not to trap the
cable of the appliance.
Securing the oven to the kitchen unit
– Open the oven door. With the screws provided secure the appliance to
the unit inclining the screws from the inside to outside.
50
EEB 6550.8
Page 26

KÜPPERSBUSCH HAUSGERÄTE AG
Postfach 10 01 32, D-45801 Gelsenkirchen, Küppersbuschstr. 16, D-45883 Gelsenkirchen
Telefon: (02 09) 4 01-0, Telefax: (02 09) 4 01-3 03
www.kueppersbusch.de
Küppersbusch Ges.m.b.H.
Eitnergasse 13, 1231 Wien, Telefon: 01 / 8 66 80-0, Telefax: 01 / 8 66 80 72
www.kueppersbusch.at · e-Mail: verkauf@kueppersbusch.at
 Loading...