

Page 1
Datenblatt
Feature List
Feuille de Caractéristiques
Snelle handleiding
EEB 6260.0
EEH 6260.0
EEBK 6260.0
Page 2
8
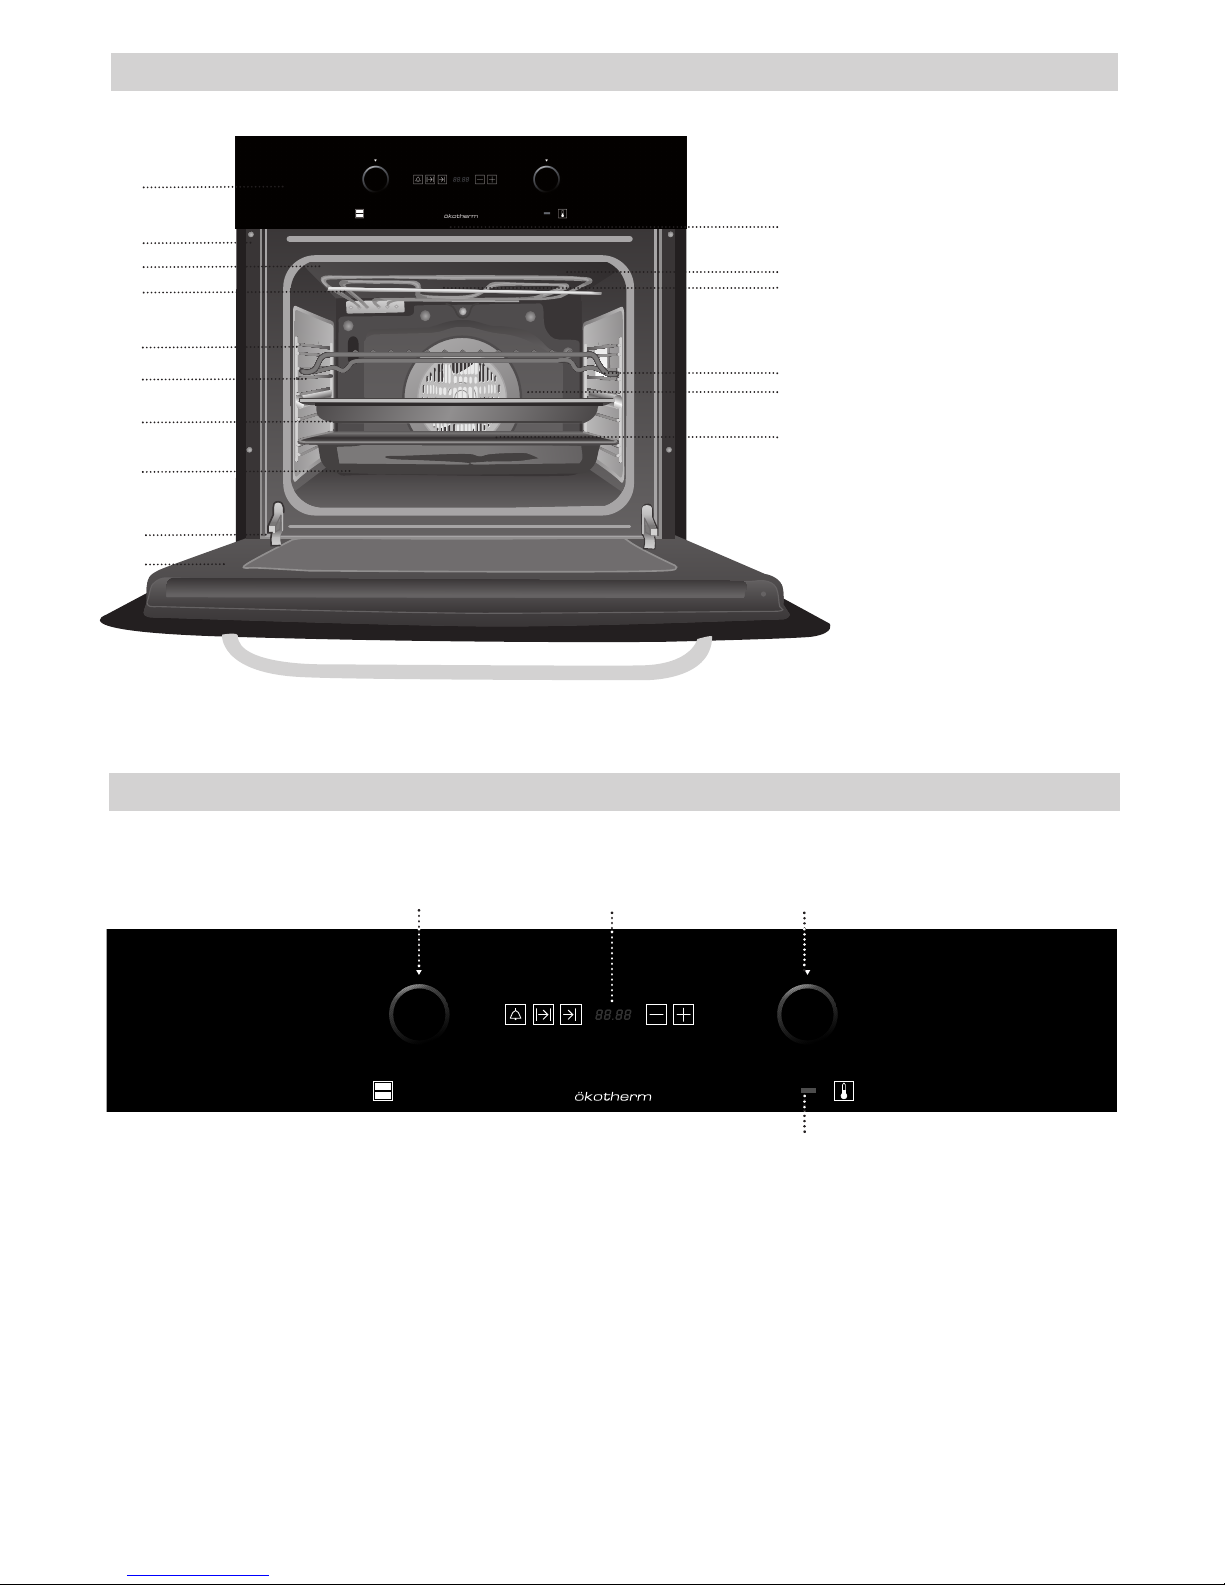
CONTROL PANEL
1 Function selector.
2 Electronic clock.
3 Temperature selector.
4 Heating-up indicator.
EEB 6260.0
1 Control Panel
2 Fixing to Unit
3 Oven Seal
4 Grill element
5 Chrome Support +
Telescopic Guide
6 Grid
7 Cake Tray
8 Roasting Tray
9 Hinge
10 Door
11 Air cooling outlet
12 Grill Screen
13 Smoke Outlet
14 Light
15 Rear Panel
16 Fan
3
2
4
6
7
8
9
10
5
11
12
14
13
14
16
1
1
2 3
Models EEB 6260.0/EEBK 6260.0
4
Page 3
9
ENGLISH
0 Switch off oven
Lighting
Conventional
It is used for sponges and cakes where the heat
received must be uniform to achieve a spongy
texture.
Grill
For preparing dishes with superficial roasting. It
allows the outer layer to be browned without
affecting the inside of the food. Ideal for flat
food, such as steaks, ribs, fish, toast.
MaxiGrill
Allows greater surfaces to be prepared, than
with the grill, together with higher power reducing the time required for browning of the food.
Intensive hot air convention
Baking large flat cakes with a dry topping (such
as a crumble topping), intensive roasting of large
joints and large poultry such as goose or turkey.
Caution
While using the Grill or MaxiGrill, the door must
be kept closed.
Turbo
The fan distributes the heat coming from an element located at the back of the oven. As a result
of the evenly distributed temperature, food can
be cooked on two levels at the same time.
Without temperature setting, for gently defrosting and cooling food..
Lower Element with Turbo
Ideal for baking pizzas, pies, and fruit tarts or
sponges.
Lower element
Heats only from beneath. Suitable for heating
dishes and raising pastry and similar.
Top heat
For when you need to heat food gently. Plate
warming.
Oven Functions
6
2
6 1
6 6
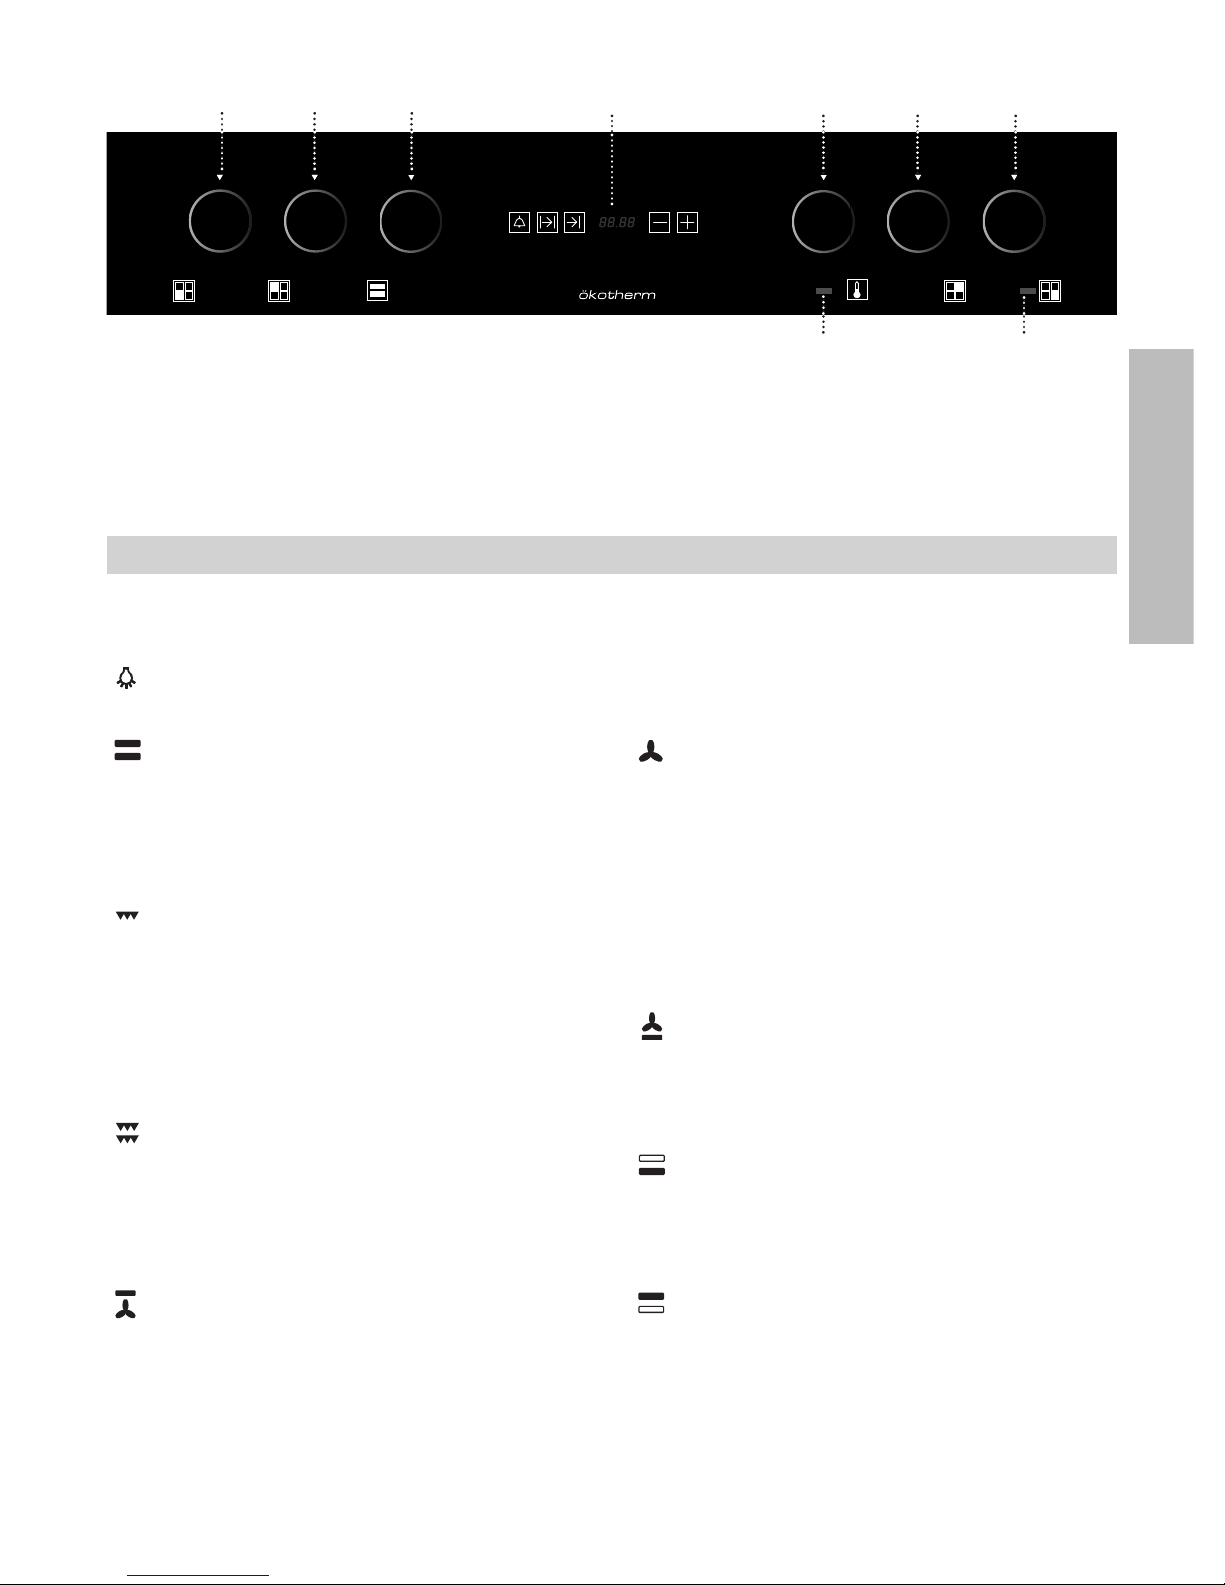
Model EEH 6260.0
3
4 5
1 Function selector.
2 Electronic clock.
3 Temperature selector.
4 Heating-up indicator.
5 Pilot light cooking zone.
6 Cooking zone controls.
Page 4

10
Note
The electronic clock features Touch-Control
technology. To operate, simply touch the glass
control symbols with your fingertip.
The touch control sensitivity continuously
adapts to changing conditions. Ensure that the
glass front control surface is clean and free of
any obstacles when turning on the oven.
If the clock does not respond correctly when you
touch the glass control, it will be necessary to
turn off the oven for a few seconds and then
turn it back on. By doing this, the sensors adjust
automatically and will react once more to fingertip control.
Setting the Electronic Clock
When you connect the oven, you will notice that
12:00 will flash and the symbols and
light up. Set the clock by touching the or
symbols on the glass. You will hear 2 beeps confirming the time has been set.
To change the time, touch the and
symbols together until the indicated time
flashes on the display. Adjust the time with the
or symbols.
The two beeps you hear after that will confirm
the new time has been set.
Manual Operation
After setting the clock, the oven is ready for use.
Select a cooking temperature and function by
pressing and turning the oven controls.
To turn off the oven, set the controls to 0. Push
down on the controls to conceal them.
Electronic Clock functions
Timer Alarm: An audible signal is produced at
the programmed time, even if the oven is not
being used.
Cooking Time: This function allows you to programme cooking time length, after which the
oven will turn off automatically.
Cooking Stop Time: This function allows you to
programme the time for cooking to stop, after
which the oven will turn off automatically.
Cooking Time and Cooking Stop Time: This
function allows both cooking time length and
the stop time to be programmed. The oven turns
on automatically at the set time and operates
for the cooking time it has been programmed
for. It turns off automatically at the programmed
stop time.
Child Safety Function. This function locks the
oven, preventing small children from playing
with it.
Programming the Timer Alert
1 Touch the symbol on the glass surface. It
will begin to flash. 0:00 will appear on the display and the and will light up.
2 Set the alarm time by touching the or
symbols.
3 2 beeps will then be heard. The symbol
will flash and the display will show the time
left before the alert sounds.
4 An alarm will sound at the end of the pro-
grammed time.
5 Touch any symbol to stop the alarm. The
symbol will turn off.
Use of the Oven
Page 5

ENGLISH
11
You can change the timer at any time by touching the symbol and later the and
symbols. They will then light up. The two beeps
you hear after that will confirm the new time has
been set.
Programming Cooking Time
1 Touch the symbol on the glass surface. It
will begin to flash. 0:00 will appear on the display and the and will light up.
2 Touch the or symbols to programme
the cooking time.
3 2 beeps will then be heard. The symbol
will flash and the display will show the time
left before the oven switches off automatically.
4 Select a cooking function and temperature.
5 When the set cooking time is over, the oven
will turn off and an alarm will sound.
6 Touch any symbol to stop the signal. The
oven will turn on again.
7 Set the controls to 0 to turn off the oven.
You can change the timer at any time by touching the symbol and later the and
symbols. They will then light up. The two beeps
you hear after that will confirm the new time has
been set.
Programming the Cooking Stop Time
1 Touch the symbol of the glass surface. It
will begin to flash. The current time will appear on the display and the and will light
up.
2 Touch the or symbols to programme
the cooking stop time.
3 The alarm will be confirmed by two beeps and
the display will show the current time, while
the symbol will remain lit to indicate that
the oven will switch itself automatically.
4 Select a cooking function and temperature.
5 Once it is the set time, the oven will turn off,
an audible signal will sound and the
symbol will flash.
6 Touch any symbol to stop the signal. The oven
will turn on again.
7 Set the controls to 0 to turn off the oven.
You can see the set cooking stop time by touching the symbol. You can then also change
the timer setting by using the and
symbols, which will light up. The two beeps you
hear after that will confirm the new time has
been set.
You can use this function even if you are cooking with the oven. If this is the case, follow all
of the above instructions except No. 4.
Programming Cooking Time and Cooking
Stop Time
1 Touch the symbol on the glass surface.
It will begin to flash. 0:00 will appear on the
display and the and will light up.
2 Touch the or symbols to programme
the cooking time.
3 2 beeps will then be heard. The symbol
will flash and the display will show the time
left before the oven switches off automatically.
4 Touch the symbol of the glass surface. It
will begin to flash. The current time will
appear on the display and the and
will light up.
Page 6
12
5 Touch the or symbols to programme
the cooking stop time.
6 This will be confirmed by two beeps. The
current time will show on the display and the
symbol will light up.
7 Select a cooking function and tempera ture.
8 The oven will remain off with the and
symbols lit up. The oven is programmed.
9 When it is time to start cooking, the oven will
switch on and will operate for the programmed cooking time. The symbol will flash.
10. At the set stop time the oven will switch off,
an alarm will sound and the and
symbols will flash.
11. Touch any symbol to stop the signal. The
oven will turn on again.
12. Set the controls to 0 to turn off the oven.
You can change the timer setting while cooking.
First touch the or symbols. Then touch
the or to change the set time.
Child Safety Function
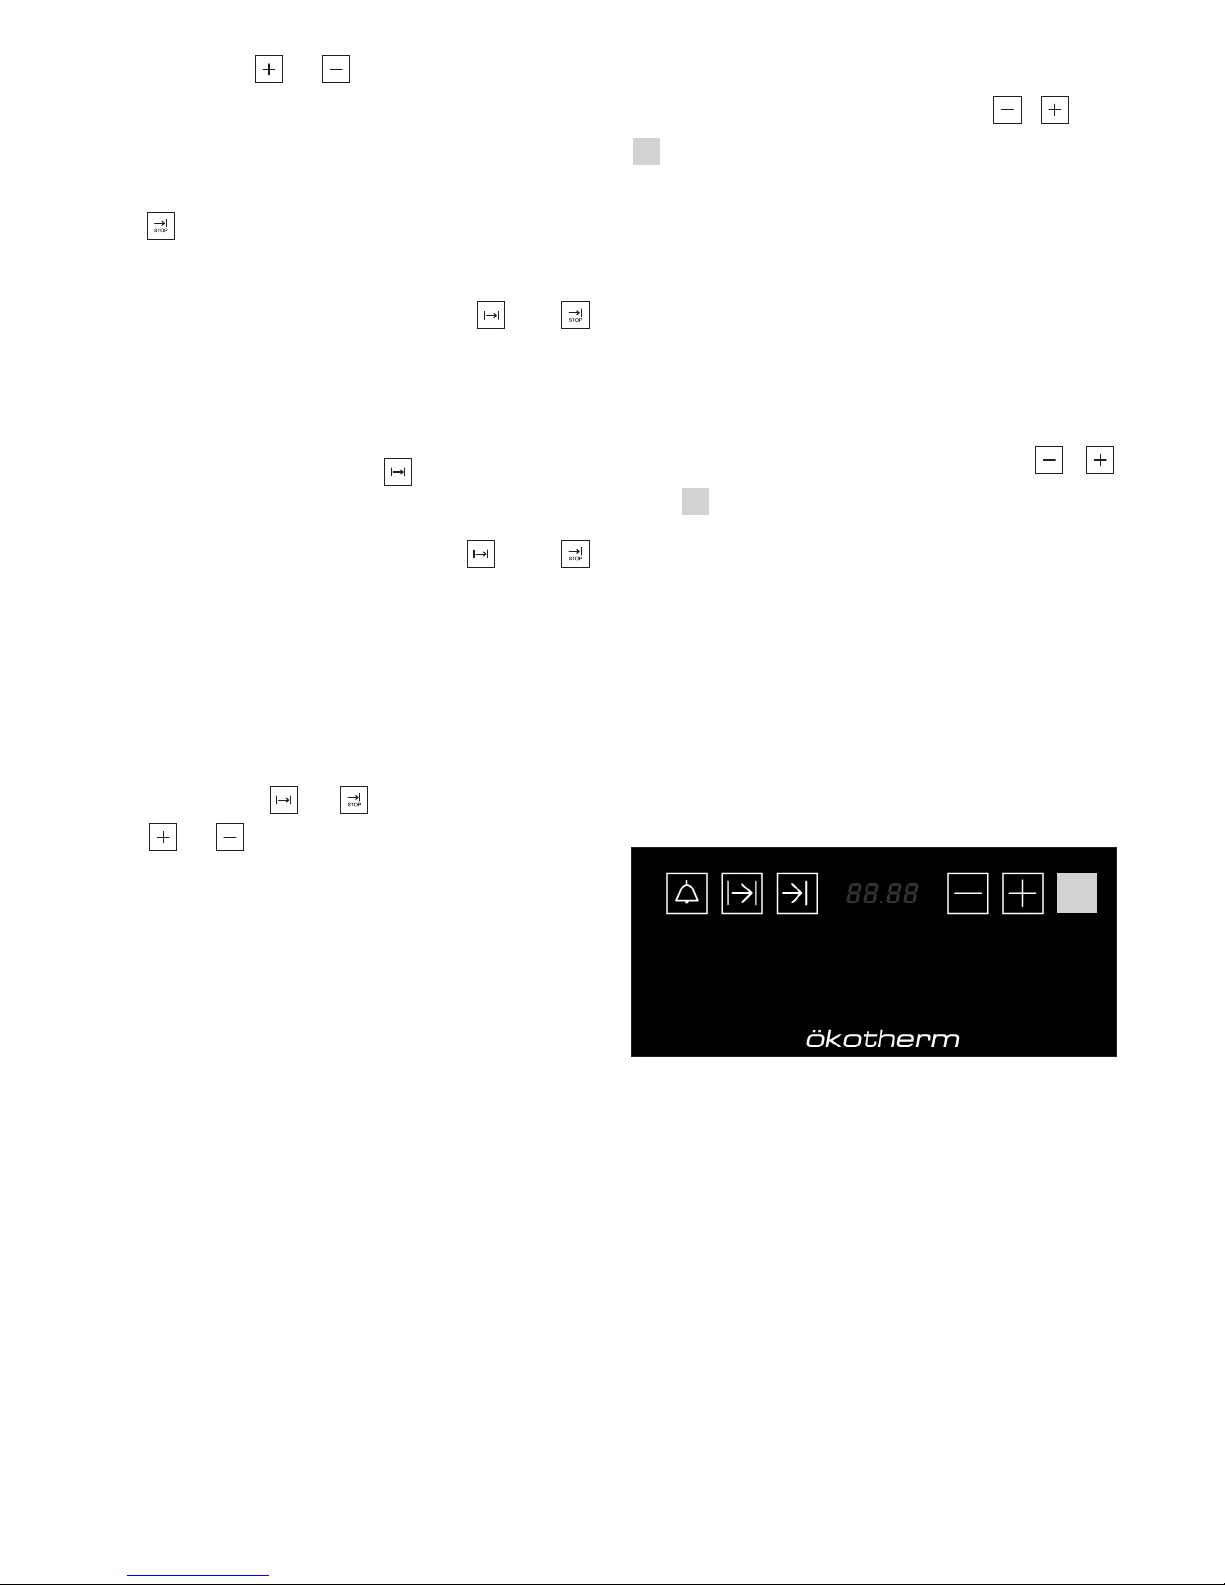
To activate this function, touch the , and
(Key invisible) symbols simultaneously. You
will hear one long beep and see a lit dot moving
on the clock display. The clock is locked.
Activating the child safety function with the oven
off (with control settings on 0) will stop the oven
from being turned on. If the safety feature is activated with any cooking function in operation, it
will only lock the electronic clock settings.
To deactivate the function, touch the ,
and (Key invisible) symbols simultaneously.
You will hear one long beep.
Caution
In the event of an electrical short circuit, all the
electronic clock programmed settings will be
cancelled and a 12:00 reading will flash on the
display. Reset the clock and programme.
Page 7

Energieeffizienzklasse auf
einer Skala
von A
(niedriger
Verbrauch)
bis G (hoher
Verbrauch).
Beheizung.
Konventionelle
Beheizung.
Umluft /
Hei
ßluft.
Energieverbrauch.
Konventionelle
Beheizung.
Umluft /
Heißluft.
Netto-volumen
(liter).
Typ:
Klein
Mittel
Groß
Kochzeit bei
Standardbeladung.
Konventionelle
Beheizung.
Umluft /
Heißluft.
Backfläche
Geräusch (dB
(A) re 1 pW).
Energy
efficiency
class on a
scale of A (more
efficient) to G
(less
efficient).
Heating
function.
Conventional.
Forced air
convection.
Energy
consumption.
Conventional.
Forced air
convection.
Usable volume
(litres).
Size:
Small
Medium
Large
Time to cook
standard load.
Conventional.
Forced air
convection.
Baking area.
Noise (dB (A) re
1 pW).
Classement
selon son
efficacité
énergétique sur
une
échelle
allant de A
(économe) à G
(peu économe).
Fonction
chauffage.
Classique.
Convection
forcée.
Consommation
d´énergie.
Classique.
Convection
forcée.
Volume utile
(litres).
Type:
Faible volume
Volume moyen
Grand volume
Temps de
cuisson en
charge normale.
Classique.
Convection
forcée.
Surface de cuisson.
Bruit (dB (A) re
1 pW).
Klasse van
energieefficiëntie, op
een schaal van
A (meest
efficiënt) tot G
(minst
efficiënt).
Verwarmingsfunctie.
Verwarmingsfunctie.
Geforceerde
convectie.
Energieverbruik
Conventionele
verwarming.
Geforceerde
convectie.
Nettovolume
(liter).
Type:
Klein
Middelgroot
Groot
Baktijd bij
normale lading.
Conventionele
verwarming.
Geforceerde
convectie.
Bakoppervlak
Geluid (db (A)
re 1 pW).
A
0,88
Kwh
0,79
Kwh
53
46 min.
47 min.
1300 cm
2
DATENBLATT / FICHA / FICHA / SPECIFICATIONS
Hersteller Manufacturer Fabricant Fabrikant
KÜPPERSBUSCH
Modell Model Modèle Model
Unser Beitrag zum Umweltschutz: wir verwenden umweltfreundliches Papier.
Our contribution to enviromental protection: we use recycled paper.
Notre contribution à la protection de l’environnement : nous utilisons du papier recyclé.
Onze bijdrage aan de milieubescherming: wij gebruiken kringlooppapier.
Cod.: 83172672/3172652-000
EEB 6260.0
EEH 6260.0
EEBK 6260.0
 Loading...