

Page 1
User instructions
Clock Thermostat
SR 310/3
1.0 Specified Use
Application:
The clock thermostat is designed for temperature control of residential and business
areas, but not for areas with severe dirt generation (assembly bays). For example
during office hours heating is controlled at normal temperature and at the end of
office hours at a reduced temperature (energy saving program). The beginning and
end of the normal and energy saving temperature can be freely programmed.
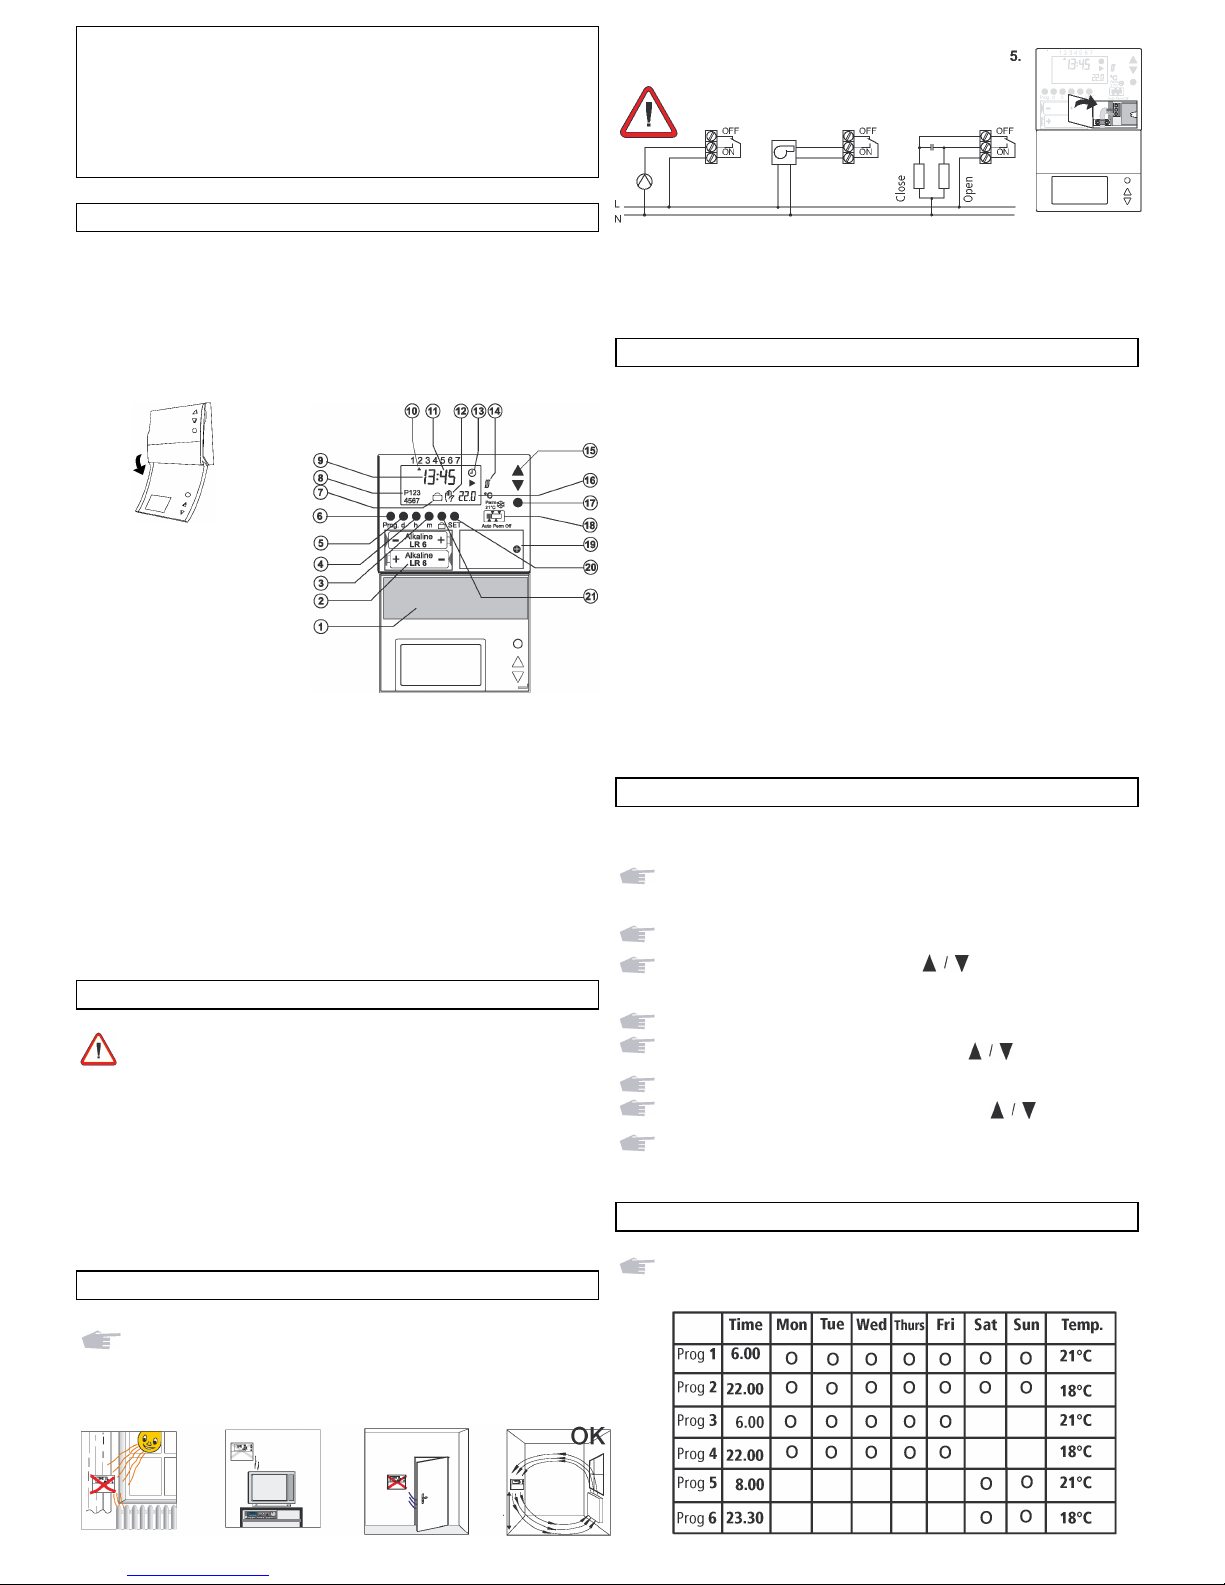
1 Type label
2 Battery compartment
3 Setting minutes
4 Setting hours
5 Setting weekday
6 Interrogate/change program
7 Symbol holiday program active
8 Display basic program P1 .. P6 active
9 Display of actual time (hour)
10 Display of actual weekday
11 Display of actual time (minute)
12 Display manual temperature change
13 Display automatic operation
14 Display heating is ON
15 Adjustment keys
16 Temperature display
17 Economy key ECO
18 Program selection switch
19 Compartment for electrical connection
20 Setting wall levelling, control accuracy, cycle times
21 Activating holiday program
2.0 Safety
Make sure when installing and dismantling the clock thermostat that the
electrical supply is switched off. The product may not be installed on a
conductive background.
The connection and installation of electrical products may be effected only
by a qualified electrician. If clock thermostats are used in a system with
other products, care must be taken to ensure that the whole system does not
cause radio interference. National regulations and prevailing safety instruc-
tions are to be observed. Interference with and changes to the product will
result in the loss of the guarantee.
3.0 Installation
• Fix the back-plate to the wall approx. 1,5 m above the floor, if possible
on an interior wall, around which air can circulate without hindrance.
• Connect the back-plate according to the corresponding connection
diagram.
4.0 Loading/changing battery (alkaline type LR 6)
Loading battery: 1. Open the front cover of the clock thermostat.
2. Note the polarity and insert new batteries of the same type.
3. Close the front cover of the clock thermostat.
Recommendation: Check the batteries from time to time, leaking batteries
damage your product.
Changing
batteries: The program is retained without batteries for a few minutes.
1. Remove the used batteries.
2. Dispose of the used batteries in an enviromentally
friendly way.
3. Use only new alkaline LR6 cells of the same type.
Behaviour with run-down batteries:
The display flashes at this point for a few days. Then the clock stops.
The relay condition is ON. The heating is permanent ON.
5.0 First time of use
Remove the insulating tape from the battery case.
Press the key RES. for approx 1 sec.
Set actual weekday:
Hold the key d firmly.
Set the actual weekday with the keys
.
Set actual time:
Hold the key h firmly.
Set the hour of the actual time with the keys
.
Hold the key m firmly.
Set the minutes of the actual time with the keys
.
Release the keys.
6.0 Interrogate basic program
Press the key Prog repeatedly.
The 6 selectable basic programs will be displayed one after another.
e.g.: Control via
circulation pump,
warm air and storage
heatin
g
Control via the
oil-/ gas
furnance relay
The connecting leads
must conform to
national regulations
Page 2
7.0 Select basic program
If necessary, press Prog key repeatedly, until the desired basic program
P1 .. P6 is displayed.
Note: If programs P1 and P2 are mixed with programs P5 and P6, time overlapping
can occur.
If the switching times of P1/P2 and P5/P6 are not changed, the daily times of P1/P2
are effective, even on Saturday and Sunday, see table.
Activating program:
Press SET key. Display e.g. P1 is static.
Not activating program:
Press SET key. Display e.g. P1 flashes.
Store by pressing the Prog key.
Press Prog key until SET appears in the clock display.
Now press SET key in order to store the program.
8.0 Change basic program
If necessary, press Prog key repeatedly, until the desired basic program
P1 .. P6 ist displayed.
Change days:
For the setting period hold the key d firmly.
Change the weekdays with the keys
(see table).
Change heating-/set-back time:
For the setting period hold the key h or m firmly.
Select the desired heating time with the keys
.
Change temperature:
Change the temperature with the keys
.
Store with Prog key.
Press Prog key until SET appears in the clock display.
Now press the SET key in order to store the program.
Info: You can activate a maximum of all 6 basic programms.
9.0 Manual temperature change in automatic operation
Operation:
In automatic mode, an individual temperature change can be set between 5 °C ..
39 °C. This setting is active until the next heating time P1 .. P6. After that the
product is controlled according to the time and temperature specification.
Change the temperature setting:
Set the desired temperature with the keys
.
Afterwards release the key.
10.0 ECO program
Operation:
For a period between 1 hour (ECO 1) and 8 hours (ECO 8), a fixed set temperature
of 16° C can be selected. The residual
ECO
time is displayed. If the ECO program
has expired, the product controls again in accordance with the programmed time
and temperature specification.
Setting in the automatic mode:
Press repeatedly the ECO key to set the desired program (ECO 1 ... ECO 8).
E.g. ECO 6 = 6 hours set-back to 16 °C.
Terminate ECO program:
Hold the ECO key firmly for approx. 2 secs.
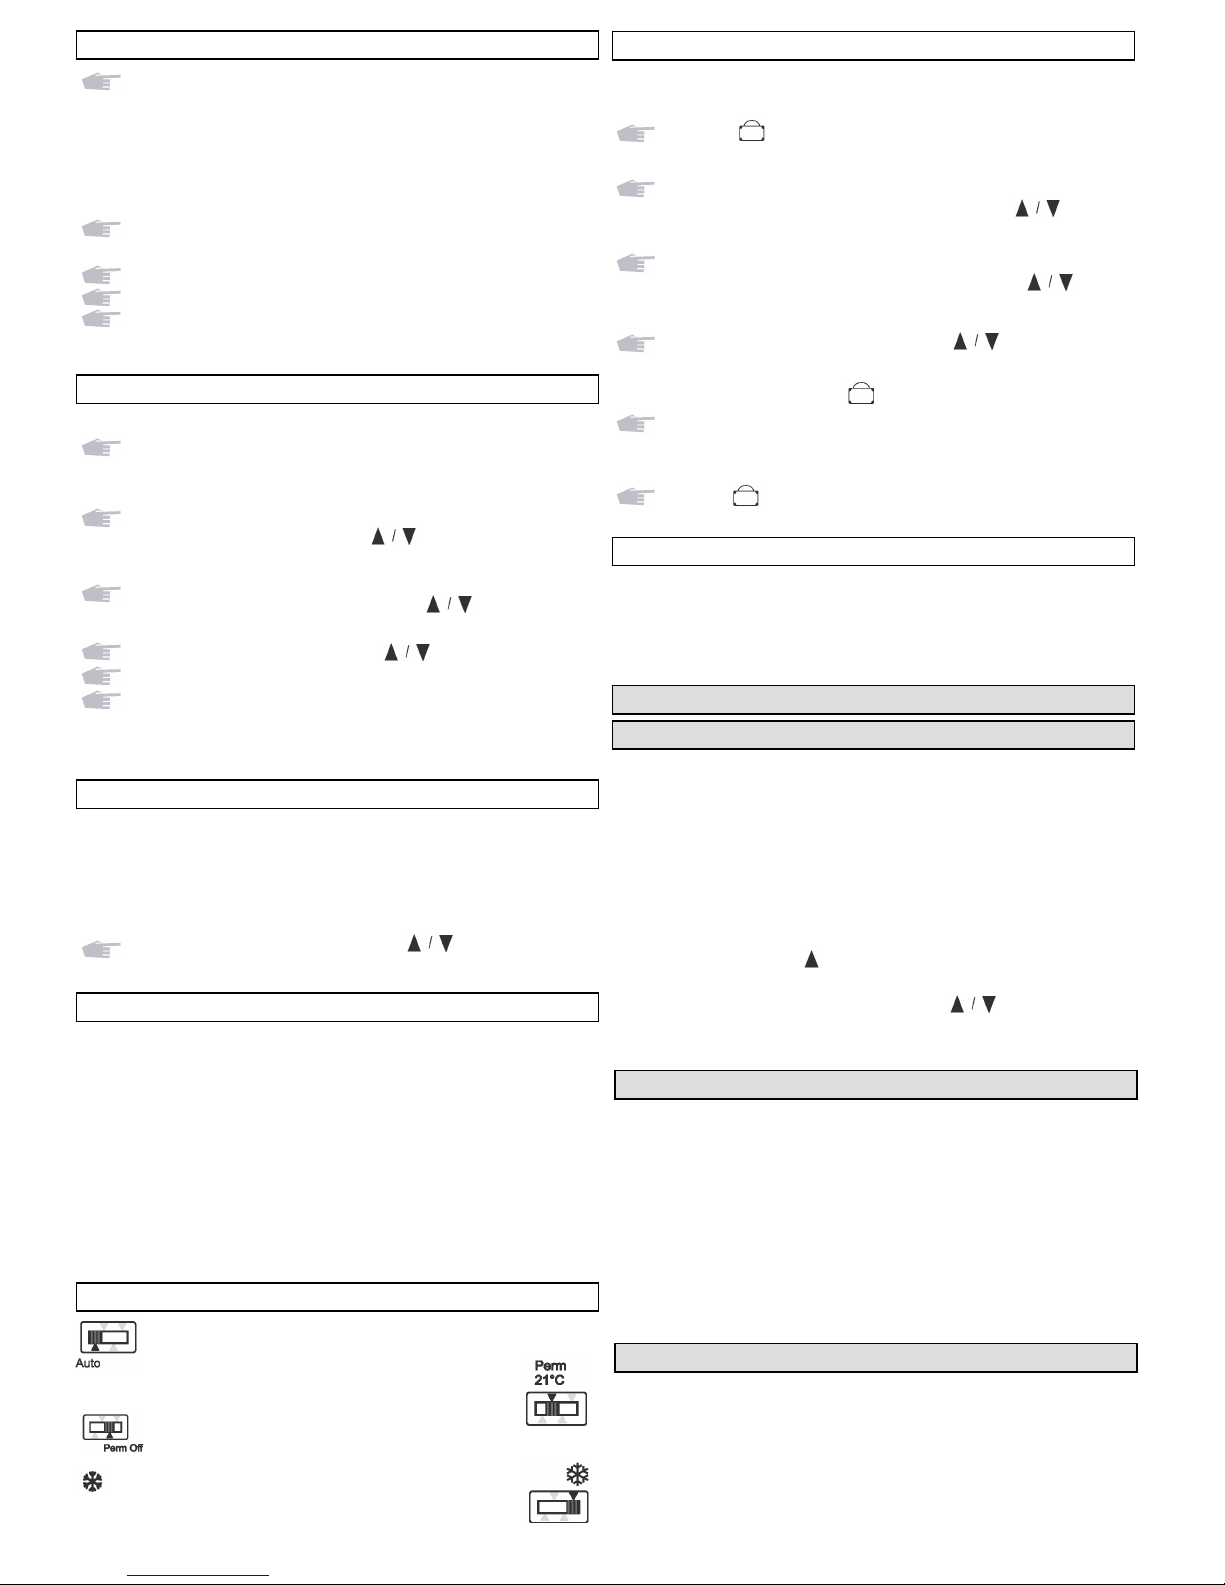
11.0 Program selection switch
Auto = product controls according to the stored heating program.
Manual temperature change possible
Perm 21 °C = the product controls permanently at 21 °C.
Manual temperature change is not possible.
Perm Off = The product is switched off.
Manual temperature change is not possible.
= Permanent frost protection +5 °C.
Manual temperature change is not possible.
12.0 Holiday program
For the duration of a holiday program the clock thermostat controls at a selectable
set-back temperature. Beginning and end of the program is at midnight.
Press the
key briefly.
In how many days is the holiday program to start?
For the setting period hold the key d firmly.
Set the period of the holiday program with the keys
.
How long shall the holiday program last?
For the setting period hold the key d firmly.
Set the duration of the holiday program with the keys
.
Which temperature is to be controlled during the holiday program?
Set the desired temperature with the keys
.
Store with SET key.
Display holiday active: Symbol
appears
In the clock display appears e.g. 00:14, i. e. the duration of the holiday
program is 14 days and ends at midnight.
Cancel holiday program prematurely:
Hold the
key firmly for 2 secs.
13.0 RESET/ total deletion
The changed and stored data revert to the basic setting. Even after a RESET, the
clock thermostat retains the captive basic program. See table: section 6.0.
If no time is set, the product controls at constant 21 °C.
The clock stops and waits for input.
Recommendation: Adjustment with the help of an expert
14.0 Adjustment of the wall alignment
The clock thermostat is adjusted in the factory. If, as a result of its installation
location e. g. cold cement wall, an adjustment is necessary, the temperature
deviation can be corrected.
Correcting temperature deviation:
You can correct the temperature deviation in the range from – 3 °C and +3 °C.
Example: Temperature difference between measured and controlled
temperature is +2 °C. Correction: –2 °C.
Adjustment from automatic mode:
Æ Hold the SET and key firmly for approx. 2 secs.
Æ For the setting period hold the key SET.
Æ Set the value to be corrected with the keys .
Æ Store the changed valve with the SET key.
15.0 Setting of the control accuracy
Operation:
The control accuracy can be adjusted to ±0.5 or ±1 K. The basic setting is ±1 K.
Adjustment from the automatic mode:
Æ Hold the SET key and h for approx. 2 secs. firmly.
Æ Release only the key h.
Æ Change the set valve with the key h.
Æ Release the key and store with SET key.
16.0 Technical data
Control type RS Typ 1 in accordance with EN 60730-2-9
Control hysteresis
Control accuracy ±0.5 K or ±1K
Permitted ambient temperature 0 °C ... + 55 °C
Battery operation 2 x alkaline LR 6
Contact rating 2 (1) A 250 V~ min. 1 mA, 5 V DC
Protection class II according to EN 60730-1 in flush-fitting
Enclosure type IP 20 according to EN 60529
Subject to modification
 Loading...