

Page 1
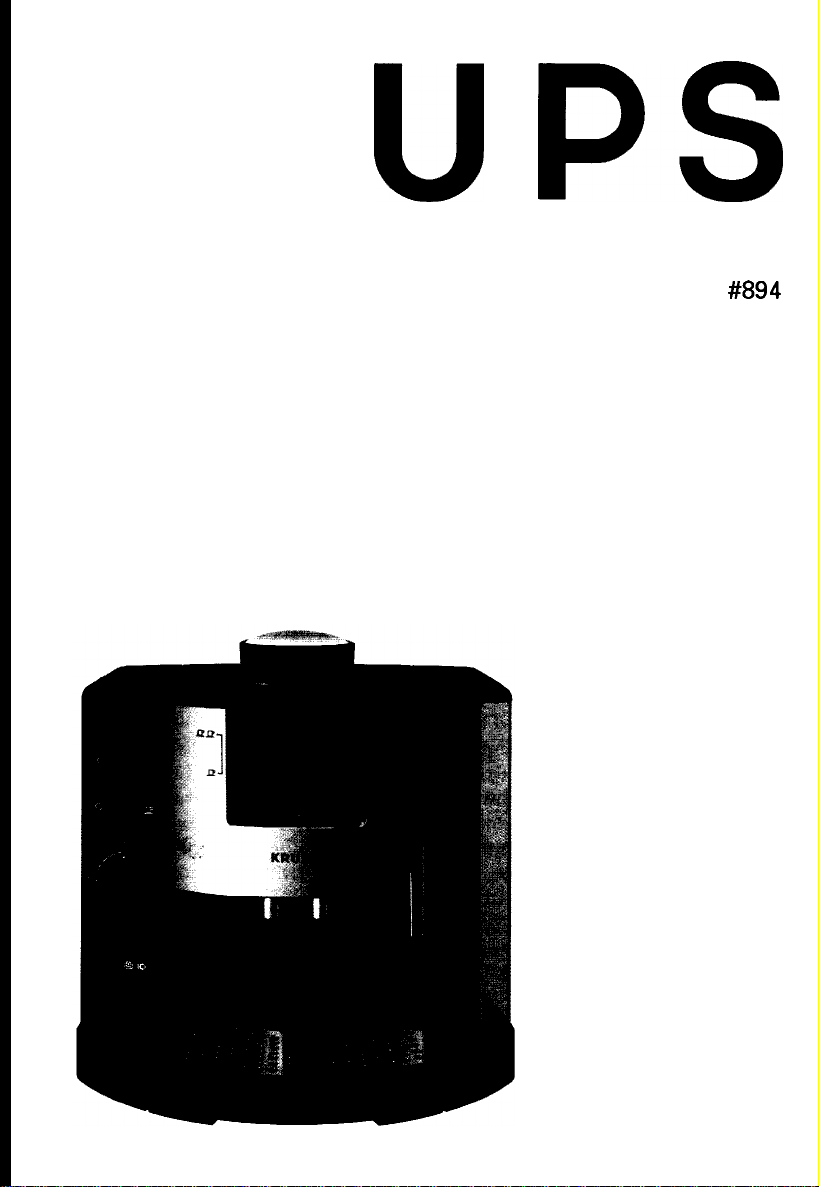
KR
u
PS
Superiore
Model #894
Instructions
for Use
Warranty
Guarantee of
Performance
Page 2

IMPORTANT SAFEGUARDS
When using electrical appliances, basic safety precautions
should always be followed to reduce the risk of fire, electric
shock, and/or injury to persons, including the following:
0
Read all instructions and information in this instruction book
and any other literature included in this carton referring to
this product before operating or using this appliance.
0
Do not touch hot surfaces. Use handles or knobs.
0
To protect against fire, electric shock and personal injury do
not immerse cord, plugs, or appliance in water or other liquid.
0
Close supervision is necessary when any appliance is used
by or near children.
0
Unplug from outlet when not in use and before cleaning. Allow
to cool before putting on or taking off parts, and before cleaning
the appliance.
0
Do not operate any appliance with a damaged cord or plug
or after the appliance malfunctions, or has been damaged in
any manner. Return appliance to your nearest authorized
KRUPS Service Center for examination, repair or adjustment, or
call KRUPS Consumer Service Department (see GUARANTEE OF
PERFORMANCE) for repair procedure.
0
The use of accessory attachments not recommended or sold
by KRUPS may result in fire, electric shock or personal injury.
0
Do not use outdoors.
0
Do not let cord hang over edge of table or counter, or touch
hot surfaces.
0
Do not place on or near a hot gas or electric burner, or in a
heated oven.
0
Always attach plug to appliance first, then plug cord into the
wall outlet. To disconnect, turn any control to “off”, then
remove plug from wall outlet.
0
This appliance is for household use only. Any servicing other
than cleaning should be performed by your local authorized
KRUPS Service Center.
0
Use extreme caution when disposing hot steam.
SAVE THESE INSTRUCTIONS
Page 3
CAUTION
This appliance is for household use. Any servicing other, than
cleaning and user maintenance should be performed by an
authorized service representative.
0
Do not immerse appliance in water or try to disassemble.
0
To reduce the risk of fire or electric shock, do not remove the
base. No user serviceable parts inside. Repair should be done
by authorized service personnel only.
0
Check voltage to be sure that the voltage indicated on the
name plate agrees with your voltage.
0
Never use warm or hot water to fill the water container!
Use cold water only!
0
Keep your hands and the cord away from hot parts of the
appliance during operation.
0
Never clean with scouring powders or hard implements.
SPECIAL CORD SET INSTRUCTIONS
Regarding your Cord Set:
A. A short power-supply cord (or detachable power-supply
cord) is to be provided to reduce risks resulting from
becoming entangled in or tripping over a longer cord.
B. Longer detachable power-supply cords or extension cords are
available and may be used if care is exercised in their use.
C. If a long detachable power-supply cord or extension cord is
used,
power-supply cord or extension cord should be at least as
great as the electrical rating of the appliance, (2) if the
appliance is of the grounded type, the extension cord should
be a grounding-type 3-wire cord, and
should be arranged so that it will not drape over the counter
top or table top where it can be pulled on by children or
tripped over.
D. This appliance has a polarized plug (one blade is wider than
the other). To reduce the risk of electric shock, this plug is
intended to fit into a polarized outlet only one way. If the
plug does not fit fully into the outlet, reverse the plug. If it
still does not fit, contact a qualified electrician. Do not
attempt to modify the plug in any way.
(I)
the marked electrical rating of the detachable
(3)
the longer cord
Page 4
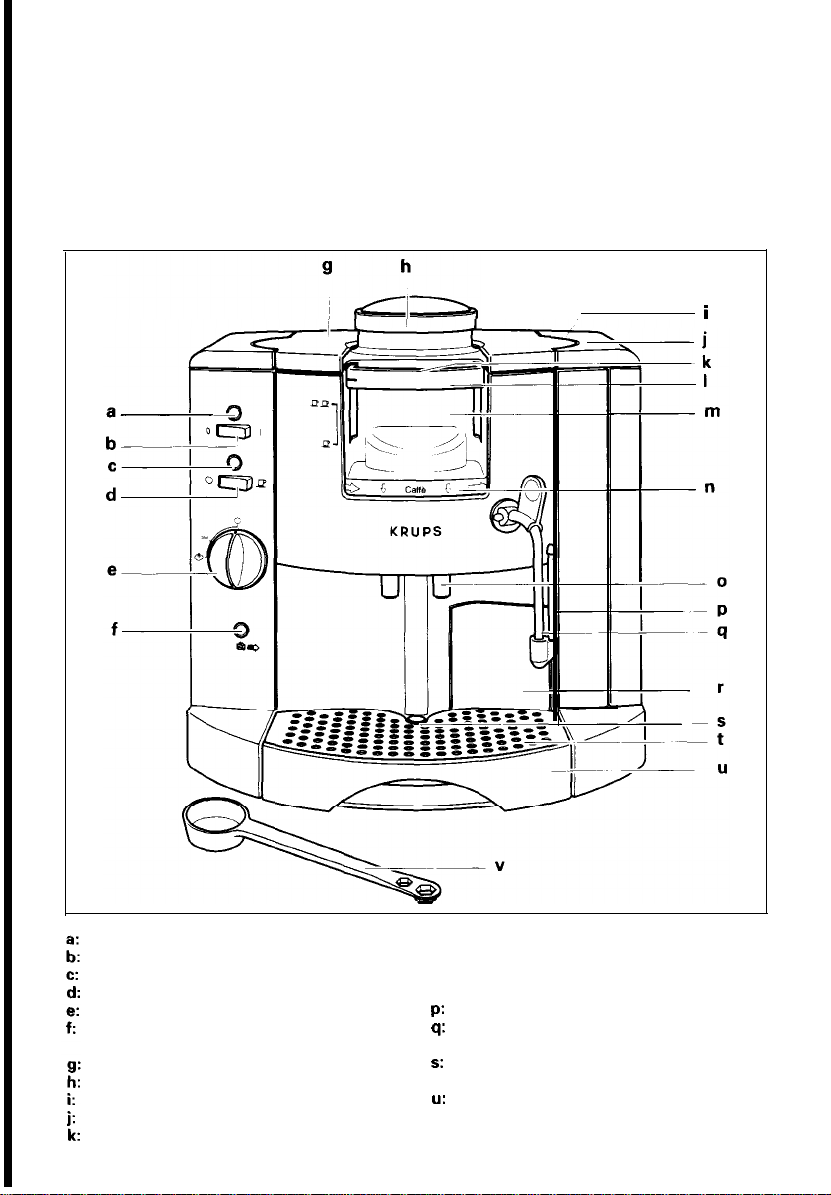
Krups Superiore
i
operating indicator lamp
ON/OFF switch
heating indicator lamp
pump switch
steam knob
indicator lamp for discarded coffee
grounds holder
drum cover
drum knob
removable water container
water container lid
release key
I: function lever
m: drum
n: symbol panel
o: espresso delivery pipe
p:
frothing aid
q:
steam nozzle
r: discarded coffee grounds holder
s:
float
t: cup grid
u:
drawer
v: measuring spoon
Page 5
2
Page 6

I I
I I
Page 7

28
A
B
C
p
c
Page 8

&press0
Espresso coffee
Espresso is stronger and much more
aromatic than ordinary coffee. It is drunk out
of small cups, called espresso cups.
During the preparation, hot water is forced
under pressure through the espresso
grounds, which is how the delicious black
liquid with the stimulating effect is
produced.
Apart from its characteristic flavour,
espresso is also known for its typical
creamy head, known as crema. This
requires a very considerable pressure and
the use of genuine, properly-roasted
espresso coffee beans which have been
ground to the correct degree of coarseness.
If you do not purchase ready-ground
espresso coffee grounds, grind your coffee
beans in a coffee mill at a medium coarse to
fine setting.
-
Preparing
I
Pull the lid of the water container
upwards and lift out the container
n
Fill the container with water
n
Replace the water container, pressing it
firmly into place, so that the base valve
opens. Close the lid
Turn the steam knob to position
Before
Before using the appliance for the first time,
or after a lengthy period of non-use, you
should allow several cups of water to run
through without using coffee grounds, in
order to cleanse the system.
First put the largest convenient container
beneath the espresso delivery pipe.
n
Switch on the appliance, whereby the red
operating indicator lamp and the yellow
heating indicator lamp will both light
up
(4).
a
the appliance
(1).
(21.
(3).
3.
first use
n
Turn the drum in the direction of the
arrow until
panel. As soon as the correct position is
reached, there will be an audible click (5).
n
Press the release key on the function
lever and then press the lever right
down (6).
n Set the pump switch to the p position.
This switches the pump on (7).
If the heating system is empty, upon first
use for instance, the system will first take up
water and a clearly-audible pumping noise
will be heard before water issues from the
espresso delivery pipe.
n
As soon as water runs out of the espresso
delivery pipe, move the pump switch to
the c)position and allow the appliance
to heat up
n
When the yellow heating indicator lamp
ceases to glow, return the pump switch to
the rP position (9).
Now allow 2-3 cups of water to run through
the system.
To empty the container, the process can
be interrupted by returning the pump
switch to the 0 position
Press the release key on the function
lever and pull the latter upwards to the
stop. Then press it right down again to
remove the rest of the water from the
brewing chamber
To cleanse through the steam pipe, place
a container beneath the steam nozzle,
turn the steam knob to position -, then
the pump switch to position B and allow
l-2 cups to run through
Move the pump switch to position
return the steam knob to position 0 and
then remove the container.
Filling
,,Caffe”
(8).
the
heat&system
appears in the symbol
(8).
(10).
(11).
3,
withwater
Before working with the appliance, check
that the heating system is full of water.
H
Fill the container with water and insert it
in the appliance (l-3).
n
Switch on the appliance (4).
Page 9

n
Hold a container under the steam nozzle,
turn the steam knob to - and then the
pump switch to p
As soon as water runs out of the steam
nozzle, move the pump switch to 0 and
then return the steam knob to
ration
n
Fill the water container and insert it (l-31.
n
Switch on the appliance, whereby the red
operating indicator lamp and the yellow
heating indicator lamp will both light
up
(4).
As soon as the yellow lamp goes out, the
temperature necessary for making espresso
has been reached.
For further espresso preparations, no notice
need be taken of the yellow lamp.
Warm the espresso cups by holding them
under the steam nozzle, then turning the
steam knob to - and lastly the pump
switch to p. Fill the cups with hot water,
then move the pump switch to G and
return the steam knob to 0.
Empty the prewarmed cup or cups and
place them beneath the espresso delivery
nozzle.
Press the release key on the function lever
and then pull the lever upwards to the stop.
Turn the drum counterclockwise until the
measuring spoon symbol - appears in
the symbol panel. A click will be heard
when the correct position has been
reached
Put in the coffee grounds
for one cup = 1 level measuring
for two cups = 2 level measuring
NOTE: If more than two level measuring
spoonfuls are put in, the excess will be
automatically thrown out into the discarded
coffee grounds holder during the ensuing
operation. If you are making a single cup,
however, a little more coffee meal can be
added if it suits your taste.
(12).
(11).
0.
of
(131:
spoonful
spoonfuls
w
Turn the drum counterclockwise to the
,,Caffe”
position. A click will be heard
when the correct position is reached (14).
Pull the release key on the function lever
forwards and then press the lever
downwards until there is a
resistance.
The distance it can be pushed down
depends upon the amount of coffee meal
present.
n
When preparing two cups of espresso,
the function lever must be depressed at
least as far as the p g symbol
n
Set the pump switch to the B position
(161.
As soon as the required quantity of
espresso has run through, return the pump
switch to the 0 position.
n
Pull the release key forwards and then
pull the function lever upwards to the
stop
(17).
W
Turn the drum counterclockwise to the
original
This will automatically cause the used
coffee to be thrown into the discarded
coffee holder and the brewing chamber to
be emptied, whereby a little water will run
into the drawer.
W
As soon as the red lamp indicating that
the discarded coffee holder is full lights
up, it is essential to empty the holder
immediately
W
Pull the drawer out of the appliance, take
out the discarded coffee holder and
empty it (19).
The red lamp indicating that the discarded
coffee holder is full will continue to glow
until the drawer is reinserted.
n
The red float in the drawer indicates
when the drawer contains too much
water and must be emptied
position again (12).
-
(18).
noticable
(15).
(20).
Page 10

Pr ration
Steam can be used for frothing up milk for
cappuccino and also for the heating of
liquids.
Since a higher temperature is required for
the production of steam than is necessary
for making espresso, the espresso should
always be prepared first, as the coffee
grounds might otherwise get burnt.
A
’
CAREFUL: After each time steam has
been used, the heating system must be
refilled with water (see ‘Filling the
heating system with water’). Note that
the residue of steam issues from the
steam nozzle first.
NOTE: When the steam knob is on symbol
Q!5,
the pump cannot be switched on.
of
steam
Frothing-up milk for cappuccino
After you have prepared the espresso, froth
up the milk for cappuccino.
Make sure that the heating system is filled
with water (see ‘Filling the heating system
with water’).
The separate frothing aid should be used in
order to assure an optimum result.
n
Push the frothing aid onto the steam
nozzle (21).
Q
’
CAREFUL: The frothing aid is to be
used ONLY for the frothing-up of milk.
Pour about 3 oz. of low fat milk into a
stainless steel pitcher of not more than 17
oz. capacity, which must fit conveniently
below the steam nozzle of the machine.
The milk should be well cooled. You should
also use a cold pitcher, so do not wash it
out first with warm water.
Before starting with the frothing operation:
Turn the steam knob to symbol
producing steam, water will issue from the
steam nozzle for a moment and this should
be caught in a separate container. As soon
as steam issues, turn the steam knob to
position 0.
@3.
Before
Now start the frothing operation as follows:
Hold the pitcher beneath the frothing aid in
such a way that the nozzle dips completely
into the milk.
n
Set the steam knob to the
Hold the pitcher steady during the
frothing operation (22).
The nozzle should not touch the bottom of
the pitcher, so as not to impede the flow of
steam.
When the frothing operation is complete,
turn the steam knob to 0 and remove the
pitcher.
Now turn the steam knob to
moment to blow out any residual milk from
the steam nozzle, putting a small container
underneath to catch the drops.
Clean the frothing aid and also the steam
nozzle with a moist cloth immediately after
the frothing operation.
Q?3
position.
f$?
for a
Heating liquids
Pull the frothing aid off the steam nozzle.
Switch on the appliance.
Make sure that the heating system is full of
water (see ‘Filling the heating system with
water’).
As soon as the yellow indicator lamp goes
out, turn the steam knob to
a small amount of water will run out of the
steam nozzle and should be caught in a
separate container. As soon as steam
issues, turn the steam knob to the C
position.
Place the container with the liquid to be
heated below the steam nozzle and dip the
latter into the liquid.
n
Turn the steam knob to the GV position
(23).
When the liquid is sufficiently heated, return
the steam knob to 0 and remove the
container with the liquid.
Now turn the steam knob to @3 for a
moment to blow out any residues from the
steam nozzle, putting a small container
underneath to catch the drops.
Clean the steam nozzle with a moist cloth
immediately after heating the liquid.
@5,
whereupon
10
Page 11

Preptrrlng hot
With this appliance you can prepare hot
water for making instant drinks and the like.
Make sure that the heating system is full of
water (see ‘Filling the heating system with
water’).
Start with the preparation of hot water as
soon as the yellow indicator lamp goes out.
Swing out the steam pipe and hold the
tallest possible cup beneath it.
n Turn the steam knob to - and the pump
switch to e (24).
When the hot water preparation is
complete, turn the pump switch to 0 and
the steam knob to 0. Then remove the
container.
After
To remove coffee residues from the inside
of the system, it is advisable to cleanse
through the appliance after use.
Do this as if you were making espresso, but
without using any coffee grounds.
uie
watqr
Cleaning
Always pull out the mains plug before any
cleaning operation. Allow the appliance to
cool down. Clean the casing with a moist
cloth only.
The water container is to be emptied after
each usage.
The drum should be cleaned after about ten
runs through and in any case 2-3 times a
week and after any lengthy period of
use.
Before the drum is taken out for cleaning
purposes, one extra complete turn should
be made so that any residues of coffee meal
will be thrown out of the drum into the
discarded coffee grounds holder.
Then take out the drum as follows:
W
Turn the drum counterclockwise until
appears in the symbol panel
non-
.,--
(25).
Open the drum cover.
n
Reach with the thumb into the depression
in the drum release and press the slide
towards the drum knob. Pull the drum
upwards by the drum knob and lift it out
of the appliance (26).
Press the release key on the function lever
and then press the lever itself right down,
thereby pushing out the piston, which can
now be more easily cleaned.
Rinse out the drum under running water.
Do not put it in the dishwasher!
Use washing-up liquid if the drum is very
dirty or for a thorough clean.
Wipe the inside of the appliance with a
moist cloth.
Replace the drum after drying it by first
pressing the slide towards the drum knob
and then inserting the drum from above
until it registers.
When inserting the drum, make certain that
the function lever is in the upper position.
Remove the cup grid and clean it.
Empty and clean the drawer and discarded
coffee grounds holder.
Rinse all loose parts under running water
and do not put them in the dishwasher.
Use washing-up liquid if the parts are very
dirty or for a thorough clean.
Clean the steam nozzle immediately after
frothing up milk by making steam for a
further l-2 seconds to blow out any residue.
Then wipe the nozzle with a moist cloth. If
the nozzle becomes clogged, clean it out
with a needle.
H If necessary, the steam nozzle can be
screwed off in an counterclockwise
direction using the hexagonal key on the
measuring spoon and then thoroughly
cleaned (27).
A
NOTE! Danger of burning or scalding
with the steam nozzle so do not
dismantle or assemble it while hot.
Screw the cleaned nozzle clockwise back
into position again and tighten lightly using
the hexagonal key.
11
Page 12

The frothing aid can be disassembled in
order to clean it properly, as follows:
n
Pull the two parts A + C from the small
metal tube B
Wash all three parts in warm water. If the
small suction orifice in part A has become
clogged, free it by poking a fine needle
through the blockage.
If the appliance is not to be used for a
lengthy period, the drum and discarded
coffee grounds holder should be thoroughly
cleaned and dried.
Before such a lengthy period of non-usage,
you can also drive off the water from the
heating system as steam. Place a container
beneath the steam nozzle and turn the
steam knob to
steam is generated, return the knob to the
3 position.
Switch off the appliance.
unoe-
The machine must have lime-scale removed
regularly. For an average usage of 4 cups
daily and hard water, we recommend
descaling the appliance every three months.
The appliance MUST be descaled if the
espresso preparation time increases
noticeably or if the coffee temperature is
reduced.
A
NOTE
Only the following are to be used as
descaling agents:
n
n
Do not under any circumstances use the
conventional amidosulphonic acid or any
descaling agent using such, as these can
damage your appliance (check the
composition of any descaling agent which
you use).
(28).
@!3.
As soon as no more
8
removal
Citric acid or
Tartaric acid
Carry out the descaling operation as
follows:
Pull off the frothing aid.
1.
2.
Dissolve 2 tablespoonfuls of citric or
tattaric acid (both obtainable from
chemists or drugstores) in 17 oz. of
lukewarm water and pour it into the
water container.
Place one container beneath the
3.
espresso delivery pipe and another
beneath the steam pipe.
Switch on the appliance.
4.
As soon as the yellow heating indicator
5.
lamp ceases to glow, turn the steam
knob to - and then the pump switch to
the G position.
Allow about
6.
to run through.
Move the pump switch to the
7.
3 position.
Allow the descaling solution to work for
8.
lo-15 minutes.
Now let a further third of the solution
9.
run through. Set the pump switch to the
3 position and turn the steam knob
also to position 3.
10. Press down the function lever to the
lowest position.
11. Move the pump switch to the L!
position and allow the rest of the
descaling solution to run through and
out of the espresso delivery pipe into a
container.
12. Finally allow one
water to run through in order to rinse
out the appliance.
13. Switch off the appliance and allow it to
cool down.
14. Push the frothing aid back onto the
appliance.
l/3
of the descaling solution
containerful
of clear
Cord storage
n
Any excess cord length can be
accommodated in the cord storage at the
rear side of the appliance
(29).
12
Page 13

PROBLEM:
Espresso has no crema.
Take out the drum.
Press the release key on the function lever
and then press the lever right down.
N Remove the screw. Take out the brewing
sieve, the brewing sieve ring and the
brewing sieve seal. Exchange the seal for
a new one and then replace all three parts
in the reverse sequence
Pr+lems
and their
(30).
ns
PROBLEM:
The pump makes a loud noise.
POSSIBLE REASONS:
n
No water in the water container.
N Water container not properly inserted.
H Coffee old or too dry, so that the pump
can only develop a low pressure.
No espresso runs out.
POSSIBLE REASONS:
N No water in the water container.
N Water container not properly inserted.
N Appliance requires descaling
(see ‘Lime-scale removal’).
N Heating system not filled with water.
N Drum not in the correct position.
N Function lever not fully depressed.
n
Espresso meal too fine - mix it with
coarser meal.
N Brewing sieve is clogged -take out the
drum, clean the brewing sieve,
screwing it off if necessary
(see ‘Changing the brewing sieve seal’).
N Brewing sieve seal is damaged
(see ‘Changing the brewing sieve seal’).
POSSIBLE REASONS:
4
Coffee is old or dried out.
N
There is too little espresso meal per cup.
n
Function lever not fully depressed.
PROBLEM:
Too little or no froth when frothing up.
POSSIBLE REASONS:
N Heating system not filled with water.
N
Steam nozzle is blocked.
N Milk is old.
N Milk is too warm - it should be at
refrigerator temperature.
N
Container is unsuitable - preferably use a
coffee-pot or pitcher.
N Unsuitable sort of milk - use one with a
different fat content.
PROBLEM:
Espresso coffee is too cold.
POSSIBLE REASONS:
N Appliance insufficiently heated up.
N
Espresso cups insufficiently prewarmed.
N Appliance requires descaling
(see ‘Lime-scale removal’).
PROBLEM:
Drum refuses to turn.
POSSIBLE REASON:
N
Failure to throw out the spent coffee after
the previous espresso preparation - switch
on the pump for ten seconds to clear.
PROBLEM:
Drum is difficult to turn.
POSSIBLE REASON:
N Coffee meal has collected beneath the
drum - clean the drum.
13
Page 14

Your KRUPS #894 is covered by the
following warranty:
If from date of purchase within one year this
KRUPS product fails to function because of
defects in materials or workmanship,
KRUPS North America will, at its option,
repair or replace the unit without charge,
provided the owner has a proof of date of
purchase.
This warranty will be void if malfunction
was caused by damage to the product by
accident, misuse, use on frequency or
voltage other than marked on the product
and/or described in the instructions, abuse
including tampering, damage in transit, or
use for commercial purposes. This warranty
gives you specific legal rights, and you may
also have other rights which may vary from
state to state.
14
Page 15

GUARANTEE OF PERFORMANCE
This fine KRUPS product is manufactured according to a rigid code of
quality standards, and, with minimum care, should give years of
satisfying service.
However, should the need arise for repairs or for replacement parts
within or after the warranty period, please call our CONSUMER
SERVICE DEPARTMENT:
(800)
526-5377
24-hours
You will be provided with specific instructions on how to get your
product repaired, as well as the name and address of your nearest
authorized KRUPS Service Center. The department will also be able
to answer any general product questions you may have.
Before calling the Consumer Service Department, please have the
type number of your KRUPS appliance available.
You must have this information before calling our Consumer Service
Department so that we may better answer your questions. The type
number can be located by looking at the bottom of your appliance.
This product is Type #894
a day, 7 days a week
Any general correspondence can be addressed to:
KRUPS North America, Inc.
P.O. Box 3900
Peoria, IL 61612
 Loading...