

Page 1

For any help or support, please call our KRUPS in house customer service team on: 0345 330 6460 (UK) or 01 677 4003 (ROI)
QUICK START GUIDE
& MAINTENANCE
KEEP THIS GUIDE SOMEWHERE SAFE SO YOU HAVE IT AT HAND WHEN CLEANING YOUR KRUPS MACHINE
For instructional videos on how to setup your machine and maintenance,
please visit the KRUPS Youtube Channel (you can nd this by searching
“krups uk” on YouTube.com) or Download the KRUPS Espresso Application
Available on…
To purchase accessories and key
maintenance products for your product go to:
www.krups.co.uk/accessories-store/home
www.krups.co.uk
MACHINE TOP TIPS
Light- medium roasts are the best to start with if you are new to
the own ground coee experience, this will help you nd the best
avour and aroma of coee for you.
Use your machine on a regular basis once or twice a day, leaving
your machine for longer periods of inactivity can be bad for
the quality of the output. If you are leaving your machine for
longer periods (eg to go on holiday) empty the water tank and
remove the beans to store and use when you return. Ensure you
clean your machine before rst use upon return by running a
full coee through to clean the system.
Do a quick rinse when you use the steam arm to remove milk
residue.
A quick clean after every use can increase the
longevity of your machine. Just rinse o and wipe the arm before
going to enjoy your fresh coee.
Always start a new roast at the most course grind setting, and
adjust to taste. Be careful of extra dark roast coee as some
beans become oily in the roasting process and can cause
blockages in the grinders. The ner the grind setting the slower
the ow of coee to your cup.
Good Crema indicates all is well; if you have a good crema on
the espresso you’ve made, it’s a good indication that the brewing
cycle and machines are well maintained. Follow the machine’s
cleaning cycle indicators, as they are dened based on the
water quality and heat preferences you have selected when
installing the machine. Ensure you check your water quality
every season (Spring, Summer, etc) as it can change through
the year depending on your water provider.
1
2
3
5
4
SYMBOLS CONSTANT FLASHING MEANING
The coee grounds collector is missing or positioned incorrectly.
Empty the coee grounds collector + empty the drip tray
Rell the water tank / The water tank is positioned incorrectly.
Place a container (600ml minimum) under the steam and coee outlets
Maintenance cycle in progress
Malfunction: unplug the machine for ten seconds then plug it back in
Install water lter cartridge
Rinsing cycle in progress
Clean machine with KRUPS cleaning tablet
Cleaning cycle interrupted
Descale machine with KRUPS descaling sachet
Descaling cycle interrupted
Adjust the water hardness
Enable automatic rinsing of the coee circuit when the machine starts.
Program auto-o settings
Adjust the coee temperature/Pre-heating indicator
Favourite A or B - 2 drinks can be saved in memory
Registering favourite A or B
Preparation progress indicator
Press the START-STOP button
Coee strength indicator
Volume or time indicator
Number of cups (1 or 2)
Active use indicator
Maintenance or settings selection
BUTTONS AND DIALS
“On-o” button Navigation button
Favourite button
To adjust selected settings
Steam button Start or stop button
Maintenance and settings button Coee grind setting dial.
BUTTONS AND LIGHTS
Page 2
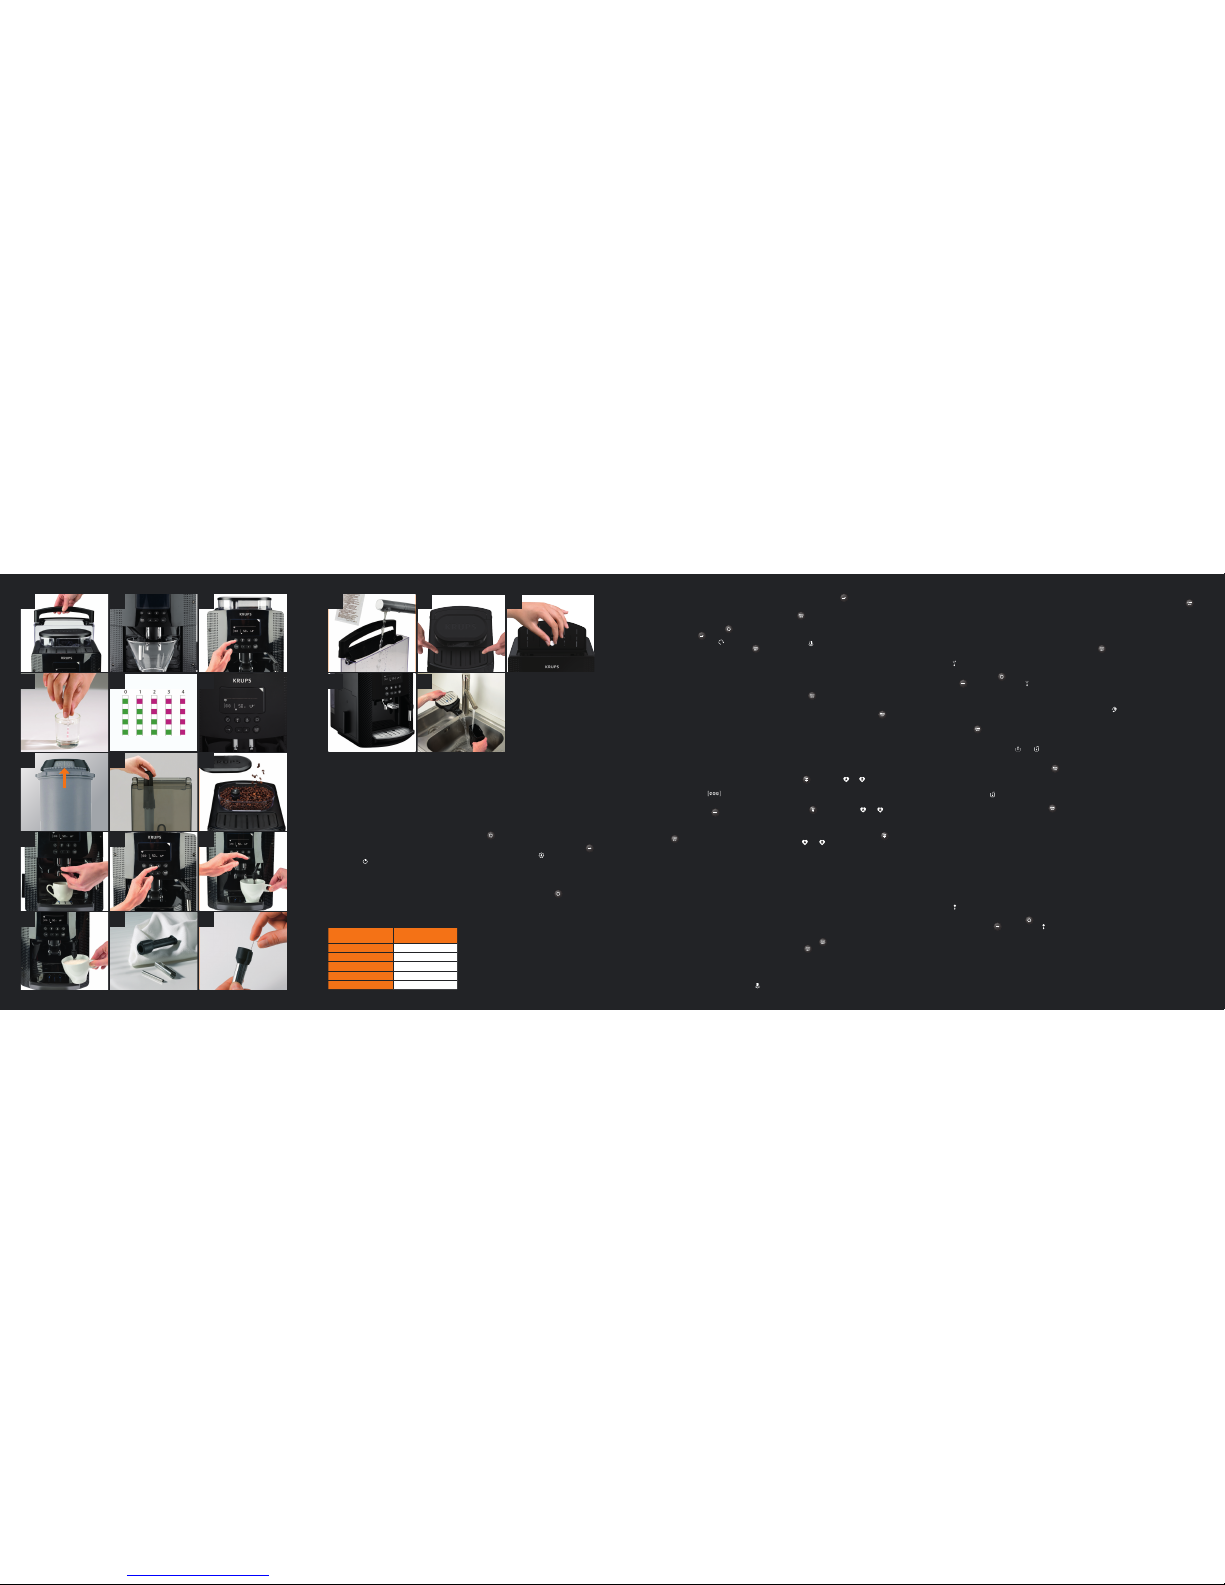
MACHINE START UP
Congratulations on purchasing your new KRUPS Arabica bean to cup machine! We recommend you follow the
steps below to get your machine up and running as soon as possible.
SWITCHING ON THE MACHINE
1 Fill the water tank.
2 Place a 600ml container under the steam and
coee outlets.
3 Press the
button once to switch on the machine
and follow the instructions on the screen.
CHECKING YOUR WATER HARDNESS
4 Fill a glass of water and insert the water hardness
test strip. You can nd the test strip in your KRUPS
welcome pack.
5 After 1 minute read the level of water hardness.
SETTING YOUR WATER HARDNESS
6 To access machine maintenance and settings press
the
button.
You can move through the settings using the
button until you reach the
icon.
You can set your water hardness between 0 and 4
by pressing the + or – buttons according to your
water hardness test results.
To leave the settings mode press
.
For access and information for all machine settings
see the full user manual.
INSTALLING THE WATER FILTER
Remove the water tank from the back of the machine.
7 Set the month when the cartridge is tted (left side
of the cartridge) by turning the grey ring located on
the upper end of the filter. The month when the
cartridge should be replaced is indicated on the right
side of the cartridge or indicated by your machine.
MACHINE MAINTENANCE
To ensure that your machine is running smoothly for years to come, we recommend you follow the
maintenance steps below.
CLEANING YOUR STEAM NOZZLE
We recommend cleaning the milk nozzle once you are
ready to switch off your machine or after preparing a
milk based drink.
To remove milk residue from the steam nozzle. Place a
container under the steam nozzle and press the
button followed by . Allow the steam to run for 10
seconds and
to stop.
18
After use remove and rinse the steam nozzle. W
ash it
with water and washing up liquid using a small non-
abrasive brush to remove the milk residue.
15 Ensure that the air holes are not blocked by any
milk residue. If necessary, unblock them using the
needle supplied with the machine.
DESCALING YOUR MACHINE
We recommend descaling your machine when the alert
appears on the display. The frequency of descaling is
dependent your machine usage.
The
icon will appear when the machine needs to be
descaled. To begin the descaling program enter the
machines settings via the button. Click the navigation
button
until you select symbol .
16 Fill the water tank up to the ‘CALC’ line, dissolve
one sachet of KRUPS descaling powder (40g) into
the tank and replace onto the machine. Remove,
empty and replace the drip tray and place a 600ml
container under the steam nozzle. Once complete
press the to continue with the descaling program.
The rst phase (8 minutes) of the program will begin.
At the end of this stage the
and symbol will
ash. Empty and return the 600ml container under
the steam nozzle. Empty, rinse, rell and replace
the water tank. Once complete press the
to
continue with the descaling program.
The second phase (6 minutes) will begin. At the end
of this stage the
symbol will appear. Empty and
return the drip tray and 600ml container under the
steam nozzle. Once complete press the to
continue
with the descaling program.
The nal phase (6 minutes) will begin and perform
a full rinse of the machine.
We recommend installing a water lter to protect your
machine against the build up of scale, see “Installing
the water lter” section under “Machine Start up”.
CLEANING YOUR MACHINE
We recommend running a cleaning program when prompted
by your machine or following a long period of inactivity.
The
icon will appear when the machine needs to
run the cleaning program. To begin the cleaning program
enter the machine’s settings via the
button. Click
the navigation button
until you select symbol.
Remove, empty and replace the coee ground collector,
drip tray and 600ml container. Fill up the water tank.
17 To access the maintenance hatch remove the cup
tray located at the top of your machine. To do this,
press down on the back corners of the cup tray
to release the cover.
18
Insert a KRUPS Cleaning tablet into the cleaning
tablet funnel.
Once complete press the to
continue with the cleaning program.
The first phase (10 minutes) of the program will
complete. At the
end of this stage the machine will
beep for 10 seconds.
Empty and return the 600ml
container and the drip tray. Once complete press
the
to continue with the cleaning program.
The nal phase (3 minutes) will begin and perform
a full rinse of the machine. Once the cleaning cycle
is nished, the coee menu will appear.
EMPTYING YOUR COFFEE GROUNDS
24 & 25
When the
light ashes you must remove, empty
and clean both the coee grounds collector and
the drip tray.
Degree of
water hardness
Appliance setting
Soft 0
Slightly Hard 1
Moderately Hard 2
Hard 3
Very Hard 4
8 Screw the lter cartridge into the bottom of the water
tank using the accessory supplied with the cartridge.
Fill and replace the water tank.
Enter the machines settings via the
button. Click
the navigation button
until you select the lter
cartridge installation symbol
. Place a 600ml
container under the steam nozzle and press
.
Once the cycle is nished the screen will return to the
coee menu.
We recommend your machine is always tted with
a water lter, which is replaced every 3 months or when
prompted by your machine.
PREPARING A DRINK
Now that you have set up your Arabica machine, it’s time
to prepare your drink. Simply follow the instructions below.
ENJOY A BLACK COFFEE
9 Remove the lid of the coee bean container and add
coee beans (max. 250 g).
10 Place the cup(s) under the coee nozzles. You can
lower or raise the coee outlet according to the size
of your cup or glass.
Select the coee strength
with the + button
to increase or the - button to decrease.
Press the navigation button
to set the volume:
select the volume of water displayed on the screen
using the + or – buttons.
Press the
button to start your drink.
ENJOY TWO COFFEES AT ONCE
Follow the steps above to set your coee strength and
volume.
Press the navigation button
to set the number of
cups: select 1 or 2 cups using the + or – buttons.
Press the
button to start your drinks.
ENJOY FROTHY MILK
11 Press the button. The machine will launch a
pre-heating stage. Once this is complete ‘PRESS
START’ will appear on the screen.
12
Pour the milk into your milk jug and immerse the nozzle
in the milk. Only ll the jug half way to leave room
for the milk to froth.
13
Press the button to begin frothing the milk.
Gradually lower the milk jug as the froth accumulates.
Once the milk is frothy enough, press the icon
to stop the steam.
We recommend cleaning the steam nozzle once you are
ready to switch o your machine and after preparing a
milk based drink. See “Cleaning your steam nozzle”
for further instructions.
SAVE YOUR FAVOURITE DRINK
Press on the to select the or favourite icon.
Select the coffee strength, volume and quantity as
instructed in the “preparing drink section” above.
Hold down on
button until the or icons
ash. The icon will stop ashing after the drink favourite
has been registered.
To access your favourite drink Press on the
to
select your
or favourite.
1 16
4 19 20
7
10
13
2 17
5
8
11
14
3 18
6
9
12
15
 Loading...