

Page 1
~OOQ1J~
Instruction Book I Warranty I KRUPS Guarantee of Performance
«
Espresso Pronto
(Model # 988)
II
Page 2
~-~~~-~---~~~
~-~-~~ ~~
------------
~-----------
------------
ut<Ho'n,~"
I~
-1\
-""";:-.'P'\
";"'j -
A i
\hI\ I
,\1
\
II
4-
,~
1Jjjff§g§~~~~~
.
'.~.<rc'"'rn."",
Page 3
..
""
0
~
~
1 ~= 1-
2e=2-
~uu,"r.r.n.n'"
KIIIJPS
~
2)
@5
'I~I ;
!
I
I
..
.
I
C
..
(
(
c
.
,
a
..
a
c:
cr.
Q.
:::I
Ct
~
>
c
cu
...
...
cu
~
.:t:.
0
0
m
s::
.2
-
0
::I
...
-
0
s::
."' nM,
,',
Page 4
~ .--
DO°\3f)
~Tm3
~~n"""""'"
Ij=- --
~
.
~::::::::::::::::h___"
~f.""'m
L.".""~r~
: ! '
c I ~
(:)
'~.
. :~ ~~:"
'1'---~'~:
.......--------
F ~
r~~
,
N~
O
0 O°\3f) ..~
r ~TI
~~
= .(!.-=--=
--u... --,
w
EEEgg~,gg~i
7Jiim"
~~~~""~ '".-...
I
~
Page 5

ESPRESSO PRONTO # 988
Featu'res
. Thermoblock Heating
System features a 47"
tube which heats up
water to the precise tem-
perature for brewing
espresso which is then
pumped onto the espres-
so. When espresso
making is done, excess
water is flushed from the
system into the drip tray.
No stale water remains in
the system and there is
no bacteria build-Up,
ensuring a fresher,
tasting cup of espresso.
. Microchip Monitored
Steam Pump delivers a
constant flow of "dry"
steam. This unique dry-
ness of steam and its reo
gulated pressure froth milk
for perfect cappucino.
. Program Dial enables
you to turn to any of the
following three positions
" rr " espresso,
" ~" for steaming and
"O"=OFF position.
. Ready Light Indicator
alerts user when
machine has reached
the proper temperature.
. 37 oz. Water Reservoir.
Large capacity, easy to
fill water container, pro-
duces a continous num-
berofcupsofespresso
and cappucino.
15 demitasse cups
(2.5 oz.)
7 cappucino cups
(5.0 oz.)
R
. Warming Plateenables
you to preheat you
espresso and cappucino
cups.
.. Perfect Froth Attach-
ment effortlesslyprodu-
ces frothfor perfect
cappuccino.
. Steam Nozzle for. fro-
thing, steaming and
other beverages (tea, hot
cocoa, and other instant
beverages).
. WaterLevelIndicator
easy to see how much
water is in the water
reservoir.
. One & Two Cup Filter
Baskets allow you to
choose the desired
amount of espresso that
you wish to brew.
. Removable Drip Tray &
Grid large capacity and
easy to remove and
clean.
Introduction
Your new Espresso Pronto
is a machine that has been
constructed like no other
espresso maker in the
world. This machine fea-
tures a highly sophisticated
pump technology called
Thermo-Block. Your
Espresso Pronto is another
one of KRUPS finest
espresso makers that is
now available to you for at
home use.
Genuine Espresso
Espresso is a far richer and
stronger brew than regular
coffee. It should be deep,
dark and delicious. Most
people find they enjoy it in
small quantities because of
its richness and for that
reason, espresso is usually
served in small 2-2,5 oz.
demitassse cups.
The mark of real espresso
is its wonderful inviting fra-
grance and a light brown
"Crema", found on top of
the surface of the coffee.
Your "Espressso Pronto",
properly used, will always
produce espresso that is
peep, dark, and delicious.
Just follow the instructions
and use fresh, well roasted
espresso beans.
Grinding Espresso Beans
If you choose to grind your
own beans we recommend
using either the KRUPS
Fast-Touch grinder #203 or
Touch-Top grinder #208.
Remember, espresso
requires a much finer grind
than regular coffee. We
recommend grinding
your espresso beans for
aporoximately 60 seconds;
or until it has a talcum pow-
der appearance and
texture.
.'
Page 6

~
Using your
Espresso Pronto
for the first time
We recommend that you
get familiar with all the
parts of your "Espresso
I
Pronto" before operating
the machine. Insert the fil-
ter holder into the machine,
and remove and replace
water reservoir. Wipe off
the steam nozzle and Per-
fect Froth attachment with
a damp cloth to make sure
all dust particles from
transport are removed.
Wash all loose parts in
warm, soapy water, rinse
thoroughly and dry.
When using your "Espresso
Pronto" for the first time we
recommend running water
through the machine to
remove any dust particles
which may have settled
during shipping..
Make sure before you start
that the removable overfl~
grid (g) is properly in place
and that the drip tray (h) is
properly inserted.
Before plugging the appli-
ance. into an electrical out-
let. make sure that the con-
trol dial (c) is in the "0"
position and the On/OFF
1
switch (I) is in the "OFF"
J
position.
Cleaning The
Internal System
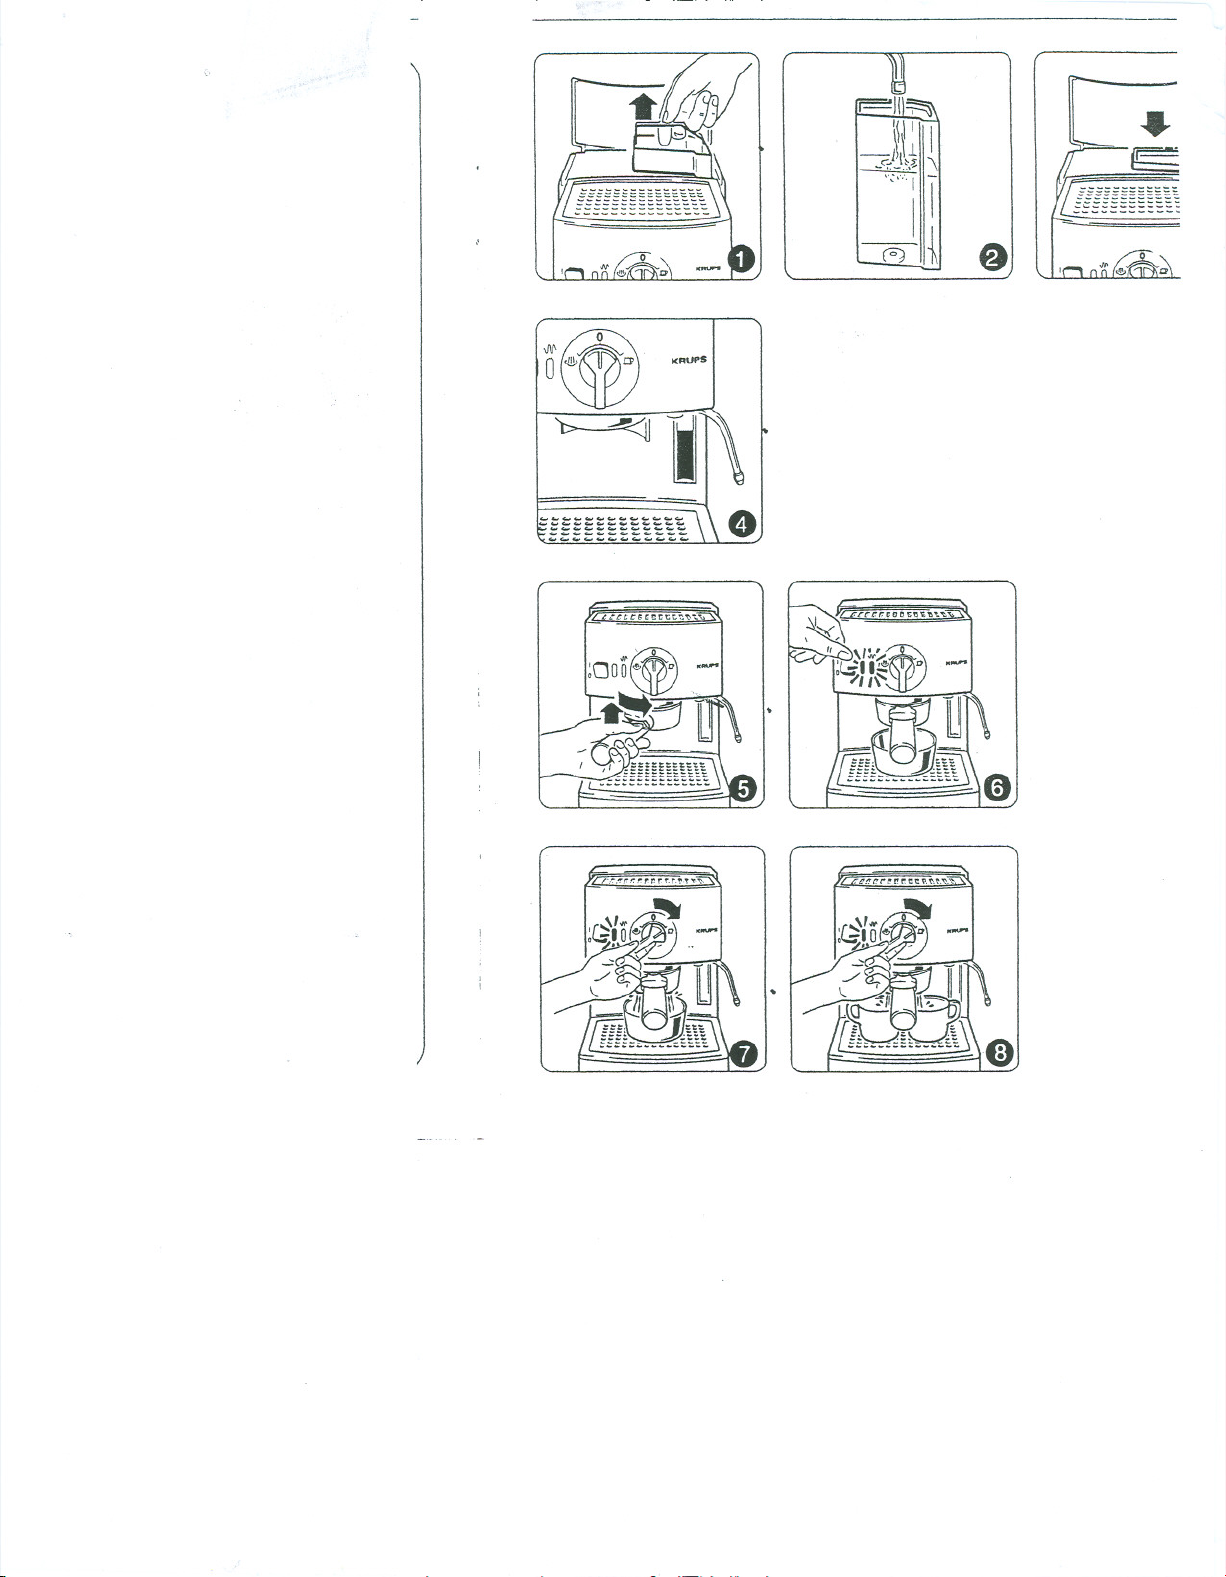
Step 1
. Open the water chamber
lid and remove the water
reservoir (see figure 1).
This allows you to con-
veniently bring the water
reservoir to the faucet.
. Fillthe water container
~ with fresh. cold water just
below the hinge of the
handle (see figure 2).
. Insert the water contai-
ner back into the
appliance (see figure 3).
Make sure that it sits in
properly so the valve on
the base of the water
reservoir is activated.
The front view water level
indicator tells you how
~much water you have
added (see figure 4).
. Insert filter holder with
either the one or two cup
filter basket. Do this by
raising the filter holder
up into the machine at a
45 degree angle (see
figure 5). Turn the filter
holder to the right until it
is in the center of the
machine. This will lock
the filter holder into
.place. Now you are
ready to warm up your
"Espresso Pronto".
. Turn the "On/Off" s'
to "'" ON. The two ii
cator lights, both ye
and red, will illumin
As soon as the yell(
(thermostat) light g(
out, the machine is
ted up and ready te
. Turn the control dial
the" a "position al
allow cup of water Ie
through the machinE
Repeat this process
half the water in the
water container has
emptied (see figure
THIS WILL REQUIR
YOU TO STAY Win
THE MACHINE TO
EMPTY EACH CUP
BECOMES FULL. U
COMPLETION OF E
CUP RETURN TO TI
"0" POSITION!
Preparing. .
Espresso"
Step 1
. Fill the water contair
with fresh, cold watE
(see figure 1-3).
While making espre~
water can be added
the reservoir by opel
the hinged water Chi
ber lid and adding VI
to the water reservoi
using another recep'
to fill the container.
Step 2
. Place a cappuccino cup
that has at least a 5 oz.
capacity underneath the
filter holder spout
(see figure 6).
Page 7

..
Otherwise, the water
reservoir can be removed
and taken to the faucet.
Caution
If the water reservoir is
empty and the pump is run-
ning,youwillhearavery
distinct noise, which is lou-
der than the normal opera-
ting sound. If this happens,
turn the machine "OFF".
Check water reservoir and
refill as needed.
Never let the pump run
when the water reservoir is
empty as this can damage
the pump.
Step2
. Makesurethecontrol
dial is set to "0" position.
Then switch the applian- (0) only requires two
ce "ON" using the KRUPSmeasuring spo-
"ON/OFF" switch. 80th
indicator lights will illumi-
.nate (yellow and red).
When the yellow indica-
tor light goes out. the
machine is ready for use.
Prewarming Espresso!
Cappuccino Cups
If the machine is being you remove any coffee that
used for the first time
during the day, we rim of the filter holder, while
recommend prewarming you were filling or tamping
your cups with hot water
(see figure 8). After you
have made several cups
of espresso, the cups can
be prewarmed on the
warming plate (b) of your
"Espresso Pronto".
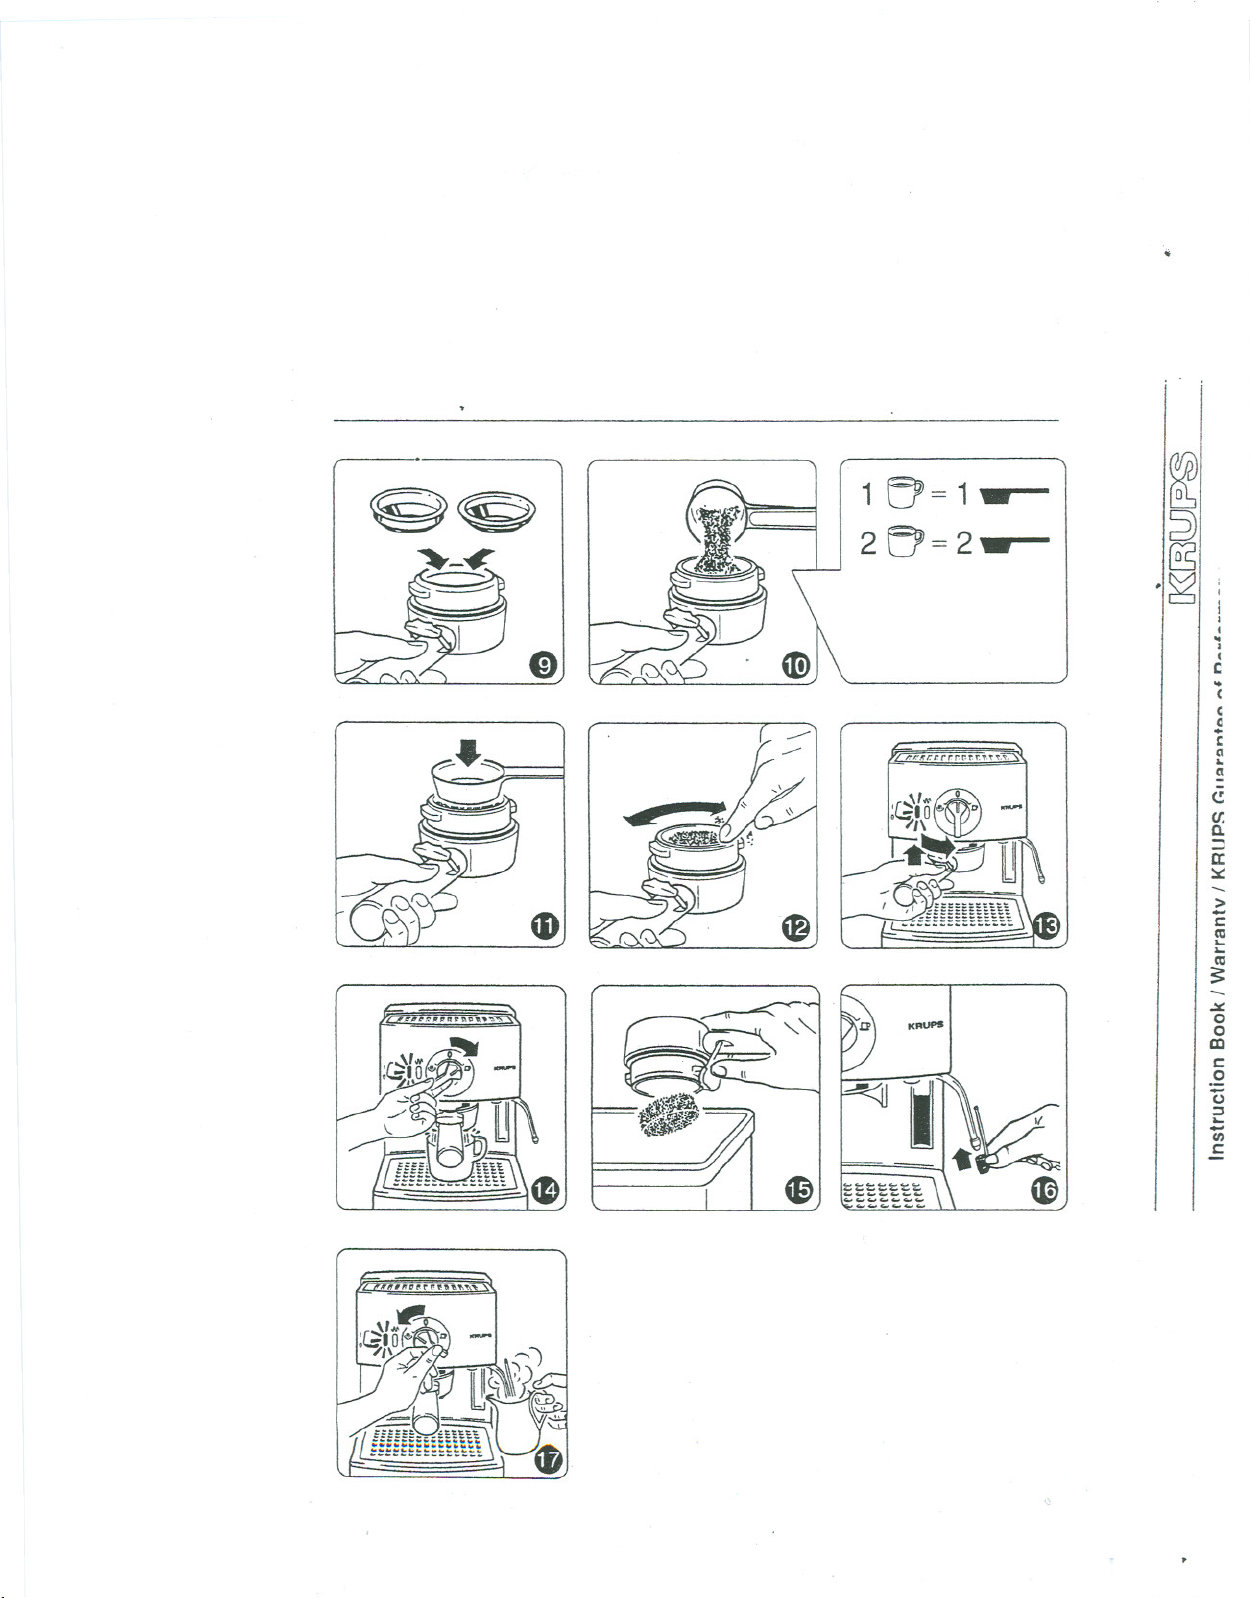
Step 3 Place acup which has at
Remove filter holder from
the appliance. Choose the
desired filter basket which
is required for making one
or two cups of espresso espresso, be sure to positi-
and insert filter holder
(see figure 9).
Depending upon which fil- When preparing cappucino,
ter basket you have cho-
sen, add one measuring
spoon of espresso coffee
for each cup of espresso
that you are preparing
(see figure 10).
. The one cup filter basket
(n) only requires one
level
KRUPSmeasuring
spoon of espresso
coffee.
. The two cup filter basket
ons of espresso coffee.
Make sure that you do not
overfill the filter basket, and
that you use the measuring
spoon (m) to press your
coffee to the proper
consistency for brewing
(see figure
It is also very important that
might have fallen onto the
the coffee (see figure 12).
Insert filter holder back into
the machine by raising it
up at a 45 degree angle
and turning it to the right.
Turn the filter holder to the
right, until it is firmly locked
into place (see figure 13).
11).
least a 2-2,5 oz. capacity
underneath the filter holder
spout. If you are preparing
more than one cup of
on two cups underneath
the brewing spouts.
you will need a cup that has
at leasta5 oz. capacity.
As soon as the yellow ther-
mostat light goes out turn
the control dial to the" il' "
position ( see figure 14).
When the desired amount
of espresso is inthe
cup(s), turn the control dial
back to the "0" position.
Place the cup aside.
To removethe coffee from
the filter basket, remove
the filter holder from the
machine by grasping the
filter holder and turning it to
the left,until it dislodges.
Dispose of used coffee
in a waste receptacle
(see figure 15).
Reinsert the empty filter
holder back into the machi-
ne to help keep it warm.
If you are preparing more
than one cup of espresso,
d;sregard the yellow ther-
mostat light. It simply indi-
cates that the thermostat is
regulating temperature.
.
2)
@5
-
a.
-
-
C)
en
a.
::>
c:
-
;:
oX
m
c
0
0
:J
...
(;j
c
Q)
()
c
(II
E
...
0
...
Q)
0
Q)
Q)
c
(II
...
(II
:J
>-
c
(II
...
...
(II
0
0
10
Page 8

::J
(J)
-
....
c:
0
-
o.
::J
aJ
0
0
~
:;E
II)
....
....
II)
::J
-
'<
A
JJ
C
"
(J)
G)
c:
II)
....
II)
::J
-
(!)
(!)
0
-
"
(!)
....
-
0
~
A
.
I
~ ~
(S
~
Preparing
Cappuccino
In addition to preparing
espresso, you also use your
"Espresso Pronto" to froth
milk for cappucino. Cappu-
cino reportedly takes its
name from the chocolate
hues of the robes worn by
the Capuchin monks who
favored this delicious desert
coffee. While cappuccino is
traditionally made up of
espresso and frothed milk,
it can be tailored to one's
own taste with cinnamon,
sugar, chocolate flakes, or
even liquor. Its versatility
makes cappucino a world-
wide gourmet choice.
As long as your "Espresso
Pronto" is turned on and
the water reservoir is pro-
perly filled, you can use the
steaming feature. There is
no need to prepare espres-
so before using'this
steaming feature. .
For best results, you sho~
use the "Perfect Froth"
attachment (e). if it is not in
place, attach it now (see
figure 16). KRUPS "Perfect
Froth" attachment lets you
froth milk perfectly for
making cappuccino.
I-
Frothing Milk
for Cappuccino
Step1
. Thefirst step in making
cappucino is to make
espresso. Seesection
"PreparingEspresso".
When preparing cappuc-
cino use a cappuccino
.cup which has a capacity
of at least 5 oz. You
should fill the cup '/2way
with espresso.
. Make sure that the con-
trol dial is in the "0" posi-
tion before turning on the
machine.
Step 2
. Take a stainless steel
frothing pitcher and fill it
.'/3 to '/2full with fresh.
cold milk and set aside.
This amount of milk will
yield enough froth for
two cups of cappuccino.
If you need more froth,
repeat these steps.
. We recommend using
skim or 2% milk if you pre-
fer a stiff, dense froth. Use
regular milk if you prefer a
more liquid type of froth.
AOTE:
When you start frothing milk,
there will be a thumping
sound which occurs during
the steam preparation. This
results from the interval con-
trolled water pump conden-
sing water into steam.
As the thumping sound
begins a few drops of water
will come out of the steam
nozzle before entirely
c.hanging over to steam.
Step 3
. When the yellow ther-
mostat light goes out,
insert the steam nozzle
half way into the mi
turn the control dia
"$" (see figure 1
. Leave the steam ne
the milk for approxi
45-60 seconds, del
ding on how much
you want and the ty
milk you are using.
NOTE:
. Do not bring milk t(
boil (this will hapPE
large bubbles star!
ming at the surfacE
the milk).
. Do not let the "Perf
Froth" attachment t
the bottom of the p
This will prevent yo
from frothing the m
Step 4
. After the milk is frot
keep the "Perfect F
in the milk until the
trol dial has been It
to the "0" position.
will prevent any spl
ring from occuring.
. After milk is frothed
aside. If you like ve
froth, let the pitcher
for a few seconds.
. Now you are ready
add the frothed mill
the already preparE
espresso. Pour the
into the cup by hole
back the froth with ~
spoon. Fill the reme
of the cup with the I
milk and then SpOOl
the frothed. In Italy
puccino is normally
part espresso to tWI
parts milk plus froth
"
Page 9

oj
If you are making more than
one or two cups of cappuc-
cino, it is recommended
that you place the finished
espresso on top of the war-
ming plate with a cloth or
saucer covering the cups.
This will help to keep the
espresso hot.
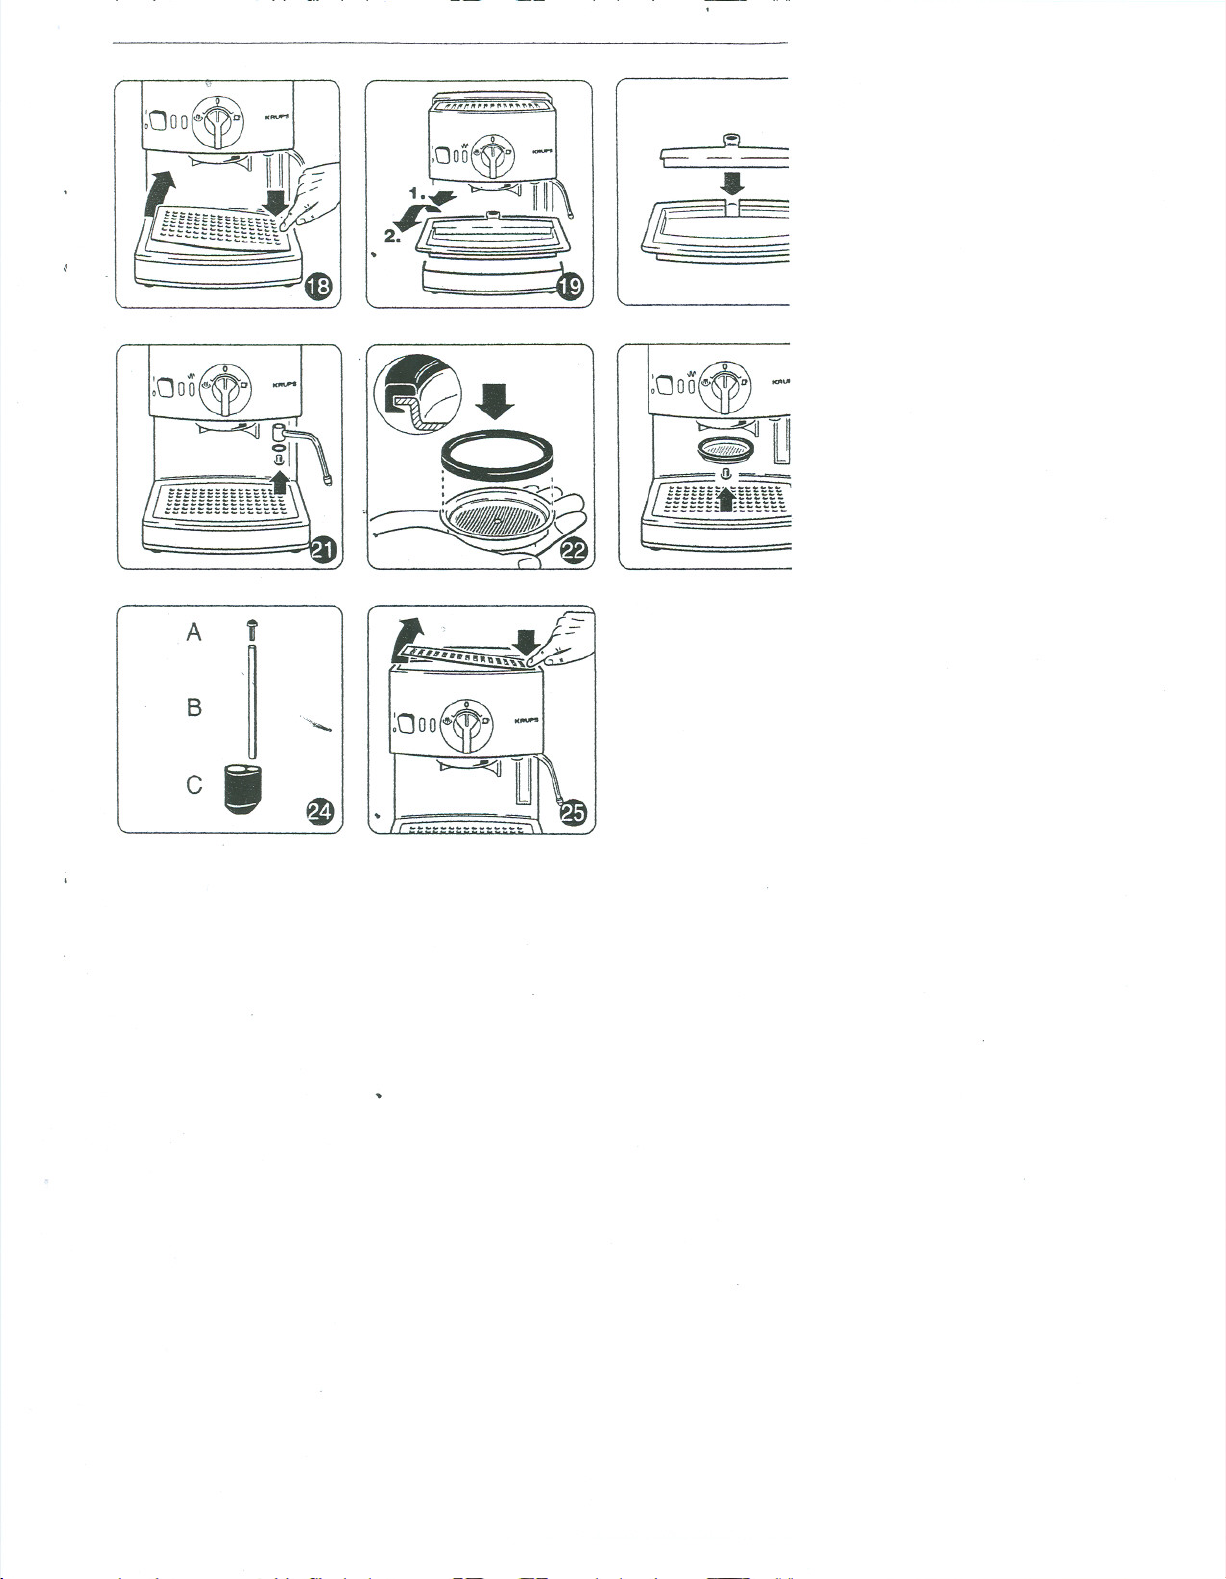
Attention:
The top closure of the "Per-
fect Froth" attachment (see
figure 24, part A) has a
very fine hole which draws
air into the milk. If this tiny
hole gets clogged, "Perfect
Froth" will not work pro-
perly. Therefore, never
immerse the top closure in
milk or froth.
If you wish to prepare
espresso immediately after
using the steam nozzle, the
machine must be cooled
down to the proper brewing
temperature. (When fro-
thing milk, the temperature
of the water is much hotter
than when you are brewing
espresso.)
In order that you do not
burn your next batch of
espresso, insert the clean
filter holder into the machi-
neand turn the control dial
to" a ". Allow '/2 cup of
water to run through the
machine.
This process cools the
machine sufficiently to
prepare additional cups
of espresso.
12
Cleaning The
" PerlectFroth
Attachment
It is strongly advised that
you wipe off the milk resi-
due which may have
collected on the "Perfect
Froth" and steaming nozzle
after the frothing process is
completed.
For a thorough cleaning of
the "Perfect Froth" attach-
ment, remove the separate
:.
parts A, B, & C .
(see figure 24).
All parts should be rinsed
in warm, soapy water. If the
small section of part A is
clogged, it can be opened
using a fine sewing needle.
Use caution when remo-
ving the "Perfect Froth"
from the steaming nozzle
as it may stili be hot.
Use a damp cloth to clean
the steam nozzle.
Use caution when clea-
ning or removing the
steaming nozzle as it may
stili be hot.
Cleaning. .
Th~. Mac:hioe
. After preparing espresso
five times, the drip tray
and grid may need to be
emptied and cleaned
(see figures 19 and 19).
. The water reservoir, drip
tray, baffle grid, filter hol-
der, and Perfect Froth
attachment should be
washed and rinsed in
warm, soapy water on a
regular basis.
. Before replacing the drip
tray and grid, make sure
the baffle has been pla-
ced in the drip tray pro-
perly (see figure 20).
. If the steam nozzle be-
comes clogged for any
reason, remove the
screw that is holding it in
position (see figure 21).
Rinse it under the faucet
with warm water. If it is still
clogged, take a sewing
needle and insert it into the
tip of the steam nozzle to
free any milk particles.
. The warming tray can be
removed and wiped with
a damp Cloth for easy
cleaning (see figure 25).
DO NOT PLACE ANY
LOOSE PIECES IN THE
DISHWASHER.
IMPORT ANT
Clean the steam nozzle
each time you have immer-
sed it in milk, otherwise the
inside of the nozzle beco-
mes clogged with milk par-
ticles. Allow the steam to
bscape into a wet cloth for
one or two seconds after
frothing milk. This will flush
out any milk residue.
& CAUTION:
DO NOT TRY TO
DISASSEMBLE THE MAIN
BODY OF THE MACtiINE.
'I~
~:
2)
@5
,
I
I
4
C
.
'(
,
Page 10

Decalcifying
Under normal conditions
you do not need to decalcify
your "Espresso Pronto".
However, in areas where
there is hard water or if you
use your machine very fre-
quently we recommend
decalcifying. You will know
::J
/JI
-
...
c
2.
o.
tD
0
0
=""
:E
I»
...
...
I»
::J
.:<
"
:a
c
."
(/)
G)
c
I»
...
I»
::J
-
(1)
0
-
."
(1) voir.
...
-
0
...
3
I»
::J
A'
n
(1)
22J
(S
when such a cleaning is
necessary by an obvious
slowdown in the brewing
time. Decalcifier is widely
availableand can be
purchased through KRUPS
ConsumerService Depart-
ment.
How To Decalcify
. Before beginning, it is
necessary to removethe
strainer from the brewing
head (see
This can be done using
a flat head srew driver.
. Removethe water reser-
voir and fill it with luke
warm water. Dissolve'1he
decalcifying solution into
the water reservoir.
Replace the water reser-
. Place acup underneath
the brewing spout.
.Turn the control dial (c)
to the" U "position.
-
Stop between each cup
and empty it as it beco-
mes full. Proceed with
this until all of the water
has run through the
machine. Allow the appli- brewing head.
ance to cool for 10-15
minutes when done.
figure 22).
.Toeliminatetracesof the
decalcifying solution, fill Pump makes loud r
the water reservoir with
fresh, cold water.
. Turn the control dial to
the" U " position and
clean the machine until
there is no more water in
the reservoir.
Problem:
Cause:
. No water in the w
reservoir.
. Oldor dry coffee
being used, wate,
not properly flow I
the coffee.
Problem and
causes
Problem:
Coffee leaking from filter::J
holder.
Cause:
!' Filterholder not properly
inserted in the machine.
. Filterholder not pushed
in as far as itwill go.
. No elasticity in the
brewing head seal.
(Thismay happen after a
long period of use). This
part can be ordered
through KRUPSConsu-
mer Service Department.
. If the seal has lost its
elasticity, it must
replaced with a new one.
Allow the appliance to
cool down and then
unscrew the sieve from
the brewing head. Re-
move the seal carefully
from the brewing head
using a screw driver.
. Place the new seal onto
the machine and then
place the flattened side
of the sieve back into
be
Problem:
Coffee does not carr
of filter holder.
Cause:
. No water in the We
reservoir.
. Water reservoir no
ted correctly.
. Filter blocked bec.
the coffee mixture
fine or has been ta
too hard.
. Machine needs to
decalcified.
Problem:
Espresso has no "Cre
Cause:(1)
. Oldordriedoutco
being used.
. Coffeenotsuitable
espresso.
. Coffee ground too
coarsely.
. Toolittlecoffeein tt
filter or not properly
tamped.
.
Page 11
it
"
Problem:
Notenough frothwhen
frothingmilk.
Cause:
. Steam nozzle is clogged.
. Milkis not fresh.
. The pitcher that you are
using is not suitable.
(Itis recommended that
you use a(j)tainless steel
frothing pitcher.) Cold
conducts better to metal
than to glass or plastic.
. The type of milkis not
suitable.
We recommend using
2% or skim milk.Whole
milkis acceptable, but
due to the fat molecules,
itwillnot have as dense
a froth, as ifyou were to
use 2% or skimmilk.
KRUPSLIMITEDONEYEAR
WARRANTY
YourKRUPSproduct is covered by the
followingwarranty ( broken glass jars are
excluded fromwarranty):
Ifwithinone year from the date of
purchase, this KRUPSproducts failsto
function because of defect in materials or
workmanship, KRUPSNorthAmerica,
Inc. will,at its option, repair or replace
the unitwithoutcharge, provided the
owner returns:
. the KRUPSproduct
(securely packed) and
. Proofof date of purchase to:
KRUPSConsumerService
KRUPSNorthAmerica, Inc.
7 Reuten Drive
Closter, NJ 07624
To assure prompt service, please include
a letter indicating the specific cause for
returning your KRUPS product. Do not
return any glass jars or other loose
parts, or any accessories which are not
defective with your appliance to avoid
damage and loss in transit.
This warranty will be void if malfunction
or damage was caused to the product by
accident, misuse or voltage other than
marked on the product and/or described
in the instructions, abuse including
tampering, damage in transit or use for
commercial purposes.
This warranty gives you specific legal
rights, and you also may have other
rights which vary from state to state.
~
tl
2)
~ B
'J~ ~
-
a..
-
Q)
-
s::
tV
...
tV
;j
G
C/)
a..
::>
a:
~
c
s::
tV
...
...
tV
3:
oX
0
0
m
s::
0
U
;j
...
-
U)
s::
...
0
...
Q)
0
Q)
14
Page 12

::J
0
-
...
c
!l
O'
::J
aJ
0
0
~
-..
:;E
II)
...
...
II)
::J
-
'<
"
JJ
C
"
en
G)
c
II)
...
II)
::J
-
(1)
(1)
0
-
"
(1)
...
-
0
~
~I'
I
~ ~
CS
~
\'; .
GUARANTEE OF PERFORMANCE
This fine KRUPS product is manufactured according to a rigid code of qu
standards, and, with minimum care, should give years of satisfying servh
However, should the need arise for repairs or for replacement parts
(within or after the warranty Deriod), please do as follows for the fastest,
most convenient service.
For parts orders or anx other questions on how to ooerate your KRUPS
duct, call our CONSUMER SERVICE DEPARTMENT toll free (Monday thr
Friday (except holidays) from 9AM
1-800-526-5377.
PLEASE NOTE THE TYPE NUMBER OF YOUR KRUPS APPLIANCE. YOl
MUST HAVE THIS INFORMATION BEFORE CALLING OUR CONSUMER!
VICE. This product is Tyee #988.
KRUPS Consumer Service
KRUPS North America
7 Reuten Drive
CLOSTER, New Jersey 07624
Pack up your appllanc~ carefully to avoid damage In shipping and be su
provide us with the following information:
A. Your name, address and type number of the appliance on the outside
wrapping of the packaging.
B. Tape'a brief note to the body of the machine indicating:
how long you owned it;
-"'" the possible defect.
IMPORTANT: ONLY SENDTHE DEFECTIVEAPPLIANCE. KEEP ALL
REMOVABLE PARTS AT HOME TO AVOID FURTHER
DAMAGE IN TRANSIT!
We will repair or replace your KRUPS product without delay and send it
to vou with no charee fOr shipping (if you send us a receipt for the UPS
ground or Parcel Post charges, we will reimburse you for shipping char~
within or after the warranty period).
On all-repair work to be done after the warranty period, our Consumer
Service Department will bill you for material and labor only.
Do not return your appliance to the store. The KRUPS Guarantee of Perf,
mance program has been designed to provide you with the best posslblt
service
using genuine KRUPS parts.
until 4 PM Eastern Standard Time)
All repair work and replaced parts will carry an extended 90-day-warrant'
"
 Loading...