

Krups CaféPresso Crematic Time Instruction Manual
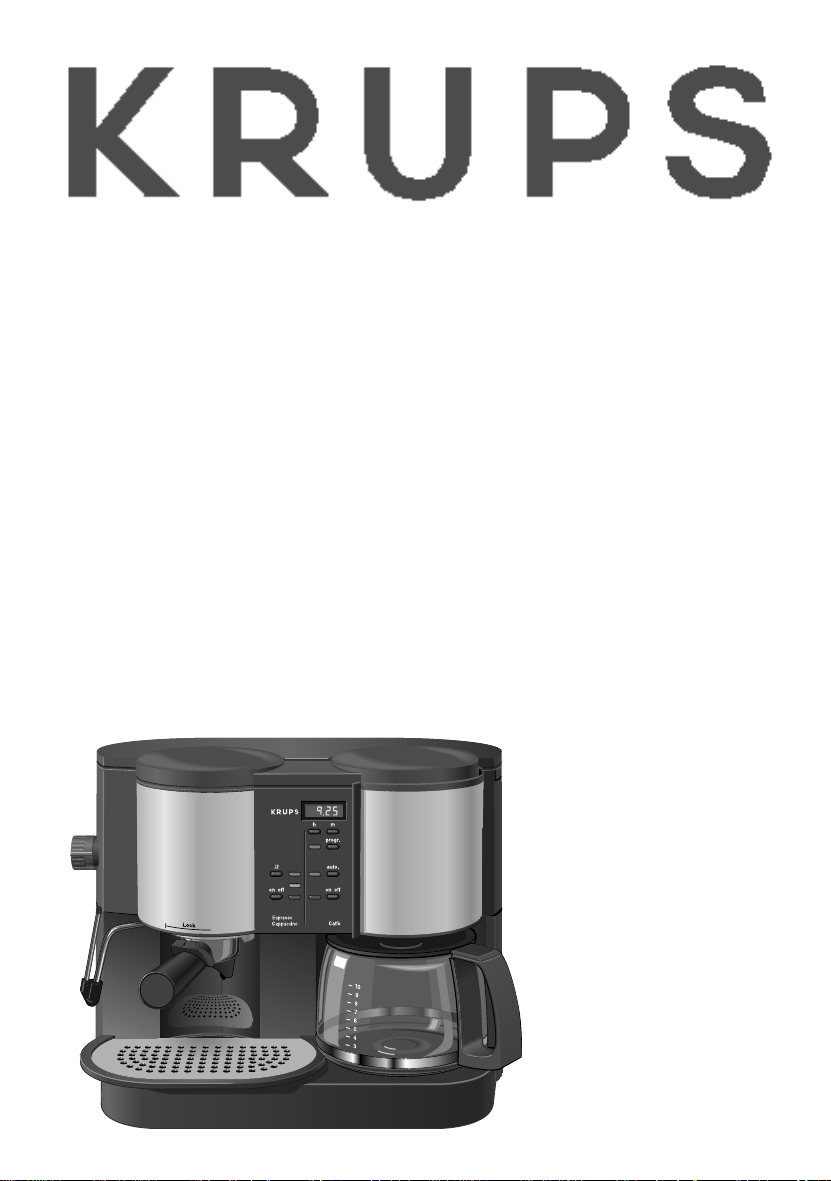
CaféPresso Crematic Time
Art. 888
hm
progr.
auto.
on offon off
a
s
t
u
v
e
f
g
b
h
i
j
k
l
c
d
hm
progr.
auto.
on offon off
m
n
o
p
q
r
Espresso
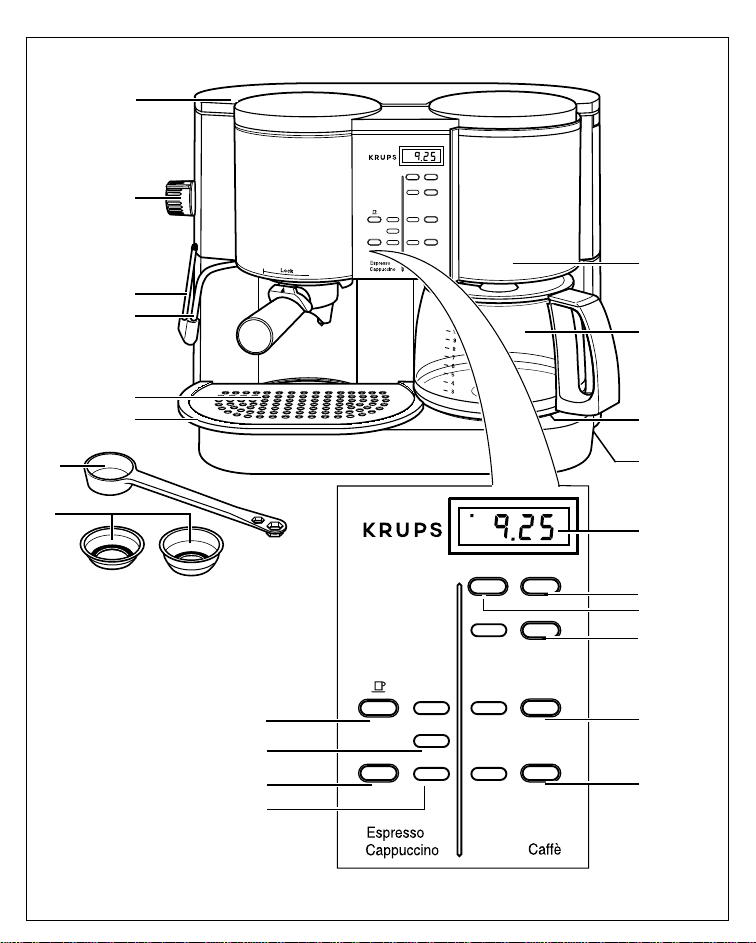
a:
Water container lid
b: Rotary valve knob
c:
Espresso key
d:
Heating indicator lamp (yellow)
e: ON/OFF switch
f:
Operating indicator lamp (red)
g: Frothing aid
h: Steam & hot water nozzle
i: Cup grid
j: Drip tray
k: Measuring spoon
l: Filter sieve for 1 cup or 2
Caffè
m:
Display panel
n: Setting key for minutes
o: Setting key for hours
p: Programme key
q: Automatic preparation of
coffee
r: ON/OFF key
s: Swivel filter
t: Glass jug
u: Warming plate
v: Flex storage
Espresso
a:
Couvercle du réservoir d’eau
b: Robinet vapeur rotatif
c: Touche espresso
d: Témoin lumineux (jaune) de
chauffage
e: Bouton marche/arrêt
f: Témoin lumineux (rouge) de
fonctionnement
g: Accessoire Cappuccino
h: Buse vapeur/eau chaude
i: Grille repose-tasses
j: Tiroir récolte-gouttes
k: Cuillère doseur
l: Filtre pour 1 ou 2 tasses
Caffè
m:
Ecran à affichage digital
n: Touche de réglage des
minutes
o: Touche de réglage des
heures
p: Touche de programmation
q: Préparation automatique du
café
r: Touche marche/arrêt
s: Porte filtre pivotant
t: Verseuse
u: Plaque chauffante
v: Enrouleur de cordon

Espresso
Tapa del depósito de agua
a:
b: Botón de la válvula giratorio
c: Tecla Espresso
d: Luz piloto indicadora de
calentamiento (amarilla)
e: Interruptor ON/OFF
f: Luz piloto indicadora de
puesta en marcha (rojo)
g: Accesorio capuccino
h: Vaporizador de agua caliente
y vapor
i: Rejilla para tazas
j: Bandeja recogegotas
k: Cuchara dosificadora
l: Tamiz del filtro para 1 o 2
tazas
Caffè
Panel de display
m:
n: Tecla de ajuste de los
minutos
o: Tecla de ajuste de las horas
p: Tecla de programa
q: Preparación automática del
café
r: Tecla ON/OFF
s: Filtro giratorio
t: Jarra de vidrio
u: Placa de calentamiento
v: Recogecables
hm
progr.
auto.
on offon off
on off
hm
progr.
auto.
on offon off
on off
hm
progr.
auto.
on offon off
on off
hm
progr.
auto.
on offon off
on off
hm
progr.
auto.
on offon off
hm
progr.
auto.
on offon off
4
5
6
hm
progr.
auto.
on offon off
hm
progr.
auto.
on offon off
1
2
3
7
8
9
10 11
12
Espresso
A
B
C
24
hm
progr.
auto.
on offon off
hm
progr.
auto.
on offon off
on off
h
on off
20
19
21
18
22
23
hm
progr.
auto.
on offon off
on off
hm
progr.
auto.
on offon off
13
14
15
16
17

hm
progr.
auto.
on offon off
31
hm
progr.
auto.
on offon off
30
hm
progr.
auto.
on offon off
29
hm
progr.
auto.
on offon off
hm
progr.
34
hm
progr.
auto.
on offon off
hm
progr.
33
hm
progr.
auto.
on offon off
auto.
on off
32
36
37
hm
progr.
auto.
on offon off
auto.
on off
35
hm
progr.
auto.
on offon off
hm
progr.
hm
progr.
auto.
on offon off
25
26
27
28
Caffè

English
GB
Safety precautions
■ Carefully read through these instructions
before using the appliance. Connect the
appliance only to an earthed mains
supply socket. The voltage rating stated
on the rating plate of the appliance must
correspond with that of the mains supply.
■ Do not place or use the appliance on hot
surfaces, such as a stove hotplate, or in
the vicinity of a naked gas flame.
■ Do not remove the filter carrier filled with
ground coffee whilst the liquid is running
through, as the appliance is at this time
under pressure.
■ Do not refill the coffee-appliance whilst it
is still hot; it takes about ten minutes to
cool down.
■ Do not pour hot water into the water
reservoirs.
■ The mains plug must be pulled out if
anything untoward occurs during the
brewing operation, as also before every
time the appliance is cleaned.
■ Do not remove the mains plug by pulling
on the flex and do not place or hang the
flex over edges or corners.
■ Do not allow yourself or the mains flex to
come into contact with hot parts of the
appliance, such as the filter carrier,
warming plate or steam nozzle.
■ Never dip the appliance into water.
■ The glass jug is not suitable for use in
microwaves, above open fire or on stove
plates.
■ Keep the appliance away from children.
Do not let the mains flex hang down.
■ Do not use the appliance if either the
mains flex or the appliance itself is
damaged.
■ Observe the instructions for descaling.
■ If the mains flex of this appliance
becomes damaged, it must be repaired
only by the KRUPS customer service
department or by a similarly qualified
individual, in order to avoid any danger to
the person.
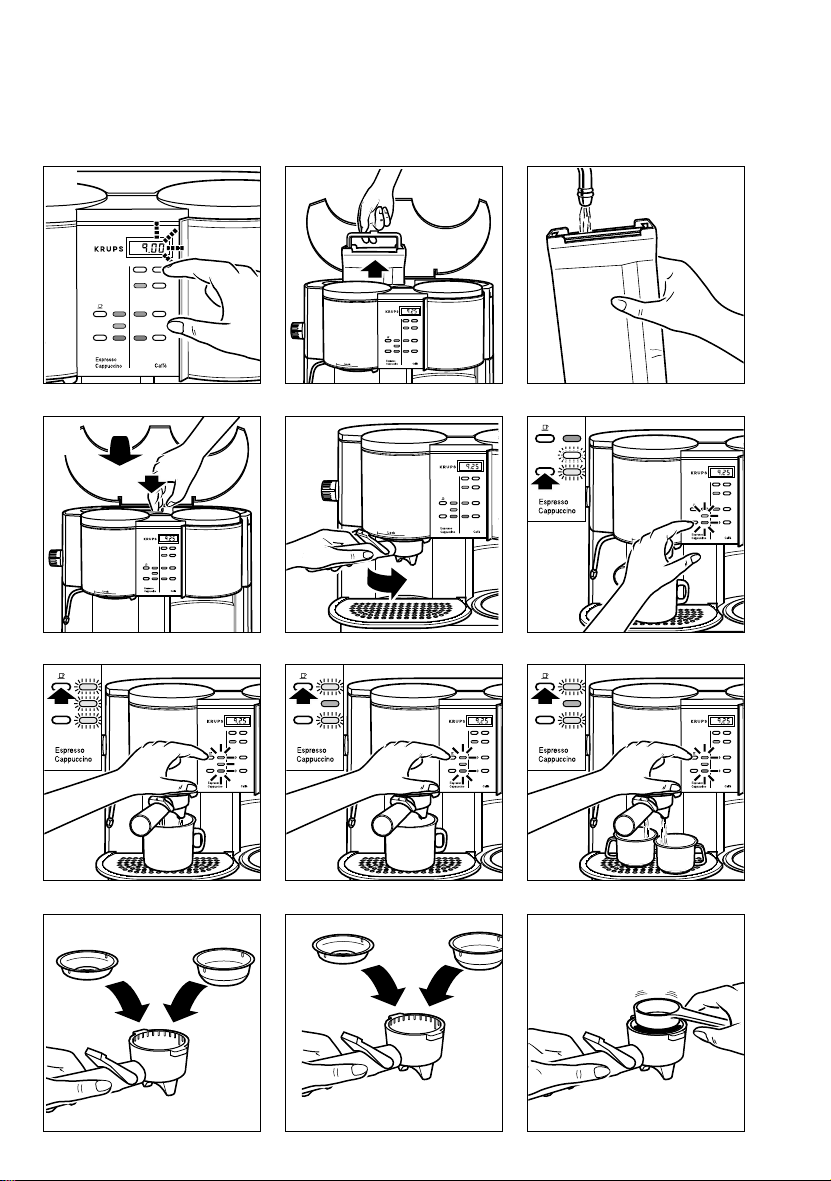
Setting the clock
■ After plugging in at the mains, 0.00 will
blink in the display panel. Press the “h“
key to set the hours and the “m“ key to
set the minutes (1).
Espresso / Cappuccino
Espresso Coffee
Espresso is much stronger and more
aromatic than normal coffee and is drunk
out of small cups called espresso cups. It is
prepared by forcing hot water under
pressure through ground coffee. This
produces the delightful black coffee with the
stimulating effect.
Apart from its characteristic flavour, the
hallmark of espresso is the typical formation
of a splendid froth, called crema. This
requires a high pressure and the use of
genuine, properly roasted espresso coffee
beans which have been correctly ground.
If you do not purchase ready-ground
espresso coffee, grind the coffee beans in a
coffee mill with the setting medium to fine.
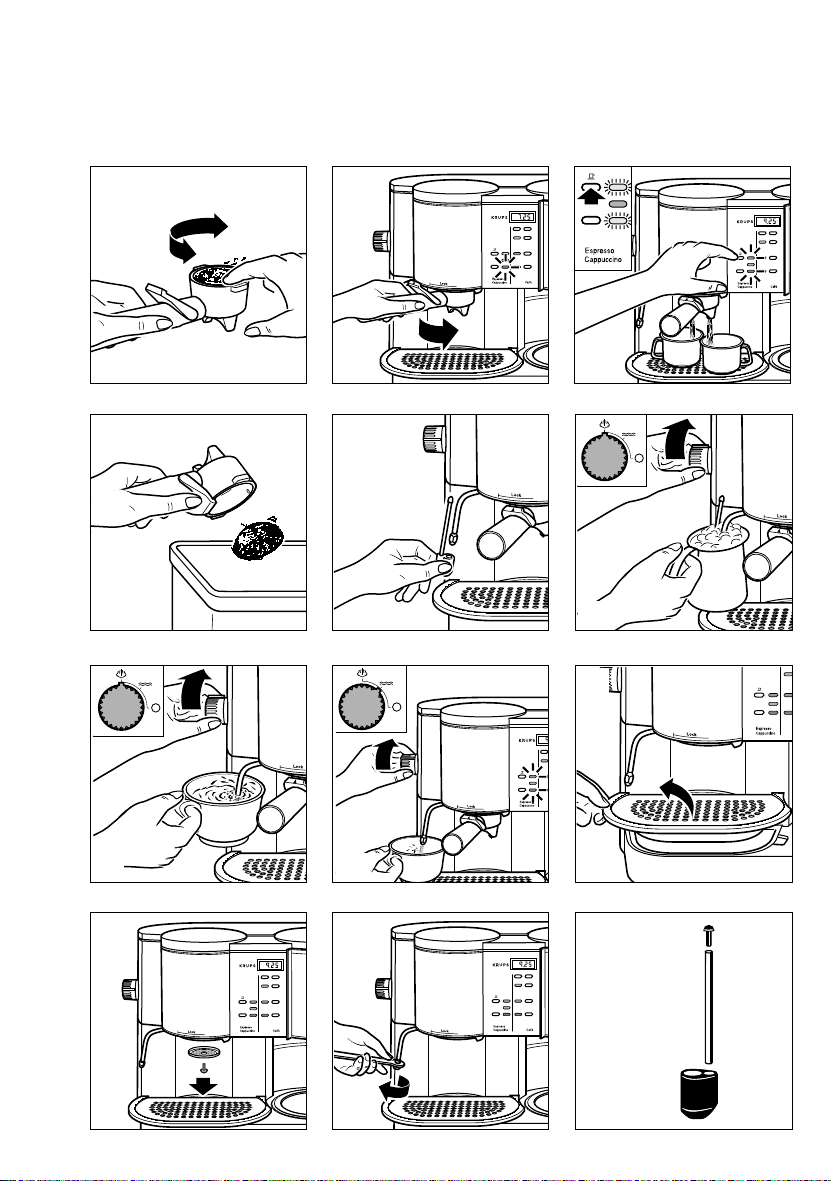
Preparing the appliance
■ Open the lid and remove the water
container (2).
■ Fill the water container with water (3).
■ Replace the water container, pressing it
down firmly so that the base valve will
open. Then close the lid (4).
Before first use
Before using the appliance for the first time,
as well as if it has not been used for a
lengthy period, you should allow several
cups of water to run through the system
without using espresso coffee meal, in order
to rinse out the system.
Place one of the two filter sieves in the filter
carrier and push the sieve holder back.
■ Locate the filter carrier on the left at the
mark on the housing of the brewing head
and turn it tightly to the right (5).
Place the largest convenient receptacle
beneath the filter carrier.
■ Swith on the appliance by pressing the
“on off“ key (6).
The operating indicator lamp will glow red
and the heating indicator lamp will glow
yellow.
■ Press the espresso key , whereby the
pump will be switched on (7).
The green control lamp will then glow.
If the heating system is empty, such as upon
first use, the system will first fill with water,
acoompanied by an audible pumping noise,
before water runs out of the filter carrier.
As soon as water runs out, press the
espresso key , whereupon the green
indicator lamp will cease to glow, and allow
the appliance to heat up.
A little water may run out of the brewing
head during the heating phase.
■ When the yellow heating control lamp
ceases to glow, press the espresso key
again (8).
Allow 2-3 cups of water to run through the
system. To empty the receptacle, interrupt the
operation by pressing the espresso key .
To clean through the steam pipe, place a
receptacle beneath it, turn the valve knob to
the position and press the espresso key
. Then allow 1-2 cups to run through.
Finally press the espresso key once
again, return the valve knob to the
position and empty the receptacle.
Filling the heating
system with water
Before working with the appliance, make
sure that the heating system is filled with
water by pressing the espresso key ,
whereby water should run out of the
brewing head.
If the heating system should become empty
whilst generating steam, which then ceases
to issue form the steam pipe, then the
heating system must be refilled.
Place a receptacle under the brewing head,
set the valve knob to and press the
espresso key .
As soon as water runs out of the brewing
head, press the espresso key again. Then
continue with steam generation by turning
the valve knob to the position again.
Preparation of espresso
■ Fill the water container (2) (3) (4).
■ Press the espresso key and check that
water runs from the brewing head (7).
Press the espresso key once again.
The yellow heating indicator lamp will cease
to glow when the necessary temperature
has been reached.
Prewarm the espresso cups by putting the
filter carrier in place without espresso coffee
meal and then placing the cups under the
filter carrier.
■ Press the espresso key (9).
Fill the cups with hot water and then press
the espresso key once again.
Remove the filter carrier.
■ Insert the desired filter sieve for 1 cup or
2 into the filter carrier (10).
■ Fill with 1 or 2 level measuring spoonfuls
of espresso coffee meal (11).
■ So that the coffee meal is evenly
distributed in the filter sieve, it should be
lightly pressed down with the measuring
spoon (12).

■ Clean any coffee grains from the edge of
the filter sieve (13).
■ Insert the filter carrier and turn it firmly to
the right (14).
Place one or two prewarmed espresso
cup(s) beneath the filter carrier.
■ Prepare espresso by pressing the
espresso key (15).
■ After the required espresso has run
through, press the espresso key again,
remove the filter carrier and knock out the
spent coffee meal (16).
The next lot of espresso can be prepared
after the sieve has been replenished with
espresso meal.
Generation of steam
Steam can be used both for frothing up milk
for cappuccino and for the heating of
liquids.
Since a higher temperature is necessary for
the generation of steam than that required
for preparing espresso, the espresso should
always be prepared first, as the coffee meal
might otherwise become burnt.
Due to the nature of the system, a little
water, which can be collected in a separate
vessel, will issue from the steam pipe before
the steam appears.
Frothing up milk for cappuccino
After you have prepared the espresso, froth
up the milk for the cappuccino.
To obtain the best possible frothing results,
you should make use of the separate
frothing aid.
■ Push the frothing aid onto the steam
nozzle (17).
N.B. THE FROTHING AID IS TO BE
USED ONLY FOR THE FROTHING UP
OF MILK
Pour about 100 ml of low fat milk into a
small narrow jug of maximum 0,5 ml
capacity, which must fit conveniently below
the steam/hot water nozzle of the machine.
The milk should be well cooled. You should
also use a cold jug, so do not wash it out
first with warm water.
As soon as the yellow control lamp ceases
to glow, hold a separate vessel beneath the
steam pipe and turn the knob to position
. Allow water to run into the vessel until
steam appears. Then turn the knob to
position .
Now commence the milk frothing operation.
Hold the jug under the frothing aid in such a
way that the nozzle dips completely into the
milk.
■ Turn the valve knob to the position.
Hold the jug steady during the frothing
operation (18).
The nozzle should not touch the bottom of
the jug so as not the impede the flow of
steam.
After the frothing operation, turn the valve
knob to the position and remove the jug.
Now turn the valve knob to the steam
position for a moment to blow out any
residual milk from the steam/hot water
nozzle, putting an empty receptacle below
to cat the drops.
Clean the frothing aid and also the
steam/hot water nozzle with a moist cloth
immediately after the frothing operation.
Heating liquids
Swing out the steam/hot water nozzle.
Pull off the frothing aid.
Switch on the appliance.
■ Make sure that the heating system is full
of water by pressing the espresso key
to check that water runs through (7).
Then press the espresso key again.
Due to the nature of the system, water and
steam will issue from the brewing head
during the heating operation.
As soon as the yellow control lamp ceases
to glow, hold a separate vessel beneath the
steam pipe and turn the knob to position
. Allow water to run into the vessel until
steam appears. Then turn the knob to
position .
So position the vessel beneath the steam
pipe that the jet dips into the liquid.
 Loading...