


Couverture B90 oneway US 0827 984-B.qxd:Couverture B90 onewa#2699F0.qxd 29/01/08 9:20 Page
0827 984-C
Couverture B90 oneway US 0827 984-B.qxd:Couverture B90 onewa#2699F0.qxd 29/01/08 9:20 Page
1-Beertender one way B90 US.qxd:1-B95 oneway Amsterdam_UK.qxd 29/01/08 9:22 Page 1
1- Im por tantsa fegua rds
2- Gene ral Information
3- Produc tde scription
4- Befor e use
5- UsingtheBee rTende r®
6- Troubleshooting
7- Dispo sal
8- Consu me rservice
9- Lim itedwa rra nty
2
4
5
6
7
1 1
1 6
1 6
1 7
E N G L IS H
1

1-Beertender one way B90 US.qxd:1-B95 oneway Amsterdam_UK.qxd 29/01/08 9:22 Page 2
E N G L IS H
|
1 |
- IMPO |
R TAN T |
|||
|
SAF |
EGU |
A RD |
S |
||
W |
hen using electricalap |
plianc |
es, b asic |
safety |
||
prec autions |
sho ulda lways be |
followed |
to red uce the |
|||
riskof fire, electricshoc |
k, a nd/ or injury to p ersons |
|||||
including the following : |
|
|
|
|||
1. |
Re ad allinstructions . |
|
|
|||
2. |
To protec ta gainstfire, elec tric shock an d injury |
|||||
|
to pe rsons , do |
not p lace |
c ord, p lugs o r |
|||
|
appli anc |
e in wa teror otherliquid. |
|
|||
3.Cl ose supervision is nece ssary when an y
appli anc e is used nea rc hildr en. Keep a p p liance outof reac h o fc hildren. Produ c tno tintended foruseby c hildren.
4.Unplugfrom outletwhen not inusea nd b efore
|
clea ning. Allo w to c ool be fore p uttingon |
or |
||
|
taking off p a rts, a nd befo reclea ning the rest |
|||
|
of theap pliance . |
|
|
|
5. |
Do not o p era tea ny ap pliance |
witha |
d ama |
ged |
|
cor d o rplugor afterthea pp |
lianc e ma |
lfunctions, |
|
|
or has be en da m a ged in any m a nner.Return |
|||
|
appli anc e to yournea resta uthorized |
KRUPS |
||
|
Service Cente rfor exam ination, repair o r |
|
||
|
adjustment(see Lim ited War |
ra nty). |
|
|
6.The useof an ac c essory not evaluated foruse
|
withthisappl iance |
by KRUP S m a y resultinfire, |
||||
|
electric shoc k or injury to pe rson s. |
|||||
7 . |
Do |
not useoutdoor s. |
|
|||
8 . |
Do |
not letcord |
ha ng overed ge of tab leo r |
|||
|
c ounter,o rtouch hot surface s. |
|||||
9 . |
Do |
not pla ce on |
or nea ra hot gas o relectric |
|||
|
burner,or ina hea ted oven. |
|||||
1 0 . |
To |
disconn ect, turnthecon |
tro lto «off»then |
|||
|
remo |
ve plugfrom |
wa llo utlet. |
|||
1 1. |
Do |
not usea pplian ce forother than intended |
||||
|
use. |
|
|
|
|
|
1 2 . |
Ap |
pliance for househo ld indo or use o nly. |
||||
1 3 . |
Do |
not imm erse inwa ter. |
|
|||
SA V E |
TH ES E |
INS |
TRUCTIONS |
|||
2
1-Beertender one way B90 US.qxd:1-B95 oneway Amsterdam_UK.qxd 29/01/08 9:22 Page 3
CA UTION
Thisapp liance isfor househo ld useon ly.An y servicing otherthan c lea ning a nd usermain tenance should be pe rform ed by a n a uthorized service representative.
• To red uce theriskof fireor electricsho ck, d o not remo ve thebas e. No userserviceab lep arts inside. Re pa irshould be done b y authorized service personne lonly.
•Chec k voltage to be sure thatthe voltage indicated on thena me pla teisc o mp atiblewith yourvoltage.
•Nev erc lean withsc ouring pow ders or harsh chem icals.
•Nev erm a ke technical c ha nges o rusethe
appli anc e in a ny m a nnero therthan as d irected.
|
SHOR |
TC OR |
D |
|
|
INS |
TRU C TION |
S |
|
A. |
W e do not rec om |
me nd |
using an extension co rd |
|
withthisd evice. |
|
|
|
|
B. |
Ifan extension c ord isa bs olutely necessar y : |
|||
1- thema rked elec trical rating of the extension c ord should b e at leastas great as the electrica lrating of thea ppl iance.
2- To reduce therisk of injury,d o not d rap e cor d o verthec o untertop o rtable top where
itca n b e p ulled o n b y ch ildren o rtripp ed over unintentionally.
3 - Theextension co rd should be at least 18 A WG .
E N G L IS H
3
1-Beertender one way B90 US.qxd:1-B95 oneway Amsterdam_UK.qxd 29/01/08 9:22 Page 4
E N G L IS H
2 General informat ion
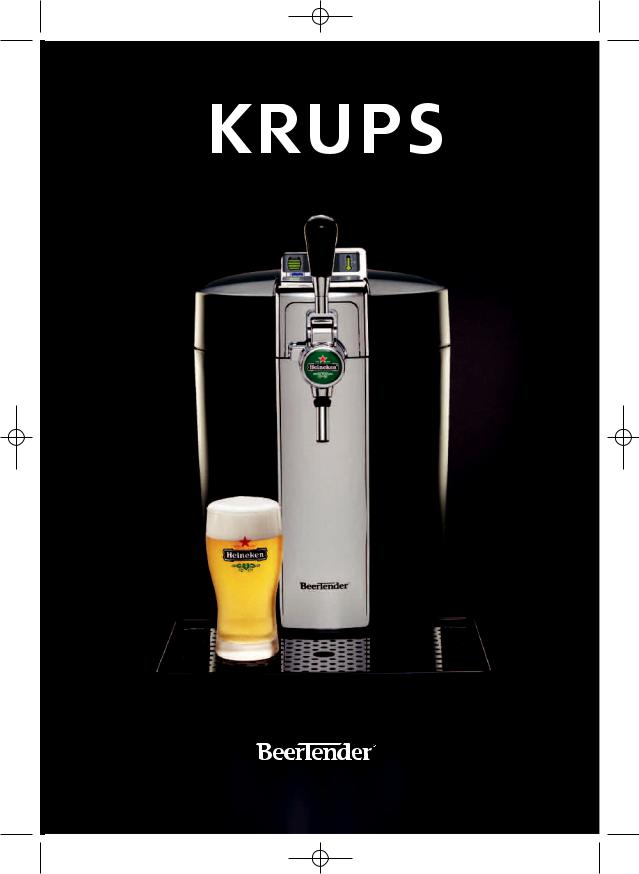
The BeerTender® is designed to dispense chilled beer in a domestic setting. Only a Heineken® 5 Liter DraughtKegTM and Heineken Premium Light® 5 Liter DraughtKegTM can be used with the BeerTender. You should not use any other commercially available beer containers or kegs. Do not introduce any materials other than the DraughtKeg inside the appliance.
BeerTender is designed for use by responsible adults of legal drinking age.
G uidelines for read ing these instructions
* The warning triangle indicates instructions that are important for the userʼs safety.
* Please adhere strictly to these directions to ensure proper use and avoid serious injury!
* This symbol highlights information that is especially important for making the best use of the machine.
4
1-Beertender one way B90 US.qxd:1-B95 oneway Amsterdam_UK.qxd 29/01/08 9:22 Page 5
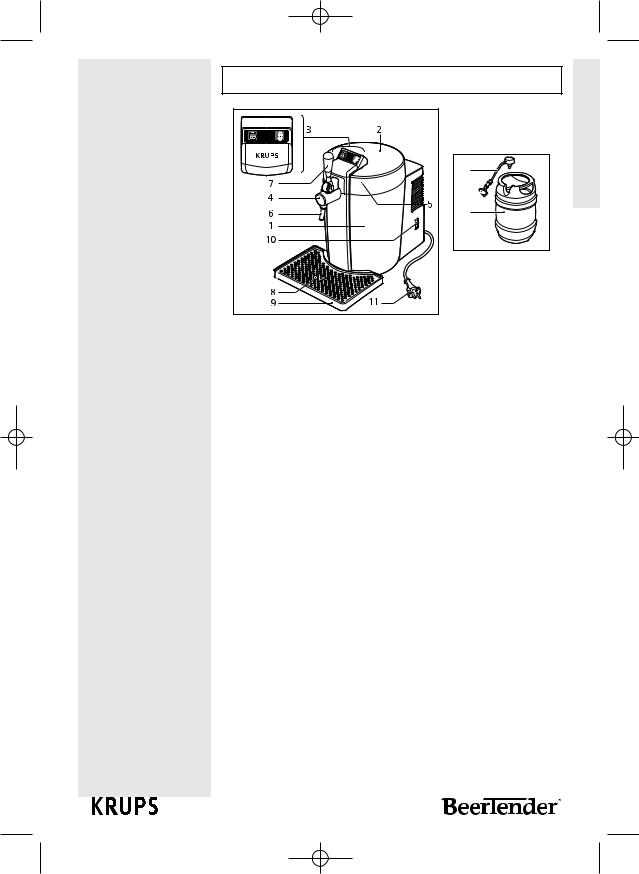
3 - Pro duct d escription
E N G L IS H
13
12
1Bee. rTenderBeerTenderCom atponehomentsdraughting system 2. Lid
3. LED Control panel
4. Tap cover
5. Press-in panel to open lid of BeerTender 6. Dispensing pour spout
7. Beer tap handle
8. Drip grate
9. Drip tray
10. ON/OFF switch
11. Power cord with plug
TM
12Dr aughtKeg. 5 Liter DraughtKegCom pone (nottsincluded)
13. Draught beer tube (should be changed with each new DraughtKeg)
5
1-Beertender one way B90 US.qxd:1-B95 oneway Amsterdam_UK.qxd 29/01/08 9:22 Page 6
E N G L IS H
54°F |
86°F |
4 - Befo reuse
*ChildMakeSa surefetyLocthatkchildren can not play with the appliance.
* Do not leave the materials used to pack the appliance within childrenʼs reach.
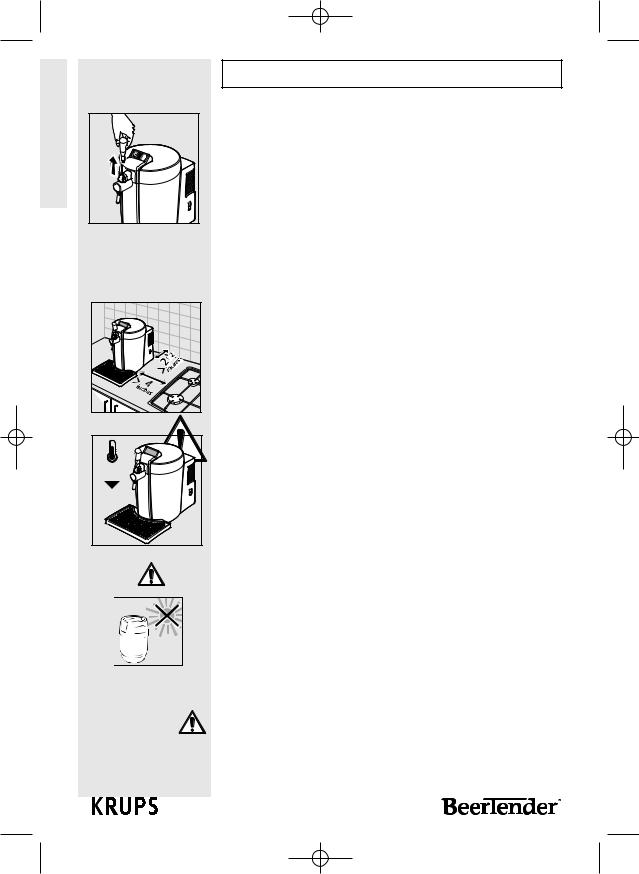
* To prevent children from using the appliance, you can remove the tap handle. To remove the handle, make sure that it is in an upright position and pull upward.
InFirethepreventionevent of a fire, use carbon dioxide (CO2) extinguishers.
Do not use water or powder extinguishers. *SetupInstallndtheMainteBeerTender®na nce in an upright position in a safe
place.
* To ensure that the BeerTender works correctly and efficiently, the following is strongly advised.
* Place it on a perfectly level and stable surface;
* Choose a clean, well-lit area with an easily accessible electric socket.
* Keep the appliance at a minimum distance (4 inches) from the stove as shown in the diagram.
* Keep the appliance at a minimum distance (2 ½ inches) from the walls.
* Store the DraughtKegTM at room temperature or in the refrigerator.
* Make sure the BeerTender is not exposed to direct sunlight.
* Do not use the BeerTender outdoors.
* Do not place the BeerTender on very hot surfaces or near open flames, as these may melt or damage the casing.
* Your BeerTender uses a technology that delivers ultimate cooling results when the ambient temperature is between 54°F and 86°F. At colder temperatures, the appliance cooling system could be damaged. At warmer temperatures, the cooling system will not be able to reach the temperature you program.
To avoid overheating, always keep the BeerTenderW arning! appliance out of direct sunlight. To obtain good cooling performance, never install your machine in a room with an ambient temperature above 86°F.
6
1-Beertender one way B90 US.qxd:1-B95 oneway Amsterdam_UK.qxd 29/01/08 9:22 Page 7
5 - UsingtheBee rTende r® System
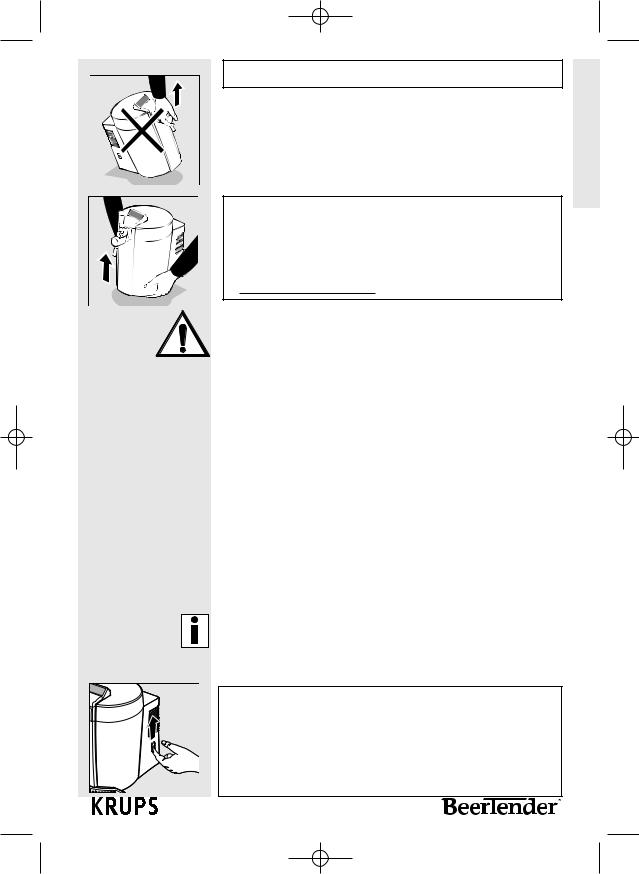
* Always hold the appliance by the bottom edge when lifting.
* To obtain draught beer of optimal quality you should keep two basic factors in mind, the temperature of the beer and hygienic conditions. Follow these few simple steps for the ideal use of BeerTender.
A new dr aughtbee rtube sho uld b e used with eac h Dra ughtKe gTM
An initial pac kag e of d raughtbe ertubes isinclud ed withyourm a chine. Addi tiona ldr a ughtb eertub es can be purch a sed from Hei neken. Go to
www. Beer Tende r.c om for m ore inform a tion.
Chi llingtheDr aughtKe g
1. Before pouring a draught beer, it is very important that the Heineken and Heineken Premium Light DraughtKeg reach the correct temperature.
2. Ensure DraughtKeg is sufficiently chilled before pouring a draught beer. Insufficiently chilled DraughtKegs will produce too much foam. It is ideal to purchase the DraughtKeg pre-chilled or pre-chill over night before intended use. If the DraughtKeg needs additional chilling, there are 2 recommended options:
a. Inside the BeerTender – Depending on the temperature of the DraughtKeg, it will take up to 18 hours to chill to the ideal serving temperature.
b. In a refrigerator – Depending on the temperature of your refrigerator, it will take up to 12 hours to chill to the ideal serving temperature.
We recommend that you always keep an extra Tip:DraughtKeg in your refrigerator to always have a chilled keg available.
Prepar ing theBeeIt is importantrTender that the BeerTender power switchIMP ORTisANT:turned on before inserting the DraughtKeg. This allows the scale to reset and accurately measure the amount of beer left in the keg. If you remove a partially full DraughtKeg from an operating machine or open the lid while power is on, the scale will need to be reset.
7
E N G L IS H

1-Beertender one way B90 US.qxd:1-B95 oneway Amsterdam_UK.qxd 29/01/08 9:22 Page 8
E N G L IS H
¡F |
Simply open the lid and lift up the keg for approximately
5-10 seconds before setting back into the machine and closing the lid.
* After setting up the BeerTender and before use, it is vital to clean the detachable pour spout – this is the only part of the appliance that will come into contact with the beer. The spout should be rinsed by hand.
After cleaning, screw back into place.
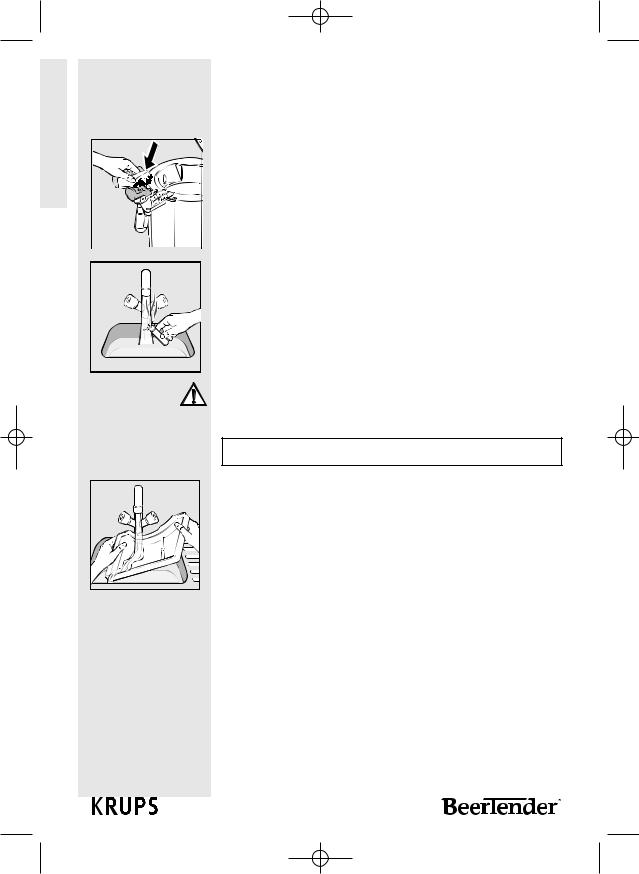
* Before inserting the DraughtKeg into the BeerTender, simply snap the patented disposable draught beer tube (included) onto the DraughtKeg.
* Open the BeerTender cover by pressing in the release panel on the front of the machine.
* Open the tap spout cover by turning counter clockwise.
* Insert DraughtKeg into BeerTender and position the draught beer tube as shown on drawing.
* Close the tap by turning clockwise and snapping into place.
* Carefully close the lid.
* Set the drip tray and grate in place at the front of the appliance. Make sure the drip tray is properly fitted and positioned.
The drip tray must be positioned on a level WsurfaceARNING! and must not jut out from the surface it is resting on.
Contr ol Pa nel
Your appliance features a large display providing you with important and useful information.
8
1-Beertender one way B90 US.qxd:1-B95 oneway Amsterdam_UK.qxd 29/01/08 9:22 Page 9
|
On the left side of the display: |
|
|
a. Volume indicator |
|
|
The BeerTender DraughtKeg volume is indicated with 4 |
|
|
levels. |
|
|
The 4 levels are visible when the DraughtKeg is full. |
|
|
They disappear progressively while emptying the |
|
|
DraughtKeg. The last level starts to blink when only two |
|
|
glasses of beer (+ / - one) are left in the DraughtKeg. |
|
|
On the right side of the display: |
|
|
b. Temperature indicator |
|
|
The temperature indicator goes from red, for a beer that |
|
|
is too warm, to orange when cooling of the beer is |
|
¡F |
almost complete, to green when the perfect draught |
|
|
beer temperature has been reached. |
|
|
War ning: never use your BeerTender with ambient |
|
|
temperature above 86°F. Above that level, the ideal |
|
|
serving temperature can not be attained. |
|
|
* Before pouring a beer, rinse a clean glass in cold |
|
|
Pouring a bee rfrom theBee rTend er |
|
|
water which chills the glass and wets the inside to |
|
|
enable a perfectly smooth draught pour. Use of 8 oz |
|
|
glasses is recommended to maintain the ideal serving |
|
|
temperature. |
|
|
* Be aware that the first glass you pour from every new |
|
|
Dr a ughtnd |
Dr ink |
|
DraughtKeg will contain mostly foam. This is typical of |
|
|
draught beer. Allow the foam to settle and continue to |
|
|
pour. |
|
|
* Tilt and pour: Tilt your glass at a 45 degree angle as |
|
|
you pour and adjust upright as the glass fills. |
|
|
* Ensure you pull the tap handle all the way down. Not |
|
|
opening the handle all the way will result in excessive |
|
|
foam. |
|
|
* For the optimal draught beer drinking experience, |
|
|
serve your beer with a foam head of 2 fingers in height |
|
|
(approximately 1.5”). |
|
|
* The drip tray and grate should be emptied and |
|
|
Pro per Ca re |
nd Clea ning f yourBeerTend er |
|
cleaned after each use. |
|
E N G L IS H
9
1-Beertender one way B90 US.qxd:1-B95 oneway Amsterdam_UK.qxd 29/01/08 9:22 Page 10
E N G L IS H
*Before cleaning the appliance, it is essential to turn off the ON/OFF switch and then pull the plug out of the socket.
*Keep in mind that during use the drip tray will have to be emptied and rinsed regularly.
The tray and grate are dishwasher safe or can be washed by hand with a mild detergent. Dry completely.
*Always wipe down the interior of the BeerTender after use. Beer is a natural product that can spoil. Therefore, you should always keep the appliance clean to maintain the quality of the beer dispensed and avoid unpleasant odors.
*Rinse the pour spout between uses for optimal results. Handwash with warm soapy water. Do not wash in dishwasher.
*To remove, unscrew turning counterclockwise from main unit. To re-attach, simply screw back in place turning clockwise.
*You should never attempt to access internal parts of the appliance.
IMPO RTANT : Afterc lean ing, ensureallparts of your Bee rTende r® ha ve c omp letely dr ied be forec losing thelid.
Storing theBe erTende r®
* When the BeerTender is not being used for a long period of time, remove the DraughtKegTM and turn the control to “off”.
* Remove the plug from the power outlet.
* Store the BeerTender at room temperature in a dry place out of childrenʼs reach.
* Protect from dust and dirt.
10
 Loading...