

Page 1
Page 2
a
b
d
f
g
m
h
e
j
k
k1
i
k3
k2
c
l
p
o
n
2
q
Page 3
1 2 3
4 5
876
9
3
Page 4
10 11
12
13 14 15
1716
4
Page 5
18
19
21 2322
2524
20
26
5
Page 6

27
34
28
29 30
31
32
33
6
Page 7
Espresso Novo 2300 Plus Art. 968
Deutsch 8
English 17
Français 25
Nederlands 33
Español 41
Português 49
Italiano 57
Dansk 65
Sverige 73
Suomi 80
´
7
Page 8

Deutsch
◆
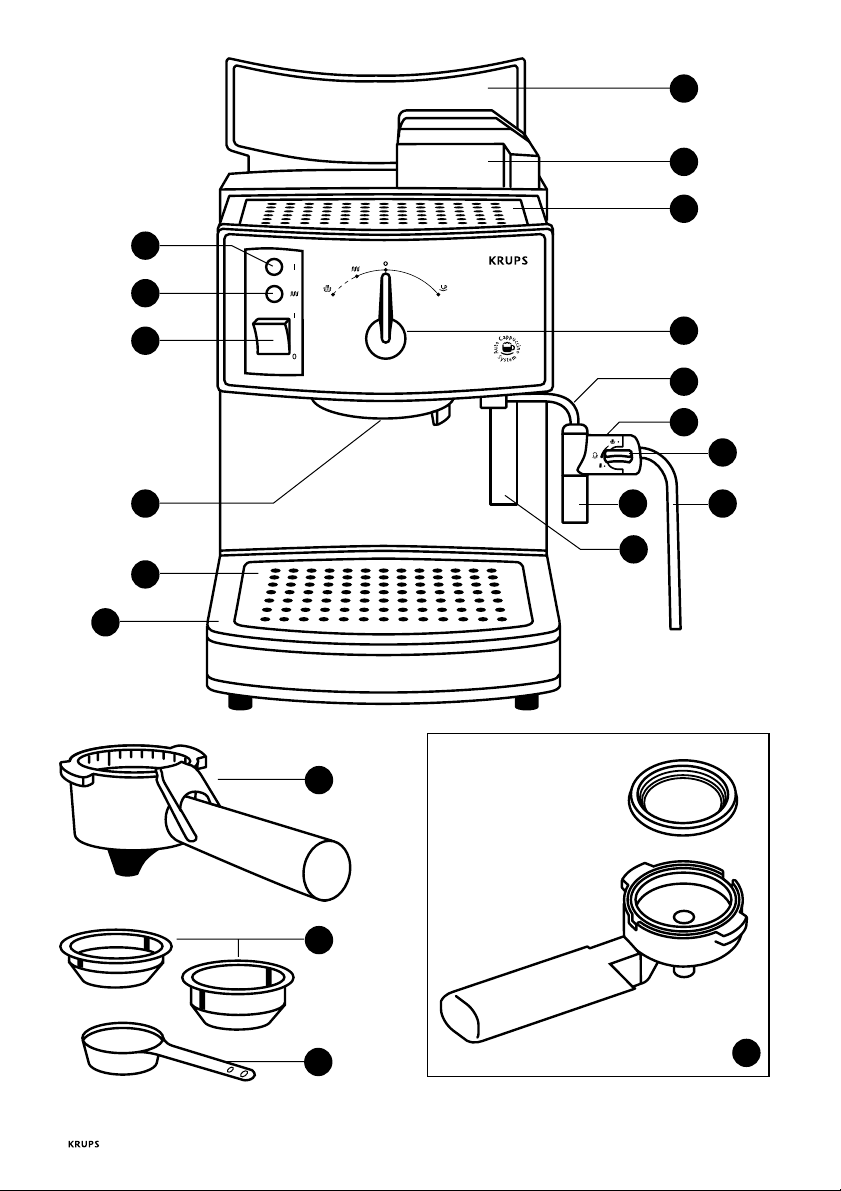
Beschreibung
a Deckel
b entnehmbarer Wasserbehälter
c Wasserstandsanzeige
d Tassenvorwärmplatte
e Wahlschalter Kaffee/Dampf
f Betriebskontrolleuchte (rot)
g Aufheizkontrolleuchte (orange)
h Ein/Aus - Schalter
i Brühkopf
j Dampfdüse
k Auto-Cappuccino-System
k1 Ventil
k2 flexibler Schlauch
k3 Aufschäumdüse
l Abstellgitter
m Auffangschale
n Dosierlöffel
o Filtersiebe für gemahlenen Kaffee
1 oder 2 Tassen
p Filterträger für Filtersiebe
q Illycaffé-Portionen Filterträger
Sicherheitshinweise
• Lesen Sie diese Bedienungsanleitung vor der
Inbetriebnahme Ihrer Espressomaschine
aufmerksam durch. Schließen Sie das Gerät
nur an eine geerdete Schutzleiter-Steckdose
an. Überprüfen Sie, daß die auf dem
Typenschild dieses Gerätes angegebene
Spannung mit der Ihres Stromnetzes
übereinstimmt.
• Bei falschem Anschluß erlischt die Garantie.
• Benutzen Sie das Gerät niemals im Freien.
• Stellen sie das Gerät nicht auf heiße Flächen
(z.B. Herdplatte) oder in der Nähe von
offenen Flammen ab.
• Entfernen sie den mit Kaffeemehl gefüllten
Filterträger nicht während des Durchlaufes
da das Gerät unter Druck steht.
• Benutzen Sie das Gerät nicht, wenn
Abstellgitter und Auffangschale nicht in
Position sind.
• Stellen Sie sicher, daß der Filterträger gut
festgezogen ist bevor Sie mit der
Kaffeezubereitung beginnen und stellen Sie
den Wahl Schalter auf O zurück bevor Sie
den Filterträger entnehmen.
• Bei Problemen während des Brühvorgangs
und vor der Reinigung des Gerätes muß der
Netzstecker gezogen werden.
• Ziehen Sie den Stecker nicht durch Ziehen
am Netzkabel und legen sie dieses nicht
über scharfe Kanten oder über Ecken.
• Vermeiden Sie einen Kontakt des Netzkabels
oder Ihrer Hände mit den heißen Teilen des
Gerätes (Tassenvorwärmplatte, Filterträger,
Dampfdüse, Brühkopf)
• Tauchen Sie das Gerät niemals in Wasser
oder andere Füssigkeiten.
• Halten Sie Kinder vom Gerät fern und lassen
Sie das Netzkabel nicht herunterhängen.
• Halten Sie sich an die Entkalkungshinweise
in der Bedienungsanleitung.
• Benutzen Sie das Gerät keinesfalls, wenn es
beschädigt ist, nicht korrekt funktioniert
oder wenn der Stecker oder das Netzkabel
beschädigt sind. In solchen Fällen wenden
Sie sich bitte sofort an den KrupsKundendienst (siehe Adressen im KrupsServiceheft), da Spezialwerkzeug
erforderlich ist.
• Das Gerät darf nicht von Ihnen geöffnet
werden.
• Außer der Reinigung und normalen
Gebrauchsprüfung, müssen alle anderen
Arbeiten an dem Gerät vom KrupsKundendienst ausgeführt werden.
• Zu Ihrer eigenen Sicherheit sollten Sie nur
original Krups Zubehör-und Ersatzteile
passend zu Ihrem Gerät verwenden.
• Der Hersteller kann nicht für Schäden
verantwortlich gemacht werden, die durch
nicht bestimmungsgemäße Verwendung
oder falsche Bedienung verursacht werden.
8
Page 9

Der Espresso
Espressokaffee ist aromatischer als ein
normaler Kaffee. Er wird aus kleinen,
vorgewärmten Espressotassen getrunken. Bei
der Zubereitung wird heißes Wasser unter
Druck durch das Kaffeemehl gepreßt, um
diesen wohlschmeckenden schwarzen Kaffee
mit der anregenden Wirkung zu erhalten.
Espresso erkennen Sie an seinem
charakteristischen Aroma und seiner typischen
Crema. Dies setzt hohen Druck voraus und die
Verwendung von echtem, gut geröstetem
Espressokaffee sowie die richtige Mahlung der
Bohnen. Falls Sie keinen gemahlenen
Espressokaffee kaufen können, mahlen Sie die
Espressobohnen mit einer Mahlwerkmühle.
Der Kaffee darf nicht „zu fein“ gemahlen
sein. Er muß noch leicht körnig sein. Zu fein
gemahlener Kaffee könnte das Brühsieb und
die Filtersiebe verstopfen und das Wasser
würde nicht mehr durchlaufen. Um einen
vollendeten Espresso zu garantieren, ist es
notwendig frisches, kaltes Wasser zu
verwenden.
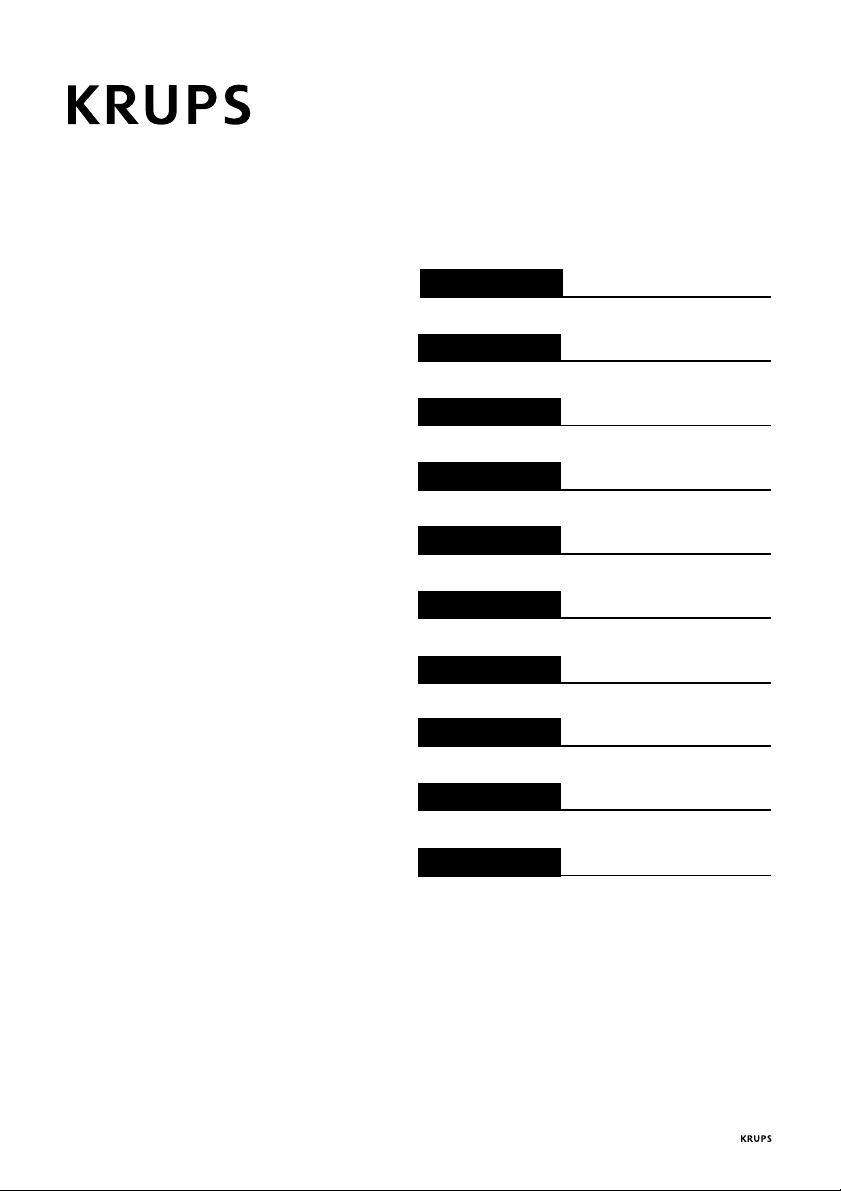
• Setzen Sie eines der Filtersiebe in den
Filterträger ein (11). Setzen Sie dann den
Filterträger in den Brühkopf des Gerätes ein.
• Um den Filterträger korrekt einzusetzen,
halten Sie den Griff des Filterträgers nach
links (6), drücken den Filterträger nach
oben an den Brühkopf und drehen den Griff
dann nach rechts (7) bis der Griff nach vorn
zeigt (8).
• Stellen Sie ein möglichst großes Gefäß unter
den Filterträger.(9)
• Sobald die orange Kontrolleuchte erlischt,
drehen Sie den Wahlschalter auf die Stellung
(9) und lassen Sie den gesamten
Wasserbehälterinhalt durchlaufen.
• Falls notwendig, unterbrechen Sie diesen
Vorgang um den Behälter zu entleeren.
Stellen Sie hierzu den Wahlschalter auf Position O. Danach können Sie mit dem
Durchlauf fortfahren.
Gebrauch der verschiedenen
Funktionen der
Espressomaschine
Vor dem ersten Gebrauch
Bevor Sie Ihr Gerät das erste Mal benutzen,
reinigen Sie das Heizsystem indem sie ein oder
zwei Füllungen des Wasserbehälters ohne
Kaffeemehl wie folgt durchlaufen lassen:
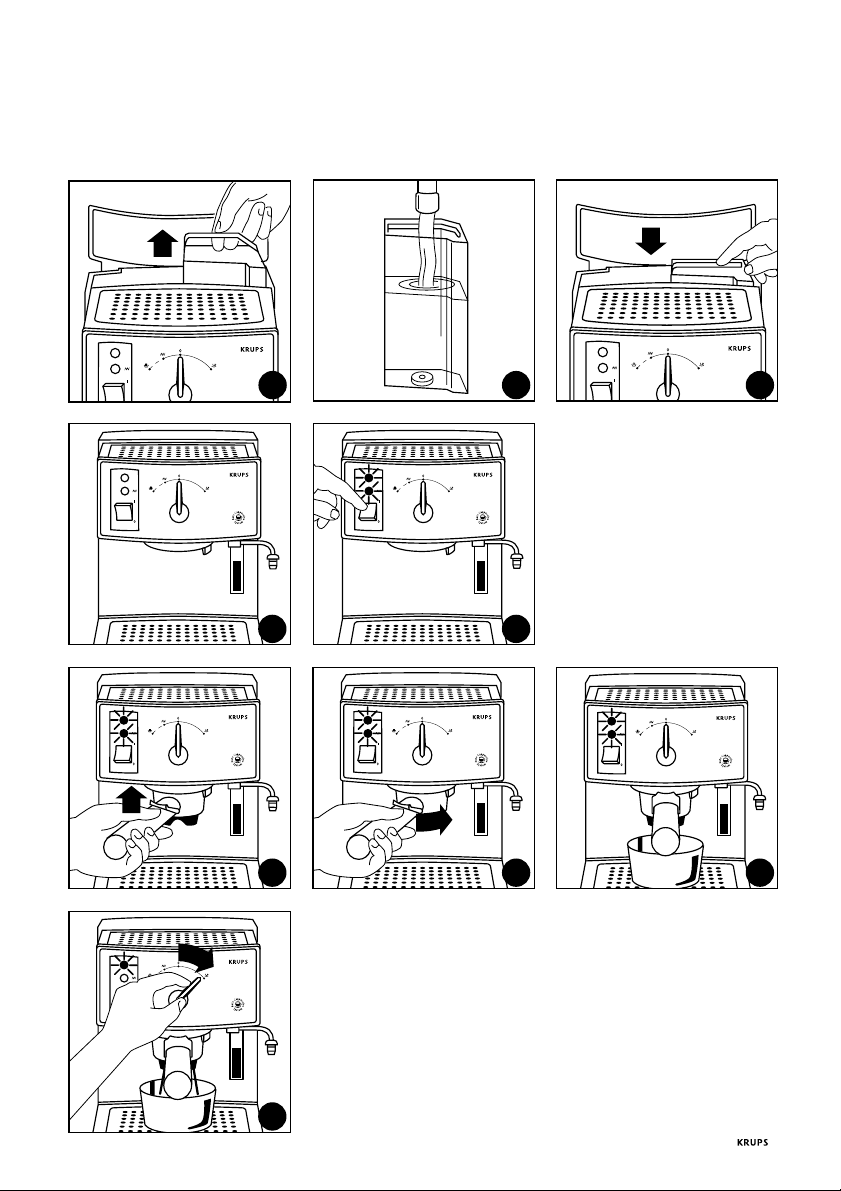
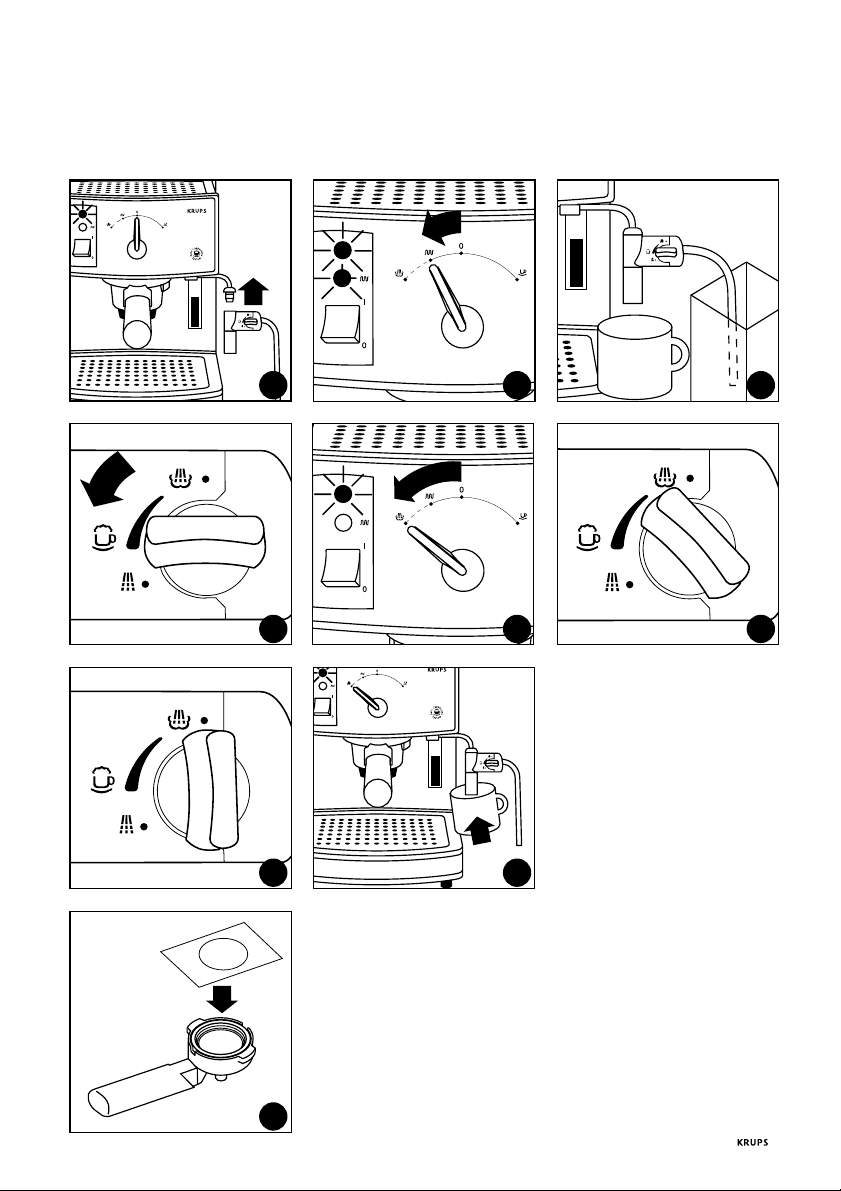
• Öffnen Sie den Deckel und entnehmen Sie
den Wasserbehälter am Griff (1). Füllen Sie
Wasser in den Wasserbehälter (2).
• Setzen Sie den Wasserbehälter wieder in das
Gerät ein, indem Sie ihn fest nach unten
drücken (3) und somit das Ventil im Boden
des Behälters geöffnet wird. Schließen Sie
den Deckel wieder.
Der Wasserstand im Wasserbehälter kann
jederzeit in dem kleinen Sichtfenster
kontrolliert werden, so daß Sie, falls
notwendig, rechtzeitig Wasser nachfüllen
können.(4)
• Schalten Sie das Gerät ein (5). Die rote
Betriebskontrolleuchte und die orange
Aufheizkontrolleuchte leuchten auf.
1. FUNKTION ESPRESSO
Um ein gutes Ergebnis zu erzielen,
empfehlen wir Ihnen den Filterträger mit
Filtersieb ohne Kaffeemehl und die Tassen
wie folgt vorzuwärmen:
• Füllen Sie den Wasserbehälter (1)(2)(3) und
schalten Sie das Gerät ein (5).
•
Setzen Sie den Filterträger mit dem leeren
Filtersieb in das Gerät ein (6)(7)(8), stellen
Sie die Espressotassen darunter und drehen
Sie den Wahlschalter auf die Position
• Sobald die Tassen mit warmem Wasser
gefüllt sind, stellen Sie den Wahlschalter
zurück auf Position O.
Wenn das Gerät einmal warm ist, können die
Espressotassen später auch auf der
Tassenvorwärmplatte vorgewärmt werden.
Zubereitung von Espresso:
• Füllen Sie den Wasserbehälter (1)(2)(3) und
schalten Sie das Gerät ein (5).
(9).
9
Page 10

• Sobald das Gerät die Betriebstemperatur
erreicht hat, erlischt die orange
Kontrolleuchte.
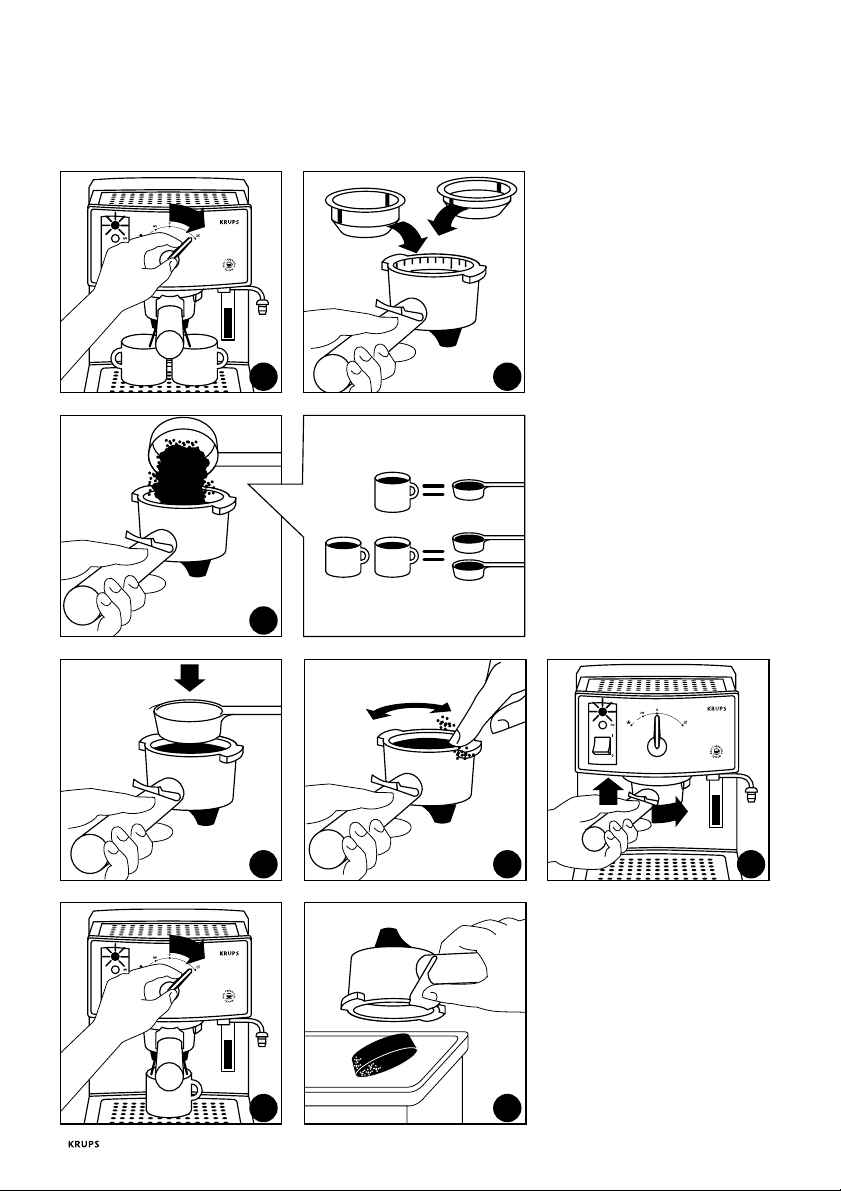
• Setzen Sie das Filtersieb für 1 oder 2 Tassen
in den Filterträger ein (11).
• Füllen Sie das Espressomehl in das Filtersieb
und drücken Sie es leicht an. Das Sieb muß
bis zum oberen Rand gefüllt sein (12) (13).
• Säubern Sie den Rand des Filtersiebes von
Kaffee mehl (14).
• Setzen Sie den Filterträger in das Gerät ein
(15).
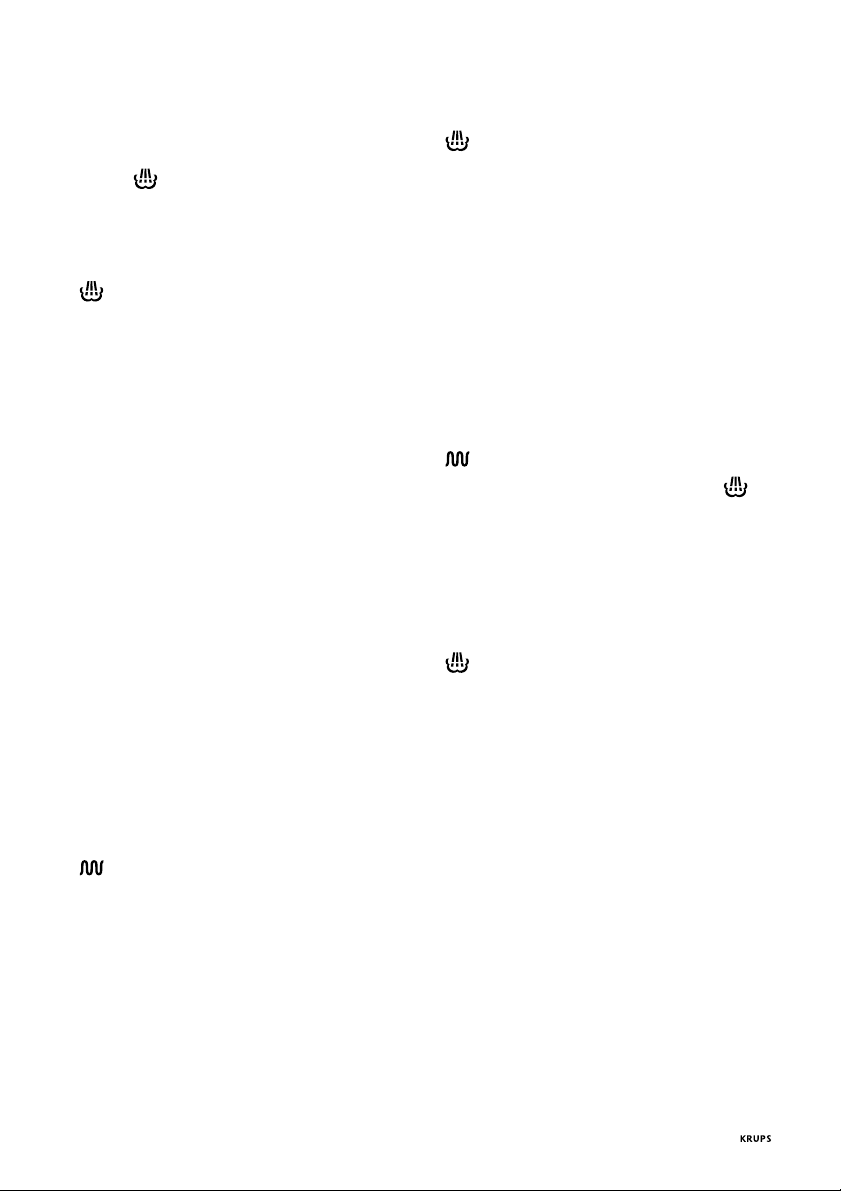
• Stellen Sie eine oder zwei Espressotassen
unter den Filterträger und drehen Sie den
Wahlschalter auf die Position
• Sobald die Tassen gefüllt sind, stellen Sie den
(10).
Wahlschalter auf Position O zurück und
nehmen Sie Filterträger mit Filtersieb aus
dem Gerät. Leeren Sie das Kaffeemehl aus
(17).
Nach erneuter Füllung des Filtersiebes kann
der nächste Espresso zubereitet werden.
2. FUNKTION DAMPF
Der Dampf kann zum Auschäumen von Milch
oder zum Erhitzen von Flüssigkeiten benutzt
werden. Das Taktgeräusch während der
Dampfzubereitung entsteht durch die
Intervallsteuerung der Wasserpumpe, die für
die Dampferzeugung notwendig ist.
Falls Sie direkt nach der Dampferzeugung
einen Espresso zubereiten wollen, muß das
Gerät zuerst abgekühlt werden, um die zur
Espressozubereitung geeignete Temperatur zu
erreichen.
• Hierzu setzen Sie den Filterträger ohne
Kaffeemehl in das Gerät ein und stellen ein
Gefäß darunter. Drehen Sie dann den
Wahlschalter auf die Position
• Lassen Sie so lange Wasser durchlaufen, bis
die orange Kontrolleuchte aufleuchtet.
Drehen Sie dann den Wahlschalter zurück
auf die Position O.
Danach können Sie wieder Espresso
zubereiten.
Achtung: Während und nach dem Gebrauch
des Gerätes werden die Metallteile der
Dampfdüse sehr heiß. Verbrennungsgefahr!
(10).
. Auto-Cappuccino-System
• Die Dampffunktion mit dem Krups Auto-
Cappuccino-System erlaubt die einfache
Zubereitung von Milchschaum für Cappuccino, oder Café Creme, die Zubereitung von
heißer Schokolade oder das Erhitzen von
Wasser z.B. für Tee.
Die Milch wird durch den flexiblen
Schlauch eingesaugt und durch Dampf
erhitzt, bevor sie aus der Aufschäumdüse
des Auto-Cappuccino-Systems wieder
austritt.
Da der flexible Schlauch direkt in eine
Milchpackung eingetaucht werden kann,
reicht nur ein einziges Gefäß zur Zubereitung
von Cappuccino oder Café Creme aus.
Mit dem Ventil am Auto-Cappuccion-System
kann die Feinheit des Milchschaumes geregelt
werden.
Es sollte frische, entrahmte Milch, nicht
abgekocht und gut gekühlt
(Kühlschranktemperatur) verwendet werden.
Das Auto-Cappuccino-System muss sofort
nach jedem Gebrauch gereignigt werden.
Siehe hierzu das Kapitel „Reinigung des AutoCappuccino-Systems“.
. Aufschäumen von Milch für Cappuccino:
• Schwenken Sie die Dampfdüse aus dem
Gerät heraus und montieren sie das AutoCappuccino-System darauf (18).
• Füllen sie den Wasserbehälter (1)(2)(3) und
schalten Sie das Gerät ein (5).
• Achten Sie auf die Montagerichtung des
flexiblen Schlauches: Das gerade
abgeschnittene Ende muß am Auto-Cappuccino-System befestigt werden.
• Drehen Sie den Wahlschalter auf die Position
(19).
• Tauchen Sie den flexiblen Schlauch in die zu
erwärmende Milch. Der Schlauch muß den
Boden des Behältnisses berühren (20).
• Stellen Sie eine Tasse, die bereits zu 1/3 mit
frisch zubereitetem Espresso gefüllt ist,
unter die Aufschäumdüse (20).
• Für feinen und cremigen Schaum stellen Sie
das Ventil auf
(21) .
10
Page 11
• Um etwas weniger schaumige Milch zu
erhalten, drehen Sie das Ventil des AutoCappuccino-Systems in Richtung Logo
Dampf
(25).
Sobald das Gerät die erforderliche Temperatur
erreicht hat, erlischt die orange
Kontrolleuchte.
• Drehen Sie den Wahlschalter auf die Position
(22) . Warme, schaumige Milch tritt aus
der Aufschäumdüse.
• Wenn genügend Milch aufgeschäumt ist,
drehen Sie den Wahlschalter auf die Position
O.
• Nehmen Sie den flexiblen Schlauch aus dem
Gefäß.
. Zubereitung leicht aufgeschäumter
warmer Milch für Café Creme, heißer
Schokolade oder Erwärmen von Wasser
(z.B. zur Teezubereitung)
Anmerkungen:
. Café Creme: Stellen Sie die Tasse, die bereits
den frisch zubereiteten Kaffee enthält, direkt
unter die Aufschäumdüse
.Heiße Schokolade: Tauchen Sie den flexiblen
Schlauch direkt in die Packung, um
trinkfertigen kalten Kakao zu erwärmen oder
erwärmen Sie die Milch, wenn Sie
Kakaopulver benutzen. Rühren Sie das
Kakaopulver dann in die erwärmte Milch ein.
• Schwenken Sie die Dampfdüse aus dem
Gerät heraus und montieren sie das AutoCappuccino-System darauf (18)
• Füllen sie den Wasserbehälter (1)(2)(3) und
schalten Sie das Gerät ein (5).
• Drehen Sie den Wahlschalter auf die Position
(19).
• Drehen Sie das Ventil des Auto-Cappucino-
Systems auf die feinste Einstellung (23).
• Tauchen Sie den flexiblen Schlauch in die zu
erwärmende Flüssigkeit. Der Schlauch muß
den Boden des Behältnisses berühren (20).
• Stellen Sie ein Gefäß unter die
Aufschäumdüse (20).
Sobald das Gerät die erforderliche Temperatur
erreicht hat, erlischt die orange
Kontrolleuchte.
• Drehen Sie den Wahlschalter auf die Position
(22) .
• Wenn die gewünschte Menge warmer
Flüssigkeit ausgetreten ist, drehen Sie den
Wahlschalter auf die Position O.
Nehmen Sie den flexiblen Schlauch nach dem
Gebrauch aus dem Gefäß.
. Erwärmen von Flüssigkeiten (z.B.:
Suppe)
• Schwenken Sie die Dampfdüse aus dem
Gerät heraus und montieren sie das
• Auto-Cappuccino-System darauf (18)
• Füllen sie den Wasserbehälter (1)(2)(3) und
schalten Sie das Gerät ein (5).
• Drehen Sie den Wahlschalter auf die Position
(19).
• Drehen Sie das Ventil auf die Position
• Tauchen Sie die Aufschäumdüse des Auto-
.
Cappuccino-Systems in die zu erwärmende
Flüssigkeit.
Sobald das Gerät die erforderliche Temperatur
erreicht hat, erlischt die orange
Kontrolleuchte.
• Drehen Sie den Wahlschalter auf die Position
(22), bis die Flüssigkeit genügend
erwärmt ist, stellen Sie den Wahlschalter
dann auf Position O zurück und entfernen
Sie das Gefäß.
3. FUNKTION ESPRESSO MIT SPEZIALFILTERTRÄGER
„ESE“
Das System E.S.E. wurde entwickelt, um einen
starken italienischen Espresso ‘ristretto’ (kurzer
Espresso) zubereiten zu können. Die Menge
der einzelnen Illycaffé-Einzelportion ist für 35
ml Wasser bestimmt, die innerhalb von 20
Sekunden durchlaufen.
„ESE“ bedeutet „Easy Serving
Espresso“(Einfache Espressozubereitung) und
ist eine Portion ausgewählten, hochwertigen
Kaffees, gemahlen und verdichtet zwischen
zwei Papierfiltern, die sofort einsatzbereit ist
(z.B Illycaffé-Einzelportionen). Dieses System
vereinfacht Ihnen die Espressozubereitung,
indem es Ihnen die Dosierung und das
Stopfen des Espressomehls abnimmt und
Ihnen die Reinigung des Gerätes erleichtert.
11
Page 12
Wir empfehlen Ihnen, die IllycafféEinzelportionen so zu handhaben und
aufzubewahren, daß diese nicht verformt
werden.
Es ist weder vorgesehen, noch
empfehlenswert, mehr als 35 ml Wasser
durch die Illycaffé-Einzelportionenen
durchlaufen zu lassen und den Espresso
damit zu strecken (langer Espresso).
Wir empehlen Ihnen, die Zubehörteile
Filterträger mit Spezialfiltersieb ohne
Kaffeemehl und die Tasse wie folgt
vorzuwärmen:
• Füllen Sie den Wasserbehälter (1)(2)(3) und
schalten Sie das Gerät ein (5).
• Setzen Sie den leeren Spezialfilterträger ESE
ein (6)(7)(8) und stellen Sie die
Espressotasse darunter.
Sobald die Betriebstemperatur erreicht ist,
erlischt die orange Kontrolleuchte.
• Drehen Sie nun den Wahlschalter auf die
Position
• Sobald die Tasse mit warmem Wasser gefüllt
(9).
ist, drehen Sie den Schalter auf Position O
zurück.
Wenn das Gerät einmal warm ist, können die
Tassen später auch auf der
Tassenvorwärmplatte (oben auf dem Gerät)
vorgewärmt werden.
. Zubereitung des Espresso:
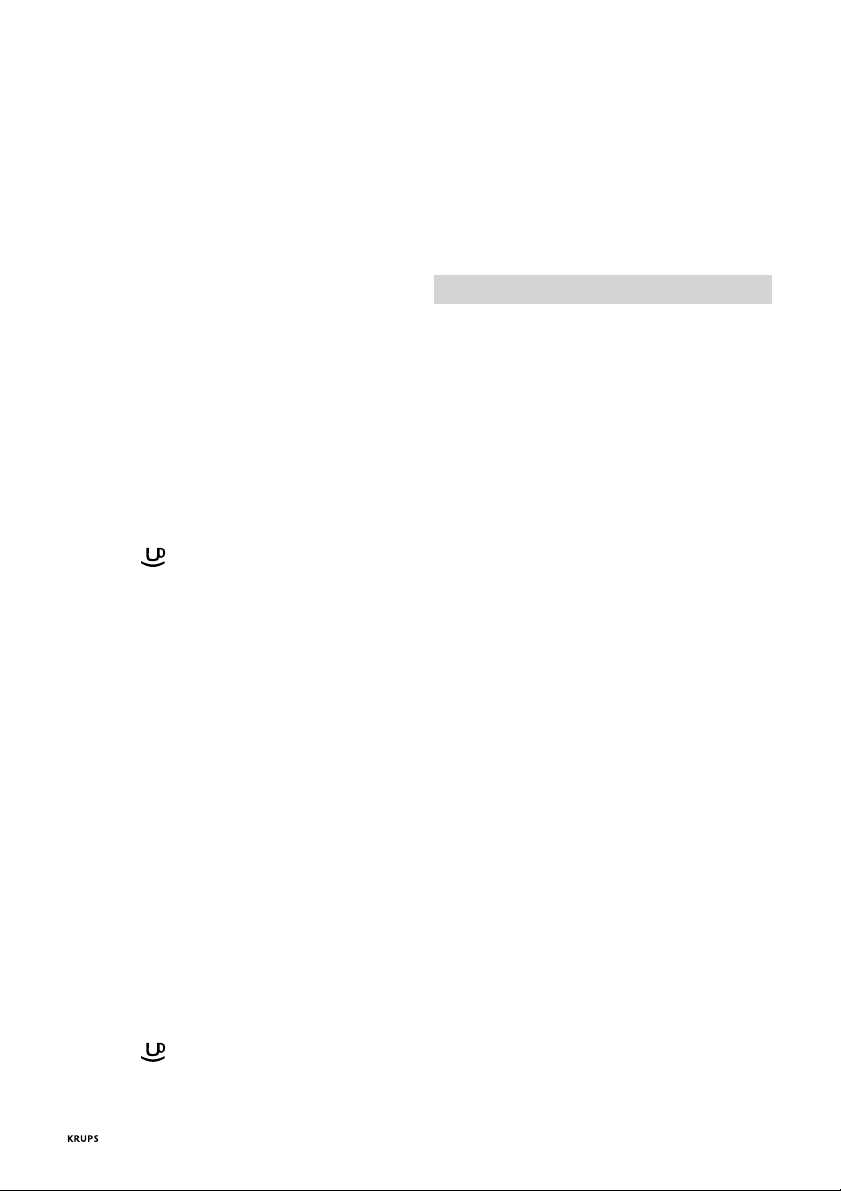
• Setzen Sie das Spezialfiltersieb in den
Spezialfilterträger ESE ein und legen Sie
dann die „Illycaffé-Einzelportionen“ in
den Filterträger.
• Der Schriftzug „Illydown“ muß beim
Einlegen nach unten zeigen und die lange
Seite des Papierfilters muß parallel zum Griff
liegen. (26)
• Setzen Sie den Filterträger ein (6)(7)(8) und
ziehen Sie ihn nach rechts fest.
Sobald das Gerät die Betriebstemperatur
erreicht hat, erlischt die orange
Kontrolleuchte.
• Drehen Sie nun den Wahlschalter auf die
Position
(9).
• Sobald die empfohlene Wassermenge durch
die Illycaffé-Einzelportion durchgelaufen ist,
stellen Sie den Wahlschalter (e) wieder auf
Position O.
• Entfernen Sie den Illycaffé-Filterträger vom
Brühkopf und werfen Sie die benutzte
Kaffeeportion weg. Die benutzten
Kaffeeportionen können umweltfreundlich
in der Biotonne entsorgt werden.
Pflege
- Gerät abkühlen lassen.
Geben sie die Zubehörteile ihrer
Espressomaschine nicht in die Spülmaschine.
Nach Gebrauch muß der Wasserbehälter
entleert werden.
. Die Auffangschale:
. Sie muß nach Gebrauch des Gerätes entleert
werden (28). Falls mehrere Espresso
nacheinander zubereitet werden, sollte die
Auffangschale von Zeit zu Zeit entleert
werden (ca. alle 7 bis 8 Tassen). Falls
notwendig, reinigen sie die Auffangschale
und das Abstellgitter (27) mit Wasser dem
etwas mildes Spülmittel beigefügt ist, spülen
Sie sie nach und trocknen Sie sie ab. Achten
Sie beim Wiederzusammenbau auf den
korrekten Sitz der Kunststoffabdeckung (29).
. Der Brühkopf, das Filtersieb und der
Filterträger müssen nach jeder Benutzung
gereinigt werden. Es genügt den Brühkopf
mit einem feuchten Tuch abzuwischen und
die anderen Zubehörteile unter fließendem
Wasser abzuspülen.
Im Falle einer starken Verschmutzung des
Brühkopfes, schrauben Sie das Sieb mit Hilfe
einer Münze ab, reinigen Sie es und
montieren Sie es wieder, indem Sie es gut
festschrauben (30).
Lassen Sie den Filterträger nicht eingesetzt,
wenn das Gerät nicht benutzt wird, da dies
die Dichtungen beansprucht und zu kürzerer
Lebensdauer führt.
. Tassenvorwärmplatte: Entnehmen Sie
diese zur Reinigung mit Wasser und einem
milden Spülmittel, spülen Sie sie nach und
trocknen Sie sie ab. (31)
12
Page 13
. Das Auto-Cappuccino-System:
Das Auto-Cappuccino-System muss nach
jedem Gebrauch gereignit werden. Gehen Sie
folgendermaßen vor:
• Drehen Sie den Wahlschalter auf die Position
(19).
• Drehen Sie das Ventil auf die Position
(33).
• Tauchen Sie den flexiblen Schlauch in ein
Glas Wasser (die benötigte Mindestmenge
ist 100ml)
• Stellen Sie ein Gefäß unter die
Aufschäumdüse.
Sobald die Betriebstemperatur erreicht ist,
erlischt die orange Kontrolleuchte.
• Drehen Sie jetzt den Wahlschalter auf die
Position
(22).
• Sobald die komplette Wassermenge durch
das Auto-Cappuccino-System durchgelaufen
ist, stellen Sie den Wahl Schalter auf O .
• Nehmen Sie nach Gebrauch den flexiblen
Schlauch aus dem Glas.
• Wischen Sie die Aufschäumdüse mit einem
feuchten Tuch ab.
Wir empfehlen Ihnen das Auto-CappuccinoSystem regelmäßig zu demontieren und es mit
Wasser, einem milden Spülmittel und einer
kleinen Bürste zu reinigen. Spülen Sie es klar
nach und trocknen Sie es ab, bevor Sie es
wieder zusammenbauen (34)
Achten Sie auf die Montagerichtung des
flexiblen Schlauches: Das gerade
abgeschnittene Ende muß am Auto-Cappuccino-System befestigt werden.
. Brühkopfdichtung
Von Zeit zu Zeit sollte die Brühkopfdichtung
wie folgt gereinigt werden :
• Filterträger mit Sieb in den Brühkopf leicht
einhängen, nicht festdrehen.
• Flaches Gefäss unter den Filterträger stellen.
• Gerät einschalten. Wahlschalter auf Position
drehen.
• Das Wasser füllt jetzt das Sieb und erreicht
so die Brühkopfdichtung.
• Den Filterträger leicht nach rechts und links
hin und her bewegen.
Entkalkung
• Entkalken Sie Ihre Espressomaschine, je nach
örtlicher Wasserhärte, regelmäßig mit
Zitronensäure oder Weinsäure.
Wir empfehlen das KRUPS Entkalkungsset
Art. 054, welches in den Krups
Kundendiensten erhältlich ist. Dieses Set
enthält, neben zwei Portionen Entkalker,
einen Wasserhärte-Teststreifen, um die
Häufigkeit der Entkalkung Ihres Gerätes bei
normalem Gebrauch zu bestimmen. Die
Verkalkung hängt von der Wasserhärte, aber
auch von der Benutzung ab. Die ermittelte
Entkalkungshäufigkeit ist daher nur als
Anhaltspunkt zu verstehen.
- Gehen Sie nach folgender Methode vor:
• Schrauben sie das Sieb am Brühkopf ab und
reinigen Sie Sieb und Brühkopf von
Kaffeeresten und Kalkpartikeln.
• Lösen Sie 2 Eßlöffel Weinsäure oder
Zitrinensäure oder ein Päckchen des
Entkalkers KRUPS Art.054 in einem halben
Liter lauwarmem Wasser auf und gießen Sie
diese Lösung in den leeren Wasserbehälter.
• Stellen Sie ein Gefäß unter den Brühkopf
des Gerätes. Gerät einschalten. Lassen Sie
etwa ein Drittel der Flüssigkeit direkt
durchlaufen, indem Sie den Wahlschalter
(9) stellen.
auf
• Schalten Sie das Gerät aus, aber lassen Sie
den Wahlschalter in Position
lassen Sie die Lösung 10 bis 15 min
einwirken.
• Schalten Sie dann das Gerät wieder ein und
lassen Sie die restliche Flüssigkeit
durchlaufen.
• Lassen Sie anschließend 2 Wasser-
behälterfüllungen klares Wasser durchlaufen
und montieren sie das Sieb wieder am
Brühkopf (siehe Abschnitt „Pflege“).
(9) und
13
Page 14
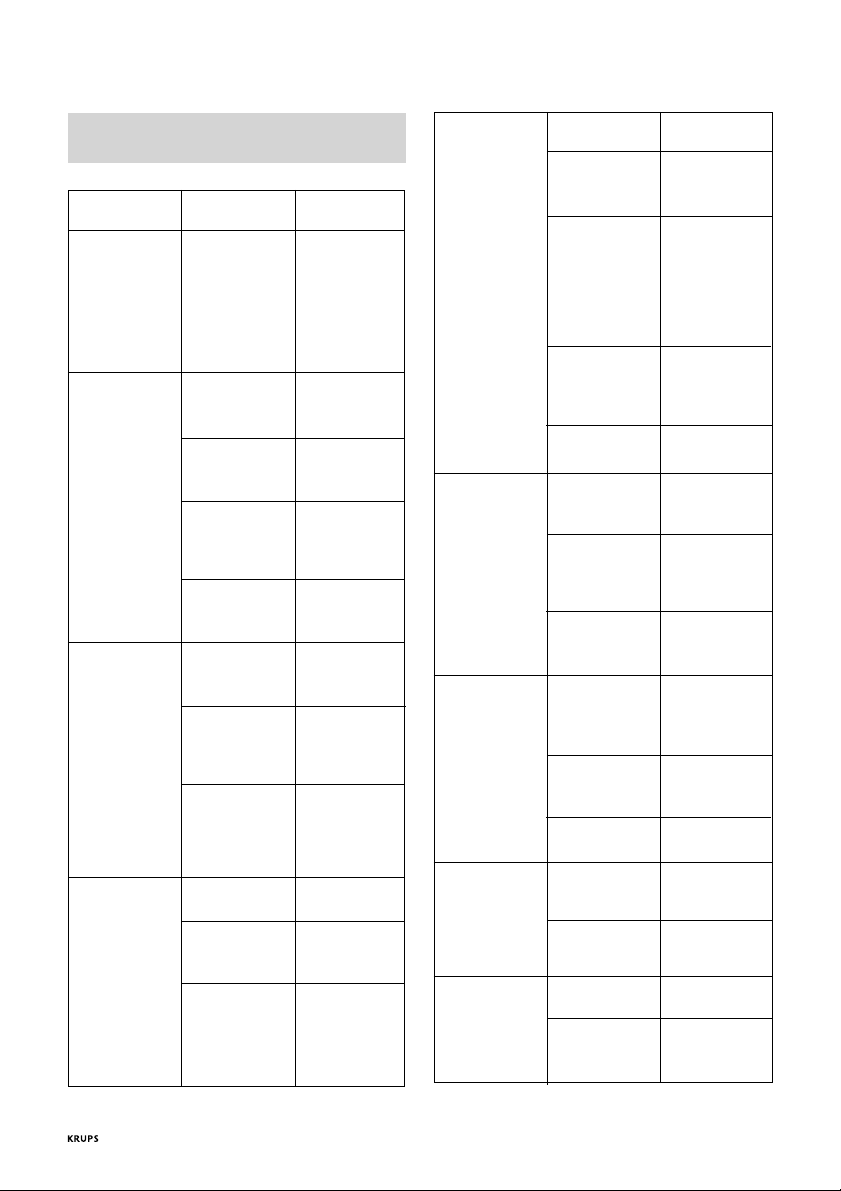
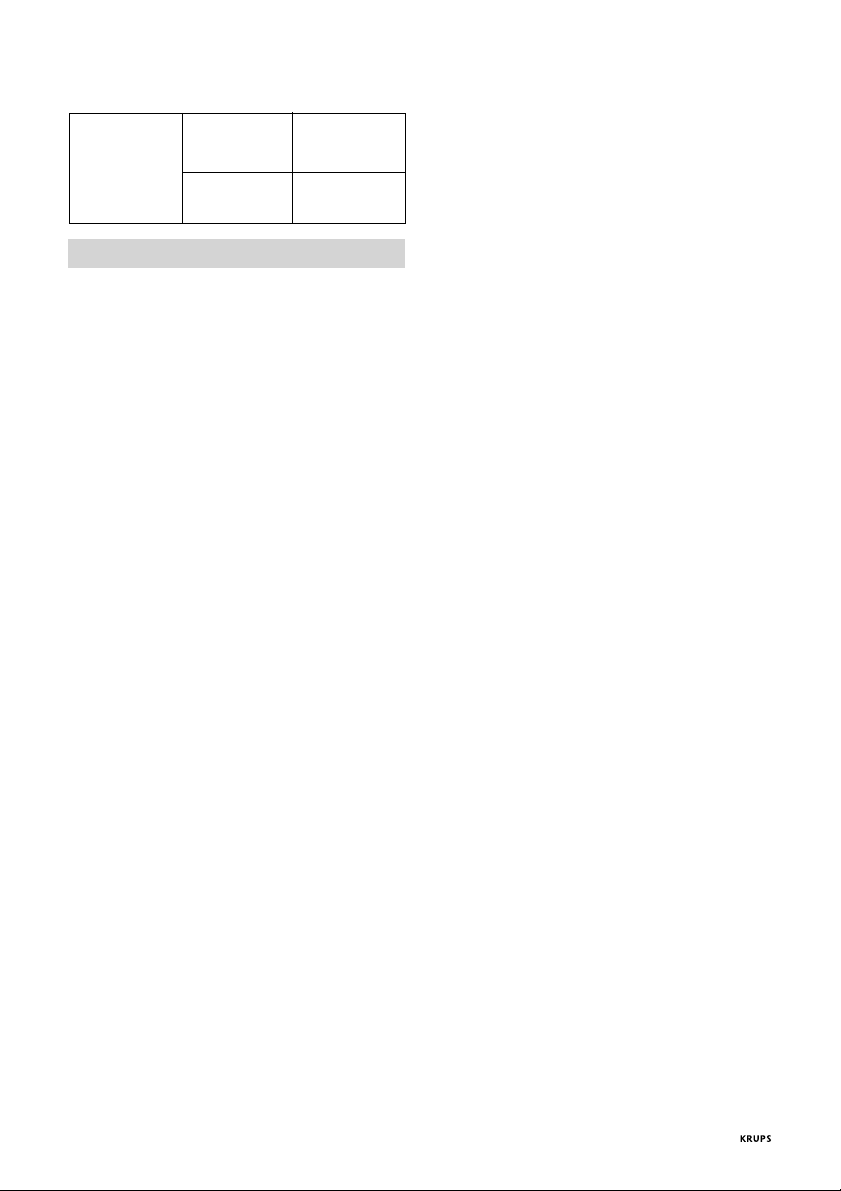
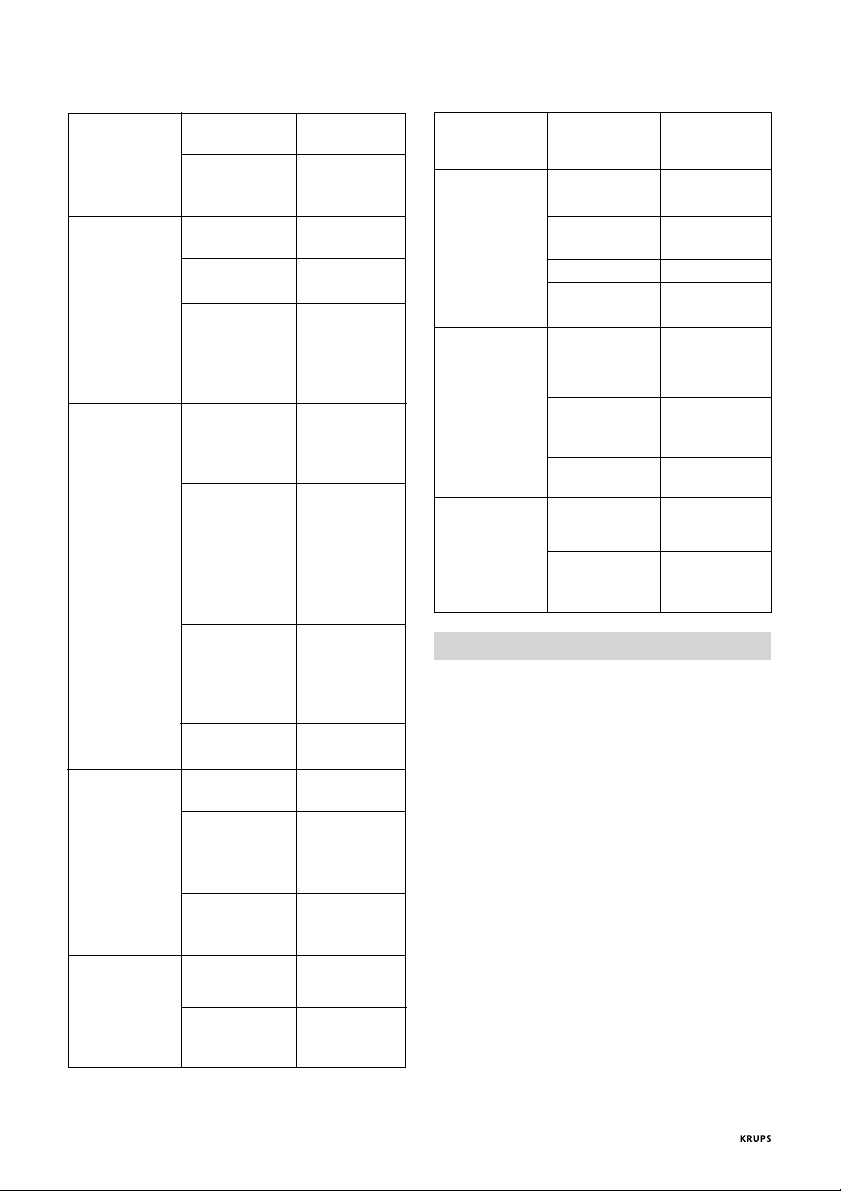
Probleme, mögliche Ursachen
und Abstellmaßnahmen
Probleme mögliche Abstellmaß-
Ursache nahmen
Der Espresso ist Tassen,Filtersieb, Wärmen sie die
nicht heiß genug Filterträger sind Zubehörteile
kalt (Tassen,
Filtersieb, Filterträger) vor. siehe
Abschnitt
„Espressozubereitung“
Espresso tritt Der Filterträger Siehe Abschnitt
oberhalb des ist nicht richtig „Espresso
Filterträgers aus eingesetzt zubereitung“
Es liegt Kaffeemehl Reinigen Sie den
auf dem Rand des Filterrand.
Filters
Die Brühkopfdich- Reinigen Sie die
tung ist Dichtung mit
verschmutzt einem feuchten
Tuch.
Die Brühkopfdich- „Wenden Sie sich
tung ist defekt. an den KRUPS
Kundendienst
Während der Illycaffé-Einzel- siehe Kapitel 3,
Espresso-Zuberei- portion wurde nicht ‘E.S.E.-Funktion’
tung mit E.S.E. - richtig eingelegt.
System läuft Wasser
aus dem Filterträger Der Filterträger ist Ziehen Sie den
nicht weit genug Filterträger fest an.
nach rechts
angezogen.
Sie haben mehr als Beschränken Sie
35 ml Wasser durch die Wassermenge
die Illycaffé-Einzel- auf 35 ml.
portion laufen
lassen.
Sehr lautes Kein Wasser im Füllen Sie den
Pumpengeräusch Wasserbehälter Wasserbehälter auf
Wasserbehälter Drücken Sie den
nicht richtig einge- Wasserbehälter
setzt kräftig nach unten.
Kaffeemehl zu alt Benutzen sie
oder sehr trocken, frisches Kaffeeso daß die Pumpe mehl.
keinen Druck aufbauen kann
Es tritt kein Wasser Kein Wasser im Füllen Sie den
aus Wasserbehälter Wasserbehälter auf
Wasserbehälter Drücken Sie den
nicht richtig einge- Wasserbehälter
setzt kräftig nach unten
Das Filtersieb ist Reinigen Sie den
verstopft, das Kaf- Filter und das Sieb
feemehl ist zu fein des Brühkopfes
oder zu sehr (s. Kap. „Pflege“)
zusammengedrückt und benutzen Sie
Brühkopfsieb Legen Sie das Sieb
verschmutzt in Entkalkerlösung
Gerät verkalkt siehe Kapitel
Wasser läuft zu Kaffeemehl zu grob Verwenden Sie
schnell durch feineres
Zu wenig Kaffee- Benutzen Sie den
mehl eingefüllt mitgelieferten
Kaffeemehl nicht Drücken Sie das
angedrückt Kaffeemehl fester
Der Espresso hat Kaffeemehl zu Verwenden Sie
keine Crema grob feineres
(Schaumschicht Kaffeemehl
auf dem Kaffee)
Kaffeemehl nicht Drücken Sie das
genügend ange- Kaffeemehl fester
drückt an
Kaffeemehl zu alt Verwenden Sie
oder zu trocken frisches Kaffeemehl
Zuviel Wasser auf
dem Espressomehl nicht ausreichend Espressomehl
Milch ist nicht ge- Auto cappuccinno- siehe Kapitel
nug aufgeschäumt System verstopft „Pflege“
Espressomehl wurde
angedrückt. fester an.
Es ist zu wenig Füllen Sie mehr
Espressomehl im Espressomehl in
Filtersieb. das Filtersieb.
Milch zu alt Benutzen Sie
eine weniger feine
Mahlung.
zum Einweichen(s.
Kap. „Pflege)
„Entkalkung“
Kaffeemehl
Meßlöffel zum
Dosieren
an
Drücken Sie das
frische Milch
14
Page 15
Milch ist nicht ge- Milch lauwarm Stellen Sie die
nug aufgeschäumt Milch in den
Kühlschrank
falscher Fettgehalt Benutzen Sie
fettarme Milch
Rezepte
Genießen Sie Ihren Espresso so wie Sie ihn
lieben: Wenn Sie sich entspannen wollen oder
zum Abschluß eines guten Essens. Folgende
Rezepte können Sie dank Ihrer
Espressomaschine zubereiten.
. Original Espresso
• Verwenden sie einen Meßlöffel eines
qualitativ hochwertigen gut gerösteten
Espressos und filtern Sie ihn direkt in eine
vorgewärmte Tasse.
Bei richtigem Kaffeemehl und richtiger
Mahlung bildet sich eine schöne Crema.
• Je nach Geschmack Zucker zugeben und
Schluck für Schluck genießen. Original
Espresso wird ohne Milch, aber mit viel
Zucker getrunken.
. Cappuccino
Für einen Cappuccino nach allen Regeln der
Kunst sind folgende Mengen ideal: 1/3
Kaffee, 1/3 warme Milch und 1/3
Milchschaum. Die Menge an warmer Milch
und Schaum soll etwa doppelt so groß sein
wie die Menge des zubereiteten Kaffees.
• Benutzen Sie große Tassen die Sie vorher
bereits vorgewärmt haben.
• Füllen Sie diese mit der Kaffeemenge, die
etwa einem normalen Espresso entspricht
und fügen Sie Milch hinzu, die Sie unter
Verwendung des Auto-Cappuccino-Systems
aufgeschäumt haben.
• Überstäuben Sie mit Schokoladen-oder
Kakaopulver.
. Café Creme
• Bereiten Sie einen normalen Espresso in
einer großen Tasse zu.
Geben Sie einen Schuß Sahne dazu, um einen
Café Creme zu erhalten. Statt Sahne können
sie auch warme Milch verwenden.
.Café Corretto
• Bereiten Sie eine Tasse Espresso wie üblich
zu.
• «Korrigieren» Sie dann den Geschmack
etwas, indem Sie 1/4 oder 1/2 Schnapsglas
Cognac hinzufügen. Anissette, Grappa,
Sambuco,Kirschwasser oder Cointreau
eignen sich ebenfalls.
Es gibt sicherlich noch zahlreiche andere
Möglichkeiten den Espresso „zu veredeln“.
Der Phantasie sind hierbei keine Grenzen
gesetzt.
. Kaffeelikör
• Mischen Sie in einer 0,75l Flasche 3 Tassen
Espresso mit 250g braunem Kandiszucker
und 1/3 l Cognac oder Kirschwasser.
• Lassen Sie die Mischung mindestens 2
Wochen durchziehen.
Sie werden einen köstlichen Likör erhalten,
besonders für Kaffeeliebhaber.
. Italienischer Eiskaffee
4 Kugeln Vanilleeis, 2 Tassen kalter,
gezuckerter Espresso, 1/8 l kalte Milch, frische
Sahne, geriebene Schokolade.
• Mischen sie den kalten Espresso mit der
Milch.
• Verteilen sie das Vanilleeis in Gläser, gießen
Sie den Kaffee darüber und dekorieren sie
mit Sahne und geriebener Schokolade .
. Friesenkaffee
• Geben sie ein kleines Glas Rum zu einer
Tasse gut gesüßten Espresso.
• Dekorieren Sie mit einer dicken Haube
frischer Sahne und servieren Sie ihn.
. Flambierter Espresso
2 Tassen Espresso, 2kleine Gläser Cognac,
2Teelöffel brauner Zucker, frische Sahne.
• Gießen Sie den Cognac in zwei
hitzebeständige Gläser erwärmen und
flambieren Sie ihn.
• Geben Sie den Zucker hinzu, rühren Sie um,
gießen Sie den Espresso zu und dekorieren
Sie mit der frischen Sahne.
Nach Wunsch kann der Espresso mit etwas
heißem Wasser verdünnt werden.
15
Page 16

. Espressoparfait
2 Tassen Espresso, 6 Eigelb, 200g Zucker, 1/4 l
gesüßte Schlagsahne, 1 kleines Glas
Orangenlikör.
• Schlagen Sie die Eigelbe mit dem Zucker, bis
eine dicke schaumige Masse entsteht.
• Geben Sie den kalten Espresso und den
Orangenlikör hinzu.
• Ziehen Sie dann die geschlagene Sahne
unter.
• Verteilen Sie die Mischung in Gläser oder
Schälchen.
• Stellen Sie die Gläser in das Gefrierfach
. Mokkapudding
2 Tassen Espresso, 1/2 l Milch, 1 Päckchen
Vanille-Puddingpulver, 3 Eigelb, 1/8 l gesüßte
Sahne, 150g Zucker.
• Bereiten Sie den Vanillepudding mit der
Milch, dem Puddingpulver und dem Zucker
zu.
• Geben Sie die Eigelbe zu dem noch warmen
Pudding
• Lassen Sie abkühlen und geben Sie Espresso
und geschlagene Sahne hinzu.
Entsorgung
Die Verpackung besteht ausschließlich aus
umweltfreundlichen Materialien, die den
örtlichen Recyclestellen übergeben werden
sollten.
Entsorgungsmöglichkeiten für das
ausgediente Gerät erfahren Sie bei Ihrer
Gemeinde-bzw. Stadtverwaltung.
16
Page 17
English
◆
Description
a Lid
b Removable water tank
c Visible water level
d Warming plate for cups
e Steam / coffee selector
f Operational indicator light (red)
g Temperature control light (orange)
h Start / stop switch
i Brewing head
j Steam nozzle
k Autocappuccino accessory:
k1 tap
k2 flexible tube
k3 outlet nozzle
l Grid
m Drip plate
n Measuring spoon
o Filter for one or two cups
p Filter holder for ground coffee
q ESE filter holder and filter system
Safety recommendations
• Please read these instructions carefully
before first using your espresso. The
appliance must only be connected to the
mains via an earthed plug. Check that the
voltage shown on the appliance’s indicator
plate corresponds to that of your electricity
system.
Wiring instructions for U.K and Ireland
only :
APPLIANCES WITH FITTED PLUG
Important : For your convenience this
appliance is supplied complete with a plug
incorporating a 13 amp fuse.
In the event of replacing a fuse in the plug
supplied, a 13 amp fuse approved by ASTA to
BS1362 must be used.
If the socket outlets are not of the 13A BS
1363 type, and therefore do not accept the
plug connected to this appliance, cut off the
plug.
When cut off, this plug is a shock hazard if
inserted into a socket outlet and must
therefore be disposed of safely.
If the fuse cover is detachable, never use the
plug with the cover omitted. Replacement
covers can be obtained from your service
agent.
Fit the appropriate plug according to the
instructions in paragraph "Fitting a plug".
With alternative plugs a 15 amp fuse must be
fitted either in the plug or adaptor or at the
main fuse box.
APPLIANCES WITHOUT FITTED PLUG
FITTING A PLUG - IMPORTANT
The wires in the mains lead are coloured in
accordance with the following code:
GREEN & YELLOW : EARTH
BLUE : NEUTRAL
BROWN : LIVE
As the colours in the mains lead of this
appliance may not correspond with the
coloured markings identifying the terminals in
your plug, proceed as follows:
The wire which is coloured GREEN & YELLOW
must be connected to the terminal in the plug
which is marked with the letter ‘E’ or by the
earth symbol
and yellow. The wire which is coloured BLUE
must be connected to the terminal which is
marked with the letter ‘N’ or coloured black.
The wire which is coloured BROWN must be
connected to the terminal which is marked
with the letter ‘L’ or coloured red.
This appliance is manufactured to conform to
the Low Voltage Electrical Equipment (Safety)
Regulations 1989 and is designed to comply
with BS 3456. It complies with the
requirements of the EEC Directive (89/336/
EEC).
• Never put your espresso on a hot surface
(electric warming plate, for example) or close
to a flame.
• Never remove the filter holder containing
the coffee grounds while water is being
passed through, since the appliance is under
pressure at this time.
• Never use the appliance if the drip plate and
the grid are not in position.
or coloured green or green
17
Page 18

• Disconnect the electricity if there is any
problem while the coffee is percolating or
prior to cleaning your appliance.
• Never unplug the appliance by pulling on
the cord and never lay the cord across a
sharp edge or the corner of an item of
furniture.
• Do not allow the cable or your hands to
come into contact with the hot parts of the
appliance (cup warming plate, filter holder,
steam nozzle).
• Never immerse the appliance in water.
• Keep away from children and do not allow
the cord to hang down.
• Follow the instructions given for descaling.
• Never start the machine if it is damaged or if
the cord is in poor condition.
• If the cord or any other specific part
becomes defective, these can only be
replaced by a Krups approved service centre.
You must never, under any circumstances,
open the appliance yourself.
• Check that the filter holder is pushed well
down before starting the coffee and reset
the selector to O before releasing the filter
holder.
Espresso coffee
Espresso coffee is richer in aroma and stronger
than normal coffee. It is drunk from small preheated espresso cups. Hot water is passed
through the ground coffee to obtain this
delicious foamy black coffee, which has an
invigorating effect.
You can recognise an espresso by its
characteristic aroma and its typical froth. But
this requires high pressure and an excellent
espresso coffee which has been well roasted
and correctly ground. If you cannot buy
ground espresso coffee, use a coffee grinder
to grind the beans. The coffee must not be
ground too fine. It must be slightly
granulated. If it is too fine, you risk blocking
the grid of the brewing head and the filter.
To guarantee complete success for your
espresso, you must also use freshly-drawn
water (so that it has not had time to stagnate
in the air), without any chlorine odour and at
a fairly cold temperature.
Before first using your
machine
Before using your appliance for the first time,
clean the water heating system, without
coffee in the filter holder, filling the water
tanks once or twice, as follows:
• Open the lid and lift out the water tank
using the handle (1). Fill with water (2).
• Replace the water tank by positioning it
firmly (3) by opening the connection flap
located below the water tank and close the
lid.
The water level in the water tank can be
checked at any time using the window
provided for this purpose, so if necessary you
can add more water (4).
• Start the appliance (5). The red operating
light and the orange temperature control
indicator light will both come on.
• Place one of the filters in the filter holder
(11). Then put the filter holder on the
appliance’s brewing head.
• To ensure that the filter holder is in the
correct position, turn the handle so it points
to the left (6), place the filter holder flat
against the brewing head, then turn the
handle towards the right (7) as far as it can
go (8).
• Place a container, as large as possible,
beneath the filter holder (9).
• As soon as the orange indicator light goes
off, turn the selector to the
and allow all the water in the water tank to
run through.
• If necessary, you can stop the operation by
turning the selector to the O setting to
empty the container, then resume the
operation.
setting (9)
18
Page 19
Using the various functions of
your espresso machine
1. ESPRESSO FUNCTION
For best results, we recommend that you first
pre-heat the accessories (filter holder, filter
and cups) without putting in ground
coffee. To do this :
• Fill the water tank (1) (2) (3) and start the
appliance (5).
• Put the filter holder and an empty filter in
place (6) (7) (8), and place the espresso
cups underneath.
As soon as the appliance reaches the correct
temperature the orange indicator light will
go out.
• Turn selector to the setting (9).
• When the cups are full of hot water, reset
the selector to the O setting.
Once the appliance is hot, the espresso cups
can then be pre-heated on the cup warming
plate.
. Preparing an espresso :
• Fill the water tank (1) (2) (3) and start the
appliance (5).
• Put the filter for one or two cups into the
filter holder (11) .
• Place some ground coffee in the filter, at the
same tamping it down firmly; the coffee
should reach the lip of the filter (12) (13).
• Remove any ground coffee which is lying
around the filter (14).
• Replace the filter holder (15).
• Place one or two espresso cups beneath the
filter holder.
As soon as the appliance reaches the correct
temperature the orange indicator light will go
out.
• Then turn the selector to the setting
(10).
• When the cups are full, reset the selector to
the O setting.
• Remove the filter holder and the filter from
the machine, and take out the coffee
grounds (17).
The filter can be refilled to make more
espressos.
2. STEAM FUNCTION
The tapping noise which occurs while steam is
being produced comes from the intermittent
regulation of the pump and has no effect on
the proper working of the appliance.
If you wish to make an espresso immediately
after steam, the appliance must first be
allowed to cool down in order to achieve the
correct temperature for preparing an espresso.
• To do this, place a container below the filter
holder without coffee and position correctly,
then turn the selector to the
(10).
• Allow the water to flow through until the
orange indicator light comes on. Then turn
the selector to the O setting.
After this, you can make another espresso.
Beware: during and after use of the machine,
the metallic parts of the steam nozzle can
become burning hot.
. The steam function together with the
Krups Autocappuccino accessory makes it
easy to obtain:
. milk with varying amounts of froth for
making a cappuccino, a café crème or hot
chocolate.
. Hot water, for tea, for example.
These liquids are drawn in through the
flexible tube and heated with the aid of
steam before coming out via the outlet
nozzle of the autocappuccino accessory. If
the flexible tube is immersed directly in a
carton of milk, a single cup is enough to
prepare a cappuccino or a café crème. You
can adjust the fineness of the milk froth using
the tap of this accessory.
It is best to use fresh semi-skimmed milk, not
boiled and well chilled (kept in the
refrigerator). The container must also be cold
(do not run it under hot water before frothing
the milk).
For heating thick liquids, please refer to the
paragraph «Heating thick liquids (e.g. soup)»
setting
19
Page 20
We recommend that you clean the
autocappuccino accessory immediately after
use - please refer to paragraph «Cleaning the
autocappuccino accessory».
. Preparing frothy milk for a cappuccino:
• Fill the water tank (1) (2) (3) and start the
appliance (5).
• Move the nozzle to the exterior of the
appliance and mount the autocappuccino
accessory on the nozzle (18).
• Turn the selector to the
• Immerse the flexible tube in the milk to be
setting (19) .
heated. The tube must touch the bottom of
the container (20).
• Place a cup one third filled with freshly-
made espresso (20) under the outlet nozzle.
• Place the tap in the
setting (21). You
will obtain a fine smooth froth.
• To obtain milk which is less frothy, turn the
tap to the top of the user scale.
Once the appliance reaches the right
temperature, the orange temperature control
light will go out.
• Turn the selector to the setting (22) .
Hot frothy milk will come out of the outlet
nozzle.
• Once you have obtained the desired
quantity of frothy milk, turn the selector to
the O setting.
• After use, remove the flexible tube from the
container and clean the autocappuccino
accessory (see «Maintenance»).
. Preparing hot, lightly whipped milk for
café crème, hot chocolate or for heating
water (for tea, for example).
Notes:
. Café crème: place the cup containing the
freshly-prepared coffee directly under the
outlet nozzle.
. Hot chocolate: immerse the flexible tube
directly into the carton if the chcoclate is
ready-made,
or heat the milk if you are using powdered
chocolate. Then mix the powder in the heated
milk.
• Move the nozzle to the exterior of the
appliance and mount the autocappuccino
accessory on the nozzle (18).
• Fill the water tank (1) (2) (3) and start the
appliance (5).
• Turn the selector to the
• Turn the tap of the autocappuccino
setting (19) .
accessory to the fine end of the setting
scale (23).
• Immerse the flexible tube in the liquid to be
heated. The tube must touch the bottom of
the container (20).
• Place a container under the outlet nozzle
(20).
Once the appliance reaches the right
temperature, the orange temperature control
light will go out.
• Turn the selector to the steam
setting
(22).
• Once you have obtained the desired
quantity of frothy milk, turn the selector to
the O setting.
• After use, remove the flexible tube from the
container.
. Heating thick liquids (soup, for example)
• Move the steam nozzle to the exterior of the
appliance and mount the autocappuccino
accessory on the steam nozzle (18).
• Fill the water tank (1) (2) (3) and start the
appliance (5).
• Turn the selector to the
• Turn the tap on the autocappuccino
accessory to the
• Immerse the flexible tube in the liquid to be
setting (19).
setting (24).
heated (25).
Once the appliance reaches the correct
temperature, the orange temperature control
light will go out.
• Turn the selector to the setting (22) until
the liquid is hot enough, then reset the
selector to the O setting and remove the
container.
20
Page 21
3. ESPRESSO FUNCTION WITH THE SPECIAL
“ ESE ” FILTER HOLDER
The E.S.E. system was designed for making
Italian-style “espresso ristreto” (squeezed).
The amount of coffee is 35 ml and the water
should take 20 seconds to run through.
«ESE», which stands for «Easy Serving
Espresso» , is a selected measure of coffee,
ground and pressed between two filter papers
making it ready for use (for example
«illycaffé» serving). This system thus makes it
easy for you to prepare your espresso because
you avoid the measurement and tamping
down operations and it also makes it easier
for you to clean the appliance.
We do not intend, or recommend, that
the ESE servings are used for making a
long coffee.
We recommend that you take care, when
handling and storing the ESE servings, that
they do not become deformed.
For best results, we recommend that you preheat the accessories (filter holder, filter and
cups) without any coffee. To do this:
• Fill the water tank (1) (2) (3) and start the
appliance (5).
• Put the empty ESE filter in place (6) (7) (8)
and position the espresso cup underneath.
Once the appliance reaches the correct
temperature, the orange temperature
control light will go out.
• Then turn the selector to the
• When the cup is full of hot water, reset the
selector to the O setting.
Once the machine has heated up, the
espresso cups can be pre-heated on the cup
warming plate (on top of the machine).
. Preparing an espresso:
Place the serving of «illycafé» in the ESE filter
holder fitted with its own filter. The wording
«illycafé» must be pointing towards the
bottom and the long side of the paper filter
must be aligned with the handle (26).
Put the ESE filter holder in place (6) (7) (8) by
pressing it firmly to the right.
Once the appliance reaches the correct
setting (9).
temperature, the orange temperature control
light will go out.
•
Then turn the selector to the setting (9).
• When the recommended quantity of coffee
has been reached (35 ml) turn the selector
to the O position.
Remove the ESE filter holder from the brewing
head and throw away the used measure.
Maintenance
- Never wash your espresso machine
accessories in the dishwasher.
After use, the water tank must be emptied.
. Drip plate
This must be emptied after using the
appliance after taking off the grid (27) (28). If
several espressos are being prepared one after
the other, the drip plate should be emptied
from time to time (about once every 7 - 8
espressos). If necessary, clean the drip plate
and its grid (21) with water and a little nonabrasive washing-up liquid, rinse and dry.
When reassembling the machine, ensure that
the plastic lining is in the right place (29).
. The brewing head, the filter and the
filter holder
These must be cleaned after each use. All you
need to do is wipe a damp cloth over the
brewing head of your appliance and to wash
the other accessories in water and a little nonabrasive washing-up liquid, rinse and dry.
If the brewing head is heavily clogged up,
unscrew the grid using a coin, clean it and
refit it, pressing down firmly (30).
When your espresso is not being used, do not
leave the filter holder on the appliance to
prevent wear on the gasket.
. The cup warming plate: remove this to
clean it with water and a little non-abrasive
washing-up liquid, rinse and dry (31).
. Steam nozzle: wipe with a damp cloth after
each use.
. The autocappuccino accessory
After each use, we recommend that you rinse
the autocappuccino accessory in the following
manner:
21
Page 22
• Turn the selector to the steam pre-heating
• Turn the tap to the cleaning position
position
(19).
(33).
• Immerse the flexible tube into a glass of
water. (The minimum quantity necessary is
100 ml).
• Place a container below the outlet nozzle.
Once the appliance reaches the correct
temperature, the orange temperature control
light will go out.
• Then turn the selector to the steam setting
(22).
• When all the water has run through the
autocappuccino accessory turn the selector
to the O position.
• After use, remove the flexible tube from the
container.
• Once this operation is completed, clean the
outlet nozzle with a damp cloth.
We recommend that you regularly dismantle
the autocappuccino accessory and clean it
with water, a little non-abrasive washing-up
liquid and a small brush. Rinse and dry before
reassembling it (34).
Be careful to mount the flexible tube the
right way: engage the straight cut end into
the autocappuccino accessory.
. Percolation head gasket
From time to time this gasket must be cleaned :
• Put the filter in the filter holder.
• Place a jug or container under the filter
holder.
• Switch on the appliance.
• Turn the selector to the setting
• When the hot water starts to filter through,
turn the filter holder slowly from left to right
so that the water filters through between
the gasket and the filter.
Descaling
• Descaling of your espresso should be done
fairly frequently with citric or tartaric acid.
22
However, we would advise you to use the
Krups descaling accessory, reference 054,
which is available from Krups after-sales service centres. This accessory includes, apart
from two descaling doses, a testing strip for
water hardness to assess the frequency of
descaling of your appliance in normal use.
Descaling depends on the hardness of the
water, but also on the use cycle. The frequently
of descaling indicated by the 054 accessory is
thus given by way of indication only.
- Then follow the following method:
• Unscrew the grid from the head of the
appliance and clean it.
• Dissolve 2 dessertspoons of the descaling
product or a sachet of KRUPS descaling
accessory, reference 054, in half a litre of
lukewarm water and pour the whole lot into
the empty water tank.
• Place a container under the brewing head.
Run through about 1/3 of the liquid
immediately, setting the selector to the
position (9).
• Stop the appliance, leaving the
position
(9) engaged and wait for 10 - 15 minutes to
allow the descaler to take effect.
• Next, start the machine again and allow the
rest of the liquid to run through.
•
Then rinse with two water tanks of fresh
water and replace the grid on the head of the
appliance (see paragraph on maintenance).
Problems, probable causes and
how to correct them
Problems Probable causes Corrective actions
Espresso not hot The accessories Preheat the
enough (cups, filter and accessories (cups,
Coffee leaks The filter holder See paragraph
around the filter has not been as- «Preparing an
holder sembled correctly espresso».
filter holder filter, filter holder)
are cold). See paragraph
«Preparing an
espresso».
There are coffee Clean around the
grounds on the filter and the
edge of the filter gasket.
Page 23
Coffee leaks The brewing head Clean the gasket
around the filter gasket is dirty. with a damp cloth.
The brewing Contact an
head gasket approved Krups
is defective service centre.
Pump is very noisy No water in the Fill the water tank.
water tank.
Water tank incor- Press firmly down
rectly mounted. on the water tank.
Coffee grounds too Use fresh coffee
old or very dry
and the pump cannot produce
pressure.
Water does not run No water in the Fill the water tank.
through water tank. Press firmly down
Water tank incor- on the water tank.
rectly mounted.
The filter is blocked, Clean the filter and
the coffee grounds the grid on the
are too fine or head.
tamped down too See the paragraph
hard. «Maintenance»
and try a coarser
coffee.
Brewing head Put the grid to
grid is encrusted soak in descaling
solution
See paragraph
«Maintenance».
Appliance needs See paragraph
descaling. «Descaling».
Water runs through Coffee grounds too Try a finer coffee
too quickly coarse
Quantity of Use the spoon
ground coffee provided to
is insufficient. measure out the
coffee.
Coffee grounds not Tamp down the
tamped down coffee again.
firmly enough
The espresso has Coffee grounds Try a finer-ground
no froth (froth on too coarse coffe
coffee)
Coffee grounds Tamp down the
not tamped coffee again
The espresso has Coffee grounds Use fresh coffee
no froth (froth on stale or too dry
coffee)
The milk is not very Steam nozzle bloc- See paragraph
frothy ked «Maintenance»
Cappuccino acces- See paragraph
sory blocked «Maintenance»
Milk not fresh. Use fresh milk
Milk is lukewarm. Put milk in
refrigerator.
During E.S.E. use, ESE serving is badly See “Espresso
coffee leaks from positioned function with the
around the filter E.S.E. filter holder”
holder
Filter holder not Press the filter
properly inserted holder down more
firmly
Extraction too long Limit extraction to
35 ml
Lots of water on Grounds not Tamp down the
the coffee grounds properly tamped grounds
down
Insufficient quantity Increase the
of ground coffee quantity of ground
coffee.
Recipes
Savour your espresso just as you like it: when
you want to relax or to round off a good
meal.
Here are a few recipes which you will be able
to create with your espresso machine.
. Original espresso
• Take one measuring spoonful of good
quality well roasted espresso coffee, and
filter it directly into the pre-heated cup.
If you use good, finely ground coffee, the cup
will be crowned by a fine head of froth.
• Add sugar if desired and treat yourself. Ori-
ginal espresso is drunk without milk but
plenty of sugar.
. Cappuccino
For a state of the art cappuccino, the ideal
quantities are as follows: 1/3 coffee, 1/3 hot
milk, 1/3 frothy milk. The quantity of hot milk
23
Page 24

+ froth obtained should be about double the
amount of coffee prepared.
• Use large cups which have been pre-heated.
• Fill them with coffee to the equivalent of
one cup of espresso and top up with milk
which has been frothed up using the
autocappuccino accessory.
• Lastly, sprinkle with drinking chocolate
powder.
. Café crème
• Prepare a classic espresso in a large cup.
• Add a cloud of cream to make an espresso
with milk.
You can also replace the cream with hot milk.
. Caffe corretto *
• Prepare a cup of espresso in the normal way.
• Then slightly ‘correct’ the taste by adding
1/4 or 1/2 a glass of cognac.
You can also use anisette, grappa, Sambuco,
Kirsch or Cointreau for the same effect.
And there must be countless other
possibilities for «ennobling» an espresso. Let
your imagination run wild.
. Coffee Liqueur *
• Mix in an empty 0.75 litre bottle: 3 cups of
espresso, 250 g brown cane sugar, 1/2 litre
cognac or Kirsch.
• Leave the mixture to soak for at least 2
weeks.
You will then have a delicious liqueur,
especially for coffee lovers.
. Iced coffee à l’italienne
4 vanilla ice cubes, 2 cups of cold sugared
espresso, 1/8 litre milk, fresh cream, grated
chocolate.
• Mix the cold espresso with milk.
• Distribute the ice cubes among the glasses,
pour the coffee over them and decorate
with fresh cream and grated chocolate.
. Friesian coffee *
• Add a small glass of rum to a sugared cup
of espresso.
• Decorate with a good layer of fresh cream
and serve.
. Espresso flambé *
2 cups of espresso, 2 small glasses of cognac,
2 teaspoonfuls of brown sugar, fresh cream.
• Pour the cognac into heat-resistant glasses,
heat and flame.
• Add sugar, mix, pour the coffee and
decorate with fresh cream.
If you like, the espresso can also be diluted
with a little boiling water.
. Perfect espresso *
2 cups of espresso, 6 egg yolks, 200g sugar,
1/8 litre sugared fresh cream, 1 small glass of
orange liqueur.
• Beat the egg yolks with the sugar until it
forms a thick foamy mass.
• Add the cold espresso and orange liqueur.
• Then mix in the fresh whipped cream.
• Pour the mixture into cups or glasses.
• Put the cups into the freezer.
. Mocha pudding
2 cups of espresso, 1/2 litre milk, 1 sachet
vanilla pudding powder, 3 egg yolks, 1/8 litre
sugared fresh cream, 150 g sugar.
• Prepare a vanilla pudding with the milk,
vanilla powder and sugar.
• Add the egg yolks to the pudding while it is
still hot.
• Chill and add espresso and whipped cream.
(* : The abuse of alcohol is dangerous to your
health).
24
Page 25
Français
◆
Description
a Couvercle
b Réservoir d’eau amovible
c Niveau d’eau visible
d Plateau chauffe-tasses
e Sélecteur café/vapeur
f Témoin lumineux de fonctionnement
(rouge)
g Témoin lumineux de contrôle de
température (orange)
h Interrupteur marche/arrêt
i Tête de percolation
j Buse vapeur
k Accessoire Autocappuccino :
k1 robinet
k2 tuyau souple
k3 buse de sortie
l Grille
m Plateau récolte-gouttes
n Cuillère doseur
o Filtre pour une et deux tasses
p Porte-filtre pour café moulu
q Porte-filtre et filtre système «ESE»
Consignes de sécurité
• Avant la mise en marche de votre expresso,
lisez attentivement ce mode d’emploi. Ne
branchez l’appareil que sur une prise avec
terre. Vérifiez que la tension indiquée sur la
plaque signalétique de l’appareil corresponde bien à celle de votre installation
électrique.
• Ne posez pas votre expresso sur une surface
chaude (plaque électrique par exemple) ou à
proximité d’une flamme.
• N’enlevez pas le porte-filtre contenant la
mouture durant le passage de l’eau car
l’appareil est alors sous pression.
• N’utilisez pas l’appareil lorsque le plateau
récolte-gouttes et la grille ne sont pas mis en
place.
• La prise doit être retirée en cas de problème
durant l’écoulement du café ou avant de
nettoyer votre appareil.
• Ne débranchez pas l’appareil en tirant sur le
cordon et ne placez pas le cordon sur l’angle
vif ou le coin d’un meuble.
• Evitez le contact du cordon ou de vos mains
avec les parties chaudes de l’appareil
(plateau chauffe-tasses, porte-filtre, buse
vapeur).
• Ne plongez jamais l’appareil dans l’eau.
• Tenez les enfants à distance et ne laissez pas
pendre le cordon.
• Conformez vous à la notice pour les
instructions de détartrage.
• Ne mettez pas en marche la machine si elle
est endommagée ou si le cordon est en
mauvais état.
• Si le cordon ou tout autre élément spécifique
devenait défectueux, ils devront seulement
être remplacés par le centre service agréé
Krups. En aucun cas, l’appareil ne doit être
ouvert par vos soins.
• Vérifiez que le porte-filtre est bien serré
avant de faire couler le café et remettez le
sélecteur sur O avant de déserrer le portefiltre.
Le café Expresso
Le café expresso est plus riche en arôme et
plus fort qu’un café normal. Il se boit dans de
petites tasses à expresso préalablement
chauffées. L’eau chaude passe à travers le café
moulu pour obtenir ce délicieux café noir et
mousseux à l’effet revigorant.
Vous reconnaîtrez l’expresso grâce à son
arôme caractéristique et à sa mousse typique.
Mais ceci suppose une pression élevée et un
excellent café expresso bien torréfié et
correctement moulu. Si vous ne pouvez
acheter du café expresso moulu, utilisez un
broyeur à café pour broyer les grains. Le café
ne doit pas être moulu «trop fin». Il doit être
légèrement granuleux. Trop fin, vous risquez
de boucher les grilles de la tête de percolation
et du filtre.
25
Page 26
Pour garantir la total réussite d’un bon
expresso, il est aussi nécessaire d’utiliser de
l’eau fraîche (qui n’a donc pas stagné
longtemps à l’air libre), sans odeur de chlore
et de température assez froide.
Avant la première utilisation
Avant d’utiliser votre appareil pour la première
fois, nettoyez, sans utiliser de mouture dans le
porte-filtre, le système de chauffage de l’eau
avec un ou deux réservoir d’eau, comme suit:
• Ouvrez le couvercle et enlevez le réservoir à
l’aide de la poignée (1).Remplissez-le d’eau
(2).
• Replacez le réservoir en le positionnant
fermement de façon à ouvrir le clapet de
raccordement situé sous le réservoir et
refermez le couvercle (3) .
Le niveau d’eau dans le réservoir peut être
surveillé à tout moment grâce à la fenêtre
prévue à cet effet, ainsi, lorsque cela sera
nécessaire, vous pourrez rajouter de l’eau (4).
• Mettez en marche l’appareil (5), le témoin
lumineux rouge et le témoin lumineux
orange s’allument.
• Mettez l’un des filtres dans le porte-filtre
(11). Puis montez le porte-filtre sur la tête de
percolation. Pour que le porte-filtre soit
correctement positionné, orientez la poignée
vers la gauche (6), plaquez le porte-filtre
contre la tête de percolation, puis tournez la
poignée vers la droite (7) jusqu’au blocage
(8).
• Placez un récipient le plus grand possible
sous le porte-filtre (9).
• Dès que l’appareil atteint la bonne tempéra-
ture le témoin lumineux orange s’éteint,
tournez alors le sélecteur sur la position
(9) et laissez couler toute l’eau contenue
dans le réservoir.
• Si nécessaire, interrompez l’opération en
tournant le sélecteur sur la position O pour
vider le récipient puis reprenez l’opération.
Utilisation des différentes
fonctions de votre expresso
1. FONCTION EXPRESSO
Pour un meilleur résultat, nous vous conseillons d’effectuer au préalable un préchauf-
fage des accessoires (porte-filtre, filtre et
tasses) sans mouture.
Pour cela:
• Remplissez le réservoir d’eau (1) (2) (3) et
mettez en marche l’appareil (5).
• Mettez en place le porte-filtre et l’un des
filtres vide (6) (7) (8), placez les tasses à
expresso dessous.
Dès que l’appareil atteint la bonne température, le témoin lumineux orange s’éteint.
• Tournez alors le sélecteur sur la position
(9).
• Quand les tasses sont remplies d’eau chau-
de, remettez le sélecteur sur la position O.
Lorsque l’appareil est chaud, les tasses à
expresso peuvent être préchauffées sur le
plateau chauffe-tasses.
Préparation de l’expresso :
• Remplissez le réservoir d’eau (1) (2) (3) et
mettez en marche l’appareil (5).
• Mettez le filtre pour une ou deux tasses dans
le porte-filtre (11).
• Mettez du café moulu dans le filtre, tout en
tassant fermement la mouture, jusqu’à
atteindre le rebord du filtre. (12) (13).
• Enlevez la mouture qui reste autour du filtre
(14).
• Mettez le porte-filtre en place (15).
• Placez une ou deux tasses à expresso sous le
porte-filtre.
Dès que l’appareil atteint la bonne température, le témoin lumineux orange s’éteint.
• Tournez alors le sélecteur sur la position
(10).
• Quand les tasses sont remplies, remettez le
sélecteur sur la position O.
• Enlevez le porte-filtre et le filtre de l’appareil,
et retirez la mouture (17).
26
Page 27
Le filtre peut de nouveau être rempli pour
préparer d’autres expressos.
2. FONCTION VAPEUR
Le claquement, qui se produit lors de la
préparation de la vapeur, vient de la régulation intermittente de la pompe et n’a aucune
incidence sur le bon fonctionnement de
l’appareil.
Si vous voulez faire un expresso immédiatement après la vapeur, l’appareil devra d’abord
être refroidi pour atteindre la température
adéquate pour la préparation de l’expresso.
• Pour se faire, placez un récipient sous le
porte-filtre sans mouture et mis en place,
puis tournez le sélecteur sur la position
(10).
• Laissez couler l’eau jusqu’à ce que le témoin
lumineux orange s’allume. Puis, tournez le
sélecteur sur la position O.
Après quoi un expresso peut de nouveau être
fait.
Attention: pendant et après le fonctionnement de l’appareil, les parties métalliques de
la buse vapeur peuvent devenir brûlantes.
. La fonction vapeur avec l’accessoire
Krups autocappuccino permet d’obtenir
facilement :
. un lait plus ou moins mousseux pour un
cappuccino, un café crème ou un chocolat
chaud.
. de l’eau chaude pour un thé par exemple.
Ces liquides sont aspirés par le tuyau
souple et chauffés grâce à la vapeur
avant de ressortir par la buse de sortie de
l’accessoire autocappuccino. En plongeant
directement le tuyau souple dans une brique
de lait, une seule tasse suffit alors pour
préparer un cappuccino ou un café crème.
Avec le robinet de l’accessoire vous pourrez
régler la finesse de la mousse de lait.
Il est préférable d’utiliser du lait demi-écrémé
frais, non bouilli et bien froid (stocké au
réfrigérateur).Le récipient doit aussi être froid
(ne le passez pas sous l’eau chaude avant de
faire mousser le lait).
Pour le réchauffage des liquides épais,
reportez-vous au paragraphe: «Réchauffage
des liquides épais (par exemple de la soupe)».
Nous vous conseillons de nettoyer l’accessoire
autocappuccino immédiatement après son
utilisation en vous reportant au paragraphe :
«nettoyage de l’accessoire autocappuccino».
. Préparation d’un lait mousseux pour un
cappuccino:
• Remplissez le réservoir d’eau (1) (2) (3) et
mettez en marche l’appareil (5).
• Déplacez la buse vers l’extérieur de l’appareil
et montez l’accessoire autocappuccino sur la
buse vapeur (18).
• Tournez le sélecteur sur la position
• Plongez le tuyau souple dans le lait à
(19).
chauffer. Le tuyau doit toucher le fond du
récipient (20).
• Placez une tasse remplie au tiers d’un
expresso fraîchement préparé (20) sous la
buse de sortie.
• Placez le robinet sur la position (21).
Vous obtiendrez une mousse fine et
onctueuse.
• Pour obtenir un lait moins mousseux,
tournez le robinet vers le haut de la plage
d’utilisation.
Dès que l’appareil atteint la bonne température, le témoin lumineux orange s’éteint.
• Tournez le sélecteur sur la position (22).
Du lait chaud mousseux sortira de la buse de
sortie.
• Après avoir obtenu la quantité de lait
mousseux souhaitée, tournez le sélecteur sur
la position O.
• Après utilisation, retirez le tuyau souple du
récipient et nettoyez le système
Autocappuccino (voir chapitre «Entretien/
Nettoyage»)
. Préparation d’un lait chaud légèrement
fouetté pour un café crème, d’un chocolat
chaud ou du réchauffage de l’eau (pour
un thé par exemple)
Remarques :
. Café crème: placez directement la tasse
contenant le café fraîchement préparé sous la
buse de sortie.
. Chocolat chaud : plongez le tuyau souple
directement dans la brique dans le cas de
chocolat prêt à l’emploi,
27
Page 28

ou, chauffez le lait si vous utilisez du chocolat
en poudre. Mélangez ensuite la poudre de
cacao dans le lait chauffé.
• Déplacez la buse vapeur vers l’extérieur de
l’appareil et montez l’accessoire
autocappuccino sur la buse vapeur (18).
• Remplissez le réservoir d’eau (1)(2)(3) et
mettez en marche l’appareil (5).
• Tournez le sélecteur sur la position (19).
• Tournez le robinet de l’accessoire
autocappuccino vers l’extrémité fine de la
plage de réglage (23).
• Plongez le tuyau souple dans le liquide à
chauffer. Le tuyau doit toucher le fond du
récipient (20).
• Placez un récipient sous la buse de sortie
(20).
Dès que l’appareil atteint la bonne température, le témoin lumineux orange s’éteint.
• Tournez le sélecteur sur la position (22).
• Quand la quantité désirée de liquide chaud
est obtenue, tournez le sélecteur sur la
position O.
• Après utilisation, retirez le tuyau souple du
récipient.
. Réchauffage des liquides épais (par
exemple de la soupe):
• Déplacez la buse vapeur vers l’extérieur de
l’appareil et montez l’accessoire
autocappuccino sur la buse vapeur (18).
• Remplissez le réservoir d’eau (1)(2)(3) et
mettez en marche l’appareil (5).
• Tournez le sélecteur sur la position (19).
• Tournez le robinet de l’accessoire
autocappuccino sur la position (24).
• Plongez la buse de sortie de l’accessoire
autocappuccino dans le liquide à réchauffer
(25).
Dès que l’appareil atteint la bonne température, le témoin lumineux orange s’éteint.
• Tournez le sélecteur sur la position (22)
jusqu’à ce que le liquide soit suffisamment
chaud, puis remettez le sélecteur sur la
position O et enlevez le récipient.
3. FONCTION EXPRESSO AVEC LE PORTE-FILTRE
«ESE»
SPÉCIAL
Le système E.S.E est conçu pour la réalisation
d’espresso «ristreto» (serré) à l’italienne. La
quantité de café correspond à 35 ml et à 20
secondes de passage de l’eau.
«ESE» pour «Easy Serving Expresso» (préparation simplifiée de l’expresso) est une dose de
café sélectionnée, moulue et compactée entre
deux papiers filtres qui la rendent prête à
l’emploi (par exemple «serving illycaffé»). Ce
système simplifie la préparation de l’
expresso en évitant les opérations de dosage,
de tassage et en facilitant le nettoyage de
l’appareil.
Il n’est pas prévu ni recommandé d’effectuer un café long avec ces doses.
Nous vous conseillons de manipuler et de
stocker les doses «ESE» en évitant de les
déformer.
Pour un meilleur résultat, nous vous conseillons d’effectuer au préalable un préchauffage sans mouture des accessoires (portefiltre, filtre et tasses). Pour cela :
• Remplissez le réservoir (1)(2)(3) et mettez en
marche l’appareil (5).
• Mettez en place le porte-filtre «ESE» vide
(6)(7)(8) et placez la tasse à expresso
dessous
Dès que l’appareil atteint la bonne température, le témoin lumineux orange s’éteint.
• Tournez alors le sélecteur sur la position
(9).
• Quand la tasse est remplie d’eau chaude,
remettez le sélecteur sur la position O.
Dès que l’appareil est chaud, les tasses à
expresso peuvent être préchauffées sur le
plateau chauffe-tasses (sur le dessus de
l’appareil).
. Préparation de l’expresso :
• Déposez la dose «serving illycafé» dans le
porte-filtre «ESE» équipé de son filtre.
L’inscription «illycaffé» doit être orientée
vers le bas et le côté long du filtre en papier
doit être dans l’axe de la poignée (26).
• Mettez en place le porte-filtre «ESE»
(6)(7)(8) en le serrant fort vers la droite.
28
Page 29

Dès que l’appareil atteint la bonne température, le témoin lumineux orange s’éteint.
• Tournez alors le sélecteur sur la position
(9).
• Quand la quantité de café recommandée est
atteinte (35 ml), tournez le sélecteur sur la
position O .
• Ôtez le porte-filtre «ESE» de la tête de
percolation et jetez la dose usagée.
Entretien
- Ne lavez pas les accessoires de votre
expresso au lave-vaisselle.
Après usage, le réservoir d’eau doit être vidé.
. Le plateau récolte-gouttes
Après chaque utilisation de l’appareil, il doit
être vidé après avoir ôté la grille (27)(28). Si
plusieurs expressos sont préparés les uns après
les autres, il convient de le vider de temps en
temps (tous les 7 à 8 expressos environ).Si
nécessaire, nettoyez le plateau récolte-gouttes
et sa grille avec de l’eau et un peu de produit
vaisselle non agressif, rincez et séchez. Au
remontage, assurez vous de la bonne place de
l’habillage plastique (29).
. La tête de percolation, le porte-filtre et
le filtre
Ils doivent être nettoyés après chaque
utilisation. Il suffit de passer un linge humide
sur la tête de percolation et de nettoyer les
autres accessoires avec de l’eau et un peu de
produit à vaisselle non agressif. Rincez et
séchez.
En cas de fort encrassement de la tête de
percolation, dévissez sa grille à l’aide d’une
pièce de monnaie, nettoyez-la et remontez-la
en serrant fermement (30).
Lorsque vous n’utilisez pas votre expresso, ne
laissez pas le porte-filtre sur l’appareil pour
éviter l’usure du joint.
. Le plateau chauffe-tasses: retirez-le pour
le nettoyer avec de l’eau et un peu de produit
à vaisselle non agressif. Rincez et séchez (31).
. La buse vapeur: elle doit être nettoyée avec
un linge humide après chaque utilisation.
. l’accessoire autocappuccino :
Après chaque utilisation, nous vous conseillons de rincer l’accessoire autocappuccino
de la manière suivante:
• Tournez le sélecteur sur la position
• Tournez le robinet sur la position
• Plongez le tuyau souple dans un verre d’eau.
(19).
(33).
(La quantité d’eau minimum nécessaire est
de 100 ml).
• Placez un récipient sous la buse de sortie.
Dès que l’appareil atteint la bonne température, le témoin lumineux orange s’éteint.
• Tournez alors le sélecteur sur la position
(22).
• Quand toute l’eau est passée dans l’acces-
soire autocappuccino, tournez le sélecteur
sur la position O.
• Après utilisation, retirez le tuyau souple du
récipient.
• Dès que cette opération est terminée,
nettoyez la buse de sortie avec un linge
humide.
Nous vous conseillons de démonter complètement et régulièrement l’accessoire
autocappuccino à l’aide de la queue de la
cuillère doseur et de le nettoyer avec de l’eau,
un peu de produit à vaisselle non agressif et
une petite brosse. Rincez-le et séchez-le avant
d’effectuer le remontage (34).
Attention au sens de montage du tuyau
souple : engagez l’extrémité coupée droite
dans l’accessoire autocappuccino.
. Le joint de la tête de percolation
De temps en temps ce joint doit être nettoyé :
• Mettez le porte filtre en place avec le filtre.
• Positionnez un récipient sous le porte filtre.
• Mettez l’appareil en marche.
• Tournez le sélecteur sur la position .
• Lorsque l’eau chaude coule, tournez le porte
filtre doucement de gauche à droite afin que
de l’eau s’écoule entre le joint et le porte
filtre.
29
Page 30

Détartrage
• Détartrez plus ou moins souvent votre
expresso avec de l’acide citrique ou tartrique.
Cependant nous vous conseillons d’utiliser
l’accessoire de détartrage Krups référence
054 disponible dans les centres service agréés
Krups. Cet accessoire comprend en plus de
deux doses de détartrage, un ruban testeur de
dureté de l’eau pour évaluer la fréquence de
détartrage de votre appareil en utilisation
normale. L’entartrage dépend de la dureté de
l’eau mais aussi du cycle d’utilisation. La
fréquence de détartrage indiquée par
l’accessoire 054 est donc donnée à titre
indicatif.
- Suivez ensuite la méthode suivante:
• Dévissez la grille de la tête de percolation et
nettoyez-la.
• Dissolvez 2 cuillères à soupe de produit de
détartrage ou un sachet de l’accessoire 054
dans un demi-litre d’eau tiède et versez le
tout dans le réservoir d’eau vide.
• Placez un récipient sous la tête de
percolation. Faites passer environ 1/3 du
liquide directement, en mettant le sélecteur
sur la position
• Arrêtez l’appareil en laissant la position
(9) enclenchée et attendez 10 à 15 minutes
pour laisser agir le détartrant.
• Remettez ensuite en marche et laissez
s’écouler le reste du liquide.
• Rincez ensuite avec deux réservoirs d’eau
claire et remettez la grille sur la tête de
l’appareil ( voir paragraphe «entretien»).
(9).
Problèmes, causes probables et
actions correctives
Problèmes Causes Actions
probables correctives
L’expresso n’est Les accessoires Préchauffez les
pas assez chaud sont froids (tasses, accessoires (tasses,
filtre et porte-filtre). filtre et porte
filtre).Voir le paragraphe «Préparation d’un
expresso».
Fuite de café au Le porte filtre n’est Voir paragraphe
niveau du porte- pas monté «Préparation d’un
filtre correctement. expresso».
Il reste de la mou- Nettoyez le tour du
ture sur le bord du filtre et le joint.
filtre.
Le joint de la tête Nettoyez le joint
de percolation est avec un linge
sale. humide.
Le joint de la tête Contactez un
de percolation est centre service
défectueux. agréé Krups.
Bruit très fort dans Pas d’eau dans le Remplissez le réla pompe. réservoir. servoir.
Réservoir mal Appuyez fermemonté. ment sur le réser-
voir.
Mouture trop vieille Utilisez une mouou très sèche et la ture fraîche
pompe ne peut
créer de pression.
L’eau ne passe pas. Pas d’eau dans le Remplissez le réser-
réservoir. voir.
Réservoir mal Appuyez ferme-
monté. ment sur le réser-
voir.
Le filtre est bouché, Nettoyez le filtre et
la mouture est trop la grille de la tête
fine ou trop tassée. Voir le paragraphe
«Entretien» et
essayez une mouture moins fine.
Grille de la tête de Mettez la grille à
percolation tremper dans la
encrassée. solution de
détartrage.Voir le
paragraphe
«Entretien».
Appareil entartré Voir le paragraphe
«détartrage»
30
Page 31

L’eau passe trop Mouture trop Essayez une mouvite. grosse. ture plus fine.
Quantité de mou- Utilisez la cuillère
ture insuffisante. fournie pour doser
le café.
Mouture non Tassez plus la
tassée. mouture.
L’expresso n’a pas Mouture trop Essayez une moude crème. grosse. ture plus fine
(mousse sur le café)
Mouture pas assez Tassez plus la
tassée. mouture.
Mouture vieille ou Utilisez une moutrop sèche. ture fraîche
Le lait n’est pas très Buse vapeur Voir paragraphe
mousseux. bouchée. «Entretien»
Accessoire cappuc- Voir paragraphe
cino bouché. «Entretien»
Lait trop vieux. Utilisez du lait frais
Lait tiède. Mettez le lait au
réfrigérateur.
En utilisation E.S.E Dose mal position- Voir «Fonction
fuite de café au née Espresso avec le
niveau du porte porte filtre E.S.E»
filtre Porte filtre mal Serrez plus fort
serré le porte filtre
Extraction trop Limitez l’extraction
longue à 35 ml
Beaucoup d’eau Mouture non tassée Tassez la mouture
sur la mouture
Quantité de moutu- Augmentez la
re insuffisante quantité de
mouture
Recettes
Dégustez votre expresso comme vous l’aimez:
lorsque vous désirez vous détendre ou pour
terminer un bon repas.
Voici quelques recettes à réaliser avec votre
machine à expresso.
. Expresso original
• Prenez une cuillère doseur de café à
expresso de bonne qualité, bien torréfié et
filtrez-le directement dans la tasse préchauffée.
Si vous utilisez du bon café bien moulu, une
belle couronne de mousse décorera la tasse.
• Ajoutez du sucre si vous aimez et régalez
vous. L’expresso original se boit sans lait
mais avec beaucoup de sucre.
. Cappuccino
Pour un cappuccino dans les règles de l’art, les
quantités idéales sont les suivantes: 1/3 de
café, 1/3 de lait chaud, 1/3 de lait mousseux.
La quantité lait chaud + mousse obtenue doit
donc être d’environ le double du café préparé.
• Utilisez de grandes tasses que vous aurez
chauffées au préalable.
• Remplissez-les de café pour l’équivalent
d’une tasse à expresso et complétez avec du
lait que vous aurez fait mousser en utilisant
l’accessoire autocappuccino.
• Saupoudrez enfin de chocolat en poudre.
. Café crème
• Préparez un expresso classique dans une
grande tasse. Ajoutez un nuage de crème
pour obtenir un café crème.
Vous pouvez aussi remplacer la crème par du
lait chaud.
. Café corretto*
• Préparez un tasse d’expresso comme
d’habitude.
• Corrigez ensuite légèrement le goût en
ajoutant 1/4 ou 1/2 verre à liqueur de
cognac.
L’anisette, l’eau de vie de raisins, le Sambuco,
le Kirsch et le Cointreau conviennent aussi à
cet effet.
Il existe sûrement encore de nombreuses
autres possibilités pour «anoblir» l’expresso.
L’imagination est illimitée.
. Liqueur au café*
• Mélangez dans 1 bouteille vide de 0,75 litre
3 tasses d’expresso, 250 g de sucre candi
brun, 1/2 litre de Cognac ou de Kirsch.
• Laissez macérer le mélange pendant au
moins 2 semaines.
Vous aurez ainsi une liqueur délicieuse,
surtout pour les amateurs de café.
. Café glacé à l’italienne
4 boules de glace à la vanille, 2 tasses
d’expresso froid sucré, 1/8 l de lait , crème
fraîche, chocolat râpé.
31
Page 32

• Mélangez l’expresso froid avec du lait.
• Répartissez les boules de glace dans des
verres, versez le café dessus et décorez avec
la crème fraîche et le chocolat râpé.
. Café à la frisonne*
• Ajoutez un petit verre de rhum à une tasse
d’expresso sucré.
• Décorez avec une bonne couche de crème
fraîche et servez.
. Expresso flambé*
2 tasses d’expresso, 2 petits verres de Cognac,
2 cuillerées à café de sucre brun, crème
fraîche.
• Versez le Cognac dans des verres résistant à
la chaleur, chauffez et flambez.
• Ajoutez le sucre, mélangez, versez le café et
décorez de crème fraîche.
Si on le désire, l’expresso peut aussi être dilué
avec un peu d’eau bouillante.
. Expresso parfait*
2 tasses d’expresso, 6 jaunes d’oeuf, 200g de
sucre, 1/4 litre de crème fraîche sucrée, 1 petit
verre de liqueur d’orange.
• Battez les jaunes d’oeuf avec le sucre jusqu’à
formation d’une masse épaisse et mousseuse.
• Ajoutez l’expresso froid et la liqueur
d’orange.
• Mélangez ensuite la crème fraîche fouettée.
• Versez le tout dans des coupes ou des
verres.
• Mettez les coupes dans le congélateur.
. Pudding à la mocca
2 tasses d’expresso, 1/2 litre de lait, 1 sachet
de poudre à pudding à la vanille, 3 jaunes
d’oeuf, 1/8 litre de crème fraîche sucrée, 150
g de sucre.
• Préparez un pudding à la vanille avec le lait,
la poudre à la vanille et le sucre.
• Ajoutez les jaunes d’oeuf au pudding encore
chaud.
• Faites refroidir et ajoutez l’expresso et la
crème fouettée.
(* : L’abus d’alcool est dangereux pour la
santé.)
32
Page 33

Nederlands
◆
Beschrijving
a Deksel
b Uitneembaar waterreservoir
c Zichtbaar waterpeil
d Warmhoudplaat voor kopjes
e Keuzeknop koffie/stoom
f Controlelampje werking (rood)
g Controlelampje temperatuur (oranje)
h Aan/uit schakelaar
i Percolatorkop
j Stoompijpje
k Autocappuccino-hulpstuk
k1 kraantje
k2 slangetje
k3 buisje
l Rooster van de lekbak
m Lekbak
n Maatschepje
o Filter voor een of twee kopjes
p Filterhouder voor koffiemaling
q «ESE»-filterhouder met filter
Belangrijke
veiligheidsvoorschriften
• Lees deze gebruiksaanwijzing zorgvuldig
door alvorens u het apparaat in gebruik
neemt. Dit apparaat mag uitsluitend
aangesloten worden op een deugdelijk
stopcontact met randaarde. De
aansluitwaarde die op het typeplaatje
vermeld staat, dient overeen te komen met
de netspanning bij u thuis.
• Plaats dit apparaat niet op een hete
ondergrond, zoals een kookplaat, of in de
buurt van een open gasvlam.
• Ontgrendel de filterhouder met koffiemaling
niet zolang het water doorloopt, want het
apparaat staat op dat moment onder druk.
• Maak geen gebruik van het apparaat zonder
de lekbak en het rooster.
• Trek de stekker uit het stopcontact als er
tijdens het doorlopen van de koffie een
storing optreedt en voordat u het apparaat
gaat schoonmaken.
• Trek niet aan het snoer maar aan de stekker
als u de stekker uit het stopcontact haalt.
• Laat het snoer niet over hoeken en randen
hangen.
• Raak de heet geworden delen van het
apparaat (warmhoudplaat kopjes,
filterhouder, stoompijpje) niet aan. Houd het
snoer van heet geworden delen verwijderd.
• Dompel het apparaat nooit onder in water.
• Houd het apparaat buiten bereik van
kinderen. Laat het snoer niet laag hangen.
• Neem de instructies voor het ontkalken in
acht.
• Gebruik het apparaat niet als het snoer of
het apparaat zelf beschadigd is.
• Als het aansluitsnoer of een ander onderdeel
van dit apparaat beschadigd is, laat het dan,
om persoonlijk letsel te voorkomen,
repareren door de KRUPS reparatie-service.
Maak het apparaat nooit zelf open.
• Controleer of de filterhouder goed
aangedraaid is voordat u de koffie laat
doorlopen; zet de keuzeknop op O voordat
u de filterhouder weer losdraait.
Espresso koffie
Espresso heeft een vollere smaak dan normale
koffie. U drinkt het uit voorverwarmde
espressokopjes. Warm water loopt door de
koffiemaling en geeft een heerlijk kopje
schuimige koffie met een opwekkend effect.
U herkent een espresso aan het
karakteristieke aroma en aan het
schuimlaagje. Om dit te verkrijgen, is het
noodzakelijk een apparaat met hoge druk te
gebruiken en een speciale espressomaling.
Als er geen geschikte espressomaling te koop
is, kunt u zelf koffiebonen malen met behulp
van een koffiemolen. Maal de koffie niet te
fijn; de maling moet enigszins korrelig blijven.
Als het te fijn gemalen is, kunnen de gaatjes
van de percolatorkop en van het filter verstopt
33
Page 34

raken, waardoor het water niet meer kan
doorlopen.
Voor het welslagen van uw kopje espresso
dient u vers, koud kraanwater zonder
chloorsmaak te gebruiken.
Voor het eerste gebruik
Voordat u het apparaat voor het eerst in
gebruik neemt, dient u het
verwarmingssysteem een of twee keer schoon
te maken met water, maar zonder
koffiemaling in het filter. Ga als volgt te werk:
• Open het deksel en haal het reservoir uit het
apparaat met behulp van de handgreep (1).
Vul het reservoir volledig met water (2).
• Plaats het reservoir krachtig terug in het
apparaat zodat de verbindingsklep onder het
reservoir opengaat; sluit het deksel (3).
Het waterpeil in het reservoir is altijd zichtbaar
dankzij het kijkvenster, zodat u kunt zien of u
water toe moet voegen (4).
• Zet het apparaat aan (5). Het rode
controlelampje, dat aangeeft of het
apparaat in werking is, en het oranje
controlelampje van de temperatuur branden.
• Doe een van de filters in de filterhouder
(11). Monteer vervolgens de filterhouder op
de percolatorkop.
• Voor juiste vergrendeling van de filterhouder,
dient u de handgreep naar links te richten
(6), de filterhouder tegen de percolatorkop
te drukken en vervolgens de handgreep naar
rechts te draaien (7) totdat deze niet verder
kan (8).
• Plaats een zo groot mogelijke kom onder de
filterhouder (9).
• Zodra het oranje controlelampje uitgaat,
draait u de keuzeknop op stand (9); laat
al het water uit het reservoir doorlopen.
• Indien nodig kunt u deze handeling
onderbreken om de kom te legen door de
keuzeknop op stand O te zetten. Daarna
kunt u de handeling vervolgen.
Gebruik van de verschillende
functies van uw espressoapparaat.
1. ESPRESSO-FUNCTIE
Voor het beste resultaat raden wij u aan de
accessoires (filterhouder, filter en kopjes)
eerst voor te verwarmen zonder
koffiemaling. Ga als volgt te werk:
• Vul het reservoir met water (1) (2) (3) en zet
het apparaat aan (5).
• Vergrendel de filterhouder met daarin een
van de lege filters (6) (7) (8), plaats
daaronder de espressokopjes.
Zodra het apparaat de juiste temperatuur
heeft bereikt, gaat het oranje controlelampje
uit.
• Draai de keuzeknop op stand (9).
• Zodra de kopjes gevuld zijn met warm water,
draait u de keuzeknop weer op stand O .
Als het apparaat warm is, dan kunnen de
espressokopjes worden voorverwarmd op de
warmhoudplaat.
Bereiding van een kopje espresso:
• Vul het reservoir met water (1) (2) (3) en zet
het apparaat aan (5).
• Plaats het filter voor een of twee kopjes in
de filterhouder (11).
• Doe koffiemaling in het filter (12) .Druk de
koffiemaling goed aan (13), het filter moet
tot aan de rand gevuld zijn.
• Verwijder de rondom het filter gemorste
koffiemaling (14).
• Plaats de filterhouder in het apparaat (15).
• Plaats een of twee espressokopjes onder de
filterhouder.
Zodra het apparaat de juiste temperatuur
heeft bereikt, gaat het oranje controlelampje
uit.
• Draai de keuzeknop op stand
• Als de kopjes zijn gevuld, draait u de
keuzeknop weer op stand O.
• Haal de filterhouder en het filter uit het
apparaat; gooi de koffiemaling weg (17).
(10).
34
Page 35

• Het filter kan opnieuw gevuld worden voor
de bereiding van een volgend kopje
espresso.
2. DE STOOMFUNCTIE
Het klakkende geluid dat u hoort tijdens de
bereiding van stoom is afkomstig van het
onderbroken regelsysteem van de pomp. Het
heeft geen nadelige invloed op de werking
van het apparaat.
Als u direct na gebruik van de stoomfunctie
espresso wilt bereiden, dan dient het apparaat
eerst af te koelen tot de geschikte
temperatuur voor bereiding van espresso.
• Hiervoor plaatst u een kom onder de
filterhouder zonder filter en koffiemaling, en
draait u de keuzeknop op stand (10).
• Laat het water doorlopen totdat het oranje
controlelampje aangaat. Draai dan de
keuzeknop op stand O.
Nu kunt u weer espresso bereiden.
Let op: Tijdens en na de bereiding kunnen de
metalen onderdelen van het stoompijpje
gloeiend heet worden.
. In de stoomfunctie kunt u met het Krups
autocappuccino-hulpstuk eenvoudig:
. een meer of minder schuimige melk
bereiden voor cappuccino, koffie met melk
of warme chocola.
. water verwarmen voor bv. thee.
Deze vloeistoffen worden opgezogen via
het slangetje en verwarmd door de stoom
voordat ze via het buisje van het
autocappuccino-hulpstuk weer naar
buiten stromen. Door het slangetje direct in
een pak melk te houden, hebt u dus alleen
maar een kopje nodig om cappuccino of
koffie met melk te bereiden. Met het kraantje
van het hulpstuk kunt u de structuur van het
schuim regelen.
Gebruik bij voorkeur verse, niet-gekookte,
(half-)volle melk uit de koelkast.
Voor het verwarmen van dikke vloeistoffen,
verwijzen we u naar het hoofdstuk:
«Verwarmen van dikke vloeistoffen (bv.
soep)».
Wij raden u aan het autocappuccino-hulpstuk
onmiddellijk na gebruik schoon te maken, zie
hoofdstuk: « Schoonmaken van het
autocappuccino-hulpstuk».
. Bereiding van schuimige melk voor
cappuccino:
• Vul het reservoir met water (1) (2) (3) en zet
het apparaat aan (5).
• Draai het stoompijpje naar buiten en
monteer het autocappuccino-hulpstuk aan
het stoompijpje (18).
• Draai de keuzeknop op stand
voorverwarming stoom
• Dompel het slangetje in de te verwarmen
(19).
melk. Het slangetje moet de bodem van het
pak raken (20).
• Plaats een kop die voor 1/3 gevuld is met
zojuist bereide espresso onder het buisje
(20).
• Zet het kraantje op stand (21) voor een
fijn en romig schuim.
• Voor minder schuimige melk, draait u het
kraantje op de hoogste stand.
Zodra het apparaat de juiste temperatuur
heeft bereikt, gaat het oranje controlelampje
uit.
• Draai de keuzeknop op stand (22).
Warme, schuimige melk komt uit het buisje.
• Zodra u voldoende schuimige melk hebt,
draait u de keuzeknop op stand O.
• Haal na de bereiding het slangetje uit het
pak melk.
. Bereiden van warme, enigszins
opgeklopte melk (bv. voor koffie met
melk of voor warme chocolademelk) of
verwarmen van water (bv. voor thee):
Opmerkingen:
. Koffie met melk: plaats de kop met
versgezette koffie direct onder het buisje van
het hulpstuk.
. Warme chocolademelk: dompel het slangetje
direct in een pak kant-en-klare chocolademelk
of verwarm melk, als u cacaopoeder gebruikt.
Roer vervolgens de cacaopoeder door de
warme melk.
• Draai het stoompijpje naar buiten en
monteer het autocappuccino-hulpstuk aan
het stoompijpje (18).
35
Page 36

• Vul het reservoir met water (1) (2) (3) en zet
het apparaat aan (5).
• Draai de keuzeknop op stand (19).
• Draai het kraantje op de laagste stand
(23).
• Dompel het slangetje in de te verwarmen
vloeistof. Het slangetje moet de bodem van
het pak of kannetje raken (20).
• Plaats een bakje of kopje onder het buisje
(20).
Zodra het apparaat de juiste temperatuur
heeft bereikt, gaat het oranje controlelampje
uit.
• Draai dan de keuzeknop op stand (22)
• Als u voldoende verwarmde vloeistof hebt,
draait u de keuzeknop op stand O.
• Haal na de bereiding het slangetje uit het
pak of kannetje.
. Verwarmen van dikke vloeistoffen (bv.
soep):
• Draai het stoompijpje naar buiten en
monteer het autocappuccino-hulpstuk aan
het stoompijpje (18).
• Vul het reservoir met water (1) (2) (3) en zet
het apparaat aan (5).
• Draai de keuzeknop op stand (19).
• Draai het kraantje van het het
autocappuccino-hulpstuk op stand (24).
• Dompel het slangetje in de te verwarmen
vloeistof (25).
Zodra het apparaat de juiste temperatuur
heeft bereikt, gaat het oranje controlelampje
uit.
• Draai de keuzeknop op stand (22)
totdat de vloeistof warm genoeg is, draai
vervolgens de keuzeknop weer op stand O
en verwijder het bakje.
3. ESPRESSO-FUNCTIE MET DE SPECIALE «ESE»-
FILTERHOUDER
Het «ESE» systeem is bestemd voor de
bereiding van Italiaanse espresso «ristreto»
(zeer sterk). De dosering is bestemd voor een
kopje espresso van 35 ml en het water moet
in 20 seconden doorlopen.
«ESE» is de afkorting van «Easy Serving
Espresso» (eenvoudige bereiding van
espresso); het betreft een dosering
geselecteerde koffiemaling, samengedrukt
tussen 2 papieren filters, die direct klaar is
voor gebruik (bv. «serving illycaffé). Dit
vereenvoudigt de bereiding van uw kopje
espresso want u hoeft de koffiemaling nu niet
zelf te doseren en aan te drukken; bovendien
is de filterhouder makkelijker schoon te
maken.
Het is niet de bedoeling en zeker niet aan
te bevelen om met deze dosering een
grote kop espresso te zetten.
Let op dat u de «ESE»-dosering niet vervormt
tijdens het opruimen en beetpakken.
Voor het beste resultaat raden wij u aan om
de accessoires (filterhouder, filter en kopjes)
voor te verwarmen. Ga hiervoor als volgt te
werk:
• Vul het reservoir met water (1) (2) (3) en zet
het apparaat aan (5).
• Plaat de lege «ESE»-filterhouder (6) (7) (8)
en plaats er een leeg kopje onder.
Zodra het apparaat de juiste temperatuur
heeft bereikt, gaat het oranje controlelampje
uit.
• Draai de keuzeknop op stand
• Als het kopje gevuld is met water, draait u
(9).
de keuzeknop weer op O.
Zodra het apparaat warm is, kunt u de kopjes
voorverwarmen op de warmhoudplaat
(bovenop het apparaat).
Bereiding van de espresso:
• Doe een dosering «serving illycaffé» in de
«ESE»-filterhouder, voorzien van filter. De
aanduiding «illycaffé» moet naar beneden
gericht zijn en de lange kant van het
papieren filter moet in het verlengde van de
handgreep liggen (26).
• Vergrendel de «ESE»-filterhouder (6) (7) (8)
door deze krachtig naar rechts te draaien.
Zodra het apparaat de juiste temperatuur
heeft bereikt, gaat het oranje controlelampje
uit.
• Draai de keuzeknop op stand
• Als het kopje gevuld is met de aanbevolen
(9).
hoeveelheid espresso (35 ml), draait u de
keuzeknop weer op O.
36
Page 37

• Ontgrendel de «ESE»-filterhouder en gooi
de gebruikte dosering weg.
Onderhoud
- De accessoires van uw espresso-apparaat
kunnen niet in de vaatwasmachine.
Na gebruik dient u het waterreservoir te
legen.
. De lekbak
Na gebruik dient u het rooster te verwijderen
en de lekbak te legen (27) (28).
Als u meerdere kopjes espresso na elkaar
bereidt, dan dient u de lekbak van tijd tot tijd
te legen (na ongeveer 7 à 8 bereidingen).
Indien nodig kunt u de lekbak en het rooster
met water en een zacht afwasmiddel
afwassen, daarna afspoelen en drogen. Let
erop dat u de lekbak en het rooster weer op
de juiste manier terugplaatst in het apparaat
(29).
. De percolatorkop, het filter en de
filterhouder.
Deze moeten na ieder gebruik worden
schoongemaakt. U kunt de percolatorkop
afnemen met een vochtige doek; het filter en
de filterhouder maakt u schoon onder de
kraan. Daarna afspoelen en drogen.
• Bij sterke verontreiniging van de
percolatorkop kunt u het roosterplaatje
losschroeven met behulp van een muntstuk;
maak het roosterplaatje schoon en plaats
het terug in het apparaat door het stevig
vast te draaien (30).
Als het apparaat voor langere tijd niet wordt
gebruikt, ontgrendel dan de filterhouder om
onnodige slijtage van de afdichting te
voorkomen.
. De warmhoudplaat van de kopjes: deze
kunt u uit het apparaat halen en
schoonmaken met water en een zacht
afwasmiddel, daarna afspoelen en drogen
(31).
Het autocappuccino-hulpstuk
Na ieder gebruik raden wij u aan het
autocappuccino-hulpstuk als volgt om te
spoelen:
• Draai de keuzeknop op stand (19).
• Draai het kraantje op stand (33).
• Dompel het slangetje in een glas water. (De
benodigde hoeveelheid water is minimaal
100 ml).
• Plaats een bakje onder het buisje.
Zodra het apparaat de juiste temperatuur
heeft bereikt, gaat het oranje controlelampje
uit.
• Draai de keuzeknop op stand (22).
• Als al het water weer uit het
autocappuccino-hulpstuk is gekomen, draait
u de keuzeknop op stand O.
• Na gebruik haalt u het slangetje uit het glas.
• Als de handeling is beëindigd, maakt u het
buisje schoon met een vochtige doek.
Wij raden u aan het autocappuccino-hulpstuk
regelmatig uit elkaar te halen en het schoon
te maken met water, afwasmiddel en een
borsteltje. Goed afspoelen en afdrogen
voordat u het weer in elkaar zet (34).
Let op bij de montage van het slangetje:
doe het rechtgesneden uiteinde in het
autocappuccino-hulpstuk.
. De ring van de percolatorkop
Van tijd tot tijd dient deze ring gereinigd te
worden :
• Plaats de filterhouder met het filter.
• Zet een kopje onder de filterhouder.
• Stel het apparaat in werking.
• Draai de keuzeknop op stand .
• Terwijl het water doorloopt, draait u de
filterhouder voorzichtig van links naar rechts,
zodat het water tussen de ring en de
filterhouder terecht komt.
Ontkalken
• Het espresso-apparaat dient regelmatig
ontkalkt te worden met citroenzuur of
wijnsteenzuur.
Wij raden u echter aan om het Krups
ontkalkingsaccessoire te gebruiken (ref.
054, verkrijgbaar bij uw leverancier of bij de
Krups Onderdelenservice). Dit accessoire bevat
37
Page 38

2 zakjes ontkalkingsmiddel en een teststrip
om de hardheid van het water te bepalen.
Daaruit kunt u afleiden hoe vaak u het
espresso-apparaat dient te ontkalken bij een
normaal gebruik.
De hoeveelheid kalkaanslag is afhankelijk van de
hardheid van het water, maar ook van het
aantal keren dat u het apparaat gebruikt. De
ontkalkingsfrequentie, aangegeven op accessoire 054, is dan ook bij benadering gegeven
.
- Ga volgens onderstaande methode te
werk:
• Schroef het roosterplaatje van de
percolatorkop los en maak het schoon.
• Los 2 eetlepels ontkalkingsmiddel of een
zakje ontkalkingsmiddel van Krups
(behorende bij accessoire ref. 054) op in een
halve liter lauw water en schenk dit in het
lege waterreservoir.
• Plaats een kom onder de percolatorkop. Zet
de keuzeknop op stand (9) en laat
ongeveer 1/3 deel van de vloeistof direct
doorlopen.
• Schakel het apparaat uit, laat de keuzeknop
op stand staan en wacht 10 à 15
minuten om het ontkalkingsmiddel in te
laten werken.
• Schakel het apparaat weer in en laat de rest
van de vloeistof doorlopen.
• Vervolgens het apparaat doorspoelen door
nog 2x het reservoir met schoon water te
vullen en dit door te laten lopen. Plaats
tenslotte het roosterplaatje weer op de
percolatorkop (zie hoofdstuk «onderhoud»).
Problemen, mogelijke
oorzaken en oplossingen
Probleem Mogelijke oorzaak Oplossing
De espresso wordt De accessoires zijn Verwarm de
niet warm genoeg. koud (kopjes, filter, accessoires voor
Er komt koffie via De filterhouder is Zie hoofdstuk
de zijkanten uit de niet goed «Espressode zijkanten uit de geplaatst. functie».
filterhouder
filterhouder) (kopjes, filter,
filterhouder). Zie
hoofdstuk
«Espresso-functie».
Er komt koffie via Er ligt nog koffie Maak de rand van
de zijkanten uit de op de rand het filter en de
filterhouder van het filter. afdichting schoon.
De afdichting van Maak de afdichting
de percolatorkop schoon met een
is vies. vochtige doek.
De afdichting van Neem contact op
de percolatorkop met de Krups
is versleten. Consumenten-
service.
De pomp maakt Er zit geen water Vul het reservoir.
lawaai. in het reservoir.
Het reservoir is niet Druk krachtig op
juist geplaatst. het reservoir.
De koffiemaling is Gebruik verse
te oud of te droog koffiemaling.
en de pomp geeft
geen druk.
Het water loopt Er zit geen water in Vul het reservoir.
niet door. het reservoir.
Het reservoir is niet Druk krachtig op
juist geplaatst. het reservoir.
Het filter is verstopt, Maak het filter en
de koffiemaling het roosterplaatje
is te fijn of te hard van de percolatoraangedrukt. kop schoon (zie
hoofdstuk
«Onderhoud») en
gebruik een
grovere
koffiemaling.
Roosterplaatje van Laat het
de percolatorkop roosterplaatje
is verontreinigd. weken in een
ontkalkingsoplossing (zie
hoofdstuk
Onderhoud).
Het apparaat heeft Zie hoofdstuk
kalkaanslag. «Ontkalken».
Het water loopt te De koffiemaling is Probeer een fijnere
snel door. te grof. koffiemaling.
Te weinig koffie- Gebruik het
maling. maatschepje om de
juiste dosering te
bepalen.
De koffiemaling is Druk de
niet genoeg koffiemaling
aangedrukt. steviger aan.
De espresso heeft De koffiemaling is Probeer een fijnere
geen schuimlaagje. te grof. koffiemaling.
38
Page 39

De espresso heeft De koffiemaling is Druk de
geen schuimlaagje. niet genoeg koffiemaling
aangedrukt. steviger aan.
De koffiemaling is Gebruik verse
te oud of te droog. koffiemaling.
De melk wordt niet Het stoompijpje is Zie hoofdstuk
schuimig. verstopt. «Onderhoud».
Het autocappuc- Zie hoofdstuk
cino-hulpstuk «Onderhoud».
is verstopt.
De melk is niet vers Gebruik verse
melk.
De melk is lauw. Zet de melk in de
koelkast.
Bij gebruik van ESE De dosering is niet Zie «Espresso-funckomt er koffie via goed geplaatst. tie met de speciale
de zijkanten uit de «ESE -filterhouder»
filterhouder.
De filterhouder is Draai de filterhouniet goed vastge- der krachtiger aan.
draaid.
Er is teveel water Beperk de hoeveeldoorgelopen. heid door te lopen
water tot 35 ml.
Veel water op de De koffiemaling is Druk de koffiemakoffiemaling niet aangedrukt. ling aan.
Te weinig koffie- Voeg meer koffiemaling. maling toe.
Recepten
Geniet op uw eigen manier van uw espresso:
drink het ter ontspanning of na de maaltijd.
Wij geven u een aantal recepten die u met
behulp van uw espresso-apparaat kunt
bereiden.
. Originele espresso
• Doe een maatschepje espressokoffie van
goede kwaliteit in het filter en laat het direct
in het voorverwarmde kopje doorlopen.
Als u de juiste koffiemaling gebruikt, komt er
een mooi schuimlaagje op de espresso.
. Cappuccino
Volgens de regels van de kunst zijn de ideale
verhoudingen van een kopje cappuccino als
volgt: 1/3 deel koffie, 1/3 deel warme melk en
1/3 deel opgeschuimde melk.
De hoeveelheid warme melk + verkregen
schuim moet ongeveer 2x zoveel zijn als de
hoeveelheid koffie.
• Gebruik grote koppen en verwarm ze voor.
• Vul ze met een hoeveelheid koffie die
overeenkomt met de inhoud van een
espressokopje en vul dit aan met melk die u
hebt opgeschuimd met behulp van het
autocappuccino-hulpstuk.
• Strooi tenslotte wat cacaopoeder over het
schuim.
. Koffie met room
• Bereid een espresso in een grote kop.
• Voeg een wolkje room toe.
In plaats van room kunt u ook warme melk
toevoegen.
. Café Corretto *
• Maak espresso op de gebruikelijke wijze.
• Geef er een iets andere smaak aan door 1/4
à 1/2 likeurglas cognac toe te voegen.
U kunt ook anisette, jenever, Sambuco, Kirsch
of Cointreau gebruiken.
Voor een opwaardering van uw espresso zijn
er ongetwijfeld nog vele andere
mogelijkheden. Laat uw fantasie de vrije loop!
. Koffielikeur *
• Meng in een lege fles van 0,75 l. 3 kopjes
espresso, 250 gr. bruine kristalsuiker en 1/2
l. cognac of Kirsch.
• Laat dit mengsel minstens 2 weken
intrekken.
Vooral de liefhebbers van koffie zullen deze
heerlijke likeur kunnen waarderen.
. Italiaanse ijskoffie
4 bolletjes vanille-ijs, 2 kopjes koude espresso
met suiker, 1/8 l. melk, crème fraîche,
geraspte chocola.
• Meng de espresso met de melk.
• Verdeel de bolletjes ijs over glazen, schenk er
de koffie op en garneer dit met een toefje
crème fraîche en geraspte chocola.
39
Page 40

. Koffie met rum *
• Voeg een glaasje rum toe aan een kopje
espresso met suiker.
• Schep er een toefje crème fraîche op.
. Geflambeerde espresso *
2 kopjes espresso, 2 glaasjes cognac, 2
theelepels bruine suiker, crème fraîche.
• Schenk de cognac in hittebestendige glazen,
verwarm en flambeer de cognac.
• Roer er suiker door, voeg de espresso toe en
schep er een toefje crème fraîche op.
De espresso kan eventueel aangelengd
worden met kokend water.
. Espresso-ijs *
2 kopjes espresso, 6 eidooiers, 200 gr. suiker,
1/4 l. crème fraîche met suiker, 1 glaasje
sinaasappellikeur.
• Klop de eidooiers op met de suiker totdat
een dikke, schuimige massa ontstaat.
• Voeg de koude espresso en de
sinaasappellikeur toe.
• Meng er vervolgens de opgeklopte crème
fraîche door.
• Verdeel het mengsel over ijscoupes of
glazen.
• Zet de coupes of glazen in de vriezer.
. Mokkapudding
2 kopjes espresso, 1/2 l. melk, 1 zakje poeder
voor vanillepudding, 3 eidooiers, 1/8 l. crème
fraîche met suiker, 150 gr. suiker.
• Bereid een vanillepudding van melk, poeder
en suiker.
• Voeg de eidooiers toe aan de warme
pudding.
• Laat het afkoelen en voeg vervolgens de
espresso en de opgeklopte crème fraîche
toe.
* Gebruik van alcohol kan schadelijk zijn voor
de gezondheid.
40
Page 41

Espanol
◆
Descripción
a Tapa
b Depósito de agua extraíble
c Nivel visible del agua
d Placa calientatazas
e Selector café/vapor
f Indicador luminoso de funcionamiento
(rojo)
g Indicador luminoso de control de
temperatura (naranja)
h Interruptor de puesta en marcha/paro
i Cabezal
j Vaporizador
k Accesorio «Autocappuccino»:
k1 mando
k2 tubo flexible
k3 boquilla de salida
l Rejilla
m Bandeja recogegotas
n Cuchara dosificadora
o Filtro para una o dos tazas
p Portafiltros para café molido
q Portafiltros y filtro sistema “ESE”
Consejos de seguridad
• Antes de poner en marcha la cafetera
Expreso, lea cuidadosamente las
instrucciones. Este aparato debe conectarse
a enchufe con toma de tierra. Asegúrese de
que el voltaje indicado en la placa de datos
del aparato corresponde al de su conexión
eléctrica.
• No sitúe la cafetera sobre una superficie
caliente (como una placa de cocina eléctrica)
ni cerca de una llama.
• No saque el portafiltros que contiene el café
molido mientras esté pasando el agua, ya
que el aparato se halla en ese momento bajo
presión.
• No utilice el aparato cuando la bandeja
recogegotas y la rejilla no estén colocados en
su lugar.
• El enchufe deberá desconectarse siempre
que ocurra algo poco habitual durante la
preparación del café o antes de limpiar el
aparato.
• No desenchufe tirando del cable de
alimentación eléctrica, que no deberá dejar
sobre un saliente ni sobre el canto de un
mueble.
• Evite el contacto del cable de alimentación
eléctrica o de sus manos con las partes
calientes del aparato (placa calientatazas,
portafiltro, vaporizador).
• No sumerja nunca el aparato en el agua.
• Mantenga el aparato fuera del alcance de
los niños y no deje colgando el cable de
alimentación eléctrica.
• Siga atentamente las instrucciones para
desincrustar las formaciones de cal.
• No ponga en marcha la máquina si está
dañada o si el cable de alimentación
eléctrica está en mal estado.
• Si el cable u otro elemento específico
estuviera defectuoso, deberá ser sustituido
únicamente en un centro de asistencia de
Krups. En ningún caso deberá abrir usted el
aparato.
• Antes de hacer pasar el café, compruebe
que el portafiltros esté bien apretado y
seleccione O antes de aflojarlo.
El café expreso
El café expreso es más rico en aroma y más
fuerte que un café normal. Se bebe en tacitas
para expreso, previamente calentadas. El agua
caliente pasa a través del café molido para
obtener ese delicioso café negro y espumoso
de efectos revigorizantes.
El expreso se reconoce por su aroma
característico y su típica espuma. Pero ello
supone una presión elevada y un excelente
café expreso bien torrefacto y correctamente
molido. Si no pudiera adquirirlo ya molido,
utilice un molinillo. El café no deberá molerse
“demasiado fino”. Habrá de quedar
ligeramente granulado. En caso contrario, se
corre el riesgo de embozar las rejillas del
41
Page 42

cabezal y del filtro por lo que el agua ya no
pasaría.
Para garantizar el éxito total de un buen café
expreso también es necesario utilizar agua
corriente (que no haya estado mucho tiempo
en contacto con el aire), sin olor a cloro y a
una temperatura bastante fresca.
Antes de la primera utilización
Antes de utilizar el aparato por primera vez,
limpie, sin poner café en el portafiltros, el
sistema de calentado del agua con uno o dos
depósitos de agua, tal como se indica a
continuación:
• Abra la tapa y quite el depósito con la ayuda
del asa (1). Llénelo de agua (2).
• Vuelva a colocar el depósito, apretándolo
firmemente para que se abra la válvula de
conexión situada debajo del depósito, y
vuelva a tapar (3).
Podrá vigilar en todo momento el nivel del
agua gracias a la ventana prevista a tal efecto,
de este modo podrá añadir agua siempre que
sea necesario (4).
• Ponga en marcha el aparato (5). El indicador
rojo de funcionamiento y el naranja de
control de temperatura se encenderán.
• Ponga uno de los filtros en el portafiltros
(11). Seguidamente coloque el portafiltros
en el cabezal del aparato. Para que esté
correctamente situado, oriente el asa hacia
la izquierda (6), apoye el portafiltros contra
el cabezal y gire el asa hacia la derecha (7)
hasta que quede bloqueado (8).
• Coloque un recipiente lo más grande posible
bajo el portafiltros (9).
• Cuando el aparato alcance la temperatura
adecuada, el indicador luminoso naranja se
apagará; gire el selector hasta la posición
(9) y deje pasar toda el agua del depósito.
• Si es necesario, interrumpa la operación
girando el selector hasta la posición O para
vaciar el recipiente y volver a iniciar la
operación.
Utilización de las diferentes
funciones de su cafetera
Expreso
1. FUNCIÓN EXPRESO:
Le aconsejamos que, para obtener mejores
resultados, caliente previamente los
accesorios (portafiltros, filtro y tazas) sin café.
Para ello:
• Llene el depósito de agua (1) (2) (3) y
ponga en marcha el aparato (5).
• Coloque en su lugar el portafiltros y uno de
los filtros vacío (6) (7) (8); sitúe debajo las
tazas de expreso.
Cuando el aparato alcance la temperatura
adecuada, el indicador luminoso naranja se
apagará.
• Gire entonces el selector hasta la posición
(9).
• Cuando las tazas estén llenas de agua
caliente, vuelva a poner el selector en la
posición O.
Cuando el aparato esté caliente podrá
calentar las tazas en la placa calientatazas.
Preparación del café expreso:
• Llene de agua el depósito (1) (2) (3) y
ponga en marcha el aparato (5).
• Introduzca el filtro para una o dos tazas en
el portafiltros (11).
• Rellene el filtro hasta el borde con el café
molido, comprimiéndolo con fuerza (12)
(13).
• Quite los restos de café de alrededor del
filtro (14).
• Ponga el portafiltros en su lugar (15).
• Coloque una o dos tazas de café expreso
bajo el portafiltros.
Cuando el aparato alcance la temperatura
adecuada, se apagará el indicador luminoso
naranja.
• Gire entonces el selector hasta la posición
(10).
• Cuando estén llenas las tazas, vuelva a
situar el selector en la posición O.
42
Page 43

• Quite el portafiltros y el filtro del aparato y
retire el café usado (17).
Podrá llenar de nuevo el filtro para preparar
otros cafés expresos.
2. FUNCIÓN VAPOR:
El chasquido que se produce durante la
preparación del vapor procede de la
regulación de la bomba y no interviene para
nada en el buen funcionamiento del aparato.
Si desea hacer un café expreso
inmediatamente después del vapor, deberá
dejar que el aparato se enfríe para alcanzar la
temperatura adecuada para la preparación del
café expreso.
• Para ello, coloque un recipiente bajo el
portafiltros sin café y, una vez el portafiltros
esté en su lugar, gire a continuación el
selector hasta la posición (10).
• Deje pasar el agua hasta que se encienda el
indicador luminoso naranja. Seguidamente,
gire el selector hasta la posición O.
Después de lo cual podrá preparar
nuevamente un café expreso.
Atención: durante y después del
funcionamiento del aparato, las partes
metálicas del vaporizador pueden llegar a
quemar.
. La función vapor con el accesorio Krups
autocappuccino permite obtener fácilmente:
. una leche más o menos espumosa para un
cappuccino, un café crema o un chocolate
caliente.
. agua caliente para preparar una infusión.
El tubo flexible aspira estos líquidos, que
se calientan gracias al vapor antes de salir
por la punta de salida del accesorio
autocappuccino. Hundiendo directamente el
tubo flexible en un «bric» de leche, basta una
sola taza para preparar un cappuccino o un
café crema. Con el mando del acccesorio
podrá regular la finura de la espuma de leche.
Es preferible utilizar leche semidescremada
fresca, sin hervir y bien fría (guardada en la
nevera). El recipiente tambié deberá estar frío
(no lo pase bajo el agua caliente antes de
espumar la leche).
Para el recalentado de líquidos espesos diríjase
al apartado: «Recalentado de líquidos espesos
(por ejemplo, la sopa)”.
Le aconsejamos que limpie el accesorio
autocappuccino inmediatamente después de
su utilización, según las indicaciones del
apartado: “Limpieza del accesorio
autocappuccino”.
. Preparacion de leche espumosa para un
cappuccino:
• Llene el depósito de agua (1) (2) (3) y ponga
en marcha el aparato (5).
• Desplace el tubo hacia el exterior del aparato
y monte el accesorio autocappuccino sobre
el vaporizador (18).
• Gire el selector hasta la posición (19).
• Introduzca el tubo flexible en la leche a
calentar. El tubo deberá tocar el fondo del
recipiente (20).
• Coloque una taza llena hasta un tercio de
un café expreso recién hecho (20) bajo el
tubo de salida.
• Coloque la llave en la posición (21).
Obtendrá una espuma fina y untuosa.
• Para obtener una leche menos espumosa,
gire el mando hacia lo alto del campo de
utilización.
Cuando el aparato alcance la temperatura
adecuada, el indicador luminoso naranja se
apagará.
• Gire el selector a la posición (22). El
tubo de salida proporcionará una leche
caliente y espumosa.
• Después de haber obtenido la cantidad de
leche espumosa deseada, gire el selector
hasta la posición O.
• Después de utilizarlo, retire el tubo flexible
del recipiente.
. Preparación de una leche caliente
ligeramente batida para un café crema,
de un chocolate caliente o calentar agua
(para una infusión)
Notas :
. Café crema: sitúe directamente la taza que
contenga el café recién preparado bajo el
tubo de salida.
43
Page 44

. Chocolate caliente: introduzca directamente
el tubo flexible en el «bric» en el caso de un
chocolate listo para su uso, o caliente la leche
si utiliza chocolate en polvo. Mezcle
enseguida el cacao en polvo con la leche
caliente.
• Desplace el tubo hacia el exterior del aparato
y monte el accesorio autocappuccino sobre
el vaporizador (18).
• Vuelva a llenar de agua el depósito (1) (2)
(3) y ponga en marcha el aparato (5).
• Gire el selector hasta la posición (19).
• Gire la llave del accesorio autocappuccino
hacia el extremo fino del campo de
utilización (23).
• Introduzca el tubo flexible en el líquido a
calentar. El tubo deberá tocar el fondo del
recipiente (20).
• Coloque un recipiente bajo el tubo de salida
(20).
Cuando el aparato alcance la temperatura
adecuada, el indicador luminoso naranja se
apagará.
• Gire el selector hasta la posición (22).
• Cuando haya obtenido la cantidad deseada
de líquido caliente, gire el selector hasta la
posición O .
Después de la utilización retire el tubo flexible
del recipiente.
. Recalentado de líquidos espesos (por
ejemplo, la sopa):
• Desplace el vaporizador hacia el exterior del
aparato y monte el accesorio
autocappuccino sobre el vaporizador (18).
• Llene el depósito de agua (1) (2) (3) y ponga
en marcha el aparato (5).
• Gire el selector hasta la posición (19).
• Gire la llave del accesorio autocappuccino
hasta la posición (24).
• Introduzca el tubo de salida del accesorio
autocappuccino en el líquido a recalentar
(25).
Cuando el aparato alcance la temperatura
adecuada, el indicador luminoso naranja se
apagará.
44
• Gire el selector hasta la posición (22)
hasta que el líquido esté suficientemente
caliente; vuelva a poner el selector en la
posición O y quite el recipiente.
3. FUNCIÓN EXPRESO CON EL PORTAFILTROS
«ESE»
ESPECAIL
El sistema E.S.E se ha diseñado para preparar
un café espresso «ristreto» (fuerte) a la
italiana. La cantidad de café es de 35 ml y
corresponde a 20 segundos de salida agua.
“ESE”, por “Easy Serving Expreso”
(preparación simplificada del café expreso) es
una dosis de café seleccionado, molido y
compactado entre dos filtros de papel listo
para su uso (por ejemplo “serving illycaffé”).
Este sistema facilitará la preparación de su
café expreso y le evitará las operaciones de
dosificación y preparación de las tazas,
además de mantener la limpieza del aparato.
No es recomendado preparar cafés largos
con estas dosis.
Le aconsejamos que manipule y guarde las
dosis “ESE” evitando deformarlas.
Para obtener mejores resultados, le
aconsejamos que efectúe previamente un
precalentado sin café molido de los accesorios
(portafiltros, filtro y tazas). Para ello:
• Llene el depósito de agua (1) (2) (3) y ponga
en marcha el aparato (5).
• Coloque el portafiltros “ESE” vacío (6)(7)(8)
y sitúe la taza de expreso debajo.
Cuando el aparato alcance la temperatura
adecuada, el indicador luminoso naranja se
apagará.
• Gire entonces el selector hasta la posición
(9).
• Cuando la taza esté llena de agua caliente,
vuelva a poner el selector en la posición O .
Cuando el aparato esté caliente, podrán
precalentarse las tazas de expreso en la placa
calientatazas (en la parte superior del
aparato).
. Preparación del café expreso :
• Deposite la dosis “serving illycafé” en el
portafiltros “ESE” equipado con su filtro. La
inscripción “illycafé” deberá estar orientada
hacia abajo y el lado largo del filtro de papel
deberá estar en el eje del asa (26).
Page 45

• Coloque el portafiltros “ESE” (6)(7)(8)
apretándolo fuertemente hacia la derecha.
Cuando el aparato alcance la temperatura
adecuada, el indicador luminoso naranja se
apagará.
• Gire entonces el selector hasta la
posición (9).
• Cuando se alcanza la cantidad recomendada
(35 ml), gire el selector sobre la posición O.
• Quite el portafiltros “ESE” del cabezal y
deseche la dosis utilizada.
Mantenimiento
- No introduzca los accesorios de su Expreso
en un lavavajillas.
El depósito del agua deberá vaciarse después
de cada utilización.
. La bandeja recogegotas
Deberá vaciarse después de utilizar el aparato
y haber quitado la rejilla (27) (28). Es
conveniente vaciar el cajón recogegotas
cuando se hayan preparado varios cafés
expresos seguidos (cada 7 u 8 expresos
aproximadamente). Si es necesario, limpie la
bandeja recogegotas y su rejilla con agua y un
poco de producto no agresivo para la vajilla,
enjuague y seque. Cuando vuelva a instalarla,
asegúrese de montar en su sitio el
cubrimiento de plástico (29).
. El cabezal, el filtro y el portafiltros
Deberán limpiarse después de cada utilización.
Bastará con pasar un paño húmedo por el
cabezal del aparato y limpiar los otros
accesorios con agua corriente y un poco de
producto no abrasivo para la vajilla. Enjuague
y seque.
En el caso de que el cabezal estuviera muy
sucio, extraiga la rejilla con la ayuda de una
moneda, límpielo y vuelva a montarlo
apretando fuertemente (30).
Cuando no utilice la cafetera Expreso, no deje
el portafiltros en el aparato, para evitar el
desgaste excesivo de la junta.
. La placa calientatazas: retírela para
limpiarla con agua y un poco de producto no
agresivo para la vajilla. Enjuague y seque (31).
. El vaporizador: deberá limpiarse con un
paño húmedo después de cada utilización.
. El accesorio autocappuccino:
Le aconsejamos que después de cada
utilización enjuague el accesorio
autocappuccino de la forma siguiente:
• Gire el selector hasta la posición (19).
• Gire el mando hasta la posición (33).
• Introduzca el tubo flexible en un vaso de
agua. (La cantidad de agua mínima
necesaria es de 100 ml).
• Coloque un recipiente bajo el tubo de salida.
Cuando el aparato alcance la temperatura
adecuada, el indicador luminoso naranja se
apagará.
• Gire entonces el selector hasta la posición
(22).
• Cuando haya pasado toda el agua por el
accesorio autocappuccino, gire el selector
hasta la posición O
• Después de la utilización, retire el tubo
flexible del recipiente.
• Cuando haya finalizado esta operación,
limpie el tubo de salida con un paño
húmedo.
Le aconsejamos que desmonte regularmente
el accesorio autocappuccino y que lo limpie
con agua, un poco de producto no abrasivo
para la vajilla y un cepillito. Enjuáguelo y
séquelo antes de efectuar el montaje de
nuevo (34).
Atención al sentido de montaje del tubo
flexible: encaje la extremidad cortada recta
en el accesorio autocappuccino.
. La junta del porta-filtros
Esta junta deberá limpiarse de vez en cuando:
• Coloque el porta-filtros en su sitio con el
filtro.
• Coloque un recipiente bajo el porta-filtros.
• Ponga en marcha el aparato.
• Gire el selector sobre la posición .
• Mientras el agua circula, gire delicadamente
el filtro de izquierda a derecha para que el
agua pase entre la junta y el porta-filtros.
45
Page 46

Desincrustación
• Desincruste de vez en cuando su cafetera
Expreso con ácido cítrico o tartárico.
De todas formas, le aconsejamos la utilización
del accesorio de desincrustación Krups,
referencia 054, disponible en los centros de
servicio posventa de Krups. Este accesorio
incluye, además de dos dosis de
desincrustante, una cinta de prueba de la
dureza del agua para calcular la frecuencia de
desincrustación de su aparato en condiciones
normales de utilización. La incrustación
depende de la dureza del agua, pero también
del ciclo de utilización. La frecuencia de
desincrustación señalada en el accesorio 054
se proporciona a título indicativo.
- Realice el método siguiente:
• Desatornille la rejilla del cabezal del aparato
y límpiela.
• Disuelva 2 cucharadas de producto de
desincrustación, o un sobrecito del accesorio
054, en medio litro de agua tibia y viértalo
todo en el depósito de agua vacío.
• Coloque un recipiente bajo el cabezal del
aparato. Haga pasar alrededor de 1/3 del
líquido directamente, poniendo el selector
en la posición (9).
• Pare el aparato dejándolo en la posición
(9) y espere de 10 a 15 minutos para que
actúe el desincrustador.
• Vuelva a poner en marcha el aparato y deje
pasar el resto del líquido.
• Enjuague enseguida con dos depósitos de
agua clara y vuelva a poner la rejilla en el
cabezal del aparato (véase apartado
“mantenimiento”).
Problemas, causas probables y
acciones correctoras
Problemas Causas Acciones
El café expreso no Los
está muy caliente fríos (tazas, accesorios (tazas,
Se sale el café al No se ha montado Véase apartado
nivel del portafiltros el portafiltros “Preparación
Ruido muy fuerte No hay agua en el Llene el depósito.
en la bomba. Depósito.
No pasa el agua. No hay agua en el Vuelva a llenar el
probables correctoras
accesorios están
filtro y portafiltros). filtro y portafiltros).
correctamente. de un café
Queda café molido Limpie alrededor
en el borde del filtro
La junta del Limpie la junta
cabezal está sucia. con un paño
La junta del cabezal Contacte con un
es defectuosa. centro de a-
Depósito mal Apriete firmemente
montado. el depósito.
Café molido Utilice café
“pasado” o muy molido nuevo.
seco y la bomba
no puede crear
presión.
depósito. Depósito.
Depósito mal Apriete firmemente
montado. el depósito.
El filtro está embo- Limpie el filtro y la
zado, el café molido rejilla del cabezal.
es demasiado fino Véase el
o está demasiado apartado
apretado. “Mantenimiento”
Rejilla del cabezal Ponga la rejilla en
sucia. Remojo en la
Aparato con cal. Véase el apartado
Precaliente los
Véase el apartado
“Preparación de un
café expreso”.
expreso”.
del filtro y la junta.
húmedo.
sitencia de Krups.
y pruebe un molido
menos fino.
solución de
desincrustación.
Véase el apartado
“Mantenimiento ”.
“Desincrustación”
46
Page 47
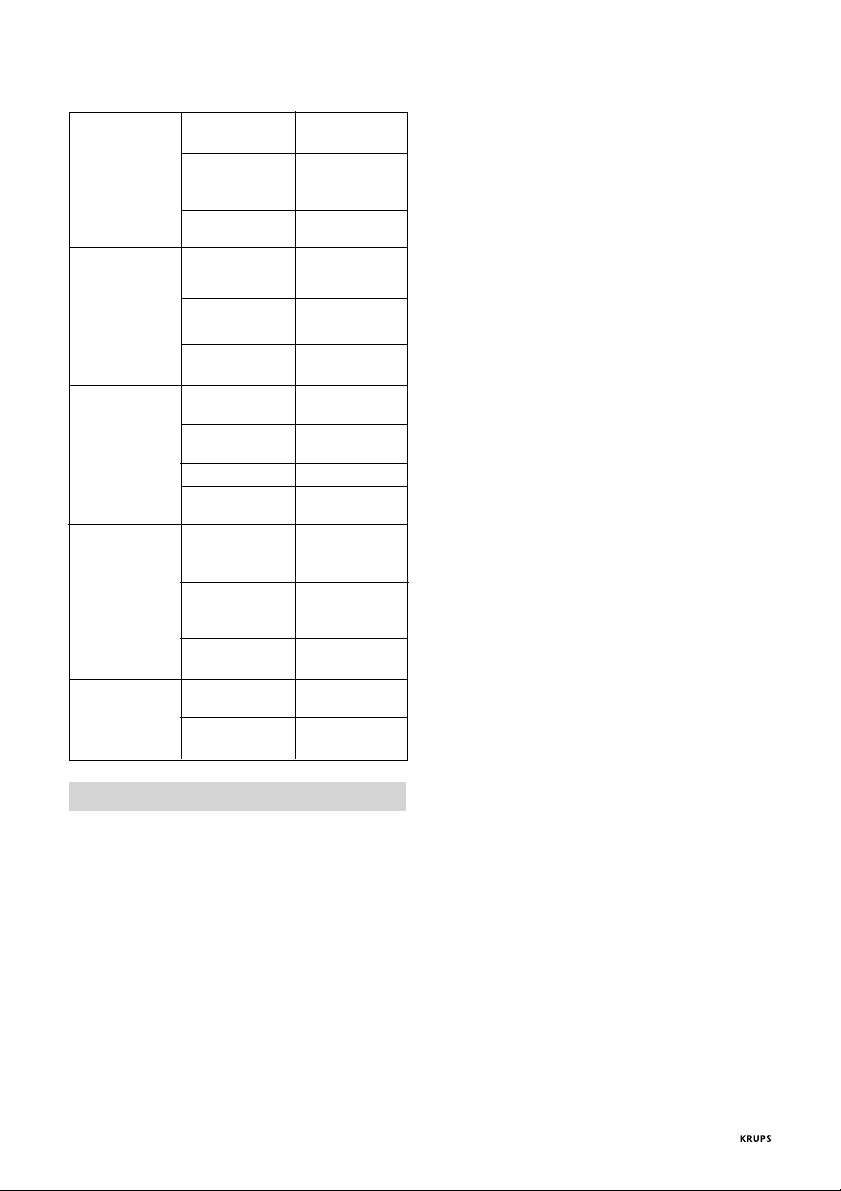
El agua pasa Molido demasiado Pruebe un molido
demasiado deprisa. grueso. Más fino.
Cantidad de café Utilice la cuchara
molido insuficiente. medidora Para
dosificar el café.
Molido no apretado Apriete más el
molido.
El café expreso no Molido demasiado Pruebe un molido
tiene crema. grueso. más fino.
(espuma en el café)
Molido poco Apriete más el
apretado. molido.
Café «pasado» o Utilice un producto
demasiado seco. recién molido.
La leche no queda Vaporizador Véase el apartado
muy espumosa. embozado. “Mantenimiento”.
Accesorio cappuc- Véase el apartado
cino embozado. “Mantenimiento”.
Leche agria. Utilice leche fresca.
Leche tibia Ponga la leche en
la nevera.
En función E.S.E Dosis mal colocada Véase función
fuga de café a ni- «Espresso con el
vel del portafiltros portafiltros E.S.E»
Portafiltros mal Enroscar con más
enroscado fuerza el portafil-
tros
Salida demasiado Limite la salida a
lenta 35 ml
Mucha agua sobre Café mal prensado Comprima más el
los posos de café café molido
Cantidad insuficien- Aumente la cantite de café molido dad de café molido
Recetas
Disfrute de su café expreso tal como a usted
le gusta: cuando desee relajarse o para
culminar una buena comida.
A continuación le ofrecemos algunas de las
recetas que su cafetera Expreso le permite
realizar.
.Café expreso original
• Ponga una dosis de café expreso de buena
calidad, bien torrefacto, y fíltrelo
directamente en la taza precalentada.
Si utiliza un buen café bien molido, se formará
una bonita corona de espuma que adornará la
taza.
• Si le gusta, añada azúcar y disfrute. El
expreso original se bebe sin leche pero con
mucho azúcar.
. Cappuccino
Para un cappuccino en toda regla, las
cantidades ideales son las siguientes: 1/3 de
café, 1/3 de leche caliente, 1/3 de leche
espumada. La cantidad de leche caliente +
espuma obtenida debe ser el doble que la del
café preparado.
• Utilice tazas grandes, previamente
calentadas.
• Llénelas con un café, equivalente a una taza
de expreso, y complete con la leche que
habrá espumado utilizando el accesorio
autocappuccino.
• Termine espolvoreando con chocolate en
polvo.
. Café crema
• Prepare un café expreso clásico en una taza
grande. Añada una «nube» de nata para
obtener un café crema.
También puede sustituir la nata por leche
caliente.
. Café corretto*
• Prepare una taza de café expreso tal como
tenga por costumbre.
• Corrija ligeramente su gusto añadiéndole 1/
4 o 1/2 vasito de coñac.
El anís, el aguardiente de uvas, el Sambuco, el
Kirsch y el Cointreau también son adecuados.
Seguramente todavía existen numerosas
posibilidades más para “ennoblecer” el café
expreso. La imaginación es ilimitada.
. Licor de café*
• Mezcle en una botella vacía de 0,75 litros, 3
tazas de expreso, 250 g de azúcar candi
moreno, 1/2 litro de coñac o de Kirsch.
• Deje la mezcla en maceración durante al
menos 2 semanas.
Así habrá conseguido un licor delicioso, sobre
todo para los amantes del café.
47
Page 48

. Café helado a la italiana
4 bolas de helado de vainilla, 2 tazas de café
expreso frío azucarado, 1/8 l de leche, nata,
chocolate rallado.
• Mezcle el café expreso frío con la leche.
• Reparta las bolas de helado en copas, vierta
el café por encima y adorne con la nata y el
chocolate rallado.
. Café a la frisona*
• Añada un vasito de ron a una taza de café
expreso azucarado.
• Adorne con una buena capa de nata y sirva.
. Café expreso flambeado*
2 tazas de café expreso, 2 vasitos de coñac, 2
cucharaditas de azúcar moreno, nata.
• Vierta el coñac en vasitos resistentes al calor,
caliente y flambee.
• Añada el azúcar, mezcle, vierta el café y
adorne con nata.
Si se desea, el café expreso puede diluirse
también con un poco de agua hirviendo.
. Expreso perfecto*
2 tazas de café expreso, 6 yemas de huevo,
200g de azúcar, 1/4 de litro de nata
azucarada, 1 vasito de licor de naranja.
• Bata las yemas de huevo con el azúcar hasta
obtener una masa espesa y espumosa.
• Añada el café expreso frío y el licor de
naranja.
• Añada la nata montada.
• Reparta la mezcla en copas o vasos.
• Ponga las copas en el congelador.
. Pudin a la moca
2 tazas de café expreso, 1/2 litro de leche, 1
sobre de preparado en polvo de pudin de
vainilla, 3 yemas de huevo, 1/8 litro de nata
azucarada, 150 g de azúcar.
• Prepare un pudin de vainilla con la leche, el
polvo a la vainilla y el azúcar.
• Añada las yemas de huevo al pudin todavía
caliente.
• Deje enfriar y añada el café expreso y la nata
montada.
(* : El abuso del alcochol es peligroso para la
salud).
48
Page 49

Português
◆
Descrição
a Tampa
b Depósito de água amovível
c Visor do nível de água
d Placa aquecedora para chávenas
e Selector café/vapor
f Luz piloto de funcionamento
(vermelho)
g Luz piloto de controlo da
temperatura (laranja)
h Interruptor ligar/desligar
i Cabeça de saída de água
j Vaporizador
k Acessório autocappuccino
k1 torneira
k2 tubo flexível
k3 tubo de saída
l Grelha
m Tabuleiro de recolha de água
n Colher doseadora
o Filtro para uma ou duas chávenas
p Porta-filtro para café moído
q Porta-filtro e filtro sistema “ESE”
recolha de água ou a grelha não estiverem
colocados.
• Deve tirar a ficha da tomada em caso de
problemas durante o funcionamento e antes
de limpar o aparelho.
• Não desligue o aparelho puxando a ficha da
tomada e não deixe o cabo eléctrico numa
esquina de um móvel ou bancada.
• Evite tocar com o cabo eléctrico ou com as
mãos nas partes quentes do aparelho (placa
aquecedora para chávenas, porta-filtro,
vaporizador).
• Nunca molhe o aparelho.
• Não deixe o aparelho ou o cabo eléctrico ao
alcance das crianças.
• Respeite as instruções de descalcificação do
aparelho.
• Não utilize o aparelho se o cabo eléctrico ou
o próprio aparelho estiverem de algum
modo danificados.
• Se o cabo, ou qualquer outra peça, estiver
danificado deverá ser substituído por um
Serviço Após Venda Krups. O aparelho
nunca deve ser aberto pelo utilizador.
• Verifique se o porta-filtro ficou bem
apertado antes de preparar o seu café e
coloque o selector na posição O antes de
desapertar o porta-filtro.
Conselhos de segurança
• Antes de utilizar o aparelho leia atentamente
as instruções. Ligue o aparelho apenas a
uma tomada com terra. A voltagem indicada
na placa sinalética do aparelho deverá
corresponder à da instalação eléctrica de sua
casa.
• Não coloque o aparelho sobre uma
superfície quente (ex: placa eléctrica) ou
perto de uma chama.
• Não retire o porta-filtro com café durante o
funcionamento pois o aparelho estará sob
pressão.
• Não utilize o aparelho se o tabuleiro de
O café expresso
O café expresso tem um aroma mais rico e
mais forte do que o café normal. Bebe-se em
chávenas pequenas previamente aquecidas. A
água quente passa pelo café moído e obtémse um café preto e cremoso com um efeito
revigorante.
É fácil reconhecer um café expresso pelo seu
aroma característico e pelo típico aspecto
cremoso. Mas isso requer uma pressão
elevada na sua preparação e a utilização de
café bem torrado de qualidade superior e
uma moagem própria. Se não puder adquirir
café moído, utilize um moinho de café para o
moer.
49
Page 50

A moagem não deverá ser demasiado fina,
mas ligeiramente granulada. Se for muito fina,
arrisca-se a entupir as grelhas da cabeça de
saída de água e do filtro e o café não sai.
Para garantir o melhor café expresso, utilize
água fresca (que não estagnou ao ar livre),
sem cheiro a cloro e bastante fria.
Antes da primeira utilização
Antes de utilizar o aparelho pela primeira vez,
passe, sem colocar café no porta-filtro, um ou
dois depósitos de água pelo sistema de
aquecimento de água, do seguinte modo:
• Abra a tampa e tire o depósito pela pega
(1). Encha o depósito com água (2).
• Volte a colocar o depósito encaixando-o
bem de modo a que a válvula de ligação
debaixo do depósito fique aberta. Feche a
tampa (3).
Poderá controlar o nível de água no depósito
graças ao visor previsto para esse efeito,
podendo assim adicionar mais água sempre
que necessário (4).
• Ligue o aparelho (5). A luz piloto vermelha
de funcionamento e a luz piloto de controlo
da temperatura, laranja, acendem.
• Coloque um dos filtros no porta-filtro (11) e
encaixe o porta-filtro na cabeça de saída de
água. Para que o porta-filtro fique bem
colocado, rode a pega para a esquerda (6),
encoste o porta-filtro à cabeça de saída de
água e rode a pega para a direita (7) até
encaixar (8).
• Coloque o maior recipiente possível debaixo
do porta-filtro (9).
Assim que a luz piloto laranja apagar, rode o
selector para a posição (9) e deixe sair a
água toda do depósito.
• Se for necessário despejar o recipiente,
interrompa a operação rodando o selector
para a posição O e retome depois a
operação.
Utilização das diferentes
funções do seu aparelho
1. FUNÇÃO EXPRESSO:
Para obter um melhor resultado, aqueça
primeiro os acessórios (porta-filtro, filtro e
chávenas), sem café. Para isso:
• Encha o depósito de água (1) (2) (3) e ligue
o aparelho (5).
• Coloque o porta-filtro e um dos filtros sem
café (6) (7) (8). Coloque as chávenas
debaixo do porta-filtro.
Assim que o aparelho atingir a temperatura
ideal, a luz piloto laranja apaga.
• Rode o selector para a posição (9).
• Quando as chávenas estiverem cheias de
água quente, coloque o selector na posição
O .
Quando o aparelho já estiver quente, poderá
aquecer as chávenas colocando-as
simplesmente sobre a chapa.
. Preparação do café expresso:
• Encha o depósito de água (1) (2) (3) e ligue
o aparelho (5).
• Coloque no porta-filtro o filtro para uma ou
duas chávenas (11).
• Coloque o café moído no filtro,
comprimindo-o firmemente até atingir o
bordo do filtro (12) (13).
• Tire os restos de café à volta do filtro (14).
• Coloque o porta-filtro (15).
• Coloque uma ou duas chávenas debaixo do
porta-filtro.
Ao atingir a temperatura ideal, a luz piloto
laranja do aparelho apaga-se.
• Rode o selector para a posição (10).
• Quando as chávenas estiverem cheias, rode
o selector para a posição O.
• Tire o porta-filtro e o filtro e deite fora as
borras do café (17).
Pode voltar a encher o filtro para preparar
mais expressos.
50
Page 51

2. FUNÇÃO VAPOR
O estalo que se ouve aquando da preparação
do vapor resulta da regulação intermitente da
bomba e não afecta de modo algum o bom
funcionamento do aparelho.
Se desejar preparar um café expresso
imediatamente após a preparação do vapor,
deixe primeiro o aparelho arrefecer, até atingir
a temperatura adequada à preparação do café
expresso.
- Coloque um recipiente debaixo do portafiltro, sem café, e rode o selector para a
posição (10).
- Deixe sair água até que a luz piloto laranja
acenda. Rode depois o selector para a
posição O.
Pode agora preparar o seu café expresso.
Atenção: durante e após o funcionamento do
aparelho, as partes metálicas do vaporizador
ficam muito quentes.
. A função vapor com o acessório Krups
autocappuccino permite obter facilmente:
. leite mais ou menos cremoso para preparar
um cappuccino, um café creme ou chocolate
quente.
. água quente para preparar um chá.
Estes líquidos são aspirados pelo tubo
flexível e aquecidos graças ao vapor antes
de voltar a sair pelo acessório
autocappuccino. Ao mergulhar directamente
o tubo flexível num pacote de leite, basta-lhe
ter uma chávena para preparar um cappuccino ou um café creme. A torneira do
acessório permite-lhe regular o tipo de
espuma que produz no leite.
É preferível utilizar leite meio gordo do dia,
não fervido e bem frio (guardado no
frigorífico). O recipiente deverá também estar
frio (não o passe por água quente antes de
fazer espuma).
Para aquecer líquidos espessos, consulte o
parágrafo “Aquecimento de líquidos espessos
(por exemplo sopa)”.
Aconselhamos a limpeza imediata do
acessório autocappuccino imediatamente
após a sua utilização consultando o parágrafo
“Limpeza do acessório autocappuccino”.
. Preparação do leite com espuma para
um cappuccino:
• Encha o depósito de água (1) (2) (3) e ligue
o aparelho (5).
• Puxe o vaporizador para fora e monte o
acessório autocappuccino na extremidade
do vaporizador (18).
• Rode o selector para a posição (19).
• Mergulhe o tubo flexível no leite. O tubo
deve tocar no fundo do recipiente (20).
• Coloque uma chávena com 1/3 de café
expresso acabado de preparar (20) debaixo
da saída de água.
• Coloque a torneira na posição (21).
Obterá uma espuma fina e cremosa.
Para obter leite menos cremoso, rode a
torneira.
Assim que o aparelho atingir a temperatura
adequada, a luz piloto laranja apaga.
• Rode o selector para a posição (22).
Sairá um leite quente e cremoso pelo
vaporizador.
• Ao obter a quantidade desejada de leite com
creme, rode o selector para a posição O.
• Após a utilização, tire o tubo flexível do
recipiente.
. Preparação de leite quente ligeiramente
batido para um café creme, chocolate
quente ou aquecimento de água (para
preparar chá, por exemplo).
Observações:
. Café creme: coloque a chávena com o café
acabado de fazer directamente sob a saída.
. Chocolate quente: mergulhe o tubo flexível
directamente no pacote de leite, no caso de
chocolate já preparado. Ou aqueça o leite se
utilizar chocolate em pó. Misture depois o
cacau em pó no leite aquecido.
• Puxe o vaporizador para fora e monte o
acessório autocappuccino na extremidade
do vaporizador (18).
51
Page 52

• Encha o depósito de água (1) (2) (3) e ligue
o aparelho (5).
• Rode o selector para a posição (19).
• Rode a torneira do acessório autocappuccino
para a extremidade fina (23)
• Mergulhe o tubo flexível no leite. O tubo
deve tocar no fundo do recipiente (20).
• Coloque um recipiente debaixo da cabeça
de saída (20).
Assim que o aparelho atingir a temperatura
adequada, a luz piloto laranja apaga-se.
• Rode o selector para a posição (22).
• Ao obter a quantidade desejada de líquido
quente, rode o selector para a posição O .
• Após a utilização, tire o tubo flexível do
recipiente.
. Aquecimento de líquidos espessos (por
exemplo sopa):
• Puxe o vaporizador para fora e monte o
acessório autocappuccino na extremidade
do vaporizador (18).
• Encha o depósito de água (1) (2) (3) e ligue
o aparelho (5).
• Rode o selector para a posição (19).
• Rode a torneira do acessório autocappuccino
para a posição (24)
• Mergulhe o vaporizador do acessório
autocappuccino no líquido que pretende
aquecer (25).
Assim que o aparelho atingir a temperatura
adequada, a luz piloto laranja apaga-se.
• Rode o selector para a posição (22) até
que o líquido esteja suficientemente quente,
e volte a rodar o selector para a posição O .
Retire o recipiente.
3. FUNÇÃO EXPRESSO COM PORTA-FILTRO
“ESE”
ESPECIAL
O sistema E.S.E. está concebido para a
realização de café expresso “ristreto” (curto) à
italiana. A quantidade de café corresponde a
35 ml e a 20 segundos de passagem de água.
“ESE”, “Easy Serving Expresso” (preparação
simplificada do café expresso) consiste numa
dose pronta a utilizar de café seleccionado,
moído e compactado entre dois papéis de
filtro (por exemplo “serving illycaffé”). Este
sistema simplifica a preparação do seu café
expresso, evitando as operações de dosagem
e de compactagem, facilitando também a
limpeza do aparelho.
Manipule e guarde as doses “ESE” com
cuidado para não as deformar.
Não está previsto, nem é recomendado
fazer um café longo com estas doses.
Para obter o melhor resultado, aconselhamos
a aquecer previamente, sem café, os
acessórios (porta-filtro, filtro e chávenas).
Proceda do seguinte modo:
• Encha o depósito de água (1) (2) (3) e ligue
o aparelho (5).
• Coloque o porta-filtro “ESE” vazio (6) (7) (8)
e coloque a chávena debaixo.
Assim que o aparelho atingir a temperatura
ideal, a luz piloto laranja apaga-se.
• Rode o selector para a posição (9).
• Quando a chávena estiver cheia de água
quente, coloque o selector na posição O .
Quando o aparelho já estiver quente, poderá
aquecer as chávenas colocando-as
simplesmente sobre a chapa do aparelho.
. Preparação do café expresso:
• Deite a dose “serving illycafé” no porta-
filtro “ESE” equipado com o filtro
adequado. A inscrição “illycafé” deve ficar
virada para baixo e a parte comprida do
filtro de papel no eixo da pega (26).
• Coloque o porta-filtro “ESE” (6) (7) (8)
rodando firmemente para a direita.
Ao atingir a temperatura ideal, a luz piloto
laranja do aparelho apaga-se.
• Rode o selector para a posição (9).
• Quando a quantidade de café recomendado
for atingida (35 ml), rode o selector para a
posição O.
• Tire o porta-filtro “ESE” e deite fora a dose
de café utilizado.
52
Page 53

Manutenção
- Não ponha os acessórios do seu aparelho na
máquina de lavar a loiça.
Depois de utilizar o aparelho despeje o
depósito.
. O tabuleiro de recolha de água
Após cada utilização, despeje o tabuleiro
depois de ter tirado a grelha (27) (28). Se
preparar vários cafés expresso de seguida, é
conveniente ir despejando o tabuleiro (todas
as 7 ou 8 chávenas). Se for necessário, limpe
o tabuleiro de recolha de água e a grelha com
água e um pouco de detergente, passe por
água e seque. Quando voltar a montar o
conjunto, verifique se colocou convenientemente a peça de plástico (29).
. A cabeça de saída, o filtro e o porta filtro
Devem ser limpos após cada utilização. Passe
um pano húmido no vaporizador e lave com
água os outros acessórios.
No caso da cabeça de saída estar muito suja,
desatarraxe a grelha com uma moeda, limpe-a
e volte a montar apertando-a com força (30).
Se não utilizar o aparelho durante muito
tempo, tire o porta filtro do aparelho para não
forçar a junta e reduzir o tempo de vida do
aparelho.
. A placa aquecedora para chávenas : retire-a para lavar com um pouco de
detergente, passe por água e seque (31).
. O acessório vaporizador: deve ser limpo
após cada utilização com um pano húmido.
. O acessório autocappuccino
Após cada utilização, aconselhamos a limpar o
acessório do seguinte modo:
• Rode o selector para a posição (19).
• Rode a torneira para a posição (33).
• Coloque o tubo flexível num copo de água.
(A quantidade mínima necessária é de
100ml).
• Coloque um recipiente debaixo da cabeça
de saída.
Ao atingir a temperatura ideal, a luz piloto
laranja do aparelho apaga-se.
• Rode o selector para a posição (22).
Quando tiver passado toda a água pelo
acessório autocappuccino, rode o selector de
volta para a posição O.
• Após a utilização, retire o tubo flexível do
recipiente.
Ao terminar a operação, limpe a cabeça de
saída com um pano húmido.
Aconselhamos a desmontar regularmente o
acessório autocappuccino e a limpa-lo com
água e um pouco de detergente. Passe por
água e seque bem antes de voltar a montá-lo
(34).
Cuidado com o sentido da montagem do
tubo flexível: encaixe a extremidade cortada
a direito no acessório autocappuccino.
. A junta da cabeça
De tempos a tempos esta deve ser limpa :
• Coloque o porta-filtro no local com o filtro
• Coloque um recipiente debaixo do porta-
filtro.
• Coloque o aparelho em funcionamento.
• Rode o selector para a posição .
• Assim que a água quente correr, rode o
porta-filtro docemente da esquerda para a
direita para que a água circule entre a junta
e o porta-filtro.
Descalcificação
• Consoante o grau de dureza da água,
descalcifique o aparelho periodicamente
com ácido cítrico ou tartárico.
No entanto aconselhamos a utilização do
acessório de descalcificação Krups
referência 054 à venda nos revendedores
habituais. Este acessório inclui duas doses de
descalcificação, uma fita de teste de dureza
da água para avaliar a frequência de
descalcificação do seu aparelho em utilização
normal. O cálcio que afecta o aparelho
depende do grau de dureza da água mas
também do ciclo de utilização. A frequência
53
Page 54

de descalcificação dada no acessório 054 é a
título indicativo.
- Proceda do seguinte modo:
• Desatarraxe a grelha da cabeça do aparelho
e limpe-a.
• Dissolva duas colheres de sopa de produto
de descalcificação ou uma dose do acessório
054 em meio litro de água morna e deite a
solução no depósito vazio.
• Coloque um recipiente debaixo da cabeça
do aparelho. Deixe passar cerca de 1/3 da
solução directamente, colocando o selector
na posição (9).
• Desligue o aparelho deixando o selector na
posição (9) e aguarde cerca de 10 a 15
minutos para deixar agir o descalcificante.
• Ligue o aparelho e deixe passar o resto da
solução.
• Passe dois depósitos pelo sistema e volte a
colocar a grelha na cabeça do aparelho (ver
parágrafo “Manutenção”).
Problemas, causas prováveis e
acções correctivas
Problemas Causas prováveis Acções
correctivas
O café não sai Os acessórios estão Pré-aqueça os
suficientemente frios (chávenas, acessórios
quente filtro e porta-filtro) (chávenas, filtro e
porta-filtro). Ver
parágrafo “Preparação de um café
expresso”
Fuga de café a O porta-filtro não Ver parágrafo
nível do porta- está correctamente “Preparação do
filtro colocado café expresso”
Não foi retirado o Limpar o bordo do
excesso de café do filtro e a junta
bordo do filtro
A junta da cabeça Limpar a junta
está suja com um pano
húmido
A junta da cabeça Contacte um
está defeituosa Serviço Após
Venda Krups
A bomba faz muito Não há água no Encha o depósito
barulho depósito
Depósito mal colo- Encaixe bem o
cado depósito
Café velho ou seco Utilize café fresco
e a bomba não
consegue criar
pressão
A água não passa Não há água no Encha o depósito
depósito
Depósito mal colo- Encaixe bem o
cado depósito
O filtro está entupi- Limpe o filtro e a
do, o café é dema- grelha da cabeça
siado fino ou foi (ver parágrafo
demasiado com- “Manutenção”)
pactado
Aparelho com ins- Ver parágrafo
crutação Tartárica “Descalcificação”
A água passa de- Moagem demasia- Experimente uma
masiado rápido do grossa moagem mais fina
Quantidade de café Utilize a colher
insuficiente doseadora
Café não Compacte o café
compactado
O expresso não é Moagem demasia- Experimente uma
cremoso do grossa moagem mais fina
O café não foi Compacte o café
compactado
Café demasiado Utilize café fresco
velho ou seco
O leite não fica Vaporizador Ver parágrafo
cremoso entupido “Manutenção”
Acessório cappuc- Ver parágrafo
cino entupido “Manutenção”
Leite fora da vali- Utilize leite fresco
dade
Leite morno Ponha o leite no
frigorífico
Na utilização E.S.E. Dose mal posicio- Ver “Função
dá-se fuga de café nada Expresso com o
ao nível do porta porta filtro
filtro E.S.E.”
Porta filtro mal Aperte com mais
posicionado força o porta
filtro
Extracção Limite a extracção
demasiado longa a 35 ml
54
Page 55

Demasiada água Café não Pressione o
sobre o café pressionado café
Quantidade de café Aumente a
insuficiente quantidade de
café
Receitas
Saboreie o seu café expresso como gostar
mais: quando quiser relaxar ou no final de
uma boa refeição.
Eis algumas receitas que pode realizar com o
seu aparelho expresso.
. Expresso original
• Filtre directamente para a chávena pré-
aquecida uma colher doseadora de café
expresso de boa qualidade e bem torrado.
• Se utilizar café de boa qualidade e bem
moído, verá formar-se uma coroa de espuma
à volta da chávena.
• Adicione açúcar e saboreie o café. O
expresso original bebe-se sem leite e com
muito açúcar.
. Cappuccino
Para obter um verdadeiro cappuccino, as
quantidades ideais são as seguintes: 1/3 de
café, 1/3 de leite quente, 1/3 de leite
cremoso. A quantidade total de leite deve ser
o dobro da quantidade de café.
• Utilize chávenas grandes previamente
aquecidas.
• Encha a chávena com a quantidade de café
equivalente a um expresso e adicione o leite.
• Polvilhe com chocolate em pó.
. Café creme
• Prepare um café expresso clássico numa
chávena grande. Adicione um pouco de
natas.
Pode também substituir as natas por leite
quente.
. Café “corretto”*
• Prepare uma chávena de café expresso nor-
mal
• Adicione depois, e conforme o gosto, 1/4 ou
1/2 copo de licor de cognac.
Pode também utilizar Anisette, aguardente de
uvas, Sambuco, Kirsch e Cointreau.
Existem com certeza outras possibilidades. A
imaginação não tem limites.
. Licor de café*
• Misture numa garrafa vazia de 0.75 l 3
chávenas de café expresso, 250g de açúcar
amarelo, 1/2 litro de cognac ou Kirsch.
• Deixe a mistura macerar durante 2 semanas.
Obterá assim uma bebida deliciosa,
sobretudo para os apreciadores de café.
. Café gelado à italiana
4 bolas de gelado de baunilha, 2 chávenas de
café expresso frio e com açúcar, 1/8 l de leite,
natas, chocolate ralado.
• Misture o café expresso frio com leite
• Disponha as bolas de gelado em copos,
deite o café por cima e enfeite com as natas
e o chocolate ralado.
. Café “à la frisonne”*
• Adicione um pequeno copo de rum a uma
chávena de café expresso com açúcar.
• Enfeite com uma camada de natas e sirva.
. Expresso flambé*
2 chávenas de café expresso, 2 pequenos
copos de cognac, 2 colheres de café de açúcar
amarelo, natas.
• Deite o cognac em copos resistentes ao
calor, aqueça e flameje.
• Adicione o açúcar, misture e deite o café
enfeitando depois com as natas.
Se desejar, pode diluir o café expresso num
pouco de água a ferver.
55
Page 56

. Expresso “parfait”*
2 chávenas de café expresso, 6 gemas de ovo,
200g de açúcar, 1/4 litro de natas açucaradas,
1 pequeno copo de licor de laranja.
• Bata as gemas com o açúcar até obter uma
massa espessa e cremosa.
• Adicione o café expresso frio e o licor de
laranja.
• Adicione as natas batidas.
• Deite tudo em copos ou taças.
• Ponha as taças no congelador.
. Pudim de moca
2 chávenas de café expresso, 1/2 litro de leite,
1 saqueta de pudim de baunilha, 3 gemas de
ovo, 1/8 de natas açucarado, 150 g de açúcar.
• Prepare o pudim de baunilha com o leite, a
saqueta e o açúcar.
• Adicione as gemas dos ovos ao pudim ainda
quente.
• Deixe arrefecer e junte o café expresso e as
natas batidas.
(* : O abuso do álcool é prejudicial à saúde).
56
Page 57
Italiano
◆
Descrizione
a Coperchio
b Serbatoio acqua estraibile
c Livello d’acqua visibile
d Piano scalda-tazze
e Selettore caffè/vapore
f Lampada spia di funzionamento
(rosso)
g Lampada spia controllo della
temperatura (arancio)
h Interrutore avvio/arresto
i Supporto porta-filtro
j Beccuccio vapore
k Accessorio Auto-cappuccino :
k1 rubinetto
k2 tubicino morbido
k3 condotto di uscita
l Griglia di appoggio tazzine
m Cassetto raccogli-gocce
n Misurino
o Filtro da una o due tazze
p Porta-filtro per miscela caffè
q Porta-filtro e filtro sistema “ESE”
Consigli di sicurezza
• Prima di utilizzare la Vostra macchina per
caffè espresso, leggete attentemente queste
istruzioni per l’uso. Collegate sempre
l’apparecchio ad una presa elettrica provvista
di terra e verificate che la tensione indicata
sulla placca segnaletica corrisponda a quella
del Vostro impiato elettrico.
• Non appogiate mai la Vostra macchina
espresso sopra di una superficie calda
(es.piastra elettrica) o in prossimità di una
fiamma.
• Non estraete mai il porta-filtro – contenente
la miscela del caffè - durante il passaggio
dell’acqua poiché l’apparecchio a questo
punto è sotto pressione.
• Non utilizzate l’apparecchio senza che il
cassetto raccogli-gocce e la griglia siano al
loro posto.
• L’apparecchio deve essere scollegato dalla
rete elettrica (togliete la presa) in caso di
malfunzionamento durante la fuoriuscita del
caffè o prima delle operazioni di pulizia.
• Il cavo elettrico non deve essere mai tirato
per scollegare l’apparecchio e mai pressato
fra gli angoli dei mobili.
• Evitate che sia il cavo che le Vostre mani
vengano a contatto con le parti calde della
macchina del caffè (piano scalda-tazze,
porta-filtro, beccuccio vapore).
• Non immergete mai l’apparecchio
nell’acqua.
• Tenete l’apparecchio fuori dalla portata dei
bambini e non lasciate penzolare il cavo.
• Per l’operazione di disincrostazione,
atteneteVi scrupolosamente alle istruzioni.
• Non utilizzate l’apparecchio se rilevate dei
guasti o se il cavo elettrico risulta
danneggiato. Sia il cavo che ogni altro
specifico elemento dell’apparecchio, se
danneggiati, debbono essere sostiuiti solo da
un Centro Assistenza autorizzato Krups. In
alcun caso l’apparecchio deve essere
manomesso da Voi stessi.
• Prima dell’erogazione del caffè, verificate
che il porta-filtro sia ben chiuso ; prima di
estrarre il porta-filtro, riposizionate il
selettore sullo O.
Il caffè Espresso
Il caffè espresso è un caffè più forte e più ricco
di aroma rispetto ad un caffè normale e
questo grazie alla sua particolare miscela che
non deve essere macinata troppo fine ma
leggermente granulosa. Se troppo fine,
rischiate di otturare il porta-filtro con
conseguente blocco del passaggio dell’acqua.
Per garantire un’ottima preparazione di un
espresso, è necessario utilizzare sempre
dell’acqua corrente (non acqua rimasta per
lungo tempo a stagnare all’aria), senza tracce
di cloro e molto fredda.
57
Page 58

Al primo utilizzo
Al primo utilizzo del Vostro apparecchio
effettuate un’operazione di risciacquo (senza
miscela di caffè) del sistema di riscaldamento
dell’acqua, con uno o due serbatoi, come
segue:
• Aprite il coperchio, e con l’aiuto della
manopola (1), estraete il serbatoio e
riempitelo d’acqua (2)..
• Rimettete il serbatoio al suo posto avendo
cura di ben posizionarlo in modo da aprire la
valvola di raccordo situata sotto al serbatoio
e richiudete il coperchio (3) .
Grazie alla finestrella prevista sul serbatoio, il
livello dell’acqua può essere verificato ad ogni
momento e quindi, in caso di necessità,
l’acqua può essere aggiunta (4).
• Mettete in funzione l’apparecchio (5), la spia
rossa di funzionamento e quella arancio di
controllo temperatura si accendono.
• Mettete uno dei filtri nel porta-filtro (11)
quindi mettete il porta-filtro nel suo
supporto. Per posizionare correttamente il
porta-filtro, orientate la manopola verso
sinistra (6), mettendolo di piatto contro il
supporto, quindi girate la manopola verso
destra (7) fino a bloccarlo (8).
• Posizionate un recipiente abbastanza grande
sotto al porta-filtro (9).
• Quando la spia luminosa arancio si spegne,
girate il selettore sulla posizione
lasciate passare nel contenitore tutta l’acqua
contenuta nell’apparecchio.
• Se è necessario vuotare il recipiente,
interrompete l’operazione girando il
selettore sulla posizione O quindi
riprendente l’operazione.
(9) e
Utilizzo delle differenti
funzioni del Vostro
apparecchio
1. FUNZIONE EXPRESSO
Per un risultato ottimale, Vi consigliamo di
effettuare preferibilmente (senza miscela)
un preriscaldamento degli accessori
(porta-filtro, filtro et tazze) come di seguito:
• Riempite il serbatoio d’acqua (1) (2) (3) e
mettete in funzione l’apparecchio (5).
• Posizionate al loro posto il porta-filtro, un
filtro vuoto (6) (7) (8) sotto le tazze.
Quando l’apparecchio raggiunge la giusta
temperatura, la spia luminosa arancio si
spegne.
• Girate il selettore sulla posizione (9).
• Quando le tazze sono piene di acqua calda,
riportate il selettore sulla posizione O (5).
Quando l’apparecchio è caldo le tazze
possono essere immediatamente riscaldate
mettendole sopra il piano scalda-tazze.
Preparazione del caffè espresso:
• Rimpiete il serbatoio dell’acqua (1) (2) (3) e
mettete in funzione l’apparecchio (5).
• Mettete il filtro, per una o due tazze, nel
porta-filtro (11).
• Mettete la miscela di caffè nel filtro,
pressandola bene, fino a raggiungere il
bordo del filtro (12) (13).
• Eliminate la miscela attorno al filtro (14).
• Riposizionate il porta-filtro (15).
• Mettete una o due tazze sotto al porta-filtro.
Quando l’apparecchio raggiunge la giusta
temperatura, la spia luminosa arancio si
spegne.
• Girate allora il selettore sulla posizione
(10).
• Quando le tazze sono piene, riportate il
selettore sulla posizione O.
• Estraete dall’apparecchio sia il filtro che il
porta-filtro ed eliminate i fondi (17).
Il filtro può essere nuovamente riempito per
successive preparazioni.
2. FUNZIONE VAPORE
Il rumore che si avverte al momento della
preparazione del vapore, viene dalla
regolazione intermittente della pompa e non
ha alcuna incidenza sul buon funzionamento
dell’apparecchio.
Se immediatamente dopo la funzione
“vapore” volete fare un espresso, dovrete
58
Page 59

attendere che l’apparecchio si raffreddi e
raggiunga la temperatura adatta per la
preparazione del caffè.
• Per fare ciò, mettete un recipiente sotto al
porta-filtro (posizionato al suo posto senza
miscela, portando il selettore sulla posizione
(10).
• Lasciate fuoriuscire l’acqua fino a che la spia
arancio si spegne, quindi portate il selettore
sulla posizione O.
Dopo di che un espresso può essere
nuovamente fatto.
Attenzione: durante e dopo il
funzionamento dell’apparecchio le parti
metalliche del condotto vapore, possono
diventare bollenti.
. La funzione vapore con l’accessorio
Krups auto-cappuccino consente di ottenere
facilmente:
. un latte più o meno cremoso (schiuma) per
la preparazione del cappuccino, un caffècrema o un cioccolato caldo.
. oppure dell’acqua calda per la preparazione
di un thé.
Questi liquidi vengono aspirati dal
tubicino morbido e riscaldati dal vapore
prima di essere nuovamente emessi dal
condotto di uscita dell’accessorio autocappuccino. Immergendo direttamente il
tubetto morbido nell’imballo del latte
(bottiglia, cartone,…) è sufficiente adoperare
una sola tazza per preparare un cappuccino o
di un caffè crema. Con il rubinetto
dell’accessorio potete regolare la densità della
schiuma del latte.
E’ preferibile utilizzare del latte fresco,
parzialmente scremato, non bollito e ben
freddo (conservato nel frigorifero). Anche il
recipiente deve essere ugualmente ben freddo
e non lavatelo nell’acqua calda prima di
utilizzarlo per fare la schiuma.
Per il riscaldamento di liquidi spessi,
riportateVi al paragrafo “ riscaldamento di
liquidi consistenti ” (per esempio i passati o le
zuppe) .
Noi Vi consigliamo di pulire l’accessorio autocappuccino dopo ogni utilizzo, riportandoVi al
paragrafo : “pulizia dell’accessorio auto-cappuccino”.
. Preparazione di un latte schiumoso per
cappuccino:
• Riempito il serbatoio dell’acqua (1) (2) (3) e
mettete in funzione l’apparecchio (5).
• Spostate il condotto verso l’esterno
dell’apparecchio e montate l’accessorio
auto-cappuccino sul beccuccio vapore (18).
• Girate il selettore sulla posizione
• Immergete il tubetto morbido nel latte da
(19).
riscaldare . Esso deve toccare il fondo del
recipiente (20).
• Mettete una tazza (piena per un terzo con
del caffè fatto fresco (20) sotto il condotto
di uscita.
• Mettete il rubinetto sulla posizione
(21).
Otterrete una schiuma fine e setosa.
• Per ottenere un latte meno montato, girate il
rubinetto verso l’alto della zona di utilizzo.
Quando l’apparecchio ha raggiunge la giusta
temperatura, la spia luminosa arancio si
spegne.
• Girate il selettore sulla posizione
(22).
Dal condotto di uscita, verrà emesso del latte
caldo e schiumoso.
• Dopo aver ottenuto la quantità di schiuma
desiderata, girate il selettore sulla posizione
O.
• Dopo averlo utilizzato, estraete il tubetto
morbido dal recipiente.
. Preparazione di un latte caldo
leggermente montato per fare un caffècrema, un cioccolato caldo, o per
riscaldare dell’acqua (per un thé, per
esempio)
Note :
. Caffè crema: posizionate direttamente la
tazza contenente il caffè fatto fresco, sotto il
condotto di uscita.
. Cioccolato caldo: immergete il tubetto
morbido direttamente nella confezione, nel
caso specifico quella del cioccolato già pronto
o, in quella del latte, se utilizzate cacao in
polvere. Mescolate quindi il cacao,
direttamente nel latte già caldo.
59
Page 60
• Posizionate il beccuccio vapore verso
l’esterno dell’apparecchio e montatevi
l’accessorio auto-cappuccino (18).
• Riempite il serbatoio dell’acqua (1)(2)(3) e
mettete in funzione l’apparecchio (5).
• Girate il selettore sulla posizione
• Girate il rubinetto dell’accessorio auto-cap-
(19).
puccino verso l’estremità della zona di
regolazione (23).
• Immergete il tubetto morbido nel liquido da
riscaldare. Il tubetto deve toccare il fondo del
recipiente (20).
• Posizionate un recipiente sotto il condotto di
uscita (20).
Quando l’apparecchio raggiunge la giusta
temperatura, la spia arancio si spegne.
• Girate il selettore sulla posizione
• A quantità desiderata di liquido caldo
(22).
ottenuto , girate il selettore sulla posizione
O.
A fine utilizzo, ritirate il tubetto morbido dal
recipiente.
. Riscaldamento di liquidi consistenti (per
esempio : un passato):
• Posizionate il beccuccio vapore verso
l’esterno dell’apparecchio e montatevi
l’accessorio auto-cappuccino (18).
• Riempite il serbatoio dell’acqua (1)(2)(3) e
mettete in funzione l’apparecchio (5).
(24).
(19).
• Girate il selettore sulla posizione
• Girate il rubinetto dell’accessorio auto-cap-
puccino sulla posizione
• Immergete il condotto di uscita
dell’accessorio auto-cappuccino nel liquido
da riscaldare (25).
Quando l’apparecchio raggiunge la giusta
temperatura, la spia arancio si spegne.
• Girate il selettore sulla posizione
(22)
fino a che il liquido sia sufficientemente
caldo, poi riportatelo sulla posizione O e
ritirate il recipiente.
3. FUNZIONE ESPRESSO CON LO SPECIALE PORTA-
FILTRO “ESE”
Il sistema ESE è stato ideato per preparare un
espresso ristretto. La quantità di caffè è pari a
35 ml e a 20 secondi di scorrimento
dell’acqua.
“ESE” che significa “Easy Serving Expresso”
(preparazione semplificata dell’espresso) è una
dose di caffè selezionata macinata e pressata
fra due carte-filtri, che la rendono pronto
all’uso (per esempio “serving illycaffé”).
Questo sistema semplifica al massimo la
preparazione dell’espresso evitando le
operazioni di dosaggio e pressatura,
facilitando la pulizia dell’apparecchio.
Non è previsto ne raccomandato di
preparare un caffè lungo con queste
cialde.
Al fine di non danneggiarle, Vi consigliamo la
massima cura nella manipolazione delle dosi.
Per un miglior risultato, Vi consigliamo di
preriscaldare, senza caffè, gli accessori (portafiltro, filtro e tazzine) come di segiuto :
• Riempite il serbatoio dell’acqua (1)(2)(3) e
mettete in funzione l’apparecchio (5).
• Posizionate il porta-filtro “ESE” (vuoto)
(6)(7)(8) e sotto di esso la tazzina.
Quando l’apparecchio raggiunge la giusta
temperatura la spia arancio si spegne.
• Girate allora il selettore nella posizione
(9).
• Quand la tasse est remplie d’eau chaude,
remettez le sélecteur sur la position O.
Quando l’apparecchio è caldo, le tazzine
possono essere riscaldate sul piano scaldatazze (posto in cima all’apparecchio).
. Preparazione dell’espresso :
• Mettete la cialde “serving illycafé” nel
porta-filtro “ESE” equipaggiato del suo
filtro. La scritta “illycaffé” deve essere
orientata verso la base ed il lato lungo del
filtro deve essere in asse con la manopola
(26).
• Posizionate il porta-filtro “ESE” (6)(7)(8)
strigendolo forte verso destra.
Quando l’apparecchio raggiunge la giusta
temperatura, la spia arancio si spegne.
• Girate allora il selettore sulla posizione
(9).
• Quando si è raggiunto la quantità di caffè
60
Page 61

ottimale (35 ml), girate il selettore sulla
posizione O.
• Estraete il porta-filtro “ESE” dal supporto
porta-filtro e gettate via la dose di caffè
utilizzata.
Manutenzione
- Non mettete mai gli accessori nella
lavastoviglie.
Dopo ogni utilizzo, il serbatoio dell’acqua
deve essere svuotato del suo contenuto.
. Il cassetto raccogli-gocce
Deve essere svuotato, dopo aver svitato la
griglia , al termine di ogni utilizzo (27) (28).
Se si preparano più espressi, uno dopo l’altro,
conviene vuotare di tanto in tanto (ogni 6/7
espressi fatti) il cassetto raccogli-gocce. Se
necessario, pulite il cassetto raccolgi-gocce e
la sua griglia con acqua calda e leggero
detersivo per i piatti, poi sciacquate e
asciugate. Al momento di rimontare gli
elementi, assicurateVi che la vaschetta in
plastica sia perfettamente posizionata nel suo
alloggiamento (29).
. Il supporto del porta-filtro, il portafiltro, il filtro
Essi debbono essere puliti dopo ogni utilizzo.
E’ sufficiente passare un panno umido sul
supporto del porta-filtro e sciacquare filtro e
porta-filtro sotto l’acqua corrente. Sciacquate
ed asciugate.
In caso di forte incrostazione della supporto
del porta-filtro con l’aiuto di una moneta
svitate la griglia, pulitela,quindi rimontatela
avvitando bene (30).
Durante i periodi di non utilizzo del Vostro
apparecchio non lasciate il porta-filtro
montato sull’apparecchio : questo farebbe
lavorare inutilmente il suo sistema di
avvitamento e giuntura ed accorcerebbe la sua
durata di vita.
. Ripiano scalda tazze: estraetelo per pulirlo
con acqua calda e detersivo per piatti, poi
sciacquate ed asciugate (31).
. Il beccuccio vapore: dopo ogni utilizzo,
deve essere pulito con un panno umido.
. l’accessorio auto-cappuccino :
Dopo ogni utilizzo, Vi consigliamo di pulirlo
nel seguente modo:
• Girate il selettore sulla posizione
• Girate il rubinetto sulla posizione
• Immergete il tubicino morbido dentro un
(19).
(33).
bicchiere d’acqua. (La quantità minima
necessaria è di 100 ml.).
• Mettete un recipiente sotto al condotto di
uscita.
Quando l’apparecchio ha raggiunge la giusta
temperatura la spia arancia si spegne.
• Girate allore il selettore sulla posizione
(22).
• Quando tutta l’acqua è passata attraverso
l’accessorio auto-cappuccino, girate il
selettore sulla posizione O.
• A fine utilizzo, estraete il tubetto morbido
dal recipiente.
• Alla fine di questa operazione pulite con un
panno umido il condotto di uscita.
Vi consigliamo di smontare regolarmente
l’accessorio auto-cappuccino e di pulirlo con
acqua, detersivo per piatti ed una spazzolina.
Risciacquate ed asciugate prima di rimontarlo
(34).
Fate molta attenzione al senso di mon-
taggio del tubicino morbido : inserite
l’estremità tagliata dritta nell’accessorio autocappuccino.
. La guarnizione del supporto del portafiltro
La guarnizione deve ogni tanto essere pulita :
• Inserite il porta-filtro munito del filtro.
• Posizionate un contenitore sotto il porta-
filtro.
• Mettete l’apparecchio in funzione.
• Girate il selettore sulla posizione .
• Quando l’acqua calda comincia a fuoriuscire,
girate lentamente il porta-filtro da sinistra a
destra, in modo da lasciare scorrere
dell’acqua tra la guarnizione ed il portafiltro.
61
Page 62

Decalcificazione
• Decalcificate più o meno spesso il Vostro
apparecchio con dell’acido citrico o tartarico.
Comunque noi Vi consigliamo di utilizzare la
confezione di decalcificazione Krups (ref.
054) disponibile presso ogni Centro
Assistenza autorizzato Krups. Questa
confezione comprende oltre alle due dosi di
decalcificante, un nastro atto a testare la
durezza dell’acqua per poter cosi valutare,
durante un normale utilizzo dell’apparecchio,
la frequenza delle operazioni di
decalcificazione. L’incrostazione dipiende sia
della durezza dell’acqua che dalla quantità di
utilizzo, quindi la frequenza di decalcificazione
indicata sulla confezione è da riternersi a puro
titolo indicativo.
- Seguite la seguente metodica:
• Svitate la griglia del supporto del porta-filtro
e pulitela.
• Sciogliete 2 cucchiai di prodotto anti-calcare
o un sacchetto della confezione Krups 054
in mezzo litro di acqua tiepida, versando il
tutto nel serbatoio vuoto.
• Mettete un recipiente sotto il supporto
porta-filtro. Fate passare circa un terzo del
liquido mettendo il selettore sulla posizione
(9).
• Fermate l’apparecchio lasciandolo sulla
posizione
minuti per permettere all’anti-calcare di
agire.
• Rimettete in funzione l’apparecchio e
lasciate fuoriuscire il liquido rimanente.
• Fate seguire un risciacquo riempendo due
volte il serbatoio di acqua corrente e
riposizionate la griglia sul supporto portafiltro (vedere paragrafo “manutenzione”).
(9) ed attendete 10/15
Problemi, possibili cause e
soluzioni
Problemi Possibili Soluzioni
cause
Il caffè non è abbas- Gli accessori sono Preriscaldate gli
tanza caldo. freddi (tazze, filtro accessori (tazze,
e porta-filtro). filtro e porta-filtro
Vedere paragrafo
“ Preparazione
dell’espresso ”.
Fuoriuscita di Il porta-filtro non è Vedere paragrafo
caffè a livello porta- stato montato cor- “ Preparazione
filtro. rettamente. dell’ espresso ”.
C’è della miscela Pulite tutto intorno
sullo bordo del filtro e guarnizione.
filtro.
La guarnizione del Pulite la guarnisupporto del porta- zione con un
filtro è sporca. panno umido.
La guarnizione del RivolgeteVi presso
supporto del porta- un Centro Assisfiltro è difettoso. tenza autorizzato
Krups.
Rumore forte Manca l’acqua nel Riempite il serbadella pompa. serbatoio. toio
Serbatoio montato Spingete a fondo il
male. serbatoio.
Miscela vecchia o Utilizzate una mistroppo secca cela fresca
La pompa non può
creare pressione.
L’acqua non passa. Manca l’acqua nel Riempite il
serbatoio. serbatoio
Serbatoio montato Spingete a fondo il
male. serbatoio
Il filtro è otturato Pulite il filtro e la
la miscela e troppo griglia del supporto
fine o troppo pres- del porta filtro.
sata. Vedere paragrafo
“ Manutenzione ”
e utilizzate una
miscela meno fine.
La griglia del sup- Immergete la griporto del porta- glia nella soluzione
filtro è incrostata. decalcificante.
Vedere paragrafo
“ Manutenzione ”.
Apparecchio incros- Vedere paragrafo
tato Decalcificazione ”
62
Page 63

L’acqua passa Miscela troppo Utilizzate una
troppo veloce- spessa. miscela più fine.
mente .
Quantità di miscela Utilizzate l’apposiinsufficiente. to. Misurino per
dosare il caffè.
Miscela non pres- Pressate di più la
sata. miscela.
L’espresso non Miscela troppo Utilizzate una
é cremoso. spessa. miscela più fine
Miscela non abbas- Pressate di più la
tanza pressata. miscela.
Miscela vecchia o Utilizzate una
troppo secca. miscela fresca
Il latte non risulta Beccuccio vapore Vedere paragrafo
cremoso. otturato. “ Manutenzione ”
Accessorio cappuc- Vedere paragrafo
cino otturato. “ Manutenzione ”
Latte troppo vec- Utilizzate del latte
chio. fresco
Latte tiepido. Mettete il latte in
frigo.
Utilizzando il sis- La cialda non è Vedere “Funzione
tema E.S.E, il caffè ben inserita Espresso con il
dal porta-filtro. fuoriesce porta-filtro E.S.E”
Il porta-filtro Chiudete il portanon è correttamen- filtro con cura.
te chiuso
Preparazione Limitate la
troppo preparazione
lunga a 35 ml.
Troppa acqua sulla Miscela non premu- Premete la miscela.
Miscela ta
Quantità di miscela Aumentate la
insufficiente quantità di
miscela
Ricette
Gustate il Vostro espresso nella forma che
amate di più: o per distenderVi un momento o
alla fine di un buon pasto.
Vi proponiamo qualche ricetta che potrete
realizzare con la Vostra macchina.
. Cappuccino
• Per un cappuccino a regola d’arte, le
quantità ideali sono le seguenti: 1/3 de
caffè, 1/3 di latte caldo, 1/3 de latte
montato (con il vapore). La quantità di latte
ottenuta dal latte caldo più latte montato
deve essere circa il doppio di quella del caffè.
• Utilizzate delle tazze grandi, preferibilmente
pre-scaldate.
• Riempitele con il caffè (l’equivalente di una
tazzina) quindi aggiungete il latte che avrete
prima “ montato ” con l’accessorio cappuccino
• Spolverate il Vostro cappuccino con del ca-
cao in polvere.
. Caffè crema
• Dentro una tazza grande mettete un
espresso classico
• Aggiungete quindi due cucchiaini di panna
per ottenere un caffè crema.
Potete anche sostituire la panna con del latte
caldo.
. Caffè corretto *
• Preparate una tazza di caffè espresso.
• Correggete leggermente il gusto
aggiungendo 1/4 o 1/2 di bicchiere con del
cognac.
L’Anisetta, la Grappa, la Sambuca ed il
Cointreau sono liquori ugualmente adatti alla
correzione del caffè.
Esistono comunque mille altre possibilità per
rendere più “ nobile ” il caffè.
L’immaginazione è illimitata.
. Liquore al caffè *
• Mescolate dentro una bottiglia vuota dalla
capacità di 0,75 Lt. tre tazzine di caffè
espresso, 250 g di zucchero di canna, 1/2 Lt.
di cognac o di Kirsch.
• Lasciate riposare per almeno due settimane
prima di gustare i liquore.
Otterrete cosi un liquore davvero gustosa,
soprattutto per gli amatori di caffè.
. Affogato al caffè
4 palline di gelato alla vaniglia, 2 tazzine di
caffè espresso freddo e zuccherato, 1/8 Lt di
latte, panna fresca, cioccolato grattugiato.
• Mescolate l’espresso freddo con il latte.
• Ripartite le palline nei bicchieri, versatevi
63
Page 64

sopra il caffè e decorate con panna e
cioccolato grattugiato.
. Caffè al brivido *
• Aggiungete ad una tazzina di espresso
zuccherato, un bicchierino di Rhum.
• Decorate con un buon strato di panna fresca
e servite.
. Espresso alla fiamma *
2 tazzine di caffè espresso, 2 bicchierini di
cognac, 2 cucchiaini di zucchero di canna,
panna fresca.
• Versate il cognac in due bicchieri di vetro
resistenti al calore, riscaldate ed infiammate.
• Aggiungete lo zucchero, mescolate, versate
il caffè ed aggiungete la panna.
Potete allungare il caffè espresso con un po’
d’acqua bollente.
. Espresso perfetto *
2 tazzine di caffè espresso, 6 rossi d’uovo,
200g di zucchero, 1/4 Lt. di panna fresca
zuccherata, 1 bicchierino di liquore all’arancia.
• Sbattete i tuorli con lo zucchero fino ad
ottenere un composto spesso e schiumoso :
• Aggiungete il caffè freddo ed il liquore
all’arancia.
• Unite quindi la panna fresca montata.
• Versate in coppe o bicchieri.
• Mettete nel congelatore.
(* : Ci permettiamo ricordare che l’abuso di
alcool è pericoloso per la salute).
64
Page 65

Dansk
◆
Beskrivelse
a Låg
b Udtagelig vandbeholder
c Vandstandsmåler
d Varmeplade til kopper
e Programvælger for kaffe/damp
f Kontrollys for tænd/sluk (rødt)
g Kontrollys for temperatur (orange)
h Tænd/sluk knap
i Bryggehoved
j Dampdyse
k Autocappuccino tilbehør:
k1 Reguleringsknap
k2 Bøjeligt rør
k3 Udløbsdyse
l Rist
m Drypbakke
n Måleske
o Filter til en eller to kopper
p Filterholder til malet kaffe
q “ESE” filterholder og filter
Gode råd om sikkerhed
• Læs brugsanvisningen omhyggeligt
igennem, før espressomaskinen tages i brug.
• Maskinen må kun tilsluttes 230 volt
vekselspænding.
• Espressomaskinen må kun tilsluttes til et stik
med jordforbindelse eller HFI-relæ, der lever
op til de gældende normer vedrørende
elektricitet. Maskinen skal placeres således,
at stikkontakten er tilgængelig på ethvert
tidspunkt. Kontroller ligeledes, at der er fri
adgang til Deres hovedafbryder.
• Garantien bortfalder ved tilslutning til forkert
spænding.
• Anbring ikke apparatet på en varm
overflade, som f.eks. en kogeplade, eller i
nærheden af et tændt gasblus.
• Filterholderen med kaffepulver må ikke
fjernes under kaffebrygningen, da apparatet
er under tryk.
• Apparatet må kun bruges, når drypbakken
og risten er på plads.
• Stikket skal tages ud af kontakten, hvis
bryggefunktionen ikke fungerer normalt, og
ligeledes før rengøring af apparatet.
• Stikket må ikke tages ud af kontakten ved
træk i ledningen. Ledningen må ikke
anbringes, så den hænger over skarpe
kanter eller omkring hjørner.
• Undgå at røre ved apparatets varme dele
(varmepladen til kopper, filterholderen og
dampdysen). Sørg for, at ledningen ikke
kommer i kontakt med de varme dele.
• Apparatet må aldrig nedsænkes i vand.
• Hold apparatet uden for børns rækkevidde
og lad ikke ledningen hænge ned.
• Ved afkalkning af apparatet skal
instruktionerne i brugsanvisningen følges.
• Tænd ikke for apparatet, hvis ledningen eller
selve apparatet er beskadiget.
• Hvis ledningen eller en af apparatets dele
bliver beskadiget og skal udskiftes, må
udskiftnigen kun foretages af KRUPS
serviceværksted. Forsøg ikke selv at reparere
apparatet.
• Kontrollér, at filterholderen sidder helt fast,
før kaffebrygningen startes og sæt
programvælgeren tilbage på position O, før
filterholderen tages af.
Espressokaffe
Espressokaffe er mere aromatisk og stærkere
end almindelig kaffe. Den drikkes af små
forvarmede espressokopper. Espressokaffe
brygges ved, at varmt vand presses gennem
kaffepulveret. Dette giver den delikate, sorte
og skummende kaffe med den stimulerende
virkning.
Espressokaffen er kendetegnet ved den
karakteristiske smag og den typiske crema.
Dette kræver højt tryk under brygningen og
ægte espresso kaffebønner, som er blevet
korrekt ristet og malet. Hvis man ikke kan
købe malet espressokaffe, bør man anvende
65
Page 66

en kaffemølle til at male bønnerne. Bønnerne
må ikke males for fint, da man ellers risikerer,
at kaffepulveret tilstopper sien i
bryggehovedet og filteret.
Man får den bedste espressokaffe, når man
anvender frisk vand (dvs. vandet må ikke have
stået i længere tid i en beholder). Vandet skal
være koldt og uden klorlugt.
Før espressomaskinen tages i
brug første gang
Før espressomaskinen tages i brug første
gang, skal vandopvarmningssystemet skylles
igennem 1-2 gange med vand uden kaffe.
• Åbn låget og løft vandbeholderen op ved
hjælp af håndtaget (1). Fyld beholderen med
vand (2).
• Sæt beholderen tilbage og tryk den på
plads, således at bundventilen åbnes og luk
herefter låget igen (3).
Vandstanden kan aflæses i måleglasset,
således at der kan påfyldes ekstra vand efter
behov (4).
• Tænd for apparatet (5). Det røde kontrollys
for tænd/sluk og det orange termostatlys
tændes.
• Læg et af filtrene i filterholderen (11).
Filterholderen anbringes således: Sæt
filterholderen på bryggehovedet, således at
holderens håndtag peger til venstre (6). Drej
herefter håndtaget til højre (7), indtil det er
låst fast (8).
• Anbring en stor skål under filterholderen (9).
• Så snart apparatet er varmet op til den
rigtige temperatur, slukkes det orange
termostatlys. Sæt nu programvælgeren på
position (9), og lad al vandet fra
vandbeholderen løbe ned i skålen.
• Hvis skålen skal tømmes, kan apparatet
afbrydes ved at sætte programvælgeren på
position O. Herefter fortsættes
gennemskylningsprocessen.
Betjening af espressomaskinens forskellige
funktioner
1. ESPRESSO-FUNKTIONEN
For at opnå det bedst mulige resultat
anbefales det at forvarme tilbehørsdelene
(filterholderen, filteret og kopperne) uden
kaffe, som følger:
• Fyld vandbeholderen med vand (1) (2) (3)
og tænd for apparatet (5).
• Læg et tomt filter i filterholderen, sæt
filterholderen fast på bryggehovedet (6) (7)
(8) og anbring espressokopperne neden
under filterholderen.
Når apparatet har nået den rigtige temperatur,
slukkes det orange kontrollys.
• Indstil nu programvælgeren på position
(9).
• Når kopperne er fyldt op med varmt vand,
sættes programvælgeren tilbage på position
O.
Når apparatet er varmt, kan espressokopperne
forvarmes på varmepladen.
Tilberedning af espresso:
• Fyld vandbeholderen med vand (1) (2) (3)
og tænd for apparatet (5).
• Læg filteret til en eller to kopper i
filterholderen (11).
• Kom kaffebønner i filteret og tryk bønnerne
sammen. Fyld bønner på til kanten af filteret
(12) (13).
• Overskydende kaffepulver på kanten af
filteret børstes væk (14).
• Sæt filterholderen på plads (15).
• Stil en eller to espressokopper under
filterholderen.
Når apparatet har nået den rigtige temperatur,
slukkes det orange kontrollys.
• Drej nu programvælgeren hen på position
(10).
• Når kopperne er fyldt op, sættes
programvælgeren tilbage på position O.
• Tag filterholderen af og tøm filteret for
kaffepulver (17).
66
Page 67

Filteret kan nu fyldes op igen, hvis der skal
brygges flere espressoer.
2. DAMPFUNKTIONEN
Under opvarmningen til dampproduktion
høres en bankelyd. Lyden skyldes vandpumpens intervalstyring og er uden betydning
for apparatets funktion.
Hvis man ønsker at lave espresso umiddelbart
efter dampproduktionen, skal apparatet først
afkøles til espresso-temperatur.
• For at gøre dette anbringes en skål under
filterholderen, som sættes på plads med
tomt filter; programvælgeren indstilles
herefter på position (10).
• Lad vandet løbe igennem, til det orange
kontrollys tændes. Programvælgeren drejes
tilbage på position O.
Herefter kan man igen lave espresso.
Vigtigt: Mens og efter apparatet har været i
gang, kan dampdysens metaldele være
brændende varme.
. Dampfunktionen med KRUPS
Autocappucino tilbehør gør det lettere at:
. Variere mælkeopskumningen til cappucino,
café crème eller varm chokolade
. Fremstille varmt vand til f.eks. en kop te.
Væsken bliver suget op af det bøjelige rør
og opvarmet af dampen; herefter
kommer væsken ud igen gennem
Autocappucino tilbehørets dyse. Når røret
sættes direkte ned i en mælkekarton er en
enkelt kop nok til tilberedning af en cappucino eller en café crème.
Mælkeopskumningen reguleres med
tilbehørets reguleringsknap.
Det er bedst at bruge frisk letmælk til
mælkeopskumningen. Mælken skal være kold
(opbevares i køleskabet) og må ikke være
kogt. Beholderen skal ligeledes være kold (den
må ikke skylles i varmt vand før
mælkeopskumningen).
Opvarmning af tyktflydende væske: se under
afsnittet “Opvarmning af tyktflydende væske
(f.eks. suppe)”.
Autocappuccino tilbehøret bør rengøres
umiddelbart efter anvendelsen, se under
“Rengøring af Autocappuccino tilbehøret”.
. Opskumning af mælk til cappuccino:
• Fyld vandbeholderen med vand (1) (2) (3)
og tænd for apparatet (5).
• Drej dampdysen ud til siden af apparatet og
anbring Autocappuccino tilbehøret på dysen
(18).
• Indstil programvælgeren på position (19).
• Anbring det bøjelige rør i mælken, der skal
opskummes. Røret skal røre beholderens
bund (20).
• Fyld en kop 1/3 op med frisklavet espresso
(20) og stil den under udløbsdysen.
• Sæt reguleringsknappen på position (21)
for at få et fint, tykt mælkeskum.
• Hvis man ønsker mindre mælkeskum, drejes
reguleringsknappen.
Når apparatet er varmet op til den rigtige
temperatur, slukkes det orange kontrollys.
• Programvælgeren drejes hen på position
(22), hvorefter mælkeskummet kommer ud
af udløbsdysen.
• Når den ønskede mængde mælkeskum er
kommet ud, sættes programvælgeren på
position O.
• Efter brugen tages det bøjelige rør op af
beholderen.
. Fremstilling af let opskummet varm
mælk til café crème, varm chokolade, eller
varmt vand (til f.eks. en kop te):
Bemærkninger:
. Café crème: Fyld en kop op med frisklavet
kaffe og stil den under udløbsdysen.
. Varm chokolade: Hvis man anvender en
karton færdiglavet chokolademælk, anbringes
det bøjelige rør direkte i kartonen. Laver man
chokoladen med cacaopulver, opvarmes
mælken, og cacaopulveret røres i den
opvarmede mælk.
• Drej dampdysen ud til siden af apparatet og
anbring Autocappuccino tilbehøret på dysen
(18).
• Fyld vandbeholderen med vand (1) (2) (3)
og tænd for apparatet (5).
• Sæt programvælgeren på position (19).
• Drej Autocappuccino tilbehørets
reguleringsknap hen til den smalle ende af
reguleringsstregen (23).
67
Page 68

• Anbring det bøjelige rør i væsken, der skal
opvarmes. Røret skal røre beholderens bund
(20).
• Stil en beholder under udløbsdysen (20).
Når apparatet er varmet op til den rigtige
temperatur, slukkes det orange kontrollys.
• Programvælgeren drejes hen på position
(22).
• Når den ønskede mængde varm væske er
kommet ud, sættes programvælgeren på
position O.
• Efter brugen tages det bøjelige rør op af
beholderen.
. Opvarmning af tyktflydende væske
(f.eks. suppe):
• Drej dampdysen ud til siden af apparatet og
anbring Autocappuccino tilbehøret på dysen
(18).
• Fyld vandbeholderen med vand (1) (2) (3)
og tænd for apparatet (5).
• Sæt programvælgeren på position (19).
• Indstil Autocappuccino tilbehørets
reguleringsknap på position (24).
• Anbring udløbsdysen i væsken, der skal
opvarmes (25).
Når apparatet er varmet op til den rigtige
temperatur, slukkes det orange kontrollys.
• Sæt programvælgeren på position (22),
indtil væsken er tilstrækkeligt opvarmet;
herefter drejes programvælgeren tilbage på
position O, og beholderen tages væk.
3. TILBEREDNING AF ESPRESSO MED DEN
SPECIELLE
E.S.E systemet er beregnet til at lave italiensk
espresso. Dosseringen passer til en kop på
35 ml og til at vandet løber igennem i ca. 20
sekunder.
“ESE” («Easy Serving Espresso») er et system,
som gør det nemmere at tilberede espresso.
Det består af 2 stykker filterpapir, der er føjet
sammen omkring et mål sammenpresset,
malet kvalitetskaffe, klar til brug (f.eks.
“Serving Illycaffé”). Systemet forenkler
tilberedningen af espresso, idet man hverken
skal måle kaffepulveret op eller presse det
sammen i filteret, ligesom rengøringen af
apparatet er nemmere.
FILTERHOLDER “ESE”
Det kan ikke anbefales at anvende
dosseringen til en almindelig
kopstørrelse.
Ved håndtering og opbevaring af “ESE”kaffeposerne skal man passe på ikke at bøje
dem.
Den bedste espressokaffe fås ved at forvarme
det tomme tilbehør (filterholder, filter og
kopper):
• Fyld vandbeholderen med vand (1) (2) (3)
og tænd for apparatet (5).
• Sæt den tomme filterholder “ESE” på plads
(6) (7) (8) og anbring espressokoppen
nedenunder.
Når apparatet har nået den rigtige temperatur,
slukkes det orange kontrollys.
• Drej herefter programvælgeren hen på
• Når koppen er fyldt med varmt vand, sættes
position
(9).
programvælgeren på position O.
Efter apparatet er varmet op, kan espressokopperne forvarmes på varmepladen (oven på
apparatet).
. Tilberedning af espresso:
• Læg filteret i filterholderen “ESE”. Anbring
herefter kaffeposen “Serving illycaffé” i
filteret, således at teksten “Serving illycaffé”
vender nedad, og posens langside ligger i
forlængelse af filterholderens håndtag (26).
• Sæt filterholderen “ESE” på plads (6) (7) (8)
og drej den i et fast greb til højre.
Når apparatet har nået den rigtige temperatur,
slukkes det orange kontrollys.
• Drej herefter programvælgeren hen på
• Når den anbefalede mængde kaffe (35 ml)
position
(9).
er opnået, drejes funktionsvælgeren tilbage
på position O.
• Tag filterholderen “ESE” af bryggehovedet
og smid den brugte kaffepose ud.
Vedligeholdelse
- Espressomaskinens tilbehør må ikke vaskes i
opvaskemaskine.
68
Page 69

Efter brug bør vandbeholderen tømmes.
. Drypbakken:
Hver gang apparatet har været i brug, tages
risten af og drypbakken tømmes (27) (28).
Hvis man tilbereder espresso i flere omgange,
kan man nøjes med at tømme bakken fra tid
til anden (efter ca. 7-8 espressotilberedninger). Vask drypbakken og risten i
vand tilsat lidt mildt opvaskemiddel, skyl efter
og tør delene af. Når drypbakken sættes på
plads, bør man sikre sig, at den separate
plastikdel er korrekt fastgjort (29).
. Bryggehovedet, filterholderen og
filteret:
Bryggehovedet, filterholderen og filteret
rengøres hver gang, delene har været brugt.
Det er tilstrækkeligt at tørre bryggehovedet af
med en fugtig klud. Filterholderen og filteret
vaskes i vand tilsat lidt mildt opvaskemiddel,
skylles og tørres af.
Hvis bryggehovedet er meget snavset, skrues
sien af med en mønt; sien renses og skrues
fast i bryggehovedet igen (30).
Anvendes espressomaskinen ikke i længere
tid, tages filterholderen af bryggehovedet. I
modsat fald vil pakningen være trykket fast
for længe og kan derved blive ødelagt.
. Varmepladen til kopper:
Varmepladen tages af og vaskes i vand tilsat
lidt mildt opvaskemiddel, skylles og tørres af
(31).
. Dampdysen:Dampdysen rengøres
med en fugtig klud, hver gang den har
været i brug.
. Autocappuccino tilbehøret:
Det anbefales at rengøre Autocappuccino
tilbehøret hver gang, det har været i brug:
• Indstil programvælgeren på position (19).
• Sæt reguleringsknappen på position (33).
• Anbring det bøjelige rør i et glas vand
(mindst 1 dl vand).
• Stil en beholder under udløbsdysen.
Når apparatet har nået den rigtige
temperatur, slukkes det orange kontrollys.
• Drej herefter programvælgeren hen på
position (22).
• Når alt vandet er passeret gennem
Autocappuccino tilbehøret, sættes programvælgeren på O.
• Det bøjelige rør tages op af glasset.
• Til sidst tørres udløbsdysen af med en fugtig
klud.
Man bør regelmæssigt demontere
Autocappuccino tilbehøret og rengøre det
med en lille børste i vand tilsat lidt mildt
opvaskemiddel. Skyl tilbehøret og tør det af,
før det monteres igen (34).
Vigtigt: Det bøjelige rør monteres på
Autocappuccino tilbehøret med den ende af
røret, der er skåret lige over.
. Bryggehovedets pakning
Fra tid til anden skal bryggehovedets pakning
rengøres:
• Sæt filterholderen på plads med filteret i.
• Stil en beholder under kaffeudløbet.
• Start maskinen.
• Drej funktionsvælgeren over på position
• Mens vandet løber ud, drejes filterholderen
forsigtigt fra side til side, så der kommer
vand mellem pakningen og filterholderen.
Afkalkning
• Afkalk espressomaskinen efter behov med
citron- eller vinsyre.
Det anbefales at anvende KRUPS afkalk-
ningsudstyr nr. 054, som kan fås hos KRUPS
kundeservice. Udstyret består af to poser
afkalkningsmiddel samt en teststrimmel til
bestemmelse af vandets hårdhedsgrad.
Hårdhedsgraden har betydning for, hvor
hyppigt espressomaskinen skal afkalkes ved
normal brug. Tilkalkningens omfang afhænger imidlertid ikke blot af vandets hårdhedsgrad, men også af hvor tit apparatet anvendes. Den afkalkningshyppighed, som er angivet i udstyr nr. 054, er derfor kun vejledende.
- Apparatet afkalkes således:
• Bryggehovedets si skrues af og renses.
• 2 spsk citron- eller vinsyre eller 1 pose
afkalkningsmiddel fra Krups udstyr nr. 054
opløses i en halv liter lunkent vand.
69
Page 70

Opløsningen hældes i den tomme
vandbeholder.
• Anbring en beholder under bryggehovedet.
Lad ca. en trediedel af opløsningen løbe
direkte igennem ved at sætte
programvælgeren på position (9).
• Sluk apparatet og lad programvælgeren blive
stående på position (9). Lad
afkalkningsmidlet virke i 10-15 minutter.
• Tænd apparatet igen og lad resten af
opløsningen løbe igennem.
• Herefter skylles apparatet igennem to gange
med rent vand i vandbeholderen, og sien
sættes tilbage i bryggehovedet. (Se under
“Vedligeholdelse”).
Problemer, mulige årsager og
løsninger
Problemer Mulige årsager Løsninger
Espressoen er ikke Tilbehøret er koldt Forvarm tilbehøret
tilstrækkeligt varm. (kopper, filter og (kopper, filter og
filterholder). filterholder). Se
under “Tilberedning af espresso”.
Kaffen løber ud på Filterholderen er Se under
siden af filter- ikke sat rigtigt på “Tilberedning af
holderen. plads. espresso”.
Der er kaffepulver Kanten og
på kanten af filteret pakningen børstes
af.
Bryggehovedets Rens pakningen
pakning er snavset. med en fugtig
klud.
Bryggehovedets Henvend Dem til
pakning er defekt. KRUPS service-
værksted.
Pumpen hvæser. Der er ikke vand i Fyld vandbehold-
vandbeholderen eren med vand.
Vandbeholderen er Giv vandbehold-
ikke monteret eren et fast tryk.
korrekt.
Kaffen er for gam- Brug friskmalet
mel eller meget tør, kaffe.
og pumpen kan
ikke yde det nødvendige tryk.
Vandet løber ikke Der er ikke vand i Fyld vandbeholdigennem. vandbeholderen eren med vand.
Vandet løber ikke Vandbeholderen er Giv vandbeholdigennem. ikke monteret eren et fast tryk.
korrekt.
Filteret er tilstoppet. Rens filteret og
Kaffen er for fint bryggehovedets si.
malet eller presset Se under “Vedligefor hårdt sammen. holdelse” og prøv
en grovere malet
kaffe.
Bryggehovedets si Læg sien i en
er snavset. afkalknings
opløsning, se
under “Vedligeholdelse”.
Apparatet er Se under
tilkalket. “Afkalkning”.
Vandet løber for Kaffen er for groft Prøv en finere
hurtigt igennem. malet. malet kaffe.
Der er ikke fyldt Brug den medføltilstrækkelig kaffe gende måleske til
i filteret. dosering af kaffen.
Kaffen er ikke Pres kaffen
presset sammen. sammen.
Der er ikke skum Kaffen er for groft Prøv en finere
på espressoen / malet. malet kaffe.
kaffen.
Kaffen er ikke Pres kaffen mere
presset tilstrække- sammen.
ligt sammen.
Kaffen er for gam- Brug en friskmalet
mel eller for tør. kaffe.
Mælken skummer Dampdysen er Se under “Vedligeikke særlig meget. tilstoppet. holdelse”.
Autocappuccino Se under “Vedlige
tilbehøret er holdelse”.
tilstoppet.
Mælken er for Brug frisk mælk.
gammel.
Mælken er lunken. Sæt mælken i
køleskab.
Kaffe løber ud ved Portionen er ikke Se «Tilberedning
filterholderen ved placeret korrekt af espresso med
brug af ESE den specielle filtersystemet holder ESE».
Filterholderen er Stram filterikke strammet holderen.
ordentlig til.
Brygningen er for Bryg kun 35 ml.
lang
Der er meget vand Bønnerne har ikke Pres bønnerne
ved bønnerne efter været tilstrække- sammen inden
brygning ligt presset sammen brygning
70
Page 71

Der er meget vand Mængde af bønner Anvend en
ved bønnerne efter er utilstrækkelig tilstrækkelig
brygning mængde bønner.
Opskrifter
Espressokaffe kan nydes, når man har lyst, når
man vil slappe af eller som afslutning på et
festligt måltid.
Nedenfor følger nogle spændende opskrifter
som forslag til, hvordan man også kan bruge
sin espressomaskine.
. Original espresso
• Brug 1 mål ægte, korrekt ristet espressokaffe
pr. kop og bryg kaffen direkte i en varm
espressokop.
Bruger man den rigtige type kaffe, som er
malet korrekt, vil den danne en dejlig crema.
Der tilsættes sukker efter behag. Original
espresso drikkes uden mælk, men med meget
sukker.
. Cappuccino
En ægte cappuccino laves af 1/3 kaffe, 1/3
varm mælk og 1/3 opskummet mælk. Den
samlede mængde af varm mælk +
opskummet mælk bør således være ca.
dobbelt så meget som kaffemængden.
• Brug store forvarmede kopper.
• Kopperne fyldes med kaffe svarende til en
espressokop og toppes med mælk, som er
opskummet med Autocappuccino tilbehøret.
• Drysses med chokoladespåner.
. Café Crème
• Tilbered en klassisk espresso i en stor kop,
tilsæt lidt fløde.
• Fløden kan erstattes af varm mælk.
. Café Corretto*
• Tilbered en kop espresso som angivet
ovenfor.
• Smag espressoen til med 1/4 eller 1/2 glas
cognac eller likør.
Man kan også bruge Pernod, Grappa,
Sambuco, Kirsch eller Cointreau.
Der eksisterer sikkert mange andre
muligheder for at “højne” espressosmagen.
Man skal bare bruge sin fantasi.
. Likør med kaffe*
• I en tom 0,75 l flaske blandes følgende: 3
kopper espresso, 250 g brunt puddersukker,
1/2 l cognac eller Kirsch.
• Lad blandingen trække i mindst 2 uger.
Resultatet er en dejlig likør, især for
kaffeelskere.
. Italiensk kaffe med is
4 kugler vanilleis, 2 kopper sødet, kold
espresso, 11/4 dl mælk, flødeskum, revet
chokolade.
• Bland den kolde espresso med mælken.
• Fordel iskuglerne i glas, hæld kaffen over og
dekorer med flødeskummet og den revne
chokolade.
. Café à la frisonne*
• Hæld et lille glas rom i en kop sødet
espresso.
• Drikken toppes med et pænt lag flødeskum
og serveres.
. Flamberet espresso*
2 kopper espresso, 2 små glas cognac, 2 tsk
brunt sukker, flødeskum.
• Hæld cognac i ildfaste glas. Cognac’en
varmes i glassene og flamberes.
• Tilsæt sukker, rør rundt og hæld kaffen i
blandingen. Toppes med flødeskum.
Den flamberede espresso kan eventuelt
fortyndes med lidt kogende vand.
. Espresso parfait*
2 kopper espresso, 6 æggeblommer, 200 g
sukker, 1/4 l sødet flødeskum, 1 lille glas
appelsinlikør.
• Pisk æggeblommerne med sukkeret til en
tyk, skummende masse.
• Tilsæt den kolde espresso og
appelsinlikøren.
• Vend herefter flødeskummet i massen.
71
Page 72

• Kom blandingen i portionsglas eller
almindelige glas.
• Sæt glassene i fryseren.
. Moccabudding
2 kopper espresso, 1/2 l mælk, 1 pose
vanillebuddingpulver, 3 æggeblommer, 11/4
dl sødet flødeskum, 150 g sukker.
• Lav en vanillebudding af mælken,
buddingpulveret og sukkeret.
• Tilsæt æggeblommerne, mens buddingen
endnu er varm.
Når buddingen er afkølet, tilsættes
espressoen og flødeskummet.
(*: Misbrug af alkohol er skadeligt for
helbredet.)
72
Page 73

Sverige
◆
Beskrivning
a lock
b löstagbar vattenbehållare
c synlig vattennivå
d värmeplatta för koppar
e väljare ånga/kaffe
f på/av-lampa (röd)
g temperaturlampa (orange)
h på/av-knapp
i brygghuvud
j ångrör
k AutoCappuccino-tillbehör
k1 kran
k2 böjbart rör
k3 ångmunstycke
l droppgaller
m avrinningsplåt
n mätskopa
o filter för en eller två koppar
p filterhållare för malet kaffe
q ESE-filterhållare och filtersystem
Säkerhetsanvisningar
• Läs bruksanvisningen noggrant innan
du använder din espressobryggare
första gången. Får endast anslutas till 220
V växelström, jordat uttag. Garantin gäller
inte vid felaktig anslutning.
• Placera inte espressobryggaren på varma
ytor (spisplatta etc) eller nära öppen eld.
• Ta inte bort filterhållaren medan vattnet
rinner igenom, eftersom bryggaren är under
tryck.
• Använd inte bryggaren om inte droppgallret
och avrinningsplåten sitter på plats.
• Dra alltid ur kontakten om fel skulle uppstå
under bryggning, liksom före rengöring.
• Dra inte i själva sladden - fatta tag om
kontakten istället. Låt inte heller sladden
hänga ner över bordskanter och liknande.
• Vidrör inte bryggarens varma delar
(uppvärmningsplatta, filterhållare,
ångmunstycke). Se till att inte heller sladden
kommer i kontakt med dessa.
• Doppa aldrig bryggaren i vatten.
• Förvara utom räckhåll för barn. Låt inte
heller sladden hänga ner så att barn kan nå
den.
• Om sladden eller någon annan del skadas,
kontakta Krups. Alla sådana reparationer
måste utföras av Krups Servicecenter. Öppna
under inga omständigheter bryggaren själv.
• Kontrollera att filterhållaren sitter ordentligt
på plats innan du startar bryggningen. Se till
att på/av-knappen är i läge O innan du tar
loss filterhållaren.
Espresso
Espresso har en rikare smak och är starkare än
vanligt kaffe. Det dricks ur små, förvärmda
espressokoppar. Hett vatten pressas under
tryck genom kaffepulvret, vilket ger ett utsökt
aromatiskt svart kaffe med uppiggande effekt.
Du känner igen espresso på dess
karakteristiska arom och lagret av gulaktigt
skum - crema. Detta resultat får du endast
med hjälp av högt tryck och espressokaffe
som har rostats och malts på rätt sätt. Om du
inte hittar färdigmalt espressokaffe, använd en
kaffekvarn och mal bönorna. Kaffet får inte
vara alltför finmalet, eftersom du då riskerar
att blockera brygghuvudet och filtret.
Du bör också använda ganska kallt vatten
direkt ur kranen. Låt inte vattnet stå innan du
häller det i bryggaren.
Före första användning
Innan du använder bryggaren för första
gången, skölj igenom systemet med enbart
vatten. Gör så här:
• Öppna locket och lyft ut vattenbehållaren
med hjälp av handtaget. (1) Fyll på vatten
(2).
• Sätt tillbaka vattenbehållaren på plats (3)
genom att öppna öppna anslutningsfliken
under behållaren. Sätt på locket.
73
Page 74

• Du kan kontrollera vattennivån när som helst
under bryggningen genom fönstret - du kan
också om nödvändigt fylla på mera vatten
(4).
• Starta bryggaren (5). Den röda på/av-lampan
och den orangefärgade temperaturlampan
tänds.
• Sätt ett av filtren i filterhållaren (11). Skruva
sedan fast filtret på brygghuvudet genom att
vrida handtaget åt vänster (6), placera
filterhållaren mot brygghuvudet och sedan
vrida handtaget så långt åt höger (7) du kan
(8).
• Placera en stor skål eller liknande under
filterhållaren (9).
• Så snart den orangefärgade
temperaturlampan släckts, vrid väljaren till
läge
(9) och låt allt vatten i behållaren
rinna igenom.
• Om du behöver tömma skålen, avbryt
genom att vrida väljaren till läge O. Vrid
sedan tillbaka väljaren till läge O och
fortsätt.
Användning av
espressobryggarens funktioner
1. ESPRESSO
För bästa möjliga resultat rekommenderar vi
att du först förvärmer tillbehören (filterhållare,
filter och koppar) utan kaffepulver. Gör så här:
• Fyll vattenbehållaren (1) (2) (3) och slå på
bryggaren (5).
• Sätt filterhållaren på plats med ett tomt filter
(6) (7) (8), och placera kopparna under
hållaren.
Så snart bryggaren uppnår tillräcklig
temperatur släcks den orangefärgade
temperaturlampan.
• Vrid väljaren till läge
• När kopparna är fyllda med hett vatten, vrid
tillbaka väljaren till läge O.
När bryggaren är uppvärmd kan du förvärma
kopparna på uppvärmningsplattan.
(9).
. Så här brygger du espresso:
• Fyll vattenbehållaren (1) (2) (3) och slå på
bryggaren (5).
• Placera filtret för en eller två koppar i
filterhållaren (11).
• Lägg i det malda kaffet i filtret och packa det
eftersom noggrant : kaffet skall packas upp
till bredden av filtret (12) (13).
• Avlägsna eventuellt kaffespill på filtrets kant
(14).
• Sätt tillbaka filterhållaren (15).
• Placera en eller två espressokoppar under
filterhållaren.
Så snart bryggaren har uppnått tillräcklig
temperatur släcks den orangefärgade
temperaturlampan.
• Vrid väljaren till läge
• När kopparna är fyllda, vrid tillbaka väljaren
(10).
till läge O.
• Ta ut filterhållaren och filtret och töm ut
kaffesumpen (17).
Du kan fylla på filtret igen om du vill brygga
fler omgångar.
2. ÅNGFUNKTION
Det knackande ljud som uppstår under
ångproduktionen härrör från bryggarens
pump och är helt normalt.
Om du vill brygga espresso omedelbart efter
att du använt ångfunktionen måste bryggaren
först svalna och återfå den korrekta
temperaturen för espressobryggning. Gör så
här:
• Sätt i filterhållaren utan kaffe. Placera ett
lämpligt kärl under hållaren och vrid väljaren
till läge
• Låt vattnet rinna igenom tills den
orangefärgade temperaturlampan tänds.
Vrid sedan väljaren till läge O.
Nu kan du brygga en omgång espresso till.
OBS! Ångrörets metalldelar blir mycket
heta under användning. Låt bryggaren
svalna innan du vidrör delarna.
. Med hjälp av ångfunktionen i
kombination med Krups AutoCappuccinotillbehör kan du :
(10).
74
Page 75

. skumma mjölk till cappuccino, café au lait
eller varm choklad
. Du kan också värma vatten till t ex te.
AutoCappuccino-tillbehöret suger in
mjölken eller vattnet genom det böjbara
röret och hettar upp vätskan med hjälp av
ånga. Mjölken eller vattnet kommer
sedan ut igen via ångmunstycket.
Om du stoppar ner det böjbara röret direkt i
en mjölkförpackning räcker en enda kopp till
en cappuccino eller en café au lait. Du kan
reglera skummets konsistens med hjälp av
kranen.
Bäst resultat får du om du använder
kylskåpskall lätt- eller minimjölk. Kärlet du
skummar i bör också vara avkylt.
Om du vill värma tjockare vätskor, t ex soppa,
se Värma tjockare vätskor.
Vi rekommenderar att du rengör
AutoCappuccino-tillbehöret noggrant
omedelbart efter användning - se Rengöring
av AutoCappucino-tillbehör.
. Skumning av mjölk till cappuccino
• Vrid ut ångröret och tryck fast
AutoCappuccino-tillbehöreet på munstycket
(18).
• Fyll vattenbehållaren (1) (2) (3) och slå på
bryggaren (5).
• Vrid väljaren till läge
• Doppa det böjbara röret i mjölken. Röret
(19).
måste vidröra kärlets botten (20).
• Placera en kopp fylld till en tredjedel med
nybryggt espresso (20) under
ångmunstycket.
• Vrid kranen till läge
• Ett fint skum bildas.
• Om du vill ha ett skum av lite lösare
(21).
konsistens, vrid kranen.
Så snart bryggaren uppnått tillräcklig
temperatur släcks den orangefärgade
temperaturlampan.
• Vrid väljaren till läge
(22). Den
skummade mjölken kommer ut ur
munstycket.
• När du har tillräckligt mycket skum i koppen,
vrid väljaren till läge O.
• Avlägsna det böjbara röret ur kärlet.
. Skumning av mjölk till café au lait, varm
choklad och uppvärmning av vatten till t
ex te:
. Café au lait: Placera koppen med nybrygg
espresso direkt under munstycket.
. Varm choklad: Värm mjölken först. Blanda
sedan i chokladpulvret.
• Vrid ut ångröret och tryck fast
AutoCappuccino-tillbehöreet på munstycket
(18).
• Fyll vattenbehållaren (1) (2) (3) och slå på
bryggaren (5).
• Vrid väljaren till läge
• Vrid kranen på AutoCappuccino-tillbehöret
(19).
till läge (23).
• Doppa det böjbara röret i vätskan som ska
värmas. Röret måste vidröra kärlets botten
(20).
• Placera ett kärl under ångmunstycket (20).
Så snart bryggaren uppnått tillräcklig
temperatur släcks den orangefärgade
temperaturlampan.
• Vrid väljaren till ångläge
• När du har tillräcklig mängd skum, vrid
(22).
väljaren till läge O.
• Avlägsna det böjbara röret ur kärlet.
. Värma tjocka vätskor (t ex soppa)
• Vrid ut ångröret och tryck fast
AutoCappuccino-tillbehöreet på munstycket
(18).
• Fyll vattenbehållaren (1) (2) (3) och slå på
bryggaren (5).
• Vrid väljaren till läge
• Vrid kranen på AutoCappuccino-tillbehöret
• Doppa det böjbara röret i vätskan som ska
till läge
(24).
(19).
värmas (25).
Så snart bryggaren uppnått tillräcklig
temperatur släcks den orangefärgade
temperaturlampan.
• Vrid väljaren till läge
(22) tills vätskan är
tillräckligt varm. Vrid sedan tillbaka väljaren
till läge O och avlägsna kärlet.
75
Page 76

3. ESPRESSOFUNKTION MED DEN SÄRSKILDA
ESE-FILTERHÅLLAREN
E.S.E systemet har tillkommit för att kunna
tillbereda det italienska kaffet «espresso
ristreto» (pressat). Mängden kaffe skall vara
35 ml och det skall inte ta mer än 20
sekunder för vattnet att rinna igenom kaffet.
ESE står för “Easy Serving Espresso” och är en
särskild typ av espressokaffe. Kaffet säljs malet
och sammanpressat mellan två filterpapper,
färdigt för användning (t ex “illycaffé”). ESE
gör det mycket enkelt att brygga espresso
eftersom du slipper mäta upp kaffet.
Rengöringen är också mycket enklare.
Tanken/avsikten är inte alt E.S.E systemet
skall användas för att brygga en vanlig
kopp kaffe.
Var försiktig när du handskas med ESE-kaffet
så inte portionerna blir deformerade.
Vi rekomenderar att du , för bästa resultat,
förvärmer tillbehören (filterhållare, filter och
koppar) utan kaffe. Gör så här:
• Fyll vattenbehållaren (1) (2) (3) och slå på
bryggaren (5).
• Sätt det tomma ESE-filtret i filterhållaren (6)
(7) (8), och placera kopparna under
hållaren.
Så snart bryggaren uppnår tillräcklig
temperatur släcks den orangefärgade
temperaturlampan.
• Vrid väljaren till läge
• När kopparna är fyllda med hett vatten, vrid
tillbaka väljaren till läge O.
När bryggaren är uppvärmd kan du förvärma
kopparna på uppvärmningsplattan.
. Så här brygger du espresso med ESEfunktionen
• Placera «illycafé»-portionen i ESE-
filterhållaren, försedd med dess filter. Se till
att texten «illycafé» pekar mot botten, och
att den långa sidan av pappersfiltret
stämmer överens med handtaget.
• Sätt ESE-filterhållaren på plats (6) (7) (8)
genom att pressa den hårt åt höger.
Så snart bryggaren uppnår tillräcklig
temperatur släcks den orangefärgade
temperaturlampan.
(9).
• Vrid sedan väljaren till läge
• När den rekommenderade mängden kaffe
(9).
på 35 ml har nåtts vrid tilbaka vredet till läge
O.
• Avlägsna ESE-filterhållaren från
brygghuvudet och släng den använda
portionen.
Underhåll
- Tillbehören till din bryggare tål INTE
maskindisk.
Töm vattenbehållaren efter varje användning
. Avrinningsplåt
Töm avrinningsplåten efter varje användning.
Ta först bort gallret (27)(28). Om du brygger
flera omgångar espresso efter varandra, glöm
inte att tömma avrinningsplåten med jämna
mellanrum (ungefär var 7-8 bryggomgång).
Vid behov kan du diska avrinningsplåten i
ljummet vatten och milt diskmedel. Skölj och
torka noggrant. När du sätter tillbaka
avrinningsplåten, se till att plastlisten sitter
ordentligt på plats (29).
. Brygghuvud, filter och filterhållare
Rengör brygghuvud, filter och filterhållare
efter varje användning. Torka av brygghuvudet
med en fuktig trasa, diska de andra delarna i
ljummet vatten och milt diskmedel. Skölj och
torka noggrant.
Om brygghuvudet är blockerat, skruva ut
gallret med hjälp av ett mynt, rengör
brygghuvudet och skruva tillbaka gallret (30).
Ta ut filterhållaren för förvaring när du inte
använder din espressobryggare.
. Uppvärmningsplatta för koppar
Ta loss plattan och diska den i ljummet vatten
och milt diskmedel. Skölj och torka (31).
. Ångmunstycke: Torka av ångmunstycket
noggrant med en fuktig trasa efter varje
användning.
. AutoCappuccino-tillbehöret
Vi rekommenderar att du rengör
76
Page 77

AutoCappuccino-tillbehöret efter varje
användning. Gör så här:
• Vrid väljaren till uppvärmningsläge (19).
• Vrid kranen till rengöringsläge
• Doppa det böjbara röret i ett glas vatten
(33).
(minst 1 dl).
• Placera ett lämpligt kärl under
ångmunstycket.
Så snart bryggaren uppnått tillräcklig
temperatur släcks den orangefärgade
temperaturlampan.
• Vrid sedan väljaren till ångläge
• När allt vatten har runnit igenom
(22).
AutoCappuccino-tillbehöret, vrid tillbaka
väljaren till läge O.
• Ta upp det böjbara röret ur kärlet med
vatten.
• Avsluta med att rengöra ångmunstycket
med en fuktig trasa.
Vi rekommenderar att du monterar isär
AutoCappuccino-tillbehöret med jämna
mellanrum och diskar delarna i ljummet vatten
och milt diskmedel. Skölj och torka och
montera ihop delarna igen (34).
OBS! Se till att det böjbara röret sitter på
rätt sätt - den ände som är rakt avskuren ska
in i espressobryggaren.
. Bryggarens huvudpackning
Från gång till gång måste packningen
rengöras :
• Sätt filtret på plats i hållaren.
• Placera en mugg eller skål under
filterhållaren.
• Sätt igång apparaten.
• Vrid knappen till .
• När det varma vattnet börjar rinna igenom,
vrid filterhållaren saktä från vänster till höger
så att vattnet filtreras igenom packningen
och filtret.
Avkalkning
• Kalka av bryggaren med jämna mellanrum
med hjälp av ättikssprit.
Vi rekommenderar dock att du använder dig
av KRUPS avkalkningssats (ref 054). Satsen
innehåller, förutom två avkalkningsdoser, ett
test som avgör vattnets hårdhet och visar hur
ofta du behöver kalka av. Eftersom
avkalkningsfrekvensen beror dels på vattnets
hårdhet, dels på hur ofta du använder
bryggaren ska detta test endast ses som
rekommendationer.
. Kalka av så här:
• Skruva loss brygghuvudets galler och rengör
det.
• Lös 1 påse Krups avkalkningsmedel i 5 dl
vatten (eller blanda hälften ättikssprit,
hälften vatten). Häll blandningen i den
tomma vattenbehållaren.
• Placera ett lämpligt kärl under
brygghuvudet. Vrid väljaren till läge
(9)
och låt ungefär en tredjedel av blandningen
rinna igenom.
• Slå av bryggaren och låt blandningen verka i
10-15 minuter. OBS! Låt väljaren stå kvar i
läge
• Starta bryggaren igen och låt resten av
.
blandning rinna igenom.
• Skölj igenom systemet med två fyllda
vattenbehållare och skruva tillbaka gallret på
brygghuvudet ( Se Underhåll).
Felsökning
Problem Trolig orsak Åtgärd
Kaffet blir inte Tillbehören Förvärm tillbehören
varmt (koppar, filter och (se “Så här gör du
Kaffe läcker ut Filterhållaren sitter Se “Så här gör du
runt filterhållaren inte ordentligt på espresso”
Pumpen låter Vattenbehållaren Fyll på vatten
onormalt mycket är tom
filterhållare) är kalla. espresso”.
plats
Det sitter kafferester Rengör filtret och
på filterkanten packningen
Brygghuvudets Rengör packningen
packning är med en fuktig
smutsig. trasa.
Brygghuvudets Kontakta Krups
packning är defekt ServiceCenter.
77
Page 78

Pumpen låter Vattenbehållaren Tryck fast behållaren
onormalt mycket sitter inte ordentligt ordentligt.
på plats.
Kaffet är för Använd färskt kaffe.
gammalt eller torrt,
och pumpen kan
inte producera
tryck.
Vattnet rinner Vattenbehållaren är Fyll på vatten
inte igenom tom
Vattenbehållaren Tryck fast behållaren
sitter inte ordentligt ordentligt.
på plats.
Filtret är blockerat, Rengör filtret och
kaffepulvret är för brygghuvudets
finmalt eller för hårt galler. Se Underhåll.
packat Använd grovare
malt kaffe.
Brygghuvudets Lägg gallret i blöt i
galler är blockerat avkalkningslösning.
Se Underhåll.
Bryggaren behöver Se Avkalkning
kalkas av
Vattnet rinner Kaffet är för Använd mer
igenom för fort grovmalet finmalet kaffe
Du har använt för Använd mätskopan
liten mängd kaffe för att mäta upp
rätt mängd kaffe.
Kaffet är inte Packa kaffet hårdare
tillräckligt hårt
packat
Espressokaffet har Kaffet är för Använd mer
ingen crema grovmalet. finmalet kaffe.
(gulaktigt skum)
Kaffet är inte Packa kaffet hårdare
tillräckligt hårt
packat
Kaffet är gammalt Använd färskt kaffe.
eller för torrt.
Mjölken Ångröret är Se Underhåll
skummas inte blockerat
AutoCappuccino- Se Underhåll
tillbehöret är
blockerat
Mjölken är sur Använd färsk mjölk
Mjölken är för varm Använd kylskåpskall
mjölk.
Under E.S.E E.S.E systemet är Se «espresso funkanvändningen lä- felplacerat tion med E.S.E filcker kaffe ut runt terhållare
filterhållaren
Under E.S.E Filterhållaren är inte Truck fast hållaren
användningen lä- ordentligt fatsatt ordentligt
cker kaffe ut runt För lång utvinning Avstanna utvinninfilterhållaren gen vid 35 ml
Mycket vatten Bönorna har inte Packa noggrant
bland kaffe- packats tillräckligt
bönorna väl
Otillräcklig mängd Öka kaffemängden
kaffebönor.
Recept
Njut av ditt espressokaffe när du bara vill
koppla av eller som avslutning på en god
måltid.
Här följer ett antal recept på olika kaffetyper
som du kan göra med din espressobryggare.
. Äkta espresso
• Mät upp en skopa välrostat, malet
espressokaffe och filtrera det direkt i en
förvärmd kopp.
Om du har använt kaffe av rätt kvalitet bildas
ett gulaktigt skum på ytan av kaffet.
• Tillsätt socker om du vill, och njut. Äkta
espresso dricks utan mjölk men med mycket
socker.
. Cappuccino
En perfekt cappuccino är gjord på 1/3 kaffe,
1/3 varm mjölk och 1/3 skummad mjölk.
Mängden varm mjölk och skummad mjölk ska
vara ungefär dubbelt så stor som mängden
kaffe.
• Använd stora koppar som förvärmts.
• Fyll på kaffe motsvarande 1 kopp espresso,
och toppa sedan med mjölk skummad med
hjälp av AutoCappuccino-tillbehöret.
• Pudra till sist över kakaopulver.
. Café crème
• Brygg en vanlig espresso i en stor kopp.
• Tillsätt en klick grädde eller varm mjölk.
. Caffe corretto
• Brygg en kopp espresso.
• Spetsa med 1/4 or 1/2 glas konjak.
78
Page 79

Du kan också prova med anisette, grappa,
Sambuco, Kirsch eller Cointreau.
Använd din fantasi!
. Coffee Liqueur
• Blanda 3 koppar espresso, 250 g råsocker
och 5 dl konjak eller Kirsch.
• Låt blandningen stå och dra i minst 2 veckor.
Efter två veckor har du en mycket god likör
med kaffesmak.
. Italienskt iskaffe
4 iskuber, 2 koppar kall espresso med socker,
drygt 1 dl mjölk, vispgrädde, riven
blockchoklad.
• Blanda espresso och mjölk.
• Lägg upp isbitarna i glas, häll över kaffet och
garnera med vispgrädde och riven
blockchoklad.
. Friesiskt kaffe
• Brygg 1 kopp espresso. Tillsätt socker.
• Blanda i ett litet glas rom.
• Garnera med vispgrädde.
. Espresso flambé
2 koppar espresso, 2 små glas konjak, 2 tsk
farinsocker, vispgrädde
• Häll upp konjaken i värmetåliga glas. Hetta
upp och flambera.
• Tillsätt socker, blanda i kaffet och garnera
med vispgrädde.
Om du vill kan du späda ut espressokaffet
med lite kokande vatten.
. Perfekt espresso
2 koppar espresso, 6 äggulor, 200 g socker,
drygt 1 dl sockrad vispgrädde, 1 litet glas
apelsinlikör.
• Vispa äggulor och socker till en tjock smet.
• Blanda i espresso och apelsinlikör.
• Tillsätt vispgrädden.
• Häll blandningen i koppar eller glas.
• Ställ in i frysen.
. Mokka pudding
2 koppar espresso, 1/2 l mjölk, 1 påse
vaniljsåspulver, 3 äggulor, 1/8 l grådde, 150 g
socker.
• Blanda ihop vaniljpuddingen och tillsått
socker.
• Tillsått ägg gulorna i puddingen medans den
ännu är varm
• Kyl och tillsått espresson och den vispade
grädden.
79
Page 80

Suomi
◆
Laitekuvaus
a kansi
b irrotettava vesisäiliö
c näkyvä vedenpinnan osoitin
d kuppien lämmityslevy
e höyry / kahvi valitsin
f toiminnan merkkivalo (punainen)
g lämpötilan merkkivalo (oranssi)
h virtakytkin
i suodatinpää
j höyrysuutin
k Autocappuccino-varustus
k1 vipu
k2 taipuva putki
k3 ulostulosuutin
l tipparitilä
m tippa-allas
n mittalusikka
o yhden ja kahden kupillisen suodatin
p suodatinteline
q ESE suodatinteline ja suodatin
Turvallisen käytön ohjeita
• Lue nämä käyttöohjeet huolellisesti, ennen
kuin ryhdyt käyttämään espressokeitintäsi.
Noudata annettuja neuvoja ja säilytä ohje
mahdollista myöhempää tarvetta varten.
Laite saadaan liittää vain asianmukaisesti
asennettuun pistorasiaan. Tarkista että
sijoitustaloudessa on sama jännite kuin on
merkitty laitteen arvokilpeen.
• Älä koskaan sijoita espressokeitintäsi
kuumalle pinnalle (esim. keraaminen
keittotaso) tai liekin lähelle.
• Älä koskaan yritä ottaa kahvijauhetta
sisältävää suodatintelinettä pois paikaltaan
veden valuessa sen läpi. Suodatin on
paineen alainen suodatuksen aikana.
• Älä koskaan käytä laitetta, mikäli ritilä ja
tippa-allas eivät ole paikoillaan.
• Ota pistotulppa pistorasiasta, mikäli
suodatuksessa on ongelmia. Ota pistotulppa
rasiasta myös aina ennen puhdistusta.
• Älä ota pistotulppaa rasiasta johdosta
vetämällä, tartu kiinni itse pistotulpasta; älä
myöskään anna johdon roikkua terävän
reunan yli.
• Pidä huolta, että liitosjohto ei kosketa
keittimen kuumia osia. Varo myös itse
koskettamasta laitteen kuumia osia (kuppien
lämmityslevy, suodatinteline, höyrysuutin).
• Älä koskaan upota laitetta veteen.
• Pidä lapset loitolla keittimestä äläkä anna
liitosjohdon roikkua pöydältä.
• Noudata kalkinpoistosta annettuja ohjeita.
• Älä koskaan käynnistä laitetta, mikäli se on
vaurioitunut tai mikäli liitosjohto on
huonossa kunnossa.
• Mikäli liitosjohto tai jokin muu laitteen osa
vaurioituu, ne saa korjata vain valtuutettu
Krups huolto. Älä koskaan itse yritä korjata
laitetta.
• Tarkista, että suodatinteline on kunnolla
kierretty paikalleen, ennen kuin käynnistät
kahvin suodatuksen. Muista myös palauttaa
kytkin asentoon O, ennen kuin otat
suodatintelineen pois.
Espresso
Espresso on tavallista kahvia aromikkaampaa
ja vahvempaa. Se juodaan pienistä
esikuumennetuista espressokupeista. Kuuma
vesi johdetaan jauhetun kahvin läpi, jolloin
saadaan tämä herkullinen vaahtopintainen
musta kahvijuoma, joka virkistää
suunnattomasti.
Tunnistat espresson sen tyypillisestä aromista
ja pinnalla olevasta ohuesta vaahtokerroksesta
nimeltään crema. Jotta tämä saadaan aikaan,
tarvitaan suurta painetta ja korkealaatuista
espressokahvia, joka on paahdettu oikein ja
jauhettu sopivaksi. Voit ostaa valmiiksi
jauhettua espressokahvia tai itse jauhaa
espressopapukahvin kahvimyllyllä sopivan
hienoksi. Kahvia ei saa jauhaa liian hienoksi.
Mikäli kahvi on liian hienoksi jauhettua,
vaarana on suodatinpään siivilän
80
Page 81

tukkeutuminen samoin kuin suodattimen
tukkeutuminen.
• Jotta takaat espresson onnistumisen, käytä
vain raikasta vastaotettua vettä (vesi ei saa
seistä ilman hapen vaikutukselle alttiina),
joka ei tuoksu kloorille ja joka on melko
kylmää.
Ennen ensimmäistä
käyttökertaa
Ennen kuin ensimmäistä kertaa käytät
keitintäsi, puhdista veden
kuumennusmekanismi. Älä laita kahvia
kahvisuodattimeen. Täytä säiliö vedellä pari
kertaa seuraavasti:
• Avaa kansi ja nosta vesisäiliö pois kahvasta
kohottamalla (1). Täytä säiliö vedellä (2).
• Pane säiliö takaisin paikalleen (3) , paina
kevyesti jotta sen alla oleva läppä aukeaa.
Sulje kansi.
• Voit koska vain käytön aikana tarkistaa
veden määrän säiliössä tätä tarkoitusta
varten olevasta veden pinnan näytöstä (4).
Lisää tarvittaessa vettä.
• Kytke virta laitteeseen (5). Punainen
toiminnan merkkivalo ja oranssi lämpötilan
merkkivalo syttyvät molemmat.
• Pane toinen suodattimista (11)
suodatintelineeseen. Kierrä sitten
suodatinteline paikalleen suodatinpäähän.
• Varmista suodatintelineen oikea paikka
kiertämällä sitä seuraavasti: pane
suodatinteline suodatinpäätä vasten niin että
sen kahva osoittaa vasemmalle (6), kierrä
kahvaa oikealle (7) niin pitkälle kuin se
menee (8).
• Pane mahdollisimman suuri astia
suodattimen alle (8).
• Kun oranssi merkkivalo sammuu, käännä
valitsin (9) asentoon
vettä valua laitteen läpi. Pidä silmällä alla
olevaa astiaa.
• Tarvittaessa voit keskeyttää veden virtauksen
kääntämällä valitsimen takaisin O-asentoon
ja tyhjentää astian. Jatka sitten veden
juoksutusta.
ja anna säiliöllisen
Espressokeittimen eri
toimintojen käyttö
1. ESPRESSON VALMISTUS
• Jotta saat hyvän tuloksen suosittelemme,
että esilämmität välineet (suodatinteline,
suodatin ja kupit) ilman kahvijauhetta. Tee
näin:
• Täytä vesisäiliö (1) (2) (3) ja käynnistä laite
(5).
• Pane suodatinteline ja tyhjä suodatin
paikalleen (6) (7) (8) ja pane espressokupit
alle.
• Kun laite on kuumentunut kyllin, oranssi
merkkivalo sammuu.
• Käännä valitsin asentoon
• Kun kupit ovat täynnä kuumaa vettä,
käännä valitsin takaisin O-asentoon.
Kun espressokeitin on kuuma, voit kuumentaa
kupit keittimen päällä kuppien
kuumennuslevyllä.
Espresson valmistus
• Täytä vesisäiliö (1) (2) (3) ja kytke virta
laitteeseen (5).
• Pane suodatintelineeseen joko yhden tai
kahden kupin suodatin (11).
• Pane espressokahvia suodattimeen ja paina
kahvijauhe tiiviiksi mittalusikan avulla ;
kahvijauhetta tulee olla suodattimen
reunaan asti (12) (13).
• Puhdista reunoille mahdollisesti varissut
kahvijauhe (14).
• Pane suodatinteline paikalleen (15).
• Pane suodatintelineen alle yksi tai kaksi
espressokuppia.
Kun laite on kuumentunut sopivaksi, oranssi
merkkivalo sammuu.
• Kierrä nyt valitsin asentoon
• Kun kupit ovat melkein täynnä, palauta
kytkin O-asentoon.
• Ota suodatinteline suodattimineen pois
keittimestä ja tyhjennä suodatin (17).
Voit täyttää suodattimen uudestaan ja
valmistaa lisää espressoa.
(9).
(10).
81
Page 82
2. HÖYRYN VALMISTUS
Höyryn valmistuksen aikana kuuluva
naputtava ääni johtuu pumpun
epäkeskosäädöstä. Sillä ei ole minkäänlaista
vaikutusta laitteen kunnolliseen toimintaan.
Jos haluat valmistaa espressoa heti höyryn
valmistuksen jälkeen, keittimen on annettava
jäähtyä jonkin aikaa, jotta keittimeen saadaan
espresson valmistukseen sopiva lämpötila.
• Voit jäähdyttää laitetta nopeasti panemalla
astian paikallaan olevan tyhjän
suodatintelineen alle ja kierrä sitten valitsin
asentoon
• Anna veden valua läpi, kunnes oranssi
merkkivalo syttyy. Kierrä valitsin takaisin Oasentoon.
Nyt voit valmistaa espressoa.
Varo: Käytön aikana ja sen jälkeen
höyrysuuttimen metalliosat saattavat olla
polttavan kuumia.
. Höyryn valmistus yhdessä Krupsin
Autocappuccino-varustuksen kanssa
tekee helpoksi valmistaa:
. maitoa erilaisilla vaahtomäärillä cappuccinoa,
café crèmeä tai kuumaa suklaajuomaa
varten.
. kuumaa vettä esimerkiksi teetä varten.
Nämä nesteet imetään taipuvan putken
avulla, höyry kuumentaa ne ja ne tulevat
ulos autocappuccino varustuksen
ulostulosuuttimen kautta. Mikäli taipuva
putki upotetaan suoraan maitopurkkiin, voit
valmistaa cappuccinon vain yhtä kuppia
käyttämällä. Voit säätää maidon vaahdon
rakennetta varustuksen vivun avulla.
Saat parhaan vaahdon vähärasvaisesta tai
rasvattomasta hyvin jäähdytetystä
keittämättömästä maidosta. Myös käytetyn
astian tulee olla kylmä (älä huuhtele sitä
kuumalla vedellä ennen vaahdotusta).
Paksujen nesteiden kuumentaminen selviää
kohdassa ”Paksujen nesteiden
kuumentaminen (esim. keitto)”.
Suosittelemme autocappuccino-varustuksen
puhdistamista välittömästi käytön jälkeen - lue
kappale ”Autocappuccino-varustuksen
puhdistus”.
(10).
. Vaahdotetun maidon valmistus
cappuccinoa varten
• Täytä vesisäiliö (1) (2) (3) ja kytke virta
laitteeseen (5).
• Siirrä suutin laitteen reunaan ja pane
autocappuccino-varustus paikalleen
suuttimeen (18).
• Kierrä valitsin asentoon
• Upota taipuva putki kuumennettavaan
(19).
maitoon. Putken tulee koskettaa astian
pohjaa (20).
• Pane ulostulosuuttimen alle espressokuppi,
jossa on kolmannes vasta suodatettua
espressoa (20).
• Kierrä vipu asentoon
(21). Saat aikaan
hienon pehmeän vaahdon.
• Jos haluat vähemmän vaahtoista maitoa,
kierrä vipua käyttöasteikon xxxxx paksuun
päähän.
Kun keitin on kuumentunut sopivasti, oranssi
merkkivalo sammuu.
• Kierrä valitsin asentoon
(22). Kuumaa
vaahtoista maitoa tulee ulostulosuuttimesta.
• Kun olet saanut haluamasi määrän
vaahtoavaa maitoa, kierrä valitsin O-
asentoon.
• Ota taipuva putki pois astiasta käytön
jälkeen.
. Kuuman vähän vaahdotetun maidon
valmistus café crèmeä tai kuumaa
kaakaota varten tai veden
kuumentaminen esim. teetä varten.
Tärkeää:
. Café crème: pane vasta valmistettua kahvia
täynnä oleva kuppi suoraan ulostulosuuttimen alle.
. Kuuma kaakao: upota taipuva putki suoraan
kaakaojuomapurkkiin, mikäli käytät valmista
kaakaojuomaa.
tai kuumenna maito mikäli käytät
kaakaojuomajauhetta. Sekoita
kaakaojuomajauhe lopuksi maitoon.
• Siirrä suutin laitteen reunaan ja pane
autocappuccino-varustus paikalleen
suuttimeen (18).
82
Page 83

• Täytä vesisäiliö (1) (2) (3) ja käynnistä laite
(5).
• Kierrä valitsin asentoon
• Kierrä autocappuccino-varustuksen vipua
(19).
käyttöasteikon ohueen päähän (23).
• Upota taipuva putki kuumennettavaan
nesteeseen. Putken tulee koskettaa astian
pohjaa (20).
• Pane ulostulosuuttimen alle astia (20).
Kun keitin on kuumentunut sopivasti, oranssi
merkkivalo sammuu.
• Kierrä valitsin höyryasentoon
• Kun olet saanut haluamasi määrän
(22).
vaahtoista maitoa, kierrä valitsin O-
asentoon.
• Ota taipuva putki pois astiasta käytön
jälkeen.
. Paksujen nesteiden kuumentaminen
(esim. keitto)
• Siirrä suutin laitteen reunaan ja pane
autocappuccino-varustus paikalleen
suuttimeen (18).
• Täytä vesisäiliö (1) (2) (3) ja käynnistä laite
(5).
• Kierrä valitsin asentoon
• Kierrä autocappuccino-varustuksen vipu
asentoon
• Pane ulostulosuuttimen (k3) alle astia, jossa
(24).
(19).
on kuumennettava neste (25).
Kun keitin on kuumentunut sopivasti, oranssi
merkkivalo sammuu.
• Kierrä valitsin asentoon
(22) kunnes
keitto on kyllin kuumaa. Kierrä valitsin sitten
O-asentoon. Ota astia pois.
3. ESPRESSON VALMISTUS ERITYISEN ”ESE”
SUODATINTELINEEN AVULLA
• ESE-järjestelmä on suunniteltu italialais-
tyyppisen «espresso ristreton» valmistusta
varten. Valmiin kahvin määrä on 35 ml ja sen
suodatus kestää noin 20 sekuntia.
”ESE” tarkoittaa ”Easy Serving Espresso”. Se
puolestaan tarkoittaa tiettyä mitattua
kahvimäärää, joka on jauhettu ja puristettu
kahden suodatinpaperin väliin käyttövalmiiksi
= kahvipanos (esim. ”illycaffe”). Se helpottaa
espresson valmistusta, sillä sinun ei tarvitse
mitata ja painaa tiiviiksi kahvijauhetta. Se
myös helpottaa laitteen puhdistusta.
Emme suosittele, että ESE kahvipanosta
käytetään suuremman kahviannoksen
valmistamissen.
Ole huolellinen varastoidessasi ESE
kahvipakkauksia, että ne eivät väänny
käyttökelvottomiksi.
• Jotta saat erinomaisen tuloksen, esilämmitä
laite (suodatinteline, suodatin ja kupit) ilman
kahvia.
• Täytä vesisäiliö (1) (2) (3) ja kytke virta
laitteeseen (5).
• Pane ESE suodatinteline ja tyhjä suodatin
paikalleen (6) (7) (8) ja pane espressokuppi
alle.
• Kun laite on kuumentunut kyllin, oranssi
merkkivalo sammuu.
• Käännä valitsin asentoon
• Kun kuppi on täynnä kuumaa vettä, käännä
(9).
valitsin takaisin O-asentoon.
Kun espressokeitin on kuuma, voit kuumentaa
kupit keittimen päällä kuppien
kuumennuslevyllä.
. Espresson valmistus
• Aseta ”illy” kahvipanos omalla
suodattimella varustettuun ESE
suodatintelineeseen. Tekstin <illycafe> tulee
olla alaspäin ja paperisuodattimen pitkän
sivun tulee olla kahvan suuntaisesti (26).
• Pane ESE suodatinteline paikalleen kevyesti
oikealle kääntäen (6) (7) (8).
• Kun laite on kuumentunut kyllin, oranssi
merkkivalo sammuu.
• Käännä valitsin asentoon
• Kun suositeltu määrä espressoa (35 ml) on
(9).
suodattunut kuppiin, käännä valitsin takaisin
O-asentoon.
Ota ESE suodatinteline pois ja heitä
kahvipanos pois.
Hoito
- Älä koskaan pese espressokeittimesi
varusteita astianpesukoneessa.
83
Page 84

Tyhjennä vesisäiliö aina käytön jälkeen.
. Tippa-allas
• Tyhjennä tippa-allas käytön jälkeen. Ota ritilä
pois (27) (28). Jos olet valmistanut
useamman espressoerän, puhdista allas
välillä (yleensä 7 - 8 espresson jälkeen).
• Tarvittaessa pese allas ja ritilä vedellä ja
käsitiskiaineella, huuhtele ja kuivaa ne. Kun
kokoat altaan, varmista että muovireunus on
oikein paikoillaan (29).
. Suodatinpää, suodatin ja suodatinteline
Puhdista nämä jokaisen käyttökerran jälkeen.
Pyyhi kostealla pyyhkeellä laitteen höyrypää ja
pese varusteet vedellä ja käsitiskiaineella,
huuhtele ja kuivaa ne.
• Mikäli suodatinpää on erittäin likainen,
tukkeutunut, ruuvaa kolikolla sen ritilä irti,
puhdista ritilä ja pane takaisin paikalleen
kevyesti painaen (30).
Kun et käytä espressokeitintäsi, ota
suodatinteline pois. Muutoin se kuolettaa
tiivisteen.
. Kuppien lämmityslevy: ota levy pois ja
pese vedellä ja käsitiskiaineella, huuhtele ja
kuivaa (31).
. Höyrysuutin: pyyhi kostealla pyyhkeellä
jokaisen käyttökerran jälkeen.
. Autocappuccino varustus : Huuhtele
autocappuccino-varustus jokaisen
käyttökerran jälkeen seuraavalla tavalla:
• Kierrä valitsin höyryn esilämmitysasentoon
(19).
• Kierrä vipu puhdistusasentoon
• Upota taipuva putki lasilliseen vettä.
(33).
(Minimimäärä tähän on 1 dl.)
• Pane astia höyrysuuttimen alle.
Kun keitin on kuumentunut sopivasti, oranssi
merkkivalo sammuu.
• Kierrä valitsin höyryasentoon
• Kun kaikki vesi on valunut autocappuccino-
(22).
varustuksen läpi, kierrä valitsin O-asentoon.
• Ota taipuva putki pois lasista.
• Kun olet tehnyt puhdistusoperaation
loppuun, pyyhi höyrysuutin kostealla
pyyhkeellä.
• Suosittelemme, että otat autocappuccino-
varustuksen säännöllisesti irti keittimestä ja
puhdistat sen pesemällä käsitiskiaineella ja
pienellä harjalla. Huuhtele ja kuivaa ennen
kokoamista (34).
Ole huolellinen pannessasi taipuvaa
putkea paikalleen: pane suoraan leikattu
pää kiinni autocappuccino-varustukseen.
. Suodatinpään tiiviste
Puhdista tämä tiiviste aika ajoin :
• Pane suodatin suodatintelineeseen.
• Pane astia suodatintelineen alle.
• Kytke virta laitteeseen.
• Käännä valitsin asentoon
• Kun kuuma vesi alkaa suodattua läpi,
.
käännä suodatintelinettä hitaasti
vasemmalta oikealle niin että vesi suodattuu
tiivisteen ja suodattimen välistä.
Kalkinpoisto
• Poista kalkki keittimestäsi säännöllisesti
sitruunahapolla.
Suosittelemme käytettäväksi myös Krups
kalkinpoistopakkausta, tilausnumero 054.
Tässä pakkauksessa on kahden
kalkinpoistoannoksen lisäksi testiliuska veden
kovuuden mittaamiseksi. Näin tiedät
tarkemmin, kuinka usein sinun tulee poistaa
kalkki laitteestasi normaalikäytössä.
Kalkinpoistotarve riippuu sekä veden
kovuudesta että laitteen käyttömäärästä. 054
pakkauksen antama puhdistustiheys on
ohjeellinen.
- Tee näin:
• Ruuvaa höyrypään ritilä irti ja puhdista se.
• Liuota 2 ruokalusikallista kalkinpoistoainetta
tai pussillinen Krups kalkinpoistoainetta
puoleen litraan haaleaa vettä ja kaada täysin
liuennut seos tyhjään vesisäiliöön.
• Pane astia höyrypään alle. Anna noin 1/3
nesteestä valua astiaan kiertämällä valitsin
asentoon
• Pysäytä keitin, anna valitsimen olla
asennossa
(9).
(9) ja odota 10 - 15
84
Page 85

minuuttia, jotta kalkinpoistoaine ehtii
tehota.
• Kytke laitteeseen virta uudestaan ja anna
lopun nesteestä valua laitteen läpi.
• Huuhtele keitin juoksuttamalla kaksi
säiliöllistä puhdasta vettä sen läpi. Pane ritilä
paikalleen höyrypäähän (katso kohtaa
”Hoito”).
Ongelmia, ongelman syitä ja
ratkaisuja
ongelma ongelman syy ongelman
ratkaisu
espresso ei ole varusteet (kupit, esilämmitä
kyllin kuumaa suodatin ja varusteet (kupit,
suodatinteline) ovat suodatin ja
kylmiä suodatinteline),
katso kappaletta
”Espresson
valmistus”
kahvia valuu suodatinteline on katso kappaletta
suodatintelineen koottu väärin ”Espresson
luota valmistus”
kahvijauhetta on puhdista
suodattimen suodattimen reuna
reunalla ja tiiviste
suodatinpään puhdista tiiviste
tiiviste on likainen kostealla pyyhkeellä
suodatinpään tiiviste ota yhteys Krupson vaurioitunut huoltoon
pumppu on vesisäiliö on tyhjä täytä vesisäiliö
hyvin äänekäs
vesisäiliö on väärin paina säiliö
paikoillaan paikoilleen
kahvijauhe on liian käytä tuoretta
vanhaa tai kuivaa ja kahvia
pumppu ei pysty
synnyttämään
painetta
vesi ei valu lävitse vesisäiliö on tyhjä täytä vesisäiliö
vesisäiliö on väärin paina säiliö
paikoillaan paikoilleen
suodatin on puhdista suodatin
tukossa, kahvi on ja höyryliian hienoksi suodattimen
jauhettua tai se pää; katso kohtaa
on painettu liian ”Hoito” ja kokeile
tiiviiksi karkeampaa kahvia
vesi ei valu lävitse höyrysuodattimen pane suodatinritilä
pää on tukkeutunut likoamaan kalkin-
poistoliuokseen;
katso kohtaa
”Hoito”
laite kaipaa katso kohtaa
kalkinpoistoa ”Kalkinpoisto”
vesi valuu kahvijauhe on liian käytä hienompaa
liian nopeasti läpi karkeaa kahvia
kahvijauheen käytä mittalusikkaa
määrä on annostuksessa
riittämätön
kahvijauhetta ei ole tiivistä kahvijauhe
tiivistetty kyllin uudestaan
espresson pinnalla kahvijauhe on liian käytä hienompaa
ei ole vaahtoa karkeaa kahvia
kahvijauhetta ei ole tiivistä kahvijauhe
tiivistetty uudestaan
kahvijauhe on käytä tuoretta
vanhaa tai liian kahvia
kuivaa
maito ei ole kovin höyrysuutin on katso kohtaa
vaahtoista tukkeutunut ”Hoito”
cappuccinovarustus katso kohtaa
on tukkeutunut ”Hoito”
maito ei ole käytä tuoretta
tuoretta maitoa
maito on haaleaa pane maito
jääkaappiin
ESE-käytön aikana ESE kahvipanos ei Katso kohtaa «Eskahvia valuu suoda- ole paikallaan presson valmistus
tintelineen luota «ESE» suodatinte-
lineen avulla»
Suodatinteline ei Pane suodatinteline
ole paikallaan tiukemmin paikal-
leen
Suodatusaika on Suodata espressoa
liian pitkä korkeintaan 35 ml
Kahvijauhe on Kahvijauhetta ei ole Tiivistä kahvijauhe
hyvin märkää kunnolla tiivistetty uudestaan
Kahvijauhetta on Lisää kahvijauheen
liian vähän määrää
Reseptit
Nauti kupillinen espressoa halutessasi, kun
haluat rentoutua tai herkullisen aterian
päätteeksi.
Ohessa muutama ohje esimerkkinä siitä, miten
voit käyttää espressokeitintäsi.
85
Page 86

. Alkuperäinen espresso
• Käytä 1 mitallinen aitoa tummapaahtoista
espressokahvia kupillista kohti ja suodata
kahvi suoraan espressokuppiin.
Mikäli käytät oikeaa kahvilaatua ja oikeaa
jauhatusta, kupin pinnalle tulee kaunis
vaahtorengas.
• Lisää sokeria maun mukaan ja nauti.
Alkuperäinen espresso nautitaan ilman
maitoa mutta makeana.
. Cappuccino
Cappuccinon suhteet ovat: 1/3 kahvia, 1/3
kuumaa maitoa ja 1/3 maitovaahtoa. Kuumaa
maitoa ja valmistettua vaahtoa tulisi olla
yhteensä noin kaksi kertaa valmistetun kahvin
määrä.
• Käytä suuria lämmitettyjä kuppeja.
• Valmista yksi kupillinen espressoa suoraan
kuppiin. Täytä vaahdotetulla maidolla, joka
on valmistettu autocappuccino-varustuksella.
• Sirottele päälle suklaarakeita.
. Café crème
• Valmista klassinen espresso laakeaan
kuppiin.
• Lisää pilvi kermaa.
Voit korvata kerman kuumalla maidolla.
. Cafe Corretto *
• Valmista tavalliseen tapaan kupillinen
espressoa.
• ”Korjaa” sen jälkeen juoman makua
lisäämällä siihen 1/4 - 1/2 pikkulasillista
konjakkia.
Voit myös käyttää aniksen makuisia juomia,
grappaa, Sambucaa, kirsikkaviiniä tai
Cointreauxia. Voit myös jalostaa espressoa
monilla muilla juomilla. Käytä vain
mielikuvitustasi.
. Kahvilikööri *
• 3/4 litran pullollista varten tarvitset 3 pientä
kupillista espressoa, 250 g ruskeaa sokeria, 5
dl konjakkia tai kirsikkalikööriä
• Sekoita kaikki ainekset hyvin ja anna
«vetäytyä» vähintään 2 viikkoa.
Ihana likööri kaikille kahvikissoille.
. Italialainen jäätelökahvi
4 palloa vaniljajäätelöä, 2 kupillista makeaa
jäähdytettyä espressoa, 1,25 dl maitoa,
vispikermaa, suklaasirotetta
• Sekoita valmis kylmä espressokahvi maitoon.
• Jaa jäätelö laseihin, kaada päälle kahviseos ja
annostele lopuksi päälle paksu kerros
kermavaahtoa, jonka koristelet
suklaasirotteella.
. Friisiläinen kahvi *
• Valmista kupillinen espressoa ja makeuta se
kunnolla. Kaada sekaan pieni lasillinen
rommia.
• Kaada päälle paksulti kermavaahtoa ja nauti.
. Espresso flambé *
2 kupillista espressokahvia, 2 pikkulasillista
konjakkia, 2 teelusikallista ruskeaa sokeria,
vispikermaa
• Kaada konjakki kuumuutta kestäviin laseihin,
lämmitä konjakki, sytytä.
• Lisää sokeri ja sekoita. Kaada espresso
sekaan ja annostele päälle vatkattua kermaa.
Voit myös laimentaa espressoa lisäämällä
kiehuvaa vettä.
. Espresso-jäädyke *
2 kupillista espressokahvia, 6 keltuaista, 200 g
sokeria, 1,25 dl tuoretta kermaa, 1 pieni
lasillinen appelsiinilikööriä
• Vatkaa keltuaiset ja sokeri kuohkeaksi
vaahdoksi.
• Lisää kylmä espresso ja appelsiinilikööri ja
vatkaa edelleen.
• Sekoita sitten joukkoon kovaksi vaahdoksi
vatkattu kerma.
• Kaada seos laseihin tai kulhoihin.
• Pakasta pakastimessa.
. Mokkakreemi
5 dl maitoa, paketillinen
vaniljavanukasjauhetta, 3 keltuaista, 1,25 dl
kermaa, 2 pientä kupillista espressoa, 150 g
sokeria
• Valmista vanukas vanukasjauheesta,
maidosta ja sokerista.
86
Page 87

• Sekoita keltuaiset joukkoon vanukkaan
ollessa vielä kuuma.
• Anna seoksen jäähtyä ja sekoita sitten
joukkoon espresso ja kovaksi vaahdoksi
vatkattu kerma.
(*: Alkoholi vaarantaa terveytesi)
87
 Loading...