

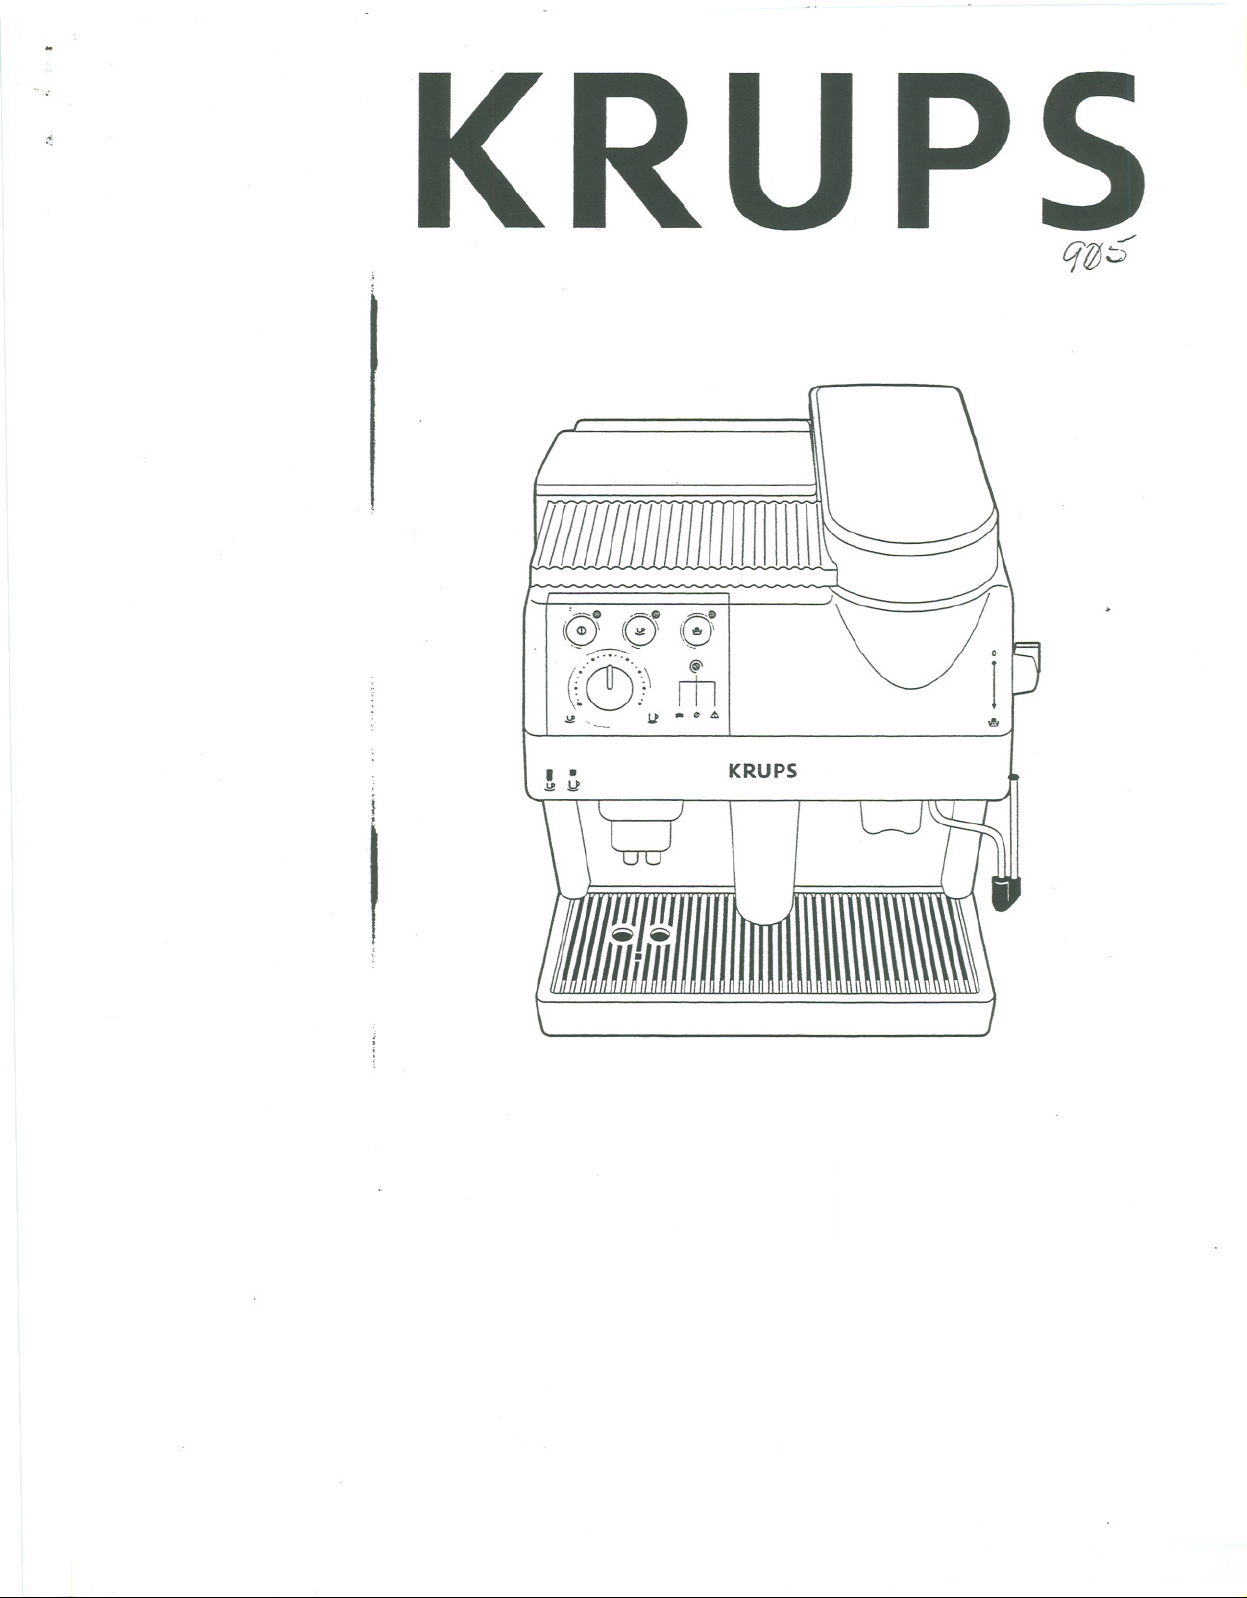
Page 1
..
~
qtj5'
'~. ~..
(0 (v\ (~)
((!))\~
~ ...~ JJ" .. &
i
I
;
I .
.!! Y
KRUPS
.&
Page 2
0
a
b1
c
d
m
f
p
k
o~
(~)-10 0
(d)) Iil
"'-- IJ-'"
rr\
KRUPS
b
e
9
h
n
Page 3
0
q
f
p
d2
d1
d4
!J
~
m
a 0 &.
d3
d5
Page 4
e
e
a
0
h
CD
0
0
a
0
Page 5
e : ~
cl
Page 6

.KRUPS
Palatino Art.905
8
Instructions for use
Warranty
Guarantee of Performance
Francais
Manuel d'utilisation
Garantie
Garantie de rendement
Espanal
Instruccionesde Usa
Garantia
Garantia de rendimiento
17
27
KRUPS7
Page 7

I!Jl!i:
IMPORTANT SAFEGUARDS
When using electrical appliances, basic safety precautions should
always be followed.
. Read all instructions.
. Do not touch hot surfaces, including the water tank.
. To avoid electrical shocks, do not immerse the cord, plug or any
other non-removable part in water or other liquid.
. Never direct steam or hot water spray toward the body: danger
of burns.
. Close supervision is necessary when any appliance is used near
children.
. Unplug the appliance when not in use and before cleaning. let it
.cool before putting on or removing parts and before cleaning.
. Do not use outdoors.
. Do not let the power cord hang over the edge of the table or
counter, or touch hot surfaces.
. The main plug must be pulled out ifanything unusual occurs
during the brewing process, and always be sure to unplug the
machine before any cleaning operation.
. Do not place on or near a hot gas or electric burner, or in an
oven.
. Make sure the appliance is OFFbefore unplugging or plugging it
back in.
. Do not use the appliance for other than the intended use.
. Do not pour liquids other than water and descaling solutions
specified in this manual into the water tank.
. Do not lift and/or move entire unit when the machine is in use.
. Do not get too close to the water tank during the brewing cycle:
it may be hot because of the steam.
. The use of accessories not recommended or sold by KRUPSmay
result in fire, electric shock or injury.
. This appliance is designed for household use. Allprocedures
other than cleaning and daily maintenance should be handled by
your nearest authorized KRUPSService Center.
8 KRUPS
Page 8

. Toreduce the risk of fire or electric shock. do not dismantle the
appliance. There are no parts which can be repaired by the user.
All repairs must be made only by an authorized KRUPSService
Center.
SAVE THESE INSTRUCTIONS
INSTRUCTIONS FOR THE CORD
. Connect the appliance only to a grounded electrical outlet.
. Check that the voltage of your appliance is the same as the vol-
tage supplied to your outlet. Any error in connecting the
appliance invalidates the warranty.
. The length of the cord was selected to reduce the chances of
accident.
. Extension cords may be used but with caution. If using an exten-
sion cord, its electrical capacity must equal or be greater than
that of the appliance. Ifthe appliance is a grounded model, the
extension must have three conductors, one of which is grounded.
The cord with its extension should be placed out of the reach of
children and in such a way that it cannot be tripped over.
. The appliance has a polarized plug (one prong is wider than the
other). As a safety measure, this plug will fit into a polarized
outlet only one way. Ifthe plug does not fit into the outlet
properly, reverse the plug. If it still does not fit, contact an
electrician. Do not attempt to defeat this safety feature.
. If the cord is damaged, do not use your appliance. In order to
avoid any accident, have it replaced at an authorized KRUPS
Service Center.
KRUPS9
Page 9

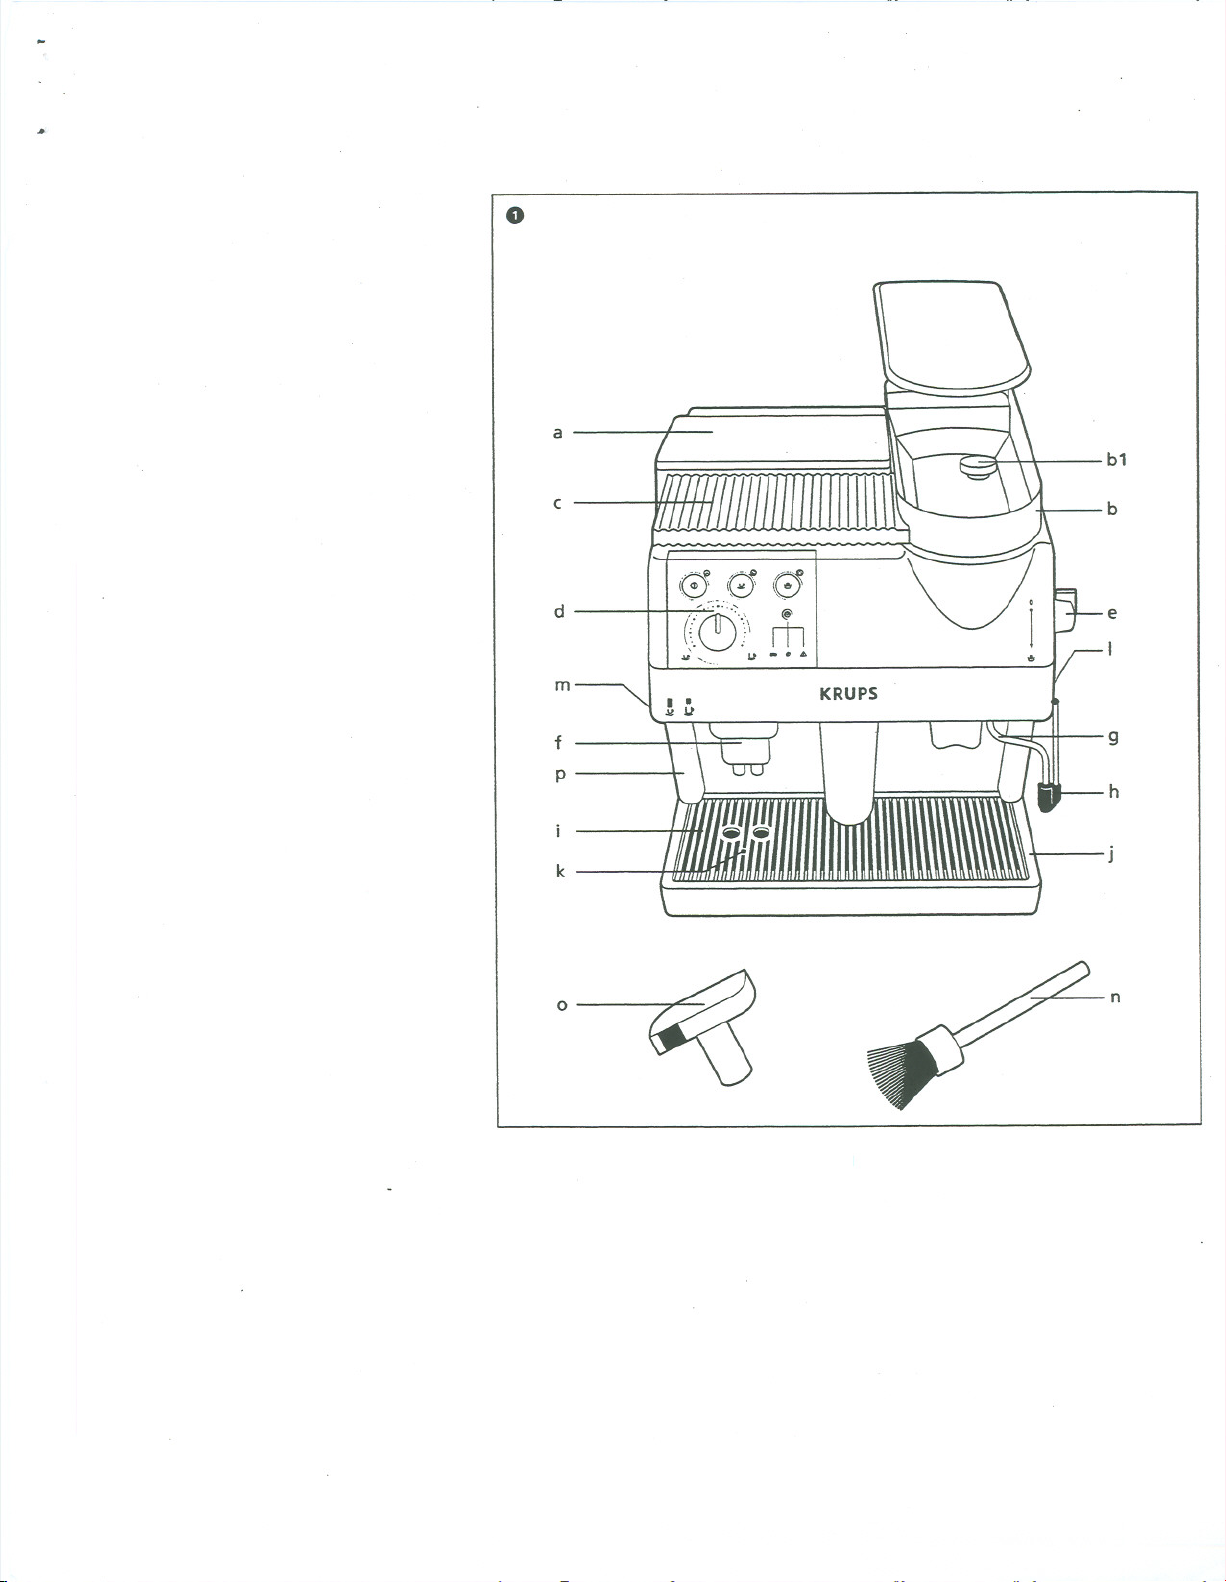
Description (1)
a
Water tank with removable lid
b
Coffee bean compartment with
removable lid
b1
FinenessAdjustment knob for
grinding
c
Cup warming tray
d
Control panel
d1
On I Off button with indicator light
d2
Coffee button with indicator light
Steam selection control with indicator
d3
light
d4
Regulator knob for cup-fillquantity
dS
Warning indicator light
e
Selector knob for steam! hot water
f
g
h
j
k
I
m
n
0
p
q
1. Fillingthe water tank
Height-adjustable spigot for coffee
Steam! hot water nozzle
Perfect froth accessory
Base grid
Removable drip tray
Saturation indicator
Power cable
Compartment for used coffee grounds
Brush
Key
Servicehatch
Detachable extraction chamber
.Remove the lid and remove the water tank
(2).
.Filltank with cold water
.Replace the water tank securely by pressing
firmlyso that the base valveat the base
allows water to flow through.
.Placethe lid on the water tank.
Please note: you can fillthe water tank
without removing it by pouring from a bottle
of cold water on the spot.
2. Switching on
.Pluginthe appliance.
.Press the ani Off button (d1) and the
indicator light willcome on.
The integrated electronic system willnow
perform an internal diagnostic. The noises
made are completely normal.
Next,the indicator light willflash.Once the
machine warms up after about two minutes,
the light willglow steadily.
3. Starting the heating system
Before first use, it is necessary to prime the
system to release any air inside.
.Place a container beneath the steamlhot
water nozzle (g).
.Turn the selector knob for steam ~ (e)
towards you and the pump automatically
begins to function.
.Wait until water is flowing steadily.
.Turn the knob (e) to the off position by
turning it away from you.
4. Filling the coffee bean compartment (b)
.Remove the lid.
.Fillthe compartment with coffee beans
(maximum capacity 12.5 oz. or about 3/4
lb.).
The fineness adjustment knob(b1) allowsyou
to adjust the fineness when grinding the
coffeebeans.Whenusingthe appliancefor
the first time we advise you to set the knob to
the intermediate position "8" (3).
.Replace the lid on the coffee bean
compartment (b).
Caution:
.Adjust the fineness setting only when
the grinder is running. Avoid extreme
adjustments as well.
.Useonlycoffeebeans.
.Make sure that no foreign objects become
mixed in with the coffee beans to avoid
damaging the appliance.
. Tips on adjusting the fineness of
grinding:
A fine setting is preferred for lightly-roasted
10 KRUPS
Page 10

. coffeebeansand a coarsersettingfor darker-
roasted coffee beans.
Youwill obtain a fine ground on the settings 1
through 8 and a coarser ground on the
settings 9 through 18-
. Ifyour espresso runs through too quickly
without forming a frothy head, this means
your coffee isground too coarsely.Reduce
the knob by 2 settings.
. Ifyour espresso has difficultyrunning
through or is burned. your coffee is ground
too fine. Increase the knob by 2 settings.
Yourappliance is now ready for use.
.THE ESPRESSO FUNCTION
Youhave now prepared your appliance for
use. The indicator lights on the controls (d1)
and (d2) are litand the water tank and the
coffee bean compartment have been filled.
.Placea cup under the coffee spigot (t). You
can adjust the height of the flow depending
on the size of the cup being used (4).
.Usingthe regulator knob for cup-fillquantity
(d4). choose the amount of coffee/espresso
desired. The minimum setting corresponds
to 30 ml (about 10z.)and the maximum
setting to 250 ml (about 8.5oz.).
.Pressthe coffee button (d2).The indicator
light will flash. .
The coffee/espresso willstart to flow.
Whilethe coffee/espresso isflowing, you can
increase or reduce the quantity selected by
turning the quantity knob (d4) to the right or
to the left.
.Waituntil the coffee/espresso has finished
flowing.
When the indicator light of the control (d2)
becomes steady. your appliance is ready for
use again.
Please note: you can stop the flow of coffee
at any time after it has started bypressing the
coffee button again (d2).
.To prepare two espressos
simultaneously:
.Place two cups under the coffee spigot (t).
.Choose the quantity of coffee desired per
cup with the cup fillquantity knob (d4).
.Press the coffee button twice (d2). The
indicator light will flash twice.
The appliance will grind two lots of coffee
seperately. The flow of coffee/espresso will
thus occur automatically in two stages.
.Wait until the end of the second flow, and
you can now enjoy your espressos.
.THE FROTH STEAM FUNCTION
Steam is used to froth milkto whip up a
cappuccino and is also used for heating
liquids.As the production of steam requiresa
higher temperature, the appliance allowsfor a
pre-heating phase to build-up the steam.
Youhave prepared your appliance. The
indicatorlight on the controls (d1 and d2) are
lit.Thewater tank has been filled.
.Selectthe steam selection control button
(d3).The indicator light willflash and the
indicatorlight of the coffee button (d2) will
go out.
When the indicator light of the steam
selection control (d3) becomes steady, the.
appliance is ready to produce steam.
1. Frothing the milk to make a cappuccino
A cappuccino consists of one third coffee. one
third steamed milk and one third milkfroth.
.Preparean espresso.
.Selectthe steam selection control button
(d3).The indicator light willflash and the
indicator light of the coffee button (d2)will
go out.
When the indicator light of the steam
selection control (d3) becomes steady. the
appliance is ready to produce steam.
.Placean empty cup under the steam nozzle
and turn the steam selector knob (e) on
byturning it towards you to allowfor any
water in the nozzle to empty out before a
drysteam develops.
~
KRUPS11
Page 11

.Once a dry steam develops, turn the steam
selector knob (e) off by turning it away from
you.
Forbest results, make sure that the perfect
froth attachment (h)is correctlypositioned at
the end of the steam! hot water nozzle (g)(S).
Thisaccessory must only be used for frothing
milk.
.Pour milk (skim or lowfat recommended)
into a frothing pitcher. The milkand the
pitcher must be cold.
.Place the frothing pitcher under the nozzle
ensuring that the rubber tip is completely
immersed in the milk.
.Turn the steam selector knob on \ill! by
turning ittowards you (6).
.Hold the frothing pitcher during the frothing
<'~
operation and do not allow the nozzle to
touch the bottom of the pitcher, so as not to
impede the outflow of steam.
.Once you have obtained the froth, return
the steam selector knob to the" off"
position byturning itaway from you.
.Clean the perfect froth attachment and the
rubber nozzle with a damp cloth
immediatelyafter use. Youmust also
produce steam for a moment to eliminate
any possible trace of milkon the nozzle
which could lead to clogging ifyou do not
clear it before shutting down the machine.
Youcan now add hot frothy milkto your
espresso.
.Hold back the milk froth with a spoon and
pour the steamed milk into your espresso.
.Then, spoon the milk froth on top of the
beverage to complete a deliciouscappuc-
cino.
2. Steaming MilkI Heating liquids
.Remove the perfect froth attachment (h).
.Select the steam selection control button
(d3).The indicator light willflash and the
indicatorlight of the coffee button (d2)will
go out.
When the indicator light of the steam
selectioncontrol (d3) becomes steady,the
appliance is ready to produce steam.
.Place the frothing pitcher or cup containing
the liquid under the nozzle (g) ensuring that
the tip is completely immersed.
.Turn steam selector knob on ~ by turningr
towards you (7).
.Holdthe frothing pitcher or cup during the
operation and do not allow the nozzle to
touch the bottom of the jug, so as not to
impede the outflow of steam.
.Once the liquid is hot enough, return the
steam! hot water tap (e) to the" off"
position by turning the knob away from you
.Clean the perfect froth attachment and the
rubber nozzle with a damp cloth
immediately after use. You must also
produce steam for a moment to eliminate
any possible trace of milkon the nozzle
which could lead to clogging if you do not
clear it out before shutting down the
machine.
3. Returning to espresso or hot water
preparation
.Press the steam selection control (d3). The
indicator lights of the controls (d2 and d3)
willstart to flash.
.Place a container under the steam! hot
water nozzle (g).
.Turn steam selector knob (e) on ~ and the
outflow of water willstop automatically
when the machine has cooled.
.Return the steam! hot water tap (e) to the
"off" position.
The indicator light on the control (d2) should
now be steady.
Yourappliance is now ready to make an
espresso or produce hot water again.
.THE HOT WATER FUNCTlON
Yourappliance also allows you to heat water.
Youhave prepared your appliance. The
indicator lights on the controls (d1 and d2) are
lit.The water tank has been filled. Do not
press the steam selector control button (d3).
.Place a container under the steam/hot water
nozzle (g).
.Turn the nozzle on~ by turning the steam
selector knob towards you(8).
12KRUPS
Page 12

. Once the container has been filled with
sufficient hot water, return the tap (e) to the
"off" position.
. .
.To clean the appliance, unplug it and
allow it to cool down.
.Do not wash the various accessories of your
appliance in the dishwasher.
The body of the appliance
.Clean this using a damp cloth. Do not use
tools or cleaning products which might
scratch the bodywork.
The water tank (a)
.Empty the water tank daily and refill with
fresh water as necessary.
It is not advisable to allow water to stagnate
for a long period in the tank. If the appliance
is not to be used for long periods, drain and
leave empty.
. The compartment for used coffee
grounds (m)
Youmust empty the coffee grounds in the
compartment relativelyfrequently. At least
every 20 uses, as this is the maximum
capacity.
.Removethe used coffee grounds'
compartment from its housing (9). The
warning light willflash (dS).
.Clean the compartment with hot water and
a milddishwashing liquid.Rinseand dry.
.Replacethe compartment correctly in its
housing.The warning light (dS)willgo out.
The drip tray (j) (10)
The trayisfitted with a saturation indicator
(k).
.Removethe tray and empty it when the
saturation indicator (k)shows above the grid
(10).The warning light (dS)willflash. Failure
to drain may lead to overflow.
. Cleanthe tray 0) and the grid (i)with hot
water and d milddishwashing liquid. Rinse
and dry.
.Placethe grid on the tray.
.Make sure the tray is pushed in all the way
or the warning light will not go out.
Ifeverything is placed properly,the warning
light (dS)willgo out.
The adjustable spigot for coffee (f)
Youcan remove the adjustable outlet for
coffee to clean it. The appliance must be
switched off and unplugged.
.Open the service hatch (p). This hatch opens
from the left handside and swings outward.
.Remove the support tabs which hold the
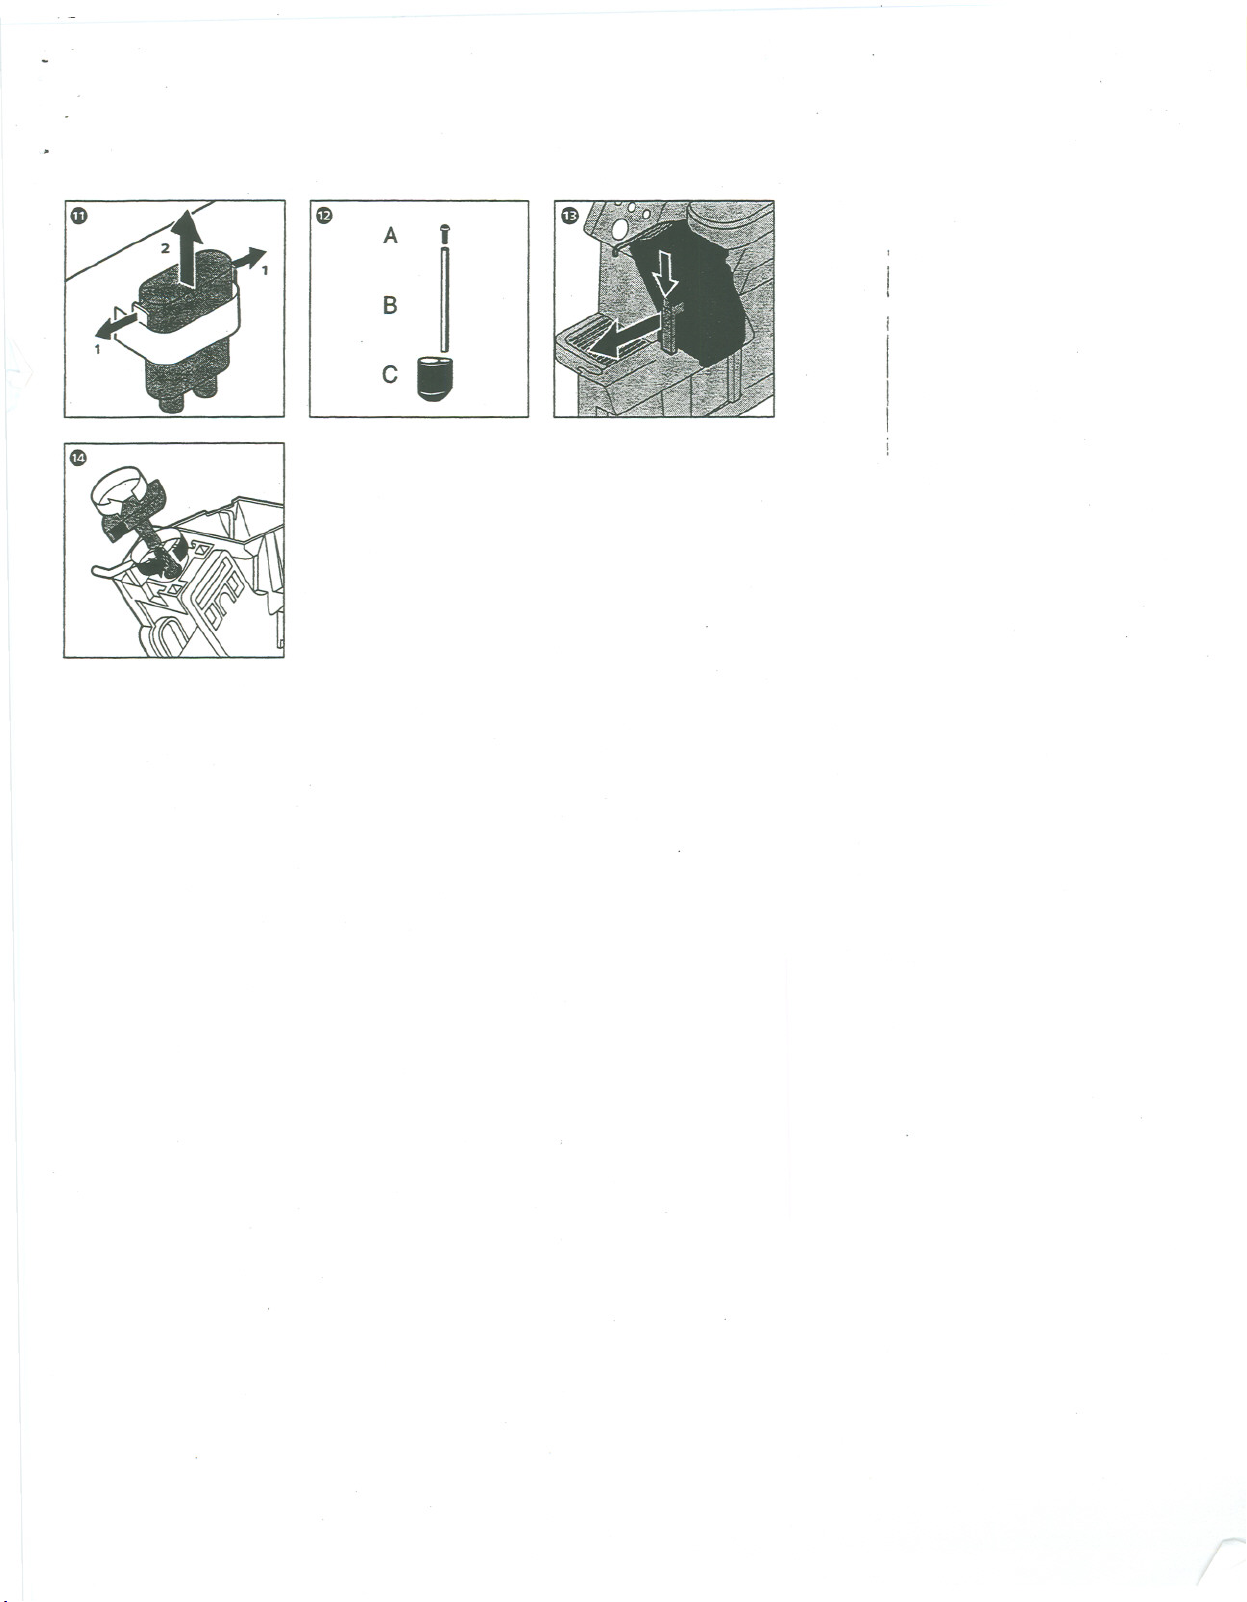
coffee outlet (f) and pull them upwards (11).
.Clean the spigot in hot water and a mild
dishwashing liquid. Rinse and dry.
.Replace the accessory in its housing. You will
hear a "click" as it locks.
.Close the service hatch, plug in the
appliance and press the On I Off button (d 1)
to restart.
The steam I hot water nozzle (g)
.Clean the nozzle after every use allowing the
appliance to produce steam for 2-3 seconds
and then by wiping it with a damp cloth.
Be careful: it may still be extremely hot.
.If the opening in the nozzle outlet is
blocked, clear it using a fine needle.
Cappuccino accessory (h)
.Tocompletely clean the perfect froth
attachment, separate parts A, Band C (12).
.Rinse the three parts in hot water.
.Ifthe small hole in part A is blocked, clean it
using a fine needle. Cleaning immediately
after use will prevent future blockages.
The detachable extraction chamber (q)
The detachable extraction chamber must be
cleaned once or twice a week depending on
how often the appliance is used. The
appliance must be switched off and
unplugged, before any cleaning actions take
place.
.Open the service hatch (p) from the left and
gently remove the used coffee grounds
compartment (9).
KRUPS13
Page 13

.Using the handle, remove the extraction
chamber by pressing on "PRESS"(13).
.Clean the extraction chamber with hot
water and a mild dishwashing liquid. Rinse
and dry.
Please note:
For thorough cleaning, you can remove the
filter by undoing the screw, turning
counterclockwise, using the key (0) (14).
Clean the filter in hot water then screw it
back into place.
.Replace the extraction chamber in its
housing, without pressing on "PRESSn.
.Reposition the coffee grounds compartment
(m) correctly.
.Close the service hatch, plug in the
appliance and press the On / Off button (d1)
to restart.
Please note:
Ifthe extraction chamber is incorrectly fitted,
the warning light (d5) will flash. Switch off
and unplug the appliance again, then remove
and replace the extraction chamber once
more.
Ifthe extraction chamber is blocked, plug the
appliance in again and turn it on using the
control (d1). As soon as the indicator light on
the control (d2) flashes, switch off the
appliance and unplug it. The extraction
chamber is now unblocked.
To ensure that your appliance is working at its
best and for top quality coffee, we
recommend that you descale your KRUPS
appliance at regular intervals. Depending on
how hard your water is, this descaling should
be performed every three to six months.
However, if the water in your region is very
hard or if you use the appliance a great deal,
it would be advisable to do this more
frequently.
Pleasenote! UseonlyKRUPSproducts for
descaling, citric acid or tartaric acid.
No liabilitywillbe accepted in the event of
any damage being caused to the appliance as
the result of using other products. Descaling
14KRUPS
products are available in approved KRUPS
servicecenters or specialist shops.
Inno circumstances should you use classic
amidosulphonic or other products containing
this acid as there is a riskof damaging the
appliance. Carefullycheck the composition 01
the descaling products which you intend to
use.
The appliance must be plugged in but
switched off (indicator light of control (d1)
out). For best results, we advise you to descal,
the appliance when it is cold.
The entire process should take approximately
20 minutes.
.Removethe lid and take out the water tank
(a).Fillthiswith0.5 liter(170z.)ofwarm
water and pour the contents of one packet
of Krups descaler, or 4 tablespoons of citric
or tartaric acid.
.Mixdescaler in the warm water until it
dissolves.Replacethe water tank together
with its lid.
Proceed as follows:
.Placea mug (about 70z.) under the nozzle
for steam! hot water (g).
.Turnthe steam selector knob (e)on \!!Y.
.Allow 1/3 of the water tank to flow through
(about 40 seconds) the nozzle.
.Turn the steam selector knob (e) "off".
.Turn off the machine by pressing the Onl Of
button (d1).The indicator light will go out.
.Empty the container. Let the machine sit for
five minutes or so while the descaling
solution works on the inside of the
appliance.
.Repeat these operations two more times.
.Now, rinse the water tank (a) thoroughly
and fillwith fresh water.
.Turn the machine back «on» (d1).
.Placea container under the nozzle for
steam/hot water (g).
.Turn the steam selector knob (e) on \!!Y.
.Allow the contents of one full water tank to
flow through.
Yourappliance is now ready for use again.
Page 14

Ifthe following table does not help you to
remedy a fault in your appliance, contact an
approved KRUPSService Center.
Problems Causes
The appliance
does not come on
The warning light
(dS) isflashing chamber (q) is missing
The appliance is
not plugged in
The service hatch
(p) isopen
The extraction Position the
or badly fitted
intoplace
The coffee grounds Correctlyposition
compartment (m) the compartment in
is missingor wrongly its housing
installed
The drip tray Correctlyposition
(j)ismissing the tray
or badlyfitted
into place
The warning light
(dS)islit
Hot water or
steam does not steam! hot water in the nozzle with a
come out of the
steam Ihot water
nozzle (g)
The coffee runs
too fast
The coffee runs too
slowly or with
difficulty fineness adjustment
The espresso and/or
hot water functions steam
do not work
The milk does not The milk is not fresh
froth
The water tank (a)
isempty restart the appliance
The coffee beans
compartment
(b) isempty
The nozzle for Unblodc the hole
isblocked
The ground coffee Reducethe setting
isnot fine enough
The ground coffee
istoo fine
Theappliance needs
to be descaled
Youhave just made
or has the wrong
content of fat
The milk is too hot Cool it in the
Solutions
Plugitin
Close it
extraction chamber
or reinstall it
correctly
in its housing
Fillitand
(see «Preparing the
appfiance» )
Fillit with beans
fine needle
of the fineness
adjustment knob (bI)
Increasethe
setting of the
knob (hI)
Descaleit.See
section «Descaling»
Referto the section
«Returning to
espresso or hot wate
function.
Change to lowfat
milk
refrigerator.
The muk does not The steam! hot water
froth
The appliance takes The appliance is
a longtime
(g) or the cappuccino
accessory are blodced
scaled up appliance (see
toheatup.
Unblodcusing a fine
needle
Descalethe
sectionon
«Descaling> ).
.Retain and re-use the original packaging to
transport the appliance.
After transport, it will be necessary to restart
the heating system (see "Starting the heating
system").
The packaging consists solelyof materials
which pose no riskto the environment, and
which can be disposed of in accordance with
the regulations on recyclinginforce.
Todispose of the appliance, contact the
appropriate department of your local
authority.for further information.
YourKRUPS#905iscoveredbythe following
warranty:
Iffrom date of purchase within one year this
KRUPS
productfailsto functionbecauseof
defectsinmaterialsor workmanship,KRUPS
North Americawill, at its option, repair or
replace the unit with our charge, provided the
owner has a proof of date of purchase.
Thiswarranty willbe void if malfunction was
caused by damage to the product by accident,
misuse, use on frequency or voltage other
than marked on the product and/or described
inthe instructions, abuse includingtampering,
damage in transit, or use for commercial
purposes. Thiswarranty givesyou specific
legal rights, and you may also have other
rightswhichmayvaryfrom stateto state.
kRUPS15
Page 15
GUARANTEE OF PERFORMANCE
Thisfine KRUPSproduct is manufactured according to a rigid code
of quality standards, and, with minimum care, should give years of
service. However, should the need arise for repairs or for replace-
ment parts within or after the warranty period, please call our
CONSUMER SERVICEDEPARTMENT:
USA: (800) 526-5377
24-hours a day, 7 days a week
Canada:
(905) 669-0114
Monday-Friday 8:00 a.m - 4:30 p.rn
You will be provided with specific instruction on how to get your
product repaired.
The department will also be able to answer any general product
questions you may have.
Before calling the Consumer Service Department, please have the
type number of your KRUPSappliance available.
You must have this information before calling our Consumer Ser-
vice Department so that we may better answer your questions. The
type number can be located by looking at the bottom of your
appliance.
This product is Type # 905
Any general correspondance can be addressed to:
USA:
KRUPSNorth America, Inc.
P.O.Box3900
Peoria, IL61612
Canada: KRUPSService
20 Caldari Rd
Concord, Ontario
L4K4N8
16 KRUPS
 Loading...