

Page 1
KRU
P’S
1-r
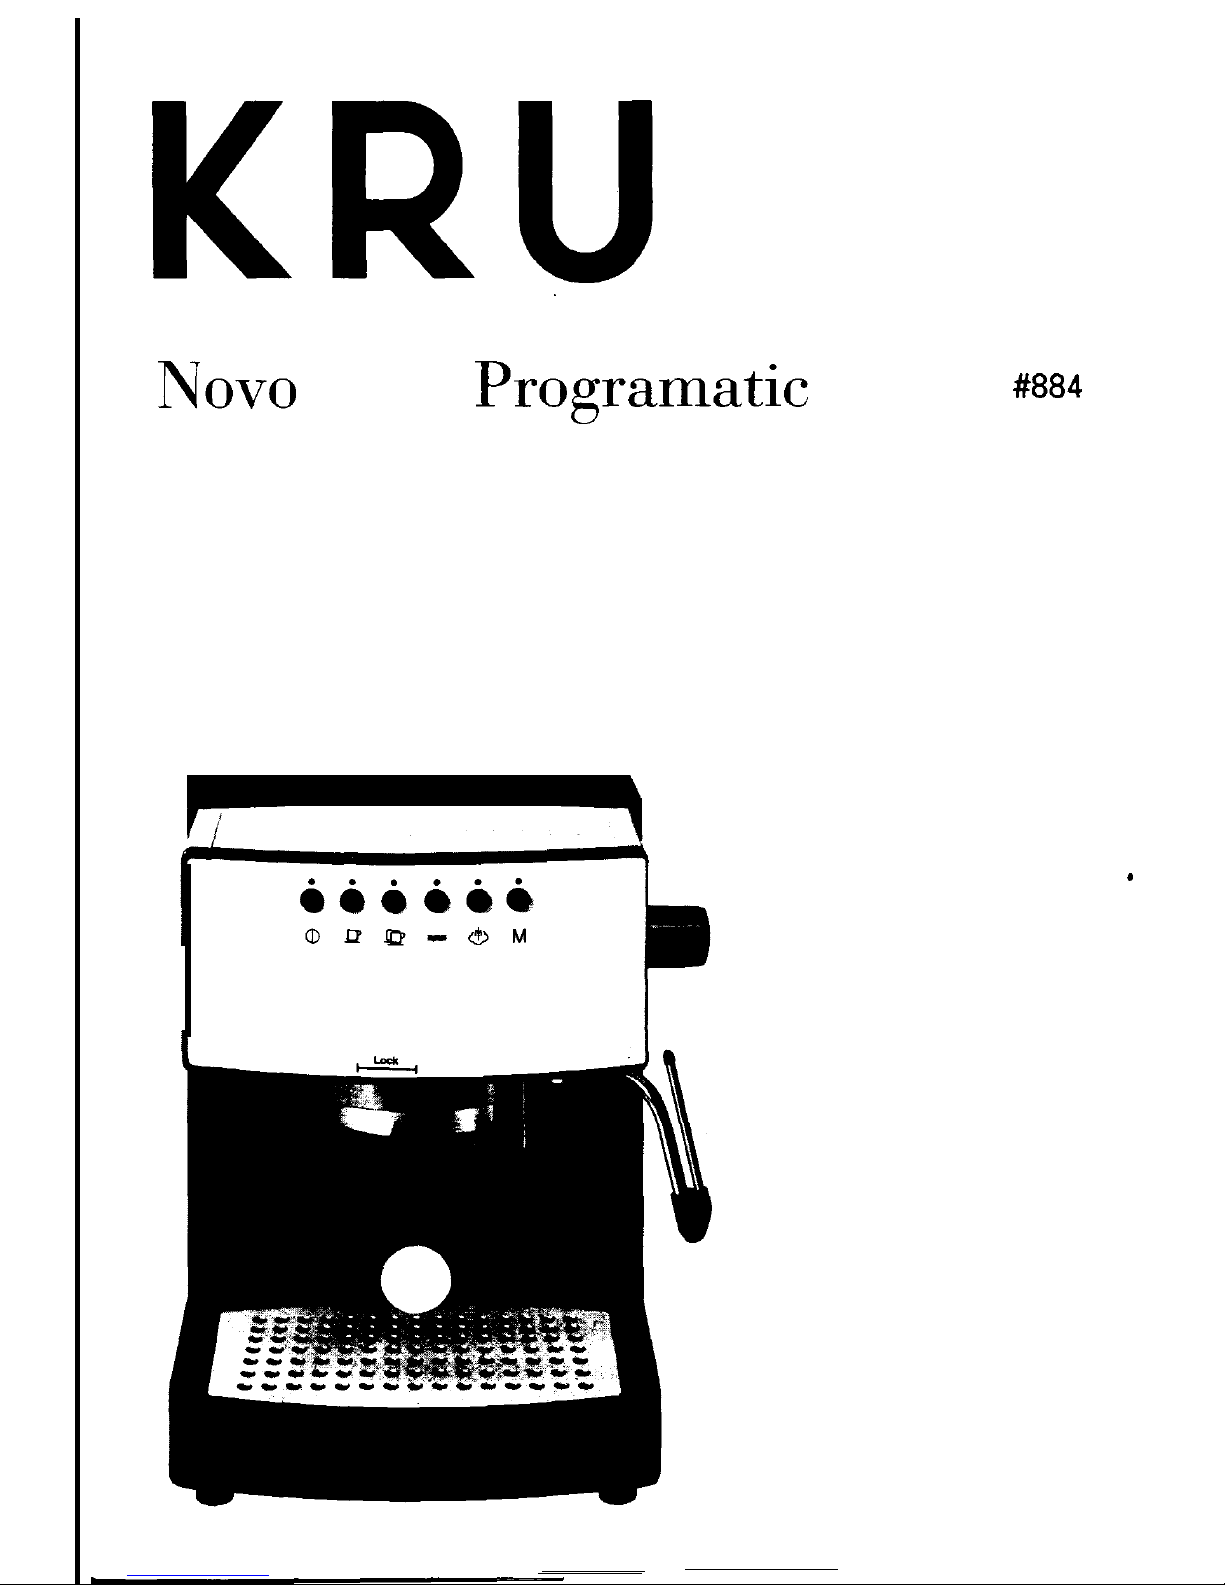
nova
4000 Programatic
Model
#884
KRUPS
Instructions
for Use
Warranty
Guarantee of
Performance
.
Page 2
IMPORTANT SAFEGUARDS
When using electrical appliances, basic safety precautions
should always be followed to reduce the risk of fire,
l
Read fl instructions and information in this instruction
book and any other literature included in this carton
0
l
To protect against electric shock, do not immerse cord,
plugs, or appliance in water or other liquid.
0
Close supervision is necessary when any appliance is
used by or near children.
l
Unplug from outlet when not in use and before
l
l
0
0
Do not let cord hang over edge of table or counter, or
touch hot surfaces.
0
Do not place on or near a hot gas or electric burner, or in
a heated oven.
0
To disconnect, press button to “OFF”, then remove plug
0
0
Use extreme caution when dispensing hot steam.
Page 3

CAUTION
This appliance is for household use. Any servicing other
than cleaning and user maintenance should be performed by
the nearest authorized KRUPS Service Center (see
Guarantee of Performance).
Do not immerse base in water.
To reduce the risk of fire or electric shock, do not remove the
base. No user serviceable parts inside. Repair should be
done by an authorized KRUPS Service Center only.
SAVE THESE INSTRUCTIONS
SPECIAL CORD SET INSTRUCTIONS
Regarding your Cord Set:
A. A short power-supply cord is provided to reduce risks
resulting from becoming entangled in or tripping over a
longer cord.
B. Longer extension cords are available and may be used if
care is exercised in their use.
C. If a long extension cord is used, (1) the marked electrical
rating of the extension cord should be at least as great as
the electrical rating of the appliance,
(2)
if the appliance is
grounding-type S-wire cord, and
(3)
Page 4
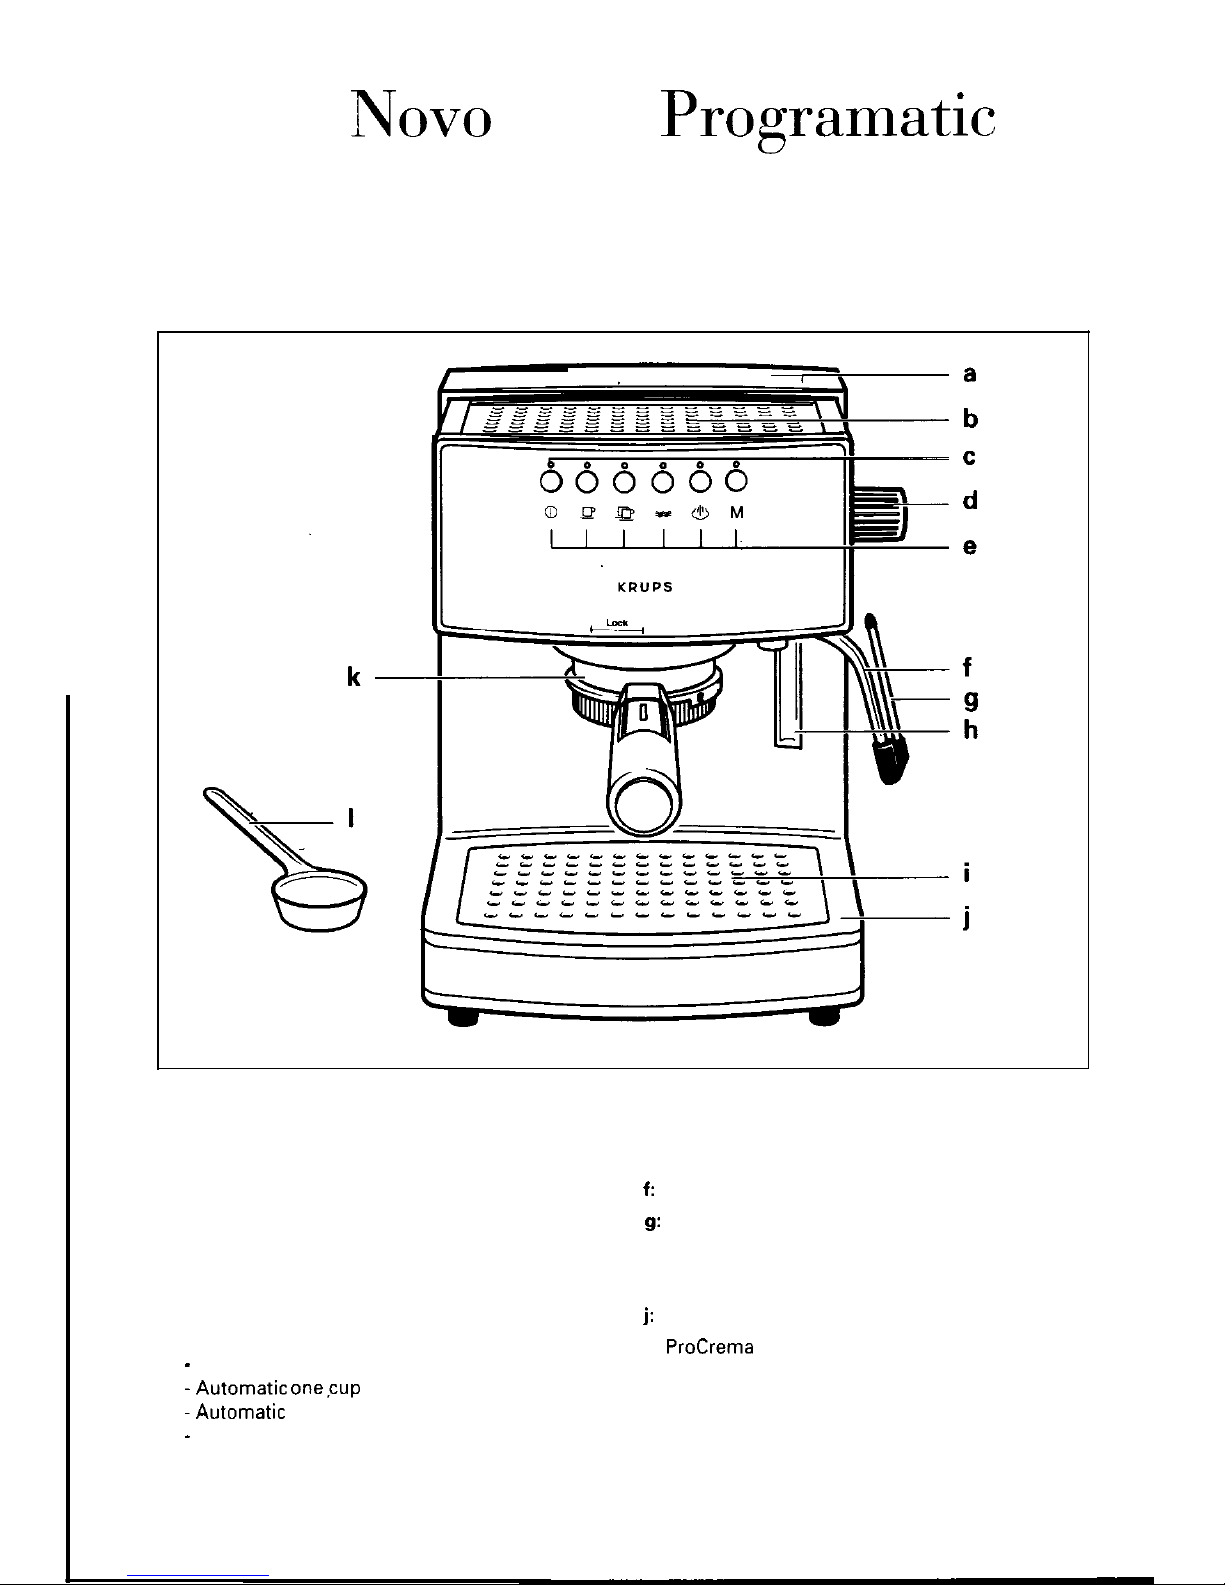
Krups
Nova
4000
Programatic
a: Removable water reservoir under lid
f:
Swivel nozzle for steam and hot water
b: Cup warming tray
g:
“Perfect Froth” attachment
c: ON/OFF button with red indicator light
h: Water level indicator
d:
Rotary changeover dial
i: Removable cup grid
e: Central control panel with LED display
j:
Removable drip tray
(from left):
-
ON/OFF
-Automatic
onecup portion
-Automatic
two cup portion
-
Hot water dispenser
Steam
Memory
k:
ProCrema
filter holder
I: Measuring spoon
Page 5
8
..I..
9
Page 6

15
Page 7

19
23
Page 8

33
A
B
C
c
f
1
D
Page 9

Stainless Steel Pro Thermoblock Heating
System
(PTS)
clears the machine of any
excess water in the machine’s system,
and
m,aintains
the ideal extraction
temperature.
Microchip Monitored Steam Pump
control delivers a constant flow of “dry”
steam. This unique dryness of steam and
its regulated pressure froth milk for
cappuccino and latte.
Electronic Touch Pad Control with LED
offers various functions, including
automatic “one” and “two” cup portioning
and memory at the touch of a button.
Programmable features lets you set and
store the cup portioning to deliver just
the right amount of espresso to suit your
taste.
ProCrema Filter Holder
All-in-One ProCrema filter holder features
a selector dial that adjusts the amount of
coffee you need for 1 cup of regular
strength espresso, 2 cups of mild
espresso or 1 cup of strong espresso, or 2
cups of regular strength espresso to suit
your personal taste. The all-in-one filter
holder also features a spring mechanism
that will ensure that your coffee is evenly
tamped upon insertion for flawless
crema-laden espresso every time.
Rotary Changeover Dial enables you to
steam milk or dispense hot water for tea
and other hot beverages.
KRUPS unique “Perfect Froth”
attachment takes the guesswork out of
frothing milk for cappuccino and latte.
n
Large 37 oz. removable water reservoir
makes continuous cups of espresso,
cappuccino and latte.
n
Warming Tray for pre-warming cups.
H Removable Drip Tray and grid allow for
easy clean-up.
The KRUPS “Novo 4000 Programatic’
extracts rich, natural flavors from the coffee
beans and brings those flavors together to
deliver a single perfect cup of espresso. This
is achieved by precisely applying the right
amount of pressure
(15
bars), which draws
out all of the coffee’s natural richness. With
the push of a button, you can enjoy the full
bodied flavor and aroma of authentic
restaurant quality espresso.
Genuine Espresso
Espresso is a far richer and stronger brew
than regular coffee. It should be deep, dark
and delicious. Most people find they enjoy it
in small quantities because of its richness
and for that reason, espresso is usually
served in small 2-2,5 oz. demitassse cups.
The mark of real espresso is its wonderful
inviting fragrance and a light brown
“Crema”, found on top of the surface of the
coffee. Your “Novo 4000 Programatic”,
properly used, will always produce espresso
that is deep, dark, and delicious. Just follow
the instructions and use fresh, well roasted
espresso beans.
Grinding Espresso Beans
If you choose to grind your own beans we
recommend using the KRUPS “IL Barista”
grinder
#220.
Remember, espresso requires a much finer
grind than regular coffee.
We recommend that you get familiar with
all the part of your KRUPS ‘Novo 4000
Programatic” before operating the machine.
Insert the filter holder into the machine and
remove and replace the water reservoir.
9
Page 10

Move the steam nozzle.
.
n
Wash all loose parts in warm soapy water,
rinse thoroughly and dry.
When using your KRUPS ‘Novo 4000
Programatic”
for the first time we
recommend running water through the
machine to remove any dust particles which
may have settled during shipping.
A
Attention!
n
Before you start, make sure that the cup
grid
(i)
is in place and the removable drip
tray
(j)
is properly inserted (figure 27).
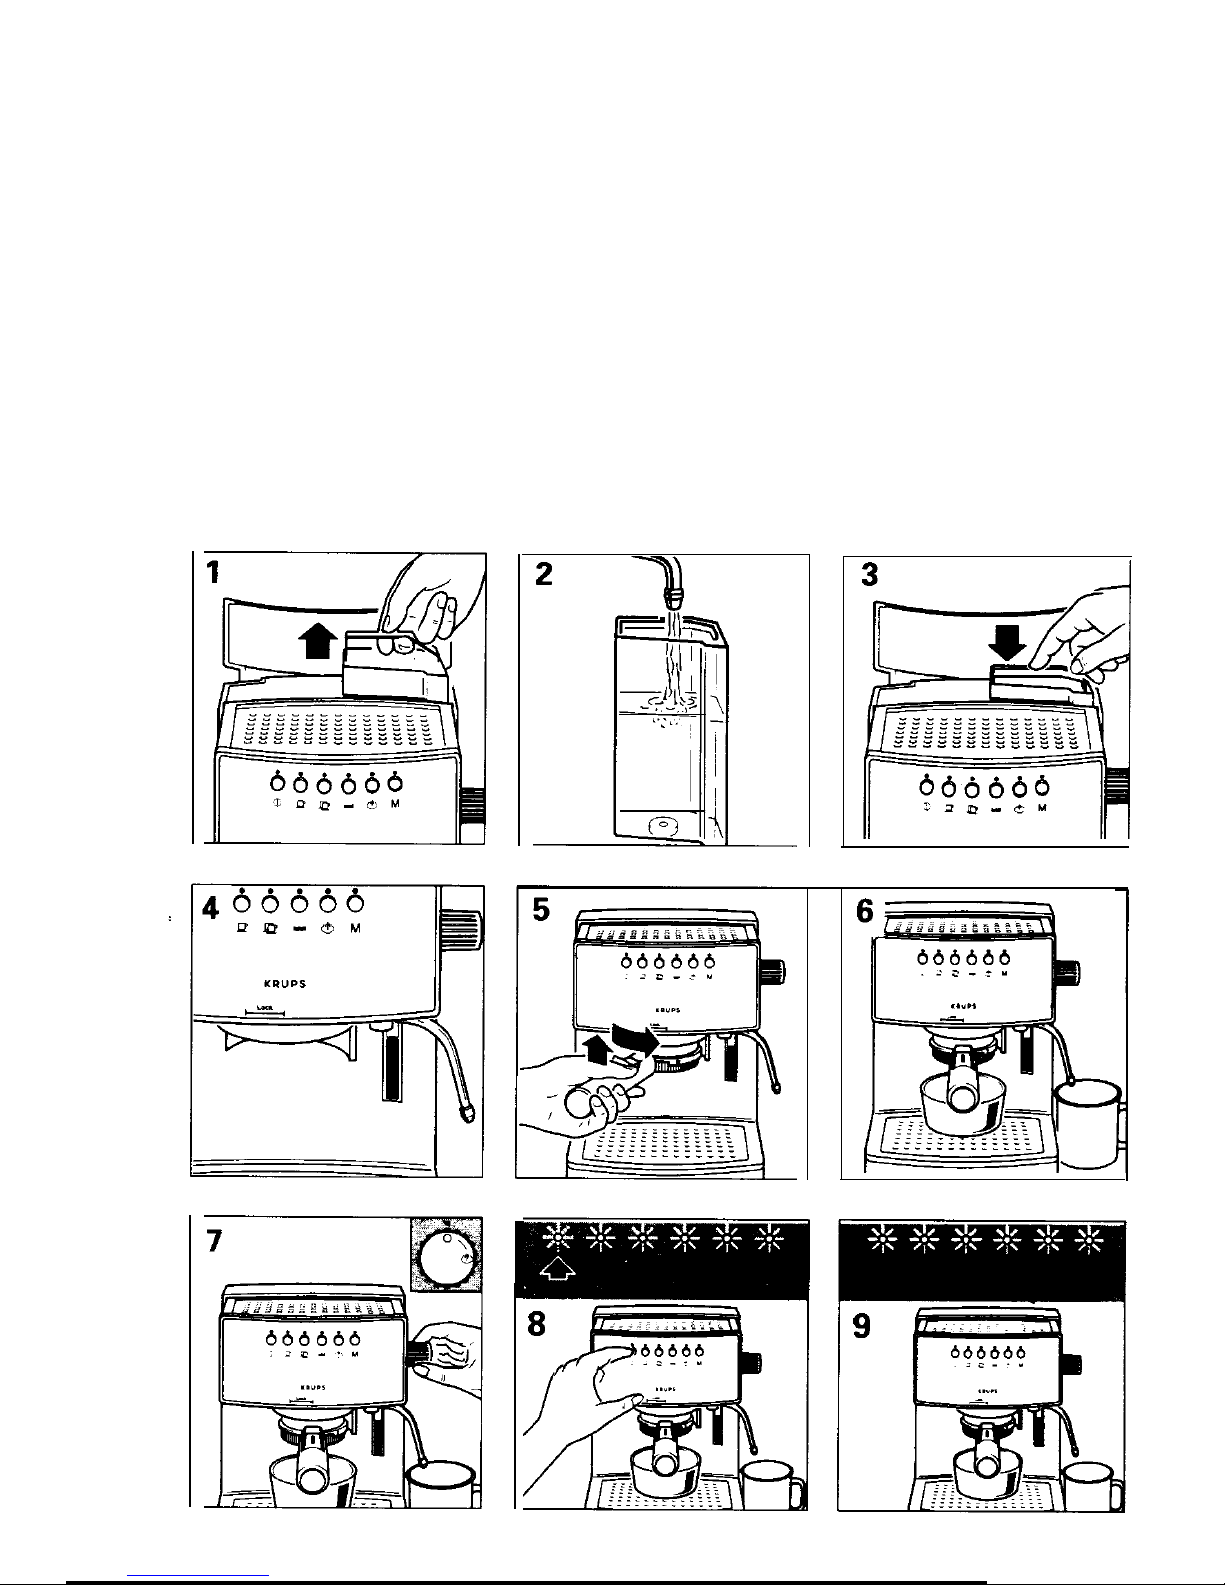
Step 1
Before first use, we recommend allowing
water to run through the machine to cleanse
the internal system.
n
Remove the water reservoir from the
machine by lifting up on the handle,
located on top of the water reservoir
(see figure 1).
W
This allows you to conveniently bring the
water reservoir to the faucet. Fill with
cold water (see figure 2).
n
Replace reservoir back into the machine
(see
figure 3).
W
The water level indicator will let you see
how much water remains in the
container, and you should refill as needed
(see figure 4).
n
Insert the filter holder (without coffee)
into the machine and raise it up into the
brewing head at a 45 degree angle. Turn
the filter holder to the right until the
marking located on the auto-eject button
of the filter holder handle is within the
“lock-range” indicated on the lower edge
of the front panel. This will lock the filter
holder into place (see figure 5).
You are now ready to warm-up the
machine.
Step 2
n
Place a cup that has at least a 5 oz.
capacity under the filter holder spout and
another cup or frothing pitcher under the
steam nozzle (see figure 6).
10
Turn the rotary dial to the 0 position
(see
figure 7).
Press the ON/OFF button
(c) (D
.
The red
indicator light will flash, four LED lights
will be stationary green and the “memory
light”
M
will be orange (see figure 8).
When the red indicator light stops
flashing, the machine is ready for use
(see
figure 9).
Press the automatic ‘two” portion control
button
m
It
will flash first, then begin to
run water through the system, dispensing
the hot water through the filter
holder-
(see
figure 10).
The portion control is pre-set into memory
and will dispense approximately 4 oz. of
water, then shut off automatically. You do
not need to manually stop or turn off the
system.
Repeat this process five times, each time
waiting for the red light to stop flashing.
This process will require you to stay with
the machine to empty each cup as it
becomes full.
n
To clear the steam nozzle, press the hot
water button = and turn the rotary dial
to the 6 position. Place a cup or pitcher
under the nozzle
(see
figure 11).
Allow several ounces of water to run
through and then turn the rotary dial back to
the 0 position.
Note: Your machine has a thermostat that
controls the temperature continuously so
that it will be ready anytime you need it.
You may leave your machine on for several
hours using a minimum amount of power. If
you don’t intend to use the machine for a
long period of time (overnight, for example),
it is recommended that you turn it off.
When using the appliance, you should pre-
warm the cups with hot water. Afterwards,
you can keep the cups at their ideal
temperature by placing them on top of the
warming tray upside down. You may also
want to place a dishcloth on top of the cups
to help keep them warm.
Page 11

Pre-Warming Cups:
Turn the rotary dial to the 0 Position.
Insert the filter holder without coffee into
the machine.
Press the ON/OFF button
(cl a
.
The red indicator light will flash, four LED
lights will be stationary green and the
“memory light”
M
will be orange.
When the red indicator light stops flashing,
the machine is ready for use. Place
cup(s)
under the filter holder spout and press “one”
or “two” portion control button according to
the size of the
cup(s).
If the machine is ready
for use, the warming tray will slowly begin
to heat up. Place the cups upside down onto
the warming plate.
Step 1
n
Fill the water reservoir with fresh cold
water (see
figures l-31.
Step
2
n Turn the rotary dial to the 0 position
(see
figure 7).
W
Press the ON/OFF button
(cl 0
.
The red
indicator light will flash, four LED lights
will be stationary green and the “memory
light”M will be orange (see figure
8).
When the red indicator light stops flashing,
the machine is ready for use.
To prevent previous coffee particles from
clogging the brewing head, run a small
amount of water through the filter holder
(see
Using for the first
time)
without coffee.
Hint: Leave the filter holder in the machine
without coffee and allow it to heat for
several minutes before brewing.
This, along with pre-warming the cups will
contribute to a hotter cup of espresso.
Step
3
n
Remove the ProCrema filter holder from
the machine.
The filter holder selector ring can be
adjusted to three individual positions to
suit your personal taste (see figure 121:
R
1 cup regular strength espresso
4p,p
1 cup strong espresso
2 cups mild espresso
J@
2 cups regular strength espresso
Turn the selector ring to the desired
position.
l
Depending on which setting you have
chosen add one, one and a half, or two
KRUPS measuring spoons of espresso
coffee
(see
figure 13).
m
Make sure that you do not overfill the
basket. Press (tamp) the coffee lightly into
the filter holder using the back of your
KRUPS measuring spoon (see
figure
14).
Your ProCrema filter holder also features a
built-in tamper, which will ensure that the
coffee has been evenly tamped.
n
It is also vet-y important that you remove
any coffee that has fallen onto the rim of
the filter holder while you were filling or
tamping the coffee (see figure 151.
n
Insert the filter holder into the machine
by raising it up at a 45 degree angle. Turn
the filter holder to the right until it is
firmly locked into place. The marking
located on the auto-eject button of the
filter holder handle must be within the
“lock-range” indicated on the lower edge
of the front panel (see
figure
181.
Place the warmed
cup(s)
under the filter
holder spout.
Step
4
The machine is already pre-programmed to
prepare either “one” (1.7 oz.) or “two’ (4 oz.)
cups of espresso.
n
Press the appropriate button for “one”
cp
or “two”
12p
(see figure
17).
The green light will begin to flash and the
appropriate amount of coffee will be
dispensend. Once brewed, the red indicator
light will begin to flash, indicating that the
machine is readjusting the brewing
temperature. However, this will not stop you
from continuing to brew espresso.
11
Page 12

A
Caution:
If the water reservoir is empty and the pump
is running, you will hear a distinct noise,
which is louder than the normal operating
sound. Turn off the machine! Never let the
pump run when the water reservoir is
empty, as this can damage the pump.
Step 5
n
To remove coffee from the filter basket,
remove the filter holder from the
machine. To remove the coffee cake from
the filter holder, press the auto-eject
button located on the handle and knock
out the espresso grounds
(see
figure
18).
Reinsert the filter holder back into the
machine to help keep it warm.
~~~a~
The memory function can be used to alter
the pre-programmed portions to make
“shorter” or “taller” amounts of espresso.
Once selected, the new portion will remain
in memory until the next time it is manually
changed.
Step 1
Turn ON the appliance as you would for
preparing espresso.
Insert the filter holder (with coffee) into the
brewing head. Place a cup under the filter
holder.
Once the red indicator light stops
flashing, press the M key. The
M
indicator light will flash, while the
indicator lights for “one” and “two” cup
portions will remain constant
(see
figure
19).
Press and hold in either the “one”
Q
or “two” Sp selection until the
desired quantity of espresso is
dispensed (see figure 201.
Press the M key to store the new
programmed amount into memory
(see figure 21
I.
Your “Novo 4000 Programatic” machine can
be used to dispense hot water for tea,
cocoa, instant soup and other hot beverages
by using the steam/hot water nozzle (do not
use the “Perfect Froth” attachment for this
procedure).
Step 1
Make sure the reservoir is filled with fresh,
cold water.
Turn the rotary dial to the 0 position and
turn the machine ON. When the red
indicator light stops flashing, swing out the
steam/hot water nozzle
(f)
and place a cup
under the nozzle.
n
Press the
HB:
button and turn the rotary
dial to the
.$J
position (see figure 22).
When you have reached the desired
quantity of hot water, turn the rotary dial
back to the 0 position.
Note: If you do not turn the rotary dial to
activate the hot water function within 2
minutes, the machine will automatically
reset to the normal operating mode.
Once you have removed the cup from under
the steam/hot water nozzle, swing the nozzle
inward, over the drip tray to catch any
excess water.
A
Exercise caution when using the
steam nozzle, it is very hot!
In addition to preparing coffee and
espresso, you can also use your “Novo 4000
Programatic” machine to froth milk for
cappuccino. Cappuccino is traditionally
served in a 5 oz. cup consisting of
l/3
espresso,
l/3
steamed milk, topped with
l/3
froth.
n
For best results, you should use the
included KRUPS patented ‘Perfect Froth’
attachment
(see
figure 23).
12
Page 13

The “Perfect Froth” attachment should be
used to froth milk only.
As long as the machine is ON and the water
reservoir is properly filled, you can
froth/steam at any time. It is not required
that you brew coffee before
frothing/steaming. The thumping sound
which occurs during frothing/steaming
results from the interval-controlled water
pump. As the thumping sound begins a few
drops of water will come out of the nozzle
before changing to steam.
Step 1
The first step in making cappuccino is to
make espresso (see Preparing Espresso).
When making cappuccino, use a cappuccino
cup which has a capacity of at least 5 oz.
Fill one third to half the cup with espresso,
depending on your personal taste.
Step
2
Fill a stainless steel pitcher
l/3
to
l/2
full
with fresh, cold milk (skim or low-fat works
best).
n With the rotary dial in the 0 position,
press the 6 button (see figure 24).
w
Submerge the tip of the “Perfect Froth”
approximately
l/2
way. Do not let
“Perfect Froth” touch the bottom of the
pitcher; it will prevent the milk from
properly frothing. Turn the rotary dial to
the
(?3
position (see figure 25).
Leave the steam nozzle in the milk for about
45-60 seconds, depending on the
consistency of froth you desire and type of
milk being used.
Attention: Do not bring milk to a boil
(if large bubbles start forming at the surface
of the milk).
The top closure of the “Perfect Froth” has a
very fine hole which draws air into the milk.
If this hole becomes clogged, the “Perfect
Froth” will not work properly. Never
immerse the top closure.
Once the milk is frothed, keep the “Perfect
Froth” tip submerged as you turn the rotary
dial back to the 0 position. This will
prevent any hot milk from splattering.
Step 3
Pour the steamed milk to the waiting
espresso and spoon on froth. If you prefer
stiff froth, let the pitcher stand for a few
seconds after frothing.
Immediately wipe off the milk residue left
on the nozzle (see Cleaning).
Heating liquids
n
To conveniently heat liquids, make sure
that the “Perfect Froth” attachment is
removed. Follow the same instructions
for frothing milk, placing the steam
nozzle into a cup or receptacle and
steaming (see figure 26).
“Perfect Froth”:
It is strongly advised that you wipe off milk
residue from the steam nozzle and “Perfect
Froth” once frothing is complete.
n
For a thorough cleaning, remove each
separate part (see figure 33).
All parts should be handwashed in warm,
soapy water.
n
If the nozzle becomes clogged for any
reason, remove the screw holding the
steam nozzle in position
(see
figure 32)
and remove all milk particles (use a
needle and rinse running water).
Replace the steam nozzle and be sure screw
is turned tightly.
A
Use caution when removing the
“Perfect Froth” attachment; it may still
be hot.
Important
Clean the steam nozzle each time it has
been immersed in milk, otherwise the inside
of the nozzle becomes clogged and difficult
to remove. Allow the steam to escape into a
wet cloth for one or two seconds to flush
any residue.
13
Page 14

Cleaning the ProCrema filter holder
Do not place the ProCrema filter holder in
the dishwasher. Rinse the filter holder under
running water after each use.
l
Should the filter holder require a more
thorough cleaning, loosen the screw
located in the center of the filter holder
(see figure
301.
n
Slowly remove each part and gently rinse
by hand. Replace each part as shown on
figure 31.
General Cleaning:
n
After use, empty the water reservoir and
drip tray (see figure
27).
After preparing espresso approximately 10
times, the drip tray will need to be emptied
and cleaned in warm, soapy water.
n
Before replacing the drip tray and grid,
make sure the baffle has been
placed in the back of the drip tray
(see figure 28 +
29).
Do not try to disassemble the main body of
the machine!
The appliance should be descaled at regular
intervals taking into consideration the
hardness of the local water. For this
purpose, the brewing sieve and its sealing
ring MUST first be unscrewed from the
brewing head. In doing this, a valve spring
will also fall out. Remove lime and coffee
powder from the brewing sieve and the
brewing head.
The filter holder must NOT be inserted in
the brewing head. Pull the “Perfect Froth”
attachment off the steam / hot water nozzle.
Dissolve 4 tablespoons of tartaric or citric
acid (obtainable at chemists and drugstores)
in 34 ounces of lukewarm water and pour
the solution into the water container.
Place the largest convenient receptacle
beneath the brewing head and switch on the
appliance.
As soon as the red control lamp glows
continuously, press the B key. Repeat this
process three times. Then switch off the
appliance immediately and allow the
remainder of the solution to act internally
for lo-15 minutes.
Now switch the appliance on again and
repeat the entire process a further time.
Place a receptacle beneath the steam I hot
water nozzle and press the Q key. As soon
as the red control lamp glows continuously,
turn the steam knob to the @ position.
Allow the appliance to generate steam for
about 1 minute. Now return the knob to the
0 position and switch machine off for 10
minutes. Then switch the appliance on
again and repeat this process a further time.
After the steam generation, allow the
remainder of the descaling solution to run
through the brewing head be pressing
either the Cp or the m key.
After the completion of the descaling
operation, wash out the water container
thoroughly with clean water.
Place receptacle beneath the brewing head
and fill the water container with clean water.
Switch on the appliance. As soon as the red
control lamp glows continuously, press the
Sp key. Repeat this operation five times.
Now place a receptacle beneath the steam
/
hot water nozzle and press the
clr,
key. As
soon as the red control lamp glows
continuously, turn the steam knob to the
@
position and let the appliance generate
steam for about a minute. Then return the
steam knob to the 0 position and switch
off the appliance.
Insert the valve spring with the rubber seal
upwards. Relocate the brewing sieve and
seal in the brewing head.
Empty the drip tray and clean it.
Problem:
Coffee temperature too low.
Solution:
n
Place the cups on the warming plate of
the appliance to preheat.
Page 15

Problem:
Loud pump noise.
Solution:
n
Check to make sure the water reservoir
has been filled and inserted correctly.
Problem:
Not enough froth when frothing milk.
Solution:
n
Steam nozzle or “Perfect Froth” clogged.
n
Milk is not fresh.
n
Milk is not cold.
w
The pitcher that you are using is not
suitable. It is recommended that you use
a stainless steel frothing pitcher.
n
The type of milk is not suitable.
We recommend using 2% or skim milk.
Whole milk is acceptable, but due to the
fat molecules, it will not have as dense a
froth, as if you were to use 2% or skim
milk.
. -----.-“__--
-_. _
Your KRUPS
#884
is covered by the
following warranty:
If within one year from date of purchase this
KRUPS product fails to function because of
defects in materials or workmanship,
KRUPS North America will, at its option,
repair or replace the unit without charge,
provided the owner has a proof of date of
purchase.
This warranty will be void if malfunction
was caused by damage to the product by
accident, misuse, use on frequency or
voltage other than marked on the product
and/or described in the instructions, abuse
including tampering, damage in transit, or
use for commercial purposes. This warranty
gives you specific legal rights, and you may
also have other rights which may vary from
state to state.
Problem:
Coffee does not flow out.
Solution:
H
Make sure water reservoir is properly
filled.
n
Check whether the water reservoir has
been properly inserted.
n
The machine may need to be decalcified
(see section “Decalcifying’).
H
Brewing head may be clogged with old
coffee grounds.
15
Page 16

10971 v I 884.
14314 OfxitI
US 71843
GUARANTEE OF PERFORMANCE
This fine KRUPS product is manufactured according to a rigid code
of quality standards, and, with minimum care, should give years of
satisfying service.
However, should the need arise for repairs or for replacement parts
within or after the warrant-v Deriod, please call our CONSUMER
SERVICE DEPARTMENT:
(800)
526-5377
2dhours
a day, 7 days a week
You will be provided with specific instruction on how to get your
product repaired, as well as the name and address of your nearest
.
authorized KRUPS Service Center. The department will also be able
to answer any general product questions you may have.
Before calling the Consumer Service Department, please have the
type number of your KRUPS appliance available.
You must have this information before calling our Consumer
Service Department so that we may better answer your questions.
The type number can be located by looking at the bottom of your
appliance.
This product is Type #884
Any general
correspondance
can be addressed to:
KRUPS North America, Inc.
P.O. Box 3900
Peoria, IL 61612
 Loading...