


USER MANUAL
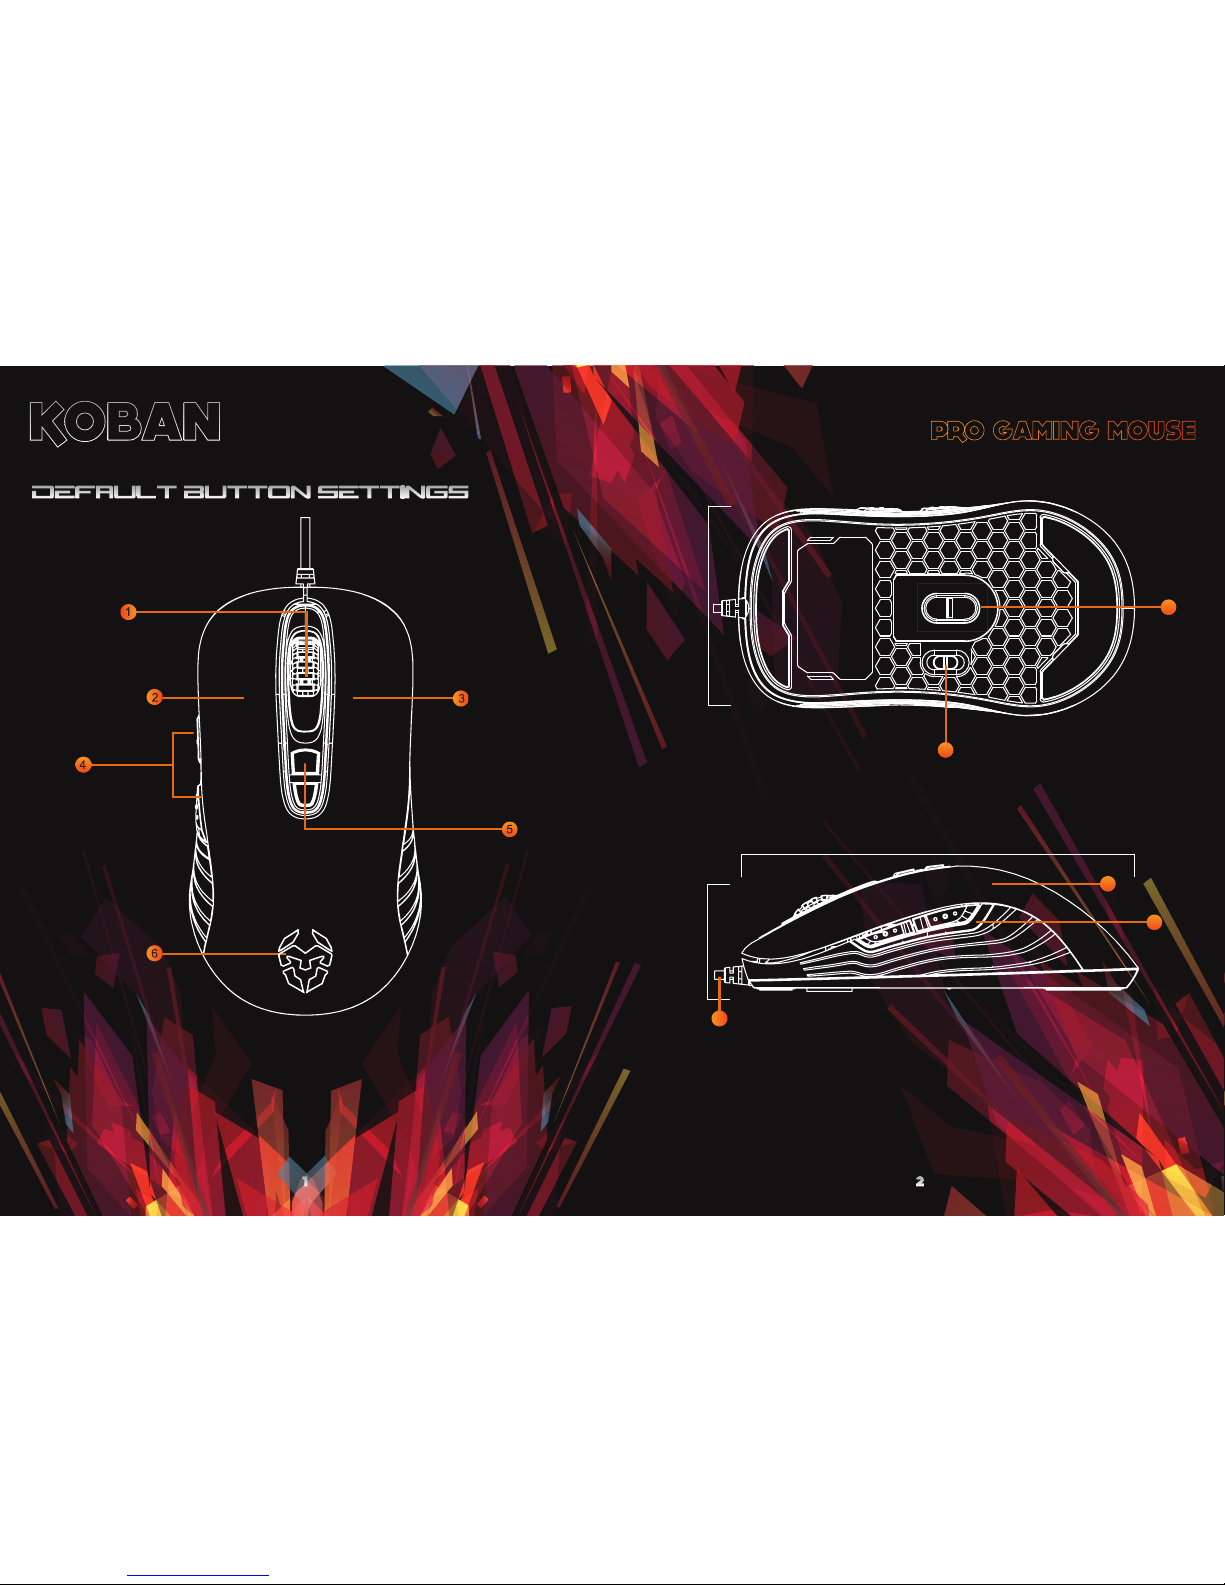
1) Scroll wheel / button
2) Left button
3) Right button
4) Programmable left buttons
5) DPI button
6) Krom logo
7) Optical technology
8) Change Hz
9) Rubber nish for better grip
123mm
10) Left side line backlight
11) PVC cable
38 mm
66 mm
11
9
10
8
7

1. Operation system:
Windows vista / windows 7 / Windows 8
2. Free USB 1.1 / 2.0 / 3.0 port
3. Driver installation
4. 50MB free hard disk space
SYSTEM REQUIREMENTS
INSTALLATION INSTRUCTIONS
1. Plug USB connector of KROM KOBAN to a USB port of your PC
2. Double click “setup.exe” to start the installation program.
3. Select the folder to save the driver and click “next” to continue.
4.
1) In the “left panel”, click the button that need to be changed.
2) In the “rigth panel”, click the option “Avanced Function” from
the drop in the “left panel”*.
3) Then click “Apply” to complete the change.
Programmable buttons
1. BUTTON CONTROL

1.1. Button asignament
1.1.1 Assign a macro
1.1.2 Prole
1) Select a button and click ”Macro Manager” from the menu.
2) In the pop-up window, click “NEW” and give the macro a personalized
name.
3) Select the options of “Record Delays” and set the “Loop Times” from the
right column if needed.
4) Click ”Start Record” type your desired keys and click “Stop Record” when
5) Click “Select a Macro” and choose one of the 3 options.
6) Assign one of the “Macro” created to a “Button” and click “Apply” to
complete the settings.
1)
2)
the settings.
Cycle Switching /

1.1.3 CPI Switch
1) Select a button and click ”CPI Switch” from the menu.
2) Select the desired function in the sub-menu and click
“Apply” to conrm the settings.
CPI Cycle: Cycle Switching / CPI Up: DPI level + / CPI Down: DPI level -
1.1.4 Windows
1) Select a button and click ”Windows” from the menu.
2) Select the desired function in the sub-menu and click “Apply” to

1.1.5 Mouse functions
1.1.6 Assing a launch
1) Select a button and click the desired mouse function in the menu: “Click”,
“Menu”,“Wheel Click”, “Double-click”, “IE Forward”, “IE Backward”,
“Scroll Up”, “Scroll Down”,“Tilt Left”, “Tilt Right”, “Fire Button”,
“On-To-Go (One of the combination buttons for continuous mouse function:
Hold this button and another button with an assigned mouse function at the
same time to repeat a corresponding mouse function)”.
2) Then, click “Apply”
Single mouse click to launch a PC program that you use frequently.
1) Select a button and click “Assign a launch” from the menu.
2) In the pop-up window, select the desired program from the folder and click
“OK” to continue.
3) Click “Apply” to complete the settings.

1.1.7 Windows Key
1.1.7 Open driver
”Windows Key” from the menu.1) Select a button and click
1) The same function as the windows key on the keyboard.
Then, click 2) “APPLY”
2) This function allow to open a software / programe
1) Select a button and click ”Open driver” from the menu.
2) Then, click “APPLY”

1.2 Avanced mousewheel options
1.1.8 Avanced function
1) Select the option “Avanced Function” from the drop-down menu.
2) Press the keyboard key to assign to this button or select one of the
“Avanced functions” sub-menu: “Basic comands”, “Additional commands”
or “Media functions”.
3) Then click “Apply” to complete the change.
1) Select an option from the drop down menu to assign the mousewheel.
2) Then click “Apply” to complete the change.

2. SENSITIVITY 3. LIGHT CONTROL
3) Then click “Apply” to complete the change.
Sensitivity options
1) X,Y axis sensitivity setting control the DPI of X axis and Y axis, when the
value is 0, the DPI on this axis remains unchanged; when the value is below 0,
then the DPI reduce; when the value is above 0, then the DPI increase.
If ‘XY synchronize’ is selected, then the DPI of X and Y axis are same, andthey
increase or reduce in same amount.
2) The DPI resolution has four levels and you can change the resolutions of
every level or desactivate one of these.
Light options
2) Then click “Apply” to complete the change.
1) Select the “light options” and “light mode” that you prefer.

4. GAMMING PROFILE SETTINGS
The mouse has ve different proles with own settings.
Each conguration prole is for a custom t mouse. Therefore,
you can congure each of the ve proles differently.
You can create a variety of congurations and save them for future use.
This will avoid duplication of settings. If you change to a different
computer, you can simply import you saved congurations and you will
not have set your personalized settings again.
Sensor ................................................... Optical AVAGO 3050
Resolution
............................
400-800-1600-3200-4000 DPI
Buttons ....................................................................................... 7
Brightness ....................................................................
.........Logo, scr
oll wheel, left side and DPI buttons
Polling
rate ................................................. 125/500/1000Hz
Acceleration ...................................................................... 20 gr
Response time ..................................... 1ms/2ms/4ms/8ms
Speed .................................................................. 60 inches/sec
Memoria interna ........................................................... 128kb
Macros ..................................................................................... 40
Perles ....................................................................................... 5
Dimensions ........................................... 123 x 66.7 x 38 mm
Cable Length ............................................................... 180 cm
Plug ........................................................................................ USB
Net Weight ................................................................
141±5 g
Compatibility ........................ Windows Vista/Win7/Win 8

1. Mouse
2. User Manual
3. Package Box
1 pc
1 pc
1 set
Accessories List
If you have any questions regarding technical problems please
contact us via our website:
 Loading...