

Page 1
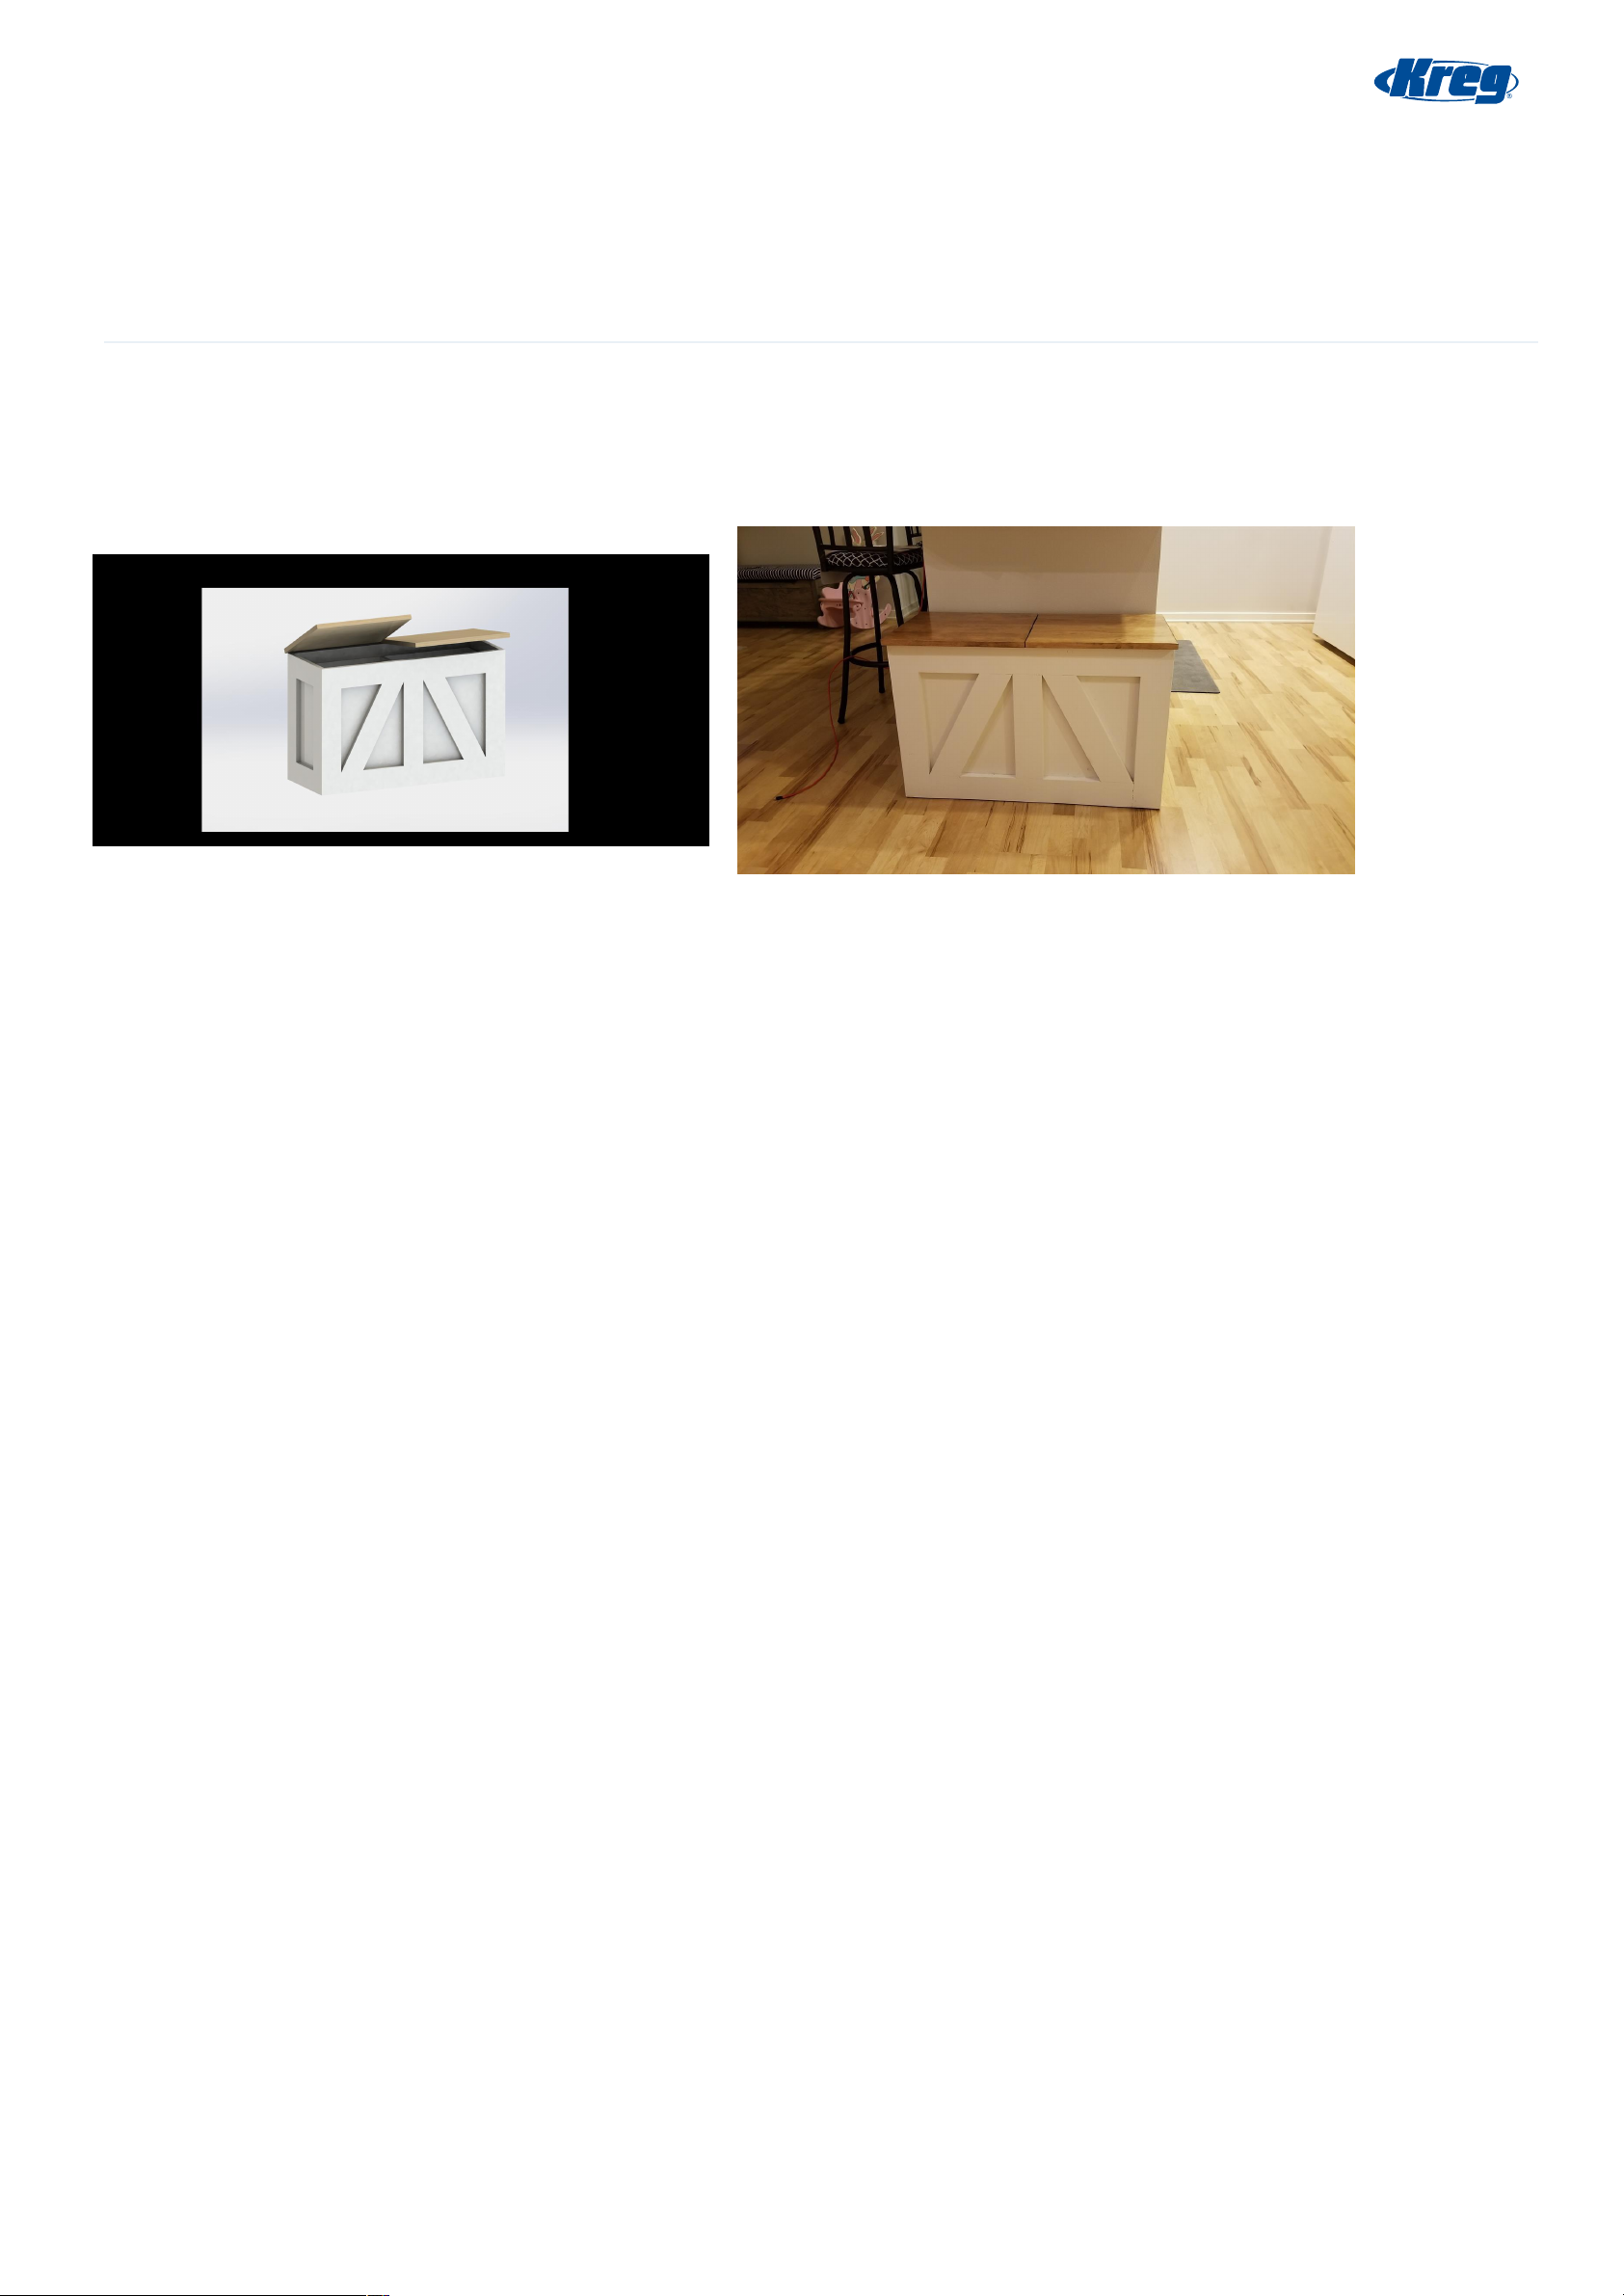
Trash/Recycle Bin
Difficulty
Moderate
My wife and I wanted to have a nice looking trash and recycle bin. We were using old black plastic bins and they we getting
dusty and the lid mechanism kept breaking. My wife found plans from Ana White but we could not find something we
really liked, so I made my own.
Page 1 of 13
Page 2

Tools
Kreg Tools
Rip-Cut™
Wood Project Clamp - 6"
Kreg® Pocket-Hole Jig 720
Mobile Project Center
Other Tools
Circular Saw (cordless)
Miter Saw
Square
Tape Measure
Drill (cordless)
Stapler
Sander
Air Compressor
Shop Vacuum
Materials
Wood Products
Plywood , 1/4" Thick , Half Sheet1
Board , 1x3 , 96"1
Board , 1x4 , 96"7
Hardware & Supplies
Wood Glue1
Hinges4
1-1/4" Coarse Pocket Hole Screw80
1/"-3/4" Staples50
Page 2 of 13
Page 3

Cut List & Parts
Front Top And Bottom , 1x4x27"4
Front Sides , 1x4x21"4
Sides Top And Bottom , 1x4x11.5"4
Sides Left And Right , 1x3x14"4
Front Middle , 1x4x14"2
Angles , 1x4x~18"4
Middle 3/4" Plywood , 3/4"x11.5"x19"1
Plywood Top , 3/4"x1/2"x11.5"1
Plywood Front And Back , 1/4"x19"x15"4
Plywood Sides , 1/4"x19"x11"2
Trash Can , 10.3 Gallon2
Page 3 of 13
Page 4
Directions
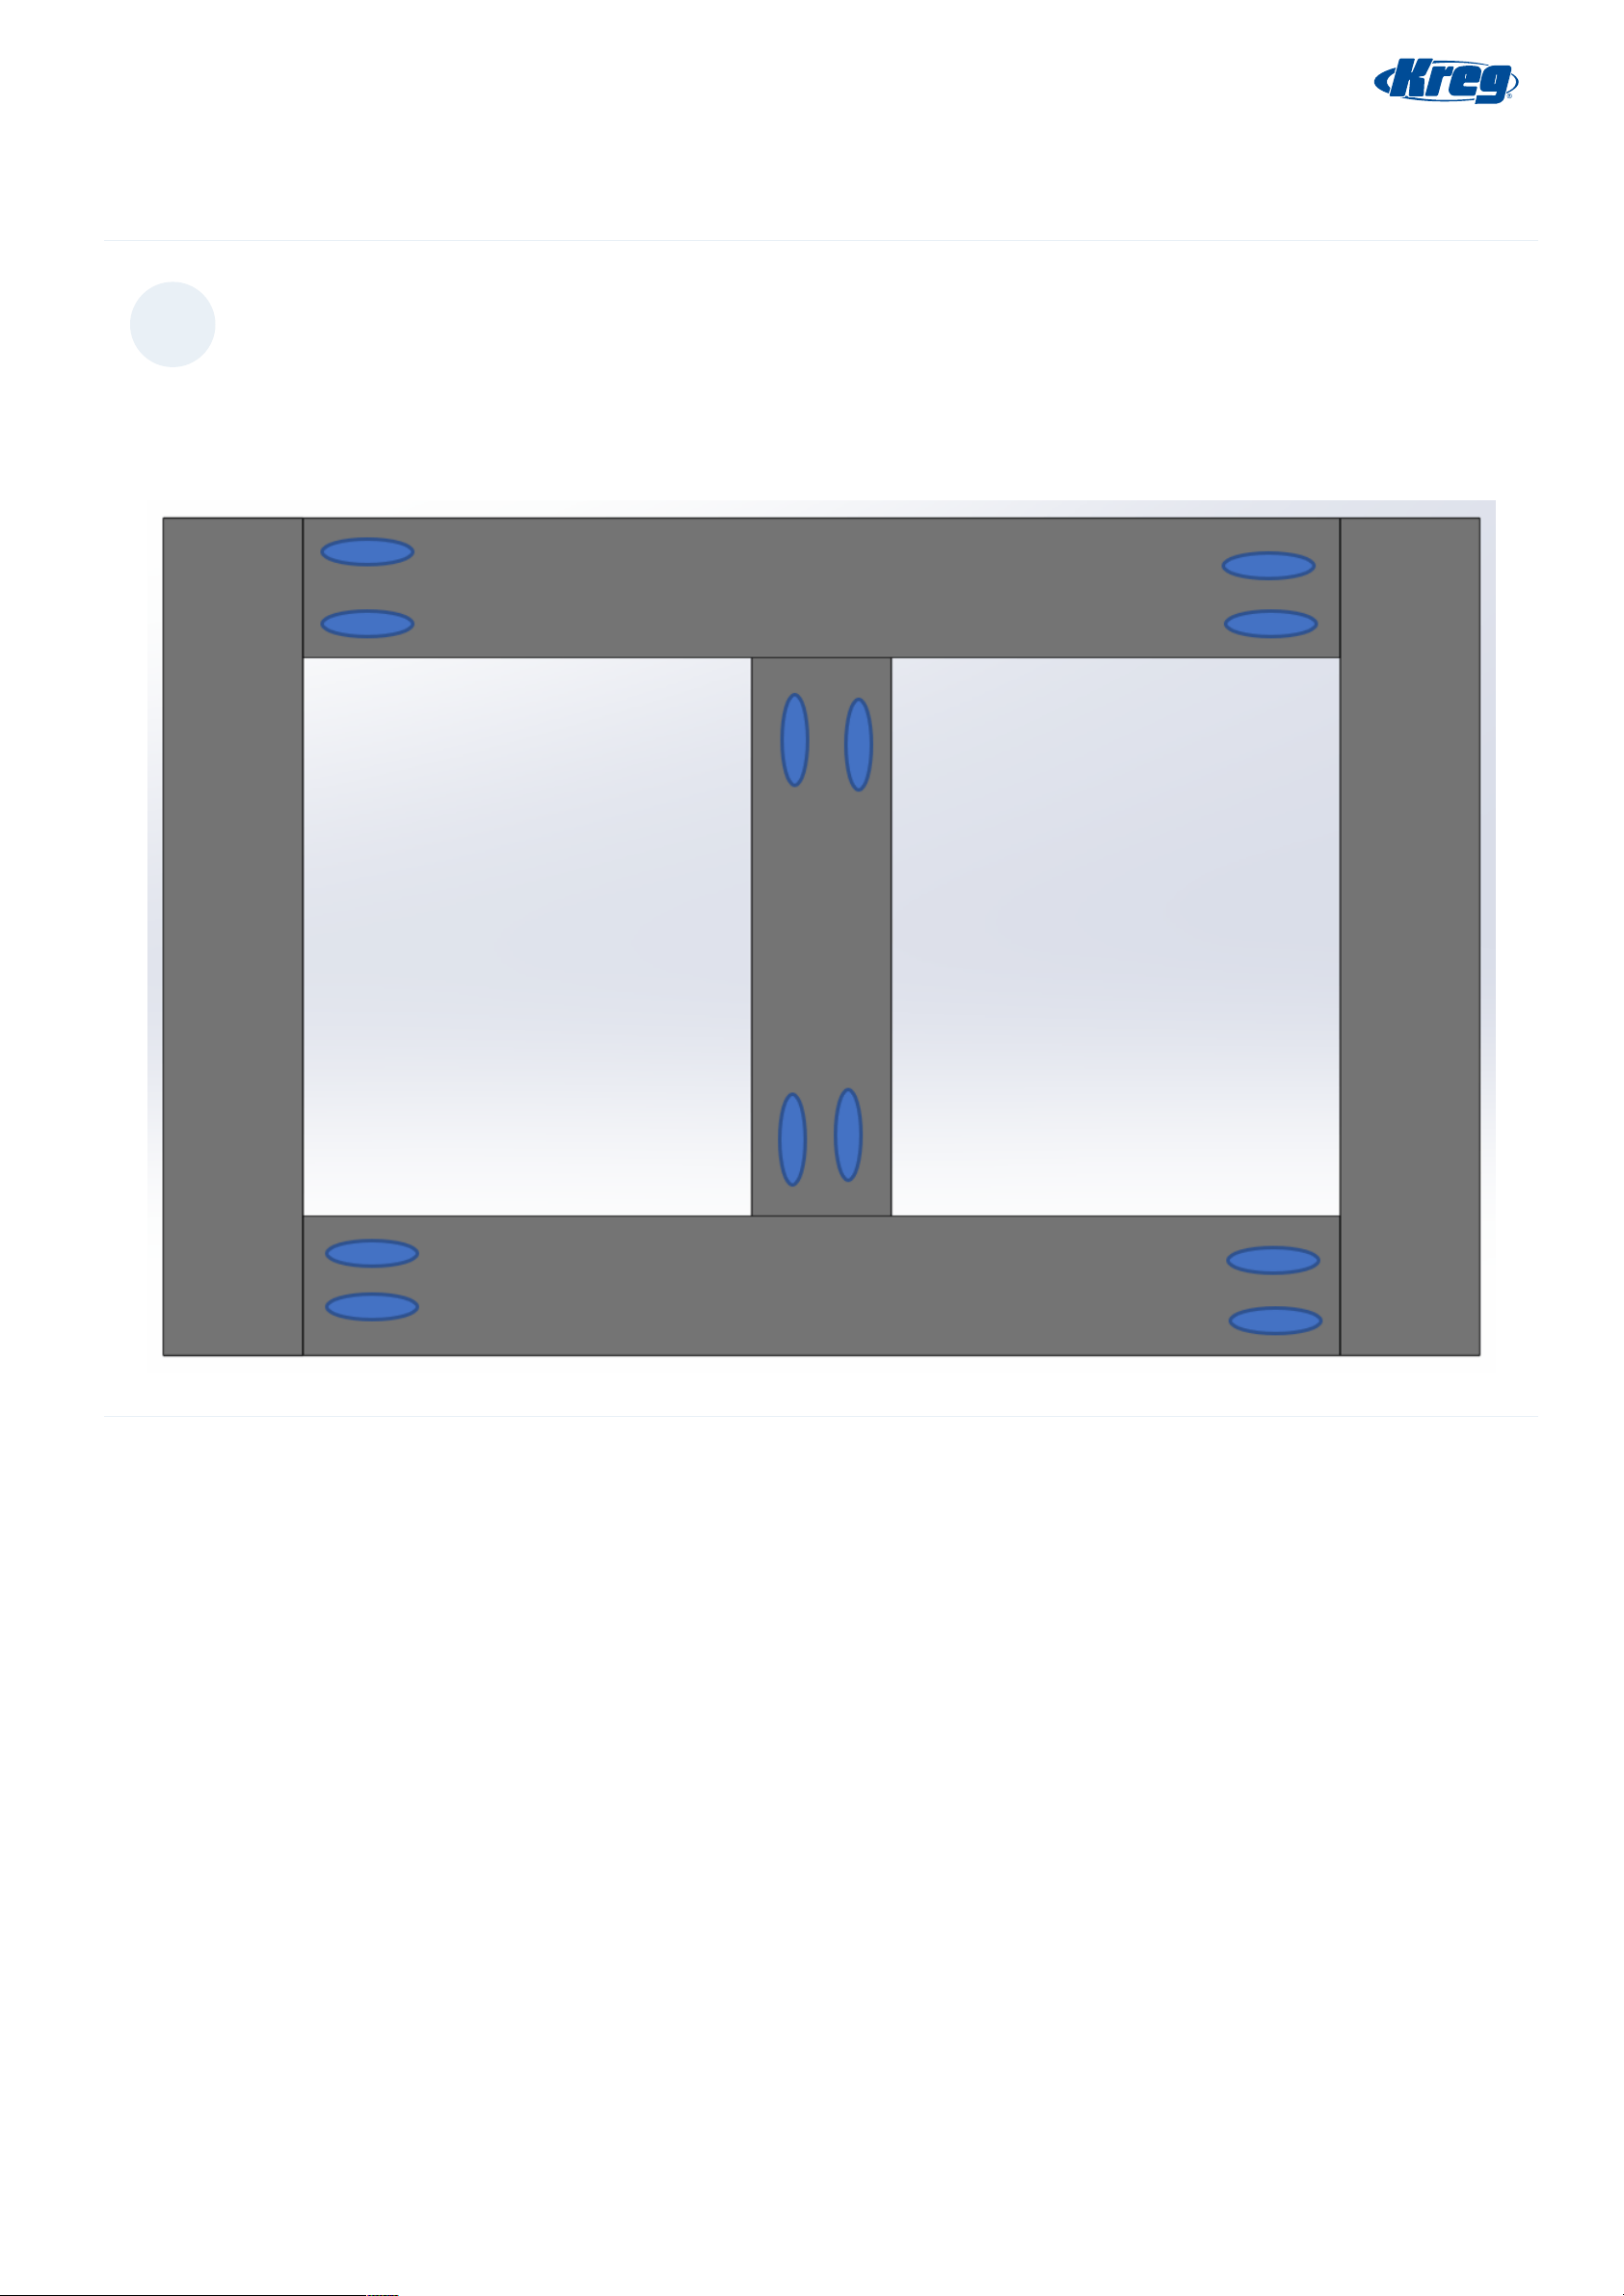
Fronts
1
First I made the fronts. We will use 2 of the 1x3x21s and 1x3x27s. I drilled two pocket holes in each end of the 27s pieces and
fastened it to the 21" pieces. See the picture of the orientation. Then, mark the center of the 27" piece and one of the 1x4x14"
pieces. Drill two pocket holes into each side and attach in the middle of the 27" piece. Also, remember to do this twice, one
for the front and one for the back!
Page 4 of 13
Page 5

2
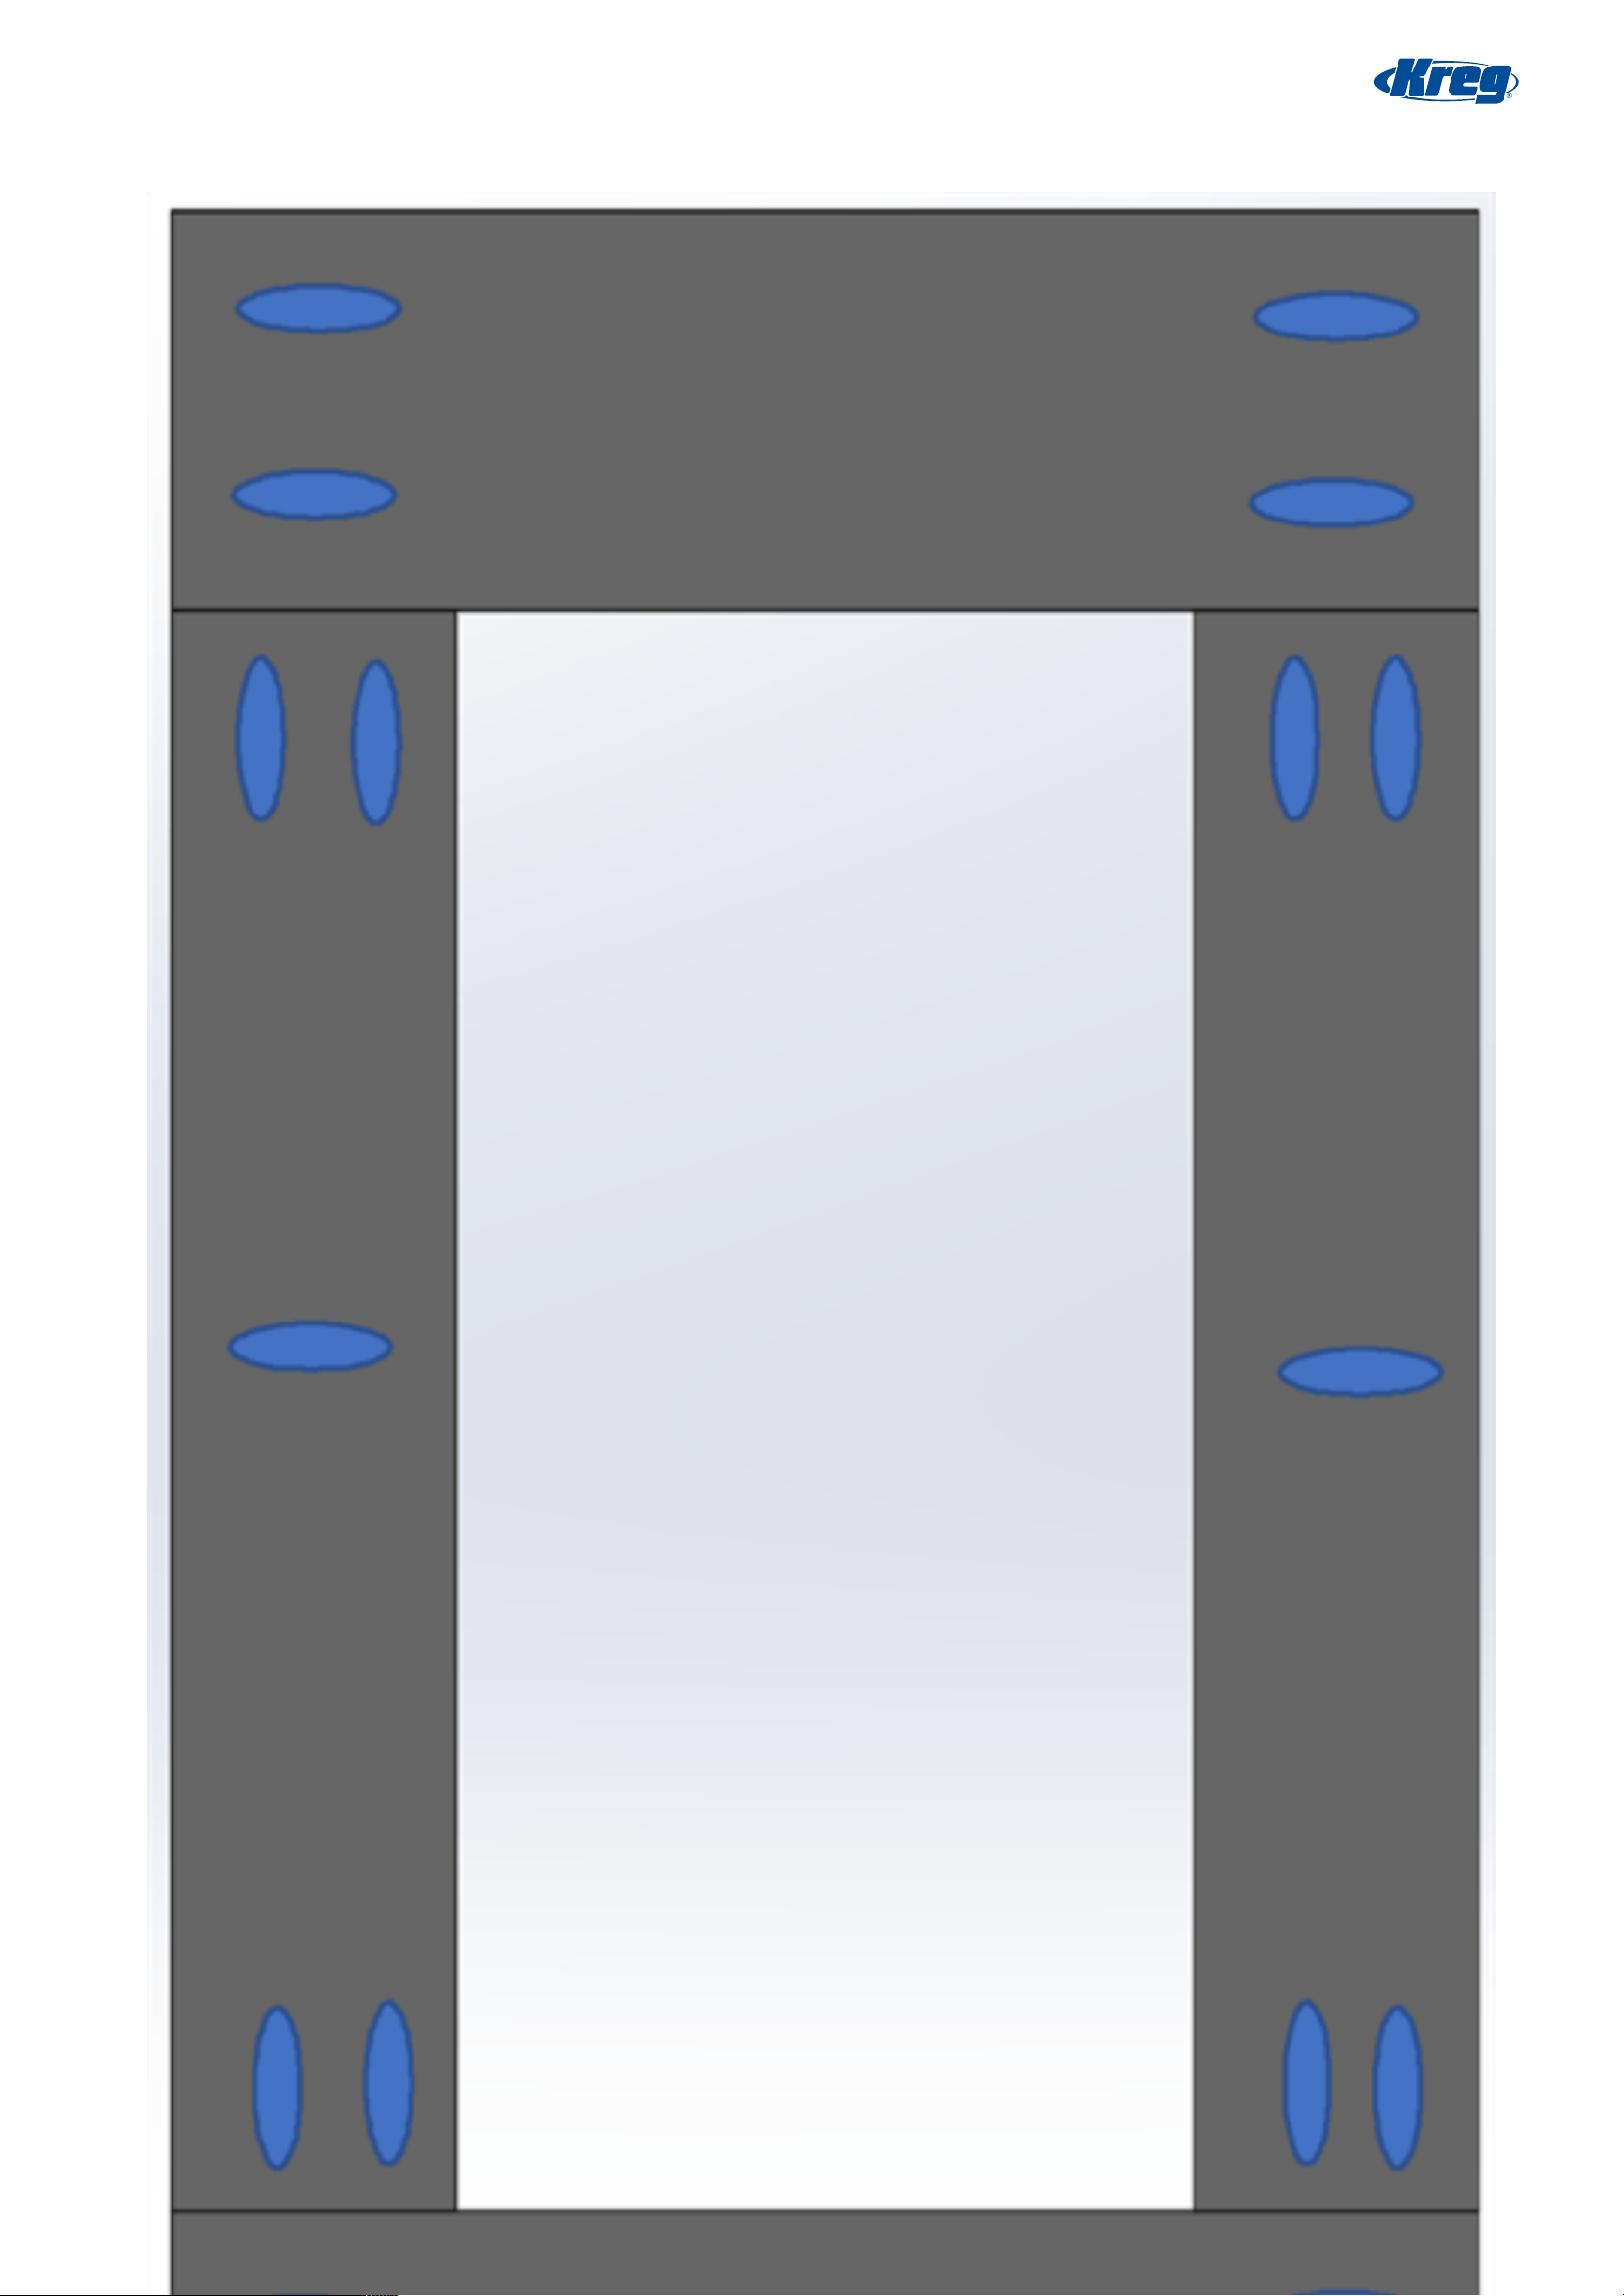
Sides
Using 2 of the 1x4x11.5s and 2 of the 1x3x14s drill two pocket holes into all of the ends. The reason this step is different is
because we will use the extra holes on the 1x4x11.5" pieces to attache the sides to the front pieces. Also, Add one pocket hole
in the middle of the 1x3x14s. Make sure the orientation and holes are like the picture. Assemble using the pocket hole screws
and do this a second time for the other side.
Also, he reason we are using 1x3 on the sides and not 1x4 is because when we fasten the front and sides together this side
will get 3/4" long from the thickness of the front, making the length 3-1/4", pretty close to the 3.5" of the 1x4.
Page 5 of 13
Page 6
Page 6 of 13
Page 7
3
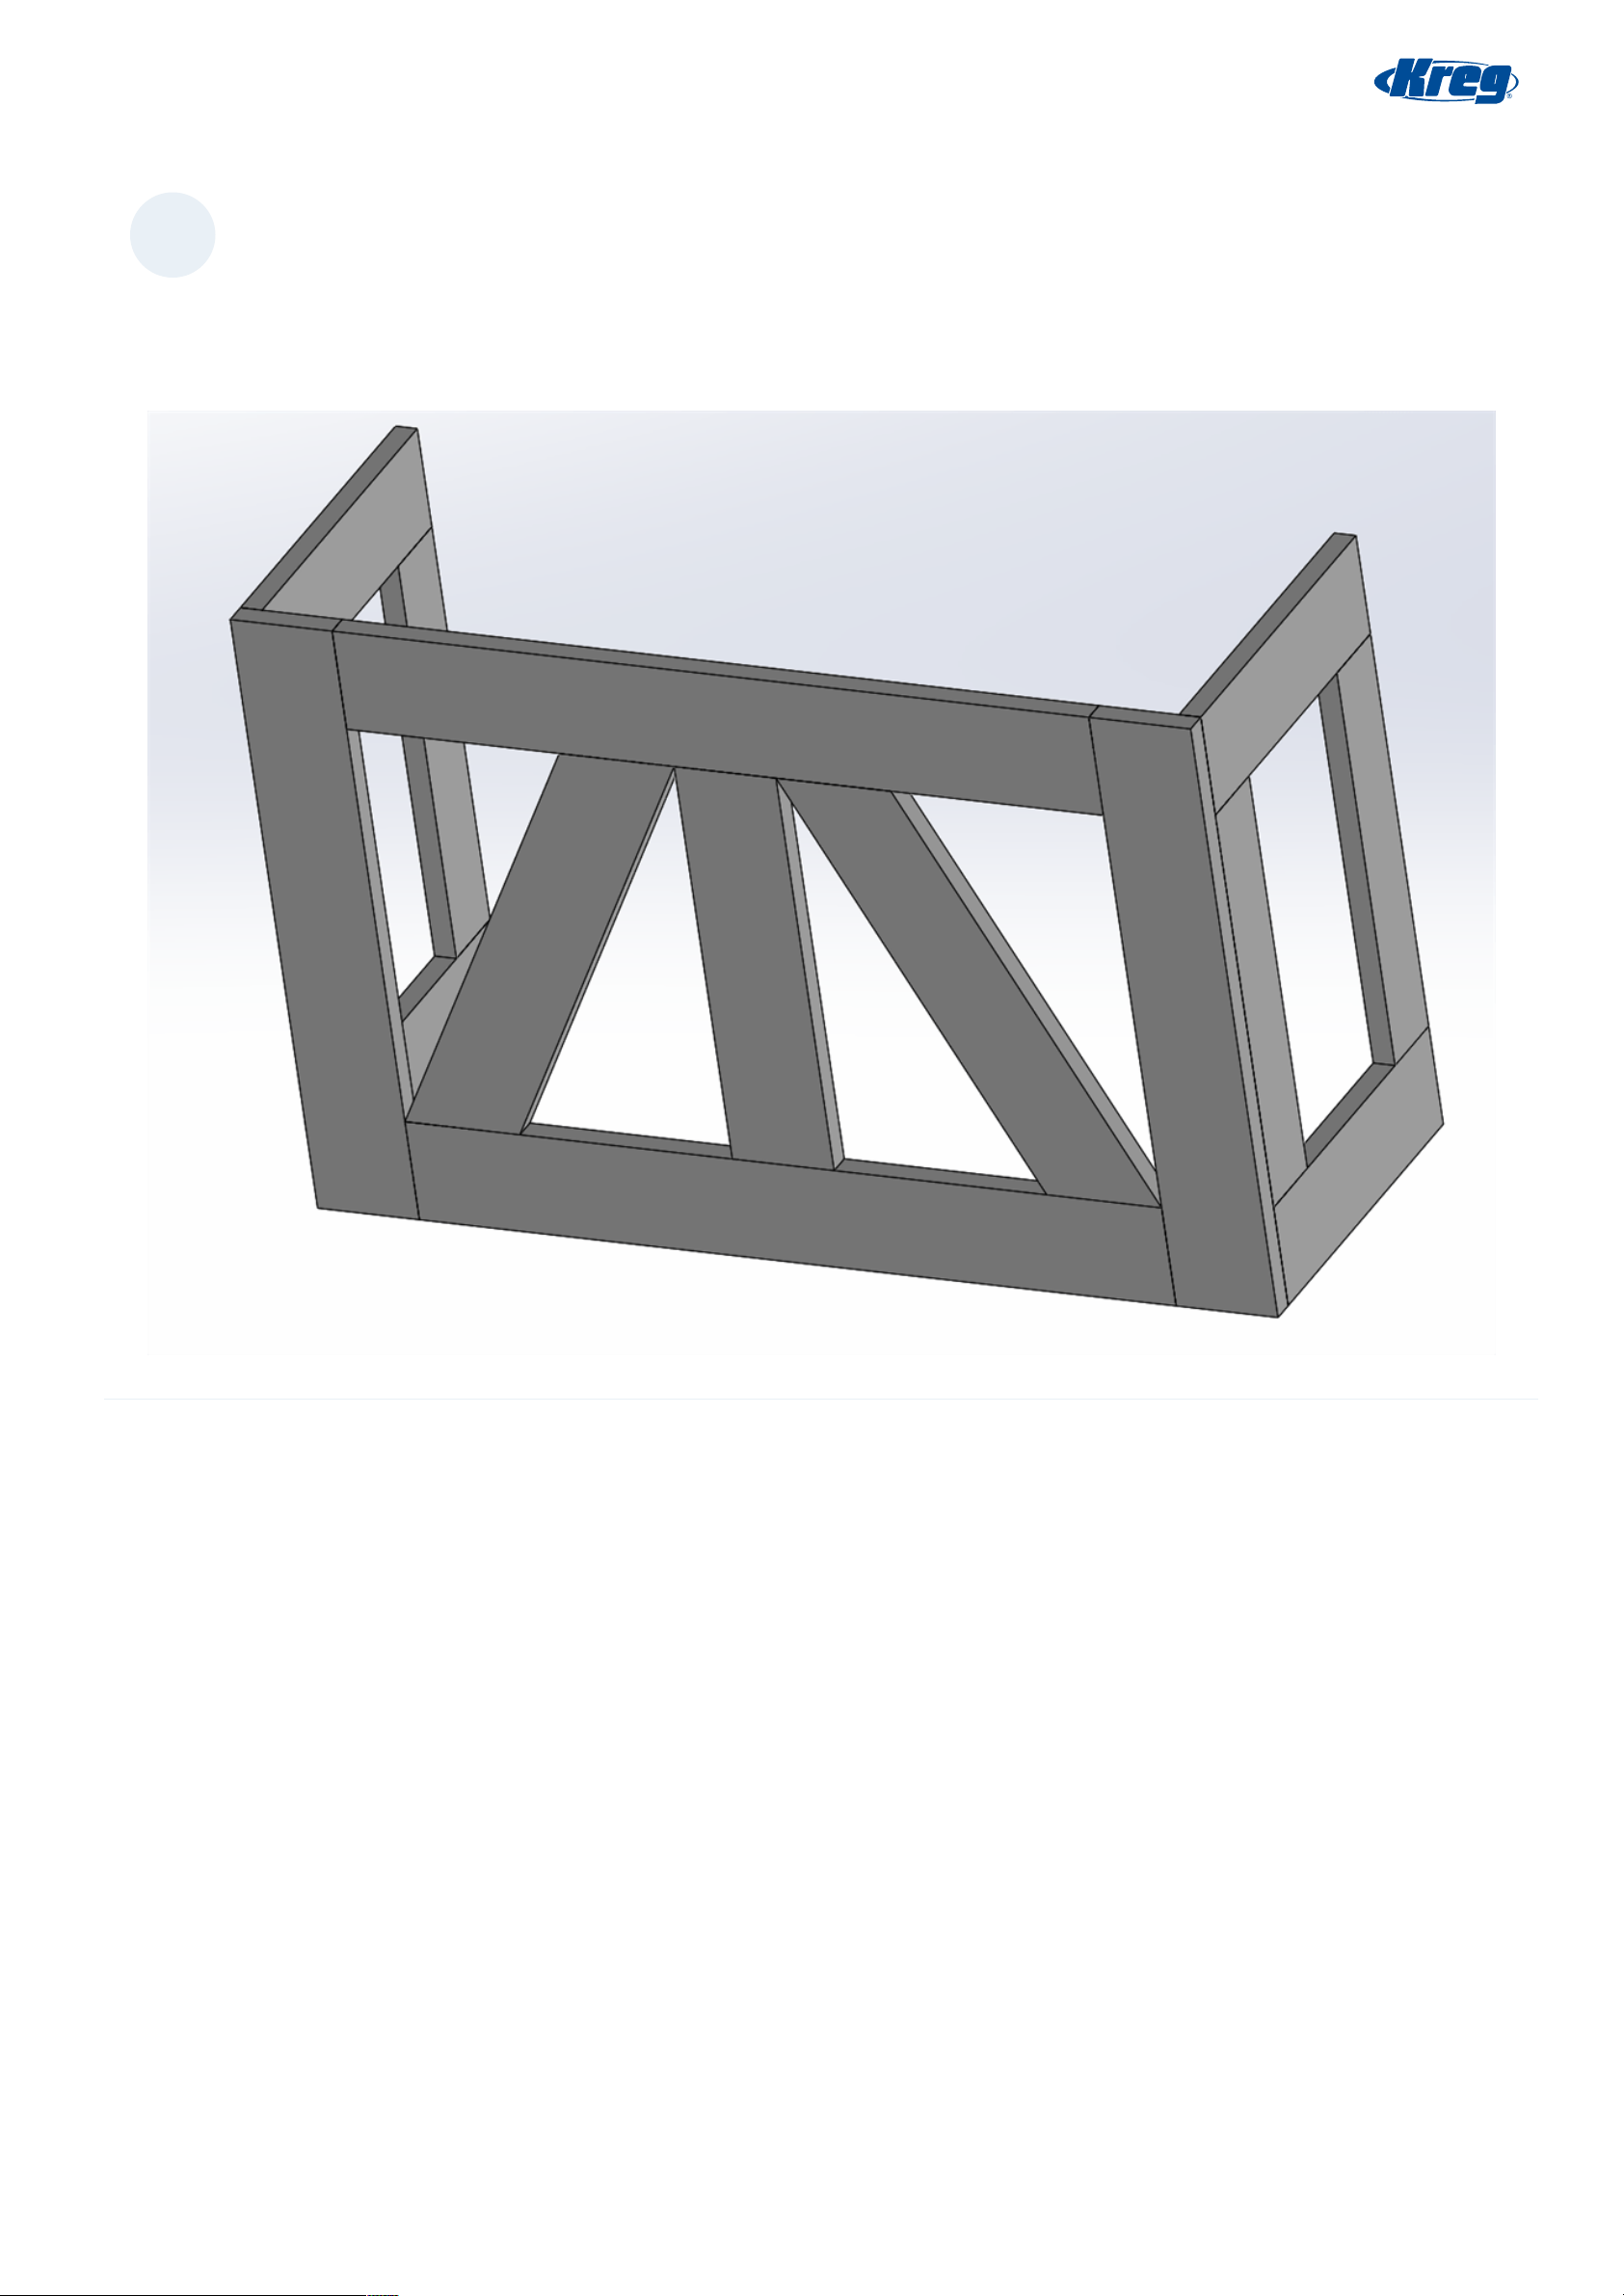
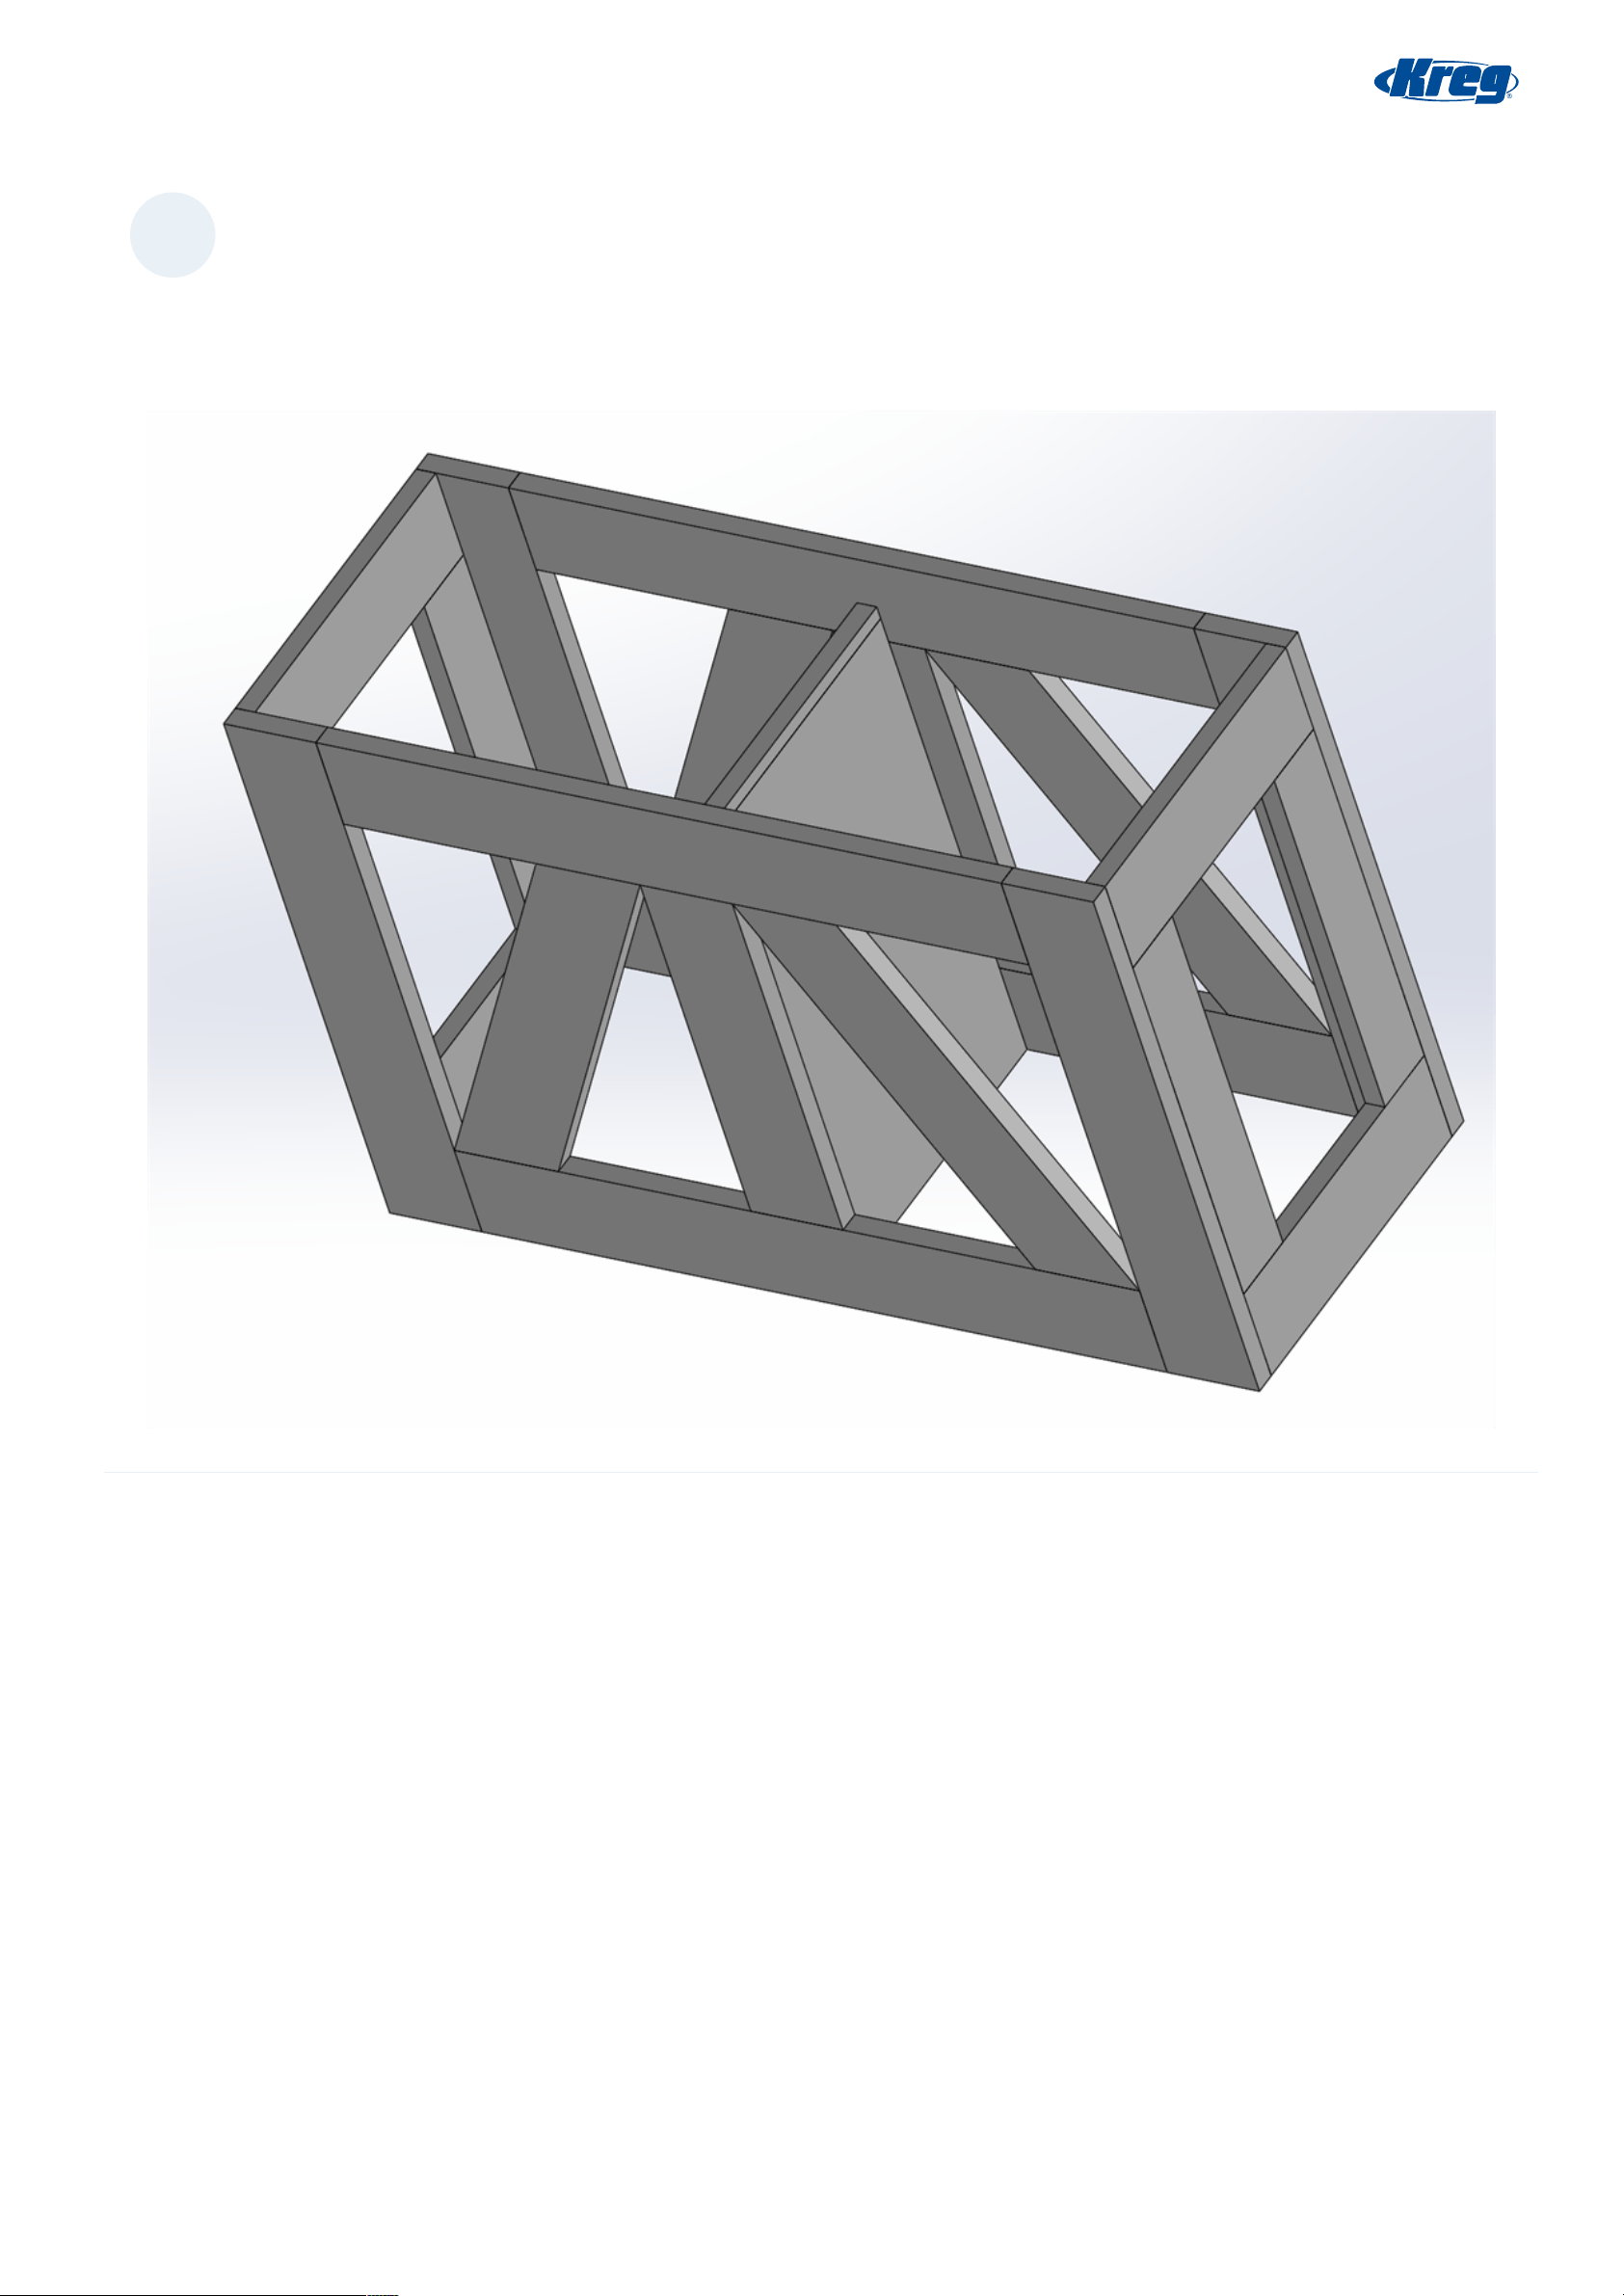
Attach the sides to the front
In this step we are attaching the sides to the front. This is where we will using those extra holes we just drilled. The sides will
go on the inside of the front, please see the picture to make sure you are assembling it correctly. Line up the same side on
each corner, we will make the ones lined up the top and the bottom can be trimmed later. I used both my Kreg right angle
clamp and my Kreg 90 degree corner clamp. These make this simpler but are not mandatory.
Page 7 of 13
Page 8
4
Attach the back and middle
Attaching the back should be easier than the front. Lay it down on the ground or your workbench and attach one side and
then the other. Ensure the top is aligned and the bottom can be a little off and trimmed later. After the back is fully
attached, mark the center of the 3/4" plywood. Line it up with the bottom and the marks from the middle of the 1x4x27"
front and back. Attach using pocket holes or using finish nails if painting.
Page 8 of 13
Page 9
5
Cut and attach the angle pieces
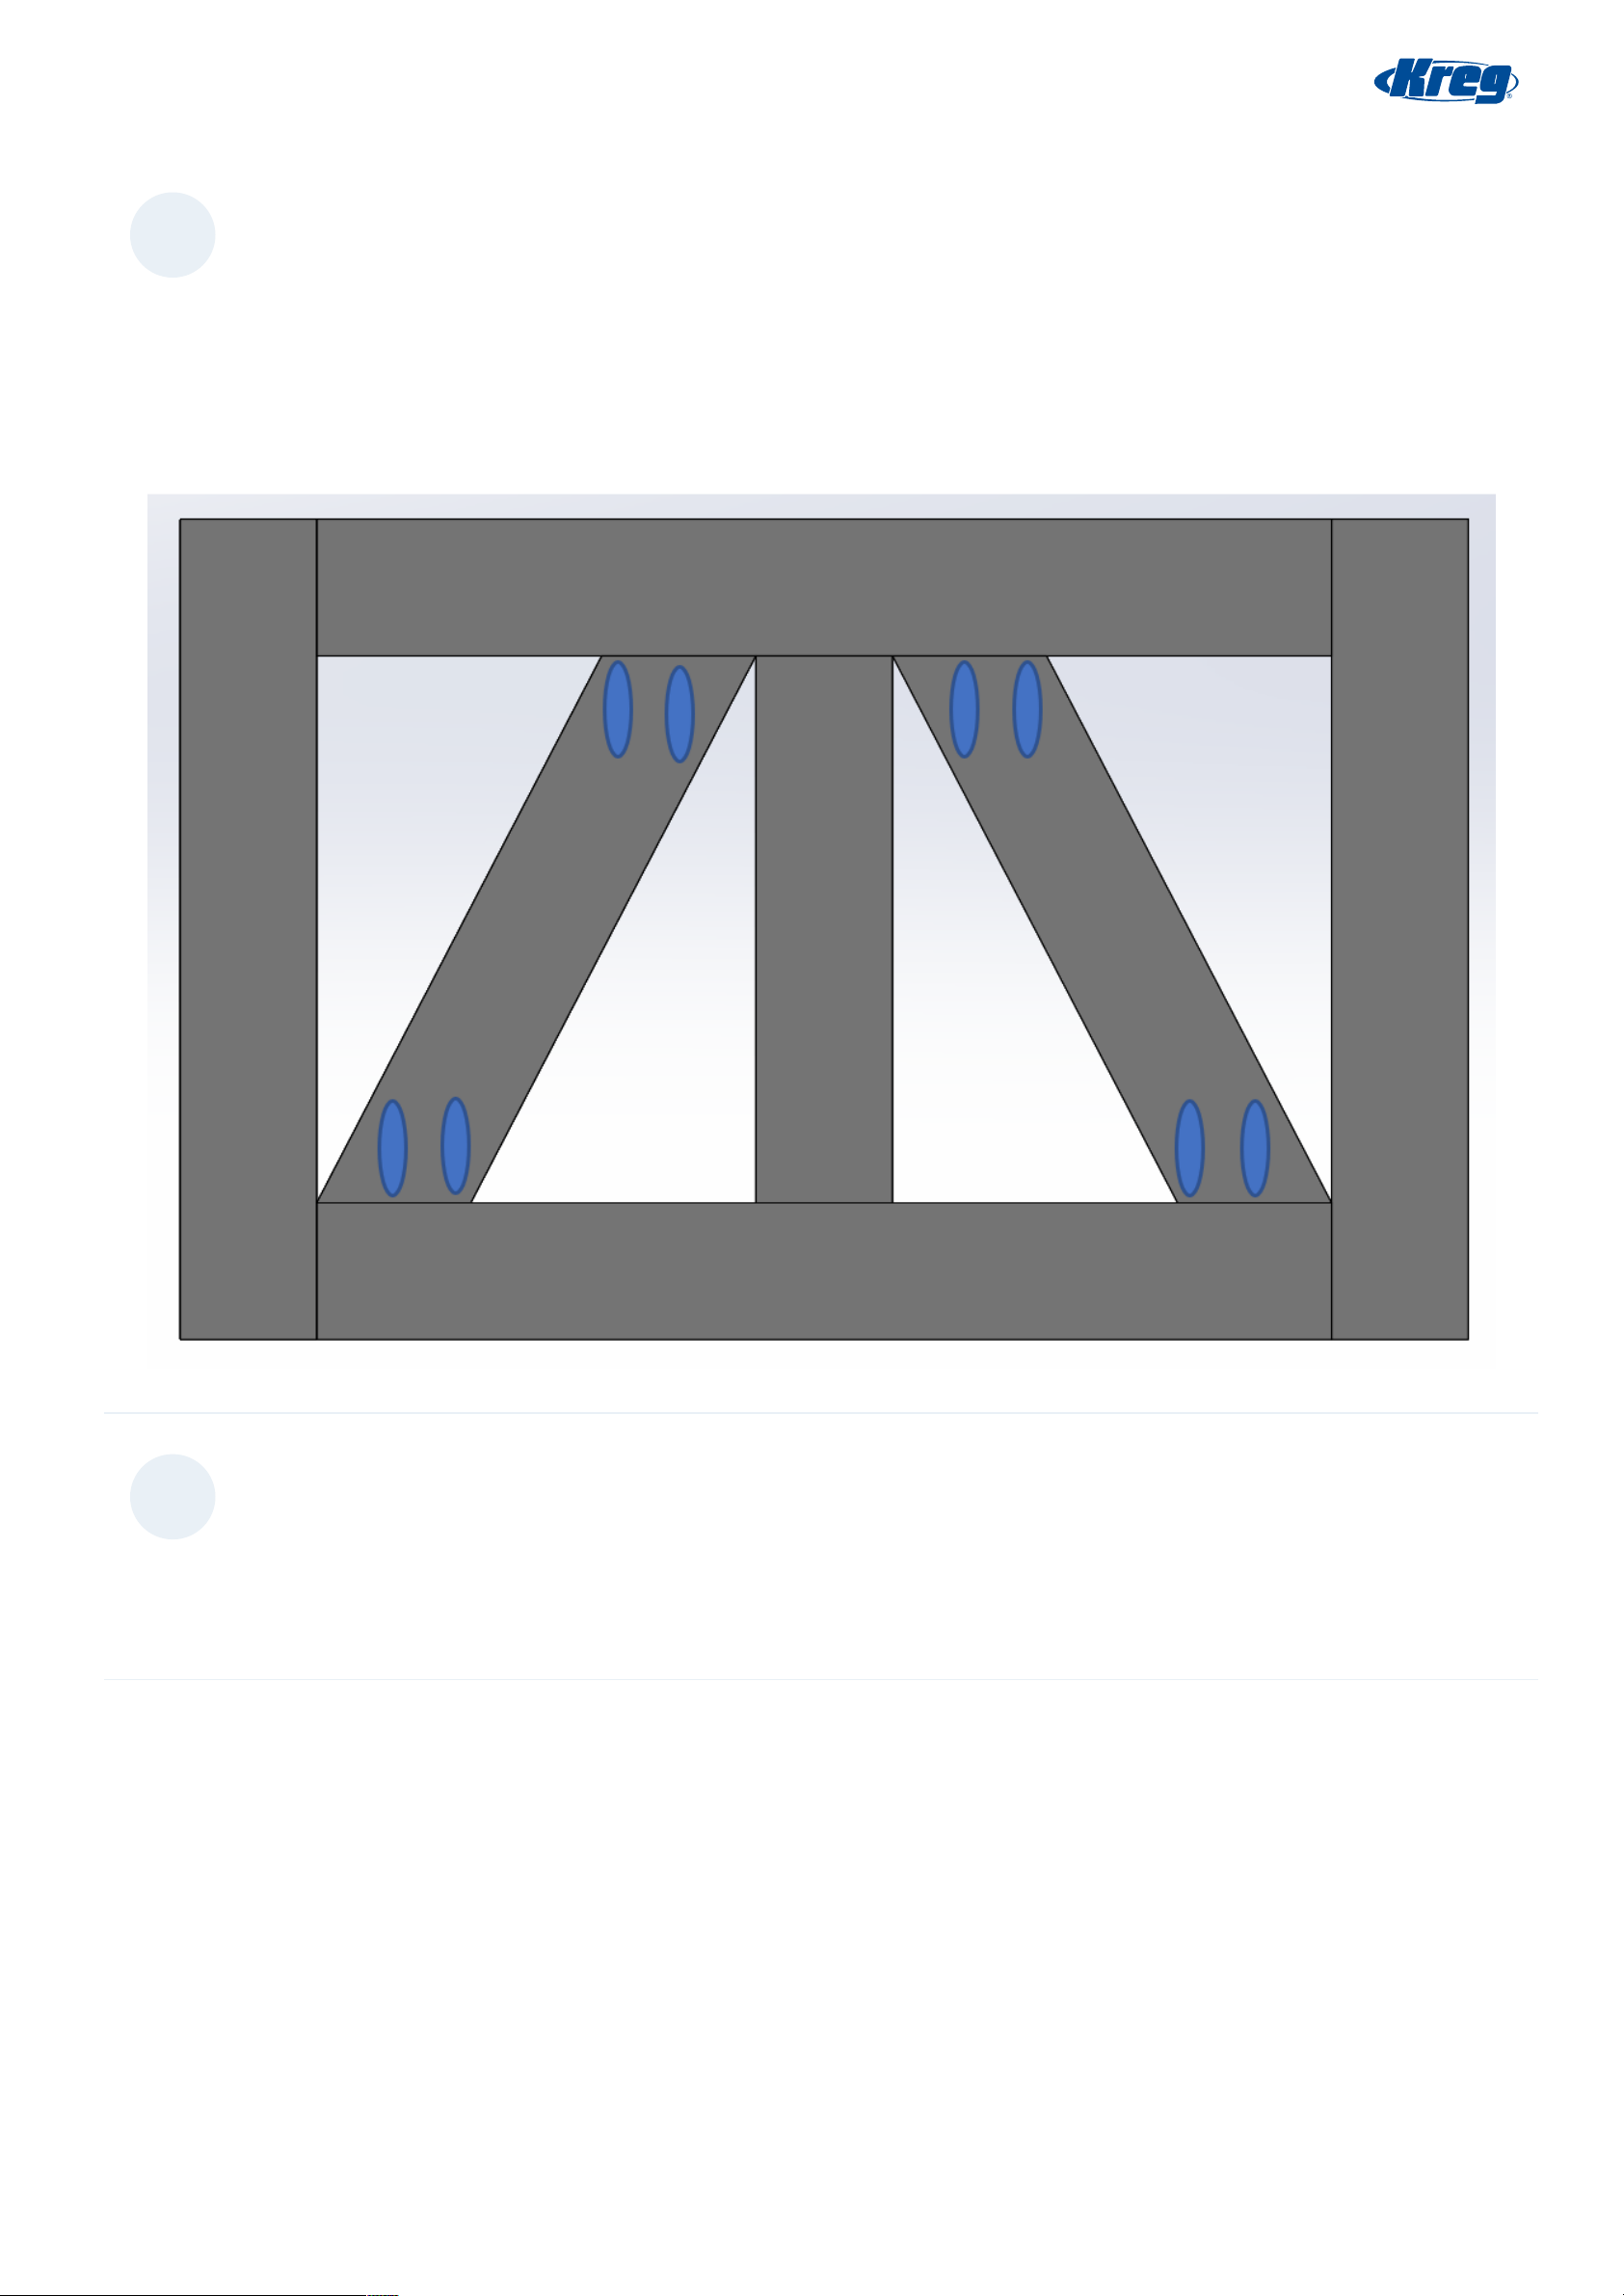
For this step I laid out the angles and cut and assembled them. I used clamps when they were in place and scribed a line
using a pencil. I then went to the miter saw and cut the angles. I then drilled two pocket holes on each end, make sure to do
the inside holes first and use the center mark on the jig so the hole doesn't miss the board. After those are drilled mark
where the hole starts and then drill down approximaelty there so you get the furthest point away but also don't cut through
the side of the wood. See the attached picture for a visual of what I am talking about.
You may want to use the scrap side of the angle to play with the pocket holes on an angle if you have never done it.
6
Attach trim piece to the middle
I attached a 3/4"x1/2" trim piece to cover the end of the plywood. This isn't necessary, I actually had this from a previous
project. I used glue and finish nails, but if I didn't paint it I would only use glue. The nails are really only to keep it aligned
while the glue dries.
Page 9 of 13
Page 10
7
Build the top
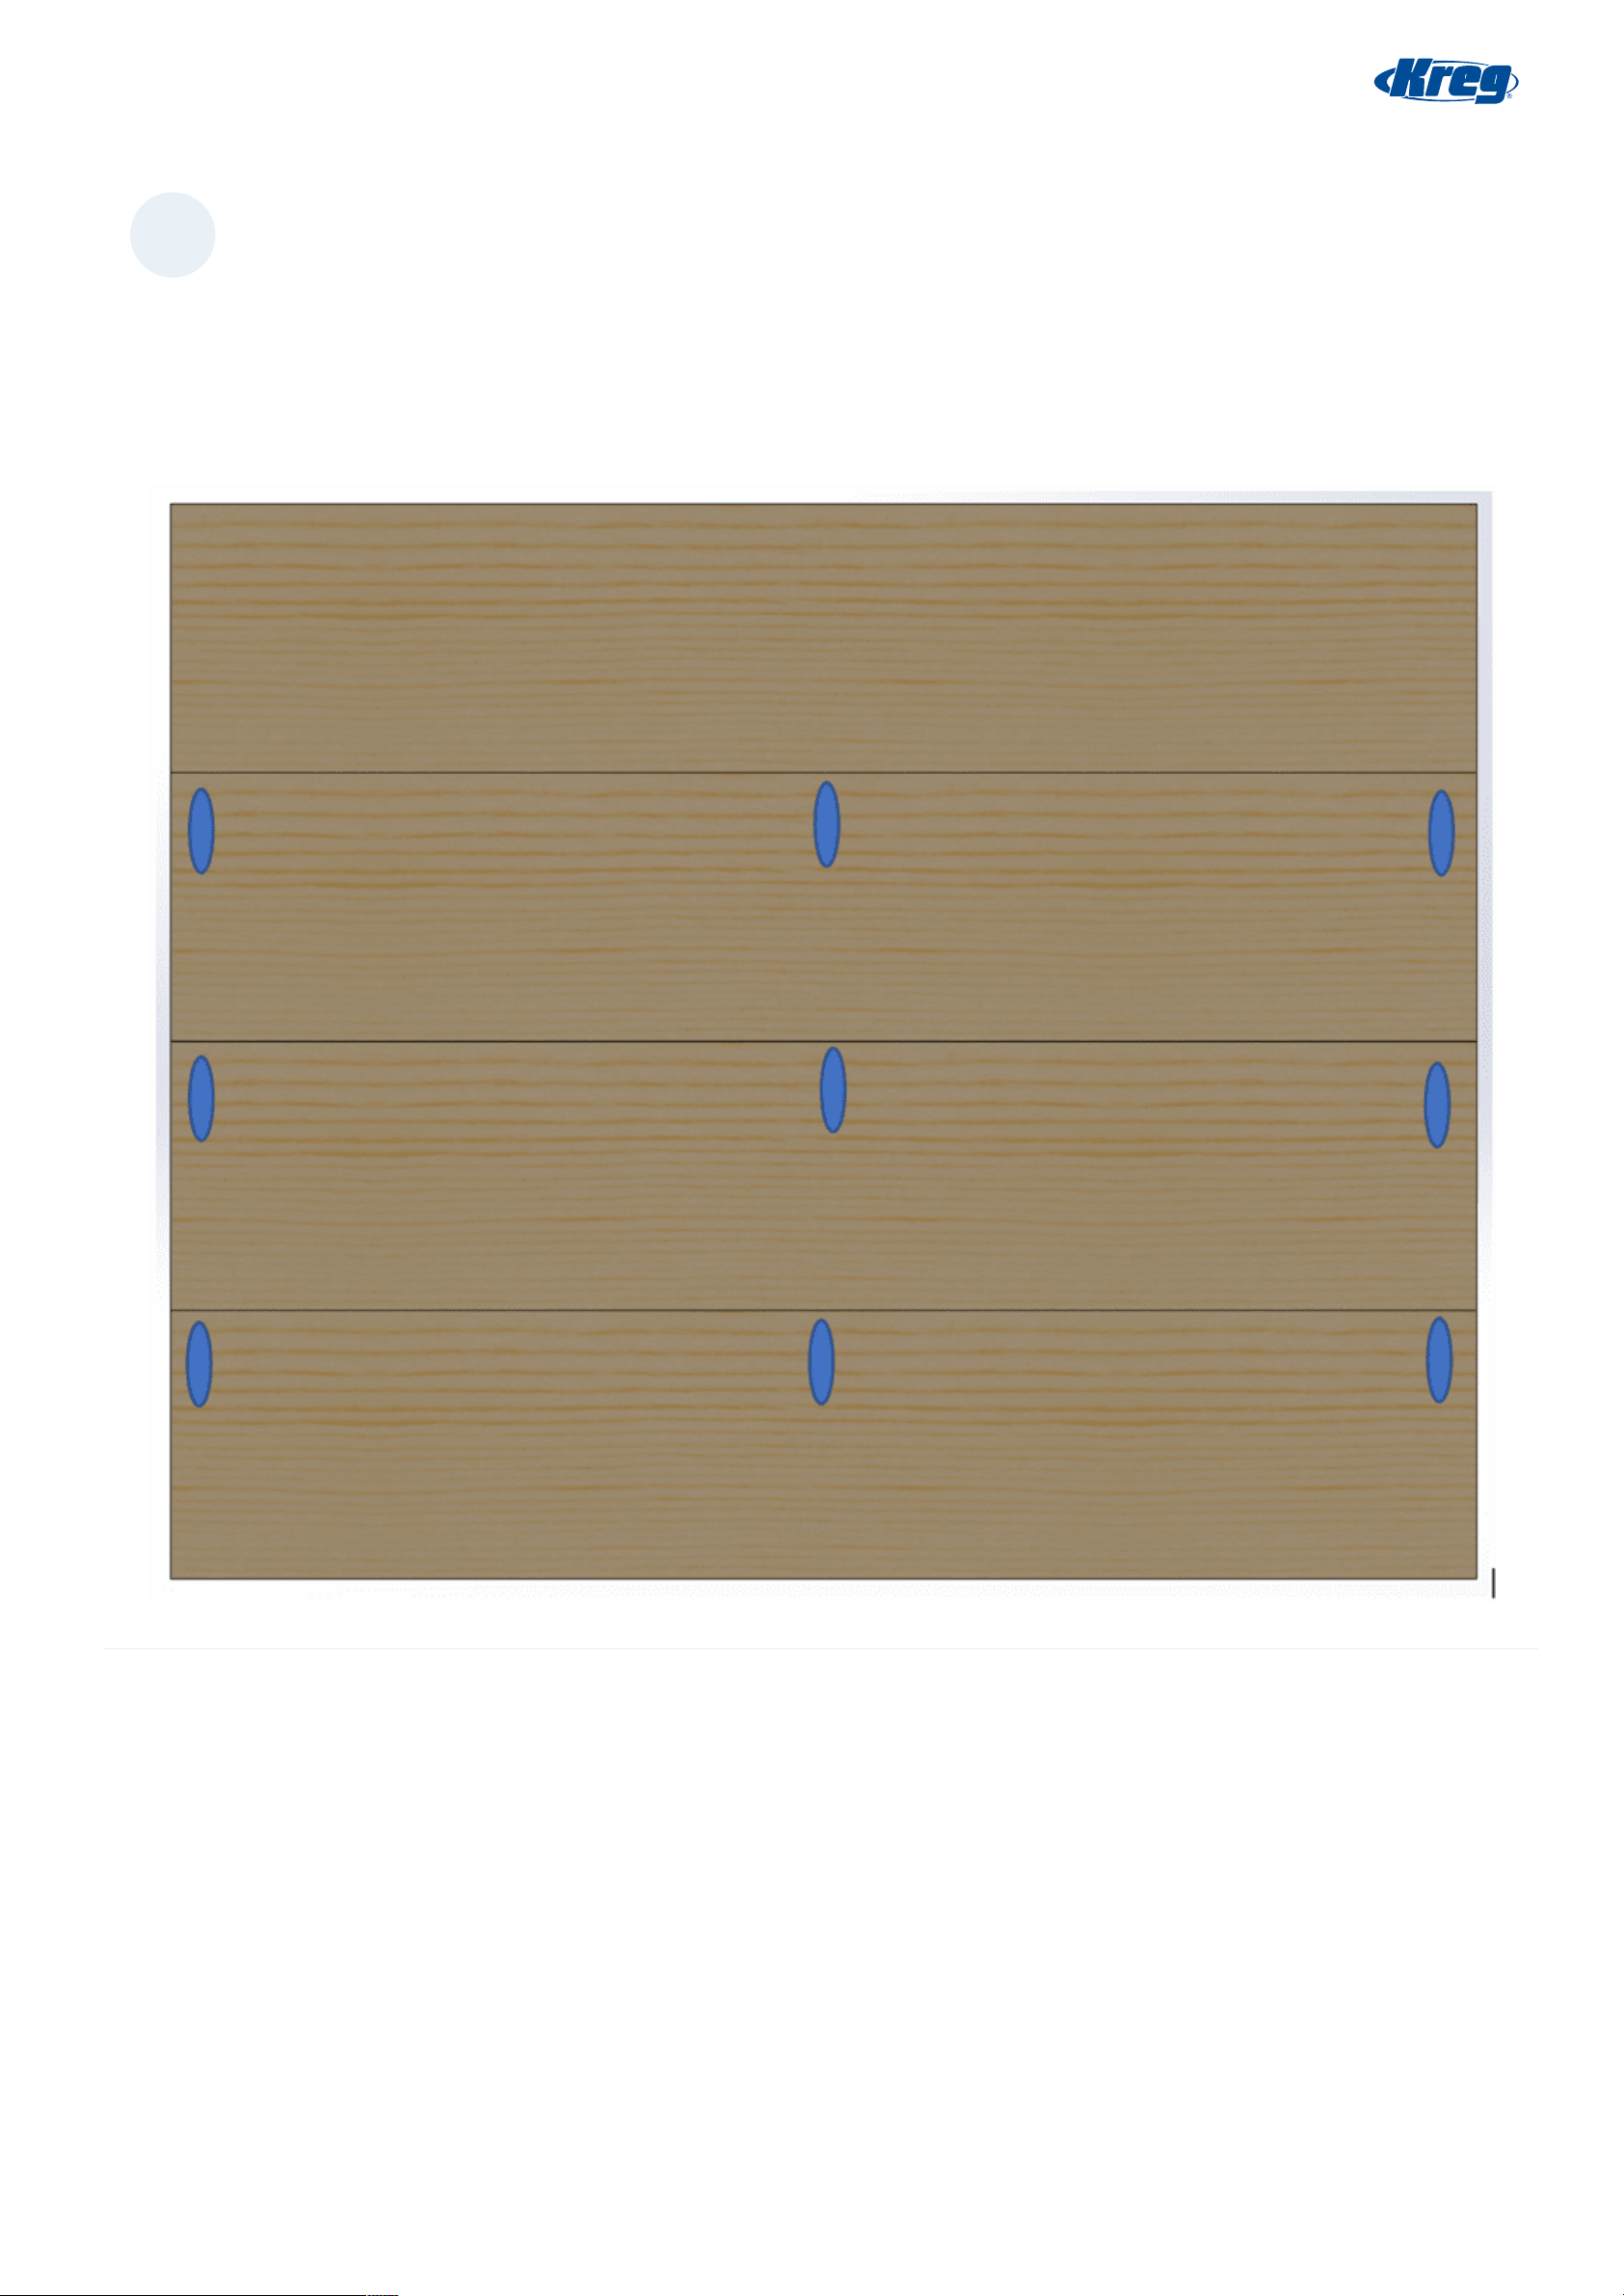
I actually messed this step up. I build the top as one piece, which can be done if you want the lid to open as a whole.
However, I did not want that but accidentally made it in one piece and forgot and had to cut it after and I didn't have
enough pocket holes at that time and it warped. So don't do what I did if you want it in two pieces. Also, ensure you use
enough glue as well.
Do this again for the other side. If you want to do the whole thing in one piece, I would use 4 pocket holes on each piece
and glue.
Page 10 of 13
Page 11

8
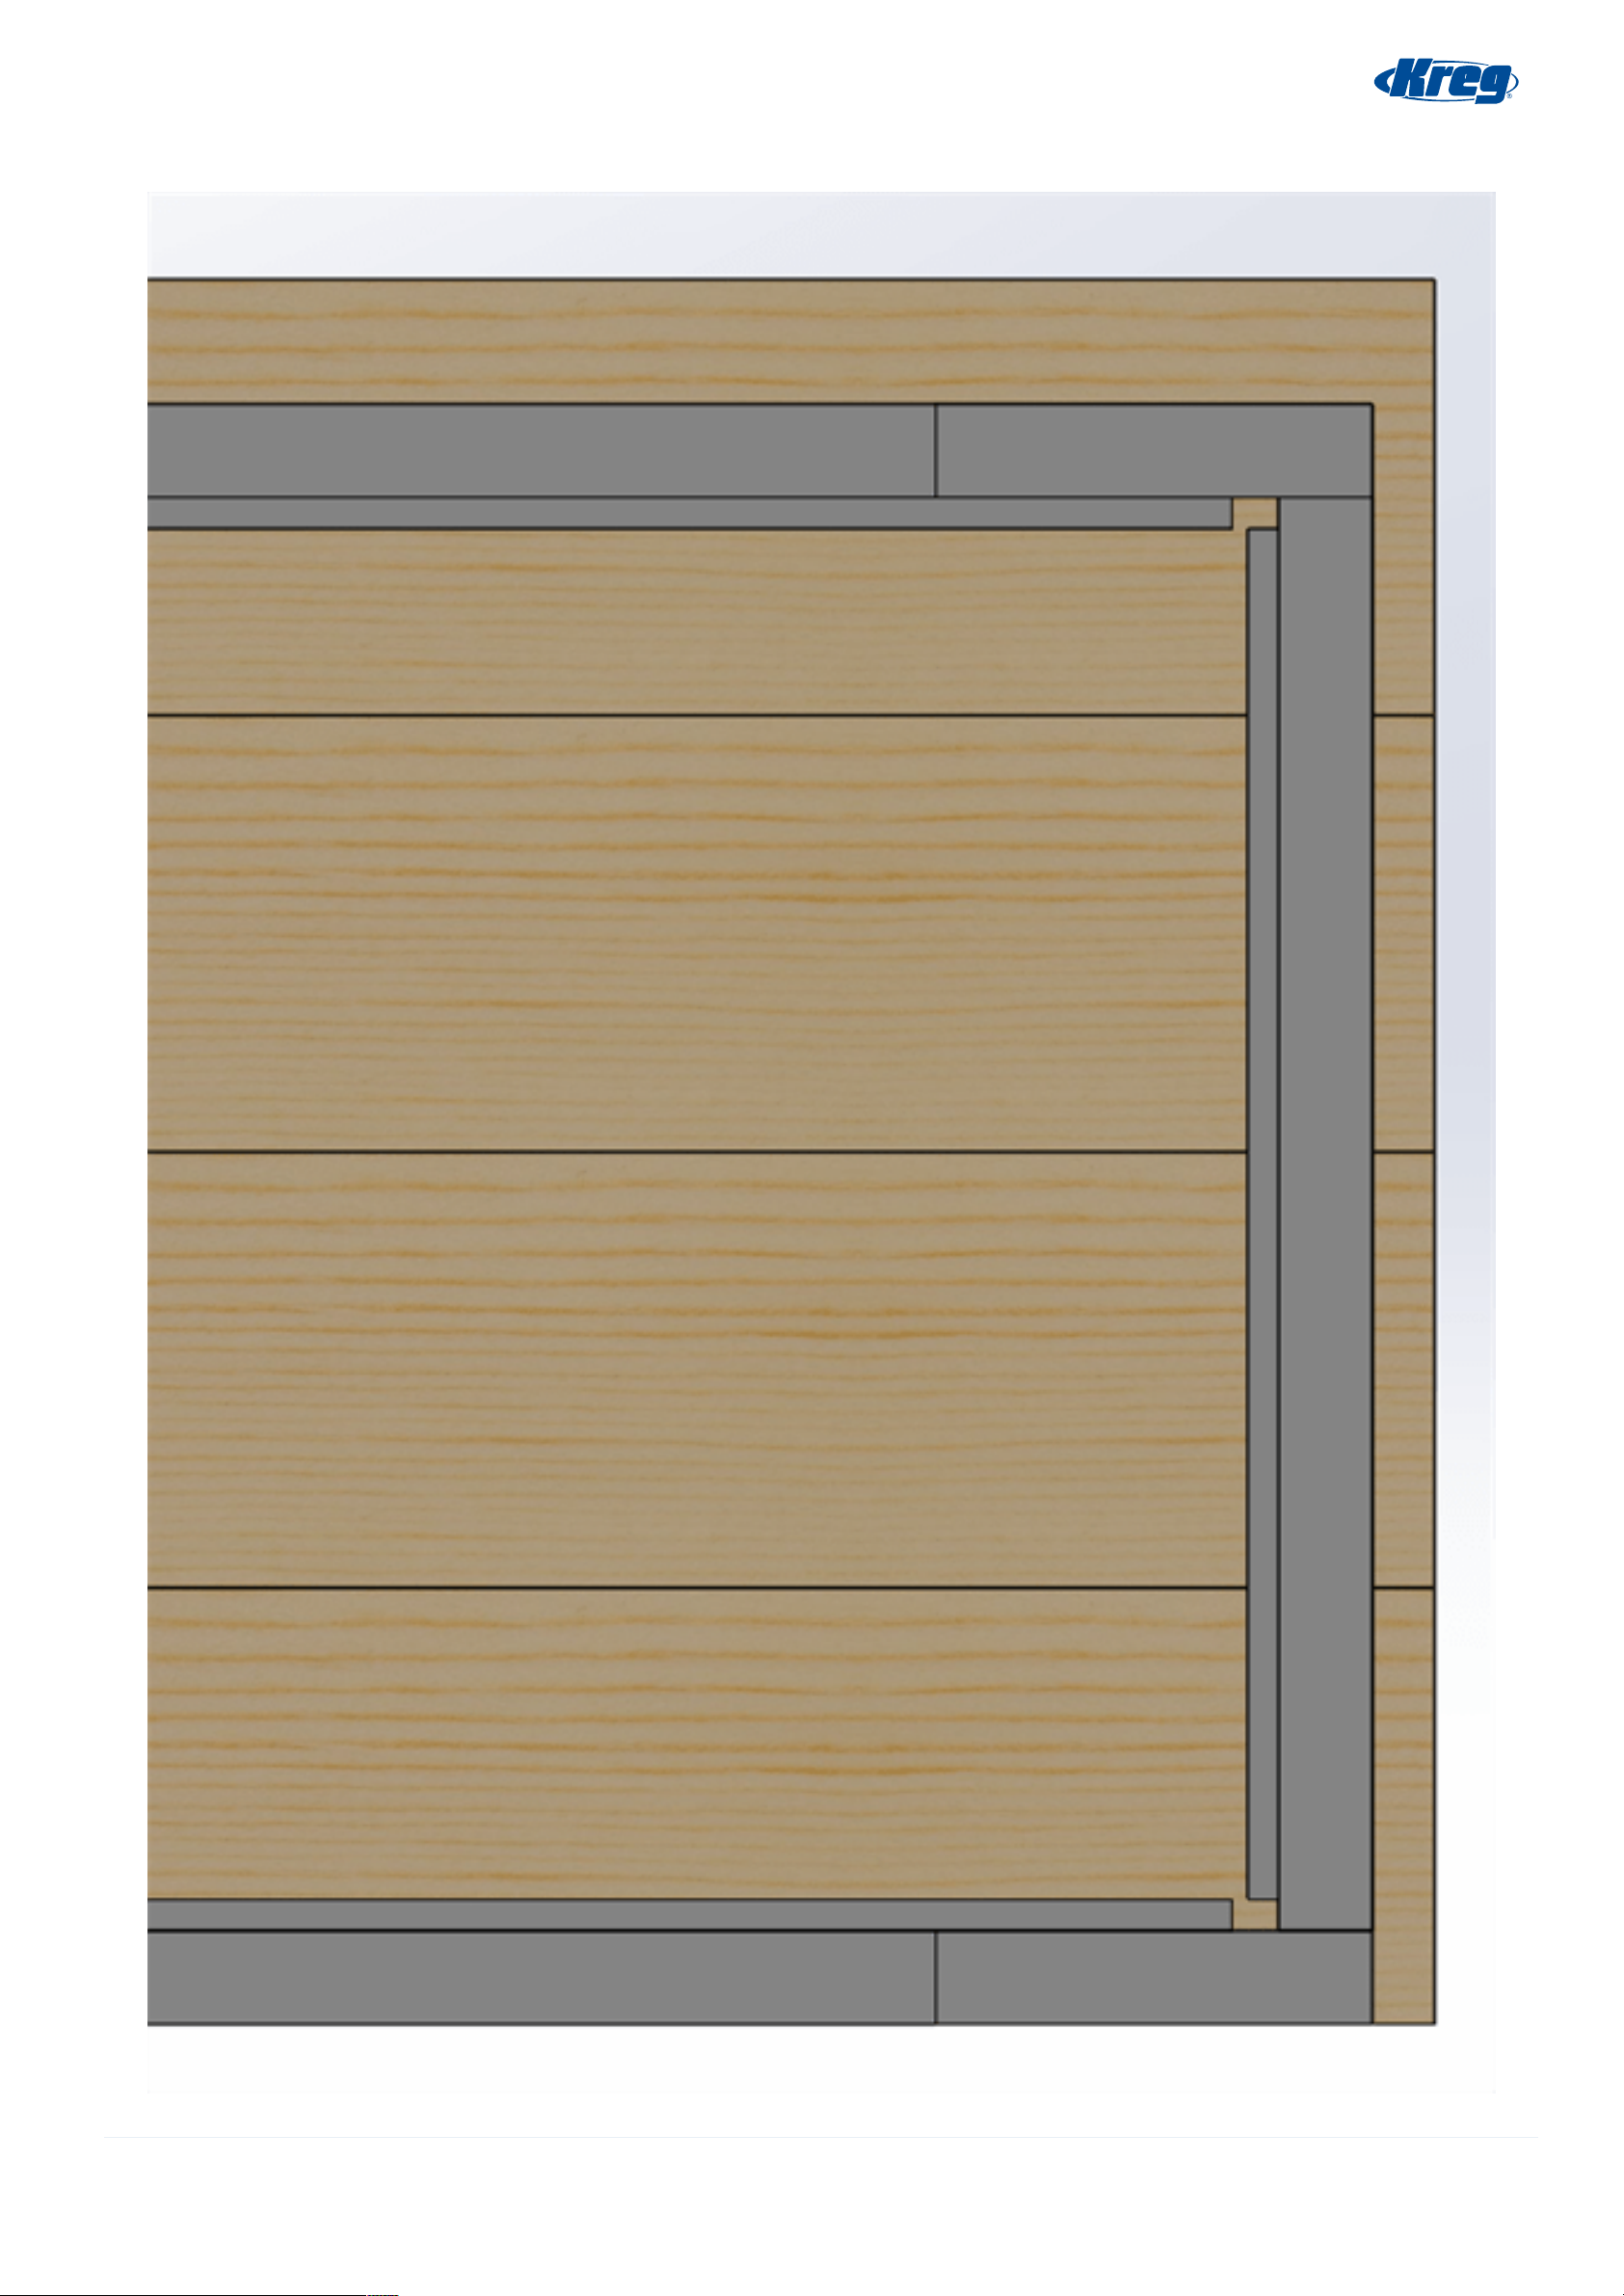
Attache Plywood to inside
Next we will attach the backing, the 1/4" plywood. It is helpful to sand the angles and inside before you attach the back as it
will be easier to access it. You can also paint the from and the 1x4 after you sand it as well. I used 60-80 grit for the rough
parts and 220 to finish.
I attached the ends first, using glue and staples. Make sure you mark out the holes so you apply the glue so it doesn't
squeeze out. I then attached the front and back pieces.
Page 11 of 13
Page 12
Page 12 of 13
Page 13
9
10
Attach the top
This was the hardest part for me honestly, I have always struggled with hinges. I first attached the hinges 1" from each end. I
also made the "back" (where the hinges mount) as the end with pocket holes in the wood. I then attached the tops to the
frame.
Finish as wanted
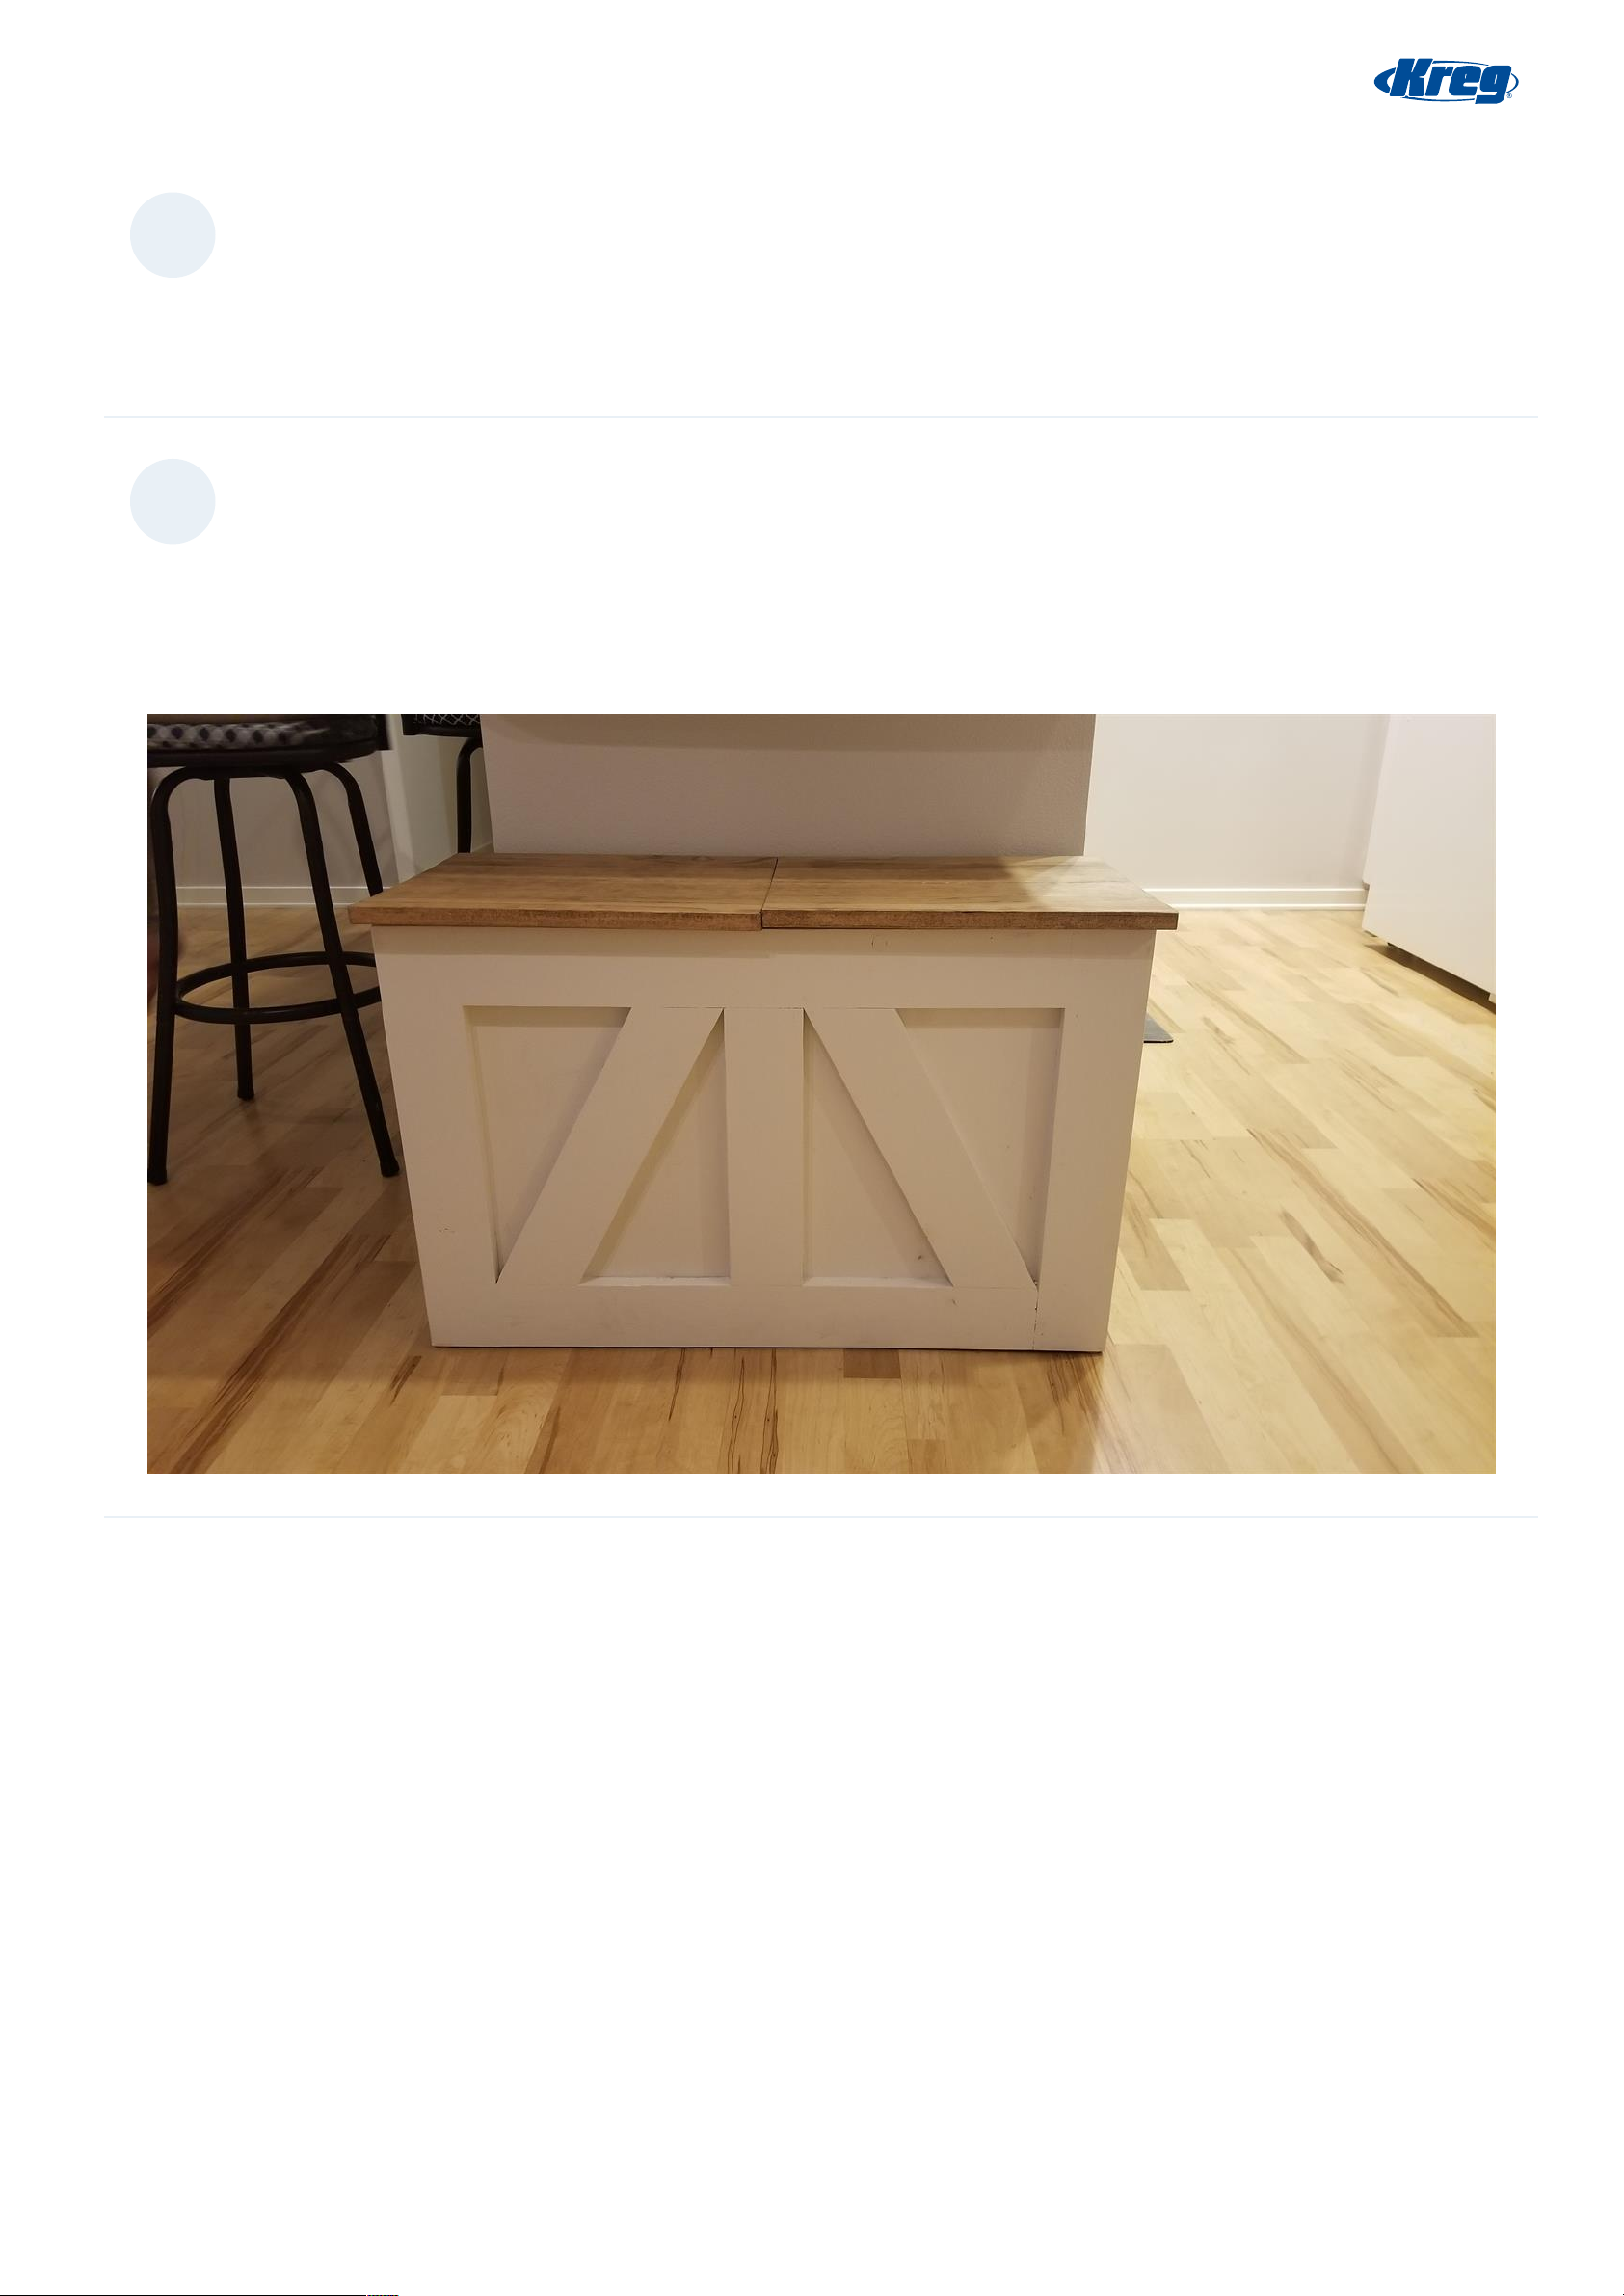
Like I said before, I painted the frame and stained/sealed the top. I actually built and stained the top first to let it dry to then
seal it when I was done with the first coat of paint on the frame. I painted the frame white, but I used plastic wood to fill
some of the small gaps. This is okay if you are painting but I wouldn't do this will stain since it changes colors over the putty.
You can used the color match putty but I still have had issues with that.
You can also see where my top warped after I cut it in this picture, I will redo it when I have the chance.
Page 13 of 13
 Loading...