


TM
Deck JigDeck Jig
Concealed Fastening System
Système de fi xations dissimulées
Sistema de sujeción oculto
Quick-Start Guide
Guía de inicio rápido • Guide de démarrage
U.S. Patent #7,044,460
www.kregtool.com
www.kregtool.com 800-447-8638 - customerservice@kregtool.com
Introduction
Congratulations on your purchase of a new Kreg Deck Jig™!
Whether you’re building a deck from scratch or remodeling an existing one, the
Deck Jig™ can help you build a better-looking deck in less time and with less
frustration. We made every effort to make the Deck Jig™ as fun and easy-to-use
as possible. In addition to this Quick-Start Guide, here are three resources you
may fi nd helpful:
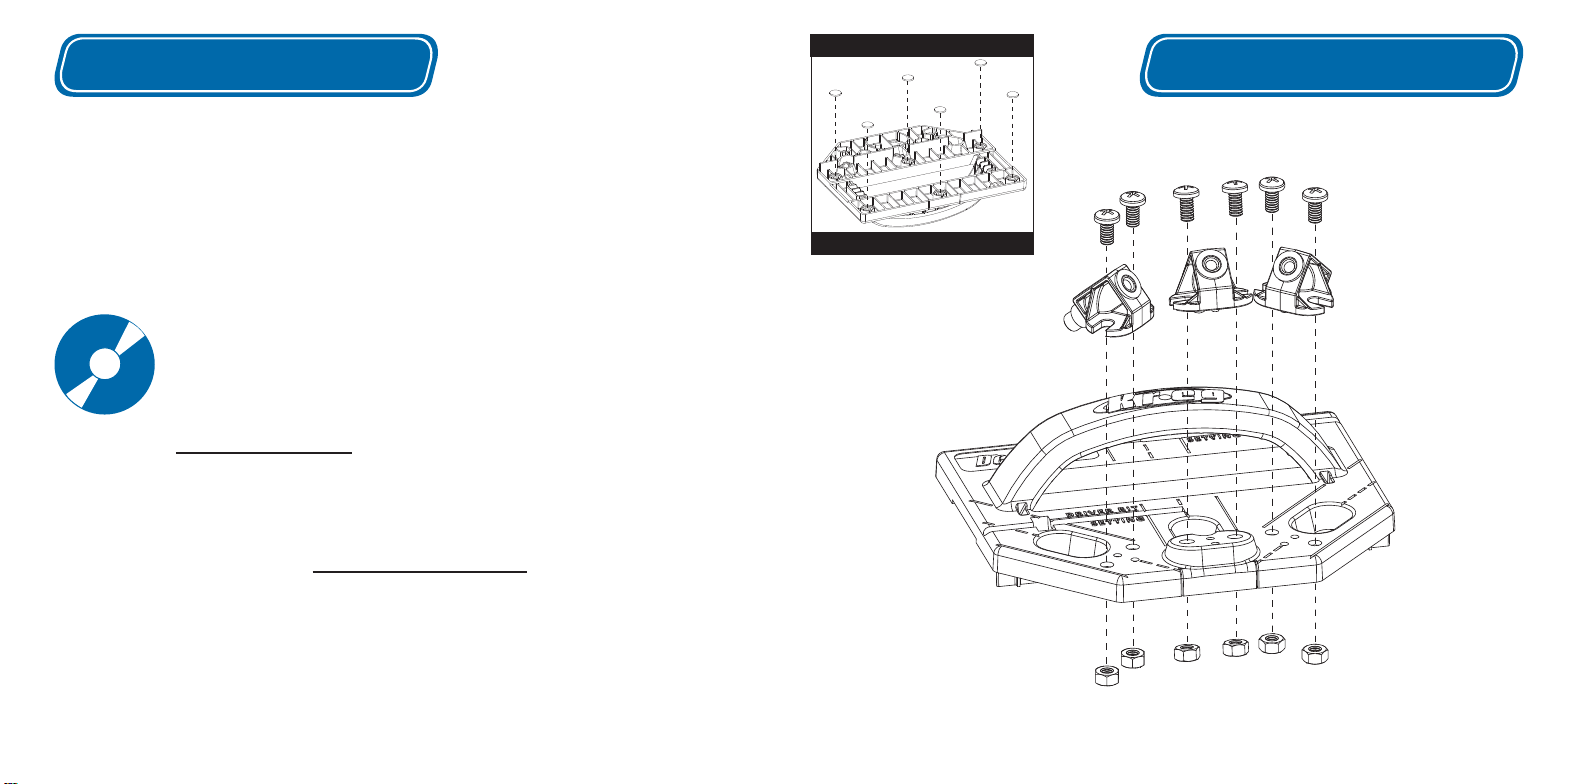
Rubber Feet
Assembly
Includes Four Extra
Instructional DVD: Start Here! This DVD is full of information you’ll
™
need to start building and keep building with the Kreg Deck Jig
.
Follow along as master carpenter Gary Streigler walks you through
the process.
Kreg Website: www.kregtool.com is your online resource for everything Kreg.
Whether you can’t remember a particular step of the process, need to order
another box of specialized Kreg Deck Screws, or just want to see what kind of
accessories are available for your new jig… this is where you’ll fi nd it.
Kreg Owners Community: Visit http://kregjig.ning.com to see what other
™
Kreg Deck Jig
owners are building, get your questions answered in the forums,
and sign up to receive the Kreg Plus Newsletter. Don’t forget to
post photos of your new deck!
www.kregtool.com 800-447-8638 - customerservice@kregtool.com
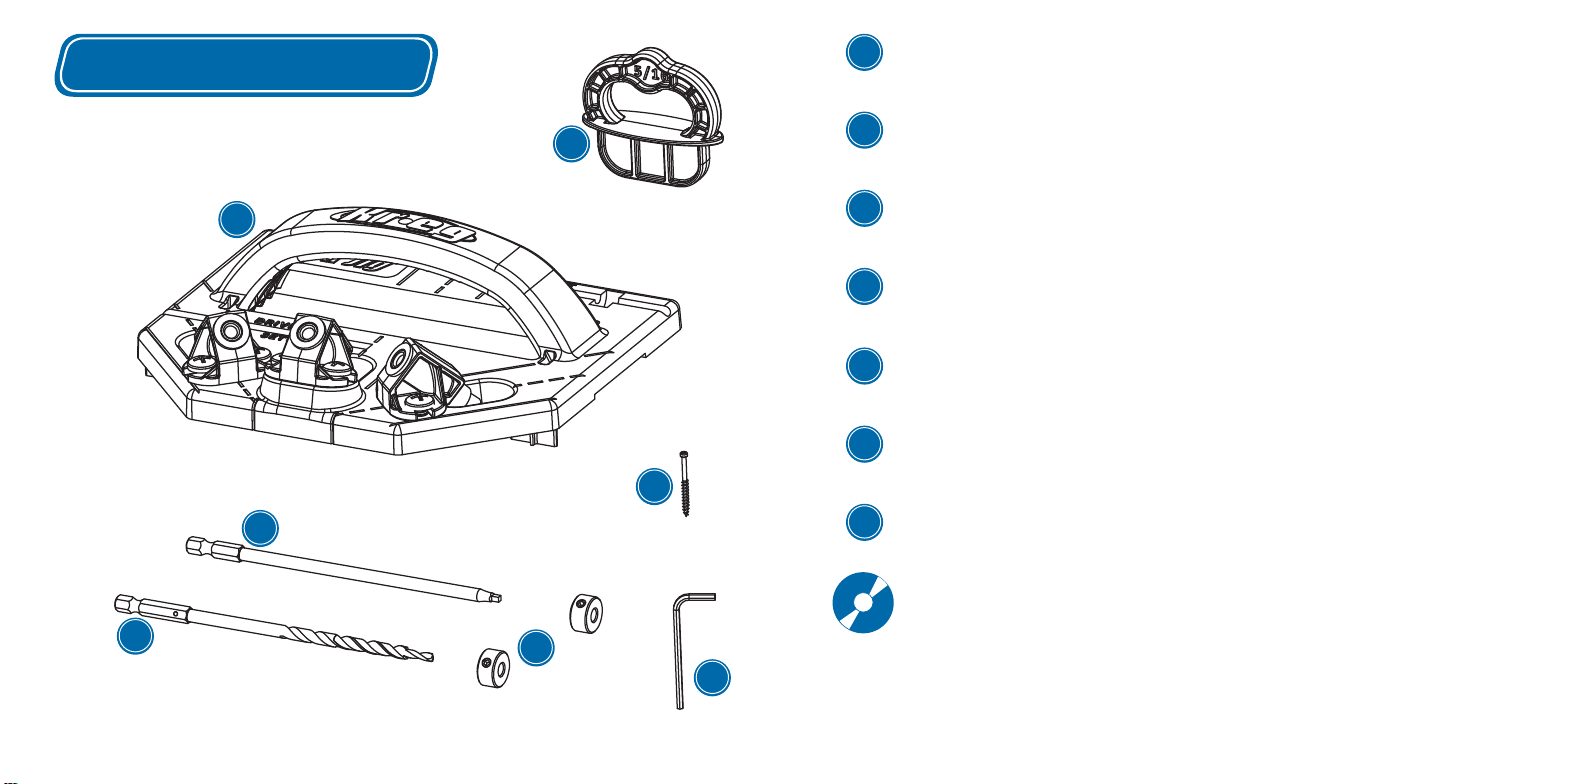
Parts
Kreg Deck Jig
A
B
A
Deck Jig
The core of the system. Allows you to quickly and securely add deck boards to
™
E
D
C
your deck without visible fasteners.
6” Deck Jig™ Drill Bit
B
This specialized stepped bit creates the unique shouldered hole in the deck board for
Kreg Deck Screws.
6” KTX Square Driver Bit
C
The KTX Square Head on this bit ensures optimal driver engagement while driving
your Deck Screws to the proper depth.
D
2” Deck Screws
100 screws 2”-long to get you started. All screws feature our Protec-Kote
rust-resistant coating, self-tapping tip, and KTX square drive.
Spacer Rings
E
Three ¼” rings for standard spacing and three 5/16” rings for stock prone to excess
expansion allow quick deck-board spacing.
F
Stop Collars
Stop Collars for your drill and driver bits guarantee precise drilling depth and screw placement.
For non-grooved decking, use the gauges on the Deck Jig™ to correctly position them.
G
Allen Wrench
Use the wrench to lock the Stop Collars in the correct position on the drill and driver bits.
™
™
Instructional DVD (Not shown)
Follow along as Master Carpenter Gary Streigler walks you through the basics, tips,
and tricks for using the Kreg Deck Jig™.
F
G
2-5/8” Deck Screws (Not included)
These longer screws are designed especially for fastening 1 ½”-thick deck boards
(2x4s and 2x6s).
www.kregtool.com 800-447-8638 - customerservice@kregtool.com

How It Works Operation
The Kreg Deck Jig™ allows you to drill a specialized hole at
the optimum angle necessary to secure your deck boards
to the deck joists. The hole is created by a stepped (or
shouldered) drill bit that drills the pocket hole and screw pilot
hole in one simple motion. The depth of the hole is controlled
by a Stop Collar.
The Kreg Deck Jig™ also guides the deck screws so they
follow the exact path necessary for a strong connection, and
so you don’t over-drive or under-drive them. With the Drill
Guide aligned with the pilot hole, insert a screw into the Drill
Guide, ensure that the screw is correctly positioned to enter
the pilot hole, and drive it until the Driver Stop Collar contacts
the Drill Guide.
IMPORTANT!
Driving your screws without using
the Stop Collar and the Deck Jig™
can cause over-driving, which results
in a joint with signifi cantly reduced
strength and the potential for
excessive moisture build-up on the
screw head.
Stop Collars
Before drilling your fi rst hole, position the Stop Collars on both the drill bit and driver bit. The drill-bit Stop
Collar controls hole depth and where the hole “shoulder” stops the screw. The driver-bit Stop Collar prevents
over-driving the screws and ensures that they are driven to the proper depth for the strongest possible joint and
minimum exposure to the elements.
Setting the Stop Collar on your Deck Jig™ Drill Bit & Driver Bit:
Non-Grooved Decking
Place shoulder of bit at line.
Drill Bit
For non-grooved decking from 3/4” to 1-1/2” thick
fastened with 2” or 2-5/8” long deck screws, use the
recessed Drill Bit Setting Gauge built into the Deck
Jig™. Secure the Stop Collar with the included
Allen wrench.
Tip – Check your Stop Collar settings from time to time
to ensure they are still correctly positioned.
Driver Bit
For non-grooved decking from 3/4” to 1-1/2” thick
fastened with 2” or 2-5/8” long deck screws, use
the recessed Driver Bit Setting Gauge built into
the Deck Jig™. Secure the Stop Collar with the
included Allen wrench.
www.kregtool.com 800-447-8638 - customerservice@kregtool.com

Operation Operation
Setting the Stop Collar on your Deck Jig™ Drill Bit & Driver Bit:
Grooved Decking
Drill Bit
For grooved decking, use the end of a deck board
as a gauge and slide the Deck Jig™ Drill Bit into
the center drill guide, extending it from the bottom
of the guide until the drill bit shoulder is even with
the bottom of the groove. Holding the drill bit in this
position, slide the Stop Collar onto the bit until the
collar rests against the Drill Guide. Secure the Stop
Collar with the Allen wrench.
Tip – Check your Stop Collar settings from time to time
to ensure they are still correctly positioned.
Driver Bit
For grooved decking, use the end of a deck board
as a gauge and slide the Deck Jig™ Driver Bit into
the center drill guide, extending it from the bottom
of the guide until the tip of the driver bit is even with
the bottom of the groove. Holding the driver bit in
this position, slide the Stop Collar onto the driver
until the collar rests against the drill guide. Secure
the Stop Collar with the Allen wrench.
Screw Placement
Test-drive a deck screw into a scrap of grooved
decking. The bottom of the screw head should bear
against the bottom lip of the groove. There should
not be any of the screw shank exposed, but the
head should not be buried. (Burying the screw head
in the bottom lip of the groove reduces the amount
of material needed to prevent the screw from
pulling through the decking and could cause the
lip to split.) Make any necessary adjustment to the
position of the Driver Bit Stop Collar
Spacer Rings
There are two sizes of Spacer Rings, 5/16” and 1/4”,
included with your Deck Jig™. These Spacer Rings
help you create consistent spaces between deck
boards. Building your deck with 1/4” minimum spaces
allows debris to fall through for a clean deck, and more
importantly, ensures adequate air movement to reduce
moisture buildup. If your decking material is prone to a
high rate of expansion and contraction, we recommend
using the 5/16” Spacer Rings as this helps maintain
proper spacing even after signifi cant expansion.
Tip – Be sure to check your decking manufacturer’s
spacing recommendations
www.kregtool.com 800-447-8638 - customerservice@kregtool.com

Operation
Hole Placement
Locating screw holes for maximum joint strength depends on several factors. Use the suggestions on the
following pages as a guide.
Operation
Board to Board Splice
When securing a splice centered on a
joist, use the End Drill Guides. For ¾”- to
1 1/8”-thick deck boards fastened with
2”-long Kreg Deck Screws, align the end
of the Deck Jig™ with the splice.
Using 2-5/8” long Kreg Deck Screws Using 2-5/8” long Kreg Deck Screws
For 1 ½”-thick deck boards fastened with
2 ⅝”-long Kreg Deck Screws, position the
end of the jig ½” from the splice.
1/2”
End of Board (obstructed)
When securing the end of a ¾”- to
1 1/8”-thick deck board with a 2”-long
Kreg Deck Screw where the Deck Jig™
cannot protrude beyond the end of the
board (wall obstruction), align the end of
the jig with the end of the board and use
the End Drill Guide.
For a 1 ½”-thick deck board fastened
with a 2 ⅝”-long Kreg Deck Screw,
position the end of the jig ½” from the
end of the board.
Wall
Wall
1/2”
www.kregtool.com 800-447-8638 - customerservice@kregtool.com

Operation
Hole Placement
Operation
End of Board (un-obstructed)
When securing the end of a deck board
to a perimeter joist with either 2”-long
Kreg Deck Screws or 2 ⅝”-long Kreg
Deck Screws where the Deck Jig™ can
protrude beyond the end of the board
(no wall obstruction), use the Center Drill
Guide, centering it on the thickness of
the joist.
Long Edge of Board
(un-obstructed)
Most decking-to-joist joints will be
unobstructed, and you’ll drill and drive
screws through the edges of the deck
boards and into the joists. For these
joints, use the Center Drill Guide,
centering it on the joists.
Long Edge of Board (obstructed)
Where the edge of the deck board is
against a wall, or along the outside of the
deck where, for appearance, you don’t
want to see the angled holes, do not use
the jig. Instead, “face screw” the board by
drilling pilot holes and driving Kreg Deck
Screws through the deck board from the
top face.
Long Edge of Board
(45° Decking)
When securing a deck board that crosses
the joist at a 45° angle, position the Center
Drill Guide at the intersection of the joist and
deck board, using the dashed line on the jig
as a guide. Then drill and drive the screw.
Face Screw
www.kregtool.com 800-447-8638 - customerservice@kregtool.com

Choosing a Deck
The Kreg Deck Jig™ works with almost any type of decking material. Here are the characteristics of some of
the most popular types of decking:
• ACQ – “Green Treat” is one of the most affordable types of decking material, and is usually made from pine. This
material commonly suffers from shrinking/swelling/splitting and won’t last as long as many other types of decking.
• Composite Material – Composite decking is usually made from a combination of wood fi bers and
plastic. It is more expensive than pine, but lasts much longer and is less prone to shrinking/swelling/splitting.
We recommended using composite decking material.
• Exotic Hardwoods – Exotic woods, such as Ipe, are much harder and denser than pine. Because
of this, they last longer, look better, and cost more. Exotic woods still require periodic treatment to prevent
discoloration and water damage.
Note: The Kreg Deck Jig™ works with grooved and non-
grooved stock. For 4/4 to 5/4 (¾”- to 1 ⅛”-thick)
material, fasten with 2”-long Kreg Deck Screws.
To fasten 1 ½”-thick material, use 2 5/8”-long
Kreg Deck Screws.
non-grooved
grooved
Deck Screws
Protec-Kote™ - Three anti-corrosion layers protect against rusting in a wide variety of decking applications.
Perfect for use with ACQ treated lumber.
Stainless - For even more protection, choose stainless. Stainless steel screws provide the best long-term
resistance to corrosion and protects your investment when using premium decking.
Multi-Function
Kreg Deck Screws are designed specifi cally for use with the Kreg Deck Jig™, a high-quality concealed-
fastening system. These screws also can be used for simple face-screwing on a variety of outdoor projects.
Oculto
Concealed
KTX Square Drive
Solid driver engagement.
Flat Bottom Head
Won’t split the workpiece.
Protec-Kote
Perfect for treated lumber.
305 Stainless Steel
Ultimate rust protection.
No bending. No breaking.
Visible
Face-Screw
™
Case-Hardened Steel
No bending. No breaking.
Self-Tapping Tip
Faster and easier driving.
www.kregtool.com 800-447-8638 - customerservice@kregtool.com

Welcome to the Kreg Jig® family.
NK7746B-Deck Jig™ Quick Start Guide
Bienvenido a la familia de Kreg.
Bienvenue dans la famille Kreg.
 Loading...