

Page 1

Installation Instructions
MODELS:
WP-3H2, W-3H2
HDMI Extender
SAFETY WARNING
Disconnect the unit from the power supply before opening and servicing
For the latest information on our products and a list of Kramer distributors, visit our Web site where
updates to this user manual may be found.
We welcome your questions, comments, and feedback.
www.kramerAV.com
info@kramerAV.com
P/N:
2900-301252
Rev:
2
Page 2

The WP-3H2 / W-3H2, HDMI Extender
Thank you for purchasing the Kramer WP-3H2 Wall Plate (US, UK and EU versions) and/or W-3H2
Dual Insert HDMI Extenders. The HDMI Extender is ideal for ProAV, multimedia and home cinema
applications. The device extends the HDMI transmission length by reclocking and regenerating the
HDMI signal before it sends the output to the HDMI display. It extends the HDMI cable distance
between the HDMI player and the HDMI display. By placing WP-3H2 / W-3H2 in the transmission
path, it removes dropout and digital noise (sparkles) in your picture that may result from using long
HDMI cables. In addition, the HDMI Extender:
• Provides a method of transmitting 4K@60Hz (4:4:4) signals at a distance of up to 20m from the
source (10m from the source to the HDMI Extender, and 10m from the HDMI Extender to the
display).
• Maintains an HDMI single link video resolution of up to 4K@60Hz (4:4:4).
• Supports the DDWG standard for HDMI compliant displays.
• Complies with HDCP 1.4 and HDCP 2.2.
• Supports ARC, CEC, deep color, x. v. color™, 7.1 PCM, 4K and 3D as specified in HDMI 2.0.
#
Feature
Function
1
INPUT HDMITM Connector
Connects to an HDMI source.
2
POWER LED
Lights when power powered (via the HDMI source or via an external
power source connected to the 2-pin terminal block connector).
3
External Power Supply 2-pin Terminal
Block Connector
Optional: Connect to a power supply. Connect GND to GND, +5V to
+5V. (Typically used when the HDMI source is not strong enough to
power the device, or when the device is located far from the source or
when driving sources such as AOCH cables).
4
Ring Tongue Terminal Grounding Screw
Connect to grounding wire (optional).
5
OUTPUT HDMITM Connector
Connect to an HDMI acceptor
The terms HDMI, HDMI High-Definition Multimedia Interface, and the HDMI Logo are trademarks or registered trademarks of HDMI
Licensing Administrator, Inc.
Page 3
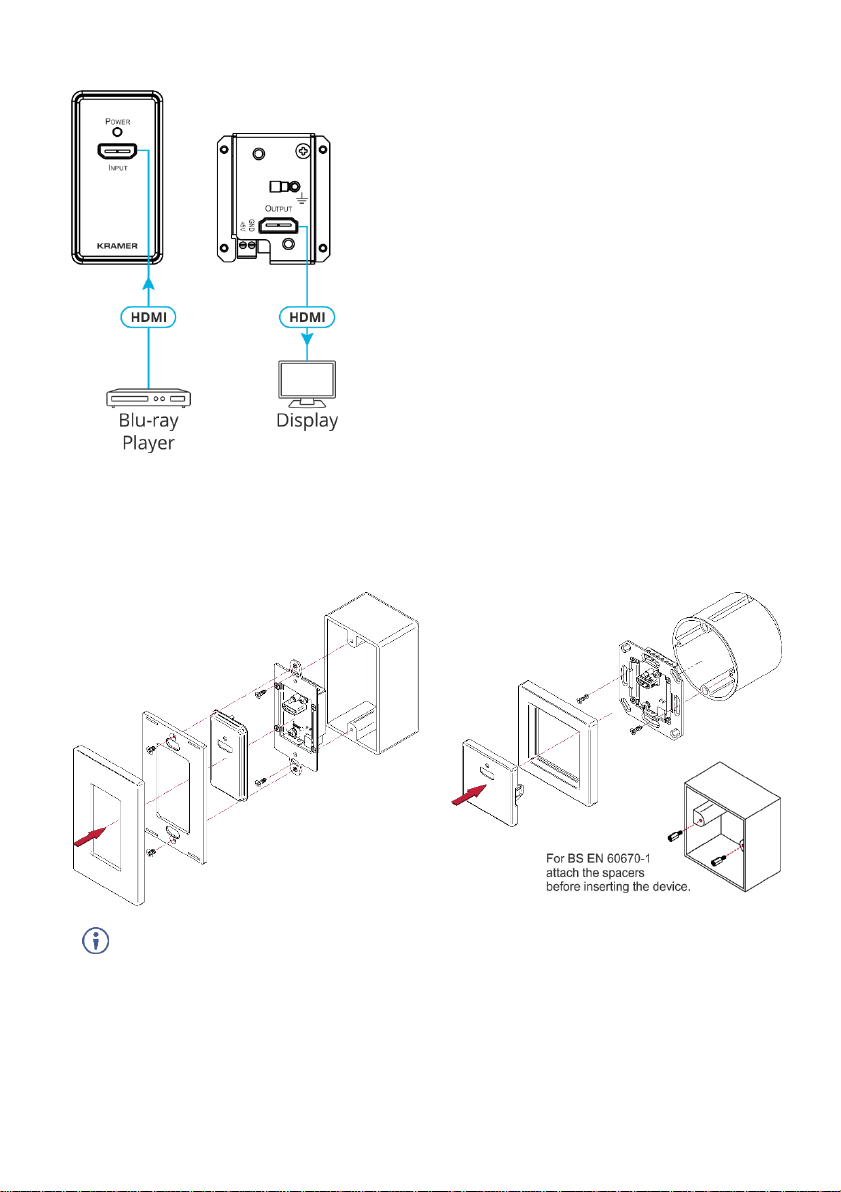
Connecting the Input and Output
The WP-3H2 / W-3H2 input is connected via a
male-to-male HDMI cable (not provided) to an HDMI
source, such as a 4K UHD Blu-ray player.
The WP-3H2 / W-3H2 output is connected via a
second male-to-male HDMI cable (not provided) to an
HDMI acceptor, such as a 4K UHD projector or
display.
See the Technical Specifications for the maximum
lengths of the input and output HDMI cables.
Installing the WP-3H2 / W-3H2
After connecting the ports, insert the device into the in-wall box and connect the parts as shown in the
illustrations below:
WP-3H2 US-D Version
WP-3H2 EU/UK Version
DECORA® is a registered trademark of Leviton Manufacturing Co., Inc.
DECORA® design frames are included in US-D models.
We recommend that you use any of the following standard 1 Gang in-wall junction boxes:
• US-D: 1 Gang US electrical junction boxes.
• EU: 1 Gang in-wall junction box, with a cut-hole diameter of 86mm and depth that can fit in both
the device and the connected cables (DIN 49073).
• UK: 1 Gang in-wall junction box, 75x75mm (W, H) and depth that can fit in both the device and
the connected cables (BS 4662 or BS EN 60670-1 used with supplied spacers and screws).
Page 4
W-3H2 Dual Insert
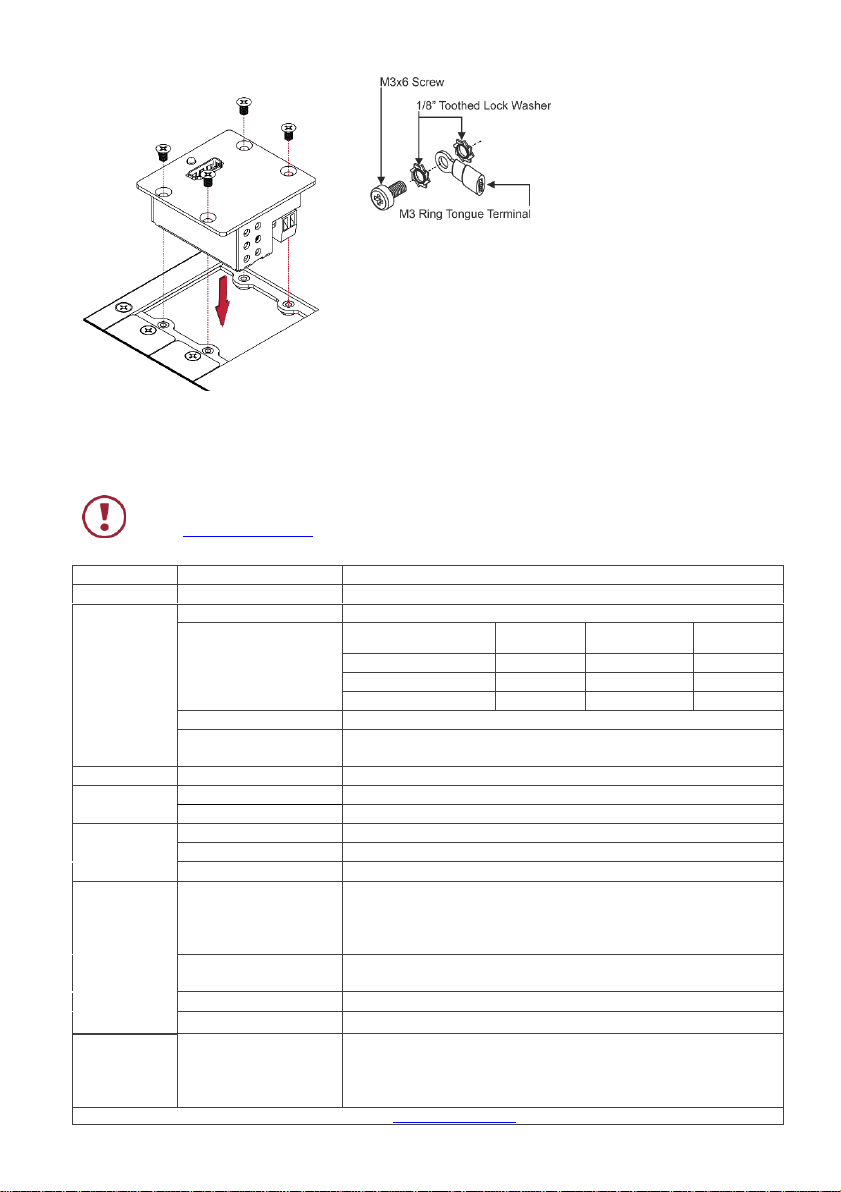
Grounding the HDMI Extender (Optional)
1. Connect the ring tongue terminal to the building grounding
point wire (a green-yellow, AWG#18 (0.82mm2) wire,
crimped with a proper hand-tool is recommended).
2. Insert the M3x6 screw through the toothed lock washers and
the tongue terminal in the order shown above.
3. Insert the M3x6 screw (with the two toothed lock washers
and ring tongue terminal) into the grounding screw hole and
tighten the screw.
Connect the Power (Optional)
Connect the 5V DC power adapter to the HDMI Extender and plug the adapter into the mains.
Safety Instructions
Caution:
There are no operator serviceable parts inside the unit.
Warning:
Disconnect the power and unplug the unit from the wall before installing.
See www.KramerAV.com for updated safety information.
Technical Specifications
Input
HDMI
On an HDMI Connector
Output
HDMI
On an HDMI Connector
Video
Maximum Resolution:
4K@60Hz 4:4:4
Maximum Range:
Resolution
Total
Distance
HDMI Source
to Device
Device to
Display
4K@60 4:4:4
20m (65ft)
10m (33ft)
10m (33ft)
4K@60 4:2:0 / 4K@30
40m (130ft)
25m (82ft)
15m (49ft)
1080p@60
45m (150ft)
30m (98ft)
15m (49ft)
Compliance
Up to HDCP 2.2
HDMI Support
ARC, CEC, deep color, x. v. color™, 7.1 PCM, 4K and 3D as specified in
HDMI 2.0
Control
Front Panel
Power LED
Power
Consumption
5V DC, 150mA
Source (WP-3H2)
5.2V/4A
Environmental
Conditions
Operating Temperature:
0° to +40°C (32° to 104°F)
Storage Temperature:
-40° to +70°C (-40° to 158°F)
Operating Humidity:
10% to 90%, RHL non-condensing
Enclosure
Net Dimensions
(W, D, H)
US-D: 7cm x 2.4cm x 11.4cm (2.8" x 0.9" x 4.5);
EU: 8cm x 2.4cm x 8cm (3.1" x 0.9" x 3.1);
UK: 8.6cm x 2.4cm x 8.6cm (3.4" x 0.9" x 3.4")
Dual insert: 5cm x 2.8cm x 4.7cm (2" x 1.1" x 1.8")
Shipping Dimensions
(W, D, H)
Wall plate: 23.2cm x 13.6cm x 10cm (9.1" x 5.4" x 3.9") (W, D, H)
Dual Insert: 12.6cm x 8.4cm x 4.1cm (5" x 3.3" x 1.6") (W, D, H)
Net Weight
0.17kg (0.4lbs) approx..
Shipping Weight
0.56kg (1.2lbs) approx.
Accessories
(WP-3H2)
Included
Power adapter and cord
US-D version: 1 white US Frame set and faceplate
European version: 1 EU white frame, 1 UK white frame, 1 EU/UK white
faceplate
Specifications are subject to change without notice at www.kramerav.com
 Loading...