

Page 1
VS-84UT Quick Start (P/N: 2900-300970QS REV 1)
P/N:
2900- 300970QS
Rev:
1
Scan for full manual
VS-84UT Quick Start Guide
This guide helps you install and use your VS-84UT for the first time.
Go to www.kramerav.com/downloads/VS-84UT to download the latest user manual and check if
firmware upgrades are available.
Step 1: Check what’s in the box
VS-84UT 8x4 HDMI/HDBT 2.0 Matrix Switcher
1 Power cord
1 Quick start guide
1 Set of rack ears
4 Rubber feet
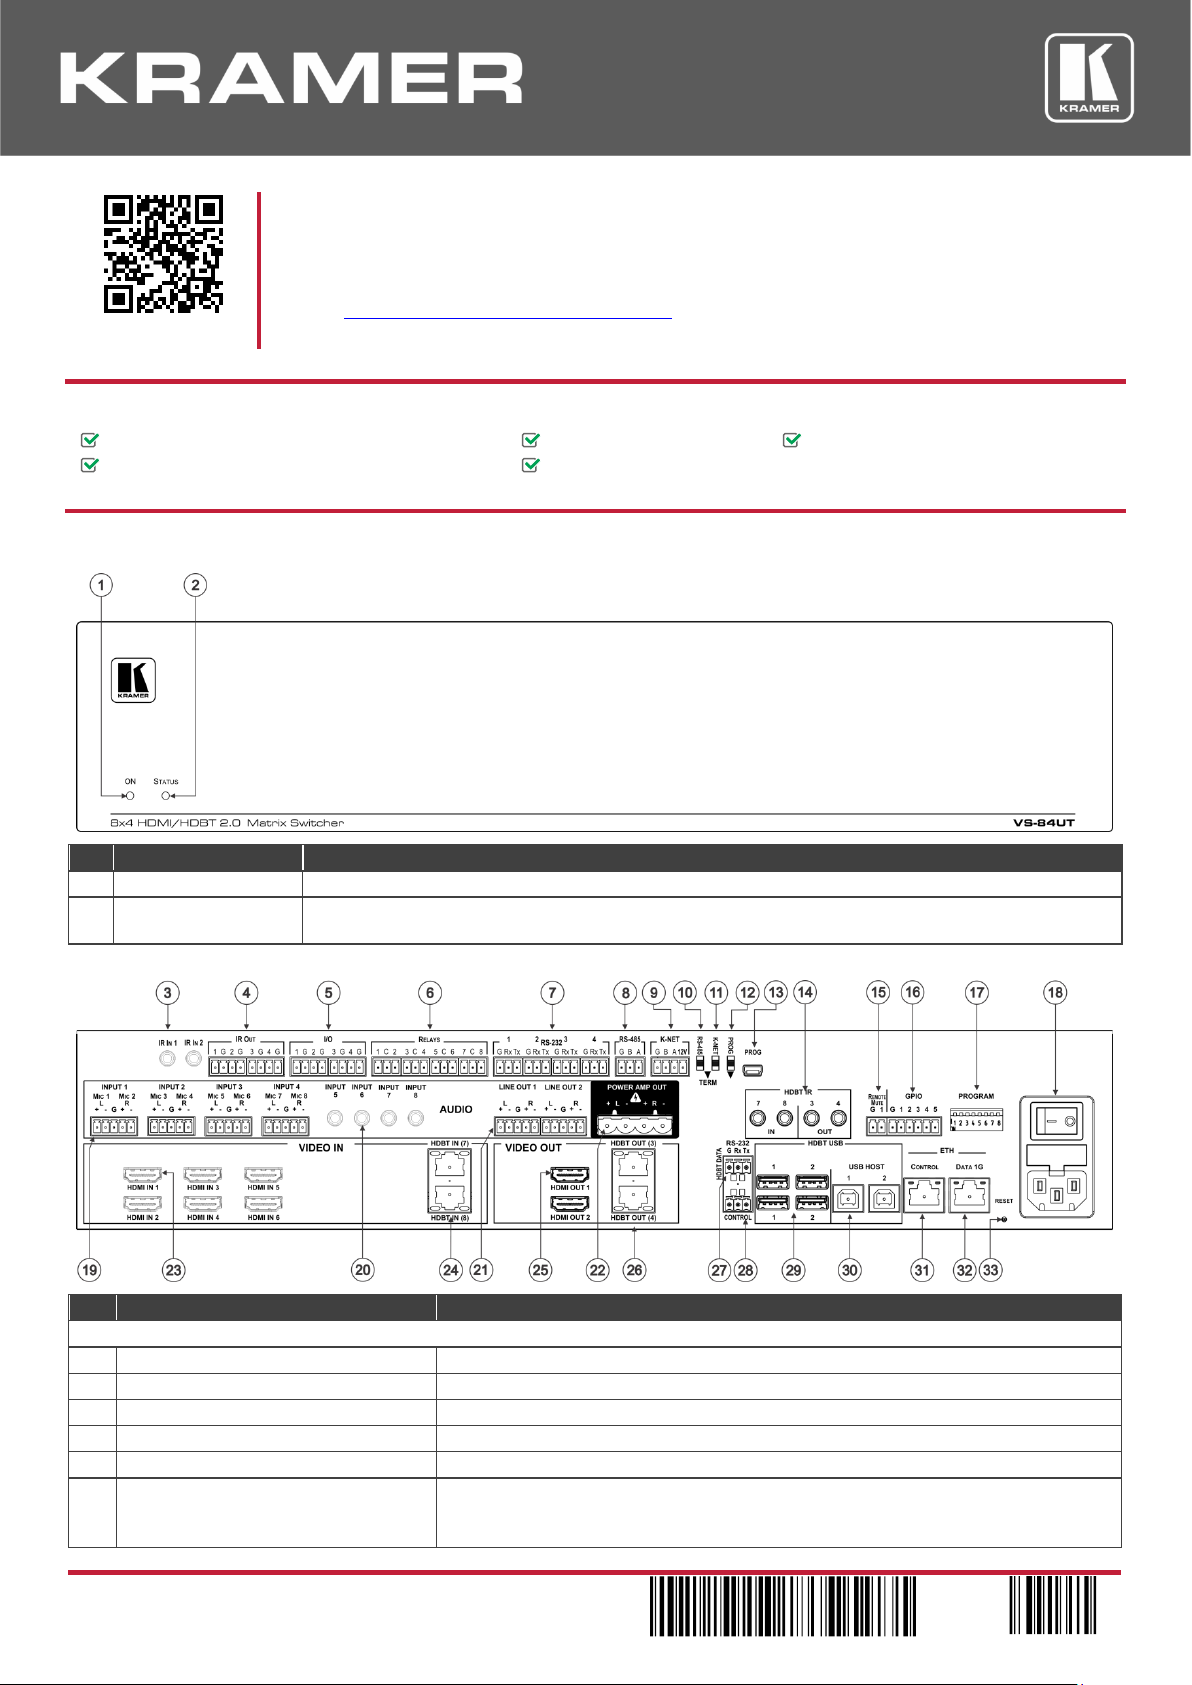
Step 2: Get to know your VS-84UT
#
Feature
Function
1
ON LED
Lights when receiving power.
2
STATUS LED
Multi-color LED lights upon startup, flashes green upon boot and lights green when ready to use.
The LED lights red to indicate internal errors.
#
Feature
Function
Controller Functionality
3 IR IN 3.5mm Mini Jack
Connect to an external IR receiver (1 and 2).
4
IR OUT Terminal Block Connectors
Connect to IR emitter cables (from 1 to 4).
5
GPI/O Terminal Block Connectors
Connect to various analog and digital sensors (from 1 to 4).
6
RELAYS Terminal Block Connectors
Connect to low-voltage relay-driven devices (from 1 to 8).
7
RS-232 Terminal Block Connectors
Connect to RS-232 controlled devices (from 1 to 4).
8
RS-485 Terminal Block Connector
Connect to the RS-485 detachable terminal block on a switcher or PC.
Pins B (-) and A (+) are for RS-485; Pin G may be connected to the shield (if
required).
Page 2

#
Feature
Function
9
K-NET Terminal Block Connector
Use with the K-Config control system. PIN GND is for the Ground connection; PIN
B (-) and PIN A (+) are for RS-485, and PIN +12V is for powering other devices.
10
RS-485 TERM Switch
Slide down for RS-485 termination with 120; slide up for no RS-485 line
termination.
The first and the last units on the RS-485 line should be terminated (ON). Other
units should not be terminated (OFF).
11
K-NET TERM Switch
Use with the K-Config control system.
Slide down (in the direction of the arrow) for K-NET termination; slide up for bus to
not be terminated. The last physical device on a K-NET bus must be terminated.
12
PROG Switch
For factory use only.
13
PROG Mini USB Connector
For room controller functionalities.
Matrix Functionality
14
HDBT IR
3.5mm Mini
Jack
IN
Connect to an external IR sensor/emitter to send/receive IR signals (7 and 8) via
HDBT inputs 7 and 8 respectively.
OUT
Connect to an external IR sensor/emitter to send/receive IR signals (3 and 4) via
HDBT outputs 3 and 4, respectively.
15
REMOTE MUTE 2-pin Terminal
Block Connector
Remote switch to mute the video and audio signals. Enables easy integration of
the audio system with PA systems, usually used for alarms or other public audio
messages.
16
GPIO Terminal Block Connectors
For future use.
17
PROGRAM DIP-switches
For future use.
18
Power Connector with Switch and
Fuse
AC connector, enabling power supply to the unit.
Power switch for turning the unit on or off.
19
AUDIO
INPUT (MIC/line) 5-pin
Terminal Block
Connectors
Connect to stereo audio balanced sources (from 1 to 4) and/or microphone inputs
(from 1 to 8).
20
INPUT 3.5mm Mini Jack
Connect to an unbalanced audio source (from 5 to 8).
21
LINE OUT 5-pin Terminal
Block Connectors
Connect to a stereo balanced audio acceptor (1 and 2).
22
POWER AMP OUT 4-pin
Terminal Block
Connectors
Connect to a pair of loudspeakers.
23
VIDEO
HDMI™ IN Connector
Connect to an HDMI source (from 1 to 6).
24 HDBT IN Connectors
Connect to a transmitter (7 and 8)
The HDBT Transmitter (for example, the Kramer TP-590Txr) can pass audio and
video signals as well as USB, Ethernet, power and serial commands.
25 HDMI OUT Connector
Connect to an HDMI acceptor (1 and 2).
26
HDBT OUT RJ-45
Connector
Connect to an HDBT receiver (for example, the Kramer TP-590Rxr) to pass audio
and video signals as well as USB, Ethernet, power and serial commands (3 and 4).
27
RS-232 HDBT DATA Terminal Block
Connectors (G, Rx, Tx)
Connect to the PC or the remote controller and pass data between this RS-232
port and the HDBT OUT ports or one of the HDBT IN ports.
28
RS-232 CONTROL Port Terminal
Block Connectors (G, Rx, Tx)
Connect to the PC or the remote controller to control the VS-84UT via Protocol
3000 commands.
29
HDBT USB Device Port Pairs
Connect up to two USB clients to each pair (1 and 2) to pass data via the HDBT
inputs or outputs.
30
HDBT USB HOST Ports
Connect to a USB host (1 and 2) to pass data via the HDBT inputs or outputs.
31
ETH RJ-45
Ports
CONTROL
Connect to the PC or other controller through computer networking.
32
DATA 1G
Connect to the PC or other controller via the Ethernet to pass data between HDBT
ports and the controller.
33
RESET Recessed Button
Press briefly to restart the system. Press for about 5 seconds to reset settings to
factory default values and restart the system.
The terms HDMI, HDMI High-Definition Multimedia Interface, and the HDMI Logo are trademarks or registered trademarks of HDMI Licensing Administrator, Inc.
Step 3: Install the VS-84UT
To rack mount the machine attach both ear brackets to the machine (by removing the five screws
from each side of the machine and replacing those screws through the ear brackets) or place the
machine on a table.
Page 3

Step 4: Connect the inputs and outputs
Always switch OFF the power on each device before connecting it to your VS-84UT. For best results, we recommend that you
always use Kramer high-performance cables to connect AV equipment to the VS-84UT.
RJ-45 pinout:
Connect the audio input:
To a balanced stereo audio
source:
To an unbalanced stereo
audio source:
For the Ethernet and HDBaseT connectors, see the proper
wiring diagram below
PIN EIA /TIA 568B
PIN
Wire Color
1
Orange / White
2
Orange
3
Green / White
4
Blue
5
Blue / White
Connect the audio output:
6 Green
To a balanced stereo audio
acceptor
To an unbalanced stereo
audio acceptor
7
Brown / White
8
Brown
Step 5: Connect the power
Connect AC power to the rear of the VS-84UT, switch on its power and then switch on the power on each device.
Safety Instructions
Caution:
There are no operator serviceable parts inside the unit.
Warning:
Use only the power cord that is supplied with the unit.
Warning:
Do not open the unit. High voltages can cause electrical shock! Servicing by qualified personnel only.
Warning:
Disconnect the power and unplug the unit from the wall before installing.
See www.KramerAV.com for updated safety information.
Page 4
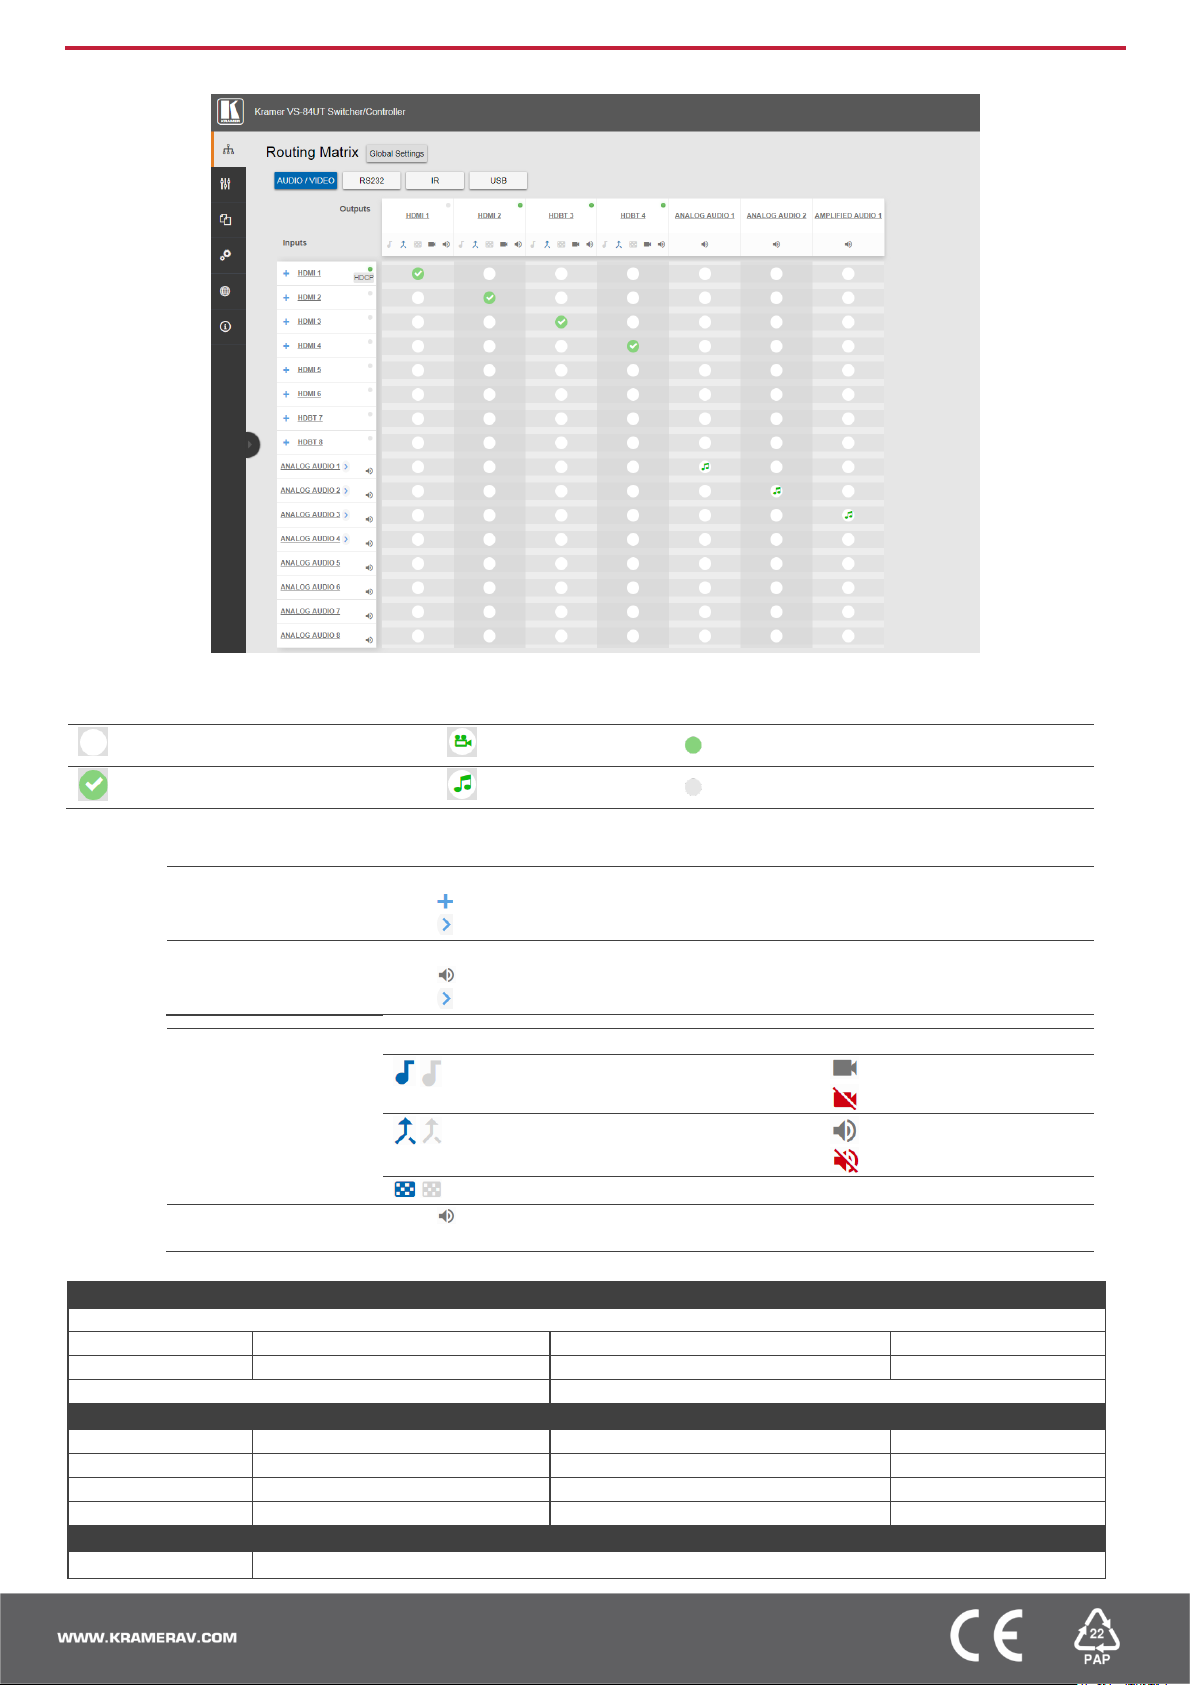
Step 6: Operate via the web pages:
Route video and audio signals:
Click a white button in the matrix to route an input to an output (audio and/or video).
Optional input to output routing.
Video only is routed.
An active signal is detected (for inputs and
outputs).
Current input to output routing
state.
Audio only is routed.
No active signal is detected (for inputs and
outputs).
Additional functions:
Inputs:
HDMI and HDBT
Click the input name to change its settings.
Click to route the audio and video inputs separately.
Click to toggle between the HDBT and HDMI input.
Analog Audio
Click the input name to change its settings.
Click to change audio level settings.
Click to toggle between one analog input signal and two mic. Input signals.
Outputs:
HDMI and HDBT
Click the output name to change its settings.
/
Audio-only mode is enabled/disabled.
/
HDMI is on/off (audio
and video).
/
Audio-follow-video mode is
enabled/disabled.
/
AUDIO is on/off.
/
Pattern is selected/not selected.
Analog and Amplified
Audio:
Click to change audio settings.
Default communication parameters:
RS-232
Protocol 3000
Baud Rate:
115,200
Stop Bits:
1
Data Bits:
8
Parity:
None
Example (Set the volume on analog audio input 5 to 10dB):
#X-AUD-LVL IN.ANALOG_AUDIO.5.AUDIO.1,10
TCP/IP Parameters
IP Address:
192.168.1.39
UDP Port #:
50000
Subnet mask:
255.255.000.000
Maximum UDP Connections:
Unlimited
Default gateway:
192.168.0.1
Maximum TCP Connections:
Unlimited
TCP Port #:
5000
Web page authentication (User/Password):
Admin/Admin
Full Factory Reset
Protocol 3000
Use “#FACTORY” command and use “#RESET” to restore the factory default values.
 Loading...