

Page 1

VP
2900- 3 0 0 8 7 5 QS
1
Scan for full manual
VP-772T Quick Start Guide
Control Panel Functionality
through 1 to 4 and A (all the devices).
F – Indicates factory reset. Appears when powering the device while pressing the ON button.
3
LAMP ON Button (x2)
Press to turn light on or off.
4
ON Button
Power the T-bar console on or off.
This guide helps you install and use your VP-772T for the first time.
Go to www.kramerav.com/downloads/VP-772T to download the latest user manual and check if firmware
upgrades are available.
Step 1: Check what’s in the box
VP-772T Presentation Matrix Switcher Control Panel
1 Desktop mounting bracket kit
Step 2: Get to know your VP-772T
2 Lamps
4 Rubber feet
1 Bracket set
1 Quick start guide
1 Power adapter
# Feature Function
1 MACHINE # Button Press to select the device to be controlled. The 7-segment display shows the selection (cycles
All the operation buttons on the front panel refer to the selected controlled device.
7-segment Display Displays the number of the device that is currently controlled as well as other indications:
1 – The VP-772 unit that is connected to RS-485-1 port is currently controlled (same for 2, 3 and 4).
A –All the connected devices are currently controlled.
L – Indicating that VP-772T is currently powering up.
2 Lamp XLR Connector (x2) Connect a gooseneck lamp.
-772T Quick Start (P/N: 2900-300875QS REV 1)
P/N:
Rev:
Page 2
transition is implemented.
6
WIPE DIRECTION Buttons
Select the direction of the transition (for example, inwards/outwards, left/right, up/down).
VP-772
Once a transition is complete, the PREVIEW
indicating the direction for the next transition.
Switcher Functionality
mode and not within the OSD menu mode, press to increase the Audio OUT 1 Preview volume.
and not within the OSD menu mode, press to decrease the Audio OUT 1 Preview volume.
general volume.
12
OSD Button
Press to lock the menu buttons (button illuminates). Press again to unlock the menu buttons.
13
MODE Button
Select the operation mode: AFV (audio follow video), video or audio.
16
PROGRAM Buttons
Press to select the input (from 1 to 8) to switch to the PROGRAM output.
17
PROGRAM FREEZE Button
Press to freeze/unfreeze the PROGRAM output video image.
20
PROGRAM BLACK Button
Press to toggle between a blank screen (black) and the PROGRAM display.
21
TAKE
Press to perform a transition.
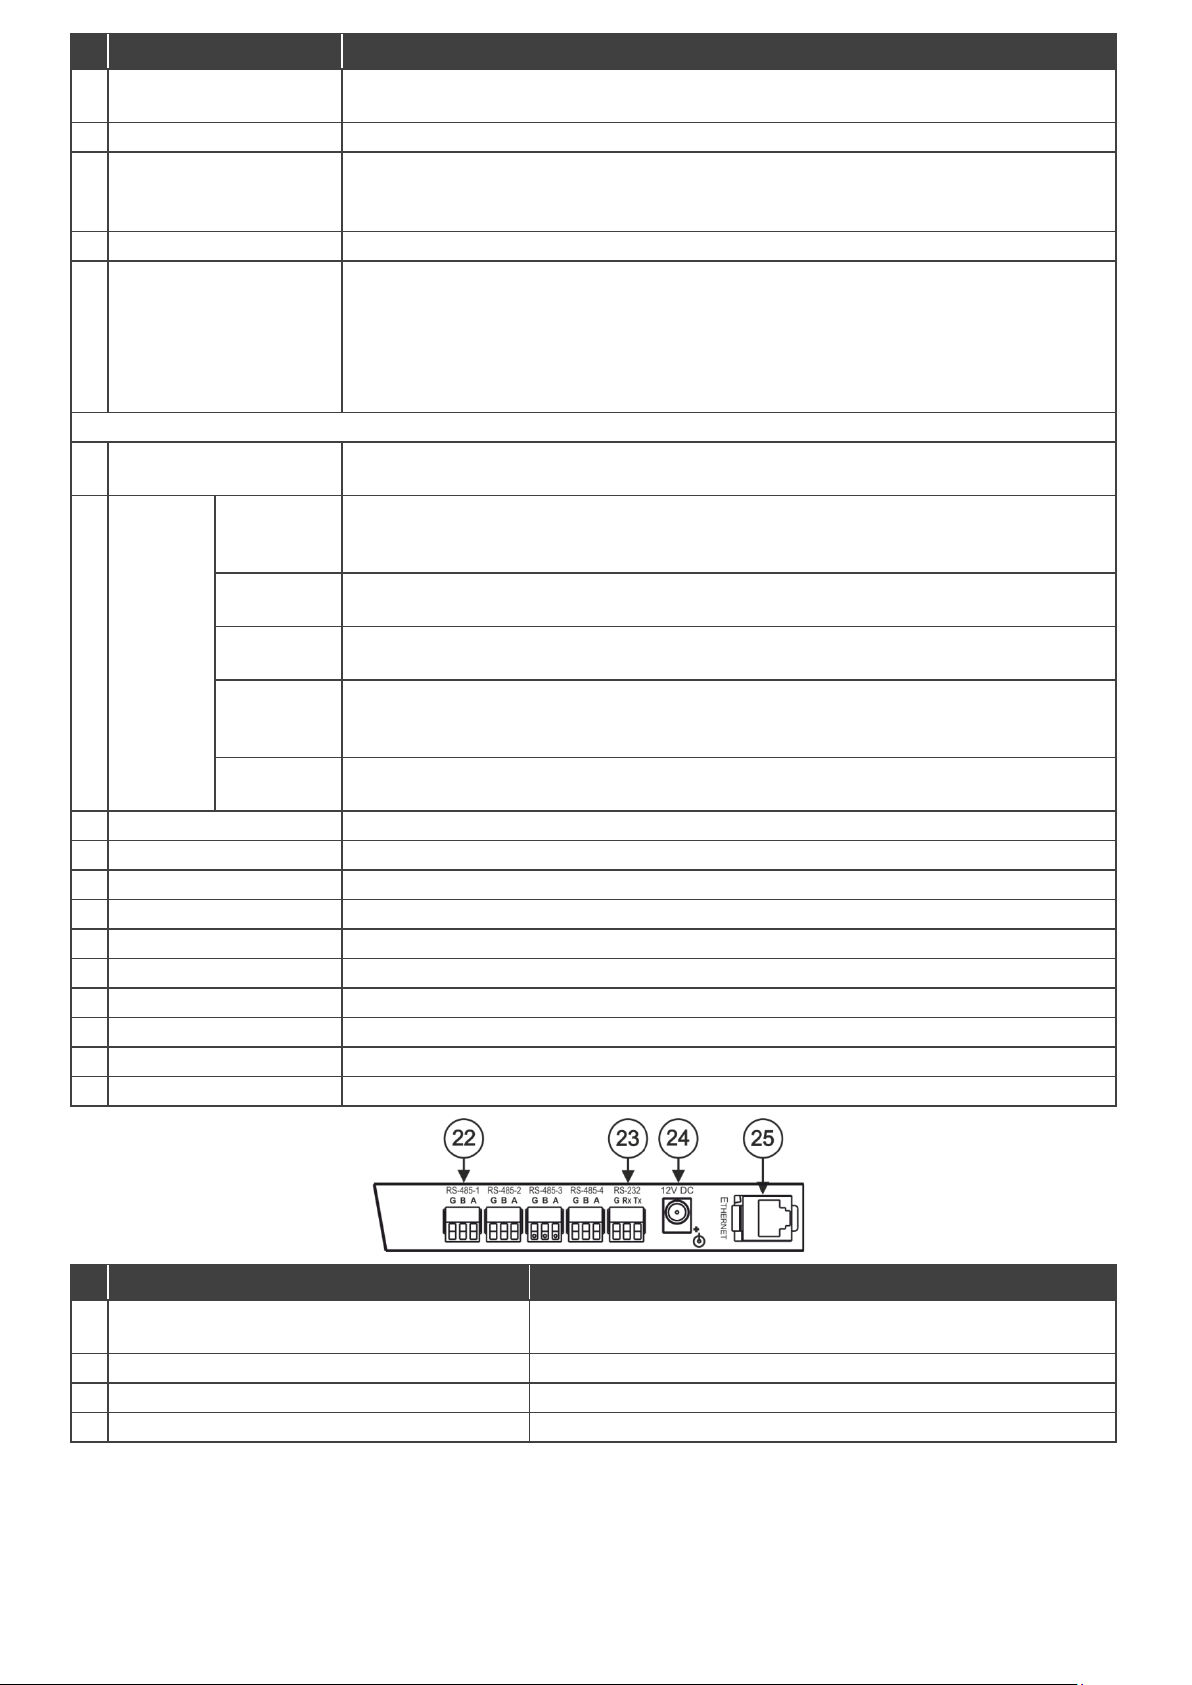
24
12V DC
12V DC connector for powering the unit.
25
Ethernet RJ-45 Connector
Connect to the PC or other Controller through computer networking.
# Feature Function
5 EFFECT Buttons Press to select one of 11 effects or press RANDOM to randomly select an effect each time a
7 SPEED Potentiometer Turn to set the speed of the transition when using the TAKE button to implement a transition.
When turned completely to the left, a click sound indicates that the speed level is at its default value
set in the
8 T-Bar Control Stick Move to implement a transition manually.
9 PREVIEW LEDs Located on both sides of the T-bar control stick.
A PREVIEW LED lights to indicate the transition direction for moving the preview output to the
program output. Moving the T-bar control stick towards the lit PREVIEW LED moves the preview
output to the program output, completing the transition.
LED on the T-bar control stick side turns off and the PREVIEW LED on the opposite side lights,
10 MENU Button Press to access/exit the OSD menu on the selected VP-772 device. When browsing the Program
OSD menu, a long press on the MENU button switches to the Preview menu and vice versa.
11
// VOLUME Press to move up the menu list values and to increase numerical values. When in the transition
// VOLUME Press to move to the previous level in the OSD screen. When not within the OSD menu: in the
transition mode, press to decrease the Audio OUT 2 Program volume. In the Overlay mode, press
to decrease the general volume.
.
// VOLUME Press to move down the menu list and to decrease numerical values. When in the transition mode
Navigation
Buttons
// VOLUME Press to move to the next level in the OSD screen. When not within the OSD menu: in the transition
mode, increase the Audio OUT 2 Program volume. In the Overlay mode, press to increase the
ENTER Press to enter sub-menu items, and save. When in the transition mode and not within the OSD
menu, performs as the TAKE button.
14 Mode LED Indicators Indicate the operation mode, as selected via the MODE button.
15 PREVIEW Buttons Press to select the input (from 1 to 8) to switch to the PREVIEW output.
18 PREVIEW FREEZE Button Press to freeze/unfreeze the PREVIEW output video image.
19 PREVIEW BLACK Button Press to toggle between a blank screen (black) and the PREVIEW display.
# Feature Function
22 RS-485-1 (G B A) 3-pin Terminal Block Connector Connects to the RS-485 port on the VP-772 which is recognized as
machine # 1 (from 1 to 4).
23 RS-232 (G, Rx, Tx) 3-pin Terminal Block Connector Connect to the PC or other serial controller.
Page 3

Caution:
There are no operator serviceable parts inside the unit.
Warning:
Use only the Kramer Electronics power supply that is provided with the unit.
Warning:
Disconnect the power and unplug the unit from the wall before installing.
See www.KramerAV.com for updated safety information.
Baud Rate:
115200
Parity:
None
Example: (Identify slave 2):
#IDENTIFY-SLV 2<CR>
Step 3: Install VP-772T
Install VP-772T using one of the following methods:
• Remove the 5 screws from each side of the unit, reinsert those
screws through the rack ears and spacers and mount on a 19"
rack.
• Attach the rubber feet and place the unit on a flat surface.
• Install the VP-772T in a desktop using the mounting bracket kit.
Step 4: Connect the inputs and outputs
Always switch OFF the power on each device before connecting it to your VP-772T. For best results, we recommend that you
always use Kramer high-performance cables to connect AV equipment to VP-772T.
Step 5: Connect the power
Connect the 12V DC power adapter to VP-772T and plug it into the mains electricity.
Safety Instructions
Step 6: Operate VP-772T
RS-232 and Ethernet:
RS-232
Data Bits: 8 Command Format: ASCII
Stop Bits: 1
Default Ethernet Parameters
IP Address: 192.168.1.39 TCP Port #: 5000
Subnet mask: 255.255.0.0 Max. TCP Connections: 100
Default gateway: 192.168.0.1
Use front-panel button shortcuts:
• Press and hold MODE for ~2 seconds to enable damping to the VP-772 that is currently controlled (indicated on the display).
TAKE flashes once to indicate that damping is ON.
• Press and hold MODE for ~4 seconds to disable damping to the VP-772 that is currently controlled (indicated on the display).
TAKE flashes twice to indicate that damping is OFF.
• Press and hold MACHINE # for ~2 seconds to identify the machine that is currently controlled (indicated on the display).
Page 4
ensure a smooth
1 Ethernet
On an RJ-45 female connector for device control
Controls
Front panel
Front panel buttons
MAC
Chrome version 49; Firefox version 52; Safari version 10.1
Minimum Browser Window Size
1024 x 768
Operating Temperature
0° to +40°C (32° to 104°F)
Storage Temperature
-40° to +70°C (-40° to 158°F)
Safety
CE
Environmental
RoHs, WEEE
Shipping Dimensions (W, D, H)
55cm x 29.4cm x 16.1cm (21.65" x 11.57" x 6.34")
in a table)
Included
Power supply, mounting bracket kit, bracket set, 2 goose-neck lamps
available at
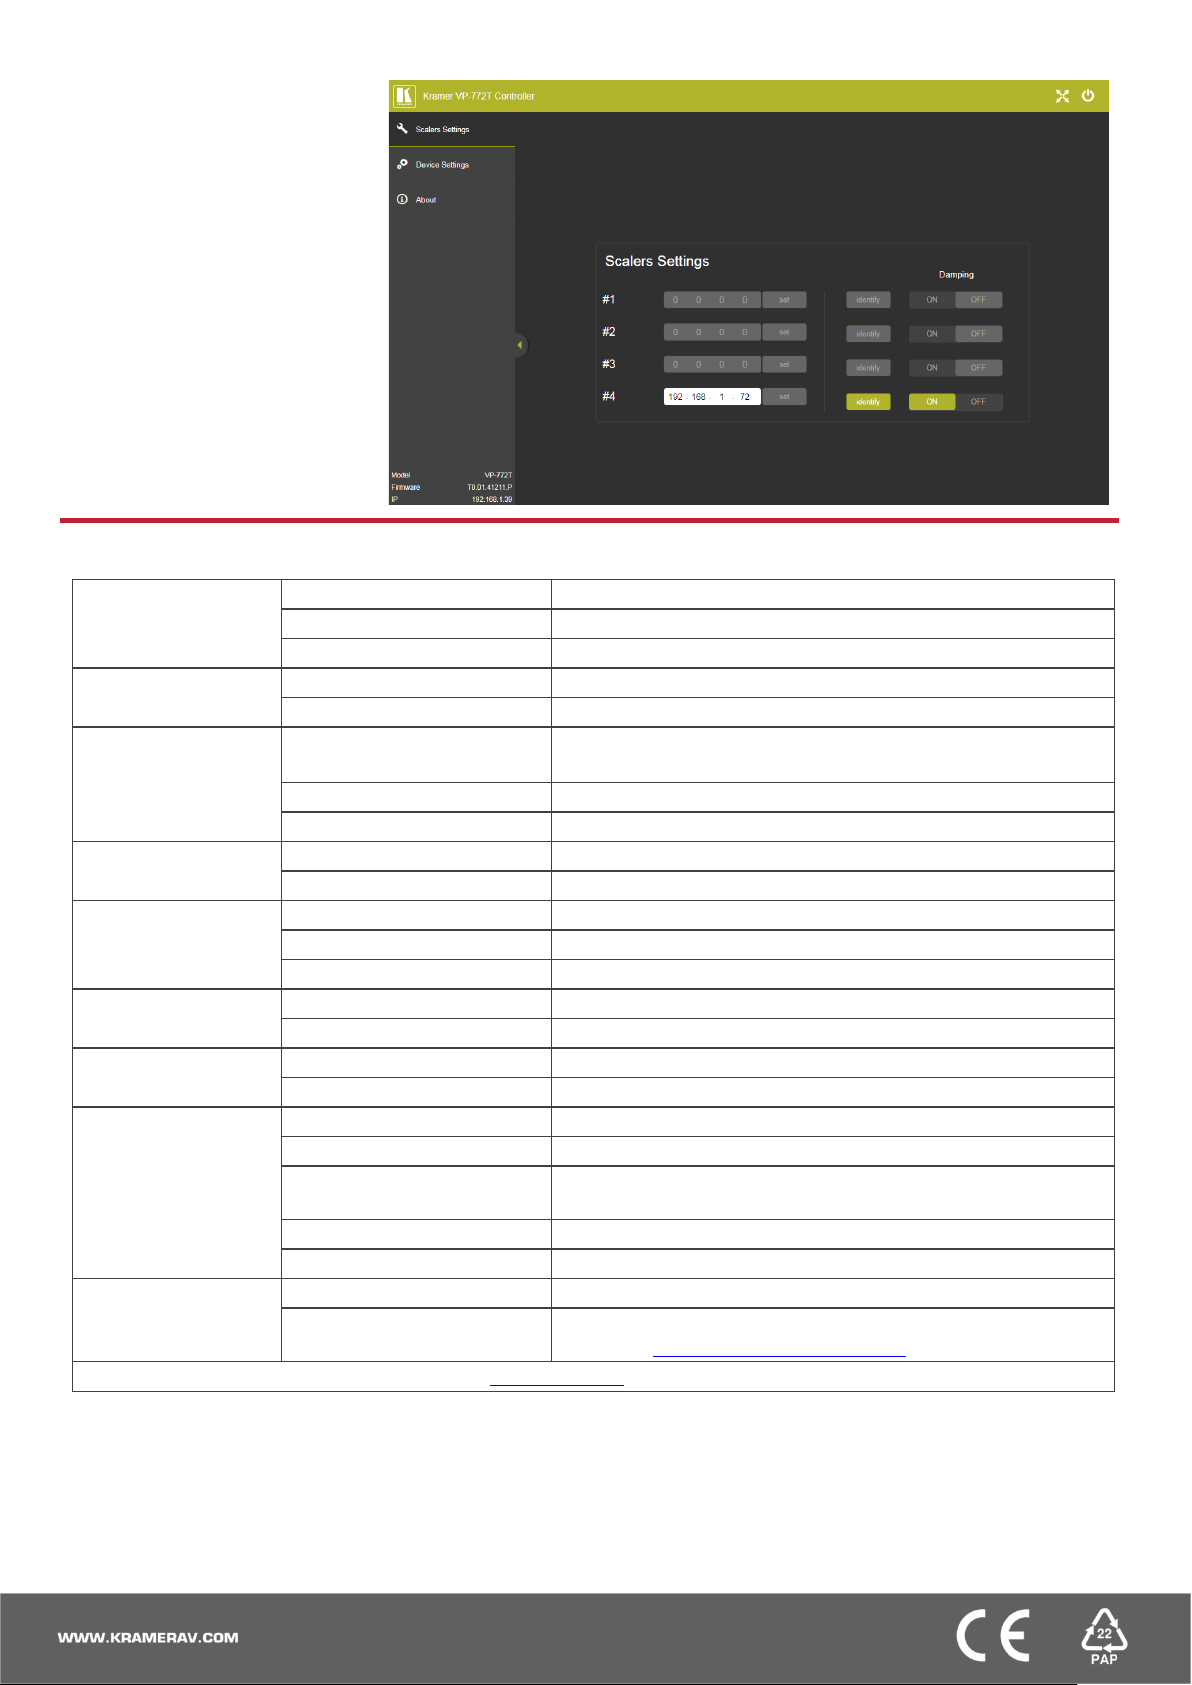
Use embedded web pages to set
parameters:
Enter the IP addresses of the controlled
devices.
Click Identify to identify the selected
VP-722 device.
Set Damping to ON to
transition.
Technical Specifications
Ports 4 RS-485 On 3-pin terminal block connectors
1 RS-232 On a 3-pin terminal block for device control
Other Web Pages, RS-232 commands
Supported PC Web
Browsers
Power Consumption 12V DC, 350mA
Environmental
Conditions
Regulatory Compliance
Enclosure Size 4U
General Net Dimensions (W, D, H) 43.6 cm x 17.7cm x 14.33cm (17.17" x 6.97" x 5.64")
Accessories
Specifications are subject to change without notice at www.kramerav.com
Windows 7 and Higher
Source 12V DC, 2A
Humidity 10% to 90%, RHL non-condensing
Type Aluminum
Surface cutout size (for installing
Net Weight 1.62kg (3.6lbs)
Shipping Weight 3.46kg (7.6lbs) approx.
Optional For optimum range and performance use the recommended cables
Internet Explorer (32/64 bit) version 11; Firefox version 52;
Chrome version 49
416 ±2mm x 160 ±2mm (16.38 ±0.08” x 6.3 ±0.08”)
www.kramerav.com/product/VP-772T
 Loading...