

Page 1

Kramer Electronics, Ltd.
Preliminary
USER MANUAL
Models:
VM-3AN, 1:3 Audio DA
VM-3SN, 1:3 s-Video DA
VM-3VN, 1:3 Video DA
Page 2

Contents
i
Contents
1 Introduction 1
2 Getting Started 1
2.1 Quick Start 1
3 Overview 3
3.1 VM-3AN Audio DA 3
3.2 VM-3SN s-Video DA 3
3.3 VM-3VN Video DA 3
3.4 Achieving the Best Performance 4
4 Your Distribution Amplifier 4
4.1 Your VM-3AN Audio DA 5
4.2 Your VM-3SN s-Video DA 6
4.3 Your VM-3VN Video DA 7
5 Connecting Your Distribution Amplifier 7
5.1 Connecting Your VM-3AN Audio DA 8
5.2 Connecting Your VM-3SN s-Video DA 9
5.3 Connecting Your VM-3VN Video DA 10
6 Technical Specifications 11
Figures
Figure 1: VM-3AN Audio DA 5
Figure 2: VM-3SN s-Video DA 6
Figure 3: VM-3VN Video DA 7
Figure 4: Connecting the VM-3AN Audio Distributor 8
Figure 5: Connecting the VM-3SN s-Video Distributor 9
Figure 6: Connecting the VM-3VN Video Distributor 10
Tables
Table 1: VM-3AN Audio DA Features 5
Table 2: VM-3SN s-Video DA Features 6
Table 3: VM-3VN Video DA Features 7
Table 4: Technical Specifications 11
Page 3

Introduction
1
1
2
3
1 Introduction
Welcome to Kramer Electronics! Since 1981, Kramer Electronics has been
providing a world of unique, creative, and affordable solutions to the vast
range of problems that confront the video, audio, presentation, and
broadcasting professional on a daily basis. In recent years, we have
redesigned and upgraded most of our line, making the best even better! Our
1,000-plus different models now appear in 11 groups1 that are clearly
defined by function.
Thank you for purchasing your Kramer TOOLS™ VM-3AN Audio DA,
VM-3SN s-Video DA, and/or VM-3VN Video DA.
These products are ideal for the following typical applications:
Audio duplication studios, delivering high-quality audio and video
duplicates
Broadcast and production studios for signal distribution
Presentation and multimedia distribution
Field distribution
The package includes the following items:
VM-3AN Audio DA, or VM-3SN s-Video DA, or VM-3VN Video DA
Power adapter, this user manual2
2 Getting Started
We recommend that you:
Unpack the equipment carefully and save the original box and
packaging materials for possible future shipment
Review the contents of this user manual
Use Kramer high-performance high-resolution cables3
2.1 Quick Start
This quick start chart summarizes the basic setup and operation:
GROUP 1: Distribution Amplifiers; GROUP 2: Switchers and Matrix Switchers; GROUP 3: Control Systems;
GROUP 4: Format/Standards Converters; GROUP 5: Range Extenders and Repeaters; GROUP 6: Specialty AV Products;
GROUP 7: Scan Converters and Scalers; GROUP 8: Cables and Connectors; GROUP 9: Room Connectivity;
GROUP 10: Accessories and Rack Adapters; GROUP 11: Sierra Products
Download up-to-date Kramer user manuals from the Internet at this URL: http://www.kramerelectronics.com
The complete list of Kramer cables is on our Web site at http://www.kramerelectronics.com
Page 4
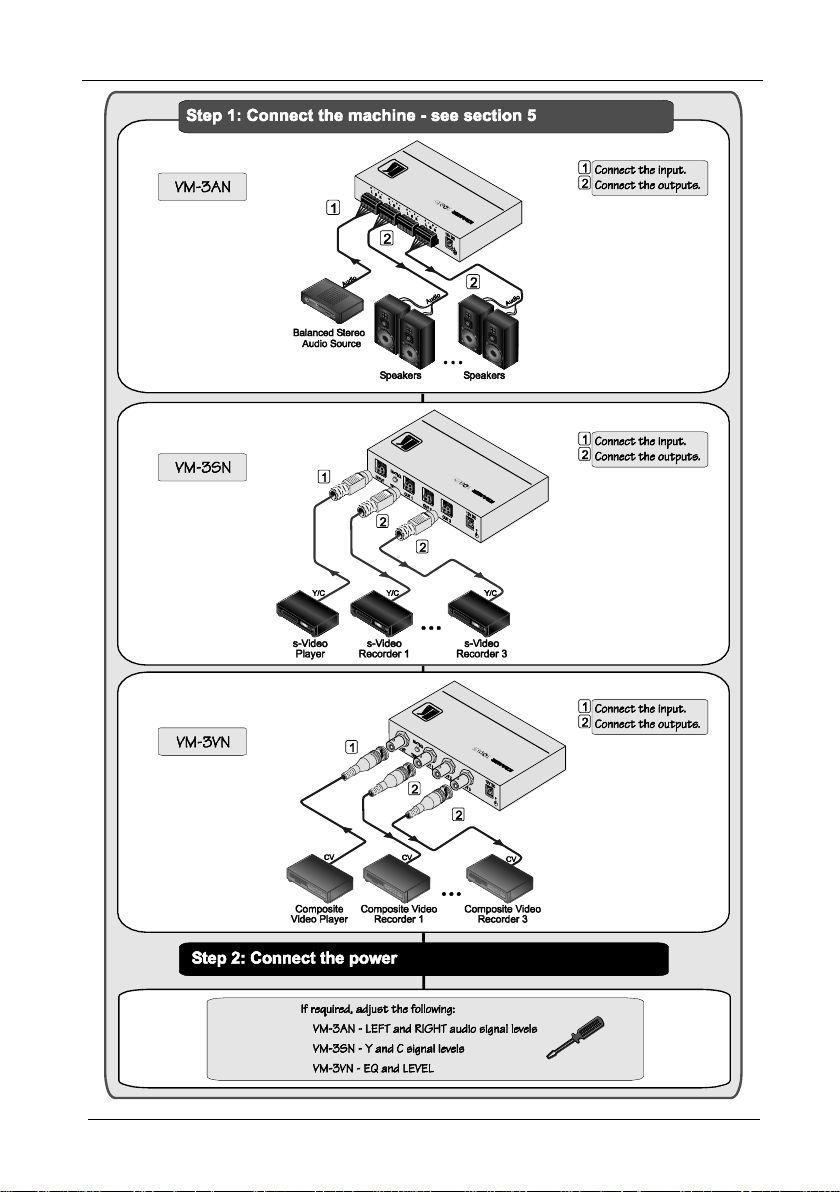
KRAMER: SIMPLE CREATIVE TECHNOLOGY
Getting Started
2
Page 5

Overview
3
3 Overview
This section gives a summary of:
The VM-3AN Audio DA, see section 3.1
The VM-3SN s-Video DA, see section 3.2
The VM-3VN Video DA, see section 3.3
Recommendations for achieving the best performance, see section 3.4
3.1 VM-3AN Audio DA
The VM-3AN is a high-quality 1:3 balanced stereo audio distribution
amplifier. It accepts one balanced stereo input on a removable terminal
block and distributes the signal to three identical outputs on removable
terminal blocks.
Specifically, the VM-3AN features:
Left and right signal level trimmers on the front panel
12V DC power
3.2 VM-3SN s-Video DA
The VM-3SN is a high-quality 1:3 distribution amplifier for s-Video
signals. It accepts one s-Video input on a 4-pin connector and distributes the
signal to three identical outputs on 4-pin connectors.
Specifically, the VM-3SN features:
C and Y level trimmers on the front panel
12V DC power
3.3 VM-3VN Video DA
The VM-3VN is a high-quality 1:3 distribution amplifier for composite
video signals. It accepts one composite video input on a BNC connector and
distributes the signal to three identical composite video outputs on BNC
connectors.
Specifically, the VM-3VN features:
EQ and LEVEL trimmers on the front panel
12V DC power
Page 6
KRAMER: SIMPLE CREATIVE TECHNOLOGY
Your Distribution Amplifier
4
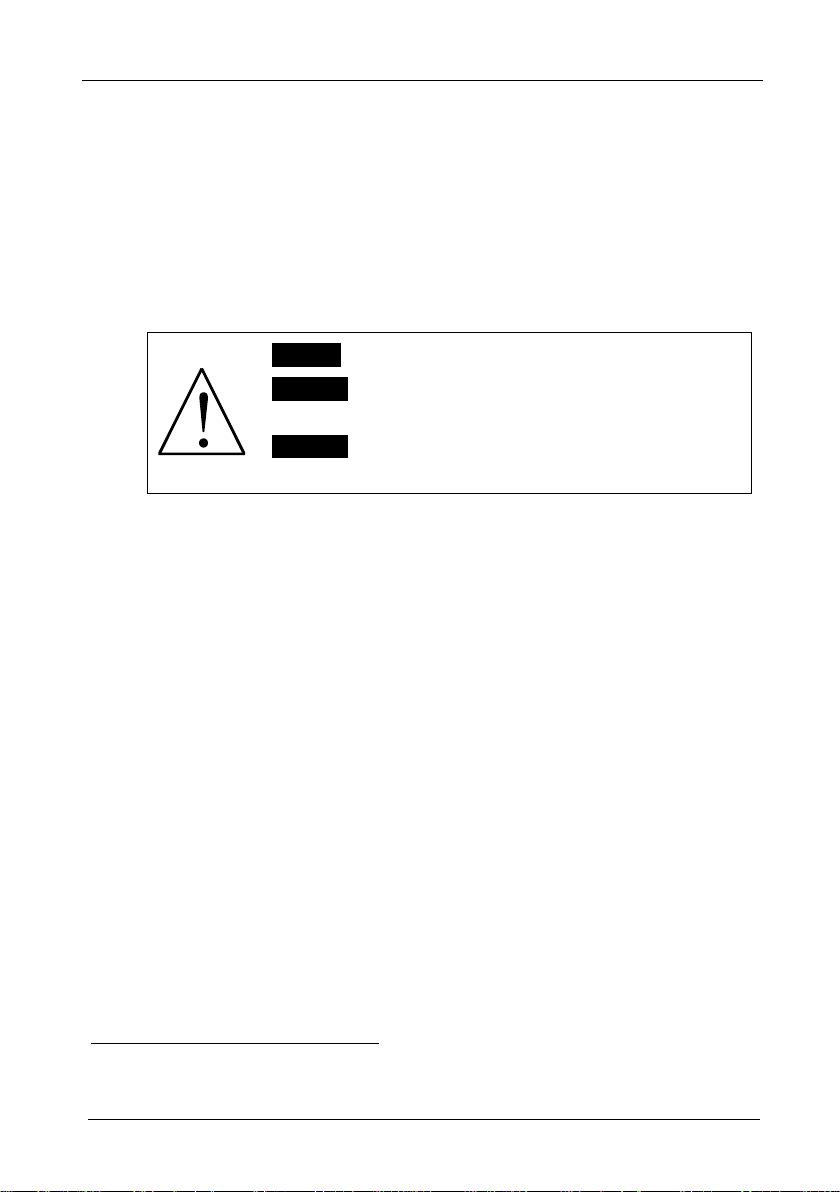
Caution – No operator-serviceable parts inside unit.
Warning – Use only the Kramer Electronics input power
wall adapter that is provided with this unit2.
Warning – Disconnect power and unplug unit from wall
before installing or removing device or servicing unit.
1
2
3.4 Achieving the Best Performance
To achieve the best performance:
Use only good quality connection cables1 to avoid interference,
deterioration in signal quality due to poor matching, and elevated
noise levels (often associated with low quality cables).
Avoid interference from neighboring electrical appliances that
may adversely influence signal quality and position your Kramer
products away from moisture, excessive sunlight and dust
4 Your Distribution Amplifier
This section defines your:
VM-3AN Audio DA, see section 4.1
VM-3SN s-Video DA, see section 4.2
VM-3VN Video DA, see section 4.3
Available from Kramer Electronics on our Web site at http://www.kramerelectronics.com
For example, part number 2535-000251
Page 7
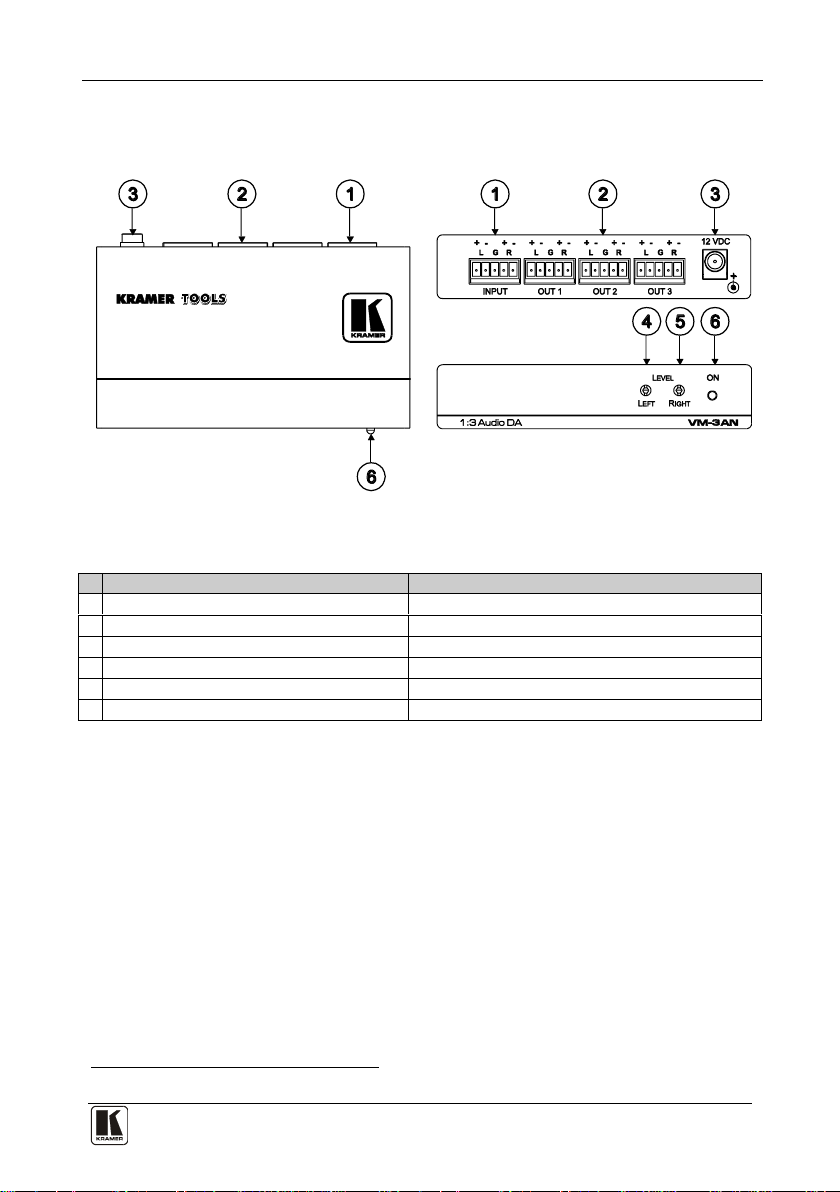
Your Distribution Amplifier
5
#
Feature
Function
1
INPUT Detachable Terminal Block Connector
Connects to the balanced audio source
2
OUT Detachable Terminal Block Connector
Connects to the balanced audio acceptor (from 1 to 3)
3
12V DC
+12V DC connector for powering the unit
4
LEFT LEVEL Trimmer
Adjusts1 the left output signal level
5
RIGHT LEVEL Trimmer
Adjusts1 the right output signal level
6
ON LED
Illuminates when receiving power
1
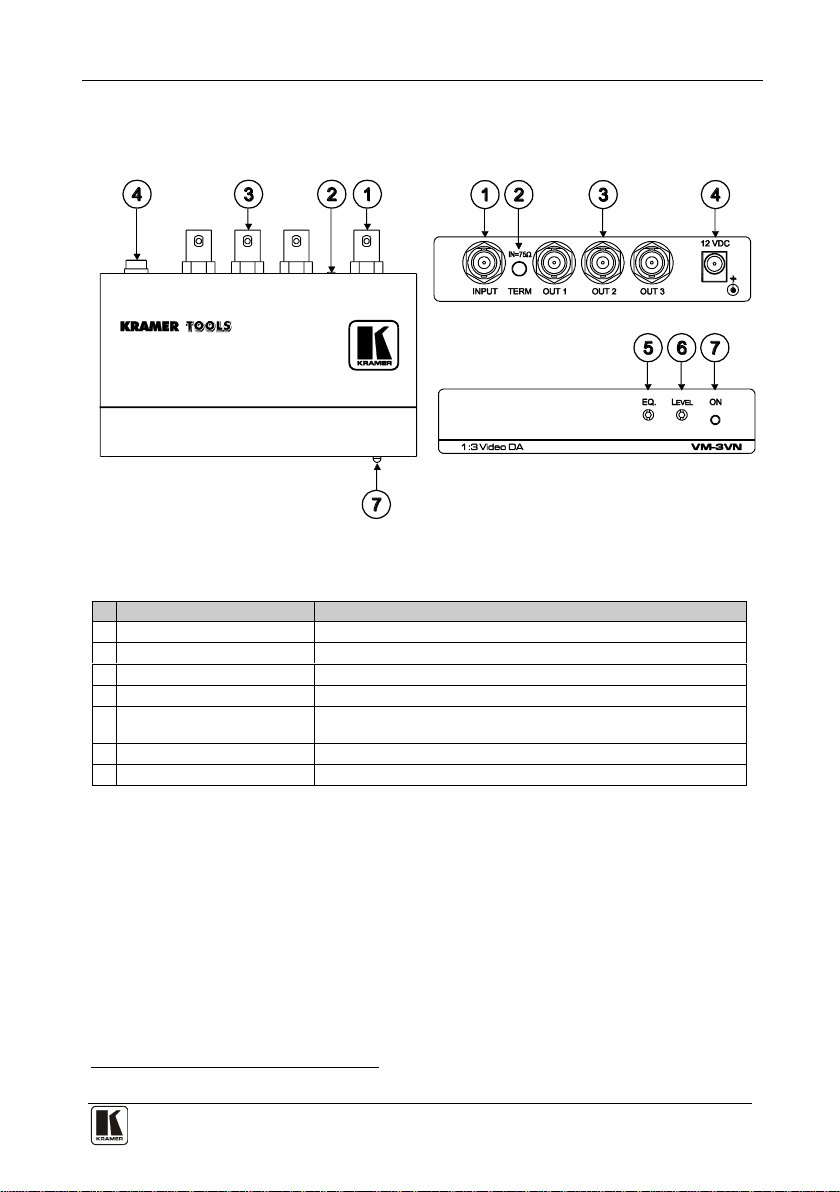
4.1 Your VM-3AN Audio DA
Figure 1 and Table 1 define the VM-3AN:
Figure 1: VM-3AN Audio DA
Table 1: VM-3AN Audio DA Features
Insert a screwdriver into the small hole and carefully rotate it, trimming the appropriate output level
Page 8
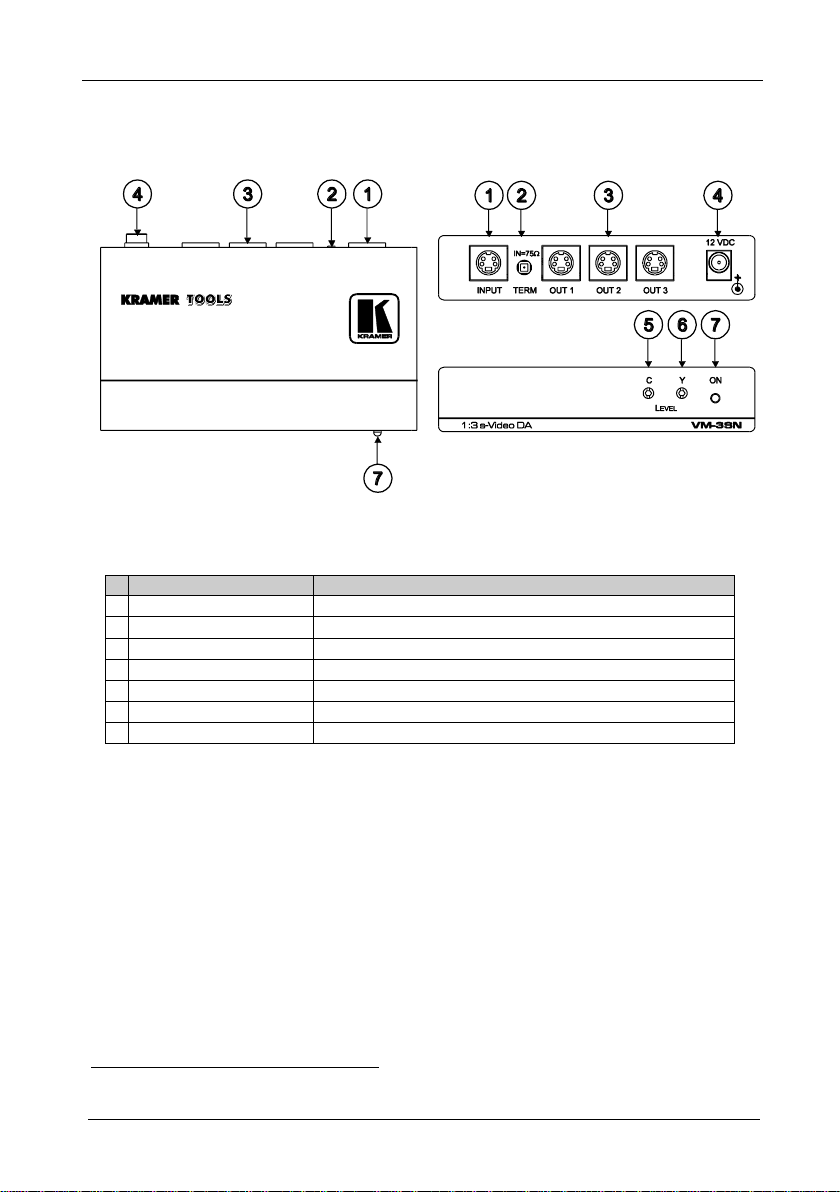
KRAMER: SIMPLE CREATIVE TECHNOLOGY
Your Distribution Amplifier
6
#
Feature
Function
1
INPUT 4-pin Connector
Connects to the s-Video source
2
IN=75Ω TERM Pushbutton
Terminates the input with 75Ω
3
OUT 4-pin Connector
Connects to the audio acceptor (from 1 to 3)
4
12V DC
+12V DC connector for powering the unit
5
C LEVEL Trimmer
Adjusts1 the chrominance output signal level for the s-Video output
6
Y LEVEL Trimmer
Adjusts1 the luminance output signal level for the s-Video output
7
ON LED
Illuminates when receiving power
1
4.2 Your VM-3SN s-Video DA
Figure 2 and Table 2 define the VM-3SN:
Figure 2: VM-3SN s-Video DA
Table 2: VM-3SN s-Video DA Features
Insert a screwdriver into the small hole and carefully rotate it, trimming the appropriate output level
Page 9
Connecting Your Distribution Amplifier
7
#
Feature
Function
1
INPUT BNC Connector
Connects to the composite video source
2
IN=75Ω TERM Pushbutton
Terminates the input with 75Ω
3
OUT BNC Connector
Connects to the composite video acceptor (from 1 to 3)
4
12V DC
+12V DC connector for powering the unit
5
EQ Trimmer
Adjusts1 the EQ. (equalization) compensation level for the composite
video outputs
6
LEVEL Trimmer
Adjusts1 signal level for the composite video outputs
7
ON LED
Illuminates when receiving power
1
4.3 Your VM-3VN Video DA
Figure 3 and Table 3 define the VM-3VN:
Figure 3: VM-3VN Video DA
Table 3: VM-3VN Video DA Features
5 Connecting Your Distribution Amplifier
This section explains how to connect your:
VM-3AN Audio DA, see section 5.1
VM-3SN s-Video DA, see section 5.2
VM-3VN Video DA, see section 5.3
Insert a screwdriver into the small hole and carefully rotate it, trimming the appropriate output level
Page 10
KRAMER: SIMPLE CREATIVE TECHNOLOGY
Connecting Your Distribution Amplifier
8
1
2
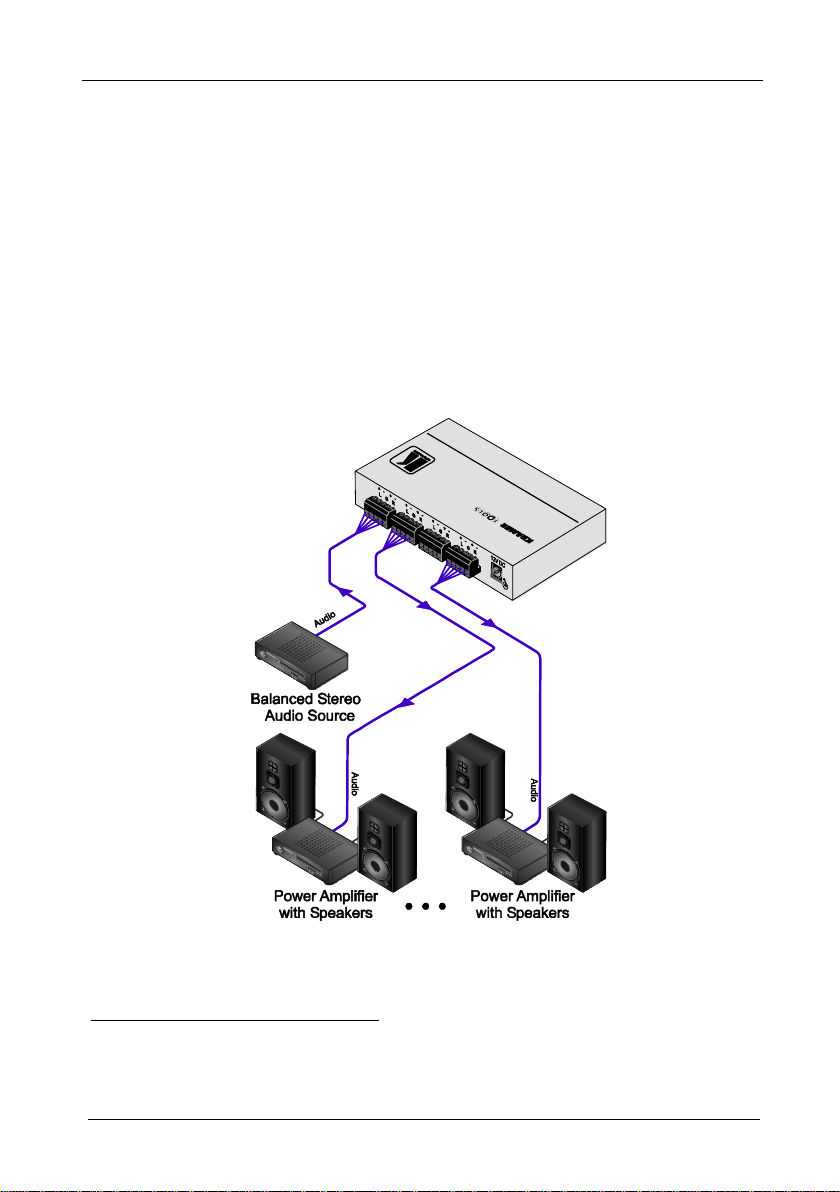
5.1 Connecting Your VM-3AN Audio DA
To connect1 the VM-3AN, as illustrated in the example in Figure 4, do the
following:
1. Connect the balanced stereo audio source to the INPUT terminal block
connector.
2. Connect the OUT terminal block connectors (from 1 to 3) to up to three
balanced stereo audio acceptors2 (for example, power amplifiers).
3. Connect the 12V DC power adapter to the power socket and connect the
adapter to the mains electricity (not illustrated in Figure 4).
4. If required, adjust the audio signal levels by turning the LEFT and RIGHT
level trimmers with a small screwdriver.
Figure 4: Connecting the VM-3AN Audio Distributor
Switch OFF the power on each device before connecting it to your VM-3AN. After connecting your VM-3AN, switch on its
power and then switch on the power on each device
You do not have to connect all the outputs
Page 11
Connecting Your Distribution Amplifier
9
1
2
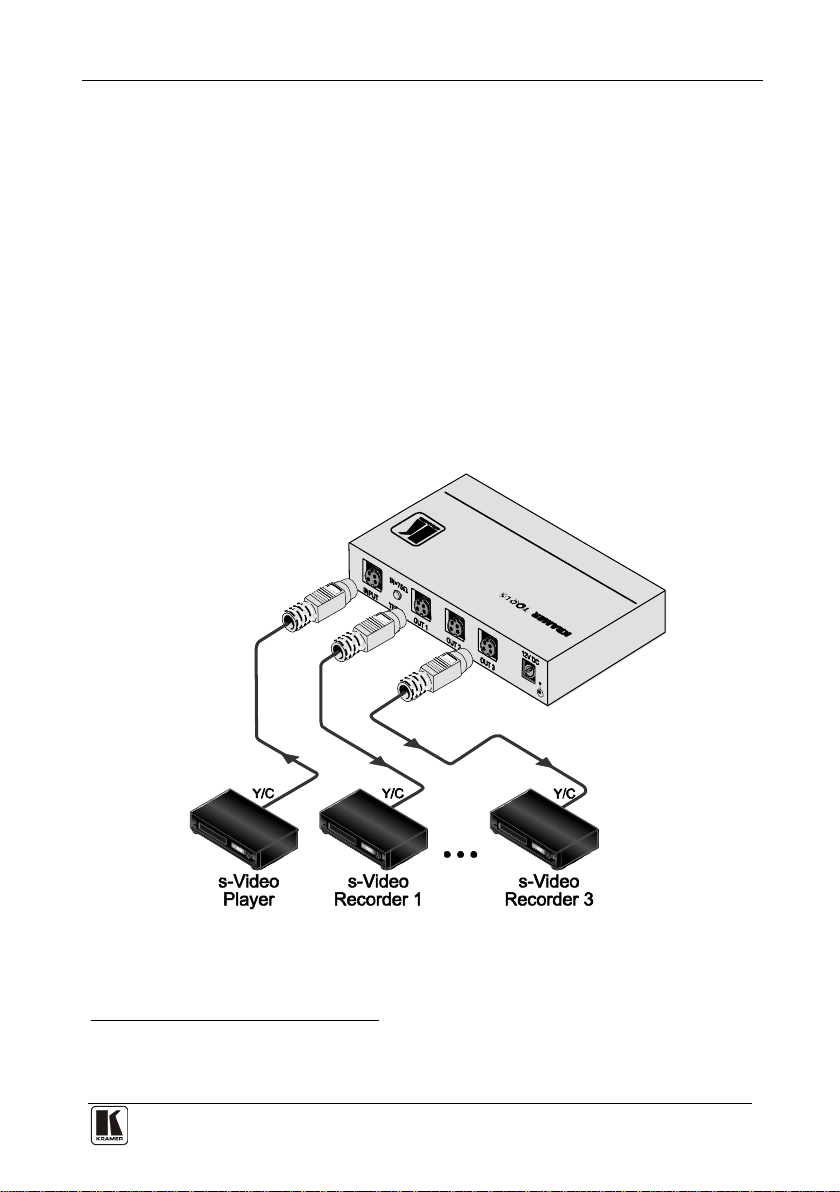
5.2 Connecting Your VM-3SN s-Video DA
To connect1 the VM-3SN, as illustrated in the example in Figure 5, do the
following:
1. Connect the s-Video source (for example, an s-Video player) to the INPUT
4-pin connector.
2. Terminate the input by ensuring that the TERM switch is pressed to the IN
position.
3. Connect the OUT 4-pin connectors (from 1 to 3) to up to three s-Video
acceptors2 (for example, s-Video recorders).
4. Connect the 12V DC power adapter to the power socket and connect the
adapter to the mains electricity (not illustrated in Figure 5).
5. If required, adjust output chrominance (C) and luminance (Y) signal levels
by turning the appropriate trimmer with a small screwdriver.
Figure 5: Connecting the VM-3SN s-Video Distributor
Switch OFF the power on each device before connecting it to your VM-3SN. After connecting your VM-3SN, switch on its
power and then switch on the power on each device
You do not have to connect all the outputs
Page 12
KRAMER: SIMPLE CREATIVE TECHNOLOGY
Connecting Your Distribution Amplifier
10
1
2
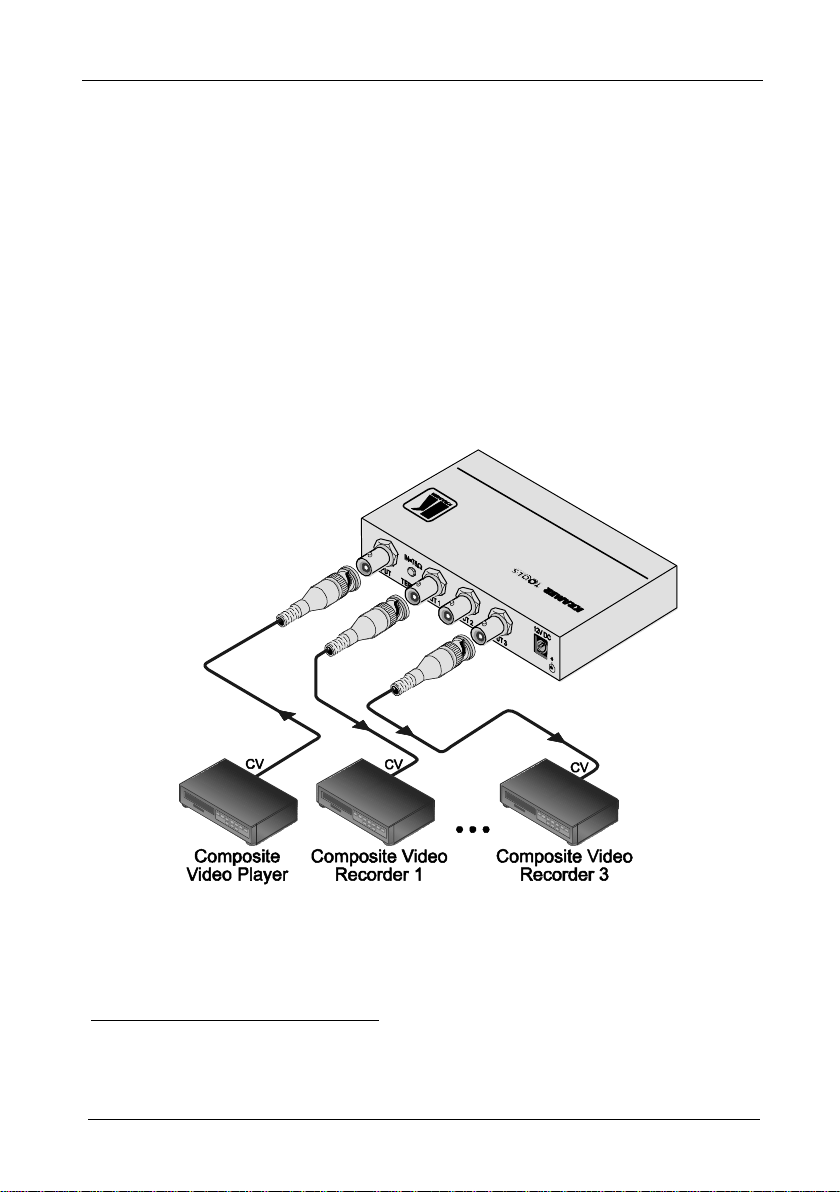
5.3 Connecting Your VM-3VN Video DA
To connect1 the VM-3VN, as illustrated in the example in Figure 6, do the
following:
1. Connect the composite video source to the INPUT BNC connector.
2. Terminate the input by ensuring that the TERM switch is pressed to the IN
position.
3. Connect the OUT BNC connectors (from 1 to 3) to up to three composite
video acceptors2.
4. Connect the 12V DC power adapter to the power socket and connect the
adapter to the mains electricity (not illustrated in Figure 6).
5. If required, adjust output equalization (EQ) and signal level (LEVEL) by
turning the appropriate trimmer with a small screwdriver.
Figure 6: Connecting the VM-3VN Video Distributor
Switch OFF the power on each device before connecting it to your VM-3VN. After connecting your VM-3VN, switch on its
power and then switch on the power on each device
You do not have to connect all the outputs
Page 13
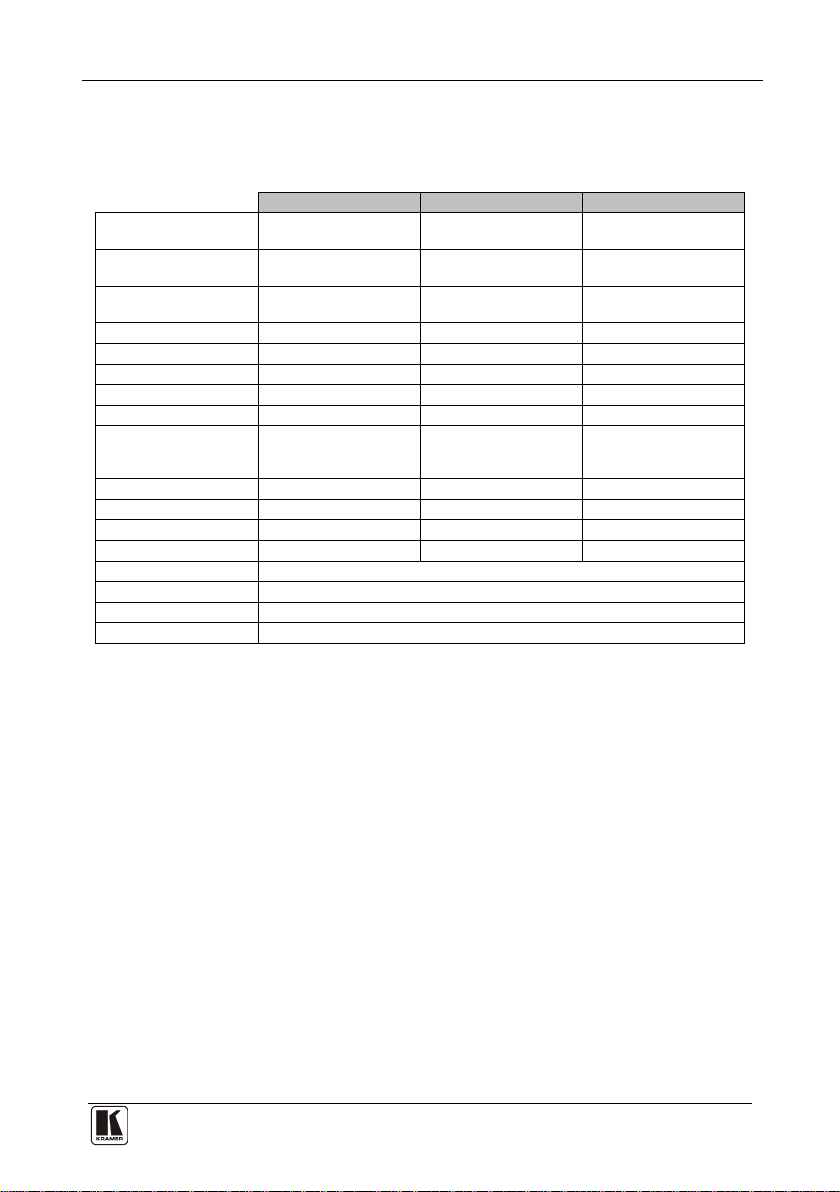
Technical Specifications
11
VM-3AN
VM-3SN
VM-3VN
INPUT:
1 balanced audio stereo
on 5-pin terminal blocks
1 YC on a 4-pin
connector
1 composite video on a
BNC connector
OUTPUTS:
3 balanced audio stereo
on 5-pin terminal blocks
3 YC on 4-pin
connectors
3 composite video on
BNC connectors
MAX. INPUT / OUTPUT
LEVEL:
18.5Vpp
2Vpp, Y
1.8Vpp
BANDWIDTH (-3dB):
>100 kHz
135MHz
430MHz
DIFF GAIN:
–
0.03%
0.12%
DIFF PHASE:
–
0.03Deg
0.03Deg
K-FACTOR:
–
<0.05%
<0.05%
S/N RATIO:
90dB @1kHz
78dB @5MHz
74.3dB
CONTROL:
Output level control:
-77 to +6dB, R+/-, L+/channels
Y-level: -1.6 to +6.3dB;
C-level: -0.4 to +7.6dB
Level: -1.6 to +6dB;
Equalization: 0 to +6dB
COUPLING:
–
AC
AC
AUDIO THD + NOISE:
0.008%
– – AUDIO 2d HARMONIC:
0.001%
– – POWER SOURCE:
12V DC, 89mA
12V DC, 29mA
12V DC, 27mA
DIMENSIONS:
11.7cm x 6cm x 3.2cm (4.6” x 2.4” x 1.3”) W, D, H
WEIGHT:
0.28 kg (0.62 lbs.) approx.
ACCESSORIES:
Power supply
OPTIONS:
Rack adapter
6 Technical Specifications
Table 4 includes the technical specifications.
Table 4: Technical Specifications
Page 14
KRAMER: SIMPLE CREATIVE TECHNOLOGY
12
Page 15
!
SAFETY WARNING
Disconnect the unit from the power
supply before opening and servicing
P/N:
2900-000486
Rev:
2
For the latest information on our products and a list of Kramer distributors, visit our Web site where
updates to this user manual may be found.
We welcome your questions, comments, and feedback.
Web site: www.kramerelectronics.com
E-mail: [email protected]
Kramer Electronics, Ltd.
Web site: www.kramerelectronics.com
E-mail: [email protected]
2900–000486 REV 2
 Loading...