

Page 1
VIA Connect² Quick Start
P/N:
2900- 301626QS
Rev:
5
Scan for full manual
VIA Connect² Quick Start Guide
For Installer
This guide helps you install and use your VIA Connect² for the first time.
Go to https://www1.kramerav.com/product/via connect2 to download the latest user manual and check if
firmware upgrades are available.
Step 1: Check what’s in the box
VIA Connect² Collaboration Device
1 VESA mounting bracket
1 Quick start guide
1 Power supply (12V DC) with adapters for US, UK, and EU
1 VESA screw set
1 Video toggle cable
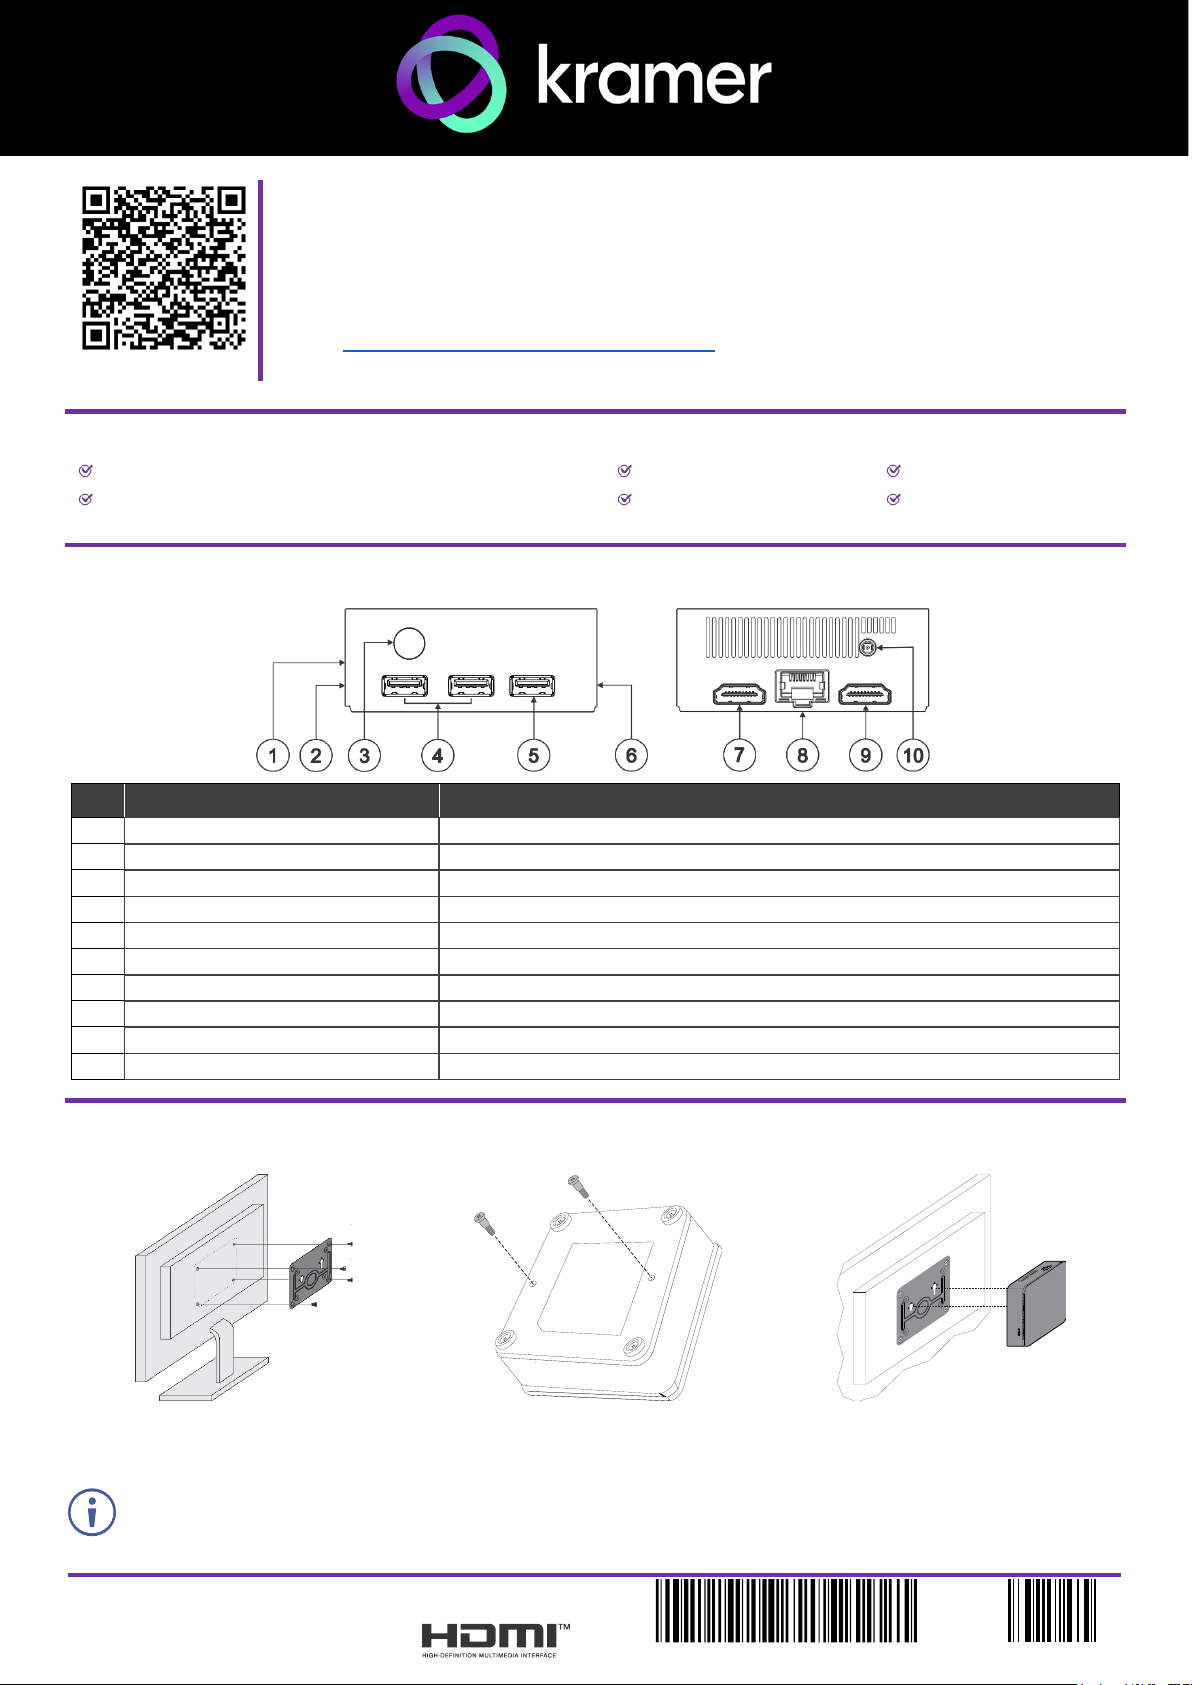
Step 2: Get to know your VIA Connect²
#
Feature
Function
1
Video Toggle Connector
Connect to video toggle cable for toggling between VIA input and HDMI™ input.
2
Micro SD Card Slot
Not in use.
3
Power Button with LED
Press to power ON or turn OFF the device.
4
USB 3.0 Connectors (x2)
Connect to USB devices, for example, a keyboard and a mouse.
5
USB 2.0 Connector
Connect to a USB device, for example, a keyboard or mouse.
6
Lock Opening
Connect to a security locking cable.
7
HDMI™ OUT Connector
Connect to an HDMI sink.
8
RJ-45 Connector
Connect to a LAN (default mode).
9
HDMI™ IN Connector
Connect to an HDMI source.
10
Power Connector
Connect to the 12V DC power supply.
Step 3: Mount VIA Connect²
Place VIA Connect² on a flat surface, or mount on a wall or the back of a display using the included VESA mounting bracket:
1. Attach the VESA mounting bracket to
the back of the display with 4 screws.
2. Fasten two screws to the bottom of
VIA Connect².
3. Insert the screws on the bottom of
VIA Connect² into the slots on the
mounting bracket.
When mounting the device on a display, the installer MUST secure the display to prevent instability.
Page 2
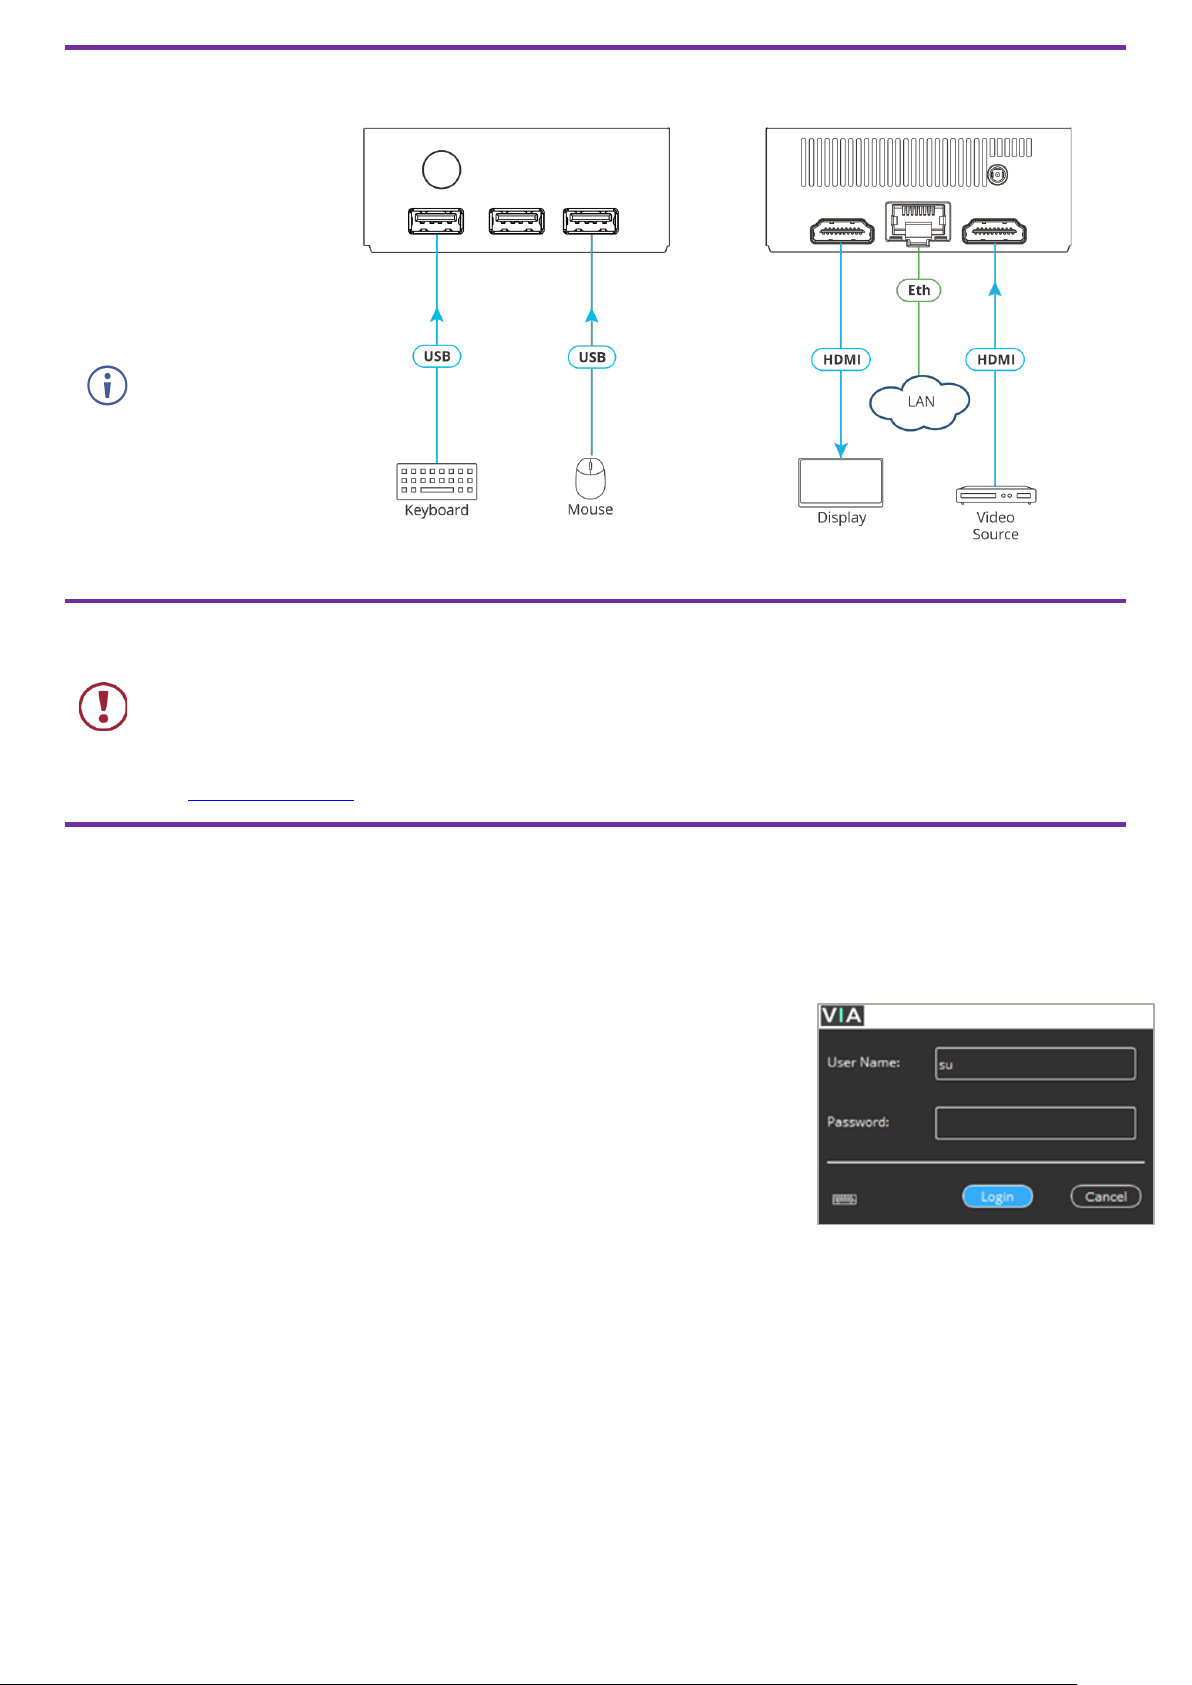
Step 4: Connect inputs and outputs
Always switch OFF the power on each device before connecting it to your VIA Connect².
1. Connect the keyboard
and mouse.
2. Connect an HDMI
display.
3. Connect to the LAN
(default mode).
4. If required, connect a
wired HDMI video source.
If you wish to use a
Kramer active optical
pluggable HDMI cable
with your VIA
Connect², contact your
local Kramer office to
assist in purchasing the
correct cable.
Step 5: Connect power
Connect the 12V DC power adapter to VIA Connect² and plug it into the mains electricity.
Caution:
There are no operator serviceable parts inside the unit.
Caution:
The device is intended to be installed at a height of 2 meters or less.
Warning:
Use only the Kramer Electronics power adapter that is provided with the unit.
Warning:
Disconnect the power and unplug the unit from the wall before installing.
See www.KramerAV.com for updated safety information.
Step 6: Configure VIA Connect²
A wizard guides you through configuration.
For more information about configuration see “For Web Administrator: Gateway Management pages” in the User Manual.
If you choose to skip the wizard, follow the basic configuration steps described below. For more information see “For Web
Administrator: Gateway Dashboard” in the User Manual.
1. Click the VIA tile at the bottom left of the screen: The Gateway Dashboard will open.
2. On the Kramer Gateway Dashboard, click Settings: The settings login window
appears.
3. Enter the User Name (default = su) and Password (default = supass) and click
Login: The VIA Settings window appears.
The VIA Settings tabs are:
▪ LAN Settings – Configure network parameters (default = DHCP allocated IP).
▪ System Controls – Manage your display and audio settings.
▪ Wifi – Activate and configure the built-in Wi-Fi capability.
4. When you have finished configuring settings, click Reboot to apply all settings.
To enable Wi-Fi:
1. Click the Wi-Fi tab and switch on Wi-Fi. The switch turns green and additional Wi-Fi settings appear.
2. Choose between AP Mode and Client Mode: AP Mode sets the VIA Connect² as an independent Wi-Fi network, Client Mode
connects the VIA Connect² to an existing Wi-Fi network, making it a secondary access point for guests.
▪ Defining AP Mode: Enter a new name in the SSID field and a new password or use the default name and password.
Select a Wi-Fi channel for the Access Point.
Select Enable Internet if the primary LAN network is connected to the Internet OR Activate Standalone Wi-Fi to create an
autonomous network without Internet access, and click Apply.
▪ Defining Client Mode: Select an available network from the drop-down, enter the password and click Apply.
Disconnect the LAN cable (if connected).
3. Reboot the device.
Page 3
Scan for full manual
VIA Connect² Quick Start Guide
For User
This guide helps you install and use your VIA Connect² for the first time.
Go to https://www1.kramerav.com/gc/product/via connect2 to download the latest user manual.
Step 1: Connect your personal device to the proper network
Connect your personal device to the same Wi-Fi or LAN network as the VIA Connect² in your meeting room.
Step 2: Run or Download the Kramer VIA app
See “Installing or Running the VIA app” in the User Manual.
For Mac or PC:
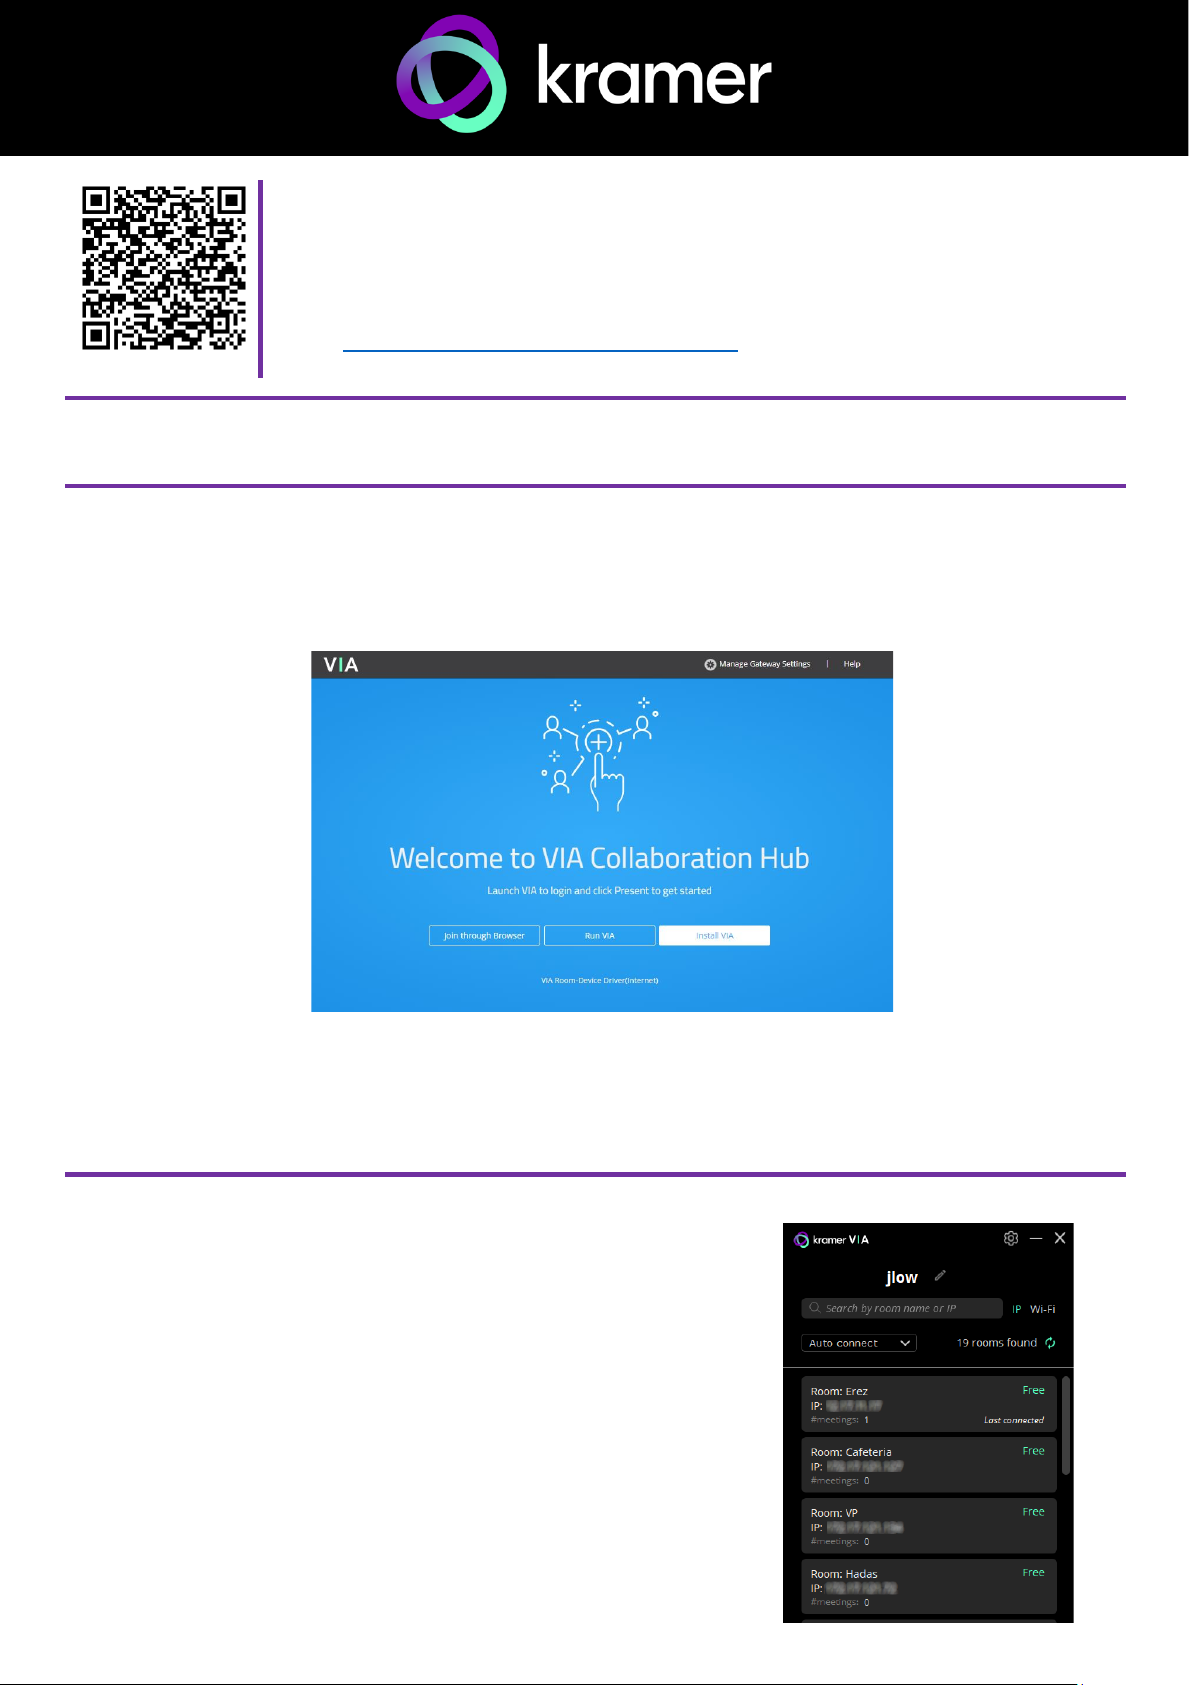
1. Enter the Room Name of the VIA Connect² device into your computer’s browser. The Welcome page of VIA
Connect² appears.
2. Click Run VIA to execute the Kramer VIA app without downloading it. For guests who are using VIA temporarily.
OR Click Install VIA to download the Kramer VIA app onto your computer. For regular users of the VIA.
OR Click Join Through Browser to use an online version of Kramer VIA (only when there is internet access).
For iOS or Android devices:
• Download and install the free Kramer VIA app from Apple App Store or Google Play.
Step 3: Join the meeting using Kramer VIA App
See “Joining a Room with the VIA app” in the User Manual.
1. Open the Kramer VIA app and select the room or IP to which you want to
connect: If your site requires a Room Code, the Room Code window will
appear.
2. In the Room Code field, enter the 4-digit code as it appears on the Main
Display.
3. You are logged into the VIA meeting.
The VIA Dashboard appears on your device screen (see next page).
Page 4
Step 4: Using the VIA dashboard menu
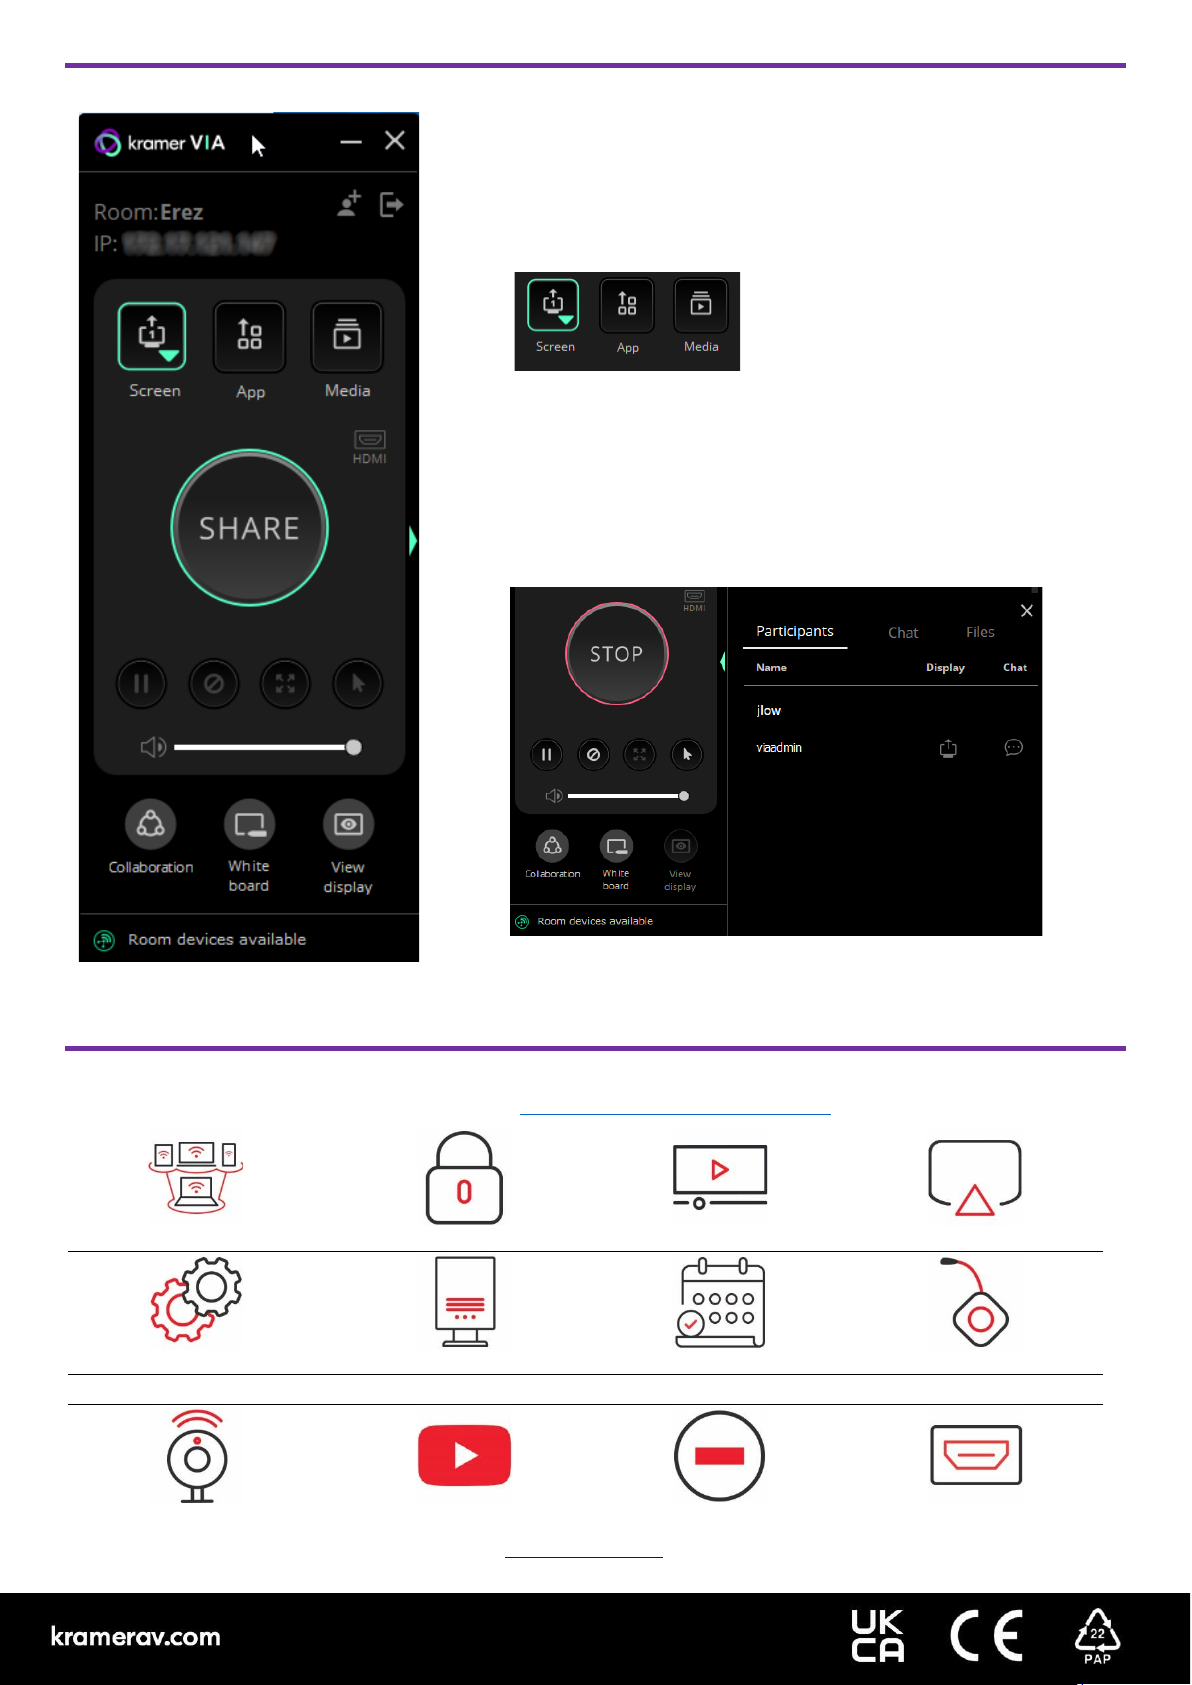
For more information see “Presenting from the VIA User Dashboard” in the
User Manual.
1. Select what you want to share:
▪ Screen – Share your screen.
▪ App – Share a window or a third party app.
▪ Media – Share (stream) a media file.
2. Click SHARE:
▪ The SHARE button becomes the STOP button.
▪ Your screen, app or media will be displayed to meeting participants (on the
main display).
3. Click the green arrow on the right to view participants, chat or to send files.
Bottom of VIA dashboard
4. Use the 4 buttons below STOP to control sharing.
5. Use the 3 buttons at the bottom for collaborating with other participants.
6. Click STOP to end sharing.
Step 7: VIA Connect² Features
For a complete, updated list of available features go to: https://via2.kramerav.com/via-solutions.
Wireless Connection
Powerful Content Security
Video Streaming
Mobile Mirroring
VIA Site Management (VSM)
Digital Signage
Calendar Integration
VIA Pad Compatible
Web Conferencing
Integrated YouTube Player
Do Not Disturb (DND)
HDMI Input
Specifications are subject to change without notice at www.kramerav.com
The terms HDMI, HDMI High-Definition Multimedia Interface, and the HDMI Logo are trademarks or registered trademarks of HDMI Licensing Administrator, Inc.
 Loading...